

Page 1

OCOM Technologies Limited.
OCBS-D007
STOCKTAKING HANDHELD TERMINAL
USER’S MANUAL
Page 2

CHAPTER I BRIEFING ...................................................................................................................... 1
1.1 Package List ....................................................................................................................... 1
1.2 Safety Cautions .................................................................................................................. 1
1.3 Battery Charging............................................................................................................... 1
1.4 Battery Installation ........................................................................................................... 2
1.5 Accessories ......................................................................................................................... 3
CHAPER II FUNCTIONS & OPERATIONS........................................................................... 4
2.1 Overview ............................................................................................................................ 4
2.2 Basic Operation ................................................................................................................. 5
2.2.1 Bootup ..................................................................................................................... 5
2.2.2 Shutdown ................................................................................................................ 5
2.2.3 Status Bar................................................................................................................ 5
2.3 Main Functions .................................................................................................................. 5
2.3.1 Receiving/Shipping/Cycle Count/Damage/Replenish.......................................... 5
2.3.2 Other ....................................................................................................................... 6
2.3.3 Upload ..................................................................................................................... 6
2.3.4 Search ...................................................................................................................... 6
2.3.5 Download ................................................................................................................ 6
2.3.6 Settings .................................................................................................................... 6
2.3.7 Communication ...................................................................................................... 6
2.3.8 Advanced................................................................................................................. 6
CHAPER III WIRELESS RECEIVER ..................................................................................... 7
3.1 Installation ......................................................................................................................... 7
3.2 Check the Port Number .................................................................................................... 8
CHAPTER IV PC APPLICATION ........................................................................................... 8
4.1 Installation ......................................................................................................................... 8
4.2 Operation Description .................................................................................................... 10
4.2.1 Update Program ................................................................................................... 10
4.2.2 Download Item File ........................................................................................ 12
4.2.3 System Settings ..................................................................................................... 19
4.2.3.1 Communication ................................................................................................. 19
4.2.4 Data Storage ......................................................................................................... 20
4.2.5 Query ..................................................................................................................... 22
4.2.6 Export File ............................................................................................................ 22
4.2.7 Empty Data ........................................................................................................... 27
4.2.8 Laguage Switch..................................................................................................... 27
WARRANTY ................................................................................................................................. 27
Page 3

User’s Manual for OCBS-D007 Stocktaking Handheld Terminal Page 1 of 30
1
CHAPTER I BRIEFING
1.1 Package List
1.One Stocktaking handheld terminal
2.One USB mini-receiver;
3.One cable;
4.One charger;
5. One CD (contains User’s Manual, PC Application, Receiver Driver and Update
Utility)
1.2 Safety Cautions
Please read the following concise rules. Violation of these rules may cause danger or
infringement of the law.
Boot in safety: Don’t switch on the handheld terminal when wireless device is
forbidden or is to cause interference and danger.
Interference: all wireless devices may be subject to radio interference which may
affect their performance.
Fare use: the handheld terminal terminal can be only used in the purpose described
in this manual.
Maintenance: only technically qualified person can disassemble the handheld
terminal terminal.
Accessories and battery: use only approved accessories and battery. Don’t connect
to inconsistent products.
Water-proof: the handheld terminal terminal is not water-proof, please keep it dry.
Data backup: please make a backup for the data saved in the handheld terminal
terminal.
Connection: If in need of connecting to other devices, please obtain necessary safety
instructions from their manual or manufacturer. Never connect to an inconsistent device.
1.3 Battery Charging
1.3.1 battery icon:a battery icon displays on top right of the screen to show the
battery power. When the battery is running low, the icon blinks. As the battery level
going too low to maintain any operation, the Stocktaking shuts down automatically.
1.3.2 battery charging:simply plug one end of the charger into the power outlet and the
other end into the Stocktaking handheld terminal terminal terminal.
CAUTIONS:
(1) The Stocktaking accepts only authorized battery and charger;
(2) For first time charging, please make sure the charging time is over 10 successive
Page 4
User’s Manual for OCBS-D007 Stocktaking Handheld Terminal Page 2 of 30
2
hours;
(3) Battery may self-discharge. Please charge up the battery before use if the battery
stands idle for a long period;
(4) If a fully charged battery’s life goes short greatly, please replace the battery with a
new one;
(5) Do not impact,shock or throw the battery violently, or it may cause leakage, damage
or even explosion.
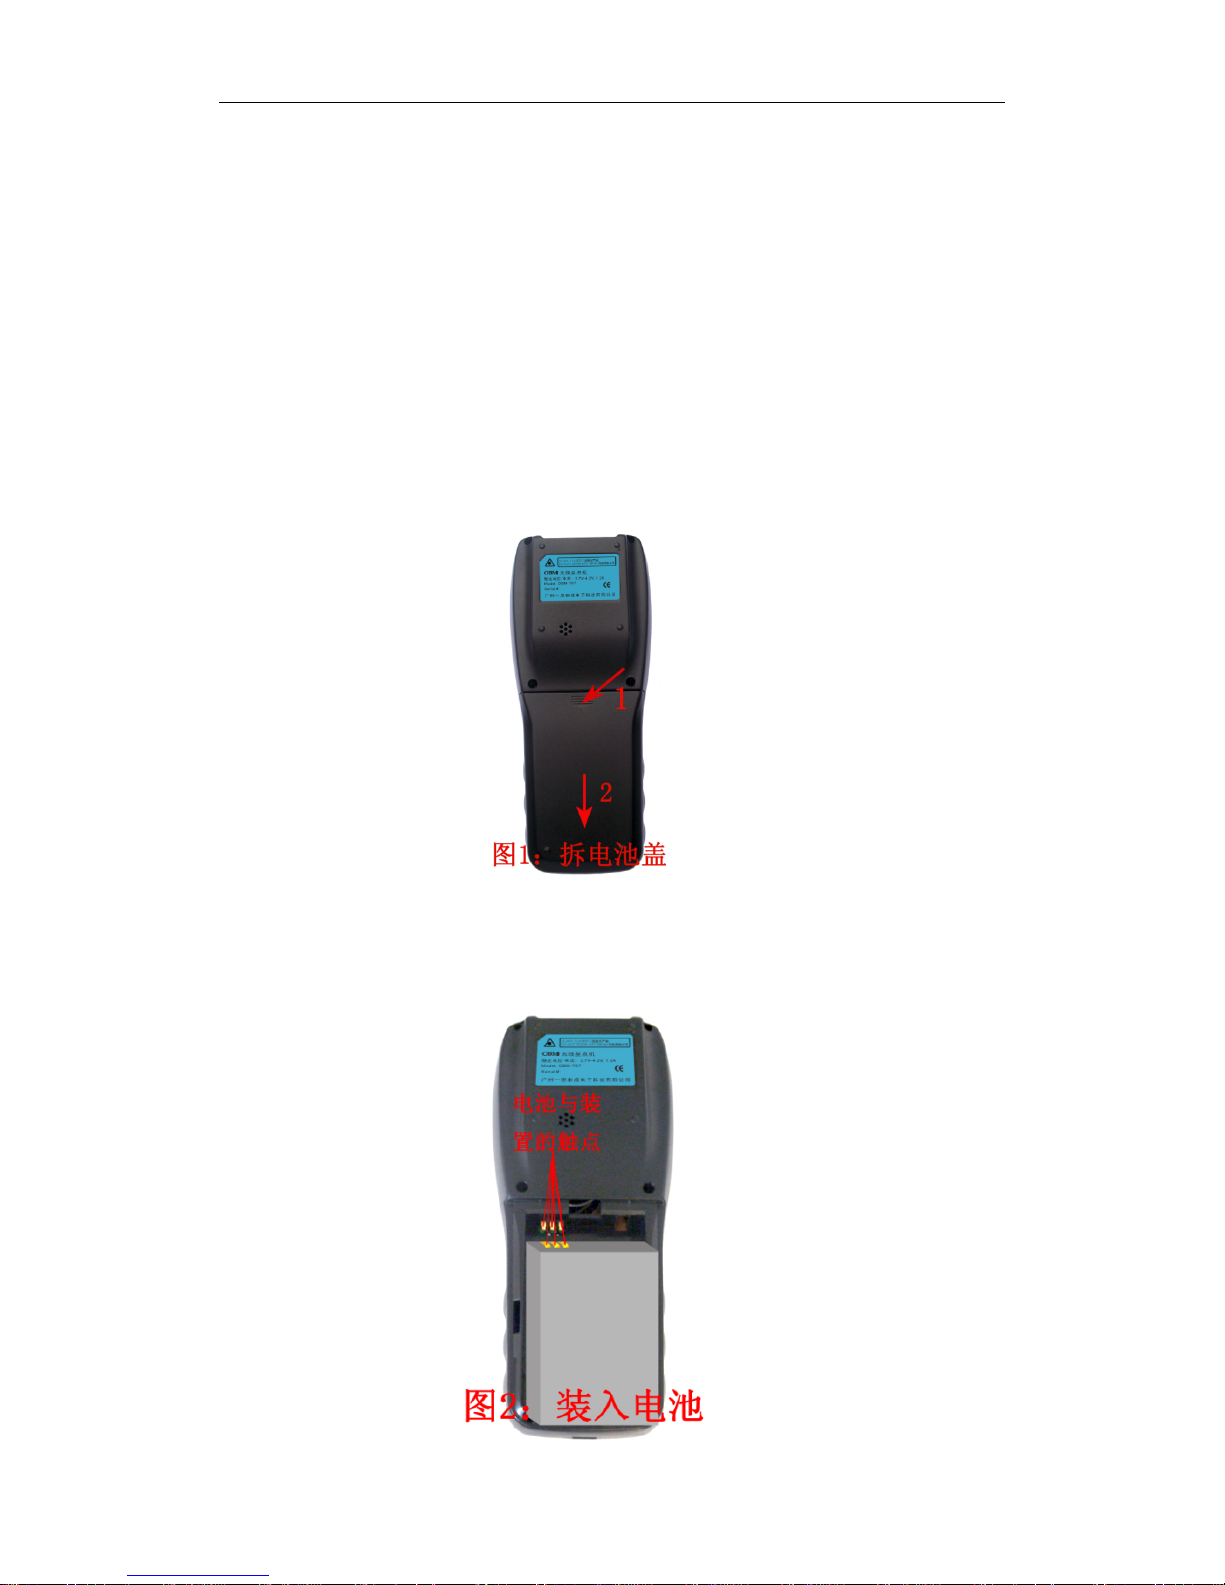
1.4 Battery Installation
1.4.1 Remove battery cover. Turn the Stocktaking to its back, put some stress on the
battery cover, then push it downward as figure 1 shows:
1.4.2 Load battery. Make sure the metal contacts on the battery and the Stocktaking are
in the same position as figure 2 shows:
Page 5

User’s Manual for OCBS-D007 Stocktaking Handheld Terminal Page 3 of 30
3
1.4.3 Refit battery cover. Put some stress on the cover to fit it back to its place, then
push upward as figure 3 shows:
1.5 Accessories
1.5.1 Polymer Li-ion Battery
1.5.2 Cable and Receiver
Page 6
User’s Manual for OCBS-D007 Stocktaking Handheld Terminal Page 4 of 30
4
CHAPER II FUNCTIONS & OPERATIONS
2.1 Overview
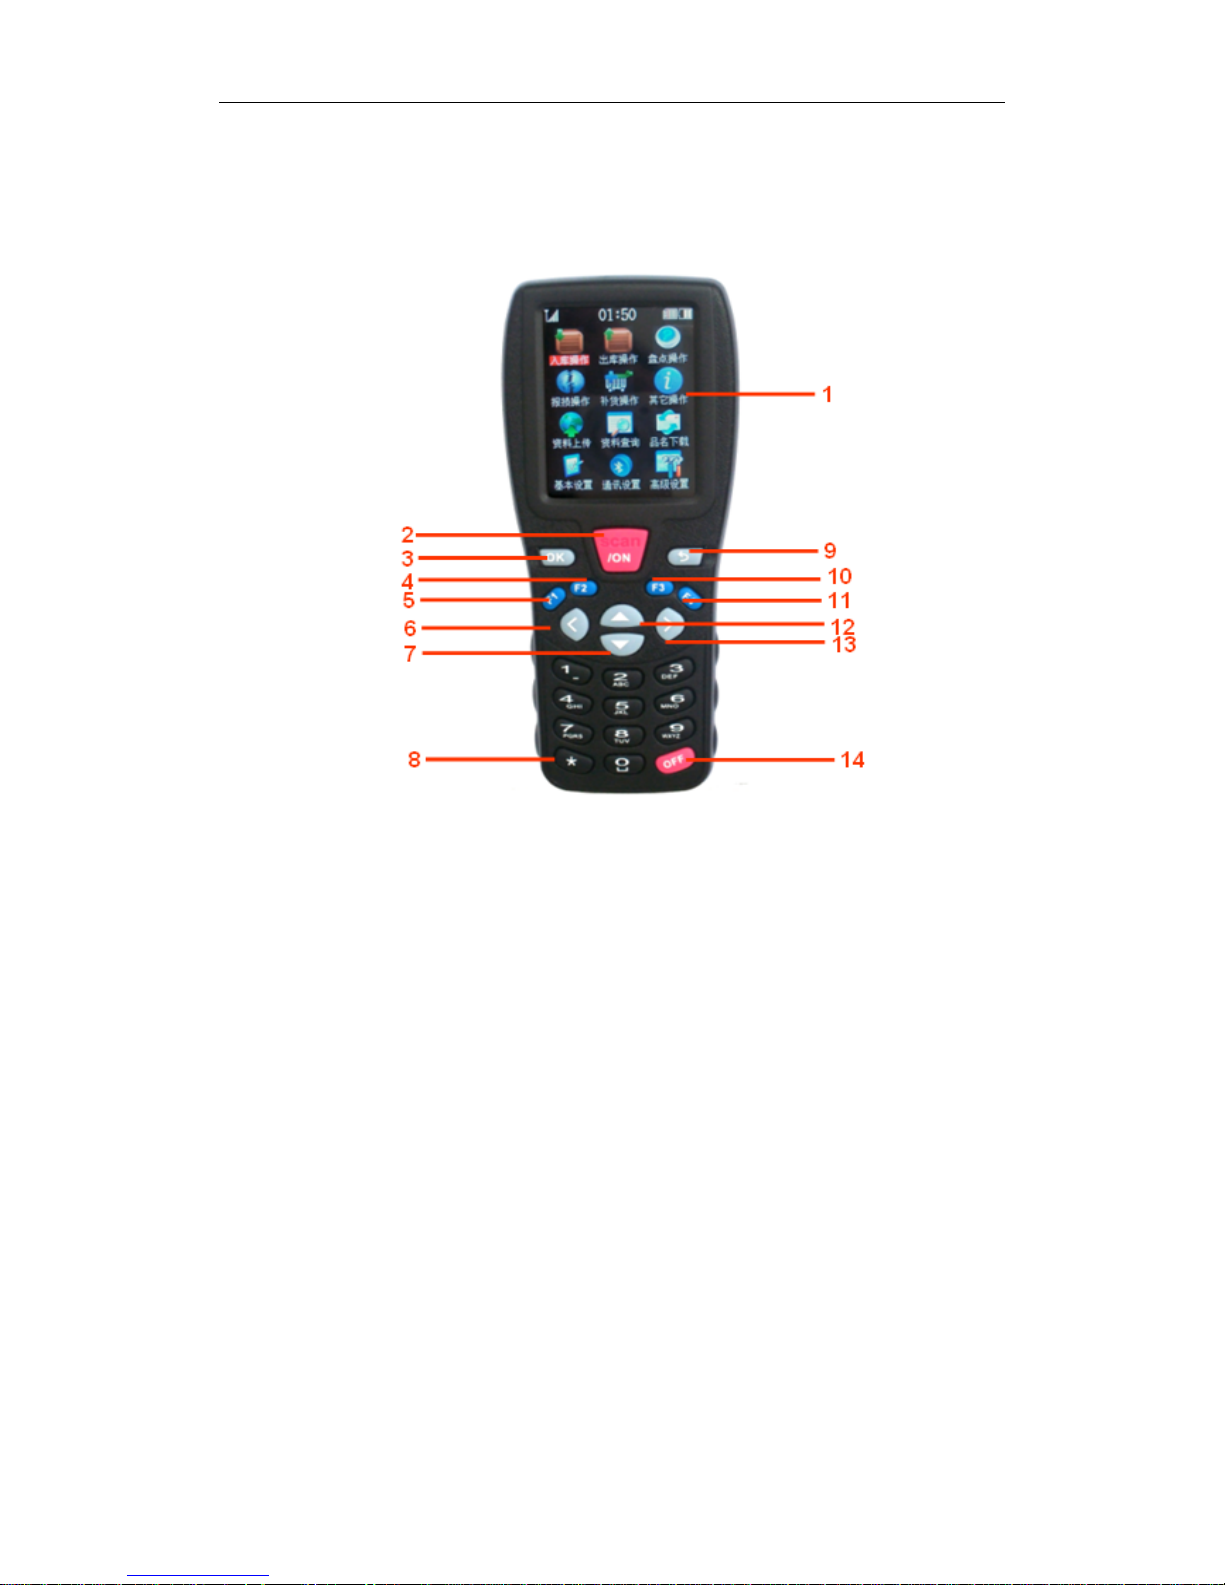
Figure 2-1
1. SCREEN
2. SCAN/ON: turn on the Stocktaking handheld terminal or scan a barcode
3. OK: confirm an operation
4. F2: data upload via USB cable under the BATCH mode
5. F1: data upload wirelessly under the BATCH mode
6. Left Arrow Key: switch between Real-time and Save mode
7. Down Arrow Key: move downward
8. Star Key: switch among number / capital letter / small letter (valid only in manual
input states)
9. Return: return to last menu
10. F3: show the cursor (valid only in manual mode)
11. F4: backspace (valid only in cursor blink state)
12. UP ARROW KEY: move upward
13. Right Arrow Key: switch between auto and manual mode
14. OFF: shutdown the Stocktaking handheld terminal
Special function keys under input state:
In the barcode line –under alphabet state, a decimal point or a minus sign appears in turn
Page 7
User’s Manual for OCBS-D007 Stocktaking Handheld Terminal Page 5 of 30
5
by press key 1 successively; while a blank or an exclamation point appears in turn by
press key 0.
In the quantity line –press F3 to enter negative number and star key to enter decimal
point.
2.2 Basic Operation
2.2.1 Bootup
Make sure the battery is properly loaded and fully charged. Long press the SCAN/ON
key until a beep sounds to indicate the startup of the Stocktaking and enter the welcome
page.
2.2.2 Shutdown
Hold down the OFF key for 1.5 seconds to turn off the Stocktaking handheld terminal.
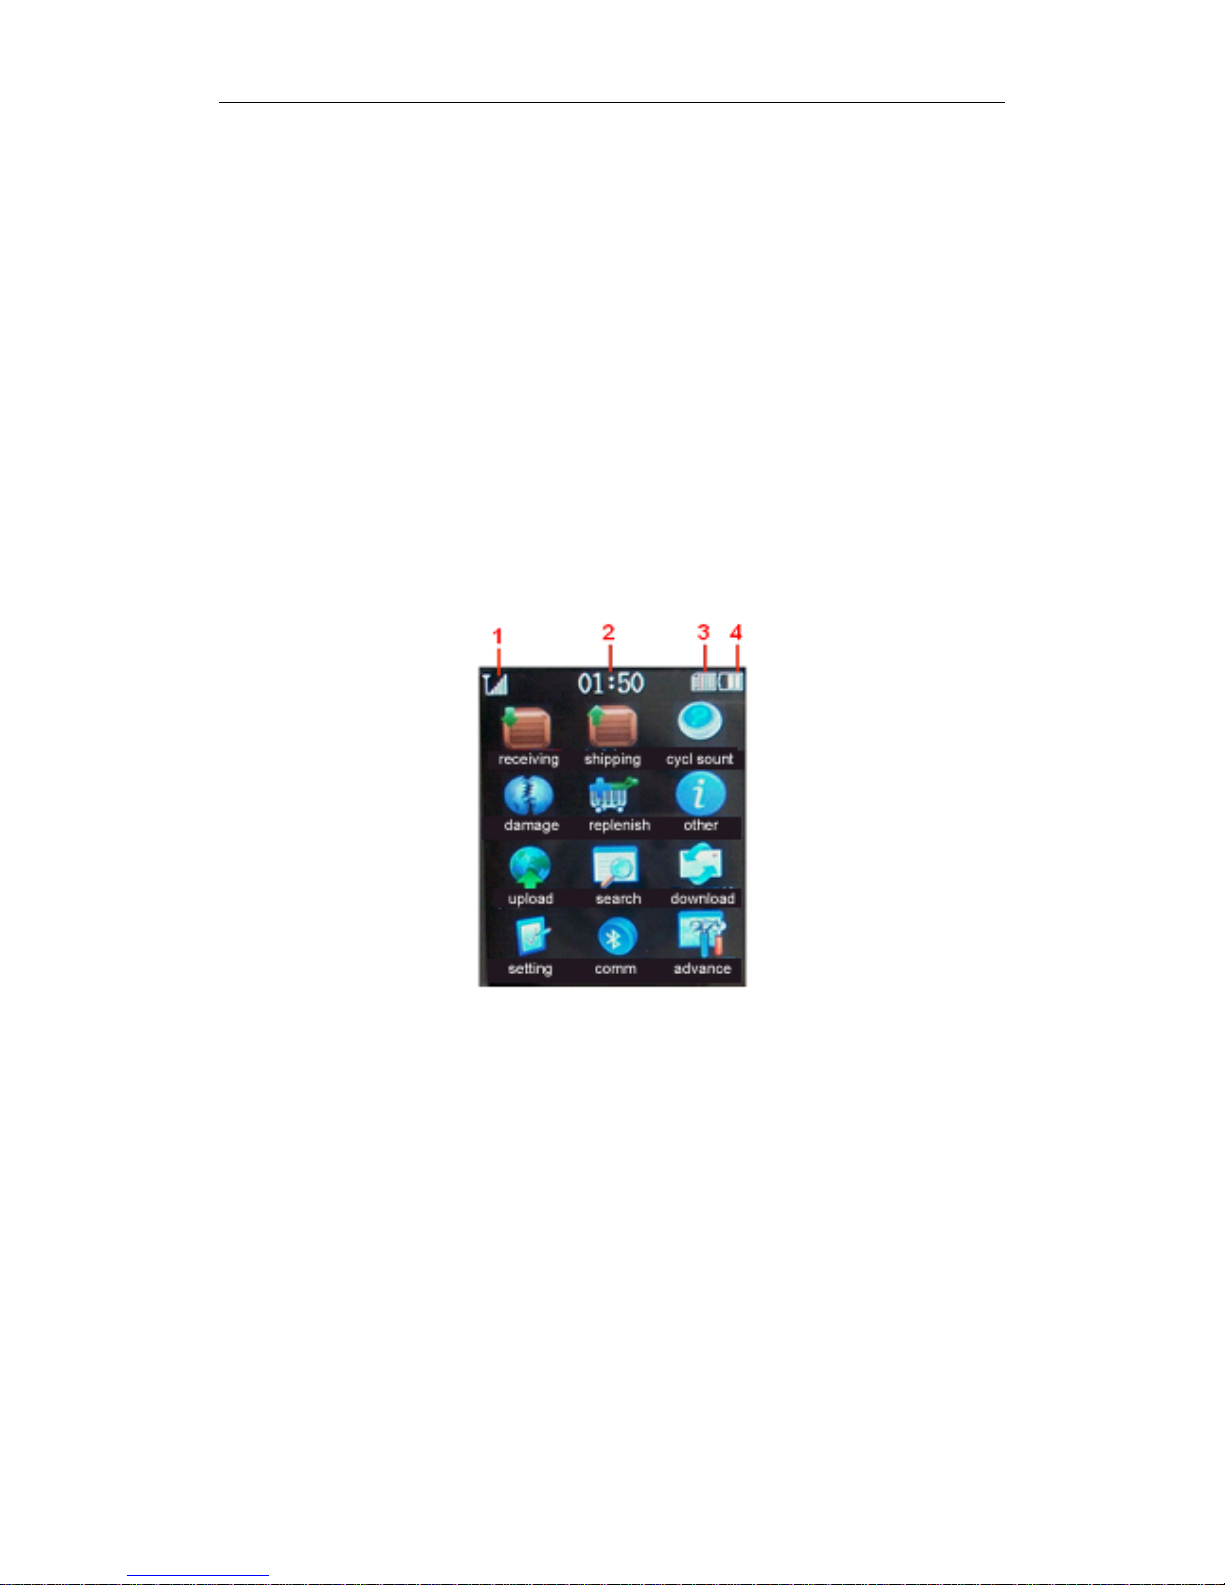
2.2.3 Status Bar
Main Menu
Figure 2-2
1.Signal strength
2.Time
3.Memory used
4.Battery level
2.3 Main Functions
2.3.1 Receiving/Shipping/Cycle Count/Damage/Replenish
Choose one menu item then press OK to enter it. Press Left Arrow key to switch between
REAL-TIME and SAVE mode, while Right Arrow key to select manual or auto mode.
Under the manual mode, the Up Arrow key and Down Arrow key are activated for
entering batch number and quantity, while other information is automatically withdrawn
from the downloaded item file. And the operation status is shown right below.
Page 8

User’s Manual for OCBS-D007 Stocktaking Handheld Terminal Page 6 of 30
6
2.3.2 Other
Reserved for extended function
2.3.3 Upload
Highlight UPLOAD in the main menu and press OK to enter the sub-menu. In the
sub-menu page, you can see a summary list for data unsent. Press F1 or F2 to upload data
to the computer.
F1: send data wirelessly. This is available only when the signal is good and the PC
application is running.
F2: send data via a cable. Click DOWNLOAD on the menu bar of the pc application and
choose RECEIVE FROM USB.
* Cable transmission is much faster than wireless transmission.
2.3.4 Search
summary:a summary list to show data saved in the Stocktaking handheld terminal and
the computer.
by category:search by [type + barcode]
by time:search by [type + time + barcode]
2.3.5 Download
Download item file and update the Stocktaking Handheld terminal program, which must
work together with the PC application.
2.3.6 Settings
Set date, time, off time, time display and language.
2.3.7 Communication
Set the working channel and system code which must be the same as that in the PC
application.
2.3.8 Advanced
Clear the memory of the Stocktaking Handheld terminal (clear only the operational
information) and restore to factory default.
00:00
Upload
1.all:100
2.rece:20
3.ship:40
4.count:35
5.dama:5
6.repl:0
F1-start wireless
F2-start USB
OK MENU ESC
Page 9
User’s Manual for OCBS-D007 Stocktaking Handheld Terminal Page 7 of 30
7
CHAPER III WIRELESS RECEIVER
For the first time use of OCBS-D007 Stocktaking Handheld terminal, you need to
install a driver for the wireless receiver.
3.1 Installation
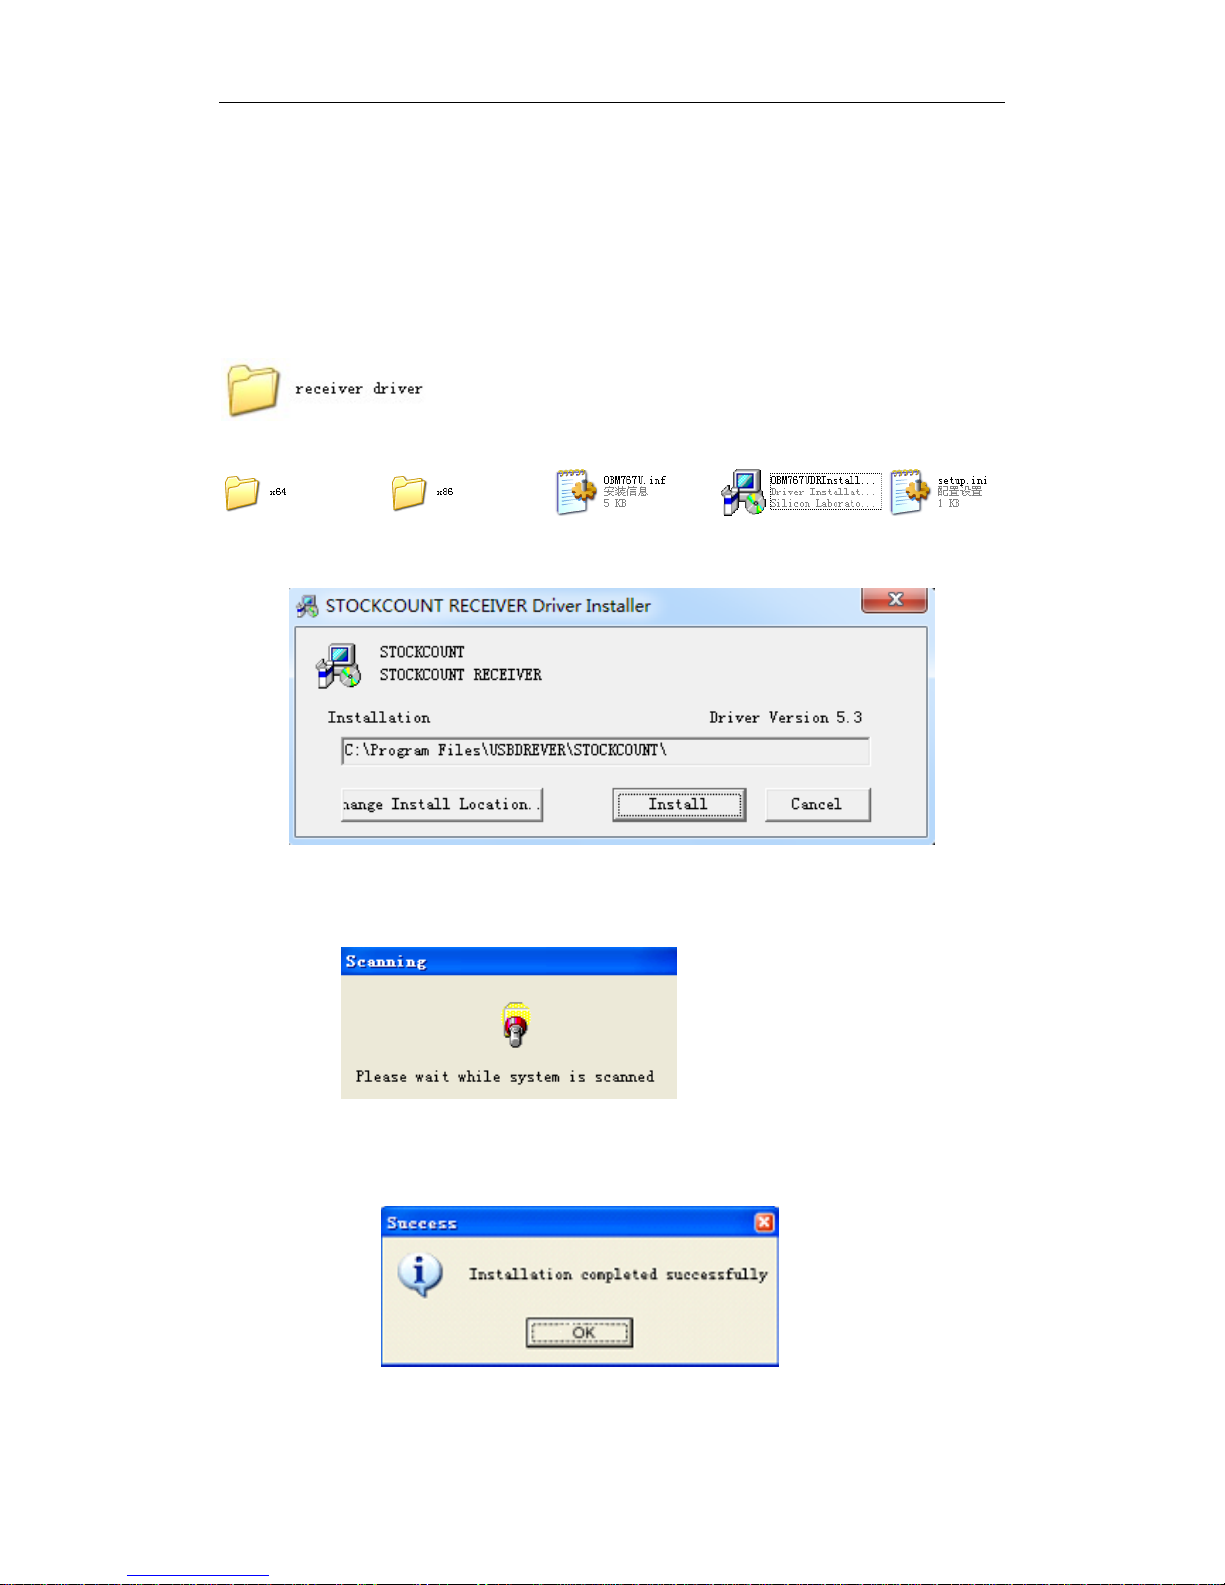
Step 1:Find the following folder in the CD attached:
Double click and access to the following files:
Figure 3-1
Double click " STOCKCOUNTDRInstaller.exe " and open a dialog as below:
Figure 3-2
Click " Install " and wait while system searching
Figure 3-3
Installation succeeded.
Figure 3-4
Page 10

User’s Manual for OCBS-D007 Stocktaking Handheld Terminal Page 8 of 30
8
Notice:After installation of the driver, we can check the receiver COM port in the
"Device Manager " dialog box.
3.2 Check the Port Number
On the Desktop right-click My Computer/properties/hardware/device manager, and opens the
following window:
Figure 3-9
The list here displays that STOCKCOUNT RECEIVER's COM port is COM3.
Once the driver is installed, the receiver can be plugged and played ever since.
CHAPTER IV PC APPLICATION
4.1 Installation
Find the following folder in the CD attached:
Figure 4-1
Double click on the application installor:
Page 11

User’s Manual for OCBS-D007 Stocktaking Handheld Terminal Page 9 of 30
9
Figure 4-2
Follow the instructions of the wizard until completion and the application icon
will be created on the desktop.
Double click it, the application dialog should pop up as below:
Figure 4-3
Note:during installation if an error message pops up as below:
Figure 4-4
Page 12

User’s Manual for OCBS-D007 Stocktaking Handheld Terminal Page 10 of 30
10
Click YES and then unpack the folder of PC APPLICATION and install the .net
program:
Figure 4-5
This may take a few minutes. After completion, go back to install the application again
as shown in figure 4-1 & 4-2
4.2 Operation Description
Download function is accomplished by the cable attached.
4.2.1 Update Program
In the Stocktaking Handheld terminal, highlight DOWNLOAD in the main menu and
press OK into the download page:
Figure 4-6
Open the PC application, select “download program” from the DOWNLOAD
drop-down menu:
00:00
DOWNLOAD
1.item update
2.firmware update
Waiting command…
OK MENU BACK
Page 13

User’s Manual for OCBS-D007 Stocktaking Handheld Terminal Page 11 of 30
11
Figure 4-7
A dialog box pops up. Specify the path of the file (..\update utility\update.bin) then
click OPEN:
Figure 4-8
The Stocktaking Handheld terminal shows “downloading”. When the download has
Page 14

User’s Manual for OCBS-D007 Stocktaking Handheld Terminal Page 12 of 30
12
completed, the handheld terminal will reboot automatically. A new program is updated to the
handheld terminal. Meanwhile the PC application also gives a notification of completion.
Figure 4-9
4.2.2 Download Item File
In the Stocktaking Handheld terminal, highlight DOWNLOAD in the main menu and
press OK into the download page:
Open the PC application, select from the DOWNLOAD drop-down menu “Import
Format Set”:
Page 15

User’s Manual for OCBS-D007 Stocktaking Handheld Terminal Page 13 of 30
13
Figure 4-10
Configuration Instruction:
1.File Type:GOODS
2.Format: MS Excel, CSV and TXT format available
3.Seperator: any character will do. Default choice includes comma, semicolon, TAB and
fix-length.
4.with Title:check to import a file with field headings
5.Field Name:default field names
6.Field Title:custom field name
7.Import:Y for importing the field; N for not importing
8.Index:indicates the original field sequence
9.length:required only for fix-length file
Page 16

User’s Manual for OCBS-D007 Stocktaking Handheld Terminal Page 14 of 30
14
EXAMPLE:
Import an EXCEL file:
STEP 1:IMPORT FORMAT CONFIGURATION
There are 16 columns in this excel file, but we need only the 5 fields as the item code, item
name, unit, specification and barcode.
Figure 4-11
The import format is set as below:
Figure 4-12
STEP 2:IMPORT ITEM FILE INTO BACKEND DATABASE
Click SAVE and CLOSE when format is configured. Then on the menu bar, click
DOWNLOAD/IMPORT FROM FILE and specify the excel file to be imported:
Page 17

User’s Manual for OCBS-D007 Stocktaking Handheld Terminal Page 15 of 30
15
Figure 4-13
Select a work sheet:
Figure 4-14
Confirm to start the import. When “import succeeded!” appears in the PC application, the
item file has been imported into the backend database.
Page 18

User’s Manual for OCBS-D007 Stocktaking Handheld Terminal Page 16 of 30
16
Figure 4-15
STEP 3:DOWNLOAD ITEM FILE TO THE HANDHELD TERMINAL
Select DOWNLOAD FROM LOCAL ITEM SHEET from the drop-down menu of
DOWNLOAD, and update backend data to the Stocktaking handheld terminal. If download
has been successfully proceeding, the handheld terminal screen will refresh automatically.
Figure 4-16
Import a TXT file:
1.original item information is as below:
2.format is set as below:
Page 19

User’s Manual for OCBS-D007 Stocktaking Handheld Terminal Page 17 of 30
17
Import a fix-length TXT file:
1. There are 6 columns in this file, but we need only the 5 fields as the barcode, item name,
specification, price and barcode. Cost is not allowed to be imported:
2.format is set as below:
Page 20

User’s Manual for OCBS-D007 Stocktaking Handheld Terminal Page 18 of 30
18
STEP 4:ITEM SEARCH
Select DOWNLOAD/ITEM SEARCH and view commodity details imported in the backend
database:
Page 21

User’s Manual for OCBS-D007 Stocktaking Handheld Terminal Page 19 of 30
19
4.2.3 System Settings
Select SYSTEM SETTING and enter the SYSTEM PARAMETER page as figure4-17:
Figure 4-17
Pick the COM port number mapped to the wireless receiver.
4.2.3.1 Communication
Page 22

User’s Manual for OCBS-D007 Stocktaking Handheld Terminal Page 20 of 30
20
Figure 4-18
Check the present registered channel and system number by clicking “set
channel” and “set system no”
433MH configuration: Channel and system number are preset in the Stocktaking and
corresponds to those in the PC application. Generally, channel is set to be 35 which gets
better transmission effect (change channel if transmission is not good enough).
One receiver can responds to several handheld terminals. In this case, register different
channels for each handheld terminal. However, it may affect the scan rate under real-time
mode if receiver is responding to over 5 handheld terminals at the same time.
4.2.4 Data Storage
Figure 4-19
In pages of Receiving/Shipping/Cycle Count/Damage/Replenish, you can preset information
Page 23

User’s Manual for OCBS-D007 Stocktaking Handheld Terminal Page 21 of 30
21
as "bill no.", "supplier", "operator", etc. to define the scanned data.
Here is an example of making a stocktaking list with a heading row:
Step 1:In the dialog box shown in figure4-2-4, select "cycle count" page and input header
information one by one, then click "save":
Figure 4-20
Notes: :
Whether to add headers as well to data saved before.
:change the language of header to Chinese/English
Step 2:Click on "Start" and begin to scan barcodes:
When the screen is full, you can right click the mouse and select “clear” to clear
screen. This operation is only for visual clearance, the data is not deleted.
Figure 4-21
Step 3: Click "pause" then "query" button and open the "Query & Export" dialog. Click
"query" and shows the following dialog:
Page 24

User’s Manual for OCBS-D007 Stocktaking Handheld Terminal Page 22 of 30
22
Figure 4-22
Now you can see that the barcode scanned is mapping with information set just now: bill
no., warehouse, etc.
Notice:The setting will remain till the PC application is closed. When the PC application is
closed, all information will be removed automatically.
4.2.5 Query
When all items are scanned, you can query, export and cleanup data in specified
conditions.
After query criterion is set,click "query" button and the result will be shown as below:
Figure 4-23
4.2.6 Export File
You could export and save query results in various file formats (eg. xls or txt).
Click QUERY and open the QUERY & EXPORT dialog.
Click FORMAT and pops up the following dialog box:
Page 25

User’s Manual for OCBS-D007 Stocktaking Handheld Terminal Page 23 of 30
23
Figure 4-24
Configuration instruction:
1.file type:export data;
2.fiel format:Excel,TXT,CSV,XML available
3.mark:add a quotation mark to each field(valid only for TXT file)
4.except number:no quotation mark to numbers even though the MARK option is selected.
5. seperator:any character will do. Default choice includes comma, semicolon, TAB and
fix-length.
6. header:export a file with field headers you defined.
7.blank data source: allow to export blank data source.
8.fix-length separator: export a fix-length file with a separator.
9.decimal:-1:remove decimal;0:rounded to integer,1:one decimal
Page 26

User’s Manual for OCBS-D007 Stocktaking Handheld Terminal Page 24 of 30
24
EXAMPLE:
Step 1:configure the format of the file to be exported
Figure 4-25
Click SAVE and OK to close the dialog box then click EXPORT again
Step 2: specify a path for saving the exported file:
Figure 4-26
Page 27

User’s Manual for OCBS-D007 Stocktaking Handheld Terminal Page 25 of 30
25
Enter a file name (eg. Export.xls) and click SAVE.
Step 3:Open the exported file:
Figure 4-27
An exported TXT file looks like this:
Figure 4-28
It’s format should be configured as below:
Figure 4-29
Page 28

User’s Manual for OCBS-D007 Stocktaking Handheld Terminal Page 26 of 30
26
An exported fix-length TXT file looks like this:
Figure 4-30
It’s format should be configured as below:
Figure 4-31
Page 29

User’s Manual for OCBS-D007 Stocktaking Handheld Terminal Page 27 of 30
27
4.2.7 Empty Data
In the "QUERY & EXPORT" interface, click "Empty data" and pop up a dialog box as
below:
Figure 4-32
Select YES.
4.2.8 Laguage Switch
Default application is in Chinese. For an English version, just click LANGUAGE and
select ENGLISH from the drop-down menu. Likewise, choose English as the language for
the Stocktaking Handheld terminal.
Figure 4-33
Figure 4-34
WARRANTY
Page 30

User’s Manual for OCBS-D007 Stocktaking Handheld Terminal Page 28 of 30
28
OCBS-D007 Wireless Stocktaking Handheld terminal is warranted for a period of twelve(12)
months from the date of purchase.
Terms & Conditions:
A. Warranty service is only available for products purchased from OCOM or its authorized
dealers
B. Product may be serviced provided it remains unmodified and is operated under normal
and proper conditions, while the buyer must present the original purchase invoice or receipt for
verification when warranty service is rendered. No charge will be made to Buyer for replacement
parts for warranty repairs.
C. The above warranty provisions shall not apply to the following cases, but repair service
may be rendered at the Buyer’s expense:
1. Warranty service is expired.
2. The Buyer is incapable of presenting a warranty card or the information in the warranty
card is not complete or is altered.
3. Defects or damage cause by accident or artificial factors like unusual physical or electrical
stress, water or other liquids, etc.
4. Defects or damage results from failure to perform operator handling and scheduled
maintenance instructions stating in the user’s manual.
5. Other defects or damage do not cause by workmanship or material.
D. No repair service shall apply to the following products:
1. Products not made by OCOM.
2. Products that has been repaired, tampered with, altered or modified, without authorization
from OCOM.
-----------------------------------------------------------------
Notes:
The product specification and information mentioned in this manual is subject to changes
without prior notice. For the latest news and information, please visit: www.ocominc.com
 Loading...