

Page 1

2D Barcode Scanner
USER’S GUIDE
Page 2

Page 3

Getting to Start
Specification
........................................................................................................01
04
Distance of Field
....................................................................................................
02
Connect Scanner to the Host................................................................................05
Removal of Communication Cable
.....................................................................06
Reading
Hand-held Mode..................................................................................................07
Hands-Free Mode................................................................................................08
Programming Code
Query ...................................................................................................................09
Factory Default.....................................................................................................
10
Reading Mode.......................................................................................................11
RS232 Programming.............................................................................................12
USB Programming................................................................................................15
USB HID-KBW Programming............................................................................16
Beeper .................................................................................................................19
Line Feed and Carriage Return...........................................................................20
1D Symbols..........................................................................................................22
2D Symbols..........................................................................................................26
Appendi
x
A. Testing Codes ..................................................................................................28
B. Digit Code and Save
.......................................................................................29
C. Troubleshooting
..............................................................................................30
Content
Specification
ON, OFF, IDLE, RESTART ................................................................................
04
1
Page 4
Getting to Start
Specification
Performance
Image Sensor CMOS
Resoluing 752 * 480
Interface RS232 / HID-KBW / UDP / USB COM Port Emulation / HID-POS
Symbologies
2D
PDF417, QR Code(Model 1/2), DataMatrix (ECC200, ECC000, 050,
080,100,140), Aztec, Maxicode, etc.
1D
Code128, EAN-13, EAN-8, Code39, UPC-A, UPC-E, Codabar,
China post 25,Interleaved 2 of 5, ISBN, Code 93, GS1 Databar,
Code 11,etc
Precision ≥ 5mil
Light Source LED(630 nm ± 10 nm)
Light Intensity 300 LUX (130 mm )
Depth of Scan Field 30 mm ~ 445 mm
Print Contrast Signal ≥30%
Roll 360°
Pitch 45°
Yaw 45°
Illumination 0 ~ 100,000 LUX
Mechanical/ Electrical
Power Consumption 1.65 W
Voltage DC 5 V
Current
Max 330 mA
Oper. 290 mA
Idle 200 mA
Weight
235g
Environment
Operate Temperature -5°C - +45°C
Storage Temperature -40°C - +60°C
Humidity 5% - 95% ( non-condensing )
Certificates
FCC Part15 Class B, CE EMC Class B
2
Page 5
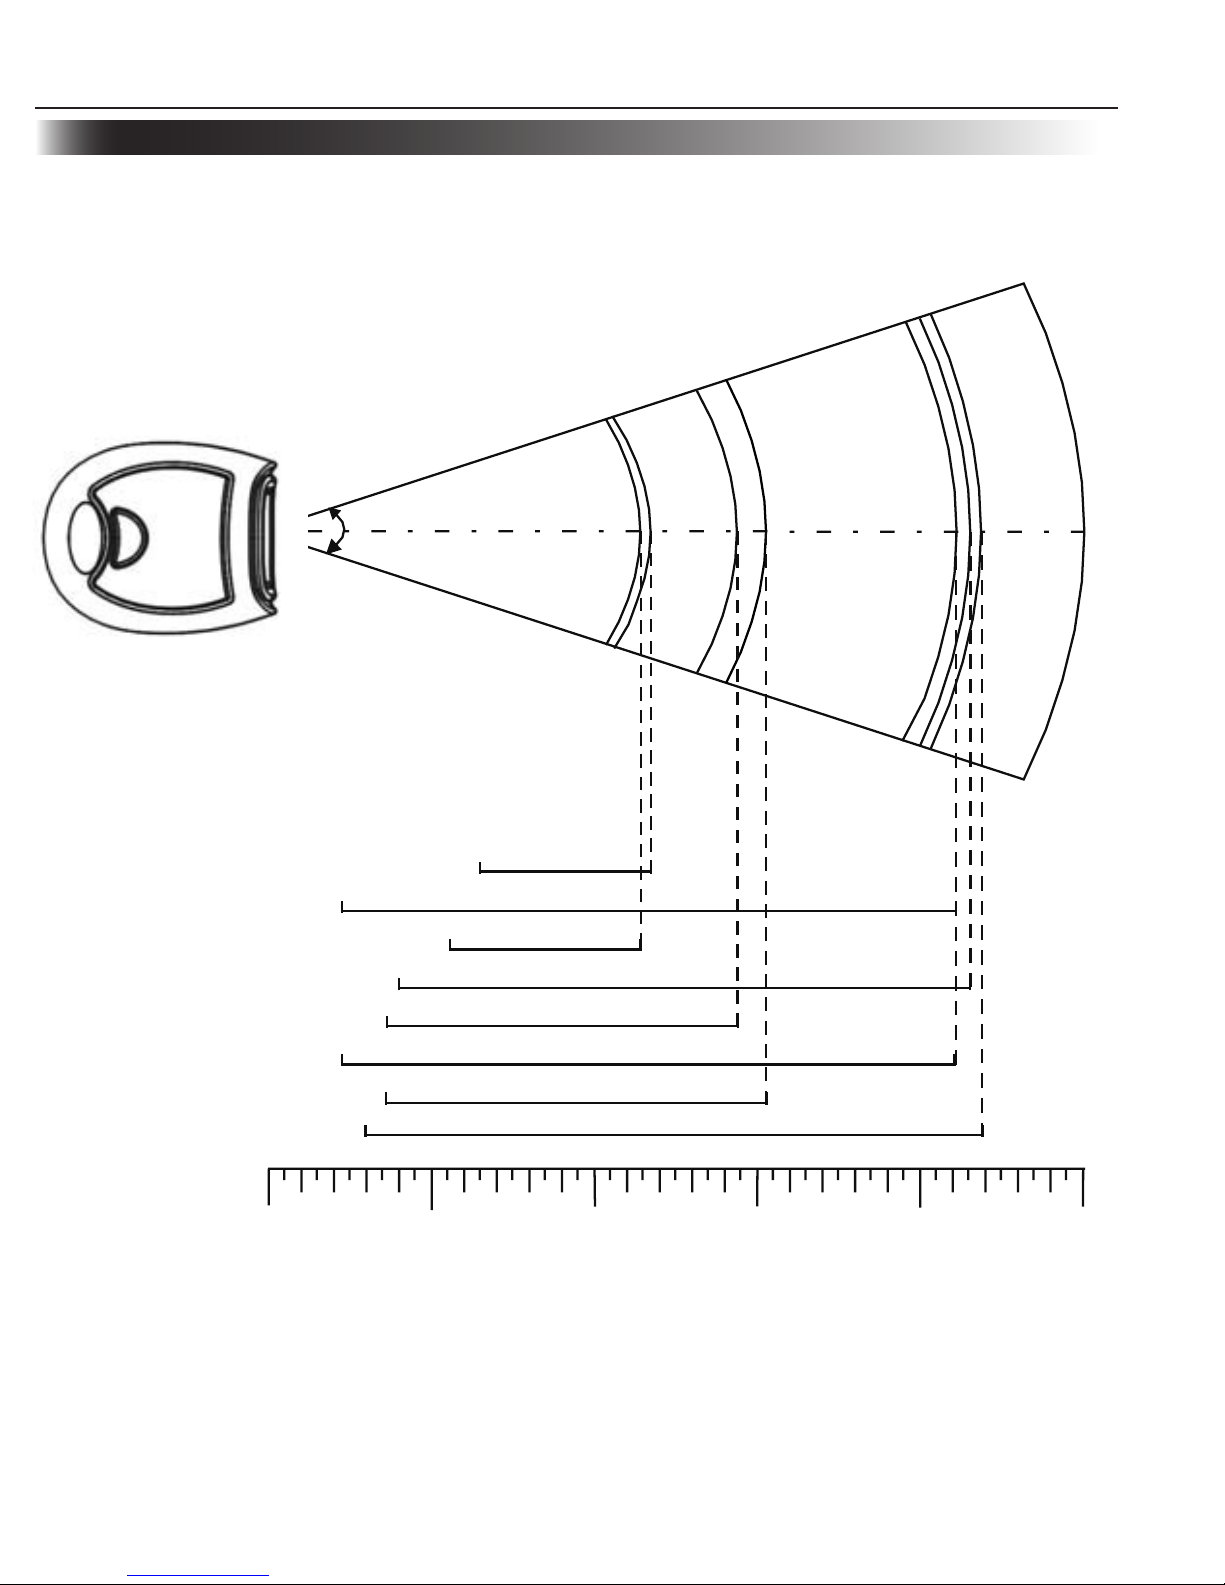
Getting to Start
Distance of Field
36°
63mm Code 39 (5 mil) 120mm
25mm Code 39 (10 mil) 210mm
57mm PDF417 (5 mil) 115mm
37mm PDF417 (10 mil) 215mm
35mm
QR Code (10 mil) 145mm
25mm QR Code (15 mil) 210mm
35mm Data Matrix (10 mil) 155mm
30mm Data Matrix (15 mil)
220mm
0 50 100 150 200 250
3
Page 6

Getting to Start
ON, OFF, IDLE, RESTART
Connect Scanner and Host. One click the "Trigger". Scanner powers on and in "Idle" (ready to
use) state (factory default).
Power On
Power Off
There are 4 ways to "Power OFF":
Remove Cable Off scanner ; »
Remove Power Adapter Off RS232 Cable; »
Remove USB Cable Off the Host; »
Remove PS/2 cable off the Host or power adaptor off. »
IDLE
When scanner is NOT reading, it is in "IDLE mode".
No reading attempt within a timeout, the Imager switch to IDLE mode automatically.
RESTART
If Scanner halted and does not respond to operations, please "Restart" by "Power OFF", and
then "Power ON".
4
Page 7
Getting to Start
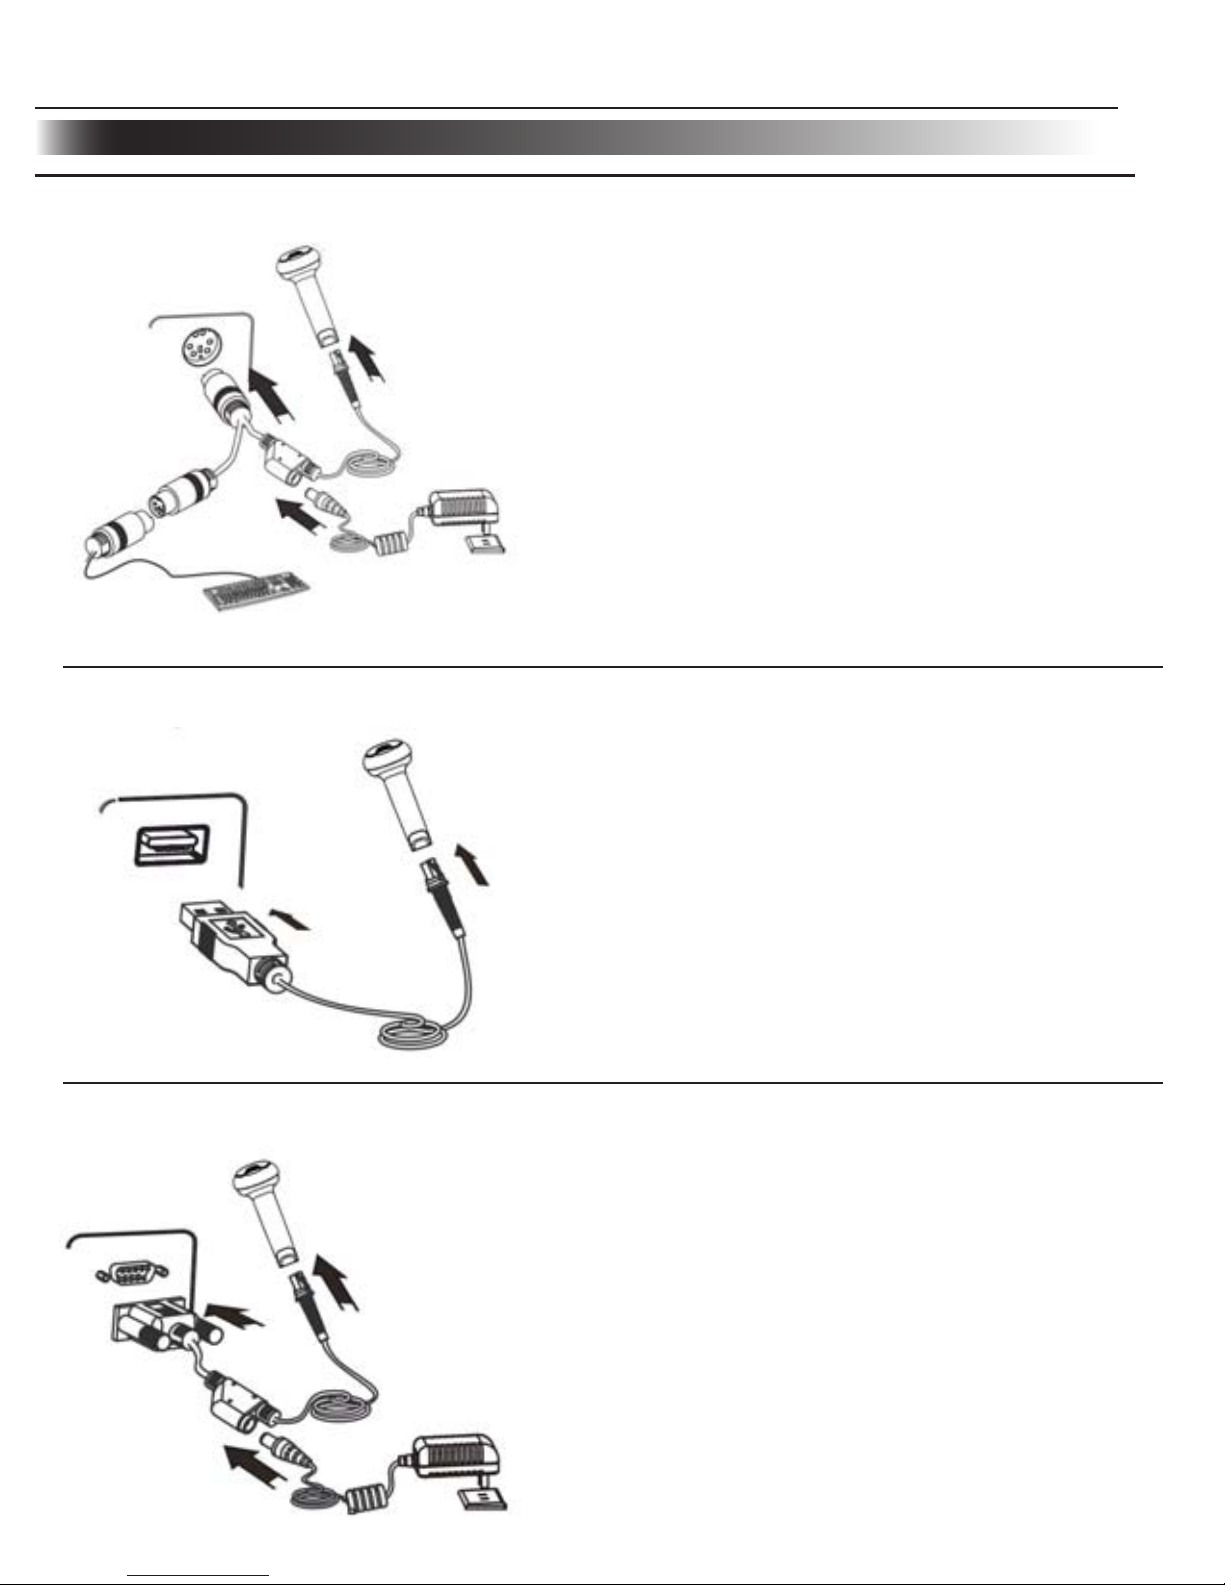
Connect Scanner to the Host
Connecting with USB Cable
Connecting with PS/2 Cable
Insert PS/2 cable (RJ 45 male DIN) into Scanner 1、
cable slot;
Insert PS/2 cable (PS/2 male DIN) into Host PS/2 2、
female slot;
If necessary, connect PS/2 cable and the power 3、
adapter;
If necessary, keyboard can connect to female slot 4、
on the PS/2 cable.
Insert USB Cable (RJ45 male head) into Scanner 1、
cable slot;
Insert USB Cable (USB male head) into Host’s 2、
(female) USB connector.
Connecting with RS232 Cable
Insert RS232 cable (RJ45 male head) into Scanner 1、
cable slot;
Insert RS232 cable (RS232 male head) into 2、
Host’s (female) RS232 connector;
Connect RS232 cable and the power adapter. 3、
5
Page 8
Getting to Start
Removal of Communication Cable
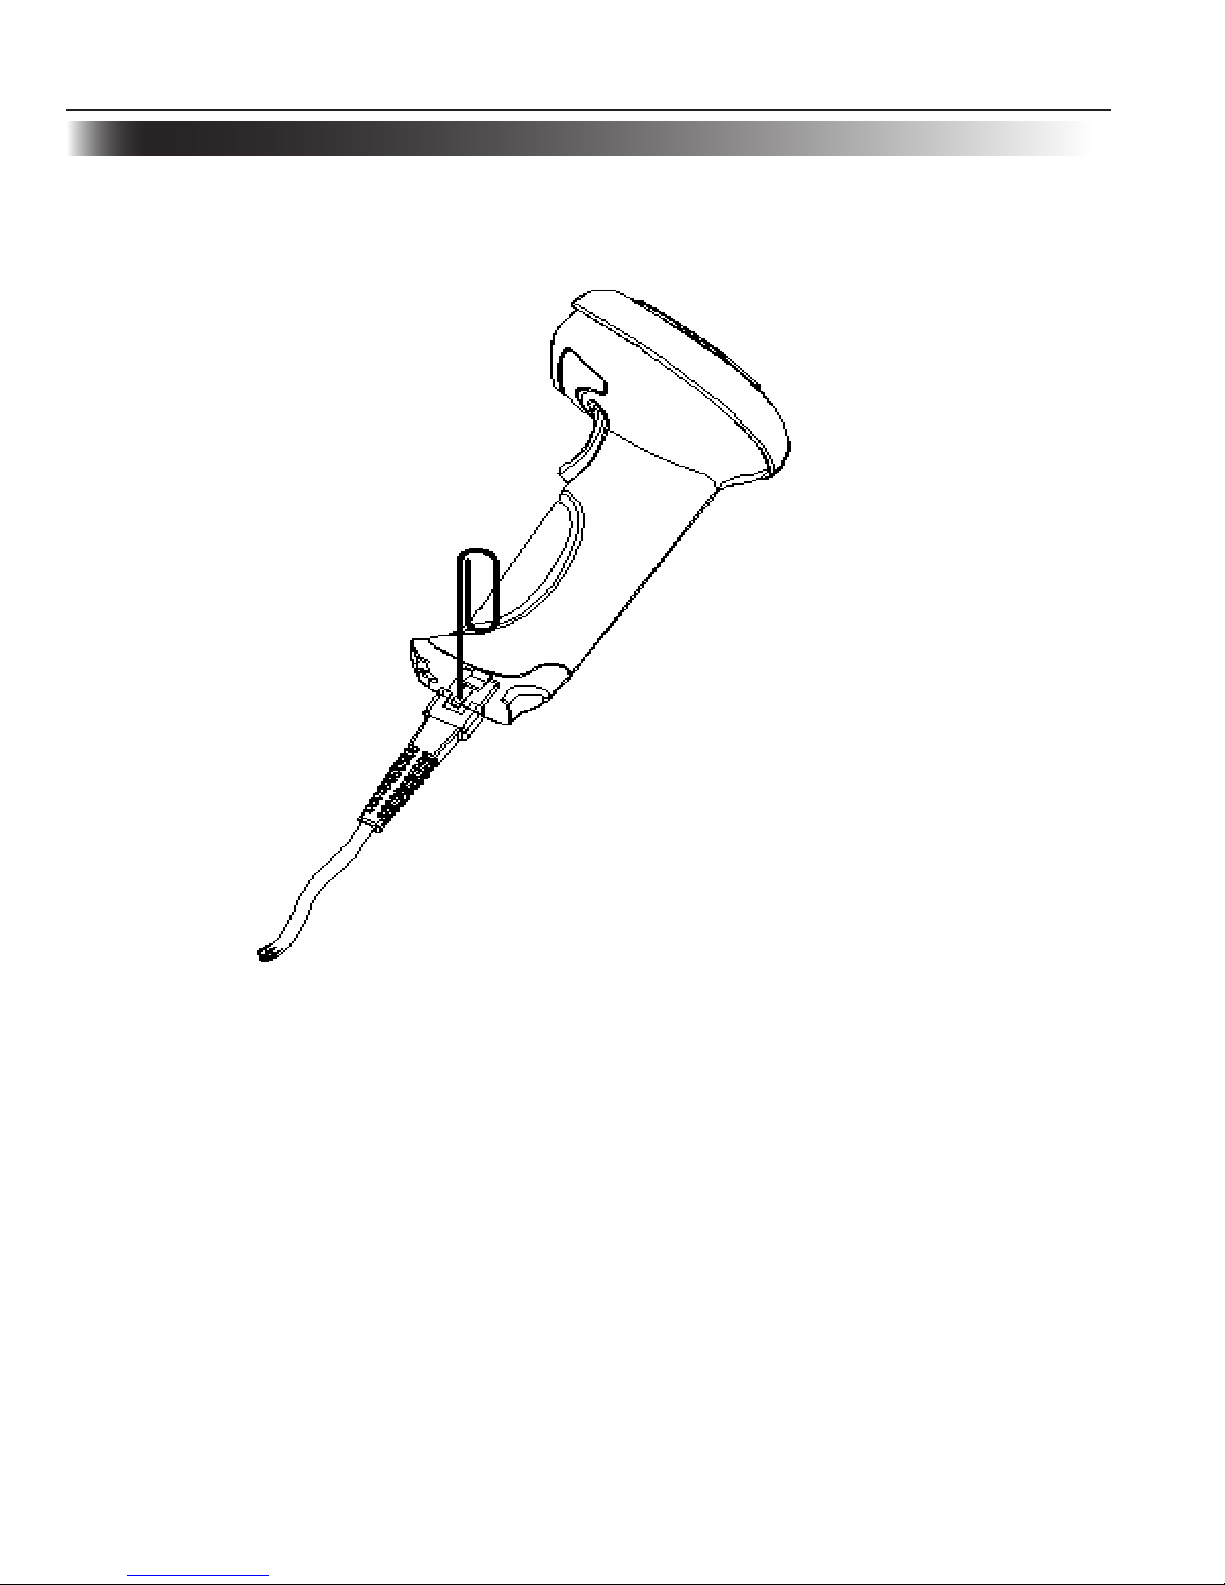
Getting to Start
Removal of Communication Cable
Pull out the Pin after the cable is removed. 4、
Unplug the connector from the Host. 5、
6
A Pin that fit the Scanner “ dismount hole” is needed. A paper clip could be ideal. Stretch one
end of the paper clip to fit the “Dismount Hole”. Follow the steps:
For RS232 and PS/2 connections, unplug the power adaptor. 1、
Insert the Pin into “Dismount Hole” and keep some pressure. 2、
Pull out the cable gently. 3、
Page 9
请更换节标题
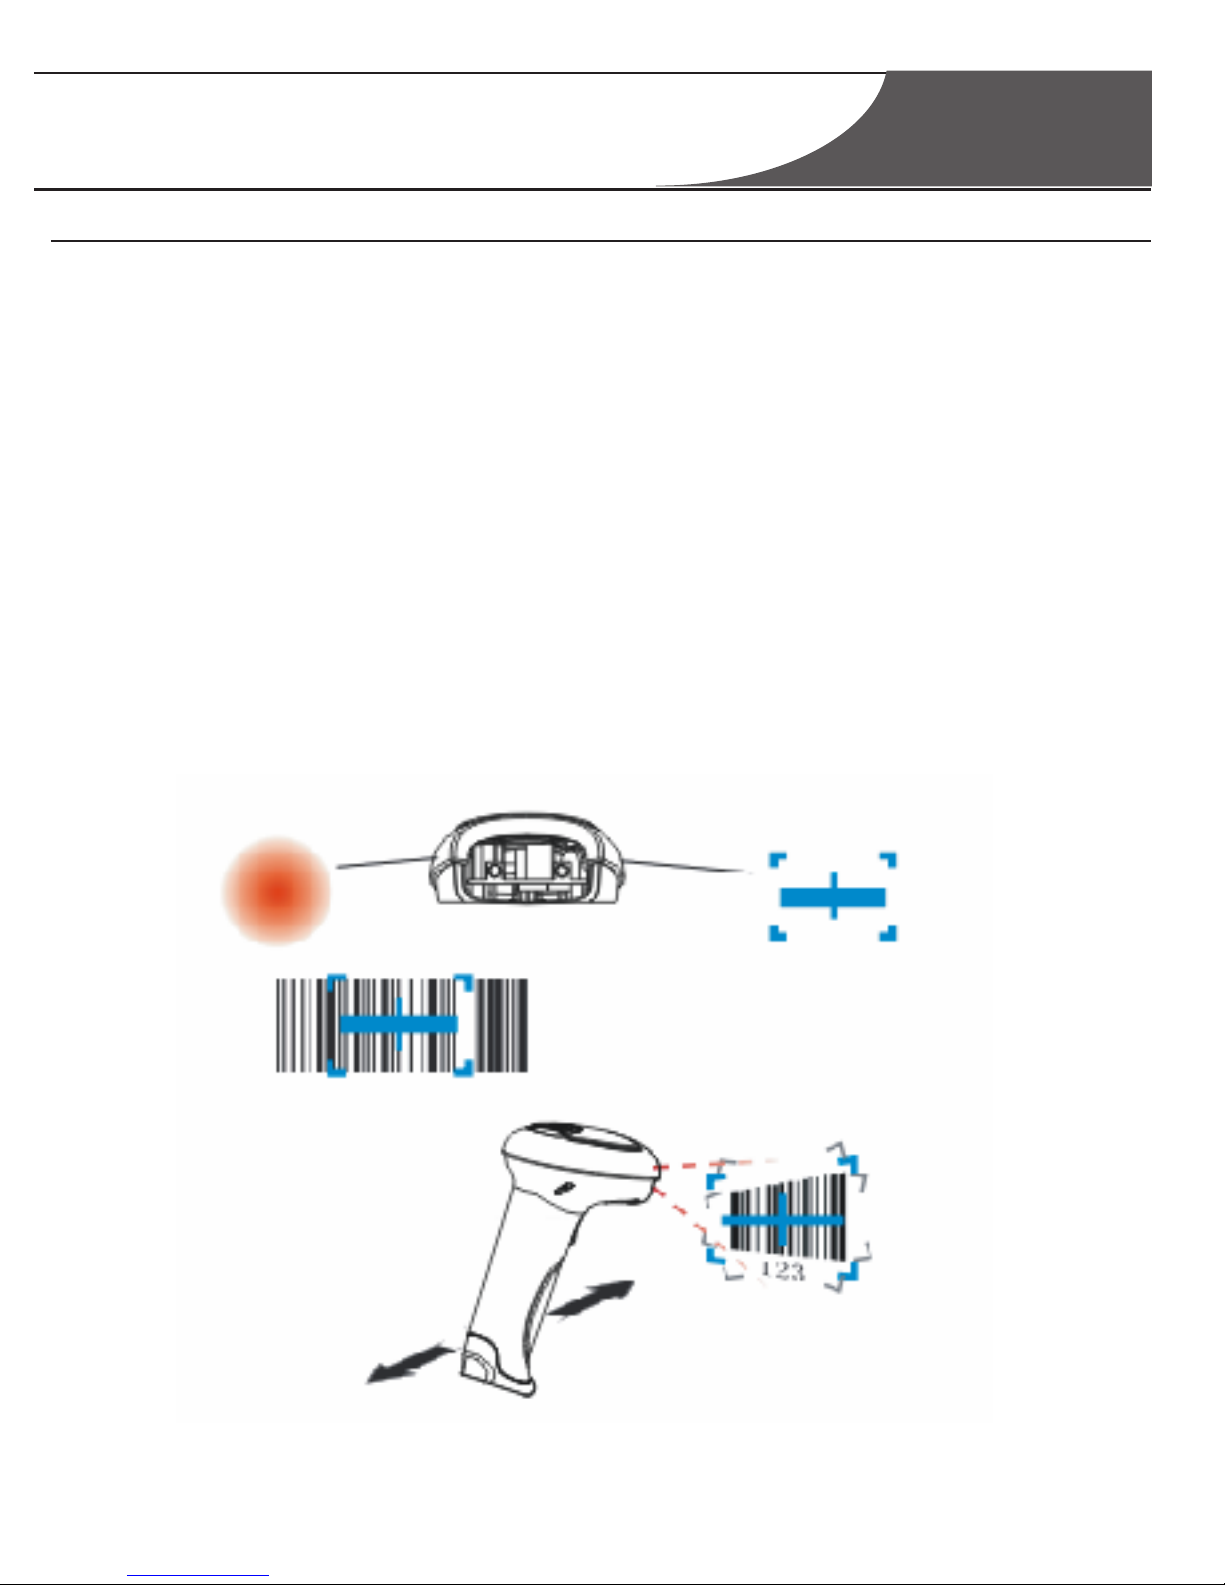
Reading
Hand-held Mode
NOTE: Experiences tell a certain range of distances has higher successful reading rate. This
range is the Optimum Reading Stance.
7
Ensure Scanner, cables, and the Host are connected, then turn the unit Power ON 1、
Press & hold Trigger. Illumination LED and Aiming LED cast an Illumination Pattern 2、
(red light) and an Aiming Pattern (blue light);
Keep Illumination Pattern in the center of a bar code. Zoom in and zoom out to allocate 3、
the Optimum Reading Stance.
On a successful reading, there’ll be a beep sound, 4、
die out. The scanner then transmits barcode message to the Host.
illumination & aiming patterns
Page 10
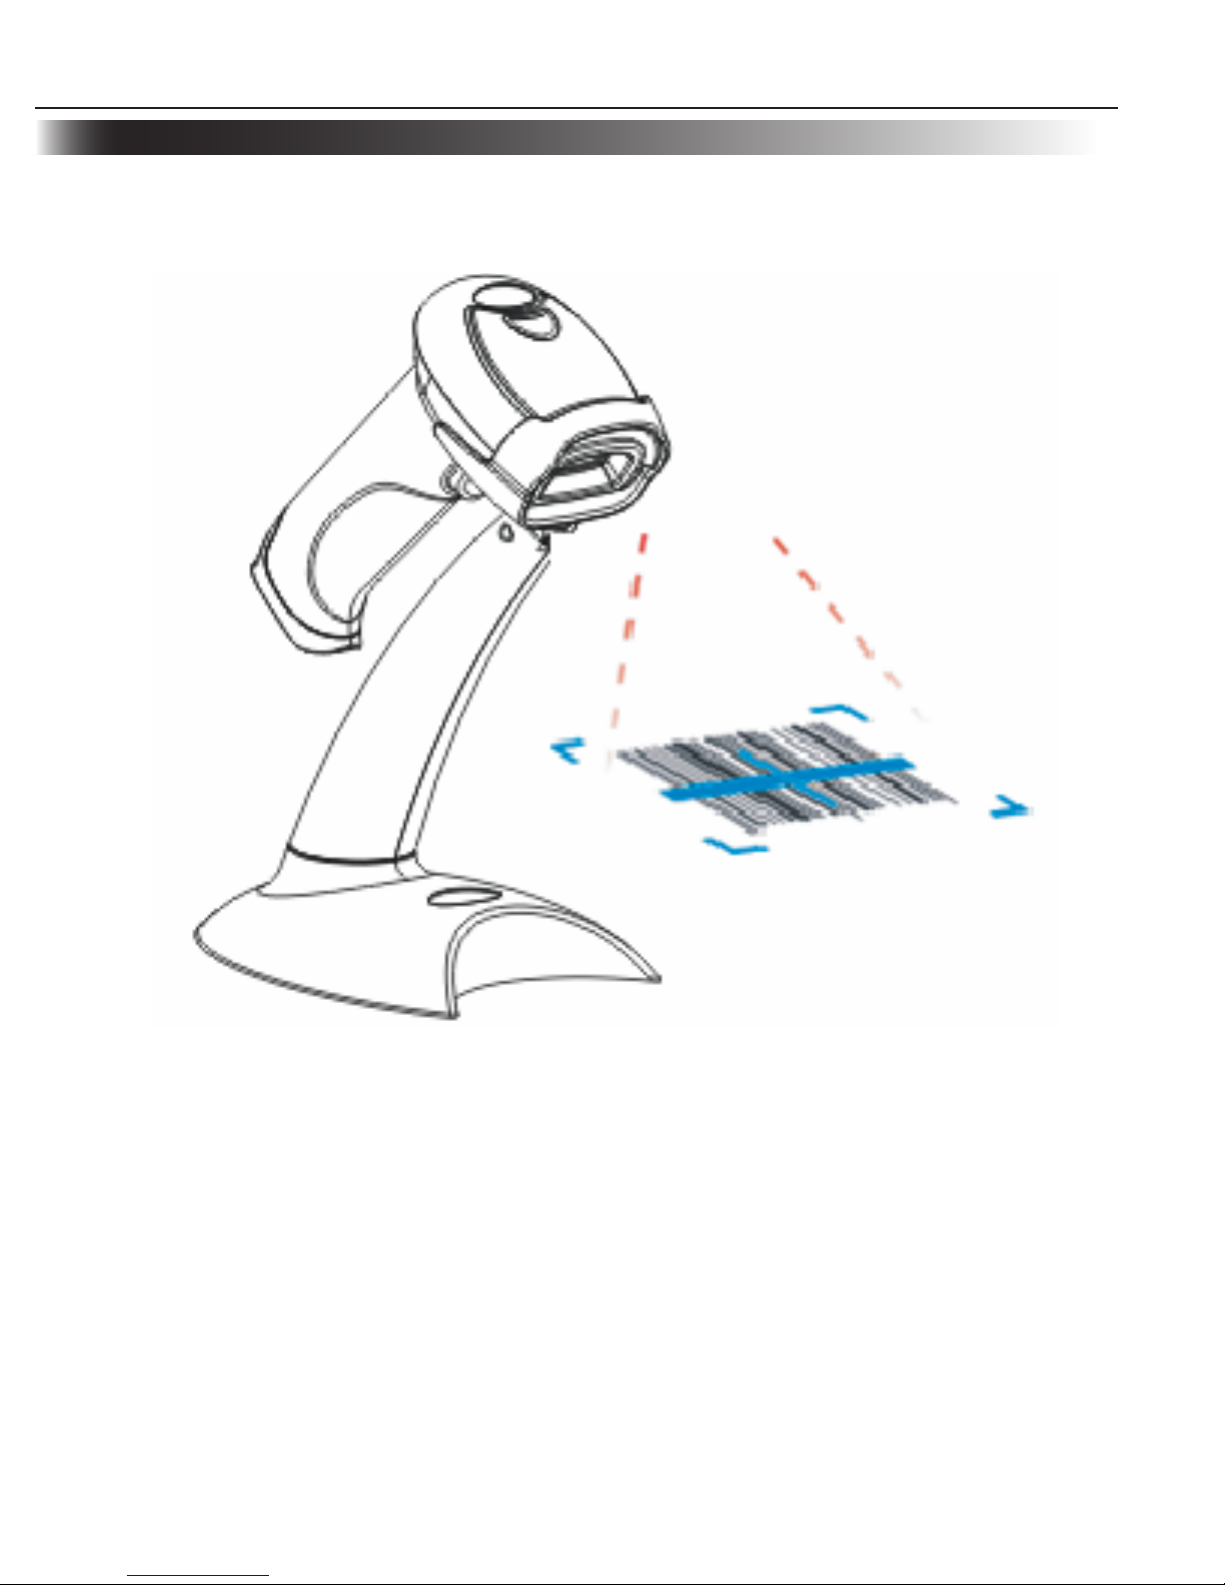
Reading
Hands-Free Mode
Select reading mode “sensor mode” or “continuous mode” when working in hands- 1、
free mode.
Adjust the stand height for the optimum reading stance. 2、
8
Page 11

请更换节标题
Programming Code
Code Programming ON
Code Programming OFF
Query
“Send Product Info”, the engine sends product information to the
Host immediately.“Send Sys Info when Power ON”, the engine sends
product information through RS232(only) to the Host after Power ON.
The system information is provided as follows:
Title Remarks
Firmware Ver Device Firmware Version
Build Time Device Firmware Version Establishing Time
Device ID Device Type
App Ver Device Application Version
uIMG Ver Device uIMG Version
Date Device Manufacture Date
S/N Device serial number
ESN User-defined device serial number
Manufacture ID Device Name
Interface
1 types of communication interfaces:
TTL232 or RS232, baud rate, parity check, data bits, stop bit
1D Indicate that reading 1D is allowed.
2D Indicate that reading 2D is allowed.
Scan Mode
Manual Scan 1.
Auto Scan 2.
Continuous Scan3.
Send Product Info
Send Sys Info when Power ON
Do not Send Product Info when Power ON
(Factory Default)
9
Page 12

Programming Code
Code Programming ON
Code Programming OFF
Factory Default
Part of Factory Default
Subject Factory Default
Interface
RS232 and USB Self-adaption ,The default value is as below:
RS232(Baud Rate: 9600bit/s,Parity Check:No Check,Data / Stop
Bit:8 bits/1 bit); USB(HID-KBW)
Beep On
Scan Mode Hand-held Mode
1D 1D Symbols(Enable)
Code128, EAN-13, EAN-8, Code39, UPC-A, UPC-E, Codabar,
China post 25,Interleaved 2 of 5, ISBN/ISSN, Code 93, GS1
Databar, Code 11,etc
2D 1D Symbols(Enable)
PDF417, QR Code(Model 1/2), DataMatrix (ECC200, ECC000,
050, 080,100,140), Aztec, Maxicode, LP Code, etc.
Load All Factory Default
10
Page 13

Programming Code
Code Programming ON
Code Programming OFF
Reading Mode
Hand-held Mode: Pull and keep holding the trigger line »
to read. Complete one reading or release the trigger to terminate
reading status.
Auto Mode: The ambient luminance change in front of the »
engine automatically initiates reading. After completion of reading,
the engine goes to idle. Both luminance change and the Trigger can
initiate reading when idle.
Continuous Mode: Pull the Trigger line low to start reading. »
The engine will keep reading. To stop, pull trigger line low again.
Hand-held Mode
(Factory Default)
Auto Mode
Continuous Mode
11
Page 14

Code Programming ON
Code Programming OFF
Programming Code
RS232 Programming
Baud Rate
Under RS232 connection, the engine and the Host should set
communication baud rate to the same to keep normal communication.
Baud rate is the bits transmitted per second (8 bits per bytes). The engine
and the Host must communicate at the same baud rate.
The scanner supports baud rate as the following:
9600
(Factory Default)
2400
14400
38400
115200
1200
4800
19200
57600
12
Page 15

Programming Code
Code Programming ON
Code Programming OFF
RS232 Programming
Parity Check
NO Check
(Factory Default)
Even Check
Odd Check
1 Stop Bit
(Factory Default)
2 Stop Bits
Stop Bits
13
Page 16

Programming Code
Code Programming ON
Code Programming OFF
RS232 Programming
Data Bits Transmitted
8 Data Bits
(Factory Default)
7 Data Bits
6 Data Bits
5 Data Bits
14
Page 17

Programming Code
Code Programming ON
Code Programming OFF
USB Programming
Select USB HID-KBW
Select USB DataPipe
Select USB COM Port Emulation
Select USB HID-POS
Note: A driver has to be installed before using USB DataPipe and USB COM Port Emulation.
15
Page 18

Programming Code
Code Programming ON
Code Programming OFF
USB HID-KBW Programming
The keyboard arrangements and country codes vary in different
countries. Refer country codes to the table “USB Country Keyboard
Types”. Follow the steps mentioned below to program.
1.“Code Programming ON”
2.“Select Country Code”
3. Read digit codes (See “country code” and appendix for digit
code)
4.“Save ”
5.“Code Programming OFF”
Select Country Code
Keyboard Coutry
Country/Language Code
Country/Language
Code
U.S.(Factory Default) 0
(Dutch)
14
Belgium 1
Norway
15
Brazil 2
Poland
16
Canada(French) 3
Portugal
17
Czechoslovakia 4
Romania
18
Denmark 5
Russia
19
Finland(Swedish) 6
Slovakia
21
France 7
Spain
22
Germany/Austria 8
Sweden
23
Greece 9
Switzerland(German)
24
Hungary 10
Turkey F
25
Israel(Hebrew) 11
Turkey Q
26
Italy 12
U.K
27
Latin-American 13
Japan
28
Country Code
16
Page 19

Programming Code
Code Programming ON
Code Programming OFF
USB HID-KBW Programming
Keystroke Delay
This parameter sets the delay, in milliseconds, between emulated key-
strokes. Scan programming code below to increase the delay when the Host
require a slower transmission of data.
Short Delay(Continuous keystroke)
(Factory Default)
Medium Delay(20ms)
Long Delay(40ms)
Caps Lock Override
The case of the data is inverted regardless of the state of the Caps Lock key on the Host. Lower
case and upper case are converted correspondingly.
No Caps Lock Override
(Factory Default)
Caps Lock Override
17
Page 20

Programming Code
Code Programming ON
Code Programming OFF
USB HID-KBW Programming
Convert Case
The Imager converts all barcode messages to the selected case.
No Case Conversion
(Factory Default)
Convert All to Upper Case
Convert All to Lower Case
18
Page 21

Programming Code
Code Programming ON
Code Programming OFF
Beeper
Beep Denotation (Beeper Definitions)
Beep Denotation
low-higher-higher-higher Power ON completed
1 beep successful reading of an ordinary barcode
2 beeps successful reading of an programming barcode
3 short low-2 high reading failure
1 long low Unknown Character, Virtual Keypad (USB connection)
Volume
Loud
(Factory Default)
Medium
Low
Decoding Beep
Beep ON
(Factory Default)
Beep OFF
19
Page 22

Programming Code
Code Programming ON
Code Programming OFF
Line Feed and Carriage Return
Need to program stop suffix and enable it supports line feed and
carriage return.
Program Stop Suffix
Read “Program Stop Suffix”. Then program stop suffix byte(s) to end
the suffix, read “Save ”. The stop suffix byte is programmed in its
hex values. For Windows OS, the hex values of "line feed and carriage
return” are “0X0D/0X0A”.
Disable Stop Suffix
(Factory Default)
Enable Stop Suffix
Program Stop Suffix
Stop Suffix Enable and Disable
Read “Code Programming ON” 1、
Read “Program Stop Suffix” 2、
Read “0”“D”“0”“A” 3、
Read “Save ” 4、
Read “Code Programming OFF” 5、
6、Read “Allow Stop Suffix” to enable above programming. A line feed will appear to the
right of a barcode.
Steps for Windows OS to achieve “line feed and carriage return“
20
Page 23

Programming Code
Code Programming ON
Code Programming OFF
1D Symbols
Code 128
Disable Code 128
Enable Code 128
(Factory Default)
Min Message Length (default: 1)
Max Message Length (default: 48)
All 1D Symbols
Enable Reading All 1D
Disable Reading All 1D
21
Page 24

Programming Code
Code Programming ON
Code Programming OFF
1D Symbols
EAN-8
Enable EAN-8
(Factory Default)
Disable EAN-8
EAN-13
Enable EAN-13
(Factory Default)
Disable EAN-13
22
Page 25

Programming Code
Code Programming ON
Code Programming OFF
1D Symbols
UPC-E
Enable UPC-E
(Factory Default)
Disable UPC-E
UPC-A
Enable UPC-A
(Factory Default)
Disable UPC-A
23
Page 26

Programming Code
Code Programming ON
Code Programming OFF
1D Symbols
Interleaved 2 of 5
Enable Interleaved 2 of 5
(Factory Default)
Disable Interleaved 2 of 5
Min Message Length (default: 4)
Max Message Length (default: 80)
24
Page 27

Programming Code
Code Programming ON
Code Programming OFF
1D Symbols
Min Message Length (default: 1)
Max Message Length (default: 48)
Code 39
Enable Code 39
(Factory Default)
Disable Code 39
GS1 Databar
Enable GS1 Databar
(Factory Default)
Disable GS1 Databar
25
Page 28

Programming Code
Code Programming ON
Code Programming OFF
2D Symbols
PDF417
Enable PDF417
(Factory Default)
Disable PDF417
Data Matrix
Enable Data Matrix
(Factory Default)
Disable Data Matrix
All 2D Symbols
Enable Reading All 2D
Disable Reading All 2D
26
Page 29

Programming Code
Code Programming ON
Code Programming OFF
2D Symbols
Aztec
Enable Aztec
Disable Aztec
(Factory Default)
Maxicode
Enable Maxicode
Disable Maxicode
(Factory Default)
QR Code
Enable QR Code
(Factory Default)
Disable QR Code
27
Page 30

Appendix
B. Digit Code and Save
0
1
2
3
4
5
6
7
8
9
A
B
C
D
E
F
Save
It is must to read save after reading digit code.
28
Page 31

Appendix
C. Troubleshooting
Problem Possible Cause Possible Solution
Scanner does not turn on
With RS232
communication, adapter
not inserted
Insert the adapter
With RS232
communication,
communication interface
fails.
Connect communication
port in right way
With USB or PS/2
communication,
communication interface
fails.
Connect communication
port in right way
Scanner does not send data
to host computer
Scanner is not connected to
the host.
Check all cable to host
computer.
Receive garbled with
RS232
Scanner and the host
baud rate settings are
inconsistent
Check scanner and PC-side
communication port baud
rate settings are the same
Scanner does not read
barcodes
Did not enable the barcode Please enable it
Scanner can not read the
barcode by it’s firmware.
Please contact the dealer
or us
29
 Loading...