

Page 1

Page 2
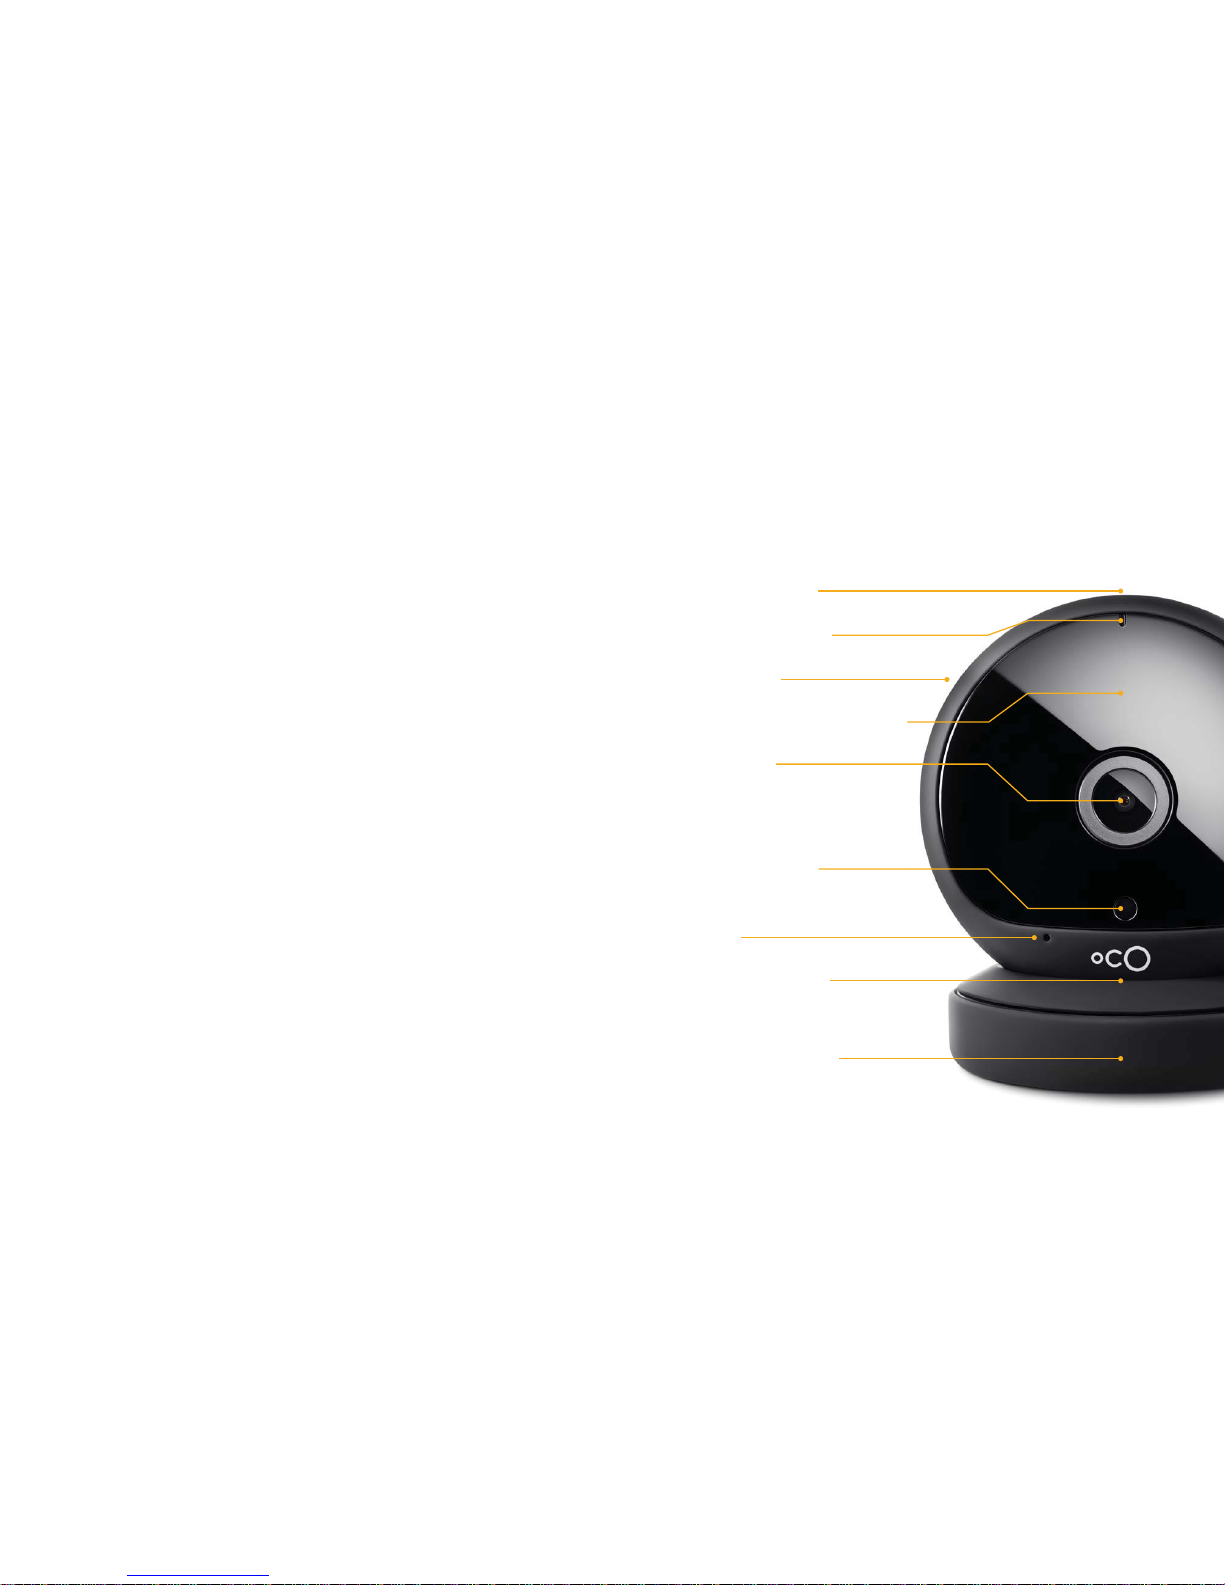
Description of Device
SD card slot
LED indicator
Speaker
Night vision LED light
Full HD
140° view angle
Light sensor
Mic
Screw thread
for tripod
Magnetic base
Thank you for purchasing
an Oco2 camera!
Page 3

Before You Get Started
Please make sure you have everything you need to
set up the Oco2:
1. Oco2 Full HD Wi-Fi camera with magnetic stand.
2. AC power adapter and Micro-USB cable.
3. The Quick Start Guide.
4.
An iPhone or iPad running iOS 7 or later (not
included) or an Android device running Android
4.1 or later (not included).
Technical Specifications
Dimensions:
3.68 × 3.49 × 1.61 inches
93.5 × 88.7 × 41 mm
Weight: 6.7 Oz / 190 g
Video: H.264 encoding,
up to Full HD
(1920 × 1080)
at 30 frames/sec
Zoom: 8x digital
Field of view:
140° (diagonal)
Audio: Built-in
microphone/speaker
Wireless network:
Wi-Fi, 802.11, b/g/n
(2.4 and 5GHz support)
Bluetooth: Bluetooth
LowEnergy 4.0
Night vision: High
powerinfrared LED
Wireless safety:
WEP/WPA/WPA2/
WPA-PSK/WPA2-PSK
Operation system:
Android/iOS/
Windows/MacOS
Set up: Android/iOS
Motion detection: Yes
Power: MicroUSB
5V DC, 2.0A
Operation temperature: 0-40 degrees Celsius
Page 4
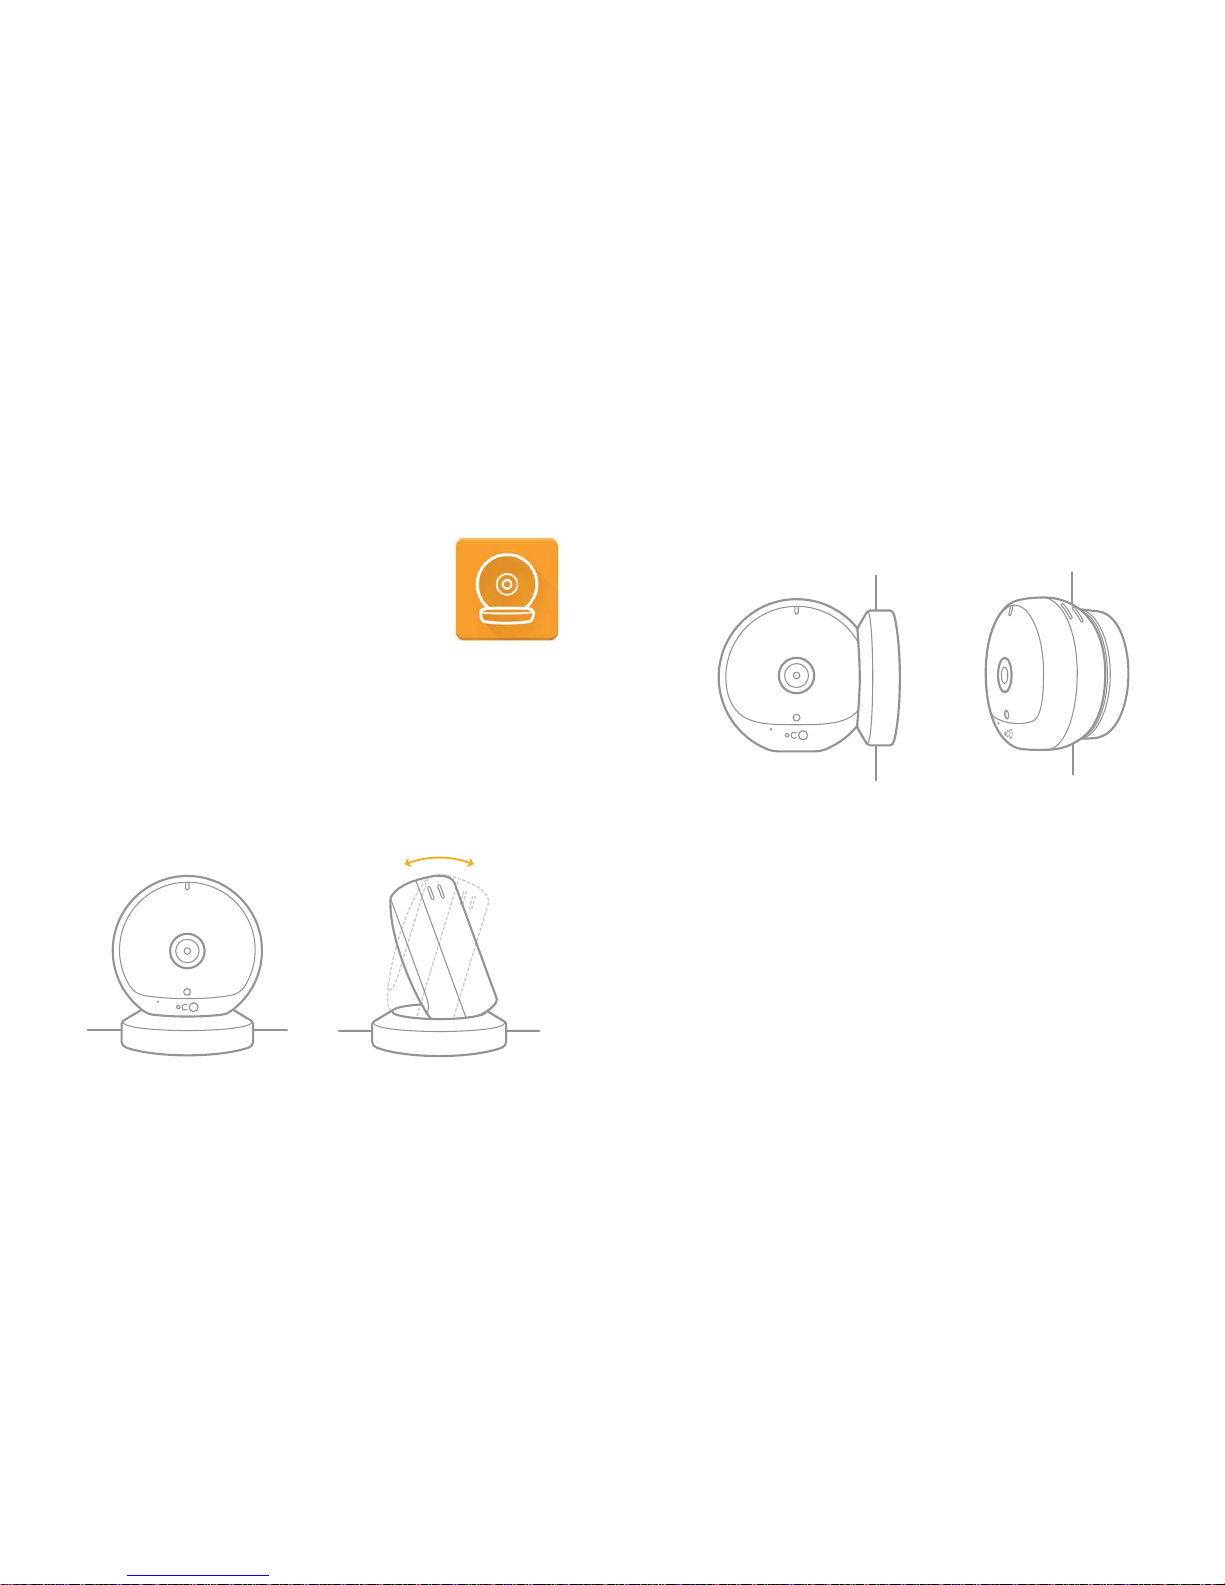
2. Mount it on a wall using the magnet stand as a
wall mount:
You can mount the camera on a wall in three ways:
a. Attach the Oco2 camera using the magnetic
stand to any metal surface.
b. Attach the Oco2 camera on a flat wall using the
enclosed 3M sticker.
c. Attach the Oco2 camera on the wall with the
enclosed screws:
Download the App
Download the Oco mobile app from
the Apple App Store or Google
Play Store. Then, launch the app and
create your account.
Set Up Oco2
You can set up the camera in two ways:
1. Place it on a flat surface using a magnetic base
and adjust the desired tilt angle:
Page 5

Add Oco2 Camera to Your Account
1. Wait until the orange-light indicator
on the
camera starts blinking.
2. Connect your smartphone or tablet to the same
Wi-Fi network that you are going to use with the
Oco2 camera.
3. Click the Add a new camera or + icon in the
Oco app to add the camera, and follow the
instructions.
Connecting the camera can take up to 1 minute.
The status light will glow a steady green
when the
configuration procedure is successfully completed.
Note: To make the camera work in another
Wi-Fi network, it is necessary to reset the
settings, and repeat the setup procedure.
To reset the settings, hold down the RESET
button on the back panel of the camera for
3 seconds until the camera beeps.
— Separate the mount into two parts.
— Screw the mount to the wall using the enclosed
screws and dowels.
— Put the second part of the magnetic stand over
the wall mount.
— Attach the camera by the back or side part.
3. Connect the camera to
the power outlet using the
enclosed power adapter
and Micro-USB cable.
Page 6

Add Cloud Recording Service
Sometimes you need to add more people to your
Oco account, or you need to store data for a
longer period. That is where our extended plans
come in handy. You can activate the extended
cloud recording and the enhanced features (such
as additional users per account) by choosing one
of the price plans. Or you can continue with our
basic free plan.
Grant Access to Other Users
You can use this feature if you wish to grant access
to your Oco2 camera to other users. In your Oco
app, choose Camera and then tap to
Camera settings → Grant access
Set Up Hybrid Storage
Our cameras give you the flexibility to store
footage in the Cloud and locally. With Oco2,
you can use a microSD card as a local storage.
Please note that the events snapshots are stored
in the Cloud even if you use microSD card and
basic free plan.
Insert the microSD card into the Oco2 camera.
Reboot the camera by turning the power off
and then on again. The microSD card will
be automatically formatted for use in the Oco2
camera. The Timeline with archive recordings
should appear on the camera view screen in the
Oco app.
Note: To store the video archive on a
microSD card, we recommend you use
a microSD card with Speed Class 6 or
higher. Oco2 supports microSD cards up
to 128Gb.
128GB
Page 7

Adjust Notifications Settings
You can choose which types of notifications you
would like to receive — e-mail, push, or both. In
your Oco app, choose Camera and tap to
Camera settings → Notifications (Settings)
Adjust the Sensitivity of the
Motion/Sound Sensors
Oco2 uses an intelligent self-learning algorithm to
avoid false notifications. But if you’d like to adjust
sensitivity of the sensors manually, open your Oco
Mobile app, choose Camera and tap
Camera settings → Motion/sound
Integrate Other Smart Devices
via IFTTT
With IFTTT, your Oco2 camera can communicate
with other smart devices or function according
to your geolocation, weather, or Moon phase.
You can enhance the capabilities of the Oco2 by
using ready recipes or by creating your own at
ifttt.com/oco_camera
Page 8

FCC Statement
This equipment has been tested and found to
comply with the limits for a Class B digital device,
pursuant to Part 15 of the FCC Rules. These limits
are designed to provide reasonable protection
against harmful interference in a residential
installation. This equipment generates, uses and can
radiate radio frequency energy and, if not installed
and used in accordance with the instructions,
may cause harmful interference to radio
communications. However, there is no guarantee
that interference will not occur in a particular
installation. If this equipment does cause harmful
interference to radio or television reception, which
can be determined by turning the equipment off
and on, the user is encouraged to try to correct
the interference by one or more of the following
measures:
— Reorient or relocate the receiving antenna.
— Increase the separation between the equipment
and receiver.
— Connect the equipment into an outlet on a
circuit different from that to which the receiver is
connected.
— Consult the dealer or an experienced radio/TV
technician for help.
FCC Radiation Exposure Statement. This equipment
complies with FCC RF radiation exposure limits
set forth for an uncontrolled environment. This
transmitter should be installed and operated with a
minimum distance of 20 centimeters between the
radiator and your body and must not be collocated
or operating in conjunction with any antenna or
transmitter.
Page 9

This device complies with Part 15 of the FCC
Rules. Operation is subject to the following two
conditions: (1) this device may not cause harmful
interference, and (2) this device must accept any
interference received, including interference that
may cause undesired operation.
Warning. Changes or modifications to this unit
not expressly approved by the party responsible
for compliance could void the user’s authority to
operate the equipment.
Déclaration de la FCC à propos
des interférences
Cet appareil a été testé et déclaré conforme aux
limites imposées aux appareils électroniques
de classe B, définies à la section 15 de la
réglementation de la FCC. Ces normes sont
destinées à assurer une protection raisonnable
contre les interférences nuisibles dans un
environnement résidentiel. Cet appareil produit,
utilise et peut émettre des fréquences radio et,
s'il n'est pas installé et utilisé conformément aux
instructions, provoquer des interférences gênantes
pour les communications radio. Cependant, tout
risque d'interférences ne peut être totalement
exclu : si cet appareil provoque des interférences
lors de la réception d'émissions de radio ou de
télévision (il suffit, pour le constater, de mettre
l'appareil successivement hors, puis de nouveau
sous tension), l'utilisateur devra prendre les mesures
nécessaires pour les éliminer. À cette fin, il devra:
— Réorienter ou déplacer l'antenne de réception.
— Augmenter la séparation entre l'équipment et le
récepteur.
— Brancher l'équipment sur une prise de courant
reliée à un circuit différent de celui sur lequel le
récepteur est branché.
Page 10

— Consulter le revendeur ou un technicien radio/
TV experimenté pour obtenir de l'aide.
Déclaration d'exposition aux radiations. Cet
équipement est conforme aux limites d’exposition
aux radiofréquences de la norme RSS-102 d'IC,
établies pour un environnement non contrôlé. Cet
équipement ne doit pas être placé ni utilisé de sorte
que l’émetteur se trouve dans un rayon inférieur à
20 cm entre celui-ci et votre corps. Cet appareil est
conforme à la section 15 de la réglementation FCC.
Son utilisation est soumise aux deux conditions
suivantes: (1) ce matériel ne doit pas générer
d'interférences ; (2) ce matériel doit accepter toute
réception d'interférence, y compris les interférences
pouvant générer un fonctionnement indésirable.
Attention! Le fabricant ne peut être tenu
responsable des interférences radio ou TV
provoquées par des modifications non autorisées
apportées à cet appareil. De telles modifications
peuvent annulaer le droit d’utilisation de ‘appareil
par l’utilisateur.
Déclaration concernant les normes d’IC. Cet
appareil numérique de la classe B est conforme
à la norme NMB-003 du Canada. Cet appareil
est conforme à(aux) norme(s) RSS exempte(s) de
licence d'Industrie Canada. Son fonctionnement est
sujet aux deux conditions suivantes : (1) cet appareil
ne peut pas provoquer d'interférence nuisible et (2)
cet appareil doit accepter toute interférence reçue,
y compris des interférences pouvant entraîner un
fonctionnement non désiré.
Page 11

For detailed guidelines, please visit
getoco.com/help
If you have any questions on the installation
or working of the Oco2 camera, please call
customer service at 1-888-683-8950 (English only)
or e-mail us at support@getoco.com
The camera has a one-year guarantee period.
See the details at getoco.com
 Loading...