

OCHIAI DP-10, CB-20, CX-10, CP-10, CH-20 Owner's Manual

English
Combination Tool
OWNER'S MANUAL
OWNER'S MANUAL
Français
Multi Outils
MANUEL DU PROPRIÉTAIRE
MANUEL DU PROPRIÉTAIRE
Deutsch
Kombiwerkzeug
BEDIENUNGSANLEITUNG
BEDIENUNGSANLEITUNG
Italiano
Utensile combinato
ISTRUZIONI PER L'USO
ISTRUZIONI PER L'USO
Español
Herramienta de combinación
MANUAL DEL PROPIETARIO
MANUAL DEL PROPIETARIO
Nederlands
Combigereedschap
GEBRUIKSHANDLEIDING
GEBRUIKSHANDLEIDING
Português
Ferramenta Combinada
MANUAL DE INSTRUÇÕES
MANUAL DE INSTRUÇÕES
OWNER'S MANUAL
COMBINATION
TOOL
Power Unit
Attachments
●
Nylon Cutter
●
Articulating Hedge Trimmer
●
Pruner
●
Extension for Pruner
DP-10
CB-20
CH-20
CP-10
CX-10


1
English
POWER UNIT DP-10
READ THIS FIRST
General Production
The production is a high-speed, fast-cutting power tool, not a
toy. For your own safety and the safety of others, read and be
sure you understand all of the safety precautions contained in
this Owner’s Manual before operating the production. Retain
the Owner’s Manual, and make it available to all persons who
will be using the production. Periodically, review the manual to
refresh your understanding of the safety instructions contained
in it.
● Careless or improper use can cause serious or fatal
injury.
Observe the safety instructions contained in this manual as
well as all applicable governmental and workplace safety
standards, regulations and ordinances. Your authorized
equipment dealer can show you how to operate your
production properly.
● The rotating production can hurl objects, causing injury.
Keep bystanders, children and animals at least 15 m away
while the production is running. Never use a production in
areas where the blade may strike a hard foreign object, such
as stone. Striking a hard object can damage the production,
and may crack, chip or even break off cutting blade. Flying
blade pieces can cause severe or fatal injury.
● Do not allow children to operate the production.
Operators must have sufficient size, strength and maturity
to be able to lift and operate the production correctly for
extended periods of use. They must also be able to read,
understand and follow the safety instructions in this manual.
● Exhaust fumes contain poisonous carbon monoxide gas.
Operate your production only outdoors in a well-ventilated
area. Stop the engine immediately if exhaust fumes cause
you to experience symptoms of headache or nausea.
● Gasoline is highly ammable and can be explosive under
certain conditions.
Before refueling, stop the engine and allow it to cool. Do not
smoke. Make sure refueling area is well ventilated and free
from any source of flame or sparks, including appliances with
a pilot light. Wipe up fuel spills immediately. Check for and
repair any fuel leaks before starting the production.
Operator
● Avoid serious or fatal injury.
Never operate the production under the influence of drugs or
alcohol. Do not use the production if you are sick or taking
medication that causes drowsiness. If you get tired while
using the production, take a break.
● Always wear appropriate protective gear to avoid injury.
Eye protection in the form of goggles or properly fitted safety
glasses must be worn. Hearing protection, such as earplugs,
should also be used. Have your hearing checked regularly.
Protect your hands and feet by always wearing non-slip
gloves and heavy-duty boots when operating and handling
the production. Do not wear short pants, sandals, or go
barefoot.
Wear a hard hat to reduce the risk of injury to your head when
there is a danger of head injuries.
● Loose clothing or scarves can lead to injury.
Long hair and loose articles of clothing such as scarves,
necklace jewelry, and so forth can become caught in nearby
brush or in rotating parts of the production itself. Always wear
sturdy close-fitting long-sleeve shirts and long pants that still
allow freedom of movement. Secure hair so that it is above
shoulder level.
● Maintain your balance to avoid loss of control and injury.
Before and operating, inspect the area for loose and uneven
ground, holes or ditches, tree branches or stumps, and
other such objects on or above the ground that could cause
stumbling. The production must be operated stably on the
ground and with the operator maintaining footing and balance
at all times. Keep the production, and any part of your body
away from fences, the side of buildings, tree trunks, stones
or other such objects which can cause improper footing or
balance. Keep both hands on the production and do not
overreach. Never attempt to cut with one hand.
● Always be aware of your surroundings and stay alert for
possible hazards that you may not hear due to the noise
of the production.
● Gasoline is highly ammable and can burn or irritate
skin.
Change clothing immediately if fuel is spilled on it. Never
remove the fuel cap while the engine is running.
● Be alert for signs of repetitive stress injury.
Using the production or any vibrating machinery over a period
of time may cause numbness, burning sensations, or other
indications of injury. If you experience any such symptoms, do
not operate the production and consult your doctor.
● Disconnect spark plug wire before you work on the unit
or leave it unattended.
● Always keep both hands or control handles. DO NOT
operate one-handed. DO NOT hold material you are
cutting.
● The mufer side of the engine should be away from your
body. This is necessary to avoid arm burns.
English

2
English
SAFETY AWARENESS
Whenever you see the symbols shown below, heed their
instructions! Always follow safe operating and maintenance
practices.
DANGER
DANGER indicates a hazardous situation which, if not
avoided, will result in death or serious injury.
WARNING
WARNING indicates a hazardous situation which, if not
avoided, could result in death or serious injury.
CAUTION
CAUTION indicates a hazardous situation which, if not
avoided, could result in minor or moderate injury.
NOTICE
NOTICE is used to address practices not related to
personal injury.
NOTE
○
This note symbol indicates points of particular interest for
more efcient and convenient operation.
ENVIRONMENTAL PROTECTION
To help preserve the environment, properly discard used
batteries, oils and uids, or other engine components that you
might dispose of in the future.
Consult your authorized equipment dealer or local
environmental waste agency for their proper disposal procedure.
This also applies to disposal of the entire engine at the end of
its life.
FOREWORD
Thank you for choosing this production. This Owner’s Manual
is provided to aid you in the safe and reliable operation of your
production. READ AND UNDERSTAND IT THOROUGHLY
BEFORE OPERATING YOUR PRODUCTION.
To ensure a long, trouble-free life for your production, give it
proper care and maintenance in accordance with this Owner’s
Manual.
No part of this publication may be reproduced, stored in a
retrieval system, or transmitted in any form or by any means,
electronic mechanical photocopying, recording or otherwise.
Although every possible care has been taken to make
this manual as complete and accurate as possible, the
manufacturers cannot guarantee against errors and omissions.
Due to improvements in design and performance during
production, procedures and specications are subject to change
without prior notice.
Illustrations are provided for general reference purposes, and
may differ from actual product aspects and components.
March 2015 (2)
TABLE OF CONTENTS
POWER UNIT DP-10 …………………………………………… 1
READ THIS FIRST ………………………………………… 1
TABLE OF CONTENTS …………………………………… 2
SAFETY AWARENESS …………………………………… 2
ENVIRONMENTAL PROTECTION ……………………… 2
FOREWORD ………………………………………………… 2
SPECIFICATIONS ………………………………………… 3
PREPARING FOR OPERATION/DP-10 …………………… 3
OPERATING INSTRUCTIONS …………………………… 6
CATALYTIC CONVERTER ………………………………… 7
MAINTENANCE AND ADJUSTMENT …………………… 8
TROUBLESHOOTING GUIDE …………………………… 10
STORAGE …………………………………………………… 10
ATTACHMENTS ………………………………………………… 11
1. Nylon Cutter CB-20 ………………………………………… 11
READ THIS FIRST ………………………………………… 11
SPECIFICATIONS ………………………………………… 12
ASSEMBLY AND PREPARATION ………………………… 12
OPERATING INSTRUCTION ……………………………… 13
MAINTENANCE AND ADJUSTMENT …………………… 15
2. Articulating Hedge Trimmer CH-20 …………………… 16
READ THIS FIRST ………………………………………… 16
SPECIFICATIONS ………………………………………… 16
ASSEMBLY AND PREPARATION ………………………… 17
OPERATING INSTRUCTIONS …………………………… 18
MAINTENANCE AND ADJUSTMENT …………………… 18
3. Pruner CP-10 ……………………………………………… 19
READ THIS FIRST ………………………………………… 19
SPECIFICATION …………………………………………… 19
OPERATING INSTRUCTIONS …………………………… 20
MAINTENANCE AND ADJUSTMENT …………………… 20
ASSEMBLY AND PREPARATION ………………………… 20
4. Extension CX-10 …………………………………………… 22
READ THIS FIRST ………………………………………… 22
SPECIFICATIONS ………………………………………… 22
ASSEMBLY AND PREPARATION ………………………… 22
3
English
SPECIFICATIONS
Model Power Unit DP-10
Overall dimensions Length × Width × Height mm 1,030×320×220
Weight Kg 4.3
Engine Type
Forced air-cooled, 2-stroke piston valve, gasoline engine
Displacement ml 26.3
Ignition Flywheel magneto with CDI.
Spark plug NGK BPMR7A
Starter Recoil starter
Clutch/diameter mm Automatic centrifugal type/54
Fuel Mixing ratio 50 Parts of regular unleaded gasoline to 1
part of 2-stroke engine oil by volume
Tank capacity L 0.5
Drive shaft assembly Bearing of shaft Metal BUSH
Direction of rotation Counterclockwise (viewed from PTO side)
Lubrication High quality lithium grease
Drive shaft dia. mm ø 7
Drive shaft material High tensile steel
Drive shaft type Solid steel
Joint type Coupling square hole mm 5.1×5.1
CAUTION
Information that the machine cannot be use in the potentially explosive ambient.
PREPARING FOR OPERATION/DP-10
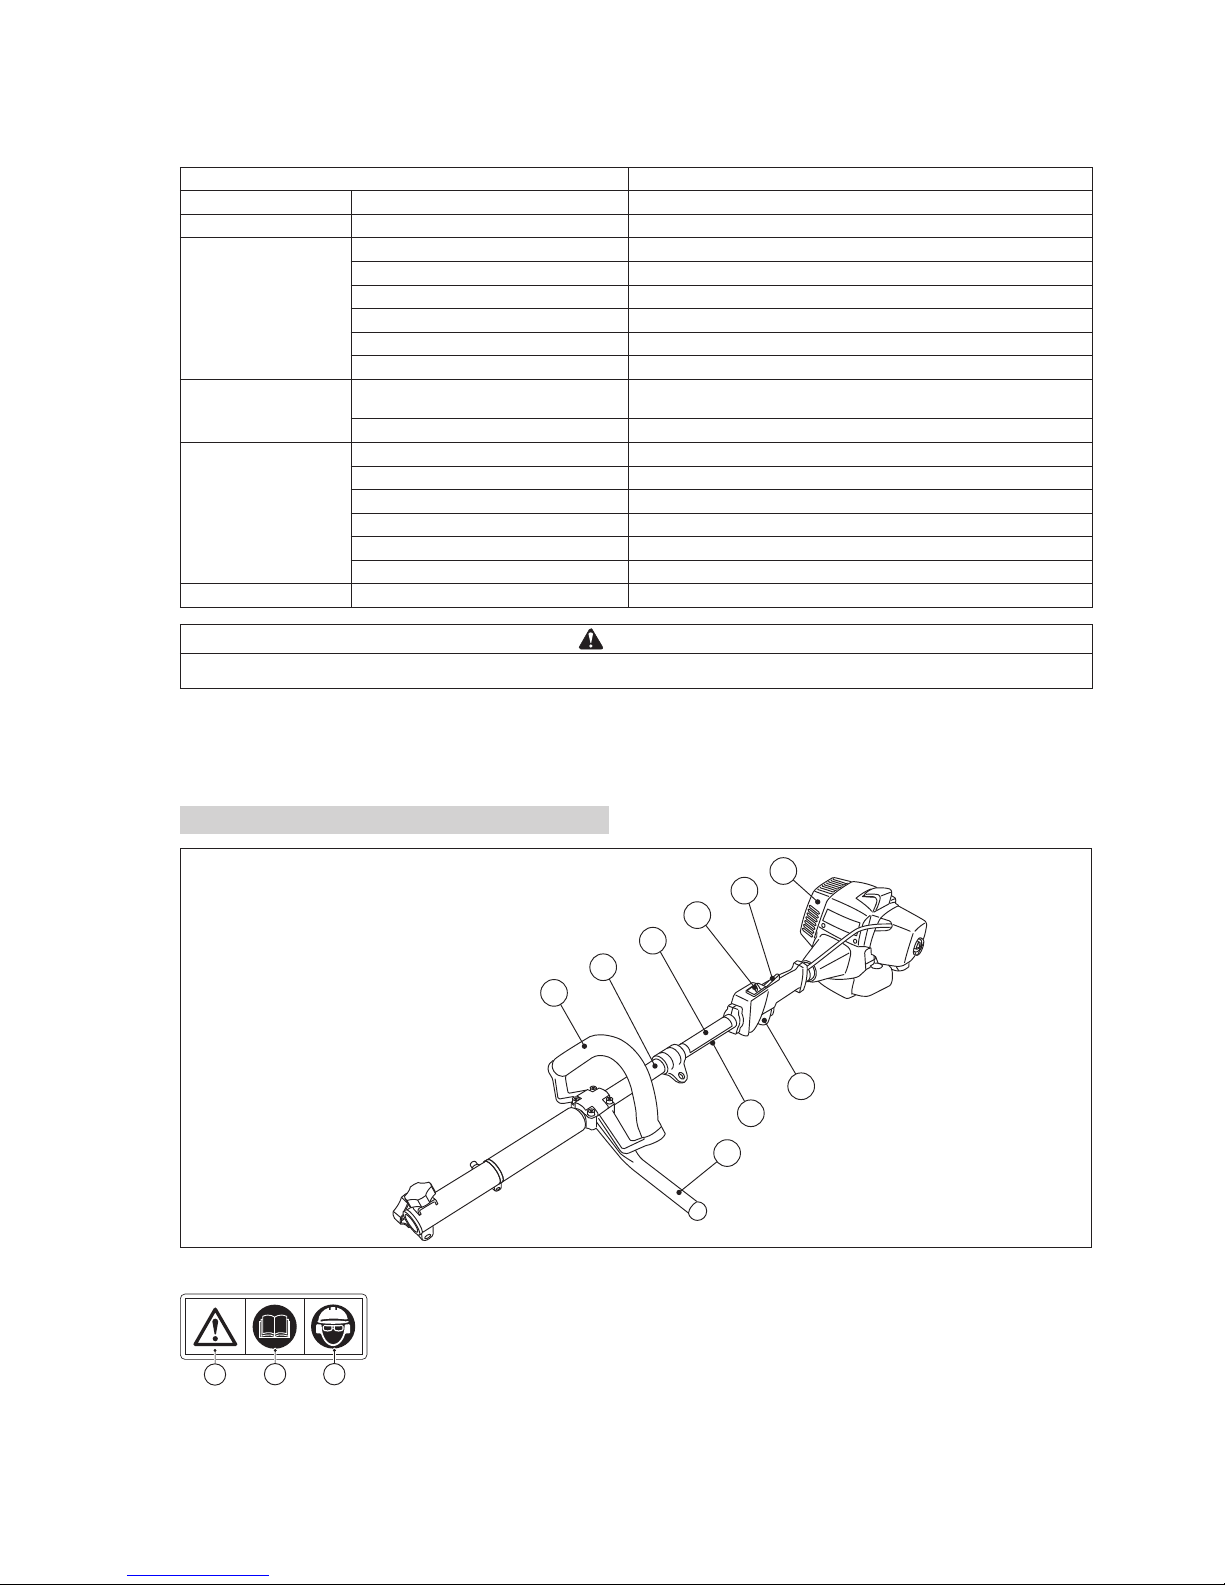
Location of Parts and Labels
A
H
G
F
E
B
D
I
C
A. Pipe Assembly
B. Loop Handle
C. Barrier-Bar
D. Throttle Lever
E. Throttle Lock
F. Engine Switch
G. Engine Assembly
H. Warning Label
I. Frame Serial Number Label
H. Warning Label
a
b
c
(a) WARNING
(b) Read the instruction manual carefully.
(c) Wear head, eye and ear protectors.
Frame Serial Number
The frame serial number (I) is the only means of identifying your
particular products from others of the same model type.
The frame serial number is needed by your dealer when
ordering parts.
4
English
C
E
H
F
B
A
G
J
K
L
ID
A. Fuel Tank
B. Tank Cap
C. Air Cleaner Assembly
D. Lift Up Lever
E. Carburetor
F. Priming Pump
G. Recoil Starter
H. Recoil Starter Grip
I. Spark Plug / Spark Plug Cap
J. Mufer (with spark arrester)
K. Mufer Cover
L. Cylinder
O
P
M
N
Q
R
M. Throttle Cable
N. Engine Switch Harness
O. Clutch Housing
P. Engine Serial Number Label
Q. Certication Label
R. Warning Label
P. Engine Serial Number Label
Engine Serial Number
The engine serial number (P) is the only means of identifying
your particular engine from others of the same model type.
The engine serial number is needed by your dealer when
ordering parts.
Q. Certication Label
R. Warning Label
a
b
c
d
(a) WARNING
(b) The Owner’s manual contains important information on safe
operation. Read it before operating engine.
(c) Gasoline is extremely ammable and explosive. Stop engine
before refueling.
(d) Exhaust gas contains carbon monoxide, an odorless and
deadly poison. Do not run Engine in an enclosed area.
Dealer/Owner Assembly Parts
A
B
F
G
C
H
I
D
E-1E-2E-3E-4E-5
A. Loop Handle
B. Bracket (Barrier Bar)
C. Bolts (M5×30 For Loop
Handle)
D. Nuts (M5 For Loop Handle)
E. Tool Kit
E-1. Bag
E-2. Screwdriver
E-3. Wrench (17×19)
E-4. Allen Wrench (M5)
E-5. Allen Wrench (M6)
F. Goggles
G. Belt
H. Owner’s Manual
I. MDC Sheet
Assembly
Installation of the Loop Handle
Place loop handle assembly
at positioning label on the pipe
assembly and tighten the 4 bolts
by using the screwdriver.
Loop handle position
Place the loop handle over the
positioning label as pictured
below.
Shoulder Harness
Put on the harness diagonally
settled on the left shoulder (see
illustration).
A
F
D
BE
C
A. Bracket (Barrier Bar)
B. Loop Handle
C. Positioning Label
D. Pipe Assembly
E. Bolts
F. Nuts
A
B
C
A. Handle Position Label
B. Loop Handle
C. Grip
5
English
How to Assemble the Attachments
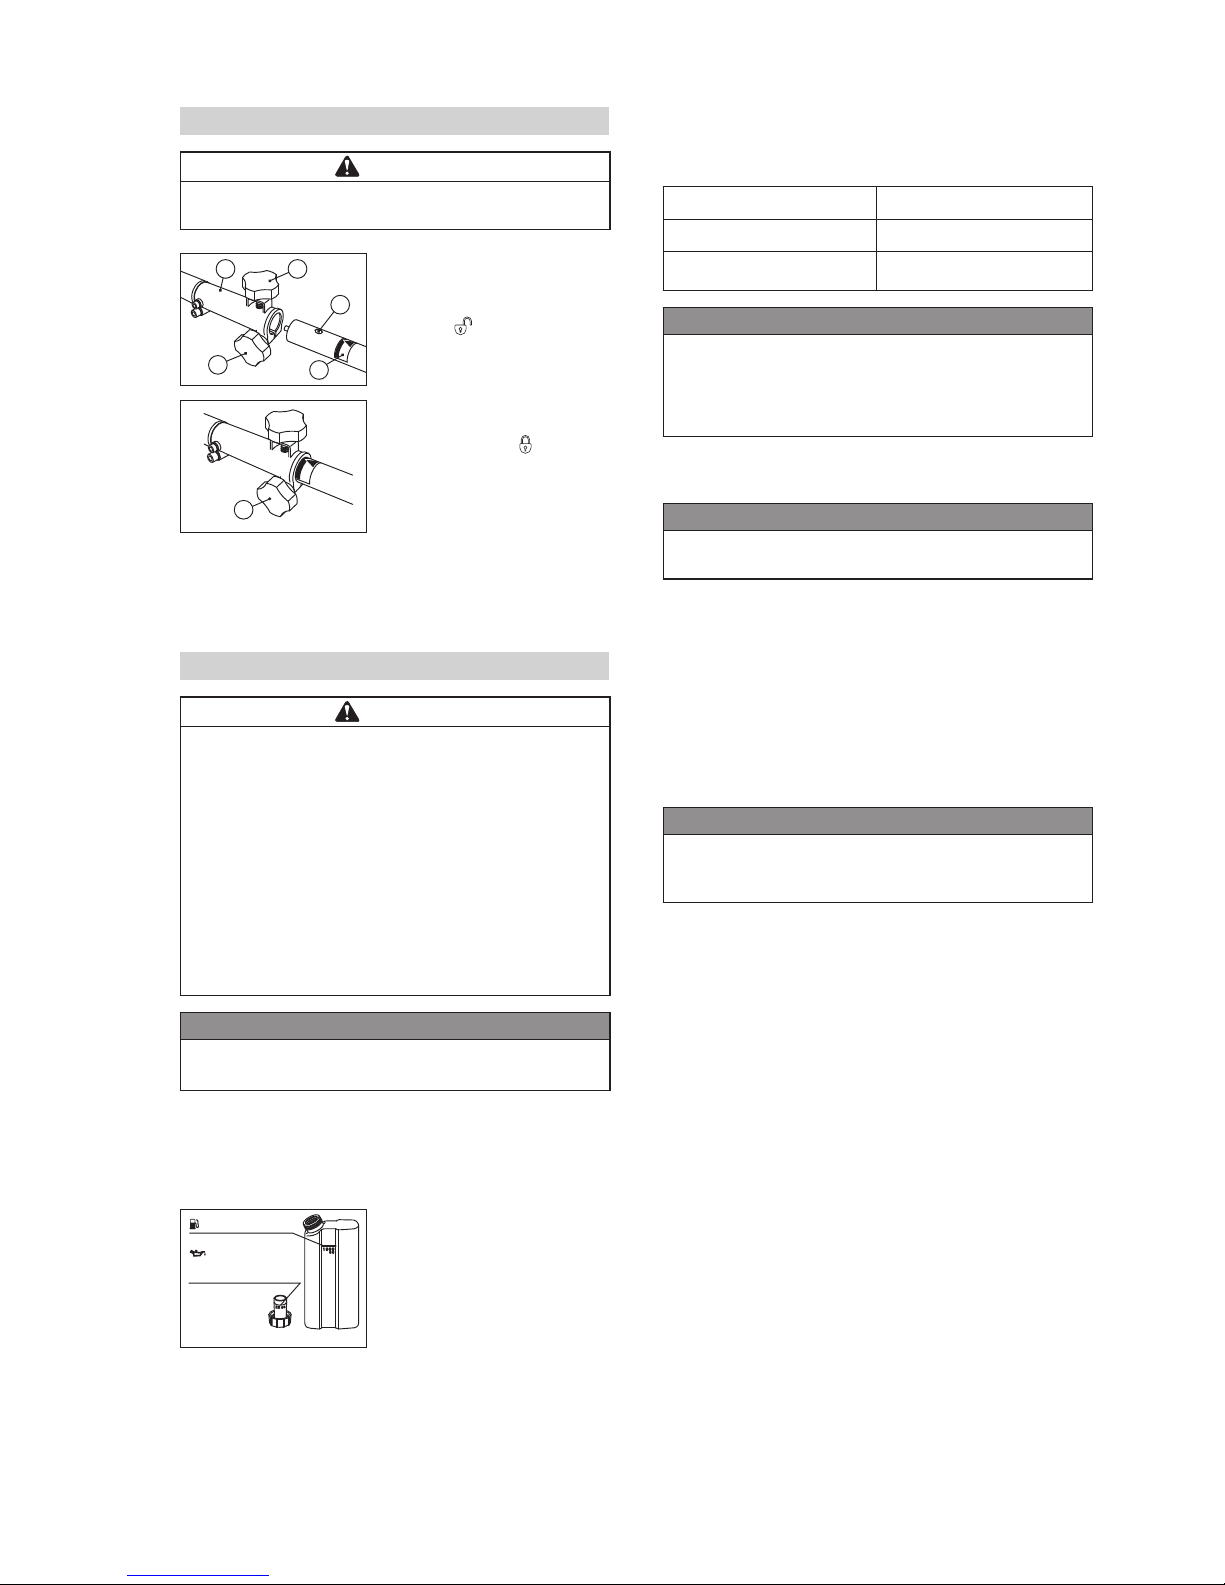
WARNING
It will be able to cause injury if attachment dose not put
in tightly.
1. Work in level place.
2. Loosen the knob (C).
3. Pull and turn the stop-pin knob
(A) to release stop-pin’s lock.
4. When “
mark” is on the
pipe, you can put in or pull out
your attachments.
If it is difcult to put in, twist
the attachment’s pipe and put
it in tightly.
When put it in tightly, turn the
knob and move “ mark” to
on the pipe to lock it.
5. Conrm the stop-pin is put in
to stop-pin hole (E).
Tighten the knob (C) to x it.
Fuel and Oil
WARNING
Gasoline is extremely ammable and can be explosive
under certain conditions, creating the potential for
serious burns.
Turn the ignition switch to “OFF”.
Do not smoke. Make sure the area is well-ventilated and
free from any source of ame or sparks; this includes
any appliance with a pilot light.
Never ll the tank completely to the top.
If the tank is lled completely to the top, heat may cause
the fuel to expand and overow through the vents in the
tank cap.
After refueling, make sure the tank cap is closed
securely.
If gasoline is spilled on the fuel tank, wipe it off
immediately.
NOTICE
Running on gasoline only will cause the engine to seize.
Use gasoline-oil mixture.
2-stroke engine requires a gasoline-oil mixture.
Gasoline and engine oil mixing ratio:
50:1
(Gasoline 50, 2-stroke engine Oil 1)
Pour the 2-stroke engine oil and
the gasoline into an appropriate
container with the ratio shown
above, and shake it thoroughly to
avoid the separation of them. And
then, pour it into the fuel tank.
Fuel Type and Octane Rating
Use clean, fresh unleaded gasoline with ethanol volume content
not more than 10% and an octane rating equal to or higher than
that shown in the table.
Fuel Type Unleaded Gasoline
Ethanol Content E10 or less
Minimum Octane Rating
Research Octane Number
(RON) 91
NOTICE
Do not use any fuel that contains more ethanol or other
oxygenates than specied for *E10 fuel in this engine.
Damage to the engine and fuel system, or engine
starting and/or performance problems may result from
the use of improper fuel.
* E10 means fuel containing up to 10% ethanol as specied by
European directive.
NOTICE
Do not use leaded gasoline, as this will destroy the
catalytic converter.
NOTE
○
Do not use gasoline that has been stored longer than two
month.
○
To ensure proper starting at low ambient temperatures, fresh
winter grade fuel must be used.
○
If “knocking or pinging” occurs, use a different brand of
gasoline or higher octane rating.
Recommended Engine Oil
High quality 2-stroke engine oil
JASO Service Classication - FC class
NOTICE
Do not use 2-stroke oil that contains Phosphorus (P),
Lead (Pb) or Sulfur (S). These elements will reduce the
life and performance of the catalytic converter.
A
D
B
E
C
C
A. Stop-pin Knob
B. Power Unit Joint Case
C. Knob
D. Label
E. Stop-pin Hole
Gasoline 1000mL
2-Stroke engine oil
20mL
Container mixing fuel (Example)

6
English
OPERATING INSTRUCTIONS
Starting the Engine
Fuel
● Level the engine before fueling.
● Open the fuel tank cap and fill the fuel tank with 50:1 gas/oil
pre-mixed fuel.
● Pour slowly to avoid “spill back” and allow air to escape from
the fuel tank.
● Close the tank cap securely by turning it clockwise as far as
it will go.
WARNING
Never ll the tank so the fuel level rises into the ller
neck. If the tank is overlled, heat may cause the fuel to
expand and overow through the vents in the tank cap.
After refueling, make sure the fuel tank cap is closed
securely.
If gasoline is spilled on the fuel tank, wipe it off
immediately.
DANGER
Exhaust gases contain carbon monoxide, a colorless,
odorless, poisonous gas.
Do not operate the engine in enclosed areas. Provide
adequate ventilation at all time.
● Turn the engine switch on the
engine or the equipment to the
“ I ” (starting) position.
● Move the throttle lever on the
equipment to the fully CLOSED
(engine idle speed) position.
NOTE
○
If the throttle lever is squeezed or locked at a half position,
the engine won’t start. Be sure the throttle lever is in the fully
closed position.
● Slowly push the priming pump
several times until the fuel
comes out of the overflow tube.
NOTE
○
This engine is designed so that overowed fuel due to
pushing a priming pump is to be returned to the fuel tank.
○
There is no fear of ooding the engine, so push the priming
pump enough times to get the engine started.
● Turn the lift up lever clockwise
to switch to the “STARTING”
position.
NOTE
○
When the engine is already warm or on hot days, do not push
down the lift up lever.
● Pull the recoil starter grip
slowly to engage the starter,
then give a short, quick pull.
WARNING
Releasing the starting rope suddenly may allow the rope
to whip around and cause injury and/or damage the
recoil starting mechanism. When starting the engine,
rmly grasp the recoil starter grip; do not grasp the
starter rope itself. Always control the rope as it rewinds
into the housing.
NOTE
○
For long life of recoil starter rope, pull the rope within the
direction range shown by arrow.
● Once squeeze the throttle
lever to switch the lift up lever
to the “RUNNING” (engine
idle speed) position, and then
release the throttle lever back
to fully CLOSED (engine idle
speed) position.
NOTE
○
Should the engine fail to start, do not try to pull the recoil
starter grip too many times with the lift up lever to the
“STARTING” position. This will cause the fuel to ood into the
cylinder and make starting even more difcult. In this case,
set the lift up lever to the “RUNNING” position and repeat the
starting procedure.
○
After starting, vary the engine speed a few times, by
operating the throttle lever to draw out the remaining air in the
carburetor.
Warming Up
● After starting the engine, run
the engine at the idling speed
(throttle lever position is fully
CLOSED) for a few minutes.
A
B
A. Engine Switch
B. Throttle Lever
A
C
B
A. Priming Pump
B. Overow Tube
(transparent)
C. Fuel Inlet Tube
A
A. Lift Up Lever
A
A. Recoil Starter Grip
A
A. Throttle Lever
A
A. Lift Up Lever
A
A. Throttle Lever
 Loading...