

Page 1
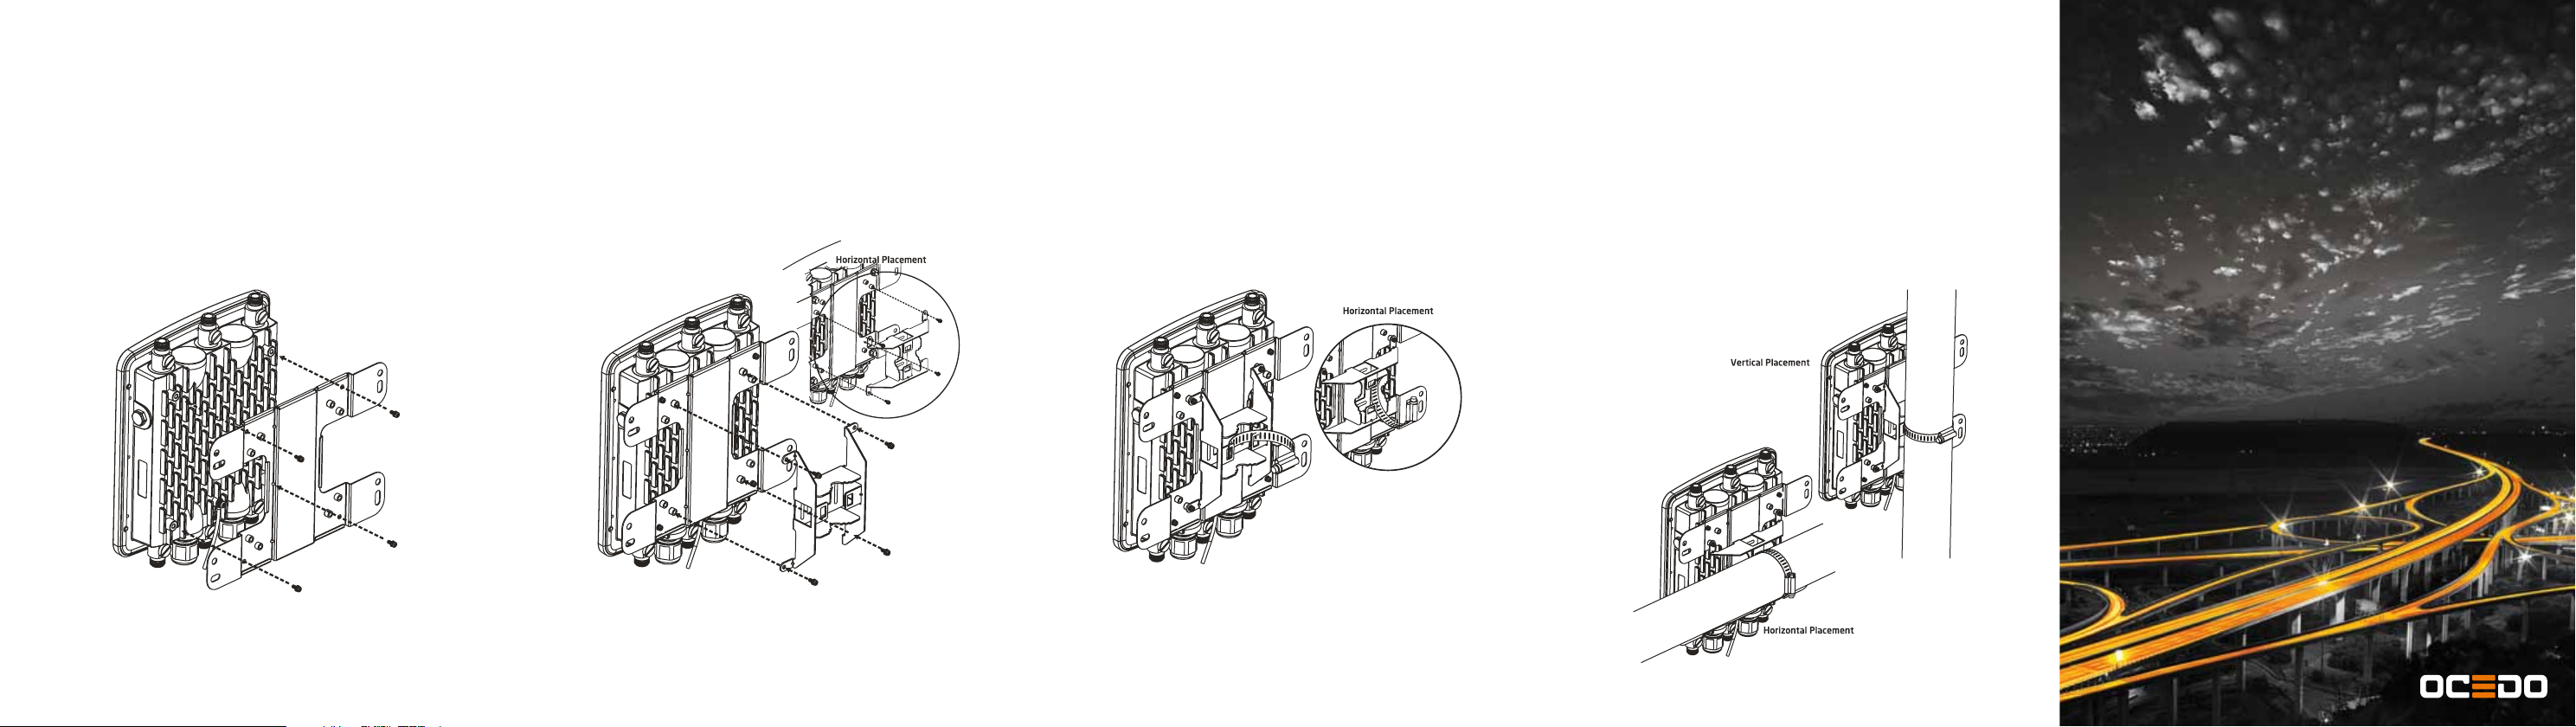
POle MOUNTiNg THe AP
B) Determine which placement to be assembled. Drive the four round
head screws to attach the Pole Mount Bracket to the bracket.
C) Thread the open end of the Pole Strap through the two tabs on the
Pole Mount Bracket.
D) Lock and tighten the Pole Strap to secure the Pole Mount Bracket to
the pole.
A) Place the lock and flat washers on the four cap screws and drive the
screws to attach the bracket to the back of the Access Point.
THANK YOU!
LET'S GET YOUR GATEWAY STARTED…
Page 2
POSITION DEVICE
1.
The AP can be mounted to a wall or a pole using the attached
mounting kit. Make sure to mount all antennas as indicated
on the device (2.4GHz and 5GHz). Please refer to the
corresponding mounting instructions on the following pages.
2.
CONNECT POWER
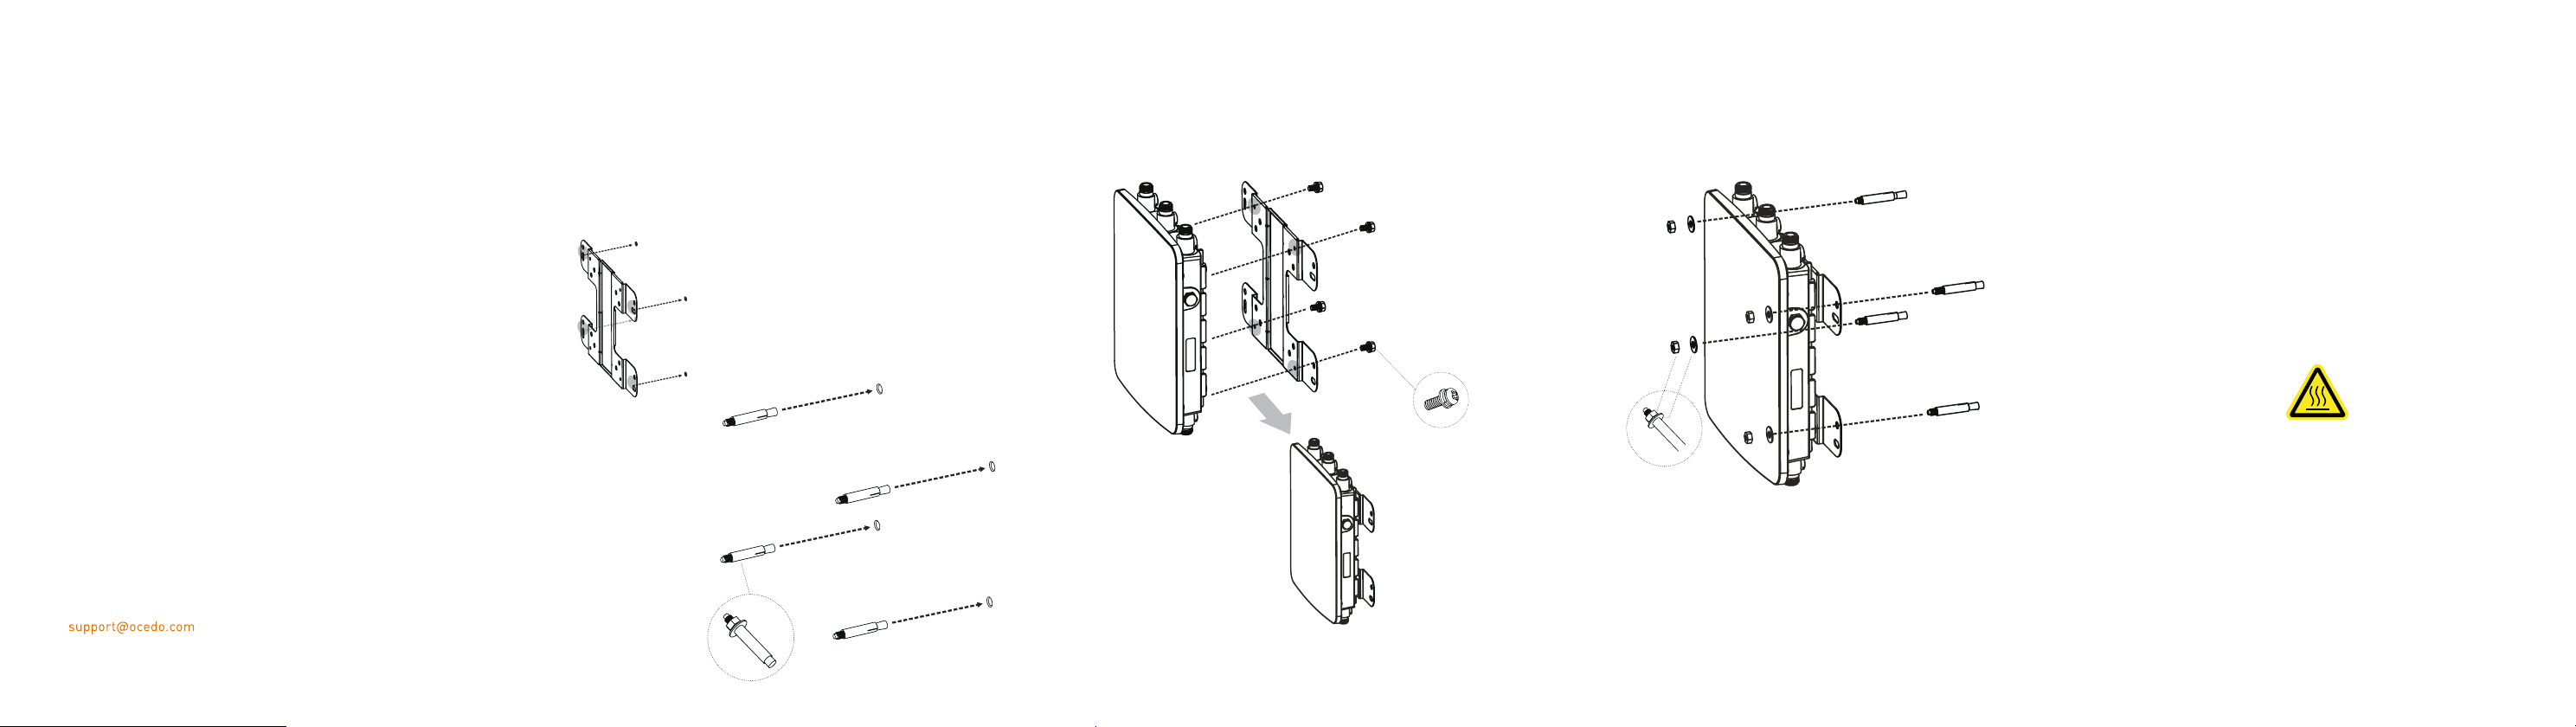
WALL MOUNTING THE AP
sno
A
surface.
B
bolts into the openings.
l ruof eht kraM )
of llirD )
itaco
eht fo
oh
mm8 peed mm73 ru
kram eht ni sel
lP )C
screws to attach the bracket to the back of the Access Point.
eht no seloh gnitnuom
tafl
gnitnuom
ht remmah dna sgni
e
eht evird dna swercs pac ruof eht no srehsaw tafl dna kcol eht eca
D) Attach the device onto the wall by tightening the bolt’s flat washers
and nuts to secure the bracket to the mounting surface.
POE RATING
PoE Input: 48Vdc,0.8A
PSE Output: 54Vdc, 0.3A
GROUNDING STRAP
Connect one end of the grounding strap to grounding post with included
screw and washer. Securely attach it to another nearby metal structure.
The AP can only be powered by PoE+ (IEEE 802.3at) via LAN1.
Supply power by connecting this port either to a PoE+ injector
or a PoE+ capable switch port.
3.
CONNECT INTERNET
Connect the AP to your local network. In order to find its managing
Ocedo Connect instance the AP has to be able to access the internet.
Hence, the network needs to provide a DHCP service so the AP
can establish a connection automatically.
FINISHED.
Need help?
| +49 (721) 754 03 444 | www.ocedo.com
RESTRICTED ACCESS LOCATION
For equipment intended for installation in a Restricted Access Location.
This product can only be accessed by service person.
WARNING
HOT SURFACE
DOT NO TOUCH
TEMPERATURE RANGES
Operating temperature: -20
Storage temperature: -30
℃ - 70℃
℃ - 80
℃
Page 3

Professional installation instruction
1. Installation personal
This product is designed for specific application and needs to be
installed by a qualified personal who has RF and related rule knowledge.
The general user shall not attempt to install or change the setting.
2. Installation location
The product shall be installed at a location where the radiating antenna
can be kept 41cm from nearby person in normal operation condition to
meet regulatory RF exposure requirement.
3. External antenna
Use only the antennas which have been approved by the applicant. The
non-approved antenna(s) may produce unwanted spurious or excessive
RF transmitting power which may lead to the violation of FCC limit and is
prohibited.
4. Installation procedure
Please refer to user’s manual for the detail.
5. Warning
Please carefully select the installation position and make sure that the
final output power does not exceed the limit set force in relevant rules.
The violation of the rule could lead to serious federal penalty.
Federal Communication Commission
Interference Statement
This equipment has been tested and found to comply with the limits for a
Class B digital device, pursuant to Part 15 of the FCC Rules. These limits
are designed to provide reasonable protection against harmful interference
in a residential installation. This equipment generates, uses and can radiate
radio frequency energy and, if not installed and used in accordance with the
instructions, may cause harmful interference to radio communications.
However, there is no guarantee that interference will not occur in a particular
installation. If this equipment does cause harmful interference to radio or
television reception, which can be determined by turning the equipment off
and on, the user is encouraged to try to correct the interference by one of the
following measures:
-Reorient or relocate the receiving antenna.
-Increase the separation between the equipment and receiver.
-Connect the equipment into an outlet on a circuit different from that to which
the receiver is connected.
-Consult the dealer or an experienced radio/TV technician for help.
FCC Caution: Any changes or modifications not expressly approved by the party
responsible for compliance could void the user's authority to operate this
equipment.
This device complies with Part 15 of the FCC Rules. Operation is subject to the
following two conditions:
(1) This device may not cause harmful interference, and
(2) this device must accept any interference received, including interference that
may cause undesired operation.
IMPORTANT NOTE
FCC Radiation Exposure Statement:
This equipment complies with FCC radiation exposure limits set forth for an
uncontrolled environment. This equipment should be installed and operated
with minimum distance 41cm between the radiator & your body.
 Loading...