


The Oceanscience Group
Q-Boat 1800 User Guide
Q-Boat 1800 Page 1 8/26/2011
V2.1.0

Table of Contents Section
Introduction 1.0
Q-Boat 1800 Safety and Cautions 2.0
Q-Boat 1800 Specifications 3.0
Order Codes 3.1
Q-Boat 1800D Assembly and Installation 4.0
Outdrive and Steering Linkage Installation 4.1
Skeg Installation 4.2
Charging and Installing the Battery Systems 4.3
Q-Boat 1800P Assembly and Installation 5.0
Outdrives and Steering Linkage Installation 5.1
Skeg Installation 5.2
Charging the Battery Systems 5.3
Installing the Battery Systems and Power Up 5.4
Installing the Control System 6.0
Installing the ADCP Instrument 7.0
River Ray ADCP Installation 7.1
S5/M9 River Surveyor Installation 7.2
Workhorse Rio Grande Installation 7.3
Q-Boat 1800 Page 2 8/26/2011

Deploying the Q-Boat 1800 8.0
User of the Fail Safe 8.1
Conducting a Range Test 8.2
Launching and Retrieving the Q-Boat 1800 8.3
Emergency Stop 8.4
Maintenance 9.0
Q-Boat Warranty 10.0
Addendum 11.0
Installing the Oceanscience OysterPE II 11.1
Installing the Trimble SPS 351 GPS (or similar unit) 11.2
Q-Boat 1800 Page 3 8/26/2011

1.0 Introduction
Congratulations on your recent purchase of the Oceanscience Q-Boat 1800.
The Oceanscience Q-Boat 1800 is a remotely-operated electric boat designed to make safe, unmanned
measurements of currents, bathymetry, and discharge with ADCPs. It can be customized with an
Oceanscience Oyster PE onboard computer, GPS, depth sounder and a variety of other instruments.
The rugged, lightweight hull is constructed of high-impact UV-resistant ABS. The boat’s powerful
outdrives are capable of reaching speeds up to 5 m/s and the efficient V-bottom design produces smooth,
predictable, agile handling even in choppy waters. The large watertight electronics compartment is
spacious and easily accessible. Two people can easily handle the boat and it can be transported in a
pickup, and SUV or some cars.
There are two models of Q-Boat 1800: the 1800D (displacement) and the 1800P (planning). The Q-Boat
1800D operates in displacement mode with a single 200W outdrive and a 12V NiMH battery pack,
producing a top speed of around 1.5 m/s (5 f/s). The Q-Boat 1800P operates in planning mode with twin
750W outdrives and three 24V NiMH battery packs. With the stock propellers, top speed is 4.5 m/s (15
f/s).
2.0 Safety and Cautions
Safety is a major concern when working around moving propellers. Extreme caution must be observed
when working on or around the Q-Boat. The propellers can rotate at more than 3,000 RPM and produce
750 W (1.0 HP) each. There is extreme danger of injury if the propellers are touched while operating.
Always stay clear of the propellers when the batteries are onboard.
When powering up the Q-Boat, always turn the radio transmitter on before powering the boat itself. If,
when powered up, the receiver on the boat does not detect a controller signal, the Vessel Control Unit
may unexpectedly enter the fail safe mode. This could be extremely dangerous, depending on the failsafe
setting. Though customizable in the field, the Q-Boat’s default failsafe behavior is to travel in a wide circle
until RC contact is reestablished.
Conversely, when shutting down always power down the boat (using the red battery switch) before
shutting down the transmitter. Again, if the transmitter is shut off before the boat, unexpected and
possibly very dangerous maneuvers will likely occur.
Properly installed instruments can cause the boat to fill with water. Never try to operate the Q-Boat 1800
without properly installed instruments.
Q-Boat 1800 Page 4 8/26/2011

Q-BOAT 1800 SPECIFICATIONS
1800D
1800P
Typical Cruising Speed
1.0 m/s
4 m/s
Top Speed
1.8 m/s
5 m/s
Hull Length
1800 mm
1800 mm
Hull Width
900 mm
900 mm
Battery Endurance – Top
Speed
40 minutes
45 minutes
Battery Endurance –
Cruising Speed
60-120 minutes
45-140 minutes
Payload
40 lbs.
30 lbs.
Power
12V NiMH Packs (1)
24V NiMH Packs (3)
Motor
Brushed DC outdrive (1)
Brushless DC Outdrive (2)
Hull Material
UV Resistant ABS
UB Resistant ABS
Weight
23-25 kg
25 kg
Hardware
Stainless Steel
Stainless Steel
R/C Control
Futaba 6-channel
Futaba 6-channel
Remote Antenna
Omni Directional
Omni Directional
Remote Range
300 m
300 m
Remote RF Scheme
FHSS
FHSS
Remote Frequency
2.4 GHz
2.4 GHz
ADCP Size
2” – 9” diameter
2” – 9” diameter
Depth Sounder Transducer
Internal or external mount
Internal or external mount
3.0 Q-Boat 1800 Specifications
3.1 Q-Boat 1800 Order Codes
Q1800D – Q-Boat 1800 D Remotely Operated Boat
Q1800P – Q-Boat 1800P High Speed Remotely Operated Boat
QDB – Q-Boat 1800D Battery Pack with Charger
QPB – Q-Boat 1800P Battery with Charger
FRC900 – Remote Control System
Q-Boat 1800 Page 5 8/26/2011

4.0 Q-Boat 1800D Assembly and Installation
The Q-Boat 1800D is shipped with the outdrive and skeg removed. This section provides
instructions to attach the outdrive and skeg to the Q-Boat 1800D, to connect the steering linkage
and how to properly charge and install the battery.
4.1 Outdrive and Steering Linkage Installation (Q-Boat 1800D)
The following items are required to install the outdrive and steering linkage:
1 Outdrive
1 Steering Clamp
1 Steering Linkage
1 #10-32 x3/4” Hex Head Machine Screw
1 #10 Split Washer
1 ¼” Flat Washer
1 5/32” Hex Driver
1. Insert the connector and cable up through the outdrive mount and steering clamp. (See
Figure 4.1)
2. Position the outdrive shaft so that the top of the cable gland is 2-3 inches above the top of
the outdrive steering arm. (See figure 4.2)
3. Tighten the steering clamp using the 5/32” hex driver. DO NOT OVERTIGHTEN.
4. Attach the steering linkage to the outdrive steering arm and servo arm. The steering linkage
should rotate freely around its longitudinal axis within the limits of the ball ends’ rotation.
(See figure 4.3)
5. Connect the motor power / control cable to the 4-pin bulkhead as shown. (See figure 4.4)
Note: the connector is keyed and will fit in only one orientation.
Notes about proper alignment
If a control signal is not present when the servo is powered up, the servo arm may turn to an
extreme angle, causing damage to the steering linkage or the servo. Use caution when powering
up the servo to avoid damaging the system. We recommend the steering linkage be
disconnected from the servo arm for the initial bench testing.
Q-Boat 1800 Page 6 8/26/2011

(Fig. 4.1) Insert connector and cable up
through outdrive mount and steering
(Fig. 4.2) Position outdrive shaft so top of
cable is 2-3” above outdrive steering arm
(Fig. 4.3) Attach steering linkage to
outdrive steering and servo arm.
(Fig. 4.4) Connect motor power/control
cable to the 4-pin bulkhead
4.2 Skeg Installation (Q-Boat 1800D)
The following items are required to install the skeg:
1 Aluminum skeg
6 #10-24 x 1” flathead machine screws
6 #10-24 locking nuts
6 #10 flat washers
1 Phillips screwdriver
1 3/8” end wrench
RTV sealant as required
Q-Boat 1800 Page 7 8/26/2011

(Fig. 4) Standard crossbar with wire rope
bridle and instrument safety cable
(Fig. 5) Safety cable, wire rope bridle, and
carabiner ready for tow line
(Fig. 4.5) Apply RTV sealant to skeg
screw holes
(Fig. 4.6) Set skeg and thread flathead screws
to hold in place
(Fig. 4.7) Properly installed skeg
(Fig. 4.8) Install washer and lock nut on
each protruding mounting screw
1. Turn the Q-Boat 1800D over and support it at the forward and aft deck areas. Apply RTV
sealant to the skeg screw holes as shown. (See figure 4.5)
2. Apply RTV sealant to the threads of the #10-24 flathead screws by inserting the screws into
the end of the sealant tube.
3. Set the skeg in position on the hull and thread in the #10-24 flathead screws to hold it in
place. Start all of the screws before tightening them down as shown. (See figure 4.6) Wipe
away excess sealant. Skeg designs may vary from boat to boat. See figure 4.7 for a properly
installed skeg.
4. Turn the hull over and install (1) flat washer and (1) #10-24 locking nut on each of the skeg
mounting screws protruding through the hull. The aft-most screw (closest to the back) ties
into the transom gusset for added rigidity. (See figure 4.8)
Q-Boat 1800 Page 8 8/26/2011
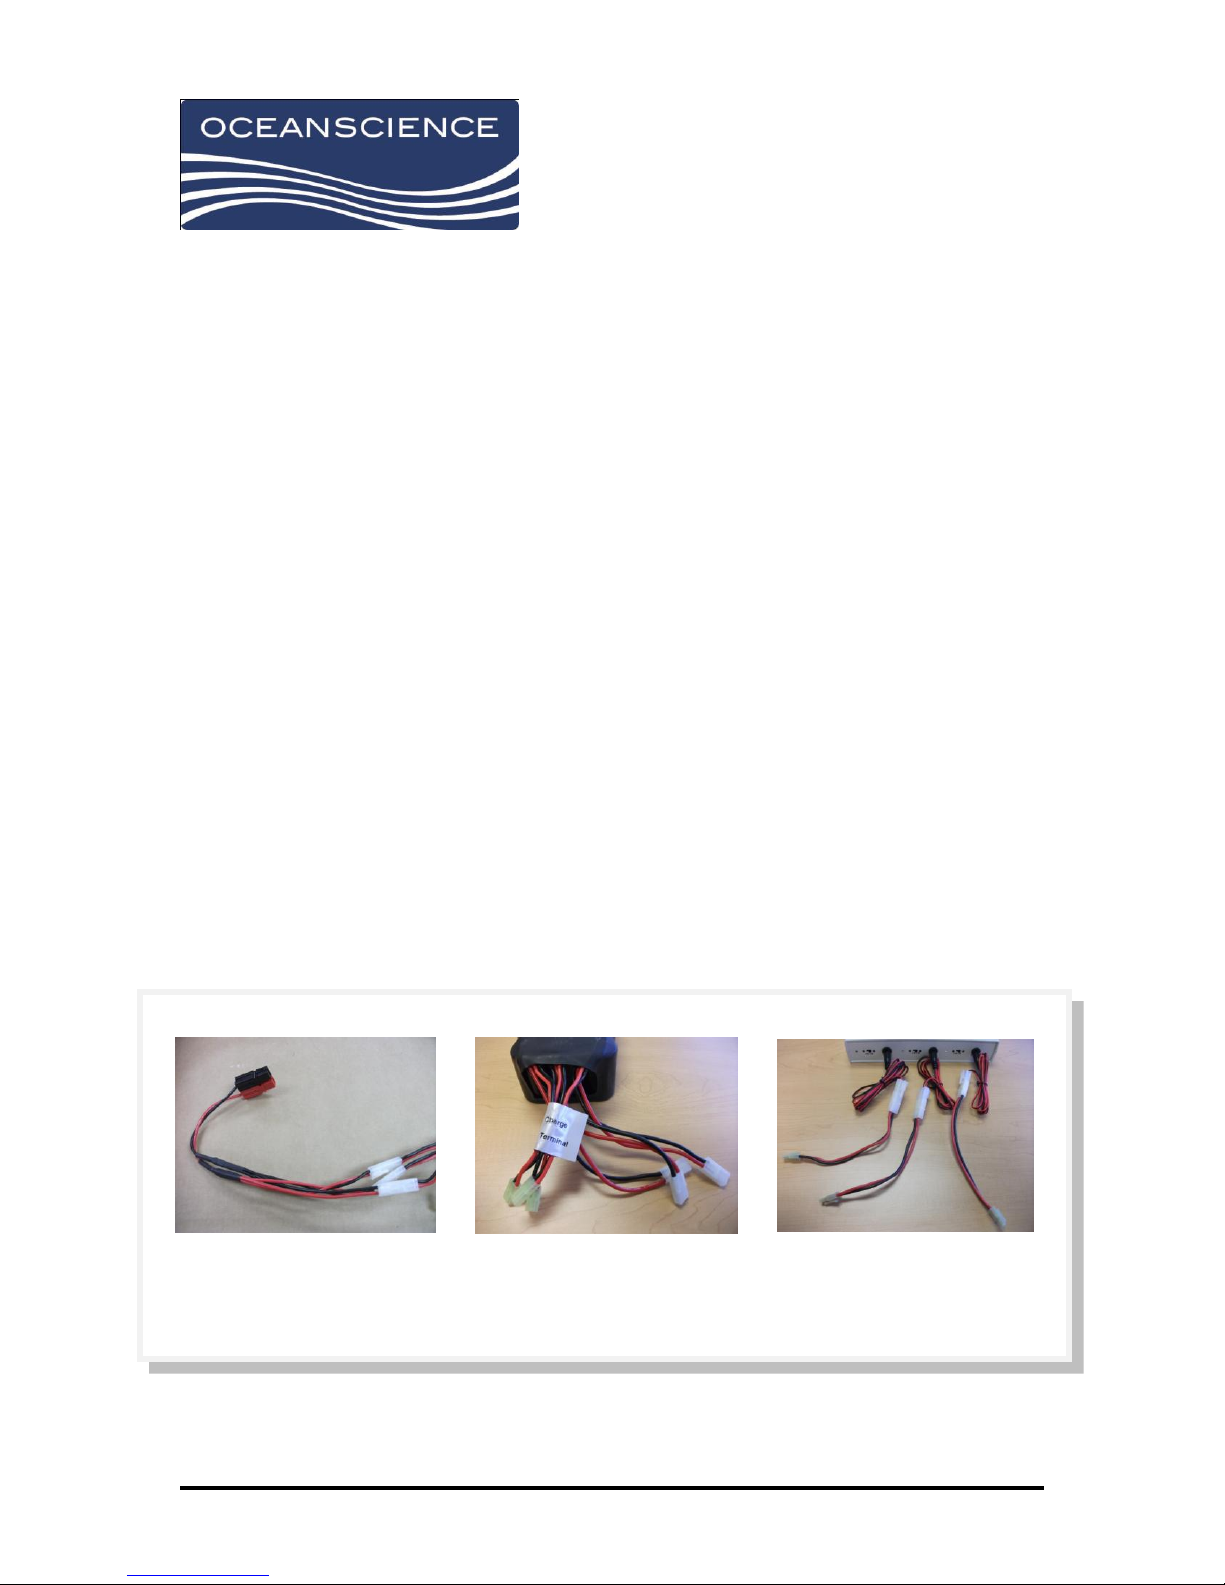
(Fig. 4.9) Disconnect all Molex
connectors
(Fig. 4.10) Tamiya connectors
and identifying labels.
(Fig. 4.11) Connect three
charging adapters to battery
charger ports
4.3 Charging the Battery Systems (Q-Boat 1800D)
The Q-Boat 1800D is normally equipped with a 12V 30Ah NiMH battery pack and a Futaba 6EX
transmitter with a 9.6V NiCd battery pack. It is important that the user fully charge each battery
system before deployment.
The propulsion batteries’ operating endurance between charges ranges from 70 minutes to 240
minutes depending on operating speed and use of steering.
To charge the remote control transmitter’s battery pack, please refer to the transmitter
manufacturer’s instruction manual.
1. Disconnect all shipboard connections to the battery and remove the battery from the Q-Boat.
Place the battery in a well-ventilated area away from flammable hazards.
2. Ensure the 3-to-1 adapter cable has been disconnected from all three white Molex
connectors, or “discharge terminals”, as shown. (See figure 4.9)
Important: The battery charge terminals consist of three Tamiya connectors that are tinted
greenish-yellow. There are the connectors that will be used for charging. The white Molex
connectors are used for discharge (runtime operation) only and should never be used to
charge the battery. Depending on the battery, one or both types of these connectors may
have identifying labels. (See figure 4.10)
3. Connect the three charging adapters to each port on the 12V battery charger. Each adapter
is a 2-piece assembly. Ensure all adapters terminate in greenish-yellow Tamiya connectors
that match each battery’s charge terminals. (See figure 4.11)
Q-Boat 1800 Page 9 8/26/2011

(Fig. 5.9) Connect greenish-
yellow terminals to the adapters
on the charger
(Fig. 5.10) Connect the charger to
the outlet and turn on front
power switch to begin charge
4. Select the desired charging rate on each port via switches on the panel. Choose either a
0.9A or 1.8A charging rate (slow and fast charge respectively). By default, the chargers ship
with a 1.8A charging rate selected.
5. Connect the three greenish-yellow charge terminals on the battery to the three charging
adapters on the charger. (See figure 4.12)
6. Verify that the charger’s input power requirements are compatible with your region’s line
voltage before proceeding. Connect the charger’s AC cord to the outlet and turn on the
front power switch to begin charging. The charger indicator lights will show red during
charge and green when charging is complete. (See figure 4.13)
7. Do NOT overcharge the batteries. Batteries should be supervised while charging and should
not be left unattended. Ensure that the batteries are disconnected as soon as charging is
complete.
8. Under rare circumstances, the charger may finish the charging cycle prematurely before the
battery has been fully charged. Verify that the battery has been fully charged by measuring
the voltages across each of the 3 discharge terminals. All voltages should be roughly equal
and should be higher than the battery’s rated voltage of 12V. Also, factor in the duration of
charge when deciding whether to trust the battery charger’s automatic cutoff. For example,
a 30 Amp-hour capacity battery, if fully depleted, should require a minimum of 5.55 hours to
charge if each of the 3 charge ports are set to charge at a rate of 1.8A [30 Amp-hours / (3 *
1.8A) = 5.55 hours]. In practice, it takes batteries about 50% longer to charge than the time
spent discharging them. If you suspect that the charging cycle may have terminated
prematurely, disconnect and then re-connect the batteries and restart the charge process.
9. Once each month, the propulsion battery(s) should be fully discharged before recharging to
avoid memory problems that may be caused by repeatedly charging partially discharged
batteries.
Q-Boat 1800 Page 10 8/26/2011

(Fig. 5.11) Load the battery(s) pack in
the hull with the leads facing toward
electronics box
(Fig. 5.12) Connect the power leads
to the electronics box
4.4 Installing the Battery System (Q-Boat 1800D)
1. Load the three NiMH battery packs in the Q-Boat 1800P hull with the leads facing toward
the electronics box, as shown. (See figure 5.11)
2. Connect all three power leads to the electronics box as shown. (See figure 5.12)
Q-Boat 1800 Page 11 8/26/2011

5.0 Q-Boat 1800P Assembly and Installation
The Q-Boat 1800P is shipped with the outdrives and skeg removed. This section provides
instruction for attaching the outdrives and steering linkage.
5.1 Outdrive and Steering Linkage Installation (Q-Boat 1800P)
The following items are required to install the outdrives and steering linkage.
1 Port outdrive
1 Starboard outdrive
2 ¼” x 2.5” quick release pins
1 Short steering linkage
1 Long steering linkage
1 #10-32 x ¾” Phillips machine screw
1 #10 x 1” Phillips machine screw
1 #10 x 1 ¼” Phillips machine screw
10 #10 split washers / spacers
1 Pair medium-size pliers
1 Phillips screw driver
1. Identify the port (left) outdrive by “P” in the serial number stamped in the steering head. Install
this outdrive to the port motor mount using the quick release pin as shown. (See figure 5.1)
2. Install the starboard (S) outdrive to the starboard motor mount using the remaining quick
release pin.
3. Connect the long steering link to the starboard outdrive using the #10-32 x 1” screw and (3) #10
split washers as shown. (See figure 5.2)
4. Connect the short steering link to the servo arm using the #10-32 x ¾” screw, as shown. (See
figure 5.3)
5. Connect the short and long steering link to the port outdrive using the #10-32 x 1 ¼” screw and
(4) #10 split washers. (See figure 5.4)
Q-Boat 1800 Page 12 8/26/2011

(Fig. 5.1) Install outdrive to port motor
mount using quick release pin
(Fig. 5.2) Connect long steering link to
starboard outdrive with screw and washer
(Fig. 5.3) Connect short steering link
to servo arm with screw
(Fig. 5.4) Connect short and long
steering link to port outdrive with screw
and washers
5.2 Skeg Installation (Q-Boat 1800P)
The following items are required to install the skeg:
2 Aluminum skeg
6 #10-24 x 1” flathead machine screws
6 #10-24 locking nuts
6 #10 flat washers
1 Phillips screwdriver
1 3/8” end wrench
RTV sealant as required
Q-Boat 1800 Page 13 8/26/2011

(Fig. 5.5) Apply RTV sealant to skeg
screw holes
(Fig. 5.6) Set skeg and thread flathead
screws in place
(Fig. 5.7) Properly installed skeg
(Fig. 5.8) Install flat washer and locking
nut on each protruding mounting screw
1. Turn the Q-Boat 1800P over and support it at the forward and aft deck areas. Apply RTV
sealant to the skeg screw holes as shown. (See figure 5.5)
2. Apply RTV sealant to the threads of the #10-24 flathead screws by inserting the screws into
the end of the sealant tube.
3. Set the skeg in position on the hull and thread in the #10-24 flathead screws to hold it in
place. Start all of the screws before tightening them down as shown and wipe away excess
sealant. (See figure 5.6) Skeg designs may vary from boat to boat. See figure 5.7 for a
properly installed skeg.
4. Turn the hull over and install (1) flat washer and (1) #10-24 locking nut on each of the skeg
mounting screws protruding through the hull. The aft-most screw (closest to the back) ties
into the transom gusset for added rigidity. (See figure 5.8)
Q-Boat 1800 Page 14 8/26/2011

5.3 Charging the Battery Systems (Q-Boat 1800P)
The Q-Boat 1800P is normally equipped with three 24V 10Ah NiMH battery packs and a smaller
battery pack inside the handheld RC transmitter. It is important that the user fully charge each
battery system before deployment.
The propulsion batteries’ operating endurance between charges ranges from 30 minutes to 90
minutes, depending on operating speed and use of steering.
Once each month, the propulsion battery(s) should be fully discharged before recharging to
avoid memory problems that may be caused by repeatedly charging partially discharged
batteries.
To charge the remote control transmitter’s battery pack, refer to the transmitter manufacturer’s
instruction manual.
1. Disconnect all shipboard connections to the batteries and remove the battery(s) from the
boat.
2. Place the batteries in a well-ventilated area away from flammable hazards ensuring the
batteries are spaced sufficiently to allow proper airflow during charging.
3. Ensure the 3-to-1 adapter cable has been disconnected from all three white Molex
connectors, or “discharge terminals”, as shown. (See figure 5.9)
Important: The battery charge terminals consist of three Tamiya connectors that are tinted
greenish-yellow. These are the connectors that will be used for charging. The white Molex
connectors are used for discharge (runtime operation) only and should never be used to
charge the battery. Depending on the battery, one of both types of these connectors may
have identifying labels. (See figure 5.10)
4. Connect the three charging adapters to each port on the 12V battery charger. Each adapter
is a 2-piece assembly. Ensure all adapters terminate in greenish-yellow Tamiya connectors
that match each battery’s charge terminals. (See figure 5.11)
5. Select the desired charging rate on each port via switches on the panel. Choose either a
0.9A or 1.8A charging rate (slow and fast charge respectively). By default, the chargers ship
with a 1.8A charging rate selected.
6. Connect the three greenish-yellow charge terminals on the battery to the three charging
adapters on the charger. (See figure 5.12)
7. Verify that the charger’s input power requirements are compatible with your region’s line
voltage before proceeding. Connect the charger’s AC cord to the outlet and turn on the fron
power switch to begin charging. The charger indicator lights will show red during charge and
green when charging is complete. (See figure 5.13)
Q-Boat 1800 Page 15 8/26/2011

(Fig. 5.9) Rigid Bridle
connection detail
(Fig. 5.10) Rigid Bridle loose
parts
(Fig. 5.9) Disconnect all Molex
connectors
(Fig. 5.10) Tamiya connectors
and identifying labels.
(Fig. 5.11) Connect three
charging adapters to battery
charger ports
(Fig. 5.12) Connect greenish-yellow
terminals to the adapters on the
charger
(Fig. 5.13) Connect the charger to
the outlet and turn on front
power switch to begin charge
8. Do NOT overcharge the batteries. Batteries should be supervised while charging and should
not be left unattended. Ensure the batteries are disconnected as soon as charging is
complete.
9. Under rare circumstances, the charger may finish the charging cycle prematurely before the
battery has been fully charged. Verify that the battery has been fully charged by measuring
the voltages across each of the 3 discharge terminals. All voltages should be roughly equal
and should be higher than the battery’s rated voltage of 12V. Also, factor in the duration of
chare when deciding whether to trust the battery charger’s automatic cutoff. For example, a
30Amp-hour capacity battery, if fully depleted, should require a minimum of 5.55 hours to
charge if each of the 3 charge ports are set to charge at a rate of 1.8A [30 Amp-hours / (3*
1.8A) = 5.55 hours]. In practice, it takes batteries about 50% longer to charge than the time
spent discharging them. If you suspect that the charging cycle may have terminated
prematurely, disconnect and then re-connect the batteries and restart the charge process.
10. Once each month, the propulsion battery(s) should be fully discharged before recharging to
avoid memory problems that may be caused by repeatedly charging partially discharged
batteries.
Q-Boat 1800 Page 16 8/26/2011

(Fig. 5.14) Load the battery packs in the
hull with the leads facing toward
electronics box
(Fig. 5.15) Connect all three power
leads to the electronics box
5.4 Installing the Battery System (Q-Boat 1800P)
1. Load the three NiMH battery packs in the Q-Boat 1800P hull with the leads facing toward the
electronics box, as shown. (See figure 5.14)
2. Connect all three power leads to the electronics box as shown. (See figure 5.15)
Q-Boat 1800 Page 17 8/26/2011

(Fig. 6.1) Preferred Towing
Angle. Tether and bridle are
collinear.
(Fig. 6.2) Positive towing
angle. Acceptable
(Fig. 6.1) Foam tray for the VCU
and battery(s)
(Fig. 6.2) Connection the
VCU to motor output and
power input
(Fig. 6.3) Connecting the VCU
to servo output
(Fig. 6.4) Insert VCU into foam tray and
secure
6.0 Installing the Control System
The Q-Boat 1800 is a versatile platform that can be used for a wide variety of applications. The
internal compartment is supplied with straps to facilitate installation of various hardware. Careful
placement of payload allows adjustment of hull trim to optimize boat performance.
1. The foam tray provides a secure location for the VCU (Vessel Control Unit) and battery. (See
figure 6.1)
2. Connect the VCU as shown. (See figures 6.2 and 6.3)
3. Once all connections are made, insert the VCU into the foam tray for securing as shown. (See
figure 6.4)
4. Tie-downs are provided in the instrumentation compartment to secure user-supplied electronics
and instrumentation. The placement of the instruments and battery(s) may be changed to adjust
the fore-and-aft trim of the boat.
Q-Boat 1800 Page 18 8/26/2011

(Fig. 7.1) Install RiverRay
instrument onto plate
(Fig. 7.2) Place foam plug
around instrument
(Fig. 7.3) Insert instrument and
foam plug into instrument well
7.0 Installing ADCP Instrument (if applicable)
The Q-Boat 1800 cannot be operated without a properly installed instrument. Please follow
these instructions to ensure the Q-Boat 1800 does not take on water through the instrument
well. We recommend you test the instrument seal before each deployment by running the boat
at high speed for a few minutes and then inspecting the top of the instrument.
Although a variety of instruments and sensors can be configured on and into the Q-Boat 1800,
the most common varieties are shown here.
7.1 RiverRay ADCP Installation
The following items are required to install a RiverRay instrument
5 ¼-20 x 1 ½” socket cap screw
7 M6 x 20mm socket head cap
7 M6 large OD flat washer
7 M6 Lock washer
1 M5 Allen wrench
10 ¼ Fender washer
5 ¼ Lock
5 ¼-20 Wing nut
1. Install the RiverRay instrument onto the plate using the M6 x 20mm screws and washers
provided. Do not overtighten. (See figure 7.1)
2. Place the foam plug around the instrument as shown ensuring a secure fit. (See figure 7.2)
3. Insert the instrument and foam plug into the instrument well as shown. (See figure 7.3)
4. Secure the instrument by installing the ¼-20 x 1 ½” screws, washers, and wing nuts provided.
5. Connect the ADCP cable to the RiverRay instrument.
Q-Boat 1800 Page 19 8/26/2011

(Fig. 7.5) Place the S5 / M9 in
the mounting plate 6 ¾” from
bottom of plate
6 ¾”
(Fig. 7.6) Place foam plug
around the instrument
(Fig. 7.4) Install instrument
clamp around S5 or M9 – Do
not over tighten
7.2 S5 / M9 River Surveyor Installation
The following items are required to install a River Surveyor S5 or M9 instrument.
1 1/4”-20 x 2 ¼” hex screw
3 1/4” fender washer
3 ¼” flat washers
2 ¼-20 1” BHSC screw
2 ¼-20 wing nut
2 ¼-20 hex nut
1 ¼-20 x 1 ¾” BHSC screw
1. Install the instrument clamp around the S5 / M9 as shown. Do not overtighten. (See figure
7.4)
2. Place the S5 / M9 in the mounting plate so that it protrudes 6 ¾ inches from the bottom of
the plate as shown (see figure 7.5).
3. Insert the screws that attach the clamp to the instrument mounting plate. Tighten all of the
screws at this time.
4. Place the foam plug around the instrument as shown (see figure 7.6).
5. Install the instrument with the foam plug into the instrument well as shown (see figure 7.7).
6. Before pressing the instrument fully into the well ensure the mounting holes are aligned as
closely as possible (see figure 7.8).
Q-Boat 1800 Page 20 8/26/2011

(Fig. 7.7) Install instrument
with foam plug into the
instrument well
(Fig. 7.8) Ensure mounting
holes are aligned
(Fig. 7.9) Secure the instrument
mount to the well flange
7. Secure the instrument mount to the well flange with the instrument mounting screws and
tighten (see figure 7.9).
7.3 Workhorse Rio Grande Installation
The following are required to install a Workhorse Rio Grande instrument.
4 ¼-20 x 3” threaded screw
8 ¼-20 hex nuts
4 ¼” special flat washers
2 7/16” open-end wrenches
12 Oversize ¼” flat washers
8 ¼” split lock washers
4 ¼-20 x ¾” hex head bolts
8 Wing nuts
1 Strap handle
1 Instrument seal
1 Instrument mounting plate
1 7/16” open-end wrench
1. Install the studs, nuts, and special flat washers on the RDI ADCP mounting holes as shown.
Tighten the studs securely. (See figure 7.10)
2. Install the instrument seal around the center of the Workhorse Rio Grande as shown. Be
sure the recesses in the seal are aligned with the screw as shown. (See figure 7.11)
NOTE: Align the seal split facing toward the bow, or front, or the boat.
Q-Boat 1800 Page 21 8/26/2011

(Fig. 7.10) Install studs, nuts
and flat washers on the ADCP
(Fig. 7.11) Install instrument
seal around the center of the
Rio Grande
(Fig. 7.12) Carabiner with wire
rope harness and instrument
safety cable, attached to the
Rigid Bridle
(Fig. 7.13) Press the instrument into
the instrument well and align the
screw holes
(Fig. 7.14) Completed installation
3. Connect the ADCP cable to the ADCP. It will be easier to do this now rather than after the
instrument ring is mounted.
4. Place four oversize flat washers over the mounting studs and place the instrument
mounting plate on top.
5. Secure the mounting plate and strap handle with oversize flat washers, lock washers, and
wing nuts as shown. (See figure 7.12)
6. Press the instrument into the Q-Boat 1800 instrument well as shown and align the screw
holes. (See figure 7.13)
7. Install the ¼”-20 hex head screws, oversize flat washers (top and bottom), lock washers and
hex nuts to secure the ADCP in place. Figure 7.14 shows a completed installation.
Q-Boat 1800 Page 22 8/26/2011

8.0 Deployment of the Q-Boat 1800
The Q-Boat 1800 is simple to operate, but some basic rules and precautions should be followed
to deploy the boat safely. Please read through all of the instructions before beginning any work.
8.1 Use of the Fail Safe
We strongly encourage use of the Fail Safe for safety reasons in the event of radio interference
or loss of transmitter signal. You may select from one of two options. The “NOR” (normal)
setting holds the servo and throttle(s) in the last transmitted command position, while the “F/S”
(Fail Safe) function moves the servo and throttle(s) to a predetermined position. “F/S” is set as
the default mode.
Oceanscience sets the throttle channel so the throttle is moved to idle when there is interference
or the transmitter is inadvertently turned off. This prevents the boat from accidentally
accelerating if operators are in the water. You may wish to set the failsafe so that it makes a
slow curve towards the operator’s position during operation. In this case, any interference of
loss of communications will have the boat make a slow curve back to the operator.
To set the Fail Safe Function: (consult the Futaba Operating Instruction manual for more detailed
information)
1. Enter the programming mode.
2. Access the “F/S” screen with the MODE key.
3. Press DATA Input lever downward when you need to set the Fail Safe. The arrow moves to
“F/S” side. This means the F/S function is activated.
4. Move the throttle stick to the position where you want the throttle to be when the “F/S”
function works and press DATA INPUT lever downward for approximately 2 seconds. A
percentage number will be shown with a beeping sound when complete.
5. Press the DATA INPUT lever upward if you want to set “NOR”. The arrow will move to “NOR”
side and then the “NOR” function is selected.
6. Repeat steps 3-5 for both throttle sticks.
7. Turn off the transmitter and check if the throttle and rudder move to the desired settings.
Q-Boat 1800 Page 23 8/26/2011

8.2 Conducting a Range Test
It is important to test the range of the Q-Boat 1800 transmitter at the site where measurements
will be made. Environmental factors can affect transmitter range, and it is important to know of
any limitations before deploying the boat in moving water. Power lines, large metal objects and
other obstructions can affect transmission range.
To conduct a range test:
1. Power up the Q0Boat and have an observer hold the boat firmly in place
2. The observer should monitor the steering servo performance as the operator walks
away from the boat while continually moving the steering joystick.
3. Continue until the steering servo no longer responds or the desired range between
operator and boat is reached.
8.3 Launch and Retrieval of the Q-Boat 1800
The Q-Boat 1800 should be launched stern first (back end). This will protect the outdrive from
accidental grounding and possible propeller damage.
1. Thoroughly familiarize yourself with the way the boat responds to the controls before
deploying in fast-moving water.
2. When the boat is traveling away from you it will respond to control signals as expected.
3. When the boat is inbound (traveling toward you), the same control signals create a
response that an inexperienced operator may not expect. An inexperienced operator’s
first response in an emergency may guide the boat in an unintended direction.
4. To prolong the life of the batteries, accelerate slowly and minimize the use of rudders;
the rudder servo consumes significant power.
Q-Boat 1800 Page 24 8/26/2011

(Fig. 8.1) Q-Boat equipped with
Emergency Stop button
(Fig. 8.2) Emergency Stop cable
connected to VCU
8.4 Emergency Stop
Some Q-Boats are equipped with an Emergency Stop (Fig. 8.1). Pushing this button will quickly
shut down the propulsion system. To enable the motors after the Emergency Stop has been
pressed, the button must be pulled up to its normal position. Ensure that the button is up before
releasing the boat into the water. Otherwise, the motors will not function. Payload electronics
such as an ADCP, modem, etc., are unaffected by the Emergency Stop and will remain powered
even after the button has been pushed.
When performing maintenance on the Q-Boat where personal safety might be at stake (if
clearing debris from the propellers, for example), the safest action is to first turn off the main
power switch on the VCU and to disconnect the batteries. Note: The Emergency Stop cable must
be plugged into the VCU as shown in Fig. 8.2 in order for the Emergency Stop button to function.
If this cable is disconnected, the motors will continue to run even after the Emergency Stop has
been pressed. The Emergency Stop should also be tested periodically to verify proper shutdown
of running motors.
Q-Boat 1800 Page 25 8/26/2011

9.0 Maintenance
The Q-Boat 1800 is designed to be easy to maintain.
1. To prolong the life of the ABS hull and finish, wash with mild soap and water after each use.
2. Lubricate the steering ball joints with “3-in-1” or equivalent oil and regularly check the
tightness of all bolts and connectors. (See figures 9.1, 9.2, and 9.3)
3. Check the deck lid gasket for cuts, cracks or deformation. This gasket seals the
instrumentation area from water intrusion and should be checked frequently.
10.0 Q-Boat Warranty
The Oceanscience Group, Ltd makes every effort to assure its products meet the highest quality,
reliability and durability standards and warrants to the original purchaser or purchasing agency
that each Q-Boat 1800 be free from defects in materials or workmanship for a period of one year
from date of shipment.
Warranty does not apply to defects due directly or indirectly to misuse, negligence or accidents,
repairs or alterations outside of our facilities, use of the Q-Boat for purposes other than water
measurements, or use with instruments weighing more than 25 lbs.
Oceanscience is not responsible for loss of boat, instruments, damage to property, injury or
death associate with the use of any of its products or products that may be included or used with
Oceanscience products. Oceanscience does not warrant third party products sold by
Oceanscience. These may include GPS, depth sounders and other ancillary equipment.
All warranty services are FOB Oceanscience’s facility in Oceanside, CA.
Q-Boat 1800 Page 26 8/26/2011

11.0 Addendum
11.1 Installation of a Trimble SPS 351 GPS (or similar unit)
1. The Q-Boat 1800 is equipped with Velcro tie downs for all equipment and instrumentation.
Positions for specific equipment are shown.
2. Install the Trimble GPS unit first by connecting the right angle TNC antenna cable connector
and the Trimble 7-pin Lemos connector as shown.
3. Place the GPS receiver as shown and secure it in place with the Velcro straps.
4. Route the power cable that comes from the DB9 of the Trimble cable along the port side of
the Q-Boat 1800 and insert into one of the two female circular power connectors coming
from the auxiliary power port on the VCU.
Q-Boat 1800 Page 27 8/26/2011
 Loading...