

Ocean Reef GSM, GSM DC, GSM DAT, M101A Owner's Manual

WARNINGS, CAUTIONS, NOTES
Pay special attention that is accompanied by these symbols:
A WARNING indicates a procedure or situation that, if not avoided,
could result in serious injury or death to the user.
A CAUTION indicates any situation or technique that could cause
damage to the product, and could subsequently result in injury to the
user.
A NOTE is used to emphasize important points, tips, and reminders.
Rel 8.1. October 2009
OCEAN REEF
GSMTM- GSM DCTM- GSM DATTM- M101A
OWNER’S MANUAL
INDEX
Chapter 1 Introduction
Chapter 2 Description of the GSMs and M-101A Units
Chapter 3 Attaching the GSMs to a Full face Mask or
Integrated System
Chapter 4 Installing the battery
Chapter 5 Checking before use
Chapter 6 Basic Instructions
Chapter 7 Instructions for underwater communication
Chapter 8 Precautions
Chapter 9 Guarantee
Chapter 10 Technical Characteristics
IMPORTANT INFORMATION
Congratulations on purchasing an Ocean REEF underwater com unit.
This manual contains the instructions for the entire unit’s functions as well
as warnings in relation to using the OCEAN REEF GSMs / M101A
underwater communication system. These must be read carefully before
using the equipment.
WARNING!
Continue to breathe while surfacing from a dive even if you are
listening to the communications unit. Lung expansion injuries may result if
you ascend while holding your breath. DO NOT STOP BREATHING
WHILE SURFACING FROM A DIVE.
If you are going to speak while diving you should take in a larger than
normal breath. ALWAYS MONITOR YOUR PRESSURE GAUGE.
Before attempting to use this device in open water you must practice using
the unit in confined water (such as a pool).
Chapter 1
INTRODUCTION
The Ocean REEF communication system is lightweight and compact. The
frequency it uses is compatible with other communication systems on the
market.
In the present manual GSMs are the available models of GSM:
GSM Global Submarine Messenger
GSM DC
TM
Double Channel
GSM DAT
TM
Digital Activation Transmission
The GSMs are a wireless underwater communication receiver/transmitter
using ultrasound. The GSMsswitch on automatically (as does the M-101A
model) when immersed in water. You can speak to your partner by
pressing the transmission button. The system is attached to the Neptune
masks by NACS (see forward).
1
GSM(gray color)
GSM DC
TM
(black color)
GSM DATTMModels
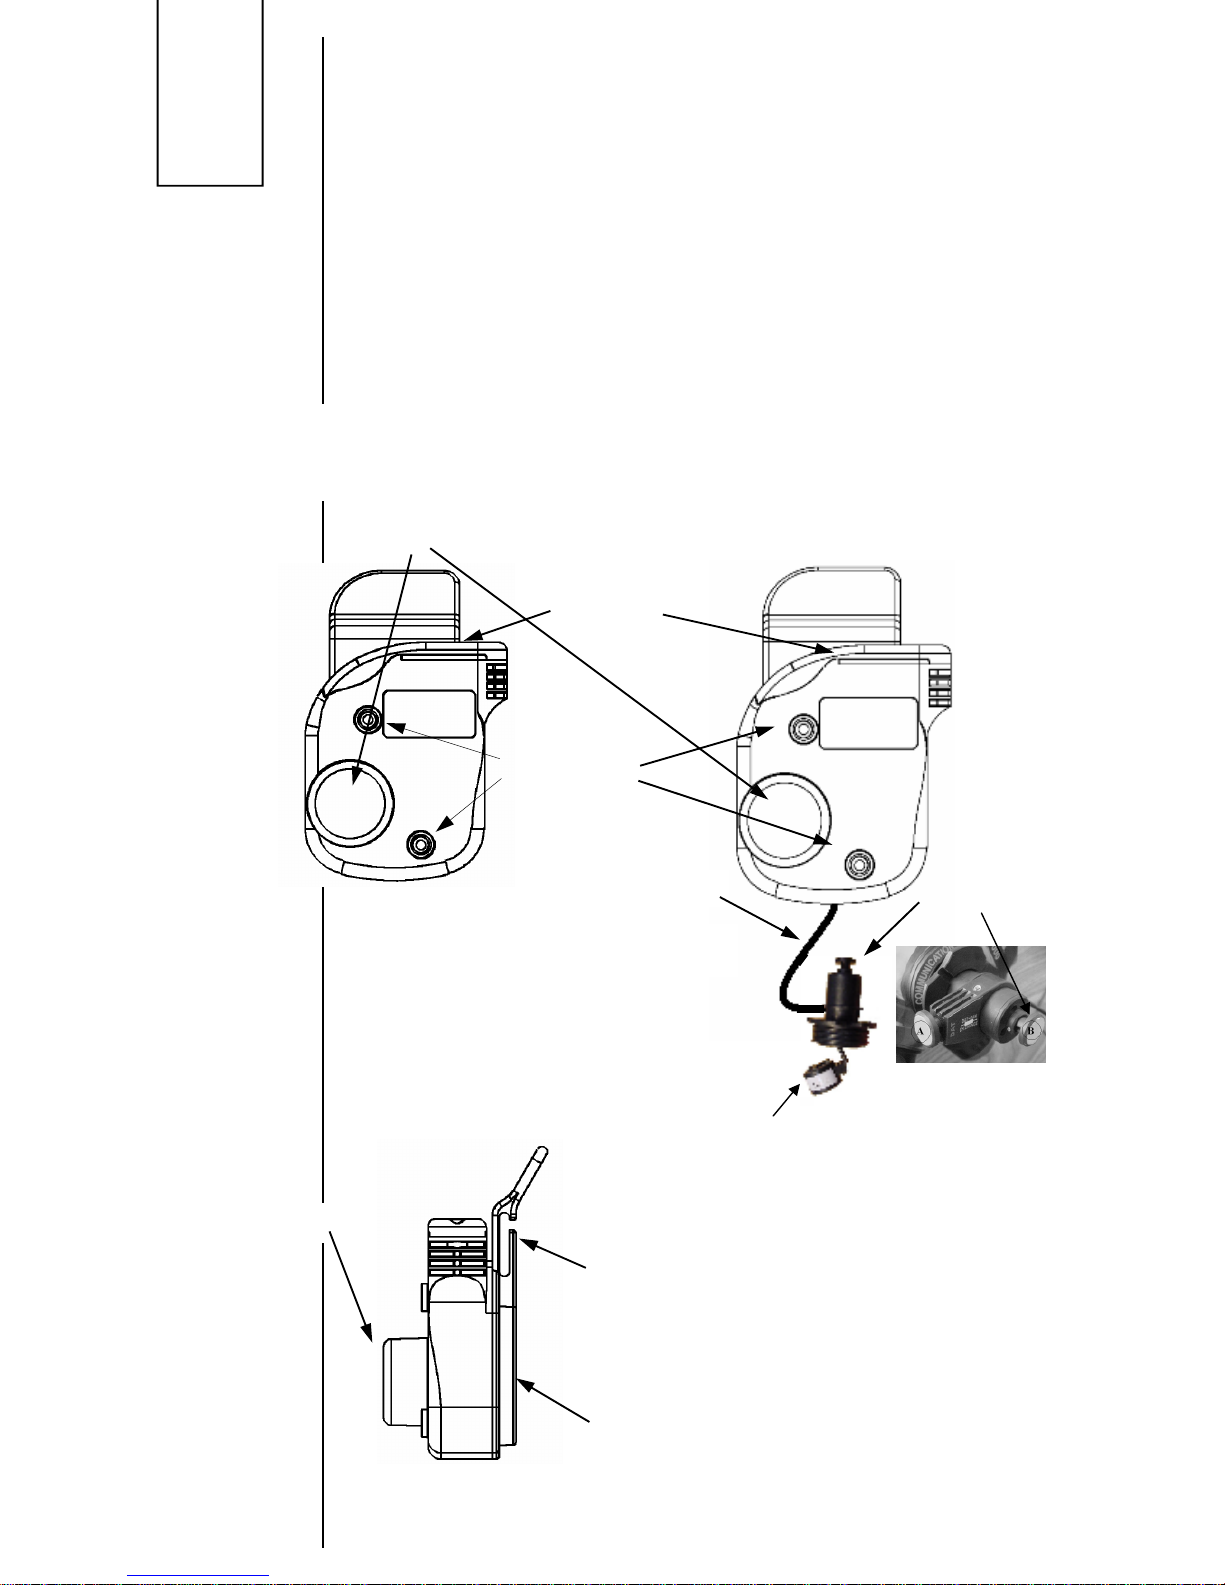
Side View
.M-101A Model
(yellow color)
Side View
Fig. 1
Front View for
GSM - GSM DCTM- GSM DAT
TM
and M-101A
Fig. 2
NACS slot
(Strap slot for M101A
only)
speaker
antenna
2
Battery housing
On/Off switch
contacts
Microphone cable
antenna
Transmission
Button
Microphone
GSM
GSM DAT
TM
GSM DC
TM
The M-101A is a receiver unit. It may be attached to any type mask of
goggles.
The communication range for the various models extends to about 200
meters (600 feet) and to a depth of 40 meters (120 feet).
(This may vary due to salinity, particulate, water temperature and noise level
in the water)
The OCEAN REEF underwater communication system uses the standard
UCF (32768 Hz frequency)
Rel 8.1. October 2009
3
Chapter 2
DESCRIPTION OF THE GSMs and M-101A UNITS
Figures 1 and 2 provide a description of the parts for the GSMs and M101A.
Chapter 3
ATTACHING THE GSMs TO A FULL FACE MASK OR INTEGRATED
SYSTEM
The GSMs can be attached to any of the major full-face
masks available on the market if equipped with a female
DIN connection for the transmission and microphone button
and two quick connections. For optimum functioning we
recommend using the unit on Ocean REEF Neptune
masks, as the unit’s acoustic characteristics are designed
to suit these masks.
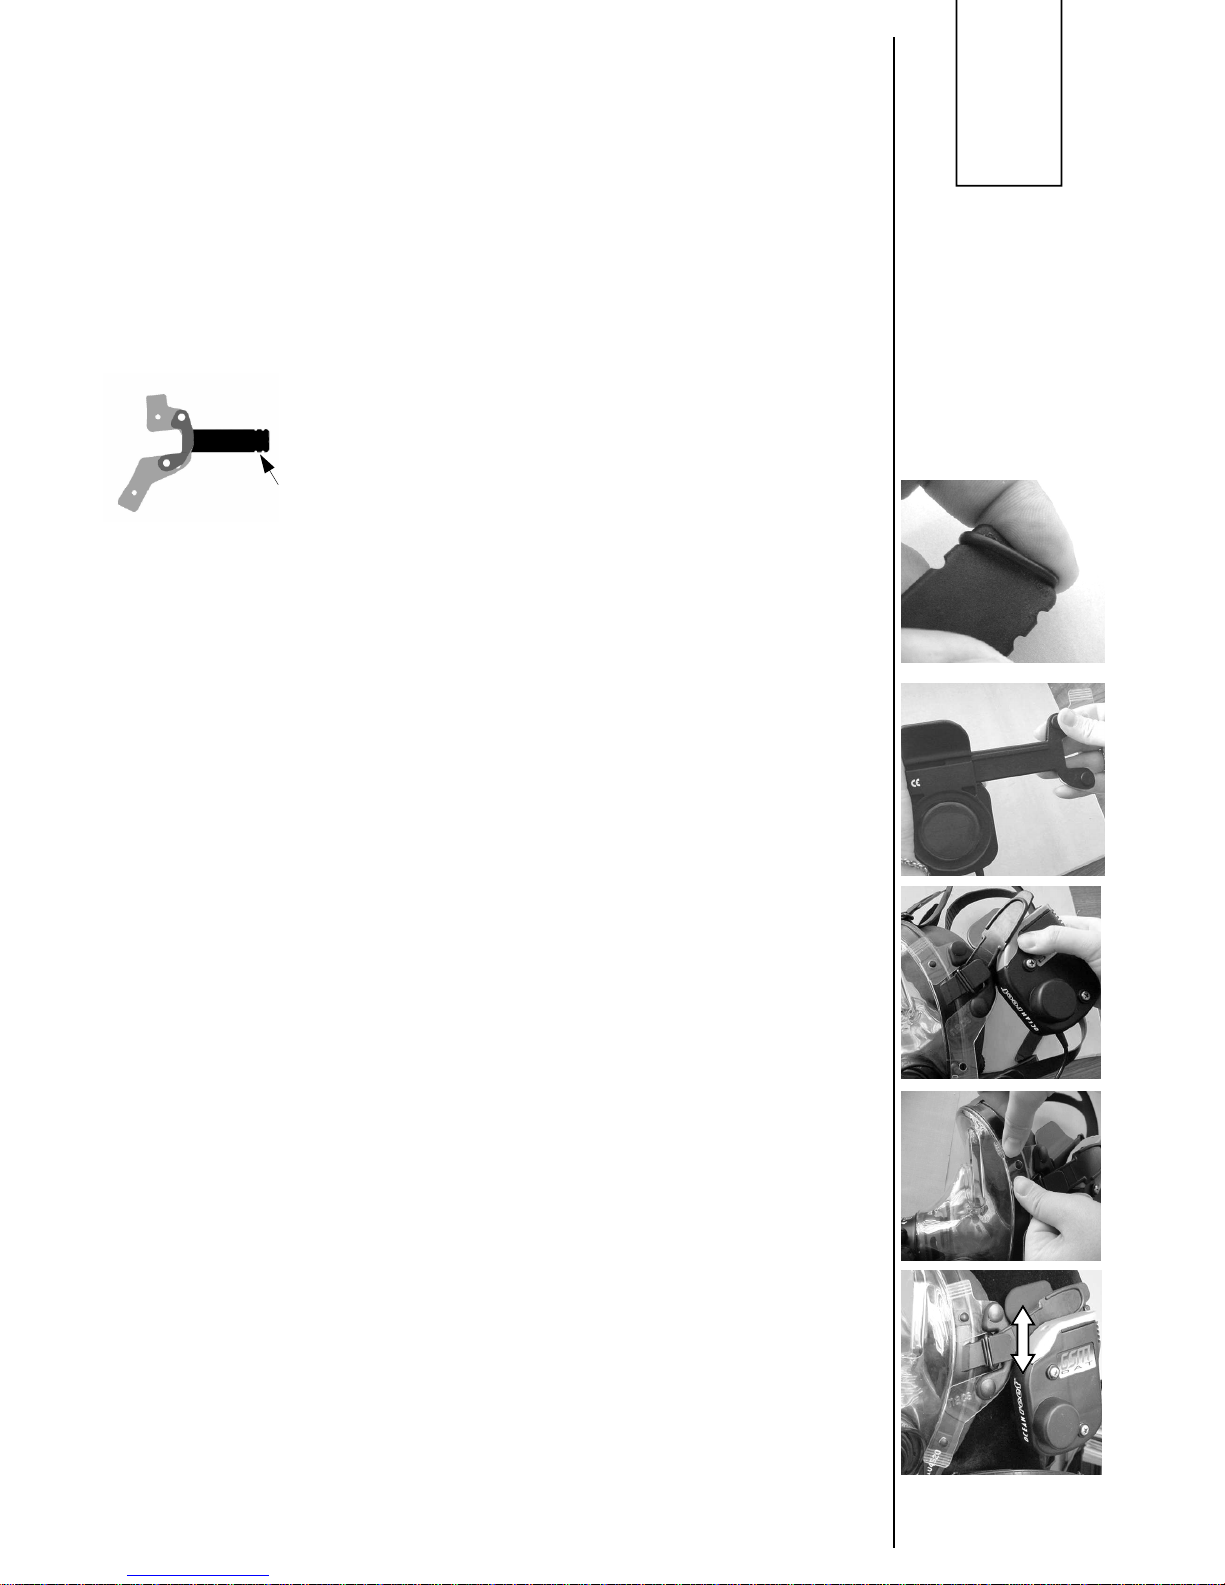
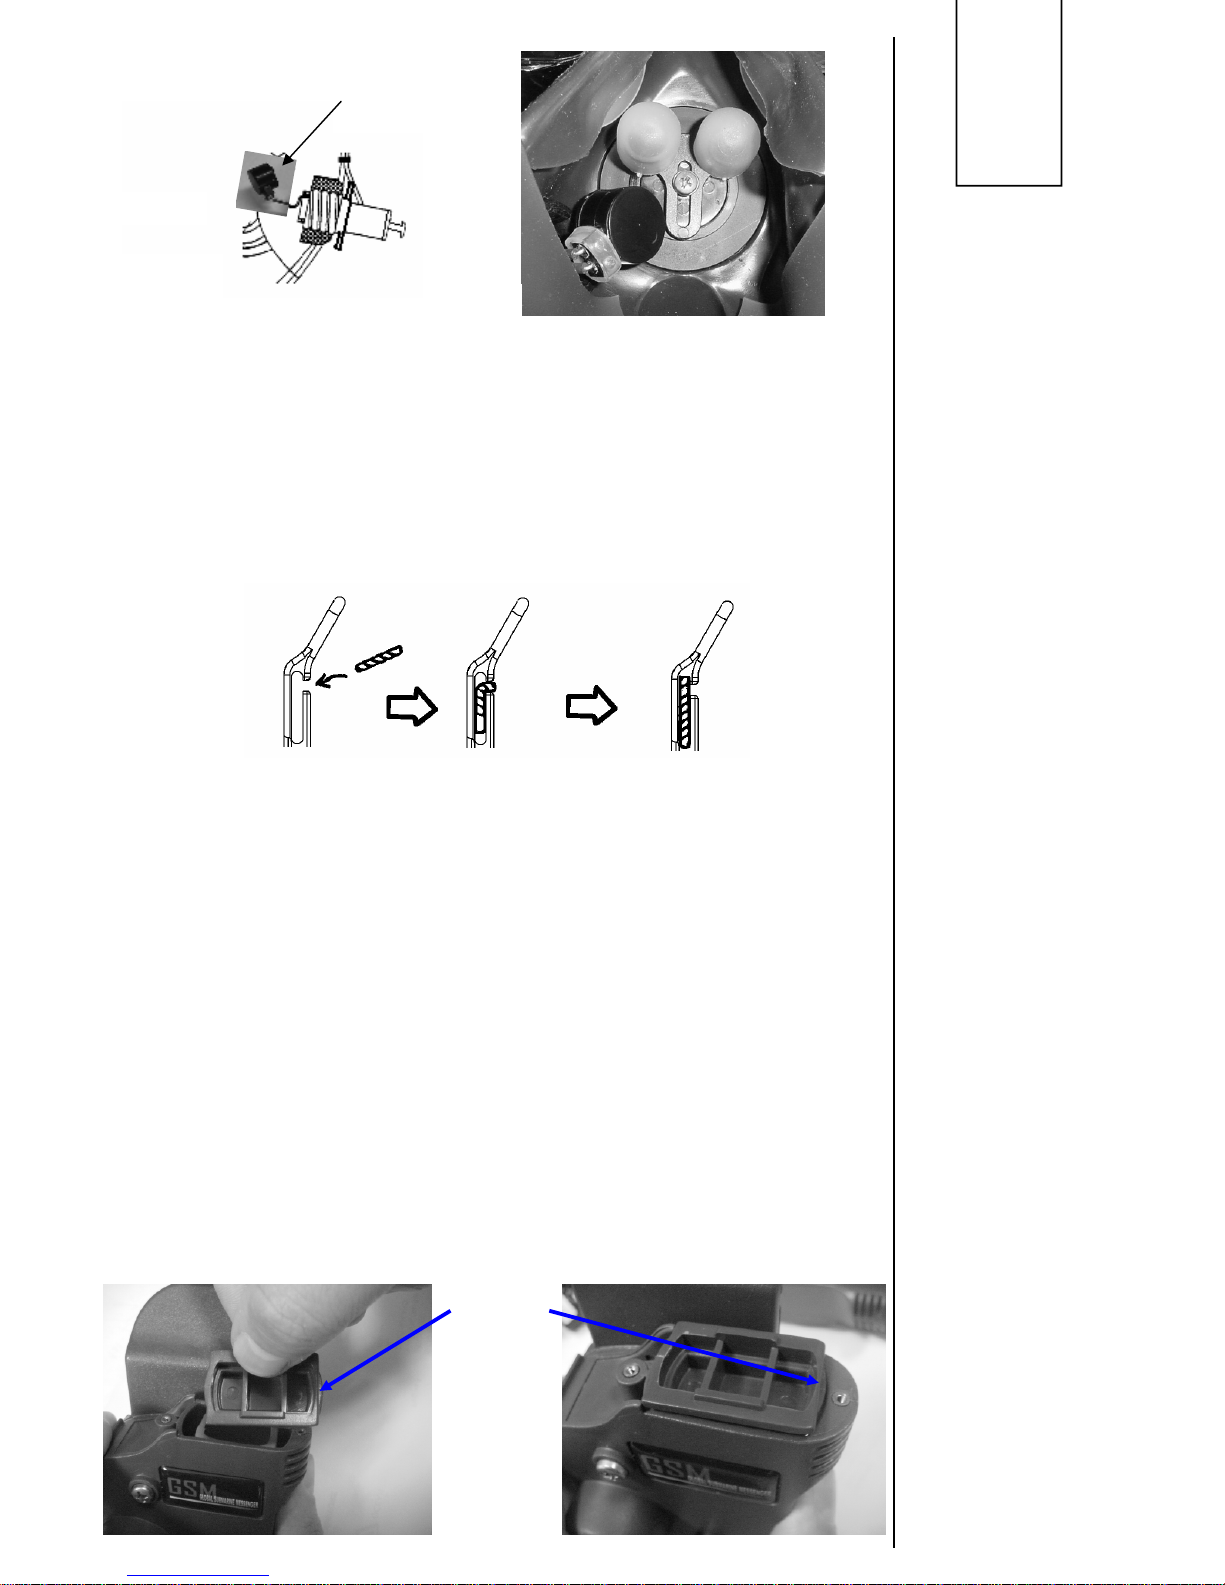
HOW TO INSTALL THE NACSTM(Neptune Adjustable Communication
Support)
Hold the NACSTMas pictured with the transparent stationary part to the left
and the black rotating part to the right.
Remove the o-ring from the notch at the end of the black rotating part of the
NACSTM(see drawing).
Slide the GSMs onto the NACSTM.
Replace the o-ring on the notch at the end of the black rotating support.
The left middle strap (of the octopus strap) must be positioned over the
rotating support.
Attach the NACSTMto the mask by positioning the holes of the transparent
part over the black buttons of the clamping band and pressing. These buttons
are the same ones that hold the protective shield when the mask is not in
use. Make sure the protective shield is removed prior to attaching the
NACSTMto the mask.
The black rotating part of the NACSTMhas a vertical rotation angle of 25°.
After wearing the mask you will find the most comfortable angle for you. If
you prefer to move the GSMs closer or father away from your face, simply
slide the GSMs over to the selected position and move the o-ring to a
different notch.
The use of the NACSTMallows for a more comfortable wearing of the mask
and best strap adjustment.
The GSMs must be always used with the NACS.
NACS is a patented product of Ocean REEF.

4
INSTALLING THE MICROPHONE
The GSMs use a dynamic microphone, ”D-Mic” encapsulated and protected
by a hydrophobic membrane (see fig. 4).
The microphone allows dependable clear
reproduction of the human voice. It removes
unnecessary noise such as the noise of
bubbles being exhaled from the mask.
The D-Mic microphone uses a hydrophobic membrane that allows air to pass
through while protecting the microphone from water. This membrane also
reduces the “muffling” effect allowing a phonic performance that is very high.
Another characteristic of the hydrophobic membrane is its mechanical
strength. The D-Mic, shown in figure 4, is fitted with a membrane that is
designed to handle pressure of more than 14.7 PSI. If the membrane
ruptures, the microphone will flood causing transmission to cease.
Remember, the Neptune masks are designed to operate under “balanced”
pressure. If the mask is removed underwater the microphone WILL NOT
suffer any damage. However, continuing to dive WITHOUT the mask sealed
on the face the microphone may be damaged if the limits, indicated above,
are exceeded. (In relation to the depth at which the mask was removed).
Ascending must be done in accordance with the dive tables or dive computer
to avoid decompression problems. The communicator and microphone
should be rinsed with fresh water (immersed, not a strong “jet of water”) after
each dive and should be placed in a well ventilated area that is not exposed
to direct sunlight to dry.
PROCEDURE FOR THE ASSEMBLING OF A PTT & D-MIC MICROPHONE
• unscrew the communication port plug (COMMUNICATION), insert the
PTT & microphone through the mask into the “communication” port
with the hydrophobic membrane facing the visor.
• If the membrane is turned the wrong way, facing the mouth, phonic
performance will be diminished. Check that the microphone is in the
position shown in figure 8. Move the microphone so that it does not
interfere with the diver’s lips or the pressure compensation bracket.
The D-MIC is supplied with a “flexible contacts protective band”.
The band avoid the interaction of the mouth with the D-MIC connectors.
fig. 5
fig. 4
fig. 6
Rel 8.1. October 2009
ATTACHING M101A TO A GOGGLE
Connect the M101A to the left or right side strap of the goggle as indicated
in Figure 3. Make sure that the strap sits entirely inside the strap housing on
the M101A. Check that the M101A slides freely on the strap.
Chapter 4
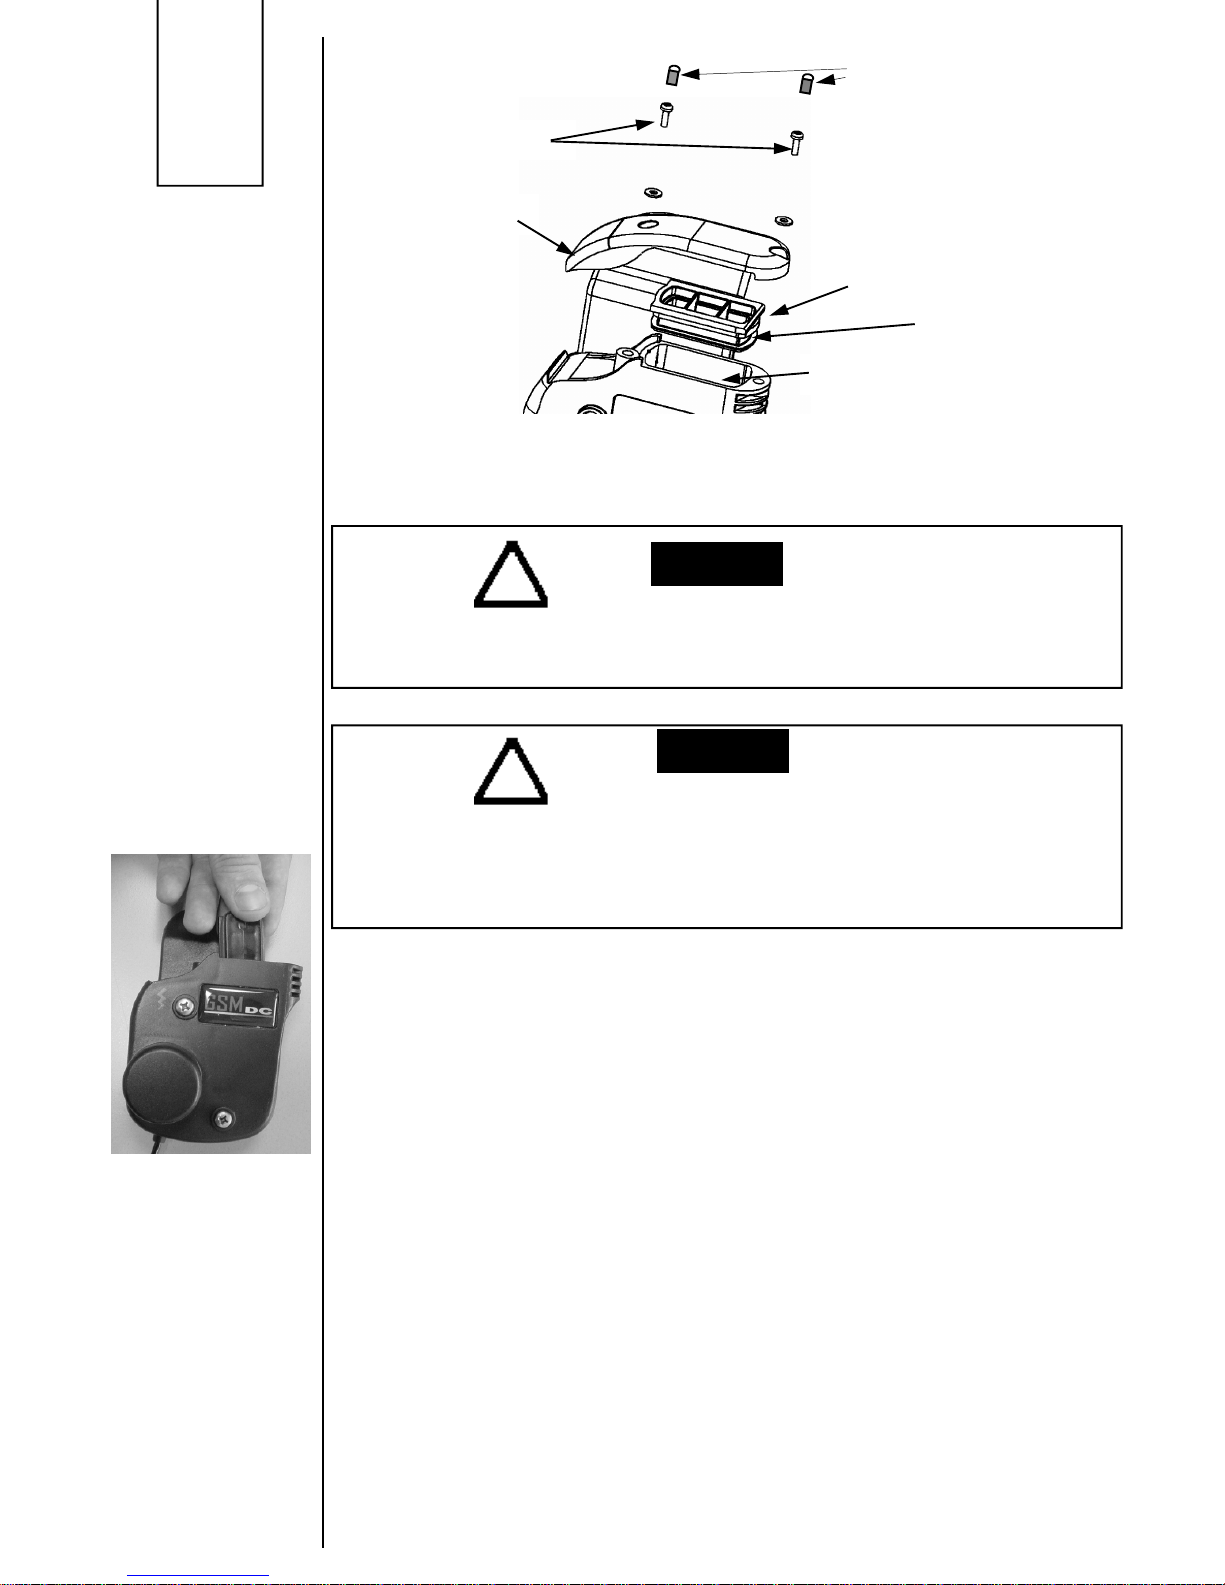
INSTALLING THE BATTERY
All the models work with a conventional 9V alkaline battery.
Do not use manganese batteries.
(1) Unscrew the two screws on the cover and remove the cover and cap with
its O-ring.
(2) Remove the dead battery from the main compartment.
(3) Install a new battery in the compartment, making sure that the polarity is
correct (see label on the inside).
(4) Clean and lubricate the O-ring. Reposition the cap as indicated in figure
9. The cap MUST face the right direction. The flat side of the battery cap
must be on the rear side (when wearing the mask with the GSM) in order to
get a good seal.
(5) Holding the cap in position, position the cover and screw the two screws
in place until they are tight. DO NOT OVER-TIGHTEN the screws!
5
fig. 3
fig. 8
fig. 7
membrane
fig. 9a
Flat side
fig. 9b
6
When the battery has been installed, check that the battery housing and
O-ring are clean. The O-ring must always be lubricated with a thin layer of
silicone lubricant.
A screwdriver for GSMS/M101A assembling/
disassembling is provided in the com unit package.
If the GSMS or M101A are not going to be used for a while, the
battery should be removed. The cap must be stored into the battery
compartment (figure 11). This will ensure that the unit will work properly for a
longer period of time.
Chapter 5
CHECKING BEFORE USE
GSMs and M-101A
Once the battery has been installed and you have checked that the cap and
cover have been closed properly, dampen your fingers and touch the two
screws (On/Off switch contacts) and activate the polarity circuit. You will hear
a “beep” indicating activation.
Run another finger along the antenna. You will hear a “zzzzzz” type sound
coming from the speaker.
Try to bring the antenna transducer near the antenna on a Digital M105 unit,
or the antenna on a GSMs unit (about 5 cm / 2 inches), keeping your fingers
on the On/Off contacts. You should also be able to hear the communication
when the unit is not immersed in water.
If you hear a repeated “beep” (about every 30 seconds) this means that the
battery is running low. Change it.
WARNING
fig. 11
O-ring
fig. 10
screws
cover
cap
battery housing
Screw protection
WARNING

Rel 8.1. October 2009
GSMs
In addition to the above, check that the microphone is installed correctly,
following the instructions above. Try moving the unit near the antenna
transducer on the Digital M105 unit, or the antenna of a GSMs or M101A
unit (about 5 cm/ 2 inches) Press the activation switch, keeping your
fingers on the two On/Off controls. You should hear a "beep" that lasts
about 1 second.
Begin speaking while holding the button down. Any units near your GSMs
should pick up your voice. This test can be carried out without the unit
being immersed in water.
Put on a full-face mask so that it seals properly.
Check that there are no leaks between the edges and your face. The
GSMs speaker should be very close to your ear. Check that the reception
device is not too far from your ear.
Handle the microphone carefully.
Chapter 6
BASIC INSTRUCTIONS
The GSMs and M101A units are activated for reception as soon as they
are immersed in water, and they turn off a few seconds after they dry out.
When they are switched on, this is confirmed by a "beep".
M-101A Model
Listen to your friends who are diving with GSMs units, or those out of the
water, using M105 Digital units.
GSM DATTM(Digital Activation Transmission)
The GSM DATTMunit is equipped with an automatic transmission
activation, which allows the user to speak without keeping the microphone
button pressed down.
To activate the DAT you simply need to push and release the button
quickly, at which point, a series of impulses are sent out keeping the GSM
transceiver automatically on for 30 seconds.
Then it will return to the receiving mode for 20 seconds with a series of
impulses in a different tone from the first. This cycle on 30 – 20 – 30
seconds goes on until the button is pressed again for at least 1 second to
return to the manual mode or until the batteries are exhausted.
This feature is extremely important in that it allows “hands free”
communication especially in a “diver emergency” or if a diver is
experiencing difficulty.
GSM DC
TM
The GSM DC™ (code 33122) underwater transceiver unit incorporates
the latest innovation in underwater ultrasonic 2-Way Radio communication;
featuring a digital driver for vocal message equalization, an automatic
system for activating (DAT) transmission and a double transceiver
channel. The GSM DC™ can be used on the OCEAN REEF Full Face
Masks, preferred, or on other Full Face Masks equipped with a standard
DIN female connection. Underwater communication technology is
7
 Loading...