

Page 1
Scupper Pro Rudder Installation Instructions (1997 or newer models)
This kit is designed for the Scupper Pro with rudder mount and notches, first shipped October 29, 1996, serial numbers greater than XKA11274. Your Pro must
also have the front and center hatches to allow acess to the hull for rudder installation.
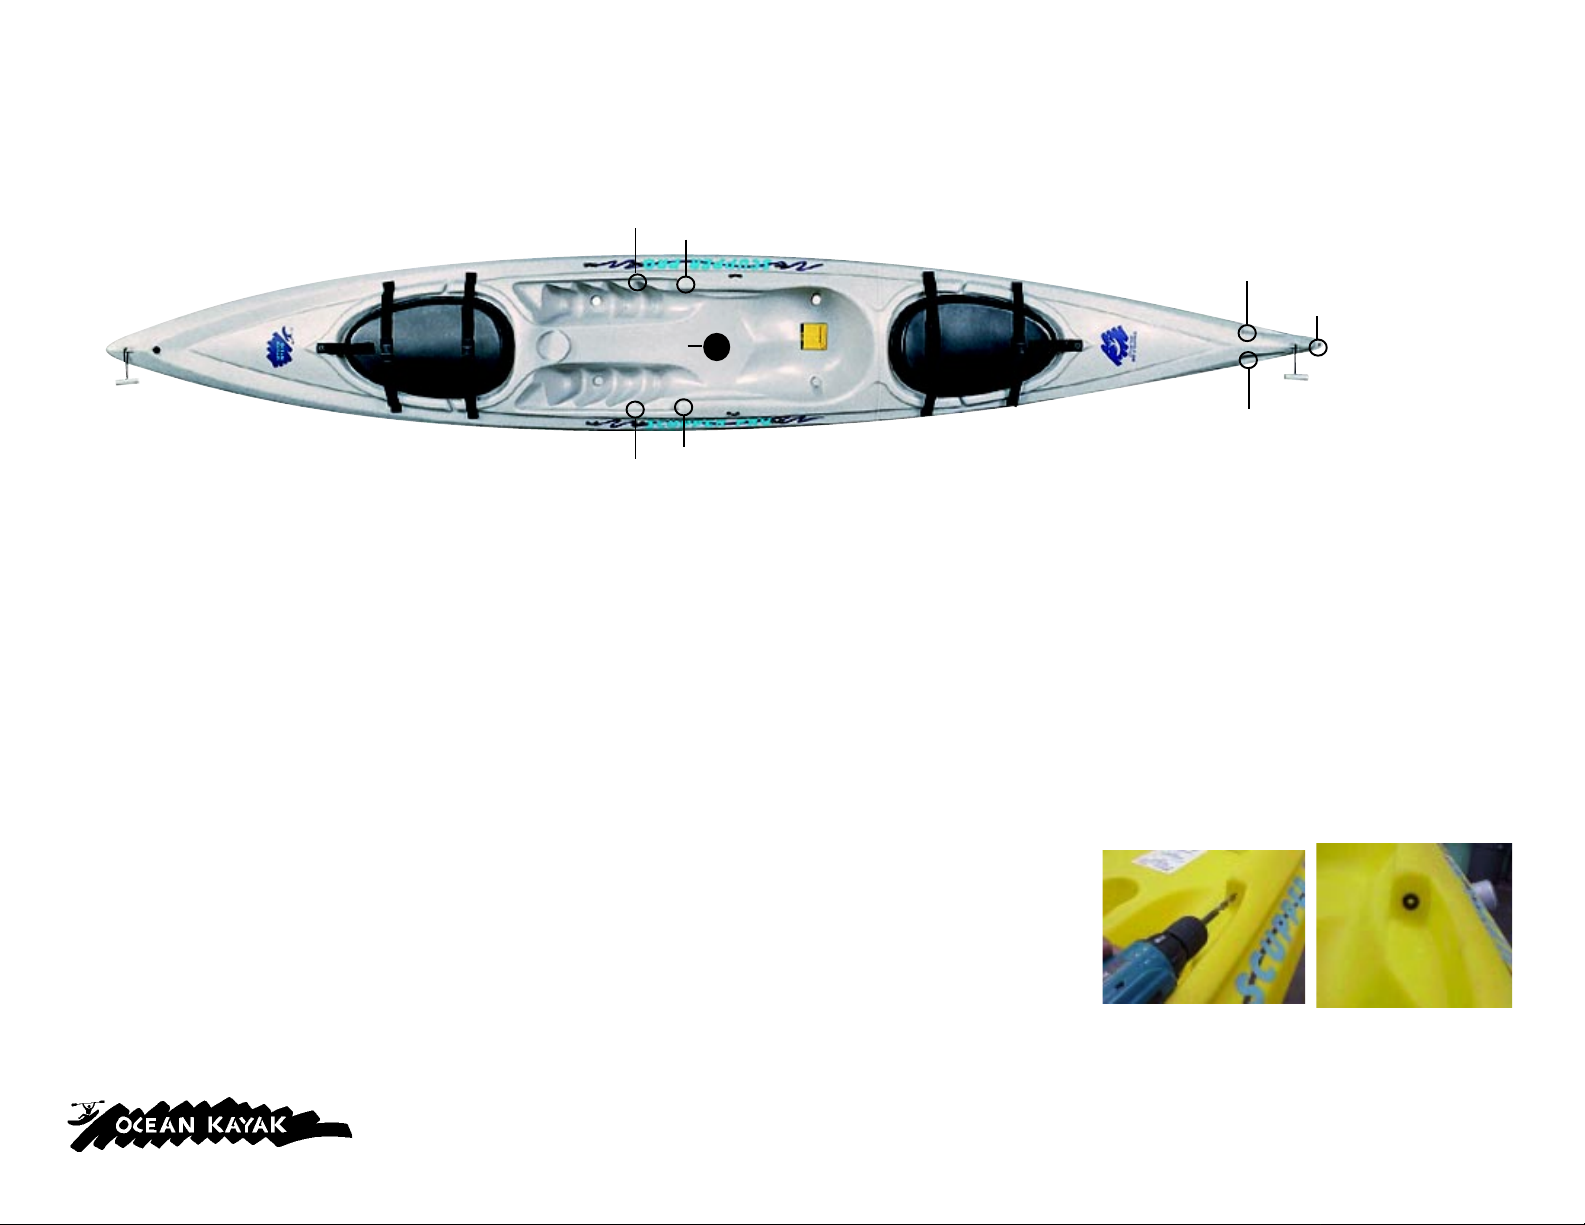
14561
BOW STERN
Parts Included:
1 rudder assembly (300386)
2 steering tracks with slides and pedals
(300107)
2 lengths of tubing (300153)
2 steering lines (300084)
1 nylon sleeve (300077)
4 long machine screws (300163)
4 well nuts (300162)
Ledge (for
steering track)
6-inch hatch (needed
to install steering lines)
Ledge (for
steering track)
Notch (vertical surface for
tubing and steering lines)
2
3
1
4
Notch (vertical surface for
tubing and steering lines)
1 clam cleat (300099)
1 strap eye (300048)
2 adhesive-backed strap eyes (for 2-hatch Pro)
(300104)
4 self-tapping screws (300036
2 short machine screws (300110)
4 rubber grommets (300097)
Notch (vertical surface for
tubing and steering lines)
Notch (vertical surface for
tubing and steering lines)
Tools Needed:
drill
3/8” drill bit
7/16” wrench
knife
phillips screwdriver
pen or marker
Rudder mount
(insert nylon sleeve)
6
7
5
hammer
small block of wood
soapy water
duct tape
stiff wire (for TW)
Drill Tubing Holes
1. You must first drill holes at the center of each notch (3, 4, 5, 6). Hold the drill at 90 degrees to the vertical surface
of the notch, and hold it tightly to keep the drill straight through the layer of plastic.
2. Smooth any rough patches where you have drilled. Insert each of the 4 rubber grommets into each of the drilled
notches. Tubing and steering lines will run through the kayak at these points.
Call your local dealer or Ocean Kayak if you have questions. 800-8-KAYAKS or 360-366-4003. Or e-mail service@oceankayak.com.
Page 2
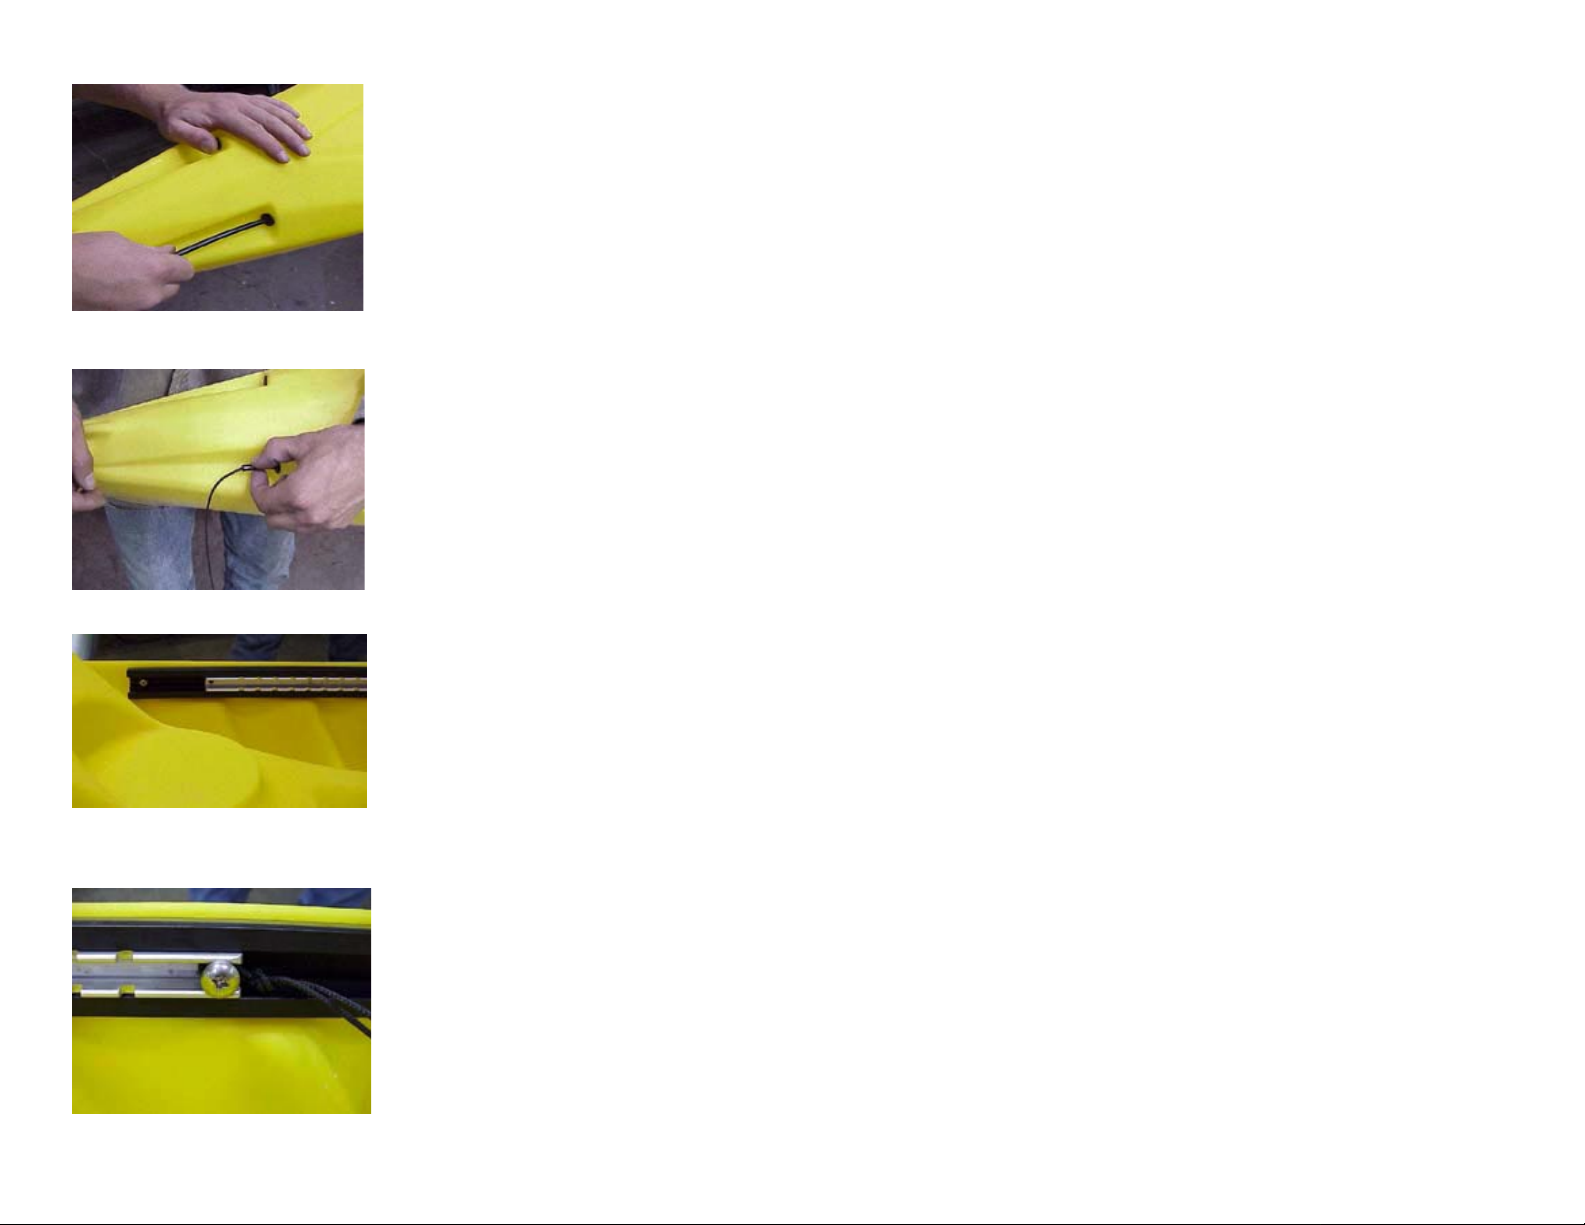
Install Tubing
1. Use a knife to cut the ends of the tubing at an angle to make inserting the tubing easier. Lubricate one length of tubing with
soapy water and insert it into a stern grommet (5). Push the tubing inside the kayak, leaving a few inches outside.
2. Reach inside the 6-inch hatch to get the tubing. Push the tubing (inside the kayak) through the bow grommet (4). Hold your
fingers over the grommet as you pull the tubing out, to make sure the grommet stays in place. Make sure the tubing is routed
outside the scupper holes along the inside of the kayak.
3. Repeat this process on the other side of the kayak, moving from point 6 to point 3.
NOTE: If you have a 2-hatch Pro, open the stern hatch to help you push the tubing inside the kayak. If you have a Pro with tank
well, cut a small hole in one end of the tubing and insert a wire. Use the wire to help pull the tubing from the stern grommet to the
bow grommet. (Tip the kayak on the side you are working so the tubing will pass outside the scupper hole.) Use the adhesivebacked strap eyes to keep the tubing off to the sides within the stern hatch of the 2-hatch Pro.
Install Steering Lines
1. Straighten each steering line and trim frayed ends. Insert a steering line into the tubing at the rear of the kayak and push it
through to the other end of the tubing. If the line bunches, pull it out, straighten it, and re-insert it. Do this on both sides of the kayak.
Install Steering Tracks
1. Place a steering track above the ledge at the top of the foot wells (1), lining it up so the front of the track is even with the front
edge of the last foot well, and the upper edge of the track is even with the upper edge of the kayak. (The track must be high enough
so it does not get caught on the foot wells.) Make sure the drainage slot on the slide is facing down.
2. While you hold the track in place and the slide out of the way, mark the holes on the steering track to use as a guide for the drill.
3. Using the markings as a guide, drill 3/8” holes into the kayak. Insert a well nut into each hole (2 on each side).
4. Place the steering track over the well nuts and match up the holes. Thread a large machine screw through the track and into
each well nut (not too tight). Make sure the heads of the screws are in far enough to allow the steering slide to move freely.
5. Repeat this process on the other side of the kayak.
Attach Steering Pedals to Steering Slides (if they are not already installed)
1. Remove the tape from the steering tracks and slides.
2. Attach the steering pedals to the steering slides by squeezing the lever on each steering pedal while sliding it into the end of the
steering slide.
Tie Steering Line to Steering Slides
1. Sit in the kayak and adjust the position of the steering pedals with the pedal lever so you can push both pedals with your feet
comfortably.
2. Center the steering slide in the steering track and temporarily hold in place with duct tape. (This will keep the slides secure
when you attach steering lines to the rudder.)
3. Tie a bowline knot in the front of each steering line. Begin to thread a short machine screw into the hole at the back of steering
slide. Before threading too far, hook the loop of the knot over the head of the screw. Continue threading the screw until the head
comes in contact with the sides of the steering slide.
Page 3

Attach Rudder to Kayak
1. Lubricate the nylon sleeve with soapy water and insert it in the top of the rudder mount (7).
2. Place a small wooden block over the end of the sleeve (to avoid damage), and hammer it into place. The sleeve must go at
least halfway into the rudder mount. Excess sleeve can be cut off.
3. Remove the ring from the end of the pin on the rudder assembly. Pull the pin out of the rudder housing--don’t lose the white
washers.
4. Insert the pin through the nylon sleeve to attach it to the mount. Make sure to place the white washers between the rudder
housing and the kayak on both ends of the pin.
5. Replace the ring in the end of the pin once the rudder assembly is mounted.
Attach Steering Lines to Rudder
1. At the stern of the kayak, put the end of each steering line down through the top of the shoulder washer in the middle hole on
each side of the rudder steering plate.
2. Hold the rudder still with the blade centered within the housing. Pull each steering line equally tight through
the middle hole. (Which hole you use is not critical, although it will effect rudder responsiveness.)
3. Loop the steering lines through the holes and finish off as shown. By pulling the bungie tight, the
steering line can be inserted into the same hole as the bungie and no knots will be required to keep
the line in place.
4. Trim the excess line, leaving at least 3 inches below the steering plate. (You can now remove the
tape from the steering slides.)
Install Rudder Retraction Line
1. The rudder retraction line should go through the center of the rudder housing. Continue pulling the line up toward the seat and
through the loop in the hatch/gear straps along the right side of the kayak to keep the line out of the way.
2. Place the clam cleat at the rear of the seat on the right side of the kayak, as indicated by two small “v” marks in the plastic.
Make sure the cleat is facing forward (the “c” shape should face the bow). Attach the clam cleat with 2 self-tapping screws.
3. Place the standard strap eye 1 inch in front of the clam cleat, as indicated by two more small “v” marks, and secure it with the
other two self-tapping screws.
4. Run the line through the strap eye. Pull the line so there is no slack, but not so tightly that the rudder rises. Tie the line to the
strap eye.
5. The rudder can now be raised by pushing the line away from the side of the kayak (just behind the clam cleat). Insert the tight
line into the clam cleat to hold the rudder up. To lower the rudder, pull the line out of the clam cleat.
Page 4

Helpful Hints & Troubleshooting:
After a long car trip or a long-distance paddle, make sure all the screws are tight.
To prevent fraying in any of the lines, use a lighter to singe the ends of the lines.
What to do if...
Steering pedals are too tight (they should feel stiff):
Check the steering tracks. They should be secured to the boat tightly enough to keep them in place and not hinder the movement of the slide. If the slide does not move
easily, loosen the track screws.
Steering line will not feed through steering tubes:
Check the line for fraying and trim ends if necessary. Run line through soapy water. Straighten line if it has become tangled. Straighten tubing.
Steering pedals are not even when the rudder is straight:
Make sure pedals are in the same notch on each slide. If pedals are still not even, adjust the steering line where it meets the plate on the rudder. To move the right
pedal closer to the stern of the boat, pull the right line through the holes on the plate. To move the pedal closer to the bow, release line from the steering plate. When
adjusting lines, have someone hold the pedals in an even position while you work.
To use the rudder on your Scupper Pro:
Retracting the rudder:
Push the line away from the side of the kayak, just behind the clam cleat. Inset the line into the cleat to hold the rudder up.
Lowering the rudder:
Pull the line out of the clam cleat. Release the line and allow the rudder to fall.
Launching and landing:
The rudder should be retracted (up) when launching or landing. This will prevent the rudder from getting wedged in rocks, logs, or sand. Once you are away from shore,
release the rudder and begin steering with the pedals.
Pedal Operation:
To steer in a straight line, keep the pedals aligned with even pressure on both pedals. To turn right, press the right pedal forward. To turn left, press the left pedal
forward.
A standard one year warranty on manufacturer’s workmanship or defective parts applies. Ocean Kayak will not be responsible for any damages resulting from
inappropriate usage of the equipment or damages resulting from installation of the product by non-Ocean Kayak personnel. This warranty does not apply to commercial
application of the product.
 Loading...