

Page 1

MODEL: OBZ-50DEP
Before operating this product, please read the instructions
carefully and save this manual for future use.
Service Number: 1-866-277-7878
Page 2

1
CONTENTS
SAFETY PRECAUTIONS
Warning ..........................................................................................................................................2
Caution ...........................................................................................................................................2
Electrical information ......................................................................................................................3
OPERATING THE UNIT
Before operating the unit ...................................................................................................................7
Removing the collected water ........................................................................................................9
CARE AND MAINTENANCE
Cleaning and Care ..........................................................................................10
TROUBLESHOOTING TIPS
Troubleshooting ...... ....................................................................................................................... 11
DEHUMIDIFIER CONTROLS
Control panel....................................................................................................................................4
Other features................................................................................................................. ...............5
DESCRIPTION OF PARTS
Identifying the parts ...... ....................................................................................................................6
Placing the unit ...
....... ..............................
..... ............................
.........................................................................................7
Page 3
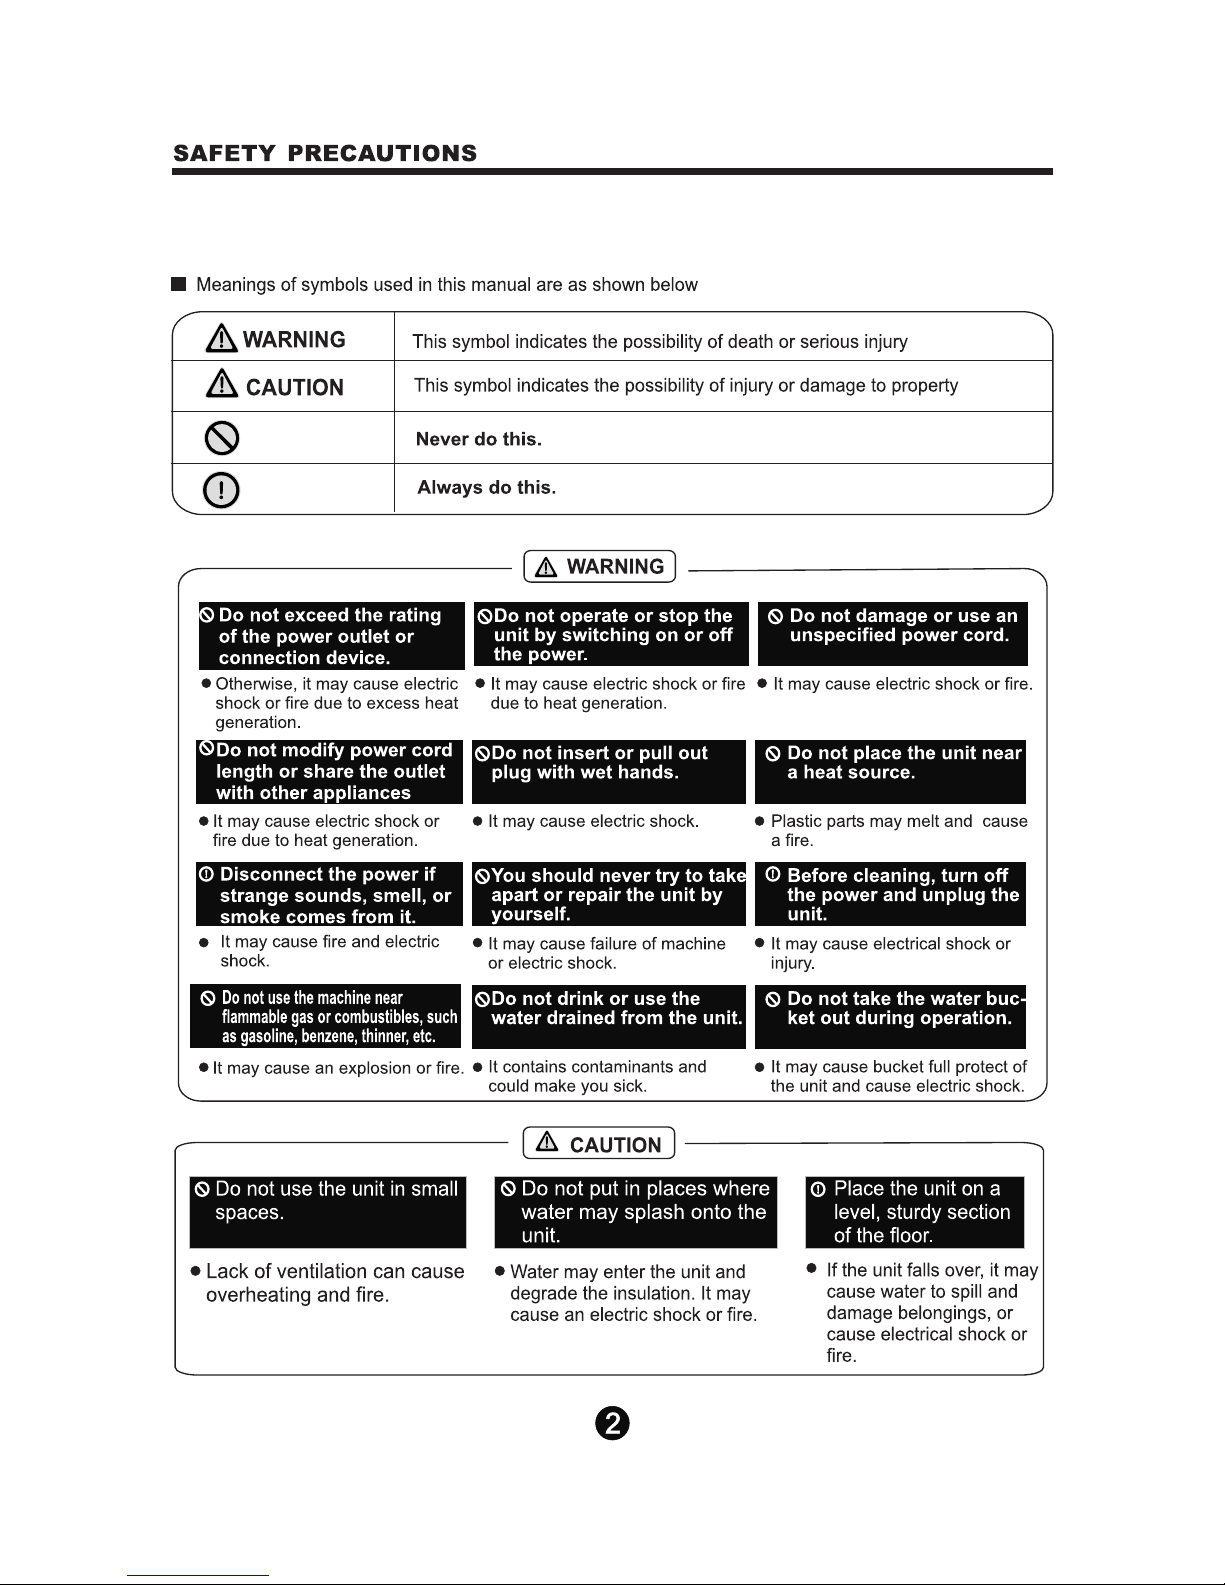
To prevent injury to the user or others, the followiing instructions must be followed.
Improper operation due to not following the instructions may cause harm or damage.
Page 4

This will cause the
corrosion to the unit
due to chemicals
evaporated in the air
Page 5

Fig.1
3
High fan
indicator light
Filter
Full
Cont.
On Off
Turbo
Auto defrost
1
2
4
5
67
Clean filter
indicator light
Pump
operation
indicator light
Timer on/off
indicator light
Bucket full
indicator light
Auto defrost operation on
indicator light
Continuous operation
indicator light
Pump
Pump
The control panel of the unit you purchased may be slightly different depending on the model.
When you push the button to change
operation modes, the unit will make a
beep to confirm mode change.
Refer to page 8 for insctrutions on removal of the
collected water.
button
button
button
hours.
DEHUMIDIFIER CONTROLS
Page 6

5
CONTROL PADS ON THE DEHUMIDIFIER
Other features
Buck et Full Light
Glow s when the buck et is ready to be emptied.
When f rost builds u p on the evapor ator coils, t he
comp ressor will c ycle off and the fan will continue
to run u ntil the fros t disappear s.
Auto D efrost
Wait 3 minutes bef ore resumin g operation
After the unit has stopped, it cannot be restarted
immediately in the first 3 minutes. This is to prevent
damage to the unit. Operation will automatically
star t after 3 minutes.
Sett ing the Timer
While the unit is on, press the TIMER button
to initiate the AUTO STOP program, indicated
by the TIMER OFF light. Press again to initiate
the AUTO START program, indicated by the
TIMER ON light.
While the unit is off, press the TIMER button
to initiate the AUTO START program, indicated
by the TIMER ON light.
Press or hold the UP or DOWN button to change
the Auto Timer by half hour increments up to 24
hours. The display will show the time remaining
until start.
The selected time will show for 5 seconds and
then the system will automatically revert back to
displaying the previous humidity setting.
Turning the unit ON or OFF at any time or adjusting
the Timer setting to 0 will cancel the Timer.
When the AUTO START & STOP times are set,
the TIMER ON/OFF indicator lights up to show
that the Timer is on.
Chec k filter feat ure
The system counts every time the fan motor operates.
when the accumulated operation time acheives 250 hours
or more, the check filter light will flash to remind that the
the filter needs cleaning. After finishing cleaning and putting
back the air filter, be sure to press the filter button to reset
the clean filter counter and turn off the indicator light.
10
Display
Shows the set humidity level from 35% to 85% or auto
start/stop time (0~24) while setting, then shows the actual
( ± 5% accuracy) room humidity level in a range of
RH(Relative Humidity) to 90%RH(Relative Humidity).
Error Codes and Protection Code:
AS- Humidity sensor error: Unplug the unit and plug it back
in. If error repeats, call for service.
ES- Temperature sensor error: Unplug the unit and plug it
back in. If error repeats, call for service.
P2- Bucket is full: Empty the bucket.
30%
Auto S hut Off
The shut s off wh en the bucket i s
full , or when the buc ket is remove d or not plac ed
in the p roper posit ion. When the setting humidity is
reac hed, the unit w ill be shut off autom atically.
For so me models,t he fan motor wi ll continue
oper ating.
dehu midifier
Auto-Restart
If the unit shuts off unexpectedly due to a power outage,
it will restart with the previous operation automatically
when the power resumes.
EC- Unit malfunction: Please make sure that the
Please make sure whether the
environment temperature is within the standard operating
temperature in the manual. If the current temperature is
working, call for service.
within the standard operating temperature and it still isn’t
6
Timer button
Press to initiate the Auto start and Auto stop feature,
in conjuction with the and buttons.
E3- Unit malfunction: Unplug the unit and plug it back in. If
error repeats, call for service.
Eb- Bucket is not present or not in right position: Remove
the bucket and put back in the right position.
Page 7
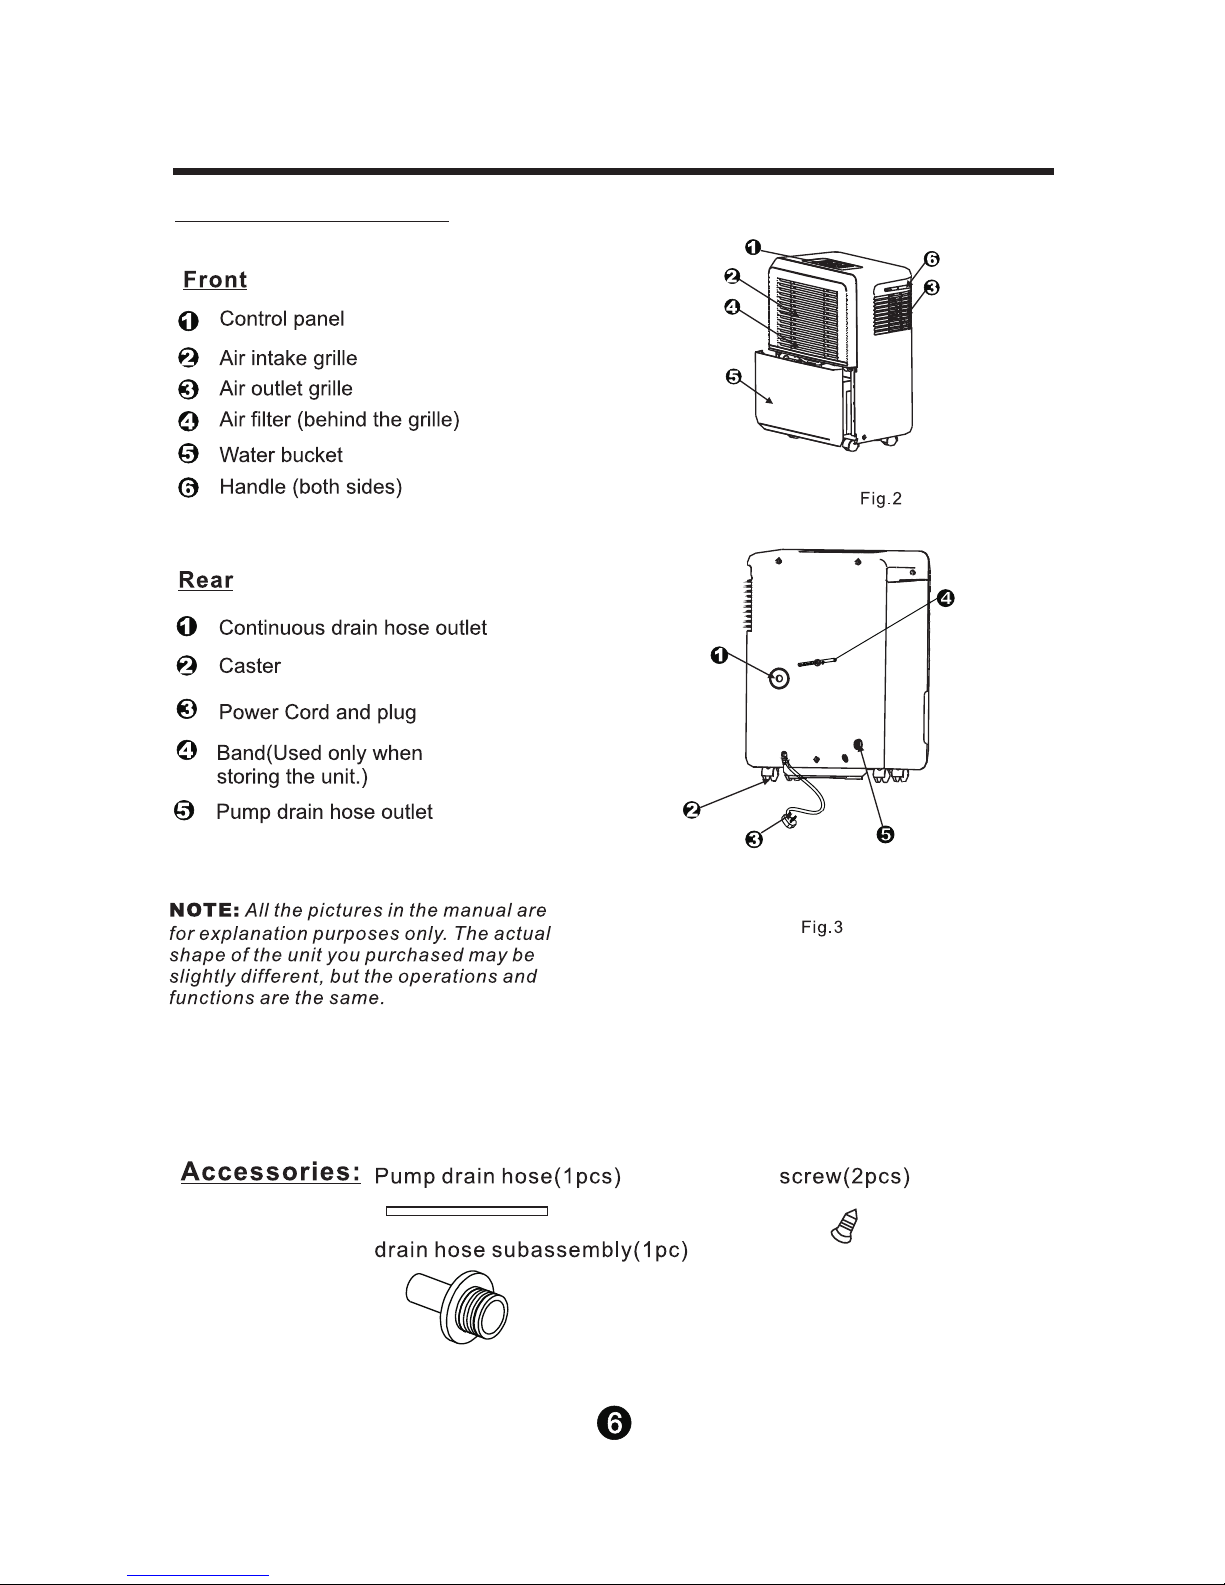
DESCRIPTION OF PARTS
Identifiying the parts
Page 8

Placing the unit
Before Operating the Unit
7.8 in
3 minutes to restart the unit.
Plug the unit into an electric outlet with a grounded connection.
level. Please be careful when moving the unit to prevent
the unit from falling over.
Page 9

Removing the collected water
1. Pull out the bucket a little.
2. Hold both sides of the bucket
with even strength, and pull it
out from the unit.
3. Pour the water out.
There are three ways to remove collected water.
1. Use the bucket
When the unit is off and the bucket is full, the Full
f,if the bucket is full, the Full indicator
indicator light will light up.
When the unit is on and the bucket is full, the compressor
and fan will turn off. The Full indicator light go off and
the digital display will show ‘P2.’
Slowly pull out the bucket. Grip the left and right
handles securely, and carefully pull out straight so
water does not spill. Do not put the bucket on the floor
because the bottom of the bucket is uneven. Otherwise
the bucket will fall over and cause the water to spill.
Throw away the water and replace the bucket. The
bucket must be in right place and securely seated for the
dehumidifier to operate.
The machine will re-start when the bucket is restored
in its correct position.
NOTES:
When you remove the bucket, do not touch any parts
inside of the unit. Doing so may damage the product.
Be sure to push the bucket gently all the way into the
unit. Banging the bucket against anything or failing to
push it in securely may cause the unit not to operate.
If the pump detaches when you remove the bucket (see
Fig.7),you must reinstall the pump properly to the unit
before replace the bucket back into the unit (see Fig.8).
After you remove the bucket,if there is some water in
the unit you must dry it out.
When the unit is on, if the bucket is removed, the
compressor and fan will turn off, then the unit will beep
8 times and the digital display will show ‘Eb.’
When the unit is off and the bucket is removed, the unit
will beep 8 times and the digital display will show ‘Eb.’
Fig.5
Fig.6
OPERATING THE UNIT
2. Continuous draining
Water can be aut omaticall y emptied into a floor
drai n by attaching the unit with a water hose
(Id≥ 5/ 16 , not includ ed))with a female thre aded
end (I D:M=1 ,not in cluded) .
8
Install the drain hose onto the adaptor A (See Fig.9,
placed in the bucket).
Remove the plastic cover from the back drain outlet of
the unit and set aside and remove bucket,then insert
the drain hose through the drain outlet of the unit and
securely press it into the connector on the front of the
unit.(See Fig.10 and Fig.11)
Tighten the adaptor A and the unit by using two screws
(placed in the bucket).
Install the female threaded end of the water hose into
the adaptor A.(See.Fig.12),then lead the water hose
to the floor drain or a suitable drainage facility.
Make sure the hose is secure so there are no leaks.
Direct the hose toward the drain,making sure that
there are no obstructions that will stop the water flowing.
Fig.10
Plastic cover
Drain hose
Adaptor A
Fig.9
Drain hose
subassembly
Fig.7
Fig.8
Pump drops
Reinstall
pump properly
Fig.11
Connector
Drain hose
Page 10

9
Fig.12
Water hose
Female threaede
end
NOTE: When the continuous drain feature is not being used,
remove the drain hose from the outlet.
Removing the collected water
3. Pump draining
Water can be aut omaticall y emptied into a floor
drai n or a suitable drainage f acility by at taching
the pu mp drain out with a pump dra in hose
( od=1 /4 , supplied).
Remove the continuous drain hose and the drain hose
subassembly from the unit. Install the plastic cover to
the continuous drain hose outlet of the unit by using two
screws.(See Fig.11)
Reinsert the pump drain hose into the pump drain hose
outlet (See Fig.12), then lead the water hose to the floor
drain or a suitable drainage facility.
Press the pump button to activate the pump operation.
When the bucket is full, the pump will start to work.
NOTE: The pump may cause a loud noise when it starts to
work for 3~5 minutes. This is normal.
Make sure the hose is secure so there are no leaks.
Direct the hose toward the drain,making sure that there
are no blockages that will stop the water flowing.
Place the end of the hose into the drain and make sure
the end of the hose is level or down to let the water flow
smoothly. Do not interrupt the flow.
Select the desired humidity setting and fan speed on the
unit for pump draining to start.
Drain hose
subassembly
Continuous drain
hose
Plastic cover
Fig.11
Pump drain
hose
Pump drain
hose outlet
Fig.12
NOTE: The pump operation on light flashes when there
is a problem. Please turn off the unit and unplug the cord.
Check the following things:
Cleaning the filter of the pump.
-Remove the bucket from the unit, take down the pump
and clean the filter. (See Fig.13).
Place the end of the hose into the drain and make sure
the end of the hose is level or down to let the water flow
smoothly. Do not interrupt flow.
Place the bucket back in the unit and make sure
that it is placed correctly.
Select the desired humidity setting and fan speed
on the unit for continuous draining to start.
Filter of the pump
Check that the pump drain hose does not link or block.
Fig.13
Empty the water of the bucket.
Reinstall the pump and the bucket properly. Turn on the
unit. If the error repeats, call for service.
OPERATING THE UNIT
NOTE: Do not use this operation when the outdoor temperature
O O
is equal to or less than 0 C (32 F). Otherwise water can turn
into ice that may block the water hose and cause the unit to fail.
When the pump drain feature is not being used, remove the
pump drain hose from the outlet.
2,Take the pump
drain hose out
1,Press the pump drain
hose outlet down
Press the pump drain hose outlet down and take the pump
drain hose out from it (See Fig.14).
Fig.14
Page 11

or on some models, remove the bucket then pull filter
Store the unit upright in a dry, well-ventilated area.
Page 12

TROUBLESHOOTING TIPS
Before calling for service, review the chart below first.
Problem
What to check
Unit does not start
Make sure the dehumidifier plug is pushed completely
into the outlet.
Check the house fuse/circuit breaker box.
Dehumidifier has reached its preset level or bucket is full.
Water bucket is not in the proper position.
Dehumidifier does not
dry the air as it should
Did not allow enough time to remove the moisture.
Make sure there are no curtains, blinds or furniture blocking the
front or back of the dehumidifier.
The humidity control may not be set low enough.
Check that all doors, windows and other openings are
securely closed.
O O
Room temperature is too low, below 5 C(41 F).
There is a kerosene heater or something giving off water vapor
in the room.
,
The unit makes a loud
noise when operating
The air filter is clogged.
The unit is tilted instead of upright as it should be.
The floor surface is not level.
Frost appears on the
coils
This is normal. The dehumidifier has Auto defrost feature.
Water on floor
Hose to connector or hose connection may be loose.
Intend to use the bucket to collect water,
but the back drain plug is removed.
ES, AS,P2,EC ,Eb and
E3 appear in the display
These are error codes and protection code. See the
DEHUMIDIFIER CONTROLS section on page 5.
The pump operation
light is flashing
Clean the filter of the pump.
Check the pump hose does not link or block.
Empty the water of the bucket.
11
 Loading...