

SAVE THESE INSTRUCTIONS
DEALER/INSTALLER: GIVE TO HOMEOWNER
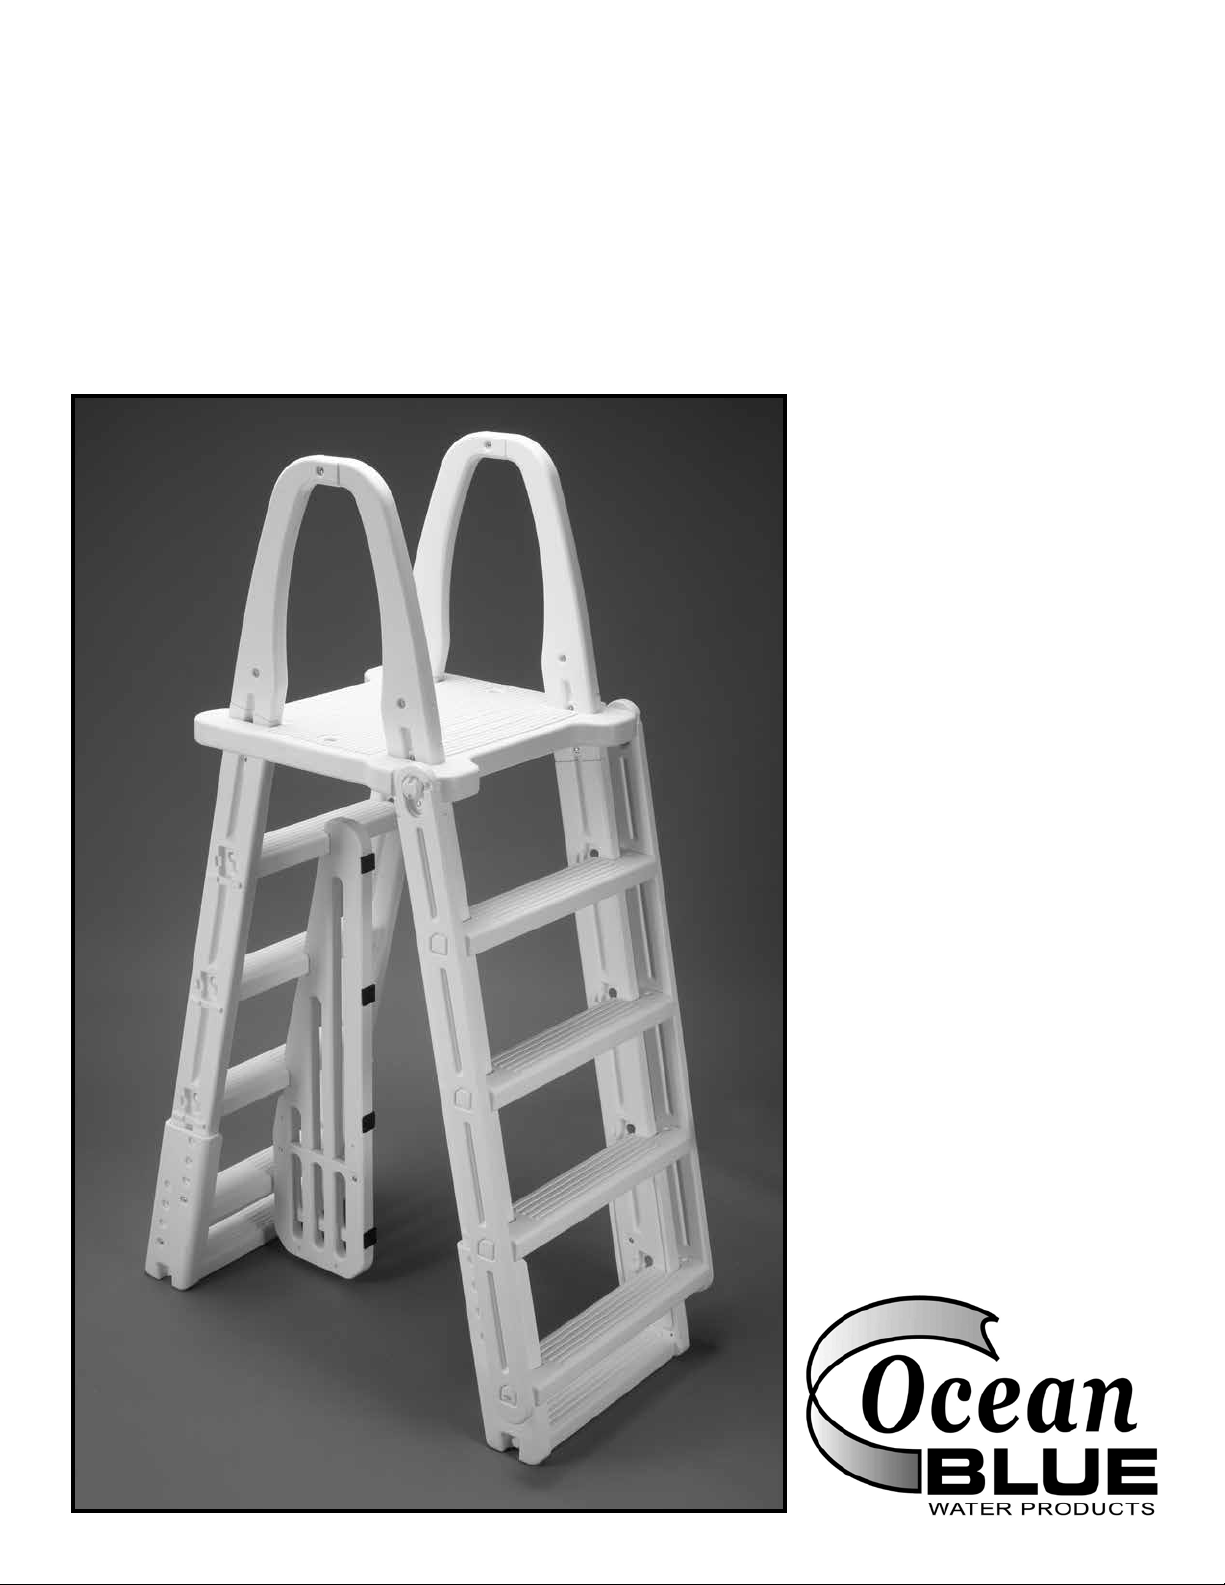
Ocean Blue
Above Ground A-Frame Pool Ladder
Assembly and Installation Manual
Part no. 400200
Not for Use
with Soft
Sided Pools
Ocean Blue A-Frame Ladder
for above ground pools
ASSEMBLY INSTRUCTIONS - PLEASE READ BEFORE ATTEMPTING ASSEMBLY
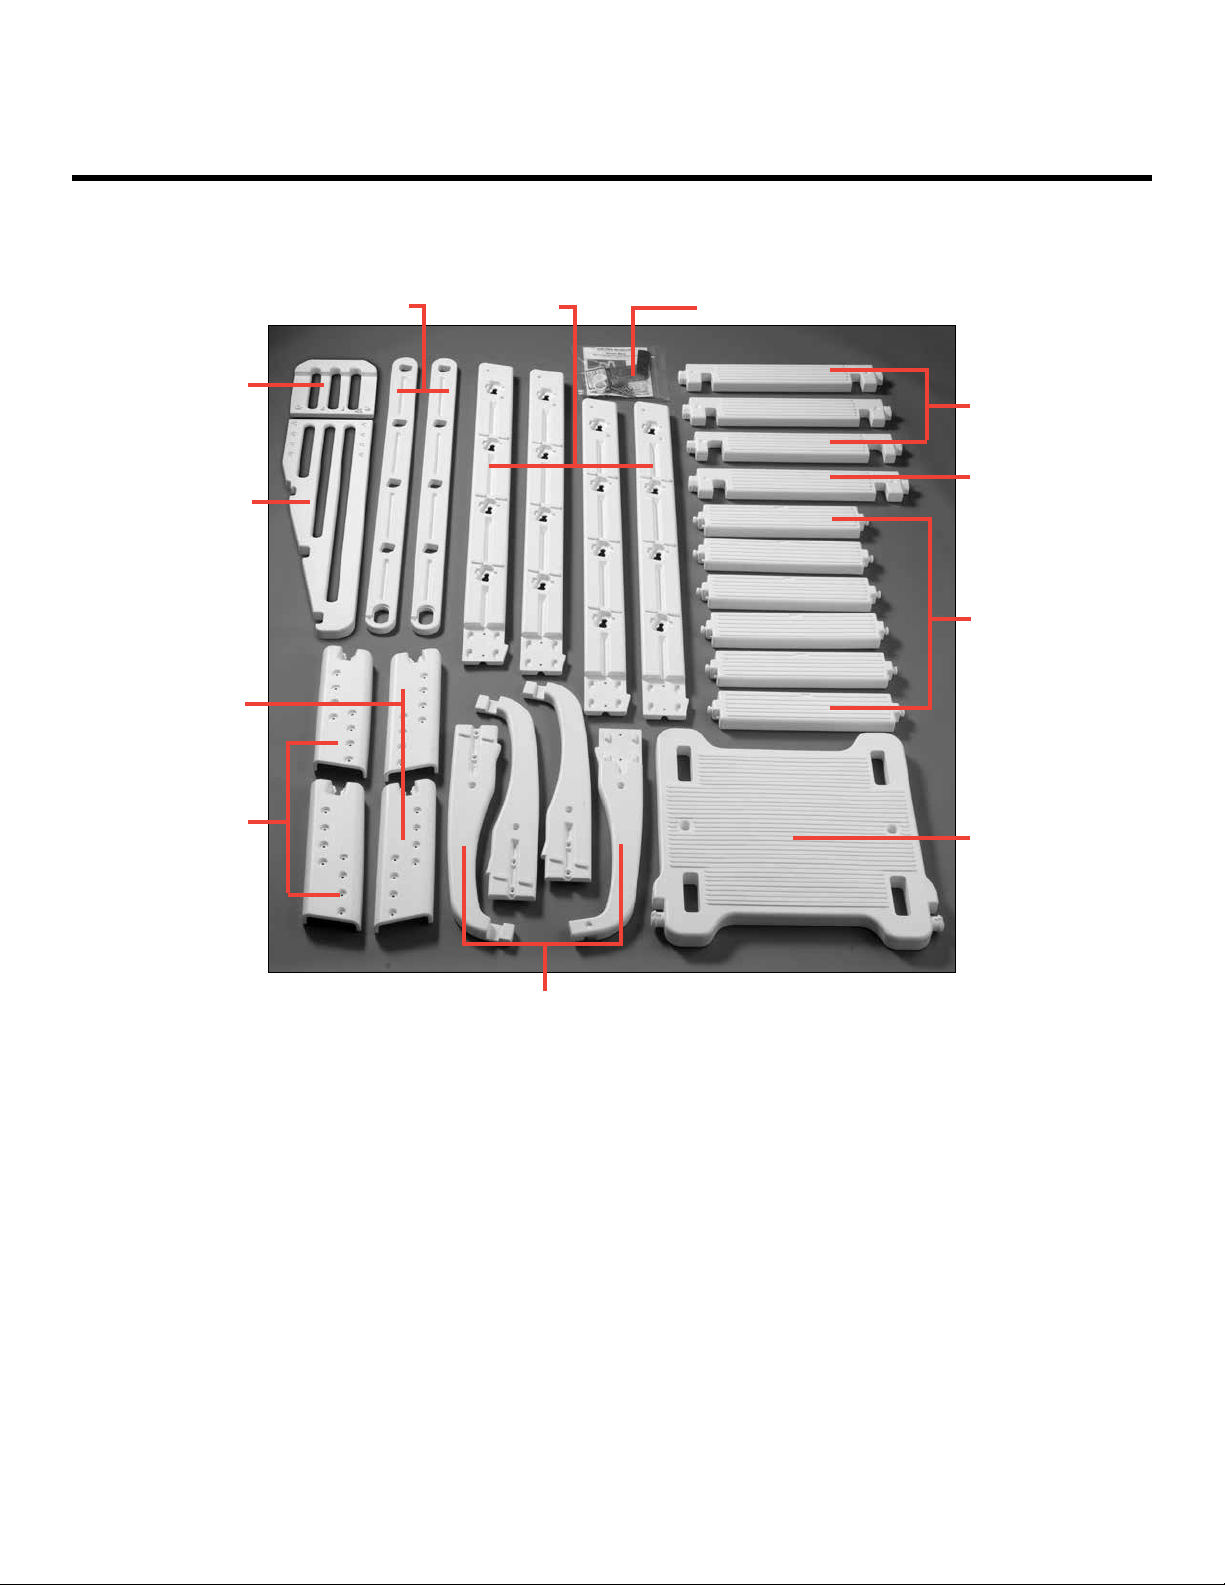
1 - Anti-Swim
Barrier Extension
1 - Anti-Swim
Barrier
2 - Right
Adjustable
Rail Boots
2 - Left Adjustable
Rail Boots
2 – Swing-up Rails
4 - Side Rails
1 - Hardware/Safety Pack
3 - Swing-up
Treads
1 - Bottom
Swing-Up Tread
6 - Fixed Ladder
Treads
1 - Platform
Tools Needed for Assembly
■ Rubber Mallet
■ Cordless Drill w/Phillips
Driver
■ 5/16” Drill Bit
■ Phillips Screwdriver
4 – Handrails
Parts List
■ 4 - Side Rails
■ 4 - Handrails
■ 1 - Platform
■ 2 - Right Adjustable Rail Boot
■ 2 - Left Adjustable Rail Boot
■ 2 - Swing-up Rails
■ 3 - Swing-up Treads
■ 1 - Bottom Swing-Up Tread
■ 6 - Fixed Ladder Treads
■ 1 - Anti-Swim Barrier
■ 1 - Anti-Swim Barrier Extension
■ 1 - Fixed Ladder Tread
■ 1 - Hardware Safety Pack
- 1 -
Hardware Bag
■ 20 - 1/4-20 hex nuts
■ 2 - 1/4-20 x 1.25” Philips pan
head screws
■ 8 - 1/4-20 x 1.5” Philips pan head
screws
■ 8 - 1/4-20 x .625” Philips pan
head screws
■ 4 - 1/4-#10 x .75” Philips self-
tapping screws
■ 2 - 1/4 - 20 x 3-1/2” Bolts
■ 2 - 1/4” Flat Washers
■ 1 - Strip of Foam Pads (4 pads)
■ Instructions
■ Warning Labels
■ Padlock
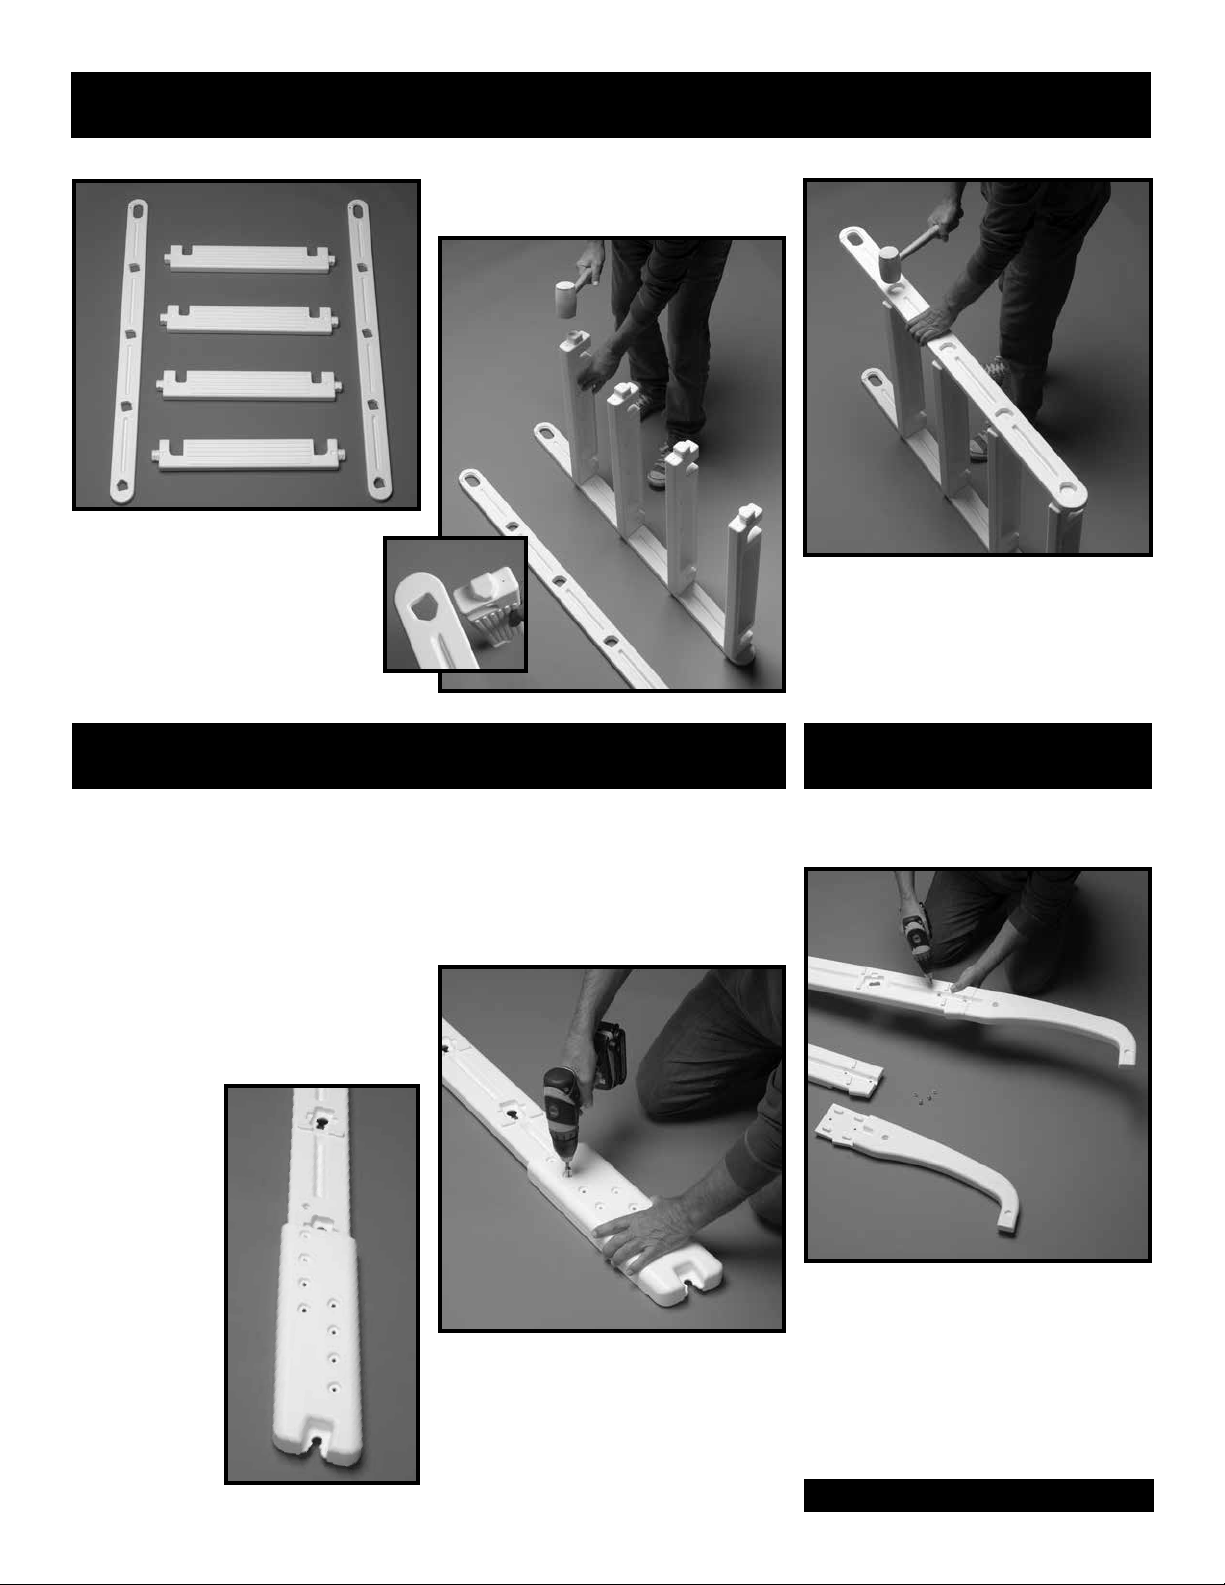
Step #1
Tools Needed: Rubber Mallet
#1: Lay out the Swing-up
Rails and Swing-up Treads as
shown.
NOTE: The bottom Swing-up
Tread has a “house shaped”
tab and is positioned at the
bottom of the Swing-up Rail.
#2: Using a rubber mallet, tap the
Swing-up Treads into place.
#3: Place the remaining Swing-up
Rail over the tabs of the Swing-up
Treads and tap into place using the
rubber mallet. Set this assembly
aside.
Step #2
Tools Needed: Rubber Mallet, cordless drill with Phillips bit.
Adjustable Rail Boots are not required if the outside height of your pool
(measured from the ground to the top of the pool ledge) is 48” or less. If
this measurement is more than 48” rail boots will be required. If the out-
side measurement of your pool is 48” or less, skip to step 3.
#1: Slip one of the Adjustable Rail
Boots over the end of a Side Rail.
It will need to be all the way on
if the outside dimension of your
pool is 50” or
backed off to
the marked
number that
corresponds
with the height
of your pool.
#2: Using two 1/4-20 x 1 1/2” long
bolts and two 1/4-20 hex nuts,
fasten the Adjustable Rail Boot to
the Side Rail. Repeat for remaining
three Side Rails.
Step #3
Tools Needed: Rubber Mallet, cordless drill with Phillips bit.
#1: Overlap the at end of the
Handrail onto the top of the Side
Rail. Using two 1/4 - 20 x 5/8” bolts
and two 1/4- 20 hex nuts, attach the
Handrail to the Side Rail. Repeat for
the remaining three Side Rails.
Step #3 continued
- 2 -

Step #3 continued
#2: Lay one of
the Side Rail
assemblies on a
at surface.
Matching the
tabs in the Fixed
Ladder Treads
to the notches
in the Side Rail
assembly, use
the rubber mallet to tap the treads
into place.
#3: Placing your foot on the Side
Rail to hold it steady, use the rubber
mallet to tap down the Fixed Ladder
Treads until they are rmly seated
in the Side Rail.
#4: Place the opposite Side Rail
assembly on top of the Fixed
Ladder Treads so that the notches
and tabs align and tap it into place.
Placing your foot on the Side Rail
to hold it steady, use the rubber
mallet to tap down the Fixed Ladder
Treads until they are rmly seated
into both Side Rails.
#5: With ladder assembly on edge,
position one of the remaining Fixed
Ladder Treads so that the tabs
align with the notches at the bottom
of the Side Rail assemblies and tap
in with the rubber mallet until the
tread is properly seated.
#7: Using the rubber mallet, tap
the Platform down until seated on
the lugs on the Side Rails.
#6: Using the openings opposite
the tabbed end, slide the Platform
over the two Handrails.
- 3 -

Step #4
Tools Needed: Rubber Mallet, cordless drill with Phillips bit.
#1: Lay the Anti-Swim Barrier and
the Anti-Swim Barrier Extension on
a at surface.
#4: Evenly space the foam
adhesive pads to the Barrier.
#2: Position the Anti-Swim Barrier
Extension over the Anti-Swim Barrier so that the length of the Barrier
matches the length from the top
tread to the bottom tread of the
ladder. Attach with two 1/4 - 20 x 1
1/4” bolts and two 1/4- 20 hex nuts.
#3: Using the rubber mallet, tap
the Anti-Swim Barrier into place.
Step #5
Tools Needed: Rubber Mallet, cordless drill with Phillips bit.
#1: Flip entire ladder assembly
onto its side. Slide the two remaining
Side Rail assemblies through
the two openings on the tabbed end
of the Platform. Using the rubber
mallet, tap down on the Platform
until it is seated against the lugs
on the Side Rails. IT MAY REQUIRE SEVERAL HARD BLOWS WITH
A RUBBER MALLET TO SEAT THE PLATFORM ALL THE WAY DOWN
ONTO LUGS.
Step #5 continued
- 4 -

Step #5 continued
#2: Using two #10 x 3/4” self-
tapping screws, connect the Handrails together by using one screw
on the outside and one screw on
the inside. Repeat for the remaining
handrail.
#3: Position the remaining Fixed
Ladder Tread so that the tabs align
with the notches at the bottom of
the Side Rail assemblies and tap in
with the rubber mallet until the tread
is properly seated. NOTE: The small
groove should face the inside of the
ladder.
#5: Using the
rubber mallet tap
down to secure.
#4: Stand the ladder upright.
Attach the Swing Ladder assembly
by exing the oval openings over
the two round tabs on the Platform.
- 5 -

Step #5
Step #6
Placing A-Frame Ladder in Pool
CHOOSE A LOCATION THAT IS LEVEL AND IN FULL VIEW.
POOL MUST HAVE COMPETENT ADULT SUPERVISION AT ALL TIMES WHEN IN USE.
Tools Needed: Cordless drill with Phillips bit.
#1: Carefully lift the ladder over the pool wall
making sure the Swing Ladder is on the outside
of the pool. Be careful not to damage liner or
pool wall. The platform must be level should
rest on the pool top seat and the bottom tread
should rest rmly on the pool bottom. Depending on the outside height of the swimming pool
ledge, rail boots may need to be readjusted at
this time. Use of a ladder pad is highly
recommended to protect pool liner.
#2: Tip the ladder sideways to allow the treads
to ll the water. This will prevent oating. Allow
ladder to ll with water until it settles on the
bottom of the pool. Small holes in the side rails
will let the water in. this may take a few minutes.
#3: Check to make sure the hole
locations in the platform are clear
of pool wall and supports. Drill two
5/16” holes through the Platform
and pool ledge. Fasten the ladder
platform to the pool ledge using two
¼-20 x 2-1/4” bolts, ¼-20 hex nuts.
You MUST secure the ladder to
the pool top rail for strength and
stability.
#4: When the pool is not in use,
rotate the Swing Ladder to the
up position and secure it in place
with the padlock as shown.
OUTSIDE TREADS MUST
BE IN THE UP POSITION
AND LOCKED AT ALL
TIMES WHEN POOL IS
NOT IN USE.
- 6 -

Safety Rules
■ Locate ladder on a solid base.
■One person on the ladder at
a time.
■ Ladder MUST be installed per
manufacturer’s instructions.
■ Face ladder when entering
and leaving pool.
■ To prevent entrapment or
drowning — DO NOT swim
through, behind or around
ladder.
■ Secure ladder to top rail of
pool for greater stability and
safety as outlined in this
assembly manual. Use of a
ladder pad is highly
recommended to protect
pool liner.
■ Ladder to be used as a
swimming pool ladder only.
■ Weight limit -
300 lbs. maximum
■ Warning: Exceeding the
maximum weight restriction
■ DANGER: No Jumping or
may cause the ladder to fail.
Diving from ladder.
IMPORTANT For Your Safety
■ Check the contents of the
carton with the parts list for
this ladder.
■ DO NOT attempt to
assemble or install the ladder
if there are ANY shortages of
parts or hardware.
■ For proper assembly and
installation follow all
instructions in the sequence
shown.
MAINTENANCE:
To keep your new ladder
working properly, just hose off
once a week with clean water.
Check the Swing-up Ladder for
proper operation. Check padlock
for proper operation, lubricate if
necessary.
■ Before using the product, after
assembly and installation, go
over the instructions and
procedures again to make
sure nothing has been
overlooked.
■ Be sure and safe. The
manufacturer IS NOT
responsible for improper
assembly, installation
and use.
WINTERIZING:
Unfasten the ladder from pool
ledge and remove from the
water. Lay the ladder on its side
to drain. It will take several
minutes for the water to drain
out of the ladder rails. A small
amount of water left in ladder will
not cause any damage. Store in
a safe place out of the elements.
■ When ladder is not in use,
swing up outside ladder
section and lock using
padlock. Ladder must be
locked at all times when not in
use or when there is no
qualied adult supervision.
■ Consult your local Building
Department before installation
of your pool and equipment.
■ DANGER: Use a cordless
drill for assembly and
installation. NEVER use an
electric drill in or around the
pool.
Not for Use with
Soft Sided Pools
OCEAN BLUE WATER
PRODUCTS WARRANTY
Ocean Blue Water Products warrants
their swimming pool ladders to be free
from defects in workmanship for one
year from date of purchase
DO NOT RETURN
DEFECTIVE PART TO
DEALER
The defective part should be
returned, postpaid, to:
Ocean Blue Water Products
7447A S Central Ave
Bedford Park IL 60638
Enclose proof of purchase (receipts,
etc.) showing date purchased, your
name, address, and daytime phone
number. You will be notied of cost to
replace part. This warranty gives you
specic legal rights, and you may
also have other rights which may vary
from state to state.
.
Made in U.S.A • Printed in U.S.A.
- 7 -
 Loading...