

Page 1

CONGRATULAZIONI!
Ottima scelta! Con l’acquisto del nostro elettrodomestico avete scelto un
prodotto affidabile e dalle alte prestazioni, discreto, efficiente, utile: grazie al
freddo che conserva i cibi la nostra alimentazione è più varia e più sana.
Il vostro nuovo apparecchio è facile da usare. Vi preghiamo comunque di
leggere attentamente le istruzioni, in modo da scoprire quei piccoli accorgimenti
che vi consentiranno di sfruttare al massimo le potenzialità del vostro
apparecchio risparmiando energia.
Certi che l’utilizzo vi soddisferà, ci auguriamo di avervi sempre come nostri
clienti.
Il marchio OCEAN.
INDICE
Pag
Norme di sicurezza / Raccomandazioni................................................ 2
Installazione ............................................................................................ 3
Descrizione generale.............................................................................. 4
Uso del congelatore ............................................................................... 4
Sbrinamento............................................................................................ 6
Manutenzione.......................................................................................... 6
Guasti e anomalie................................................................................... 7
Page 2

RACCOMANDAZIONI
Se questo apparecchio sostituisce un altro dotato di chiusura meccanica o lucchetto, vi
consigliamo di rendere tale chiusura inutilizzabile o di smontare il coperchio al fine di evitare
que dei bambini possano rimanere chiusi dentro.
Se il vostro apparecchio deve essere distrutto, rivolgetevi al vostro rivenditore o ad uno
specialista in quanto alcuni materiali possono essere nocivi per l’ambiente e per la salute.
ATTENZION ! alcuni apparecchi sono dotati di una chiusura con chiave: non lasciate ch i
vostri bambini giochino con l’apparecchio o nei pressi del medesimo. Tenete la chiave fuori
dalla portata dei bambini in modo da evitare che restino chiusi dentro. Per la stessa ragione
non dimenticatevi di distruggere la serratura quando eliminerete l’apparecchio.
NORME DI SICUREZZA
L’apparecchio è adatto a conservare e congelare alimenti per uso domestico: ogni altro uso è
improprio.
L’installazione deve essere effettuata secondo le istruzioni del presente libretto: un’errata
installazione può danneggiare l’apparecchio. Per eventuali problemi rivolgetevi ai centri di
assistenza autorizzati o, comunque, sempre e solo a personale specializzato.
Prima di ogni operazione di manutenzione staccate la spina di alimentazione elettrica
evitando di tirare il cavo di alimentazione o l’apparecchio, ma afferrando direttamente
la spina.
Le parti destinate al contatto con gli alimenti sono conformi al D.L. n. 108 del 25/01/1992 e
alla direttiva CEE 89/109.
Per qualsiasi operazione di pulizia, vogliate prima sconnettere l’apparecchio dalla
presa di corrente.
RACCOMANDAZIONI
Dopo avere sballato l’apparecchio, assicuratevi che non sia stato danneggiato. Un
apparecchio danneggiato non deve essere connesso, In caso di danno, rivolgetevi al vostro
rivenditore entro le 24 ore dall’acquisto. Tenete i materiali dell’imballo fuori dalla portate
dei bambini.
Il circuito del frigorifero contiene il refrigerante isobutano (R600a), un gas naturale che
non inquina, ma che è infiammabile. Durante il trasporto e l’installazione assicuratevi che
nessuno componente del circuito sia stato danneggiato. In caso di danno, tenere
l’apparecchio lontano da fonti di calore e aerare il locale dove si trova.
Per un funzionamento ottimale dell’apparecchio, installatelo lontano da fonti di calore e
assicuratevi che l’aria possa circolare intorno all’apparechio (vedere paragrafo
sull’Installazione).
2
Page 3

INSTALLAZIONE
Prima di procedere all’installazione leggete attentamente le Norme di Sicurezza alfine
di evitare inconvenienti.
Dopo aver sballato l’apparecchio controllate che non sia danneggiato. Eventuali danni vanno
segnalati immediatamente al rivenditore.
Non disperdete nell’ambiente le parti dell’imballo (sacchetti di plastica, strisce di polistirolo
ecc.), né lasciatele alla portata dei bambini.
Se l’apparecchio è stato trasportato in casa vostra in posizione orizzontale, attendete un paio
d’ore prima di inserire la spina elettrica, per dar modo all’olio di rifluire nel compressore.
Collocate l’apparecchio in un ambiente asciutto e aerato, al riparo da agenti atmosferici.
Evitate balconi, verande, terrazzi: l’eccessivo caldo in estate e freddo in inverno potrebbero
alterare il funzionamento dell’apparecchio o addirittura danneggiarlo.
Non mettetelo vicino ad una fonte di calore come un forno o un calorifero e mantenete una
distanza minima di 3/5 cm ai lati e 10 cm sopra. Tenete l’apparecchio staccato dal muro.
Regolate i piedini anteriori in modo che l’apparecchio sia leggermente inclinato indietro: in
questo modo faciliterete la buona chiusura della porta.
La classe climatica del vostro apparecchio è indicata sulla targa dati. Questa determina il
gamma di temperatura ambiente per cui è stato concepito l’apparecchio e che ne garantisce
il buon funzionamento. Quando due classi sono indicate, il buon funzionamento
dell’apparecchio è garantito alle condizioni di ciascuna classe.
Classe Temperatura Ambiente
N 16° a 32°
ST 18° a 38°
T 18° a 43°
Collegamento elettrico
Caratteristiche della presa : 220-230V con presa a terra.
Evitare di usare adattatori o prolunghe.
Evitare di mettere in contatto il cavo con il compressore.
Evitare che il cavo resti sotto l’apparecchio.
L’apparecchio è dotato di messa a terra. Per la vostra sicurezza, connettete l’apparecchio ad
una presa di corrente dotata di messa a terra efficace (conformemente alle norme in vigore
sulla sicurezza dell’installazione elettrica).
Il costruttore declina qualsiasi responsabilità per danni derivanti dalla mancanza di messa a
terra.
ATTENZIONE PRIMA DI EFFETTUARE IL COLLEGAMENTO ELETTRICO
1 – Pulire l’interno dell’apparecchio
2 – Per un corretto funzionamento attendere 2 ore prima di accenderlo.
3 – Posizionare il termostato sullo “0”.
3
Page 4
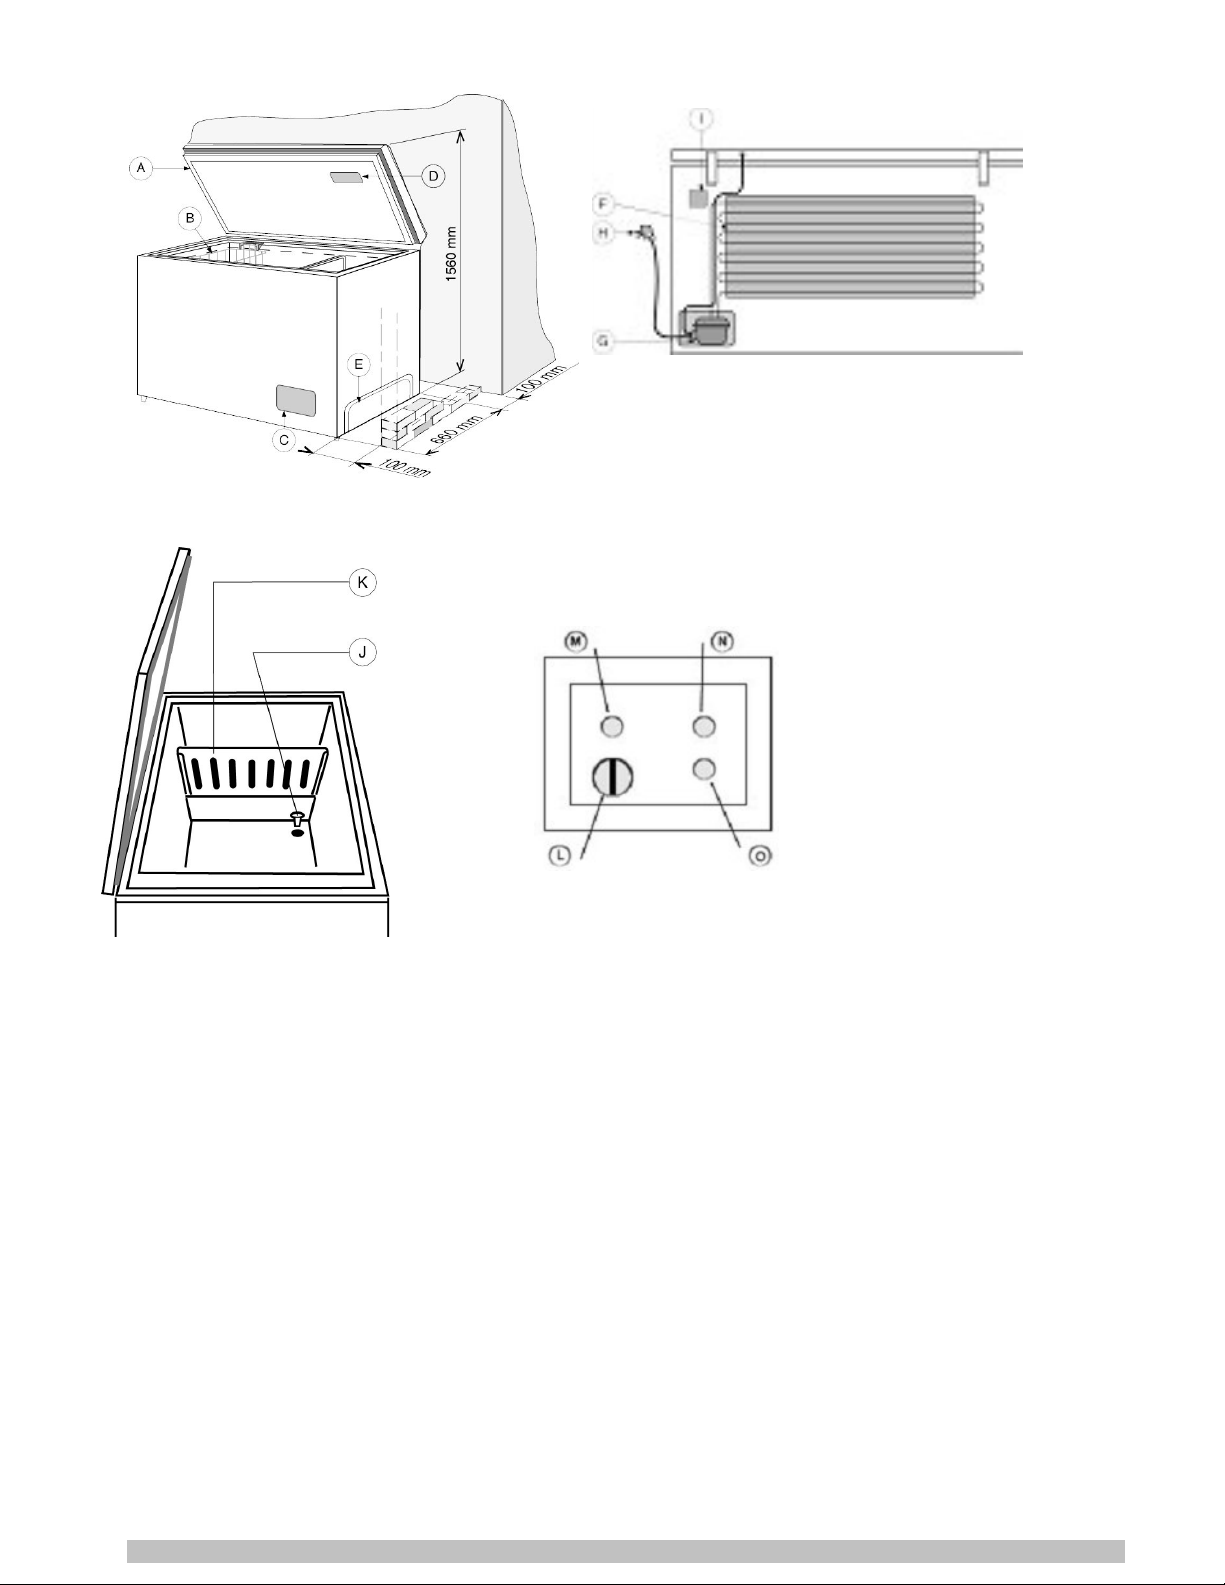
DESCRIZIONE GENERALE
A
B
- Coperchio
C – Pannello comandi D –Luce interna (secondo il modello)
E – Zona compressore F - Condensatore
G - Compressore H - Spina
I – Targa dati J – Foro per le scolo
K – Vassoio per raccolta acqua di sbrinamento (secondo il modello)
L - Termostato M – Spia di funzionamento
N – Spia allarme O – Tasto "Super Congelazione”
- Cestello
USO DEL CONGELATORE
ACCENSIONE
1. Inserite la spina nella corrente: le spie verde (funzionamento) e rossa (allarme) si
illuminano.
2. Regolate il termostato in posizione intermedia e lasciate funzionare l’apparecchio per
alcune ore: la spia rossa di allarme deve spegnersi.
Dopo l’accensione, nel caso in cui ci sia una risalita anomala della temperatura all’interno del
vostro congelatore, la spia allarme si illuminerà.
CONSERVAZIONE
Quando il tasto “Super Congelazione” non è attivato, il vostro apparecchio funziona come un
conservatore. Dovete quindi introdurre solo alimenti già congelati e imballati. La durata di
conservazione dipende essenzialmente dalla natura degli alimenti.
4
Page 5
CONGELAZIONE
Il potere di congelazione è definito in base alla quantità massima di prodotti che
l’apparecchio può congelare in 24 ore portandoli dalla loro temperatura ambiente ad una
temperatura di –18°C. Tale quantità è indicata sulla targa dati posta sul retro
dell’apparecchio. Almeno 24 ore prima di introdurre degli alimenti da congelare, attivate il
tasto “Super Congelazione” del vostro apparecchio. Introducete in seguito i vostri alimenti
freschi e mantenete la “Super Congelazione” accesa almeno per le successive 24 ore.
Potete in seguito sia procedere ad una nuova congelazione, o rimettere il vostro apparecchio
in regime di conservazione disattivando la “Super Congelazione”.
Mettete di preferenza gli alimenti da congelare a contatto con le pareti (di fondo e laterali)
dell’apparecchio al fine di assicurare una congelazione più rapida dei prodotti. Evitate di
mettere gli alimenti da congelare a contatto con alimenti già congelati.
Attenzione : quando introducete nuovi prodotti nell’apparecchio, la spia rossa di allareme può
accendersi per qualche istante, senza che ciò comporti degli inconvenienti per i prodotti o per
l’apparecchio.
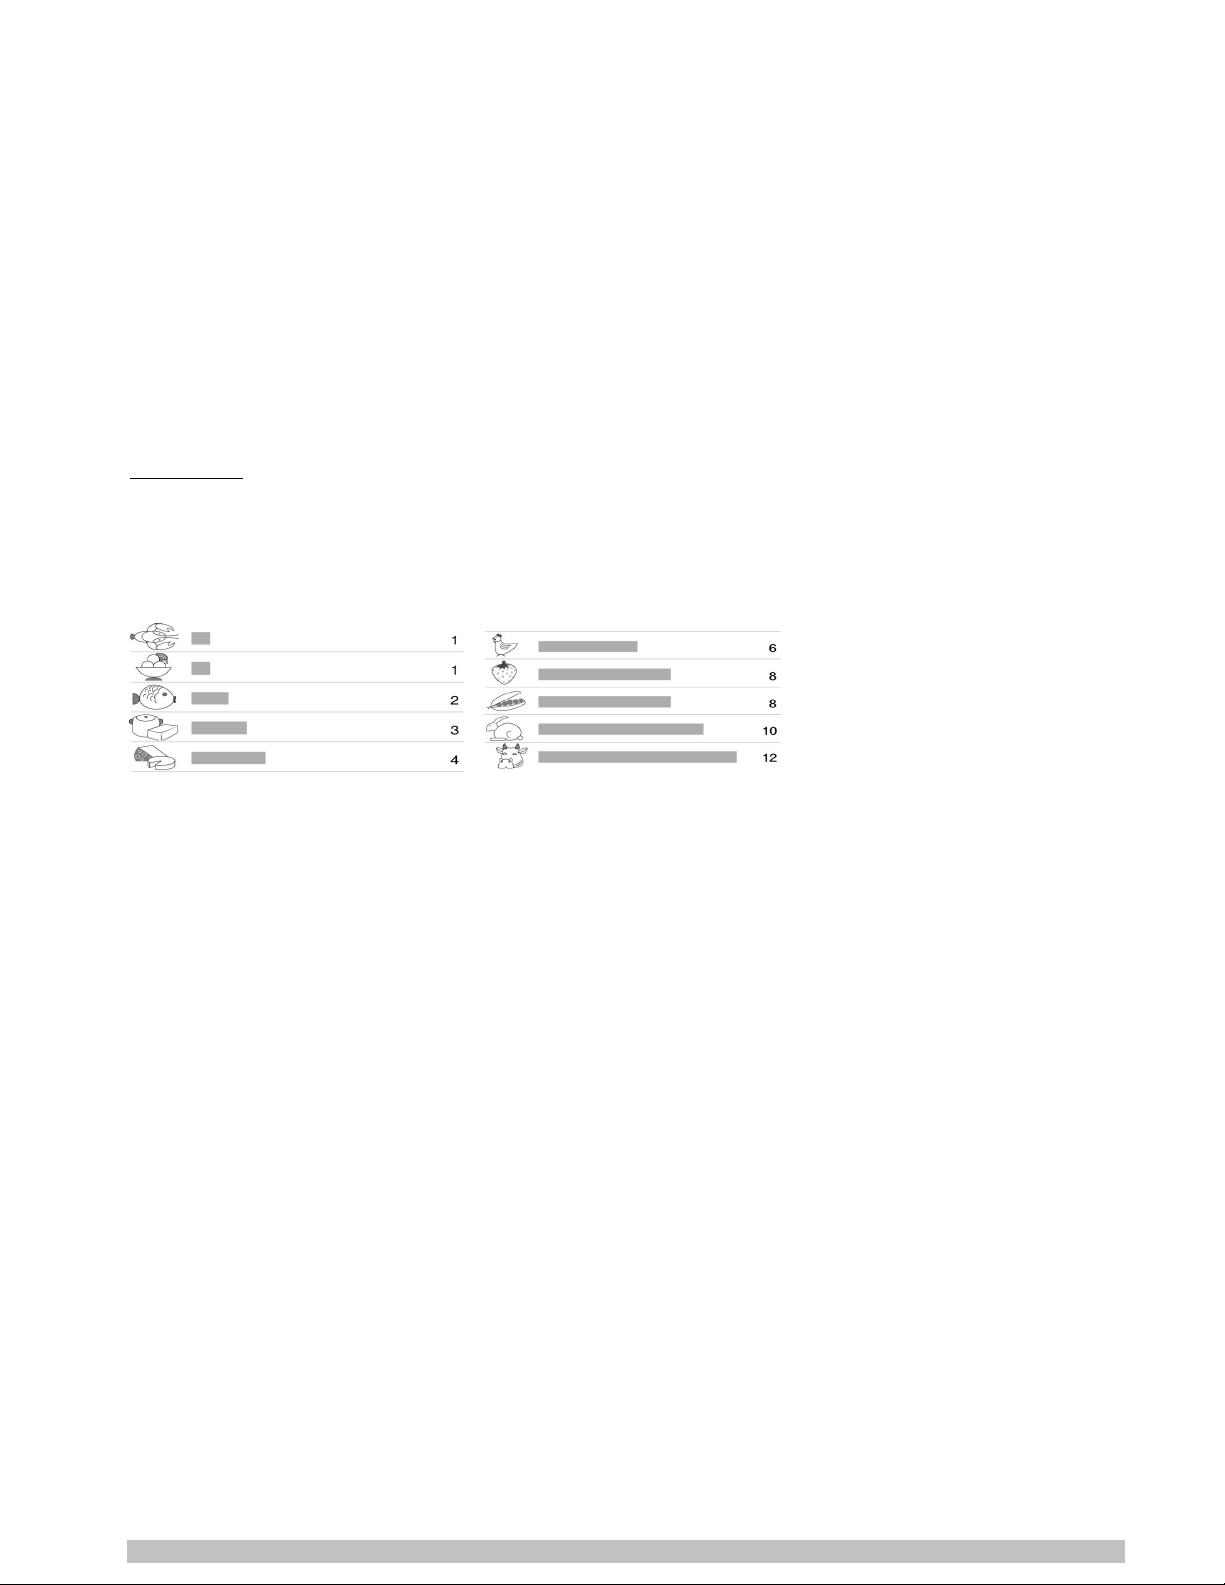
GUIDA ALLA CONSERVAZIONE DEGLI ALIMENTI
Congelate solo alimenti freschi, puliti e imballati adeguatamente.
Etichettate ciascun sacchetto scrivendo la data di congelazione, il peso o il numero dei pezzi,
e la natura del prodotto.
Non mettete bottiglie o lattine nel vostro congelatore in quanto potrebbero esplodere.
Non ricongelate mai un prodotto scongelato, quest’ultimo deve essere consumato
immediatamente.
Non aprite troppo spesso il coperchio del congelatore alfine di evitare una
risalite della temperatura all’interno dello scomparto.
Non superate la data limite di conservazione degli alimenti raccomandata
sugli imballi dei prodotti surgelati.
RISPARMIATE ENERGIA
Lasciate raffreddare gli alimenti prima di porli nel vostro apparecchio.
Quando il vostro apparecchio è nella stato di “conservazione” vi consigliamo di
regolare il vostro termostato per mantenere una temperatura di –18°C all’interno
dell’apparecchio.
La posizione del termostato che corrisponde alla cifra 3 vi consente di ridurre il
consumo di energia quando gli alimenti congelati occupano solo la metà del vostro
apparecchio.
Pulite 1 o 2 volte all’anno la griglia del condensatore situato sul retro
dell’apparecchio alfine di lasciar passare l’aria tra le alette di raffreddamento.
5
Page 6

SBRINAMENTO
Il sistema di sbrinamento del congelatore è manuale. Potete aiutarvi ad eliminare lo strato
di ghiaccio che si è formato usando una paletta o altro strumento di plastica. NON USATE
STRUMENTI METALLICI O APPARECCHI ELETTRICI PER SBRINARE IL VOSTRO
APPARECCHIO.
Per consentire un corretto funzionamento del congelatore, è necessario effettuare le
sbrinamento almeno una volte all’anno o quando le strato di ghiaccio supera i 10 mm:
1.
Scegliete di farlo quando il vostro apparecchio non è troppo pieno.
2.
Attivate il tasto “Super Congelazione” 24 ore prima in modo che gli alimenti raggiungano
al temperatura più bassa possibile.
3.
Togliete gli alimenti dal congelatore, avvolgeteli e metteteli nel frigorifero o in un luovo
fresco.
4.
Staccate la spina del congelatore e mettete un recipiente adatto sotto l’apparecchio.
Alcuni modelli sono dotati di un vassoio per lo sbrinamento.
5.
Staccate il ghiaccio con una paletta di legno o di plastica.
6.
Togliete il tappo dal foro di scolo dell’acqua e lavate l’interno con dell’acqua tiepida. Non
usate MAI polverio spugne abrasive o prodotti aggressivi (alcool, diluenti …).
7.
Asciugate delicatamente la lasciate il coperchio semi aperto per qualche minuto.
8.
Dopo aver rimesso il tappo e il vassoio al loro posto, inserite la spina e attivate la
funzione “Super Congelazione”. Rimettete gli alimenti nel congelatore.
9.
Lo sbrinamento deve essere svolte il più rapidamente possibile alfine di evitare che gli
alimenti già congelati si riscaldino troppo, causando una diminuzione della loro durata di
conservazione.
MANUTENZIONE
CONSIGLI
In caso di interruzione della corrente : se l’interruzione è prevista, attivate il tasto super
congelazione 24 ore prima nella misura del possibile. Non aprite l’apparecchio durante tutta
la durata dell’interruzione.
Riserva di freddo : 2 casi possibili :
Il vostro congelatore è pieno per ¾. In questo caso la riserva di freddo già costituita evita
un aumento anomalo e brusco della temperatura
Il vostro apparecchio è quasi vuoto. In questo caso vi consigliamo di introdurre dei
recipienti pieni di acqua che, congelando, costituirà la riserva di freddo indispensabile
durante l’interruzione di corrente.
Nel caso in cui il vostro apparecchio resti spento a lungo, vi consigliamo di staccare la spina
e raccomandiamo di lasciare il coperchio semi aperto per consentire un corretto ricircolo
dell’aria all’interno dell’apparecchio in modo da evitare la formazione di cattivi odori.
6
Page 7

SOSTITUZIONE DELLA LAMPADINA
QUESTO APPARECCHIO RISPETTA LE DIRETTIVE CEE
73/23, 93/68, 89/336, 96/57, 92/31, 94/62
Staccate la spina
Smontate la plafoniera agendo dolcemente sulle 2 clips situate a destra e a sinistra
della parte superiore, aiutandovi con la punta di un cacciavite.
Svitate la lampadina e sostituitela con una che abbia le stesse caratteristiche. La
potenza massima autorizzata è indicata in prossimità della lampadina.
Rimontate la plafoniera.
GUASTI E ANOMALIE
Alcuni rumori sono assolutamente normali in un congelatore:
Il gaz refrigerante può produrre gorgoglii mentre circola nel circuito.
Il compressore può produrre ronzii che si possono accentuarsi durante l’avvio.
Il “crac” prodotto dalla dilatazione e la contrazione dei materiali usati è normale.
PROBLEMA SOLUZIONE
Il congelatore non funziona
Il congelatore non raffredda.
Il compressore funziona
continuamente
Verificate che la spina sia ben inserita o che il fusibile non sia
fuso.
Verificate la posizione del termostato e fate attenzione che il
coperchio resti aperto. Verificate anche che il coperchio chiuda
bene
Assicuratevi che il congelatore sia ben ventilato lasciando degli
spazi come indicato nel paragrafo “Installazione”. Verificate
inoltre che il vostro apparecchio non sia esposto ad alcuna fonte
di calore. Può anche essere che abbiate introdotto troppi alimenti
o che il coperchio non sia chiuso bene.
SERVIZIO ASSISTENZA POST VENDITA
Se dopo aver verificato quanto indicato sopra il problema persiste, NON EFFETTUATE
ALCUNA RIPARAZIONE, ma contattate il Servizio di Assistenza Tecnica più vicino
.
.
7
Page 8

Dear Customer,
You have just purchased a OCEAN freezer, for which we thank you.
Our research teams have designed a new generation of appliances to make
your life easier.
With its dedicated areas for optimum, flexible storage, clean and fluid lines
allied with appreciable performance, the new OCEAN freezer have everything
you need to conserve your food and provide the answers to your everyday
consumption needs.
The Brandt range of products also includes a wide choice of dishwashers,
washing machines and clothes dryers, fridges, cookers and ovens, hot-plates
and extractor hoods, that you can combine with your new OCEAN freezer.
At the innovative cutting edge, OCEAN thus helps to improve the quality of life
on a daily basis, by offering you simple but high-performance products that are
respectful of the environment, good-looking and reliable.
OCEAN
INDEX
Page
Safety standards / Recommendations .................................................. 9
Installation............................................................................................. 10
General description .............................................................................. 11
Using the freezer .................................................................................. 11
De-icing ................................................................................................. 13
Maintenance.......................................................................................... 13
Operating problems.............................................................................. 14
8
Page 9

SAFETY STANDARDS
This appliance is designed ONLY for domestic conservation of foodstuffs.
Installation must be as instructed in this guide. Incorrect installation could damage the
appliance.
For any operating problems, always and only contact authorised After Sales Service centres,
or qualified personnel.
Before carrying out any maintenance, disconnect the appliance, but not by pulling
on the power supply cable.
If this freezer replaces another, which had a latching, spring-mounted, locking or other
closure system, do not forget to destroy the closure device or better yet remove the door of
your old freezer, so that no-one could become trapped inside (children playing, animals, etc.).
RECOMMENDATIONS
If this freezer replaces another with a mechanical closing system, we recommend disabling
this system or removing the door so that children cannot lock themselves in, which is
dangerous. If the system must be destroyed, call your retailer or a specialist. Some
components could be hazardous for your health or the environment.
CAUTION! Some devices lock with a key. Do not let children play in the vicinity. Put the keys
in a safe place to avoid locking them in by mistake. Similarly, remember to disable the lock
when you scrap the device.
After unpacking the appliance, make sure that it is undamaged. If it is, the reseller should be
notified of any damage within 24 hours of delivery. The packaging materials used are entirely
recyclable (cardboard, PE bubble wrap, EPS, etc.). Keep these materials out of the reach
of children.
For optimum operation of the appliance, install it away from sources of heat and make sure
that air can circulate freely around it.
The appliance's cooling circuit contains a coolant called isobutane, a relatively clean
natural gas which is nonetheless flammable. During transport and installation of the
appliance, make sure that none of the components of the cooling circuit is damaged. In the
event of damage, keep away from flames and ignition sources, and ventilate the room well.
9
Page 10

INSTALLATION
Before installing, carefully read the Recommendations and Safety standards in order
to avoid a certain number of problems.
If you want to move your freezer, hold it by the sides or by the base. You should never lift it
by its top.
Install the device in a dry, well-aired room, away from sources of heat and leaving at least
10 cm between the wall and the back and sides of the freezer. Make sure that the freezer
vents are clear.
.
Make sure that the air vents on your freezer are not covered or blocked.
The climate class of your freezer is marked on its ID plate. It determines the range of
ambient temperatures for which the cooling unit is designed, and within which correct
operation of the appliance is guaranteed.
Class Ambient temperatures
N 16° to 32°
ST 18° to 38°
T 18° to 43°
Electrical connection
Connector characteristics: 220-230V with earth.
Avoid using adapters or extension leads.
Avoid the cable coming into contact with the compressor.
Avoid trapping the cable under the appliance.
The appliance's electrical installation is earthed. For your safety, connect the appliance to a
power outlet with effective earthing (in conformity with current electrical installation safety
standards).
The manufacture declines all liability for damage caused by the absence of an earth
connection.
CAUTION - BEFORE CONNECTING
1. Clean the inside of the freezer with warm water and bicarbonate of soda. Rinse and dry
thoroughly.
2. Wait for 2 hours before switching it on, to ensure that the coolant is stabilised.
3. Check that the thermostat is set to "0".
10
Page 11

GENERAL DESCRIPTION
A
B
- Door
C - Control panel D - Internal light (varies with model)
E - Compressor compartment F - Capacitor
G - Compressor H - Power plug
I - ID plate J - Draining plug
K - De-icing tray (varies with model) L - Thermostat
M - Operating indicator N - Alarm indicator
O - "Super Freeze" key
- Basket
USING THE FREEZER
OPERATION
1. Plug in the freezer: the green (power) and red (alarm) indicators light up.
2. Turn the thermostat to a central setting and let the device operate for approximately
4 hours; the alarm indicator should go out.
Once the device is in operation, the alarm indicator will light up if the temperature inside the
freezer rises abnormally during conservation.
11
Page 12

CONSERVATION
When the "Super Freeze" key is not on, the freezer operates in conservation mode. You must
only place ready-frozen, packed food in it. Conservation periods depend on the nature of the
foodstuff.
FREEZING
The freezing power is defined by the maximum quantity of products that the device can cool
in 24h from ambient temperature down to –18°C. The ID plate inside the device gives this
value. At least 24h before putting fresh food in the freezer press the "Super Freeze" key.
Keep the freezer in Super Freeze mode at least for 24 hours after placing the fresh food in it.
Afterwards you may either freeze more fresh food, or return the freezer to conservation mode.
Place the food to be frozen against the device bottom or walls for faster freezing. Avoid
placing fresh food against already-frozen products.
Caution: when storing food, the alarm indicator may light up briefly. This is not a problem for
the device or products.
CONSERVATION GUIDE
Only freeze fresh, clean and suitably-packaged food.
Label each package and mark the freezing date, the weight or number of portions, and the
nature of the product.
Do not place bottles or cans of carbonated drinks in your freezer, as they could explode.
Never return to the freezer a defrosted product: it must be consumed straight away.
Do not open the freezer door too often as this could cause the temperature
inside the compartment to rise.
Do not exceed the maximum conservation date on the packaging of frozen
goods.
SAVE ENERGY
Do not put warm food in the freezer.
When the freezer is in "conservation" mode, set the thermostat to a temperature of
–18°C inside the device.
The thermostat position 3 lowers electrical consumption when the frozen food fills
half the freezer.
Dust the grid above the capacitor at the rear of the freezer once or twice a year in
order to let in the air through the cooling slats.
12
Page 13

DE-ICING
The freezer de-icing system is manual. You can from time to time remove the layer of ice
that forms, using a scraper or other plastic instrument.
NEVER USE A METAL INSTRUMENT OR ELECTRICAL DEVICE TO DE-ICE THE
FREEZER.
For the freezer to operate correctly it must be de-iced at least once a year or when the ice
layer is over 10 mm thick:
1.
Pick a time when your freezer is not too full.
2.
Press the "Super Freeze" key 24h beforehand so that the frozen food is cooled to the
lowest possible temperature.
3.
Remove the frozen food from the freezer, wrap it carefully and place it in the refrigerator
or a very cool place.
4.
Unplug the freezer. Place a suitable container below it. Some models have their own deicing tray.
5.
Remove the ice with a wooden or plastic scraper.
6.
Remove the draining plug and wash the freezer with warm, lightly soapy water. NEVER
use scouring powder, abrasive sponges or aggressive products (alcohol, solvents, etc.).
7.
Rinse well, dry carefully and leave the door open for a few minutes.
8.
After replacing the plug and tray, connect the freezer again and start the "Super Freeze"
mode. Replace the food in the freezer.
9.
De-icing must be fast for the frozen food to warm up as little as possible, which could
reduce its conservation time.
MAINTENANCE
RECOMMENDATION
In the event of a power cut: if programmed, press the "Super Freeze" key 24h beforehand if
possible. Do not open the freezer throughout the duration of the cut.
Cold reserve: there are two possible cases:
Freezer three-quarters full. In this case, the frozen goods make up a cold reserve that will
avoid abnormal temperature rises.
Freezer nearly empty. In this case, we recommend you place plastic containers filled with
water inside the freezer; once frozen, these containers will make up the essential cold
reserve.
If the freezer is stopped for a prolonged period, unplug it. We recommend leaving the door
open in order to air it.
13
Page 14

REPLACING THE LIGHT BULB
Unplug the freezer.
Remove the light appliance by gently disengaging the two 2 clips on the top left
and right sides using a tip or a screwdriver.
Unscrew the light bulb and replace it by another of the same characteristics (E14).
The maximum power authorized is indicated close to the bulb.
Replace the appliance.
OPERATING PROBLEMS
The freezer creates a number of noises that are perfectly normal:
The coolant gas can create a gurgling sound as it circulates through the system.
The compressor can rumble, a sound which can be more intense when it starts up.
Sharp cracking sounds produced by expansion and contraction of the materials used.
PROBLEM SOLUTION
Check that it is properly plugged in, that the fuse
The freezer does not operate
has not blown or that the circuit-breaker has not
tripped.
Check the thermostat and make sure that the
The freezer is too warm
door stays open as little as possible. Also check
that the door closes properly.
Make sure that the freezer is well ventilated,
leaving gaps as mentioned in the "Installation"
chapter. Also check that your appliance is not
The motor runs continuously
exposed to a direct source of heat.
You may also have placed too much food inside
or the door may not close properly.
TECHNICAL ASSISTANCE SERVICE
If you have carried out the above checks, and your problem persists, ATTEMPT NO
REPAIRS YOURSELF. Contact the nearest Technical Assistance Service.
THIS APPLIANCE IS IN CONFORMITY WITH EC DIRECTIVES
73/23, 93/68, 89/336, 96/57, 92/31, 94/62
14
 Loading...