

Page 1

Océ VarioPrint
®
6160/6200/6250
Océ User manual
Workflow
Page 2

Edition 2007-09
US
Océ-Technologies B.V.
Copyright
©
2007, Océ
All rights reserved. No part of this work may be reproduced, copied, adapted, or
transmitted in any form or by any means without written permission from Océ.
Océ makes no representation or warranties with respect to the contents hereof and
specifically disclaims any implied warranties of merchantability or fitness for any
particular purpose.
Further, Océ reserves the right to revise this publication and to make changes from
time to time in the content hereof without obligation to notify any person of such
revision or changes.
Page 3

3
Trademarks
Trademarks
List of trademarks
Océ, VarioPrint, PRISMAaccess, PRISMAprepare, PRISMAproduction, DPconvert
and DocSetter are registered trademarks of Océ-Technologies B.V.
Xerox, DocuTech, DigiPath and FreeFlow are registered trademarks of Xerox
Corporation.
Adobe and PostScript are registered trademarks of Adobe Systems Incorporated.
Microsoft, Windows and Windows XP are either registered trademarks or
trademarks of Microsoft Corporation in the United States and/or other countries.
Products in this publication are referred to by their general trade names. In most, if
not all cases, these designations are claimed as trademarks or registered trademarks
of their respective companies.
Page 4

4
Trademarks
Page 5

5
Table of Contents
Table of Contents
Chapter 1
Introduction . . . . . . . . . . . . . . . . . . . . . . . . . . . . . . . . . . . . . . . . . . . . . . . . . . . . . . . 7
Notes for the reader. . . . . . . . . . . . . . . . . . . . . . . . . . . . . . . . . . . . . . . . . . 8
Available documentation . . . . . . . . . . . . . . . . . . . . . . . . . . . . . . . . . . . . . . 9
Aim of this manual . . . . . . . . . . . . . . . . . . . . . . . . . . . . . . . . . . . . . . . . . . 10
Chapter 2
Prepare and print. . . . . . . . . . . . . . . . . . . . . . . . . . . . . . . . . . . . . . . . . . . . . . . . . . 13
Use Océ Doc Works 3.6.2 . . . . . . . . . . . . . . . . . . . . . . . . . . . . . . . . . . . . 14
Use Océ Doc Works to print PDF files . . . . . . . . . . . . . . . . . . . . . . . . 14
Use Océ Doc Works for tab printing . . . . . . . . . . . . . . . . . . . . . . . . . . 17
Use Océ Doc Works to create booklets . . . . . . . . . . . . . . . . . . . . . . . 22
Use Océ PRISMAprepare . . . . . . . . . . . . . . . . . . . . . . . . . . . . . . . . . . . . 27
Use Océ PRISMAprepare to collect, modify, and print documents. . . 27
Use Océ PRISMAprepare for tab printing. . . . . . . . . . . . . . . . . . . . . . 30
Use Océ PRISMAprepare to create booklets . . . . . . . . . . . . . . . . . . . 33
Use Océ PRISMAproduction and Océ DocSetter . . . . . . . . . . . . . . . . . . 35
Use Océ PRISMAproduction to print bitmapped Adobe PDF
and TIFF files . . . . . . . . . . . . . . . . . . . . . . . . . . . . . . . . . . . . . . . . . . . 35
Use Océ PRISMAproduction to print prepared Adobe PostScript 3 files
39
Use Océ DocSetter and Océ PRISMAproduction to print documents 41
Use Océ DocSetter and Océ PRISMAproduction to create and
print a document with tab sheets . . . . . . . . . . . . . . . . . . . . . . . . . . . . 42
Define media in Océ PRISMAproduction . . . . . . . . . . . . . . . . . . . . . . 48
Use the Océ VarioPrint
®
6160/6200/6250 printer driver . . . . . . . . . . . . . 50
Print Microsoft Office documents . . . . . . . . . . . . . . . . . . . . . . . . . . . . 50
Use the 'Page programmer' . . . . . . . . . . . . . . . . . . . . . . . . . . . . . . . . 52
Program a job with tab sheets . . . . . . . . . . . . . . . . . . . . . . . . . . . . . . 54
Print a made-ready file . . . . . . . . . . . . . . . . . . . . . . . . . . . . . . . . . . . . 57
Use the Océ VarioPrint
®
6160/6200/6250 in Xerox environments . . . . . 58
Configure the Océ VarioPrint
®
6160/6200/6250 as Xerox®
DocuTech 61xx emulation. . . . . . . . . . . . . . . . . . . . . . . . . . . . . . . . . . 58
Use Océ DPconvert and Océ Doc Works to print Xerox RDO files . . 61
Use Océ DPconvert and Océ DocSetter to print Xerox RDO files . . . 63
Chapter 3
Copy and scan. . . . . . . . . . . . . . . . . . . . . . . . . . . . . . . . . . . . . . . . . . . . . . . . . . . . 65
Use the Océ DS60 scanner to make a copy . . . . . . . . . . . . . . . . . . . . . . 66
Use the Océ DS60 scanner to scan, store and improve a document . . . 68
Page 6

6
Table of Contents
Use Océ DocSetter to optimize the scanned documents. . . . . . . . . . . . . 70
Appendix A
Miscellaneous . . . . . . . . . . . . . . . . . . . . . . . . . . . . . . . . . . . . . . . . . . . . . . . . . . . . 75
Reader's comment sheet . . . . . . . . . . . . . . . . . . . . . . . . . . . . . . . . . . . . . 76
Addresses of local Océ organisations . . . . . . . . . . . . . . . . . . . . . . . . . . . 78
Page 7

7
Chapter 1
Introduction
Page 8
8 Chapter 1 Introduction
Notes for the reader
Notes for the reader
Introduction
This manual helps you use the Océ VarioPrint
®
6160/6200/6250. The manual
contains a description of the Océ VarioPrint
®
6160/6200/6250 and guidelines for its
use and operation. There are also tips given to help you increase your knowledge of
the Océ VarioPrint
®
6160/6200/6250 and to help you better manage the workflow.
Definition
Attention Getters
Parts of this manual require your special attention. These parts provide important,
additional information or are about the prevention of damage to your properties.
Note, Attention and Caution
Caution: A part marked with Caution contains information to prevent
personal injury.
Attention: A part marked with Attention contains information to prevent
damage to items, for example the Océ VarioPrint
®
6160/6200/6250 or a file.
Note: A part marked with Note contains additional information about the correct
operation of the Océ VarioPrint
®
6160/6200/6250.
Safety information
The safety information for this product is included in a separate user manual with the
title Safety information. This manual is part of the documentation set that you
received with your product.
Page 9
9
Available documentation
Available documentation
Introduction
Océ delivers the Océ VarioPrint
®
6160/6200/6250 with a documentation set. The
documentation set contains the following:
■ A CD-ROM with all the manuals mentioned below
■ A hardcopy of the Safety manual
■ Integrated Online Help in the Océ VarioPrint
®
6160/6200/6250 printer driver, the
Océ VarioPrint
®
6160/6200/6250 Settings Editor and other Océ applications.
Main Content of the User Manuals
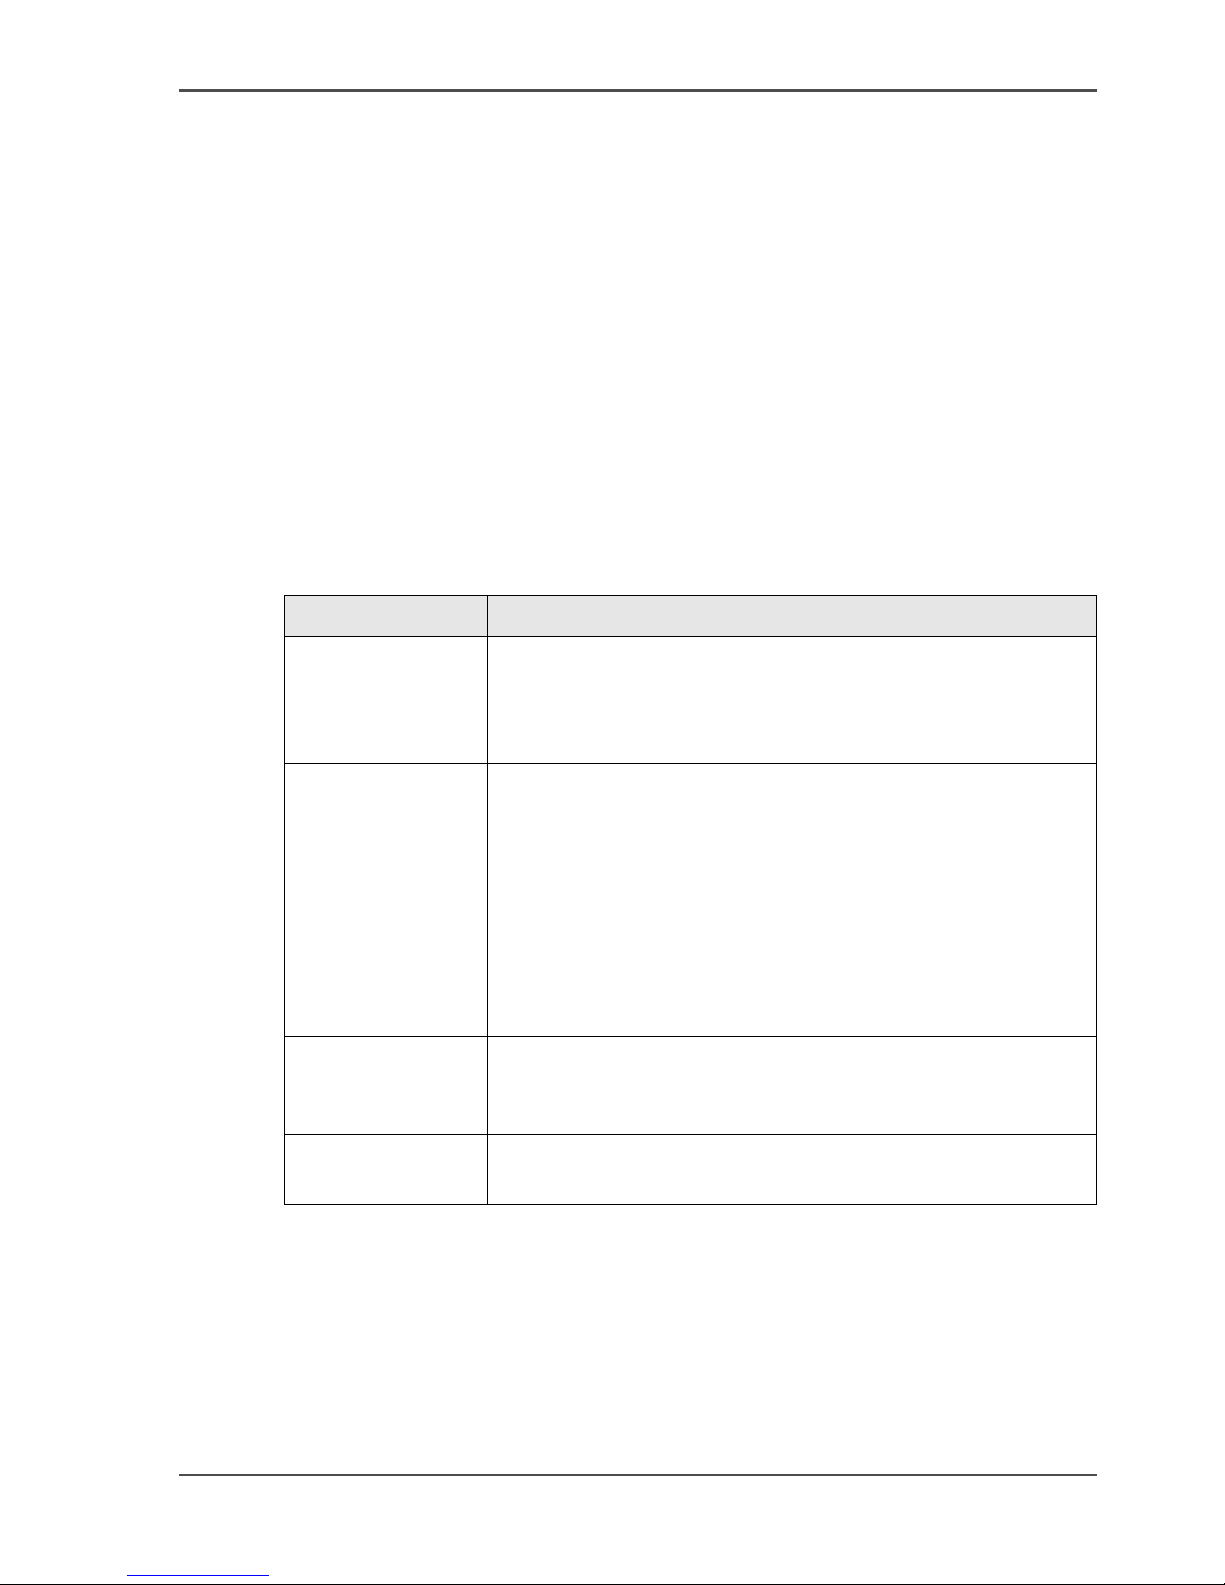
The following table provides an overview of the main content of the user manuals.
[1]
[1] Main Content of the User Manuals
User Manual Main content
Operating
information
■ Overview of the main system components
■ Working with the operator panel
■ Handling and managing jobs on the operator panel
■ Adding media, toner and staples.
Workflow Use the Océ VarioPrint
®
6160/6200/6250 in combination
with
■ Océ PRISMAproduction
®
■ Océ PRISMAprepare
®
■ Océ Doc Works
®
■ Océ DPconvert
™
■ Océ DocSetter
®
■ Xerox
®
DigiPath
®
■ Xerox
®
FreeFlow™.
Maintenance tasks
■ Replacing parts
■ Cleaning parts
■ Clearing a paper jam in the engine module.
Safety information
■ Instructions for safe use
■ Safety data sheets.
Page 10
10 Chapter 1 Introduction
Aim of this manual
Aim of this manual
Introduction
The purpose of this manual is to show the possibilities and the flexibility of the Océ
Va ri o Pr i nt® 6160/6200/6250 in combination with other Océ hardware and software
components. Practical examples provide suggestions and support for everyday tasks
in copy shops and in production printing.
This manual is not a complete guide to the Océ VarioPrint
®
6160/6200/6250 and is
not intended to replace detailed product-specific information.
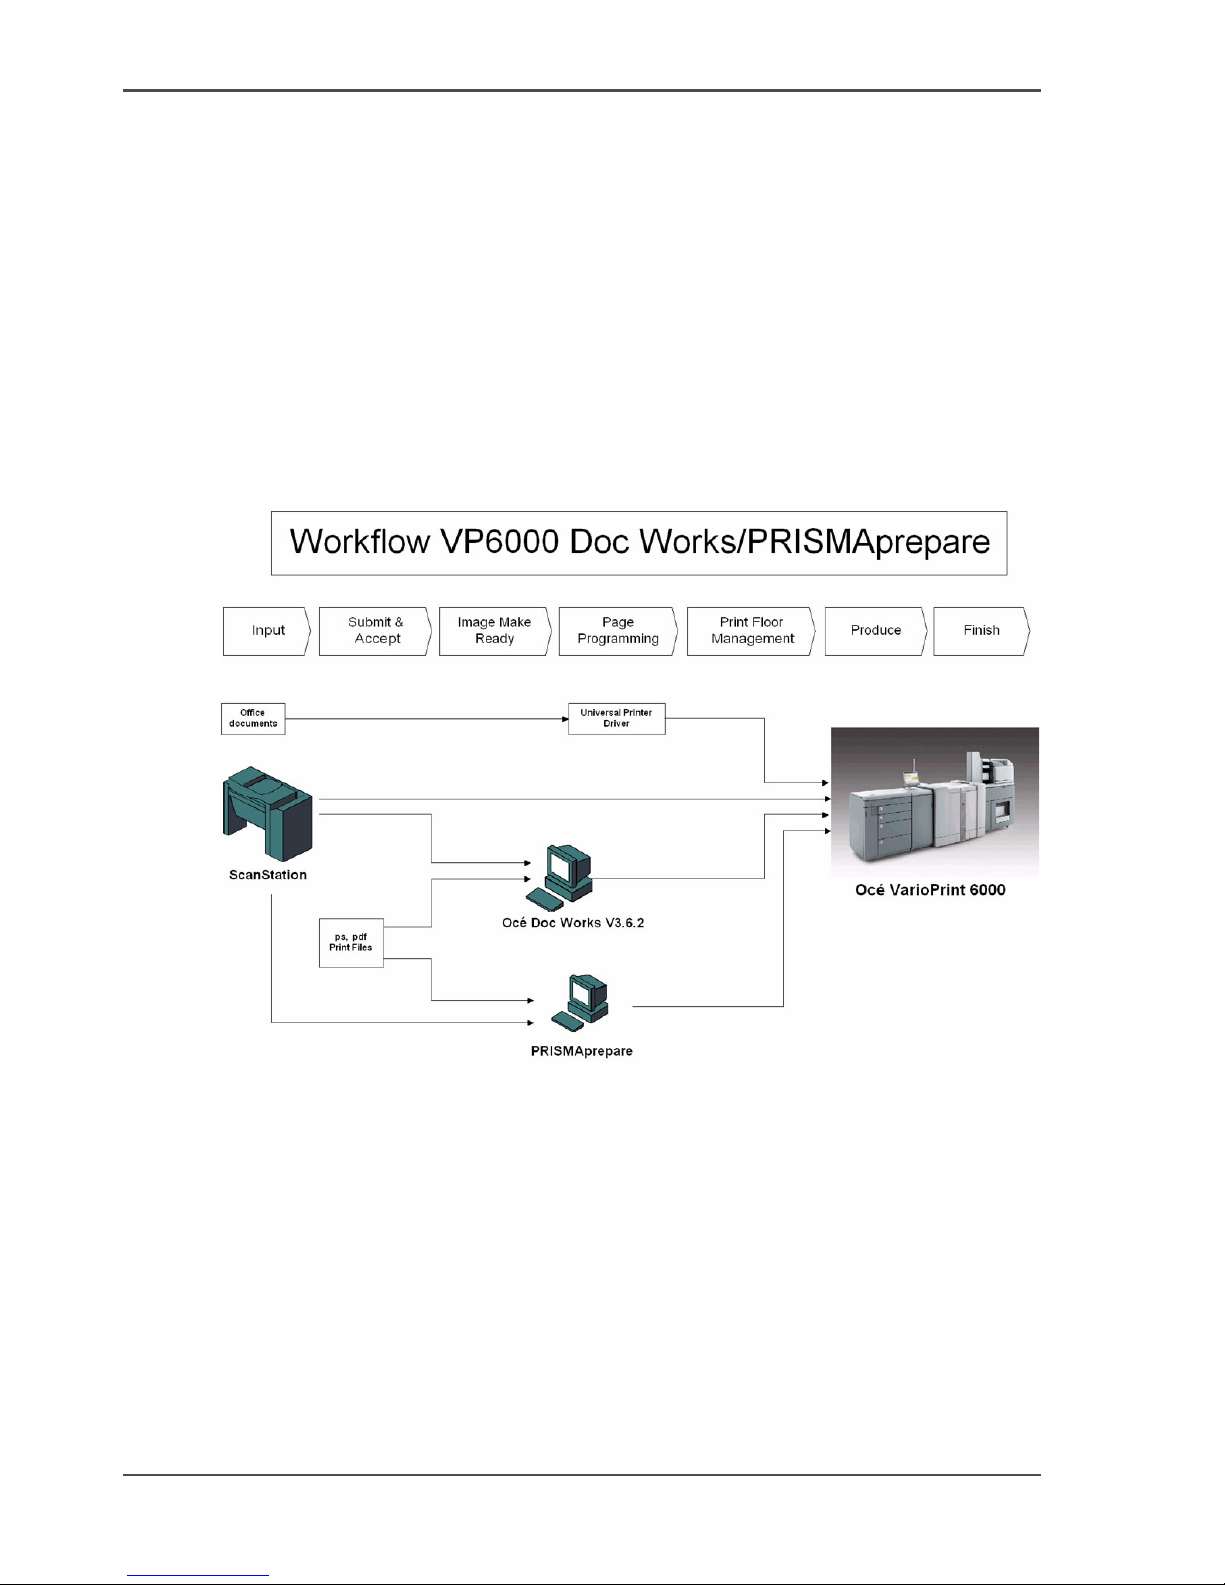
Example of a print shop environment
[1]
Page 11
11
Aim of this manual
Example of a printing plant environment
[2]
This manual describes possible workflows for general print environments with the
following components.
■ An Océ VarioPrint
®
6160/6200/6250
■ An Océ DS60 scanner
■ A networked scan server for scan-to-file data
■ Networked PCs with office applications and an installed Océ VarioPrint
®
6160/6200/6250 printer driver
■ Océ PRISMAproduction
®
+ PoD
■ Océ DocSetter
®
.
■ Océ Doc Works
®
■ Océ PRISMAprepare
®
Page 12
12 Chapter 1 Introduction
Aim of this manual
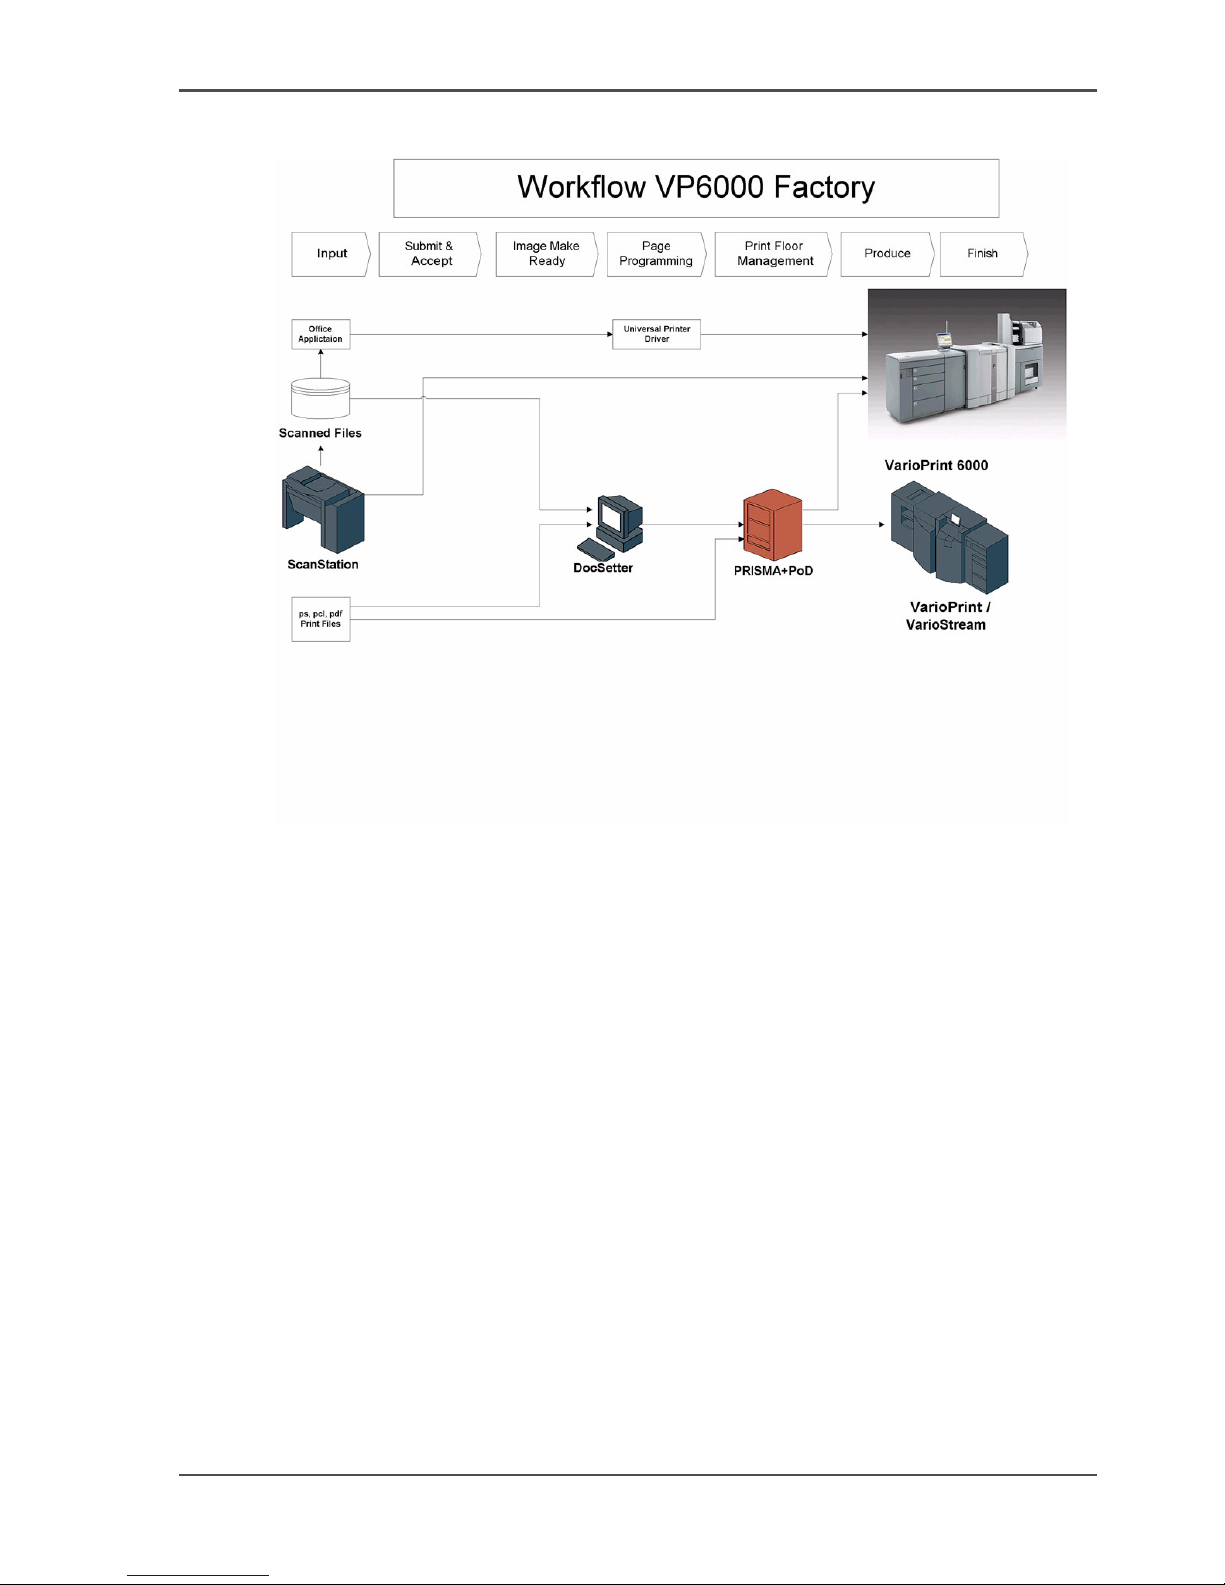
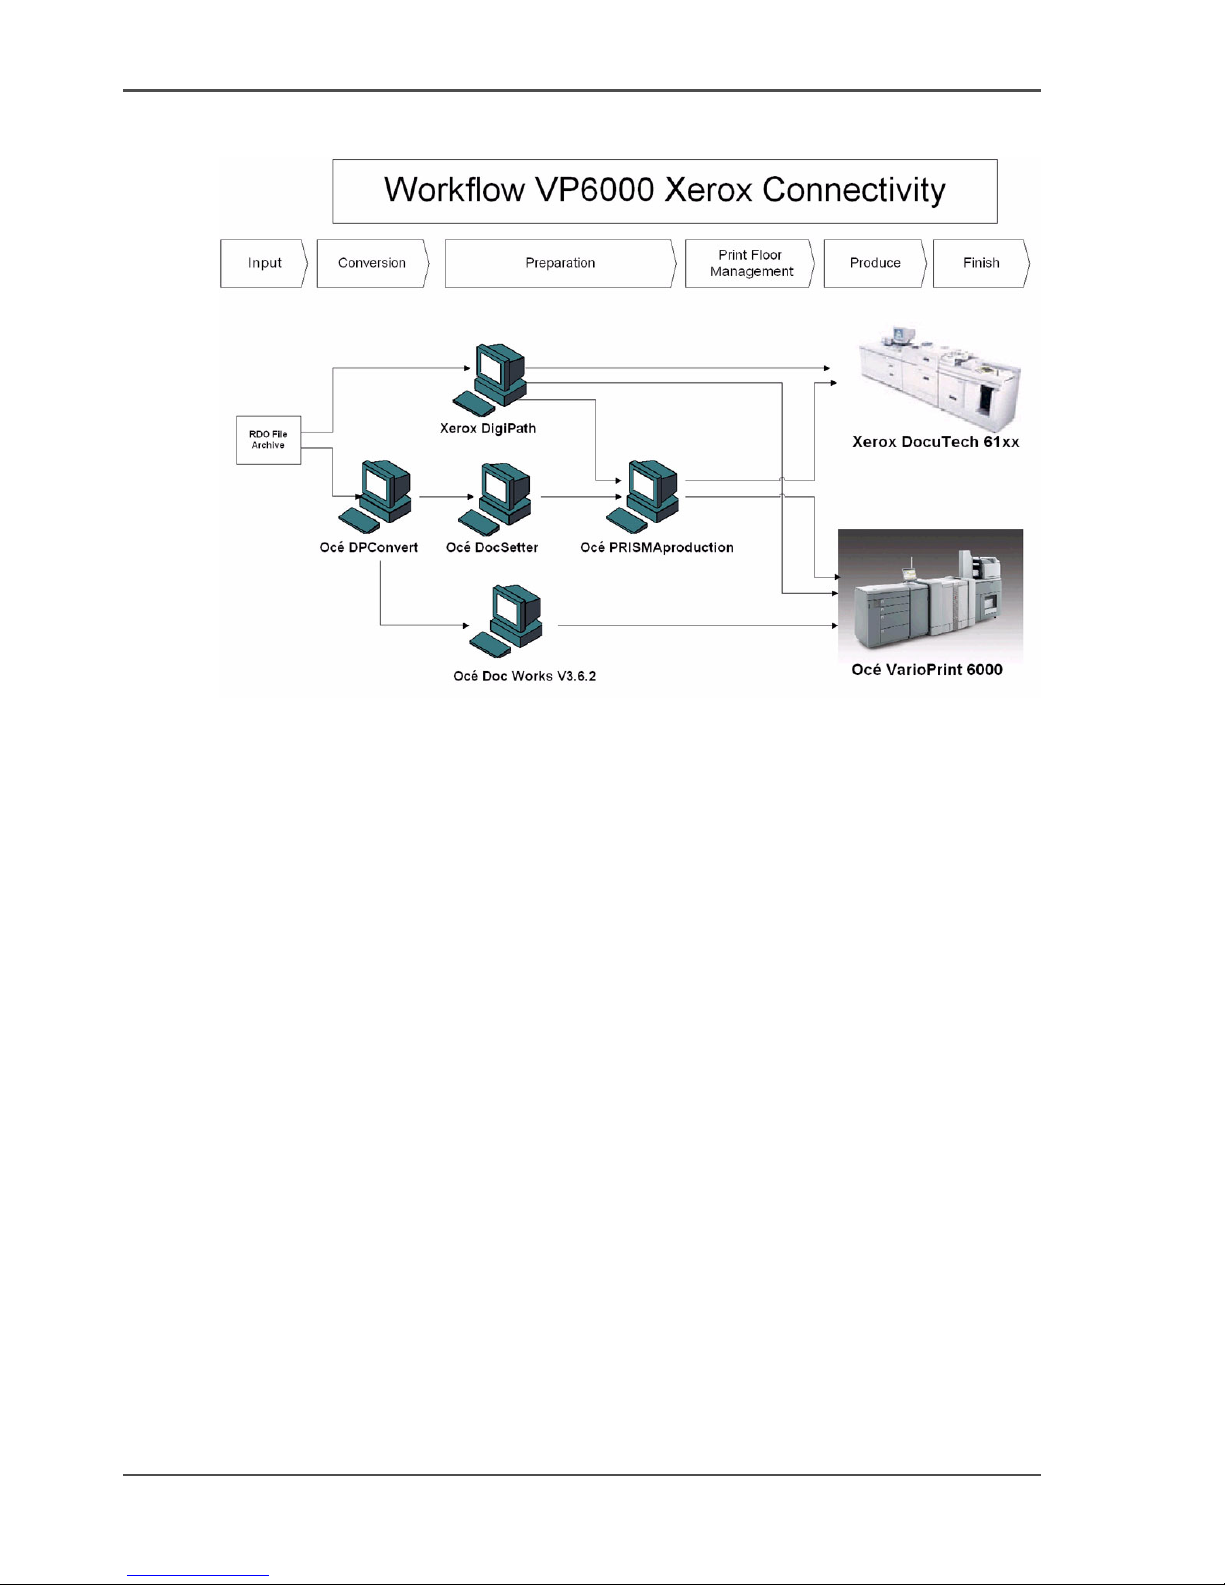
Example of a Xerox® environment
[3]
The manual also describes the possible workflows in Xerox® environments with the
following components.
■ An Océ VarioPrint
®
6160/6200/6250
■ Xerox
®
DigiPath®, FreeFlow™ and DocuTech™ system environments
■ Océ DPconvert
™
and Océ DocSetter
®
■ Océ PRISMAproduction
®
Page 13

13
Chapter 2
Prepare and print
Page 14

14 Chapter 2 Prepare and print
Use Océ Doc Works to print PDF files
Use Océ Doc Works 3.6.2
Use Océ Doc Works to print PDF files
Introduction
Océ Doc Works
®
V3.6.2 helps you to easily print PDF files on your Océ VarioPrint®
6160/6200/6250.
The following example describes the printing of an A4 job that has no special
options.
Before you begin
It is advised to use the user interface of the Océ Doc Works
®
operator console from
left to right:
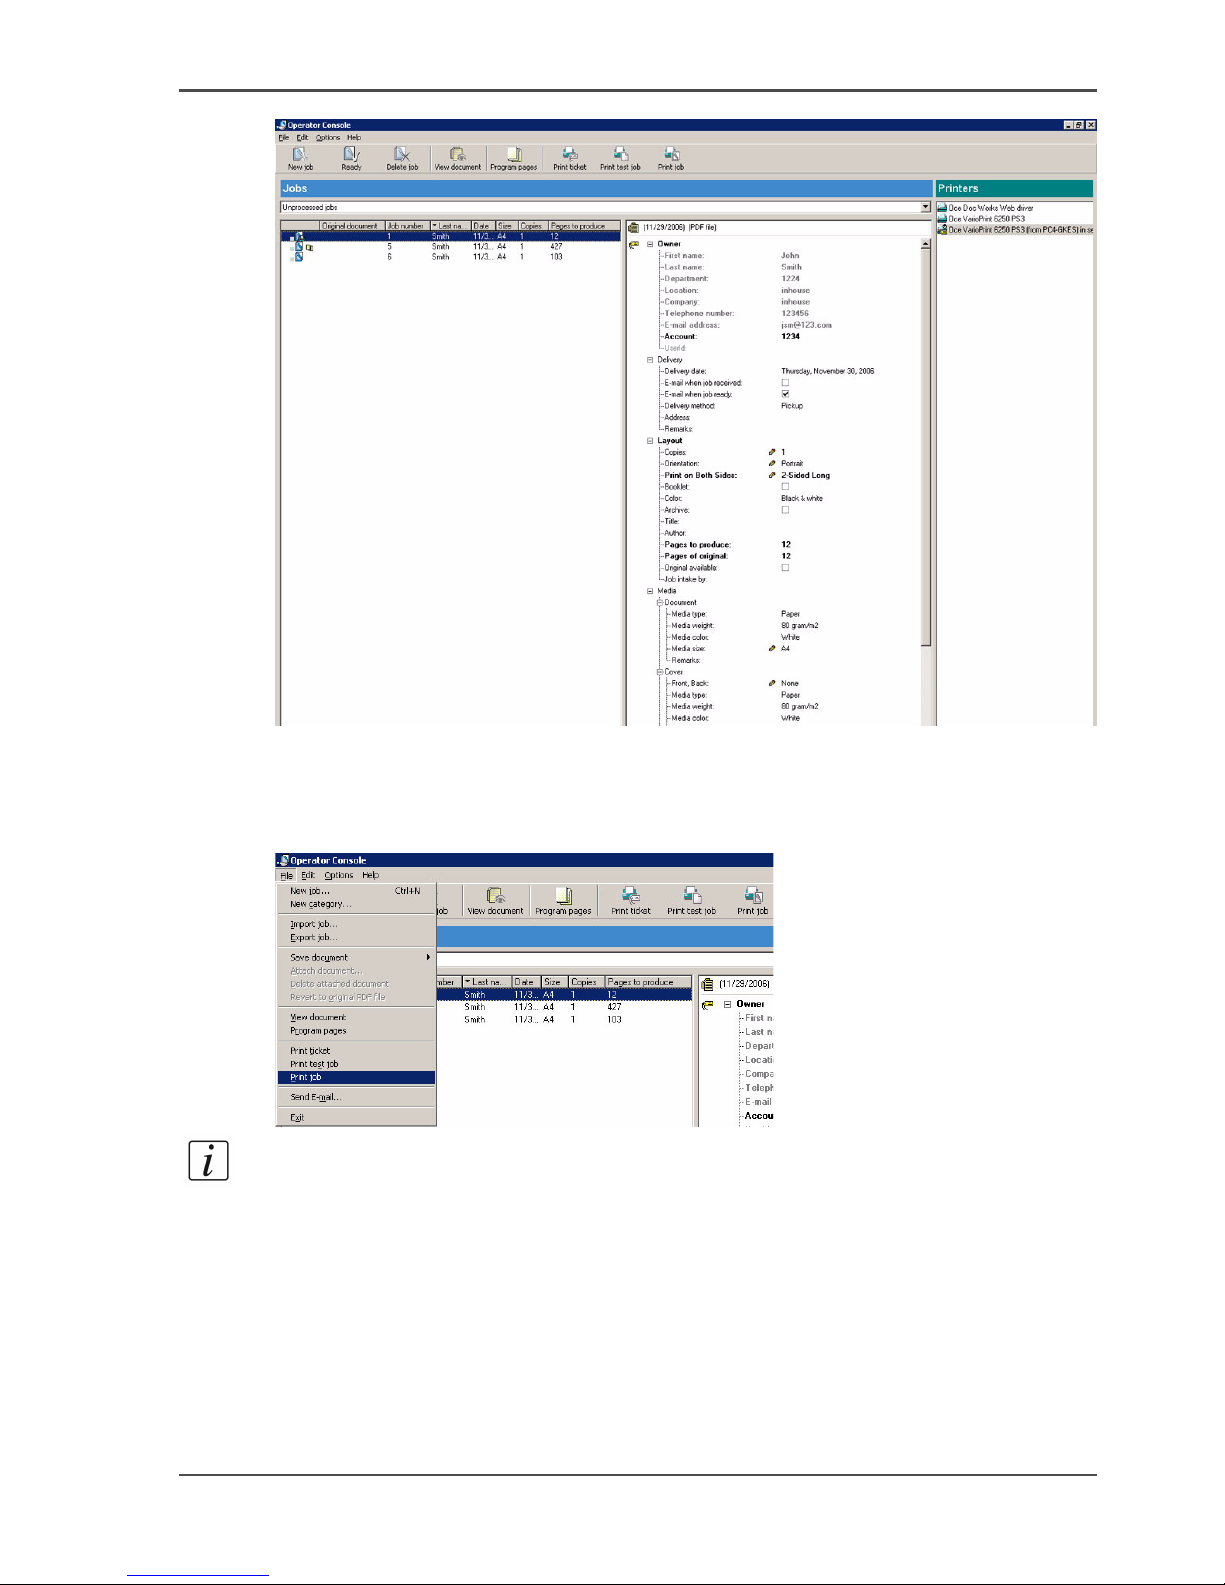
■ The left-hand column displays the received jobs.
■ The middle column displays the properties of the job ticket for each job. You
must click on a job to view the properties.
■ The right-hand column allows you to select the printer for the job.
Required tools
Océ VarioPrint
®
6160/6200/6250
Océ Doc Works
®
V3.6.2
PDF print file in the job queue (without special options )
Print a received job from the operator console
1. Click on the job that you want to print.
Page 15
15
Use Océ Doc Works to print PDF files
[1]
2. Check in the job ticket whether special page programming and/or other options are
required. In this example, this is not required.
3. Select your printer.
4. Select 'File' -> 'Print job'.
[2]
Note: The settings in the job ticket where you see the pencil symbol are
automatically transferred to the print dialog.
5. Click 'OK'
Page 16
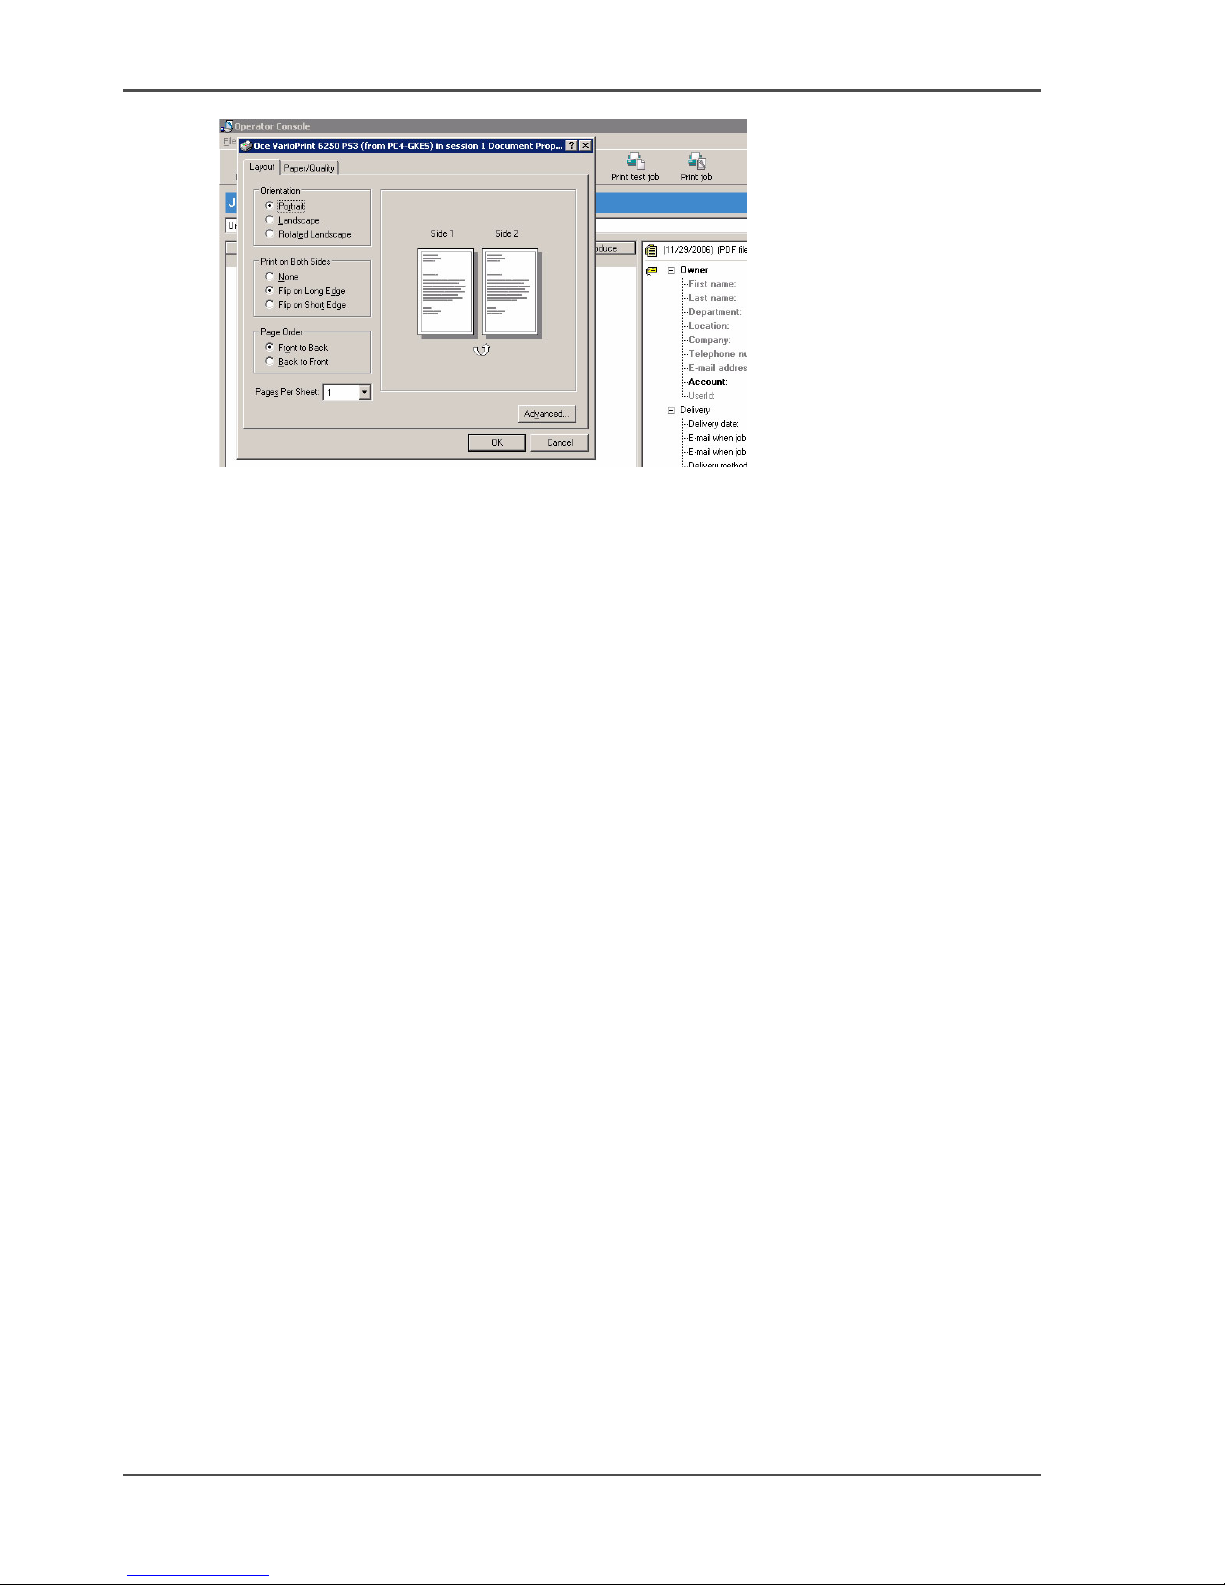
16 Chapter 2 Prepare and print
Use Océ Doc Works to print PDF files
[3]
6. Print the job on your Océ printer.
Page 17

17
Use Océ Doc Works for tab printing
Use Océ Doc Works for tab printing
Introduction
The job ticket of a received job, as displayed in the operator console of Océ Doc
Work s® V3.6.2, indicates whether page programming, for example tab printing, is
required.
The following steps describe the procedure of page programming for tab printing.
■ Define the tab paper.
■ Insert the tab media at the appropriate position in the print file.
■ Define the tab captions.
■ Print the job.
Required tools
Océ VarioPrint
®
6160/6200/6250
Océ Doc Works
®
V3.6.2
Print job with job ticket
Define the tab paper.
1. Select a job.
2. Open the page programmer with 'Program pages'.
Page 18
18 Chapter 2 Prepare and print
Use Océ Doc Works for tab printing
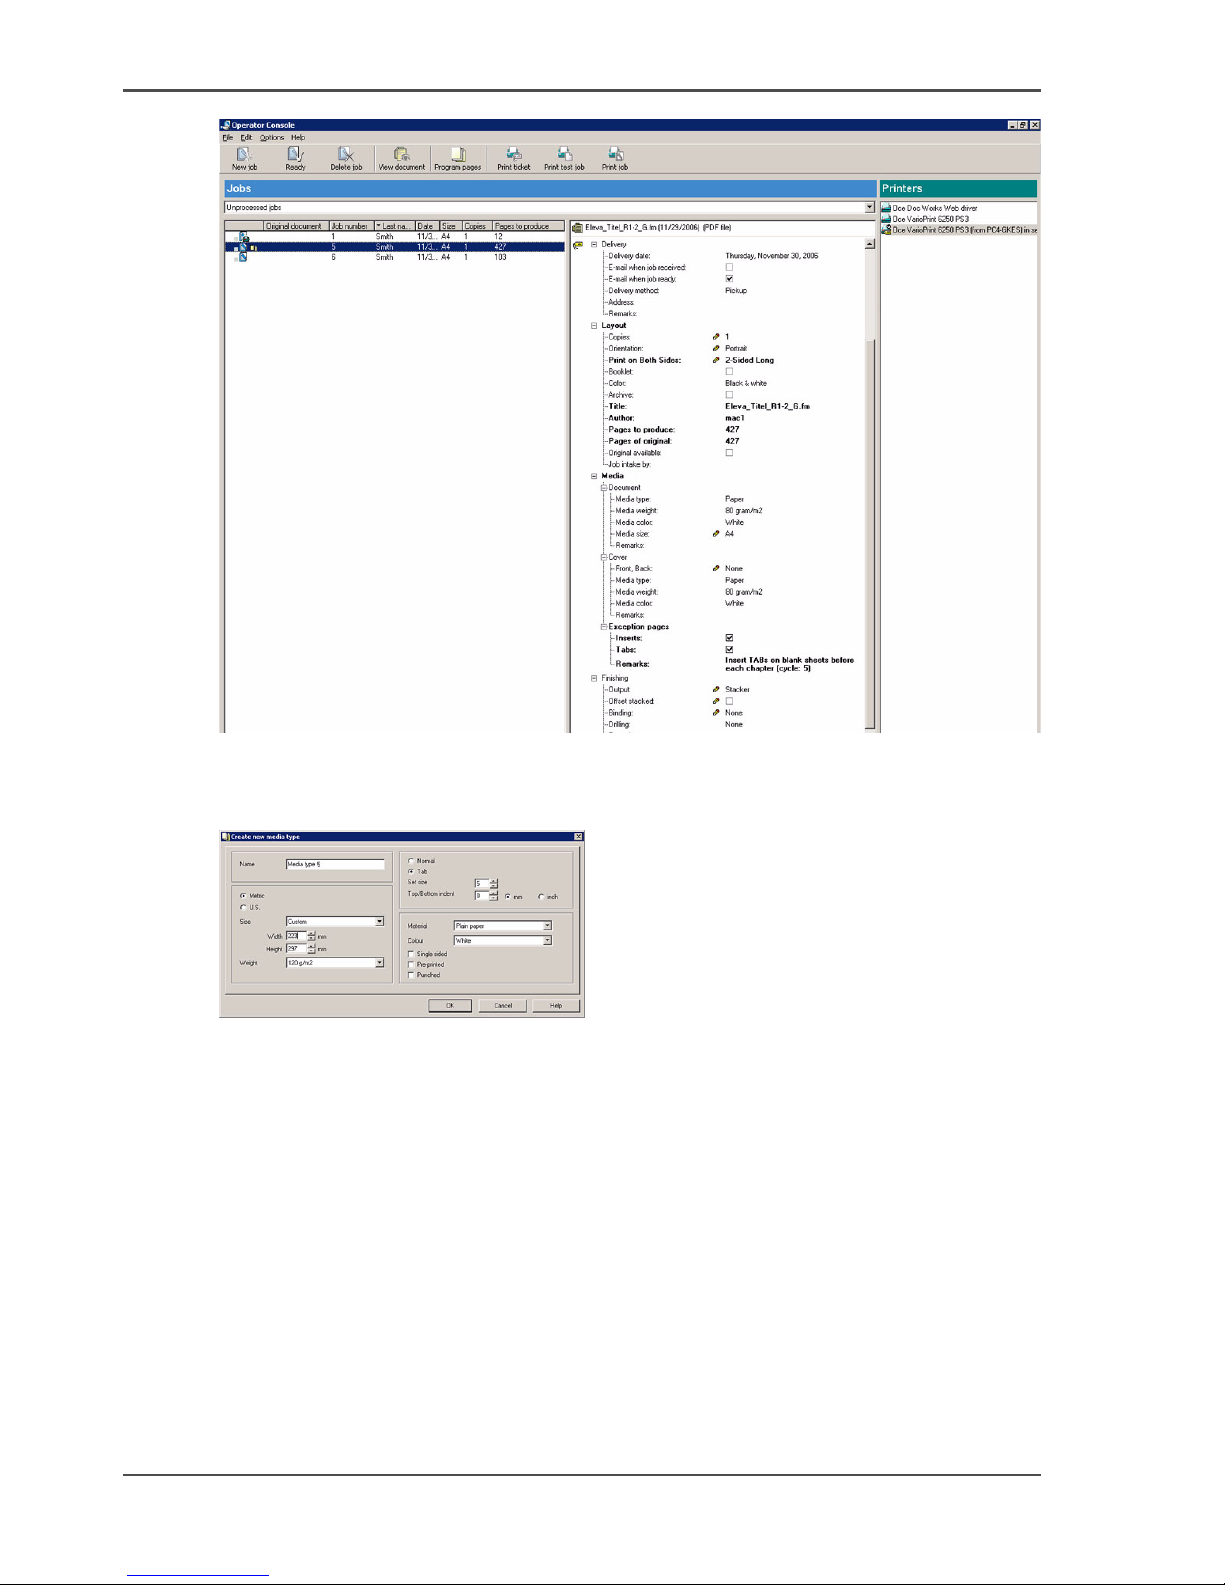
[4]
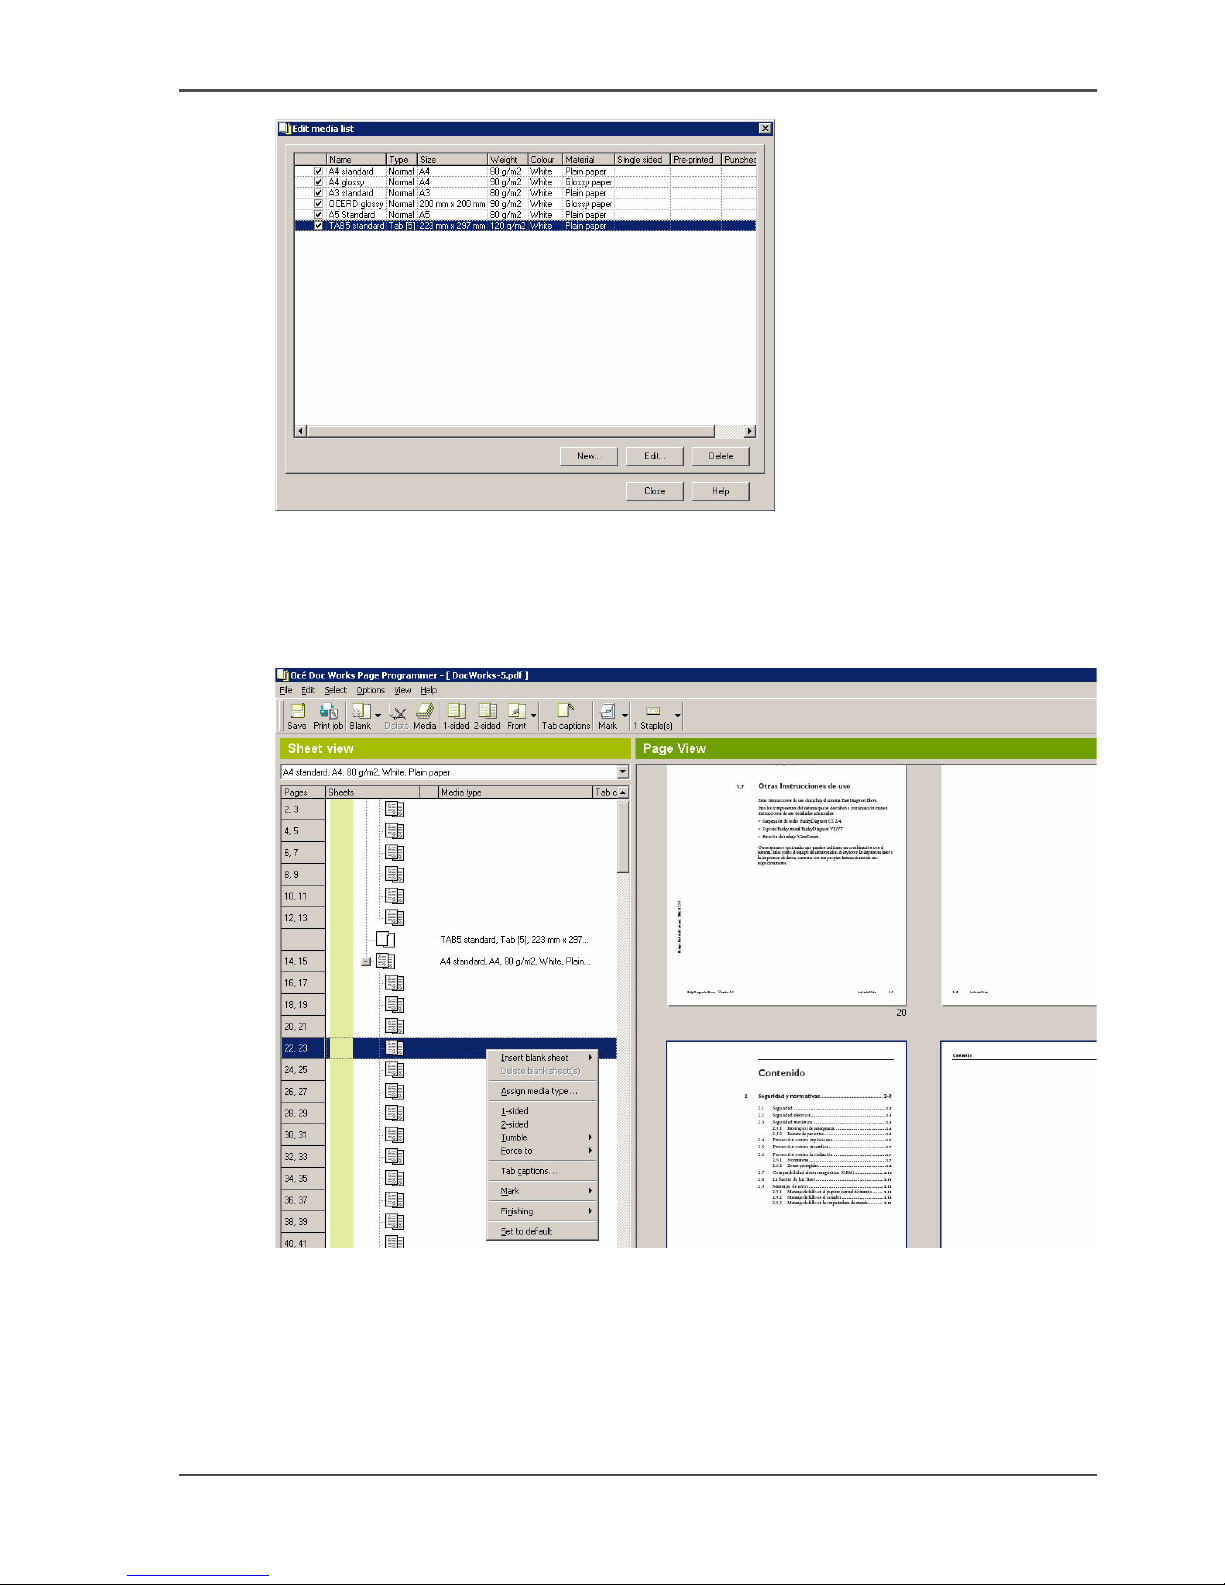
3. In the page programmer window choose the button 'Media'.
4. In the pop-up window choose 'New'.
5. Enter the tab properties in the next pop-up window.
[5]
6. Click 'OK' to store.
Page 19
19
Use Océ Doc Works for tab printing
[6]
7. Click 'Close'.
Insert tab media in the print file
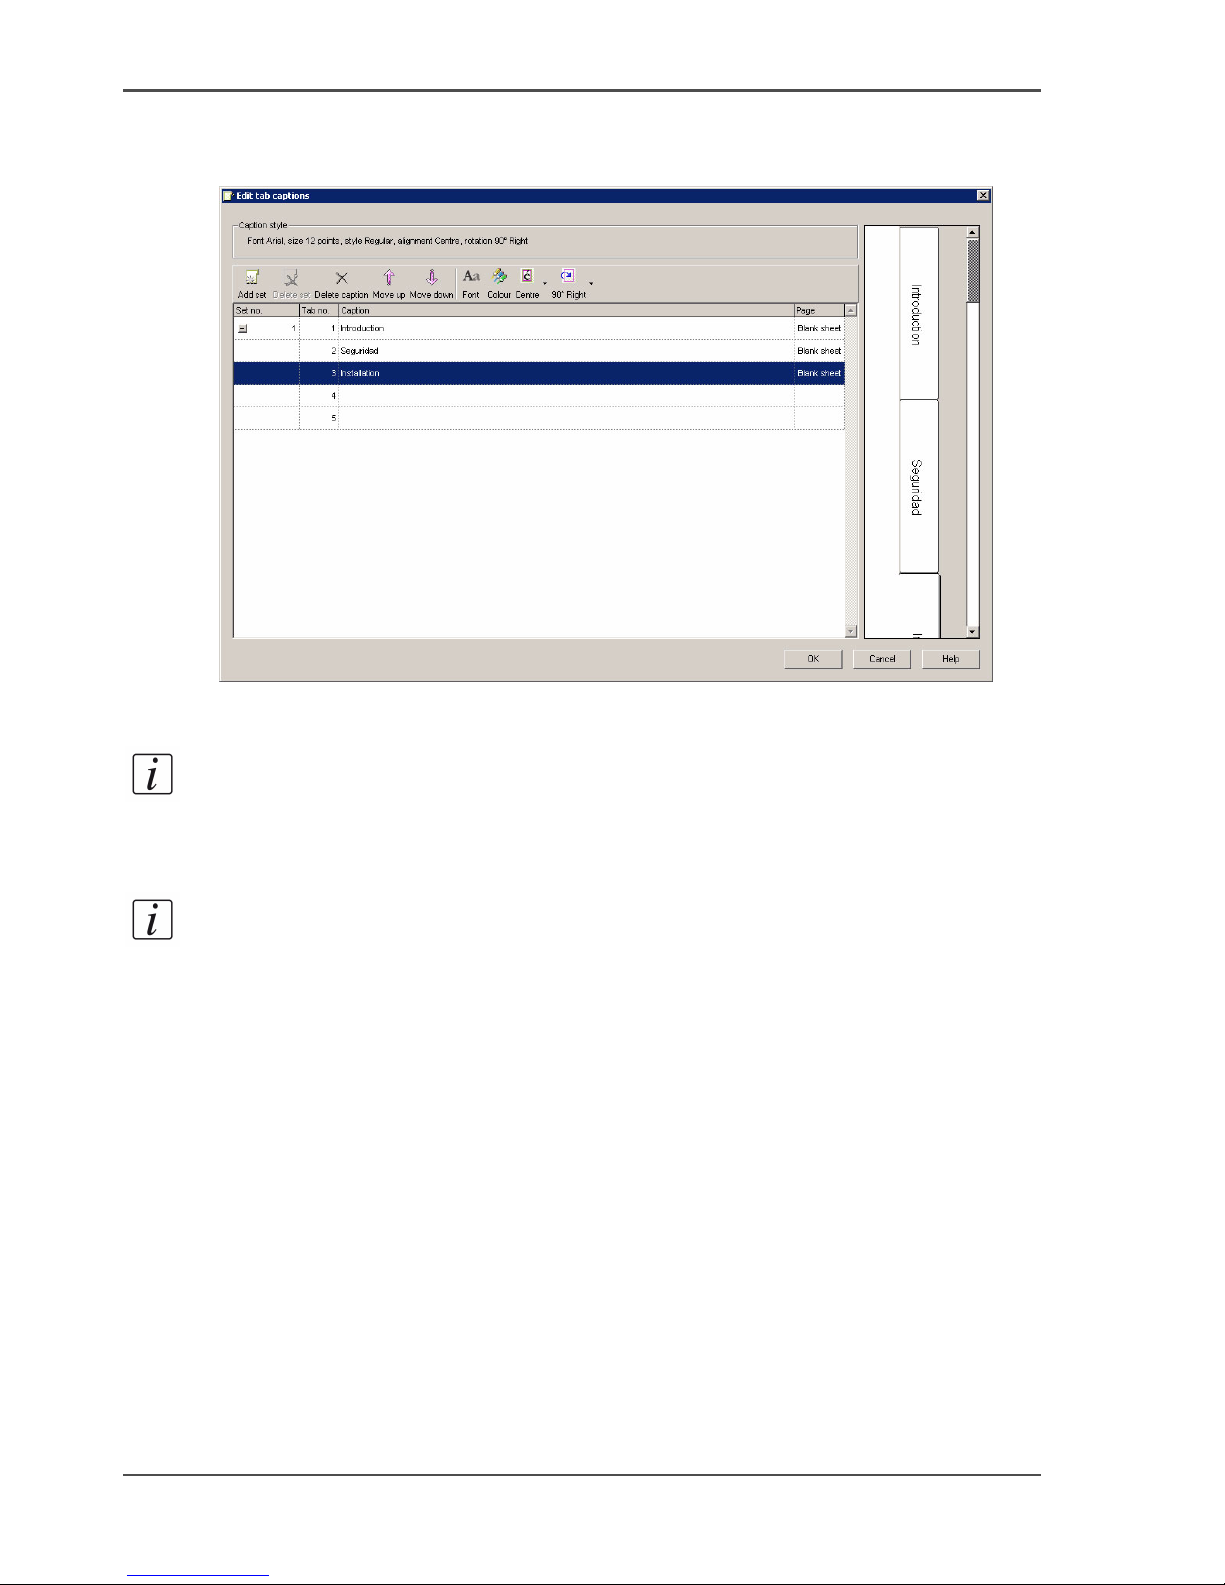
1. Right-click the first page of each chapter and select 'Insert blank sheet'.
[7]
2. Right-click on each blank sheet.
3. Select 'Assign media type...'.
4. Assign the respective tab media.
5. Click 'Apply' to confirm.
Page 20
20 Chapter 2 Prepare and print
Use Océ Doc Works for tab printing
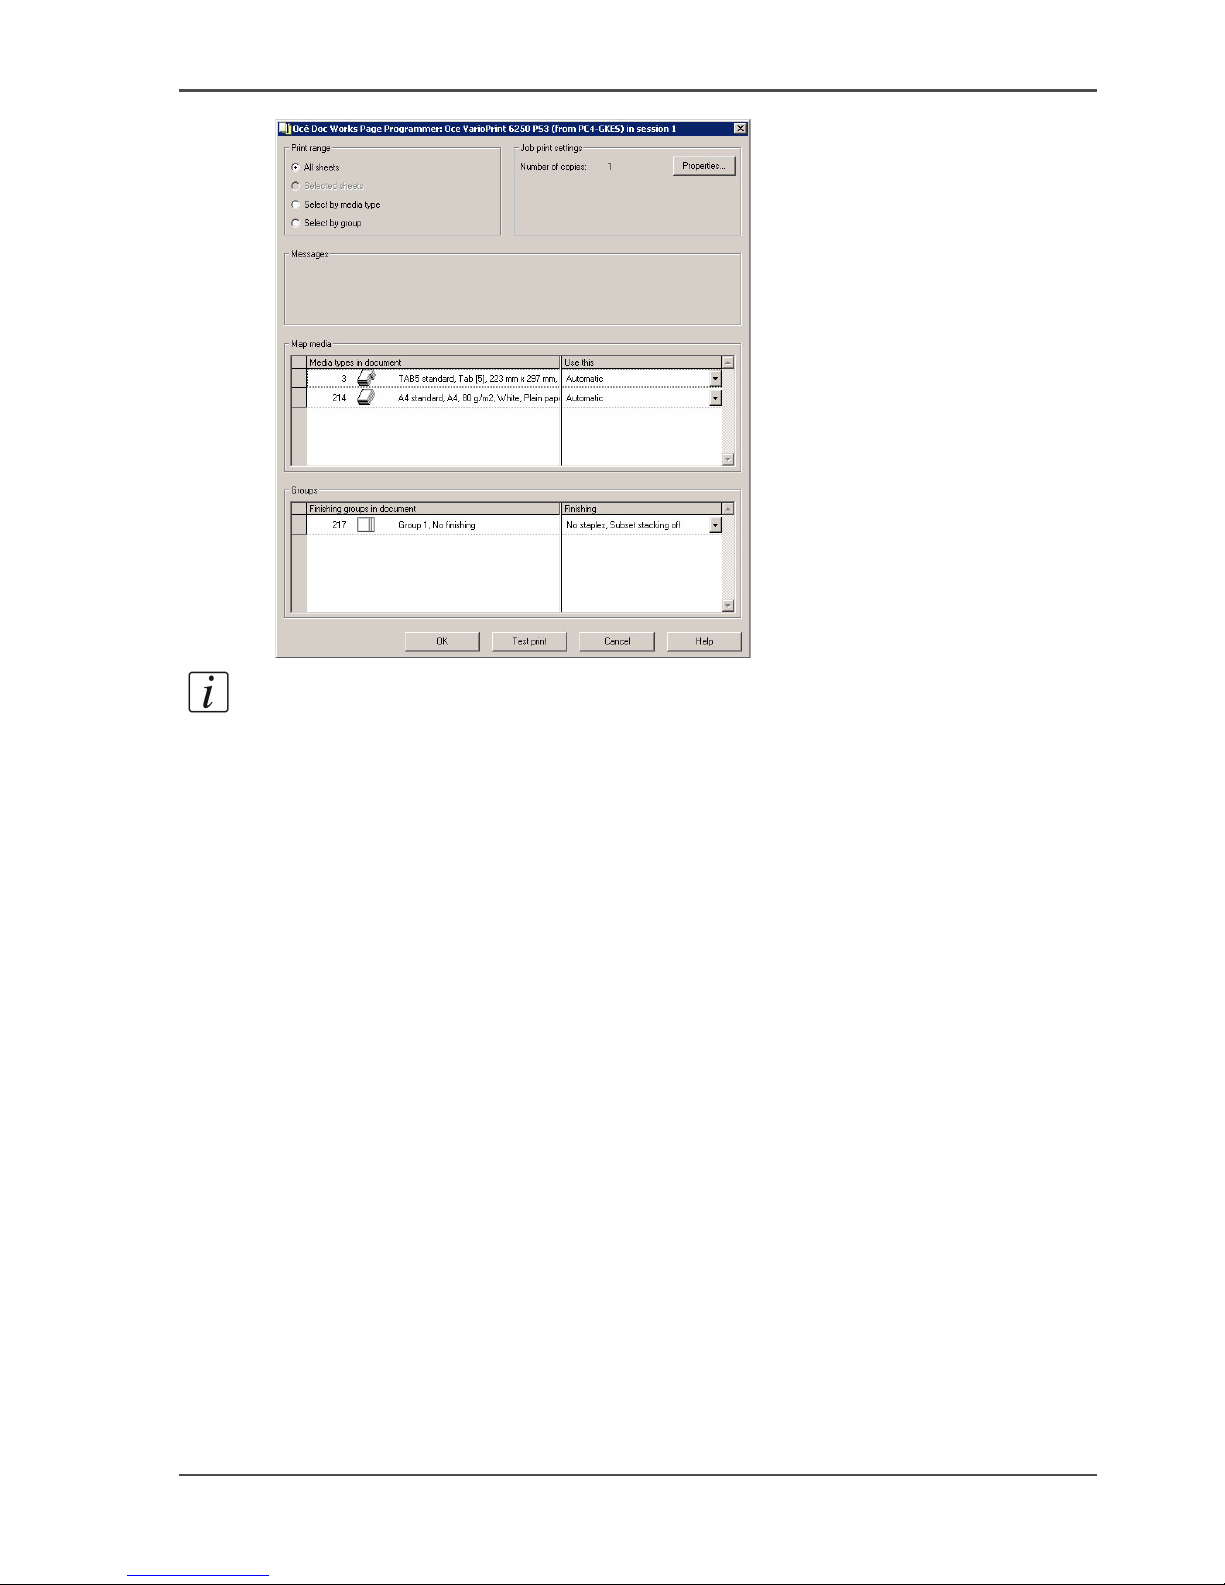
Define the tab captions.
1. Right-click the first tab sheet and select 'Tab captions'.
[8]
2. Enter the text and define the properties.
3. Click 'OK' to confirm.
Note: When you define more tabs than the number of tabs in a tab set, you will
automatically get the appropriate number of tab sets.
4. Close the page programmer and save the changes when prompted.
Note: When you use Océ Doc Works
®
V3.6.2, you can only print the tabs 1-sided.
Even when the printer can print the tabs 2-sided.
Print the job.
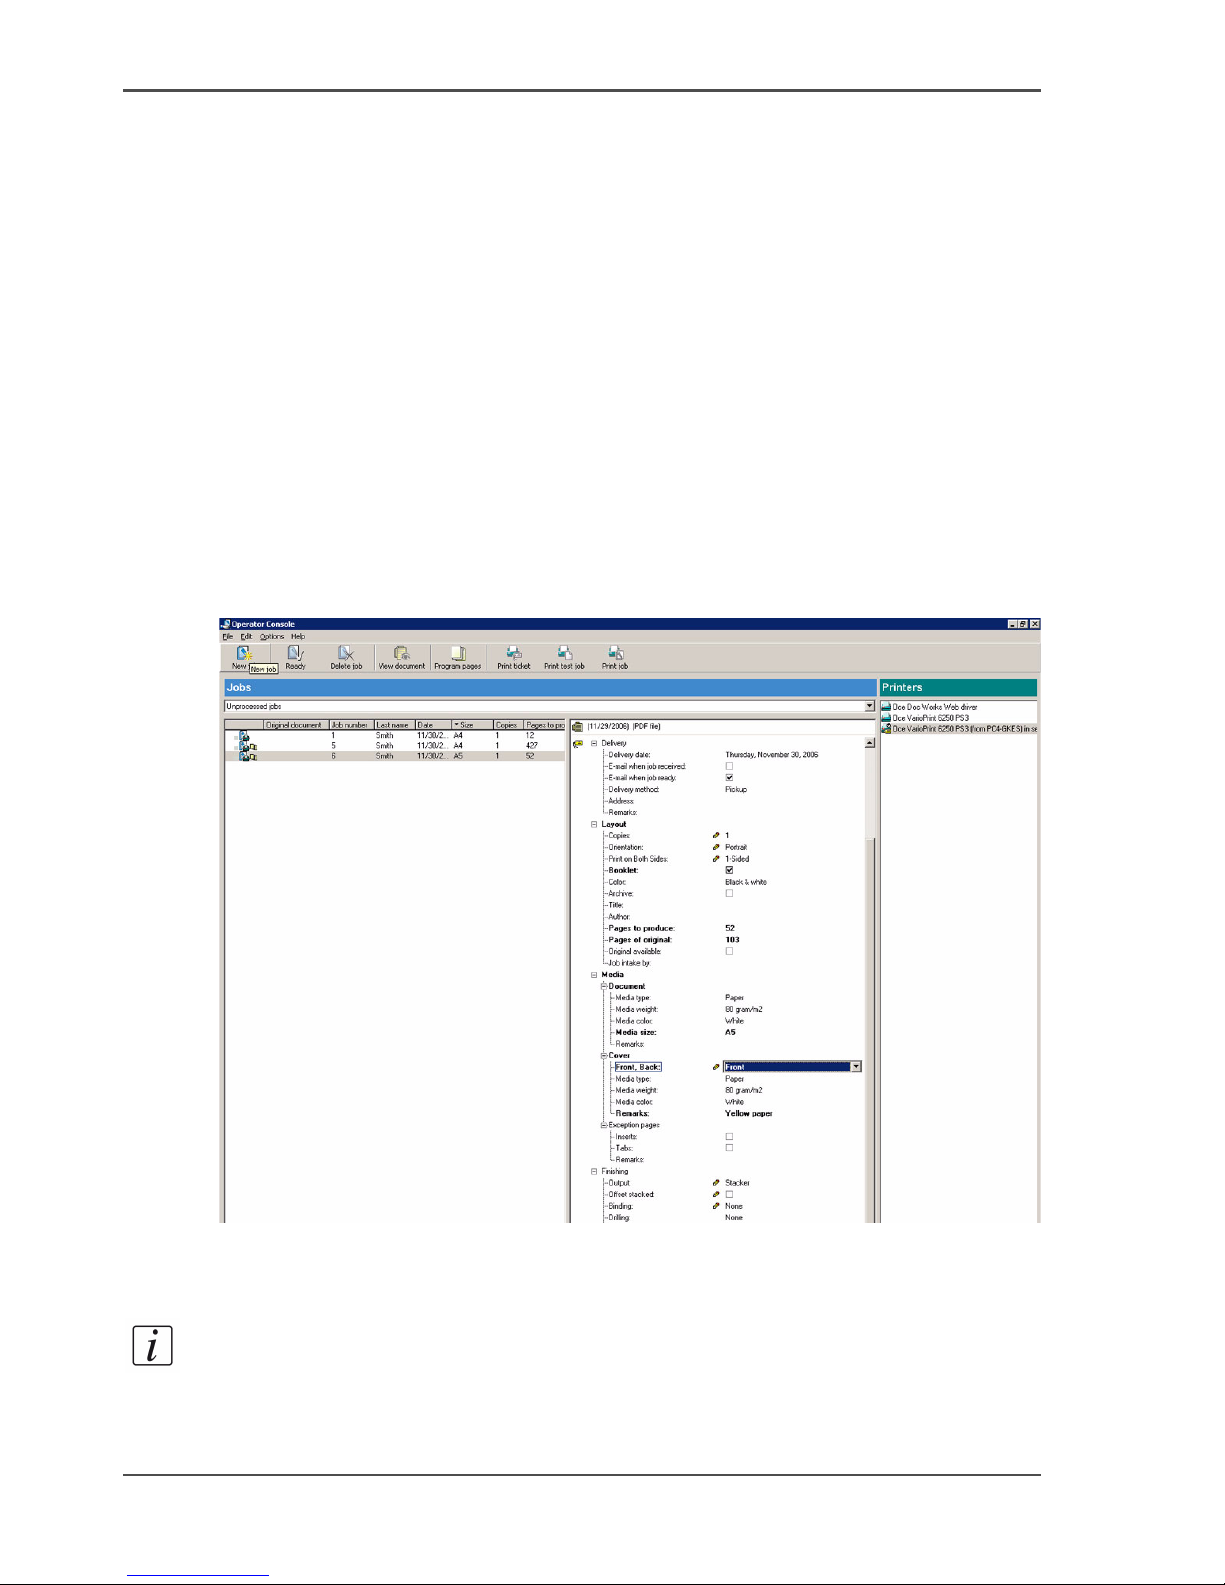
1. Select your printer.
2. Quit the page programmer and choose 'Print job' in the operator window.
3. Click 'OK'.
Page 21
21
Use Océ Doc Works for tab printing
[9]
Note: This print dialog is more detailed than "simple" printing. This is because you
used the page programmer.
4. Print the job on your Océ VarioPrint
®
6160/6200/6250 printer.
Page 22
22 Chapter 2 Prepare and print
Use Océ Doc Works to create booklets
Use Océ Doc Works to create booklets
Introduction
The job ticket of a received job, as displayed in the operator console of Océ Doc
Work s® V3.6.2, indicates whether page programming or booklet printing is required.
The following steps describe the procedure of page programming for booklet
printing.
■ Create the page order and media size via Adobe Acrobat
®
plug-in.
■ Define additional page programming and/or finishing options via the page
programmer.
■ Print the job.
In the following example, an A5 document must be printed as a booklet on A4
media. The cover must be printed on yellow media.
[10]
Before you begin
Note: Océ Doc Works
®
V3.6.2 uses a plug-in for Adobe Acrobat® to put the pages
in the correct printing order. Therefore, you must first use Adobe Acrobat
®
and then
the page programmer.
Page 23
23
Use Océ Doc Works to create booklets
Required tools
Océ VarioPrint
®
6160/6200/6250
Océ Doc Works
®
V3.6.2
Print job with job ticket
Create the page order and media size with Adobe Acrobat
®
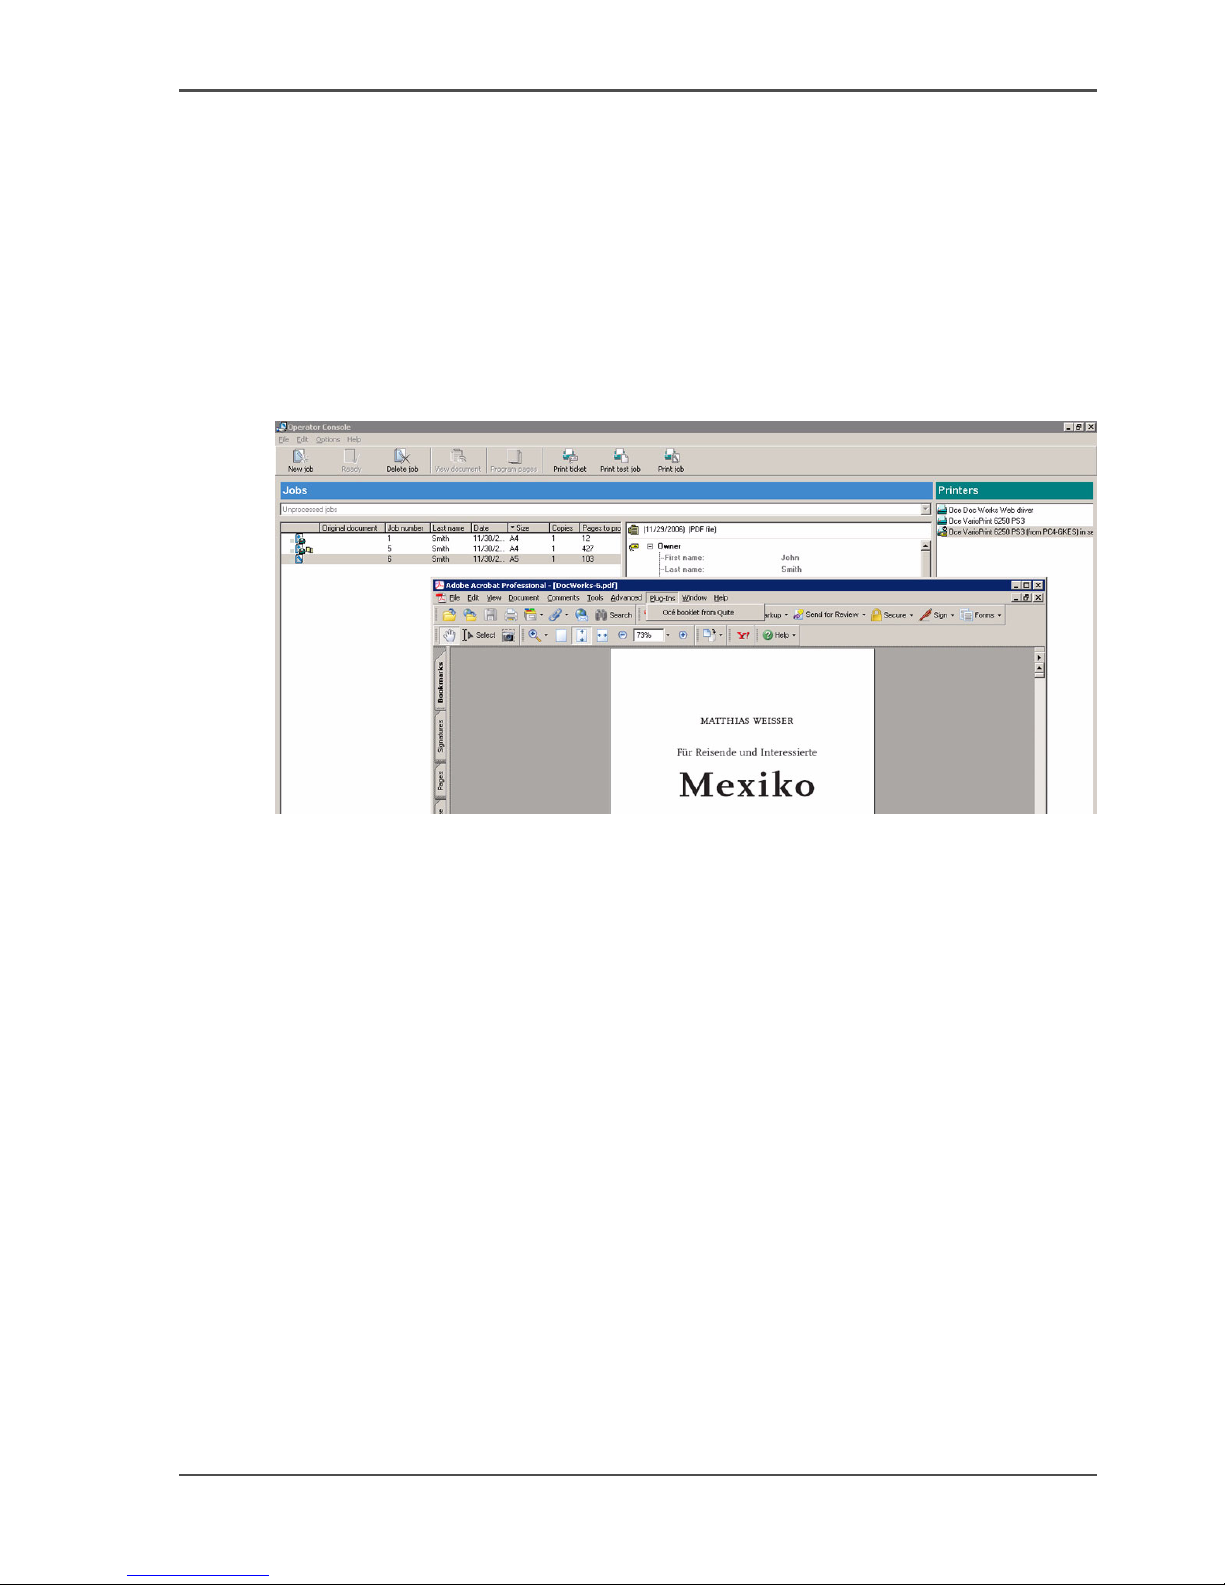
1. From the Océ Doc Works
®
operator console, select 'View document' and start
therewith Adobe Acrobat
®
.
2. Select 'Plug-Ins' --> 'Océ booklet from Quite'.
[11]
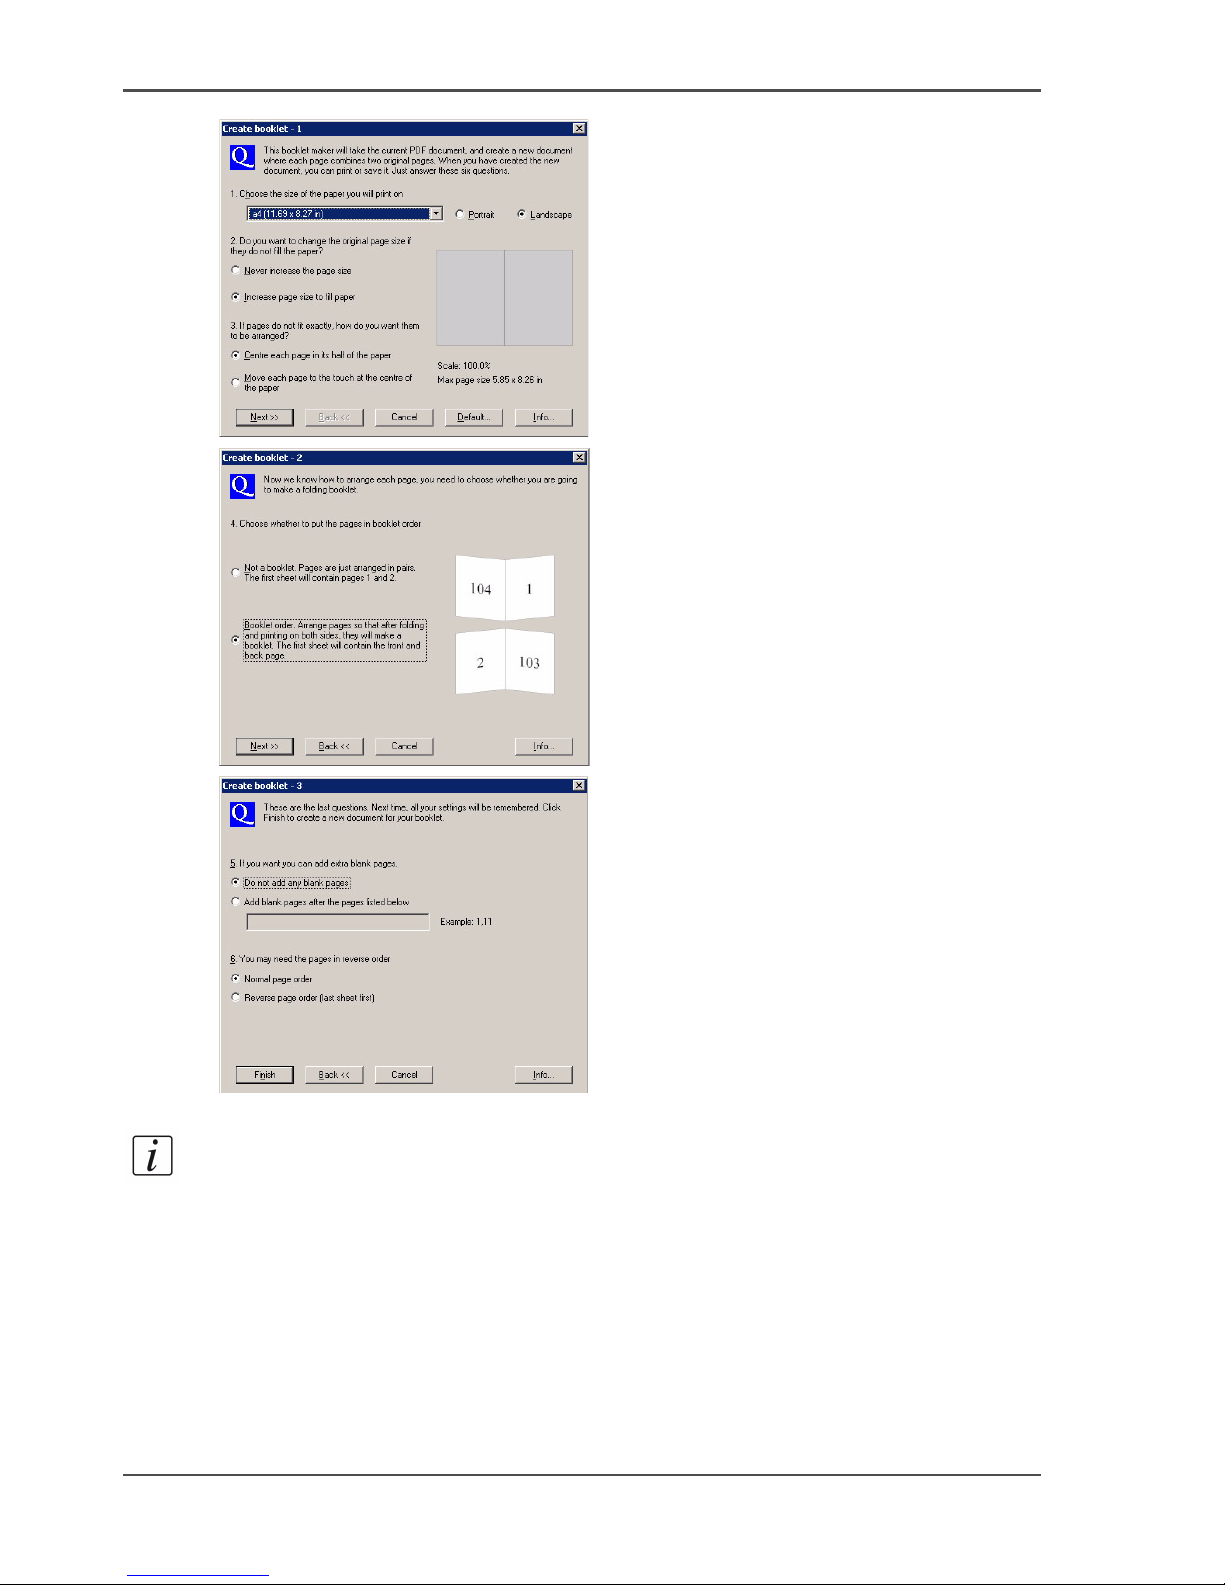
3. Select the required properties in the next 3 pop-up windows.
Page 24
24 Chapter 2 Prepare and print
Use Océ Doc Works to create booklets
[12]
[13]
[14]
4. Close Adobe Acrobat
®
and attach the new document to the job.
Note: You will see that the media size and the number of pages have changed.
Do the additional page programming via the page programmer
1. Use 'Program pages' to select the page programmer.
2. Select the first 2 pages, then select 'Assign media type...'.
3. Select 'A4 yellow' and apply.
Page 25
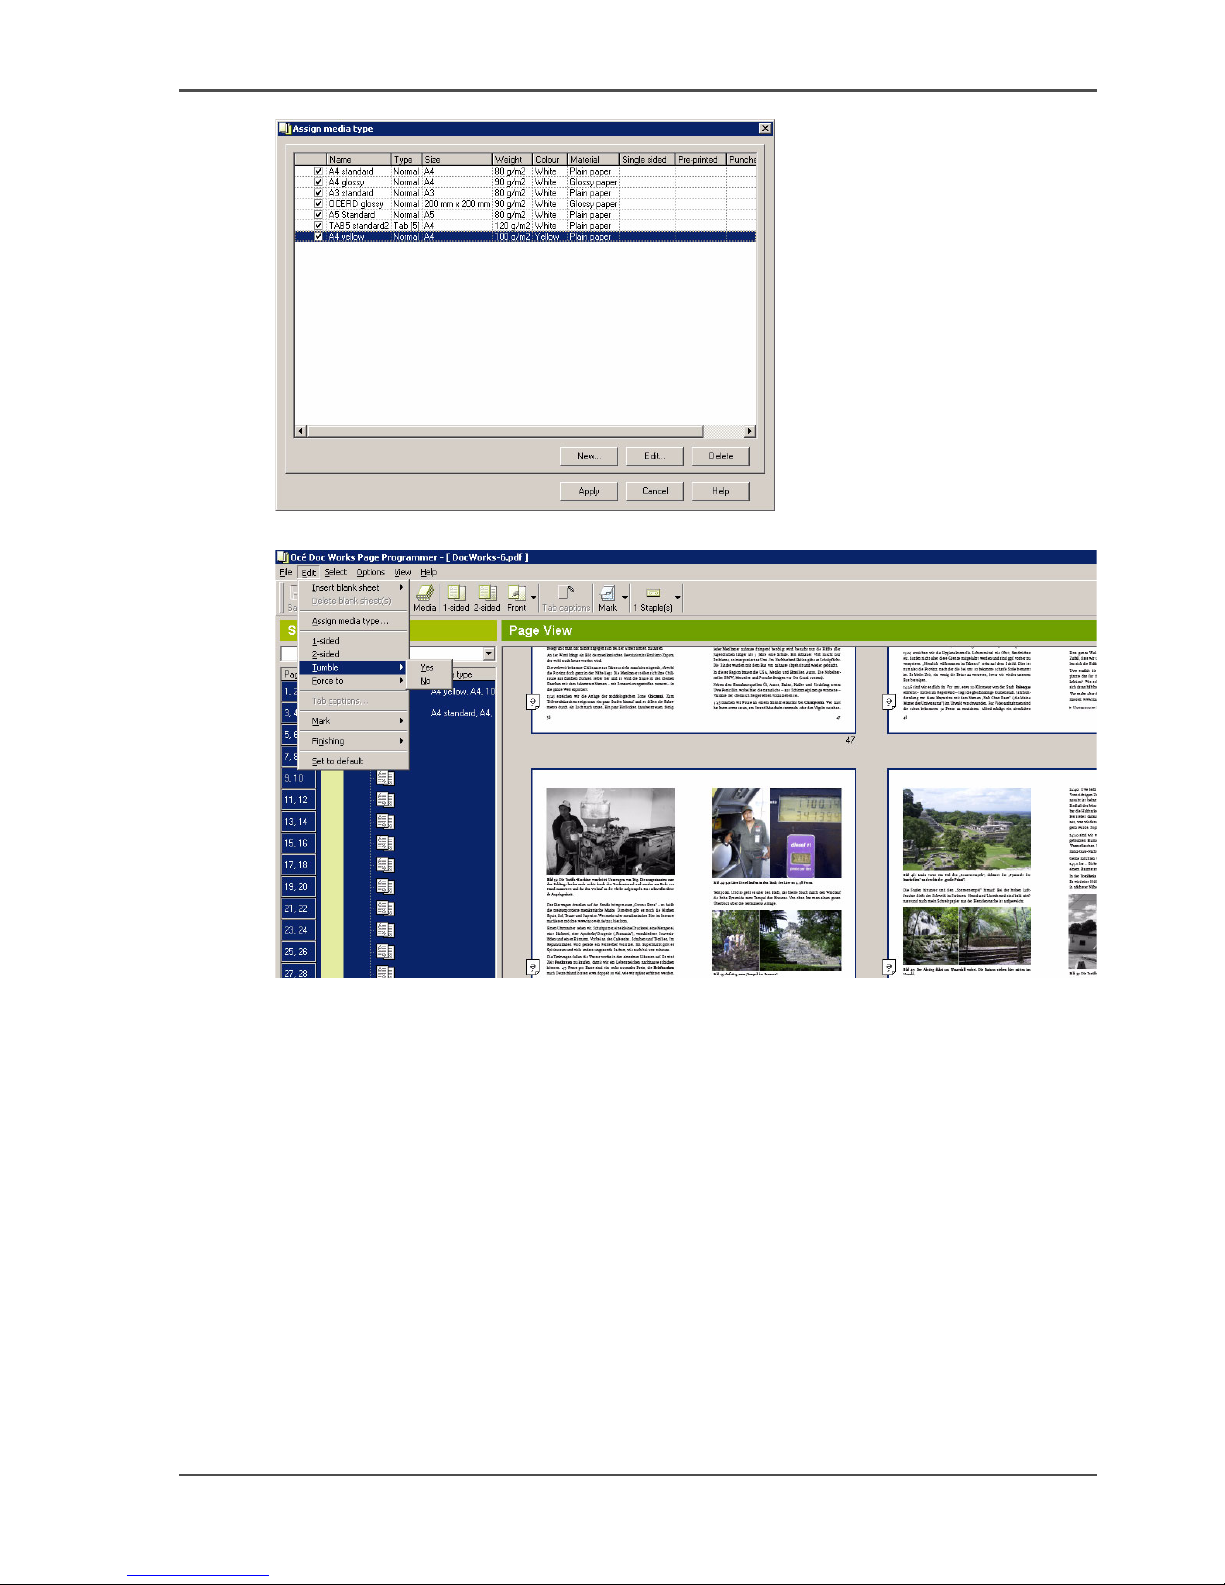
25
Use Océ Doc Works to create booklets
[15]
4. Activate the 'Tumble' function.
[16]
5. Close the page programmer and store the changes.
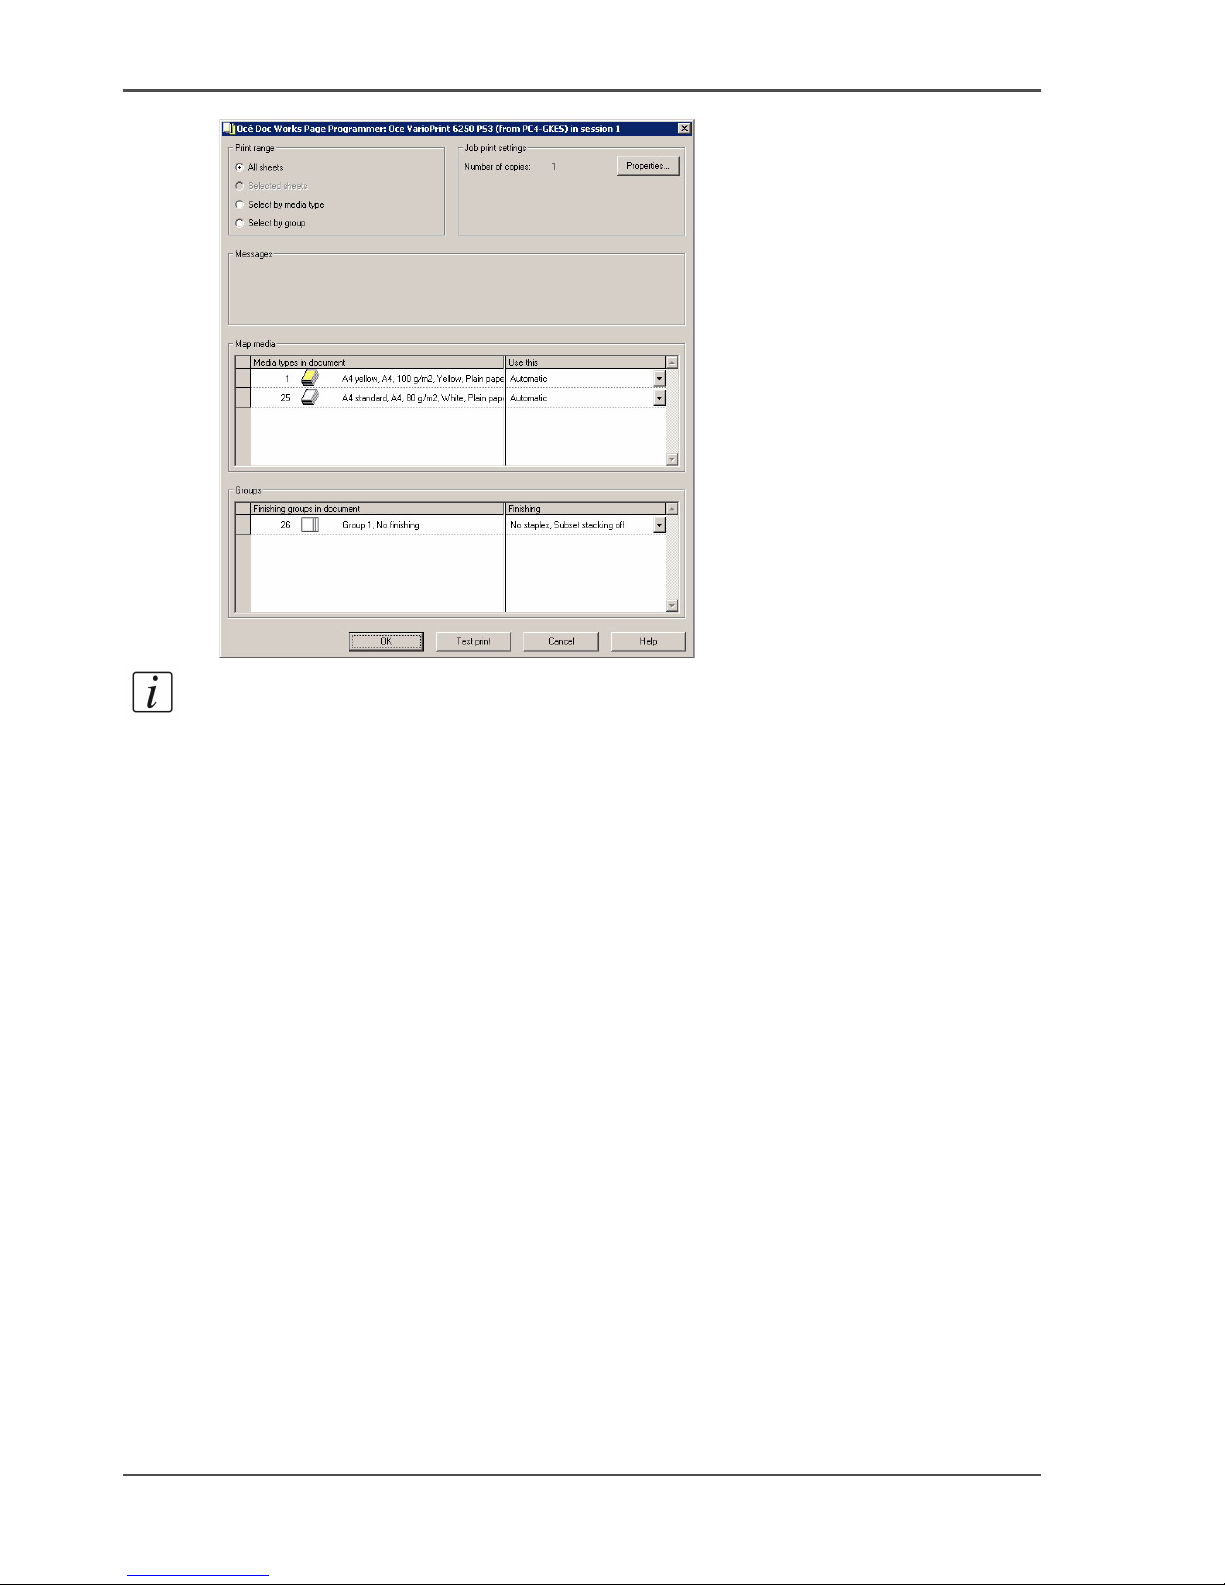
Print the job
1. Right-click the job and select 'Print job'.
2. Click 'OK'.
Page 26
26 Chapter 2 Prepare and print
Use Océ Doc Works to create booklets
[17]
Note: This print dialog is more detailed than "simple" printing. This is because you
used the page programmer.
3. Print the job on your Océ VarioPrint
®
6160/6200/6250 printer.
Page 27

27
Use Océ PRISMAprepare to collect, modify, and print documents
Use Océ PRISMAprepare
Use Océ PRISMAprepare to collect, modify, and print
documents
Introduction
You can use Océ PRISMAprepare
®
to do the following.
■ Collect various PDF documents
■ Modify the documents
■ Merge the documents into a new file.
These documents can be of different origins and types, for example electronically
produced texts, bitmapped documents, or scanned documents.
This requires 2 basic steps:
1. Open a document and define the document as a section.
2. Insert the next sections at the correct position.
The following example shows how different files, for example representing chapters
of a document, are combined into 1 print file.
Required tools
Océ VarioPrint
®
6160/6200/6250
Océ PRISMAprepare
®
V4.02
PDF files, each file representing a chapter of a document.
Open a file that must be merged with other documents
1. Use 'File' --> 'Open' to select the file or first chapter.
2. Select all pages of the opened document.
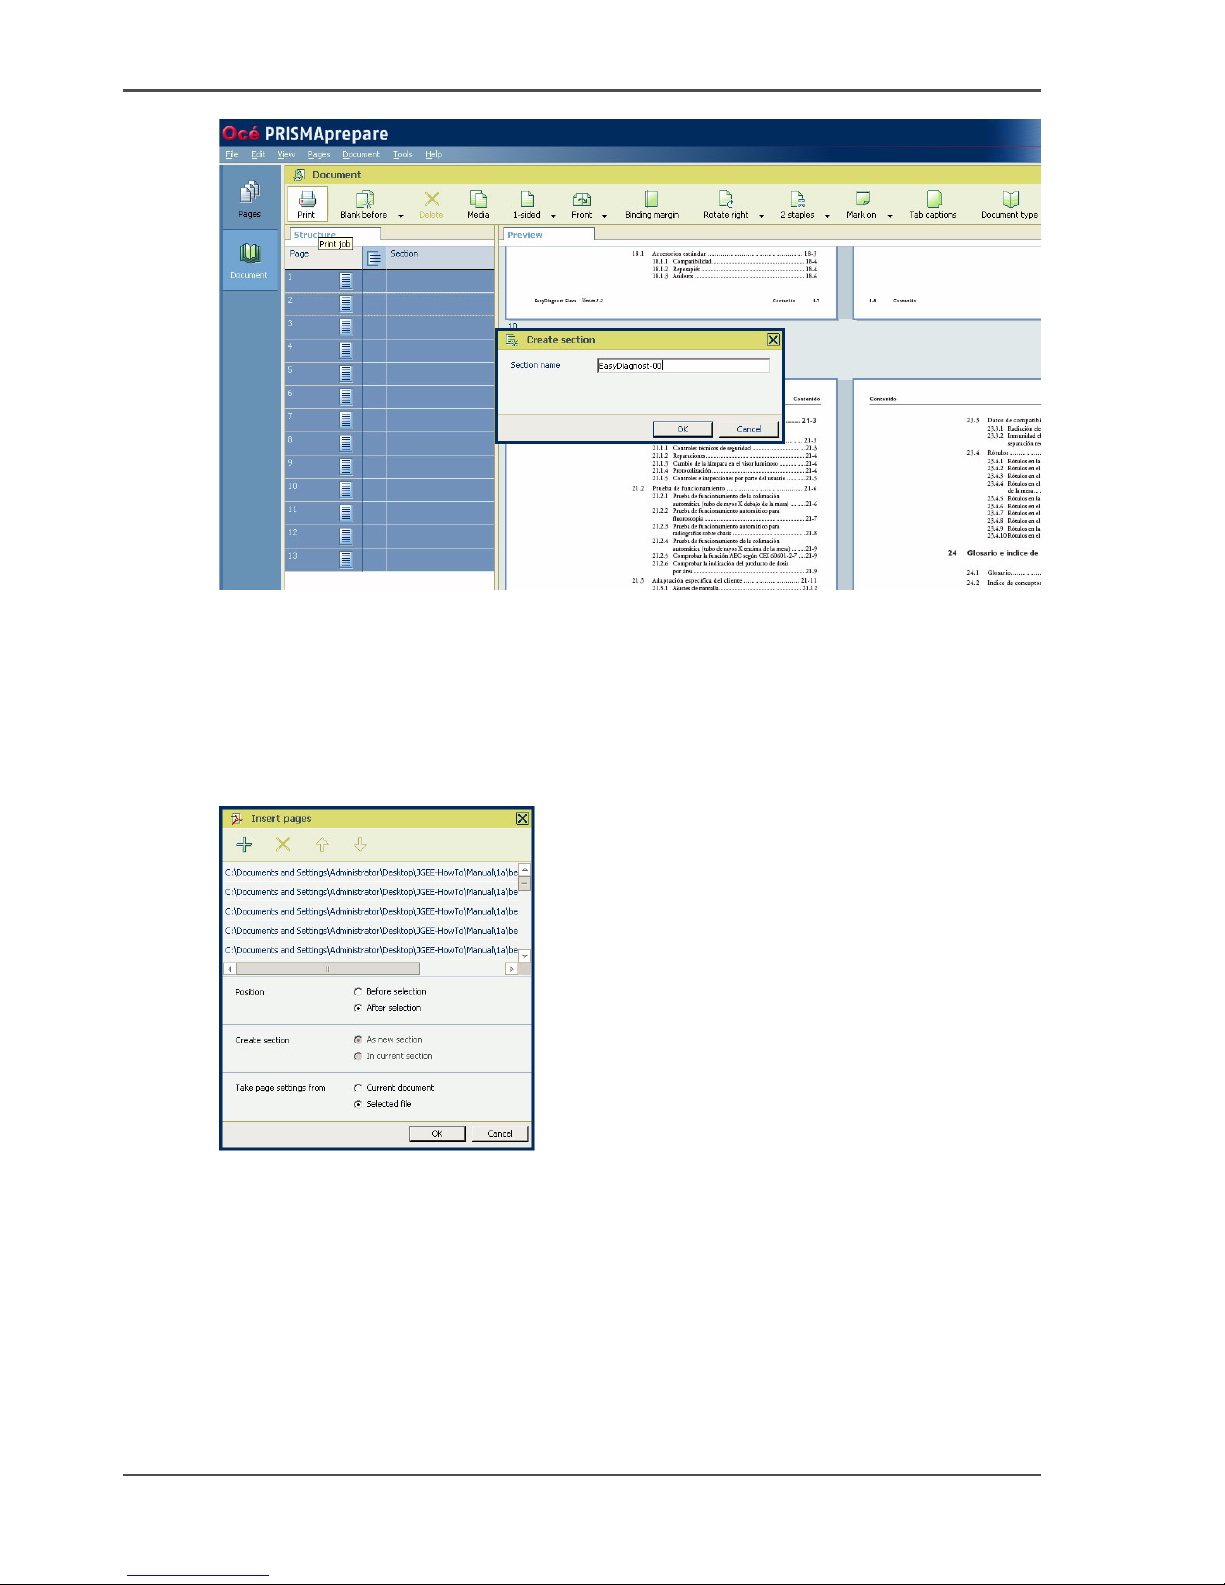
3. Select 'Pages' --> 'Section' --> 'Create...' to create a new section. You can also
right-click the selected pages.
Page 28
28 Chapter 2 Prepare and print
Use Océ PRISMAprepare to collect, modify, and print documents
[18]
4. Enter a name of your choice and click 'OK'.
5. Choose 'Save &as...' to save the file under a new name.
Insert the remaining files
1. Select the first section which you defined in the previous steps.
2. Select 'Pages' --> 'Insert pages'.
[19]
3. Select the 'Add file(s)' (+) button.
4. Select the files that must be inserted.
5. Check the order of the files that must be inserted. If necessary, correct the order by
using the up and down arrows.
6. Click 'OK'.
Page 29

29
Use Océ PRISMAprepare to collect, modify, and print documents
Result
You have created a new PDF file that you can print on your Océ VarioPrint
®
6160/6200/6250. Check your document in the preview and, if necessary, correct the
settings.
Print the job on your Océ VarioPrint
®
6160/6200/6250 printer.
Page 30
30 Chapter 2 Prepare and print
Use Océ PRISMAprepare for tab printing
Use Océ PRISMAprepare for tab printing
Introduction
You can use PRISMAprepare
®
to insert tab sheets into an existing PDF file and/or
define that existing pages be printed as tab sheets.
This requires the following steps.
1. Define the tab media in the media catalog.
2. Insert blank pages and assign the tab media to these blank pages, or assign tab media
to existing pages.
3. Define the tab captions.
Required tools
Océ VarioPrint
®
6160/6200/6250
Océ PRISMAprepare
®
4.02
PDF file
Define new tabs in the media catalogue
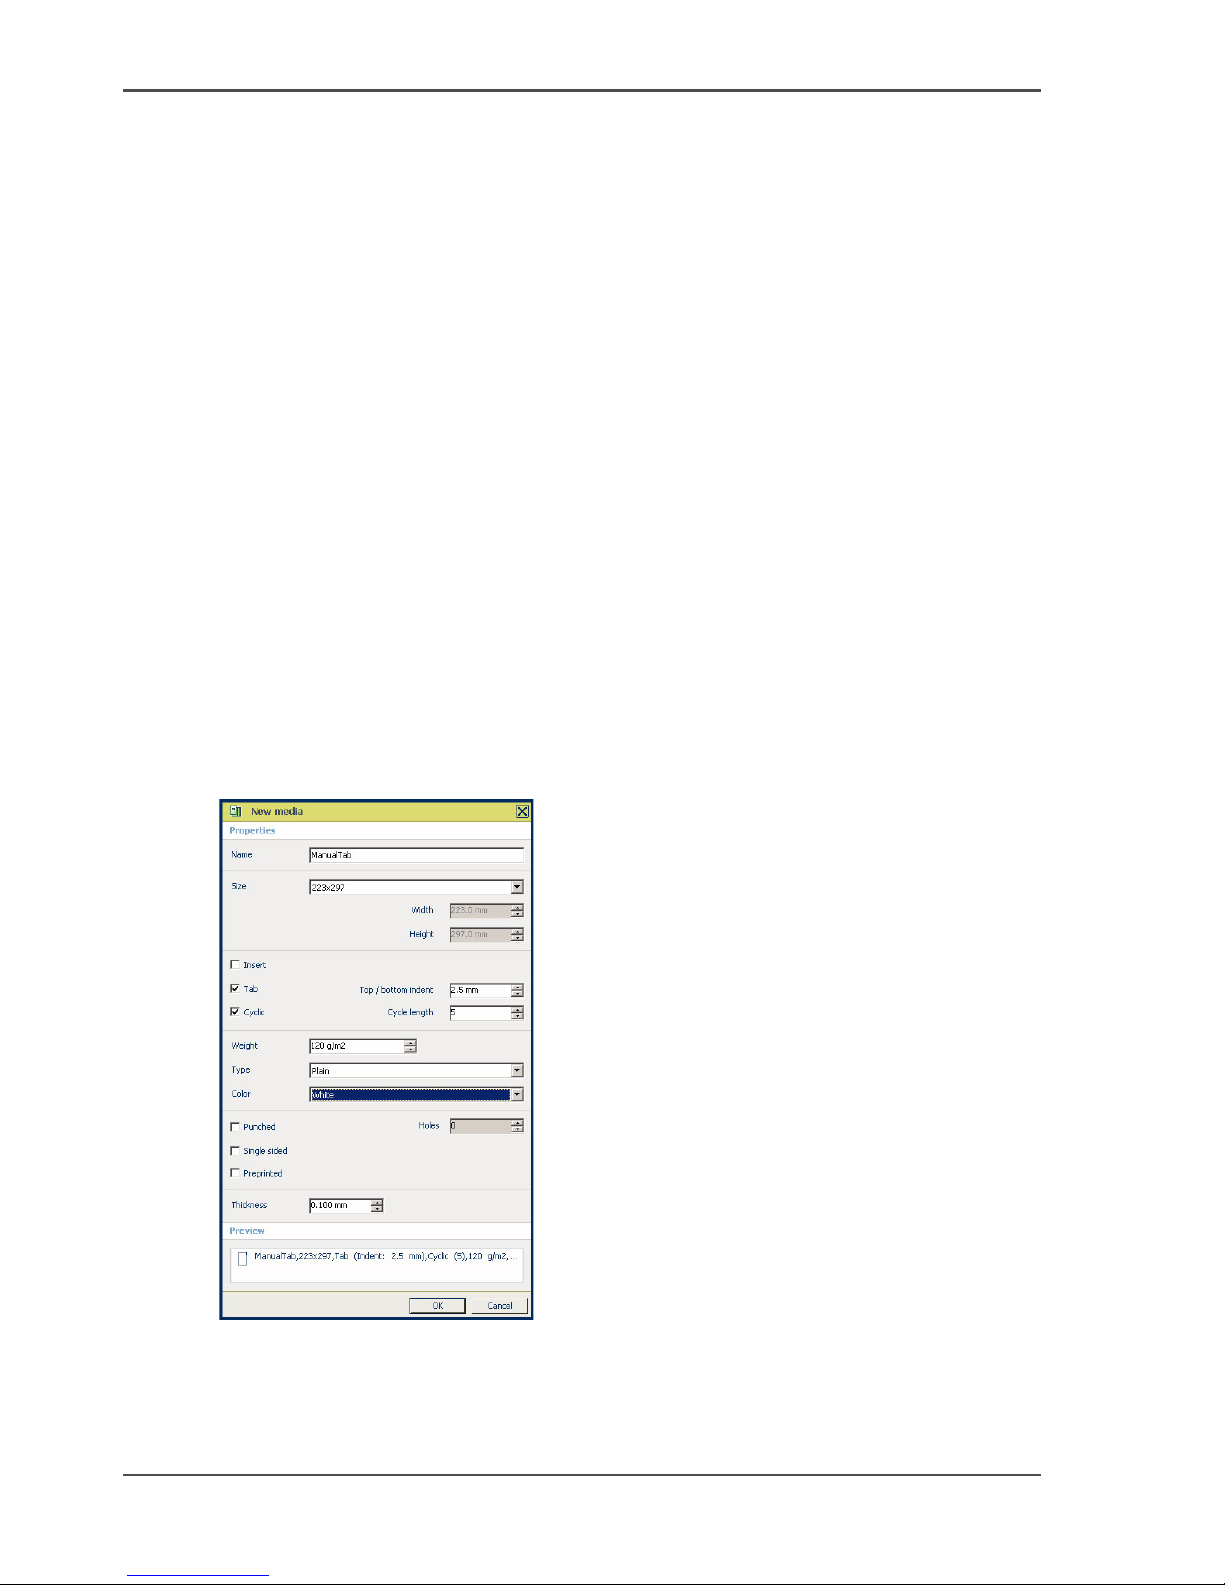
1. Select '&Tools' --> 'Media Catalog'.
2. Select 'New'.
[20]
3. Enter the attributes of your tabs.
4. Click 'OK'.
Page 31
31
Use Océ PRISMAprepare for tab printing
Assign tab media to pages
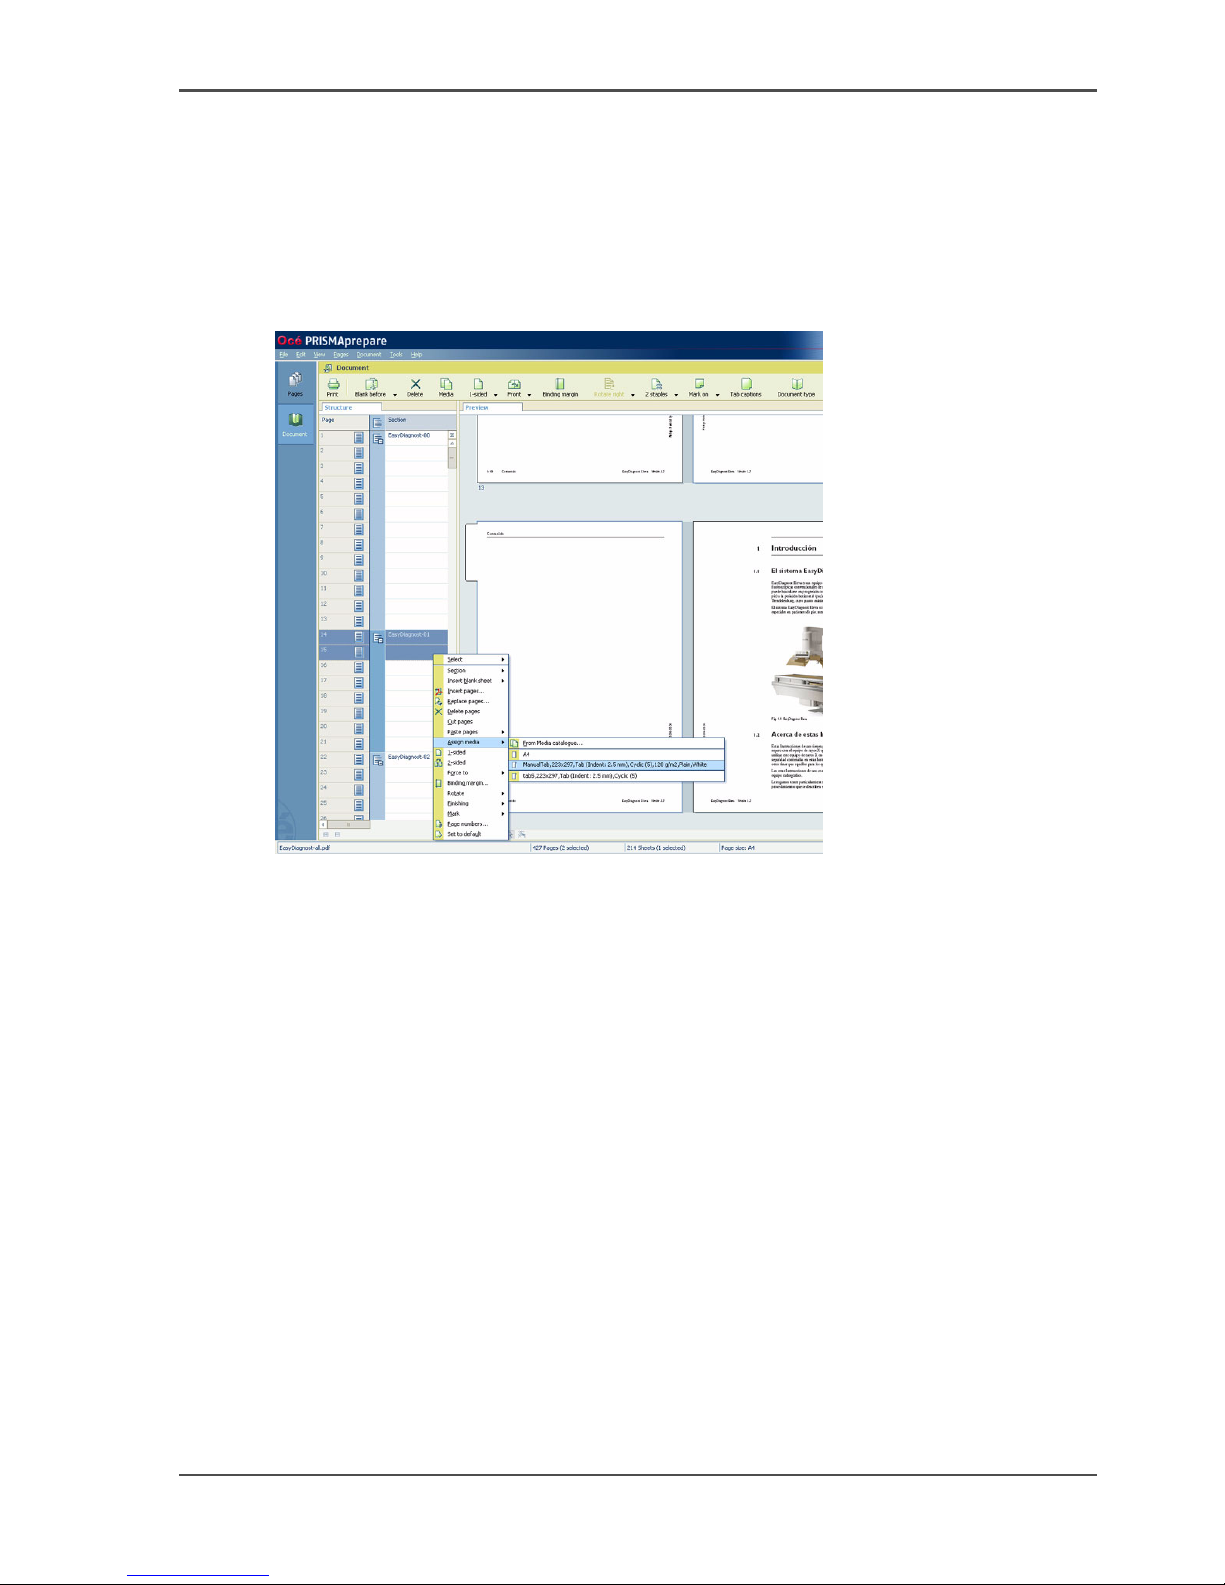
1. To insert tab sheets, you must insert 2 empty pages (with 'Insert blank sheet before
selection') and select these pages.
Alternatively select the first 2 pages of a section that must be printed on the tab
media.
2. Right-click the selected pages and select 'Assign media' --> '&From Media
catalog...'.
[21]
3. Choose the tab media from the media catalog. The menu presents all media that are
used in the document.
4. Click 'Assign'.
5. Continue with the other sections.
Define tab captions
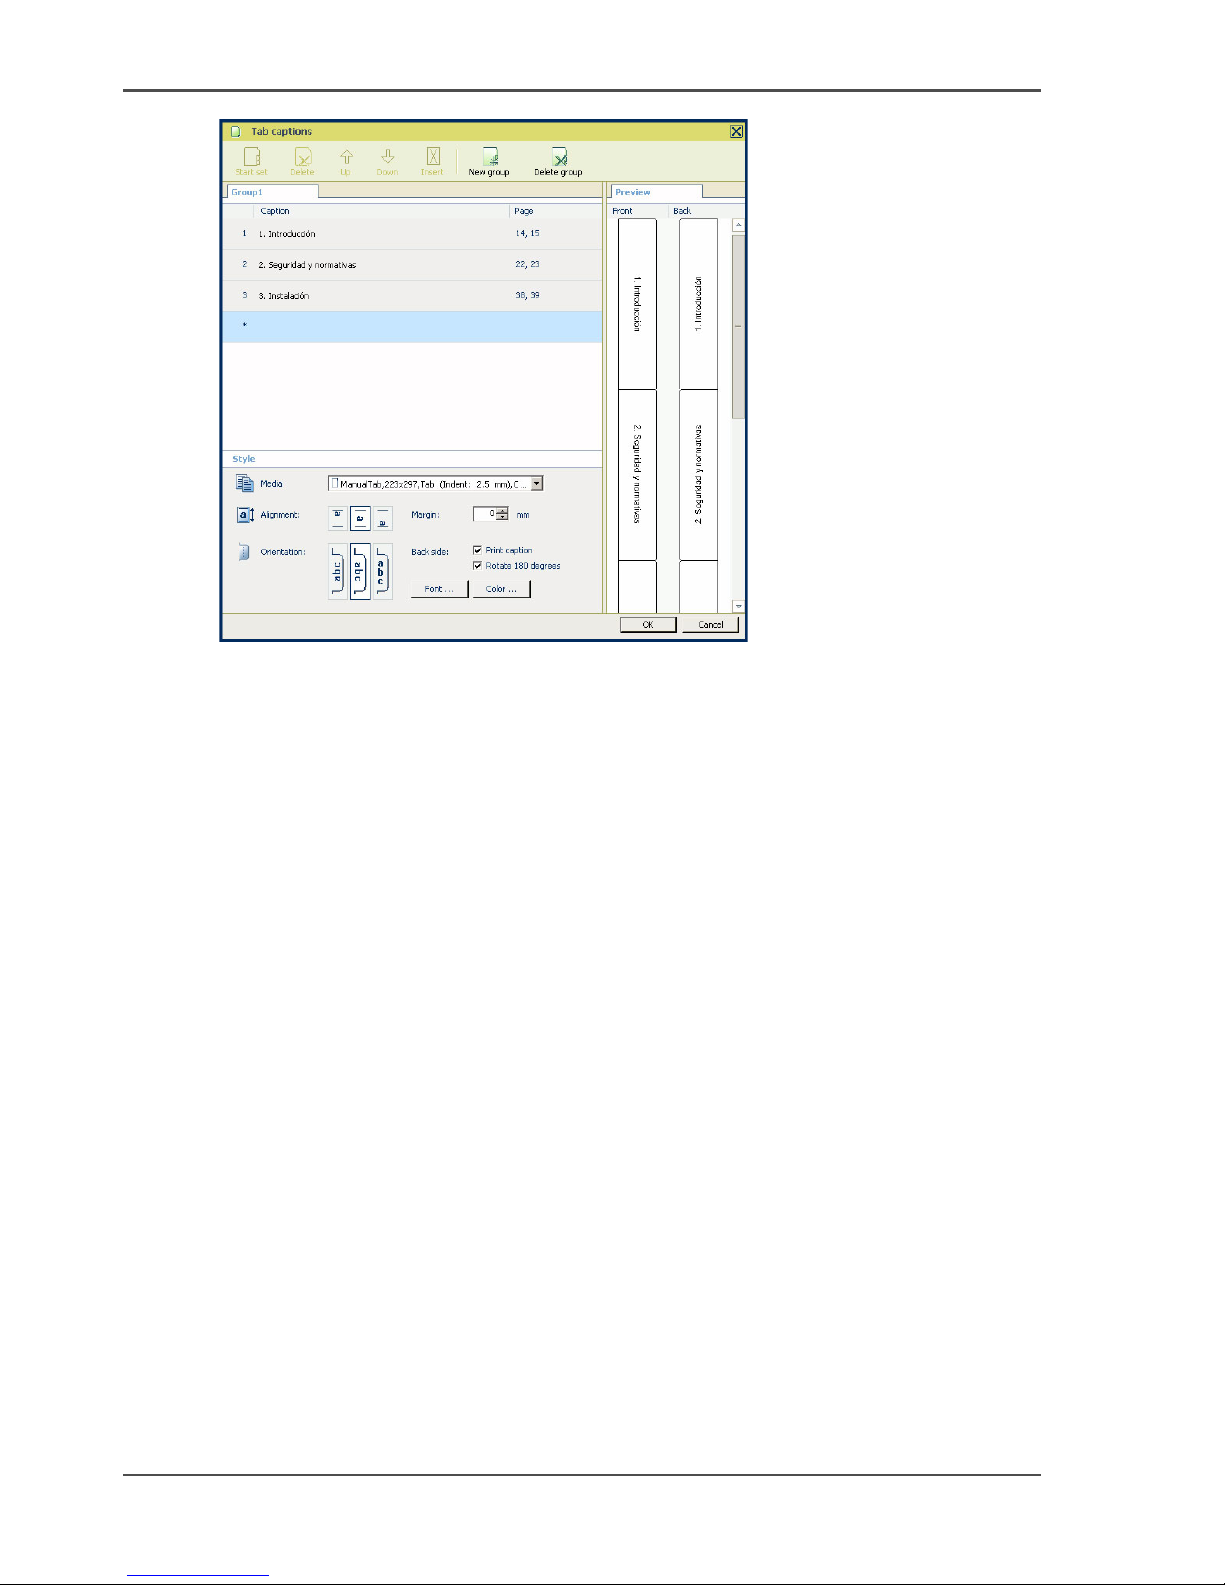
1. Select 'Document' --> 'Tab captions'.
2. In the pop-up window, click the area with the asterisk.
The first caption opens.
3. Enter the text and check the preview.
Page 32
32 Chapter 2 Prepare and print
Use Océ PRISMAprepare for tab printing
[22]
4. Go to the next caption.
5. Click 'OK'.
Result
You have inserted tabs in your document.
You can check the complete document in the preview.
Print the job on your Océ VarioPrint
®
6160/6200/6250 printer.
Page 33
33
Use Océ PRISMAprepare to create booklets
Use Océ PRISMAprepare to create booklets
Introduction
You can use Océ PRISMAprepare
®
to create an A4 booklet from existing A5 PDF
files.
Required tools
Océ VarioPrint
®
6160/6200/6250
Océ PRISMAprepare
®
4.02
PDF file, suitable for booklet creation
Open a PDF file and print the file as a booklet (with 2 staples)
1. Click 'File' --> 'Open' to open the document.
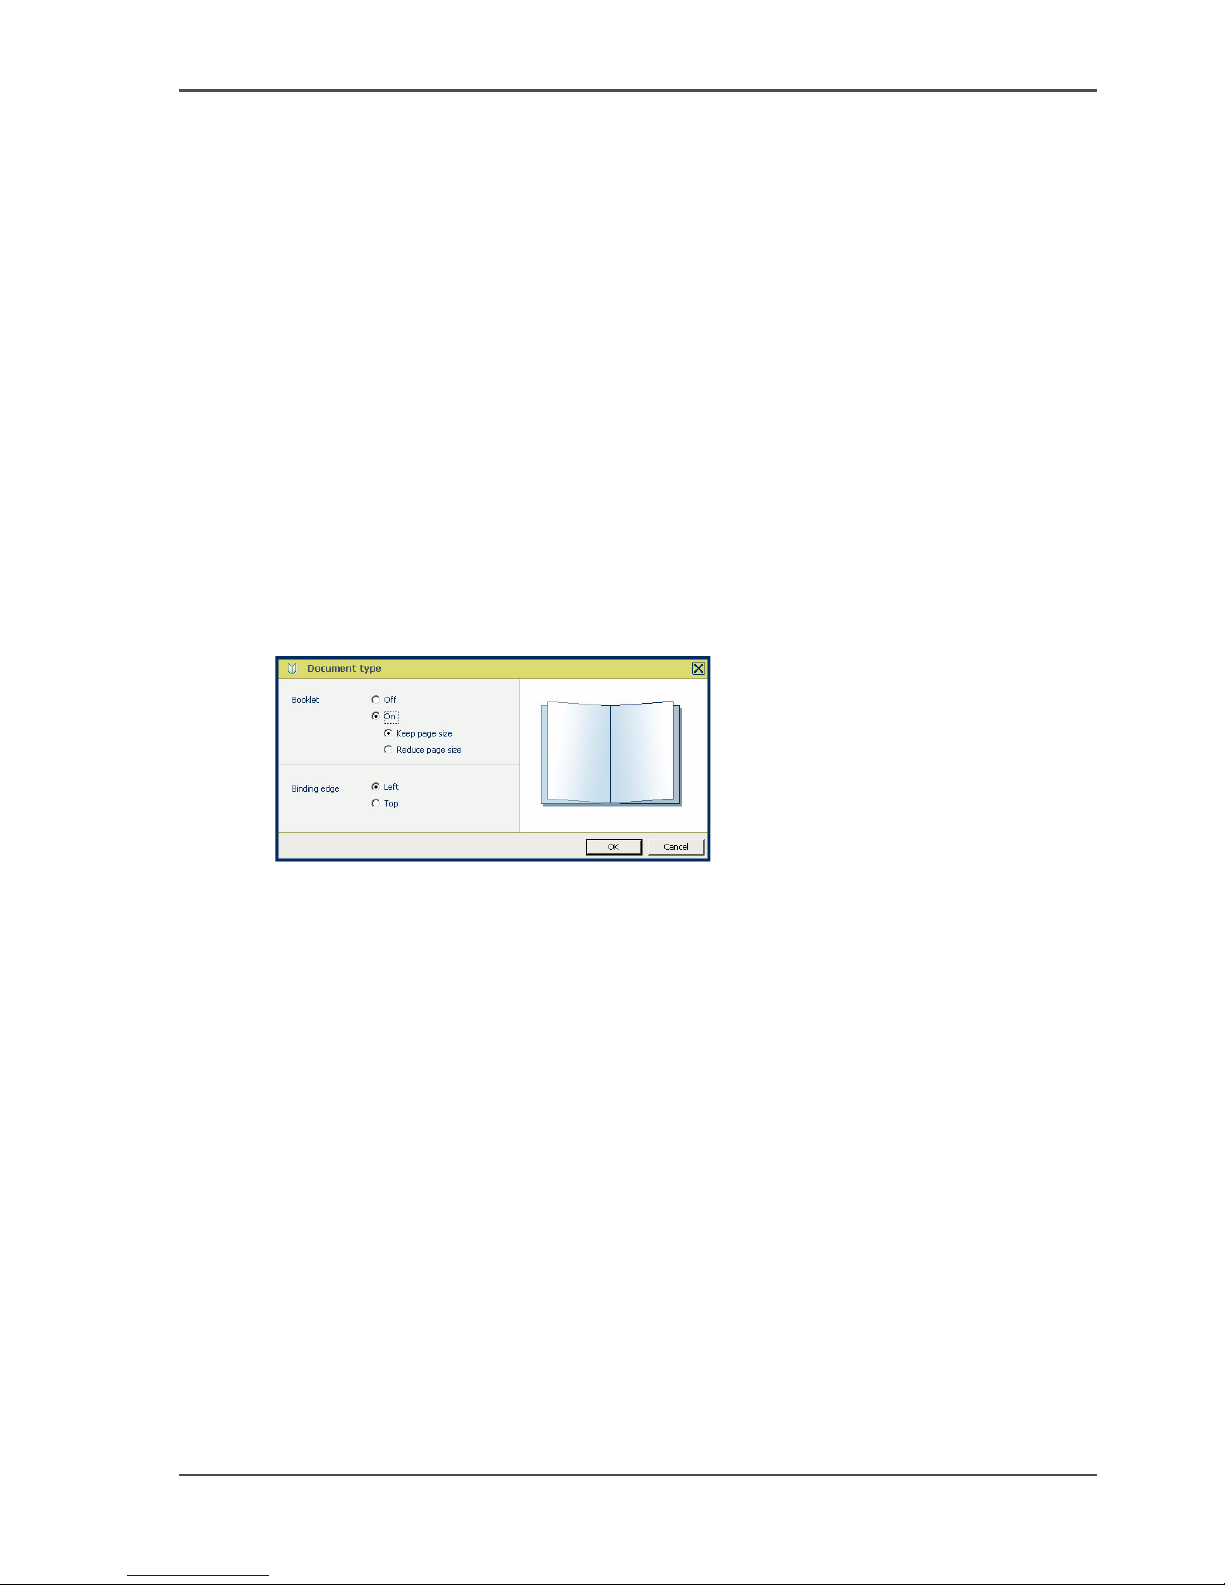
2. Select 'Document' --> 'Document type'.
A pop-up window appears.
[23]
3. Select 'Booklet' --> 'On' and the required scaling options.
Page 34
34 Chapter 2 Prepare and print
Use Océ PRISMAprepare to create booklets
[24]
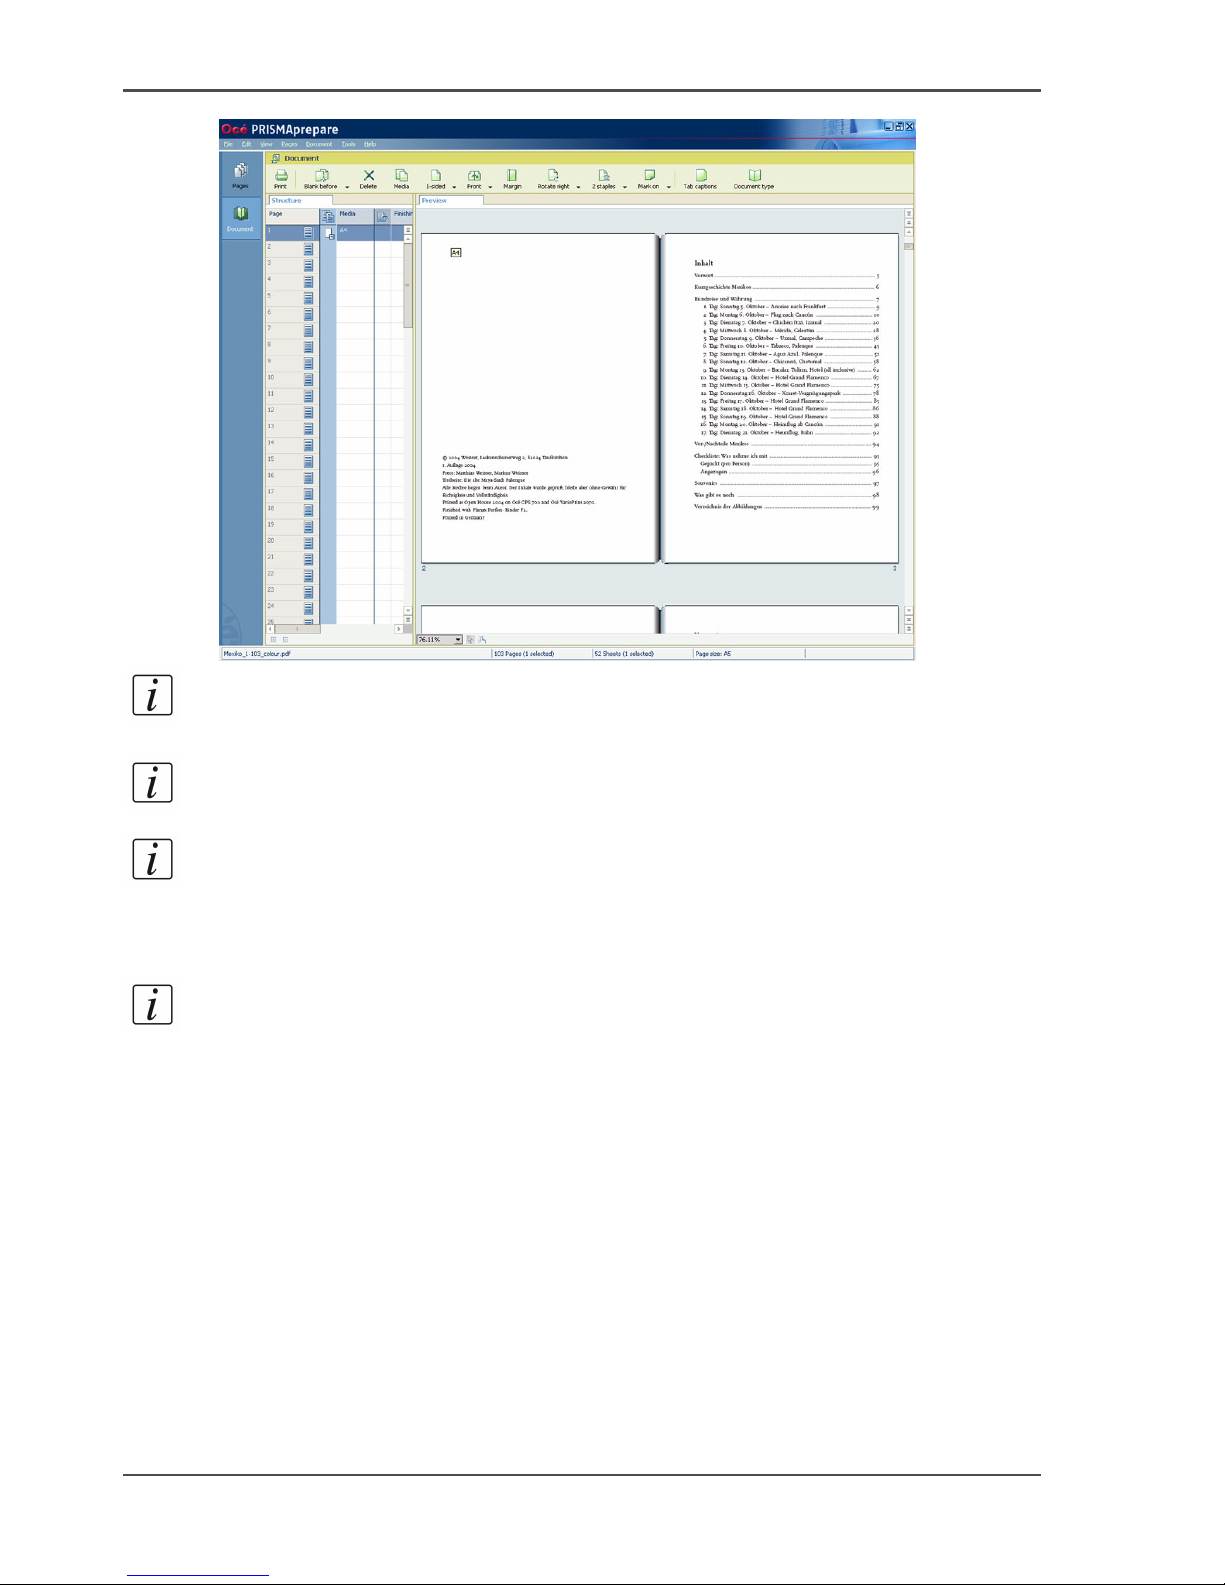
Note: Océ VarioPrint® 6160/6200/6250Océ VarioPrint® 6160/6200/6250If you
choose to keep the page size, the media size in the structure view will be doubled.
Note: The preview now shows the fold at the centre of the booklet.
Note: The imposition required for booklet will be performed when sending the
document to the printer.
4. Select all pages.
5. Choose 'OK' to confirm.
Note: A message appears that asks you to store the document.
6. Store the document.
7. Select your Océ VarioPrint
®
6160/6200/6250 printer in the print dialogue
8. Define the print options.
9. Click 'OK' to start the print job.
Page 35

35
Use Océ PRISMAproduction to print bitmapped Adobe PDF and TIFF files
Use Océ PRISMAproduction and Océ
DocSetter
Use Océ PRISMAproduction to print bitmapped Adobe PDF
and TIFF files
Introduction
The Océ PRISMAproduction
®
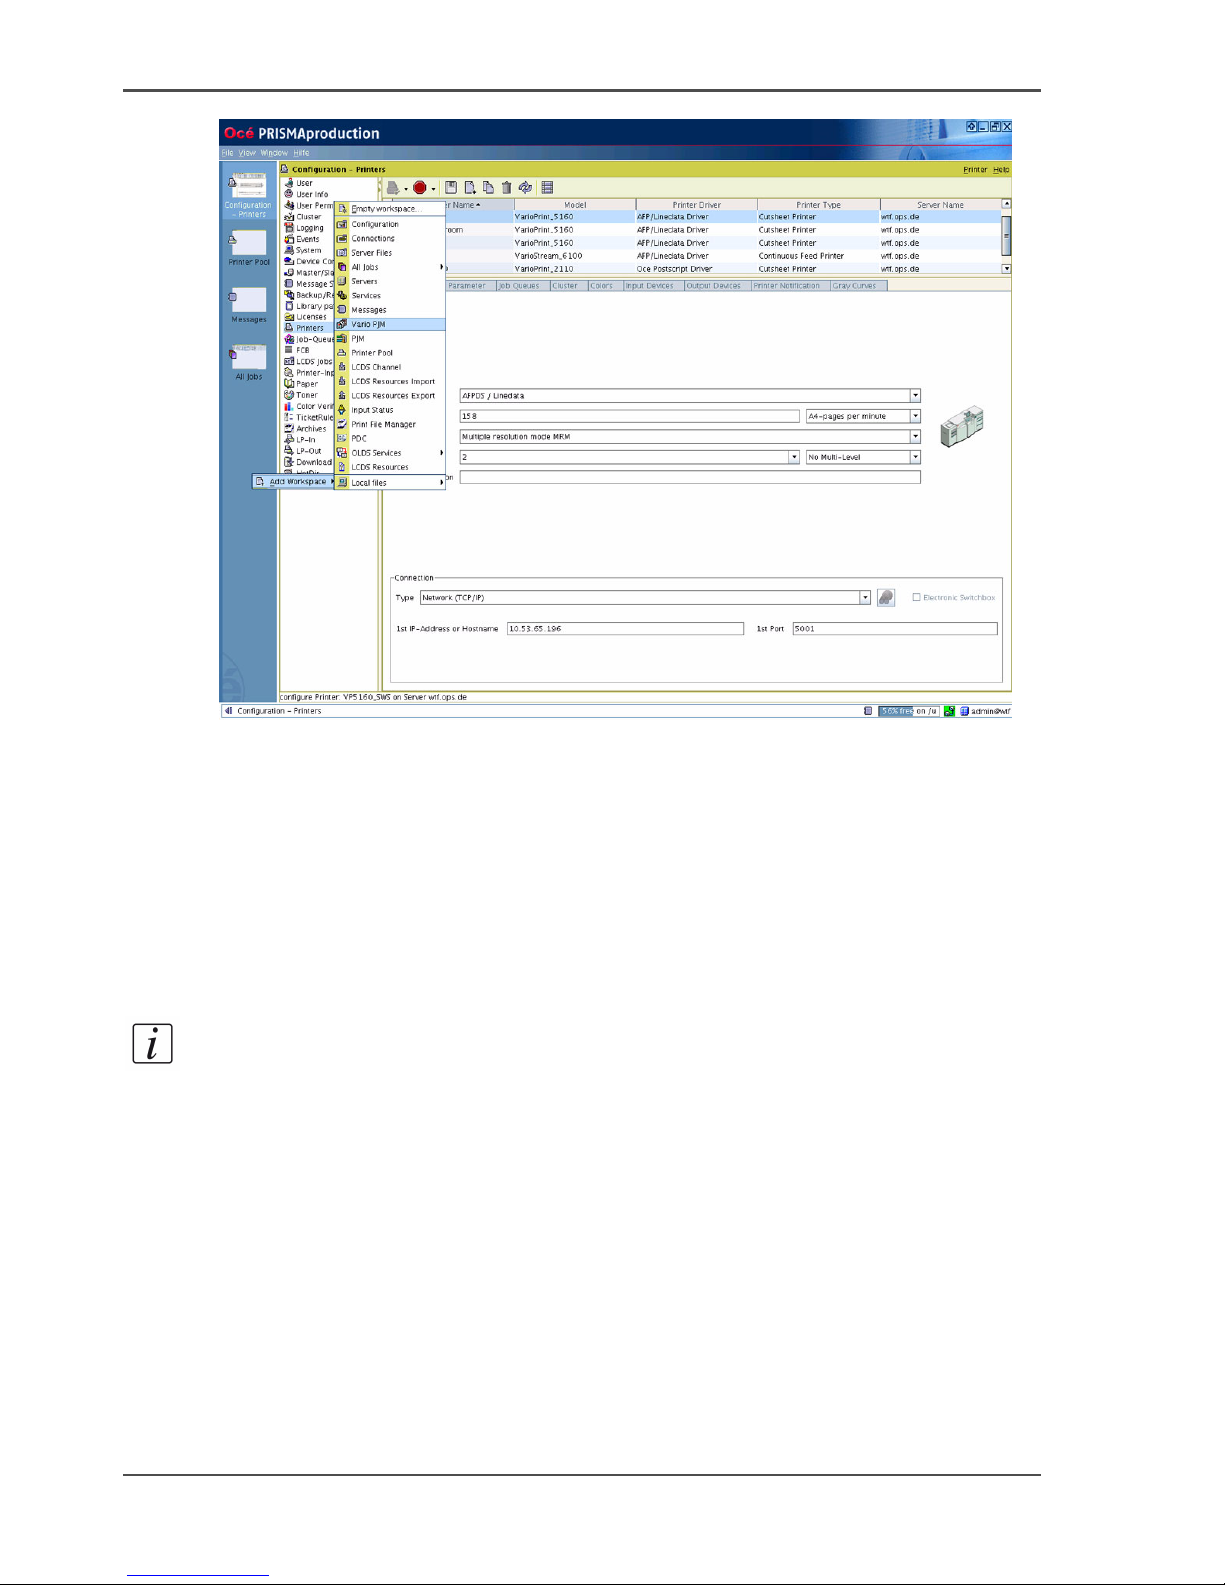
application includes the Vario PJM, a user interface
to edit print jobs. The Vario PJM is a combination of the Print Job Manager (PJM)
and the Professional Document Composer (PDC).
You can use the Vario PJM to print a PDF or TIFF file directly to the Océ VarioPrint
®
6160/6200/6250.
Required tool
Océ PRISMAproduction Version 3.10.04 or higher with PoD module
Print PDF or TIFF files
1. Open the Vario PJM in Océ PRISMAproduction
®
.
Page 36
36 Chapter 2 Prepare and print
Use Océ PRISMAproduction to print bitmapped Adobe PDF and TIFF files
[25]
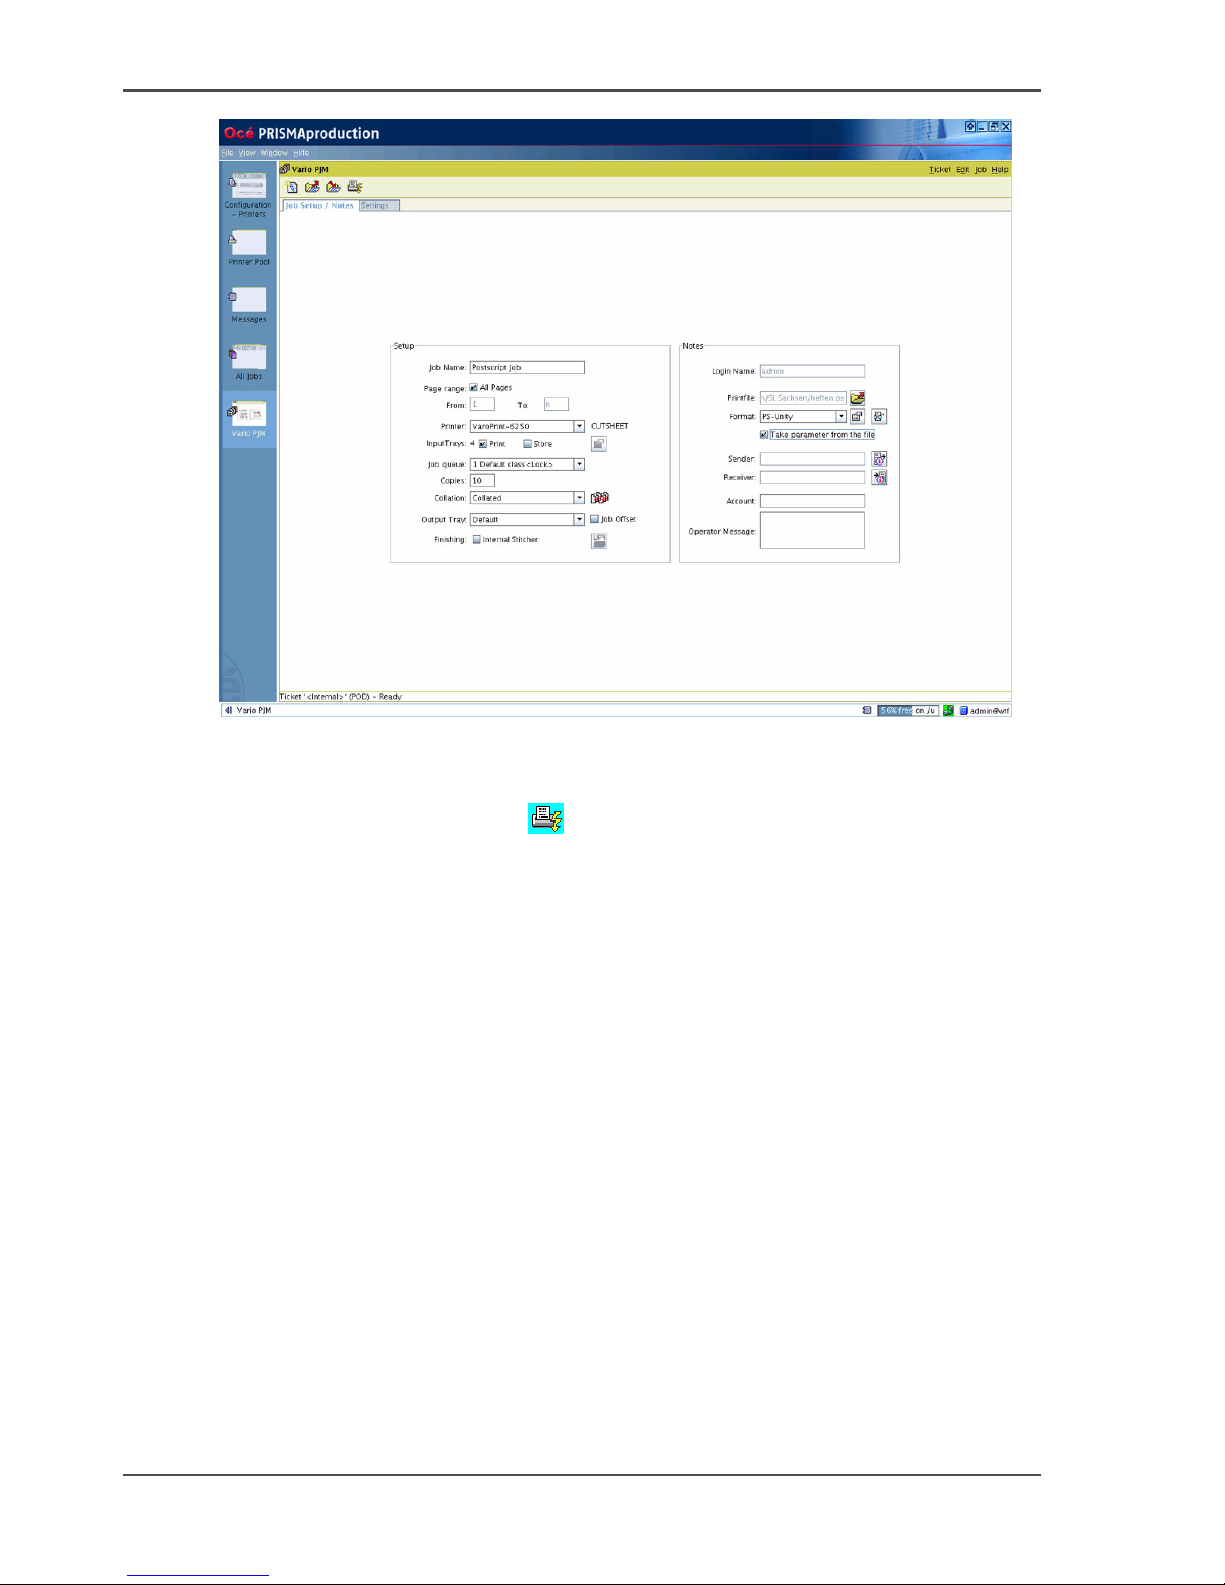
2. Select 'Job Setup / Notes'.
3. In the 'Setup' section, enter the following.
■ Print file
■ 'Job Name'
■ 'Page range', usually all pages
■ The printer, which is the Océ VarioPrint
®
6160/6200/6250
■ Other required settings, such as the number of copies and the output location.
4. In the 'Notes' section, define your printfile with 'Printfile'.
(The upper folder button allows you to select a file locally from a drop-down list.)
Note: The 'Format' setting now displays the format of the selected print file. You can
select another format from the drop-down list.
The 'Take parameter from the file' setting is not activated.
5. On the right side in the 'Format' line choose the 'Edit file parameter' button.
6. In the pop-up window choose 'Use medias from document'.
Page 37
37
Use Océ PRISMAproduction to print bitmapped Adobe PDF and TIFF files
[26]
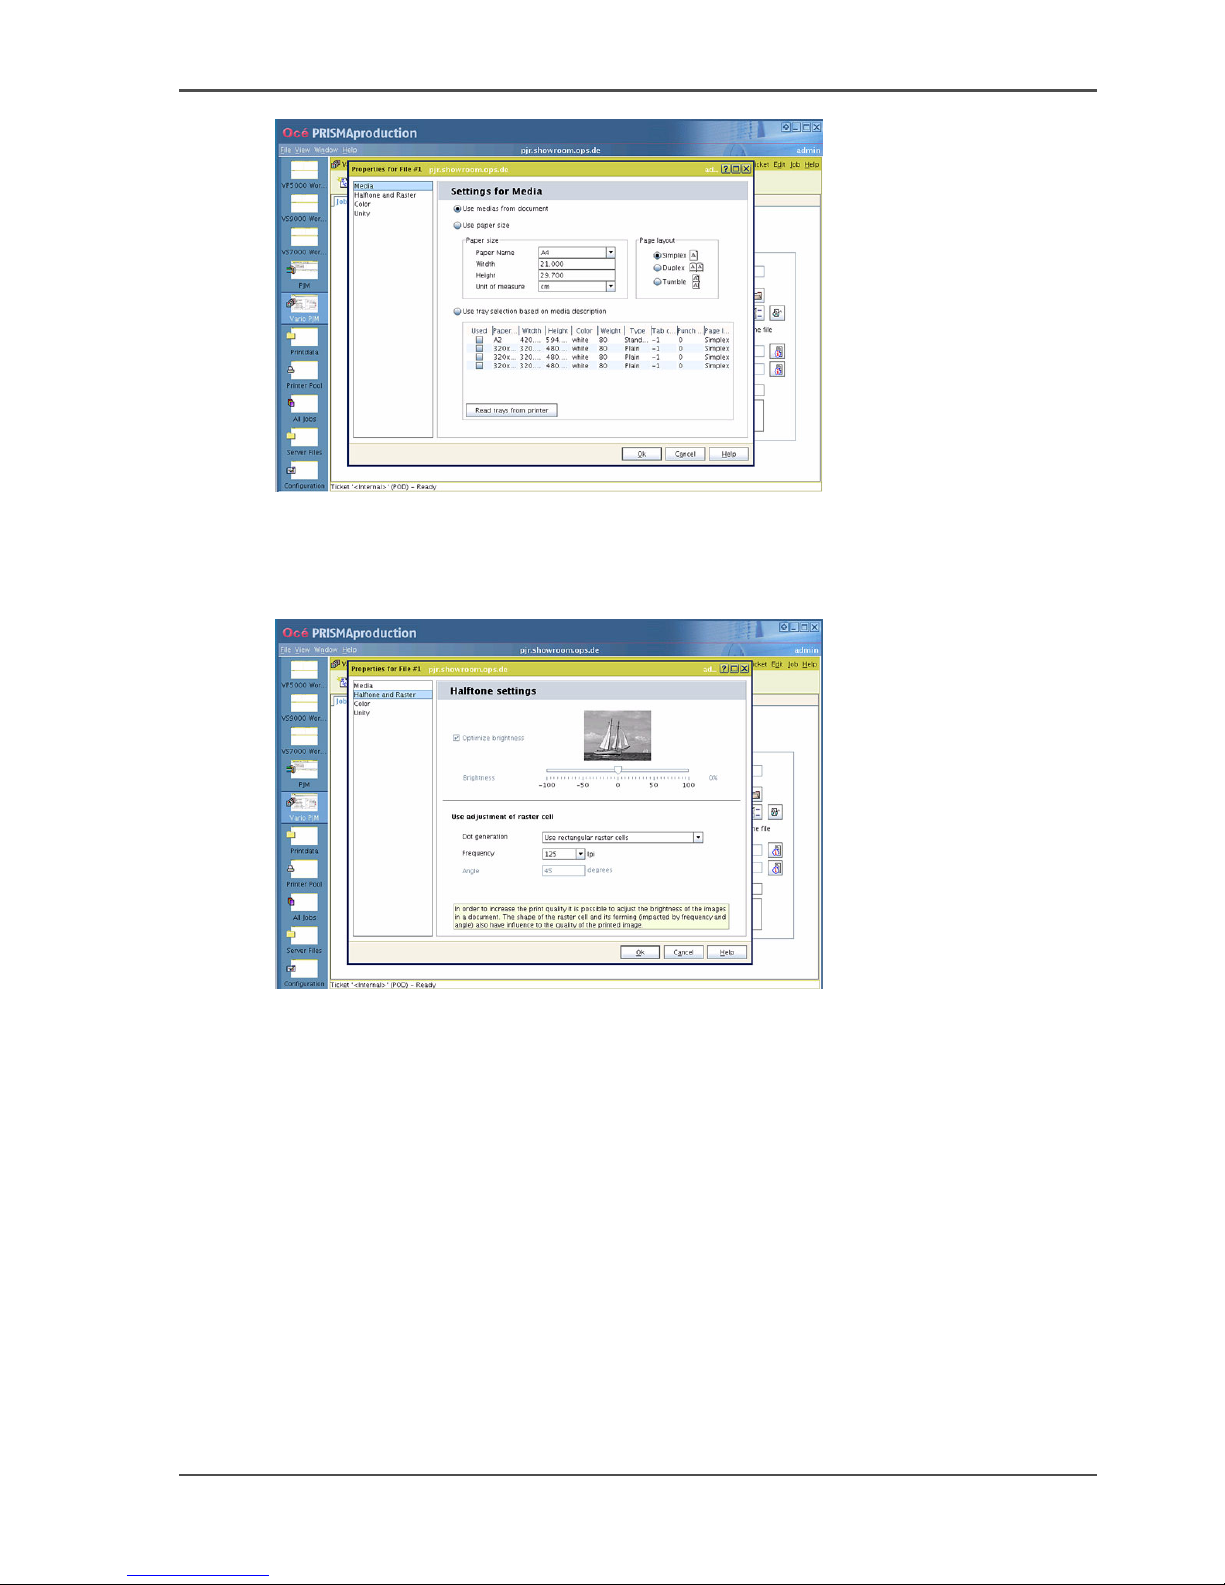
7. Make the following adjustments in 'Halftone and raster':
■ 'Use rectangular raster cells'
■ 125 lpi
[27]
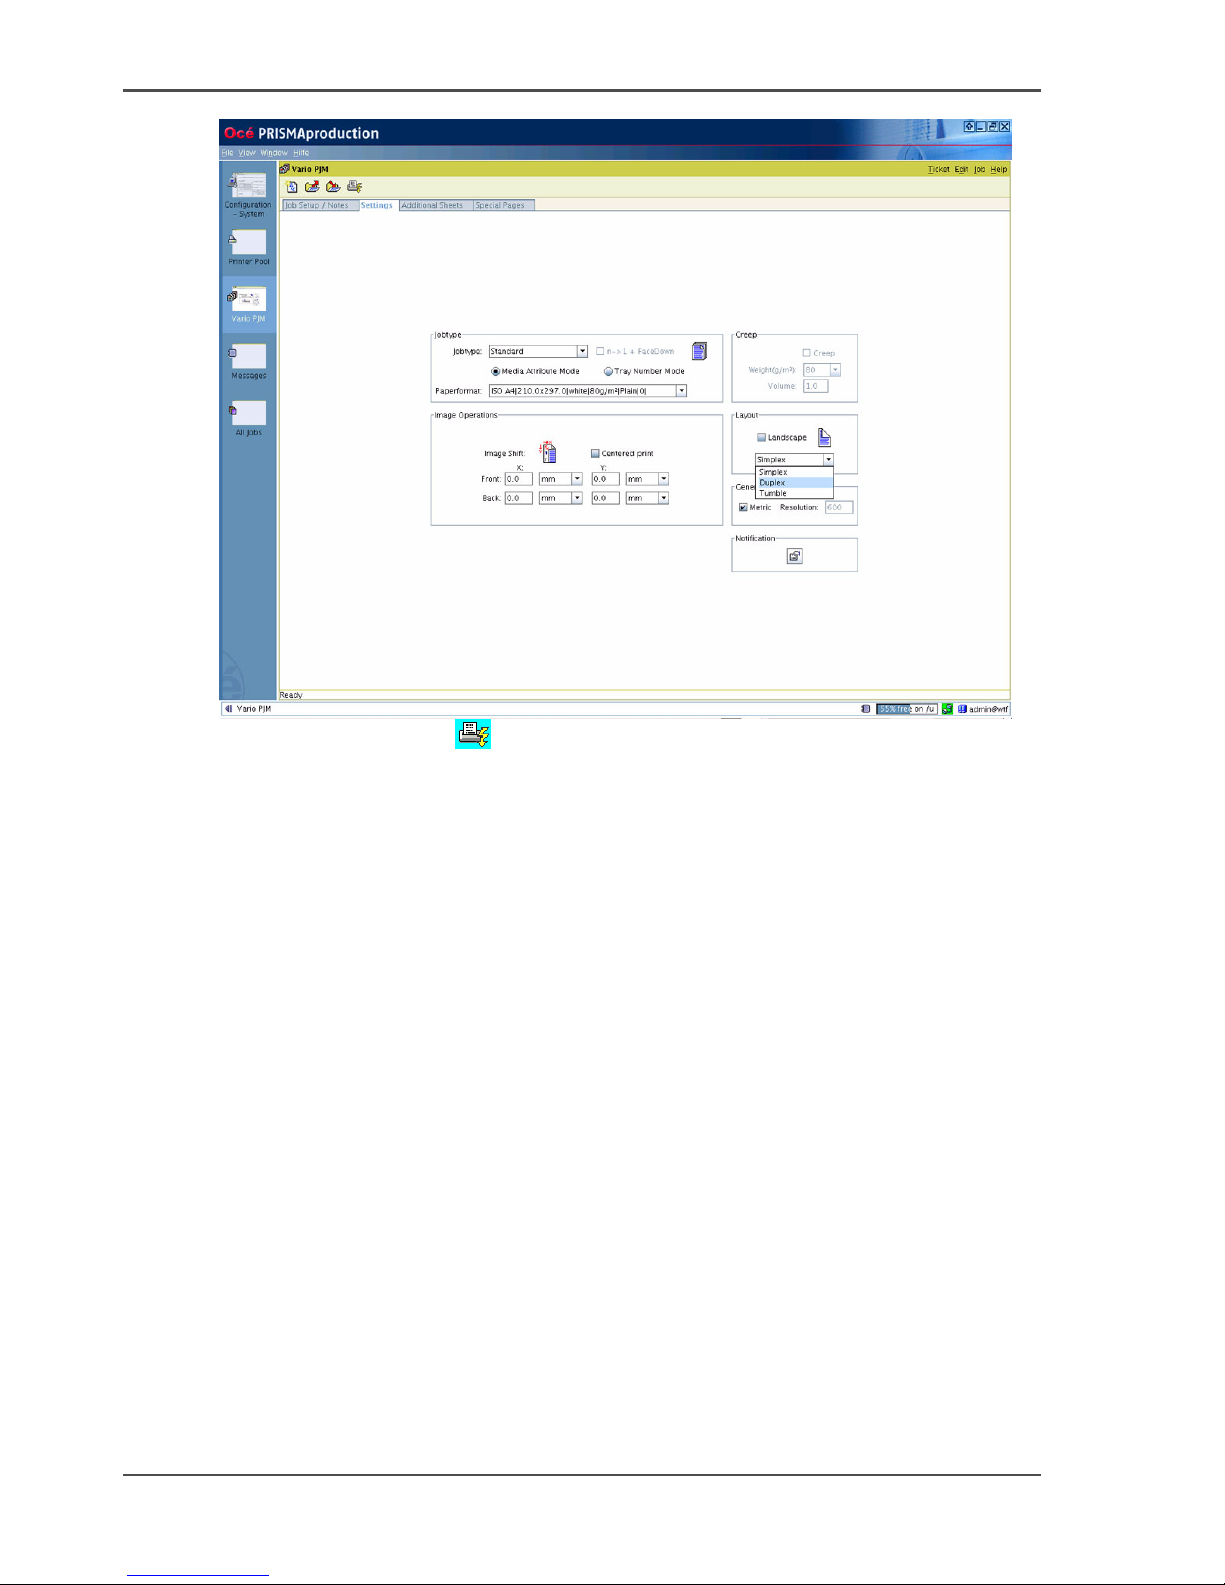
8. In the 'Settings' tab define:
■ Mode (usually 'Media Attribute Mode')
■ Required paper (usually ISO A4)
■ The 'Layout', which can be simplex or duplex (1-sided or 2-sided print)
■ Other options if necessary.
Page 38
38 Chapter 2 Prepare and print
Use Océ PRISMAproduction to print bitmapped Adobe PDF and TIFF files
[28]
9. Start the print job with
Page 39

39
Use Océ PRISMAproduction to print prepared Adobe PostScript 3 files
Use Océ PRISMAproduction to print prepared Adobe
PostScript 3 files
Introduction
Océ PRISMAproduction
®
enables you to print prepared Adobe® 3™ files directly to
the Océ VarioPrint
®
6160/6200/6250.
The procedure to print these Adobe
®
PostScript® 3™ files is basically the same as the
procedure to print Adobe
®
PDF and TIFF files. When you print prepared files,
however, these files can contain processing information, such as the required media
types. In some situations you may have to change this processing information.
The procedure below describes how to print an Adobe
®
Postscript™ 3™ file directly
in Océ PRISMAproduction
®
and apply the attributes already defined in the data
stream.
Required tool
Océ PRISMAproduction Version at least 3.10.04 or higher
Print files with media attributes in the data stream:
1. Open the Vario PJM in Océ PRISMAproduction
®
.
2. Select 'Job Setup / Notes'.
3. In the 'Setup' section, enter the following.
■ 'Job Name'
■ 'Page range', usually all pages
■ The printer, which is the Océ VarioPrint
®
6160/6200/6250
■ The other required settings like the number of copies and the output location.
4. In the 'Notes' section, define the file to print if necessary.
Note: 'Printfile' displays the name of the print file. The upper folder button allows
you to select a file locally from a drop-down list.
The 'Format' setting now displays the format of the selected print file. You can select
another format form the drop-down list. 'IOCA' is the default format or file type for
the PoD module. PDF and TIFF files are converted to this IOCA format. If you want
to store your file you can reconvert the file to the PDF or TIFF format again.
5. In the section 'Notes' activate 'Take parameter from the file'.
Page 40
40 Chapter 2 Prepare and print
Use Océ PRISMAproduction to print prepared Adobe PostScript 3 files
[29]
You can no longer access the settings in the sections 'Additional Sheets' and 'Special
Pages'.
You can only access some options in the 'Settings' section.
6. Start the printing process with
Page 41
41
Use Océ DocSetter and Océ PRISMAproduction to print documents
Use Océ DocSetter and Océ PRISMAproduction to print
documents
Introduction
This section describes how to print documents on the Océ VarioPrint
®
6160/6200/6250 via Océ DocSetter
®
and Océ PRISMAproduction®.
Required tools
Océ DocSetter
®
version 2.10 or higher
Océ PRISMAproduction Version 3.10.04 or higher with PoD module
1. Start the Océ DocSetter
®
application.
2. From the 'File' menu, select 'Open' to open the file you want to print.
3. From the 'File' menu, select 'PRISMAproduction Print'.
4. The Océ PRISMAproduction job ticket is displayed.
Note: You can only change the job name. You cannot change the name of the print
file.
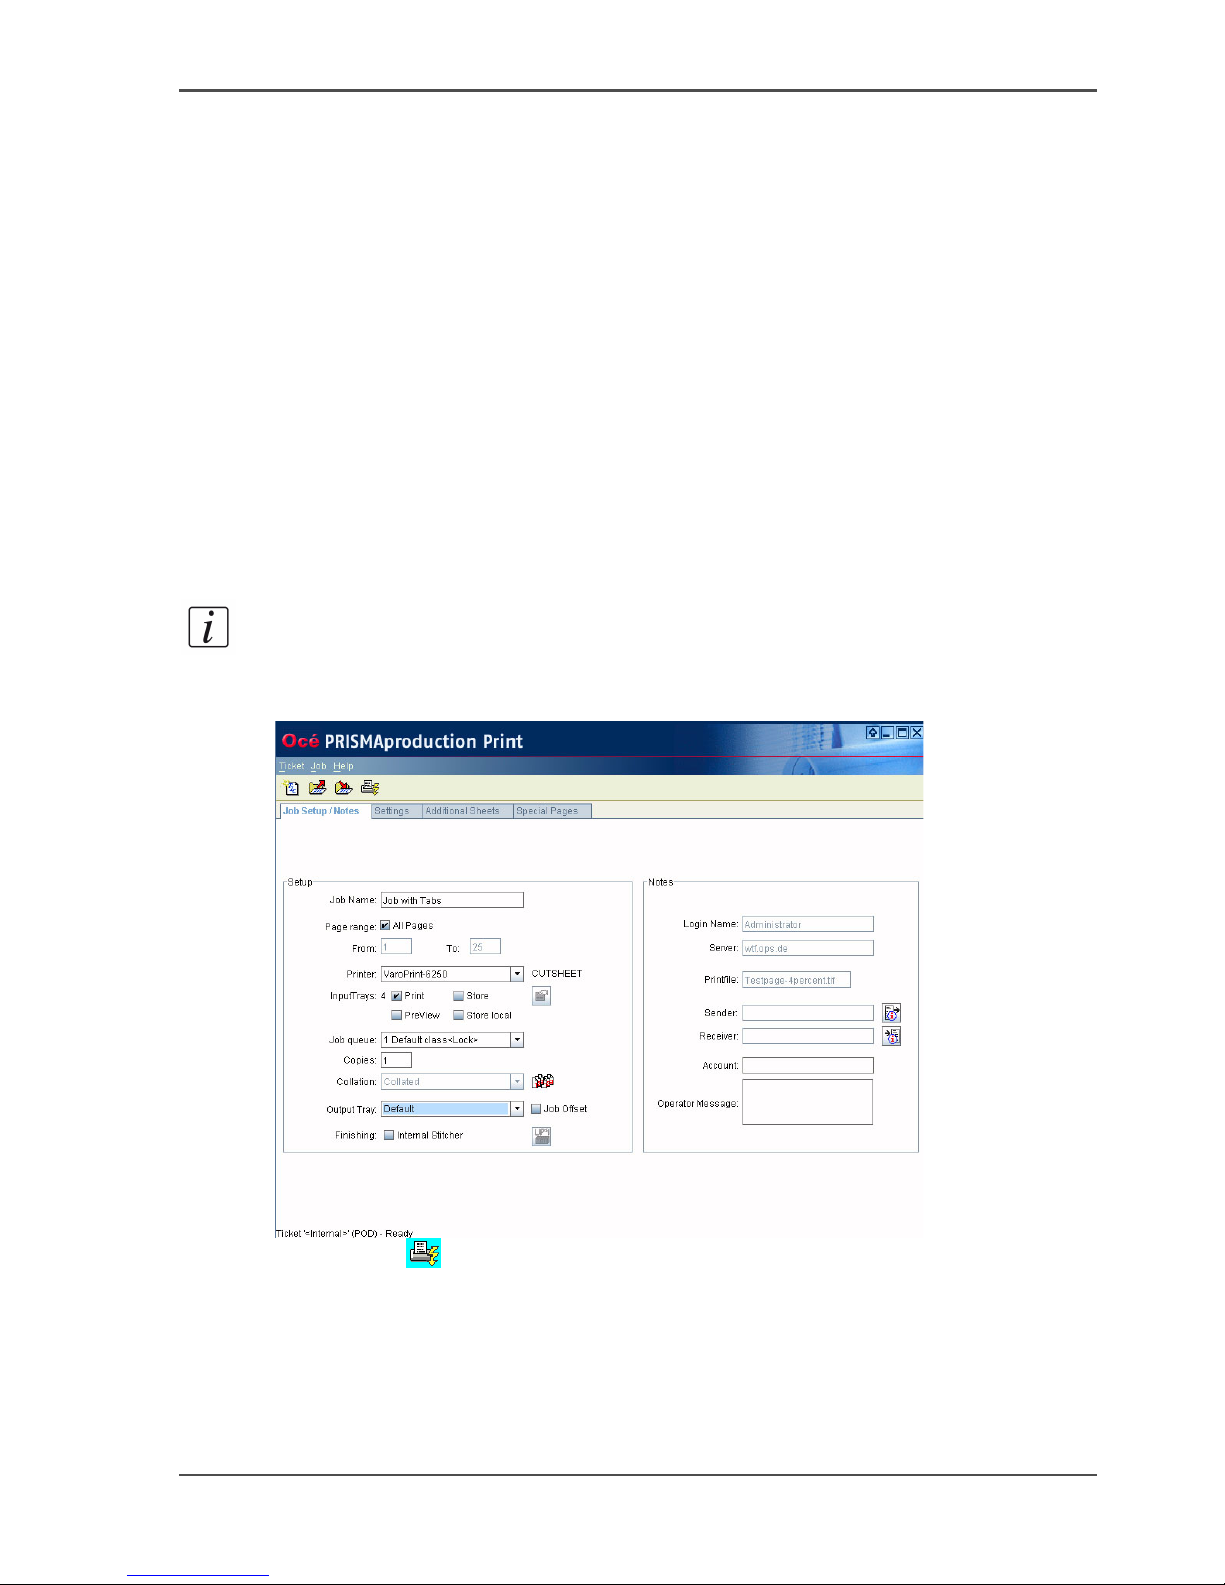
5. Define the settings in the job ticket. Check if the job class and the printer are correct.
[30]
6. Click 'Print' .
Check that the print job appears in the "All Jobs" directory.
The printer must be ready and active in order to print the job.
Page 42

42 Chapter 2 Prepare and print
Use Océ DocSetter and Océ PRISMAproduction to create and print a document with tab
Use Océ DocSetter and Océ PRISMAproduction to create
and print a document with tab sheets
Introduction
To insert tab sheets in a previously created document, you need to do the following.
1. Open the previously created document.
2. Define the tab sheets in Océ DocSetter
®
.
3. Insert the tab sheets into the previously created document to create a new file with
tab sheets.
4. Print the prepared file with the tab sheets on the Océ VarioPrint
®
6160/6200/6250.
Before you begin
1. Open the Microsoft Office
®
application.
2. Open the previously created document.
Required tools
Server with Océ DocSetter
®
version 2.10 or higher
Server with Océ PRISMAproduction
®
version 2.10 or higher
Note: The names of the tab sheet sets are defined according to the following
criteria:
Format - tab identification - number of tab sheets - sort order for printing - tab type
(cascade or single tab). An example of a name for a tab sheet set is A4Tab05S.
Define the tab sheets in the Océ DocSetter® TABwizard
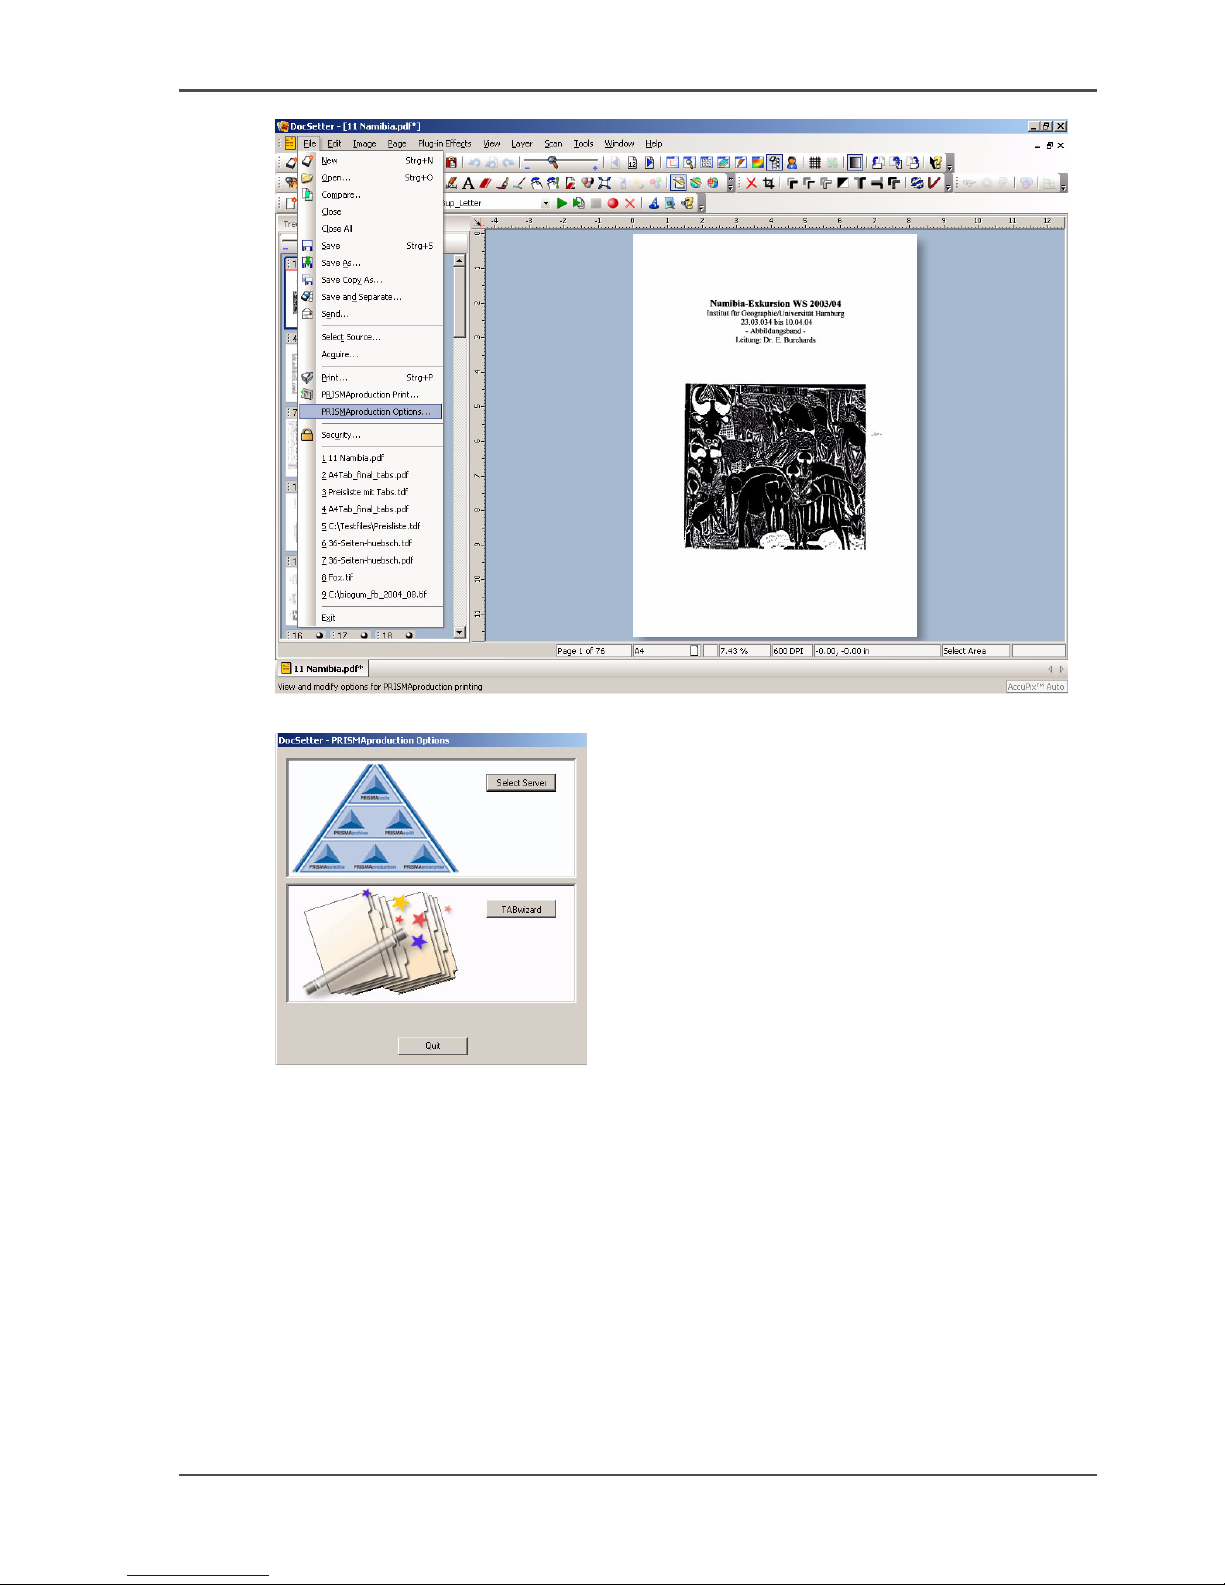
1. Select 'File' --> 'PRISMAproduction Options'.
Page 43
43
Use Océ DocSetter and Océ PRISMAproduction to create and print a document with tab
[31]
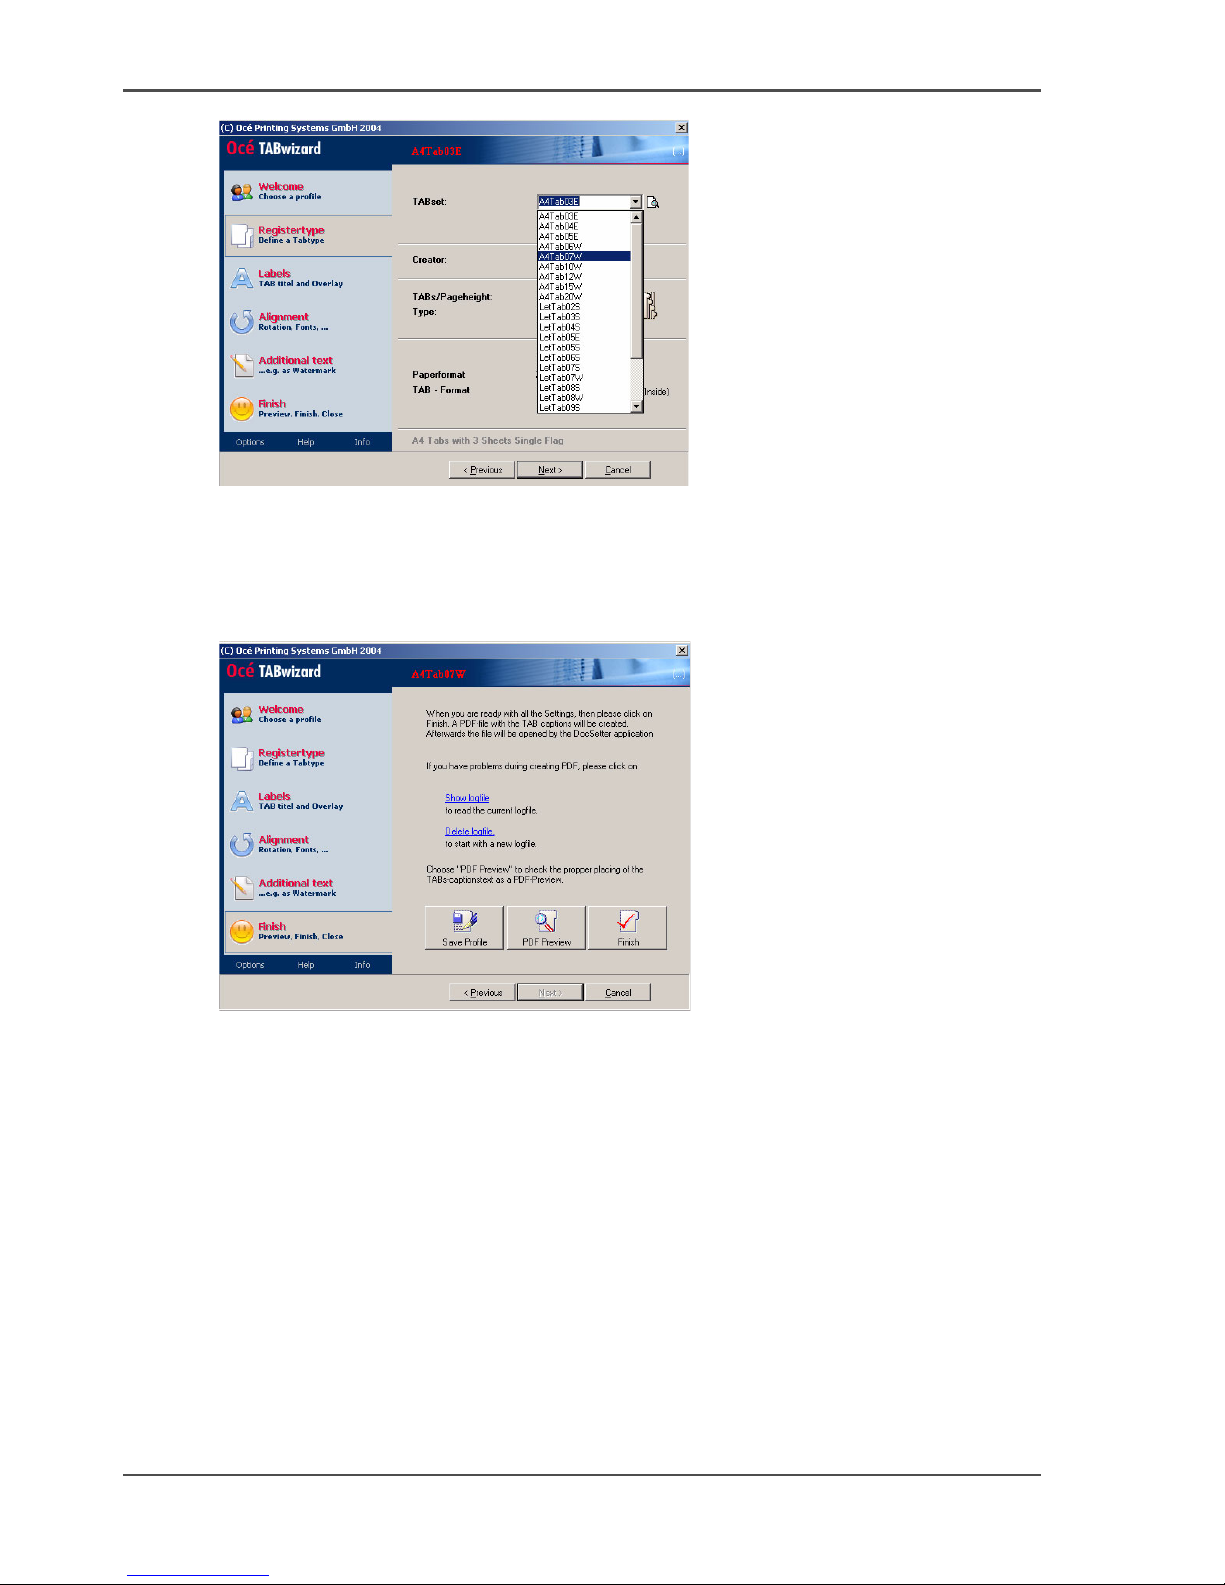
2. Start the 'TABwizard' in the menu that pops up.
[32]
3. Define profile and register type.
Note: The register type is the tab sheet type.
Page 44
44 Chapter 2 Prepare and print
Use Océ DocSetter and Océ PRISMAproduction to create and print a document with tab
[33]
4. Define the order to print and sort the inserted tab sheets.
5. Define the labels for the tab sheet heads.
6. Define the orientation of the tab sheet texts.
7. Define any additional texts.
8. Select 'Finish' --> 'PDF Preview'.
[34]
9. Check the preview PDF and make any necessary corrections.
10. Click 'Finish' to complete the definition of the tab sheets.
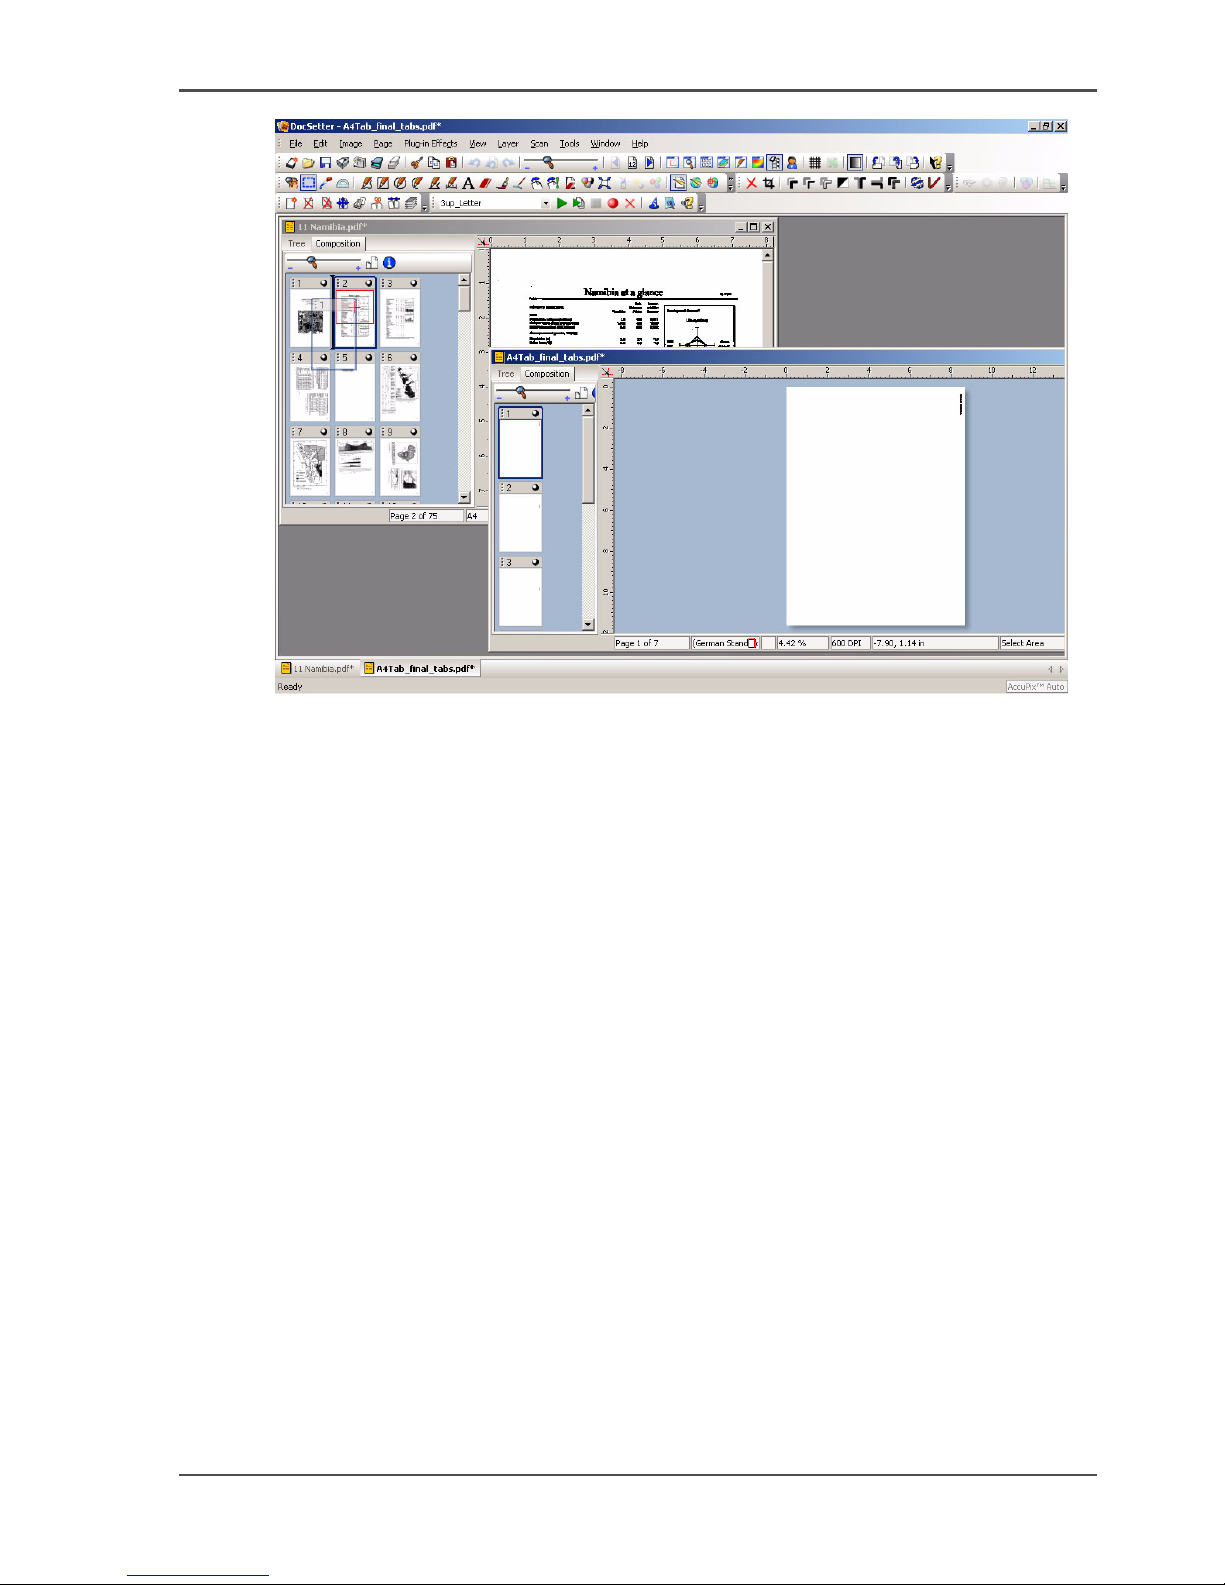
Insert the tab sheets into the previously created document
1. If necessary, open the previously created document in which you want to insert the
tab sheets.
2. Open the file that contains the tab sheets that you just defined.
3. Drag a tab sheet from the file with the generated tab sheets to the desired position in
the document in which you want to insert the tab sheets.
Repeat this step for all tab sheets that you want insert. In this way you create a new
print file.
Page 45
45
Use Océ DocSetter and Océ PRISMAproduction to create and print a document with tab
[35]
4. Save the new print file.
Result
You can now send the generated print file to the Océ VarioPrint
®
6160/6200/6250
with the Océ DocSetter
®
and Océ PRISMAproduction® applications.
Print the created file with the tab sheets
1. Start the Océ DocSetter
®
application.
2. From the 'File' menu, select 'Open' to open the file that you want to print.
3. From the 'File' menu, select 'PRISMAproduction Print'.
The Océ PRISMAproduction
®
job ticket is displayed.
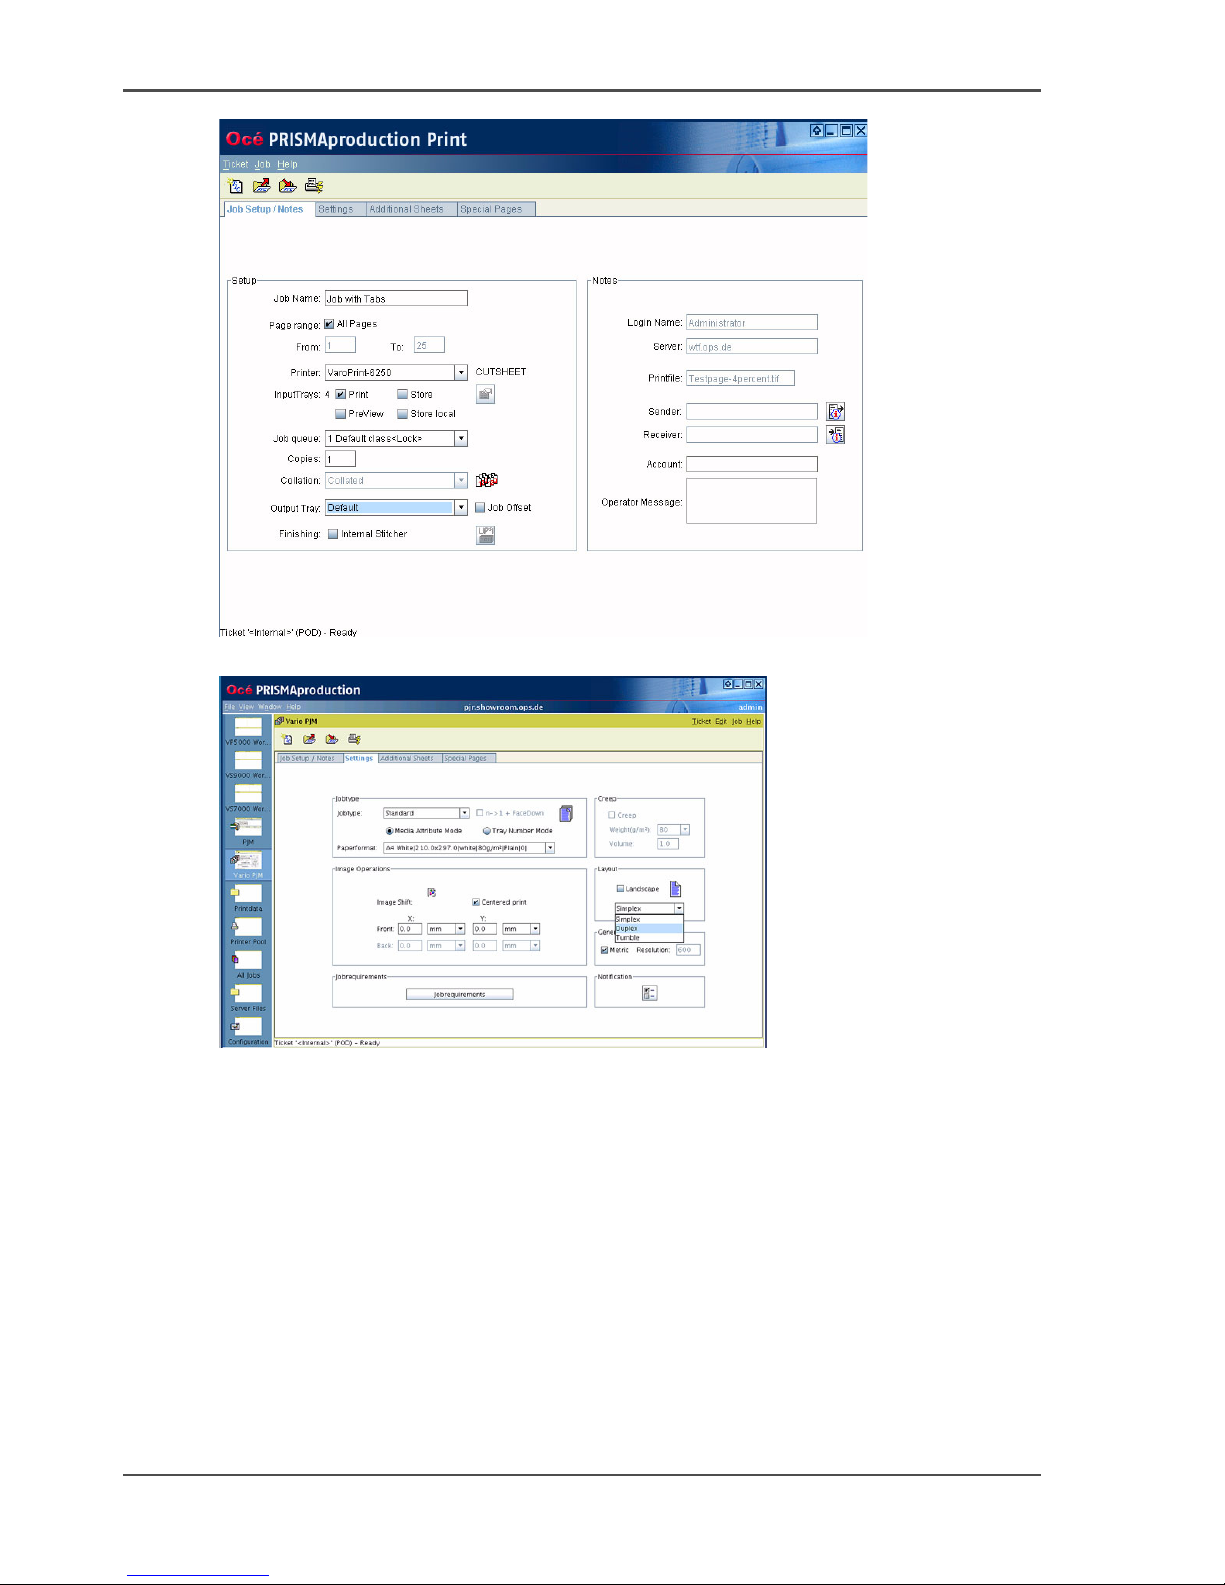
4. Define the print job on the 'Job Setup / Notes' tab.
Page 46
46 Chapter 2 Prepare and print
Use Océ DocSetter and Océ PRISMAproduction to create and print a document with tab
[36]
5. Define the print job on the 'Settings' tab.
[37]
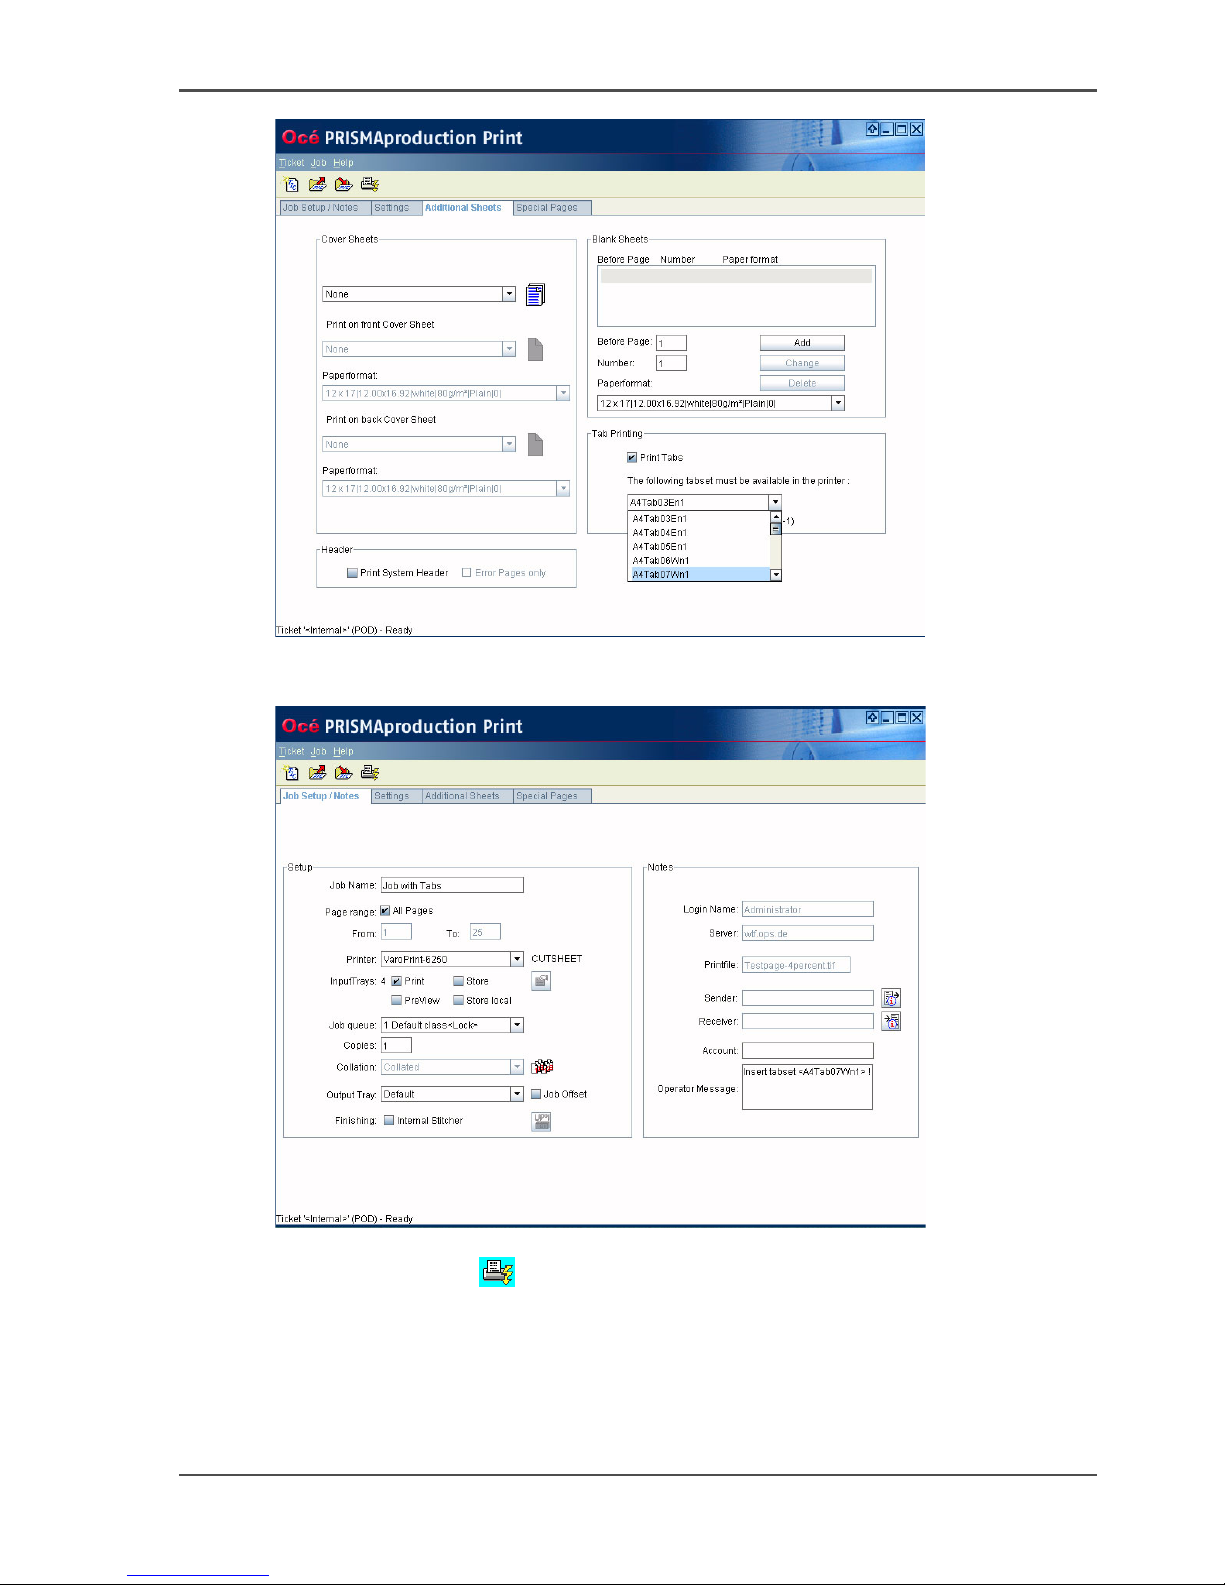
6. Check the box for 'Print Tabs' on the 'Additional Sheets' tab. Define the tab sheet
media.
Page 47
47
Use Océ DocSetter and Océ PRISMAproduction to create and print a document with tab
[38]
7. Next, an operator message on the 'Job Setup / Notes' tab asks you to insert the tab
sheet media.
[39]
8. Place the required tab paper in any input tray.
9. Click the print icon to print the tab sheet file.
Page 48

48 Chapter 2 Prepare and print
Define media in Océ PRISMAproduction
Define media in Océ PRISMAproduction
Introduction
Task for admin, service
Océ PRISMAproduction® Version 3.10 and higher allow the use of media types with
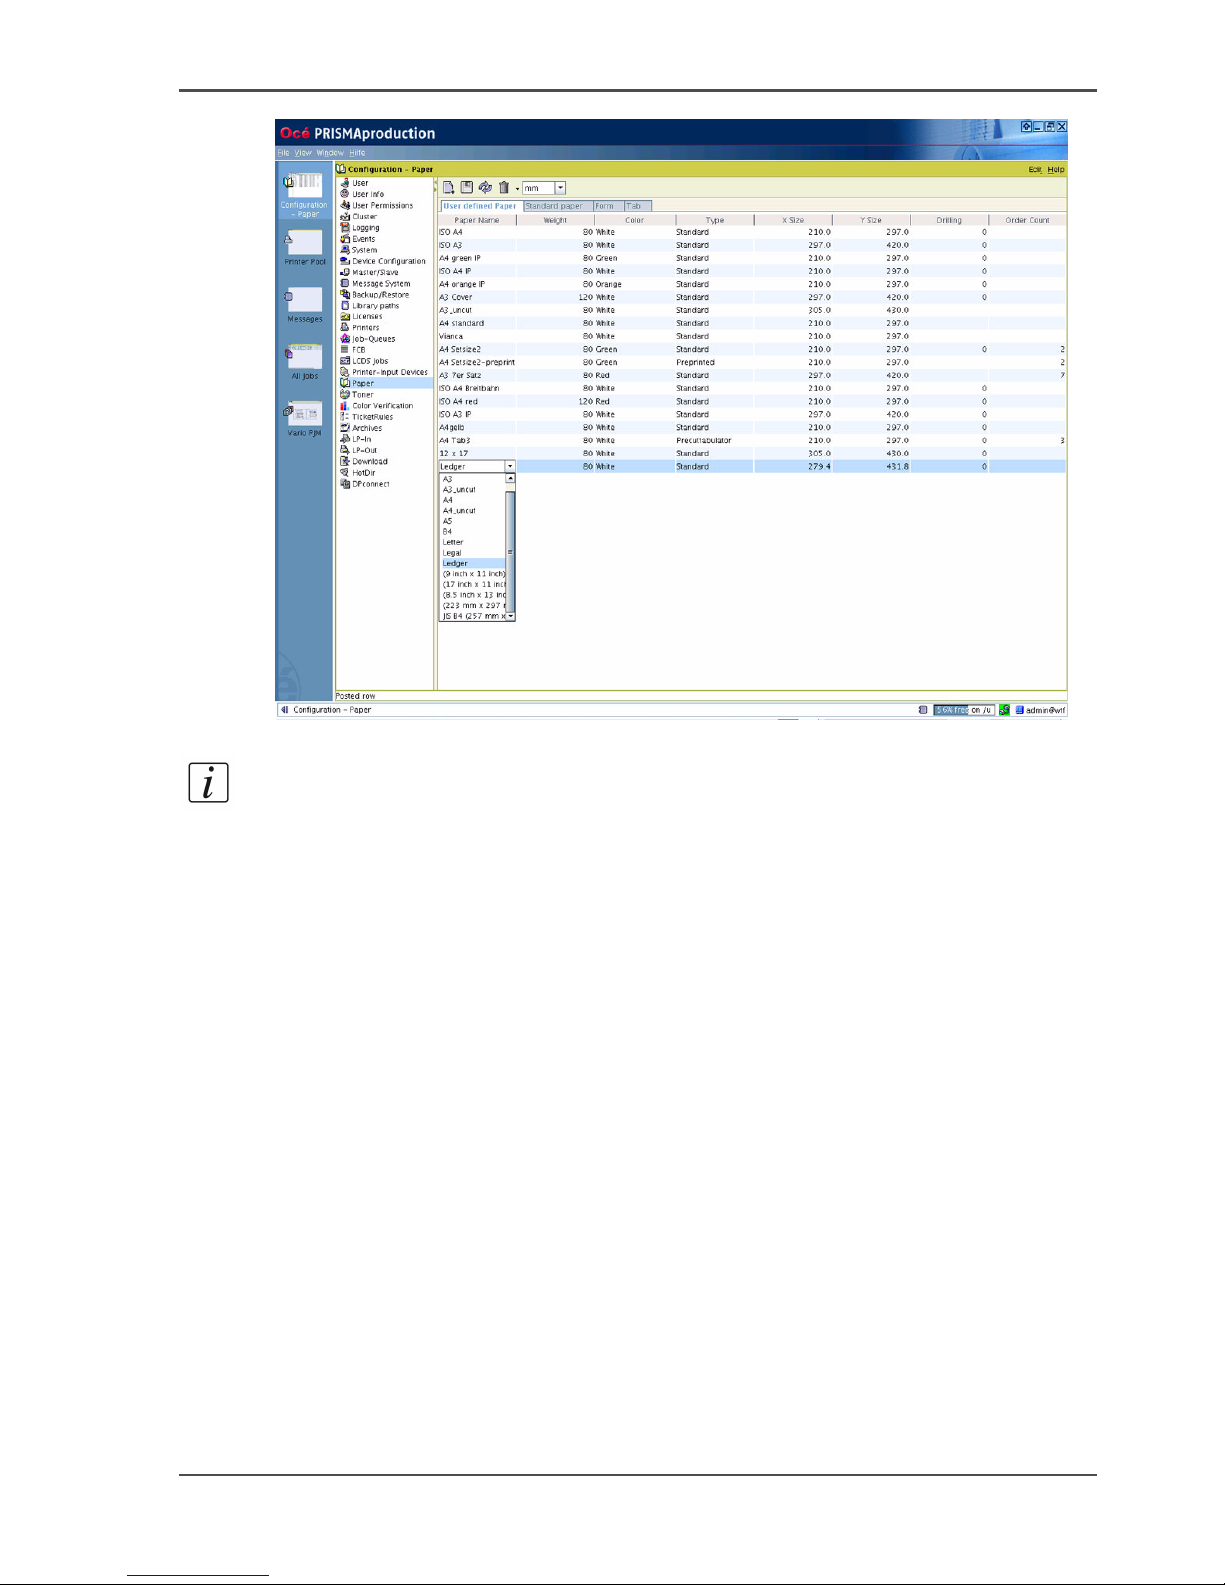
specific attributes. These media types are not standard media types, but 'User defined
Paper' types. You must define or add these media types to the central database with
configuration data first. The media types then become available for use in print jobs.
You can add the user defined media types in the 'Paper' menu of the 'Configuration'
workspace. Only the users 'admin' and 'service' are authorized to add the user defined
media types.
Before you begin
If you did not configure the 'Configuration' view, you must do the following.
1. Open the Océ PRISMAproduction
®
Explorer.
2. Click 'View'.
3. Click 'Add Workspace' --> 'Configuration'.
All configuration applications appear, one application below the other application,
in a tree- like view. You can now click a configuration application to open the
application.
Note: When you right-click an application, a menu appears with functions that
allow you to customize the menu of the application.
Add media
1. Open the Océ PRISMAproduction
®
Explorer.
2. Click 'View' --> 'Configuration'.
3. Click the 'Paper' menu.
4. Click the 'User defined Paper' tab.
5. Define the following.
■ 'Paper Name'
■ 'Weight'
■ 'Color'
■ 'Type' ( for example standard, foil, preprinted)
■ 'X Size'
■ 'Y Size'
■ 'Drilling'
■ 'Order Count', if applicable.
Refer to your Océ PRISMAproduction
®
documentation for more information.
Page 49
49
Define media in Océ PRISMAproduction
[40]
Note: Enter the sizes for A3 media always as follows.
X: 297 mm
Y: 420 mm
Result
You can now click 'View' --> 'Configuration''Printer' 'Input Devices' to display the
user defined media types.
Page 50

50 Chapter 2 Prepare and print
Print Microsoft Office documents
Use the Océ VarioPrint® 6160/6200/6250
printer driver
Print Microsoft Office documents
Introduction
If you want use the Océ VarioPrint
®
6160/6200/6250 as a central departmental
printer in a network that runs on a Microsoft Windows
®
Operating system, read the
information below.
This section explains how to print a document that you created with Microsoft
Office
®
.
Before you begin
Install and configure the Océ VarioPrint
®
6160/6200/6250 printer driver on all PCs
in your network.
Required tool
The Océ VarioPrint
®
6160/6200/6250 printer driver for Microsoft Windows®
environments.
Note: The Microsoft Windows
®
printer driver includes a page programming
function (see ‘Use the 'Page programmer'’ on page 52)
Create a job
1. Open the Microsoft Office
®
application.
2. Open your document.
3. Select 'File' -> 'Print'.
The 'Print' menu is displayed.
4. Select the Océ VarioPrint
®
6160/6200/6250 in the 'Printer name' drop-down list.
5. Select 'Properties'.
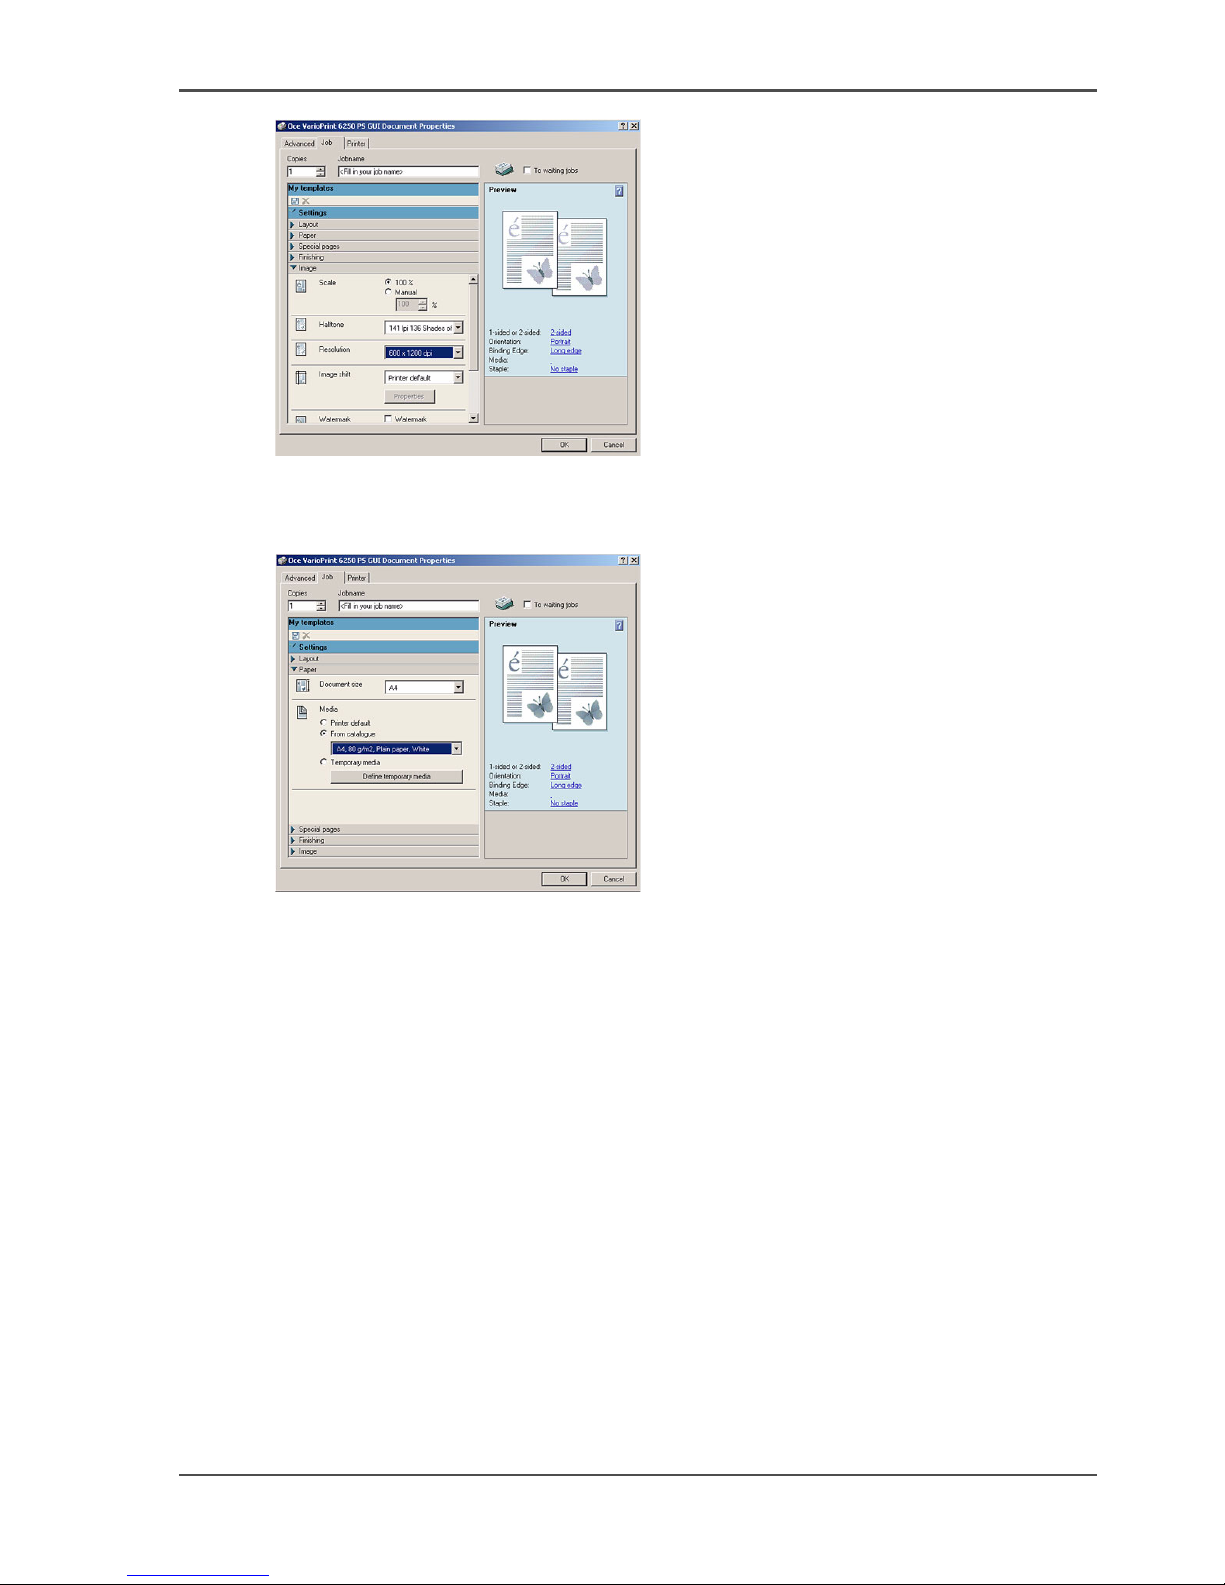
The settings on the 'Job' tab are now displayed together with several templates. If not,
click the 'Job' tab.
Note: If you use a certain group of setting values often, you can store the group as
a template.
6. Click a setting, for example 'Layout', 'Paper', or 'Finishing' to display and change the
values.
Page 51
51
Print Microsoft Office documents
[41]
7. Click the 'OK' button.
8. In the 'Print' dialog, select the final settings, such as the number of copies and the
'Page range'.
[42]
9. Click the 'OK' button.
Result
The Océ VarioPrint
®
6160/6200/6250 will print the document.
Page 52

52 Chapter 2 Prepare and print
Use the 'Page programmer'
Use the 'Page programmer'
Introduction
The Océ VarioPrint
®
6160/6200/6250 printer driver for Microsoft Windows®
includes a 'Page programmer' function which enables you to program different parts
of documents in different ways. You can then print or store the different parts as one
document.
Before you begin
Check that the 'Page programmer' is enabled, in the following way.
1. Click 'Start' --> 'Settings' --> 'Printers'.
Note: In Windows XP
®
, click 'Printers and Faxes' instead of 'Printers'.
2. Select the Océ VarioPrint
®
6160/6200/6250 and click the right mouse button.
3. Select 'Properties' from the drop-down menu.
4. Click the Océ VarioPrint
®
6160/6200/6250 tab.
5. Check that the check box 'Enable page programmer' is marked. If not, check the
check box.
6. Click 'Apply' and then 'OK'.
Create a job
1. Open the Microsoft Office
®
application.
2. Open your document.
3. Select 'File' -> 'Print'.
The 'Print' menu is displayed.
4. Select the Océ VarioPrint
®
6160/6200/6250 in the 'Printer name' drop-down list.
5. Select 'Properties'.
The settings on the 'Job' tab are now displayed together with several templates. If not,
click the 'Job' tab.
6. Select 'Special pages' -> 'Page programmer'.
Next the 'Page programmer' window appears. This window contains a screen with
your job and several icons, grouped in a toolbar. To see the meaning of an icon, point
to the icon. The screen then shows the function of the icon.
7. Select your job in the 'Page programmer'.
8. Enter the page range for each document part or chapter in the 'Special page range(s)'
box separately. Click the 'Add' button after entering each page range.
9. Select a document part and use the icons on the toolbar to define the settings for that
part. Do the same for the other document parts.
10. Select all document parts and click the 'Combine page ranges' button.
Page 53

53
Use the 'Page programmer'
The 'Combine page ranges' groups all page ranges with the same settings. This
function makes your page programs more organized.
11. Click 'OK'.
You now return to the 'Job' tab.
12. Define the other settings and click 'OK' to send the document to the Océ VarioPrint
®
6160/6200/6250.
Page 54

54 Chapter 2 Prepare and print
Program a job with tab sheets
Program a job with tab sheets
Introduction
The 'Page programmer' enables you to program parts of documents in such a way
that each different part is processed differently. You can use the 'Page programmer'
for example to insert tab sheets into your document. There is no need to count the
pages of your document any more. The 'Page programmer' keeps track of the number
of pages and inserts the tab sheets at the correct places.
This section gives an example of how to program a job with tab sheets.
The job requirements of this example are the following.
You want to insert tab sheets at defined points of a previously prepared document,
for example a document that consists of 80 A4 pages. The document is divided into
5 chapters. You want to insert a tab sheet before each chapter.
Before you begin
Check that the 'Page programmer' is enabled, in the following way.
1. Click 'Start' --> 'Settings' --> 'Printers'.
Note: In Windows XP
®
, click 'Printers and Faxes' instead of 'Printers'.
2. Select the Océ VarioPrint
®
6160/6200/6250 and click the right mouse button.
3. Select 'Properties' from the drop-down menu.
4. Click the Océ VarioPrint
®
6160/6200/6250 tab.
5. Check that the check box 'Enable page programmer' is marked. If not, check the
check box.
6. Click 'Apply' and then 'OK'.
Program a job with tab sheets
1. Open the Microsoft Office
®
application.
2. Open your document.
3. Select 'File' --> 'Print'.
4. Select the Océ VarioPrint
®
6160/6200/6250 in the 'Printer name' drop-down list and
then 'Properties'.
5. Select 'Special pages' --> 'Page programmer'.
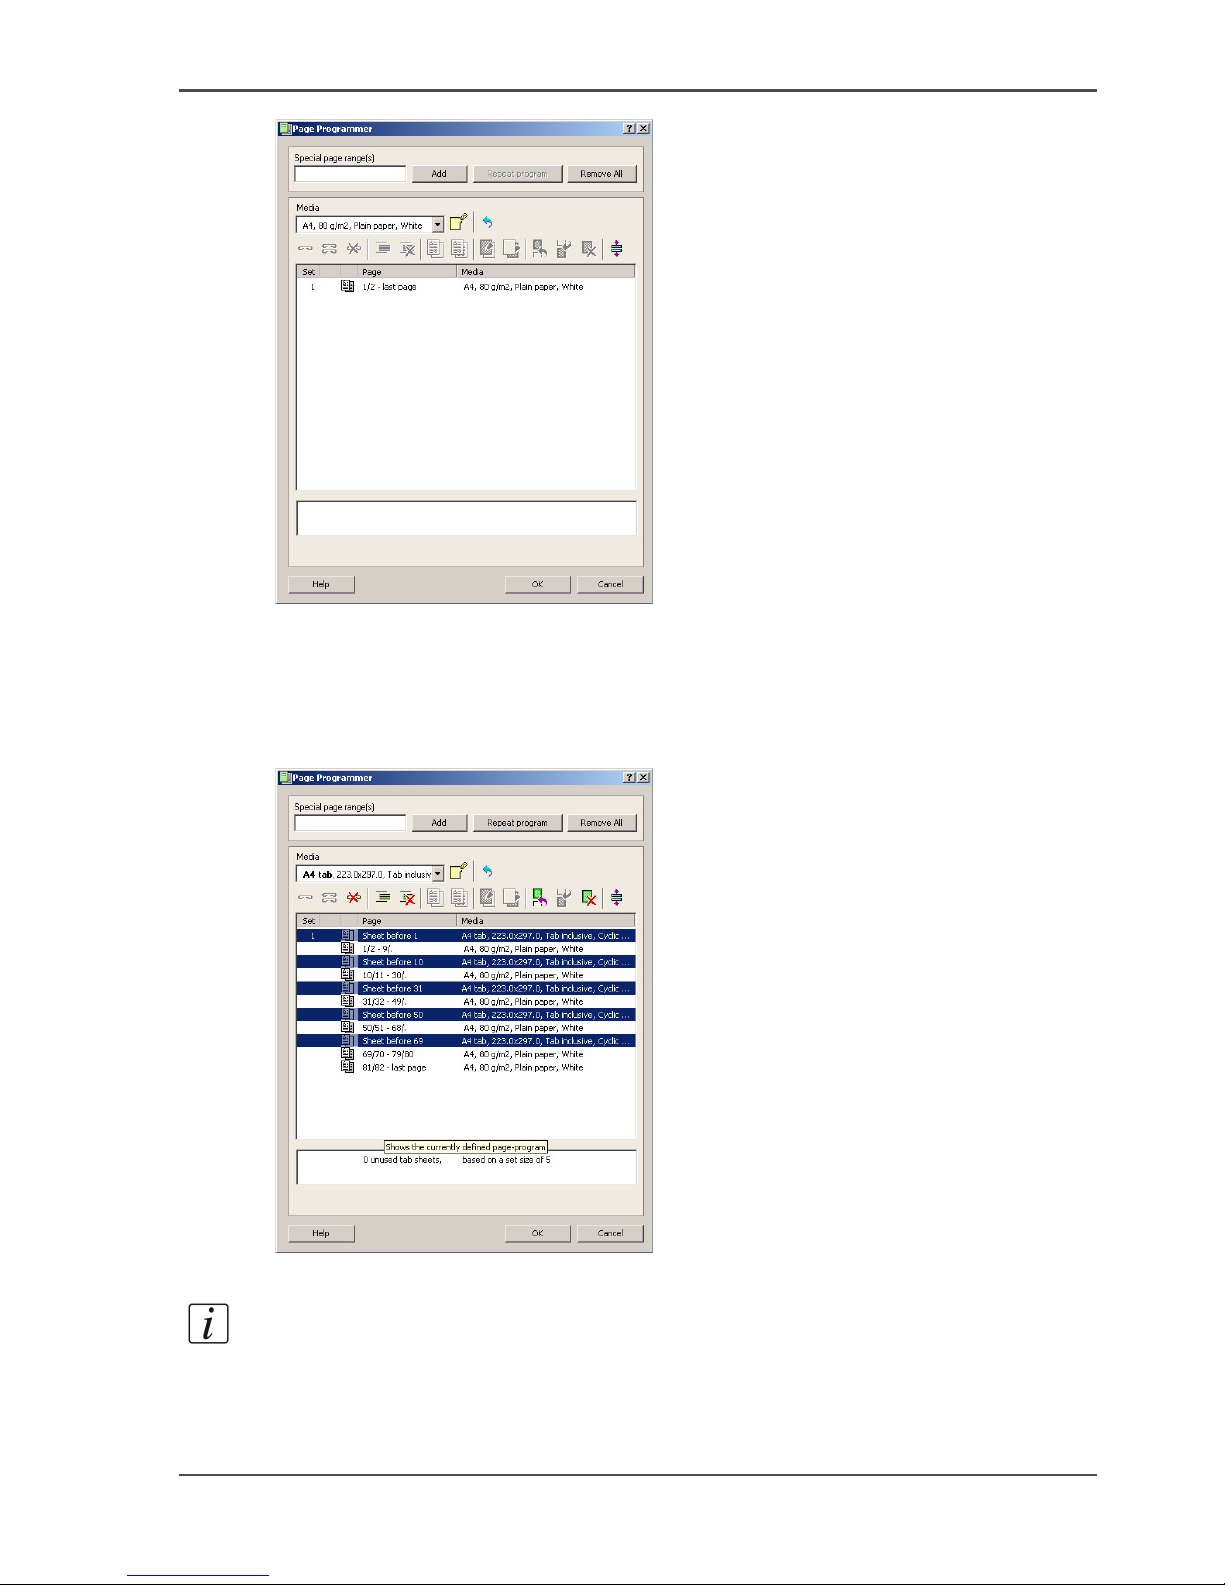
6. In the 'Page programmer', select your job (1/2 - last page). Click the 'No staple' icon
on the toolbar.
7. Deselect your job.
Page 55
55
Program a job with tab sheets
[43]
[43] The Page Programmer. The job is deselected.
8.
Now select your tab sheet type in the 'Media' drop-down menu.
9. Enter the page ranges of your chapters in the 'Special page range(s)' box.
10. Click the 'Add sheet before' button in the toolbar.
The following is the result.
[44]
[44] A page program with tab sheets
Note: You can also define the page ranges first and then click the 'Add' button. After
the page ranges are inserted, you can select each chapter separately and add a tab
sheet with the 'Add sheet before' button.
Page 56

56 Chapter 2 Prepare and print
Program a job with tab sheets
11. Select all document parts and click the 'Combine page ranges' button.
12. Edit the layout and the texts on the tab sheets, as described in the procedure below.
Edit the tab sheets
1. Click the yellow button at the right-hand side of the 'Media' drop-down menu in the
'Page programmer' to open the 'Tab caption editor'.
The 'Tab caption editor' enables you to define the layout of the tab sheets and the text
on the tab sheets. The editor shows the results of your input directly.
2. Select the values for the displayed settings, for example 'Set size', 'Alignment' and
'Font'.
3. Click the plus sign in the captions section of the screen to add the captions for your
tab sheets.
4. Click the text in the column that is named 'Caption' to enter the text for each of your
tab sheets separately.
5. Click 'OK' three times to return to the 'Print' window.
6. Click the 'OK' button to send the print job to the Océ VarioPrint
®
6160/6200/6250.
Page 57

57
Print a made-ready file
Print a made-ready file
Introduction
Made-ready files are files that contain all necessary print information, such as layout
and required media, for example PostScript® files.
If you frequently print many made-ready files, you can create a batch file for the
'Send To' menu in the Microsoft Windows
®
Explorer to help you save time.
Create a batch file
1. Create an empty .txt file in Microsoft Word
®
, Microsoft Notepad® or Microsoft
Word Pad
®
.
2. Insert the following text string: Lpr -Pp -Svp6250 %1
In the line above, the string after -S is the hostname of the printer.
3. Store the file with the extension ".bat" to the destination: C:\Documents and
Settings\<user>\SendTo
Your file name is for example "Send to VP6250.bat".
Print the made-ready file
1. Copy the PostScript
®
job to a directory of your choice.
2. Right-click the file.
3. Select 'Send To' in the menu that appears.
4. Select 'Send to VP6250.bat'.
Result
The Océ VarioPrint
®
6160/6200/6250 will print the document.
Page 58

58 Chapter 2 Prepare and print
Configure the Océ VarioPrint® 6160/6200/6250 as Xerox® DocuTech 61xx emulation
Use the Océ VarioPrint® 6160/6200/6250
in Xerox environments
Configure the Océ VarioPrint® 6160/6200/6250 as Xerox®
DocuTech 61xx emulation
Introduction
The Océ VarioPrint
®
6160/6200/6250 supports the Document Scan and Makeready
application of the Xerox DigiPath
®
Production Software. To link the Océ
Va ri o Pr i nt
®
6160/6200/6250 and the Xerox® DigiPath® Production Software, Océ
developed the Océ DPlink
®
software as an interface between the two systems.
Before you can send print jobs from the DigiPath
®
Document Scan and Makeready
application to the Océ VarioPrint
®
6160/6200/6250, you must add the Océ
Va ri o Pr i nt
®
6160/6200/6250 to the list of printers. The following procedure
describes how to add the Océ VarioPrint
®
6160/6200/6250 to the DigiPath®
Document Scan and Makeready application.
The Océ DPlink
®
interface works with Xerox® Digipath® 1.2, 2.0, 2.1, 3.0 and
FreeFlow
™
2.0 and 4.0.
Required tool
Océ VarioPrint
®
6160/6200/6250 with Océ DPlink® installed.
Configure the Océ VarioPrint
®
6160/6200/6250 on Xerox® DigiPath
®
1. From the workstation, click "Start-Programs-Xerox DigiPath Production Software".
Select one of the following, depending on your version of DigiPath
®
.
■ Printer Administration
■ Printer Setup.
2. The Servers and Connections window appears.
3. Click the 'Production Print' tab.
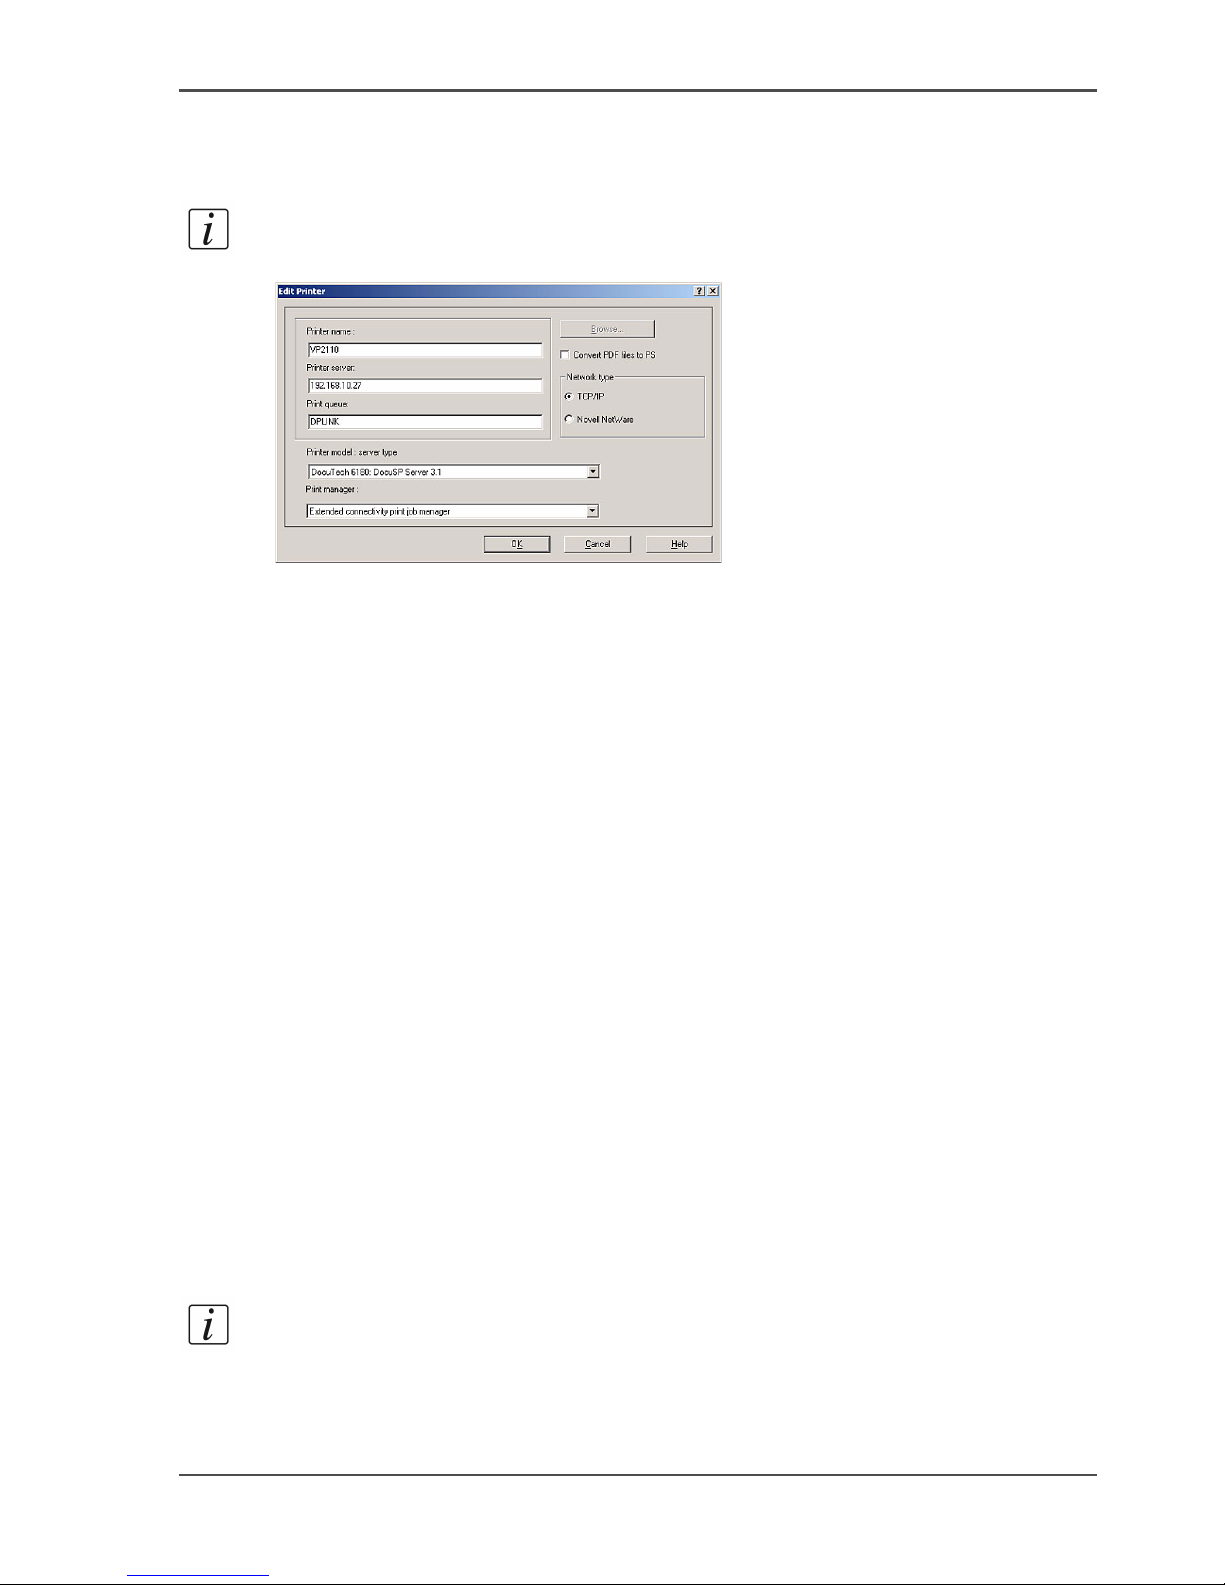
4. Click 'Add Printer'.
The Add Printer dialog box appears.
5. Enter a printer name in the 'Printer name' field. You can enter any name.
6. Enter the host name or IP address of the print server in the 'Printer server' field.
7. Enter the destination of the print jobs in the 'Print queue' field.
■ Select 'PPPprint' to send the jobs to the list of 'Scheduled jobs'.
■ Select 'PPPhold' to send the jobs to the list of 'Waiting jobs'.
Page 59
59
Configure the Océ VarioPrint® 6160/6200/6250 as Xerox® DocuTech 61xx emulation
8. Select the printer model and the server type in the 'Printer model' box.
You must select 'DocuTech 6180: DocuSP Server 2.1' or 'DocuTech 6180: DocuSP
Server 3.1'
Note: Make sure that you install the correct version. Other versions will not work.
[45]
9. Select 'Extended connectivity print job manager' in the 'Print manager' box.
10. Select your 'Network type': 'TCP/IP'.
11. Click 'OK'.
The printer is added to the Servers and Connections.
Configure the Océ VarioPrint
®
6160/6200/6250 on Xerox® FreeFlow
™
1. From the workstation, click "Start-Programs-Xerox DigiPath Production Software".
Select one of the following, depending on your version of DigiPath
®
.
■ Printer Administration
■ Printer Setup.
2. The Servers and Connections window appears.
3. Click the 'Production Print' tab.
4. Select 'Add Printer'.
The Add Printer dialog box appears.
5. Enter a printer name in the 'Printer name' field. You can enter any name.
6. Enter the host name or IP address of the print server in the 'Printer server' field.
7. Enter the destination of the print jobs in the 'Print queue' field.
■ Select 'PPPprint' to send the jobs to the list of 'Scheduled jobs'.
■ Select 'PPPhold' to send the jobs to the list of 'Waiting jobs'.
8. Select the printer model and the server type in the 'Printer model' box.
You must select 'DocuTech 6180: DocuSP Server 2.1' or 'DocuTech 6180: DocuSP
Server 3.1'.
Note: Make sure that you install the correct version. Other versions will not work.
Page 60
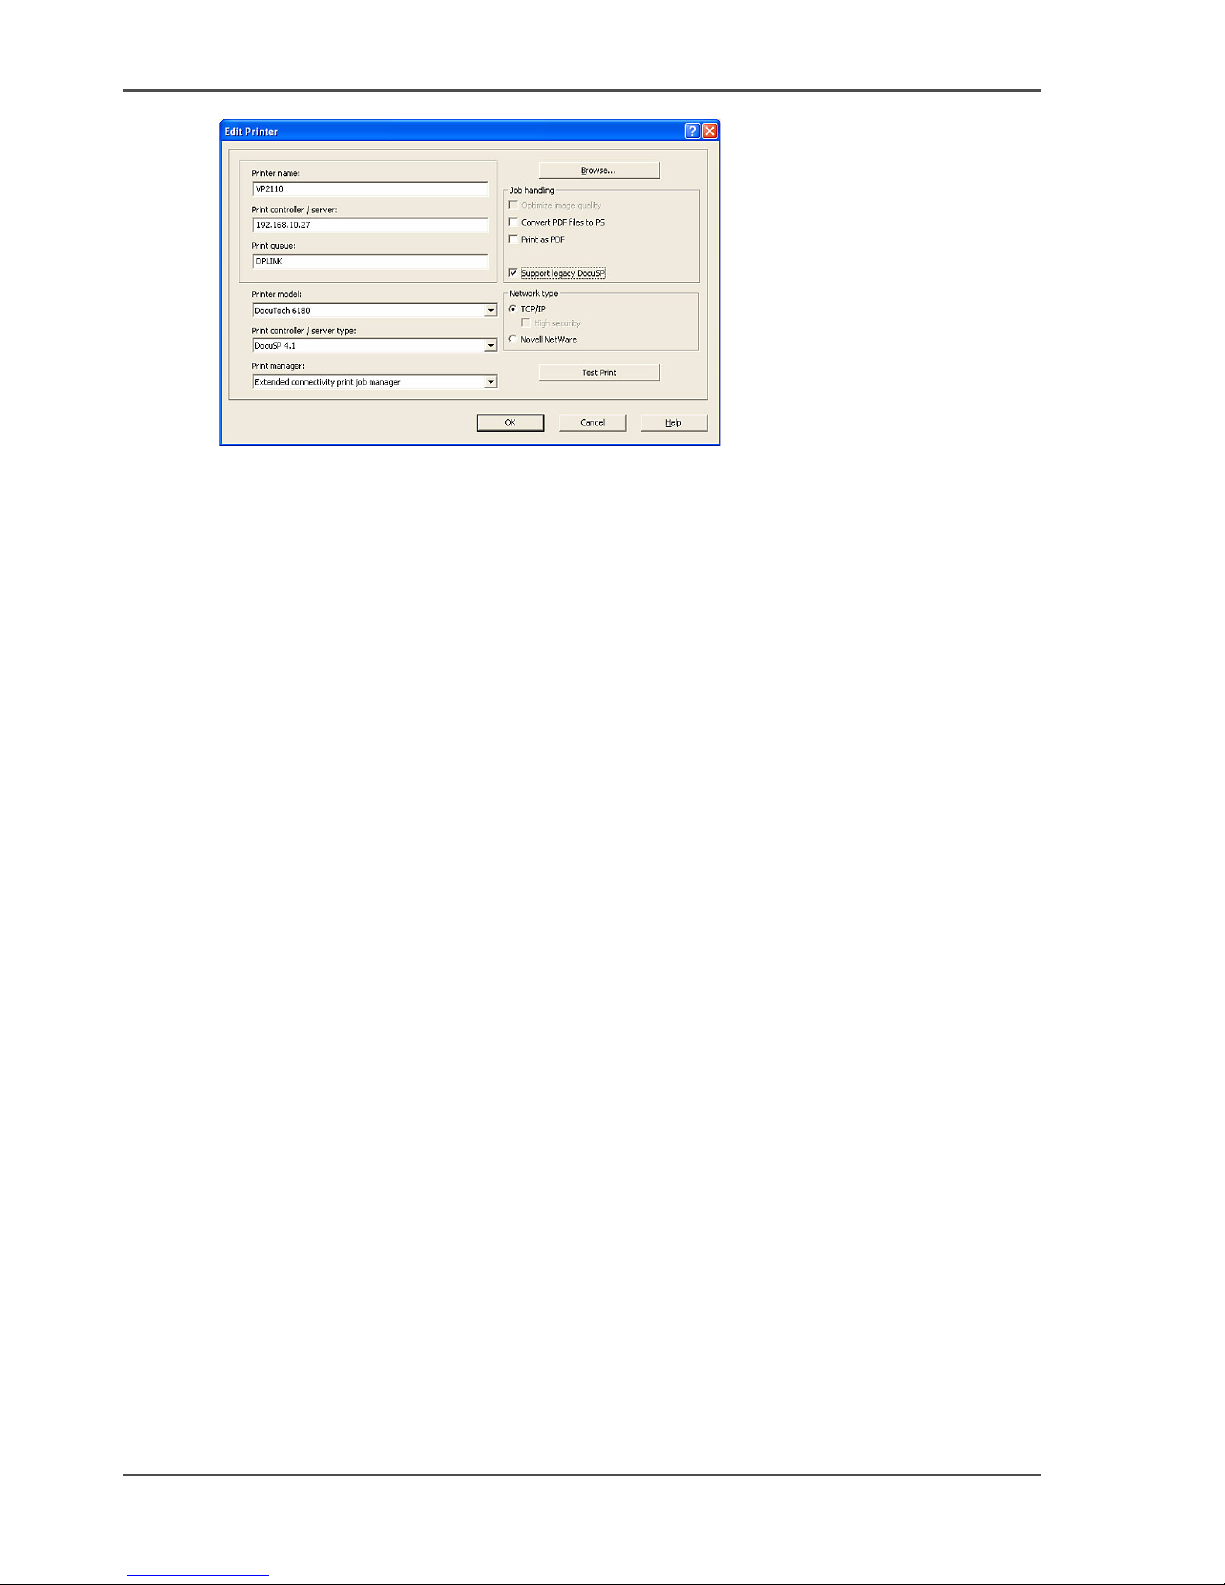
60 Chapter 2 Prepare and print
Configure the Océ VarioPrint® 6160/6200/6250 as Xerox® DocuTech 61xx emulation
[46]
9. Select 'Extended connectivity print job manager' in the 'Print manager' box.
10. Check the 'Support legacy DocuSP' box.
11. Select your 'Network type': 'TCP/IP'.
12. Click 'OK'.
The printer is added to the Servers and Connections.
Page 61
61
Use Océ DPconvert and Océ Doc Works to print Xerox RDO files
Use Océ DPconvert and Océ Doc Works to print Xerox RDO
files
Introduction
The Océ PRISMA
®
architecture includes the Océ DPconvert® software. Together
with Océ Doc Works
®
, this software enables you to print Xerox® Raster Document
Object (RDO) files on the Océ VarioPrint
®
6160/6200/6250.
RDO files contain extensive 'Page program' information about tabs and stapling, for
example. The Océ DPconvert
®
software enables you to automate the production of
these documents in an Océ environment in the same way as in a Xerox
®
environment.
RDO is the Xerox
®
data format for print jobs. RDO files contain rastered print pages,
information about the print file, and device-specific information about the printer
and the post-processing methods.
The Océ DPconvert
®
software provides an easy-to-use converter for Xerox® RDO
files. The RDO files are converted into an Océ Doc Works
®
format. The processing
information (the job ticket) is also converted so that most of the automated workflow
is preserved. The only features not incorporated are those not supported by the
respective printer version.
Required tools
Océ VarioPrint
®
6160/6200/6250
Océ DPconvert
®
version 1.1 or higher
Océ Doc Works
®
V3.6.2
RDO print job
Convert RDO files
1. Open Océ DPconvert
®
.
2. Click 'File' --> 'Destination application'.
3. Make sure that Océ Doc Works
®
is defined as the 'Destination application'.
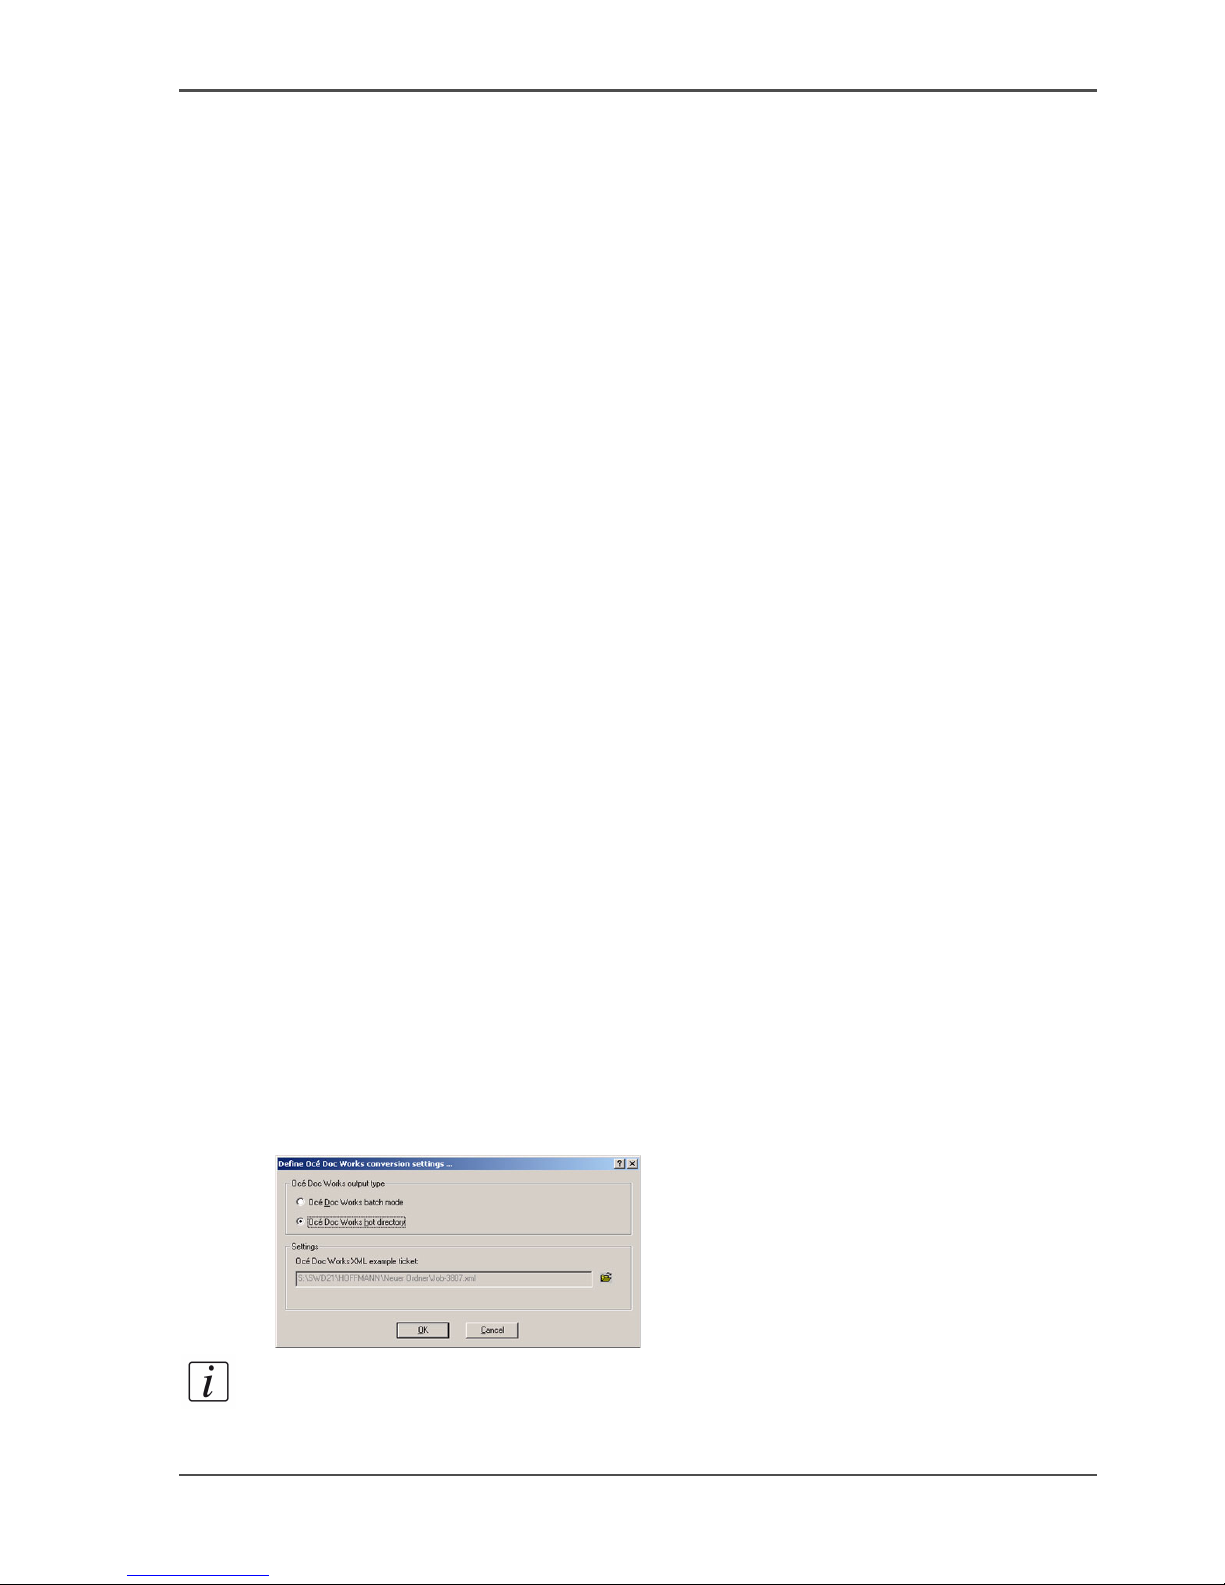
4. Select 'Define Océ Doc Works conversion settings' -> 'Océ Doc Works hot directory'.
[47]
Note: If you select this option, your converted job will be directly transferred to the
Océ Doc Works
®
operator console.
Page 62
62 Chapter 2 Prepare and print
Use Océ DPconvert and Océ Doc Works to print Xerox RDO files
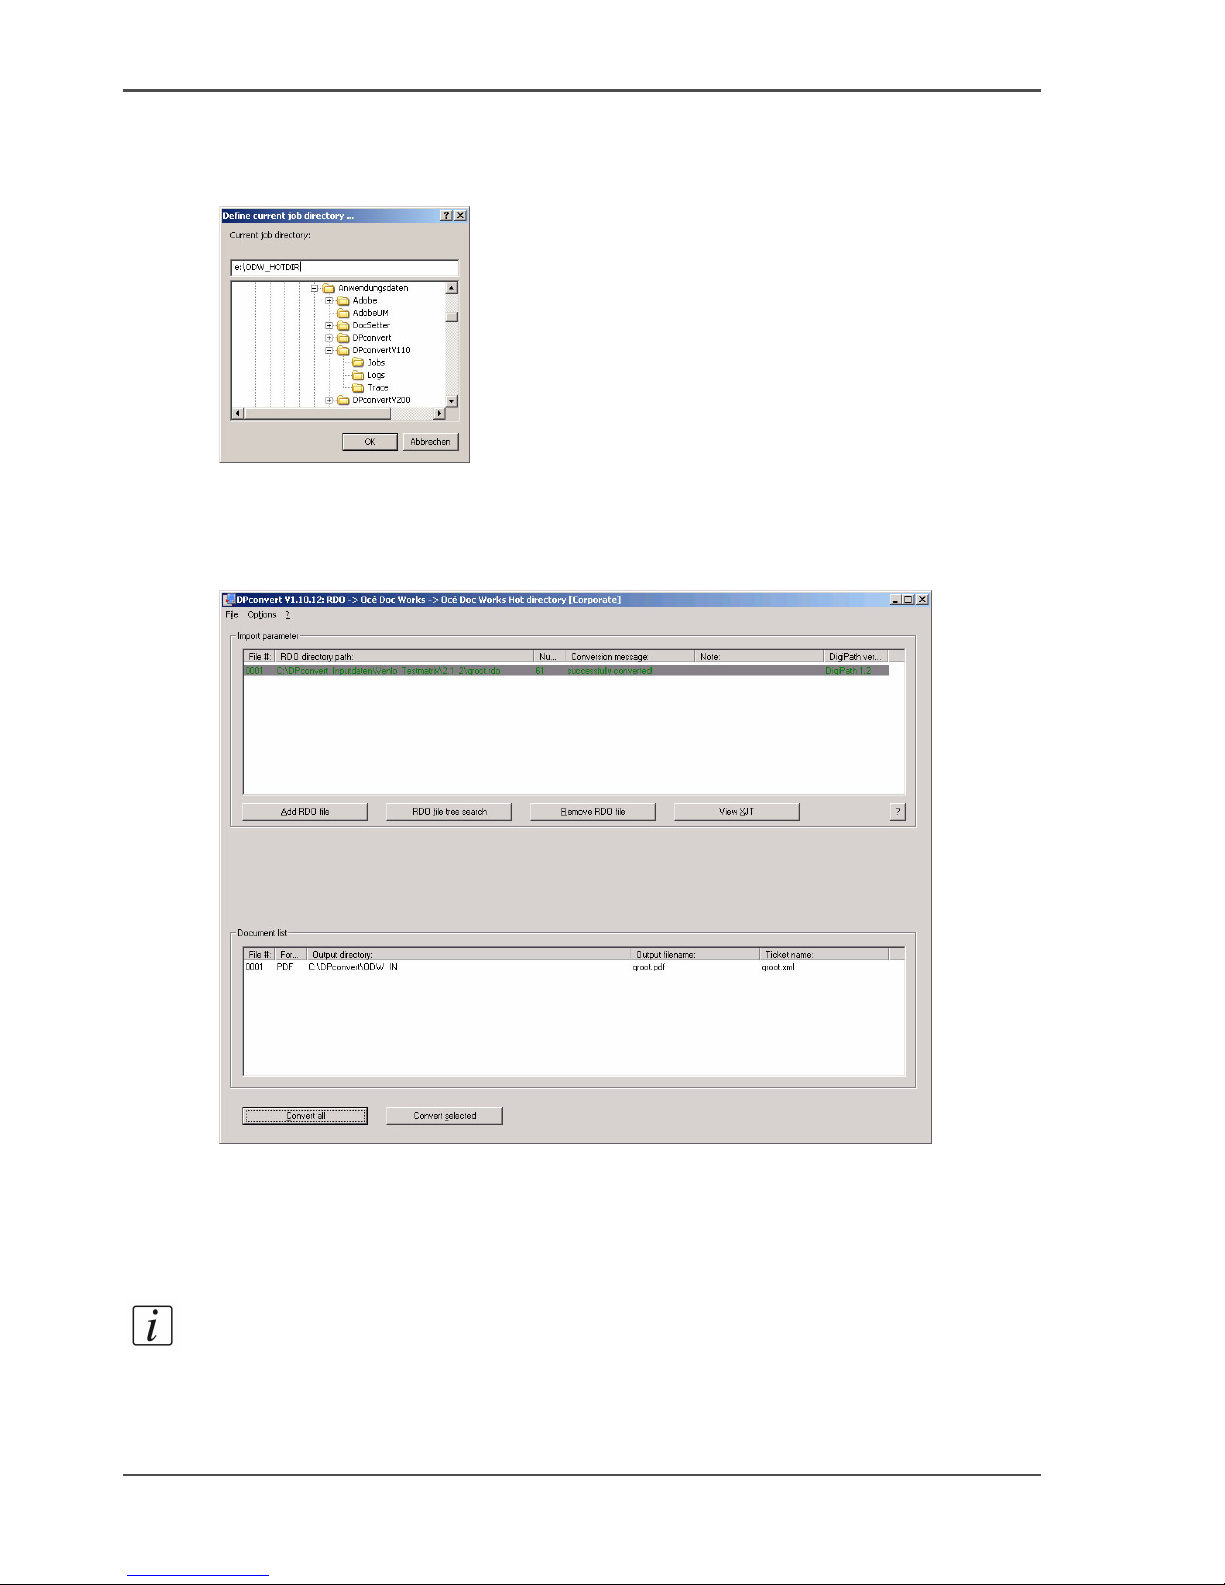
5. Click 'File' --> 'Destination directory'.
6. Make sure that the Océ Doc Works
®
hot directory is defined as the 'Destination
directory'.
[48]
7. Select the required RDO file and click the 'Insert RDO file' button.
8. Click the 'Convert all' or 'Convert Selection' button to start the conversion.
9. The files are now converted and saved to the target directory as Océ Doc Works
®
files.
[49]
Print the document
1. Check whether the job has arrived in the Océ Doc Works
®
operator console.
2. Check the job ticket and the other properties.
Note: Océ DPconvert 1.1 creates a PDF file in the Océ Doc Works
™
format. This
format can also be read by Océ PRISMAprepare.
3. Start the print job.
Page 63
63
Use Océ DPconvert and Océ DocSetter to print Xerox RDO files
Use Océ DPconvert and Océ DocSetter to print Xerox RDO
files
Introduction
Océ DPconvert
®
enables you to print Xerox® Raster Document Object (RDO) files
on the Océ VarioPrint
®
6160/6200/6250.
RDO files contain extensive 'Page program' information about tabs and stapling, for
example. The Océ DPconvert
®
software enables you to automate the production of
these documents in an Océ environment in the same way as in a Xerox
®
environment.
RDO is the Xerox
®
data format for print jobs. RDO files contain rastered print pages,
information about the print file, and device-specific information about the printer
and the post-processing methods.
The Océ DPconvert
®
software provides a converter for Xerox® RDO files that is
easy to use. The RDO files can be converted to an Océ DocSetter
®
format. Printing
is done via Océ DocSetter
®
and Océ PRISMAproduction®.
Required tools
Océ PRISMAproduction
®
version 3.10 or higher
Océ DocSetter
®
version 2.0 or higher
Océ DPconvert
®
version 1.1 or higher
Xerox Digipath
®
versions V1.0 or V2.0 or V2.1 (based on TIFF's)
Convert RDO files
1. Open Océ DPconvert
®
.
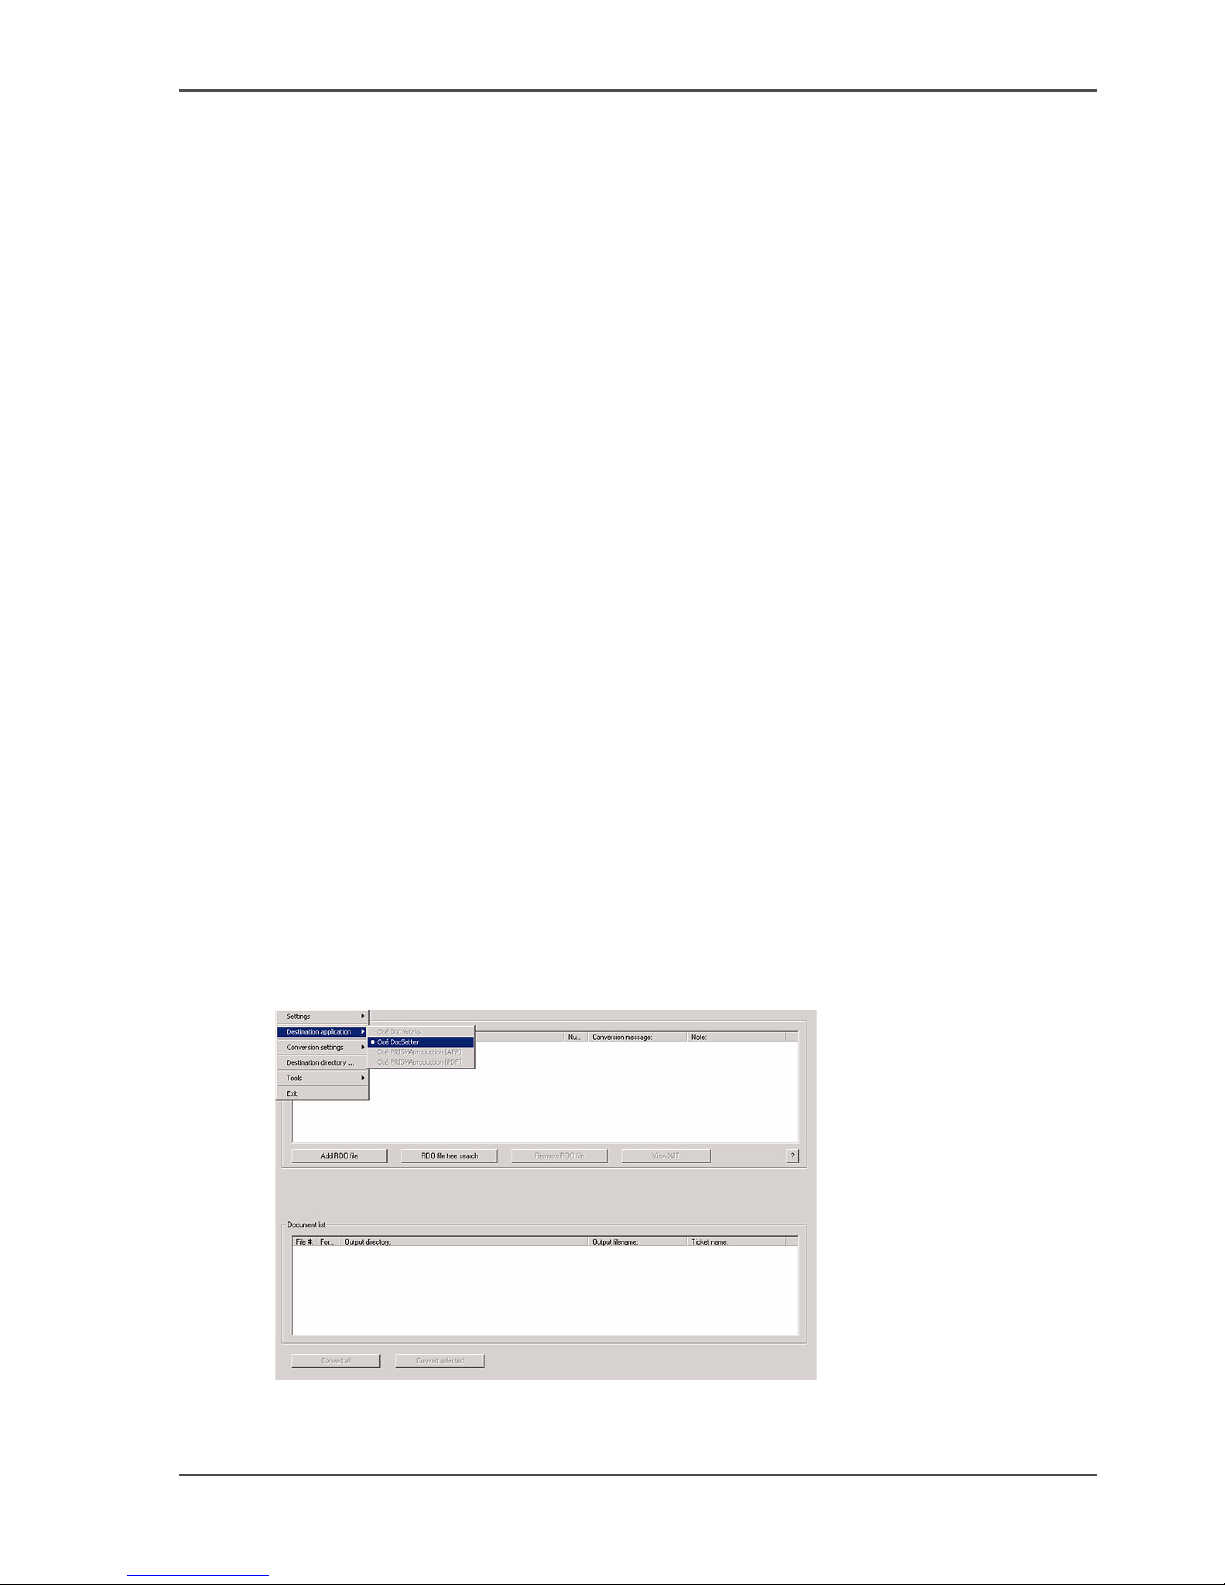
2. Click 'File' --> 'Destination application'.
[50]
3. Make sure that Océ DocSetter
®
is defined as the 'Destination application'.
Page 64
64 Chapter 2 Prepare and print
Use Océ DPconvert and Océ DocSetter to print Xerox RDO files
4. Click 'File' --> 'Destination directory'.
5. Make sure that the Océ DocSetter
®
hot directory is defined as the 'Destination
directory'.
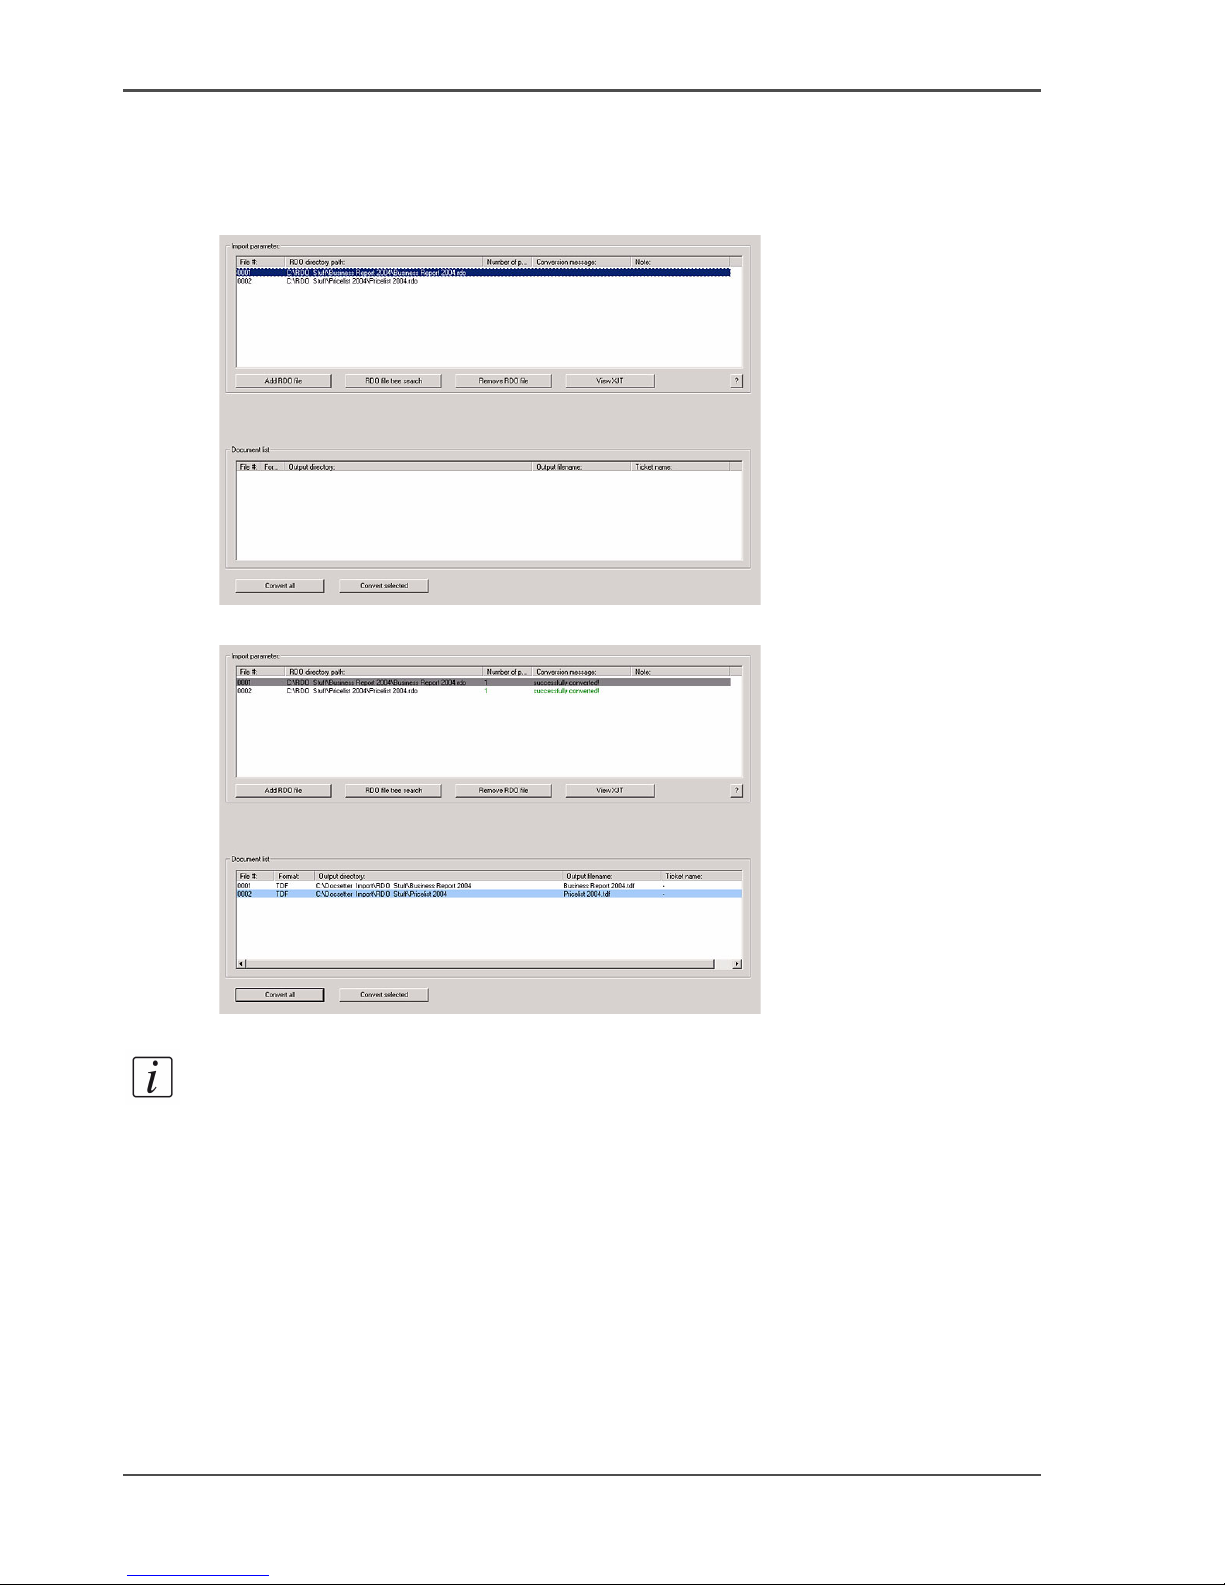
6. Select the required RDO file and click the 'Insert RDO file' button.
[51]
7. Click the 'Convert all' or 'Convert Selection' button to start the conversion.
[52]
Note: The files are now converted and saved to the target directory as Océ
DocSetter
®
files.
Print the document
1. Start Océ DocSetter
®
.
2. Click 'File'.
3. Select the destination directory for the data conversion.
4. Open the converted file.
5. Make the required changes to the converted document.
6. Print the document (see ‘Use Océ DocSetter and Océ PRISMAproduction to print
documents’ on page 41) .
Page 65

65
Chapter 3
Copy and scan
Page 66
66 Chapter 3 Copy and scan
Use the Océ DS60 scanner to make a copy
Use the Océ DS60 scanner to make a copy
Introduction
If you have the optional Océ DS60 scanner, the system supports a direct copy path
from the scanner to the Océ VarioPrint® 6160/6200/6250. Refer to the User Manual
of the Océ DS60 scanner for detailed scanner information.
This section gives an example of a copy job on the scanner. The example describes
the copying of several A4 pages via the direct copy path.
Make a copy
Note: Make sure that you first select a printer first and a copy template next. When
you select a copy template, you can no longer change the printer selection.
1. Put the originals face down and in readable form into the automatic document feeder
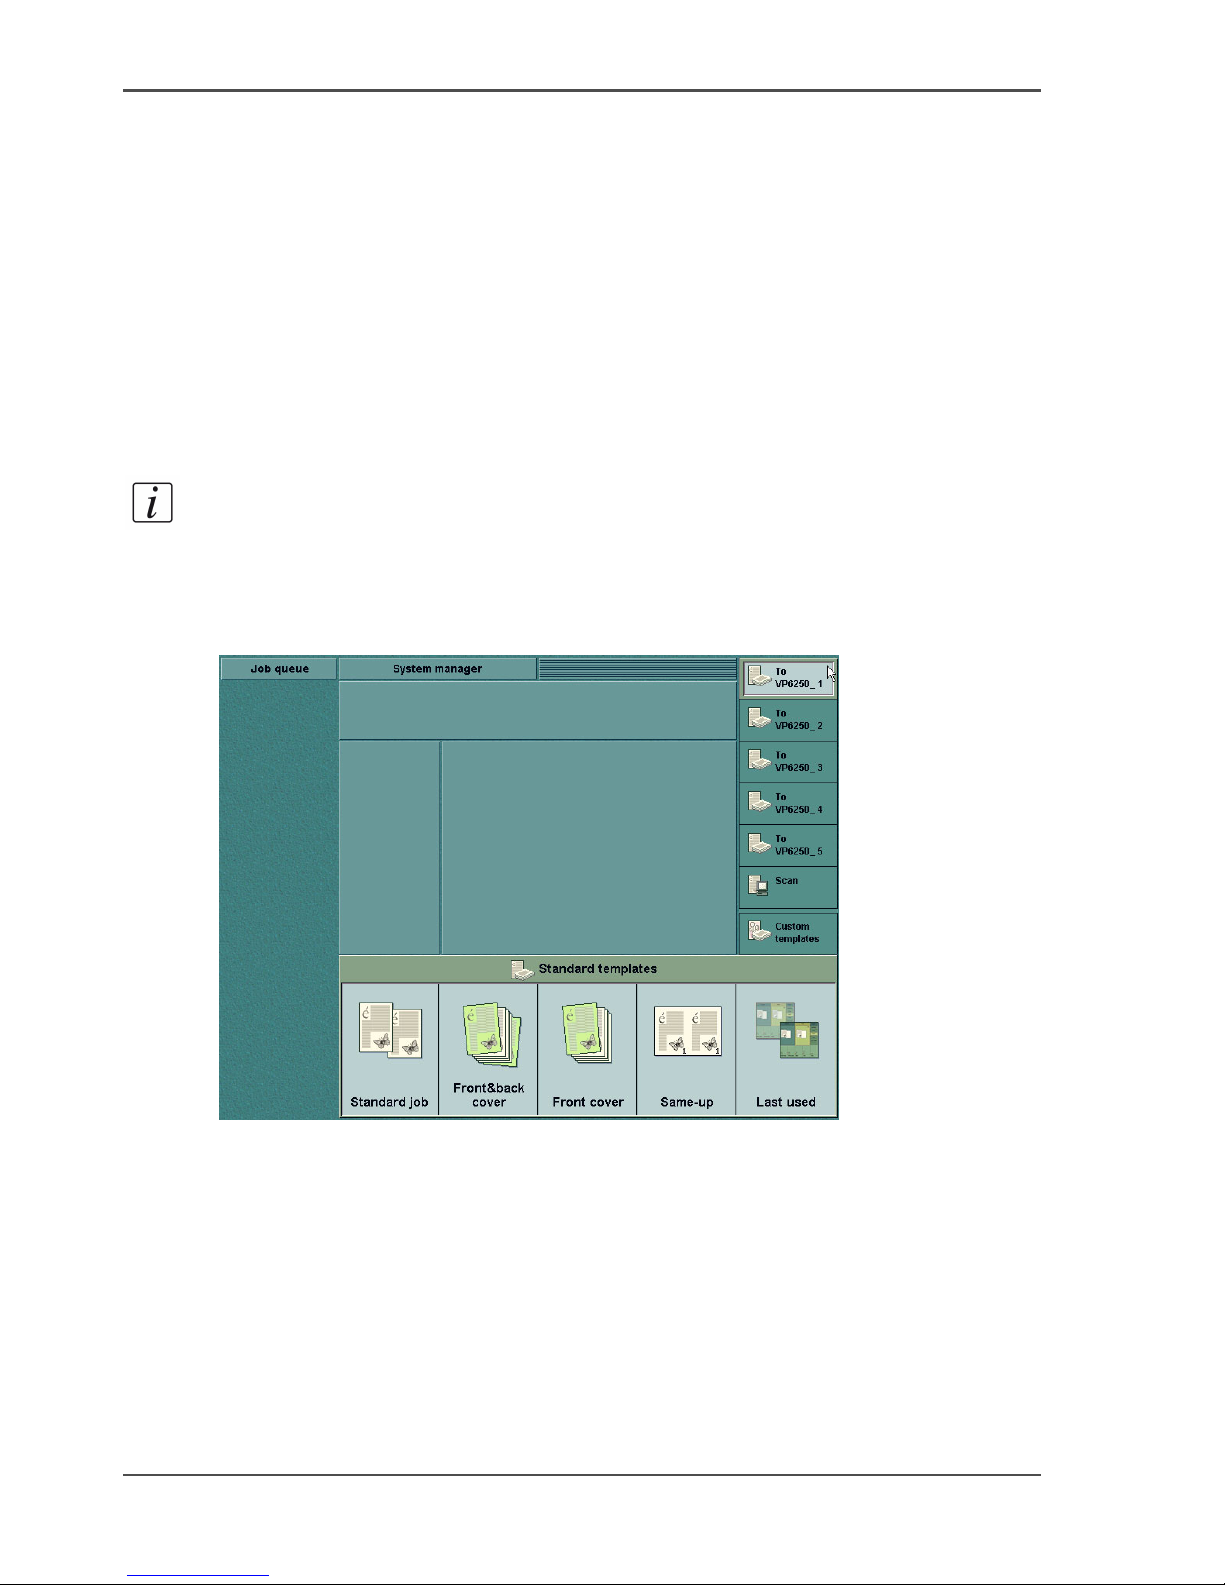
or on the glass plate.
2. Select the printer of your choice at the right-hand side of the operator panel.
[1]
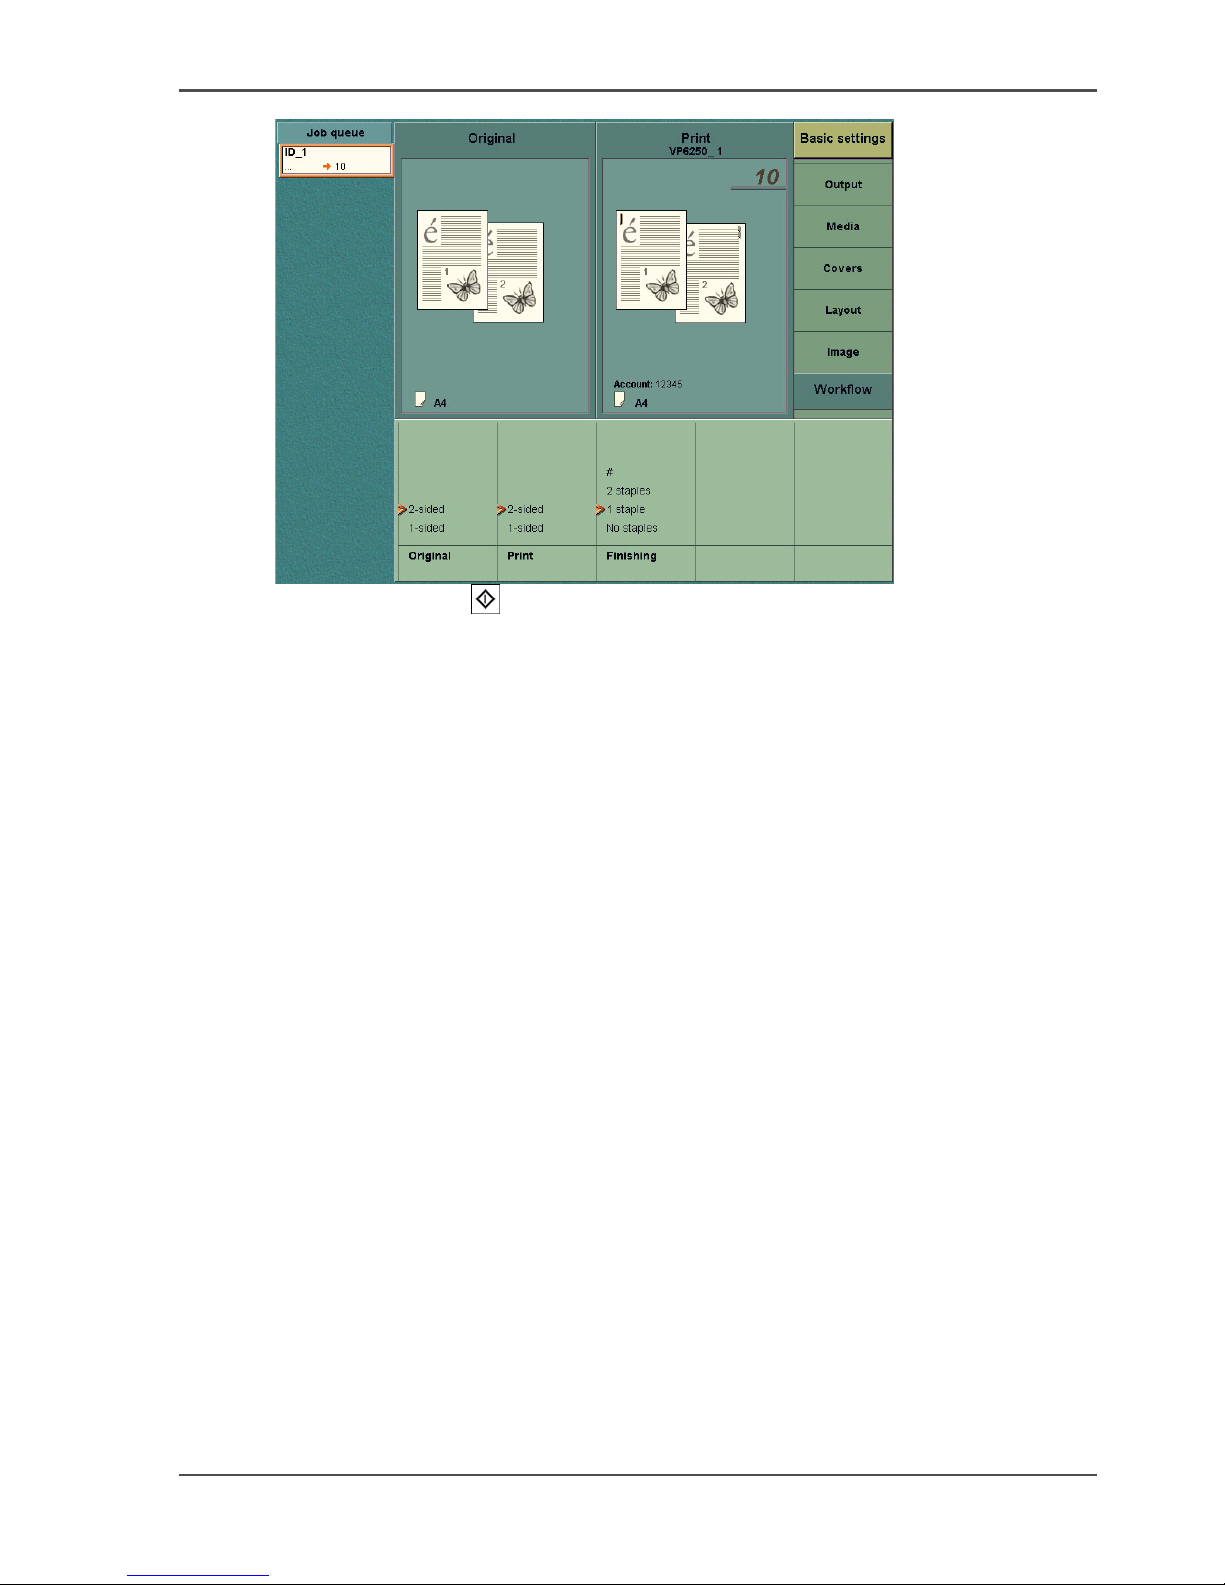
3. Select a copy template.
4. Define the settings for 'Original' and 'Print'.
5. Enter the number of prints and the 'Finishing' method (if you want to staple the jobs
and the optional finisher is available).
Page 67
67
Use the Océ DS60 scanner to make a copy
[2]
6. Press the Start key .
Result
1. The documents are scanned.
2. The scanned documents are sent directly to the list of 'Scheduled jobs' on the selected
printer.
3. The job is printed with the defined settings.
Page 68
68 Chapter 3 Copy and scan
Use the Océ DS60 scanner to scan, store and improve a document
Use the Océ DS60 scanner to scan, store and improve a
document
Introduction
The Océ DS60 scanner has a scan-to-file function. You can use the scan-to-file
function to scan a document now and print the document later.
You can also use the scan-to-file function to improve the quality of the originals. If
the quality of a set of originals is poor, you can scan the originals and store the scans
to improve the quality later. To optimize the documents and make the documents
ready for printing, you can use for example Océ DocSetter
®
(see ‘Use Océ DocSetter
to optimize the scanned documents’ on page 70).
This section gives an example of a scan-to-file job.
Required tools
An Océ DS60 scanner with scan-to-file license
A networked and configured scan server
If required, an application to customize the stored files
A print application to print the stored files.
Note: Refer to the online help of the Océ DS60 Settings Editor and to the user
manual of the Océ DS60 scanner for more information about the scan-to-file
function. The online help and the user manual also contain more information about
the configuration of the scan server.
Create a scan-to-file job
1. Put the originals face down and in readable form into the automatic document feeder
or on the glass plate.
2. Select 'Scan'.
3. Select a scan profile.
Note: If all settings are correct, you can now press the Start key . If you need to
adjust the job settings, continue with steps 4 to 6.
4. Select 'Edit...' to access the job settings for the scan-to-file job.
5. Define the settings for 'Original' and 'Scan'.
6. Press the Start key .
Page 69

69
Use the Océ DS60 scanner to scan, store and improve a document
Print a scan-to-file job
Note: The documents are scanned and sent to the destination folder of your scan
server as a (multi-page) PDF or a TIFF file, depending on the selected scan profile.
There are two ways to print the scanned documents.
1. Open the documents in a print application on a networked PC (see ‘Print Microsoft
Office documents’ on page 50).
2. Open the documents and print through the Océ PRISMA architecture (see ‘Use Océ
DocSetter and Océ PRISMAproduction to print documents’ on page 41).
Page 70

70 Chapter 3 Copy and scan
Use Océ DocSetter to optimize the scanned documents
Use Océ DocSetter to optimize the scanned documents
Introduction
You can use Océ DocSetter
®
to optimize the scanned documents before you print the
documents. For example, you can do the following.
■ Solve image defects on margins, for example due to punch holes in the originals
■ Remove noise in text and illustrations
■ Straighten documents when the original documents were creased.
Required tool
Océ DocSetter
®
version 2.0 or higher
Preparations
1. Start the Océ DocSetter
®
application.
2. Click the button to start the 'interactive guide'.
From the toolbar, you can also click 'View' - 'Controls' - 'interactive guide'.
Note: The 'interactive guide' helps you with the following tasks and offers
additional help and explanations. The additional information can be very helpful.
Optimize the image
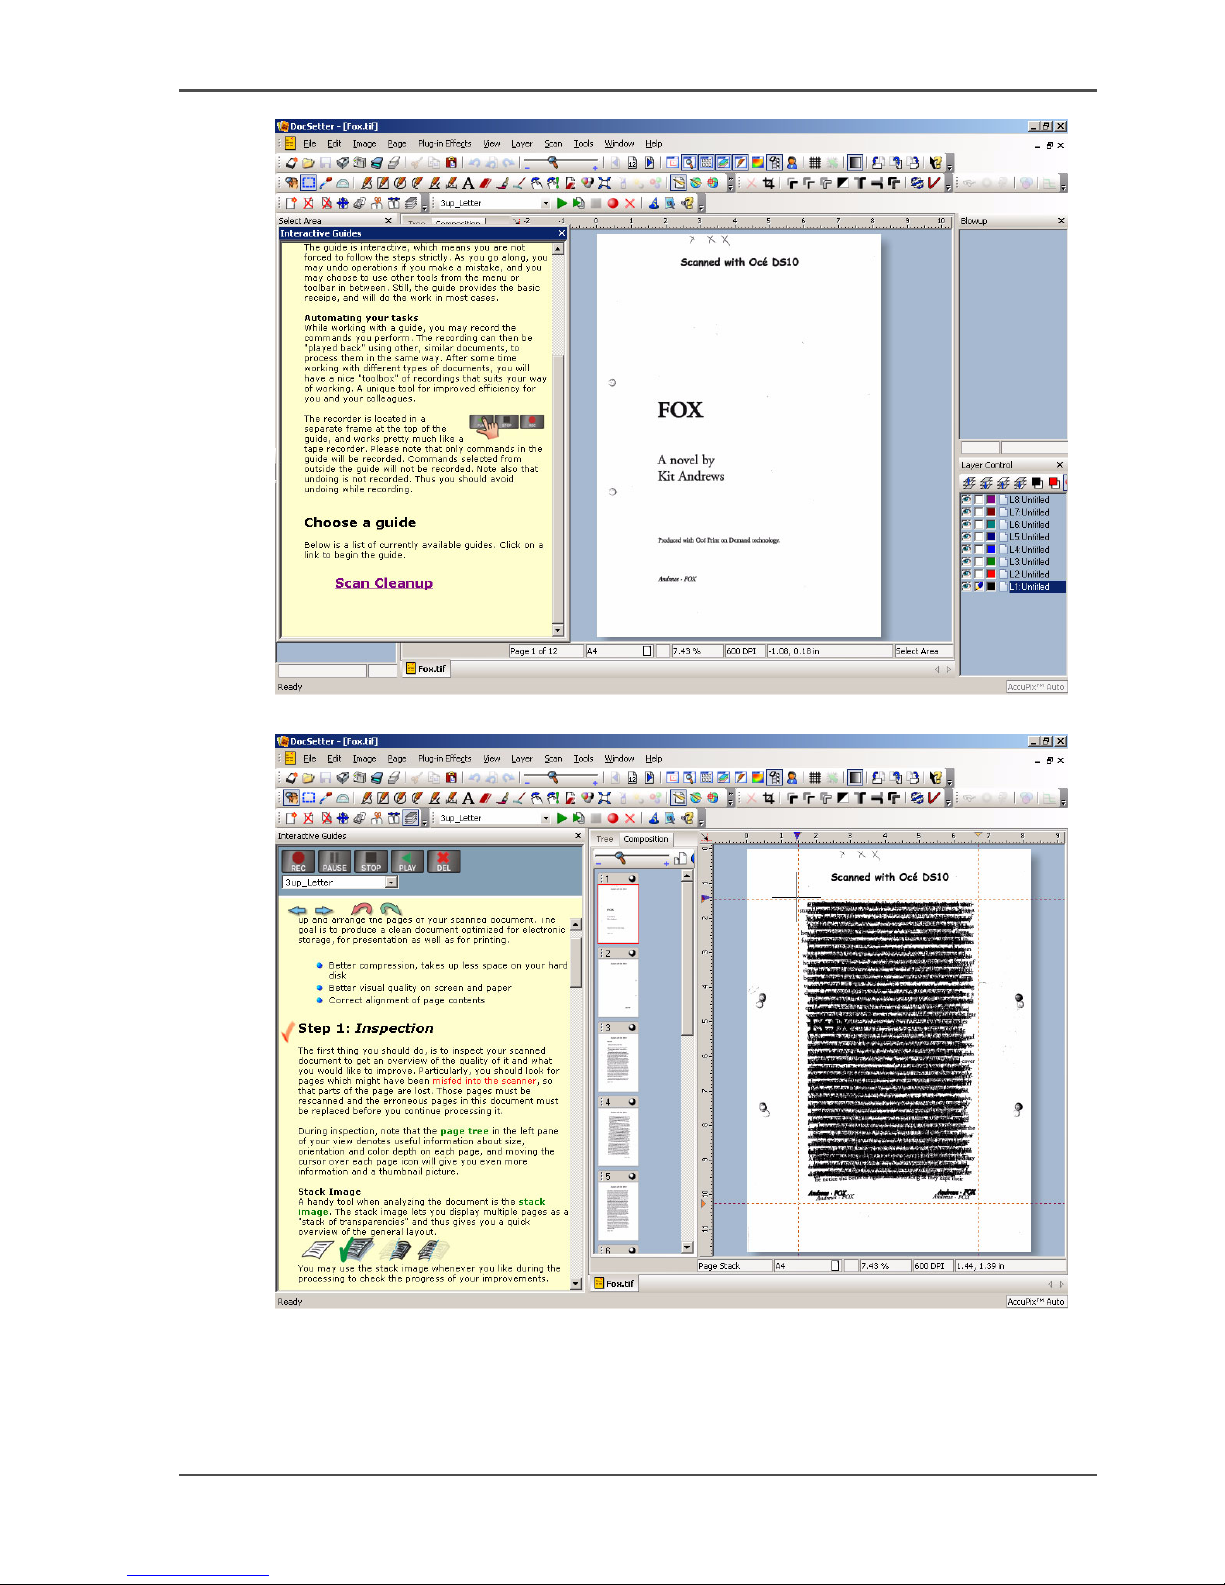
1. From the 'interactive guide', select 'Scan post-processing'.
Page 71
71
Use Océ DocSetter to optimize the scanned documents
[3]
2. Go to step 1 'Inspection'.
[4]
3. Use the 'Stack image' command to place all the odd pages over each other.
Note: Even and odd pages often have different margins.
Page 72
72 Chapter 3 Copy and scan
Use Océ DocSetter to optimize the scanned documents
[5]
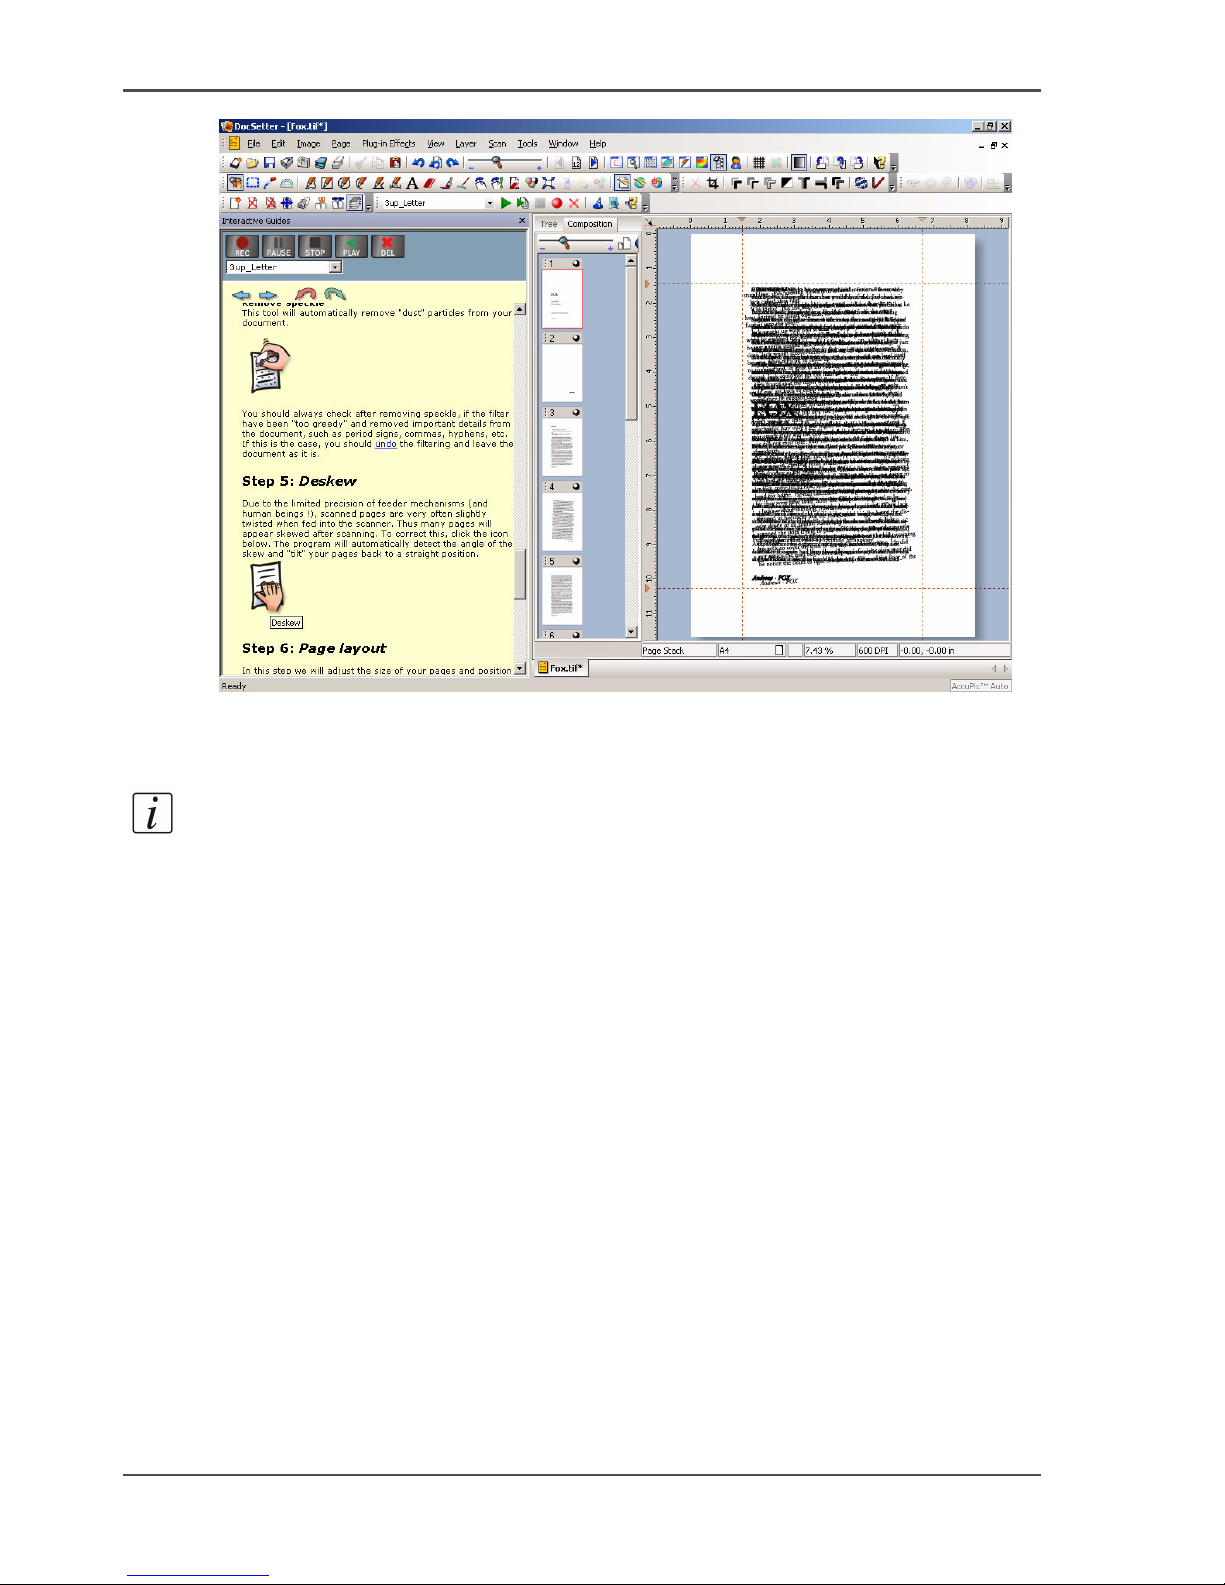
4. Determine the maximum white space outside the margin that must be despeckled, in
the following way. Click the guidelines at the left edge and the top edge of the main
window. Then drag the guidelines into the image.
Note: Use 4 guidelines to frame the inner area. This area contains the information
that must not be deleted.
5. Go to step 4 'Despeckle and erase'.
6. Use the 'Erase' command to remove the defects outside the guidelines.
7. Repeat the steps 3-6 for the even pages.
Page 73
73
Use Océ DocSetter to optimize the scanned documents
[6]
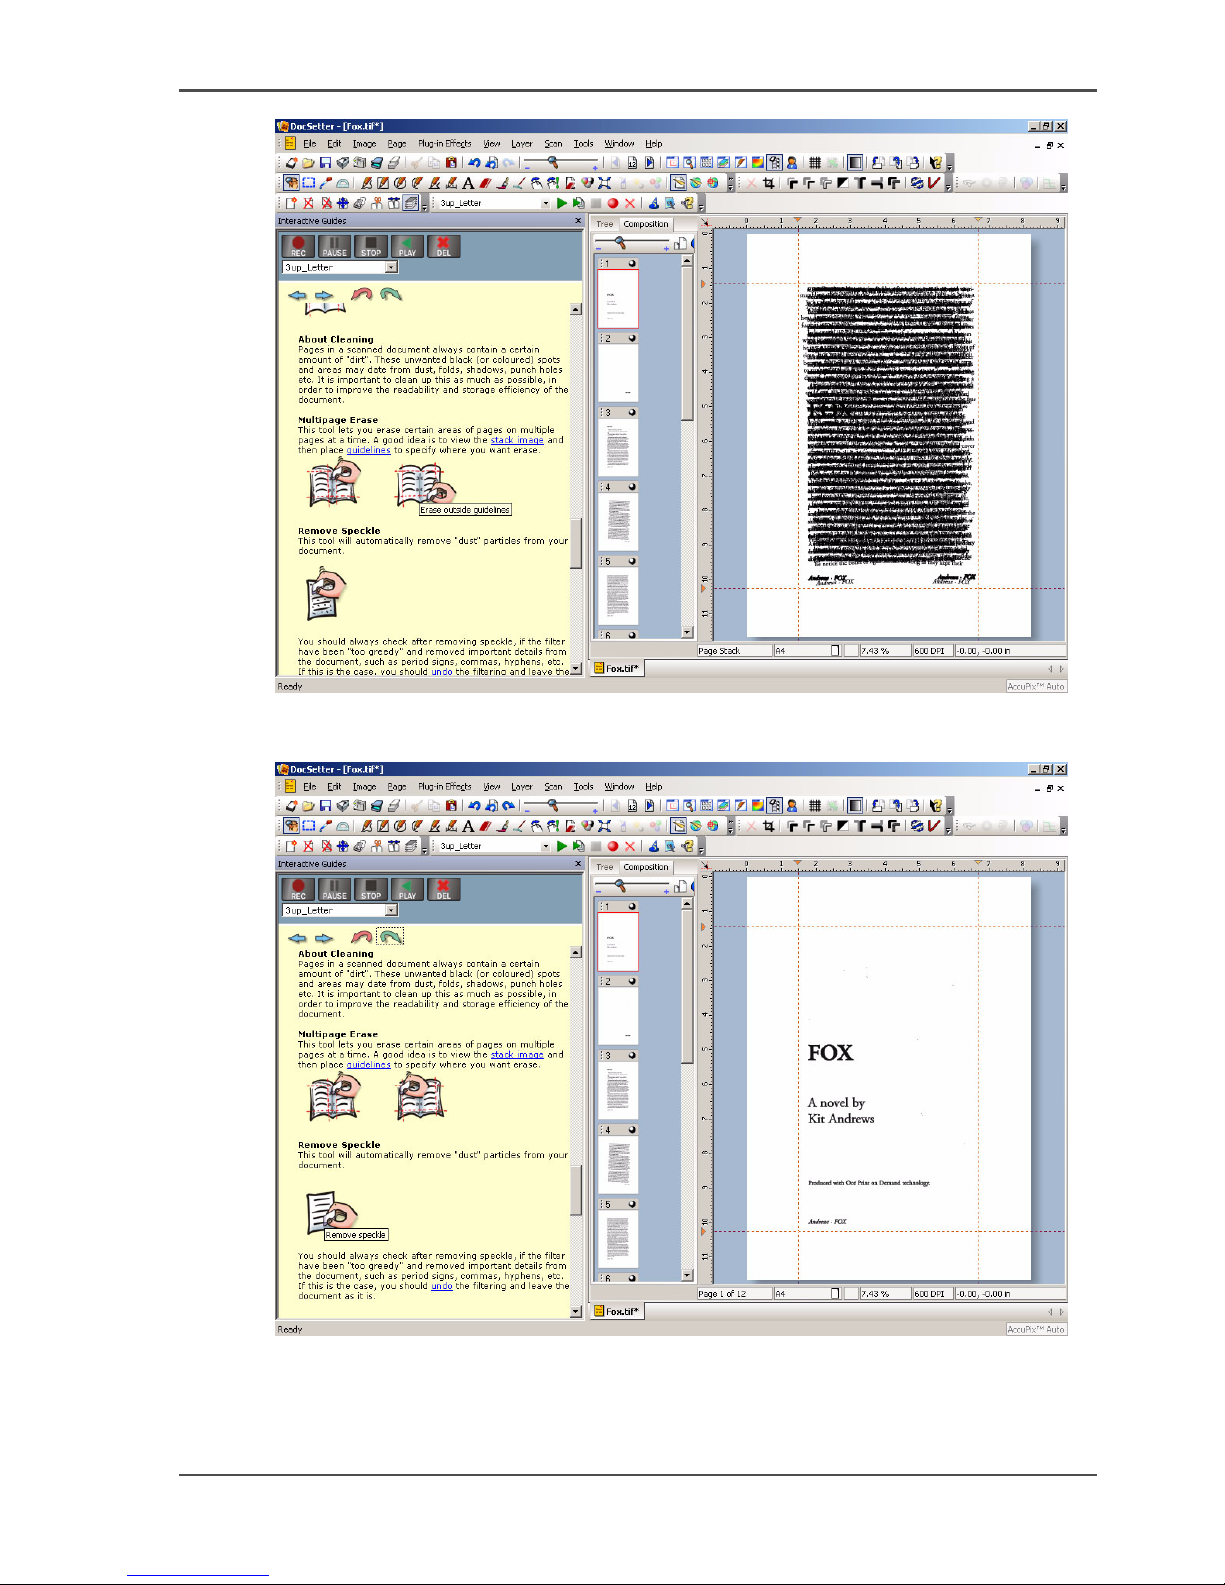
8. Use the 'Remove spots' filter to remove the other defects in the document. Start with
the preset properties of the filter.
[7]
9. Select 'Straighten' in step 5 of the 'interactive guide'. This automatically aligns the
pages.
Page 74
74 Chapter 3 Copy and scan
Use Océ DocSetter to optimize the scanned documents
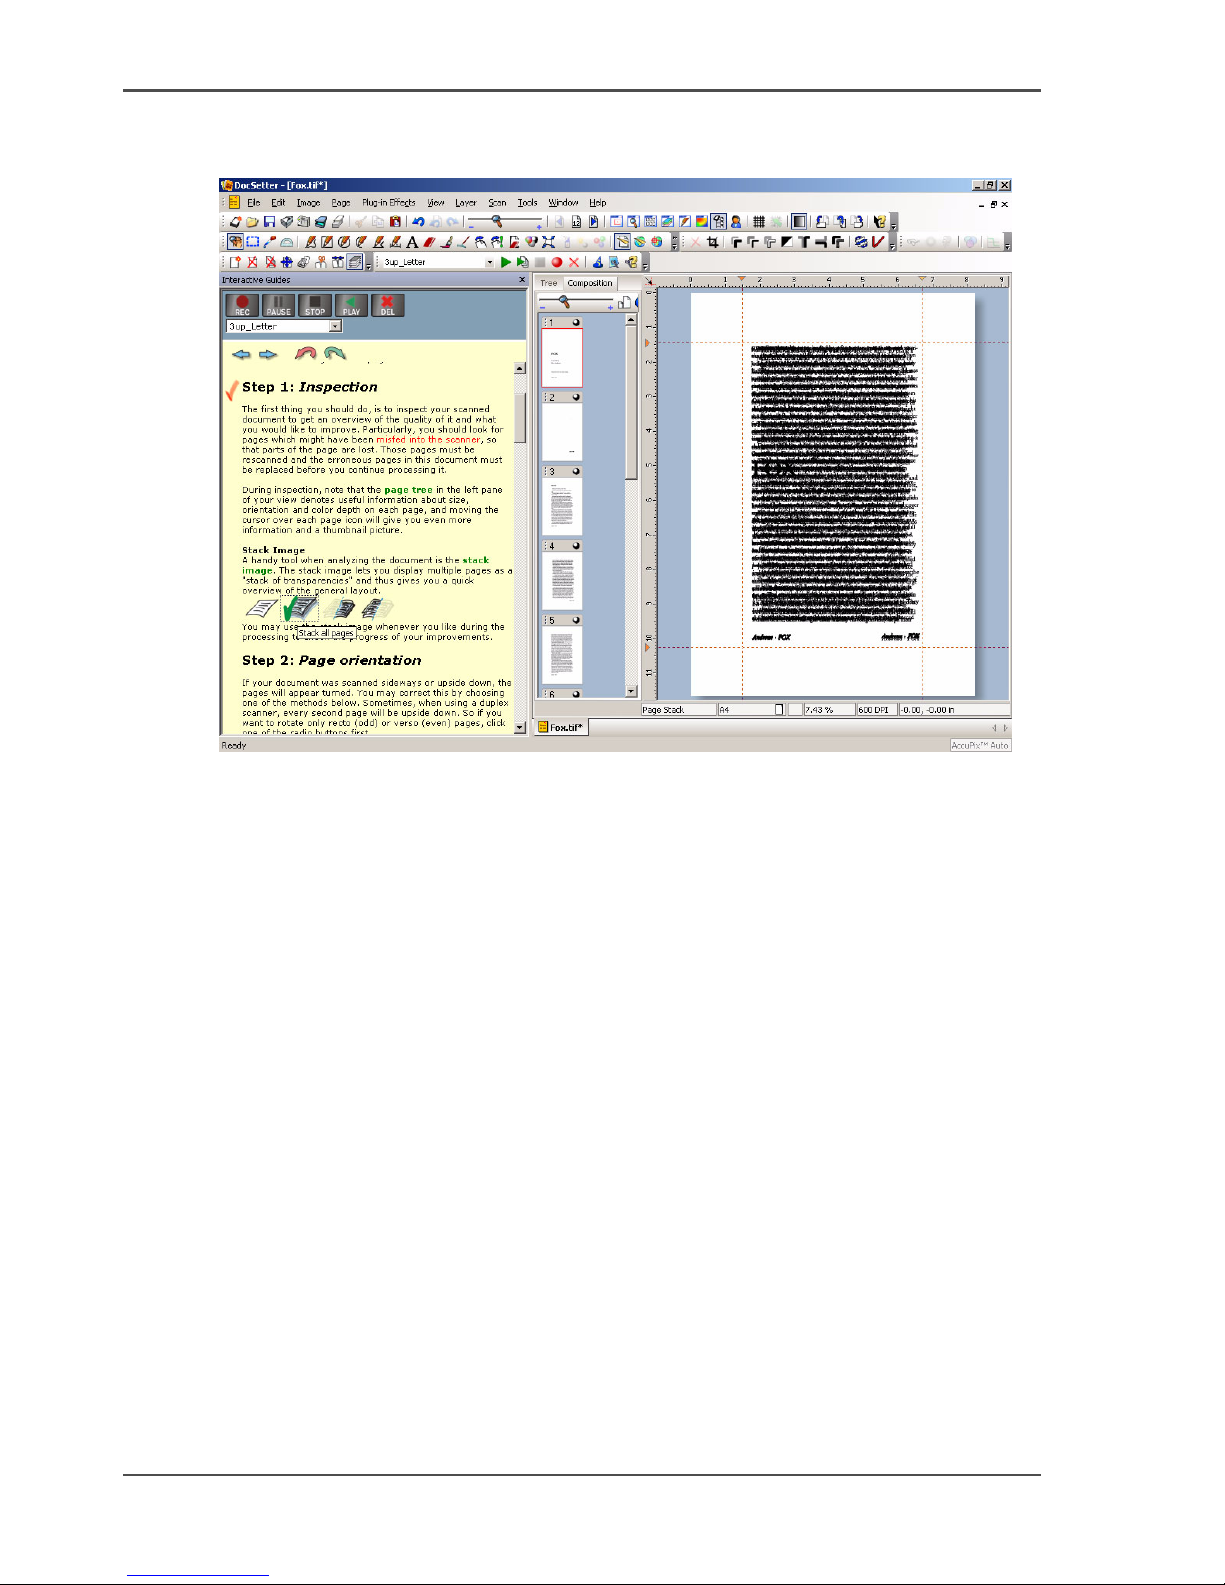
Note: You can create another stacked image for checking purposes.
[8]
Exit the interactive guide and save the document
1. Exit the 'interactive guide'.
2. From the 'File' menu, select 'Save as'.
3. Enter a file name, select a file format and save the document.
Page 75

75
Appendix A
Miscellaneous
Page 76

76 Appendix A Miscellaneous
Reader's comment sheet
Reader's comment sheet
Questions
Have you found this manual to be accurate?
O Yes
O No
Were you able to operate the product, after reading this manual?
O Yes
O No
Does this manual provide sufficient background information?
O Yes
O No
Is the format of this manual convenient in size, readability and arrangement (page
layout, chapter order, etc.)?
O Yes
O No
Could you find the information you were looking for?
O Always
O Most of the times
O Sometimes
O Not at all
What did you use to find the required information?
O Table of contents
O Index
Are you satisfied with this manual?
O Yes
O No
Thank you for evaluating this manual.
If you have other comments or concerns, please explain or suggest improvements
overleaf or on a separate sheet.
Comments:
----------------------------------------------------------------------------------------------------
----------------------------------------------------------------------------------------------------
----------------------------------------------------------------------------------------------------
----------------------------------------------------------------------------------------------------
----------------------------------------------------------------------------------------------------
----------------------------------------------------
Page 77

77
Reader's comment sheet
Date:
This reader's comment sheet is completed by:
(If you prefer to remain unknown, please do fill in your occupation)
Name:
Occupation:
Company:
Phone:
Address:
City:
Country:
Please return this sheet to:
Océ-Technologies B.V.
For the attention of ITC User Documentation.
P.O. Box 101,
5900 MA Venlo
The Netherlands
Send your comments by E-mail to: [email protected]
For the addresses of local Océ organisations see: http://www.oce.com
Page 78

78 Appendix A Miscellaneous
Addresses of local Océ organisations
Addresses of local Océ organisations
[1]
Océ-Australia Ltd.
P.O. Box 363
Ferntree Gully MDC
Vic 3165
Australia
http://www.oce.com.au/
Océ-Österreich GmbH
Postfach 95
1233 Vienna
Austria
http://www.oce.at/
Océ-Belgium N.V./S.A.
J. Bordetlaan 32
1140 Brussel
Belgium
http://www.oce.be/
Océ-Brasil Comércio e Indústria Ltda.
Av. das Nações Unidas, 11.857
Brooklin Novo
São Paulo-SP 04578-000
Brasil
http://www.oce-brasil.com.br/
Océ-Canada Inc.
4711 Yonge Street, Suite 1100
Toronto, Ontario M2N 6K8
Canada
http://www.oce.ca/
Océ Office Equipment (Beijing) Co., Ltd.
Xu Mu Cheng
Chaoyang District
Beijing 100028
China
http://www.oce.com.cn/
Océ-Czech Republic ltd.
Hanusova 18
140 21 Praha 4
Czech Republic
http://www.oce.cz/
Océ-Danmark a/s
Vallensbækvej 45
2605 Brøndby
Denmark
http://www.oce.dk/
Océ Finland OY
Valkjärventie 7 D, PL 3
02130 Espoo
Finland
http://www.oce.fi/
Océ-France S.A.
32, Avenue du Pavé Neuf
93161 Noisy-le-grand, Cedex
France
http://www.oce.fr/
Océ-Deutschland GmbH
Solinger Straße 5-7
45481 Mülheim/Ruhr
Germany
http://www.oce.de/
Océ-Hong Kong and China head office
12/F 1202 The Lee Gardens
33 Hysan Avenue
Causeway Bay
Hong Kong
http://www.oce.com.hk/
Page 79

79
Addresses of local Océ organisations
Océ-Hungaria Kft.
1241 Budapest
Pf.: 237
Hungary
http://www.oce.hu/
Océ-Ireland Ltd.
3006 Lake Drive
Citywest Business Campus
Saggart
Co. Dublin
Ireland
http://www.oce.ie/
Océ-Italia S.p.A.
Strada Padana Superiore 2/B
20063 Cernusco sul Naviglio (MI)
Italia
http://www.oce.it/
Océ Japan Corporation
3-25-1, Nishi Shinbashi
Minato-Ku
Tokyo 105-0003
Japan
http://www.ocejapan.co.jp/
Océ-Belgium S.A.
Rue Astrid 2/A
1143 Luxembourg-Belair
http://www.oce.lu/
Océ Malaysia Sdn. Bhd.
#3.01, Level 3, Wisma Academy
Lot 4A, Jalan 19/1
46300 Petaling Jaya
Selangor Darul Ehsan
Malaysia
http://www.ocemal.com.my/
Océ-Mexico S.A. de C.V.
Prolongación Reforma 1236,
4to Piso
Col. Santa Fé, Del. Cuajimalpa
C.P. 05348
México, D.F.
México
http://www.oceusa.com/
Océ-Norge A.S.
Postboks 4434 Nydalen
Gjerdrums vei 8
0403 Oslo
Norway
http://www.oce.no/
Océ-Poland Ltd. Sp.z o.o.
ul. Bitwy Warszawskiej 1920 r. nr. 7
02-366 Warszawa
Poland
http://www.oce.com.pl/
Océ-Lima Mayer, S.A.
Av. José Gomes Ferreira, 11 Piso 2 Miraflores
1497-139 Algés
Portugal
http://www.oce.pt/
Océ Singapore Pte Ltd.
190 MacPherson Road
#03-00 Wisma Gulab
Singapore 348548
Océ Printing Systems (PTY) Ltd.
P.O. B ox 62 9
Rivonia 2128
South Africa
Page 80
80 Appendix A Miscellaneous
Addresses of local Océ organisations
Note: The web site http://www.oce.com gives the current addresses of the local Océ
organizations and distributors.
Note: The addresses of local Océ organizations for information about the Wide
Format Printing Systems and the Production Printing Systems can be different from
the addresses above. Refer to the web site http://www.oce.com for the addresses you
need.
Océ España SA
Business Park Mas Blau
Osona, 2 08820 El Prat de Llobregat
Barcelona
Spain
http://www.oce.es/
Océ-Svenska AB
Sollentunavägen 84
191 27 Sollentuna
Sweden
http://www.oce.se/
Océ-Schweiz AG
Sägereistrasse 10
CH8152 Glattbrugg
Schweiz
http://www.oce.ch/
Océ (Thailand) Ltd.
B.B. Building 16/Floor
54 Asoke Road
Sukhumvit 21
Bangkok 10110
Thailand
Océ-Nederland B.V.
P.O.Box 800
5201 AV 's-Hertogenbosch
The Netherlands
http://www.oce.nl/
Océ (UK) Limited
Océ House
Chatham Way
Brentwood, Essex CM14 4DZ
United Kingdom
http://www.oce.co.uk/
Océ North America Inc.
5450 North Cumberland Avenue
Chicago, IL 60656
USA
http://www.oceusa.com/
Page 81

81
Index
Index
A
Available documentation . . . . . . . . . . . . . . . . . . . 9
C
Content of the manuals . . . . . . . . . . . . . . . . . . . . . 9
M
Made-ready file
Create batch file . . . . . . . . . . . . . . . . . . . . . . 57
Print . . . . . . . . . . . . . . . . . . . . . . . . . . . . . . . 57
O
Océ Doc Works
Create booklets . . . . . . . . . . . . . . . . . . . . . . . 22
Print PDF files . . . . . . . . . . . . . . . . . . . . . . . 14
Print RDO files . . . . . . . . . . . . . . . . . . . . . . . 61
Tab printing . . . . . . . . . . . . . . . . . . . . . . . . . 17
Océ DocSetter
Interactive guide . . . . . . . . . . . . . . . . . . . . . . 70
Optimize documents . . . . . . . . . . . . . . . . . . 70
Print RDO files . . . . . . . . . . . . . . . . . . . . . . . 63
Printing documents . . . . . . . . . . . . . . . . . . . 41
Tab sheets . . . . . . . . . . . . . . . . . . . . . . . . . . . 42
Océ DPconvert
Print RDO files . . . . . . . . . . . . . . . . . . . . 61, 63
Océ DS60 . . . . . . . . . . . . . . . . . . . . . . . . . . . . . . 66
Océ PRISMAprepare
Collect, modify, print documents . . . . . . . . . 27
Create booklets . . . . . . . . . . . . . . . . . . . . . . . 33
Tab printing . . . . . . . . . . . . . . . . . . . . . . . . . 30
Océ PRISMAproduction . . . . . . . . . . . . . . . . . . 39
Add media . . . . . . . . . . . . . . . . . . . . . . . . . . 48
Defining Media . . . . . . . . . . . . . . . . . . . . . . 48
Print Adobe PS 3 files . . . . . . . . . . . . . . . . . 39
Print PDF files . . . . . . . . . . . . . . . . . . . . . . . 35
Print TIFF files . . . . . . . . . . . . . . . . . . . . . . . 35
Printing documents . . . . . . . . . . . . . . . . . . . 41
Tab sheets . . . . . . . . . . . . . . . . . . . . . . . . . . . 42
Office documents . . . . . . . . . . . . . . . . . . . . . . . . 50
Optimize documents . . . . . . . . . . . . . . . . . . . . . . 70
P
Page programmer
Create job with tab sheets . . . . . . . . . . . . . . 54
Tab sheet s . . . . . . . . . . . . . . . . . . . . . . . . . . . 54
Page programming . . . . . . . . . . . . . . . . . . . . . . . 52
Print shop environment . . . . . . . . . . . . . . . . . . . . 10
Printer driver
Page programmer . . . . . . . . . . . . . . . . . . . . . 52
Print MS Office documents . . . . . . . . . . . . . 50
Printing documents
Via Océ DocSetter . . . . . . . . . . . . . . . . . . . . 41
Via Océ PRISMAproduction . . . . . . . . . . . . 41
Printing plant environment . . . . . . . . . . . . . . . . . 11
R
RDO files
Print via Océ Doc Works . . . . . . . . . . . . . . . 61
Print via Océ DocSetter . . . . . . . . . . . . . . . . 63
Print via Océ DPconvert . . . . . . . . . . . . . 61, 63
S
Scan to file
Create a job . . . . . . . . . . . . . . . . . . . . . . . . . 68
Improve the originals . . . . . . . . . . . . . . . . . . 68
Printing a Job . . . . . . . . . . . . . . . . . . . . . . . . 69
T
Tab sheets
Océ DocSetter . . . . . . . . . . . . . . . . . . . . . . . 42
Océ PRISMAproduction . . . . . . . . . . . . . . . 42
X
Xerox DocuTech 61xx emulation . . . . . . . . . . . . 58
Xerox environment . . . . . . . . . . . . . . . . . . . . . . . 12
Page 82

82
Index
 Loading...