


Océ VarioPrint
2105
Job Manual

Océ-Technologies B.V.
Trademarks
Products in this manual are referred to by their trade names. In
most, if not all cases, these designations are claimed as trademarks
or registered trademarks of their respective companies.
Copyright
© 2004, Océ-Technologies B.V. Venlo, The Netherlands
All rights reserved. No part of this work may be reproduced, copied, adapted,
or transmitted in any form or by any means without written permission from
Océ.
Océ-Technologies B.V. makes no representation or warranties with respect to
the contents hereof and specifically disclaims any implied warranties of
merchantability or fitness for any particular purpose.
Further, Océ-Technologies B.V. reserves the right to revise this publication and
to make changes from time to time in the content hereof without obligation to
notify any person of such revision or changes.
Edition 2004-01
US

Table of Contents
Chapter 1
Introduction
Notes for the reader 8
General Information 9
About the Océ VarioPrint 2105 9
The Océ VarioPrint 2105 configuration 12
A new workflow 13
The Print Station 18
The parts of the print station 18
The switches of the print station 19
The Control Station 20
The parts of the control station 20
The switches of the control station 21
The Scan Station 22
The parts of the scan station 22
The switches of the scan station 24
The Operator Panel 25
The keys on the operator panel 25
The structure of the information on the screen 29
Getting Started 40
Power modes on the Océ VarioPrint 2105 40
Turn on the Océ VarioPrint 2105 43
Shut down the Océ VarioPrint 2105 45
Adjust the Océ VarioPrint 2105 for daily use 48
Control the backlight of the screen 55
Chapter 2
The Copy Function
Basic Copies 58
General 58
Make a copy 58
Make a copy or print with the copy card 60
Copy with templates 61
Defining Job Settings 63
Types of job settings 63
Change the settings for a copy job 71
Correct settings in the job editor 73
Stapled Copies 74
Changing the Zoom Factor 77
Adjust the exposure settings 79
Table of Contents 3

Erase the margin 81
Change the margin (shift) 83
Stopping a Job 86
Stop scanning 86
Stop printing 88
Extended Copies 89
Using Special Materials 89
Copy special originals and originals of a non-standard size 89
Copy on special material 92
Create a document with covers 95
Using the Mailbox 96
Scan a document to mailbox 96
Edit a mailbox job 98
Print a job from the mailbox 101
Move to mailbox 103
Remove jobs from the mailbox 105
Combining Subsets 106
Combine subsets into one document 106
Concatenation and chapterization 110
Bundle printing 113
Delete subsets 117
Chapter 3
Chapter 4
The Print Function
General 120
Printer driver information 120
Print jobs on the Océ VarioPrint 2105 127
Printing a document 129
Make a copy or print with the copy card 131
Stapled prints 132
Print on special material 135
Using the Mailbox 137
Print a job from the mailbox 137
Edit a mailbox job 140
Move to mailbox 143
Remove jobs from the mailbox 145
Bundle printing 146
Stopping a Job 150
Stop printing 150
The scan-to-file function
General 154
About the scan-to-file function 154
Scan-to-file jobs on the Océ VarioPrint 2105 156
About the scan profiles 158
Original input on the glass plate or into the ADF 161
4 Océ VarioPrint 2105 Job manual

Chapter 5
Chapter 6
Scan-to-file 164
Create a scan-to-file job 164
Types of scan-to-file settings 169
Change the zoom factor 174
Optimizing Scan Quality 179
Stopping a scan-to-file job 181
Error messages and possible solutions 183
Accounting
About Accounting 186
Define the workflow settings for accounting 189
Accessing the Accounting Log File 191
Job Management
About job management on the Océ VarioPrint 2105 194
Overview of actions in the job queue manager 199
Managing jobs on the Océ VarioPrint 2105 203
Chapter 7
Chapter 8
Appendix A
Appendix B
Maintenance
How to get information about the supplies 208
How to fill and refill the paper tray 212
How to fill special paper 218
How to handle errors
How to handle contradictions 224
How to handle errors 226
Original jam on the scan station 228
Paper jam on the print station 229
Overview and Tables 231
Product specifications 232
Originals that can be used 233
Paper types that can be used 234
Table of Contents 5

Appendix C
Safety Information 237
Instructions for safe use 238
Safety data sheets 241
EPA Energy Star® Océ VarioPrint 2105 Multifunction device 250
EPA Energy Star® Océ VarioPrint 2105 Print station 252
Miscellaneous 255
Reader's comment sheet 256
Addresses of local Océ organisations 258
6 Océ VarioPrint 2105 Job manual

Chapter 1
Introduction
Océ VarioPrint 2105
Job Manual
7

Notes for the reader
Introduction
This manual helps you to use the Océ VarioPrint 2105. The manual contains a
description of the Océ VarioPrint 2105 and guidelines to use and operate the
Océ VarioPrint 2105. There are also tips to increase your knowledge of the Océ
VarioPrint 2105 and to help you manage the workflow even better.
Definition
Attention Getters
Parts of this manual require your special attention. These parts provide
important, additional information or are about the prevention of damage to
your properties.
Note, Attention and Caution
The words Note, Attention and Caution indicate these important parts.
■ The word Note comes before additional information about the correct
operation of the Océ VarioPrint 2105 or a tip.
■ A part marked with Attention contains information to prevent damage to
items, for example the Océ VarioPrint 2105, an original or a file.
■ A part marked with Caution contains information to prevent personal
injury. Caution is found only in manuals that describe physical products.
Safety information
You can find the safety information for this product in the Instructions for
safe use and the Safety Data Sheets. The instructions for safe use and the
Safety Data Sheets are included in the appendices of this manual.
8 Océ VarioPrint 2105 Job manual

General Information
About the Océ VarioPrint 2105
Introduction
The Océ VarioPrint 2105
With the Océ VarioPrint 2105, Océ created a new copy, scan and print concept
for your Document Production Center. Professional document handling and
efficient production printing and copying are key elements in this central
environment. Every day you receive hardcopy jobs and digital jobs. These jobs
must be printed quickly and easily. The traditional method for delivering
analog documents to you was to walk down to the DPC and have them hand
the documents over to you. This continues to be an important part of your
work. More and more, you and your customers use digital job submission
through the network and make prints instead of copies.
The Océ VarioPrint 2105 helps you to get a smooth change from analog to
digital document production. The Océ VarioPrint 2105 handles and processes
both analog and digital jobs in an identical and easy way.
Available configurations
The Océ VarioPrint 2105 has a modular configuration. You can use the scan
station and the print station together or separately. The control station is always
part of the system. The parts are described in detail in the following section:
See The configuration.
The Océ VarioPrint 2105 is available in two configurations.
■ Printer only
■ Hybrid.
The printer-only configuration consists of the print station and the control
station. You can only use this configuration to print your jobs.
The hybrid configuration consists of the print station, the control station and in
addition the scan station. You can use this configuration to print, copy and scan
your jobs.
This manual describes both the printer-only configuration and the hybrid
configuration. If you have the printer-only configuration, the sections about
Introduction 9

copying and scanning and scan-to-file in this manual do not apply to your
system. The user interface of the control station is the same for both
configurations with only one difference. The standard templates for copy jobs
and scan jobs are grayed-out for the printer-only configuration.
Types of users
[1] Types of users
Type of user Task
Operator
Key operator
System administrator
[1] Types of users
■ Copy paper originals
■ Print digital files
■ Scan analogue files to digital files
■ Manage the jobs on the operator panel
■ Manage the paper load settings on the operator panel
■ Load paper
■ Handle contradictions and errors
Note: The Job manual describes the tasks of operators
■ Provide maintenance
■ Control the system settings
Note: The Configuration and Maintenance Manual
describes the tasks of key operators
Control the connection to the network
Note: The Configuration and maintenance manual
describes the tasks of system administrators
10 Océ VarioPrint 2105 Job manual

Contents
The manual describe the following tasks.
[2] Contents of th e manuals
Manual Tasks
Job Manual
Configuration and
Maintenance Manual
[2] Contents of the manuals
■ Making copies
■ Scanning documents to the mailbox
■ Printing documents
■ Scan-to-file
■ Managing jobs
■ Managing the paper load
■ Managing contradictions and errors.
■ Setting the configuration of the Océ VarioPrint
2105
■ Adjusting the printer properties and the network
properties
■ Providing maintenance for the Océ VarioPrint
2105.
Introduction 11

The Océ VarioPrint 2105 configuration
The modules of the Océ VarioPrint 2105
[3] Modules of the hybrid configurati on
Component Function
The Print Station Process the print and copy jobs
The Control Sta-
Operate the Océ VarioPrint 2105
tion
The scan station
(with the Océ
Smart Imager
Scan the originals and store these scanned images.
Store the digital originals from the network on the controller.
controller).
[3] Modules of the hybrid configuration
[4] Modules of the printer only con figuration
Component Function
The Print Station Process the print and copy jobs
The Control Sta-
Operate the Océ VarioPrint 2105
tion
The Océ Smart
Imager.
[4] Modules of the printer only configuration
Store the digital originals from the network on the controller.
12 Océ VarioPrint 2105 Job manual

A new workflow
Introduction
Compared to the traditional, analog copiers, the Océ VarioPrint 2105 contains
new features to copy and print documents. The new features are:
■ Original and print definition
■ Paper management
■ Job queue
■ Set-build
■ Templates
■ Mailbox
■ Multi-jobbing
■ Accounting
■ Scan-to-file.
Original and print definition
When you prepare a copy job, you describe the original and the print. You can
define the settings for the sheet and the layout of the originals and the prints
separately.
An important part of the new workflow is that you only have to define the
settings for the original and the print. The system automatically calculates the
transformation from original to print (zoom, rotation and binding). For
example: you have a tabloid size original and you want a letter-standard copy.
Just tell the system you have a tabloid original and you want a letter-standard
copy. The system calculates the 71% adjustment for you.
Paper management
This is a completely new concept. You can now define what type of paper you
want to use in a job. On previous machines, you defined the which tray you
wanted to use. Because of the possibility of a large job queues, the paper load
of the trays may change while your job is in the queue. Then the Océ VarioPrint
2105 will notify you to load the paper type you defined in your job.
The 'Paper manager' allows you to define the paper load of the paper trays
exactly.
Introduction 13

Job queue
Set-build
Templates
All scan jobs and print jobs go into the job queue before they are printed. The
jobs in the job queue are managed from the operator panel in the 'Job queue
manager'.
The set-build key ( ) on the operator panel allows you to use different
settings (both original and print settings) for different parts (subsets) of your
documents.
A template is a group of pre-set settings. Templates help you to define the
settings of a job. There are three methods to use the templates.
[5] Methods to use templ ates
Mailbox
Num
Description
ber
1 Press the start key ( ). The default 'Copy job' template will be used.
Only 1 copy is possible.
2 Select a template and press the start key ( ).
3 Select a template and edit the settings in the job editor.
[5] Methods to use templates
The 'Last used' template
This template contains the settings of the last started job.
Note: The 'Last used' template does not contain the settings of all the subsets
of a set-build job.
A mailbox is a digital storage area (not for archiving purposes) for scanned
documents and print jobs from the network. This digital storage area is on a
hard disk in the Océ Smart Imager.
The Océ VarioPrint 2105 has two mailboxes, a 'Local mailbox' and a 'Network
mailbox'. The 'Network mailbox' is the location for print jobs and the 'Local
mailbox' is the location for scanned jobs (copy job to mailbox) and jobs that
are moved from the job queue to the mailbox. The jobs in the 'Network
mailbox' are displayed with the file name, the user name, the number of pages
14 Océ VarioPrint 2105 Job manual

in the job, the number of sets you want to copy/print, the media type of the first
page and the date and time. The 'Local mailbox' shows the same information
but displays a job number instead of a name and there is no user name.
[6] Options in the mailb ox
Num
Description
ber
1 You can select one or more jobs in the mailbox and press the start key
()
2 You can select a job in the mailbox, edit the job and then press the
start key ( ).
3 You can select one or more jobs in the mailbox and then delete the
selection.
[6] Options in the mailbox
The jobs started from the mailbox are copies of the jobs in the mailbox. You
can start a job from the mailbox as many times as required. Each time, you
create a new copy in the job queue.
To delete a job from the mailbox, you must delete the job.
Job order in the mailbox
When you open the mailbox view, the last job that arrived in the mailbox is
selected. 'New' jobs are added at the top, above the jobs that are 'Done' .
If you press the start key ( ), copies of all the selected mailbox jobs are
created and started into the job queue.
Use the star arrow keys to select a job in the mailbox. Use the arrow-up key
and the arrow-down key to select the jobs one by one. Use the arrow-left key
and the arrow-right key to move through the jobs in the mailbox screen by
screen. The arrow right key is equal to the Page down key and moves the screen
down. The arrow left key is equal to the Page up key and moves the screen up.
Mailbox information
The mailbox contains 'New' jobs and 'Done' jobs that were not deleted. A check
mark indicates the 'Done' jobs. 'Done' means that the jobs were sent to the
queue. However, this does not mean that the jobs must have been printed.
Introduction 15

The jobs in the mailbox contain the following information.
[7] Presentation of t he jobs in the mailbox
Description Job in the 'Network
mailbox'
Graphic information A check mark when the
job is completed
'Document' or 'Identifier'
Document name to identify the document
'User' Name of the user who
sent the document to the
Job in the 'Local mailbox'
A check mark when the
job is completed
Number to identify the
document
This information is not
visible.
mailbox
'Pages' The total number of
originals
The total number of
originals
'Copies' The total number of sets The total number of sets
'Paper' A description of the pa-
per size, weight and the
paper type of the first
page of the job
A description of the pa-
per size, weight and the
paper type of the first
page of the job
'Submitted' The date and time of the
job submission
[7] Presentation of the jobs in the mailbox
The date and time of the
job submission
Move to mailbox
The option 'Move to mailbox' is available in the job queue manager. This
option allows you to move a job that has not started yet from the job queue to
the mailbox. A print job is moved to the network mailbox and a copy job is
moved to the local mailbox.
A job that is moved to the mailbox is treated as if a new job is added to the
mailbox. You can change the properties of the job.
16 Océ VarioPrint 2105 Job manual

Multi-jobbing
You can for example use the move-to-mailbox functionality for the following.
[8] Move-to-mailbox function
Number Description
1 Save a job for later use.
2 Use the extra editing options from the mailbox.
3 Mix jobs from the network mailbox and the local mailbox.
[8] Move-to-mailbox function
The Océ VarioPrint 2105 allows you to define and scan a new job while another
job is printing.
The new workflow can help the operator to do more in less time. The operator
can scan the originals while the Océ VarioPrint 2105 is printing other
documents. All the documents are scanned one by one and added to the job
queue. The operator can do other tasks while the Océ VarioPrint 2105 is
printing the earlier scanned documents.
Accounting
Scan-to-file
The accounting function allows the operator to store the print and copy job
information under an account number. The operator can generate an
accounting log file with the information sorted per account number. The
operator can use this information for example to create summaries of prints per
project or per client.
You can use predefined scan profiles to scan analogue originals.The scanned
originals are saved as digital documents on the scan server. You can retrieve the
documents from the scan server, and for example, print the documents on
demand or archive them in a digital file system.
Introduction 17

The Print Station
The parts of the print station
The Print Station
[1] The Print Station
[1] The Print Station
[9] The parts of t he print station
Part Function
1 Output trays Trays to collate printed sheets (stapled, sort-
ed by page or by set, offset stacked).
2 External output Receive printed sheets to deliver to an exter-
nal finishing device.
3 Print tray Receive printed sheets (sorted by page or by
set). Also used to deliver error prints.
4 Paper compartment Contains the paper trays that hold the paper.
5 Front cover Fill the toner unit.
[9] The parts of the print station
18 Océ VarioPrint 2105 Job manual

The switches of the print station
The Print Station
The print station has the following switches and buttons. You can find these at
the right-hand side of the belly (light gray area) on the print station.
[10] Switches an d buttons on the pri nt station
Number Action
1 Power switch ( )
The power switch cuts and connects the power to the print station.
2 On/Off button with orange and green LED ( )
The On/Off button on the print station allows you to toggle the
status of the print station between the stand-by mode and the
sleep mode. This is only possible if the scan station power
switch ( ) is in '1' position and the startup phase is passed
(templates visible on the screen).
3 The key switch
If you want to prevent that any person switches on the machine
you can take out the key in the OFF position. If you take out the
key in ON position, any person can turn off the machine with the
power switch.
[10] Switches and buttons on the print station
Introduction 19

The Control Station
The parts of the control station
The Control Station
[2] The Control Station
[2] The Control Station
[11] The par ts of the operator panel
Part Function
1 Keypad Contains the 'Start' key, the 'Stop' key, the
'Correction' key, the 'Set-build', the 'Help'
key and the numeric keys.
2 Monitor Holds the screen that displays the visual
feedback about the system, the job queue,
the job editor, the system manager and the
paper manager. The screen also displays the
warnings and the errors. The monitor also
has a 2 colored LED (red and green).
3 Function keys / soft-
keys
Enable you to access the menus and func-
tions and to change settings. The function of
the key is displayed on the screen next to,
above or under the key.
4 Backlight control You can use the 2 keys at the rear side of the
monitor to adjust the backlight of the screen.
[11] The parts of the operator panel
20 Océ VarioPrint 2105 Job manual

The switches of the control station
The Control Station
The scan station starts up the control station. The control station has no
separate switch to turn on the station.
The monitor of the control station contains a LED that indicates the status of
the Océ VarioPrint 2105.
[12] System status
LED color System status
Green The system is stand-by or processes a job.
The print station of the Océ VarioPrint 2105 may be in
the low power mode. The screen is on.
One of the two stations, print station or scan station can
be in sleep mode.
Red The scan station and the print station are both in the sleep
mode. The screen is off/black.
Green (blinking) The Océ VarioPrint 2105 starts up. The screen will re-
main off/black for approximately 2 minutes.
[12] System status
Introduction 21

The Scan Station
The parts of the scan station
The Scan Station
[3] The Scan Stat ion
[3] The Scan Station
[13] The Scan Stat ion
Part Function
1 Automat ic document
feeder
Feed a stack of originals. The originals can
be sets of documents but also single-sheet
documents like letters and forms.
2 Glass plate Copy special, non-standard and damaged
originals.
3 Original receiving
tray
Receive the originals that come from the au-
tomatic document feeder.
4 Set-build key Create subsets.
5 Handle Open the automatic document feeder to put
an original on the glass plate.
[13] The Scan Station
22 Océ VarioPrint 2105 Job manual

The automatic document feeder on the scan station handles 1-sided originals
and 2-sided originals. The automatic document feeder can hold 50 sheets of
letter-standard paper (20 lb. bond) or 35 sheets of tabloid paper (20 lb. bond).
If you want to add more than 50 sheets, use the set-build key. You can find the
set-build key on the scan station and on the operator panel.
Introduction 23

The switches of the scan station
The Scan Station
The scan station has the following switches and buttons. You can find these at
the right-hand side of the scan station.
[14] Switches and button s on the scan station
Step Action
1 Power switch ( )
The power switch at the rear of the right-hand side cuts and connects the power to the scan station and the Océ Smart Imager
(see below). When you press the power switch ( ), the Océ
Smart Imager also turns on or off.
2 On/Off button with orange and green LED ( )
The On/Off button at the front of the right-hand side allows you
to toggle the status of the scan station between the stand-by
mode and the sleep mode. This is only possible if the scan station power switch ( ) is in '1' position and the startup phase is
passed (templates visible on the screen).
3 Key switch (at the front of the right-hand side)
If you want to prevent that any person switches on the machine
you can take out the key in the OFF position. If you take out the
key in ON position, any person can turn off the machine with the
power switch.
[14] Switches and buttons on the scan station
Inside the scan station, behind the right-hand door, you find the Océ Smart
Imager. This is a controller that contains all the high-level user interface
software and that stores jobs from the job queue and the mailboxes.
When you turn the scan station on or off with the power switch, the Océ Smart
Imager will also be turned on or off.
24 Océ VarioPrint 2105 Job manual

The Operator Panel
The keys on the operator panel
The keys on the operator panel
You can divide the keys on the operator panel in two groups. The keys that have
a fixed function and the keys (softkeys) that have a function as displayed on the
screen. In the table below you see the functions of the fixed keys.
[4] The keys on the operator panel
[4] The keys on the operator panel
Introduction 25

[15] Fixed keys
Keys Function
Start key ( ) Send a job to the queue or the mailbox or to continue
in an error situation.
Correction key
()
Correct the settings in the job editor or to stop scan-
ning.
Stop key ( ) Stop printing.
Set-build key ( ) Scan a subset.
Help key ( ) Access the Help function.
Numeric keys Enter number of copies.
Up and down arrow
Scroll the Job queue.
key ( )
Selection key ( ) Use the round key to open a job in the job queue.
Star arrow keys
()
Scroll the mailbox. Increase and decrease the values of
the settings in the job editor.
Selection key ( ) Use the round key to select a job for bundle printing.
[15] Fixed keys
The arrow keys
The 4 arrow keys are the arrow-up key, the arrow-down key, the arrow-right
key and the arrow-left key. You can use the keys to navigate through the
26 Océ VarioPrint 2105 Job manual

mailbox or you can use the keys to change values in the job editor. The job
editor function for the arrow keys is listed below.
[16] Function of the arrow keys
If Then
you press the arrow-up key ( ) you increase the value in minimum
step size.
you press the arrow-down key ( ) you decrease the value in minimum
step size.
you press the arrow-right key ( ) you increase the value in pre-set
steps
you press the arrow-left key ( ) you decrease the value in pre-set
steps.
you press the round key ( you select a job in the mailbox for
bundle printing.
[16] Function of the arrow keys
Introduction 27
In the table below you see the functions of the softkeys. Use these keys to
navigate, to select or to change settings.
If the screen changes, the function of the key may change also.
[17] Softkeys or function keys a round the screen
Location
Key(s) Function
(quantity)
Bottom (5) Select a template or
change the settings in
relation to the menus
Right (6) Mailboxes and stan-
dard templates or
the menus for the
original and print definition
Top-right (1) 'Paper manager' or
the print definition in
the job editor
Top-middle (1) 'System manager' or
the original definition
in the job editor
■ Open the job editor using the
template
■ change settings in the
different menus that you
select in the 'job editor', the
'System manager', the 'Paper
manager' and the 'Queue
manager'.
■ Access the mailboxes, display
the 'Standard templates'
■ to navigate through the menus
in the job editor.
■ Enter and quit the 'Paper
manager' to define the paper
load in the paper trays
■ to change the settings for the
'Print ' in the print menus
■ to select a tray in the paper
manager.
■ Enter and quit the 'System
manager'to define the system
settings
■ to change the settings for the
'Original' in the original
menus.
Top-left (1) Job queue Enter and quit the 'Job queue
[17] Softkeys or function keys around the screen
28 Océ VarioPrint 2105 Job manual
manager'.

The structure of the information on the screen
Introduction
The design of the operator panel shows the information in a new structured
method. In the tables below, you see the main screen structure.
When the Océ VarioPrint 2105 is turned on, the main screen shows.
[18] The main screen
Area Function
1 'Standard templates' (at the
bottom of the screen)
Note: The 'Standard
templates' are grayed out
for the printer-only
configuration.
Allows selection of one of the presented
templates. Each template contains
pre-defined settings to help you access
the functions or the settings of the
last-used job. If you select a template the
job editor opens.
2 'Job queue' Present a view on the job queue manager.
3 Navigation area at the
right-hand side of the
screen
Allows navigation through the menus in
the job editor, the 'Job queue', the 'Paper
manager' , the 'System manager' or allows
you to select 'Local mailbox', 'Network
mailbox', 'Standard templates' and 'Scan
profiles'.
4 Navigation area at the top of
the screen
Allows navigation to the 'Job queue', the
'System manager' and the 'Paper manag-
er'.
5 'System monitor' Show information about the paper trays,
the supplies, the disk usage and the day
counter.
[18] The main screen
Introduction 29

You can navigate to other screens by selecting one of the following functions:
[19] The Sections of the Main Scre en
Area Function
1 'System manager' Access the 'System manager' to define the
system settings or select a system function
('Shut down').
2 'Paper manager' Access the 'Paper manager' to define the pa-
per load of the paper trays.
3 'Job queue' Access the 'Job queue manager' to manage
('Delete', 'Move to top', 'Move to mailbox',
'Hold', 'Release' and 'Stop after this') the
jobs in the queue.
4 'Network mailbox' Access the print jobs sent to the 'Network
mailbox'. If you edit a job in the 'Network
mailbox', the job editor opens.
5 'Local mailbox' Access the jobs that are scanned to the 'Lo-
cal mailbox'. If you edit a job in the 'Local
mailbox', the job editor opens.
6 'Standard templates' (on
7 'Scan profiles' Access the scan profiles to create a
[19] The Sections of the Main Screen
Standard templates
The screen shows the 5 standard templates. A template is a group of
pre-defined settings. The standard templates are typical for the hybrid
configuration. Select a template to open the job editor. You can use the
standard templates for copy jobs and scan jobs.
Note: You can not use the standard templates if you have the printer-only
configuration.
Display the 5 'Standard templates'.
the right-hand side of
the screen)
scan-to-file job.
30 Océ VarioPrint 2105 Job manual

Scan-to-file is also not an option if you have a printer-only configuration.
[5] The templates of th e main screen
Job editor
[5] The templates of the main screen
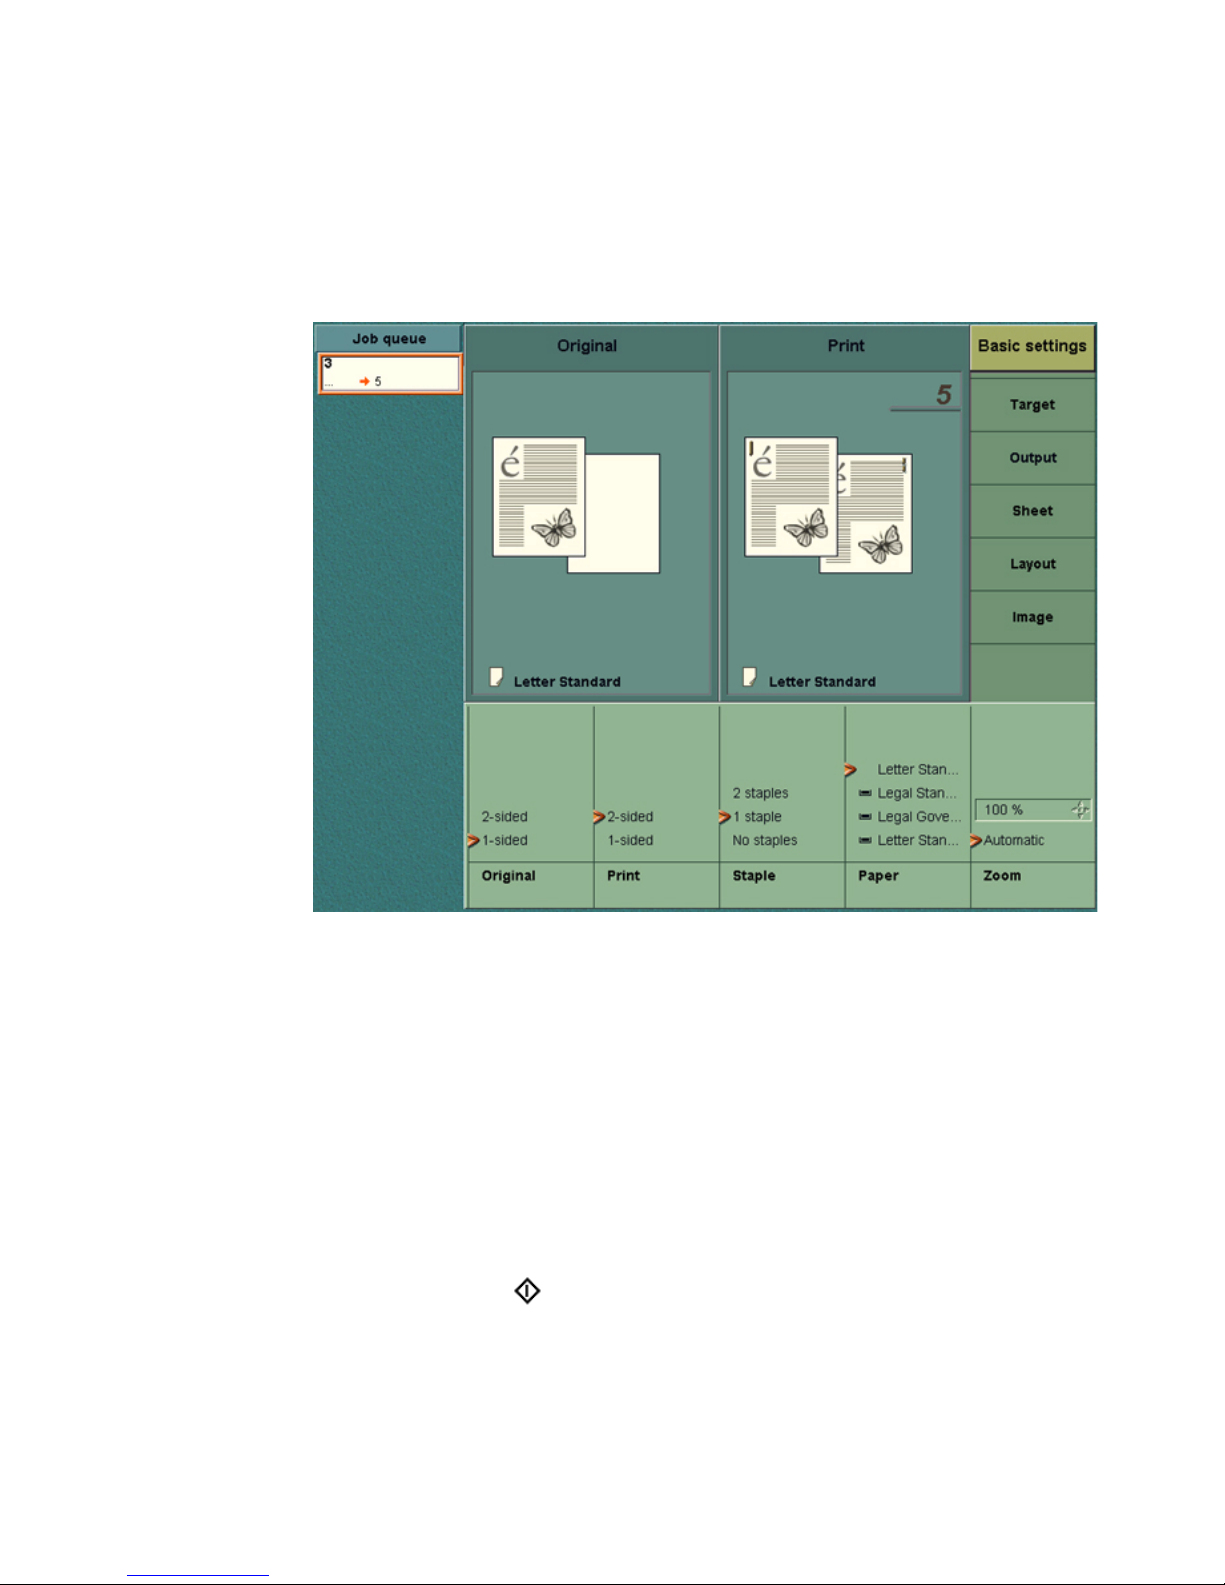
After you select a template, the 'Basic settings' menu is displayed. The 'Basic
settings' contain 5 shortcuts to the most used settings for a copy job. If you can
Introduction 31

not change all the settings you need, you can navigate to the settings for the
'Original' and the 'Print ' with the keys at top of the screen.
[6] The job editor in th e Basic settings menu
[6] The job editor in the Basic settings menu
32 Océ VarioPrint 2105 Job manual

You can change the settings with the keys below the screen. You can navigate
to the appropriate menu with the keys at the right side of the screen.
[7] The original settings for the Sour ce menu in the jo b editor
[7] The original settings for the Source menu in the job editor
Introduction 33

The table below shows the menus for 'Original'.
[20] Menus for Original
Menus Explanation
'Source' The settings for the type and the orientation of the origi-
nal.
'Sheet' The settings for the paper size.
'Layout' The settings for 1-sided or 2-sided, document type and
margin erase.
[20] Menus for Original
[8] The print settings for the Target menu in the job editor
[8] The print settings for the Target menu in the job editor
34 Océ VarioPrint 2105 Job manual

The table below shows the menus for 'Print '. You can navigate to the
appropriate menu with the keys at the right side of the screen.
[21] Menus for Prin t
'Print ' menus Explanation
'Target' The settings for the type of document.
'Output' The settings for the finishing settings and the destination.
'Sheet' The settings for the paper type.
'Layout' The settings for 1-sided or 2-sided, document type, mar-
gin shift and shift to center.
'Image' The settings for the contrast and for the zoom factor.
[21] Menus for Print
Introduction 35

Network mailbox
The 'Network mailbox' contains the jobs that are sent to the network mailbox
via the network.
A mailbox icon in the selection area for the 'Network mailbox' indicates that
there are new jobs in the network mailbox. When you open the 'Network
mailbox' the icon disappears.
You can access the print jobs in the network mailbox through the key for the
'Network mailbox' on the right-hand side of the screen.
[9] The Network Mailbox
[9] The Network Mailbox
36 Océ VarioPrint 2105 Job manual

The 'Network mailbox' shows the following information for each job.
[22] Information in the Network Mailbox
Number Action
1 A check mark that indicates that the job has been sent to
the queue
2 The document name
3 The user name
4 The number of pages of the originals
5 The number of sets
6 The paper size, weight and color of the first page of the
job
7 The date and the time on which the job arrived in the
mailbox.
[22] Information in the Network Mailbox
Introduction 37

Local mailbox
The 'Local mailbox' contains the jobs that the operator scans to the mailbox.
The 'Scan job' template has this default setting to 'Mailbox'.
A mailbox icon in the selection area for the 'Local mailbox' indicates that there
is a new job in the local mailbox. You can access the print jobs in the local
mailbox through the key for the 'Local mailbox'.
[10] The local mailbox
[10] The local mailbox
38 Océ VarioPrint 2105 Job manual

The 'Local mailbox' shows the following information for each job:
[23] Information in the local mailbox
Number Action
1 A check mark that indicates that the job has been sent to
the queue
2 The number that identifies the job
3 The number of pages of the originals
4 The number of sets
5 The paper size, weight and color of the first page of the
job
6 The date and the time on which the job arrived in the
mailbox.
[23] Information in the local mailbox
Introduction 39

Getting Started
Power modes on the Océ VarioPrint 2105
Introduction
The Océ VarioPrint 2105 can be in 4 different power modes:
1 OFF mode
2 Sleep mode
3 Low power mode
4 Process or stand-by mode.
OFF mode
The Océ VarioPrint 2105 print station can be in OFF mode. The scan station is
always turned on, because of the Océ Smart Imager, that controls the power of
the system. You can turn off the print station with the power switch ( ) and
still scan your documents on the scan station.
Sleep mode
When the print station or the scan station is in sleep mode, this indicates that
the power consumption is decreased to a very low level.
It will take up to 12 minutes to turn the print station into stand-by mode. It will
take up to 4 minutes to turn the scan station into stand-by mode.
You can turn the scan station and the print station into the sleep mode with the
On/Off button ( ). If the print station prints a document while you press the
On/Off button ( ), the print station stops at the end of a set and then goes into
sleep mode.
If you do not use the Océ VarioPrint 2105 for a defined time (EPA-setting), the
scan station and the print station turn into the sleep mode. To change the
EPA-setting for the sleep mode delay, change the sleep mode timer (see the
Configuration and maintenance manual). If the Océ VarioPrint 2105 is in the
sleep mode, you have to press the On/Off button ( ) to activate the scan
station or print station.
If the scan station and the print station are in the sleep mode, the screen on the
operator panel is off/black. The LED on the monitor is red. If either the scan
40 Océ VarioPrint 2105 Job manual

station or the print station is not in the sleep mode, the screen of the operator
panel is on.
Low power mode
When the print station is in low power mode, this indicates that the power
consumption is decreased to lower level. It will take up to 4 minutes to turn the
print station into stand-by mode.
The print station turns into the low power mode when the station is not used
for some time. The low power mode timer settings indicate this time. If the Océ
VarioPrint 2105 must be active to print a document, the print station
automatically returns to the stand-by mode.
Note: Only the print station can turn into the low power mode. You can not put
the print station into low power mode manually (only by timer).
Process or stand-by mode
Both stations can be in process mode or stand-by mode separately.
The print station is in process mode when it prints a job. The scan station is in
process mode when it scans a job.
The scan station and the print station are in stand-by mode when they are not
processing a job. When a job needs to start, the stations are active immediately.
There is no extra warm-up time.
Warm-up time
You can adjust the warm-up time of the Océ VarioPrint 2105 to take into
account special climate conditions. The warm-up time is the time the system
needs to become operational when you start the system. You can increase the
standard warm-up time with 5 minutes to decrease the effect of moisture on the
print quality caused by condensation. Configure the warm-up time
Introduction 41

Summary
The Océ VarioPrint 2105 can be in 4 different modes:
[24] Power modes
Mode Power
switch
Status LED in
the On/Off but-
Condition of the Océ
VarioPrint 2105
ton
OFF 0 OFF OFF
Sleep 1 ON/orange The print station first has
to boot, connect, initialize,
warm up before it reaches
stand-by.
The scan station first has
to boot, connect, initialize
before it reaches stand-by.
1
Low power
1 ON/green The print station has to
warm up after a job arrives, before it reaches
stand-by.
Stand-by or
process
1 ON/green The print station is ready
to print or printing.
The scan station ready to
scan or scanning.
[24] Power modes
1
Only applicable for the print station
Note: If the scan station or the print station has a permanent error, the LED in
the button remains orange. An error screen appears with the message to call
service.
Note: The Océ VarioPrint 2105 has no auto-wakeup function. This means that
the system will not become active at the arrival of an automatic print job.
42 Océ VarioPrint 2105 Job manual

Turn on the Océ VarioPrint 2105
Introduction
This chapter describes the different procedures to turn on the printer-only
configuration and the hybrid configuration of the Océ VarioPrint 2105.
Before you begin
■ Empty the output trays of the finisher.
■ Make sure that the paper trays do not contain more sheets than the
specifications allow.
Upper tray: Letter-standard / 1000 sheets of 20 lb. bond
Middle tray: Letter-standard / 1000 sheets of 20 lb. bond
Lower tray: Letter-standard / 3000 sheets of 20 lb. bond
If you load more sheets, the Océ VarioPrint 2105 may not become warm
because some switches in the paper tray are opened.
How to turn on the hybrid configuration
Press the power switch ( ) on the scan station.
1
The Océ Smart Imager starts up. The following occurs.
■ The green LED on the monitor of the control station blinks.
■ The screen of the operator panel is off/black.
2 Press the power switch ( ) on the print station.
■ Wait for 2 minutes, then the screen displays the Océ VarioPrint 2105 logo.
■ Wait until the screen displays the 'Standard templates'.
3 Press the On/Off button ( ) on the scan station. The LED in the On/Off
button changes to green.
4 Press the On/Off button ( ) on the print station. The LED in the On/Off
button changes to green.
How to turn on the printer-only configuration
Press the power switch on the Océ Smart Imager.
1
The Océ Smart Imager starts up.
The following occurs.
■ The green LED on the monitor of the control station blinks.
■ The screen of the operator panel is off/black.
Introduction 43

2 Press the power switch ( ) on the print station.
■ Wait for 2 minutes, then the screen displays the Océ VarioPrint 2105 logo.
■ Wait until the screen displays the grayed-out 'Standard templates'.
3 Press the On/Off button ( ) on the print station. The LED in the On/Off
button changes to green.
How to wake-up the Océ VarioPrint 2105 from sleep mode
1
Press the On/Off button ( ) on the scan station. The LED in the On/Off
button changes to green.
2 Press the On/Off button ( ) on the print station. The LED in the On/Off
button changes to green.
Note: Step 1 is only relevant if you have the hybrid configuration.
44 Océ VarioPrint 2105 Job manual

Shut down the Océ VarioPrint 2105
Introduction
This chapter describes how to shut down the Océ VarioPrint 2105. The Océ
Smart Imager is a PC that controls the Océ VarioPrint 2105. Follow the
shut-down procedure to shut down the Océ Smart Imager and eventually the
complete system.
When to do
When you shut down the Océ VarioPrint 2105 at the end of the day, the
information in the mailbox will be available again after you restart the Océ
VarioPrint 2105.
Information in the job queue will be lost when you shut down the machine.
Jobs that have not entered the mailbox at the moment that you shut down the
machine will also be lost.
Turn off the system at least one time a week. This will clean up the Océ Smart
Imager. As a result of this shut-down action the Océ Smart Imager will keep its
productivity.
Attention: Follow the shut-down procedure on the operator panel before you
shut down the Océ VarioPrint 2105 with the power switches ( ) on the print
station and, if you have the hybrid configuration, the scan station.
Introduction 45

Illustration
[11] Shutdown of the system
[11] Shutdown of the system
How to shut down the Océ VarioPrint 2105
Press the key for'System manager' on the operator panel. The system manager
1
is opened.
2 Select 'System'.
3 Press the key for 'Shut down' to start the shut-down procedure.
4 Press the key for 'Yes' to confirm the procedure or 'No' to stop the procedure.
5 Read the message and press the key for 'OK'.
The Océ Smart Imager will start shutting down. Wait until the red LED on the
monitor is Off.
6 Press the power switch ( ) on the print station.
7 Press the power switch ( ) on the scan station if you have the hybrid
configuration.
How to put the print station into sleep mode
1
Press the On/Off button ( ) on the print station. The print station switches to
sleep mode. The LED in the button turns from green to orange.
Note: If the print station processes a job, the print station stops printing at the
end of a set and then goes into sleep mode.
46 Océ VarioPrint 2105 Job manual

How to put the scan station into sleep mode
1
Press the On/Off button ( ) on the scan station. The scan station turns into
the sleep mode. The LED in the button turns from green to orange.
Note: If the scan station processes a job, the scan station finishes this job
before it goes into sleep mode.
Introduction 47

Adjust the Océ VarioPrint 2105 for daily use
Introduction
To improve the efficiency of the Océ VarioPrint 2105, you can adjust several
settings in the 'System manager' or in the remote Océ VarioPrint 2105 Settings
Editor. For example you can indicate in the 'System manager' what the Océ
VarioPrint 2105 must do if the needed supplies for a job are not available. In
the Océ VarioPrint 2105 Settings Editor you may define what paper sizes you
want to present in the preferred paper sizes picklist for the scan station and the
print station.
[12] The system m anager and the wo rkflow menu
[12] The system manager and the workflow menu
48 Océ VarioPrint 2105 Job manual

You can define the following settings in the 'Workflow' menu of the 'System
manager'.
[25] Workflow menu of the sy stem manager
Settings in the
Options in the 'Workflow' menu
'System manager'
'Automatic print-
1
ing'
Automatic printing has two options:
'Continue': the automatic print jobs
2
in the queue will be
printed.
'Stop': the automatic print jobs in the queue are stored in
a buffer. A counter in the job queue area displays the
number of automatic print jobs in the buffer. The jobs are
not printed until you change this setting to 'Continue'.
[13] The counter for stopped automat ic printing
[13] The counter for stopped automatic printing
'Processing' 'Keep sequence' : The system will always print the jobs
in the same order as displayed in the job queue. If a job
can not start printing, the system will stop. No jobs will
be printed.
'Keep going': The system will always try to keep producing. If a job in the job queue cannot start printing, be-
3
cause the job is on hold or has a start contradiction
,
other jobs in the job queue may overtake and start printing.
'New print jobs' You can direct new print jobs 'To mailbox' or 'To queue'.
'Job separation' You can indicate how the jobs are sent to the finisher.
[25] Workflow menu of the system manager
1
You can define the settings for Automatic printing on the operator panel.
2
An automatic print job is a job that comes directly from the network into the
job queue. If you start a job from the mailbox, this job is called an interactive
print job.
Introduction 49
'Next tray', indicates that each set of prints is delivered to
another output tray. Each output tray contains a maximum of one job.'Stack offset' indicates that the sets are
jogged in the same output tray.

3
A start contradiction indicates a problem with the availability of the resources
for a job. For example the job needs red paper, but there is no red paper in the
paper trays.
[14] The system m anager and the sca n station menu
[14] The system manager and the scan station menu
50 Océ VarioPrint 2105 Job manual

You can define the following settings in the 'Scan station' menu of the 'System
manager'.
[26] Scan statio n menu of the system manager
Settings in the
Options in the 'Scan station' menu
'System manager'
'Double sheet detection'
'On'. This is the default setting. The system checks for
separations of two or more originals on the automatic
document feeder.
'Off'. The system does not check for double sheet separations on the automatic document feeder. Paste-up
originals can be scanned via the automatic document
feeder. If the 'Double sheet detection' is disabled, an
icon in the system monitor displays the 'Off' status of
the 'Double sheet detection'.
[26] Scan station menu of the system manager
[15] The system ma nager and the user interface menu
[15] The system manager and the user interface menu
Introduction 51

You can define the following settings in the 'User interface' menu of the
'System manager'.
[27] User interface menu of the system manager
Settings in the
Options in the 'User interface'
'System manager'
'Reset day counter' The print counter in the 'System monitor' is set to 0.
There is no confirmation for this action.
'Language' You can select one language out of a list that contains
14 languages:
English, Dutch, French, German, Italian, Norwegian,
Swedish, Danish, Spanish, American English, Portuguese, Polish, Czech, Hungarian
Note: When you change the language of the user
interface, the language of the Océ VarioPrint 2105
Settings Editor also changes.
[27] User interface menu of the system manager
[16] The system m anager and the sys tem menu
[16] The system manager and the system menu
52 Océ VarioPrint 2105 Job manual

You can select the following function in the 'System' menu of the 'System
manager'.
[28] System menu of the system manag er
Setting in the
Options in the 'System' menu
'System manager'
'Shut down' This is the only way to shut down the system in a cor-
rect way.
[28] System menu of the system manager
[17] The system ma nager and the acco unting menu
[17] The system manager and the accounting menu
Introduction 53

You can define the following settings in the 'Accounting' menu of the 'System
manager'.
[29] Accountin g menu of the system manager
When to do
Setting in the
Options in the 'Accounting' menu
'System manager'
'Accounting' You can select one of the following options
■ 'Per job'
■ 'Automatic'
■ 'Off'.
'Set account number'
The current account number is displayed. You can
change the account number with the softkey below the
screen. If you press this key, a message box appears
where you can enter and confirm a new account number.
[29] Accounting menu of the system manager
Use the settings and functions in the 'System manager' to do the following.
■ Adjust the Océ VarioPrint 2105 for daily use.
■ Reset the day counter.
■ Restart the Océ VarioPrint 2105 Smart Imager.
■ Define the accounting settings.
How to work within the System manager
1
Press the key for 'System manager'.
2 Navigate to the appropriate menu.
3 Define your settings or select a function.
4 Press the 'Quit system manager' key.
Your settings are activated after you close the 'System manager'.
Note: If you shut down the Océ VarioPrint 2105 you do not have to quit the
'System manager' to activate this function.
54 Océ VarioPrint 2105 Job manual

Control the backlight of the screen
Introduction
At the rear side of the monitor you find the 2 keys to adjust the backlight of the
screen. You can adjust the backlight in the range 0 to 7. Default value is 4.
The keys are not repetitive (no repeat function).
The system keeps the backlight setting in the memory. A restart of the system
has no influence on this setting.
Before you begin
Wait until the machine has passed the initialisation phase.
The figure below shows you where to find the keys for the backlight control.
The keys to operate the backlight control are located at the rear side of the
monitor where the arrow marks the position.
Introduction 55

Illustration
[18] Operator panel
[18] Operator panel
How to control the backlight of the screen
Press the right backlight key.
1
The brightness level increases one step.
2 Press the right key again until you reach the needed level of brightness.
(Press the left backlight key to decrease the level of the backlight brightness).
56 Océ VarioPrint 2105 Job manual

Chapter 2
The Copy Function
Océ VarioPrint 2105
Job Manual
57

Basic Copies
General
Make a copy
Introduction
On the Océ VarioPrint 2105 there are four ways to start a copy job. Each time
the flexibility and the complexity increases. See the table below.
[30] 4 methods to make a copy
12 3 4
Start key
()
Select a template
Enter number of
prints
Start key ( )
Select a template Select a template
Change settings
for original and
print
Enter number of
prints
Start key ( )
Change settings for
original and print
set-build key ( )
Enter number of
prints
Start key ( )
Print
[30] 4 methods to make a copy
1
Change settings for every subset.
2
Go back to 1 to define a new subset. When all subsets are scanned, press the
start key.
Description of the 4 methods.
1 The 'Green button' copy.
2 Select a template and change the number of prints.
3 Select a template, change settings of original and print and the number of
prints.
4 Combine different subsets, extended copy.
1
2
In this paragraph you find the description of the 1st method.
58 Océ VarioPrint 2105 Job manual

If you only press the start key ( ), without selecting a template, you make a
'Green button' copy. The settings of the copy job template are used. Use the
procedure below to make a 'Green button' copy. You can not change the
number of prints for a 'Green button' copy.
Before you begin
When you start a copy job.
■ Remove all staples from your originals with the staple remover.
■ Remove the paper clips.
■ Make sure that the originals in the automatic document feeder have the
same size.
■ Make sure that the originals are not curled.
How to make a copy
Put the originals face down and in readable form into the automatic document
1
feeder.
Note: The system detects the size and the orientation of the original in the
automatic document feeder. The system makes the settings for the print
automatically. The size of the original in the automatic document feeder must
be a standard paper size.
2 Adjust the original guides.
3 Press the start key ( ).
Note: If a paper tray runs out of paper during a job, and a paper tray with the
same paper type is available, the job continues using this other tray
(continuous copying).
The Copy Function 59

Make a copy or print with the copy card
Introduction
You can use the Océ VarioPrint 2105 in combination with a separate copy
count device. You can use the copy count device as a prepaid credit system or
a post-paid debit system. The prepaid system requires copy cards with credit
units. The post-paid system uses an account number.
Prepaid system
The prepaid system uses a copy card that contains credit units. The print clicks
are subtracted from the credit value on the card each time the system makes a
print. When the card runs out of credits during a print job or copy job, the
system stops printing and displays a message. The user must refill the credits
or insert a new card.
Post-paid system
The post-paid system uses an account number that you must enter at the start
of a job.
How to make a copy with the copy card
Insert the copy card into the copy count device or enter the account number.
1
2 Select a job from the local mailbox or the network mailbox. You can also create
a copy job with the green start button (see ‘Make a copy’ on page 58).
3 Start the job. The job is sent to the job queue.
Note: If you run out of credits during a job, the system stops the job and asks
you to refill the credits on your card or insert a new card.
60 Océ VarioPrint 2105 Job manual

Copy with templates
Introduction
A template contains settings that are pre-set to specific values. The main screen
displays 5 selectable templates. When you select a template, a job opens in the
section 'Basic settings' in the Job editor. The 'Basic settings' section contains
shortcuts to the 5 most used settings for a copy job.
The Océ VarioPrint 2105 has 5 templates.
[31] Description of the te mplates
When to do
Name of the
Function
template
'Copy job' Use this template for standard copy jobs.
'Scan job' Use this template to scan a document to the 'Local mail-
box'.
'Margin erase' Use this template to clear gray stripes or shadows at the
binding edge of the original (for example to remove staple holes).
'Margin shift' Use this template to shift the image away from the bind-
ing edge on the front and rear of the print.
'Last used' This template contains the settings of the last started job.
[31] Description of the templates
The templates allow you to access the functions of the Océ VarioPrint 2105
fast. You can prepare a job while the Océ VarioPrint 2105 prints other jobs.
The Copy Function 61

Illustration
[19] The 5 standa rd templates
[19] The 5 standard templates
How to start a copy job using a template
To create a new job, press the key for one of the five templates. The job editor
1
opens with the 'Basic settings' menu on the screen. The new job is displayed in
the job queue area.
2 Press the keys below the 5 settings on the screen to change the 'Basic settings'.
See the next paragraphs for complete information.
3 Press the start key ( ). The scan station starts to scan.
Note: The job editor closes and the templates are disabled when the job scans.
4 When the scanning process is completed, the main screen appears. You can
select a template for the next job.
62 Océ VarioPrint 2105 Job manual

Defining Job Settings
Types of job settings
Introduction
When you select a template, you can change the following settings for your job
in the job editor.
■ The settings in the 'Basic settings' section. This section is a subset of the
most used settings in 'Original' and 'Print '.
■ The original document settings in the 'Original' section.
■ The copy/print document settings in the 'Print ' section.
Settings for the Original
[20] The setting s in the original sec tion
[20] The settings in the original section
The Copy Function 63

The table below shows the settings for originals in the automatic document
feeder or originals on the glass plate.
[32] Settings for the origin al
Settings for
Settings Definition
'Original'
'Source' 'Type' This setting is read-only.
'Paper'
■ If you select a template this setting will
be set to 'Paper'.
The original comes from the glass plate or
the automatic document feeder.
'Mailbox'
■ If you edit a mailbox job, this setting
will be set to 'Network mailbox' or
'Local mailbox'. The original comes
from the network mailbox or the local
mailbox.
'Network'
■ If you view a print job in the queue, the
network file name is displayed.
'Orientation' This setting is read-only for the originals
to be scanned from the automatic document feeder.
This setting can be changed if you scan the
original from the glass plate and the original is small enough to be scanned in two
directions (tabloid can only be scanned in
one direction on the glass plate).
'Sheet' 'Size' This setting is read-only for the originals
to be scanned from the automatic document feeder. Select one of the preferred
paper sizes in the list if you copy from the
glass plate.
'User-defined'
You can define the size of
the 'Long edge' and the size
of the 'Short edge' of the
original.
'Layout' 'Original' You can indicate that the originals are to
be scanned 1-sided or 2-sided.
64 Océ VarioPrint 2105 Job manual

Settings for
'Original'
Settings Definition
'Document
type'
The icons show the following.
■ How the information is mapped on the
paper.
■ The binding edge of a 2-sided
document. A 2-sided document can
turn on the long edge or the short edge.
'Margin erase' This setting indicates the size of the mar-
gin part that is to be erased from the original, seen from the binding edge (see
'Document type').
'Image' 'Image type' This setting describes the original. The
system takes this information into account. This function enhances the quality
of the copy job.
You can indicate the type of information
on the original.
■ 'Photo'. The original represents an
illustration or photo.
■ 'Text'. The original contains only text.
■ 'Mixed'. The original contains both text
and an illustration.
[32] Settings for the original
The Copy Function 65

Settings for the Print
[21] The settings in the print section
[21] The settings in the print section
66 Océ VarioPrint 2105 Job manual

The table below shows the settings that you can set for the print.
[33] Settings for the print
Settings
Settings Definition
for 'Print '
'Target' 'Type' 'Paper'. This setting indicates that you send the
document directly into the job queue.
'Mailbox'. This setting indicates that you send
the document to the mailbox.
'File'. This setting is optional. It is only available if the Scan-to-file function is active. the
setting indicates that you can generate a digital
file that is sent to the scan server.
'Output' 'Destination' This setting indicates the destination of the
prints. The destination can be the output trays,
the print tray or the Océ DFS10.
'Sort' This setting indicates that the prints are sorted
by set or by page.
'Staple' This setting indicates that the prints are stapled
or not stapled. You can select 1 staple, 2 staples
and no staples.
The staple setting is only available if the output
trays are selected.
Note: The position of 1 staple depends on the
selected document type (landscape stapling
possible).
'Offset
stacked'
This setting indicates that sets go into the output trays in offset stacks or straight stacks.
'Yes'. Each set has an offset.
'No'. Only the first set has an offset (every new
job has an offset)
The Copy Function 67

Settings
Settings Definition
for 'Print '
'Sheet' 'Paper' 'Other'
In this setting you can select 'Size', 'Weight',
'Color' and 'Special front' separately.
('Special front' indicates that the front and the
rear side of a sheet in the paper tray are different).
'Special'. In this setting you can select the paper
size, tab sheets, inserts transparencies and 3
special paper types.
In case of a tab sheet you can select to 'Print on
the tab' or not.
'Layout' 'Print ' The setting indicates that a print must be 1-sid-
ed or 2-sided.
'Document
type'
The icons show the following.
■ How the information is mapped on the paper
■ The binding edge of a 2-sided document. A
2-sided document can turn on the long edge
or the short edge.
'Margin
shift'
This setting indicates the image shift on the
front and the rear side of the print seen from the
binding edge. (see 'Document type')
'Shift to center'
This setting indicates that the image is put into
the center of the sheet.
'Image' 'Zoom' The zoom range is between 25% and 400%.
'Exposure' You can adjust the settings for light areas and
dark areas on the print independently.
If an area on the print is light grey and you want
it to be white, move the cursor in the 'Light' bar
to white.
If an area on the print is dark grey and you want
it to be black, move the cursor in the 'Dark' bar
to black.
[33] Settings for the print
68 Océ VarioPrint 2105 Job manual

Offset stacked
The prints are collated in the finisher and ejected in sets into one of the output
trays. Select 'Offset stacked' to separate the different sets. If you set 'Offset
stacked' to 'Yes' each printed set is moved approximately 1 cm to separate the
set from the previous sets.
Sorted by page
You can sort sheets 'By page' or 'By set'.
If you copy single-page documents like forms, you should sort the documents
'By page'. Sort 'By set' slows down the print speed within this copy job.
If you print one copy of a multi-page document, select sort 'By set'. Sort 'By
page' slows down the print speed within this copy job.
[22] Sorted docu ments: 3 copies, sor ted by page
[22] Sorted documents: 3 copies, sorted by page
Set 1,2,3: indicate the sorted sets 'By page'.
The Copy Function 69

Sorted by sets
[23] Sorted doc uments: 3 copies, sor ted by set
[23] Sorted documents: 3 copies, sorted by set
Set 1,2,3: indicate the sorted sets 'By set'.
70 Océ VarioPrint 2105 Job manual

Change the settings for a copy job
Introduction
After you select a template, you can change all the settings for your copy job
in the Job editor.
Note: If you edit a mailbox job you can only change output settings, document
type settings and number of copies.
Illustration
[24] The Basic settings
[24] The Basic settings
The Copy Function 71

How to define the settings for a new job
1
Automatic document feeder: Put the originals face down and in readable
form into the automatic document feeder. Adjust the original guides to the
original paper size.
Glass plate: Put the originals on the glass plate.
2 Select a template.
3 The Job editor opens with the 'Basic settings' menu. All settings are set to the
values defined for this template.
Note: When you put your originals into the automatic document feeder, the
original size, original sheet orientation and the original document type are
selected automatically (Only for A4 and Letter Standard. Other formats can
only be fed in one feed direction).
The print size and document type are also automatically selected and adapted
to the original settings.
4 To change the settings for the original document, press the key for 'Original'
and go through the 3 menus at the right side of the screen ('Source', 'Sheet' and
'Layout').
5 To change the settings for the print, press the key for 'Print ' and go from top to
bottom through the 5 menus at the right side of the screen ('Target', 'Output',
'Sheet', 'Layout' and 'Image').
6 Set the number of prints with the numeric keys.
Note: You can set the number of prints at all times during the job definition.
The print feedback area displays the number of prints.
72 Océ VarioPrint 2105 Job manual

Correct settings in the job editor
Introduction
You can define or change the settings in the job editor until you press the start
key ( ) or the set-build key ( ). To correct settings you must use the
correction key ( ).
When to do
■ To reset the number of copies to 1
■ To reset the job settings to the template defaults
■ To delete the last subset
■ To cancel the definition of the new job.
Correction key behavior
[34] Correction key behavior
If you press the correc-
Then
tion key ( )
One time The quantity setting (number of prints) is reset
to one of the following values.
■ The template default
■ The 'Last used' template
■ The quantity setting in the mailbox job.
Two times All other settings are reset to the default values
of the template or the mailbox job.
Three times The job definition is canceled or the last subset
is deleted.
[34] Correction key behavior
The Copy Function 73

Stapled Copies
Introduction
The Océ VarioPrint 2105 finisher has two staplers for stapling sets. You can
staple in three different ways.
■ 1 staple in portrait direction
■ 2 staples
■ 1 staple in landscape direction.
To create a document with a landscape staple you only have to select the
correct document type.
[25] Staple function
[25] Staple function
If your set turns out to be too thick to staple (this is measured), a dialog is
displayed on the screen. You can do the following:
■ Continue without staples.
■ Cancel the job.
If one of the staplers is or runs empty, a dialog is displayed on the screen. You
can do the following:
■ Continue without staples.
■ Refill the staplers.
■ Cancel the job.
Note: If the margin has not enough space for staples, you can shift the margin
(see ‘Change the margin (shift)’ on page 83).
74 Océ VarioPrint 2105 Job manual
Before you begin
1
Remove any staples or paper clips.
2 Check that the originals in the automatic document feeder have the same size.
3 Check that the originals are not curled.
Illustration
[26] Settings for 1 stapl e
[26] Settings for 1 staple
How to staple the copies
Put the originals face down and in readable form into the automatic document
1
feeder.
2 Align the original with the original guides.
3 Select a template, for example 'Copy job'.
4 Select '2 staples', '1 staple' or 'No staples'.
Note: You can do also the following: Select 'Print '. Select 'Output'. Define the
staple setting.
5 Enter the number of copies.
6 Press the start key ( ).
The Copy Function 75

How to staple a landscape oriented document
1
Put the originals face down and in readable form into the automatic document
feeder.
2 Align the original with the original guides.
3 Select a template, for example 'Copy job'.
If you could not feed the original in readable form (see 4A) or the print
document type is not the same as the original document type (see 4B) do step
4 and 5. Otherwise, the system will automatically use the correct settings for
landscape stapling.
4 A: To describe the original you use, select 'Original', 'Layout'. The print
document type settings will automatically follow.
B: To describe the print you need, select 'Print ', 'Layout'.
5 Select landscape in the 'Document type' section.
6 Select 'Output'.
7 Select '1 staple' (check the staple position in the 'Print ' feedback area).
8 Enter the number of copies.
9 Press the start key ( ).
76 Océ VarioPrint 2105 Job manual

Changing the Zoom Factor
Introduction
The automatic zoom function is active when you put standard size originals
into the automatic document feeder. If the size of the original is larger than the
size of the print, the size of the information is automatically reduced. The zoom
function is by default set to 'Automatic'. To change the zoom factor manually,
press the key for 'Zoom' in the 'Print ', 'Image' menu to change the zoom factor
with the star arrow keys ( ).
If you use non-standard size or special originals on the glass plate, you can also
change the zoom factor with the star arrow keys ( ).
The screen of the operator panel gives you the feedback for the increased or
decreased size of the information (Compare the 'Original' and the 'Print ' in the
illustration below).
The zoom function for the originals in the automatic document feeder is
different from the zoom function for the originals on the glass plate.
[35] Difference betwe en the automatic document feeder and t he glass plate
Original Zoom function Starting point of
the zoom function
Automatic
document
feeder
Automatic
Note: You can always overrule the
automatic zoom function and define the
center
zoom factor manually.
Glass plate After you define the size of the origi-
Upper left corner
nal: Automatic
Note: You can always overrule the
automatic zoom function and define the
zoom factor manually.
[35] Difference between the automatic document feeder and the glass plate
The Copy Function 77

Illustration
[27] Zoom factor c hanged to 141%
[27] Zoom factor changed to 141%
How to set the zoom factor
Put the originals into the automatic document feeder or on the glass plate.
1
2 Press the key for a template, for example 'Copy job'.
If you only need to change the 'Basic settings', go to step 5.
3 Press the key for 'Print '.
4 Press the key for 'Image'.
5 Select 'Zoom' to adjust the value with the star arrow keys.
Note: The minimum size is 25%. The maximum size is 400%.
78 Océ VarioPrint 2105 Job manual

Adjust the exposure settings
Introduction
Photos, rasters and fine lines on the original are detected and adjusted
automatically. The Océ VarioPrint 2105 processes these originals to make
prints with a high quality. If necessary, you can customize the exposure settings
manually.
You can adjust the settings for light areas and dark areas on the print separately.
■ If an area on the print is light grey and you want it to be white, move the
cursor in the 'Light' bar to white.
■ If an area on the print is dark grey and you want it to be black, move the
cursor in the 'Dark' bar to black.
How to make a test print
If you change a setting, make a test print to check the accuracy of the setting.
1 Select a template, for example 'Copy job'.
2 Set the number of prints to 1.
3 Press the start key ( ).
4 Check the quality of the print.
The Copy Function 79

Illustration
[28] Adjust the exposur e settings
[28] Adjust the exposure settings
How to set the exposure
Put the originals into the automatic document feeder or on the glass plate.
1
2 Define the settings for the 'Original'.
3 Press the key for 'Print '.
4 Press the key for 'Image'.
5 Press the key for 'Exposure' to change for dark area or light area adjustments.
6 To make the light areas on the print darker, move the pointer for 'Light' to the
left.
To make the dark areas on the print darker, move the pointer for 'Dark' to the
left.
7 Make a test print.
80 Océ VarioPrint 2105 Job manual

Erase the margin
Introduction
The Océ VarioPrint 2105 allows you to hide a part of the information of your
original, for example to prevent that your printed documents show prints from
staples or holes. The erase function always hides information at the binding
edge (define in original document type) of the original.
In all the templates you can navigate to the 'Margin erase' function in the
original definition of the job editor ('Original', 'Layout', 'Margin erase'). You
can also use the 'Margin erase' template.
Range
You can set the 'Margin erase' setting between 0 mm and 100 mm in steps of 1
mm (Europe) or between 0" and 4" in steps of 1/24" (USA). The default value
for the 'Margin erase' setting in the 'Margin erase' template is 10 mm.
Illustration
[29] Erase the margin
[29] Erase the margin
The Copy Function 81

How to erase the margin
1
Select a template, for example 'Copy job'. (you can also use the 'Margin erase'
template to automatically erase a default margin of 10 mm)
Note: The margin is erased at the binding edge of the print.
2 Navigate to the 'Original', 'Layout' menu.
3 Press the key for 'Margin erase'.
4 Use the star arrow keys to adjust the value for 'Margin erase'.
If you press Then
the arrow up key the value increases by 1.
the arrow down key the value decreases by 1.
the arrow right key the value increases by 5.
the arrow left key the value decreases by 5.
Note: If you reach the upper limit (100) or the lower limit (0), the value does
not change.
82 Océ VarioPrint 2105 Job manual

Change the margin (shift)
Introduction
If you bind a document or use perforation, you may need a larger margin. If the
document has a narrow margin, you could loose text. In all the templates you
can navigate to the 'Margin shift' function in the print definition of the job
editor ('Print ', 'Layout', 'Margin shift'). You can also use the 'Margin shift'
template.
The Copy Function 83

Margin shift is possible for 1-sided or 2-sided documents. The information on
the front and back of the print is always shifted away from the binding edge of
the print.
When you print a document, the 'Document type' must be defined correctly (for
a standard paper size in readable direction in the automatic document feeder or
if the print document type is the same as the original document type, this is
defined automatically).
The form of a document can be booklet form or a calendar form. This form
defines the binding edge and orientation of the information. The figure below
shows the orientation and the binding edge for different documents.
1 portrait original, long-edge binding, booklet form
2 landscape original, short-edge binding, booklet form
3 portrait original, short-edge binding, calendar form
4 landscape original, long-edge binding, calendar form.
[30] Document type
[30] Document type
84 Océ VarioPrint 2105 Job manual

To get a correct binding for 2-sided prints, you must shift the front side and the
back side margin of the print.
[31] Margin shift on the fr ont side
[31] Margin shift on the front side
[32] Margin shift on the back side
The Copy Function 85

[32] Margin shift on the back side
The default value for the 'Margin shift' template is 10 mm (1/2 inch) for the
front and the back side of the paper.
How to define the margin shift for a 1-sided or 2-sided original
1
Put the originals in the reading direction and face down into the automatic
document feeder.
2 Adjust the original guides or put your 1-sided original on the glass plate.
3 Select the template 'Margin shift'.
4 Press the key for 'Print '.
5 Select 'Layout'.
6 If your document is not in the automatic document feeder in reading direction
or if the print document type is not the same as the original document type,
adjust the 'Document type' setting.
7 Select 'Margin shift'.
8 Use the arrow keys to change the margin shift. Remember that you must shift
the margin on front and back side for 2-sided prints. (see ‘Erase the margin’
on page 81) for complete information on the use of the arrow keys.
Stopping a Job
Stop scanning
Introduction
You can stop a scan job with the correction key ( ) on the operator panel. If
you press the correction key, the scanning will stop after the scan station has
processed the originals that are already separated from the automatic document
feeder.
A message with two options is displayed.
■ 'Cancel' the job
■ 'Resume' the job.
86 Océ VarioPrint 2105 Job manual

How to stop scanning
1
Press the correction key ( ) on the operator panel while the scan station
scans the originals.
Result
1
The job in the job queue is now displayed in orange color.
2 The scanning of documents stops.
3 The message with the two options appears. You can cancel or resume the job.
4 When you select 'Cancel', the job is removed from the queue.
Note: If you use the set-build function, cancel will only cancel the last subset,
not the job in the job queue.
Note: If you cancel a scan job, this also indicates that you cancel the
corresponding print job.
The Copy Function 87

Stop printing
Introduction
Press the stop key ( ) one time if you want to stop a print job at the end of a
set. Press the stop key two times to stop within a set (end of page).
After you press the stop key ( ), the printing stops and a dialog is displayed.
Then you can cancel or resume the job.
When to do
For example you find out that you made a mistake in the job definition.
Note: If you press the stop key ( ) while a job is printing, the job is displayed
in orange color.
Stop key behavior
[36] Stop key behavior
Result
If you want to stop a job at the then press the stop key ( ) ...
end of a set one time
end of a page two times
[36] Stop key behavior
After the print station stops printing, a dialog with two options appears.
[37] Stop key dialog
dialog Results
Cancel the job The job is canceled. If the job is stored in the mailbox,
you can print the job again. If you stopped printing at the
end of a page, the partial set must be removed from the
output destination. The Océ VarioPrint 2105 prints the
next job in the queue (if any).
Resume the job The Océ VarioPrint 2105 continues printing the job.
[37] Stop key dialog
88 Océ VarioPrint 2105 Job manual

Extended Copies
Using Special Materials
Copy special originals and originals of a non-standard size
Introduction
Use the glass plate to copy special originals.
Special originals are the following.
■ Pages from a bound original like a book or a magazine
■ Damaged or curled originals
■ Originals of a non-standard size.
To copy an original of a non-standard size, you must enter the short edge size
and the long edge size of the original. The original must fit in the following
ranges.
■ The minimum size for the short edge is 10 mm. The maximum size for the
short edge is 297 mm.
■ The minimum size for the long edge is 10 mm. The maximum size for the
long edge is 432 mm.
The Copy Function 89

If the original is larger than the copy material, the Océ VarioPrint 2105 adjusts
the zoom settings (auto zoom). There is no information loss.
The system automatically adapts the print document type settings to the
original settings of the original on the glass plate.
[33] The orientati on of the original on the glass plate
[33] The orientation of the original on the glass plate
Remember the following.
■ Special originals can cause problems in the automatic document feeder.
Copy special originals from the glass plate.
■ When you use the glass plate, you can make 2-sided copies if you use the
set-build key.
Before you begin
1
Open the scanner cover.
2 Put the original face down, in horizontal or vertical orientation on the glass
plate (in readable form).
Note: Put the original in the upper left corner on the glass plate.
90 Océ VarioPrint 2105 Job manual

How to copy special originals
1
Press the key for a template, for example 'Copy job'.
2 Press the key for 'Original' on top of the screen.
3 Select 'Source'. Press the key for 'Orientation' to indicate the orientation of the
original on the glass plate.
4 Select 'Sheet'. Press the key for 'Size' to indicate the size of the original.
5 If you did not put the originals on the glass plate in readable form, select
'Layout' and make your 'Document type' settings (The settings for 'Print ',
'Layout', 'Document type' will automatically follow).
6 To change the settings for the print, press the key for 'Print ' and go from top to
bottom through the 5 menus at the right side of the screen ('Target', 'Output',
'Sheet', 'Layout' and 'Image').
7 Press the start key ( ) to copy the document.
The Copy Function 91

Copy on special material
Introduction
Special materials are for example the following.
■ Transparencies
■ Tab sheets
■ Inserts (no copy possible)
■ Pre-printed paper
■ Punched paper
■ Covers
■ Labels
■ Adhesive film.
Before you begin
If you use material with a special orientation (front and rear are different), like
pre-printed or punched paper select 'Sheet', 'Paper', 'Other', 'Special front' or
select one of the three special paper types under 'Sheet', 'Paper', 'Type'. To print
correctly, put the material into a paper tray with the heading of the material
toward the front of the Océ VarioPrint 2105 because the image rotates 180°.
Put the side to print first face down.
If you use heavy material, remember the following. Some heavy materials, like
transparencies, do not move through the finisher. To print correctly, change the
output destination to the print tray. This change has two results.
■ All output goes into the print tray.
■ The staple function is not available.
Attention: Do not use pre-printed paper because pre-printed paper can
damage the Océ VarioPrint 2105. There is one exception. You can use copied
paper as an insert, because an insert does not go through the warm areas of
the print station. Inserts do not damage the Océ VarioPrint 2105.
Note: If you use tab sheets, remember that you can print only 1-sided. The right
margin of your original must not contain more information than the tab of the
tab sheet can contain. The Océ VarioPrint 2105 moves the information of your
original 12 mm or 1/2 inch toward the tab if you select 'Print on the tab'.
92 Océ VarioPrint 2105 Job manual

Illustration
[34] Select inserts
[34] Select inserts
How to copy on special material
Put the originals face down and in readable form into the automatic document
1
feeder.
2 Press the key for a template, for example 'Copy job'.
3 Press the key for 'Sheet' in the 'Print ' definition.
4 Press the key for 'Paper' to select 'Special'.
Note: If you select 'Special' this automatically means that paper is handled in
the same way as 'Special front' paper.
The Copy Function 93

5 Press the key for 'Type' to select 'Transparency' or another special material.
[35] The use of a tab sheet.
[35] The use of a tab sheet.
If you have a subset to print on a tab sheet, select 'Paper', 'Special' and 'Print on
the tab'. In the picture above you should press the key for 'Print on the tab' to
print on the tab.
6 Press the key for 'Output' to select staples, sort and destination.
7 If necessary, press the key for 'Destination' to select 'Print tray'.
8 Press the start key ( ) to finish the job or press the set-build key ( ) to scan
the subset.
94 Océ VarioPrint 2105 Job manual

Create a document with covers
Introduction
The Océ VarioPrint 2105 allows you to create documents with a front cover
and a back cover. You can print the covers on colored or special paper. You can
print the covers 1-sided or 2-sided.
If you want to use a cover, this automatically indicates the use of a subset.
Before you begin
Remove any staples and paper clips.
1
2 Check that the originals in the automatic document feeder have the same size.
3 Check that the originals are not curled.
Illustration
[36] The settings for Sheet. Define the paper settings for the covers here.
[36] The settings for Sheet. Define the paper settings for the covers here.
The Copy Function 95

How to prepare the originals for the cover
1
Put the originals face down and in readable form into the automatic document
feeder or put a non-standard original on the glass plate.
2 Press the key for a template, for example 'Copy job'.
3 Press the key for 'Original'.
4 Define the settings for the original.
How to define the covers
1
Select 'Print '.
2 Press the key for 'Sheet'.
3 Press the key for 'Paper'.
4 Select 'Special' to copy the cover on special paper, or select 'Other' to define
the 'Weight', 'Color' and 'Special front' of the paper you want to use separately.
5 Because you use covers, you define subsets for the cover material. Press the
'Set-build' key ( ).
6 Add more subsets to complete the document as described in (see ‘Combine
subsets into one document’ on page 106).
Using the Mailbox
Scan a document to mailbox
Introduction
The scan function is part of the new workflow. While you scan your
documents, the Océ VarioPrint 2105 can print. You can also scan your
documents and store the resulting jobs in the local mailbox. The setting 'Type'
in the 'Target' menu for the 'Print ' definition must be set to 'Mailbox' for this
purpose. In the 'Scan job' template this setting to 'Mailbox' is done by default.
When to do
For example for the following purposes.
■ Make a test print.
■ Store the jobs that you need to print more than one time.
■ Store the jobs that you need to print later.
96 Océ VarioPrint 2105 Job manual

Illustration
[37] Th e destin ation is the l ocal m ailbox
[37] The destination is the local mailbox
How to scan a document to the mailbox
Put the originals into the automatic document feeder or on the glass plate.
1
2 Select the template 'Scan job' or navigate to 'Print ', 'Target', 'Type', 'Mailbox'
in the other templates.
3 Define the settings.
4 If you have different subsets, use the set-build key ( ) to add the different
subsets to create one document.
5 Press the start key ( ).
The job is stored in the local mailbox.
The Copy Function 97

Edit a mailbox job
Introduction
When you start a job from the mailbox, a copy of the mailbox job is created in
the job queue. You can change the settings of that job (only possible if you
select a single job). The changes you make are not applied to the job in the
mailbox. They are applied to the new job in the job queue.
Options
You can change the following settings for the jobs in the mailbox.
■ Number of copies
■ 1-sided or 2-sided
■ 'Sort' (by set or by page)
■ 'Staple'
■ 'Offset stacked'
■ 'Destination'
■ 'Document type'
1
You can change the 'Document type' only for changing the position of a
single staple (landscape and portrait). A change in the layout is not
applicable, although the feedback may suggest that rotation is applied.
1
.
Note: When you select more than one job in the mailbox, the 'Edit' key is
disabled. You cannot edit more than one job at a time.
98 Océ VarioPrint 2105 Job manual

Illustration
[38] Edit a mail box job
[38] Edit a mailbox job
How to edit a mailbox job
[38] Settings to edit a mailbox job
Step Action Remarks
1 Press the key for 'Network mail-
2 Use the star arrow keys ( ) to
3 Press the key for 'Edit' to create a
4 Change the settings for the new
box' or 'Local mailbox'.
select exactly one job in the mail-
box.
new job in the job queue.
job.
The job editor opens with
settings of the initial mailbox job to change for the
new job.
The settings are pre-set to
the values in the job ticket.
5 Press the start key ( ).
[38] Settings to edit a mailbox job
The Copy Function 99

Result
A new job is created in the job queue.
100 Océ VarioPrint 2105 Job manual
 Loading...