

Page 1

Océ VarioPrint® 2062/75 NC
Océ User manual
Configuration and Maintenance Manual
Page 2

Edition 2005-12
US
Océ-Technologies B.V.
Océ-Technologies B.V.
Copyright
2005, Océ-Technologies B.V. Venlo, The Netherlands.
All rights reserved. No part of this work may be reproduced, copied, adapted, or
transmitted in any form or by any means without written permission from Océ.
Océ-Technologies B.V. makes no representation or warranties with respect to the
contents hereof and specifically disclaims any implied warranties of
merchantability or fitness for any particular purpose.
Further, Océ-Technologies B.V. reserves the right to revise this publication and to
make changes from time to time in the content hereof without obligation to notify
any person of such revision or changes.
Page 3

3
Trademarks
Trademarks
List of trademarks
Océ, Océ VarioPrint
®
2062/75 NC are registered trademarks of Océ-Technologies
B.V..
Adobe
®
, Acrobat®, Reader® and Distiller® are registered trademarks of Adobe®
Systems Incorporated.
PostScript
®
3 is a registered trademark of Adobe® Systems Incorporated.
Apple
®
, Mac® , Mac OS® and Macintosh® are registered trademarks of Apple®
Computer, Inc.
InstallShield
®
is a registered trademark of InstallShield® Software Corporation.
FLEXlm is a trademark of Macrovision Corporation.
Microsoft
®
, Windows® , Windows NT®, Windows 98®, Windows 2000®, Windows
XP
®
, Windows Server 2003® are either registered trademarks or trademarks of
Microsoft
®
Corporation in the United States and/or other countries.
Products in this publication are referred to by their general trade names. In most, if
not all cases, these designations are claimed as trademarks or registered trademarks
of their respective companies.
Copyright
2005, Océ-Technologies B.V. Venlo, The Netherlands.
All rights reserved. No part of this work may be reproduced, copied, adapted, or
transmitted in any form or by any means without written permission from Océ.
Océ-Technologies B.V. makes no representation or warranties with respect to the
contents hereof and specifically disclaims any implied warranties of merchantability
or fitness for any particular purpose.
Further, Océ-Technologies B.V. reserves the right to revise this publication and to
make changes from time to time in the content hereof without obligation to notify
any person of such revision or changes.
Page 4

4
Notes for the reader
Notes for the reader
Introduction
This manual helps you to use the Océ VarioPrint
®
2062/75 NC. The manual contains
a description of the Océ VarioPrint
®
2062/75 NC and guidelines to use and operate
the Océ VarioPrint
®
2062/75 NC. There are also tips to increase your knowledge of
the Océ VarioPrint
®
2062/75 NC and to help you manage the workflow even better.
Definition
Attention Getters
Parts of this manual require your special attention. These parts provide important,
additional information or are about the prevention of damage to your properties.
Note, Attention and Caution
The words Note, Attention and Caution indicate these important parts.
■ The word Note comes before additional information about the correct operation
of the Océ VarioPrint
®
2062/75 NC or a tip.
■ A part marked with Attention contains information used to prevent damage to
items, for example the Océ VarioPrint
®
2062/75 NC, or a file.
■ A part marked with Caution contains information to prevent personal injury.
Caution is found only in manuals that describe physical products.
Safety information
You can find the safety information for this product in the Instructions for safe use
and the Safety Data Sheets. The instructions for safe use and the Safety Data Sheets
are included in the appendices of this manual.
Page 5

5
Table of Contents
Table of Contents
Chapter 1
Introduction . . . . . . . . . . . . . . . . . . . . . . . . . . . . . . . . . . . . . . . . . . . . . . . . . . . . . . . 9
Your Océ product. . . . . . . . . . . . . . . . . . . . . . . . . . . . . . . . . . . . . . . . . . . 10
What is in the Configuration and Maintenance Manual . . . . . . . . . . . . . . 11
Who are the Océ VarioPrint® 2062/75 NC users . . . . . . . . . . . . . . . . . . 13
More information on the Océ VarioPrint® 2062/75 NC . . . . . . . . . . . . . . 14
Chapter 2
Getting to know the Océ VarioPrint® 2062/75 NC . . . . . . . . . . . . . . . . . . . . . . . 15
Maintenance and configuration on the Network Printer . . . . . . . . . . . . . . 16
The Parts of the Network Printer . . . . . . . . . . . . . . . . . . . . . . . . . . . . . . . 17
The operator panel of the Network Printer. . . . . . . . . . . . . . . . . . . . . . . . 19
Chapter 3
Getting to know the Digital Copier. . . . . . . . . . . . . . . . . . . . . . . . . . . . . . . . . . . . 21
Maintenance and configuration on the Digital Copier . . . . . . . . . . . . . . . 22
The Parts of the Digital Copier. . . . . . . . . . . . . . . . . . . . . . . . . . . . . . . . . 23
The operator panel of the Digital Copier . . . . . . . . . . . . . . . . . . . . . . . . . 25
Chapter 4
The Key Operator System. . . . . . . . . . . . . . . . . . . . . . . . . . . . . . . . . . . . . . . . . . . 27
Enter or quit the key operator system . . . . . . . . . . . . . . . . . . . . . . . . . . . 28
Changing the PIN of the Key Operator . . . . . . . . . . . . . . . . . . . . . . . . . . 30
Chapter 5
Getting Started. . . . . . . . . . . . . . . . . . . . . . . . . . . . . . . . . . . . . . . . . . . . . . . . . . . . 31
Turn the machine on and off for daily use . . . . . . . . . . . . . . . . . . . . . . . . 32
Enter the IP address information of the Network Printer . . . . . . . . . . . . . 34
Chapter 6
The End-user Display Screen. . . . . . . . . . . . . . . . . . . . . . . . . . . . . . . . . . . . . . . . 37
Change or restore the default job settings . . . . . . . . . . . . . . . . . . . . . . . . 38
Changing the Default Reset Time . . . . . . . . . . . . . . . . . . . . . . . . . . . . . . 40
Change the display language . . . . . . . . . . . . . . . . . . . . . . . . . . . . . . . . . 42
Enter the telephone number of the key operator . . . . . . . . . . . . . . . . . . . 43
Chapter 7
The Access Security . . . . . . . . . . . . . . . . . . . . . . . . . . . . . . . . . . . . . . . . . . . . . . 45
The Access Security of the Network Printer . . . . . . . . . . . . . . . . . . . . . . 46
About the access-secured system of the Network Printer . . . . . . . . . 46
Page 6

6
Table of Contents
Secure the access to the Network Printer machine . . . . . . . . . . . . . . 48
Secure automatic printing . . . . . . . . . . . . . . . . . . . . . . . . . . . . . . . . . . 50
Define the job charges of the Network Printer. . . . . . . . . . . . . . . . . . . 52
Enable the Copy control device connected to the Network Printer . . . 54
The Access Security of the Digital Copier . . . . . . . . . . . . . . . . . . . . . . . . 56
About the access-secured system of the Digital Copier . . . . . . . . . . . 56
Secure the access to the Digital Copier machine . . . . . . . . . . . . . . . . 58
Define the job charges of the Digital Copier . . . . . . . . . . . . . . . . . . . . 60
Enable the Copy control device connected to the Digital Copier . . . . . . . 62
Chapter 8
User Access to the Machine Components . . . . . . . . . . . . . . . . . . . . . . . . . . . . . 65
Control the access to the paper trays . . . . . . . . . . . . . . . . . . . . . . . . . . . 66
Control the access to the special feeder . . . . . . . . . . . . . . . . . . . . . . . . . 68
Chapter 9
The Page and Paper Settings . . . . . . . . . . . . . . . . . . . . . . . . . . . . . . . . . . . . . . . . 71
Define the paper trays for the report jobs. . . . . . . . . . . . . . . . . . . . . . . . . 72
Defining the Folio Size . . . . . . . . . . . . . . . . . . . . . . . . . . . . . . . . . . . . . . . 74
Link the paper trays . . . . . . . . . . . . . . . . . . . . . . . . . . . . . . . . . . . . . . . . . 75
Change the default margin shift . . . . . . . . . . . . . . . . . . . . . . . . . . . . . . . . 77
Chapter 10
The Interrupt Mode . . . . . . . . . . . . . . . . . . . . . . . . . . . . . . . . . . . . . . . . . . . . . . . . 79
Disable the Interrupt function . . . . . . . . . . . . . . . . . . . . . . . . . . . . . . . . . . 80
Chapter 11
The Print and Scan Modes of the Network Printer . . . . . . . . . . . . . . . . . . . . . . . 81
Define the default operating mode of the Network Printer . . . . . . . . . . . . 82
Define the banner pages . . . . . . . . . . . . . . . . . . . . . . . . . . . . . . . . . . . . . 83
Defining the Mailbox Input . . . . . . . . . . . . . . . . . . . . . . . . . . . . . . . . . . . . 85
About the mailbox . . . . . . . . . . . . . . . . . . . . . . . . . . . . . . . . . . . . . . . . 85
Control the automatic print jobs. . . . . . . . . . . . . . . . . . . . . . . . . . . . . . 87
Controlling jobs without an Océ job ticket . . . . . . . . . . . . . . . . . . . . . . 88
Controlling the Time Delay for Print Jobs. . . . . . . . . . . . . . . . . . . . . . . . . 89
About the printing delay. . . . . . . . . . . . . . . . . . . . . . . . . . . . . . . . . . . . 89
Define the printing delay for the automatic print jobs . . . . . . . . . . . . . 90
Chapter 12
System Information . . . . . . . . . . . . . . . . . . . . . . . . . . . . . . . . . . . . . . . . . . . . . . . . 93
Reading Job-page Counters . . . . . . . . . . . . . . . . . . . . . . . . . . . . . . . . . . 94
Check the machine memory . . . . . . . . . . . . . . . . . . . . . . . . . . . . . . . . . . 96
Check the machine number . . . . . . . . . . . . . . . . . . . . . . . . . . . . . . . . . . . 97
Printing System Information of the Network Printer . . . . . . . . . . . . . . . . . 98
Printing system reports . . . . . . . . . . . . . . . . . . . . . . . . . . . . . . . . . . . . 98
Print the accounts-database file . . . . . . . . . . . . . . . . . . . . . . . . . . . . . 99
Page 7

7
Table of Contents
Chapter 13
The Energy Save Timers . . . . . . . . . . . . . . . . . . . . . . . . . . . . . . . . . . . . . . . . . . 101
The Energy Save Timers of the Network Printer . . . . . . . . . . . . . . . . . . 102
About the energy save modes of the Network Printer. . . . . . . . . . . . 102
Setting the energy save timers of the Network Printer . . . . . . . . . . . 103
Disabling the Sleep Mode Timer of the Network Printer . . . . . . . . . . 105
The Energy Save Timers of the Digital Copier. . . . . . . . . . . . . . . . . . . . 106
About the energy save modes of the Digital Copier . . . . . . . . . . . . . 106
Setting the energy save timers of the Digital Copier. . . . . . . . . . . . . 107
Disabling the Automatic Switch Off. . . . . . . . . . . . . . . . . . . . . . . . . . 109
Chapter 14
The Accounting System . . . . . . . . . . . . . . . . . . . . . . . . . . . . . . . . . . . . . . . . . . . 111
About the accounting system. . . . . . . . . . . . . . . . . . . . . . . . . . . . . . . . . 112
About the system accounts . . . . . . . . . . . . . . . . . . . . . . . . . . . . . . . . . . 113
Creating User Accounts. . . . . . . . . . . . . . . . . . . . . . . . . . . . . . . . . . . . . 114
A valid user account . . . . . . . . . . . . . . . . . . . . . . . . . . . . . . . . . . . . . 114
Creating a new user account record on the Network Printer . . . . . . 115
Creating a new user account record on the Digital Copier . . . . . . . . 116
Maintaining the Accounts Database . . . . . . . . . . . . . . . . . . . . . . . . . . . 117
Change the account number. . . . . . . . . . . . . . . . . . . . . . . . . . . . . . . 117
Assign or change a PIN . . . . . . . . . . . . . . . . . . . . . . . . . . . . . . . . . . 118
Changing the Status . . . . . . . . . . . . . . . . . . . . . . . . . . . . . . . . . . . . . 119
Defining the Job-page Limit . . . . . . . . . . . . . . . . . . . . . . . . . . . . . . . 120
Change the sequence of the user accounts . . . . . . . . . . . . . . . . . . . 121
Reset the job-page counters. . . . . . . . . . . . . . . . . . . . . . . . . . . . . . . 122
Delete the user accounts . . . . . . . . . . . . . . . . . . . . . . . . . . . . . . . . . 124
Chapter 15
Finishing Jobs . . . . . . . . . . . . . . . . . . . . . . . . . . . . . . . . . . . . . . . . . . . . . . . . . . . 127
Disabling the Side Correction . . . . . . . . . . . . . . . . . . . . . . . . . . . . . . . . 128
Direct the output to the finisher bins . . . . . . . . . . . . . . . . . . . . . . . . . . . 130
Controlling the Output of Copy Jobs from Platen. . . . . . . . . . . . . . . . . . 132
Chapter 16
Maintaining the Machine. . . . . . . . . . . . . . . . . . . . . . . . . . . . . . . . . . . . . . . . . . . 133
Add the toner . . . . . . . . . . . . . . . . . . . . . . . . . . . . . . . . . . . . . . . . . . . . . 134
Adding Staples. . . . . . . . . . . . . . . . . . . . . . . . . . . . . . . . . . . . . . . . . . . . 137
Empty the staple receptacle. . . . . . . . . . . . . . . . . . . . . . . . . . . . . . . . . . 141
Clean the Océ VarioPrint® 2062/75 NC . . . . . . . . . . . . . . . . . . . . . . . . 142
Shut down the Digital Copier system. . . . . . . . . . . . . . . . . . . . . . . . . . . 143
Shut down the Network Printer system . . . . . . . . . . . . . . . . . . . . . . . . . 144
Replace the removable hard disk . . . . . . . . . . . . . . . . . . . . . . . . . . . . . 145
Page 8

8
Table of Contents
Chapter 17
Clearing Jams . . . . . . . . . . . . . . . . . . . . . . . . . . . . . . . . . . . . . . . . . . . . . . . . . . . 147
Clearing paper jams . . . . . . . . . . . . . . . . . . . . . . . . . . . . . . . . . . . . . . . . 148
Clear the staple jams . . . . . . . . . . . . . . . . . . . . . . . . . . . . . . . . . . . . . . . 149
Chapter 18
Troubleshooting on the Network Printer. . . . . . . . . . . . . . . . . . . . . . . . . . . . . . 151
Stop automatic printing . . . . . . . . . . . . . . . . . . . . . . . . . . . . . . . . . . . . . 152
Change the account-log mode. . . . . . . . . . . . . . . . . . . . . . . . . . . . . . . . 153
Restart the controller . . . . . . . . . . . . . . . . . . . . . . . . . . . . . . . . . . . . . . . 155
Delete the jobs . . . . . . . . . . . . . . . . . . . . . . . . . . . . . . . . . . . . . . . . . . . . 156
Restoring the Network Settings . . . . . . . . . . . . . . . . . . . . . . . . . . . . . . . 157
Appendix A
Specifications . . . . . . . . . . . . . . . . . . . . . . . . . . . . . . . . . . . . . . . . . . . . . . . . . . . 159
Product Specifications . . . . . . . . . . . . . . . . . . . . . . . . . . . . . . . . . . . . . . 160
Input Trays and Output Bins . . . . . . . . . . . . . . . . . . . . . . . . . . . . . . . . . 161
Originals to use . . . . . . . . . . . . . . . . . . . . . . . . . . . . . . . . . . . . . . . . . . . 164
Media . . . . . . . . . . . . . . . . . . . . . . . . . . . . . . . . . . . . . . . . . . . . . . . . . . . 165
Appendix B
Addresses . . . . . . . . . . . . . . . . . . . . . . . . . . . . . . . . . . . . . . . . . . . . . . . . . . . . . . 169
Addresses of local Océ organisations . . . . . . . . . . . . . . . . . . . . . . . . . . 170
Page 9

9
Chapter 1
Introduction
Page 10

10 Chapter 1 Introduction
Your Océ product
Your Océ product
Introduction
The Océ VarioPrint
®
2062/75 NC is a digital printer, scanner and copier. When the
Océ VarioPrint
®
2062/75 NC is not connected to a controller, the Océ VarioPrint®
2062/75 NC can be used as a digital copier.
The Océ VarioPrint
®
2062/75 NC types
The Océ VarioPrint
®
2062/75 NC product range includes two product types.
■ The Network Printer
This product type is connected to the network and can be used for copy, print and
scan jobs.
■ The Digital Copier
This product type is not connected to the network and can be used for copy jobs.
The Océ VarioPrint
®
2062/75 NC products
The Océ VarioPrint
®
2062/75 NC product range represents two products.
■ The Océ VarioPrint
®
2062.
■ The Océ VarioPrint
®
2075.
The products only have different print speeds.
Page 11
11
What is in the Configuration and Maintenance Manual
What is in the Configuration and Maintenance Manual
Introduction
The Configuration and Maintenance Manual describes the tasks that the Key
operator can do with the Key Operator System. The tasks are explained in
step-by-step instructions with many illustrations to make the steps clear. But this
manual also provides some practical background information on functions you or the
end-users want to use.
Where to find the Configuration and Maintenance Manual
The user CD-rom, delivered with the Océ VarioPrint
®
2062/75 NC, provides you the
Configuration and Maintenance Manual in digital format. You can also find the Job
manual and Instruction cards on this CD-rom.
Océ Website
The Océ website (www.oce.com) facilitates the free user's manual and driver
downloads.
Use the Configuration and Maintenance Manual for your Océ VarioPrint
®
2062/75
NC
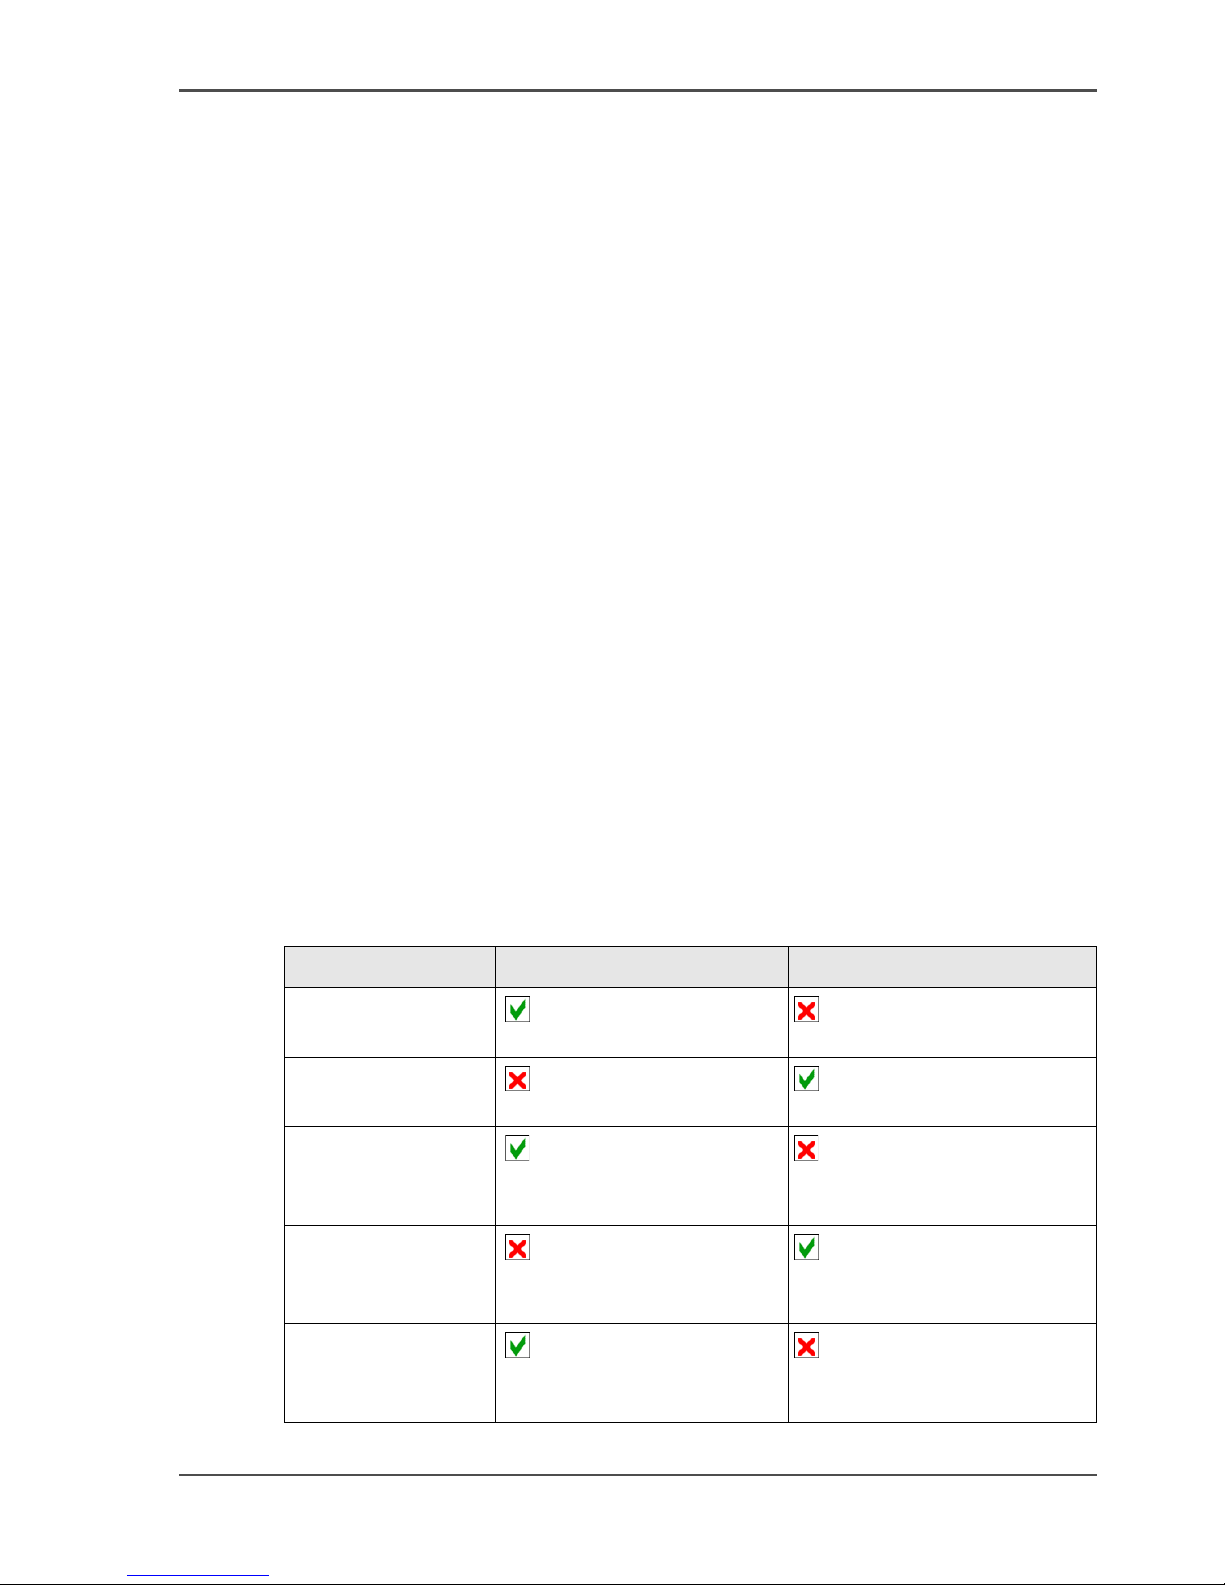
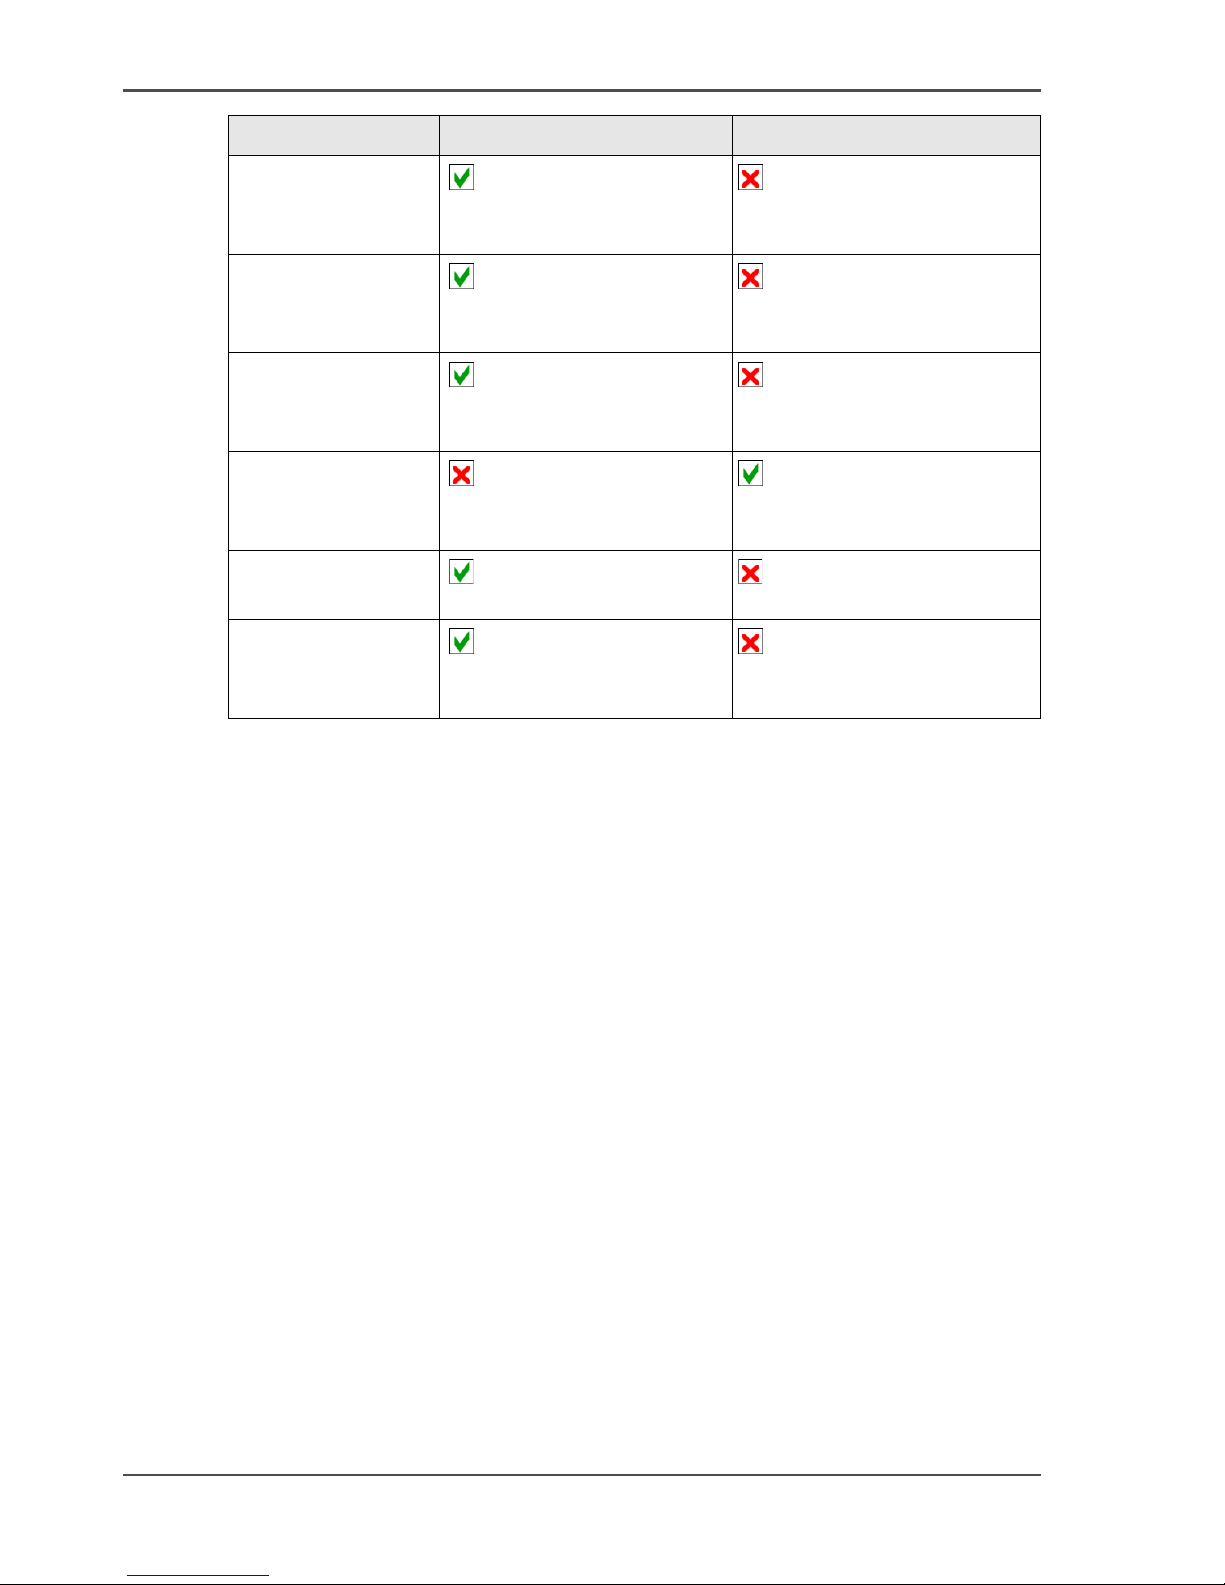
The table below describes which topics of the Configuration and Maintenance
Manual specifically apply to one of the Océ VarioPrint
®
2062/75 NC product types.
All other chapters are applicable to both the Network Printer and Digital Copier.
[1]
Chapter or topic Network Printer Digital Copier
Getting to know the
Network Printer
[1] [2]
Getting to know the
Digital Copier
[3] [4]
The access security
of the Network
Printer
[5] [6]
The access security
of the Digital
Copier
[7] [8]
The network
settings of the
Network Printer
[9] [10]
Page 12
12 Chapter 1 Introduction
What is in the Configuration and Maintenance Manual
The print and scan
mode of the
Network Printer
[11] [12]
Print the system
information of the
Network Printer
[13] [14]
The Energy save
timers of the
Network Printer
[15] [16]
The Energy save
timers of the Digital
Copier
[17] [18]
Troubleshooting on
the Network Printer
[19] [20]
Replace the
removable hard
disk
[21] [22]
Chapter or topic Network Printer Digital Copier
Page 13

13
Who are the Océ VarioPrint® 2062/75 NC users
Who are the Océ VarioPrint® 2062/75 NC users
Introduction
The Océ VarioPrint
®
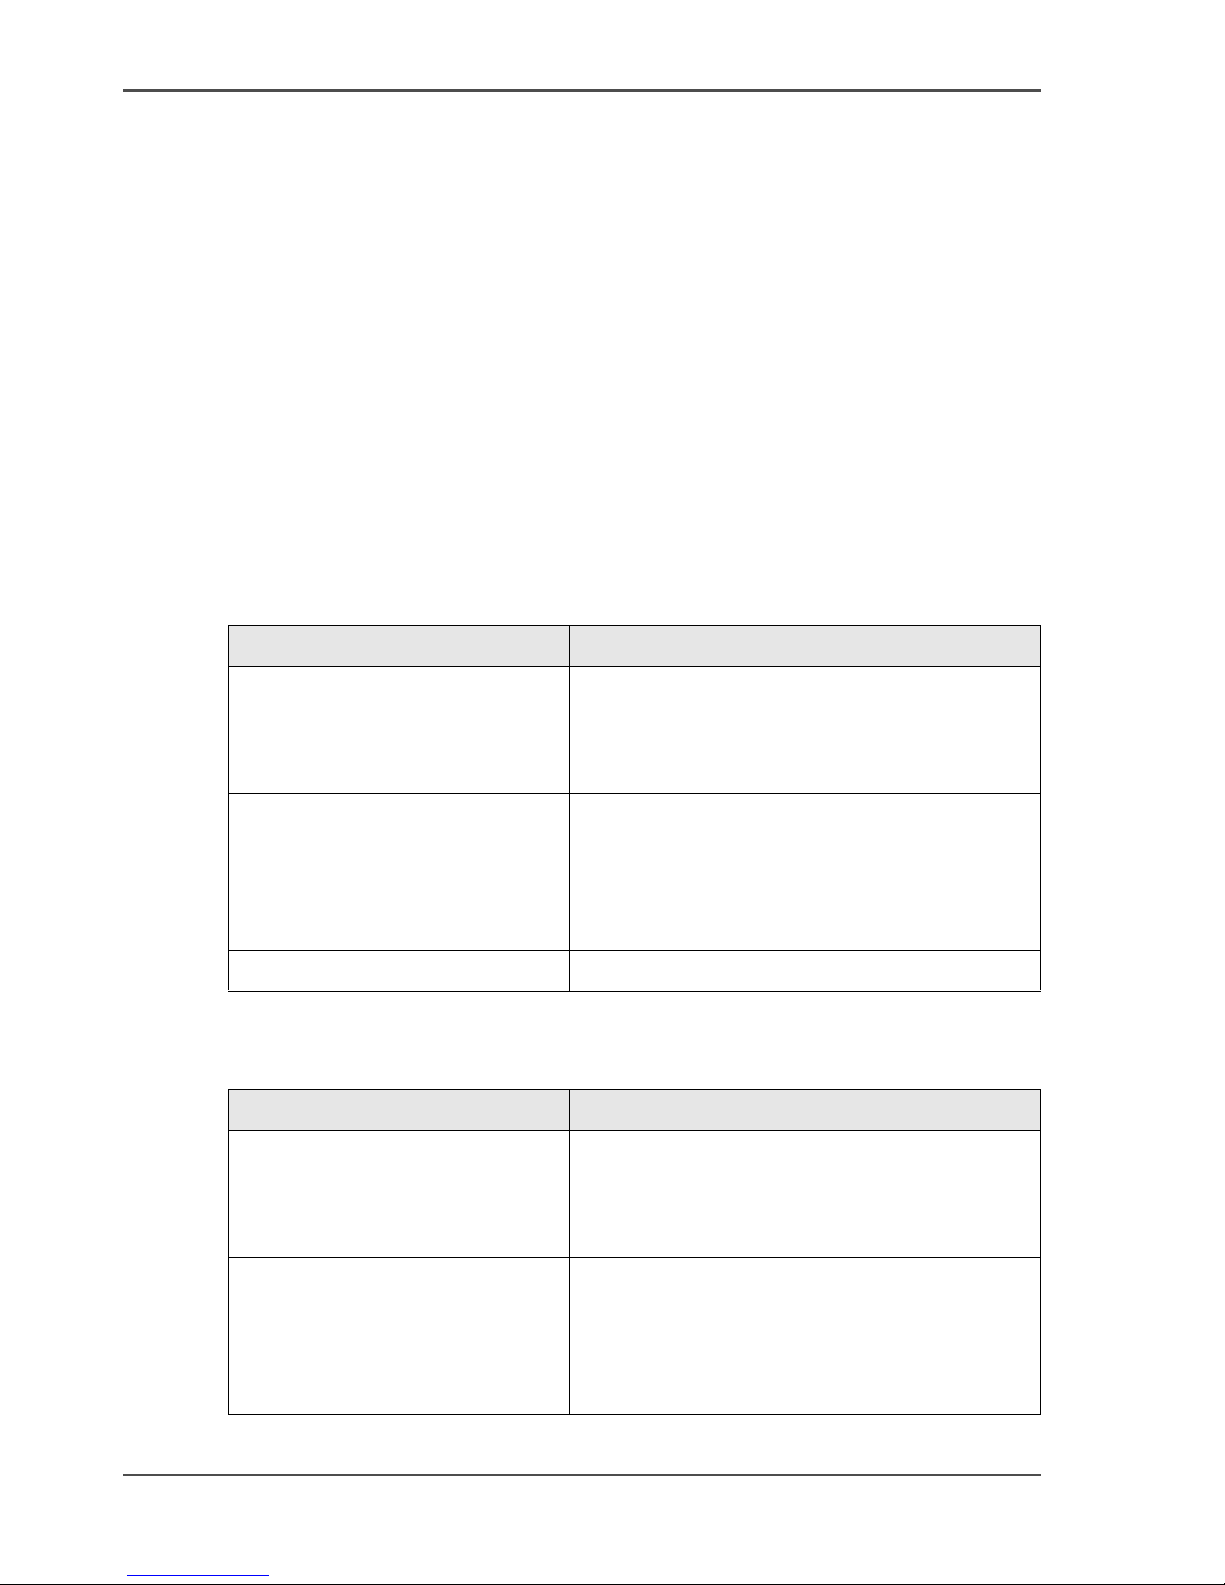
2062/75 NC documentation is meant for three types of users.
Each user has defined tasks related to the Océ VarioPrint
®
2062/75 NC system. This
Configuration and maintenance manual describes the tasks of the Key operator.
Types of users and their tasks
[2]
Types of users Tas ks
End user
■ Print documents from computer or USB stick.
■ Copy paper documents.
■ Scan paper documents to a server, a USB stick or Email
address.
■ Add paper to the paper trays
■ Clear paper jams.
Key operator Uses the Key Operator System to:
■ Define access-security to machine and the machine's
components.
■ Set the default job settings.
■ Control the paper trays.
■ Control the output.
■ Control the print mode.
■ Obtain the system information.
■ Set energy save timers.
■ Maintain the Accounting system.
Performs the following maintenance tasks:
■ Maintain the machine supplies.
■ Solve easy machine problems.
System
administrator
Uses the Océ System Configuration application to:
■ Control the connection of the system to the network.
■ Configure the scan server.
■ Configure the print server.
■ Configure print protocols.
■ Configure the print languages.
■ Maintain the accounts database.
■ Create scan profiles.
Page 14
14 Chapter 1 Introduction
More information on the Océ VarioPrint® 2062/75 NC
More information on the Océ VarioPrint® 2062/75 NC
Introduction
Océ develops manuals, Instruction cards and On-line helps to help you with your
jobs on the Océ VarioPrint® 2062/75 NC.
Where to find the Océ VarioPrint
®
2062/75 NC documentation
The user CD-rom, delivered with the Océ VarioPrint
®
2062/75 NC, provides you
with the Job Manual in digital format. You can also find Instruction Cards and the
Safety manual on this CD-rom.
The Océ Web site www.oce.com facilitates free user manual and driver download.
Network Printer information
[3]
Digital Copier information
[4]
Types of users Information
End user
■ The Océ VarioPrint
®
2062/75 NC Job
Manual.
■ Instruction Cards, which easily explain
copy, print and scan jobs.
Key operator
■ The Océ VarioPrint
®
2062/75 NC
Configuration and Maintenance Manual.
■ Maintenance Card, which easily explains
the maintenance tasks on the Network
Printer.
System administrator
■ The System administrator manual.
Types of users Documentation
End user
■ The Océ VarioPrint
®
2062/75 NC Job
Manual.
■ Instruction Card, which easily explains
copy jobs.
Key operator
■ The Océ VarioPrint
®
2062/75 NC
Configuration and Maintenance Manual.
■ Maintenance Card, which easily explains
the maintenance tasks on the Digital
Copier.
Page 15

15
Chapter 2
Getting to know the Océ
VarioPrint
®
2062/75 NC
Page 16

16 Chapter 2 Getting to know the Océ VarioPrint® 2062/75 NC
Maintenance and configuration on the Network Printer
Maintenance and configuration on the Network Printer
Introduction
The Network Printer is a copier and scanner, but most of all it is a printer. It offers
the same functions any desktop printer offers, and lots more. The operator panel is
user friendly and easy to operate.
You as Key operator are responsible for the machine supplies and the configuration
of the system through the Key operator system (see ‘Who are the Océ VarioPrint®
2062/75 NC users’ on page 13). You need a password to enter the Key operator
system.
What to do as a Key operator of Network Printer
As a Key operator you are responsible to set the initial configuration. You are
advised to read this manual carefully to decide which settings are important for your
organization or department.
Remember that most of the network, server and security configuration must be done
through the Océ System configuration. Refer to the System Administration Manual
how to use the Océ System Configuration (see ‘More information on the Océ
VarioPrint® 2062/75 NC’ on page 14).
Applications
There are two applications to configure the Network Printer.
[5]
Applications Description
Key operator system The display screen provides access to the Key
operator system.
You need a Key operator password to open the
Key operator system.
Océ System Configuration The web based Océ System Configuration
provides the settings for the system, machine
and network configuration.
You need a System administrator password to
start the application.
Note: There are settings that can
be found in both the Key operator
system and the Océ System
Configuration application.
Page 17
17
The Parts of the Network Printer
The Parts of the Network Printer
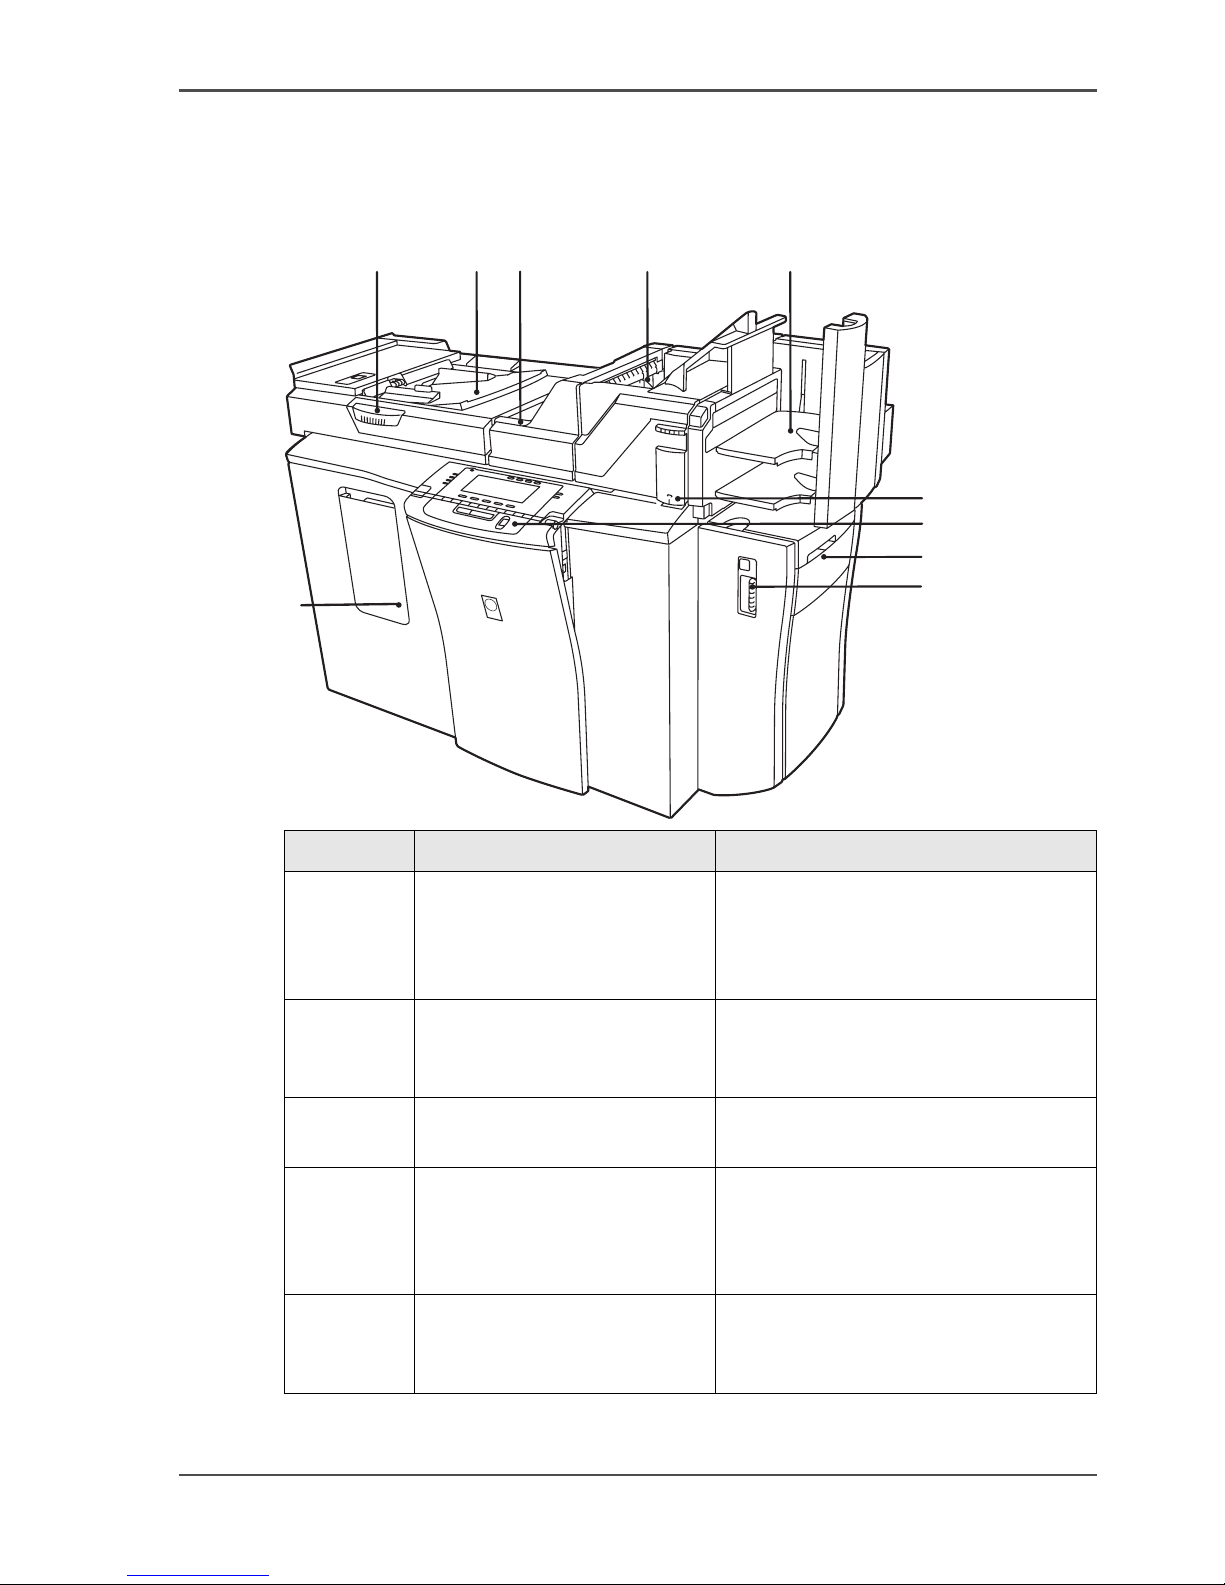
The Network Printer machine
[23]
[6]
123 4 5
6
7
8
9
10
Number Part Description
1 Access to platen On the platen you can place originals
that the automatic document feeder
cannot handle. One side of the
original is scanned.
2 Automatic document feeder You can place a set of 1-sided or
2-sided originals in the automatic
document feeder.
3 Original receiving bin The originals are collected on this
bin.
4 Multi-size bin The copies and prints with a special
paper size or paper weight are
collected on this bin. Stapling is not
possible.
5 Finisher The A4/Letter 8.5x11 copies and
prints are collected on this bin.
Stapling is possible.
Page 18

18 Chapter 2 Getting to know the Océ VarioPrint® 2062/75 NC
The Parts of the Network Printer
The finisher
The finisher has two bins that collect the finished sets. The Key operator decides to
which bin the finished sets are sent.
6 Off-line stapler You can staple your copies and prints
manually with this stapler.
7 Operator panel The operator panel allows you to
make the settings for the job.
8 Special feeder You can use the special feeder to
insert special material that the paper
trays cannot handle.
9 Paper compartment door Door to access the paper trays.
10 Front door Door to access the toner reservoir and
the machine counter.
Number Part Description
Page 19
19
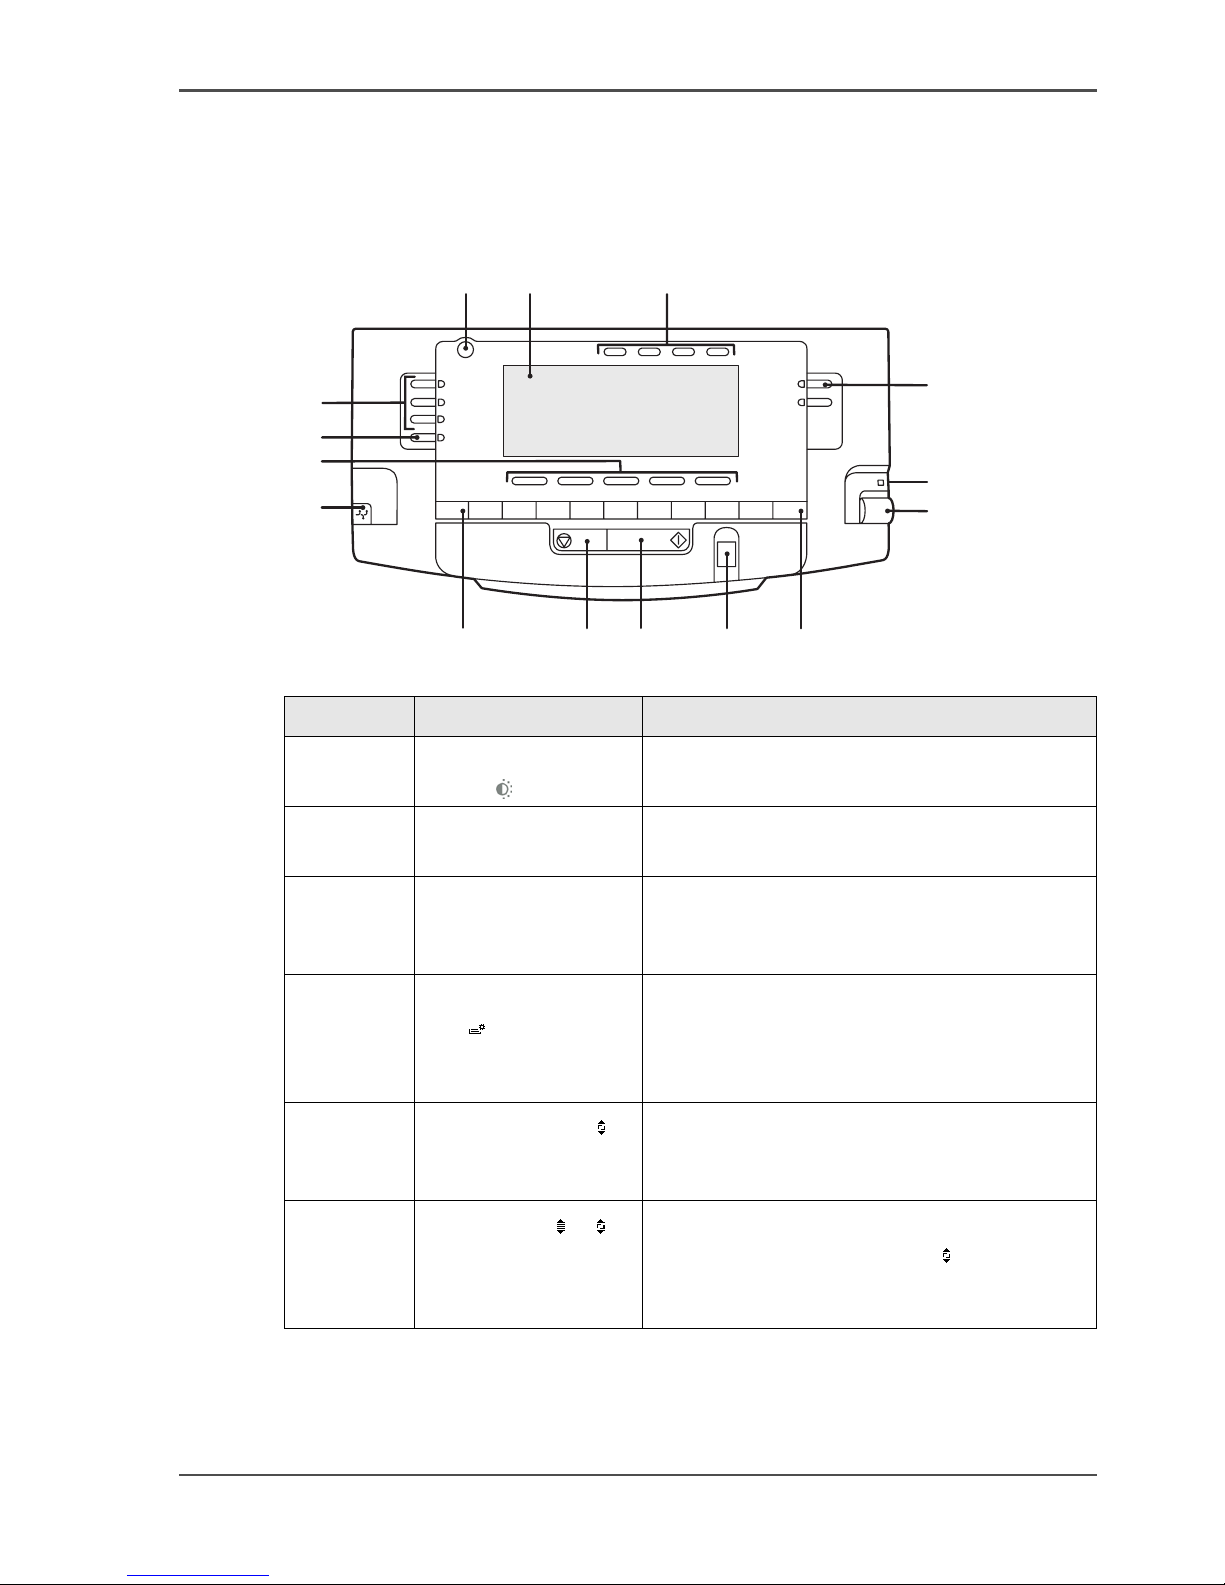
The operator panel of the Network Printer
The operator panel of the Network Printer
The parts of the operator panel
[24]
[7]
1234567890C
12 3
4
5
6
7891011
12
14
15
13
Number Part Description
1 Screen brightness
button
You can adjust the brightness of the screen.
2 Display screen The display screen shows the settings and the
messages.
3 Top function keys Use the keys to:
■ Select a collection of settings.
■ Perform a task.
4 Status and system
key
Use the key to:
■ Check the level of the toner, paper and
staples.
■ Go to the Key operator system.
5 Scroll wheel key Key to open a series of settings. You can use
the key after that you selected an item with
the scroll wheel.
6 Scroll wheel or Use the scroll wheel to go to an item in a list.
When the displays shows the icon, you can
use the scroll wheel key to open a series of
settings after you selected an item.
Page 20
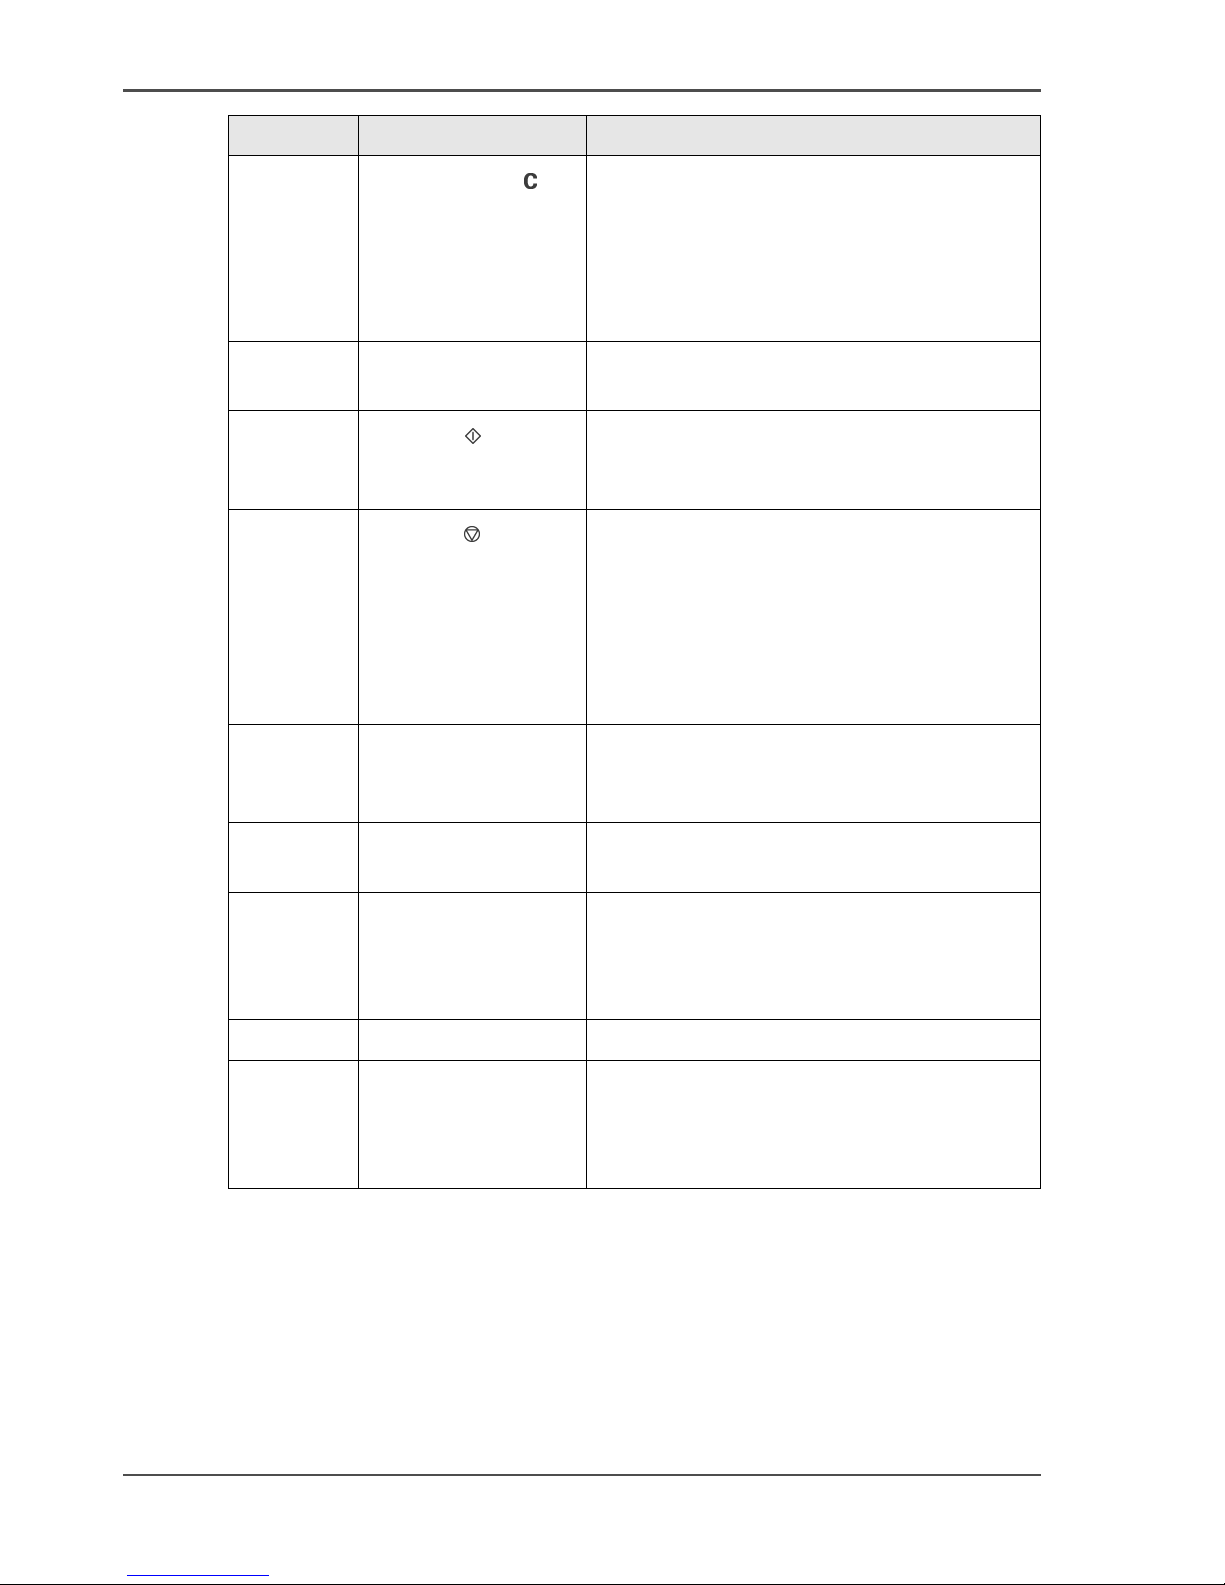
20 Chapter 2 Getting to know the Océ VarioPrint® 2062/75 NC
The operator panel of the Network Printer
7 Correction key Use the key to:
■ Reset the number of sets to 1 (copy jobs)
or the value as defined in the printer driver
(print jobs).
■ Delete the last digit when you enter a
code.
8 Fingerprint sensor Use the sensor for TouchTo Print
(fingerprinting).
9 Start key Use the key to:
■ Starting a job.
■ Confirm the changes.
10 Stop key Use the key to:
■ Stop a job.
■ Finish your jobs when you must enter a
PIN to get access to the settings. When
you do not stop the jobs with the Stop key,
an other user can start jobs that are
charged to your user account.
11 Numeric keys Use the keys to:
■ Enter a code or a PIN.
■ Entering the number of sets.
12 USB port Use the USB port to insert a USB stick
(Pocket mailbox function).
13 Lower function keys Use the keys to:
■ Select a collection of settings.
■ Perform a task.
■ Select a value or a function.
14 Wizards key Use the key to go to the wizards.
15 Main keys The Network Printer has several main keys.
■ The 'Print' key to go to the print settings.
■ The 'Copy' key to go to the copy settings.
■ The 'Scan' key to go to the scan settings.
Number Part Description
Page 21

21
Chapter 3
Getting to know the Digital
Copier
Page 22

22 Chapter 3 Getting to know the Digital Copier
Maintenance and configuration on the Digital Copier
Maintenance and configuration on the Digital Copier
Introduction
The Digital Copier is a copier. The operator panel is user friendly and easy to
operate.
You as Key operator are responsible for the machine supplies and configuration of
the system through the Key operator system. You need a password to enter the Key
operator system.
What to do as a Key operator of the Digital Copier
As a Key operator you are responsible to set the initial configuration. You are
advised to read this manual carefully to decide which settings are important for your
organization or department.
Page 23
23
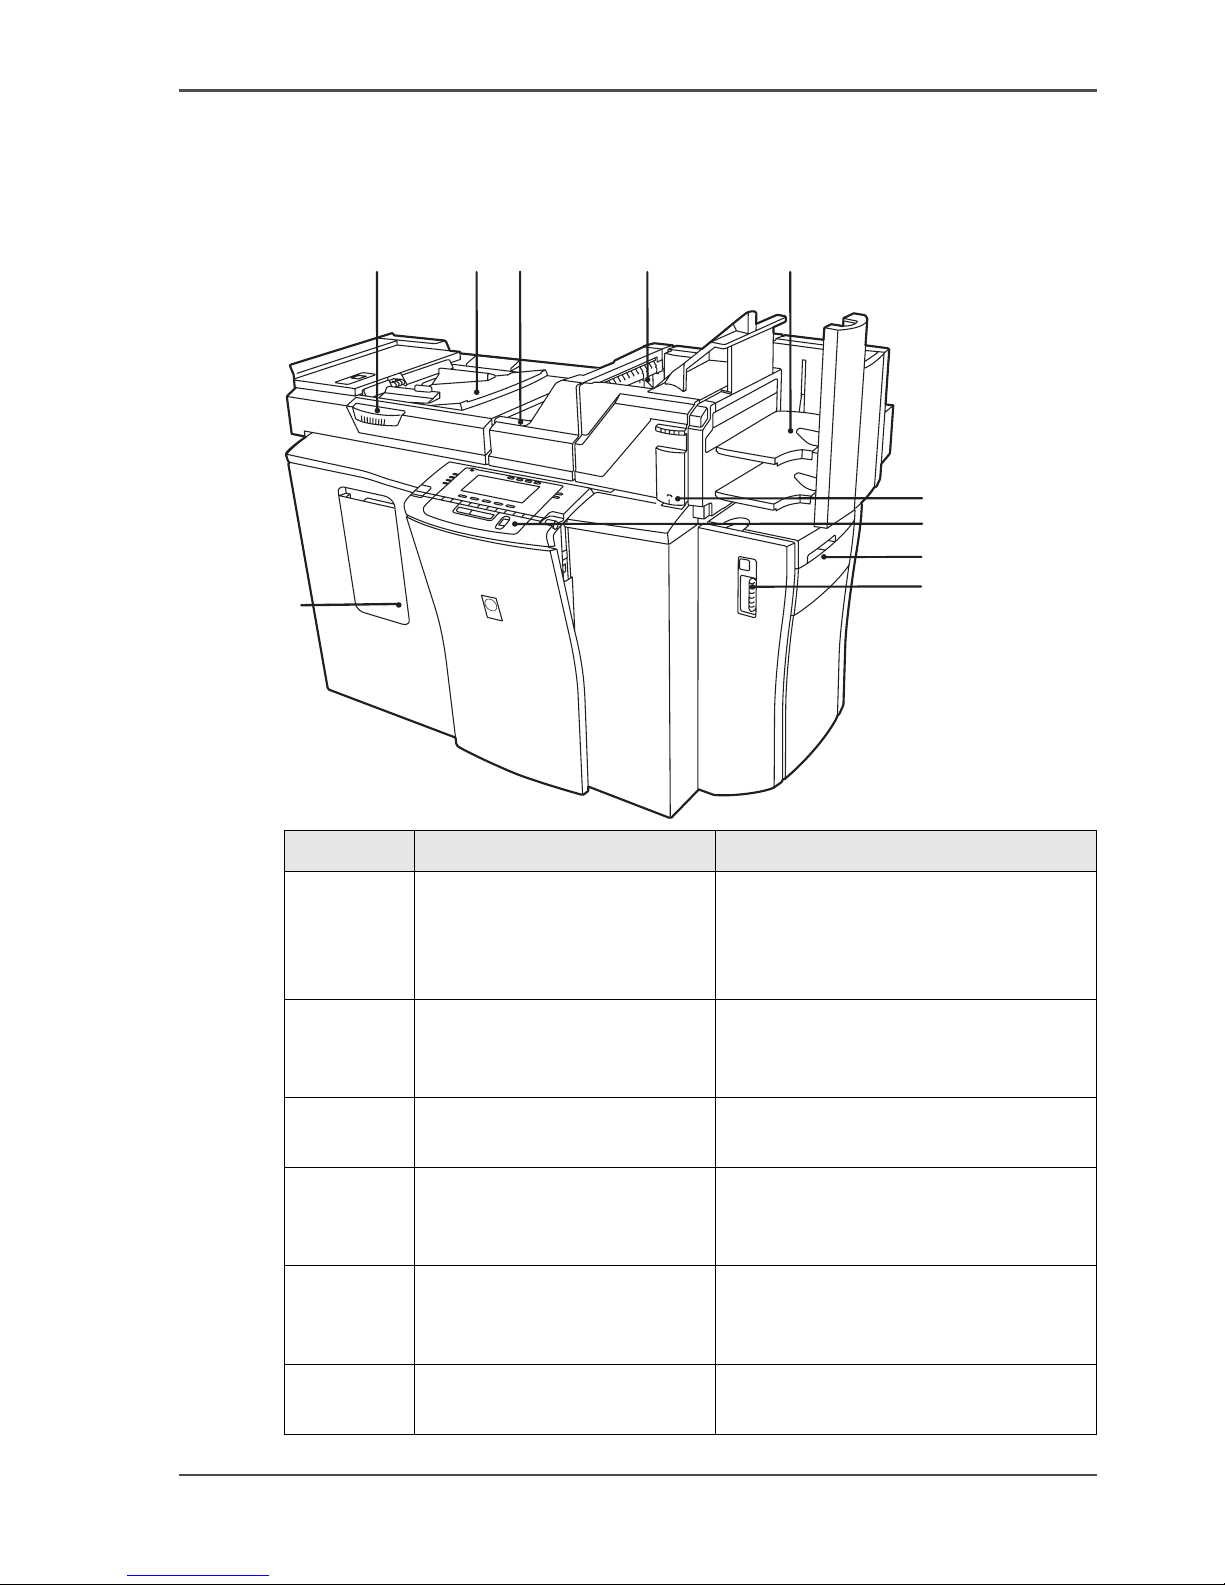
The Parts of the Digital Copier
The Parts of the Digital Copier
The Digital Copier machine
[25]
[8]
123 4 5
6
7
8
9
10
Number Part Description
1 Access to platen On the platen you can place originals
that the automatic document feeder
cannot handle. One side of the
original is scanned.
2 Automatic document feeder You can place a set of 1-sided or
2-sided originals in the automatic
document feeder.
3 Original receiving bin The originals are collected on this
bin.
4 Multi-size bin The copies with a special paper size
or paper weight are collected on this
bin. Stapling is not possible.
5 Finisher The A4/Letter 8.5x11 copies and
prints are collected on this bin.
Stapling is possible.
6 Off-line stapler You can staple your copies manually
with this stapler.
Page 24

24 Chapter 3 Getting to know the Digital Copier
The Parts of the Digital Copier
The finisher
The finisher has two bins that collect the finished sets. The Key operator decides to
which bin the finished sets are sent.
7 Operator panel The operator panel allows you to
make the settings for the job.
8 Special feeder You can use the special feeder to
insert special material to copy on.
9 Paper compartment door Door to access the paper trays.
10 Front door Door to access the toner reservoir and
the machine counter.
Number Part Description
Page 25
25
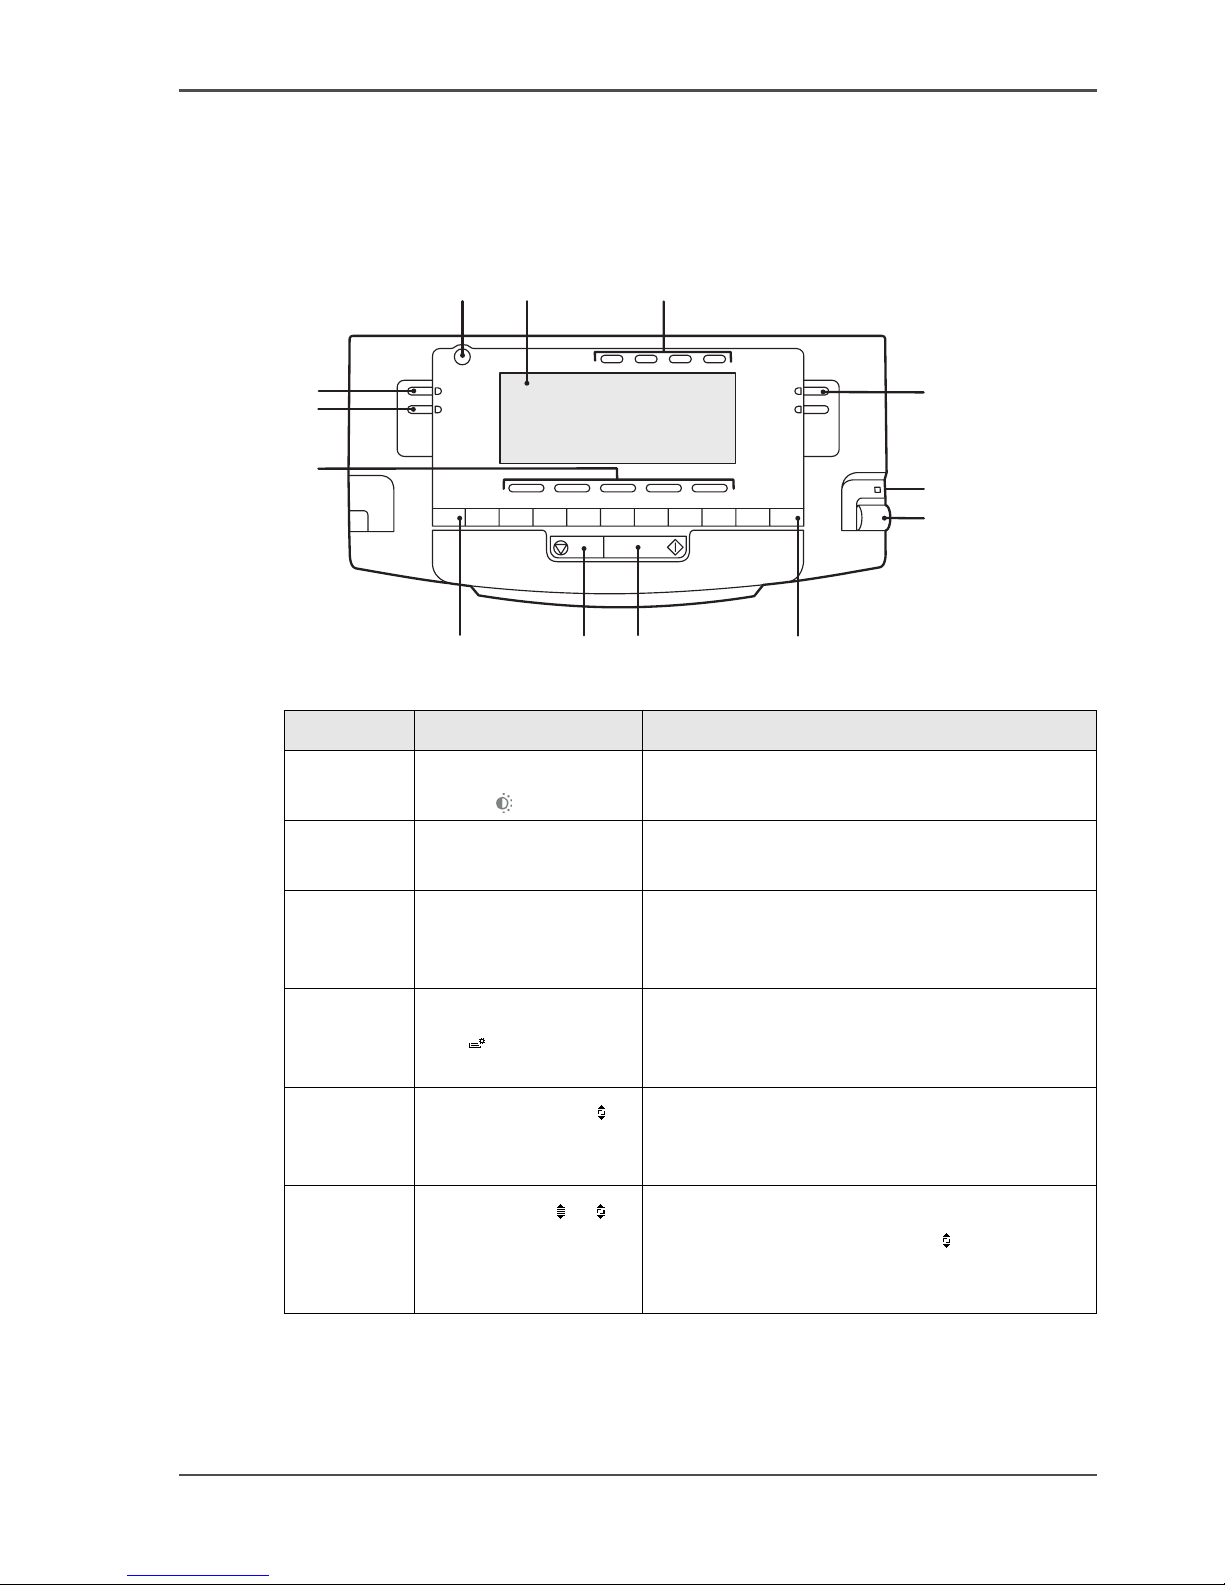
The operator panel of the Digital Copier
The operator panel of the Digital Copier
The parts of the operator panel
[26]
[9]
1234567890C
12 3
4
5
6
78910
11
12
13
Number Part Description
1 Screen brightness
button
You can adjust the brightness of the screen.
2 Display screen The display screen shows the settings and the
messages.
3 Top function keys Use the keys to:
■ Select a collection of settings.
■ Perform a task.
4 Status and system
key
Use the key to:
■ Open the supply information screen.
■ Go to the Key operator system.
5 Scroll wheel key Key to open a series of settings. You can use
the key after that you selected an item with
the scroll wheel.
6 Scroll wheel or Use the scroll wheel to go to an item in a list.
When the displays shows the icon, you can
use the scroll wheel key to open a series of
settings after you selected an item.
Page 26
26 Chapter 3 Getting to know the Digital Copier
The operator panel of the Digital Copier
7 Correction key Use the key to:
■ Reset the number of sets to 1.
■ Delete the last digit when you enter a
code.
8 Start key Use the key to:
■ Starting a job.
■ Confirm the changes.
9 Stop key Use the key to:
■ Stop a job.
■ Finish your jobs when you must enter a
PIN to get access to the settings. When
you do not stop the jobs with the Stop key,
an other user can start jobs that are
charged to your user account.
10 Numeric keys Use the keys to:
■ Enter a code or a PIN.
■ Entering the number of sets.
11 Lower function keys Use the keys to:
■ Select a collection of settings.
■ Perform a task.
■ Select a value or a function.
12 Wizards key Use the key to go to the wizards.
13 Copy key Use the key to go to the copy settings.
Number Part Description
Page 27

27
Chapter 4
The Key Operator System
Page 28
28 Chapter 4 The Key Operator System
Enter or quit the key operator system
Enter or quit the key operator system
Introduction
The key operator system contains the settings to change, or restore, the default
configuration of the Océ VarioPrint® 2062/75 NC.
You can enter the Key operator system when the Océ VarioPrint
®
2062/75 NC does
not process a job. A PIN is necessary to access the Key operator system. The changes
you did, are applied after you have left the Key operator system.
Before you begin
Make sure that the Océ VarioPrint® 2062/75 NC does not process or announce a job.
Illustration
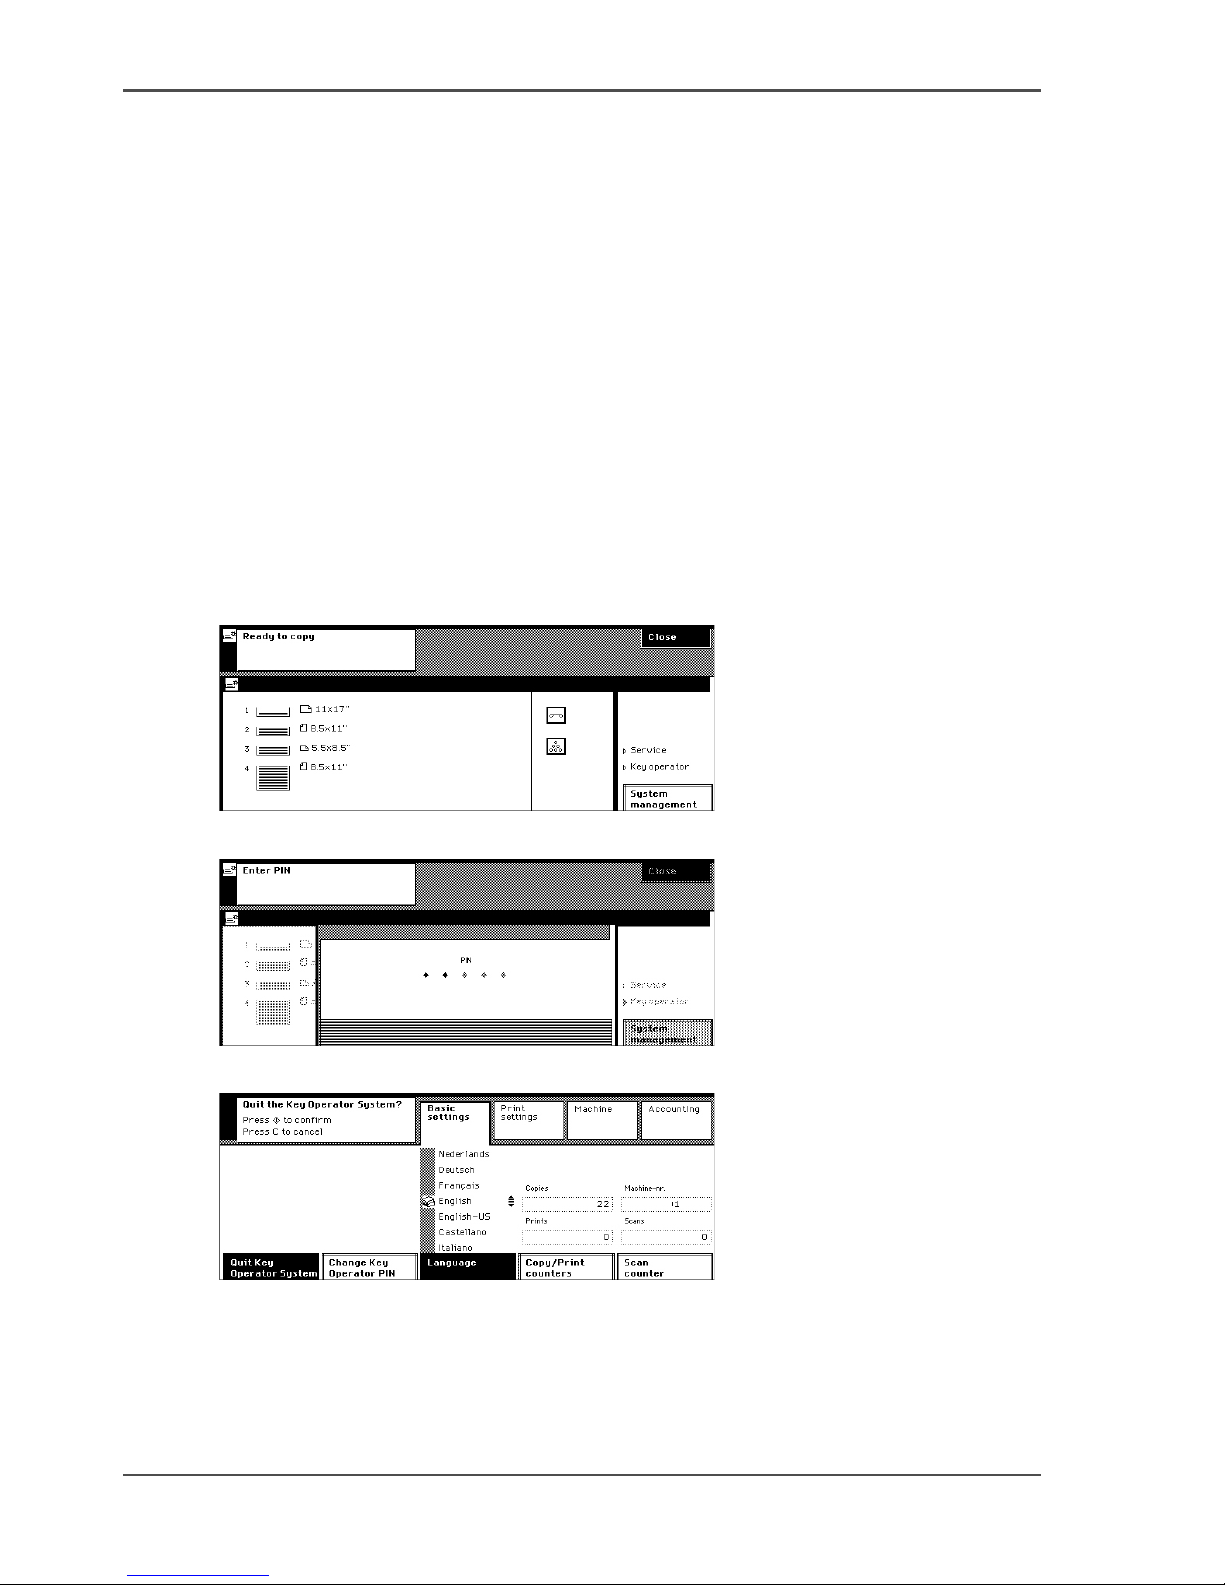
[27]
[27] Go to the Status and system screen
[28]
[28] Enter the Key Operator System with a PIN
[29]
[29] Quitting the Key Operator System
Page 29

29
Enter or quit the key operator system
Entering the Key Operator System
1. Press the Status and system key .
2. Press the 'System management' function key.
3. Select 'Key operator'.
4. Press the Start key .
5. Use the numeric keys to enter the Key operator PIN.
Quitting the key operator system
1. Press the 'Basic settings' key.
2. Press the 'Quit Key Operator System' function key.
3. Press the Start key .
Page 30
30 Chapter 4 The Key Operator System
Changing the PIN of the Key Operator
Changing the PIN of the Key Operator
Introduction
The Key Operator has a default PIN to access the Key Operator System on the
machine. You can change the default PIN if you want to use a different PIN.
Before you begin
Enter the Key operator system (see ‘Enter or quit the key operator system’ on
page 28).
Illustration
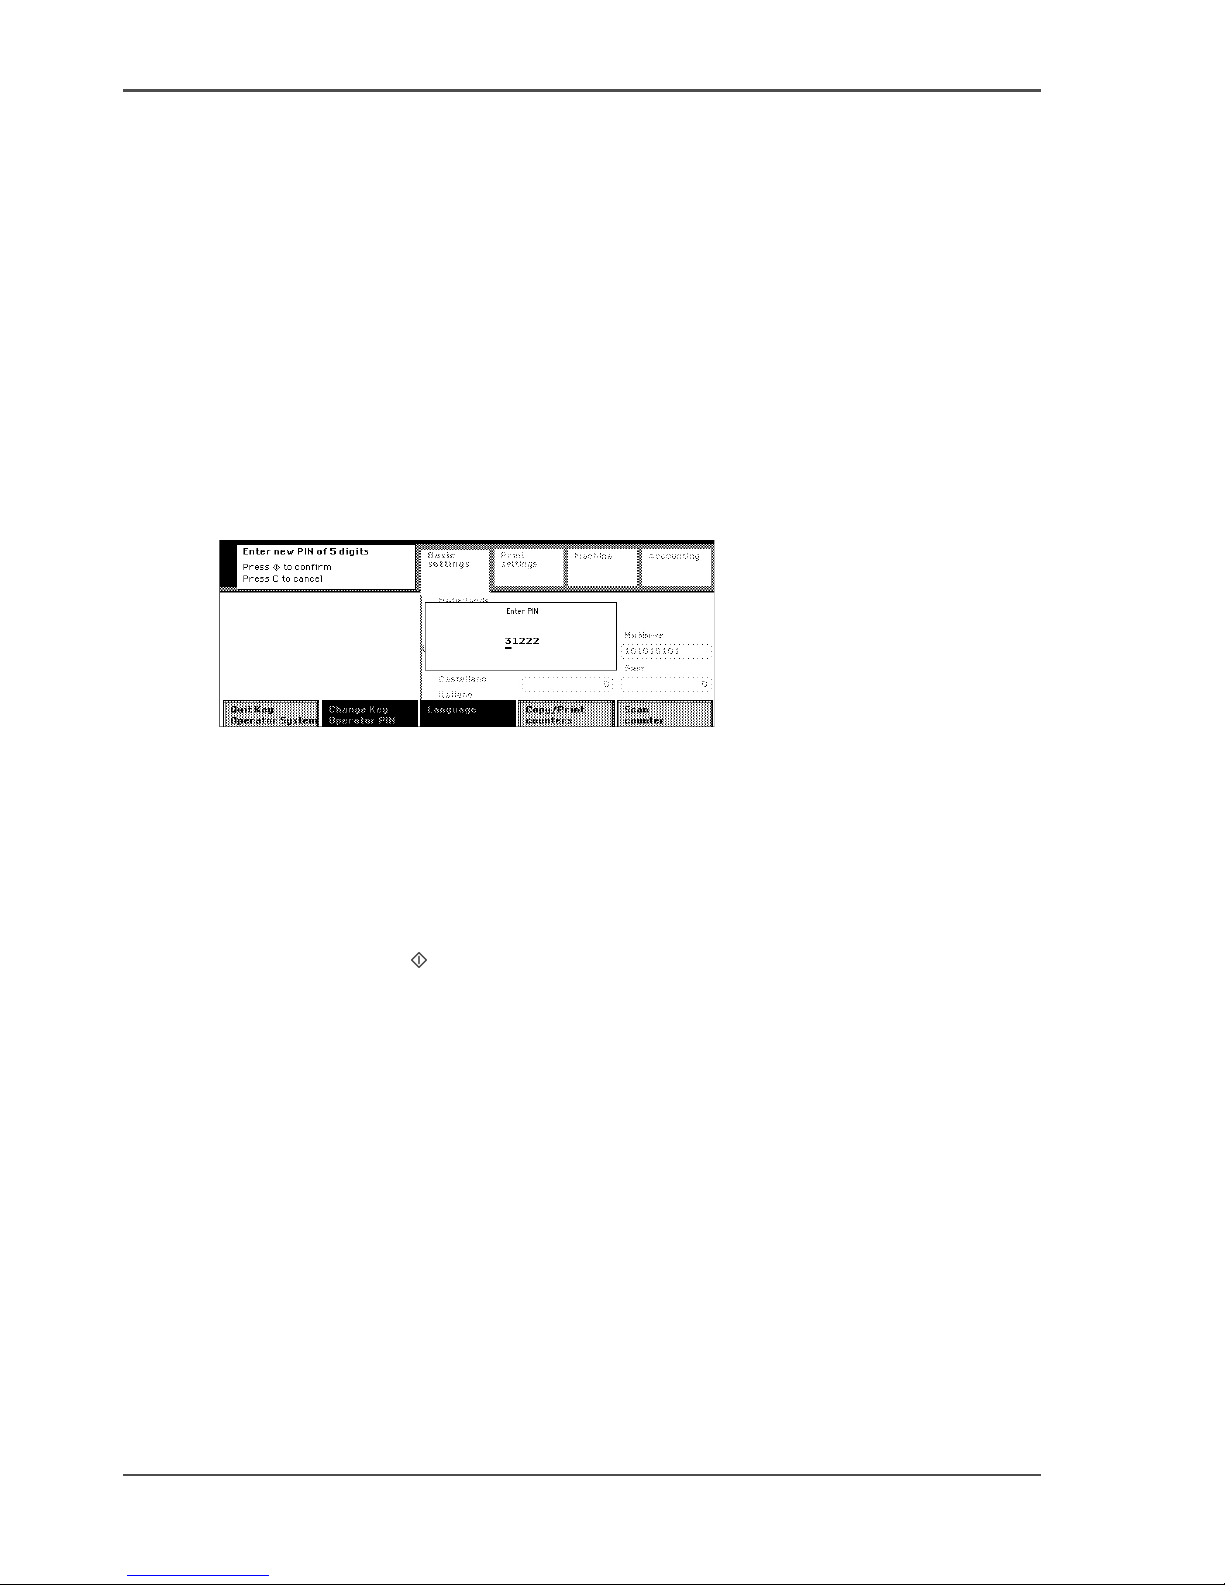
[30]
[30] Change the Key operator PIN
Changing the PIN of the Key Operator
1. Press the 'Basic settings' key.
2. Press the 'Change Key Operator PIN' key.
3. Use the numeric keys to enter a unique 5-digit PIN.
4. Press the start key to confirm.
Check
1. Print the accounts-database file or go to the list of accounts.
2. Make sure that you remember or find the PIN to re-open the Key operator system.
Page 31

31
Chapter 5
Getting Started
Page 32
32 Chapter 5 Getting Started
Turn the machine on and off for daily use
Turn the machine on and off for daily use
Introduction
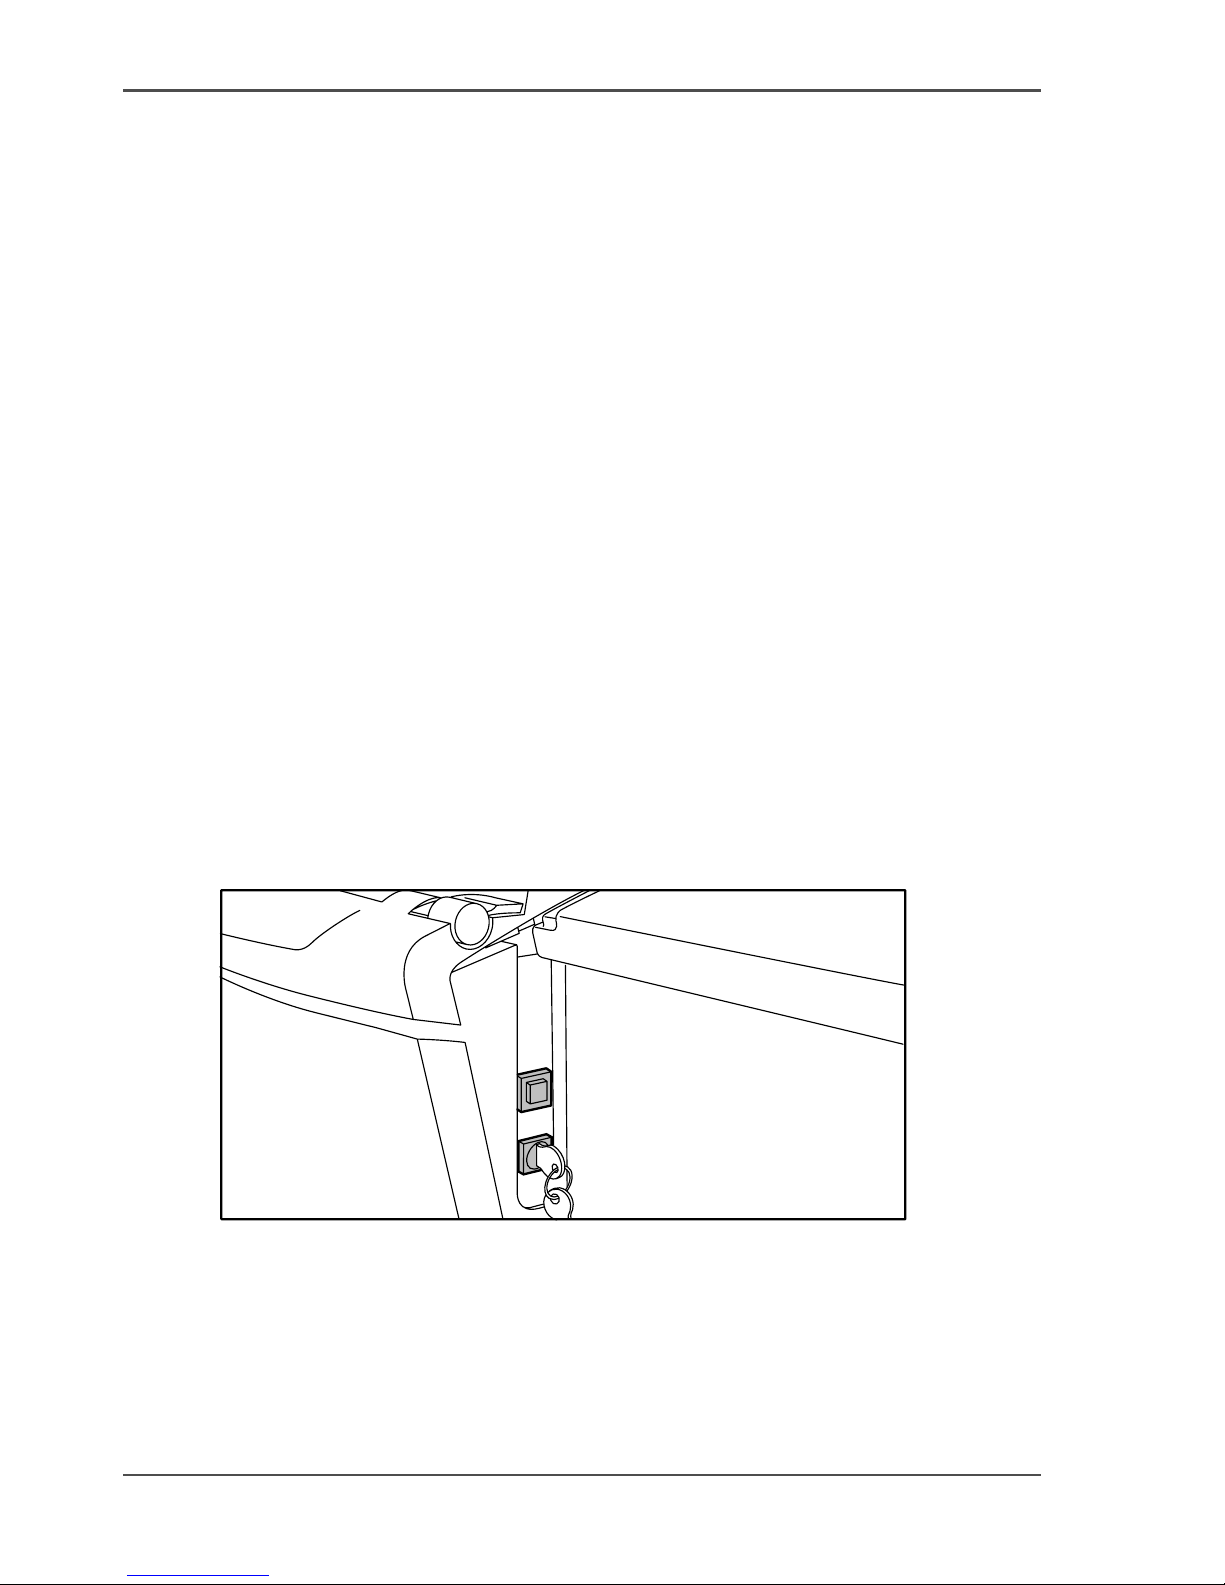
The machine has the following buttons.
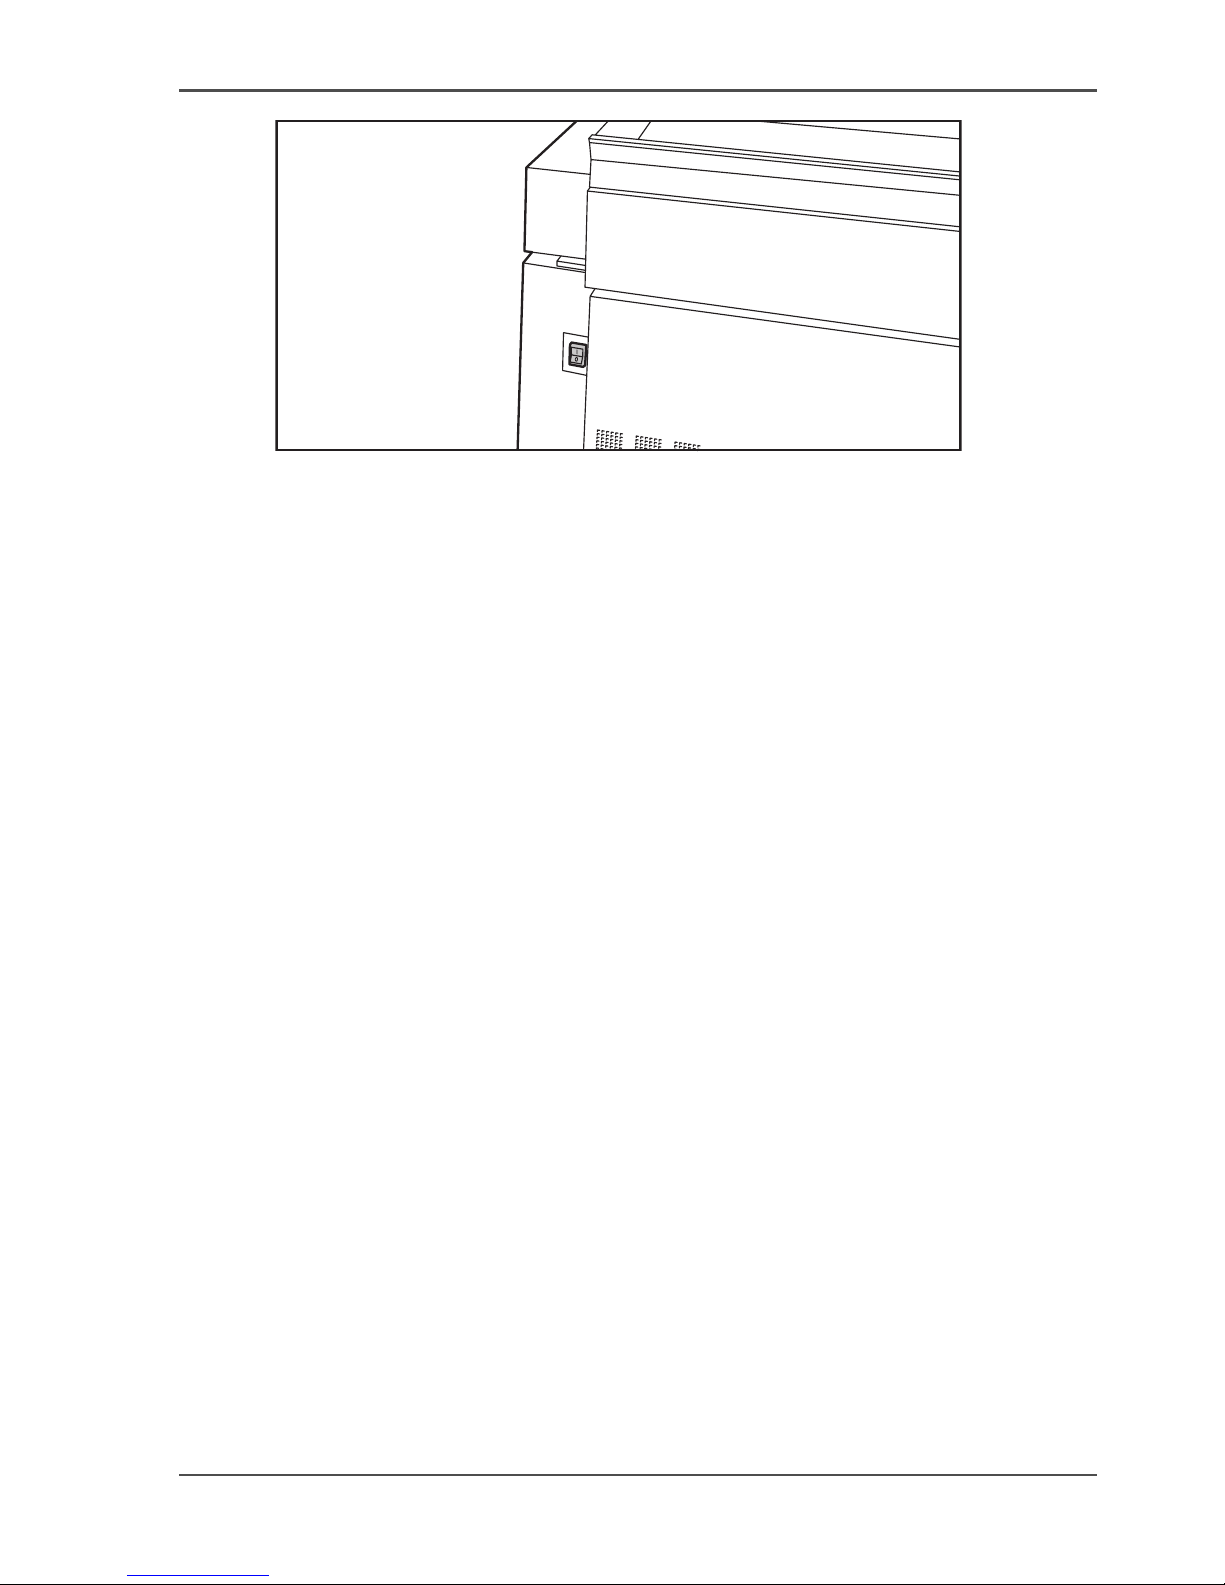
■ ON / OFF button with green LED.
The ON / OFF button allows you to start the machine to do jobs. You can only
turn on or off the machine if the power switch is in '1' position and the start-up
phase was done. You can turn off and then back on the machine with the ON /
OFF button in particular circumstances, for example to correct an error. The
system requires 8 minutes to reach the operating temperature. When the machine
is ready, a message is displayed.
■ Power switch.
You can find the power switch at the left flank of the machine. The power switch
cuts and connects the power to the complete system (the machine and if available
the controller). Do not use the power switch to turn on and off the machine for
daily use (see ‘Shut down the Digital Copier system’ on page 143)(see ‘Shut
down the Network Printer system’ on page 144).
Before you begin
The Océ VarioPrint
®
2062/75 NC can have a key switch to protect access. If there is
a lock available, check to see if key is available.
Illustration
[31]
[31] The ON / OFF button
Page 33
33
Turn the machine on and off for daily use
[32]
[32] The power switch
How to turn the Océ VarioPrint® 2062/75 NC on or off
1. Make sure that the power switch is in the '1' position.
2. Turn the key to the right in the horizontal position, if a key switch is available.
3. Press the green ON / OFF button.
Page 34
34 Chapter 5 Getting Started
Enter the IP address information of the Network Printer
Enter the IP address information of the Network Printer
Introduction
To configure the IP address information, you can use the Key Operator System and
the Océ System Configuration.
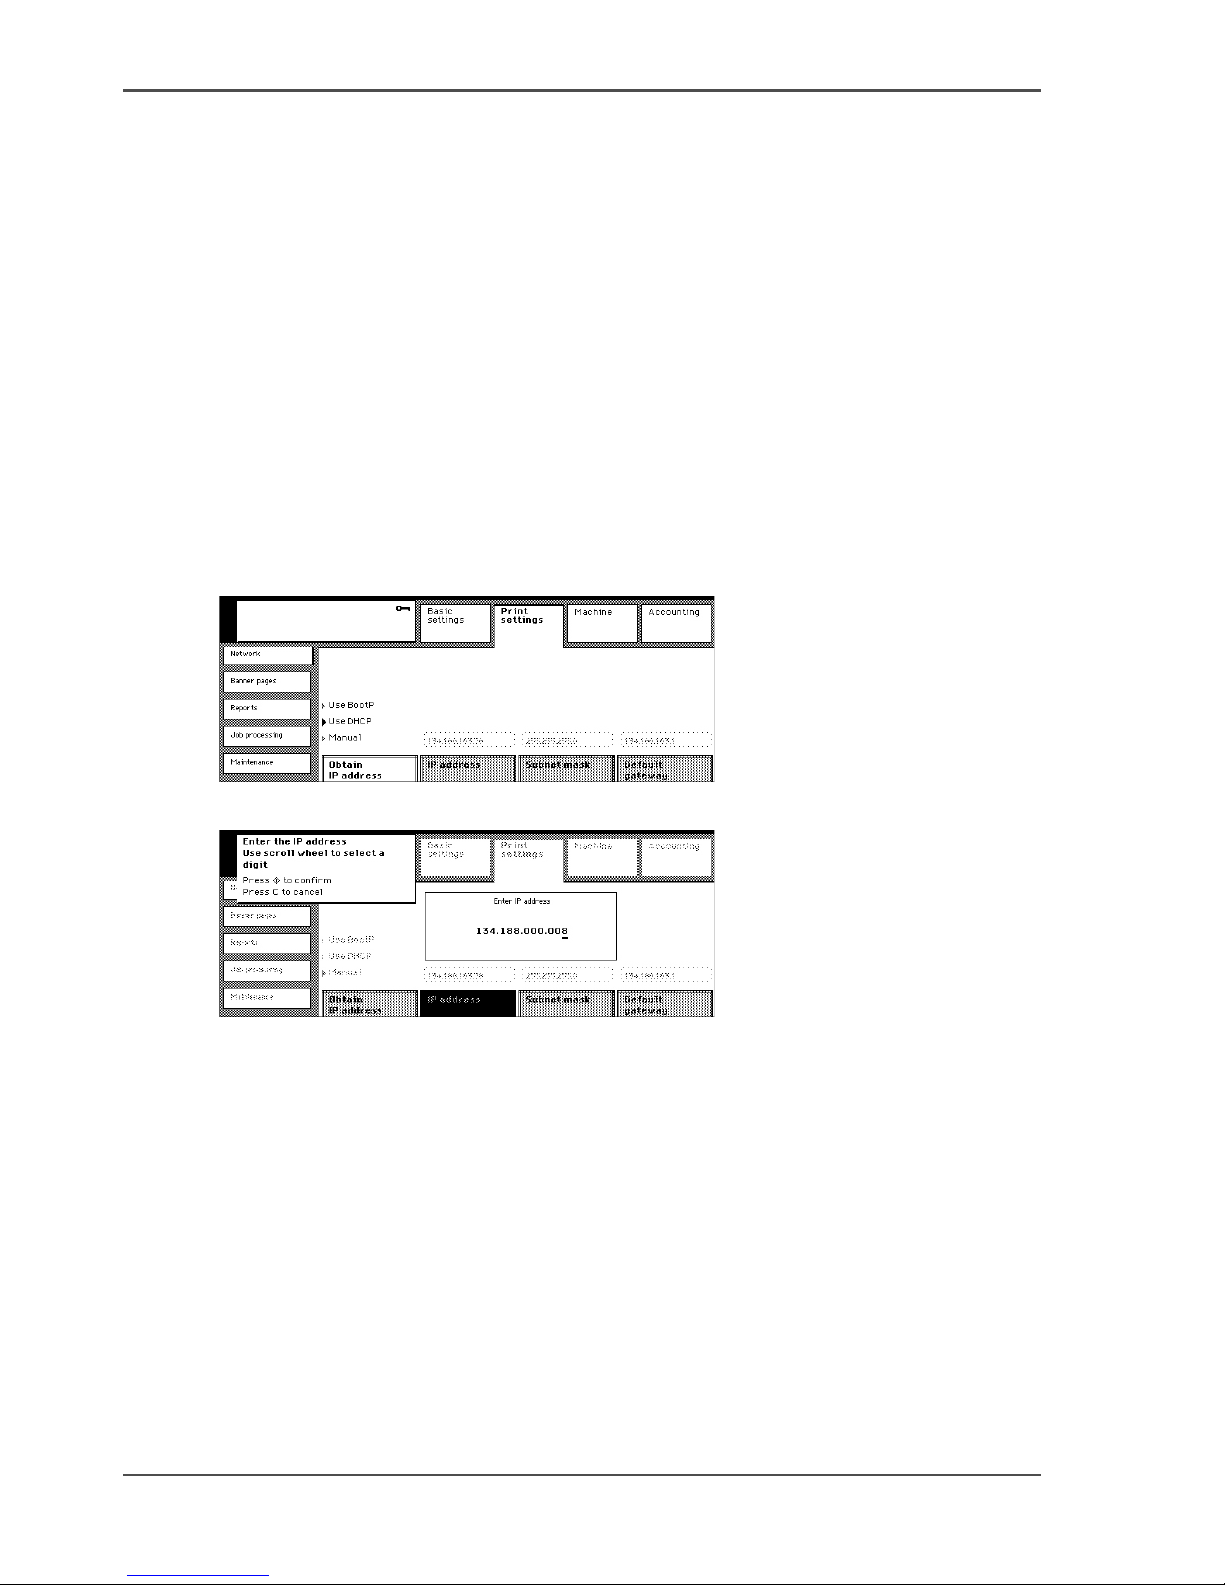
You can configure the IP address statically or dynamically through BootP or DHCP.
Before you begin
Enter the Key operator system (see ‘Enter or quit the key operator system’ on
page 28).
Illustration
[33]
[33] Obtain the IP address
[34]
[34] Enter the IP address
How to change the IP address information
1. Press the 'Print settings' key.
2. Select the 'Network' tab.
3. Press the 'Obtain IP address' key to select the address assignment.
Page 35

35
Enter the IP address information of the Network Printer
[10]
Defining the IP address manually
1. Press the 'Print settings' key.
2. Select the 'Network' tab.
3. Check that 'Manual' is selected in the 'Obtain IP address' box.
4. Press the IP address key.
5. Use the numeric keys to enter the IP address. You can use the scroll wheel to
navigate.
6. Press the start key to confirm the IP address.
How to define the Subnet mask manually
1. Press the 'Print settings' key.
2. Select the 'Network' tab.
3. Check that 'Manual' is selected in the 'Obtain IP address' box.
4. Press the 'Subnet mask' key.
5. Use the numeric keys to enter the Subnet mask. You can use the scroll wheel to
navigate.
6. Press the start key to confirm the Subnet mask.
How to define the Default gateway manually
1. Press the 'Print settings' key.
2. Select the 'Network' tab.
3. Check that 'Manual' is selected in the 'Obtain IP address' box.
4. Press the 'Default gateway' key.
5. Use the numeric keys to enter the Default gateway. You can use the scroll wheel to
navigate.
6. Press the start key to confirm the Default gateway.
Address assignment Result
'Manual' The IP address must be entered manually in the 'IP
address' box.
'Use DHCP' DHCP is used to obtain the IP address.
'Use BootP' BootP is used to obtain the IP address.
Page 36

36 Chapter 5 Getting Started
Enter the IP address information of the Network Printer
Page 37

37
Chapter 6
The End-user Display Screen
Page 38
38 Chapter 6 The End-user Display Screen
Change or restore the default job settings
Change or restore the default job settings
Introduction
The Océ VarioPrint
®
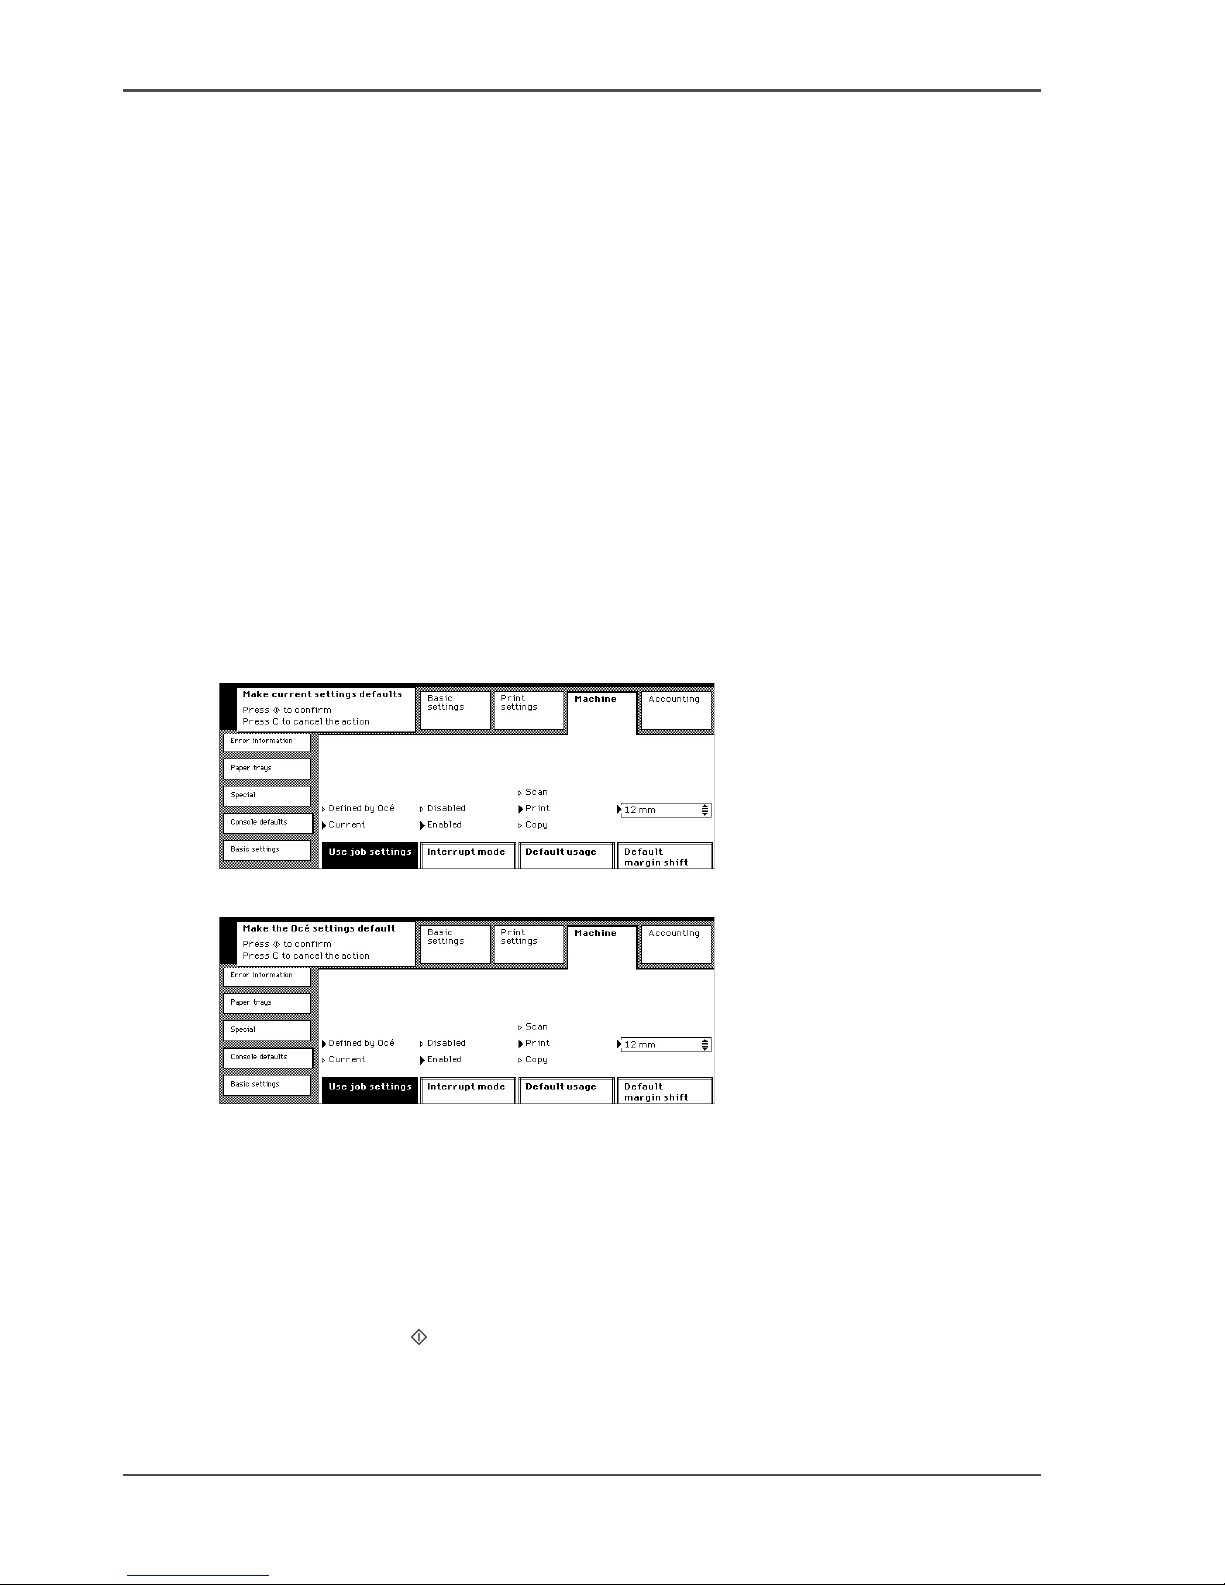
2062/75 NC has a collection of job settings, defined by Océ.
You can change the Océ settings, according to the requirements of your company or
department. The Océ VarioPrint
®
2062/75 NC allows you to recover the Océ defined
settings, at your convenience.
Before you begin
1. When defining the company or department settings, first define the required job
settings in the available operating modes.
2. Enter the Key operator system (see ‘Enter or quit the key operator system’ on
page 28).
Illustration
[35]
[35] Save the current job settings
[36]
[36] Restore the default Océ settings
Changing the default job settings
1. Press the 'Machine' key.
2. Select the 'Console defaults' tab.
3. Press the 'Use job settings' key to select 'Current'.
4. Press the start key to confirm.
Page 39

39
Change or restore the default job settings
Restoring the default job settings
1. Press the 'Machine' key.
2. Select the 'Console defaults' tab.
3. Press the 'Use job settings' key to select 'Defined by Océ'.
4. Press the start key to confirm.
Check
1. Exit the key operator system.
2. Check to insure that the default job settings are set for your needs.
Page 40
40 Chapter 6 The End-user Display Screen
Changing the Default Reset Time
Changing the Default Reset Time
Introduction
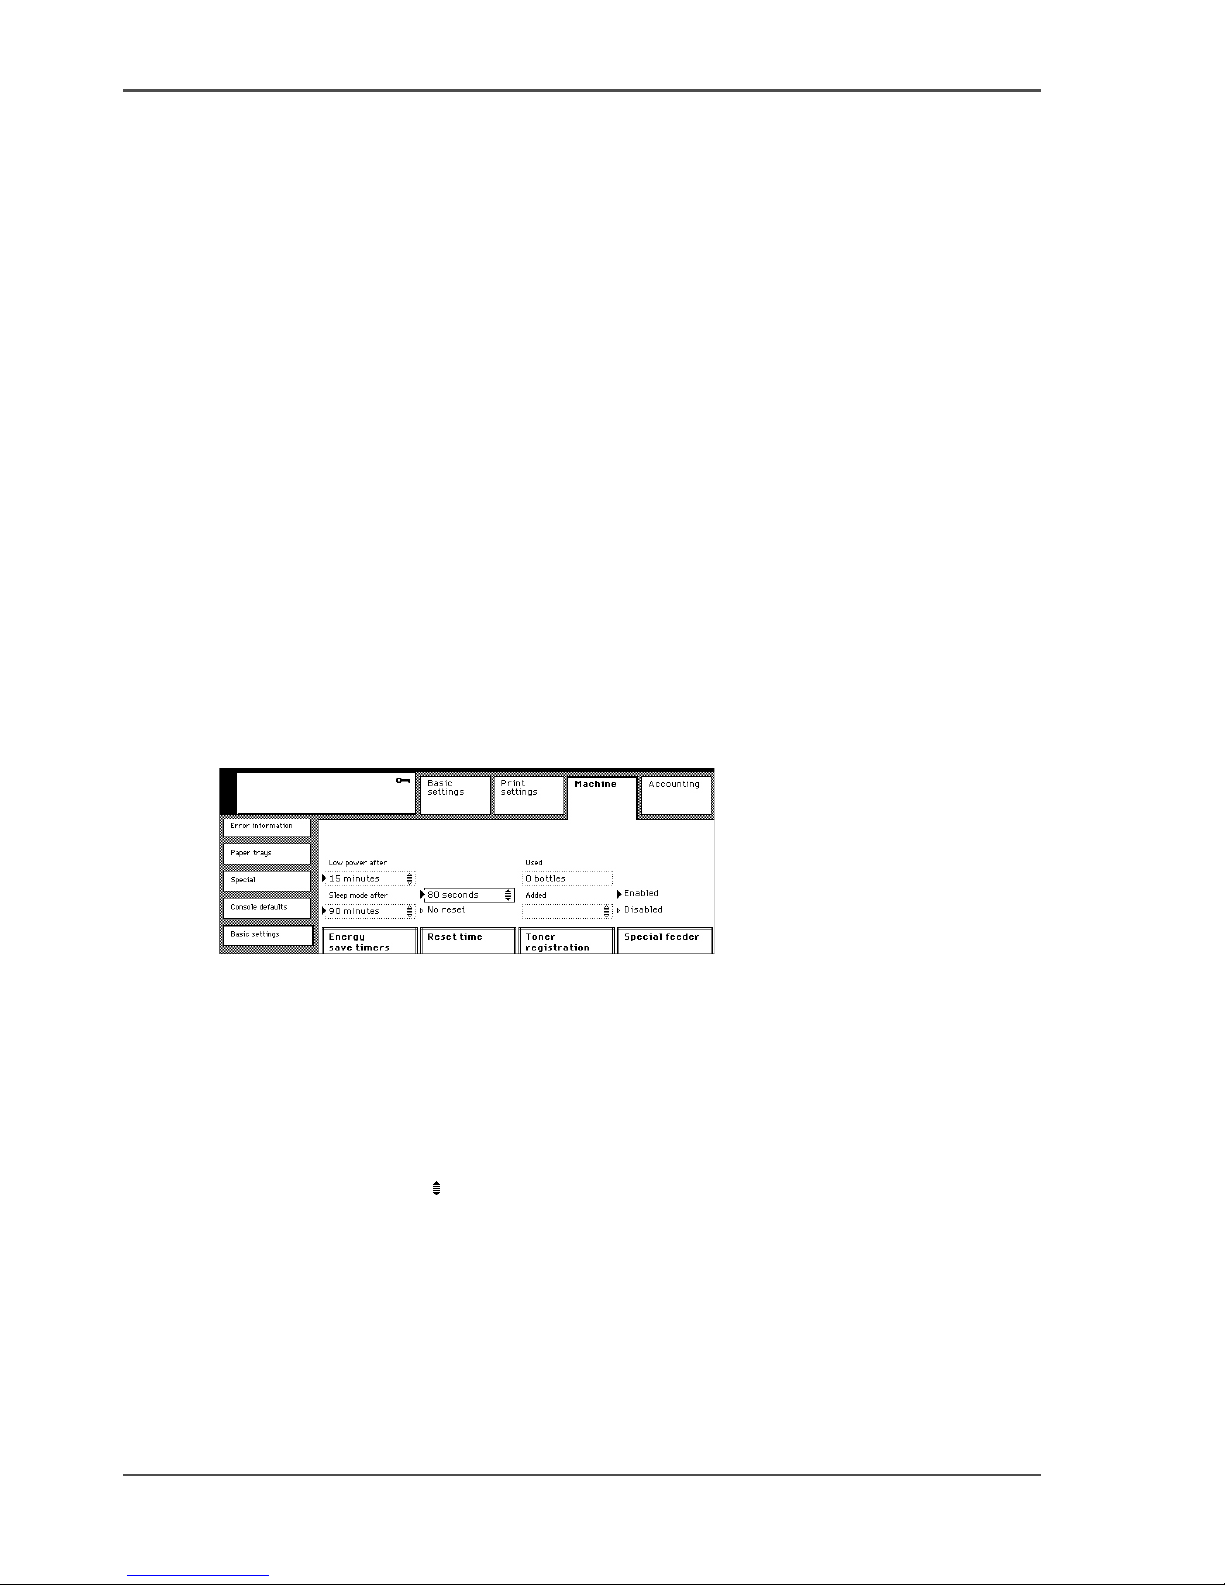
The reset time is the delay period, between the last user operation and the return to
the default job settings.
A timer starts if the user presses a key, opens a door or places the originals. When
the reset time has expired, the Océ VarioPrint
®
2062/75 NC returns to the default
operating mode and the default job settings are displayed. The user loses the changed
settings.
The default reset time is 60 seconds, but you can set any other time from 10 seconds
up to 5 minutes.
Before you begin
Enter the Key operator system (see ‘Enter or quit the key operator system’ on
page 28).
Illustration
[37]
[37] Define the reset time
Changing the reset time
1. Press the 'Machine' key.
2. Select the 'Basic settings' tab.
3. Press the 'Reset time' key to select the series of values.
Use the scroll wheel to adjust the reset time.
Disabling the reset time
1. Press the 'Machine' key.
2. Select the 'Basic settings' tab.
3. Press the 'Reset time' key to select 'No reset'.
Page 41

41
Changing the Default Reset Time
Check
1. Quit the Key operator system.
2. Check to see that the reset time is set according to your purposes.
The Océ VarioPrint
®
2062/75 NC must return to the default settings after the reset
time has expired.
When 'No reset' is selected, the default settings will not be restored.
Page 42
42 Chapter 6 The End-user Display Screen
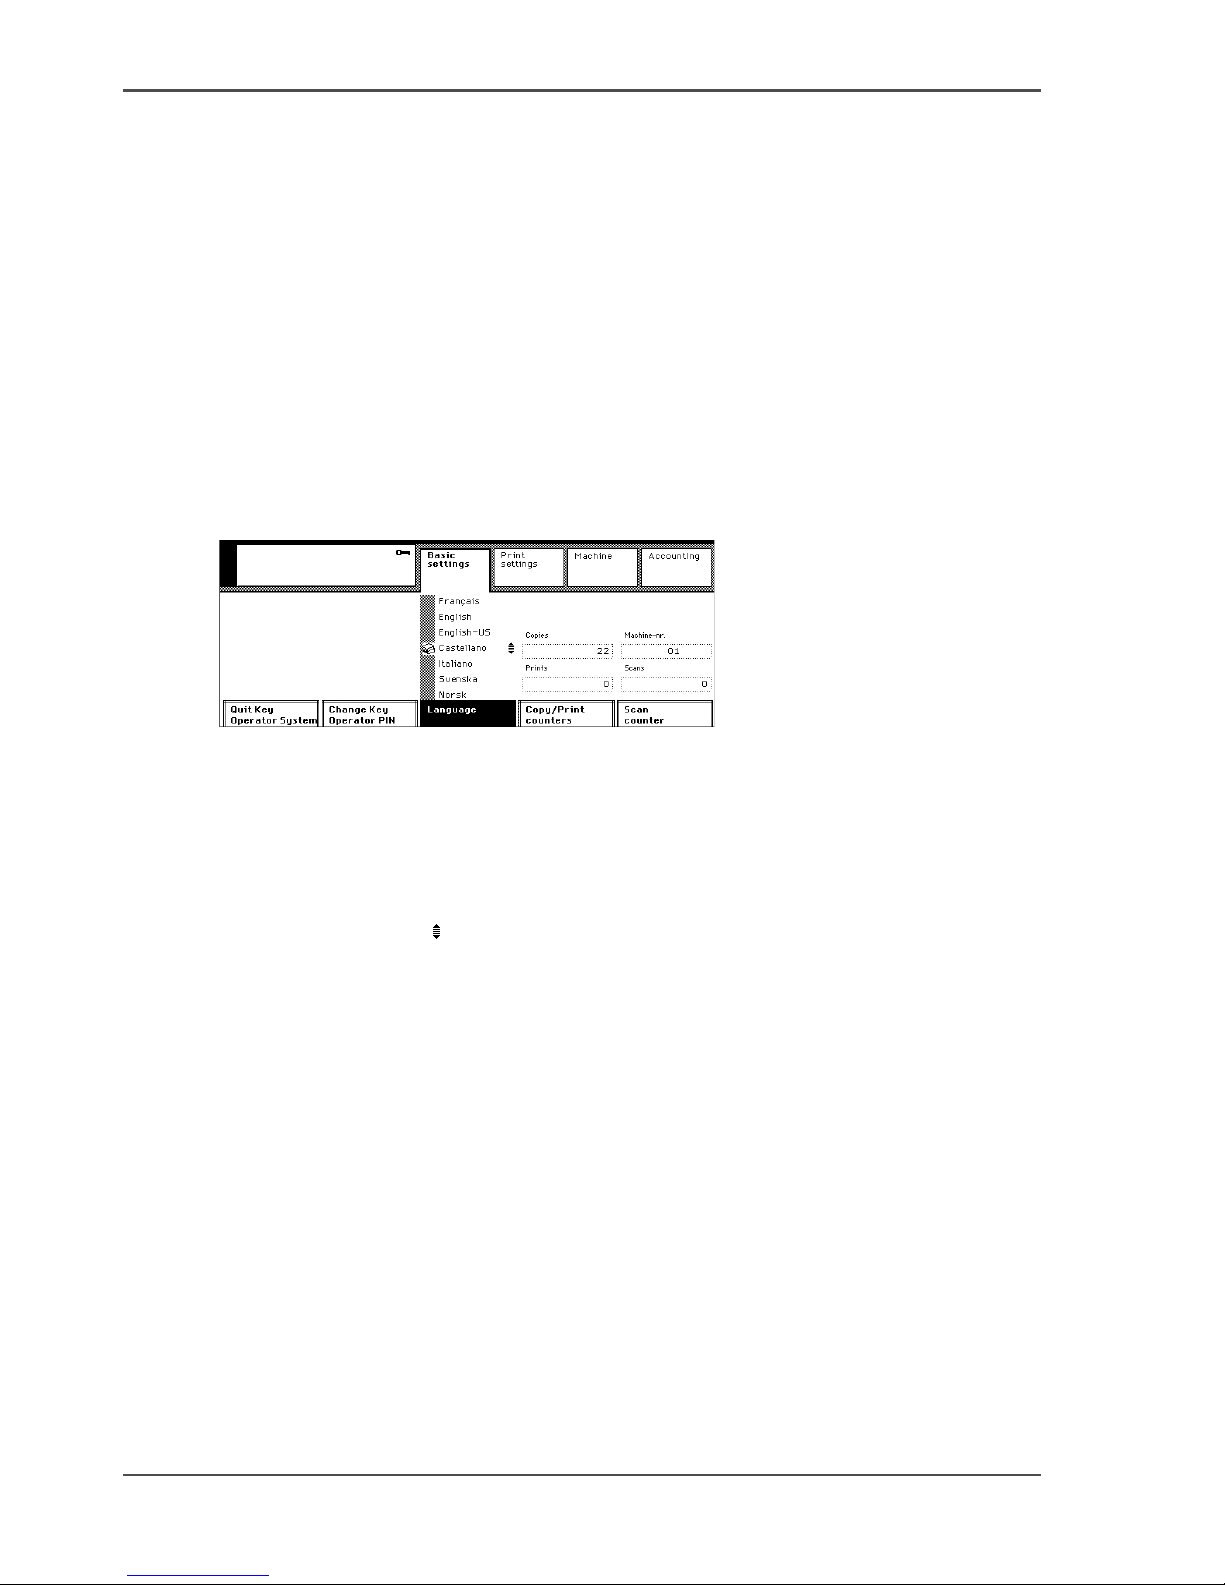
Change the display language
Change the display language
Introduction
The Océ VarioPrint
®
2062/75 NC allows you to select one of the 15 display
languages.
Before you begin
Enter the Key operator system (see ‘Enter or quit the key operator system’ on
page 28).
Illustration
[38]
[38] Change the display language of the Océ VarioPrint® 2062/75 NC Network Printer
Changing the display language
1. Press the 'Basic settings' key.
2. Make sure the 'Language' function is selected.
3. Use the scroll wheel to select the required language.
The display language will be displayed immediately in the Key operator system.
Page 43
43
Enter the telephone number of the key operator
Enter the telephone number of the key operator
Introduction
If an error is reported, the Océ VarioPrint
®
2062/75 NC asks the user to call the Key
Operator. A telephone number can be a part of the message.
You can change or ignore the telephone number.
Before you begin
Enter the Key operator system (see ‘Enter or quit the key operator system’ on
page 28).
Illustration
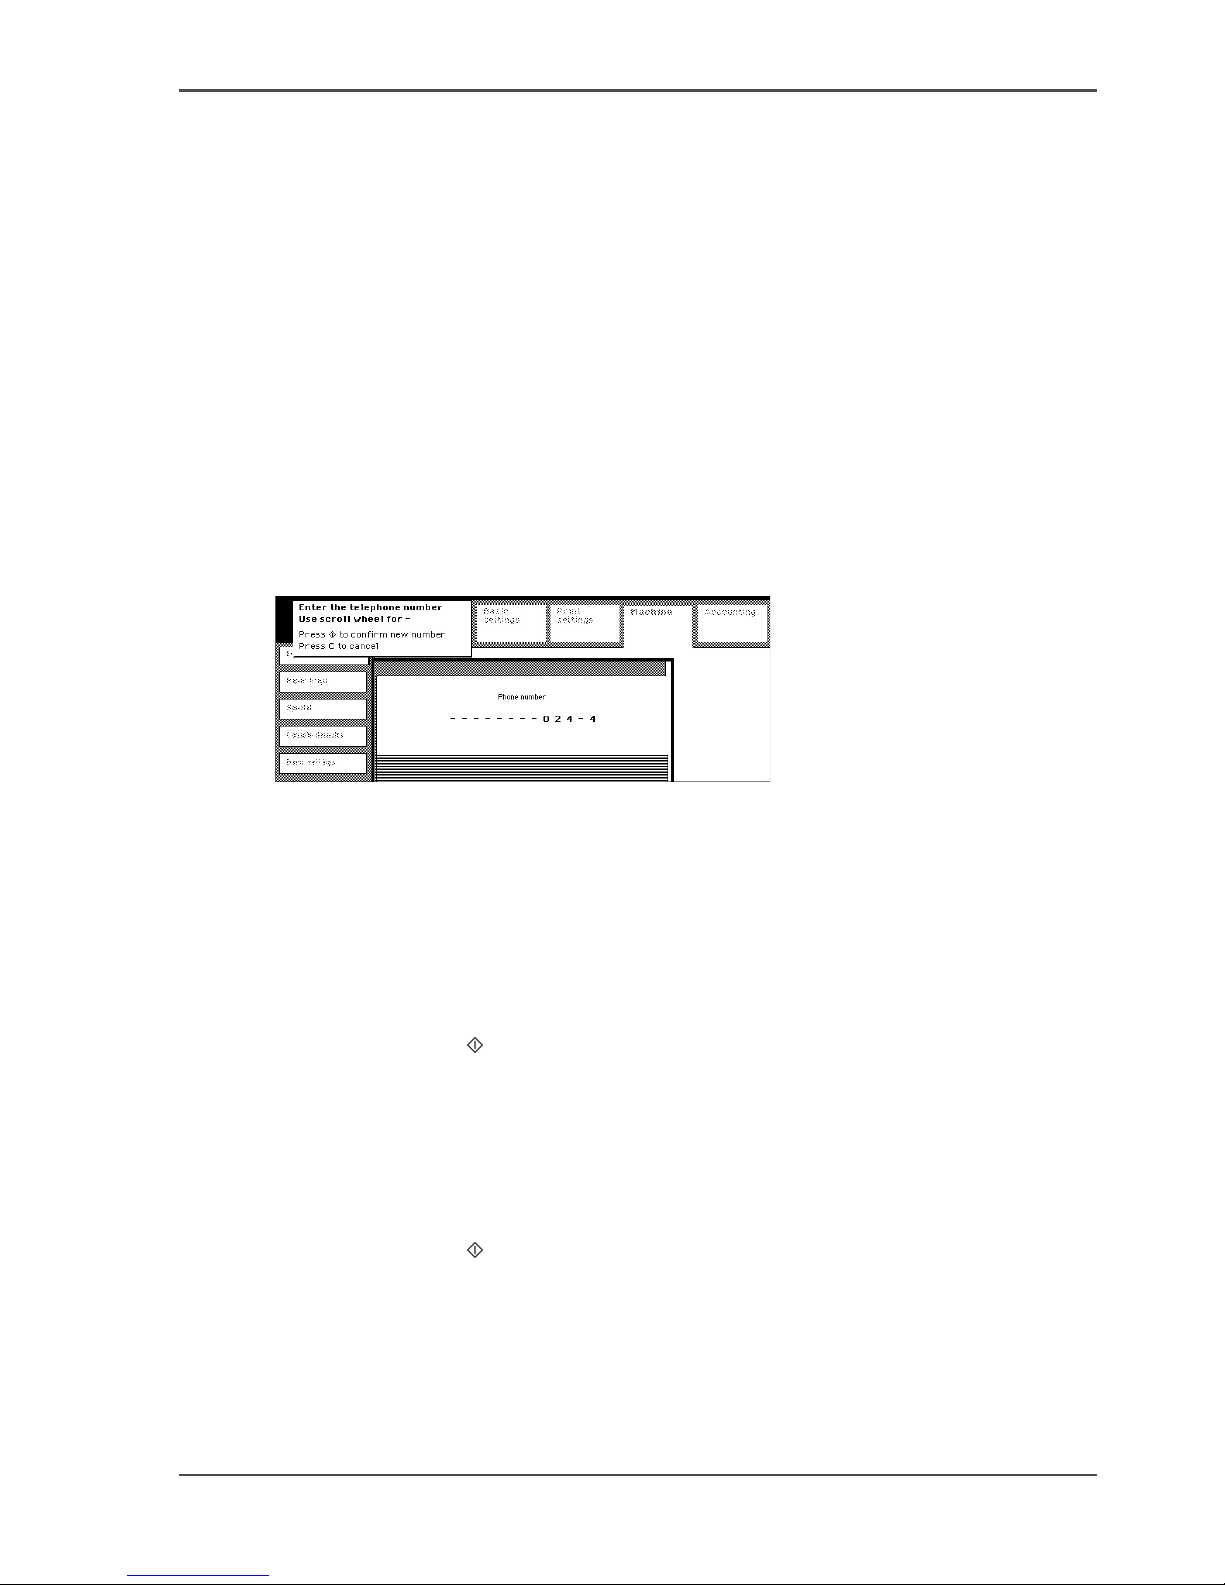
[39]
[39] Enter the Key operator telephone number of the Network Printer
Entering a key operator telephone number
1. Press the 'Machine' key.
2. Select the 'Error information' tab.
3. Press the 'Change phone number' key.
4. Use the numeric keys to enter a telephone number with a maximum of 13 digits.
5. Press the start key to confirm the new number.
Ignoring a telephone number
1. Press the 'Machine' key.
2. Select the 'Error information' tab.
3. Press the 'Change phone number' key.
4. Press the start key to ignore the telephone number.
Page 44

44 Chapter 6 The End-user Display Screen
Enter the telephone number of the key operator
Page 45

45
Chapter 7
The Access Security
Page 46

46 Chapter 7 The Access Security
About the access-secured system of the Network Printer
The Access Security of the Network
Printer
About the access-secured system of the Network Printer
Introduction
An access-secured system allows you to perform the following tasks:
■ Define which users can access the machine to start mailbox, copy and scan jobs.
■ Define which user can perform automatic print jobs.
■ Define the job-page limit for each user.
■ Follow the number of job-page clicks the users have done.
To create an access-secured system, proceed as follows:
1. Secure the access to the machine.
When the access to the machine is secured, all authorized users need a unique PIN
to enter the display menu. If the PIN is correct, the user can start mailbox, copy and
scan jobs (see ‘A valid user account’ on page 114).
2. Secure automatic printing (see ‘Secure automatic printing’ on page 50).
3. Enter the accounting system. Define the authorization for each user or each user
group (see ‘About the accounting system’ on page 112).
To accept external users, a copy control device can be a part of the system.
Access-secured system
An access-secured system has the following properties:
[11]
The authorized users can use the machine until the job-page limit of the user account
is reached (Accounting system) (see ‘Defining the Job-page Limit’ on page 120).
Properties
The 'Access to machine' is 'Secured' (Key operator system) (see ‘Secure the access
to the Network Printer machine’ on page 48).
The authorized users have a PIN (Accounting system) (see ‘Assign or change a
PIN’ on page 118).
The authorized users have a valid user account (Accounting system) (see ‘Change
the account number’ on page 117).
Page 47
47
About the access-secured system of the Network Printer
Secured automatic printing
Secured automatic printing has the following properties:
[12]
Security through the copy control device
Security through the copy control device has the following properties:
[13]
When automatic printing is not secured, each user with a network user name can
print the automatic print jobs, without a charge.
Properties
A new user can only print automatic jobs after that the status of the automatically
created user account has been changed to '+' (Accounting system).
In order to check the user, manually authorize the user account.
The automatic print jobs come into the mailbox of the user if the user account
record has not yet been authorized.
Properties
Océ Service must install and configure the Copy control device.
The access control for the Copy control device is set to 'Enabled' (Key operator
system) (see ‘Enable the Copy control device connected to the Network Printer’
on page 54).
The 'Access to machine' can be secured, so that the authorized, internal users can
use a PIN instead of using coins or a credit card.
Page 48
48 Chapter 7 The Access Security
Secure the access to the Network Printer machine
Secure the access to the Network Printer machine
Introduction
The Océ VarioPrint
®
2062/75 NC allows you to secure the access to the machine. If
the machine is secured, the user must enter a unique PIN, to enter the display screen
menu and to start the jobs (see ‘About the access-secured system of the Network
Printer’ on page 46).
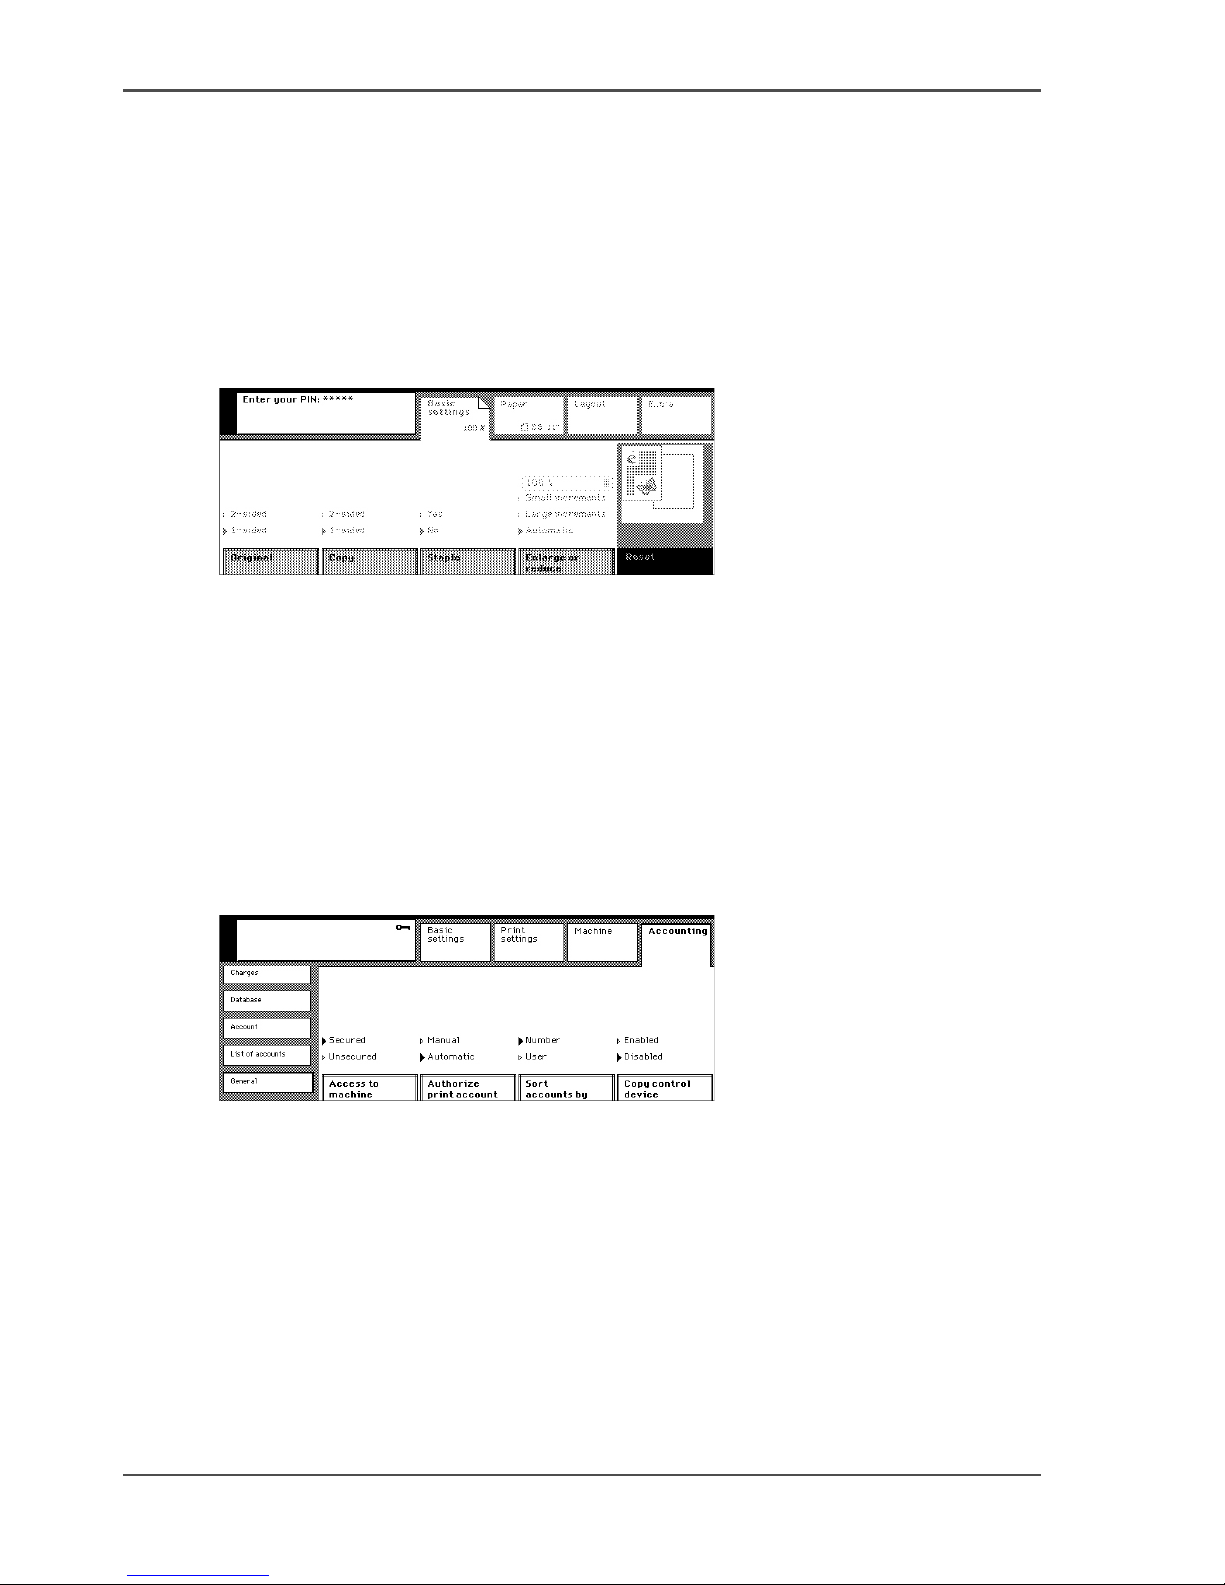
[40]
[40] Entry screen, when the access is secured
Before you begin
1. Enter the Key operator system (see ‘Enter or quit the key operator system’ on
page 28).
2. Check that the authorized users have valid user accounts (see ‘A valid user account’
on page 114).
Illustration
[41]
[41] Secure the machine-access
Page 49

49
Secure the access to the Network Printer machine
Defining machine security
1. Press the 'Accounting' key.
2. Select the 'General' tab.
3. Press the 'Access to machine' key to select 'Secured' or 'Unsecured'.
[14]
Check
1. Exit the key operator system.
2. Check to insure that the access is controlled according to your needs.
Access to machine Result
Secured
■ The user must have a PIN, to access the machine.
■ The user account must be valid.
■ You can secure automatic printing by using the
'Authorize print account' function (see ‘Secure
automatic printing’ on page 50).
Unsecured
■ Any user can access the machine.
■ You can secure automatic printing by using the
'Authorize print account' function.
Page 50
50 Chapter 7 The Access Security
Secure automatic printing
Secure automatic printing
Introduction
When the access to the machine is secured, the user must use a PIN to enter the
display screen menu (see ‘About the access-secured system of the Network Printer’
on page 46). In order to print a job that is stored in the mailbox, the user needs a PIN
to enter the mailbox. When a user sends an automatic print job, the operator panel is
not necessary to print the job. You can secure the automatic printing so that new users
cannot print, unless you change the status of the user account manually.
Before you begin
1. Enter the Key operator system (see ‘Enter or quit the key operator system’ on
page 28).
2. Check that the access-security has been defined.
Illustration
[42]
[42] Secure automatic printing
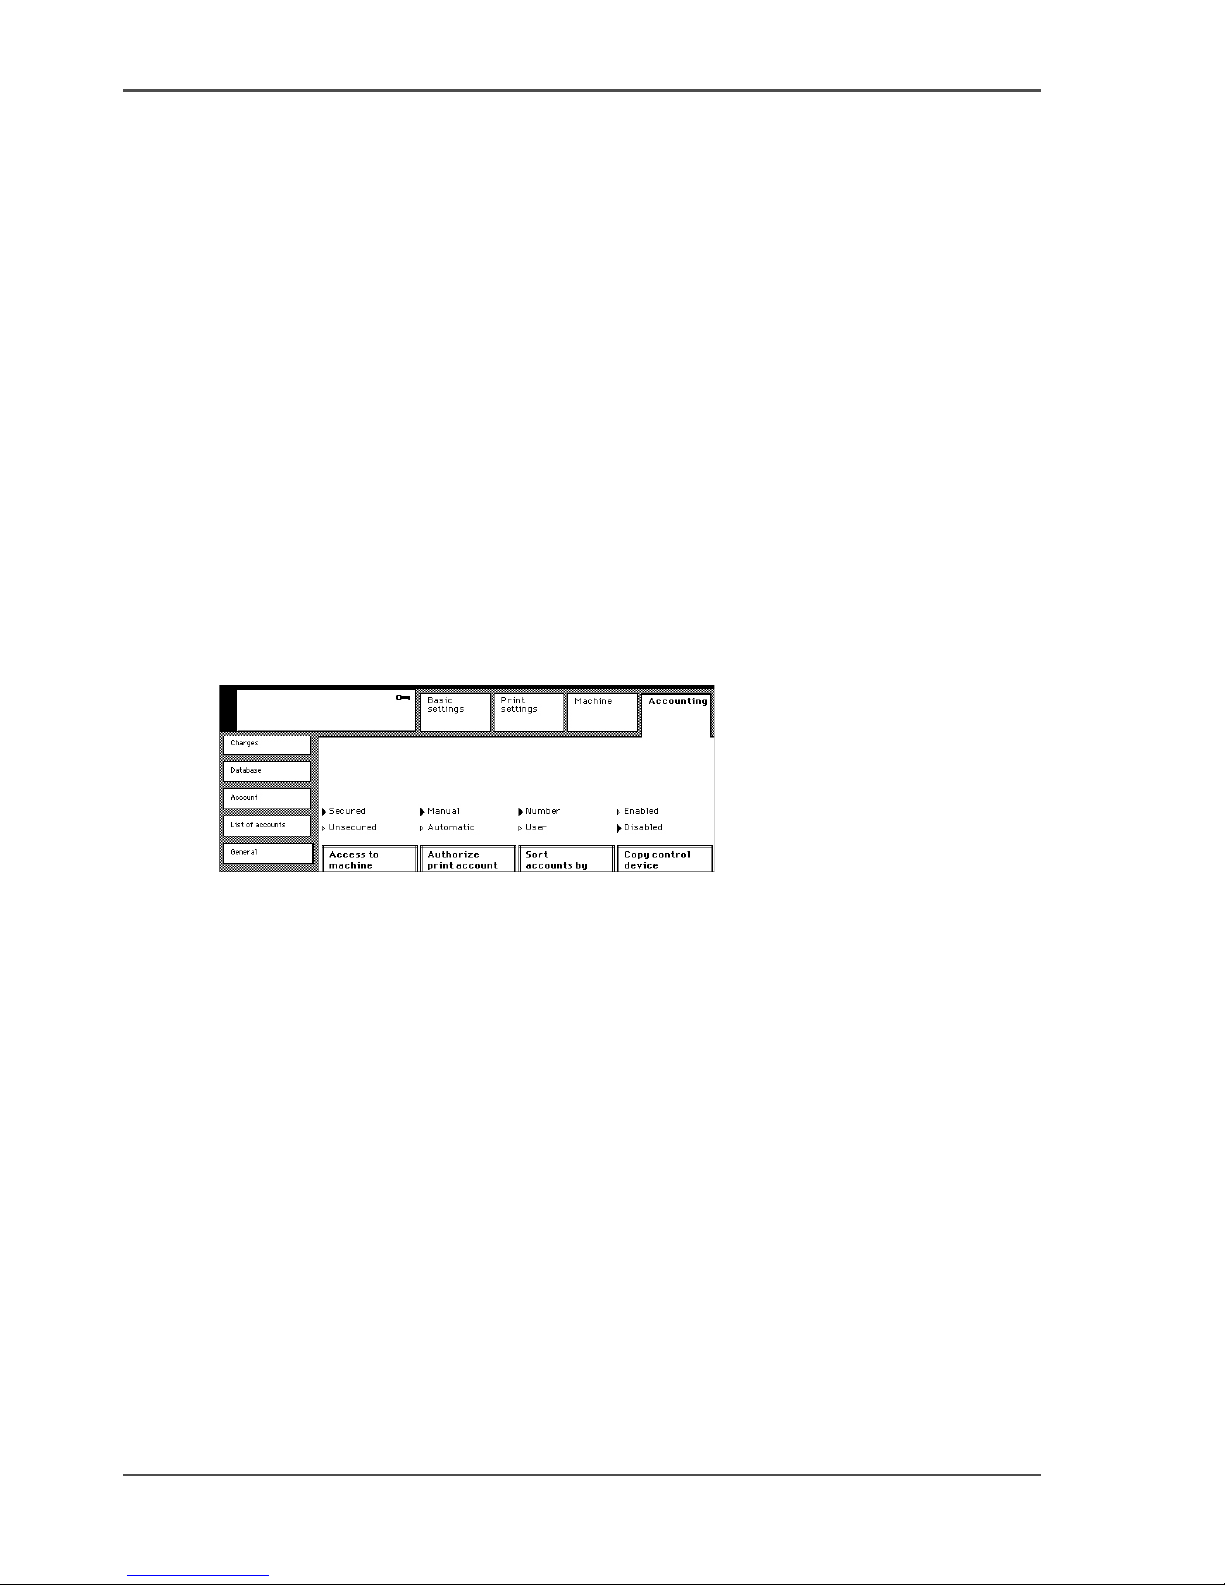
Defining the automatic printing security
1. Press the 'Accounting' key.
2. Select the 'General' tab.
3. Press the 'Authorize print account' key to select 'Manual' or 'Automatic'.
Page 51

51
Secure automatic printing
[15]
Check
1. Quit the Key operator system.
2. Check that the status of new user accounts have the correct status.
Authorize
print account
Result
'Manual'
■ When a user sends an automatic print job to the machine, a
record is automatically added to the accounts database. To
prevent unlimited printing, use the 'Manual' setting.
The newly created user account records receive a '-' status,
which means that the user accounts are not valid. The refused
automatic print job is not printed and stored in the mailbox of
the document owner. You must change the status of the user
account to allow the user to print automatic print jobs in
future.
■ If a user sends a mailbox job to the machine, a record is
automatically added to the accounts database. In order to
enable the user to enter the mailbox, you must define a PIN,
if the machine access is secured, and change the status to +.
'Automatic'
■ When a user sends an automatic print job to the machine, a
user account record is automatically added to the accounts
database. The status of the user account is '+', which means
that the user can start unlimited automatic print jobs.
■ When a user sends a mailbox job to the machine, a user
account record is automatically added to the accounts
database. In order to enable the user to enter the mailbox, you
must define a PIN, if the machine access is secured.
Page 52
52 Chapter 7 The Access Security
Define the job charges of the Network Printer
Define the job charges of the Network Printer
Introduction
The Océ VarioPrint
®
2062/75 NC default charge is one click for each job page side
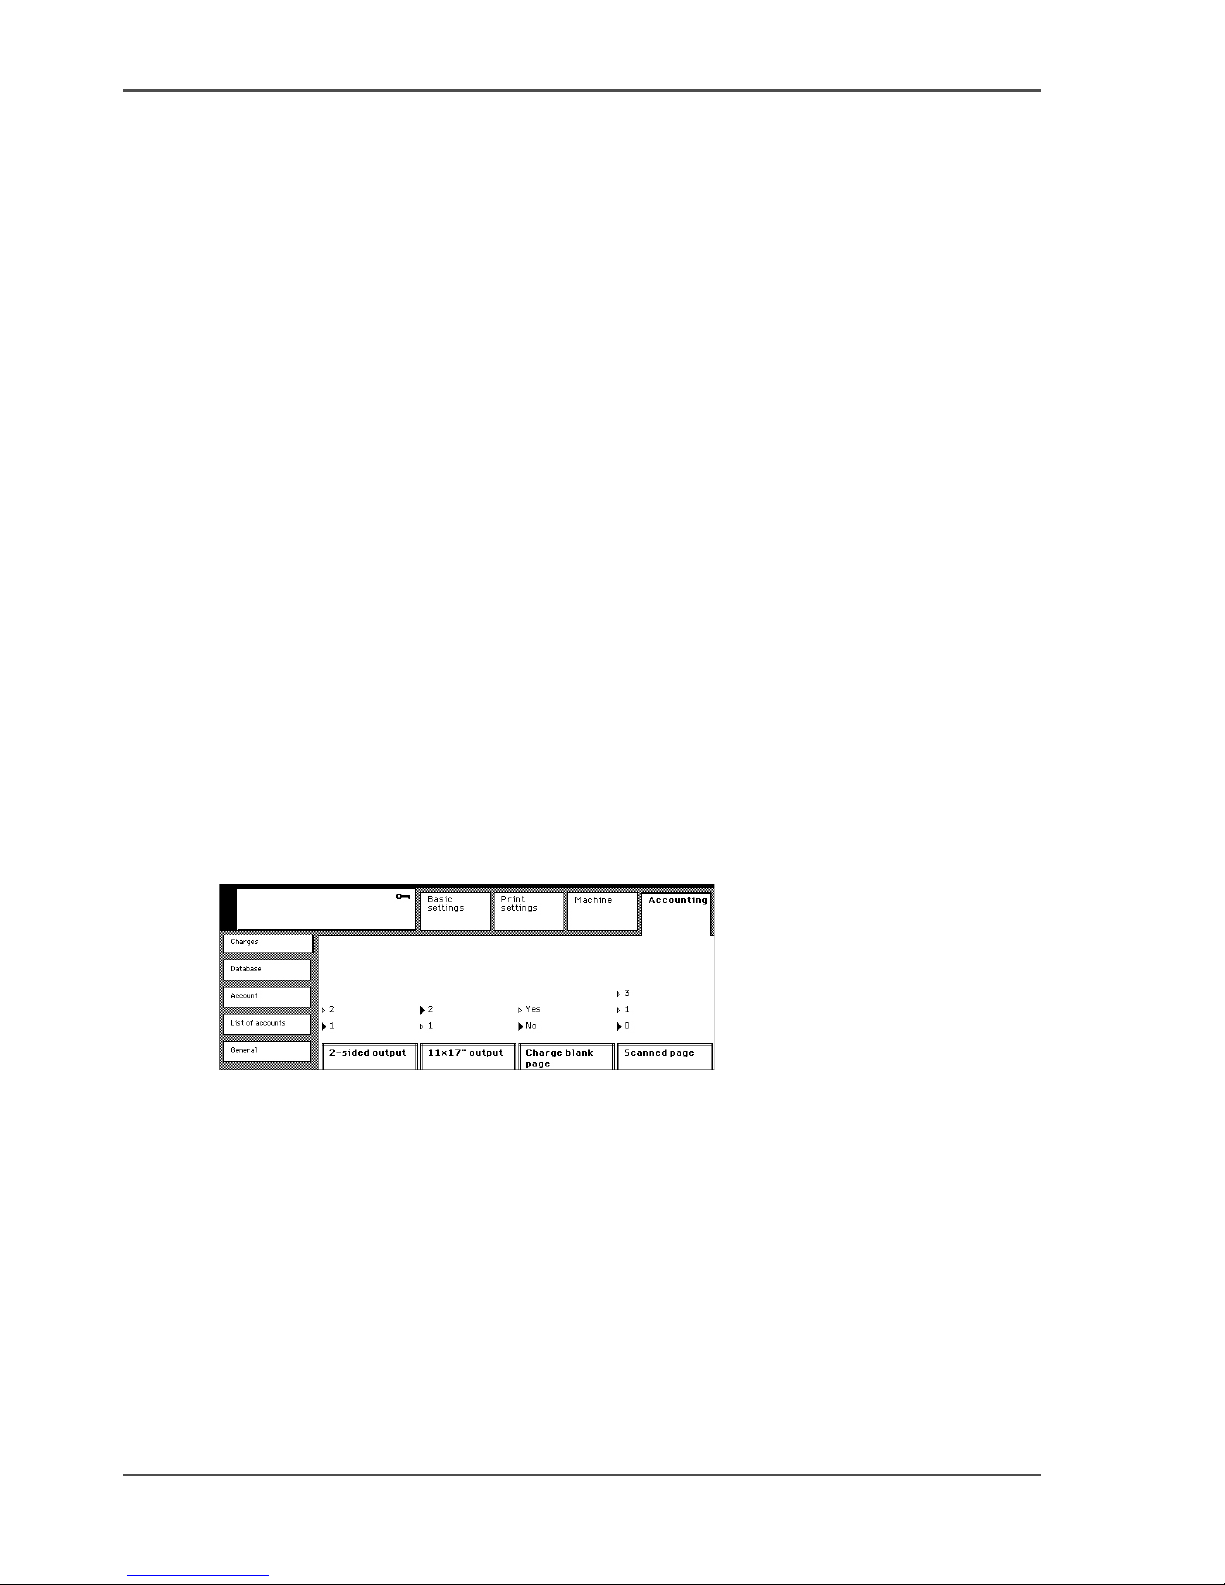
that is copied or printed. You can define the charge for the following output.
■ 2-sided output. Select a factor.
■ A3/Tabloid 11x17 output. Select a factor.
■ Blank page. Select 'Yes' or 'No'.
The default setting is no charge for blank pages of any size. The user must identify
the blank pages in the display screen menu.
The charges for scan jobs depend on the number of page sides scanned. You can
define a factor for charging. If required, you can ignore the charges of scan jobs.
Then, select '0'.
The charges are passed on to the Accounting system and the Copy control device.
Before you begin
Enter the Key operator system (see ‘Enter or quit the key operator system’ on
page 28).
Illustration
[43]
[43] Define the job charges
Defining the job charge for 2-sided output
1. Press the 'Accounting' key.
2. Select the 'Charges' tab.
3. Press the '2-sided output' key to select '1' or '2'.
Page 53

53
Define the job charges of the Network Printer
How to define the job charge for A3/Tabloid 11x17 output
1. Press the 'Accounting' key.
2. Select the 'Charges' tab.
3. Press the '11x17 output' function key to select '1' or '2'.
Defining the job charge for a blank page
1. Press the 'Accounting' key.
2. Select the 'Charges' tab.
3. Press the 'Charge blank page' key to select 'Yes' or 'No'.
Defining the job charge for a scanned page
1. Press the 'Accounting' key.
2. Select the 'Charges' tab.
3. Press the 'Scanned page' key to select '0', '1' or '2'.
Check
1. Quit the Key operator system.
2. To check the selection, make a test job.
Check that the job is charged correctly.
Page 54
54 Chapter 7 The Access Security
Enable the Copy control device connected to the Network Printer
Enable the Copy control device connected to the Network
Printer
Introduction
The copy control device is connected externally to the machine. The system gives
access to external users who are not authorized in the accounts database. The
external user must insert coins or a credit card to gain access to the machine.
Océ Service must install and configure the Copy control device.
You can enable or disable an installed and configured copy control device.
An enabled Copy control device and an access-secured system (see ‘About the
access-secured system of the Network Printer’ on page 46) can be combined, to
enable use by internal and external user groups.
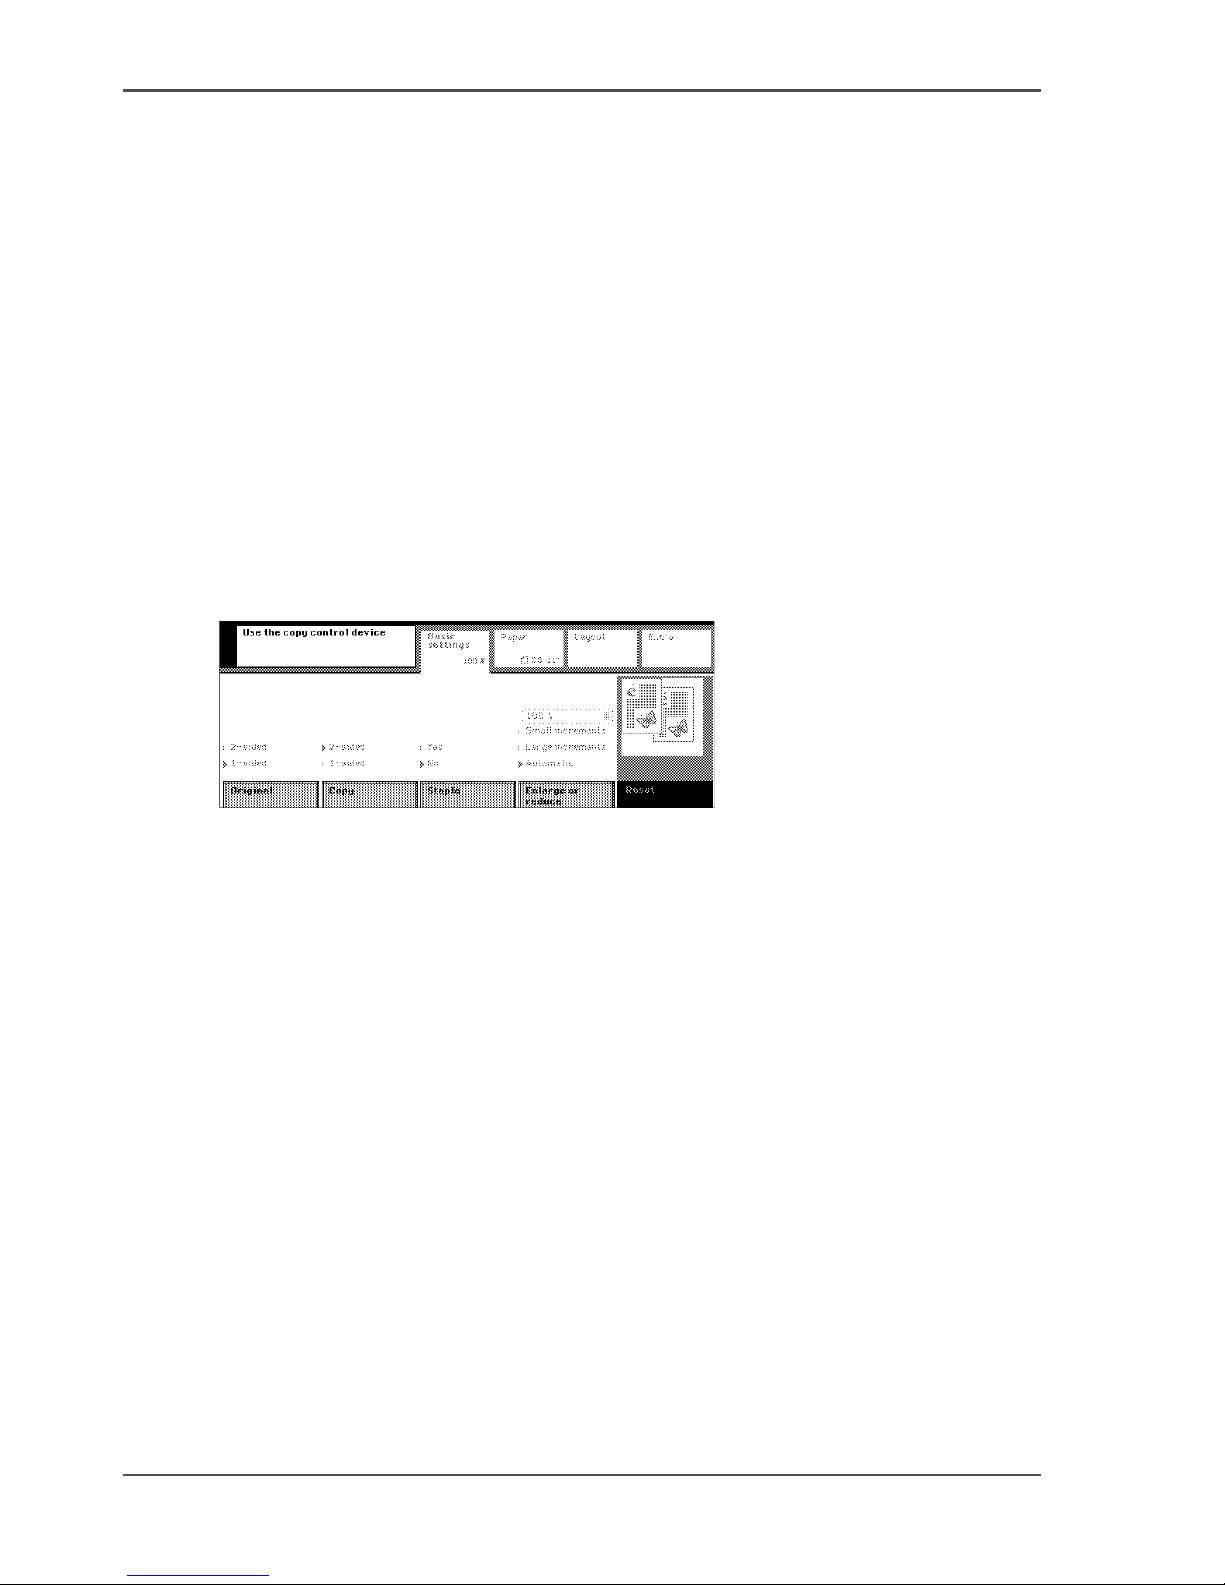
[44]
[44] Entry screen for external users
The following table displays the requirements for the external users when the copy
control device is enabled:
Page 55
55
Enable the Copy control device connected to the Network Printer
[16]
Before you begin
Enter the Key operator system (see ‘Enter or quit the key operator system’ on
page 28).
Illustration
[45]
[45] Enable the copy control device
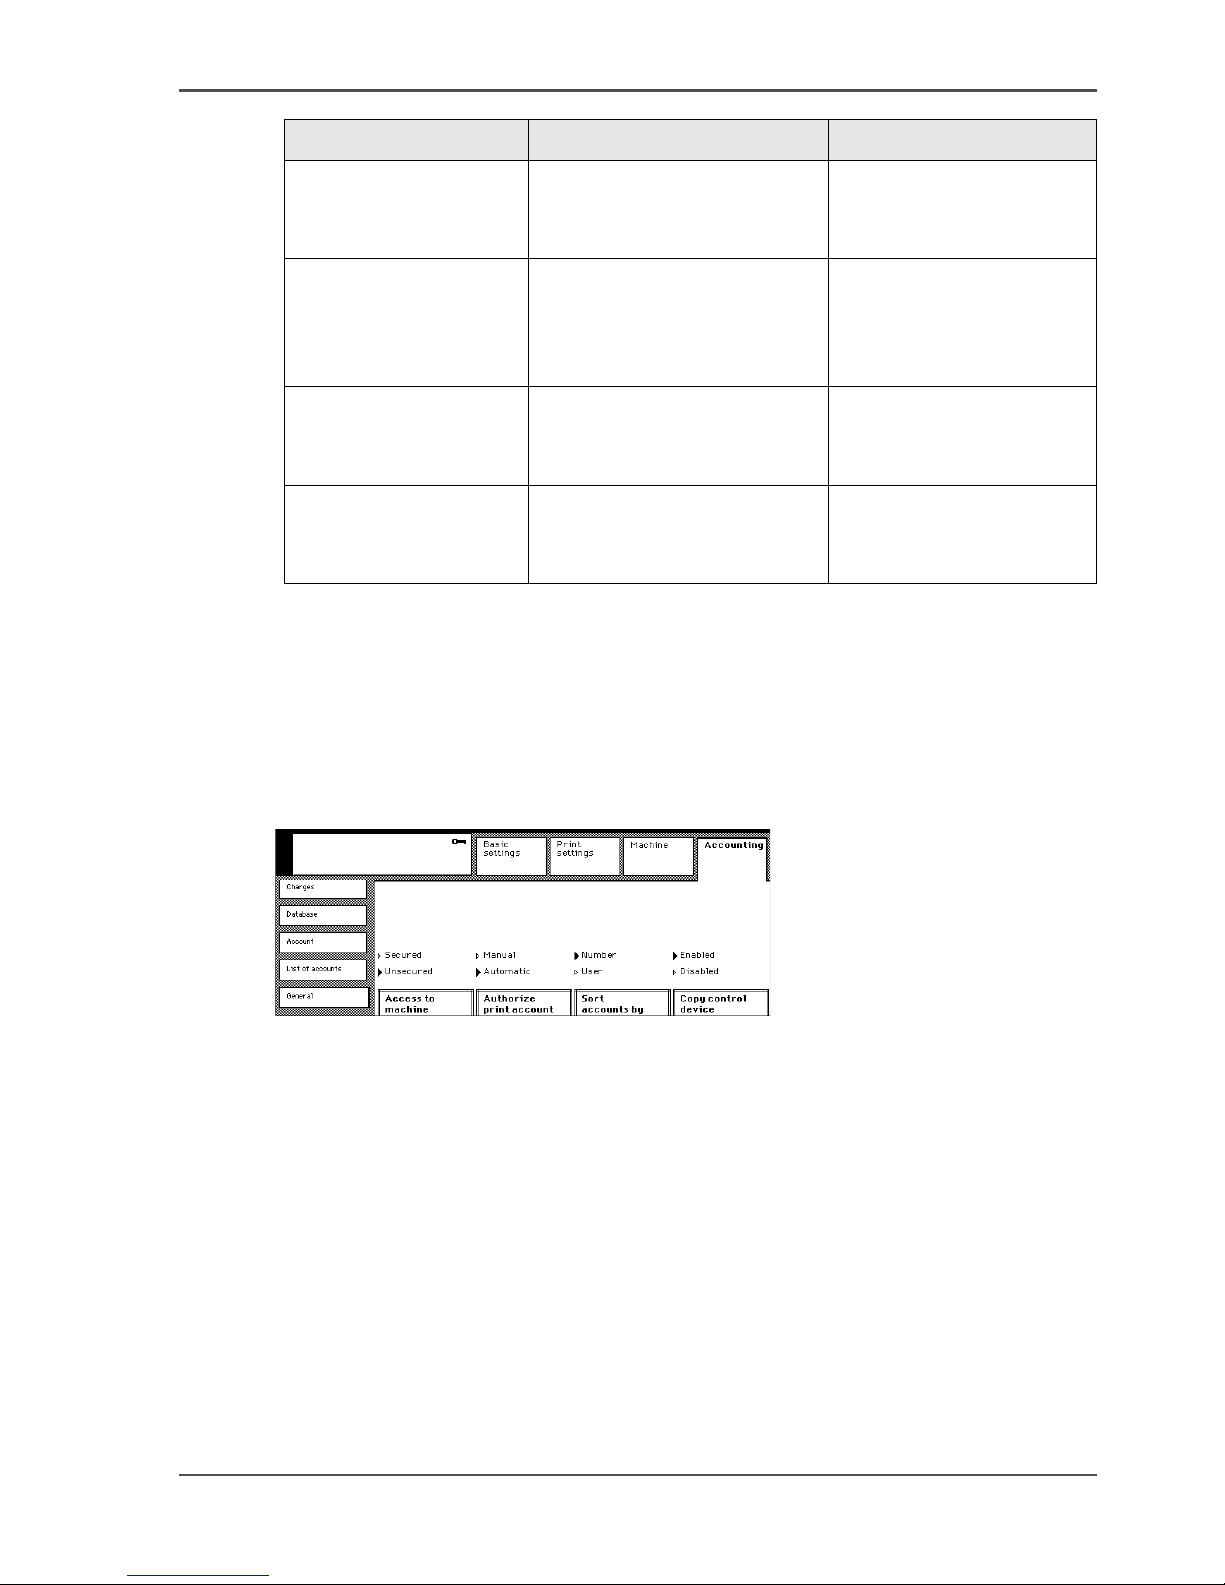
Configuring the copy control device
1. Press the 'Accounting' key.
2. Select the 'General' tab.
3. Press the 'Copy control device' key to select 'Enabled'.
Check
1. Quit the Key operator system.
2. To check the selection, make a test job.
Open the Accounting system, to see if the test job is charged to the Copy control
device account.
Job Requirement Charges
Copy job The user must insert coins or
a credit card, to access the
machine.
Jobs are charged to the
'Copy control device'
system account.
Automatic print job The user can perform an
automatic print job if
automatic print jobs are
permitted.
Jobs are not charged to
any account.
Mailbox job The user must enter coins or
a credit card, to access the
mailbox.
Jobs are charged on the
'Copy control device'
system account.
Scan job The user must enter coins or
a credit card, to access the
machine.
Jobs are charged on the
'Copy control device'
system account.
Page 56

56 Chapter 7 The Access Security
About the access-secured system of the Digital Copier
The Access Security of the Digital
Copier
About the access-secured system of the Digital Copier
Introduction
An access-secured system allows you to perform the following tasks:
■ Define the job-page limit for each user.
■ Follow the number of job-page clicks the users have done.
To create an access-secured system, proceed as follows:
1. Secure the access to the machine (see ‘Secure the access to the Digital Copier
machine’ on page 58).
When the access to the machine is secured, all authorized users need a unique PIN
to enter the display menu. If the PIN is correct, the user can start jobs.
2. Enter the accounting system. Define the authorization for each user or each user
group (see ‘About the accounting system’ on page 112).
To accept external users, a copy control device can be a part of the system.
Access-secured system
An access-secured system has the following properties:
[17]
The authorized users can use the machine until the job-page limit of the user account
is reached (accounting system).
Properties
The 'Access to machine' is 'Secured' (Key operator system) (see ‘Secure the access
to the Digital Copier machine’ on page 58).
The authorized users have a PIN (Accounting system) (see ‘Assign or change a
PIN’ on page 118).
The authorized users have a valid user account (Accounting system) (see ‘Change
the account number’ on page 117).
Page 57
57
About the access-secured system of the Digital Copier
Security through the copy control device
Security through the copy control device has the following properties:
[18]
Properties
Océ Service must install and configure the copy control device.
The access control for the Copy control device is set to 'Enabled' (Key operator
system) (see ‘Enable the Copy control device connected to the Digital Copier’ on
page 62).
The 'Access to machine' can be secured, so that the authorized, internal users can
use a PIN instead of using coins or a credit card (see ‘Secure the access to the
Digital Copier machine’ on page 58).
Page 58
58 Chapter 7 The Access Security
Secure the access to the Digital Copier machine
Secure the access to the Digital Copier machine
Introduction
The Océ VarioPrint
®
2062/75 NC allows you to secure the access to the machine. If
the machine is secured, the user must enter a unique PIN, to enter the display screen
menu and to start the jobs (see ‘About the access-secured system of the Digital
Copier’ on page 56).
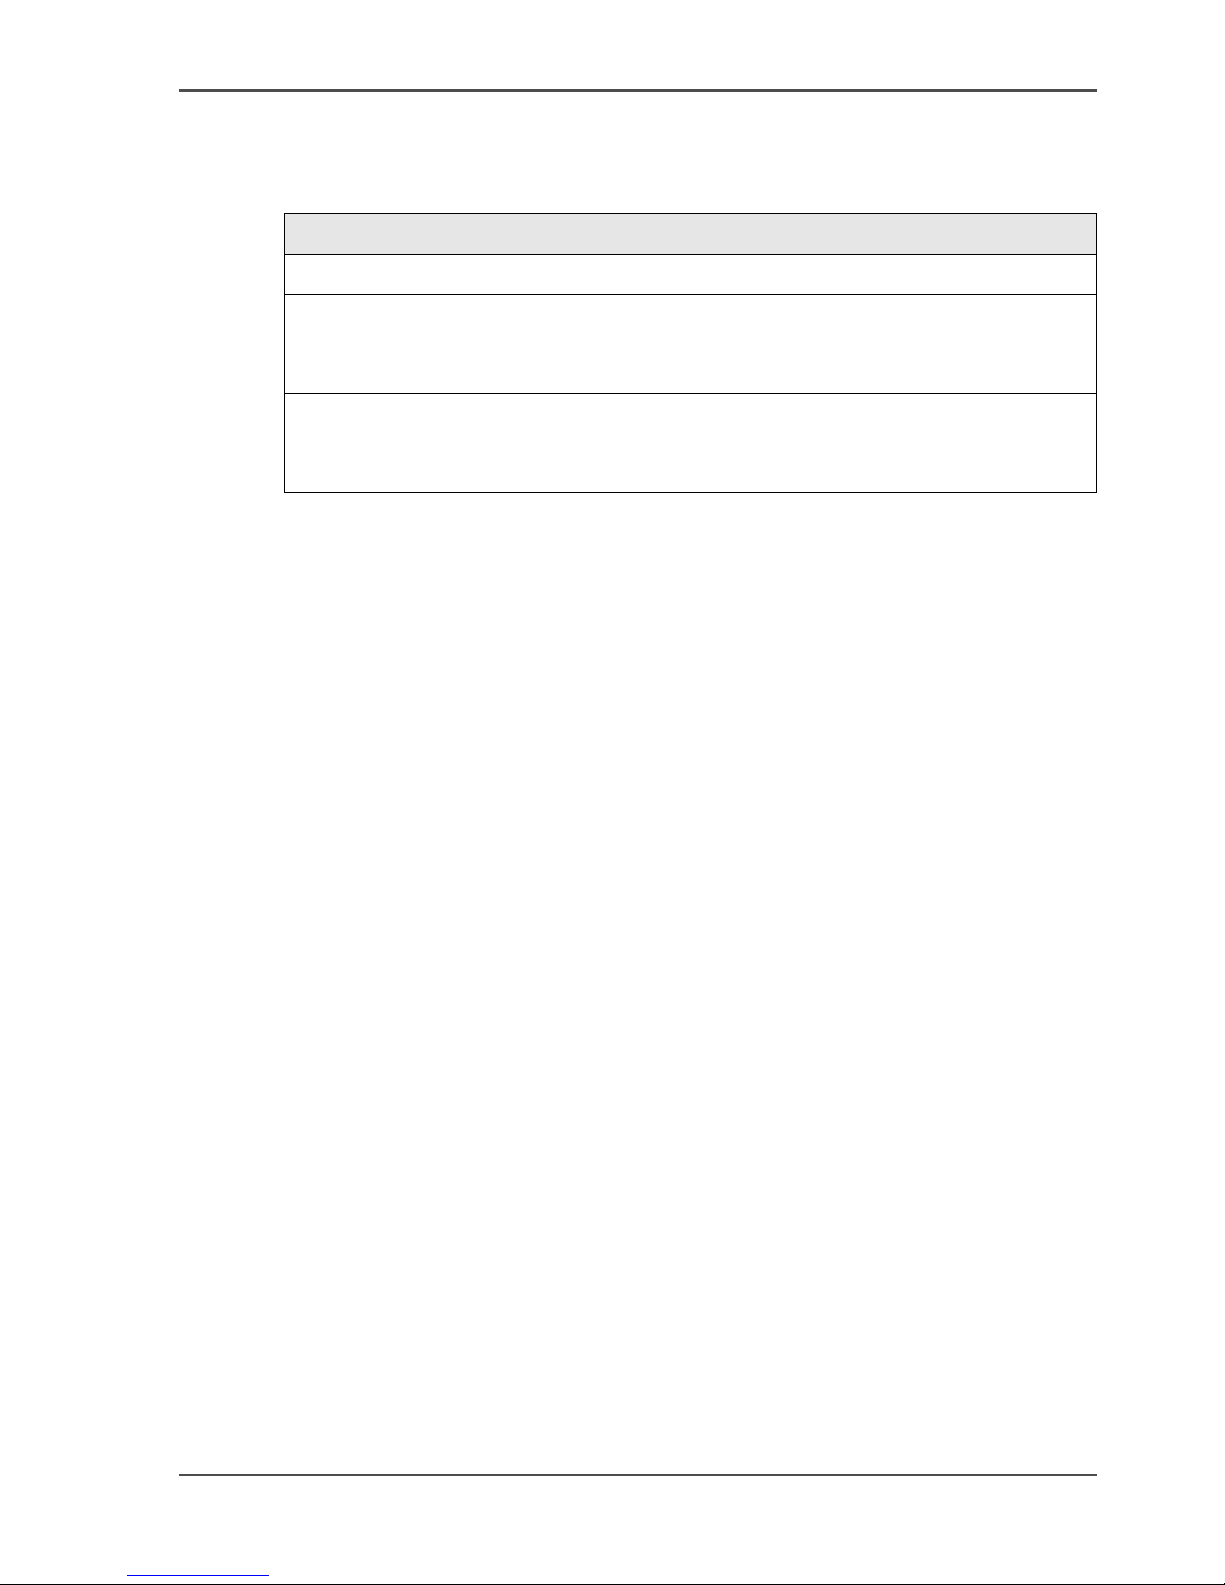
[46]
[46] Entry screen, when the access is secured
Before you begin
1. Enter the Key operator system (see ‘Enter or quit the key operator system’ on
page 28).
2. Check that the authorized users have valid user accounts (see ‘A valid user account’
on page 114).
Illustration
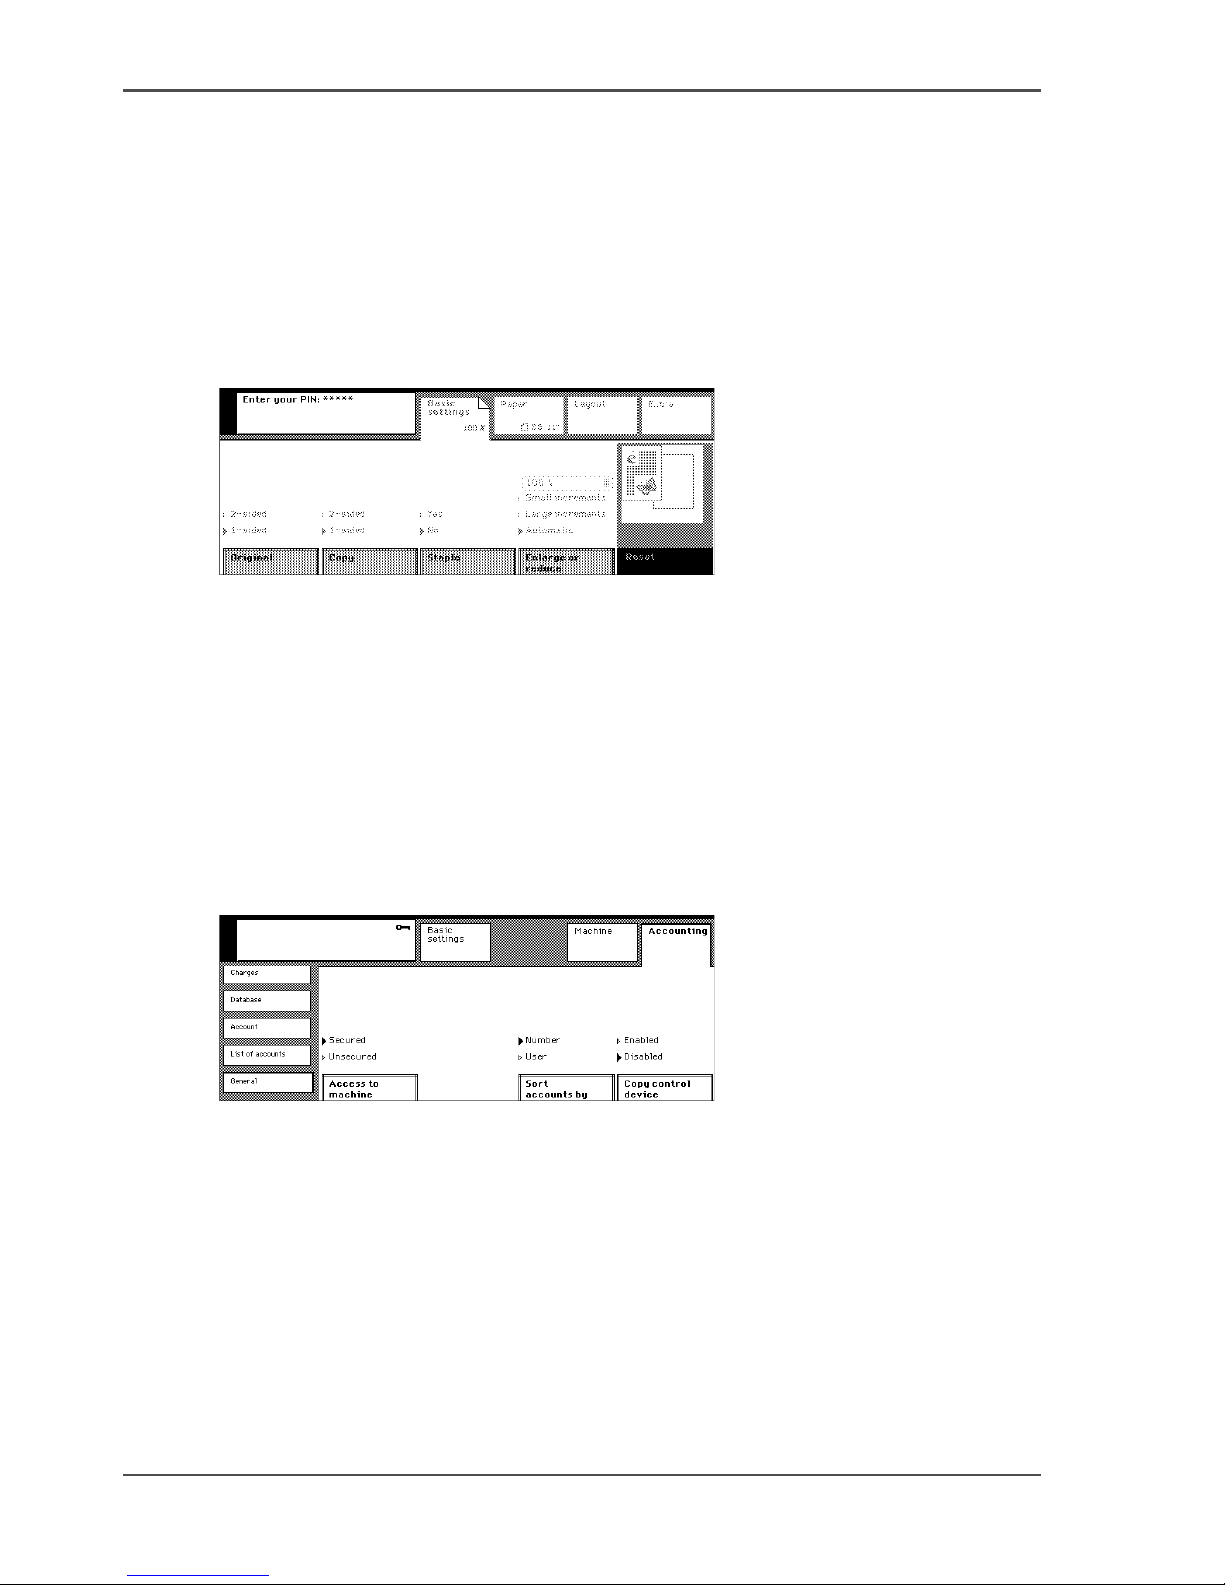
[47]
[47] Secure the machine-access
Page 59

59
Secure the access to the Digital Copier machine
Defining machine security
1. Press the 'Accounting' key.
2. Select the 'General' tab.
3. Press the 'Access to machine' key to select 'Secured' or 'Unsecured'.
[19]
Check
1. Exit the key operator system.
2. Check to insure that the access is controlled according to your needs.
Access to machine Result
Secured
■ The user must have a PIN, to access the machine.
■ The user account must be valid.
Unsecured
■ Any user can access the machine.
Page 60
60 Chapter 7 The Access Security
Define the job charges of the Digital Copier
Define the job charges of the Digital Copier
Introduction
The Océ VarioPrint
®
2062/75 NC default charge is one click for each job page side
that is copied. You can define the charge for the following output.
■ 2-sided output. Select a factor.
■ A3/Tabloid 11x17 output. Select a factor.
■ Blank page. Select 'Yes' or 'No'.
The default setting is no charge for blank pages of any size. The user must identify
the blank pages in the display screen menu.
The charges are passed on to the Accounting system and the Copy control device.
Before you begin
Enter the Key operator system (see ‘Enter or quit the key operator system’ on
page 28).
Illustration
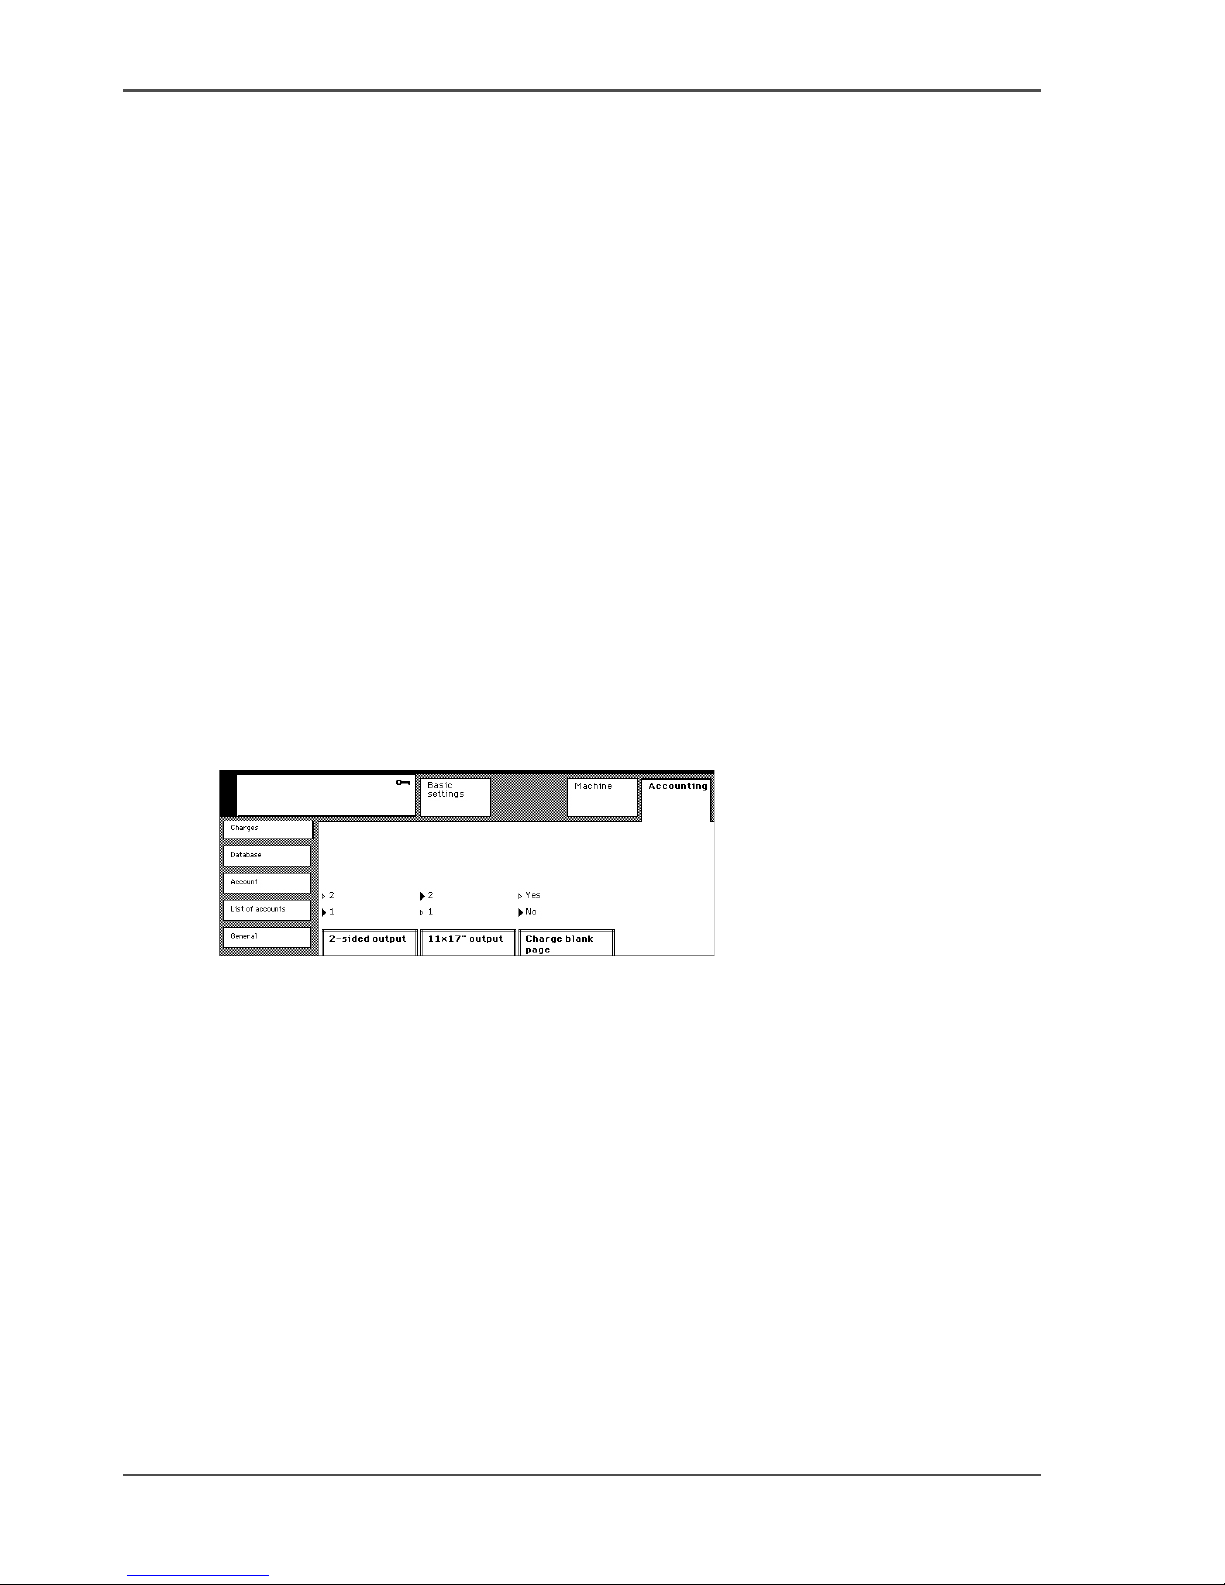
[48]
[48] Define the job charges
Defining the job charge for 2-sided output
1. Press the 'Accounting' key.
2. Select the 'Charges' tab.
3. Press the '2-sided output' key to select '1' or '2'.
How to define the job charge for A3/Tabloid 11x17 output
1. Press the 'Accounting' key.
2. Select the 'Charges' tab.
3. Press the '11x17 output' key to select '1' or '2'.
Page 61

61
Define the job charges of the Digital Copier
Defining the job charge for a blank page
1. Press the 'Accounting' key.
2. Select the 'Charges' tab.
3. Press the 'Charge blank page' key to select 'Yes' or 'No'.
Check
1. Quit the Key operator system.
2. To check the selection, make a test job.
Check that the job is charged correctly.
Page 62
62 Chapter 7 The Access Security
Enable the Copy control device connected to the Digital Copier
Enable the Copy control device connected to the Digital
Copier
Introduction
The Copy control device is connected externally to the machine (see ‘About the
access-secured system of the Digital Copier’ on page 56). The system gives access
to external users who are not authorized in the accounts database. The external user
must insert coins or a credit card to gain access to the machine.
Océ Service must install and configure the copy control device.
You can enable or disable an installed and configured copy control device.
An enabled Copy control device and an access-secured system can be combined, to
enable use by internal and external user groups.
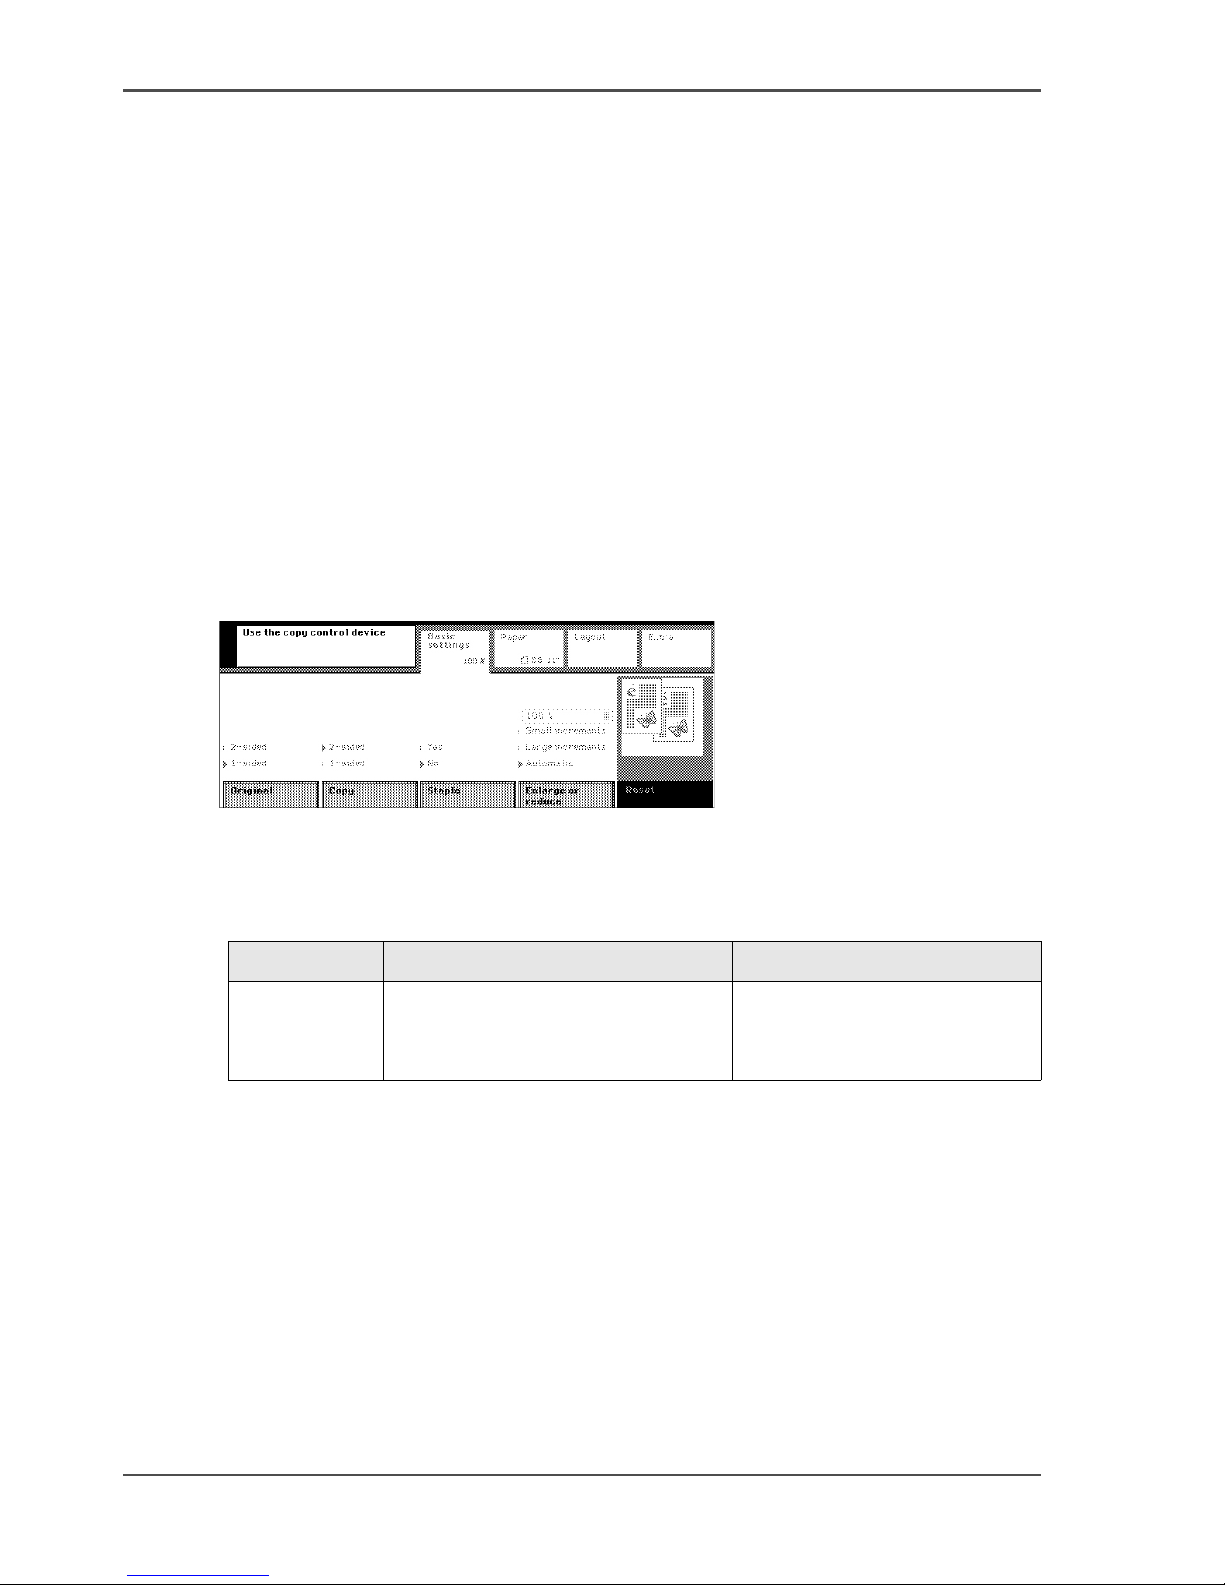
[49]
[49] Entry screen for external users
The following table displays the requirements for the external users when the copy
control device is enabled:
[20]
Before you begin
Enter the Key operator system (see ‘Enter or quit the key operator system’ on
page 28).
Job Requirement Charges
Copy job The user must insert coins or a
credit card, to access the machine.
Jobs are charged to the 'Copy
control device' system
account.
Page 63

63
Enable the Copy control device connected to the Digital Copier
Illustration
[50]
[50] Enable the copy control device
Configuring the copy control device
1. Press the 'Accounting' key.
2. Select the 'General' tab.
3. Press the 'Copy control device' key to select 'Enabled'.
Check
1. Quit the Key operator system.
2. To check the selection, make a test job.
Open the Accounting system, to see if the test job is charged to the Copy control
device account.
Page 64

64 Chapter 7 The Access Security
Enable the Copy control device connected to the Digital Copier
Page 65

65
Chapter 8
User Access to the Machine
Components
Page 66
66 Chapter 8 User Access to the Machine Components
Control the access to the paper trays
Control the access to the paper trays
Introduction
You can follow two procedures for controlling the user access to the paper trays.
First, you can lock the paper-compartment to prevent users from entering the paper
compartment. The Océ VarioPrint
®
2062/75 NC can have a key switch on the
paper-compartment door. If the door of the paper-compartment door is open, the
users can perform the following tasks:
■ Refill the stocks of paper in the trays.
■ Place sheets of special material in the paper tray for a particular job.
■ Clear the paper jams in the paper-compartment unit.
Secondly, you can instruct the users to call the key operator. The Océ VarioPrint
®
2062/75 NC instructs the users to call the key operator if a paper tray is empty or a
paper jam occurs. The request is not related to the lock on the door. So, although the
door is open, the display can still ask the users to call the key operator.
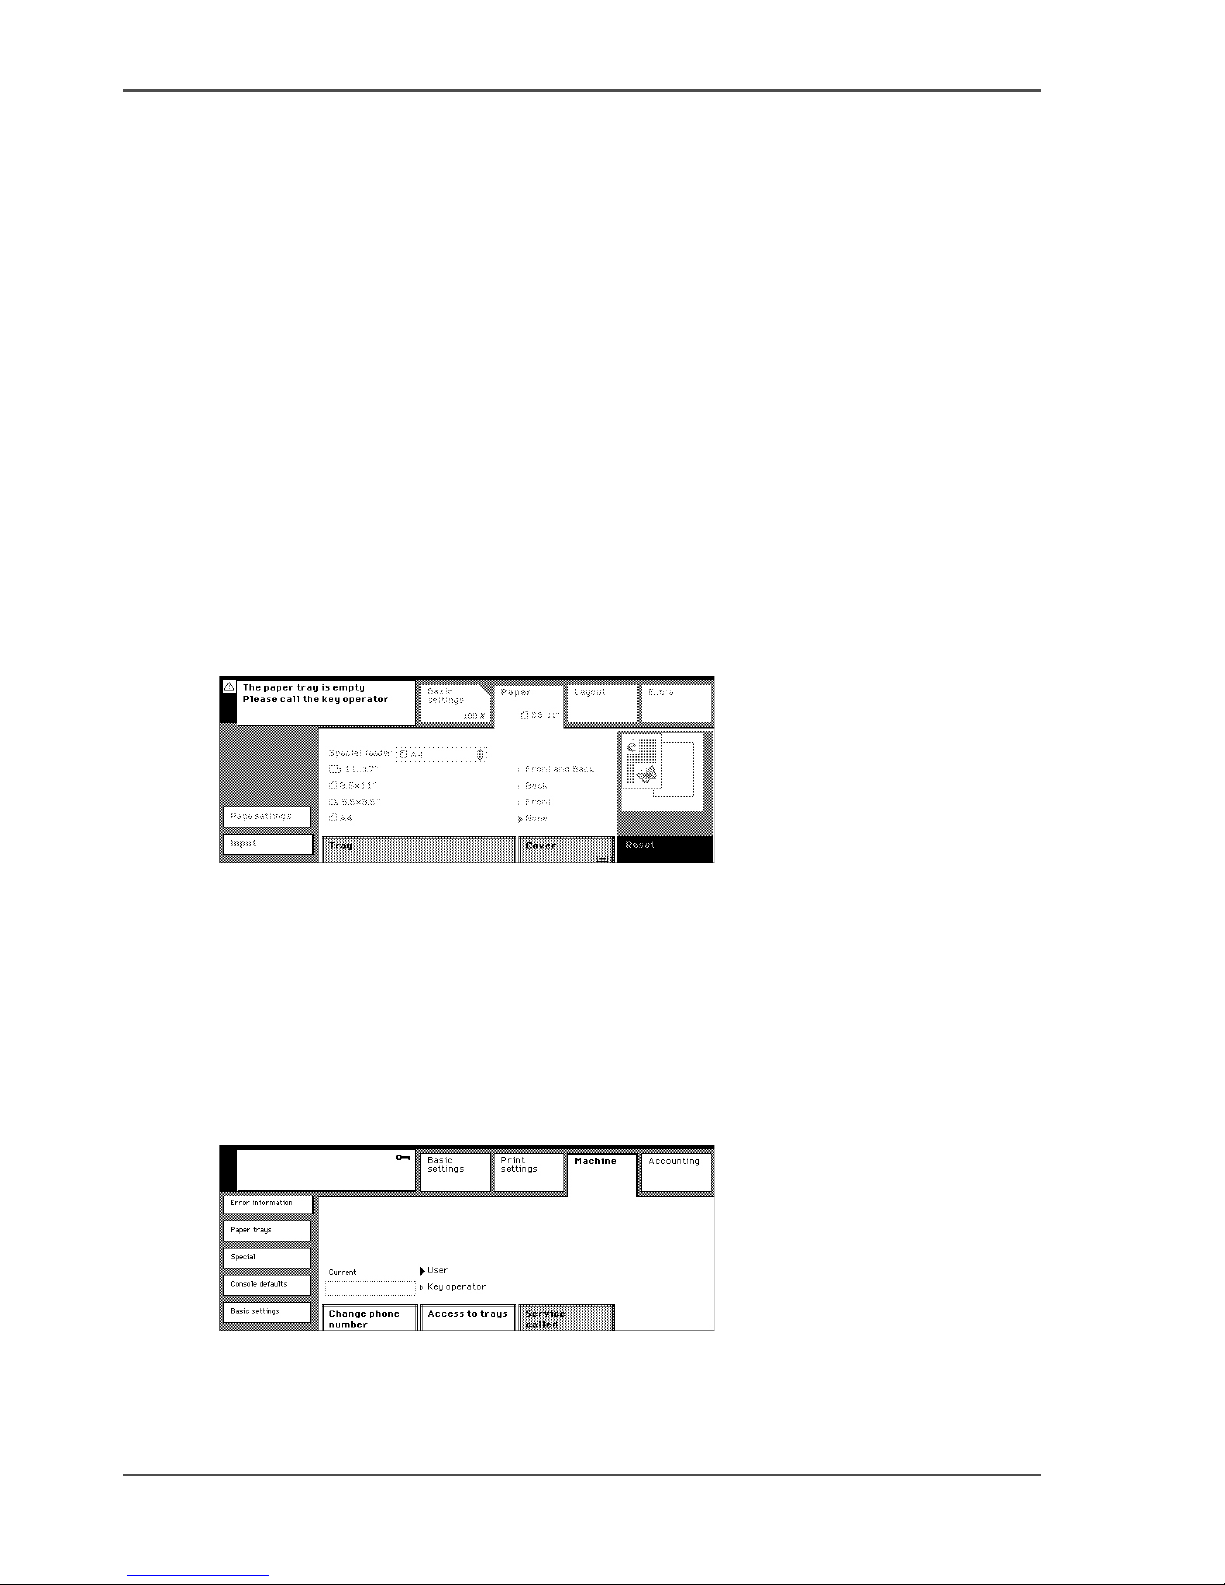
[51]
[51] User screen if the paper tray is empty
Before you begin
Enter the Key operator system (see ‘Enter or quit the key operator system’ on
page 28).
Illustration
[52]
[52] Permit the users to access the Network Printer paper trays
Page 67

67
Control the access to the paper trays
Preventing access to the paper trays
1. Press the 'Machine' key.
2. Select the 'Error information' tab.
3. Press the 'Access to trays' key to select 'Key operator'.
Permitting the user to access the paper trays
1. Press the 'Machine' key.
2. Select the 'Error information' tab.
3. Press the 'Access to trays' key to select 'User'.
Check
1. Exit the key operator system.
2. To check the selection, remove the stock of paper from one of the trays.
Then, start a copy job that uses the empty paper tray.
Page 68
68 Chapter 8 User Access to the Machine Components
Control the access to the special feeder
Control the access to the special feeder
Introduction
The users can use the special feeder to feed the special material that is not available
or allowed in the paper trays. If you disable the special feeder, the special feeder
function is not selectable on the display screen menu.
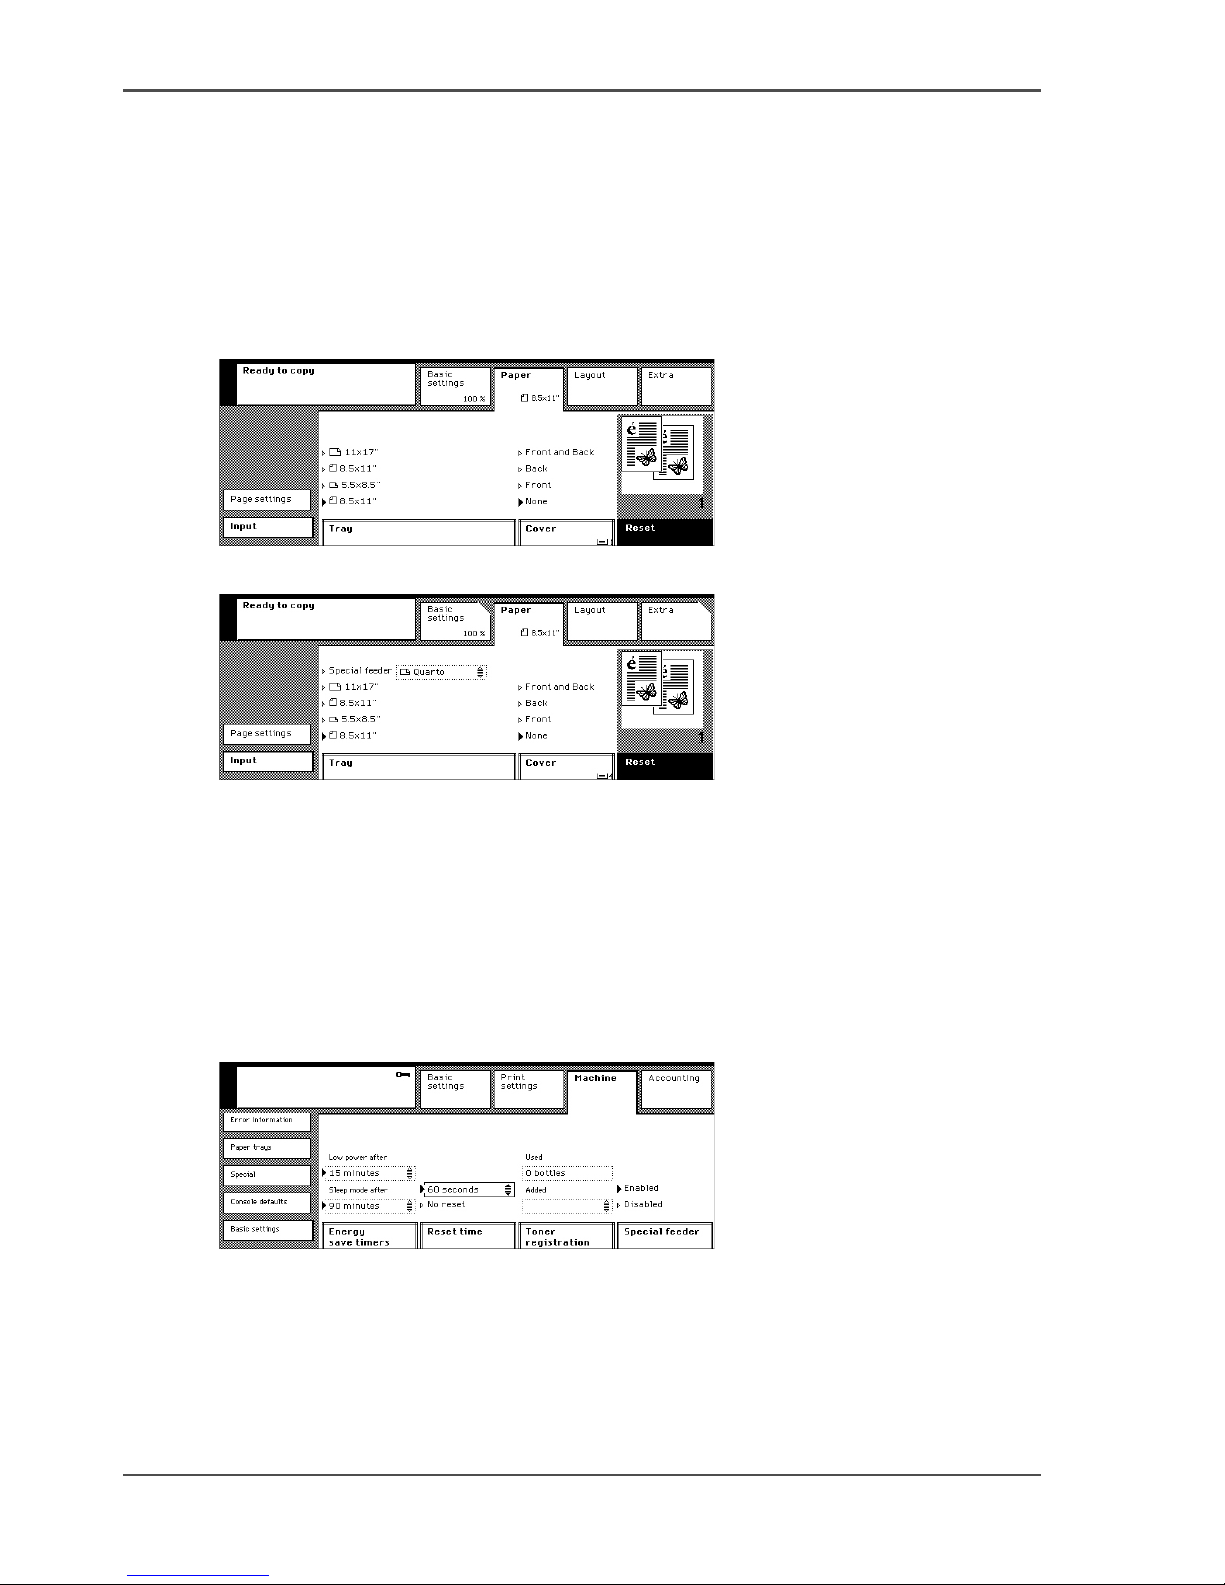
[53]
[53] The user cannot select the special feeder
[54]
[54] The user can select the special feeder
Before you begin
Enter the Key operator system (see ‘Enter or quit the key operator system’ on
page 28).
Illustration
[55]
[55] Permit the users to access the special tray
Page 69

69
Control the access to the special feeder
Preventing access to the special tray
1. Press the 'Machine' key.
2. Select the 'Basic settings' tab.
3. Press the 'Special feeder' key to select 'Disabled'.
Permitting the users access to the special tray
1. Press the 'Machine' key.
2. Select the 'Basic settings' tab.
3. Press the 'Special feeder' key to select 'Enabled'.
Check
1. Exit the key operator system.
2. To check the selection, start a test job that requires the special feeder.
Page 70

70 Chapter 8 User Access to the Machine Components
Control the access to the special feeder
Page 71

71
Chapter 9
The Page and Paper Settings
Page 72
72 Chapter 9 The Page and Paper Settings
Define the paper trays for the report jobs
Define the paper trays for the report jobs
Introduction
The Océ VarioPrint
®
2062/75 NC has maximum 4 paper trays, located in the paper
compartment.
The size, orientation and supply of any paper, placed in the trays, is displayed in the
user-display screen.
The user can create reports with paper from several paper trays.
In addition to the standard sheets, a report can contain:
■ Covers.
■ Separation sheets.
■ Appendix sheets.
You can allocate the paper trays that contain the material for covers, separation
sheets and appendix sheets.
Before you begin
Enter the Key operator system (see ‘Enter or quit the key operator system’ on
page 28).
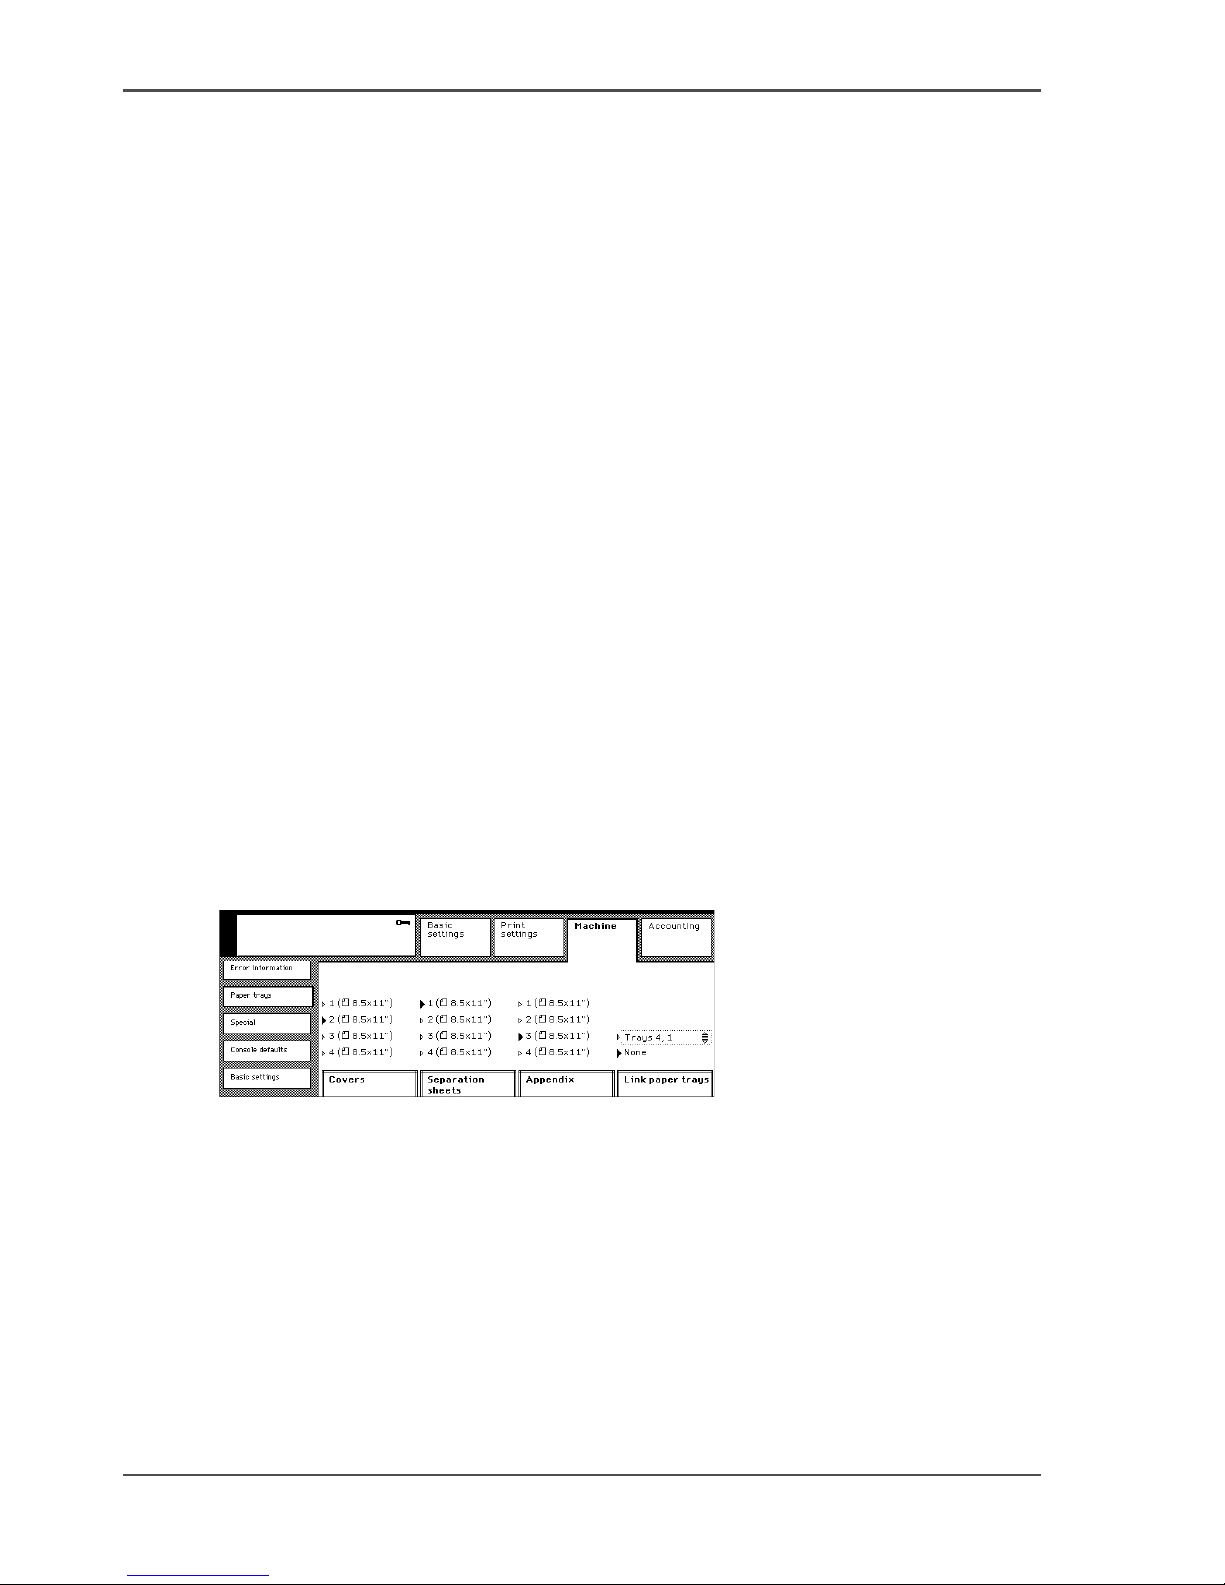
Illustration
[56]
[56] Allocate the paper trays for the report jobs
How to define the paper trays for the report jobs
1. Press the 'Machine' key.
2. Select the 'Paper trays' tab.
3. Press the 'Covers', 'Separation sheets' and 'Appendix' key to select a tray.
Page 73

73
Define the paper trays for the report jobs
Check
1. Exit the key operator system.
2. To check the selection, make a test report job.
Place the necessary materials in the paper trays.
Check to insure that the material is set for your needs.
Page 74
74 Chapter 9 The Page and Paper Settings
Defining the Folio Size
Defining the Folio Size
Introduction
Paper tray 1, which is adjustable for different paper sizes, can detect the dimensions
of the paper with the exception of Folio and Foolscap folio. The difference between
the two folio sizes is not be detected. Therefore, you must indicate which type is
placed in tray 1. The automatic document feeder can detect the different folio sizes.
The Océ VarioPrint
®
2062/75 NC supports the following folio sizes:
■ 'Folio' (12.4 x 8.4 inches).
■ 'Foolscap folio' (13.2 x 8.12 inches).
'Folio' is the default setting. If the users require jobs on Foolscap folio paper, change
the setting for these jobs.
Before you begin
Enter the Key operator system (see ‘Enter or quit the key operator system’ on
page 28).
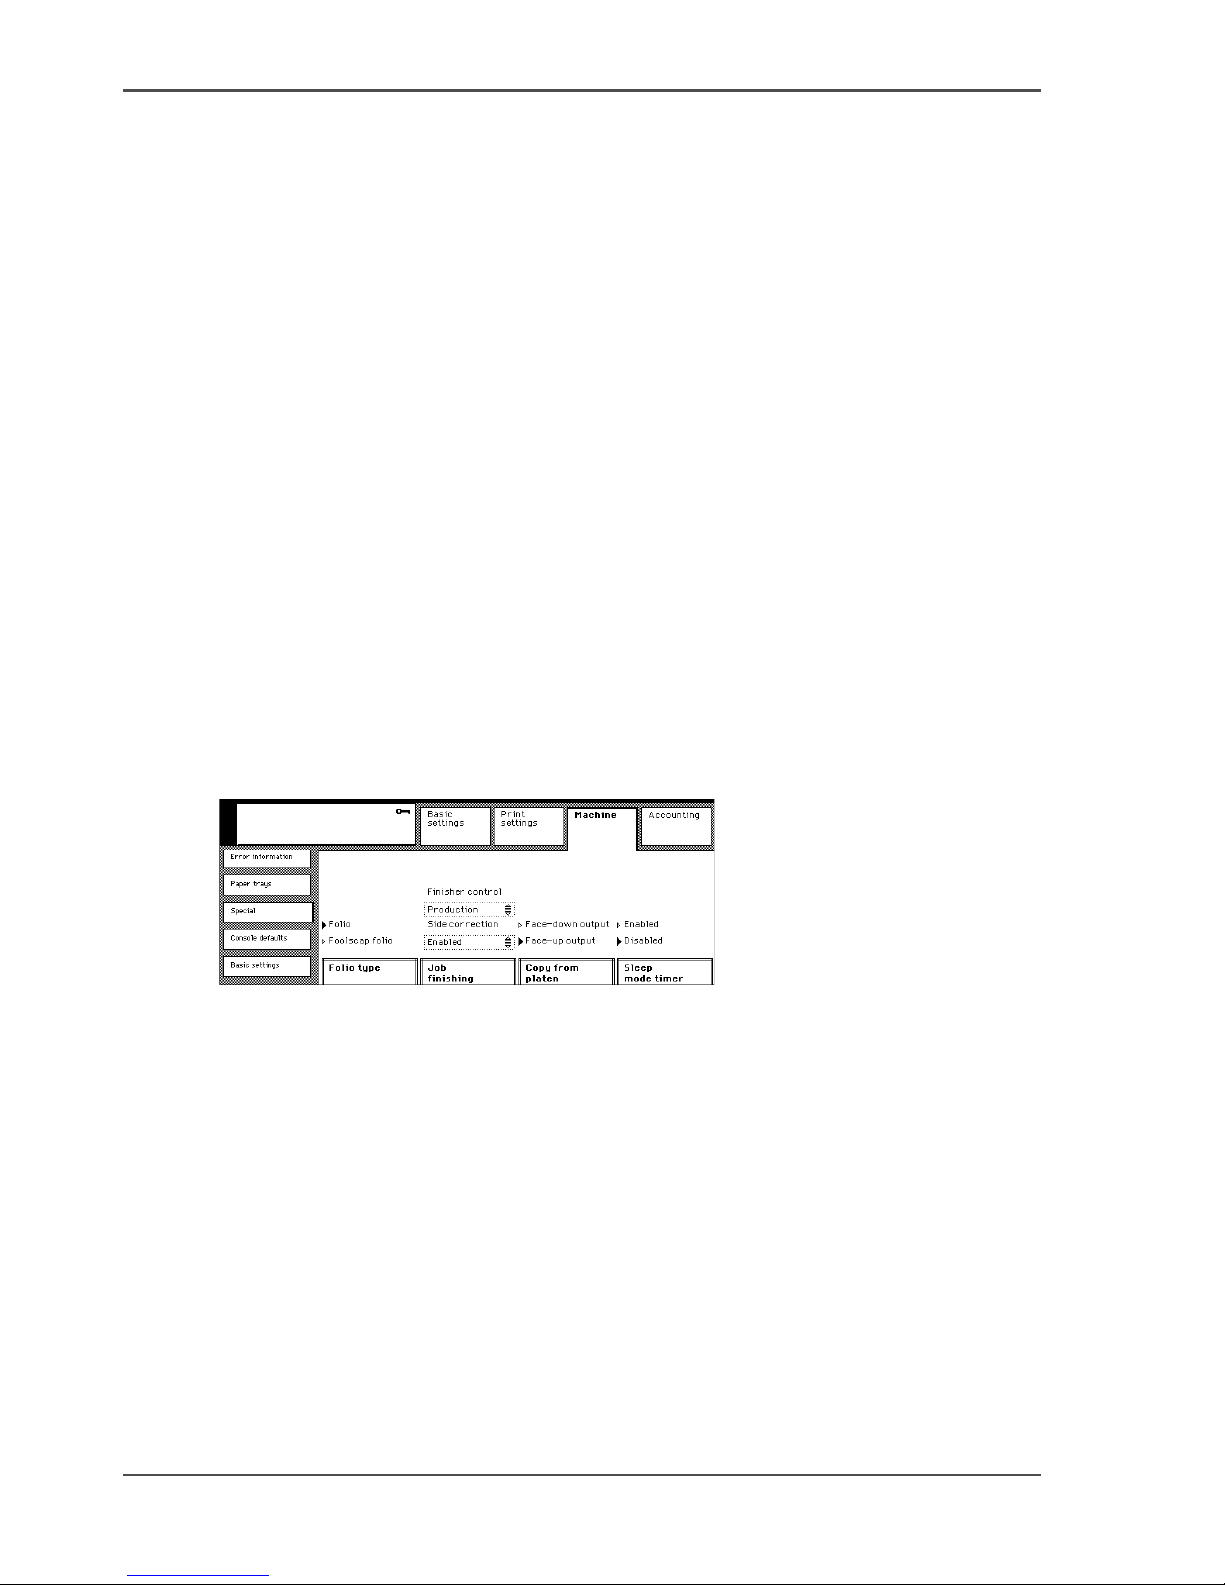
Illustration
[57]
[57] Changing the Folio Size
How to change the folio size
1. Press the 'Machine' key.
2. Select the 'Special' tab.
3. Press the 'Folio type' key to select 'Folio' or 'Foolscap folio'.
Check
1. Exit the key operator system.
2. To check the selection, make a test copy job. Use an original of the selected Folio
size.
The original information must fit correctly on the copy page.
Page 75
75
Link the paper trays
Link the paper trays
Introduction
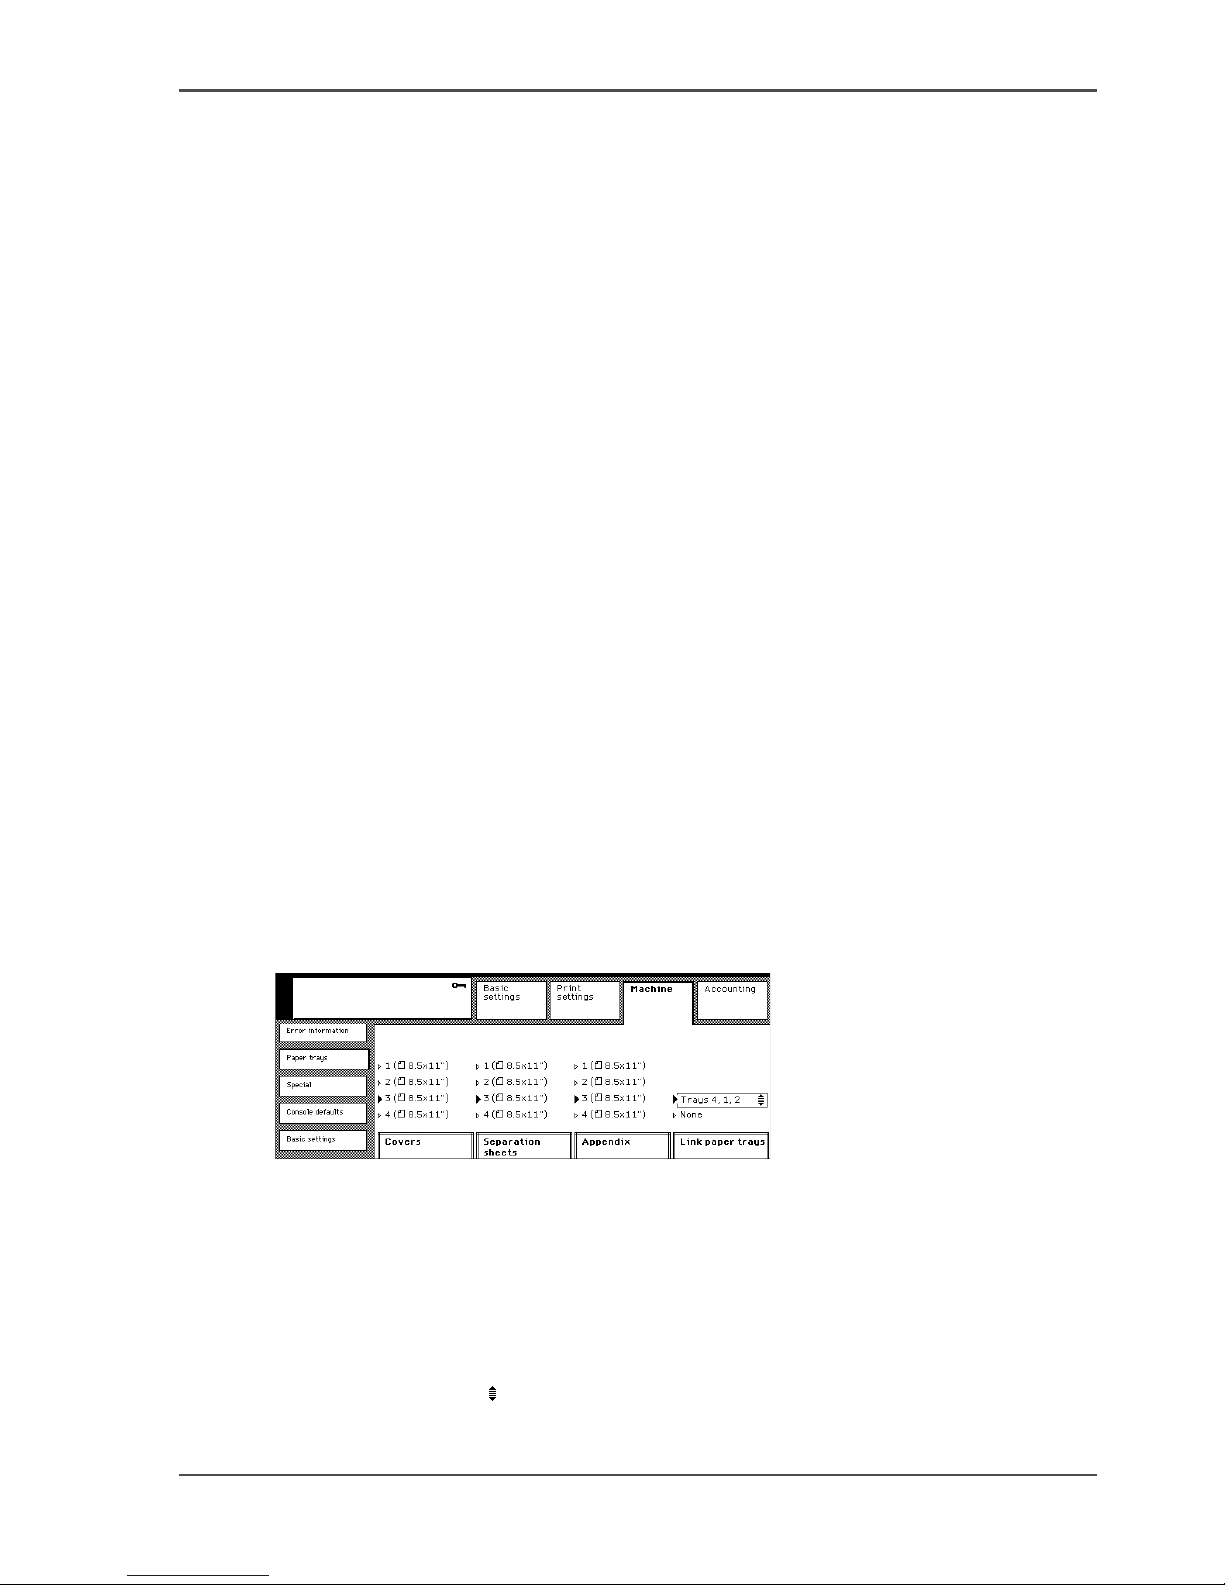
To increase the available paper stock for the jobs, you can link one or more paper
trays. When a tray gets empty during a job, paper will be used from the linked paper
tray or trays. The paper trays that are linked must contain paper with the same size
and orientation.
The following tray linking is possible, depending on the configuration of the
machine.
■ 'Trays 4, 1'
■ 'Trays 4, 2'
■ 'Trays 4, 3'
■ 'Trays 4, 1, 2'
■ 'Trays 4, 1, 3'
■ 'Trays 1, 2'
■ 'Trays 1, 3'
For example: 'Trays 4, 2' means that the job will first use paper from tray 4. When
tray 4 is empty, the job will continue and will use paper from tray 2.
Before you begin
Enter the Key operator system (see ‘Enter or quit the key operator system’ on
page 28).
Illustration
[58]
[58] Link the paper trays
Linking the paper trays
1. Press the 'Machine' key.
2. Select the 'Paper trays' tab.
3. Press the 'Link paper trays' key to select the series of values.
Use the scroll wheel to select the tray or trays.
Page 76

76 Chapter 9 The Page and Paper Settings
Link the paper trays
Canceling the link between paper trays
1. Press the 'Machine' key.
2. Select the 'Paper trays' tab.
3. Press the 'Link paper trays' key to select 'None'.
Check
1. Quit the Key operator system.
2. To check the selection, make a test copy job.
Fill the main paper tray with a few sheets.
Fill the linked paper trays with the same sized paper.
The linked paper trays are used when the paper tray 4 is empty.
Page 77
77
Change the default margin shift
Change the default margin shift
Introduction
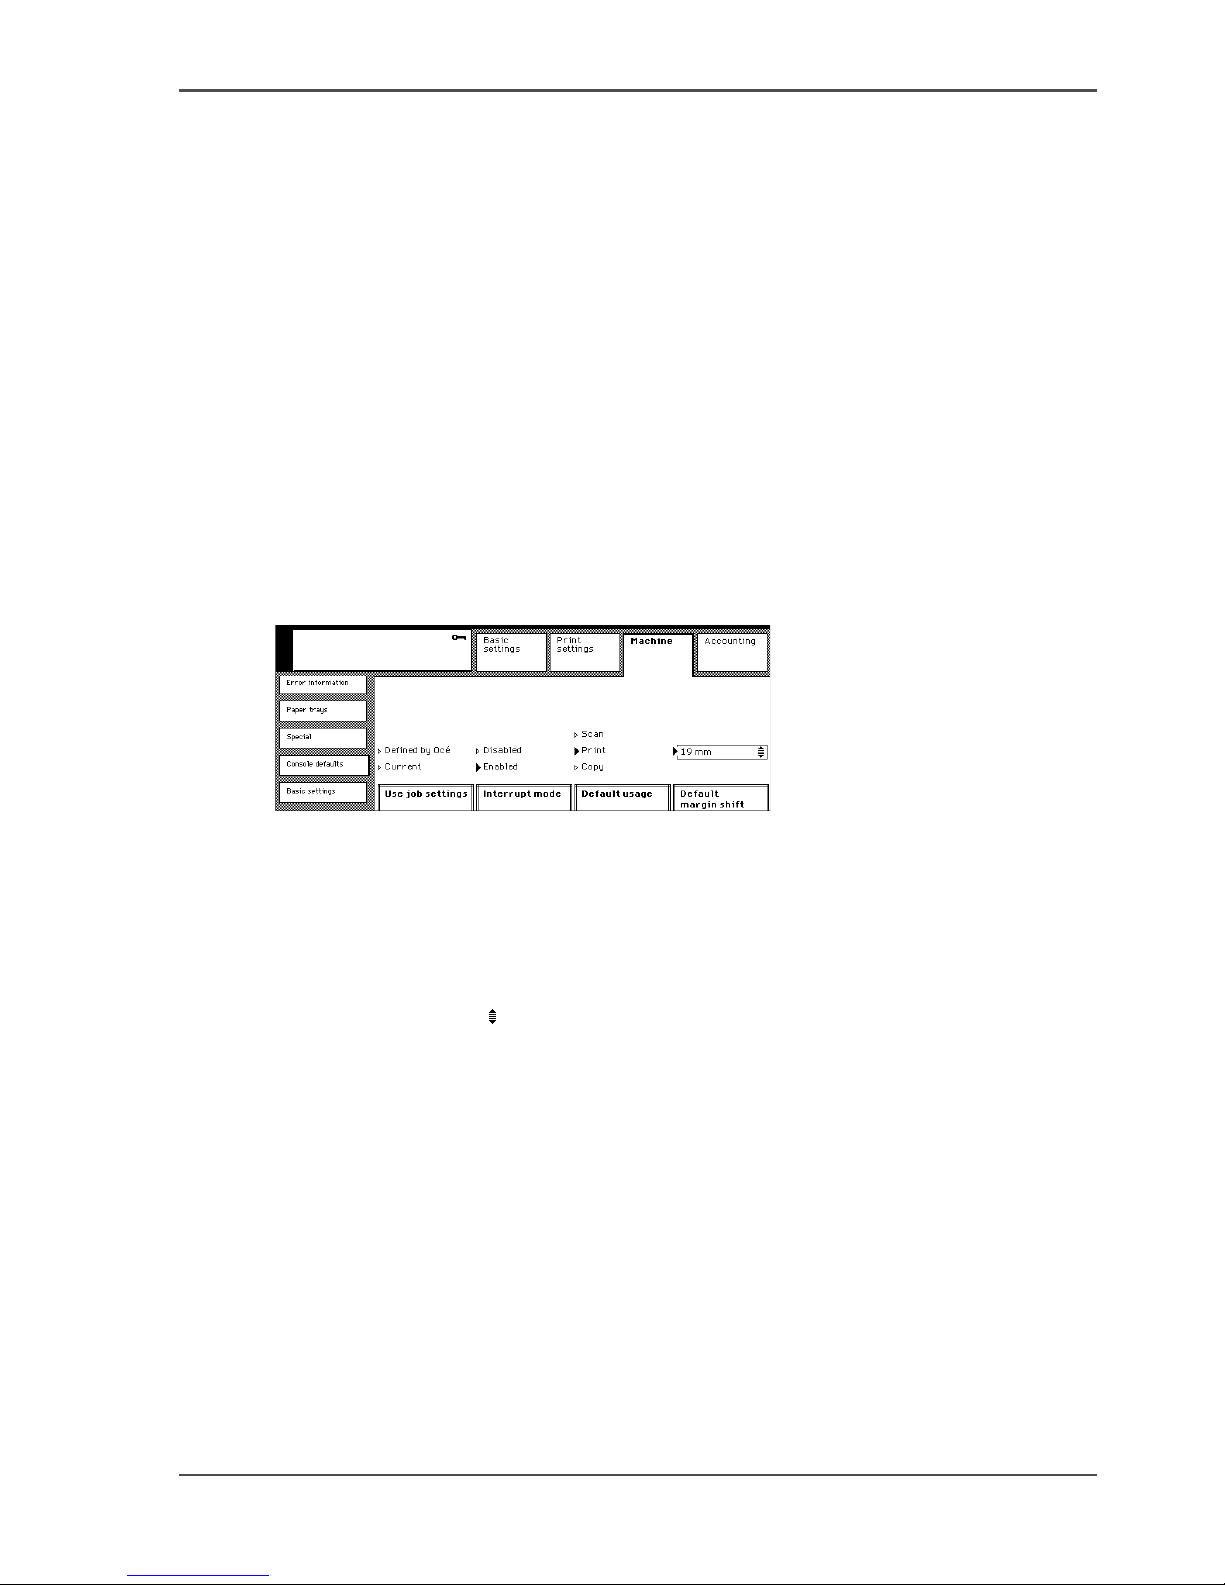
The margin shift is the distance that the margin is moved to the right or to the left of
the page.
The default margin shift is .48 inches. To change the default value, enter a value from
+ 1 inch (left direction) down to - 1 inch (right direction).
Before you begin
Enter the Key operator system (see ‘Enter or quit the key operator system’ on
page 28).
Illustration
[59]
[59] Define the default margin shift
Changing the default margin shift
1. Press the 'Machine' key.
2. Select the 'Console defaults' tab.
3. Use the scroll wheel to adjust the default margin shift.
Check
1. Exit the key operator system.
2. To check the selection, make a test copy job.
Check that the default margin shift is set for your needs.
Page 78

78 Chapter 9 The Page and Paper Settings
Change the default margin shift
Page 79

79
Chapter 10
The Interrupt Mode
Page 80
80 Chapter 10 The Interrupt Mode
Disable the Interrupt function
Disable the Interrupt function
Introduction
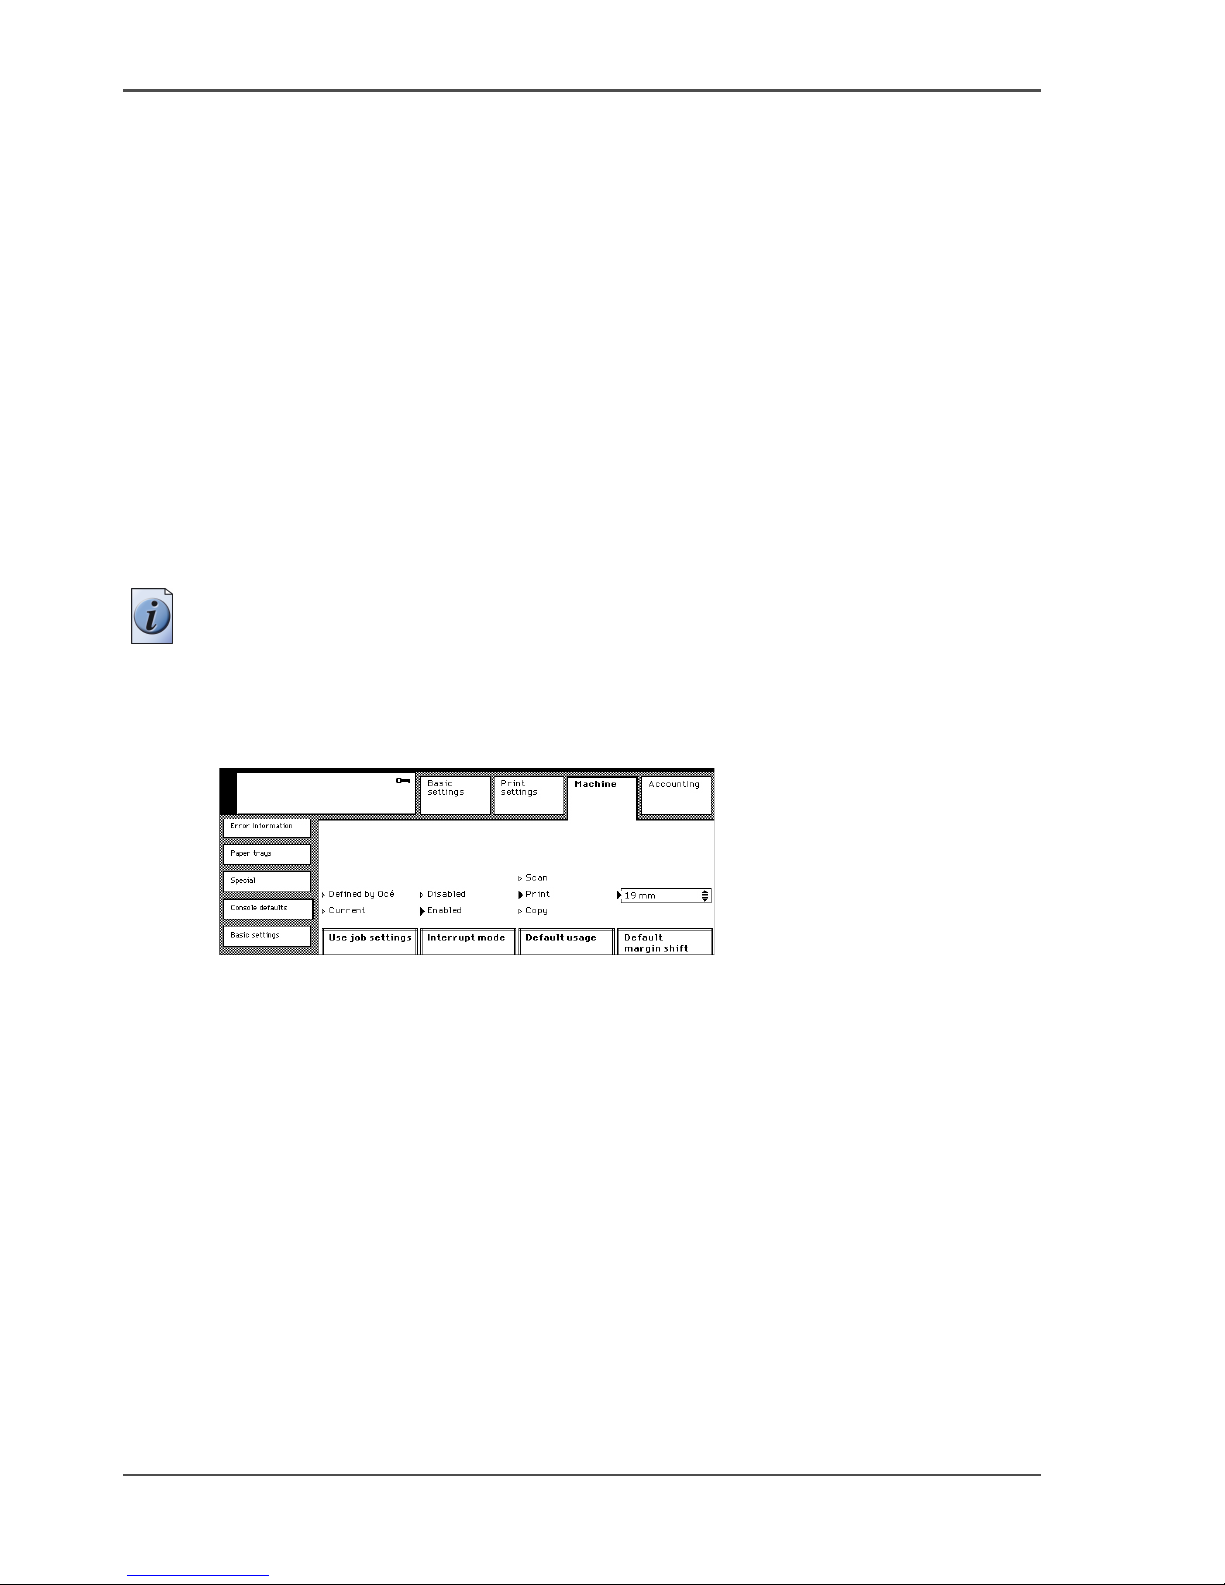
The Interrupt function allows users to suspend a large job, so that a new job can be
started. The suspended job continues, when the new jobs are completed and the user
resumes the suspended job.
You can disable the Interrupt function, when the Interrupt function proves to be
unacceptable to the users.
Before you begin
Enter the Key operator system (see ‘Enter or quit the key operator system’ on
page 28).
Note: When a Copy control device or an external finisher is installed, the Interrupt
function does not work.
Illustration
[60]
[60] Disable the Interrupt function
How to disable the Interrupt function
1. Press the 'Machine' key.
2. Select the 'Console defaults' tab.
3. Press the 'Interrupt mode' key to select 'Disabled'.
Check
1. Quit the Key operator system.
2. To check the selection, make a test copy job.
Page 81

81
Chapter 11
The Print and Scan Modes of
the Network Printer
Page 82
82 Chapter 11 The Print and Scan Modes of the Network Printer
Define the default operating mode of the Network Printer
Define the default operating mode of the Network Printer
Introduction
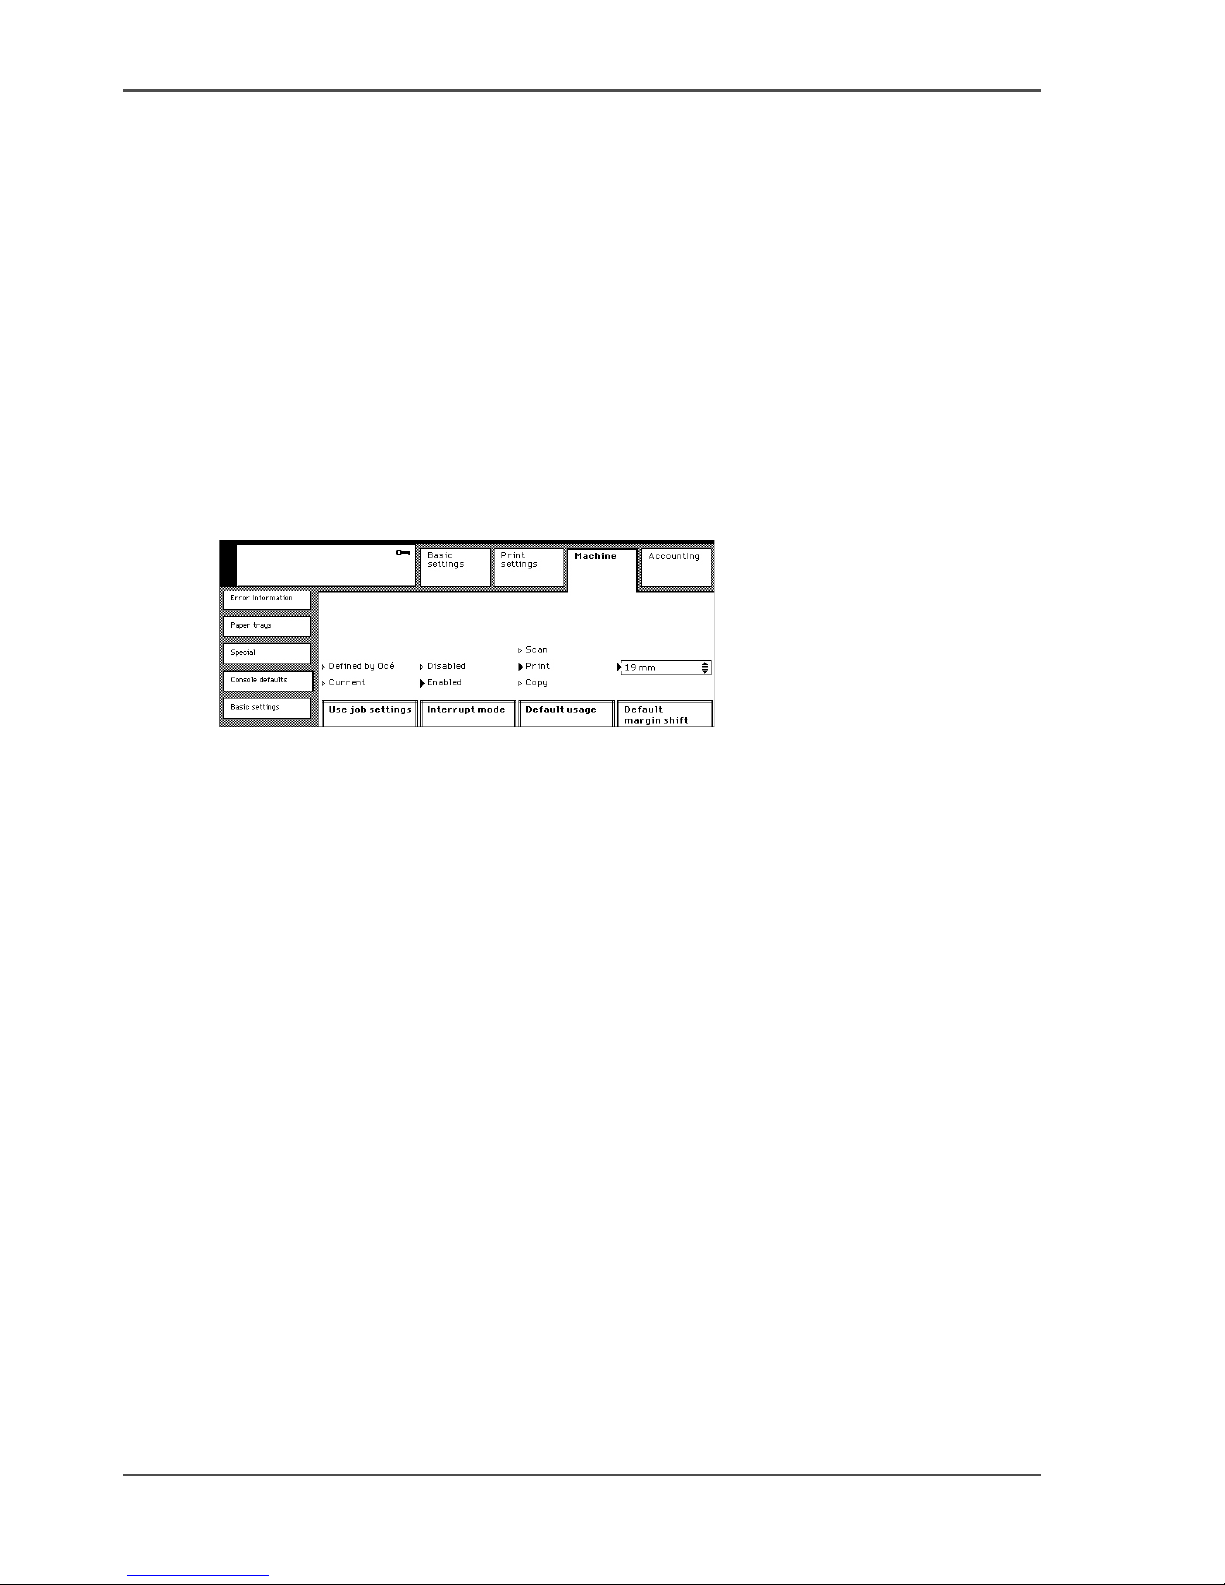
You can define the default operating mode. The selected operating mode must match
the most started jobs.
Before you begin
Enter the Key operator system (see ‘Enter or quit the key operator system’ on
page 28).
Illustration
[61]
[61] Define the default operating mode
Defining the default operating mode
1. Press the 'Machine' key.
2. Select the 'Console defaults' tab.
3. Press the 'Default usage' key to select the operating mode.
Check
1. Exit the key operator system.
2. Check to insure that the default operating mode is set for your needs.
Page 83
83
Define the banner pages
Define the banner pages
Introduction
The first page of a printed set can be a banner page. A banner page contains
information about the print job: such as the user name, the name of the document,
the date and the printer name.
You can allocate the paper tray for the banner pages.
To define the banner page configuration, proceed as follows:
[21]
Before you begin
Enter the Key operator system (see ‘Enter or quit the key operator system’ on
page 28).
Illustration
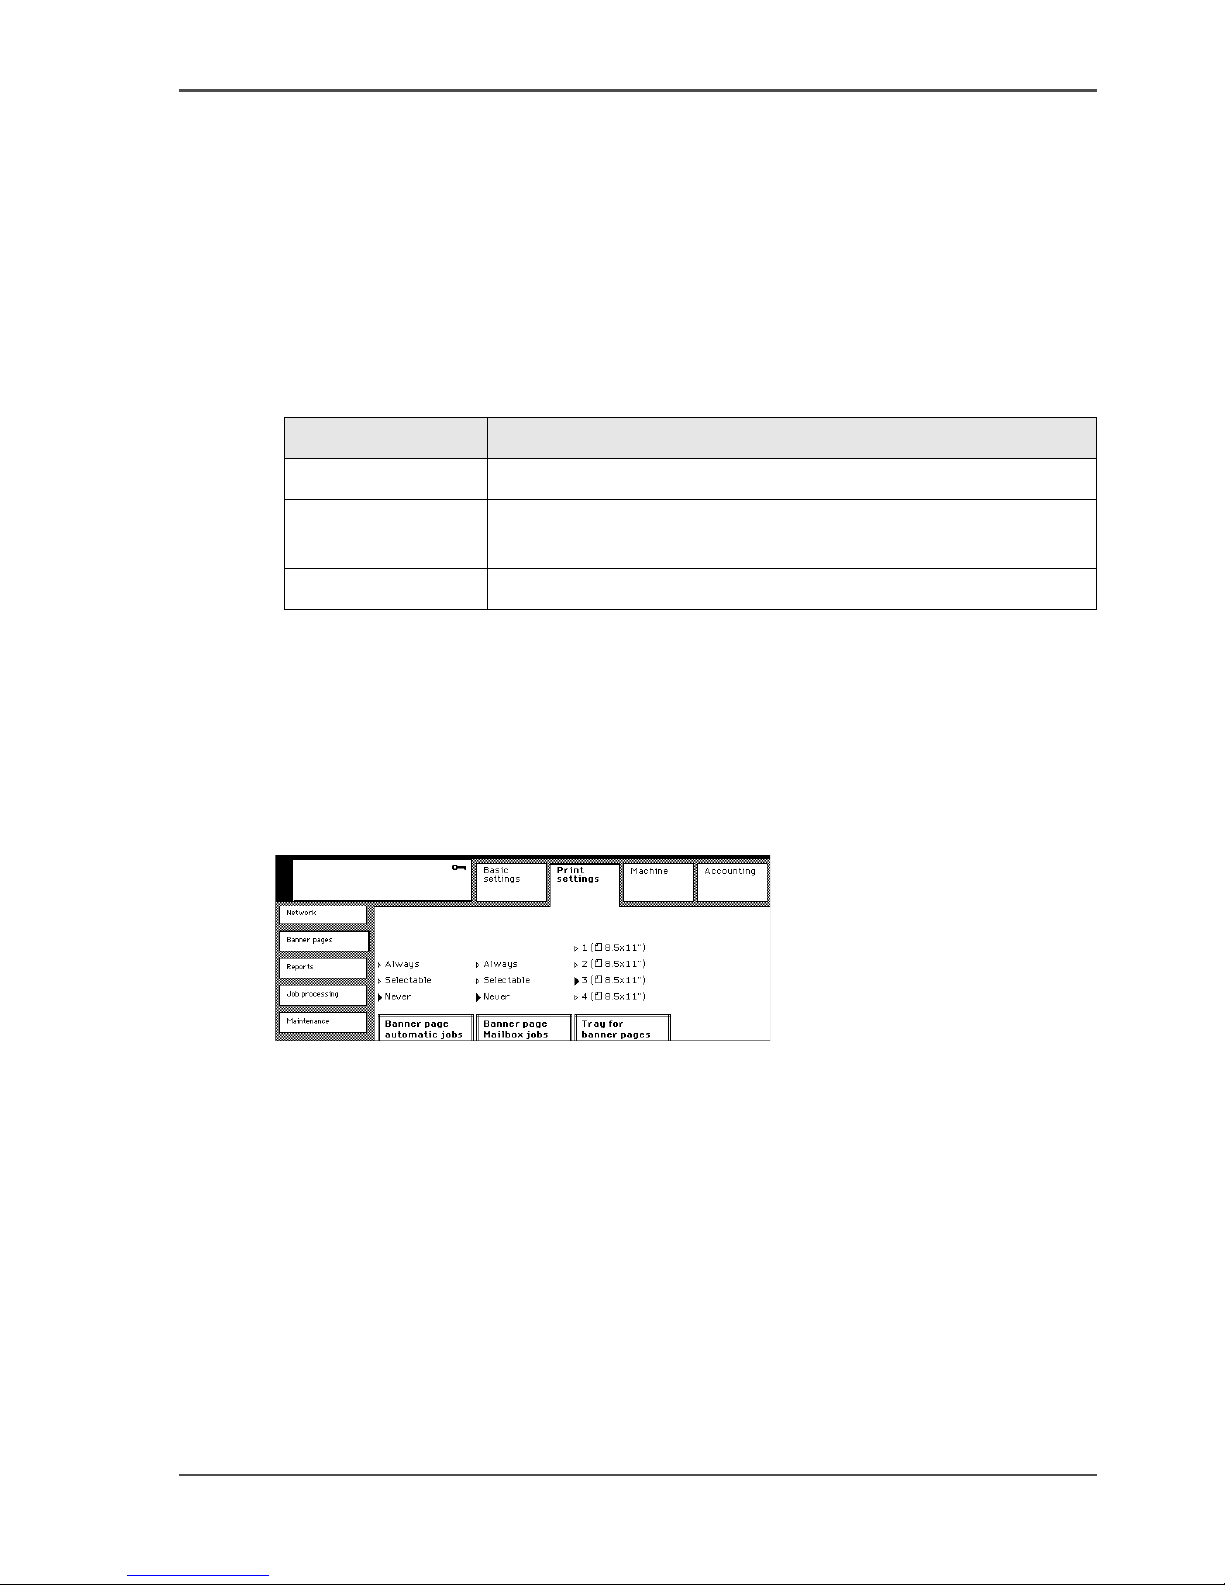
[62]
[62] Enter the banner page settings
Defining the banner pages
1. Press the 'Print settings' key.
2. Select the 'Banner pages' tab.
3. Press the 'Banner page Mailbox jobs' or 'Banner page automatic jobs' key to enter the
selection.
Allocating the paper tray for banner pages
1. Press the 'Print settings' key.
2. Select the 'Banner pages' tab.
3. Press the 'Tray for banner pages' key to select the required paper tray.
Setting Result
'Never' A banner page is never printed.
'Selectable' A banner page is printed if the user has specified the banner
page in the printer driver.
'Always' A banner page is always printed.
Page 84

84 Chapter 11 The Print and Scan Modes of the Network Printer
Define the banner pages
Check
1. Exit the key operator system.
2. To check the selection, make a test print job.
Place the necessary material in the paper tray.
Check to insure that the banner page configuration is set for your needs.
Page 85

85
About the mailbox
Defining the Mailbox Input
About the mailbox
Definition
The mailbox is a personal storage area on the system. The users can print, change
and store print jobs from their mailbox.
Smart mailbox
The Smart mailbox adds extra functionality to use the mailbox. The Smart mailbox
function can be used when the user can print to more than one printer from the Océ
Va ri o Pr i nt® 2062/75 NC family. The mailbox jobs sent to other printers become
local mailbox jobs.
The Smart mailbox configuration must be done with the Océ System Configuration.
Pocket mailbox
The Pocket mailbox enables the users to print documents stored on a USB stick and
to scan documents to a USB stick.
The Pocket mailbox configuration must be done with the Océ System Configuration.
Page 86

86 Chapter 11 The Print and Scan Modes of the Network Printer
About the mailbox
Mailbox jobs
[22]
Mailbox security
To secure the mailbox of a user, you must assign a PIN to the user account record of
the user. Then, the user must enter a PIN to open the mailbox (see ‘About the
access-secured system of the Network Printer’ on page 46).
TouchTo Print
The Océ VarioPrint
®
2062/75 NC has a fingerprint sensor to quickly open the
mailbox and print the documents.
To use the fingerprint function, the user must first enroll the fingerprint.
The TouchTo Print configuration must be done with the Océ System Configuration.
A print job becomes a mailbox print job, in the following circumstances:
The user selects 'To mailbox', 'Security' or 'Special feeder' in the Océ printer driver.
The user, who sends a print job, is not authorized to use the printer (see ‘Secure
automatic printing’ on page 50).
Someone cancels an automatic print job.
The system moves all new jobs to the mailbox, following a configuration setting
(see ‘Control the automatic print jobs’ on page 87).
The system moves the jobs without an Océ job ticket to the mailbox, following a
configuration setting (see ‘Controlling jobs without an Océ job ticket’ on page 88).
The system receives jobs from other printers (Smart mailbox members) after that
the user asks to fetch Smart mailbox jobs.
Page 87
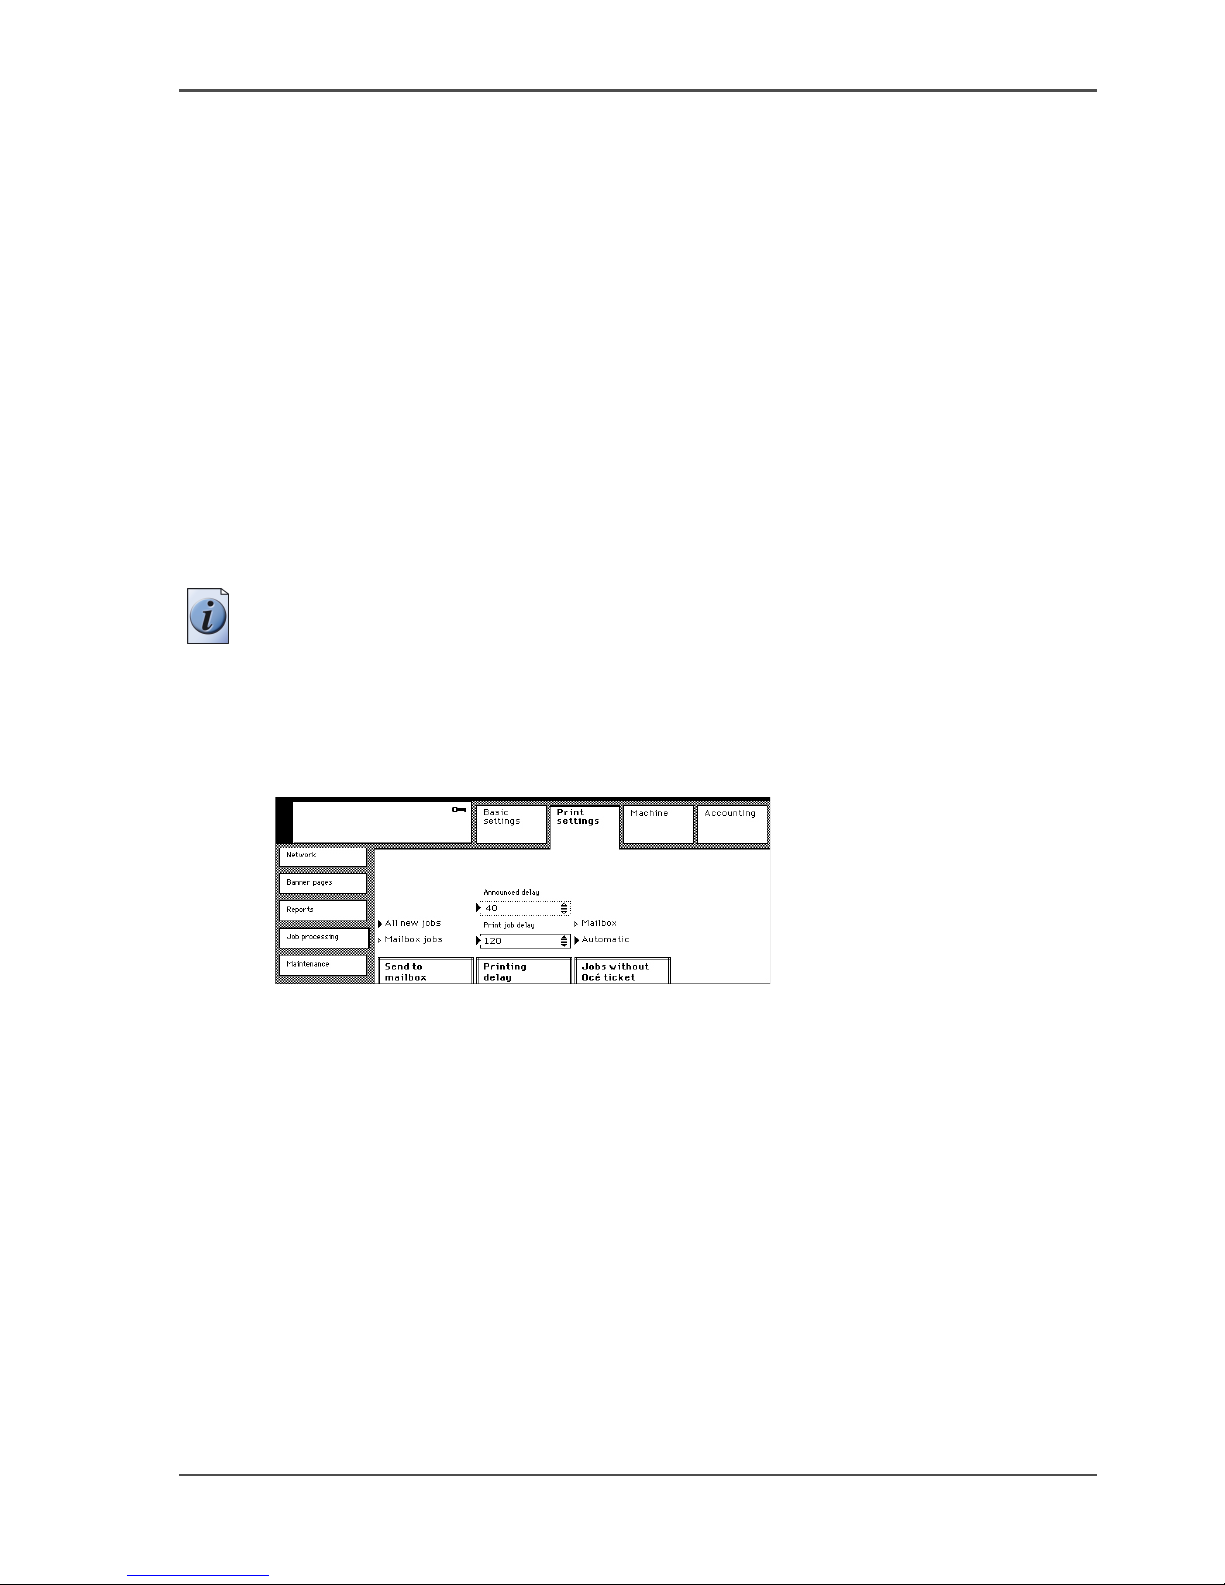
87
Control the automatic print jobs
Control the automatic print jobs
Introduction
The users can instruct the Océ VarioPrint
®
2062/75 NC, through the printer driver,
that the print job must be stored in the mailbox. When the job is not a mailbox job
but an automatic print job, the job is sent to the print queue.
You can prevent automatic printing, so that all print jobs are stored in the mailbox.
Check that the users are authorized to open their mailbox.
Before you begin
Enter the Key operator system (see ‘Enter or quit the key operator system’ on
page 28).
Note: You can stop automatic printing, so that the print jobs remain in the print
queue. The user can still initiate the automatic print jobs, but the jobs are not
printed.
Illustration
[63]
[63] Prevent automatic printing
Controlling the automatic print jobs
1. Press the 'Print settings' key.
2. Select the 'Job processing' tab.
3. Press the 'Send to mailbox' key to select 'All new jobs' or 'Mailbox jobs'.
Check
1. Exit the key operator system.
2. To check the selection, make a test print job.
Check that the print operation on the Océ VarioPrint
®
2062/75 NC is according to
your purposes.
Page 88
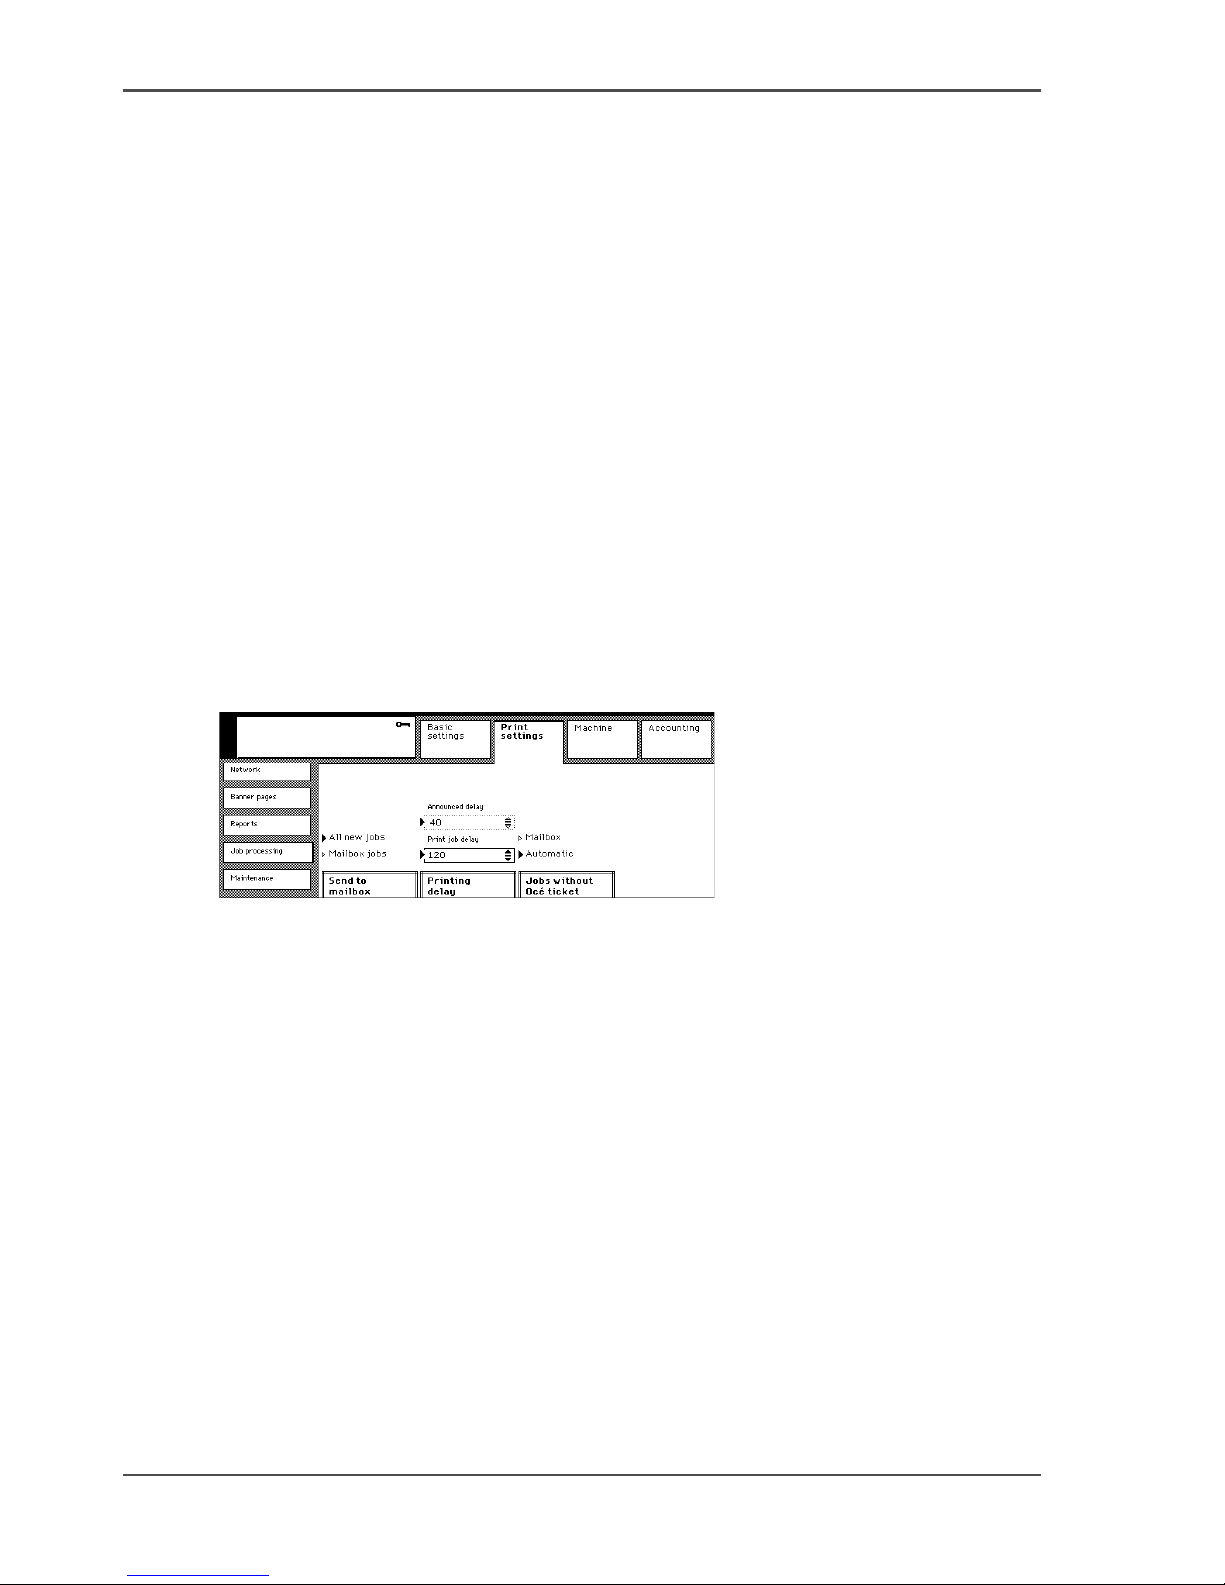
88 Chapter 11 The Print and Scan Modes of the Network Printer
Controlling jobs without an Océ job ticket
Controlling jobs without an Océ job ticket
Introduction
If a user does not have a printer driver that is supported by Océ, the special Océ print
features are not displayed. The generated print file does not include an Océ job
ticket. The Océ VarioPrint
®
2062/75 NC allows the user to control the Océ job
features through the operator panel. Therefore, the print job must become a mailbox
job.
You can instruct the Océ VarioPrint
®
2062/75 NC to send all jobs without an Océ job
ticket to the mailbox.
Before you begin
Enter the Key operator system (see ‘Enter or quit the key operator system’ on
page 28).
Illustration
[64]
[64] Sending All Jobs Without an Océ Ticket to the Mailbox
Controlling jobs without an Océ ticket
1. Press the 'Print settings' key.
2. Select the 'Job processing' tab.
3. Press the 'Jobs without Océ ticket' key to select 'Mailbox' or 'Automatic'.
Check
1. Quit the key operator system.
2. To check the selection: start a print job with a generic printer driver.
Page 89
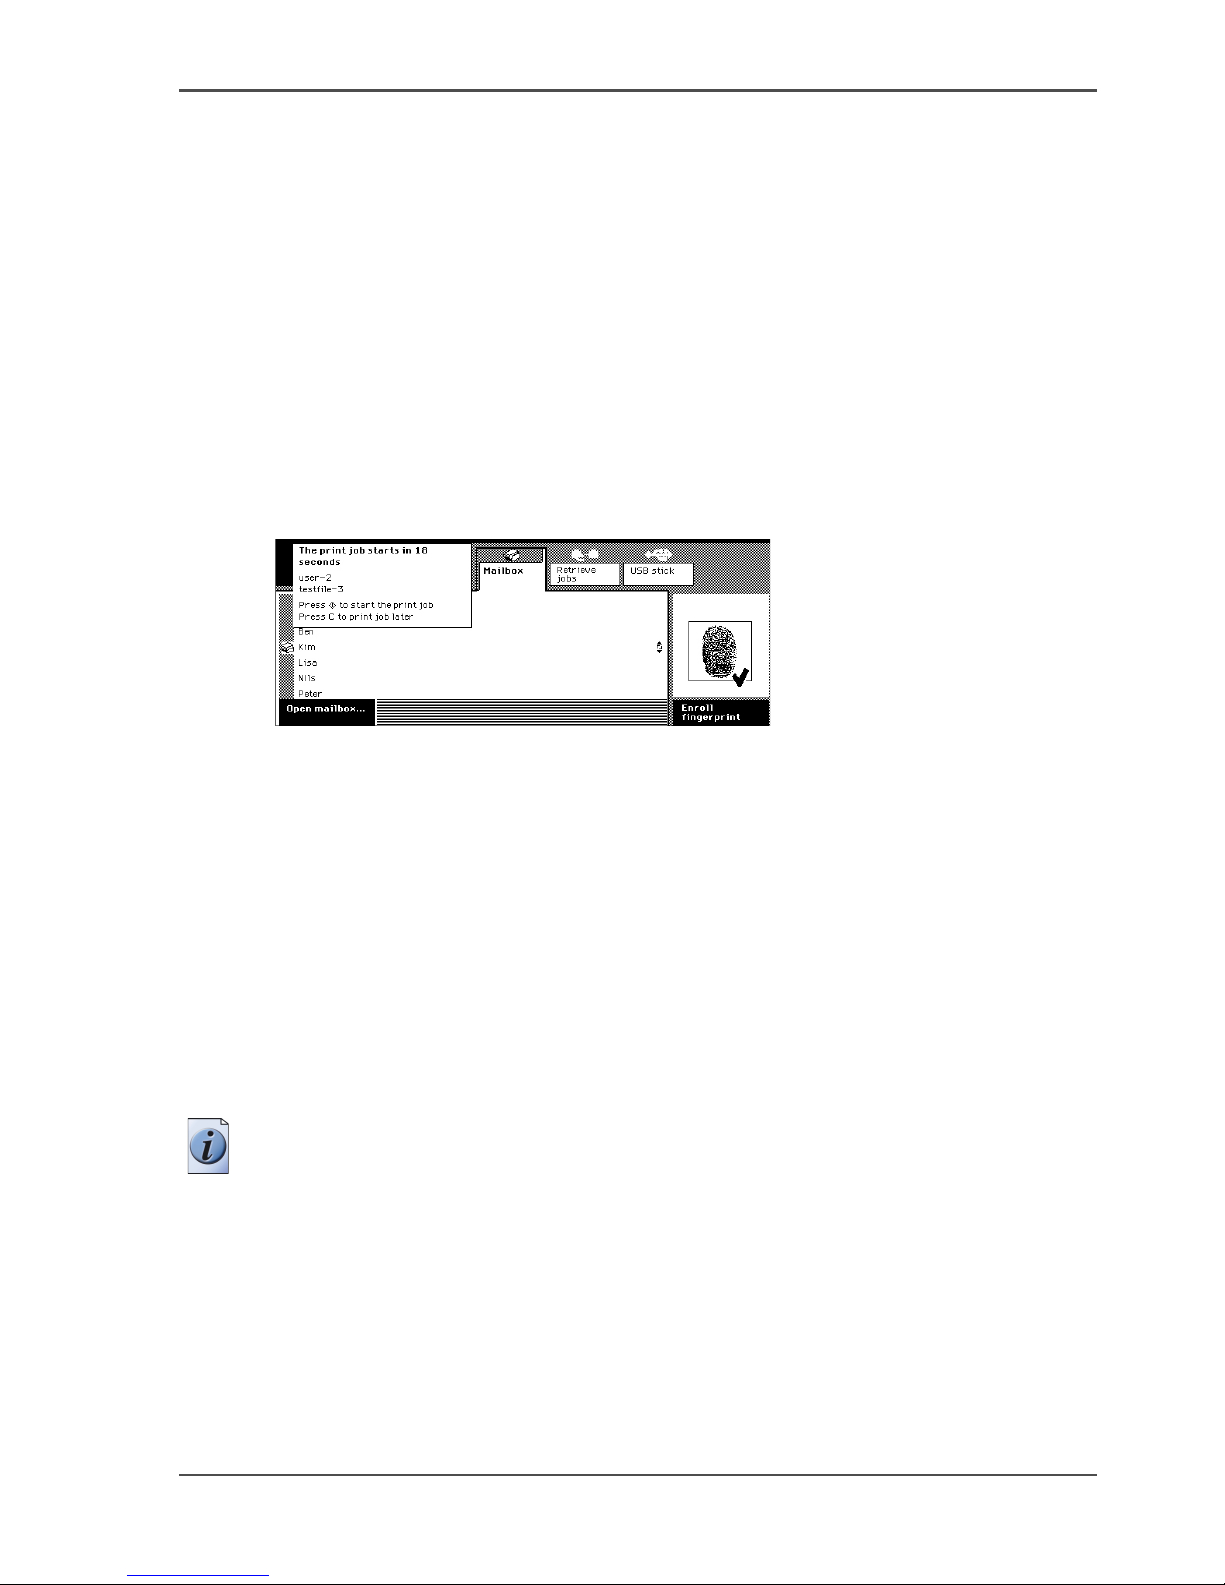
89
About the printing delay
Controlling the Time Delay for Print
Jobs
About the printing delay
Definition
The printing delay is the minimum interval between the printing of two automatic
print jobs that originate from the print queue.
Illustration
[65]
[65] User Screen An automatic print job is announced
The timers
The period of the printing interval is derived from the following two timers:
■ Print job delay timer.
The print job delay timer starts when an automatic print job is complete. During
the delay, the users can use the Océ VarioPrint
®
2062/75 NC for other work.
■ Announced delay timer.
The announced delay timer starts before the end of the print job delay. During the
announced delay time, a message informs the user that a new automatic print job
will be printed within 'xx' seconds.
Note: The user can start any job if an automatic print job is announced.
Page 90
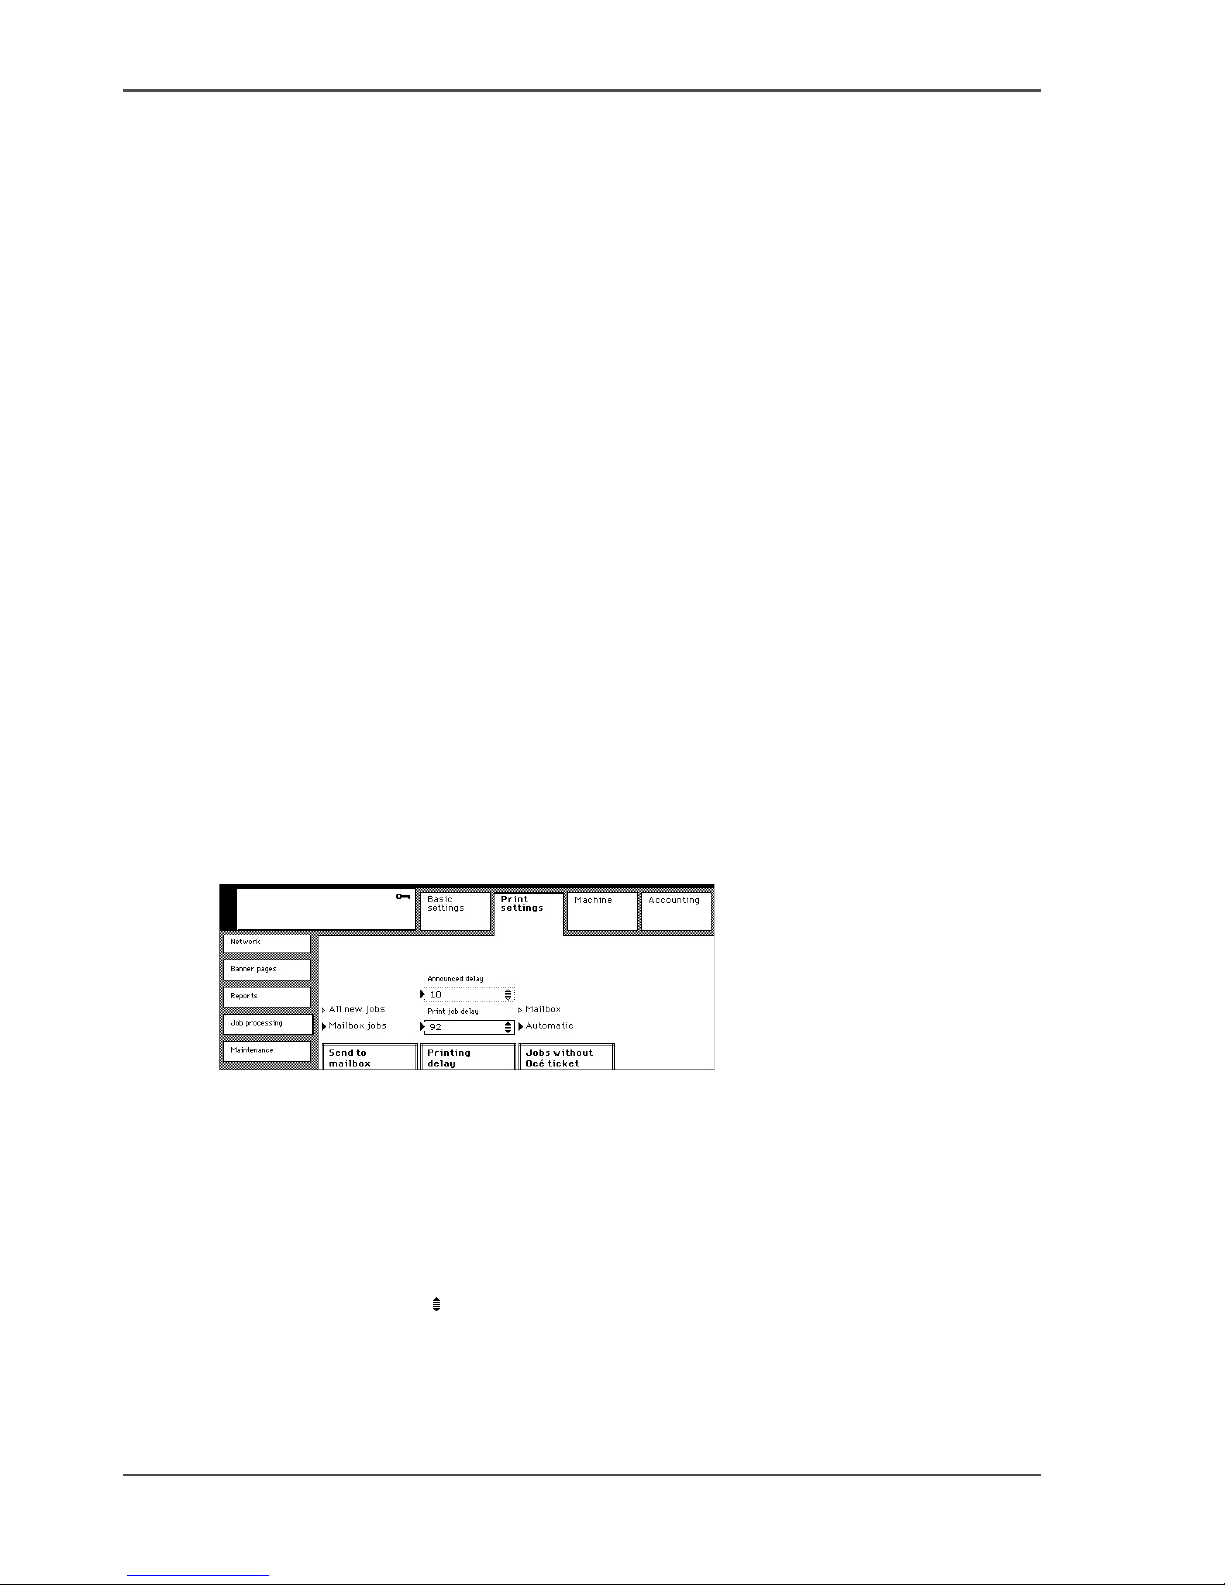
90 Chapter 11 The Print and Scan Modes of the Network Printer
Define the printing delay for the automatic print jobs
Define the printing delay for the automatic print jobs
Introduction
The printing delay is determined by the following two items.
■ Print job delay (10 - 300 seconds).
■ Announced delay (10 - 100 seconds).
You can change the default values of the print job delay (120 seconds) and
announced delay (20 seconds).
If the machine is mainly used for copy, scan or mailbox jobs, you can increase the
print job delay. The longer interval, between two automatic print jobs, allows the
users to start the jobs on an idle machine.
If the machine is mainly used for automatic printing, you can shorten the print job
delay. The shorter interval between two automatic jobs prevents an accumulation of
automatic print jobs in the print queue.
Before you begin
Enter the Key operator system (see ‘Enter or quit the key operator system’ on
page 28).
Illustration
[66]
[66] Define the printing delay timers
Changing the print job delay
1. Press the 'Print settings' key.
2. Select the 'Job processing' tab.
3. Press the 'Printing delay' key to select 'Print job delay'.
Use the scroll wheel to define the print job delay.
Page 91

91
Define the printing delay for the automatic print jobs
Changing the announced delay
1. Press the 'Print settings' key.
2. Select the 'Job processing' tab.
3. Press the 'Printing delay' key to select 'Announced delay'.
Use the scroll wheel to define the announced delay.
Check
1. Exit the key operator system.
2. To check the selection, send a series of automatic print jobs to the machine.
Check that the timers work according to your purposes.
Page 92

92 Chapter 11 The Print and Scan Modes of the Network Printer
Define the printing delay for the automatic print jobs
Page 93

93
Chapter 12
System Information
Page 94
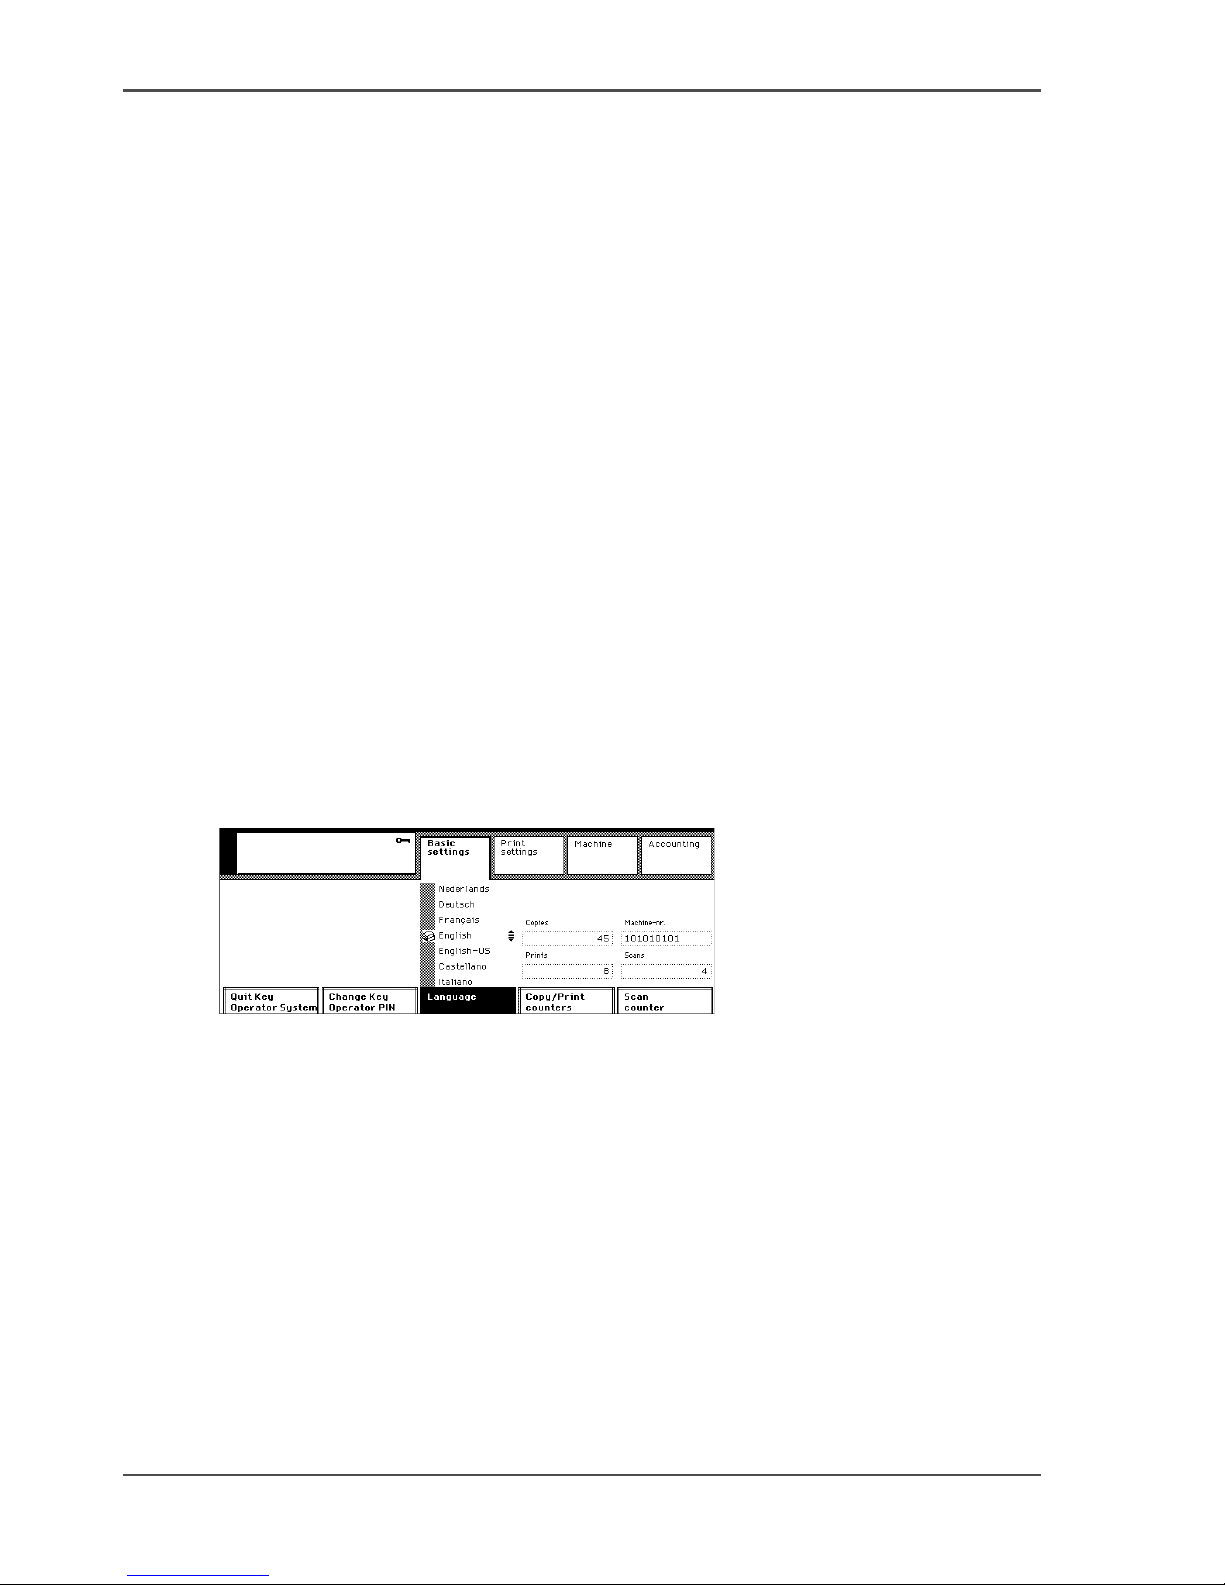
94 Chapter 12 System Information
Reading Job-page Counters
Reading Job-page Counters
Introduction
The Océ VarioPrint
®
2062/75 NC records the number of job-page clicks and page
charges.
The Océ VarioPrint
®
2062/75 NC provides the following procedures for retrieving
the job counters:
■ The key operator system records the number of job-page clicks for each operating
mode as stored since the last installation.
■ A total counter, behind the front main door of the machine, displays the total
number of job-page clicks that the machine has made.
Océ Service configures the charges for scan jobs. The Configuration report
records the configured charge for scan job pages.
■ The Accounting system records the job pages made by each user.
Before you begin
Enter the Key operator system (see ‘Enter or quit the key operator system’ on
page 28).
Illustration
[67]
[67] Reading the job page counters of the Océ VarioPrint® 2062/75 NC Network Printer
How to read the job page counters in the Key operator system
1. Press the 'Basic settings' key.
2. The 'Copy/Print counters' and 'Scan counter' function box show the number of
completed pages, handled during copy, print and scan jobs.
Page 95
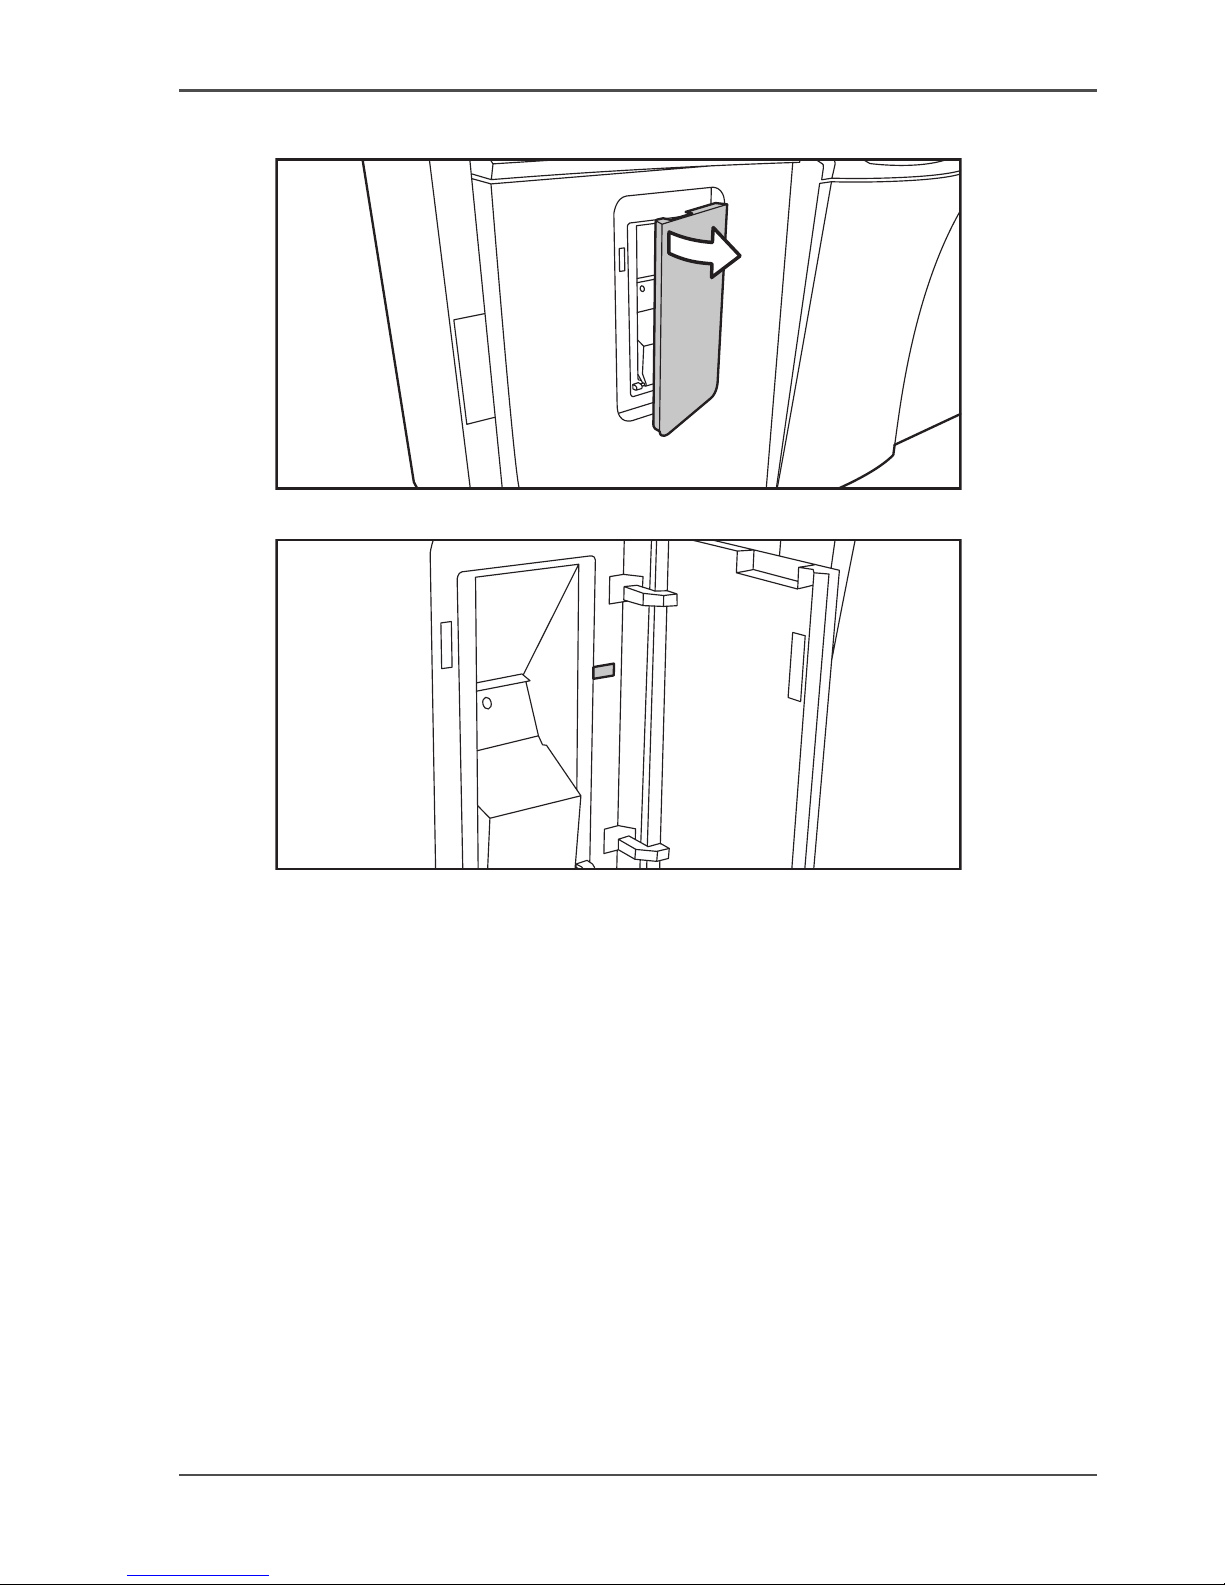
95
Reading Job-page Counters
Illustration
[68]
[68] Open the front door
[69]
[69] Read the total counter
Reading the total counter
1. Open the front door.
2. Read the total counter.
Page 96

96 Chapter 12 System Information
Check the machine memory
Check the machine memory
Introduction
The default size of the machine memory is 128 Mb, but this can be extended.
You can check the machine memory, in the Configuration report. If the scan module
is not installed, check the machine memory in the key operator system.
Before you begin
Enter the Key operator system (see ‘Enter or quit the key operator system’ on
page 28).
Checking the machine memory in the key operator system
1. Press the 'Basic settings' key.
2. The 'Memory' function box shows the machine memory.
Page 97
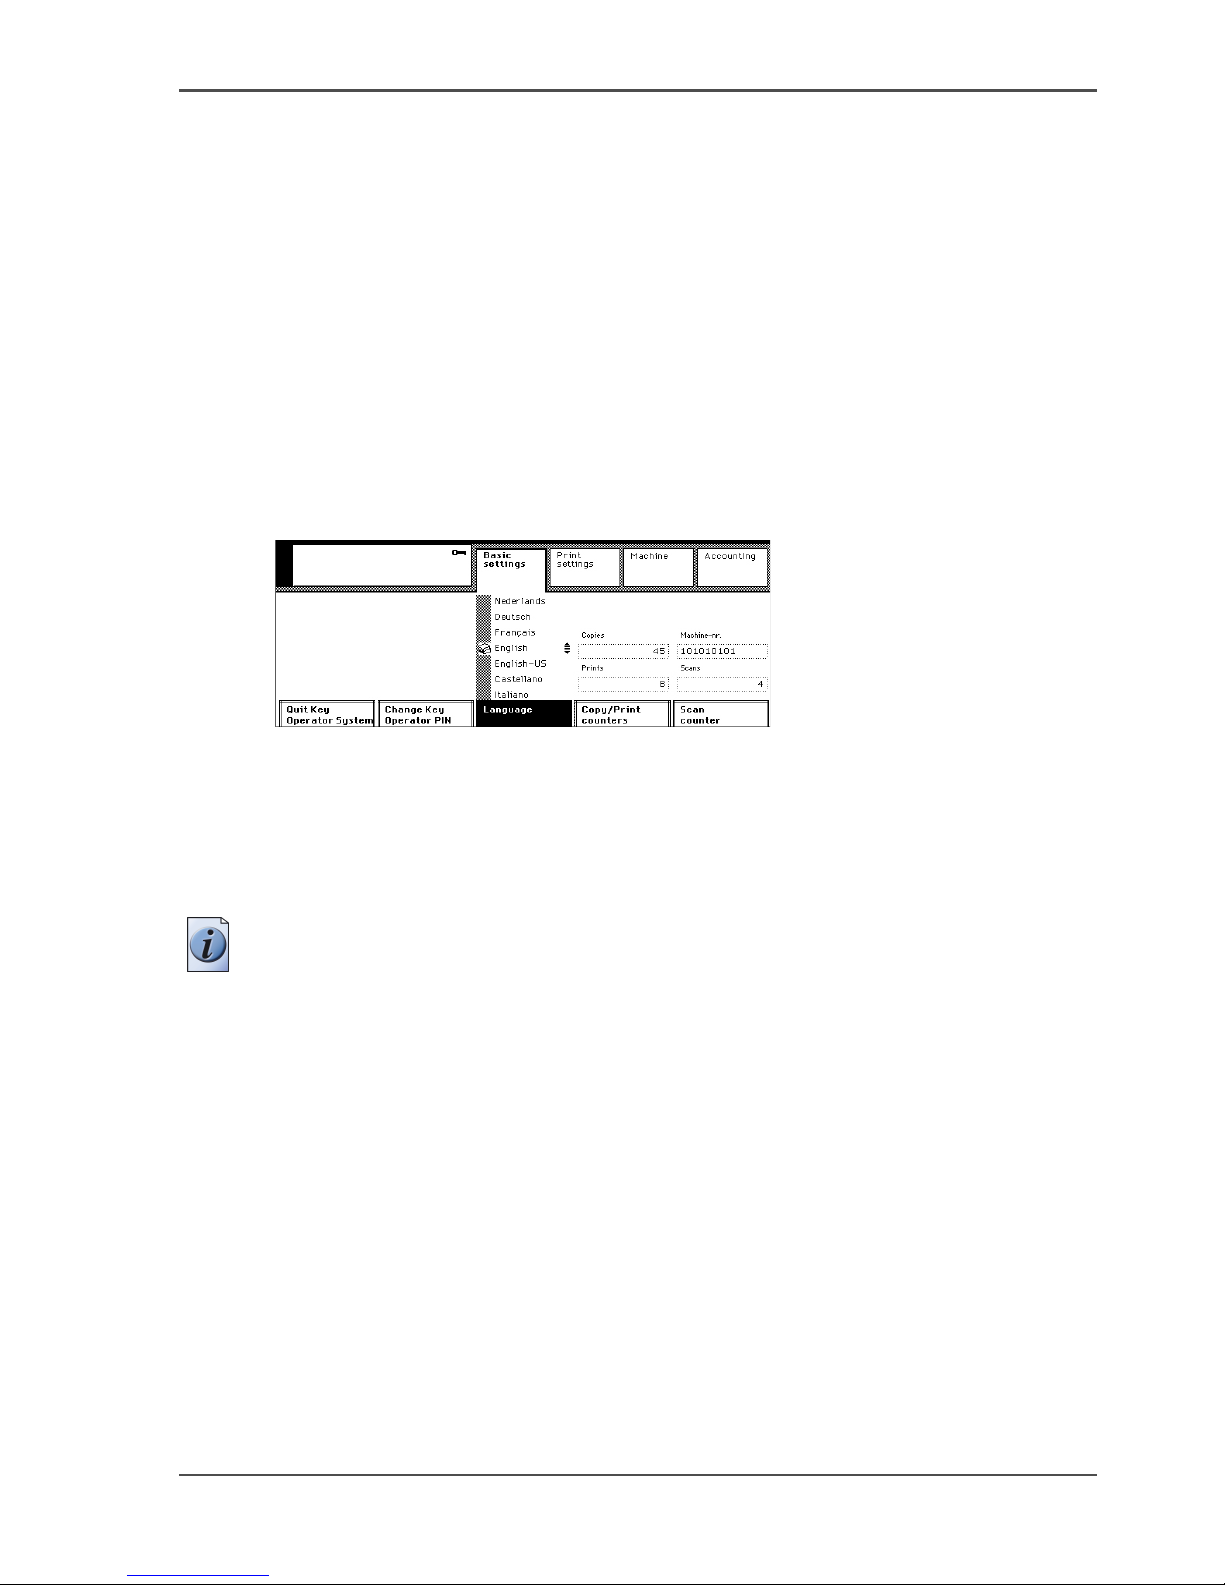
97
Check the machine number
Check the machine number
Introduction
When you call Océ Service, you may be asked to give the machine number of your
Océ VarioPrint® 2062/75 NC.
Before you begin
Enter the Key operator system (see ‘Enter or quit the key operator system’ on
page 28).
Illustration
[70]
[70] Check the machine number
Checking the machine number
1. Press the 'Basic settings' key.
2. The 'Scan counter' box shows the machine number.
Note: If the scan module is not installed, the function 'Memory' is displayed.
Page 98
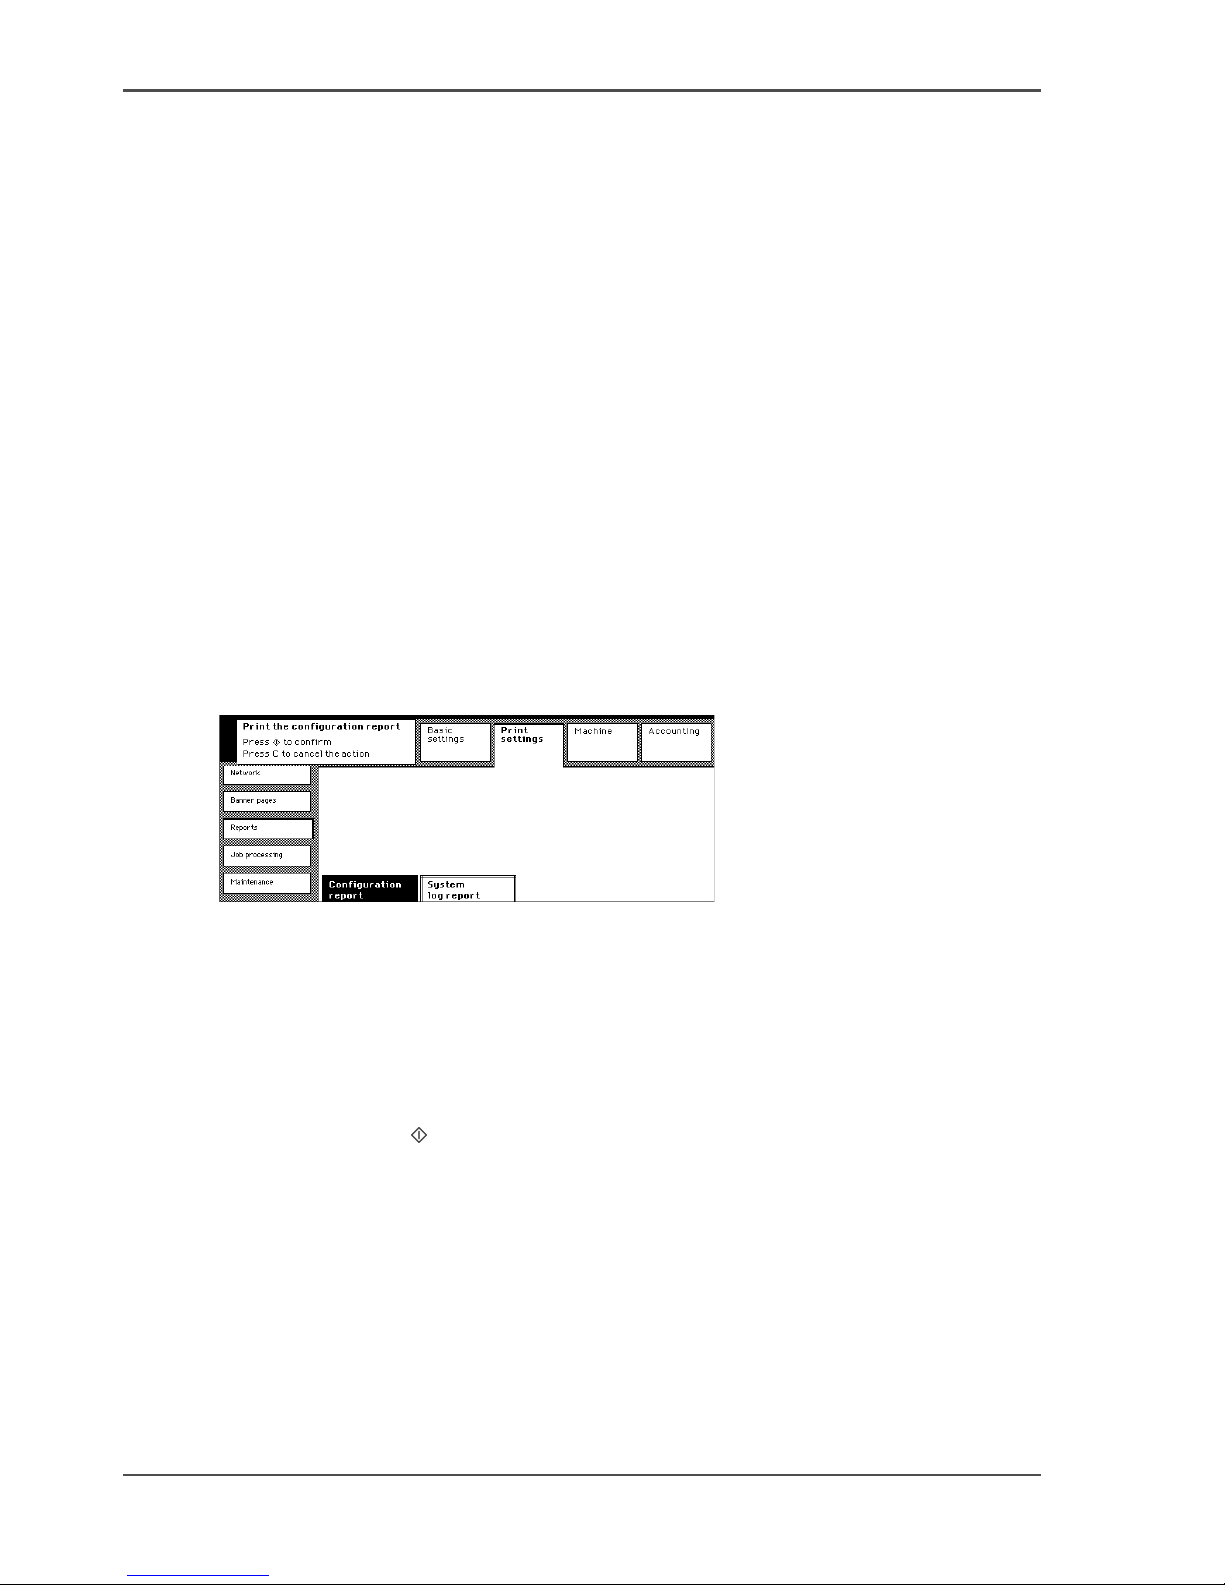
98 Chapter 12 System Information
Printing system reports
Printing System Information of the
Network Printer
Printing system reports
Introduction
The system reports list the configuration or system logs.
You can print these reports. The Configuration report provides you an overview of
the current settings.
Before you begin
Enter the Key operator system (see ‘Enter or quit the key operator system’ on
page 28).
Illustration
[71]
[71] Printing the configuration report
How to print the system reports
1. Press the 'Print settings' key.
2. Select the 'Reports' tab.
3. Press the 'Configuration report' or the 'System log report' key.
4. Press the start key to confirm.
Check
1. Exit the key operator system.
2. The selected report will be printed after you have left the key operator system.
Page 99
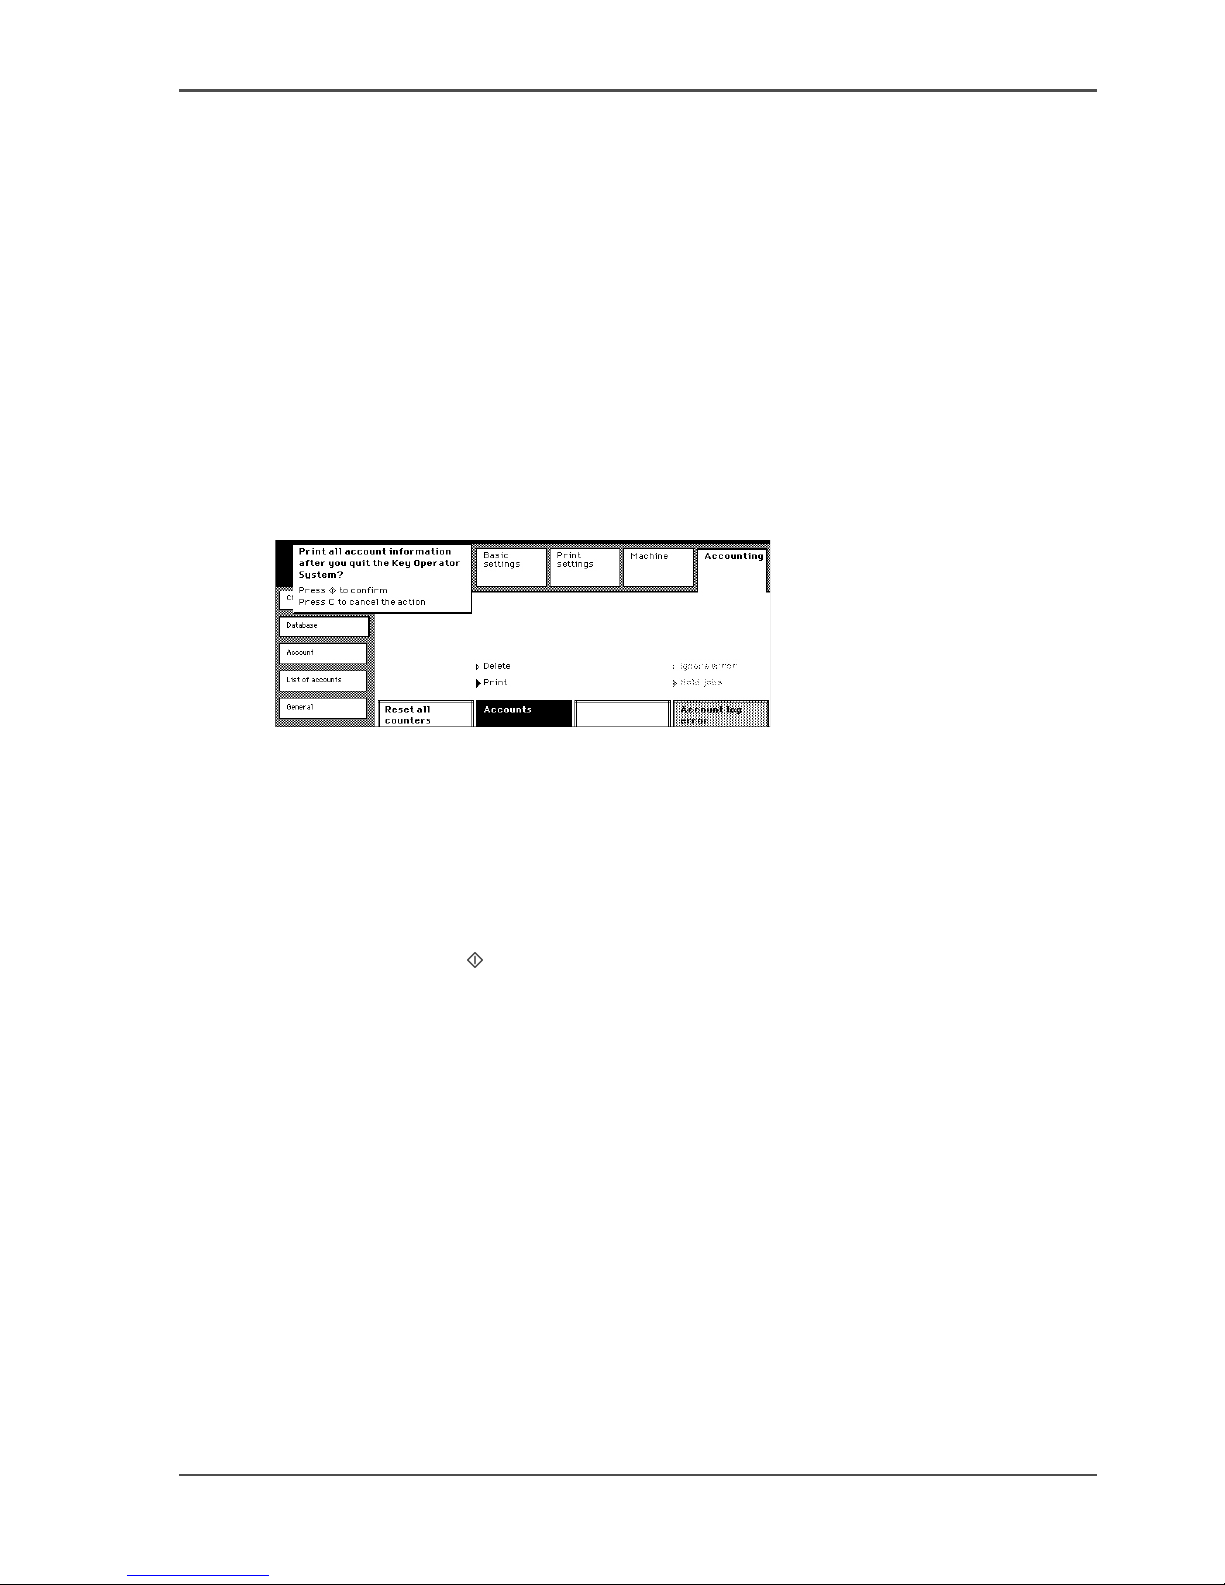
99
Print the accounts-database file
Print the accounts-database file
Introduction
You can print the accounts-database file, that contains the information about the
accounts on the system (see ‘About the accounting system’ on page 112).
Before you begin
Enter the Key operator system (see ‘Enter or quit the key operator system’ on
page 28).
Illustration
[72]
[72] Print the accounts-database file
Printing the accounts-database file
1. Press the 'Accounting' key.
2. Select the 'Database' tab.
3. Press the 'Accounts' key to select 'Print'.
4. Press the start key to confirm.
Check
1. Exit the key operator system.
2. The report will be printed after you have left the key operator system.
Page 100

100 Chapter 12 System Information
Print the accounts-database file
 Loading...