

Page 1

o
Océ VarioPrint® 2062/75
Job manual
..
User manual
Océ
Page 2

Océ-Technologies B.V.
© 2007, Océ-Technologies B.V. Venlo, The Netherlands.
All rights reserved. No part of this work may be reproduced, copied, adapted, or
transmitted in any form or by any means without written permission from Océ.
Océ-T echnologies B.V. makes no representation or warranties with respect to the contents
hereof and specifically disclaims any implied warranties of merchantability or fitness
for any particular purpose.
Further, Océ-Technologies B.V. reserves the right to revise this publication and to make
changes from time to time in the content hereof without obligation to notify any person
of such revision or changes.
Order number: Publication code number
Edition: 2007-08
Page 3

Trademarks
List of trademarks
Océ, Océ VarioPrint® 2062/75 are registered trademarks of Océ-Technologies B.V..
Adobe®, Acrobat®, Reader® and Distiller® are registered trademarks of Adobe®
Systems Incorporated.
PostScript® 3™ is a registered trademark of Adobe® Systems Incorporated.
Apple®, Mac® , Mac OS® and Macintosh® are registered trademarks of Apple®
Computer, Inc.
InstallShield® is a registered trademark of InstallShield® Software Corporation.
FLEXlm™ is a trademark of Macrovision™ Corporation.
Microsoft®, W indows® , Windo ws NT®, W indows 98®, W indows 2000®, Windo ws
XP®, Windows Server 2003® are either registered trademarks or trademarks of
Microsoft® Corporation in the United States and/or other countries.
Products in this publication are referred to by their general trade names. In most, if
not all cases, these designations are claimed as trademarks or registered trademarks
of their respective companies.
Copyright
© 2007, Océ-Technologies B.V. Venlo, The Netherlands.
All rights reserved. No part of this work may be reproduced, copied, adapted, or
transmitted in any form or by any means without written permission from Océ.
Océ-Technologies B.V. makes no representation or warranties with respect to the
contents hereof and specifically disclaims any implied warranties of merchantability
or fitness for any particular purpose.
Further, Océ-Technologies B.V. reserves the right to revise this publication and to
make changes from time to time in the content hereof without obligation to notify any
person of such revision or changes.
3
Trademarks
Page 4

Notes for the reader
Introduction
This manual helps you to use the Océ VarioPrint® 2062/75 . The manual contains a
description of the Océ VarioPrint® 2062/75 and guidelines to use and operate the Océ
VarioPrint® 2062/75 . There are also tips to increase your knowledge of the Océ
VarioPrint® 2062/75 and to help you manage the workflow even better.
Definition
Attention Getters
Parts of this manual require your special attention. These parts provide important,
additional information or are about the prevention of damage to your properties.
Note, Attention and Caution
The words Note, Attention and Caution indicate these important parts.
■
The word Note comes before additional information about the correct operation
of the Océ VarioPrint® 2062/75 or a tip.
■
A part marked with Attention contains information to prevent damage to items,
for example the Océ VarioPrint® 2062/75 , an original or a file.
■
A part marked with Caution contains information to prevent personal injury.
Caution is found only in manuals that describe physical products.
Safety information
The safety information for this product is included in a separate manual with the title
Safety manual. This manual is part of the documentation set that you received with
your product.
4
Notes for the reader
Page 5

Contents
Chapter 1
Introduction.................................................................................................................9
Your Océ product...............................................................................................10
What is in the Job Manual.................................................................................11
Who are the Océ VarioPrint® 2062/75 users.....................................................12
More information on the Océ VarioPrint® 2062/75 ...........................................13
Chapter 2
Get to know the Network Printer.............................................................................15
Smart solutions to pr int, scan and copy your documents..................................16
The Parts of the Network Printer.......................................................................20
The operator panel of the Network Printer.........................................................22
The keyboard.....................................................................................................25
Applications for managing the document flow...................................................26
What can the messages of the Network Printer tell you....................................27
Chapter 3
Get to know the Digital Copier................................................................................29
Smart solutions to copy your documents...........................................................30
The Parts of the Digital Copier...........................................................................32
The operator panel of the Digital Copier............................................................34
What can the messages of the Digital Copier tell you.......................................36
Chapter 4
Get started................................................................................................................37
Turn the Océ VarioPrint® 2062/75 on or off ......................................................38
Need identification, coins or a credit card..........................................................39
Chapter 5
Place your originals.................................................................................................43
Your originals.....................................................................................................44
Place originals in the automatic document feeder.............................................47
Place an original on the platen..........................................................................49
Chapter 6
The print jobs............................................................................................................53
What can you print.............................................................................................54
The ease of your mailbox...................................................................................55
Start the pr int job in the printer dr iver................................................................57
The printer driver.........................................................................................57
Send a document to your mailbox...............................................................59
Starting an Automatic Print Job...................................................................60
5
Contents
Page 6

Creating a Template (Windows Printer Driver).............................................61
Starting a Print Job That Uses a Template...................................................63
Send a secured document to your mailbox..................................................64
Your mailbox documents....................................................................................66
Open your mailbox.......................................................................................66
Print your documents...................................................................................67
Print a secured document ...........................................................................68
Change the document settings....................................................................70
Delete documents from your mailbox..........................................................71
Use your finger to print......................................................................................72
The ease of fingerprinting............................................................................72
Enroll your fingerprint...................................................................................75
Print with your fingerprint.............................................................................77
Delete your fingerprint.................................................................................79
Get documents from your other mailboxes........................................................80
The ease of fetching documents from your other mailboxes........................80
Fetching documents from your other mailboxes..........................................83
Print from your USB stick...................................................................................85
The ease of printing from your USB stick....................................................85
Put a printable document on your USB stick...............................................87
Print a document from your USB stick.........................................................88
Print on special material....................................................................................90
Print on special material placed in a paper tray...........................................90
Print on special material inser ted in the special feeder...............................92
Stop or interrupt printing....................................................................................94
Interrupting a Print Job................................................................................94
Stop a print job.............................................................................................96
Chapter 7
The copy jobs...........................................................................................................97
What can you copy............................................................................................98
Use the automatic document feeder to copy.....................................................99
Copy in a simple way...................................................................................99
Create a booklet........................................................................................101
Sorting the Output......................................................................................102
Use the automatic document feeder to create an enlarged or reduced
document...................................................................................................103
Use the platen to copy.....................................................................................104
Copying a Book or Magazine.....................................................................104
Copy an A4/Letter 8.5x11 original from the platen.....................................106
Copy an A3/Tabloid 11x17 original from the platen...................................107
Copy an A5/Us Std 5.5x8.5 original from the platen..................................108
Use the platen to create an enlarged or reduced copy..............................109
Copy on special material.................................................................................111
Copy on special material placed in a paper tray........................................111
6
Contents
Page 7

Copy on special material inserted in the special feeder.............................112
Assemble jobs.................................................................................................113
Assemble separate copy job par ts (Combined copy job)...........................113
Change the default copy quality.......................................................................115
Improve the copy quality if the originals are text........................................115
Improve the copy quality when the original is a photo...............................116
Stop or interrupt copying..................................................................................117
Interrupt a copy job....................................................................................117
Stop a copy job..........................................................................................119
Chapter 8
The scan jobs.........................................................................................................121
What can you copy..........................................................................................122
Get to know the digital documents...................................................................123
The destination for the digital document....................................................123
The scan profiles.......................................................................................125
Use the automatic document feeder to scan...................................................127
Simple scanning........................................................................................127
Use the automatic document feeder to create an enlarged or reduced digital
document...................................................................................................129
Use the platen to scan.....................................................................................130
Scan from the platen..................................................................................130
Use the platen to create an enlarged or reduced digital document...........131
Scan to your USB stick....................................................................................133
The ease of scanning to your USB stick....................................................133
Scan to your USB stick..............................................................................135
Scan-to-Email..................................................................................................137
The ease of scan-to-email.........................................................................137
Scan-to-email without using a keyboard....................................................140
Scan-to-email using a keyboard................................................................142
Assemble jobs.................................................................................................144
Assemble separate scan job parts (Combined scan job)..........................144
Change the default scan quality......................................................................146
Create a password-protected PDF file.......................................................146
Change the scan resolution for the digital document.................................147
Improve the scan quality if the originals are text........................................148
Improve the scan quality if the original is a photo......................................149
Stop scanning..................................................................................................150
Stop a scan job..........................................................................................150
Chapter 9
Paper, staples and toner........................................................................................151
Staples in your finished sets............................................................................152
Add paper to paper tray 4................................................................................153
Add paper to paper tray 1, 2 and 3..................................................................155
7
Contents
Page 8

Insert mater ial into the special feeder..............................................................158
Check the toner, paper and staple supply.......................................................160
Chapter 10
Errors.......................................................................................................................161
Correcting Errors.............................................................................................162
Clear a paper jam............................................................................................164
Appendix A
All settings..............................................................................................................165
The print settings.............................................................................................166
The copy settings.............................................................................................170
The scan settings.............................................................................................178
Appendix B
Specifications.........................................................................................................183
Product Specifications.....................................................................................184
Input Trays and Output Bins.............................................................................185
Originals to use................................................................................................188
Media ..............................................................................................................189
Appendix C
Addresses...............................................................................................................191
Addresses of local Océ organisations ............................................................192
8
Contents
Page 9

Chapter 1
Introduction
o
9
Page 10

Your Océ product
Introduction
The Océ VarioPrint® 2062/75 is a digital printer, scanner and copier. When the Océ
VarioPrint® 2062/75 is not connected to a controller, the Océ VarioPrint® 2062/75
can be used as a digital copier.
The Océ VarioPrint® 2062/75 products
The Océ VarioPrint® 2062/75 product range represents two products.
■
The Océ VarioPrint® 2062.
■
The Océ VarioPrint® 2075.
The products only have different print speeds.
The Océ VarioPrint® 2062/75 configurations
The Océ VarioPrint® 2062/75 has two configurations.
■
The Network Printer
This product type is connected to the network and can be used for copy, print and
scan jobs.
■
The Digital Copier
This product type is not connected to the network and can be used for copy jobs.
10Chapter 1 - Introduction
Your Océ product
Page 11
What is in the Job Manual
Introduction
The Job manual describes the functions that the Océ VarioPrint® 2062/75 can perform.
The tasks are explained in step-by-step instructions with many illustrations to make
the steps clear. Furthermore, the Job Manual provides some practical background
information on functions the Océ VarioPrint® 2062/75 has to offer. Thus, the Job
Manual can help you learn to use all basic and smart functions.
Use the Job manual for your Océ VarioPrint® 2062/75
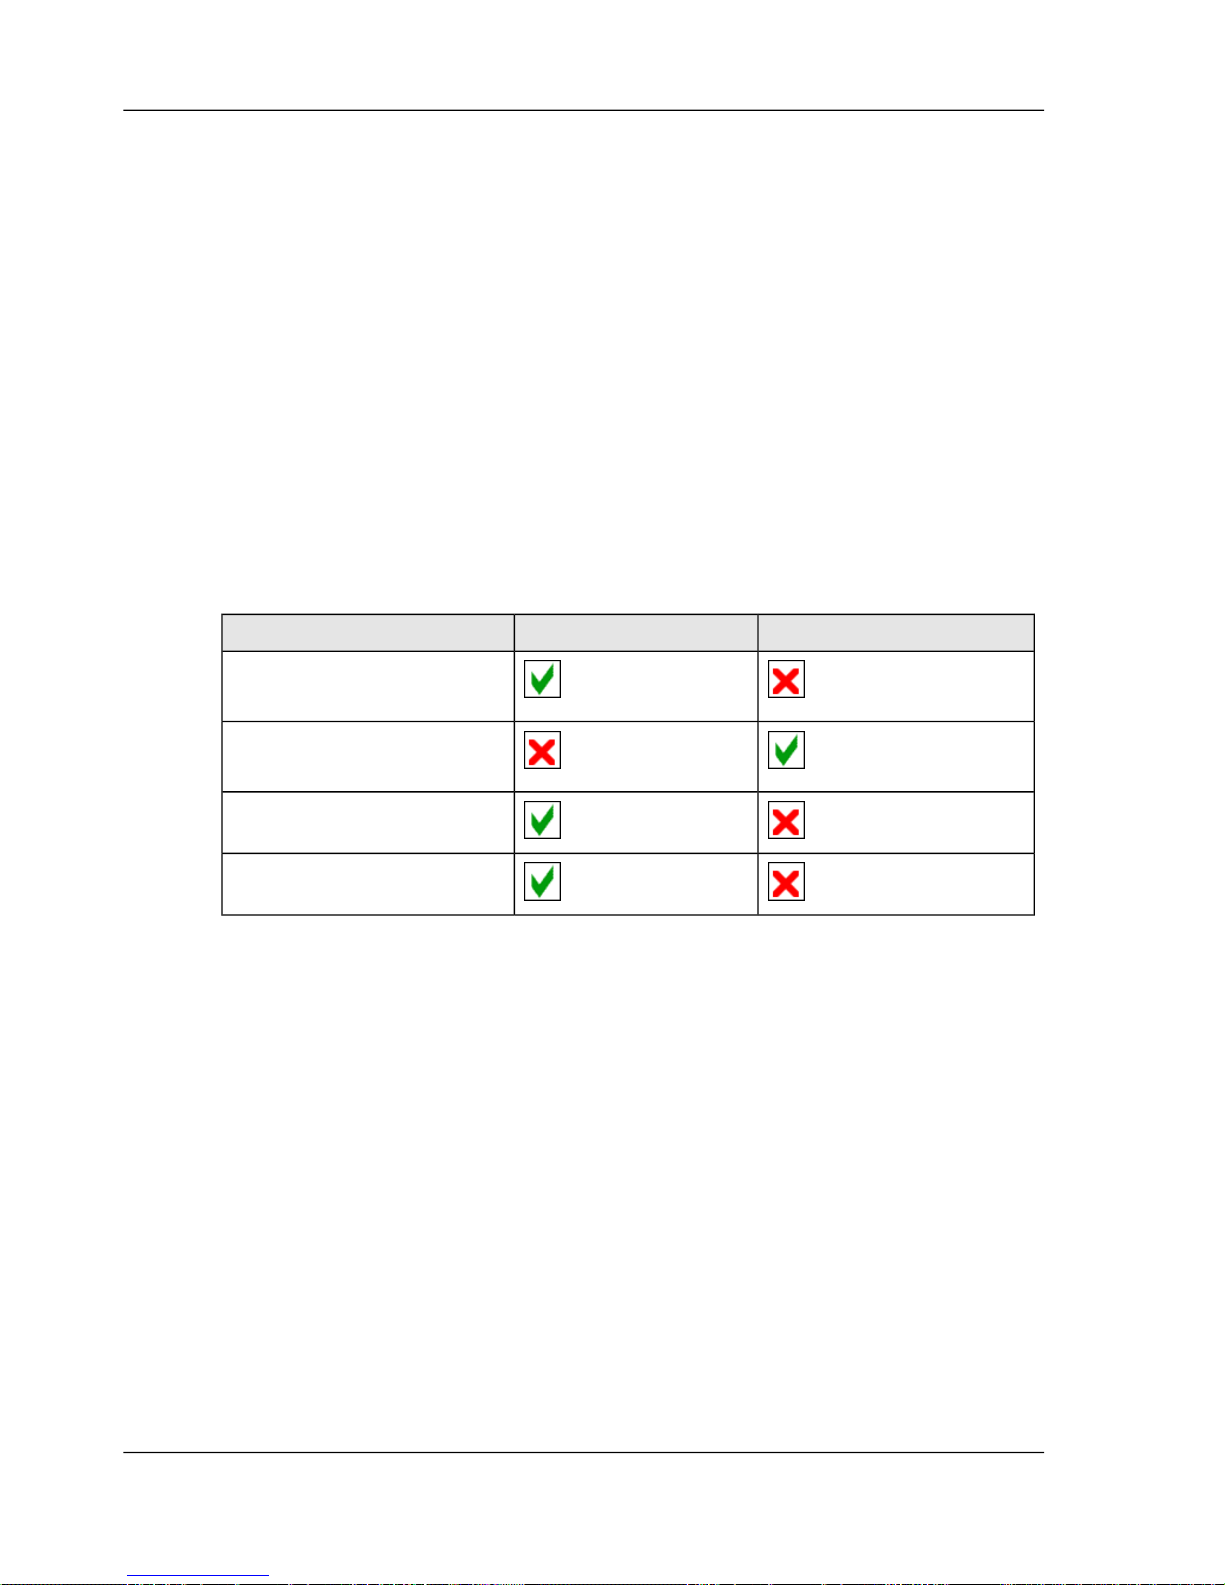
The table below describes which chapters of the Job manual specifically apply to one
of the Océ VarioPrint® 2062/75 product configurations. All other chapters are
applicable to both the Network Printer and the Digital Copier.
[1]
Digital CopierNetwork PrinterChapter
Getting to know the
Network Printer
Getting to know the Digital
Copier
The print jobs
The scan jobs
11Chapter 1 - Introduction
What is in the Job Manual
Page 12

Who are the Océ VarioPrint® 2062/75 users
Introduction
The Océ VarioPrint® 2062/75 documentation is meant for three types of users. This
Job manual describes the tasks of the end user.
Types of users and their tasks
[2]
TasksTypes of users
■
Print documents from computer or USB stick.
■
Copy paper documents.
■
Scan paper documents to a server, USB stick or Email
address.
■
Add paper to the paper trays.
■
Clear paper jams.
End user
■
Set the default job settings.
■
Define the access control to the machine and machine
components.
■
Control the paper trays.
■
Control the output.
■
Control the print, copy and scan mode.
■
Obtain the system information.
■
Define the Energy saving timers.
■
Maintain the Accounting system.
■
Maintain the machine supplies.
■
Solve simple machine problems.
■
Maintain the machine supplies.
Key operator
■
Control the connection of the system with the network.
■
Configure the security settings so that data and services
are protected.
■
Configure user access to the system.
■
Configure the servers that are in volved with print and scan
jobs.
■
Configure the servers that are involved with user
authentication.
■
Configure the system.
■
Configure the protocols.
■
Define the PCL defaults.
■
Maintain and install the drivers.
System
administrator
12Chapter 1 - Introduction
Who are the Océ VarioPrint® 2062/75 users
Page 13

More information on the Océ VarioPrint® 2062/75
Introduction
Océ develops manuals, instruction cards, tutorials and on-line helps to help you with
your jobs on the Océ VarioPrint® 2062/75 .
Where to find the Océ VarioPrint® 2062/75 documentation
The user CD-rom, delivered with the Océ VarioPrint® 2062/75 , provides you with
the user manuals in digital format. You can also find instruction cards and tutorials
on this CD-rom.
The Océ Web site, www.oce.com, makes viewing manuals on-line and downloading
documents easier.
Océ VarioPrint® 2062/75 documentation for each type of user
[3]
InformationTypes of users
■
The Océ VarioPrint® 2062/75 Job Manual.
■
Instruction cards which explain copy, print
and scan jobs in a way that is easy to
understand.
■
Add paper card, which explains how to add
paper to the trays and special feeder.
■
Tutorials, which explain smart functions
from your computer screen.
End user
■
The Océ VarioPrint® 2062/75
Configuration and Maintenance Manual.
■
Maintenance card, which explains how to
add toner and staples.
Key operator
■
The System administrator manual.System administrator
13Chapter 1 - Introduction
More information on the Océ VarioPrint® 2062/75
Page 14

14Chapter 1 - Introduction
More information on the Océ VarioPrint® 2062/75
Page 15

Chapter 2
Get to know the Network
Printer
o
15
Page 16
Smart solutions to print, scan and copy your documents
What can you do
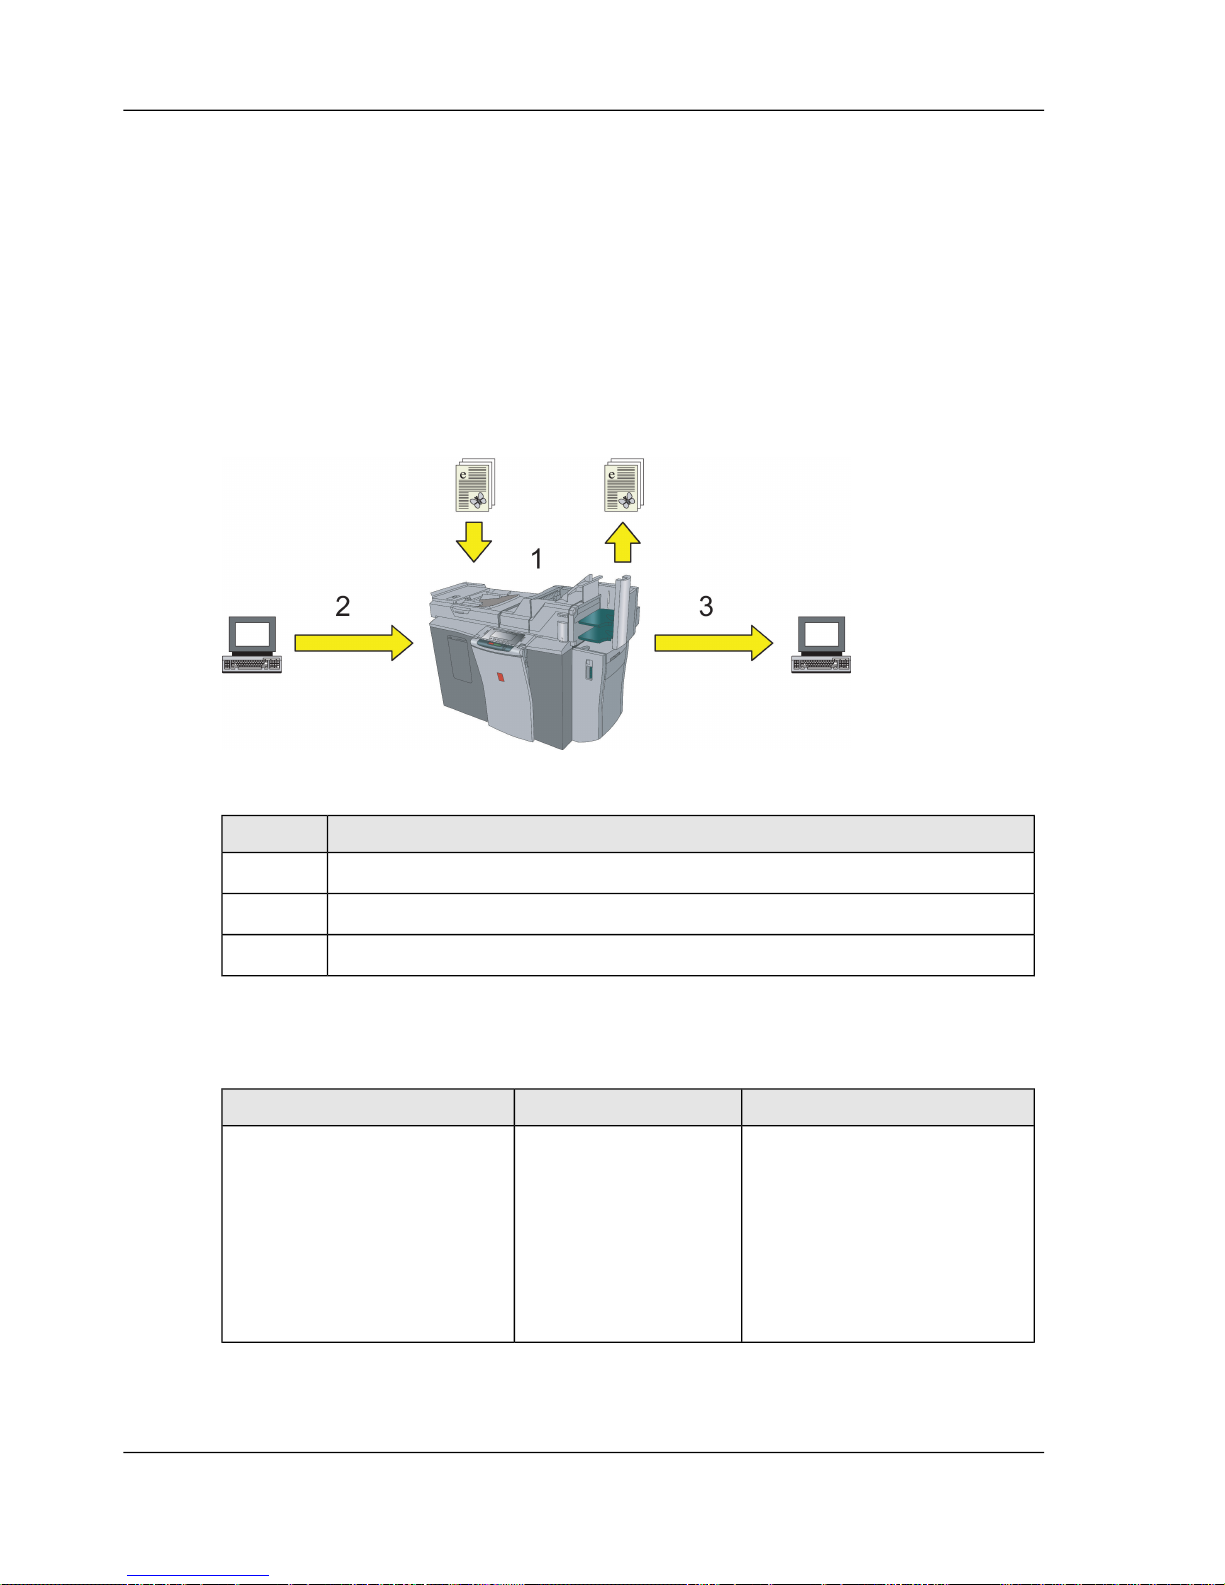
The Network Printer is a copier and scanner, but most of all it is a printer. It offers
the same functions any desktop printer offers, and lots more. The operator panel is
user-friendly and easy to operate. The Network Printer has man y smart solutions that
make work easier on you. Moreover, there are functions for those who have jobs that
require a professional quality.
[9] What can you do
[4]
What can you do
Copying1
Printing2
Scanning3
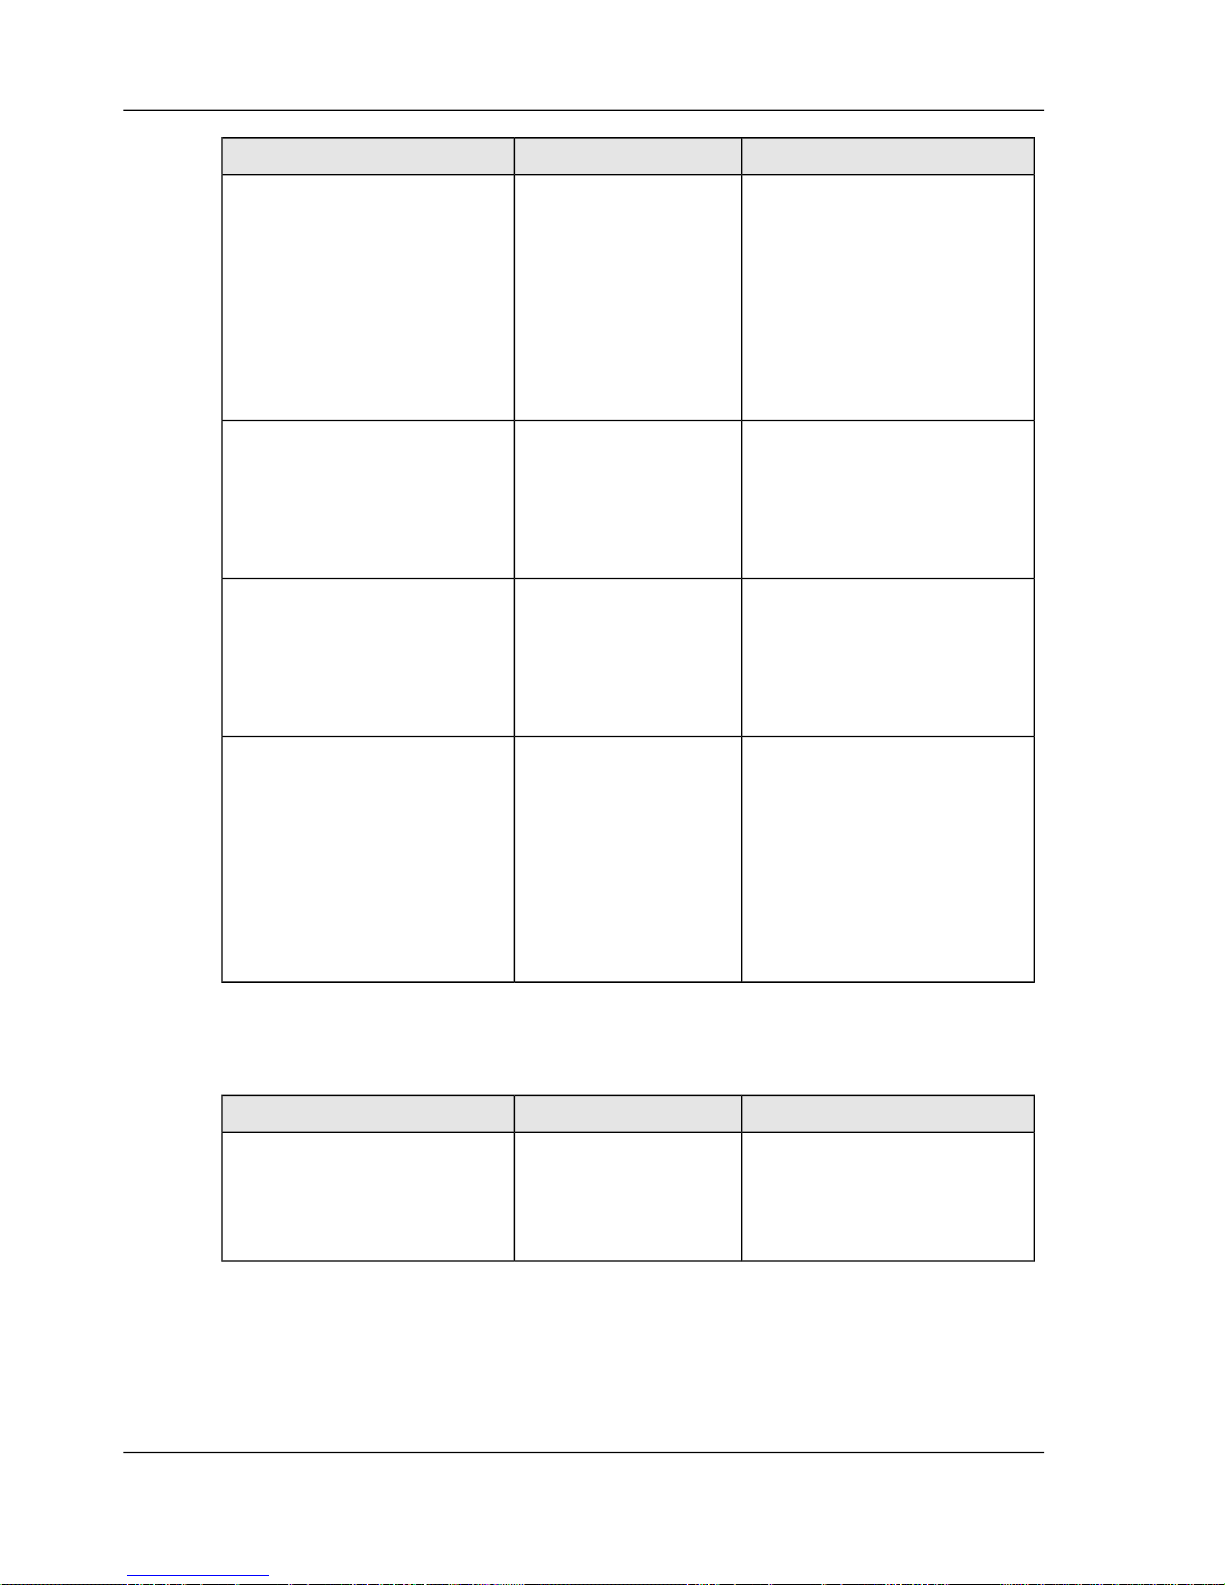
Smart solutions for printing
[5]
HowSmart solutionWhat would you like to do
Send a mailbox job from
your Océ printer driver.
Y our mailbox k eeps all your
documents until you start
printing them from the
operator panel ‘The ease of
your mailbox’ on page 55.
MailboxStore all your sent print jobs
on the printer so that you do
not need to look for your
documents in a huge pile of
paper.
16Chapter 2 - Get to know the Network Printer
Smart solutions to print, scan and copy your documents
Page 17
HowSmart solutionWhat would you like to do
Send a secured job from
your Océ printer driver . The
printer driver asks you to
attach a security code to the
print job. Only you can print
the document ‘Send a
secured document to your
mailbox’ on page 64.
Secured printingPrint a confidential report.
Fetch your documents from
your other mailboxes ‘The
ease of fetching documents
from your other mailboxes’
on page 80.
Smart mailboxPrint your mailbox
document on another
printer, for e xample because
your colleague is busy on
your usual printer.
Put your finger on the
fingerprint sensor. Your
new documents are printed
immediately ‘The ease of
fingerprinting’ on page 72.
TouchTo PrintPrint your new mailbox
documents without opening
your mailbox.
Store the documents on
your USB stick. When you
need to print a document,
insert the USB stick into the
USB port of the printer.
Print the document ‘The
ease of printing from your
USB stick’ on page 85.
Pocket mailboxPrint your documents if you
do not have access to a
computer.
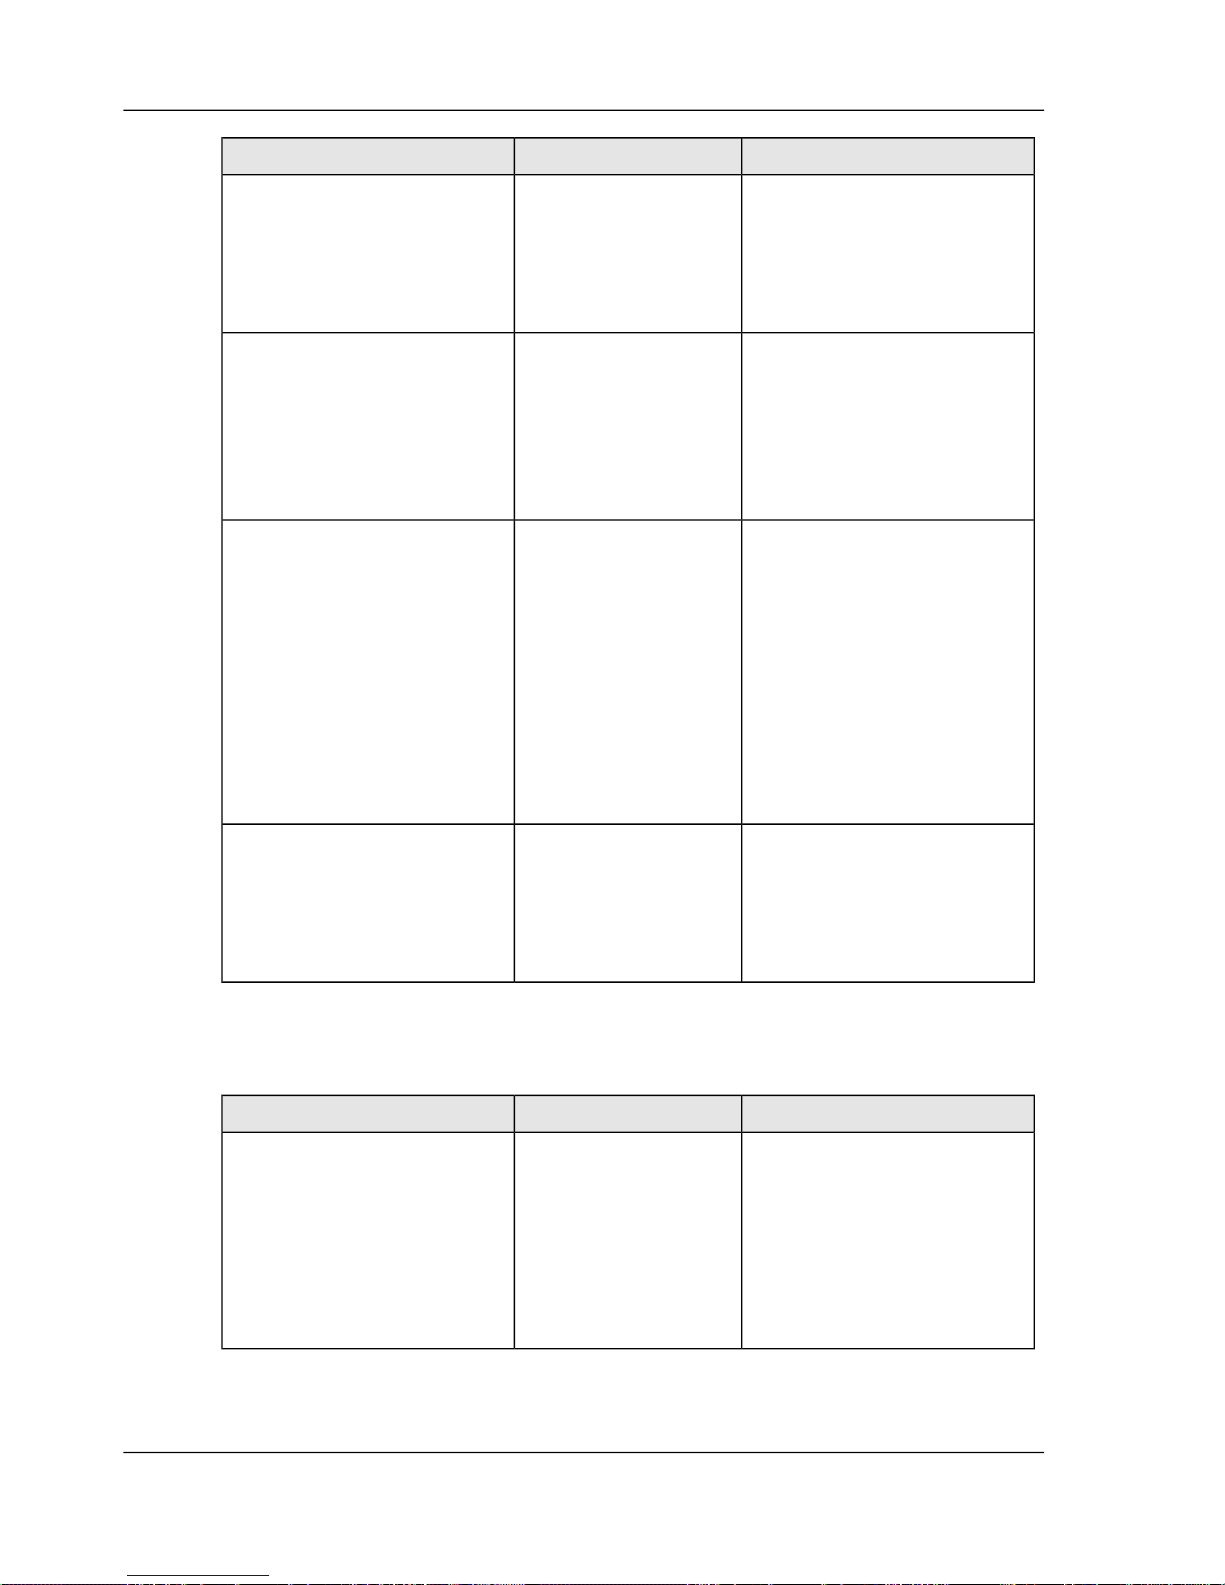
Smart solutions for copying
[6]
HowSmart solutionWhat would you like to do
Put your originals in the
automatic document feeder
and start copying ‘Copy in
a simple way’ on page 99.
Automatic document
feeder
Copy many pages of your
document.
17Chapter 2 - Get to know the Network Printer
Smart solutions to print, scan and copy your documents
Page 18
HowSmart solutionWhat would you like to do
Put your originals in the
automatic document feeder,
select the Booklet function
and start copying ‘Create a
booklet’ on page 101.
Booklet functionTurn your 20 pages
document into a handy,
folded booklet.
Put your opened book on
the platen, select the Book
function and start copying.
Both pages of your book are
copied ‘Copy a book or
magazine’ on page 104.
Book functionCopy several pages of a
book.
Create job parts. Use the
Assemble jobs wizard. Use
the automatic document
feeder for your document
pages and the platen for
your photo. The photo
becomes one of the copied
pages ‘Assemble separate
copy job parts (Combined
copy job)’ on page 113.
WizardsYou need 5 copies of a
document. Y ou also want to
include a photo in each
copied set.
Use the special feeder to
insert such a sheet of paper
‘Copy on special material
inserted in the special
feeder’ on page 112.
Special feederUse paper that is too heavy
to be handled by paper
trays.
Smart solutions for scanning
[7]
HowSmart solutionWhat would you like to do
Use the automatic document
feeder for your letter . Select
Scan-to-email and start
scanning. You receive the
letter as an attachment in
your Inbox ‘The ease of
scan-to-email’ on page 137.
Scan-to-EmailStore a letter of a customer
on your computer.
18Chapter 2 - Get to know the Network Printer
Smart solutions to print, scan and copy your documents
Page 19
HowSmart solutionWhat would you like to do
Use the automatic document
feeder for your document
pages. Select Scan to USB
and start scanning ‘The ease
of scanning to your USB
stick’ on page 133.
Pocket mailboxScan your documents when
you do not have a computer
at your disposal.
Create job parts. Use the
Assemble jobs wizard. Use
the automatic document
feeder for your document
pages and the platen for
your photos ‘Assemble
separate scan job parts
(Combined scan job)’ on
page 144.
WizardsYou want to archive some
photos and documents into
one digital document
Use the automatic document
feeder for your document.
Select Scan-to-email and
enter the addresses of your
project group members.
Indicate that you want a
protected PDF and enter a
password the members
know. They need the
password to open the PDF
file ‘Protect your scanned
document’ on page 127.
Password-protected
PDF
You want to send a printed
confidential report by Email
to your project group.
19Chapter 2 - Get to know the Network Printer
Smart solutions to print, scan and copy your documents
Page 20
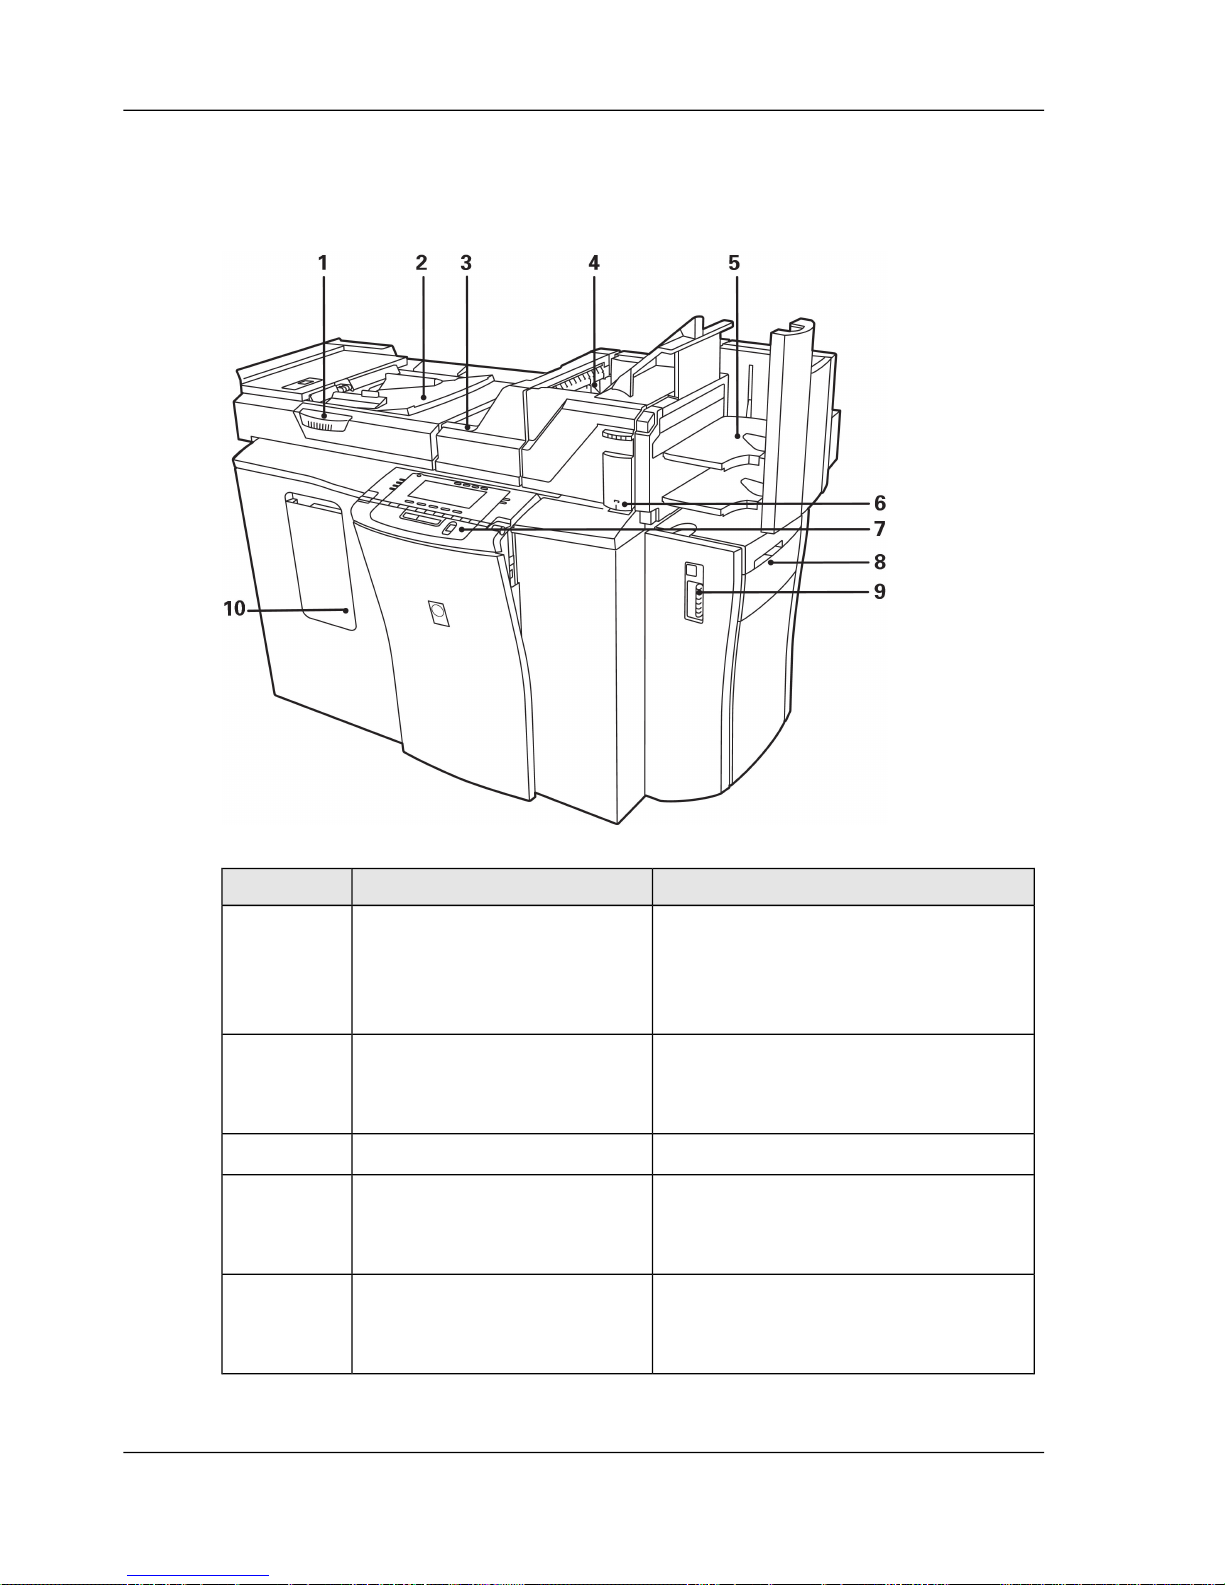
The Parts of the Network Printer
The Network Printer machine
[8]
DescriptionComponentNumber
Use the platen for originals that do
not fit into the automatic document
feeder. One side of the original is
scanned.
Access to the platen1
You can place a set of single-sided
or double-sided originals into the
automatic document feeder.
Automatic document feeder2
Originals are collected in this bin.Original receiving bin3
Copies and prints with special paper
sizes or weights are collected in this
bin. Stapling is not possible.
Multi-size bin4
The A4/Letter 8.5x11 copies and
prints are collected in the finisher.
Stapling is available.
Finisher5
20Chapter 2 - Get to know the Network Printer
The Parts of the Network Printer
Page 21
DescriptionComponentNumber
Use this stapler to staple your copies
and prints manually.
Off-line stapler6
Use the operator panel to define job
settings.
Operator panel7
Use the special feeder for special
materials that do not fit into the paper
trays.
Special feeder8
Access door to paper trays.Paper compartment door9
Toner reservoir access door.Front door10
The finisher
The finisher has two bins that collect the finished sets. The Key operator decides to
which bin the finished sets are sent.
21Chapter 2 - Get to know the Network Printer
The Parts of the Network Printer
Page 22
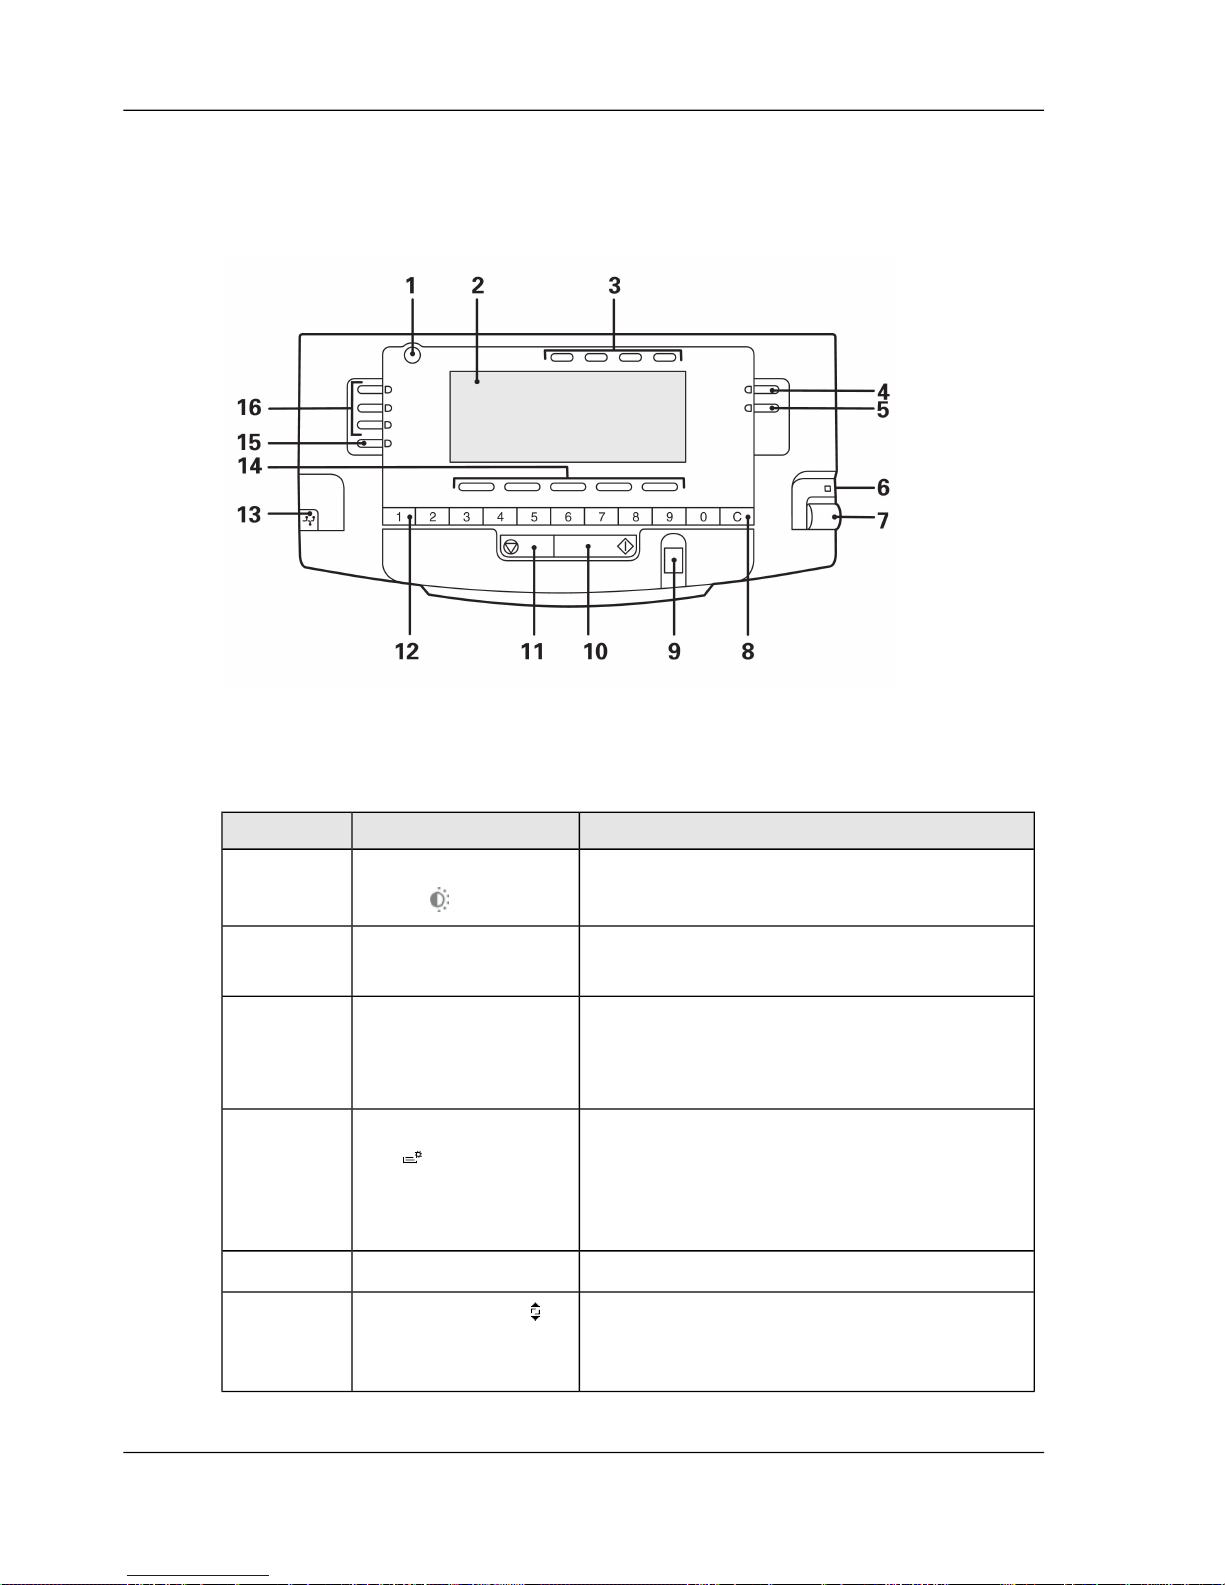
The operator panel of the Network Printer
The parts of the operator panel
: When your machine has a ke yboard, you can use the keyboard keys to enter characters
into fields that allow alphanumerical input.
[9]
DescriptionPartNumber
You can adjust the brightness of the screen.Screen brightness
button
1
The display screen shows the settings and the
messages.
Display screen2
Use the keys to:
■
Select a collection of settings.
■
Do a task.
Top keys3
Use the key to:
■
Check the level of the toner, paper and
staples.
■
Go to the Key operator system.
Status and system
key
4
Key that opens the Help topics.Help key5
Key to open a series of settings. You can use
the key after you select an item with the scroll
wheel.
Scroll wheel key
6
22Chapter 2 - Get to know the Network Printer
The operator panel of the Network Printer
Page 23
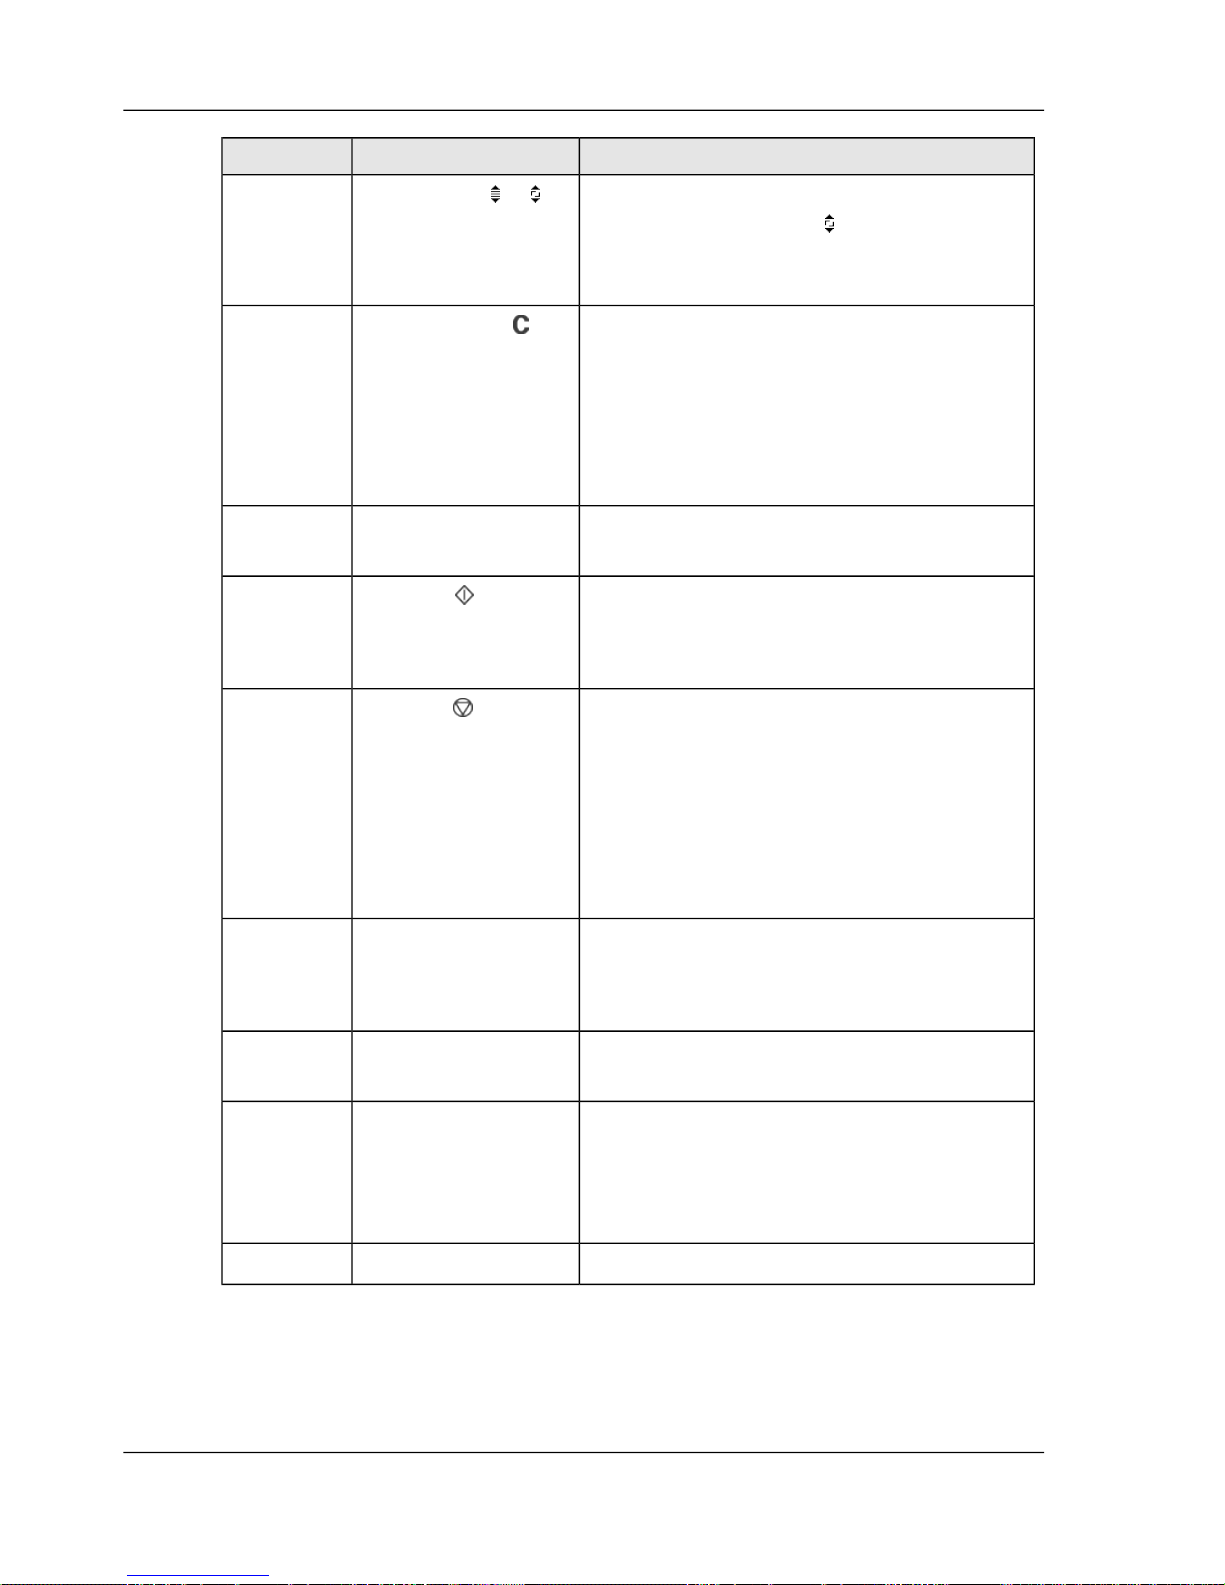
DescriptionPartNumber
Use the scroll wheel to go to an item in a list.
If the displays shows the icon, you can press
the scroll wheel key to open a series of
settings after you select an item.
Scroll wheel or
7
Use the key to:
■
Reset the number of sets to 1 (copy jobs)
or the value as defined in the printer driv er
(print jobs).
■
Delete the last digit when you enter a
code.
Correction key
8
Use the sensor for TouchTo Print
(fingerprinting).
Fingerprint sensor9
Use the key to:
■
Starting a job.
■
Confirm the changes.
Start key
10
Use the key to:
■
Stop a job.
■
Finish your jobs if you must enter a PIN
to get access to the settings. If you do not
stop the job with the Stop key, another
user could process jobs that are charged
to your user account.
Stop key
11
Use the keys to:
■
Enter a code or a PIN.
■
Entering the number of sets.
Numeric keys12
Use the USB port to insert a USB stick
(Pocket mailbox function).
USB port13
Use the keys to:
■
Select a collection of settings.
■
Do a task.
■
Select a value or a function.
Bottom keys14
Use the key to go to the wizards.Wizards key15
23Chapter 2 - Get to know the Network Printer
The operator panel of the Network Printer
Page 24
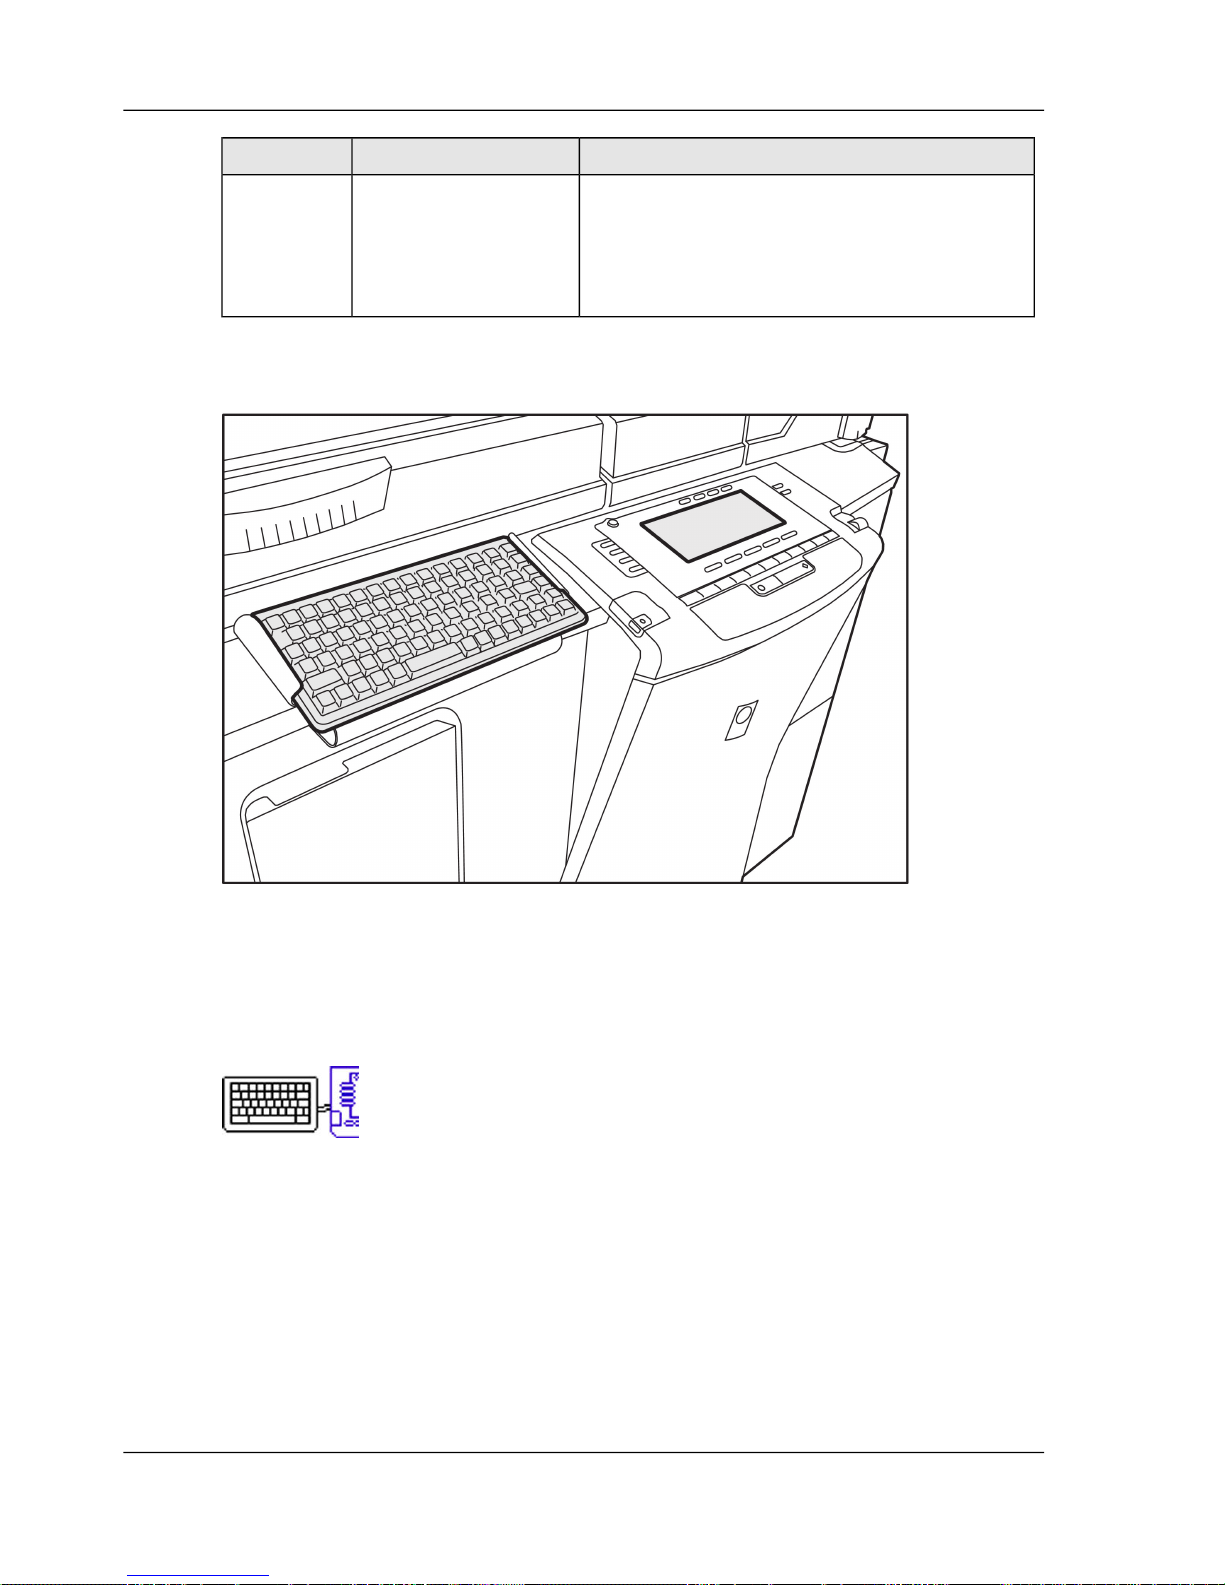
DescriptionPartNumber
The Network Printer has several main keys.
■
The 'Print' key to go to the print settings.
■
The 'Copy' key to go to the copy settings.
■
The 'Scan' key to go to the scan settings.
Main keys16
The keyboard
When your machine has a keyboard, you can use the keyboard k eys to enter characters
into fields that allow alphanumerical input ‘The keyboard’ on page 25.
The display screen and this manual show the following keyboard symbol when you
can use the keyboard to enter information.
24Chapter 2 - Get to know the Network Printer
The operator panel of the Network Printer
Page 25
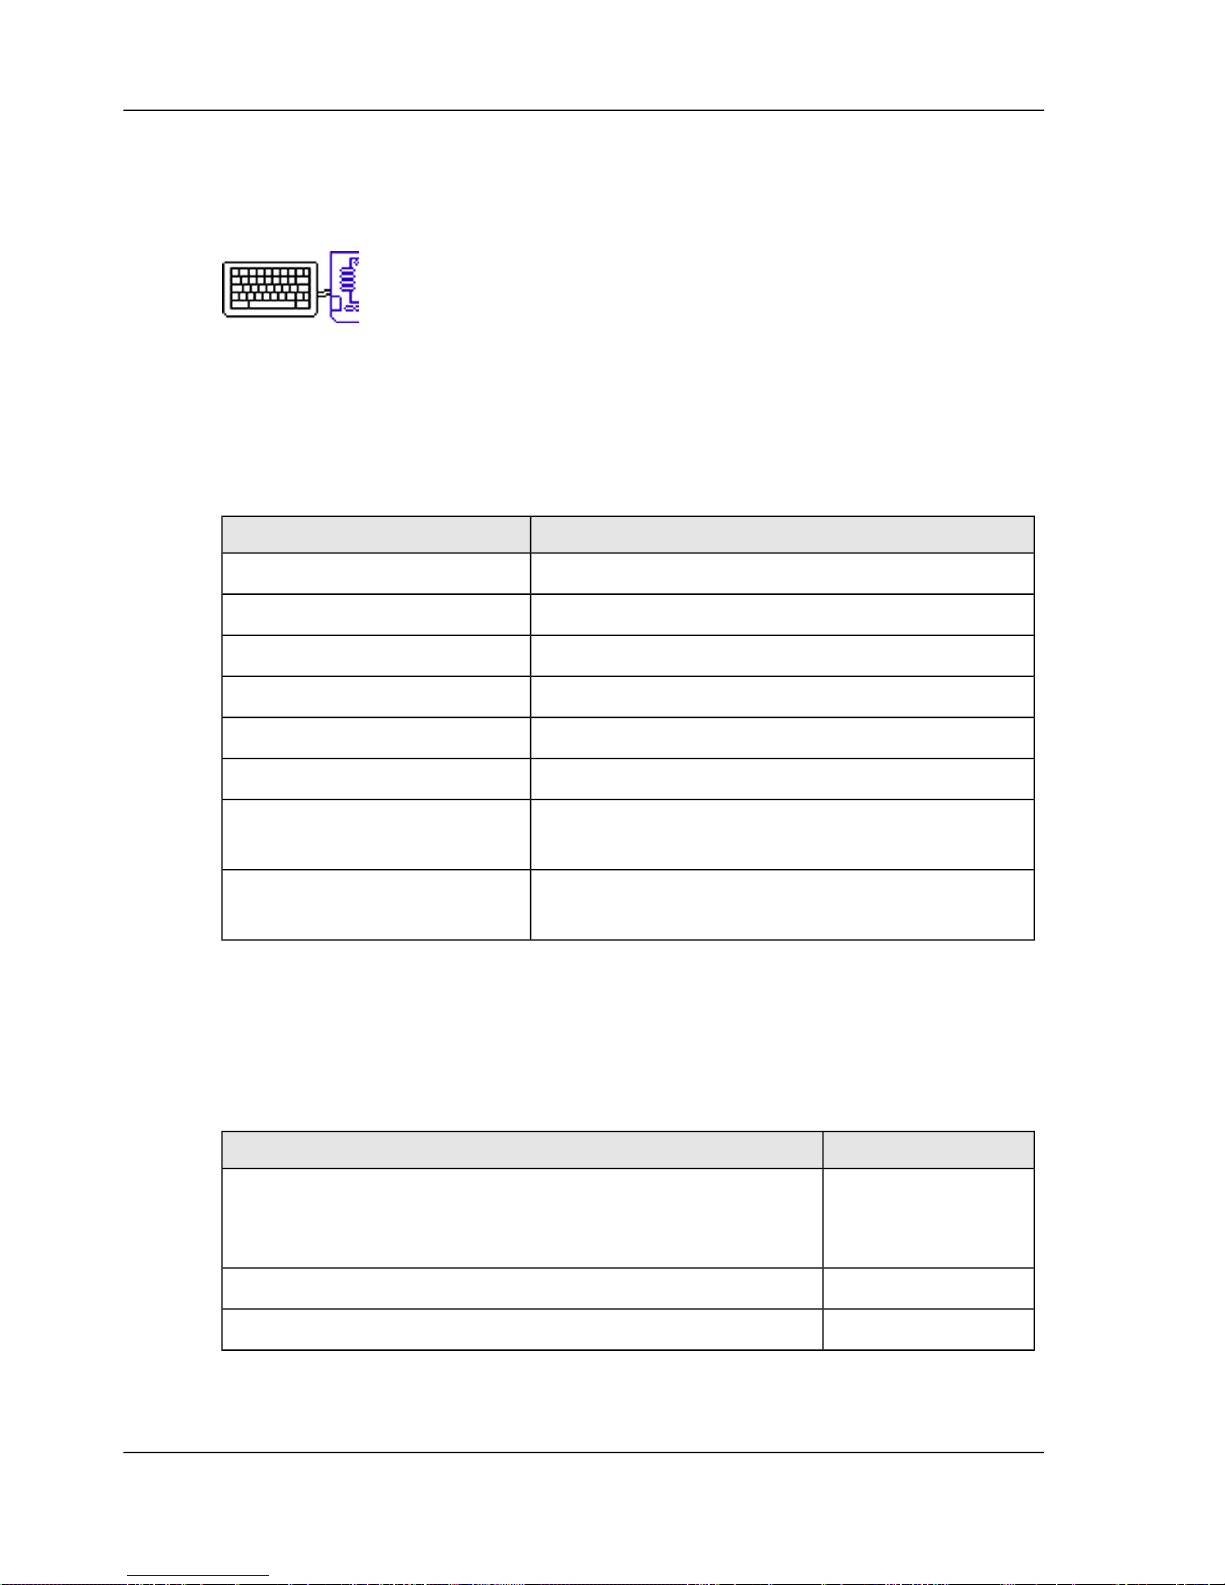
The keyboard
Introduction
When your machine has a keyboard installed next to the operator panel, you are able
to enter alphanumerical characters in the display screen.
The active keyboard keys
[10]
Characters or keysKey group
a, b, c, ..., A, B, C, ...Alphanumerical
0, 1, 2, 3,...Numerical
, . ? ! ; : ' " `Punctuation marks
< > [ ] { } ( )Brackets
% * - = + / < >Mathematical symbols
~ @ # $ & _ \ |Other symbols
Arrows, Page up, Page down, Home, End, Tab,
Enter
Cursor movements
Num lock, Caps lock, Shift, Ctrl, Alt, Backspace,
Delete, Esc, Space
Other keys
Globalization
The set of special ASCII characters that is available depends on the display language
of the machine.
[11]
Code page usedMachine display language
ISO 8859-1Chinese, Danish, Dutch, English (United Kingdom), English
(United States), Finnish, French, German, French, Italian,
Norwegian, Portuguese, Spanish, Swedish
ISO 8859-2Czech, Hungarian, Polish
ISO 8859-5Russian
25Chapter 2 - Get to know the Network Printer
The keyboard
Page 26
Applications for managing the document flow
Applications
The Océ VarioPrint® 2062/75 supports the following Océ applications for managing
the document flow:
[12]
What can you doApplications
Manage the print and scan jobs to, on
and from your computer. Refer to
www.oce.com for more information.
Océ Intra Logic
Manage the print jobs to and from a
central printing department. Refer to
www.oce.com for more information.
Océ Job SubmitIT
Create a print job while the application
selects the most appropriate printer for
your job. All available printers are
connected to each other to optimize the
document flow. Scanning, faxing and
archiving is organized from a central
approach. Refer to www.oce.com for
more information.
Océ PRISMAsatellite for Office
26Chapter 2 - Get to know the Network Printer
Applications for managing the document flow
Page 27
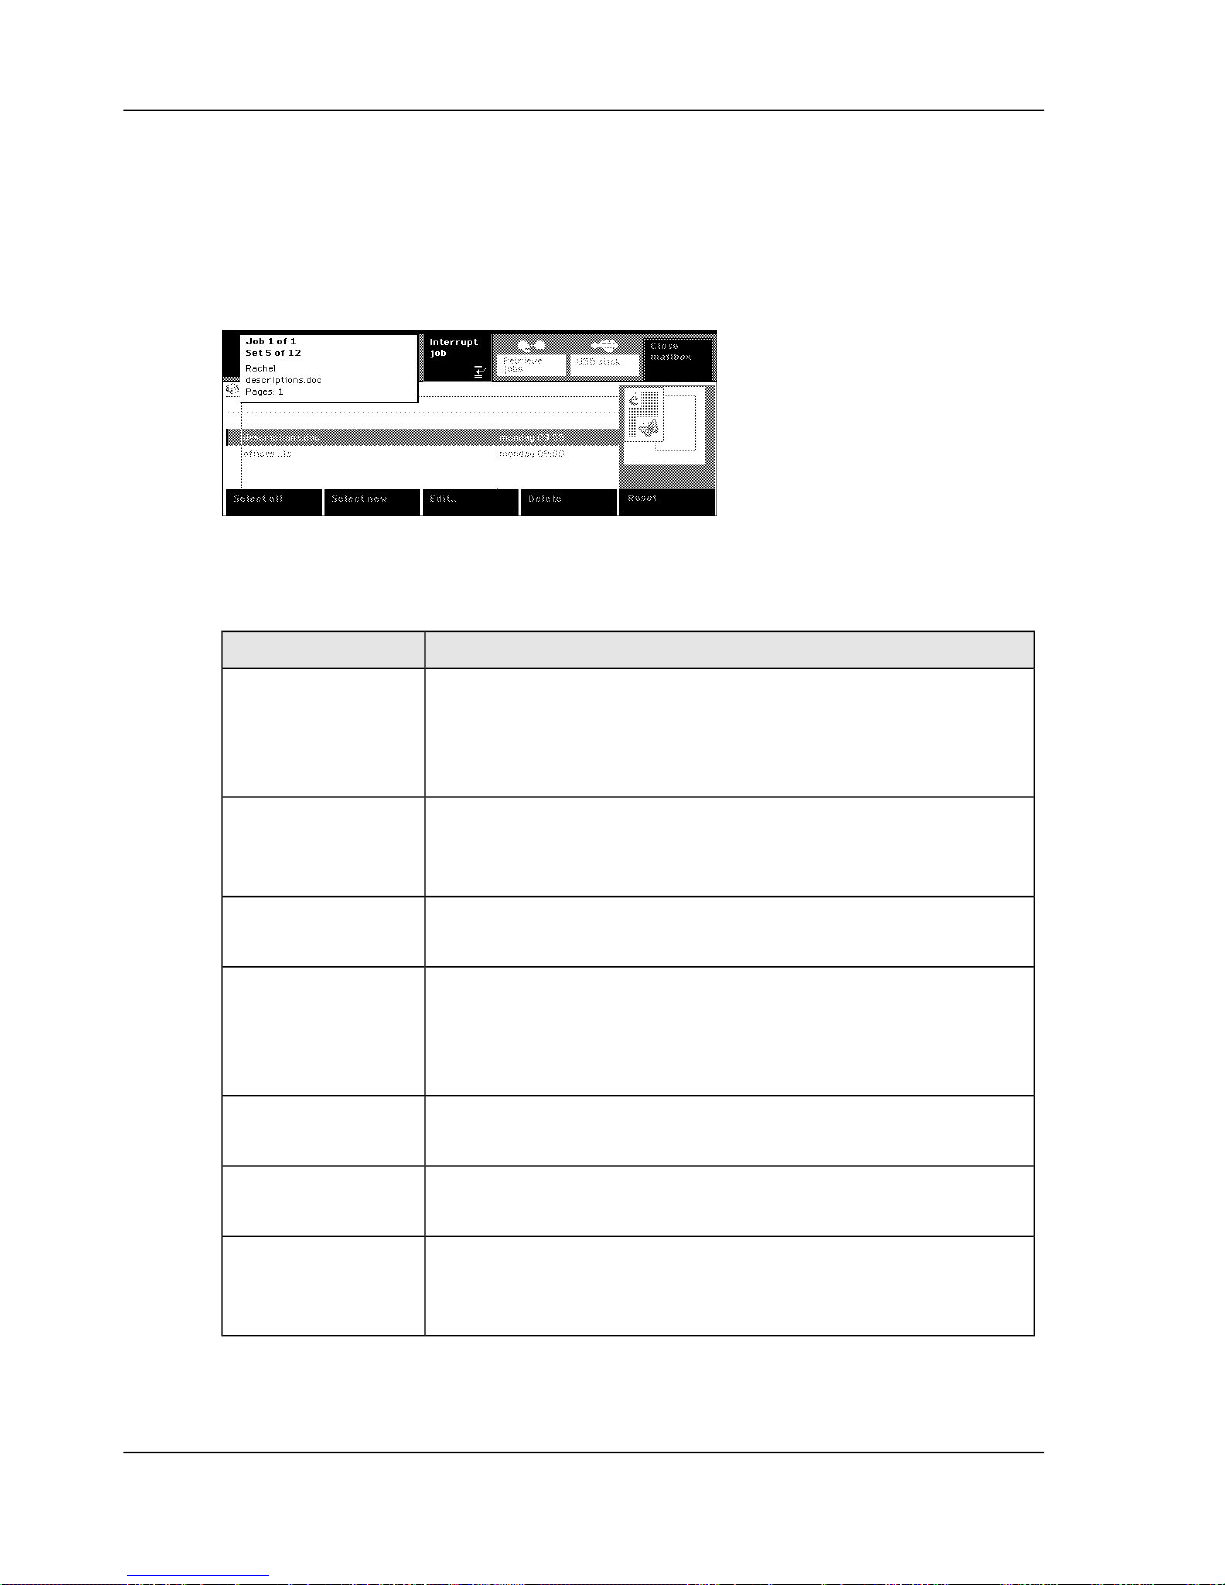
What can the messages of the Network Printer tell you
The message box
The message box gives you information about the current status or acti vity of the Océ
VarioPrint® 2062/75 .
What can the messages tell you
[13]
DescriptionMessages
To switch the machine on, you must press the ON / OFF
button on the machine. The machine needs 8 minutes to warm
up ‘Turn the Océ VarioPrint® 2062/75 on or off’ on page
38.
No messages: The
display screen is
off
When the machine is warming up you can already make
settings for a job. The printing of the print or copy job starts
after the machine has warmed up.
Machine is
warming up
The machine is ready to copy, print or scan.Ready to start a
job
The machine is connecting to other printers after your started
the Smart mailbox function. The message box informs you
about the progress of this process ‘Fetch documents from
your other mailboxes’ on page 83.
Busy to fetch jobs
from other
mailboxes
The machine is processing a job. You are informed about the
progress of a job.
Busy
The machine has entered the Low power mode. Y ou can press
any key to leave the Low power mode.
Low power mode
The machine has entered the Sleep mode. Y ou can press an y
key to leave the Sleep mode. The machine needs 8 minutes
to wake up.
Sleep mode
27Chapter 2 - Get to know the Network Printer
What can the messages of the Network Printer tell you
Page 28

DescriptionMessages
If an error occurred, you cannot use the machine. Follow the
instructions on the display screen ‘Correct the errors’ on
page 162.
Error
28Chapter 2 - Get to know the Network Printer
What can the messages of the Network Printer tell you
Page 29

Chapter 3
Get to know the Digital Copier
o
29
Page 30

Smart solutions to copy your documents
What can you do
The Digital Copier is an easy-to-use copier. You can use the Digital Copier to copy
your documents with ease. Howev er , the Digital Copier has many smart solutions that
make work easier for you. Moreover, there are functions for people who have jobs
that require professional quality.
Smart solutions for copying
[14]
HowSmart solutionWhat would you like to do
Put your originals in the
automatic document feeder
and start copying ‘Copy in
a simple way’ on page 99.
Automatic document
feeder
Copy many pages of your
document.
Put your originals in the
automatic document feeder,
select the Booklet function
and start copying ‘Create a
booklet’ on page 101.
Booklet functionTurn your 20 pages
document into a handy,
folded booklet.
Put your opened book on
the platen, select the Book
function and start copying.
Both pages of your book are
copied ‘Copy a book or
magazine’ on page 104.
Book functionCopy several pages of a
book.
Create job parts. Use the
Assemble jobs wizard. Use
the automatic document
feeder for your document
pages and the platen for
your photo. The photo
becomes one of the copied
pages ‘Assemble separate
copy job parts (Combined
copy job)’ on page 113.
WizardsYou need 5 copies of a
document. Y ou also want to
include a photo in each
copied set.
30Chapter 3 - Get to know the Digital Copier
Smart solutions to copy your documents
Page 31

HowSmart solutionWhat would you like to do
Use the special feeder to
insert such a sheet of paper
‘Copy on special material
inserted in the special
feeder’ on page 112.
Special feederUse paper that is too heavy
to be handled by paper
trays.
31Chapter 3 - Get to know the Digital Copier
Smart solutions to copy your documents
Page 32
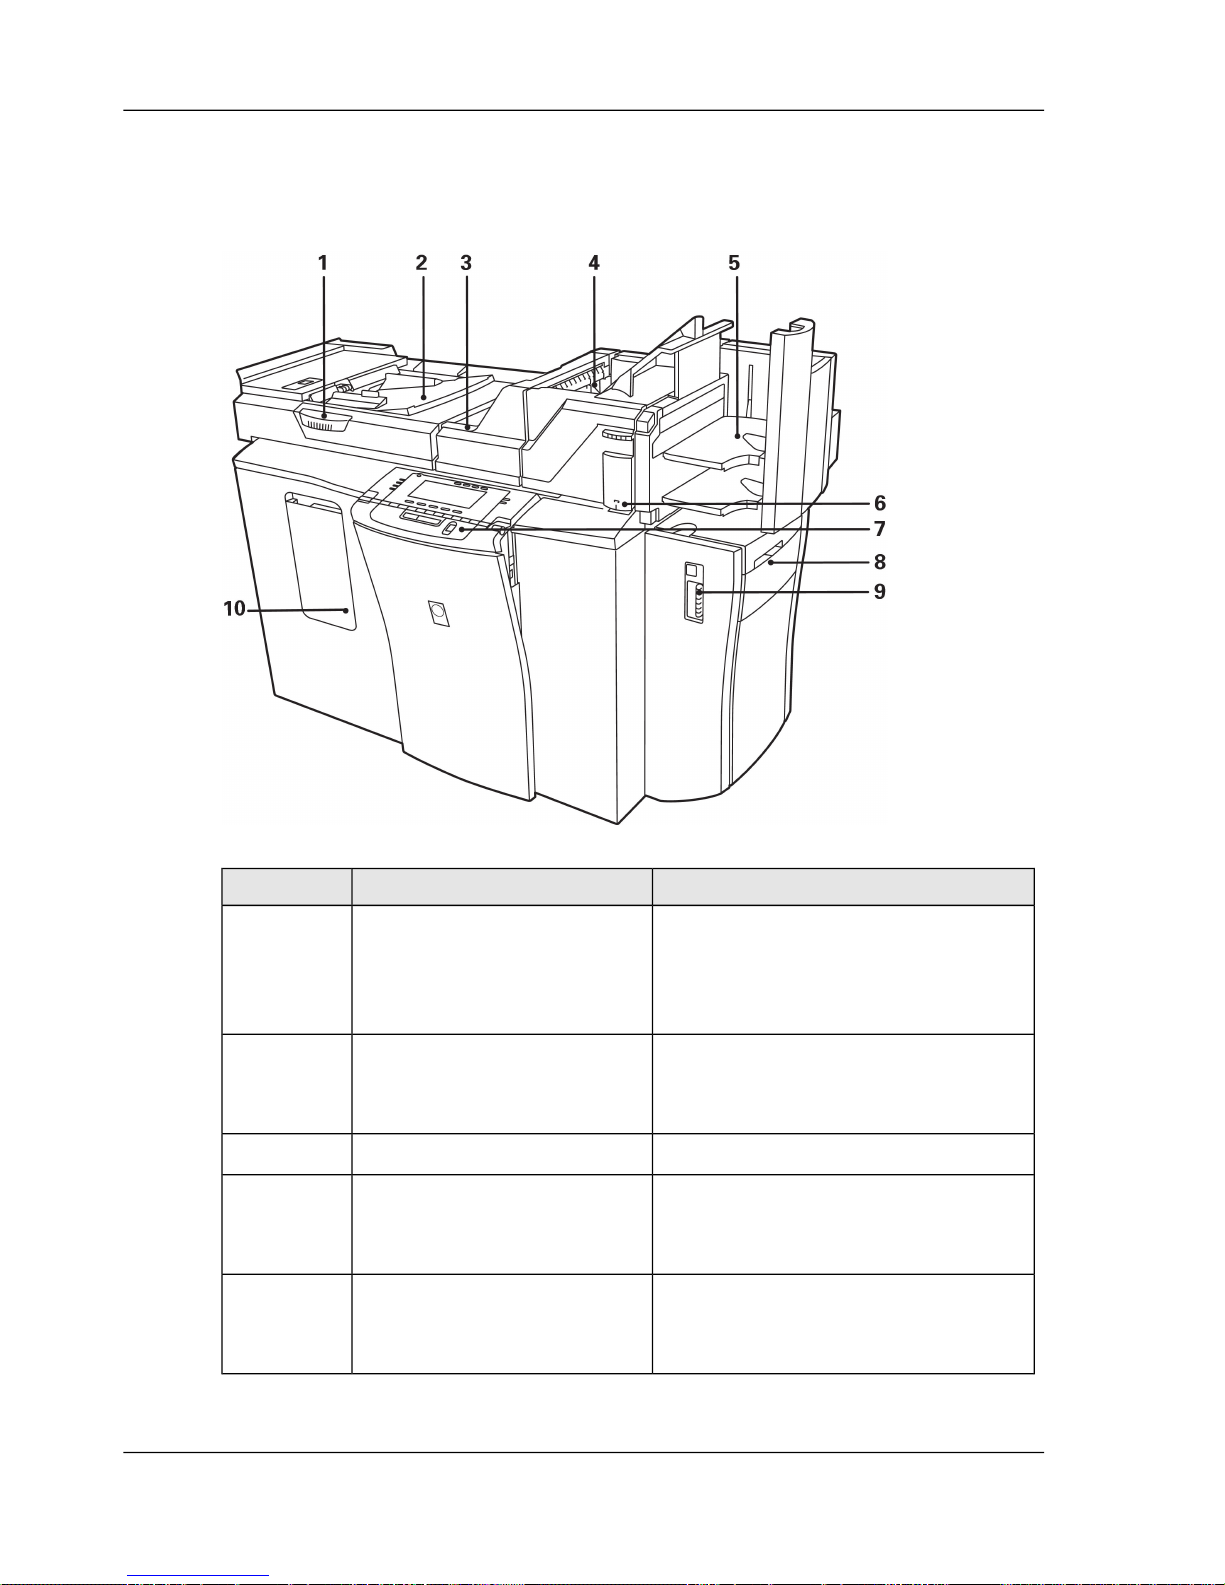
The Parts of the Digital Copier
The Digital Copier machine
[15]
DescriptionComponentNumber
Use the platen for originals that do
not fit into the automatic document
feeder. One side of the original is
scanned.
Access to the platen1
You can place a set of single-sided
or double-sided originals into the
automatic document feeder.
Automatic document feeder2
Originals are collected in this bin.Original receiving bin3
Copies with special paper sizes or
weights are collected in this bin.
Stapling is not possible.
Multi-size bin4
The A4/Letter 8.5x11 copies and
prints are collected in the finisher.
Stapling is available.
Finisher5
32Chapter 3 - Get to know the Digital Copier
The Parts of the Digital Copier
Page 33
DescriptionComponentNumber
You can staple your copies manually
with this stapler.
Off-line stapler6
Use the operator panel to define job
settings.
Operator panel7
Use the special feeder to copy onto
special materials.
Special feeder8
Access door to paper trays.Paper compartment door9
Toner reservoir access door.Front door10
The finisher
The finisher has two bins to collect the finished sets. The Key operator decides to
which bin the finished sets are sent.
33Chapter 3 - Get to know the Digital Copier
The Parts of the Digital Copier
Page 34
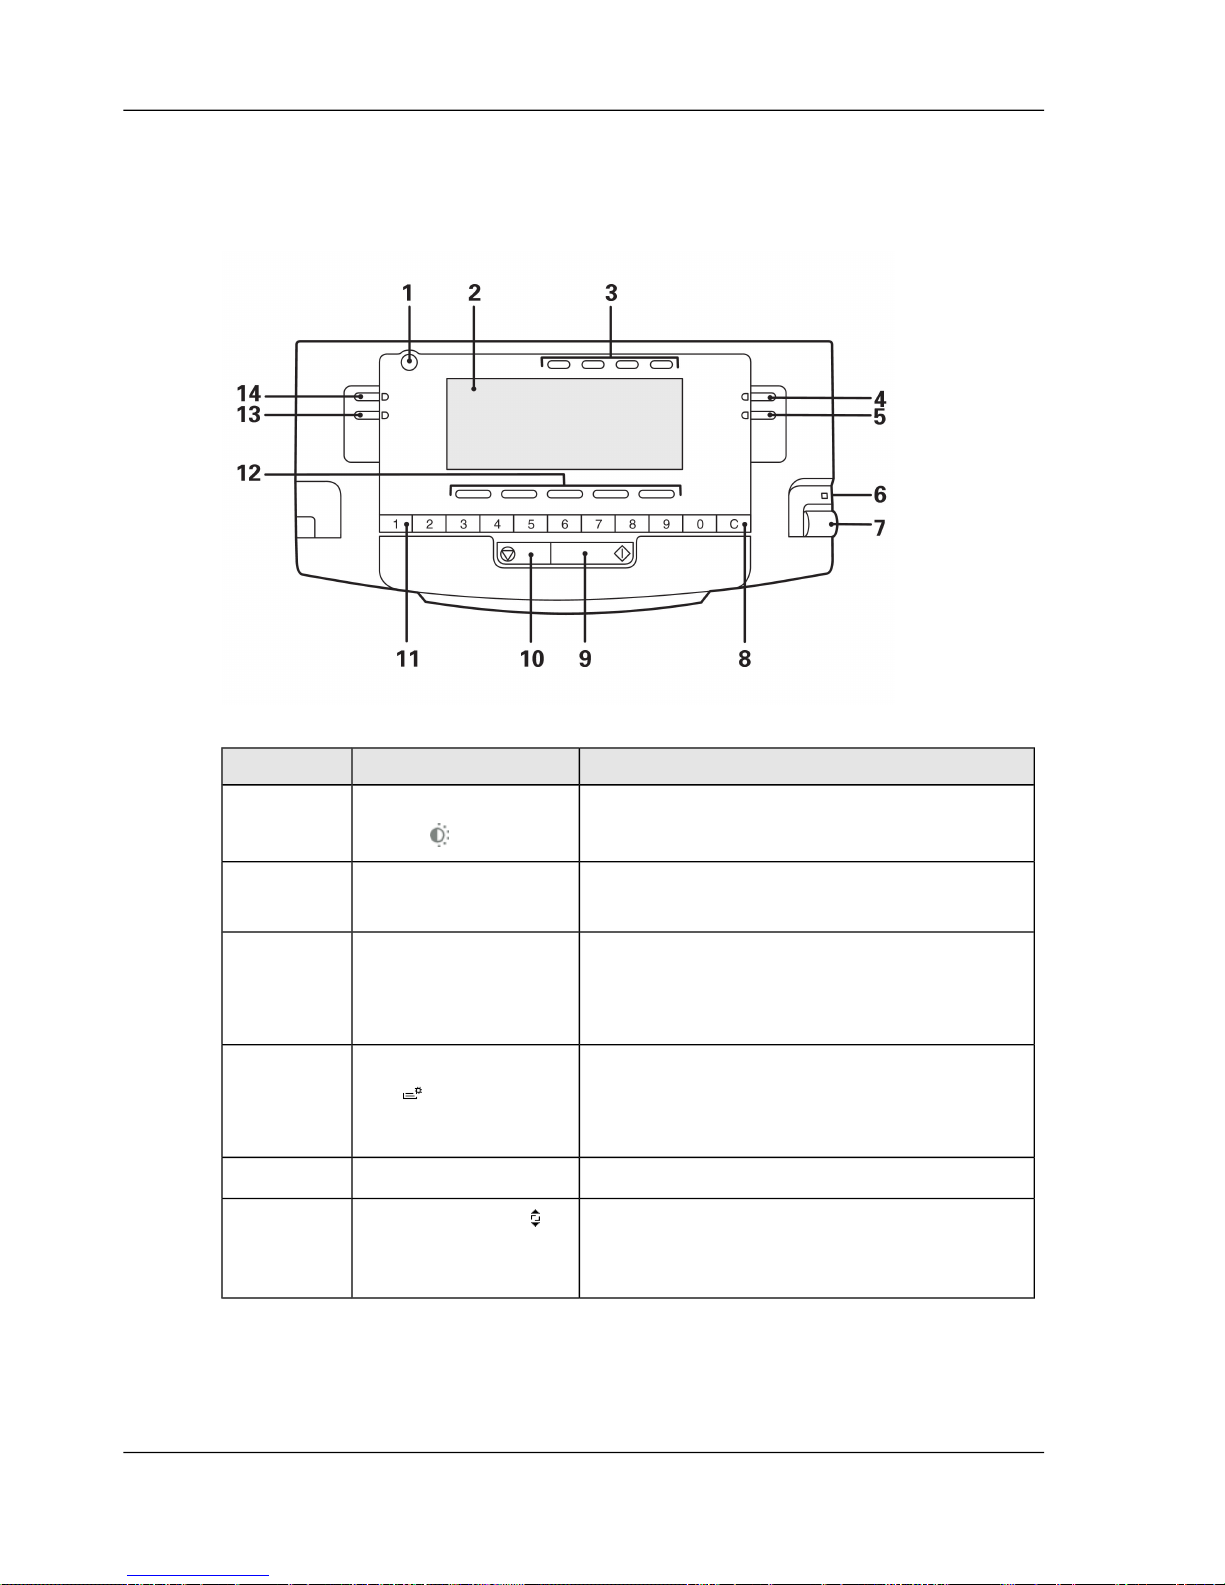
The operator panel of the Digital Copier
The parts of the operator panel
[16]
DescriptionPartNumber
You can adjust the brightness of the screen.Screen brightness
button
1
The display screen shows the settings and the
messages.
Display screen2
Use the keys to:
■
Select a collection of settings.
■
Do a task.
Top keys3
Use the key to:
■
Open the supply information screen.
■
Go to the Key operator system.
Status and system
key
4
Key to open the help topics.Help key5
Key to open a series of settings. You can use
the key after you select an item with the scroll
wheel.
Scroll wheel key
6
34Chapter 3 - Get to know the Digital Copier
The operator panel of the Digital Copier
Page 35
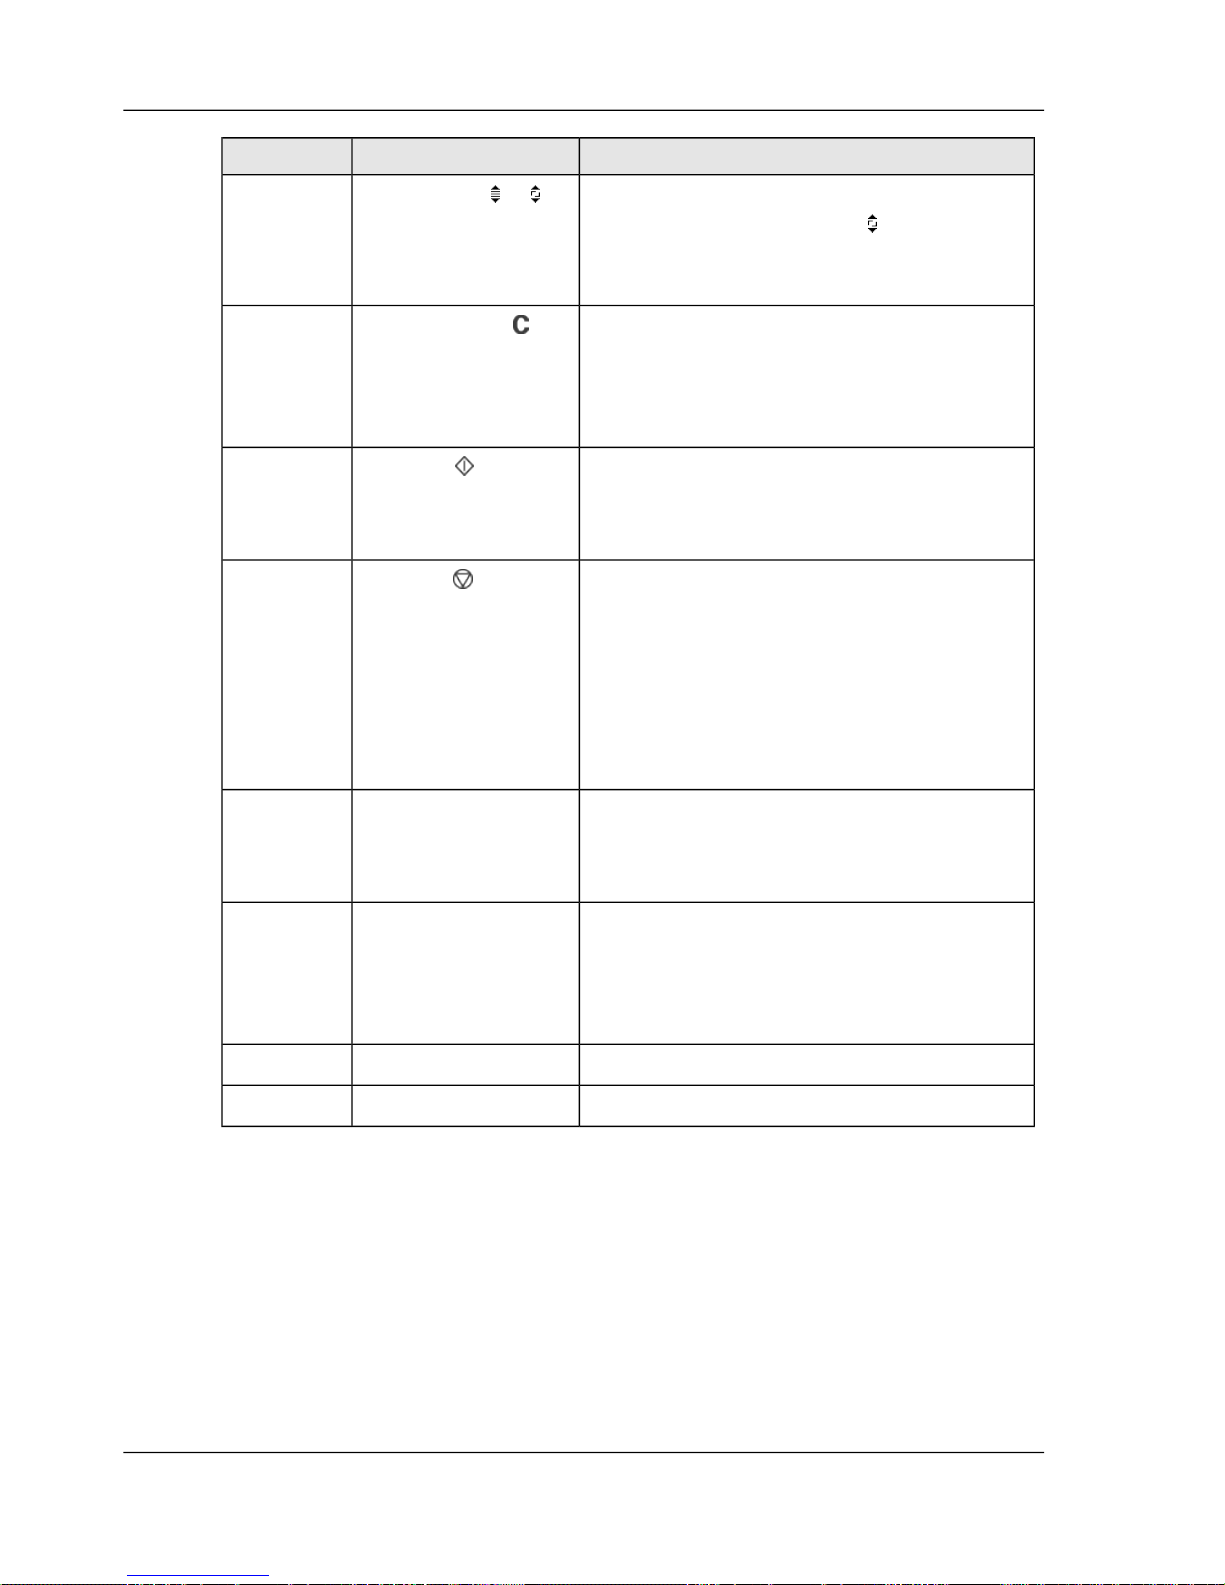
DescriptionPartNumber
Use the scroll wheel to go to an item in a list.
When the display shows the icon, you can
use the scroll wheel key to open a series of
settings after you select an item.
Scroll wheel or
7
Use the key to:
■
Reset the number of sets to 1.
■
Delete the last digit when you enter a
code.
Correction key
8
Use the key to:
■
Starting a job.
■
Confirm the changes.
Start key
9
Use the key to:
■
Stop a job.
■
Finish your jobs if you must enter a PIN
to get access to the settings. If you do not
stop the job with the Stop key, another
user could process jobs that are charged
to your user account.
Stop key
10
Use the keys to:
■
Enter a code or a PIN.
■
Entering the number of sets.
Numeric keys11
Use the keys to:
■
Select a collection of settings.
■
Do a task.
■
Select a value or a function.
Bottom keys12
Use the key to go to the wizards.Wizards key13
Use the key to go to the copy settings.Copy key14
35Chapter 3 - Get to know the Digital Copier
The operator panel of the Digital Copier
Page 36
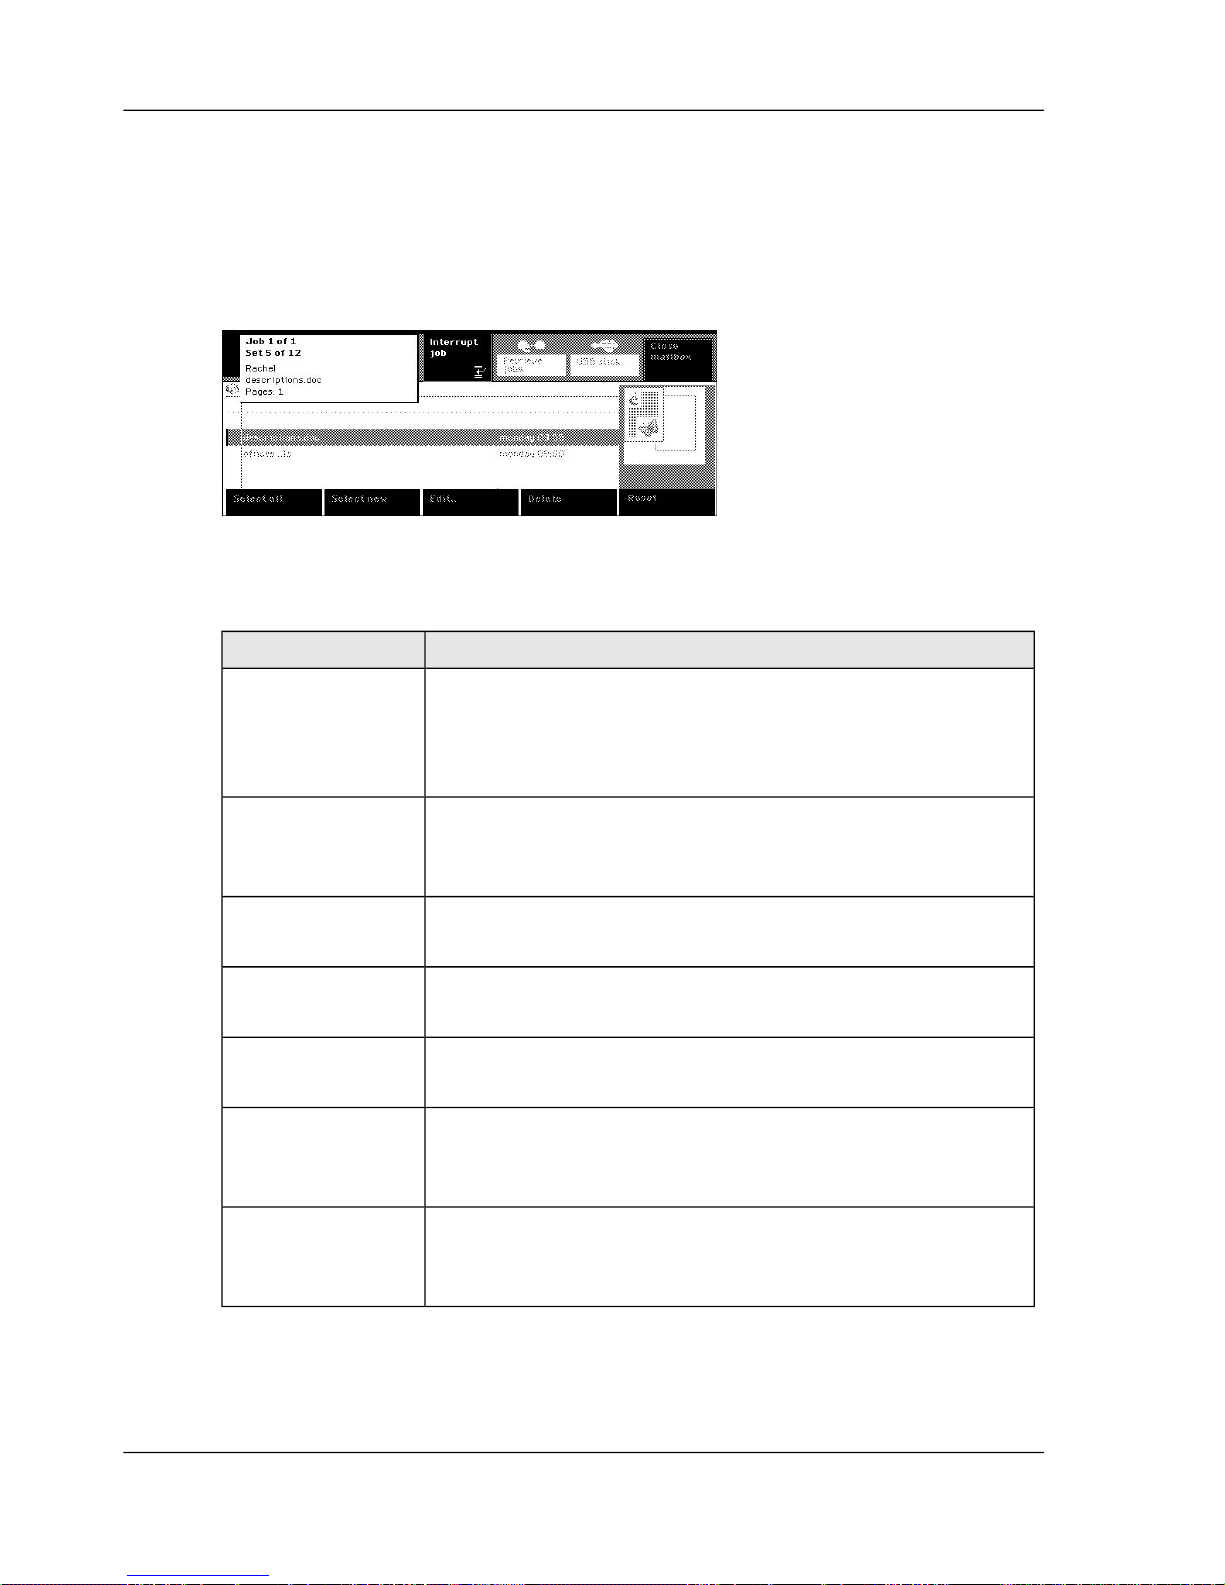
What can the messages of the Digital Copier tell you
The message box
The message box gives you information about the current status or acti vity of the Océ
VarioPrint® 2062/75 .
What can the messages tell you
[17]
DescriptionMessage
To switch the machine on, you must press the ON / OFF
button on the machine. The machine needs 8 minutes to warm
up ‘Turn the Océ VarioPrint® 2062/75 on or off’ on page
38.
No messages: The
display screen is
off
When the machine is warming up you can already make
settings for a job. The printing of the copy job starts after the
machine has warmed up.
Machine is
warming up
The machine is ready to copy.Ready to start a
job
The machine is processing a job. You are informed about the
progress of the job.
Busy
The machine has entered the Low power mode. Y ou can press
any key to leave the Low power mode.
Low power mode
The machine has entered the Switch-off mode. Y ou can press
any key to leave the Switch-off mode. The machine needs 8
minutes to wake up.
Switch-off mode
If an error occurred, you cannot use the machine. Follow the
instructions on the display screen ‘Correct the errors’ on
page 162.
Error
36Chapter 3 - Get to know the Digital Copier
What can the messages of the Digital Copier tell you
Page 37

Chapter 4
Get started
o
37
Page 38
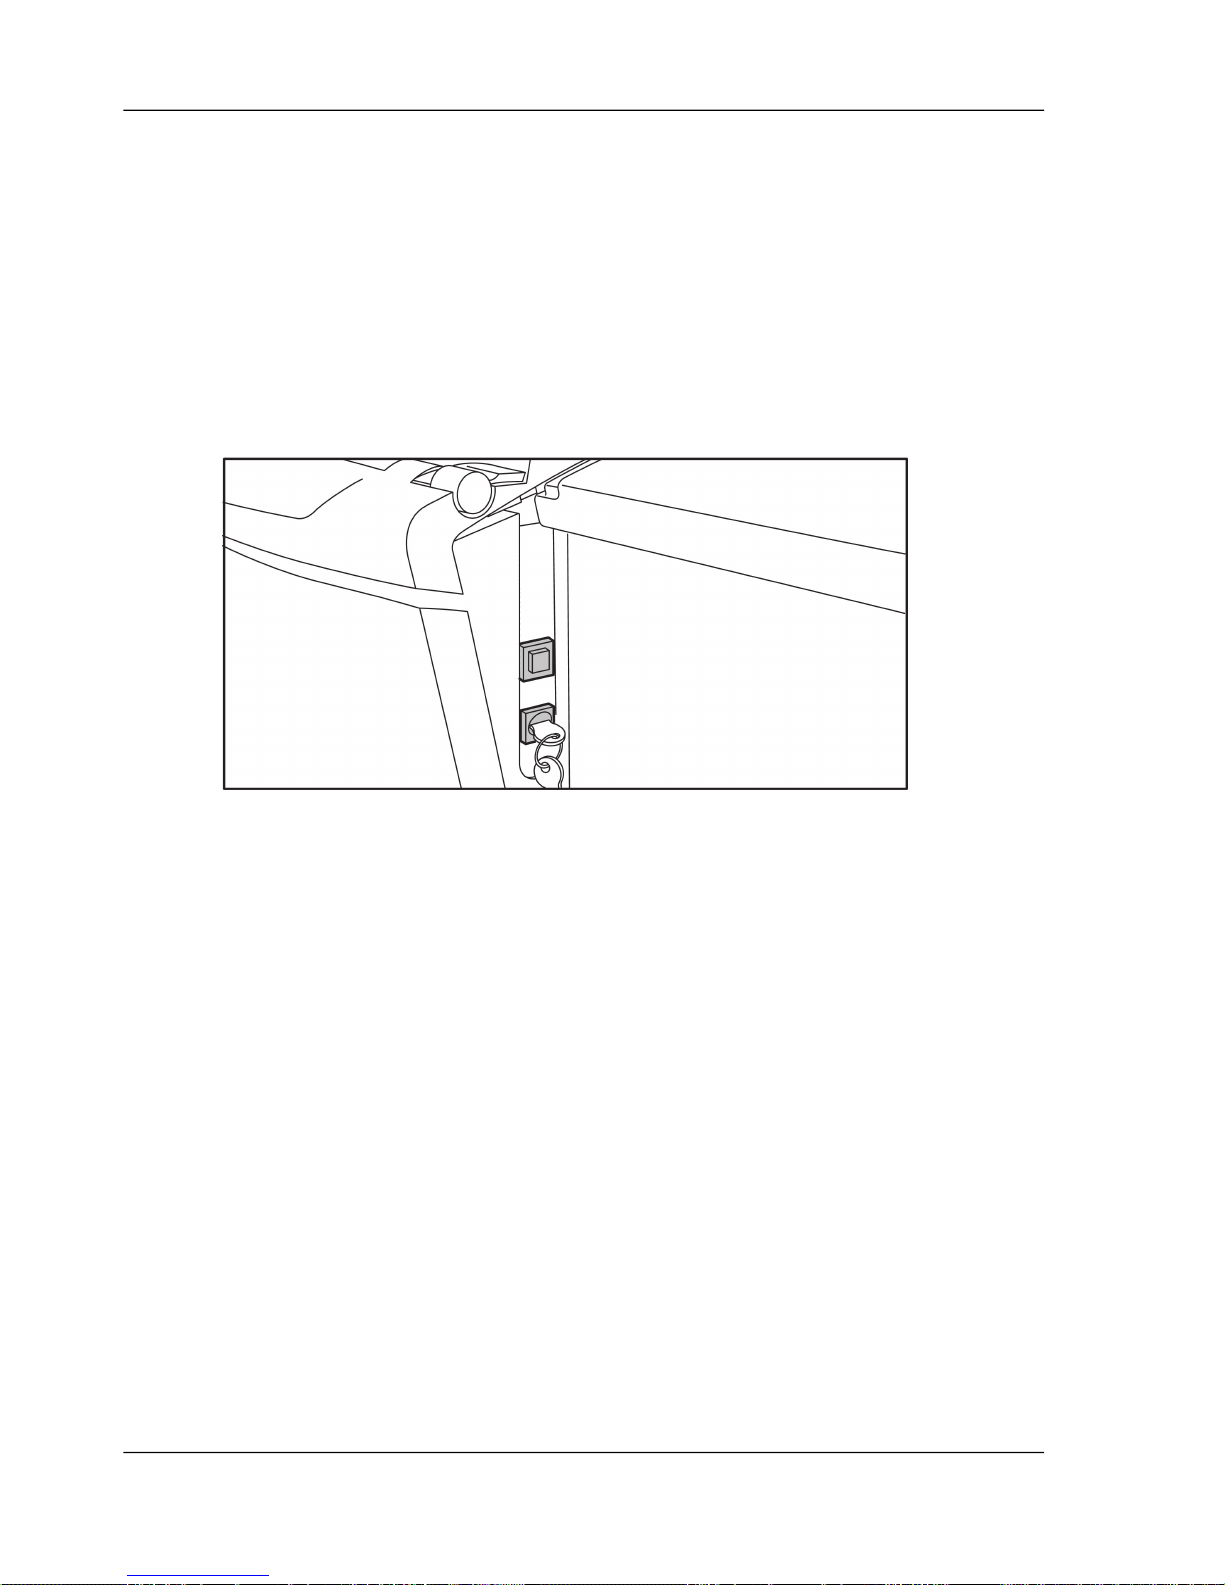
Turn the Océ VarioPrint® 2062/75 on or off
Introduction
The Océ VarioPrint® 2062/75 must be switched on to do your jobs. When the Key
operator is responsible for turning the machine on or off, the following information
is not relevant for you. Otherwise, use the following procedure to turn the machine
on or off.
You can turn the machine off and then back on to correct an error.
[19] The ON / OFF button
Before you begin
The Océ VarioPrint® 2062/75 can have a key switch, to prevent unauthorized use.
Then you need the key, before you can turn the machine on or off.
How to turn the Océ VarioPrint® 2062/75 on
1.
Turn the key to the right, to the horizontal position, if a key switch is available.
2.
Press the green ON / OFF button.
The color of the LED in the button lights up. The system needs 8 minutes to reach the
operating temperature. The display screen indicates when the machine is ready.
How to turn the Océ VarioPrint® 2062/75 off
1.
Make sure that no job is processed.
2.
Turn the key to the left, to the vertical position, if a key switch is available.
3.
Press the green ON / OFF button.
4.
Remove the key, if applicable.
38Chapter 4 - Get started
Turn the Océ VarioPrint® 2062/75 on or off
Page 39
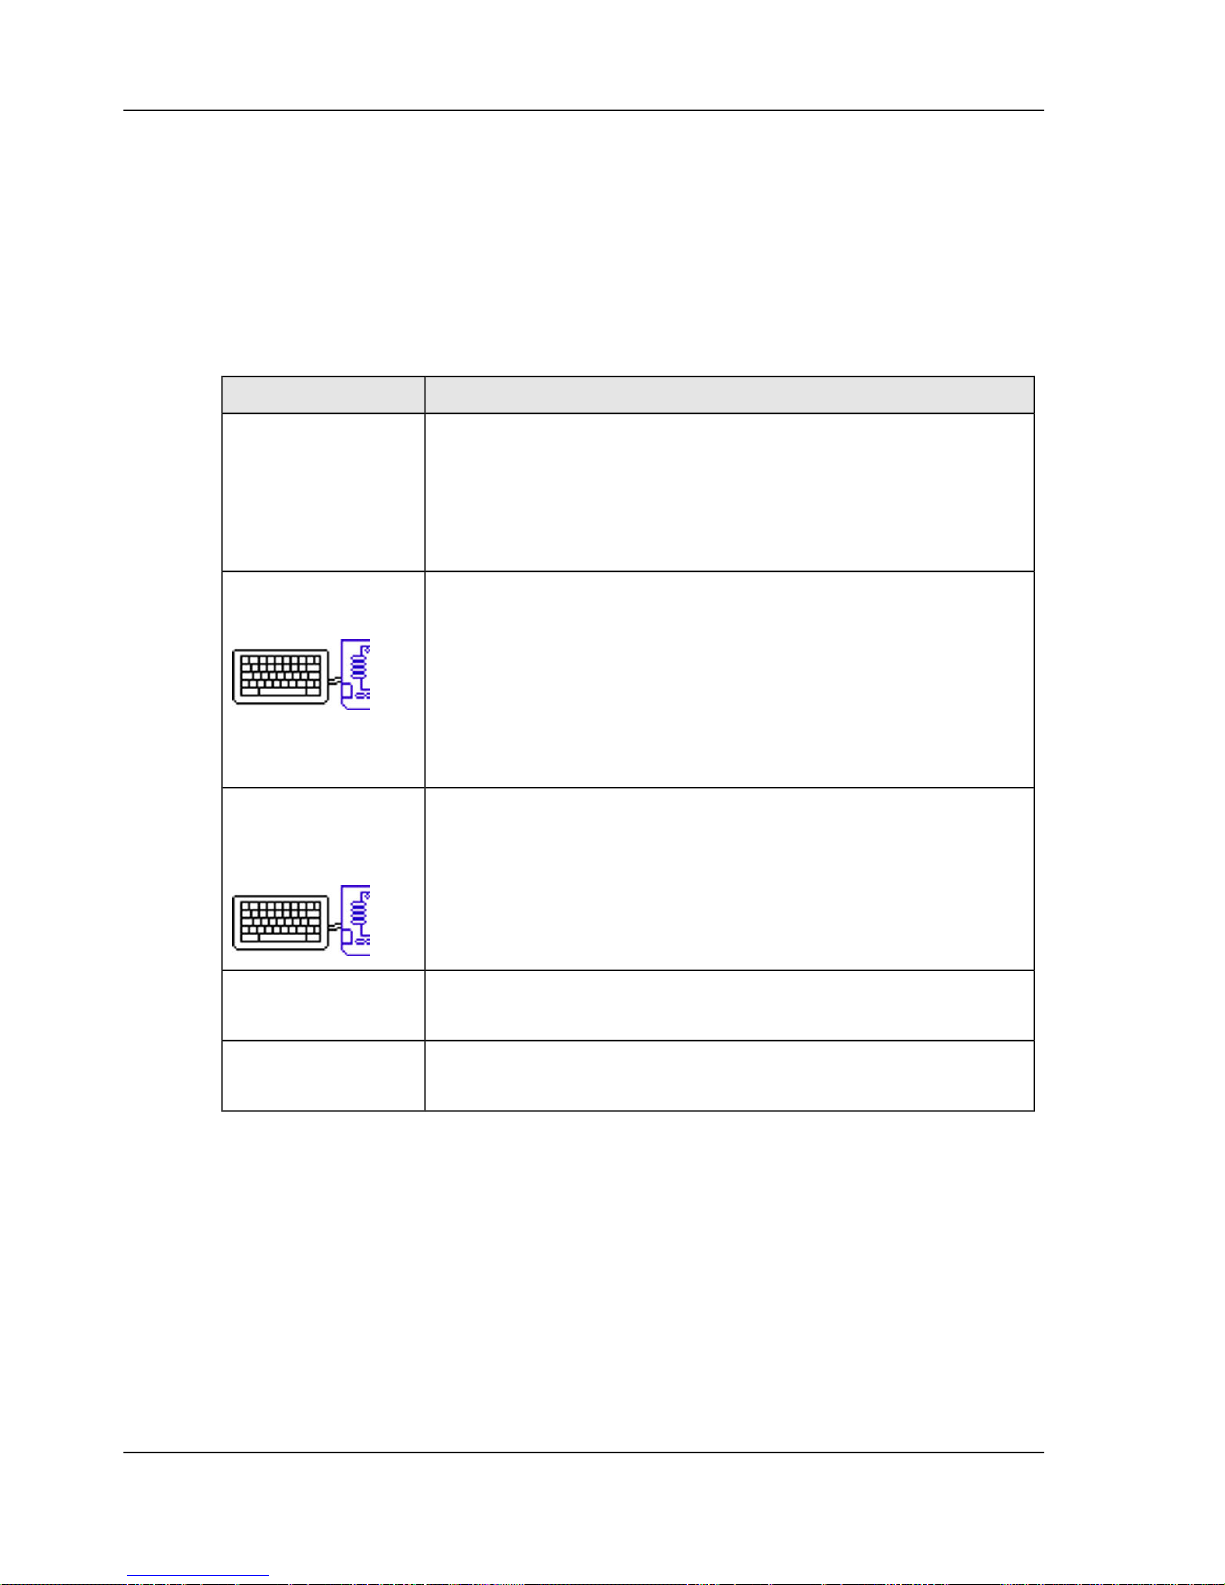
Need identification, coins or a credit card
Introduction
Depending the agreements of your department, the Key operator decides who is
allowed to get access to the menu. So you can be asked to identify yourself or to use
coins or a credit card before you can start the jobs.
[18]
DescriptionWhen you need
You may be asked to enter a PIN. The Océ VarioPrint®
2062/75 includes an accounts database, to store information
about your processed jobs. The job pages you make are
charged to your user account. The K ey operator decides ho w
many job pages you are allowed to make.
to enter a PIN
When a keyboard is installed you may be asked to enter your
user name and password. You may also be asked to select a
domain. The Océ VarioPrint® 2062/75 includes an accounts
database, to store information about your processed jobs. The
job pages you make are charged to your user account. The
Key operator decides how many job pages you are allowed
to make.
to identify with a
user name
When a keyboard is installed and project accounting is
configured on your system, you may be asked to enter your
user information as well as a project number. The Océ
VarioPrint® 2062/75 includes an accounts database, to store
information about the processed jobs charged to the projects.
to identify with
user name and
project number
You need coins to start a job. You may be asked to add credits
to complete a job.
coins
You need a credit card to start a job. You may be asked to
recharge your credit card when there are not enough credits.
a credit card
Before you begin
Ask the Key operator about:
■
what you need to do your jobs,
■
your PIN or your user name, project number and password,
■
the number of job pages you are allowed to make.
39Chapter 4 - Get started
Need identification, coins or a credit card
Page 40
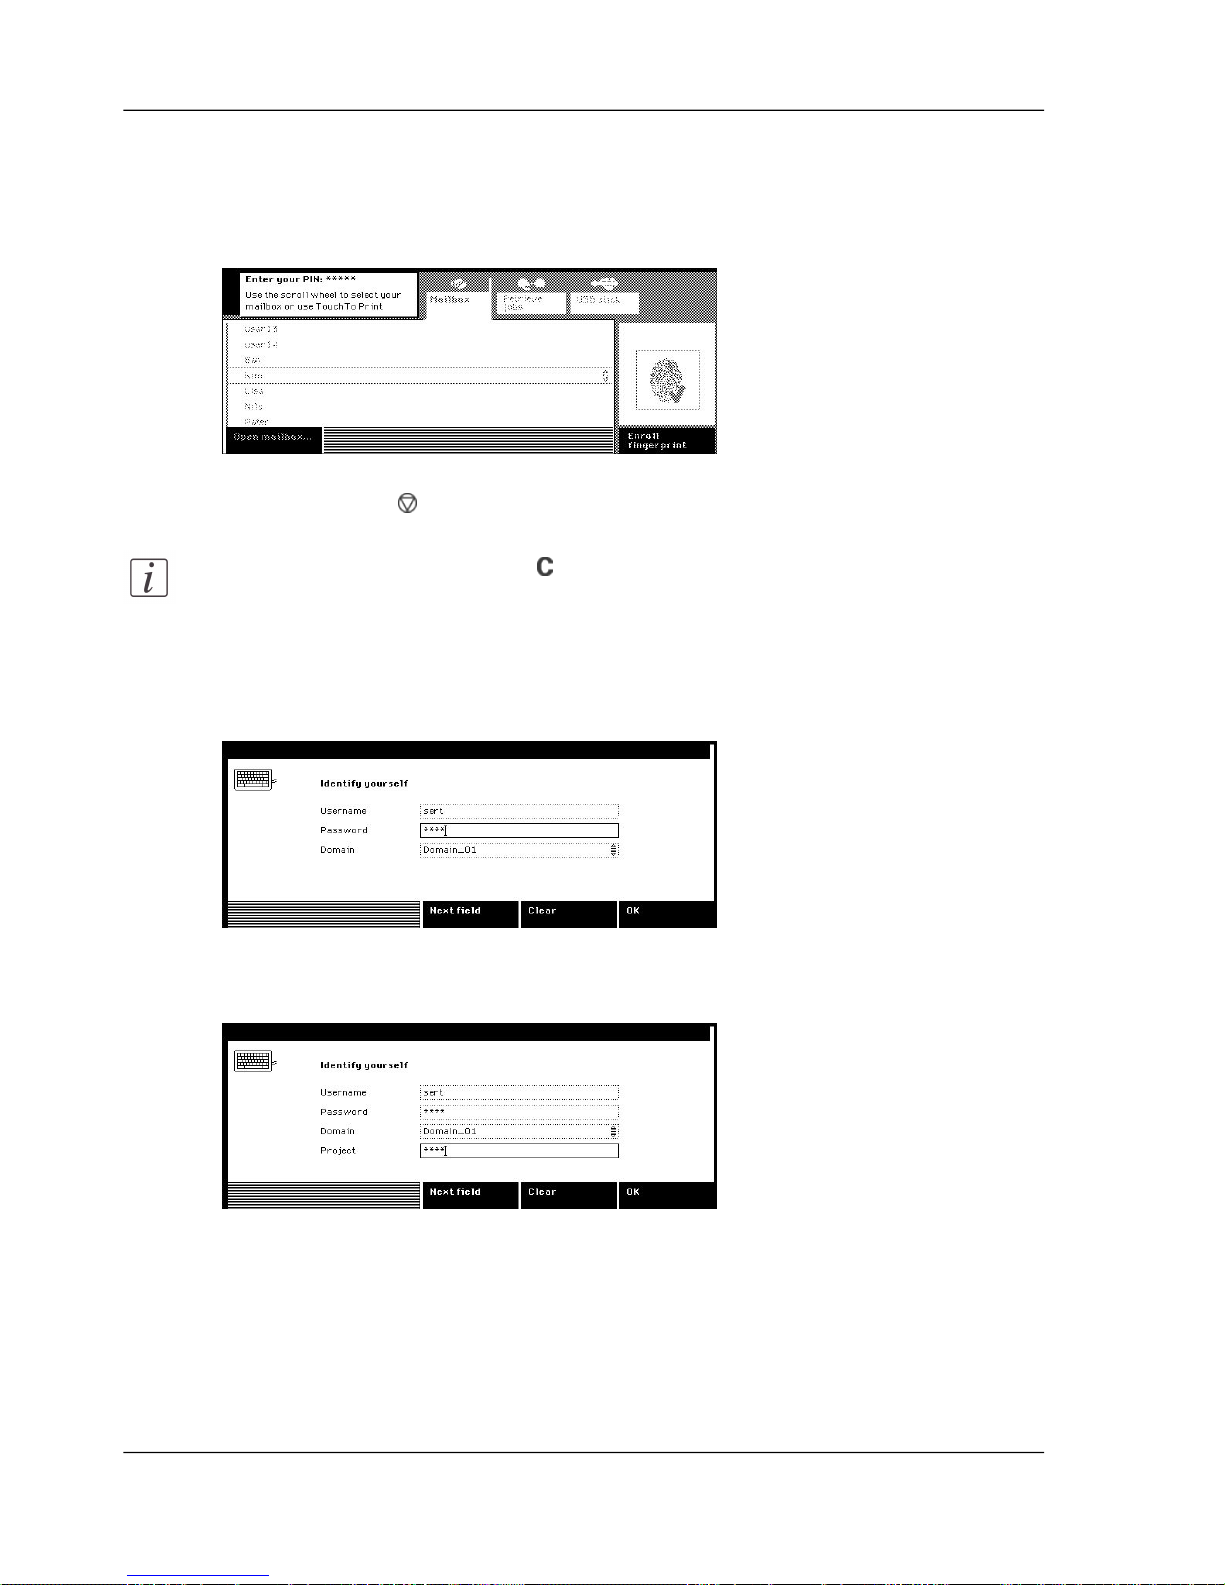
How to use your PIN
1.
Use the numeric keys to enter your PIN (5 digits). If the PIN is correct, the display screen
menu appears.
2.
Start one or more jobs. The job pages are charged to your user account.
3.
Press the Stop key after your last job.
Note:
Press the Corr ection ke y when you make a mistake while entering the PIN.
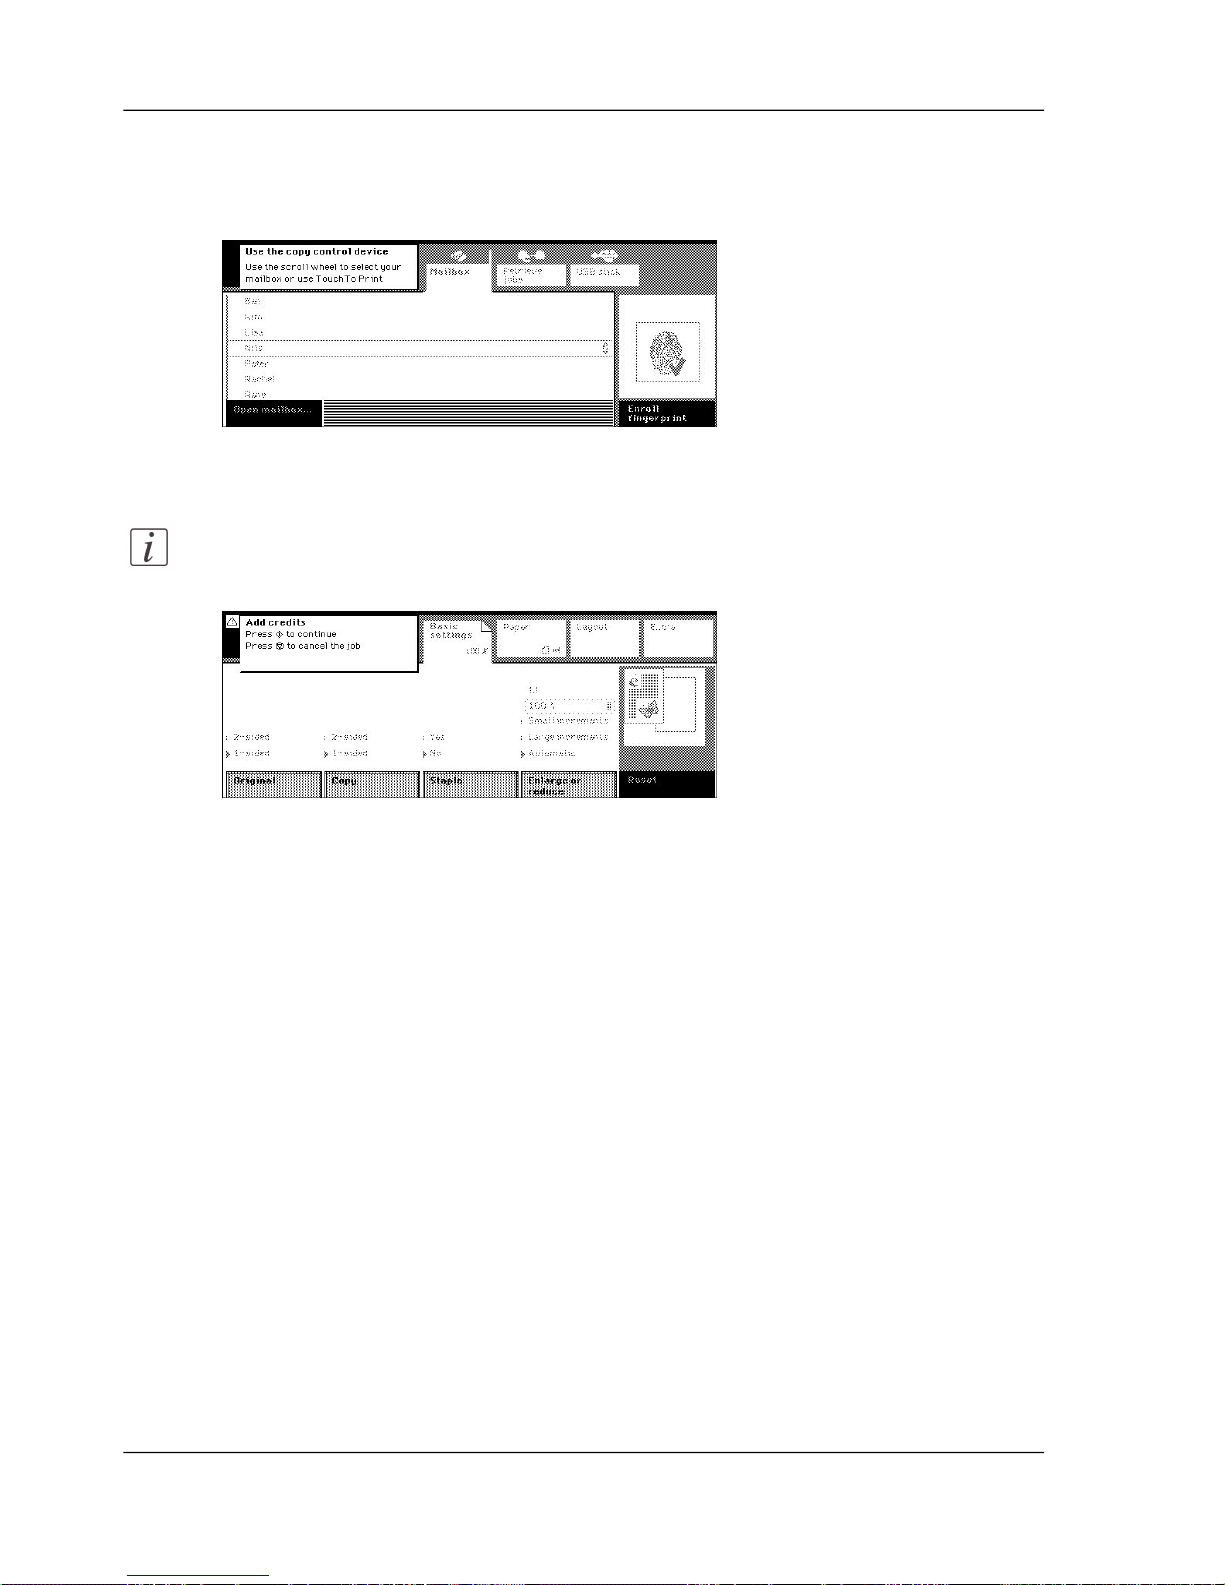
How to identify yourself using the keyboard
1.
Use the keyboard keys to enter your user name.
2.
Use the keyboard keys to enter your password.
3.
Check the selected domain, if this is a part of the requested login information.
4.
Use the keyboard keys to enter a project number, if requested.
5.
Press the 'OK' key to confirm your identification.
When your entered information is correct, you can enter the display screen menu.
40Chapter 4 - Get started
Need identification, coins or a credit card
Page 41
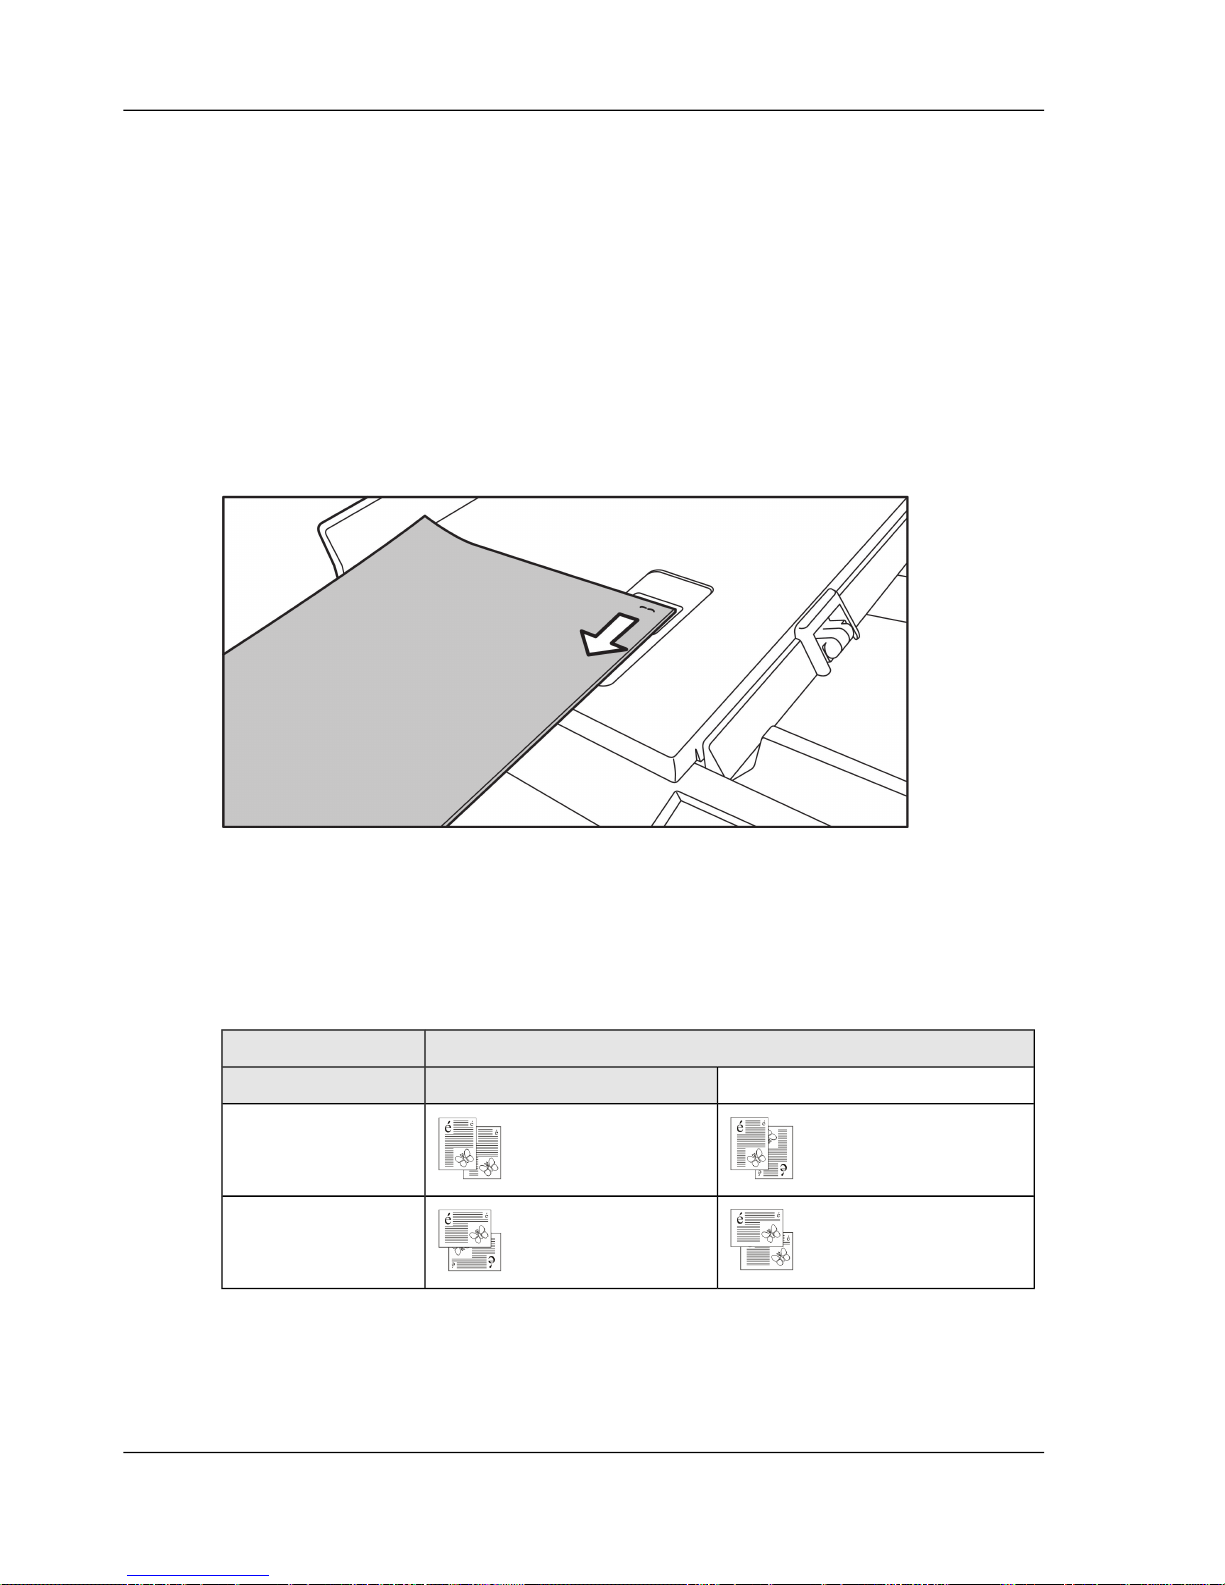
How to use coins or a credit card
1.
Put the credit card or coins in the slot.
2.
Start the jobs.
3.
Add credits when you run out of credits and your job is not yet finished.
Note:
Your job stops when no credits are added. Only the paid part of your job will
be printed.
4.
Remove the credit card, if applicable.
41Chapter 4 - Get started
Need identification, coins or a credit card
Page 42

42Chapter 4 - Get started
Need identification, coins or a credit card
Page 43

Chapter 5
Place your originals
o
43
Page 44
Your originals
Examine your originals
When you prepare your job, you must first examine your originals. Examine:
■
if there are staples or paper clips to remove,
■
the paper size of the originals,
■
if the originals are printed 1-sided or 2-sided,
■
if the orientation on the originals is portrait or landscape,
■
if the originals are long-edge or short-edge bound (only for 2-sided originals),
■
where to place the originals,
■
if you need separate job parts.
[27] Remove the staples from your originals
The orientation and the binding of your documents
Orientation is the way in which the information is displayed on a sheet. Documents
can have portrait or landscape orientation. Binding indicates how a page turns. The
following table shows the relation between binding and orientation.
[19]
BindingOrientation
Short-edgeLong-edge
Portrait
Landscape
Where to place the originals
The following table shows when to use the automatic document feeder and the platen.
44Chapter 5 - Place your originals
Your originals
Page 45
[20]
PlatenAutomatic document feeder
A3/Tabloid 11x17 maximum
■
A3/Tabloid 11x17
■
A4/Letter 8.5x11
■
A5/Us Std 5.5x8.5
Paper sizes
Less than 60 g/m² or more than 170
g/m²
60 -170 g/m²Weight
■
One sheet, only 1-sided
■
One or two pages of a book
Not more than 50,
1-sided or 2-sided
Number of
sheets of the
document
■
An open magazine
■
A curled, damaged or folded
original
■
Art paper or transparent film
■
A photo
■
A document
containing A4/Letter
8.5x11 pages.
■
Smooth and flat
originals
Examples
Note:
Read the original specifications for more information on the use of originals
‘Originals to use’ on page 188.
When do you need separate job parts
Split your originals in separate job parts and use the Assemble jobs wizard ‘Assemble
separate copy job parts (Combined copy job)’ on page 113‘Assemble separate scan
job parts (Combined scan job)’ on page 144, when the set of originals contains:
■
more than 50 A4/Letter 8.5x11, 50 A5/Us Std 5.5x8.5 or 35 A3/Tabloid 11x17
sheets,
■
pages that you must place on the platen,
■
mixed size originals.
The following examples illustrate when you need separate job parts.
■
Your document has mixed size pages, for example 20 A4/Letter 8.5x11 sheets and
three A3/Tabloid 11x17 sheets. Your job needs two job parts, one to copy or scan
your A4/Letter 8.5x11 sheets and one to copy or scan your A3/Tabloid 11x17
sheets.
■
Your document has only A4/Letter 8.5x11 pages, but you want to include a photo
that must be placed on the platen. Your job needs two job parts, one to copy or
scan your A4/Letter 8.5x11 sheets with the automatic document feeder and one to
copy or scan your photo from the platen.
■
Your document has 100 A4/Letter 8.5x11 pages. Your job needs two job parts,
each to copy or scan 50 sheets with the automatic document feeder.
45Chapter 5 - Place your originals
Your originals
Page 46

When the Océ VarioPrint® 2062/75 is scanning the originals, you can add more
originals to the set of originals in the automatic document feeder. However, you are
advised to split your set of originals into different job parts. When you add originals
in the automatic document feeder during scanning, there is a possibility that a paper
jam occurs. Then it is necessary to feed all your originals again in the automatic
document feeder and to restart the job.
46Chapter 5 - Place your originals
Your originals
Page 47
Place originals in the automatic document feeder
Introduction
The automatic document feeder can detect the paper size of the originals. The following
table shows how to place your originals in the automatic document feeder ‘Your
originals’ on page 44.
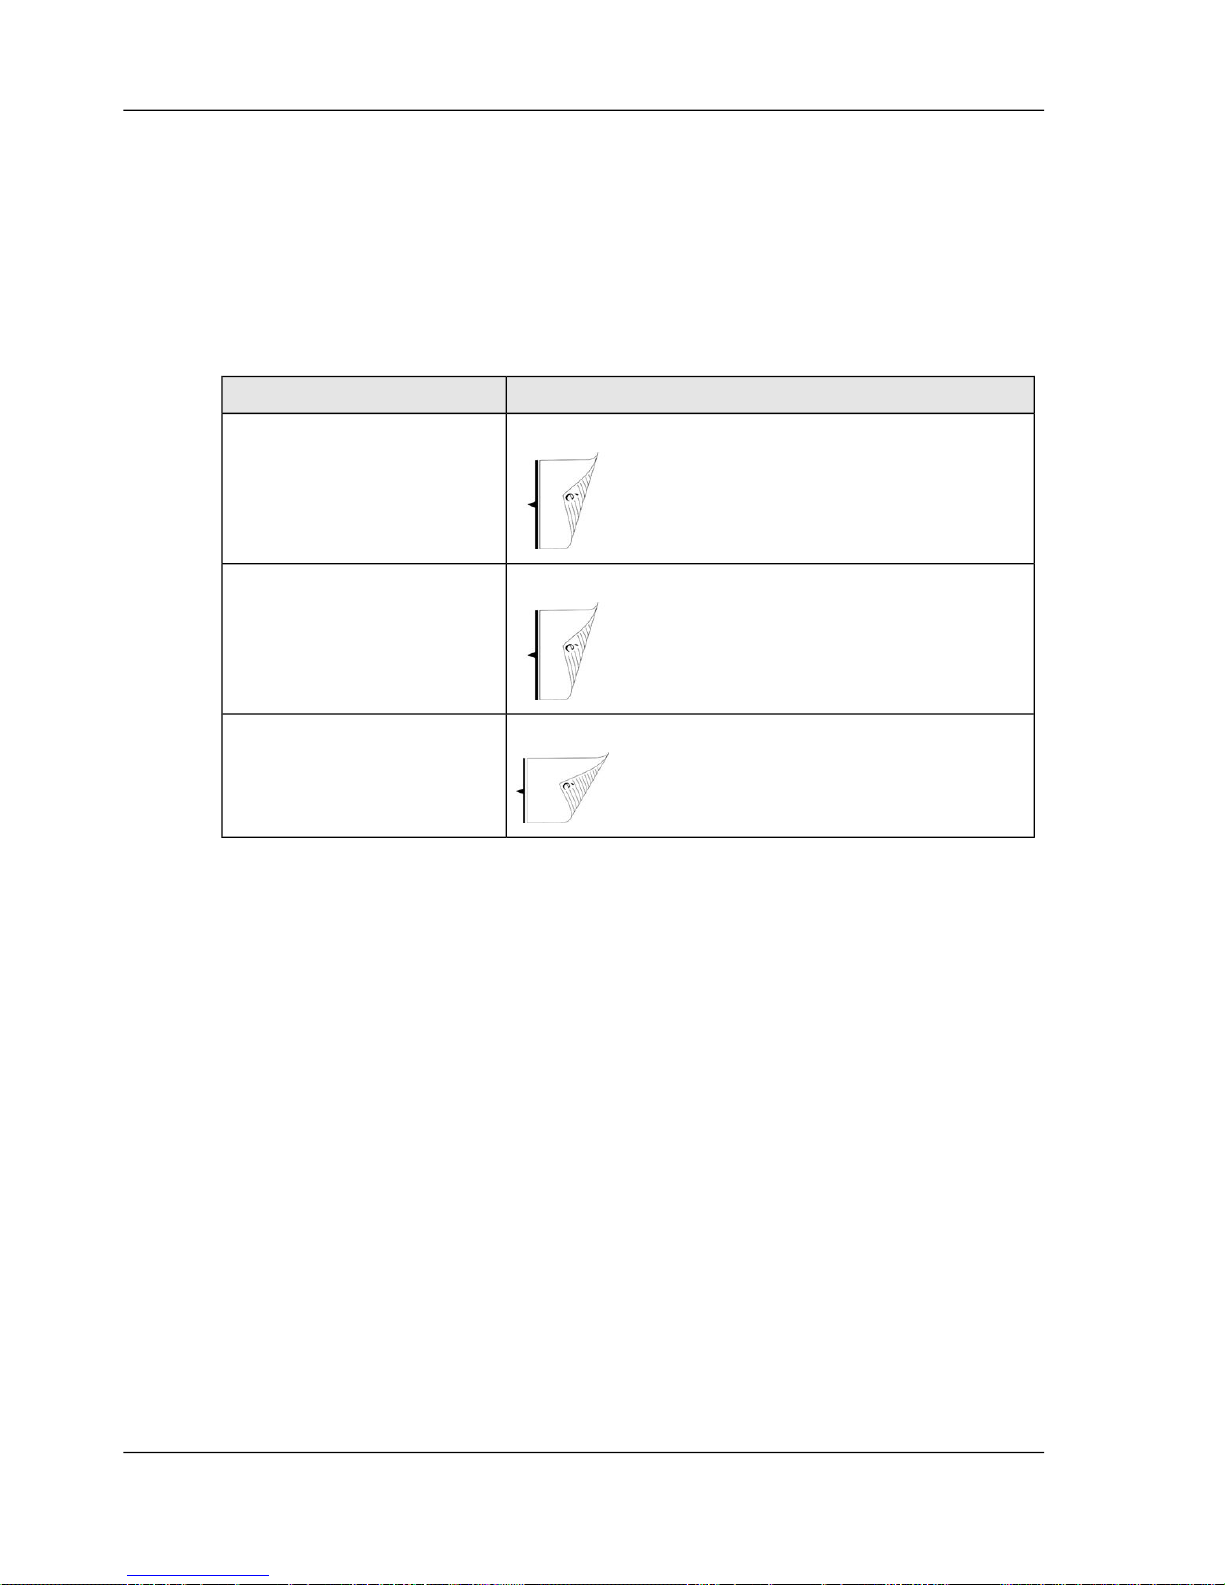
[21]
How to place the originalsPaper size of originals
Long-edgeA4/Letter 8.5x11
Long-edgeA5/Us Std 5.5x8.5
Short-edgeA3/Tabloid 11x17
How to use the automatic document feeder
1.
Arrange the originals in order. Start with 50 originals maximum ‘Your originals’ on page
44.
2.
Hold the originals face-up in reading direction.
3.
Turn the originals upside down.
47Chapter 5 - Place your originals
Place originals in the automatic document feeder
Page 48
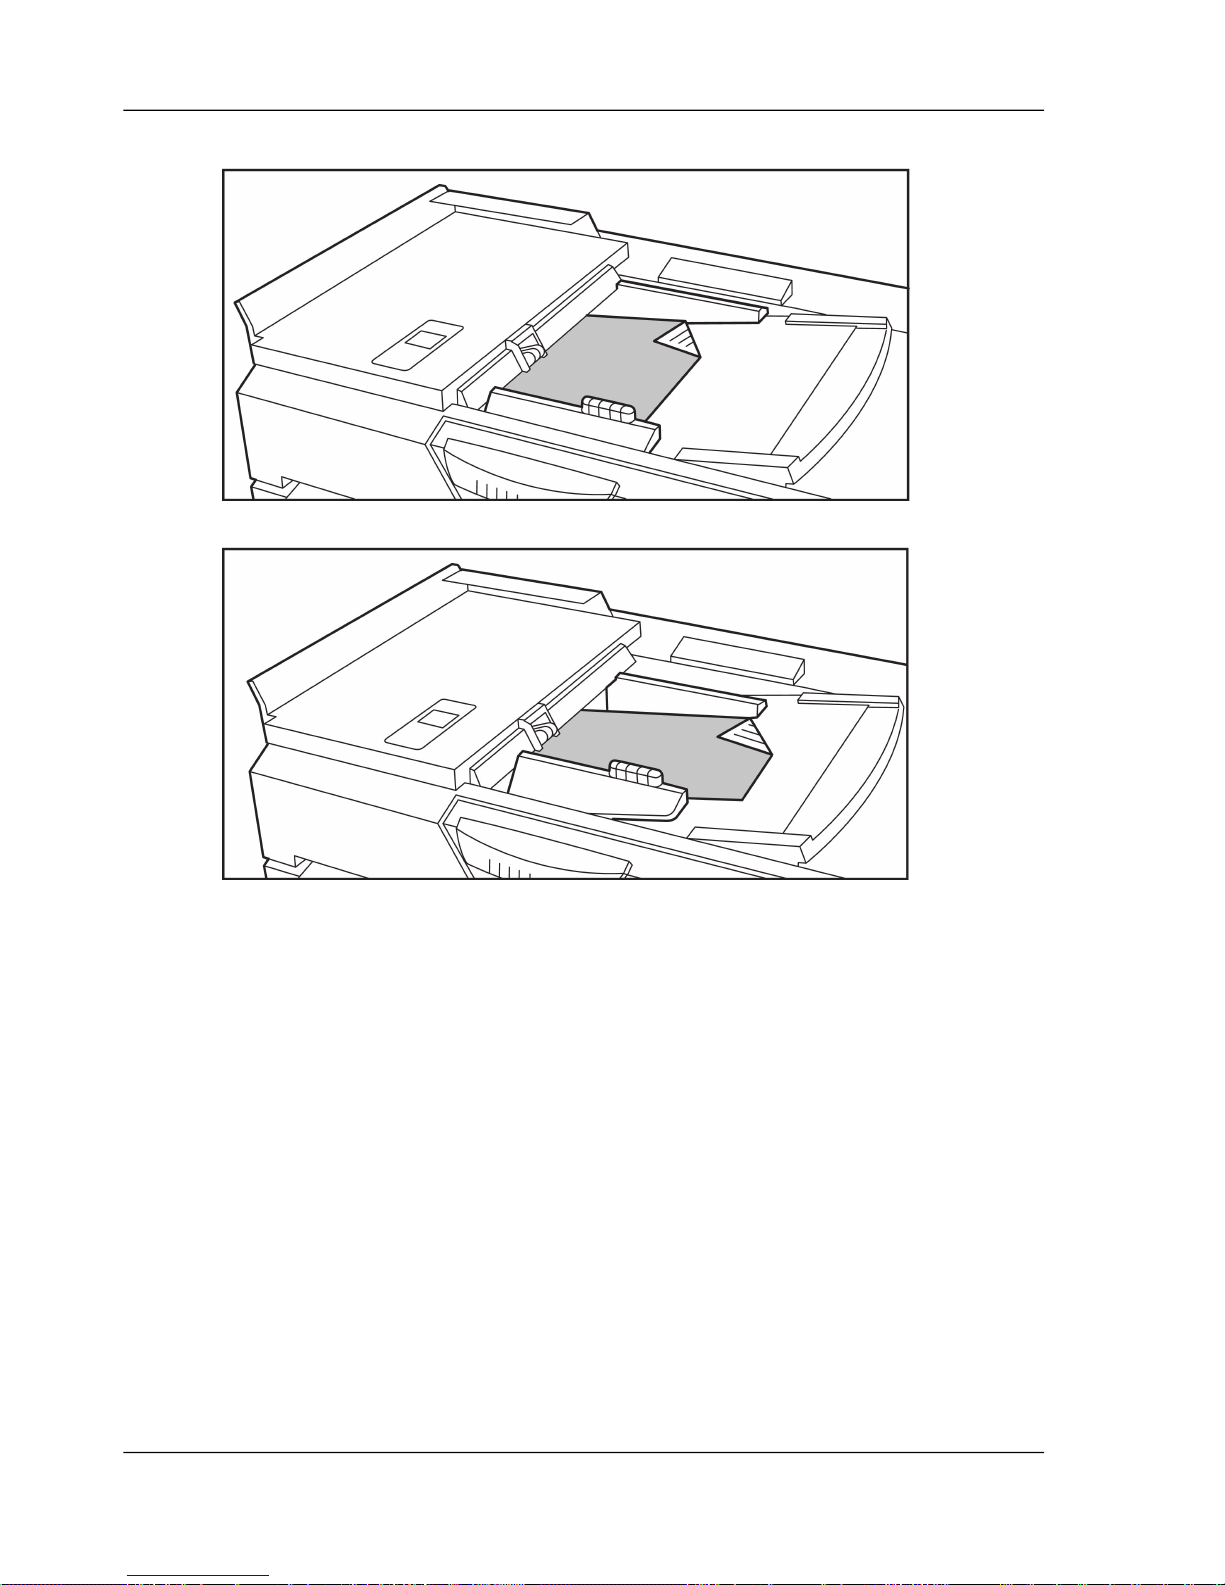
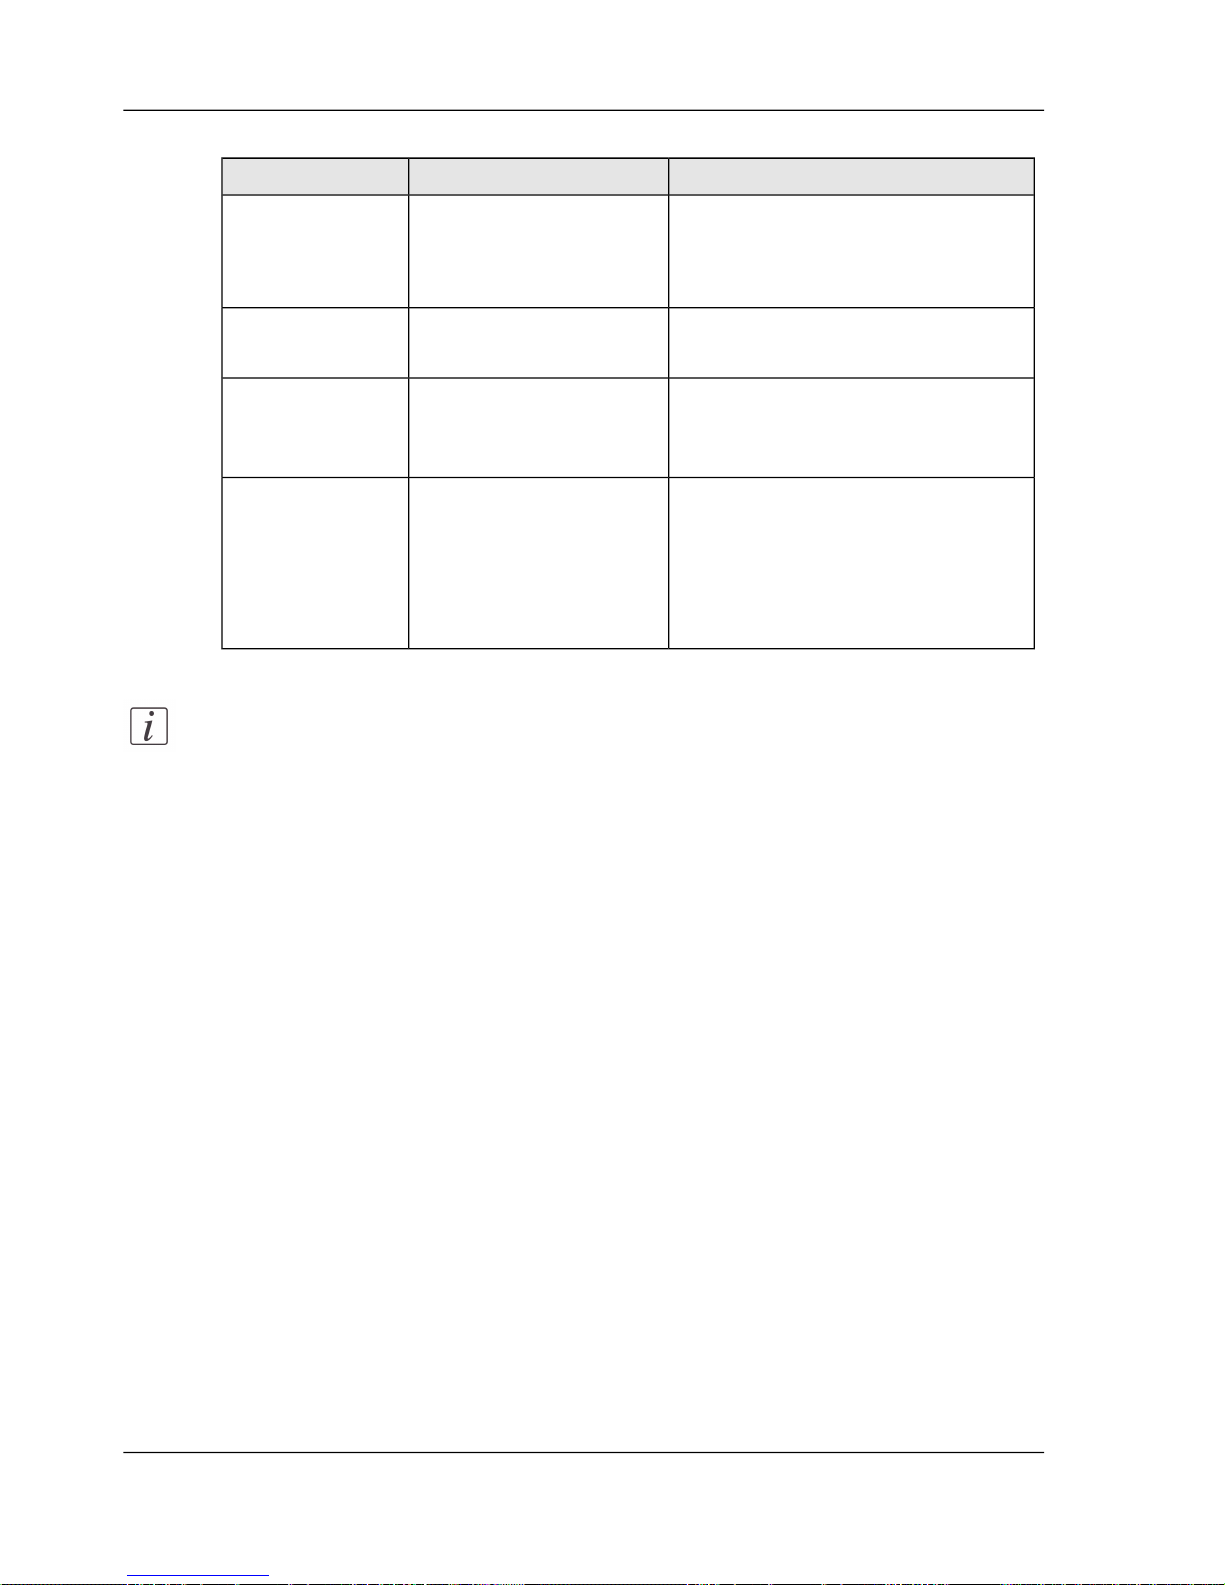
4.
Keep the originals face-down and put the originals into the automatic document feeder.
[35] Long-edge feed direction of the originals
[36] Short-edge feed direction of the originals
5.
Push the sliders towards the edges of the originals to fix the position of the originals.
48Chapter 5 - Place your originals
Place originals in the automatic document feeder
Page 49
Place an original on the platen
Introduction
Use the platen to copy or scan an original that the automatic document feeder cannot
handle ‘Your originals’ on page 44. When you place the original on the platen it is
important that you place the original correctly on the platen. The position depends on
the size to which you want to copy or scan. The following table shows how to place
your original on the platen.
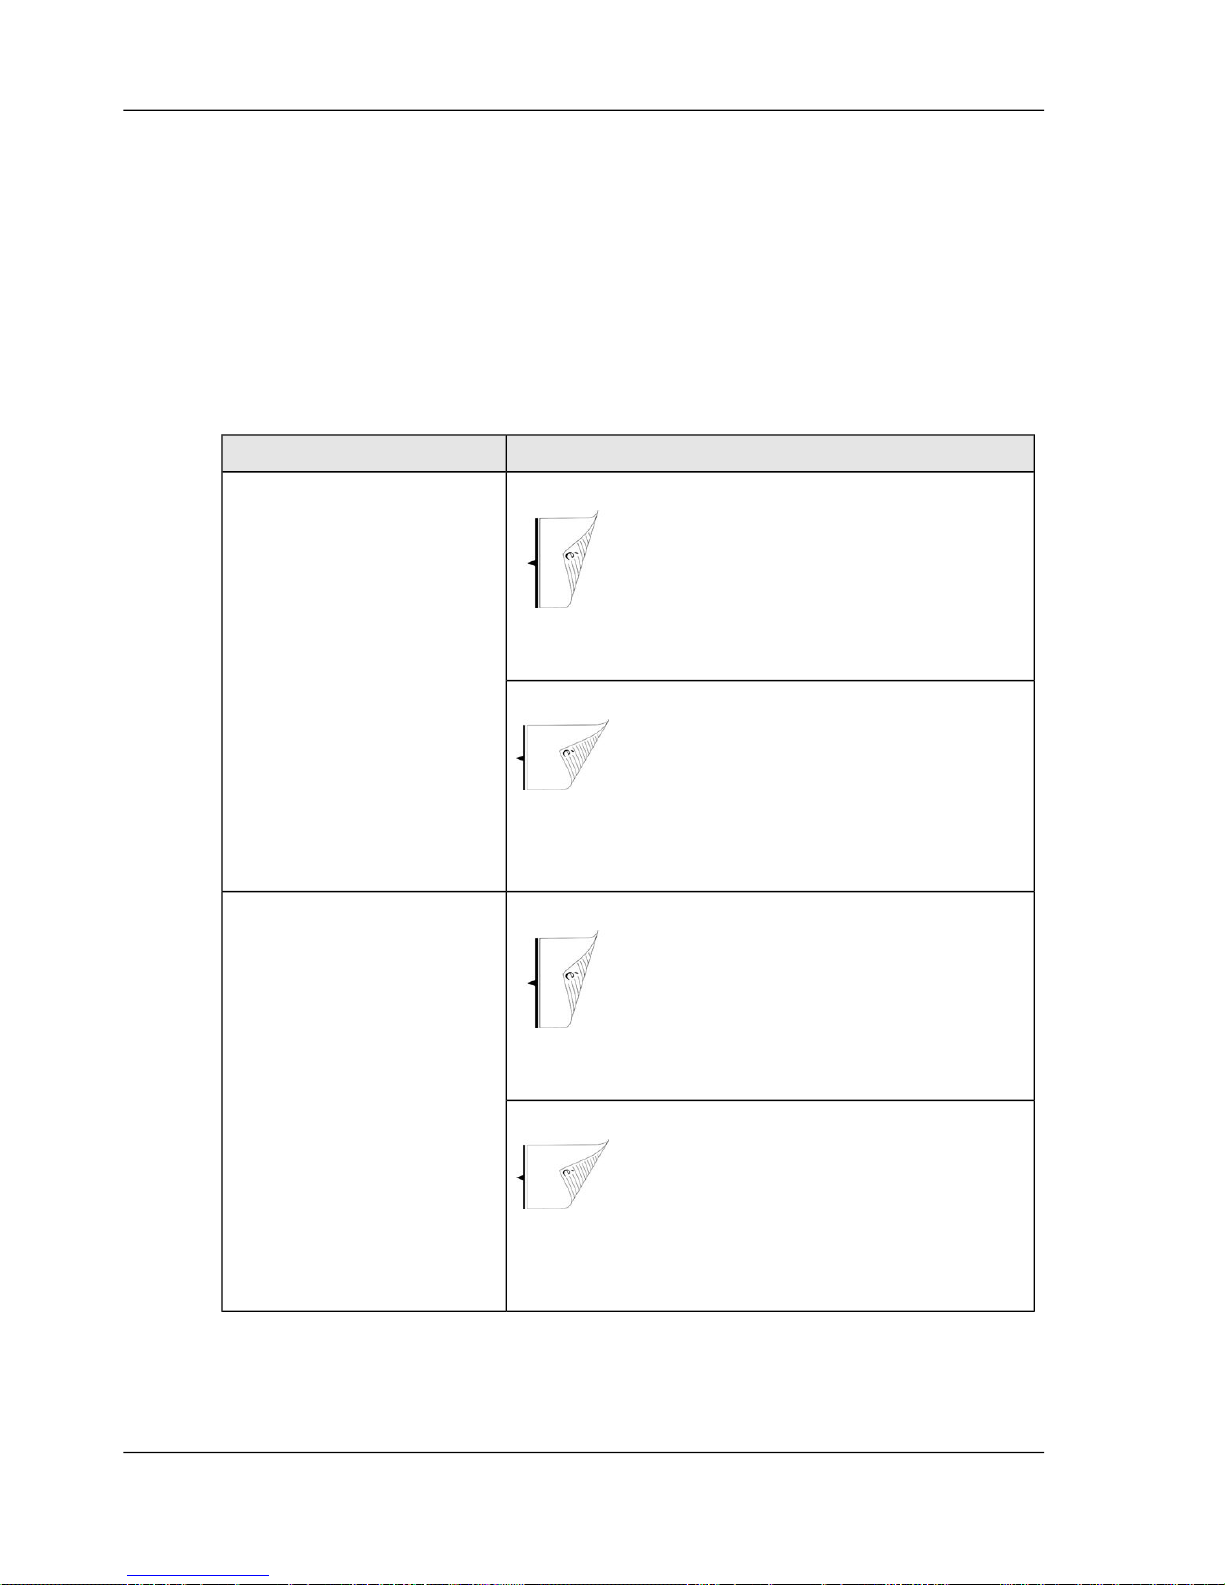
[22]
How to place the originalPaper size of original
Long-edge
Use the long-edge position when you want to copy
or scan to the A4/Letter 8.5x11 size.
A4/Letter 8.5x11
Short-edge
Use the short-edge position when you want to copy
or scan to the A5/Us Std 5.5x8.5 or A3/Tabloid
11x17 size.
Long-edge
Use the long-edge position when you want to copy
or scan to the A4/Letter 8.5x11 size.
A5/Us Std 5.5x8.5
Short-edge
Use the long-edge position when you want to copy
or scan to the A5/Us Std 5.5x8.5 or A3/Tabloid
11x17 size.
49Chapter 5 - Place your originals
Place an original on the platen
Page 50
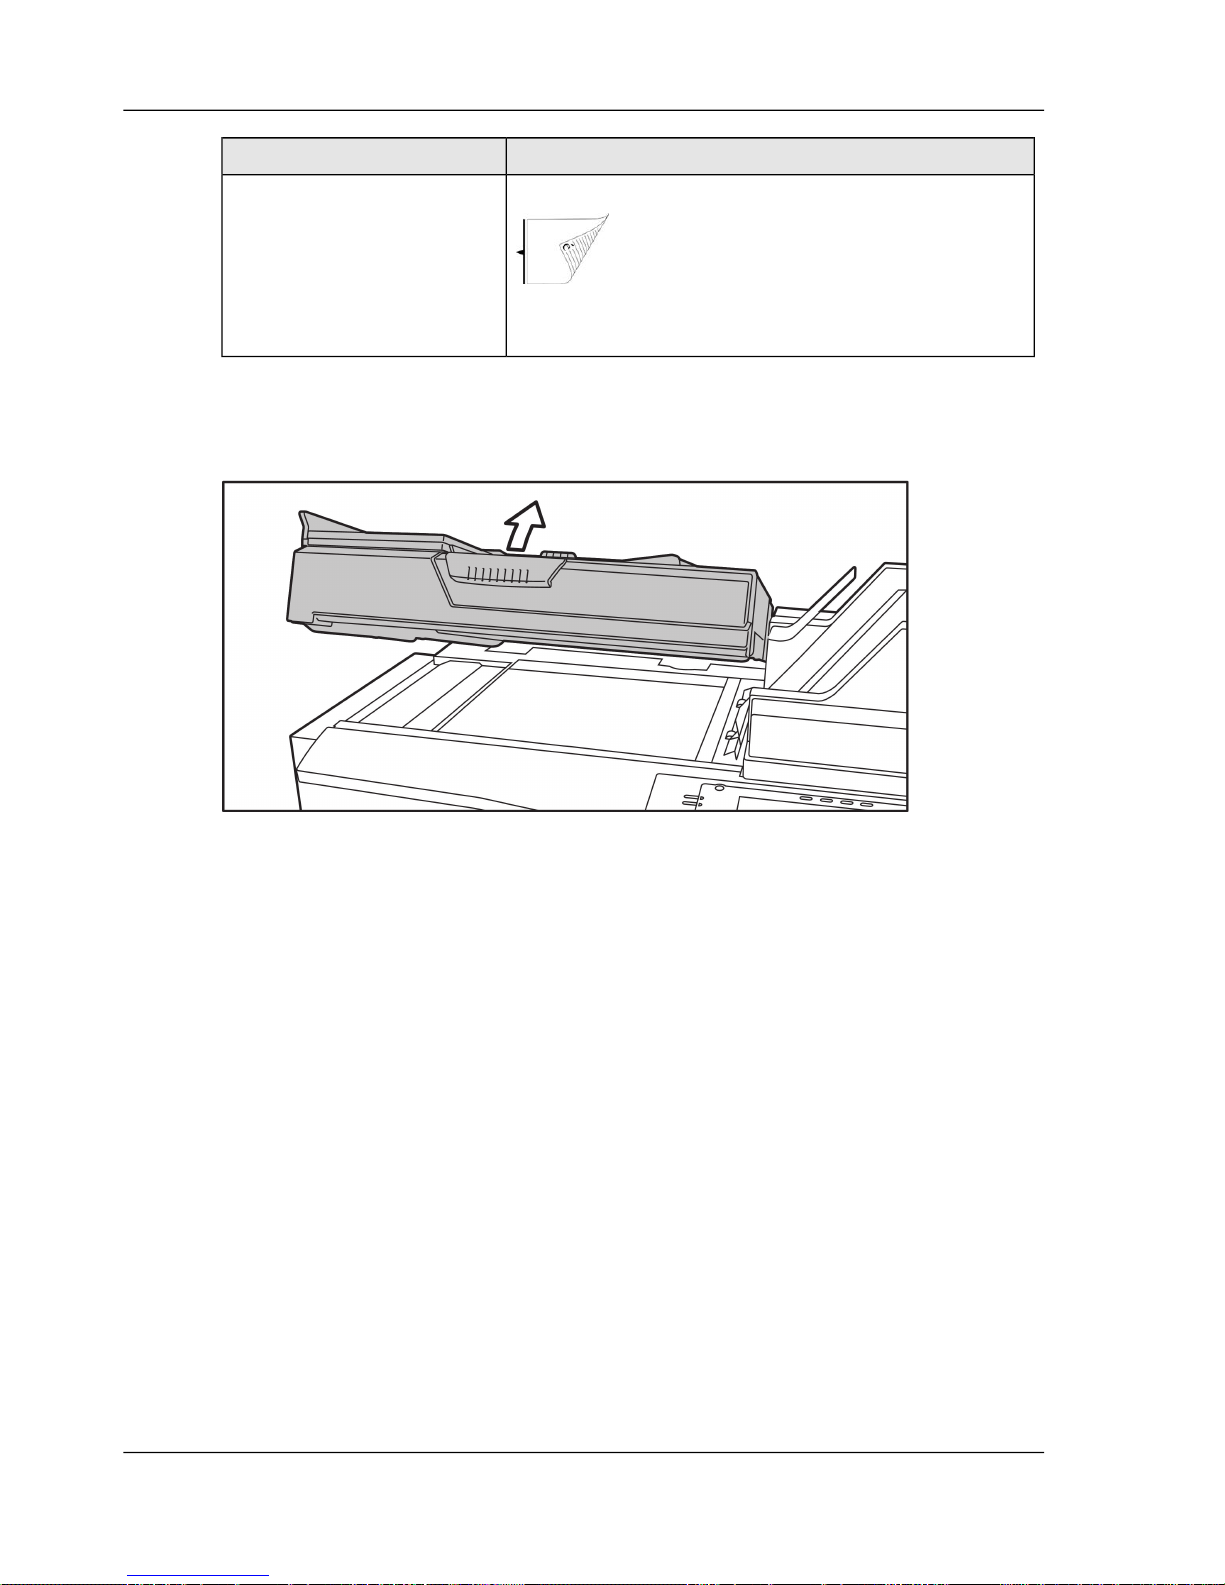
How to place the originalPaper size of original
Short-edge
Always use the short-edge position to copy or scan
the A3/Tabloid 11x17 original.
A3/Tabloid 11x17
How to use the platen
1.
Open the cover of the platen.
2.
Hold the originals, face-up in reading direction.
3.
Turn the original upside down.
4.
Keep the original face-down and place the original on the platen.
50Chapter 5 - Place your originals
Place an original on the platen
Page 51
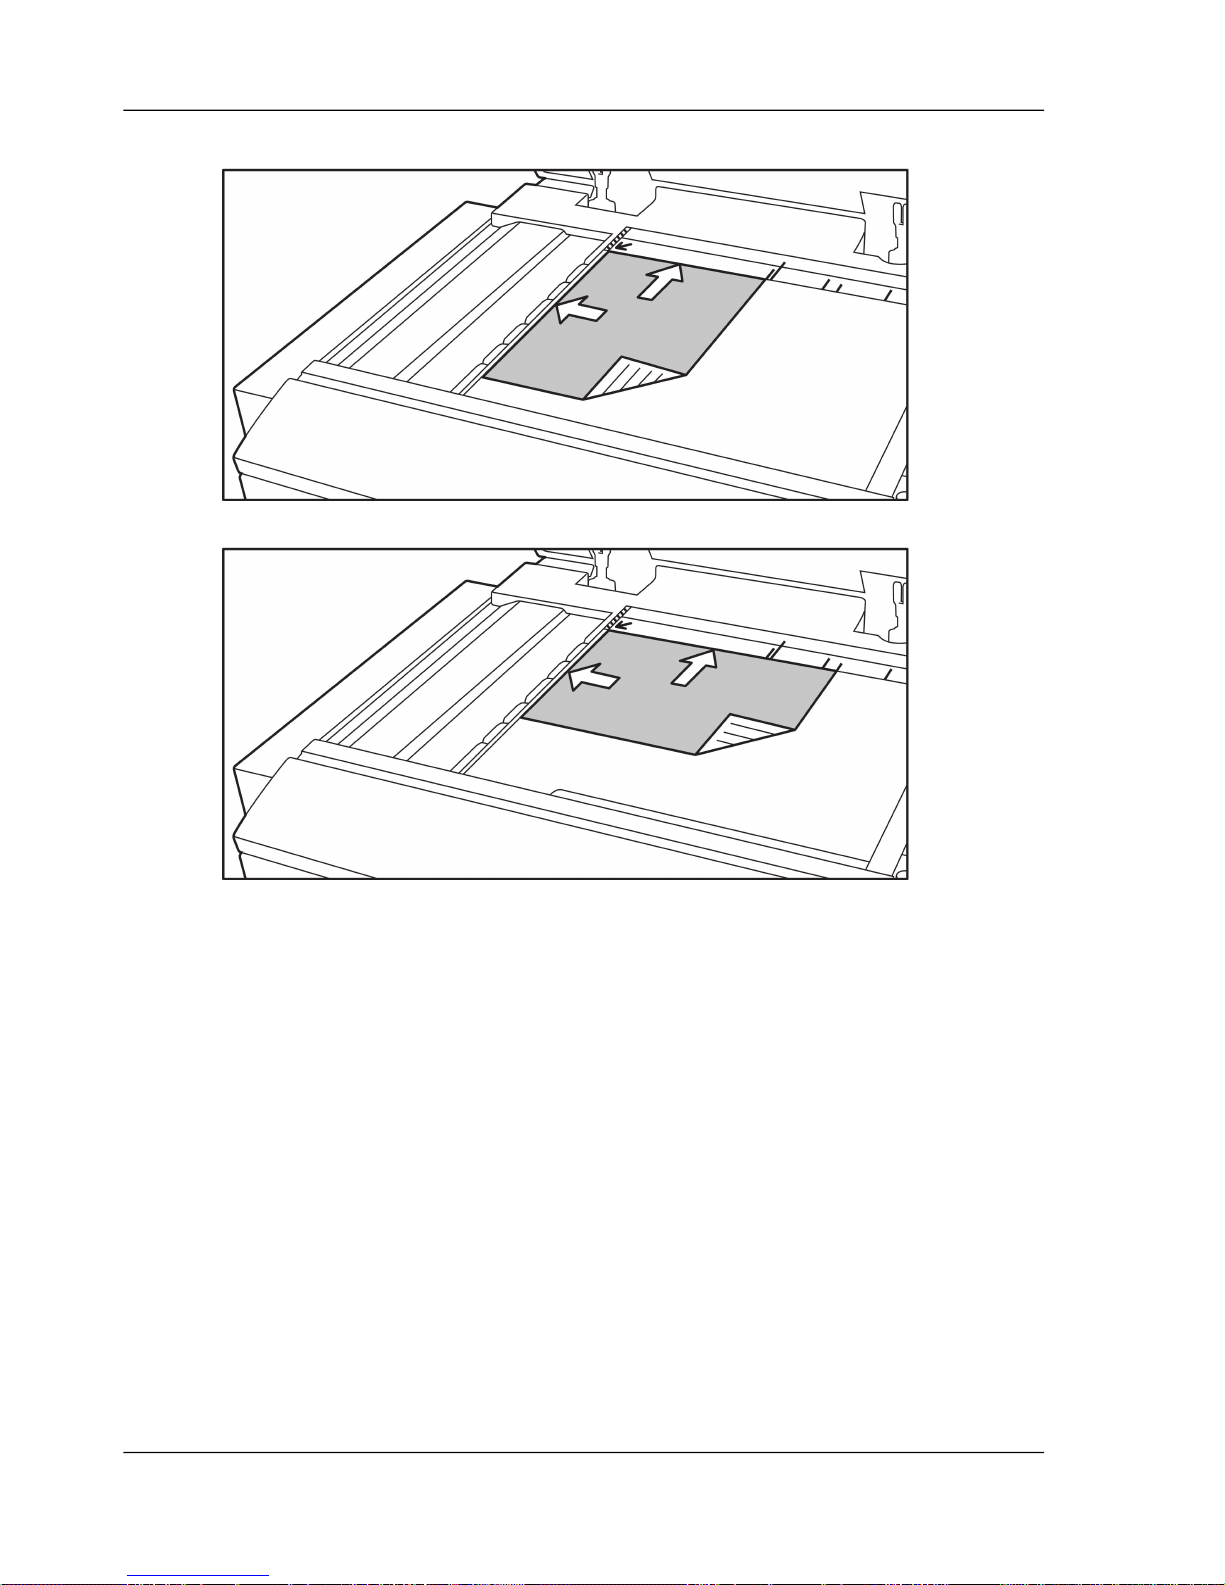
5.
Use the size information on the edge of the platen to align the original.
[43] Place original long-edge on the platen
[44] Place original short-edge on the platen
51Chapter 5 - Place your originals
Place an original on the platen
Page 52

52Chapter 5 - Place your originals
Place an original on the platen
Page 53

Chapter 6
The print jobs
o
53
Page 54
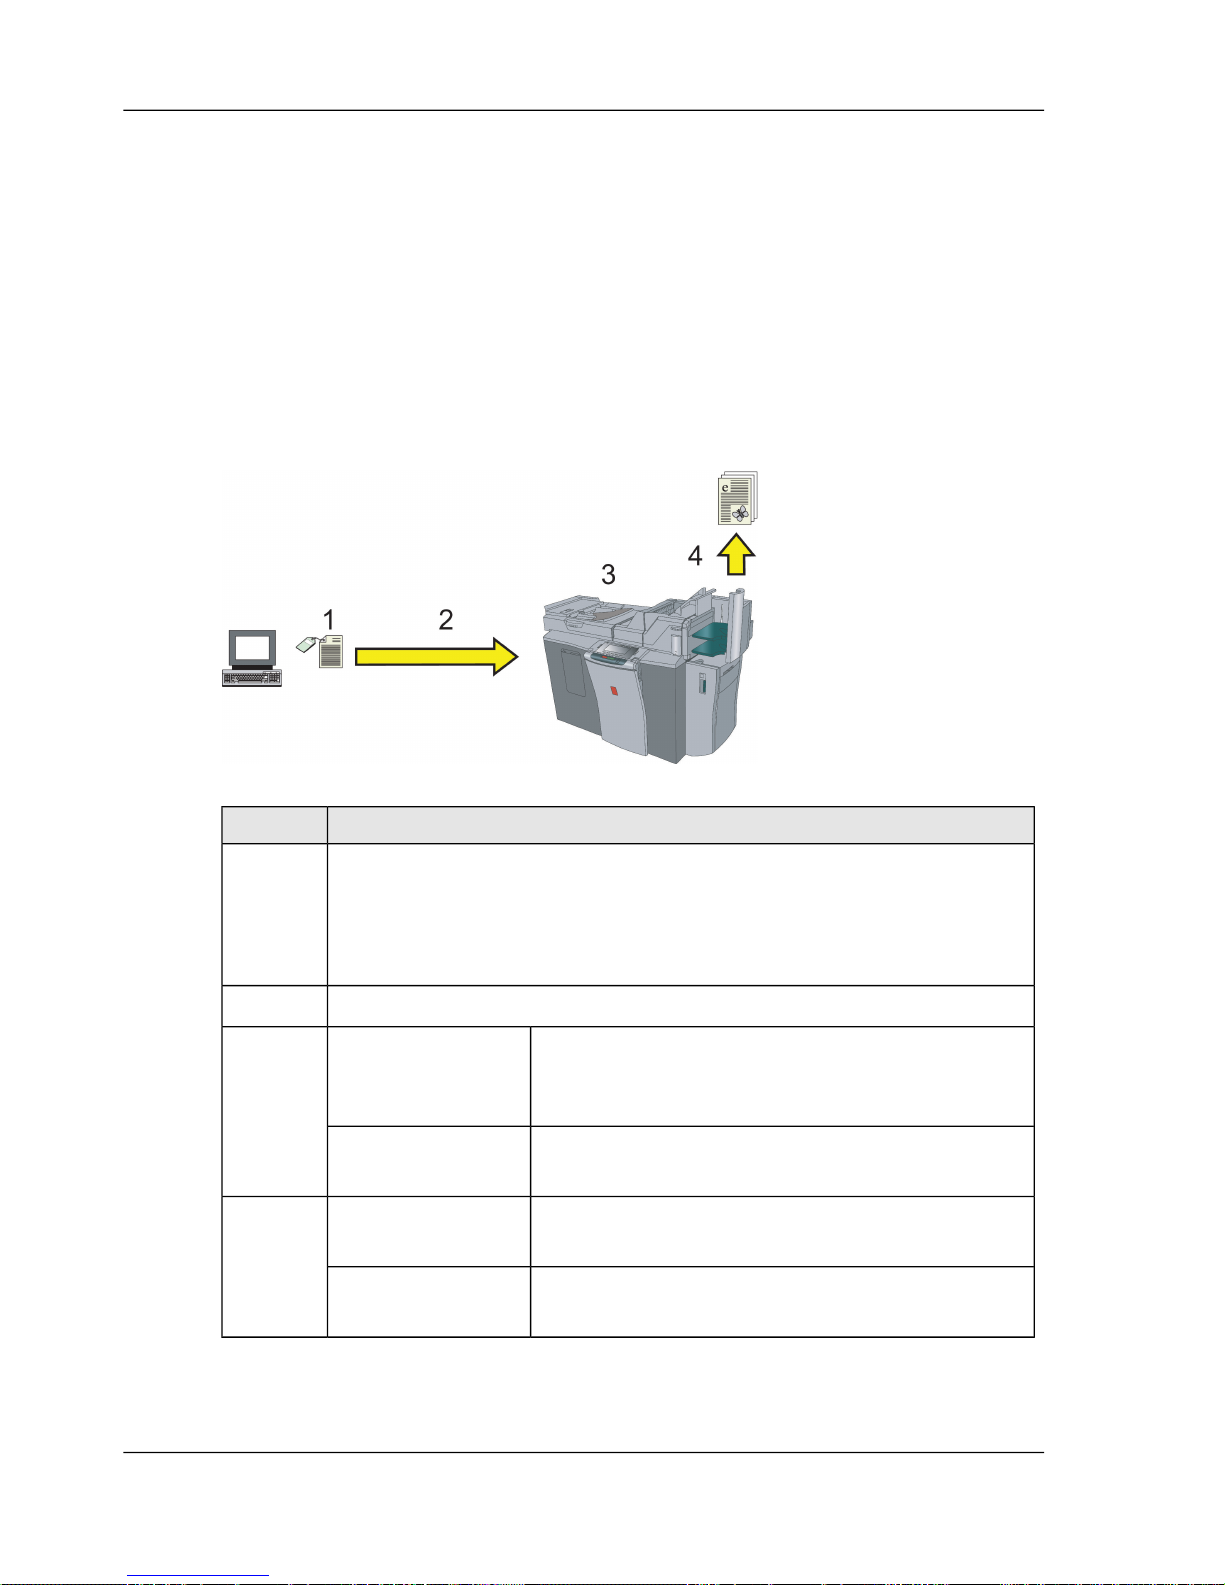
What can you print
Mailbox jobs and automatic print jobs
Y ou need an Océ printer dri ver to send your documents to the Océ VarioPrint® 2062/75
. The Océ VarioPrint® 2062/75 printer driver allows you to indicate whether your
document should be stored in the mailbox or must be printed directly.
What happens when you print
[23]
DescriptionStep
■
You use the Print function of the application.
■
You enter the settings for your print job in the printer driver: you
decide if your document must be sent to your mailbox or must be
printed directly.
1
The print job is sent to the Océ VarioPrint® 2062/75 .2
The Océ VarioPrint® 2062/75 stores the
documents in your mailbox. You print the job
whenever you want.
Mailbox job3
The print job is printed when it reaches the top of
the queue of automatic print jobs.
Automatic print
job
You print the documents from your mailbox. The
finisher collects the prints.
Mailbox job4
The automatic print job is printed. The finisher
collects the prints.
Automatic print
job
54Chapter 6 - The print jobs
What can you print
Page 55

The ease of your mailbox
Why using the mailbox
When you print a document to your mailbox, the document remains in your mailbox
until you start printing the document on the operator panel. You do not need to walk
to your printer each time to collect your prints, but you can start printing all documents
together.
The Océ VarioPrint® 2062/75 also has a Smart mailbox function and a Pocket mailbox
function. Y ou can use the Smart mailbox to print the documents that you sent to other
mailboxes ‘The ease of fetching documents from your other mailboxes’ on page 80.
The Pocket mailbox enables you to print documents you stored on a USB stick ‘Print
a document from your USB stick’ on page 88.
You can run the Océ Intra Logic application to view or manage the mailbox jobs from
your computer.
What can you do with the documents in your mailbox?
What can you do with your mailbox?
■
Print your documents. When you open your mailbox, you can see all documents
you sent to the Océ VarioPrint® 2062/75 ‘Open your mailbox’ on page 66. You
can select all documents, all new documents or only one document ‘Print your
documents’ on page 67.
■
Change the print job settings. If the settings you defined in the printer driver are
not correct, you can change these settings before you print the document ‘Change
the document settings’ on page 70.
■
Print the job several times. After you have printed the document, it remains in the
mailbox.
■
Make a test print. If you need many sets, you are advised to first make a test print
to check the settings.
When do the documents go into your mailbox?
When does a document go into your mailbox?
■
You select 'Mailbox' in the printer driver ‘Send a document to your mailbox’ on
page 59.
■
You select 'Security' in the printer driver ‘Send a secured document to your mailbox’
on page 64.
■
You press the 'Retrieve jobs' key . The jobs you sent to other printers become
your mailbox jobs ‘Fetch documents from your other mailboxes’ on page 83.
55Chapter 6 - The print jobs
The ease of your mailbox
Page 56
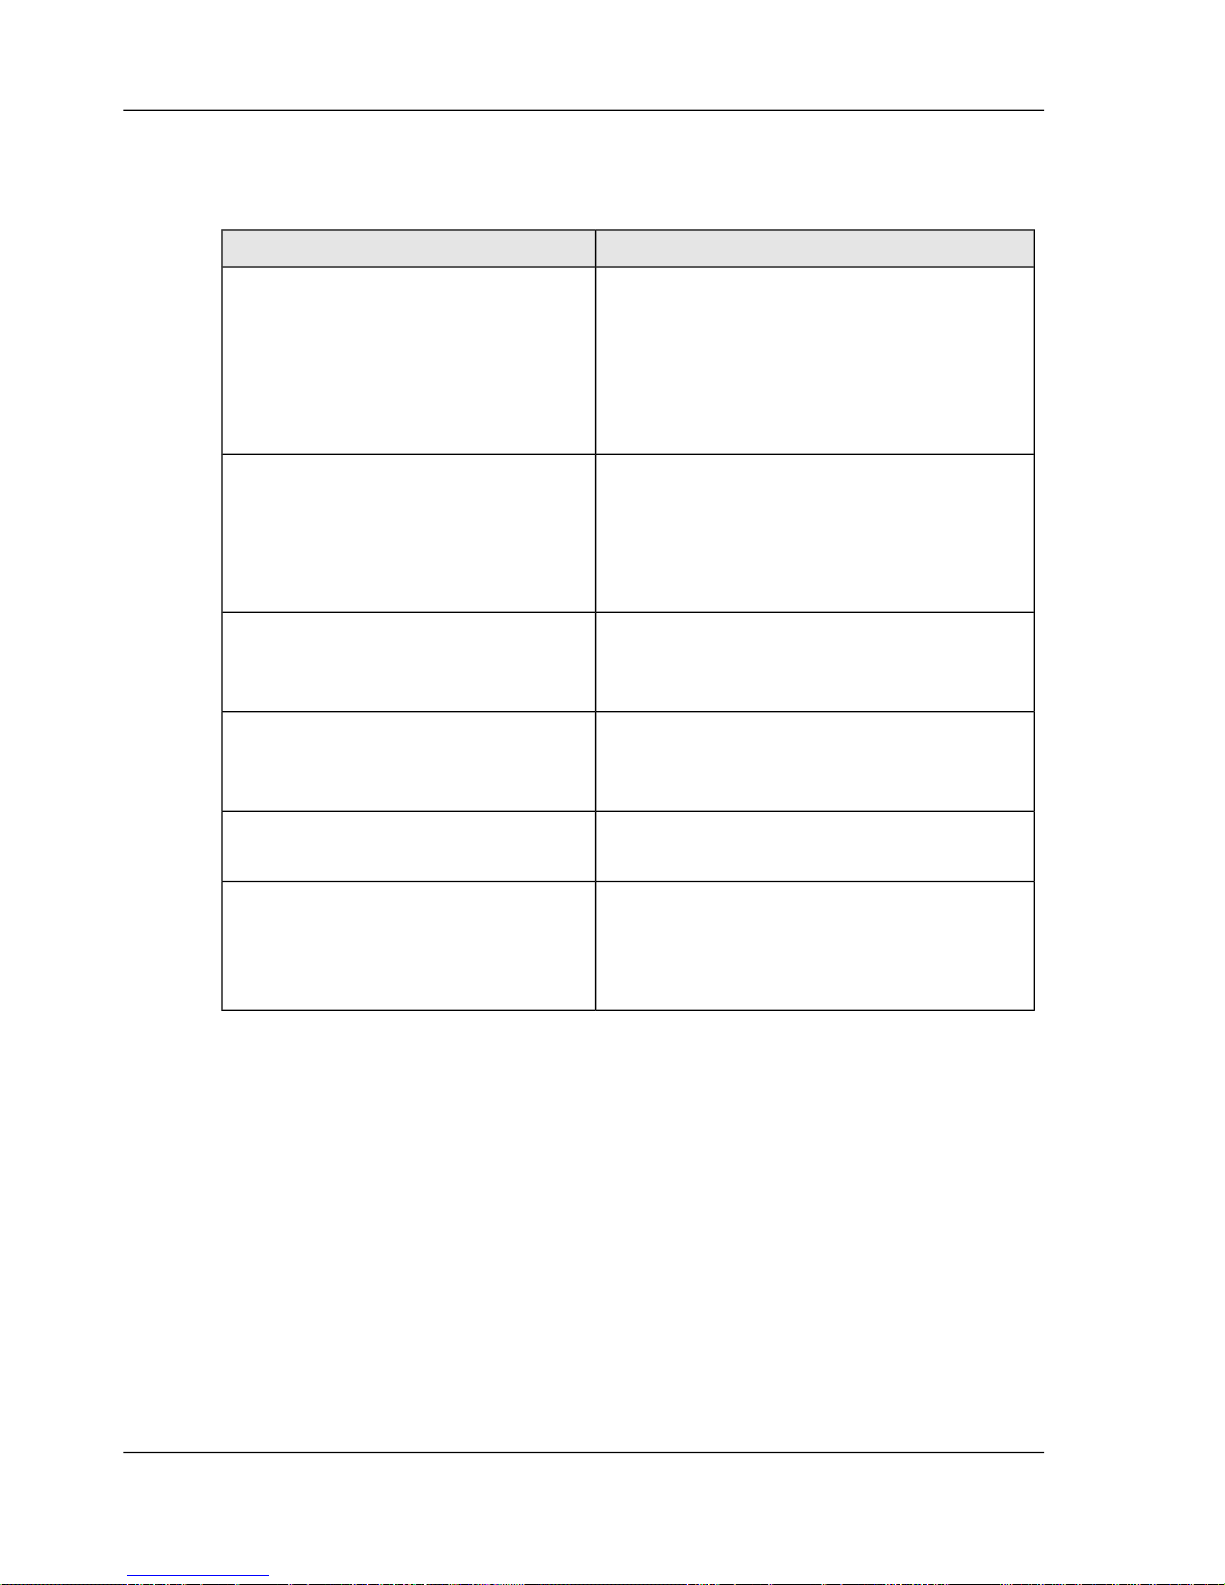
User questions
[24]
AnswerQuestion
When you print for the first time to the Océ
VarioPrint® 2062/75 , a mailbox is
automatically created.
The Key operator decides if you are
allowed to print documents from your
mailbox.
Who is creating my mailbox
When there are no more documents in your
mailbox, your user name is not on the list
of user names. The Key operator decides
how long documents remain in your
mailbox.
My user name was on the list of user
names, but I cannot find it anymore.
The Key operator can assign a PIN to you
so that your mailbox is only opened when
you enter the correct PIN.
How can I protect my mailbox so
that I am the only one that can open
the mailbox
Someone cancelled your automatic print
job. Then your automatic print job goes into
your mailbox.
I found a document in my mailbox
that was sent as an automatic print
job
The Key operator decides how long your
documents remain in your mailbox.
How long are the documents stored
in my mailbox
The Key operator or your compan y decided
that automatic print jobs are not allowed.
Then all automatic print jobs become
mailbox jobs.
Why do all my automatic print jobs
arrive in my mailbox
56Chapter 6 - The print jobs
The ease of your mailbox
Page 57
Start the print job in the printer driver
The printer driver
Which Océ VarioPrint® 2062/75 printer drivers are available
You need a printer driver to send your documents to the Océ VarioPrint® 2062/75 .
Océ provides sev eral types of printer drivers. The Océ VarioPrint® 2062/75 supports
the Adobe PostScript® 3™ and the PCL6 print language formats. The Océ V arioPrint®
2062/75 directly accepts the Adobe PDF format.
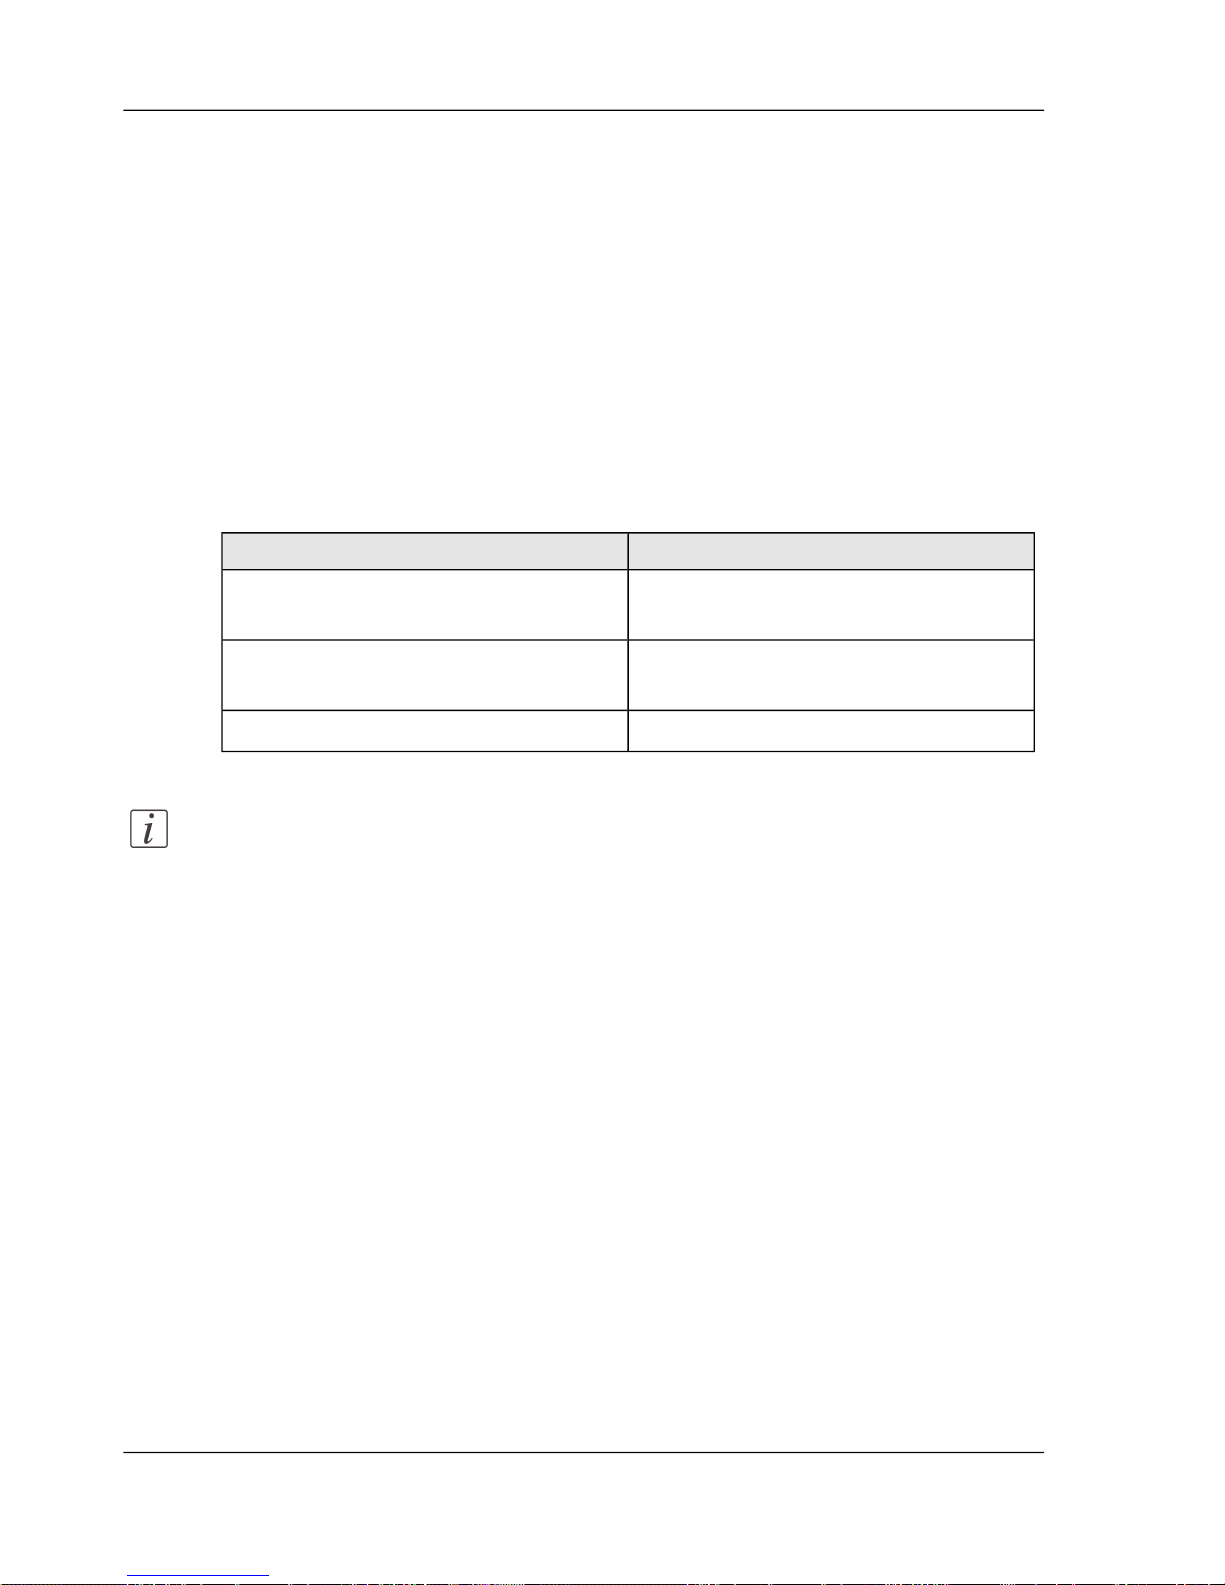
The following Océ VarioPrint® 2062/75 printer drivers are available.
[25]
Printer driverOperating system
PCLWindows 2000®, Windows XP® and
Windows Server 2003®
Adobe PostScript 3Windows 2000, Windows XP and
Windows Server 2003
Adobe PostScript 3Apple Mac OS X® (10.3 and higher)
Note:
New printer driver releases can occur in the future. You can download the
latest printer drivers from www.oce.com.
57Chapter 6 - The print jobs
The printer driver
Page 58
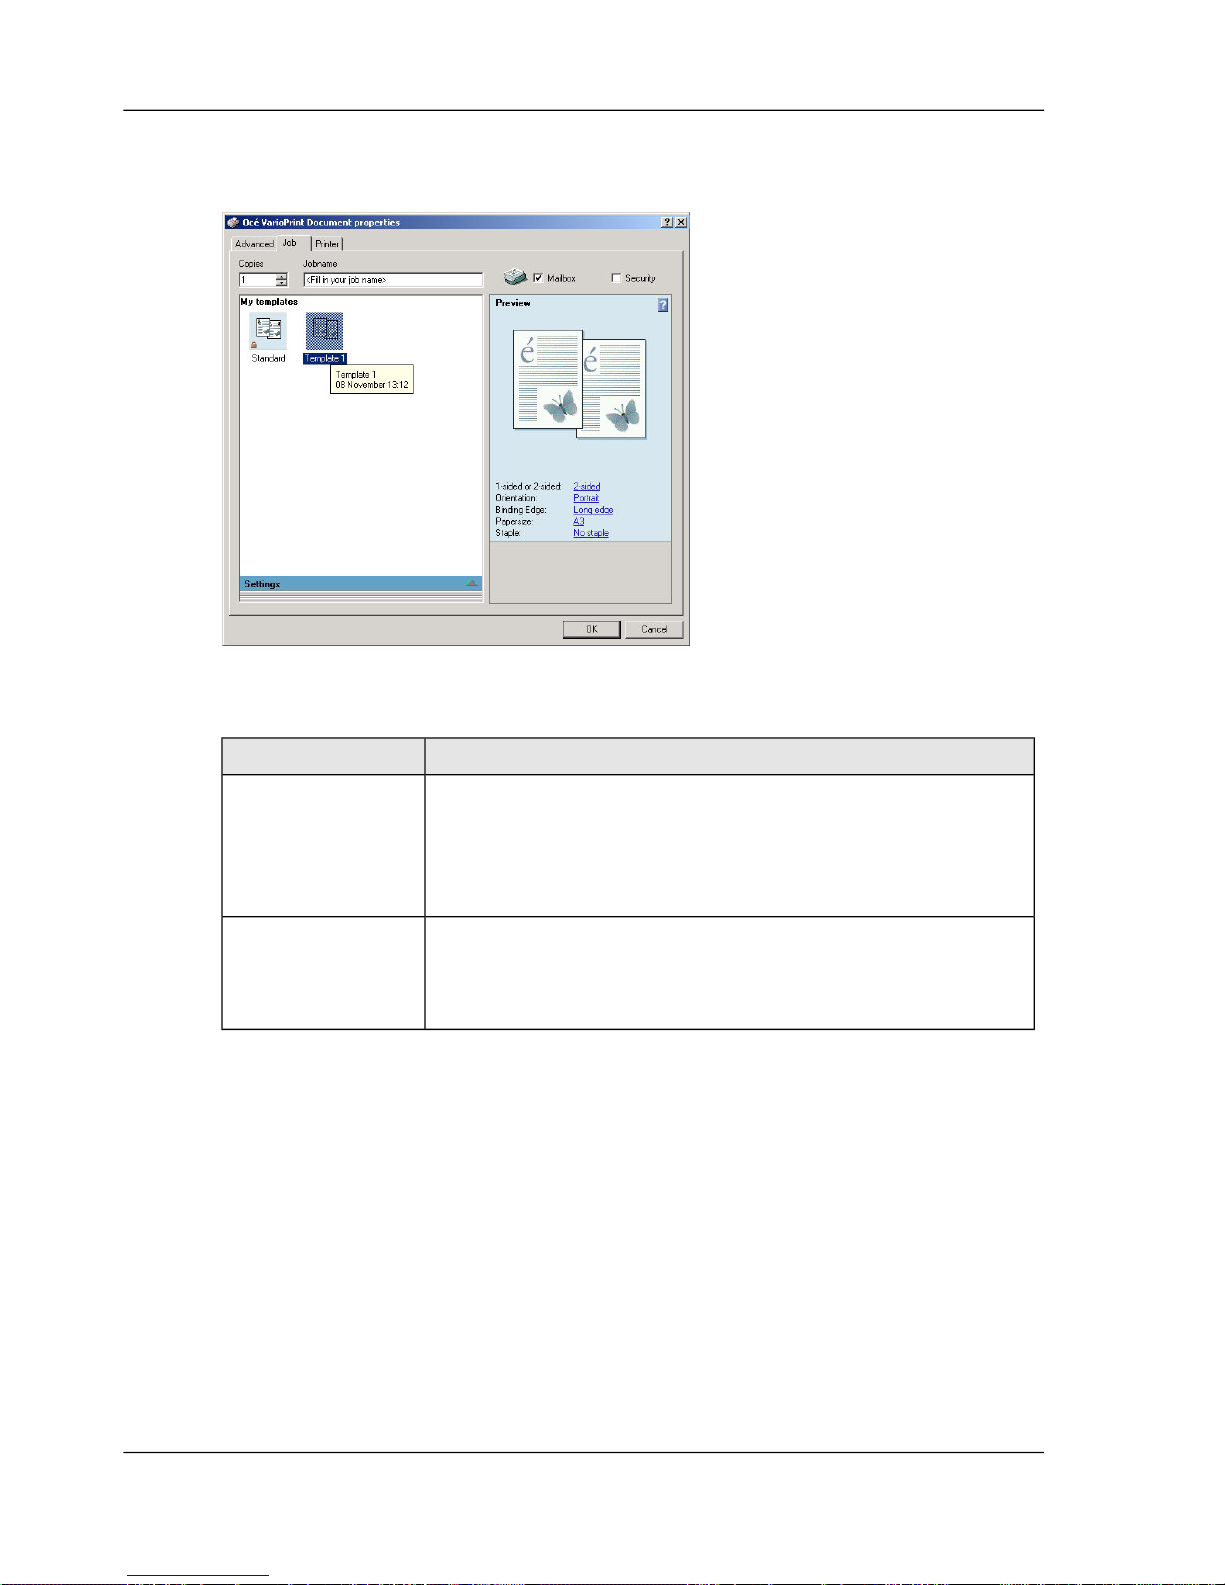
Open the printer driver
You can open the printer driver from the application you use.
[26]
How to openPrinter driver
■
From the 'File' menu of the application, click 'Print'.
■
Select the Océ VarioPrint® 2062/75 in the 'Printer' area
of the 'Print' dialog box.
■
Click 'Properties'.
Windows
■
From the 'File' menu of the application, click 'Print'.
■
Select the Océ VarioPrint® 2062/75 in the 'Printer' area
of the 'Print' dialog box.
Apple Mac OS X
The settings in the printer driver
When you open the printer driver you see the default settings. These settings are
defined by Océ or by your company. Click the ? icon to start the On-line help of the
printer driver. This On-line help contains all information about the settings.
58Chapter 6 - The print jobs
The printer driver
Page 59
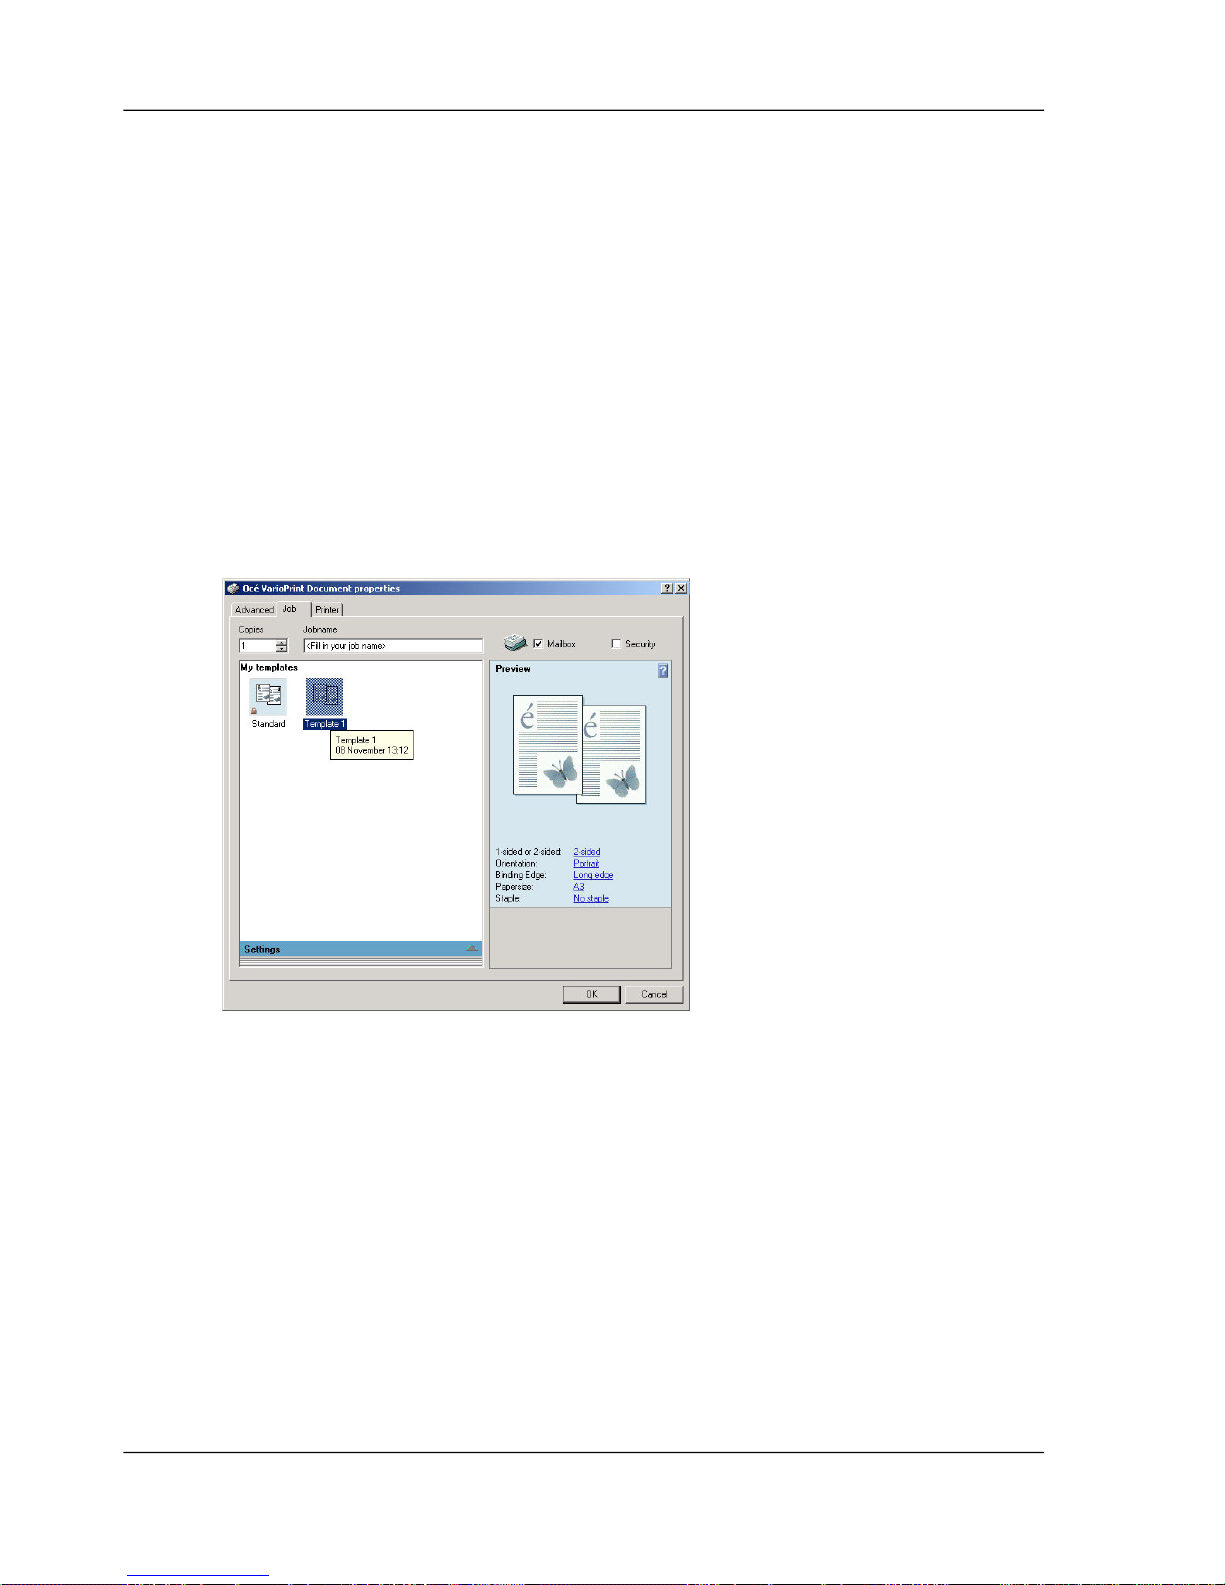
Send a document to your mailbox
Introduction
To start a mailbox job, open the printer driver and indicate that you want to send the
document to your mailbox.
Before you begin
Open the printer driver ‘The printer driver’ on page 57.
How to send a document to your mailbox
1.
Make sure that the 'Job' tab is selected.
2.
Click the 'Mailbox' check box.
[47] Starting a Mailbox Job
3.
Click 'OK'.
The print job is sent to your mailbox.
59Chapter 6 - The print jobs
Send a document to your mailbox
Page 60
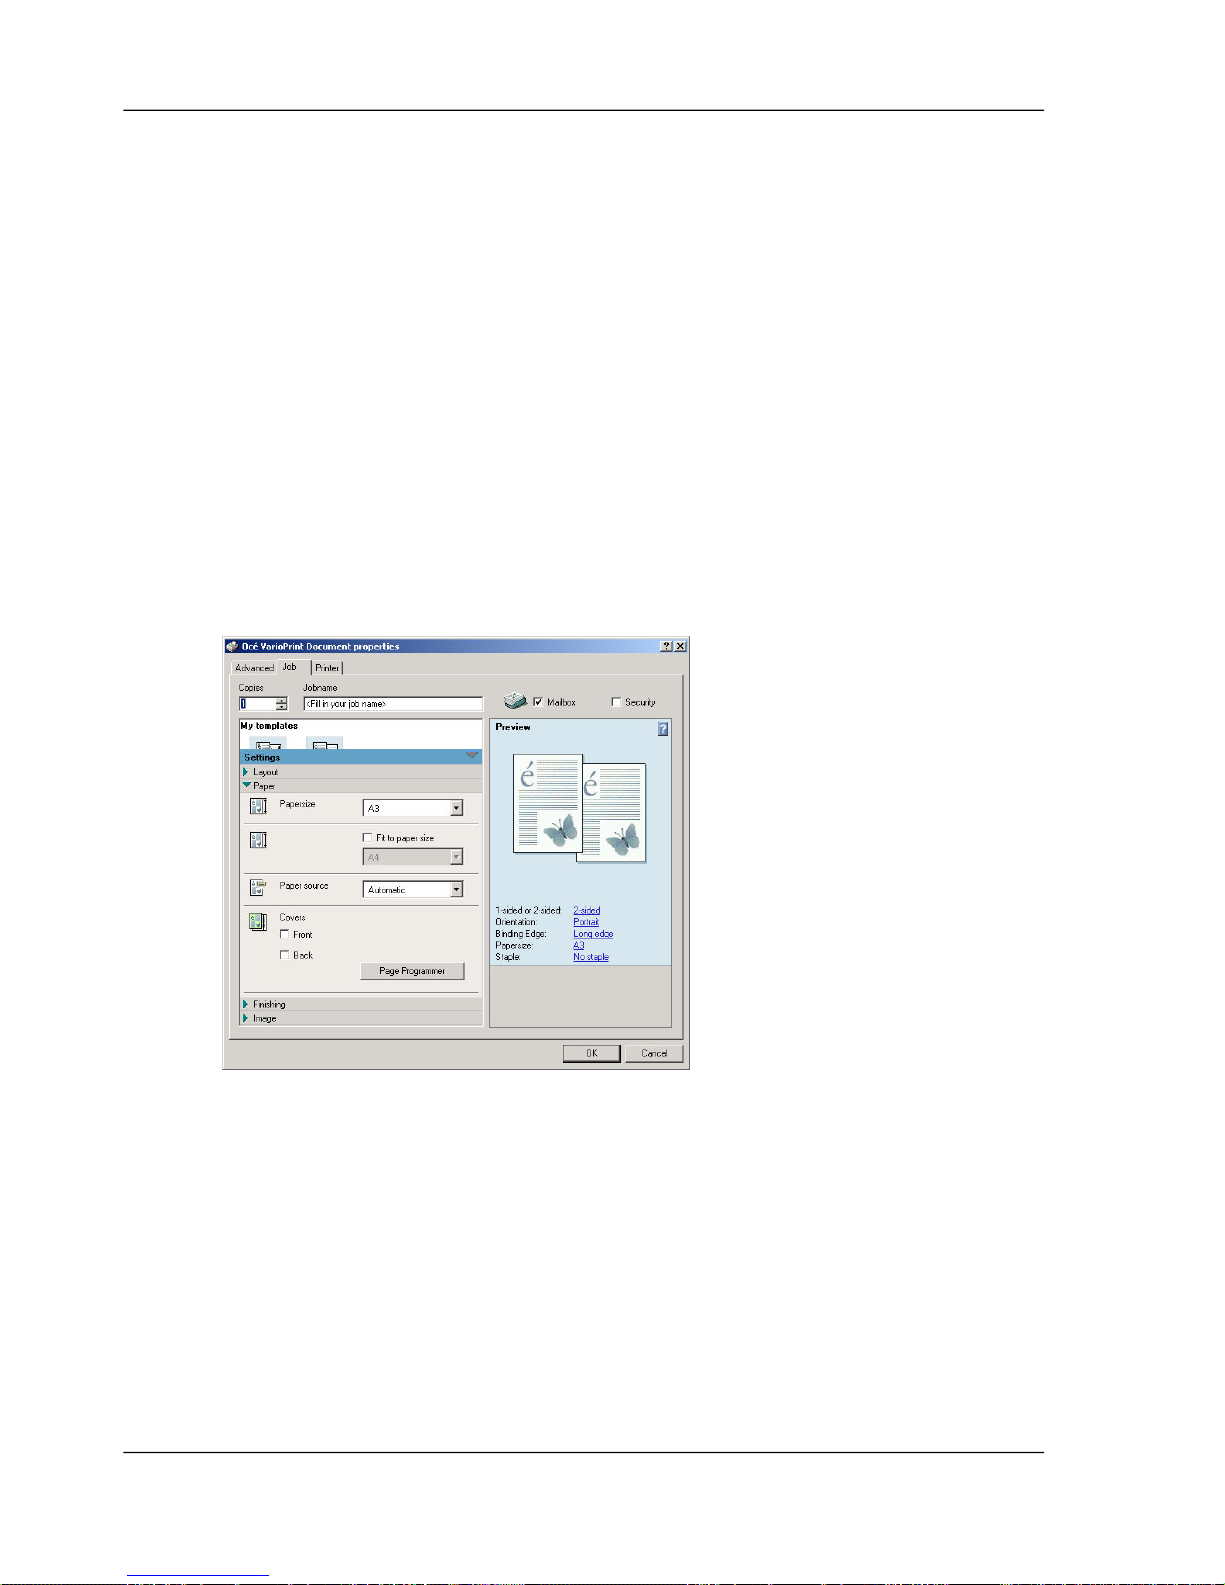
Starting an Automatic Print Job
Introduction
An automatic print job is not stored in your mailbox. An automatic print job is printed
when it reaches the top of the queue of jobs that wait to be printed. Go immediately
to the printer to fetch your documents. Be aware that everyone can read or take these
printed documents.
Before you begin
Open the printer driver ‘The printer driver’ on page 57.
How to start an automatic print job
1.
Make sure that the 'Job' tab is selected.
2.
Click to clear the 'Mailbox' and 'Security' check boxes.
[48] Starting an Automatic Print Job
3.
Click 'OK'.
The job is added to the print queue.
60Chapter 6 - The print jobs
Starting an Automatic Print Job
Page 61
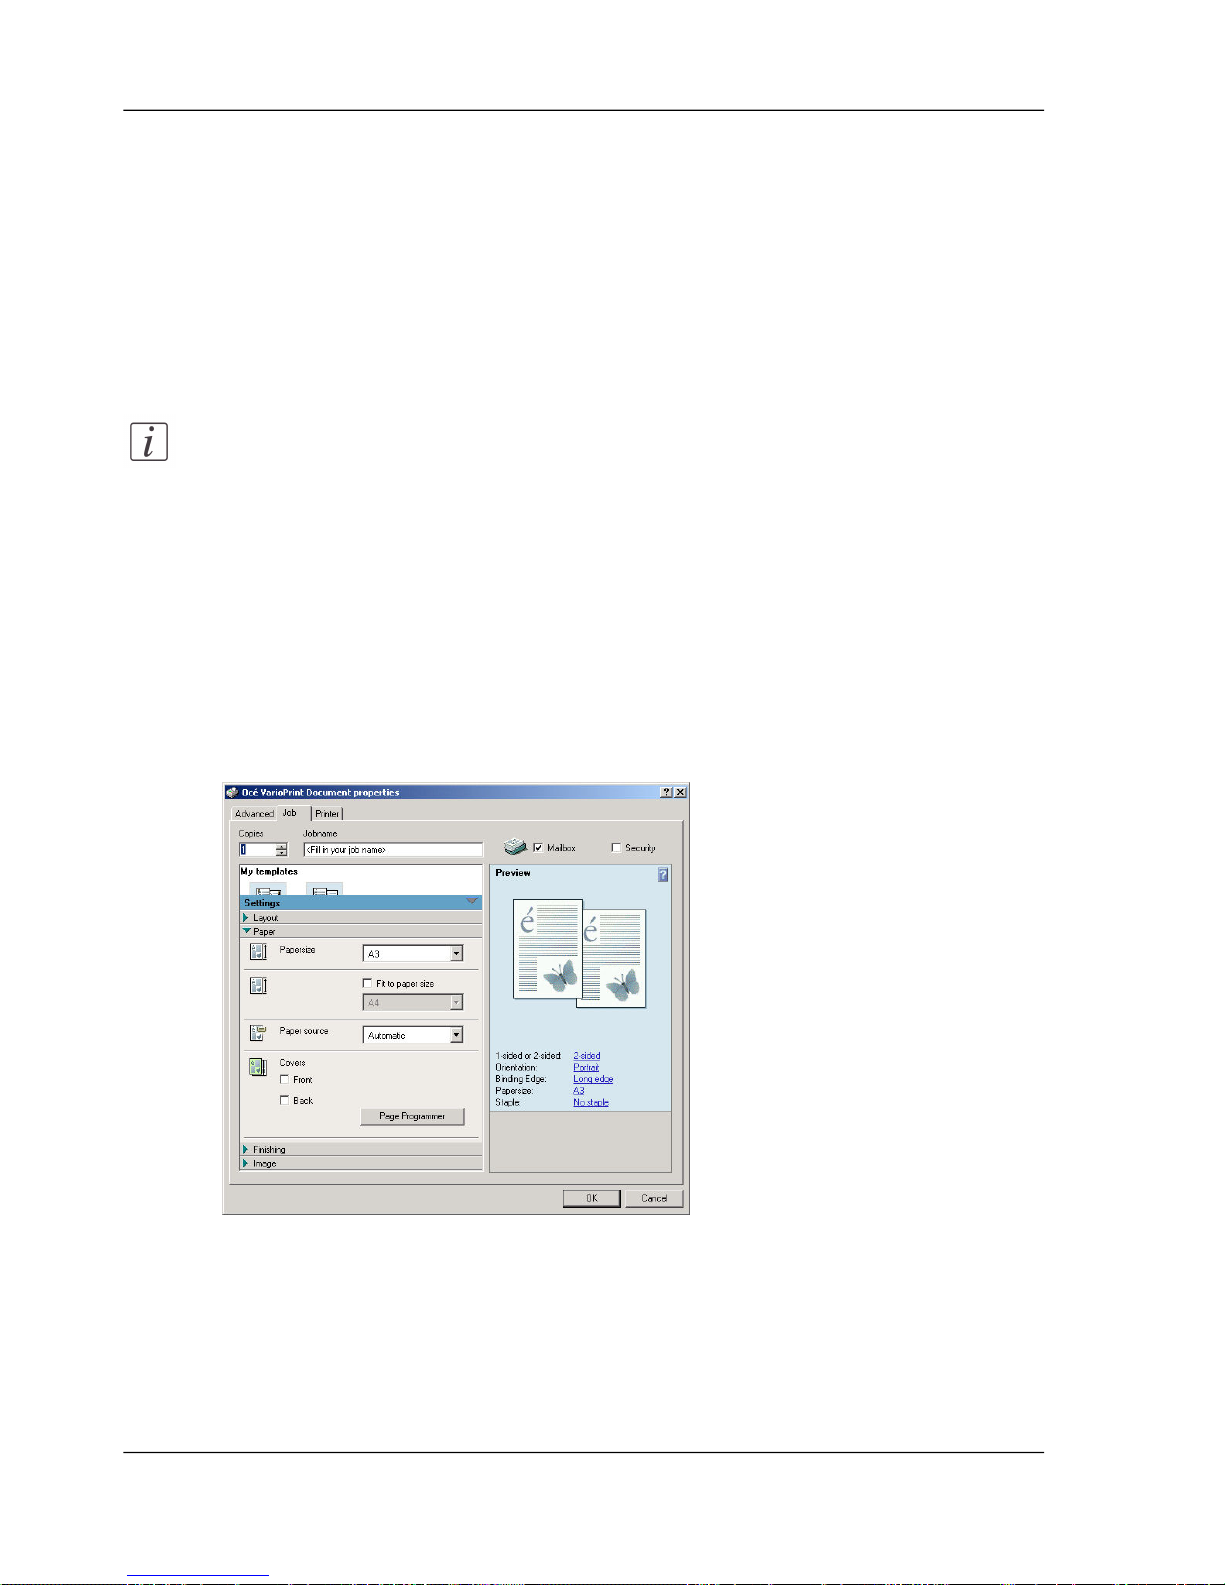
Creating a Template (Windows Printer Driver)
Introduction
When you want to use a number of printer driver settings more than one time, create
a template. A template is a set of default settings that describe a print job. You do not
need to change each individual setting. Simply select a template that matches your
needs.
Note:
You cannot include the 'Mailbox' and 'Security' settings.
Before you begin
Open the printer driver ‘The printer driver’ on page 57.
How to create a template
1.
Make sure that the 'Job' tab is selected.
2.
Click the 'Settings' bar to go to the settings.
3.
Enter the settings you want to add to your template.
[49] Entering the Settings for the Template
61Chapter 6 - The print jobs
Creating a Template (Windows Printer Driver)
Page 62
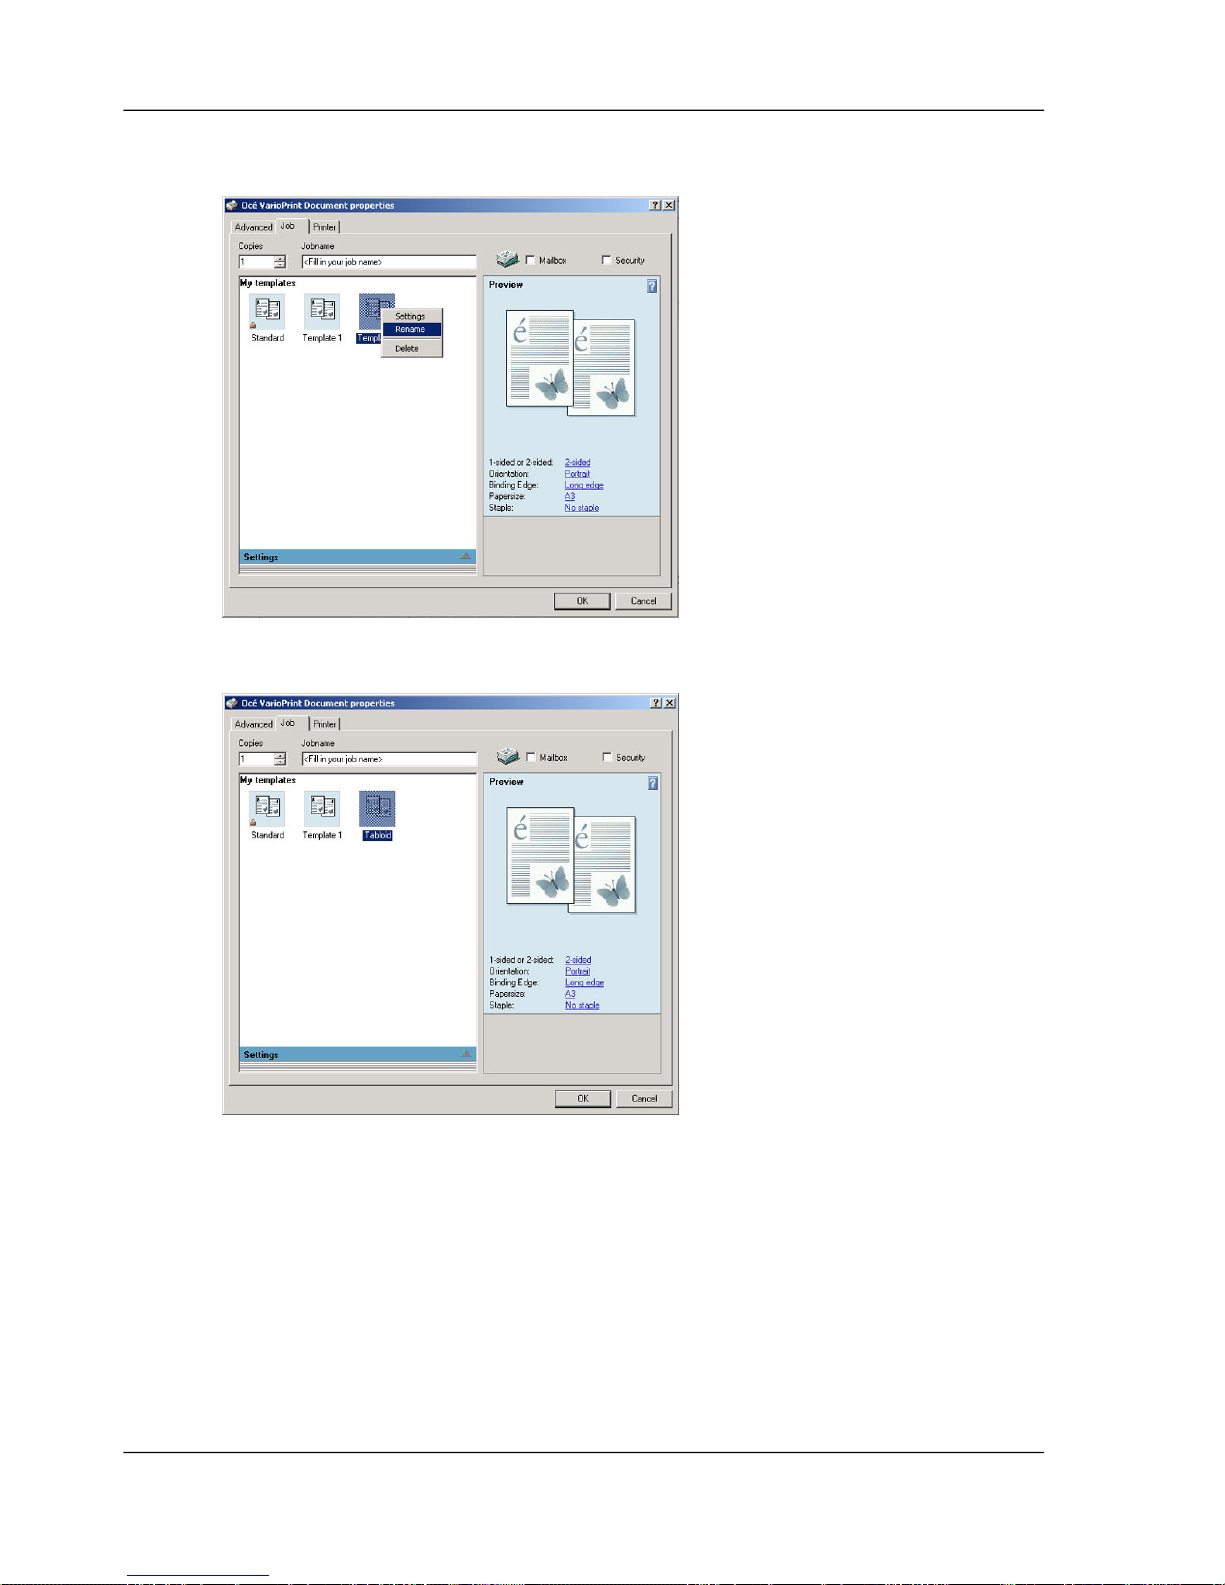
4.
Click the 'Settings' bar to display the templates.
An icon is displayed to indicate that a new template has been created.
[50] A New Template Has Been Created
5.
Right-click the icon and change the default name of the template.
[51] The New Template
62Chapter 6 - The print jobs
Creating a Template (Windows Printer Driver)
Page 63
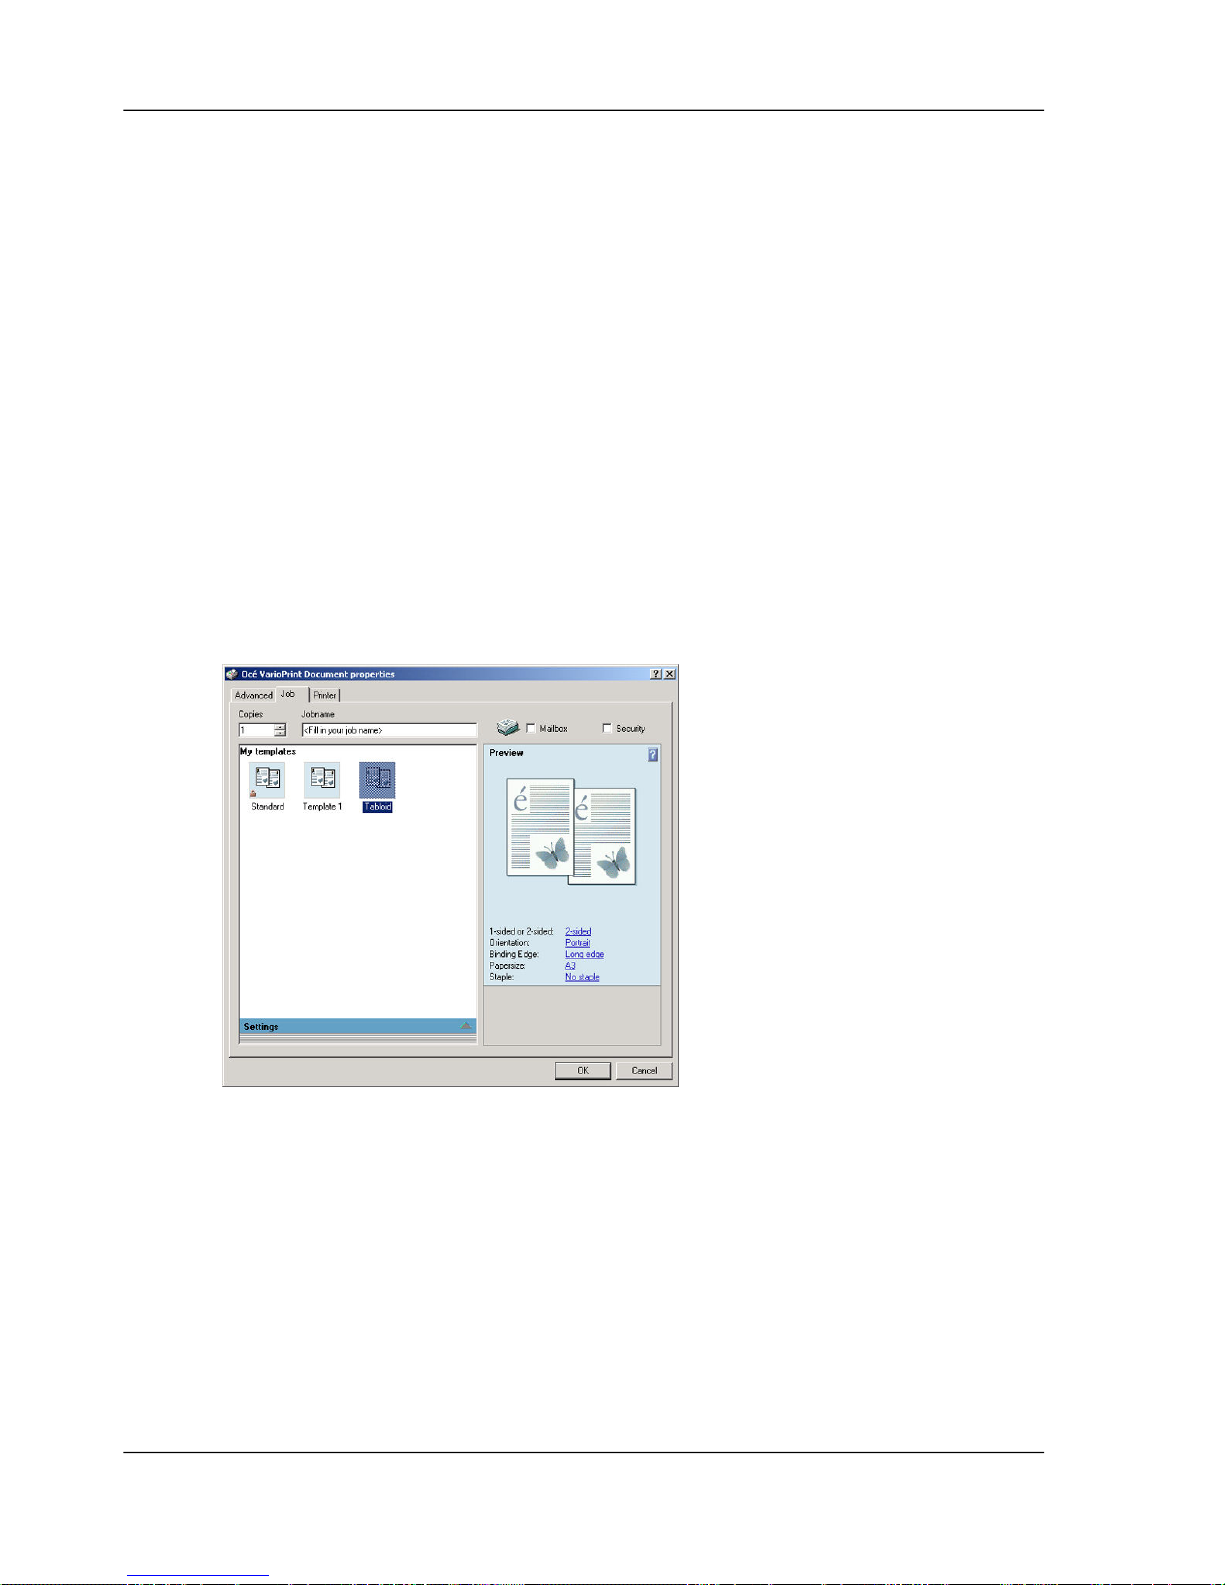
Starting a Print Job That Uses a Template
Introduction
When you want to use a number of printer driver settings more than one time, create
a template. A template is a set of default settings that describe a print job. You do not
need to change each individual setting. Simply select a template that matches your
needs.
Before you begin
Open the printer driver ‘The printer driver’ on page 57.
How to start a print job that uses a template
1.
Make sure that the 'Job' tab is selected.
2.
Make sure that the 'Settings' bar is displayed.
3.
Select a template in the Templates list.
[52] Selecting a Template
4.
Click 'OK' to start the job with the template settings.
63Chapter 6 - The print jobs
Starting a Print Job That Uses a Template
Page 64

Send a secured document to your mailbox
Introduction
When you want to print a document that is for your eyes only, you are advised to start
a secured print job. Especially when your mailbox is not protected with a PIN, secured
printing can be very useful for confidential information. You can only print a secured
document if you know the security code that has been attached to the print job in the
printer driver . Y ou must enter the security code again if you w ant to print the document
from the mailbox.
Remember the following security guidelines to start a secured print job:
■
Use at least 4 digits to define the security code in the printer driver.
■
Print the secured document from your mailbox as soon as possible. Do not wait
longer than one hour.
■
Delete the document immediately after you have printed it.
If you often start secured print jobs, use the same security code for these print jobs.
All documents in the mailbox secured with the same security code can be printed with
only one entry of that security code.
Before you begin
Open the printer driver ‘The printer driver’ on page 57.
How to send a secured document to your mailbox
1.
Make sure that the 'Job' tab is selected.
2.
Click the 'Security' check box.
64Chapter 6 - The print jobs
Send a secured document to your mailbox
Page 65
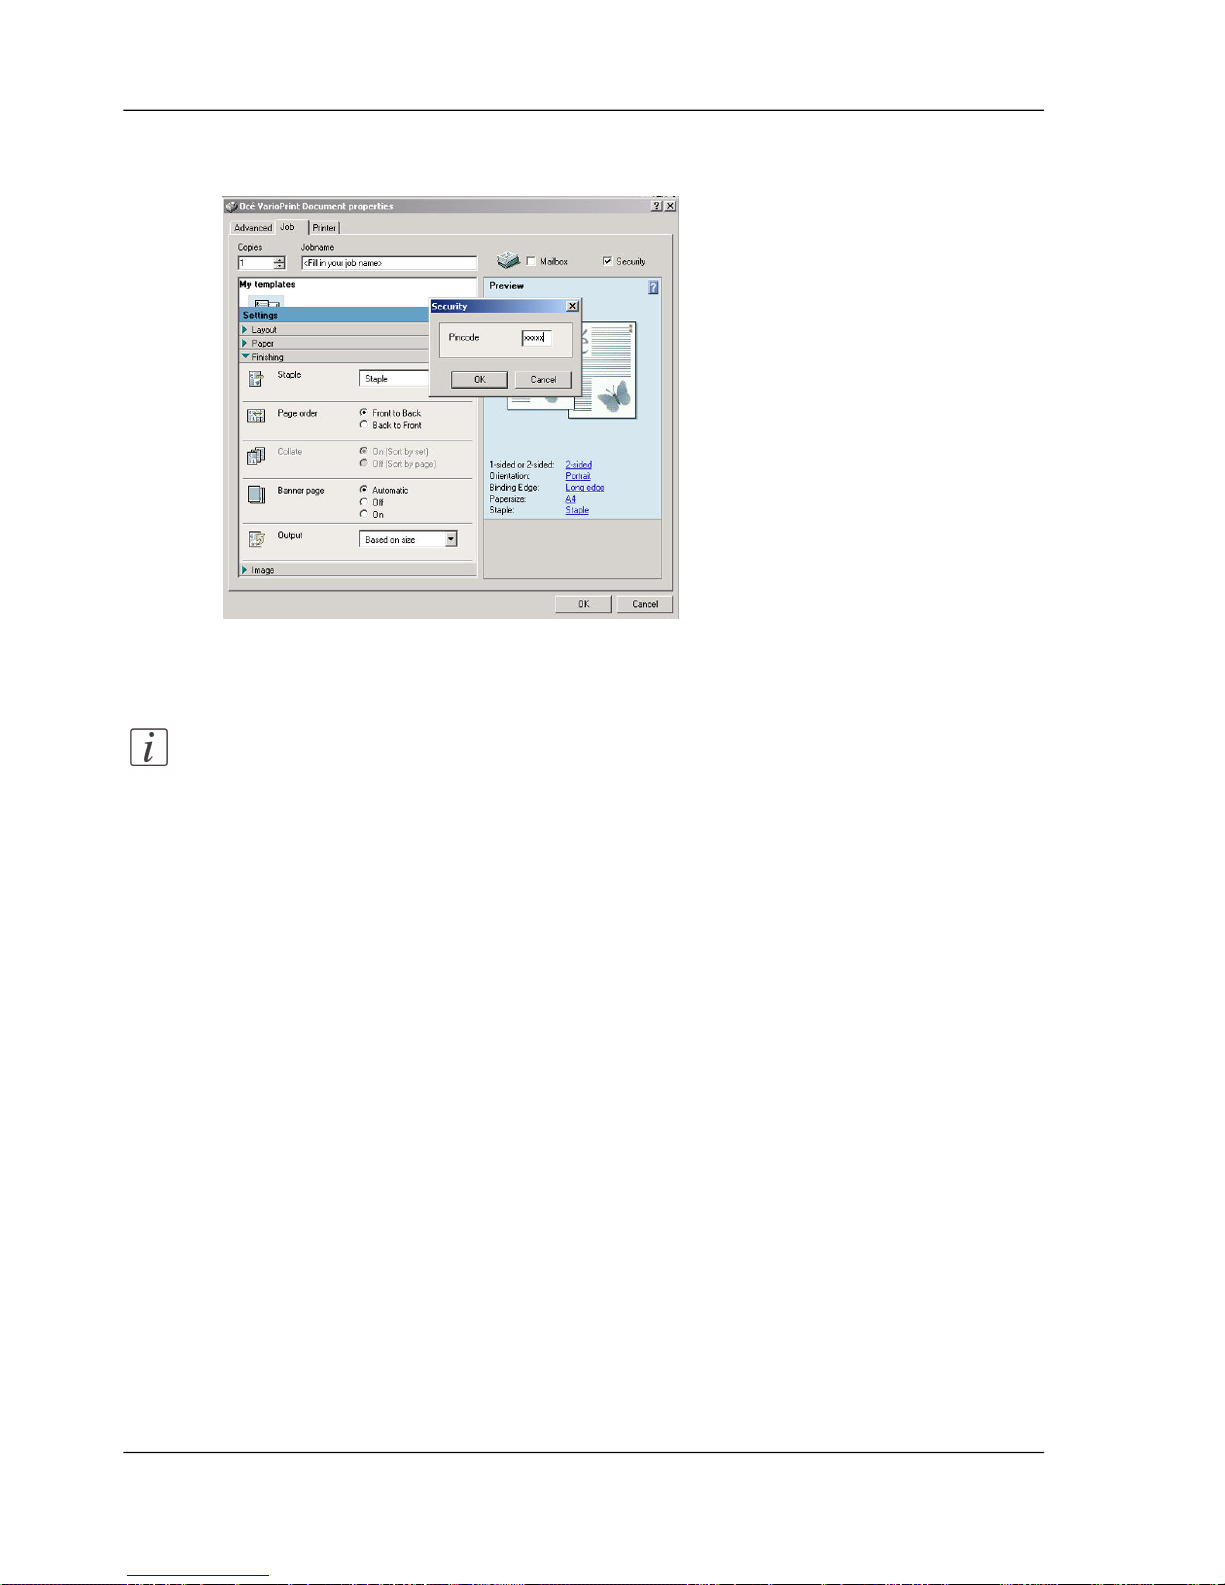
3.
Enter a security code in the 'Security' dialog box.
Use 4 - 6 digits to meet the security guidelines.
[53] Entering the Security Code
4.
Click 'OK' to close the 'Security' dialog box.
Note:
Remember that you must enter the security code again when you print the job
from the mailbox.
5.
Click 'OK'.
The print job is sent to your mailbox.
65Chapter 6 - The print jobs
Send a secured document to your mailbox
Page 66
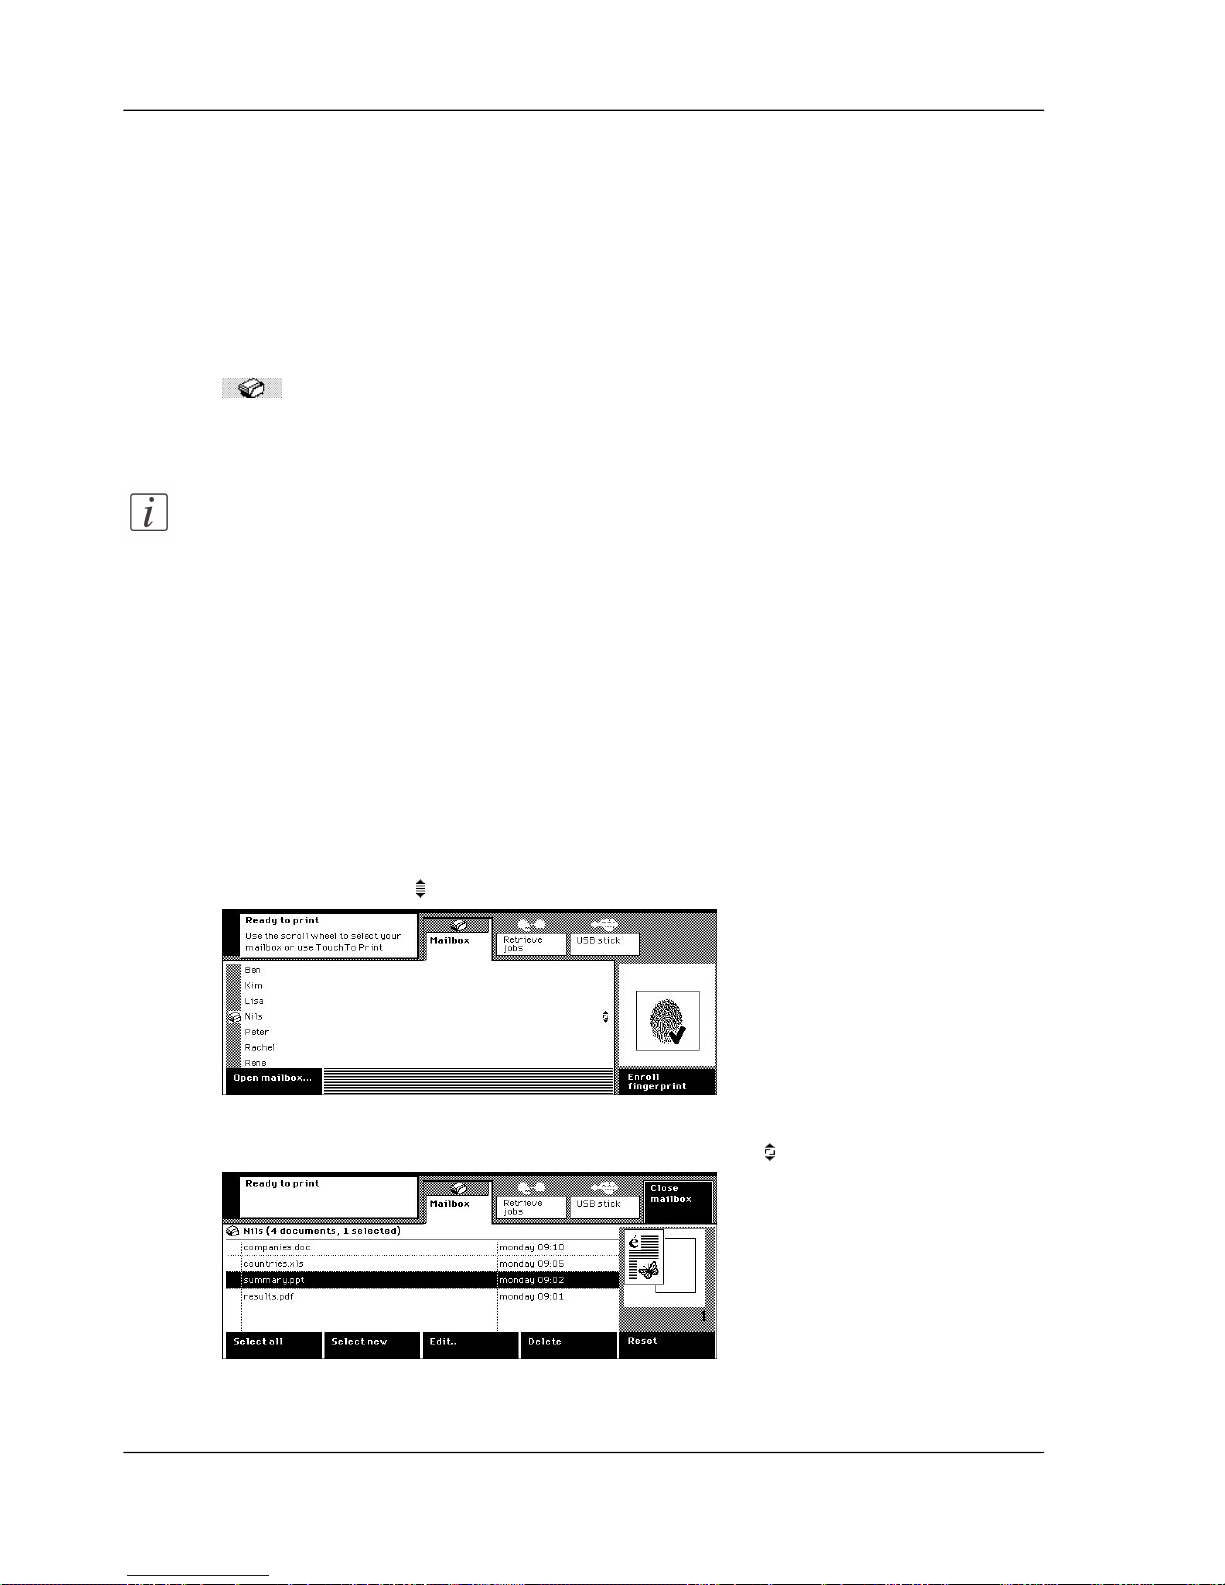
Your mailbox documents
Open your mailbox
Introduction
When you want to print your mailbox documents, first select and open your mailbox
. The name of your mailbox is your network user name. Y ou can only open your
mailbox when there are documents stored in your mailbox.
Note:
To go directly to your mailbox, you can use fingerprinting (TouchTo Print)
‘Print with your fingerprint’ on page 77.
Before you begin
■
You need to enter the correct settings in the printer driver to send the document to
the mailbox ‘Send a document to your mailbox’ on page 59.
■
You may be asked to identify or insert coins or a credit card before you can start
the jobs ‘Need PIN coins or a credit card’ on page 39.
How to open your mailbox
1.
Press the 'Print' key.
2.
Use the scroll wheel to select your mailbox in the 'User' list.
[54] Use the scroll wheel to select your mailbox
3.
Press the 'Open mailbox' key or press the scroll wheel key .
[55] The documents in a mailbox
66Chapter 6 - The print jobs
Open your mailbox
Page 67
Print your documents
Introduction
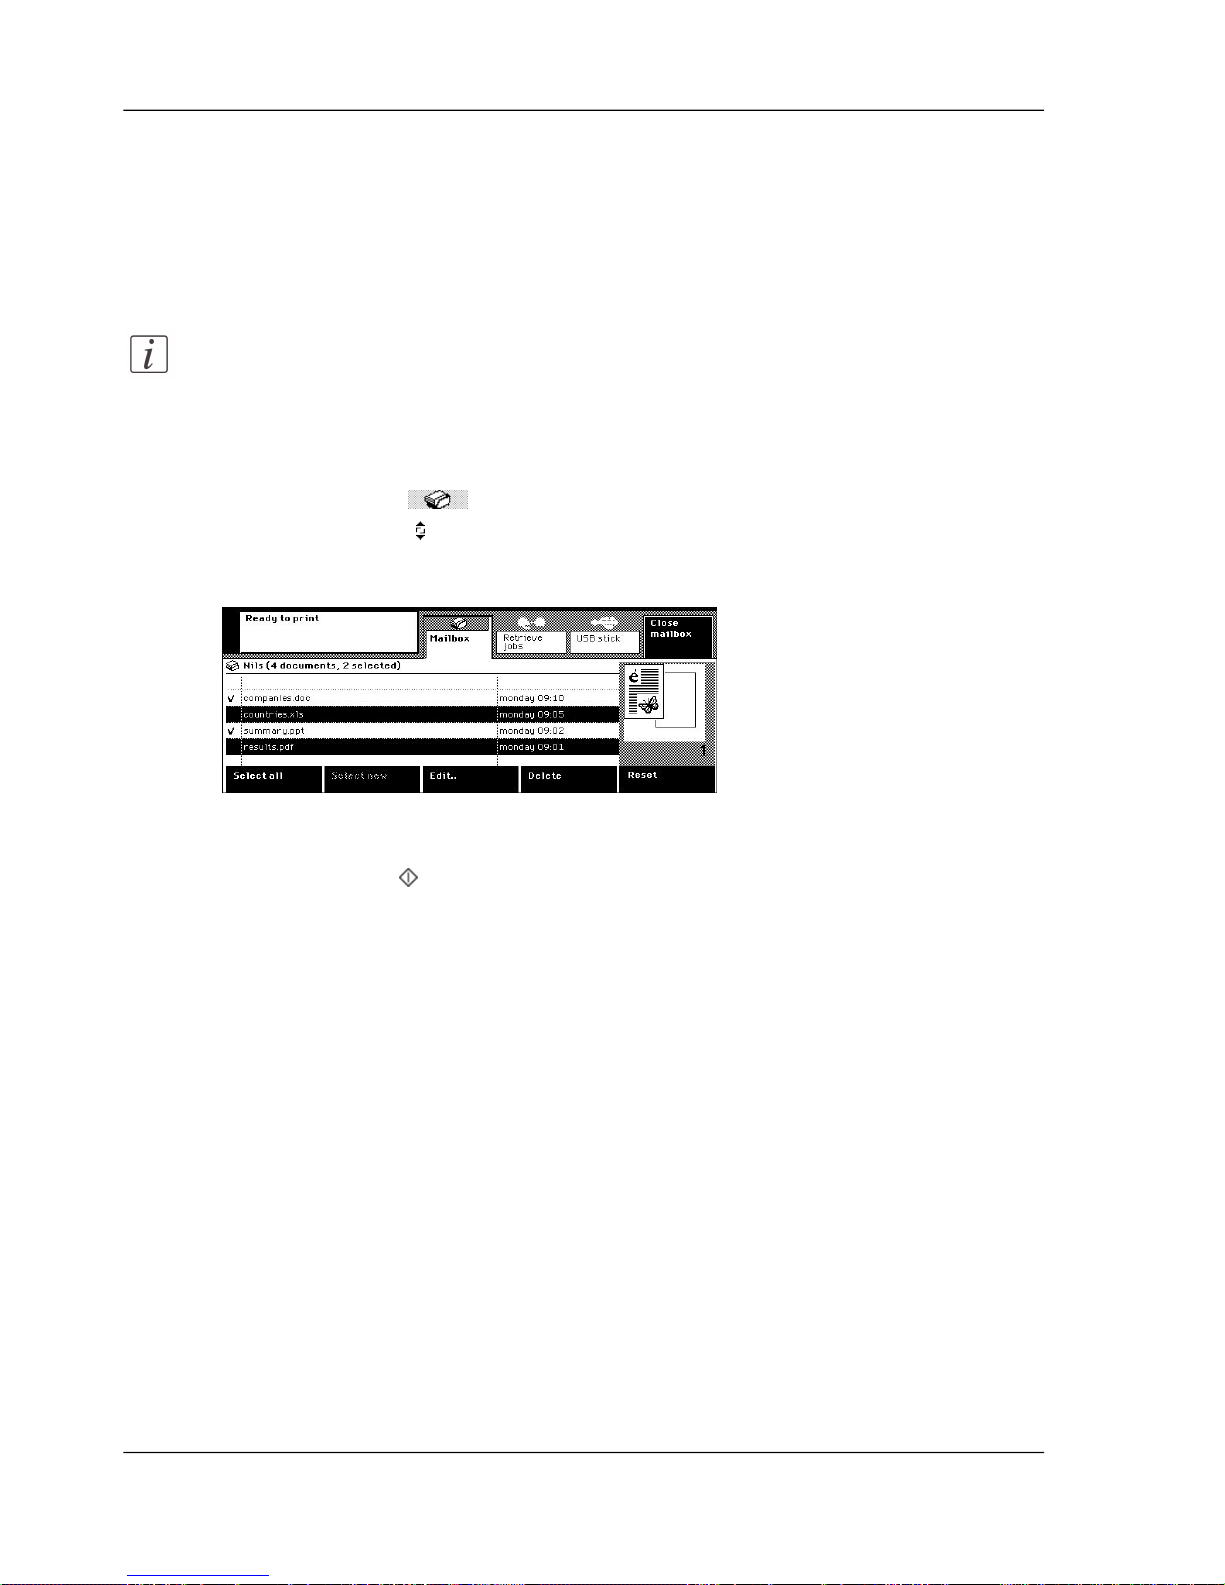
When you have opened your mailbox, you can select one or more documents to print.
Note:
To print the new documents directly, you can use fingerprinting (TouchTo
Print) ‘Print with your fingerprint’ on page 77.
How to print your documents
1.
Open your mailbox ‘Open your mailbox’ on page 66.
2.
Use the scroll wheel to select the document you want to print.
To select specific new documents or to select all documents, press the 'Select new' k e y or
the 'Select all' key.
[56] Select new documents
3.
Use the numeric keys to enter the number of sets.
4.
Press the Start key .
The printed documents will be marked with a V.
5.
Press the 'Close mailbox' key to quit your mailbox.
67Chapter 6 - The print jobs
Print your documents
Page 68

Print a secured document
Introduction
When you need to print a document that is for your eyes only, you can start a secured
print job. Especially when your mailbox is not protected with a PIN, secured printing
can be very useful for confidential information. You can only print a secured document
when you know the security code that has been attached to the print job in the printer
driver. You must enter the security code again when you want to print the document
from your mailbox.
Remember the following security guidelines to start a secured print job.
■
Use at least 4 digits to define the security code in the printer driver.
■
Print the secured document from your mailbox as soon as possible. Do not wait
longer than one hour.
■
Delete the document immediately after you have printed the document.
When you often start secured print jobs, use the same security code for these print
jobs. All documents in the mailbox secured with the same security code can be printed
while you only once enter the security code.
Note:
If your mailbox is not protected with a PIN, any per son can delete the secured
document from your mailbox. However, nobody can print your secured document.
Before you begin
You need to enter the correct settings in the printer driver to send a secured document
to your mailbox ‘Send a secured document to your mailbox’ on page 64.
How to print a secured document
1.
Open your mailbox ‘Open your mailbox’ on page 66.
2.
Use the scroll wheel to select one or more documents that have the same security code.
3.
Use the numeric keys to enter the number of sets.
4.
Press the Start key .
68Chapter 6 - The print jobs
Print a secured document
Page 69
5.
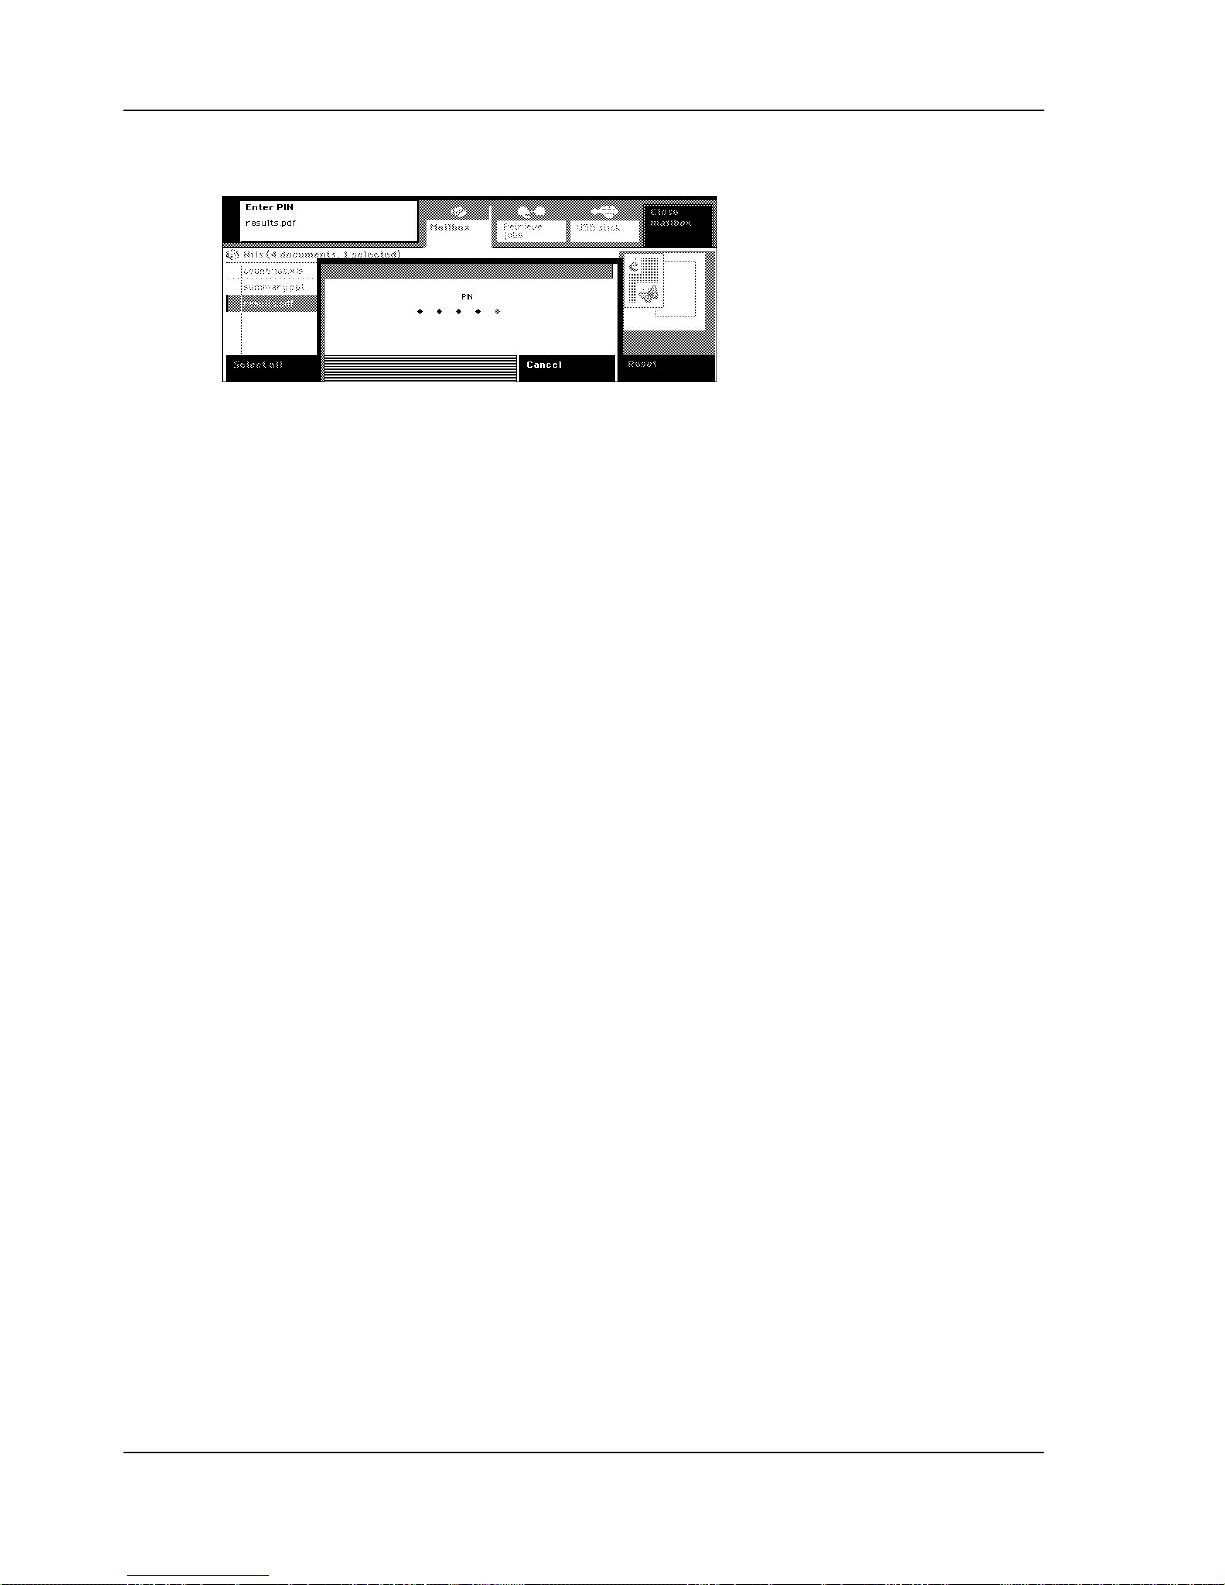
Use the numeric keys to enter the security code that you attached to the document or
documents.
[57] Entering the Security Code
6.
Press the 'Close mailbox' key to quit your mailbox.
69Chapter 6 - The print jobs
Print a secured document
Page 70
Change the document settings
Introduction
You define the print properties for your document in printer driver . After you sent the
document to the mailbox, you can change the properties of the document in the
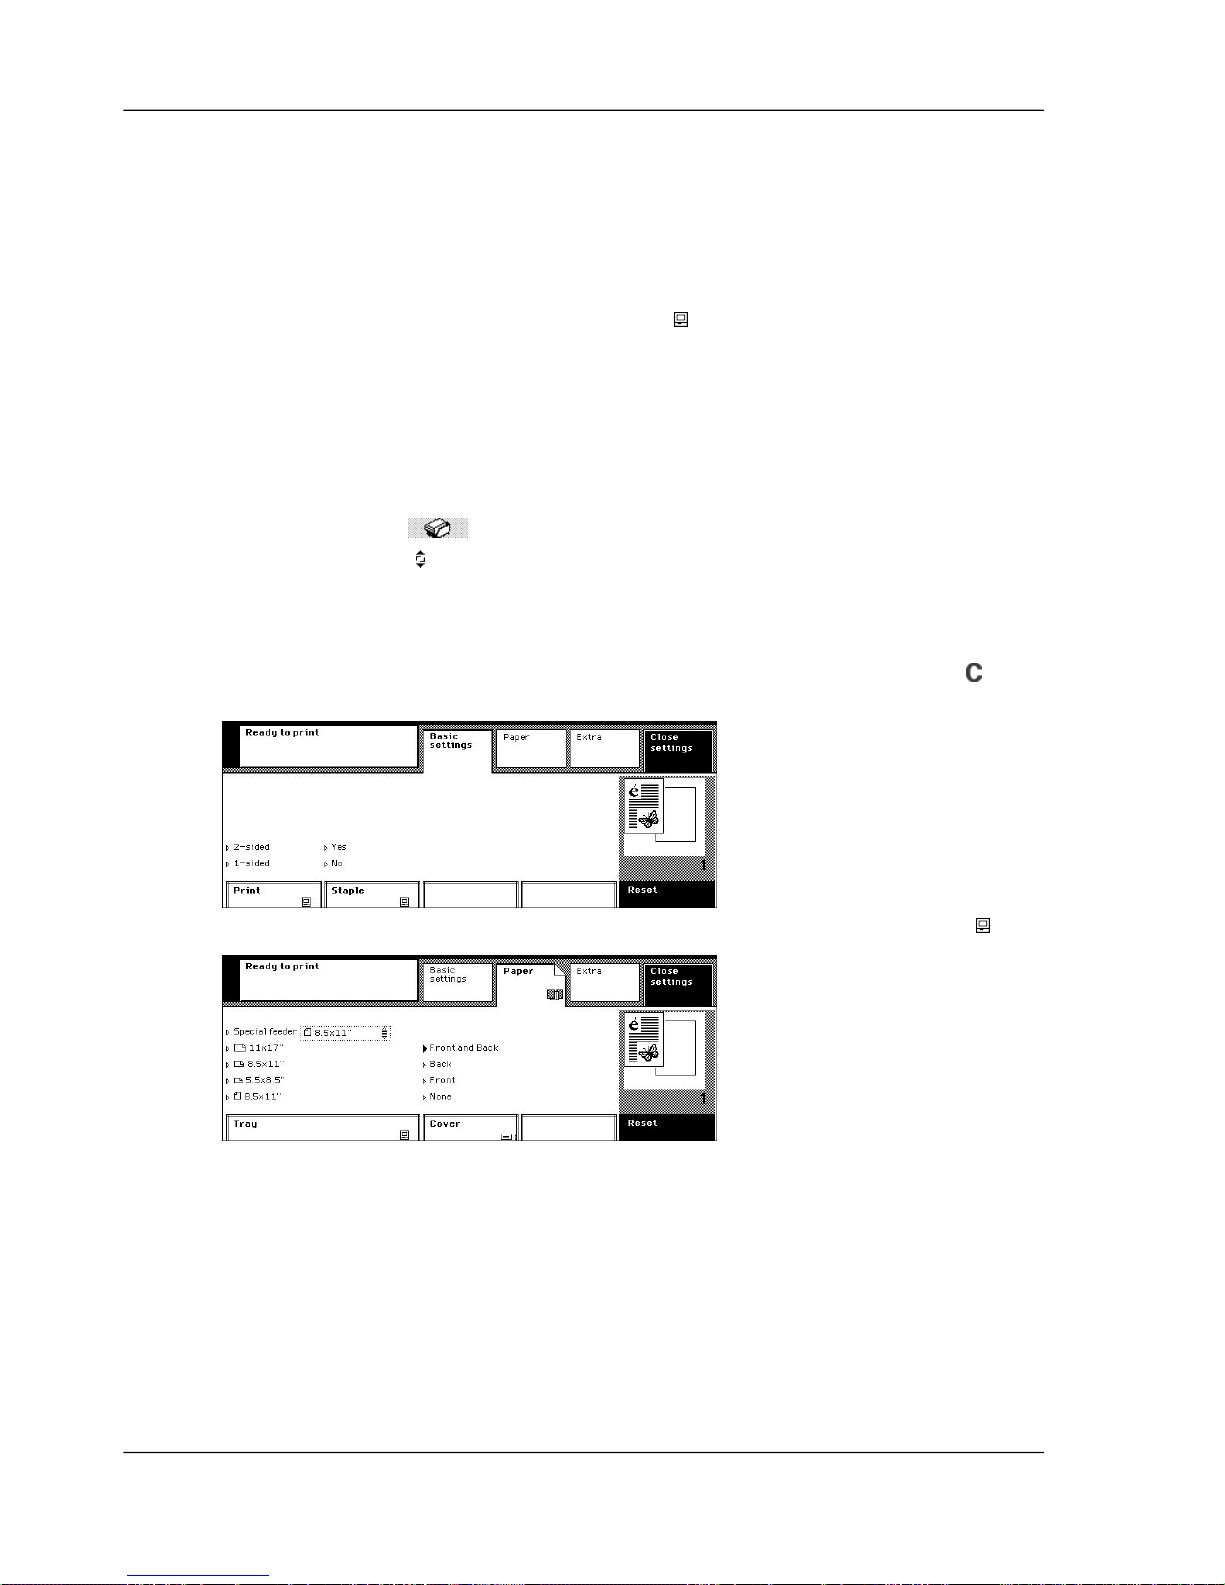
mailbox. The settings with a computer symbol in the function name box refer to the
'As in document' option in the printer driver. Then the application from which you
sent your document determines how your prints will look. You can also change these
settings if you want.
How to change the document settings
1.
Open your mailbox ‘Open your mailbox’ on page 66.
2.
Use the scroll wheel to select the document you want to change.
To select new or all documents, press the 'Select new' key or the 'Select all' key.
3.
Press the 'Edit settings' key or press the scroll wheel key.
4.
Press the 'Basic settings', 'Paper' or 'Extra' keys to go to the print settings ‘The print settings’
on page 166. Press the 'Reset' key to restore the printer driver settings. Press the key to
restore the number of sets as defined in the printer driver.
[58] The printer driver settings that will be used for the document have the computer symbol
[59] The prints will get covers
5.
Press the 'Close mailbox' key to return to your mailbox.
70Chapter 6 - The print jobs
Change the document settings
Page 71
Delete documents from your mailbox
Introduction
You can delete one or more documents from your mailbox, for example after you
printed the documents.
Remember that the Key operator defines the storage time of the mailbox documents.
The documents can be deleted immediately after printing or after an expired storage
time.
How to delete documents from your mailbox
1.
Open your mailbox ‘Open your mailbox’ on page 66.
2.
Use the scroll wheel to select the document you want to delete.
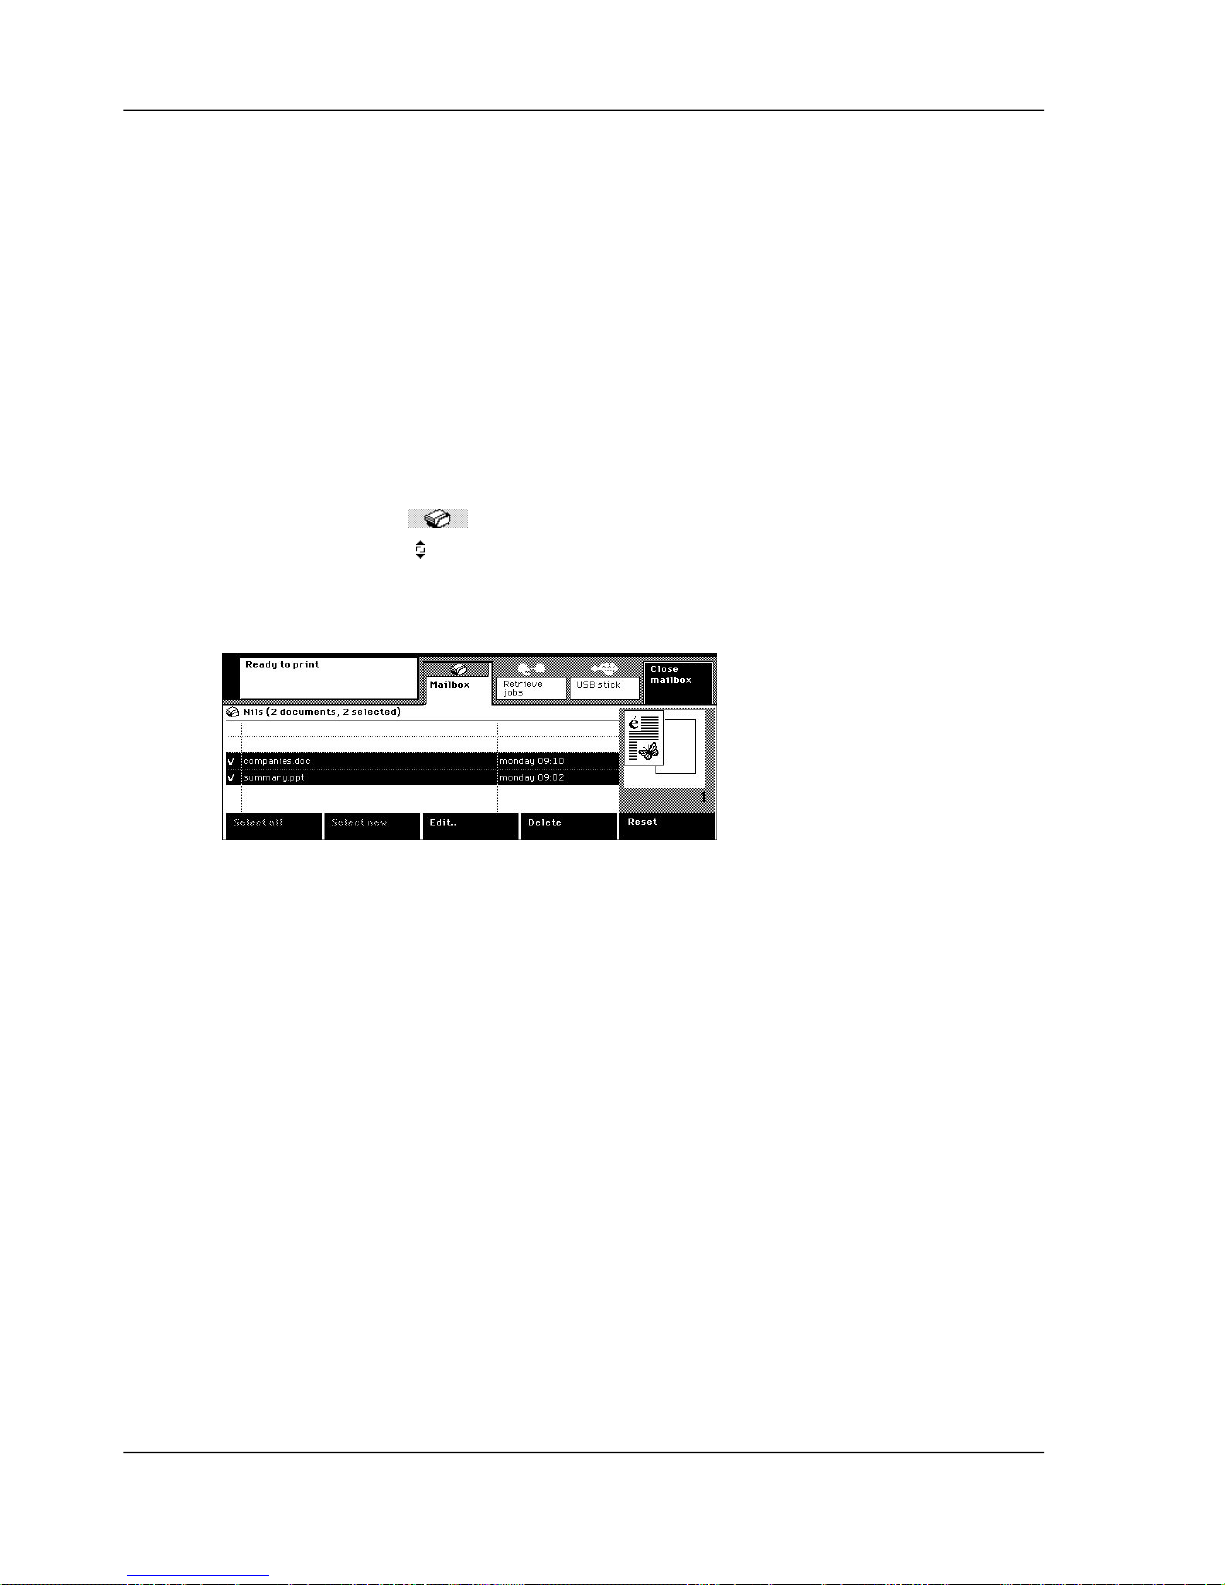
To select specific new documents or to select all documents, press the 'Select new' k e y or
the 'Select all' key.
3.
Press the 'Delete' key.
[60] All documents that can be deleted are selected
4.
Press the 'Close mailbox' key to quit your mailbox.
71Chapter 6 - The print jobs
Delete documents from your mailbox
Page 72
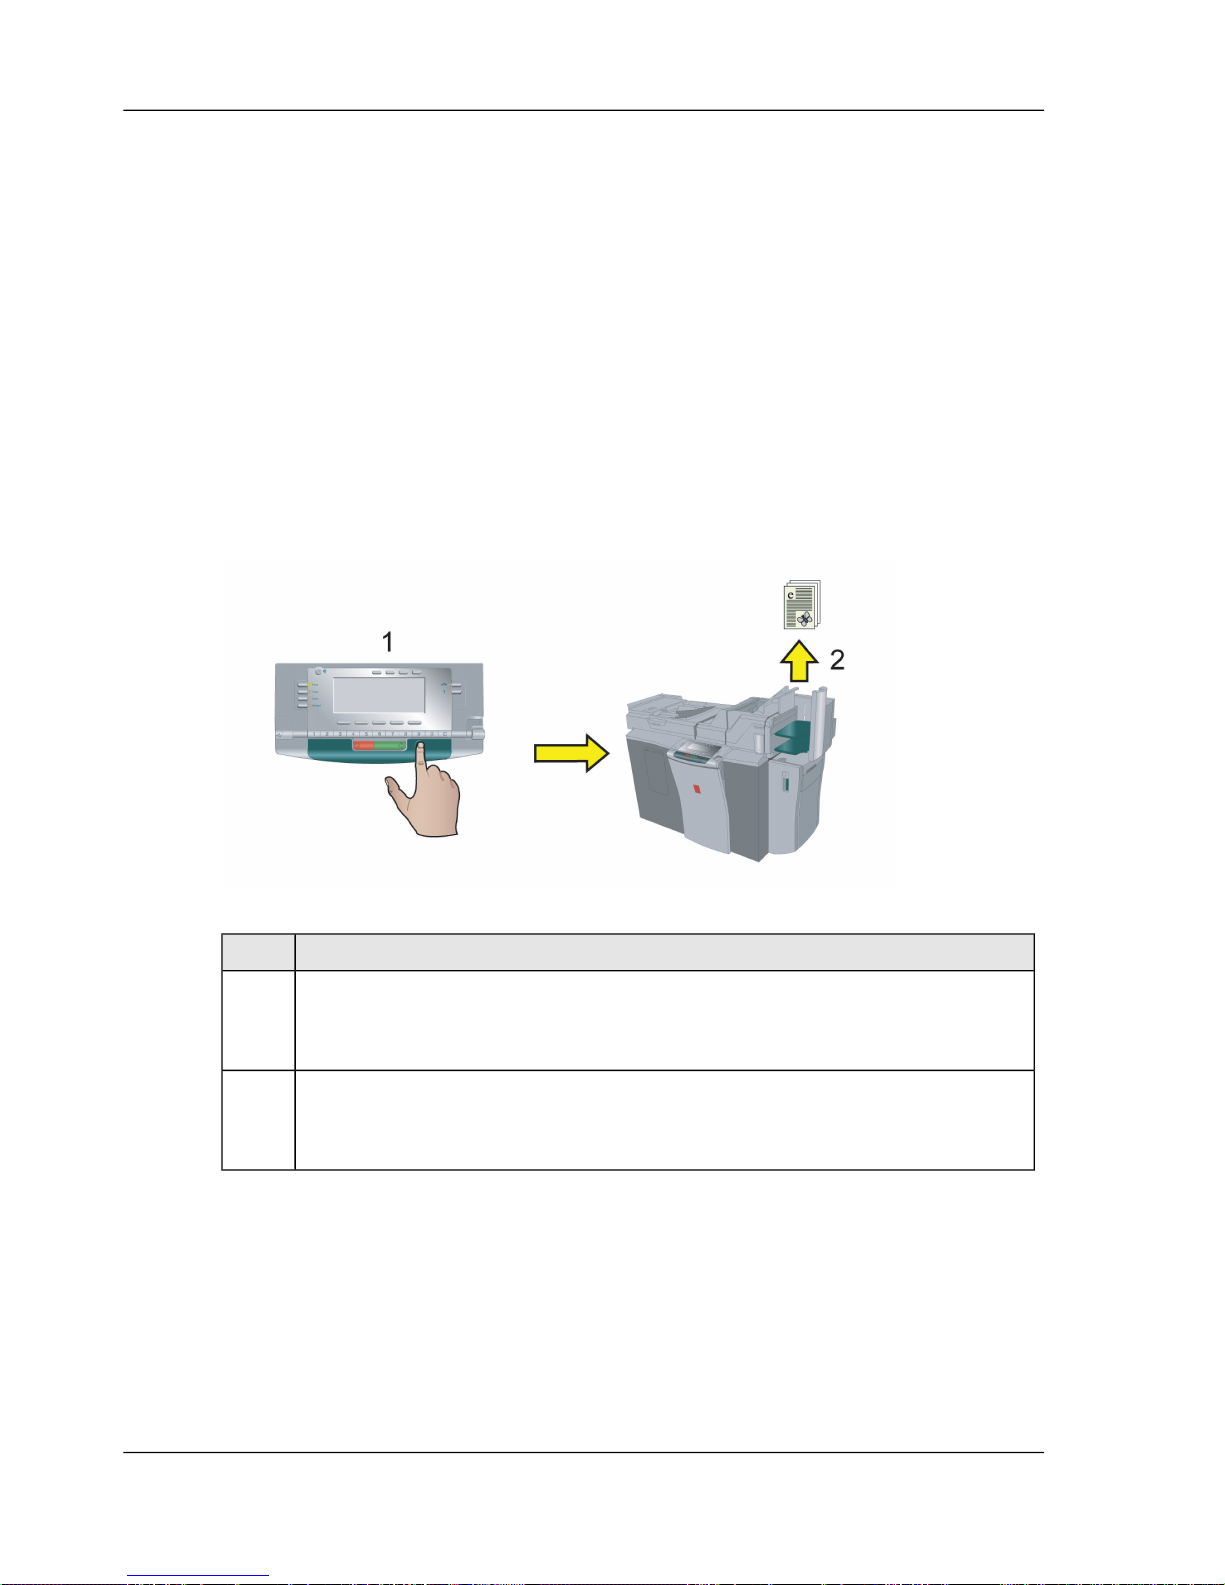
Use your finger to print
The ease of fingerprinting
Why use fingerprinting
You can use fingerprinting (TouchTo Print) to print your documents quickly. One
touch of your finger on the fingerprint sensor is enough to open your mailbox or print
your new documents. You must first enroll your fingerprint before you can use
TouchTo Print.
How does fingerprinting work
[27]
DescriptionStep
You only enroll your fingerprint once with the Enroll fingerprint wizard.
When successfully enrolled, you can place your finger on the sensor to
print your documents quickly.
1
Your fingerprint is recognized. Your mailbox is opened or your new
documents are printed, depending on the fingerprint mode you select during
the enrollment.
2
72Chapter 6 - The print jobs
The ease of fingerprinting
Page 73
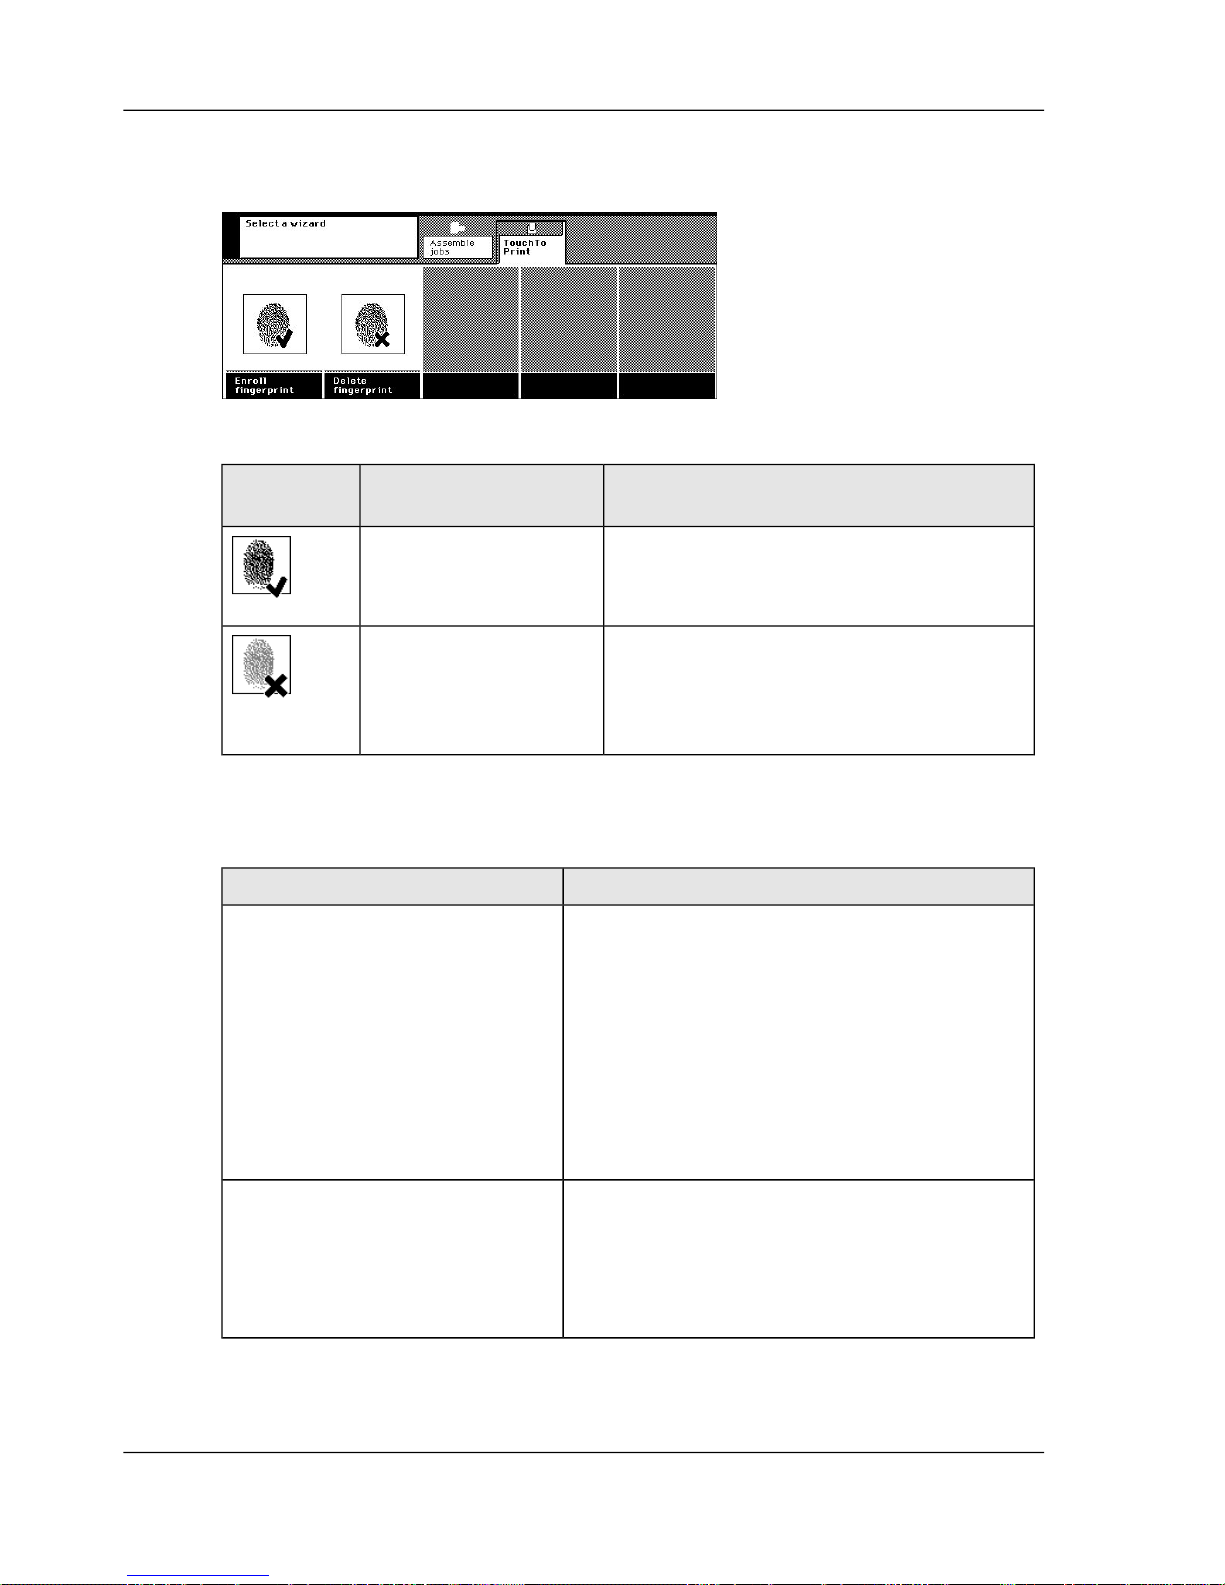
The TouchTo Print wizards
[62] The two TouchTo Print wizards
[28]
DescriptionNameTouchTo
Print wizards
Start the Enroll fingerprint wizard when
you want to use fingerprinting ‘Enr oll your
fingerprint’ on page 75.
Enroll fingerprint
wizard
Start the Delete fingerprint wizard if you
do not want to use fingerprinting any
longer ‘Delete your fingerprint’ on page
79.
Delete fingerprint
wizard
User questions
[29]
AnswerQuestion
The system needs to know your identity.You
are asked to enter an identification code or
select your user name when the system does
not know who you are.
If your machine reads data from a central
server that stores the contact information of
employees, identification codes are used. If
necessary, ask the Key operator or System
administrator what your identification code is.
What information is needed
during enrollment?
When your mailbox is protected with a PIN
and you have enrolled your fingerprint with
this PIN, you are not asked to enter the PIN
again ‘Need PIN coins or a credit card’ on
page 39.
Do I need a PIN to use
fingerprinting
73Chapter 6 - The print jobs
The ease of fingerprinting
Page 74
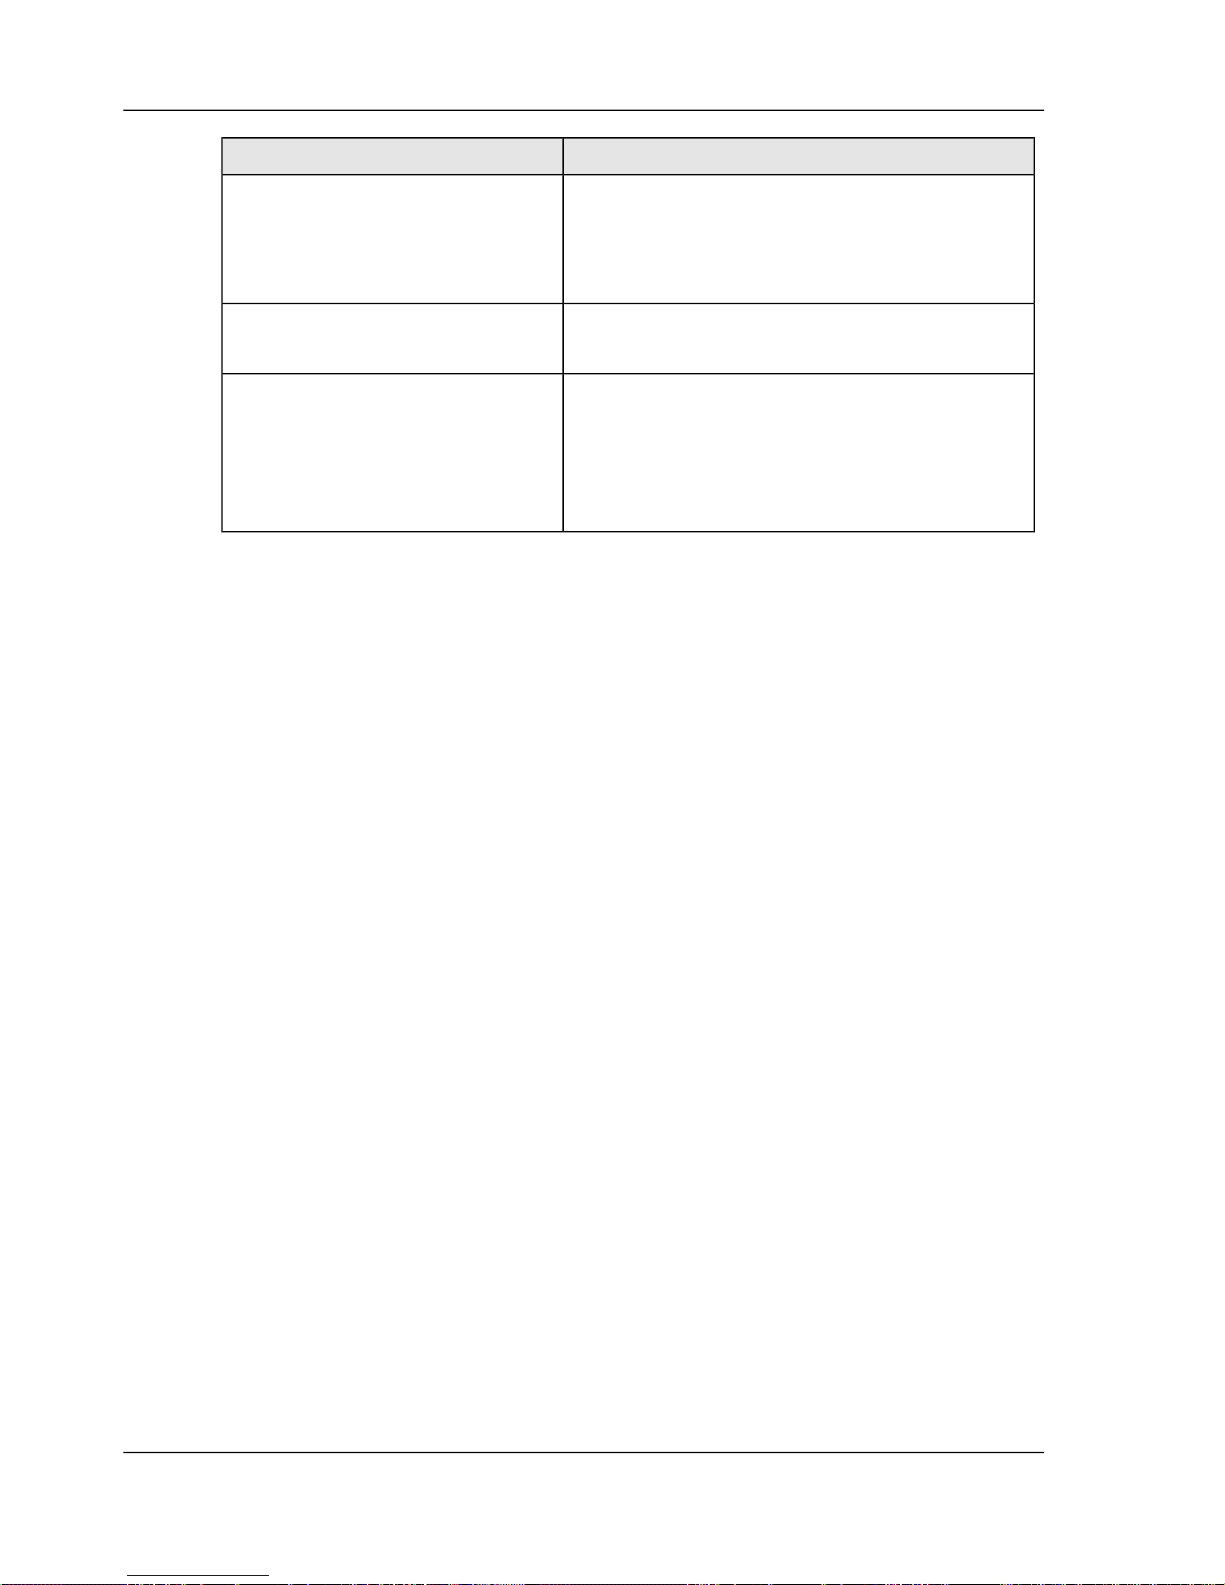
AnswerQuestion
If you have a secured print job in your mailbox,
you must enter the security code you assigned
to the job ‘Print a secured document’ on page
68.
How does my secured print job
behave during fingerprinting
You can enroll two fingerprints belonging to
your mailbox. Attach one mode to each finger .
Can I use both fingerprint modes
Your fingerprint information is safely stored
on the printer . Y ou can delete your fingerprint,
if you do not want to use the function any
longer. No information about your deleted
fingerprint is left on the printer.
Is my fingerprint information
safely stored
74Chapter 6 - The print jobs
The ease of fingerprinting
Page 75
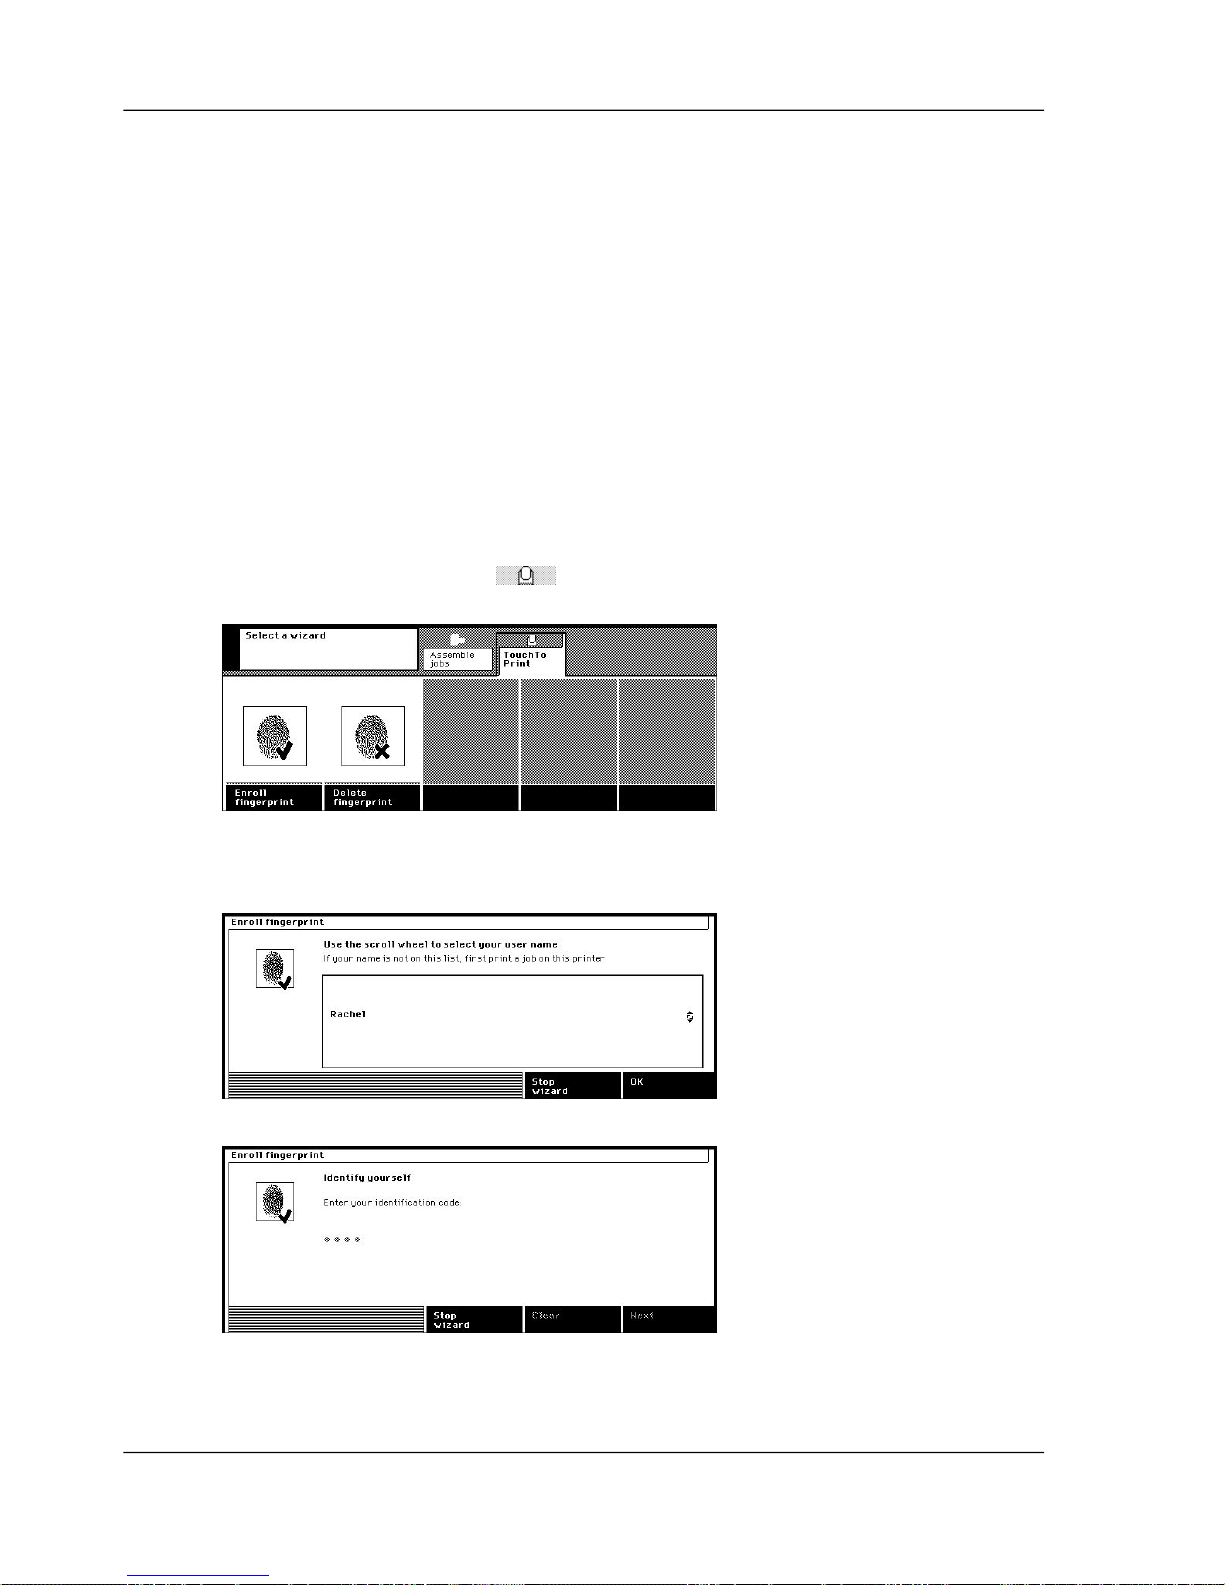
Enroll your fingerprint
Introduction
Start the Enroll fingerprint wizard to enroll your fingerprint when you want to use
T ouchT o Print. The wizard e xplains step by step how you must enroll your fingerprint.
The following procedure describes the main steps you must take.
The system needs to know your identity. You must enter an identification code or
select your user name when the system does not know who you are. If necessary, ask
the Key operator or System administrator what your identification code is.
How to enroll your fingerprint
1.
Press the 'Wizards' key.
2.
Press the 'TouchTo Print' key .
3.
Select the 'Enroll fingerprint' wizard.
[63] The two TouchTo Print wizards
4.
Press the 'Next' key.
5.
Identify yourself when necessary.
[64] Identification by user name
[65] Identification by code
75Chapter 6 - The print jobs
Enroll your fingerprint
Page 76
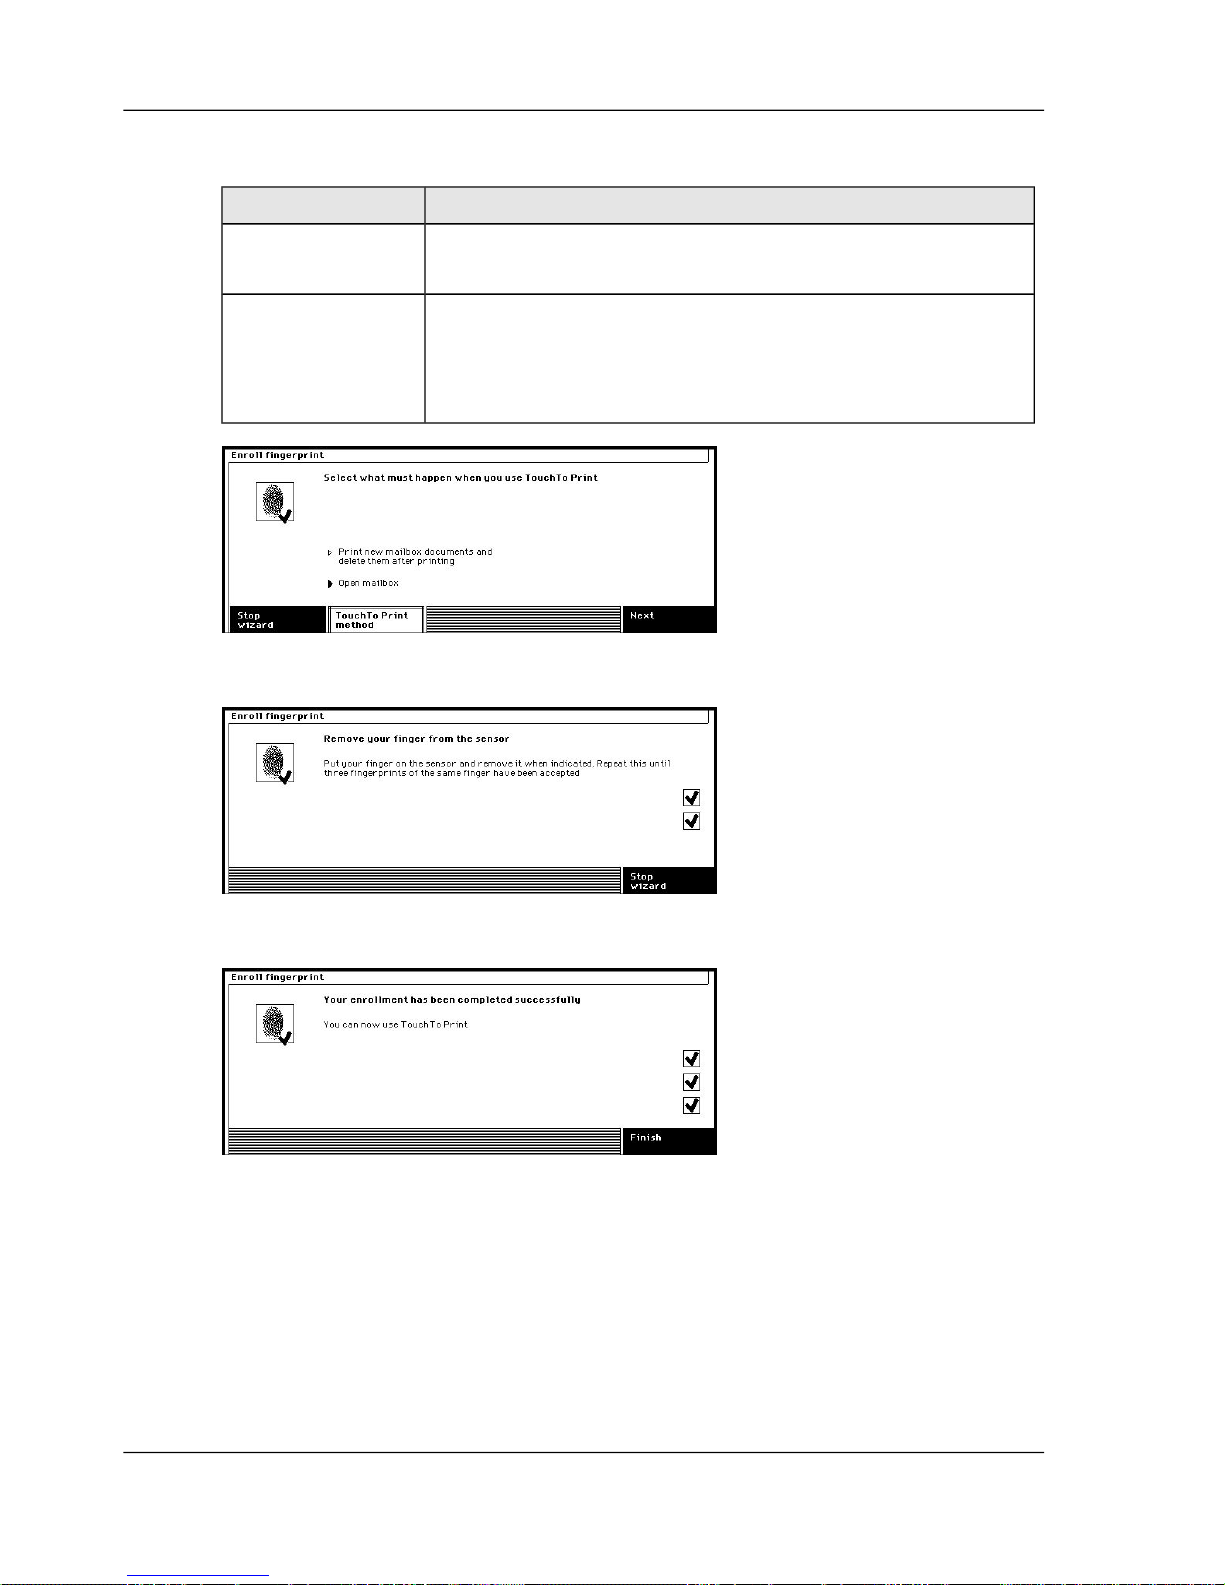
6.
Select the TouchTo Print mode.
[30]
DescriptionTouchTo Print mode
Your mailbox will be opened after your fingerprint is
recognized.
'Open mailbox'
Your new documents are printed after your fingerprint is
recognized. The documents are deleted after being printed.
'Print new mailbox
documents and
delete them after
printing'
[66] Select how you want to use fingerprinting
7.
Follow the instructions how to read your fingerprint.
[67] Instructions how to read your fingerprint
8.
Finish the wizard.
[68] Finish the wizard
76Chapter 6 - The print jobs
Enroll your fingerprint
Page 77
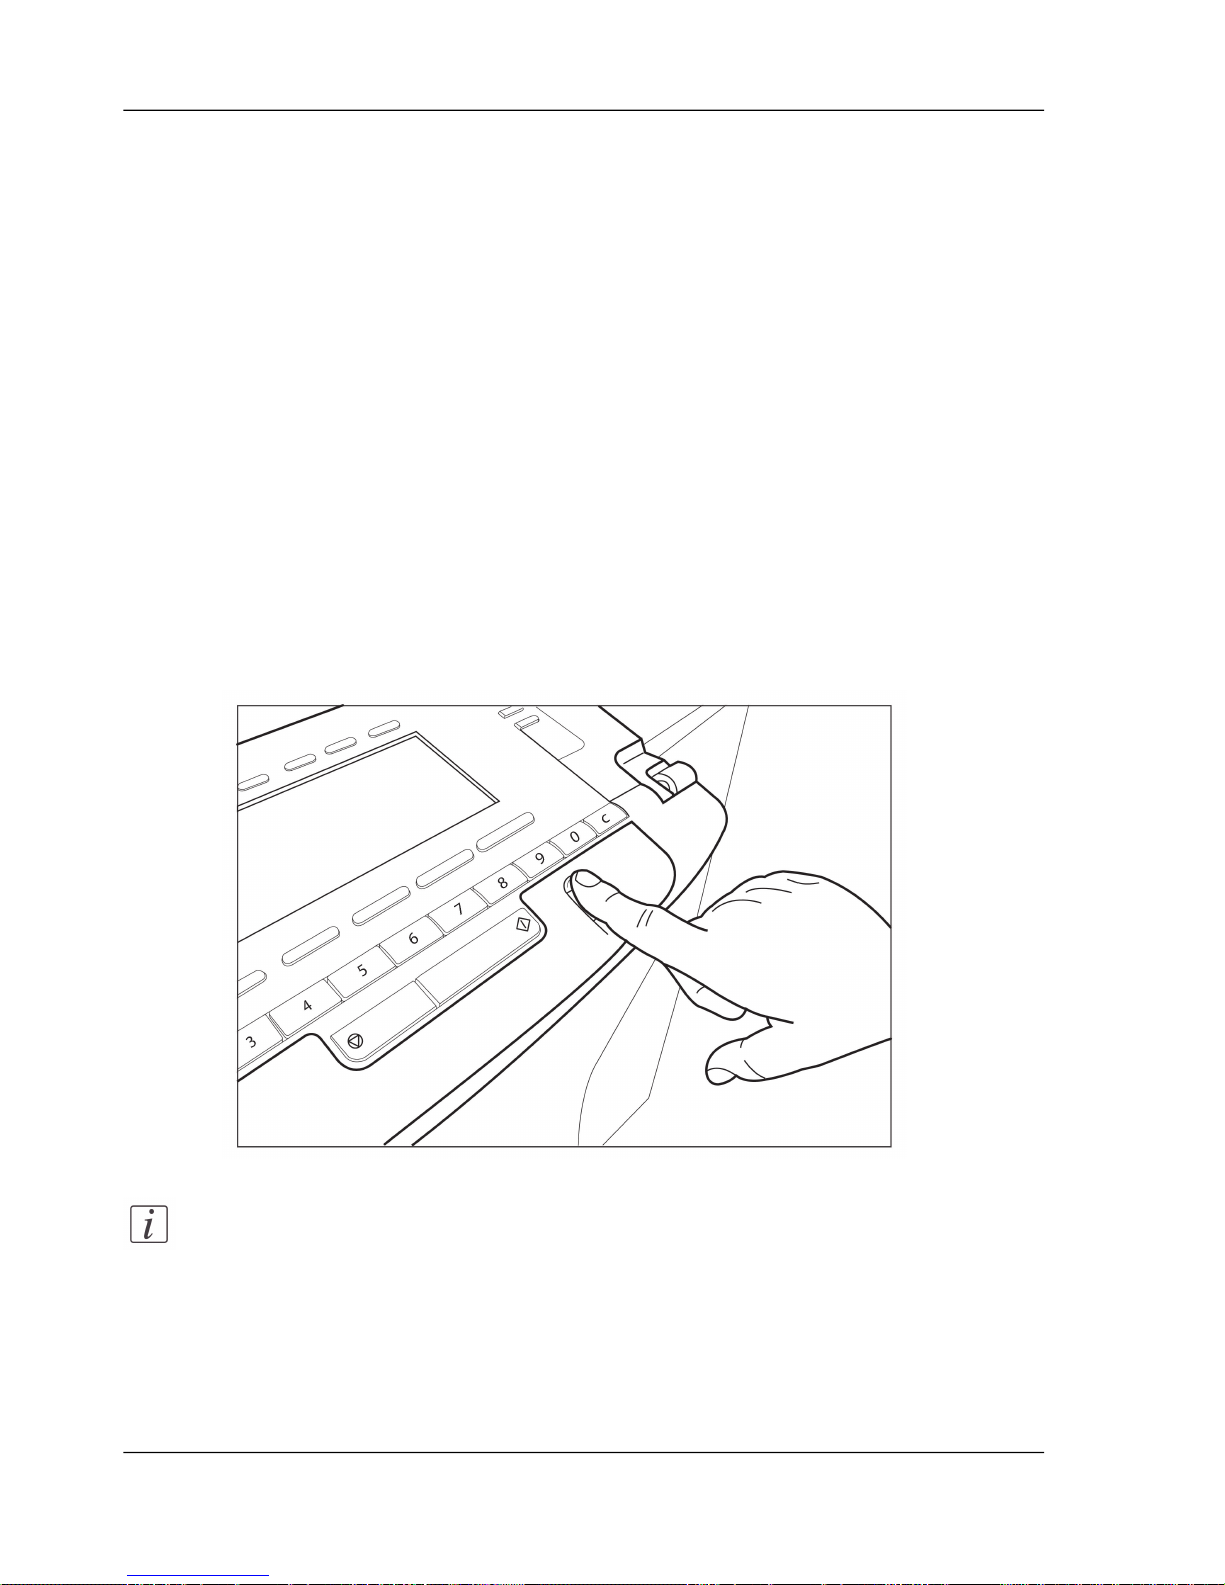
Print with your fingerprint
Introduction
You must enroll your fingerprint before you can print with your fingerprint ‘Enroll
your fingerprint’ on page 75. Depending on the fingerprint mode you selected during
enrollment, the following happens after you put your finger on the sensor:
■
Your mailbox will be opened after your fingerprint is recognized, or
■
Your new documents will be printed after your fingerprint is recognized. The
documents are deleted from your mailbox after being printed.
Before you begin
Note that your fingerprint must be successfully enrolled ‘Enroll your fingerprint’ on
page 75.
How to open your mailbox with your fingerprint
1.
Put your finger on the fingerprint sensor.
Note:
If your fingerprint is not recognized, try again.
77Chapter 6 - The print jobs
Print with your fingerprint
Page 78
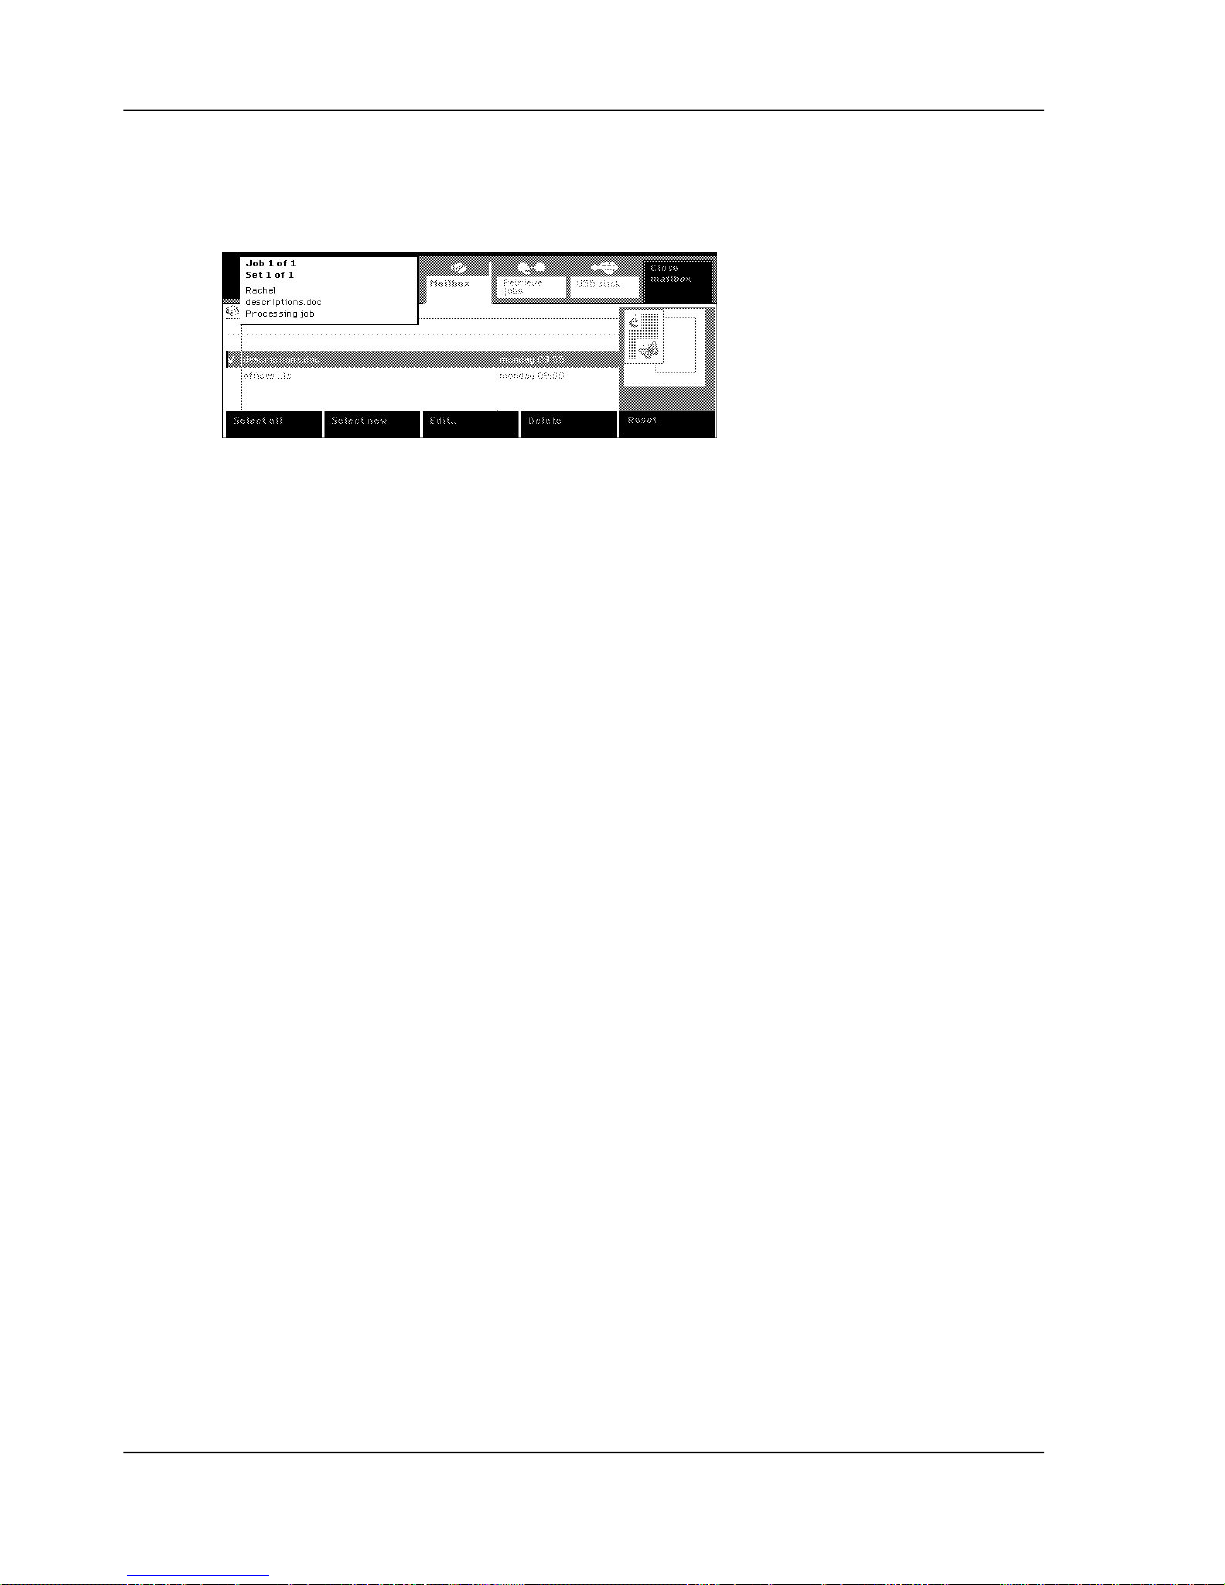
2.
The new documents are immediately printed, if you attached the 'Print new mailbox
documents and delete them after printing' mode to your fingerprint.
Select your document if you attached the 'Open mailbox' mode to your fingerprint. Print
your document.
[70] The job is printed after you put y our finger on the sensor ('Print new mailbox documents and delete
them after printing' mode)
78Chapter 6 - The print jobs
Print with your fingerprint
Page 79
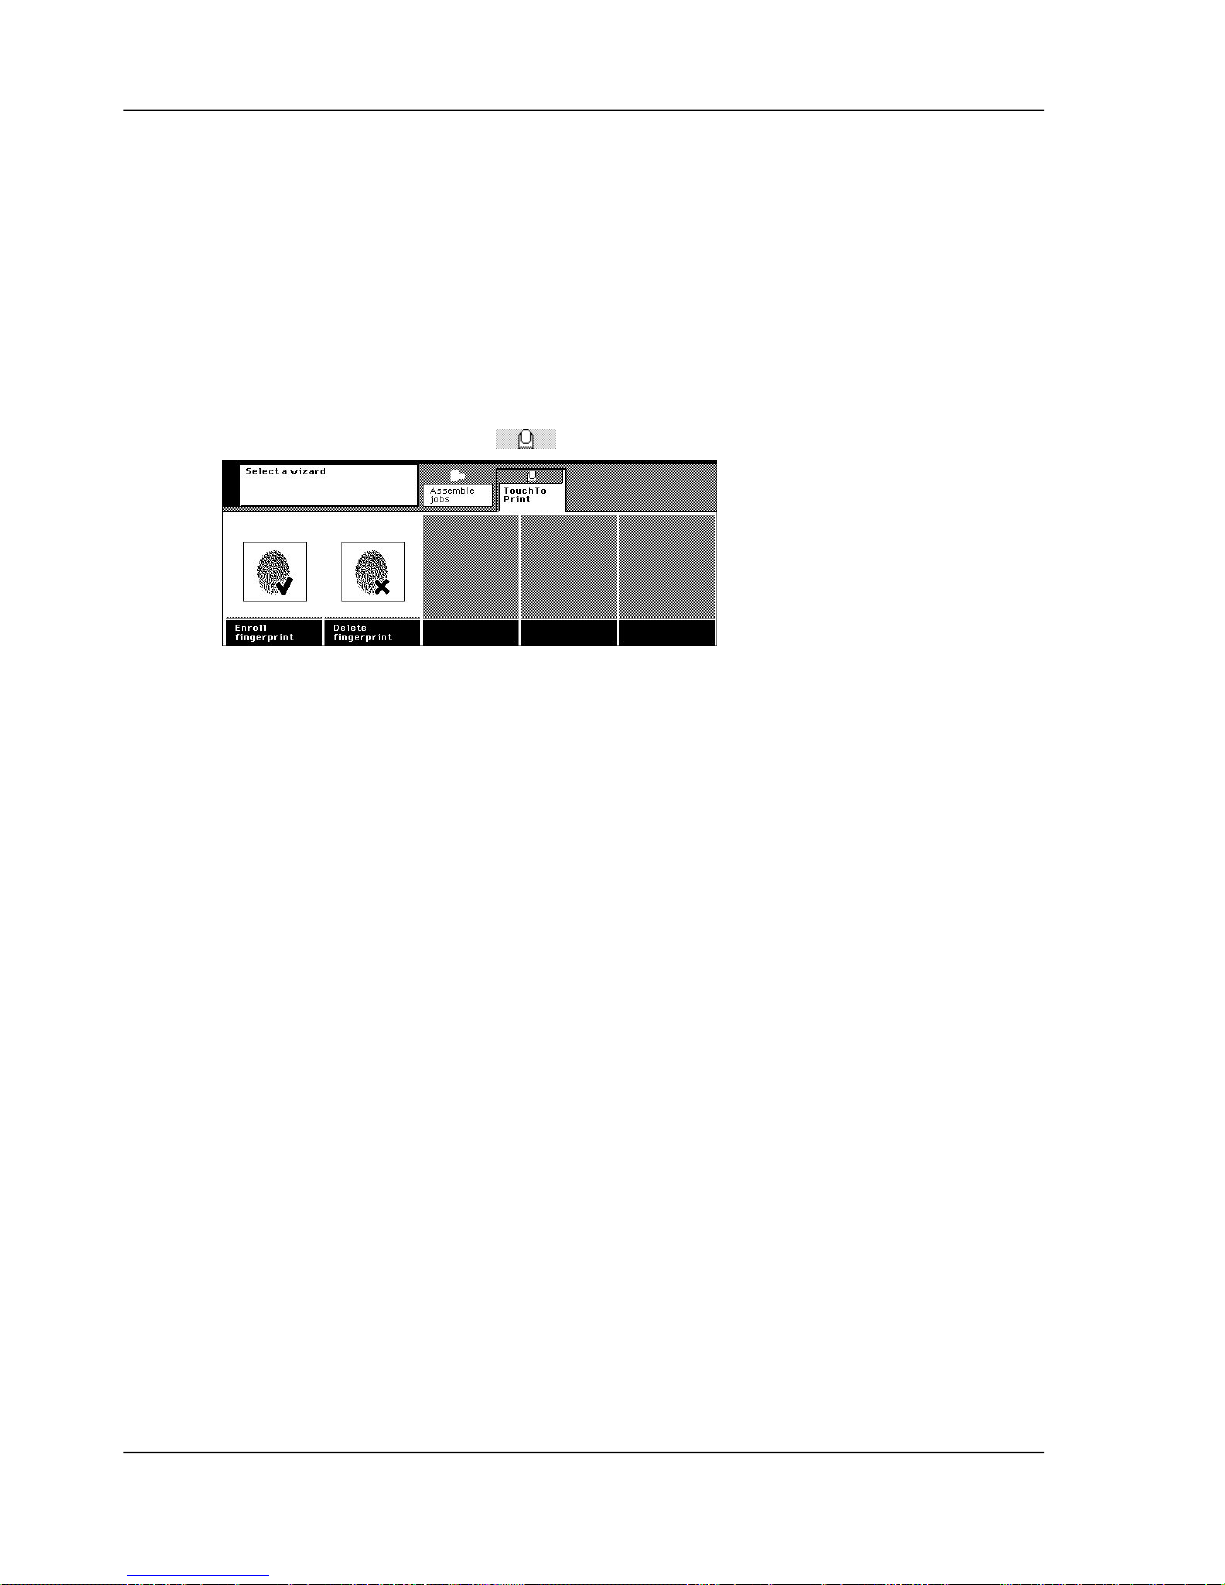
Delete your fingerprint
Introduction
You can always delete your fingerprint when you do not want to use fingerprinting
any longer.
How to delete your fingerprint
1.
Press the 'Wizards' key.
2.
Press the 'TouchTo Print' key .
[71] The two TouchTo Print wizards
3.
Select the 'Delete fingerprint' wizard.
4.
Put your enrolled finger on the sensor.
5.
Remove your finger from the sensor.
6.
Press the 'Yes' key to confirm the action.
7.
Finish the wizard.
79Chapter 6 - The print jobs
Delete your fingerprint
Page 80

Get documents from your other
mailboxes
The ease of fetching documents from your other mailboxes
Why fetching documents from your other mailboxes
When there are several printers in the office, the Smart mailbox function can be v ery
useful for you. You can fetch your mailbox documents from wherever you are. For
example, you sent a mailbox job to the printer on the ground floor, but you urgently
need the document when you are on the fourth floor . Y ou walk to printer on the fourth
floor and start the Smart mailbox function. The printer on the fourth floor fetches all
your documents you sent to other printers in the building. Now you can select and
print the document you need ‘Fetch documents from your other mailboxes’ on page
83.
The Smart mailbox only works if the printers share the Smart mailbox functionality.
The System administrator configures the Smart mailbox on the printers.
80Chapter 6 - The print jobs
The ease of fetching documents from your other mailboxes
Page 81
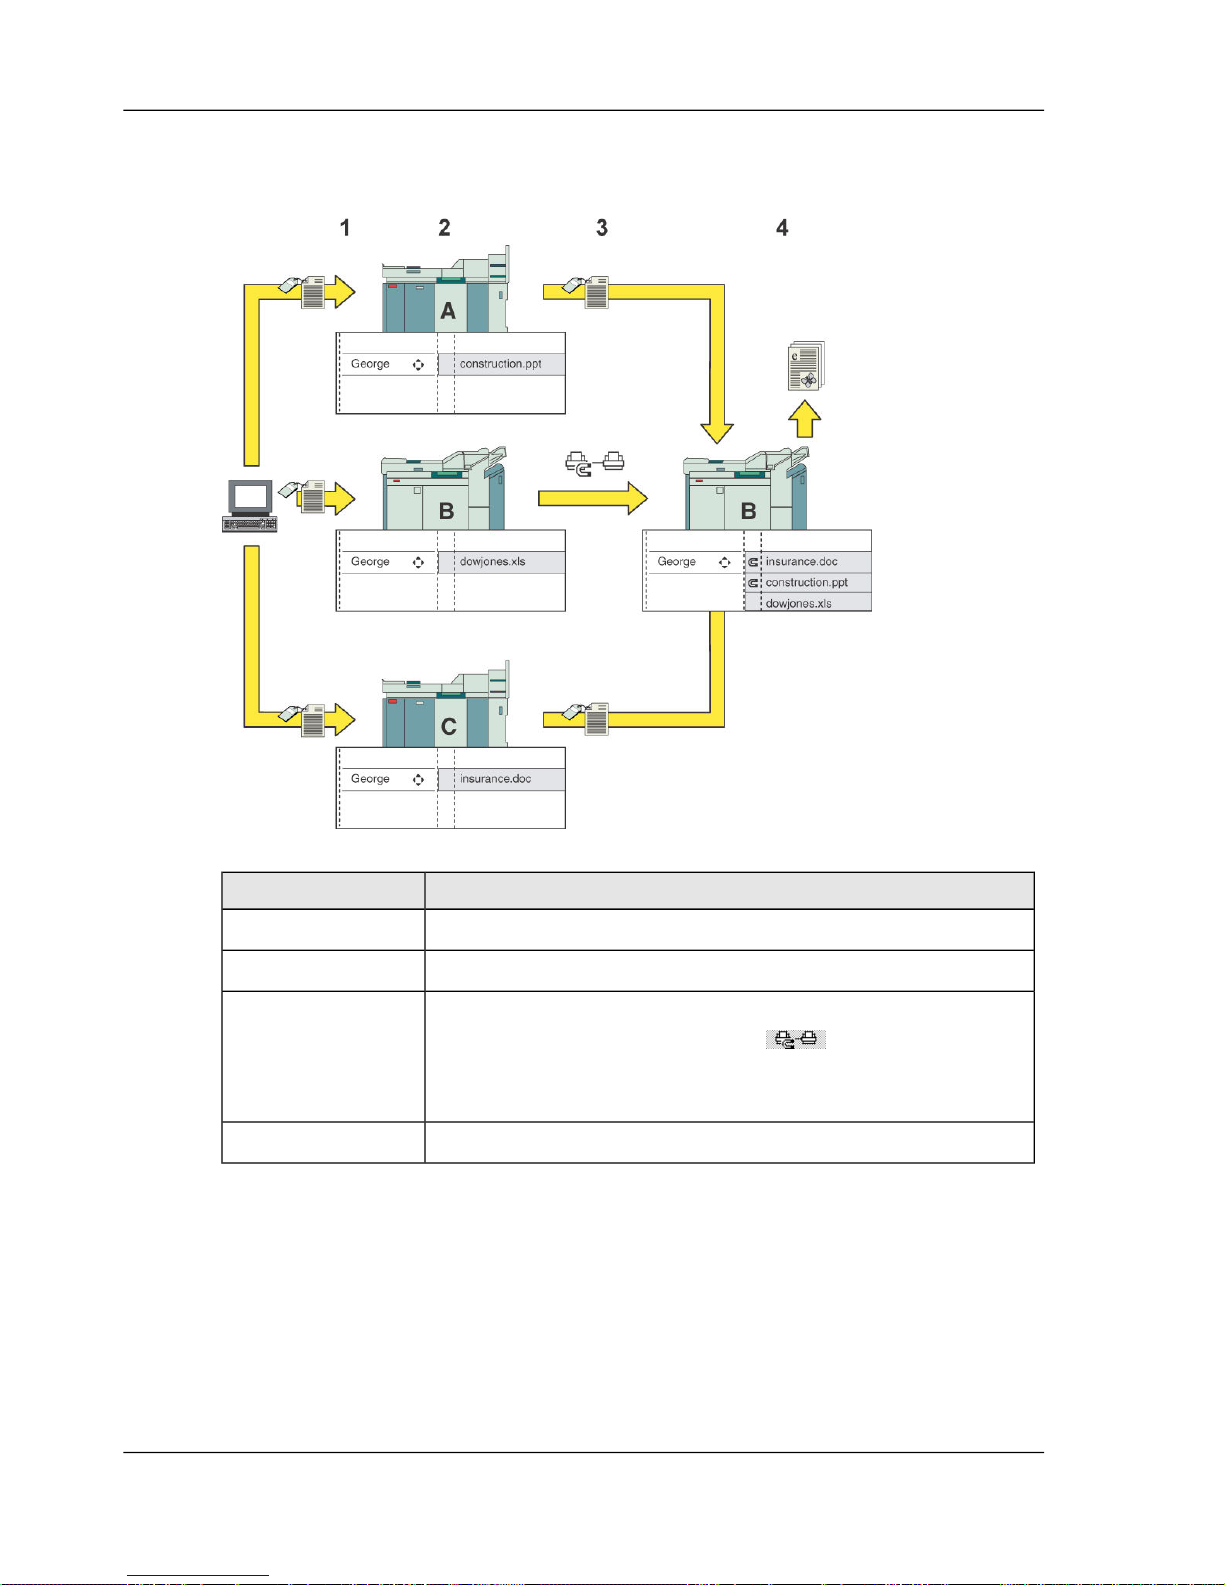
How does the Smart mailbox work
[31]
DescriptionStep
George sent 3 jobs to three printers.1
George walks to printer B .2
George wants to hav e all documents he sent to his mailboxes.
He presses the 'Retrieve jobs' key and identifies
himself. The mailbox documents from printer A and C are
sent to printer B.
3
George selects the documents he wants to print.4
Identify yourself
The system needs to know who you are. You are asked to enter an identification code
or select your user name when the system does not know who you are.
If your machine reads data from a central server that stores the contact information
of employees, identification codes are used. If necessary, ask the Key operator or
81Chapter 6 - The print jobs
The ease of fetching documents from your other mailboxes
Page 82
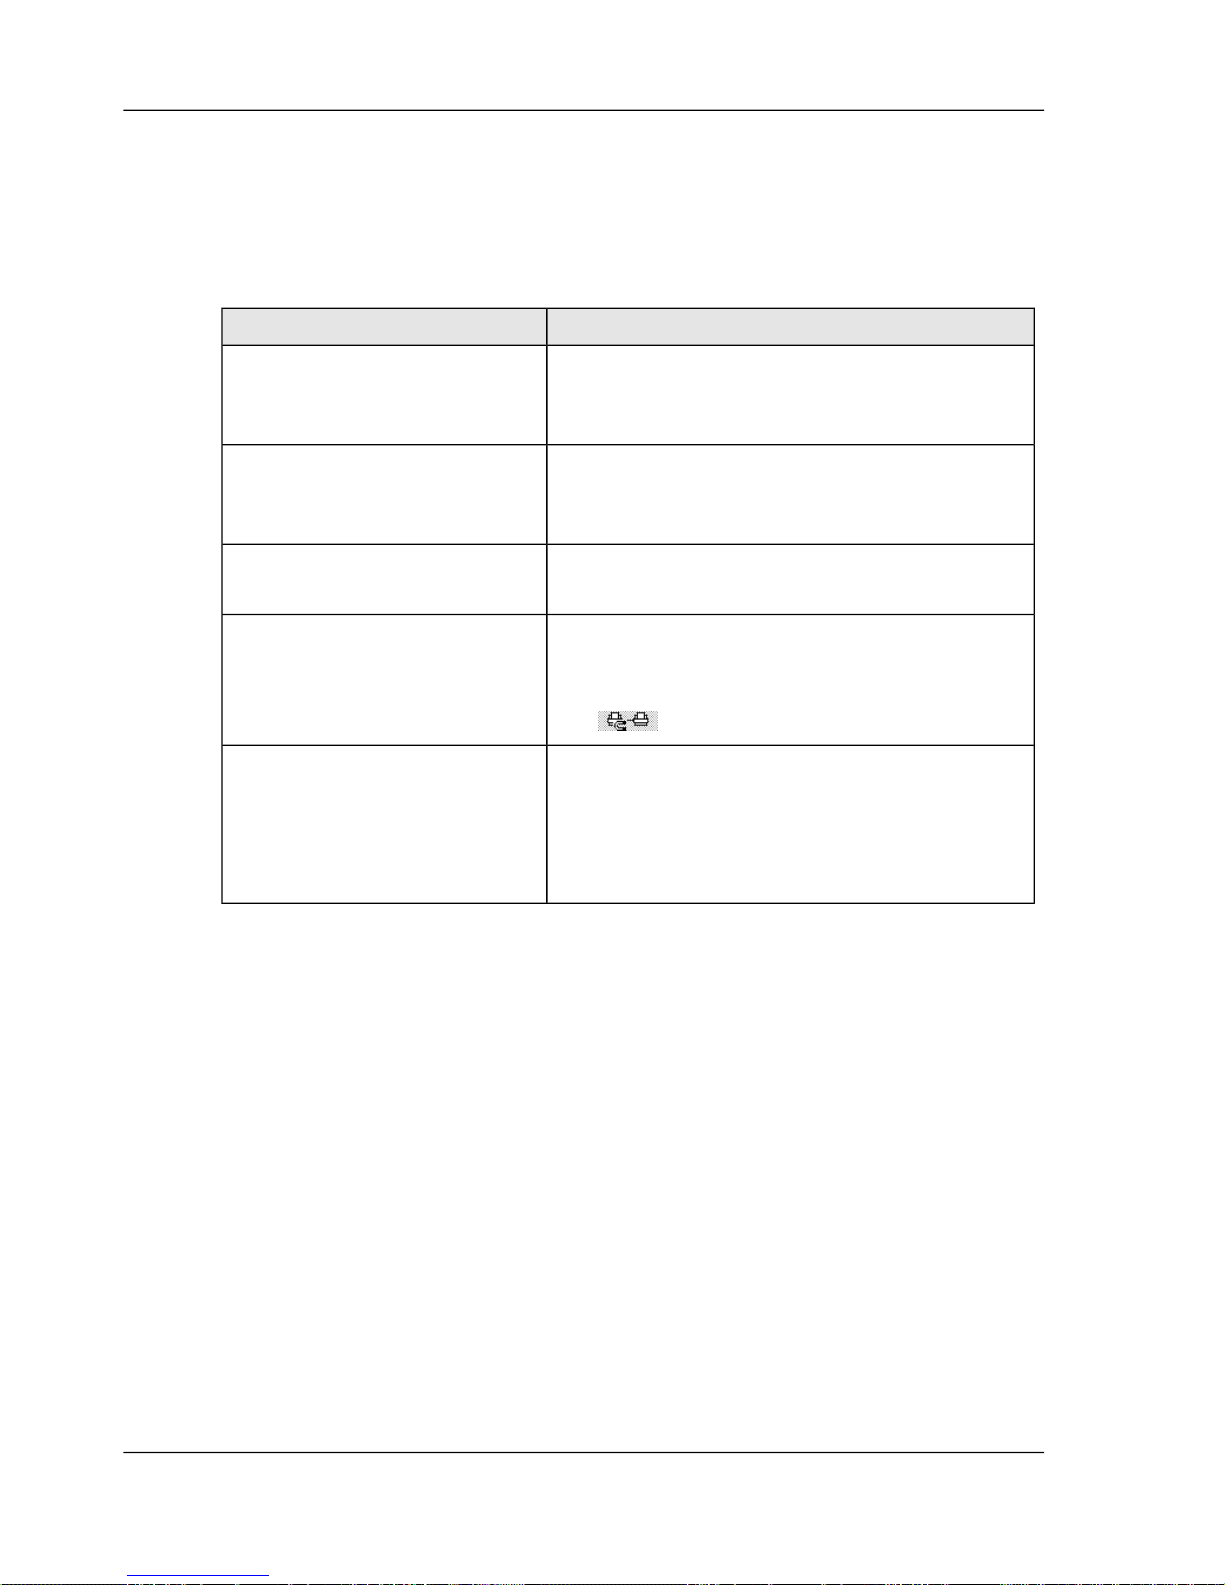
System administrator what your identification code is. If there is no central server,
you must first open your mailbox before you can use the Smart mailbox.
User questions
[32]
AnswerQuestion
The retrieved documents behave like normal
mailbox documents. You can change the print
properties before printing.
Can I change the print
properties of the documents
retrieved from other mailbox es?
When you print a retrieved document, the
document in the original mailbox will also be
marked with a V..
Can I see which retrieved
documents have already been
printed?
When you delete a retrieved document, it will
also be removed from the original mailbox.
What happens when I delete a
retrieved document?
The documents retrieved from other printers are
removed when you close your mailbox. To see
the documents again, press the 'Retrieve jobs'
key once more.
What happens when I close my
mailbox?
Depending on the security level of the system,
you may be able to retrieve secure documents.
If the system does not support the retrieval of
secure documents, they will remain in their
original mailboxes.
Can I retrieve secure
documents?
82Chapter 6 - The print jobs
The ease of fetching documents from your other mailboxes
Page 83
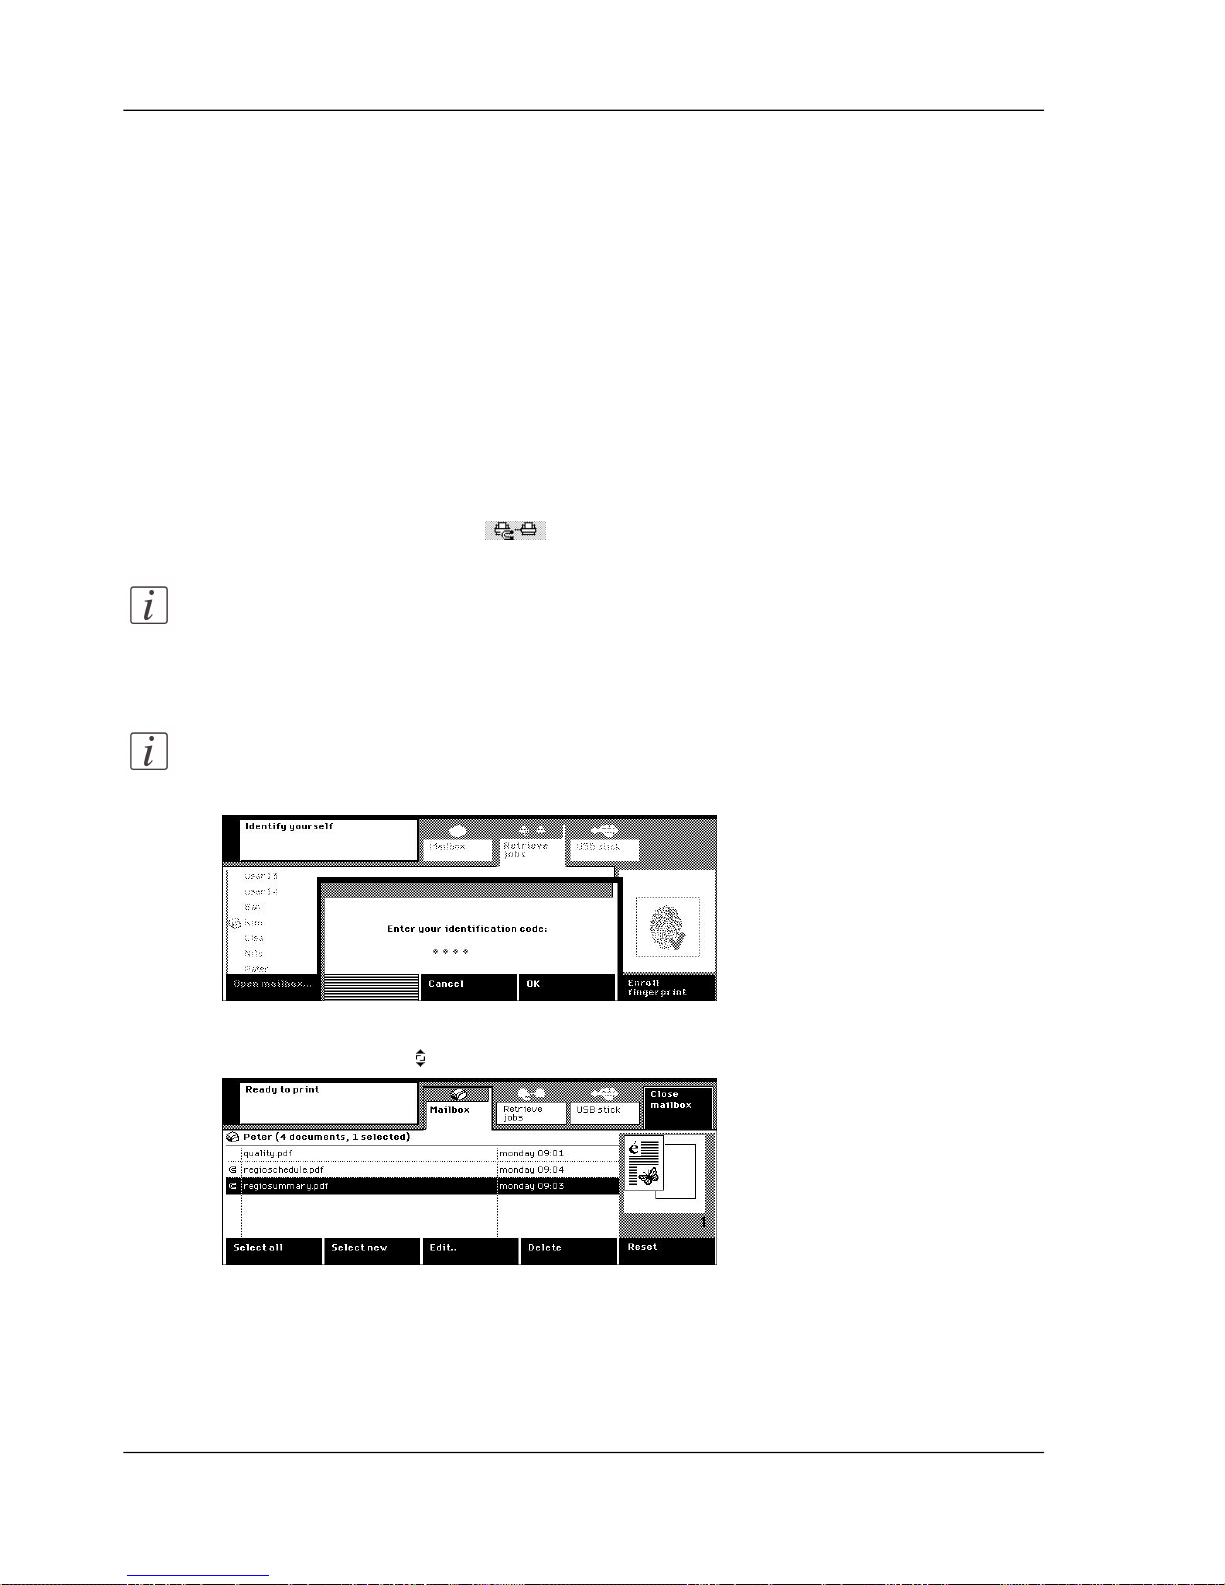
Fetching documents from your other mailboxes
Introduction
You can fetch the documents from your mailboxes on other printers.
Before you begin
Note that the Smart mailbox must be configured on your system.
How to get your documents from your other mailboxes
1.
Press the 'Print' key.
2.
Press the 'Retrieve jobs' key .
Note:
You can also first open your mailbox and then press the 'Retrieve jobs' key.
Then, you do not need to enter an identification code.
3.
Use the numeric keys to enter your identification code and press the 'OK' key.
Note:
If you are already known to the system, you are not asked for a code.
[73] Identify yourself
4.
Use the scroll wheel to select the documents you want to print.
[74] You can select the documents that have been gotten.
5.
Use the scroll wheel key or press the 'Edit settings' key to change the settings, if required.
83Chapter 6 - The print jobs
Fetching documents from your other mailboxes
Page 84

6.
Press the Start key .
Note:
You can start to print documents even while the Océ VarioPrint® 2062/75 is
still getting documents.
84Chapter 6 - The print jobs
Fetching documents from your other mailboxes
Page 85
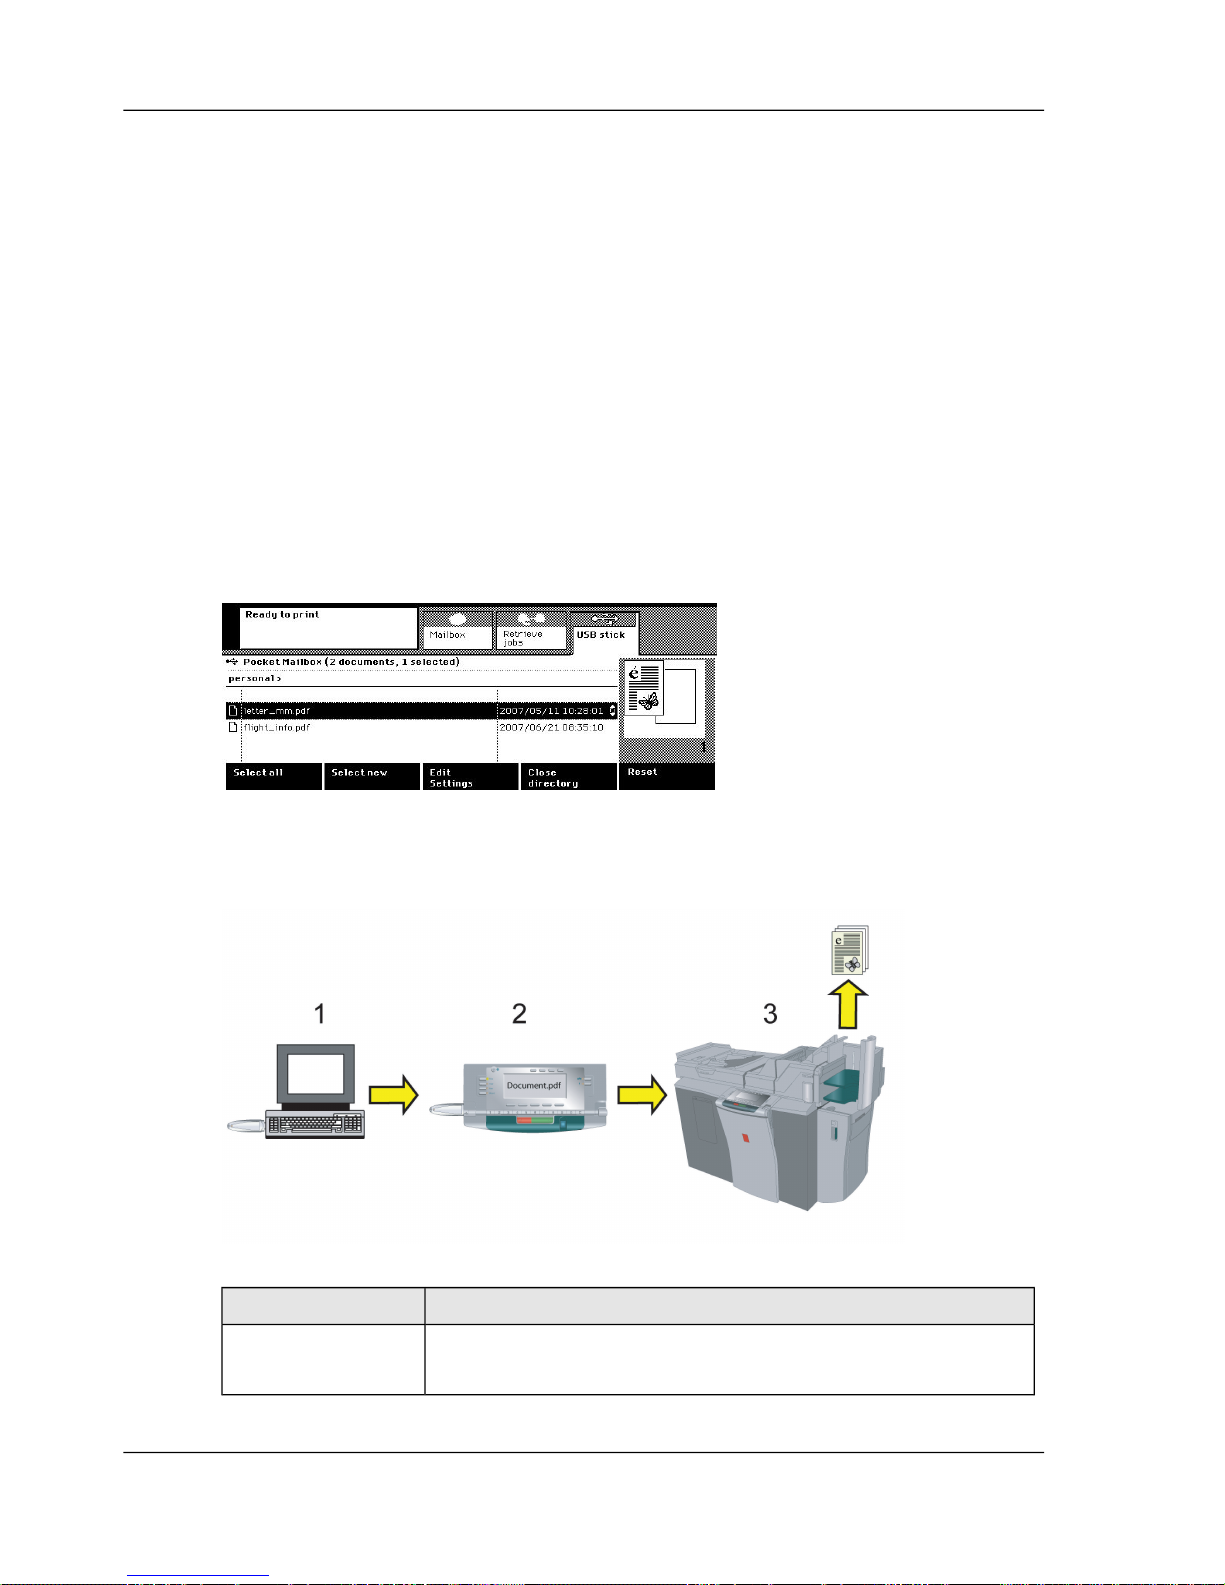
Print from your USB stick
The ease of printing from your USB stick
Why print from your USB stick
You can put documents (*.pdf, *.ps, *.prn files) on your USB stick and then print
them (Pocket mailbox). You do not need a printer driver. All you have to do is put
the documents on your USB stick ‘Put a printable document on your USB stick’ on
page 87. You can, for example, put some PDF documents on your USB stick that
may be important during a study meeting. Y ou need one of the documents during the
meeting. Y ou simply walk to an Océ VarioPrint® 2062/75 and connect the USB stick
to the USB port. The printable documents are shown and you can select and print the
documents ‘Print a document from your USB stick’ on page 88.
[75] Printable documents on your USB stick
How does printing from your USB stick work
[33]
DescriptionStep
You put a document (*.pdf, *.ps, *.prn file) on your USB
stick.
1
85Chapter 6 - The print jobs
The ease of printing from your USB stick
Page 86
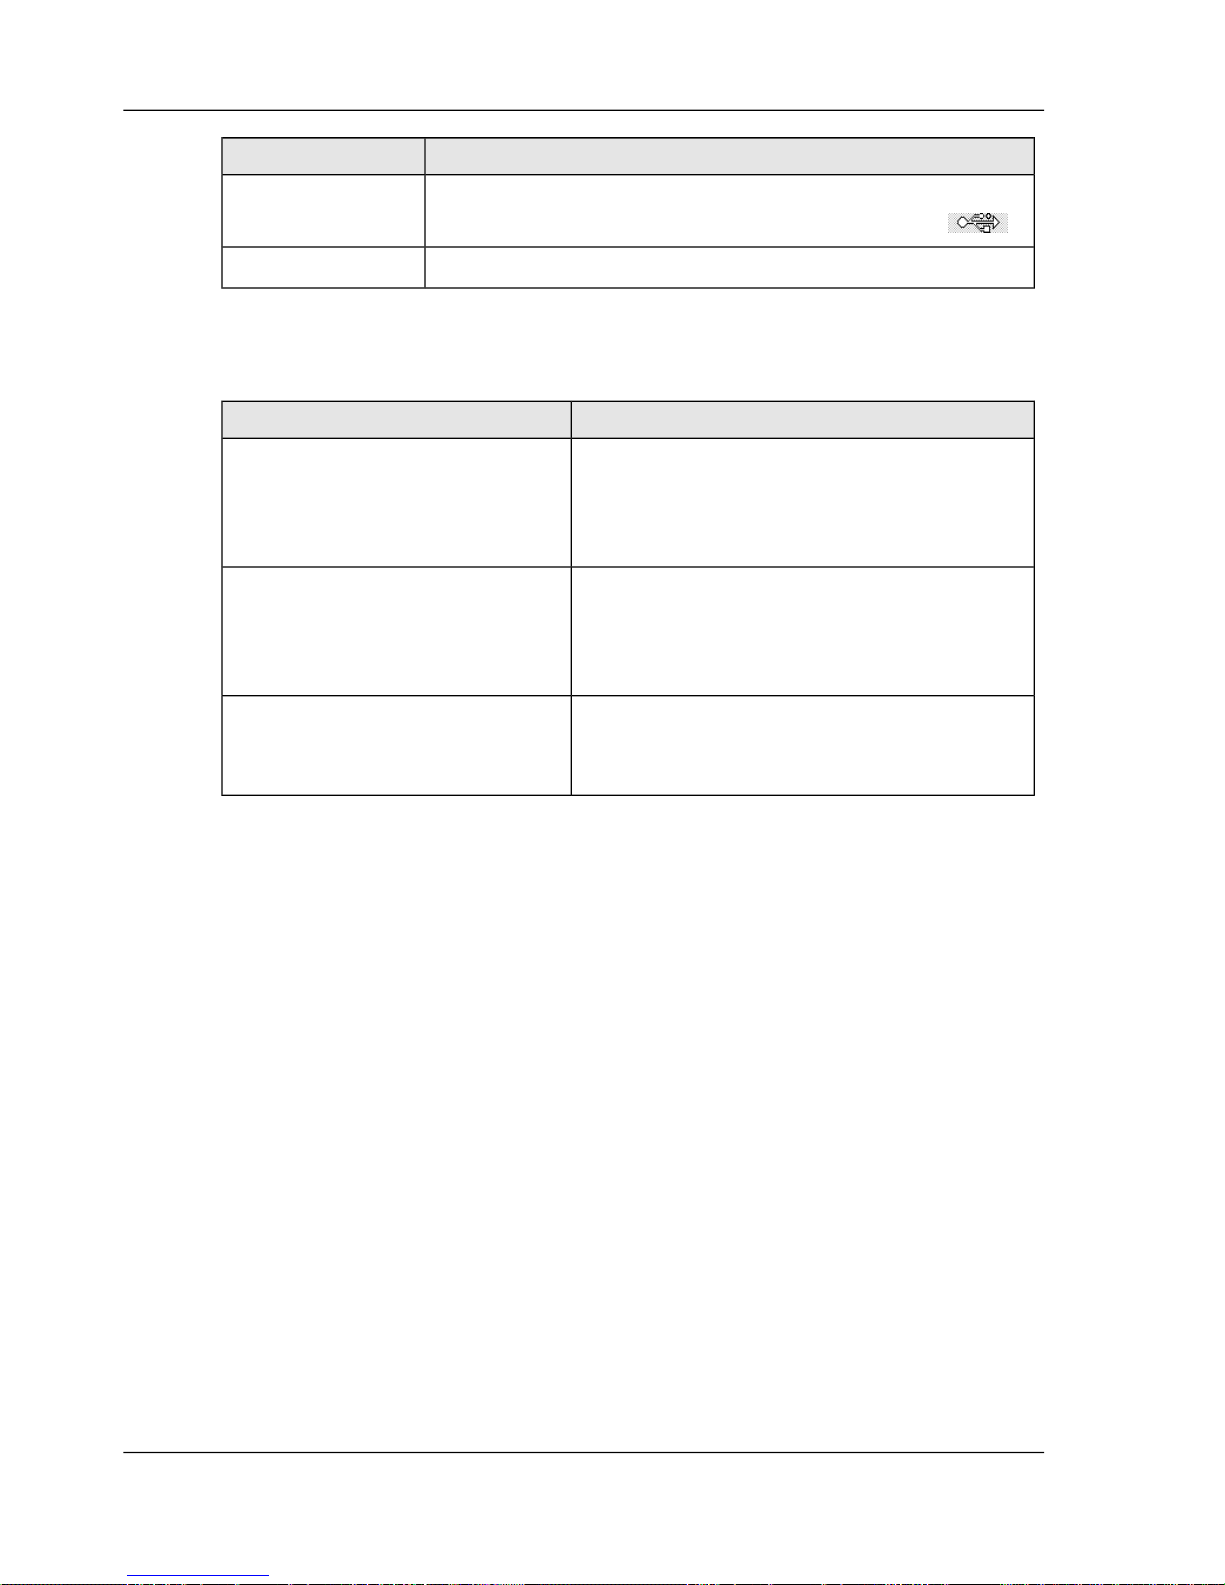
DescriptionStep
You insert the USB stick into the USB port of the Océ
VarioPrint® 2062/75 . You press the 'USB stick' key .
2
You browse to your document and print it.3
User questions
[34]
AnswerQuestion
The documents in the Pocket mailbox behave
like normal mailbox documents. You can
change the properties before printing the
documents.
Can I change the print properties
of the documents on the USB
stick
Use an application that converts your
document into PDF format or create a print
file ‘Put a printable document on your USB
stick’ on page 87.
Most documents I print are
Microsoft Office documents. How
can I make those documents
printable
When you remove the USB stick, the
documents are no longer stored on the printer .
Do the documents remain on the
printer when I remove the USB
stick
86Chapter 6 - The print jobs
The ease of printing from your USB stick
Page 87

Put a printable document on your USB stick
Introduction
If you print your document from a USB stick, make sure that the document has a
printable file format. The documents must have the correct format ( *.pdf, *.ps, *.prn).
If a document has another format (for example *.doc, *.ptt or * .xls), you must first
convert it into one of the following formats:
■
PostScript 3
■
PCL
■
PDF.
If you do not have an application to create a PDF file, you can use your printer dri v er
to easily put a printable document on your USB stick. The following procedure
describes how to do this.
How to use the printer driver to put a printable document on the USB stick
1.
Insert the USB stick into the USB port of your computer.
2.
Open the document in the application you use.
3.
Click 'Print' from the 'File' menu.
4.
Select the 'Print to file' check box in the 'Print' command dialogue box.
5.
Click 'OK'.
6.
Enter a file name.
Note:
There are no restrictions on the extensions you can use.
7.
Save the file on the USB stick.
Note:
Your file can be located in a directory on the USB stick.
8.
Remove the USB stick, following the 'safe remove' instructions.
87Chapter 6 - The print jobs
Put a printable document on your USB stick
Page 88
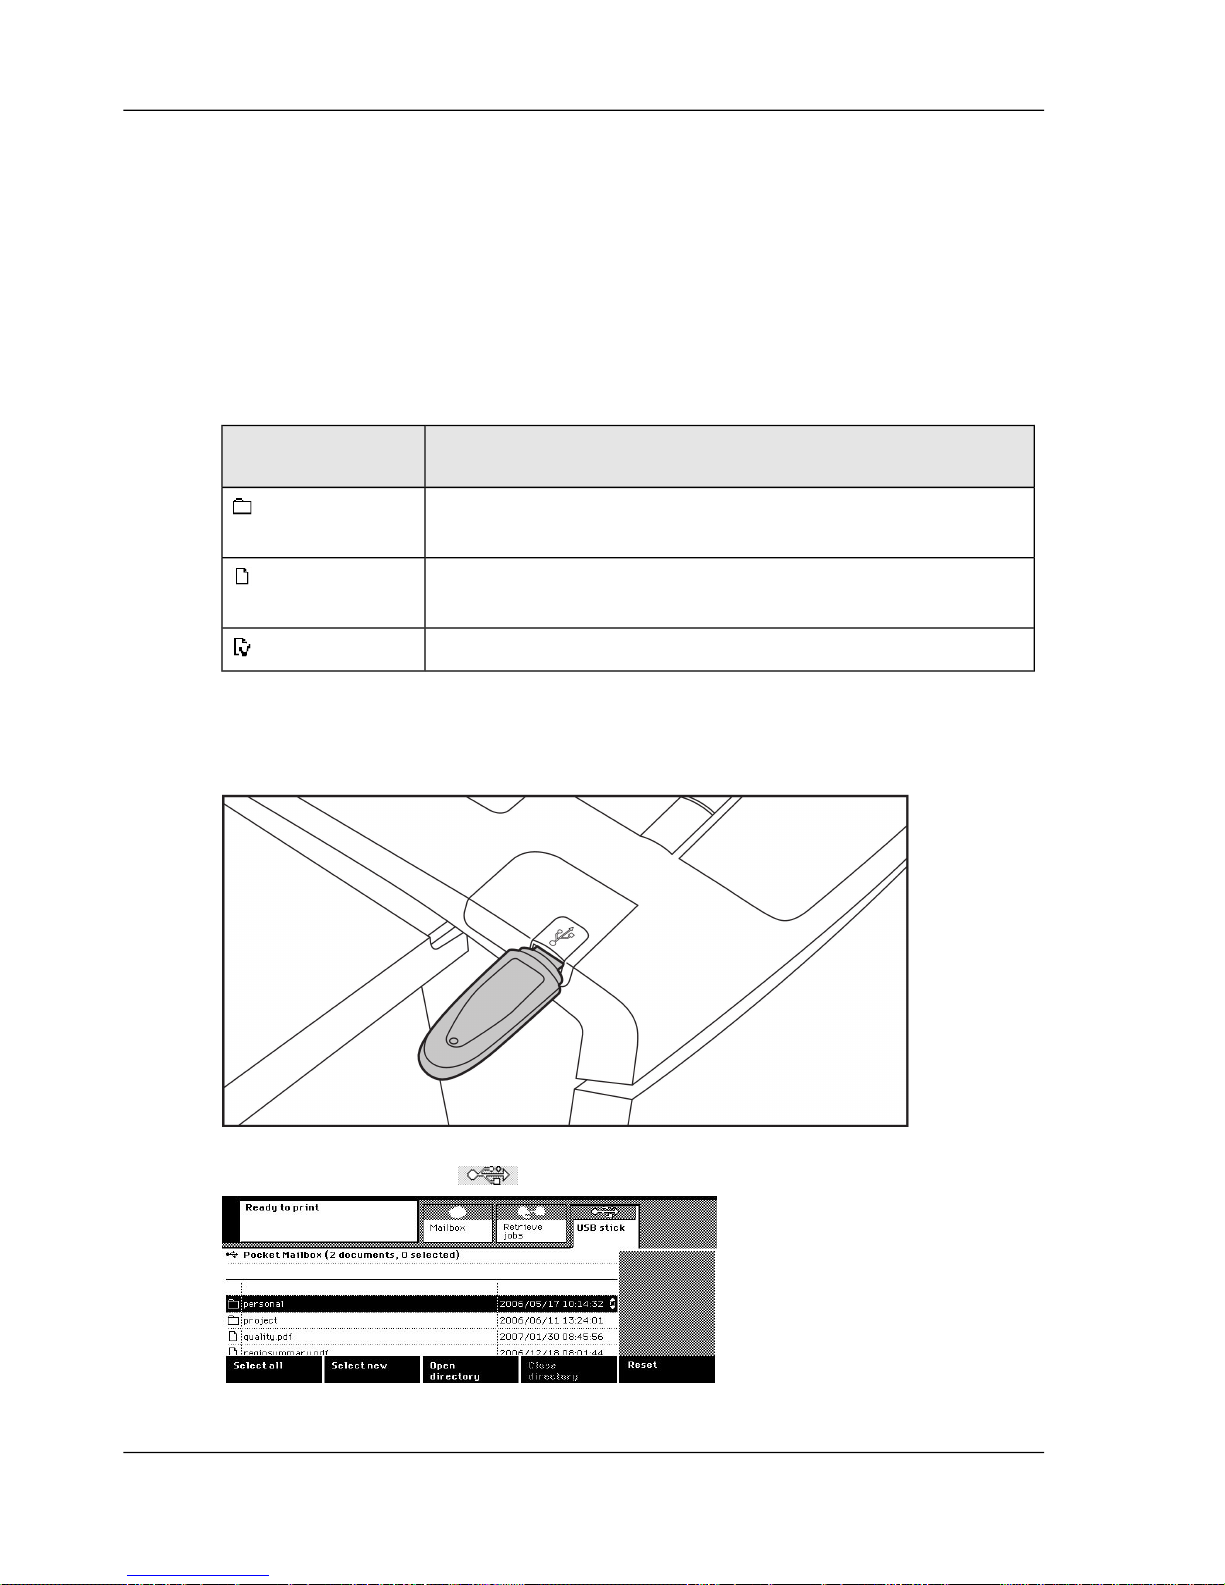
Print a document from your USB stick
Introduction
You can put documents (*.pdf, *.ps, *.prn files) on your USB stick ‘Put a printable
document on your USB stick’ on page 87 and then print them (Pocket mailbox).
When you put the USB stick in the port, you see the directory structure of your USB
stick. You can open a directory and print the documents you want.
[35]
DescriptionPocket mailbox
symbols
Directory . Select the directory and press the 'Open directory'
key to go to the printable documents.
Printable document. Select the document and press the green
Start key.
Already printed document. If required, you can print it again.
How to print a document from USB stick
1.
Insert the USB stick into the USB port.
2.
Press the 'Print' key.
3.
Press the 'USB stick' key .
[78] Directory structure on your USB stick
88Chapter 6 - The print jobs
Print a document from your USB stick
Page 89
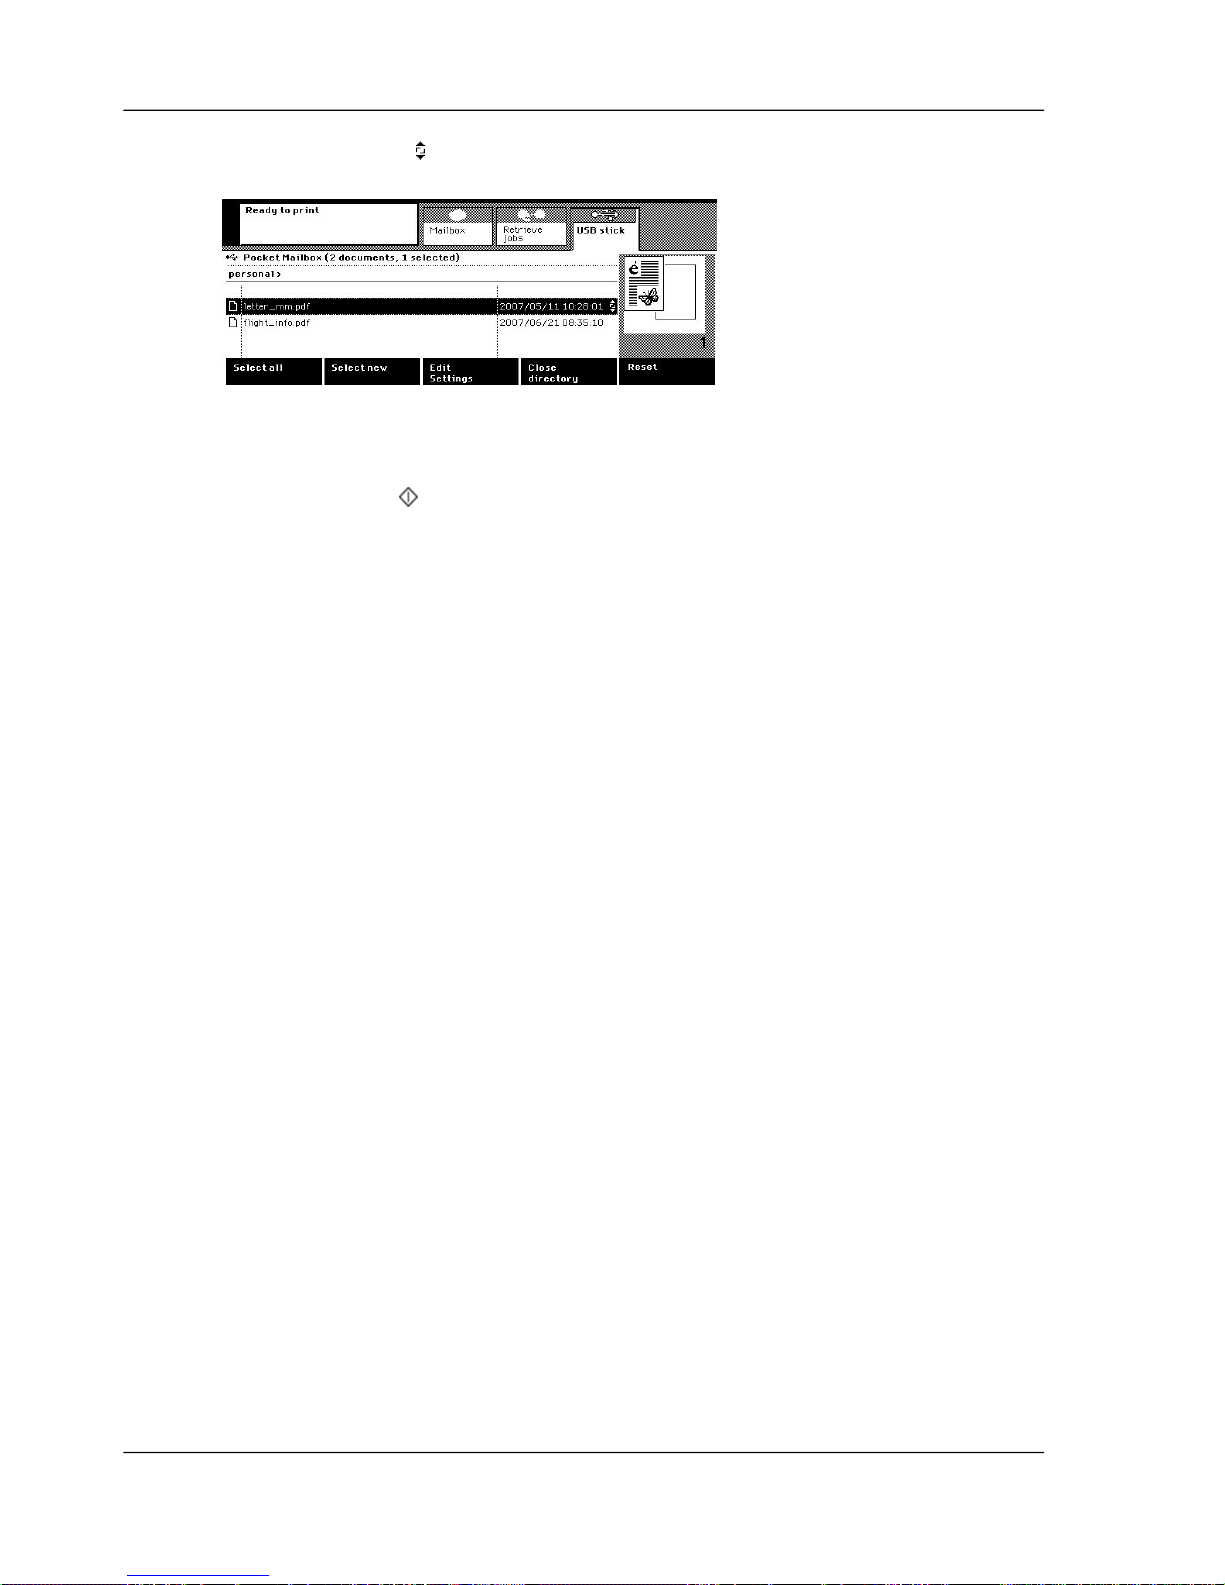
4.
Use the scroll wheel and the 'Open directory' key to go to the documents you want to
print.
[79] The file to print
5.
Press the 'Edit settings' key or press the scroll wheel key to change the settings, if required.
6.
Use the numeric keys to enter the number of sets.
7.
Press the Start key .
8.
Remove the USB stick when the prints are ready.
89Chapter 6 - The print jobs
Print a document from your USB stick
Page 90
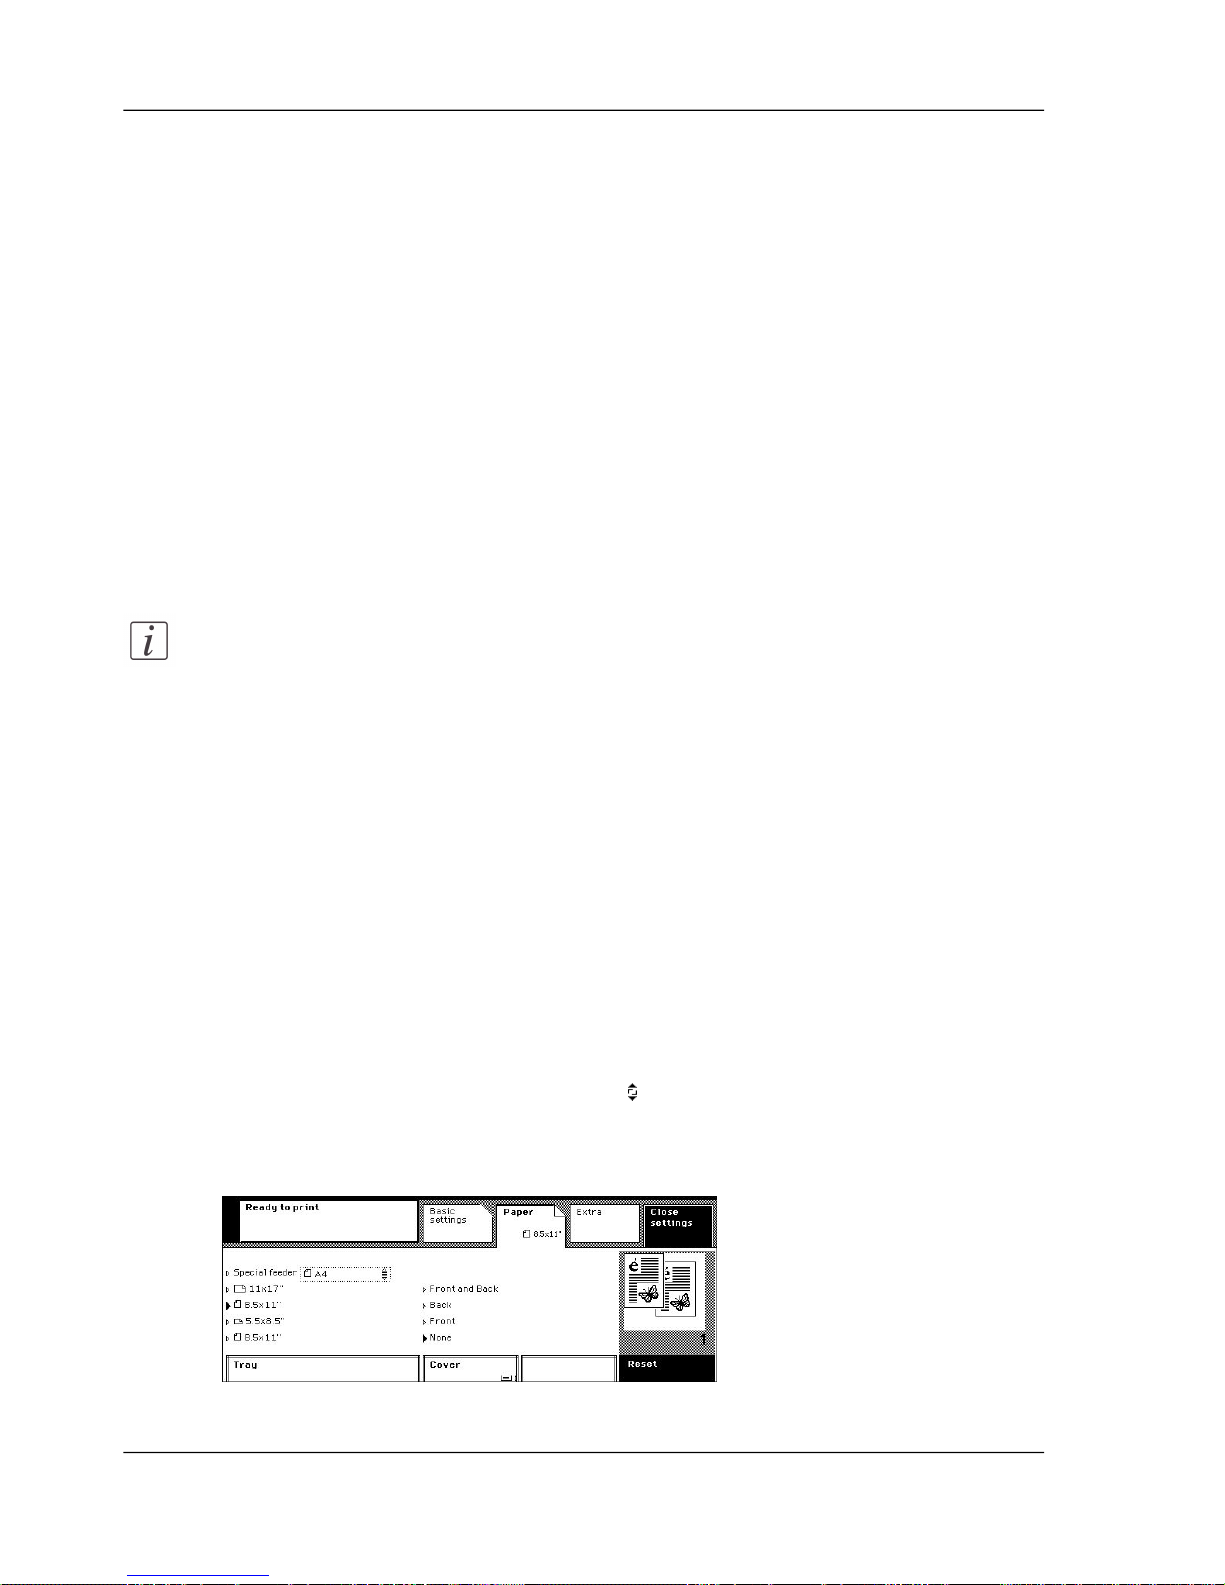
Print on special material
Print on special material placed in a paper tray
Introduction
You can use the following material for the print jobs.
■
Paper that is already in the trays.
■
Special material that you place in a tray for the current job.
■
Special material that is not suitable for the trays. You can insert such a sheet into
the special feeder.
The Key operator can have locked the paper-compartment door. This means that you
cannot load the special paper.
Note:
Y ou can also make the settings for a print job on special material in the printer
driver. When you arrive at the printer, you only have to place the material in the
paper tray and print the document ‘The printer driver’ on page 57.
Before you begin
■
Send a document to your mailbox ‘Send a document to your mailbox’ on page 59.
■
Check which paper tray is suitable for your material.
How to print a job on special material placed in a paper tray
1.
Open the paper-compartment door, place the material in one of the trays and close the
door ‘Add paper to paper tray 1 2 and 3’ on page 155‘Add paper to paper tray 4’ on page
153.
When you use labeled or punched material, you must pay attention to how you place the
material.
2.
Open your mailbox and use the scroll wheel to select the document ‘Open your mailbox’
on page 66.
3.
Press the 'Edit settings' key or press the scroll wheel key.
4.
Press the 'Paper' key.
[80] Select another tray
90Chapter 6 - The print jobs
Print on special material placed in a paper tray
Page 91

5.
Select the tray in which you placed the material, in the 'Tray' box.
6.
Press the 'Close settings' key to return to your mailbox.
7.
Use the numeric keys to enter the number of sets.
8.
Press the Start key .
9.
Press the 'Close mailbox' key to quit your mailbox.
91Chapter 6 - The print jobs
Print on special material placed in a paper tray
Page 92
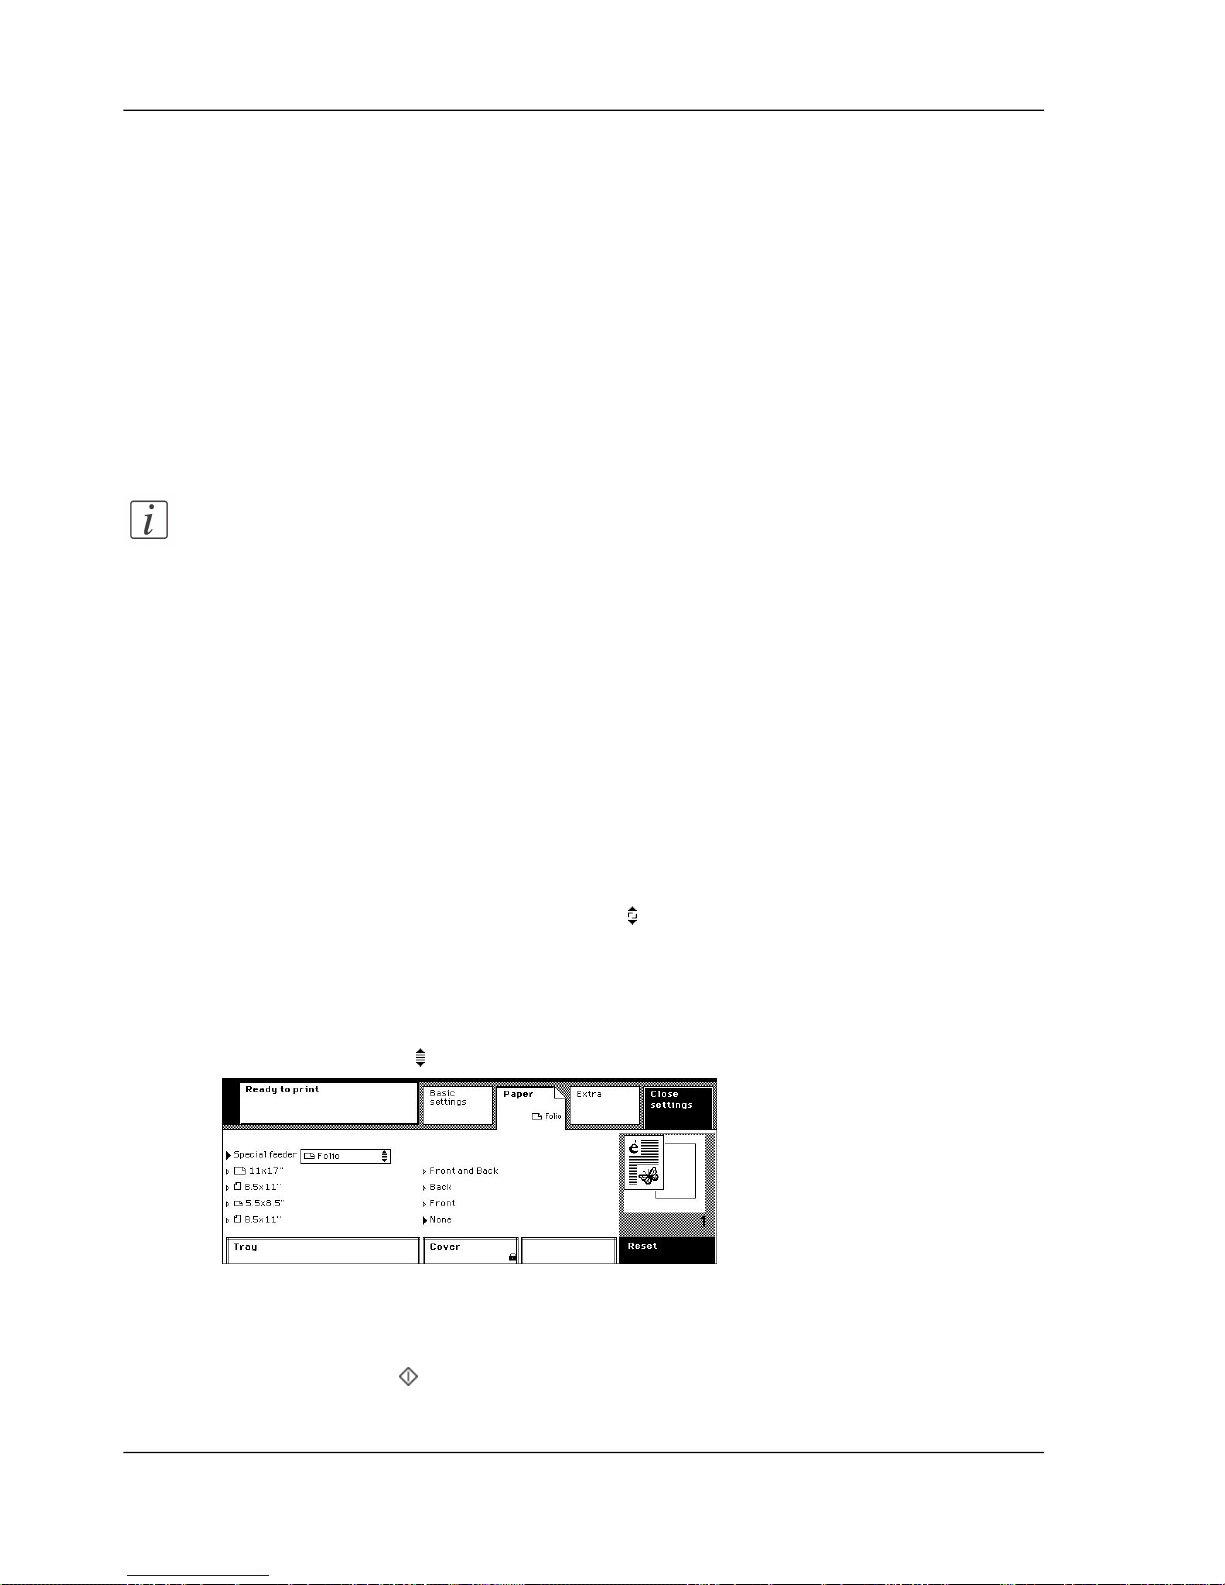
Print on special material inserted in the special feeder
Introduction
The paper trays cannot handle all materials on which you can print. When you want
to print on this material that is not suitable for the paper trays, you can insert this
material into the special feeder, one sheet at a time. Be aware that the special feeder
also has restrictions on the use of material ‘Input trays and output bins’ on page 185.
The Key operator can decide to disable the special feeder. Then you can only place
your material in the paper trays.
Note:
Y ou can also make the settings for a print job on special material in the printer
driver. When you arrive at the printer, you only have to insert the material into the
special feeder and print the document ‘The printer driver’ on page 57.
Before you begin
■
Send a document to your mailbox ‘Send a document to your mailbox’ on page 59.
■
Check if the special feeder can handle your special material.
How to print a job on special material inserted into the special feeder
1.
Insert one sheet of the special material into the special feeder ‘Insert paper into the special
feeder’ on page 158.
The face-down side will be printed.
2.
Open your mailbox and use the scroll wheel to select the document ‘Open your mailbox’
on page 66.
3.
Press the 'Edit settings' key or press the scroll wheel key.
4.
Press the 'Paper' key.
5.
Select 'Special feeder' in the 'Tray' box.
6.
Use the scroll wheel to select the size of the material you inserted.
[81] Select the size of the material in the special feeder
7.
Press the 'Close settings' key to return to your mailbox.
8.
Use the numeric keys to enter the number of sets.
9.
Press the Start key .
10.
Press the 'Close mailbox' key to quit your mailbox.
92Chapter 6 - The print jobs
Print on special material inserted in the special feeder
Page 93

11.
Close the special feeder.
93Chapter 6 - The print jobs
Print on special material inserted in the special feeder
Page 94
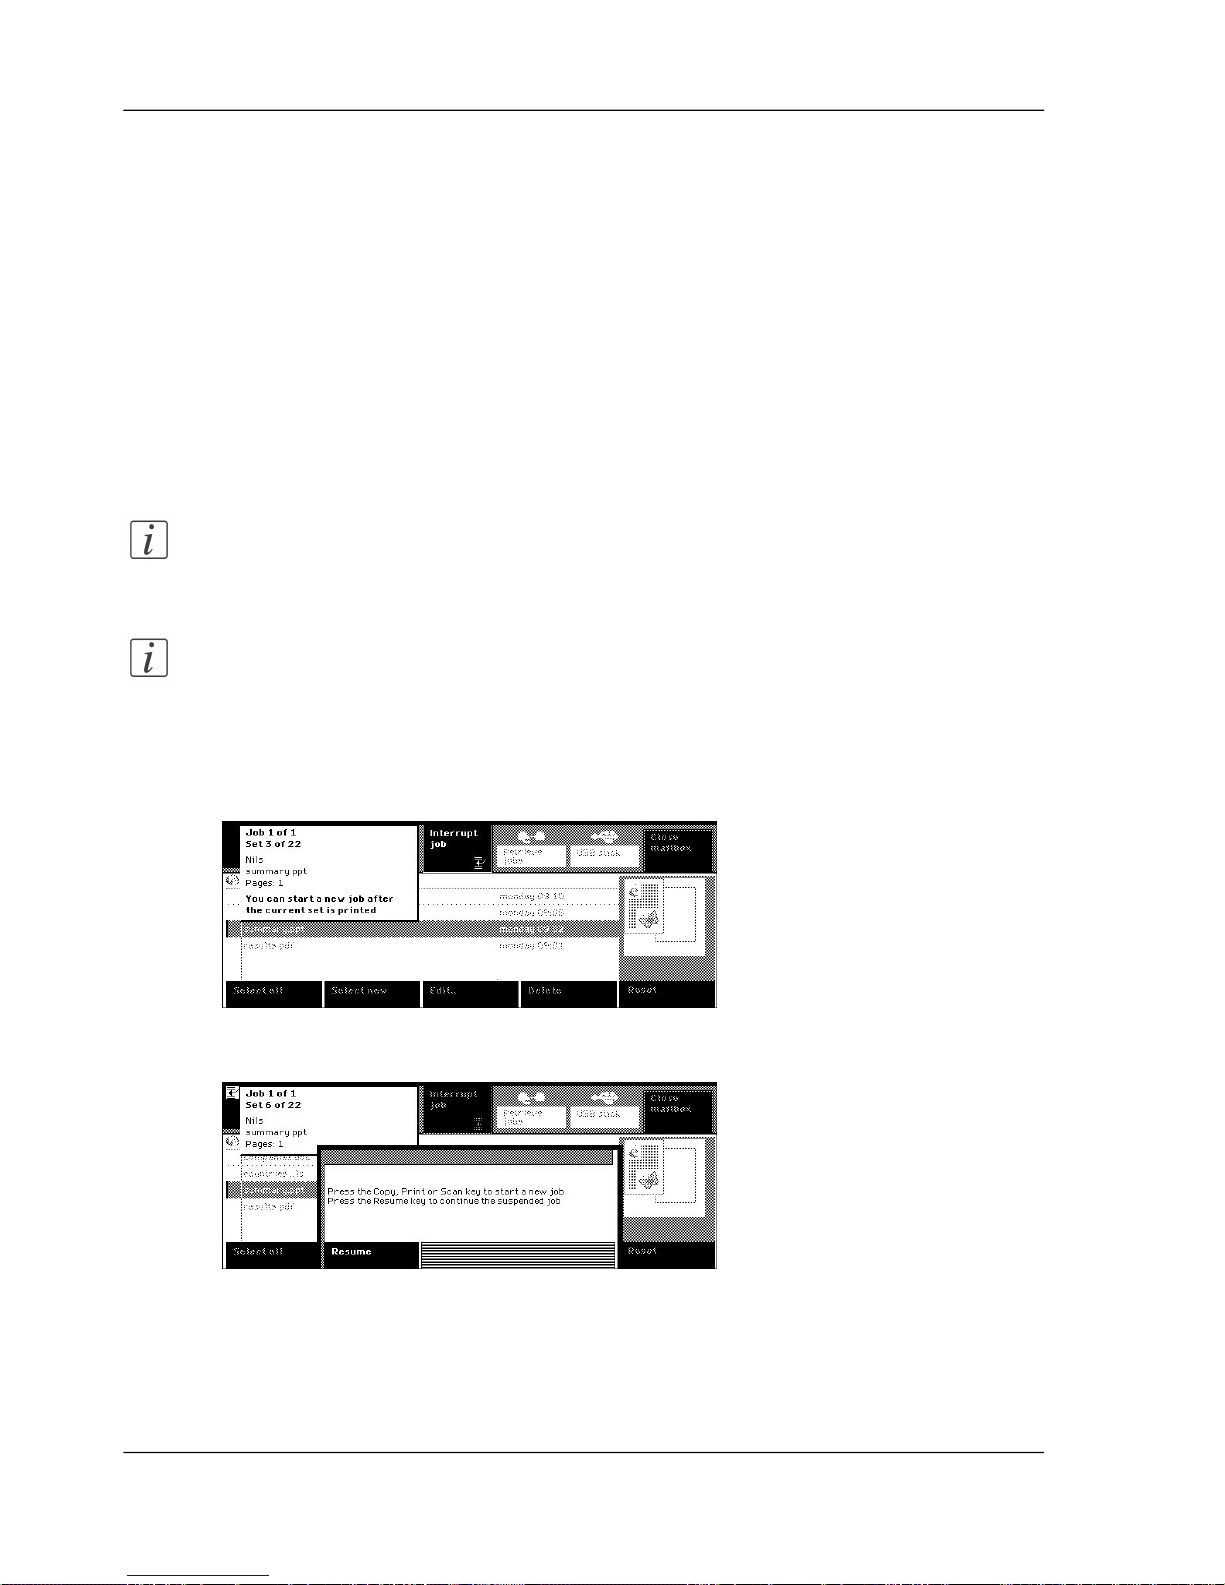
Stop or interrupt printing
Interrupting a Print Job
Introduction
You can temporarily stop your print job, for example, because someone does not want
to wait until your large print job is finished. You interrupt the printing of the job, and
new copy, print or scan jobs can be started. When the new jobs are ready, you can
continue your large print job.
Note:
The Key operator can decide to disable the Interrupt job function.
Note:
You cannot interrupt a job if you need coins or a credit card to start a job.
Interrupting a print job
1.
Press the 'Interrupt job' key while a print job is printing.
[82] Press the Interrupt job key
2.
Wait until the display screen indicates that you can start a new job.
[83] The job is interrupted
3.
Press the 'Copy', 'Print' or 'Scan' key to go to the settings for the new job.
94Chapter 6 - The print jobs
Interrupting a Print Job
Page 95
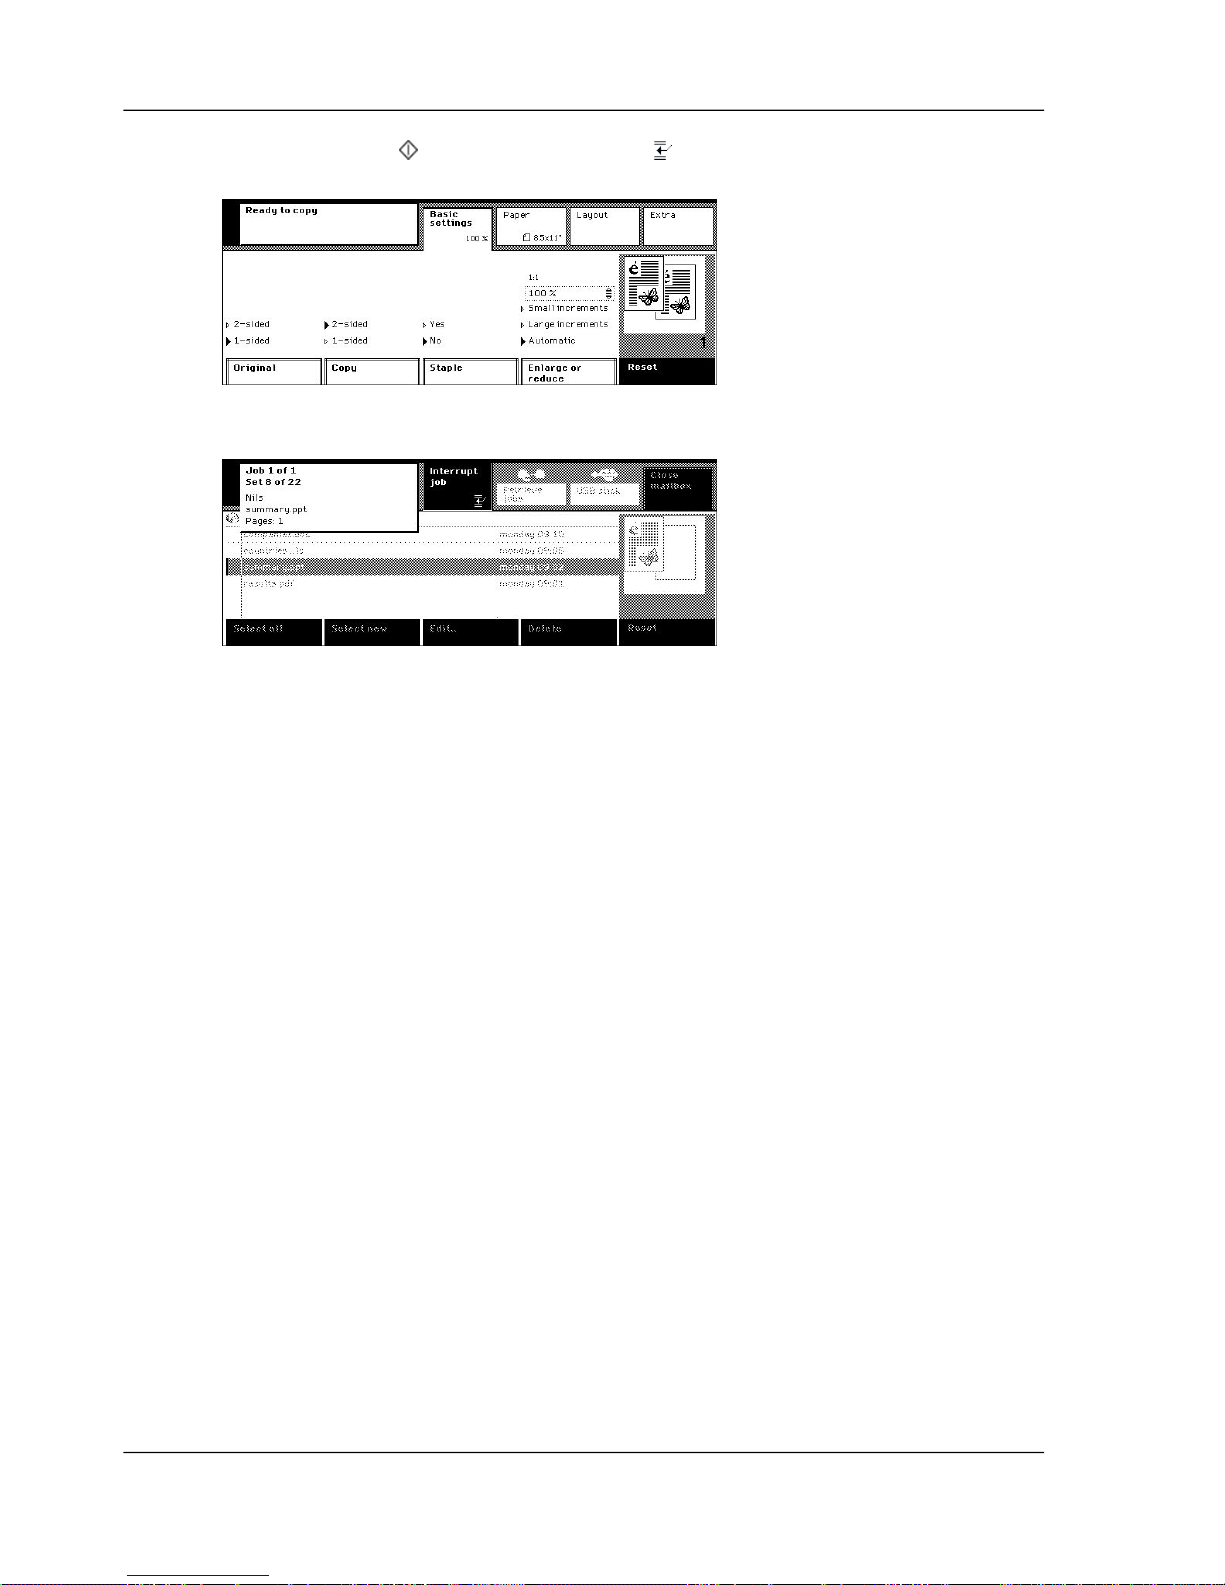
4.
Press the Start key to start the new job. The icon indicates that you are interrupting
a job.
[84] You can start a new job
5.
Press the 'Resume' key to continue the suspended job.
[85] The suspended job continues
95Chapter 6 - The print jobs
Interrupting a Print Job
Page 96
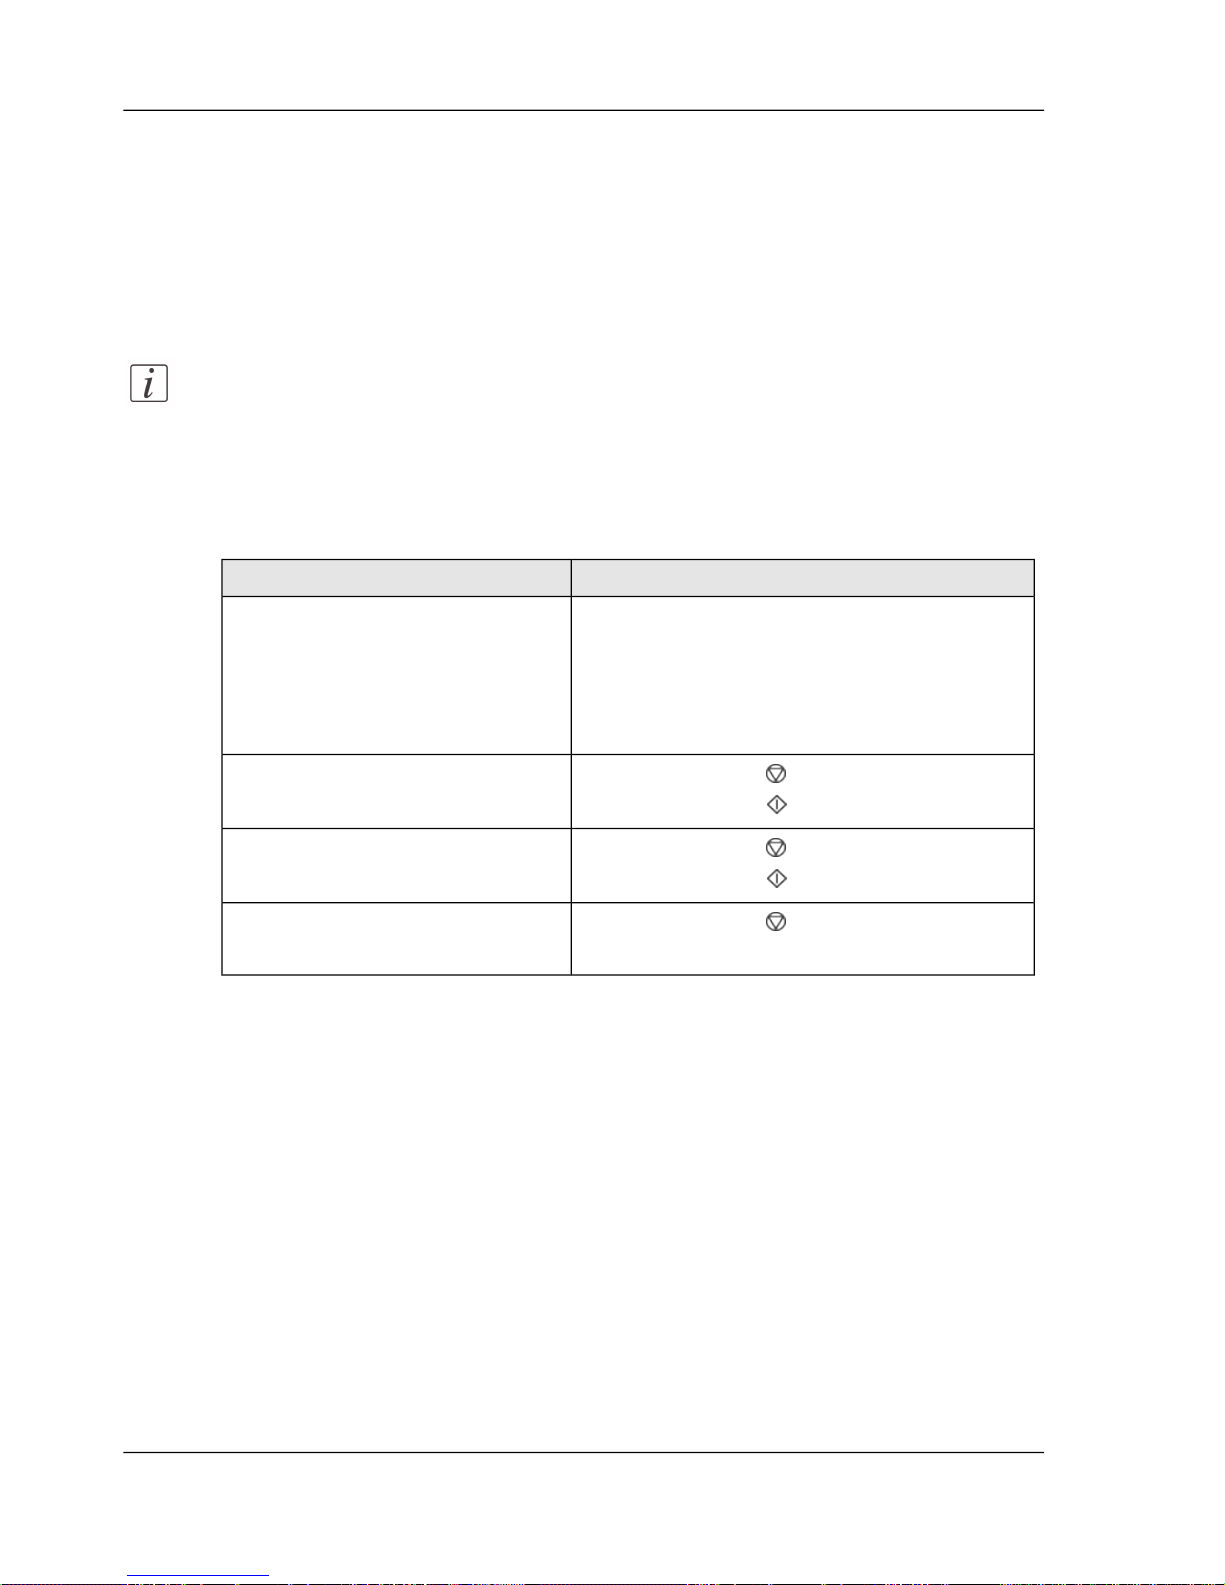
Stop a print job
Introduction
You can stop the printing of a job, for example when you notice that the output of
your print job is not correct.
Note:
You can also interrupt the printing before the print job is ready. You or
someone else can start a new job. You can resume the suspended job afterwards
‘Interrupt a print job’ on page 94.
How to stop a print job
[36]
ThenIf you want to
Press the 'Print', 'Scan' or 'Copy' key. You can
start another job after the current automatic
print job is finished. The printing of the
automatic print jobs resumes when your job
is ready.
Stop the printing of automatic
print jobs, for example to start
another job
Press the Stop key once.
Press the Start key to resume.
Stop the printing of the job after
finishing the current set
Press the Stop key twice.
Press the Start key to resume.
Stop the printing of the job
immediately
Press the Stop key three times.
The job is stored in the mailbox.
Cancel the print job
96Chapter 6 - The print jobs
Stop a print job
Page 97

Chapter 7
The copy jobs
o
97
Page 98
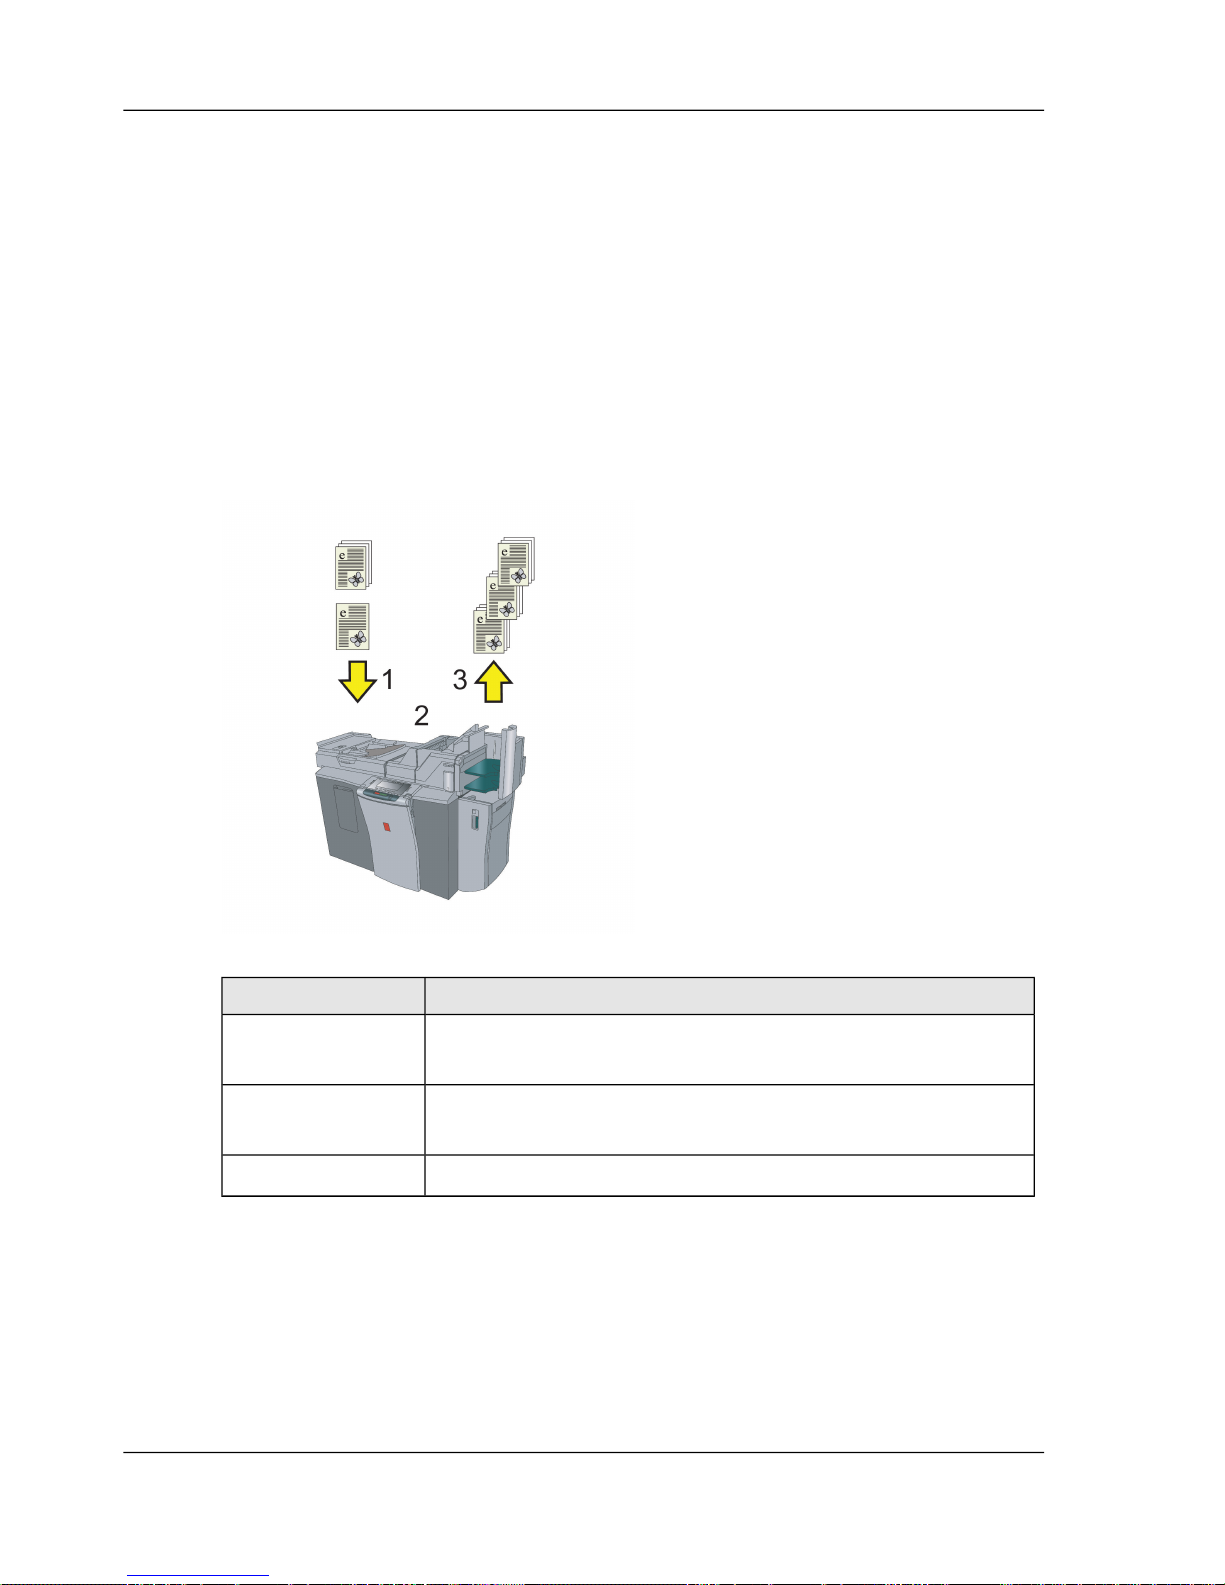
What can you copy
Simple copy jobs or professional copy jobs
The Océ VarioPrint® 2062/75 has many functions to copy your documents. You can,
for example, copy with just one push of the green start key to get copies like your
originals. But you can also choose the Booklet function and turn your documents into
a complete handy booklet.
What happens when you copy
[37]
DescriptionStep
You place the originals in the automatic document feeder or
on the platen and start the copy job.
1
The information of the originals is scanned, digitized and
converted into an image.
2
The images are printed. The finisher collects the sets.3
98Chapter 7 - The copy jobs
What can you copy
Page 99

Use the automatic document feeder to
copy
Copy in a simple way
Introduction
Use the automatic document feeder to copy your documents in a simple and quick
way. When you insert the originals, the automatic document feeder detects their
dimensions. If a matching paper size is loaded in one of the paper trays, this paper
will be selected for your copies. If the paper size of the originals is not available, the
most acceptable size for your copies is selected.
The following procedure describes a simple copy job. You can change the default
settings if your copy job has special properties ‘The copy settings’ on page 170.
Note:
If the paper orientation in this tray does not match the feed direction of the
originals, the Océ VarioPrint® 2062/75 rotates the image 90°. The rotation symbol
will be shown in the feedback box.
Before you begin
■
Examine your originals to be sure that the automatic document feeder can handle
the originals ‘Your originals’ on page 44.
■
If the originals are different sizes or types, use the Assemble jobs wizard to enter
the settings ‘Your originals’ on page 44.
■
You may be asked to identify or insert coins or a credit card before you can start
the jobs ‘Need PIN coins or a credit card’ on page 39.
How to use the automatic document feeder to copy
1.
Place and align the originals face down in the automatic document feeder ‘Place originals
in the automatic document feeder’ on page 47.
99Chapter 7 - The copy jobs
Copy in a simple way
Page 100
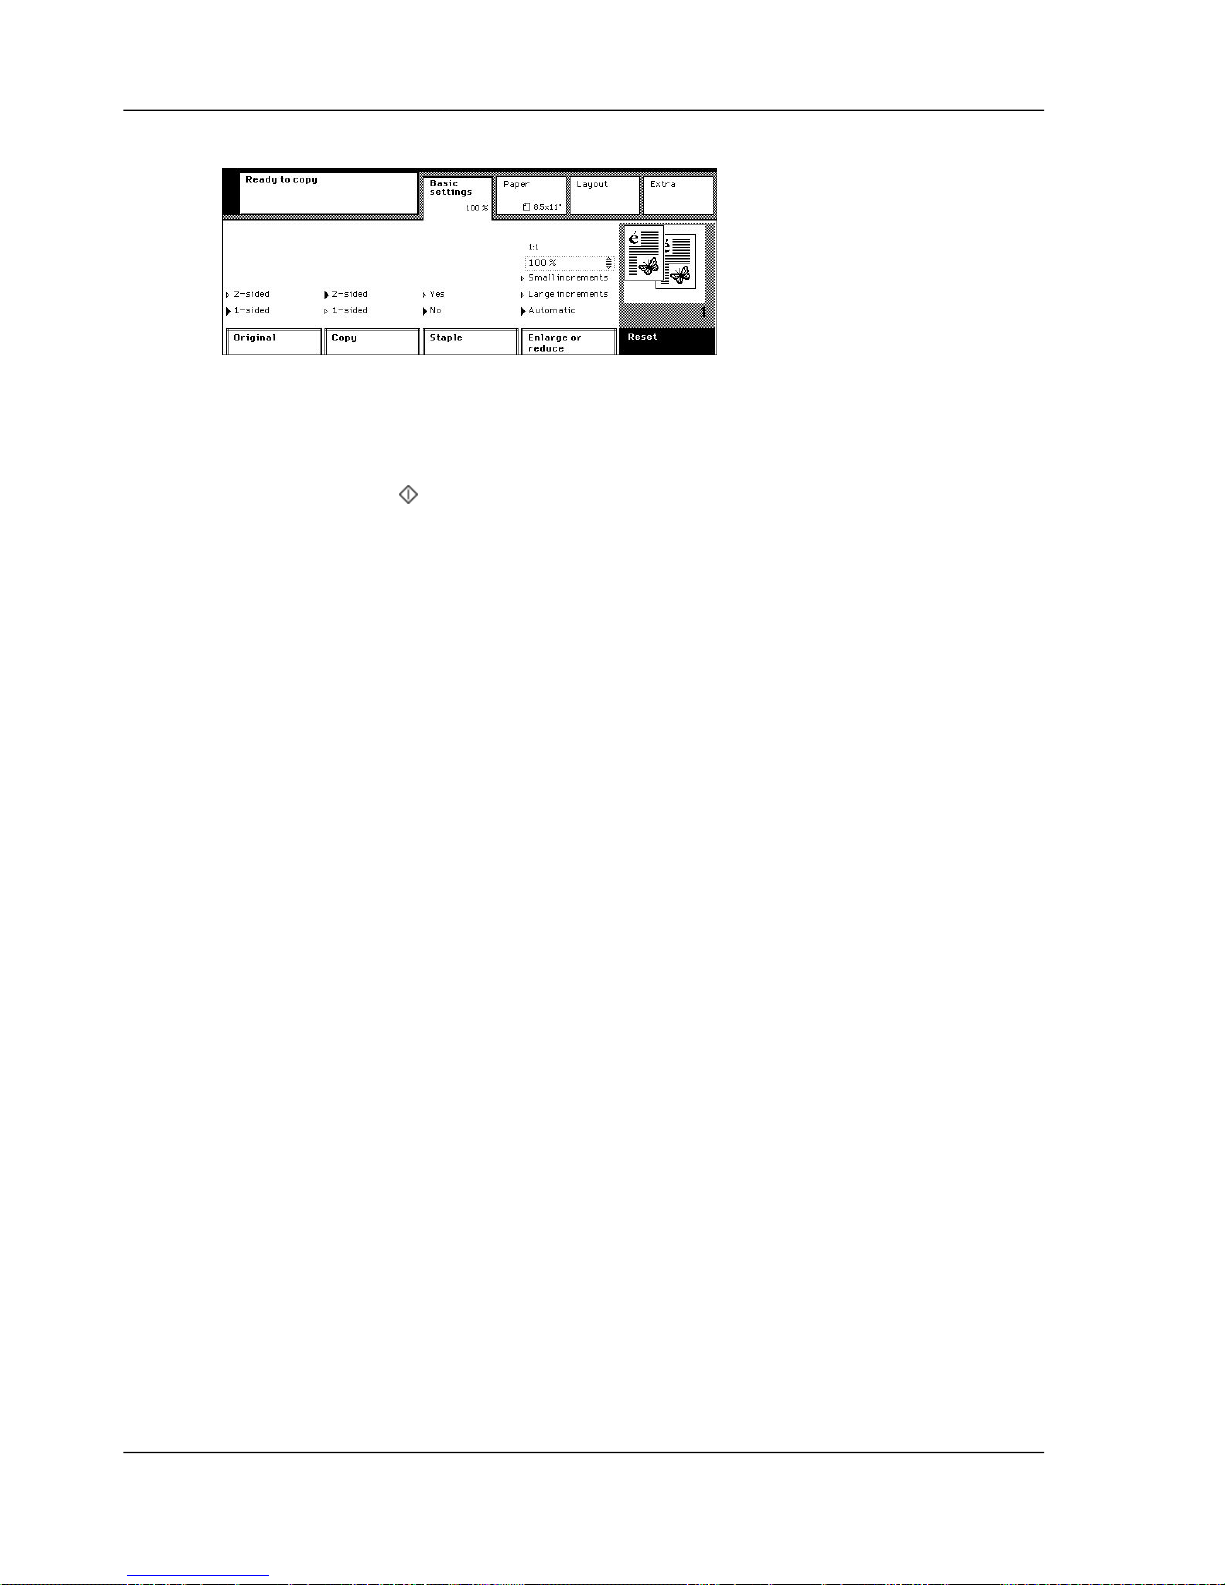
2.
Press the 'Copy' key.
[87] The copy job settings
3.
Select '1-sided' or '2-sided' in the 'Original' and 'Copy' boxes.
4.
Select 'Yes' or 'No' in the 'Staple' box.
5.
Use the numeric keys to enter the number of copies.
6.
Press the Start key .
100Chapter 7 - The copy jobs
Copy in a simple way
 Loading...