

Océ PlotWave 340, PlotWave 360 User Manual
-
o
Océ
PlotWave 340/360
Touch The New Way
Of Printing
User manual
Operating
information

Copyright
© 2013 Océ. All rights reserved.
No part of this work may be reproduced, copied, adapted, or transmitted in any form or
by any means without written permission from Océ.
Océ makes no representation or warranties with respect to the contents hereof and specifically disclaims any implied warranties of merchantability or fitness for any particular purpose.
Further, Océ reserves the right to revise this publication and to make changes from time
to time in the content hereof without obligation to notify any person of such revision or
changes.
Edition: 2013-06
Operating Information: PlotWave (PW) 340, PW350 - Edition 2013-06

Trademarks
Océ, Océ PlotWave 340/360, Océ Express WebTools, Océ Publisher Express, Océ
Publisher Mobile, and Océ Mobile WebTools are registered trademarks of Océ.
Adobe®, Acrobat®, Reader® are registered trademarks of Adobe® Systems Incorporated.
Microsoft®, Windows®, Windows XP®, Windows Server 2003®, Windows Vista® ,
Windows Server 2008® and Windows 7® are either registered trademarks or trademarks
of Microsoft® Corporation in the United States and/or other countries.
Mozilla ® and Firefox® are registered trademarks of Mozilla® Systems Incorporated.
PostScript® 3™ is a registered trademark of Adobe® Systems Incorporated.
“QR Code” is a registered trademark of DENSO WAVE INCORPORATED.
Products in this publication are referred to by their general trade names. In most, if not
all cases, these designations are claimed as trademarks or registered trademarks of their
respective companies.
3
Trademarks
Operating Information: PlotWave (PW) 340, PW350 - Edition 2013-06

Contents
Chapter 1
Introduction.......................................................................................................11
Notes for the reader.................................................................................12
Available documentation.........................................................................14
Chapter 2
Get to Know the Printing System...................................................................17
Introduction...............................................................................................18
The Océ PlotWave 340/360................................................................18
The key concepts................................................................................19
Connect your Printing System................................................................23
Working area [Footprint]....................................................................23
Connect the mains supply cable and the network cable.................24
Switch on the printing system..........................................................25
The Hardware...........................................................................................26
The components of the printer (front)..............................................26
The components of the printer (left side).........................................28
The components of the printer (back)..............................................29
The media drawer..............................................................................30
The user panel: Océ ClearConnect....................................................31
The output delivery............................................................................33
The components of the scanner (optional)......................................35
The front original tray (optional).......................................................36
The folder (optional)...........................................................................38
The printing system consumables....................................................40
Océ ClearConnect: the multi-touch user panel......................................41
Introduction to Océ ClearConnect.....................................................41
The home screen................................................................................43
The Smart Access...............................................................................45
Presets and advanced settings..........................................................48
The settings concept..........................................................................51
The locations.......................................................................................53
Job preview........................................................................................56
The jobs queue and the system menu.............................................57
Quick Start: default jobs..........................................................................60
The Smart Inbox process for copy, scan and print jobs.................60
Do a default copy job ........................................................................63
Do a default scan job .........................................................................65
Do a default print job ........................................................................67
4
Contents
Operating Information: PlotWave (PW) 340, PW350 - Edition 2013-06

The cloud.............................................................................................69
Chapter 3
Define your Workflow with Océ Express WebTools.....................................73
Introduction...............................................................................................74
Océ Express WebTools......................................................................74
The system requirements..................................................................75
The 'Jobs' tab.....................................................................................77
The Smart Inbox.................................................................................79
The job states......................................................................................81
The 'System' tab.................................................................................83
The system monitor...........................................................................84
The 'Preferences' tab..........................................................................87
The 'Configuration' tab......................................................................89
The 'Support' tab................................................................................91
Define your Printing System Default Settings ......................................92
About the default settings in Océ Express WebTools.....................92
Set another language for Océ Express WebTools...........................93
How to edit a setting..........................................................................95
View and check the settings..............................................................96
Save the settings in a file...................................................................97
Load the settings from a file..............................................................98
Restore the factory defaults...............................................................99
Set the print job default settings.....................................................100
Set the copy job default settings.....................................................104
Set the scan job default settings.....................................................105
Manage Jobs on your Printing System................................................107
The 'Smart Inbox' and the Queue concept.....................................107
Use Smart Inboxes in a multiple-user environment.....................111
Use Smart Inboxes in a repro environment...................................113
Use Smart Inboxes in a multiple-user and repro environment....115
Create and open a Smart Inbox for print jobs...............................117
Create and open a Smart Inbox for scan jobs................................119
Store print, copy and scan jobs in the Smart Inbox......................121
Close or delete a 'Smart Inbox' ......................................................123
Configure your Network and Security Settings...................................124
Configure the network settings in Océ Express WebTools...........124
Access and Passwords.....................................................................125
User roles and authorizations....................................................125
Log in as an authorized user......................................................126
Change the password for authorized users..............................127
Shut down or restart the system...............................................128
Secure Protocols...............................................................................129
Define the IP type........................................................................129
Enable Access control................................................................130
5
Contents
Operating Information: PlotWave (PW) 340, PW350 - Edition 2013-06

Access control and IPsec settings.............................................131
Remote security..........................................................................133
Remote security: generate a CA-signed certificate request....134
Remote security: import a CA-signed certificate.....................136
E-shredding.......................................................................................138
Enable or disable the e-shredding function.............................138
Select the e-shredding algorithm..............................................139
Specify the number of overwrite passes..................................140
Configure the presets and stamping....................................................141
What you need to know about presets...........................................141
Set the copy presets.........................................................................142
Set the scan presets.........................................................................145
Set the print presets.........................................................................148
Create a stamp..................................................................................151
Configure External Locations................................................................153
Configure your locations.................................................................153
Enable or disable USB.....................................................................154
Create an external location..............................................................156
Error messages when validation fails.............................................158
Configure the printer settings...............................................................162
Configure the regional settings ......................................................162
Configure the 'User panel timeout' ................................................163
Configure Automatic wake-up.........................................................164
Configure the sleep mode timeout.................................................165
Configure the 'Media request timeout' ..........................................166
Configure the media sizes...............................................................167
Configure the pen settings..............................................................168
Configure Mobile Printing and Scanning.............................................169
Océ Mobile WebTools......................................................................169
Configure Océ Express WebTools settings for a mobile connec-
tion.....................................................................................................171
Generate the 'Quick Response Card' .............................................173
Connect your mobile device to Océ Mobile WebTools.................175
Optimize your Print Quality and Print Productivity.............................177
Set the 'PDF transparency flattening' ............................................177
Set the 'PDF wipeout correction' ....................................................178
Set the 'Long plot mode' ................................................................179
Set the 'Automatic roll switch' .......................................................180
Set the 'Spool threshold' ................................................................181
Set the 'Rotation' mode...................................................................182
Set the 'Alignment' mode ...............................................................183
Set the link speed and duplex mode..............................................184
Chapter 4
Use the Printing System................................................................................185
6
Contents
Operating Information: PlotWave (PW) 340, PW350 - Edition 2013-06

What you need to know before you start a job...................................186
How to feed an original.........................................................................188
How to auto-feed an original.................................................................190
How to use the carrier sheet.................................................................191
Print Jobs - Job submission tools........................................................193
Use Océ Publisher Express to send a print job..............................193
Use the Smart Inbox to send a print job........................................196
Use Océ Publisher Select to send a print job.................................197
Use the Océ Wide format Printer Driver for Microsoft® Windows® to
send a print job.................................................................................199
Use the Océ PostScript® 3 Driver to send a print job....................201
Use Océ Publisher Mobile to send a print job...............................203
Print from your mobile device.........................................................206
Use FTP to send a print job.............................................................208
Use LPR to send a print job.............................................................210
Use the cloud to send a print job....................................................211
Basic Print Jobs - Default.......................................................................212
Do a default print job ......................................................................212
Direct print........................................................................................214
Print from a USB mass storage device...........................................216
Extended Print Jobs - Presets...............................................................217
Print presets on the user panel.......................................................217
Extended Print Jobs - Advanced Settings............................................218
Advanced settings for print jobs.....................................................218
Basic Copy Jobs - Default......................................................................223
Advised settings for copy jobs........................................................223
Do a default copy job ......................................................................225
Extended Copy Jobs - Presets...............................................................227
Copy presets on the user panel.......................................................227
Make a half size copy.......................................................................228
Copy by set.......................................................................................229
Extended Copy Jobs - Advanced Settings...........................................230
Advanced settings for copy jobs.....................................................230
Make a copy and add a strip............................................................240
Make a copy and remove a strip.....................................................242
Make a copy of a specific area of an original.................................244
Make a copy and remove a specific area of an original................246
Make a copy and scale to another size...........................................247
Make a copy on a cut sheet.............................................................249
Make a copy with a stamp...............................................................251
Basic Scan Jobs - Default......................................................................252
Advised settings for scan jobs........................................................252
Do a default scan job .......................................................................254
Extended Scan Jobs - Locations and Presets......................................256
7
Contents
Operating Information: PlotWave (PW) 340, PW350 - Edition 2013-06

Scan presets on the user panel.......................................................256
Scan a photo to 'JPEG' format........................................................257
Scan CAD color to 'TIFF' format......................................................258
Scan to a USB mass storage device...............................................260
Scan to an external location............................................................261
Scan to a Smart Inbox and collect your file...................................263
Save a scanned document on your mobile device........................266
Extended Scan Jobs - Advanced Settings...........................................267
Available settings for scan jobs......................................................267
'File type' ..........................................................................................274
Make a scan and remove a strip.....................................................277
Pause, Stop or Clear the System..........................................................279
Pause, resume or stop an active job ..............................................279
Clear the system...............................................................................281
Chapter 5
Maintain the Printing System........................................................................283
Update your System..............................................................................284
Update the system software............................................................284
Move the Printing System.....................................................................286
Turn off the printing system............................................................286
Disconnect the network cable and the mains supply cable..........288
Move and re-adjust the printing system........................................289
Connect the mains supply cable and the network cable...............295
Switch on the printing system........................................................296
Replace the Media..................................................................................297
The media drawer............................................................................297
Remove a media roll........................................................................299
Unpack the media roll......................................................................303
Load a media roll (position 1)..........................................................305
Load a media roll (position 2)..........................................................310
Change the media type and media size..........................................315
Preferred Océ media types and sizes..............................................316
Refill the Toner.......................................................................................318
Refill the toner..................................................................................318
Replace the residual toner container..............................................321
Maintain the Scanner.............................................................................323
Clean the scanner.............................................................................323
Calibrate the scanner.......................................................................327
Chapter 6
License Management.....................................................................................329
Introduction to license management....................................................330
Check your licenses................................................................................331
Save the currently active licenses.........................................................333
8
Contents
Operating Information: PlotWave (PW) 340, PW350 - Edition 2013-06

Install a new license...............................................................................334
Chapter 7
Account Management....................................................................................337
An overview of Océ Account Center.....................................................338
Océ Account Console ®..........................................................................340
Introduction to Océ Account Console.............................................340
Summary of Océ Account Console.................................................341
Enable account management in Océ Express WebTools.............344
Accounting workflow.......................................................................346
Chapter 8
Support............................................................................................................347
'Counter history' ....................................................................................348
View events.............................................................................................350
Event messages......................................................................................351
Remote Service......................................................................................355
Solve Problems......................................................................................358
How to solve problems with jobs...................................................358
Clear an original jam in the scanner...............................................359
Clear a media jam in the heater section.........................................361
Clear a media jam in the media bypass section............................363
Clear a media jam in the roll feed section......................................366
Print a demo print.............................................................................367
Print a test print................................................................................368
Print the print density chart.............................................................369
Chapter 9
Contact.............................................................................................................371
Online support for your product...........................................................372
Reader's comment sheet.......................................................................373
9
Contents
Operating Information: PlotWave (PW) 340, PW350 - Edition 2013-06

10
Contents
Operating Information: PlotWave (PW) 340, PW350 - Edition 2013-06

Chapter 1
Introduction
Operating Information: PlotWave (PW) 340, PW350 - Edition 2013-06
Notes for the reader
Introduction
This manual helps you to use the Océ PlotWave 340/360. The manual contains a description of the product and guidelines to use and operate the Océ PlotWave 340/360.
Definition
Attention-Getters
Parts of this manual require your special attention. These parts can provide the following:
•
Additional general information, for example, information that is useful when you
perform a task.
•
Information to prevent personal injuries or property damage.
Note, Attention, and Caution
The words Note, Attention and Caution draw your attention to important information.
Overview of the attention-getters#
IndicatesIconWord
Tips or additional information about the correct use
of the product.
Note
Information to prevent property damage, for example
damage to the product, documents, or files.
Attention
Information to prevent personal injuries.
The Caution indication has several icons that warn
against various hazards. The icons are shown below.
Caution
General hazardCaution
Hot surfaceCaution
Electric shockCaution
Chapter 1 - Introduction12
Notes for the reader
Operating Information: PlotWave (PW) 340, PW350 - Edition 2013-06
IndicatesIconWord
Moving partsCaution
Laser beamCaution
The use of heat-resistant gloves is mandatory when you
carry out these actions.
Safety information
Before using this Océ product, make sure that you read and understand the safety information which is part of the user documentation. You can download the safety information
via http://global.oce.com/support/ or, if applicable, find it on the user documentation
CD/DVD that is delivered together with the machine or obtain the safety information
from your local Océ representative. To avoid potential hazards, maintenance is strictly
preserved to properly qualified and trained service technicians.
Sustainability Information
Océ is focused on creating value for all stakeholders by realizing profitable, sustainable
growth. The Océ strategy is aimed at optimizing business processes, strengthening its
product portfolio and boosting distribution power. Sustainability underpins these strategic
aims. A strong performance in sustainability contributes to operational efficiency as well
as generating stronger product propositions and a more powerful market image. It is no
coincidence that Océ embraced sustainability as part of its core proposition decades ago.
You can find more information about the sustainability policy of Océ via www.sustain-
ability.oce.com.
Chapter 1 - Introduction 13
Notes for the reader
Operating Information: PlotWave (PW) 340, PW350 - Edition 2013-06

Available documentation
Introduction
This manual is part of a complete documentation set. The following table shows a complete
overview of the available documentation.
Note:
For up-to-date documentation, visit Océ on the internet and find all the information
on your printer on the support page.
Available documentation
#
AvailabilityDocumentation
•
On the Océ website (http://global.oce.com) under the PlotWave support
page.
Available as a PDF file in multiple languages.
User Manual - Operating guide
•
On the Océ website (http://global.oce.com) under the PlotWave support
page.
Available as a PDF file in English and
Japanese.
User Manual - Installation guide
•
Embedded in the application
Available in multiple languages.
Online Help - Océ Express
WebTools
•
On the Océ website (http://global.oce.com) under the PlotWave support
page.
Available as a PDF file (multilingual).
User manual - Safety guide
•
On the Océ website (http://global.oce.com) under the PlotWave support
page.
Available as a PDF file.
Quick Reference Guide for the use
of Océ Mobile WebTools
Chapter 1 - Introduction14
Available documentation
Operating Information: PlotWave (PW) 340, PW350 - Edition 2013-06

AvailabilityDocumentation
•
On the Océ website (http://global.oce.com) under the PlotWave support
page.
Available as a PDF file in English only.
Océ Large Format Systems Connectivity - Administration guide
•
On the Océ website (http://global.oce.com) under the PlotWave support
page.
Available as a PDF file in English only.
Océ Large Format Systems Security
- Administration guide
Available documentation Océ Wide format Printer Driver for Microsoft ® Windows
®
#
AvailabilityDocumentation
•
On the Océ website (http://global.oce.com) under the PlotWave support
page.
Available as a PDF file in multiple languages.
User guide
•
Embedded in the application
Available in multiple languages.
Online Help
Available documentation Océ PostScript® 3 Driver
#
AvailabilityDocumentation
•
On the Océ website (http://global.oce.com) under the PlotWave support
page.
Available as a PDF file in multiple languages.
Installation guide
•
Embedded in the application
Available in multiple languages.
Online Help
Chapter 1 - Introduction 15
Available documentation
Operating Information: PlotWave (PW) 340, PW350 - Edition 2013-06

Available documentation Océ Publisher Select
#
AvailabilityDocumentation
•
On the Océ website (http://global.oce.com) under the PlotWave support
page.
Available as a PDF file in multiple languages.
User guide - Océ Publisher Select
•
Embedded in the application
Available in multiple languages.
Online Help
Chapter 1 - Introduction16
Available documentation
Operating Information: PlotWave (PW) 340, PW350 - Edition 2013-06

Chapter 2
Get to Know the Printing
System
Operating Information: PlotWave (PW) 340, PW350 - Edition 2013-06
Introduction
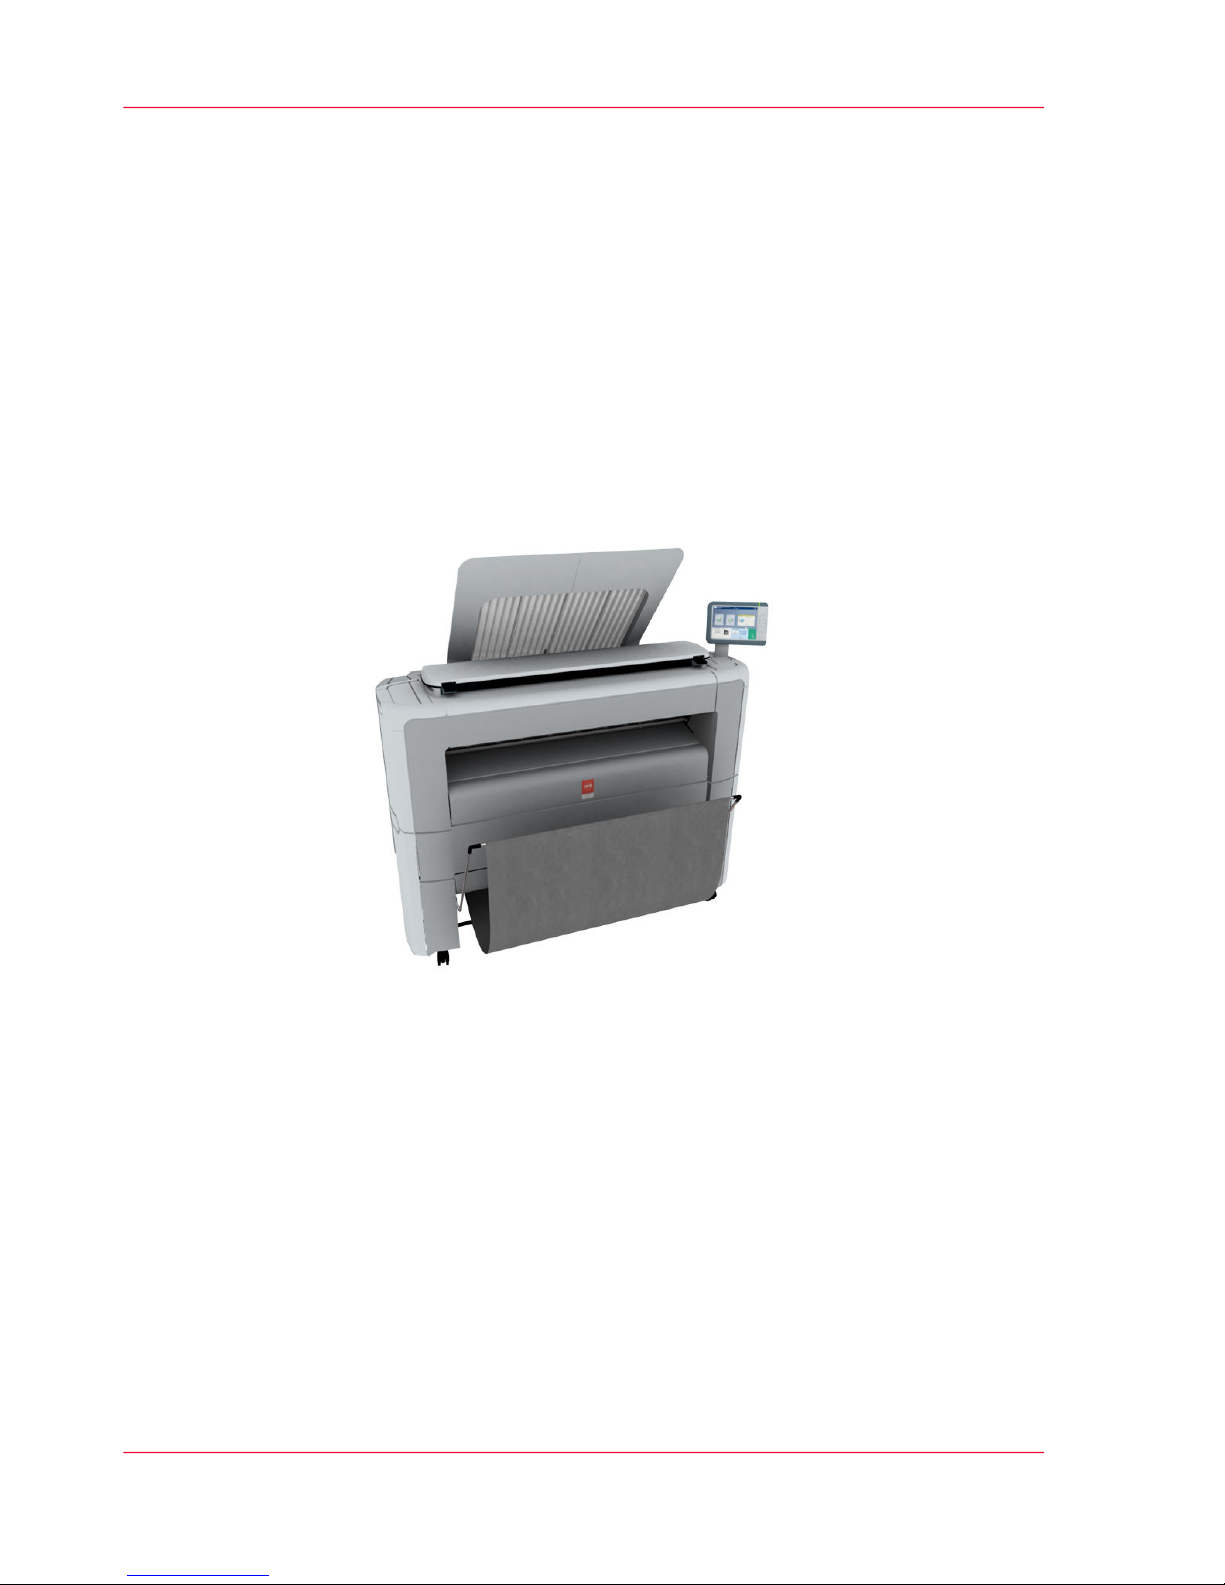
The Océ PlotWave 340/360
Introduction
The Océ PlotWave 340/360 is a black and white, all-in-one wide format print, copy and
scan system with a multi-touch user panel and an optional color scanner.
Illustration
Chapter 2 - Get to Know the Printing System18
The Océ PlotWave 340/360
Operating Information: PlotWave (PW) 340, PW350 - Edition 2013-06

The key concepts
Introduction
The Océ PlotWave 340/360 features several concepts that make the printer unique.
An understanding of these main concepts is key to optimally profiting from your PlotWave
system.
Printer configuration
The Océ PlotWave 340/360 printer has 1 or 2 media rolls. The 'Océ Scanner Express',
the front original tray, the Océ 2400 fanfold or Océ 4311 fullfold are optional.
Automatic paper feed
The Océ PlotWave 340/360 offers a fully automated paper feed function. Place the roll
on the media drawer's roll loading station and the paper is fed into the printer, cut and
sized completely automatically.
The original feed of the scanner is also automated. Feed the paper in the scanner between
the marker lines. The scanner takes the original and aligns it properly to make sure the
scan is correct. The Smart Access displays the detected width and gives a live scan view
of the scanning process.
Océ Radiant Fusing technology
With the Océ Radiant Fusing technology, the printer instantly wakes up and uses half
the energy of comparable systems. When in idle mode, the system is cold and requires
minimal energy. The user can activate the printer with the wake-up button on the user
panel and the system is up and running within several minutes.
Océ ClearConnect
The Océ ClearConnect is the multi-touch user panel of the Océ PlotWave 340/360 that
is used like a tablet. It gives easy access to all your copy, scan or print jobs and offers instant
feedback on the system. The breadcrumbs show the navigation of your job and with the
home button you can always return to the home screen.
Features such as the Smart Inbox, the Smart Access, presets and access to the cloud make
the Océ ClearConnect unique.
Chapter 2 - Get to Know the Printing System 19
The key concepts
Operating Information: PlotWave (PW) 340, PW350 - Edition 2013-06

Print functionality
The Océ PlotWave 340/360 supports printing from various applications and drivers.
Create and send jobs from optional drivers or mobile devices. Feel free to start multiple
jobs at one time since the Océ PlotWave 340/360 allows neatly collated and stacked
documents of up to 50 A0/E-size plots on the 'Top Delivery Tray' due to the special air
separation technology.
Copy functionality
With the Océ PlotWave 340/360 and the integrated 'Océ Scanner Express', a large
number of copy activities can be performed. A wide variety of settings are supported. You
can specify the copy job's layout, media, finishing, image and quality enhancement options
from the user panel.
Scan functionality
The 'Océ Scanner Express' offers full hybrid performance with its scan-to-file functionality. Documents are scanned and copied and then stored digitally. Via SMB, FTP, LPR
or WebDAV users can send their files to various locations such as local drives, personal
Smart Inboxes, Eneo or the cloud application of your choice. Insert a USB device into
the USB port on the multi-touch user panel to scan to USB or use Océ Mobile WebTools
and Oce Publisher Mobile to scan to your mobile device.
Live view and preview
The Océ ClearConnect supports a job by offering a live scan view of the scanning process.
The user can see if the document is scanned accordingly. In the preview window, the
user can also view the jobs. Swipe between several jobs and pan to view the image in detail.
Mobility and the cloud
The Océ PlotWave 340/360 makes it possible to print from and scan to the cloud application of your choice. Together with mobile applications such as Océ Mobile WebTools
or Oce Publisher Mobile, the printer can be easily accessed and used from any location.
Green button principle
The Océ PlotWave 340/360 is a user-friendly system. Default jobs can be performed by
simply tapping the green button in the Smart Access of the user panel. When you want
to change settings, you can easily switch the presets and tap the green button.
Chapter 2 - Get to Know the Printing System20
The key concepts
Operating Information: PlotWave (PW) 340, PW350 - Edition 2013-06

Presets
Predefined settings: presets, listed on the user panel, help to edit the job settings for copy,
scan and print jobs. Presets give easy access to change the most common used settings.
To start a job with different settings, you simply select a job tile, select the preferred
presets and tap the green button. Presets can be predefined in Océ Express WebTools.
Integrated Océ Express WebTools controller application
The Océ Express WebTools controller application supports a centralized workflow.
The application has an intuitive layout from which you can perform many tasks based
on user role defined access. Separate work spaces give you a complete overview and full
control over print and scan job management.
Tasks you can manage are:
•
Settings and configuration management
•
Network connectivity management
•
Queue management
•
License management
•
System monitoring
•
Scan retrieval
•
Print job submission
You can access the integrated Océ Express WebTools controller application from any
networked workstation.
Adobe® PostScript® 3™/PDF
The Océ PlotWave 340/360 fully supports Adobe® PostScript® 3™. For Japanese,
Chinese and Korean language extra fonts are optional. They can be enabled with a license
in the Océ Express WebTools.
Processing sets
The Océ PlotWave 340/360 supports the processing of sets. This means that a job can
consist of several files or originals. You can print or scan these files or originals multiple
times and sort them by page or by set.
Chapter 2 - Get to Know the Printing System 21
The key concepts
Operating Information: PlotWave (PW) 340, PW350 - Edition 2013-06

Spool memory
The Océ PlotWave 340/360 contains a spool memory that provides a queuing system
for documents you want to print or copy. The spool memory allows multiple users to
send print and copy jobs to the Océ PlotWave 340/360 at the same time. The print and
copy jobs are then placed in the print queue where they wait to be printed. The job that
is put into the queue first is printed first. The system can be set up to give priority to either
print or copy jobs.
Chapter 2 - Get to Know the Printing System22
The key concepts
Operating Information: PlotWave (PW) 340, PW350 - Edition 2013-06
Connect your Printing System
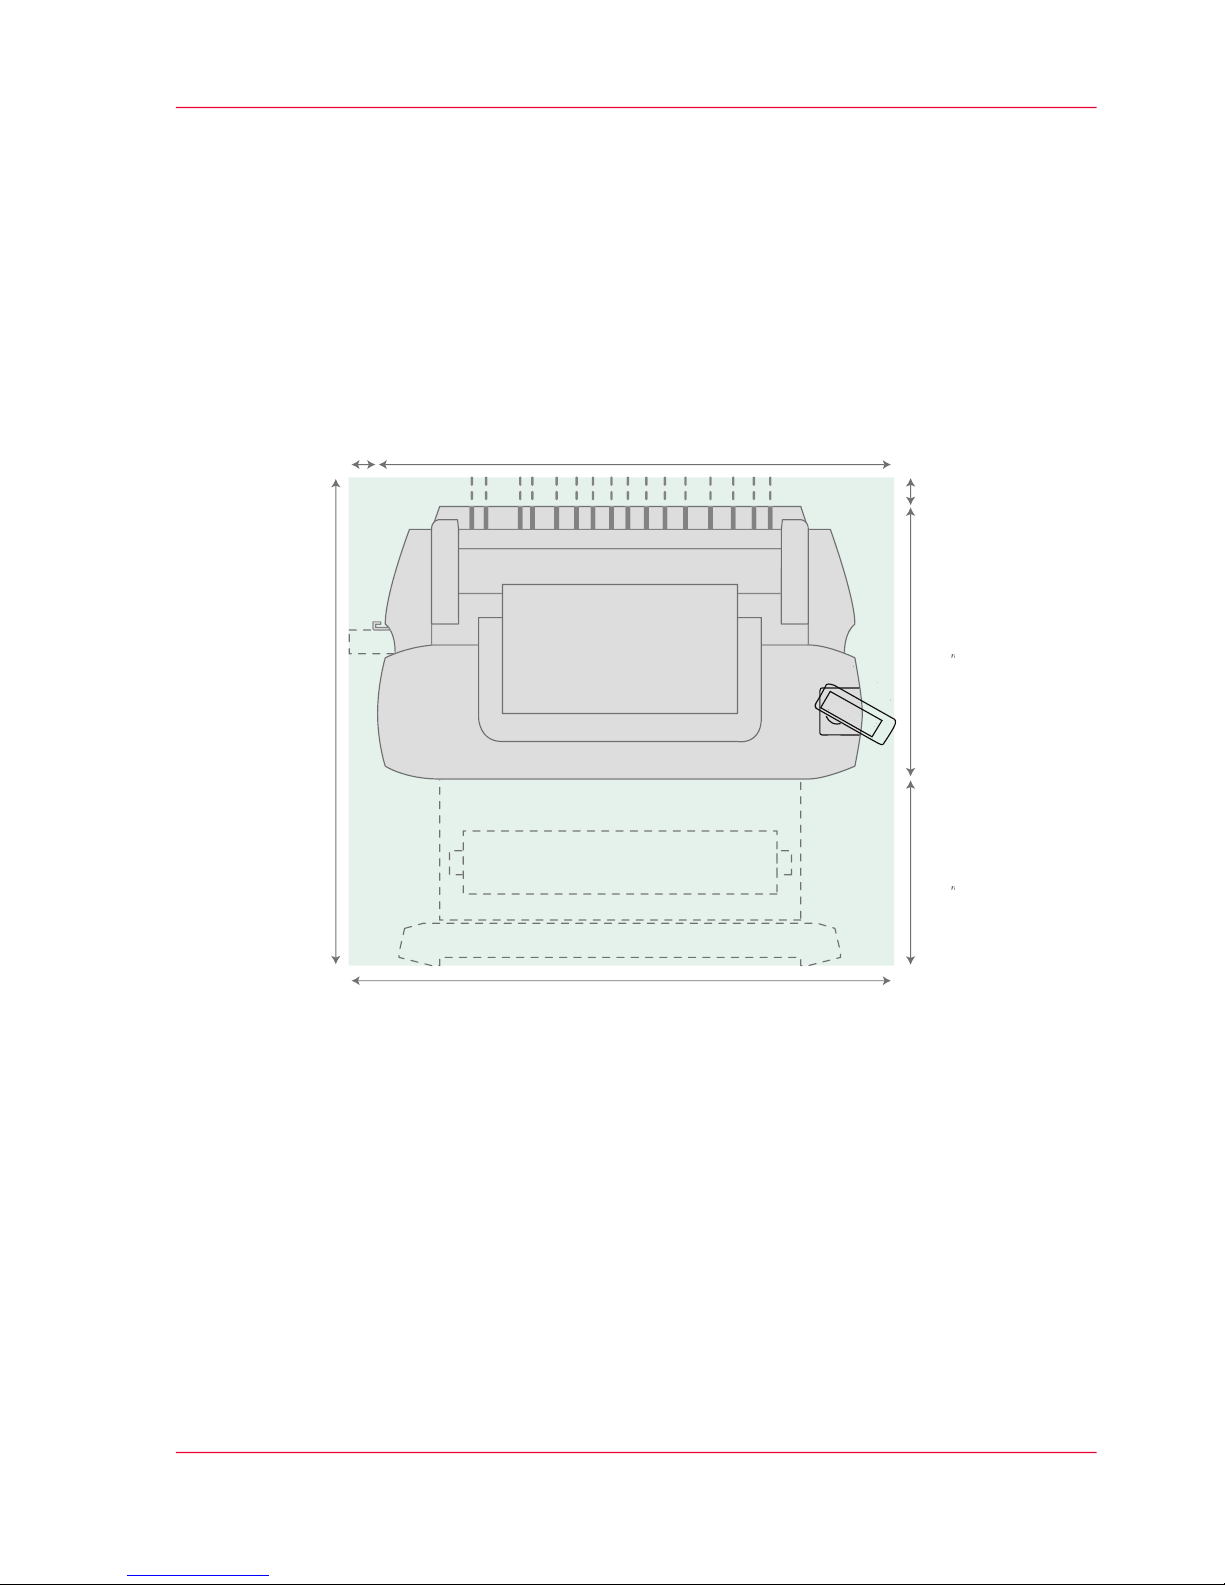
Working area [Footprint]
The printing system (with or without the optional 'Océ Scanner Express') requires a floor
space / working area of at least 1810 mm x 1470 mm (71,3 inch x 57.9 inches).
Chapter 2 - Get to Know the Printing System 23
Working area [Footprint]
Operating Information: PlotWave (PW) 340, PW350 - Edition 2013-06
Connect the mains supply cable and the network cable
Attention:
Make sure the power switch(B) is in the off position.
1.
Plug the power supply cable into the power connection at the back of the printer (A) (on
the left-hand side).
A
B
C
2.
Plug the other side of the mains supply cable into the wall socket.
3.
Plug the network cable into the network connection (C) at the back of the printer (on
the right-hand side) to connect the printer to your company network.
Chapter 2 - Get to Know the Printing System24
Connect the mains supply cable and the network cable
Operating Information: PlotWave (PW) 340, PW350 - Edition 2013-06

Switch on the printing system
Attention:
Make sure the power supply cable (A) is plugged in.
Attention:
Make sure the network cable (C) is plugged in.
1.
Switch on the power switch at the back of the printing system (B).
A
B
C
[13] The power switch at the back of the printer.
Chapter 2 - Get to Know the Printing System 25
Switch on the printing system
Operating Information: PlotWave (PW) 340, PW350 - Edition 2013-06
The Hardware
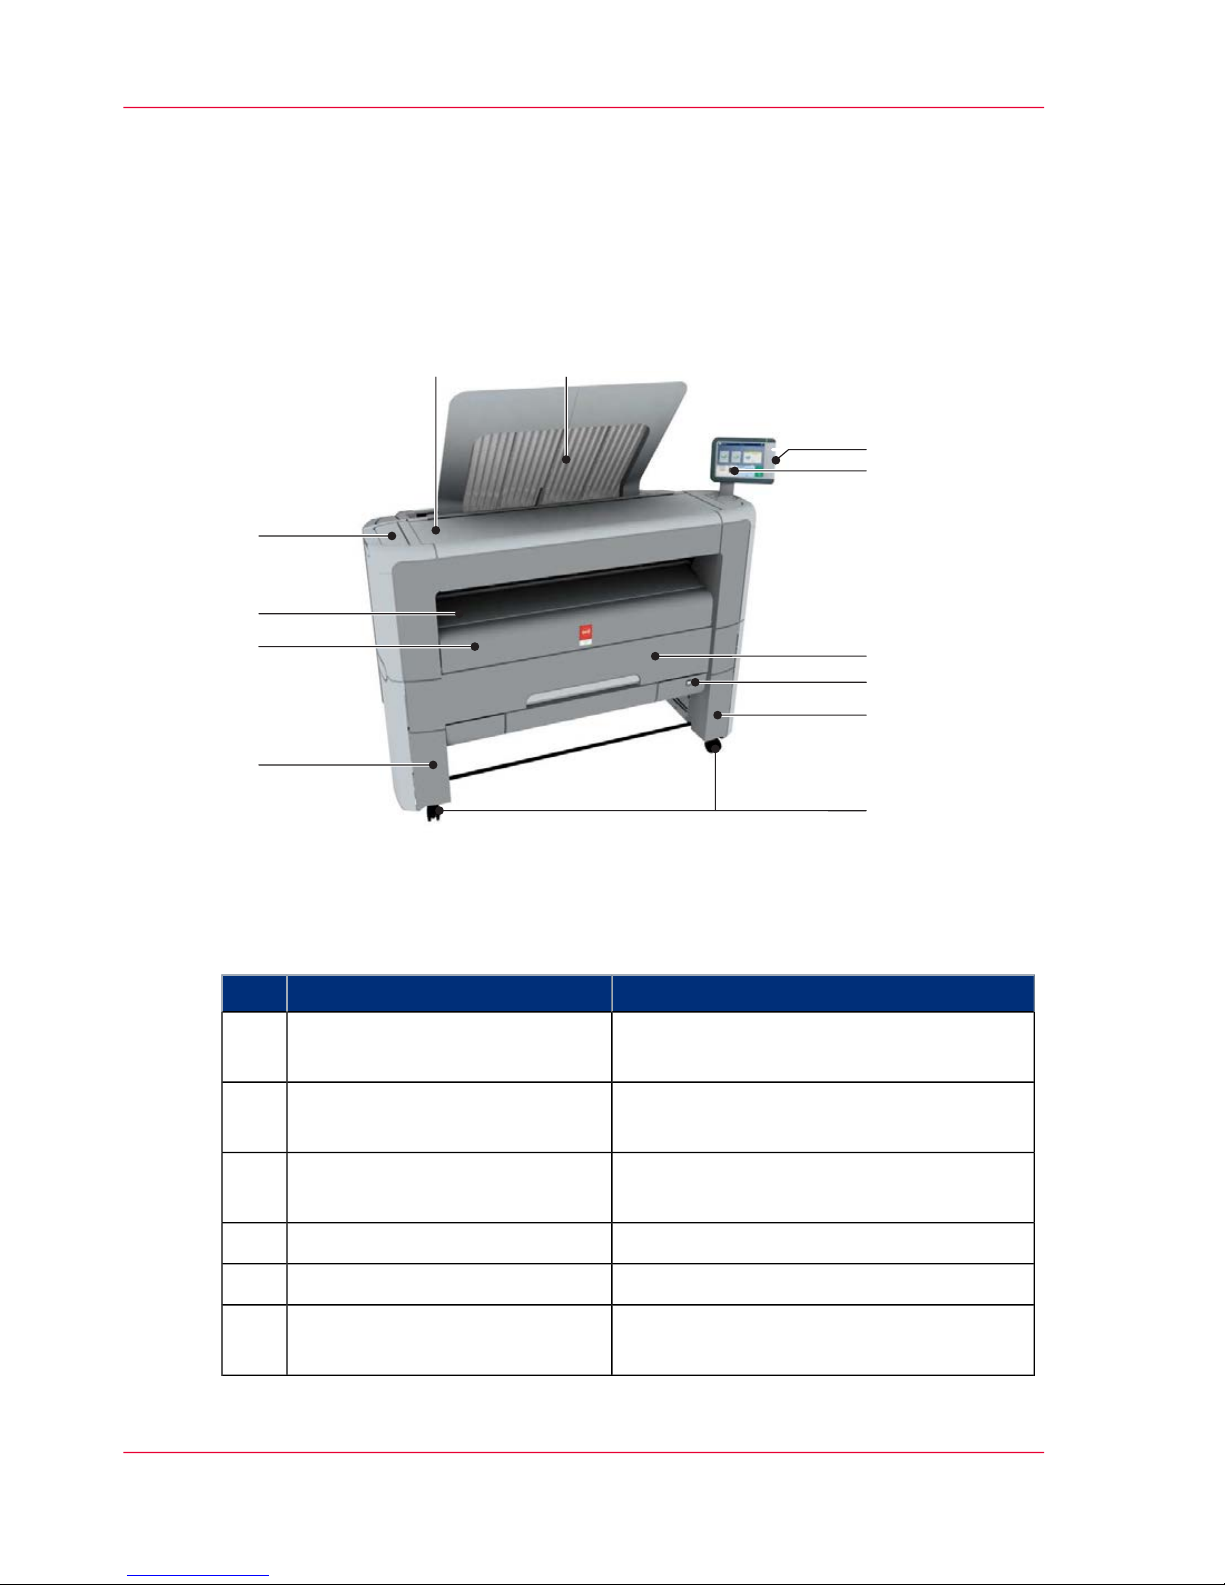
The components of the printer (front)
Illustration
8
7
1
2
3
4
9
10
11
12
65
Component - function table
#
Description / FunctionComponentNo.
Remove this cover when you want to move
the printer.
lower left front cover1
Located at the front, used for error recovery.
lower front cover2
To manually feed cut-sheets up to 36"
width.
media bypass3
Compartment to refill toner.toner compartment4
Only available in printer-only version.printer top cover5
Delivery tray that collects the printed
sheets.
top delivery tray6
Chapter 2 - Get to Know the Printing System26
The components of the printer (front)
Operating Information: PlotWave (PW) 340, PW350 - Edition 2013-06

Description / FunctionComponentNo.
USB connector to use a USB mass storage
device to print from or to scan to.
USB port7
The Océ ClearConnect user panel allows
the user to start copy, scan or print jobs and
to monitor the system and the job status.
Océ ClearConnect: multi-touch
user panel
8
Media drawer that contains the media roll
1 and/or 2.
media drawer9
Button to start or shut down the printer.
This button is equivalent to the 'Shut
down' button in Océ Express WebTools.
on / off button10
Located at the front, used to level the
printer.
lower right front cover11 /
B
Swivel wheel with brakes.wheel12
Chapter 2 - Get to Know the Printing System 27
The components of the printer (front)
Operating Information: PlotWave (PW) 340, PW350 - Edition 2013-06

The components of the printer (left side)
Illustration
1
Component - function table
#
Description / FunctionComponentNo.
Gives access to the residual toner container.residual toner compartment1
Chapter 2 - Get to Know the Printing System28
The components of the printer (left side)
Operating Information: PlotWave (PW) 340, PW350 - Edition 2013-06

The components of the printer (back)
Illustration
3
1
2
Component - function table
#
Description / FunctionComponentNo.
Switch the main power supply on or off.
You can find the serial number of the
printer on the sticker above the power
switch.
power switch1
Open the upper back cover with the media
jam clearance handle when you want to
access the heater section in case of a media
jam.
upper back cover2
Use this handle to access the paper in case
of a paper jam in the heater section.
media jam clearance handle3
Chapter 2 - Get to Know the Printing System 29
The components of the printer (back)
Operating Information: PlotWave (PW) 340, PW350 - Edition 2013-06

The media drawer
Illustration
1
2
3
5
4
Component - function table
#
Description / FunctionComponentNo.
Carries the media rollroll holder1
Media placed on roll holder in first position.media roll 12
Media placed on roll holder in second position.
Note:
The scanner calibration sheet is located at
the back of roll 2.
media roll 2 (optional)3
Groove integrated behind the front cover of the
media drawer, on which the media can be easily
loaded.
roll loading station4
Button used to trim a strip of a new or damaged
media roll.
clean cut button5
Chapter 2 - Get to Know the Printing System30
The media drawer
Operating Information: PlotWave (PW) 340, PW350 - Edition 2013-06
 Loading...