

Oce Saddle Finisher-AF2, Finisher-AF1, Puncher Unit BP1, Puncher Unit BQ1, Puncher Unit BR1 User Manual
Page 1

Océ User Manual
Finisher-AF1/Saddle Finisher-AF2/Puncher Unit-
BP1/BQ1/BR1
Operating information
Page 2

Copyright
Copyright 2011-2012 by Canon Inc. All rights reserved.
No part of this publication may be reproduced or transmitted in any form or by any means,
electronic or mechanical, including photocopying and recording, or by any information
storage or retrieval system without the prior written permission of Canon Inc.
© 2011-2012, Océ
All rights reserved. No part of this work may be reproduced, copied, adapted, or transmitted
in any form or by any means without written permission from Océ.
Océ makes no representation or warranties with respect to the contents hereof and specifically disclaims any implied warranties of merchantability or fitness for any particular purpose.
Furthermore, Océ reserves the right to revise this publication and to make changes from
time to time in the content hereof without obligation to notify any person of such revision
or changes.
Edition: 2012-01
Page 3

Contents
Contents
Chapter 1
Preface.................................................................................................................5
Notes for the reader...................................................................................6
Naming conventions for finishers (commercial naming and naming in
User Interfaces)..........................................................................................8
Chapter 2
Parts and their functions....................................................................................9
External view............................................................................................10
Internal view.............................................................................................11
Chapter 3
Use the stacker/stapler....................................................................................13
The finishing modes................................................................................14
Check the status of the staple cartridges...............................................20
Replace the staple cartridge of the stapler unit.....................................22
Replace the staple cartridge of the saddle stitch unit...........................25
Remove the puncher waste box.............................................................28
Chapter 4
Troubleshooting................................................................................................31
Labels inside the stacker/stapler.............................................................32
Clear a paper jam in the top cover of the stacker/stapler.....................35
Clear a paper jam inside the stacker/stapler..........................................41
Clear a paper jam in the saddle stitch unit.............................................44
Clear a staple jam inside the stapler unit...............................................49
Clear a staple jam in the saddle stitch unit............................................52
Appendix A
Miscellaneous....................................................................................................55
Specifications............................................................................................56
Optional accessories................................................................................59
3
Page 4

Contents
4
Page 5

Chapter 1 Preface
Page 6

Notes for the reader
Notes for the reader
Introduction
This manual helps you to use the Finisher-AF1/Saddle Finisher-AF2/Puncher UnitBP1/BQ1/BR1. The manual contains a description of the product and guidelines to use
and operate the Finisher-AF1/Saddle Finisher-AF2/Puncher Unit-BP1/BQ1/BR1.
Definition
Attention-Getters
Parts of this manual require your special attention. These parts can provide the following:
•
Additional general information, for example, information that is useful when you
perform a task.
•
Information to prevent personal injuries or property damage.
Warning, Caution and Note
The words Warning, Caution and Note draw your attention to important information.
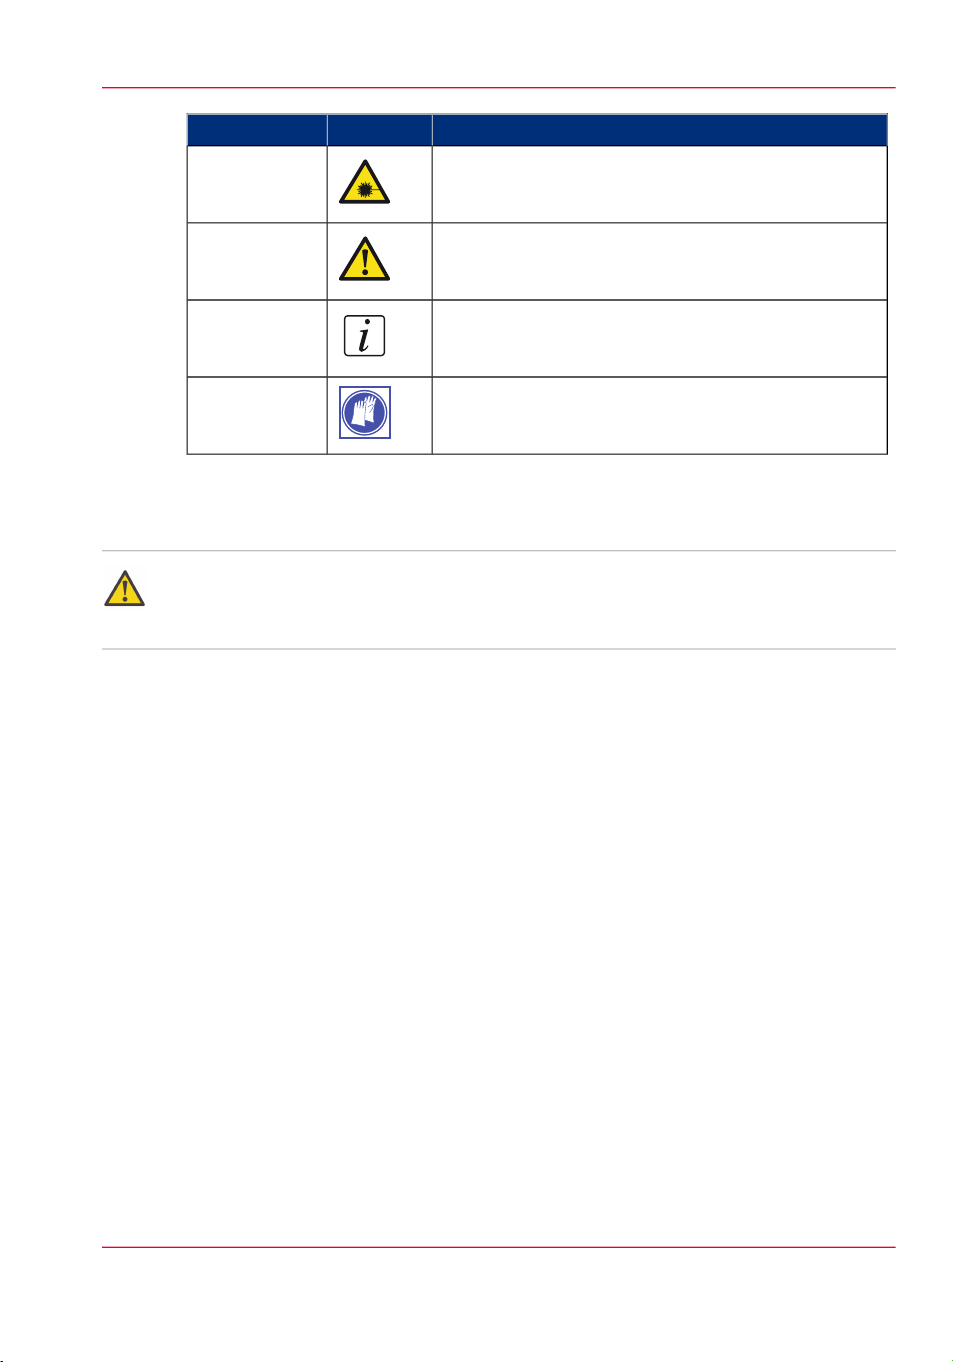
Overview of the attention-getters#
Warning
IndicatesIconWord
Ignoring this warning could cause serious injury or
even death.
The Warning indication has several icons that warn
against various hazards. The icons are shown below.
General hazardWarning
Hot surfaceWarning
Electric shockWarning
Moving partsWarning
Chapter 1 - Preface6
Page 7
Notes for the reader
IndicatesIconWord
Laser beamWarning
Caution
Important safety instructions
Warning:
Do not touch the stacker/stapler while the machine is printing, as this may result in personal injury.
Ignoring this warning could cause injury or damage to
property.
Indicates additional important information.Note
The use of heat-resistant gloves is mandatory when you
carry out these actions.
Chapter 1 - Preface 7
Page 8

Naming conventions for finishers (commercial naming and naming in User Interfaces)
Naming conventions for finishers (commercial naming and
naming in User Interfaces)
Hardware and hardware naming in User Interfaces
To improve the readability of texts in User Interfaces of operator panels and software,
the finishers are generally referred to by their function. The table below shows the naming
conventions for finishers (commercial product names and the way these are referred to
in User Interfaces).
Note:
In some cases, there is only 1 name for several modules. The reason is that a configuration
can only contain 1 of the available types of modules.
Conversion table for commercial names versus user-friendly names in User Interfaces#
Commercial product name:
In UI, printer driver and software referred to as:
'Stacker/stapler'Finisher-AF1
'Stacker/stapler'Saddle Finisher-AF2
'Puncher'Puncher Unit-BP1/BQ1/BR1
'Folder'Paper Folding Unit-F1
'Inserter'Document Insertion Unit-F1
'Stacker'High-Capacity Stacker-E1
'Trimmer'Booklet Trimmer-D1
'Trimmer'Two-Knife Trimmer-A1
'Perfect Binder'Perfect Binder-C1
'Scanner'Duplex Color Image Reader Unit-D1
Chapter 1 - Preface8
Page 9

Chapter 2 Parts and their functions
Page 10

External view
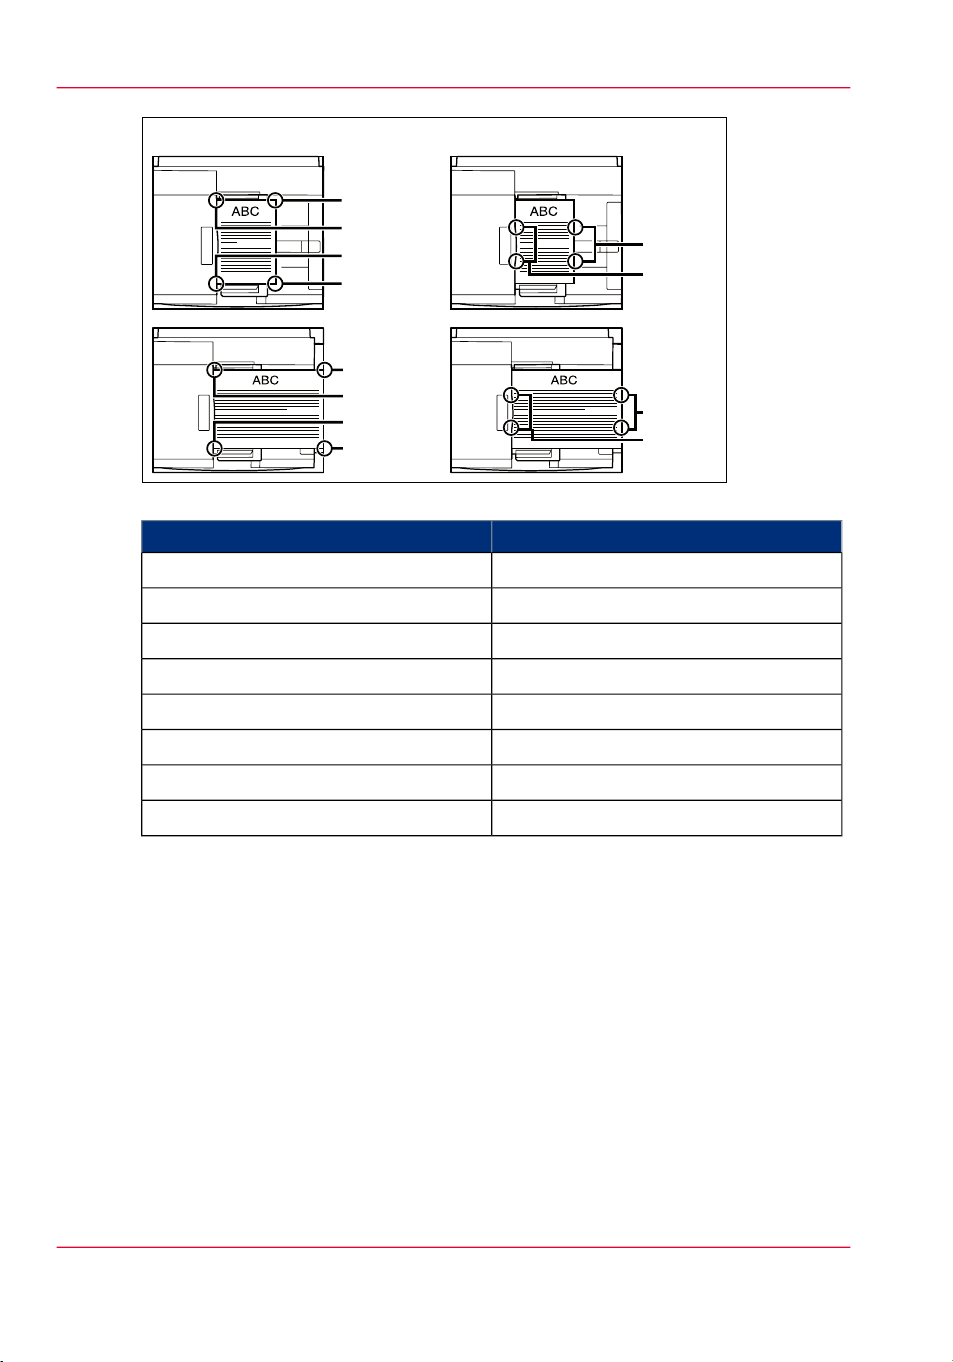
External view
Illustration
[10] The main parts of the Saddle Finisher-AF2 and Finisher-AF1
Main parts
Main parts#
FunctionComponent
Main power switch1
Put the switch on "I" to turn on the
stacker/stapler.
Top cover2
Open the top cover to clear a paper
jam inside the unit.
Front door3
Open the front door to replace the
staple cartridge, remove jammed paper, or clear a staple jam in the
stacker/stapler, in the stapler unit or
in the saddle stitch unit.
4
Receive saddle stitched booklets.Booklet tray (Saddle Finisher-
AF2 only)
5
Auxiliary booklet tray (Saddle
Finisher-AF2 only)
Pull out the auxiliary booklet tray to
receive large size booklets.
Receive finished documents.Lower tray6
Receive finished documents.Upper tray7
Chapter 2 - Parts and their functions10
Page 11
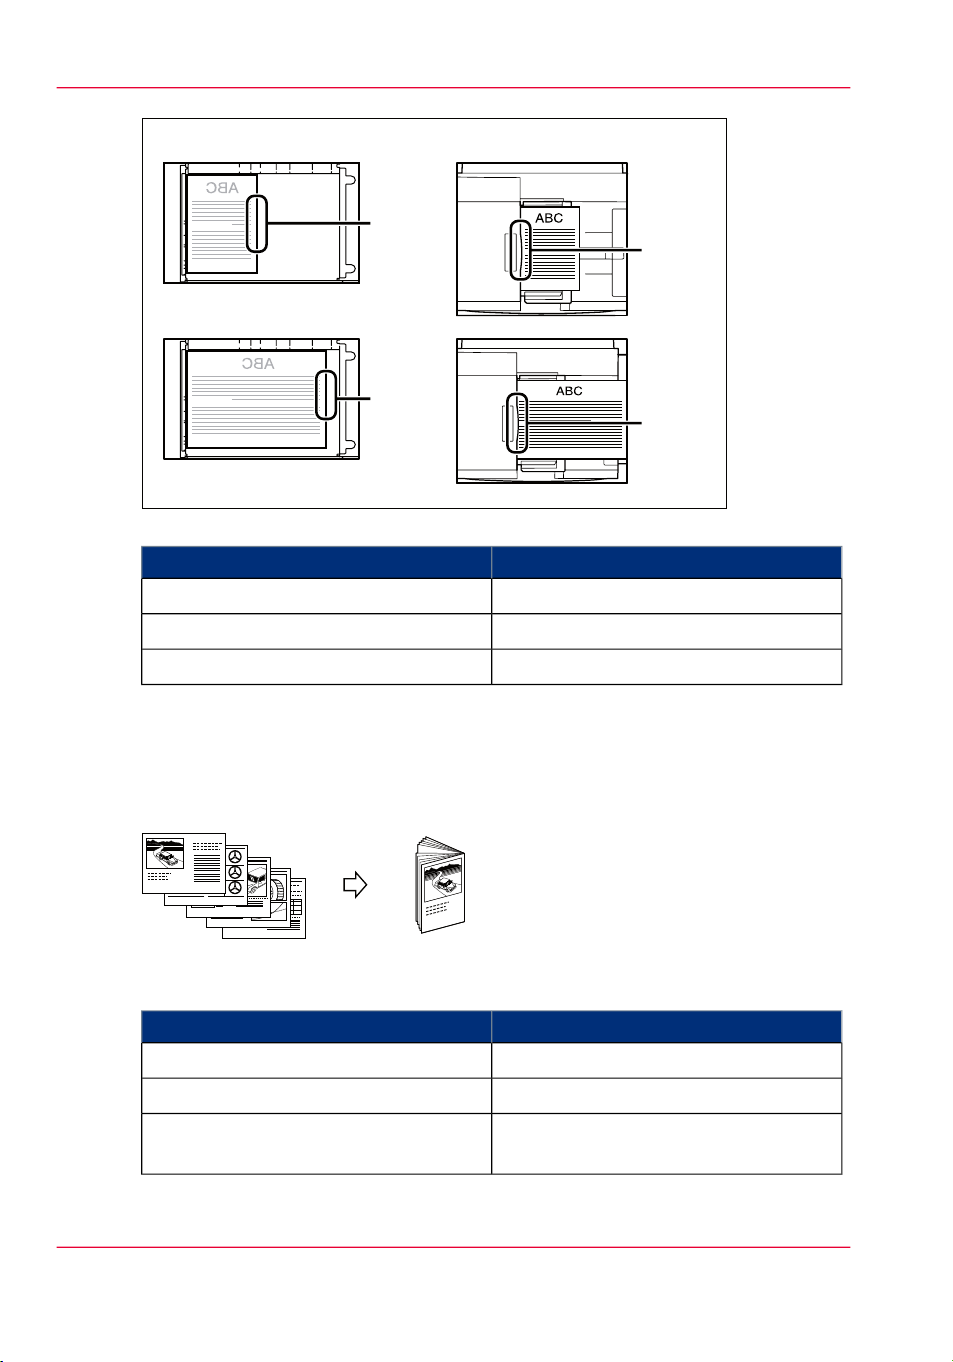
Internal view
12
Illustration
Internal view
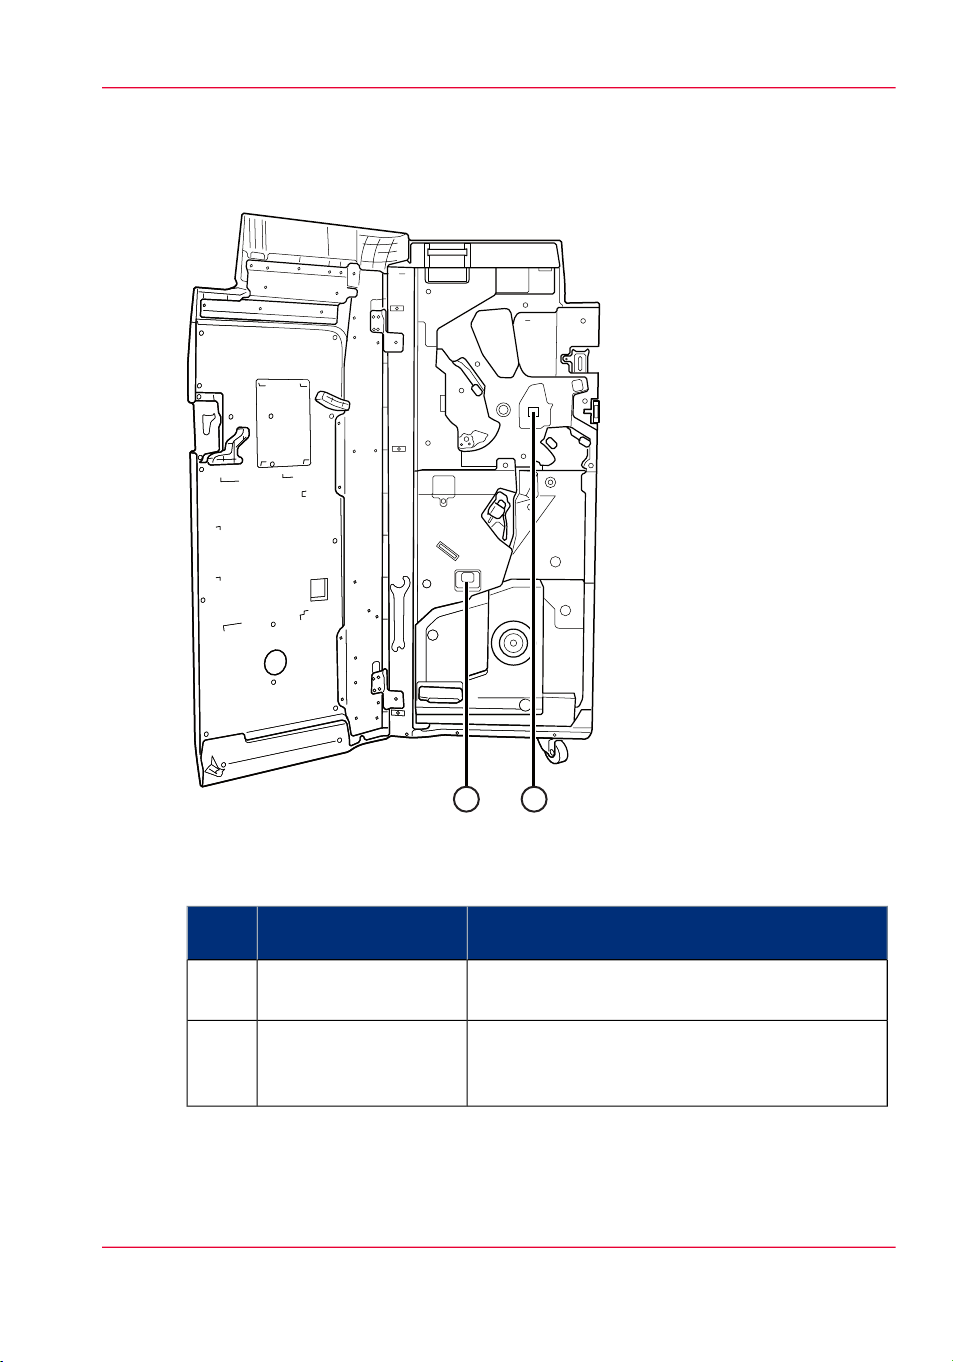
[11] The waste trays
#
ber
Puncher waste box1
Stapler waste box2
DescriptionItemNum-
The punch waster box contains the confetti that
occurs when holes are punched.
The stapler waste box contains the residual material that occurs when the staples are cut to the required length.
Chapter 2 - Parts and their functions 11
Page 12

Internal view
Chapter 2 - Parts and their functions12
Page 13

Chapter 3 Use the stacker/stapler
Page 14
The finishing modes
The finishing modes
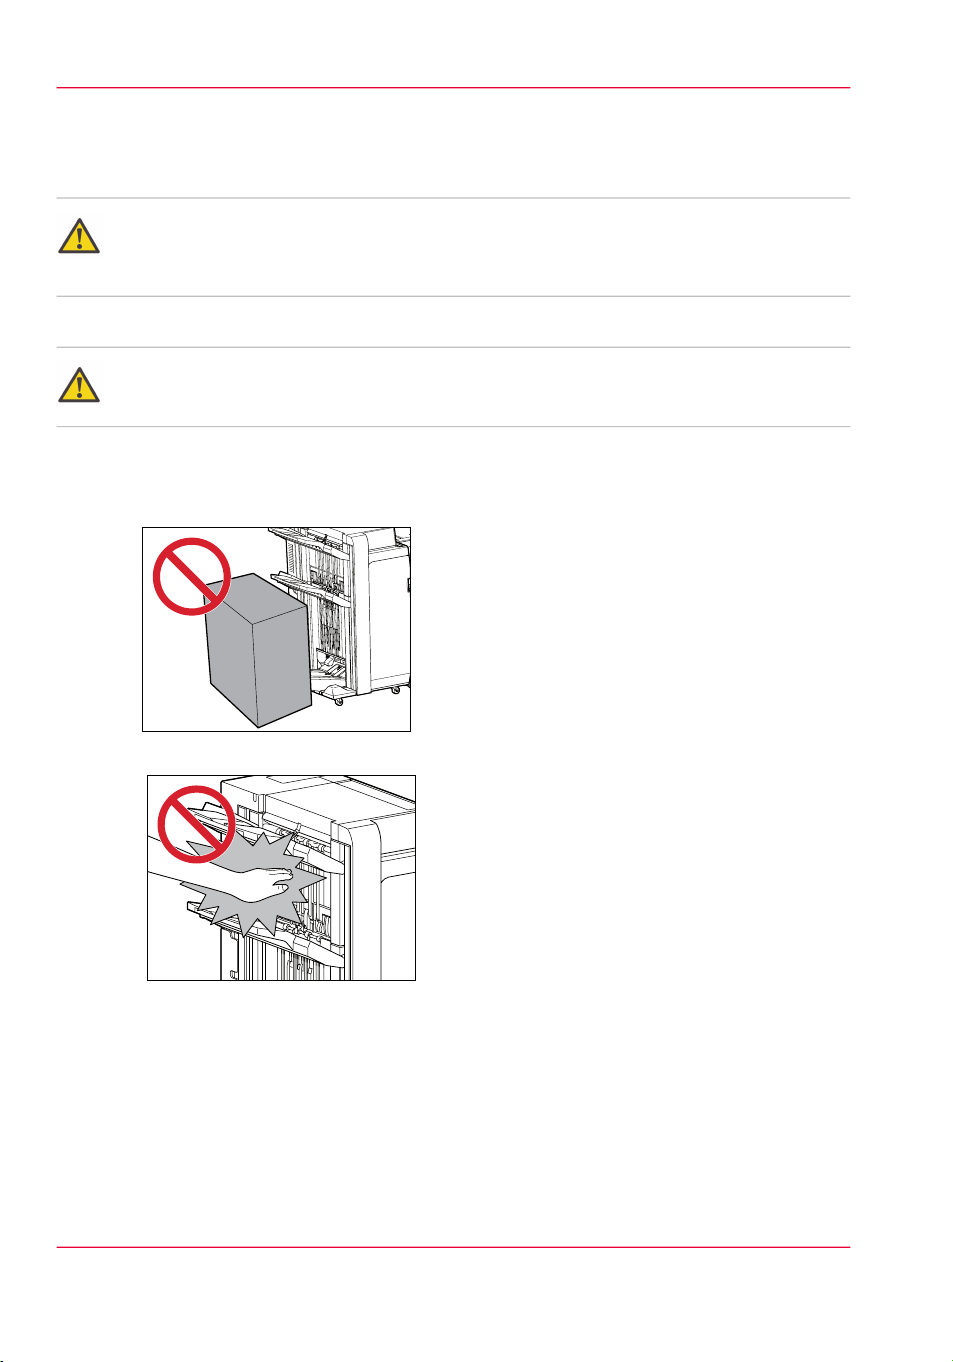
Caution:
Do not place anything other than output paper in the trays of the finisher, as doing so
may damage the trays.
Caution:
Do not place anything under the trays of the finisher, as doing so may damage the trays.
Illustration
[12] Do not place anything under the trays
[13] Do not place your hands in the part of the tray where stapling is performed (near the rollers)
when a finisher is attached, as this may result in personal injury.
Sort by set mode
Prints are automatically collated into sets arranged in page order (123, 123, for example).
Chapter 3 - Use the stacker/stapler14
Page 15
Sort by page mode
Right Side
Left Side
Right Side
Left Side
Upper Right
Upper Left
Lower Left
Lower Right
Double Staple AreaCorner Staple Area
Upper Right
Upper Left
Lower Left
Lower Right
All prints of the same original page are grouped together (111, 222, 333, for example).
Offset stacking mode
The printed output is shifted alternately to the front and back of the tray, in a vertical
(portrait) orientation, or a horizontal (landscape) orientation, depending on the orientation
of your originals. For example, if you place A4R or LetterR originals, the paper is output
and shifted in the horizontal direction. If you place A4 or Letter originals, the paper is
output and shifted in the vertical direction.
When you use the Offset stacking mode while Sort by set or Sort by page is selected, then
each set of prints is shifted the following amount before it is delivered to the output tray:
•
No staple: each set is shifted 30 mm (1 1/4").
•
Corner staple: each set is shifted 20 mm (3/4").
•
Double staple: no shift between sets.
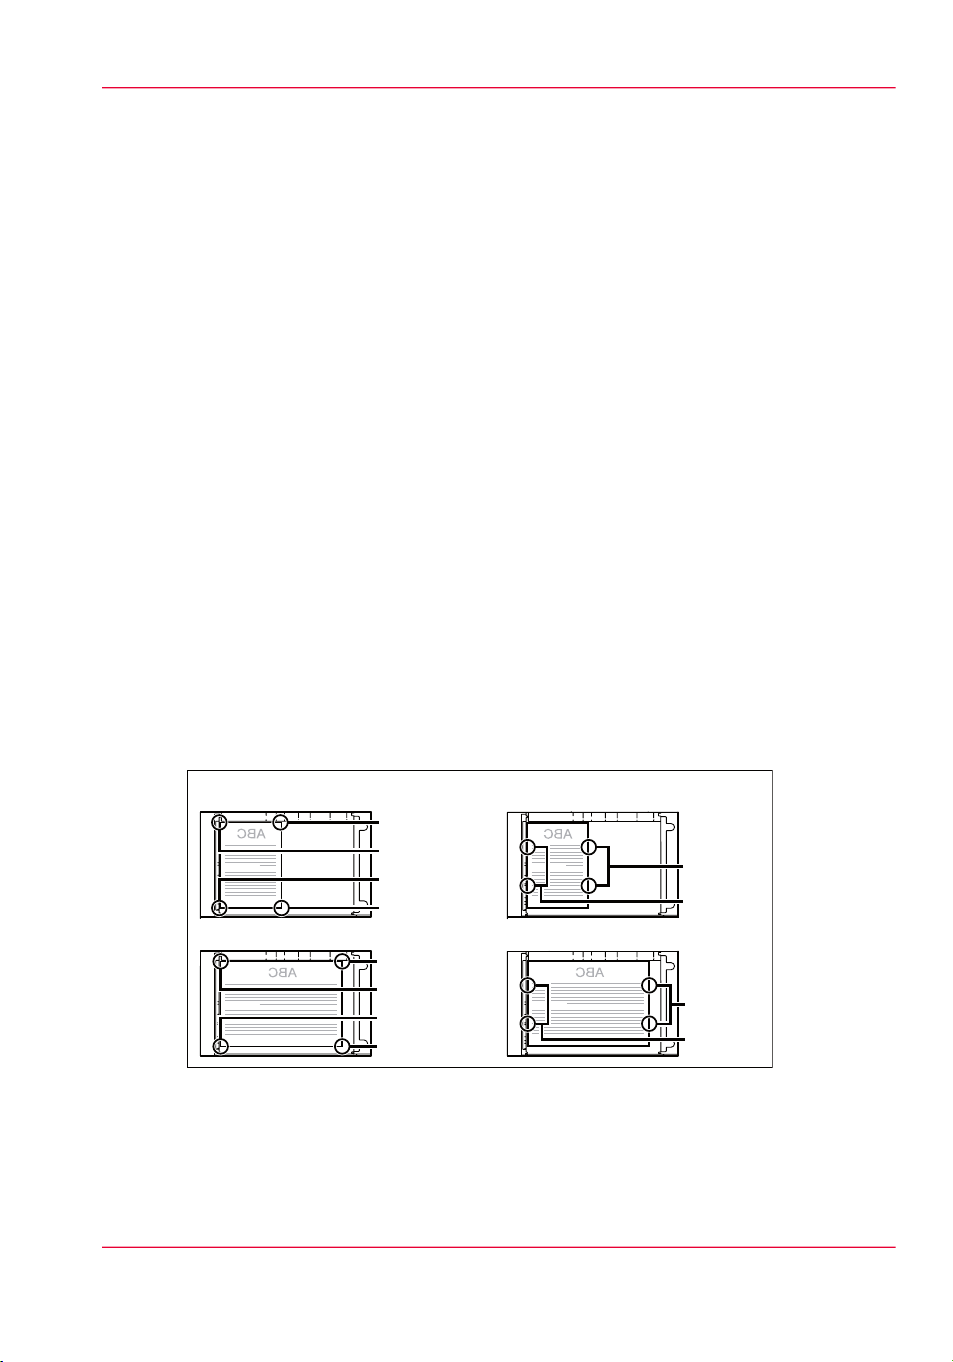
Staple mode
Prints are automatically sorted by set and stapled. When you carry out a copy job, the
prints are stapled at the following positions:
The finishing modes
If an original is placed on the glass plate:
If originals are placed in the ADF:
Chapter 3 - Use the stacker/stapler 15
Page 16
Corner Staple Area
Upper Right
Upper Left
Lower Left
Lower Right
Upper Right
Upper Left
Lower Left
Lower Right
Right Side
Left Side
Double Staple Area
Right Side
Left Side
The finishing modes
Legend for the illustrations above#
TranslationEnglish text
Corner Staple AreaCorner Staple Area
Double Staple AreaDouble Staple Area
Remarks:
•
•
•
Upper LeftUpper Left
Upper RightUpper Right
Lower RightLower Right
Lower LeftLower Left
Left SideLeft Side
Right SideRight Side
You can corner staple and double staple A3, A4, A4R, Tabloid, Letter, LetterR, B4
(353x250 mm / 13.9x9.8") and B5 (176×250 mm / 9.8x6.9").
You cannot staple vellums, transparencies, or labels.
If you want to staple more than 50 sheets (80 g/m² or 20 lb Bond) of A3, A4R,
Tabloid, Letter, LetterR, B4 (353x250 mm or 13.9x9.8") or 100 sheets (80 g/m² or
20 lb Bond) of A4, Letter or B5 (176×250 mm / 9.8x6.9") paper, the copies/prints
are only offset but not stapled. In addition, when selecting coated or heavy paper, you
may not be able to staple the job even if the number of sheets, including sheet insertions
or job separators, is below the set limit of a finisher.
Chapter 3 - Use the stacker/stapler16
Page 17

Saddle stitch mode
6
5
4
3
4
3
2
1
3
8
7
6
5
8
7
2
1
6
8
1
Originals
Copy
The pages are folded
and stapled in the centre to
form a booklet.
The Saddle Stitch mode enables you to make booklets, consisting of pages that are folded
and stapled in the centre.
Legend for the illustration above#
The finishing modes
TranslationEnglish text
OriginalsOriginals
The pages are folded and stapled in the
centre to form a booklet.
Punch mode
Note:
The punch mode is only available when the Puncher Unit-BP1/BQ1/BR1 is installed.
The punch mode allows you to punch your documents. The number of holes depends
on the type of puncher unit installed. You only punch A4, A3, Letter and Tabloid media.
Holes cannot be punched in transparencies, labels, or pre-punched paper.
When you carry out a copy job, the hole punched areas are shown in the illustration below.
CopyCopy
The pages are folded and stapled in the
centre to form a booklet.
Chapter 3 - Use the stacker/stapler 17
Page 18
Feeder
Hole
Punched
Area
Hole
Punched
Area
Platen Glass
Hole
Punched
Area
Hole
Punched
Area
5
4
3
2
1
1
The paper is saddle folded
with a maximum of 5 sheets
seipoCslanigirO
The finishing modes
Legend for the illustration above#
TranslationEnglish text
Glass platePlaten Glass
ADFFeeder
Saddle fold mode
This is a mode for folding multiple sheets in 2-folds.
#
The paper is saddle folded with a maximum of 5 sheets
Hole Punched AreaHole Punched Area
TranslationEnglish text
OriginalsOriginals
CopiesCopies
The paper is saddle folded with a maximum of 5 sheets
Chapter 3 - Use the stacker/stapler18
Page 19

High-volume mode
The Settings Editor on the PRISMAsync controller contains a 'High-volume mode enabled' setting. When this setting is set to 'Yes' the upper tray and the lower tray of the
stacker/stapler will be linked to increase the output capacity for non-stapled jobs. The
total output capacity will become 5,000 sheets for 80g/m² / 20 lb bond media (3,000
sheets in the upper tray and 2,000 sheets in the lower tray).
Note:
The mode is not active when trimmer D1 is present.
•
You can still select the lower tray or upper tray as desired output location but the system
ignores the choice.
•
First the lower tray will be filled, then the upper tray.
•
When both trays are full, you must first empty the trays before printing continues.
•
When stapling is required, the trays will be filled to their normal capacity (3,000
sheets).
The finishing modes
Chapter 3 - Use the stacker/stapler 19
Page 20

Check the status of the staple cartridges
Check the status of the staple cartridges
Introduction
The stacker/stapler is the output location that can staple printed documents before these
are delivered into an output tray. Before each of the following output trays, 2 staplers are
present:
•
The upper tray.
•
The lower tray.
•
The booklet tray (optional).
The booklet tray is only available when your stacker/stapler is equipped with the optional saddle stitch unit.
When all the staple cartridges are sufficiently filled, the staple icon in the dashboard is
blue. When the staple icon in the dashboard is orange or red, one of the staple cartridges
is empty or almost empty. You must refill the staple cartridge as soon as possible.
To find out which staple cartridge is empty or almost empty, you must go to the 'Printer'
section of the 'System' view. The icon for the staple cartridge that must be refilled is orange
or red.
Note:
Even when the staple icon is blue, you can still go to the 'System' view to check the
number of staples that has been used since the last refill.
The colors of the staple icon
The colors of the staple icon#
DescriptionStaple icon
A blue staple icon indicates that all the staple cartridges contain
sufficient staples.
An orange staple icon indicates that one of the staple cartridges
is almost empty.
A red staple icon indicates that one of the staple cartridges is
empty. The printer stops when a job requires staples from the
empty staple cartridge.
Chapter 3 - Use the stacker/stapler20
Page 21

Illustration
Check the status of the staple cartridges
[22] Check the status of the staple cartridges
How to check the status of the staple cartridges
Check the staple icon in the dashboard.
1.
When the staple icon is orange or red, go to the 'Printer' section of the 'System' view to
2.
check which staple cartridge must be refilled.
Chapter 3 - Use the stacker/stapler 21
Page 22

Replace the staple cartridge of the stapler unit
Replace the staple cartridge of the stapler unit
Introduction
When a staple cartridge of the stapler unit inside the stacker/stapler is empty, the operator
panel will display a message indicating which staple cartridge must be replaced. The
procedure below describes how to replace the staple cartridge.
Required tool
•
Staple N1
Note:
You can order all required supplies at your local authorized dealer.
How to replace the staple cartridge of the stapler unit
Replace the staple cartridge of the stapler unit#
IllustrationActionStep
1
Open the front door of the stacker/stapler.
2
Grab the green tab of the staple case
and pull the staple case out of the
staple unit.
Note:
When the stapler unit is at
the back and it is difficult to
pull out the staple case, turn
the dial at the bottom lefthand side to the left to move
the stapler unit.
Chapter 3 - Use the stacker/stapler22
Page 23

Replace the staple cartridge of the stapler unit
IllustrationActionStep
Pull out the staple cartridge.3
4
Insert the new staple cartridge (Staple
N1).
5
Gently push the staple case as far as
possible into the stapler unit until the
staple case is securely in place.
6
Pull out the stapler waste box. The
stapler waste box is located below the
stapler unit.
7
Empty the stapler waste box into a
common dustbin.
Note:
Do not touch the staple
waste.
Chapter 3 - Use the stacker/stapler 23
Page 24

Replace the staple cartridge of the stapler unit
8
Put the stapler waste box back into
place.
IllustrationActionStep
9
Close the front door of the stacker/stapler.
WARNING
When you close the front door of the
stacker/stapler, be careful not to get
your fingers caught, because this may
result in personal injury.
Chapter 3 - Use the stacker/stapler24
Page 25

Replace the staple cartridge of the saddle stitch unit
Replace the staple cartridge of the saddle stitch unit
Introduction
When a staple cartridge of the saddle stitch unit of the optional Saddle Finisher-AF2 is
almost empty, the operator panel will display a message indicating which staple cartridge
must be replaced. The procedure below describes how to replace the staple cartridge.
Note:
This procedure is only necessary when the Saddle Finisher-AF2 is attached.
Required tool
•
Staple P1
Note:
You can order all required supplies at your local authorized dealer.
How to replace the staple cartridge of the saddle stitch unit
Replace the staple cartridge of the saddle stitch unit#
IllustrationActionStep
1
Open the front door of the stacker/stapler.
Pull out the saddle stitch unit.2
Chapter 3 - Use the stacker/stapler 25
Page 26

Replace the staple cartridge of the saddle stitch unit
3
Grab the tab of the staple case and
pull the staple case out of the staple
unit.
IllustrationActionStep
4
Hold the cover of the staple case by
its left and right sides
Lift the cover and slide the cover off.
5
Squeeze at the indicated positions to
release the empty staple cartridge.
Lift the empty staple cartridge and
pull the staple cartridge out.
6
Insert the new staple cartridge (Staple
P1).
Note:
When you replace the staple
cartridges, replace both the
front and back staple cartridges.
Chapter 3 - Use the stacker/stapler26
Page 27

Replace the staple cartridge of the saddle stitch unit
IllustrationActionStep
7
Return the staple case to its original
position in the saddle stitch unit.
Make sure that the arrow on the staple case aligns with the arrow on the
saddle stitch unit.
Note:
Follow the steps 3 to 7 to replace the other staple cartridge in the saddle stitch
unit.
8
Gently push the saddle stitch unit
back into the printer.
9
Close the front door of the stacker/stapler.
WARNING
When you close the front door of the
stacker/stapler, be careful not to get
your fingers caught, because this may
result in personal injury.
Chapter 3 - Use the stacker/stapler 27
Page 28

Remove the puncher waste box
Remove the puncher waste box
Warning:
Be careful when you handle optional units that are attached to the machine. When you
open the door or cover of an optional unit to replace a staple cartridge, discard the punch
waste, or clear paper jams or staple jams, prints may still be output if other optional units
are operating normally, and are not involved in the paper or staple jam removal procedure.
Note:
When the puncher waste box is full, you cannot use the punch function when you perform a copy job or print job.
How to remove the puncher waste box
Remove the punch waste box#
1
Open the front door of the stacker/stapler.
IllustrationActionStep
Pull out the puncher waste box.2
3
Discard the punch waste into a common dustbin.
Chapter 3 - Use the stacker/stapler28
Page 29

Remove the puncher waste box
IllustrationActionStep
4
Put the puncher waste box back.
Make sure that you insert the
puncher waste box as far as possible.
Note:
If the puncher waste box is
not securely in place, you
cannot use the punch function when you carry out a
copy job or print job.
5
Close the front door of the stacker/stapler.
WARNING
When you close the front door of the
stacker/stapler, be careful not to get
your fingers caught, because this may
result in personal injury.
Chapter 3 - Use the stacker/stapler 29
Page 30

Remove the puncher waste box
Chapter 3 - Use the stacker/stapler30
Page 31

Chapter 4 Troubleshooting
Page 32

Labels inside the stacker/stapler
Labels inside the stacker/stapler
Introduction
If a paper jam occurs in the stacker/stapler (Finisher-AF1/Saddle Finisher-AF2), the operator panel will display the location of the paper jam and a procedure to clear the paper
jam. The procedure contains references to the error locations you must check, for example
A1 or A2. The illustration below shows an overview of all the error locations.
Illustration
[46] The error locations
Chapter 4 - Troubleshooting32
Page 33

[47]
Overview of the error locations and their labels
The table below describes the error locations in the order these must be checked in general. Depending on the paper jam, the order to check the error locations can be different.
Always follow the instructions on the operator panel to clear a paper jam.
Labels inside the stacker/stapler
Note:
The steps 12 to 19 are only applicable when the Saddle Finisher-AF2 is installed.
#
Location labelOrder
Front door1
A12
A23
A34
A45
A56
B17
B28
B39
Chapter 4 - Troubleshooting 33
Page 34

Labels inside the stacker/stapler
Location labelOrder
B410
B511
C112
C213
C314
C415
C516
C617
C718
C819
Chapter 4 - Troubleshooting34
Page 35

Clear a paper jam in the top cover of the stacker/stapler
Clear a paper jam in the top cover of the stacker/stapler
Introduction
If a paper jam occurs in the top cover of the stacker/stapler (Finisher-AF1/Saddle FinisherAF2), the operator panel will display the location of the paper jam and the procedure to
clear the paper jam. Follow the instructions on the operator panel to clear the paper jam.
The procedure below describes how to clear a paper jam in the top cover of the stacker/stapler.
Warning:
When you remove jammed originals or paper, take care not to cut your hands on the
edges of the originals or paper.
Warning:
When you remove jammed originals or paper, take care not to cut your hands on the
inside of the machine. If you cannot remove the paper, contact Service or your local authorized dealer.
Warning:
Be careful when you handle optional units that are attached to the machine. When you
open the door or cover of an optional unit to replace a staple cartridge, discard the punch
waste, or clear paper jams or staple jams, prints may still be output if other optional units
are operating normally, and are not involved in the paper or staple jam removal procedure.
Note:
If the inserter (Document Insertion Unit-F1) is attached to the stacker/stapler, the part
of the inserter may interfere with the stacker/stapler when you clear jams. Lift up the
inserter before you clear jams in the stacker/stapler.
Chapter 4 - Troubleshooting 35
Page 36

Clear a paper jam in the top cover of the stacker/stapler
How to clear a paper jam in the top cover of the stacker/stapler
Clear a paper jam#
IllustrationActionStep
1
Open the front door of the stacker/stapler.
2
Press the button (F-A1) on the optional Puncher Unit-BP1/BQ1/BR1,
as far as possible, to return the
puncher unit to its original position.
Note:
This procedure is only necessary if the optional Puncher
Unit-BP1/BQ1/BR1 is attached, and the button (FA1) on the optional Puncher
Unit-BP1/BQ1/BR1 is protruding.
Open the guide (F-A2).3
Remove any jammed paper.4
Chapter 4 - Troubleshooting36
Page 37

Clear a paper jam in the top cover of the stacker/stapler
IllustrationActionStep
Close the guide (F-A2).5
6
Open the top cover (F-A3) of the
stacker/stapler.
WARNING
Open the top cover slowly, because
opening the top cover too fast may
result in personal injury.
Note:
If a Document Insertion
Unit-F1 is installed, lift the
inserter first to create space
for opening the top cover.
Note:
Do not turn OFF the main
power switch of the stacker/stapler when you open the
top cover (F-A3) to remove
the jammed paper. If you do
so accidentally, follow the
procedures to turn OFF the
main power switches of the
attached optional equipments and the machine, and
then back ON.
Chapter 4 - Troubleshooting 37
Page 38

Clear a paper jam in the top cover of the stacker/stapler
Remove any jammed paper.7
Open the guide (F-A4).8
Remove any jammed paper.9
IllustrationActionStep
Close the guide (F-A4).10
Chapter 4 - Troubleshooting38
Page 39

11
Clear a paper jam in the top cover of the stacker/stapler
IllustrationActionStep
Close the top cover (F-A3) of the
stacker/stapler.
WARNING
When you close the top cover, be
careful not to get your fingers caught,
as this may result in personal injury.
Note:
After closing the top cover,
press down on the top cover,
at the locations indicated by
the labels, to make sure the
cover is securely closed.
Note:
Do not turn OFF the main
power switch of the stacker/stapler when you close the
top cover. If you do so accidentally, follow the procedures to turn OFF the main
power switches of the attached optional equipments
and the machine, and then
back ON.
Remove any jammed paper.12
Chapter 4 - Troubleshooting 39
Page 40

Clear a paper jam in the top cover of the stacker/stapler
13
Close the front door of the stacker/stapler.
WARNING
When you close the front door of the
stacker/stapler, be careful not to get
your fingers caught, because this may
result in personal injury.
IllustrationActionStep
14
Follow the instructions on the operator panel.
Chapter 4 - Troubleshooting40
Page 41

Clear a paper jam inside the stacker/stapler
Clear a paper jam inside the stacker/stapler
Introduction
If a paper jam occurs inside the stacker/stapler (Finisher-AF1/Saddle Finisher-AF2), the
operator panel will display the location of the paper jam and a procedure to clear the paper
jam. Follow the procedure on the operator panel to clear the paper jam. The procedure
below describes how to clear a paper jam inside the stacker/stapler.
Warning:
When you remove jammed originals or paper, take care not to cut your hands on the
edges of the originals or paper.
Warning:
When you remove jammed originals or paper, take care not to cut your hands on the
inside of the machine. If you cannot remove the paper, contact Service or your local authorized dealer.
Warning:
Be careful when you handle optional units that are attached to the machine. When you
open the door or cover of an optional unit to replace a staple cartridge, discard the punch
waste, or clear paper jams or staple jams, prints may still be output if other optional units
are operating normally, and are not involved in the paper or staple jam removal procedure.
How to clear a paper jam inside the stacker/stapler
#
IllustrationActionStep
1
Open the front door of the stacker/stapler.
Chapter 4 - Troubleshooting 41
Page 42

Clear a paper jam inside the stacker/stapler
Open the guide (F-B1).2
IllustrationActionStep
3
Turn the dial (F-B2) in the direction
of the arrow (clockwise).
Remove any jammed paper.4
Close the guide (F-B1).5
6
Turn the dial F-B4 in the direction
of the arrow (clockwise) and then the
dial F-B3 in the direction of the arrow (clockwise) to feed the jammed
paper to the output slot.
Chapter 4 - Troubleshooting42
Page 43

Clear a paper jam inside the stacker/stapler
IllustrationActionStep
7
Open the output slot (F-B5), and
remove any jammed paper.
8
Close the front door of the stacker/stapler.
WARNING
When you close the front door of the
stacker/stapler, be careful not to get
your fingers caught, because this may
result in personal injury.
9
Follow the instructions on the operator panel.
Chapter 4 - Troubleshooting 43
Page 44

Clear a paper jam in the saddle stitch unit
Clear a paper jam in the saddle stitch unit
Introduction
If a paper jam occurs in the saddle stitch unit of the stacker/stapler (Saddle Finisher-AF2),
the operator panel will display the location of the paper jam and a procedure to clear the
paper jam. Follow the procedure on the operator panel to clear the paper jam. The procedure below describes how to clear a paper jam in the saddle stitch unit of the stacker/stapler.
Warning:
When you remove jammed originals or paper, take care not to cut your hands on the
edges of the originals or paper.
Warning:
When you remove jammed originals or paper, take care not to cut your hands on the
inside of the machine. If you cannot remove the paper, contact Service or your local authorized dealer.
Warning:
Be careful when you handle optional units that are attached to the machine. When you
open the door or cover of an optional unit to replace a staple cartridge, discard the punch
waste, or clear paper jams or staple jams, prints may still be output if other optional units
are operating normally, and are not involved in the paper or staple jam removal procedure.
How to clear a paper jam inside the saddle stitch unit
Clear a paper jam#
IllustrationActionStep
1
Open the front door of the stacker/stapler.
Chapter 4 - Troubleshooting44
Page 45

Clear a paper jam in the saddle stitch unit
IllustrationActionStep
Open the guide (F-C1).2
3
Turn the upper dial (F-C2) in the
direction of the arrow (clockwise), to
feed the jammed paper to the guide
(F-C1).
4
Turn the lower dial (F-C2) in the
direction of the arrow (counterclockwise), to feed the jammed paper
to the guide (F-C1).
Remove any jammed paper.5
Close the guide (F-C1).6
Chapter 4 - Troubleshooting 45
Page 46

Clear a paper jam in the saddle stitch unit
7
If the lamp is ON, while pushing in
the dial (F-C3), turn it in the direction of the arrow (clockwise) until
the lamp turns off.
Turning the dial, feed the jammed
paper to the delivery guide of the
booklet tray.
If the optional trimmer (Booklet
Trimmer-D1) is attached, turning
the dial feeds the jammed paper to
the feeding belt of the trimmer.
Note:
If the lamp is OFF, proceed
to step 9.
IllustrationActionStep
Lamp = Lamp
8
10
Remove any jammed paper protruding from the booklet tray.
Note:
If the optional trimmer
(Booklet Trimmer-D1) is
attached, remove any
jammed paper protruding
from the feeding belt.
Pull out the saddle stitch unit (F-C4).9
Open the right-hand cover of the
saddle stitch unit (F-C5), and remove
any jammed paper.
Chapter 4 - Troubleshooting46
Page 47

11
Clear a paper jam in the saddle stitch unit
IllustrationActionStep
Close the right-hand cover of the
saddle stitch unit (F-C5).
WARNING
When you close the right-hand cover
of the saddle stitch unit, be careful
not to get your fingers caught, as this
may result in personal injury.
12
13
Turn the dial on the pressing unit
(F-C6) in the direction of the arrow
(counterclockwise), and push it as far
left as possible.
Note:
If the pressing unit is in its
correct position, this procedure is unnecessary.
Note:
The pressing unit ensures a
clean fold in the centre of the
paper to create a booklet. If
the pressing unit is not in its
correct position, the paper to
be saddle stitched cannot be
fed to the booklet tray.
While pushing in the dial (F-C7),
turn it in the direction of the arrow
(clockwise) until the lamp turns off.
Remove any jammed paper.
Chapter 4 - Troubleshooting 47
Page 48

Clear a paper jam in the saddle stitch unit
14
Open the delivery guide (F-C8), and
remove any jammed paper.
Close the delivery guide (F-C8).15
IllustrationActionStep
16
17
18
Gently push the saddle stitch unit (FC4) back into the printer.
WARNING
When you return the saddle stitch
unit to its original position, be careful
not to get your fingers caught, because this may result in personal injury.
Note:
Always make sure that you
push the saddle stitch unit in
as far as possible.
Close the front door of the stacker/stapler.
WARNING
When you close the front door of the
stacker/stapler, be careful not to get
your fingers caught, because this may
result in personal injury.
Follow the instructions on the operator panel.
Chapter 4 - Troubleshooting48
Page 49

Clear a staple jam inside the stapler unit
Clear a staple jam inside the stapler unit
Introduction
If a staple jam occurs inside the stapler unit of the stacker/stapler (Finisher-AF1/Staple
Finisher-AF2), the operator panel will display the location of the staple jam and a procedure to clear the staple jam. Follow the procedure on the operator panel to clear the staple
jam. The procedure below describes how to clear a staple jam inside the stapler unit of
the stacker/stapler.
Warning:
Be careful when you handle optional units that are attached to the machine. When you
open the door or cover of an optional unit to replace a staple cartridge, discard the punch
waste, or clear paper jams or staple jams, prints may still be output if other optional units
are operating normally, and are not involved in the paper or staple jam removal procedure.
How to clear a staple jam inside the stapler unit
Clear a staple jam#
IllustrationActionStep
1
Open the front door of the stacker/stapler.
2
Remove the paper waiting to be stapled from the output tray.
Chapter 4 - Troubleshooting 49
Page 50

Clear a staple jam inside the stapler unit
3
Pull out the staple case.
Note:
When the stapler unit is at
the back and it is difficult to
pull out the staple case, turn
the dial on the bottom lefthand side to the left to move
the stapler unit.
IllustrationActionStep
4
Push up the bracket on the staple
case.
5
Remove all of the jammed and protruding staples from the staple cartridge.
6
Return the bracket on the staple case
to its original position.
Chapter 4 - Troubleshooting50
Page 51

Clear a staple jam inside the stapler unit
IllustrationActionStep
7
Gently push the staple case back into
the stapler unit until it is securely in
place.
Note:
Always make sure to insert
the staple case as far as possible.
8
Close the front door of the stacker/stapler.
WARNING
When you close the front door of the
stacker/stapler, be careful not to get
your fingers caught, because this may
result in personal injury.
Chapter 4 - Troubleshooting 51
Page 52

Clear a staple jam in the saddle stitch unit
Clear a staple jam in the saddle stitch unit
Introduction
Note:
This procedure is only required when the optional Saddle Finisher-AF2 is installed.
If a staple jam occurs in the saddle stitch unit of the stacker/stapler (Saddle Finisher-AF2),
the operator panel will display the location of the staple jam and a procedure to clear the
staple jam. Follow the procedure on the operator panel to clear the staple jam. The procedure below describes how to clear a staple jam in the saddle stitch unit of the stacker/stapler.
Before you begin
First remove all output sheets from the booklet tray.
Warning:
Be careful when you handle optional units that are attached to the machine. When you
open the door or cover of an optional unit to replace a staple cartridge, discard the punch
waste, or clear paper jams or staple jams, prints may still be output if other optional units
are operating normally, and are not involved in the paper or staple jam removal procedure.
Note:
If a paper jam occurs at the same time as a staple jam, first remove the jammed paper,
then remove the jammed staples.
How to clear a staple jam in the saddle stitch unit
Clear a staple jam#
IllustrationActionStep
1
Open the front door of the stacker/stapler.
Chapter 4 - Troubleshooting52
Page 53

Clear a staple jam in the saddle stitch unit
IllustrationActionStep
Pull out the saddle stitch unit (F-C4).2
3
Pull out the staple case from the saddle stitch unit.
4
Hold the staple case by its left-hand
and right-hand sides, and lower the
bracket on the staple case.
5
Remove the jammed staples from the
staple cartridge.
6
Return the bracket on the staple case
to its original position.
Chapter 4 - Troubleshooting 53
Page 54

Clear a staple jam in the saddle stitch unit
7
Return the staple case to its original
position in the saddle stitch unit.
Make sure to align the arrow on the
staple case with the arrow on the
saddle stitch unit, as shown below.
Note:
When you return the staple
case, always make sure to insert the staple case until the
arrows are aligned as shown
in the illustration.
IllustrationActionStep
8
Gently push the saddle stitch unit (FC4) back into the printer.
WARNING
When you return the saddle stitch
unit to its original position, be careful
not to get your fingers caught, because this may result in personal injury.
Note:
Always make sure that you
push the saddle stitch unit in
as far as possible.
9
Close the front door of the stacker/stapler.
WARNING
When you close the front door of the
stacker/stapler, be careful not to get
your fingers caught, because this may
result in personal injury.
Chapter 4 - Troubleshooting54
Page 55

Appendix A Miscellaneous
Page 56

Specifications
Specifications
Finisher-AF1
Note:
Whenever a number of sheets is mentioned in the table below, the figure is based on
media of 80 g/m² (20 lb Bond).
Specifications of Finisher-AF1#
Description
SpecificationsItem
(Offset) stacking and stapling with staple cut
functionality for thin sets
2Number of output trays
Output capacity of upper tray
Output capacity of lower tray
Stapling capacity
Staple positions
A3, B4, A4(R), B5(R), 13" x 19", 12" x 18", 11"
x 17", Legal, Letter(R), Executive(R), 320 mm x
450 mm (12.6" x 17.7"):
•
1,000 sheets (not stapled), or
•
100 sets (stapled).
A4(R), B5(R), Letter(R), Executive(R):
•
2,000 sheets (not stapled), or
•
100 sets (stapled)
A3, B4, 13" x 19", 12" x 18", 11" x 17", Legal,
320 mm x 450 mm (12.6" x 17.7"):
•
1,000 sheets (not stapled), or
•
100 sets (stapled)
Maximum 330.2 mm x 487.7 mm (13" x 19.2")Supported media sizes
50 - 300 g/m² (14 lb Bond - 110 lb Cover)Supported media weights
A4, B5, Letter, Executive:
•
100 sheets
A3, B4, A4R, 11" x 17", Legal, Letter, LetterR:
•
50 sheets
•
Corner stapling
•
Double stapling
Appendix A - Miscellaneous56
Page 57

Dimensions (HxWxD)
Saddle Finisher-AF2
Note:
Whenever a number of sheets is mentioned in the table below, the figure is based on
media of 80 g/m² (20 lb Bond).
Specifications of Saddle Finisher-AF2#
Description
Specifications
SpecificationsItem
1,180 mm x 800 mm x 792 mm (46.5" x 31.3" x
31.2")
Note:
When the extension tray is pulled out, the
width is 890 mm (35 3/8").
130 kg (287 lbs)Weight
120 - 240 V AC, 50/60 Hz, 8.0 APower source
Approximately 450 WMaximum power consumption
SpecificationsItem
Finisher with identical stacking and stapling capabilities as Finisher-AF1, plus a saddle stitching
function
Booklet tray capacity
Saddle stitch capacity
Staple positions
3Number of output trays
In case of A3, A4R, B4, Letter, LetterR, Legal,
11"x17", 12"x18". 13"x19" and custom sizes of
210x279.4 mm to 330.2x487.7 mm (8.3x11" to
13x19.2"):
•
maximum 30 booklets
For A3, B4, A4(R), 13"x19", 12"x18", 11"x17",
Legal, Letter, LetterR, 12 5/8"x17 3/4" (320x450
mm) and custom sizes of 210x279.4 mm to
330.2x487.7 mm (8.3x11" to 13x19.2"):
•
2 - 25 sheets
•
Corner stapling
•
Double stapling
•
Saddle stitching
Appendix A - Miscellaneous 57
Page 58

Specifications
Saddle fold capacity
SpecificationsItem
For A3, B4, A4R, 13"x19", 12"x18", 11"x17",
Legal, LetterR, 12 5/8"x17 3/4" (320x450 mm)
and custom sizes of 210x279.4 mm to
330.2x487.7 mm (8.3x11" to 13x19.2"):
•
Saddle-folding multiple sheet (5 sheets)
Dimensions (HxWxD)
Puncher Unit-BP1/BQ1/BR1
Specifications of Puncher Unit-BP1/BQ1/BR1#
Supported media for punching
1,180 x 800 x 792 mm (46.5 x 31.3 x 31.2")
Note:
When the auxiliary booklet tray is pulled
out, the width is 1,060 mm (41.7").
180 kg (396 lbs)Weight
120 - 240 V AC, 50/60 Hz, 8.0 APower source
Approximately 450 WMaximum power consumption
SpecificationsItem
•
BQ1 (2-hole): Legal, LetterR
•
BQ1 (3-hole): Letter, 11"x17", Executive
•
BP1 (2-hole): A3, A4, A4R
•
BP1 (4-hole): A3, A4
•
BR1 (4-hole): A3, A4, A4R
Appendix A - Miscellaneous58
Page 59

Optional accessories
Staple N1
[103] Staple N1
A case that holds staples for the Staple mode.
Staple P1
Optional accessories
[104] Staple P1
A case that holds staples for the Saddle stitch mode.
Appendix A - Miscellaneous 59
Page 60

Index
Index
Accessories
Case for Staple N1 ..........................................59
Case for Staple P1 ...........................................59
B
Booklet making
Booklet making ..............................................17
C
Check
Staple cartridges ..............................................20
Conversion table for commercial names and user
interface names
Conversion table for commercial names and user
interface names .................................................8
E
Empty the puncher waste box
Empty the puncher waste box .........................28
Error locations
Error locations ................................................32
Labels of error locations ..................................32
O
Offset stacking
Offset stacking ................................................15
P
Paper jam
In the saddle stitch unit ..................................44
In the top cover ..............................................36
Inside the stacker/stapler .................................41
Puncher waste box
Empty ............................................................28
Remove ..........................................................28
Punching
Punching ........................................................17
R
Remove the puncher waste box
Remove the puncher waste box .......................28
Replace staple cartridge
Saddle stitch unit ............................................25
Stacker/stapler ..........................................22, 25
Stapler unit .....................................................22
F
Finishing modes
Booklet making ..............................................17
Offset stacking ................................................15
Punching ........................................................17
Saddle stitching ..............................................17
Sort by page ....................................................15
Sort by set .......................................................14
Stapling ..........................................................15
H
Hardware naming in User Interfaces
Hardware naming in User Interfaces .................8
L
Labels of error locations
60
S
Saddle stitching
Saddle stitching ..............................................17
Sort by page
Sort by page ....................................................15
Sort by set
Sort by set .......................................................14
Specifications
Stacker/stapler ................................................56
Stacker/stapler
External view ..................................................10
Internal view ...................................................11
Replace staple cartridge of saddle stitch unit ....25
Replace staple cartridge of stapler unit ............22
Specifications ..................................................56
Staple Cartridge
Replace ....................................................22, 25
Staple icons
Staple icons .....................................................20
Staple jam
In the saddle stitch unit ..................................52
Page 61

In the stapler unit ...........................................49
Staples
Stacker/stapler ..........................................22, 25
Stapling
Stapling ..........................................................15
Index
61
 Loading...