

Page 1

Océ User Manual
Duplex Color Image Reader Unit-D1
Operating information
Page 2

Copyright
Copyright 2011 by Canon Inc. All rights reserved.
No part of this publication may be reproduced or transmitted in any form or by any means,
electronic or mechanical, including photocopying and recording, or by any information
storage or retrieval system without the prior written permission of Canon Inc.
© 2011, Océ
All rights reserved. No part of this work may be reproduced, copied, adapted, or transmitted
in any form or by any means without written permission from Océ.
Océ makes no representation or warranties with respect to the contents hereof and specifically disclaims any implied warranties of merchantability or fitness for any particular purpose.
Furthermore, Océ reserves the right to revise this publication and to make changes from
time to time in the content hereof without obligation to notify any person of such revision
or changes.
Edition: 07-2011
Page 3

Contents
Contents
Chapter 1
Preface.................................................................................................................5
Notes for the reader...................................................................................6
Naming conventions for finishers (commercial naming and naming in
User Interfaces)..........................................................................................8
Chapter 2
Use the scanner..................................................................................................9
The main parts of the scanner................................................................10
Scanning information..............................................................................13
Copy or scan originals using the glass plate.........................................15
Copy or scan originals using the ADF....................................................18
Chapter 3
Maintenance......................................................................................................21
Clean the scanner sensors.......................................................................22
Chapter 4
Troubleshooting................................................................................................27
Clear a paper jam.....................................................................................28
Appendix A
Specifications....................................................................................................31
Specifications............................................................................................32
3
Page 4

Contents
4
Page 5

Chapter 1 Preface
Page 6

Notes for the reader
Notes for the reader
Introduction
This manual helps you to use the Duplex Color Image Reader Unit-D1. The manual
contains a description of the product and guidelines to use and operate the Duplex Color
Image Reader Unit-D1.
Definition
Attention-Getters
Parts of this manual require your special attention. These parts can provide the following:
•
Additional general information, for example, information that is useful when you
perform a task.
•
Information to prevent personal injuries or property damage.
Warning, Caution and Note
The words Warning, Caution and Note draw your attention to important information.
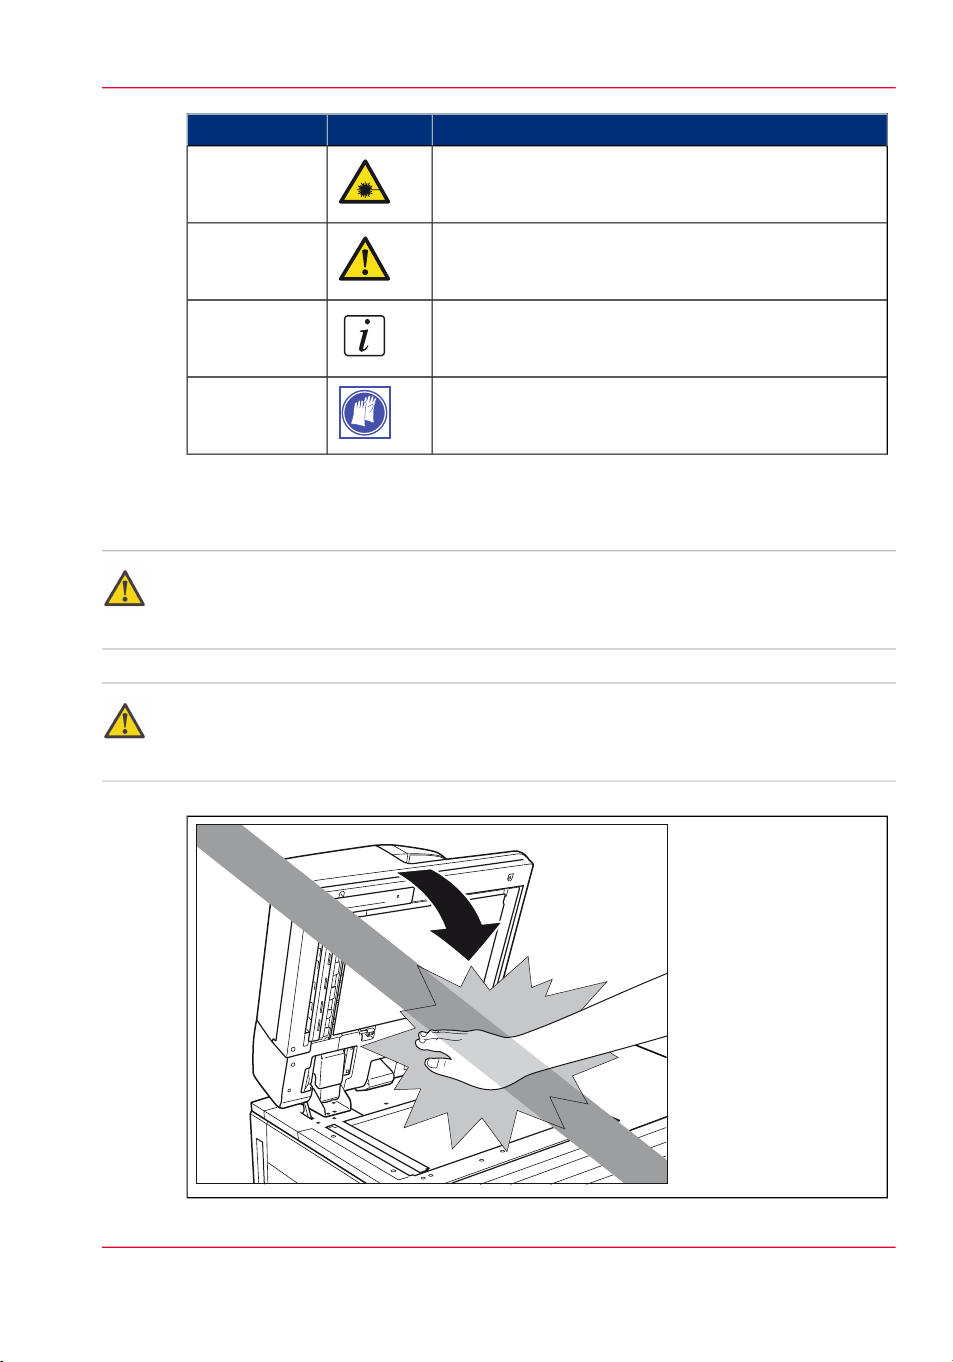
Overview of the attention-getters#
Warning
IndicatesIconWord
Ignoring this warning could cause serious injury or
even death.
The Warning indication has several icons that warn
against various hazards. The icons are shown below.
General hazardWarning
Hot surfaceWarning
Electric shockWarning
Moving partsWarning
Chapter 1 - Preface6
Page 7
Notes for the reader
IndicatesIconWord
Laser beamWarning
Caution
Important safety instructions
Warning:
Close the feeder cover gently to avoid catching your hands, as this may result in personal
injury.
Warning:
Do not press down hard on the feeder cover when using the glass plate to make copies
of thick books. Doing so may damage the glass plate and result in personal injury.
#
Ignoring this warning could cause injury or damage to
property.
Indicates additional important information.Note
The use of heat-resistant gloves is mandatory when you
carry out these actions.
Chapter 1 - Preface 7
Page 8

Naming conventions for finishers (commercial naming and naming in User Interfaces)
Naming conventions for finishers (commercial naming and
naming in User Interfaces)
Hardware and hardware naming in User Interfaces
To improve the readability of texts in User Interfaces of operator panels and software,
the finishers are generally referred to by their function. The table below shows the naming
conventions for finishers (commercial product names and the way these are referred to
in User Interfaces).
Note:
In some cases, there is only 1 name for several modules. The reason is that a configuration
can only contain 1 of the available types of modules.
Conversion table for commercial names versus user-friendly names in User Interfaces#
Commercial product name:
In UI, printer driver and software referred to as:
'Stacker/stapler'Finisher-AF1
'Stacker/stapler'Saddle Finisher-AF2
'Puncher'Puncher Unit-BP1/BQ1/BR1
'Folder'Paper Folding Unit-F1
'Inserter'Document Insertion Unit-F1
'Stacker'High-Capacity Stacker-E1
'Trimmer'Booklet Trimmer-D1
'Trimmer'Two-Knife Trimmer-A1
'Perfect Binder'Perfect Binder-C1
'Scanner'Duplex Color Image Reader Unit-D1
Chapter 1 - Preface8
Page 9

Chapter 2 Use the scanner
Page 10

The main parts of the scanner
The main parts of the scanner
Introduction
Place your originals on the glass plate or into the automatic document feeder (ADF),
depending on the size and type of the original, and the copy modes that you want to use.
Both sides of 2-sided originals can be scanned simultaneously. The table below describes
the glass plate and the ADF.
Overview of the feeding possibilities#
FunctionComponent
Glass plate
Place the originals on the glass plate to copy bound
originals (such as books and magazines), heavy or
lightweight originals, and transparencies.
Automatic document feeder
(ADF)
Place the originals into the ADF when you want
to copy several originals at the same time. The
originals are automatically fed to the glass plate
and scanned. 2-sided originals can also be scanned
as 2-sided documents.
The ADF has a capacity of 300 sheets (80 g/m²
or 20 lb Bond).
Warning:
Do not insert your fingers into the gaps around the originals tray, because your fingers
may get caught.
Caution:
Be careful not to drop objects such as paper clips into the gaps because this can cause
damage to the machine.
Note:
If the original document consists of more than 300 sheets (based on 80 g/m² or 20 lb
Bond media), you must split the original document into smaller partial sets (subsets).
Then you must use the 'Combined copy job' function to scan the subsets individually
and create 1 document containing all the subsets.
Chapter 2 - Use the scanner10
Page 11
Note:
If the glass plate is dirty, the print quality may deteriorate. In this case, clean the feeding
belt and the glass plate.
Note:
Blocking the original output area can result in damaging originals, and printing may
not take place correctly. Therefore, do not place objects into the original output area.
Illustration
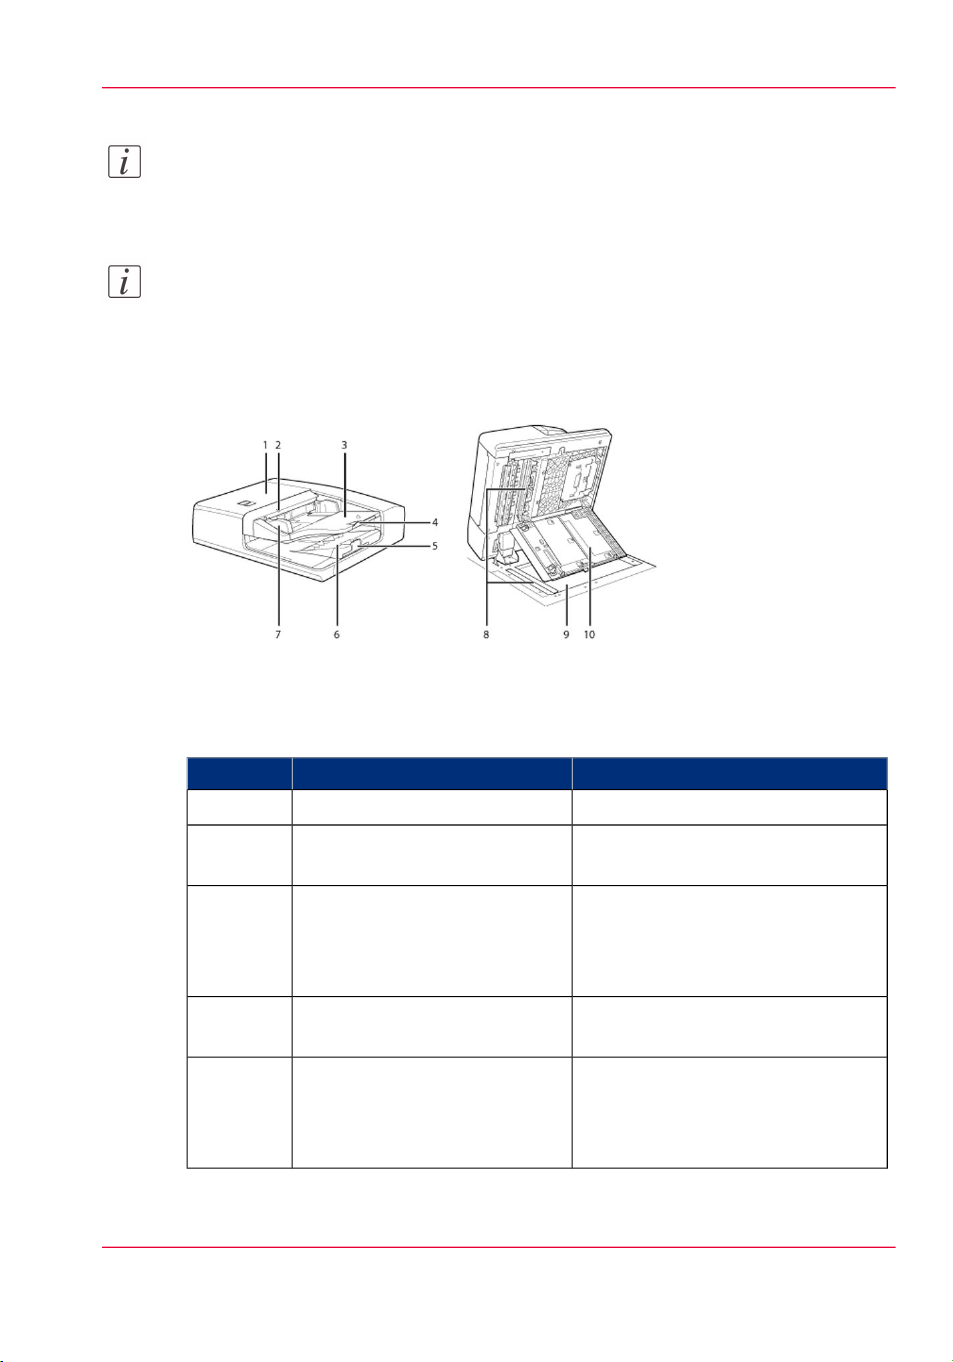
The main parts of the scanner
[11] Main parts of the scanner
Components and their functions
Main parts of the scanner#
Originals indicator2
Originals tray3
Auxiliary originals tray4
Auxiliary originals receiving tray5
FunctionComponent
Open this cover to clear a paper jam.ADF cover1
Lights when originals are placed in
the originals tray of the scanner.
Originals placed here are automatically fed sheet by sheet into the ADF.
Place originals into this tray with the
surface that you want to scan face up.
Pull out this tray when you want to
feed large originals.
The originals output tray receives the
scanned originals. Pull out the auxiliary tray before you scan large originals.
Chapter 2 - Use the scanner 11
Page 12

The main parts of the scanner
Originals output tray6
FunctionComponent
The originals output tray receives the
scanned originals, in the order these
were fed in the ADF.
Paper guides7
Adjust the paper guides to match the
width of the original.
Scans documents sent from the ADF.Document feed scanning area8
Glass plate9
Use the glass plate to scan special
originals such as books, thick originals, thin originals and transparencies.
Note:
When you use the glass plate
to copy or scan thick originals, such as books or magazines, do not press down
hard on the ADF.
Inner cover10
Open this cover to clean the document feed scanning area.
Chapter 2 - Use the scanner12
Page 13

Scanning information
Introduction
You can place an original either vertically or horizontally. Always align the top edge of
your original with the back edge of the glass plate (by the arrow in the top left corner) or
the back edge of the ADF.
The size of the original is automatically detected, and the document is scanned.
The machine cannot always detect the size of the original if it is a non-standard paper
size, such as a book. In this case, specify the size of the original.
Orientation on the glass plate
When you put an original on the glass plate, always put the original face down on the
glass plate.
Note:
If the top edge of the original is not aligned with the back edge of the glass plate (by the
arrow in the top left corner), your original may not be scanned correctly.
Scanning information
Placement on the glass plate#
Vertical placement
Horizontal placement
IllustrationPlacement
Chapter 2 - Use the scanner 13
Page 14

Scanning information
Orientation in the ADF
Placement in the ADF#
Vertical placement
Horizontal placement
IllustrationPlacement
Placement of the originals
You can place originals of the following sizes either vertically or horizontally. However,
the scanning speed for horizontally placed originals is somewhat slower than that of vertically placed originals. Place originals horizontally when you copy with a preset zoom,
for example when you enlarge an A4 original to A3 paper.
Note:
You must always place A3, B4, B6 and 11" x 17" originals horizontally.
Chapter 2 - Use the scanner14
Page 15

Sensor
Copy or scan originals using the glass plate
Copy or scan originals using the glass plate
Introduction
Use the glass plate to copy or scan bound originals (such as books and magazines), heavy
or lightweight originals, and transparencies. Also place originals on the glass plate when
you want to copy an A3 original with an image that extends all the way to the edges
without the periphery of the original being cut off.
Warning:
Do not press down hard on the ADF when you use the glass plate to copy thick books.
Doing so may damage the glass plate and result in personal injury.
Note:
The scanner automatically detects the following sizes of originals (after you closed the
ADF): A5, Statement 5.5"x8.5", B5, A4, A4R, Letter 8.5"x11", LetterR, B4R, B5R,
LegalR 8.5"x14", A3R, TabloidR 11"x17", B6.
How to copy or scan originals using the glass plate
Copy originals on the glass plate#
IllustrationActionStep
1
Open the ADF.
Note:
Open the ADF at least 300
mm (11.8"). Otherwise, the
size of the originals may not
be detected correctly.
Sensor = Sensor
2
Place 1 original face down on the
glass plate.
Chapter 2 - Use the scanner 15
Page 16

Copy or scan originals using the glass plate
3
Align the top edge of your original
with the back edge of the glass plate
(by the arrow in the upper-left corner).
Note:
When you enlarge an A4 or
A5 original onto A3 paper,
place the original horizontally on the glass plate, and
align it with the A4R or A5R
marks.
Note:
When you enlarge a Letter
or Statement original onto
11"x17" or Legal paper,
place the original horizontally on the glass plate, and
align it with the LetterR or
StatementR marks.
IllustrationActionStep
4
Gently close the ADF to prevent
personal injury or damage to the
scanner.
5
Define the copy or scan settings on
the operator panel and touch 'Start'
.
6
When the copy or scan job is ready,
open the ADF and remove the original from the glass plate.
Chapter 2 - Use the scanner16
Page 17

Copy or scan originals using the glass plate
IllustrationActionStep
7
Gently close the ADF to prevent
personal injury or damage to the
scanner.
Chapter 2 - Use the scanner 17
Page 18

Copy or scan originals using the ADF
Copy or scan originals using the ADF
Introduction
Use the ADF to copy or scan a set of up to 300 originals. The scanner automatically feeds
the originals to the glass plate and scans them. 2-sided originals can also be scanned as 2sided documents.
Do not place the following types of originals into the ADF:
•
Thin originals, when the scanner is located in an environment with high temperatures
or high humidity.
•
Torn originals or originals with large binding holes.
•
Severely curled originals or originals with sharp folds.
•
Clipped or stapled originals.
•
Carbon backed paper.
•
Transparencies and other highly transparent originals.
•
Any other originals which may not feed smoothly.
Note:
Always smooth out any folds in your originals before placing them into the ADF.
How to copy or scan originals using the ADF
Copy originals in the ADF#
1
Adjust the paper guides to fit the size
of your originals.
2
Neatly place your originals with the
side to be copied face up into the
originals tray.
Place your originals as far into the
ADF as possible until the originals
indicator is lit.
Chapter 2 - Use the scanner18
IllustrationActionStep
Page 19

Copy or scan originals using the ADF
IllustrationActionStep
3
Define the copy or scan settings on
the operator panel, and touch 'Start'
.
4
When scanning is complete, remove
the originals from the original output
area to avoid paper jams.
Chapter 2 - Use the scanner 19
Page 20

Copy or scan originals using the ADF
Chapter 2 - Use the scanner20
Page 21

Chapter 3 Maintenance
Page 22

Clean the scanner sensors
Clean the scanner sensors
When to do
When copies contain stains.
Required tool
•
Soft tissue
How to clean the scanner sensors
Clean the scanner sensors#
'Open the main cover.'1
IllustrationActionStep
2
'Use a tissue to clean the scanner
sensor.'
Chapter 3 - Maintenance22
Page 23

Clean the scanner sensors
IllustrationActionStep
'Open the white plate.'3
'Open the lower right-hand guide.'4
Chapter 3 - Maintenance 23
Page 24

Clean the scanner sensors
5
'Use a tissue to clean the scanner
sensor.'
'Close the lower right-hand guide.'6
IllustrationActionStep
Chapter 3 - Maintenance24
Page 25

Clean the scanner sensors
IllustrationActionStep
'Close the white plate.'7
'Close main cover'9
Chapter 3 - Maintenance 25
Page 26

Clean the scanner sensors
Chapter 3 - Maintenance26
Page 27

Chapter 4 Troubleshooting
Page 28

Clear a paper jam
Clear a paper jam
Introduction
If a paper jam occurs in the ADF, the operator panel display a message that indicates the
paper jam. Follow the instructions on the operator panel and the procedure described
below to solve the paper jam.
Warning:
When you remove jammed originals or paper, take care not to cut your hands on the
edges of the originals or paper.
How to clear a paper jam
Clear a paper jam#
1
Remove the originals from the originals tray.
IllustrationActionStep
2
Pull the lever and open the ADF
cover.
3
Remove any jammed originals.
Note:
If it is difficult to remove
jammed paper, do not try to
remove it by force, but proceed to step 4.
Chapter 4 - Troubleshooting28
Page 29

Clear a paper jam
IllustrationActionStep
4
Open the inner cover, holding it by
its front tab.
5
Turn the green feed dial and remove
any jammed originals.
Close the inner cover.6
Close the ADF cover.7
Chapter 4 - Troubleshooting 29
Page 30

Clear a paper jam
8
IllustrationActionStep
Open the ADF and remove any
jammed originals.
Close the ADF.9
Chapter 4 - Troubleshooting30
Page 31

Appendix A Specifications
Page 32

Specifications
Specifications
Duplex Color Image Reader Unit-D1
Note:
Whenever a number of sheets is mentioned in the table below, the figure is based on
media of 80 g/m² (20 lb Bond).
Specifications of Duplex Color Image Reader Unit-D1#
Description
Scan speed for A4/Letter (1-/2sided)
SpecificationsItem
One-pass duplex document feeder, and B&W and
color scanner
300 sheetsCapacity
•
B&W: 100 images/minute at 600x600 dpi
•
Color: 105 images/minute at 600x300 dpi
(scan to file)¹
•
Color: 25 images/minute at 600x600 dpi (scan
to file)¹
Glass plate
Automatically detected formats
Custom size originals
ADF
Note:
Color scanning is optional.
OptionalColor scanning
600x600 dpi (B&W and color)Maximum optical resolution
YesAutomatic format detection
A3R, A4, A4R, A5, B5, B5R, B4R, B6, Statement
5.5" x 8.5", Letter 8.5" x 11", LetterR, LegalR
8.5" x 14", TabloidR 11" x 17"
432 mm x 297 mm (17" x 11.7") - A3 / TabloidMaximum size of originals
•
Minimum: 10 mm x 10 mm (0.4" x 0.4")
•
Maximum: 432 mm x 297 mm (17" x 11.7")
300 sheetsCapacity
1 pass, 2-sidedDocument feeder
Appendix A - Specifications32
Page 33

Specifications
SpecificationsItem
Face upPositioning of sheets
YesAutomatic format detection
Automatically detected formats
A3R, A4, A4R, A5, A5R, B4R, B5, B5R, B6R,
Statement 5.5" x 8.5", StatementR, Letter 8.5" x
11", LetterR, LegalR 8.5" x 14", TabloidR 11" x
17"
630 mm x 304.8 mm (24.8" x 12")Maximum size of originals
•
Custom size originals
Minimum: 140 mm x 128 mm (5.5" x 5")
•
Maximum: 630 mm x 304.8 mm (24.8" x 12")
NoDouble-sheet detection
10 mmMaximum curl
64 - 220 g/m² (17 lb Bond - 80 lb Cover)Supported weights
YesSupport for mixed formats
NoSupport for punched originals
NoSupport for originals with tabs
Printing will be resumed with the jammed sheetRecovery after paper jam
¹ Only applicable when the PRISMAsync controller is not multi-tasking (scanning,
copying, printing at the same time).
Appendix A - Specifications 33
Page 34

Index
ADF
Copy jobs .......................................................18
Scan jobs ........................................................18
C
Clear a paper jam
Clear a paper jam ............................................28
Conversion table for commercial names and user
interface names
Conversion table for commercial names and user
interface names .................................................8
Copy originals
Using the ADF ...............................................18
Using the glass plate .......................................15
G
Glass plate
Copy jobs .......................................................15
Scan jobs ........................................................15
Index
S
Scan originals
Using the ADF ...............................................18
Using the glass plate .......................................15
Scanner
Clean lower sensor ..........................................22
Clean upper sensor .........................................22
H
Hardware naming in User Interfaces
Hardware naming in User Interfaces .................8
M
Main parts
Main parts ......................................................11
O
Orientation of originals
In the ADF .....................................................14
On the glass plate ...........................................13
P
Paper jam
Paper jam .......................................................28
Place the originals
Place the originals ...........................................14
34
 Loading...