

Page 1

User’s Guide
Océ
CS6 5 Pro
POD Administrator Reference
6
Page 2

Océ-Technologies B.V.
Copyright
2008,Océ-Technologies B.V. Venlo, The Netherlands.
All rights reserved. No part of this work may be reproduced, copied, adapted, or
transmitted in any form or by any means without written permission from Océ.
Océ-Technologies B.V. makes no representation or warranties with respect to the
contents hereof and specically disclaims any implied warranties of
merchantability or tness for any particular purpose.
Further, Océ-Technologies B.V. reserves the right to revise this publication and to
make changes from time to time in the content hereof without obligation to notify
any person of such revision or changes.
Edition 2008-08
GB
Page 3

CS665 Pro Contents-1
Contents
1 Introduction
1.1 Composition of user’s guide .......................................................................................................... 1-4
1.2 Machine status screen setting outlines ........................................................................................ 1-5
1.3 Utility screen setting outlines......................................................................................................... 1-7
2 Paper setting
2.1 Paper setting outlines..................................................................................................................... 2-3
2.1.1 Setting items in paper setting ........................................................................................................... 2-3
2.1.2 Paper type specifications.................................................................................................................. 2-4
2.2 Register paper type/weight............................................................................................................ 2-7
2.3 Delete paper setting...................................................................................................................... 2-12
3Adjustment
3.1 01 Machine Adjustment .................................................................................................................. 3-3
3.1.1 01 Printer Adjustment \ 01 Restart Timing Adjustment..................................................................... 3-3
3.1.2 01 Printer Adjustment \ 02 Centering Adjustment ............................................................................ 3-5
3.1.3 01 Printer Adjustment \ 03 FD-Mag. Adjustment.............................................................................. 3-7
3.1.4 01 Printer Adjustment \ 04 CD-Mag. Adjustment ............................................................................. 3-9
3.1.5 02 Scanner Adjustment \ 01 Restart Timing Adjustment................................................................ 3-11
3.1.6 02 Scanner Adjustment \ 02 Centering Adjustment........................................................................ 3-13
3.1.7 02 Scanner Adjustment \ 03 FD-Mag. Adjustment ......................................................................... 3-15
3.2 02 Image Quality Stability ............................................................................................................. 3-17
3.3 03 Execute Adjust Operation........................................................................................................ 3-18
3.4 04 Finisher Adjustment (FS-521) .................................................................................................. 3-19
3.4.1 01 Stapler Position Adj. \ 01 Staple Center Position....................................................................... 3-19
3.4.2 01 Stapler Position Adj. \ 02 Paper Width (Staple).......................................................................... 3-21
3.4.3 01 Stapler Position Adj. \ 03 Paper Width (Straight) ....................................................................... 3-23
3.4.4 01 Stapler Position Adj. \ 04 Exit Guide Center Adj........................................................................ 3-25
3.4.5 01 Stapler Position Adj. \ 05 Exit Guide Paper Width ..................................................................... 3-27
3.5 04 Finisher Adjustment (FD-503).................................................................................................. 3-29
3.5.1 02 Multi Folder (Punch) Adj. \ 01 Paper Width Adjustment............................................................. 3-29
3.5.2 02 Multi Folder (Punch) Adj. \ 02 Hole-Punch Vertical Pos............................................................. 3-31
3.5.3 03 Multi Folder (Fold) Adj. \ 01 Half Fold Position Adj. ................................................................... 3-33
3.5.4 03 Multi Folder (Fold) Adj. \ 02 Tri-Fold-in Pos. Adj........................................................................ 3-35
3.5.5 03 Multi Folder (Fold) Adj. \ 03 Tri-Fold-out Pos. Adj. .................................................................... 3-37
3.5.6 03 Multi Folder (Fold) Adj. \ 04 Double Parallel Pos. Adj. ............................................................... 3-39
3.5.7 03 Multi Folder (Fold) Adj. \ 05 Z-Fold Position Adj. ....................................................................... 3-41
3.5.8 03 Multi Folder (Fold) Adj. \ 06 Gate Fold Position Adj. .................................................................. 3-43
3.6 04 Finisher Adjustment (LS-505) .................................................................................................. 3-45
3.6.1 05 Stacker Adjustment \ 01 Paper Width Adjustment .................................................................... 3-45
3.6.2 05 Stacker Adjustment \ 02 Paper Length Adjustment................................................................... 3-47
3.7 04 Finisher Adjustment (SD-506).................................................................................................. 3-49
3.7.1 06 Saddle Stitcher Adj. \ 01 Staple Center Adj. .............................................................................. 3-49
3.7.2 06 Saddle Stitcher Adj. \ 02 Staple Paper Width Adj...................................................................... 3-51
3.7.3 06 Saddle Stitcher Adj. \ 03 Staple Pitch Adjustment..................................................................... 3-53
3.7.4 06 Saddle Stitcher Adj. \ 04 Half Fold Position Adj......................................................................... 3-55
3.7.5 06 Saddle Stitcher Adj. \ 05 Tri-Fold Position Adj........................................................................... 3-57
3.7.6 06 Saddle Stitcher Adj. \ 06 Fold Paper Width Adj. ........................................................................ 3-59
3.7.7 06 Saddle Stitcher Adj. \ 07 Trimming Adjustment......................................................................... 3-61
Page 4

Contents-2 CS665 Pro
3.7.8 06 Saddle Stitcher Adj. \ 08 Trimming Receiver Adj. ...................................................................... 3-63
3.8 04 Finisher Adjustment (RU-504).................................................................................................. 3-64
3.9 Finisher Adjustment (PB-501/PB-502) ......................................................................................... 3-65
3.9.1 01 Cover Trimming Adjustment....................................................................................................... 3-65
3.9.2 02 Cover Lead Edge Adjustment..................................................................................................... 3-67
3.9.3 03 Spine Corner Forming Position Adjustment ............................................................................... 3-69
3.9.4 04 Pasting Start Position Adjustment.............................................................................................. 3-71
3.9.5 05 Pasting Finish Position Adjustment ............................................................................................ 3-73
3.9.6 06 Paste Formation Finish Position Adjustment.............................................................................. 3-75
3.9.7 07 Temperature Adjustment............................................................................................................ 3-77
3.9.8 08 Sub Compile CD Width Adjustment ........................................................................................... 3-79
3.9.9 09 Clamp CD Width Adjustment ..................................................................................................... 3-81
3.9.10 10 Cover Up/Down CD Width Adjustment ...................................................................................... 3-83
3.9.11 11 Clamp FD Position Adjustment .................................................................................................. 3-84
3.10 Finisher Adjustment (FS-520/FS-607) .......................................................................................... 3-86
3.10.1 01 Saddle Stitcher Stopper Adj. (FS-607 Only)............................................................................... 3-86
3.10.2 02 Half Fold Stopper Adjustment (FS-607 Only) ............................................................................. 3-88
3.10.3 03 Punch Adjustment \ 01 Vertical Position Adj. (FS-520/FS-607) ................................................. 3-90
3.10.4 03 Punch Adjustment \ 02 Horizontal Position Adj. (FS-520/FS-607)............................................. 3-92
3.10.5 03 Punch Adjustment \ 03 Registration Adjustment (FS-520/FS-607)............................................ 3-94
3.10.6 03 Punch Adjustment \ 04 Paper Edge Detect Sensor Adj. (FS-520/FS-607) ................................ 3-96
3.10.7 04 Tri-Fold Adjustment (FS-607 Only) ............................................................................................. 3-97
3.10.8 05 2 Position Staple Pitch Adjustment (FS-607 Only) ..................................................................... 3-99
3.10.9 06 Paper Inserter Tray Size Adj. (FS-520/FS-607)......................................................................... 3-101
3.10.10 07 Output Quantity Limit (FS-520/FS-607).................................................................................... 3-102
3.10.11 08 Curl Adjustment (FS-520/FS-607) ............................................................................................ 3-103
3.11 05 Density Unevenness Adjustment .......................................................................................... 3-104
4 Utility screen outlines
4.1 Chart of setting items on utility screen ......................................................................................... 4-3
4.2 Function list of user setting.......................................................................................................... 4-10
4.3 Function list of machine administrator setting ........................................................................... 4-15
5 User setting
5.1 User setting outlines ....................................................................................................................... 5-3
5.2 01 System Setting............................................................................................................................ 5-5
5.2.1 01 Language Setting.......................................................................................................................... 5-5
5.2.2 02 Unit Setting................................................................................................................................... 5-6
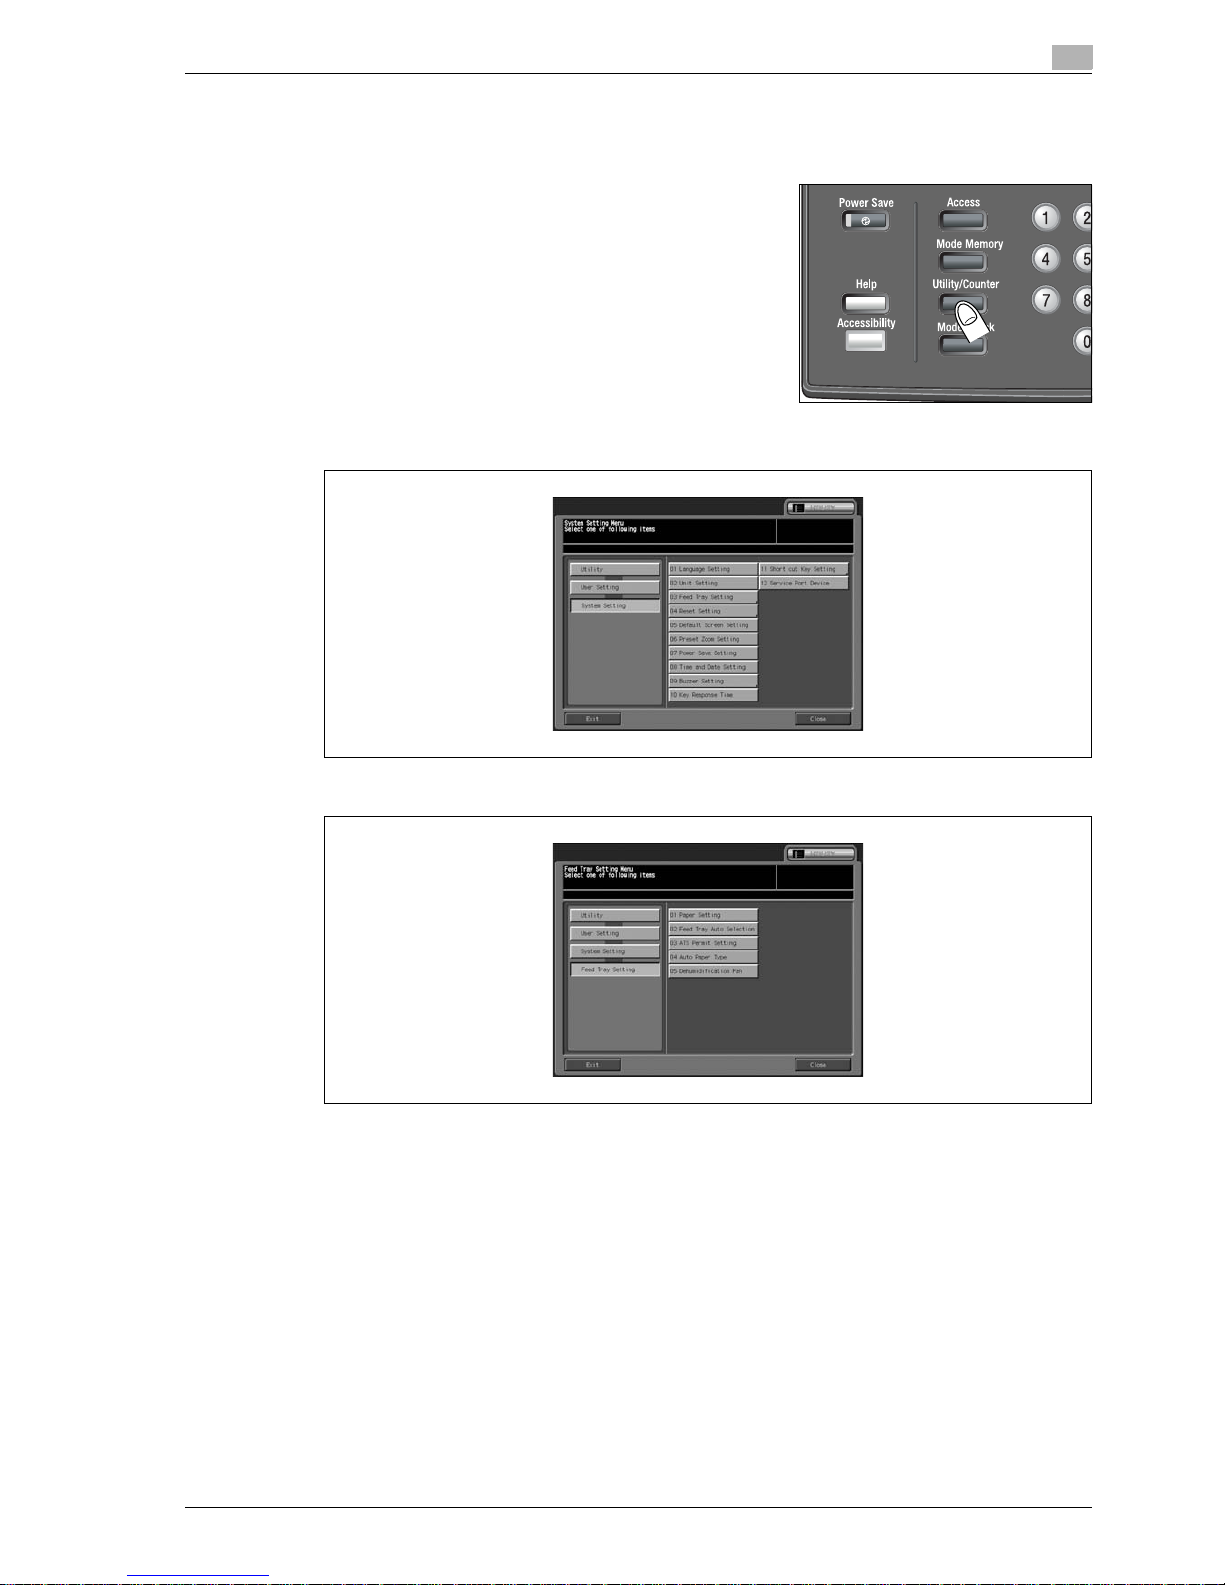
5.2.3 03 Feed Tray Setting \ 01 Paper Setting ........................................................................................... 5-6
5.2.4 03 Feed Tray Setting \ 02 Paper Feed Auto Selection ...................................................................... 5-7
5.2.5 03 Feed Tray Setting \ 03 ATS Permit Setting................................................................................... 5-8
5.2.6 03 Feed Tray Setting \ 04 Auto Paper Type ...................................................................................... 5-9
5.2.7 03 Feed Tray Setting \ 05 Dehumidification Fan ............................................................................. 5-10
5.2.8 04 Reset Setting \ 01 Auto Reset Setting........................................................................................ 5-11
5.2.9 04 Reset Setting \ 02 Mode Reset Setting ...................................................................................... 5-12
5.2.10 05 Default Screen Setting................................................................................................................ 5-14
5.2.11 06 Preset Zoom Setting................................................................................................................... 5-15
5.2.12 07 Power Save Setting.................................................................................................................... 5-16
5.2.13 08 Time and Date Setting ................................................................................................................ 5-18
5.2.14 09 Buzzer Setting ............................................................................................................................ 5-20
5.2.15 10 Key Response Time.................................................................................................................... 5-22
5.2.16 11 Short Cut Key Setting................................................................................................................. 5-23
5.2.17 12 Service Port Device .................................................................................................................... 5-25
Page 5

CS665 Pro Contents-3
5.3 02 Initial Setting............................................................................................................................. 5-26
5.3.1 01 Copy Initial setting...................................................................................................................... 5-26
5.3.2 02 Scan Initial setting...................................................................................................................... 5-27
5.4 03 Common Setting....................................................................................................................... 5-28
5.5 04 Copy Setting ............................................................................................................................. 5-30
5.6 05 Scan Setting.............................................................................................................................. 5-32
5.7 06 Printer Setting........................................................................................................................... 5-33
5.8 07 Image Quality Setting............................................................................................................... 5-36
5.8.1 01 Screen ........................................................................................................................................ 5-36
5.8.2 02 Screen Initial setting................................................................................................................... 5-37
5.8.3 03 Original Density shift .................................................................................................................. 5-38
5.8.4 04 ACS adjustment ......................................................................................................................... 5-39
5.8.5 05 Density Unevenness Adj. ........................................................................................................... 5-40
5.9 08 Change Password .................................................................................................................... 5-42
6 Machine administrator setting
6.1 Machine administrator setting outlines ........................................................................................ 6-3
6.2 01 System Setting............................................................................................................................ 6-5
6.2.1 01 Power Save Setting...................................................................................................................... 6-5
6.2.2 02 Time and Date Setting.................................................................................................................. 6-6
6.2.3 03 Weekly Timer Setting \ 01 Weekly Timer On/Off Set ................................................................... 6-7
6.2.4 03 Weekly Timer Setting \ 02 Timer Setting...................................................................................... 6-8
6.2.5 03 Weekly Timer Setting \ 03 Timer Action On/Off Set................................................................... 6-10
6.2.6 03 Weekly Timer Setting \ 04 Lunch Hour Off Setting .................................................................... 6-12
6.2.7 03 Weekly Timer Setting \ 05 Timer Interrupt Password Set .......................................................... 6-13
6.2.8 04 Operation Prohibit Set \ 01 Lock/Delete Mode Memory............................................................ 6-14
6.2.9 04 Operation Prohibit Set \ 02 Change Prohibit Setting ................................................................. 6-16
6.2.10 04 Operation Prohibit Set \ 03 Scanner Prohibit Setting ................................................................ 6-17
6.2.11 05 Expert Adjustment \ 01 AES Level Adjustment.......................................................................... 6-18
6.2.12 05 Expert Adjustment \ 02 Erase Adjustment................................................................................. 6-19
6.2.13 05 Expert Adjustment \ 03 Printer Adjustment \ 01 Restart Timing Adjustment............................. 6-21
6.2.14 05 Expert Adjustment \ 03 Printer Adjustment \ 02 Centering Adjustment .................................... 6-22
6.2.15 05 Expert Adjustment \ 03 Printer Adjustment \ 03 FD-Mag. Adjustment...................................... 6-23
6.2.16 05 Expert Adjustment \ 03 Printer Adjustment \ 04 CD-Mag. Adjustment ..................................... 6-24
6.2.17 05 Expert Adjustment \ 03 Printer Adjustment \ 05 Lead Edge Erase Adjustment......................... 6-25
6.2.18 05 Expert Adjustment \ 03 Printer Adjustment \ 06 Registration Loop Adj..................................... 6-27
6.2.19 05 Expert Adjustment \ 03 Printer Adjustment \ 07 Pre-registration Adj. ....................................... 6-29
6.2.20 05 Expert Adjustment \ 04 Finisher Adjustment.............................................................................. 6-31
6.2.21 05 Expert Adjustment \ 05 Scanner Adjustment............................................................................. 6-32
6.2.22 05 Expert Adjustment \ 06 Process Adjustment \ 01 Front & Back Density ................................... 6-33
6.2.23 05 Expert Adjustment \ 06 Process Adjustment \ 02 Toner Density Sensor .................................. 6-34
6.2.24 05 Expert Adjustment \ 06 Process Adjustment \ 03 Toner Quality/Exposure ............................... 6-35
6.2.25 05 Expert Adjustment \ 07 Quality Adjustment \ 01 Printer Gamma Offset Adj. ............................ 6-36
6.2.26 05 Expert Adjustment \ 07 Quality Adjustment \ 02 Printer Gamma Offset Auto Adj. .................... 6-38
6.2.27 05 Expert Adjustment \ 07 Quality Adjustment \ 03 Printer Gamma Sensor Adj. ........................... 6-40
6.2.28 05 Expert Adjustment \ 07 Quality Adjustment \ 04 Image Quality Stability................................... 6-42
6.2.29 05 Expert Adjustment \ 07 Quality Adjustment \ 05 Custom Screen.............................................. 6-43
6.2.30 05 Expert Adjustment \ 08 Execute Adjust Operation .................................................................... 6-44
6.2.31 06 List/Count................................................................................................................................... 6-45
6.2.32 07 Size Setting ................................................................................................................................ 6-46
6.2.33 08 Perfect Binding Setting\ 01 Useful Paper Weight ...................................................................... 6-50
6.2.34 08 Perfect Binding Setting\ 02 Paper Count Limit .......................................................................... 6-52
6.2.35 08 Perfect Binding Setting\ 03 Unfitting Cover Stop ...................................................................... 6-53
Page 6

Contents-4 CS665 Pro
6.3 02 Administrator Register............................................................................................................. 6-55
6.4 03 Scanner Send Address............................................................................................................. 6-56
6.4.1 01 Address Edit ............................................................................................................................... 6-56
6.4.2 02 E-Mail Title Setting ..................................................................................................................... 6-66
6.4.3 03 E-Mail Text Setting ..................................................................................................................... 6-67
6.5 04 User Auth./Account Track ....................................................................................................... 6-68
6.5.1 01 Authentication Method ............................................................................................................... 6-68
6.5.2 02 User Authentication Set \ 01 Management Setting .................................................................... 6-70
6.5.3 02 User Authentication Set \ 02 User Register................................................................................ 6-72
6.5.4 02 User Authentication Set \ 03 User Counter ................................................................................ 6-77
6.5.5 03 Account Track \ 01 Account Register......................................................................................... 6-79
6.5.6 03 Account Track \ 02 Account Counter ......................................................................................... 6-84
6.5.7 04 Without Authentication ............................................................................................................... 6-86
6.6 05 Network Setting ........................................................................................................................ 6-87
6.6.1 01 Machine NIC Setting................................................................................................................... 6-87
6.6.2 02 E-Mail Initial Setting.................................................................................................................... 6-88
6.7 06 Common Setting....................................................................................................................... 6-89
6.8 07 Copy Setting.............................................................................................................................. 6-91
6.9 08 Scan Setting .............................................................................................................................. 6-93
6.10 09 System Connection .................................................................................................................. 6-94
6.11 10 Security Setting......................................................................................................................... 6-95
6.11.1 01 Administrator Password ............................................................................................................. 6-95
6.11.2 02 HDD Lock Password .................................................................................................................. 6-96
6.11.3 03 Overwrite image data ................................................................................................................. 6-97
6.11.4 04 Security Strengthen Set.............................................................................................................. 6-98
7 Touch screen adjustment
8 Web utilities setting
8.1 Web utilities outlines ....................................................................................................................... 8-3
8.2 Setting account track data ............................................................................................................. 8-5
8.2.1 Adding account track ........................................................................................................................ 8-5
8.2.2 Editing account track data................................................................................................................. 8-9
8.3 Remote panel setting/job history setting .................................................................................... 8-15
8.4 Setting scan transmission function ............................................................................................. 8-19
8.5 Transmitting machine setting file................................................................................................. 8-23
8.6 Displaying job history.................................................................................................................... 8-29
8.6.1 Turning on/off job history ................................................................................................................ 8-29
8.6.2 Displaying Job history list................................................................................................................ 8-31
9 Appendix
10 Index
Page 7

1
Introduction
Page 8

Page 9

CS665 Pro 1-3
Introduction
1
1 Introduction
This section describes the overview of this document.
ACKNOWLEDGEMENTS
- Microsoft, MS, Windows and MS-DOS are registered trademarks or trademarks of Microsoft
Corporation in the United States and / or other countries.
- IBM is a registered trademarks of the IBM Corporation.
- Macintosh and PowerMac are registered trademarks or trademarks of Apple Computer, Inc. in the
United States and / or other countries.
- Adobe, Adobe Logo, Acrobat, Acrobat Logo, PostScript and PostScript Logo are registered trademarks
or trademarks of Adobe Systems, Inc.
- RC4® is a registered trademark or trademark of RSA Security Inc. in the United States and/or other
countries.
- Other company names and product names used in this manual are the registered trademarks or
trademarks of their respective companies.
Copyright © 2008 Océ-Technologies B.V. Venlo.
Copyright © 2008 GoAhead Software, Inc. All rights reserved.
EXEMPTION
- No part of this manual may be used or duplicated without permission.
- Manufacturer and Sales Company will have no liability for any influences caused by using the printing
system and this User’s Guide.
- The information written in this User’s Guide is subject to change without prior notice.
Page 10

1
Introduction
1-4 CS665 Pro
1.1 Composition of user’s guide
This machine is provided with the following user’s guides as printed matters.
CS665 Pro User’s Guide - Copier
This guide describes an outline of the machine and copy operations.
Please refer to this guide for safety information, turning on/off the machine, paper supply, dealing with
machine trouble such as paper jam, and copy operation available on the machine.
CS665 Pro User’s Guide - POD Administrator’s Reference (This book)
This guide provides you with detailed information about the machine management and how to customize the
machine according to your daily use.
Please refer to this guide for a setup and management of the machine including registration of copy paper
and tray setting.
CS665 Pro User’s Guide - Security
This guide describes the security functions.
Please refer to this guide for how to use the Security Strengthen mode, and for detailed machine operation
in Security Strengthen mode.
To operate safely, be sure to read "Chapter 1 Safety Information" in "CS665 Pro User’s Guide - Copier"
before using the machine.
Page 11
CS665 Pro 1-5
Introduction
1
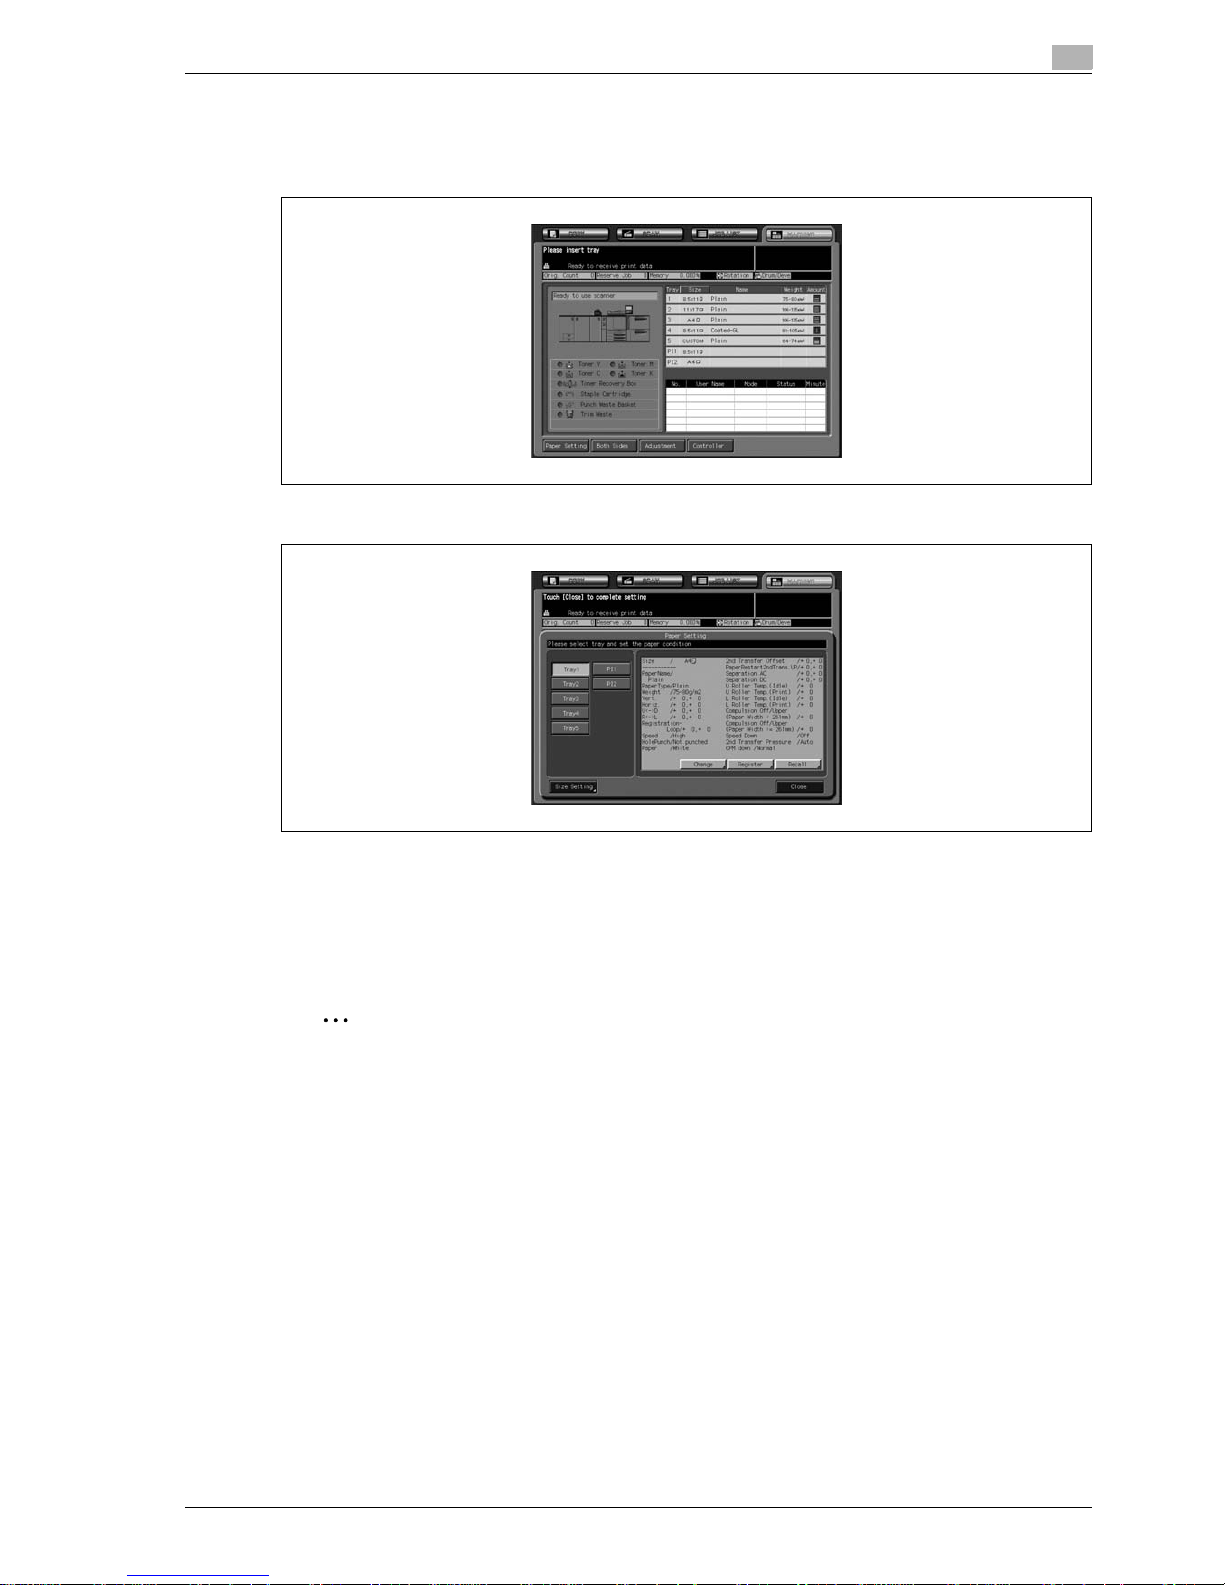
1.2 Machine status screen setting outlines
The [Paper Setting], [Both Sides], [Adjustment], and [Controller] keys are located at the bottom of the Machine
Status Screen, to display each setting screen.
[Paper Setting] key: The paper set popup screen is displayed
Specify paper settings for each tray by registering paper settings or using predefined settings. This operation
is equivalent to touching Paper Setting on the Copy Screen. Please refer to User’s Guide - Copier for more
information.
After completing the Paper Setting mode settings, touch [Close] to exit the Paper Setting mode.
Any other settings are unavailable during the Paper Setting mode.
2
Note
The Utility Screen refers to any screen that is displayed when [Utility/Counter] is pressed.
Page 12
1
Introduction
1-6 CS665 Pro
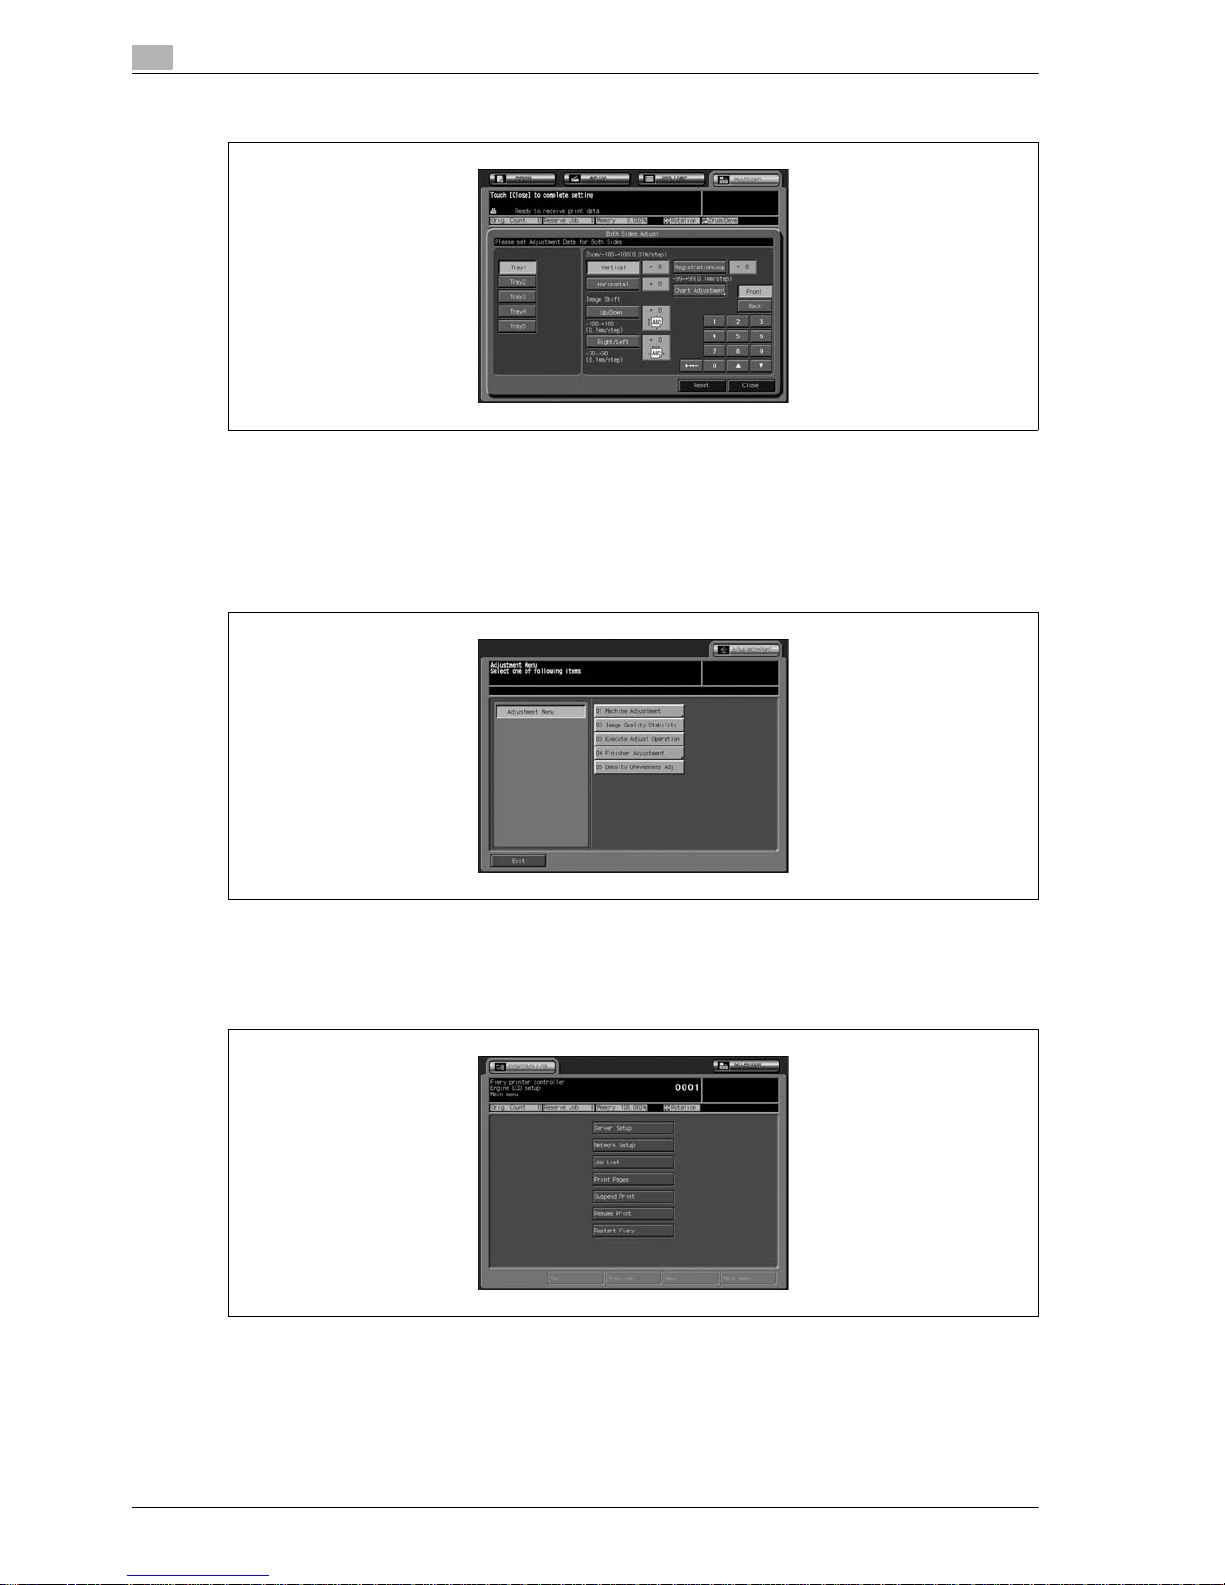
[Both Sides] key: The both sides adjustment popup screen is displayed
Specify the Vertical zoom, Horizontal zoom, Up/Down shift amount, and Right/Left shift amount for both front
and back pages. For the details, see User’s Guide - Copier.
After completing the Adjustment mode settings, touch [Close] to exit the Adjustment mode.
Any other settings are unavailable during the Both Sides Adjustment mode.
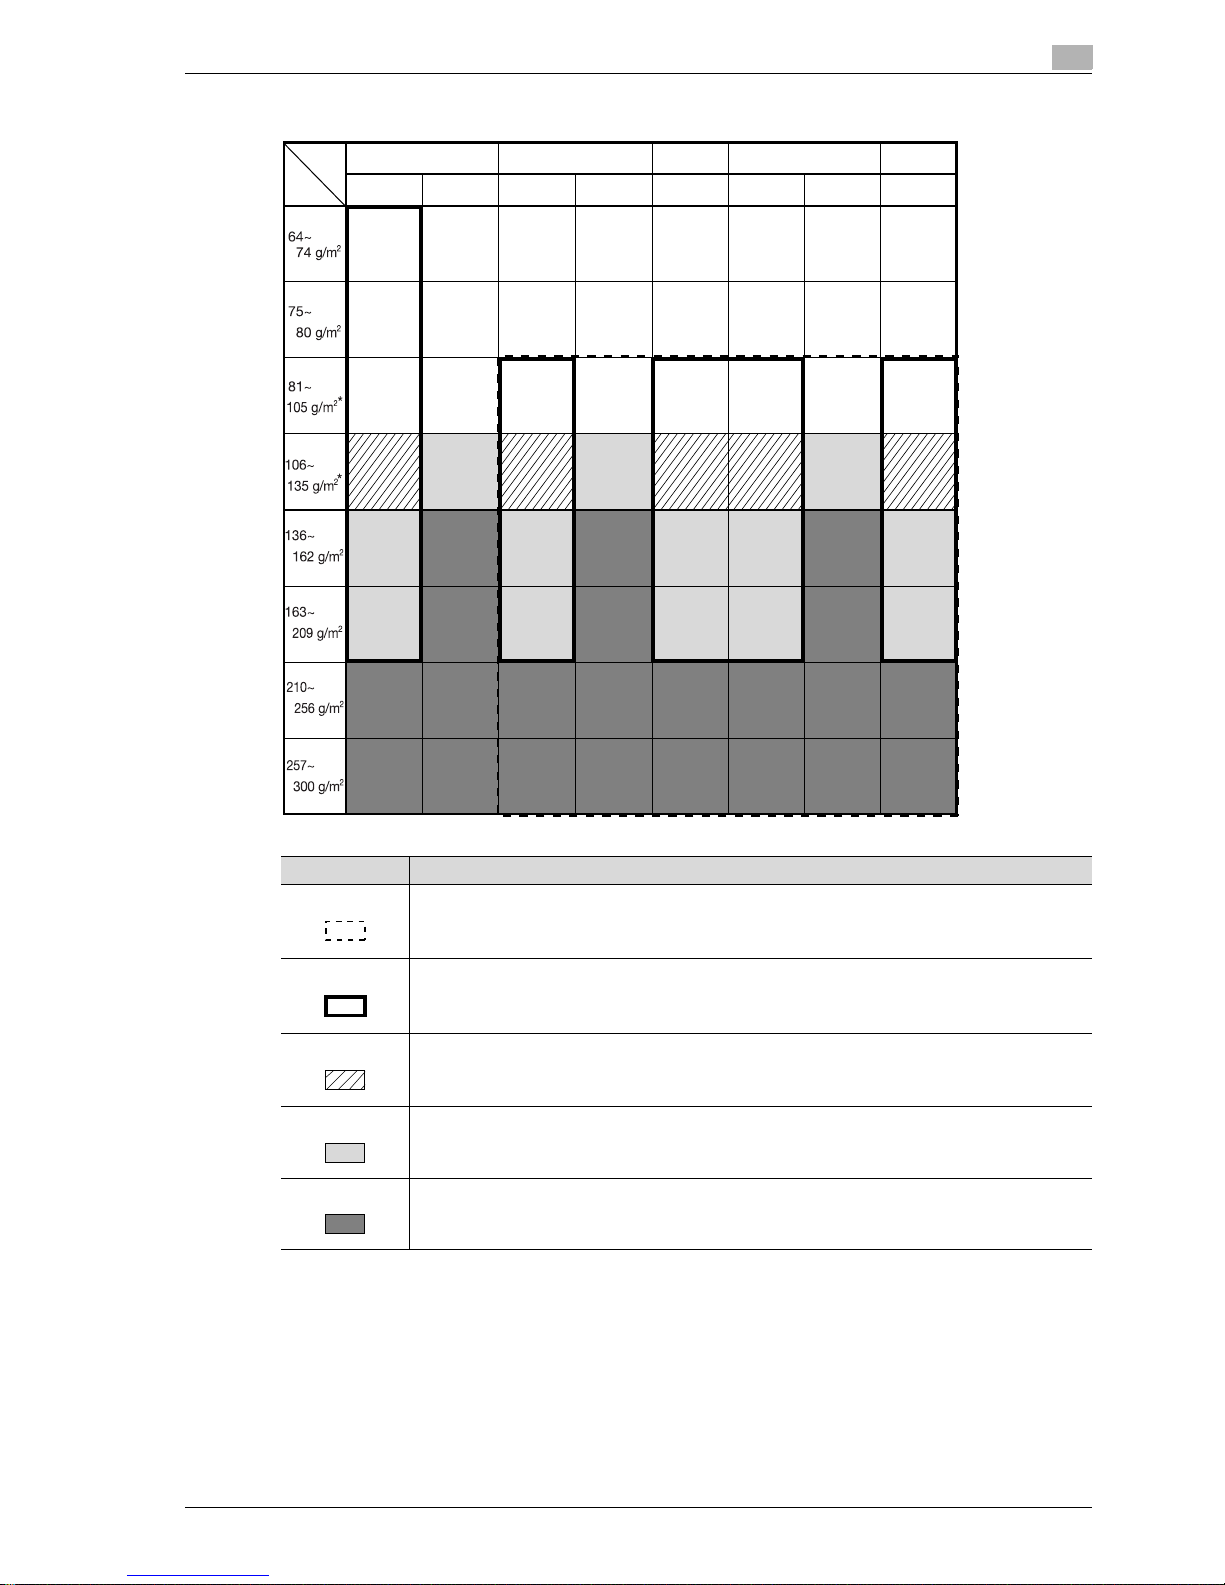
[Adjustment] key: The adjustment mode menu screen is displayed
Adjust the settings of Image Control and Output options. For the details, see page 3-3.
After completing the Adjustment mode settings, touch [Exit] to exit the Adjustment mode.
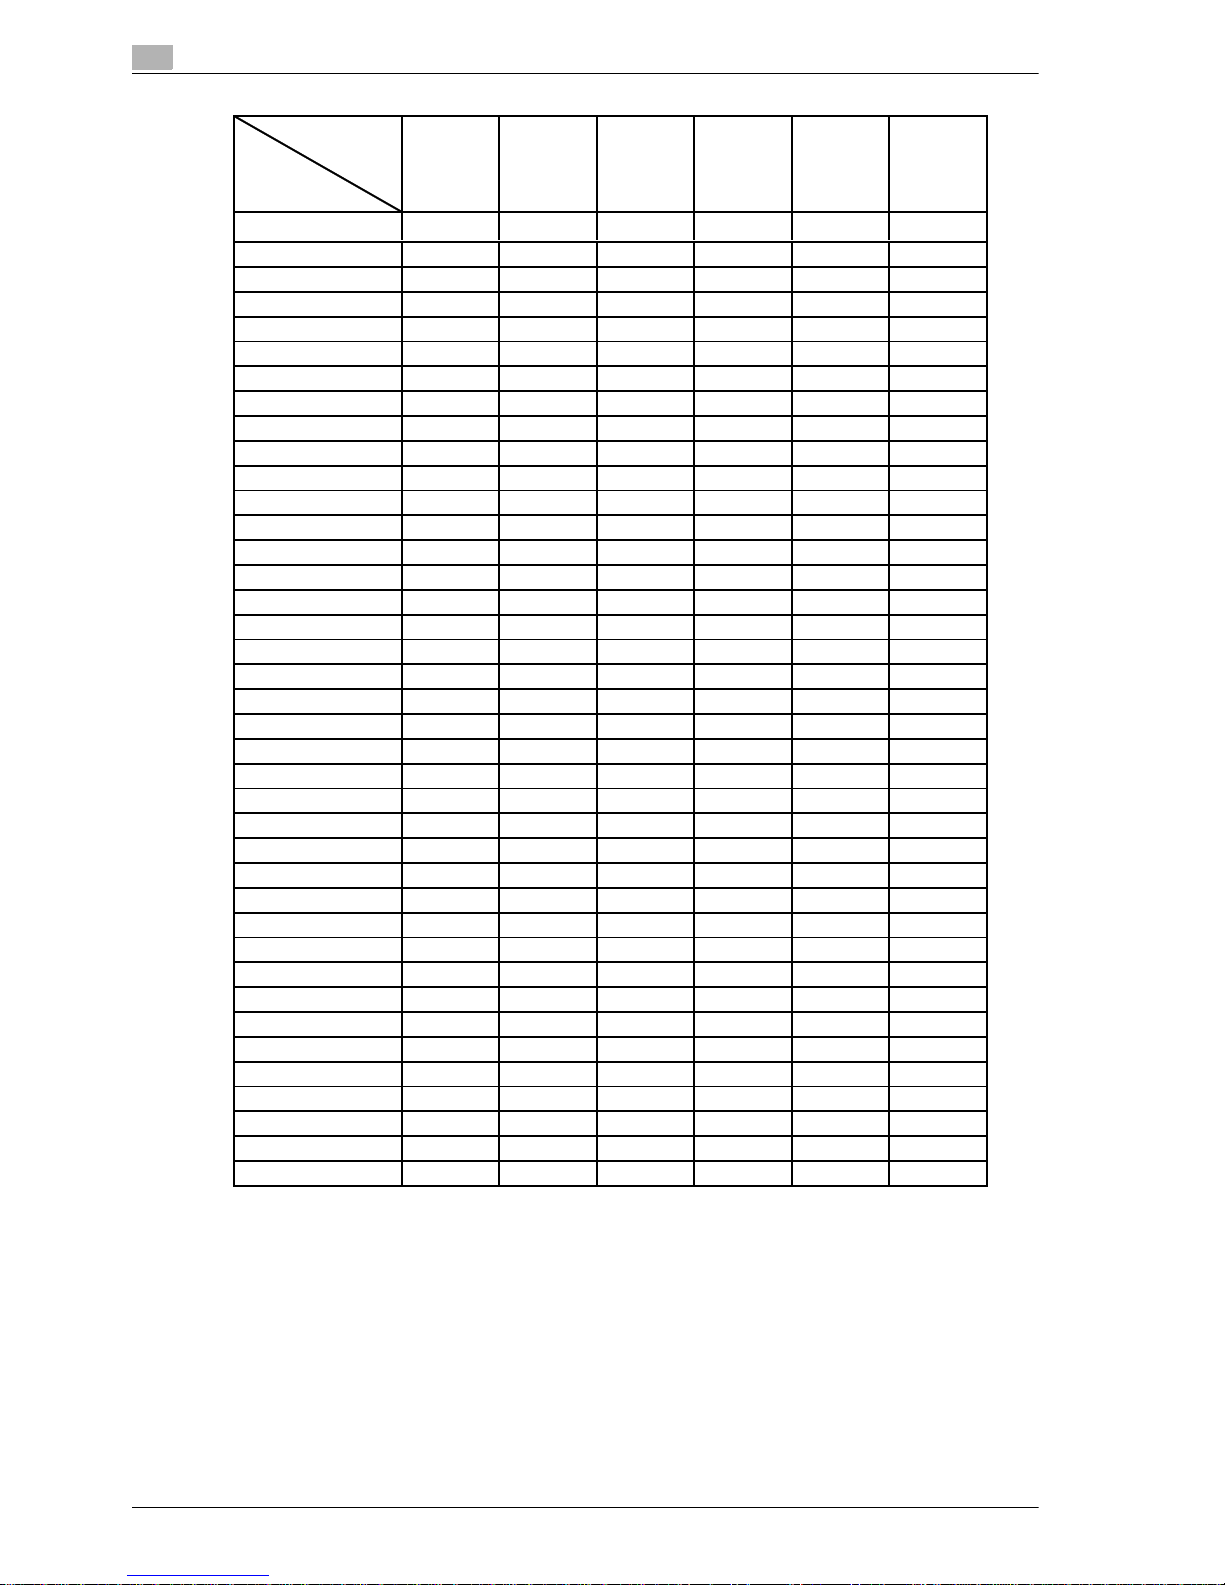
[Controller] key: The controller setting menu screen is displayed
Specify the settings concerning the optional Print Controller. For the details, see User’s Guide enclosed with
Image controller.
% Touch the [MACHINE] tab to exit the Controller Setting mode.
Page 13

CS665 Pro 1-7
Introduction
1
1.3 Utility screen setting outlines
% Press [Utility/Counter] on the control panel to display the Utility Menu Screen.
The Utility Screen includes two types of setting items: one in which a user can set and the other in which a
machine administrator is required to enter a password.
!
Detail
The machine administrator settings can be established by general users in the initial setting.
It is recommended to assign the machine administrator who will be the sole person to control the
machine administrator setting. Please contact your service representative to set up your password.
[Close] and [Exit] on the utility screen
% Touch [Close] to return to the previous screen.
% Touch [Exit] to return to the screen displayed before pressing [Utility/Counter] on the control panel.
Page 14

1
Introduction
1-8 CS665 Pro
Page 15

2
Paper setting
Page 16

Page 17

CS665 Pro 2-3
Paper setting
2
2 Paper setting
2.1 Paper setting outlines
This section provides information on, and instructions for, settings the items in the User Setting.
This machine provides Paper Setting mode in order to perform printing job according to the characteristics
of paper to be used, by specifying conditions such as Paper Name, Size, Paper Type, Weight, Both Sides
Adjustment, Process Adjustment, Speed Setting, Hole-Punch, Color Paper, and Air Assist.
Paper conditions as mentioned above are supposed to be predefined, and can be edited and even deleted
at any time. (Paper Setting in User Setting on Utility Screen)
Recall the predefined conditions for each tray, and modify them, if necessary, in order to satisfy the
environmental conditions (temperature, humidity, condition of paper, etc.) at that time. (Paper Setting on
Copy Screen or Machine Status Screen)
2.1.1 Setting items in paper setting
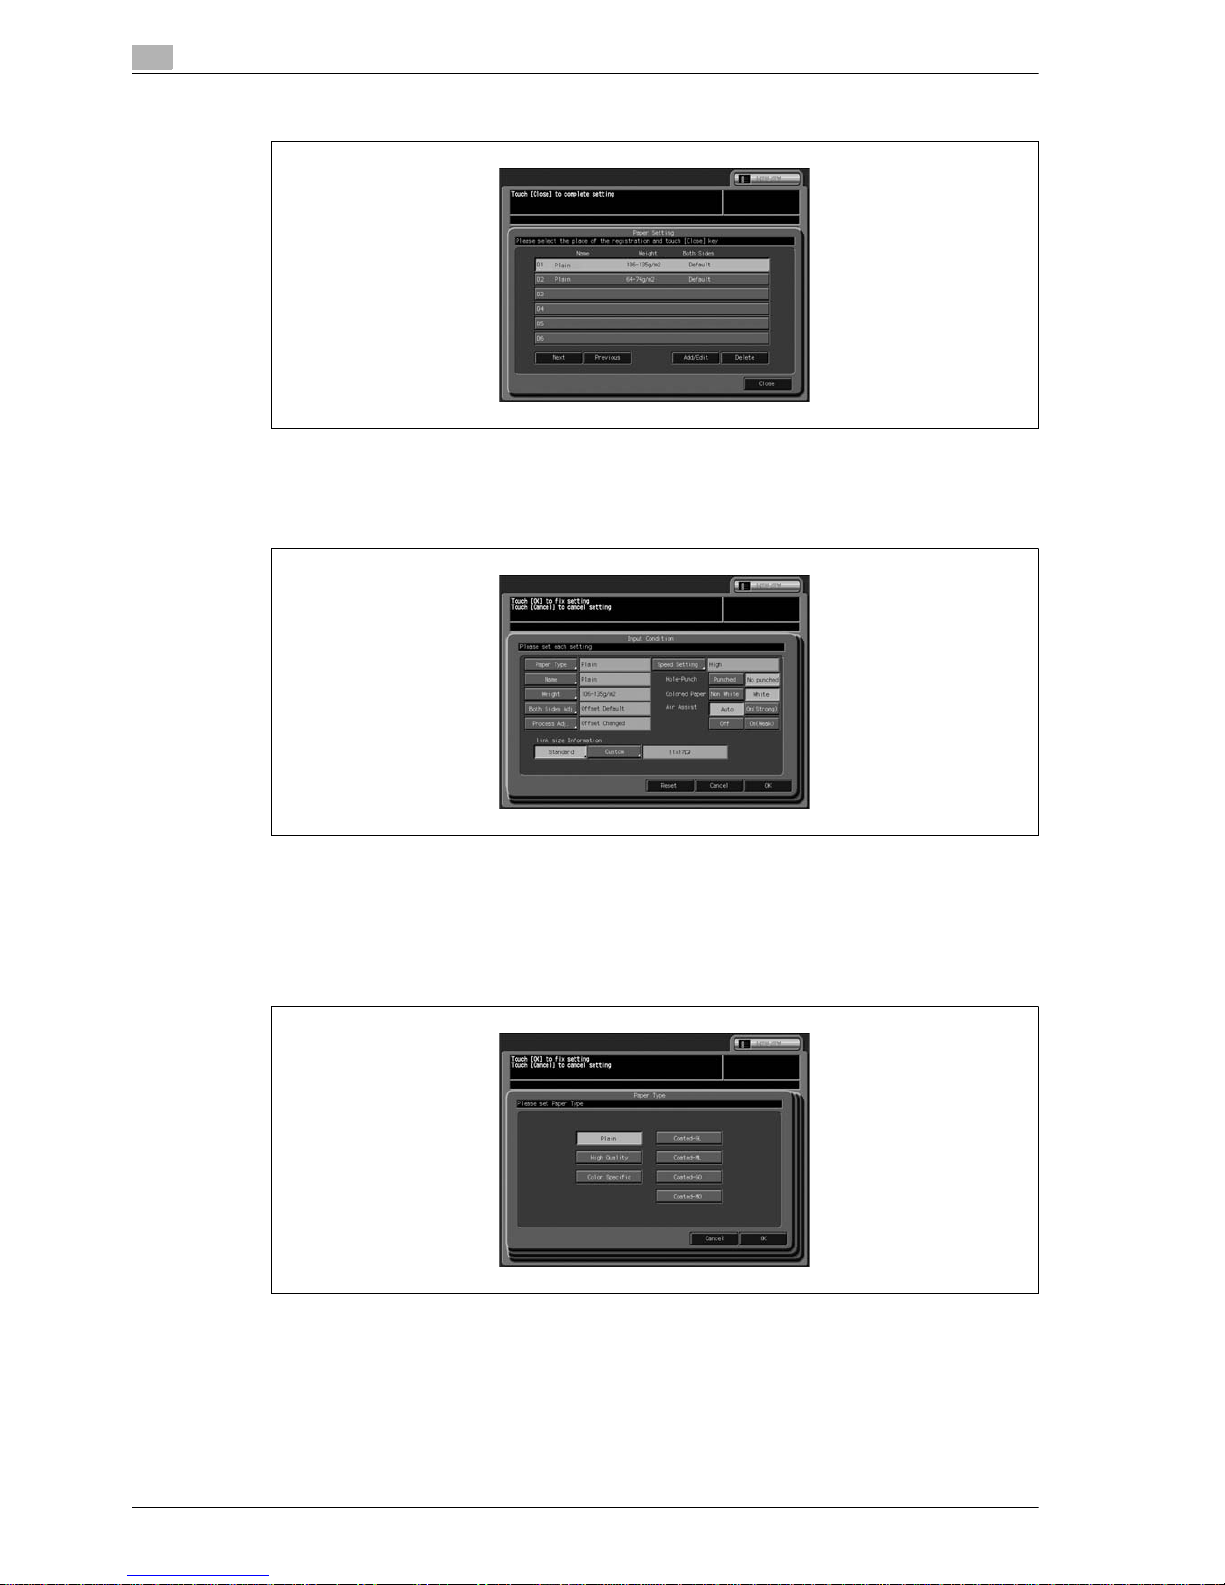
Paper type
Select one of the following seven types.
- High Quality, Plain, Color Specific, Coated-GL, Coated-ML, Coated-GO, Coated-MO
See page 2-4 for details of paper type specifications.
Paper name
You can use maximum 22 characters.
Weight
Select one of the following eight types.
- 64-74g/m
2
, 75-80g/m2, 81-105g/m2, 106-135g/m2, 136-162g/m2, 163-209g/m2, 210-256g/m2,
257-300g/m
2
The unit display for paper weight can be changed. Touch [Unit Change] to switch between the options.
See page 2-4 for details of relation between paper type and weight.
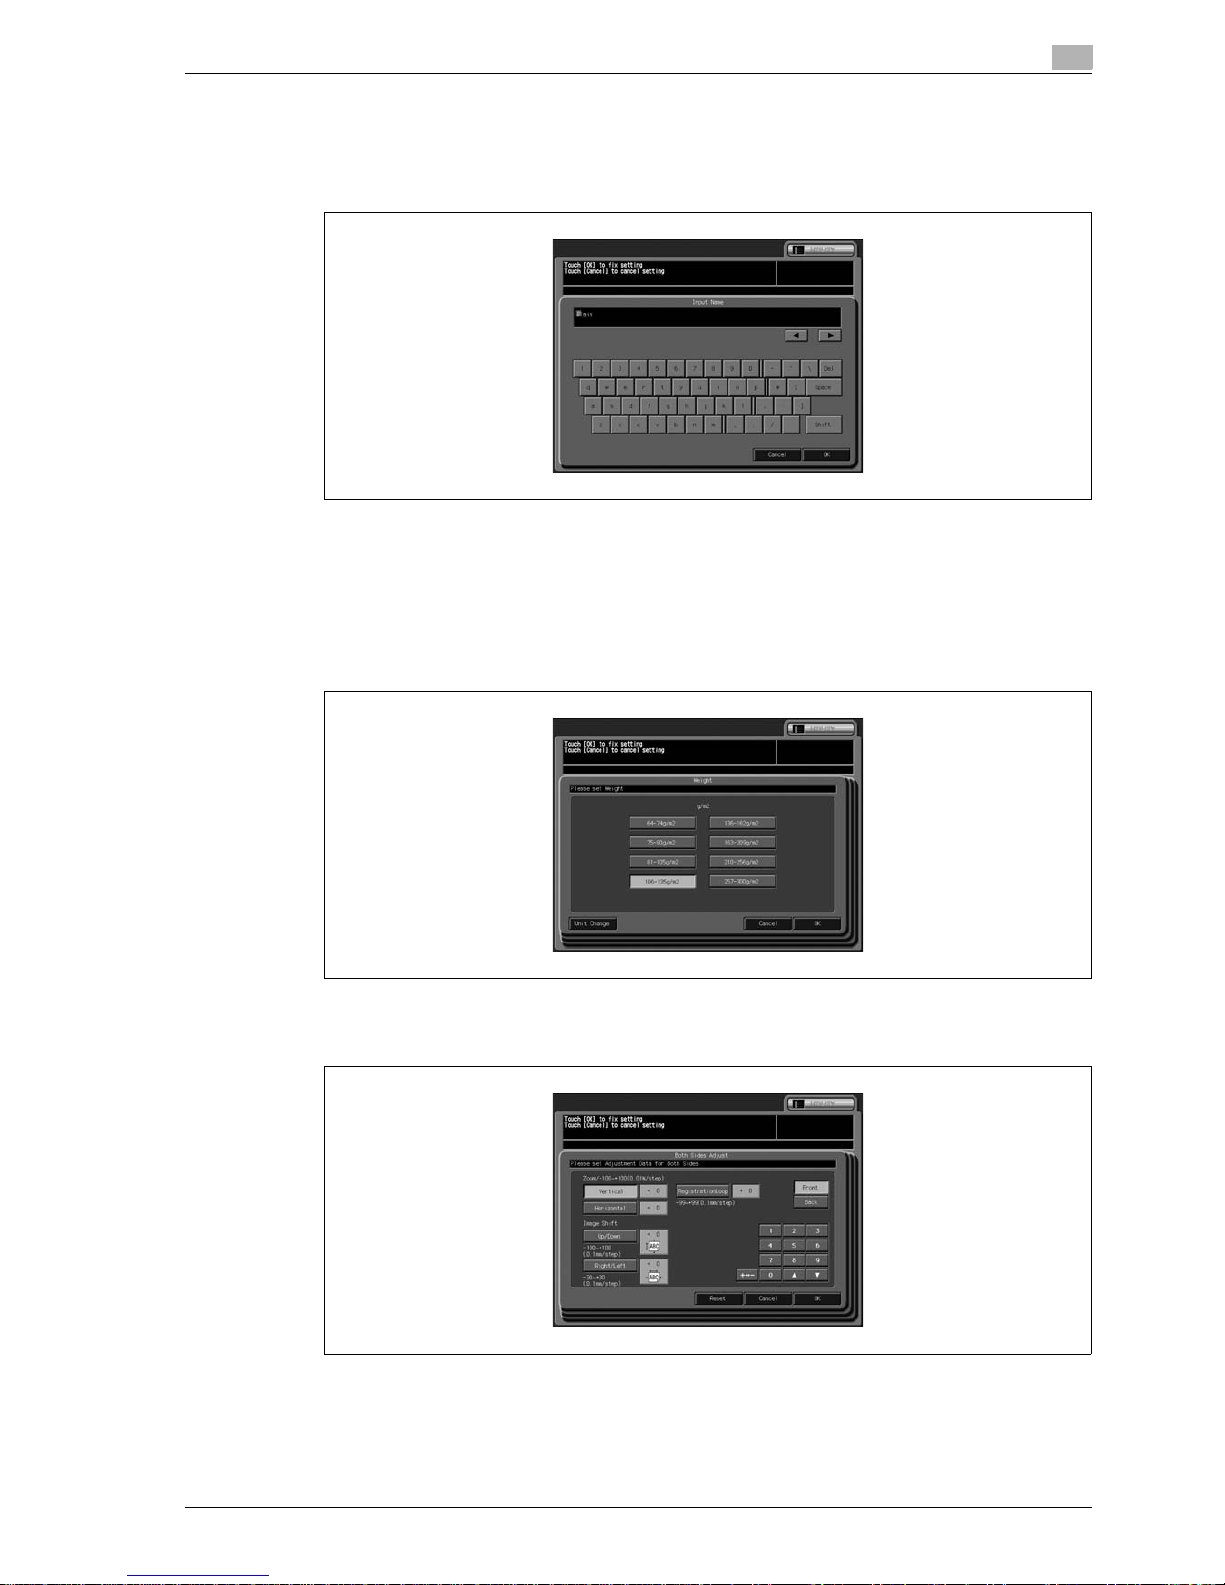
Both sides adj.
Specify the Vertical zoom, Horizontal zoom, Up/Down shift amount, Right/Left shift amount, and Registration
Loop for both front and back pages.
- Vertical zoom: Front -100 to +100, Back -80 to +20 (in 0.1% increments)
- Horizontal zoom: -100 to +100 (in 0.1% increments)
We recommend you performing this adjustment every day or every time the tray is loaded with different type
of paper, because the coefficient of contraction varies according to the paper type, brand, or the difference
in temperature and humidity of paper repository.
The Horizontal zoom of the Back side is specified with 01 System Setting of the Machine Admin. Setting.
This adjustment can be performed using a chart in Paper Setting accessed only from Copy Screen and
Machine Status Screen.
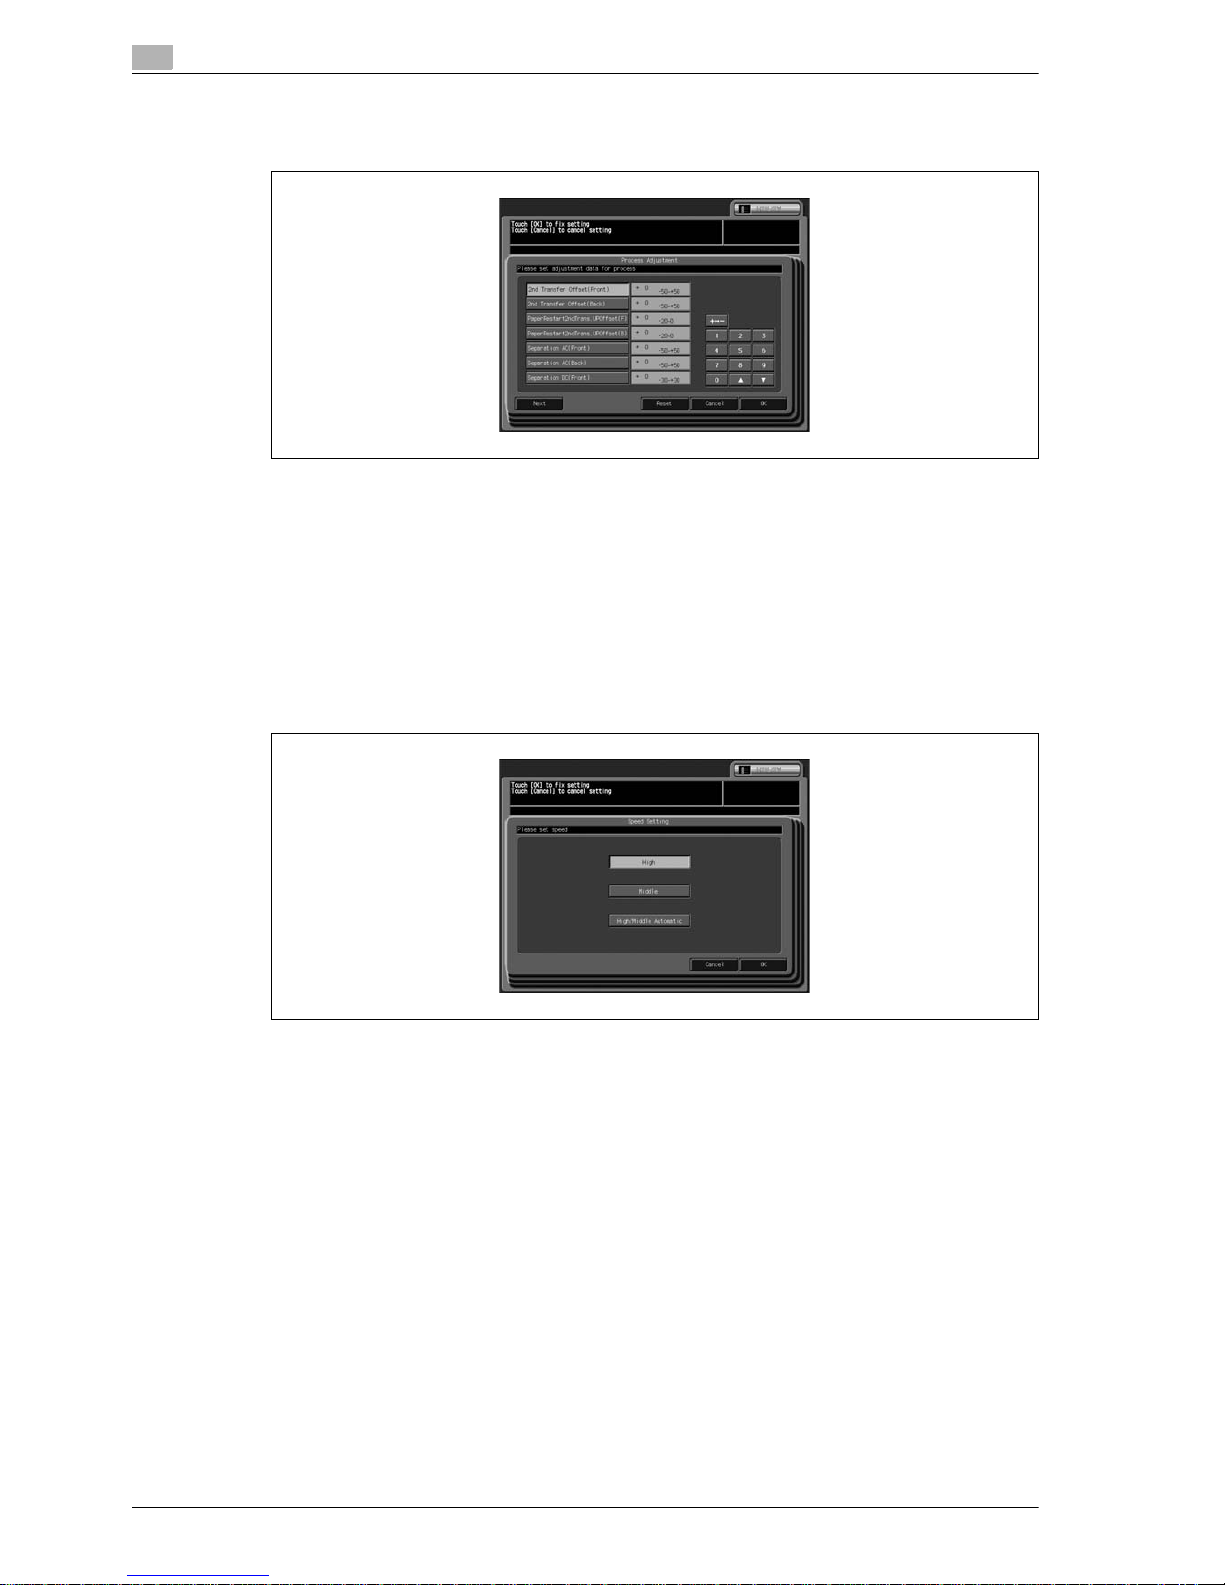
Process adj.
Usually, this adjustment is not available. Contact your service representative for detail.
Collective adjustment of the process adjustment for all tray is specified with the Machine Admin. Setting.
Page 18

2
Paper setting
2-4 CS665 Pro
Size
Select [Standard] or [Custom].
- The custom sizes registered from Copy Screen or Machine Status Screen can be recalled in paper size
setting of User Setting, so that the recalled size information can be registered together with other paper
information. (Link Size Information)
- Tab paper in sizes A4 v, 8.5" e 11" w cannot be registered from [Paper Setting] in the User Setting.
Speed setting
Copy speed change with paper type and paper weight.
[Speed Setting] can be select from [High], [Middle], or [High/Middle Automatic] only when [Weight] is set to
106 to 135 g/m
2
.
Air assist
Use the Air Assist function to blow air to the paper from the guide plate inside the tray in order to prevent
feeding troubles which a specific paper type tends to cause.
Select one of the following four conditions.
- Auto, On (Strong), On (Weak), Off
2.1.2 Paper type specifications
The following seven paper types are provided according to the plainness of paper.
- Coated-GL (Gloss Laser)
Glossy paper for laser printing.
- Coated-ML (Mat Laser)
Matte paper for laser printing.
- Coated-GO (Gloss Offset)
Glossy paper for offset printing.
- Coated-MO (Mat Offset)
Matte paper for offset printing.
- High Quality
The High Quality paper is a non-coated paper generally used for offset printing. The High Quality paper
has a high degree of whiteness and used for various purposes. Specify [High Quality] to a tray to which
the High Quality paper is loaded.
- Plain
The Plain paper is used for copying in general and is called "PPC paper." The plain paper is usually not
a recycled paper. Specify [Plain] to the tray to which the plain paper or the recycled paper for
monochrome copying is loaded.
- Color Specific
Color specific paper is the type of paper used for color copying to prevent color dulling on high quality
paper. Select [Color Specific] for those trays that are used for color specific paper.
Page 19
CS665 Pro 2-5
Paper setting
2
Weight is classified into eight types as shown in the following table.
* The coated paper of certain brand can not be used with installation environment.
Contact your service representative.
Plain/Color Specific/
High Quality
Coated-GL Coated-ML Coated-GO Coated-MO
Plain Gloss Plain Gloss Plain Plain Gloss Plain
(Disable) (Disable) (Disable) (Disable) (Disable) (Disable)
(Disable) (Disable) (Disable) (Disable) (Disable) (Disable)
Item Description
Air Assist will be activated automatically when Auto is selected.
Copy speed becomes slower due to the setting for slowing down specified in Process Adj,
Copy rate will be 45 cpm or 32 cpm (on A4 paper in simplex mode).
(Normally the Process Adj. setting is available by service only.)
Copy speed becomes faster due to the speed setting (with [High] selected) in paper setting.
Copy rate will be 65 cpm from 45 cpm (on A4 paper in simplex mode).
Copy speed becomes slightly slower.
Copy rate will be 45 cpm from 65 cpm (on A4 paper in simplex mode).
Copy speed becomes slower.
Copy rate will be 32 cpm from 65 cpm (on A4 paper in simplex mode).
Page 20
2
Paper setting
2-6 CS665 Pro
Paper type
Basic size
(
inch
)
Bond
17x22
432x559
Cover
20x26
508x660
Index
25.5x30.5
648x775
Bristol
22.5x28.5
572x724
Tag
24x36
610x914
Book
25x38
635x965
g
/m
2
lb lb lb lb lb lb
50.0 13.3 18.5 27.7 22.8 30.8 33.8
52.3 13.9 19.4 29.0 23.9 32.2 35.4
54.2 14.4 20.1 30.0 24.7 33.3 36.7
60.2 16.0 22.3 33.3 27.5 37.0 40.7
64.0 17.0 23.7 35.4 29.2 39.4 43.3
66.3 17.7 24.6 36.7 30.3 40.8 44.9
68.7 18.3 25.4 38.0 31.4 42.3 46.5
72.3 19.3 26.8 40.0 33.0 44.5 48.9
75.9 20.2 28.1 42.0 34.7 46.7 51.3
80.0 21.3 29.6 44.3 36.5 49.2 54.1
83.7 22.3 31.0 46.4 38.2 51.5 56.6
88.0 23.4 32.6 48.7 40.2 54.1 59.5
90.0 24.0 33.3 49.8 41.1 55.4 60.9
98.3 26.2 36.4 54.4 44.9 60.5 66.5
100.0 26.6 37.0 55.4 45.7 61.5 67.6
104.7 27.9 38.8 58.0 47.8 64.4 70.8
108.0 28.8 40.0 59.8 49.3 66.4 73.1
110.0 29.3 40.7 60.9 50.2 67.7 74.4
120.0 32.0 44.4 66.5 54.8 73.8 81.2
127.9 34.1 47.4 70.8 58.4 78.7 86.5
130.0 34.6 48.1 72.0 59.4 80.0 87.9
140.0 37.3 51.8 77.5 63.9 86.1 94.7
150.0 39.9 55.5 83.1 68.5 92.3 101.5
160.0 42.6 59.2 88.6 73.1 98.4 108.2
170.0 45.3 62.9 94.2 77.6 104.6 115.0
180.0 47.9 66.7 99.7 82.2 110.7 121.8
190.0 50.6 70.4 105.2 86.8 116.9 128.5
200.0 53.3 74.1 110.8 91.3 123.1 135.3
210.0 55.9 77.8 116.3 95.9 129.2 142.1
220.0 58.6 81.5 121.8 100.5 135.4 148.8
230.0 61.3 85.2 127.4 105.0 141.5 155.6
240.0 63.9 88.9 132.9 109.6 147.7 162.4
250.0 66.6 92.6 138.5 114.2 153.8 169.1
260.0 69.2 96.3 144.0 118.7 160.0 175.9
270.0 71.9 100.0 149.5 123.3 166.1 182.7
280.0 74.6 103.7 155.1 127.9 172.3 189.4
290.0 77.2 107.4 160.6 132.4 178.4 196.2
300.0 79.9 111.1 166.1 137.0 184.6 202.9
Page 21
CS665 Pro 2-7
Paper setting
2
2.2 Register paper type/weight
Follow the procedure below to register paper type/weight in the User Setting.
1 Press [Utility/Counter] on the control panel.
The Utility Menu Screen will be displayed.
2 Touch [02 User Setting], [01 System Setting], and then [03 Feed Tray Setting].
3 Touch [01 Paper Setting].
The Paper Setting Menu Screen will be displayed.
Page 22
2
Paper setting
2-8 CS665 Pro
4 Touch the key to be registered.
– To modify the a paper setting which is already registered, touch to select the corresponding name
for the setting. To register a new setting, touch to highlight a blank line.
5 Touch [Add/Edit].
The Input Condition Screen will be displayed.
6 Select the paper type.
– Touch [Paper Type] to display the Paper Type Screen.
– Select the desired paper type, and the touch [OK] to complete the setting.
See page 2-4 for details of the paper types.
Page 23
CS665 Pro 2-9
Paper setting
2
7 Enter the paper name.
– Touch [Name] to display the Input Name Screen.
– Enter the name of the paper to be used, and then touch [OK].
You can use maximum 22 characters.
The same name as the paper type specified is displayed on the screen. To alter it, enter the new paper
type name. For details on entering texts in the field, see the appendix.
8 Select the paper weight.
– Touch [Weight] to display the Paper Weight Screen.
– Select a desired key to set the paper weight. To change the unit for paper weight, touch [Unit
Change] until a desired unit is displayed. Touch [OK] on selecting an appropriate key.
9 Adjust the printed position of the front and back.
– Touch [Both Sides Adj.] to display the Front and Back Page Adjustment Screen.
– Enter the adjustment value as follows.
Touch [Front] or [Back] on the Front and Back Page Adjustment Screen to select the printed side.
Select the adjustment item (vertical zoom, horizontal zoom, vertical shift, horizontal shift, and
Registration)
Page 24
2
Paper setting
2-10 CS665 Pro
10 Operate the process adjustment.
– Touch [Process Adj.]
– Enter the adjustment value as follows.
Display the required item touching [Next] and [Previous], and touch it.
Touch [+ <--> -] to specify the value to be positive or negative. Use the touch panel keypad or arrow
keys [+] and [,] to enter the desired adjustment value.
– To reset the value, touch [Reset]. To complete the adjustment, touch [OK].
11 Adjust the copying speed.
– Touch [Speed Setting] to display the Speed Setting Screen.
– Copy speed changes with paper type and paper weight. The [Speed Setting] key is available only
when [Weight] is set to 106 - 135 g/m
2
.
– Select the desired speed setting. Touch [OK] to complete the setting.
12 Specify whether to punch holes on paper or not.
– Select [Punched] or [No punched].
13 Specify whether to use color specific paper or not.
– Select [Non White] or [White].
14 Specify the air assist setting.
– Select [Auto], [On (Strong)], [On (Weak)], or [Off].
Page 25
CS665 Pro 2-11
Paper setting
2
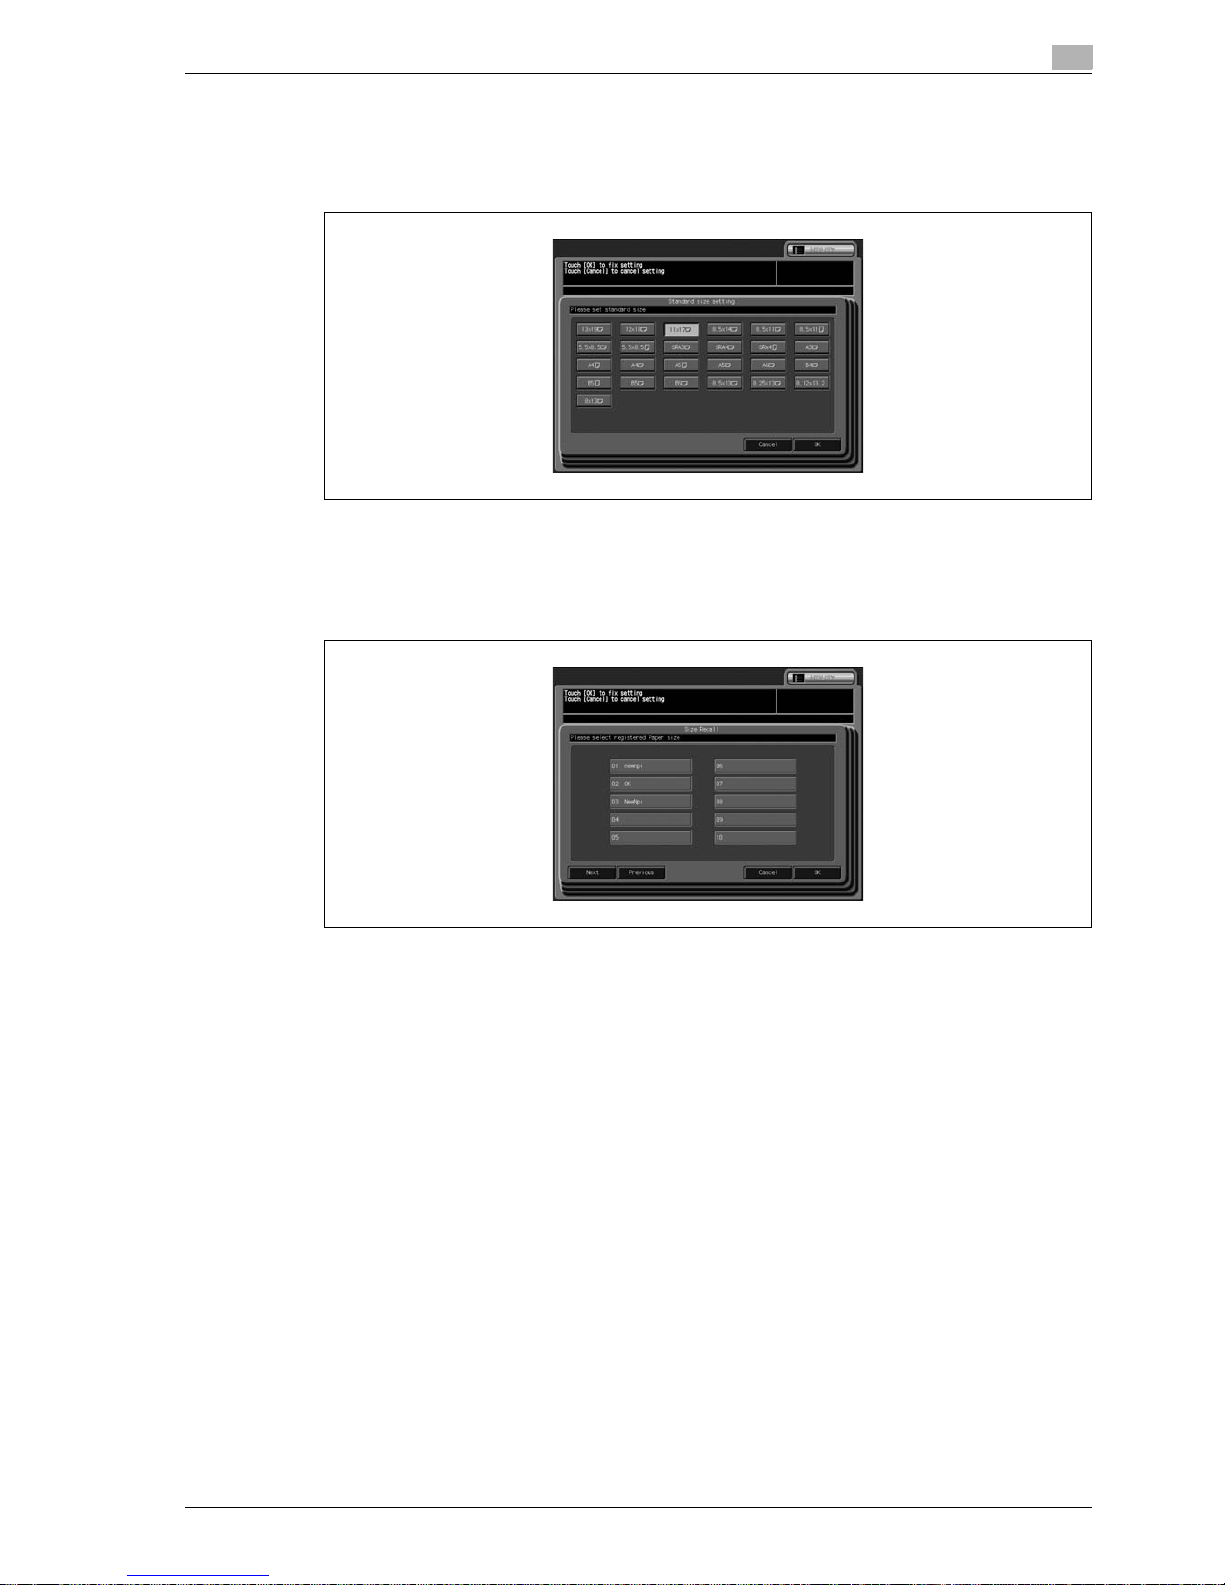
15 Select the paper size.
– To specify the standard size, touch [Standard] on the link size information to display the Standard
Size Setting Screen.
Select the desired size key, then touch [OK] to complete the setting.
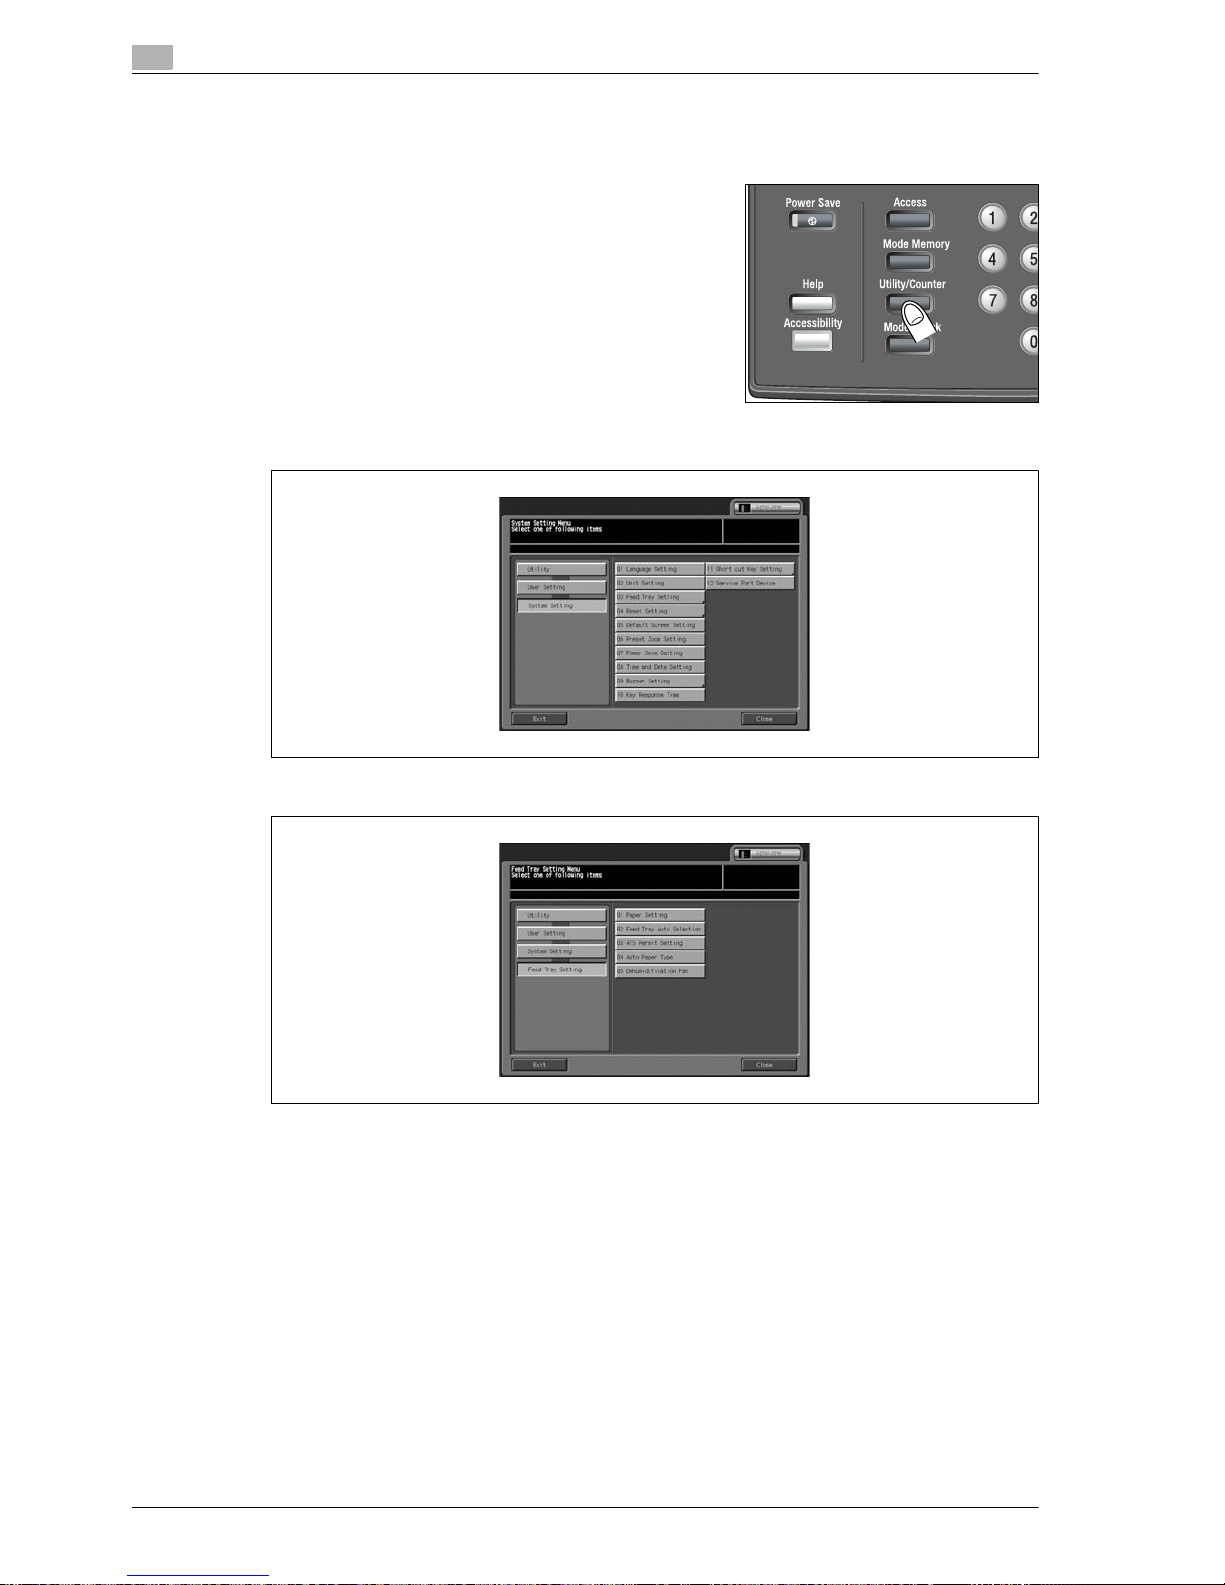
– To specify the custom size, recall the custom size registered from Copy Screen or Machine Status
Screen. Touch [Custom] on the link size information to display the Size Recall Screen. Select the
desired size key, then touch [OK] to complete the setting.
Custom sizes can be registered on the Copy Screen, or by selecting [Paper Setting] > [Size Setting]
the Machine Status Screen. Please refer to the User's Guide - Copier for more information.
16 Touch [OK] on the Input Condition Screen.
– The Paper Setting Screen will be restored.
Touch [Reset] to reset to the initial setting.
17 Touch [Close] on the Paper Setting Screen.
– Touch [Exit] to return to the Copy Screen.
!
Detail
Chart adjustment is available from the Paper Setting on the Copy Screen or Machine Status Screen
only.
Paper Setting of User Setting does not provide this function.
Contact your service representative for details.
Air assist setting will be effective only when tray 4 or tray 5 is selected.
Page 26
2
Paper setting
2-12 CS665 Pro
2.3 Delete paper setting
Follow the procedure below to delete the paper setting previously registered.
1 Press [Utility/Counter] on the control panel.
The Utility Menu Screen will be displayed.
2 Touch [02 User Setting], [01 System Setting], and then [03 Feed Tray Setting].
3 Touch [01 Paper Setting].
The Paper Setting Screen will be displayed.
Page 27
CS665 Pro 2-13
Paper setting
2
4 Touch the key to be deleted.
5 Touch [Delete].
A popup menu will be displayed to confirm that the selected register will be deleted.
6 Touch [Yes] to delete, or [No].
– Return to the Input Condition Screen. To delete multiple paper types, repeat steps 4 to 6.
7 Touch [Close] on the Paper Setting Screen.
– Touch [Exit] to return to the Copy Screen.
Page 28

2
Paper setting
2-14 CS665 Pro
Page 29

3
Adjustment
Page 30

Page 31

CS665 Pro 3-3
Adjustment
3
3Adjustment
This section describes information on adjusting the settings in the Image Control and Output options.
3.1 01 Machine Adjustment
3.1.1 01 Printer Adjustment \ 01 Restart Timing Adjustment
Perform this adjustment to control the restart timing.
2
Reminder
Perform this adjustment after completing FD-Mag. Adjustment.
To specify Restart Timing Adjustment
1 Touch [Adjustment] on the Machine Status Screen.
The Adjustment Menu Screen will be displayed.
2 Touch [01 Machine Adjustment], [01 Printer Adjustment], and then [01 Restart Timing Adjustment].
The Restart Timing Adjustment Screen will be displayed.
3 Touch [COPY] tab.
The Copy Screen will be displayed.
4 Select A3 w/11" e 17" w paper, then press [START].
The sample pattern will be output.
Page 32

3
Adjustment
3-4 CS665 Pro
5 Measure the resultant restart timing.
6 If the desired result cannot be obtained, touch the [ADJUSTMENT] tab.
The Restart Timing Adjustment Screen will be restored.
7 Display the required item using up/down arrow keys, and touch it.
8 Use the touch panel keypad to enter the desired adjustment value, then touch [<<SET].
Available range: -60 to +60, 1 step = 0.1 mm
9 Repeat the adjustment steps from 3 to 8 until the desired result is obtained.
10 Touch [Return] to restore the Adjustment Menu Screen.
20
Page 33

CS665 Pro 3-5
Adjustment
3
3.1.2 01 Printer Adjustment \ 02 Centering Adjustment
Perform this adjustment to control image centering to the direction of paper feed.
To specify Centering Adjustment
1 Touch [Adjustment] on the Machine Status Screen.
The Adjustment Menu Screen will be displayed.
2 Touch [01 Machine Adjustment], [01 Printer Adjustment], and then [02 Centering Adjustment].
The Centering Adjustment Screen will be displayed.
3 Touch [COPY] tab.
The Copy Screen will be displayed.
4 Select A3 w/11" e 17" w paper, then press [START].
The sample pattern will be output.
5 Fold the output sheet at the center to the direction of paper feed and measure the distance between
the lines on both sides.
6 If the desired result cannot be obtained, touch the [ADJUSTMENT] tab.
The Centering Adjustment Screen will be restored.
Page 34

3
Adjustment
3-6 CS665 Pro
7 Display the required item using up/down arrow keys, and touch it.
8 Use the touch panel keypad to enter the desired adjustment value, then touch [<<SET].
Available range: -40 to +40, 1 step = 0.1 mm
9 Repeat the adjustment steps from 3 to 8 until the desired result is obtained.
10 Touch [Return] to restore the Adjustment Menu Screen.
Page 35

CS665 Pro 3-7
Adjustment
3
3.1.3 01 Printer Adjustment \ 03 FD-Mag. Adjustment
Perform this adjustment to control the magnification to the direction of paper feed.
2
Note
This value is used as the baseline for the Both Sides Adjustment function in the Paper Setting. Specified
value in that adjustment will be an offset estimated from this baseline.
To specify FD-Mag. Adjustment
1 Touch [Adjustment] on the Machine Status Screen.
The Adjustment Menu Screen will be displayed.
2 Touch [01 Machine Adjustment], [01 Printer Adjustment], and then [03 FD-Mag. Adjustment].
The FD-Mag. Adjustment Screen will be displayed.
3 Touch the required item key.
4 Touch [COPY] tab.
The Copy Screen will be displayed.
5 Select A3 w/11" e 17" w paper, then press [START].
The sample pattern will be output.
Page 36

3
Adjustment
3-8 CS665 Pro
6 Measure the resultant magnification to the direction of paper feed.
7 If the desired result cannot be obtained, touch the [ADJUSTMENT] tab.
The FD-Mag. Adjustment Screen will be restored.
8 Touch the required item key.
9 Use the touch panel keypad to enter the desired adjustment value, then touch [<<SET].
Available range: -100 to +100, 1 step = 0.01%
10 Repeat the adjustment steps from 3 to 9 until the desired result is obtained.
11 Touch [Return] to restore the Adjustment Menu Screen.
205.7
Page 37

CS665 Pro 3-9
Adjustment
3
3.1.4 01 Printer Adjustment \ 04 CD-Mag. Adjustment
Perform this adjustment to control the magnification perpendicular to the direction of paper feed.
To specify CD-Mag. Adjustment
1 Touch [Adjustment] on the Machine Status Screen.
The Adjustment Menu Screen will be displayed.
2 Touch [01 Machine Adjustment], [01 Printer Adjustment], and then [04 CD-Mag. Adjustment].
The CD-Mag. Adjustment Screen will be displayed.
3 Touch the required item key.
4 Touch [COPY] tab.
The Copy Screen will be displayed.
5 Select A3 w/11" e 17" w paper, then press [START].
The sample pattern will be output.
6 Measure the resultant magnification perpendicular to the direction of paper feed.
190
Page 38

3
Adjustment
3-10 CS665 Pro
7 If the desired result cannot be obtained, touch the [ADJUSTMENT] tab.
The CD-Mag. Adjustment Screen will be restored.
8 Touch the required item key.
9 Use the touch panel keypad to enter the desired adjustment value, then touch [<<SET].
Available range: -100 to +100, 1 step = 0.01%
10 Repeat the adjustment steps from 3 to 9 until the desired result is obtained.
11 Touch [Return] to restore the Adjustment Menu Screen.
Page 39

CS665 Pro 3-11
Adjustment
3
3.1.5 02 Scanner Adjustment \ 01 Restart Timing Adjustment
Perform this adjustment to control the restart timing in scanning the original with the original glass.
To specify Restart Timing Adjustment
1 Touch [Adjustment] on the Machine Status Screen.
The Adjustment Menu Screen will be displayed.
2 Touch [01 Machine Adjustment], [02 Scanner Adjustment], and then [01 Restart Timing Adjustment].
The Scanner Restart Timing Adjustment Screen will be displayed.
3 Touch [COPY] tab.
The Copy Screen will be displayed.
4 Select A3 w/11" e 17" w paper, place the original of which a misalignment can be easily monitored on
the original glass, then press [START].
5 Check the misalignment by comparing the original and the output.
6 If the desired result cannot be obtained, touch the [ADJUSTMENT] tab.
The Scanner Restart Timing Adjustment Screen will be restored.
Page 40

3
Adjustment
3-12 CS665 Pro
7 Use the touch panel keypad to enter the desired adjustment value, then touch [<<SET].
Available range: -10 to +20, 1 step = 0.1 mm
8 Repeat the adjustment steps from 3 to 7 until the desired result is obtained.
9 Touch [Return] to restore the Adjustment Menu Screen.
Page 41

CS665 Pro 3-13
Adjustment
3
3.1.6 02 Scanner Adjustment \ 02 Centering Adjustment
Perform this adjustment to control image centering to the direction of paper feed in scanning the original with
original glass.
To specify Centering Adjustment
1 Touch [Adjustment] on the Machine Status Screen.
The Adjustment Menu Screen will be displayed.
2 Touch [01 Machine Adjustment], [02 Scanner Adjustment], and then [02 Centering Adjustment].
The Centering Adjustment Screen will be displayed.
3 Touch [COPY] tab.
The Copy Screen will be displayed.
4 Select A3 w/11" e 17" w paper, place the original of which a misalignment can be easily monitored on
the original glass, then press [START].
The sample pattern will be output.
5 Check the misalignment by comparing the original and the output.
6 If the desired result cannot be obtained, touch the [ADJUSTMENT] tab.
The Scanner Centering Adjustment Screen will be restored.
Page 42

3
Adjustment
3-14 CS665 Pro
7 Touch the required item key.
8 Use the touch panel keypad to enter the desired adjustment value, then touch [<<SET].
Available range: -30 to +30, 1 step = 0.1 mm
9 Repeat the adjustment steps from 3 to 8 until the desired result is obtained.
10 Touch [Return] to restore the Adjustment Menu Screen.
Page 43

CS665 Pro 3-15
Adjustment
3
3.1.7 02 Scanner Adjustment \ 03 FD-Mag. Adjustment
Perform this adjustment to control the magnification to the direction of paper feed in scanning the original
with original glass.
To specify FD-Mag. Adjustment
1 Touch [Adjustment] on the Machine Status Screen.
The Adjustment Menu Screen will be displayed.
2 Touch [01 Machine Adjustment], [02 Scanner Adjustment], and then [03 FD-Mag. Adjustment].
The FD-Mag. Adjustment Screen will be displayed.
3 Touch [COPY] tab.
The Copy Screen will be displayed.
4 Select A3 w/11" e 17" w paper, then press [START].
The sample pattern will be output.
5 Check the magnification in the direction of paper feed by comparing the output and the original.
6 If the desired result cannot be obtained, touch the [ADJUSTMENT] tab.
The Scanner FD-Mag. Adjustment Screen will be restored.
Page 44

3
Adjustment
3-16 CS665 Pro
7 Use the touch panel keypad to enter the desired adjustment value, then touch [<<SET].
Available range: -40 to +40, 1 step = 0.05%
8 Repeat the adjustment steps from 3 to 7 until the desired result is obtained.
9 Touch [Return] to restore the Adjustment Menu Screen.
Page 45

CS665 Pro 3-17
Adjustment
3
3.2 02 Image Quality Stability
Set priority to either the output speed or the image quality stability in a copying or printing job.
To specify Image Quality Stability
1 Touch [Adjustment] on the Machine Status Screen.
The Adjustment Menu Screen will be displayed.
2 Touch [02 Image Quality Stability].
The Image Quality Stability Screen will be displayed.
3 Select [Speed] or [Stability] for a copying or printing job.
4 Touch [OK] to restore the Adjustment Menu Screen.
Page 46

3
Adjustment
3-18 CS665 Pro
3.3 03 Execute Adjust Operation
Execute adjustment operations for the Automatic Gamma Adj., the Color Registration Adj., the Toner Refresh
Mode, and the Belt Refresh Mode.
To specify Execute Adjust Operation
1 Touch [Adjustment] on the Machine Status Screen.
The Adjustment Menu Screen will be displayed.
2 Touch [03 Execute Adjust Operation].
The Execute Adjust Operation Screen will be displayed.
3 Touch an appropriate key to execute the adjustment operation.
4 Touch [OK] to restore the Adjustment Menu Screen.
Page 47

CS665 Pro 3-19
Adjustment
3
3.4 04 Finisher Adjustment (FS-521)
3.4.1 01 Stapler Position Adj. \ 01 Staple Center Position
Perform this adjustment for the center position of copied/printed sheets and of staples processed by the
Finisher FS-521.
[02 Paper Width (Staple)] is supposed to be completed before this adjustment.
To specify Staple Center Position
1 Touch [Adjustment] on the Machine Status Screen.
The Adjustment Menu Screen will be displayed.
2 Touch [04 Finisher Adjustment], [01 Stapler Position Adj.], and then [01 Staple Center Position].
The Staple Center Position Screen will be displayed.
3 Touch [COPY] tab.
4 Press [Start] on the control panel.
A sample copy will be output.
5 If the desired result cannot be obtained, touch [ADJUSTMENT] tab.
The Staple Center Position Screen will be restored.
Page 48

3
Adjustment
3-20 CS665 Pro
6 Use the touch panel keypad to enter the desired adjustment value, then touch [<<SET].
Available range: -20 (forward) to +20 (backward), 1 step = 0.1 mm
7 Fold the output sheet in two on the center to the direction of paper feed and check misalignment (a) of
the stapling center position.
8 If the test desired result cannot be obtained, touch [ADJUSTMENT] tab. Repeat the adjustment steps
from 3 to 7 until the desired result is obtained.
9 Touch [Return] to restore the Adjustment Menu Screen.
a
[2]
[1]
Page 49

CS665 Pro 3-21
Adjustment
3
3.4.2 01 Stapler Position Adj. \ 02 Paper Width (Staple)
Perform this adjustment if stapled sheets are not aligned neatly processed by the Finisher FS-521.
To specify Paper Width (Staple)
1 Touch [Adjustment] on the Machine Status Screen.
The Adjustment Menu Screen will be displayed.
2 Touch [04 Finisher Adjustment], [01 Stapler Position Adj.], and then [02 Paper Width (Staple)].
The Paper Width (Staple) Screen will be displayed.
3 Touch [COPY] tab.
The Copy Screen will be displayed.
4 Load the desired size of paper to be adjusted on a tray, touch Staple and then press [Start].
A sample pattern will be output.
5 Open the Finisher door, and withdraw the Staple unit.
– Confirm the distance between the fixed plates and output
paper.
– When selecting the paper which length side is 239 mm or
longer, the Staple unit can not be withdrawn.
– Remove output paper from the paper exit side, withdraw
the staple unit, and then reset the output paper in the unit.
Page 50

3
Adjustment
3-22 CS665 Pro
6 Check misalignment (a), in which misalignment occurs if the paper width setting is larger than the actual
width, or paper curving (b), in which a sample set is curved if the paper width setting is smaller than the
actual width has occurred.
7 If the desired result cannot be obtained, touch [ADJUSTMENT] tab.
The Paper Width (Staple) Screen will be restored.
8 Display the required size key using up/down arrow keys, and touch it.
9 Use the touch panel keypad to enter the desired adjustment value, then touch [<<SET].
Available range: -20 (wide) to +20 (narrow), 1 step = 0.1 mm
10 Remove the output paper, and close the Finisher door.
11 If the test desired result cannot be obtained, touch [ADJUSTMENT] tab. Repeat the adjustment steps
from 3 to 10 until the desired result is obtained.
12 Touch [Return] to restore the Adjustment Menu Screen.
a
b
Page 51

CS665 Pro 3-23
Adjustment
3
3.4.3 01 Stapler Position Adj. \ 03 Paper Width (Straight)
Perform this adjustment if the paper for straight feed is misaligned in the Finisher FS-521.
To specify Paper Width (Straight)
1 Touch [Adjustment] on the Machine Status Screen.
The Adjustment Menu Screen will be displayed.
2 Touch [04 Finisher Adjustment], [01 Stapler Position Adj.], and then [03 Paper Width (Straight)].
The Paper Width (Straight) Screen will be displayed.
3 Touch [COPY] tab.
The Copy Screen will be displayed.
4 Load the desired size of paper to be adjusted on a tray, touch Staple and then press [Start].
A sample pattern will be output.
5 Open the Finisher door, and withdraw the Staple unit.
– Confirm the distance between the fixed plates and output
paper.
– When selecting the paper which length side is 239mm or
longer, the Staple unit can not be withdrawn.
– Remove output paper from the paper exit side, withdraw
the staple unit, and then reset the output paper in the unit.
Page 52

3
Adjustment
3-24 CS665 Pro
6 Check whether any misalignment or paper buckling has occurred. Misalignment may occur if the paper
width setting is larger than the actual width, and paper may become buckled if the paper width setting
is smaller than the actual width.
7 If the desired result cannot be obtained, touch [ADJUSTMENT] tab.
The Paper Width (Straight) Screen will be restored.
8 Display the required size key using up/down arrow keys, and touch it.
9 Use the touch panel keypad to enter the desired adjustment value, then touch [<<SET].
Available range: -20 (wide) to +20 (narrow), 1 step = 0.1 mm
10 Remove the output paper, and close the Finisher door.
11 If the test desired result cannot be obtained, touch [ADJUSTMENT] tab. Repeat the adjustment steps
from 3 to 10 until the desired result is obtained.
12 Touch [Return] to restore the Adjustment Menu Screen.
a
b
Page 53

CS665 Pro 3-25
Adjustment
3
3.4.4 01 Stapler Position Adj. \ 04 Exit Guide Center Adj.
Perform this adjustment for the center position of exit guides of the Finisher FS-521.
[05 Exit Guide Paper Width] is supposed to be completed before this adjustment.
To specify Exit Guide Center Adj.
1 Touch [Adjustment] on the Machine Status Screen.
The Adjustment Menu Screen will be displayed.
2 Touch [04 Finisher Adjustment], [01 Stapler Position Adj.], and then [04 Exit Guide Center Adj.].
The Exit Guide Center Adjustment Screen will be displayed.
3 Touch [COPY] tab.
The Copy Screen will be displayed.
4 Load the desired size of paper to be adjusted on a tray, and then press [Start].
A sample pattern will be output.
5 If the desired result cannot be obtained, touch [ADJUSTMENT] tab.
The Exit Guide Center Adjustment Screen will be restored.
Page 54

3
Adjustment
3-26 CS665 Pro
6 Use the touch panel keypad to enter the desired adjustment value, then touch [<<SET].
Available range: -50 (wide) to +50 (narrow), 1 step = 0.1 mm
7 Repeat the adjustment steps from 3 to 6 until the desired result is obtained.
8 Touch [Return] to restore the Adjustment Menu Screen.
Page 55

CS665 Pro 3-27
Adjustment
3
3.4.5 01 Stapler Position Adj. \ 05 Exit Guide Paper Width
Perform this adjustment for the paper width determined by exit guides of the Finisher FS-521.
To specify Exit Guide Paper Width
1 Touch [Adjustment] on the Machine Status Screen.
The Adjustment Menu Screen will be displayed.
2 Touch [04 Finisher Adjustment], [01 Stapler Position Adj.], and then [05 Exit Guide Paper Width].
The Exit Guide Paper Width Adjustment Screen will be displayed.
3 Touch [COPY] tab.
The Copy Screen will be displayed.
4 Load the desired size of paper to be adjusted on a tray, and then press [Start].
A sample pattern will be output.
5 If the desired result cannot be obtained, touch [ADJUSTMENT] tab.
The Exit Guide Paper Width Adjustment Screen will be restored.
Page 56

3
Adjustment
3-28 CS665 Pro
6 Display the required size key using up/down arrow keys, and touch it.
7 Use the touch panel keypad to enter the desired adjustment value, then touch [<<SET].
Available range: -50 (wide) to +50 (narrow), 1 step = 0.1 mm
8 Repeat the adjustment steps from 3 to 7 until the desired result is obtained.
9 Touch [Return] to restore the Adjustment Menu Screen.
Page 57

CS665 Pro 3-29
Adjustment
3
3.5 04 Finisher Adjustment (FD-503)
3.5.1 02 Multi Folder (Punch) Adj. \ 01 Paper Width Adjustment
Perform this adjustment for the specific paper size if punch holes processed by the Folding Unit FD-503
dislocate largely.
To specify Paper Width Adjustment
1 Touch [Adjustment] on the Machine Status Screen.
The Adjustment Menu Screen will be displayed.
2 Touch [04 Finisher Adjustment], [02 Multi Folder (Punch) Adj.], and then [01 Paper Width Adjustment].
The Paper Width Adjustment Screen will be displayed.
3 Touch [COPY] tab.
The Copy Screen will be displayed.
4 Load the desired size of paper to be adjusted on a tray, specify the set number to 10, then press [Start]
on the control panel.
A sample pattern will be output.
5 Check the diameter of penetrated holes when output sheets are piled up.
6 If the desired result cannot be obtained, touch [ADJUSTMENT] tab.
The Paper Width Adjustment Screen will be restored.
Page 58

3
Adjustment
3-30 CS665 Pro
7 Display the required size key using up/down arrow keys, and touch it.
8 Use the touch panel keypad to enter the desired adjustment value, then touch [<<SET].
Available range: -20 (wide) to +20 (narrow), 1 step = 0.1 mm
9 Repeat the adjustment steps from 3 to 8 until the desired result is obtained.
10 Touch [Return] to restore the Adjustment Menu Screen.
2
Note
If the setting is too wide, the center position of punch holes may dislocate. If the setting is too narrow,
the position of punch holes may vary.
Page 59

CS665 Pro 3-31
Adjustment
3
3.5.2 02 Multi Folder (Punch) Adj. \ 02 Hole-Punch Vertical Pos.
Perform this adjustment for the position of punch holes to the direction of paper feed.
Punch holes can be adjusted separately for 2-hole punch and 4-hole punch.
To specify Hole-Punch Vertical Pos.
1 Touch [Adjustment] on the Machine Status Screen.
The Adjustment Menu Screen will be displayed.
2 Touch [04 Finisher Adjustment], [02 Multi Folder (Punch) Adj.], and then [02 Hole-Punch Vertical Pos.].
3 Touch [2-Hole Punch] or [4-Hole Punch].
The corresponding Paper Width Adjustment Screen is displayed.
4 Touch [COPY] tab.
The Copy Screen will be displayed.
Page 60

3
Adjustment
3-32 CS665 Pro
5 Load the desired size of paper to be adjusted on a tray, specify Punch, then press [Start] on the control
panel.
A sample pattern will be output.
6 Check the distance (a) from the edge of the feeding sheet to the center position of the punch hole.
7 If the desired result cannot be obtained, touch [ADJUSTMENT] tab.
The Paper Width Adjustment Screen will be restored.
8 Display the required size key using up/down arrow keys, and touch it.
9 Use the touch panel keypad to enter the desired adjustment value, then touch [<<SET].
Available range: -40 (wide) to +40 (narrow), 1 step = 0.1 mm
10 Repeat the adjustment steps from 4 to 9 until the desired result is obtained.
11 If adjustment in any other size is required, repeat steps from 4 to 10.
12 Touch [Return] to restore the Adjustment Menu Screen.
a
[2]
[1]
Page 61

CS665 Pro 3-33
Adjustment
3
3.5.3 03 Multi Folder (Fold) Adj. \ 01 Half Fold Position Adj.
Perform this adjustment for the half fold position processed by the Folding Unit FD-503.
To specify Half Fold Position Adj.
1 Touch [Adjustment] on the Machine Status Screen.
The Adjustment Menu Screen will be displayed.
2 Touch [04 Finisher Adjustment], [03 Multi Folder (Fold) Adj.], and then [01 Half Fold Position Adj.].
The Half Fold Position Adjustment Screen will be displayed.
3 Touch [COPY] tab.
The Copy Screen will be displayed.
4 Load the desired size of paper to be adjusted on a tray, specify Folding, then press [Start] on the control
panel.
A sample pattern will be output.
5 Check the misalignment (a) of the edge of the feeding sheets.
6 If the desired result cannot be obtained, touch [ADJUSTMENT] tab.
The Half Fold Position Adjustment Screen will be restored.
a
Page 62

3
Adjustment
3-34 CS665 Pro
7 Display the required size key using up/down arrow keys, and touch it.
8 Use the touch panel keypad to enter the desired adjustment value, then touch [<<SET].
Available range: -50 to +50, 1 step = 0.1 mm
– When misalignment (a) of step 5 has occurred, enter the "+" value.
9 Repeat the adjustment steps from 3 to 8 until the desired result is obtained.
10 If adjustment in any other size is required, repeat steps from 3 to 9.
11 Touch [Return] to restore the Adjustment Menu Screen.
Page 63

CS665 Pro 3-35
Adjustment
3
3.5.4 03 Multi Folder (Fold) Adj. \ 02 Tri-Fold-in Pos. Adj.
Perform this adjustment for the folding positions in Tri-Fold-in mode processed by the Folding Unit FD-503.
2
Reminder
When adjusting both Single Fold and Double Fold, be sure to start with the Double Fold adjustment.
The baseline of Single Fold is calculated from the edge of the sheet, while that of Double Fold is
calculated from the position of the first fold line, therefore a distance (b) in step 5 will be altered by
changing the position of either Single Fold or Double Fold.
To specify Tri-Fold-in Pos. Adj.
1 Touch [Adjustment] on the Machine Status Screen.
The Adjustment Menu Screen will be displayed.
2 Touch [04 Finisher Adjustment], [03 Multi Folder (Fold) Adj.], and then [02 Tri-Fold-in Pos. Adj.].
The Tri-Fold-in Position Adjustment Screen will be displayed.
3 Touch [COPY] tab.
The Copy Screen will be displayed.
4 Load the desired size of paper to be adjusted on a tray, specify Letter Fold-in, then press [Start] on the
control panel.
A sample pattern will be output.
Page 64

3
Adjustment
3-36 CS665 Pro
5 Check a distance (a) and distance (b) on the output sheet.
6 If the desired result cannot be obtained, touch [ADJUSTMENT] tab.
The Tri-Fold-in Position Adjustment Screen will be restored.
7 Display the required size key using up/down arrow keys, and touch it.
8 Touch [Double Fold].
9 Use the touch panel keypad to enter the desired adjustment value, then touch [<<SET].
Available range: -50 to +50, 1 step = 0.1 mm
– The distance (a) in step 5 will increase when the "+" value is entered, and decrease when the "-"
value is entered.
10 Touch [Single Fold], then repeat step 9.
– The distance (b) in step 5 will increase when the "+" value is entered, and decrease when the "-"
value is entered.
11 Repeat steps 3 to 10 until the desired result is obtained.
12 If adjustment in any other size is required, repeat steps from 3 to 11.
13 Touch [Return] to restore the Adjustment Menu Screen.
a
b
[2]
[1]
Page 65

CS665 Pro 3-37
Adjustment
3
3.5.5 03 Multi Folder (Fold) Adj. \ 03 Tri-Fold-out Pos. Adj.
Perform this adjustment for the folding positions in Tri-Fold-out mode processed by the Folding Unit FD-503.
2
Note
The baseline of Single Fold is calculated from the edge of the sheet, while that of Double Fold is
calculated from the position of the first fold line, therefore a distance (b) in step 5 will be altered by
changing the position of either Single Fold or Double Fold.
To specify Tri-Fold-out Pos. Adj.
1 Touch [Adjustment] on the Machine Status Screen.
The Adjustment Menu Screen will be displayed.
2 Touch [04 Finisher Adjustment], [03 Multi Folder (Fold) Adj.], and then [03 Tri-Fold-out Pos. Adj.].
The Tri-Fold-out Position Adjustment Screen will be displayed.
3 Touch [COPY] tab.
The Copy Screen will be displayed.
4 Load the desired size of paper to be adjusted on a tray, specify Tri-Fold-out, then press [Start] on the
control panel.
A sample pattern will be output.
Page 66

3
Adjustment
3-38 CS665 Pro
5 Check a distance (a) and distance (b) on the output sheet.
6 If the desired result cannot be obtained, touch [ADJUSTMENT] tab.
The Tri-Fold-out Position Adjustment Screen will be restored.
7 Display the required size key using up/down arrow keys, and touch it.
8 Touch [Single Fold].
9 Use the touch panel keypad to enter the desired adjustment value, then touch [<<SET].
Available range: -50 to +50, 1 step = 0.1 mm
– The distance (a) in step 5 will increase when the "+" value is entered, and decrease when the "-"
value is entered.
10 Touch [Double Fold], then repeat step 9.
– The distance (b) in step 5 will increase when the "+" value is entered, and decrease when the "-"
value is entered.
11 Repeat steps 3 to 10 until the desired result is obtained.
12 If adjustment in any other size is required, repeat steps from 3 to 11.
13 Touch [Return] to restore the Adjustment Menu Screen.
a
b
[2]
[1]
Page 67

CS665 Pro 3-39
Adjustment
3
3.5.6 03 Multi Folder (Fold) Adj. \ 04 Double Parallel Pos. Adj.
Perform this adjustment for the folding positions in Tri-Fold-in mode processed by the Folding Unit FD-503.
2
Reminder
When adjusting both Single Fold and Double Fold, be sure to start with the Double Fold adjustment.
The baseline of Single Fold is calculated from the edge of the sheet, while that of Double Fold is
calculated from the position of the first fold line, therefore a distance (b) in step 5 will be altered by
changing the position of either Single Fold or Double Fold.
To specify Double Parallel Pos. Adj.
1 Touch [Adjustment] on the Machine Status Screen.
The Adjustment Menu Screen will be displayed.
2 Touch [04 Finisher Adjustment], [03 Multi Folder (Fold) Adj.], and then [04 Double Parallel Pos. Adj.].
The Double Parallel Position Adjustment Screen will be displayed.
3 Touch [COPY] tab.
The Copy Screen will be displayed.
4 Load the desired size of paper to be adjusted on a tray, specify Double Parallel, then press Start on the
control panel.
A sample pattern will be output.
Page 68

3
Adjustment
3-40 CS665 Pro
5 Check a distance (a) and distance (b) on the output sheet.
6 If the desired result cannot be obtained, touch [ADJUSTMENT] tab.
The Double Parallel Position Adjustment Screen will be restored.
7 Display the required size key using up/down arrow keys, and touch it.
8 Touch [Single Fold].
9 Use the touch panel keypad to enter the desired adjustment value, then touch [<<SET].
Available range: -50 to +50, 1 step = 0.1 mm
– The distance (a) in step 5 will decrease when the "+" value is entered, and increase when the "-"
value is entered.
10 Touch [Double Fold], then repeat step 9.
– The distance (b) in step 5 will decrease when the "+" value is entered, and increase when the "-"
value is entered.
11 Repeat steps 3 to 10 until the desired result is obtained.
12 If adjustment in any other size is required, repeat steps from 3 to 11.
13 Touch [Return] to restore the Adjustment Menu Screen.
b
a
[2]
[1]
Page 69

CS665 Pro 3-41
Adjustment
3
3.5.7 03 Multi Folder (Fold) Adj. \ 05 Z-Fold Position Adj.
Perform this adjustment for the folding positions in Z-Fold mode processed by the Folding Unit FD-503.
2
Reminder
When adjusting both Single Fold and Double Fold, be sure to start with the Single Fold adjustment.
The baseline of Single Fold is calculated from the edge of the sheet, while that of Double Fold is
calculated from the position of the first fold line, therefore a distance (b) in step 5 will be altered by
changing the position of either Single Fold or Double Fold.
To specify Z-Fold Position Adj.
1 Touch [Adjustment] on the Machine Status Screen.
The Adjustment Menu Screen will be displayed.
2 Touch [04 Finisher Adjustment], [03 Multi Folder (Fold) Adj.], and then [05 Z-Fold Position Adj.].
The Z-Fold Position Adjustment Screen will be displayed.
3 Touch [COPY] tab.
The Copy Screen will be displayed.
4 Load the desired size of paper to be adjusted on a tray, specify Z-Fold, then press [Start] on the control
panel.
A sample pattern will be output.
Page 70

3
Adjustment
3-42 CS665 Pro
5 Check a distance (a) and distance (b) on the output sheet.
6 If the desired result cannot be obtained, touch [ADJUSTMENT] tab.
The Z-Fold Position Adjustment Screen will be restored.
7 Display the required size key using up/down arrow keys, and touch it.
8 Touch Single Fold.
9 Use the touch panel keypad to enter the desired adjustment value, then touch [<<SET].
Available range: -50 to +50, 1 step = 0.1 mm
– The distance (a) in step 5 will increase when the "+" value is entered, and decrease when the "-"
value is entered.
10 Touch [Double Fold], then repeat step 9.
– The distance (b) in step 5 will increase when the "+" value is entered, and decrease when the "-"
value is entered.
11 Repeat steps 3 to 10 until the desired result is obtained.
12 If adjustment in any other size is required, repeat steps from 3 to 11.
13 Touch [Return] to restore the Adjustment Menu Screen.
b
a
[2]
[1]
Page 71

CS665 Pro 3-43
Adjustment
3
3.5.8 03 Multi Folder (Fold) Adj. \ 06 Gate Fold Position Adj.
Perform this adjustment for the folding positions in Gate folding mode processed by the Folding Unit FD-503.
2
Reminder
When adjusting Single Fold, Double Fold and Triple Fold at a time, be sure to start with the Single Fold
adjustment.
The baseline of Single Fold is calculated from the edge of the sheet, while that of Double Fold is
calculated from the position of the first fold line, and that of Triple Fold is calculated from the position
of the second fold line, therefore a distance (a), distance (b) and distance (c) in step 5 will be altered by
changing the position of any fold position.
To specify Gate Fold Position Adj.
1 Touch [Adjustment] on the Machine Status Screen.
The Adjustment Menu Screen will be displayed.
2 Touch [04 Finisher Adjustment], [03 Multi Folder (Fold) Adj.], and then [06 Gate Fold Position Adj].
The Gate Fold Position Adjustment Screen will be displayed.
3 Touch [COPY] tab.
The Copy Screen will be displayed.
4 Load the desired size of paper to be adjusted on a tray, specify Gate, then press [Start] on the control
panel.
A sample pattern will be output.
Page 72

3
Adjustment
3-44 CS665 Pro
5 Check a distance (a), distance (b) and distance (c) on the output sheet.
6 If the desired result cannot be obtained, touch [ADJUSTMENT] tab.
The Gate Fold Position Adjustment Screen will be restored.
7 Display the required size key using up/down arrow keys, and touch it.
8 Touch [Single Fold].
9 Use the touch panel keypad to enter the desired adjustment value, then touch [<<SET].
Available range: -50 to +50, 1 step = 0.1 mm
– The distance (a) in step 5 will decrease when the "+" value is entered, and increase when the "-"
value is entered.
10 Touch [Double Fold] and [Triple Fold] to set in the same manner respectively.
Repeat step 9.
– In Double Fold, the distance (b) in step 5 will increase when the "+" value is entered, and decrease
when the "-" value is entered.
In Triple Fold, the distance (c) in step 5 will decrease when the "+" value is entered, and increase
when the "-" value is entered.
11 Repeat steps 3 to 10 until the desired result is obtained.
12 If adjustment in any other size is required, repeat steps from 3 to 11.
13 Touch [Return] to restore the Adjustment Menu Screen.
a
b c
[3]
[1]
[2]
Page 73

CS665 Pro 3-45
Adjustment
3
3.6 04 Finisher Adjustment (LS-505)
3.6.1 05 Stacker Adjustment \ 01 Paper Width Adjustment
Perform this adjustment when output sheets are not aligned in a perpendicular position to the direction of
paper feed processed by the Large Capacity Stacker LS-505.
To specify Paper Width Adjustment
1 Touch [Adjustment] on the Machine Status Screen.
The Adjustment Menu Screen will be displayed.
2 Touch [04 Finisher Adjustment], [05 Stacker Adjustment], and then [01 Paper Width Adjustment].
The Paper Width Adjustment Screen will be displayed.
3 Touch [COPY] tab.
The Copy Screen will be displayed.
4 Specify A3 then press [Start] on the control panel.
A sample pattern will be output.
5 If output sheets are misaligned, touch [ADJUSTMENT] tab.
The Paper Width Adjustment Screen will be restored.
Page 74

3
Adjustment
3-46 CS665 Pro
6 Use the touch panel keypad to enter the desired adjustment value, then touch [<<SET].
Available range: -20 (narrow) to +20 (wide), 1 step = 0.1 mm
7 Repeat steps 3 to 6 until the desired result is obtained.
8 Touch [Return] to restore the Adjustment Menu Screen.
Page 75

CS665 Pro 3-47
Adjustment
3
3.6.2 05 Stacker Adjustment \ 02 Paper Length Adjustment
Perform this adjustment when output sheets are not aligned to the direction of paper feed processed by the
Large Capacity Stacker LS-505.
To specify Length Adjustment
1 Touch [Adjustment] on the Machine Status Screen.
The Adjustment Menu Screen will be displayed.
2 Touch [04 Finisher Adjustment], [05 Stacker Adjustment], and then [02 Paper Length Adjustment].
The Paper Length Adjustment Screen will be displayed.
3 Touch [COPY] tab.
The Copy Screen will be displayed.
4 Specify A3 then press [Start] on the control panel.
A sample pattern will be output.
5 If output sheets are misaligned, touch [ADJUSTMENT] tab.
The Paper Length Adjustment Screen will be restored.
Page 76

3
Adjustment
3-48 CS665 Pro
6 Use the touch panel keypad to enter the desired adjustment value, then touch [<<SET].
Available range: -20 (narrow) to +20 (wide), 1 step = 0.1 mm
7 Repeat steps 3 to 6 until the desired result is obtained.
8 Touch [Return] to restore the Adjustment Menu Screen.
Page 77

CS665 Pro 3-49
Adjustment
3
3.7 04 Finisher Adjustment (SD-506)
3.7.1 06 Saddle Stitcher Adj. \ 01 Staple Center Adj.
Perform this adjustment for the center (folding) position of copied/printed sheets and of staples processed
by the Saddle Stitcher SD-506.
The [06 Fold Paper Width Adj.] and [04 Half Fold Position Adj.] are supposed to be completed before this
adjustment.
To specify Staple Center Adj.
1 Touch Adjustment on the Machine Status Screen.
The Adjustment Menu Screen will be displayed.
2 Touch [04 Finisher Adjustment], [06 Saddle Stitcher Adj.], and then [01 Staple Center Adj.].
The Staple Center Adjustment Screen will be displayed.
3 Touch [COPY] tab.
The Copy Screen will be displayed.
4 Select the Fold & Staple mode, then press [Start] on the control panel.
A sample copy will be output.
Page 78

3
Adjustment
3-50 CS665 Pro
5 Check misalignment (a) of the folded line and stapling position.
6 If the test desired result cannot be obtained, touch [ADJUSTMENT] tab.
The Staple Center Adjustment Screen will be restored.
7 Use the touch panel keypad to enter the desired adjustment value, then touch [<<SET].
Available range: -50 (forward) to +50 (backward), 1 step = 0.1 mm
8 Repeat the adjustment steps from 3 to 7 until the desired result is obtained.
9 Touch [Return] to restore the Adjustment Menu Screen.
a
[2]
[1]
Page 79

CS665 Pro 3-51
Adjustment
3
3.7.2 06 Saddle Stitcher Adj. \ 02 Staple Paper Width Adj.
Perform this adjustment if stapled sheets are not aligned neatly processed by the Saddle Stitcher SD-506.
To specify Staple Paper Width Adj.
1 Touch [Adjustment] on the Machine Status Screen.
The Adjustment Menu Screen will be displayed.
2 Touch [04 Finisher Adjustment], [06 Saddle Stitcher Adj.], and then [02 Staple Paper Width Adj.].
The Staple Paper Width Adjustment Screen will be displayed.
3 Touch [COPY] tab.
The Copy Screen will be displayed.
4 Load the desired size of paper to be adjusted on a tray, select Fold & Staple and then press [Start] on
the control panel.
A sample pattern will be output.
5 Check misalignment (a), in which misalignment occurs if the paper width setting is larger than the actual
width, or paper curving (b), in which a sample set is curved if the paper width setting is smaller than the
actual width has occurred.
a
b
Page 80

3
Adjustment
3-52 CS665 Pro
6 If the desired result cannot be obtained, touch [ADJUSTMENT] tab.
The Staple Paper Width Adjustment Screen will be restored.
7 Display the required size key using up/down arrow keys, and touch it.
8 Use the touch panel keypad to enter the desired adjustment value, then touch [<<SET].
Available range: -20 (wide) to +20 (narrow), 1 step = 0.1 mm
9 Repeat the adjustment steps from 3 to 8 until the desired result is obtained.
10 If adjustment in any other paper size is required, repeat steps from 3 to 9.
11 Touch [Return] to restore the Adjustment Menu Screen.
2
Note
The following limitation is put on the paper width setting according to the actual paper width.
* Using paper size of which actual width is less than 222 mm such as A4 w, the staple pitch will be set to 91 mm
automatically even if the value shorter than 91 mm of staple pitch is entered.
Actual paper width Minimum value Maximum value
~ 222 mm 91 mm Actual width minus 91 mm
222 mm ~ 290 mm Not limited Not limited
290 mm ~ Not limited 165 mm
Page 81

CS665 Pro 3-53
Adjustment
3
3.7.3 06 Saddle Stitcher Adj. \ 03 Staple Pitch Adjustment
Perform this adjustment for the staple pitch processed by the Saddle Stitcher SD-506.
To specify Staple Pitch Adjustment
1 Touch [Adjustment] on the Machine Status Screen.
The Adjustment Menu Screen will be displayed.
2 Touch [04 Finisher Adjustment], [06 Saddle Stitcher Adj.], and then [03 Staple Pitch Adjustment].
The Staple Pitch Adjustment Screen will be displayed.
3 Touch [COPY] tab.
The Copy Screen will be displayed.
4 Load the desired size of paper to be adjusted on a tray, specify Fold & Staple, then press [Start] on the
control panel.
A sample pattern will be output.
5 Check the staple pitch (a) of the sample sheet.
aa
Page 82

3
Adjustment
3-54 CS665 Pro
6 If the desired result cannot be obtained, touch [ADJUSTMENT] tab.
The Staple Pitch Adjustment Screen will be restored.
7 Display the required size key using up/down arrow keys, and touch it.
8 Use the touch panel keypad to enter the desired adjustment value, then touch [<<SET].
Available range: -20 (wide) to +20 (narrow), 1 step = 1 mm
9 Repeat the adjustment steps from 3 to 8 until the desired result is obtained.
10 If adjustment in any other paper size is required, repeat steps from 3 to 9.
11 Touch [Return] to restore the Adjustment Menu Screen.
Page 83

CS665 Pro 3-55
Adjustment
3
3.7.4 06 Saddle Stitcher Adj. \ 04 Half Fold Position Adj.
Perform this adjustment for the double-folding position processed by the Saddle Stitcher SD-506.
To specify Half Fold Position Adj.
1 Touch [Adjustment] on the Machine Status Screen.
The Adjustment Menu Screen will be displayed.
2 Touch [04 Finisher Adjustment], [06 Saddle Stitcher Adj.], and then [04 Half Fold Position Adj.].
The Half Fold Position Adjustment Screen will be displayed.
3 Touch [COPY] tab.
The Copy Screen will be displayed.
4 Load the desired size of paper to be adjusted on a tray, specify Multi Half Fold, then press [Start] on
the control panel.
A sample pattern will be output.
5 Check the misalignment (a) of the edge of the feeding sheets.
6 If the desired result cannot be obtained, touch [ADJUSTMENT] tab.
The Half Fold Position Adjustment Screen will be restored.
a
Page 84

3
Adjustment
3-56 CS665 Pro
7 Display the required size key using up/down arrow keys, and touch it.
8 Use the touch panel keypad to enter the desired adjustment value, then touch [<<SET].
Available range: -20 to +20, 1 step = 0.1 mm
– When misalignment (a) of step 5 has occurred, enter the "+" value.
9 Repeat the adjustment steps from 3 to 8 until the desired result is obtained.
10 If adjustment in any other size is required, repeat steps 3 to 9.
11 Touch [Return] to restore the Adjustment Menu Screen.
Page 85

CS665 Pro 3-57
Adjustment
3
3.7.5 06 Saddle Stitcher Adj. \ 05 Tri-Fold Position Adj.
Perform this adjustment for the three-folding positions processed by the Saddle Stitcher SD-506.
2
Note
When adjusting both Single Fold and Double Fold, be sure to start with the Double Fold adjustment.
The baseline of Single Fold is calculated from the edge of the sheet, while that of Double Fold is
calculated from the position of the first fold line, therefore a distance (b) in step 5 will be altered by
changing the position of either Single Fold or Double Fold.
To specify Tri-Fold Position Adj.
1 Touch [Adjustment] on the Machine Status Screen.
The Adjustment Menu Screen will be displayed.
2 Touch [04 Finisher Adjustment], [06 Saddle Stitcher Adj.], and then [05 Tri-Fold Position Adj.].
The Tri-Fold Position Adjustment Screen will be displayed.
3 Touch [COPY] tab.
The Copy Screen will be displayed.
4 Load the desired size of paper to be adjusted on a tray, specify Tri-Fold, then press [Start] on the control
panel.
A sample pattern will be output.
Page 86

3
Adjustment
3-58 CS665 Pro
5 Check a distance (a) and distance (b) on the output sheet.
6 If the desired result cannot be obtained, touch [ADJUSTMENT] tab.
The Tri-Fold Position Adjustment Screen will be restored.
7 Touch the required size key.
8 Touch [Double Fold].
9 Use the touch panel keypad to enter the desired adjustment value, then touch [<<SET].
Available range: -50 to +50, 1 step = 0.1 mm
– The distance (a) in step 5 will increase when the "+" value is entered, and decrease when the "-"
value is entered.
10 Touch [Single Fold], then repeat step 9.
– The distance (b) in step 5 will increase when the "+" value is entered, and decrease when the "-"
value is entered.
11 Repeat steps 3 to 10 until the desired result is obtained.
12 If adjustment in any other size is required, repeat steps 3 to 11.
13 Touch [Return] to restore the Adjustment Menu Screen.
a
b
[2]
[1]
Page 87

CS665 Pro 3-59
Adjustment
3
3.7.6 06 Saddle Stitcher Adj. \ 06 Fold Paper Width Adj.
Adjust misalignment of the fold & staple, multi fold, and multi tri-fold paper processed by the Saddle Stitcher
SD-506.
To specify Fold Paper Width Adj.
1 Touch [Adjustment] on the Machine Status Screen.
The Adjustment Menu Screen will be displayed.
2 Touch [04 Finisher Adjustment], [06 Saddle Stitcher Adj.], and then [06 Fold Paper Width Adj.].
The Fold Paper Width Adjustment Screen will be displayed.
3 Touch [COPY] tab.
The Copy Screen will be displayed.
4 Load the desired size of paper to be adjusted on a tray, specify the number of sheets to 5, then press
[Start] on the control panel.
A sample pattern will be output.
5 Check that any dislocation is found in the output set.
6 If the desired result cannot be obtained, touch [ADJUSTMENT] tab.
The Fold Paper Width Adjustment Screen will be restored.
Page 88

3
Adjustment
3-60 CS665 Pro
7 Display the required size key using up/down arrow keys, and touch it.
8 Use the touch panel keypad to enter the desired adjustment value, then touch [<<SET].
Available range: -50 (wide) to +50 (narrow), 1 step = 0.1 mm
– If the setting is too wide, the distance of misalignment may be larger.
9 Repeat the adjustment steps from 3 to 8 until the desired result is obtained.
10 If adjustment in any other size is required, repeat steps 3 to 9.
11 Touch [Return] to restore the Adjustment Menu Screen.
Page 89

CS665 Pro 3-61
Adjustment
3
3.7.7 06 Saddle Stitcher Adj. \ 07 Trimming Adjustment
Perform this adjustment for the trimmed width.
To specify Trimming Adjustment
1 Touch [Adjustment] on the Machine Status Screen.
The Adjustment Menu Screen will be displayed.
2 Touch [04 Finisher Adjustment], [06 Saddle Stitcher Adj.], and then [07 Trimming Adjustment].
The Trimming Adjustment Screen will be displayed.
3 Touch [COPY] tab.
The Copy Screen will be displayed.
4 Load the desired size of paper to be adjusted on a tray, specify Fold & Staple, then press [Start] on the
control panel.
A sample pattern will be output.
5 Check the trimmed width (a) from the edge of the feeding sheet.
6 If the desired result cannot be obtained, touch [ADJUSTMENT] tab.
The Trimming Adjustment Screen will be restored.
Page 90

3
Adjustment
3-62 CS665 Pro
7 Display the required size key using up/down arrow keys, and touch it.
8 Use the touch panel keypad to enter the desired adjustment value, then touch [<<SET].
Available range: -400 (wide) to +400 (narrow), 1 step = 0.1 mm
9 Repeat the adjustment steps from 3 to 8 until the desired result is obtained.
10 If adjustment in any other size is required, repeat steps 3 to 9.
11 Touch [Return] to restore the Adjustment Menu Screen.
2
Note
Enter the value so that the cover should be cut more than 2.0 mm.
If "All Size" is selected as paper size, the entered adjustment value will be applied to all sizes. If specific
paper size is selected, adjustment value will be the sum of the entered value and the value previously
specified for "All Size".
Page 91

CS665 Pro 3-63
Adjustment
3
3.7.8 06 Saddle Stitcher Adj. \ 08 Trimming Receiver Adj.
Frequent trimming operations may cause damage to the receiver, resulting in trimming failures. Select the
interval in which the receiver should be moved after specified trimming operations (Trimmer Count). Select
the pitch to move the receiver (Move Pitch). Force the receiver to be moved if trimming operations are
beginning to fail (Execute Compulsive Movement).
The [08 Trimming Receiver Adj.] key is not displayed normally.
If this adjustment is required, contact your service representative.
To specify Trimming Receiver Adjustment
1 Touch [Adjustment] on the Machine Status Screen.
The Adjustment Menu Screen will be displayed.
2 Touch [04 Finisher Adjustment], [06 Saddle Stitcher Adj.], and then [08 Trimming Receiver Adj.].
The Trimming Receiver Adjustment Screen will be displayed.
3 Select the trimmer count.
Touch to choose between [700 times], [500 times], and [300 times].
4 Select the move pitch.
Touch to choose between [1.0 mm], [1.5 mm], and [2.0 mm].
5 Touch [Execute Compulsive Movement] to force the receiver to be moved.
This operation takes effect immediately, and touching [Cancel] will not abort the operation.
6 Touch [OK] to complete the setting.
The Adjustment Menu Screen will be restored.
Page 92

3
Adjustment
3-64 CS665 Pro
3.8 04 Finisher Adjustment (RU-504)
07 RU Adjustment \ 01 Curl Reform Direction
When paper jam occurs in options, it can be prevented by selecting the curl reform direction for the paper
fed into the Relay Unit.
To specify Curl Reform Direction
1 Touch [Adjustment] on the Machine Status Screen.
The Adjustment Menu Screen will be displayed.
2 Touch [04 Finisher Adjustment], [07 RU Adjustment], and then [01Curl Reform Direction].
The Curl Reform Direction Screen will be displayed.
3 Touch to select [Upper] or [Lower]. Touch [Off] if you do not use the function.
4 Touch [Return] to restore the Adjustment Menu Screen.
Page 93

CS665 Pro 3-65
Adjustment
3
3.9 Finisher Adjustment (PB-501/PB-502)
3.9.1 01 Cover Trimming Adjustment
Perform this adjustment to increase/decrease the trimming width of the right cover page determined in
Perfect Binding mode.
2
Reminder
Be sure to perform 02 Cover Lead Edge Adjustment before this adjustment.
To specify Cover Trimming Adjustment
1 Touch [Adjustment] on the Machine Status Screen.
The Adjustment Menu Screen will be displayed.
2 Touch [04 Finisher Adjustment], [08 Perfect Binder Adjustment], and then [01 Cover Trimming
Adjustment].
The Cover Trimming Adjustment Screen will be displayed.
3 Touch [Perfect Binder Tray] or [Except PB Tray] to select the tray (Main Tray or PB Tray) to feed the
cover.
4 Touch [COPY] tab.
The Copy Screen will be displayed.
5 Select the PB tray or desired main body tray if selected in step 3, then press [Start].
A sample pattern of perfect-bound book will be output.
Page 94

3
Adjustment
3-66 CS665 Pro
6 Check that the edge of the right cover page is neatly aligned with that of the left cover page.
7 If the desired result cannot be obtained, touch [ADJUSTMENT] tab.
8 Touch [+ <--> -] to specify the value to be positive or negative. Use the touch panel keypad to enter the
desired adjustment value, then touch [<<SET].
Available range: -128 (short) to +127 (long), 1 step = 0.1 mm
9 Repeat the adjustment steps from 3 to 8 until the desired result is obtained.
10 Touch [Return] to restore the Perfect Binder Adjustment Menu Screen.
Left cover page
Right cover page Trimming position
Page 95

CS665 Pro 3-67
Adjustment
3
3.9.2 02 Cover Lead Edge Adjustment
Perform this adjustment for the position of left cover page determined in Perfect Binding mode.
To specify Cover Lead Edge Adjustment
1 Touch [Adjustment] on the Machine Status Screen.
The Adjustment Menu Screen will be displayed.
2 Touch [04 Finisher Adjustment], [08 Perfect Binder Adjustment], and then [02 Cover Lead Edge
Adjustment].
The Cover Lead Edge Adjustment Screen will be displayed.
3 Touch [PB Tray] or [Except PB Tray] to select the tray (Main Tray or PB Tray) to feed the cover.
4 Display the required size key using up/down arrow keys to select the paper size of the body set to be
attached with the cover.
5 Touch [COPY] tab.
The Copy Screen will be displayed.
6 Select the PB tray or desired main body tray if selected in step 3, then press [Start].
A sample pattern of perfect-bound book will be output.
Page 96

3
Adjustment
3-68 CS665 Pro
7 Check that the edge of the left cover page extends out of the body set by the desired amount.
8 If the desired result cannot be obtained, touch [ADJUSTMENT] tab.
9 Touch [+ <--> -] to specify the value to be positive or negative. Use the touch panel keypad to enter the
desired adjustment value, then touch [<<SET].
Available range: -128 (short) to +127 (long), 1 step = 0.1 mm
10 Repeat the adjustment steps from 3 to 9 until the desired result is obtained.
11 Touch [Return] to restore the Perfect Binder Adjustment Menu Screen.
!
Detail
If "All Size" is selected as paper size, the entered adjustment value will be applied to all sizes. If specific
paper size is selected, adjustment value will be the sum of the entered value and the value previously
specified for "All Size".
Left cover page
Right cover page
Length differential
Edge of left cover paper
Body pages
Page 97

CS665 Pro 3-69
Adjustment
3
3.9.3 03 Spine Corner Forming Position Adjustment
Perform this adjustment to regulate the position when forming the spine corner of the cover.
To specify Spine Corner Forming Position Adjustment
1 Touch [Adjustment] on the Machine Status Screen.
The Adjustment Menu Screen will be displayed.
2 Touch [04 Finisher Adjustment], [08 Perfect Binder Adjustment], and then [03 Spine Corner Forming
Position Adjustment].
The Spine Corner Forming Position Adjustment Screen will be displayed.
3 Touch [COPY] tab.
The Copy Screen will be displayed.
4 Select the PB tray or desired main body tray, then press [Start]. A sample pattern of perfect-bound book
will be output.
5 Check that the position of spine corner of the cover is formed uniformly against the scanning direction.
Left cover page
Spine
Right cover page
Horizontal scanning direction
Page 98

3
Adjustment
3-70 CS665 Pro
6 If the desired result cannot be obtained, touch [ADJUSTMENT] tab.
7 Touch [Up/Down (Forward) Adj.] or [Up/Down (Rear) Adj.] to select (Forward) or (Rear) for the
adjustment.
8 Touch [+ <--> -] to specify the value to be positive or negative. Use the touch panel keypad to enter the
desired adjustment value, then touch [<<SET].
Available range: -128 (down) to +127 (up), 1 step = 0.1 mm
9 Repeat the adjustment steps from 3 to 8 until the desired result is obtained.
10 Touch [Return] to restore the Perfect Binder Adjustment Menu Screen.
Page 99

CS665 Pro 3-71
Adjustment
3
3.9.4 04 Pasting Start Position Adjustment
Perform this adjustment for the position to start pasting on the body set.
To specify Pasting Start Position Adjustment
1 Touch [Adjustment] on the Machine Status Screen.
The Adjustment Menu Screen will be displayed.
2 Touch [04 Finisher Adjustment], [08 Perfect Binder Adjustment], and then [04 Pasting Start Position].
The Pasting Start Position Adjustment Screen will be displayed.
3 Touch [Ahead] or [Back] to select the direction to start pasting.
4 Display the required size key using up/down arrow keys to select the paper size of the body set to be
attached with the cover.
5 Touch [COPY] tab.
The Copy Screen will be displayed.
6 Select the PB tray or desired main body tray, then press [Start].
A sample pattern of perfect-bound book will be output.
Page 100

3
Adjustment
3-72 CS665 Pro
7 Check that the pasting on the body set starts in proper position.
8 If the desired result cannot be obtained, touch [ADJUSTMENT] tab.
9 Touch [+ <--> -] to specify the value to be positive or negative. Use the touch panel keypad to enter the
desired adjustment value, then touch [<<SET].
Available range: -128 (early) to +127 (late), 1 step = 0.1 mm
10 Repeat the adjustment steps from 3 to 9 until the desired result is obtained.
11 Touch [Return] to restore the Perfect Binder Adjustment Menu Screen.
!
Detail
If "All Size" is selected as paper size, the entered adjustment value will be applied to all sizes. If specific
paper size is selected, adjustment value will be the sum of the entered value and the value previously
specified for "All Size".
Body pages
Start position of backward pasting
Start position of frontward pasting
 Loading...