

Page 1
Océ CS 5090
User Manual
Page 2

Océ-Technologies B.V.
Trademarks
Products in this manual are referred to by their trade names.
In most, if not all cases, these designations are claimed as
trademarks or registered trademarks of their respective
companies.
Copyright
Océ-Technologies B.V. Venlo, The Netherlands © 2001
All rights reserved. No part of this work may be reproduced, copied, adapted,
or transmitted in any form or by any means without written permission from
Océ.
Océ-Technologies B.V. makes no representation or warranties with respect to
the contents hereof and specifically disclaims any implied warranties of
merchantability or fitness for any particular purpose.
Further, Océ-Technologies B.V. reserves the right to revise this publication and
to make changes from time to time in the content hereof without obligation to
notify any person of such revision or changes.
Code number 7114136
Edition 2.0 6/5/01
GB
Page 3

Contents
Chapter 1
Introduction
How to use this manual 10
Printing with Océ CS 5090 12
Graphic reproductions 13
Choice of print mode 14
Ink cartridge preparation and alignment 14
Chapter 2
Getting started
Operate the CS 5090 16
Start up checklist 16
Locate the control panel 16
Choose menu functions 17
Set the language 17
Load media 18
Use the power media feed and take-up system 18
Load roll media 19
Use the take-up roll 19
Use the second feed roll 21
Load sheet media 22
Use the carriage 23
Move the carriage 23
Install cutter 24
Fill the ink reservoirs 25
Install ink cartridges 26
Cartridge sets 27
Inspect cartridges 28
Place cartridges 29
Prime the ink delivery lines 30
Run a colour test 35
Print the prime pattern 36
Cartridge recognition 38
Align cartridges 39
Paper axis calibration 39
Define calibration units 39
Contents 3
Page 4

Chapter 3
Chapter 4
Colour deadband calibration 40
Cartridges calibration 41
Operate the printer 43
Control panel
Main menu at a glance 46
Menu tree 47
Use the default settings 48
Save user options 50
Adjust the LCD contrast 51
Access printer information 52
Get cartridge information 52
E-Connect
Prerequisites 54
Connection 55
Configuration 57
Configuration of the E-connect printserver 57
Chapter 5
Chapter 6
Printing with HP-GL/2
Overview 60
Access the HP-GL/2 menu options 60
Select the palette 61
Set the ’Control’ function 62
Rotate a print 63
Make reprints 63
Ink reduction 64
Nesting 64
Apply the ink limit 65
Print an HP-GL/2 test file 66
Handling ink and media
Choose paper options 68
Supply Type 68
Media standard 68
4 Océ 5090 User Manual
Page 5

Rollfeed media: sizes and maximum printing areas 69
Sheet media: sizes and maximum printing areas 71
Set margins 73
Set auto-load delay 75
Select auto-cut 75
Select auto-cut delay 76
Delay status 76
Save media 77
Choose "feed media" options 78
Detect the "end of media" 78
Use the media counter 79
Ink 81
Refill ink reservoirs 81
Use the dryer 81
Select auto-wipe 83
Change ink types 83
Remove and store ink cartridges 84
Remove reservoirs 85
Install new cartridges 86
Refill ink cartridges 87
Purge ink delivery lines 89
Select ink preheat 89
Chapter 7
Chapter 8
Quality
Choose a print mode 92
Select cartridge sets 94
Select quality modes 94
Select a colour mode 95
Select resolution (dpi) 95
Set print passes 96
Set carriage speed 96
Select the print direction 97
Firmware downloads
Overall 100
Check the firmware version 101
Upgrade the firmware 102
Chapter 9
Contents 5
Page 6

Chapter 10
Maintenance and cleaning
Periodic cleaning 106
Materials to use for cleaning 107
Clean the ink cartridge jet plate 107
Clean the service station 108
Clean the Pinch Rollers and Lower Drive Rollers 110
Clean the slide shaft 111
Clean the encoder strip 112
Clean trailing cables 113
Clean flex cables 113
Clean carriage bushings 114
Clean platen vacuum holes 115
Maintain the Océ Prime tool 116
Transport the printer 116
Error handling and troubleshooting
Error handling 118
Unrecognized cartridge 118
Check the quality of ink cartridges 119
Run the prime test 119
Compensate for electrically defective jets 121
Clear clogged jets 122
Compensate manually for clogged jets 123
Troubleshooting 125
Troubleshooting areas 125
Isolating problems 125
Printer behaviour 126
Print quality 131
Data transfer 136
Application software 139
Calling for assistance 140
Appendix A
Glossary
Appendix B
Safety information
General safety information 146
Radio interference (EMC) 146
Instructions for safe use 146
6 Océ 5090 User Manual
Page 7

Appendix C
Appendix D
Appendix E
Safety data sheets 148
Miscellaneous
Notation conventions 150
Reader’s comment sheet 151
Addresses of local Océ organisations 153
Technical specifications
Océ CS 5090 printer specifications 156
Supplies
Caring for inks and media 160
Inks and ink cartridges 160
Caring for your media 161
Inks for Océ CS 5090 printers 162
Océ Standard Colour Inks accessory kits 162
Océ Standard Colour Inks replacement cartridges 162
Océ Standard Colour Inks litre kit 163
Océ Graphic Colour Inks accessory kit 164
Océ Graphic Colour Inks replacement cartridges 164
Océ Graphic Colour Inks litre kit 165
Océ Outdoor Inks accessory kits 166
Océ Outdoor Colour Inks replacement cartridges 166
Océ Outdoor Colour Ink litre kit 167
Media for Océ CS 5090 printers 168
Assortment 170
Miscellaneous Océ CS 5090 accessories 171
Warranty Inkjet Cartridges for Océ 5350-600, CS 5050/5070/5090 172
Priming 173
Causes of the most common problems 174
Return Shipments of defective cartridges 174
Index 175
Contents 7
Page 8

8 Océ 5090 User Manual
Page 9

Chapter 1
Introduction
Océ CS 5090
User Manual
The Océ CS 5090 are wide-format colour printers that give
professional quality output with all the brilliance and gloss
of liquid ink. The Océ CS 5090 printers reduce production
time while maintaining exceptional graphics quality.
9
Page 10

How to use this manual
There are a number of notation conventions used in this manual. This
consistent style enables you to quickly become conversant with the use of this
manual and consequently the Océ CS 5090.
Description
Each section or subsection contains a description of the feature or
operation identified in the title. It might also include possible applications, as
well as any guidelines that you should bear in mind.
Procedures
A description is followed by a procedure. A procedure always
begins with a phrase which briefly describes the procedure, followed by a
series of numbered steps that take you, step by step, through all phases of
performing the operation.
Figures and tables
Figures and tables are titled and numbered sequentially
throughout this manual. Figures include pictures of product components,
screendumps, examples, and diagrams of concepts discussed in the
description.
Videos
Several pages of the manual include short Quick Time videos
illustrating some manipulations or procedures described in the manual. Those
videos are represented with a small screen displaying the first image of the
movie:
All you need to do is to click on the screen. A new page is displayed with the
video on the right and the text on the left. Click the image to launch the video.
If you want to stop the video before the end, click anywhere on the page.
When the video is finished, click ’Back’ to go back to the manual.
Attention getters
your attention. This information is classified as follows:
10 Océ CS 5090 User Manual
There are several types of information to which we draw
Page 11

Note:
In a ‘Note’, information is given about matters which ensure the proper
functioning of the machine or application, but useful advice concerning its
operation may also be given.
Attention:
The information that follows ‘Attention’ is given to prevent
something (your copy or original, the copier or printer, data files etc.)
being damaged.
Caution:
The information that follows ‘Caution’ is given to prevent you
suffering personal injury.
Introduction 11
Page 12

Printing with Océ CS 5090
The Océ CS 5090 wide format inkjet printers can reproduce graphics up to the
length of a roll of media. Large format colour printing combines the technical
sophistication of the Océ CS 5090 series with the unique qualities of Océ
proprietary inks and media (coated canvas, vinyl, film, paper, etc.)
The Océ CS 5090 printers are 8-cartridge printers, which means that you can
print either with the left four cartridges, the right four cartridges or all eight
cartridges.
With the CS5090 8-colours, you can choose between two different modes:
The Productivity mode (two sets of cartridges using 4 colours, CMYK). It
■
offers a great improvement in terms of print speed and flexibility since you
can use different types of ink: Standard Colour in the four left cartridges and
Outdoor Colour in the four right, for instance.
The Quality mode (one set of 8 different colours, CMYK CLMLCMM
■
offers a real improvement in the tonal gradation of your prints thanks to the
diluted colours, Light Cyan and Magenta, Medium Cyan and Magenta.
M
1
). It
1.
L: Light, M:Medium
12 Océ CS 5090 User Manual
Page 13

Graphic reproductions
The Océ CS 5090 addresses the following printing needs:
■
Posters
■
Banners
■
DTP
■
Packaging prototypes
■
Signs
■
Displays
■
Imposition proofing
■
Point of purchase
2269
■
Fine art
■
Proofing
■
Textile design
■
Exhibits
[1] Front view Océ CS 5090 printer
Introduction 13
Page 14

Choice of print mode
There are several modes of printing, which are compromises between image
quality and speed. When printing heavy renderings, maps, or art graphics,
choose one of the quality printing modes. Certain types of media also require
quality printing modes.
To select the appropriate printing mode for a specific print job, refer to ‘Set
print passes’ on page 96.
Ink cartridge preparation and alignment
Cartridge maintenance and alignment are key factors in printer performance,
which in turn affects colour accuracy and image quality. Use the following
recommendations to keep your cartridges in optimal working condition:
Keep the printer service stations clean so that the heads stay clean.
■
Use a loupe to evaluate the registration of test patterns to achieve the best
■
possible accuracy.
Align and check cartridges to make sure all nozzles work properly.
■
Re-align all cartridges when you adjust, move, or replace a cartridge, since
■
even small, one-pixel errors can affect both colour and image quality.
14 Océ CS 5090 User Manual
Page 15

Chapter 2
Getting started
Océ CS 5090
User Manual
This section explains the initial setup procedure of the Océ
CS 5090:
■
operate the printer
■
load media
■
use the carriage
■
fill ink reservoirs
■
install, prime, and calibrate ink cartridges
15
Page 16
Operate the CS 5090
Before printing, make sure that you are familiar with the start-up checklist and
the main menu functions of the control panel.
Start up checklist
Click for Video
!!!!
To start the CS 5090, check the following:
The power cord is plugged into the electrical outlet.
■
The printer connects to your computer using a parallel cable.
■
Turn on the printer before attempting to print. When you switch on the
■
printer, carriage moves to the left and checks if there is media loaded. If it is
the case, media size is automatically determined.
In Roll/Sheet mode, the leading edge of the media is detected.
Note:
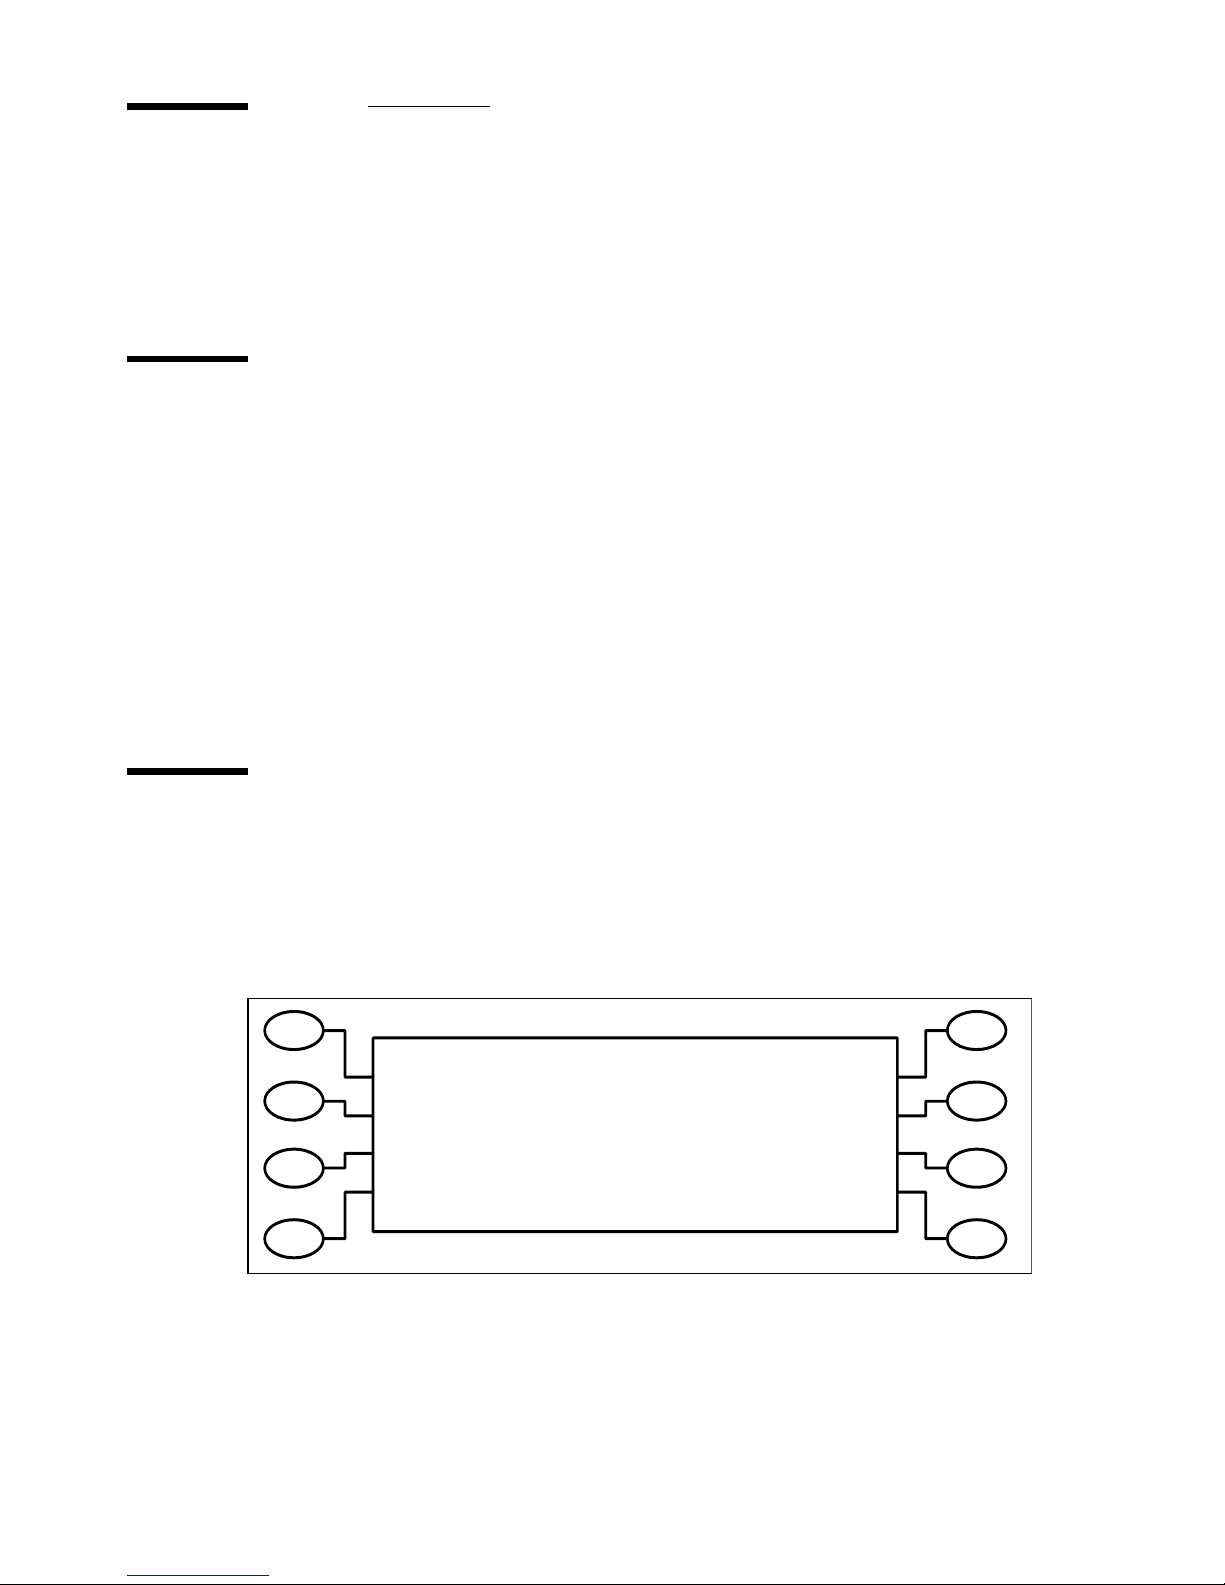
Locate the control panel
You can locate the control panel on the right-hand side of the printer. It
includes seven buttons and a display indicating modes and settings, as
illustrated below. For a complete summary of all printer options, see ‘Main
menu at a glance’ on page 46.
Load Media
Cut
Pause
Reset
[2] Océ CS 5090 control panel
16 Océ CS 5090 User Manual
2271
Feed Media Menu
Set Up Menu
Utility Menu
Page 17

Choose menu functions
There are two types of menus:
action menus
■
perform.
selection menus
■
▼▼▼▼
To select menu functions
To select a function, press the button displayed next to the function.
1
The display lists options available for the selected function.
Press the
2
When the selection you want displays, press the button for that option and
3
press
Depending on the type of menu, you can return to the previous menu level by
4
OK
.
pressing the
Press
5
Press the
6
Exit
Set the language
provide a list of additional menus or immediate tasks to
let you view and modify printer settings.
Next Option
or
OK
Exit
or
Prev. Option
button.
buttons to display the selections.
consecutively to return to the main menu.
Cancel
button to restore the previous setting and exit the menu.
▼▼▼▼
The Océ CS 5090 can display menu items in English, German, French, Italian,
Portuguese, Korean, Japanese, and simplified and traditional Chinese.
To set a language
Press
1
Select the language you want.
2
Press OK.
3
Setup/User Setup/Language
.
Getting started 17
Page 18

Load media
You can use either roll media or cut sheets. By default, the printer accepts roll
media. To ensure straight paper loading and avoid skewing, hold the media
parallel to the platen line. Use the load lines on the platen as a guide. The
printer has sensors which detect the presence of media and activate the feed
and take-up mechanisms.
The roll media core must have an inside diameter of 5 cm and a maximum
outside diameter of 15 cm. If your media has an inside diameter of 8 cm, use
the core adapter provided. If you want to store prints on the take-up roll, you
will need to have extra cores available.
Caution:
(1,52 m) wide. The media roll can be heavy, so have someone help you to
load it. Before printing, check that you have a take-up roll core available
that is the same width as the media roll you are loading.
Attention:
damaged part of the roll prior to loading to prevent the media from
jamming in the printer. Load only media with a perfectly horizontal edge
into the printer. Take care that your fingerprints do not go on the printing
side of glossy media paper.
The Océ CS 5090 printers (60” version) can use media up to 60"
If your roll media has wrinkled or damaged edges, cut off the
Use the power media feed and take-up system
The power media feed and take-up system facilitates long, unattended print
jobs by automatically unwinding and rewinding media as prints are generated.
It includes a feed roll, a take-up roll, and sensors which prevent media from
touching the floor.
When the unit is first turned on, the feeder may turn for a few seconds. If the
take-up turns, it indicates that the sensor is blocked. Clear anything blocking
the sensor before proceeding.
18 Océ CS 5090 User Manual
Page 19

Load roll media
Click for Video
!!!!
▼▼▼▼
To load roll media
Slide the rolled media onto the media (upper) roller, orienting the paper as
1
shown.
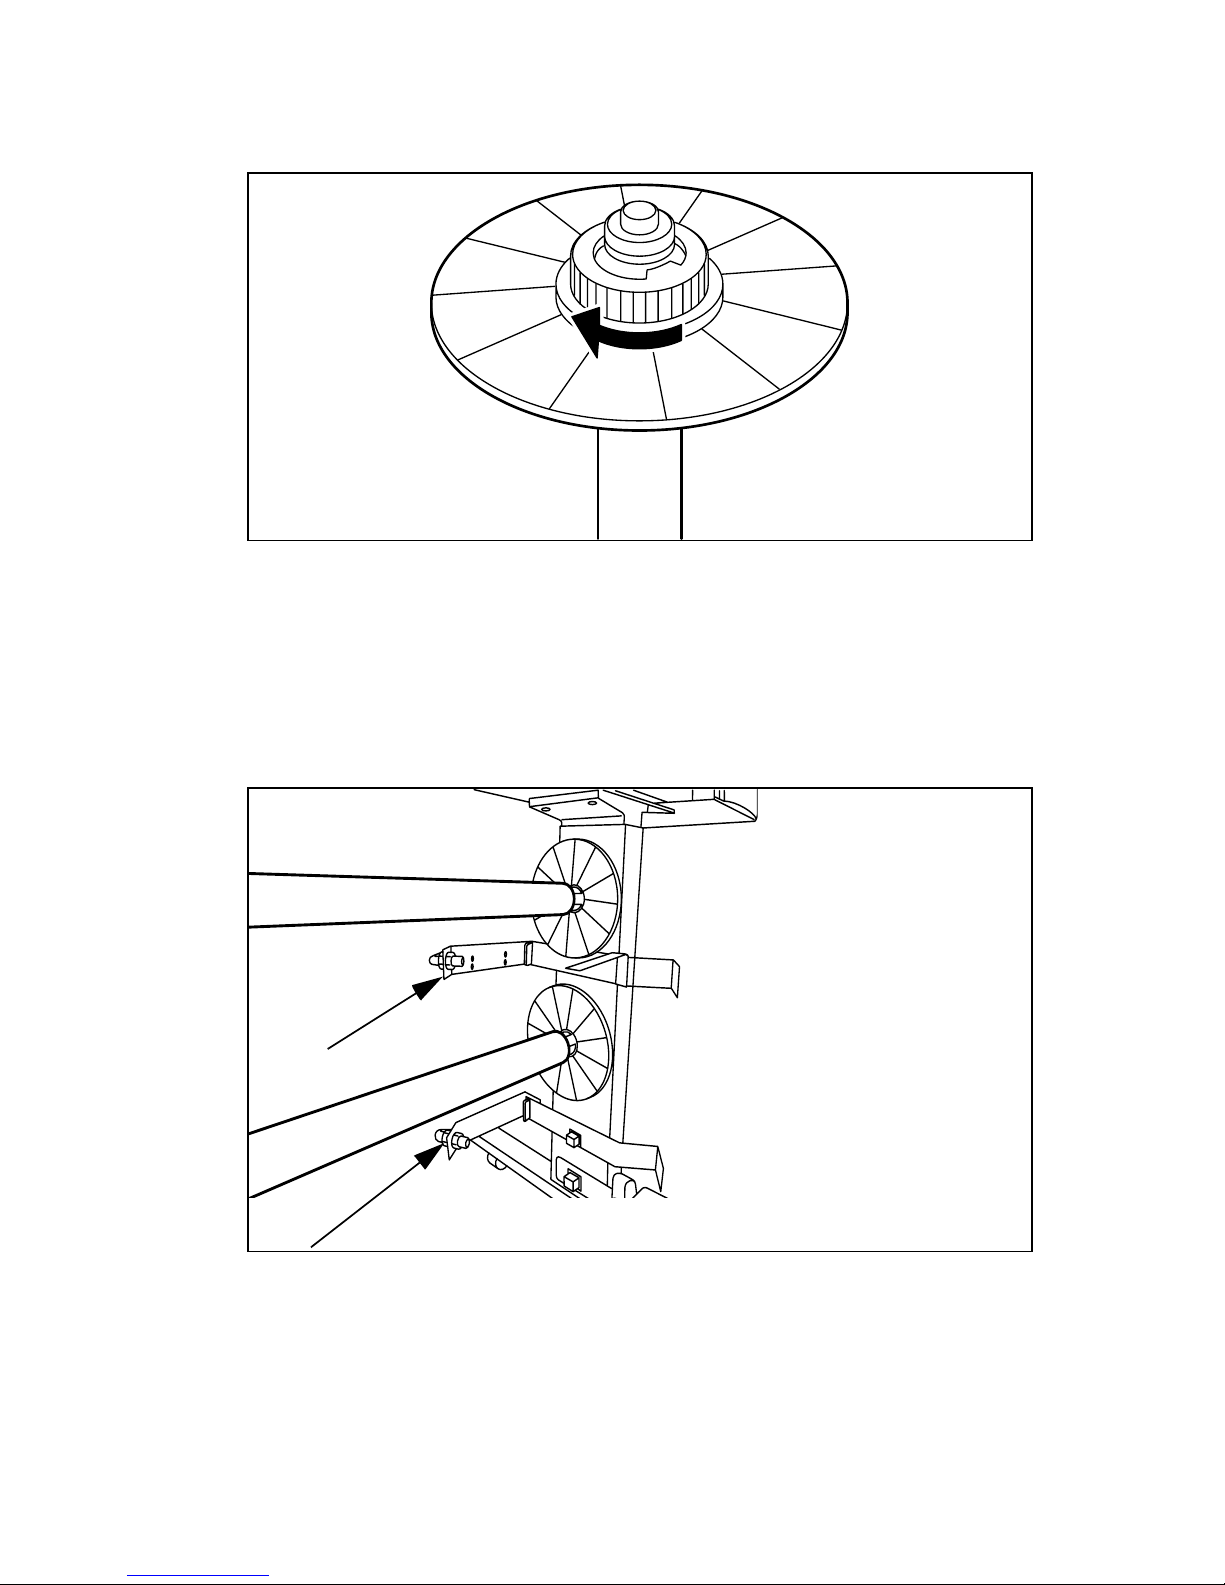
Slide the media guide into the roll core, and tighten the guide to secure the roll
2
by turning the knob clockwise.
Standing behind the printer, insert the media's leading edge into the back of the
3
printer. The printer automatically detects the presence of the media and
forwards it.
4
Press
Load Media
to move the media into printing position.
[3] Loading media
Use the take-up roll
The take-up roll facilitates unattended print jobs by automatically winding
printed media onto a core. In this mode, the automatic c.utter is disabled. When
using this option, be sure that the media sensor on the printer's right leg is not
blocked.
▼▼▼▼
To install the take-up roll
Install an empty core onto the take-up guides. Be sure that the core width
1
matches the width of the media you are using.
Slide the roll guide onto the media core, and secure it by tightening the locking
2
mechanism. If you moved the sensor mounting bracket before loading the roll
media, be sure to return it to its normal position.
Since media cores can be narrower than the media, position the media guide at
3
3 mm (1/8”) from the end of the core and lock it into place.
Click for Video
!!!!
Getting started 19
Page 20
4
Press
Feed Media/Forward
to advance enough media to allow its leading edge
to come to the center of the take-up roll.
[4] Locking the take-up roll
Using at least three pieces of tape, attach the leading edge of the media to the
5
take-up roll at the left, right, and center of the core.
As printing progresses, the media loops down to the front of the take-up core
6
until the sensor detects it on the printer stand leg. The take-up rolls then
activate to roll the media.
Be sure not to block the sensor!
Note:
[5] Sensors on the printer stand
▼▼▼▼
20 Océ CS 5090 User Manual
To set the take-up mode
Press
1
2
Setup /Paper Option
Press OK. This enables the take-up roll and disables the cutter.
2273f
, then
Supply Type/Take-up
.
Page 21
▼▼▼▼
r
To unload the take-up roll
Press the
1
Remove the roll from the printer.
2
Release the adjustable roll guide.
3
Slide the take-up roll out of the printer.
4
button to cut the media.
Cut
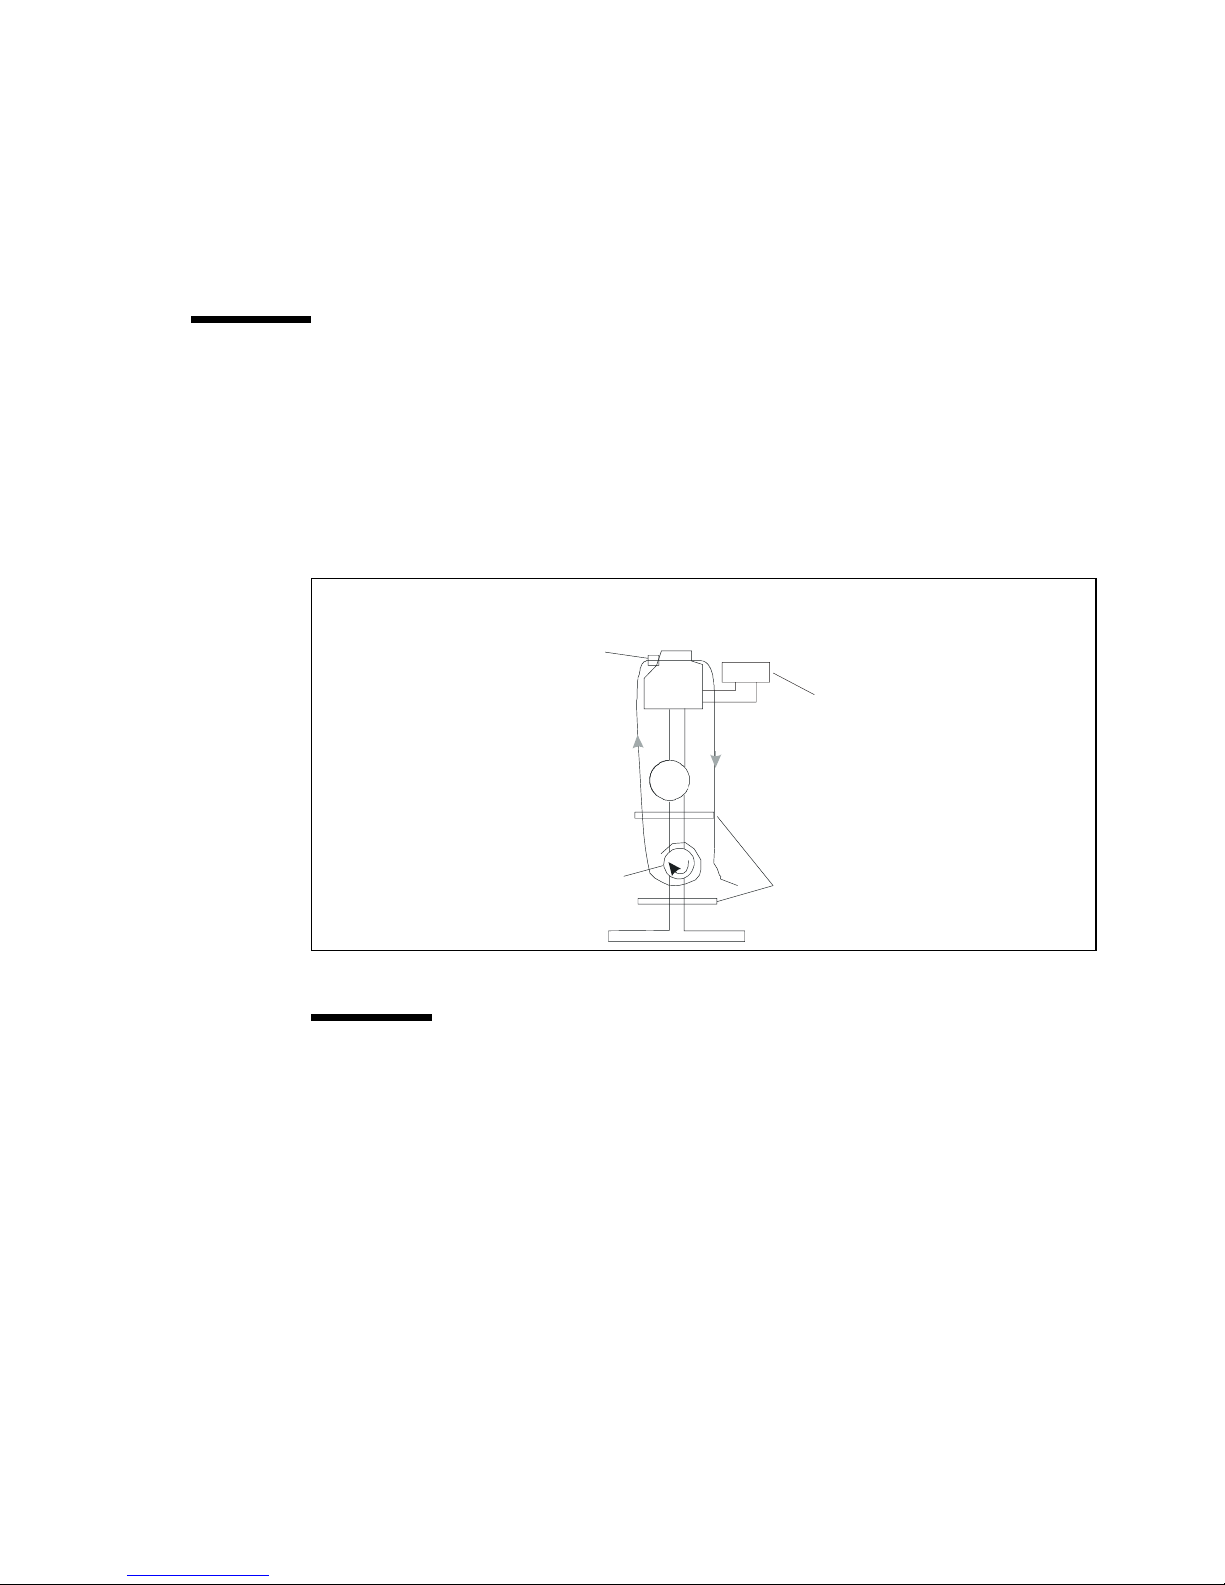
Use the second feed roll
The takeup roll can also be used as a feed roll. If you use the takeup roll as a
feed roll, you cannot use the takeup system. If you want to use the takeup roll
as a feed roll, set the printer to ROLL2 by pressing Setup Menu/Paper Options
Menu/Supply Type/Roll2. Follow the loading instructions in the previous
section using the bottom roll.
Media presence
Left Side View
sensor
Dryer
[6] Use the second feed roll
Caution:
When using the ROLL2 option, the media has a tendency to curl
Feed
Roll2
Media sensors fo
feed and take up
inward under the bottom roller. This could block the media sensor and
prevent the reed roller from feeding media. Make sure you keep the media
turned outward, away from the media sensor.
Getting started 21
Page 22

Load sheet media
▼▼▼▼
To load sheet media
Press
1
2
3
4
Setup/Paper Options
Press
Supply Type/Sheet
Press OK.
Load the sheet from the back of the printer, aligning it with the alignment mark
.
.
on the platen.
Make sure that the media is flat and under the rollers. The printer automatically
5
senses the media's presence and forwards it until it reaches the start position on
the platen.
22 Océ CS 5090 User Manual
Page 23

Use the carriage
Move the carriage
When not in use, the cartridges remain in the service station at the right side of
the printer. This device seals the inkjets to prevent them from drying out.
▼▼▼▼
With the power on, always use the
Utility/Access menu
to move the carriage
away from the service station when you install, change, adjust, or clean the ink
cartridges or the service station.
Move the carriage
On the Control Panel, select ’Utility menu’ then ’Access menu’.
1
Three options are available:
2
’Access Left’: the carriage is then moved completely to the left side of the
■
printer. Now, the left cartridges 4, 3, 2 ,1 (or, when using diluted inks: Light
Magenta, Light Cyan, Medium Magenta, Medium Cyan) can be accessed.
’Access Right’: the carriage moves a little to the left. Now, the right
■
cartridges C, M, Y, K can be accessed.
’Access Home’ to place the carriage back to the service station.
■
Getting started 23
Page 24
Install cutter
With an installed cutter, the printer cuts the media automatically after printing.
Click for Video
!!!!
▼
d
Caution:
Attention:
Be careful when handling the cutter to avoid injury.
For normal media, do not use an external knife or cutter to cut
as this can damage the platen and prevent the media sensors from working
properly. However, for heavy media such as canvas, use the "Feed media"
menu to advance the media through the printer before cutting with scissors.
To install the cutter
1
Press
Utility Menu/Access Menu/Access Right
to move the carriage out from
the service station.
Press down the lever of the old cutter to remove it from the carriage.
2
[7] Installing the cutter
Push the new cutter into the slot until it clicks into place.
3
Press
4
Utility Menu/Access Menu/Access Home
into the service station. This ensures that the cutter blade is in the home
position.
When the cutter becomes worn, it can cause the carriage to jam or can
Note:
cause a ragged media cut. In extreme cases, you might see an error message
stating "Carriage Axis Failure" (see ‘Carriage axis failure’ on page 127).
24 Océ CS 5090 User Manual
to move the carriage back
Page 25
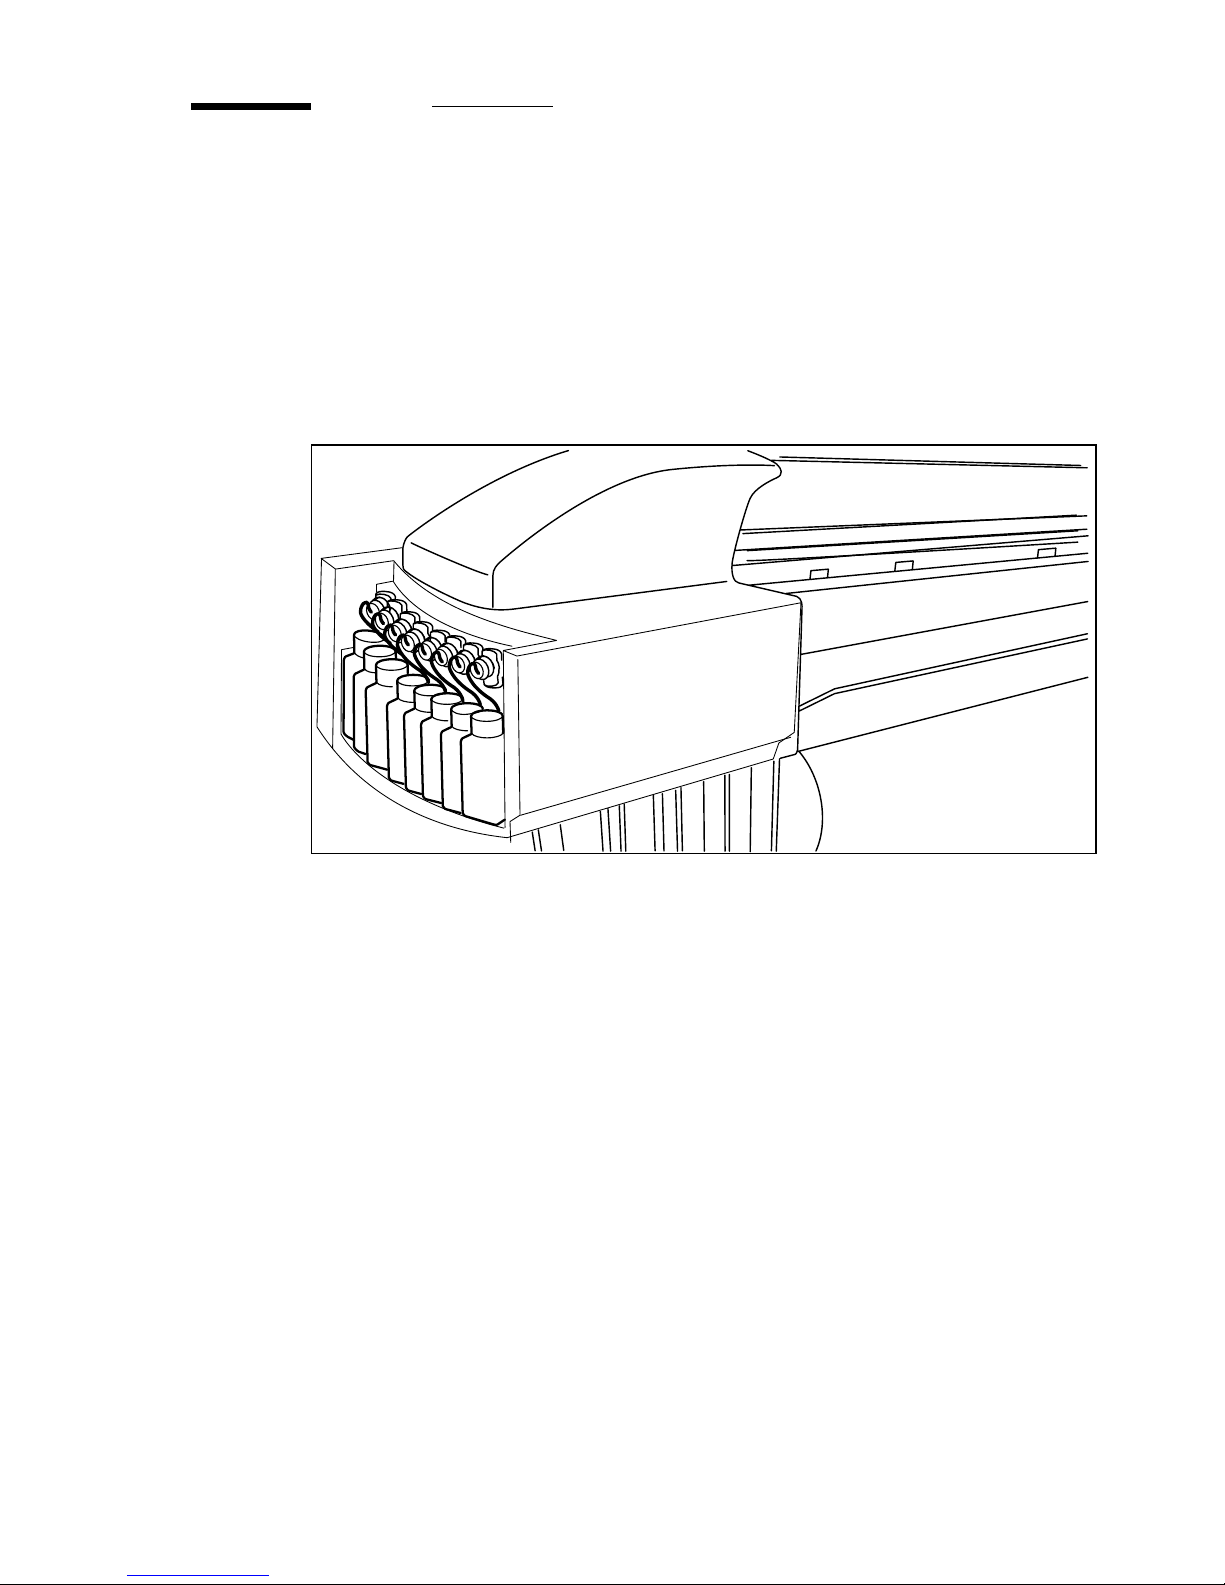
Fill the ink reservoirs
The Océ CS 5090 can handle long, uninterrupted print jobs because each of its
eight reservoirs holds 500 ml of ink. The ink reservoirs are located at the
printer's left side. Use Océ inks for best results.
Click for Video
!!!!
Note:
When running at carriage speeds faster than the default, the ink levels in
the reservoirs should be no more than 375 ml maximum.
4
3
2
1
Y
M
C
K
[8] Filling the ink reservoirs
Note:
To place the ink reservoirs in the right order, see the sticker on the
carriage. Observe the ink order from left to right as follows: 4 (Yellow or Light
Magenta), 3 (Magenta or Light Cyan), 2 (Cyan or Medium Magenta), 1 (Black
or Medium Cyan), Yellow, Magenta, Cyan, Black.
Getting started 25
Page 26

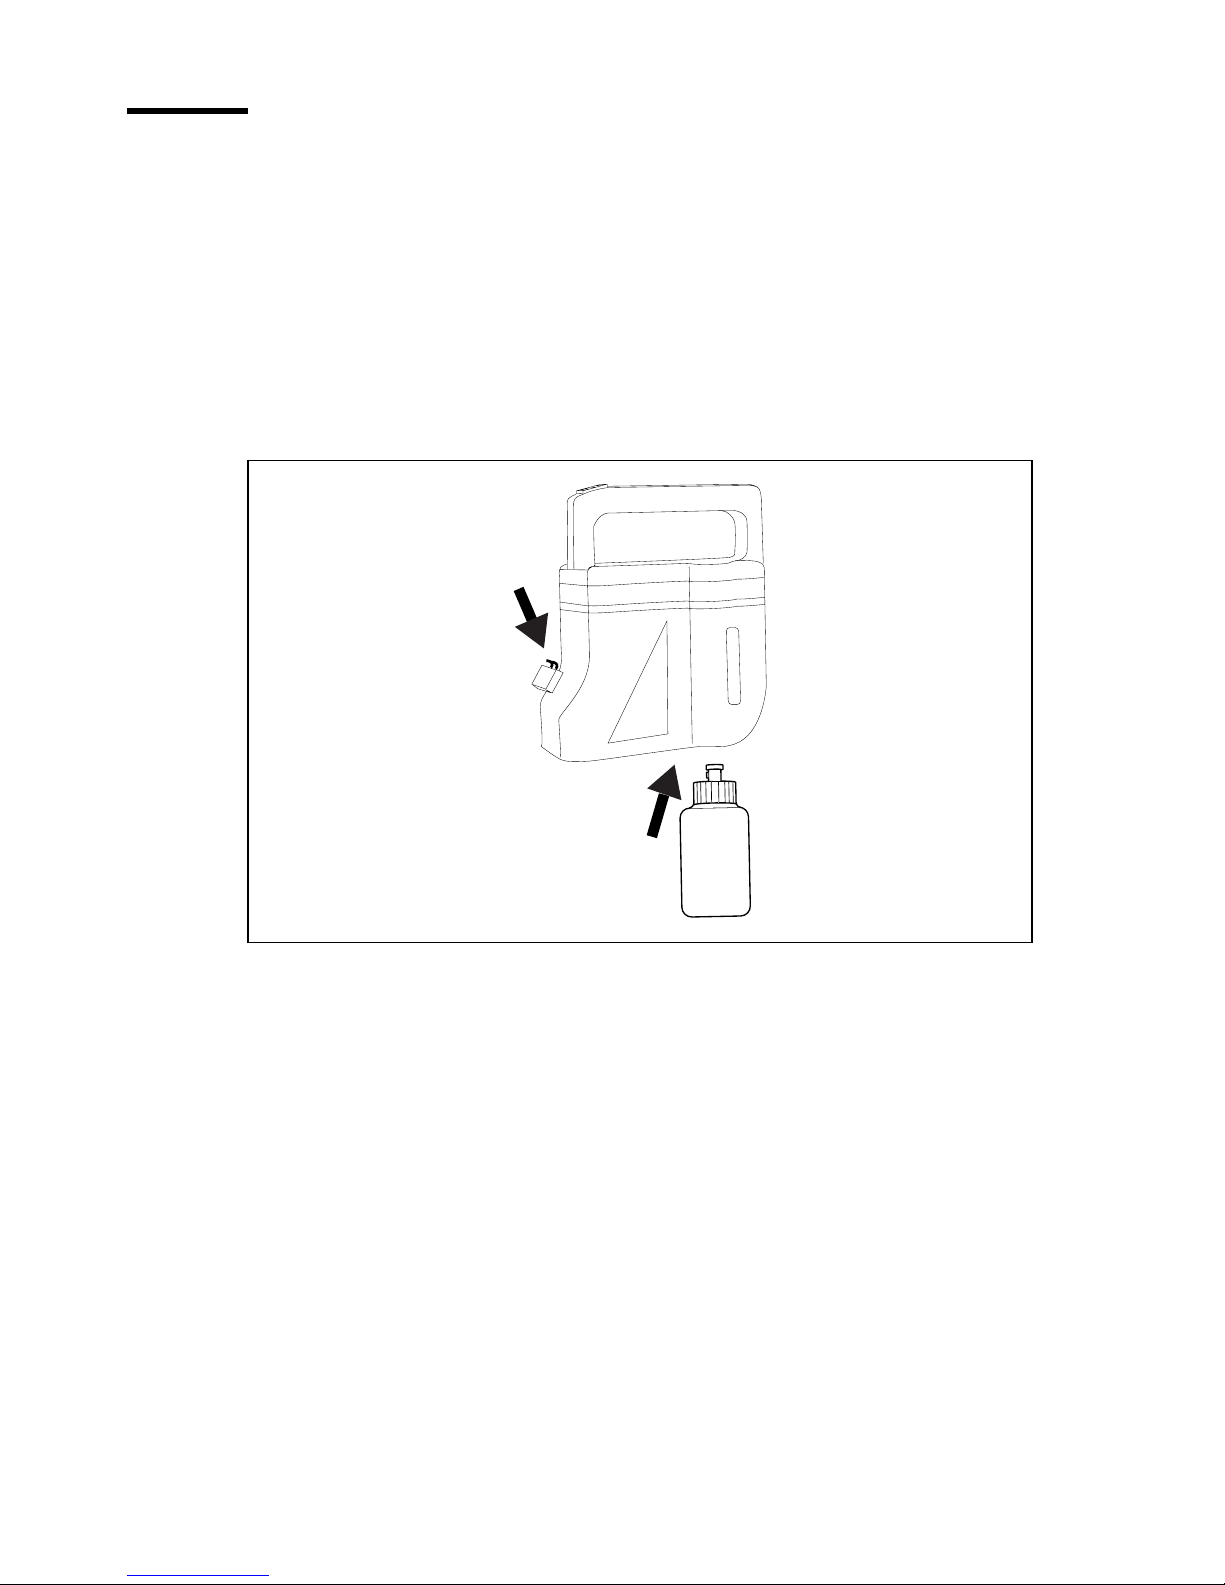
▼
To fill the ink reservoirs
Access the ink reservoirs on the left side of the printer. Unscrew the cap of one
1
reservoir.
Open only one reservoir at a time to prevent contamination with
Note:
other ink colours.
Remove cap from the bottle.
2
Check that you are using the same type of ink in all the reservoirs and
3
cartridges.
Fill the reservoir up to 375 ml, or no more than 1/2 inch from the top of the
4
reservoir.
Check that there is no excess ink on the reservoir cap.
5
Replace the cap on the reservoir.
6
Repeat for the remaining reservoirs.
7
Attention:
A complete second set of connections is provided with
colour-coded quick connect fittings for changing to another type of ink. Be
sure that each reservoir is connected to the same colour fitting.
Install ink cartridges
The process of installing new ink cartridges involves the following phases:
Place the cartridges on the carriage
■
Prime the ink delivery lines
■
Print a colour test
■
Attention:
Using other cartridges can damage the printer and/or prevent the printer
from printing.
The Océ CS 5090 works with only Océ pre-filled ink cartridges.
Click for Video
!!!!
26 Océ CS 5090 User Manual
Page 27
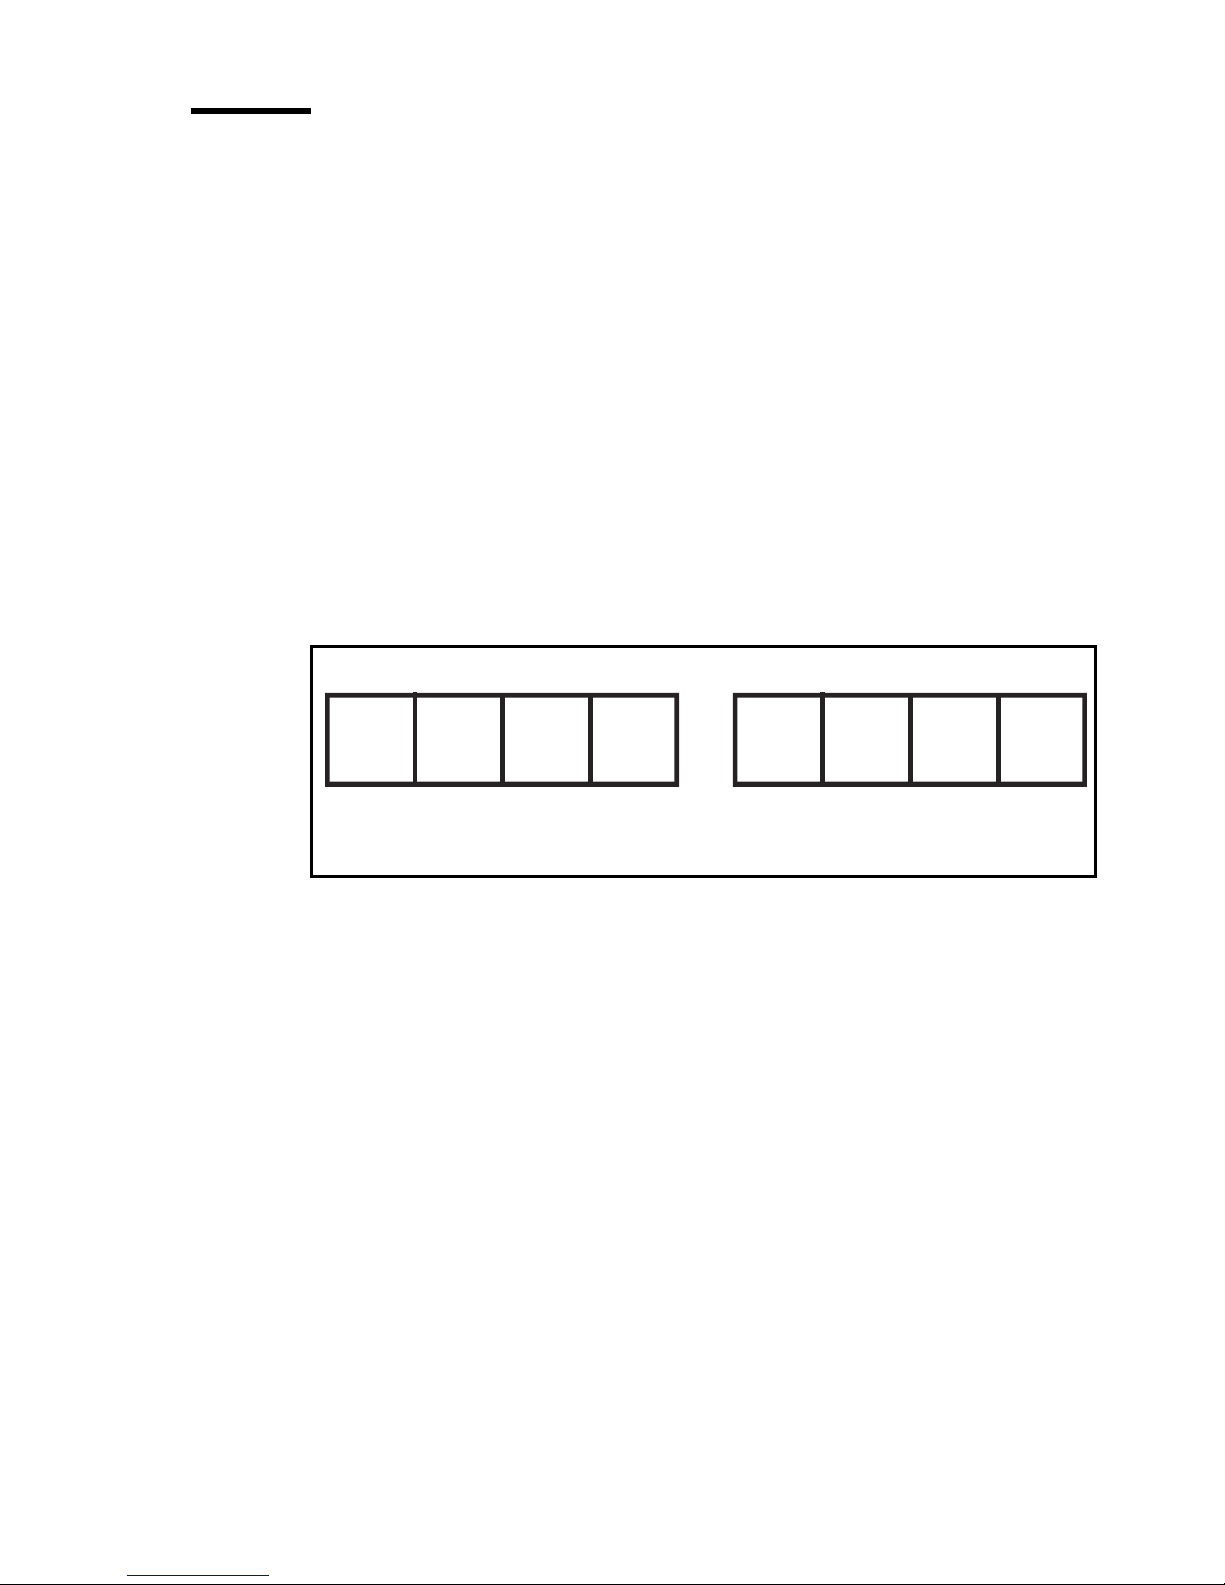
Cartridge sets
This printer is an 8-head inkjet printer. You can print with the left four
cartridges, the right four cartridges or all eight cartridges (see ‘Select cartridge
sets’ on page 94).
Facing the printer, the left four cartridges are designated as 1 x 4 Left cartridge
set, the right four cartridges are designated as 1 x 4 Right cartridge set and
when using all cartridges they are designated as 2 x 4 cartridge set or (when
available) as 1x8 when using all cartridges with 8 different colours (Diluted
inks + CMYK).
When using the 2 x 4 Cartridge Set mode, the left cartridge set has these
colours: 4 = yellow; 3 = magenta; 2 = cyan; and 1 = black. The following
illustration will help you identify each one of the stalls or slots on the carriage
where the cartridges are installed.
1 X 4 Left 1 X 4 Right
4321 YMCK
2x4
[9] Cartridge sets (1x4 & 2x4)
For a 2x4 cartridge configuration all eight cartridge stalls will be utilized with
cartridge tubing needles connected to the valves on the 'right' side of the
carriage cover.
For 1x4 Left cartridge configuration, such as with a different ink set, only the
4 left cartridge slots will be used with tubing line connections to the valves on
the 'left' side of the carriage cover.
Getting started 27
Page 28
For 1x8 cartridge configuration, the 8-cartridge set has these colours: 4 = Light
Magenta; 3 = Light Cyan; 2 = Medium Magenta; and 1 = Medium Cyan. The
following illustration will help you identify each one of the stalls or slots on
the carriage where the cartridges are installed.
M
L
[10] Cartridge sets (1x8)
Inspect cartridges
Visually inspect each cartridge before installing. Make sure the blue tape
Note:
is intact on the jet area [C] of the cartridge.
time! The tape will be removed later.)
[B] on the cartridge. Make sure it is secure and in approximately the location
shown on the following figure. If any cartridge is damaged, contact Océ for
return/replacement of the defective cartridge.
C
MMC
L
M
1x8
Inspect the cartridge recognition chip
YMCK
(Do not remove the tape at this
[11] Inspect cartridges
28 Océ CS 5090 User Manual
A
C
B
Page 29

Place cartridges
When you place the cartridges, follow closely these precautions:
Do not remove the blue tape from the cartridge until instructed to do so.
■
Do not touch the jet area or the flex contact area of the cartridge.
■
Work with only one colour at a time to avoid contamination.
■
Respect the correct cartridge sequence, especially when using a 1x8
■
configuration (see ‘Cartridge sets’ on page 27).
Check that the ink delivery lines are not twisted.
■
▼▼▼▼
To place a cartridge
With the printer powered on, press
1
one of the cartridges 4, 3, 2, 1) or
Utility /Access menu/Access Left
Access Right
(to place one of the cartridges
(to place
C, M, Y, K) to move the carriage into position for cartridge installation or
replacement.
The cartridges are prefilled and preprimed. Remove the cartridge from the
2
sealed bag and remove the shipping cap.
Place it bottom first into the correct slot on the carriage.
3
Note:
Tilt the cartridge up until it clicks into place. Make sure the cartridge is firmly
4
Do not remove the blue tape from the jet plate.
installed.
Getting started 29
Page 30
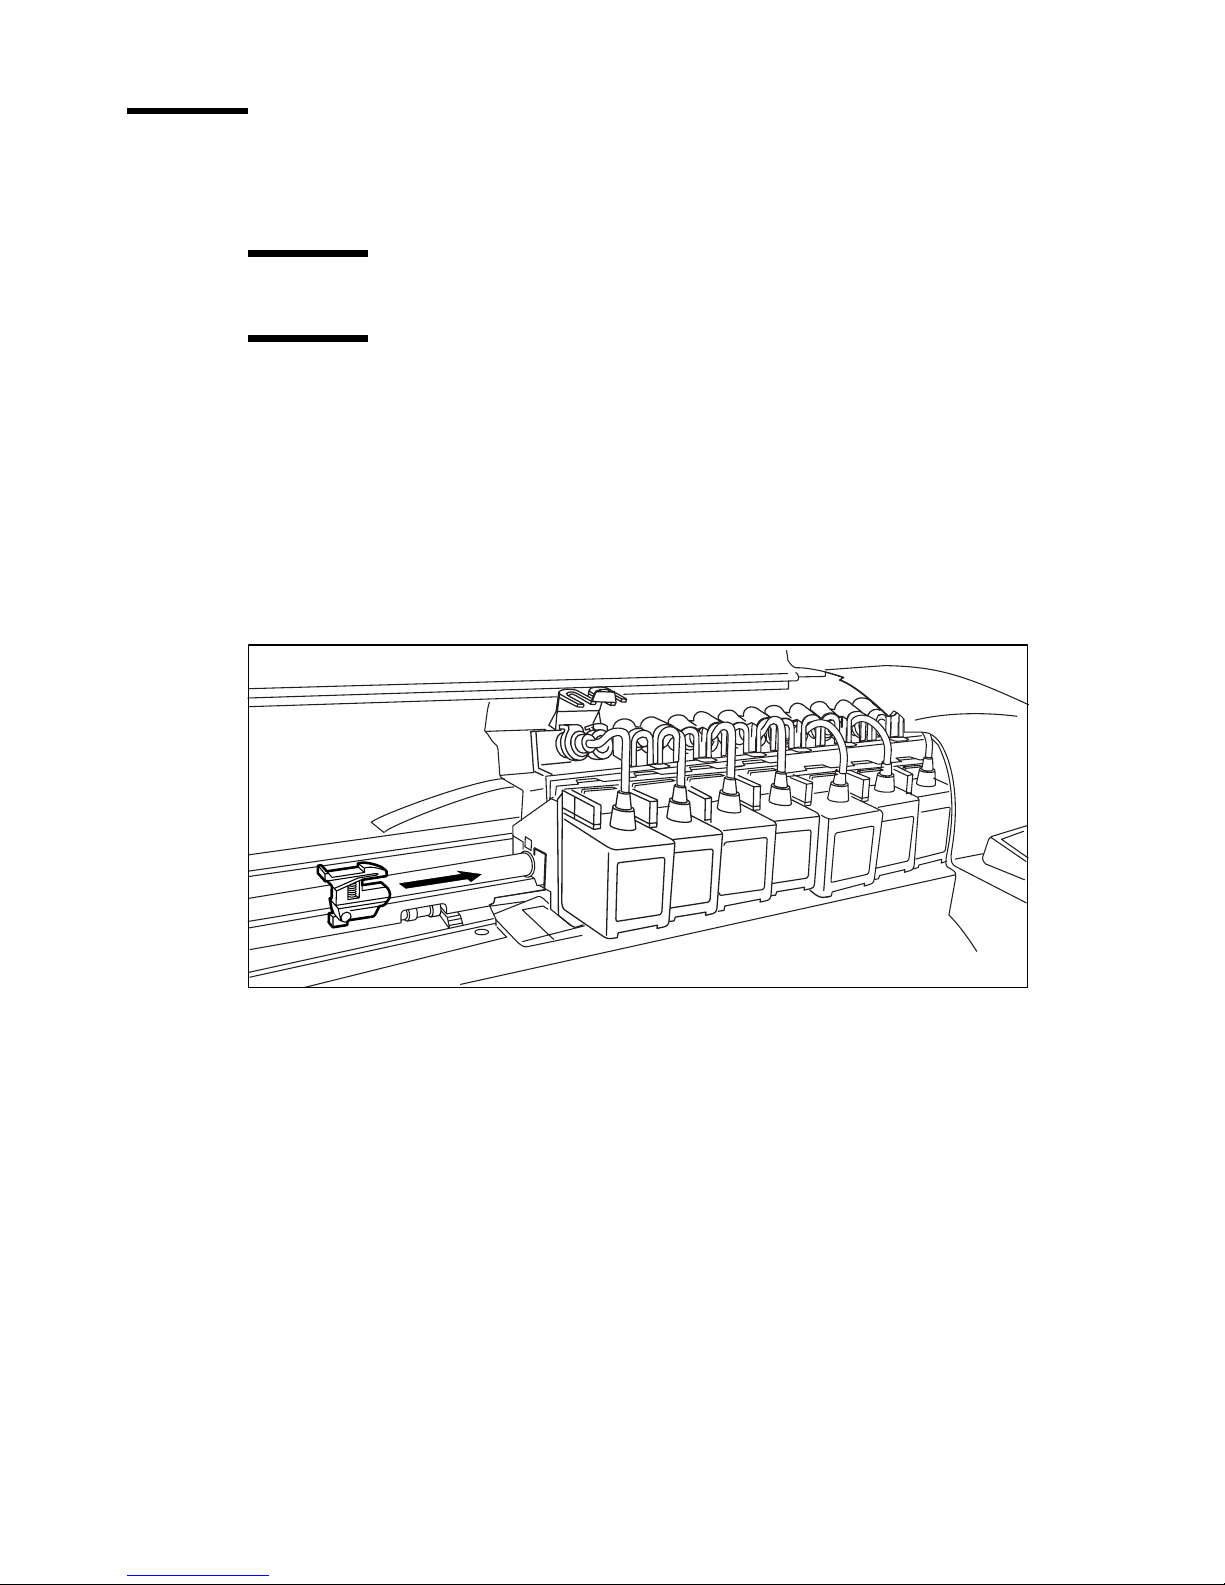
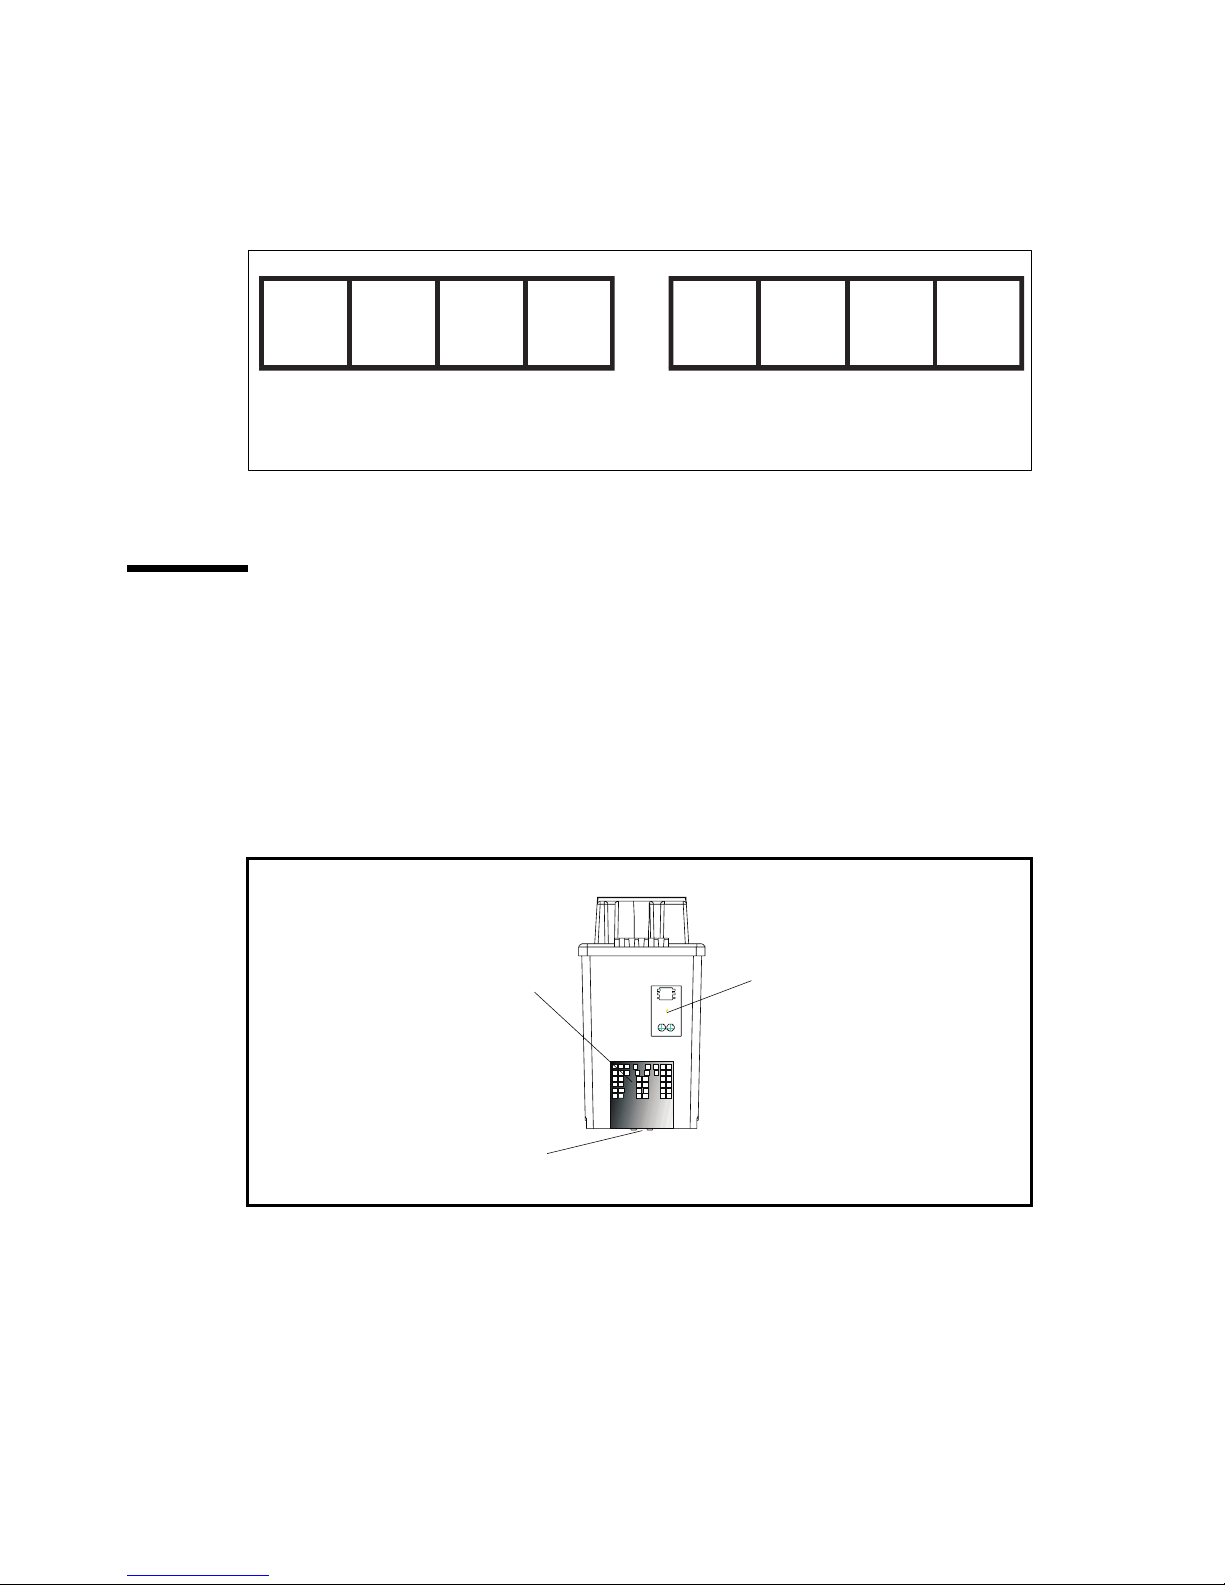
Prime the ink delivery lines
After filling the ink reservoirs, next step consists in priming each of the eight
ink delivery lines to establish ink flow between the reservoirs and cartridges.
You use the Océ Prime tool for this purpose. The Prime tool is a battery
operated ink priming device used to draw ink through the ink delivery lines and
for priming cartridges.
You perform this procedure once, the first time after you set up the printer. It
is not necessary when refilling the reservoirs or replacing ink cartridges.
Click for Video
!!!!
[12] Océ CS 5090 Prime tool
Your printer is equipped with shutoff valves for the ink delivery lines, on the
carriage. When the valve is pushed to the upright position, the ink delivery
lines are closed at the carriage. This maintains negative pressure while
installing and priming ink delivery lines.
When priming delivery lines, be sure to wipe off any excess ink from the
Note:
Océ Prime tool before going on to the next colour to avoid colour
contamination.
30 Océ CS 5090 User Manual
Page 31

▼
To prime the delivery lines
Fill ink reservoirs (see ‘To fill the ink reservoirs’ on page 26). Do not exceed
1
maximum level line.
Attach reservoir to appropriate ink delivery line by depressing quick connect
2
tab and snapping reservoir into place.
[13] Quick connect fitting
Note:
Close the ink delivery lines by pushing the valve up on the carriage:
3
Insert the needle assembly connector into the fitting on the carriage. On the left
4
For right order to place the ink reservoirs, see sticker on carriage.
set of cartridges, there are two connectors for each cartridge (one blue and one
gray). Be sure the needle assembly is plugged into the same colour connector
as in the ink reservoir.
Obtain the Océ CS 5090 Prime tool.
5
Open the ink delivery lines by pushing the valve down.
6
Prime each tubing/chain ink line by inserting the cartridge needle into the end
7
of the Prime tool and press the button several times until a solid stream of ink
is present throughout tubing.
Getting started 31
Page 32

2298
[14] Inserting the needle into the small opening of the Prime tool
Close the ink delivery lines by pushing the valve up and remove the cartridge
8
needle from the Océ Prime Tool.
Insert the needle into the cartridge opening and tighten clockwise securely.
9
[15] Removing the cartridge needle
Tighten the fitting (about 1/4 turn) to prevent air leaks.
10
Push the valve down to open the delivery lines.
11
The ink in the tubing-line will travel back up into the lines and not be
Note:
visible in the tubing-line assembly. This is normal and expected. When
printing, the cartridges will draw back the ink through the lines in the
cartridges.
Remove the cartridge from the carriage and remove blue tape from the
12
cartridge jet plate.
32 Océ CS 5090 User Manual
Page 33

Note:
Do not raise cartridge 30 degrees above electronics cover or turn
cartridge upside down during the tape removal or priming process.
[16] Removing the blue tape from the cartridge jet plate
Attach the Prime tool to the cartridge jet plate and prime cartridge with pulses
13
by pressing the activation button repeatedly.
Note:
A helpful method is to break the
seal with the jet plate after each pulse
to improve the priming success rate.
2301
[17] Attaching the Prime tool to the cartridge jet plate
Click for Video
!!!!
Getting started 33
Page 34

Blot jet plate with a lint-free towel or cloth.
14
Click for Video
!!!!
[18] Blotting the jet plate
Insert the cartridge into the carriage, making sure it snaps into place properly.
15
[19] Inser ting the car tridge into the carriage
Repeat for each cartridge.
16
When all cartridges are ready, press
17
to return the carriage to the service station.
Utility menu/Access menu/Access Home
34 Océ CS 5090 User Manual
Page 35

Run a colour test
An initial colour test checks for correct cartridge priming, to ensure that all
colours print in a uniform and solid pattern.
▼▼▼▼
▼▼▼▼
To print the colour test
Check that the printer has media loaded.
1
Press
2
Press
3
Change to 2-pass mode using the
4
Select
5
Setup menu/Print Mode menu
Print passes
Utility menu/Service menu/Diagnostics menu/Colour Test menu.
.
.
Next
or
Prev option
buttons.
At this stage, you can choose between two different options:
Print a colour test for each colour separately, one after the other.
■
Print a colour test for all colours at the same time (only supported by
■
firmware version 1.13 or above).
To print the test (colours one by one)
1
2
3
Press
option
Press
Press
Stall select
buttons.
Density select
Colour test print
to select the appropriate colour to test using the
to set the *colour test percentage to 100%.
. Several print passes will initiate in the chosen colour,
disregard the quality of the colour patterns.
Ensure each print passes completes.
4
Next
or
Prev
▼▼▼▼
To print the test (all colours at the same time
The all colour test is only supported by firmware version 1.13 or above.
Density select
All Colour test
to set the colour test percentage to 100%.
to initiate the test.
No ink starvation should be observed. If you notice ink starvation,
1
2
Note:
Press
Press
Note:
re-prime the cartridge and check the ink level.
Getting started 35
Page 36

Print the prime pattern
You print the prime pattern to check that the ink cartridges fire properly and to
detect any clogged or electrically defective jets.
▼▼▼▼
▼▼▼▼
To print the prime pattern
With media loaded, press
1
2
Select
Prime
.
Utility
menu.
A test pattern prints. The test pattern consists of four coloured double bands
(Black + 1 or Medium Magenta, Cyan + 2 or Medium Cyan, Magenta + 3 or
Light Magenta and yellow + 4 or Light Cyan), a series of lines and a CMYK
header, indicating the compensating print modes for damaged jets. (See
‘Compensate for electrically defective jets’ on page 121.)
To interpret the prime test
The bands should be smooth, without dark streaks or white lines. The lines
■
should not look fuzzy or contain gaps.
A solid bar indicates an
electrically defective
jet. Jet Compensation
will automatically
A missing line or "gap",
misdirected line, or a
light-printing line
indicates a clogged jet.
The header lets you know
the number of passes for
which compensation is
available.
compensate for that
jet.
2x4 4: 3 4 5 3 : 3 4 5 2: - - 5 1: - - 5 Y: 3 4 5 M: 3 4 5 C: 3 4
1111111111111111111111111111111111111111111111111111111111111111111111111
555555555544444444444443333333333333222222222222111111111111100000000000009999999999998888888888888777777777777766666666666655555555555554444444444444333333333333222222222222211
76543210
98765432109876543210987654321098765432109876543210987654321098765432109876543210987654321098765432109876543210987654321098765432109
[20] The upper test pattern of a prime test
1x4 Right Y: 3 4 6 8 10 M: 3 4 6 8 10 C: 3 4 6 8 1
1X4 Left 4: 3 4 6 8 10 3: 3 4 6 8 10 2: - - 6 - 1
COMPENSATION AVAILABLE IN THE ABOVE
4
Y
3
M
2
C
1
K
36 Océ CS 5090 User Manual
Page 37

Within the printed test pattern, each jet is represented by a short horizontal
■
line. Together, these short horizontal lines form a “stair step” pattern.
Electrically defective jets appear as solid bars for which you can compensate.
■
Clogged jets appear as gaps or misdirected lines in the “stair step” pattern,
■
which you clear manually.
The print modes for which compensation is available are shown above the
■
test pattern.
In the above example, the prime test shows that there are three electrically
■
defective jets and one clogged jet. The header indicates that you can
compensate for the electrically defective jets in the 4-pass mode. But you
must clear the clogged jet manually. See ‘Clear clogged jets’ on page 122 for
further information.
Note:
If all jets appear to be defective, reinstall the cartridges.
Getting started 37
Page 38

Cartridge recognition
The Océ CS 5090 printer is designed to use only Océ CS 5090 cartridges. To
avoid potential damage to the printer, a
properly installed Océ cartridges. This function activates when the printer
receives a print request (i.e., image data, prime, etc.).
If the system detects a problem, the error message “Unrecognized
Cartridge(s)” displays on the control panel, and the printer beeps three (3)
times. You must clear this error before the printer can proceed with the print
job.
cartridge recognition
feature checks for
▼▼▼▼
To clear cartridge recognition error
1
Press
Access menu/ Access Right
or
Access Left
to move the carriage to the
correct position for replacement of the ink cartridges.
Check that there are four installed Océ cartridges.
2
Replace any invalid cartridge.
3
Press OK.
4
This error can also occur with incorrectly installed Océ cartridges, due
Note:
to poor electrical connections between the cartridge and the carriage unit.
Clean the flexcable [A] as well as the electrical contacts on rearside of
cartridges. Special the contacts from the cartridge recognition chip [B].
A
B
[21] Cartridge recognition
38 Océ CS 5090 User Manual
C
Page 39

Align cartridges
For best results, perform a calibration each time you install a new cartridge.
Paper axis calibration
External factors such as room temperature, storage temperature, and humidity
can have a deforming effect on media. A paper axis calibration corrects for
minor paper length fluctuations, which you carry out using a precision ruler of
at least 34 (850 mm) inches long.
▼▼▼▼
To print the paper axis test
Load the media that you want to use. Check that the length is at least 36 (91
1
cm) inches long.
Press
2
Remove the media from the printer and measure the distance between the
3
Utility/Calibration/Paper Axis Test
witness marks. The distance between the marks should be exactly 838.2 mm
(33.00 ”).
If the distance between the marks is different from that shown on the display,
4
press
Paper Axis
Press OK.
■
to enter the value of the distance you have just measured.
Define calibration units
You can set the calibration units to English or Metric.
▼▼▼▼
To set calibration units
Select
1
Choose
2
Setup/User Setup/Units Select
English
or
Metric
. The printer prints two marks.
.
.
Getting started 39
Page 40

Colour deadband calibration
When printing in bidirectional mode, the velocity of the carriage can cause
certain dots to miss the target area on the media. To alleviate this problem, use
the
colour deadband compensation
colour deadband test pattern lets you check the velocity deadband values and
adjust them for best printing results.
feature to fine-tune dot placement. The
▼▼▼▼
To print the colour deadband test pattern
1
2
Press
Select
Setup/Utility
Calibration/Colour Db menu/Colour Db test
.
. The following pattern
prints out:
100 92 84 76 68 60 52 44 36 28 20 12
( FAST K=44, C=52, M=52, Y=52, SLOW=1)
[22] Colour deadband test pattern
For each colour, examine the vertical lines and select the set of straightest lines.
3
Note the compensation number at the bottom of the set of lines you have
selected.
Compare with the existing compensation values printed in the lower right
4
corner of the test pattern. If any of these differ from the values you selected,
enter the new compensation values by pressing the button corresponding to the
colour deadband you want to change.
Use the
5
Next
and
Previous option
buttons to scroll to the desired compensation
value.
40 Océ CS 5090 User Manual
Page 41

Cartridges calibration
▼▼▼▼
To print a colour calibration test
With paper loaded, press
■
Horiz. Calib Test.
Utility/Colour Calibration menu/ Vert. Calib Test
or
The printer draws a series of seven horizontal patterns and seven vertical
patterns as follows:
Current Heads (Y, M, C, 1, 2, 3, 4)
shows yellow, magenta, cyan, 1, 2, 3, 4 “+”
which represent the horizontal and vertical alignment between the cartridges.
Yellow
Magenta
Cyan
Black
[23] Current Heads (Y, M, C)
When the coloured “+” lines up horizontally and vertically with the black
alignment marks, no adjustment is required.
Colour Vertical Head-To-Head Calibration
[24] Colour Vertical Head-to-Head Calibration
checks for vertical alignment.
Colour Black
Getting started 41
Page 42

Colour Horizontal Head-To-Head Calibration
checks for horizontal alignment.
Three lines similar to the examples below are printed with the following colour
combinations: 4/3, 3/2, 2/1, 1/yellow, yellow/magenta, magenta/cyan, and
cyan/black.
▼▼▼▼
.... - 3
[25] Colour Horizontal Head-to-Head Calibration
- 2
- 1
0
1
2
The numbers below each set of lines represent the different horizontal and
vertical alignment values.
To adjust colour calibration values
Examine the patterns to determine which value shows the best horizontal and
1
vertical alignment between cartridges. These are the values you will set in the
printer menu.
Press
2
3
4
5
6
Vertical-Cyan
Enter the value which represents the best alignment for cyan vertical.
Press OK.
Repeat for Magenta, Yellow, 1, 2, 3, 4 vertical.
Repeat procedure for Cyan, Magenta, Yellow, 1, 2, 3, 4 horizontal.
.
3 ....
42 Océ CS 5090 User Manual
Page 43

Operate the printer
While the printer prints, you can stop it momentarily and then resume printing,
or cancel a print.
▼▼▼▼
▼▼▼▼
▼▼▼▼
To pause the printer while printing
Press
1
Press it again to resume printing.
2
Note:
To cancel a print
■
Pause
Banding might occur.
Cancel the print job from the computer using the appropriate command for
.
your software application.
To clear the buffer after canceling a print
Press
■
Reset
.
Getting started 43
Page 44

44 Océ CS 5090 User Manual
Page 45

Chapter 3
Control panel
Océ CS 5090
User Manual
■
Menu functions
■
Default printer settings
■
Save user options
45
Page 46

Main menu at a glance
Main menu Menu options Next options (in italics) or function
Load media Moves media into/away from platen
Cut Cuts media
Pause Stops print job temporarily
Reset Clears print buffer after job cancellation
Feed Media
Menu
Setup Menu Print Mode Menu Provides access to options for colour, quality, cartridge set, print
Utility
Menu
Forward Advances media to the front of printer
Media Counter Provides access to additional options where the length of a roll of
media can be entered and the media counter reset.
Display Counter Displays a screen where the current value of the media length can
be viewed and printed on the media.
Backward Moves media to the back of printer
End Of Media Provides access to another screen where the End of Media can be
redefined to look for an abnormally long absence of the loop of me-
dia that occurs between the feeder roll and the platen.
Exit Returns to the main menu
passes, carriage speed and print direction.
Paper Option
Menu
Hpgl/2 Menu Provides access to options for setting HP-GL/2 features.
User Setup Menu Provides access to options for defining and saving user settings.
Ink Option Menu Provides access to options for setting ink preheat, dryer on/off, and
Exit Returns to the main menu
Prime Prints the prime pattern
Access Menu Provides access to a further menu for options to move the ink car-
Colour Calib
Menu
Calibration Menu Provides access to a further menu for calibration options and diag-
Display Settings Displays information such as paper width and height, on time, cu-
Print Settings Prints information about media size, firmware version, RAM size
Service menu All items except the Colour Test are for use by technical support.
Exit Returns to the main menu
Provides access to options for loading media, margins, media se-
lection and other media features.
dry time.
riage away from the service station to access left and right cartridge
sets for installation/replacement of cartridges and the media cutter.
Provides access to further menus for printing the colour calibration
test pattern and for entering values determined by examining the
test patterns.
nostics.
mulative plot time
and plot hours
46 Océ CS 5090 User Manual
Page 47

Menu tree
EXIT
HP - GL / 2
EXIT
PAPER OPTION MENU USER SETUP MENU INK OPTION MENU EXIT
PRINT MODE MENU
EXIT
SAVE MEDIAMARGINS
DELAY STATUS
AUTO - CUT MENU
AUTO - CUT DELAY
AUTO - CUT
AUTO-LOAD DELAY
EXIT
EXIT
AUTO-WIPE DRYER
LCD CONTRAST
PRINT SETTINGS
INK PREHEAT MENU
INIT SETTINGS
LANGUAGE
UNITS SELECT
INK REDUCTION
ROTATION NESTING MENU REPRINTSCONTROLPALETTE SELECT INK LIMIT
PRIME ACCESS MENU COLOR CALIB MENU CALIBRATION MENU DISPLAY SETTINGS PRINT SETTINGS SERVICE MENU EXIT
CALIBRATION MENU DIAGNOSTICS MENU ABOUT CARTIDGE INFO TEST PRINT EXIT
SERVO CYCLE TEST SERVO PWM TEST CARRIAGE TEST COLOUR TEST MENU CONTINUOUS TEST EXIT
COLOR DB MENU PAPER AXIS TEST USE PAPER CALIB OPEN JET MENU PAPER AXIS EXIT
ACCESSORY MENU
Control panel 47
FORWARD MEDIA COUNTER DISPLAY COUNTER BACKWARD END OF MEDIA EXIT
LOAD MEDIA CUT PAUSE RESET FEED MEDIA MENU SETUP MENU UTILITY MENU
PRINT PASSES CARRIAGE SPEED PRINT DIRECTIONDOTS PER INCHQUALITY MODE CARTRIDGE SETCOLOR MODE
SAVE USER
MEDIA STANDARD
SELECT USER
SUPPLY TYPE
Page 48

Use the default settings
The following table shows the factory default printer settings. You can print
these settings for reference.
▼
▼
To print settings
Press
■
Setup/User
and
Setup/Print Settings
to get a listing of current settings.
Be sure to have paper loaded before you start.
To return to factory default settings
Press
■
Setup menu/User Setup menu/Init Settings
buttons. All saved user
settings return to default settings.
User Settings Default Other options
COLOUR MODE
CARTRIDGE SET
QUALITY MODE
DOTS PER INCH
PRINT PASSES
Colour Mono, Gray
2x4 1x4 Right, 1x4 Left,
1x8
Photo Production, En-
hanced, User
600 300
8 (1x8)
4 (1x4)
3 (2x4)
1, 2, 3, 4,5, 6, 8, 10
(1x8)
1, 2, 3, 4, 6, 8, 10 (1x4)
1, 2, 3, 4, 5 (2x4)
CARRIAGE SPEED
PRINT DIRECTION
AUTO-LOAD DELAY
MEDIA STANDARD
MARGIN
AUTO-CUT
AUTO-CUT DELAY
48 Océ CS 5090 User Manual
10 1-10
Bi Uni
6 1-12 Seconds
All Us Engr, Us Arch, Iso
A, Met All, Us All,
Graphics, Met Over A,
Iso B, Special
Normal Expanded
ON OFF
0 0:10,0:20,...60:00
Page 49

User Settings Default Other options
SAVE MEDIA
CALIB XY
SELECT USER
SAVE USER
UNITS SELECT
LANGUAGE
ON OFF
ON OFF
11 To 8
11 To 8
English Metric
English German, French, Ital-
ian, Spanish, Portuguese, Japanese.
Chinese, Korean
DRYER
AUTO WIPE
System settings Default Other options
SUPPLY TYPE
OFF Auto, On, Fans only
OFF ON
Take-up Sheet, Roll, Roll 2
LCD CONTRAST
END OF MEDIA
MEDIA COUNTER
Calibration settings Default Other options
DEADBAND (KCMY1234)
SLOW DEADBAND
VERTICAL (4321YMC)
HORIZONTAL (4321YMC)
PAPER AXIS
41-8
Feeder Stop Normal
01-500 FT
44 0 .... 196
0 -2 ... +2
0 -9 ... +9
0 -9 ... +9
33.00 32 - 34
Control panel 49
Page 50

Save user options
You can save the most frequently used options to avoid reconfiguring the
printer each time you print an image. You can define up to eight different
configurations and save them under a user setting number ranging from 1-8.
Select the desired user setting number before sending an image to the printer.
You can save settings for the following options:
Cut On or Off
■
Media Standard
■
Auto load delay
■
Baud Rate
■
Auto-Wipe On or Off
■
Monochrome or Colour
■
Drying Time
■
Quality Mode
■
Print Mode
■
Margins
■
Parity
■
Dryer On/Off/Auto/Fans only
■
▼
▼
To save user-defined settings
Press
1
2
3
1
2
3
Setup/User Setup/Save User
Scroll to the number under which you want to save the user settings.
Press OK.
To use a previously saved user setting
Press
Setup/User Setup/Select User
Scroll to the number of the user setting you want.
Press OK.
.
.
50 Océ CS 5090 User Manual
Page 51

Adjust the LCD contrast
The LCD contrast option lets you adjust the brightness of the control panel
(with default setting 9). The contrast values range from 1-16, with 16 as the
least contrast.
▼
To set LCD contrast
Press
1
2
3
Setup/User Setup/LCD Contrast
Choose the contrast value.
Press OK.
.
Control panel 51
Page 52

Access printer information
The printer can provide you with information on the following:
Plot area
■
Memory
■
Calibration settings
■
“On time” is the total time the machine has stayed powered on
■
“Plot time” is the total time the machine has been printing
■
Firmware version
■
The On time and the Plot time are resetable by Océ service.
Note:
▼
To access printer information
Select
1
Press the button for the item for which you want information.
2
Press OK.
3
Utility/Print Settings or Utility/Display Settings
Get cartridge information
The Service menu gives you information about the state of the current
cartridges, such as details about the type and ink colour in each stall, and the
extent of cartridge wear, with changes displayed in millimeters (by 2 ml
increments).
At 500 ml, you should replace the cartridge
■
At 1280 ml, the cartridges stops functioning
■
▼
To get cartridge information
From the
1
Press
2
Cartridge Info
menu, press
Utility
.
Service
menu.
.
52 Océ CS 5090 User Manual
Page 53

Chapter 4
E-Connect
Océ CS 5090
User Manual
The E-connect print server, included on the CS5090, offers
a quicker and simpler connection of your printer to your
computer.
This chapter is aimed at explaining how to connect and
configure your printer for the E-connect.
53
Page 54

Prerequisites
To connect your printer, you need:
a PC running Windows NT with 1 or 2 100Base-T NIC installed,
■
a Windows NT Operating System CD Rom,
■
an Océ CS 5090 printer including the E-connect,
■
a parallel printer cable,
■
a CAT5 crossover cable.
■
54 Océ CS 5090 User Manual
Page 55

Connection
Click for Video
!!!!
▼
▼
Connect the CS 5090 to the E-Connect
Attach the provided parallel printer cable between the upper centronics parallel
1
port of the printer and the lower parallel port on the right side of the E-Connect.
Connect the CS 5090 to your computer (using a crossover cable)
Connect one end of the cable to the RJ-45 socket of the E-connect.
1
Connect the other end of the cable to your PC’s second network card (NIC):
2
AB
[26] Connect the CS 5090 to your computer via a crossover cable
Check the green and yellow lights [A] illuminate.
3
Activate an E-connect test by pressing the test key [B] with a pen tip or other
4
small blunt tool and holding it no more than 3 seconds.
Caution:
If you press the button and hold it longer than 5 seconds, the
E-connect resets automatically.
E-Connect 55
Page 56

If the network is working properly, the printer prints a circular pattern.
5
56 Océ CS 5090 User Manual
Page 57

Configuration
▼
Configure your computer
On your desktop, right-click ‘Network neighborhood’.
1
Select ‘Properties’ in the popup menu.
2
Click the ‘Protocols’ tab.
3
Double-click the TCP/IP item.
4
Note:
If there is no TCP/IP, click the ‘Add’ button, select ‘TCP/IP’ among
the list of protocols and click ‘OK’.
In the ‘Microsoft TCP/IP Properties’, click the ‘IP Address’ tab.
5
Select ‘Specify an IP address’.
6
Set the IP Address to ‘192.0.0.193’.
7
Note:
If you need to change the TCP/IP address, please contact your system
administrator or your local Océ service organization.
Set the ‘Subnet mask’ to ‘255.255.255.0’:
8
[27] Configure IP address
Click ‘OK’ and again ‘OK’.
9
Note:
When the configuration is complete, you may be prompted to insert
your Windows Operation System CD Rom. If so, follow the instructions. At
the end, reboot the computer as requested.
Configuration of the E-connect printserver
The default TCP/IP address of the E-connect is ‘192.0.0.192’.
Note:
administrator or your local Océ service organization.
If you need to change this TCP/IP address, please contact your system
E-Connect 57
Page 58

58 Océ CS 5090 User Manual
Page 59

Océ CS 5090
User Manual
Chapter 5
Printing with HP-GL/2
This section explains the printing parameters generally
used with vector-based files, such as palette selection,
printer control, rotation, reprints, nesting, and ink limit.
HP-GL/2 and HP RTL are trademarks of the Hewlett-Packard Co. AutoCAD is a
Note:
trademark of Autodesk, Inc.
59
Page 60

Overview
The ’Draft’ and ’Production’ modes are the most suitable printing modes for
line drawings or drawings with light solid fills typically created by
computer-aided design.
When printing vector data, you can either control certain options from your
software application or assign the control to the printer settings. The following
section explains the HP-GL/2 print settings on the Océ CS 5090.
Access the HP-GL/2 menu options
The following menu options are available from the HP-GL/2 menu:
Palette select
■
Control
■
Rotation
■
Nesting menu
■
Reprints
■
Ink limit
■
▼
To access the HP-GL/2 menu
From the main menu, press
■
Setup menu/HP-GL/2 menu
.
60 Océ CS 5090 User Manual
Page 61

Select the palette
The ’Palette select’ option lets you choose either the HP-GL/2 or AutoCAD
palette. Each palette allows 256 colours with 8 predefined colours, as shown
below:
Pen number HP-GL/2 AutoCAD
0 White White
1 Black Red
2 Red Yellow
3 Green Green
4 Yellow Cyan
5 Blue Blue
6 Magenta Magenta
7 Cyan Black
▼
To choose a palette
From the main menu, press
1
Choose either HP-GL/2 or AutoCAD.
2
Press OK.
3
Setup menu/HP-GL/2 menu/Palette select
.
Printing with HP-GL/2 61
Page 62

Set the ’Control’ function
You set control to establish whether it is the software application or the printer
control panel that determine certain printing functions. Control overrides the
following functions in the HP-GL/2 header file:
’Repeat Plot’ (RP): when you set control to the printer, the printer will ignore
■
RP commands in the print file and output only one print. On the control
panel, you can use the ’HP-GL/2/Reprints’ menu to specify additional
copies.
’Enable Auto Cutter’ (EC): when you set control to the printer, the printer
■
will ignore EC commands in the print file, and does not cut automatically
after each print. On the control panel, you can enable automatic cutting or
initiate a command for a single cut.
Do not override software control when sending merged raster/vector
Note:
data to the printer.
▼
To set control
From the main menu, press
1
Choose either
2
Press OK.
3
Software
Setup menu/HP-GL/2 menu/Control
or
Printer
.
.
62 Océ CS 5090 User Manual
Page 63

Rotate a print
The printer automatically prints an image with the long side on the paper axis.
To fit multiple images and save media, you can use the ’Rotation’ (RO)
function to rotate vector files counter-clockwise 90 degrees at a time.
▼
Note:
Only HP-GL/2 files support rotation. RTL files do not support rotation.
When you use this setting, keep in mind the following principles:
If you specify a rotation that does not fit on the media or contains raster
■
images, the file will not rotate.
When you set the rotation value to ’Auto’, the algorithm automatically
■
rotates the print if this will save media, whether or not you have enabled
’Nesting’.
When you set the rotation value to ’0’, the print does not rotate.
■
’Control’ does not override the RO command in the print file.
■
To rotate a print
From the main menu, press
1
Choose the rotation angle (0, 90, 180, 270, Auto).
2
Press OK.
3
Setup menu/HP-GL/2 menu/Rotation
.
Make reprints
You can print up to 99 copies of a specific vector file. When you set ’Reprint’
to 0, only one copy prints.
▼
To make reprints
From the main menu, press
1
Choose the number of reprints (0 to 99).
2
Press OK.
3
Setup menu/HP-GL/2 menu/Reprints
.
Printing with HP-GL/2 63
Page 64

Ink reduction
Ink reduction lets you reduce the percentage of ink laid down by the printer.
This feature applies only to HPGL/2 format images (vector-based images) and
has no effect on continuous tone images. It is especially useful for images with
large amounts of printed area and helps to avoid bleeding or oversaturating the
media. It does, however, change the appearance of colours, so you may want
to run a small test print.
▼
Nesting
To set ink reduction
Press
1
2
3
Setup Menu/HP-GL/2 Menu/Ink Reduction
Choose a reduction percentage
Press OK.
- 0%,12.5, 25%, 37.5, or 50%
.
.
The ’Nesting’ function can save media by printing multiple prints across the
horizontal width of the media. It also reduces the time required to print
multiple prints.
When you enable this function, the printer accumulates HP-GL/2 files in a
’nest’. Printing begins when one of the following occurs:
The ’nest’ is full, when no other image can fit across the media
■
The ’Nesting Wait Time’ is up. This is the length of time during which the
■
printer idles and waits for the current nest to fill.
The printer runs out of memory
■
The printer receives a print file with different print settings than those in the
■
’nest’, such as:
Print quality
■
Number of passes
■
Print direction
■
Speed
■
Colour mode
■
DPI
■
Dry time
■
Margins
■
Wipe on/off
■
Media save
■
64 Océ CS 5090 User Manual
Page 65

The following parameters do not affect nesting:
Ink limit
■
Reprints
■
Automatic rotation
■
Automatic cutting: if any print file in the nest has the cutter enabled, the
■
printer cuts automatically when the nest finishes printing.
▼
▼
To enable nesting
From the main menu, press
1
Choose either On or
2
Press OK.
3
To set the ’nesting wait time’
From the main menu, press
1
Select the
2
Choose the nest time (30 seconds, 1 minute, 2 minutes)
3
Press OK.
4
Nest Time
Apply the ink limit
The printer can limit the amount of ink laid down when printing polygon fills
and wide vectors. This prevents bleeding when you print on inexpensive inkjet
media. The default setting is ’on’. When you print on high quality media, turn
off this setting.
.
Off
menu.
Setup menu/HP-GL/2 menu/Nesting
Setup menu/HP-GL/2 menu/Nesting
.
.
▼
To apply the ink limit
From the main menu, press
1
Choose On.
2
Press OK.
3
Printing with HP-GL/2 65
Setup menu/HP-GL/2 menu/Ink limit
.
Page 66

Print an HP-GL/2 test file
The printer’s memory contains an HP-GL/2 test file to assist in diagnosing
potential problems. The printed colours in this test file are the same RGB
values defined in AutoCAD. Turn off the ’ink limit’ setting to get AutoCAD
colours on high quality media.
▼
To print the test file
From the main menu, press
■
Utility menu/Service menu/Test print
.
66 Océ CS 5090 User Manual
Page 67

Océ CS 5090
User Manual
Chapter 6
Handling ink and media
67
Page 68

Choose paper options
The following paper options are available:
■
Supply Type
■
Margins
Supply Type
This setting allows you to select your supply options. The available options
are:
‘sheet’ if you intend to use cut sheet stock,
■
‘roll’ if you are about to use roll paper on the upper roll feeder (no takeup
■
available with this option.)
‘roll2’ if you are going to use roll paper with the lower roll feeder (no takeup
■
available with this option.)
takeup if you intend to use roll paper with the optional takeup system.
■
▼▼▼▼
To choose supply type
Press Setup ‘Menu/Paper Option Menu/Supply Type’.
1
Choose the supply type.
2
Press ‘OK’.
3
■
Save Media
■
Auto-Load Delay
■
Media Standard
■
Auto-Cut
Media standard
When you print an image, you determine its size from the software application.
Check that you have loaded the media that is wide enough to accommodate the
image size because the printer automatically defines the print area based on the
width of the loaded media. If length is a problem, use roll media. If the media
width is smaller than the image size, the image may be truncated.
▼▼▼▼
68 Océ CS 5090 User Manual
To choose the media standard
Press ‘Setup/Paper Option/Media Standard’.
1
Choose the size of media you are loading.
2
Press ‘OK’.
3
Page 69

Rollfeed media: sizes and maximum printing areas
Paper size Normal Print Area Expanded Print Area
Graphic (U.S. Offset)
A
B
C
D
E
8.5” x 11.0” 7.3” x 9.8” 8.1” x 10.6”
11.0” x 17.0” 9.8” x 15.8” 10.6” x 16.6”
17.0” x 22.0”
19.0” x 25.0”
20.0” x 28.0”
22.0” x 26.0”
22.0” x 34.0”
23.0” x 35.0”
24.0” x 29.0”
25.0” x 38.0”
32.0” x 44.0”
34.0” x 44.0”
35.0” x 45.0”
36.0” x 45.0”
40.0” x 50.0”
48.0” x 65.0”
50.0” x 65.0”
54.0" x 65.0"
60.0" x 65.0"
15.8” x 20.8”
17.8” x 23.0”
18.8” x 26.0”
20.8” x 24.0”
20.8” x 32.8”
21.8” x 33.0”
22.8” x 27.0”
23.8” x 36.0”
30.8” x 42.0”
32.8” x 42.8”
33.8” x 43.0”
34.8” x 43.0”
38.8” x 48.0”
46.8” x 63.0”
48.8” x 63.0”
52.8" x 62.4"
58.8" x 62.4"
16.6” x 21.6”
17.6” x 24.6”
18.6” x 27.6”
20.6” x 25.6”
21.6” x 33.6”
21.6” x 34.6”
22.6” x 28.6”
23.6” x 37.6”
30.6” x 43.6”
33.6” x 43.6”
33.6” x 44.6”
34.6” x 44.6”
38.6” x 49.6”
46.6” x 64.6”
48.6” x 64.6”
53.6" x 62.8"
59.6" x 62.8"
U.S. Architectural
A
B
C
D
E
U.S. Engineering
A
B
C
D
E
9.0” x 12.0” 7.8” x 10.8” 8.6” x 11.6”
12.0” x 18.0” 10.8” x 16.8” 11.6” x 17.6”
18.0” x 24.0” 16.8” x 22.8” 17.6” x 23.6”
24.0” x 36.0” 22.8” x 34.8” 23.6” x 35.6”
36.0” x 48.0” 34.8” x 46.8” 35.6” x 47.6”
8.6” x 11.0” 7.3” x 9.8” 8.1” x 10.6”
11.0” x 17.0” 9.8” x 15.8” 11.6” x 16.6”
17.0” x 22.0” 15.8” x 20.8” 16.6” x 21.6”
22.0” x 34.0” 20.8” x 32.8” 21.6” x 33.6”
34.0” x 44.0” 32.8” x 42.8” 33.6” x 3.6”
Handling ink and media 69
Page 70

Paper size Normal Print Area Expanded Print Area
ISO-A
A4
A3
A2
A1
210 x 297 mm 180 x 267 mm 200 x 287 mm
297 x 420 mm 267 x 390 mm 287 x 410 mm
420 x 594 mm 390 x 564 mm 410 x 584 mm
594 x 840 mm
625 x 880 mm
A0
METRIC-DIN
A4
A3
A2
841 x 1189 mm 811 x 1159 mm 831 x 1179 mm
250 x 337 mm 220 x 307 mm 240 x 327 mm
337 x 460 mm 307 x 430 mm 327 x 450 mm
460 x 634 mm
610 x 860 mm
A1
634 x 881 mm
860 x 1220 mm
A0
881 x 1229 mm
1000 x 1414
mm
1189 x 1682
mm
564 x 810 mm
595 x 815 mm
430 x 604 mm
580 x 795 mm
604 x 851 mm
830 x 1155 mm
851 x 1199 mm
970 x 1349 mm
1158 x 1617 mm
584 x 830 mm
615 x 825 mm
450 x 624 mm
600 x 805 mm
624 x 871 mm
850 x 1165 mm
871 x 1219 mm
990 x 1359 mm
1179 x 1627 mm
ISO-B
B3
B3
B2
B1
250 x 353 mm 220 x 288 mm 240 x 298 mm
353 x 500 mm 323 x 470 mm 343 x 490 mm
500 x 707 mm 470 x 677 mm 490 x 697 mm
707 x 1000 mm 677 x 970 mm 697 x 890 mm
70 Océ CS 5090 User Manual
Page 71

Sheet media: sizes and maximum printing areas
Paper size Normal Print Area Expanded Print Area
Graphic (U.S. Offset)
A
8.5” x 11.0” 7.3” x 9.0” 8.1” x 9.4”
B
11.0” x 17.0” 9.8” x 15.0” 10.6” x 15.4”
C
17.0” x 22.0”
19.0” x 25.0”
20.0” x 28.0”
22.0” x 26.0”
D
22.0” x 34.0”
23.0” x 35.0”
24.0” x 29.0”
25.0” x 38.0”
32.0” x 44.0”
E
34.0” x 44.0”
35.0” x 45.0”
36.0” x 45.0”
40.0” x 50.0”
48.0” x 65.0”
50.0” x 65.0”
15.8” x 20.0”
17.8” x 23.0”
18.8” x 26.0”
20.8” x 24.0”
20.8” x 32.0”
21.8” x 33.0”
22.8” x 27.0”
23.8” x 36.0”
30.8” x 42.0”
32.8” x 42.0”
33.8” x 43.0”
34.8” x 43.0”
38.8” x 48.0”
46.8” x 63.0”
48.8” x 63.0”
16.6” x 20.4”
18.6” x 23.6”
19.6” x 26.6”
21.6” x 24.6”
21.6” x 32.4”
22.6” x 33.6”
23.6” x 27.6”
24.6” x 36.6”
31.6” x 42.6”
33.6” x 42.4”
34.6” x 43.6”
35.6” x 43.6”
49.6” x 48.6”
47.6” x 63.6”
49.6” x 63.6”
U.S. Architectural
A
9” x 12.0” 7.8” x 10.0” 8.6” x 10.4”
B
12.0” x 18.0” 10.8” x 16.0” 11.6” x 16.4”
C
18.0” x 24.0” 16.8” x 22.0” 17.5” x 22.4”
D
24.0” x 36.0” 22.8” x 34.0” 23.6” x 34.4”
E
36.0” x 48.0” 34.8” x 46.0” 33.6” x 46.6”
U.S. Engineering
A
8.5” x 11.0” 7.3” x 9.8” 8.1” x 9.4”
B
11.0” x 17.0” 9.8” x 15.0” 10.6” x 15.4”
C
17.0” x 22.0” 15.8” x 20.0” 16.6” x 20.4”
D
22.0” x 34.0” 20.8” x 32.0” 21.6” x 32.4”
E
34.0” x 44.0” 32.8” x 42.0” ”33.6” x 42.4”
Handling ink and media 71
Page 72

Paper size Normal Print Area Expanded Print Area
ISO-A
A4
210 x 297 mm 180 x 247 mm 200 x 257 mm
A3
297 x 420 mm 267 x 370 mm 287 x 380 mm
A2
420 x 594 mm 390 x 544 mm 410 x 554 mm
A1
594 x 840 mm 564 x 791 mm 564 x 801 mm
A0
841 x 1189 mm 811 x 1139 mm 831 x 1149 mm
METRIC-DIN
A4
250 x 337 mm 220 x 287 mm 240 x 297 mm
A3
337 x 460 mm 307 x 410 mm 327 x 420 mm
A2
460 x 634 mm 430 x 580 mm 450 x 694 mm
A1
634 x 881 mm 604 x 831 mm 624 x 841 mm
A0
881 x 1229 mm 851 x 1179 mm 871 x 1189 mm
ISO-B
B3
353 x 500 mm 323 x 450 mm 343 x 460 mm
B2
500 x 707 mm 470 x 657 mm 490 x 667 mm
B1
707 x 1000 mm 677 x 950 mm 697 x 960 mm
72 Océ CS 5090 User Manual
Page 73

Set margins
You can set margins to ‘Normal’ or ‘Expanded’. Any part of the image that
extends outside the margin will be clipped.
The ‘Expanded’ setting enlarges the print area and decreases the
margins.When using this setting, check that you align the media accurately
using the guide on the right of the platen so that the ink doesn’t exceed the edge
of the media.
The following tables give the margin sizes for cut sheet and roll feed media:
Cut sheet media On three sides Fourth (bottom) side
Normal
Expanded
15 mm (0.6”) 35 mm (1.4”)
5 mm (0.2”) 35 mm (1.4”)
Handling ink and media 73
Page 74

IMAGE
[28] Cut sheet normal margins and expanded margins
Rollfeed media All sides
IMAGE
0.59"(15mm)
0.59"(15mm)
0.59"(15mm)
▼▼▼▼
Normal
Expanded
0.59"(15mm)
0.197"(5mm)
0.197"(5mm)
IMAGE
0.197"(5mm)
[29] Roll sheet normal margins and expanded margins
To set margins
Press ‘Setup/Paper Option/Margins’.
1
Choose ‘Normal’ or ‘Expanded’.
2
Press ‘OK’.
3
15 mm (0.6”)
5 mm (0.2”)
0.197"(5mm)
IMAGE
74 Océ CS 5090 User Manual
Page 75

Set auto-load delay
Auto-load delay is the time lapse between the moment the printer senses the
presence of the media and when it actually starts feeding the media. This gives
you time to reposition manually the media if necessary. The default is 6
seconds, selectable from a range of 1-12 seconds.
▼▼▼▼
To set auto-load delay
Press ‘Setup/Paper Option/Auto-load delay’.
1
Choose the delay time.
2
Press ‘OK’.
3
Note:
Only stored in memory in combinatio
Select auto-cut
With the ‘Auto-cut’ option activated (by default), the printer automatically cuts
the media when printing completes. To ensure that the image is dry before
cutting, turn on the dryer and/or specify a dry time. You can also select to cut
the media manually from the printer control panel at any time.
Auto-cut is disabled when the paper feed option is set to take-up’’.
▼▼▼▼
Note:
To set auto-cut
Press ‘Setup/Paper Option/Auto-Cut menu/Auto-Cut’.
1
Choose ‘On’ or ‘Off’.
2
Press ‘OK’.
3
n with a user-defined setting.
Handling ink and media 75
Page 76

Select auto-cut delay
Auto-cut delay is the time lapse before the printer automatically performs the
Auto-cut function. It provides additional time for unattended prints to dry. In
addition, you may need to delay auto-cut depending on the media used, the
ambient temperature and the humidity. Auto-cut values range from 0 to 55
seconds in five second intervals and from 1 to 60 minutes in one minute
intervals. Once the delay time has expired, the printer rolls or cuts the image
and begins printing the next image in the buffer. Auto-cut delay is ignored if
Auto-cut is set to ‘Off’.
▼▼▼▼
To set Auto-cut delay
From the ‘Setup menu’, ‘select Paper Option menu/Auto-cut menu’.
1
Press ‘Auto-cut delay’.
2
Choose a time using the ‘Next/Prev option’ buttons.
3
Press ‘OK’.
4
Delay status
Delay status allows users to view the time remaining before Auto-cut and to
cancel the remaining delay time if needed. A countdown timer displays time
left in minutes and seconds. Reset counter forces the count to zero and the
printer initiates the Auto-cut immediately.
▼▼▼▼
To reset counter
From the ‘Setup menu’, ‘select Paper Option menu/Auto-cut menu’.
1
Press ‘Delay status’.
2
‘Select Reset Counter’. ‘Auto-cut’ is initiated.
3
76 Océ CS 5090 User Manual
Page 77

Save media
With the ‘Save media’ option activated (by default), the media advances only
far enough to print the image. When not activated, the printer advances the full
print area of the loaded media. For example, if a 36 inch roll is loaded, the
printer advances the entire print area for a standard 36 x 48" sheet, even if the
printed image is only 30 inches long.
▼▼▼▼
To turn off Save Media
Press ‘Setup/Paper Option/Save Media’.
1
Choose ‘Off’.
2
Press ‘OK’.
3
Handling ink and media 77
Page 78

Choose "feed media" options
The printer’s ‘Feed media’ options allow you to:
set the "end of media" detection
■
use the media counter to estimate the remaining media length
■
Detect the "end of media"
‘End of media’ enables to detect the end of roll, in order to prevent the printer
from printing on the platen unit.
When the media jams or does not unroll properly from the feeder roll, it cannot
advance through the printer. Yet the carriage sensor still detects the presence of
media, and printing progresses. This damages the print job because the printer
continues to lay down ink on the same portion of media.
The "End of media/Feeder stop" option can limit the damage in these cases.
When the printer detects an abnormally long absence of the media loop
between the feeder roll and the platen, it automatically enters the "pause"
mode, as if you had manually pressed "Pause" on the control panel menu.
The printer beeps 3 times every 20 seconds, and remains in the "pause" mode
until you either:
manually press "Pause" to resume printing ("Pause" is a toggle function)
■
manually press "Reset" to abort printing. Abort the print job from the
■
software application as well.
Click for Video
!!!!
78 Océ CS 5090 User Manual
Page 79

When you use this setting, keep in mind the following principles:
This setting does not work with cut sheets as the selected media
■
This setting is a machine setting and therefore activates each time you switch
■
on the printer, until you manually turn it off from the control panel menu
You cannot store this setting as a user setting
■
You cannot change this setting once printing begins
■
When you manually press "Pause" to resume printing, the "Feeder stop"
■
detection disables for the remainder of the print
When activated, the "Feeder stop" detection restarts at the beginning of each
■
print.
▼▼▼▼
To set the "Feeder stop"
Press ‘Feed Media/End of Media’.
1
Choose ‘Feeder Stop’.
2
Press ‘OK’.
3
Use the media counter
The media counter gives you a means of "estimating" the length of media left
on a roll.
When you install a new roll (or used roll of media with a known length), you
■
enter the length in the media counter on the control panel.
As the printer uses up the media, this value decreases and displays on the
■
control panel.
When you remove the media roll, you can print the estimated remaining
■
length on the roll, and enter this value in the media counter the next time you
use this roll.
▼▼▼▼
▼▼▼▼
To enter a media length value
Press ‘Feed Media/Media counter’.
1
Enter the media length.
2
Press ‘OK’.
3
To display the media length value
Press ‘Feed Media’.
1
Then, select ‘Display counter’. The current value appears.
2
Handling ink and media 79
Page 80

▼▼▼▼
To print the media length value on the roll
Press ‘Feed Media/Display counter’.
1
Press ‘Print counter’.
2
▼▼▼▼
To reset the media counter to 0
Press ‘Feed Media/Media counter’.
1
Press ‘Reset counter’.
2
Press ‘OK’.
3
When you use this setting, keep in mind the following principles:
Reset the media counter to 0 to avoid confusion when not in use
■
The media counter does not decrease below 0
■
This setting is a machine setting and therefore activates each time you switch
■
on the printer, until you manually turn it off from the control panel menu
You cannot store this setting as a user setting
■
80 Océ CS 5090 User Manual
Page 81

Ink
Refill ink reservoirs
Keep the reservoirs (on the left side of the printer) always filled with ink. You
can refill them at any time, even while printing. If a reservoir runs out of ink,
the ink delivery lines will deprime and may make the ink leak, and cause
damage to the ink cartridges and the carriage electronics. When refilling ink
reservoirs, take these precautions:
Have paper towels handy
■
Wear disposable gloves.
■
Open only one reservoir at a time to prevent an ink colour from accidentally
■
contaminating another.
Use of inks other than those supplied by Océ may cause damage
▼▼▼▼
Attention:
to your printer.
To fill ink reservoirs
Access the reservoirs on the left side of the printer.
1
Remove the cap from the reservoir you want to fill.
2
Check that the ink colour and type in the bottle and the one in the ink reservoir
3
match.
Pour the ink into the reservoir to approximately 1/2 inch from the top. Do not
4
overfill.
Replace the cap on the reservoir.
5
Repeat steps 2 to 5 for the remaining reservoirs.
6
Click for Video
!!!!
Use the dryer
To ensure prints are dry for unattended printing, the CS5090 features a new
thermal drying system. The system monitors the ambient temperature and
humidity. From these measures, it adjusts the heat in order to optimize drying
time and ensure image quality.
Handling ink and media 81
Page 82

Four different modes are available:
‘Off’: when this mode is selected, the dryer firmware is active (it monitors
■
the ambient temperature and humidity) but does not take into account any
printing operation. In this case, the dryer is not activated.
‘On’: when this mode is selected, it applies maximum dryer output
■
temperature for every print job, whatever the ambient temperature and
humidity is.
‘Auto’: when this mode is selected, the dryer firmware monitors the ambient
■
temperature and humidity and calculates the best drying time to apply for
each print job. It can also increase the output temperature whenever the print
job requires it (for e.g., when a chosen print mode results in an increasing
print speed, the increase is automatically detected by the firmware which
adjusts the drying time consequently).
‘Fans only’: when this mode is selected, the dryer is working but without the
■
heaters switched on. It is blowing only cold air. It is advised to select this
mode when using specific media that do not support heating. Blowing cold
air prevents the media from curling and deforming.
▼▼▼▼
For more details about the media, please refer to the Media Product
Note:
Information Sheets on www.oce.com.
Caution:
Never connect the dryer data cable when the dryer power cable is
connected. Always unplug the dryer power cable before connecting the
data cable. When connecting or disconnecting dryer power cord or dryer
data cable, the printer power switch MUST be in the Off position. Failure
to follow these instructions may damage the printer.
Attention:
Caution:
Never open the dryer. There are no user serviceable parts inside.
Once the dryer is plugged in, there is continuous power to the
dryer, even when the printer is turned off.
Select the dryer mode
Select ‘Setup menu/Ink option menu/Dryer’.
1
Choose the dryer mode (Off/On/Auto/Fans only) by pressing ‘Next option’ or
2
‘Previous option’.
Press ‘OK’.
3
When the dryer is activated, drying continues even after the print is
Note:
finished, and as a consequence, the printer cannot be accessed until drying is
finished.
82 Océ CS 5090 User Manual
Page 83

Select auto-wipe
By default, this options is not activated. When ‘on’, the printer automatically
wipes the cartridge jet plates periodically during printing. However, you can
de-activate this setting if you are having problems with banding.
Not wiping the cartridge jet plates can cause clogging of the inkjets.
▼▼▼▼
Note:
To turn on the wiper
Press ‘Setup menu/Ink Option menu/Auto-Wipe’.
1
Choose ‘On’.
2
Press ‘OK’.
3
Change ink types
When you use a new ink type (i.e. from Océ Standard Colour ink to Océ
Outdoor Colour ink), you must change the reservoirs and the cartridges to
match the new ink type. If you are printing with only two different types of inks
using two sets of ink lines, you can use the colour coded quick connect fittings
to change ink types. However, if you use only one set of ink lines for different
ink types, you must purge and rinse the ink delivery lines with distilled water.
Attention:
precautions:
For best results when changing inks, keep in mind these
‘Do not’ use Océ Standard Colour inks with Outdoor media or vice versa.
■
‘Never’ mix inks.
■
Use only inks developed for the Océ CS 5090 printers.
■
When changing ink types, you must do the following:
Remove and store ink cartridges
■
Remove and store ink reservoirs
■
Install new ink reservoirs
■
Install new ink cartridges
■
Handling ink and media 83
Page 84

Remove and store ink cartridges
This procedure explains how to remove, store and reuse cartridges. Following
this procedure will extend the life of your cartridges and prevent ink from
leaking from the cartridges.
If you lay down a cartridge with ink in it, lay it on its front side so that
Note:
the flex contacts face up. This prevents ink from leaking out either the top
opening or out the jet area on the bottom. Do not touch the flex contact area of
the cartridge.
▼▼▼▼
To remove and store cartridges
On the printer control panel, press ‘Utility Menu/Access Menu/Access Right’.
1
This moves the carriage away from the service station and enables you to easily
remove the right cartridges (YMCK). To remove the left cartridges (1234),
select ‘Access Left’.
Disconnect the cartridge tube from the carriage by lifting up on the valve cover
2
and removing the septum fitting from the valve connection. Leave the valve
cover in the up position to.
Remove the cartridge from the carriage by gently pulling the top edge toward
3
you, then lifting it out of the carriage. ‘Do not remove the cartridge tube from
the cartridge’. Leaving the tube fitting attached to the cartridge will maintain
the negative pressure inside the cartridge that is required for proper operation.
It also prevents the cartridge from leaking.
[30] Leaving the tube fitting attached to the cartridge
Wipe any ink from the septum fitting at the end of the tube using a lint-free
4
cloth.
Insert the cartridge into the cartridge garage. Make sure that the cartridge cap
5
lip snaps and locks into the cartridge locking tab. This will assure a good seal.
Repeat the previous steps for the remaining cartridges.
6
84 Océ CS 5090 User Manual
Page 85

Remove reservoirs
▼▼▼▼
To remove the reservoirs
Remove all ink cartridges before removing the ink reservoirs.
1
Access the reservoirs on the left side of the printer. Leave on the reservoirs
2
caps.
Disconnect the quick connect fitting for each reservoir, noting the colour of the
3
fitting to which it was connected.
Slide each reservoir forward to remove it from the printer.
4
Store the reservoirs away from direct sunlight in an environment similar to that
5
of the printer.
Replace with new reservoirs.
6
Fill the reservoirs with the appropriate ink and attach to the other set of quick
7
connect fittings (not used for the previous type of ink).
Handling ink and media 85
Page 86

Install new cartridges
Your printer uses cartridges that were specifically designed for it. They are not
compatible with cartridges designed for other printer models. Use of other
cartridges may damage the printer and/or prevent it from printing. Ink
cartridges ship prefilled with ink. Be sure all cartridges and reservoirs use the
same ink type.
▼▼▼▼
To install ink cartridges
Do not touch the jet area or the flex contact area of the ink cartridge.
Note:
Work with only one ink colour at a time to prevent contamination.
Caution:
Never manually move the carriage when the printer is on. Injury
can result from unintentional carriage movement.
With printer power on, press ‘Utility Menu/Access Menu/Access Left’ or
1
‘Access Right’ to move the carriage to the position which allows replacement
of the ink cartridges (use Access Left if you are working on the left bank of
cartridges or Access Right for the right bank of cartridges).
Cartridges are prefilled and preprimed. Remove the cartridge from the sealed
2
bag and remove the shipping cap.
[31]
Install the cartridge bottom first into the correct slot on the carrier.
3
Caution:
Tilt the cartridge up until it clicks into place. Make sure the cartridge is firmly
4
Do not remove the blue tape from the jet plate
seated.
Close the ink delivery lines by pushing the valve up.
5
For every cartridge, insert the needle assembly connector into the fitting on the
6
carriage.
Open the ink delivery lines by pushing the valves down.
7
86 Océ CS 5090 User Manual
Page 87

Refill ink cartridges
New Océ cartridges are prefilled with ink. However, if you must re-install a
used or empty cartridge, make sure that the ink level in the cartridge is exactly
20 ml. Any other level (above or below 20 ml) can interfere with the
continuous ink refilling process to the cartridges during printing.
To refill a used cartridge with the correct level of ink, use the syringe and hose
provided. The hose length of the syringe is 40 mm.
▼▼▼▼
▼▼▼▼
Note:
This 40 mm length guarantees the correct amount of ink when you insert
the hose completely into the cartridge.
If you do not know the amount of ink in the cartridge, proceed as follows:
Draw excess ink from the cartridge.
1
Refill the cartridge.
2
To fill an empty cartridge
Fill the syringe with 20 ml of ink.
1
Attach the hose to the syringe.
2
Insert the hose into the cartridge.
3
Empty the syringe contents into the cartridge.
4
To draw excess ink from a cartridge
Insert the hose of the empty syringe into the cartridge.
1
Draw excess ink from cartridge. The level of remaining ink is now exactly 20
2
ml.
Remove syringe.
3
Handling ink and media 87
Page 88

▼▼▼▼
To refill a cartridge
Fill the syringe with 20 ml of ink.
1
Attach the hose to the syringe.
2
Insert the hose into the cartridge.
3
Empty the syringe contents into the cartridge.
4
Draw any excess ink from cartridge. The level of remaining ink is now exactly
5
20 ml.
Remove syringe.
6
Ink
[32] Refilling cartridge to correct ink level
40mm
20mL
88 Océ CS 5090 User Manual
Page 89

Purge ink delivery lines
If you are using one set of ink lines for several ink types, you must purge the
ink lines and rinse them with distilled water thoroughly before changing to a
new ink type. You will then have to reprime the lines as described (see ‘Prime
the ink delivery lines’ on page 30).
▼▼▼▼
To purge ink delivery lines
Remove all eight cartridges before purging the ink lines.
1
Place cartridges in the plastic garages and close the lids.
2
Open the ink delivery lines pushing the valves down.
3
Remove reservoirs, including connectors.
4
Fill one reservoir with distilled water and place it in the printer, connecting it
5
with its corresponding cartridge.
Connect the Océ Prime tool to a connector at the cartridge side and turn it on
6
until distilled water is coming through the ink line. Now, the line is clean.
Empty the reservoir filled with distilled water and reconnect it.
7
Use again the Océ Prime Tool to remove the water left within the ink line.
8
Repeat the same procedure for all the lines.
9
Select ink preheat
Cartridge preheat settings are optimized for media being printed in a standard
office environment. If you are experiencing banding, poor fills, or over dot
gain, and you have tried all other means to correct these conditions, you may
want to experiment with the ink preheat settings. These will vary depending on
the ambient temperature where the printer is located and the media and ink
used.
Defaults for the heater setting are determined by the ink type in use.
Default = 0 for each cartridge. This does however not mean that the absolute
values are the same for each cartridge. 0 for Magenta might be a different
setting as 0 for Cyan. The printer determines the ink type by reading the chip
on the back of each cartridge. When you adjust the ink settings, you are
increasing or decreasing the heat from the default temperature. Pressing the
‘Previous’ and ‘Next’ buttons increases or decreases the temperature. When
you have reached the limits of the temperature range, the panel will display
either MAX or OFF. These settings are saved in the printer. If you change to a
different type of ink, you may need to change the heater settings to
accommodate the new ink type.
Handling ink and media 89
Page 90

If you are working in a cold or dry environment, try turning the heat up for a
larger dot size. If the heat is turned up too far, the ink may run or sputter. If you
are working in a humid or hot environment, turn the heat down for a smaller
dot size.
You can set preheat values for each cartridge in the Left and Right cartridge
sets. The following example sets the preheat value for cartridge 4 of the Left
cartridge set.
▼▼▼▼
▼▼▼▼
To set the ink preheat value for cartridge 4 of the left cartridge set
Press ‘Setup Menu/Ink Option Menu/Ink Preheat Menu/Left/4 Preheat’.
1
Choose a preheat value.
2
Press ‘OK’.
3
The following example sets the preheat value for cartridge Y of the Right
cartridge set.
To set the ink preheat value for cartridge Y of the right cartridge set
Press ‘Setup Menu/Ink Option Menu/Ink Preheat Menu/Right/Y Preheat’.
1
Choose a preheat value.
2
Press ‘OK’.
3
Changing the preheat setting will change the drop size and therefore the
Note:
colour appearance. In order to avoid colour changes perform a colour
calibration / linearisation on your software (OGSL or OCC, for instance).
90 Océ CS 5090 User Manual
Page 91

Chapter 7
Quality
Océ CS 5090
User Manual
This chapter is aimed at describing the different quality
and print modes available on the CS5090:
Quality mode
■
Colour mode
■
DPI mode
■
Print passes
■
Carriage speed
■
Print direction
■
91
Page 92

Choose a print mode
Your printer offers four quality modes, three of them pre-defined, which let
you make trade-offs between speed and quality.
The quality mode you use depends on various factors, such as your software
application, whether you’re printing in colour or monochrome, and the type of
media you’re using. Each quality mode directly affects the printing speed and
quality of the image you print, so you should understand the differences.
Each of the quality modes attempts to strike a balance between speed and
quality. The default quality mode, Photo, provides quality images at a
reasonable printing speed for most users. Whenever you choose a print mode
other than Photo, you will choose to emphasize either speed or quality.
The quality modes include the following print mode options:
Colour mode
■
DPI mode
■
Print passes
■
Carriage speed
■
Print direction
■
92 Océ CS 5090 User Manual
Page 93

Selecting the User quality mode will allow you to set each of the print mode
options individually. Quality modes are summarized in the table which
follows. It is not necessary to set all the parameters, unless you want to create
a user-defined print mode.
The 8-heads CS 5090 enables to choose between four different cartridges sets:
1x4 Left, 1x4 Right, 2x4 or 1x8. According to the cartridges sets you select,
the quality modes available will be different.
Note:
Make sure you choose the cartridge set before selecting a quality mode.
Quality Modes for 1x4 Right and 1x4 Left Cartridge Sets
Quality mode Colour
Mode
Production Colour 600 2 10 Bi
Photo Colour 600 4 10 Bi
Enhanced Colour 600 6 10 Bi
User User Defined
Dots per
Inch
Print
Passes
Carriage
Speed
Direction
Quality Modes for 2x4 Cartridge Sets
Quality mode Colour
Mode
Production Colour 600 2 10 Bi
Dots per
Inch
Print
Passes
Carriage
Speed
Direction
Print
Print
Photo Colour 600 3 10 Bi
Enhanced Colour 600 4 10 Bi
User User Defined
Quality Modes for 1x8 Cartridge Sets
Quality mode Colour
Mode
Production Colour 600 2 10 Bi
Photo Colour 600 4 10 Bi
Enhanced Colour 600 6 10 Bi
User User Defined
Quality 93
Dots per
Inch
Print
Passes
Carriage
Speed
Print
Direction
Page 94

Select cartridge sets
▼
Select one of the cartridge sets
Press
1
2
3
Setup Menu/Print Mode Menu/Cartridge sets.
Choose
Press
1x4 Left, 1x4 Right, 2x4 or 1x8
OK.
Select quality modes
There are four print quality modes:
Production -
on paper media (for e.g.: CAD/GIS).
Photo -
important than printing speed. (Default)
Enhanced -
User defined -
individually to meet your unique requirements.
This setting is useful for fast, better than average quality printing
For high quality continuous tone images where quality is more
This is the best pre-defined quality mode.
Allows you to set each one of the print mode options
using
Next option/Prev option.
▼
To choose print quality
Press
1
2
3
Setup Menu/Print Mode Menu/Quality Mode.
Choose the desired quality.
Press
OK.
94 Océ CS 5090 User Manual
Page 95

Select a colour mode
Colour mode refers to whether you are printing in colour or monochrome.
▼
To choose the colour mode
Press
1
Choose
2
Press
3
Setup Menu/Print Mode Menu/Colour Mode.
Colour, Mono
OK.
Select resolution (dpi)
Select your image resolution based on the viewing distance and user
specifications. This resolution is not the same resolution as in the resulting
rasterised file created with OGSL. For best results, check that the printer
resolution (dpi) matches the image resolution of the file you are printing.
Note:
same image at 300 dpi, the printing speed does not change (if other settings are
the same.) The printer always prints at 600 dpi, even if the print mode menu
setting displays 300 dpi. This setting refers to the resolution at which your
image was created, and not the actual resolution at which it prints.
Even though a rasterized image at 600 dpi is four times larger than the
or
Gray.
▼
Note:
To choose resolution
Press
1
Select
2
OGSL automatically corrects for images with different input resolutions.
RIP
resolution
300 dpi
300 dpi
600 dpi
600 dpi
Setup menu/Print mode menu/Dots per inch
300
Printer dpi setting Result of printed output image
300 dpi 1 input pixel prints as
600 dpi 1 input pixel prints as
300 dpi 1 input pixel prints as
600 dpi 1 input pixel prints as
or
600
resolution.
4 output pixels.
1 output pixels.
1 output pixels.
1 output pixels.
The printed image is
the size of the original.
The printed image is
1/4 the original size.
The printed image is
4x the original size.
The printed image is
the size of the original.
.
Quality 95
Page 96

Set print passes
The number of passes indicates how many times the cartridges must fire to lay
down the ink for a complete scan line. You may select multiple passes, so that
on a single pass, the jets fire only a fraction of the dots. If you're printing an
image with heavy fill or shading, setting the print mode to an option that lays
down less ink can help prevent running and bleeding.
When using the 2 x 4 cartridge set, a single pass fires ink from two
Note:
cartridges for each colour.
▼
To change the number of passes
Choose
1
Choose
2
Setup Menu/Print Mode Menu/Print Passes.
Single, Two, Three, Four, Six, Eight
Single, Two, Three, Four
Six, Eight
Press
3
Note:
or
OK.
More print-passes equals higher print quality whereas less print passes
means higher speed.
Attention:
Single pass is not recommended forgraphics art printing.
Set carriage speed
Carriage speed lets you determine the number of dots per second that are laid
down as the carriage moves over the media.
or
for 1x8 cartridge set.
Ten
for 2x4 or
Five
or
for 1x4 cartridge sets or
Te n
Single, Two, Three, Four, Five,
▼
96 Océ CS 5090 User Manual
To set the carriage speed
Press
1
2
3
Setup Menu/Print Mode Menu/Carriage Speed.
Choose
Press
1, 2, 3, 4, 5, 6, 7, 8, 9
OK.
or 10. (10 is the fastest.)
Page 97

Select the print direction
The print direction determines whether the inkjets fire on both passes of the
carriage over the print area (bidirectional), or simply on the return pass
(unidirectional).
▼
Unidirectional
■
printing can reduce running and ink bleeding if you have an
image with solid fills and blends.
Bidirectional
■
printing can decrease your printing time if printer speed is more
important.
To change the print direction
Press
1
Choose
2
Press OK.
3
Setup/Print Mode/Print Direction
Unidirectional
or
Bidirectional
.
.
When printing in bidirectional mode, the velocity of the carriage can cause
certain dots to miss the target area on the media. To alleviate this problem, use
the
colour deadband compensation
feature to fine-tune dot placement. The
colour deadband test pattern lets you check the velocity deadband values and
adjust them for best printing results (see ‘To print the colour deadband test
pattern’ on page 40).
Quality 97
Page 98

98 Océ CS 5090 User Manual
Page 99

Océ CS 5090
User Manual
Chapter 8
Firmware downloads
This chapter describes the procedure to follow to upgrade
the firmware version included in your printer.
99
Page 100

Overall
The Océ 5090 inkjet printer contains firmware that can be upgraded to a newer
version. You may need to upgrade your firmware version for different reasons:
support of new ink
■
engine improvements
■
new features
■
For this reason, Océ gives all owners of an Océ 5090 system access to new
firmware versions via the WWW.
100 Océ CS 5090 User Manual
 Loading...