

Page 1
1 Safety Precautions
Safety Precautions .............................................2
2 Basic Operations
Turning the Printer On and Off ...........................6
Loading the Roll ..................................................8
Loading the Sheet ............................................12
Printing from Windows ......................................14
3 Maintenance
Replacing Ink Tanks .........................................16
Cleaning the Printer ..........................................21
Checking for Nozzle Clogging ..........................25
Cleaning the Printhead .....................................26
Adjusting the Printhead Automatically ..............27
Adjusting the Feed Amount ..............................28
4 Troubleshooting
Responding to Messages .................................29
Troubleshooting if You Cannot Print .................37
Troubleshooting IfYou Cannot Print as Expected
..45
Clearing Jammed Roll Paper ............................48
Clearing Jammed Sheet ...................................52
5 Consumables
Consumables ....................................................54
6 Appendix
Index .................................................................56
Page 2
Safety Precautions
Follow the warnings and precautions below to use the printer safely. Do not perform any
operations or procedures other than as described in this manual. Doing so m a y result in
unexpected accidents and can cau
█Printer location
Do not set up the printer in any location exposed to alcohol, thinner, or other volatile liquids.
•
If these substances come into contact with electrica l components inside the printer, there
is a risk of fire or electrical shock.
█Power Supply
Never handle the power cable with wet hands. Doing so may cause electrical shock.
•
Insert the power cable securely and co mpletely into the power source. If the power cab le is not
•
inserted completely, this could cause a fire or electrical shock.
se a fire or electrical shocks.
Do not use any power cable other than the one
•
shock. Never use the power cable with any other electrical device.
Never cut the power cable or attempt to modify it, and never stretch it or bend it forcefully.
•
Never place a heavy object on the power cable. Damaged sections of the power cable could
cause a short circuit and may cause a fire or electrical shock.
Never connect the power cable to a power strip or any power source sha red by other electrical
•
devices. This could cause a fire or electrical shock.
Never knot the power cable or wrap it around itself. This could cause a fire or electrical shock.
•
Periodically disconnect the power cable and use a dry cloth to wipe away dust that has
•
collected on the plug and the area around the power outlet. Leaving the power cable plugged in
and not cleaned for a long period, especially in an ar e a subject to dust, oil, and humidity, could
cause the insulation material to deteriorate and lead to a fire.
█In an Em ergency
If the printer emits smoke or strange odors, continuing to use the printer may cause a fire or
•
electrical shock. Switch the p
outlet. Contact the nearest service center.
provided. This could cause a fire or electrical
rinter off immediately and remove the power plug from the power
2
Page 3

█Cleaning the Printer
Use a damp cloth to clean the printer. Use a damp cloth to cle
•
come into contact with any electrical component inside the printer, a fire or electric shock
may occur.
█Pacemakers
This printer genera tes a low-level magnetic field. Anyone wearing a pacemaker who
•
experiences discomfort while working around the printer should leave the area. Consult a
physician before continuing to work around the printer.
█Printer location
Never install the printer on an unstable or vibrating surface. If it falls over, this could cause
•
personal injury.
Never set up the printer in a location that is exposed to high humidity or large amounts of dust,
•
or exposed to direct sunlight, high temperature, or open flame. This could cause a fire or
electrical shock. Use the printer location in an environment where temperature and humidity
are within the ranges of 5 Degrees C to 35 Degrees C (41 Degrees F to 95 De grees F) and 10
to 90% RH (with no condensation).
Never place the printer on a heavy wool or shag carpet. The fibers may enter the printer
•
and cause a fire.
Safety Precautions
an the printer. If such materials
Keep the area around the power outlet clear of items so that you can disconnect the power
•
cable immediately if the printer starts operating abnormally. n the event of a printer malfunction,
remove the power cable from the outlet as s oon as possible to prevent fire and electrical shocks.
Never install the printer near large office equipment or any other type of electrical device that
•
emits a strong magnetic field. Never install the printer near large office equipment or any other
type of electrical device that emits a strong magnetic field.
█Moving the Printer
The weights of main printer units are as follows:
•
39 Kg
•
Moving the printer requ ires at least two people, one person on each side of the un it. Be careful
to avoid back strain and other injuries.
When moving the printer, firmly grasp the Carrying handles located on the bottom surface
•
at both sides. Holding the printer at other positions is dangerous and poses a risk of injury
and damage if the printer is dropped
3
Page 4
Safety Precautions
█Power Supply
Always grip the plug to remove the power cable from the powe
•
cable could damage the cable and lead to a fire or electrical shock.
Never use an extension cord. This could cause a fire or electrical shock.
•
Never use any power source other than 100–240 V. T his could cause a fire or electrical shock.
•
The printer operating conditions are described below. Use the printer under the following
conditions.
Power supp ly voltage: 100–240 V
Power supply frequency: 50/60Hz
█Cleaning the Printer
Always disconnect the power cable from the outlet before cleaning the printer. If the printer is
•
switched on accidentally, moving parts inside the printer may cause personal injuries.
█ Printhead, Ink Tanks and Maintenance Cartridge
Always store consumables in a safe location out of the reach of small children. If a child licks or
•
ingests ink accidentally, seek medical assistance immediately.
r outlet. Pulling on the power
█Other
Avoid dropping or shaking Printheads,in
•
stain clothing and the work area.
Never touch the electrical contacts o
•
extremely hot and can cause minor burns.
Never disassemble the printer or attempt repairs. There are high voltage parts inside the
•
printer that can cause a fire or elec
Never use flammable sprays around the printer. The gas of flammable sprays can cause a fire
•
or electrical shock, if it contacts high voltage points inside the printer.
Never insert your hand into the printer while it is printing. Moving parts inside the printer can
•
cause injuries.
Never place anything on the pr
•
any type of liquid container that contains flammable liquids (alcohol, benzene, etc.). If such
objects fall into the printer, this could cause a fire or electrical shock.
inter such as small metal objects (paper clips, staples), liquids,
k tanks, and maintenance cartridges. Spilled ink can
fthePrinthead after printing. The contacts become
trical shock.
4
Page 5

Safety Precautions
After removing the Cutter Unit, never touch the cutting edge. This could cause personal injury.
•
To prevent a fire hazard or dangerous electric shock, if a fo
•
into the printer, press the Power button immediately to switch the printer off, unplug the printer
power cable from the outlet, and then call for service. If you continue to use the printer, this
could cause a fire or electrical shock.
Connect the interface cable correctly. To avoid damage, before connection make sure that the
•
shape of the cable connector matches the connection point on the printer.
Do not block the vents on the top and right side of the unit while the p rinter is on.
•
Avoid placing papers or other light objects near the right-side vent
•
reign object falls into or a liquid spills
5
Page 6
Turning the Printer On and Off
Turning the printer on
1
2
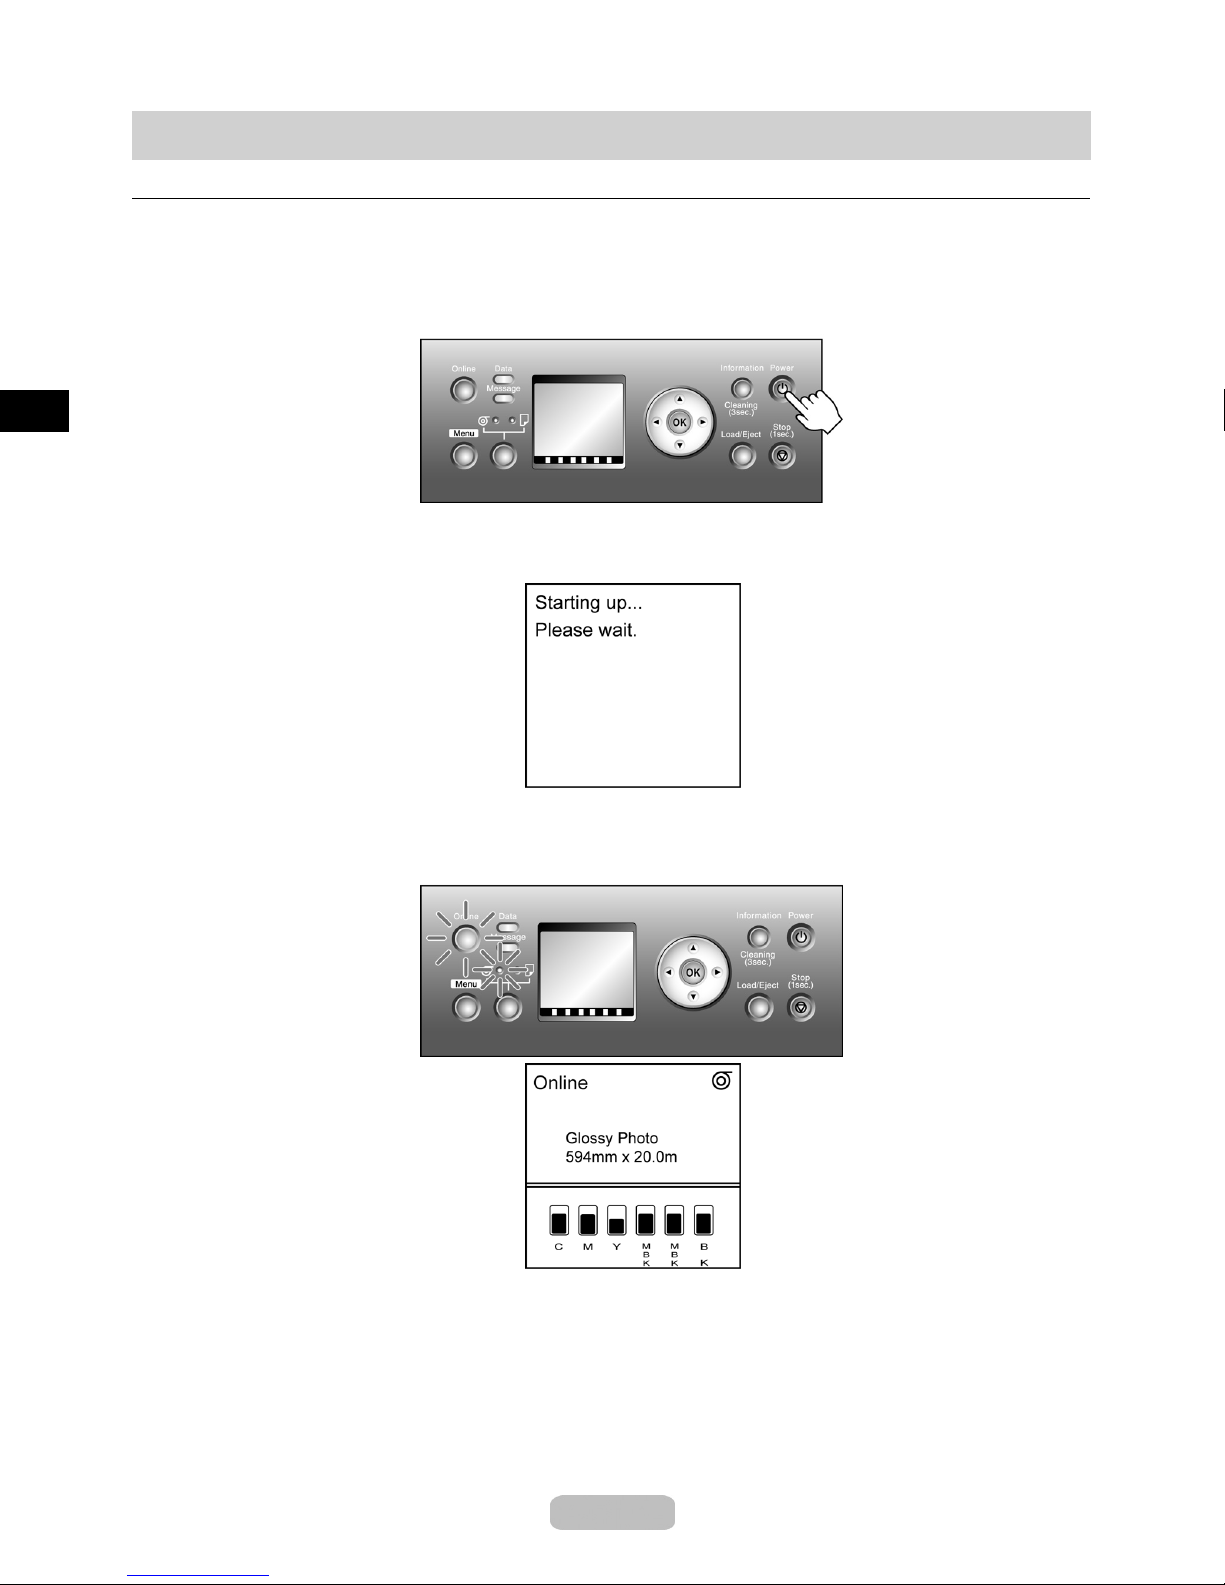
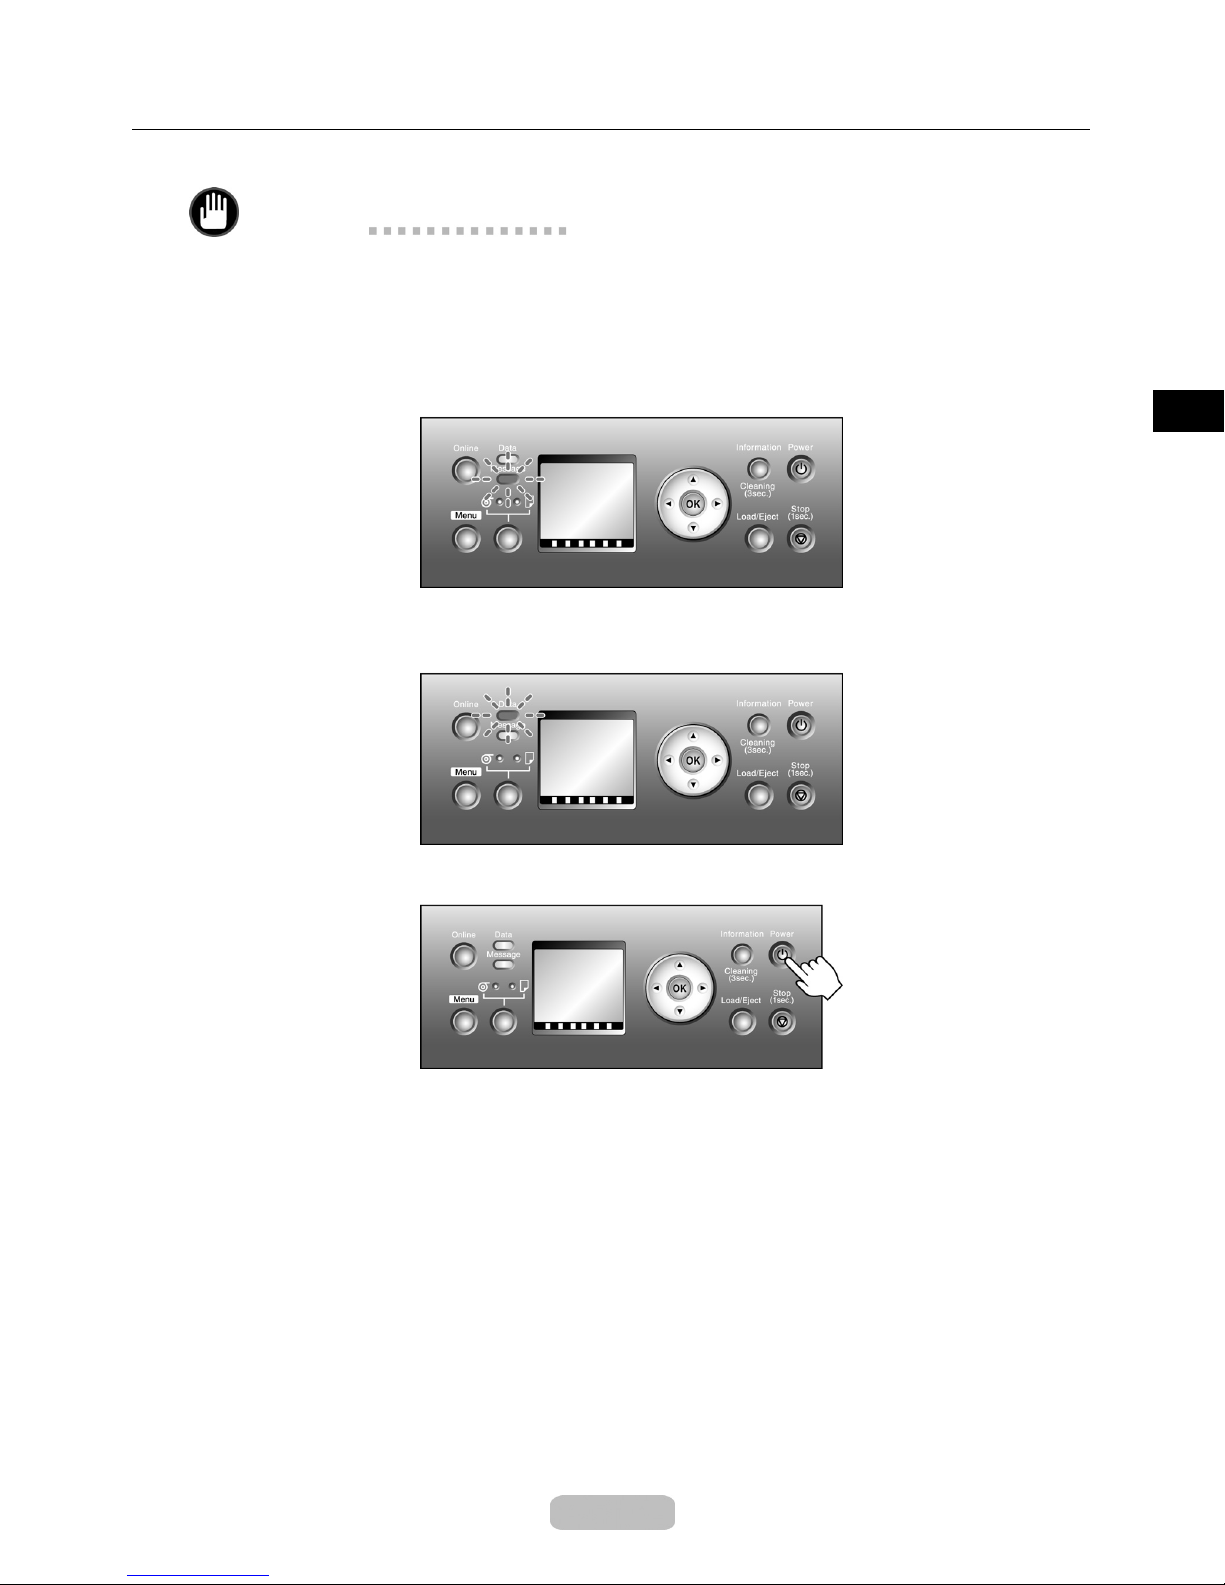
Press the Power button to turn on the printer.
The printer will now start up.
After the Display Screen shows the Océ logo,Startingup…Pleasewait.is
displayed.
The printer goes online in preparation for printing after startup, and the Online lamp
and paper source section lamp remain lit.
6
Page 7
Turning the printer off
Important
Never turn the printer off or unplug it during a prin t job. This could damage the
•
printer.
Turning the Printer On and Off
1
2
Make sure no print jobs are in progress.
If the Message lamp is flashing, check the message on the Display Screen and
take action as necessary.
If the Data lamp is flashing, the printer is receiving a print job. Turn off the printer
only after printing is finished.
Hold down the Power button for more than a second.
After Shut Down.. Please Wait.. isshownontheDisplay S creen, the printer
shuts off.
7
Page 8

Loading the Roll
1
2
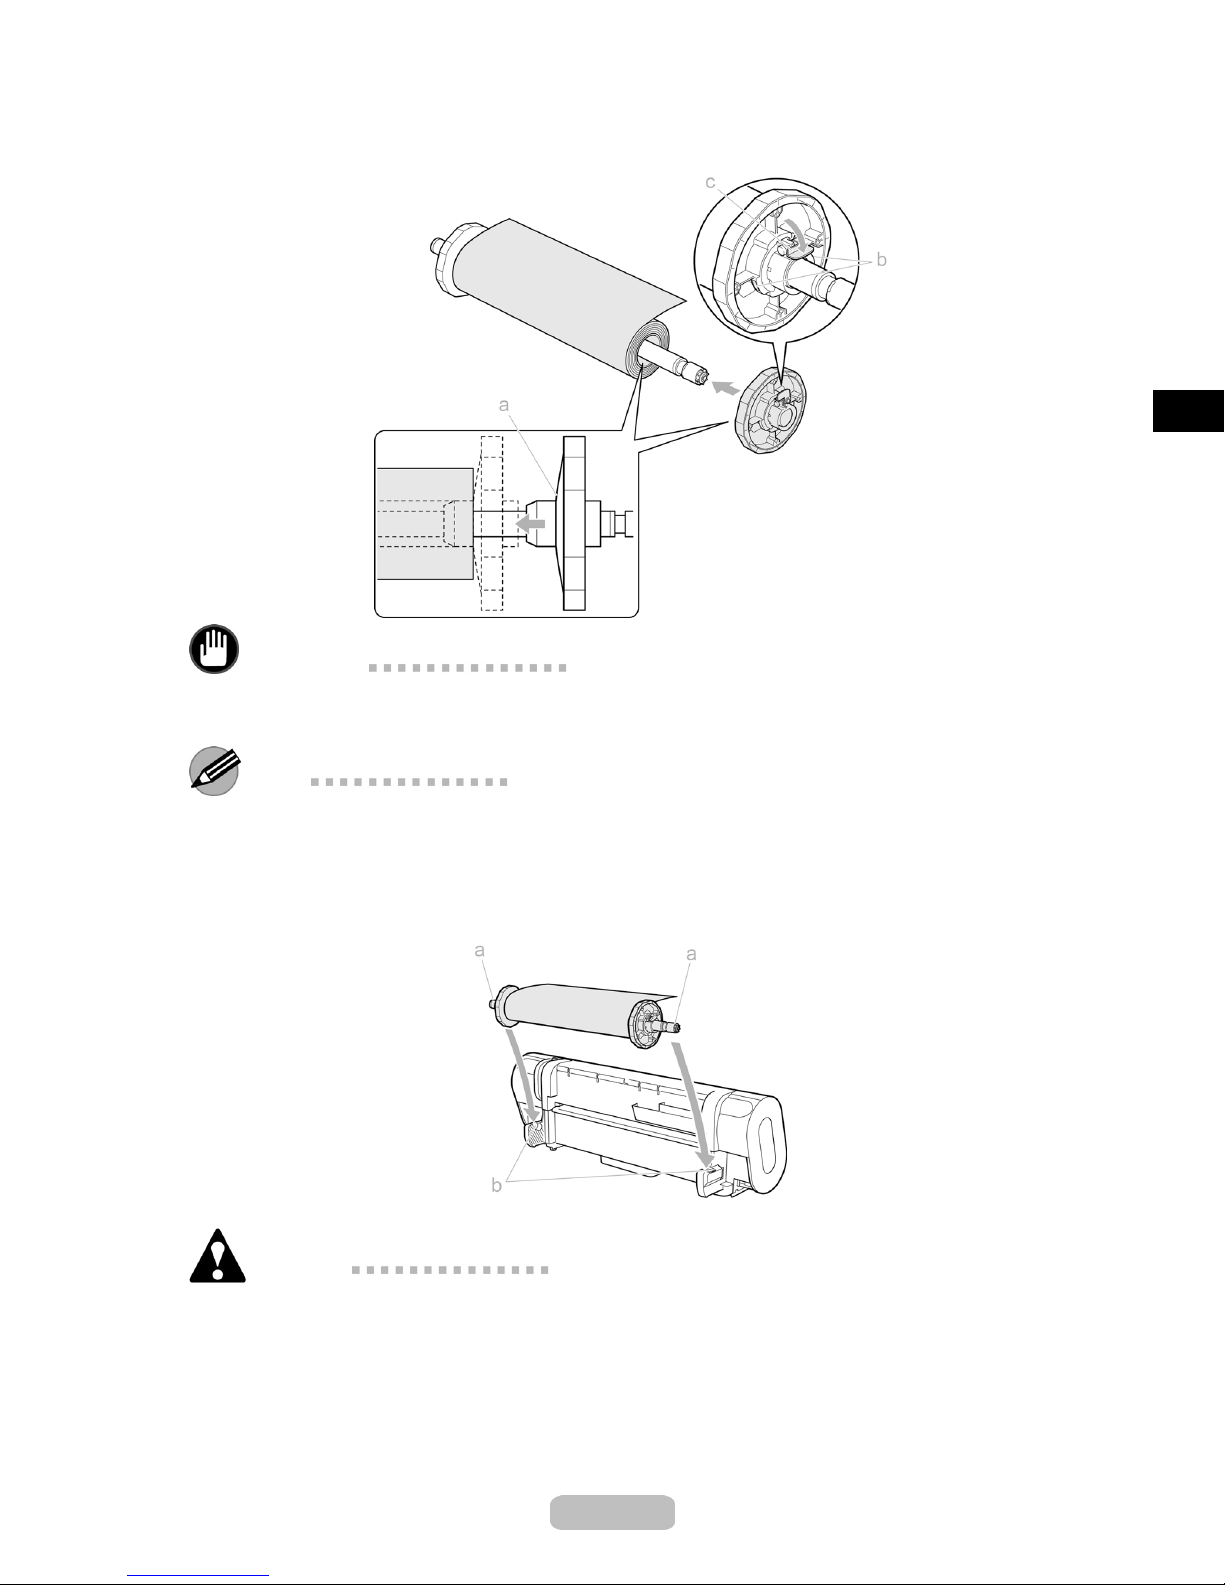
Lift the Holder Stopper lever (a) from the shaft side to unlock it. Holding the
Holder Stopper at the p osition indicated (b), remove it from the Roll Holder.
With the edge of the roll paper facing back as shown, set the roll with the Roll Holder
from the right. Insert the roll firmlyuntilittouchestheflange (a) of the Roll Holder.
3
Important
Insert the roll firmly so that there is no gap between the roll and the flange of the
•
Roll Holder. If there is a gap, it may cause feeding problems.
Insert the Holder Stopper from the right in the Roll Holder as shown. Holding it
at the position indicated (b), push it firmly in until the flange(a)oftheHolder
8
Page 9
Loading the R oll
Stopper touches the roll. Lock the Holder Stopper lever (c) by pushing it down
toward the shaft side.
4
Important
Insert the Holder Stopper firmly so that there is no gap between the roll and the
•
flange of the stopper. If there is a gap, it may cause feeding problems.
Note
Remove any loaded paper that will not be used.
•
If the Platen is dirty, clean inside the To p C o v e r .
•
With the edge of the roll paper facing toward the printer, insert the Roll Holder shaft
(a)intotheguidegrooves(b)oftheRoll Holder Slot on both sides.
Caution
Be careful not to drop a roll and hurt yourself when loading it.
•
Be careful not to put your fingers between the guide grooves (b) and the Roll
•
Holder shaft (a) when loading roll, or may hurt yo u rs elf.
9
Page 10
Loading the Roll
5
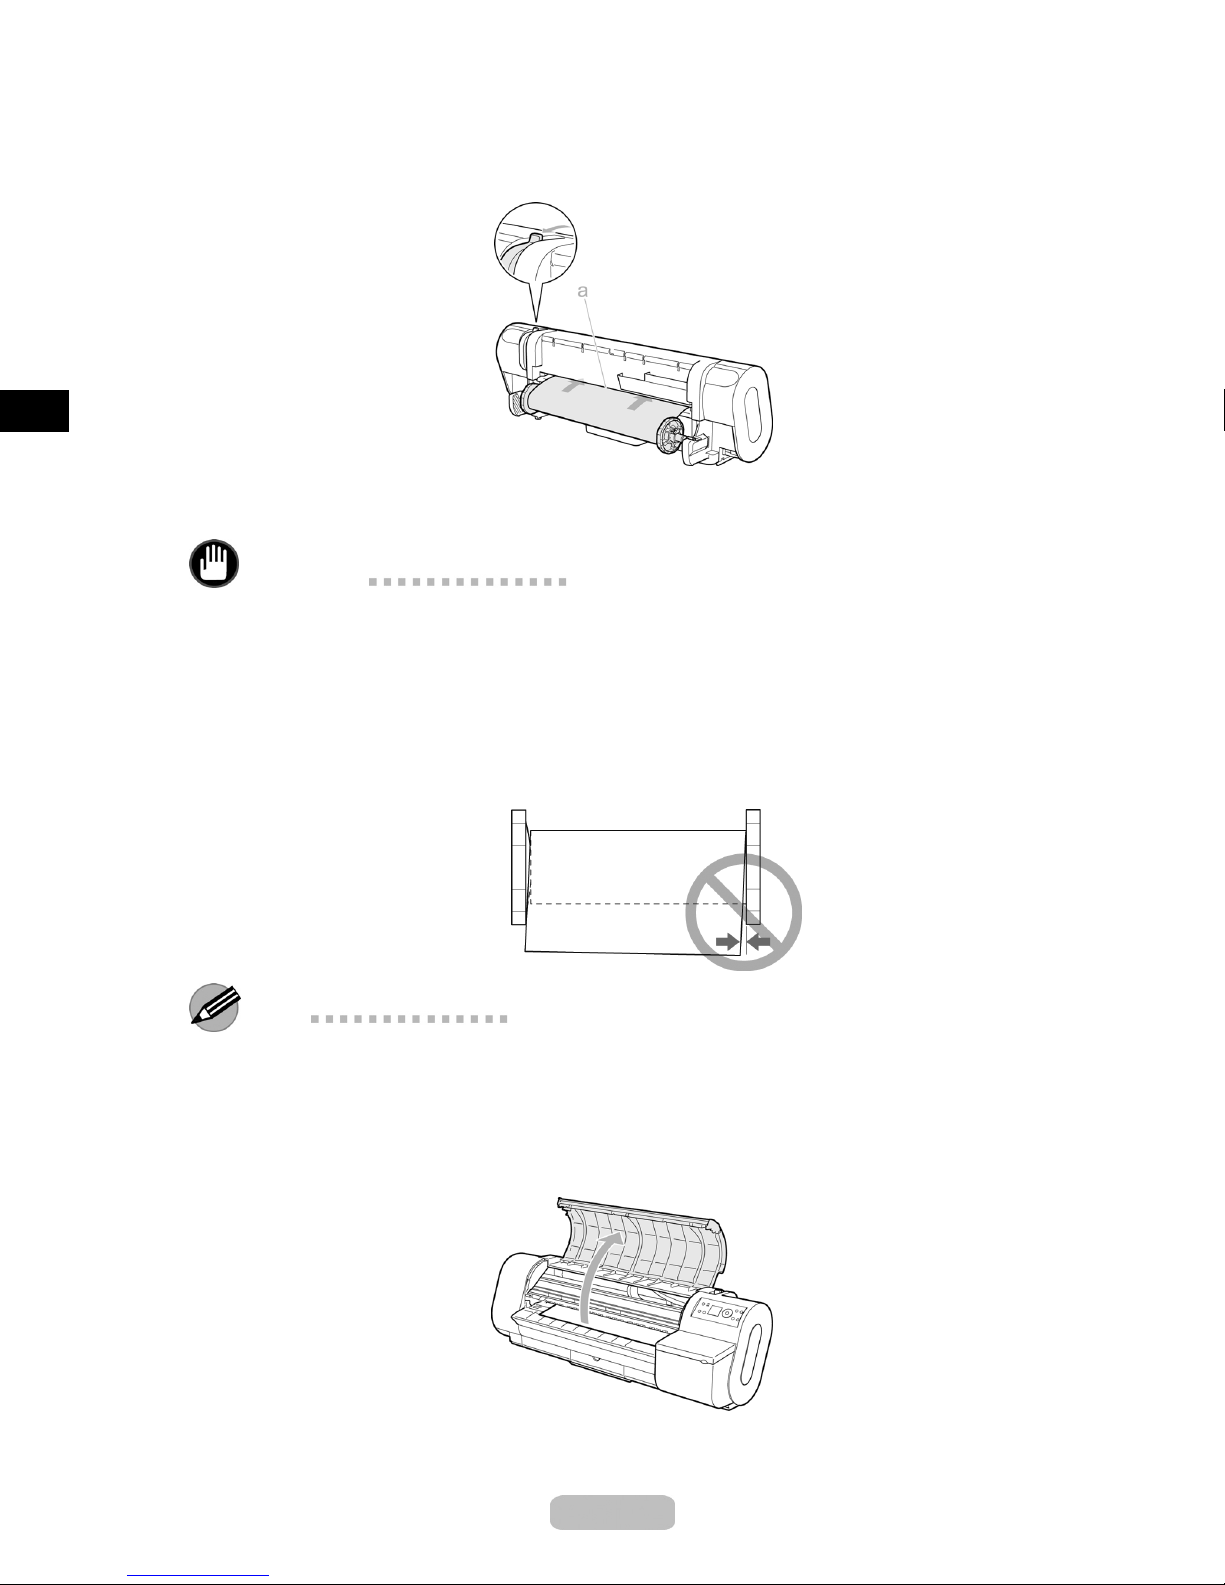
Push the Release Lever back and pull out the roll paper evenly on both ends.
Insert the edge in the Paper Feed Slot (a) and advance the paper until vacuuming
paper starts.
After the paper reaches the Platen, it is automatically advanced and vacuuming
paper starts.
Important
Be careful not to soil the printing surface of rol
•
affect the printing qual ity.
If the paper is wrinkled or warped, straighten it out before loading it.
•
If i t is difficult to insert the rol l paper in the Paper Feed Slot, insert the left or rig ht
•
corner in the slot first, and then straighten the paper as you advance it.
Load the roll so that there is no gap between the right edge of the paper and the
•
Roll Holder.
l pap er as you pull it out. This may
Note
You can adjust the strength of vacuum holding paper against the Platen when the
•
Release Lever is open. If it is difficult to load paper, press the ▲ or ▼ button on
the Control Panel to adjust the strength. Set vacuum stronger by pressing the ▲
button or weaker with the ▼ button. Three settings are available.
6
Open the To p Cov e r .
10
Page 11
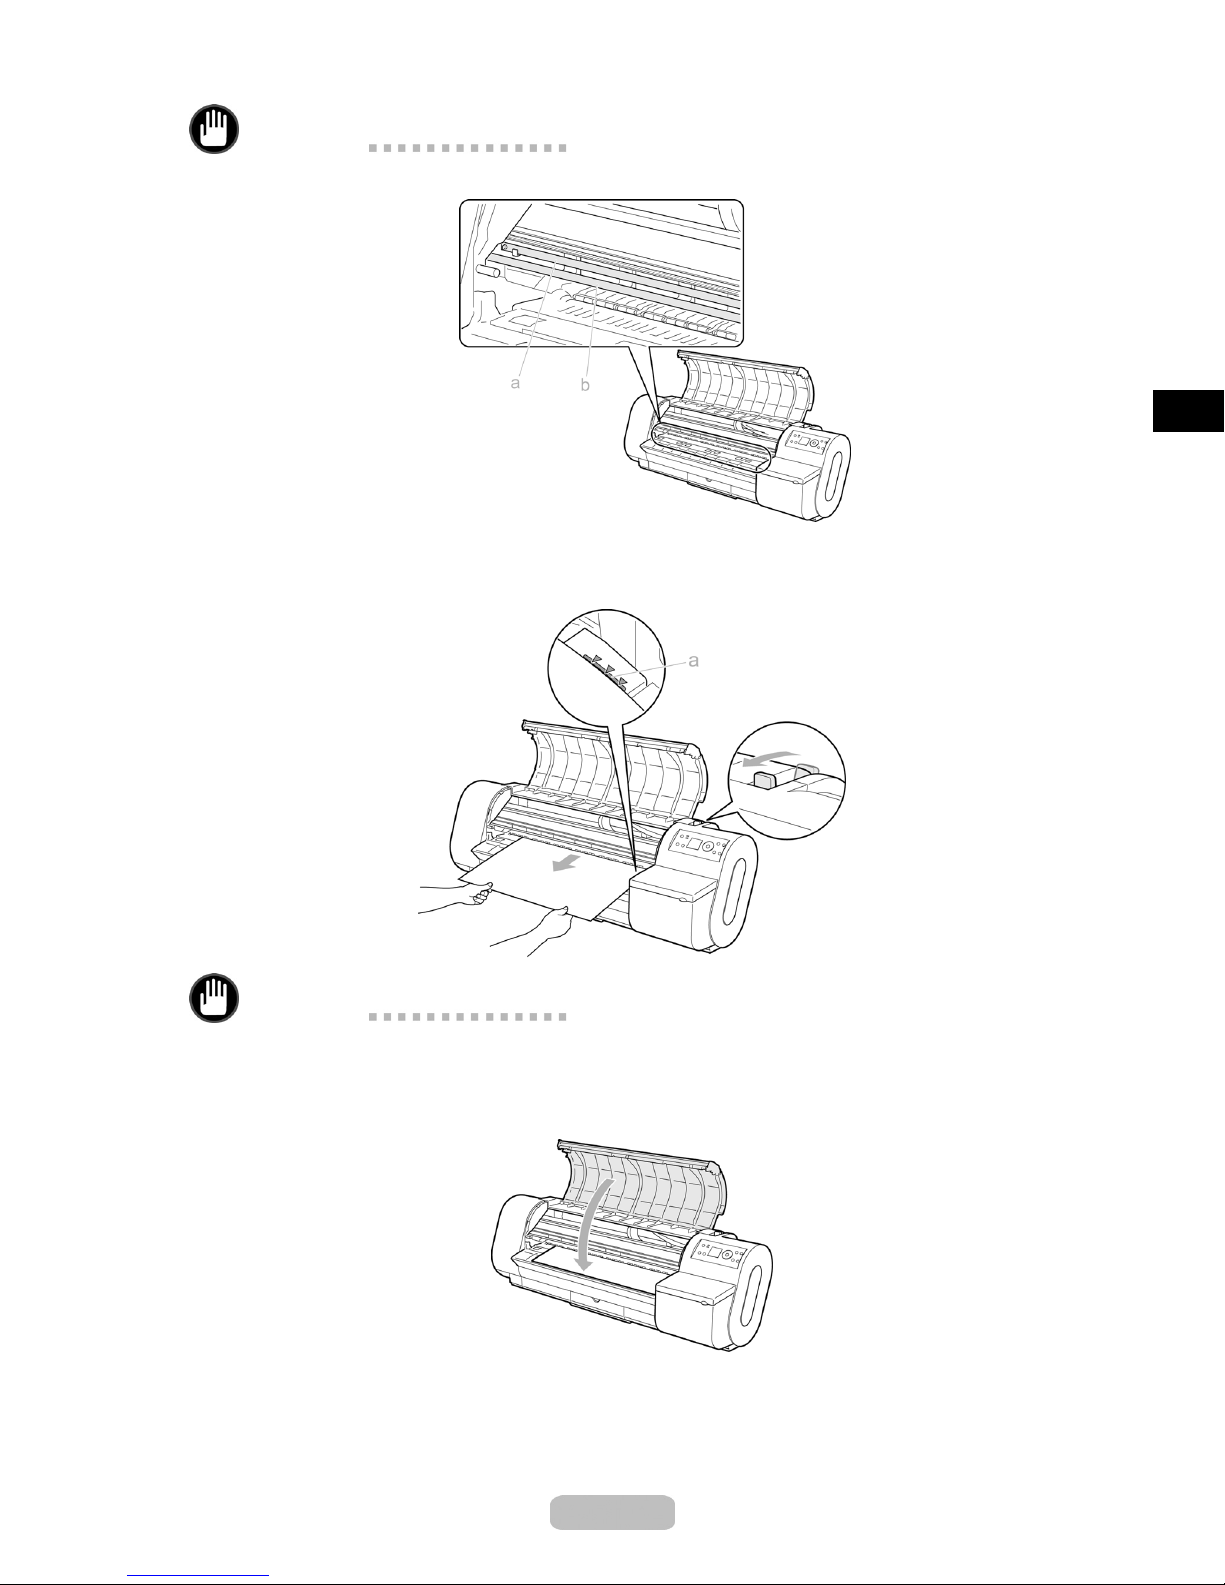
Important
Do not touch the linear scale (a) or Carriage Shaft (b).
•
Loading the R oll
7
8
Pull the roll edge gently and align it with the Paper Alignment Line (a). Lower the
Release Lever toward the front.
Important
Do not force the roll paper into alignment with the Paper Alignment Line (a) . This
•
may prevent the paper from being advanced straight.
Close the To p C o ver.
After you load a roll, the printer automatically shows a menu for selection of the paper
type on the Display Screen.
At this point, specify the paper type.
11
Page 12
Loading the Sheet
Note
If the Platen is dirty, clean inside the To p C o v e r.
•
After pressing the Load/Eject button, you can refer to instructions on the Display
•
Screen as you load the paper.
1
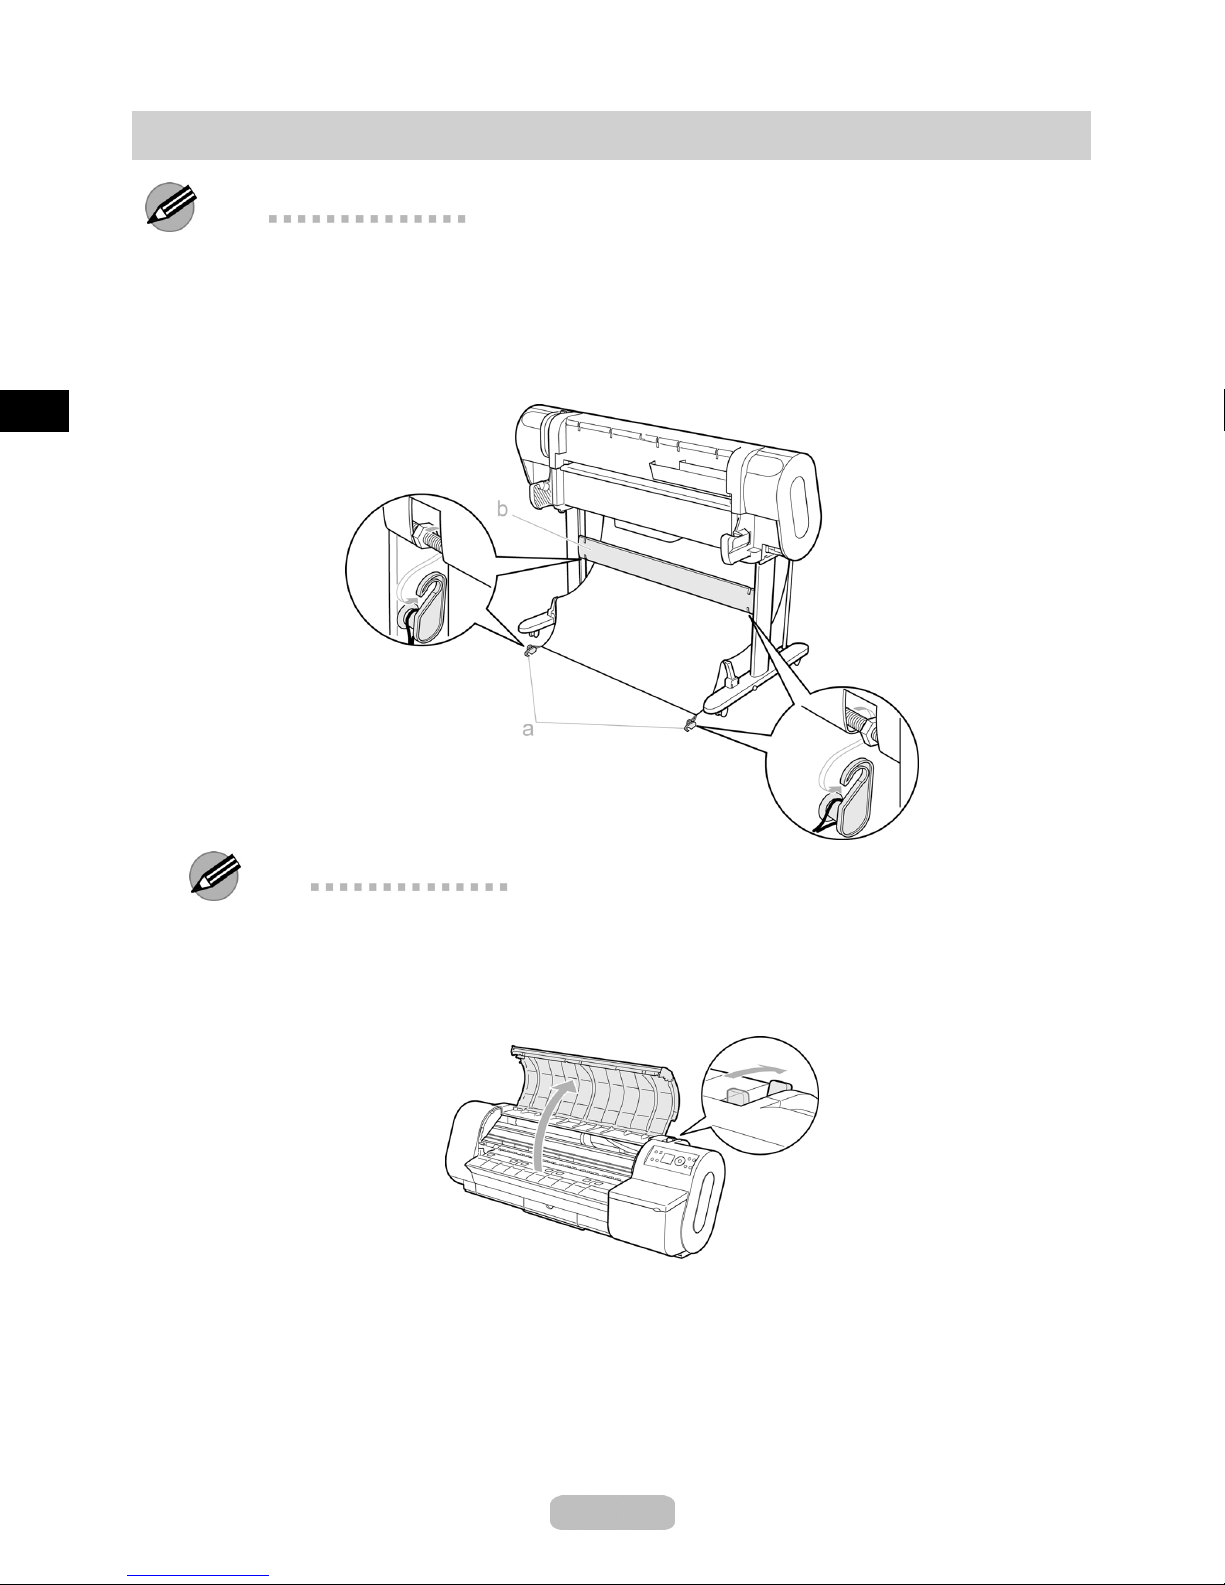
Remove the Roll Holder from the printer and remove Basket Fastener A (a) from
the Stand Stay (b).
Note
If you print on a lo ng sheet (longer than 914 mm [36 in]), the trailing edge may touch
•
the floor and become dirty. Before loading long paper, remove the Roll Hold er and
spread a clean cloth or paper on the floor.
2
Open the Top Cove r and push the Release Lever back.
12
Page 13
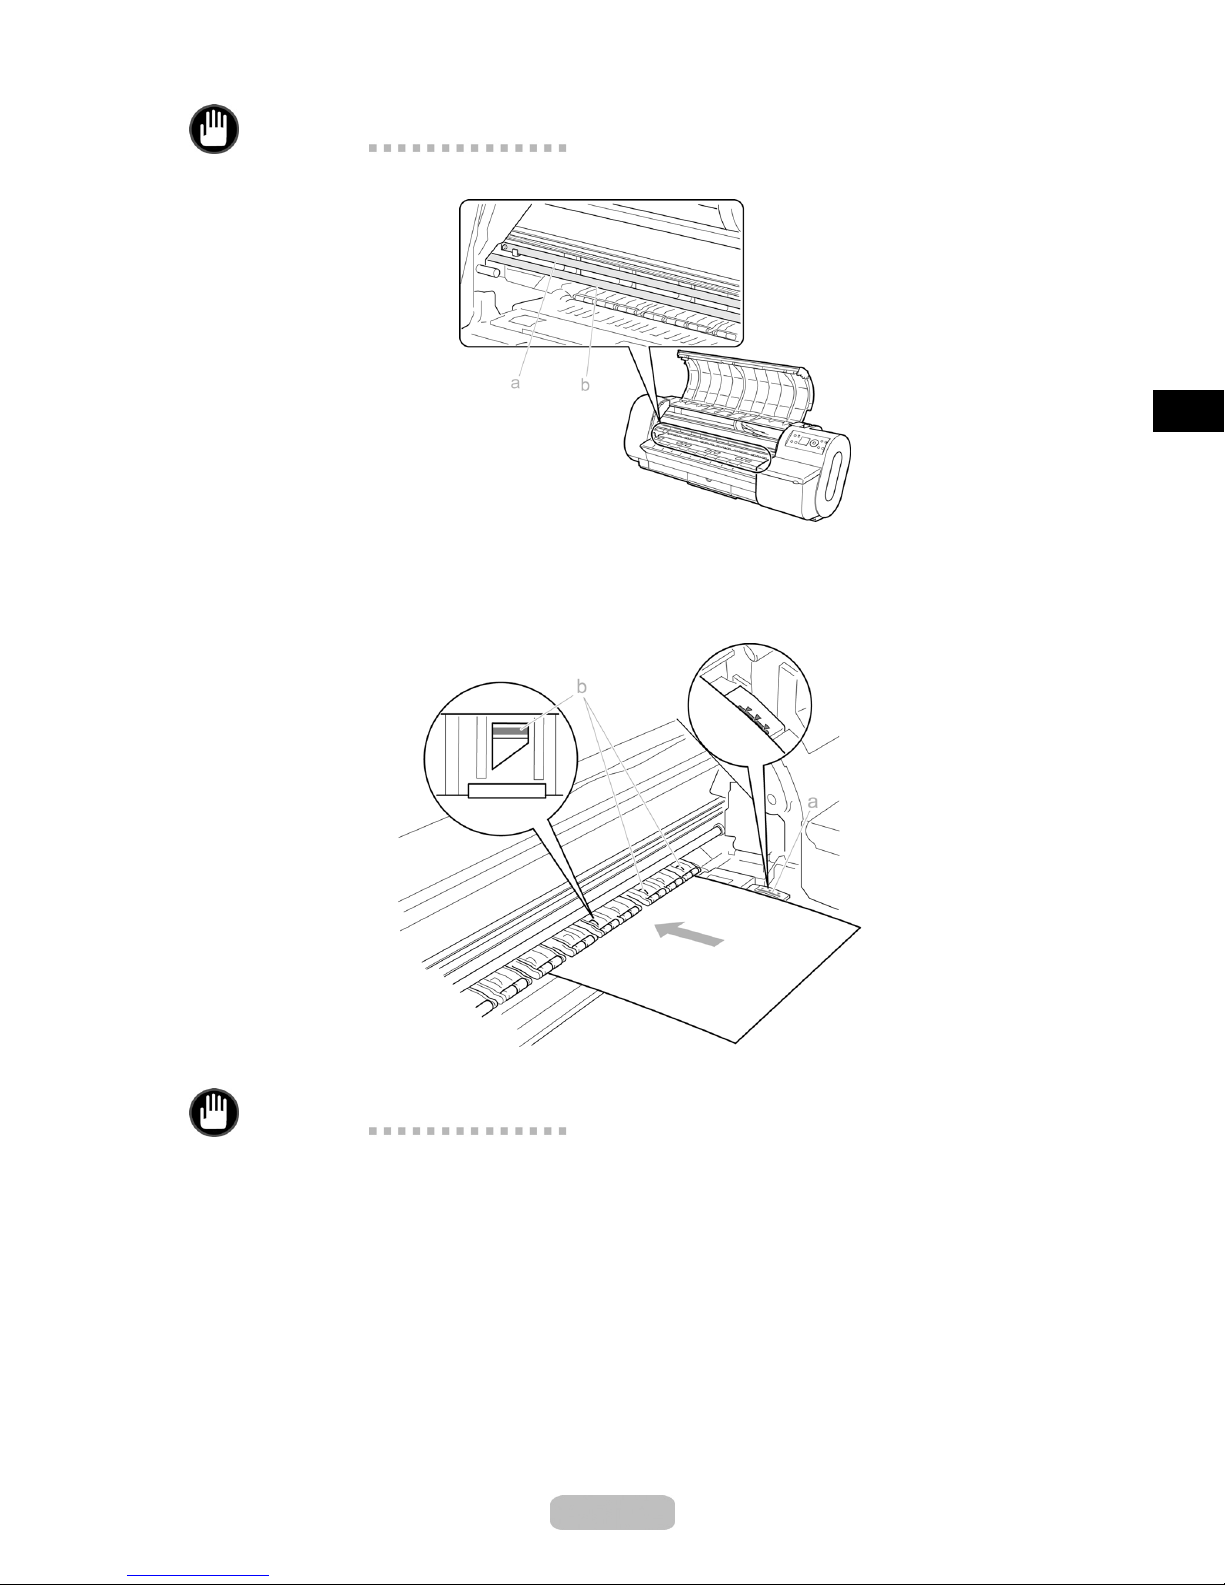
Important
Do not touch the linear scale (a) or Carriage Shaft (b).
•
Loading the Sheet
3
With a sheet lengthwise and printing-side up, insert it straight between the Platen
and the Paper Retainer. Align the sheet with the Paper Alignment Line at right
(a) and the Paper Alignment Line inside (b).
When inserted, sheets are automatically held by suction against the Platen.
Important
Load a sheet so that it is parallel to the Paper Alignment Line at right (a). Load ing
•
paper askew will cause an error.
Warped paper may rub against the Printhead. Straighten paper if it i
•
before loading it.
swarped
4
Lower the Release Lever toward the front and close the Top Cove r .
After you load the sheet, the printer automatically shows a menu for selection of
the paper type on the Display Screen.
At this point, specify the paper type.
13
Page 14
Printing from Windows
Printing
Print from the application menu.
1
2
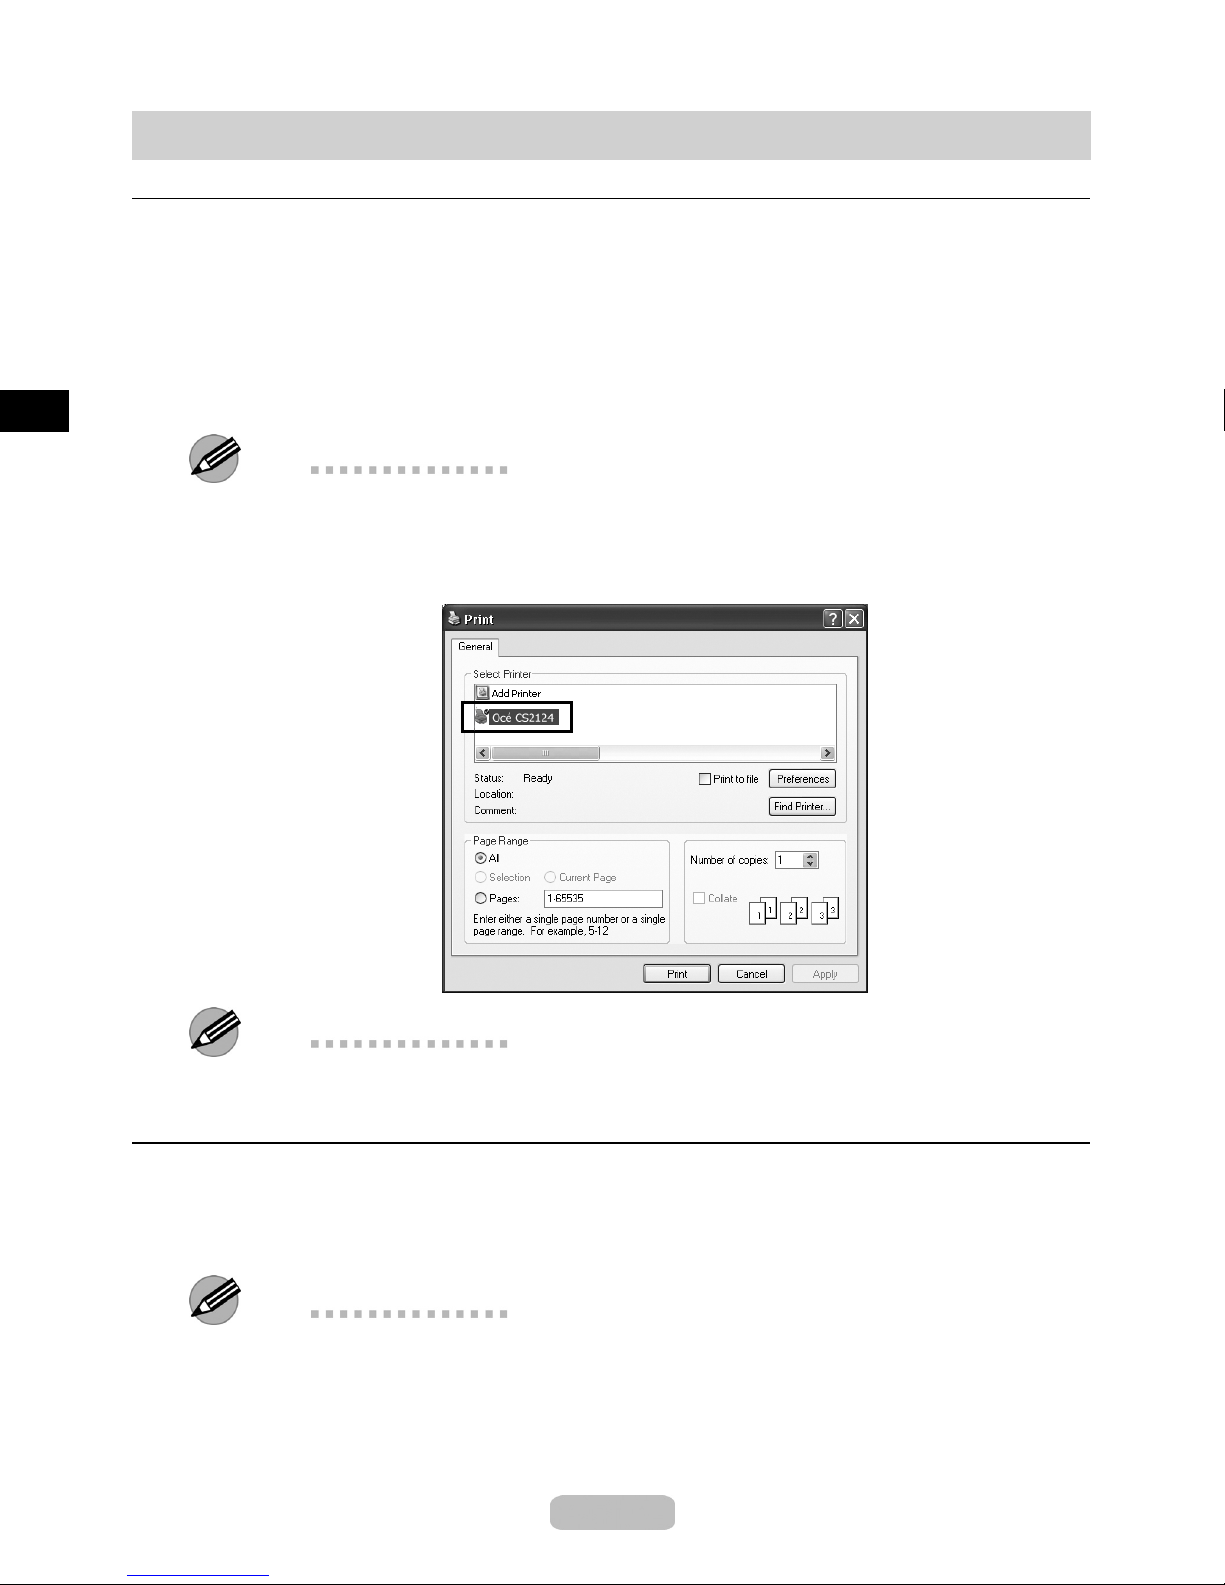
In the application software, select Print from the File menu to display the dialog
box for printing conditions.
After confirming that the printer is selected in the dialog box, click Print or OK to
start printing.
Note
The appearance of the dialog box varies depending on the application software. In
•
most cases, the dialog box includes basic printing options and enables you to choose
the printer, specify the range of page s, numb er of copies, and so on.
Example: Print dialog box displayed by the application software
Note
If another printer is selected, select the printer you want to use under Select Printer
•
or in the dialog box displayed after clicking Printer.
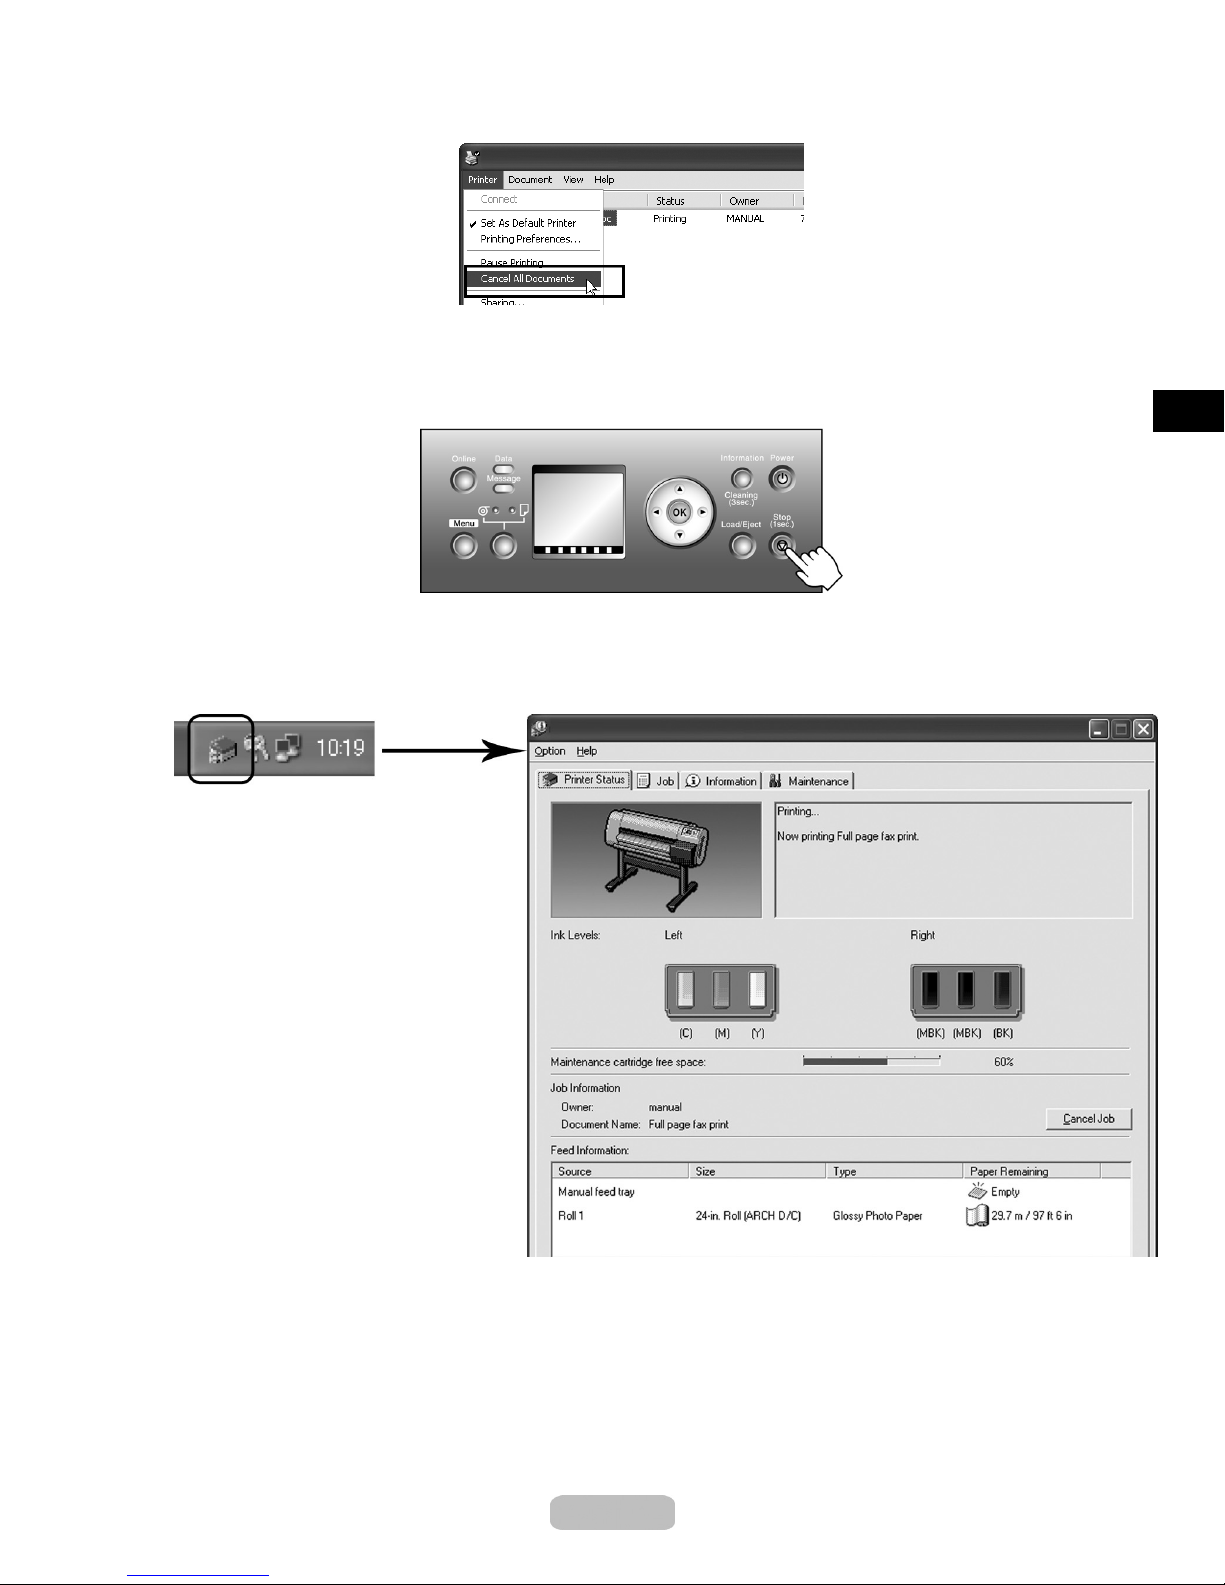
Canceling print jobs
You can cancel print jobs in the printer window.
1
Click the printer icon in the taskbar to display the printer window.
Note
You can also display this window by double-clicking the printer icon in the Printers
•
and Faxes (or Printers) folder, accessible through the Windows Start menu.
14
Page 15
Printing from Windows
2
3
1
Choose Cancel All Documents in the Printer menu to stop the pr
If the Display Screen of the Control Panel still indicates that the job is in progress
and the Data lamp continues flashing, hold down the Stop button for a second or
more to stop printing.
If the Data lamp is off and you cannot stop printing, do the following.
Double-click the taskbar icon to access t he GARO Status Monitor.
On the Printer Status sheet, click Cancel Job.
int processsing.
15
Page 16

Replacing Ink Tanks
Precautions when handling an Ink Tank
Take the following precautions when h andling an Ink Tank.
Caution
For safety, keep an Ink Tank out of the reach of children.
•
If ink is accidentally ingested, contact a physician immediately.
•
Important
Before removing an Ink Tank f ro m the pouch for installation, shake it gently seven
•
or eight times. If you do not shak e the Ink Tank, the ink may sediment, which may
affect printing quality.
Do not remove and shake an Ink Tank that has already been installed in the printer.
•
Ink may leak out.
Avoid dropping the Ink Tank after removing it from the pouch. O therwise, ink may
•
leak and cause stains.
TheremaybeinkaroundtheinkholesofInk Tank you remove. Handle an Ink
•
Tank carefully during replacement. The ink may stain clothing.
We recommend using up an Ink Tank in the course of printing within six months
•
after breaking the seal. Using an old Ink Tank may affect the printing quality.
Do not remove the Ink Tank if the printer is not used for a long period (a m onth
•
or more). Ink remainin g in th e pri nter m ay become clogged and cause of printing
problems.
ReplacinganInkTank
1
Make sure no print jobs are in progress.
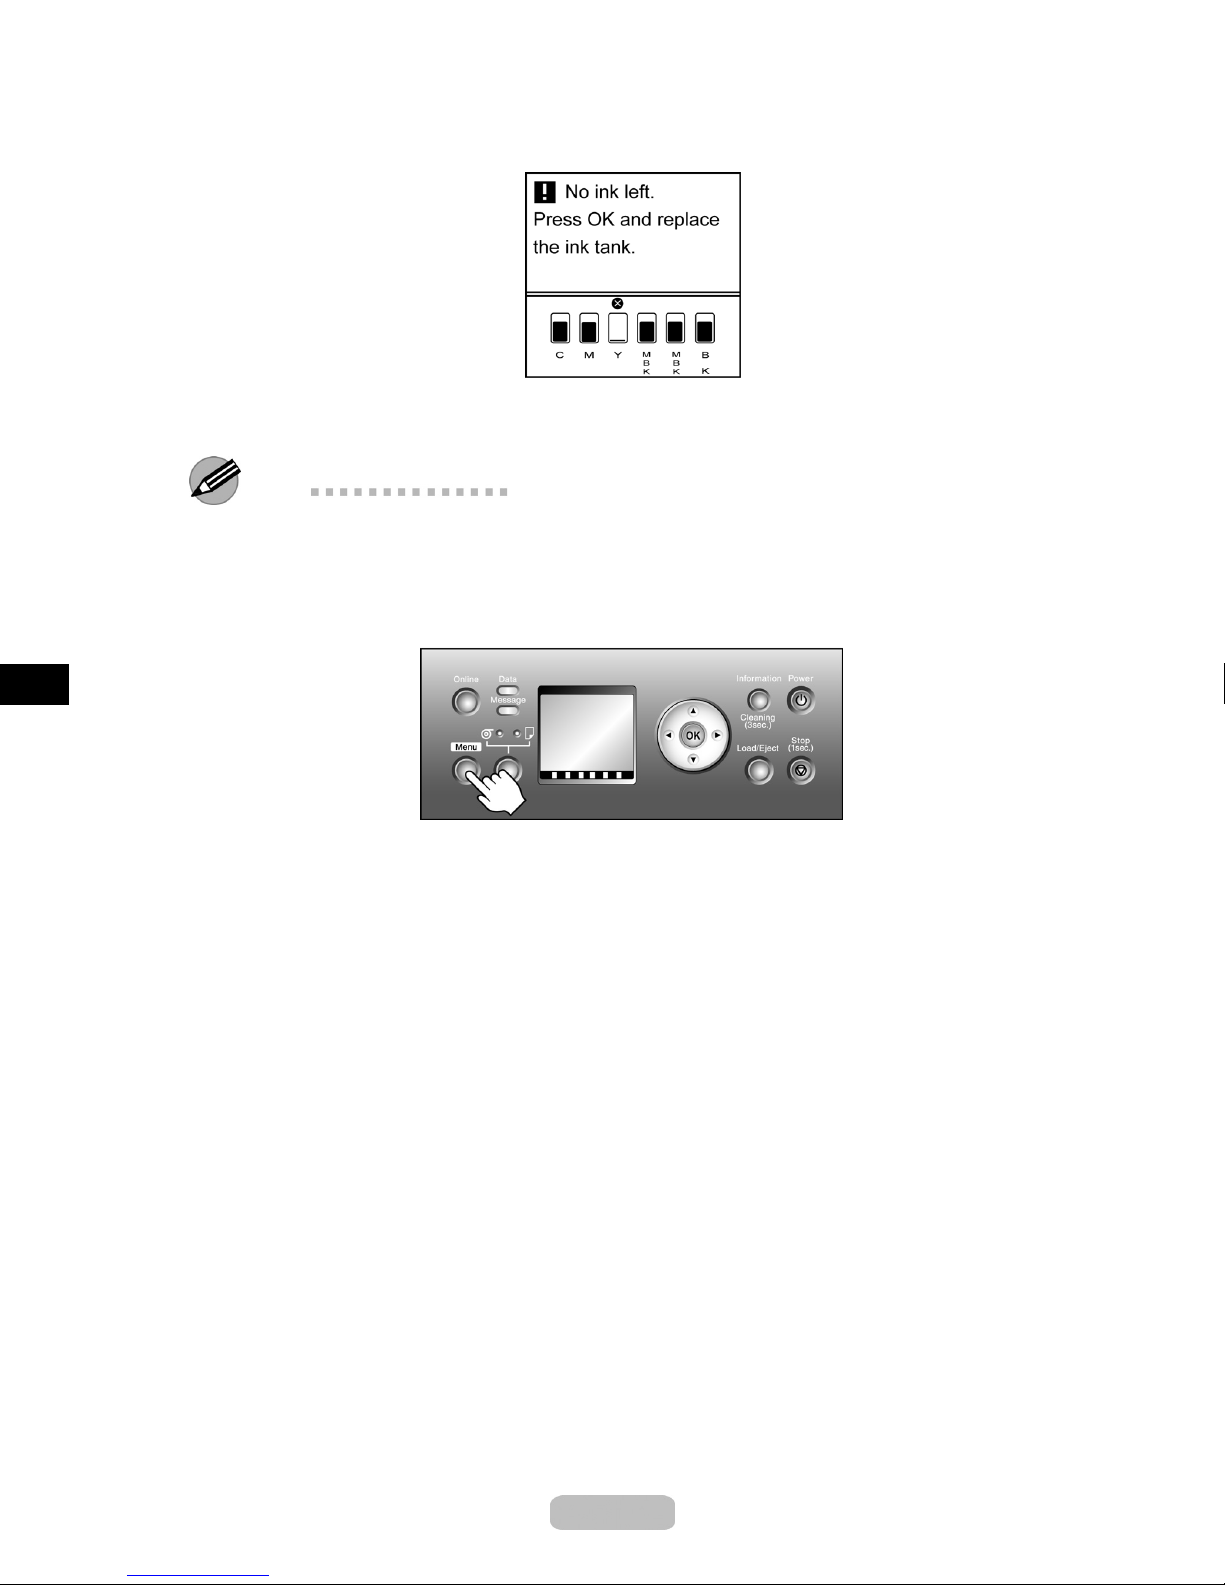
You can replace Ink Tank if the Display Screen indicates the printer is Online
or Offline, or if messages advise y ou to check the amount of ink left or replace
the Ink Tank.
16
Page 17
Replacing Ink Tanks
If a message prompts you to replace the Ink Tank,presstheOK button. Steps 2 and
3 are unnecessary in this case. Go to step 4 and remove the Ink Tank.
2
3
4
Do not remove an Ink Tank during i
printer, or during printhead cleaning.
nitialization immediately after turning on the
Note
Ink Tank replacement is possible even when print j
•
paper is being fed. In this case, the cancellation or feeding is paused during Ink
Tank replacement and resumed after replacement.
Press the Menu buttontodisplayMAIN M ENU.
Select Rep. Ink Tank→Ye s and press the OK button.
A message on the Display Screen advises you to open the Ink Tank Cover.Next,
remove the Ink Tank.
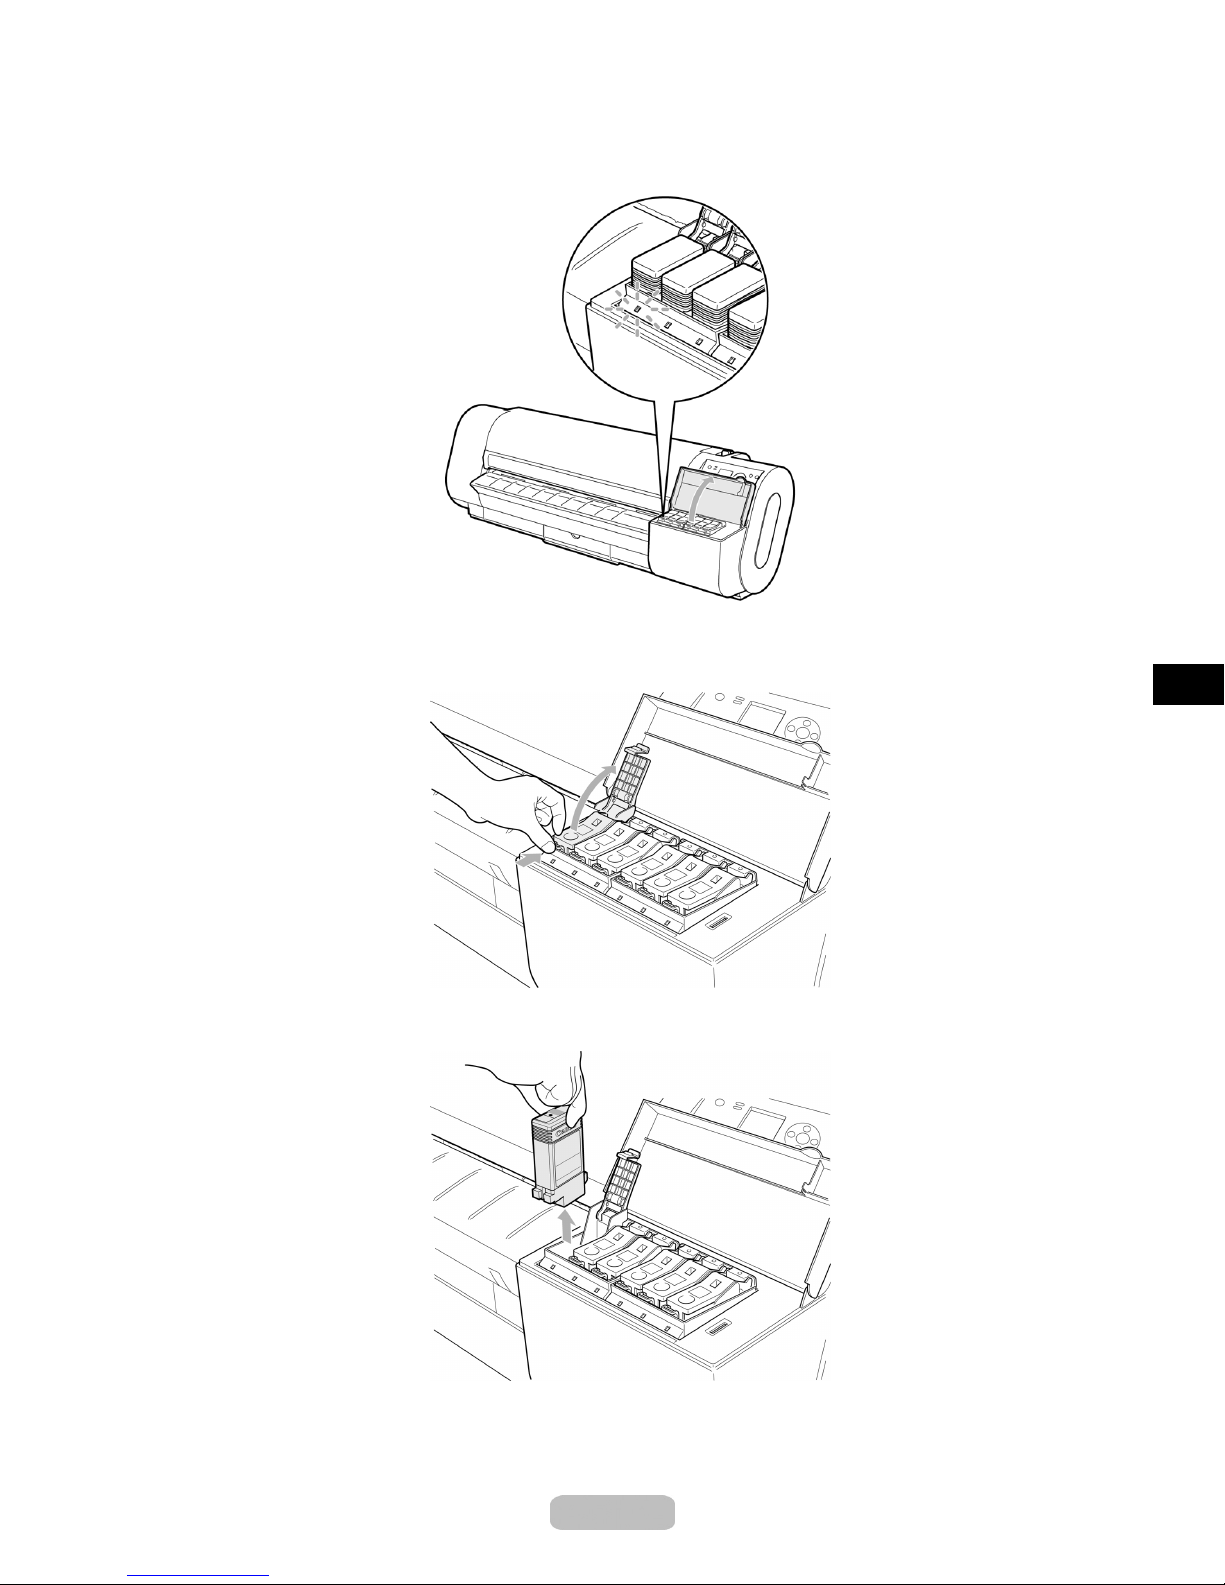
Open the Ink Tank Cover and check the Ink Lamp.
obs are being canceled or if
17
Page 18
The Ink Lamp flashes quickly if there is no ink left.
Replacing Ink Tanks
5
6
Press the tip of the InkTankLockLeverof the color for replacement and lift
the InkTankLockLeverto
Hold the empty Ink Tank bythegriptoremoveit,andpresstheOK button.
open it.
18
Page 19

Replacing Ink Tanks
Note
If there is still some ink left in the Ink Tank you removed, st
•
the ink holes (a) facing up. Otherwise, ink may leak and cause stains. Put the Ink
Tank in a plastic bag and seal it.
Dispose of the used Ink Tank according to local regulations.
•
ore the ink tank with
7
8
Before opening the pouch, shake the Ink Tank gently seven or eight times. Agitate
the ink in the Ink Tank by slowly turning the Ink Tank upside-down and right
side up several times.
Note
If you do not shake the Ink Tank, the ink may sediment, which may affect printing
•
quality.
Open the pouch and remove the Ink Tank.
Note
Never touch the ink holes or metal contacts. This may cause stains, damage the
•
Ink Tank, and affect printing quality.
Avoid dropping the Ink Tank after removing it from the pouch. O therwise, ink may
•
leak and cause stains.
Do not remove and shake an Ink Tank that has already been installed in the printer.
•
Ink may leak out.
19
Page 20

Replacing Ink Tanks
9
Press the OK button and insert the Ink T
figure,withtheinkholesdown.
ank into the holder facing as shown in the
Important
Ink Tank cannot be loaded in the holder if the colo
•
If the Ink Tank does not fit in the ho lder, do not force it into the holder. Make sure
the color of the InkTankLockLevermatches the color of the Ink Tank,and
check the orientation of the Ink Tank before re
r or orientation is wrong.
loading it.
10
11
12
Close the InkTankLockLeveruntil it clicks.
Make sure the Ink Lamp is lit in red.
Note
Ink Lamp flashes when there is l ittle ink left.
•
Close the Ink Tank Cover.
The printer returns to the mode before replacement of Ink Tank.
20
Page 21

Cleaning the Printer
Clean the printer regularly to maintain better printing quality and help prevent problems.
Aboutonceamonth,cleantheprintere
Cleaning the printer exterior
xterior.
1
2
3
Turn the printer off.
Unplug the power cord from the outlet.
Caution
Always turn off the printer and unplug the power cord before cleaning or
•
maintenance. Accidentally leaving the printer on poses a risk of injury if you
touch moving parts inside the p rinter.
Using a damp cloth that you have wrung out completely, wipe away any dirt or
paper dust from the Paper Feed Slot (a),powercordplug,andsoon. Drythese
partswithadrycloth.
Caution
Never use flammable solvents such as alcohol, benzene, or thinner. If these
•
substances come into contact with electrical components inside the printer,
there is a risk of fire or electrical shock.
4
Plug the power cord into the outlet.
21
Page 22

Cleaning the Printer
Cleaning inside the top cover
Clean inside the To p Cov e r about once a month to maintain better printing quality and
help prevent problems.
Also clean inside the Top Co v e r in the
If the printed surface or the underside of paper is dirty after printing
•
After you have used up a roll
•
After borderless printing
•
Afterprintingonsmallpaper
•
After printing on paper that generates a lot of cuttin g debris
•
If you have replaced the roll
•
following situations to ensure optimal operation.
Important
If the Platen inside the Top Cover becomes dirty, it may soil the underside of p aper.
•
Clean the Platen after borderless printing or printing on small paper.
1
2
Turn the printer off.
Unplug the power cord from the outlet.
3
Caution
Always turn off the printer and unplug the power cord before cleaning or
•
maintenance. Accidentally leaving the printer on poses a risk of injury if you
touch moving parts inside the p rinter.
Open the To p Cov e r .
22
Page 23

Cleaning the Printer
4
If paper dust has accumulated in the Vacuum holes on the Plate
Borderless Printing Ink Grooves (b), use the included Cleaning Brush (c) to
wipe it away.
n (a)orinthe
Important
Do not touch the linear scale (a) or Carriage Shaft (b).
•
Note
If the Cleaning Brush is dirty, rinse it in water.
•
5
Using a damp cloth that you have wrung out completely, wipe inside the To p Co v e r
to clean it. Wipe away any ink residue on the Top Cover Roller (a), all ov
er the
23
Page 24

Cleaning the Printer
Platen (b), the Paper Retainer (c), the Borderless Printing Ink Grooves (d), the
Ejection Guide (e), and the guide rail (f).
Important
Do not use a dry cloth to wipe inside the To p C o v er. This may create a static charge,
•
which may attract dust and affect the printing quality.
Never use flamm a ble solvents such as alcohol, benzene, or thinner. If these
•
substances come into contact with electrical com pon ents inside the printer, there is a
risk of fire or electrical shock.
6
7
Close the To p C o ver.
Plug the power cord into the outlet.
24
Page 25

Checking for Nozzle Clogging
If printing is faint or streaked in different colors, make sure the Printhead nozzles are clear
byprintingatestpatterntocheckth
Note
You can specify a number of pages in the printer’s Noz. Check Freq. menu for
•
automatic nozzle checking and cleaning every time you finish printing that quantity.
e nozzles.
1
2
3
4
Load unused paper.
Press the Menu buttontodisplayMAIN M ENU.
Select Te st P rint →Nozzle Check, and then press the OK button.
The printer goes online and prints a test pattern.
Check the printing results.
If the horizontal lines are not faint or incomplete, the nozzles are clear.
If some sections of the horizontal lines are faint or incomplete, the nozzles for those
colors are clogged.
If horizontal lines are faint or incomplete, follow the steps below and check again
for nozzle clogging.
1.
Clean the Printhead.
2.
Print a test pattern to check the nozzles.
Note
If you repeat these steps several times but the horizontal lines are still faint or
•
incomplete, contact your
Océ dealer.
25
Page 26

Cleaning the Printhead
Cleaning the Printhead may help clear nozzles that are clogged.
Note
You can specify a number of pages in the printer’s Noz. Check Freq. menu for
•
automatic nozzle checking and cleaning every time you fi
You can start Head Cleaning A by holding down the Information button for three
•
seconds or more.
Cleaning the Printhead
nish printing that quantity.
1
2
3
Press the Menu buttontodisplayMAIN M ENU.
Select Head Cleaning→ the type of cleaning, and then press the OK button.
Head Cleaning A
•
Use Head Clea ni ng A if printing is faint or contains foreign substances. This
method of cleaning consumes the least amount of ink. It takes a bo ut three minutes
to complete.
Head Cleaning B
•
Use Head Cleaning B if no ink comes out of the printhead, or if Head Cleaning A
does not solve the problem. It takes about four minutes to complete.
The printhead is cleaned, and the printer goes online.
Print a test pattern to check the nozzles, and determine whether cleaning has cleared
the nozzles.
Note
If printing does not improve after Head Cleaning A,tryHead Cleaning B.Ifthis
•
does not solve the problem, repeat Head Cleaning B two or three times. If this still
does not improve printing, the Printhead may have reached the end of its useful
life. Contact your
Caution
Do not remove the Maintenance Cartridge during cleaning.
•
Océ dealer.
26
Page 27

Adjusting the Printhead Automatical
If printed vertical lines are warped or colors are ou t of alignment, adjust the Printhead
alignment. Adjust the Printhead alignment automatically or manually by using a printed
test pattern.
Follow the steps below for standard automatic adjustment of the Printhead.
ly
1
2
3
Load unused paper.
If using sheets, load paper A4/Letter-sized or larg
at most.
er. You will need three sheets
Note
Always specify th e paper type when loading paper. Using paper that you have not
•
specified on the printer may cause feeding problems and affect the printing quality.
We recomme nd lo ading a type of paper that you use often.
•
Press the Menu buttontodisplayMAIN M ENU.
Select Adjust Printer→Auto Head Adj.→Advanced Adj.→Yes and press the
OK button.
A test pattern is printed for printhead adjustment.
After reading the pattern, the printer automatically adjusts the Printhead alignment.
Note
If adjustment is not possible using highly transparent film or similar media, try
•
another type of media. If you cannot adjust the printhead as desired using special
media, select Advanced A dj.
27
Page 28

Adjusting the Feed Amount
If printed images are affected by white streaks or dense color streaks, adjust the amount
that paper is fed.
Follow the steps below for standard automatic adjustment of the feed amount.
1
2
3
Load unused paper.
If using sheets, load paper A4/Letter-sized or larger. You will need two sheets at
most.
Note
Always specify th e paper type when loading paper. Using paper that you have not
•
specified on the printer may cause feeding problems and affect the printing quality.
We recomme nd lo ading a type of paper that you use often.
•
Press the Menu buttontodisplayMAIN M ENU.
Select Adjust Printer→Auto Band Adj.→Standard Adj.→Ye s and press the
OK button.
A test pattern is printed for band adjustment.
After reading the pattern, the printer automatically adjusts the feed amount and
goes online.
28
Page 29

Responding to Messages
Cross-references are given in the following format.
Information in the Reference Guide ( → P.XX)
Information in the User's Guide ( → CD "XX")
Messages regarding paper
Error Messages
Regular printing is selected,
but a roll is loaded.
No sheets present.
No sheets are loaded.
End of paper feed. Cannot
feed paper more.
Insufcient paper for job.
Cause
A print job for sheets was sent
when a roll is loaded.
A sheet is not loaded.
A sheet is not loaded.
You are pressing the ▲ button
on the Control Panel and
trying to rewind the roll
completely.
The printer has received a print
job longer than the amount of
roll paper left.
Corrective Action
Remove the roll.
(→ CD "Removing the Roll from the
Printer")
Hold down the Stop button for a
second or more to cancel printing.
Load paper of the type and size you
have specied in the printer driver.
(→P.12)
Hold down the Stop button for a
second or more to cancel printing.
Load paper of the type and size you
have specied in the printer driver.
(→P.12)
Hold down the Stop button for a
second or more to cancel printing.
Release the ▲ button.
Follow the steps below to replace
the roll.
Remove the roll.1.
Load a roll with enough paper left.2.
If no barcode was printed on the
3.
roll, specify the paper type.
Select the paper length, unless
4.
a barcode was printed on the
roll and you have deactivated
automatic detection of the
remaining roll paper.
Hold down the Stop button for a
second or more to cancel printing.
Press the Online button to resume
printing.
However, the roll paper will run out
during the print job, and you will not
be able to print all of the document.
29
Page 30

Responding to Messages
Error Messages
Cannot adjust with present
paper.
This paper cannot be used. The loaded paper is too large
Borderless print is not
possible with roll loaded.
Cause
The Printhead and feed
amount cannot be adjusted
when highly transparent lm is
loaded.
for the printer.
Paper that is too small for the
printer has been loaded.
The printer has received a print
job that cannot be printed using
borderless printing.
Corrective Action
We recommend loading a type of
paper that you often use, other than
lm, before adjusting the Printhead.
(→P.27)
Adjust the feed amount manually.
(→CD "Adjusting the Feed Amount
Manually")
Load paper of the correct size.
(→CD "Paper Sizes")
Load paper of the correct size.
(→CD "Paper Sizes")
Follow the steps below to change
the settings of the print job to enable
borderless printing.
Hold down the Stop button for a
1.
second or more to cancel printing.
In the printer driver, change the
2.
settings to a paper size compatible
with borderless printing, and then
try printing again.
(→CD "Borderless Printing of
Photos and Images")
Check paper size setting in
driver.
The paper size as specied
on the printer does not match
the size specied in the printer
driver.
Press the Online button to resume
printing.
However, this may cause a paper
jam or printing problem.
Load paper of the same size as you
have specied in the printer driver.
(→P.8)
(→P.12)
Follow the steps below to ensure
the paper size matches on the
printer and in the printer driver.
Hold down the Stop button for a
1.
second or more to cancel printing.
Change the paper type in the
2.
printer driver and try printing again.
Press the Online button to resume
printing.
However, this may cause a paper
jam or printing problem.
30
Page 31

Responding to Messages
Error Messages Cause Corrective Action
Borderless print not
possible. Check paper
position.
The paper is not loaded
correctly.
Load a roll of the correct size.
(→CD "Paper Sizes")
Reload the roll in the printer.
(→P.8)
Paper loaded askew.
Straighten paper and
reload.
The printer has received a print
job that cannot be printed using
borderless printing because of
the paper width.
Paper is loaded askew.
Check the size of paper loaded in
the printer.
Follow the steps below to change
the setting of the print job to a width
compatible with borderless printing.
Hold down the Stop button for a
1.
second or more to cancel printing.
In the printer driver, change the
2.
Roll Paper Width setting to a
width compatible with borderless
printing, and try printing again.
Follow the steps below to reload the
roll.
Open the Top Cover.
1.
Push the Release Lever back.2.
Align the right edge of the roll
3.
paper parallel to the Paper
Alignment Line.
Pull the Release Lever forward.4.
Close the Top Cover.
5.
Select the paper type.6.
(→CD "Selecting the Paper Type
(Roll)")
Follow the steps below to reload the
sheet.
Open the Top Cover.
1.
Push the Release Lever back.2.
Align the right edge of the
3.
sheet parallel to the right Paper
Alignment Line and the far
edge parallel to the inner paper
alignment line.
Pull the Release Lever forward.4.
Close the Top Cover.5.
31
Page 32

Responding to Messages
Error Messages Cause Corrective Action
Wrong paper size. The paper size as specied
on the printer does not match
the size specied in the printer
driver.
If you have set Ignore Mismatch to
Yes, printing resumes at this point.
Load paper of the same size as you
have specied in the printer driver.
Follow the steps below to ensure the
paper size matches on the printer
and in the printer driver.
Hold down the Stop button for a
1.
second or more to cancel printing.
Change the paper size in the
2.
printer driver and try printing again.
Press the Online button to resume
printing.
However, this may cause a paper
jam or printing problem.
Paper size not detected.
Paper Type Wrong
Paper size not detected.
Paper has been loaded askew,
or warped paper has been
loaded.
The paper type as specied
on the printer does not match
the type specied in the printer
driver.
Paper has been loaded askew,
or warped paper has been
loaded.
Reload paper straight, in the correct
position.
(→P.8)
(→P.12)
Make sure the same type of paper
is specied on the printer as in the
printer driver.
(→P.8)
(→P.12)
Follow the steps below to ensure the
paper type matches on the printer
and in the printer driver.
Hold down the Stop button for a
1.
second or more to cancel printing.
Change the paper type in the
2.
printer driver and try printing again.
Press the Online button to resume
printing.
However, this may cause a paper
jam or printing problem.
Reload paper straight, in the correct
position.
(→P.8)
(→P.12)
32
Page 33

Responding to Messages
Error Messages Cause Corrective Action
Auto paper cutting is not
possible.
Roll paper cannot be cut using
the Cutter Unit.
Cut the roll paper manually.
(→CD "Cutting Roll Paper Manually")
There is a paper jam.
Cannot feed paper. The sheet cannot be fed
correctly.
Roll printing is selected, but
sheets are loaded.
No roll is loaded. No roll is loaded. Follow the steps below to load the
The roll is empty. There is no more paper left on
A print job for rolls was sent
when a sheet is loaded.
the roll.
Remove the jammed paper.
(→CD "Clearing Jammed Roll
Paper")
Reload the sheet straight, in the
correct position.
(→P.12)
Remove the sheet.
(→CD "Removing the Sheet")
Hold down the Stop button for a
second or more to cancel printing.
type and size of roll specied in the
printer driver.
Load the roll.1.
If no barcode was printed on the
2.
roll, specify the paper type.
If no barcode was printed on the
3.
roll, specify the paper length.
Hold down the Stop button for a
second or more to cancel printing.
Follow the steps below to replace
the used roll with a new roll of the
same type and size.
Remove the roll.1.
Load the new roll.2.
If no barcode was printed on the
3.
roll, specify the paper type.
If no barcode was printed on the
4.
roll, specify the paper length.
Messages regarding ink
Phenomenon Cause Corrective Action
Ink tank is empty. There is no ink left. Open the Ink Tank Cover and
Low ink. Press OK and
replace ink tank.
Ink Level: Check Not much ink is left. Prepare a new Ink Tank.
The ink level is low, so
you cannot print, clean
the Printhead, or do other
operations that require ink.
33
replace the Ink Tank for which the
Ink Lamp is ashing.
(→P.16)
Replace the Ink Tank that is low with
a new Ink Tank.
(→P.16)
We recommend replacing the Ink
Tank with a new Ink Tank at this
point if you plan to print banners or
high-quantity jobs.
Page 34

Responding to Messages
Phenomenon
Ink tank: No XX ink
loaded.(Here, XX is an ink
color)
Other messages
Phenomenon Cause
GARO WXXXX (X represents
a number)
Check printed documents. The document may have been
Cannot print as specied.
Load paper A3/Ledger or
larger.
Cannot print as specied.
Load paper A4/LTR or larger.
Cause
There is no Ink Tank of the
indicated color in the printer.
There is a problem with the Ink
Tank.
Corrective Action
Load or reload the Ink Tank.
(→P.16)
Replace it with a new Ink Tank.
(→P.16)
Corrective Action
There is a problem with the
print job.
printed faint.
The loaded paper is too small. Load paper A3/Ledger-sized or
The loaded paper is too small. Load paper A4/Letter-sized or larger.
Try printing again, using the correct
printer driver.
It is also possible to continue printing
in this state.
If printing is faint, clean the
Printhead.
(→P.16)
larger.
Cannot adjust band. The Printhead nozzles are
clogged.
The Printhead and feed
amount cannot be adjusted
when highly transparent lm is
loaded.
Follow the steps below to check the
nozzles.
Print a test pattern to check the
1.
nozzles.
(→P.25)
Clean the Printhead if the nozzles
2.
are clogged.
(→P.26)
We recommend loading a type of
paper that you often use, other than
lm, before adjusting the Printhead.
(→CD "Borderless Printing of Photos
and Images")
(→P.27)
Adjust the feed amount manually.
(→CD "Adjusting the Feed Amount
Manually")
34
Page 35

Responding to Messages
Phenomenon Cause Corrective Action
Cannot update rmware. You have uploaded rmware for
Replace part soon. It is almost time to replace
a different model.
consumables for which service
is required.
Check the rmware version.
(→CD "Updating the Firmware")
You can continue to use the printer
for some time until Past part
replacement. is displayed.
Contact your Océ dealer for
assistance.
Past part replacement. It is past the recommended
time to replace consumables for
which service is required.
Printhead error An incompatible Printhead has
been installed.
There is a problem with the
Printhead.
P Head lock cover is open. The Printhead Fixer Cover is
open.
PHead needs cleaning. The Printhead must be
cleaned.
Cannot adjust printhead. The Printhead nozzles are
clogged.
Contact your Océ dealer for
assistance.
Install a Printhead specied for use
with the printer.
(→CD "Replacing the Printhead")
Open the Top Cover. If the Carriage
is visible, replace the Printhead with
a new one.
(→CD "Replacing the Printhead")
If, after opening the Top Cover, you
see that the Carriage is not visible,
follow the steps below.
Close the Top Cover and press
1.
the Online button.
Replace the Printhead.2.
(→CD "Replacing the Printhead")
Close the Printhead Fixer Cover.
(→CD "Replacing the Printhead")
Specify Printhead cleaning options.
(→P.26)
Follow the steps below to check the
nozzles.
Print a test pattern to check the
1.
nozzles.
(→P.25)
Clean the Printhead if the nozzles
2.
are clogged.
(→P.26)
The Printhead and feed
amount cannot be adjusted
when highly transparent lm is
loaded.
35
We recommend loading a type of
paper that you often use, other than
lm, before adjusting the Printhead.
(→P.27)
Adjust the feed amount manually.
(→CD "Adjusting the Feed Amount
Manually")
Page 36

Responding to Messages
Phenomenon Cause Corrective Action
Multisensor error. Direct sunlight or strong lighting
may be shining on the printer
and causing the sensor to
malfunction.
Take steps to ensure the printer is
not used when exposed to direct
sunlight or strong lighting.
Maint cartridge problem. An incompatible or used
Maintenance Cartridge has
been installed.
Maint cart full. The Maintenance Cartridge is
full.
No maint cartridge The Maintenance Cartridge is
not installed.
No Maintenance Cartridge
capacity.
Check maint cartridge
capacity.
The Maintenance Cartridge
cannot absorb enough ink for
Printhead cleaning.
The Maintenance Cartridge is
almost full.
Install a Maintenance Cartridge
specied for use with the printer.
(→CD "Replacing the Maintenance
Cartridge")
After conrming that the printer
has stopped operating, replace the
Maintenance Cartridge.
(→CD "Replacing the Maintenance
Cartridge")
Install the Maintenance Cartridge.
(→CD "Replacing the Maintenance
Cartridge")
After conrming that the printer
has stopped operating, replace the
Maintenance Cartridge.
(→CD "Replacing the Maintenance
Cartridge")
You can continue printing. However,
prepare a new Maintenance
Cartridge.
36
Page 37

Troubleshooting if You Cannot Print
Printing does not start
Phenomenon Cause Corrective Action
The Display Screen
of the Control
Panel is blank.
The printer is not
selected in the printer
driver.
The print job is paused. In Windows, restart the print job as follows.
In Windows, select the printer by clicking Select
Printer or Printer in the printing dialog box and try
printing again.
Select the printer icon in the Printers and Faxes (or
1.
Printers) window.
Clear Pause Printing in the File menu to restart the
2.
print job.
37
Page 38

Troubleshooting if You Cannot Print
Phenomenon
An error message
appears on the
Display Screen of
the Control Panel.
Cause
There is a paper jam. Remove the jammed paper.
The printer is ofine. If an error message appears on the Display Screen
The printer is ofine. Check the error message shown on the printer Display
No paper is loaded. Load paper in the printer.
The paper type is not
specied for the paper
source.
Corrective Action
(→CD "Clearing Paper Jams")
of the Control Panel, check the message to solve the
error, and then press the Online button on the Control
Panel to bring the printer online.
(→P.29)
If Ofine appears on the Display Screen of the
Control Panel, press the Online button to bring the
printer online.
Screen of the Control Panel, Status Monitor
(Windows)
(→P.29)
On the printer Control Panel, specify the type of paper
in the paper source.
For details on types of paper, see the Media Guide.
(→CD "Paper Sizes")
If the wrong paper is specied, stop the print job and
specify the correct paper type before attempting to print
again.
(→P.14)
If a message appears on the Display Screen of the
Control Panel prompting you to replace the ink,
replace the indicated ink tank.
(→P.16)
Wait until the system has been lled with ink. This
process may take about ten minutes.
Ink unexpectedly
starts lling the
system.
Ink tank is empty.
When the printer
was turned off
previously, some
cleaning operation was
terminated.
Troubleshooting if the printer stops during a print job
Phenomenon Status Corrective Action
An error message is
shown on the Display
Screen.
An error message is displayed
during printing.
The last portion of roll paper
was used during a print job, and
paper could not be advanced
because the trailing edge is
taped to the roll.
Check the error message and take
action as necessary.
(→CD "Error Messages")
Remove the used roll and insert a new
roll.
(→CD "Removing the Roll")
(→P.8)
38
Page 39

Troubleshooting if You Cannot Print
Phenomenon
The printer ejects blank,
unprinted paper.
Status
The leading edge of the roll
paper was cut to straighten it.
The Printhead nozzles are
clogged.
There is little ink left. Check the ink level and replace the Ink
The printer is damaged. Contact your Océ dealer for
Corrective Action
This operation is normal.
When Forced is selected under Trim
Edge First in the printer menu, the
leading edge of a roll is cut after you
load the roll to ensure the edge is
straight and eliminate any scraps of
paper. The printer is ready to print after
this initial preparation.
When No Cutting is selected under
Trim Edge First, the edge is not cut
and scraps are not removed.
Print a test pattern to check the nozzles
and make sure the Printhead is in
good condition for printing.
(→P.25)
Clean the Printhead if the nozzles are
clogged.
(→P.26)
Tank that is low.
(→P.16)
assistance.
39
Page 40

Cannot print over a network
Phenomenon Cause Corrective Action
Cannot print over a
network.
The Ethernet cable is
not connected correctly
to the printer's Ethernet
port.
Troubleshooting if You Cannot Print
Make sure the printer is connected to the network
1.
with the correct Ethernet cable, and then turn the
printer on. For instructions on connecting the cable,
refer to the Quick Start Guide.
Make sure the Link indicator is lit.2.
The Link indicator is green if the printer is connected
via 100 Base-TX and amber if connected via
10Base-T.
If the Link indicator is not lit, check the following
points.
Make sure the hub is on.
•
Make sure the end of the Ethernet cable is
•
connected correctly.
Insert the Ethernet cable until it clicks and locks in
place.
Make sure there is no problem with the Ethernet
•
cable.
If there is any problem, replace the Ethernet cable.
Check the communication mode with the hub.•
Although the printer normally detects the hub
communication mode and transmission rate
automatically (in auto negotiation mode), sometimes
the hub settings cannot be detected. In this
case, congure the connection method manually,
specifying the communication mode in use.
(→CD "Conguring the Communication Mode
Manually")
Cannot print over a
TCP/IP network.
The printer's IP
address is not
congured correctly.
The printer's TCP/IP
network settings
are not congured
correctly.
The computer you
are trying to print
from is not congured
correctly.
Make sure the printer's IP address is congured
correctly.
(→CD "Conguring the IP Address Using GARO
Device Setup Utility")
(→CD "Conguring the IP Address Using the Printer
Control Panel")
Make sure the printer's TCP/IP network settings are
congured correctly.
(→CD "Conguring the Printer's TCP/IP Network
Settings")
Make sure the computer's TCP/IP network settings are
congured correctly.
(→CD "Conguring the Printer Driver Destination
(Windows)")
40
Page 41

Troubleshooting if You Cannot Print
Phenomenon
Cannot print over
AppleTalk or Bonjour
networks.
Cannot print over a
NetWare network.
Cause
The AppleTalk protocol
is not enabled on the
printer.
The computer you
are trying to print
from is not congured
correctly.
The computer and
printer are not on the
same network.
The printer's NetWare
settings are not
congured correctly.
The computer you
are trying to print
from is not congured
correctly.
The NetWare server
and services are not
congured correctly.
Corrective Action
Activate AppleTalk on the printer.
(→CD "Conguring the Printer's AppleTalk Network
Settings")
Make sure the computer's AppleTalk settings are
congured correctly.
(→CD "Conguring the Destination for Apple Talk
Network (Macintosh)")
(→CD "Conguring the Destination forBonjour Network
(Macintosh)")
Due to the nature of Bonjour, you cannot print if the
printer is on another network behind a router. Make
sure the computer and printer are on the same
network. For information about network settings, ask
your network administrator.
Make sure the printer's NetWare settings are
congured correctly. In particular, make sure a valid
frame type is selected.
(→CD "Conguring the Printer's NetWare Network
Settings")
Make sure the computer's NetWare settings are
congured correctly. For more information,
(→CD "Conguring NetWare Network Settings")
Check the following points.
Make sure the NetWare le server is running.
1.
Make sure there is enough free disk space on the
2.
NetWare le server. Insufcient disk space may
prevent you from processing large print jobs.
Start NWADMIN or PCONSOLE and conrm that
3.
the print service is congured correctly and the print
queue is available.
If data transmission to a printer on another subnet
4.
fails, deactivate NCP burst mode in that printer's
network protocol settings.
If the printer is used in queue server mode, specify
5.
Other/Unknown as the printer type.
41
Page 42

Troubleshooting If You Cannot Print as Expected
Problems with the Printing Quality
Phenomenon
Printing is faint. You may be printing on the
Cause
wrong side of the paper.
The Printhead nozzles are
clogged.
Other printed documents are still
stacked on the Output Stacker.
Ink has adhered to the needles
that supply ink, which have
become clogged.
Paper is jammed inside the Top
Cover.
Corrective Action
Print on the printing surface.
Print a test pattern to check the nozzles
and see if they are clogged.
(→P.25)
The Output Stacker can hold one
sheet.
Remove any printouts from the Output
Stacker before printing the next print
job.
After the Ink Tank has been installed
for at least 24 hours, run Head
Cleaning B.
(→P.26)
Follow the steps below to remove
jammed scraps of paper inside the Top
Cover.
Press the Online button to bring the
1.
printer ofine.
Open the Top Cover and move the
2.
Carriage to the right side.
Remove any scraps of paper inside
3.
the Top Cover.
Close the Top Cover.4.
For tips on clearing paper jams, refer to
the following topics.
(→P.48)
(→P.51)
During borderless printing, the
ink was not dry enough before
cutting.
42
In the printer menu, specify a longer
time in Roll Drying Time in Paper
Details.
(→CD "Main Menu Settings")
Page 43

Troubleshooting If You Cannot Print as Expected
Phenomenon
Paper rubs against the
Printhead.
Cause
The paper type as specied
on the printer does not match
the type specied in the printer
driver.
Paper has been loaded
incorrectly, causing it to wrinkle.
The Printhead is set too low.
You are printing on heavyweight
paper or paper that curls or
wrinkles easily after absorbing
ink.
Corrective Action
Make sure the same type of paper is
specied on the printer as in the printer
driver.
(→CD "Selecting the Paper Type
(Roll)")
(→CD "Selecting the Paper Type
(Sheet)")
Make sure the same paper type is
specied in the printer driver as on the
printer.
Hold down the Stop button for a
1.
second or more to cancel printing.
Change the paper type in the printer
2.
driver and try printing again.
Reload the paper.
(→P.8)
(→P.12)
In Head Height, choose Automatic.
(→CD "Adjusting the Printhead
Height")
When printing on Heavyweight Coated
Paper or other paper-based media,
choose a VacuumStrngth setting of
Strong or Strongest. If paper still rubs
against the printhead, try raising the
Printhead higher in Head Height, one
level at a time.
(→CD "Adjusting the Vacuum
Strength")
(→CD "Adjusting the Printhead Height")
43
Page 44

Troubleshooting If You Cannot Print as Expected
Phenomenon
The edges of the paper
are dirty.
Cause
The Platen has become dirty
after borderless printing or
printing on small paper.
The paper type as specied
on the printer does not match
the type specied in the printer
driver.
The paper is wrinkled or warped.
You are printing on heavyweight
paper or paper that curls or
wrinkles easily after absorbing
ink.
Corrective Action
Open the Top Cover and clean the
Platen.
(→P.21)
Make sure the same type of paper is
specied on the printer as in the printer
driver.
(→CD "Selecting the Paper Type
(Roll)")
(→CD "Selecting the Paper Type
(Sheet)")
Make sure the same paper type is
specied in the printer driver as on the
printer.
Hold down the Stop button for a
1.
second or more to cancel printing.
Change the paper type in the printer
2.
driver and try printing again.
Straighten out the wrinkles or curls and
reload the paper. Do not use paper that
has been printed on previously.
(→P.8)
(→P.12)
If this function is not needed, deactivate
CutDustReduct. in the printer menu.
(→CD "Main Menu Settings")
When printing on Heavyweight Coated
Paper or other paper-based media,
choose a VacuumStrngth setting of
Strong or Strongest. If paper still rubs
against the printhead, try raising the
Printhead higher in Head Height, one
level at a time.
(→CD "Adjusting the Vacuum
Strength")
(→CD "Adjusting the Printhead Height")
In Head Height, choose Automatic.The Printhead is set too low.
(→CD "Adjusting the Printhead Height")
44
Page 45

Troubleshooting If You Cannot Print as Expected
Phenomenon
The surface of the paper
is dirty.
The back side of the paper
is dirty.
There are black or white
streaks.
Colors in printed images
are uneven.
Cause
The Paper Retainer is soiled.
The Platen has become dirty
after borderless printing or
printing on small paper.
Paper width detection is
deactivated when printing.
The Paper Retainer is soiled. Clean the Paper Retainer.
The paper feed amount is out of
adjustment.
Printing does not proceed
smoothly because print jobs are
interrupted during transmission.
In the printer menu, Feed
Priority is set to Print Length.
While printing images in many
solid colors, Line Drawing/Text
is chosen.
Corrective Action
Clean the Paper Retainer.
(→P.21)
Open the Top Cover and clean the
Platen.
(→P.21)
Open the Top Cover and clean the
Platen.
(→P.21)
(→P.21)
Adjust the feed amount.
Exit other applications and cancel other
print jobs.
Adjust the feed amount by specifying
Band Joint in Feed Priority in the
printer menu.
Specify Image in the printer driver.
45
Page 46

Problems with printed images
Troubleshooting If You Cannot Print as Expected
Phenomenon
Lines are misaligned. The Printhead is out of
Corrupted characters are
printed.
The length of printed
images is inaccurate.
Cause
alignment.
The printer has received an
invalid print job.
The print job was sent from
an incompatible printer
driver, a driver other than the
iOcé Printer Driver.
In the printer menu, Feed
Priority is set to Band Joint.
Corrective Action
Adjust the Printhead alignment.
(→P.27)
(→CD "Adjusting the Printhead
Alignment Manually")
If the previous corrective actions do not
improve printing, adjust the angle of the
printhead.
(→CD "Adjusting the Printhead
Orientation")
Turn the printer and computer off and
on, and then try printing again.
Try printing again from the
Printer Driver.
To ensure the feed amount matches
the paper size, select Print Length in
Feed Priority in the printer menu and
enter the amount for adjustment. In
Adjust Length, enter the adjustment
amount in Adj.Setting. You can adjust
the feed amount in 0.02% increments.
(→CD "Main Menu Settings")
Documents are printed in
monochrome.
Printed colors are
inaccurate.
Image edges are blurred. The Platen vacuum strength is
In the Advanced Settings of
the printer driver, Monochrome
or Monochrome (BK ink) is
specied in Color Mode.
The Printhead nozzles are
clogged.
Color adjustment has not been
activated in the Advanced
Settings of the printer driver.
Colors have not been calibrated
on the computer or monitor.
The Printhead nozzles are
clogged.
In the printer driver, Application
Color Matching Priority is not
selected.
too strong.
The Printhead is set too high. Lower the Printhead.
In the Advanced Settings of the
printer driver, choose Color in Color
Mode for printing.
Print a test pattern to check the nozzles
and see if they are clogged.
(→P.25)
In the Advanced Settings of the
printer driver, choose Color Settings
in Color Mode to adjust the colors.
Refer to the computer and monitor
documentation to adjust the colors.
Adjust the settings of the color
management software, referring to the
software documentation as needed.
Print a test pattern to check the nozzles
and see if they are clogged.
(→P.25)
Select the Application Color
Matching Priority check box in the
printer driver.
Set VacuumStrngth to Weak.
(→CD "Adjusting the Vacuum
Strength")
(→CD "Adjusting the Printhead Height")
46
Page 47

Troubleshooting If You Cannot Print as Expected
Other problems
Phenomenon
The printer consumes a lot
of ink.
Check maint cartridge
capacity. is not cleared
after you replace the
Maintenance Cartridge.
Cause
Many full-page color images
have been printed.
Head Cleaning B is performed
often.
You have just nished initial
installation.
The printer has not detected the
new Maintenance Cartridge.
Corrective Action
In print jobs such as photos, images
are lled with color, which consumes
a lot of ink. This does not indicate a
problem with the printer.
Head Cleaning B consumes a lot of
ink. This does not indicate a problem
with the printer. Unless the printer
has been moved or stored for a long
period or for the troubleshooting
Printhead problems, we recommend
not performing Head Cleaning B
unnecessarily.
After initial installation or when the
printer is rst used after relocation, ink
ows into the system between the Ink
Tank and Printhead, which may cause
the ink level indicators to drop to 80%
immediately. This does not indicate a
problem with the printer.
After replacing the Maintenance
Cartridge, press the Information
button.
After replacing the Maintenance
Cartridge, print, or clean the
Printhead.
Paper is not cut straight. Paper rises by the ends of the
cut position before it is cut.
The printer does not go
on.
Roll paper cannot be
inserted into the Paper
Feed Slot
The printer is unplugged. Plug the power cord into the outlet, and
The specied voltage is not
supplied.
The roll paper is warped. Straighten out curls and reload the roll.
Reload the paper correctly.
then turn on the printer.
Check the voltage of the outlet and
breaker. For information on the
specied voltage,
(→CD "Specications")
47
Page 48

Clearing Jammed Roll Paper
If roll paper jams, follow the steps below to remove jams.
Caution
Remove any jammed paper promptly.
•
1
2
3
Turn the printer off.
Open the Top Cover.
If the Carriage is out, move the Carriage to separate it from the paper.
48
Page 49

Clearing Jamme d Roll Paper
Important
If you push the Carriage to the left edge, the blade of the Cut
•
lowered in preparation to cut the paper. Be careful not to pinch your ngers between
the Carriage and Platen if you have pushed the Carriage totheleftedgeorifa
paper jam occurs during cutting.
Do not touch the linear scale (a) or Carriage Shaft (b).
•
ter Unit will be
4
5
Push the Release Lever back.
Holding the paper on both sides, pull the jammed portion out toward the front. Use a
scissors to cut away the printed or wrinkled portion.
Caution
When cutting paper, be careful to avoid scratching the printer.
•
49
Page 50

Clearing Jammed Roll Paper
6
7
If the Carriage is on the left, move the
Carriage to the right until it stops.
Important
Always move the Carriage to the right side. If the Carriage is on the left, a
•
Carriage error may occur when you turn on the printer.
Pull the roll edge gently and align it with the Paper Alignment Line (a). Lower the
Release Lever toward the front.
Important
Do not force the roll paper into alignment with the Paper Alignment Line (a). This
•
may prevent the paper from being advanced straight.
If you pull out too much of the roll, an excessive amount will be cut away from
•
the edge.
50
Page 51

Clearing Jamme d Roll Paper
8
9
Close the Top Cover.
Turn the printer on.
The roll is now advanced. After it is nished being advanced, you can resume
printing.
51
Page 52

Clearing a Jammed Sheet
If a sheet jams, follow the steps below to remove it.
Caution
Remove any jammed paper promptly.
•
1
2
3
Turn the printer off.
Open the Top Cover.
If the Carriage is out, move the Carriage to separate it from the paper.
Important
Do not touch the linear scale (a) or Carriage Shaft (b).
•
52
Page 53

Clearing a Jammed Sheet
4
5
Push the Release Lever back.
If the paper is visible, grasp the paper and pull it forward.
6
7
If you cannot see the paper, remove the scrap from behind the printer.
After removing the paper, make sure there are no other scraps of paper in the printer.
If the Carriage is on the left, move the Carriage to the right until it stops.
Important
Always move the Carriage to the right side. If the Carriage is on the left, a
•
Carriage error may occur when you turn on the printer.
8
Turn the printer on.
53
Page 54

Consumables
Supported paper
Printhead
A replacement Printhead.
54
Ink tank
Ink Tankpart numbers.
29952265, IJC236 BK Dye Black
29952264, IJC236 MBK Pigment Black.
29952266, IJC236 C Cyan.
29952267, IJC236 M Magenta.
29952268, IJC236 Y Yellow.
Océ Draft Paper
Océ Standard Paper
Océ Premium Paper
Océ SmartMatt Paper
Océ Top Photo Plus Paper
Océ Smart Dry Photo Paper
Océ Double Matt, Film
Océ Transparent Paper
Océ Check Plot Bond
Océ Deluxe Bond
Océ Inkjet Premium Color Bond
Océ Matte Photopaper
Océ PhotoPerfectPlus Photopaper
Océ Instant Dry Photopaper
Océ Ink Jet Film
Océ Mono Vellum
Page 55

Consumables
Printhead
•
Maintenance cartridge
A replacement Maintenance Cartridge. Maintenance Cartridge includes a Shaft
Cleaner.
Maintenance Cartridge CS2136 29952288
•
Cutter unit
A reaplacement Cutter Unit.
Cutter Unit CS2136: 29801292
•
55
Page 56

Index
a
Adjusting the printhead . . . ... . . . ... . . . ... . . . ... . . ..27
b
Borderless Printing Ink Grooves . . . .. .. . . . .. .. . . . ..24
c
Canceling print jobs . . . . ... . . . ... . . . ... . . .. .. . . . .. ..14
Cleaning. . . . ... . . . ... . . .. ... . . .. ... . . .. ... . . .. .. . . . .21
Consumables . . . .. .. . . . ... . . . ... . . . ... . . .. ... . . .. .. .54
Cutter Unit . ... . . . ... . . .. .. . . . .. .. . . . .. .. . . . .. .. . . . .55
d
Data lamp . ... . . .. ... . . .. .. . . . .. .. . . . ... . . . ... . . .. ..15
e
Ejection Guide . . .. ... . . .. .. . . . .. .. . . . ... . . . ... . . . ..24
Error messages . . .. .. . . . ... . . . ... . . . ... . . . ... . . .. .. .29
f
Feed amount. ... . . .. ... . . .. ... . . .. .. . . . ... . . . ... . . . .27
g
Status Monitor . ... . . . .. .... . . . ... . . . ... . . . ... . . .. ..15
h
Holder Stopper . . .. .. . . . ... . . . ... . . . ... . . . ... . . .. .. . . 8
i
Ink Lamp .. .. . . . .. .. . . . ... . . . ... . . . ... . . .. ... . . .. ...20
Ink Tank. .. . . . ... . . . ... . . .. ... . . .. ... . . .. ... . . .. 16, 54
Ink Tank Cover.. . . .. ... . . .. ... . . .. .. . . . .. .. . . . ... . .18
Ink Tank Lock Lever .. . . . ... . . . ... . . .. ... . . .. ... . . .18
j
Jammed roll paper . . .. ... . . .. ... . . .. .. . . . .. .. . . . ... .58
Jammed sheets . . .. ... . . .. .. . . . .. .. . . . ... . . . ... . . . ..52
m
Maintenance Cartridge . .. . . . .. .. . . . ... . . . ... . . . ... .60
n
Nozzle Checking . . .. .. . . . ... . . . ... . . . ... . . . ... . . .. .25
o
Online lamp . . ... . . . ... . . .. ... . . .. ... . . .. ... . . .. .. . . . 6
Other problems . ... . . . ... . . .. ... . . .. .. . . . .. .. . . . ... .47
p
Paper Alignment Line . . . . ... . . . ... . . . ... . . . ... . . .. .13
Paper Retainer . . . .. .. . . . ... . . . ... . . . ... . . . ... . . .. .. .24
Platen. .. .. . . . ... . . . ... . . .. ... . . .. ... . . .. ... . . .. .. . . .24
Power button . . ... . . . ... . . .. ... . . .. ... . . .. ... . . .. 6, 18
Print Center . . ... . . . ... . . . ... . . . ... . . .. ... . . .. .. . . . .16
Printhead . . . ... . . . ... . . .. .. . . . .. .. . . . ... . . . ... . .26, 54
Printhead Cleaning . . .. ... . . .. ... . . .. .. . . . .. .. . . . ...26
Printing. . . . ... . . .. ... . . .. ... . . .. ... . . .. ... . . .. .. . . . .14
Printing is not possible . ... . . . ... . . .. ... . . .. ... . . .. .37
Problems with printed images . . . ... . . .. ... . . .. ... . .45
Problems with the printing quality . ... . . . ... . . . ... .42
r
Replacing ink tanks . . ... . . .. ... . . .. .. . . . .. ... . . .. ..16
s
Stop button . . . . ... . . . ... . . . ... . . . ... . . .. ... . . .. ... . . 15
Storing an ink tank . .. . . . ... . . . ... . . . ... . . . ... . . .. ..19
t
Top Cover .. ... . . .. ... . . .. ... . . .. .. . . . .. .. . . . ... . . ..22
Turning the printer off. . . . .. .. . . . ... . . .. ... . . .. ... . . .7
Turning the printer on . . . ... . . . ... . . .. ... . . .. .. . . . .. .6
Types of paper. . ... . . . ... . . . ... . . .. .. . . . .. ... . . .. ...54
u
User Software CD-ROM . . .. .. . . . ... . . . ... . . . ... . . .54
v
Vacuum Strength ... . . .. .. . . . .. .. . . . ... . . . ... . . . ... .10
w
Windows . . . ... . . . ... . . .. ... . . .. .. . . . .. .. . . . .. .. . . . .14
56
Page 57

FCC Regulations (U.S.A)
Océ wide format printer CS2136
This device complies with Part 15 of the FCC Rules. Operation is subject to the following two conditions: (1)
This device may not cause harmful interference, and (2) this device must accept any interference received,
including interference that may cause undesired operation.
Note: This equipment has been tested and found to comply with the limits for class B digital device, pursuant
to Part 15 of the FCC Rules. These limits are designed to provide reasonable protection against harmful
interference in a residential installation.
This equipment generates, uses and can radiate radio frequency energy and, if not installed and used in
accordance with the instructions, may cause harmful interference to radio communications.
However, there is no guarantee that interference will not occur in a particular installation. If this equipment does
cause harmful interference to radio or television reception, which can be determined by turning the equipment
off and on, the user is encouraged to try to correct the interference by one or more of the following measures:
• Reorient or relocate the receiving antenna.
• Increase the separation between the equipment and receiver.
• Connect the equipment into an outlet on a circuit different from that to which the receiver is connected.
• Consult the dealer or an experienced radio/TV technician for help.
Use of shielded cable is required to comply with Class B limits in Subpart B of Part 15 of FCC Rules.
Do not make any changes or modifications to the equipment unless otherwise specified in the manual.
If such changes or modifications should be made, you could be required to stop operation of the equipment.
Océ North America Inc.
5450 North Cumberland Avenue
Chicago, IL 60656
USA
http://www.oceusa.com/
57
 Loading...