

Page 1

Océ CS193/CS173/CS163
Océ User manual
Copy Operations - GB
Page 2

Edition 2007-10
GB
Océ-Technologies B.V.
Copyright
©
2007, Océ
All rights reserved. No part of this work may be reproduced, copied, adapted, or
transmitted in any form or by any means without written permission from Océ.
Océ makes no representation or warranties with respect to the contents hereof and
specifically disclaims any implied warranties of merchantability or fitness for any
particular purpose.
Further, Océ reserves the right to revise this publication and to make changes from
time to time in the content hereof without obligation to notify any person of such
revision or changes.
Page 3

CS193/CS173/CS163 Contents-1
Contents
1 Introduction
1.1 Available features............................................................................................................................ 1-3
Selecting the print color .................................................................................................................... 1-3
Automatically selecting the paper..................................................................................................... 1-3
Adjusting copies to the size of the paper.......................................................................................... 1-3
Specifying separate horizontal and vertical zoom ratios................................................................... 1-3
Scanning the original in separate batches........................................................................................ 1-3
Center binding and folding in half ..................................................................................................... 1-4
Sorting copies ................................................................................................................................... 1-4
Stapling copies.................................................................................................................................. 1-4
Punching holes in copies .................................................................................................................. 1-4
Copying multiple original pages onto a single page ......................................................................... 1-5
Copying an original containing various page sizes........................................................................... 1-5
Adjusting copies according to the image quality of the original ....................................................... 1-5
Inserting paper between copies of OHP ........................................................................................... 1-5
Adding a cover page......................................................................................................................... 1-5
Inserting different paper into copies ................................................................................................. 1-6
Inserting pages from a different original at specified locations in a copy......................................... 1-6
Printing double-sided copies with the specified page on the front side........................................... 1-6
Copying with reversed colors............................................................................................................ 1-6
Printing a mirror image...................................................................................................................... 1-7
Copying with a background color..................................................................................................... 1-7
Improving the copy color quality....................................................................................................... 1-7
Separately copying a page spread ................................................................................................... 1-7
Repeating copy images..................................................................................................................... 1-7
Printing the enlarged image on multiple pages................................................................................. 1-7
Creating booklets from copies of pamphlets.................................................................................... 1-8
Making copies for filing ..................................................................................................................... 1-8
Adjusting the image to fit the paper size........................................................................................... 1-8
Copying with the page layout of a magazine.................................................................................... 1-8
Erasing sections of copies ................................................................................................................ 1-9
Printing a sample copy...................................................................................................................... 1-9
Printing date/time or page number on copies................................................................................... 1-9
Managing jobs................................................................................................................................... 1-9
Programming copy settings.............................................................................................................. 1-9
Checking the copy settings............................................................................................................... 1-9
Enlarging the size of text in touch panel screens.............................................................................. 1-9
Displaying explanations of functions and settings............................................................................ 1-9
Interrupting a copy job...................................................................................................................... 1-9
1.2 Explanation of manual conventions ............................................................................................ 1-10
Safety advices................................................................................................................................. 1-10
Sequence of action ......................................................................................................................... 1-10
Tips.................................................................................................................................................. 1-10
Special text markings...................................................................................................................... 1-11
1.3 Descriptions of originals and paper ............................................................................................ 1-11
1.4 User manuals................................................................................................................................. 1-12
1.4.1 Printed manual ................................................................................................................................ 1-12
User manual .................................................................................................................................... 1-12
1.4.2 User manual CD manuals................................................................................................................ 1-12
Copy Operations (this manual)........................................................................................................ 1-12
Print Operations .............................................................................................................................. 1-12
Box Operations ............................................................................................................................... 1-12
Network Scan/Fax/Network Fax Operations .................................................................................. 1-12
Network Administrator .................................................................................................................... 1-12
Page 4

Contents-2 CS193/CS173/CS163
2 Before making copies
2.1 Part names and their functions ...................................................................................................... 2-3
2.1.1 Options .............................................................................................................................................. 2-3
2.1.2 Outside of machine............................................................................................................................ 2-5
2.1.3 Inside of machine .............................................................................................................................. 2-9
2.1.4 Finisher FS-519/Output tray OT-602/Punch kit PK-515 ................................................................. 2-10
2.1.5 Saddle stitcher SD-505/Mailbin kit MT-502 .................................................................................... 2-12
2.1.6 Job separator JS-505...................................................................................................................... 2-14
2.1.7 Control panel ................................................................................................................................... 2-16
2.1.8 Basic settings screens..................................................................................................................... 2-18
2.1.9 Icons that appear in the screen....................................................................................................... 2-20
2.2 Adjusting the angle of the control panel ..................................................................................... 2-21
2.2.1 To adjust the angle of the control panel.......................................................................................... 2-21
2.3 Turning on the main power and the auxiliary power.................................................................. 2-23
2.3.1 Turning on the machine................................................................................................................... 2-23
2.3.2 Scanning during warm-up ............................................................................................................... 2-24
2.3.3 Turning off the machine................................................................................................................... 2-25
2.3.4 Automatically clearing settings (automatic panel reset) .................................................................. 2-26
2.3.5 Automatically canceling the mode screen (System Auto Reset)..................................................... 2-26
2.3.6 Automatically conserving energy (Low Power mode)...................................................................... 2-27
2.3.7 Automatically conserving energy (Sleep mode) .............................................................................. 2-28
2.3.8 Manually conserving energy............................................................................................................ 2-28
2.3.9 Automatically turning the machine on/off (Weekly Timer) ............................................................... 2-29
2.3.10 Controlling each user’s use of this machine (User Authentication)................................................. 2-31
2.3.11 Controlling each account’s use of this machine (Account Track) ................................................... 2-35
2.3.12 Controlling use of this machine with authentication unit (biometric type)....................................... 2-38
When "1-to-many authentication" has been specified.................................................................... 2-38
When "1-to-1 authentication" has been specified .......................................................................... 2-39
2.3.13 Controlling use of this machine with the authentication unit (IC card type) .................................... 2-40
When "Card Authentication" has been specified ............................................................................ 2-40
When "Card Authentication + Password" has been specified ........................................................ 2-42
2.4 Loading paper into tray 1/2/3/4.................................................................................................... 2-43
2.5 Loading paper into the LCT.......................................................................................................... 2-45
2.6 Loading paper into the bypass tray ............................................................................................. 2-47
3 Basic copy operations
3.1 General copy operation................................................................................................................... 3-3
3.2 Operations that cannot be combined............................................................................................ 3-6
3.2.1 Operations where the setting specified last is given priority............................................................. 3-6
3.2.2 Operations where the setting specified first is given priority............................................................. 3-7
3.3 Feeding the original......................................................................................................................... 3-8
3.3.1 Loading the original into the ADF ...................................................................................................... 3-8
3.3.2 Placing the original on the original glass ........................................................................................... 3-9
3.3.3 Scanning the original in separate batches ("Separate Scan" setting)............................................. 3-11
3.3.4 Scanning a multi-page original from the original glass ................................................................... 3-15
3.4 Specifying original settings .......................................................................................................... 3-19
3.4.1 Specifying the original size (Original Size settings) ......................................................................... 3-19
3.4.2 Copying originals of mixed sizes ("Mixed Original" setting)............................................................ 3-21
3.4.3 Loading folded (Z-folded) originals.................................................................................................. 3-23
3.4.4 Selecting the original orientation (Original Direction settings) ......................................................... 3-24
3.4.5 To select an Original Direction setting............................................................................................. 3-25
3.4.6 Selecting the position of the binding margin (Binding Position settings)........................................ 3-27
3.4.7 To select a Binding Position setting ................................................................................................ 3-28
3.4.8 Reducing the effects of dust on the left partition glass................................................................... 3-30
3.4.9 Changing scan settings for each original ........................................................................................ 3-31
Page 5

CS193/CS173/CS163 Contents-3
3.5 Selecting a Color setting .............................................................................................................. 3-34
3.5.1 To select a Color setting ................................................................................................................. 3-35
3.6 Selecting a Paper Setting ............................................................................................................. 3-37
3.6.1 Automatically selecting the paper size ("Auto" Paper setting) ........................................................ 3-38
3.6.2 Manually selecting the desired paper size ...................................................................................... 3-39
3.7 Specifying a Zoom setting............................................................................................................ 3-40
3.7.1 Automatically selecting the zoom ratio ("Auto" Zoom Setting) ....................................................... 3-40
3.7.2 Specifying the zoom ratio of the original ("Full Size" setting) ......................................................... 3-41
3.7.3 Typing in the zoom ratio (XY Zoom setting) .................................................................................... 3-41
3.7.4 Slightly reducing the copy ("Minimal" setting) ................................................................................ 3-43
3.7.5 Selecting a preset zoom ratio (Enlarge and Reduce settings) ........................................................ 3-44
3.7.6 Typing in separate X and Y zoom ratios (Individual Zoom settings) ............................................... 3-45
3.7.7 Selecting a stored zoom ratio ......................................................................................................... 3-47
3.7.8 Storing the desired zoom ratio........................................................................................................ 3-48
3.8 Selecting an Original > Copy setting........................................................................................... 3-50
3.8.1 Selecting single-sided copies ......................................................................................................... 3-51
3.8.2 Selecting double-sided copies........................................................................................................ 3-53
3.9 Selecting a combined copy setting ............................................................................................. 3-55
3.9.1 Copying multiple original pages onto a single page (combined copy settings).............................. 3-56
3.10 Selecting the quality of the original............................................................................................. 3-58
3.10.1 Loading originals with small print or photos (Original Type settings).............................................. 3-58
3.10.2 To select an Original Type setting................................................................................................... 3-59
3.11 Selecting the Density settings ..................................................................................................... 3-61
3.11.1 Adjusting the print density (Density settings).................................................................................. 3-61
3.11.2 Adjusting the background density (Background Removal settings) ............................................... 3-63
3.11.3 Adjusting the reproduction quality of text....................................................................................... 3-64
3.11.4 Printing with a glossy finish ("Glossy" setting) ................................................................................ 3-66
3.12 Selecting Finishing settings ......................................................................................................... 3-67
3.12.1 Separating copies by sets ("Sort" setting) ...................................................................................... 3-69
3.12.2 Separating copies by pages ("Group" Setting) ............................................................................... 3-70
3.12.3 Selecting the output tray................................................................................................................. 3-71
3.12.4 Stapling copies (Staple settings)..................................................................................................... 3-72
3.12.5 Punching holes in copies (Punch settings)...................................................................................... 3-75
3.13 Selecting a folding setting............................................................................................................ 3-77
3.13.1 Folding copies in half ("Half-Fold" setting)...................................................................................... 3-77
3.13.2 Binding copies at the center ("Center Staple & Fold" setting) ........................................................ 3-79
3.14 Selecting not to rotate the image ................................................................................................ 3-81
3.15 Scanning the next original to be copied while a copy job is being printed
(next job reservation) .................................................................................................................... 3-82
3.16 Temporarily stopping scanning/printing ..................................................................................... 3-83
3.17 Deleting a paused job ................................................................................................................... 3-84
4 Additional copy operations
4.1 Checking the Copy Settings (Check Job) ..................................................................................... 4-3
4.1.1 To check the settings........................................................................................................................ 4-3
4.1.2 To change the settings...................................................................................................................... 4-6
4.2 Printing a proof to check the settings (Proof Copy) .................................................................... 4-7
4.3 Interrupting a copy job (Interrupt mode)....................................................................................... 4-9
4.4 Registering copy programs (Mode Memory).............................................................................. 4-10
4.4.1 Deleting a copy program................................................................................................................. 4-13
4.5 Copying with programmed copy settings (Mode Memory)....................................................... 4-14
4.6 Displaying function descriptions (Help) ...................................................................................... 4-16
4.6.1 Overview of Help screens ............................................................................................................... 4-16
4.6.2 Displaying main Help screens ......................................................................................................... 4-19
Page 6

Contents-4 CS193/CS173/CS163
4.7 Specifying control panel settings (Accessibility mode) ............................................................. 4-21
4.7.1 Displaying the Accessibility Setting screen..................................................................................... 4-21
4.7.2 Setting the "Touch Panel Adjustment" function.............................................................................. 4-21
4.7.3 Setting the Key Repeat Start/Interval Time functions ..................................................................... 4-23
4.7.4 Setting the "System Auto Reset Confirmation" function................................................................. 4-24
4.7.5 Setting the "Auto Reset Confirmation" function.............................................................................. 4-26
4.7.6 Setting the "Enlarge Display Mode Confirmation" function ............................................................ 4-28
4.7.7 Setting the "Message Display Time" function ................................................................................. 4-30
4.7.8 Setting the "Sound Setting" functions............................................................................................. 4-31
5 Troubleshooting
5.1 When an error code appears .......................................................................................................... 5-3
5.2 When the message "Misfeed detected." appears........................................................................ 5-5
5.2.1 Location of paper misfeed................................................................................................................. 5-5
5.2.2 Paper misfeed indications ................................................................................................................. 5-6
5.2.3 Clearing a paper misfeed in the ADF (feed section) .......................................................................... 5-8
5.2.4 Clearing a paper misfeed in the ADF (transport section)................................................................. 5-10
5.2.5 Clearing a paper misfeed in the ADF (scanning section)................................................................. 5-13
5.2.6 Clearing a paper misfeed in the ADF (output section)..................................................................... 5-16
5.2.7 Clearing a paper misfeed in the ADF (turnover section) .................................................................. 5-18
5.2.8 Clearing a paper misfeed in the fusing unit ..................................................................................... 5-20
5.2.9 Clearing a paper misfeed in the main unit ....................................................................................... 5-23
5.2.10 Clearing a paper misfeed in the automatic duplex unit................................................................... 5-25
5.2.11 Clearing a paper misfeed in the bypass tray ................................................................................... 5-27
5.2.12 Clearing a paper misfeed in the paper transport section ................................................................ 5-29
5.2.13 Clearing a paper misfeed in tray 1................................................................................................... 5-31
5.2.14 Clearing a paper misfeed in tray 2................................................................................................... 5-33
5.2.15 Clearing a paper misfeed in paper feed cabinet (Tray 3/4) ............................................................. 5-35
5.2.16 Clearing a paper misfeed in the LCT ............................................................................................... 5-36
5.2.17 To clear a banner paper misfeed..................................................................................................... 5-38
5.2.18 Clearing a paper misfeed in finisher ................................................................................................ 5-42
5.2.19 Clearing a paper misfeed in the mailbin .......................................................................................... 5-44
5.2.20 Clearing a paper misfeed in the saddle stitcher .............................................................................. 5-46
5.2.21 Clearing a paper misfeed in the separator ...................................................................................... 5-47
5.3 When the message "Unable to staple." appears........................................................................ 5-49
5.3.1 Clearing jammed staples in finisher................................................................................................. 5-50
5.3.2 Clearing jammed staples in the saddle stitcher............................................................................... 5-52
5.4 When the message "Replenish paper." appears........................................................................ 5-53
5.5 When the message "... due to insufficient memory." appears .................................................. 5-54
5.6 When the message "Please replace following unit(s)." appears .............................................. 5-55
5.7 When the message "XXXX needs to be replaced." appears ..................................................... 5-56
5.8 When the message "Now remote operating. Please do not turn off the power."
appears........................................................................................................................................... 5-57
5.9 Simple troubleshooting................................................................................................................. 5-58
5.10 Main messages and their remedies ............................................................................................. 5-61
6 Specifications
6.1 Specifications................................................................................................................................... 6-3
6.1.1 Main unit ............................................................................................................................................ 6-3
6.1.2 Automatic duplex unit........................................................................................................................ 6-4
6.1.3 Automatic document feeder DF-611................................................................................................. 6-5
Possible combinations for mixed original sizes................................................................................. 6-5
6.1.4 Paper feed cabinet PC-104............................................................................................................... 6-5
6.1.5 Paper feed cabinet PC-204............................................................................................................... 6-6
6.1.6 Paper feed cabinet PC-405............................................................................................................... 6-6
Page 7

CS193/CS173/CS163 Contents-5
6.1.7 Finisher FS-519 ................................................................................................................................. 6-6
6.1.8 Punch kit PK-515 .............................................................................................................................. 6-7
6.1.9 Saddle stitcher SD-505..................................................................................................................... 6-7
6.1.10 Output tray OT-602........................................................................................................................... 6-7
6.1.11 Mailbin kit MT-502............................................................................................................................. 6-7
6.1.12 Job separator JS-505........................................................................................................................ 6-8
7 Copy paper/originals
7.1 Copy paper....................................................................................................................................... 7-3
7.1.1 Possible paper sizes ......................................................................................................................... 7-3
7.1.2 Paper types and paper capacities .................................................................................................... 7-4
7.1.3 Special paper .................................................................................................................................... 7-4
7.1.4 Precautions for paper........................................................................................................................ 7-5
7.1.5 Paper storage.................................................................................................................................... 7-5
7.1.6 Auto tray switch feature .................................................................................................................... 7-6
7.1.7 Order for selecting paper trays ......................................................................................................... 7-6
7.2 Selecting the Paper settings .......................................................................................................... 7-7
7.2.1 Automatically detecting the paper size ("Auto Detect" setting) ........................................................ 7-7
7.2.2 Selecting a paper size setting (Size Setting)..................................................................................... 7-8
7.2.3 Specifying a non-standard paper size (Custom Size settings) ....................................................... 7-10
7.2.4 Storing a non-standard paper size (Custom Size settings)............................................................. 7-12
7.2.5 Selecting a setting for oversized paper (Wide Paper settings)........................................................ 7-15
7.2.6 Specifying a setting for special paper............................................................................................. 7-17
7.2.7 Printing double-sided copies manually........................................................................................... 7-19
7.3 Originals ......................................................................................................................................... 7-21
7.3.1 Originals that can be loaded into the ADF ...................................................................................... 7-21
7.3.2 Precautions for loading originals into the ADF ................................................................................ 7-22
7.3.3 Originals that can be placed on the original glass .......................................................................... 7-22
7.3.4 Precautions for positioning originals on the original glass.............................................................. 7-22
8 Application functions
8.1 Color Adjust parameters and samples.......................................................................................... 8-3
8.1.1 General information about color........................................................................................................ 8-4
8.1.2 "Red" parameter ............................................................................................................................... 8-6
8.1.3 "Green" parameter ............................................................................................................................ 8-7
8.1.4 "Blue" parameter............................................................................................................................... 8-8
8.1.5 "Color Balance" parameter (CMYK color adjustment)...................................................................... 8-9
8.1.6 "Brightness" parameter................................................................................................................... 8-11
8.1.7 "Contrast" parameter ...................................................................................................................... 8-12
8.1.8 "Saturation" parameter ................................................................................................................... 8-13
8.1.9 "Sharpness" parameter................................................................................................................... 8-14
8.1.10 "Hue" parameter ............................................................................................................................. 8-15
8.1.11 "Copy Density" parameter .............................................................................................................. 8-16
8.1.12 "Single Color" function.................................................................................................................... 8-17
8.1.13 "2 Color" function............................................................................................................................ 8-18
8.1.14 "Background Color" function .......................................................................................................... 8-19
8.1.15 "Neg-/Pos. Reverse" function......................................................................................................... 8-20
Monotone copy ............................................................................................................................... 8-20
Full-color copy and "Background Color" function .......................................................................... 8-20
8.1.16 "Mirror Image" function................................................................................................................... 8-21
8.2 Inserting paper between OHP transparencies
("OHP Interleave" function) .......................................................................................................... 8-22
8.3 Adding cover pages ("Cover Sheet" function)............................................................................ 8-25
8.4 Inserting different paper into copies
("Insert Sheet" function) ............................................................................................................... 8-28
Page 8

Contents-6 CS193/CS173/CS163
8.5 Inserting copies of a different original for a specified page
("Insert Image" function)............................................................................................................... 8-31
8.6 Specifying pages to be printed on the front side ("Chapters" function) .................................. 8-34
8.7 Scanning originals with different settings and printing copies all together
("Program Jobs" function)............................................................................................................ 8-37
8.8 Copying with image colors inversed ("Neg./Pos. Reverse" function) ...................................... 8-41
8.9 Copying in a mirror image ("Mirror Image" function)................................................................. 8-43
8.10 Adding a background color to copies ("Background Color" function) .................................... 8-46
8.11 Adjusting the copy color quality (Color Adjust parameters) ..................................................... 8-48
8.11.1 To adjust the Color Adjust parameters............................................................................................ 8-49
8.11.2 Checking the print result of the Color Adjust settings (Sample Copy) ............................................ 8-51
8.12 Producing separate copies of each page in a page spread
("Book Copy" function) ................................................................................................................. 8-52
8.13 Tiling copy images ("Image Repeat" function) ........................................................................... 8-57
8.14 Copying an enlarged image on multiple pages ("Poster Mode" function)............................... 8-61
8.15 Copying booklets ("Booklet Original" function).......................................................................... 8-65
8.16 Adding a binding margin to copies ("Page Margin" function) ................................................... 8-67
8.17 Adjusting the image to fit the paper (Image Adjust settings).................................................... 8-70
8.18 Copying with the page layout of a booklet ("Booklet" function)............................................... 8-73
8.19 Erasing specified areas of copies ("Frame Erase" function)..................................................... 8-75
8.20 Printing the date/time or page number on copies
(Stamp/Composition functions) ................................................................................................... 8-77
8.20.1 Printing the date/time ("Date/Time" function).................................................................................. 8-78
8.20.2 Printing the page number ("Page Number" function)...................................................................... 8-81
8.20.3 Printing previously registered stamps ("Stamp" function)............................................................... 8-85
8.20.4 Printing copy protection text ("Copy Protect" function).................................................................. 8-89
8.20.5 Printing repeating stamps ("Stamp Repeat" function) .................................................................... 8-97
8.20.6 Printing the image scanned first overlapped by the remaining original pages
("Overlay" function)......................................................................................................................... 8-103
8.20.7 Saving a scanned image as a registered overlay ("Overlay" function) .......................................... 8-106
8.20.8 Using a registered overlay ("Overlay" function)............................................................................. 8-108
8.20.9 Printing a header/footer ("Header/Footer" function)...................................................................... 8-109
8.21 Saving the scanned original in a user box ("Save in User Box" function).............................. 8-111
9 Replacing toner cartridges and staple cartridges and emptying
punch scrap box
9.1 Replacing the toner cartridge......................................................................................................... 9-3
9.1.1 To replace the toner cartridge........................................................................................................... 9-5
9.2 Replacing the waste toner box....................................................................................................... 9-7
9.2.1 To replace the waste toner box......................................................................................................... 9-9
9.3 Replacing an imaging unit ............................................................................................................ 9-11
9.3.1 To replace the imaging unit............................................................................................................. 9-13
9.4 Replacing the staple cartridge ..................................................................................................... 9-17
9.4.1 To replace the staple cartridge in the finisher ................................................................................. 9-18
9.4.2 To replace the staple cartridge in saddle stitcher ........................................................................... 9-20
9.5 Emptying the punch scrap box..................................................................................................... 9-22
9.5.1 To empty the punch scrap box in the finisher................................................................................. 9-24
10 Care of the machine
10.1 Cleaning.......................................................................................................................................... 10-3
10.1.1 Housing............................................................................................................................................ 10-3
10.1.2 Original glass ................................................................................................................................... 10-3
10.1.3 Left partition glass ........................................................................................................................... 10-4
10.1.4 Control panel ................................................................................................................................... 10-4
10.1.5 Original pad ..................................................................................................................................... 10-5
10.1.6 Electrostatic charger wire................................................................................................................ 10-5
Page 9

CS193/CS173/CS163 Contents-7
10.1.7 Print head........................................................................................................................................ 10-6
10.2 Viewing counters (Meter Count) .................................................................................................. 10-7
10.2.1 Viewing counters............................................................................................................................. 10-7
10.2.2 Viewing the coverage rate............................................................................................................... 10-8
10.3 When the message "It is time for the scheduled inspection of the device."
appears........................................................................................................................................... 10-9
11 Managing jobs
11.1 Overview of Job List screen......................................................................................................... 11-3
11.1.1 Jobs................................................................................................................................................. 11-3
11.1.2 Multi-job feature.............................................................................................................................. 11-3
11.1.3 Job List screens .............................................................................................................................. 11-4
11.1.4 Left panel Job List........................................................................................................................... 11-7
11.2 Performing operations on jobs .................................................................................................... 11-8
11.2.1 Deleting a job .................................................................................................................................. 11-8
11.2.2 Checking job settings...................................................................................................................... 11-9
11.2.3 Checking job details...................................................................................................................... 11-10
11.2.4 Displaying the Current Jobs list (stored jobs and active jobs)...................................................... 11-11
11.2.5 Displaying the Job History list ....................................................................................................... 11-12
11.2.6 Printing a proof copy of a stored job ............................................................................................ 11-13
11.2.7 Printing a stored job...................................................................................................................... 11-14
11.2.8 Increasing printing priority ............................................................................................................. 11-16
12 Utility mode
12.1 Overview of Utility mode parameters.......................................................................................... 12-3
12.1.1 List of registration information and parameters .............................................................................. 12-3
12.2 Registering a destination.............................................................................................................. 12-7
12.2.1 Create One-Touch Destination........................................................................................................ 12-7
12.2.2 Create User Box.............................................................................................................................. 12-7
12.2.3 Limiting Access to Destinations ...................................................................................................... 12-7
Access Level ................................................................................................................................... 12-7
Level settings .................................................................................................................................. 12-8
Group .............................................................................................................................................. 12-8
Specifying a group setting .............................................................................................................. 12-9
Specifying a destination level........................................................................................................ 12-10
Specifying a user level................................................................................................................... 12-12
12.2.4 Displaying the destination registration screen .............................................................................. 12-14
12.3 Specifying user settings ............................................................................................................. 12-15
12.3.1 System Settings ............................................................................................................................ 12-15
12.3.2 Custom Display Settings ............................................................................................................... 12-17
12.3.3 Copier Settings.............................................................................................................................. 12-18
12.3.4 Scan/Fax Settings......................................................................................................................... 12-20
12.3.5 Printer Settings.............................................................................................................................. 12-21
12.3.6 Change Password......................................................................................................................... 12-21
12.3.7 Change E-Mail Address ................................................................................................................ 12-21
12.3.8 Displaying the User Settings screen ............................................................................................. 12-22
12.4 Specifying administrator settings.............................................................................................. 12-23
12.4.1 System Settings ............................................................................................................................ 12-23
12.4.2 Administrator/Machine Settings.................................................................................................... 12-28
12.4.3 One-Touch/User Box Registration................................................................................................ 12-29
12.4.4 User Authentication/Account Track .............................................................................................. 12-29
12.4.5 Network Settings........................................................................................................................... 12-32
12.4.6 Copier Setting ............................................................................................................................... 12-32
12.4.7 Printer Settings.............................................................................................................................. 12-33
12.4.8 Fax Settings .................................................................................................................................. 12-33
Page 10

Contents-8 CS193/CS173/CS163
12.4.9 System Connection ....................................................................................................................... 12-33
12.4.10 Security Settings............................................................................................................................ 12-34
12.4.11 Displaying the Administrator Settings screen................................................................................ 12-37
12.5 Check Consumable Life.............................................................................................................. 12-39
12.5.1 Displaying the Check Consumable Life screen............................................................................. 12-39
12.6 Overview of weekly timer settings............................................................................................. 12-40
12.7 Printer Adjustment....................................................................................................................... 12-41
12.7.1 Leading Edge Adjustment ............................................................................................................. 12-41
12.7.2 Centering ....................................................................................................................................... 12-42
12.7.3 Leading Edge Adjustment (Duplex Side 2).................................................................................... 12-43
12.7.4 Centering (Duplex 2nd Side).......................................................................................................... 12-44
12.8 Finisher Adjustment .................................................................................................................... 12-46
12.8.1 Center Staple Position Adjustment ............................................................................................... 12-46
12.8.2 Half-Fold Position.......................................................................................................................... 12-47
12.8.3 Punch Horizontal Position Adjustment.......................................................................................... 12-49
12.8.4 Punch Regist Loop Size Adjustment............................................................................................. 12-50
12.9 Color Registration Adjust ........................................................................................................... 12-52
12.9.1 Adjusting the color registration for yellow, magenta and cyan ..................................................... 12-52
12.10 Gradation Adjustment ................................................................................................................. 12-54
12.11 Header/Footer Settings............................................................................................................... 12-56
12.11.1 Specifying headers/footers............................................................................................................ 12-56
12.11.2 Editing headers/footers ................................................................................................................. 12-58
12.12 Authentication Method................................................................................................................ 12-59
12.12.1 User authentication and account track ......................................................................................... 12-59
12.12.2 When user authentication and account track are synchronized ................................................... 12-59
12.12.3 When user authentication and account track are used separately ............................................... 12-60
12.12.4 Selecting an authentication method.............................................................................................. 12-61
12.13 User Authentication Setting........................................................................................................ 12-64
12.13.1 Administrative Settings—List ........................................................................................................ 12-64
12.13.2 Default Function Permission.......................................................................................................... 12-64
12.13.3 Public User Access........................................................................................................................ 12-65
12.13.4 User Registration........................................................................................................................... 12-66
12.13.5 User Counter ................................................................................................................................. 12-71
12.13.6 Viewing user counters ................................................................................................................... 12-72
12.14 Account Track Setting................................................................................................................. 12-73
12.14.1 Account Track Registration........................................................................................................... 12-73
12.14.2 Account Track Counter.................................................................................................................. 12-77
12.14.3 Viewing account counters ............................................................................................................. 12-78
12.15 Password Rules ........................................................................................................................... 12-79
12.15.1 Conditions of the password rules.................................................................................................. 12-79
12.16 Enhanced Security Mode............................................................................................................ 12-81
13 Appendix
13.1 Entering text................................................................................................................................... 13-3
13.1.1 Enlarging the keyboard.................................................................................................................... 13-5
13.1.2 To type text...................................................................................................................................... 13-6
13.1.3 List of available characters.............................................................................................................. 13-6
13.2 Glossary.......................................................................................................................................... 13-7
14 Index
Page 11

1
Introduction
Page 12

Page 13
CS193/CS173/CS163 1-3
Introduction
1
1 Introduction
Thank you for choosing this machine.
This manual contains details on the operation of the various functions of the machine, precautions on its use,
and basic troubleshooting procedures. In order to ensure that this machine is used correctly and efficiently,
carefully read this manual as needed.
For detailed safety information and operation precautions, refer to the User Manual.
For descriptions on trademarks and copyrights, refer to the User Manual.
The illustrations used in this manual may appear slightly different from views of the actual equipment.
1.1 Available features
Selecting the print color
The color used to print copies can be specified, for example, the copy can be printed in full color or in black
and white.
For details, refer to "Selecting a Color setting" on page 3-34.
Automatically selecting the paper
The most appropriate paper size can automatically be selected based on the size of the loaded original and
the specified zoom ratio.
For details, refer to "Automatically selecting the paper size ("Auto" Paper setting)" on page 3-38.
Adjusting copies to the size of the paper
The most appropriate zoom ratio can automatically be selected based on the size of the loaded original and
the specified paper size.
For details, refer to "Automatically selecting the zoom ratio ("Auto" Zoom Setting)" on page 3-40.
Specifying separate horizontal and vertical zoom ratios
By specifying separate horizontal and vertical zoom ratios, copies of the original can be resized as desired.
For details, refer to "Typing in separate X and Y zoom ratios (Individual Zoom settings)" on page 3-45.
Scanning the original in separate batches
An original with a large number of pages can be divided and scanned in separate batches. Double-sided
copies can be produced by using the original glass or the original pages can be alternately loaded onto the
original glass or into the ADF, and then all pages can be copied together as a single job.
For details, refer to "Scanning the original in separate batches ("Separate Scan" setting)" on page 3-11 and
"Scanning a multi-page original from the original glass" on page 3-15.
Page 14
1
Introduction
1-4 CS193/CS173/CS163
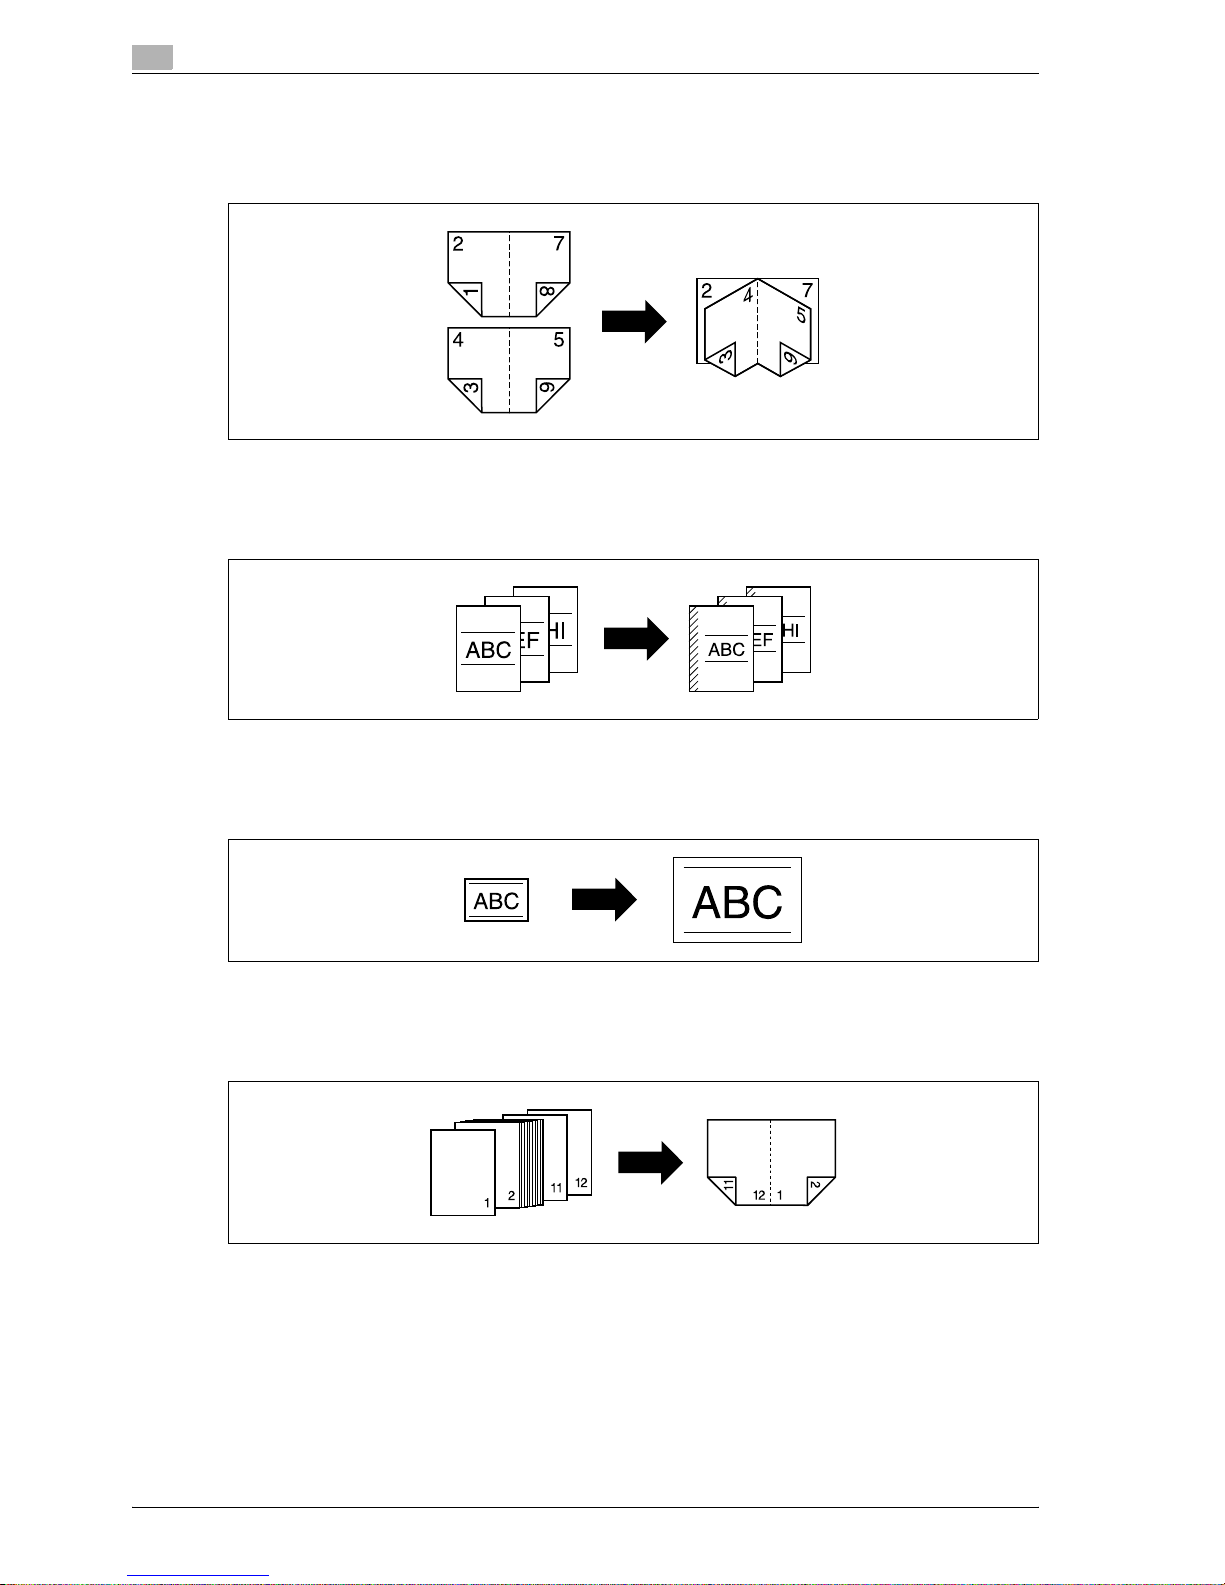
Center binding and folding in half
Copies can be folded at their center ("Half-Fold" setting) or bound with staples ("Center Staple & Fold"
setting).
For details, refer to "Selecting a folding setting" on page 3-77.
Sorting copies
The finishing method for copies can be selected.
For details, refer to "Separating copies by sets ("Sort" setting)" on page 3-69, "Separating copies by pages
("Group" Setting)" on page 3-70.
Stapling copies
Multi-page originals can be copied and stapled together.
For details, refer to "Stapling copies (Staple settings)" on page 3-72.
Punching holes in copies
Holes for filing can be punched in the copies.
For details, refer to "Punching holes in copies (Punch settings)" on page 3-75.
Half-fold Center staple and fold
Page 15
CS193/CS173/CS163 1-5
Introduction
1
Copying multiple original pages onto a single page
Multiple pages of the original can be printed together on a single page.
For details, refer to "Copying multiple original pages onto a single page (combined copy settings)" on
page 3-56.
Copying an original containing various page sizes
An original with various page sizes can be scanned and copied together.
For details, refer to "Copying originals of mixed sizes ("Mixed Original" setting)" on page 3-21.
Adjusting copies according to the image quality of the original
The copies can be adjusted according to the image quality of the original.
For details, refer to "Loading originals with small print or photos (Original Type settings)" on page 3-58or
"Adjusting the print density (Density settings)" on page 3-61.
Inserting paper between copies of OHP
In order to prevent OHP from becoming stuck to each other, a page (interleaf) can be inserted between the
transparency copies.
For details, refer to "Inserting paper between OHP transparencies ("OHP Interleave" function)" on page 8-22.
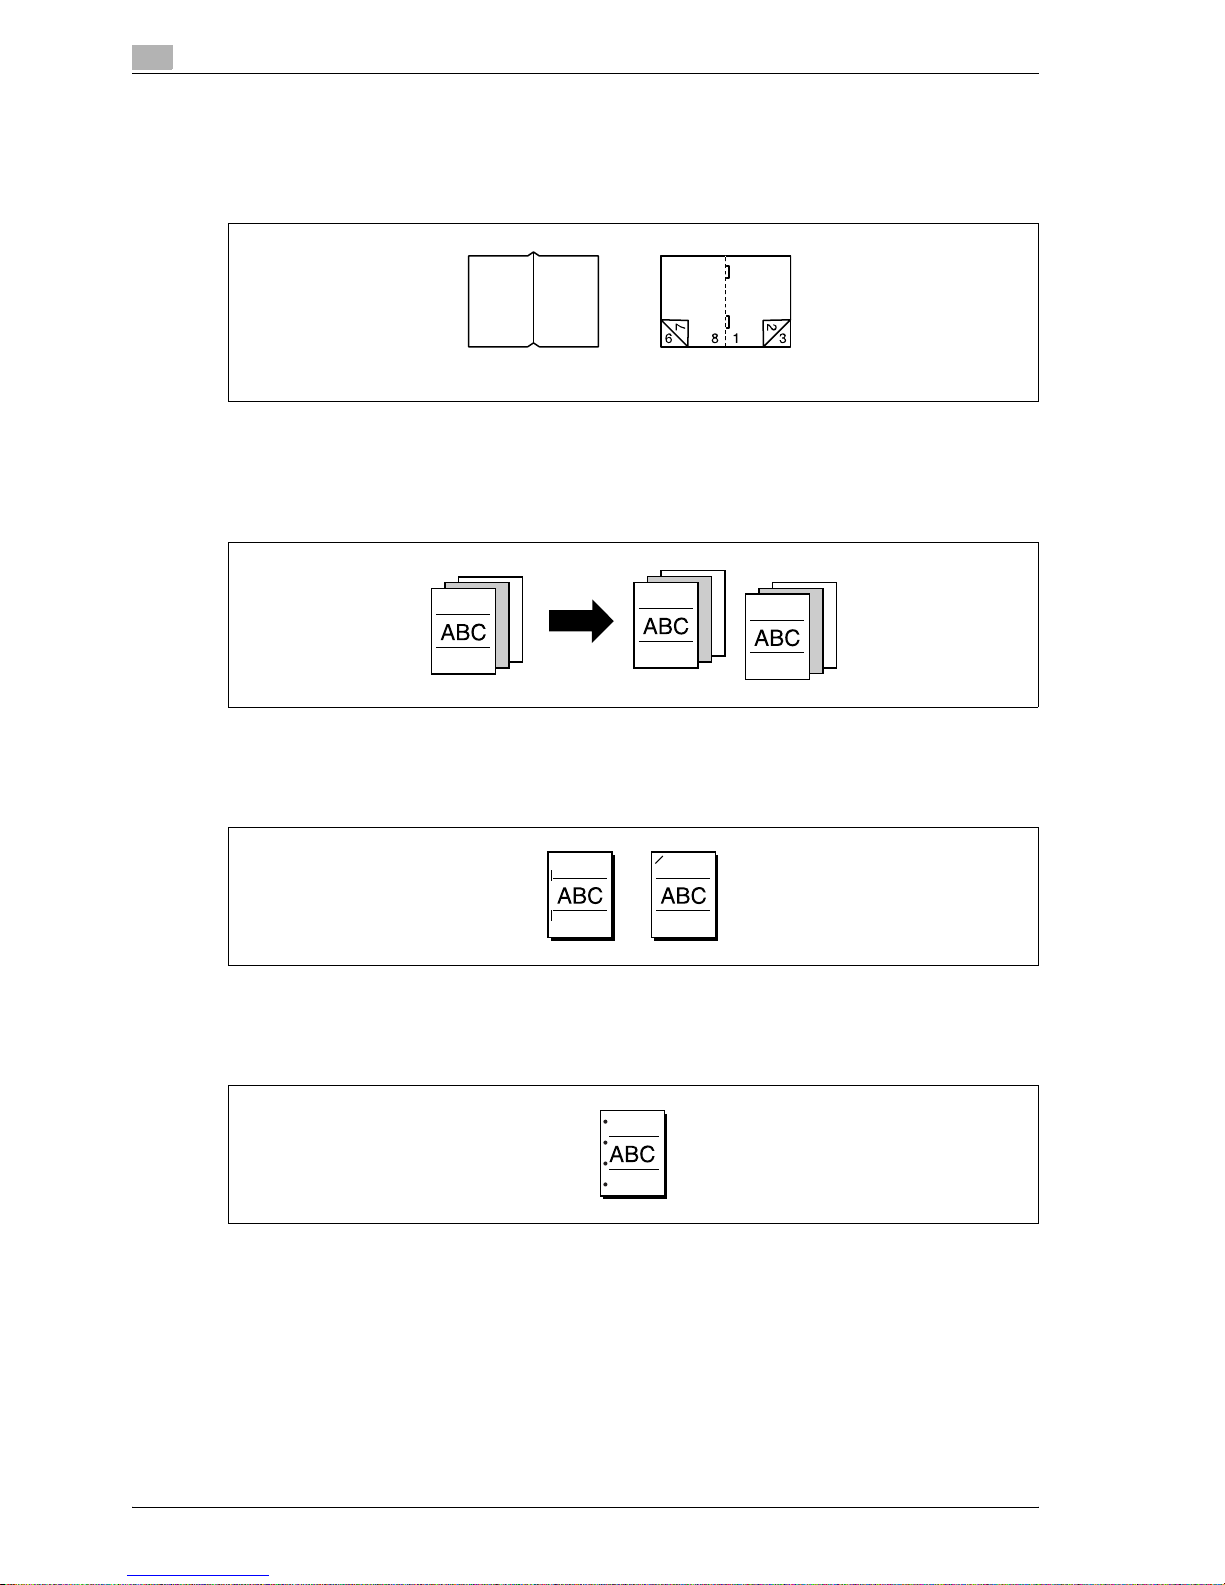
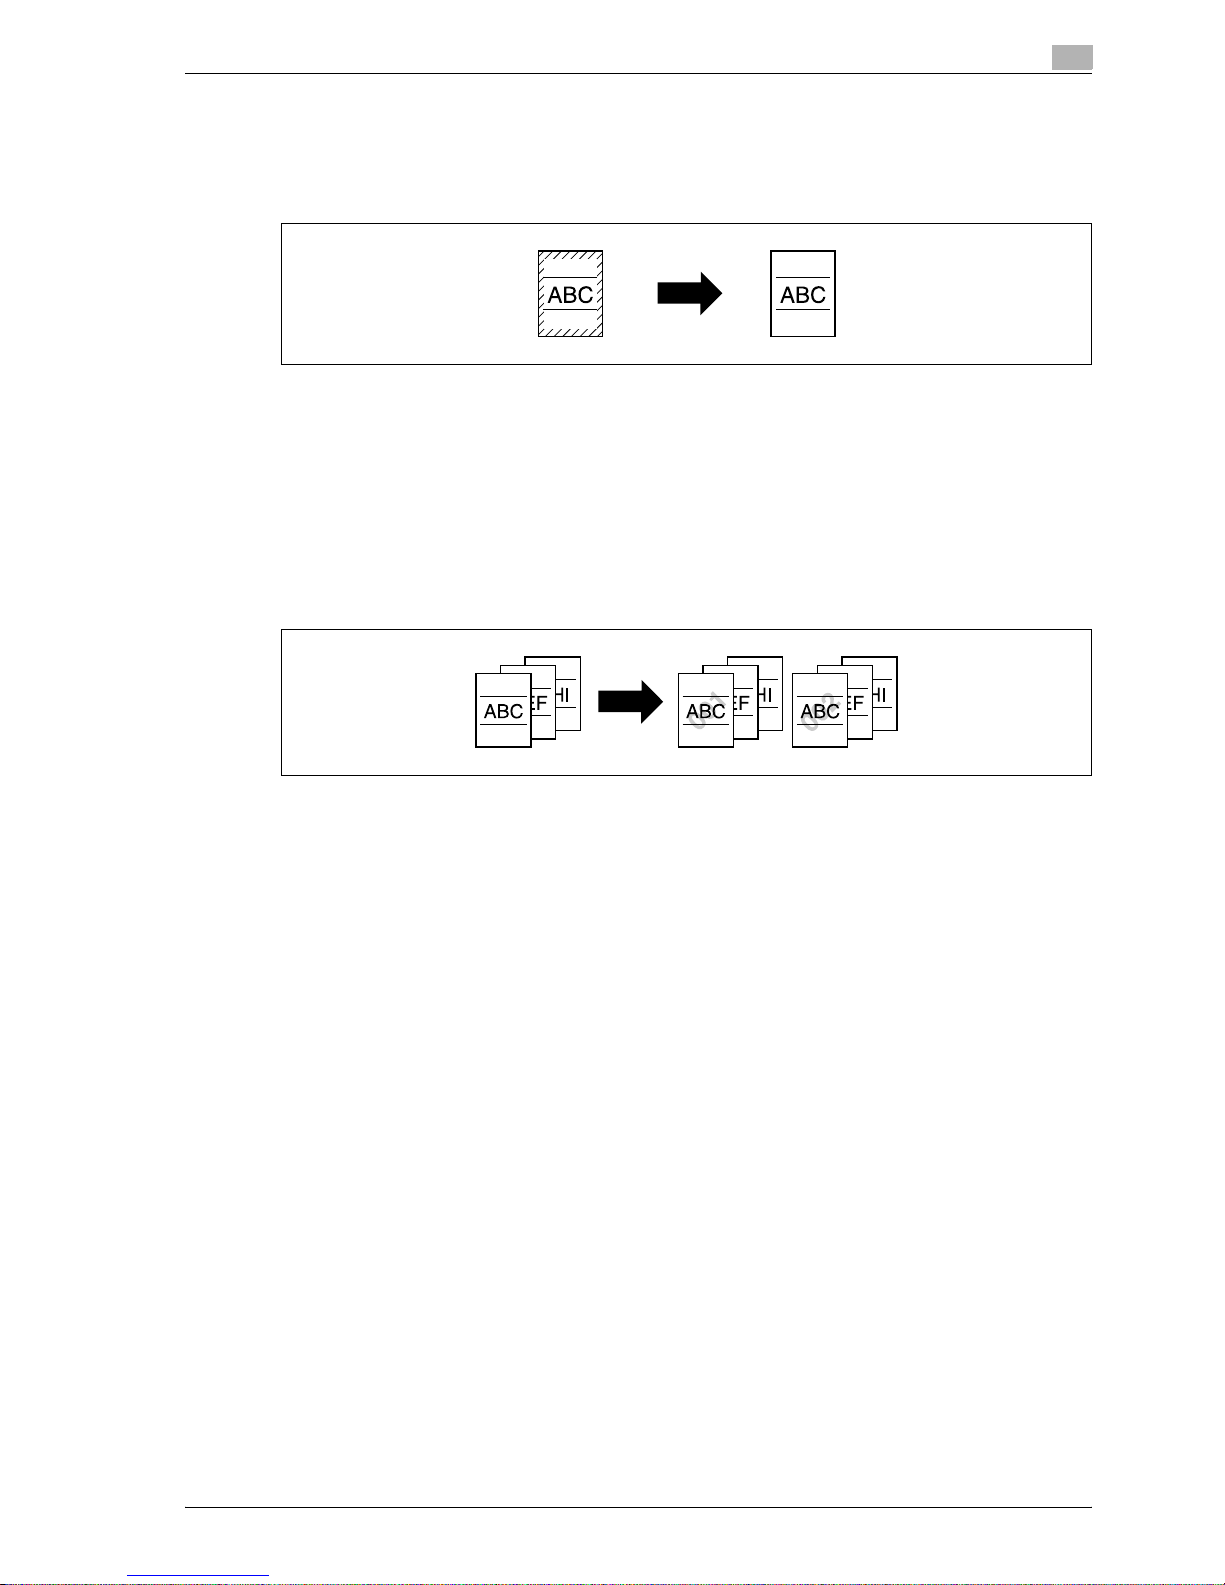
Adding a cover page
Cover pages can be added to copies, or copies can be made using different paper (for example, colored
paper) for only the cover pages.
For details, refer to "Adding cover pages ("Cover Sheet" function)" on page 8-25.
Page 16

1
Introduction
1-6 CS193/CS173/CS163
Inserting different paper into copies
Different paper (such as colored paper) can be inserted for specified pages in the copies.
For details, refer to "Inserting different paper into copies ("Insert Sheet" function)" on page 8-28.
Inserting pages from a different original at specified locations in a copy
An original scanned later can be inserted for specified pages in an original scanned earlier for copying.
For details, refer to "Inserting copies of a different original for a specified page ("Insert Image" function)" on
page 8-31.
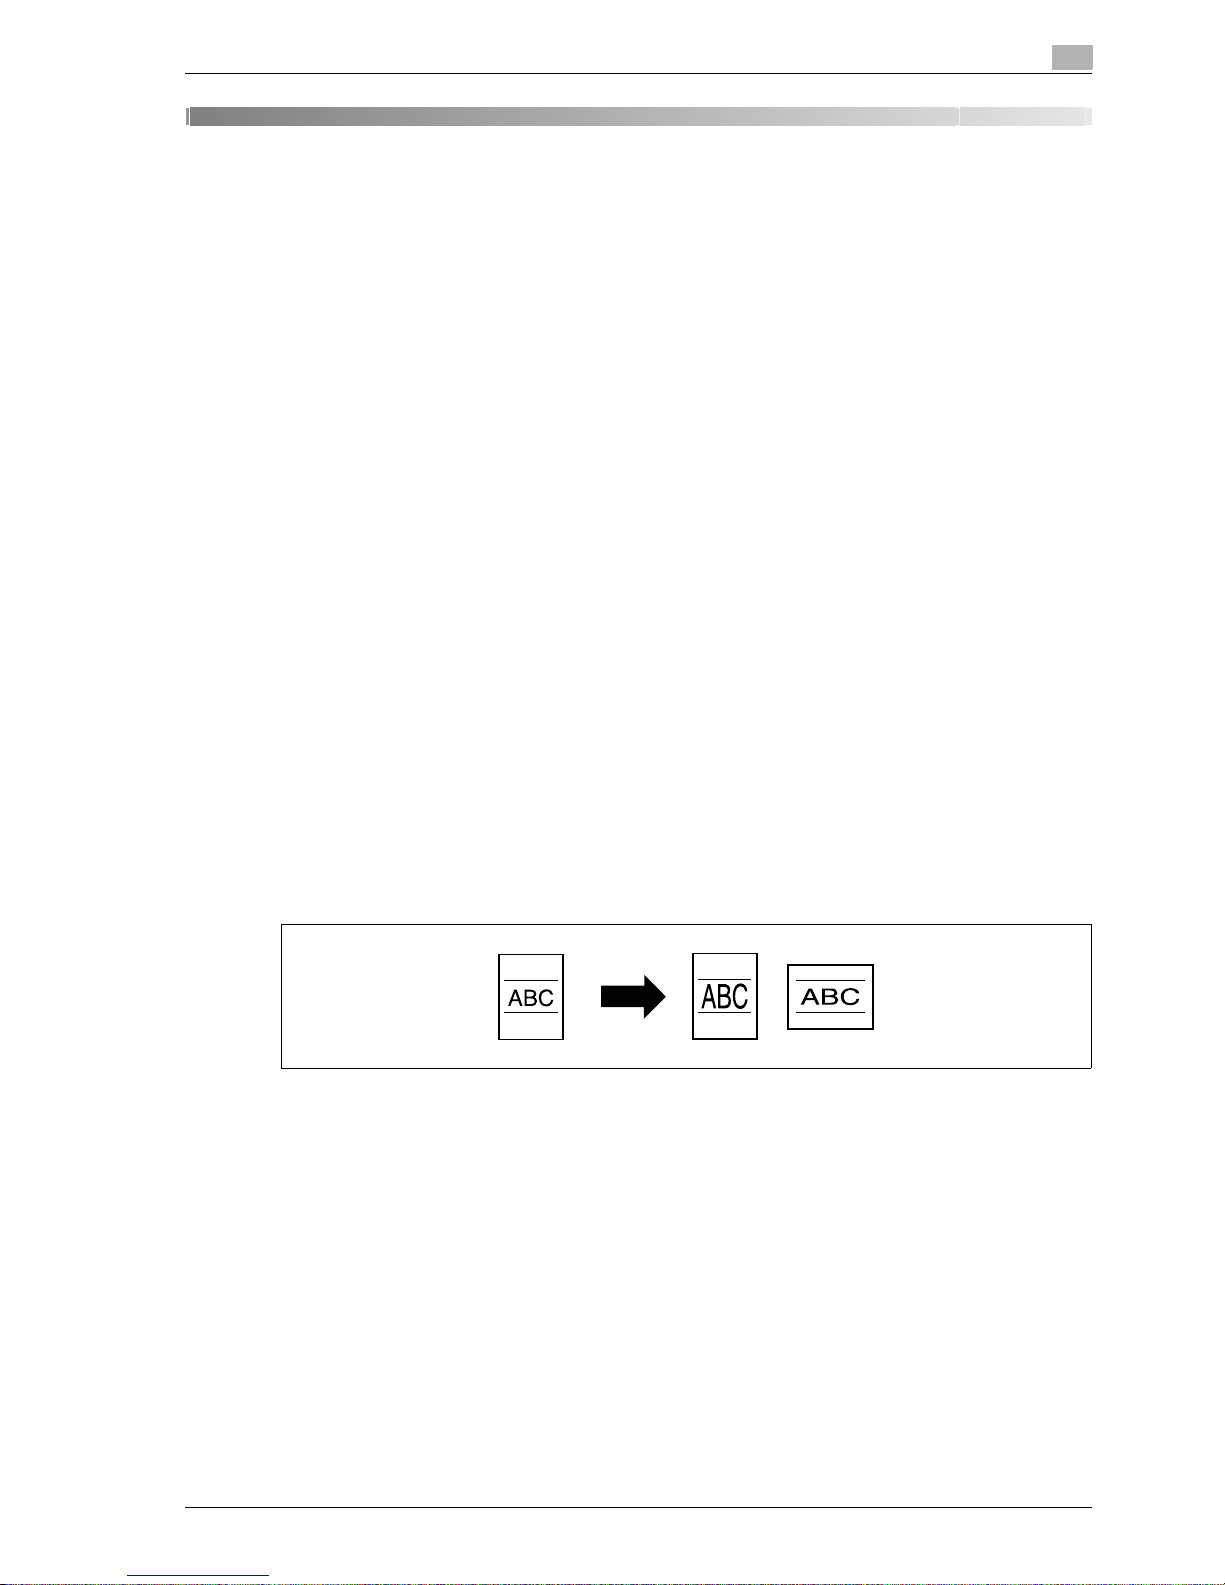
Printing double-sided copies with the specified page on the front side
Double-sided copies can be printed with the specified pages on the front side.
For details, refer to "Specifying pages to be printed on the front side ("Chapters" function)" on page 8-34.
Copying with reversed colors
An original can be copied with the light- and dark-colored areas of the original image inversed. With Color
setting "Full Color", copies are printed with the hues and brightness inversed. With Color setting "Black" or
"Single Color", copies are printed with the hues inversed.
For details, refer to "Copying with image colors inversed ("Neg./Pos. Reverse" function)" on page 8-41.
Page 17
CS193/CS173/CS163 1-7
Introduction
1
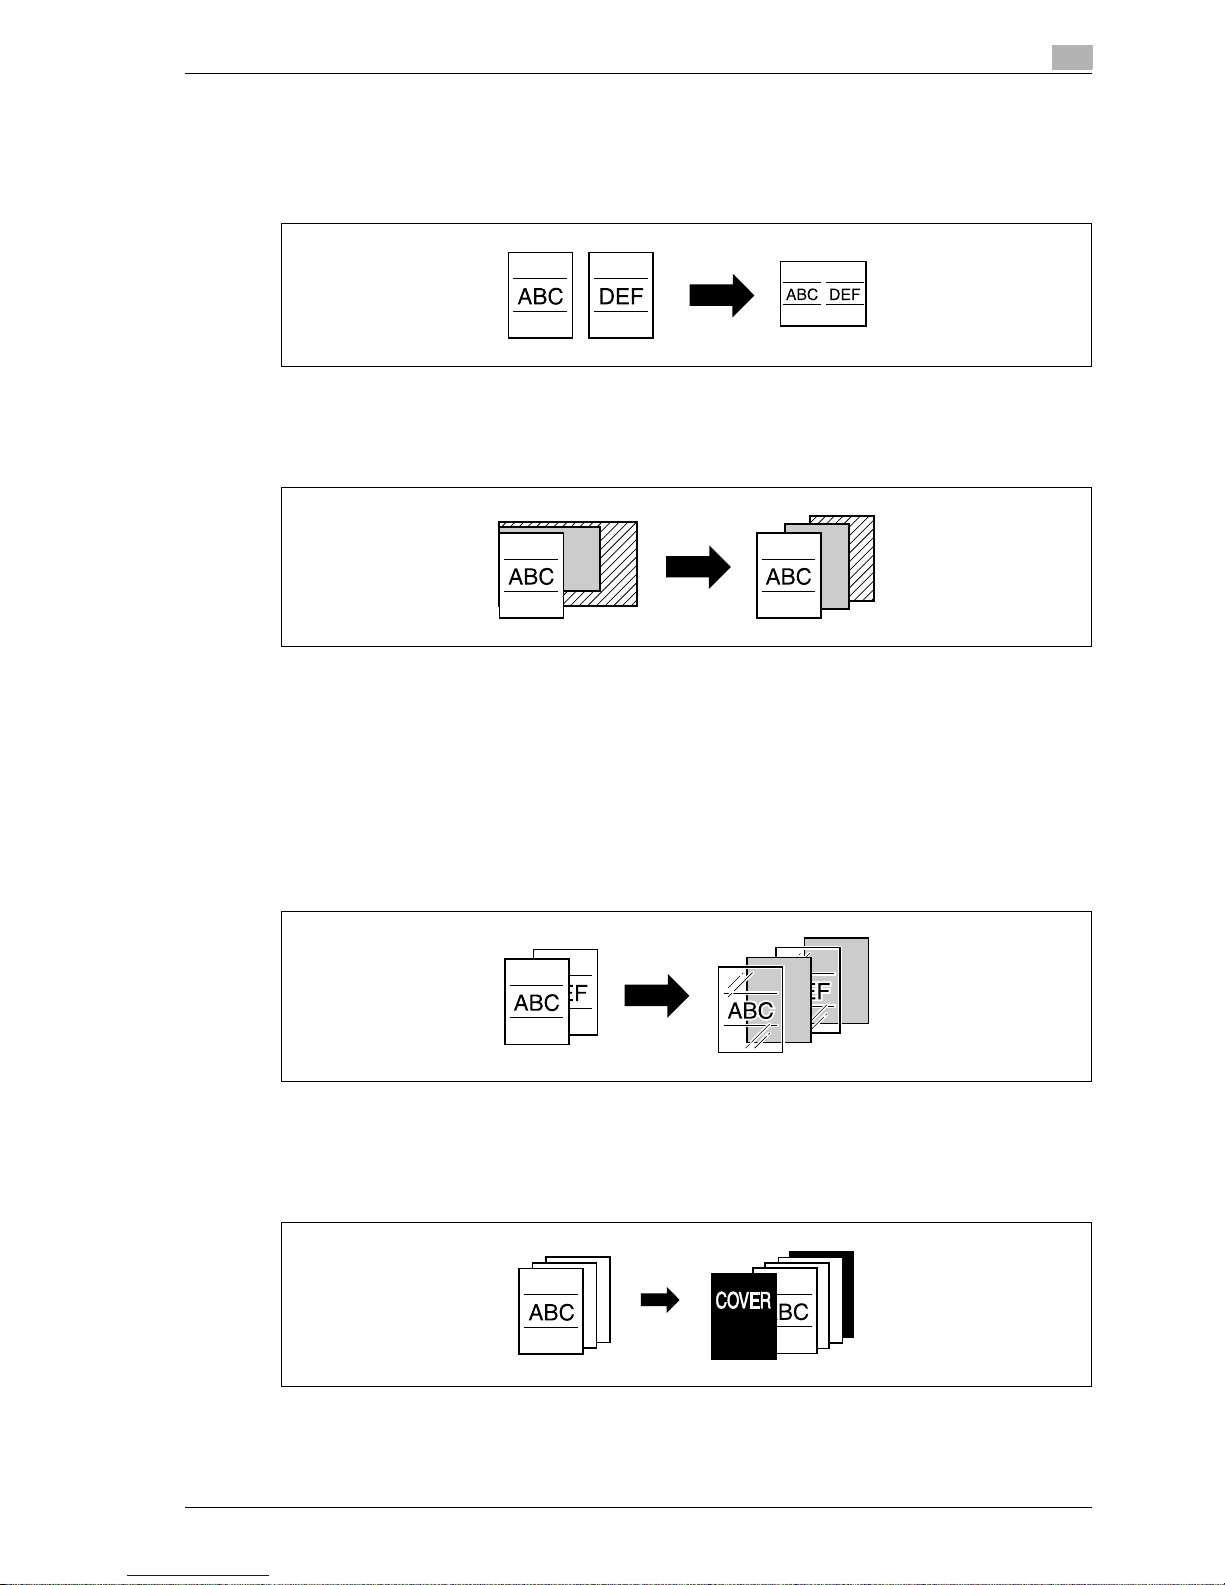
Printing a mirror image
An original can be copied in its mirror image.
For details, refer to "Copying in a mirror image ("Mirror Image" function)" on page 8-43.
Copying with a background color
An original can be copied using one of the 18 colors available as the color of the background (blank areas).
For details, refer to "Adding a background color to copies ("Background Color" function)" on page 8-46.
Improving the copy color quality
You can adjust color copies to the quality for the desired image.
For details, refer to "Adjusting the copy color quality (Color Adjust parameters)" on page 8-48.
Separately copying a page spread
A page spread, such as in an open book or catalog, can be copied onto separate pages.
For details, refer to "Producing separate copies of each page in a page spread ("Book Copy" function)" on
page 8-52.
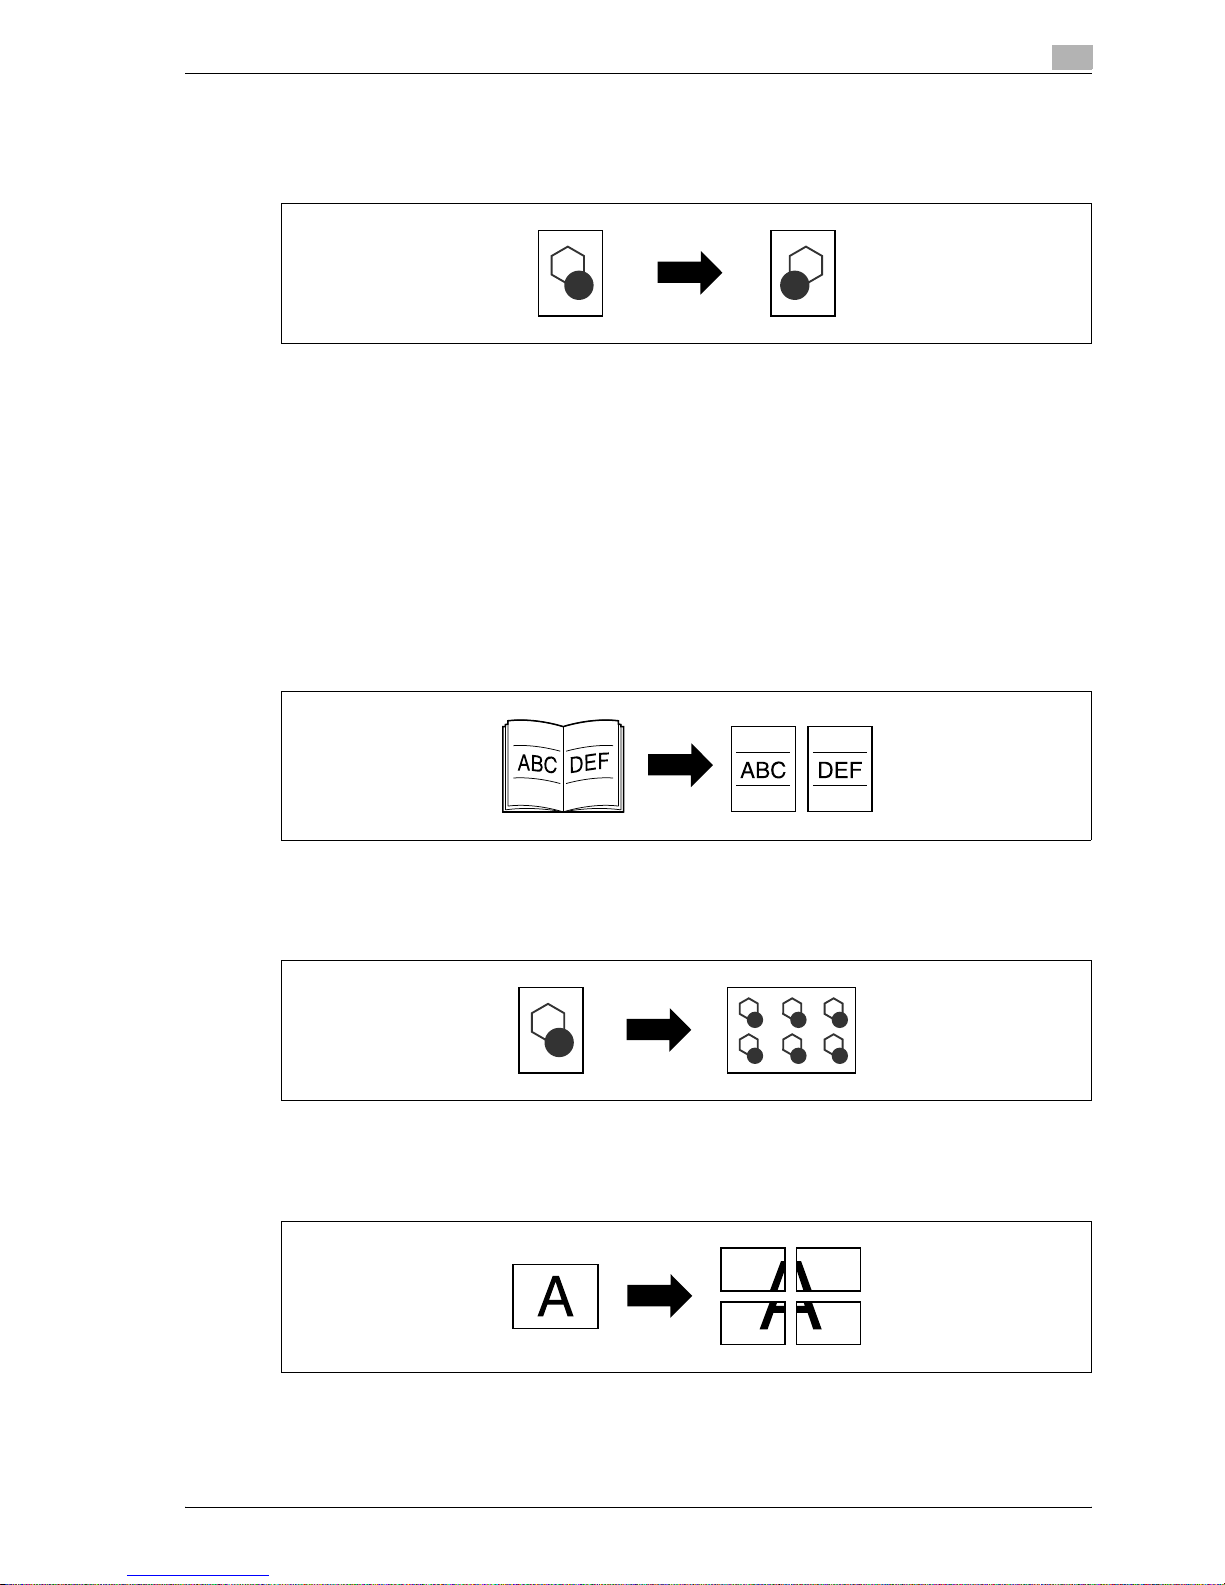
Repeating copy images
An original image can be repeatedly printed on a single sheet of paper.
For details, refer to "Tiling copy images ("Image Repeat" function)" on page 8-57.
Printing the enlarged image on multiple pages
A single original page can be automatically split into parts with each part printed enlarged.
For details, refer to "Copying an enlarged image on multiple pages ("Poster Mode" function)" on page 8-61.
Page 18
1
Introduction
1-8 CS193/CS173/CS163
Creating booklets from copies of pamphlets
Pamphlets with their staples removed can be copied and bound with staples.
For details, refer to "Copying booklets ("Booklet Original" function)" on page 8-65.
Making copies for filing
Copies can be printed with a filing margin so they can easily be stored in filing binders.
For details, refer to "Adding a binding margin to copies ("Page Margin" function)" on page 8-67.
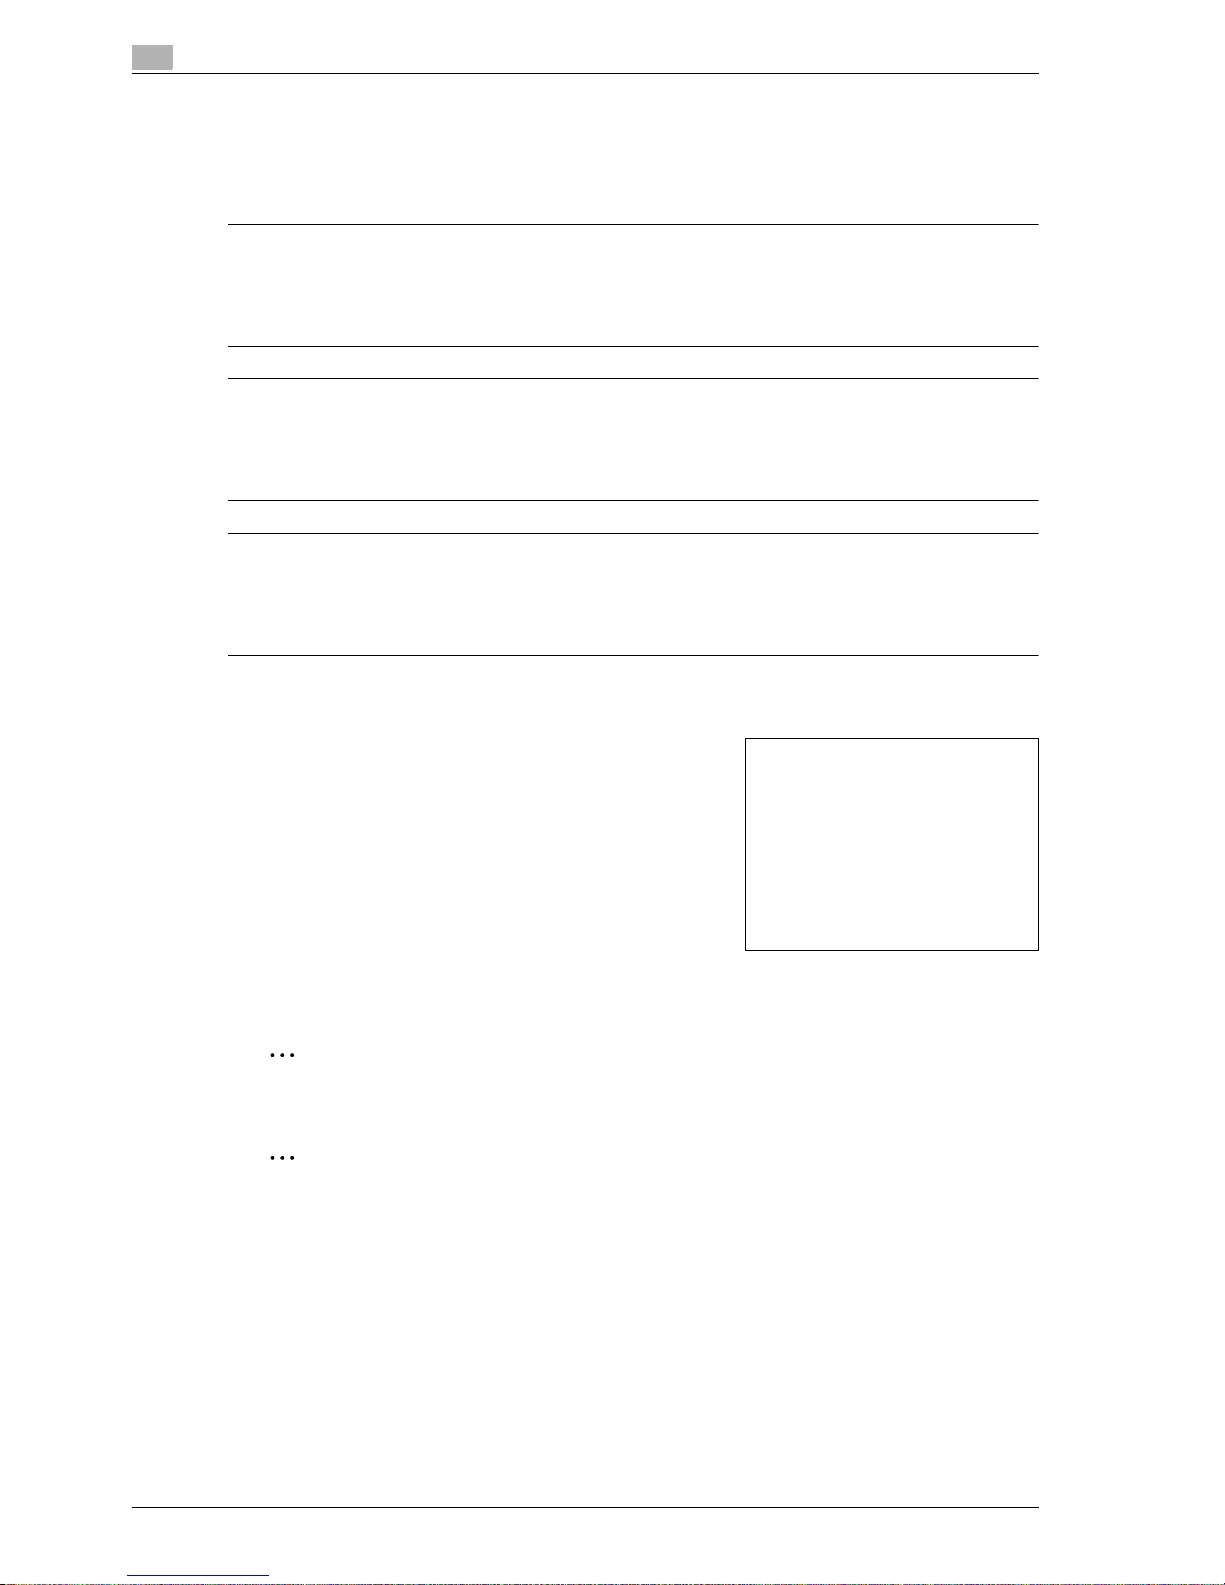
Adjusting the image to fit the paper size
When the copy paper is larger than the original, copies can be printed so that the original image fills the paper.
For details, refer to "Adjusting the image to fit the paper (Image Adjust settings)" on page 8-70.
Copying with the page layout of a magazine
Copies can be made with the pages arranged in a layout for center binding, such as for a magazine.
For details, refer to "Copying with the page layout of a booklet ("Booklet" function)" on page 8-73.
Page 19
CS193/CS173/CS163 1-9
Introduction
1
Erasing sections of copies
Areas, such as the shadows of punched holes and transmission information in received faxes, can be erased
in copies.
For details, refer to "Erasing specified areas of copies ("Frame Erase" function)" on page 8-75.
Printing a sample copy
Before printing a large number of copies, a single sample copy can be printed so that it can be checked.
For details, refer to "Printing a proof to check the settings (Proof Copy)" on page 4-7.
Printing date/time or page number on copies
The date/time, page number or copy protection text (hidden text that prevents improper copying) can be
printed on copies, or each copy set can be printed with distribution numbers.
For details, refer to "Printing the date/time or page number on copies (Stamp/Composition functions)" on
page 8-77.
Managing jobs
The print status of copy jobs can be checked and the jobs can be managed.
For details, refer to "Managing jobs" on page 11-3.
Programming copy settings
Frequently used copy settings can be programmed and recalled to be used with other copy jobs.
For details, refer to "Registering copy programs (Mode Memory)" on page 4-10.
Checking the copy settings
Screens showing the current copy settings can be displayed. From these screens, the copy settings can also
be changed.
For details, refer to "Checking the Copy Settings (Check Job)" on page 4-3.
Enlarging the size of text in touch panel screens
The text and buttons in the touch panel can be displayed in a larger size that is easier to read, allowing basic
operations to be easily performed.
For details, refer to the User manual – Enlarge Display Operations.
Displaying explanations of functions and settings
The name and function of parts and details of functions and settings appears in the Help screens.
For details, refer to "Displaying function descriptions (Help)" on page 4-16.
Interrupting a copy job
The copy job being printed can be interrupted in order for a different copy job to be printed.
For details, refer to "Interrupting a copy job (Interrupt mode)" on page 4-9.
Page 20
1
Introduction
1-10 CS193/CS173/CS163
1.2 Explanation of manual conventions
The marks and text formats used in this manual are described below.
Safety advices
6 DANGER
Failure to observe instructions highlighted in this manner may result in fatal or critical injuries in fact
of electrical power.
% Observe all dangers in order to prevent injuries.
7 WARNING
Failure to observe instructions highlighted in this manner may result in serious injuries or property
damage.
% Observe all warnings in order to prevent injuries and to ensure safe use of the machine.
7 CAUTION
Failure to observe instructions highlighted in this manner may result in slight injuries or property
damage.
% Observe all cautions in order to prevent injuries and to ensure safe use of the machine.
Sequence of action
1 The number 1 as formatted here indicates the first step of a
sequence of actions.
2 Subsequent numbers as formatted here indicate subsequent
steps of a sequence of actions.
?
Text formatted in this style provides additional assistance.
% Text formatted in this style describes the action that will
ensure the desired results are achieved.
Tips
2
Note
Text highlighted in this manner contains useful information and tips to ensure safe use of the machine.
2
Reminder
Text highlighted in this manner contains information that should be reminded.
!
Detail
Text highlighted in this manner contains references for more detailed information.
An illustration inserted
here shows what operations
must be performed.
Page 21

CS193/CS173/CS163 1-11
Introduction
1
Special text markings
[Stop] key
The names of keys on the control panel are written as shown above.
MACHINE SETTING
Display texts are written as shown above.
2
Note
The machine illustrations shown in this manual can vary and depend on the machine configuration.
1.3 Descriptions of originals and paper
The descriptions used in this manual for originals and paper are explained below.
Whenever original and paper dimensions are mentioned in this
manual, the value shown as Y in the illustration refers to the width,
and the value shown as X refers to the length.
Lengthwise (w)
If the width (Y) of the paper is shorter than the length (X), the paper
has a vertical or portrait orientation, indicated by w.
Crosswise (v)
If the width (Y) of the paper is longer than the length (X), the paper
has a horizontal or landscape orientation, indicated by v.
Page 22

1
Introduction
1-12 CS193/CS173/CS163
1.4 User manuals
This machine is provided with printed manuals and PDF manuals on the user manual CD.
1.4.1 Printed manual
User manual
This manual contains operating procedures and descriptions of the most frequently used functions.
In addition, this manual contains notes and precautions that should be followed for safe use of the machine.
Be sure to read this manual before using the machine.
1.4.2 User manual CD manuals
Copy Operations (this manual)
This manual contains descriptions of the Copy mode operations and machine maintenance.
Refer to this manual for details on the paper and originals, copy procedures using convenient Application
functions, replacing consumables, and troubleshooting operations such as clearing paper misfeeds.
Print Operations
This manual contains details of the printing functions that can be specified with the standard built-in printer
controller.
Refer to this manual for operating procedures on using the printing functions.
Box Operations
This manual contains operating procedures for using the user boxes on the hard disk.
Refer to this manual for details on saving data in user boxes, retrieving data from user boxes and transferring
data.
Network Scan/Fax/Network Fax Operations
This manual contains details on the network scan, G3 fax, network fax operations, and fax driver functions.
Refer to this manual for details on using network scan function by E-Mail or FTP, G3 fax, Internet fax, IP
address fax operations, and PC-FAX functions.
In order to use the fax functions, the optional fax kit must be purchased separately.
Network Administrator
This manual contains descriptions on setting methods for each function utilizing network connection, mainly
using the Web Connection.
Refer to this manual for details on using network functions.
Page 23

2
Before making copies
Page 24

Page 25
CS193/CS173/CS163 2-3
Before making copies
2
2 Before making copies
2.1 Part names and their functions
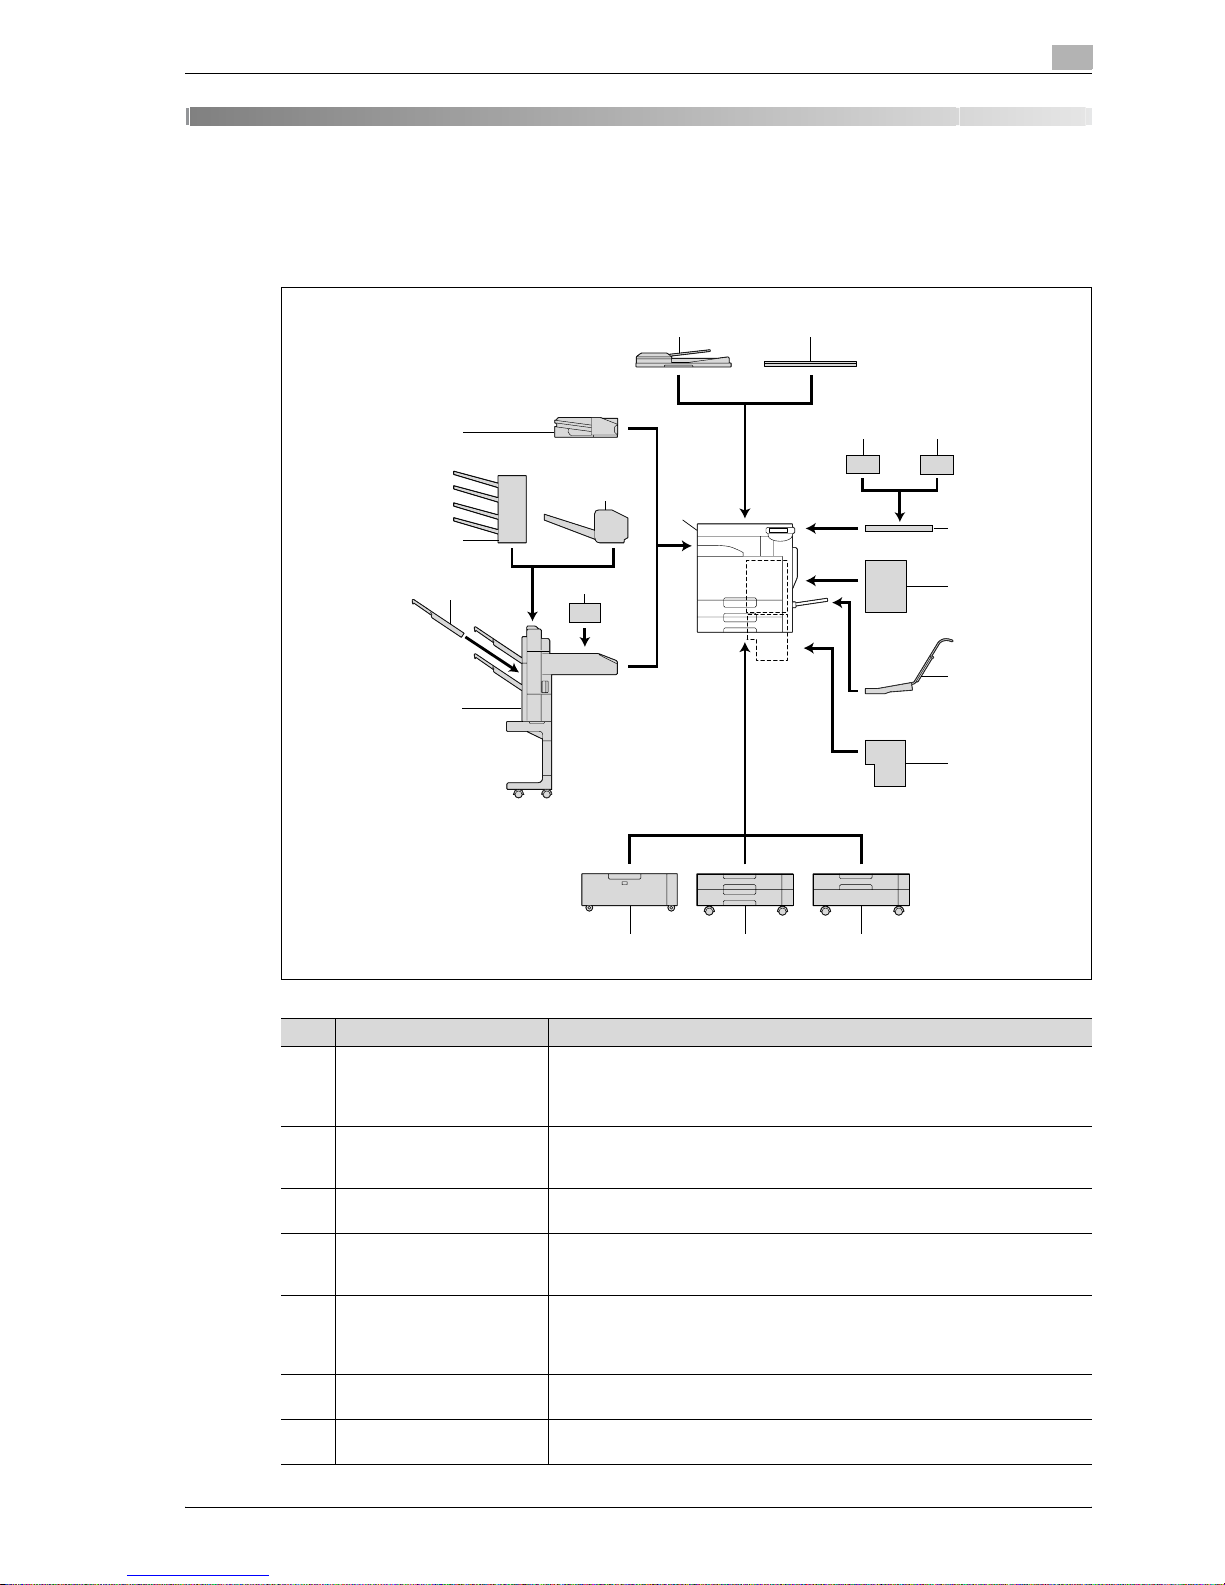
2.1.1 Options
1
23
45
6
7
8
9
101112
13
14
15
16
17
18
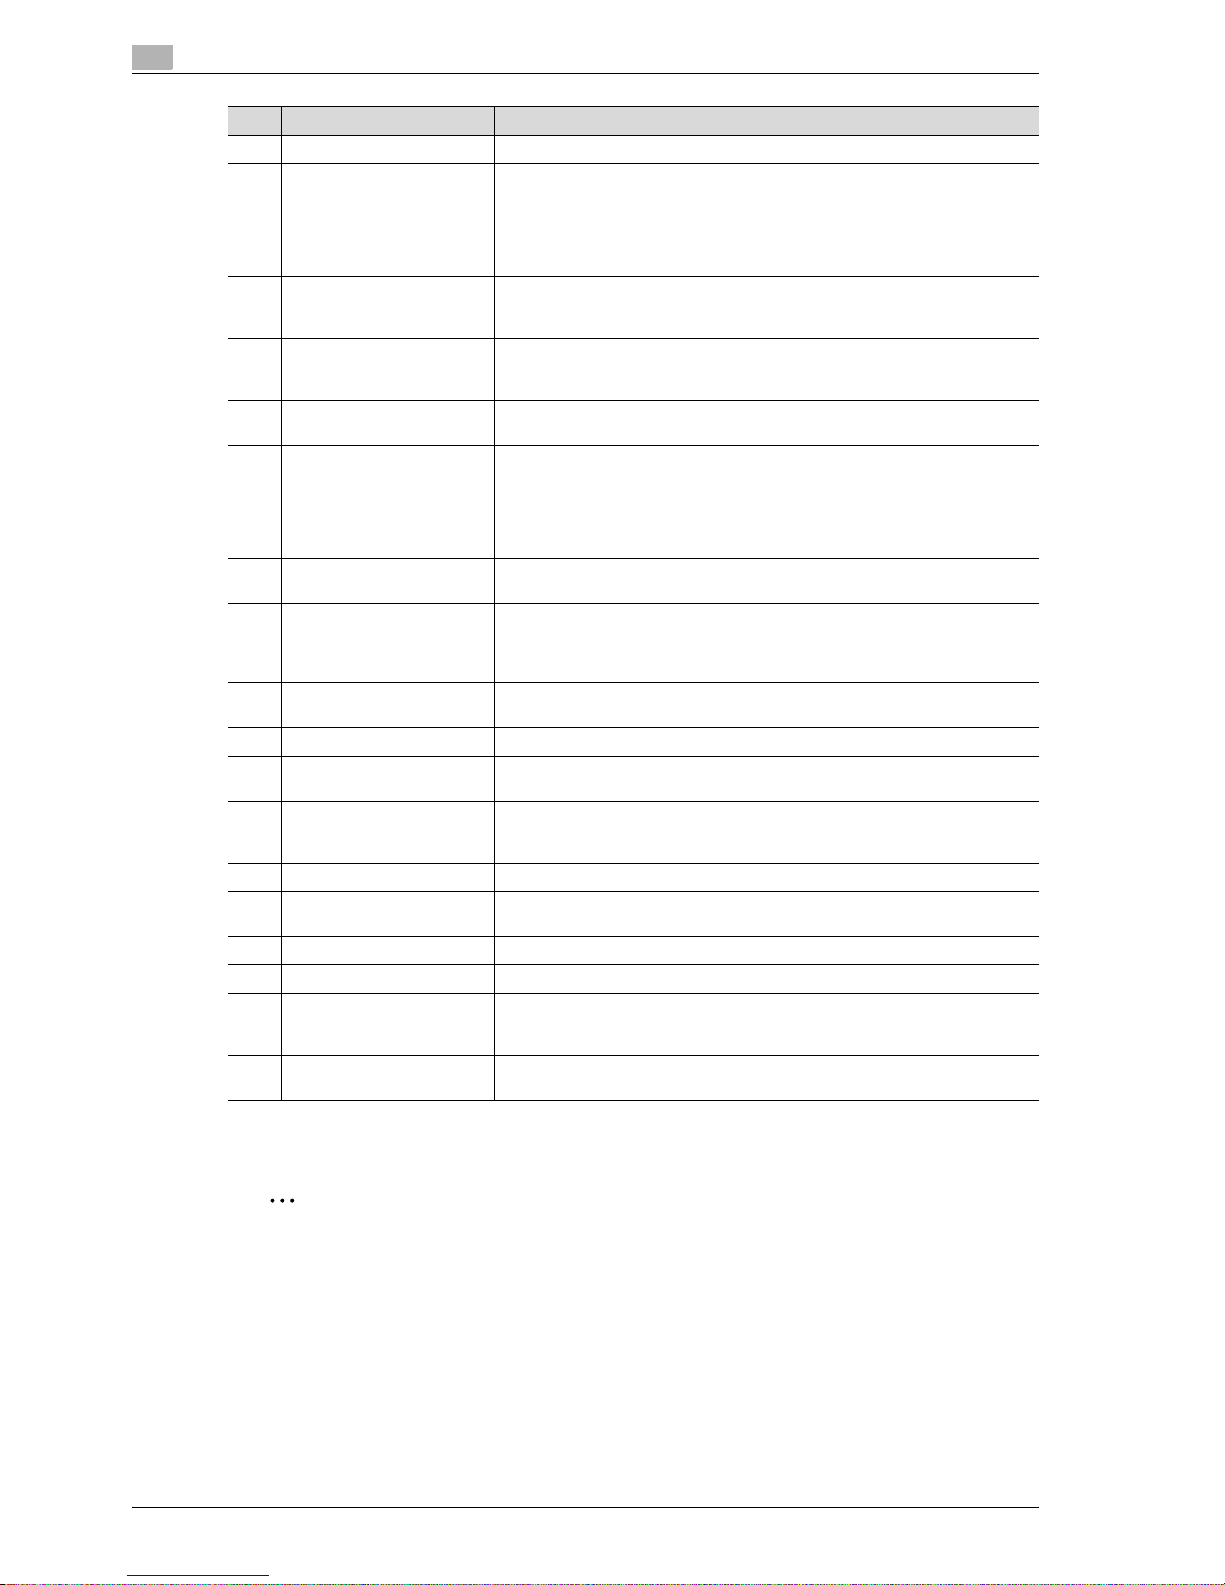
No. Part name Description
1 Main unit The original is scanned by the scanner section, and the scanned image is
printed by the printer section.
Referred to as the "machine", the "main unit", or the "CS193/CS173/CS163"
throughout the manual.
2 Automatic document feeder
DF-611
Automatically feeds one original sheet at a time for scanning, and automatically turns over double-sided originals for scanning
Referred to as the "ADF" throughout the manual.
3 Original cover OC-507 Presses down on the loaded original to keep it in place
Referred to as the "original cover" throughout the manual.
4 Authentication unit (biomet-
ric type) AU-101
Performs user authentication by scanning vein patterns in the finger.
For details, refer to the manual provided with the authentication unit (biometric
type).
5 Authentication unit (IC card
type) AU-201
Performs user authentication by reading the information registered on IC
cards.
For details, refer to the manual provided with the authentication unit (IC card
type).
6 Working table WT-502 Provides an area to temporarily place an original or other materials. This is also
used when the authentication unit is installed.
7 Mount kit MK-711 Used for installing the fax kit, local interface kit, scan accelerator kit, and fax
multi line.
Page 26
2
Before making copies
2-4 CS193/CS173/CS163
2
Reminder
To keep the features and quality of the machine, use the paper feed cabinet to place the machine on
the floor.
8 Mount kit MK-713 Used for banner printing.
9 Image controller IC-409 The external image controller connecting to CS193/CS173.
Allows this machine to be used as a color printer configured into a computer
network. For details, refer to the corresponding user manual.
To install the image controller, any of the LCT, single paper feed cabinet, or
double paper feed cabinet must be installed to the machine.
10 Paper feed cabinet PC-104 The top tray can be loaded with up to 500 sheets of paper, and the bottom tray
can be used as storage.
Referred to as the "single paper feed cabinet" throughout the manual.
11 Paper feed cabinet PC-204 Both the top and bottom trays can each be loaded with up to 500 sheets of
paper.
Referred to as the "double paper feed cabinet" throughout the manual.
12 Paper feed cabinet PC-405 Can be loaded with up to 2,500 sheets of paper
Referred to as the "LCT" throughout the manual.
13 Finisher FS-519 Feeds out finished printed pages. The "Sort" setting (separating by copy set),
"Group" setting (separating by pages), and Staple settings ("Corner" and "2
position") are available.
To install the finisher, any of the LCT, single paper feed cabinet, or double paper feed cabinet must be installed to the machine.
14 Output tray OT-602 Installed onto finisher to divide printed pages.
Referred to as the "output tray" throughout the manual.
15 Mailbin kit MT-502 Installed onto finisher to divide printed pages (only with computer printing) and
feed them into the appropriate tray assigned to a specific individual or group.
Collects printed pages.
Referred to as the "mailbin kit" throughout the manual.
16 Saddle stitcher SD-505 Installed onto finisher so that copies can be bound or folded at the center.
Referred to as the "saddle stitcher" throughout the manual.
17 Punch kit PK-515 Installed onto finisher to allow hole punching to be used.
18 Job separator JS-505 Installed onto the output tray to divide printed pages.
Referred to as the "separator" throughout the manual.
19 Local interface kit EK-603*¹ Used for connecting the authentication unit (biometric type), the authentication
unit (IC card type), the JScribe IC card reader/writer and external memory
(USB memory).
20 Fax kit FK-502*
1
Allows this machine to be used as a fax machine.
21 Scan accelerator kit
SA-501*
1
Creates images at high speed when sending scans.
22 Fax multi line ML-501 Installed to increase the telephone lines available for faxing.
23 Video interface kit VI-504*
2
Used for connecting the image controller to the CS193/CS173.
24 Stamp unit SP-501*
2
Applies a stamp to originals that have been scanned.
For details, refer to the User manual – Network scan/Fax/Network Fax Operations.
25 Security kit SC-503*
1
Installed to encode the data saved on the hard disk so that the hard disk can
be used more safely.
*1 Parts marked with an asterisk are to be installed to the mount kit, and therefore are not shown in the illustration.
*2 Parts marked with an asterisk are internal options and therefore are not shown in the illustration.
No. Part name Description
Page 27
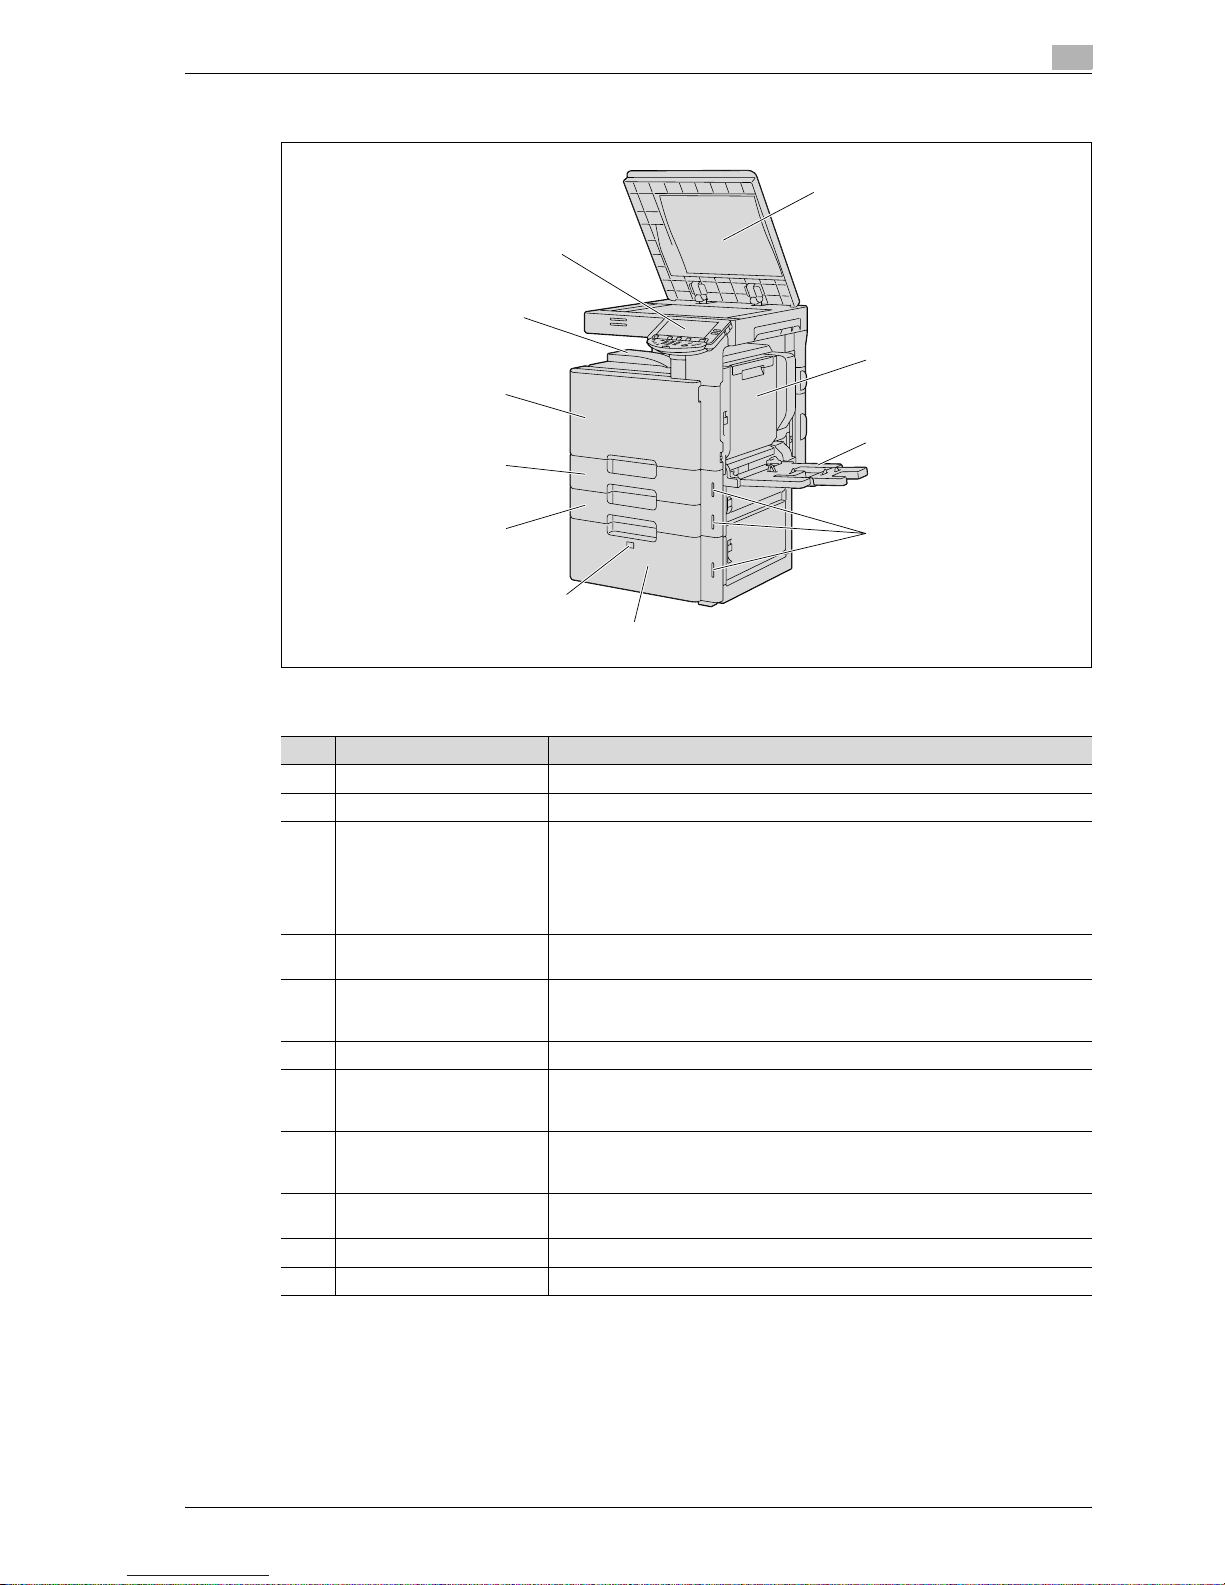
CS193/CS173/CS163 2-5
Before making copies
2
2.1.2 Outside of machine
The illustration above shows the main unit with the optional original cover and LCT installed.
1
2
3
4
5
6
7
8
9
10
11
No. Part name Description
1 Original pad Holds down the placed originals to keep it in place.
2 Automatic duplex unit Turns over the paper for double-sided printing.
3 Bypass tray Used when printing onto paper with a size not loaded into a paper tray or onto
thick paper, OHP transparencies, postcards, envelopes, label sheets or banner paper.
Can be loaded with up to 150 sheets of plain paper, 20 sheets of thick paper
1, thick paper 2, thick paper 3, thick paper 4, OHP transparencies, postcards,
or label sheets, 10 envelopes, or 10 sheets of banner paper.
4 Paper-empty indicator Flashes in orange when very few pages remain in the paper tray, and lights up
when the tray is empty.
5 LCT Can be loaded with up to 2,500 sheets of plain paper.
Can be loaded with up to 1,000 sheets of thick paper 1, thick paper 2 or thick
paper 3.
6 Tray release button Press this button to pull out the LCT.
7 Tray 2 Can be loaded with up to 500 sheets of plain paper.
Can be loaded with up to 150 sheets of thick paper 1, thick paper 2 or thick
paper 3.
8 Tray 1 Can be loaded with up to 500 sheets of plain paper.
Can be loaded with up to 150 sheets of thick paper 1, thick paper 2 or thick
paper 3.
9 Front door Opened when replacing the toner cartridge, waste toner box, or imaging unit,
or when cleaning the print head.
10 Output tray Collects printed pages.
11 Control panel Used to specify the various machine settings.
Page 28

2
Before making copies
2-6 CS193/CS173/CS163
The illustration above shows the main unit with the optional ADF and double paper feed cabinet installed.
12 13 14 15 16
17
18
19
20
21
22
23
2425
26
27
No. Part name Description
12 Left-side cover release lever Used to open the left-side cover.
13 Left-side cover Opened when clearing paper misfeeds.
14 Lateral guide Adjusted to the width of the original.
15 Original feed tray Loaded with originals facing up.
16 Original output tray Collects originals that have been scanned. Open the output tray when clearing
a misfeed in the ADF.
17 [Power] (auxiliary power) key Pressed to turn on/off machine operations.
When turned off, the machine enters a state where it conserves energy.
18 Automatic duplex unit re-
lease lever
Used to open the automatic duplex unit door when clearing paper misfeeds.
19 Automatic duplex unit door Opened when clearing paper misfeeds in the automatic duplex unit.
20 Upper right-side door re-
lease lever
Used to open the upper right-side door.
21 Center right-side door Opened when clearing paper misfeeds from the paper transport section of tray
2.
22 Center right-side door re-
lease lever
Used to open the centerright-side door.
23 Lower right-side door Opened when clearing paper misfeeds from the paper transport section of tray
2, 3 or 4.
24 Lower right-side door re-
lease lever
Used to open the Lower right-side door.
25 Tray 4/storage box Used as the storage box when the single paper feed cabinet is installed.
Can be loaded with up to 500 sheets of plain paper when the double paper
feed cabinet is installed. Can be loaded with up to 150 sheets of thick paper
1, thick paper 2 or thick paper 3.
26 Tray 3 Can be loaded with up to 500 sheets of plain paper.
Can be loaded with up to 150 sheets of thick paper 1, thick paper 2 or thick
paper 3.
27 Status indicator The machine’s current status is indicated by the color and lighting/flashing of
the indicator.
Flashing in blue: Printing normally
Flashing in orange: Warning
Lit in orange: Stopping operating
Page 29
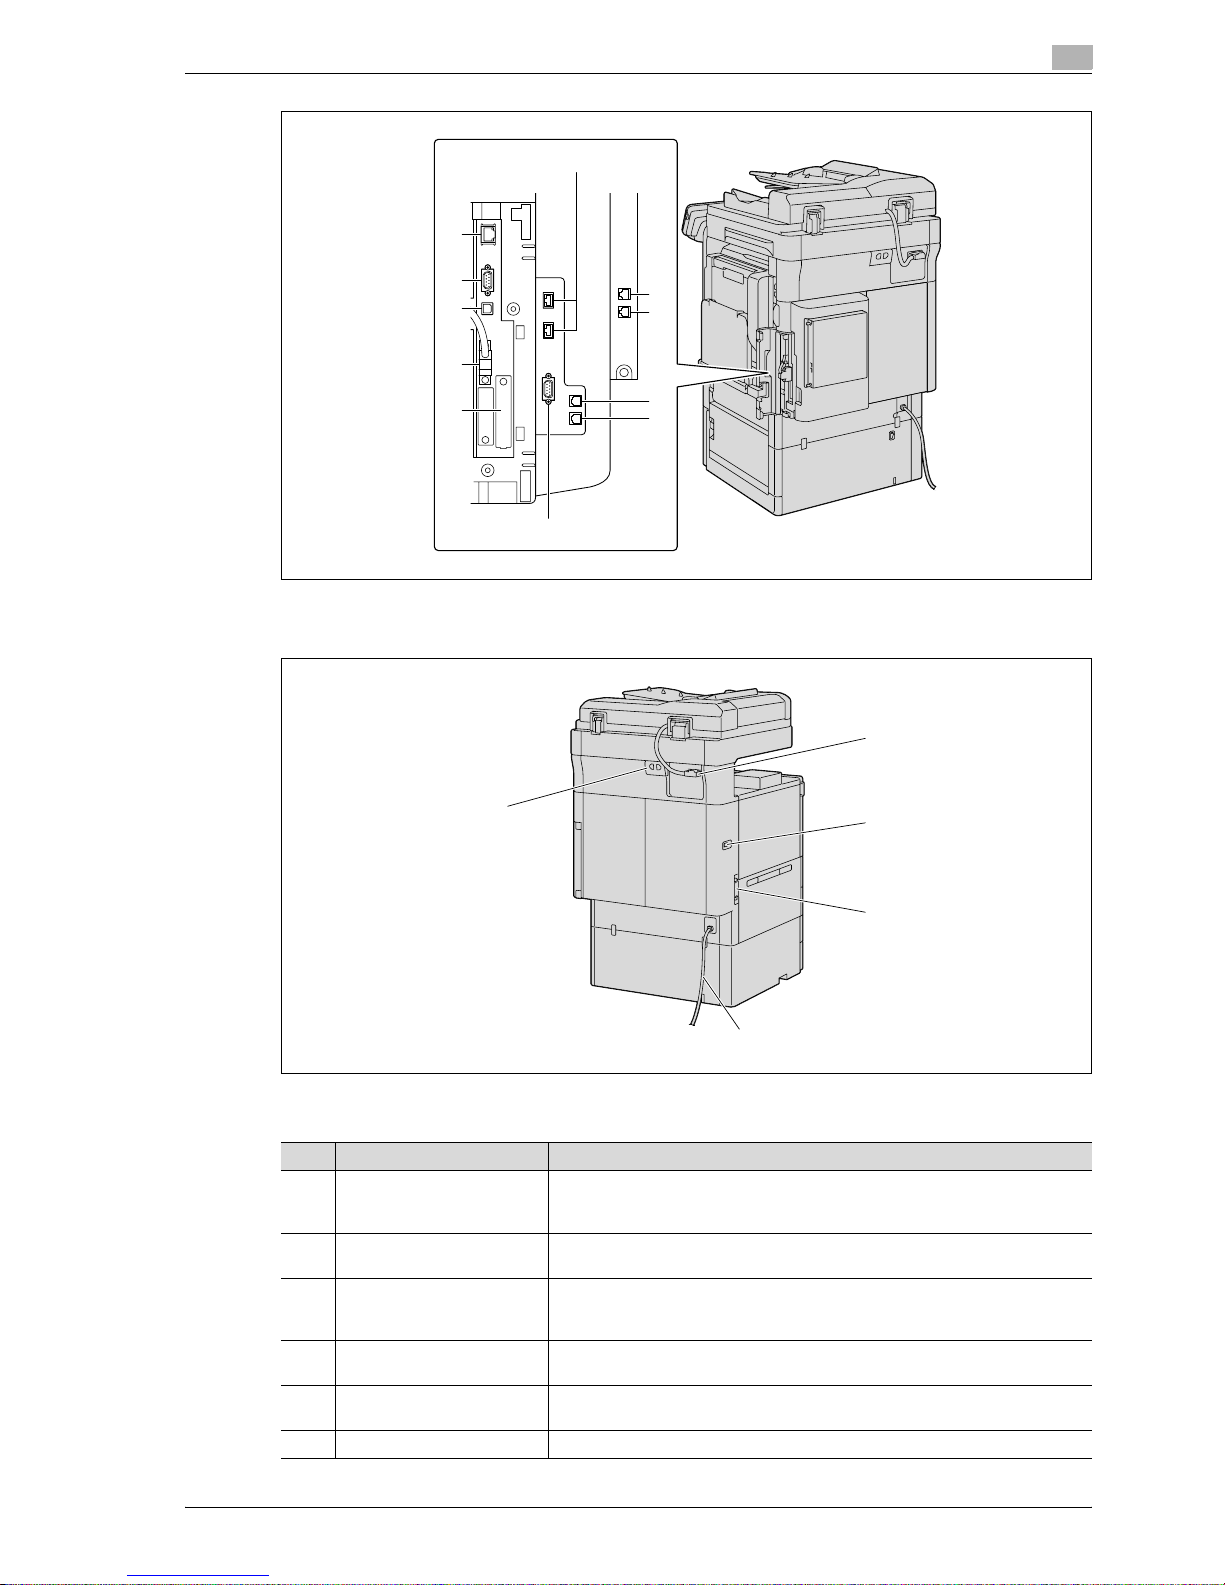
CS193/CS173/CS163 2-7
Before making copies
2
The illustration above shows the main unit with the optional fax multi line, ADF, LCT and mount kit (fax kit,
local intarface kit and fax multi line) installed.
The illustration above shows the main unit with the optional ADF and double paper feed cabinet installed.
32
28
29
30
31
33
34
35
36
37
38
39
40
41
42
43
No. Part name Description
28 Jack for connecting a tele-
phone
(TEL PORT2)
Used for connecting the cord from a telephone.
29 Telephone jack 2
(LINE PORT2)
Used for connecting a general subscriber line.
This jack is used when the optional fax multi line is installed.
30 Jack for connecting a tele-
phone
(TEL PORT1)
Used for connecting the cord from a telephone.
31 Telephone jack 1
(LINE PORT1)
Used for connecting a general subscriber line.
32 USB port (type A)
USB 2.0/1.1
Used for connecting the USB cable for the authentication unit (biometric type),
the authentication unit (IC card type) or external memory (USB memory).
33 RS-232C port Used for connecting the JScribe IC card reader/writer.
Page 30

2
Before making copies
2-8 CS193/CS173/CS163
34 External controller port Used for connecting the cable from an external controller.
35 Internal controller port Used for connecting the internal controller.
36 USB port (type B)
USB 2.0/1.1
Used for making connections when the machine is used as a USB printer.
37 RS-232 port Used for connecting the modem for CS Remote Care.
38 Network connector
(10Base-T/100BaseTX/1000Base-T)
Used for connecting the network cable when this machine is used for network
printing and network scanning.
39 ADF connector Used for connecting the ADF hookup cord.
40 Finisher connector Used for connecting the finisher hookup cord.
41 Ozone filter Collects the ozone generated in the machine.
42 Power cord Supplies power to the machine.
43 Filter Collects the toner dust generated in the machine.
No. Part name Description
Page 31

CS193/CS173/CS163 2-9
Before making copies
2
2.1.3 Inside of machine
1
2
3
4
5
6
7
8
9
11
10
12
13
14
15
16
No. Part name Description
1 Original glass The original placed on the glass is scanned.
2 Fusing unit Opened when cleaning paper misfeeds in the fusing unit.
3 Fusing unit cover lever M2 Opened when cleaning paper misfeeds in the fusing unit.
4 Upper right-side door Opened when clearing paper misfeeds from inside the main unit.
5 Unlock lever Used when removing an imaging unit.
6 Imaging unit Creates the print image.
7 Charger-cleaning tool Used to clean the electrostatic charger wire, for example, when incorrect cop-
ies are produced.
8 Print head glass cleaning
tool
Used to clean the surface of the print head glass, for example, when replacing
the imaging unit.
9 Waste toner box Collects used waste toner.
10 Main power switch Used to turn the machine on and off.
11 Total counter Shows the total number of pages that have been printed.
12 Lock tub Used when removing the toner cartridge.
13 Toner cartridges There are four toner cartridges: cyan (C), magenta (M), yellow (Y) and black (K).
The combination of the four toners generates full-color images.
14 Left partition glass Used to scan the original image in this area when the ADF is used.
15 Original scales Position the original so that it is aligned with the scales. Also, use the scales to
measure the loaded original.
16 Misfeed-clearing dial Turned when clearing paper misfeeds within the ADF.
Page 32

2
Before making copies
2-10 CS193/CS173/CS163
2.1.4 Finisher FS-519/Output tray OT-602/Punch kit PK-515
1
14
2
34567
8910111213
Page 33

CS193/CS173/CS163 2-11
Before making copies
2
Finisher FS-519
Output tray OT-602
Punch kit PK-515
No. Part name Description
1 Output tray 1 Collects printed pages.
2 Output tray 2 Collects printed pages.
3 Misfeed-clearing dial FN6 Turned when clearing paper misfeeds within the finisher.
4 Misfeed-clearing dial FN5 Turned when clearing paper misfeeds within the finisher.
5 Misfeed-clearing dial FN4 Turned when clearing paper misfeeds within the finisher.
6 Misfeed-clearing dial FN2 Turned when clearing paper misfeeds within the finisher.
7 Guide lever FN1 Raised when clearing paper misfeeds within the finisher.
8 Punch scrap box FN3.1 Removed when emptying punch scraps that have accumulated from using the
Punch settings.
9 Guide lever FN3 Raised when clearing paper misfeeds within the finisher.
10 Stapler Moved to the front when clearing jammed staples.
11 Staple cartridge holder Removed from the stapler when replacing the staple cartridge or clearing
jammed staples.
12 Dial Turned to move the stapler to the front when clearing jammed staples.
13 Finisher release lever 1 Used to disconnect the finisher and move it from the main unit when clearing
paper misfeeds.
No. Part name Description
14 Optional output tray Collects printed pages.
No. Part name Description
15 Punch kit* Punches holes for filing printed pages when the punch kit is installed onto fin-
isher.
* Parts marked with an asterisk are internal options and therefore are not shown in the illustration.
Page 34

2
Before making copies
2-12 CS193/CS173/CS163
2.1.5 Saddle stitcher SD-505/Mailbin kit MT-502
Saddle stitcher SD-505
1
23
No. Part name Description
1 Output tray Collects printed pages.
2 Misfeed-clearing door Opened when clearing paper misfeeds within the saddle stitcher.
3 Misfeed-clearing door re-
lease lever
Used to open the Misfeed-clearing door.
Page 35

CS193/CS173/CS163 2-13
Before making copies
2
Mailbin kit MT-502
4
5
3
No. Part name Description
3 Mailbins Collects printed pages.
4 Misfeed-clearing door Opened when clearing paper misfeeds within the mailbin kit.
5 Guide lever FN7 Moved when clearing paper misfeeds within the mailbin kit.
Page 36

2
Before making copies
2-14 CS193/CS173/CS163
2.1.6 Job separator JS-505
1
2
3
4
5
No. Part name Description
1 Misfeed-clearing dial Turned when clearing paper misfeeds within the separator.
2 Assist lever Used when removing printed pages.
3 Output tray 1 Collects printed pages.
4 Output tray 2 Collects printed pages.
5 Tray extension Pulled out when feeding papers longer than A4 w size.
Page 37

CS193/CS173/CS163 2-15
Before making copies
2
Precautions for using the finisher:
- Do not place objects on top of the finisher and below the paper output trays, otherwise the machine
may be damaged.
- Do not place your hand below or rest your foot on top of the output trays for finisher.
Page 38

2
Before making copies
2-16 CS193/CS173/CS163
2.1.7 Control panel
1
2
3
4
5
6
7
8
91011121314
15
16
17
18
19
20
21
22
No. Part name Description
1 Touch panel Displays various screens and messages.
Specify the various settings by directly touching the panel.
2 Main Power indicator Lights up in green when the machine is turned on with the main power switch.
3 [Power] (auxiliary power) key Press to turn on/off machine operations. When turned off, the machine enters
a state where it conserves energy.
4 [Mode Memory] key Press to register (store) the desired copy/fax/scan settings as a program or to
recall a registered program. (See p. 4-10.)
5 [Utility/Counter] key Press to display the Meter Count screen and the Utility screen.
6 [Reset] key Press to clear all settings (except programmed settings) entered in the control
panel and touch panel.
7 [Interrupt] key Press to enter Interrupt mode. While the machine is in Interrupt mode, the in-
dicator on the [Interrupt] key lights up in green and the message "Now in Interrupt mode." appears on the touch panel. To cancel Interrupt mode, press the
[Interrupt] key again.
8 [Stop] key Pressing the [Stop] key while copying, scanning or printing temporarily stops
the operation.
9 [Proof Copy] key Press to print a single proof copy to be checked before printing a large number
of copies. (See p. 4-7.)
10 [Start] key Press to start the copy, scan or fax operation. When this machine is ready to
begin the operation, the indicator on the [Start] key lights up in blue. If the indicator on the [Start] key lights up in orange, copying cannot begin.
Press to restart a stopped job. For details on jobs, refer to "Overview of Job
List screen" on page 11-3.
11 Data indicator Flashes in blue while a print job is being received.
Lights up in blue when a print job is queued to be printed or while it is being
printed.
The indicator lights up in blue when there is saved fax data or unprinted fax
data.
12 [C] (clear) key Press to clear a value (such as the number of copies, a zoom ratio, or a size)
entered using the keypad.
Page 39

CS193/CS173/CS163 2-17
Before making copies
2
2
Reminder
Do not apply extreme pressure to the touch panel, otherwise it may be scratched or damaged.
Never push down on the touch panel with force, and never use a hard or pointed object to make a
selection in the touch panel.
13 Keypad Use to type in the number of copies to be produced.
Use to type in the zoom ratio.
Use to type in the various settings.
14 [Help] key Press to display the Help Menu screen.
From this screen, descriptions of the various functions and details of operations can be displayed. (See p. 4-16.)
15 [Enlarge Display] key Press to enter Enlarge Display mode.
16 [Accessibility] key Press to display the screen for specifying settings for user accessibility func-
tions.
17 [Power Save] key Press to enter Power Save mode. While the machine is in Power Save mode,
the indicator on the [Power Save] key lights up in green and the touch panel
goes off. To cancel Power Save mode, press the [Power Save] key again.
18 [Access] key If user authentication or account track settings have been applied, press this
key after entering the user name and password (for user authentication) or the
account name and password (for account track) in order to use this machine.
19 [Brightness] dial Use to adjust the Brighthess of the touch panel.
20 [User Box] key Press to enter User Box mode.
While the machine is in User Box mode, the indicator on the [User Box] key
lights up in green. For details, refer to the User manual – Box Operations.
21 [Fax/Scan] key Press to enter Fax/Scan mode.
While the machine is in Fax/Scan mode, the indicator on the [Fax/Scan] key
lights up in green.
For more details, refer to the User manual – Network scan/Fax/Network Fax
Operations.
22 [Copy] key Press to enter Copy mode. (As a default, the machine is in Copy mode.) While
the machine is in Copy mode, the indicator on the [Copy] key lights up in green.
No. Part name Description
Page 40

2
Before making copies
2-18 CS193/CS173/CS163
2.1.8 Basic settings screens
When the machine is ready to begin making copies after being turned on, the Basic screen appears.
To activate a function or to select a setting, lightly touch the desired button in the touch panel.
Basic screen
Quick Copy screen
56
9
10
1
8
7
3
2
4
5
10
1
8
7
3
2
Page 41

CS193/CS173/CS163 2-19
Before making copies
2
Touching displays the Color settings, [Finishing] and [Auto Rotate OFF] in the left panel.
No. Item Name Description
1 Message display area The status of the machine and details on operations are displayed.
2 Functions/settings display
area
Tabs and buttons for displaying screens containing various functions are displayed.
Touch a tab or button to display the corresponding screen for specifying the
settings.
3 Icon display area Icons indicating the status of jobs and the machine are displayed.
4 [Auto Rotate OFF] button Touch to copy with the image not rotated to fit the orientation of the loaded
paper.
5 [Separate Scan] button Touch to scan the original in separate batches.
An original scanned in different batches can be treated as a single copy job.
6 [Finishing] button Touch to specify settings for collating, grouping, stapling, or hole punching.
7 Toner supply indicators These indicators show the amount of toner remaining for cyan (C), magenta
(M), yellow (Y), and black (K).
8 Left panel When the [Job List] button is pressed, a screen showing the jobs currently be-
ing performed or waiting to be performed is displayed.
When the [Check Job] button is pressed, a screen showing the result of the
specified settings is displayed.
9 [Check Job] button The result of the specified settings is displayed.
10 [Job List] button Jobs currently being performed or waiting to be performed are displayed.
Various commands for checking and managing jobs are available.
Page 42

2
Before making copies
2-20 CS193/CS173/CS163
!
Detail
The basic settings screen (Basic screen or Quick Copy screen) that appears can be set with the "Copier
Settings" parameter in the Custom Display Settings screen (displayed from the User Setting screen).
The arrangement of the buttons and screens differ with the Basic screen and Quick Copy screen;
however, the functions that can be set are the same. As a default, "Basic" is selected. This manual
contains descriptions of procedures using the Basic screen that appears when "Basic" is selected.
The Quick Copy screen displays all of the settings from the Basic screen so that many settings can
easily be specified.
!
Detail
For details on switching the basic settings screen, refer to "Custom Display Settings" on page 12-17.
2
Note
If settings have been changed from the factory defaults, the tab for the screen containing the changed
settings appears framed with a green line.
The green line can be changed to another color with the "Color Selection Settings" parameter in the
Custom Display Settings screen (displayed from the User Setting screen in Utility mode).
2.1.9 Icons that appear in the screen
Icon Description
Indicates that data is being sent from the machine, regardless of the current mode.
Indicates that data is being received from the machine, regardless of the current mode.
Indicates that an error occurred during an image stabilization operation, a print operation or a
scan operation.
Touch this icon to view a screen containing a warning code.
If the warning screen was closed when a warning occurred, touch this button to display the
warning screen again.
Appears when there is a message indicating that consumables must be replaced or the machine requires maintenance. Touch this icon to display the message, and then perform the replacement or maintenance procedure.
Appears when an error occurs with the connection to the POP server.
Indicates that paper is not loaded in the paper tray.
Indicates that very little paper remains in the paper tray.
When the optional image controller has been installed onto CS193/CS173, touch this icon to
display the image controller screen.
Indicates that "Enhanced Security Mode" is set to "ON".
Appears when a USB drive is connected.
Page 43

CS193/CS173/CS163 2-21
Before making copies
2
2.2 Adjusting the angle of the control panel
The control panel can be adjusted to any of three angles. In addition, the control panel can be tilted to the left.
Adjust the control panel to the angle that allows for easy operation.
2.2.1 To adjust the angle of the control panel
1 Pull the control panel release lever toward you, and then push
down on the control panel.
The control panel stops at the middle position.
1 Upper position (base position)
2 Middle position
3 Lower tilt position
4 Left tilt position
Control panel release lever
Page 44

2
Before making copies
2-22 CS193/CS173/CS163
2 To tilt the control panel even further, push down on the control
panel again.
The control panel stops at the lowest position.
3 To tilt the control panel to the left, hold the bottom of the
control panel, and then tilt the panel to the left.
4 To return the control panel to the upper position, pull the
control panel release lever toward you, and then pull up on the
control panel.
2
Reminder
When tilting the control panel, do not grab the touch panel.
Page 45

CS193/CS173/CS163 2-23
Before making copies
2
2.3 Turning on the main power and the auxiliary power
This machine has two power controls: the main power switch and the [Power] (auxiliary power) key.
2.3.1 Turning on the machine
The main power switch turns on/off all functions of the machine. Normally, the main power switch is turned
on.
The [Power] (auxiliary power) key turns on/off machine operations, for example, for copying, printing or
scanning. When the [Power] (auxiliary power) key is turned off, the machine enters a state where it conserves
energy.
1 Open the front door, and then set the main power switch to n.
2 Close the front door.
3 Press the [Power] (auxiliary power) key.
Check that the touch panel is turned on.
!
Detail
When the [Power] (auxiliary power) key is turned on, the indicator on the [Start] key lights up in orange,
and a screen indicating that the machine is starting up appears.
After a few seconds, the message "Warming up. Ready to scan." appears on the touch panel, and the
indicator on the [Start] key lights up in blue, indicating that a job can now be queued.
The default settings are the settings that are selected immediately after the machine is turned on (the
power switch is set to n) and before any setting is specified from the control panel or touch panel, and
those that are selected when the [Reset] key is pressed to cancel all settings specified from the control
panel or touch panel. The default settings can be changed. For more details, refer to "Custom Display
Settings" on page 12-17.
The factory default settings are the settings that were selected when this machine was sent from the
factory.
2
Note
A job can also be queued while the machine is warming up after the [Power] (auxiliary power) key is
turned on. For details, refer to "Scanning during warm-up" on page 2-24.
After the machine has finished warming up, the scanned image will be printed.
Refer to "Main unit" on page 6-3 for warm-up time.
Page 46

2
Before making copies
2-24 CS193/CS173/CS163
2.3.2 Scanning during warm-up
1 Press the [Power] (auxiliary power) key.
– For details on turning on the machine, refer to "Turning off the machine" on page 2-25.
The indicator on the [Start] key lights up in orange.
After the warm-up message is displayed, the Basic screen appears. The indicator on the [Start] key
lights up in blue.
2 Check that the message "Warming up. Ready to scan." appears on the touch panel.
3 Position the original to be copied.
– For details on positioning the original, refer to "Feeding the original" on page 3-8.
4 Specify any other desired copy settings.
5 Using the keypad, specify the desired number of copies.
– For details on specifying the number of copies, refer to "General copy operation" on page 3-3.
6 Press the [Start] key.
The original is scanned, and the job is added to the list of queued jobs.
– If the "Copy Operating Screen" parameter in Utility mode was set to "Yes", touch [Next Copy Job]
to display the Basic screen.
Page 47

CS193/CS173/CS163 2-25
Before making copies
2
– After the machine has finished warming up, the jobs will automatically be printed.
?
How can the job being printed be stopped?
% Press the [Stop] key. For details, refer to "Temporarily stopping scanning/printing" on page 3-83.
!
Detail
While the machine is warming up to begin printing after it is turned on using the [Power] (auxiliary power)
key, copy settings can be specified and an original can be scanned to reserve a copy job. After the
machine has finished warming up, the copies are automatically printed.
The print order can be changed or jobs can be deleted from the Detail screen of a job from the Current
Jobs list in the Job List screen. For details, refer to "Managing jobs" on page 11-3.
2.3.3 Turning off the machine
1 Press the [Power] (auxiliary power) key.
Check that the touch panel is turned off.
2 Open the front door, and then set the main power switch to o.
3 Close the front door.
2
Reminder
When the machine is turned off, then on again with the main power switch, wait at least 10 seconds to
turn the machine on after turning it off. The machine may not operate correctly if it is turned on
immediately after being turned off.
Do not turn off the machine with the main power switch or the [Power] (auxiliary power) key while it is
making copies or printing, otherwise a paper misfeed may occur.
Do not turn off the machine with the main power switch or the [Power] (auxiliary power) key while it is
scanning or sending or receiving data, otherwise all scan data or transmission data will be deleted.
Do not turn off the machine with the main power switch while a queued job or stored data is waiting to
be printed, otherwise the jobs will be deleted.
!
Detail
The following are cleared when the main power switch and [Power] (auxiliary power) key are turned off.
Settings that have not been programmed
Jobs queued to be printed
Page 48

2
Before making copies
2-26 CS193/CS173/CS163
2.3.4 Automatically clearing settings (automatic panel reset)
If no operation is performed for a specified length of time (even if the [Reset] key is not pressed), settings that
have not been programmed, such as the number of copies, are cleared and return to their default settings.
This is the automatic panel reset operation.
As the factory default, the automatic panel reset operation is performed after 1 minute.
!
Detail
The length of time until the automatic panel reset operation is performed and whether or not it is
performed can be set from Utility mode. For details, refer to "System Settings" on page 12-23.
Whether or not the automatic panel reset operation is performed when there is a change of user can be
set from the Utility mode. For details, refer to "System Settings" on page 12-23.
2.3.5 Automatically canceling the mode screen (System Auto Reset)
If no operation is performed for a specified length of time, the screen is automatically changed to that for the
mode given priority.
This is the System Auto Reset operation.
As the factory default, the Copy mode screen is displayed after 1 minute.
!
Detail
The mode screen that is displayed when the System Auto Reset operation is performed can be changed
from the Utility mode. For details, refer to "System Settings" on page 12-23.
Page 49

CS193/CS173/CS163 2-27
Before making copies
2
2.3.6 Automatically conserving energy (Low Power mode)
If no operation is performed for a specified length of time, the touch panel goes off and the machine
automatically enters a mode where it conserves energy.
This is the Low Power mode.
The machine can receive jobs even while it is in Low Power mode.
As the factory default, the machine enters Low Power mode after 15 minutes.
To recover from Low Power mode
1 Press the [Power Save] key.
2 The machine can receive jobs while it is warming up.
– The touch panel comes on again and, after the machine has finished warming up, it is ready to begin
printing.
2
Note
As the factory default, pressing the [Power Save] key causes the machine to enter Low Power mode.
Settings in the Administrator Settings mode can be changed to put the machine in Sleep mode instead.
For details, refer to "System Settings" on page 12-23.
The Low Power mode can also be canceled by pressing any key in the control panel or by touching the
touch panel.
!
Detail
The length of time until the machine enters Low Power mode can be changed.
For details, refer to "System Settings" on page 12-15 and page 12-23.
Page 50

2
Before making copies
2-28 CS193/CS173/CS163
2.3.7 Automatically conserving energy (Sleep mode)
If no operation is performed for a specified length of time, the machine automatically enters a mode where it
conserves energy.
Although the machine conserves more energy in Sleep mode than in Low Power mode, the machine must
warm up when Sleep mode is canceled to begin printing again, therefore taking more preparation time than
Low Power mode.
As the factory default, the machine enters Sleep mode after 20 minute.
To recover from Sleep mode
1 Press the [Power Save] key.
2 The machine can receive jobs while it is warming up.
– The touch panel comes on again and, after the machine has finished warming up, it is ready to begin
printing.
2
Note
The Sleep mode can also be canceled by pressing any key in the control panel or by touching the touch
panel.
!
Detail
As a default, the machine enters Low Power mode if no operation is performed for 15 minutes, and then
the machine enters Sleep mode after 20 minutes have elapsed.
The length of time until the machine enters Sleep mode can be changed. For details, refer to "System
Settings" on page 12-15 and page 12-23.
2.3.8 Manually conserving energy
The machine can be manually set to an energy conservation mode (Low Power mode or Sleep mode).
1 Press the [Power Save] key (or press the [Power] (auxiliary
power) key).
– As the factory default, the machine enters Low Power
mode.
!
Detail
Whether the machine enters Low Power mode or Sleep mode when the [Power Save] key is pressed
can be set from the Administrator Settings mode.
For details, refer to "System Settings" on page 12-23.
Page 51

CS193/CS173/CS163 2-29
Before making copies
2
2.3.9 Automatically turning the machine on/off (Weekly Timer)
The machine can be set to automatically enter Sleep mode according to a usage schedule determined by the
administrator so the machine’s use can be limited.
This is the Weekly Timer.
Follow the procedure described below to use the machine while the Weekly Timer is being used.
!
Detail
As the factory default, the Weekly Timer is not set. For details on setting the Weekly Timer, refer to
"System Settings" on page 12-23.
1 Press the [Power Save] key.
2 Type in the password (up to 8 digits) for non-business hours.
– For details on setting the password for non-business hours, refer to "System Settings" on
page 12-23.
3 Touch [OK].
The message "It is now non-business hour. Set the Sleep Mode time." appears.
Page 52

2
Before making copies
2-30 CS193/CS173/CS163
4 Using the keypad, again type in the length of time until the machine enters Sleep mode.
– Specify a length of time between 5 minutes and 9 hours and 59 minutes.
?
How can a single digit be entered?
% First, type in "0". If a minutes setting of less than 5 is entered, the setting changes to 5 minutes. In
addition, a minutes setting of 60 or more cannot be specified.
5 Touch [OK].
The message "Ready to copy." appears on the touch panel.
2
Note
If the message "It is now non-business hour. Set the Sleep Mode time." or "It is now non-business hour.
To use the device, enter password using the keyboard or keypad and then touch [OK]." appears after
the [Power] (auxiliary power) key is pressed, the Weekly Timer is set.
!
Detail
During the set time, the copy operations can be performed as usual.
From the Password for Non-Business Hours screen (displayed from Administrator Settings mode), the
machine can be set so that the screen for entering the password for non-business hours is not
displayed.
The default setting for the "Password for Non-Business Hours" parameter is "No" (the screen is not
displayed).
Page 53

CS193/CS173/CS163 2-31
Before making copies
2
2.3.10 Controlling each user’s use of this machine (User Authentication)
If user authentication settings have been specified by the administrator, only users that have been registered
can use this machine. In addition, the number of printed pages can be managed for each user.
0 When user authentication settings have been specified, only users who enter passwords for specified
users can use this machine.
0 Contact the administrator for a user name and password and for the server name.
0 If machine authentication or external server authentication has been set, a total of 1,000 users and
accounts can be registered.
1 Touch [User Name].
– If a list of user names can be displayed, the desired user name can be selected from the list. Touch
[User Name List], touch the button for the desired user name to select it, and then touch [OK].
– Users who have no access to a user name and password can touch [Public User Access] to use this
machine. For details on specifying public user settings, refer to "Selecting an authentication
method" on page 12-61 and "Public User Access" on page 12-65.
– If "Enhanced Security Mode" is set to "ON", [Public User Access] and [User Name List] do not
appear.
Page 54

2
Before making copies
2-32 CS193/CS173/CS163
– If external server authentication was selected as the user authentication method, [Server Name]
appears with the name of the default server.
Touch [Server Name] to display the names of the registered servers, and then select the desired
server. For details on specifying settings for an external server authentication, refer to "Selecting an
authentication method" on page 12-61.
2 Type in the user name, and then touch [OK].
3 Touch [Password].
Page 55

CS193/CS173/CS163 2-33
Before making copies
2
4 Type in the password, and then touch [OK].
5 Touch [Login] or press the [Access] key.
The Basic screen appears.
If account track settings have been applied, the account track screen appears. However, if
"Synchronize User Authentication & Account Track" has been set to "Synchronize", the account track
screen does not appear if the users and accounts are synchronized.
6 Make copies using the desired copy settings.
7 When you are finished printing, press the [Access] key.
A message appears, requesting confirmation to log off.
8 Touch [Yes], and then touch [OK].
The user authentication screen appears.
Page 56

2
Before making copies
2-34 CS193/CS173/CS163
!
Detail
For details on specifying user authentication settings, refer to "User Authentication/Account Track" on
page 12-29.
2
Note
The user authentication settings can be used together with the account track settings. If the
"Synchronize User Authentication & Account Track" parameter is set to "Synchronize", complete user
authentication, and then log on by using the account track screen.
User authentication settings can be specified using the User Authentication parameters in
Administrator Settings mode, available from the Utility mode. Settings should be specified by the
administrator.
Page 57

CS193/CS173/CS163 2-35
Before making copies
2
2.3.11 Controlling each account’s use of this machine (Account Track)
If the account track settings have been specified by the administrator, only users of registered accounts can
use this machine. In addition, the number of prints produced with each account can be controlled.
This is account track.
0 When account track settings have been specified, only users who enter passwords for specified
accounts can use this machine.
0 If you do not know the account name or password, contact your administrator.
0 A total of 1,000 users and accounts can be registered.
1 Touch [Account Name].
– If the Administrator Settings mode settings have been set to "Password Only", touch [Password],
and then continue with step 4.
Page 58

2
Before making copies
2-36 CS193/CS173/CS163
2 Type in the account name, and then touch [OK].
3 Touch [Password].
4 Type in the password, and then touch [OK].
Page 59

CS193/CS173/CS163 2-37
Before making copies
2
5 Touch [Login] or press the [Access] key.
The Basic screen appears.
6 Make copies using the desired copy settings.
7 When you are finished printing, press the [Access] key.
A message appears, requesting confirmation to log off.
8 Touch [Yes], and then touch [OK].
The account track screen appears.
!
Detail
The accounts can be managed in Administrator Settings mode, available from the Utility mode. Settings
should be specified by the administrator.
If "Account Track Input Method" on the General Settings screen of Administrator Settings mode was
set to "Password Only", log on is possible by only entering the password. For details, refer to "User
Authentication/Account Track" on page 12-29.
For details on specifying account track settings, refer to "Selecting an authentication method" on
page 12-61.
Page 60

2
Before making copies
2-38 CS193/CS173/CS163
2.3.12 Controlling use of this machine with authentication unit (biometric type)
A authentication unit (biometric type) can be used with this machine to perform authentication. The
authentication unit (biometric type) authenticates the user by scanning the vein patterns in the finger.
2
Note
1-to-many authentication: Authentication is performed simply by positioning the finger.
1-to-1 authentication: Authentication is performed by typing in the user name and positioning the finger.
!
Detail
To use biometric authentication, register the vein patterns in the finger in advance.
For details on specifying authentication settings for the authentication unit (biometric type) and on
registering finger vein patterns, refer to the user manual provided with the authentication unit (biometric
type).
When "1-to-many authentication" has been specified
% Place your finger on the authentication unit (biometric type).
Page 61

CS193/CS173/CS163 2-39
Before making copies
2
The basic screen appears.
When "1-to-1 authentication" has been specified
1 Type in the user name.
2 Place your finger on the authentication unit (biometric type).
Page 62

2
Before making copies
2-40 CS193/CS173/CS163
The basic screen appears.
2
Note
If the authentication unit (biometric type) cannot be used, it is possible to use this machine by entering
a [User name] and [Password].
2.3.13 Controlling use of this machine with the authentication unit (IC card type)
An authentication unit (IC card type) can be used with this machine to perform authentication. The
authentication unit (IC card type) authenticates users by reading the information registered on their IC card.
2
Note
Card Authentication: Authentication is performed simply by positioning the IC card.
Card Authentication + Password: Authentication is performed by positioning the IC card and entering
the password.
!
Detail
To use card authentication, register the card information in advance.
For details on specifying authentication settings for the authentication unit (IC card type) and on
registering IC card information, refer to the manual provided with the authentication unit (IC card type).
When "Card Authentication" has been specified
Page 63

CS193/CS173/CS163 2-41
Before making copies
2
% Place the IC card horizontally on the card scanning area of the
authentication unit (IC card type).
The Basic screen appears.
Page 64

2
Before making copies
2-42 CS193/CS173/CS163
When "Card Authentication + Password" has been specified
1 Place the IC card horizontally on the card scanning area of the
authentication unit (IC card type).
2 Type in the password and then touch [Login] or press the [Access] key.
The Basic screen appears.
2
Note
If the authentication unit (IC card type) cannot be used, it is possible to use this machine by entering a
user name and password.
Page 65

CS193/CS173/CS163 2-43
Before making copies
2
2.4 Loading paper into tray 1/2/3/4
The paper loading method is the same for trays 1, 2, 3, and 4.
The following describes the paper loading procedure for tray 1.
0 Tray 3/4 is an option.
1 Pull out tray 1.
2 Slide the lateral guides to fit the size of paper to be loaded.
– If the lateral guides are not positioned correctly for the
loaded paper, the paper size will not be correctly detected.
Be sure to adjust the lateral guides to the size of the loaded
paper.
3 Load the paper into the tray so that the side of the paper to be
printed on (the side facing up when the package was
unwrapped) faces up.
– Load letterhead paper so that the side to be printed on faces down.
?
How is curled paper loaded?
Film
Lateral guides
, mark
Page 66

2
Before making copies
2-44 CS193/CS173/CS163
% Flatten the paper before loading it.
?
How many sheets of paper and other media can be loaded?
% Do not load so many sheets of plain paper that the top of the stack is higher than the , mark.
4 Close tray 1.
!
Detail
If special paper is loaded, the paper type setting must be specified. For details, refer to "Specifying a
setting for special paper" on page 7-17.
2
Reminder
Be careful not to touch the film.
For details on selecting the size and type of paper loaded in tray 1/2/3/4, refer to "Copy paper" on
page 7-3.
To print on OHP transparencies, thick paper 4, envelopes or postcards, use the bypass tray.
Page 67

CS193/CS173/CS163 2-45
Before making copies
2
2.5 Loading paper into the LCT
0 If the [Power] (auxiliary power) key is turned off, even while the main power switch is on, the LCT cannot
be pulled out, even after the tray release button is pressed. Be sure that the machine is turned on with
the [Power] (auxiliary power) key.
0 LCT is an option.
1 Press the tray release button.
2 Pull out the LCT.
3 Load the paper into the right side of the LCT so that the side
of the paper to be printed on (the side facing up when the
package was unwrapped) faces up.
– Load letterhead paper so that the side to be printed on
faces down.
– To print on OHP transparencies, thick paper 4, envelopes
or postcards, use the bypass tray.
?
How is curled paper loaded?
% Flatten the paper before loading it.
Film
, mark
Film
Page 68

2
Before making copies
2-46 CS193/CS173/CS163
4 Load the paper into the left side of the LCT so that the side of
the paper to be printed on (the side facing up when the
package was unwrapped) faces up.
5 Close the LCT.
– If special paper is loaded, the paper type setting must be specified. For details, refer to "Specifying
a setting for special paper" on page 7-17.
2
Reminder
Be careful not to touch the film.
Do not load so many sheets of paper that the top of the stack is higher than the , mark.
For details on the paper that can be loaded into the LCT, refer to "Copy paper" on page 7-3.
2
Note
If the machine has entered Low Power mode or Sleep mode, the LCT cannot be pulled out, even after
the tray release button is pressed. Be sure to first cancel Low Power mode or Sleep mode.
, mark
Page 69

CS193/CS173/CS163 2-47
Before making copies
2
2.6 Loading paper into the bypass tray
Paper can be fed manually through the bypass tray if you wish to copy onto paper that is not loaded into a
paper tray, or if you wish to copy onto thick paper 4, postcards, envelopes, OHP transparencies or label
sheets.
1 Open the bypass tray.
– When loading large-sized paper, pull out the tray
extension.
2 With the side to be printed on facing down, insert the paper as much as possible into the feed slot.
3 Slide the lateral guides to fit the size of paper being loaded.
?
How is curled paper loaded?
% Flatten the paper before loading it.
?
How many sheets of paper and other media can be
loaded?
% Do not load so many sheets of plain paper that the top of
the stack is higher than the , mark.
4 Select the paper type.
Tray extension
Lateral guides
Page 70

2
Before making copies
2-48 CS193/CS173/CS163
– To print on colored paper, envelopes or letterheads, touch , and then select the paper type.
–If "A6Card w" is selected, the paper type is automatically set to "Thick 3".
– For details on selecting a setting for non-standard-size paper, refer to "Specifying a non-standard
paper size (Custom Size settings)" on page 7-10.
– For details on selecting a setting for wide paper, refer to "Selecting a setting for oversized paper
(Wide Paper settings)" on page 7-15.
– For details on special paper, refer to "Special paper" on page 7-4.
5 Touch [OK], and then touch [OK] in the next screen that appears.
The Basic screen appears again.
2
Reminder
Push the paper guides firmly up against the edges of the paper.
When loading postcards, load them in the w orientation, as shown in the illustration. Do not load
postcards in the v orientation.
If media other than postcards are inserted, select the appropriate paper type.
If label sheets are loaded, select "Thick 1".
Printing on OHP transparencies is possible only in black. When selecting OHP transparencies, select
the "Black" Color setting, and then select the paper type.
A maximum of 20 postcards can be loaded into the bypass tray.
Page 71

CS193/CS173/CS163 2-49
Before making copies
2
When loading OHP transparencies, load them in the w orientation, as shown in the illustration. Do not
load OHP transparencies in the v orientation.
A maximum of 20 OHP transparencies can be loaded into the bypass tray.
Printing on OHP transparencies is possible only in black.
Before loading envelopes, press them down to make sure that all air is removed, and make sure that
the folds of the flaps are firmly pressed, otherwise the envelopes may become wrinkled or a paper
misfeed may occur.
When loading envelopes, load them with the flap side up, as shown in the illustration. If the envelopes
are loaded with the flap side down, a paper misfeed may occur. The flap side of envelopes cannot be
printed on.
A maximum of 10 envelopes can be loaded into the bypass tray.
Flap side
Page 72

2
Before making copies
2-50 CS193/CS173/CS163
When loading label sheets, load them in the w orientation, as shown in the illustration. Do not load label
sheets in the v orientation.
A maximum of 20 label sheets can be loaded into the bypass tray.
Be sure to load letterhead paper so that the side to be printed on faces up.
2
Note
The image will be printed on the surface of the paper facing down when the paper is loaded into the
bypass tray.
!
Detail
For details on specifying the paper size for the bypass tray, refer to "Selecting a paper size setting (Size
Setting)" on page 7-8.
For details on the paper sizes, refer to "Copy paper" on page 7-3.
Side to be printed on
Page 73

3
Basic copy operations
Page 74

Page 75

CS193/CS173/CS163 3-3
Basic copy operations
3
3 Basic copy operations
3.1 General copy operation
This section contains information on the general operation for making copies.
The following procedure describes how to copy a single-sided original using basic copy operations.
2
Note
The maximum loading capacity of the output trays for the optional finisher may be limited depending
on the paper size and selected Finishing settings.
With continuous printing (multiple jobs), the warning "The output tray has reached its capacity. Remove
paper from the tray indicated by %." may appear, even if the paper was removed from the output trays.
For details on multiple jobs, refer to "Multi-job feature" on page 11-3.
Interrupting a print job resets the loading capacity of the output tray.
For details on the limitations of the loading capacity for the output trays, refer to "Specifications" on
page 6-3.
Some settings cannot be used together. For details on the settings that cannot be combined, refer to
"Operations that cannot be combined" on page 3-6.
1 Press the [Copy] key to display the Basic screen in Copy mode.
2 Position the original to be copied.
– For details on positioning the original, refer to page 3-8.
Page 76

3
Basic copy operations
3-4 CS193/CS173/CS163
3 Specify the desired copy settings.
– The factory default settings for this machine are listed below.
[Color]: Auto Color
[Paper]: Auto Paper Select
[Zoom]: Full Size (100.0%)
[Duplex/Combine]: 1 > 1
[Quality/Density]: Text/Photo (Printed Photo)
– For details on selecting settings in the Original Setting screen, refer to page 3-19.
– For details on selecting a Color setting, refer to page 3-34.
– For details on selecting a Paper setting, refer to page 3-37.
– For details on specifying a Zoom setting, refer to page 3-40.
– For details on selecting the original and copy settings, refer to page 3-50.
– For details on selecting the original image quality, refer to page 3-58.
– For details on selecting a copy density setting, refer to page 3-61.
– For details on specifying combined copy settings, refer to page 3-55.
– For details on selecting Finishing settings, refer to page 3-67.
– For details on selecting the Fold/Bind settings, refer to page 3-77.
– For details on specifying settings to not rotate the image, refer to page 3-81.
– For details on specifying settings for the Application functions, refer to page 8-3.
4 Using the keypad, type in the desired number of copies.
– If the number of copies was incorrectly entered, press the [C] (clear) key in the keypad, and then
specify the correct number of copies.
Page 77

CS193/CS173/CS163 3-5
Basic copy operations
3
5 Press the [Start] key.
– To stop the copy operation being performed, press the
[Stop] key. For details, refer to page 3-83.
– The next copy operation can be queued while a copy
operation is being performed. For details, refer to
page 3-82.
Page 78

3
Basic copy operations
3-6 CS193/CS173/CS163
3.2 Operations that cannot be combined
Certain copy settings cannot be used together.
Specifying settings that cannot be combined will result in one of the following occurring.
- The setting specified last is given priority. (The setting specified first is canceled.)
- The setting specified first is given priority. (A warning message appears.)
3.2.1 Operations where the setting specified last is given priority
The procedure for setting the "Booklet" function after selecting the "2 Position" Staple setting is described
below.
1 Select the "2 Position" Staple setting.
2 Set the "Booklet" function.
Page 79

CS193/CS173/CS163 3-7
Basic copy operations
3
The "2 Position" Staple setting is automatically canceled, and the "Booklet" function is set.
To select the "2 Position" Staple setting, cancel the "Booklet" function, and then select the "2 Position"
setting.
3.2.2 Operations where the setting specified first is given priority
If a warning message appears, indicating that settings cannot be combined, those settings cannot be
specified together.
The procedure for selecting the "2 Position" Staple setting after setting the "Booklet" function is described
below.
1 Set the "Booklet" function.
2 Select the "2 Position" Staple setting.
The message "Cannot be set with Booklet." appears and the "2 Position" Staple setting cannot be
selected.
The "Booklet" function remains selected and the "2 Position" Staple setting is canceled.
To select the "2 Position" Staple setting, cancel the "Booklet" function, and then select the "2 Position"
Staple setting.
Page 80

3
Basic copy operations
3-8 CS193/CS173/CS163
3.3 Feeding the original
The original can be fed in either of the following two ways. Be sure to position the original correctly according
to the type of original being copied.
3.3.1 Loading the original into the ADF
0 The ADF is an option.
0 Do not load originals that are bound together, for example, with paper clips or staples.
0 For details on the types of originals that can be loaded into the ADF, refer to "Originals" on page 7-21.
0 Do not load more than 100 sheets or so many sheets that the top of the stack is higher than the t mark,
otherwise an original misfeed or damage to the original or machine may occur. However, a original that
exceeds 100 pages can be scanned in separate batches. For details, refer to "Scanning the original in
separate batches ("Separate Scan" setting)" on page 3-11.
0 If the original is not loaded correctly, it may not be fed in straight or an original misfeed or damage to
the original may occur.
0 If the original is loaded in any orientation other than with the top of the original toward the back of the
machine, be sure to select the original orientation. For details on selecting the original orientation, refer
to "Selecting the original orientation (Original Direction settings)" on page 3-24.
1 Slide the lateral guides to fit the size of the original.
2 Place the original in the original feed tray in the order to be
scanned with the side to be scanned faces up.
– Load the original pages so that the top of the original is
toward the back or the right side of the machine.
Original Feed Method Features
Using the ADF By using the ADF, a multi-page original can be fed automatically, one page at a
time. This feed method can also be used to automatically scan double-sided originals.
Using the original glass Place the original directly on the original glass so that it can be scanned. This
method is best with books and other originals that cannot be fed through the ADF.
Page 81

CS193/CS173/CS163 3-9
Basic copy operations
3
3 Adjust the lateral guides to the size of the original.
– For details on loading originals of mixed sizes, refer to
"Copying originals of mixed sizes ("Mixed Original"
setting)" on page 3-21.
– For details on specifying the original orientation, refer to
"Selecting the original orientation (Original Direction
settings)" on page 3-24.
– For details on specifying the binding margin position, refer
to "Selecting the position of the binding margin (Binding
Position settings)" on page 3-27.
3.3.2 Placing the original on the original glass
0 For details on the types of originals that can be placed on the original glass, refer to "Originals" on
page 7-21.
0 When placing the original on the original glass, be sure to lift open the ADF or the original cover at least
20°.
If the original is placed on the original glass without the ADF or the original cover being lifted at least
20°, the correct original size may not be detected.
0 Do not place objects weighing more than 2 kg on the original glass. In addition, do not press down
extremely hard on a book spread on the original glass, otherwise the original glass may be damaged.
0 For thick books or large objects, make the copy without closing the ADF or the original cover. When an
original is being scanned with the ADF or the original cover open, do not look directly at the light that
may shine through the original glass. Although the light that shines through the original glass is bright,
it is not a laser beam and, therefore, is not as dangerous.
1 Lift open the ADF or the original cover.
2 Place the original face down on the original glass.
– Load the original pages so that the top of the original is toward the back or the left side of the
machine.
3 Align the original with the mark in the back-left corner of the original scales.
– For details on selecting the original orientation, refer to "Selecting the original orientation (Original
Direction settings)" on page 3-24.
Lateral guides
20° 20°
When loaded in the v orientation When loaded in the w orientation
Page 82

3
Basic copy operations
3-10 CS193/CS173/CS163
– For details on specifying the binding margin position, refer
to "Selecting the position of the binding margin (Binding
Position settings)" on page 3-27.
– For transparent or translucent originals, place a blank
sheet of paper of the same size as the original over the
original.
– For bound originals spread over two facing pages, such as
a book or magazine, position the top of the original toward
the back of this machine and align the original with the
mark in the back-left corner of the original scales, as
shown.
4 Close the ADF or the original cover.
Original scales
Blank sheet of paper
Page 83

CS193/CS173/CS163 3-11
Basic copy operations
3
3.3.3 Scanning the original in separate batches ("Separate Scan" setting)
A large original can be divided and scanned in a number of batches.
A maximum of 100 original pages can be loaded into the ADF at one time. However, by specitying the
"Separate Scan" setting, an original that exceeds 100 pages can be scanned and treated as a single copy
job. In addition, the scanning location can be switched between the original glass and the ADF during the
scanning operation.
0 The loading capacity of the ADF is 100 sheets of plain paper (80 g/m2) or 38 sheets of thick paper
(210 g/m
2
).
0 The output method used with the "Separate Scan" setting can be set to "Page Print" or "Batch Print".
As a default, "Batch Print" is selected.
0 For details on the output method used with the "Separate Scan" setting, refer to the description for
"Separate Scan Output Method" in "Copier Settings" on page 12-18.
1 Position the original to be copied.
– For details on positioning the original, refer to "Feeding the original" on page 3-8.
2 In the Basic screen, touch [Separate Scan].
– To cancel the "Separate Scan" setting, touch [Separate Scan] again to deselect it.
Page 84

3
Basic copy operations
3-12 CS193/CS173/CS163
3 Press the [Start] key.
After the original has been scanned, the following message appears.
– Load the next batch of the original, and then press the [Start] key.
– If the "Separate Scan Output Method" parameter is set to "Batch Print", touch [Finish] in the
following screen, which appears while the original is scanned with the ADF, to continue to step 5.
– If the original cannot be loaded into the ADF, place it on the original glass. For details on the types
of originals that can be loaded into the ADF, refer to "Originals" on page 7-21.
– To change the scanning settings, touch [Change Setting]. For details on changing the scanning
settings, refer to "Changing scan settings for each original" on page 3-31.
Page 85

CS193/CS173/CS163 3-13
Basic copy operations
3
– The buttons that appear in the screen for changing the settings differ depending on the specified
settings. Settings for the following can be changed.
1-Sided/2-Sided, Binding Position, Zoom, Frame Erase, Center Erase, Original Size
– To cancel changes to the settings, touch [Cancel].
– The amount of memory available can be checked beside "Memory" in the lower-left corner of the
screen.
To delete the image data, press the [Stop] key, and then delete the job. For details, refer to
"Temporarily stopping scanning/printing" on page 3-83.
4 After all original pages have been scanned, touch [Finish].
Page 86

3
Basic copy operations
3-14 CS193/CS173/CS163
5 Press the [Start] key.
– If the "Separate Scan Output Method" parameter is set to "Batch Print", touch [Print] or press the
[Start] key.
– If the "Separate Scan Output Method" parameter is set to "Batch Print", the copy settings can be
changed. To change the copy settings, touch [Change Setting], and then touch [OK] after changing
the settings as desired.
Page 87

CS193/CS173/CS163 3-15
Basic copy operations
3
3.3.4 Scanning a multi-page original from the original glass
When making double-sided or combined copies using the original glass, place each page of a multi-page
original on the original glass to scan it. The following procedure describes how to place single-sided original
pages on the original glass to make double-sided copies.
0 The output method used with the "Separate Scan" setting can be set to "Page Print" or "Batch Print".
As a default, "Page Print" is selected.
0 For details on the output method used with the "Separate Scan" setting, refer to "Copier Settings" on
page 12-18.
1 Lift open the ADF or the original cover.
2 Position the first page or the first side of the original face down onto the original glass.
– For details on positioning the original, refer to "Placing the original on the original glass" on
page 3-9.
3 Close the ADF or the original cover.
4 In the Basic screen, touch [Duplex/Combine].
The Duplex/Combine screen appears.
20° 20°
When loaded in the v orientation When loaded in the w orientation
Page 88

3
Basic copy operations
3-16 CS193/CS173/CS163
5 Touch [1-Sided > 2-Sided].
6 Touch [Binding Position], select the binding position for the copy, and then touch [OK].
– For details on specifying the binding position, refer to "Selecting double-sided copies" on
page 3-53.
7 Touch [Original Direction], select the orientation of the loaded original, and then touch [OK].
– For details on specifying the original orientation, refer to "Selecting the original orientation (Original
Direction settings)" on page 3-24.
8 Touch [OK].
Page 89

CS193/CS173/CS163 3-17
Basic copy operations
3
9 Press the [Start] key.
Scanning begins.
10 Position the second page or second side of the original onto the original glass, and then press the [Start]
key.
– To scan the remaining pages in the original, repeat step 10.
– To change the scanning settings, touch [Change Setting]. For details on changing the scanning
settings, refer to "Changing scan settings for each original" on page 3-31.
– The buttons that appear in the screen for changing the settings differ depending on the specified
settings. Settings for the following can be changed.
1-Sided/2-Sided, Binding Position, Zoom, Frame Erase, Center Erase, Original Size
– To cancel changes to the settings, touch [Cancel].
Page 90

3
Basic copy operations
3-18 CS193/CS173/CS163
11 After all original pages have been scanned, touch [Finish].
12 Press the [Start] key.
– If the "Separate Scan Output Method" parameter is set to "Batch Print", touch [Print] or press the
[Start] key.
– If the "Separate Scan Output Method" parameter is set to "Batch Print", the copy settings can be
changed. To change the copy settings, touch [Change Setting], and then touch [OK] after changing
the settings as desired.
Page 91

CS193/CS173/CS163 3-19
Basic copy operations
3
3.4 Specifying original settings
The following describes necessary settings depending on the status and placement of the originals to copy
them as desired.
3.4.1 Specifying the original size (Original Size settings)
Copies can be produced after specifying the original scanning size if the original size cannot be detected
automatically or if you wish to specify a certain original size.
1 Position the original to be copied.
– For details on positioning the original, refer to "Feeding the original" on page 3-8.
2 In the Basic screen, touch [Original Setting].
The Original Setting screen appears.
3 Touch [Original Size].
The Original Size screen appears.
Page 92

3
Basic copy operations
3-20 CS193/CS173/CS163
4 Select the original size, and then touch [OK].
– Touch or to display a different list of standard sizes.
– To specify a standard size, touch the button for the desired original size.
– To specify a custom size, touch [Custom Size] to display the Custom Size screen. Touch [X] or [Y]
to select the dimension, use the keypad to specify the desired value, and then touch [OK].
– If a value outside the allowable range is specified in the Custom Size screen, the message "Input
Error" appears. If "Input Error" appeared or if the value was incorrectly entered, press the [C] (clear)
key, and then specify the correct value.
– To cancel changes to the settings, touch [Cancel].
Original Size Screen
Custom Size screen
Page 93

CS193/CS173/CS163 3-21
Basic copy operations
3
– To specify a photo size, touch [Photo Size] to display the Photo Size screen. Touch the button for
the desired original size, and then touch [OK].
The Original Size screen appears again.
3.4.2 Copying originals of mixed sizes ("Mixed Original" setting)
Originals of different sizes can be loaded together into the ADF to be fed and scanned one by one
automatically.
0 Do not load more than 100 sheets or so many sheets that the top of the stack is higher than the , mark,
otherwise an original misfeed or damage to the original or machine may occur. However, an original
that exceeds 100 pages can be scanned in separate batches. For details, refer to "Scanning the original
in separate batches ("Separate Scan" setting)" on page 3-11.
0 If the original is not loaded correctly, it may not be fed in straight or an original misfeed or damage to
the original may occur.
1 Slide the adjustable lateral guides of the ADF to fit the size of the largest page.
– The possible combinations of original sizes differ depending on the widest original loaded (position
of the adjustable lateral guides).
– For details on the mixed original sizes that can be loaded in the ADF, refer to "Originals that can be
loaded into the ADF" on page 7-21.
2 Align the originals as the references so that the side to be scanned faces up.
Photo Size screen
Page 94

3
Basic copy operations
3-22 CS193/CS173/CS163
3 Place the original in the original feed tray in the order to be
scanned with the side to be scanned faces up.
Slide the adjustable lateral guides against the edges of the
original.
– Load the original pages into the ADF so that the top of the
pages is toward the back or the left side of the machine.
4 In the Basic screen, touch [Original Setting].
The Original Setting screen appears.
5 Touch [Mixed Original].
– To cancel the "Mixed Original" setting, touch [Mixed Original] again to deselect it.
Lateral guide
Page 95

CS193/CS173/CS163 3-23
Basic copy operations
3
3.4.3 Loading folded (Z-folded) originals
If folded originals are loaded into the ADF to be copied, the original size is correctly detected.
0 Load the original into the ADF.
0 The length of the first page of the original is detected, and all pages of the original are scanned at that
size.
1 Position the original to be copied.
– Unfold folded originals before loading them into the ADF. If the original is copied without being
unfolded, a paper misfeed may occur.
– For details on loading the original, refer to "Loading the original into the ADF" on page 3-8.
2 In the Basic screen, touch [Original Setting].
The Original Setting screen appears.
3 Touch [Z-Folded Original].
Page 96

3
Basic copy operations
3-24 CS193/CS173/CS163
– To cancel the "Z-Folded Original" setting, touch [Z-Folded Original] again to deselect it.
3.4.4 Selecting the original orientation (Original Direction settings)
When copying double-sided originals or making double-sided copies or combined copies, specify the
original orientation, otherwise the copies may not be printed in the correct page order or correct front and
back page arrangement.
2
Note
As the factory default, the first setting (with the top of the original at the top (toward the back of the
machine)) is selected.
Original loading orientation
Using the ADF Using the original
glass
Icon Description
Select this setting for an original loaded with the
top toward the back of this machine.
Select this setting for an original loaded with the
top toward the front of this machine.
• Select this setting for an original loaded into
the ADF with the top of the original toward the
left side of this machine.
• Select this setting for an original placed on
the original glass with the top of the original
toward the right side of this machine.
• Select this setting for an original loaded into
the ADF with the top of the original toward the
right side of this machine.
• Select this setting for an original placed on
the original glass with the top of the original
toward the left side of this machine.
Page 97

CS193/CS173/CS163 3-25
Basic copy operations
3
3.4.5 To select an Original Direction setting
1 Position the original to be copied.
– For details on positioning the original, refer to "Feeding the original" on page 3-8.
2 In the Basic screen, touch [Original Setting].
The Original Setting screen appears.
3 Touch [Original Direction].
The Original Direction screen appears.
Page 98

3
Basic copy operations
3-26 CS193/CS173/CS163
4 Touch the button for the orientation of the loaded original, and then touch [OK].
– To cancel the setting and select the default, press the [Reset] key.
Page 99

CS193/CS173/CS163 3-27
Basic copy operations
3
3.4.6 Selecting the position of the binding margin (Binding Position settings)
If a double-sided original is loaded into the ADF, specify the position of the top of the back side of the original
by specifying the binding margin position for the original.
2
Note
As the factory default, "Auto" is selected as the position of the binding margin.
Original binding margin position
Original binding margin Icon Description
Left Select this setting if the original is loaded with the binding mar-
gin at the left.
Right Select this setting if the original is loaded with the binding mar-
gin at the right.
Top Select this setting if the original that is loaded has a binding
margin at the top.
When the original length is 297
mm or less:
When the original length is
more than 297 mm:
Auto Select this setting to automatically select the position of the
binding margin.
If the original length is 297 mm or less, a binding position along
the long side of the paper is selected.
If the original length is more than 297 mm, a binding position
along the short side of the paper is selected.
If "Auto" is selected, the binding margin is set at the top or at
the left.
Page 100

3
Basic copy operations
3-28 CS193/CS173/CS163
3.4.7 To select a Binding Position setting
1 Position the original to be copied.
– For details on positioning the original, refer to "Feeding the original" on page 3-8.
– When loading an original with a binding margin, position the top of the original toward the back of
the machine.
2 In the Basic screen, touch [Original Setting].
The Original Setting screen appears.
3 Touch [Binding Position].
The Binding Position screen appears.
 Loading...