

Page 1

Océ CS193/CS173/CS163
Océ User manual
Network
Administration- GB
Page 2

Edition 2007-10
GB
Océ-Technologies B.V.
Copyright
©
2007, Océ
All rights reserved. No part of this work may be reproduced, copied, adapted, or
transmitted in any form or by any means without written permission from Océ.
Océ makes no representation or warranties with respect to the contents hereof and
specifically disclaims any implied warranties of merchantability or fitness for any
particular purpose.
Further, Océ reserves the right to revise this publication and to make changes from
time to time in the content hereof without obligation to notify any person of such
revision or changes.
Page 3

CS 193/173/163 Contents-1
Contents
1 Introduction
1.1 About this manual ........................................................................................................................... 1-3
1.1.1 Contents............................................................................................................................................ 1-3
1.1.2 Representation of product name ...................................................................................................... 1-3
1.2 Explanation of manual conventions .............................................................................................. 1-4
Safety advices................................................................................................................................... 1-4
Sequence of action ........................................................................................................................... 1-4
Tips.................................................................................................................................................... 1-4
Special text markings........................................................................................................................ 1-5
1.3 User manuals................................................................................................................................... 1-5
1.3.1 Printed manual .................................................................................................................................. 1-5
User manual ...................................................................................................................................... 1-5
1.3.2 User manual CD manuals.................................................................................................................. 1-5
Copy Operations ............................................................................................................................... 1-5
Print Operations ................................................................................................................................ 1-5
Box Operations ................................................................................................................................. 1-5
Network Scan/Fax/Network Fax Operations .................................................................................... 1-5
Network Administrator (this manual) ................................................................................................. 1-5
2 Setup items by operation
2.1 Specifying general settings for TCP/IP-based communication.................................................. 2-3
TCP/IP Settings................................................................................................................................. 2-3
Device Setting ................................................................................................................................... 2-4
2.2 Using Web Connection ................................................................................................................... 2-5
2.2.1 TCP/IP Settings................................................................................................................................. 2-5
2.2.2 Web Connection Settings ................................................................................................................. 2-6
2.2.3 TCP Socket Setting........................................................................................................................... 2-7
2.2.4 SSL/TLS Setting................................................................................................................................ 2-7
2.3 Logging in to Administrator mode of Web Connection............................................................... 2-8
2.4 Creating a certificate for this machine for SSL-based communication................................... 2-10
2.4.1 Create a self-signed Certificate....................................................................................................... 2-11
2.4.2 Request a Certificate....................................................................................................................... 2-12
2.4.3 Install a Certificate........................................................................................................................... 2-14
2.4.4 Set an Encryption Strength............................................................................................................. 2-15
2.4.5 Set Mode using SSL........................................................................................................................ 2-16
2.4.6 Remove a certificate........................................................................................................................ 2-17
2.5 Acquiring the certificate for this machine................................................................................... 2-18
2.5.1 Create a certificate .......................................................................................................................... 2-18
2.5.2 Download a certificate..................................................................................................................... 2-18
2.6 Registering a user certificate in this machine............................................................................ 2-19
2.6.1 E-mail Address................................................................................................................................ 2-20
2.6.2 Automatically Obtain Certificates.................................................................................................... 2-21
2.7 Specifying the date and time on this machine ........................................................................... 2-22
2.7.1 Manual Setting ................................................................................................................................ 2-23
2.7.2 TCP/IP Settings............................................................................................................................... 2-23
2.7.3 Time Zone ....................................................................................................................................... 2-23
2.7.4 Time Adjustment Setting................................................................................................................. 2-24
Page 4

Contents-2 CS 193/173/163
2.8 Sending scan data to a Windows computer ............................................................................... 2-25
2.8.1 TCP/IP Settings ............................................................................................................................... 2-25
2.8.2 Client Setting ................................................................................................................................... 2-26
2.8.3 Direct Hosting Setting ..................................................................................................................... 2-27
2.8.4 WINS Setting ................................................................................................................................... 2-28
2.9 Sending scan data by E-mail ........................................................................................................ 2-29
2.9.1 TCP/IP Settings ............................................................................................................................... 2-30
2.9.2 E-mail TX (SMTP)............................................................................................................................. 2-30
E-mail TX (SMTP)............................................................................................................................. 2-30
Admin. E-mail Address.................................................................................................................... 2-32
2.9.3 SMTP over SSL/Start TLS............................................................................................................... 2-33
E-mail TX (SMTP)............................................................................................................................. 2-33
Action for Invalid Certificate ............................................................................................................ 2-33
2.9.4 SMTP Authentication....................................................................................................................... 2-34
2.9.5 POP before SMTP ........................................................................................................................... 2-35
POP before SMTP ........................................................................................................................... 2-35
E-mail RX (POP)............................................................................................................................... 2-35
2.9.6 POP over SSL.................................................................................................................................. 2-36
E-mail RX (POP)............................................................................................................................... 2-36
Action for Invalid Certificate ............................................................................................................ 2-37
2.9.7 APOP Authentication....................................................................................................................... 2-38
2.10 Sending scan data by E-mail (With the digital signature attached).......................................... 2-39
2.10.1 TCP/IP Settings ............................................................................................................................... 2-40
2.10.2 E-mail TX (SMTP)............................................................................................................................. 2-40
2.10.3 Create a certificate .......................................................................................................................... 2-40
2.10.4 S/MIME............................................................................................................................................ 2-40
2.10.5 SMTP over SSL/Start TLS............................................................................................................... 2-41
2.10.6 SMTP Authentication....................................................................................................................... 2-41
2.10.7 POP before SMTP ........................................................................................................................... 2-41
2.10.8 POP over SSL.................................................................................................................................. 2-41
2.10.9 APOP Authentication....................................................................................................................... 2-41
2.11 Sending scan data by E-mail (Public key-based encryption) .................................................... 2-42
2.11.1 TCP/IP Settings ............................................................................................................................... 2-43
2.11.2 E-mail TX (SMTP)............................................................................................................................. 2-43
2.11.3 S/MIME............................................................................................................................................ 2-43
2.11.4 SMTP over SSL/Start TLS............................................................................................................... 2-44
2.11.5 SMTP Authentication....................................................................................................................... 2-44
2.11.6 POP before SMTP ........................................................................................................................... 2-44
2.11.7 POP over SSL.................................................................................................................................. 2-44
2.11.8 APOP Authentication....................................................................................................................... 2-44
2.12 Searching for E-mail addresses from the LDAP server ............................................................. 2-45
2.12.1 TCP/IP Settings ............................................................................................................................... 2-46
2.12.2 Manual Destination Input................................................................................................................. 2-46
2.12.3 LDAP Setting ................................................................................................................................... 2-47
2.12.4 Setting Up LDAP.............................................................................................................................. 2-48
2.12.5 LDAP over SSL................................................................................................................................ 2-50
Setting Up LDAP.............................................................................................................................. 2-50
Action for Invalid Certificate ............................................................................................................ 2-50
2.12.6 DNS Server Settings........................................................................................................................ 2-51
2.12.7 Date/Time Setting............................................................................................................................ 2-51
2.13 Sending scan data by FTP ............................................................................................................ 2-52
2.13.1 TCP/IP Settings ............................................................................................................................... 2-52
2.13.2 FTP TX Setting................................................................................................................................. 2-53
Page 5

CS 193/173/163 Contents-3
2.14 Sending scan data by WebDAV.................................................................................................... 2-54
2.14.1 TCP/IP Settings............................................................................................................................... 2-55
2.14.2 WebDAV Settings............................................................................................................................ 2-55
2.14.3 WebDAV over SSL .......................................................................................................................... 2-56
2.15 Sending an Internet fax................................................................................................................. 2-57
2.15.1 TCP/IP Settings............................................................................................................................... 2-58
2.15.2 Internet Fax Function ...................................................................................................................... 2-58
2.15.3 Regist machine information............................................................................................................. 2-59
Device Mail Address........................................................................................................................ 2-59
Machine Setting .............................................................................................................................. 2-60
2.15.4 Header Information.......................................................................................................................... 2-61
2.15.5 E-mail TX (SMTP) ............................................................................................................................ 2-62
2.15.6 I-Fax Advanced Setting................................................................................................................... 2-62
2.15.7 SMTP over SSL/Start TLS............................................................................................................... 2-63
2.15.8 SMTP Authentication ...................................................................................................................... 2-63
2.15.9 POP before SMTP........................................................................................................................... 2-63
2.15.10 POP over SSL ................................................................................................................................. 2-63
2.15.11 APOP Authentication....................................................................................................................... 2-63
2.16 Receiving Internet faxes ............................................................................................................... 2-64
2.16.1 TCP/IP Settings............................................................................................................................... 2-65
2.16.2 Internet Fax Function ...................................................................................................................... 2-65
2.16.3 E-mail RX (POP) .............................................................................................................................. 2-66
2.16.4 I-Fax Advance Setting..................................................................................................................... 2-67
2.16.5 POP over SSL ................................................................................................................................. 2-68
2.16.6 APOP Authentication....................................................................................................................... 2-68
2.17 Receiving Internet faxes encrypted with the public keys of this machine .............................. 2-69
2.17.1 Receive Internet faxes ..................................................................................................................... 2-69
2.17.2 S/MIME............................................................................................................................................ 2-70
2.17.3 POP over SSL ................................................................................................................................. 2-70
2.17.4 APOP Authentication....................................................................................................................... 2-70
2.18 Sending and receiving IP address faxes..................................................................................... 2-71
2.18.1 TCP/IP Settings............................................................................................................................... 2-72
2.18.2 IP Address Fax Function................................................................................................................. 2-72
2.18.3 SMTP TX Setting............................................................................................................................. 2-73
2.18.4 SMTP RX Setting............................................................................................................................. 2-74
2.18.5 Header Information.......................................................................................................................... 2-74
2.19 Importing images using the TWAIN scan.................................................................................... 2-75
2.19.1 TCP/IP Settings............................................................................................................................... 2-75
2.19.2 SLP Setting. .................................................................................................................................... 2-75
2.19.3 TCP Socket Setting......................................................................................................................... 2-76
2.19.4 Network TWAIN............................................................................................................................... 2-77
2.20 Printing (LPR/Port9100) ................................................................................................................ 2-78
2.20.1 TCP/IP Settings............................................................................................................................... 2-79
2.20.2 LPD Setting ..................................................................................................................................... 2-79
2.20.3 RAW Port Number........................................................................................................................... 2-79
2.21 Printing (SMB)................................................................................................................................ 2-80
2.21.1 TCP/IP Settings............................................................................................................................... 2-80
2.21.2 Print Setting..................................................................................................................................... 2-81
2.21.3 WINS Setting................................................................................................................................... 2-81
2.22 Printing (IPP) .................................................................................................................................. 2-82
2.22.1 TCP/IP Settings..........................................................................................................
..................... 2-83
2.22.2 Web Connection Settings ............................................................................................................... 2-83
2.22.3 IPP Setting....................................................................................................................................... 2-84
2.22.4 IPP Authentication Setting .............................................................................................................. 2-85
Page 6

Contents-4 CS 193/173/163
2.23 Printing (IPPS) ................................................................................................................................ 2-86
2.23.1 Printing (IPP) .................................................................................................................................... 2-87
2.23.2 SSL/TLS Setting .............................................................................................................................. 2-87
2.23.3 IPP Authentication Setting............................................................................................................... 2-87
2.24 Printing (Bonjour)........................................................................................................................... 2-88
Bonjour Setting................................................................................................................................ 2-88
2.25 Printing (AppleTalk) ....................................................................................................................... 2-89
AppleTalk Setting ............................................................................................................................ 2-89
2.26 Printing (NetWare) ......................................................................................................................... 2-90
2.26.1 NetWare Setting .............................................................................................................................. 2-90
For Remote Printer mode with NetWare 4.x bindery emulation...................................................... 2-91
For the print server mode with NetWare 4.x bindery emulation...................................................... 2-91
For NetWare 4.x Remote Printer mode (NDS) ................................................................................. 2-92
For NetWare 4.x/5.x/6 Print Server mode (NDS)............................................................................. 2-93
For NetWare 5.x/6 Novell Distributed Print Service (NDPS)............................................................ 2-94
2.26.2 NetWare Status ............................................................................................................................... 2-95
2.27 Using the WSD print function....................................................................................................... 2-96
2.27.1 TCP/IP Settings ............................................................................................................................... 2-96
2.27.2 Web Service Common Settings ...................................................................................................... 2-97
2.27.3 Printer Settings................................................................................................................................ 2-98
2.28 Using the WSD scan function....................................................................................................... 2-99
2.28.1 TCP/IP Settings ............................................................................................................................... 2-99
2.28.2 Web Service Common Settings .................................................................................................... 2-100
2.28.3 Scanner Settings ........................................................................................................................... 2-101
2.29 Using SSL for communication from Vista to this machine with WSD .................................... 2-102
2.29.1 TCP/IP Settings ............................................................................................................................. 2-103
2.29.2 SSL/TLS Setting ............................................................................................................................ 2-103
2.29.3 Web Service Common Settings .................................................................................................... 2-103
2.30 Using SSL for communication from this machine to Vista with WSD .................................... 2-104
2.30.1 TCP/IP Settings ............................................................................................................................. 2-105
2.30.2 SSL/TLS Setting ............................................................................................................................ 2-105
2.30.3 Web Service Common Settings .................................................................................................... 2-105
2.30.4 Action for Invalid Certificate .......................................................................................................... 2-106
2.31 Monitoring this machine using the SNMP manager................................................................. 2-107
2.31.1 TCP/IP Settings ............................................................................................................................. 2-107
2.31.2 NetWare Setting ............................................................................................................................ 2-108
2.31.3 SNMP Setting................................................................................................................................ 2-109
2.32 Providing notification of the status of this machine (E-mail) .................................................. 2-111
2.32.1 TCP/IP Settings ............................................................................................................................. 2-112
2.32.2 E-mail TX (SMTP)........................................................................................................................... 2-112
2.32.3 Status Notification Setting............................................................................................................. 2-113
2.32.4 SMTP over SSL/Start TLS............................................................................................................. 2-114
2.32.5 SMTP Authentication..................................................................................................................... 2-114
2.32.6 POP before SMTP ......................................................................................................................... 2-114
2.32.7 POP over SSL................................................................................................................................ 2-114
2.32.8 APOP Authentication..................................................................................................................... 2-114
2.33 Providing notification of the status of this machine (TRAP).................................................... 2-115
2.33.1 TCP/IP Settings ............................................................................................................................. 2-115
2.33.2 NetWare Setting ............................................................................................................................ 2-116
2.33.3 TRAP Setting ................................................................................................................................. 2-117
2.33.4 Status Notification Setting............................................................................................................. 2-117
Page 7

CS 193/173/163 Contents-5
2.34 Providing notification of the counter information status of this machine
via E-mail...................................................................................................................................... 2-118
2.34.1 TCP/IP Settings............................................................................................................................. 2-119
2.34.2 E-mail TX (SMTP) .......................................................................................................................... 2-119
2.34.3 Total Counter Notification Setting................................................................................................. 2-120
2.34.4 SMTP over SSL/Start TLS............................................................................................................. 2-121
2.34.5 SMTP Authentication .................................................................................................................... 2-121
2.34.6 POP before SMTP......................................................................................................................... 2-121
2.34.7 POP over SSL ............................................................................................................................... 2-121
2.34.8 APOP Authentication..................................................................................................................... 2-121
2.34.9 Meter Count .................................................................................................................................. 2-122
2.35 Limiting users using this machine (Machine authentication).................................................. 2-123
2.35.1 User Auth/Account Track.............................................................................................................. 2-124
2.35.2 User Registration........................................................................................................................... 2-125
2.35.3 Account Track Registration........................................................................................................... 2-127
2.36 Limiting users using this machine (Active Directory) .............................................................. 2-128
2.36.1 TCP/IP Settings............................................................................................................................. 2-128
2.36.2 External Server Registration.......................................................................................................... 2-129
2.36.3 User Auth/Account Track.............................................................................................................. 2-130
2.36.4 Default Function Permission ......................................................................................................... 2-131
2.36.5 Date/Time Setting.......................................................................................................................... 2-131
2.37 Limiting users using this machine (Windows domain/workgroup) ........................................ 2-132
2.37.1 TCP/IP Settings............................................................................................................................. 2-132
2.37.2 External Server Registration.......................................................................................................... 2-133
2.37.3 User Auth/Account Track.............................................................................................................. 2-134
2.37.4 Default Function Permission ......................................................................................................... 2-134
2.37.5 Client Setting................................................................................................................................. 2-135
2.37.6 WINS Setting................................................................................................................................. 2-135
2.38 Limiting users using this machine (NDS) .................................................................................. 2-136
2.38.1 External Server Registration.......................................................................................................... 2-137
2.38.2 User Auth/Account Track.............................................................................................................. 2-138
2.38.3 Default Function Permission ......................................................................................................... 2-138
2.38.4 NetWare Setting............................................................................................................................ 2-139
2.39 Limiting users using this machine (LDAP) ................................................................................ 2-140
2.39.1 TCP/IP Settings............................................................................................................................. 2-140
2.39.2 External Server Registration.......................................................................................................... 2-141
2.39.3 User Auth/Account Track.............................................................................................................. 2-142
2.39.4 Default Function Permission ......................................................................................................... 2-143
2.39.5 LDAP over SSL.............................................................................................................................. 2-143
External Server Registration.......................................................................................................... 2-143
Action for Invalid Certificate.......................................................................................................... 2-143
2.40 Performing IP address filtering .................................................................................................. 2-145
2.40.1 TCP/IP Settings............................................................................................................................. 2-145
2.40.2 IP Filtering ..................................................................................................................................... 2-146
2.41 Communicating using IPv6......................................................................................................... 2-147
TCP/IP Setting............................................................................................................................... 2-148
2.42 Communicating using IPsec ...................................................................................................... 2-150
2.42.1 TCP/IP Settings............................................................................................................................. 2-150
2.42.2 IPsec.............................................................................................................................................. 2-151
2.42.3 IKE Setting..................................................................................................................................... 2-152
2.42.4 SA Setting ..................................................................................................................................... 2-152
2.42.5 Peer .....................................................................................................................
.......................... 2-153
Page 8

Contents-6 CS 193/173/163
2.43 Using the TCP Socket/OpenAPI/FTP server function.............................................................. 2-154
2.43.1 TCP/IP Settings ............................................................................................................................. 2-154
2.43.2 SSL/TLS Setting ............................................................................................................................ 2-154
2.43.3 TCP Socket Setting ....................................................................................................................... 2-155
2.43.4 OpenAPI Setting............................................................................................................................ 2-156
2.43.5 FTP Server Setting......................................................................................................................... 2-157
2.44 Other items on the Maintenance tab ......................................................................................... 2-158
2.44.1 Using external memory.................................................................................................................. 2-158
External Memory Function Settings .............................................................................................. 2-158
2.44.2 Using the timer function ................................................................................................................ 2-159
Power Save Setting ....................................................................................................................... 2-159
Weekly Timer Setting..................................................................................................................... 2-160
2.44.3 Importing or exporting setting information .................................................................................... 2-161
Import/Export................................................................................................................................. 2-161
2.44.4 Resetting setting information......................................................................................................... 2-162
Network Setting Clear ................................................................................................................... 2-162
Reset.............................................................................................................................................. 2-163
Format All Destination ................................................................................................................... 2-164
2.44.5 Specifying support information ..................................................................................................... 2-165
Online Assistance .......................................................................................................................... 2-165
2.44.6 Registering the header or footer.................................................................................................... 2-166
Header/Footer Registration ........................................................................................................... 2-166
2.44.7 Checking the ROM version............................................................................................................ 2-167
ROM Version.................................................................................................................................. 2-167
2.45 Other items on the Security tab ................................................................................................. 2-168
2.45.1 Limiting accessible destinations by user....................................................................................... 2-168
Reference Allowed Group Registration ......................................................................................... 2-168
Public User Reference Setting....................................................................................................... 2-169
2.45.2 Restricting address registration by a user..................................................................................... 2-170
Permission of Address Change..................................................................................................... 2-170
2.45.3 Specifying the auto logout time..................................................................................................... 2-171
Auto Logout................................................................................................................................... 2-171
2.45.4 Specifying the administrator password......................................................................................... 2-172
Administrator Password Setting.................................................................................................... 2-172
2.46 Box tab settings........................................................................................................................... 2-173
2.46.1 Changing user box settings or deleting a user box....................................................................... 2-173
Open User Box .............................................................................................................................. 2-173
2.46.2 Creating a new user box................................................................................................................ 2-174
Create User Box ............................................................................................................................ 2-174
2.46.3 Changing system box settings or deleting system boxes............................................................. 2-175
Open System User Box................................................................................................................. 2-175
2.46.4 Creating a new system user box ................................................................................................... 2-176
Create System User Box ............................................................................................................... 2-176
2.47 Print Setting tab settings ............................................................................................................ 2-178
2.47.1 Specifying initial settings for the print function ............................................................................. 2-178
Basic Setting.................................................................................................................................. 2-178
2.47.2 Specifying settings for PCL/PS/XPS print..................................................................................... 2-179
PCL Settings.................................................................................................................................. 2-179
PS Setting...................................................................................................................................... 2-180
XPS Settings.................................................................................................................................. 2-181
2.47.3 Specifying the interface timeout.................................................................................................... 2-181
Interface Setting ............................................................................................................................ 2-181
Page 9

CS 193/173/163 Contents-7
2.48 Store Address tab settings......................................................................................................... 2-182
2.48.1 Registering or editing an address book destination ..................................................................... 2-182
Address Book................................................................................................................................ 2-182
2.48.2 Registering or editing a group destination .................................................................................... 2-186
Group ............................................................................................................................................ 2-186
2.48.3 Registering or editing a program destination................................................................................ 2-187
Program address........................................................................................................................... 2-187
2.48.4 Registering or editing destinations to be temporarily used .......................................................... 2-198
Temporary One-Touch.................................................................................................................. 2-198
2.48.5 Registering E-mail subject or text ................................................................................................. 2-198
Subject .......................................................................................................................................... 2-198
Text................................................................................................................................................ 2-199
2.48.6 Using an application registered in an external server ................................................................... 2-199
Application Registration................................................................................................................ 2-201
2.48.7 Simplifying E-mail address entry................................................................................................... 2-203
Prefix/Suffix................................................................................................................................... 2-203
3 Network Settings
3.1 Displaying the Network Settings screen....................................................................................... 3-3
3.2 Network Settings menu list ............................................................................................................ 3-6
Network Settings screen (1/2)........................................................................................................... 3-6
Network Settings screen (2/2)......................................................................................................... 3-14
4 Appendix
4.1 Product Specifications (Network functions)................................................................................. 4-3
4.2 Glossary ........................................................................................................................................... 4-4
5Index
Page 10

Contents-8 CS 193/173/163
Page 11

1
Introduction
Page 12

Page 13

CS 193/173/163 1-3
Introduction
1
1 Introduction
Thank you for purchasing this machine.
This user manual describes setting methods for each function utilizing CS 193/173/163, mainly using the Web
Connection. In order to allow functionality of this product fully and to use it effectively, please read through
this user manual, and then get started.
In order to operate the product safely and properly, be sure to read the accompanying User manuals –
Copy/Print/Network Scan/Fax/Network Fax/Box Operations and Network Administrator.
For detailed safety information and operation precautions, refer to the User Manual.
For descriptions on trademarks and copyrights, refer to the User Manual.
The illustrations used in this manual may appear slightly different from views of the actual equipment.
1.1 About this manual
This document is a user manual summarizing setup procedures for enabling effective usages of the product
utilizing the networking functions. For copy, scan, box, and fax operations, refer to the respective user
manuals.
This manual is intended for persons with basic knowledge of computers and the copier. For details on the
Windows or Macintosh operating systems, or software applications, refer to the respective manuals.
1.1.1 Contents
This manual consists of the following chapters:
1.1.2 Representation of product name
No. Chapter name
1Introduction
2 Setup items by operation
3 Network Settings
4 Appendix
5Index
Product name Representation
CS 193/173/163 Machine, copier, or printer
Microsoft Windows Windows
Page 14

1
Introduction
1-4 CS 193/173/163
1.2 Explanation of manual conventions
The marks and text formats used in this manual are described below.
Safety advices
6 DANGER
Failure to observe instructions highlighted in this manner may result in fatal or critical injuries in fact
of electrical power.
% Observe all dangers in order to prevent injuries.
7 WARNING
Failure to observe instructions highlighted in this manner may result in serious injuries or property
damage.
% Observe all warnings in order to prevent injuries and to ensure safe use of the machine.
7 CAUTION
Failure to observe instructions highlighted in this manner may result in slight injuries or property
damage.
% Observe all cautions in order to prevent injuries and to ensure safe use of the machine.
Sequence of action
1 The number 1 as formatted here indicates the first step of a
sequence of actions.
2 Subsequent numbers as formatted here indicate subsequent
steps of a sequence of actions.
?
Text formatted in this style provides additional assistance.
% Text formatted in this style describes the action that will
ensure the desired results are achieved.
Tips
2
Note
Text highlighted in this manner contains useful information and tips to ensure safe use of the machine.
2
Reminder
Text highlighted in this manner contains information that should be reminded.
!
Detail
Text highlighted in this manner contains references for more detailed information.
An illustration inserted
here shows what operations
must be performed.
Page 15

CS 193/173/163 1-5
Introduction
1
Special text markings
[Stop] key
The names of keys on the control panel are written as shown above.
MACHINE SETTING
Display texts are written as shown above.
2
Note
The machine illustrations shown in this manual can vary and depend on the machine configuration.
1.3 User manuals
This machine is provided with printed manuals and PDF manuals on the user manual CD.
1.3.1 Printed manual
User manual
This manual contains operating procedures and descriptions of the most frequently used functions.
In addition, this manual contains notes and precautions that should be followed for safe use of the machine.
Be sure to read this manual before using the machine.
1.3.2 User manual CD manuals
Copy Operations
This manual contains descriptions of the Copy mode operations and machine maintenance.
Refer to this manual for details on the paper and originals, copy procedures using convenient Application
functions, replacing consumables, and troubleshooting operations such as clearing paper misfeeds.
Print Operations
This manual contains details of the printing functions that can be specified with the standard built-in printer
controller.
Refer to this manual for operating procedures on using the printing functions.
Box Operations
This manual contains operating procedures for using the user boxes on the hard disk.
Refer to this manual for details on saving data in user boxes, retrieving data from user boxes and transferring
data.
Network Scan/Fax/Network Fax Operations
This manual contains details on the network scan, G3 fax, network fax operations, and fax driver functions.
Refer to this manual for details on using network scan function by E-Mail or FTP, G3 fax, Internet fax, IP
address fax operations, and PC-FAX functions.
In order to use the fax functions, the optional fax kit must be purchased separately.
Network Administrator (this manual)
This manual contains descriptions on setting methods for each function utilizing network connection, mainly
using the Web Connection.
Refer to this manual for details on using network functions.
Page 16

1
Introduction
1-6 CS 193/173/163
Page 17

2
Setup items by operation
Page 18

Page 19
CS 193/173/163 2-3
Setup items by operation
2
2 Setup items by operation
2.1 Specifying general settings for TCP/IP-based communication
% Specify settings to use this machine in a TCP/IP network environment.
– To use this machine by connecting to the network, specify these settings in advance.
2
Reminder
In order to apply all changes to the network settings, turn off this machine, then on again.
When turning off the main power switch and turning it on again, wait for 10 seconds or longer after
power-off, and then turn on the power again. The machine may not operate correctly if it is turned on
immediately after being turned off.
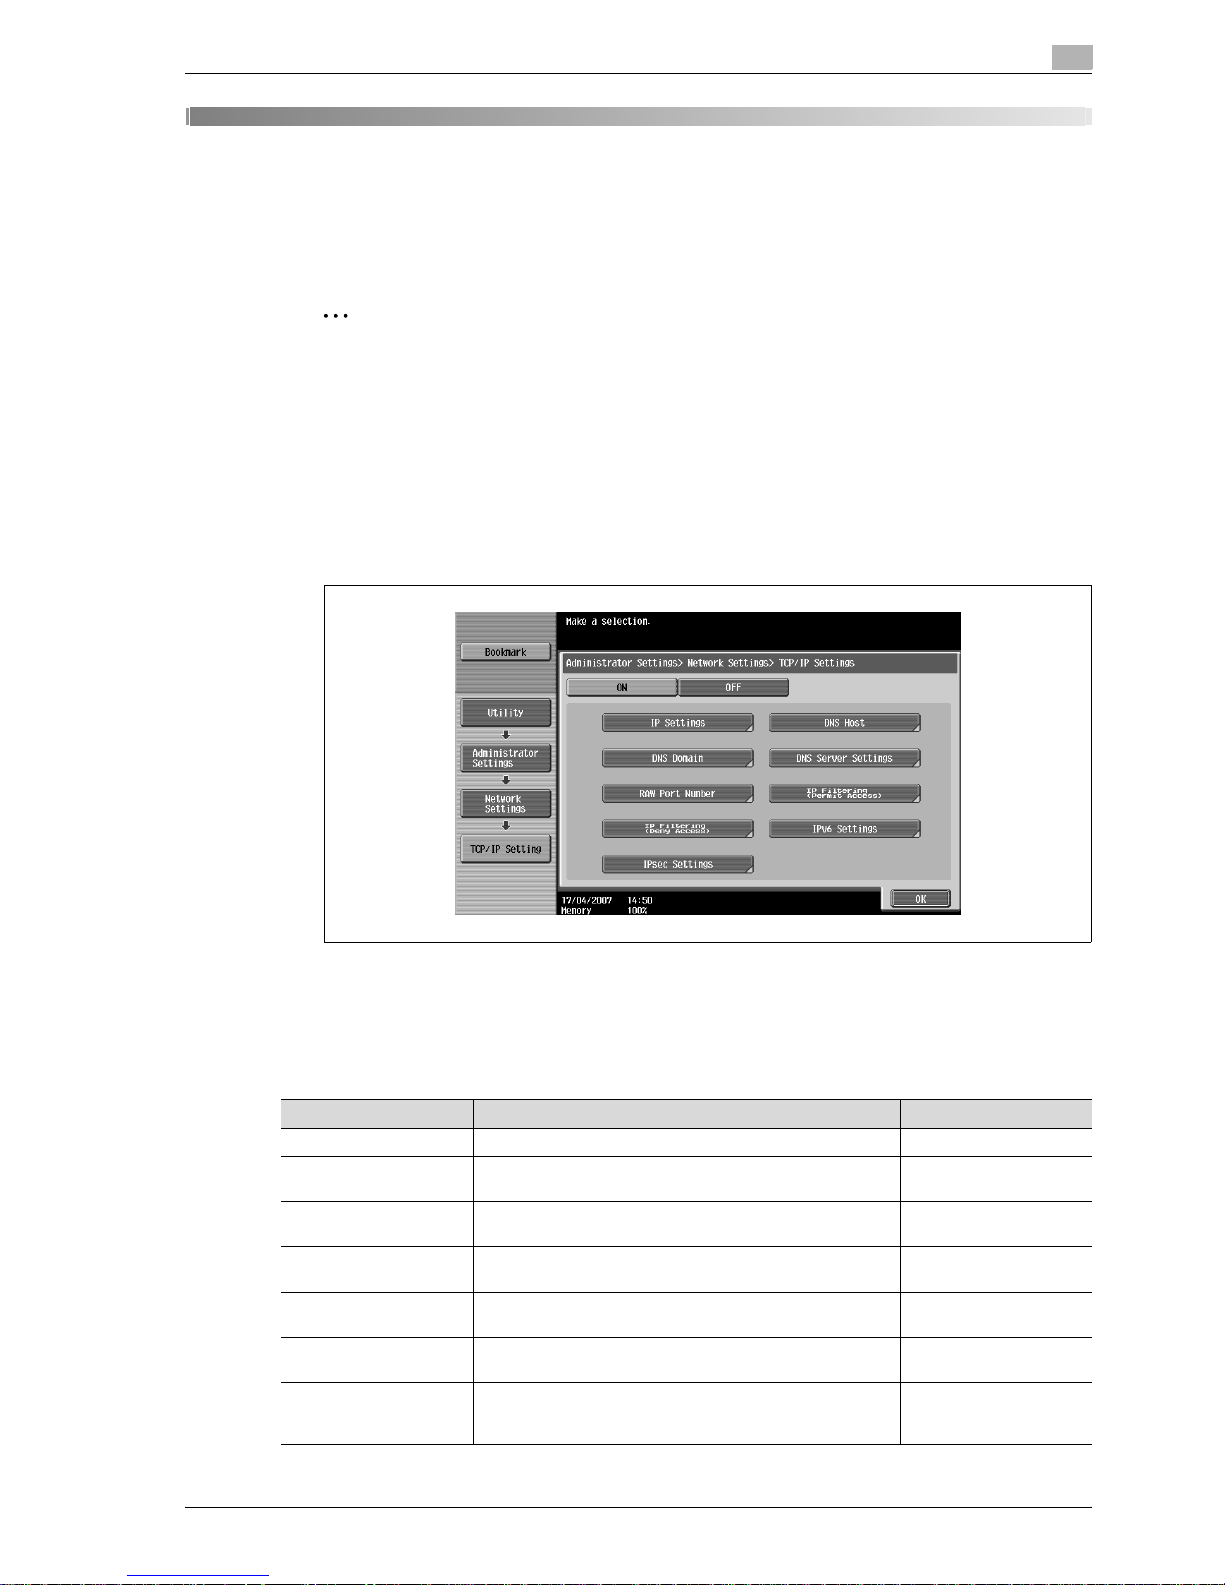
TCP/IP Settings
1 On the Administrator Settings screen of the control panel, select [5 Network Settings].
2 Select [1 TCP/IP Settings].
!
Detail
For details on displaying the Network Setting screen, refer to "Displaying the Network Settings screen"
on page 3-3.
Item Definition Prior confirmation
TCP/IP Settings Select [ON].
IP Application Method Select whether the IP address is automatically acquired or
directly specified.
IP application method to
be used
IP Application Method
Auto Setting
To automatically acquire the IP address, select the automatic acquisition method.
IP Address To directly specify the IP address, specify the IP address of
this machine.
IP address of this machine
Subnet Mask To directly specify the IP address, specify the subnet mask
of the network to be connected.
Subnet mask of this machine
Default Gateway To directly specify the IP address, specify the default gate-
way of the network to be connected.
Default gateway of this
machine
Dynamic DNS Settings To automatically register the host name specified with [DNS
Host Name] for the DNS server that supports the Dynamic
DNS function, select [Enable].
Whether Dynamic DNS is
used
Page 20
2
Setup items by operation
2-4 CS 193/173/163
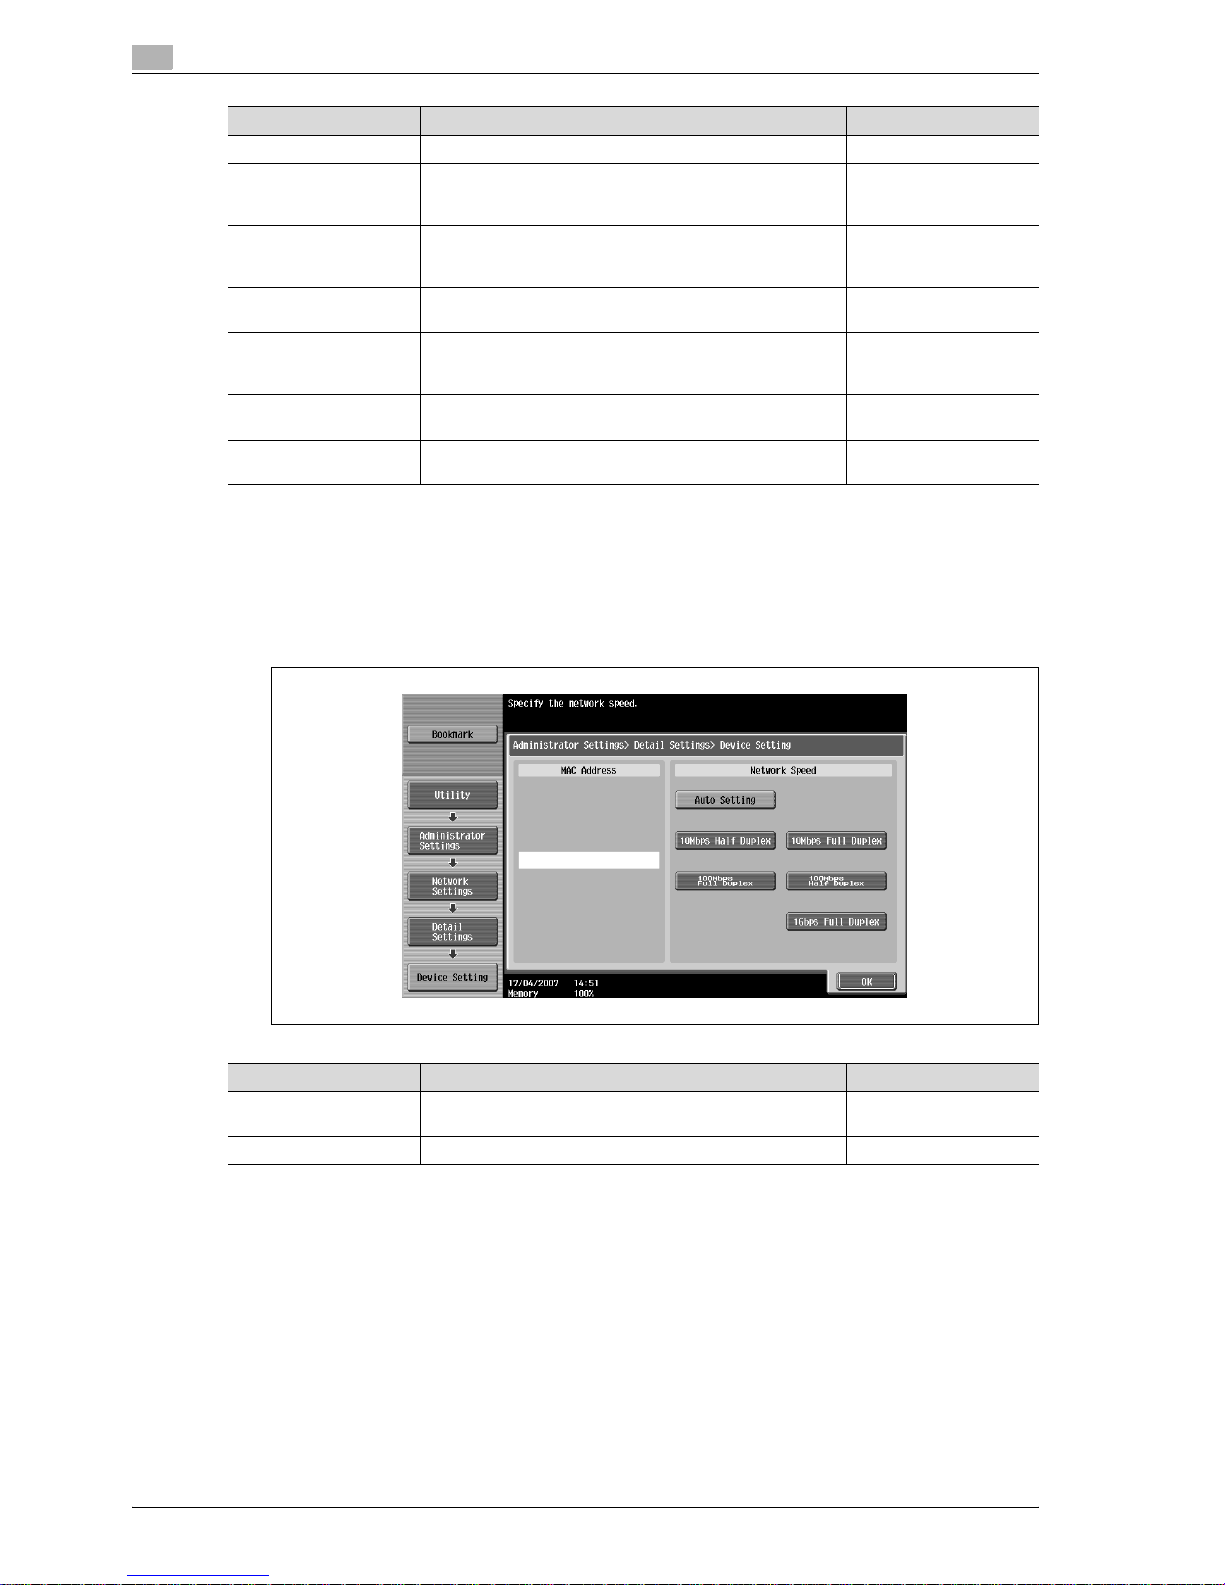
Device Setting
1 On the Administrator Settings screen of the control panel, select [5 Network Settings].
2 Select [5 Detail Settings].
3 Select [1 Device Setting].
DNS Host Name Specify the host name of this machine (up to 63 characters).
DNS Domain Name Auto
Retrieval
Select whether to automatically acquire the name of the DNS
domain.
This item is enabled when the DHCP is enabled.
Whether automatic acquisition is available with
DHCP
Default DNS Domain
Name
If not acquiring the DNS domain name automatically, specify
the domain name to which this machine belongs (up to 255
characters including the host name).
Default Domain Name
DNS Search Domain
Name 1 to 3
Specify the DNS search domain name (up to 255 characters
including the host name).
DNS Server Auto Obtain Specify whether to automatically acquire the DNS server ad-
dress.
This item is enabled when the DHCP is enabled.
Whether automatic acquisition is available with
DHCP
Priority DNS Server If not automatically acquiring the DNS server address, spec-
ify the address of the priority DNS server.
Address of the server
Secondary DNS Server 1
and 2
Specify the address of an alternate DNS server. Address of the server
Item Definition Prior confirmation
Item Definition Prior confirmation
MAC Address Displays the MAC address of the network interface card for
this machine.
Network Speed Specify the network speed.
Page 21
CS 193/173/163 2-5
Setup items by operation
2
2.2 Using Web Connection
% Specify settings for using Web Connection.
2
Note
This manual describes how to specify settings required for each operation using Web Connection.
Web Connection is a device management utility supported by the HTTP server integrated into the printer
controller. Using a Web browser on a computer connected to the network, machine settings can be specified
and the status of the machine can be checked. Some settings can be specified from the computer instead
of from the machine control panel.
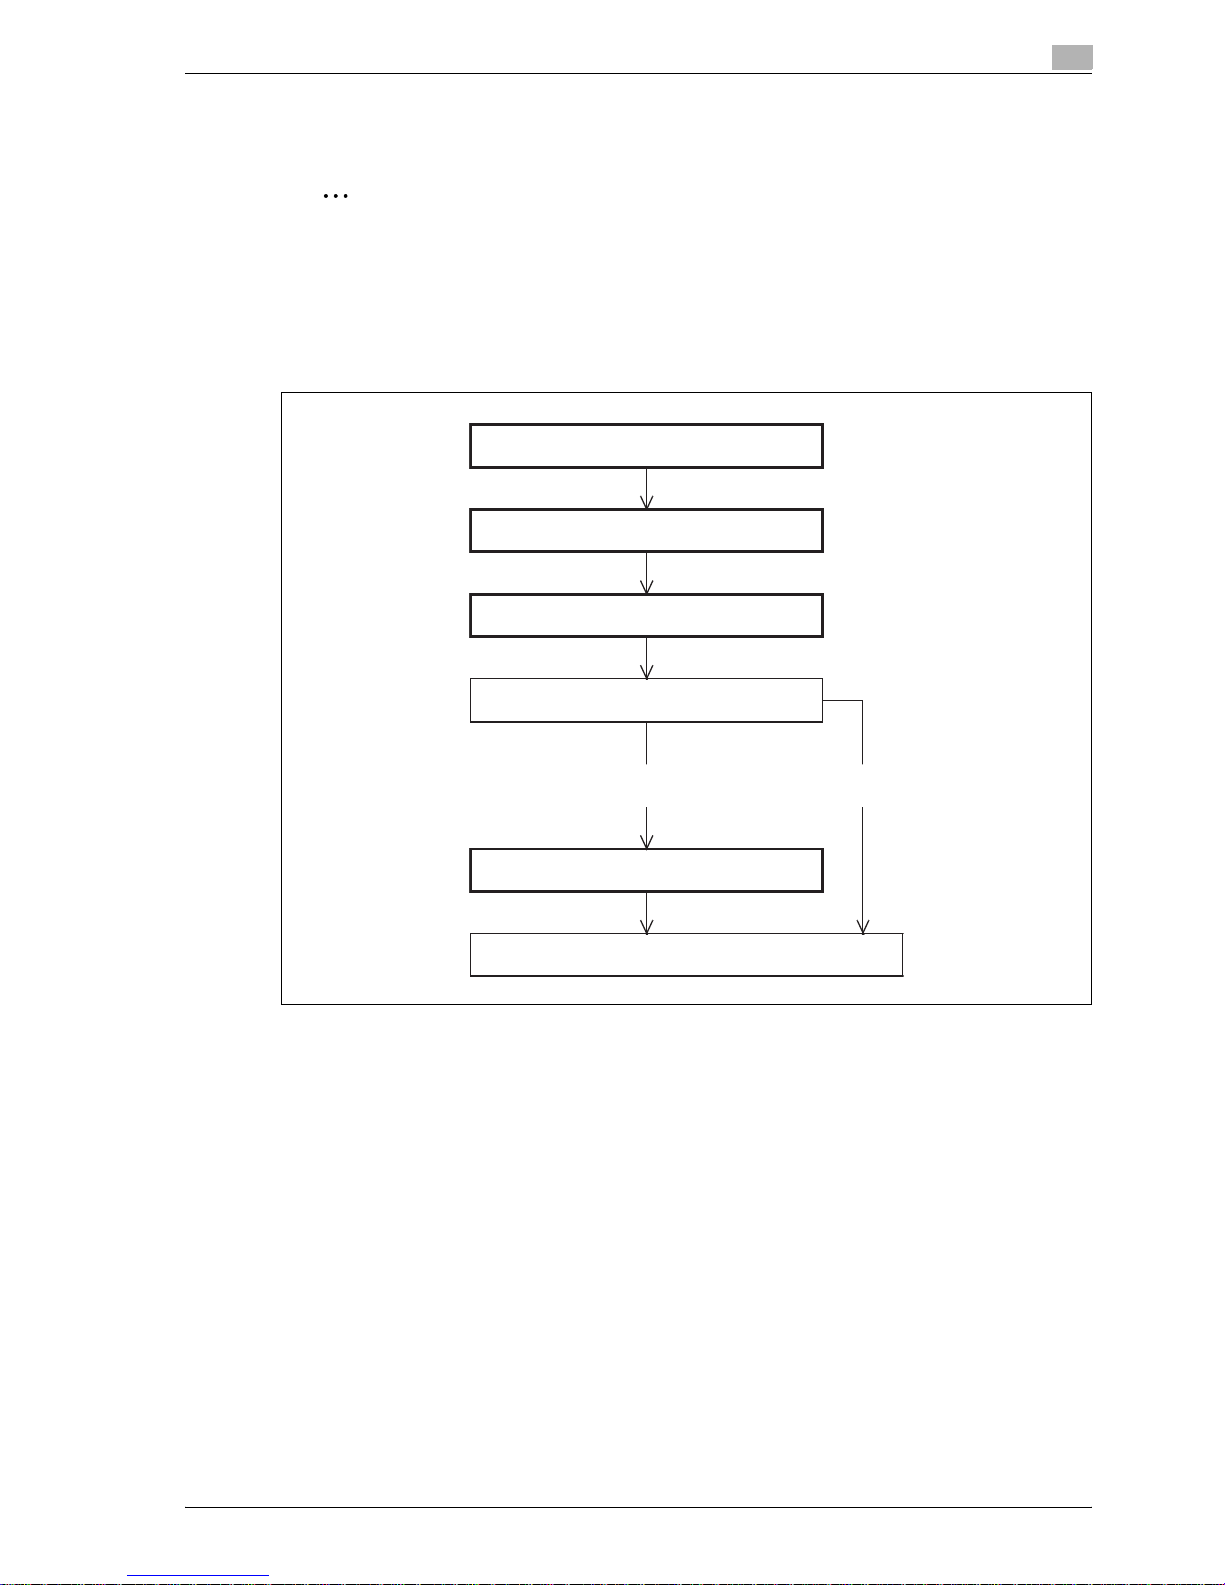
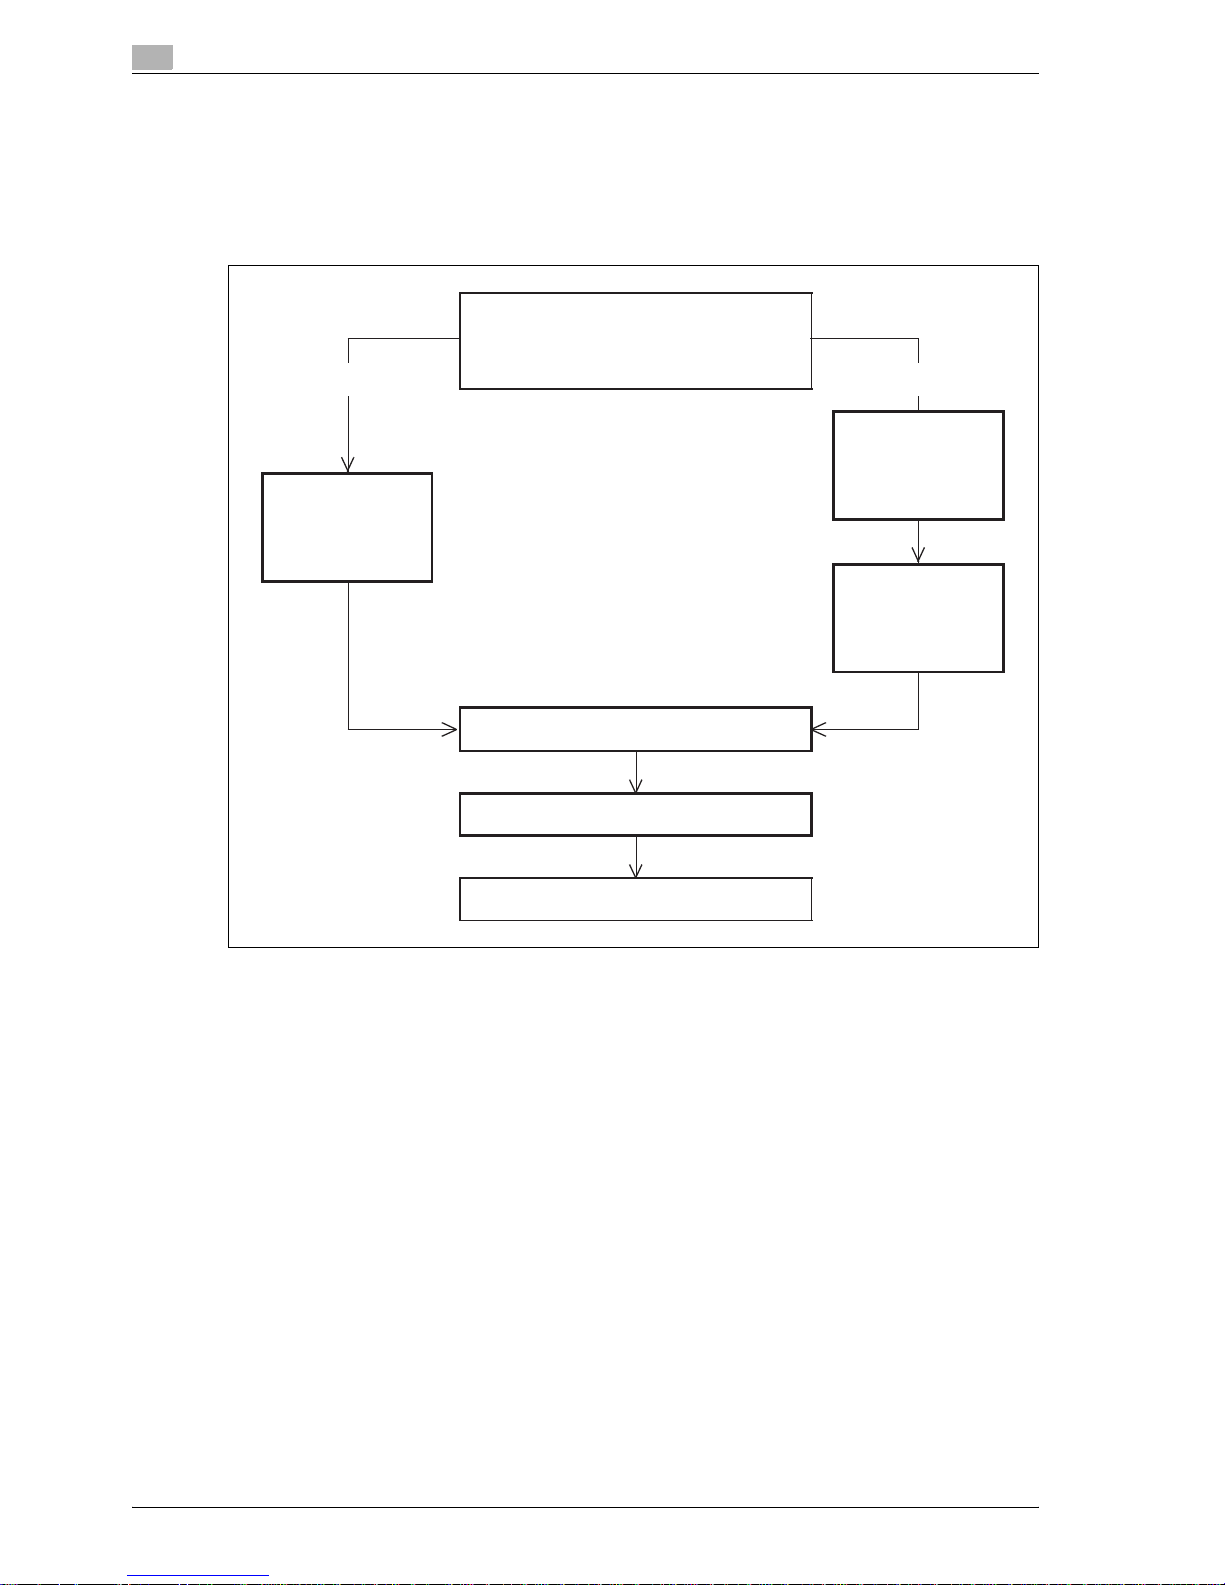
Specify the settings according to the following flowchart.
2.2.1 TCP/IP Settings
% Specify settings to use this machine in a TCP/IP network environment.
!
Detail
For details, refer to "Specifying general settings for TCP/IP-based communication" on page 2-3.
TCP/IP Settings
Web Connection Settings
TCP Socket Setting
Use with SSL?
Yes No
SSL/TLS Setting
Finish
Page 22
2
Setup items by operation
2-6 CS 193/173/163
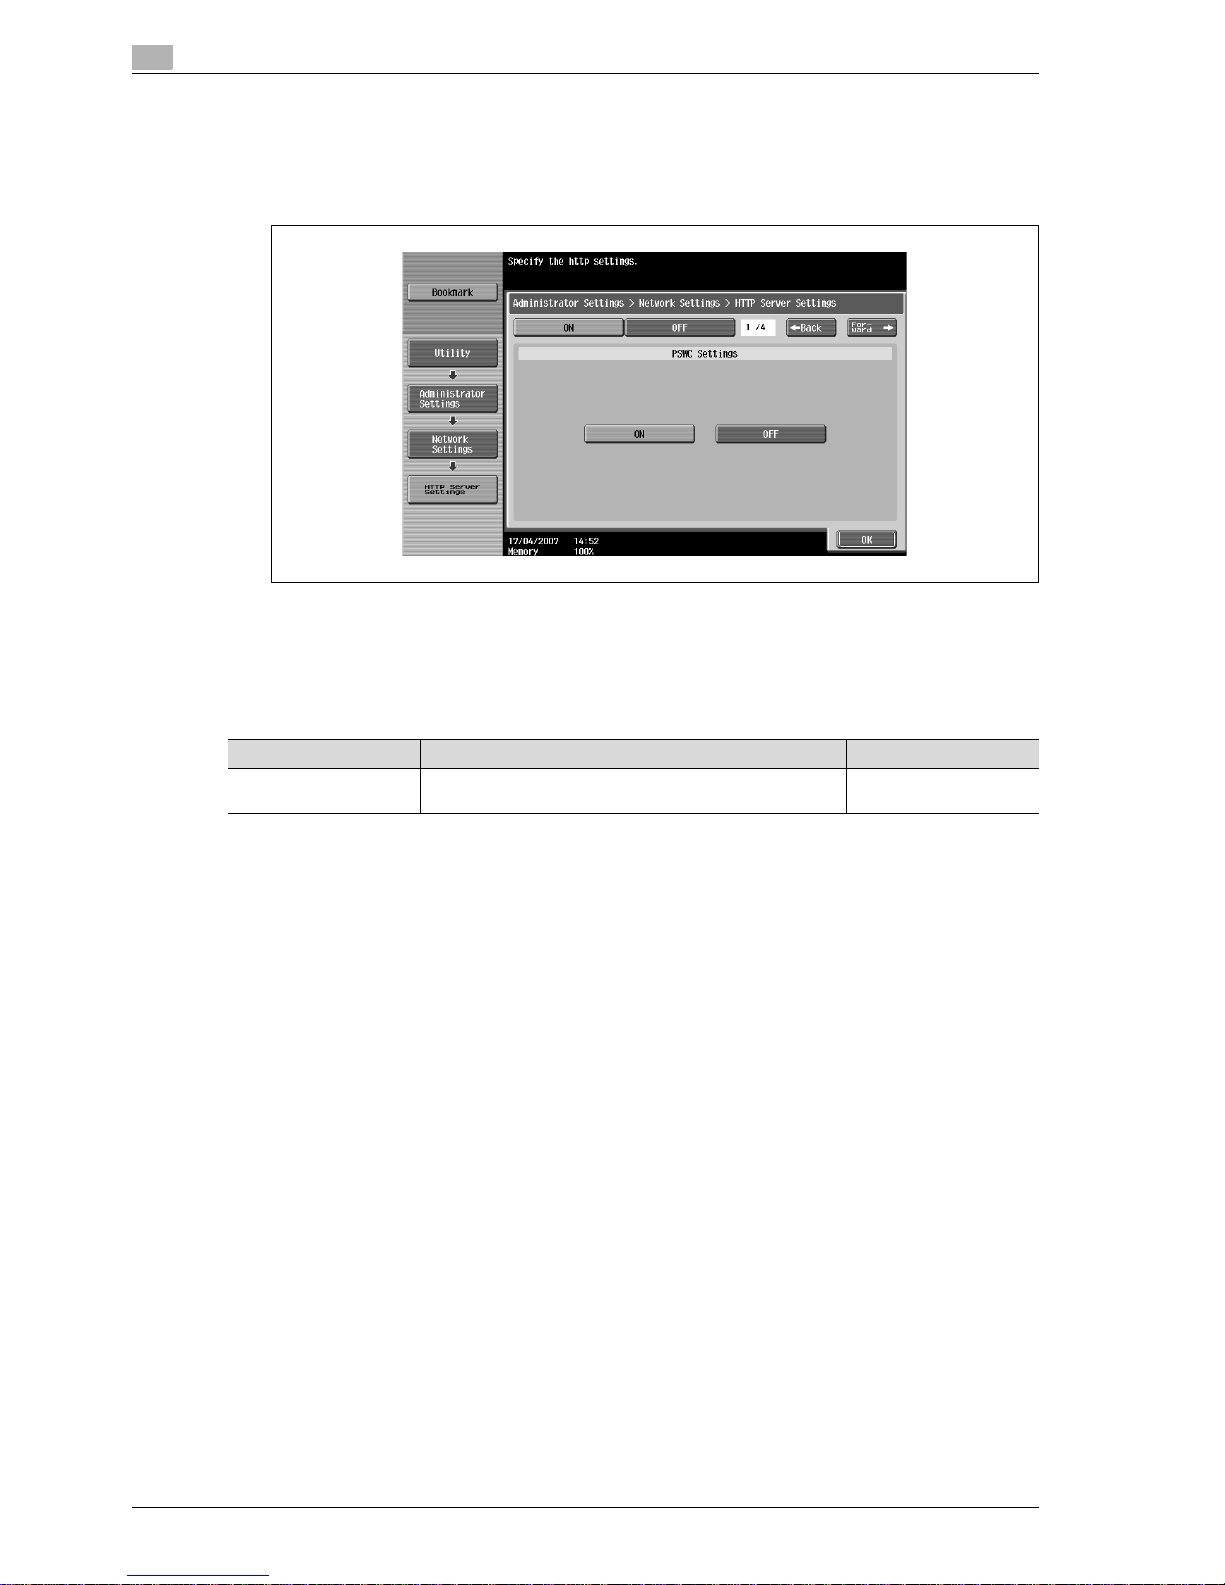
2.2.2 Web Connection Settings
1 On the Administrator Settings screen of the control panel, select [5 Network Settings]
2 Select [3 HTTP Server Settings].
!
Detail
For details on displaying the Network Setting screen, refer to "Displaying the Network Settings screen"
on page 3-3.
Item Definition Prior confirmation
Web Connection Settings
Select [ON].
Page 23
CS 193/173/163 2-7
Setup items by operation
2
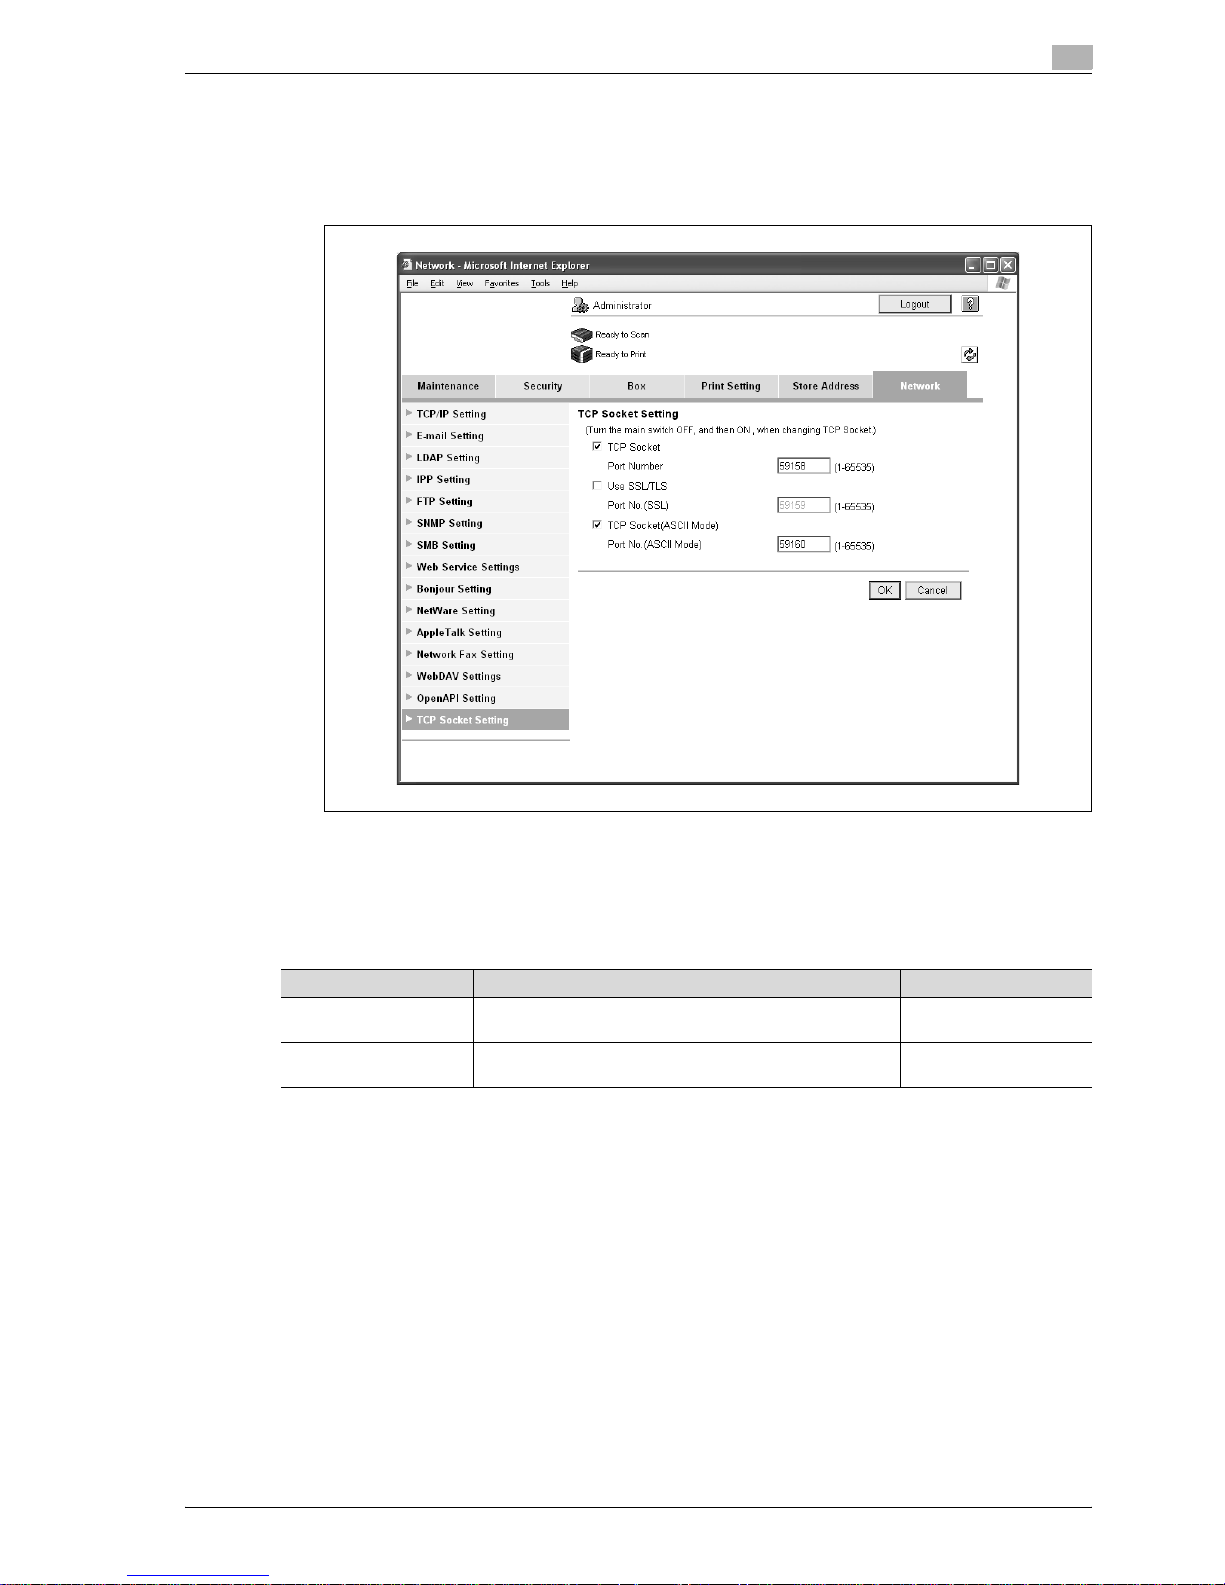
2.2.3 TCP Socket Setting
1 In Administrator mode of Web Connection, select the Network tab.
2 Select "TCP Socket Setting"
!
Detail
For details on logging in to Administrator mode of Web Connection, refer to "Logging in to Administrator
mode of Web Connection" on page 2-8.
2.2.4 SSL/TLS Setting
% Specify settings for SSL-based communication
!
Detail
For details, refer to "Creating a certificate for this machine for SSL-based communication" on
page 2-10.
Item Definition Prior confirmation
TCP Socket
(ASCII Mode)
To use in the Flash format, select the "TCP Socket (ASCII
Mode)" check box.
Port No.
(ASCII Mode)
Specify the port number.
Page 24
2
Setup items by operation
2-8 CS 193/173/163
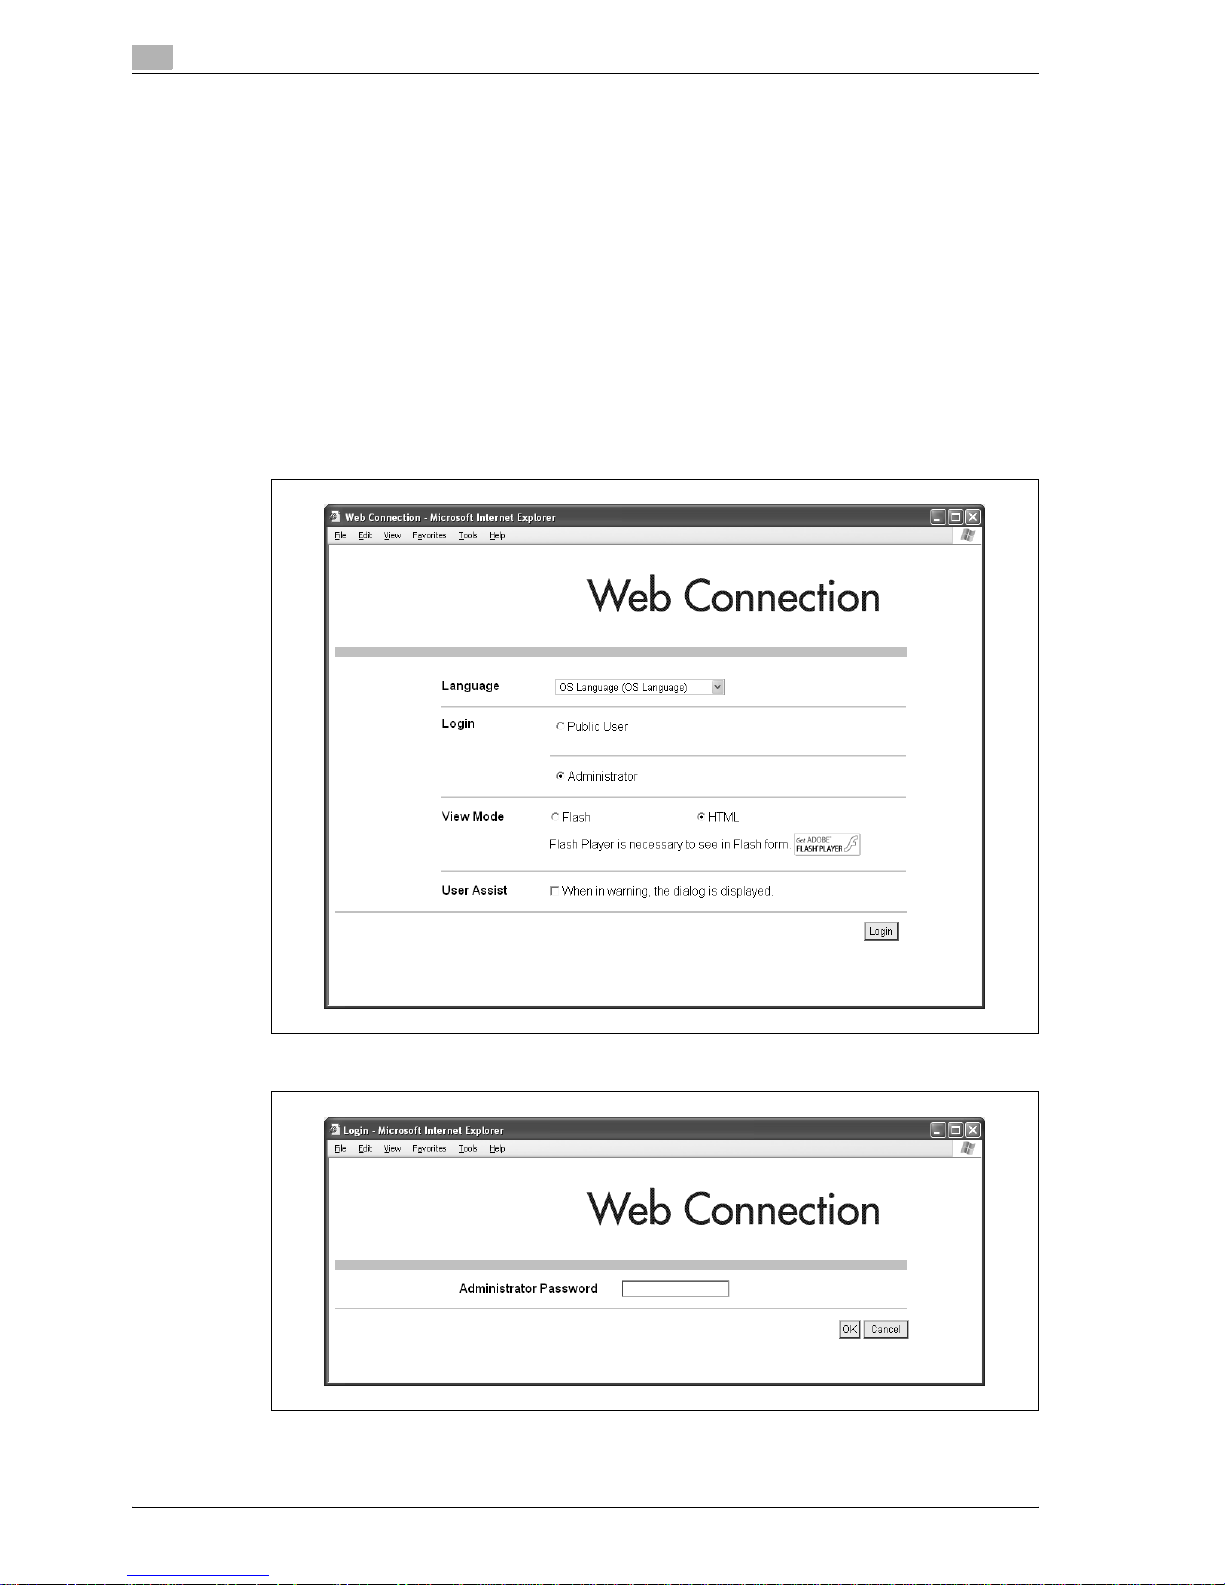
2.3 Logging in to Administrator mode of Web Connection
To specify settings for this machine with Web Connection, Administrator mode must be logged in. The
following shows how to log in to Administrator mode.
!
Detail
When logged in to Administrator mode, the control panel of the machine is locked and cannot be used.
Depending on the status of the machine, you may not be able to log in to Administrator mode.
1 In the login page, select "Administrator".
2 Click the [Login] button.
– If necessary, select the display language and format.
– If "When in warning, the dialog is displayed." check box is selected, warning messages appear
during operation after logging in.
3 Enter the password for the machine’s administrator.
Page 25

CS 193/173/163 2-9
Setup items by operation
2
4 Click the [OK] button.
The Administrator mode page appears.
2
Reminder
If "Prohibited Functions When Authentication Error" in Administrator mode is set to "Mode 2" and an
incorrect password is entered the specified number of times, it is no longer possible to log in to
Administrator mode. For details on the "Prohibited Functions When Authentication Failed" parameter,
refer to the User manual – Copy Operations.
Page 26
2
Setup items by operation
2-10 CS 193/173/163
2.4 Creating a certificate for this machine for SSL-based communication
!
Detail
Creating a certificate for this machine encrypts communication from a client computer to this machine
using SSL in order to prevent disclosure of communication contents and password.
!
Detail
When specifying the following settings, communication from a client computer to this machine can be
encrypted using SSL. For details, refer to the respective sections.
"Using Web Connection" on page 2-5
"Printing (IPPS)" on page 2-86
"Using SSL for communication from Vista to this machine with WSD" on page 2-102
"Using the TCP Socket/OpenAPI/FTP server function" on page 2-154
(1) Self-sign
(2) Issue by the certification authority
Create a
Request a
Install a
Set an Encryption Strength
Set Mode using SSL
Finish
self-signed
Certificate
Certificate
Certificate
(1) (2)
Page 27
CS 193/173/163 2-11
Setup items by operation
2
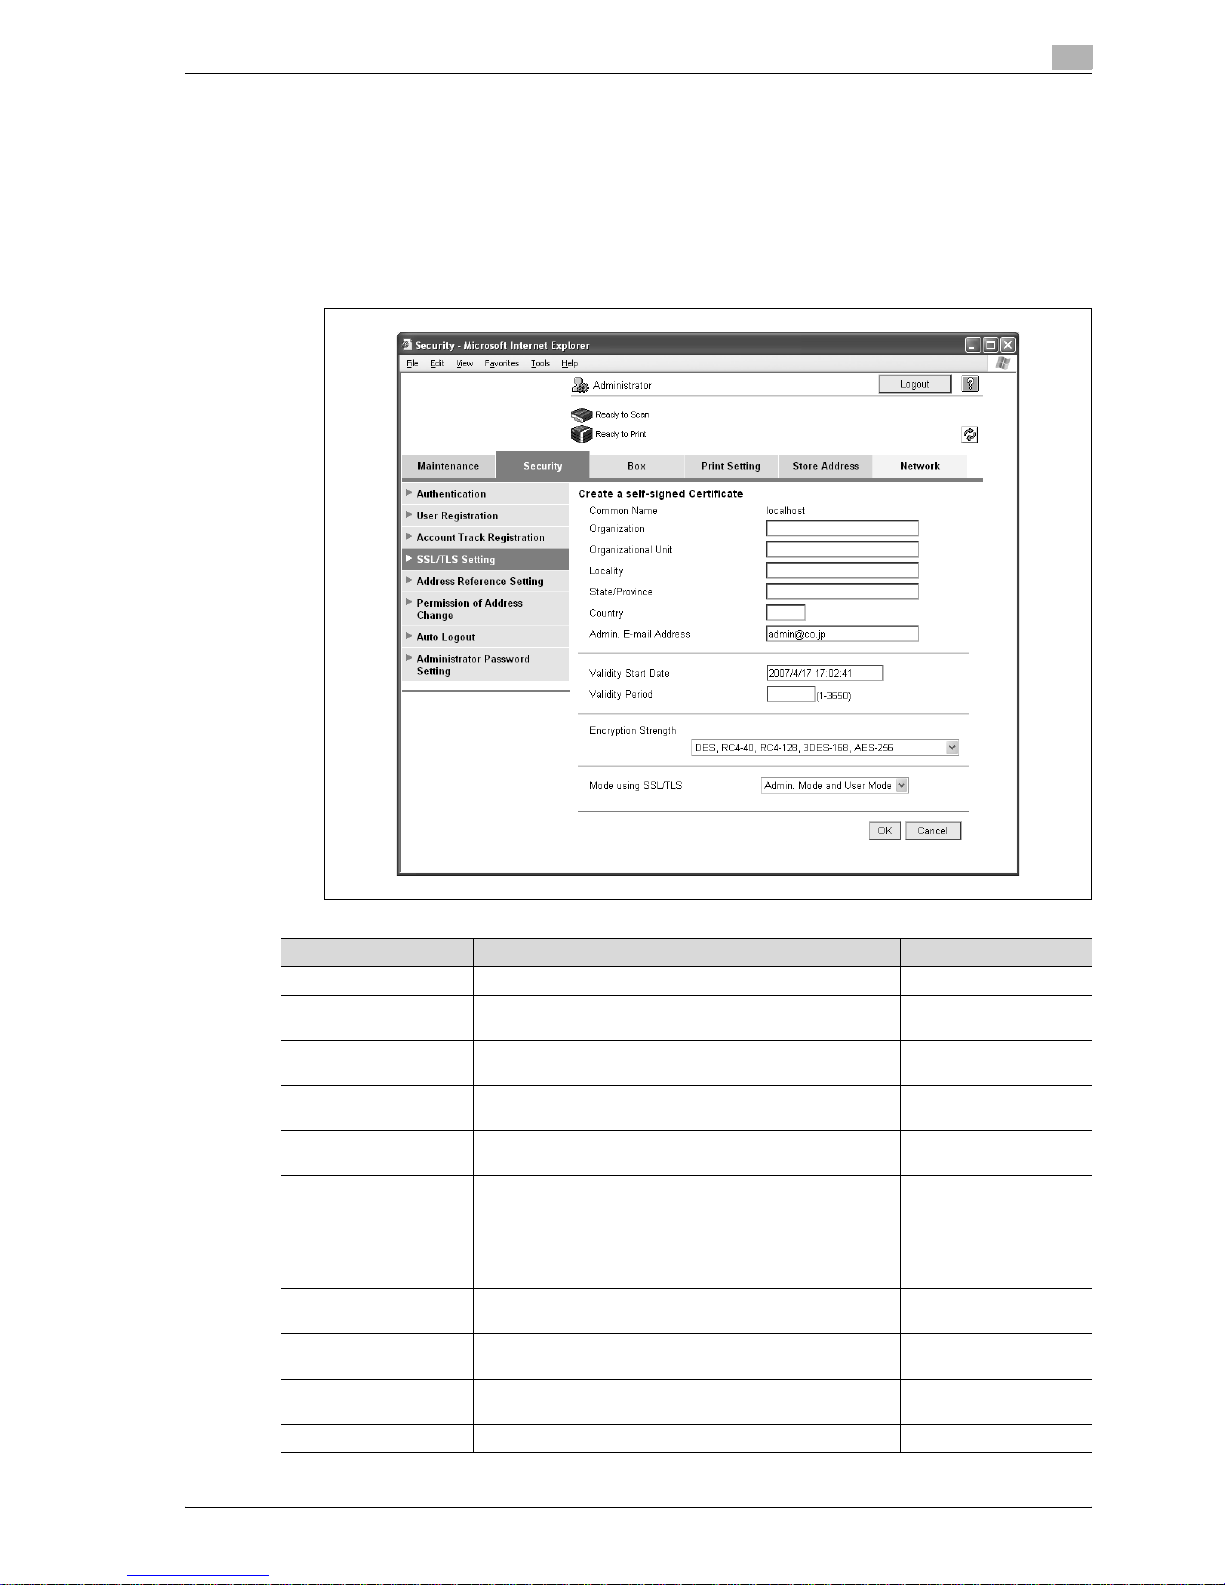
2.4.1 Create a self-signed Certificate
1 In Administrator mode of Web Connection, select the Security tab.
2 Select "SSL/TLS Setting".
3 Select [Setup].
4 Select "Create a self-signed Certificate".
Item Definition Prior confirmation
Common Name Displays the IP address or domain name of the machine.
Organization Enter the name of the organization or group used for creating
an organization certificate (up to 63 characters).
Organizational Unit Enter the name of the account used for creating an account
certificate (up to 63 characters).
Locality Enter the name of the locality used for creating a locality cer-
tificate (up to 127 characters).
State/Province Enter the name of the state/province used for creating a
state/province certificate (up to 127 characters).
Country When creating a country certificate, enter a two-character
country code regulated by ISO 3166.
United States: US, Great Britain: GB, Italy: IT, Australia: AU,
The Netherlands: NL, Canada: CA, Spain: ES, Czech Republic: CZ, China: CN, Denmark: DK, Germany: DE, Japan: JP,
France: FR, Belgium: BE, Russia: RU
Admin. E-mail Address Enter the address for the administrator (up to 128 charac-
ters).
Address for the administrator
Validity Start Date Enter the starting date for the period of validity. Displays the
date and time when this page was displayed.
Validity Period Enter the number of days from the starting date for the peri-
od of validity for the certificate.
Encryption Strength Specify the encryption method.
Page 28
2
Setup items by operation
2-12 CS 193/173/163
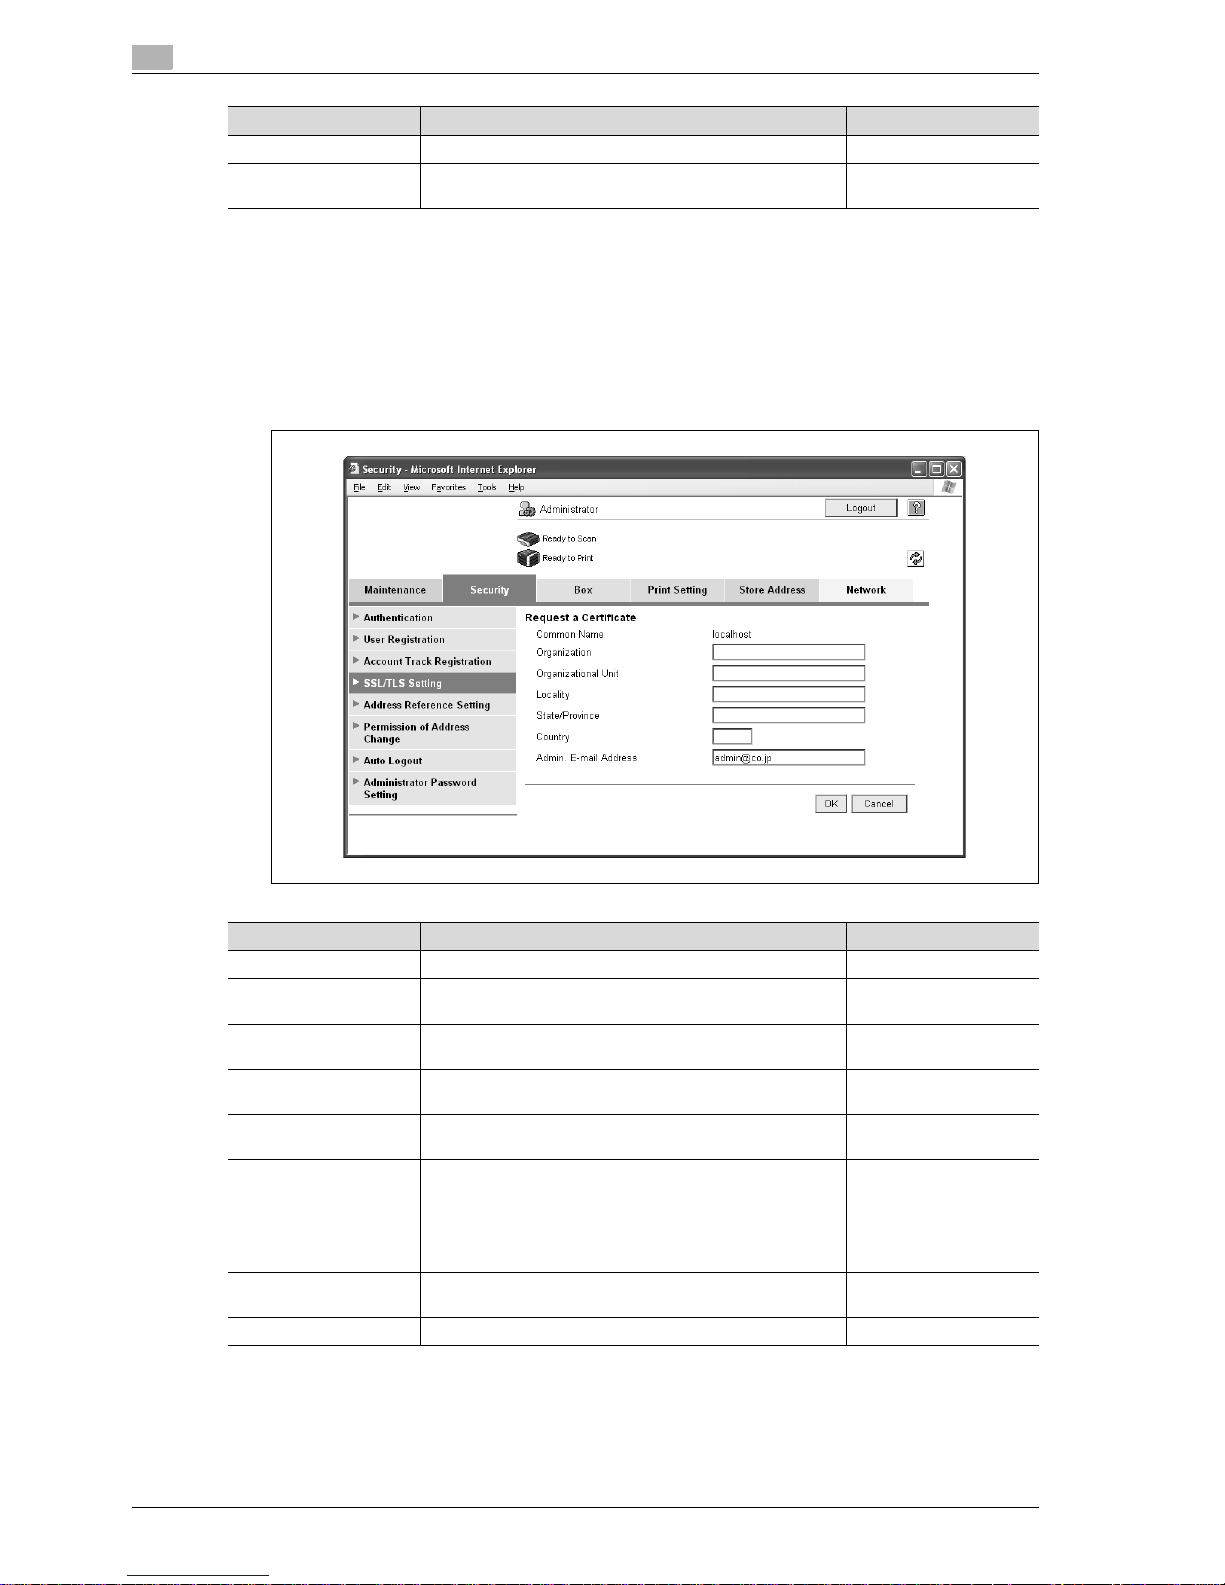
2.4.2 Request a Certificate
1 In Administrator mode of Web Connection, select the Security tab.
2 Select "SSL/TLS Setting".
3 Select [Setup].
4 Select "Request a Certificate".
Mode using SSL/TLS Specify the mode using SSL/TLS.
[OK] Creates a self-signed certificate. It may take a few minutes
to create a certificate.
Item Definition Prior confirmation
Item Definition Prior confirmation
Common Name Displays the IP address or domain name of the machine.
Organization Enter the name of the organization or group used for creating
an organization certificate (up to 63 characters).
Organizational Unit Enter the name of the account used for creating an account
certificate (up to 63 characters).
Locality Enter the name of the locality used for creating a locality cer-
tificate (up to 127 characters).
State/Province Enter the name of the state or province used for creating a
state/province certificate (up to 127 characters).
Country When creating a country certificate, enter a two-character
country code regulated by ISO 3166.
United States: US, Great Britain: GB, Italy: IT, Australia: AU,
The Netherlands: NL, Canada: CA, Spain: ES, Czech Republic: CZ, China: CN, Denmark: DK, Germany: DE, Japan: JP,
France: FR, Belgium: BE, Russia: RU
Admin. E-mail Address Specify the address for the administrator (up to 128 charac-
ters).
Address for the administrator
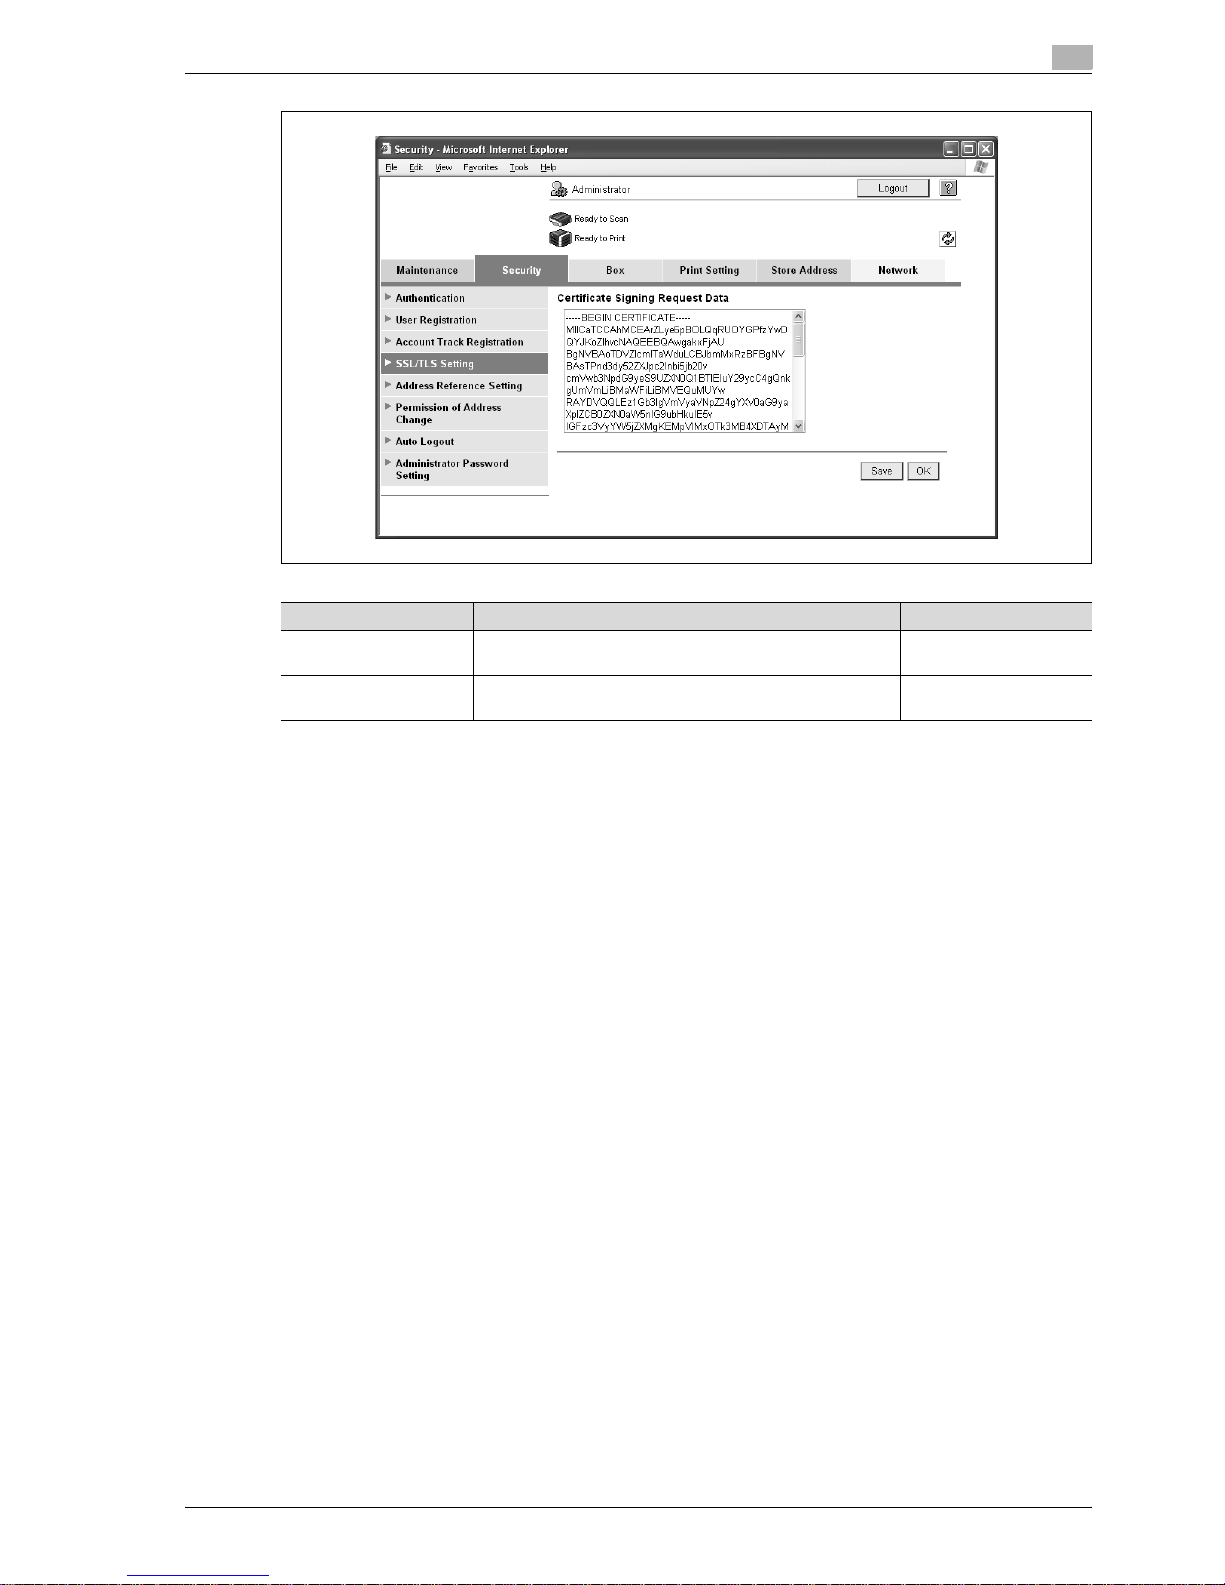
[OK] Creates certificate signing request data.
Page 29
CS 193/173/163 2-13
Setup items by operation
2
Item Definition Prior confirmation
Certificate Signing Request Data
Displays certificate signing request data.
[Save] Saves certificate signing request data in the computer as a
file.
Page 30
2
Setup items by operation
2-14 CS 193/173/163
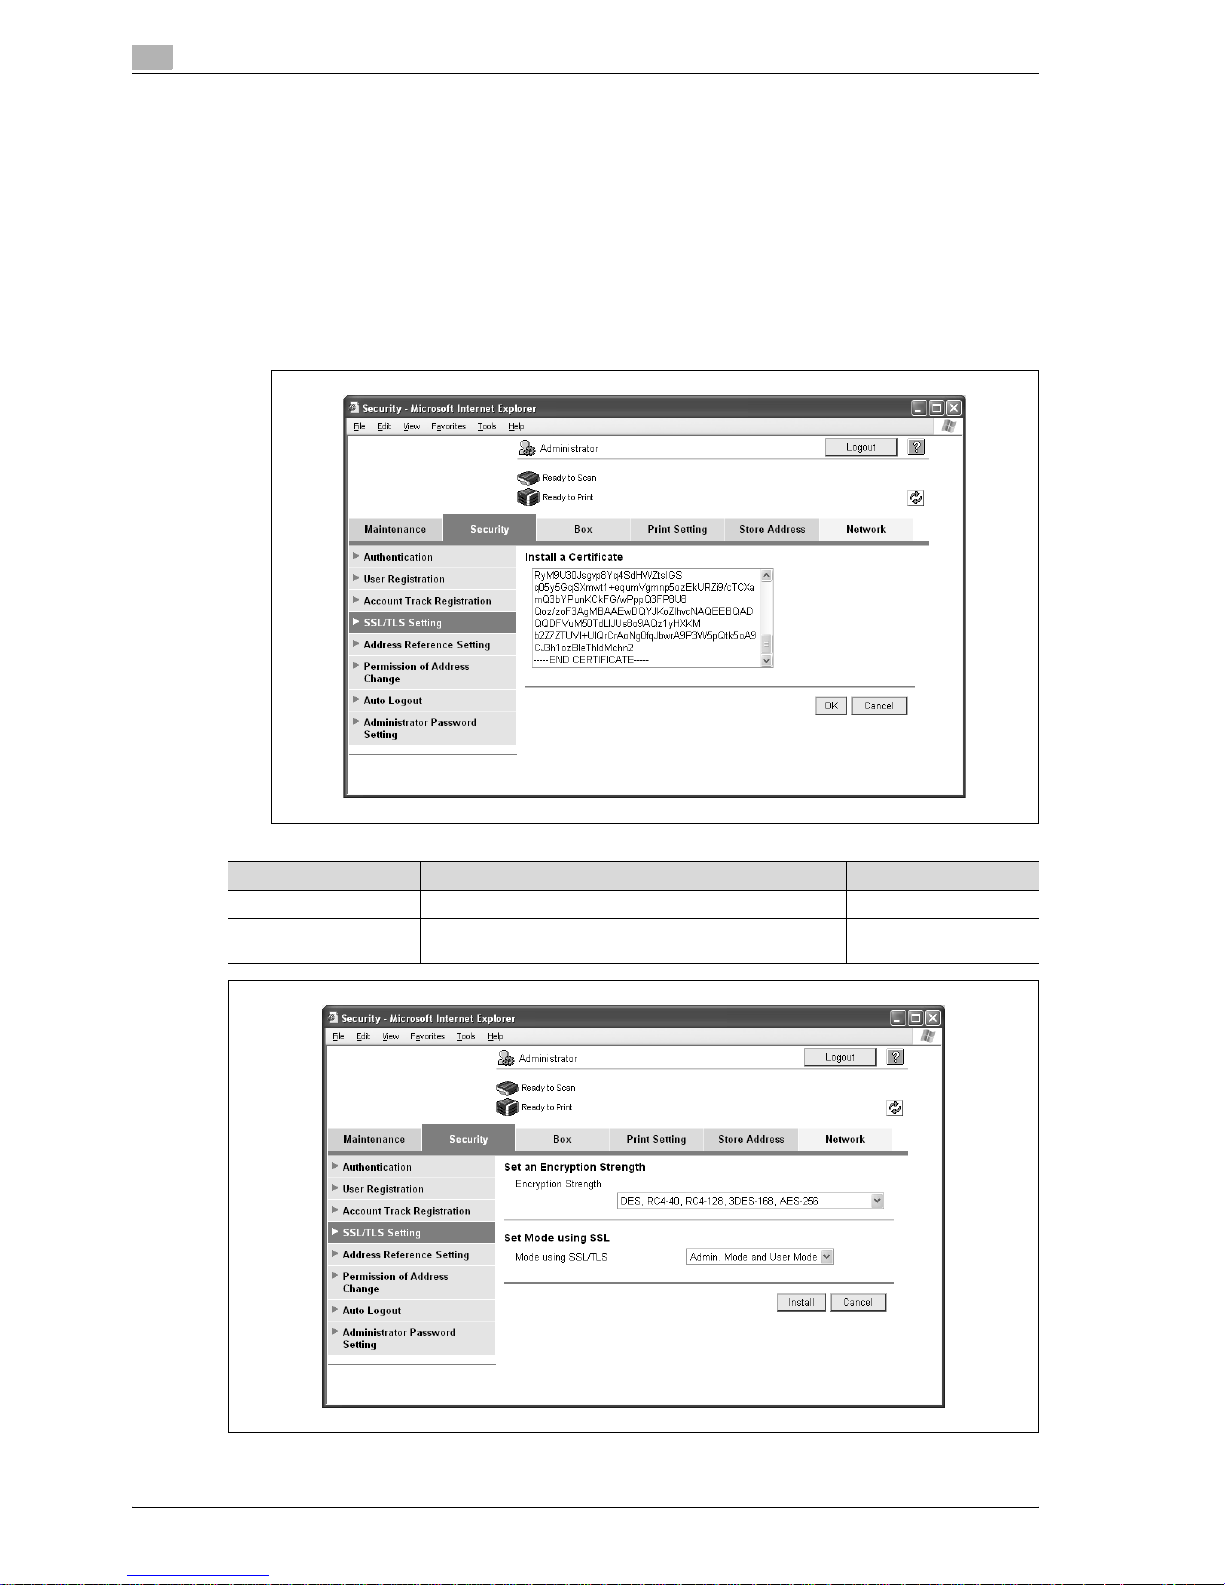
2.4.3 Install a Certificate
1 In Administrator mode of Web Connection, select the Security tab.
2 Select "SSL/TLS Setting".
3 Select [Setup].
4 Select "Install a Certificate".
5 After requesting a certificate to the certification authority, install the certificate sent from the certification
authority on this machine.
Item Definition Prior confirmation
Install a Certificate Paste text data sent from the certification authority.
[OK] Moves to the Set an Encryption Strength and Set Mode us-
ing SSL screen.
Page 31

CS 193/173/163 2-15
Setup items by operation
2
2.4.4 Set an Encryption Strength
1 In Administrator mode of Web Connection, select the Security tab.
2 Select "SSL/TLS Setting"
3 Select [Setup].
4 Select "Set an Encryption Strength".
Item Definition Prior confirmation
Encryption Strength Specify the encryption method.
Mode using SSL/TLS Specify the SSL/TLS application range.
[Install] Installs the certificate.
Item Definition Prior confirmation
Encryption Strength If necessary, change the set encryption strength. Specify the
encryption strength.
Page 32

2
Setup items by operation
2-16 CS 193/173/163
2.4.5 Set Mode using SSL
1 In Administrator mode of Web Connection, select the Security tab.
2 Select "SSL/TLS Setting".
3 Select [Setup].
4 Select "Set Mode using SSL".
Item Definition Prior confirmation
Mode using SSL/TLS If necessary, change the set SSL/TSL application range.
Specify the SSL/TLS application range.
Page 33

CS 193/173/163 2-17
Setup items by operation
2
2.4.6 Remove a certificate
1 In Administrator mode of Web Connection, select the Security tab.
2 Select "SSL/TLS Setting".
3 Select [Setup].
4 Select "Remove a Certificate".
– If necessary, remove the certificate installed on this machine. To remove the installed certificate,
click [OK].
!
Detail
If Enhanced Security Mode is set to "ON", the certificate cannot be removed.
Page 34

2
Setup items by operation
2-18 CS 193/173/163
2.5 Acquiring the certificate for this machine
% Acquire the certificate for this machine at the user side.
– Download the created certificate for this machine by accessing this machine with Web Connection.
Once the certificate for this machine is acquired, messages are encrypted based on the acquired
certificate (public key), and then sent from the user to this machine.
Specify the settings according to the following flowchart.
!
Detail
Users can acquire the certificate for this machine by receiving a message with a digital signature
attached from this machine. For details on sending E-Mails with the digital signature attached, refer to
"Sending scan data by E-mail (With the digital signature attached)" on page 2-39.
2.5.1 Create a certificate
% Create a certificate for this machine.
!
Detail
For details, refer to "Creating a certificate for this machine for SSL-based communication" on
page 2-10.
2.5.2 Download a certificate
1 In Administrator mode of Web Connection, select the Security tab.
2 Select "SSL/TLS Setting".
3 Select [Setup].
4 Select "Certificate Download".
5 To download a certificate to the computer, click [Download].
Create a certificate
Download a certificate
Finish
Page 35

CS 193/173/163 2-19
Setup items by operation
2
2.6 Registering a user certificate in this machine
% Register a user certificate in this machine
– When registering a certificate in this machine, the following methods are available: manual
registration at the time of address registration and auto registration by sending a message with a
digital signature attached.
Once the certificate for this machine is registered, messages are encrypted based on the registered
certificate, and then sent from the user to this machine.
Specify the settings according to the following flowchart.
(1) Manual registration
(2) Auto registration
(1) (2)
E-mail Address
Automatically Obtain
Certificates
Finish
Page 36

2
Setup items by operation
2-20 CS 193/173/163
2.6.1 E-mail Address
1 In Administrator mode of Web Connection, select the Store Address tab.
2 Select "Address Book".
3 Select [New Registration].
4 Select "Address Book (E-mail)".
2
Reminder
If the E-mail address to be registered does not match the E-mail address of the certificate, the
certificate cannot be registered. Confirm whether both E-mail addresses match, and then register the
certificate.
Item Definition Prior confirmation
Registration of Certification Information
Select the "Registration of Certification Information" check
box. To specify a storage location of certification information
to be registered, click [Browse].
Only files in the DER (Distinguished Encoding Rules) format
are supported for certificate information.
To delete the certificate information, select "Deletion of Certification Information".
Certificate storage location
Page 37

CS 193/173/163 2-21
Setup items by operation
2
2.6.2 Automatically Obtain Certificates
1 In Administrator mode of Web Connection, select the Network tab.
2 Select "E-mail Setting".
3 Select "S/MIME".
!
Detail
After specifying settings for "Automatically Obtain Certificates", register the E-mail address for which a
certificate is to be registered in Address Book. After registering the E-mail address, send the message
with a digital signature attached from the computer on the network to this machine. If the E-mail
address registered in this machine matches the E-mail address of the received certificate, the certificate
is automatically registered.
Item Definition Prior confirmation
S/MIME Comm. Setting Select "ON".
Automatically Obtain
Certificates
Select "ON".
Page 38

2
Setup items by operation
2-22 CS 193/173/163
2.7 Specifying the date and time on this machine
% Specify the date and time of the internal clock of this machine.
The following specification methods are available: manual specification and acquisition from the NTP server
via the network.
To use the fax function on this machine, specify the date and time of this machine in advance.
To make this machine log in to the Active Directory, it may be necessary to specify the date and time of this
machine.
Specify the settings according to the following flowchart.
!
Detail
The following sections contain descriptions on the settings to make this machine log in to the Active
Directory. For details, refer to the respective sections.
"Searching for E-mail addresses from the LDAP server" on page 2-45
"Limiting users using this machine (Active Directory)" on page 2-128
Use NTP?
Manual Setting TCP/IP Settings
Time Zone
Time Adjustment Setting
Finish
No Yes
Page 39

CS 193/173/163 2-23
Setup items by operation
2
2.7.1 Manual Setting
1 In Administrator mode of Web Connection, select the Maintenance tab.
2 Select "Date/Time Setting".
3 Select "Manual Setting".
2.7.2 TCP/IP Settings
% Specify settings to use this machine in a TCP/IP network environment.
!
Detail
For details, refer to "Specifying general settings for TCP/IP-based communication" on page 2-3.
2.7.3 Time Zone
% On the Manual Setting screen, specify setting for "Time Zone".
!
Detail
For details, refer to "Manual Setting" on page 2-23.
Item Definition Prior confirmation
Year Enter the year.
Month Enter the month.
Day Enter the day.
Hour Enter the hour.
Minute Enter the minutes.
Time Zone Select the time difference from GMT. Time zone
Daylight Saving Time If necessary, specify the daylight saving time setting.
Page 40

2
Setup items by operation
2-24 CS 193/173/163
2.7.4 Time Adjustment Setting
1 In Administrator mode of Web Connection, select the Maintenance tab.
2 Select "Date/Time Setting".
3 Select "Time Adjustment Setting".
Item Definition Prior confirmation
Time Adjustment Setting Select "ON".
NTP Server Address Specify the NTP server address. (Format: "***.***.***.***",
Range for ***: 0 to 255)
If the DNS server is specified, the address can be specified
using the host name.
This item can also be specified with IPv6.
Address of the server
Port Number Default setting: 123
Specify the port number.
Port number for the server
[Adjust] Connects to the NTP server with the specified conditions to
adjust the time.
Page 41

CS 193/173/163 2-25
Setup items by operation
2
2.8 Sending scan data to a Windows computer
% Specify settings for sending scan data to a Windows computer.
Scan data can be sent directly to a computer specified on the network. In order to perform a Scan to PC
(SMB) operation, first specify shared file settings in Windows on the computer receiving the data.
This machine supports the direct hosting service. To specify a destination computer using the computer
name in the IPv6 environment, the Direct Hosting setting must be enabled. When the Direct Hosting setting
is enabled, the DNS server is used for name resolution to start communication with the computer name
specified and the IPv6 address is acquired. To use the direct hosting service, prepare a DNS server and
specify the DNS settings of this machine correctly.
To specify a computer on another network using Windows name (NetBIOS name), a WINS server must be
used.
Specify the settings according to the following flowchart.
!
Detail
For details on registering SMB addresses, refer to "Registering or editing an address book destination"
on page 2-182.
For details on the SMB-based file transmission, refer to the User manual – Network Scan/Fax/Network
Fax Operations.
2.8.1 TCP/IP Settings
% Specify settings to use this machine in a TCP/IP network environment.
!
Detail
To specify a destination computer using the computer name in the IPv6 environment, the Direct Hosting
setting must be enabled. To enable the Direct Hosting setting, prepare a DNS server and be sure to
specify the DNS settings of this machine correctly.
For details, refer to "Specifying general settings for TCP/IP-based communication" on page 2-3.
TCP/IP Settings
Client Setting
Use the WINS server?
Yes No
Direct Hosting Setting
WINS Setting
Finish
Page 42

2
Setup items by operation
2-26 CS 193/173/163
2.8.2 Client Setting
1 In Administrator mode of Web Connection, select the Network tab.
2 Select "SMB Setting".
3 Select "Client Setting".
Item Definition Prior confirmation
SMB TX Setting Select "ON".
NTLM Setting Specify the NTLM version.
To perform SMB TX to Mac OSX, Samba (Linux/Unix), specify "v1".
To perform SMB TX to Windows 98SE/Windows Me, specify
"v1/v2" or "v1".
Destination OS
Page 43

CS 193/173/163 2-27
Setup items by operation
2
2.8.3 Direct Hosting Setting
1 In Administrator mode of Web Connection, select the Network tab.
2 Select "SMB Setting".
3 Select "Direct Hosting Setting".
Item Definition Prior confirmation
Direct Hosting Setting To use the direct hosting service, select "ON".
To communicate with the destination using an IPv6 address,
select "ON".
Whether the IPv6 environment is available
Page 44

2
Setup items by operation
2-28 CS 193/173/163
2.8.4 WINS Setting
1 In Administrator mode of Web Connection, select the Network tab.
2 Select "SMB Setting".
3 Select "WINS Setting".
Item Definition Prior confirmation
WINS To use the WINS server, select "ON".
Auto Obtain Setting To automatically obtain the WINS server address, select
"Enable".
This item is enabled when the DHCP is enabled.
Whether automatic acquisition is available with
DHCP
WINS Server Address 1
and 2
Specify the WINS server address. (Format: "***.***.***.***",
Range for ***: 0 to 255)
Address of the server
Node Type Setting Specify the name resolution method.
• B Node: Query by broadcast
• P Node: Query to WINS server
• M Node: Query in the order of broadcast, then WINS
server
• H Node: Query in the order of WINS server, then broadcast
Page 45

CS 193/173/163 2-29
Setup items by operation
2
2.9 Sending scan data by E-mail
% Specify settings for sending scan data by E-mail.
!
Detail
Scan data can be sent to a specified E-mail address as an attached file of the message.
If the SMTP server supports SMTP over SSL or STARTTLS, setting is recommended. Because
communication can be encrypted by SSL/TLS, the machine can communicate securely with the server.
If the SMTP server requires SMTP authentication, the SMTP authentication setting must be specified.
If the SMTP server requires POP before SMTP authentication, the POP before SMTP authentication
setting must be specified. In addition, if the POP server supports POP over SSL or APOP
authentication, settings for these can be specified.
Specify the settings according to the following flowchart.
TCP/IP Settings
E-mail TX (SMTP)
Communicate with the SMTP
server using SSL/TLS?
SMTP Authentication? POP before SMTP?
Yes Yes Yes
Yes
No No No
No
SMTP over SSL/Start TLS SMTP Authentication POP before SMTP
(1) POP over SSL?
(2) APOP
(1) POP over SSL
(2) APOP Authentication
Finish
Page 46

2
Setup items by operation
2-30 CS 193/173/163
!
Detail
For details on registering E-mail addresses, refer to "Registering or editing an address book
destination" on page 2-182.
For details on the E-mail-based file transmission, refer to the User manual – Network Scan/Fax/Network
Fax Operations.
2.9.1 TCP/IP Settings
% Specify settings to use this machine in a TCP/IP network environment.
!
Detail
For details, refer to "Specifying general settings for TCP/IP-based communication" on page 2-3.
2.9.2 E-mail TX (SMTP)
E-mail TX (SMTP)
1 In Administrator mode of Web Connection, select the Network tab.
2 Select "E-mail Setting.".
3 Select "E-mail TX (SMTP)".
Page 47

CS 193/173/163 2-31
Setup items by operation
2
Item Definition Prior confirmation
E-mail TX Setting Select "ON".
Scan to E-mail Select "ON".
SMTP Server Address Specify the SMTP server address. (Format: "***.***.***.***",
Range for ***: 0 to 255)
If the DNS server is specified, the address can be specified
using the host name.
This item can also be specified with IPv6.
Address of the server
Port Number Default setting: 25
Specify the port number.
Port number for the server
Connection Timeout Specify the time period before the server connection times
out.
Max Mail Size Select whether to limit the size of sent messages.
Server Capacity To limit the maximum mail size, specify the max. allowance
of the mail size including the attached file.
Mails exceeding the maximum allowance are removed.
If a mail is separated, this setting is disabled.
Receiving limit of the
server
Admin. E-mail Address The administrator address specified in "Machine Setting" in
the Maintenance tab in Administrator mode of
Web Connection is displayed.
Binary Division To divide the mail size, select "ON".
If the mail software used for receiving mails does not have
the mail restore function, the mails may not be read.
Restore function of the
mail soft
Divided Mail Size To divide the mail, specify a divided mail size. Receiving limit of the
server
Page 48

2
Setup items by operation
2-32 CS 193/173/163
Admin. E-mail Address
1 In Administrator mode of Web Connection, select the Maintenance tab.
2 Select "Machine Setting".
3 Specify the administrator address.
!
Detail
If "Change the From Address" is set to "Restrict", the From address cannot be changed when sending
an E-Mail message. For details, refer to the User manual – Network Scan/Fax/Network Fax Operations.
Item Definition Prior confirmation
Admin. E-mail Address Specify the address for the administrator (up to 128 charac-
ters).
If the administrator address is not set, messages cannot be
sent.
The set address is displayed on the transmitter section of the
message. Before messages are sent, the address can be
changed to one other than the administrator address from
the control panel.
Address for the administrator
Page 49

CS 193/173/163 2-33
Setup items by operation
2
2.9.3 SMTP over SSL/Start TLS
E-mail TX (SMTP)
1 In Administrator mode of Web Connection, select the Network tab.
2 Select "E-mail Setting".
3 Select "E-mail TX (SMTP)".
4 Specify the following settings.
Action for Invalid Certificate
1 In Administrator mode of Web Connection, select the Security tab.
2 Select "SSL/TLS Setting".
3 Select [Setup].
4 Select "Set Mode using SSL".
!
Detail
To specify settings for "Action for Invalid Certificate", create a certificate for this machine in advance.
For details, refer to "Creating a certificate for this machine for SSL-based communication" on
page 2-10.
Item Definition Prior confirmation
Use SSL/TLS To encrypt communication between this machine and the
SMTP server using SSL/TTS, select "SMTP over SSL" or
"Start TLS".
Whether the sever supports SSL or STARTTLS
Port Number Default setting: 25
If "Start TLS" is selected, specify the port number.
Port number for the server
Port No. (SSL) Default setting: 465
If "SMTP over SSL" is selected, specify the port number to
be used for SSL communication.
Port number for the server
Page 50

2
Setup items by operation
2-34 CS 193/173/163
2.9.4 SMTP Authentication
1 In Administrator mode of Web Connection, select the Network tab.
2 Select "E-mail Setting".
3 Select "E-mail TX (SMTP)".
4 Specify the following settings.
!
Detail
A SMTP authentication method that is supported by the SMTP server and provided with the strongest
encryption strength is automatically selected from Digest-MD5, CRAM-MD5, PLAIN, and LOGIN.
If there is just one domain (realm) to which the user belongs, it is notified from the SMTP server at the
time of initial communication, and communication is automatically made using the domain name.
Therefore, no domain name setting on this machine is not required. If there are two domains or more
to which the user belongs, however, specify the domain name to which the user belongs.
Item Definition Prior confirmation
Action for Invalid Certificate
Specify the operation when the validity period for the received certificate has expired.
If "Continue" is selected, processing continues even if the
date of the certificate is invalid.
If "Delete the Job" is selected, the job is deleted if the date
of the certificate is invalid.
Item Definition Prior confirmation
SMTP Authentication To perform SMTP authentication, select the "SMTP Authen-
tication" check box.
Whether the sever requests SMTP
User ID Specify the user ID for the SMTP authentication (up to 255
characters).
Password Specify the password for the SMTP authentication (up to 128
characters).
Domain Name Specify the domain name for the SMTP authentication (up to
255 characters).
If the authentication method is Digest-MD5, the domain
name must be specified.
Authentication method
Authentication Settings Specify whether to synchronize with user authentication.
When user authentication is performed, this item is displayed.
Whether to synchronize
the user authentication
Page 51

CS 193/173/163 2-35
Setup items by operation
2
2.9.5 POP before SMTP
POP before SMTP
1 In Administrator mode of Web Connection, select the Network tab.
2 Select "E-mail Setting".
3 Select "E-mail TX (SMTP)".
4 Specify the following settings.
!
Detail
If the POP server is different from the SMTP server, the POP server informs the SMTP server that it has
been logged in. Therefore, if the set POP before SMTP time is too short, messages may not be sent.
E-mail RX (POP)
1 In Administrator mode of Web Connection, select the Network tab.
2 Select "E-mail Setting".
3 Select "E-mail RX (POP)".
Item Definition Prior confirmation
POP before SMTP To perform POP before SMTP, select "ON". Whether the sever requires POP before
SMTP authentication
POP before SMTP Time Specify the time period to access the SMTP
server after logging in to the POP server.
Whether the POP server is different from
the SMTP server
Page 52

2
Setup items by operation
2-36 CS 193/173/163
2.9.6 POP over SSL
E-mail RX (POP)
1 In Administrator mode of Web Connection, select the Network tab.
2 Select "E-mail Setting".
3 Select "E-mail RX (POP)".
4 Specify the following settings.
Item Definition Prior confirmation
E-mail RX Setting To perform POP before SMTP, select "ON".
POP Server Address Specify the POP server address. (Format: "***.***.***.***",
Range for ***: 0 to 255)
If the DNS server is specified, the address can be specified
using the host name.
This item can also be specified with IPv6.
Address of the server
Login Name Enter the login name for the POP server (up to 63 charac-
ters).
Password Specify the password for logging in to the POP server (up to
15 characters).
Connection Timeout Specify the time period before the server connection times
out.
Port Number Default setting: 110
Specify the port number.
Port number for the server
Item Definition Prior confirmation
Use SSL/TLS To encrypt communication between this machine and the
POPS server using SSL, select the "Use SSL/TLS" check
box.
Whether the sever supports SSL
Port No. (SSL) Default setting: 995
Specify the port number used in SSL communication.
Port number for the server
Page 53

CS 193/173/163 2-37
Setup items by operation
2
Action for Invalid Certificate
1 In Administrator mode of Web Connection, select the Security tab.
2 Select "SSL/TLS Setting".
3 Select [Setup].
4 Select "Set Mode using SSL".
!
Detail
To specify settings for "Action for Invalid Certificate", create a certificate for this machine in advance.
For details, refer to "Creating a certificate for this machine for SSL-based communication" on
page 2-10.
Item Definition Prior confirmation
Action for Invalid Certificate
Specify the operation when the validity period for the received certificate has expired.
If "Continue" is selected, processing continues even if the
date of the certificate is invalid.
If "Delete the Job" is selected, the job is deleted if the date
of the certificate is invalid.
Page 54

2
Setup items by operation
2-38 CS 193/173/163
2.9.7 APOP Authentication
1 In Administrator mode of Web Connection, select the Network tab.
2 Select "E-mail Setting".
3 Select "E-mail RX (POP)".
4 Specify the following settings.
!
Detail
When the POP server is logged in with APOP, the password is encrypted with Digest-MD5. If "ON" is
specified for APOP authentication, you cannot log in to the server if the POP server does not support
APOP.
Item Definition Prior confirmation
APOP Authentication To encrypt the login name and password when logging in to
the POP server, select "ON".
Whether the sever requests APOP
Page 55

CS 193/173/163 2-39
Setup items by operation
2
2.10 Sending scan data by E-mail (With the digital signature attached)
% Specify settings for sending scan data by E-mail with the digital signature attached.
When scan data is sent by E-mail, it can be sent with the digital signature attached.
The certificate for this machine can be sent to the user by sending a message with the digital signature
attached. Users can encrypt the message to send to this machine using the received certificate.
Communication by combining POP before SMTP, APOP, SMTP authentication or encryption using SSL/TLS
is available.
!
Detail
For details, refer to "Sending scan data by E-mail" on page 2-29.
Specify the settings according to the following flowchart.
TCP/IP Settings
E-mail TX (SMTP)
Create a certificate
S/MIME
Communicate with the
SMTP server using
SSL/TLS?
SMTP Authentication? POP before SMTP?
Yes Yes YesNo No No
NoYes
SMTP over SSL/Start TLS
SMTP Authentication POP before SMTP
(1) POP over SSL?
(2) APOP?
(1) POP over SSL
(2) APOP Authentication
Finish
Page 56

2
Setup items by operation
2-40 CS 193/173/163
2.10.1 TCP/IP Settings
% Specify settings to use this machine in a TCP/IP network environment.
!
Detail
For details, refer to "Specifying general settings for TCP/IP-based communication" on page 2-3.
2.10.2 E-mail TX (SMTP)
% Specify settings for sending messages.
!
Detail
For details, refer to "E-mail TX (SMTP)" on page 2-30.
2.10.3 Create a certificate
% Create a certificate for this machine.
!
Detail
For details, refer to "Creating a certificate for this machine for SSL-based communication" on
page 2-10.
2.10.4 S/MIME
1 In Administrator mode of Web Connection, select the Network tab.
2 Select "E-mail Setting".
3 Select "S/MIME".
Page 57

CS 193/173/163 2-41
Setup items by operation
2
2.10.5 SMTP over SSL/Start TLS
% Specify the settings for SMTP over SSL/Start TLS.
!
Detail
For details, refer to "SMTP over SSL/Start TLS" on page 2-33.
2.10.6 SMTP Authentication
% Specify the settings for SMTP authentication.
!
Detail
For details, refer to "SMTP Authentication" on page 2-34.
2.10.7 POP before SMTP
% Specify the settings for POP before SMTP.
!
Detail
For details, refer to "POP before SMTP" on page 2-35.
2.10.8 POP over SSL
% Specify the settings for POP over SSL.
!
Detail
For details, refer to "POP over SSL" on page 2-36.
2.10.9 APOP Authentication
% Specify the settings for APOP authentication.
!
Detail
For details, refer to "APOP Authentication" on page 2-38.
Item Definition Prior confirmation
S/MIME Comm. Setting Select "ON".
Digital Signature Select "Always add signature" or "Select when sending".
Page 58

2
Setup items by operation
2-42 CS 193/173/163
2.11 Sending scan data by E-mail (Public key-based encryption)
% Specify settings for sending scan data as a message encrypted by public keys.
When scan data is sent by E-mail, the scan data can be sent by encrypting it using the user certificate
registered in this machine in advance.
Sending encrypted messages prevents disclosure of information to third parties on the transmission path. In
addition, if the message is encrypted by attaching the digital signature, authentication of this machine and
message is possible.
!
Detail
For details on attaching the digital signature to messages, refer to "Sending scan data by E-mail (With
the digital signature attached)" on page 2-39.
Communication by combining POP before SMTP, APOP, SMTP authentication or encryption using
SSL/TLS is available. For details, refer to "Sending scan data by E-mail" on page 2-29.
Specify the settings according to the following flowchart.
TCP/IP Settings
E-mail TX (SMTP)
S/MIME
Communicate with the
SMTP server using
SSL/TLS?
SMTP Authentication? POP before SMTP?
SMTP over SSL/Start TLS SMTP Authentication POP before SMTP
NoYes
(1) POP over SSL?
(2) APOP?
(1) POP over SSL
(2) APOP Authentication
Finish
NoYes NoYes NoYes
Page 59

CS 193/173/163 2-43
Setup items by operation
2
!
Detail
Addresses for which no certificate is registered are not selectable. To encrypt messages for sending,
register the user certificate in this machine in advance. For details, refer to "Registering a user certificate
in this machine" on page 2-19.
2.11.1 TCP/IP Settings
% Specify settings to use this machine in a TCP/IP network environment.
!
Detail
For details, refer to "Specifying general settings for TCP/IP-based communication" on page 2-3.
2.11.2 E-mail TX (SMTP)
% Specify settings for sending messages.
!
Detail
For details, refer to "E-mail TX (SMTP)" on page 2-30.
2.11.3 S/MIME
1 In Administrator mode of Web Connection, select the Network tab.
2 Select "E-mail Setting".
3 Select "S/MIME".
Page 60

2
Setup items by operation
2-44 CS 193/173/163
2.11.4 SMTP over SSL/Start TLS
% Specify the settings for SMTP over SSL/Start TLS.
!
Detail
For details, refer to "SMTP over SSL/Start TLS" on page 2-33.
2.11.5 SMTP Authentication
% Specify the settings for SMTP authentication.
!
Detail
For details, refer to "SMTP Authentication" on page 2-34.
2.11.6 POP before SMTP
% Specify the settings for POP before SMTP.
!
Detail
For details, refer to "POP before SMTP" on page 2-35.
2.11.7 POP over SSL
% Specify the settings for POP over SSL.
!
Detail
For details, refer to "POP over SSL" on page 2-36.
2.11.8 APOP Authentication
% Specify the settings for APOP authentication.
!
Detail
For details, refer to "APOP Authentication" on page 2-38.
Item Definition Prior confirmation
S/MIME Comm. Setting Select "ON".
E-Mail Text Encrypt.
Method
Specify the encryption type for the body of E-mail messages.
Page 61

CS 193/173/163 2-45
Setup items by operation
2
2.12 Searching for E-mail addresses from the LDAP server
% Specify settings for searching for E-mail addresses from the LDAP server.
If the LDAP server is being for user management, the LDAP server can be accessed for searching for E-mail
addresses. If this setting is specified, the [Address Search (LDAP)] key is displayed on the control panel.
Using the LDAP server when specifying addresses saves trouble of registering addresses in this machine.
Also, to specify Active Directory as the LDAP server and select "GSS-SPNEGO" as the authentication
method, be sure to specify a DNS server synchronized with Active Directory in the DNS Server Settings of
this machine, and specify the date and time of this machine.
Specify the settings according to the following flowchart.
!
Detail
For details on the LDAP search-based transmission method, refer to the User manual – Network
Scan/Fax/Network Fax Operations.
TCP/IP Settings
Manual Destination Input
LDAP Setting
Setting Up LDAP
Communicate with the LDAP
server using SSL?
Use Active Directory
(GSS-SP-NEGO)?
Yes No No Yes
LDAP over SSL DNS Server Settings
Date/Time Setting
Finish
Page 62

2
Setup items by operation
2-46 CS 193/173/163
2.12.1 TCP/IP Settings
% Specify settings to use this machine in a TCP/IP network environment.
!
Detail
For details, refer to "Specifying general settings for TCP/IP-based communication" on page 2-3.
2.12.2 Manual Destination Input
1 On the Administrator Settings screen of the control panel, select [Security Settings].
2 Select [4 Security Details].
3 Select [Manual Destination Input].
!
Detail
For details on displaying the Network Setting screen, refer to "Displaying the Network Settings screen"
on page 3-3.
Item Definition Prior confirmation
Manual Destination Input Select [Allow].
Page 63

CS 193/173/163 2-47
Setup items by operation
2
2.12.3 LDAP Setting
1 In Administrator mode of Web Connection, select the Network tab.
2 Select "LDAP Setting".
3 Select "LDAP Setting".
Item Definition Prior confirmation
Enabling LDAP Select "ON".
Page 64

2
Setup items by operation
2-48 CS 193/173/163
2.12.4 Setting Up LDAP
1 In Administrator mode of Web Connection, select the Network tab.
2 Select "LDAP Setting".
3 Select "Setting Up LDAP".
4 Select [Edit].
Page 65

CS 193/173/163 2-49
Setup items by operation
2
!
Detail
Select the authentication method that is used by the LDAP server being used. For details, refer to the
manual for the LDAP server being used.
Item Definition Prior confirmation
LDAP Server Name Specify the name of the LDAP server.
Server Address Specify the LDAP server address. (Format: "***.***.***.***",
Range for ***: 0 to 255)
If the DNS server is specified, the address can be specified
using the host name.
This item can also be specified with IPv6.
Address of the server
Port Number Default setting: 389
Specify the port number.
Port number for the server
Search Base Specify the search starting point in a hierarchical structure
placed on the LDAP server. Searches are performed through
the directory at the starting point and subdirectories under
the directory.
Search base
Timeout Specify the maximum wait time for a search operation.
Max. Search Results Specify the maximum number of destinations to be dis-
played after a search.
Authentication Method Select the authentication method used for logging in to the
LDAP server.
If "anonymous" is selected, it is not necessary to specify the
login name, password, and domain name.
When "GSS-SPNEGO" is selected, the machine logs in to
the server using the Kerberos authentication method. The
Kerberos authentication method is supported by Active Directory.
Authentication method
for the server
Login Name Specify the login name for logging in to the LDAP server (up
to 255 characters).
Password Specify the password for logging in to the LDAP server (up
to 128 characters).
Domain Name Specify the domain name for logging in to the LDAP server
(up to 64 characters).
If "GSS-SPNEGO" is selected, specify the domain name of
Active Directory.
Authentication method
Domain name
Select Server Authentication Method
Specify the server authentication method.
If "Set Value" is selected, the specified login name, password, and domain name are used.
If "Use User Authentication" is selected, the user name and
password used for external server authentication are used.
When "Dynamic Authentication" is selected, a user name
and password is requested for address search (LDAP).
Use Referral To use the referral function, select "ON".
Initial Setting for Search
Details
Specify the conditions for performing a detailed LDAP
search.
Page 66

2
Setup items by operation
2-50 CS 193/173/163
2.12.5 LDAP over SSL
Setting Up LDAP
1 In Administrator mode of Web Connection, select the Network tab.
2 Select "LDAP Setting".
3 Select "Setting Up LDAP".
4 Select [Edit].
5 Specify the following settings.
Action for Invalid Certificate
1 In Administrator mode of Web Connection, select the Security tab.
2 Select "SSL/TLS Setting".
3 Select [Setup].
4 Select "Set Mode using SSL".
!
Detail
To specify settings for "Action for Invalid Certificate", create a certificate for this machine in advance.
For details, refer to "Creating a certificate for this machine for SSL-based communication" on
page 2-10.
Item Definition Prior confirmation
Enable SSL To encrypt communication between this machine and the
LDAP server using SSL, select the "Enable SSL" check box.
Whether the sever supports SSL
Port Number (SSL) Default setting: 636
Specify the port number used in SSL communication.
Port number for the server
Page 67

CS 193/173/163 2-51
Setup items by operation
2
2.12.6 DNS Server Settings
% To specify Active Directory as the LDAP server and select "GSS-SPNEGO" as the authentication
method, specify a DNS server synchronized with Active Directory in the DNS Server Settings of this
machine.
!
Detail
For details on the DNS server, refer to "Specifying general settings for TCP/IP-based communication"
on page 2-3.
2.12.7 Date/Time Setting
% When using Active Directory, specify the date and time on this machine.
!
Detail
For details, refer to "Specifying the date and time on this machine" on page 2-22.
Item Definition Prior confirmation
Action for Invalid Certificate
Specify the operation when the validity period for the received certificate has expired.
If "Continue" is selected, processing continues even if the
date of the certificate is invalid.
If "Delete the Job" is selected, the job is deleted if the date
of the certificate is invalid.
Page 68

2
Setup items by operation
2-52 CS 193/173/163
2.13 Sending scan data by FTP
% Specify settings for sending scan data to the FTP server.
In a network environment with an FTP server, scan data can be sent to a specified folder in the FTP server
on the network. The data sent to the FTP server can be downloaded from a computer on the network. This
function is suitable for transmitting large-sized data, such as high-resolution data.
If a proxy server is available in the network environment, an FTP server on the Internet can be accessed
through the proxy server.
Specify the settings according to the following flowchart.
!
Detail
For details on registering FTP, refer to "Registering or editing an address book destination" on
page 2-182.
For details on the FTP-based file transmission, refer to the User manual – Network Scan/Fax/Network
Fax Operations.
2.13.1 TCP/IP Settings
% Specify settings to use this machine in a TCP/IP network environment.
!
Detail
For details, refer to "Specifying general settings for TCP/IP-based communication" on page 2-3.
TCP/IP Settings
FTP TX Setting
Finish
Page 69

CS 193/173/163 2-53
Setup items by operation
2
2.13.2 FTP TX Setting
1 In Administrator mode of Web Connection, select the Network tab.
2 Select "FTP Setting".
3 Select "FTP TX Settings".
Item Definition Prior confirmation
FTP TX Select "ON".
Proxy Server Address To send data via a proxy server, specify the proxy server ad-
dress. (Format: "***.***.***.***", Range for ***: 0 to 255)
If the DNS server is specified, the address can be specified
using the host name.
This item can also be specified with IPv6.
Address of the server
Proxy Server Port
Number
Specify the port number. Port number for the serv-
er
Connection Timeout Specify the time period before the server connection times
out.
Port Number Default setting: 21
Specify the port number.
Port number for the server
Page 70

2
Setup items by operation
2-54 CS 193/173/163
2.14 Sending scan data by WebDAV
% Specify settings for sending scan data to the WebDAV server.
In a network environment with a WebDAV server, scan data can be sent to a specified folder in the WebDAV
server on the network. The data sent to the WebDAV server can be downloaded from a computer on the
network.
WebDAV is based on extended specifications of HTTP, and therefore the security technology of HTTP can
be used. These settings ensure safer file transmission by encrypting communication with the WebDAV server
using SSL.
If a proxy server is available in the network environment, an WebDAV server on the Internet can be accessed
through the proxy server.
Specify the settings according to the following flowchart.
!
Detail
For details on registering WebDAV addresses, refer to "Registering or editing an address book
destination" on page 2-182.
For details on the WebDAV-based file transmission, refer to the User manual – Network
Scan/Fax/Network Fax Operations.
!
Detail
Whether or not to send using SSL encryption is specified at address registration. For details, refer to
"Address Book" on page 2-182.
TCP/IP Settings
WebDAV Settings
Communicate with the Web-
DAV server using SSL?
Yes
No
WebDAV over SSL
Finish
Page 71

CS 193/173/163 2-55
Setup items by operation
2
2.14.1 TCP/IP Settings
% Specify settings to use this machine in a TCP/IP network environment.
!
Detail
For details, refer to "Specifying general settings for TCP/IP-based communication" on page 2-3.
2.14.2 WebDAV Settings
1 In Administrator mode of Web Connection, select the Network tab.
2 Select "WebDAV Settings".
Item Definition Prior confirmation
WebDAV TX Setting Select "ON".
Proxy Server Address To send data via a proxy server, specify the proxy server ad-
dress. (Format: "***.***.***.***", Range for ***: 0 to 255)
If the DNS server is specified, the address can be specified
using the host name.
This item can also be specified with IPv6.
Address of the server
Proxy Server Port
Number
Specify the port number. Port number for the serv-
er
User Name Specify the user name for the proxy server (up to 63 charac-
ters).
Password Specify the password for the proxy server (up to 63 charac-
ters).
Connection Timeout Specify the time period before the server connection times
out.
Page 72

2
Setup items by operation
2-56 CS 193/173/163
2.14.3 WebDAV over SSL
1 In Administrator mode of Web Connection, select the Security tab.
2 Select "SSL/TLS Setting".
3 Select [Setup].
4 Select "Set Mode using SSL".
!
Detail
To specify settings for "Action for Invalid Certificate", create a certificate for this machine in advance.
For details, refer to "Creating a certificate for this machine for SSL-based communication" on
page 2-10.
Item Definition Prior confirmation
Action for Invalid Certificate
Specify the operation when the validity period for the received certificate has expired.
If "Continue" is selected, processing continues even if the
date of the certificate is invalid.
If "Delete the Job" is selected, the job is deleted if the date
of the certificate is invalid.
Page 73

CS 193/173/163 2-57
Setup items by operation
2
2.15 Sending an Internet fax
% Specify settings for sending an Internet fax.
!
Detail
In order to use the Internet fax function, settings by a service engineer is required. For details, contact
your service representative.
The Internet fax function sends and receives scanned originals as an attached file (TIFF format) via the
intranet or Internet. This via-intranet or -Internet communication largely reduces the communication cost as
compared with general fax messages.
Communication by combining POP before SMTP, APOP, SMTP authentication or encryption using SSL/TLS
is available. For details, refer to "Sending scan data by E-mail" on page 2-29.
Specify the settings according to the following flowchart.
Finish
TCP/IP Settings
Internet Fax Function
Regist machine
information
Header Information
E-mail TX (SMTP)
I-Fax Advanced Setting
Communicate with the
SMTP server using
SSL/TLS?
SMTP Authentication? POP before SMTP?
Yes No No No
No
Yes Yes
Yes
SMTP over SSL/Start TLS SMTP Authentication POP before SMTP
(1) POP over SSL?
(2) APOP?
(1) POP over SSL
(2) APOP Authentication
Page 74

2
Setup items by operation
2-58 CS 193/173/163
!
Detail
For details on registering I-Fax addresses, refer to "Registering or editing an address book destination"
on page 2-182.
For details on the Internet fax operation, refer to the User manual – Network Scan/Fax/Network Fax
Operations.
2.15.1 TCP/IP Settings
% Specify settings to use this machine in a TCP/IP network environment.
!
Detail
For details, refer to "Specifying general settings for TCP/IP-based communication" on page 2-3.
2.15.2 Internet Fax Function
1 On the Administrator Settings screen of the control panel, select [5 Network Settings].
2 Select [2 Network Fax Setting]
3 Select [1 Network Fax Function Setting].
!
Detail
For details on displaying the Network Setting screen, refer to "Displaying the Network Settings screen"
on page 3-3.
Item Definition Prior confirmation
Internet Fax Function Select [ON].
Page 75

CS 193/173/163 2-59
Setup items by operation
2
2.15.3 Regist machine information
Device Mail Address
1 In Administrator mode of Web Connection, select the Network tab.
2 Select "E-mail Setting".
3 Select "E-mail TX (SMTP)".
Item Definition Prior confirmation
Device Mail Address Specify the address for the device (up to 320 characters).
If no address is specified here, the Internet fax cannot be
sent.
Address for the device
Page 76

2
Setup items by operation
2-60 CS 193/173/163
Machine Setting
1 In Administrator mode of Web Connection, select the Maintenance tab.
2 Select "Machine Setting".
Item Definition Prior confirmation
Device Name Specify the device name (up to 255 characters). This name
is contained in the subject of the Internet fax.
Page 77

CS 193/173/163 2-61
Setup items by operation
2
2.15.4 Header Information
1 In Administrator mode of Web Connection, select the Store Address tab.
2 Select "Header Information".
Registration
Item Definition Prior confirmation
Sender Fax No. Register the sender fax number. Normally enter the fax
number of this machine.
Default If no sender name is specified when sending a fax, the send-
er name with a check mark is used.
Sender Name Displays registered sender names.
[Edit] Registers or edits the sender name.
[Delete] Deletes the registered sender name.
Item Definition Prior confirmation
No. Displays the registration number.
Sender Name Enter the sender name (up to 30 characters).
Page 78

2
Setup items by operation
2-62 CS 193/173/163
2.15.5 E-mail TX (SMTP)
% Specify settings for sending messages.
!
Detail
For details, refer to "E-mail TX (SMTP)" on page 2-30.
2.15.6 I-Fax Advanced Setting
1 In Administrator mode of Web Connection, select the Network tab.
2 Select "E-mail Setting".
3 Select "I-FAX Advanced Setting".
!
Detail
If the Internet fax function is disabled, this menu item is not displayed.
Page 79

CS 193/173/163 2-63
Setup items by operation
2
2.15.7 SMTP over SSL/Start TLS
% Specify the settings for SMTP over SSL/Start TLS.
!
Detail
For details, refer to "SMTP over SSL/Start TLS" on page 2-33.
2.15.8 SMTP Authentication
% Specify the settings for SMTP authentication.
!
Detail
For details, refer to "SMTP Authentication" on page 2-34.
2.15.9 POP before SMTP
% Specify the settings for POP before SMTP.
!
Detail
For details, refer to "POP before SMTP" on page 2-35.
2.15.10 POP over SSL
% Specify the settings for POP over SSL.
!
Detail
For details, refer to "POP over SSL" on page 2-36.
2.15.11 APOP Authentication
% Specify the settings for APOP authentication.
!
Detail
For details, refer to "APOP Authentication" on page 2-38.
Item Definition Prior confirmation
MDN Request Select "ON".
If the fax is printed at the receiving side, MDN response can
be received.
DSN Request Select "ON".
If the fax reaches the mail server at the receiving side, DSN
response can be received.
If MDN is specified to "ON", DSN is not required.
MDN/DSN Response
Observation Time
Specify the waiting time for MDN or DSN response.
MDN or DSN response of which set waiting time was up is
ignored.
Maximum Resolution Specify the maximum resolution.
Page 80

2
Setup items by operation
2-64 CS 193/173/163
2.16 Receiving Internet faxes
% Specify settings for receiving Internet faxes.
!
Detail
In order to use the Internet fax function, setting by a service engineer is required. For details, contact
your service representative.
The Internet fax function sends and receives scanned originals as an attached file (TIFF format) via the
intranet (internal company networks) or Internet. This via-intranet or -Internet communication largely reduces
the communication cost as compared with general fax messages.
Performing APOP authentication when receiving an Internet fax ensures safer communication.
Specify the settings according to the following flowchart.
!
Detail
For details on registering I-Fax addresses, refer to "Registering or editing an address book destination"
on page 2-182.
For details on the Internet fax operation, refer to the User manual – Network Scan/Fax/Network Fax
Operations.
Finish
TCP/IP Settings
Internet Fax Function
E-mail RX (POP)
I-Fax Advance Setting
Communicate with the POP
server using SSL?
APOP?
Yes YesNo No
POP over SSL APOP Authentication
Page 81

CS 193/173/163 2-65
Setup items by operation
2
2.16.1 TCP/IP Settings
% Specify settings to use this machine in a TCP/IP network environment.
!
Detail
For details, refer to "Specifying general settings for TCP/IP-based communication" on page 2-3.
2.16.2 Internet Fax Function
% Enable the Internet fax function of this machine.
!
Detail
For details, refer to "Internet Fax Function" on page 2-58.
Page 82

2
Setup items by operation
2-66 CS 193/173/163
2.16.3 E-mail RX (POP)
1 In Administrator mode of Web Connection, select the Network tab.
2 Select "E-mail Setting".
3 Select "E-mail RX (POP)".
Item Definition Prior confirmation
E-mail RX Setting Select "ON".
POP Server Address Specify the POP server address. (Format: "***.***.***.***",
Range for ***: 0 to 255)
If the DNS server is specified, the address can be specified
using the host name.
This item can also be specified with IPv6.
Address of the server
Login Name Enter the login name for the POP server (up to 63 charac-
ters).
Password Type in the login password for the POP server (up to 15 char-
acters).
Connection Timeout Specify the time period before the server connection times
out.
Port Number Default setting: 110
Specify the port number.
Port number for the server
Check for New Messag-esTo automatically receive messages, select the "Check for
New Messages" check box.
Polling Interval To automatically receive messages, specify an interval for
receive messages automatically.
Page 83

CS 193/173/163 2-67
Setup items by operation
2
!
Detail
By touching [Receive I-Fax] on the Fax/Scan mode screen of the control panel, E-mail messages can
be manually received.
2.16.4 I-Fax Advance Setting
1 In Administrator mode of Web Connection, select the Network tab.
2 Select "E-mail Setting".
3 Select "I-FAX Advanced Setting".
!
Detail
If the Internet fax function is disabled, this menu item is not displayed.
Item Definition Prior confirmation
MDN Response To reply to the message disposition notification request from
the sender, select "ON".
Page 84

2
Setup items by operation
2-68 CS 193/173/163
2.16.5 POP over SSL
% Specify the settings for POP over SSL.
!
Detail
For details, refer to "POP over SSL" on page 2-36.
2.16.6 APOP Authentication
% Specify the settings for APOP authentication.
!
Detail
For details, refer to "APOP Authentication" on page 2-38.
Page 85

CS 193/173/163 2-69
Setup items by operation
2
2.17 Receiving Internet faxes encrypted with the public keys of this
machine
% Specify settings for receiving Internet faxes encrypted by the public keys of this machine.
When the machine of the sender supports the encryption of the Internet fax, the user can encrypt Internet
faxes for transmission using the certificate including public keys for this machine acquired in advance.
Because only this machine can decrypt the encrypted data, disclosure of information to third parties on the
transmission path can be prevented.
Specify the settings according to the following flowchart.
!
Detail
For details on acquiring a certificate for this machine, refer to "Acquiring the certificate for this machine"
on page 2-18.
2.17.1 Receive Internet faxes
% Specify settings for receiving Internet faxes.
!
Detail
For details, refer to "Receiving Internet faxes" on page 2-64.
Finish
Receive Internet faxes
S/MIME
Communicate with the POP
server using SSL?
APOP?
Yes YesNo No
POP over SSL APOP Authentication
Page 86

2
Setup items by operation
2-70 CS 193/173/163
2.17.2 S/MIME
1 In Administrator mode of Web Connection, select the Network tab.
2 Select "E-mail Setting".
3 Select "S/MIME".
2.17.3 POP over SSL
% Specify the settings for POP over SSL.
!
Detail
For details, refer to "POP over SSL" on page 2-36.
2.17.4 APOP Authentication
% Specify the settings for APOP authentication.
!
Detail
For details, refer to "APOP Authentication" on page 2-38.
Item Definition Prior confirmation
S/MIME Comm. Setting Select "ON".
Print S/MIME information
Select "ON".
When receiving an encrypted Internet fax, S/MIME information can be printed.
Page 87

CS 193/173/163 2-71
Setup items by operation
2
2.18 Sending and receiving IP address faxes
% Specify settings for sending and receiving IP address faxes.
!
Detail
To use the IP address fax function, this machine must be equipped with an optional fax kit. In order to
use the IP address fax function, setting by a service engineer is required. For details, contact your
service representative.
The IP address fax enables communication on the IP network. Specify the host name or IP address for the
destination to send a Fax. SMTP protocol is used for sending and receiving faxes. Because IP address faxes
are sent and received via the SMTP server function of this machine, no SMTP server is required.
Specify the settings according to the following flowchart.
!
Detail
For details on registering IP address fax addresses, refer to "Registering or editing an address book
destination" on page 2-182.
For details on the IP address fax operation, refer to the User manual – Network Scan/Fax/Network Fax
Operations.
TCP/IP Settings
IP Address Fax Function
SMTP TX Setting
SMTP RX Setting
Header Information
Finish
Page 88

2
Setup items by operation
2-72 CS 193/173/163
2.18.1 TCP/IP Settings
% Specify settings to use this machine in a TCP/IP network environment.
!
Detail
For details, refer to "Specifying general settings for TCP/IP-based communication" on page 2-3.
2.18.2 IP Address Fax Function
1 On the Administrator Settings screen of the control panel, select [5 Network Settings.].
2 Select [2 Network Fax Setting].
3 Select [1 Network Fax Function Setting].
!
Detail
For details on displaying the Network Setting screen, refer to "Displaying the Network Settings screen"
on page 3-3.
Item Definition Prior confirmation
IP Address Fax Function Select [ON].
Page 89

CS 193/173/163 2-73
Setup items by operation
2
2.18.3 SMTP TX Setting
1 In Administrator mode of Web Connection, select the Network tab.
2 Select "Network Fax Setting".
3 Select "SMTP TX Setting".
Item Definition Prior confirmation
Port Number Default setting: 25
Specify the port number.
Port number to be used
Connection Timeout Specify the time period before the server connection times
out.
Page 90

2
Setup items by operation
2-74 CS 193/173/163
2.18.4 SMTP RX Setting
1 In Administrator mode of Web Connection, select the Network tab.
2 Select "Network Fax Setting".
3 Select "SMTP RX Setting".
2.18.5 Header Information
% Register sender information for fax transmissions.
!
Detail
For details, refer to "Header Information" on page 2-61.
Item Definition Prior confirmation
SMTP RX Select "ON".
Port Number Default setting: 25
Specify the port number.
Port number to be used
Connection Timeout Specify the time period before the server connection times
out.
Page 91

CS 193/173/163 2-75
Setup items by operation
2
2.19 Importing images using the TWAIN scan
% Specify settings for using this machine as a scanner.
Using the TWAIN driver enables this machine to be used as a scanner. This machine can be controlled from
a computer connected to the network, and the scanned data can be imported into an application on the
computer to be processed.
Specify the settings according to the following flowchart.
!
Detail
For details on installing the TWAIN driver, refer to the TWAIN driver manual on the Driver CD-ROM.
2.19.1 TCP/IP Settings
% Specify settings to use this machine in a TCP/IP network environment.
!
Detail
For details, refer to "Specifying general settings for TCP/IP-based communication" on page 2-3.
2.19.2 SLP Setting.
1 In Administrator mode of Web Connection, select the Network tab.
2 Select "TCP/IP Setting".
3 Select "TCP/IP Setting".
4 Specify the following setting.
TCP/IP Settings
SLP Setting
TCP Socket Setting
Network TWAIN
Finish
Item Definition Prior confirmation
SLP To search for this machine using TWAIN, select "Enable".
Page 92

2
Setup items by operation
2-76 CS 193/173/163
2.19.3 TCP Socket Setting
1 In Administrator mode of Web Connection, select the Network tab.
2 Select "TCP Socket Setting".
Item Definition Prior confirmation
TCP Socket Select the "TCP Socket" check box.
Port Number Specify the port number.
Page 93

CS 193/173/163 2-77
Setup items by operation
2
2.19.4 Network TWAIN
1 In Administrator mode of Web Connection, select the Maintenance tab.
2 Select "Network TWAIN".
Item Definition Prior confirmation
TWAIN Lock Time Specify the control panel lock time during TWAIN scan.
Page 94

2
Setup items by operation
2-78 CS 193/173/163
2.20 Printing (LPR/Port9100)
% Specify settings for printing by using LPR or Port9100.
LPR printing is performed via the network using the LPR protocol. LPR printing is used in the UNIX-like OS.
Port9100 printing is performed via the network by directly specifying the RAW port (Port9100) of this machine
connected to the TCP/IP network as a printer of the print destination.
Specify the settings according to the following flowchart.
!
Detail
To print data using LPR or Port9100, settings for the printer driver must be specified after these
settings. For details, refer to the User manual – Print Operations.
Finish
TCP/IP Settings
(1) LPR printing
(2) Port9100 printing
LPD Setting RAW Port Number
(1) (2)
Page 95

CS 193/173/163 2-79
Setup items by operation
2
2.20.1 TCP/IP Settings
% Specify settings to use this machine in a TCP/IP network environment.
!
Detail
For details, refer to "Specifying general settings for TCP/IP-based communication" on page 2-3.
2.20.2 LPD Setting
1 In Administrator mode of Web Connection, select the Network tab.
2 Select "TCP/IP Setting".
3 Select "TCP/IP Setting".
4 Specify the following setting.
2.20.3 RAW Port Number
1 In Administrator mode of Web Connection, select the Network tab.
2 Select "TCP/IP Setting".
3 Select "TCP/IP Setting".
4 Specify the following setting.
Item Definition Prior confirmation
LPD Select "Enable".
Item Definition Prior confirmation
RAW Port Number Select the check box for the port to be used, and then spec-
ify the RAW port number.
Page 96

2
Setup items by operation
2-80 CS 193/173/163
2.21 Printing (SMB)
% Specify settings for printing by using SMB.
The printer is sharable on the Windows network by using the SMB protocol. SMB printing is performed by
directly specifying this machine on the Windows network from the computer.
Specify the settings according to the following flowchart.
!
Detail
For details on installing the printer driver, refer to the User manual – Print Operations.
2.21.1 TCP/IP Settings
% Specify settings to use this machine in a TCP/IP network environment.
!
Detail
For details, refer to "Specifying general settings for TCP/IP-based communication" on page 2-3.
TCP/IP Settings
Print Setting
Use the WINS server?
Yes No
WINS Setting
Finish
Page 97

CS 193/173/163 2-81
Setup items by operation
2
2.21.2 Print Setting
1 In Administrator mode of Web Connection, select the Network tab.
2 Select "SMB Setting".
3 Select "Print Setting".
2.21.3 WINS Setting
% To perform SMB print via the router, specify settings for the WINS server.
!
Detail
For details, refer to "WINS Setting" on page 2-28.
Item Definition Prior confirmation
SMB Print Select "ON".
NetBIOS Name Specify the NetBIOS name with uppercase letters (up to 15
characters).
Print Service Name Specify the print service name with uppercase letters (up to
12 characters).
Workgroup Specify the workgroup name with uppercase letters (up to 15
characters).
Workgroup to which you
belong
Page 98

2
Setup items by operation
2-82 CS 193/173/163
2.22 Printing (IPP)
% Specify settings for printing using IPP.
IPP printing is performed via the network using the IPP protocol. Using the HTTP protocol can transfer print
data to the printer on the network, and therefore also enabling output to a remote printer via the Internet.
Specify the settings according to the following flowchart.
!
Detail
For details on installing the printer driver, refer to the User manual – Print Operations.
TCP/IP Settings
Web Connection Settings
IPP Setting
Allow?
Yes No
IPP Authentication Setting
Finish
Page 99

CS 193/173/163 2-83
Setup items by operation
2
2.22.1 TCP/IP Settings
% Specify settings to use this machine in a TCP/IP network environment.
!
Detail
For details, refer to "Specifying general settings for TCP/IP-based communication" on page 2-3.
2.22.2 Web Connection Settings
1 On the Administrator Settings screen of the control panel, select [5 Network Settings].
2 Select [3 HTTP Server Settings].
!
Detail
For details on displaying the Network Setting screen, refer to "Displaying the Network Settings screen"
on page 3-3.
Item Definition Prior confirmation
Web Connection Settings
Select [ON].
Page 100

2
Setup items by operation
2-84 CS 193/173/163
2.22.3 IPP Setting
1 In Administrator mode of Web Connection, select the Network tab.
2 Select "IPP Setting".
Item Definition Prior confirmation
IPP Setting Select "ON".
Accept IPP job Select "ON".
Printer Name Specify the printer name (up to 127 characters).
Printer Location Specify the printer location (up to 127 characters).
Printer Information Specify the printer information (up to 127 characters).
Printer URI Displays the URI of the printer that can use IPP when print-
ing.
Support Operation Specify the print operations supported by IPP.
 Loading...