

Page 1
Océ
CS120/125
Océ CS120/125
Copying Guide
Page 2

COLOR LASER COPIER
1180/1140
Copy Guide
Ot¯iМ©oНуькЬсj
Page 3
The manuals for this machine are divided as follows. Please refer to them for detailed information.
About the Manuals for the Machine
Basic Operation . . . . . . . . . . . . . . . . . . . . . . . . . . . .
Troubleshooting . . . . . . . . . . . . . . . . . . . . . . . . . . . .
Reference Guide
Copying Guide
(This Document)
Copying Instructions . . . . . . . . . . . . . . . . . . . . . . . . .
•
The product illustration on the cover may differ slightly from your product.
Page 4
..
Chap 1
Basic Copying
1
..
Chap 2
Useful Copy Functions
2
..
Chap 3
Adjusting Color and Image Quality
3
..
Chap 4
Making Copies in the Image Creation Mode
4
..
Chap 5
Inserting Text and Images
5
..
Chap 6
About Color
6
..
Chap 7
Troubleshooting
7
..
Chap 8
Appendix
8
Includes the color pallet sheet, and Index.
How the Copying Guide Is Organized
•
Considerable effort has been made to make sure that this manual is free of inaccuracies and omissions.
•
However, as we are constantly improving our products, if you need an exact specification, please contact Canon.
Page 5

iv
Contents
How to Use This Manual . . . . . . . . . . . . . . . . . . . . . . . . . . . . . . . . . . . . . . . . . . . .xi
Symbols Used in This Manual . . . . . . . . . . . . . . . . . . . . . . . . . . . . . . . . . . . . . . xi
Keys Used in This Manual . . . . . . . . . . . . . . . . . . . . . . . . . . . . . . . . . . . . . . . . . xi
Displays Used in This Manual . . . . . . . . . . . . . . . . . . . . . . . . . . . . . . . . . . . . . xii
About Trademarks . . . . . . . . . . . . . . . . . . . . . . . . . . . . . . . . . . . . . . . . . . . . . . . . xii
Preserving Color Copies . . . . . . . . . . . . . . . . . . . . . . . . . . . . . . . . . . . . . . . . . . .xiii
Chapter 1 Basic Copying
What the CLC 1180/1140 Can Do . . . . . . . . . . . . . . . . . . . . . . . . . . . . . . . . . . . 1-3
The Different Types of Copying . . . . . . . . . . . . . . . . . . . . . . . . . . . . . . . . . . . 1-3
Overview of the Copying Procedure . . . . . . . . . . . . . . . . . . . . . . . . . . . . . . . 1-31
Basic Copying Procedure. . . . . . . . . . . . . . . . . . . . . . . . . . . . . . . . . . . . . . . 1-31
Optimizing the Copy Speed . . . . . . . . . . . . . . . . . . . . . . . . . . . . . . . . . . . . . 1-36
Placing the Original . . . . . . . . . . . . . . . . . . . . . . . . . . . . . . . . . . . . . . . . . . . . . 1-37
The Orientation of the Original . . . . . . . . . . . . . . . . . . . . . . . . . . . . . . . . . . . 1-37
Placing the Original on the Platen Glass . . . . . . . . . . . . . . . . . . . . . . . . . . . 1-38
Placing Originals into the Feeder
(Recirculating Document Feeder RDF-E3) . . . . . . . . . . . . . . . . . . . . . . . . . 1-41
Entering the Copy Quantity . . . . . . . . . . . . . . . . . . . . . . . . . . . . . . . . . . . . . . 1-44
Specifying the Copy Quantity. . . . . . . . . . . . . . . . . . . . . . . . . . . . . . . . . . . . 1-44
Changing the Copy Quantity . . . . . . . . . . . . . . . . . . . . . . . . . . . . . . . . . . . . 1-45
Selecting the Paper Size (Paper Select). . . . . . . . . . . . . . . . . . . . . . . . . . . . . 1-46
Automatically Selecting Paper (Auto Paper Selection). . . . . . . . . . . . . . . . . 1-46
Manually Selecting Paper (Manual Paper Selection) . . . . . . . . . . . . . . . . . . 1-48
Selecting Paper Loaded in the Stack Bypass . . . . . . . . . . . . . . . . . . . . . . . 1-49
Using the Stack Bypass . . . . . . . . . . . . . . . . . . . . . . . . . . . . . . . . . . . . . . . . . . . . 1-50
Making Copies on Irregular Size Paper. . . . . . . . . . . . . . . . . . . . . . . . . . . . . . . . . 1-53
Making Two-sided Copies with the Stack Bypass. . . . . . . . . . . . . . . . . . . . . . . . . 1-54
Adjusting Exposure (Copy Exposure) . . . . . . . . . . . . . . . . . . . . . . . . . . . . . . 1-56
Adjusting the Copy Exposure Manually (Manual Exposure Adjustment) . . . 1-56
Adjusting the Copy Exposure Automatically
(Automatic Exposure Adjustment) . . . . . . . . . . . . . . . . . . . . . . . . . . . . . . . . 1-57
Selecting the Original Type . . . . . . . . . . . . . . . . . . . . . . . . . . . . . . . . . . . . . . . 1-59
Page 6

v
Changing the Copy Ratio (Copy Ratio) . . . . . . . . . . . . . . . . . . . . . . . . . . . . . . 1-61
Enlarging/Reducing Originals to a Standard Size (Preset Zoom) . . . . . . . . . 1-62
Specifying the Copy Ratio by % (Zoom Designation) . . . . . . . . . . . . . . . . . . 1-63
Automatically Setting the Copy Ratio Based on the Size of the Paper
(Auto Zoom). . . . . . . . . . . . . . . . . . . . . . . . . . . . . . . . . . . . . . . . . . . . . . . . . . 1-65
Slightly Reducing Images to Prevent the Edges of the Original from
Being Cut Off (Entire Image) . . . . . . . . . . . . . . . . . . . . . . . . . . . . . . . . . . . . .1-67
Generating the Copy Ratio Based on the Size of the Original and
the Copy (Zoom Program) . . . . . . . . . . . . . . . . . . . . . . . . . . . . . . . . . . . . . . .1-69
Making Copies with the Same XY Copy Ratio (Zoom) . . . . . . . . . . . . . . . . . . . . . . 1-70
Making Copies with Different XY Copy Ratios (XY Zoom) . . . . . . . . . . . . . . . . . . . 1-72
Enlarging/Reducing Originals with Copy Ratios Set Independently for
the X and Y Axes (XY Zoom). . . . . . . . . . . . . . . . . . . . . . . . . . . . . . . . . . . . . 1-73
Splitting the Image of the Original According to the Enlargement Ratio
(Multi-page Enlargement) . . . . . . . . . . . . . . . . . . . . . . . . . . . . . . . . . . . . . . .1-78
The Relationship Between the Copy Ratio and the Paper
(Size and Number of Sheets) . . . . . . . . . . . . . . . . . . . . . . . . . . . . . . . . . . . . . . . . . 1-78
Specifying the Enlargement by Entering the Copy Ratio (ZOOM) . . . . . . . . . . . . . 1-79
Specifying the Enlargement by Entering the Copy Ratio (XY ZOOM) . . . . . . . . . . 1-81
Specifying the Enlargement by Selecting the Number of Output Pages . . . . . . . . 1-83
Pasting the Sheets of the Divided Image Together . . . . . . . . . . . . . . . . . . . . . . . . 1-85
Sorting Copies (Stapler Sorter) . . . . . . . . . . . . . . . . . . . . . . . . . . . . . . . . . . . .1-88
Making Two-sided Copies (Two-sided Mode) . . . . . . . . . . . . . . . . . . . . . . . . . 1-95
Making Two-sided Copies from One-sided Originals (1 ➔ 2-Sided) . . . . . . .1-96
Making Two-sided Copies from Two-sided Originals (2 ➔ 2-Sided). . . . . . . .1-99
Making One-sided Copies from Two-sided Originals (2 ➔ 1-Sided) . . . . . .1-101
Making Two-sided Copies from Facing Pages of a Bound Original
(Book ➔ 2-Sided). . . . . . . . . . . . . . . . . . . . . . . . . . . . . . . . . . . . . . . . . . . . . 1-102
Specifying Auto Start . . . . . . . . . . . . . . . . . . . . . . . . . . . . . . . . . . . . . . . . . . .1-105
Interrupting the Current Job to Make Priority Copies (Interrupt Mode) . . .1-106
Using the Platen Glass . . . . . . . . . . . . . . . . . . . . . . . . . . . . . . . . . . . . . . . .1-107
Using the Feeder’s Single Sheet Document Feeder . . . . . . . . . . . . . . . . . .1-109
Switching Between the Full Color Mode and Black Monochrome Mode
(ACS). . . . . . . . . . . . . . . . . . . . . . . . . . . . . . . . . . . . . . . . . . . . . . . . . . . . . . . . . 1-112
Automatically Switching Between the Full Color and
Black Monochrome Modes (ACS) . . . . . . . . . . . . . . . . . . . . . . . . . . . . . . . .1-112
Copying in Color (Full Color Mode) . . . . . . . . . . . . . . . . . . . . . . . . . . . . . . .1-113
Copying Color Originals in Black-and-white (Black Monochrome Mode). . .1-114
Specifying Automatic Recognition of the Size of the Original
(Original Recognition). . . . . . . . . . . . . . . . . . . . . . . . . . . . . . . . . . . . . . . . . . .1-115
Page 7

vi
Centering the Copied Image (Center Shift) . . . . . . . . . . . . . . . . . . . . . . . . . 1-117
Checking the Copy Settings (Setting Confirmation) . . . . . . . . . . . . . . . . . 1-118
Changing or Canceling a Selected Copy Setting
(Setting Confirmation/Cancel) . . . . . . . . . . . . . . . . . . . . . . . . . . . . . . . . . . . 1-119
Chapter 2 Useful Copy Functions
Copying Facing Pages in a Book on Two Separate Sheets of Paper
(Two-page Separation) . . . . . . . . . . . . . . . . . . . . . . . . . . . . . . . . . . . . . . . . . . . 2-2
Adding Front and Back Covers to Copy Sets (Cover) . . . . . . . . . . . . . . . . . . 2-4
Copying onto Transparencies. . . . . . . . . . . . . . . . . . . . . . . . . . . . . . . . . . . . . . 2-8
Feeding Transparencies from a Drawer . . . . . . . . . . . . . . . . . . . . . . . . . . . . . 2-8
Feeding Transparencies from the Stack Bypass . . . . . . . . . . . . . . . . . . . . . 2-11
Interleaving a Sheet of Paper Between Transparencies
(Transparency Interleaving) . . . . . . . . . . . . . . . . . . . . . . . . . . . . . . . . . . . . . 2-13
Shifting the Original Image (Shift) . . . . . . . . . . . . . . . . . . . . . . . . . . . . . . . . . 2-17
Shifting the Original Image to the Center or Corner. . . . . . . . . . . . . . . . . . . 2-17
Shifting the Original Image Using the Number Keys on
the Touch Panel Display . . . . . . . . . . . . . . . . . . . . . . . . . . . . . . . . . . . . . . . . 2-19
Shifting the Original Image Using the Edit Pen . . . . . . . . . . . . . . . . . . . . . . 2-21
Shifting a Designated Area of the Original Image Using the Edit Pen
(Area Shift) . . . . . . . . . . . . . . . . . . . . . . . . . . . . . . . . . . . . . . . . . . . . . . . . . . 2-24
Making Copies with Margins (Margin) . . . . . . . . . . . . . . . . . . . . . . . . . . . . . . 2-29
Erasing Shadows and Frame Lines from Copies (Frame Erase) . . . . . . . . 2-32
Erasing Shadows from the Edge of Copies (Sheet Frame Erase) . . . . . . . . 2-32
Erasing Shadows Around the Original Image on Copies
(Original Frame Erase). . . . . . . . . . . . . . . . . . . . . . . . . . . . . . . . . . . . . . . . . 2-35
Erasing Shadows from the Center and Edge of Copies
(Book Frame Erase) . . . . . . . . . . . . . . . . . . . . . . . . . . . . . . . . . . . . . . . . . . . 2-37
Copying Multiple Pages onto a Single Sheet of Paper
(Image Combination) . . . . . . . . . . . . . . . . . . . . . . . . . . . . . . . . . . . . . . . . . . . . 2-40
Storing/Recalling Frequently Used Copy Settings (Mode Memory) . . . . . . 2-44
Storing Copy Settings. . . . . . . . . . . . . . . . . . . . . . . . . . . . . . . . . . . . . . . . . . 2-44
Assigning a Name to a Memory Key . . . . . . . . . . . . . . . . . . . . . . . . . . . . . . 2-47
Recalling Stored Copy Settings . . . . . . . . . . . . . . . . . . . . . . . . . . . . . . . . . . 2-48
Erasing Stored Copy Settings . . . . . . . . . . . . . . . . . . . . . . . . . . . . . . . . . . . 2-49
Recalling a Previous Copy Setting (Recall). . . . . . . . . . . . . . . . . . . . . . . . . . 2-51
Page 8

vii
Chapter 3 Adjusting Color and Image Quality
Selecting the Desired Image Quality with One Touch of a Key
(One Touch Color) . . . . . . . . . . . . . . . . . . . . . . . . . . . . . . . . . . . . . . . . . . . . . . . .3-3
Changing the Look of the Image . . . . . . . . . . . . . . . . . . . . . . . . . . . . . . . . . . . 3-3
Changing the Color Intensity . . . . . . . . . . . . . . . . . . . . . . . . . . . . . . . . . . . . . .3-5
Changing the Sharpness in Copies (Sharpness) . . . . . . . . . . . . . . . . . . . . . . . 3-7
Erasing the Background Color in Copies (Hide Background). . . . . . . . . . . . .3-9
Erasing the Image on the Reverse Side of the Original in Copies
(Hide Backside Image) . . . . . . . . . . . . . . . . . . . . . . . . . . . . . . . . . . . . . . . . . . . 3-11
Adjusting the Color Range (Color Range Adjustment) . . . . . . . . . . . . . . . . . 3-13
Enhancing the Black Areas of the Image (Black Adjustment) . . . . . . . . . . . 3-15
Adjusting the Color of Complexion (Complexion Adjustment). . . . . . . . . . .3-17
Adjusting the Color of the Image (Color Balance) . . . . . . . . . . . . . . . . . . . . .3-19
Adjusting the Color Balance (Color Balance). . . . . . . . . . . . . . . . . . . . . . . . .3-19
Adjusting the Saturation. . . . . . . . . . . . . . . . . . . . . . . . . . . . . . . . . . . . . . . . . 3-20
Adjusting the Hue. . . . . . . . . . . . . . . . . . . . . . . . . . . . . . . . . . . . . . . . . . . . . .3-21
Adjusting the Hue of All Colors Together as a Whole . . . . . . . . . . . . . . . . . . . . . . . 3-22
Adjusting the Hue of Each Color Individually . . . . . . . . . . . . . . . . . . . . . . . . . . . . . 3-23
Adjusting the Density . . . . . . . . . . . . . . . . . . . . . . . . . . . . . . . . . . . . . . . . . . .3-24
Storing/Erasing Color Balance Settings. . . . . . . . . . . . . . . . . . . . . . . . . . . . . 3-25
Storing Color Balance Settings. . . . . . . . . . . . . . . . . . . . . . . . . . . . . . . . . . . . . . . . 3-25
Assigning a Name to Stored Color Balance Settings. . . . . . . . . . . . . . . . . . . . . . . 3-28
Recalling Stored Color Balance Settings . . . . . . . . . . . . . . . . . . . . . . . . . . . . . . . . 3-29
Erasing Stored Color Balance Settings . . . . . . . . . . . . . . . . . . . . . . . . . . . . . . . . . 3-30
Changing the Color of the Original (Color Creation) . . . . . . . . . . . . . . . . . . .3-33
Making Monochrome or One-color Copies (Single Color) . . . . . . . . . . . . . . .3-34
Adding Gradations of a Desired Color to the Image or Background
(Color Gradation) . . . . . . . . . . . . . . . . . . . . . . . . . . . . . . . . . . . . . . . . . . . . . .3-35
Applying a Gradation . . . . . . . . . . . . . . . . . . . . . . . . . . . . . . . . . . . . . . . . . . . . . . . 3-35
Specifying the Width of the Gradation Frame. . . . . . . . . . . . . . . . . . . . . . . . . . . . . 3-37
Specifying the Pitch at Which Gradations Repeat . . . . . . . . . . . . . . . . . . . . . . . . . 3-39
Making Fine Adjustments to the Smoothness of Gradations . . . . . . . . . . . . . . . . . 3-41
Adding Color Filter Effects (Color Filter) . . . . . . . . . . . . . . . . . . . . . . . . . . . .3-42
Adding Colors to Designated Areas (Coloring) . . . . . . . . . . . . . . . . . . . . . . . 3-43
Changing a Coloring Setting that Was Previously Specified . . . . . . . . . . . . .3-47
Adding a New Coloring Setting . . . . . . . . . . . . . . . . . . . . . . . . . . . . . . . . . . . . . . . 3-47
Changing a Coloring Setting . . . . . . . . . . . . . . . . . . . . . . . . . . . . . . . . . . . . . . . . . 3-48
Deleting a Coloring Setting. . . . . . . . . . . . . . . . . . . . . . . . . . . . . . . . . . . . . . . . . . . 3-50
Erasing the Color of the Image (Blue Background) . . . . . . . . . . . . . . . . . . . .3-51
Page 9

viii
Adding Background Color (Base Color) . . . . . . . . . . . . . . . . . . . . . . . . . . . . 3-53
Converting Designated Colors into Different Colors (Color Conversion) . . . 3-54
Storing Colors of Your Choice into Memory (Color Registration) . . . . . . . . . 3-57
Storing Colors . . . . . . . . . . . . . . . . . . . . . . . . . . . . . . . . . . . . . . . . . . . . . . . . . . . . 3-57
Assigning a Name to a Registered Color . . . . . . . . . . . . . . . . . . . . . . . . . . . . . . . 3-59
Erasing Stored Colors . . . . . . . . . . . . . . . . . . . . . . . . . . . . . . . . . . . . . . . . . . . . . . 3-61
Selecting Colors with Each Function. . . . . . . . . . . . . . . . . . . . . . . . . . . . . . . 3-63
Selecting Colors from the Color Palette (Color Palette Selection) . . . . . . . . 3-63
Using the Edit Pen for Selection . . . . . . . . . . . . . . . . . . . . . . . . . . . . . . . . . . . . . . 3-64
Using the Number Keys on the Touch Panel Display for Selection. . . . . . . . . . . . 3-66
Changing the Color Palette Sheet Temporarily . . . . . . . . . . . . . . . . . . . . . . . . . . . 3-67
Selecting Colors Using the Edit Pen (Designated Color Selection) . . . . . . . 3-68
Selecting Stored Colors (Registered Color Selection) . . . . . . . . . . . . . . . . . 3-70
Selecting Colors from the Color Circle (Color Circle Selection) . . . . . . . . . . 3-72
Selecting the Color of the Original (Original Color Selection) . . . . . . . . . . . 3-74
Chapter 4 Making Copies in the Image Creation Mode
Reversing the Hues and Gradations (Nega/Posi) . . . . . . . . . . . . . . . . . . . . . . 4-2
Repeating the Original Image (Image Repeat) . . . . . . . . . . . . . . . . . . . . . . . . 4-3
Reversing the Original Image (Mirror Image) . . . . . . . . . . . . . . . . . . . . . . . . . 4-9
Slanting the Original Image (Slanted Image). . . . . . . . . . . . . . . . . . . . . . . . . 4-11
Modifying Part of the Image (Text Editing) . . . . . . . . . . . . . . . . . . . . . . . . . . 4-14
Specifying Colors For Text (Color for Text) . . . . . . . . . . . . . . . . . . . . . . . . . . 4-15
Specifying Contours (Contour). . . . . . . . . . . . . . . . . . . . . . . . . . . . . . . . . . . 4-17
Adding Shadows to the Image (Shadow). . . . . . . . . . . . . . . . . . . . . . . . . . . 4-19
Adding Patterns (Texture) . . . . . . . . . . . . . . . . . . . . . . . . . . . . . . . . . . . . . . . . 4-23
Adding Special Effects (Reduced Gradation and Solarization). . . . . . . . . . 4-26
Reduced Gradation . . . . . . . . . . . . . . . . . . . . . . . . . . . . . . . . . . . . . . . . . . . 4-26
Solarization . . . . . . . . . . . . . . . . . . . . . . . . . . . . . . . . . . . . . . . . . . . . . . . . . 4-27
Designating Areas on an Image for Editing (Area Designation) . . . . . . . . . 4-29
Designating Areas . . . . . . . . . . . . . . . . . . . . . . . . . . . . . . . . . . . . . . . . . . . . 4-29
Area Types and Area Designation Methods . . . . . . . . . . . . . . . . . . . . . . . . . 4-34
Modifying a Designated Area . . . . . . . . . . . . . . . . . . . . . . . . . . . . . . . . . . . . 4-38
Copying by Hiding Designated Areas (Framing/Blanking) . . . . . . . . . . . . . . 4-41
Designating an Area with the Number Keys on the Touch Panel Display . . . . . . . 4-42
Designating an Area with the Editor . . . . . . . . . . . . . . . . . . . . . . . . . . . . . . . . . . . 4-45
The Limitations of Area Designation . . . . . . . . . . . . . . . . . . . . . . . . . . . . . . 4-48
Designating Areas on Black-and-white Originals with a Marker Pen . . . . . 4-50
Page 10

ix
Designating Areas with a Marker Pen . . . . . . . . . . . . . . . . . . . . . . . . . . . . . .4-51
One-point Designation . . . . . . . . . . . . . . . . . . . . . . . . . . . . . . . . . . . . . . . . . . . . . . 4-51
Encircled Designation. . . . . . . . . . . . . . . . . . . . . . . . . . . . . . . . . . . . . . . . . . . . . . . 4-52
Making Copies with Basic Settings . . . . . . . . . . . . . . . . . . . . . . . . . . . . . . . . 4-53
Changing the Settings . . . . . . . . . . . . . . . . . . . . . . . . . . . . . . . . . . . . . . . . . .4-55
The Limitations of Marker Editing . . . . . . . . . . . . . . . . . . . . . . . . . . . . . . . . .4-57
Chapter 5 Inserting Text and Images
Inserting a Color Image into a Designated Area (Image Composition) . . . . .5-2
Inserting Characters from a Black-and-white Text Original into
a Color Original (Character Composition) . . . . . . . . . . . . . . . . . . . . . . . . . . . .5-8
Character Composition . . . . . . . . . . . . . . . . . . . . . . . . . . . . . . . . . . . . . . . . . .5-8
Character Composition with Superimpose Settings . . . . . . . . . . . . . . . . . . . . . . . . . 5-8
Character Composition with Window Settings . . . . . . . . . . . . . . . . . . . . . . . . . . . . 5-12
Character Composition Shift . . . . . . . . . . . . . . . . . . . . . . . . . . . . . . . . . . . . . 5-17
Character Composition Shift with Superimpose Settings . . . . . . . . . . . . . . . . . . . . 5-17
Character Composition Shift with Window Settings . . . . . . . . . . . . . . . . . . . . . . . . 5-20
Multiple Editing. . . . . . . . . . . . . . . . . . . . . . . . . . . . . . . . . . . . . . . . . . . . . . . .5-22
Multiple Editing with Superimpose Settings . . . . . . . . . . . . . . . . . . . . . . . . . . . . . . 5-22
Multiple Editing with Window Settings . . . . . . . . . . . . . . . . . . . . . . . . . . . . . . . . . . 5-25
Creating Color Separations of a Color Original (Offset Plate Original) . . . . 5-29
Chapter 6 About Color
The Basics of Color. . . . . . . . . . . . . . . . . . . . . . . . . . . . . . . . . . . . . . . . . . . . . . . 6-2
The Primary Colors . . . . . . . . . . . . . . . . . . . . . . . . . . . . . . . . . . . . . . . . . . . . . 6-2
Additive Primary Colors and Subtractive Primary Colors . . . . . . . . . . . . . . . . . . . . . 6-2
Full Color Images and the CLC 1180/1140 . . . . . . . . . . . . . . . . . . . . . . . . . . . . . . . 6-3
Hue, Density, and Saturation . . . . . . . . . . . . . . . . . . . . . . . . . . . . . . . . . . . . . .6-3
The Three Attributes of Color . . . . . . . . . . . . . . . . . . . . . . . . . . . . . . . . . . . . . . . . . . 6-3
Color Balance Adjustment and the CLC 1180/1140. . . . . . . . . . . . . . . . . . . . . . . . . 6-4
The Complementary Colors. . . . . . . . . . . . . . . . . . . . . . . . . . . . . . . . . . . . . . . 6-4
Full Colors and Complementary Colors . . . . . . . . . . . . . . . . . . . . . . . . . . . . . . . . . . 6-5
Surprising Effects Using Complementary Colors . . . . . . . . . . . . . . . . . . . . . . . . . . . 6-5
The Mechanism of Color Printing . . . . . . . . . . . . . . . . . . . . . . . . . . . . . . . . . .6-5
Chapter 7 Troubleshooting
When Copies Do Not Turn Out as Expected . . . . . . . . . . . . . . . . . . . . . . . . . . .7-2
Page 11

x
Chapter 8 Appendix
Color Samples of the Color Palette Sheets . . . . . . . . . . . . . . . . . . . . . . . . . . . 8-3
Color Sample of Color Sheet A . . . . . . . . . . . . . . . . . . . . . . . . . . . . . . . . . . . 8-4
Color Sample of Color Sheet B . . . . . . . . . . . . . . . . . . . . . . . . . . . . . . . . . . . 8-6
Color Sample of Color Sheet C . . . . . . . . . . . . . . . . . . . . . . . . . . . . . . . . . . . 8-8
Index . . . . . . . . . . . . . . . . . . . . . . . . . . . . . . . . . . . . . . . . . . . . . . . . . . . . . . . . . 8-10
Page 12

xi
Thank you for purchasing the Canon Color Laser Copier(CLC)1180/1140. Please read this
manual thoroughly before operating the product in order to familiarize yourself with its
capabilities, and to make the most of its many functions. After reading this manual, store it in
a safe place for future reference.
.
Symbols Used in This Manual
The following symbols are used in this manual to explain procedures, restrictions,
handling cautions, and also contain instructions that should be observed for safety.
WARNING
.
Indicates a warning concerning operations that may lead to death or
injury to persons if not performed correctly. In order to use the machine
safely, always pay attention to these warnings.
CAUTION
.
Indicates a caution concerning operations that may lead to injury to
persons, or damage to property if not performed correctly. In order to
use the machine safely, always pay attention to these cautions.
IMPORTANT
.
Indicates operational requirements and restrictions. Be sure to read
these items carefully in order to operate the machine correctly, and to
avoid damage to the machine.
NOTE
.
Indicates a clarification of an operation or contains additional
explanations for a procedure. Reading these is highly recommended.
.
Keys Used in This Manual
The symbols and key names in this manual are expressed in the following way:
•
Control panel keys......................... (Start)
•
Touch panel display keys...............[Copy Ratio]
Preface
How to Use This Manual
Page 13
xii
.
Displays Used in This Manual
Screenshots of the touch panel display used in this manual are those taken when
all the options are attached to the CLC 1140. Note that functions that cannot be
used depending on the model or options, are not displayed on the touch panel
display.
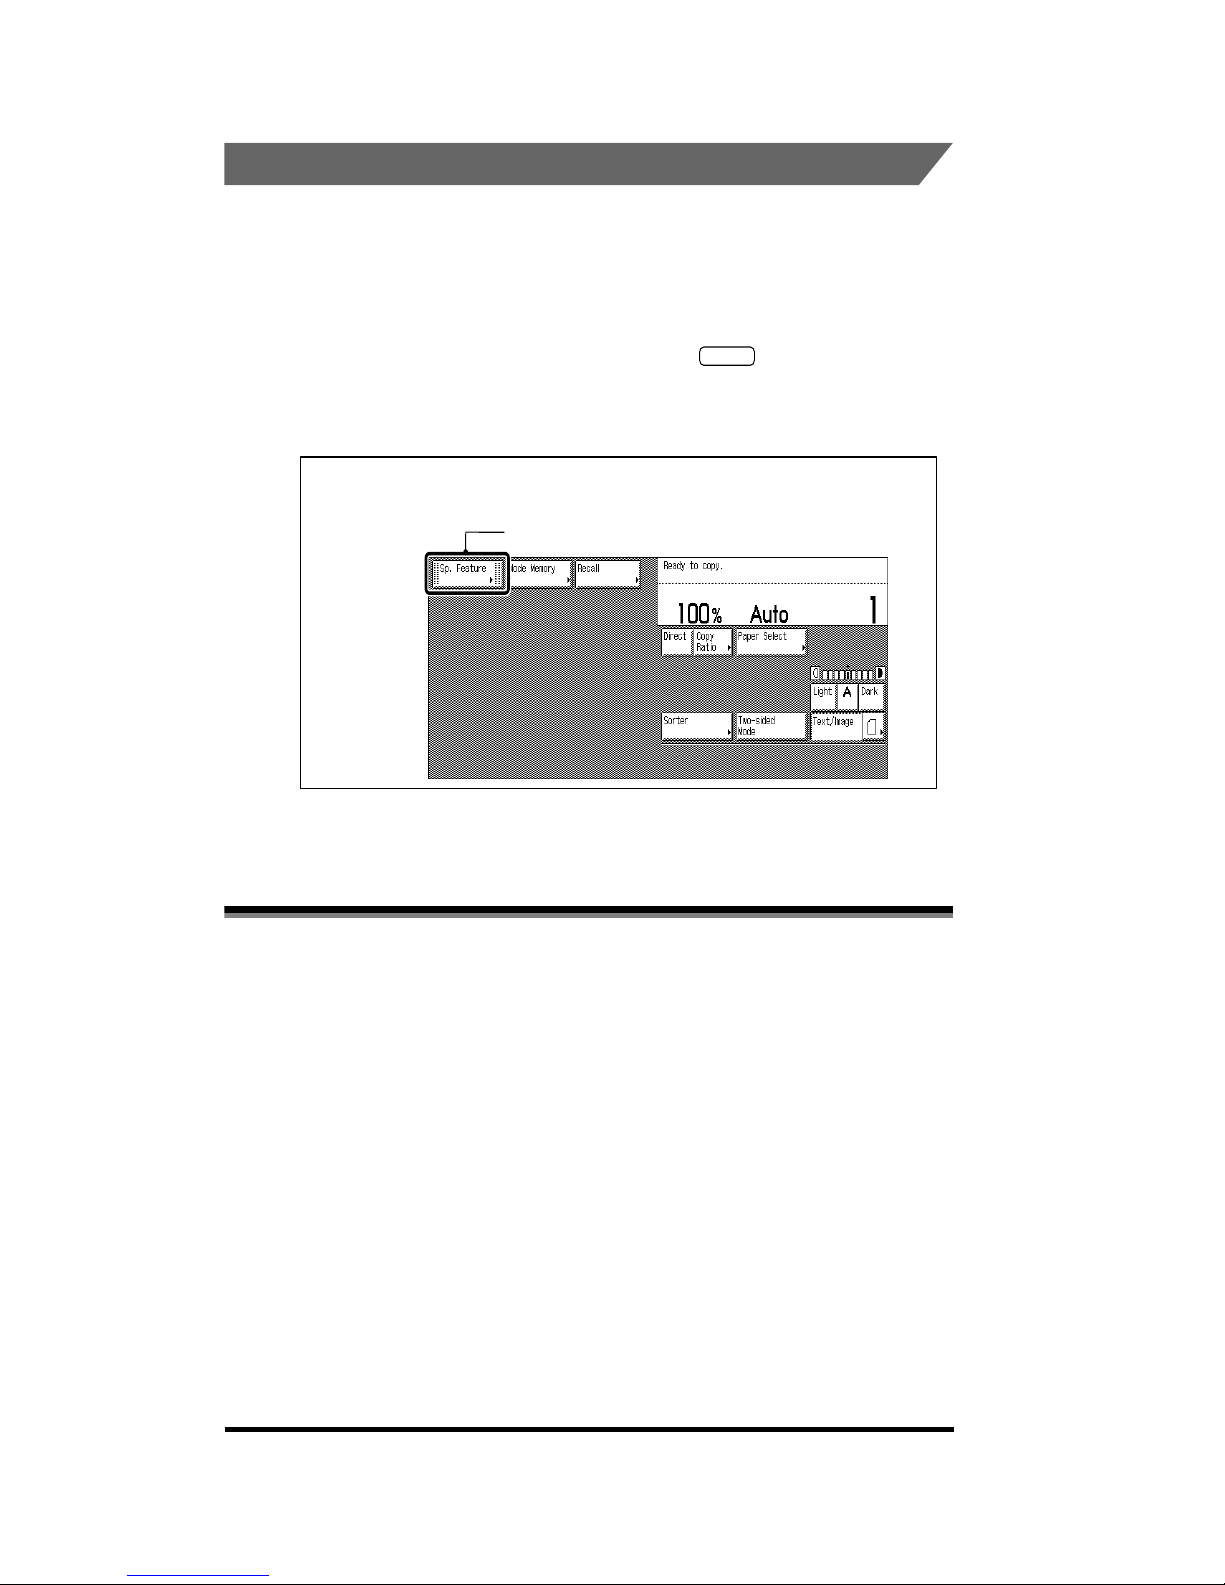
The keys which you should press are marked with , as shown below.
When multiple keys can be pressed on the touch panel display, all keys are marked.
Select the keys which suit your needs.
Canon, the Canon logo, and CLC are trademarks of Canon Inc.
Other product and company names herein may be the trademarks of their respective
owners.
Copyright 2001 by Canon, Inc. All rights reserved.
No part of this publication may be reproduced or transmitted in any form or by any means,
electronic or mechanical, including photocopying and recording, or by any information
storage or retrieval system without the prior written permission of Canon, Inc.
About Trademarks
Place the original; then press [Sp. Feature].
1
Press this key for operation
Page 14

xiii
■ Fading Due to Exposure to Light
As with all printed material and photographs, this is not a problem if the copies are stored
under normal conditions. Color copies exposed for two years to the fluorescent lighting
used in general offices will hardly fade. Color copies should be stored in binders or in
locations that are not exposed to light if they are to be kept for a long period of time.
■ Use of Clear Covers
Do not use PVC-type transparent covers. When copies are in contact with such covers,
the toner on the copy will soften, and the copy and cover will adhere to each other.
■ Use of Adhesives
Only non-solvent adhesives should be used for mounting copies; solvents will dissolve the
toner. Be sure to check the ingredients of the adhesive before use. Test some adhesive
with an unwanted color copy before using it with a valuable copy.
■ Inserting Copies Between Printed Pages
When copies are included in books, the solvents contained in printing ink may cause the
toner to soften. The printed pages should, therefore, be thoroughly dried to evaporate any
solvents before the copies are inserted.
■ Folding Copies
Color copies differ from black-and-white copies in that toners of four colors are used.
These toners are deposited on the surface of the paper in a layer considerably thicker
than with black-and-white copies, and they may peel if the copy is folded or wrinkled.
Copies should be stored in flat transparent covers, in binders, or carefully rolled.
■ Effect of High Temperatures
If copies are left in high temperature areas (near heaters, etc.), the toner will melt and the
colors will mix.
Preserving Color Copies
Page 15

xiv
Page 16

1-1
CHAPTER
1
Basic Copying
This chapter describes the basic Copy functions.
What the CLC 1180/1140 Can Do . . . . . . . . . . . . . . . . . . . . . . . . . . . . . . . . . . . . . . . . . . 1-3
The Different Types of Copying . . . . . . . . . . . . . . . . . . . . . . . . . . . . . . . . . . . . . . . . . . . . . . . . . .1-3
Overview of the Copying Procedure . . . . . . . . . . . . . . . . . . . . . . . . . . . . . . . . . . . . . . . . 1-31
Basic Copying Procedure . . . . . . . . . . . . . . . . . . . . . . . . . . . . . . . . . . . . . . . . . . . . . . . . . . . . .1-31
Optimizing the Copy Speed . . . . . . . . . . . . . . . . . . . . . . . . . . . . . . . . . . . . . . . . . . . . . . . . . . . .1-36
Placing the Original . . . . . . . . . . . . . . . . . . . . . . . . . . . . . . . . . . . . . . . . . . . . . . . . . . . . 1-37
The Orientation of the Original . . . . . . . . . . . . . . . . . . . . . . . . . . . . . . . . . . . . . . . . . . . . . . . . . .1-37
Placing the Original on the Platen Glass . . . . . . . . . . . . . . . . . . . . . . . . . . . . . . . . . . . . . . . . . .1-38
Placing Originals into the Feeder (Recirculating Document Feeder RDF-E3) . . . . . . . . . . . . . .1-41
Entering the Copy Quantity. . . . . . . . . . . . . . . . . . . . . . . . . . . . . . . . . . . . . . . . . . . . . . . 1-44
Specifying the Copy Quantity. . . . . . . . . . . . . . . . . . . . . . . . . . . . . . . . . . . . . . . . . . . . . . . . . . .1-44
Changing the Copy Quantity . . . . . . . . . . . . . . . . . . . . . . . . . . . . . . . . . . . . . . . . . . . . . . . . . . .1-45
Selecting the Paper Size (Paper Select). . . . . . . . . . . . . . . . . . . . . . . . . . . . . . . . . . . . . 1-46
Automatically Selecting Paper (Auto Paper Selection) . . . . . . . . . . . . . . . . . . . . . . . . . . . . . . .1-46
Manually Selecting Paper (Manual Paper Selection) . . . . . . . . . . . . . . . . . . . . . . . . . . . . . . . . .1-48
Selecting Paper Loaded in the Stack Bypass . . . . . . . . . . . . . . . . . . . . . . . . . . . . . . . . . . . . . .1-49
Adjusting Exposure (Copy Exposure). . . . . . . . . . . . . . . . . . . . . . . . . . . . . . . . . . . . . . .1-56
Adjusting the Copy Exposure Manually (Manual Exposure Adjustment). . . . . . . . . . . . . . . . . .1-56
Adjusting the Copy Exposure Automatically (Automatic Exposure Adjustment) . . . . . . . . . . . .1-57
Selecting the Original Type . . . . . . . . . . . . . . . . . . . . . . . . . . . . . . . . . . . . . . . . . . . . . . . 1-59
Changing the Copy Ratio (Copy Ratio). . . . . . . . . . . . . . . . . . . . . . . . . . . . . . . . . . . . . .1-61
Enlarging/Reducing Originals to a Standard Size (Preset Zoom) . . . . . . . . . . . . . . . . . . . . . . .1-62
Specifying the Copy Ratio by % (Zoom Designation) . . . . . . . . . . . . . . . . . . . . . . . . . . . . . . . .1-63
Automatically Setting the Copy Ratio Based on the Size of the Paper (Auto Zoom) . . . . . . . . .1-65
Slightly Reducing Images to Prevent the Edges of the Original from Being Cut Off
(Entire Image). . . . . . . . . . . . . . . . . . . . . . . . . . . . . . . . . . . . . . . . . . . . . . . . . . . . . . . . . . . . . . .1-67
Generating the Copy Ratio Based on the Size of the Original and the Copy
(Zoom Program) . . . . . . . . . . . . . . . . . . . . . . . . . . . . . . . . . . . . . . . . . . . . . . . . . . . . . . . . . . . . .1-69
Page 17

1-2
1. Basic Copying
Enlarging/Reducing Originals with Copy Ratios Set Independently for the X and Y Axes
(XY Zoom) . . . . . . . . . . . . . . . . . . . . . . . . . . . . . . . . . . . . . . . . . . . . . . . . . . . . . . . . . . . . . . . . . 1-73
Splitting the Image of the Original According to the Enlargement Ratio
(Multi-page Enlargement) . . . . . . . . . . . . . . . . . . . . . . . . . . . . . . . . . . . . . . . . . . . . . . . . . . . . . 1-78
Sorting Copies (Stapler Sorter) . . . . . . . . . . . . . . . . . . . . . . . . . . . . . . . . . . . . . . . . . . .1-88
Making Two-sided Copies (Two-sided Mode) . . . . . . . . . . . . . . . . . . . . . . . . . . . . . . . . .1-95
Making Two-sided Copies from One-sided Originals (1 ➔ 2-Sided) . . . . . . . . . . . . . . . . . . . . 1-96
Making Two-sided Copies from Two-sided Originals (2 ➔ 2-Sided) . . . . . . . . . . . . . . . . . . . . 1-99
Making One-sided Copies from Two-sided Originals (2 ➔ 1-Sided) . . . . . . . . . . . . . . . . . . . 1-101
Making Two-sided Copies from Facing Pages of a Bound Original (Book ➔ 2-Sided) . . . . . 1-102
Specifying Auto Start . . . . . . . . . . . . . . . . . . . . . . . . . . . . . . . . . . . . . . . . . . . . . . . . . .1-105
Interrupting the Current Job to Make Priority Copies (Interrupt Mode). . . . . . . . . . . . . 1-106
Using the Platen Glass . . . . . . . . . . . . . . . . . . . . . . . . . . . . . . . . . . . . . . . . . . . . . . . . . . . . . . 1-107
Using the Feeder’s Single Sheet Document Feeder. . . . . . . . . . . . . . . . . . . . . . . . . . . . . . . . 1-109
Switching Between the Full Color Mode and Black Monochrome Mode (ACS) . . . . . .1-112
Automatically Switching Between the Full Color and Black Monochrome Modes (ACS). . . . 1-112
Copying in Color (Full Color Mode) . . . . . . . . . . . . . . . . . . . . . . . . . . . . . . . . . . . . . . . . . . . . 1-113
Copying Color Originals in Black-and-white (Black Monochrome Mode) . . . . . . . . . . . . . . . 1-114
Specifying Automatic Recognition of the Size of the Original (Original Recognition) . .1-115
Centering the Copied Image (Center Shift) . . . . . . . . . . . . . . . . . . . . . . . . . . . . . . . . .1-117
Checking the Copy Settings (Setting Confirmation) . . . . . . . . . . . . . . . . . . . . . . . . . . .1-118
Changing or Canceling a Selected Copy Setting (Setting Confirmation/Cancel) . . . . .1-119
Basic Copying
1
Page 18
What the CLC 1180/1140 Can Do
1-3
What the CLC 1180/1140 Can Do
Most operations are executed from the touch panel display. You can make copies by
simply following the instructions displayed on the touch panel display.
.
The Different Types of Copying
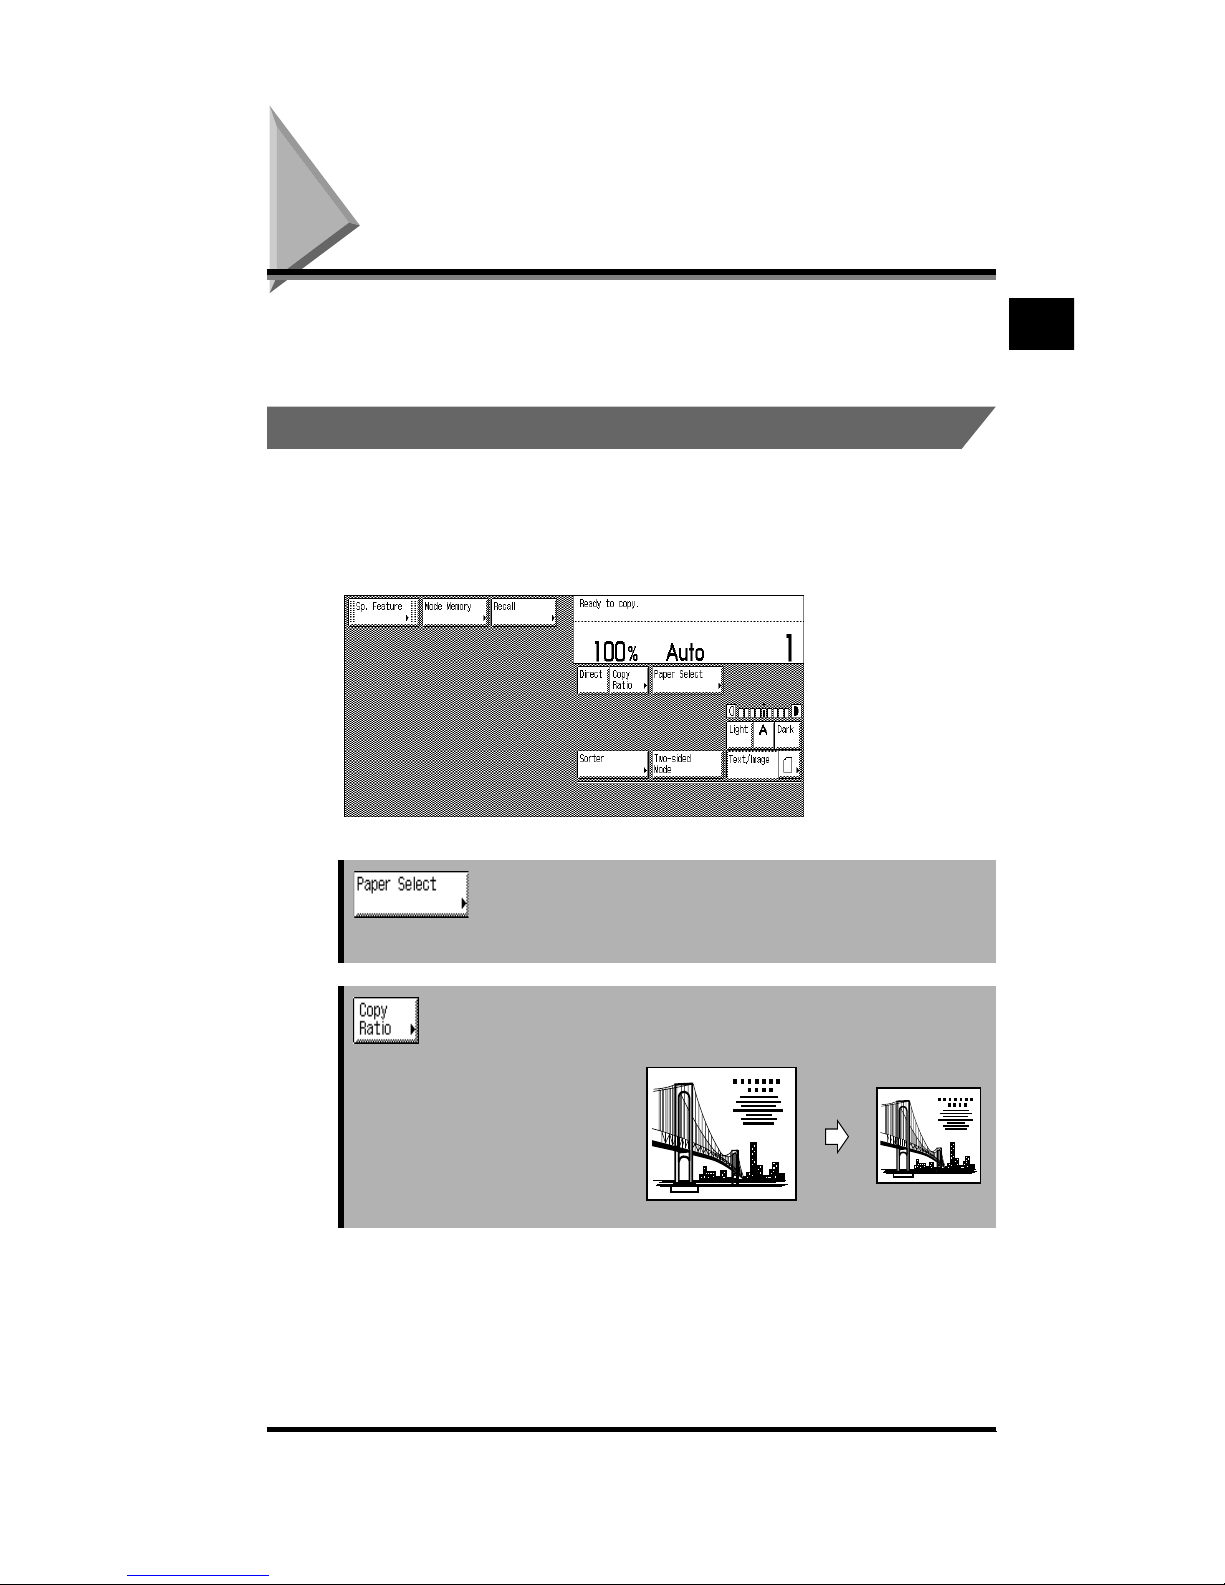
Basic Features Screen
The screen below, which appears when the copier is ready to make copies, is called the
Basic Features screen.
See “Selecting the Paper Size (Paper Select),” on p. 1-46.
Press to select the paper size, paper type, and paper feeding location.
See “Changing the Copy Ratio (Copy Ratio),” on p. 1-61.
Press to specify the copy ratio.
Basic Copying
1
Page 19
What the CLC 1180/1140 Can Do
1-4
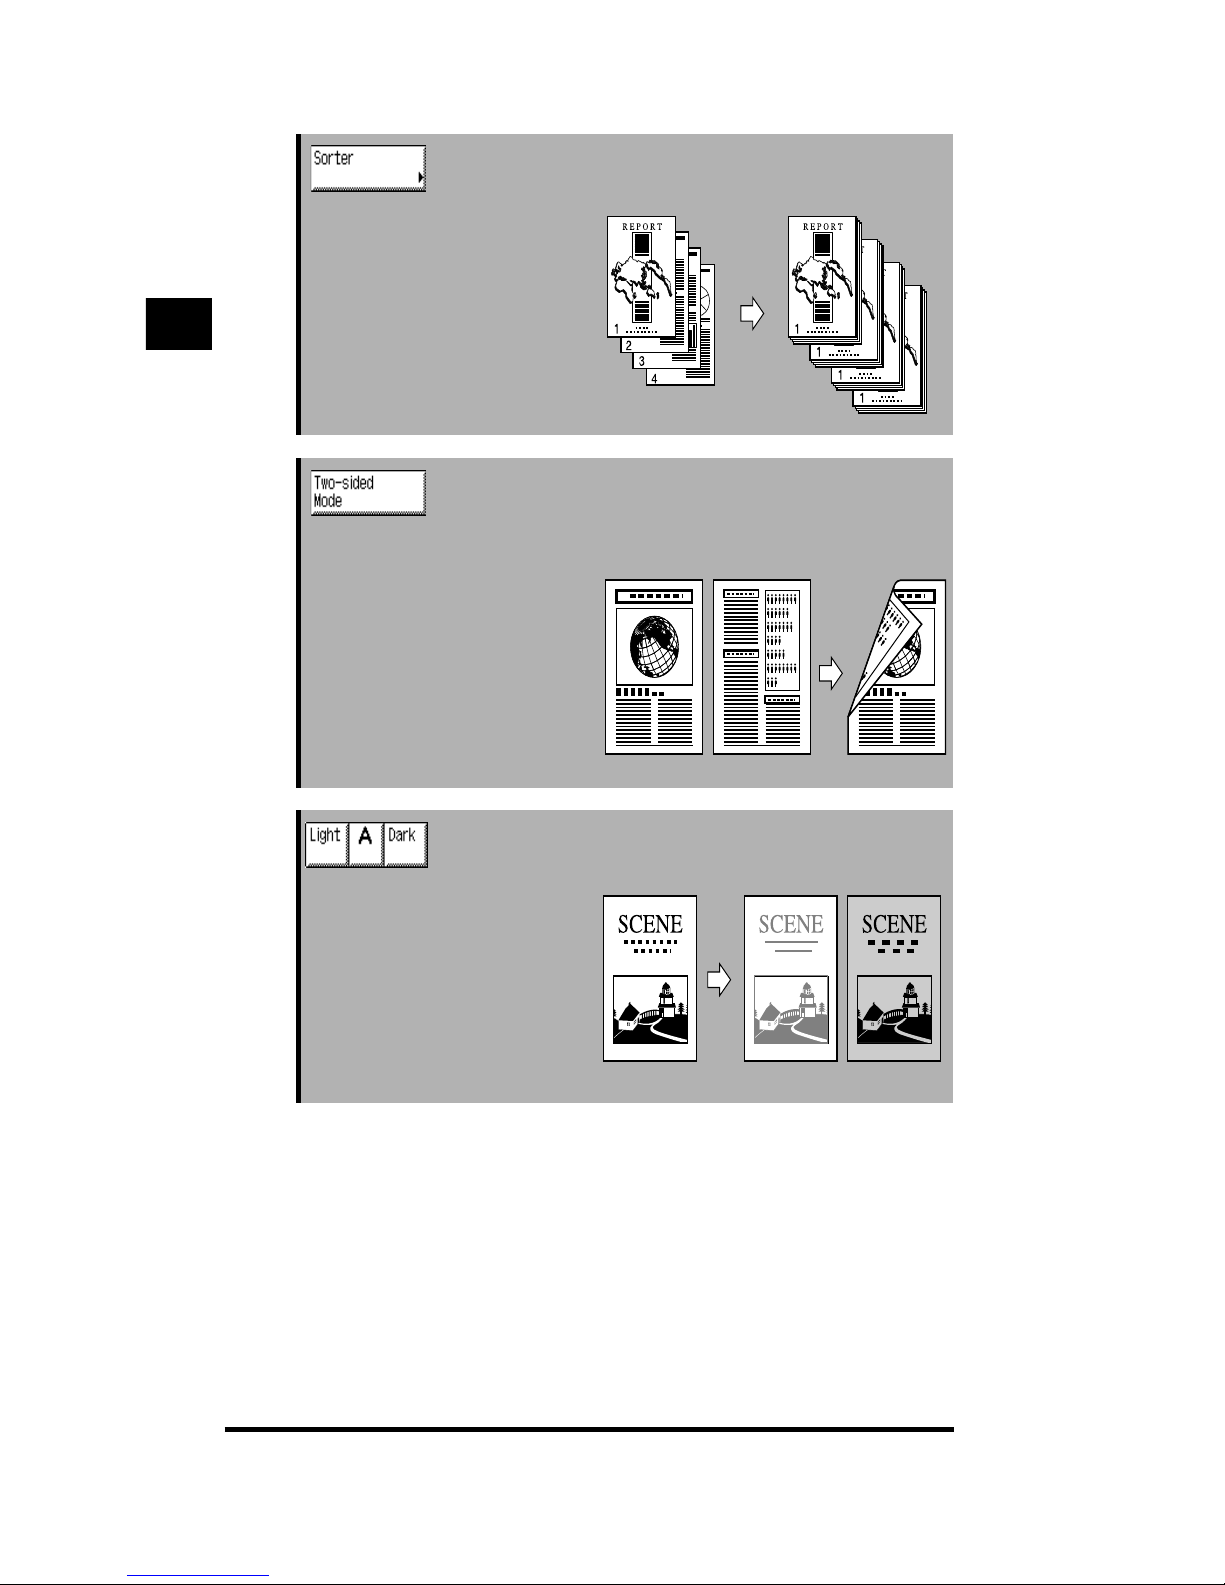
See “Sorting Copies (Stapler Sorter),” on p. 1-88.
Press to specify or cancel the Sort,
Group, or Staple-sort function.
See “Making Two-sided Copies (Two-sided Mode),” on p. 1-
95.
Press to make two-sided copies from
one-sided originals or one-sided
copies from two-sided originals.
When [1➔2-sided] Is Selected
See “Adjusting Exposure (Copy Exposure),” on p. 1-56.
Press [Light] or [Dark] to manually
control the copy exposure. Press [A]
to specify or cancel Automatic
Exposure.
Basic Copying
1
Page 20
What the CLC 1180/1140 Can Do
1-5
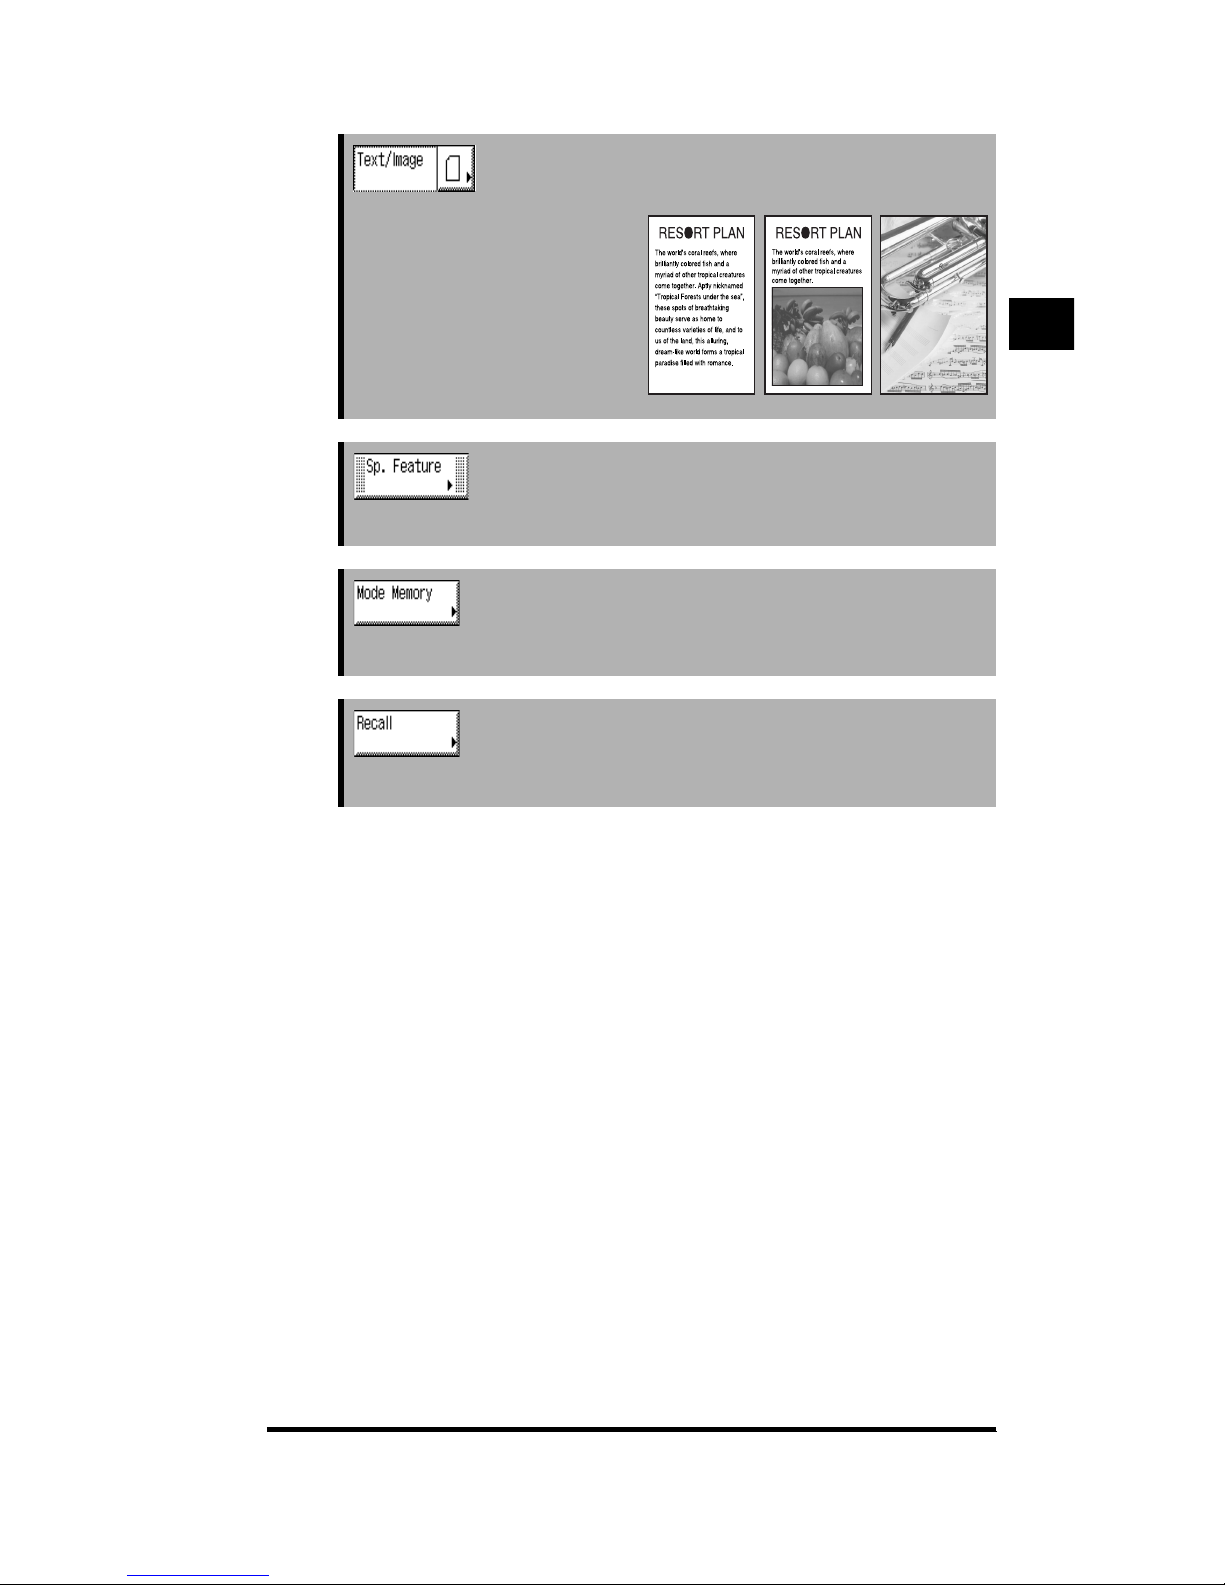
See “Selecting the Original Type,” on p. 1-59.
Press to make copies according to the
type of original (text only, text and
photo, photo only).
See “Useful Copy Functions,” in Chapter 2.
Press to specify functions under Special Features.
See “Storing/Recalling Frequently Used Copy Settings
(Mode Memory),” on p. 2-44.
Press to store or recall copy settings.
See “Recalling a Previous Copy Setting (Recall),” on p. 2-
51.
Press to recall previously specified copy settings.
Basic Copying
1
Page 21
What the CLC 1180/1140 Can Do
1-6
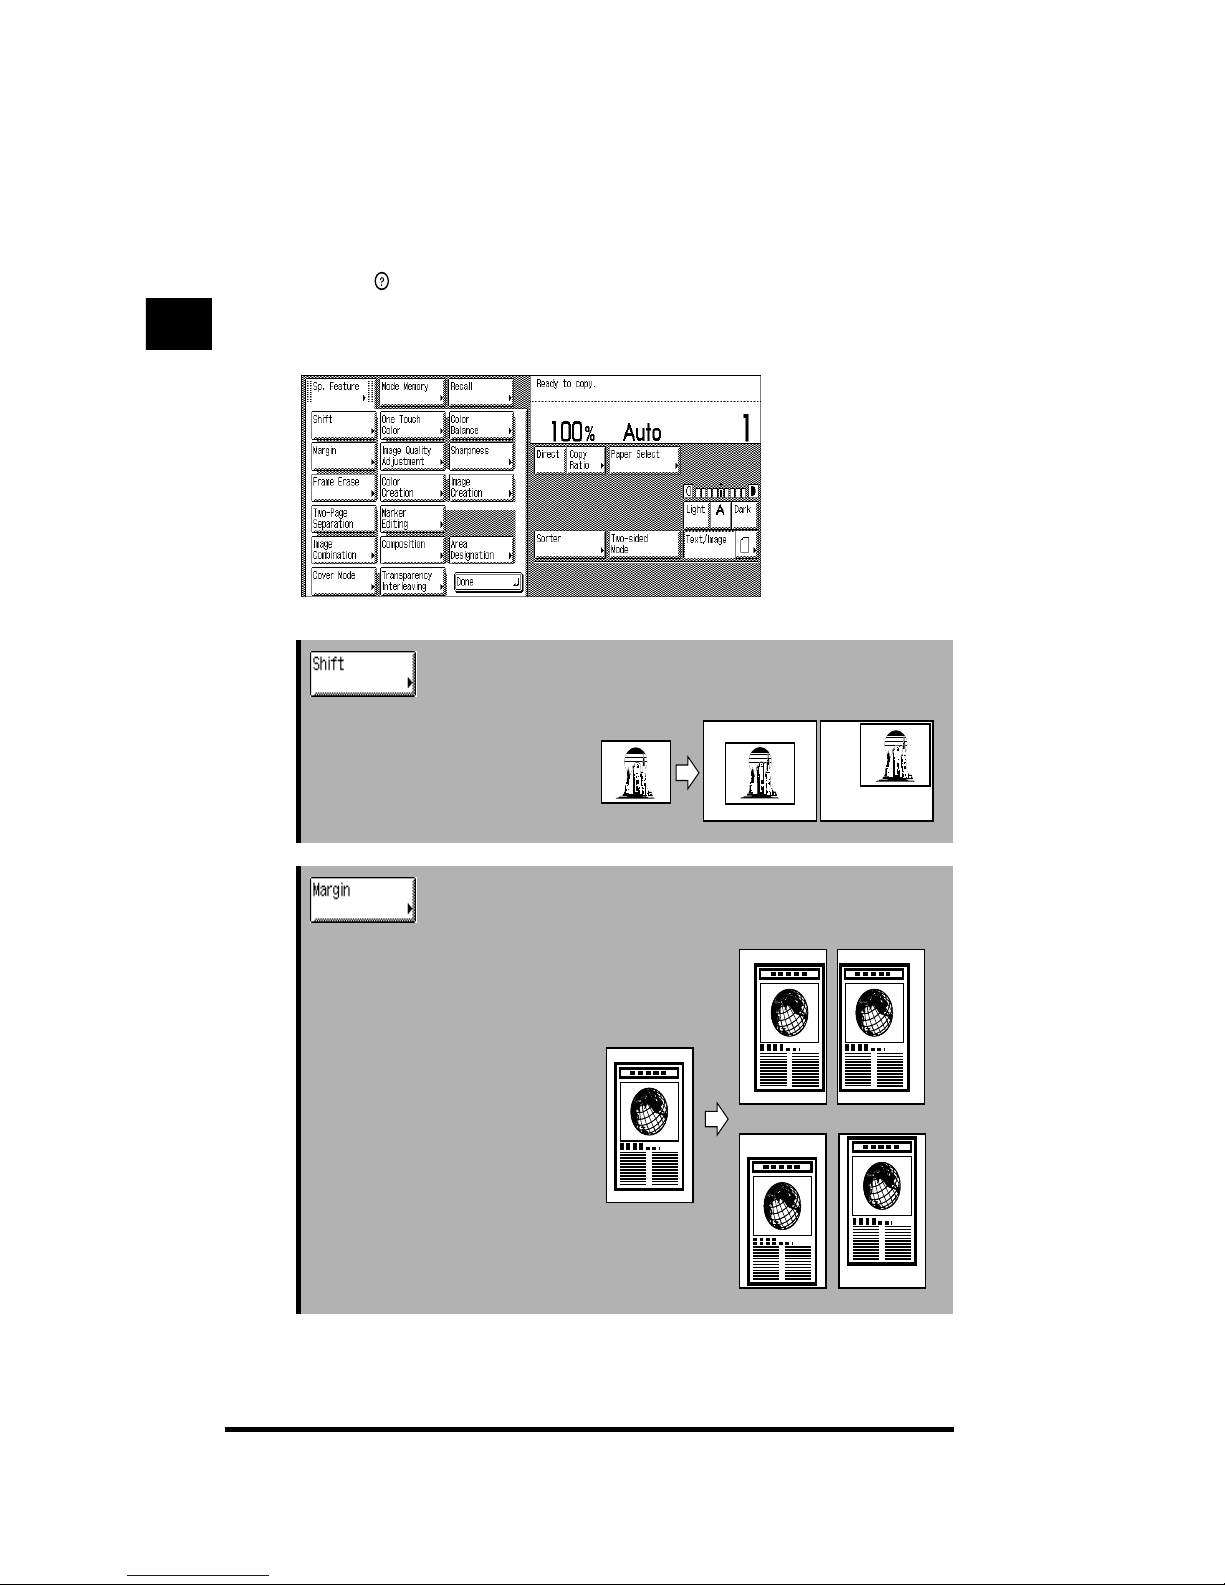
Special Features Screen
Pressing [Sp. Feature] in the Basic Features screen displays the Special Features screen,
where special Copy functions are available. In some cases, when a function is selected, a
more detailed screen for the selected function appears. To close the Special Features
screen and return to the Basic Features screen, press [Done].
Pressing (Guide) after selecting a function displays a help screen containing
information on that function.
This is useful when you want to learn more about the function.
See “Shifting the Original Image (Shift),” on p. 2-17.
Press to specify or cancel the Shift
function. This function enables you to
shift the position of the original image.
See “Making Copies with Margins (Margin),” on p. 2-29.
Press to specify or cancel the Margin
function. This function enables you to
create a margin in the copies.
Basic Copying
1
Page 22
What the CLC 1180/1140 Can Do
1-7
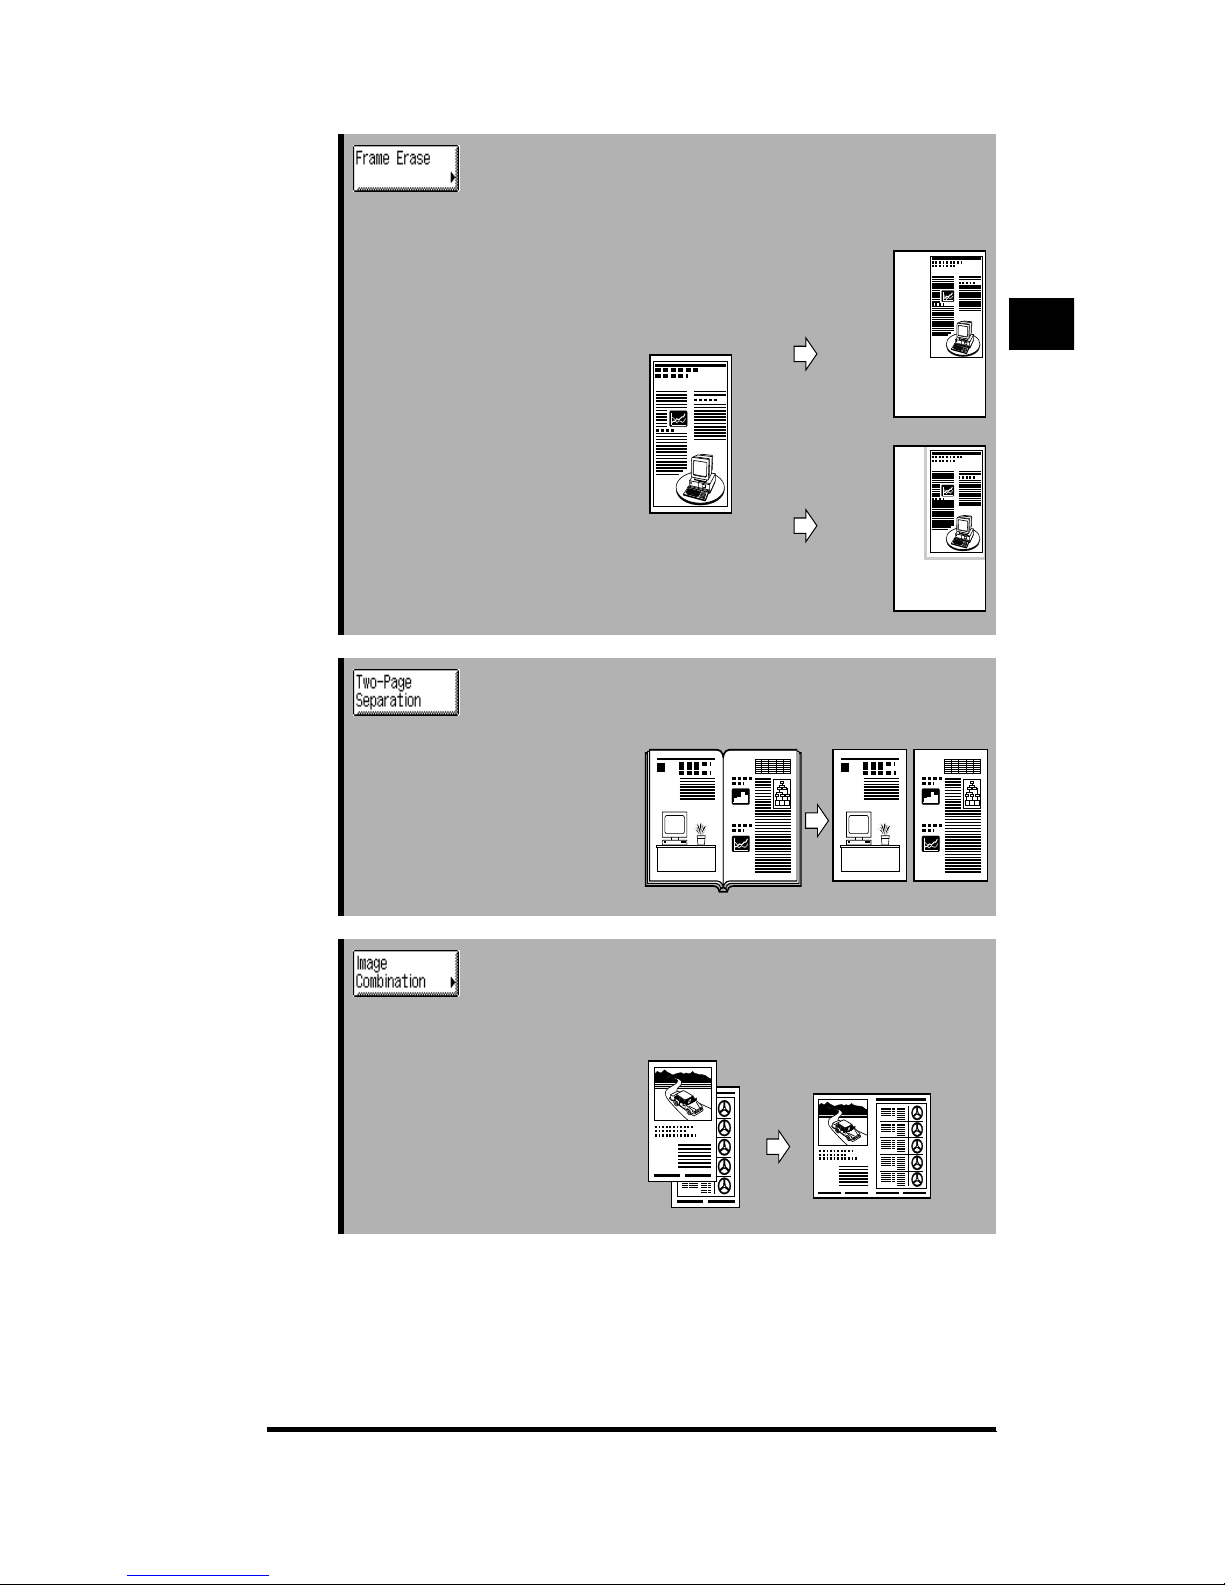
See “Erasing Shadows and Frame Lines from Copies
(Frame Erase),” on p. 2-32.
Press to specify or cancel the Frame
Erase function. This function enables
you to eliminate dark border areas
and lines that appear around the
original image.
When [Original Frame Erase] Is Selected
See “Copying Facing Pages in a Book on Two Separate
Sheets of Paper (Two-page Separation),” on p. 2-2.
Press to specify or cancel the Twopage Separation function. This
function enables you to copy facing
pages of an opened book onto
separate sheets of paper.
See “Copying Multiple Pages onto a Single Sheet of Paper
(Image Combination),” on p. 2-40.
Press to make copies by automatically
reducing two or four originals onto one
side or both sides of a sheet of paper.
When [2 on 1] Is Selected
Original Frame Erase
selected
Original Frame Erase
not selected
11
2
1
1
2
Basic Copying
1
Page 23
What the CLC 1180/1140 Can Do
1-8
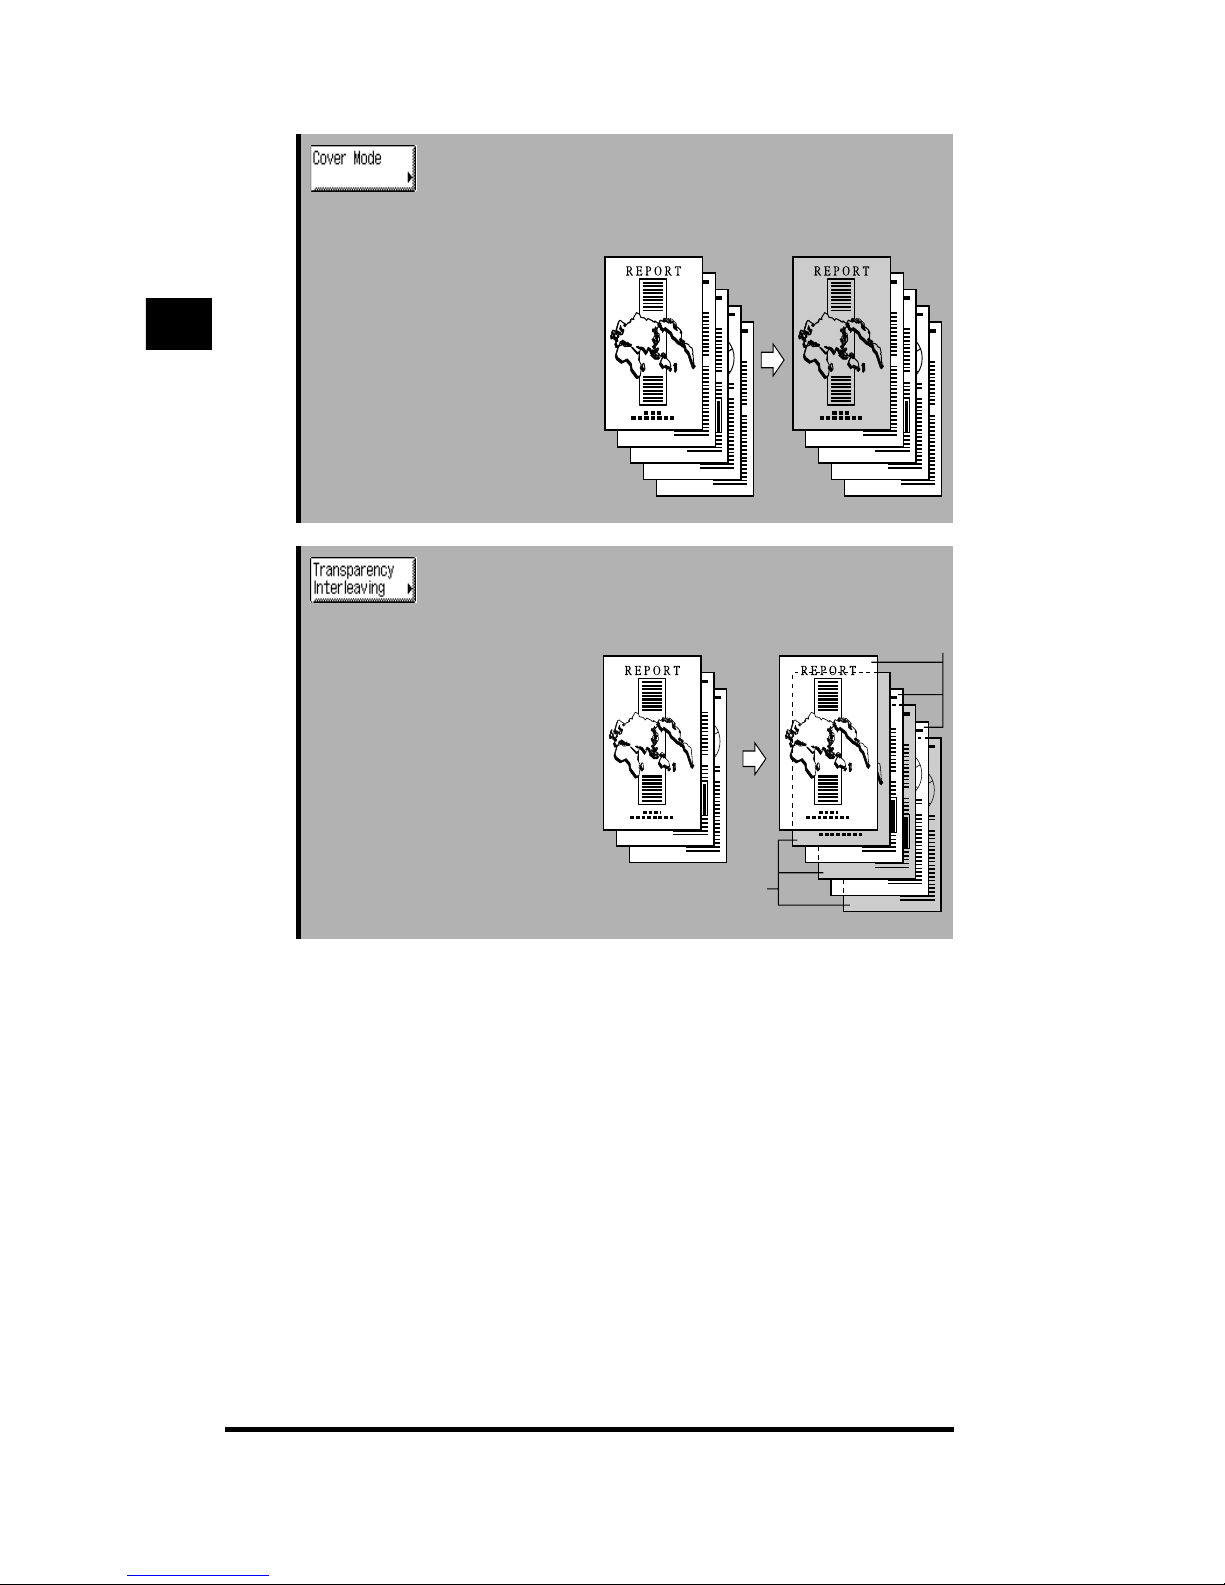
See “Adding Front and Back Covers to Copy Sets (Cover),”
on p. 2-4.
Press to specify or cancel the Cover
function. This function enables you to
add a front or back cover sheet.
When [Front Cover] Is Selected
See “Interleaving a Sheet of Paper Between Transparencies
(Transparency Interleaving),” on p. 2-13.
Press to specify or cancel the
Transparency Interleaving function.
This function enables you to insert a
sheet of paper between each
transparency when copying on
transparencies.
Transparencies
Interleaf sheets
Basic Copying
1
Page 24
What the CLC 1180/1140 Can Do
1-9
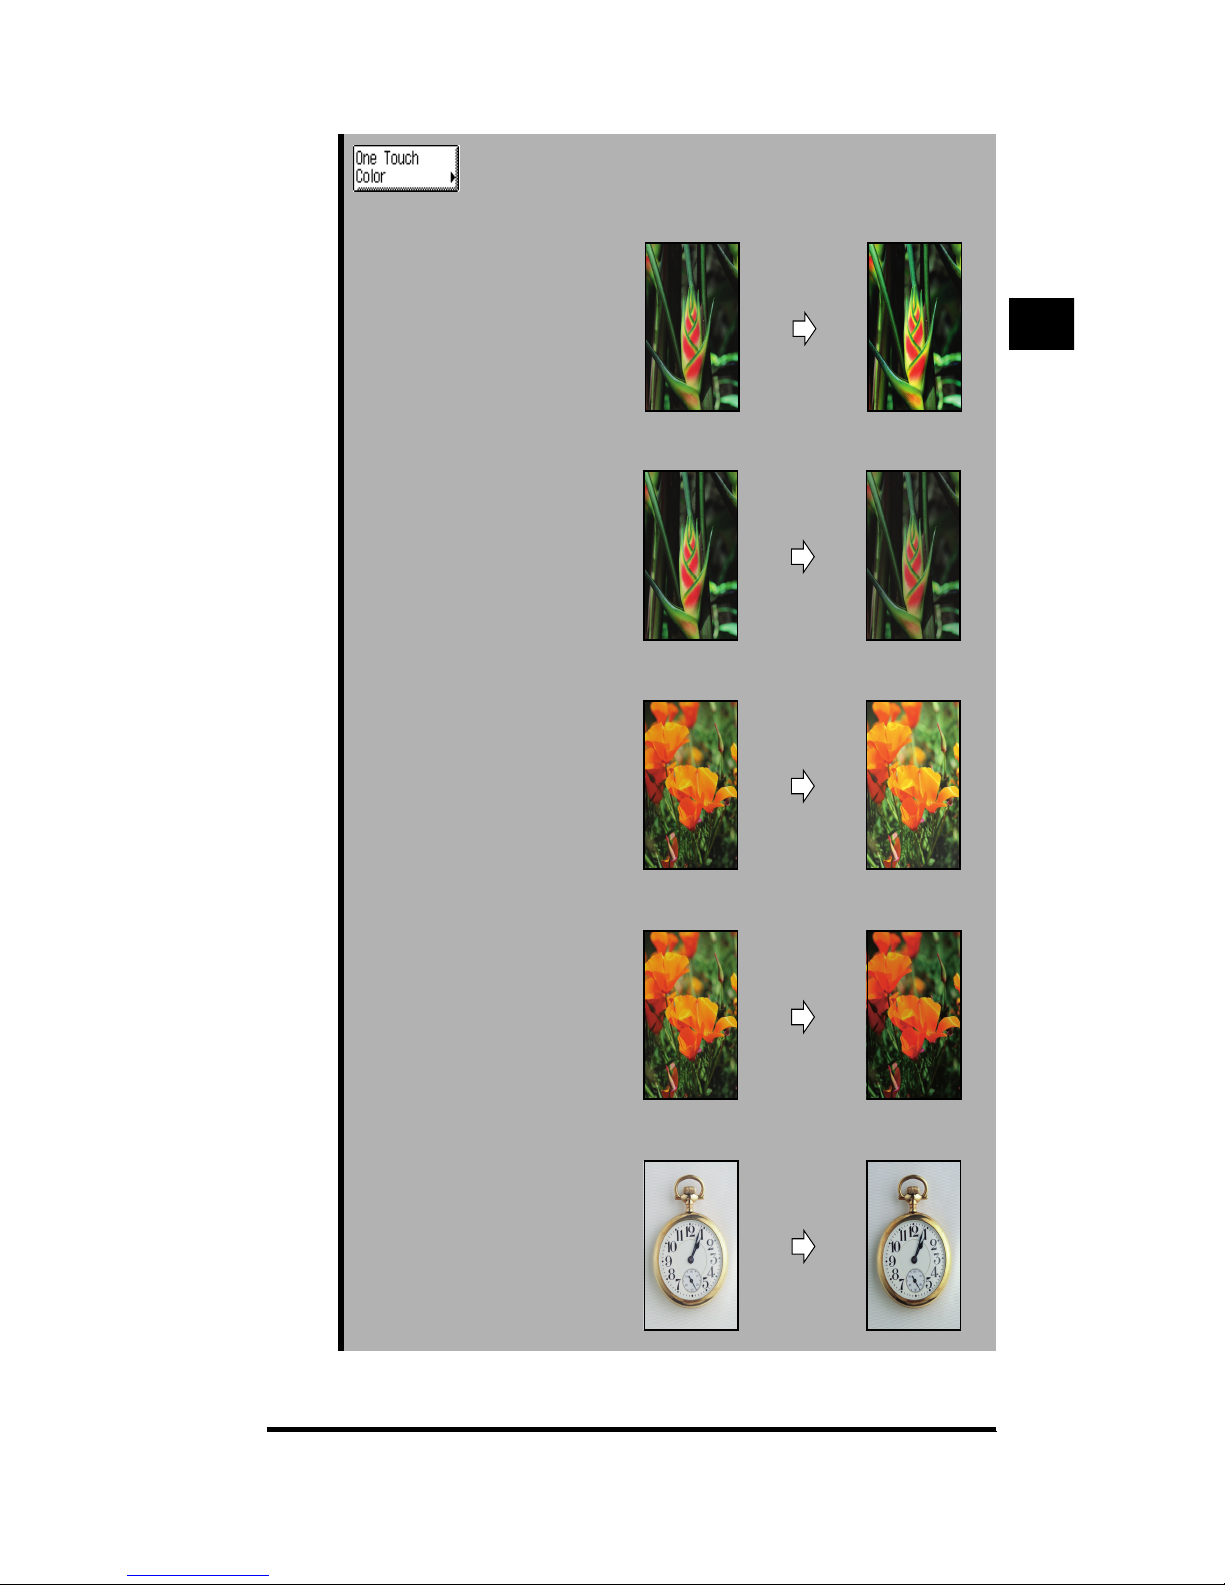
See “Selecting the Desired Image Quality with One Touch
of a Key (One Touch Color),” on p. 3-3.
Press to adjust the image quality with
one touch of a key. This function
enables you to make copies by
selecting the desired type of look or
feel, or by changing the tone of the
image by specifying the intensity of
red, blue, and yellow independently.
Original Vivid Colors
Original Tranquil Colors
Lighten Image
Original
Darken Image
Original
Highlight Reproduction
Original
Basic Copying
1
Page 25
What the CLC 1180/1140 Can Do
1-10
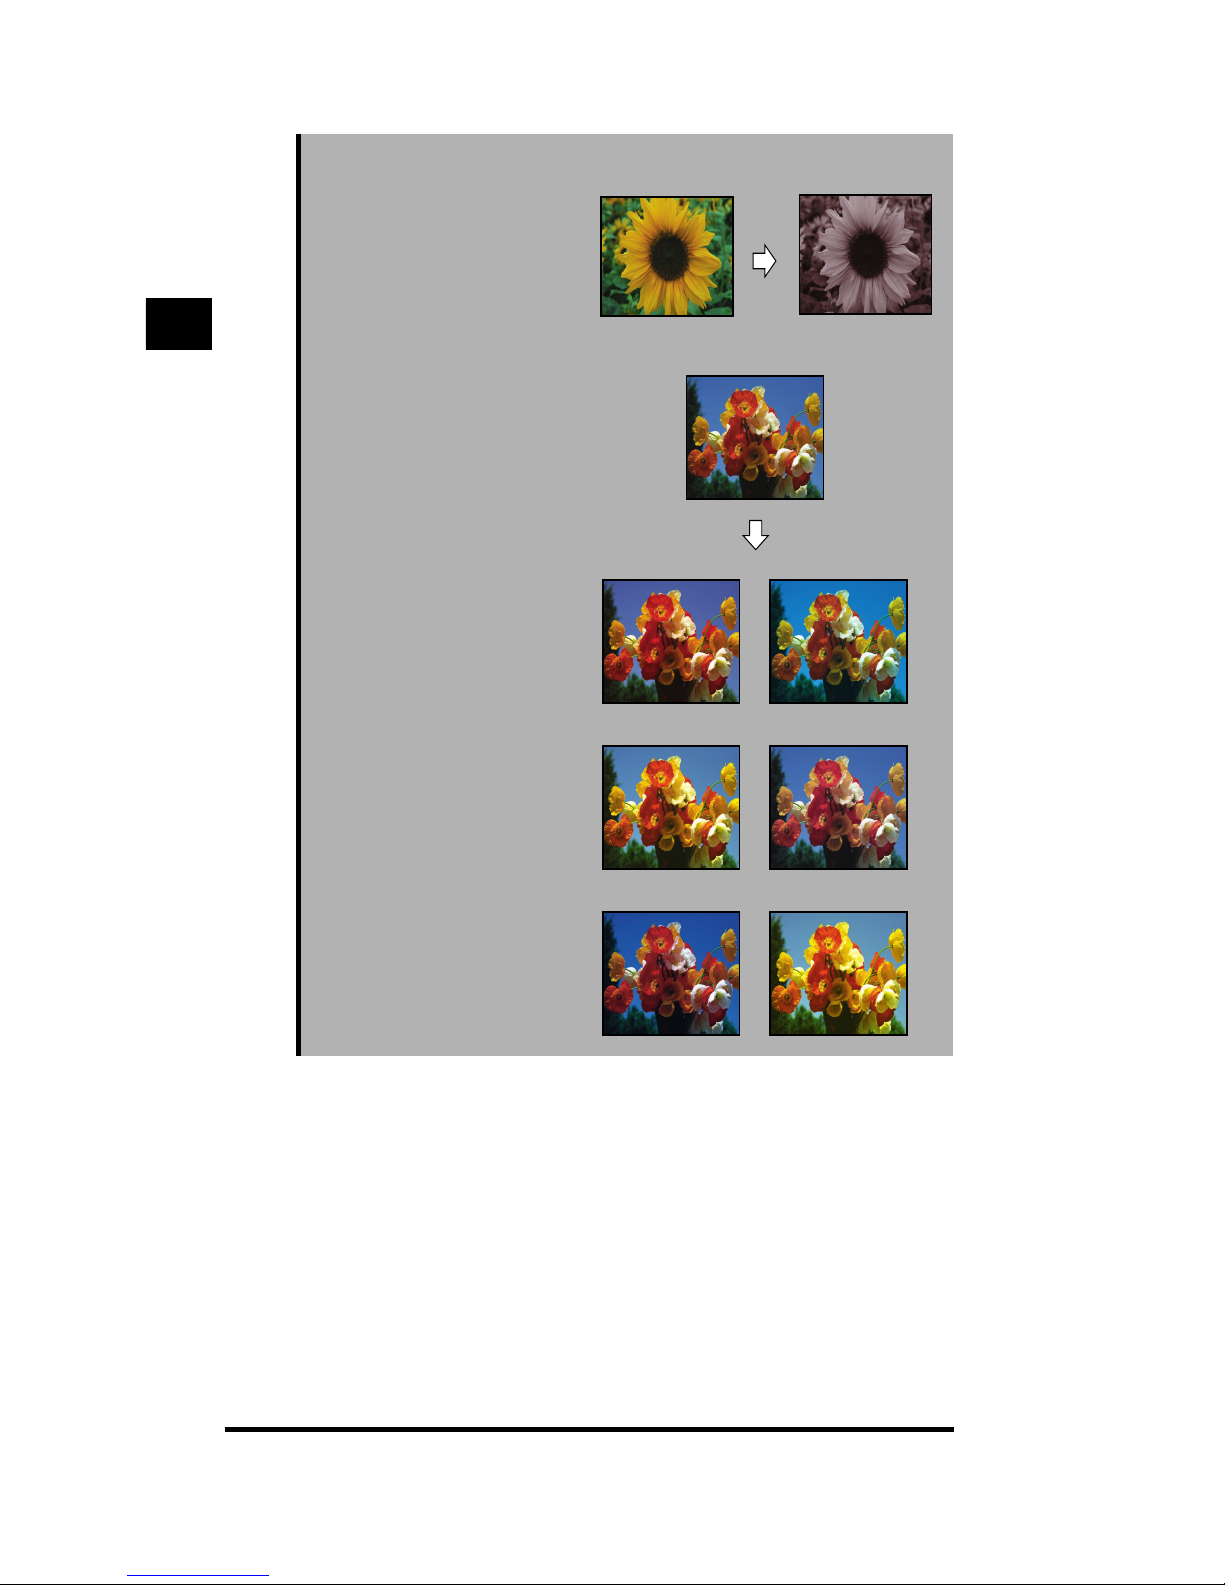
Old-fashioned
Photo Image
Original
Decrease RedIncrease Red
Original
Decrease YellowIncrease Yellow
Decrease BlueIncrease Blue
Basic Copying
1
Page 26

What the CLC 1180/1140 Can Do
1-11
See “Changing the Sharpness in Copies (Sharpness),” on
p. 3-7.
Press to increase or decrease the
clarity of the image you are copying.
Low
High
Original
Set the
sharpness
low
Copy
Original
Set the
sharpness
high
Copy
Basic Copying
1
Page 27
What the CLC 1180/1140 Can Do
1-12
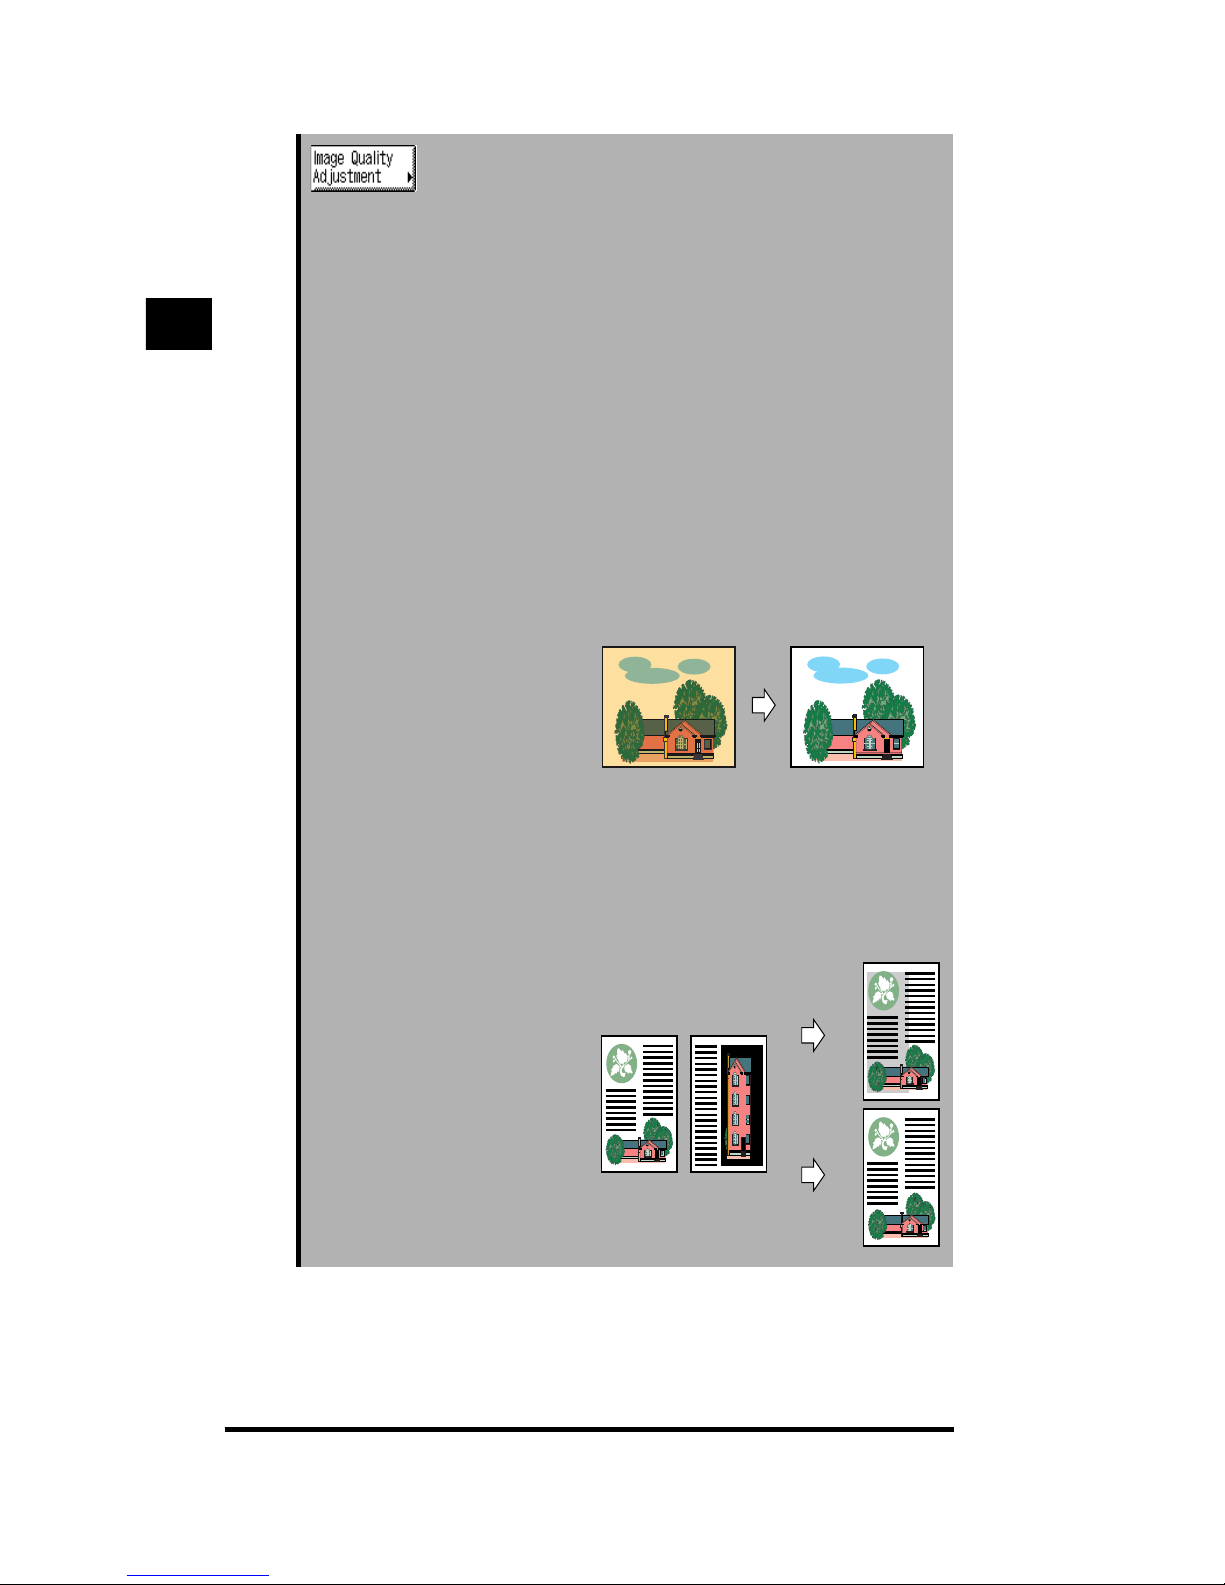
See “Erasing the Background Color in Copies (Hide
Background),” on p. 3-9.
See “Erasing the Image on the Reverse Side of the Original
in Copies (Hide Backside Image),” on p. 3-11.
See “Adjusting the Color Range (Color Range
Adjustment),” on p. 3-13.
See “Enhancing the Black Areas of the Image (Black
Adjustment),” on p. 3-15.
See “Adjusting the Color of Complexion (Complexion
Adjustment),” on p. 3-17.
Press to perform the following when
making copies: erase background
color, prevent the image on the
reverse side of the original from
showing, adjust the color range,
enhance black areas, and adjust the
color of human complexion.
Hide Background
This function enables you to erase the
background color of the original, and is
especially useful for copying originals with
background color and originals that appear
yellow from age.
Hide Backside Image
This function enables you to make fine
adjustments to prevent the image on the
reverse side of thin originals to appear in the
copies.
Copy with the background
color eliminated
Original
Two-sided original
Normal
settings
Copy
Hide Backside
Image specified
Image on
front side
Image on
rear side
Basic Copying
1
Page 28
What the CLC 1180/1140 Can Do
1-13
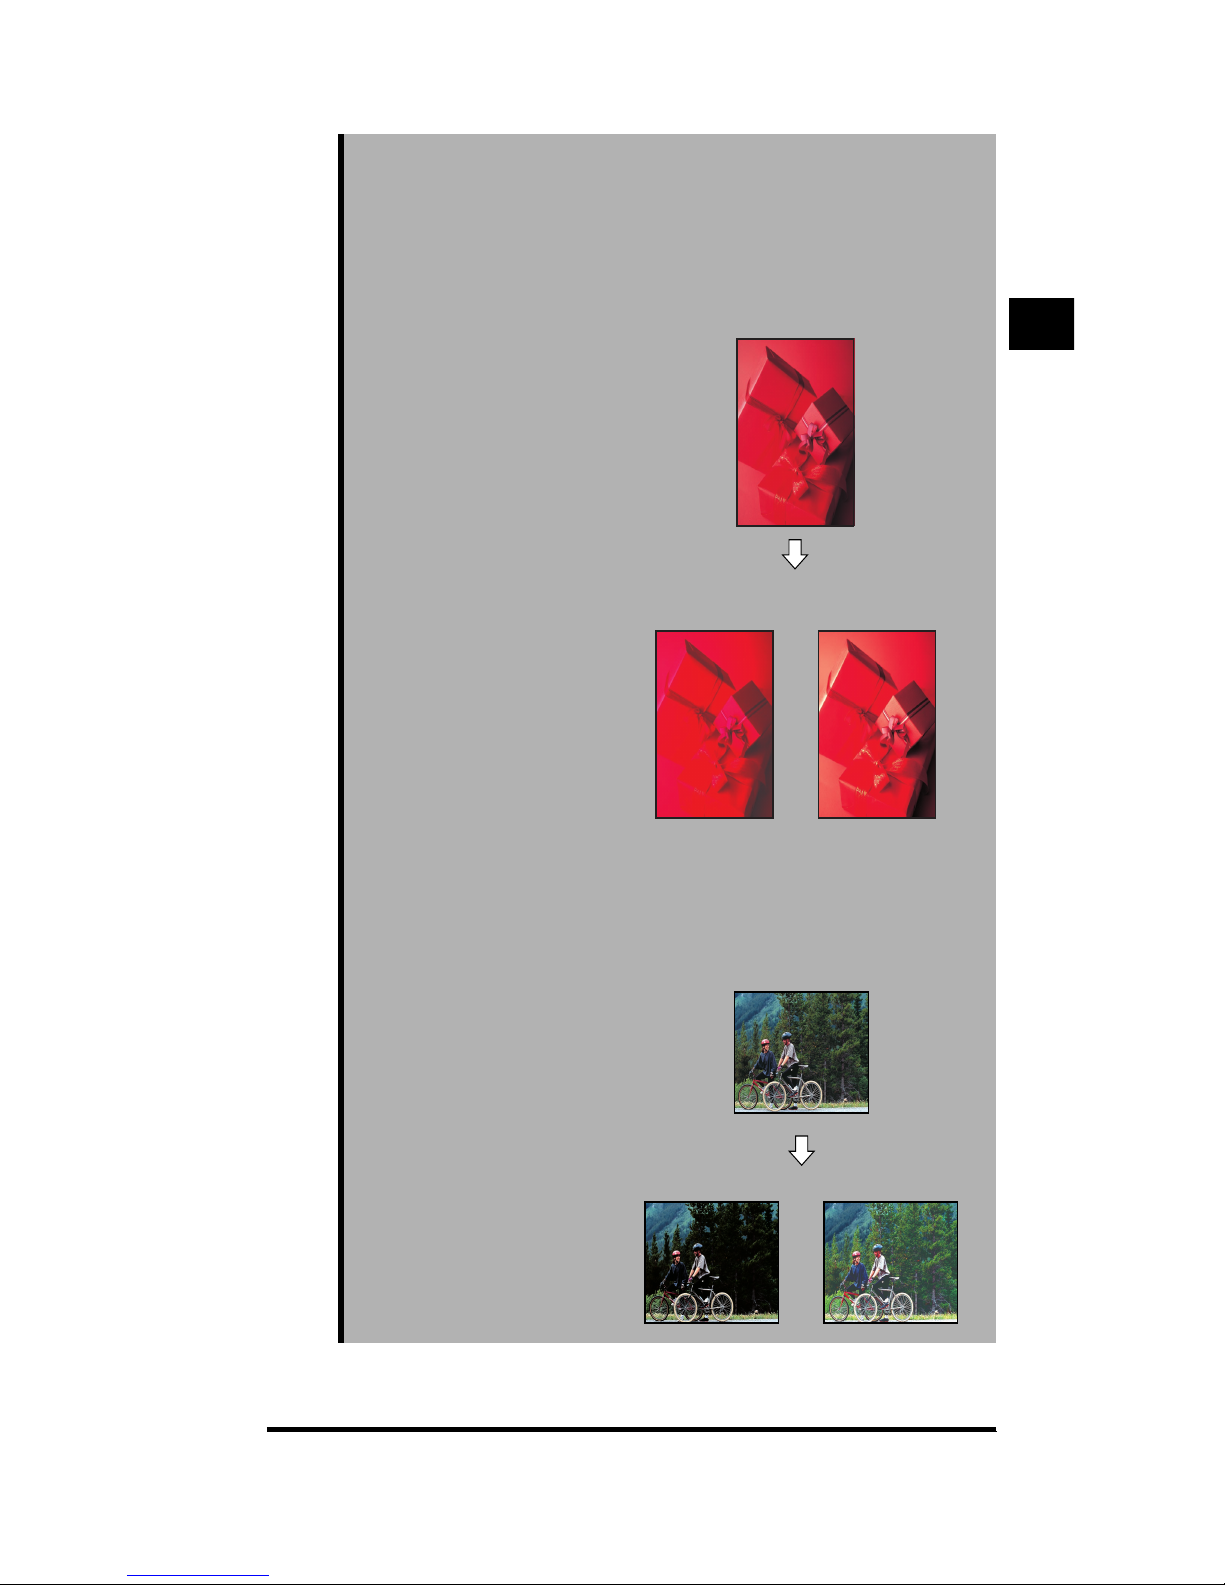
Color Range Adjustment
This function enables the copier to recognize
originals with high saturation levels or color
gradations that are difficult to reproduce, and
automatically adjust the color range to its
optimal for making copies.
Black Adjustment
This function enables you to make copies by
adjusting the gradations of black to make the
contours of such areas stand out.
Original
Without Color Range
Adjustment
With Color Range
Adjustment
Weaken BlackEnhance Black
Original
Basic Copying
1
Page 29
What the CLC 1180/1140 Can Do
1-14
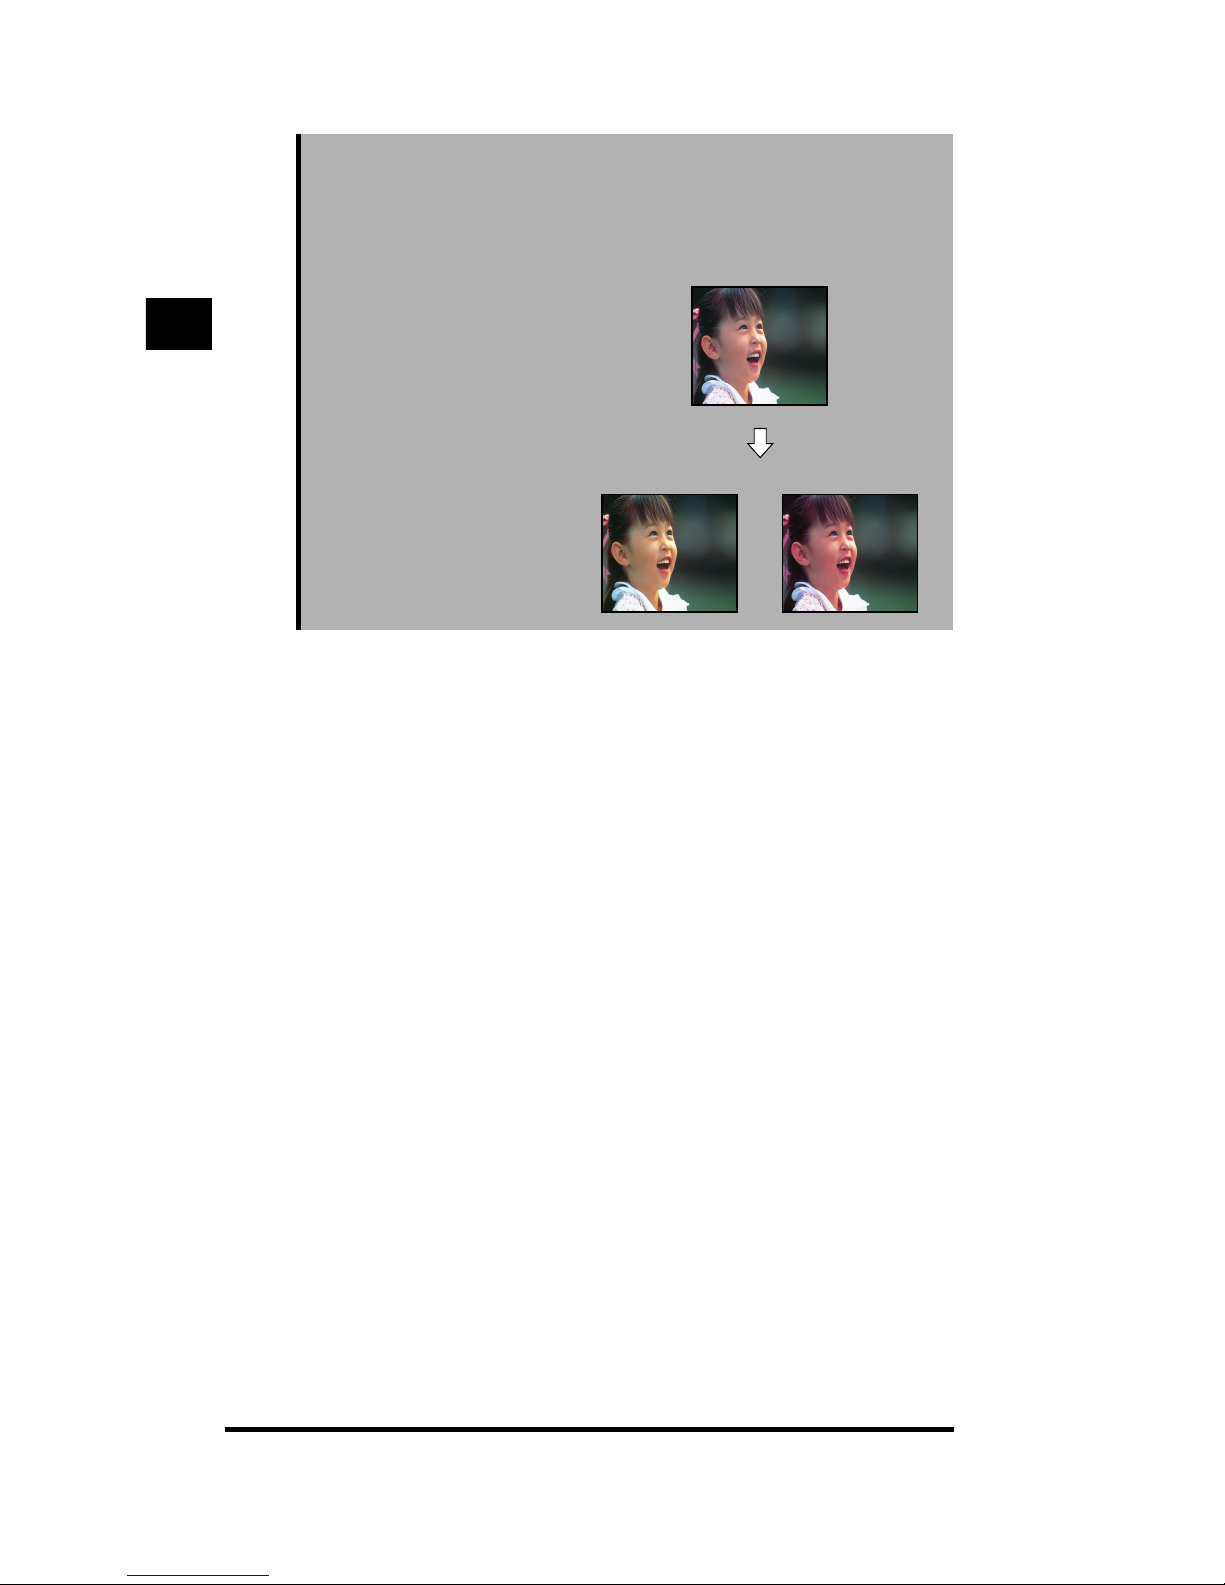
Complexion Adjustment
This function enables you to adjust the tone of
the color of human complexion when making
copies of photo originals.
Increase RedIncrease Yellow
Original
Basic Copying
1
Page 30
What the CLC 1180/1140 Can Do
1-15
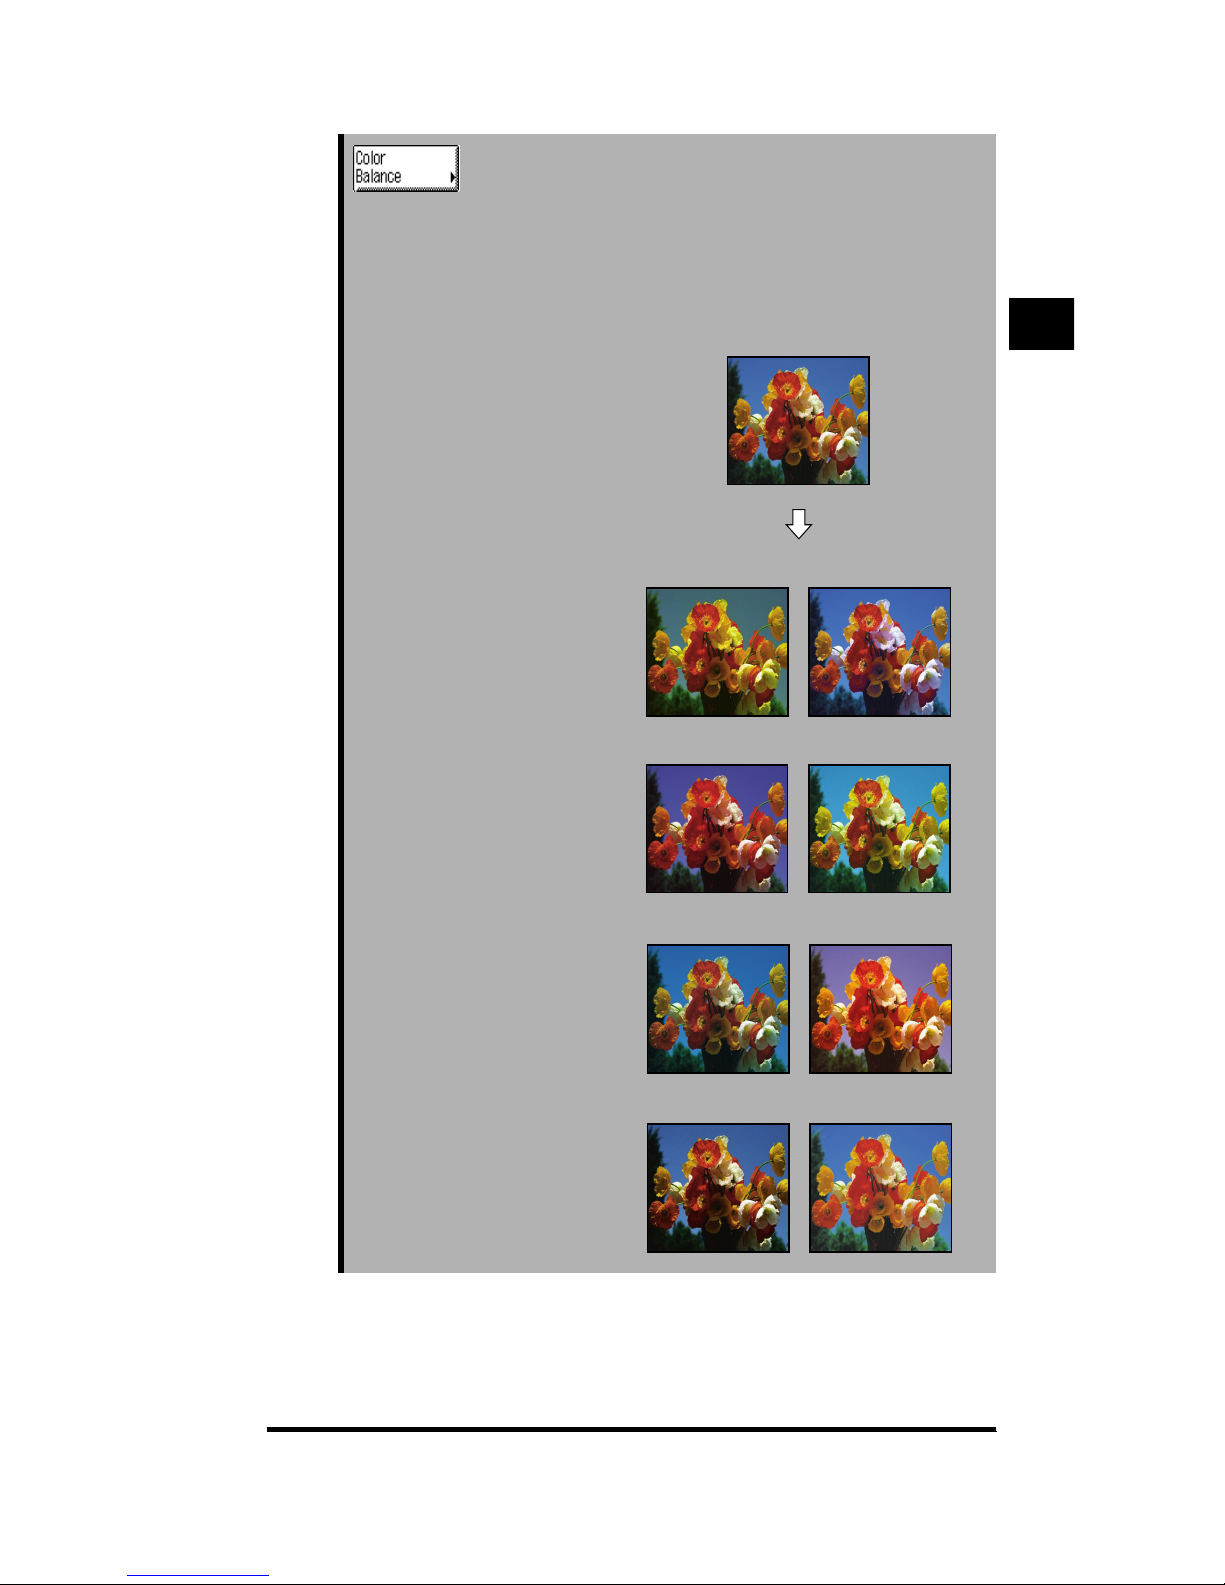
See “Adjusting the Color of the Image (Color Balance),” on
p. 3-19.
Press to adjust the color balance,
saturation, hue, and density levels
when making copies.
Color Balance
You can adjust the color balance of an image by
varying the amounts of yellow, magenta, cyan,
and black.
Increase Yellow
Decrease Yellow
Decrease MagentaIncrease Magenta
Original
Decrease Cyan
Increase Cyan
Decrease Black
Increase Black
Basic Copying
1
Page 31

What the CLC 1180/1140 Can Do
1-16
Saturation Adjustment
You can adjust the vividness of colors by
adjusting its saturation.
Original
Increased for
All Colors
Decreased for
All Colors
Basic Copying
1
Page 32

What the CLC 1180/1140 Can Do
1-17
Hue Adjustment
You can adjust the hue of any image by
adjusting the tones of colors such as red, blue,
yellow, and green.
Original
YMC → GRB YMC → RBG
Basic Copying
1
Page 33

What the CLC 1180/1140 Can Do
1-18
Density Fine Adjust
You can adjust the density or exposure for
areas of high density, medium density, and low
density individually.
See “Changing the Color of the Original (Color Creation),”
on p. 3-33.
Press to perform the following when
making copies: add color to blackand-white originals, change colors in
color originals, and apply color effects.
Single Color
This function enables you to make copies in
one specific color only.
Increase
Low-density Cyan
Original
Decrease
High-density Magenta
Increase
High-density Cyan
Decrease
Low-density Magenta
Original
Copy
Basic Copying
1
Page 34

What the CLC 1180/1140 Can Do
1-19
Color Gradation
This function enables you to add gradations of
a specific color to the image or the background
of a black-and-white original.
Original
Image/Horizontal Image/Vertical
Image/Vertical
(Repeat)
Background/
Frame
Background/
Corner
Background/
Square
Background/
Vertical (Repeat)
Basic Copying
1
Page 35

What the CLC 1180/1140 Can Do
1-20
Color Filter
This function enables you to add effects similar
to those produced by color filters on a camera.
Coloring
This function enables you to add colors to areas
bounded by lines in a black-and-white original.
Magenta Yellow Cyan
Original
Low
Medium
High
Low
Medium
High
Low
Medium
High
Original Copy
Basic Copying
1
Page 36

What the CLC 1180/1140 Can Do
1-21
Blue Background
This function enables you to change the color of
the image in a black-and-white original to white
and apply a color of your choice to the
background.
Base Color
This function enables you to add a background
of a specific color to black-and-white originals.
Color Conversion
This function enables you to change a specific
color in an original to a different color.
Original Copy
Original Copy
Original Copy
Basic Copying
1
Page 37

What the CLC 1180/1140 Can Do
1-22
See “Making Copies in the Image Creation Mode,” in
Chapter 4.
Press to specify text and image
processing functions such as Nega/
Posi, Image Repeat, and Mirror
Image.
Nega/Posi
This function enables you to make copies with
the hues and gradations of the original
reversed.
Image Repeat
This function enables you to repeatedly copy
the image of an original onto one sheet of
paper in the vertical direction.
Automatic Setting
Manual Setting
Basic Copying
1
Page 38

What the CLC 1180/1140 Can Do
1-23
Mirror Image
This function enables you to make copies of the
original with the image reversed, like a
reflection in the mirror.
Slanted Image
This function enables you to make copies with
the images of the original slanted.
Original
Mirror Symmetry
Top Symmetry Bottom Symmetry
Copy
Original
Slant
the original
Basic Copying
1
Page 39

What the CLC 1180/1140 Can Do
1-24
Text Editing
This function enables you to manipulate the
images of a black-and-white original when
making copies. You can specify to apply color to
text, copy only the contours of images, and add
shadows to text and images.
Color for Text
Contour
Original Copy
Original Copy
Basic Copying
1
Page 40

What the CLC 1180/1140 Can Do
1-25
Shadow
3-D shadow
on the right
3-D shadow
on the left
Original
Flat shadow
on the left
Flat shadow
on the right
Basic Copying
1
Page 41

What the CLC 1180/1140 Can Do
1-26
Texture
This function enables you to scan patterns and
textures from materials such as cloth and paper
so they can be applied to images when making
copies.
Special Effects
These special effects enable you to reduce the
number of gradations in the original (Reduced
Gradation) or reverse the colors of the
gradations (Solarization) when making copies.
Reduced Gradation
Solarization
Copy
Original
Texture to be scanned
Original Copy
Original Copy
Basic Copying
1
Page 42

What the CLC 1180/1140 Can Do
1-27
See “Designating Areas on an Image for Editing (Area
Designation),” on p. 4-29.
Press to designate areas to use with
the various image processing
functions.
See “Inserting Text and Images,” in Chapter 5.
Press to make copies by adding
images and text to the original.
Image Composition
This function enables you to extract an image
from a color original and insert it into a
designated area of a black-and-white original
that is used as the background original.
HOT INFORMATION
NEW SHOP
Area Group 1
Nega/Posi
Area Group 4
Original type:
MAP
Area Group 3
Single Color:
Black
Area Group 2
Original type:
PHOTO
Background
original
Copy
Insert
original
Basic Copying
1
Page 43

What the CLC 1180/1140 Can Do
1-28
Character Composition (Superimpose)
This function enables you to extract text from a
black-and-white original and insert it into a color
original.
Character Composition (Window)
This function enables you to extract a
designated area in a black-and-white text
original and insert it into a color original.
Black-and-white
original
Copy
Color original
Black-and-white
original
Copy
Color original
Basic Copying
1
Page 44

What the CLC 1180/1140 Can Do
1-29
Character Composition Shift
This function enables you to shift the position of
text when it is inserted into a color original.
Multiple Editing
This function enables you to make copies by
specifying both Superimpose and Window at
the same time, as well as specifying other text
editing processes.
Black-and-white
original
Copy
Color original
Black-and-white
original
Copy
Color original
Basic Copying
1
Page 45

What the CLC 1180/1140 Can Do
1-30
Offset Plate Original
This function enables you to separate the color
original into four color separations, and copy
each separation onto a different sheet of paper.
All four separations, consisting of yellow,
magenta, cyan, and black, are copied in black
only.
Original
Cyan separation
Magenta separation
Yellow separation
Black separation
Basic Copying
1
Page 46

Overview of the Copying Procedure
1-31
Overview of the Copying Procedure
This section describes the flow of the basic copying procedure.
NOTE
.
•
For the following topics, see the Reference Guide:
-
Power (See Chapter 1, “Before You Start Using This Copier.”)
-
Loading paper and refilling toner and fixing oil (See Chapter 3, “Loading Paper and
Refilling Consumables.”)
.
Basic Copying Procedure
1
Make sure that the touch panel display is on.
If the power is turned off, turn it on after verifying that the Security key is in the ON
position. (See Chapter 1, “Before You Start Using This Copier,” in the Reference
Guide.)
Even if nothing appears on the touch panel display, the copier is turned on as
long as (Energy Saver) is lit. In this case, the copier is in the Energy Saver
mode. Press (Energy Saver) to cancel the Energy Saver mode. (See Chapter
1, “Before You Start Using This Copier,” in the Reference Guide.)
Basic Copying
1
Page 47

Overview of the Copying Procedure
1-32
If the message <Insert a control card.> appears, insert a Control Card (option).
(See Chapter 5, “Handling Options,” in the Reference Guide.)
If the message <Enter your Dept. ID and Password with the Number keys.>
appears, enter the department ID and password. (See Chapter 1, “Before You
Start Using This Copier,” in the Reference Guide.)
2
Place the original.
NOTE
.
•
For instructions on placing the original, see “Placing the Original,” on p. 1-37.
•
If the stapler sorter (option) and the feeder (option) are attached and Auto Sort is
set to <On>, the Sort function is automatically specified when the original is placed
in the feeder. (See Chapter 2, “Customizing Settings to Your Needs,” in the
Reference Guide.)
Basic Copying
1
Page 48

Overview of the Copying Procedure
1-33
3
Specify the necessary copy settings in the Basic Features
screen.
NOTE
.
•
In the Basic Features screen, you can select the paper size, the copy exposure and
image quality settings, the copy ratio, the two-sided mode, the type of original being
copied, and the desired sorting function.
4
Specify the necessary copy settings in the Special Features
screen.
You can continue specifying other available functions in the Special Features
screen. (See “Useful Copy Functions,” in Chapter 2 and “Adjusting Color and
Image Quality,” in Chapter 3.)
Basic Copying
1
Page 49

Overview of the Copying Procedure
1-34
5
Press the keys on the control panel to specify settings for the
various functions, as necessary.
Perform the following procedures for setting the ACS function, the Full Color
mode, the Black Monochrome mode, the Original Recognition function, and the
Center Shift function.
See “Switching Between the Full Color Mode and Black Monochrome Mode
(ACS),” on p. 1-112.
See “Specifying Automatic Recognition of the Size of the Original (Original
Recognition),” on p. 1-115
See “Centering the Copied Image (Center Shift),” on p. 1-117.
6
Enter the copy quantity.
NOTE
.
•
For instructions on setting the number of copies, see “Entering the Copy Quantity,”
on p. 1-44.
7
Press (Start).
Copying starts.
When a Copy job is complete, remove the original.
IMPORTANT
.
•
You cannot change copy settings such as the copy quantity, paper size, and copy
ratio while copying is in progress.
123
456
789
ACS Full Color Black
Original
Recognition
Center Shift
Reset
Guide
Additional Functions
Clear
Basic Copying
1
Page 50

Overview of the Copying Procedure
1-35
•
Do not touch the platen glass cover, editor (option), or feeder (option) while copying
is in progress. Doing so may cause the original to shift, resulting in copies that do
not meet the specifications.
NOTE
.
•
If a Control Card (option) is inserted, remove the Control Card. (See Chapter 5,
“Handling Options,” in the Reference Guide.)
•
If Department ID Management is specified, press (ID). (See Chapter 2,
“Customizing Settings to Your Needs,” in the Reference Guide.)
● When you want to stop a Copy job
▼ Press (Stop).
NOTE
.
•
After pressing (Stop), several copies may continue to be output.
● When you want to interrupt a Copy job
▼ To interrupt a Copy job to make priority copies, press (Interrupt). (See
“Interrupting the Current Job to Make Priority Copies (Interrupt Mode),” on p. 1-
106.)
ID
Guide
Additional Functions
Interrupt
Clear
123
456
789
ID 0
C
Basic Copying
1
Page 51

Overview of the Copying Procedure
1-36
.
Optimizing the Copy Speed
To optimize the copy speed when making only one copy at the 100% copy ratio, be
sure that the following conditions are met:
• The feeder (option) is used and the original is placed into the original tray.
• Copying is made onto LTR-size paper. (The paper should be placed in the vertical
position. This applies even when the setting is made through Auto Paper
Selection.)
• Paper that is vertically longer than the original is used.
• The ACS (Automatic Color Selection) function is turned off.
• Automatic Exposure is turned off.
• Plain paper is used when feeding paper from the stack bypass. (Select [Plain
Paper] in the copy settings configuration screen for the stack bypass.)
• The Two-sided, Transparency Interleaving, Cover, and Offset Plate Original
functions are not specified.
NOTE
.
•
The following additional conditions must be met when the IP-ED board (option) is
attached:
- The Center Shift function is turned off.
- The Auto Zoom and Entire Image functions are not specified.
- The following functions are not specified:
Zoom Program, XY Zoom, Multi-page Enlargement, Image Combination, Shift, Margin,
Two-page Separation, Frame Erase, Color Creation (except Single Color), Image
Creation (except Nega/Posi), Area Designation, and Marker Editing
Basic Copying
1
Page 52

Placing the Original
1-37
Placing the Original
The original’s size and type, and the copy settings that you want to specify will
determine whether the original should be placed in the feeder (option) or on the
platen glass.
NOTE
.
•
The size graduations on the platen glass should only be used as a guide when placing
originals. They do not indicate actual original sizes that can be copied.
■ Platen Glass
Use the platen glass to place originals such as books, transparencies, and paper that is
significantly thicker or thinner than plain paper.
■ Feeder (Recirculating Document Feeder)
To make copies of more than one original at the same time, place the originals into the
feeder (option) and press (Start). Copying will start automatically. The feeder can also
be set to automatically flip two-sided originals for making two one-sided copies.
.
The Orientation of the Original
Originals can be placed in the vertical or horizontal position. However, be sure to
always align the top edge of the original with the back edge of the platen glass or
the feeder (option).
When using the platen glass
Vertical placement
Horizontal placement
Basic Copying
1
Page 53

Placing the Original
1-38
When using the feeder
NOTE
.
•
If the top edge of the original is not aligned along the back edge of the platen glass or
feeder (option), the copies may turn out to be incorrect, depending on the copy settings in
use.
•
LTR- and STMT-size originals can be placed either vertically or horizontally. However, the
copy speed for vertically placed paper is somewhat faster than that for horizontally
placed paper. Place originals horizontally when making copies using preset copy ratios to
convert one standard paper size to another, such as when making copies of a LTR-size
original onto 11" x 17"-size paper.
•
When using the feeder (option), STMT-size originals can only be placed vertically.
•
A horizontally placed LTR-size original or paper is referred to as LTRR, and a horizontally
placed STMT-size original or paper is referred to as STMTR.
•
11" x 17" - and LGL-size originals can only be placed horizontally.
.
Placing the Original on the Platen Glass
Use the platen glass to place originals such as books, transparencies, and paper
that is significantly thicker or thinner than plain paper.
.
1
Lift up the platen glass cover, feeder, or editor.
Vertical placement
Horizontal placement
Basic Copying
1
Page 54

Placing the Original
1-39
2
Place the original on the platen glass.
Place the original face down on the platen glass and align the corner of the
original with the top-left corner of the platen glass.
Place books and other bound originals on the platen glass in the same way.
IMPORTANT
.
•
Note that the position of the arrow mark on the top-left corner of the platen glass is
different when the feeder (option) is attached.
NOTE
.
•
If the original is a transparency, place a white sheet of paper over the transparency.
•
When enlarging LTR- or STMT-size originals onto 11" x 17" -, LGL- or LTRR-size
paper, place the original horizontally on the platen glass and align it with either the
LTRR or STMTR mark.
Basic Copying
1
Page 55

Placing the Original
1-40
3
Gently lower the platen glass cover, feeder, or editor.
CAUTION
.
• Lower the platen glass cover, editor (option), or feeder (option) gently to
avoid catching your hand in it, as this may result in personal injury.
• Do not press down hard on the platen glass cover, feeder (option), or
editor (option) when using the platen glass to make copies of books or
other bound originals. Doing so may damage the platen glass and result in
personal injury.
IMPORTANT
.
•
If you specify to have the copier automatically sense the size of the original
(Original Recognition) when the original is already placed on the platen glass,
make sure to lower the platen glass cover or the editor (option). The Original
Recognition function is executed only after the platen glass cover or the editor is
lowered.
•
If you specify to have the copier automatically sense the size of the original when
the original is already placed on the platen glass and the feeder (option) is
attached, copy with the feeder lifted up. If the feeder is lowered, the copier will not
be able to correctly determine the size of the original even when the Original
Recognition function is specified.
NOTE
.
•
Always remove originals that have already been copied from the platen glass.
Basic Copying
1
Page 56

Placing the Original
1-41
.
Placing Originals into the Feeder
(Recirculating Document Feeder RDF-E3)
To make copies of more than one original at the same time, place the originals into
the feeder (option) and press (Start). Copying will start automatically. The feeder
can also be set to automatically flip two-sided originals for making two one-sided
copies.
You can place the following types of originals into the feeder:
• Weight of originals
- Original tray: 15-lb bond to 110-lb index (50 to 200 g/m
2
) (32lb bond to 110-lb index (129 to 200 g/m2)
applies to vertically placed LTR-size originals
only)
- Single sheet document feeder: 12-lb bond to 110-lb index (38 to 200 g/m2)
• Size of originals: 11" x 17", LGL, LTR, LTRR, STMT
• Capacity of original tray: 11" x 17", LGL: 50 sheets (20-lb bond (80 g/m
2
))
LTR, LTRR, STMT: 100 sheets (20-lb bond (80 g/m2))
IMPORTANT
.
•
Do not place the following types of originals into the feeder (option):
- Originals with tears or large binding holes
- Severely curled originals or originals with sharp folds
- Originals that are clipped or stapled together
- Carbon-backed paper or other originals that may not feed smoothly
- Transparencies or other highly transparent originals
•
Originals that are themselves color copies may not feed properly through the feeder
(option), particularly if they are copies that contain a large amount of toner. For these
types of originals, it is highly recommended that you use the platen glass for making
copies.
•
When you use originals that are themselves color copies, it is highly recommended that
you use the single sheet document feeder. If you place originals onto the original tray,
they may be folded or torn.
•
If you place color copy originals and other types of originals together, the original tray’s
maximum capacity changes to the following:
11" x 17", LGL: 25 sheets
LTR, LTRR, STMT: 50 sheets
•
Always check the condition of originals that have been repeatedly fed through the feeder
(option). When making copies of the same originals repeatedly, they may become folded
or wrinkled and may not feed smoothly.
•
Clean the feeder (option) if its rollers are dirty from feeding originals with pencil markings.
(See Chapter 2, “Customizing Settings to Your Needs,” in the Reference Guide.)
Basic Copying
1
Page 57

Placing the Original
1-42
.
1
Adjust the slide guides to match the size of the originals.
Flip open the auxiliary tray when placing 11" x 17" -, LGL- or LTRR-size originals
into the original tray, as shown in the illustration below.
2
Neatly place the originals face up in the original tray.
Regardless of whether the originals are placed in the vertical or horizontal
orientation, always set originals with the first page on top and the top edge along
the back edge of the original tray.
When enlarging a LTR-size original onto 11" x 17" -, LGL-, or LTRR-size paper,
place the originals horizontally.
Slide the originals as far back as they will go, until the original set indicator lights.
Slide guides
L
T
R
1
1
"x
1
7
"
Basic Copying
1
Page 58

Placing the Original
1-43
IMPORTANT
.
•
Even out the edges of the originals before placing them into the original tray.
•
STMT-size originals can only be placed vertically.
•
Do not place originals of different sizes together.
•
Make sure that there is no original on the platen glass before placing your originals
into the original tray.
•
The copier automatically senses the size of the original if it is placed in the feeder
(option), regardless of whether the Original Recognition function is specified or not.
•
Once copying has begun, do not remove originals from, or add more originals to
the original tray.
NOTE
.
•
Place LTR-size originals from 32-lb bond to 110-lb index (129 to 200 g/m2) in
weight vertically.
•
The number of originals that can be placed into the feeder’s (option) original tray at
one time is as follows:
11" x 17", LGL: 50 sheets
LTR, LTRR, STMT: 100 sheets
Basic Copying
1
Page 59

Entering the Copy Quantity
1-44
Entering the Copy Quantity
The copier allows up to 100 copies to be made.
.
Specifying the Copy Quantity
1
Place the originals; then press - (Number keys) to enter
the desired copy quantity (1 to 100).
The copy quantity appears on the upper-right side of the touch panel display.
IMPORTANT
.
•
You cannot change the copy quantity while copying is in progress.
NOTE
.
•
The maximum allowable copy quantity varies according to the copy settings.
2
Press (Start).
Copying starts.
0
9
123
456
789
ID 0
C
Reset
Guide
Additional Functions
Interrupt
Clear
Basic Copying
1
Page 60

Entering the Copy Quantity
1-45
.
Changing the Copy Quantity
1
Press (Clear) to clear the number of copies entered.
2
Press - (Number keys) to enter the desired copy
quantity (1 to 100).
The copy quantity appears on the upper-right side of the touch panel display.
IMPORTANT
.
•
You cannot change the copy quantity while copying is in progress.
C
123
456
789
ID 0
C
Guide
Additional Functions
Interrupt
Clear
0
9
123
456
789
ID 0
C
Reset
Guide
Additional Functions
Interrupt
Clear
Basic Copying
1
Page 61

Selecting the Paper Size (Paper Select)
1-46
Selecting the Paper Size (Paper Select)
You can set the copier to automatically select the paper size, or you can manually
specify the paper size yourself.
When making copies on paper that does not fit into the drawers or the paper deck
(option), load the paper in the stack bypass.
NOTE
.
•
When copying an original onto paper of the same size at the 100% copy ratio, the edges
of the original may be slightly cut off on the copy. For details on the size of the non-image
areas, see Chapter 6, “Appendix,” in the Reference Guide.
•
If you specify the Entire Image function, the copied image is automatically reduced
slightly based on the paper size and the image size. As a result, the entire original image
is reproduced without its edges being cut off. (See “Slightly Reducing Images to Prevent
the Edges of the Original from Being Cut Off (Entire Image),” on p. 1-67.)
.
Automatically Selecting Paper (Auto Paper Selection)
The copier automatically selects the paper.
IMPORTANT
.
•
You cannot specify Auto Paper Selection when copying the following types of originals.
Copy these originals using the Manual Paper Selection method.
- Non-standard size originals
- Transparencies or other highly transparent originals
- Originals with an extremely dark background
- Originals smaller than STMT in size
- Originals that are extraordinarily thin
- Black 3-dimensional objects
- Glossy originals
•
You may not be able to specify Auto Paper Selection, depending on the copy settings.
•
Auto Paper Selection cannot be used with the stack bypass, or any drawer that has been
designated as the feeding location for transparencies.
NOTE
.
•
The default setting is <Auto Paper Selection>.
•
Loading paper of the same size into more than one paper feeding location, such as the
drawers and the paper deck (option), will enable the automatic switching of paper feeding
location required by the Auto Drawer Switching function when paper runs out in the
current paper feeding location during a Copy job. This will prevent the Copy job from
being interrupted. (See Chapter 1, “Before You Start Using This Copier,” in the Reference
Guide.)
Basic Copying
1
Page 62

Selecting the Paper Size (Paper Select)
1-47
.
1
Place the original; then press [Paper Select].
2
Select [Auto Paper Selection]; then press [Done].
When the Original Recognition function is turned off, [Auto Paper Selection] is
grayed out and cannot be selected.
The following screen is displayed.
3
Press (Start).
Copying starts.
Basic Copying
1
Page 63

Selecting the Paper Size (Paper Select)
1-48
.
Manually Selecting Paper (Manual Paper Selection)
You can manually select the paper size from among the available sizes loaded in
the various paper feeding locations.
NOTE
.
•
To be able to feed transparencies from a drawer, you have to first designate the drawer
as the feeding location for transparencies. For more information, see Chapter 2,
“Customizing Settings to Your Needs,” in the Reference Guide.
•
To be able to feed thin paper from a drawer or the paper deck (option), you have to first
designate the drawer or the paper deck as the feeding location for thin paper. For more
information, see Chapter 2, “Customizing Settings to Your Needs,” in the Reference
Guide.
.
1
Place the originals; then press [Paper Select].
NOTE
.
•
The default setting is <Auto Paper Selection>.
2
Select the paper size; then press [Done].
When copying onto transparencies, select the drawer that has been designated
as the feeding location for transparencies, or select the stack bypass.
When copying onto thin paper, select the drawer or the paper deck that has been
designated as the feeding location for thin paper, or select the stack bypass.
Basic Copying
1
Page 64

Selecting the Paper Size (Paper Select)
1-49
The display returns to the Basic Features screen, and the selected paper size is
displayed.
NOTE
.
•
The symbol represents paper that is loaded vertically and the symbol
represents paper that is loaded horizontally. Paper sizes with the suffix R (such as
LTRR) indicate paper that is loaded horizontally in a drawer or the stack bypass.
•
The paper sizes loaded in all paper feeding locations are displayed on the screen.
3
Press (Start).
Copying starts.
NOTE
.
•
To restore the copier’s settings to the standard copy settings, press (Reset).
.
Selecting Paper Loaded in the Stack Bypass
Use the stack bypass for heavy paper or card stock, paper of irregular sizes, or
when paper of the desired size is not loaded in the drawers.
IMPORTANT
.
•
Adjusting the slide guides too tightly or too loosely may cause paper jams or cut-off the
image due to outputting of misaligned copies. When output is continued with the images
cut off using the print controller (optional), it may result in the back of the paper getting
dirty.
•
You can load the following quantity and types of paper in the stack bypass:
- Copy quantity: 1 to approximately 250 sheets (20-lb bond (80 g/m
2
))
1 to approximately 100 sheets (transparencies)
- Paper size: 12" x 18", 11" x 17", LGL, LTR, LTRR,
irregular size paper (7
3
/16" x 7 3/16" to 12" x 18" (182 x 182 mm to
305 x 457 mm))
- Paper weight: 17-lb bond to 110-lb index (64 to 209 g/m
2
)
•
Curl down paper before use. There are some types of paper that may meet the above
specifications but cannot feed through the stack bypass if they are curled.
•
Do not load paper of different sizes at the same time.
•
Only use transparencies that are specifically recommended for use with this copier.
Other transparencies may damage the copier.
•
Make sure to immediately remove transparencies or heavy paper that are output onto the
output tray. Failure to do so may result in paper jams.
NOTE
.
•
See “Copying onto Transparencies,” on p. 2-8 for instructions on the correct way to load
transparencies in the stack bypass.
•
For high quality copies, use paper recommended by Canon.
Basic Copying
1
Page 65

Selecting the Paper Size (Paper Select)
1-50
Using the Stack Bypass
1
Open the stack bypass.
If paper is already loaded in the stack bypass, press [Paper Select]➔[Manual
Paper Selection]. Then proceed to step 4.
2
Adjust the slide guides to match the size of the paper.
Paper sizes with the suffix R (such as LTRR) indicate paper that is loaded
horizontally.
When feeding large-size paper, pull out the auxiliary tray.
Basic Copying
1
Page 66

Selecting the Paper Size (Paper Select)
1-51
IMPORTANT
.
•
Adjusting the slide guides too tightly or too loosely may cause paper jams or cut-off
the image due to outputting of misaligned copies. When output is continued with
the images cut off using the print controller (optional), it may result in the back of
the paper getting dirty.
3
Load paper into the stack bypass.
Make sure that the height of the paper stack does not exceed the limit mark.
Load the required number of sheets into the stack bypass, making sure that you
insert them along the paper guides as far back as they go.
The Paper Size Selection screen is displayed.
NOTE
.
•
If there are instructions on the package of paper about which side of the paper to
load, follow those instructions.
•
If problems such as poor copy quality or paper jams occur, try turning the paper
over and loading it.
4
Select the paper size; then press [Next].
Press [Irregular Size] when making copies onto 12" x 17 5/16" paper and irregular
size paper. (See “Making Copies on Irregular Size Paper,” on p. 1-53.)
Basic Copying
1
Page 67

Selecting the Paper Size (Paper Select)
1-52
To copy onto 12" x 18" paper, press [12X18] ➔ [Next].
IMPORTANT
.
•
Set the paper size to the same size as the paper loaded in the stack bypass.
NOTE
.
•
To select using the A series or B series paper size standard, press [A/B-Size].
5
Select the paper type; then press [OK].
Paper types
- [Plain Paper]: Normal paper (20 to 28-lb bond (80 to 105 g/m
2
)).
- [Heavy Paper/Card Stock]: Paper that is heavier than plain paper (60-lb cover
and 90-lb index (157 g/m
2
)).
- [Extra Heavy Card Stock]: The heaviest type of paper that can be loaded (110lb index (209 g/m
2
)).
- [Transparency]: Transparencies.
- [Special Paper 1]: Paper with “Special Paper 1” written on its package.
- [Special Paper 2]: Paper with “Special Paper 2” written on its package.
- [Thin Paper]: Paper lighter than plain paper (17 to 20-lb bond (64
to 79 g/m
2
)).
IMPORTANT
.
•
Select the correct paper type to avoid paper jams.
•
Select [Special Paper 1] or [Special Paper 2] only when “Special Paper 1” or
“Special Paper 2” is written on the package.
6
Place the originals, then specify the desired copy settings.
7
Press (Start).
Copying starts.
NOTE
.
•
To restore the copier’s settings to the standard copy settings, press (Reset).
Basic Copying
1
Page 68

Selecting the Paper Size (Paper Select)
1-53
Making Copies on Irregular Size Paper
1
Load paper in the stack bypass.
Refer to steps 1 through 3 of “Using the Stack Bypass” for details on this
part of the procedure. (See p. 1-50.)
2
Press [Irregular Size].
3
Press [X] and [Y] to enter their respective values.
Enter the value for X and Y after pressing [X] and [Y], using the number keys on
the touch panel display.
The acceptable irregular size paper input range is as follows:
- X: 7
3
/16" to 18" (182 to 457 mm)
- Y: 7
3
/16" to 12" (182 to 305 mm)
NOTE
.
•
To enter values in mm, press [mm].
4
Press [OK] ➔ [Next].
Basic Copying
1
Page 69

Selecting the Paper Size (Paper Select)
1-54
5
After selecting the paper type, press [OK]; then press
(Start).
Refer to steps 5 through 7 of “Using the Stack Bypass” for details on this
part of the procedure. (See p. 1-50.)
Making Two-sided Copies with the Stack Bypass
The stack bypass enables you to make two-sided copies.
IMPORTANT
.
•
If you use the stack bypass for making two-sided copies, make sure to feed the paper for
both the first and second sides using the stack bypass.
•
Do not make two-sided copies on transparencies, Special Paper 1, Special Paper 2, or
thin paper (17-lb bond (64 g/m
2
)).
.
1
Load paper in the stack bypass, and select the paper size;
then press [Next].
Refer to steps 1 through 4 of “Using the Stack Bypass” for details on this
part of the procedure. (See p. 1-50.)
2
Select the paper type; then press [1st Side] ➔ [OK].
To copy onto the reverse or second side of the paper, press [2nd Side].
NOTE
.
•
For instructions on paper type selection, refer to step 5 of “Using the Stack
Bypass.” (See p. 1-50.)
3
Place the originals, then specify the desired copy settings.
4
Press (Start).
Copying of the first side starts.
Basic Copying
1
Page 70

Selecting the Paper Size (Paper Select)
1-55
5
Place the copy face down in the stack bypass.
Make sure to place the copy such that its top edge is aligned with the front slide
guide on the stack bypass.
IMPORTANT
.
•
Make sure you place the copy that was output by pressing [1st Side] in step 2 in the
stack bypass. You cannot perform second side copying onto any other output
copies.
•
Do not reuse paper that has been printed or copied onto by printers or copiers
other than this copier.
•
Do not copy onto the same side of paper that has been previously copied onto
before. This may cause a malfunction.
•
Curl down paper before use.
6
Repeat steps 2 through 4.
Basic Copying
1
Page 71

Adjusting Exposure (Copy Exposure)
1-56
Adjusting Exposure (Copy Exposure)
The following are the two ways to adjust the copy exposure:
NOTE
.
•
You can change the exposure while copying is in progress.
■ Adjusting the Copy Exposure Manually (Manual Exposure Adjustment)
You can change the copy exposure to the desired level.
■ Adjusting the Copy Exposure Automatically (Automatic Exposure
Adjustment)
The copier automatically adjusts the copy exposure for you. The image is copied with the
original’s background color erased. You can specify the type of Automatic Exposure
Adjustment through the Image Quality Adjustment setting.
(See “Erasing the Background Color in Copies (Hide Background),” on p. 3-9, “Erasing the
Image on the Reverse Side of the Original in Copies (Hide Backside Image),” on p. 3-11,
and “Adjusting the Color Range (Color Range Adjustment),” on p. 3-13.)
.
Adjusting the Copy Exposure Manually
(Manual Exposure Adjustment)
You can manually adjust the exposure to the most appropriate level for the original.
The background color is copied as is.
.
1
Place the originals; then press [Light] or [Dark].
Pressing [Light] moves the indicator to the left, decreasing the exposure.
Conversely, pressing [Dark] moves the indicator to the right, increasing the
exposure.
Basic Copying
1
Page 72

Adjusting Exposure (Copy Exposure)
1-57
NOTE
.
•
You can increase the copy exposure’s levels of gradations through Additional
Functions. (See Chapter 2, “Customizing Settings to Your Needs,” in the Reference
Guide.)
2
Press (Start).
Copying starts.
NOTE
.
•
To restore the copier’s settings to the standard copy settings, press (Reset).
.
Adjusting the Copy Exposure Automatically
(Automatic Exposure Adjustment)
The copier automatically adjusts the copy exposure for you. When making copies of
originals with background color, such as newspapers, the background color is
automatically erased. When originals with shaded backgrounds are copied in the
monochrome mode, the darkness of the background is automatically reduced.
.
1
Place the originals; then press [A].
[A] will appear highlighted.
The exposure is automatically adjusted to the level best suited to the quality of
the original.
NOTE
.
•
To turn off Automatic Exposure Adjustment, press [A] once again.
•
When the originals are transparencies, adjust the copy exposure manually as
Automatic Exposure Adjustment may not operate correctly on transparent originals
and produce copies that are too light or too dark.
Basic Copying
1
Page 73

Adjusting Exposure (Copy Exposure)
1-58
2
Press (Start).
Copying starts.
NOTE
.
•
To restore the copier’s settings to the standard copy settings, press (Reset).
Basic Copying
1
Page 74

Selecting the Original Type
1-59
Selecting the Original Type
Selecting the correct original type setting is important because the copier makes
adjustments and calibrations according to the type of original specified. A correct
selection is necessary for the optimal reproduction of the colors of the original.
You can select from the following seven settings:
IMPORTANT
.
•
There cannot be more than one original type setting at the same time. Once you specify
an original type, the previous setting is deleted.
■ Text/Image
For originals that contain both text and printed images.
■ Text/Photo
For originals that contain both text and photo images.
■ Text
For originals that contain text only.
■ Map
For originals that contain detailed drawings and small text, such as that found on maps.
■ Printed Image
For originals that contain mainly printed images or photos, such as magazines and
newspapers.
NOTE
.
•
Copying photos or images with halftones may produce the moire effect. Use the
Sharpness function to reduce the moire effect. (See “Changing the Sharpness in Copies
(Sharpness),” on p. 3-7.)
■ Photo
For photo originals.
■ Color Copy Original
For originals that are themselves color copies.
Basic Copying
1
Page 75

Selecting the Original Type
1-60
.
1
Place the original; then press (Original Type).
2
Select the original type; then press [Done].
The display returns to the Basic Features screen and the selected original type is
displayed.
3
Press (Start).
Copying starts.
NOTE
.
•
To restore the copier’s settings to the standard copy settings, press (Reset).
Basic Copying
1
Page 76

Changing the Copy Ratio (Copy Ratio)
1-61
Changing the Copy Ratio (Copy Ratio)
You can set the copier to automatically adjust the copy ratio, or you can manually
specify the copy ratio yourself.
The following seven types of original enlargement/reduction are available:
■ Enlarging/Reducing Originals to a Standard Size (Preset Zoom)
This function enables you to enlarge or reduce standard size originals onto standard size
paper.
■ Specifying the Copy Ratio by % (Zoom Designation)
This function enables you to enlarge or reduce images by any copy ratio, in 1%
increments. The aspect ratio (vertical to horizontal ratio) remains the same.
■ Automatically Setting the Copy Ratio Based on the Size of the Paper (Auto
Zoom)
The copier automatically selects the copy ratio based on the size of the selected paper.
The aspect ratio (vertical to horizontal ratio) remains the same.
■ Slightly Reducing Images to Prevent the Edges of the Original from Being
Cut Off (Entire Image)
To prevent the edges of the original from being cut off in the copy, the image is
automatically slightly reduced.
■ Generating the Copy Ratio Based on the Size of the Original and the Copy
(Zoom Program)
This function automatically calculates an appropriate copy ratio based on the specified
original and copy sizes.
■ Enlarging/Reducing Originals with Copy Ratios Set Independently for the X
and Y Axes (XY Zoom)
This function enables you to make enlarged or reduced copies with different XY copy
ratios.
■ Splitting the Image of the Original According to the Enlargement Ratio
(Multi-page Enlargement)
This function enables you to enlarge an original such that the result is larger than an 11" x
17" -size image. This is done by splitting the original image and copying the parts onto
separate sheets of paper.
Basic Copying
1
Page 77

Changing the Copy Ratio (Copy Ratio)
1-62
.
Enlarging/Reducing Originals to a Standard Size
(Preset Zoom)
This function enables you to enlarge or reduce standard size originals onto
standard size paper.
IMPORTANT
.
•
Place the originals horizontally in the following cases:
- When enlarging LTR-size originals onto 11" x 17" -size paper
- When enlarging STMT-size originals onto 11" x 17" -size paper
•
When reducing 11" x 17" -, 11" x 15" -, or LGL-size originals onto LTR-size paper, place
LTRR-size paper in the drawer or stack bypass.
NOTE
.
•
Placing an original horizontally means setting the original with the longer side sideways.
•
When using the feeder (option), STMT-size originals can only be placed vertically.
■ Reduction
The copy ratio that is set when making reduced copies on standard paper is as follows:
• LGL ➔ LTR (78%)
• 11" x 17" ➔ LGL/11" x 15" ➔ LTR (73%)
• 11" x 17" ➔ LTR (64%)
• Minimum (25%)
■ Enlargement
The copy ratio that is set when making enlarged copies on standard paper is as follows:
• Maximum (400%)
• STMT ➔ 11" x 17" (200%)
• LTR ➔ 11" x 17" (129%)
• LGL ➔ 11" x 17" (121%)
.
1
Place the original; then press [Copy Ratio].
Basic Copying
1
Page 78

Changing the Copy Ratio (Copy Ratio)
1-63
2
To reduce the original, select a reduction ratio. To enlarge the
original, select an enlargement ratio. Then press [Done].
The display returns to the Basic Features screen, and the specified copy ratio is
displayed.
NOTE
.
•
For information on how to automatically enlarge or reduce an original based on the
selected paper size, see “Automatically Setting the Copy Ratio Based on the Size
of the Paper (Auto Zoom),” on p. 1-65.
•
For information on how to copy the entire original image without the edges being
cut off, see “Slightly Reducing Images to Prevent the Edges of the Original from
Being Cut Off (Entire Image),” on p. 1-67.
3
Press (Start).
Copying starts.
NOTE
.
•
To restore the copy ratio to 100%, press [Direct].
•
To restore the copier’s settings to the standard copy settings, press (Reset).
.
Specifying the Copy Ratio by % (Zoom Designation)
This function enables you to enlarge or reduce images by any copy ratio, in 1%
increments. The aspect ratio (vertical to horizontal ratio) remains the same.
Basic Copying
1
Page 79

Changing the Copy Ratio (Copy Ratio)
1-64
The copy ratio must lie between 25% and 400%.
.
1
Place the originals; then press [Copy Ratio].
2
Specify the copy ratio; then press [Done].
Use - (Number keys) to enter the copy ratio.
You can change the entered values with [-] or [+].
The display returns to the Basic Features screen, and the specified copy ratio is
displayed.
If you specify a value that is not within the acceptable range, a message telling
you to enter a value within the appropriate range is displayed.
NOTE
.
•
If you make a mistake when entering values, press (Clear), then enter the
correct value.
Original Copy
0
9
C
Basic Copying
1
Page 80

Changing the Copy Ratio (Copy Ratio)
1-65
3
Press (Start).
Copying starts.
NOTE
.
•
To restore the copy ratio to 100%, press [Direct].
•
To restore the copier’s settings to the standard copy settings, press (Reset).
.
Automatically Setting the Copy Ratio Based on the Size of
the Paper (Auto Zoom)
The copier automatically selects the appropriate copy ratio based on the size of the
selected paper. The aspect ratio (vertical to horizontal ratio) remains the same.
The automatically selected copy ratio lies between 25% and 400%.
IMPORTANT
.
•
The copier cannot automatically select the appropriate copy ratio if the Original
Recognition function is turned off.
•
You cannot specify the Auto Zoom function when copying the following types of originals.
Use the Preset Zoom or Zoom Designation functions.
- Non-standard size originals
- Transparencies or other highly transparent originals
- Originals with an extremely dark background
- Originals smaller than STMT in size
- Originals that are extraordinarily thin
- Black 3-dimensional objects
- Glossy originals
•
The original sizes that can be used with the Auto Zoom function are 11" x 17", LGL, LTR,
LTRR, STMT, and STMTR.
NOTE
.
•
If you notice a discrepancy between the automatically selected copy ratio and the actual
copy size, you can perform an adjustment with the Zoom Fine Adjustment function. (See
Chapter 2, “Customizing Settings to Your Needs,” in the Reference Guide.)
Original Copy
Basic Copying
1
Page 81

Changing the Copy Ratio (Copy Ratio)
1-66
.
1
Place the originals; then press [Paper Select].
If you are making copies of an original placed on the platen glass when the
feeder (option) is attached, copy with the feeder lifted up. If the feeder is
lowered, the copier will not be able to correctly determine the size of the original.
2
Select the paper size; then press [Done].
If the calculation based on the sizes of the original and the paper results in a
copy ratio of more than 400% or less than 25%, any enlargement copy of more
than 400% will be set at 400% while any reduction copy of less than 25% will be
set at 25%.
The display returns to the Basic Features screen.
IMPORTANT
.
•
Make sure that you do not select [Auto Paper Selection]. Otherwise, the copy ratio
will be automatically set based on the size of the paper loaded in the top drawer.
Basic Copying
1
Page 82

Changing the Copy Ratio (Copy Ratio)
1-67
3
Press [Copy Ratio].
4
Press [Auto Zoom] ➔ [Done].
The display returns to the Basic Features screen, and the copy ratio appears as
<Auto %>.
5
Press (Start).
Copying starts.
NOTE
.
•
To restore the copy ratio to 100%, press [Direct].
•
To cancel the setting, press [Copy Ratio]➔[Auto Zoom].
•
To restore the copier’s settings to the standard copy settings, press (Reset).
.
Slightly Reducing Images to Prevent the Edges of the
Original from Being Cut Off (Entire Image)
When copying an original that covers the entire surface of the paper onto identically
sized paper at a 100% ratio, the original image may be slightly trimmed in the copy.
However, if you specify the Entire Image function, the image is slightly reduced
based on the size of the paper and the image. As a result, the entire image is
copied without being cut off.
Basic Copying
1
Page 83

Changing the Copy Ratio (Copy Ratio)
1-68
Entire Image should also be turned on to make full bleed copies of 11" x 17"-size
originals onto paper larger than 11" x 17" to ensure that the edges of the original
are not cut off. Be sure to use 12" x 18" paper.
NOTE
.
•
When Entire Image is specified, the copy ratios change as follows:
11" x 17": 96.8%
LGL: 96.2%
LTR: 93.7%
•
If you are placing the original on the platen glass, make sure to align it with the arrow
mark.
.
1
Place the originals; then press [Copy Ratio].
2
Press [Entire Image]➔[Done].
The display returns to the Basic Features screen, and the specified copy ratio is
displayed.
3
Press (Start).
Copying starts.
NOTE
.
•
To cancel the setting, press [Copy Ratio] ➔ [Entire Image].
•
To restore the copier’s settings to the standard copy settings, press (Reset).
Basic Copying
1
Page 84

Changing the Copy Ratio (Copy Ratio)
1-69
.
Generating the Copy Ratio Based on the Size of the Original
and the Copy (Zoom Program)
The copier will automatically generate the copy ratio for you if you enter the size of
the original and the desired size of the copy.
The automatically generated copy ratio lies between 25% and 400%.
NOTE
.
•
The specified sizes are converted into a copy ratio (%) by using the following formula. (All
decimal numbers are rounded to integers.)
- Copy ratio (%) = (copy size / original size) x 100
■ Making Copies with the Same XY Copy Ratio (Zoom)
Specify the same copy ratio for the vertical and horizontal directions.
X = 4" (100 mm)
X = 5 7/8" (150 mm)
Original Copy
Basic Copying
1
Page 85

Changing the Copy Ratio (Copy Ratio)
1-70
■ Making Copies with Different XY Copy Ratios (XY Zoom)
Specify different copy ratios for the vertical and horizontal directions.
Making Copies with the Same XY Copy Ratio (Zoom)
1
Place the originals; then press [Copy Ratio].
2
Press [Other Zoom].
X = 4" (100 mm)
X = 3 1/8" (80 mm)
Y = 5 1/2"
(140 mm)
Y = 4 3/4"
(120 mm)
Original Copy
Basic Copying
1
Page 86

Changing the Copy Ratio (Copy Ratio)
1-71
3
Press [Zoom Program].
4
Press [Orig. Size] to enter the size of the original; then press
[Copy Size] to enter the size of the copy. Then press [OK].
Enter the size of the original and the copy after pressing [Orig. Size] and [Copy
Size], using the number keys on the touch panel display.
The display returns to the Basic Features screen, and the automatically
generated copy ratio is displayed.
If the copy ratio is less than 25%, a message appears telling you that the ratio will
be adjusted to 25%. If the copy ratio is more than 400%, a message appears
telling you that the ratio will be adjusted to 400%.
NOTE
.
•
When the copy ratio is greater than 200%, place the original on the platen glass.
•
If you make a mistake when entering values, press [C], then enter the correct
value.
•
To specify the sizes for the horizontal direction (X) and the vertical direction (Y)
independently, press [XY Zoom].
•
To enter values in mm, press [mm].
5
Press (Start).
Copying starts.
Basic Copying
1
Page 87

Changing the Copy Ratio (Copy Ratio)
1-72
NOTE
.
•
To restore the copy ratio to 100%, press [Direct].
•
To cancel the setting, press [Copy Ratio] ➔ [Other Zoom] ➔ [Zoom Program] ➔
[Cancel].
•
To restore the copier’s settings to the standard copy settings, press (Reset).
Making Copies with Different XY Copy Ratios (XY Zoom)
1
Place the originals; then press [Copy Ratio] ➔ [Other Zoom] ➔
[Zoom Program].
Refer to steps 1 through 3 of “Making Copies with the Same XY Copy Ratio
(Zoom)” for details on this part of the procedure. (See p. 1-70.)
2
Press [XY Zoom].
3
Press [X] (horizontal direction) and [Y] (vertical direction) for
both the original and copy size and enter the appropriate
values. Then press [OK].
Enter the value for X and Y after pressing [X] and [Y], using the number keys on
the touch panel display.
The display returns to the Basic Features screen, and the automatically
generated copy ratios are displayed.
Basic Copying
1
Page 88

Changing the Copy Ratio (Copy Ratio)
1-73
If the copy ratio is less than 25%, a message appears telling you that the copy
ratio will be adjusted to 25%. If the copy ratio is more than 400%, a message
appears telling you that the ratio will be adjusted to 400%.
NOTE
.
•
If you make a mistake when entering values, press [C], then enter the correct
value.
•
To set the same value for the X and Y axes, press [Zoom].
•
To enter values in mm, press [mm].
4
Press (Start).
Copying starts.
NOTE
.
•
To restore the copy ratio to 100%, press [Direct].
•
To cancel the setting, press [Copy Ratio] ➔ [Other Zoom] ➔ [Zoom Program] ➔
[Cancel].
•
To restore the copier’s settings to the standard copy settings, press (Reset).
.
Enlarging/Reducing Originals with Copy Ratios Set
Independently for the X and Y Axes (XY Zoom)
This function enables you to make enlarged or reduced copies with different XY
copy ratios.
The copy ratios must lie between 25% and 400%.
The following two types of XY Zoom functions are available:
Basic Copying
1
Page 89

Changing the Copy Ratio (Copy Ratio)
1-74
■ Manually Specifying the Copy Ratio (XY Zoom)
You can manually specify the XY copy ratios in 1% increments.
■ Automatically Specifying the Copy Ratio (Auto XY Zoom)
The XY copy ratio is automatically specified based on the size of the selected paper.
IMPORTANT
.
•
You cannot use the Auto XY Zoom function when copying the following types of originals.
To copy such originals, specify the copy ratio manually.
- Non-standard size originals
- Transparencies or other highly transparent originals
- Originals with an extremely dark background
- Originals smaller than STMT in size
- Originals that are extraordinarily thin
- Black 3-dimensional objects
- Glossy originals
•
If you specify the Auto XY Zoom function, make sure to select the paper size manually. If
you do not select the paper size, the copy ratio is automatically specified based on the
size of the paper set in the top drawer.
X = 120%
Y = 80%
Original
Enlarging and
reducing with
different XY
copy ratios
Copy
LTR
LTRR
Original
LTRR
selected
Copy
Basic Copying
1
Page 90

Changing the Copy Ratio (Copy Ratio)
1-75
NOTE
.
•
If the copy ratio is less than 25%, a message appears telling you that the copy ratio will
be adjusted to 25%. If the copy ratio is more than 400%, a message appears telling you
that the copy ratio will be adjusted to 400%.
•
If you notice a discrepancy between the Auto XY Zoom copy ratio and the actual copy
size, you can perform an adjustment with the Zoom Fine Adjustment function. (See
Chapter 2, “Customizing Settings to Your Needs,” in the Reference Guide.)
.
1
Place the originals; then press [Copy Ratio].
If you are making copies of an original placed on the platen glass when the
feeder (option) is attached, copy with the feeder lifted up. If the feeder is
lowered, the copier will not be able to correctly determine the size of the original.
2
Press [Other Zoom].
Basic Copying
1
Page 91

Changing the Copy Ratio (Copy Ratio)
1-76
3
Press [XY Zoom].
4
Specify the copy ratio.
● When manually specifying the copy ratio (XY Zoom)
▼ Press [X] and [Y] to enter the desired copy ratios. Then press [OK].
Enter the copy ratio for X and Y after pressing [X] and [Y], using the number
keys on the touch panel display.
You can change the entered values with [-] or [+].
If you make a mistake when entering values, press [C], then enter the correct
value.
The display returns to the Basic Features screen, and the specified copy
ratios are displayed.
If you specify a value that is not within the acceptable range, a message
telling you to enter a value within the appropriate range is displayed.
Basic Copying
1
Page 92

Changing the Copy Ratio (Copy Ratio)
1-77
● When automatically specifying the copy ratio (Auto XY Zoom)
▼ Press [X] and [Y], and select [Auto] in each case. Then press [OK].
The display returns to the Basic Features screen, and the specified copy ratios
are displayed.
IMPORTANT
.
•
When you select [Auto], you cannot use [Auto Paper Selection] for selecting a
paper size. If no specific paper size is selected, the copy ratio is automatically
specified based on the size of the paper in the top drawer.
NOTE
.
•
When you select [Auto], <X: Auto%> and <Y: Auto%> are displayed as the copy
ratios in the Basic Features screen.
5
Press (Start).
Copying starts.
NOTE
.
•
To restore the copy ratio to 100%, press [Direct].
•
To cancel the setting, press [Copy Ratio] ➔ [Other Zoom] ➔ [XY Zoom] ➔ [Cancel].
•
To restore the copier’s settings to the standard copy settings, press (Reset).
Basic Copying
1
Page 93

Changing the Copy Ratio (Copy Ratio)
1-78
.
Splitting the Image of the Original According to the
Enlargement Ratio (Multi-page Enlargement)
To enlarge an original to a size greater than 11" x 17", you will have to copy the
image of the original over several sheets of paper and then paste the sheets
together. You can specify the copy ratio for Multi-page Enlargement in % or by
setting the number of sheets the original should be copied over.
NOTE
.
•
The images of copies made with the Multi-page Enlargement Zoom function overlap.
Join neighbouring sheets together by pasting over the overlapping areas.
•
You cannot make more than one copy of the original (over multiple sheets of paper) at
one time using the Multi-page Enlargement Zoom function.
•
Multi-page Enlargement cannot make copies on transparencies.
The Relationship Between the Copy Ratio and the Paper
(Size and Number of Sheets)
When making a multi-page enlargement by specifying the copy ratio (as opposed to
specifying the number of output sheets), the number of output pages changes
according to the size of the original, the copy ratio setting, and the size of the paper.
Refer to the following table to determine the desired copy ratio.
■ Original size: 11" x 17 "
Reproduction ratio (%) Paper sizes Total sheets of paper Total size
200 11" x 17" 4 22" x 34"
200 8 1/2" x 11" (LTR) 10 22" x 34"
200 8 1/2" x 11" (LTRR) 12 22" x 34"
300 11" x 17" 16 33" x 51"
300 8 1/2" x 11" (LTR) 28 33" x 51"
300 8 1/2" x 11" (LTRR) 20 33" x 51"
400 11" x 17" 25 44" x 68"
400 8 1/2" x 11" (LTR) 45 44" x 68"
Copies
Copies cut and
pasted together
Original
Basic Copying
1
Page 94

Changing the Copy Ratio (Copy Ratio)
1-79
NOTE
.
•
The table above serves only as a guideline. The actual copy ratio may be different from
that indicated in the table.
•
After all the sheets have been pasted together, the final size of the actual copy will be
slightly smaller than the size indicated in the table.
•
You can make multi-page enlargement with copy ratios that are not listed in the table.
However, the size of the original must not be greater than 11" x 17" and the copy ratio
cannot exceed 400%.
•
The vertical and horizontal placements of the original refer to the following placements:
Specifying the Enlargement by Entering the Copy Ratio (ZOOM)
Specify the copy ratio in %. The aspect ratio (vertical to horizontal ratio) remains the
same.
.
1
Place the original; then press [Copy Ratio].
400 8 1/2" x 11" (LTRR) 42 44" x 68"
Reproduction ratio (%) Paper sizes Total sheets of paper Total size
Vertical placement
Horizontal placement
Basic Copying
1
Page 95

Changing the Copy Ratio (Copy Ratio)
1-80
2
Press [Other Zoom].
3
Press [Multi-P Enlar].
NOTE
.
•
If the drawer designated as the feeding location for transparencies is selected, the
[Multi-P Enlar] key is grayed out and cannot be selected.
4
Press [Copy Ratio(s)] ➔[Next].
Basic Copying
1
Page 96

Changing the Copy Ratio (Copy Ratio)
1-81
5
Enter the copy ratio; then press [OK].
Enter the copy ratio using the number keys on the touch panel display.
You can change the entered values with [-] or [+].
The display returns to the Basic Features screen, and the specified copy ratio is
displayed.
If you specify a value that is not within the acceptable range, a message telling
you to enter a value within the appropriate range is displayed.
NOTE
.
•
If you make a mistake when entering values, press [C], then enter the correct
value.
6
Press (Start).
Copying starts.
NOTE
.
•
If you press (Stop) while copying is in progress to cancel the Copy job, pressing
(Start) after that will resume copying from the first sheet of the divided image.
•
To restore the copy ratio to 100%, press [Direct].
•
To cancel the setting, press [Copy Ratio] ➔ [Other Zoom] ➔ [Multi-P Enlar] ➔
[Cancel].
•
To restore the copier’s settings to the standard copy settings, press (Reset).
Specifying the Enlargement by Entering the Copy Ratio (XY ZOOM)
Specify the vertical and horizontal copy ratios independently in %.
.
1
Place the original; then press [Copy Ratio] ➔ [Other Zoom] ➔
[Multi-P Enlar] ➔ [Copy Ratio(s)] ➔ [Next].
Refer to steps 1 through 4 of “Specifying the Enlargement by Entering the
Copy Ratio (ZOOM)” for details on this part of the procedure. (See p. 1-79.)
Basic Copying
1
Page 97

Changing the Copy Ratio (Copy Ratio)
1-82
2
Press [XY Zoom].
3
Press [X] and [Y] to enter the desired copy ratios. Then press
[OK].
Enter the copy ratio for X and Y after pressing [X] and [Y], using the number keys
on the touch panel display.
You can change the entered values with [-] or [+].
The display returns to the Basic Features screen, and the specified copy ratios
are displayed.
If you specify a value that is not within the acceptable range, a message telling
you to enter a value within the appropriate range is displayed.
NOTE
.
•
If you make a mistake when entering values, press [C], then enter the correct
value.
4
Press (Start).
Copying starts.
NOTE
.
•
If you press (Stop) while copying is in progress to cancel the Copy job, pressing
(Start) after that will resume copying from the first sheet of the divided image.
•
To restore the copy ratio to 100%, press [Direct].
Basic Copying
1
Page 98

Changing the Copy Ratio (Copy Ratio)
1-83
•
To cancel the setting, press [Copy Ratio] ➔ [Other Zoom] ➔ [Multi-P Enlar] ➔
[Cancel].
•
To restore the copier’s settings to the standard copy settings, press (Reset).
Specifying the Enlargement by Selecting the Number of Output Pages
The copy ratio is automatically generated from the specification of the number of
pages over which the original should be copied.
.
1
Place the original; then press [Copy Ratio] ➔ [Other Zoom] ➔
[Multi-P Enlar].
Refer to steps 1 through 3 of “Specifying the Enlargement by Entering the
Copy Ratio (ZOOM)” for details on this part of the procedure. (See p. 1-79.)
2
Press [Number Of Output Pages] ➔ [Next].
3
Press [Paper Select].
Basic Copying
1
Page 99

Changing the Copy Ratio (Copy Ratio)
1-84
4
Select the size of the paper; then press [Done].
If you select the stack bypass, the screen used for specifying the stack bypass
paper size and type appears.
NOTE
.
•
The drawer designated as the feeding location for transparencies is grayed out and
cannot be selected.
5
Select the number of output pages; then press [OK].
Refer to “The Relationship Between the Copy Ratio and the Paper (Size and
Number of Sheets)” as a guideline for specifying the number of output pages.
(See p. 1-78.)
The display returns to the Basic Features screen, and the copy ratio appears as
<Auto %>.
NOTE
.
•
If you select a paper size that is the same size as the original and select [8] for the
number of output pages, the actual output pages will be less than eight because
the enlargement requires less than eight sheets of paper.
6
Press (Start).
Copying starts.
Basic Copying
1
Page 100

Changing the Copy Ratio (Copy Ratio)
1-85
NOTE
.
•
If you press (Stop) while copying is in progress to cancel the Copy job, pressing
(Start) after that will resume copying from the first sheet of the divided image.
•
To restore the copy ratio to 100%, press [Direct].
•
To cancel the setting, press [Copy Ratio] ➔ [Other Zoom] ➔ [Multi-P Enlar] ➔
[Cancel].
•
To restore the copier’s settings to the standard copy settings, press (Reset).
Pasting the Sheets of the Divided Image Together
Example: Enlarging an 11" x 17" original by 200% to create a 22" x 34" -size
vertical copy.
Original Size, Orientation ➔ 11" x 17", vertical
Output Size, Orientation ➔ 22" x 34", vertical
Basic Copying
1
 Loading...