

Oce CPS700 Maintenance Manual

Océ CPS700
Configur ati on and
maintenance manual

Océ-Technologies B.V.
Trademarks
Products in this manual are referred to by their trade names. In
most, if not al l cases, these desi gnations are c laimed as trade marks
or registered trademarks of their respective companies.
Copyright
© 2001, Océ-Technologies B.V. Venlo, The Netherlands
All rights reserved. No part of this work may be reproduced, copied, adapted,
or transmitted in any form or by any means without written permission from
Océ.
Océ-Technologies B.V. makes no representation or warranties with respect to
the contents hereof and specifically disclaims any implied warranties of
merchantability or fitness for any particular purpose.
Further, Océ-Technologies B.V. reserves the right to revise this publication
and to make changes from time to time in the content hereof without obligation
to notify any person of such revision or changes.
Code number 7218593
Edition 1.0
GB

Contents
Chapter 1
Introduction
General information 6
About the Océ CPS700 6
Introduction to KOS and KOM 8
Chapter 2
The system configuration
Access the KOS editor 12
Access the KOS adjustments 20
Chapter 3
The system maintenance
Add the supplies 24
Add the toner 24
Add the staples 26
Access the KOM mode 28
About key ope rator maintenance 28
Refill the fuser oil 32
Replace the waste toner box 37
Replace the intermediate cleaner 42
Replace the pressure roller cleaner 54
Clear the paper jams in the process paper path 66
About the paper jams 66
Clear a paper jam between the paper input section and the paper positioning module
68
Clear a paper jam in the preheater 80
Clear a paper jam between the receiver unit and the postfuser 93
Clear a paper jam in the postfuser 105
Appendix A
Safety information
Instructions for safe use 120
Safety data sheets 122
Contents 3

Appendix B
Miscellaneous
Notation conventions 124
Reader’s comment sheet 126
Addresses of local Océ organisations 128
4 Océ CPS700 Configuration and maintenance manual

Chapter 1
Introduction
Océ CPS700
Configuration and maintenance
manual
5
General information
About the Océ CPS700
Introduction
The Océ CPS700 is a Colour Production System with new technologies and
features.
New technologies like 'Colour Copy Press' and 'Image Logic' are a guarantee
for a stable, high copy quality. The Océ CPS700 co nt ains ne w fe at ures lik e t he
templates, the job queue and the paper manager.
The Océ CPS700 is available in two configurations.
Configuration Features
Printer only
Copier and printer
■ Network prin ter
■ Glass plate to make copies
■ Controller
■ Network prin ter
■ Automatic document feeder and glass plate
to make copies
■ Controller
Note: Because the Océ CPS700 is available in two configurations, it is
possible that some information in this manual does not apply to your system.
6Océ CPS700 Configuration and maintenance manual
Types of users
The Océ CPS700 can have three types of users.
Types of users Tasks
Operator
Key operator
System
administrator
■ Copy paper originals
■ Prin t di g i ta l o ri g inals
■ Manage the jobs
■ Load paper.
Note: The job manual describes the tasks of the
operators.
■ Manage the default settings of the system
■ Add the toner and staples
■ Perform image adjustments
■ Provide maintenance
■ Clear the paper jams in the process paper path.
Note: The configuration and maintenance manual
describes the tasks of the key operators.
Control the connection to the network.
Note: The manuals of the 'Océ 900C/950C' controller
describe the tasks of the system administrators.
Contents of the job manual
The job manual describes the following tasks.
■ Make copies
■ Print documents
■ Define the job settings
■ Manage the jobs
■ Use the mailbox
■ Load the pape r
■ Correct errors.
Contents of the configuration and maintenance manual
The configuration and maintenance manual describes the following tasks.
■ Change the default settings
■ Perform image adjustments
■ Add the toner and staples
■ Maintain the system
■ Clear paper jams in the process paper path.
Introduction 7

Introduction to KOS and KOM
Introduction
Key Operator System (KOS) and Key Operator Maintenance (KOM) are tasks
of the key operator. The key operator has more permissions than the operator.
The key operator can for example change the default settings and provide
maintenance to the Océ CPS700.
The key operator needs the special key operator PIN code to access KOS and
KOM.
Note: Key operator maintenance depends on the agreement between Océ
and the customer.
Types of KOS
The key operator can access the following functions on the operator panel.
■ KOS editor
■ KOS adjustments.
The ’KOS ed itor’ refers to the default settings that the key operator can change.
The ’KOS editor’ contains the following.
■ ’Workflow’
■ ’Paper/counters’
■ ’Time/date’
■ ’ECO ’
■ ’Layout’
■ ’PIN codes’.
The ’KOS adjustments’ refer to the print qualities that the key operator can
improve. The ’KOS adjustments’ are the following.
■ ’Im a ge enl a rgem en t’
■ ’Colour registration’
■ ’OD gradation curves’
■ ’Im a g e regi str at io n’.
The key operator can change the settings for the ’KOS editor’ and the ’KOS
adjustments’ on the operator panel.
8Océ CPS700 Configuration and maintenance manual

Types of KOM
Key operator maintenance is a method to improve the up-time of the system.
When the key operator has had a special training, the key operator can do a
number of actions in the system. The key operator has more permissions than
an operator and less per m iss ion s than an O cé se rvic e engi ne er.
The actions that a key operator can take depend on the agreement between Océ
and the customer.
The types of KOM are the following.
■ KOM A
■ KOM B.
KOM A con ta ins l imit ed a ct ions tha t d o not re quir e t he k e y ope rato r t o ac cess
the Central Process Group. The KOM A actions are the following.
■ Add the toner and the staples
■ Refill the fuser oil
■ Replace the waste toner box.
KOM B contains advanced actions that require the key operator to access the
Central Process Group. The KOM B actions are the following.
■ The actions described under KOM A
■ Replace the intermediate cleaner
■ Replace the pressure roller cleaner
■ Clear the paper jams in the process paper path.
Introduction 9

10 Océ CPS700 Configuration and maintenance manual

Océ CPS700
Configuration and maintenance
manual
Chapter 2
The system configuration
11
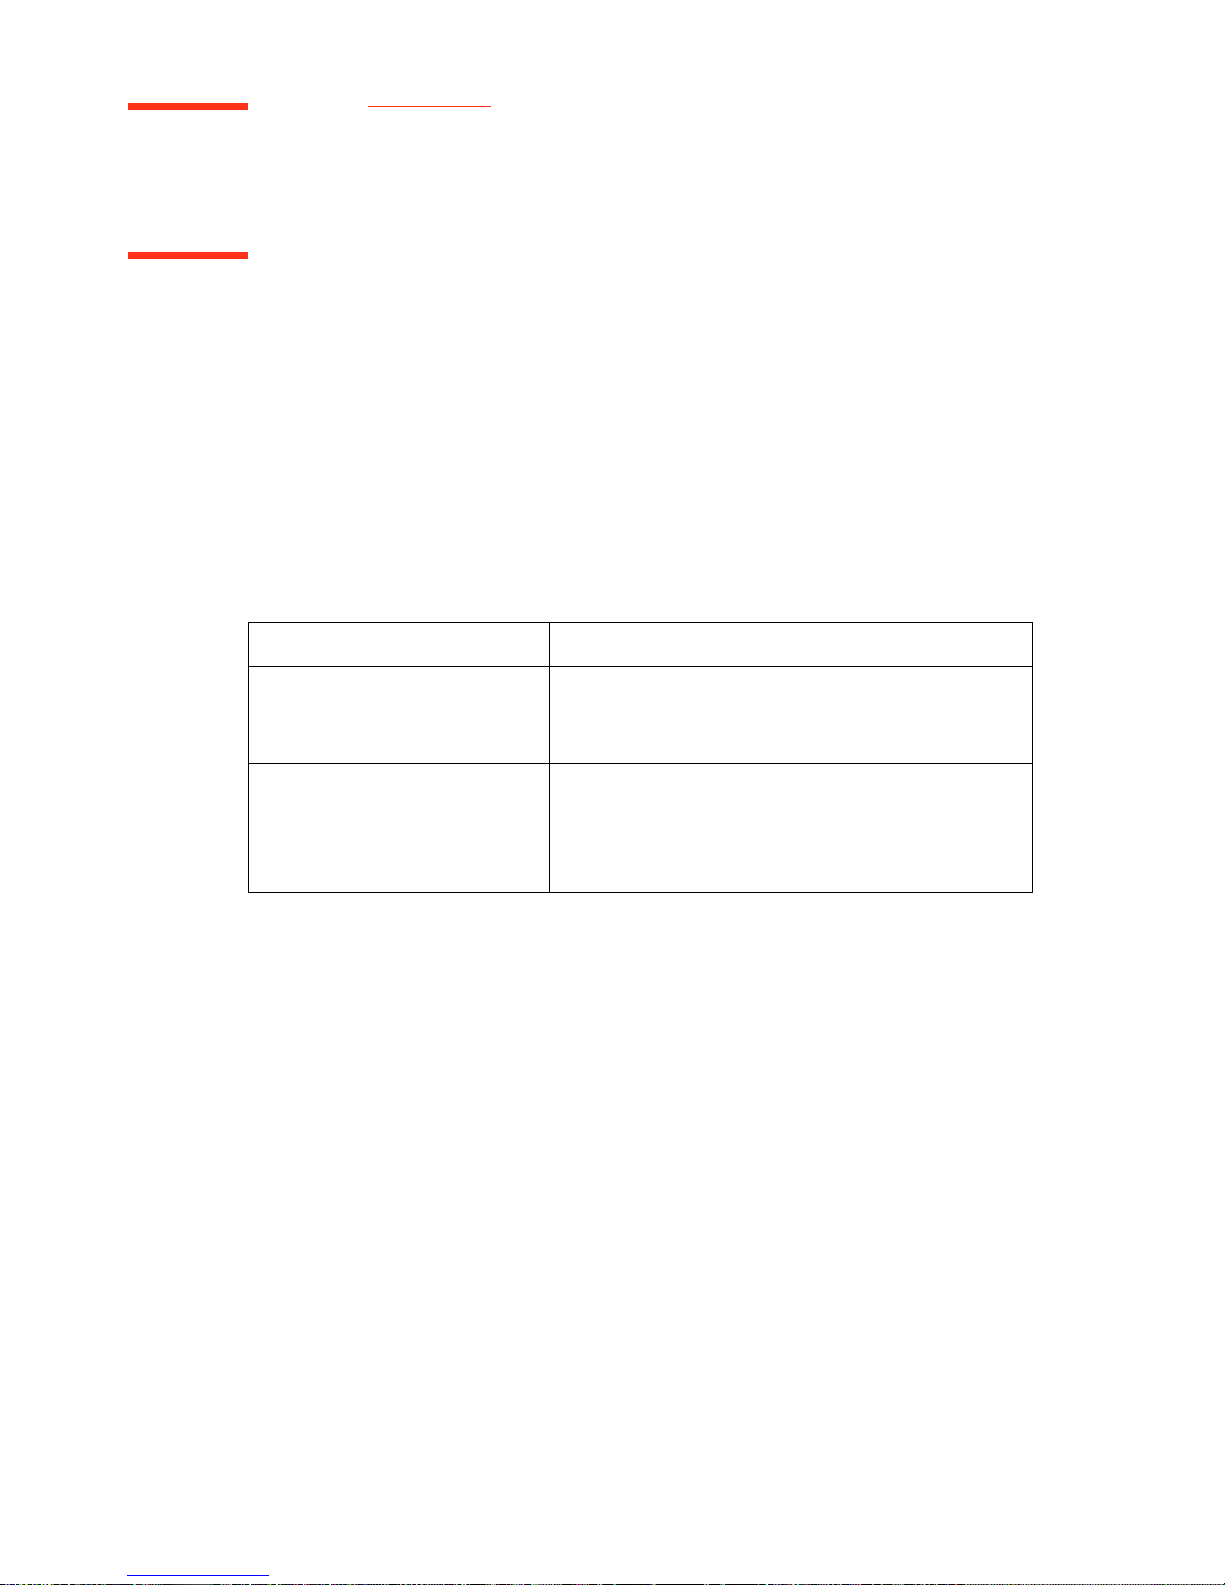
Access the KOS editor
Introduction
The key operator can change the default settings of the Océ CPS700 to adjust
the system to the requirements. The key operator can change the settings on the
operator panel. The key operator can only access the 'KOS editor' if the Océ
CPS700 does not process a job.
Before you begin
Press the key for 'System manager'.
1
2 Press the key for 'System'.
3 Press the key for 'KOS editor'.
4 Enter the key operator PIN code.
Note Attention Caution
Note: All the settings become active when you leave a group of settings or the
KOS editor.
Illustration
[1] Change the wor kflow settings
[1] Change the workflow settings
12 Océ CPS700 Configuration and maintenance manual
Change the workflow settings
Illustration
’Workflow’’New jobs’
’Controller’
[2] Change the s ettings for the pape r sizes and reset the counters
■ ’To mailbox’. The controller sends the
jobs from the network users to the
network mailbox.
■ ’To queue’. The controller sends the
automatic jobs from the network users
to the job queue.
■ ’Enable’. The controller sends the print
jobs to the system.
■ ’Disable’. The controller does not send
the print jobs to the system.
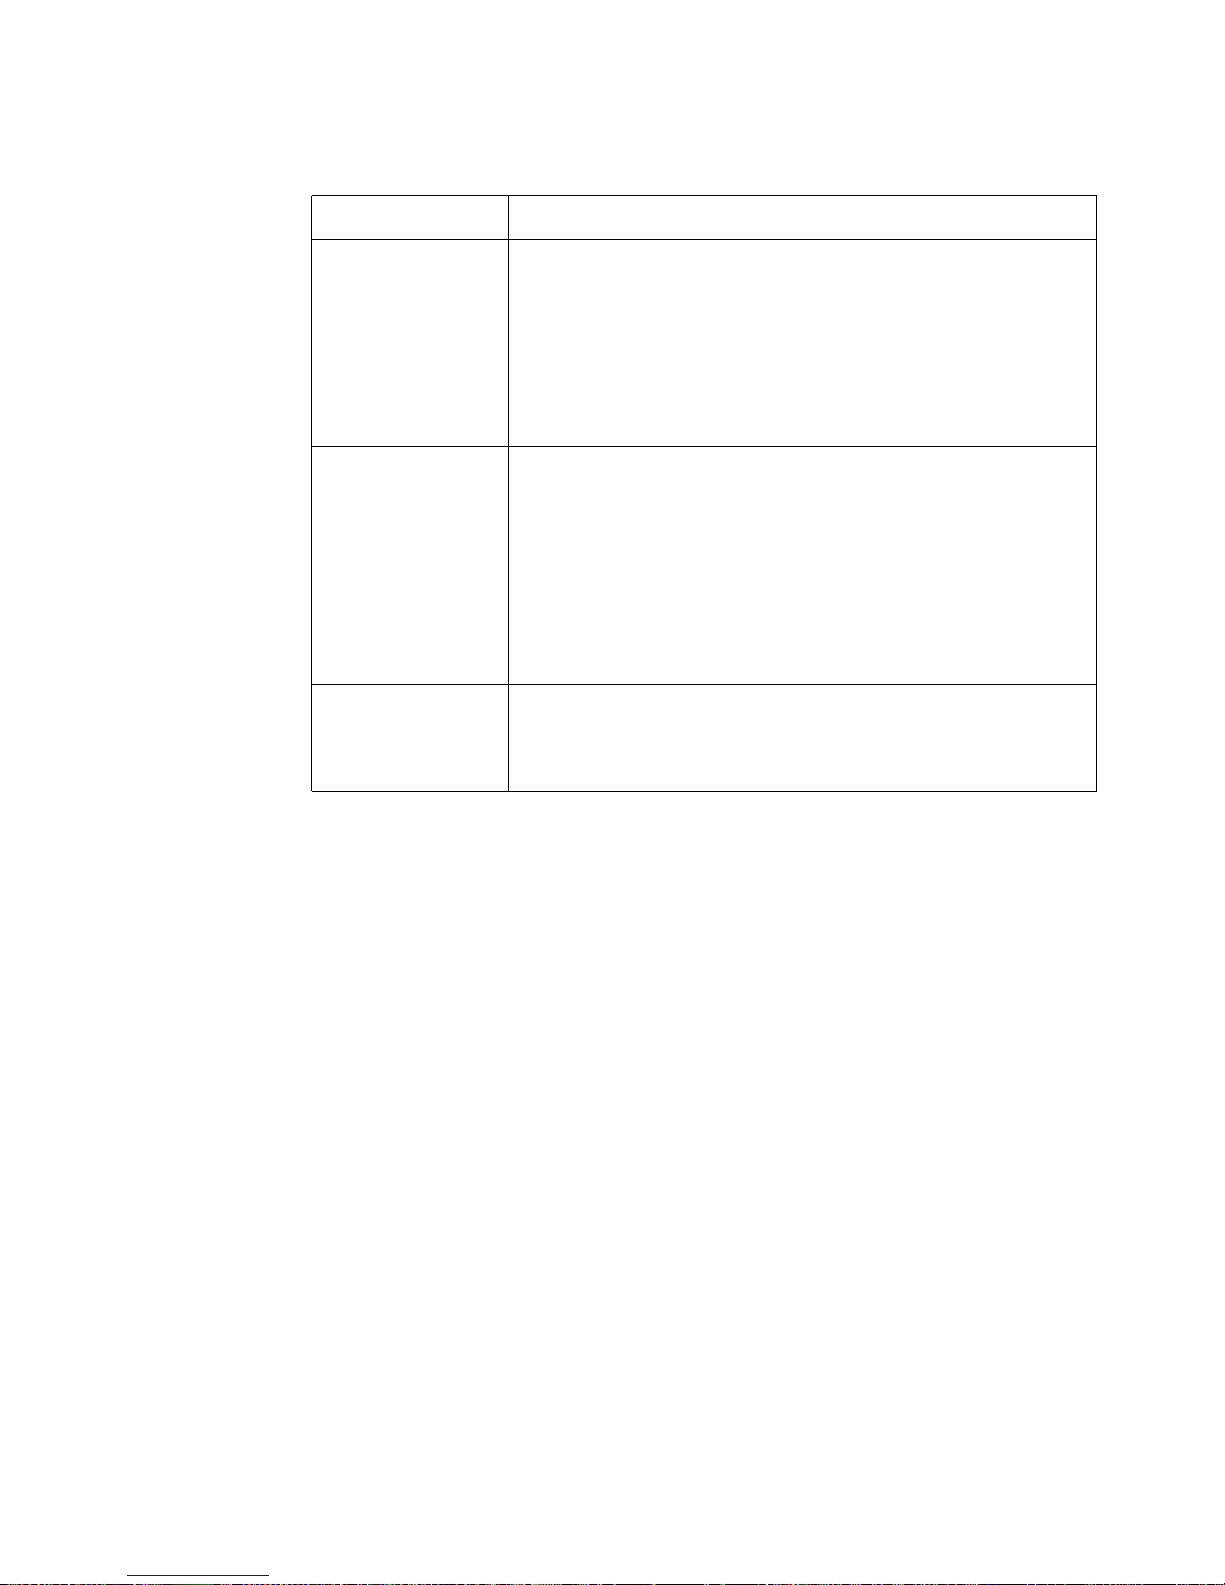
[2] Change the settings for the paper sizes and reset the counters
The system configuration 13
Change the settings for the paper sizes and reset the counters
’Paper/counters’’Reset day
counter’
’Scan paper s iz es’ Use the arrow keys ( ) to select the
’Print paper sizes’ Use the arrow keys ( ) to select the
’Full bleed size’ This setting is only displayed when
Press the key for ’Rese t day count er ’
to set the day counters to 0. The
system does not ask you to confirm.
most used paper sizes for the
originals. The setting is only
important for the jobs from the glass
plate, because the automatic
document feeder automatically
detects the paper size.
Note: The setting ’...’ indicates that
there is no value at this position.
most used paper sizes for the print.
Note: The setting ’...’ indicates that
there is no value at this position.
the Océ CPS700 has a full bleed tray
(option). Use the setting to indicate
the size of paper in the full bleed tray.
The system can not detect the size of
paper.
Note: In this group, the screen of the operator panel shows a summary of the
total counters and the day counters.
14 Océ CPS700 Configuration and maintenance manual

Illustration
[3] Change the s ettings for the time and date
[3] Change the settings for the time and date
Change the settings for the time and date
’Time/date’’Time and date’ Use the key for ’Time and date’ to switch
between ’Time’ and ’Date’. Use the arrow
keys to define the current time and date.
In the ’Date’ field, use the arrow-left key
and the arrow-ri gh t key to switch
between the day, month and year.
In the ’Time’ field, use the arrow-left key
and the arrow-ri gh t key to switch
between the hour s and minut es .
Use the arrow-up key and the
arrow-down key to change the current
value in steps of 1.
The system configuration 15
Illustration
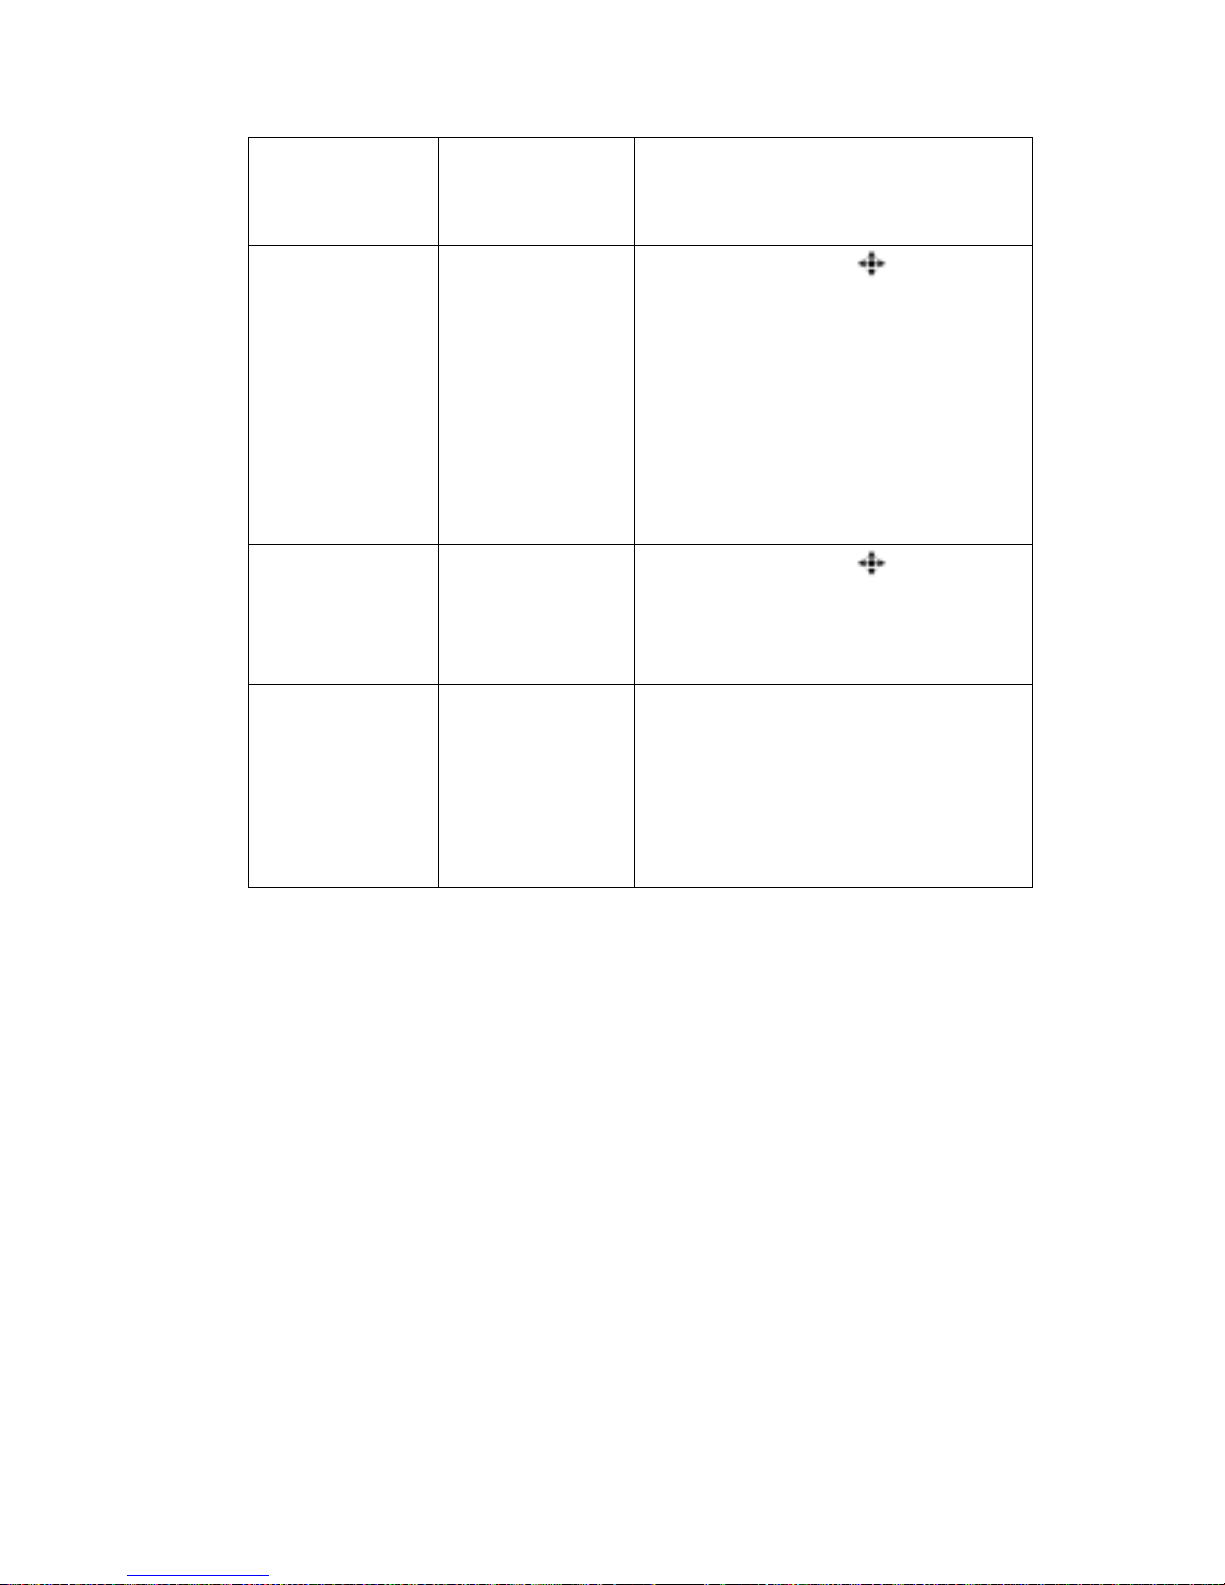
[4] Change the s ettings for ECO
[4] Change the settings for ECO
16 Océ CPS700 Configuration and maintenance manual
Change the settings for ECO
’ECO ’’Low power
mode’
’Sleep mode’ To save energy, the key operator can
To save energy, the key operator can
indicate the delay before the Océ CPS700
enters into the low power mode.
■ 'Off'. The system does not enter the low
power mode.
■ Time. Use the arrow keys to define the
delay before the Océ CPS700 enters the
low powe r mode. The default v alue is 15
minutes.
Note: If the low power time is greater than
the sleep time, the Océ CPS700 goes
directly into the sleep mode.
indicate the delay before the Océ CPS700
enters the sleep mode. Use the arrow keys to
define the delay before the Océ CPS700
enters the sleep mode. The default value is
60 minutes.
Note: You can not turn off the sleep mode.
'Keep data in
ECO'
If the Océ CPS700 enters the low power
mode, the image process unit is turned off to
sav e more energ y . This causes the lo ss of all
jobs in the jo b queue and th e local mail box.
The key operator can select the following.
'Yes'. All jobs remain in the local mailbox
and job queue.
'No'. All jobs are removed from the local
mailbox and job que ue.
The system configuration 17
Illustration
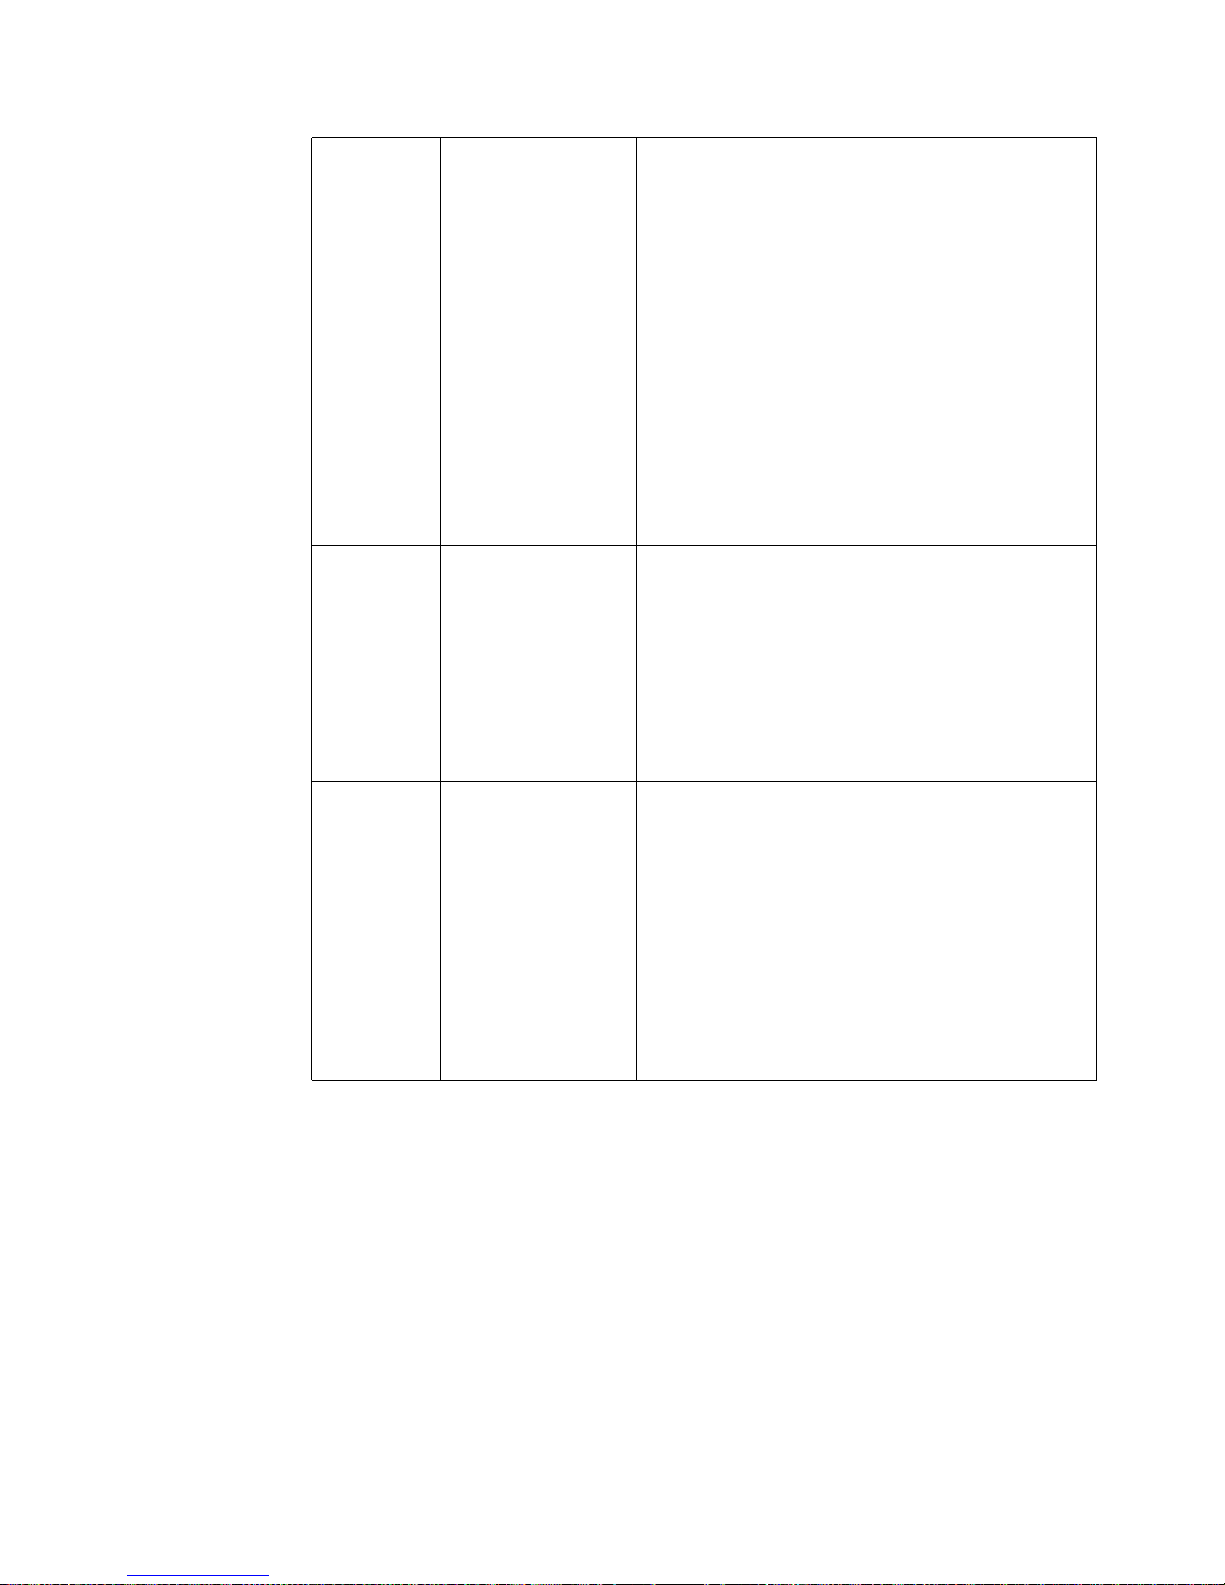
[5] Change the s ettings for the layou t
[5] Change the settings for the layout
Change the settings for the lay o ut
’Layout’’Print’
■ ’2-sided’. When the operator uses a
template, the default layout o f the prin t
is set to 2-sided.
■ ’1-sided’. When the operator uses a
template, the default layout o f the prin t
is set to 1-sided.
Note: The default setting of the Océ
CPS700 is 2-sided.
18 Océ CPS700 Configuration and maintenance manual

Illustration
[6] Change the PI N codes
[6] Change the PIN codes
Change the PIN codes
’PIN codes’’Change KOS
PIN code’
’Change KOM
PIN code’
■ Press the key for ’Change KOS PIN
code’.
■ Enter the new PIN code (five digits).
■ Press the key for ’Confirm’.
■ Press the key for ’Change KOM PIN
code’.
■ Enter the new PIN code (five digits).
■ Press the key for ’Confirm’.
The system configuration 19
Access the KOS adjustments
Introduction
You can select four adj ustment s to impro ve the print quality. The Océ CPS700
prints a number of test sheets for each adjustment. Follow the instructions on
the operat or panel. The followi ng table shows th e adjustment s and the required
paper sizes for the test.
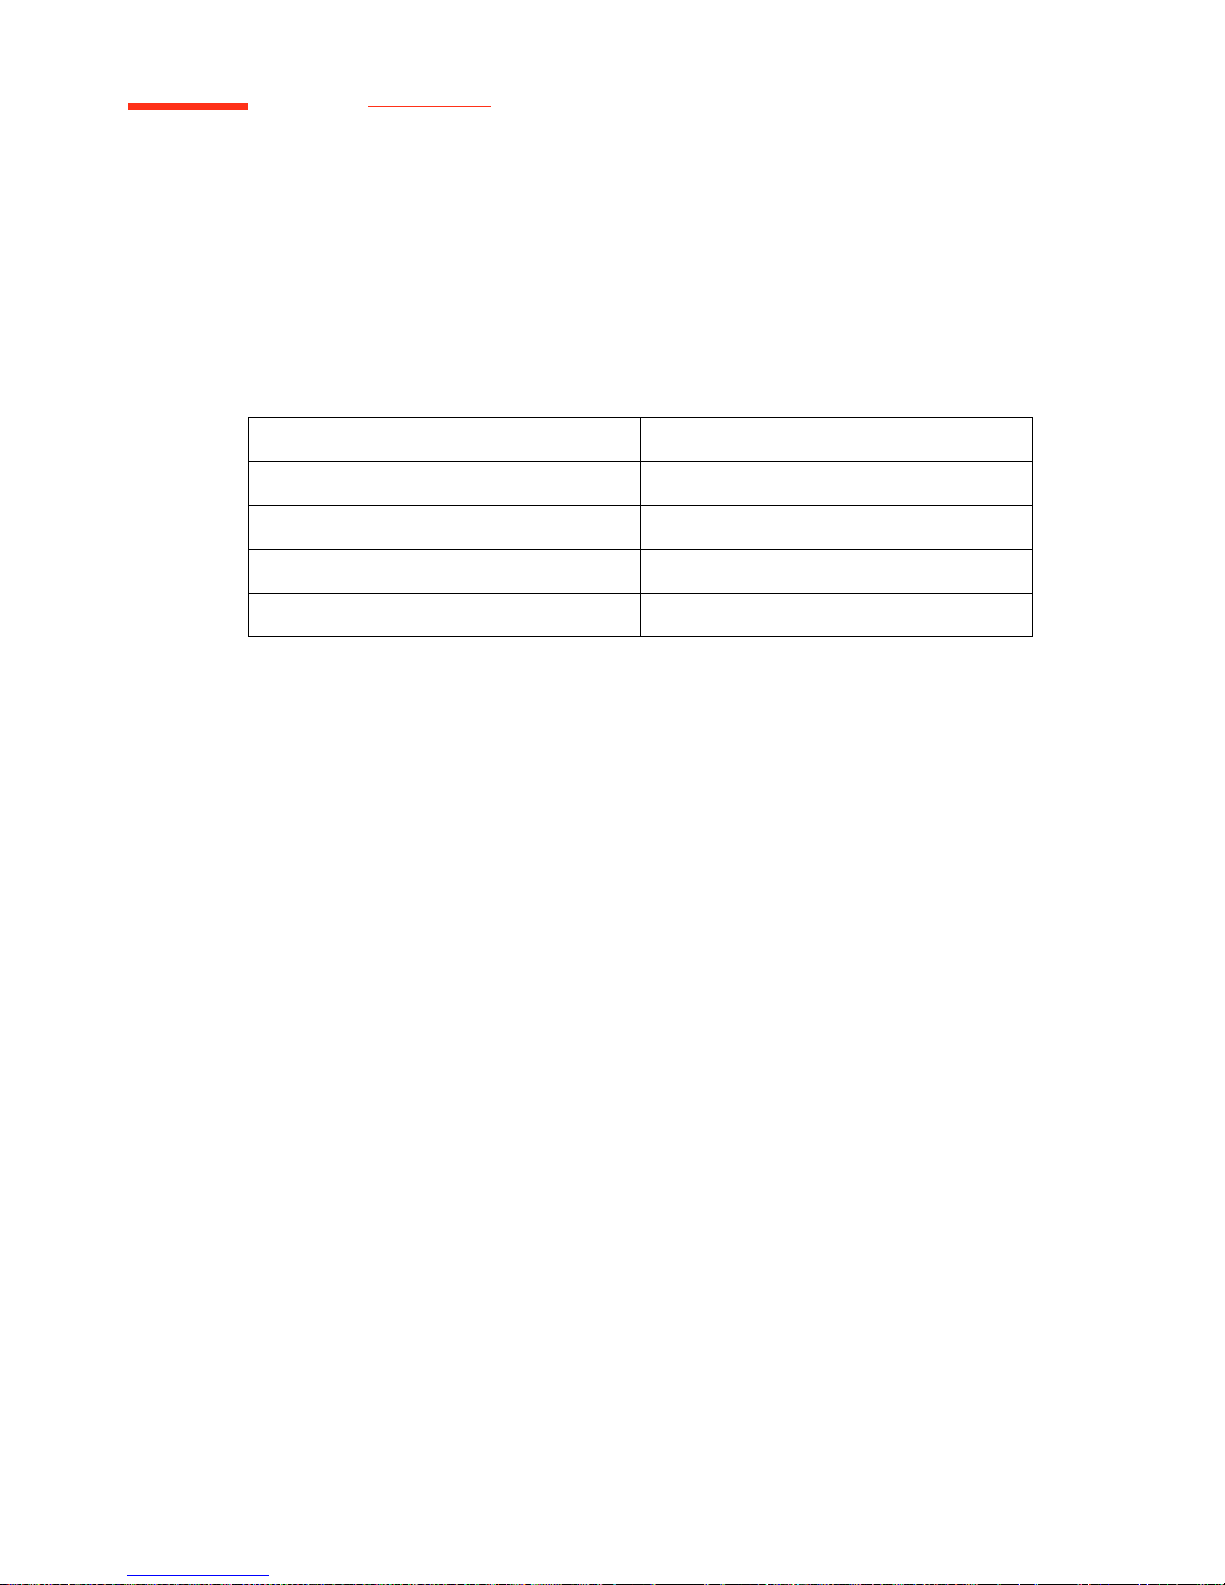
Adjustm en t Required pap er si ze
'Image enlargement' A3
'Colour registration' A3
'OD gradation curves' A3
'Image registration'. A4
The screen of the operator panel displays text messages and pictures to help
the key operator. There are no groups. All adjustments are displayed on one
screen.
Note: The set memory must be empty before the test prints are generated.
When the setting ’KOS adjustments’ is activated, all the jobs in the job queue
and in the local mailbox are removed.
Before you begin
Press the key for 'System manager'.
1
2 Press the key for 'System'.
3 Press the key for 'KOS adjustments'.
4 Enter the key operator PIN code.
Note Attention Caution
Note: You can do the ’KOS adjustments’ in random order. There is only one
pro vision. When the ’Image en lar g eme nt ’ is adjusted, the sy stem automatic ally
activates the ’Colour registration’.
20 Océ CPS700 Configuration and maintenance manual
Illustration
[7] The screen of the KOS adjustments
[7] The screen of the KOS adjustments
The system configuration 21
How to do the KOS adjus t me nt s
Select an adjustment.
1
2 The system cr e ates a test jo b. The test jo b is s ent to the job q ueue . The te st jo b
prints automatically. Every test job contains three pages.
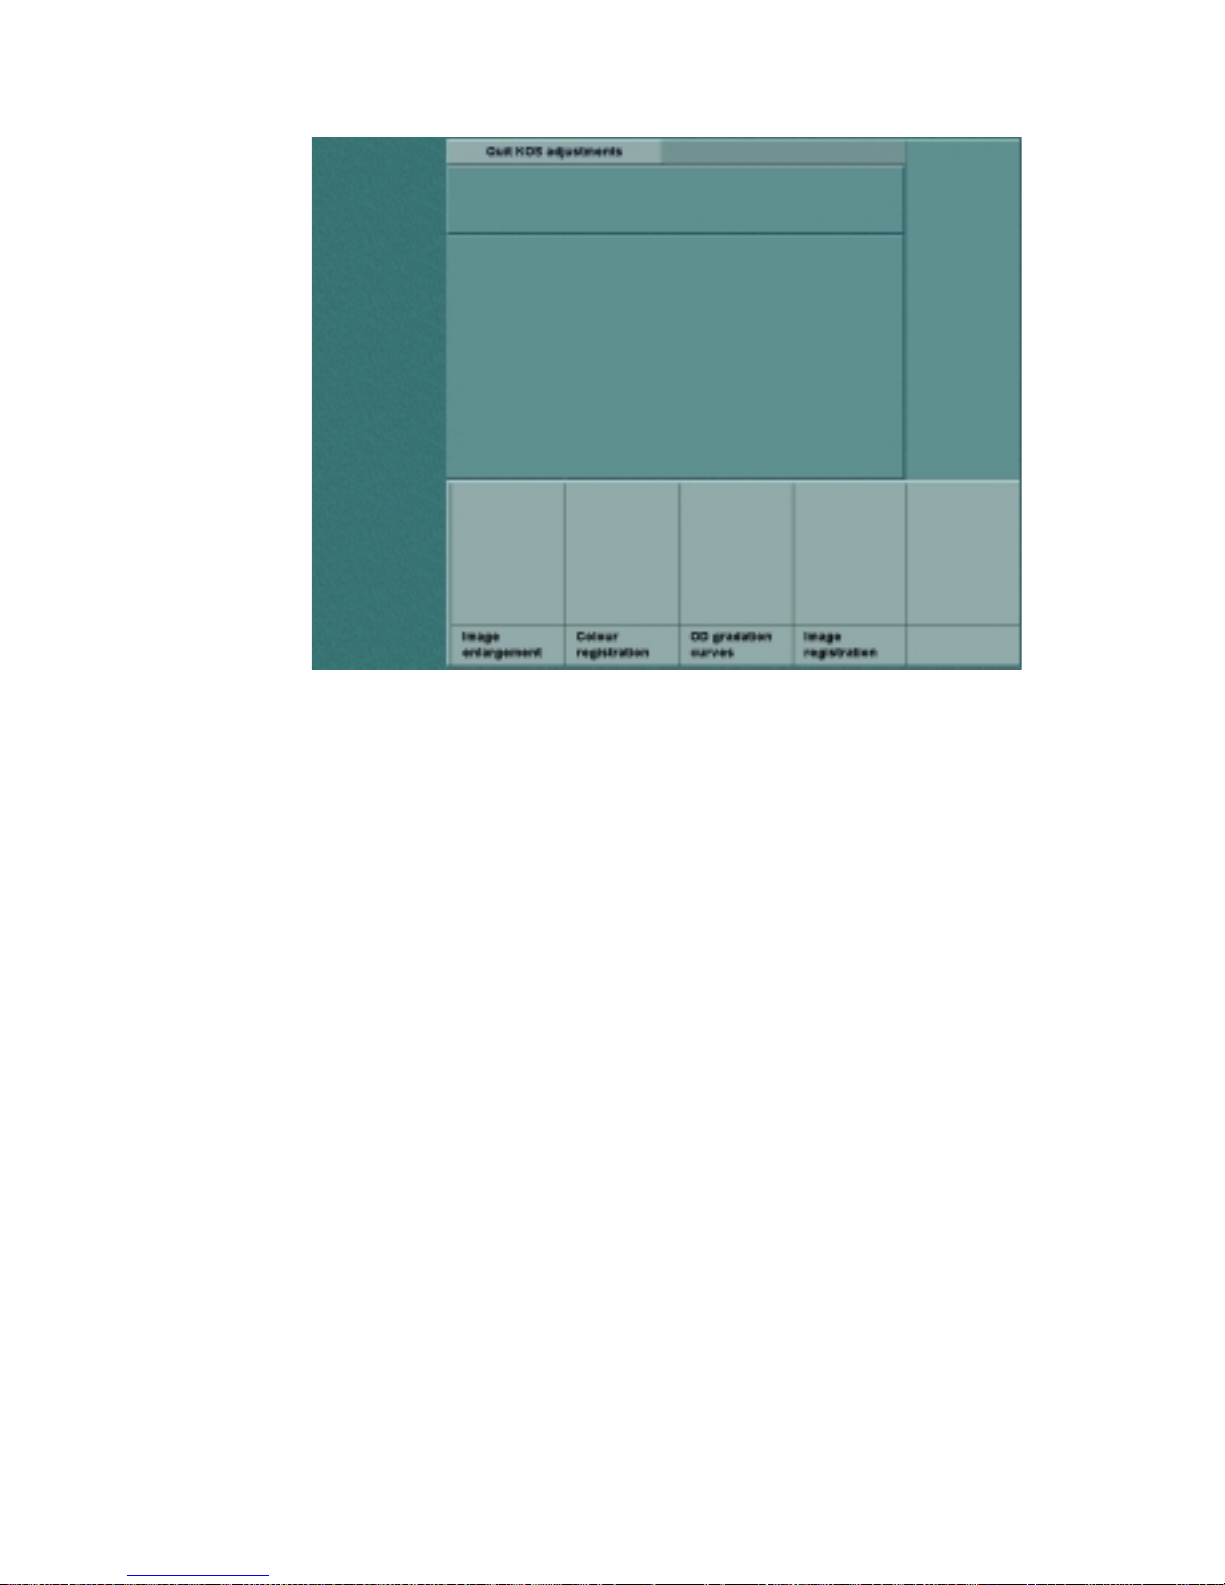
3 Get the first print from the receiving tray and put the print on the scanner. To
adjust the ’Image registration’ you must also fold th e prin t. The scree n disp lays
the following message.
[8] The screen fo r Image registration
[8] The screen for Image registration
4 The system scans and analyses the test print.
5 Repeat the steps 3 and 4 for the next test prints.
Note: The key operator must align the test print on the glass plate. If the test
print is not aligned, the system can not analyse the patterns on the test print.
Then the system asks you to reposition the print.
22 Océ CPS700 Configuration and maintenance manual

Océ CPS700
Configuration and maintenance
manual
Chapter 3
The system maintenance
23
Add the supplies
Add the toner
Introduction
The system monitor of the operator panel displays the status of the toner
supply.
When the toner level is low, the system monitor displays two warnings.
■ The toner icon is changed into orange.
■ The square icons under the toner icon indicate the colour of the toner that
the key operator must refill.
If all the toner is used, the edges around the toner icon are also changed into
orange.
[9] To ner low w arning
[9] Toner low warning
Note: The key operator can add the toner while the Océ CPS700 is in use.
24 Océ CPS700 Configuration and maintenance manual

When to do
Add the toner when the t oner ic on on th e sy stem mo nitor cha nges in to or ang e.
Note Attention Caution
Attention: If some toner is spilled, the key operator must follow the
instruct ions f or the removal of t he sp ille d t on er (se e A ppe nd ix A Sa fety
information).
How to add the toner
Open the toner cover.
1
2 Shake the toner bottle well.
3 Put the closed toner bottle upside down on the slider of the matching toner
reservoir.
Note: Every toner reservoir slider has special notches. The slide caps of the
toner bottles have notches that match with the notches of the sliders. This
makes sure that a toner colour can only be filled into the matching reservoir.
4 Open the slider of the toner reservoir. The slider of the toner reservoir also
opens the slide cap of the toner bottle.
5 Wait until the toner bottle is empty. Close the slider of the toner reservoir . The
slider of the toner reservoir also closes the slide cap of the toner bottle.
Note: Make sure that the toner reservoir is not opened longer than necessary.
Eventually the system stops printing.
6 Remove the toner bottle.
7 Close the toner cover.
The system maintenance 25
Add the staples
Introduction
The Océ CPS700 has one stapler with a capacity of 50 sheets (80 g/m2). When
the stapler is empty, the icon of the stapler on the system monitor is changed
into orange.
Illustration
[10] The icon of the stapler
[10] The ic on of t he st apler
How to access the stapler
Open the pape r com p artm e nt door.
1
2 Use the green handle to slide the frame to the right. You can identify the green
handle by the letter 'A'.
3 Open the finisher top cover.
4 Loosen the screw of the latch of the stapler frame.
5 Move the latch to the left.
6 Take the lever and lift the stapler unit. The stapler unit turns over to the right.
26 Océ CPS700 Configuration and maintenance manual

How to a dd t h e st a p les
Pull out the empty staple cartridge.
1
2 Push the green tab on the stapler frame to the right and lift the metal slider.
3 Use one hand to hold the slider. Use the other hand to remove the staples from
the staple path and the anvil.
4 Release the slider and push the green tab on the stapler frame to the left.
5 Push the new staple cartridge into the stapler.
Note: Make sure that the type of the staples is S2.
How to close the stapler
Take the lever and turn the stapler back into the original position.
1
Note: The stapler frame has a spring. Pull the lever of the stapler frame to the
left. Push the stapler completely down and release the lever.
2 Move the latch to the right and tighten the screw.
3 Close the finisher top cover.
4 Slide the frame to the left.
5 Close the paper compartment door.
The system maintenance 27

Access the KOM mode
About key operator maintenance
Introduction
Key operator maintenance is a method to improve the up-time of the system.
The key operator must have had a special key operator training.
Access the KOM mode
When the Océ CPS700 requires any type of key operator maintenance, the
KOM warning icon on the operator panel becomes orange.
[11] The KOM wa rning icon
[11] The KOM warning icon
There is a difference between preventive maintenance and corrective
maintenance.
Preventiv e ma in te nan c e. When the KOM warning icon changes into orange,
one or more KOM items are close to the end of life. The key operator can start
KOM at any convenient time. Until then, the scan jobs and the print jobs
28 Océ CPS700 Configuration and maintenance manual

remain active. The key operator must press the keys for ’System manager’ ->
’System’ -> ’KOM’ to enter the KOM mode.
Corrective maintenance. The system stops immediately in the following
cases.
■ When a KOM item has reached the end of life.
■ When a paper jam has occurred in the Central Process Group.
KOM is required before you can use the system again. When corrective
maintenance is required, the system stops and the error screen appears.
[12] The e rror s cree n
[12] The error screen
When you press the Start key ( ), the dialog box for the PIN code appears.
Enter the PIN code to start KOM.
Note: The key for KOM on the bottom of the operator panel is disabled when
the KOM warning icon is off.
The system maintenance 29
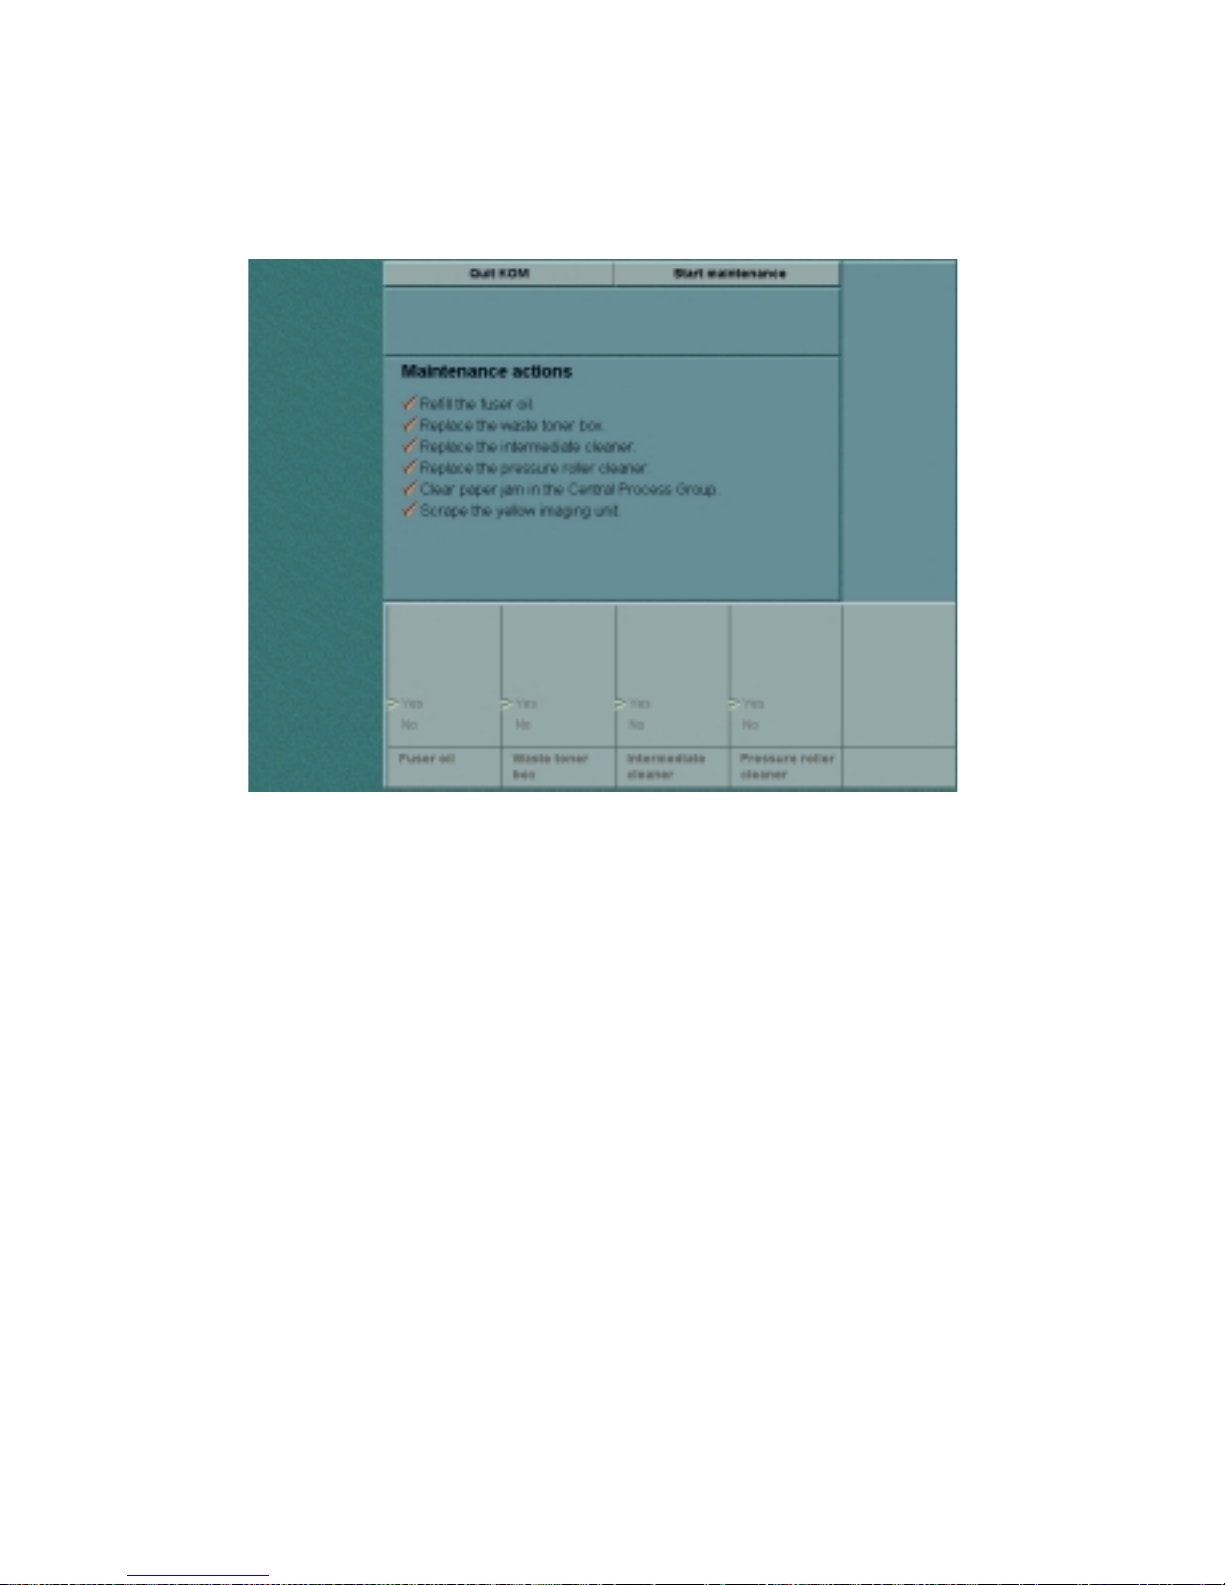
The KOM monitor
The K OM monito r enable s th e ke y oper ator t o compi le a li st o f actio ns th at the
key operator must take. The central part of the screen shows the required
and/or recommended actions.
[13] The KOM monitor
[13] The KOM monitor
The key operator can use the keys at the bottom of the screen to select the
actions. The required actions are always selected. The keys for the required
actions are disabled.
When the key operator has finished the action list, the key operator must press
the key for ’Start maintenan ce’. The screen displays the message ’Are you sure
you want to start KOM?’. Press the key for ’Yes’.
30 Océ CPS700 Configuration and maintenance manual
 Loading...