

Page 1

-
o
Océ
ColorWave® 650
Build A Colourful
World
User manual
Operating
information
Page 2

Copyright
© 2011, Océ
All rights reserved. No part of this work may be reproduced, copied, adapted, or transmitted
in any form or by any means without written permission from Océ.
Océ makes no representation or warranties with respect to the contents hereof and specifically disclaims any implied warranties of merchantability or fitness for any particular purpose.
Further, Océ reserves the right to revise this publication and to make changes from time
to time in the content hereof without obligation to notify any person of such revision or
changes.
Edition: 2012-01
Page 3

Contents
Contents
Chapter 1
Preface...............................................................................................................11
Trademarks...............................................................................................12
Notes for the reader.................................................................................13
Online support for your product.............................................................15
Chapter 2
Get to know the printing system....................................................................17
The Océ ColorWave 650 printing system...............................................18
Printer working area [Footprint]..............................................................20
The Océ ColorWave 650 hardware.........................................................21
The printer hardware components (front)........................................21
The printer hardware components (back)........................................24
The components of the scanner (optional)......................................26
The 'Media drawer'............................................................................28
The 'Imaging section'.........................................................................30
The user panel....................................................................................31
The output delivery............................................................................34
Introduction to the take-up unit.........................................................37
The Océ ColorWave 650 printing system consumables.......................39
Chapter 3
Prepare the printing system for use and get started....................................41
Introduction...............................................................................................42
How to move the Océ ColorWave 650....................................................43
Connect the Océ ColorWave 650 printer................................................48
How to connect the network cable....................................................48
How to connect the scanner..............................................................50
How to connect the folder.................................................................52
How to connect the mains supply cable...........................................54
How to switch on the printer.............................................................55
The installation procedure.......................................................................56
Introduction.........................................................................................56
Run the installation wizard from the user panel..............................57
Configure the network settings manually........................................63
Load or replace a toner cartridge......................................................66
Replace the maintenance tray...........................................................69
Load a media roll......................................................................................72
The 'Media drawer'............................................................................72
Unpack a media roll...........................................................................74
3
Page 4

Contents
Load a media roll................................................................................76
Complete the printer configuration in the Océ Express WebTools.....82
Configure the regional settings of the Océ ColorWave 650.................84
Print the Customer Analysis Tool (CAT) demo print ............................85
Chapter 4
Configure the printing system.........................................................................87
Introduction to the Océ Express WebTools...........................................88
Purpose of the Océ Express WebTools............................................88
The system requirements..................................................................93
Set another language for the Océ Express WebTools....................95
How to edit a setting..........................................................................97
View and check the settings..............................................................98
Save the settings in a file...................................................................99
Load the settings from a file............................................................100
Restore the factory defaults.............................................................101
Update the Océ ColorWave 650 software......................................102
The system monitor.........................................................................104
Shut down or restart the system.....................................................107
Check your licenses..........................................................................108
Save the currently active licenses...................................................110
Install a new license.........................................................................111
'Online services' ..............................................................................113
Security...................................................................................................115
Access and passwords.....................................................................115
User roles and authorisations...................................................115
Log in as an authorised user.....................................................117
Log out after your session.........................................................118
Change the password for authorised users.............................119
E-shredding.......................................................................................120
Enable or disable the e-shredding function.............................120
Select the e-shredding algorithm..............................................121
Specify the number of overwrite passes..................................122
Configure the printer..............................................................................123
The 'System defaults' tab in the Océ Express WebTools ............123
What you need to know about default settings (Océ Express
WebTools)...................................................................................123
Configure the regional settings of the Océ ColorWave 650....124
Define the display languages of the printer and the scanner..125
Configure the 'Media request time-out' ...................................126
Configure the 'Printer panel time-out' .....................................127
Configure the Automatic wake-up............................................128
Configure the energy save modes of the Océ ColorWave 650.129
Configure the media sizes..........................................................131
The 'Configuration' tab in the Océ Express WebTools ................133
4
Page 5

Contents
Configure the network settings in the Océ Express WebTools.133
Set the 'Network duplex mode' ................................................134
Set the 'Network speed' ............................................................135
Configure jobs........................................................................................136
Relevant settings in the Océ Express WebTools...........................136
Set the default print job settings...............................................136
Set the default copy job settings...............................................140
Set the default scan job settings...............................................142
Set the Colour management settings.......................................144
Fold settings................................................................................145
Templates..........................................................................................148
What you need to know about templates.................................148
Copy templates...........................................................................149
Scan templates...........................................................................151
Fold templates............................................................................153
Smart inbox templates...............................................................154
Remote destinations templates.................................................155
Create a remote destination......................................................157
Create a new template...............................................................159
Delete all templates....................................................................160
Export templates.........................................................................161
Import templates........................................................................162
Restore the factory defaults of the templates..........................163
Actions per template..................................................................164
Finishing..................................................................................................165
Define the finisher configuration type............................................165
Set the 'Océ Finishing Assistant' ....................................................166
Switch the finisher to manual operation and back........................167
Chapter 5
Use the printing system.................................................................................169
The Océ ColorWave 650 printer............................................................170
Set up the printer..............................................................................170
The 'Media drawer'.....................................................................170
Remove a media roll..................................................................172
Unpack the media roll................................................................175
Load a media roll........................................................................177
Define the media type and the core size...................................183
The output delivery....................................................................185
Make a new media profile available on the printer user panel.187
Load or replace a toner cartridge..............................................188
Replace the maintenance tray...................................................191
Monitor the printer...........................................................................194
The system monitor and the system states.............................194
Control the printer............................................................................198
5
Page 6

Contents
Switch on or switch off the printer............................................198
Pause or resume the printer .....................................................199
Solve problems with the printer.....................................................200
Introduction.................................................................................200
Cover or drawer opened............................................................201
Pull up the 'Top delivery tray' and open the 'Top cover'........204
Close the 'Top cover' and flap back the 'Top delivery tray'....206
Check and clean the print surface.............................................207
Adjust the 'Top delivery tray'....................................................210
Cut the media..............................................................................213
Print jobs.................................................................................................214
Create, manage and print jobs........................................................214
Set up print jobs...............................................................................216
What you need to know before you send your print jobs......216
The 'Smart Inbox' and Jobs Queue concept............................217
Use Smart Inboxes in a multiple-user environment...............220
Use Smart Inboxes in a repro environment.............................222
Use Smart Inboxes in a multiple-user and repro environment.224
Open or create a Smart Inbox...................................................226
Delete a 'Smart Inbox' ...............................................................227
Use Océ Publisher Express to send a print job........................228
Use Océ Publisher Select to send a print job...........................230
Use the Océ Windows® Printer Driver to send a print job......233
Use the Océ PostScript® 3 Driver to send a print job..............235
Use FTP to send a print job........................................................237
Use LPR to send a print job.......................................................238
Monitor print jobs.............................................................................239
The job states..............................................................................239
'Counter history' ........................................................................240
Control print jobs..............................................................................242
Pause, resume or delete an active job .....................................242
Solve problems with print jobs.......................................................244
How to solve problems with print jobs.....................................244
View events.................................................................................246
Event messages..........................................................................247
Chapter 6
Use the Océ TC4 scanner...............................................................................251
The scanner user panel..........................................................................252
Define the scanner configuration type.................................................254
Use the scanner user panel...................................................................255
Scanner accounting...............................................................................259
Scanner accounting..........................................................................259
Basic copy jobs on the Océ TC4 scanner.............................................261
6
Page 7

Contents
Introduction to copy jobs.................................................................261
Do a basic copy job..........................................................................263
Stop a copy job.................................................................................265
Extended copy jobs................................................................................266
Do an extended copy job.................................................................266
Improve the copy quality according to the original......................268
Make multiple sets of copies...........................................................272
Scale to another media size.............................................................274
Make a copy and add a strip............................................................275
Make a copy of a specific area of an original.................................276
Make a copy and delete a specific area of an original..................278
Basic scan-to-file jobs on the Océ TC4 scanner...................................280
Introduction to scan-to-file jobs......................................................280
Do a basic scan-to-file job................................................................282
Do an extended scan-to-file job......................................................283
Stop a scan-to-file job......................................................................284
Scan-to-multipage............................................................................285
Extended scan-to-file jobs.....................................................................286
Available settings for scan-to-file jobs...........................................286
'File type' ..........................................................................................288
'Resolution' ......................................................................................291
'Original type' and background compensation..............................292
'Original width' ................................................................................293
'Remove strip' ..................................................................................294
'Checkprint' ......................................................................................295
Chapter 7
Manage media on the Océ ColorWave 650 printing system......................297
Overview of the media related settings...............................................298
Configure the media sizes.....................................................................299
What is a media profile?........................................................................301
Manage the media profiles....................................................................302
Download a media profile from the Océ web site...............................304
Install a media profile............................................................................305
Replace a media roll...............................................................................307
The 'Media drawer'..........................................................................307
Remove a media roll........................................................................309
Unpack the media roll......................................................................311
Load a media roll..............................................................................313
Define the media type and the core size........................................319
The output delivery..........................................................................321
Make a new media profile available on the printer user panel....323
Define the correct media for your jobs.................................................324
Laminate the media...............................................................................325
Cut the media.........................................................................................326
7
Page 8

Contents
Chapter 8
Print quality and Print productivity...............................................................327
Main settings that influence the print quality......................................328
Main settings that influence the print productivity.............................330
Set the 'Colour mode' ...........................................................................332
Set the 'Print Setting' for print jobs......................................................333
Set the 'Print setting for scanned images' ..........................................337
Set the 'Production Plus' setting...........................................................340
Set the 'Economy monochrome enhanced' setting............................341
Set the 'Economy colour enhanced' setting........................................342
Set the 'Simulate ColorWave 600 Economy mode' setting................343
Set the 'Océ Print Assistant Behaviour' ...............................................344
Set the 'PDF transparency flattening' ..................................................345
Set the 'PDF wipeout correction' .........................................................346
Set the 'Long plot mode' ......................................................................347
Set the 'Automatic roll switch' .............................................................348
Set the 'Spool threshold' ......................................................................349
Set the 'Print while RIP' setting.............................................................350
Set the 'Rotation' mode.........................................................................351
Set the 'Alignment' mode .....................................................................352
Colour Management..............................................................................353
What is Colour management?.........................................................353
What is an input profile / standardisation?....................................354
What is Colour feel?.........................................................................357
What are Rendering intents?...........................................................359
Definition of rendering intents..................................................359
Rendering intent: 'Perceptual (photo)' .....................................360
Rendering intent: 'Saturation (business graphics)' ................361
Rendering intent: 'Relative colorimetric' .................................362
Rendering intent: 'Absolute colorimetric' ................................363
What is an output profile?...............................................................364
Colour management settings in the Océ Express WebTools.......365
Colour management settings and job submission........................366
Priorities in the colour management settings................................368
'Colour management settings for HP-GL, HP-GL/2 and HP-RTL files'
...........................................................................................................370
'Colour management settings for TIFF and JPEG files' (RGB in-
put).....................................................................................................371
'Colour management settings for TIFF and JPEG files' (CMYK in-
put).....................................................................................................372
'Color management settings for PostScript and PDF files' (RGB in-
put).....................................................................................................373
'Color management settings for PostScript and PDF files' (CMYK in-
put).....................................................................................................374
8
Page 9

Contents
Print examples........................................................................................375
Your Quality Reference Chart..........................................................375
2D CAD monochrome......................................................................379
2D CAD colour..................................................................................380
2D CAD and rendering.....................................................................381
Map....................................................................................................383
Logo and business colours..............................................................384
Point of sales graphics.....................................................................385
Consumer graphics..........................................................................387
Photo.................................................................................................389
Photo realistic impression...............................................................390
Mixed content...................................................................................391
Business graphics.............................................................................393
3D CAD..............................................................................................394
Check, analyse and solve output quality problems of print jobs.......396
Banding across the print with differences in colour and gloss....396
Horizontal, wavy lines across your print........................................398
Thin horizontal, coloured or white lines across your print...........400
Calibrate the Océ ColorWave 650 printer.......................................402
Calibration error codes....................................................................406
Chapter 9
License management.....................................................................................409
Introduction to managing licenses.......................................................410
The 'Licenses' tab in the Océ Express WebTools................................411
The basic workflow of 'Support' - 'Licenses' activation......................412
Océ License Logic...................................................................................413
Check your licenses................................................................................414
Save the currently active licenses.........................................................416
Install a new license...............................................................................417
Appendix A
Specifications of the Océ ColorWave 650.....................................................419
Specifications.........................................................................................420
Ergonomic advise...................................................................................424
Preferred Océ media types and sizes...................................................426
Support for non-Océ media types and sizes........................................431
Specifications drivers and job submission software..........................433
Appendix B
Reader's comment sheet................................................................................435
Reader's comment sheet ......................................................................436
9
Page 10

Contents
10
Page 11

Chapter 1 Preface
Page 12

Trademarks
Trademarks
Océ, Océ ColorWave® 650, Océ ColorWave 600 and the Océ Express WebTools are
registered trademarks of Océ-Technologies B.V.
Adobe® and PostScript® 3™ are registered trademarks of Adobe® Systems Incorporated.
Macintosh® is a registered trademark of Apple® Computer, Inc.
Microsoft®, Windows® , Windows NT®, Windows 95/98®, Windows 2000®, Windows
Server® 2003, Windows Server® 2008, Windows XP®, Windows 7®, Internet Explorer
and Windows Vista® are either registered trademarks or trademarks of Microsoft® Cor-
poration in the United States and/or other countries.
AutoCAD® is a registered trademark of Autodesk, Inc.
Mozilla Firefox™ is a registered trademark of The Mozilla Foundation.
Pentium® is a registered trademark of Intel Corporation.
ENERGY STAR® is a registered trademark of the U.S. Environmental Protection
Agency (EPA).
Products in this publication are referred to by their general trade names. In most, if not
all cases, these designations are claimed as trademarks or registered trademarks of their
respective companies.
®
Chapter 1 - Preface12
Page 13

Notes for the reader
Introduction
This manual helps you to use the Océ ColorWave 650. The manual contains a description
of the product and guidelines to use and operate the Océ ColorWave 650.
Definition
Attention Getters
Parts of this manual require your special attention. These parts can provide the following:
•
Additional general information, for example information that is useful when you
perform a task.
•
Information to prevent personal injuries or property damage.
Note, Attention and Caution
The words Note, Attention and Caution draw your attention to important information.
Overview of the attention getters#
Note
Notes for the reader
IndicatesIconWord
Tips or additional information about the correct use
of the product.
Attention
Caution
Information to prevent property damage, for example
damage to the product, documents or files.
Information to prevent personal injuries.
The Caution indication has several icons that warn
against various hazards. The icons are shown below.
General hazardCaution
Hot surfaceCaution
Electric shockCaution
Moving partsCaution
Chapter 1 - Preface 13
Page 14

Notes for the reader
Safety information
Before using this Océ product, make sure that you read and understand the safety information which is part of the user documentation. You can download the safety information
via http://global.oce.com/support/ or, if applicable, find it on the user documentation
CD/DVD that is delivered together with the machine or obtain the safety information
from your local Océ representative. To avoid potential hazards, maintenance is strictly
preserved to properly qualified and trained service technicians.
Sustainability information
Océ is focused on creating value for all stakeholders by realising profitable, sustainable
growth. The Océ strategy is aimed at optimising business processes, strengthening its
product portfolio and boosting distribution power. Sustainability underpins these strategic
aims. A strong performance in sustainability contributes to operational efficiency as well
as generating stronger product propositions and a more powerful market image. It is no
coincidence that Océ embraced sustainability as part of its core proposition decades ago.
You can find more information about the sustainability policy of Océ via www.sustain-
ability.oce.com.
IndicatesIconWord
Laser beamCaution
The use of heat-resistant gloves is mandatory when you
carry out the actions concerned.
Chapter 1 - Preface14
Page 15

Online support for your product
Introduction
Océ offers comprehensive support for your product on the website:
http://global.oce.com/
Here you can find the latest information that can help you to take full benefit of your
product. Furthermore you can also find answers to your questions.
Please visit the website regularly for updates on the following topics:
•
Downloads
•
Support
•
Supplies
Downloads
User manuals, printer drivers and other resources can change without prior notice. To
stay up-to-date, you are advised to download the latest resources from:
http://global.oce.com/support
Before you use your product, you must always download the latest safety information for
your product. Before you use your product, make sure that you read and understand all
safety information in the manual entitled "Safety Instructions" .
Online support for your product
Support
Supplies
A Knowledge Base (OKB) with answers to your questions or problems is continuously
being updated. To find an answer to your question or problem, please visit:
http://global.oce.com/support and select your product.
In the Support section, use the search field to enter your question. You will get a list of
possible answers.
A media guide with the latest information is available on the website:
http://global.oce.com/supplies/
Here you can find the media that your product supports, for example. You can also find
more information about supplies for your product like toner. Furthermore, you can directly order new supplies through the website.
Chapter 1 - Preface 15
Page 16

Online support for your product
Addresses local Océ organisations
For the addresses of local Océ organisations visit:
http://global.oce.com/contact/countries
Comments
Send your comments by e-mail to:
itc-userdoc@oce.com
Chapter 1 - Preface16
Page 17

Chapter 2 Get to know the printing system
Page 18

The Océ ColorWave 650 printing system
The Océ ColorWave 650 printing system
Introduction
The Océ ColorWave 650 is a wide format TonerPearl printer that uses the patented Océ
CrystalPoint technology. The Océ ColorWave 650 delivers effortlessly easy CrystalPoint
quality prints on plain paper, with all-around productivity for a wide range of applications
in an entirely sustainable concept.
The patented Océ CrystalPoint technology combines the best of the world of Toner with
the best of the Inkjet-world in an entirely sustainable process.
From the world of toner, the Océ CrystalPoint technology gives you water-fast, direct
dry prints with an even stronger adhesion you are used to from Océ LED systems. Add
the media independence, and consistency of output and Océ CrystalPoint technology
capitalises on the great aspects of the toner world.
From the inkjet-world, Océ CrystalPoint technology has adopted the accuracy of printing,
and the cleanliness of the system (no ozone or system contamination).
Chapter 2 - Get to know the printing system18
Page 19

Illustration
The Océ ColorWave 650 printing system
The main components of the Océ ColorWave 650 printing system
#
Description / FunctionComponent
Creates the printed output.The Océ ColorWave 650
printer
The Océ Express WebTools
The Océ Express WebTools provide multiple users a
remote view on the system and control on the system's
workflow, without any need to install software.
The 'System administrator' or the 'Key operator' can
also use the Océ Express WebTools to install the system
and fine tune the system to optimally fit the customer's
company workflow and processes.
Use a recommended web browser to browse to the IP
address or hostname of the Océ ColorWave 650
printer to get immediate access to the Océ Express
WebTools.
Chapter 2 - Get to know the printing system 19
Page 20

Printer working area [Footprint]
Printer working area [Footprint]
The Océ ColorWave 650 requires a floor space / working area of at least 3100 mm x
2270 mm (122 inch x 90 inch).
Chapter 2 - Get to know the printing system20
Page 21

16
2
9
6
4
3
14
12
11
10
13
19
1
7
5
8
17
18
20
21
15
The printer hardware components (front)
The Océ ColorWave 650 hardware
The printer hardware components (front)
Illustration
Component - function table
#
Description / FunctionComponentNr
'Lower left cover'1
'Media drawer'2
Media drawer that contains the media roll 5
and/or 6.
(see ‘The 'Media drawer'’ on page 28)
'Media drawer'3
Media drawer that contains the media roll 3
and/or 4.
'Media drawer'4
(see ‘The 'Media drawer'’ on page 28)
Media drawer that contains the media roll 1
and/or 2.
(see ‘The 'Media drawer'’ on page 28)
Chapter 2 - Get to know the printing system 21
Page 22

The printer hardware components (front)
'Front left cover'5
'Upper left cover'7
'Top left cover'8
Description / FunctionComponentNr
Door at front, used for error recovery'Front cover'6
'Toner cartridge' (cyan)9
'Toner cartridge' (yellow)10
'Toner cartridge' (black)11
'Toner cartridge' (magenta)12
'Top delivery tray'13
Toner cassette for cyan 'Océ TonerPearls®'
Toner cassette for yellow 'Océ TonerPearls®'
Toner cassette for black 'Océ TonerPearls®'
Toner cassette for magenta 'Océ TonerPearls®'
Delivery tray for the printed output.
Note:
It is possible to install an optional
'Receiving rack (basket)' or a folder.
'Top cover'14
Cover on top of the printer, used for error recovery. This cover gives access to the imaging
section.
(see ‘The 'Imaging section'’ on page 30)
'Top right cover'15
user panel16
The printer user panel helps the operator to
do the following.
•
set up the printer
•
define media types and sizes, used on the
Océ ColorWave 650 printer
•
monitor the media and toner stock
•
control the Océ ColorWave 650 printer
and the workflow
•
perform maintenance tasks
•
solve problems
(see ‘The user panel’ on page 31)
'Front right cover'17
'Upper right cover'18
Used to switch on/off the printer.'On / Off switch'19
'Lower right cover'20
Chapter 2 - Get to know the printing system22
Page 23

The printer hardware components (front)
Description / FunctionComponentNr
'Foot'21
Chapter 2 - Get to know the printing system 23
Page 24

11
1
9
7
4
2
3
8
6
5
13
12
10
The printer hardware components (back)
The printer hardware components (back)
Illustration
Component - function table
#
2
3
Chapter 2 - Get to know the printing system24
'Wheel'1
'Left cover of the media
drawer'
'Back cover of the media
drawer'
'Connection panel'4
'Back left cover'5
'Maintenance tray drawer'7
'Top back left cover'8
Description / FunctionComponentNr
The connection panel of the 'Océ PowerM
Plus controller '
(high-end embedded controller)
Covers the 'Océ PowerM Plus controller ''Ventilation cover'6
Page 25

The printer hardware components (back)
Description / FunctionComponentNr
'Top back cover'9
Used for error recovery.
Note:
It is possible to install an optional
'Receiving rack (basket)' or a folder.
Note:
If you select 'External output (back)',
the printed output is lead through the
slot below the 'Top back cover'.
'Top back right cover'10
The main power switch'Power'11
'Back right cover'12
13
'Right cover of the media
drawer'
Chapter 2 - Get to know the printing system 25
Page 26

1
2
3
4
6
7
8
9
5
The components of the scanner (optional)
The components of the scanner (optional)
Attention:
With the Océ TC4 scanner and the additional scanner controller box, you can upgrade
your Océ ColorWave 650 printer to a true multifunctional scan / copy / print system.
Attention:
There are two types of the scanner : the TC4 and the TC4XT, where the TC4XT has
additional the thickness lever and the thickness gauge.
Illustration
Component - function table
#
Chapter 2 - Get to know the printing system26
Description / FunctionComponent
original receiving tray (bottom)1
This is the normally used original receiving
tray. This receiving tray can not be used in
combination with the original receiving table (back).
Page 27

The components of the scanner (optional)
Description / FunctionComponent
calibration sheet holder2
original feeding table3
Feed the originals face down and right
aligned.
Covers the scan area.top cover4
original receiving table (back)5
Use this receiving table if you want to scan
thick or rigid originals up to 15 mm.
Normally the original receiving table (back)
is flapped down in a vertical position at the
back of the scanner.
To use this original receiving table you
must lift the table into the horizontal position.
This receiving table can not be used in
combination with the original receiving tray
(bottom) .
scanner user panel6
You can use the scanner user panel to do
the following.
•
Select a template
•
Change the default job settings.
•
Enter the number of copies.
thickness lever7
Use this handle to set the thickness of the
original, if you want to scan thick originals.
You can measure the thickness with the
magnetic gauge (8).
thickness gauge8
You can use the magnetic gauge in two different ways.
•
If the magnetic gauge is placed on the
scanner feed table you can use it to
guide the originals that you feed into
the scanner.
•
If you remove the magnetic gauge from
the scanner feed table, you can use it to
measure the thickness of an original.
power switch9
Chapter 2 - Get to know the printing system 27
Page 28

3
1
2
4
The 'Media drawer'
The 'Media drawer'
Illustration
Component - function table
Attention:
Only use intact media rolls. Dented media rolls can damage the 'Imaging devices'.
#
Chapter 2 - Get to know the printing system28
Description / FunctionComponentNr
Media roll 3 or 5 in other media drawers'Roll' 11
Media roll 4 or 6 in other media drawers'Roll' 22
Carries the media roll'Roll holder'3
Page 29

The 'Media drawer'
Description / FunctionComponentNr
'Roll loading station'4
Groove integrated behind the front cover of
the media drawer.
To load new media on the printer, the operator must proceed as follows
•
place the new media roll temporarily on
the roll loading station
•
insert the roll holder into the new media
roll
•
place the roll holder with the new media
roll in the correct roll position
Chapter 2 - Get to know the printing system 29
Page 30

1 2
3
The 'Imaging section'
The 'Imaging section'
Illustration
[16] When you open the 'Top cover' you get access to the 'Imaging section'.
Component - function table
#
'Print surface'1
'Imaging devices'2
Description / FunctionComponentNr
The print surface is designed to keep the media that is printed on flat.
The 8 Imaging devices jet the toner on the
media.
Carriage that contains the 8 imaging devices'Imaging carriage'3
Chapter 2 - Get to know the printing system30
Page 31
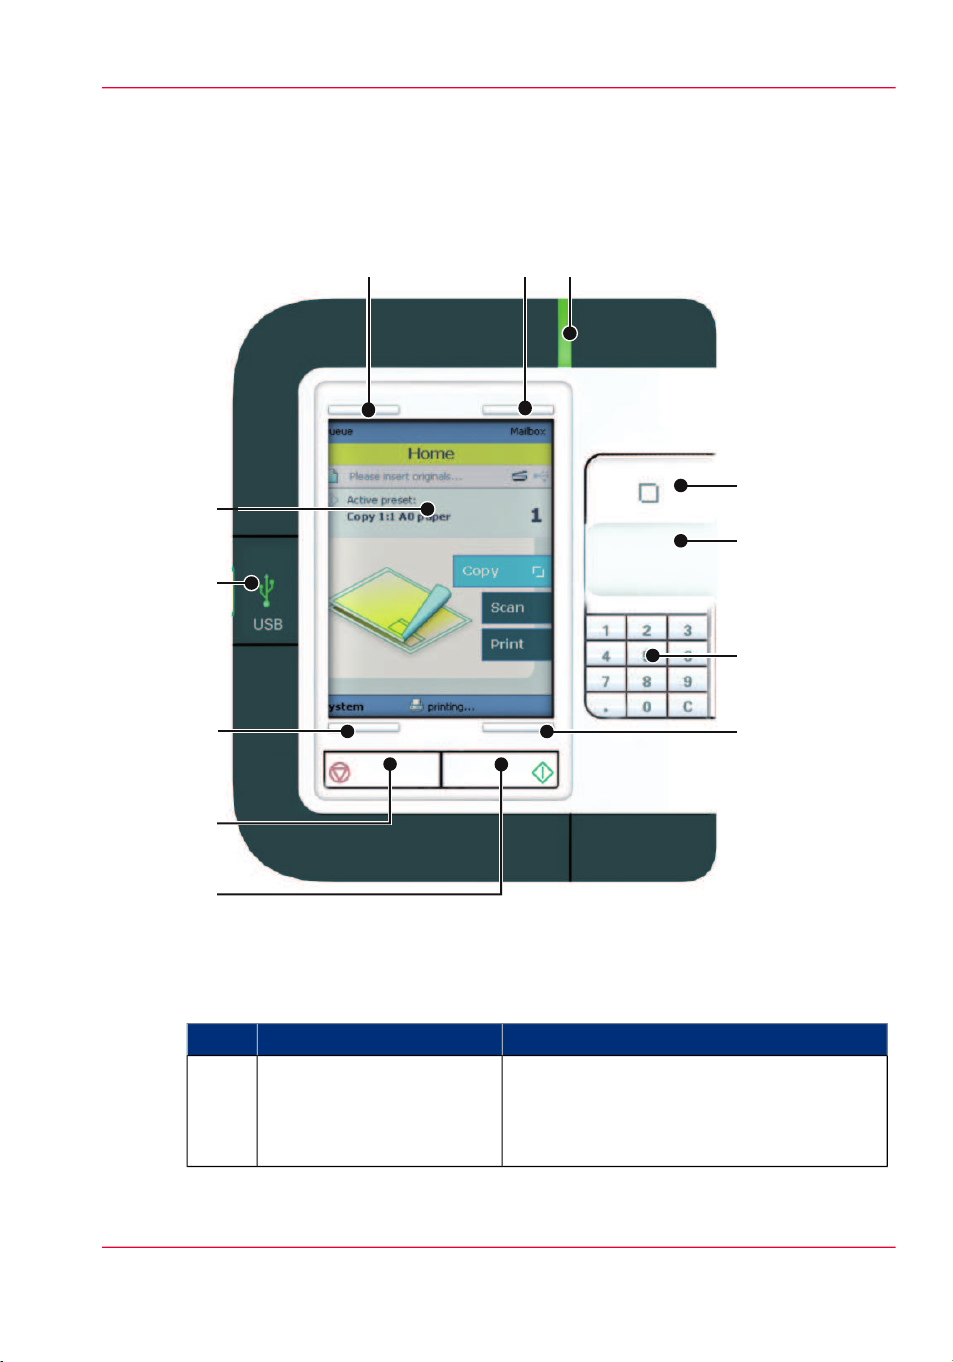
The user panel
1
2
3
5
4
6
7
8
9
10
11
12
Illustration
The user panel
Component - function table
#
green button1
Description / FunctionComponentNr
The button with a green light that allows the
operator to start a print job.
The button lights up to attract attention when
it becomes relevant and it can be pressed.
Chapter 2 - Get to know the printing system 31
Page 32

The user panel
Description / FunctionComponentNr
stop button2
The button with a red light that allows the
operator to stop a print job.
The button lights up to attract attention when
it becomes relevant.
lower left soft key3
Button that allows the operator to select the
option displayed in the lower left corner of
the user panel display.
Not in use.USB flash drive interface4
user panel display5
The colour display that displays information
for the operator.
upper left soft key6
Button that allows the operator to select the
option displayed in the upper left corner of
the user panel display.
upper right soft key7
Button that allows the operator to select the
option displayed in the upper right corner of
the user panel display.
status light8
Light that gives feedback on the status of the
printer.
•
A green light indicates that the printer is
ready.
•
A green blinking light indicates that the
printer is busy.
•
A red light indicates that operator attention
is required.
confirmation button9
Button that allows the operator to do the following.
•
Open a setting.
•
Close and confirm the selected value of a
setting.
scroll wheel10
Wheel on the right side of the user panel, that
allows the operator to do the following.
•
Scroll through the settings.
•
Scroll through the settings values.
Chapter 2 - Get to know the printing system32
Page 33

The user panel
Description / FunctionComponentNr
numeric buttons11
Buttons with the numeric values 0-9, that allow the operator to do the following.
•
Enter a numeric value, for example the
number of sets.
•
Enter a numeric value of a setting.
clear button(C)
lower right soft key12
With the clear button the operator can delete
the last added numeric character.
Button that allows the operator to select the
option displayed in the lower right corner of
the user panel display.
Chapter 2 - Get to know the printing system 33
Page 34

The output delivery
The output delivery
Introduction
The Océ ColorWave 650 is delivered with a 'Top delivery tray' to collect your printed
output.
The 'Top delivery tray' can collect 50 - 100 plain paper prints with a maximum length
of 48" [1200 mm].
Note:
The media type you use influences the output capacity.
In the Océ Express WebTools you can define the default 'Delivery destination' for your
printed output.
•
If you select 'Top delivery tray' your printed output is by default delivered in the
standard 'Top delivery tray'.
•
If you select 'External output (back)' your printed output is by default delivered at
the back of the printer. In that case you could expand your printer with one of the
following finishing options.
Attention:
If you use 2 inch media cores instead of the standard 3 inch media cores, the printed
output is automatically delivered at the back of the printer. The installation of one of the
finishing options is then advised.
Chapter 2 - Get to know the printing system34
Page 35

Attention:
Some media (for example heavy or special media) are automatically delivered at the back
of the printer.
The output delivery options
#
The 'Receiving rack (basket)' is hooked
at the rear side of the printer. It can
collect 2 - 5 prints. The 'Receiving rack
(basket)' bends the printed output. Not
all media types are appropriate for this
finishing option.
Note:
The 'Receiving rack (basket)' is
not supported in combination
with the folder or Copy delivery
tray.
The output delivery
Illustration'Receiving rack (basket)'
#
The folder is an automatic folder that
folds large sized plots.
Note:
The folder is not supported in
combination with the 'Receiving rack (basket)' or Copy delivery tray.
Note:
If you use a folder you must set
the folder value. (see ‘Define the
finisher configuration type’ on
page 165)
IllustrationFolder
Chapter 2 - Get to know the printing system 35
Page 36

The output delivery
#
The Copy delivery tray is a flat tray behind the printer. The Copy delivery tray
can collect a maximum of 150 prints.
#
The take-up unit enables you to wind
up your prints job on a roll without
cutting. This can be handy when you
want to transport your prints or want
to finish your prints at a later time.
When your machine is equiped with
the take-up unit, you must first put the
machine into the Roll-to-Roll mode.
You can enable the Roll-to-Roll mode
in the Océ Express WebTools.
IllustrationCopy delivery tray
Note:
The Copy delivery tray is not
supported in combination with
the 'Receiving rack (basket)' or
folder.
IllustrationTake-up unit
See ‘Introduction to the take-up unit’ on page
37.
Chapter 2 - Get to know the printing system36
Page 37

Introduction to the take-up unit
Introduction
The take-up unit enables Roll-to-Roll mode. The unit rolls up your prints jobs automatically on a core without cutting. This can be handy when you want to transport your
prints or want to automatically clean-cut or trim your prints, laminate or mount an adhesive back to the prints. Before you can use the take-up unit, you must first put the
printer into the Roll-to-Roll mode. You can enable the Roll-to-Roll mode in the Océ
Express WebTools.
By default, the printer is delivered in Roll-to-Sheet mode. In this mode, the machine cuts
and delivers each print to the top delivery tray.
Description of the main parts
Introduction to the take-up unit
[22] The take-up unit
#
1
Paper Guidance
Rack
DescriptionPart
The paper guidance rack guides the print from the external output to the take-up unit.
Chapter 2 - Get to know the printing system 37
Page 38

Introduction to the take-up unit
Flanges2
DescriptionPart
The flanges make sure that your prints are wound up
correctly.
The coreCore3
Scroller assy4
The scroller assy holds the core on which you can wind
your prints
5
The manual feed button allows you wind up manually.Manual feed but-
ton
6
Take-up direction
switch
Power switch 7
With this switch you choose the winding direction:
•
Reverse (your prints are winded print-side out).
•
Forward (your prints are winded print-side in)
The power switch turns the take-up unit on and off.
The take-up unit can only operate when the power
switch is in the 'I' position.
Sensor8
The sensor enables the automatic take-up of your
prints.
Positioning devices9
The positioning devices connect the printer to the takeup unit.
Chapter 2 - Get to know the printing system38
Page 39

The Océ ColorWave 650 printing system consumables
The Océ ColorWave 650 printing system consumables
#
DescriptionConsumable partConsumable
'Roll''Media'
Roll that carries the media. A roll can
have a 2" core or a 3" core.
'Core'
P2 'Toner cartridge'P2 'Toner'
'Océ TonerPearls®'
The core of the media roll is the cardboard inner part of the roll.
P2 Toner cassette for cyan, yellow, black
or magenta toner.
Solid and clean spherical-shaped toner
inside the cartridge.
Chapter 2 - Get to know the printing system 39
Page 40

The Océ ColorWave 650 printing system consumables
Chapter 2 - Get to know the printing system40
Page 41

Chapter 3
Prepare the printing system for use and get started
Page 42

Introduction
Introduction
This chapter contains all the information you need to prepare your Océ ColorWave 650
for use.
You can learn more about the following.
•
How to move the printer.
•
How to connect the power supply cable and the network cable.
•
How to connect the scanner.
•
How to connect the folder.
•
How to run the installation procedure.
•
How to (re)load the toner cartridges.
•
How to (re)place the maintenance tray.
•
How to (re)load a media roll.
•
How to complete the printer configuration in the Océ Express WebTools.
•
How to configure the regional settings of the Océ ColorWave 650.
•
How to print the Customer Analysis Tool (CAT) demo print.
Chapter 3 - Prepare the printing system for use and get started42
Page 43

How to move the Océ ColorWave 650
Introduction
How to move the Océ ColorWave 650
Attention:
If connected you must first switch off and disconnect the Océ ColorWave 650. (see
‘Switch on or switch off the printer’ on page 198)
Attention:
Close the media drawers.
Chapter 3 - Prepare the printing system for use and get started 43
Page 44

How to move the Océ ColorWave 650
Note:
Be aware of the printer working area. (see ‘Printer working area [Footprint]’ on page 20)
#
Use both hands to pull at the
1
'Lower left cover'. Remove the
'Lower left cover'.
Pull at the Foot cover. Remove
2
the 'Foot' cover.
IllustrationAction
Push the handle [1]. The 'Foot'
3
snaps up [2].
Repeat action 1 till 3 on the
4
'Lower right cover'
Chapter 3 - Prepare the printing system for use and get started44
Page 45
Move the Océ ColorWave 650
5
printer.
Note:
Be aware of the printer
working area.
Pull out the left 'Foot' [1] until
6
it touches the ground and locks
[2]. You should hear a click as it
locks.
Note:
If you do not hear a
click place your foot on
the foot of the printer
[1] and at the same time
push gently against the
printer until you hear
the click.
How to move the Océ ColorWave 650
IllustrationAction
7a
the pin into the notch.
Pin:Replace the 'Foot' covers. Place
Chapter 3 - Prepare the printing system for use and get started 45
Page 46

How to move the Océ ColorWave 650
7c
IllustrationAction
Notch:7b
8a
Pin:Replace the 'Lower left cover'.
Place the pin into the notch.
Chapter 3 - Prepare the printing system for use and get started46
Page 47

8c
How to move the Océ ColorWave 650
IllustrationAction
Notch:8b
Repeat action 6 till 8 at the right
9
hand side. Replace the 'Lower
right cover'
Chapter 3 - Prepare the printing system for use and get started 47
Page 48

How to connect the network cable
Connect the Océ ColorWave 650 printer
How to connect the network cable
#
IllustrationAction
Remove the cover of the 'Con-
1
nection panel' at the rear side of
the printer.
Lead the connection cable
2
through the cover.
Connect one side of the network
3
cable (UTP cable with a RJ45
connector) to the indicated network connection on the connection panel of the 'Océ PowerM
Plus controller '.
Connect the other side of the
network cable to your company
network.
Chapter 3 - Prepare the printing system for use and get started48
Page 49
Place the cover of the 'Connec-
4
tion panel'.
How to connect the network cable
IllustrationAction
Chapter 3 - Prepare the printing system for use and get started 49
Page 50

How to connect the scanner
How to connect the scanner
#
Remove the cover of the 'Con-
1
nection panel' at the rear side of
the printer.
Lead the connection cable
2
through the cover.
IllustrationAction
Connect one side of the data ca-
3
ble (STP cross-cable with a RJ45
connector) to the indicated
scanner connection on the connection panel of the 'Océ PowerM Plus controller '.
Chapter 3 - Prepare the printing system for use and get started50
Page 51

Connect the other side of the
4
data cable to the scanner controller.
Place the cover of the 'Connec-
5
tion panel'.
How to connect the scanner
IllustrationAction
Chapter 3 - Prepare the printing system for use and get started 51
Page 52

How to connect the folder
How to connect the folder
#
Remove the cover of the 'Con-
1
nection panel' at the rear side of
the printer.
Lead the connection cable
2
through the cover.
IllustrationAction
Connect one side of the data ca-
3
ble (serial RS232) to the indicated RS232 port on the connection panel of the 'Océ PowerM
Plus controller '.
Connect the other side of the
data cable to the folder as indicated in the folder manual.
Chapter 3 - Prepare the printing system for use and get started52
Page 53

Place the cover of the 'Connec-
4
tion panel'.
How to connect the folder
IllustrationAction
Chapter 3 - Prepare the printing system for use and get started 53
Page 54

How to connect the mains supply cable
How to connect the mains supply cable
#
IllustrationAction
Plug in the 'Power' cable at the
1
power connection on the 'Connection panel' at the back of the
printer.
Put the other side of the 'Power'
cable into the socket.
Note:
Make sure the main
power switch is in 'off'
position.
Chapter 3 - Prepare the printing system for use and get started54
Page 55

How to switch on the printer
19
#
Switch on the green main switch
1
at the rear side of the Océ ColorWave 650.
How to switch on the printer
IllustrationAction
Switch on the Océ ColorWave
2
650 at the front side of the
printer.
'On / Off switch' [19]
Chapter 3 - Prepare the printing system for use and get started 55
Page 56

Introduction
The installation procedure
Introduction
To install the printer and integrate the Océ ColorWave 650 system in your company
network you must follow four main steps.
•
Run the installation wizard from the printer user panel.
If you connect the network cable of your company network and you switch on your
Océ ColorWave 650 for the first time, an installation wizard starts automatically.
•
Complete the printer configuration in the Océ Express WebTools (from a workstation).
•
Configure the regional settings of the Océ ColorWave 650.
•
Print the Customer Analysis Tool (CAT) demo print.
Chapter 3 - Prepare the printing system for use and get started56
Page 57
6
Run the installation wizard from the user panel
Run the installation wizard from the user panel
Introduction
If you integrate the printer according to a network policy, please contact your network
administrator to get information about the network infrastructure and parameters.
As a network administrator, please refer to the Océ Large Format Systems Connectivity
Manual to get information about the different network infrastructures and configurations.
Before you begin
Note:
You can change the position and the angle of the user panel.
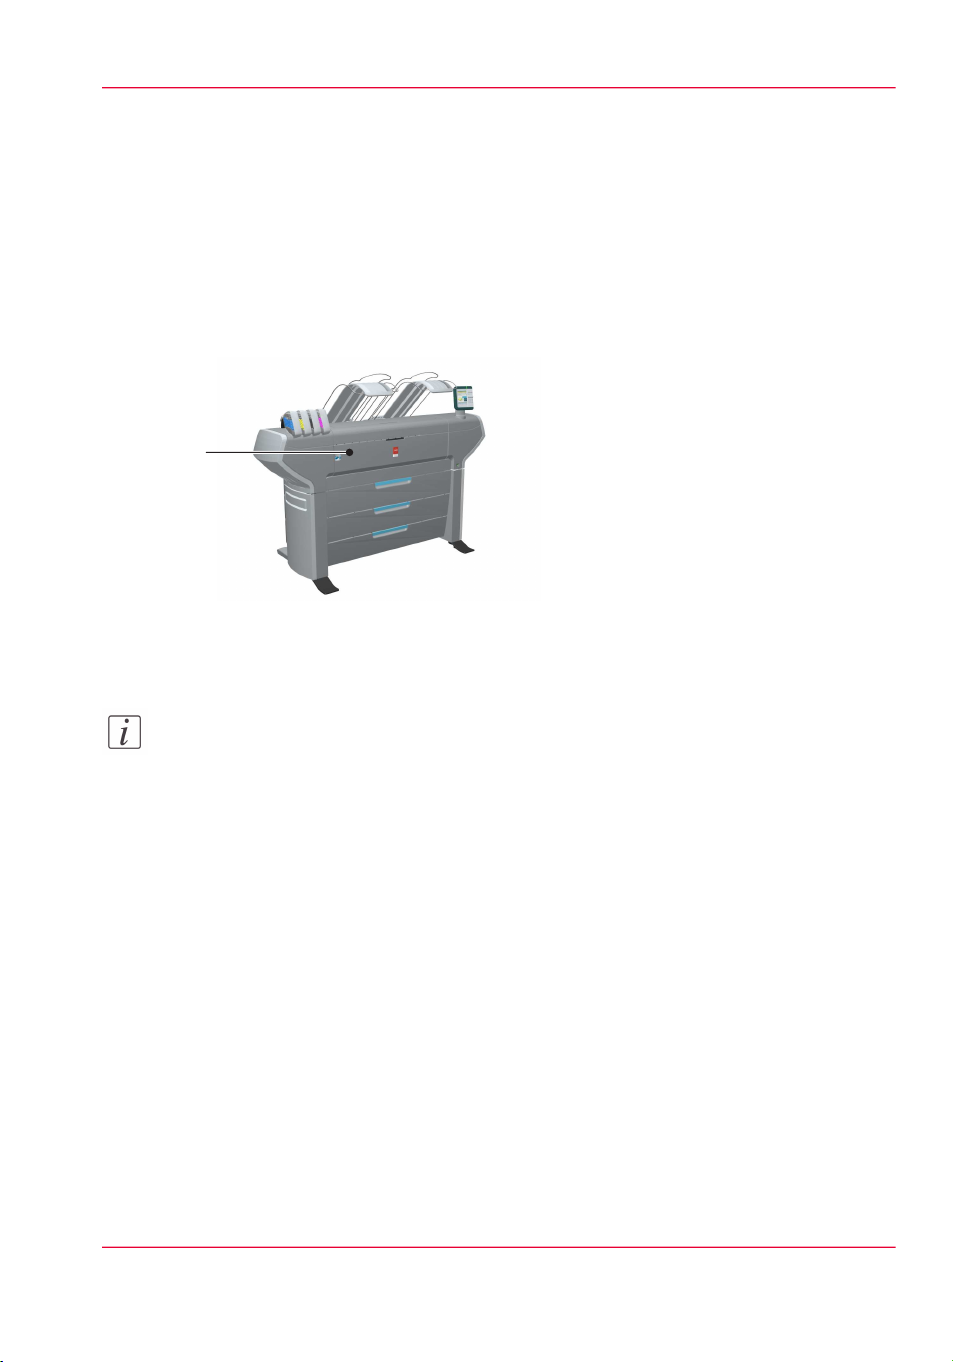
Open the 'Front cover' [6] of the Océ ColorWave 650 and locate the serial number of
the printer.
You can find the serial number on the barcode sticker next to the modification sticker.
Write down the printer serial number. (496000XXX)
You need the serial number to complete the installation wizard.
Chapter 3 - Prepare the printing system for use and get started 57
Page 58

Run the installation wizard from the user panel
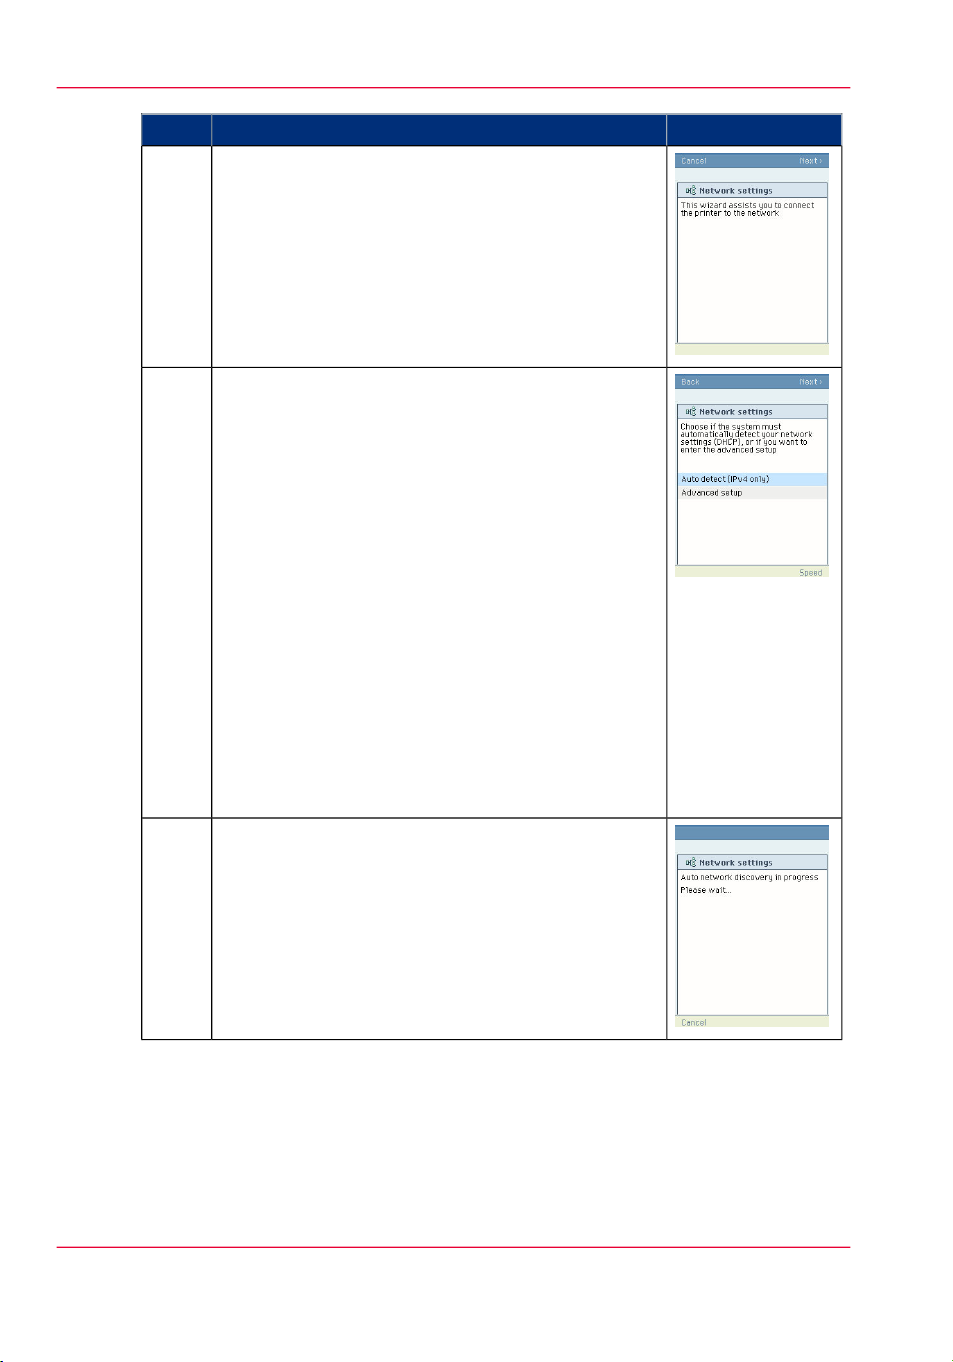
How to run the installation wizard
#
1
If you connect the network cable to your company
network and you switch on your Océ ColorWave 650
for the first time, an installation wizard starts automatically.
Use the 'Upper right softkey' to go to the next step.
IllustrationAction
2
Use the 'Scroll wheel' to select the correct language for
your printer user interface.
Use the 'Upper right softkey' to go to the next step.
3
Use the 'Scroll wheel' to confirm your language selection.
Use the 'Upper right softkey' to go to the next step.
4
Use the 'Numeric keys' to enter the serial number of
the printer. You can find the serial number behind the
'Front cover' on the right hand side.
Use the 'Upper right softkey' to go to the next step.
Note:
To change or replace the last digit, select the
'Red stop key' to delete the last digit.
Chapter 3 - Prepare the printing system for use and get started58
Page 59

Run the installation wizard from the user panel
IllustrationAction
5
Use the 'Numeric keys' again to enter the serial number
of the printer for verification purpose.
Use the 'Upper right softkey' to go to the next step.
6
The printer user panel displays the number of rolls
detected.
Use the 'Upper right softkey' to go to the next step.
7
Use the 'Scroll wheel' to select 'Yes' when asked if you
want to configure the network settings now.
Use the 'Upper right softkey' to go to the next step.
8
When you entered a password in the 'Configuration'
- 'Connectivity' - 'Passwords' - 'Password to change
network settings' setting in the Océ Express WebTools,
you must enter the correct password before you can
configure the network settings.
Chapter 3 - Prepare the printing system for use and get started 59
Page 60
Run the installation wizard from the user panel
9
The following message is displayed:
'This wizard assists you to connect the printer to the
network'.
Use the 'Upper right softkey' to go to the next step.
IllustrationAction
10
11
Select one of the following options.
•
'Auto detect (IPv4 only)'
Use the 'Scroll wheel' to select 'Auto detect (IPv4
only)' if the system must automatically detect your
network settings. Confirm your entry with the
'Confirmation key' above the 'Scroll wheel'.
Use the 'Upper right softkey' to go to next step and
continue with step 11.
•
'Advanced setup'
Use the 'Scroll wheel' to select 'Advanced setup' if
you want to configure the network settings manually. Confirm your entry with the 'Confirmation key'
above the 'Scroll wheel'.
Use the 'Upper right softkey' to go to the next step.
You must now first follow the procedure to enter
the network settings manually. (see ‘Configure the
network settings manually’ on page 63)
The following message is displayed:
'Auto network discovery in progress'
Chapter 3 - Prepare the printing system for use and get started60
Page 61

12
Run the installation wizard from the user panel
IllustrationAction
The printer user panel now displays the network settings.
Record the IP address (for example, 134.188.26.173).
You need this IP address to access the 'Océ Express
WebTools' later in order to complete the printer configuration.
Use the 'Upper right softkey' to finish the network installation procedure and to continue with the printer
installation.
13
14
15
The following message is displayed:
'Place the cyan toner cartridge'
A comparable message is displayed for all other cartridges.
Follow the steps as indicated in the wizard to complete
the installation of the printer.
For more information about specific steps please refer
to the following sections.
‘Load or replace a toner cartridge’ on page 188
‘Replace the maintenance tray’ on page 191
If the toner cartridges are placed correctly, the following
message is displayed:
'The installation procedure continues when the printer
is warm'.
This procedure takes several minutes.
After warming up, open media drawer 1.
'Load the supplied installation media on roll 1'
(see ‘Load a media roll’ on page 313)
Note:
Only roll position 1 can be used for calibrations. You must use a media roll with size A0
or larger.
Note:
Use Océ 'Media' for reliable calibrations
(LFM090, A0 or larger).
Chapter 3 - Prepare the printing system for use and get started 61
Page 62

Run the installation wizard from the user panel
16
The printer will do the calibration automatically. You
do not need to keep this printed calibration chart.
Note:
The calibration will take several minutes. The
printed output is lead to the 'External output
(back)'.
IllustrationAction
17
18
The following message in the 'Home' screen is displayed:
'Ready to print'.
Continue with the following procedure:
‘Complete the printer configuration in the Océ Express
WebTools’ on page 82.
Chapter 3 - Prepare the printing system for use and get started62
Page 63

Configure the network settings manually
Configure the network settings manually
Introduction
If you want configure the network settings manually, please contact your network administrator to get information about the network infrastructure and parameters.
How to configure the network settings manually
#
1
Use the 'Scroll wheel' to select 'Advanced setup'
if you want to configure the network settings
manually. Confirm your entry with the 'Confirmation key' above the 'Scroll wheel'.
IllustrationAction
2
Use the 'Scroll wheel' to select 'Network settings'.
Confirm your entry with the 'Confirmation key'
above the 'Scroll wheel'.
3
The printer user panel displays the following
message: 'The following network settings were
set:'.
Use the 'Upper right softkey' to go to next step.
Chapter 3 - Prepare the printing system for use and get started 63
Page 64

Configure the network settings manually
4
The printer user panel displays the following
message: 'This wizard assists you to connect the
printer to the network'.
Use the 'Upper right softkey' to go to next step.
IllustrationAction
5
Use the 'Scroll wheel' to select your network speed.
•
'Auto negotiation' (strongly recommended)
•
'10 MBit FD'
•
'10 MBit HD'
•
'100 MBit FD'
•
'100 MBit HD'
Confirm your entry with the 'Confirmation key'
above the 'Scroll wheel'
Use the 'Upper right softkey' to go to the next
step.
6
Use the 'Scroll wheel' to select the connection.
Confirm your selection with the above the 'Scroll
wheel'.
Use the 'Upper right softkey' to go to the next
step.
7
Enter your IP address.
Use the 'Scroll wheel' to select the first numeric
field. Confirm your selection with the 'Confirmation key' above the 'Scroll wheel'.
Use the 'Numeric keys' to enter the first value of
your IP address.
Confirm your entries with the 'Confirmation key'
Repeat this procedure for the other numeric fields
until you entered the complete IP address.
Use the 'Upper right softkey' to go to the next
step.
Chapter 3 - Prepare the printing system for use and get started64
Page 65

Configure the network settings manually
IllustrationAction
8
Enter your subnet mask.
Use the 'Scroll wheel' to select the first numeric
field. Confirm your selection with the 'Confirmation key' above the 'Scroll wheel'.
Use the 'Numeric keys' to enter the first value of
your subnet mask.
Confirm your entries with the 'Confirmation key'
Repeat this procedure for the other numeric fields
until you entered the complete subnet mask.
Use the 'Upper right softkey' to go to the next
step.
9
10
Enter your default gateway.
Use the 'Scroll wheel' to select the first numeric
field. Confirm your selection with the 'Confirmation key' above the 'Scroll wheel'.
Use the 'Numeric keys' to enter the first value of
your default gateway.
Confirm your entries with the 'Confirmation key'
Repeat this procedure for the other numeric fields
until you entered the complete default gateway.
Use the 'Upper right softkey' to go to the next
step.
Enter your DNS address.
Use the 'Scroll wheel' to select the first numeric
field. Confirm your selection with the 'Confirmation key' above the 'Scroll wheel'.
Use the 'Numeric keys' to enter the first value of
your DNS address.
Confirm your entries with the 'Confirmation key'
Repeat this procedure for the other numeric fields
until you entered the complete DNS address.
Use the 'Upper right softkey' to go to the next
step.
You can now continue with step 12 of the installation wizard procedure. (see ‘Run the installation
wizard from the user panel’ on page 57)
Chapter 3 - Prepare the printing system for use and get started 65
Page 66

91211
10
Load or replace a toner cartridge
Load or replace a toner cartridge
Illustration
Chapter 3 - Prepare the printing system for use and get started66
#
Description / FunctionComponentNr
10
'Toner cartridge' (cyan)9
'Toner cartridge' (yel-
Toner cassette for cyan 'Océ TonerPearls®'
Toner cassette for yellow 'Océ TonerPearls®'
low)
11
'Toner cartridge'
Toner cassette for black 'Océ TonerPearls®'
(black)
12
'Toner cartridge' (ma-
Toner cassette for magenta 'Océ TonerPearls®'
genta)
Page 67

How to load or replace a toner cartridge
#
The printer user panel displays
1
a request when you must load or
replace a toner cartridge.
Unpack the toner cartridge.
2
Note:
Please do not throw
away the empty packaging of the new toner
cartridge. This packaging is used as maintenance tray.
Load or replace a toner cartridge
IllustrationAction
Remove the empty toner car-
3
tridge.
Chapter 3 - Prepare the printing system for use and get started 67
Page 68

Load or replace a toner cartridge
Place the new toner cartridge.
4
Note:
You must place the toner cartridge in the correct colour position. The
toner cartridges have
fixed positions.
When the new toner cartridge is
5
placed correctly, the following
message is displayed on the
printer user panel.
'Replace the maintenance tray.
Use the packaging of the new
toner cartridge.'
Follow the instructions in the
wizard. (see ‘Replace the mainte-
nance tray’ on page 69)
IllustrationAction
Chapter 3 - Prepare the printing system for use and get started68
Page 69

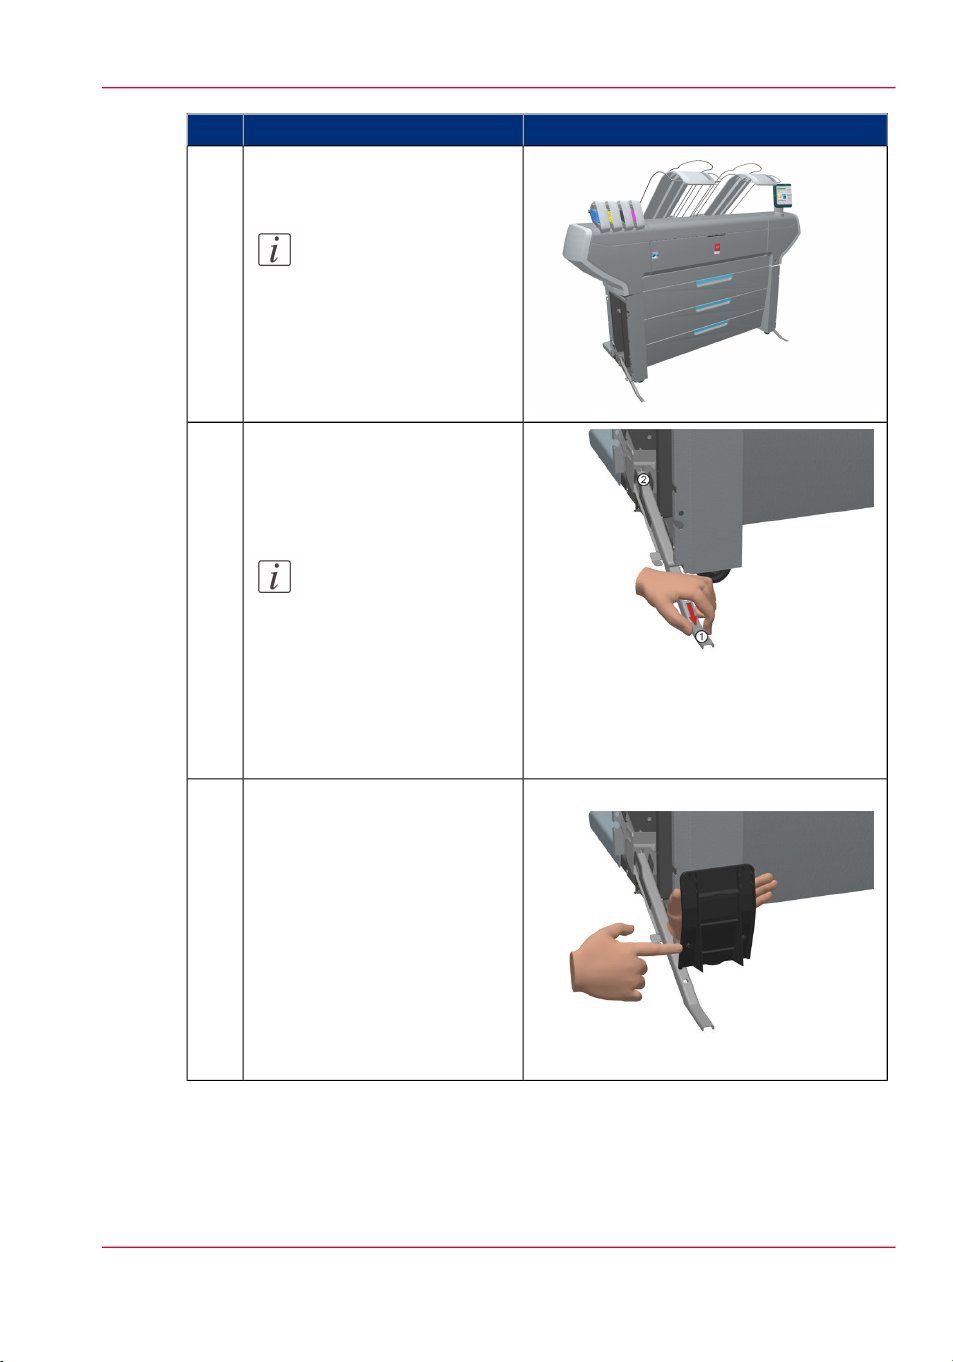
Replace the maintenance tray
7
Illustration
Replace the maintenance tray
#
Description / FunctionComponentNr
7
'Maintenance tray
drawer'
When printheads start up in the morning,
toner is needed to reach a status were the
printheads can perform with maximum print
quality. This is done with a so called pressure
puls wipe sequence. The toner used to reach
Ready to Print is gathered in the waste tray.
During the day no spitting procedures are
needed. Some toner is needed to keep print-
heads in good shape.
Chapter 3 - Prepare the printing system for use and get started 69
Page 70

Replace the maintenance tray
How to replace the maintenance tray
#
The printer user panel displays
1
a request when you must replace
the maintenance tray.
Follow the instructions in the
2
wizard.
Note:
Please note that the
'Maintenance tray
drawer' is located at the
rear side of the Océ
ColorWave 650 printer.
Push the 'Maintenance
tray drawer' to open it.
IllustrationAction
Pull the 'Maintenance tray
3
drawer' open.
Chapter 3 - Prepare the printing system for use and get started70
Page 71

Lift the old maintenance tray
4
out.
Place the empty maintenance
5
tray.
Replace the maintenance tray
IllustrationAction
Push the 'Maintenance tray
6
drawer' shut.
When the new maintenance tray
7
is placed correctly, use the 'Upper right softkey' to continue.
The old maintenance tray can be
disposed of as part of regular office waste.
Chapter 3 - Prepare the printing system for use and get started 71
Page 72

3
1
2
4
The 'Media drawer'
Load a media roll
The 'Media drawer'
Illustration
Component - function table
Attention:
Only use intact media rolls. Dented media rolls can damage the 'Imaging devices'.
#
Chapter 3 - Prepare the printing system for use and get started72
Description / FunctionComponentNr
Media roll 3 or 5 in other media drawers'Roll' 11
Media roll 4 or 6 in other media drawers'Roll' 22
Carries the media roll'Roll holder'3
Page 73

The 'Media drawer'
Description / FunctionComponentNr
'Roll loading station'4
Groove integrated behind the front cover of
the media drawer.
To load new media on the printer, the operator must proceed as follows
•
place the new media roll temporarily on
the roll loading station
•
insert the roll holder into the new media
roll
•
place the roll holder with the new media
roll in the correct roll position
Chapter 3 - Prepare the printing system for use and get started 73
Page 74

Unpack a media roll
Unpack a media roll
How to unpack a media roll
Attention:
Handle the media roll with care. A dented media roll can damage the imaging devices.
Attention:
Please note down the media code (for example LFM090) indicated on the sticker on the
media box. You need this code to select the correct media type on the printer operator
panel.
Attention:
Always write the correct media name and media code inside the core, after you unpack
the media roll. In that case, if you replace a media roll before it is empty and you want
to re-use it later, you will have the correct media information available.
#
IllustrationAction
Place the media box on a table
1
and open it.
Chapter 3 - Prepare the printing system for use and get started74
Page 75

Remove the plug from the media
2
roll.
Carefully remove the media roll
3
from the box.
Unpack a media roll
IllustrationAction
Remove the other plug and
4
plastic around the media roll.
Chapter 3 - Prepare the printing system for use and get started 75
Page 76

Load a media roll
Load a media roll
How to load a media roll
Attention:
Do not use dented media rolls to prevent damage to the imaging devices.
Attention:
Do not open the media drawer during the print process. When the last print is delivered,
wait until the status light on the printer user panel stops blinking, before you open the
media drawer.
Attention:
Do not open more than one media drawer at the same time to prevent overbalance of
the printer.
Attention:
It is very important to select the media type with the correct media code (for example
LFM090). You can find the media code of the new media roll on the sticker on media
box. The media code represents a specific media profile that the Océ ColorWave 650
uses to optimise the printed output for the corresponding media type. If the correct media
code is not available on your printer user panel, you must first make a new media profile
available on the printer user panel. (see ‘Make a new media profile available on the printer
user panel’ on page 187)
Attention:
When you unpack a media roll, always write the correct media name and media code
inside the core. In that case, if you replace a media roll before it is empty and you want
to re-use the media roll later, you will have the correct media information available.
Caution:
Watch your fingers when you handle the media roll.
Chapter 3 - Prepare the printing system for use and get started76
Page 77

Load a media roll
#
IllustrationAction
Open the correct media drawer
1
to load the new media roll.
Place the new media roll on the
2
roll loading station.
Pull the handle of the roll holder
3
locking mechanism towards you.
Chapter 3 - Prepare the printing system for use and get started 77
Page 78

Load a media roll
4
5
IllustrationAction
Slide the roll holder in the core
of the new media roll.
Align the roll with the correct
size indicator on the roll holder
(At the left and right hand side).
Release the handle of the locking
mechanism.
Remove the tapes from the new
6
media roll. Use both hands (as
indicated) to place the media roll
in the media drawer.
Chapter 3 - Prepare the printing system for use and get started78
Page 79

Keep the media tight on the roll
1
7
and in-line with the side edge.
Use both hands to turn the me-
8
dia roll backwards until the media flap has passed the metal paper guide (1).
Load a media roll
IllustrationAction
Chapter 3 - Prepare the printing system for use and get started 79
Page 80

2
Load a media roll
9
IllustrationAction
Use both hands to slide the media under the metal paper guide.
A "beep" confirms the correct
paper transport (2).
Close the media drawer.
10
Note:
Do not open the 'Media
drawer' while the machine is loading the roll.
Chapter 3 - Prepare the printing system for use and get started80
Page 81

The following screen appears on
11
the printer user panel.
Note:
When you load a media
roll the printer automatically detects the roll
width. If the detected
roll width is not a standard width, the printer
selects the next smaller
roll width that is supported by the printer.
Note:
Configure the media
type of the media roll
you loaded.
Load a media roll
IllustrationAction
Chapter 3 - Prepare the printing system for use and get started 81
Page 82

Complete the printer configuration in the Océ Express WebTools
Complete the printer configuration in the Océ Express
WebTools
Open a web browser on a workstation connected to the network.
1.
Enter the following address: 'http://<Océ ColorWave 650 IP address>' (for example
2.
http://134.188.26.173) to access the Océ Express WebTools.
Note:
If the Océ Express WebTools do not appear, contact the network administrator to check
the network parameters. Check if the Océ ColorWave 650 network settings have been
registered in the network infrastructure.
Select 'Configuration' - 'Connectivity'.
3.
In the 'Identification' section, click 'Edit'.
4.
Use the password 'SysAdm' or the new password to logon as System administrator.
5.
Chapter 3 - Prepare the printing system for use and get started82
Page 83

Complete the printer configuration in the Océ Express WebTools
Note:
It is advised to change the password. (see ‘Change the password for authorised users’ on page
119)
Once logged in, enter the printer 'Host name' (for example: OceColorWave650) in the
6.
'Identification' window, in order to address the Océ ColorWave 650 by its 'Host name'.
You can define the other settings if needed. Restart is required.
Turn the printer off and on to restart the Océ ColorWave 650 printing system.
7.
Wait until the system is ready again.
8.
Enter the following address: 'http://<Océ ColorWave 650 Hostname>' (for example
9.
http://OceColorWave650) in the workstation web browser:
If the Océ Express WebTools appear the printer is integrated in the network and ready
for use.
If an error page ('Page cannot be displayed') appears, contact the network administrator.
Check the Host name and the other web browser security and network settings.
Refer to the Océ Large Format Systems Connectivity Manual, 'Chapter 2 - Windows
TCP/IP environment' to find technical information about the Océ ColorWave 650 integration in a network environment.
Chapter 3 - Prepare the printing system for use and get started 83
Page 84

Configure the regional settings of the Océ ColorWave 650
Configure the regional settings of the Océ ColorWave 650
Purpose
The regional settings are configured during the installation of your Océ ColorWave 650.
If you want to change the initial configuration, you can do so in the 'Regional settings'.
Define the regional settings for the printer in the following order.
•
'First language' and 'Second language' of the printer user panel
•
'Measurement unit'
•
'Time zone'
If you change the 'Time zone' you must first reboot the system, before you set the
'Current date and time'.
•
'Current date and time'
•
'Time format'
Note:
Every time you change the 'Measurement unit', the controller recalculates the values
from millimetre to inches and vice versa. If you reverse to the original value of this setting
a slight calculation difference can occur due to rounding differences.
How to define the regional settings
Select 'Preferences' - 'System defaults'.
1.
Click 'Edit' in the 'Regional settings' bar or click the value of the setting you want to
2.
edit, for example 'First language'.
Modify the settings. You can choose between:
3.
•
settings that are commonly used in the USA
•
or settings that are commonly used in the rest of the world.
Click 'Ok' to confirm you entries or 'Cancel' to reject your entries.
4.
Chapter 3 - Prepare the printing system for use and get started84
Page 85

Print the Customer Analysis Tool (CAT) demo print
Print the Customer Analysis Tool (CAT) demo print
When to do
When you installed the printer and prepared the printer for use, you can print the Customer Analysis Tool demo print. You can use this demo print to check if the Océ ColorWave 650 works correctly.
How to print the Customer Analysis Tool (CAT) demo print
#
IllustrationAction
1
From the 'Home' screen on the printer user panel select
the 'System' tab with the lower left softkey.
Select the 'Setup' tab with the upper right softkey.2
3
Use the 'Scroll wheel' to select 'Demo print' and confirm with the 'Confirmation key' (above the 'Scroll
wheel').
Chapter 3 - Prepare the printing system for use and get started 85
Page 86

Print the Customer Analysis Tool (CAT) demo print
4
Use the 'Scroll wheel' to select 'Customer Analysis
Tool'.
IllustrationAction
Result
5
Press 'Finish' to print the 'Customer Analysis Tool'
demo print.
6
Select '< Back' and 'Home' to return to the 'Home'
screen.
Evaluate the 'Customer Analysis Tool' demo print. Check if the print does not show any
of the following output quality problems:
•
‘Banding across the print with differences in colour and gloss’ on page 396
•
‘Horizontal, wavy lines across your print’ on page 398
•
‘Thin horizontal, coloured or white lines across your print’ on page 400
If no output quality problems occur, the installation procedure is finished. Your Océ
ColorWave 650 is now ready for use.
Chapter 3 - Prepare the printing system for use and get started86
Page 87

Chapter 4 Configure the printing system
Page 88
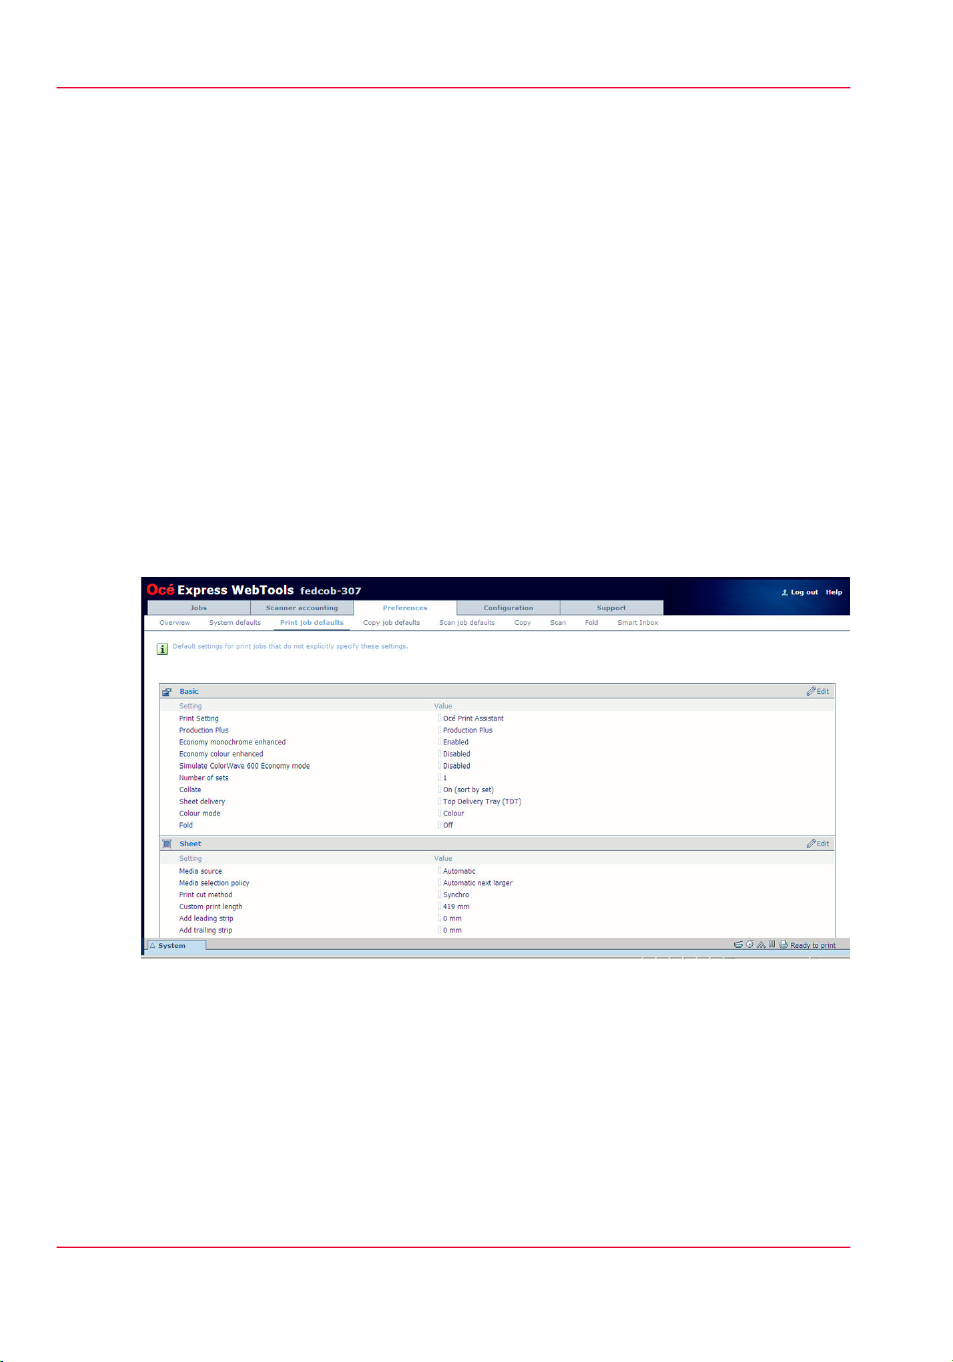
Purpose of the Océ Express WebTools
Introduction to the Océ Express WebTools
Purpose of the Océ Express WebTools
Definition
The Océ Express WebTools is an application that runs embedded on the Océ ColorWave
650.
This application gives you access to the settings to manage the configuration and preferences of the Océ ColorWave 650. To change settings in the Océ Express WebTools you
must log in using one of three predefined user roles because the settings are all password
protected. (see ‘User roles and authorisations’ on page 115)
Illustration
'Jobs' tab
Chapter 4 - Configure the printing system88
Editable for any user. For some specific actions you must log in as a Key operator.
When you access the 'Jobs' tab you can see 4 different sections.
•
The Océ Publisher Express section.
To submit a new job click 'Create new job'. A new window opens, where you can
define some basic job settings and where you can browse to the files you want to print.
Page 89

Purpose of the Océ Express WebTools
•
The 'Jobs - Queue' section.
This section gives an overview of the jobs in the queue, waiting to be printed. The
buttons on top of the 'Jobs - Queue' section allow you to move a selected job to the
top of the queue or to delete the job. If you click 'Delete all' all jobs are deleted from
the queue.
•
The Scan - Queue section.
This section gives an overview of the scan jobs in progress. The buttons on top of the
section allow you to delete a job, to retry sending a job or to send a job to an alternative
destination.
•
The 'Smart Inbox' section.
This section gives an overview of every 'Smart Inbox' that currently contains one or
more print jobs. You can select a print job in the Smart Inbox and use the buttons on
top of the Smart Inbox section to print, edit or delete the job.
When you click 'Open Smart Inbox' you can create a new Smart Inbox that immediately appears in the Smart Inbox section.
If you click 'Delete all' in the 'View all' Smart Inbox all jobs are deleted from all Smart
Inboxes.
If you have a scanner installed, copy and scan jobs are also present in the Smart Inbox.
You can click on a scan job, opening a preview of the image(s). You can rename the
scan job and rotate, zoom and pan the image. Navigation through images of a job and
to the next or previous job in the active Smart Inbox is also possible. Preview functionality is only available for scan jobs as indicated in the Smart Inbox. You can save a
scan job to your PC.
Note:
The 'View all' Smart Inbox is only available if you enable the 'Preferences' - 'System
defaults' - 'Job management' - 'Display a view on all Smart Inbox jobs' setting.
'Scanner accounting' tab
Editable for Key operator and Power user.
The 'Scanner accounting' tab allows you to unlock the scanner for copying or scan-tofile. Valid accounting information is required to unlock the scanner.
'Preferences' tab
Editable for Key operator and Power user. (see ‘User roles and authorisations’ on page 115)
The 'Preferences' tab contains the default settings to fine tune the system to optimally fit
your company's workflow and processes.
Chapter 4 - Configure the printing system 89
Page 90

Purpose of the Océ Express WebTools
#
'Preferences'
'Configuration' tab
Editable for System administrator and Power user.
The 'Configuration' tab contains the settings to install the system in your infrastructure,
according to your standards. These settings are configured during installation and do not
need frequent adjustment.
GroupsTab
•
'Overview'
Summary of the settings organised in different groups.
•
'System defaults'
•
'Print job defaults'
•
'Copy job defaults', only available if a scanner is installed
•
'Scan job defaults', only available if a scanner is installed
•
'Copy', only available if a scanner is installed
•
'Scan', only available if a scanner is installed
•
'Fold', only available if a folder is installed
•
'Smart Inbox'
#
'Configuration'
'Support' tab
Editable for System administrator and Power user.
GroupsTab
•
'Overview'
Summary of the settings organised in different groups.
•
'Connectivity'
•
'Printer setup'
•
'Remote Destinations'
Chapter 4 - Configure the printing system90
Page 91

Purpose of the Océ Express WebTools
The 'Support' tab contains the tasks that involve contact with Océ or reseller.
#
GroupsTab
'Support'
'About'
•
Information about the Océ ColorWave 650 system
software version.
•
Counters.
The Total Area Click or 'TAC' is a click that is a function of print volume (square metre) and of toner coverage (grammes /square metre).
•
Included licenses.
'Counter history'
•
Overview of the consumables used per printed job.
'Media'
•
Configure the media settings.
•
Overview of the media profiles active on the system.
•
Management of media profiles.
'System' tab
Accessible for any user.
Open the 'System' tab in the lower left corner of the screen to get an overview of the
current status of the printing system.
•
•
•
'Update'
•
Information about the current Océ ColorWave 650
system software version.
•
Update the system software.
•
Scanner configuration.
•
Operating system patches.
'Licenses'
•
License details
•
Information to order a new license
•
Installation of a new license
The toner status.
The available media on the printer.
The system status (for example 'Printer paused', 'Ready to print', 'Sleeping...').
Chapter 4 - Configure the printing system 91
Page 92

Purpose of the Océ Express WebTools
•
The active job.
•
The scanner status.
•
The E-shredding status.
Chapter 4 - Configure the printing system92
Page 93

The system requirements
The system requirements
Introduction
You can use an Internet browser to open the home page of the Océ Express WebTools.
Depending on the Internet browser you use, you must set the required minimum
browser security settings as indicated below.
Note:
The minimum system requirements are a 3 GHz Pentium 4 with 1 Gbyte RAM and
Windows XP.
Note:
Preferred web browsers are Internet Explorer 7 (and newer) and Firefox 7 (and newer).
Set the minimum browser security settings for Internet Explorer 7 and newer
Attention:
You must enable cookies and Javascript.
#
ValueActionStep
Select Tools / Internet Options / Security / Local intranet / Custom Level1
ActiveX controls and plug-ins2
EnableBinary and script behaviours
Downloads:3
EnableFile download
Miscellaneous4
EnableAllow META REFRESH
EnableLaunching applications and unsafe files
DisableUse Pop-up blocker
Scripting5
EnableActive scripting
Chapter 4 - Configure the printing system 93
Page 94

The system requirements
Set the minimum browser security settings for Firefox 7 and newer
#
Select Tools / Options1
Main2
ValueActionStep
Show the downloads window when downloading a file
Content:3
Privacy4
Recommended
EnableLoad images automatically
EnableEnable Javascript
EnableAccept cookies from sites
Chapter 4 - Configure the printing system94
Page 95

Set another language for the Océ Express WebTools
Set another language for the Océ Express WebTools
Introduction
The language setting of the internet browser you use defines the language in which the
user interface of the Océ Express WebTools is displayed.
Note:
This language setting does not influence the language on the user panel. On the user
panel you can only toggle between the 'First language' and the 'Second language'. You
can define the values for the 'First language' and the 'Second language' in the regional
settings of the Océ Express WebTools (see ‘Configure the regional settings of the Océ Col-
orWave 650’ on page 124).
Note:
If the selected language cannot be supported, the standard user interface language for
the Océ Express WebTools will be US English.
Purpose
Change the language setting of the user interface of the Océ Express WebTools.
How to change the language setting in Microsoft® Internet Explorer
1.
Open Microsoft® Internet Explorer.
Select Tools menu - Internet options. The internet options window appears.
2.
Make sure the General tab is selected.
3.
Click the Languages button in the lower part of the window. Another window opens.
4.
Select the language of your choice. A new language can be added to the list with the Add
5.
button.
Move the newly added language up in the list to the top position.
6.
Click OK to confirm or Cancel to close both windows again.
7.
Click Refresh in the toolbar or open another page. The language of the application will
8.
be changed.
Note:
It is possible that the internet options are put under a different menu, depending on the
Microsoft® Internet Explorer version you use.
Chapter 4 - Configure the printing system 95
Page 96

Set another language for the Océ Express WebTools
How to change the language setting in Mozilla Firefox™
Open Mozilla Firefox™.
1.
Select the Extra menu - Options. The Options window appears.
2.
Click the Advanced button and make sure you have selected the General tab.
3.
In the Languages section click the Choose... button. Another window opens.
4.
Select the language of your choice. A new language can be added to the list with the Add
5.
button.
Move the newly added language up in the list to the top position.
6.
Click OK to confirm or Cancel to close both windows again.
7.
Click Reload in the toolbar or open another page. The language of the application will
8.
be changed.
Chapter 4 - Configure the printing system96
Page 97

How to edit a setting
Browse to the settings group you want to edit, for example 'Preferences' - 'System defaults'
1.
- 'Regional settings'.
Click directly on the value of a setting if you want to edit a single setting
2.
or
click 'Edit' in the settings group bar to access a window for all settings in the group if
you want to edit more settings in the settings group.
Note:
Before you can edit a setting or a settings group, you must log on as an authorised user.
Modify the setting or settings.
3.
Click 'Ok' to confirm you entries or 'Cancel' to reject your entries.
4.
How to edit a setting
Chapter 4 - Configure the printing system 97
Page 98

View and check the settings
View and check the settings
Purpose
View and check the settings and the values that are stored when you save the settings file.
When to do
•
Before you save the setting and the values in the Océ Express WebTools.
•
To check which settings are no longer set to the factory default value.
Note:
Not all settings are stored in the settings file. The network settings are excluded from
the file because the network settings can not be duplicated to another printer. The
passwords for authorised users and the passwords for remote scan destinations are excluded
from the file for security reasons. License information is not included in the file either.
How to view and check the settings
Click the 'Configuration' tab or the 'Preferences' tab.
1.
Click 'View set' in the top-right hand corner of the screen. A secondary window is
2.
opened.
Scroll through the list of settings. The first column displays the setting and the second
3.
column displays the values. A "*"indicates that the value of the setting is different from
the original factory default value.
Note:
You can print the information with the standard print function of your browser.
Chapter 4 - Configure the printing system98
Page 99

Save the settings in a file
Purpose
Save the settings and the values that you configured in the Océ Express WebTools in a
file.
When to do
•
Duplicate the settings very easily to another printer of the same type.
Note:
Not all settings are stored in the settings file. The network settings are excluded from
the file because the network settings can not be duplicated to another printer. The
passwords for authorised users and the passwords for remote scan destinations are excluded
from the file for security reasons. License information is not included in the file either.
How to save the settings in a file
Click the 'Configuration' tab or the 'Preferences' tab.
1.
Click 'Save set' in the top-right hand corner of the screen. A secondary window is
2.
opened.
Navigate to a location on the network to store the file.
3.
Save the settings<hostname of printer><date>.xml file. The file name is not fixed. You
4.
can change the name if required.
Click 'Ok' to confirm or 'Cancel' to close the window without storing the file.
5.
Save the settings in a file
Chapter 4 - Configure the printing system 99
Page 100

Load the settings from a file
Load the settings from a file
Purpose
Load the settings and the values for the Océ Express WebTools from a file.
When to do
•
Duplicate the settings to another printer of the same type.
Attention:
When you are logged in as a Key operator you can only load the Key operator settings.
When you are logged in as a System administrator you can only load the System administrator settings. To load all the settings that are stored in the file you must log in as a
Power user.
Note:
Not all settings are stored in the settings file. The network settings are excluded from
the file because the network settings can not be duplicated to another printer. The
passwords for authorised users and the passwords for remote scan destinations are excluded
from the file for security reasons. License information is not included in the file either.
How to load the settings from a file
Click the 'Configuration' tab or the 'Preferences' tab.
1.
Click 'Open set' in the top-right hand corner of the screen. A secondary window is
2.
opened.
Navigate to a location on the network and select the settings file.
3.
Click 'Ok' to load the settings file or 'Cancel' to close the window without loading the
4.
settings file.
In some cases a reboot dialogue will appear.
Result
The values of the settings in the settings file overwrite the current values. The network
configuration settings of the system and the passwords are not restored to prevent connectivity problems and to guarantee the integrity of the passwords.
Chapter 4 - Configure the printing system100
 Loading...