

Page 1

Quick Index
Please read this manual before operating this equipment. After you finish reading this
manual, store it in a safe place for future reference.
COLOR SYSTEM 110/115
Page 2

II
Preface
Congratulations on your purchase of the Océ Color System 110/115!
The manuals (three books) of this copier describe the functions, operating methods, and notes on
usage of the CS 110/115.
Before operating the CS 110/115, please carefully read these manuals to gain a clear
understanding of the various functions so that you can use them effectively to meet your copying
needs. After reading the manuals, store them in a safe place for future reference.
CAUTION
In this manual, CAUTION MESSAGES with the
symbol indicate that neglecting the suggested
procedure or practice could result in personal injury.
The safety precautions are described in the User’s Manual. The safety precautions include
warnings concerning operations that may cause fatal or serious injury to persons if not performed
correctly and cautions concerning operations that may cause personal injury or damage to
property if not performed correctly. Make sure to read these safety precautions before using this
copier and always observe those warnings and notes to use the machine safely.
Some copy samples in this manual are photo copies.
Page 3

II
Using This Manual
The Color System 110/115 includes three manuals; Quick Index (this manual), Operator’s
Manual, and User’s Manual.
●Manual Overview
Quick Index (this manual)
The Quick Index lists indexes to the Operator’s Manual and User’s Manual.
Use this reference to check how copies are made by a specific function (Visual Index), to check
the operation method of a specific function (Index by Purpose), to check the meanings of the terms
used on the Touch Panel Display or the Operator’s/User’s Manuals (Glossary), or to find pages for
detailed explanation of a specific topic (General Index).
Operator’s Manual
The Operator’s Manual describes the operation method of all the functions of this copier. Use this
manual to learn the details about operating this copier.
User’s Manual
The User’s Manual primarily describes the handling method of mechanical sections in this copier.
Use this manual to check how to supply consumables or how to remove an original or copy paper
jammed in the copier.
●Configuration of the Quick Index
<Indexes>
Chapter 1 Visual Index
Visual Index helps you to visually find “what you want to do” with the copier. Use this chapter
when you have no idea about what function to use or when you do not know how copies will be
made with a specific function.
On every Visual Index page, you can check how copies will be made with the respective functions
by viewing the original and the copy result. You can also use the page number of the Operator’s
Manual to refer to the detailed operation procedure of each function used in the explanation on
every page.
Chapter 2 Index by Purpose
Index by Purpose helps you to find “what you want to do” with the copier by the description of the
action. Each item briefly shows the operation procedure using an illustration and the Touch Panel
Display. So, you can use Index by Purpose as a quick reference for the operation procedure.
<References>
Chapter 3 Glossary
This chapter explains the terms appearing in the Operator’s/User’s Manuals or on the Touch Panel
Display.
Page 4

IIIIII
Using This Manual
Chapter 4 Messages
This chapter briefly describes the messages shown on the Touch Panel Display, the meanings of
the messages, and the action to be taken for each message.
Chapter 5 When Copies Cannot Be Made as Desired
This chapter describes what to do when copies cannot be made as intended. It divides the
description into two categories; one primarily for the copier operation and the other primarily for the
Touch Panel operation and settings.
Chapter 6 Color Sheet Color Charts
This chapter shows the color charts, color numbers and primary color densities of sheets A to C.
Chapter 7 General Index
General Index helps you to find a page where a term or a key is explained or used throughout the
three manuals.
●About Page Reference
The Operator’s/User’s Manuals with a given function or procedure described are indicated by the
following symbols:
: Operator’s Manual
: User’s Manual
Indicates a function that can be used when the copier is equipped with the optional
IP-ED Board-B1.
Indicates a function that can be used when the copier is equipped with the optional
Editor-F1. The Editor-F1 is referred to as the Editor hereinafter.
Indicates a function that can be used when the copier is equipped with the optional
Recirculating Document Feeder RDF-E2. The Recirculating Document Feeder
RDF-E2 is referred as the Feeder hereinafter.
Indicates a function that can be used when the copier is equipped with the optional
Stapler Sorter-F1. The Stapler Sorter-F1 is referred as the Sorter or Stapler Sorter
hereinafter.
Indicates a function that can be used on the CS 115.
Indicates a function that can be used when the copier is equipped with the optional Film
Projector-D1.
CS 110/115 NC
Indicates a function that can be used when the copier is equipped with the optional
Océ CS 110/115 NC.
Example displays used in this manual assume that the copier is equipped with all possible options.
The actual displays will vary with the attached options.
Page 5

IV
CONTENTS
Preface ....................................................................................................................................I
Using This Manual .................................................................................................................II
<Indexes>
Chapter 1 Visual Index ................................................................................................ 1-1
Zoom ...................................................................................................................................1-2
Zoom .................................................................................................................................1-2
XY Zoom ........................................................................................................................... 1-3
Multi-page Enlargement ....................................................................................................1-4
Shift .....................................................................................................................................1-5
Margin .................................................................................................................................1-6
Frame Erase .......................................................................................................................1-7
Original Frame/Sheet Frame Erase ..................................................................................1-7
Book Frame Erase ............................................................................................................1-8
Two-page Separation .........................................................................................................1-9
Image Combination
..................................................................................................1-10
One Touch Color .............................................................................................................. 1-11
One Touch Image Quality Adjustment .............................................................................1-11
One Touch Image Quality Adjustment .............................................................................1-12
One Touch Color Intensity Adjustment ............................................................................ 1-13
Image Quality Adjustment............................................................................................... 1-14
Background Color Adjustment ........................................................................................1-14
Color Range Adjustment .................................................................................................1-15
Black Adjustment ............................................................................................................ 1-16
Complexion Adjustment ..................................................................................................1-17
Color Balance ...................................................................................................................1-18
Color Balance ................................................................................................................. 1-18
Saturation Adjustment/Hue Adjustment/Density Fine Adjustment .................................. 1-19
Sharpness......................................................................................................................... 1-20
Color Creation ..................................................................................................................1-21
Single Color ....................................................................................................................1-21
Color Gradation............................................................................................................... 1-22
Color Filter ...................................................................................................................... 1-23
Coloring
...........................................................................................................1-24
Color Conversion
............................................................................................1-25
Base Color ......................................................................................................................1-26
Blue Background............................................................................................................. 1-27
Image Creation .................................................................................................................1-28
Nega/Posi .......................................................................................................................1-28
Image Repeat ................................................................................................................. 1-29
Mirror Image....................................................................................................................1-30
Slanted Image .................................................................................................................1-31
Text Editing
.............................................................................................................1-32
Texture
....................................................................................................................1-33
Special Effects
........................................................................................................1-34
Composition .....................................................................................................................1-35
Image Composition
.........................................................................................1-35
Character Composition
................................................................................... 1-36
Offset Plate Original ........................................................................................................1-37
Framing/Blanking............................................................................................................. 1-38
Page 6
V
CONTENTS
Transparency Interleaving ..............................................................................................1-39
Marker Editing ..........................................................................................................1-40
Chapter 2 Index by Purpose....................................................................................... 2-1
Activating/deactivating Auto sort .....................................................................2-2
Activating/deactivating Auto Start when an original is placed
in the single sheet document feeder of the Feeder
........................................2-2
Activating/deactivating automatic switching to a drawer
with the same size paper loaded as the currently selected paper
when the drawer runs out of paper ..................................................................2-2
Activating/deactivating Confirmation Window Auto Display ......................................... 2-2
Activating/deactivating error alert sound or operation sound ......................................2-3
Activating/deactivating sound when a key is touched ...................................................2-3
Activating/deactivating the Inch Entry mode ..................................................................2-3
Adding a color to the image (Text Editing - Color For Text)
...................................2-3
Adding a pattern (Texture)
........................................................................................2-3
Adding a solid color to the background ..........................................................................2-4
Adding color to an area (Coloring)
................................................................... 2-4
Adding covers (Front & Back Covers)
......................................................................2-5
Adding covers (Front Covers)
...................................................................................2-5
Adding gradations to the image or background .............................................................2-5
Adding shadows to the image (Shadow)
.................................................................2-6
Adding the frame with gradations ....................................................................................2-6
Adjusting an area
...............................................................................................2-7
Adjusting the black area ................................................................................................... 2-7
Adjusting the color balance ..............................................................................................2-7
Adjusting the color range (Color Range Adjustment) ....................................................2-8
Adjusting the gradation smoothness ..............................................................................2-8
Adjusting the hue of a complexion ..................................................................................2-9
Adjusting the hues............................................................................................................. 2-9
Adjusting the hues............................................................................................................. 2-9
Adjusting the hues by a one-touch operation (One Touch Color) ..............................2-10
Adjusting the image quality by a one-touch operation (One Touch Color) ................ 2-10
Adjusting the photo and text priority level ....................................................................2-10
Adjusting the vividness (Saturation Adjustment) ......................................................... 2-11
Applying the color filter effects ......................................................................................2-11
Automatically selecting copy paper according to the original size
(Auto Paper Selection) ............................................................................................ 2-11
Blanking ............................................................................................................................ 2-11
Calibrating the print gradation
CS 110/115 NC
.......................................................................2-12
Changing a color (Color Conversion) ............................................................................2-12
Changing the color in an area (Color Conversion)
.......................................2-12
Changing the color sheet
........................................................................................2-13
Changing the number of gradations for exposure adjustment ...................................2-13
Changing the position of the image to a designated position
(Number Key Entry) .................................................................................................2-13
Changing the position of the image to a designated position (Pen Entry)
........2-14
Changing the position of the image to the center by a one-touch operation ............2-14
Changing the position of the image to the top, bottom, right, left, corner,
or center ...................................................................................................................2-15
Page 7
VI
CONTENTS
Cleaning the Feeder
.................................................................................................2-15
Cleaning the Feeder when a copy has unnecessary black lines
.........................2-15
Cleaning the wire .............................................................................................................2-15
Cleaning the wire when a copy is dirty ..........................................................................2-15
Designating a free area
................................................................................... 2-15
Designating a polygonal area
.........................................................................2-16
Designating a rectangular area
.......................................................................2-16
Designating a rectangular area with rounded corners
.................................2-16
Designating an area
.........................................................................................2-16
Designating an area of the image and moving it to another area
.......................2-17
Designating an elliptical area
......................................................................... 2-17
Designating an oval area
.................................................................................2-17
Dividing one original into sections and making an enlarged copy onto a number
of sheets (Multi-page Enlargement at the specified copy ratio) .........................2-18
Dividing one original into sections and making an enlarged copy onto a number
of sheets (Multi-page Enlargement with the specified page count) ................... 2-18
Duplicating a color sheet
........................................................................................2-19
Editing a black-and-white text original for each area and inserting
the edited areas into a color image (Multiple Editing)
..........................2-20
Enhancing the edges .......................................................................................................2-21
Enhancing/weakening one primary color ......................................................................2-21
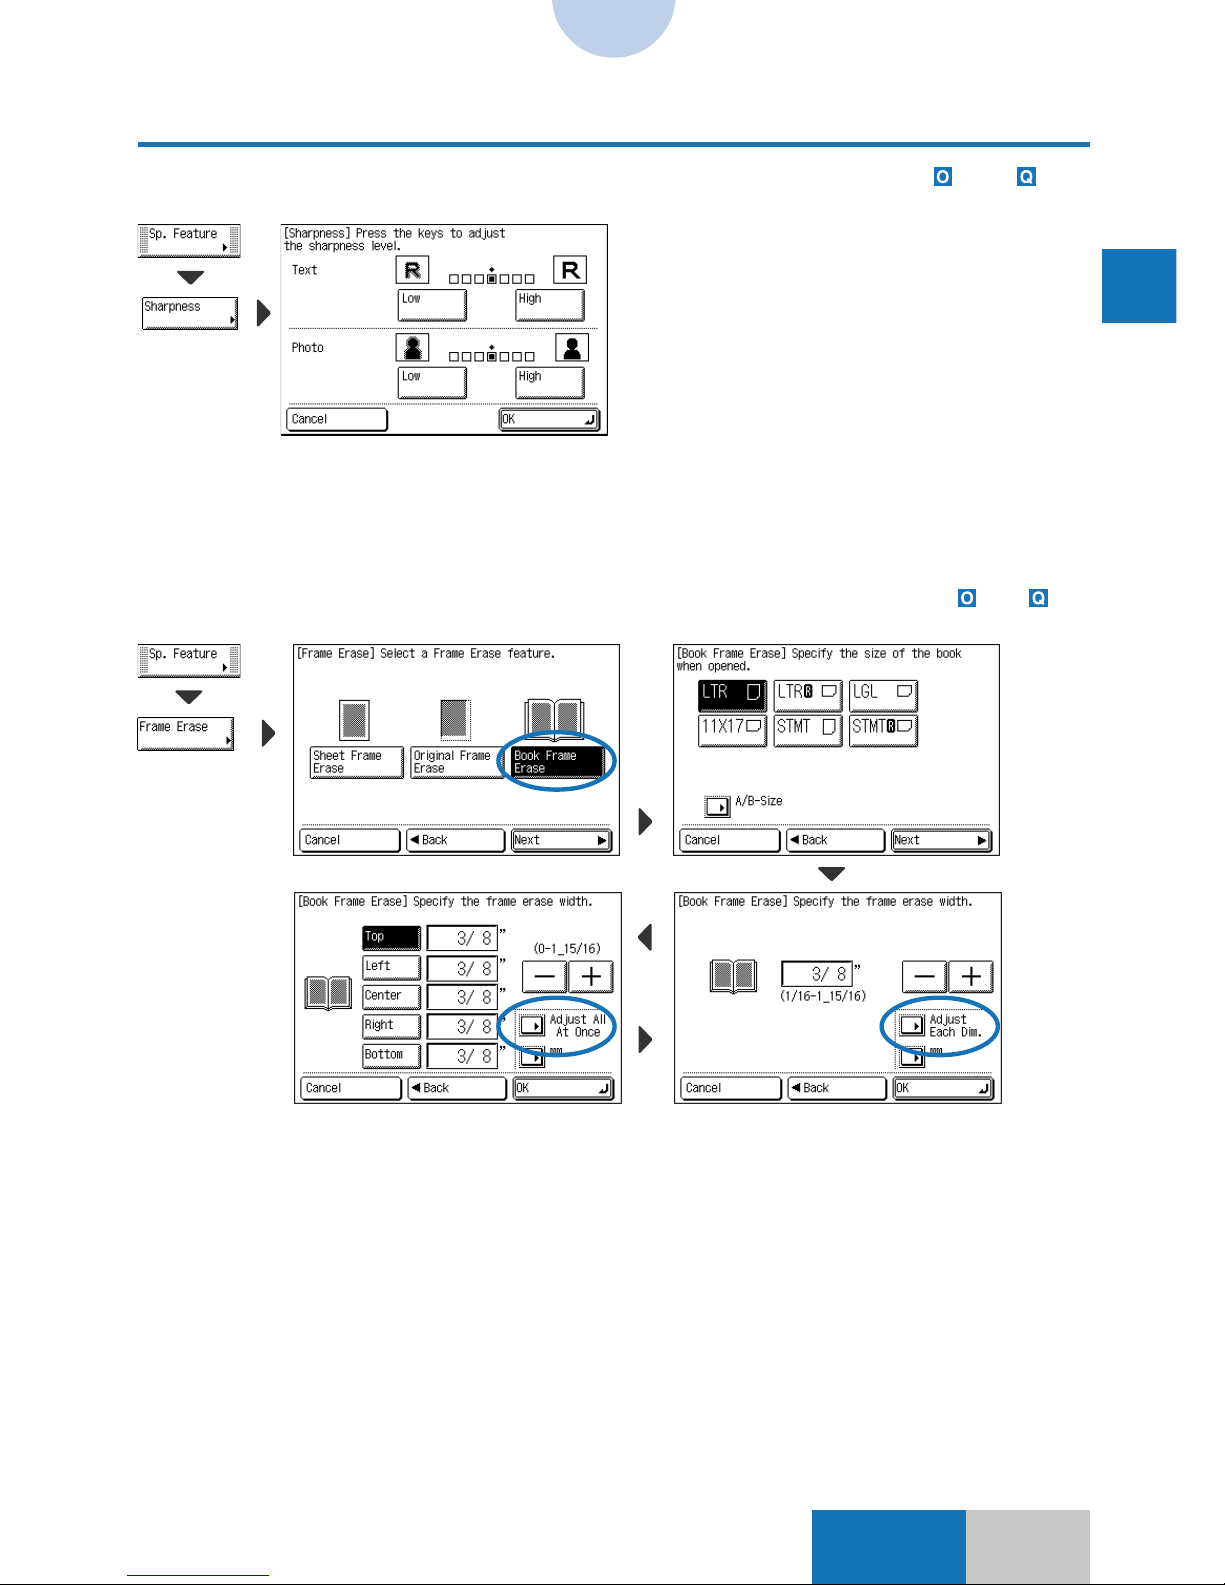
Erasing shadows of an original (Book Frame Erase) ...................................................2-21
Erasing shadows of an original (Original Frame Erase) ..............................................2-22
Erasing shadows of an original (Sheet Frame Erase) ..................................................2-22
Faithfully reproducing highlights ...................................................................................2-22
Finely adjusting the color density ..................................................................................2-23
Finely adjusting the zoom copy ratio............................................................................. 2-23
Framing .............................................................................................................................2-23
Increasing the density in a light tone portion (Highlight Reproduction) ....................2-23
Initializing the standard copy settings........................................................................... 2-24
Inserting a black-and-white text original into a color image
(Character Composition)
......................................................................... 2-25
Inserting a color original into a black-and-white text original
.....................2-27
Inserting text from a black-and-white text original into a designated area
on a color image (Character Composition Shift)
.................................. 2-28
Interleaving a copy sheet between transparencies (Transparency Interleaving) ......2-29
Making a pair of symmetric images from one image (Mirror Image) ..........................2-30
Making color copies in a single color ............................................................................2-30
Making colors closer to the offset SWOP Emulations
CS 110/115 NC
.................................2-30
Making copies by changing a black-and-white original image to white and adding
a color to the background (Blue Background) .....................................................2-31
Making copies by changing the vertical and horizontal ratio (XY Zoom) ...................2-31
Making copies by erasing shadows at the center and around the image ..................2-31
Making copies by manually feeding copy sheets .........................................................2-32
Making copies from 35 mm negative film
..............................................................2-33
Making copies from 35 mm positive film
...............................................................2-35
Making copies from a transparency
.......................................................................2-37
Making copies from large-size negative film
.........................................................2-38
Making copies from large-size positive film
..........................................................2-39
Making copies in a tranquil color ...................................................................................2-40
Page 8

VII
CONTENTS
Making copies in black only ........................................................................................... 2-40
Making copies of a photograph ......................................................................................2-40
Making copies of a print containing a photograph....................................................... 2-40
Making copies of an original consisting of small characters and graphics .............. 2-40
Making copies of contours of the image (Contour) .............................................. 2-40
Making copies of the area inside a designated area
(Framing, Number Key Entry) .................................................................................2-41
Making copies of the area inside a designated area (Framing, Pen Entry)
........2-41
Making copies of the area outside a designated area
(Blanking, Number key Entry) ................................................................................2-42
Making copies of the area outside a designated area (Blanking, Pen Entry)
.....2-42
Making copies of the image repeatedly onto one sheet .............................................. 2-43
Making copies of two originals onto one sheet (Image Combination)
...............2-43
Making copies onto transparencies ...............................................................................2-43
Making copies which look like old-fashioned photographs ........................................2-44
Making copies with a margin (Margin) ...........................................................................2-44
Making copies with heavier tones ..................................................................................2-44
Making copies with lighter tones ................................................................................... 2-44
Making copies with no surrounding edges missing (Entire Image) ........................... 2-44
Making copies with the white text and color background
from a black-and-white original .............................................................................. 2-44
Making copies with vivid colors .....................................................................................2-44
Making copies without the background color (Hide Background) .............................2-45
Making enlarged/reduced copies onto standard size paper........................................ 2-45
Making one-sided copies from a two-sided original onto two sheets
................2-45
Making one-sided copies of facing (right and left) pages onto two sheet
(Two-page Separation) ............................................................................................2-46
Making two-sided copies by manually feeding copy sheets .......................................2-46
Making two-sided copies from a one-sided original (Two-sided Mode)
.............2-46
Making two-sided copies from a two-sided original
..................................... 2-46
Making two-sided copies of facing (right and left) pages (Book → 2-sided)
......2-47
Manually selecting the copy paper size......................................................................... 2-47
Preventing a backside image from being copied on the front side
(Hide Backside Image) ............................................................................................2-47
Printing a color sheet
......................................................................................2-48
Printing a test chart for Automatic Gradation Adjustment ..........................................2-48
Recalibrating the copy exposure ................................................................................... 2-49
Recalling the registered copy settings from mode memory ....................................... 2-49
Reducing the number of gradations (Reduced Gradation)
..................................2-49
Registering a drawer with thin paper loaded ................................................................2-49
Registering a drawer with transparencies loaded ........................................................2-50
Registering a color sheet
........................................................................................2-50
Registering the copy settings in mode memory ...........................................................2-51
Registering the standard copy settings ........................................................................ 2-51
Returning the Custom Settings to the initial state .......................................................2-52
Reversing the colors in the middle of gradations (Solarization)
.........................2-52
Reversing the hues and gradations (Nega/Posi) ..........................................................2-52
Reversing the image upside down (Mirror Image)........................................................ 2-52
Selecting a color ..............................................................................................................2-52
Selecting a color from the color palette (Number Key Entry)
..............................2-53
Page 9

VIII
CONTENTS
Selecting a color from the color palette (Pen Entry)
....................................2-53
Selecting a color from the color wheel ..........................................................................2-53
Selecting a color from the registered colors................................................................. 2-54
Selecting a color from an original or other reference
(Designated Color)
...........................................................................................2-54
Selecting a color in an original (Original Color) ........................................................... 2-54
Selecting a color using the Editor
..........................................................................2-54
Selecting a width of a tracing line (Area Designation)
................................. 2-55
Selecting an original type (Original Type) .....................................................................2-55
Selecting the processing for the area inside a designated area
................. 2-55
Setting drawers for Auto Paper Selection ..................................................................... 2-56
Setting the Energy Saver mode ......................................................................................2-56
Setting the original type selection for the printer
CS 110/115 NC
........................................2-56
Setting the standard display content .............................................................................2-56
Setting the stack bypass paper ......................................................................................2-57
Setting the time for returning to the standard copy settings (Auto Clear Time) .......2-57
Setting the time for the Energy Saver mode (Auto Energy Saver Time) ....................2-57
Setting the time for the power to be automatically turned OFF
(Auto Power-OFF Time) ...........................................................................................2-58
Specifying the copy ratio (Preset Zoom) .......................................................................2-58
Specifying the editing with markers (One-point Designation)
............................2-59
Specifying the editing with markers (Encircled Designation)
.............................2-60
Setting the gradation pitch .............................................................................................2-60
Tracing an original and designating an area
.................................................2-61
Transforming the image with a slant..............................................................................2-61
Using the Group mode for sorting
.........................................................................2-61
Using the Sort mode for sorting
.............................................................................2-61
Using the Staple-sort mode for sorting
.................................................................2-61
Weakening the moiré effects ..........................................................................................2-61
<References>
Chapter 3 Glossary ..................................................................................................... 3-1
Chapter 4 Messages ................................................................................................... 4-1
Chapter 5 When Copies Cannot Be Made as Desired ............................................. 5-1
Mechanical Problem ..........................................................................................................5-2
Operational Problem.......................................................................................................... 5-3
Chapter 6 Color Sheet Color Charts.......................................................................... 6-1
Chapter 7 General Index ............................................................................................. 7-1
Soft Key Index ....................................................................................................................7-2
Hard Key Index ...................................................................................................................7-5
Index .................................................................................................................................... 7-6
Page 10

CHAPTER 1
Visual Index
This chapter shows sample copies made with the respective functions.
1
Page 11

1-2
Indexes
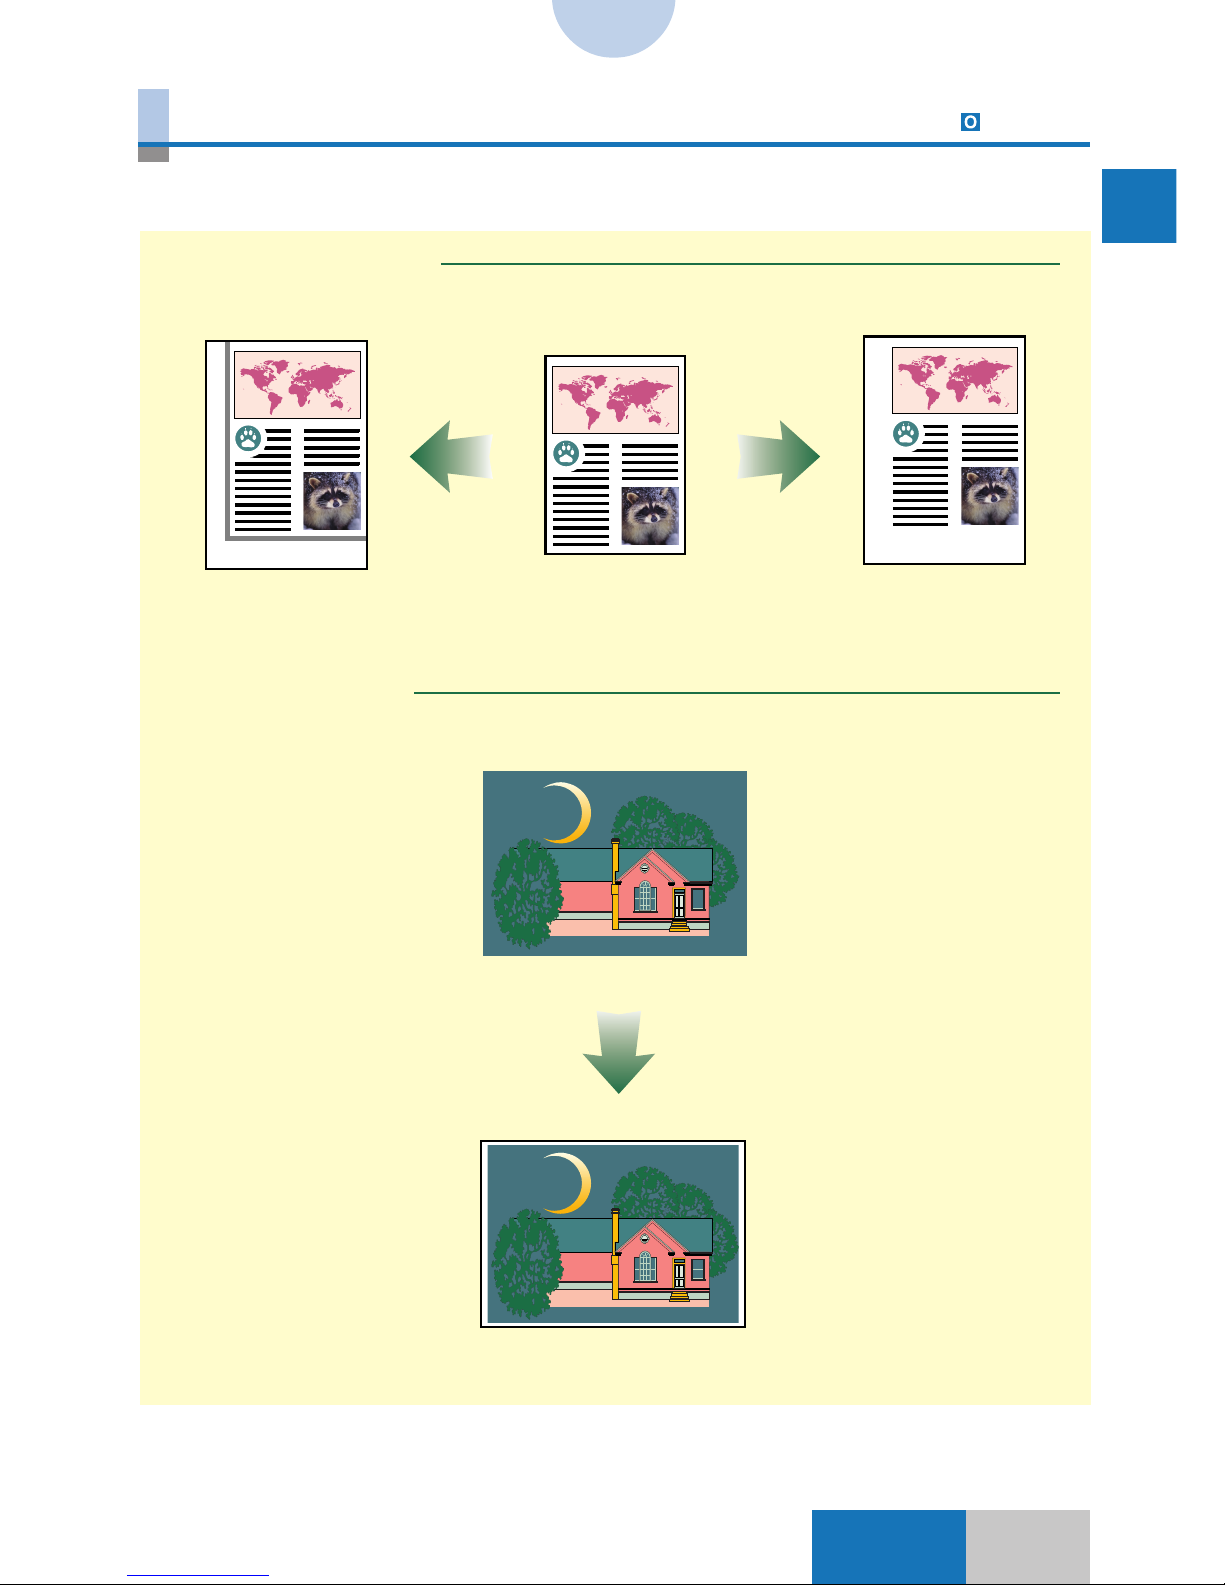
Zoom
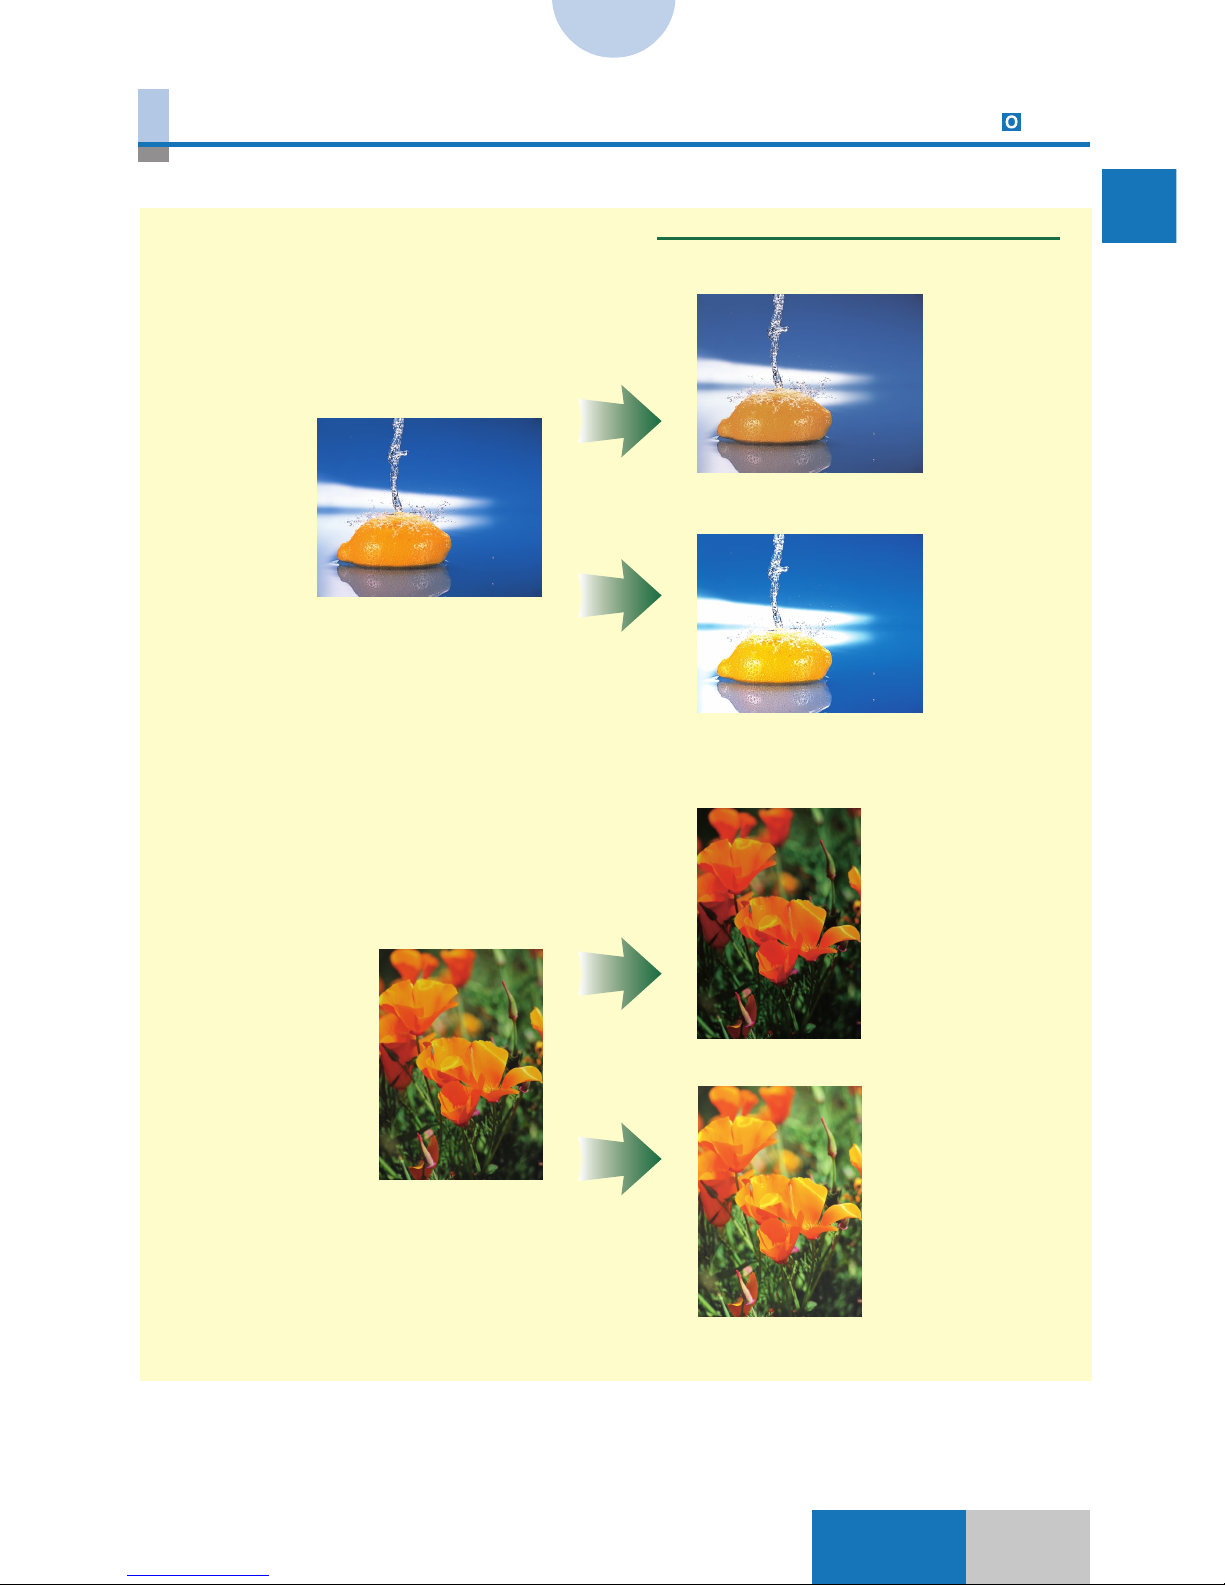
Zoom 3-2
LGL-size original
Copying onto 11″×17″-size paper
Copying onto LTR-size paper
Enlarged/Reduced automatically to fit the selected paper size
Enlarged/reduced copies are made with the copy ratio from the minimum 25% to the maximum 400% without changing the horizontal and vertical ratio of the image in an original.
The copy ratio can be manually specified as well as it can be automatically set to fit the
selected paper size.
Enlarged/Reduced with the manually specified copy ratio
Page 12

31-3
1
Visual Index
Indexes
An image is copied to be longer horizontally or vertically than the standard zoom ratio. The
copy ratio can be specified in the horizontal, vertical, or both directions as well as it can be
automatically set to fit the selected paper size. It is also possible to automatically reduce
the copy size slightly to capture all the edges of the image.
XY Zoom
Entire Image
XY Zoom to fit the selected paper
Original Copy
Zoom
XY Zoom 3-7
Page 13

1-4
Indexes
A single image is divided into a number of sections and its enlarged copy is made onto
multiple sheets of paper.
It is numerically possible to enlarge the image up to 400% in the Zoom mode. However, the
maximum enlarged copy will not have a complete image of the original. In such a case, use
of the Multi-page Enlargement enables making enlarged copies by dividing the original
image into a number of sections. The copies output by the Multi-page Enlargement
function can be pasted together to reproduce an enlarged image.
Multi-page Enlargement
Original
Multi-page
Enlargement
Pasted together
Zoom
Multi-page Enlargement 3-11
Page 14
51-5
1
Visual Index
Indexes
The position of the image in an original is changed to the center, top, bottom, left, right,
corner, or a designated location on a copy sheet when copies are made.
Shift
Original
Center shift
Lower left corner shift
Shift 4-2
Page 15
1-6
Indexes
A margin can be created when copies are made by shifting the entire image of an original to
the top, bottom, left, or right. It is possible to set the direction of image shift separately
between the front and the back, so this function is also useful for making two-sided copies.
Margin
Left Right
Top
Original
Bottom
Margin 4-13
Page 16
71-7
1
Visual Index
Indexes
Shadows that may appear on copies can be erased. This function is useful when the
original size is smaller than the copy paper size.
Original Frame Erase
Sheet Frame Erase
Without Frame Erase Original With Frame Erase
Original
Frame Erase
Original Frame/Sheet Frame Erase 5-4, 5-7
Page 17
1-8
Indexes
Shadows that may appear on copies can be erased. This function is useful for making
copies from a bound original such as a book.
Book Frame Erase
Without Frame Erase
Original
With Frame Erase
Frame Erase
Book Frame Erase 5-9
Page 18
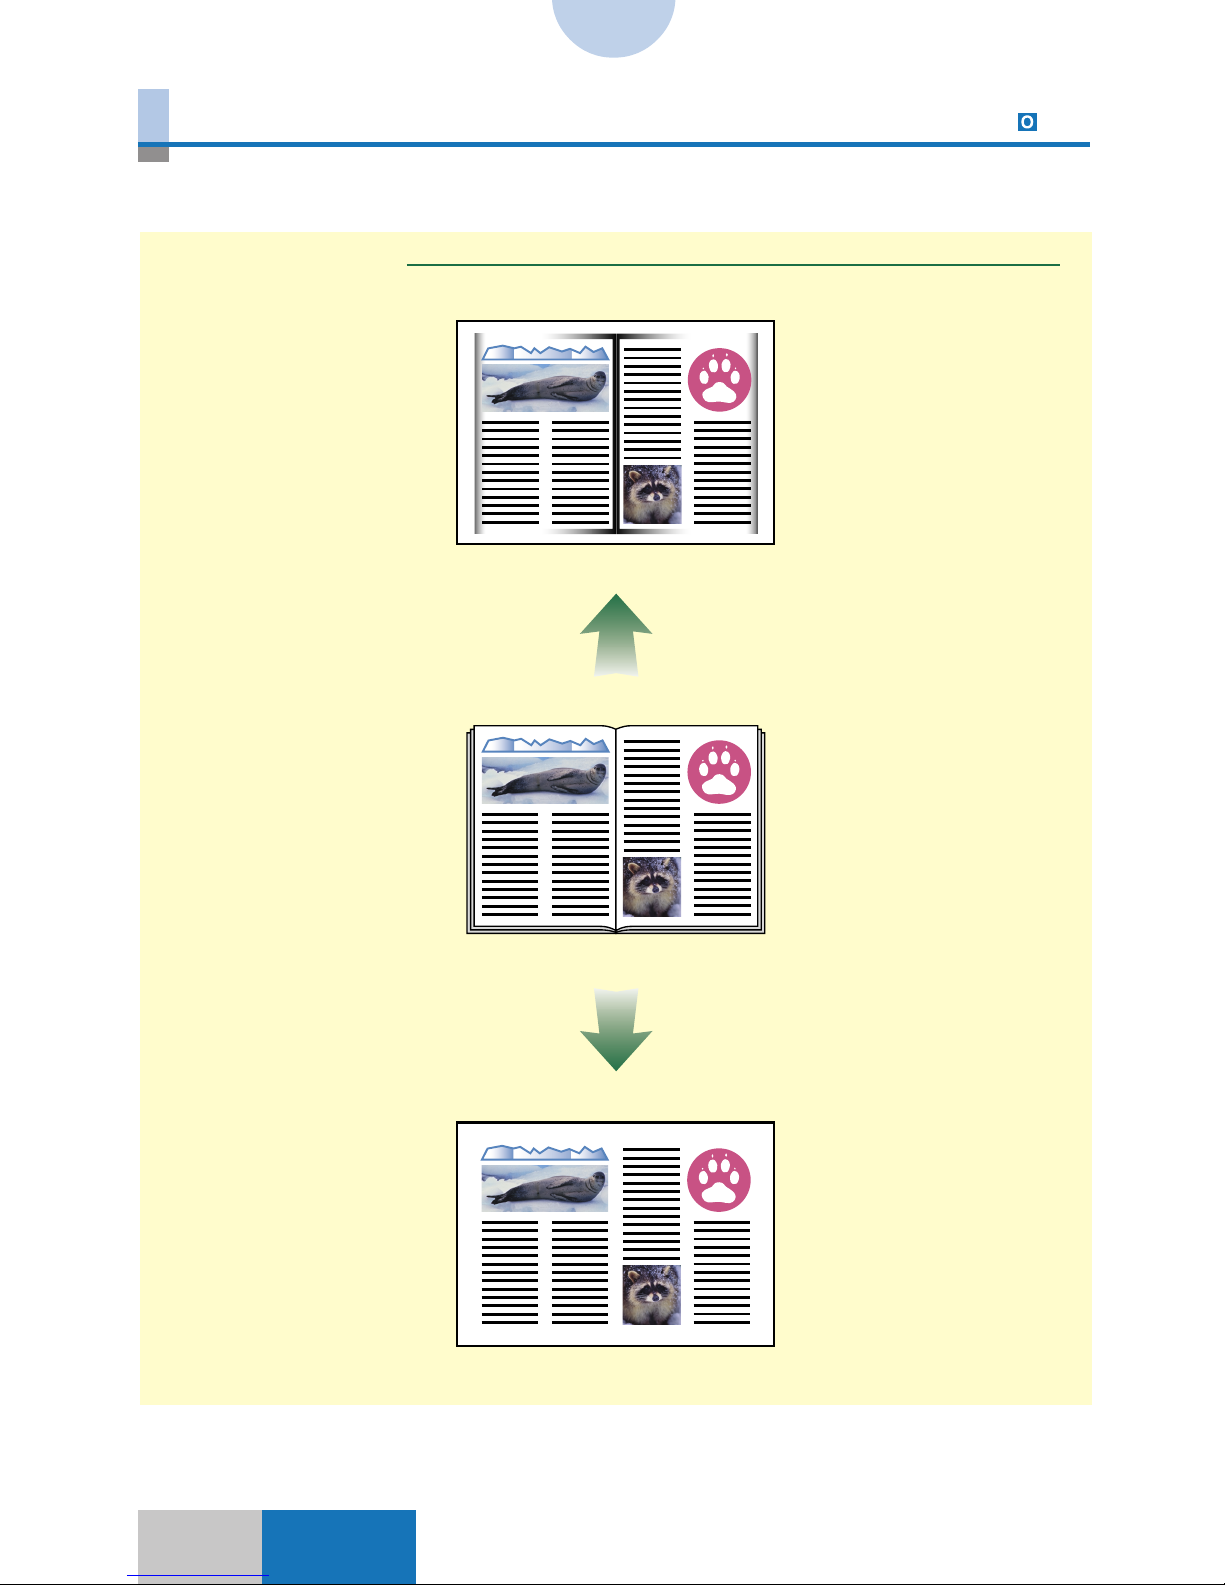
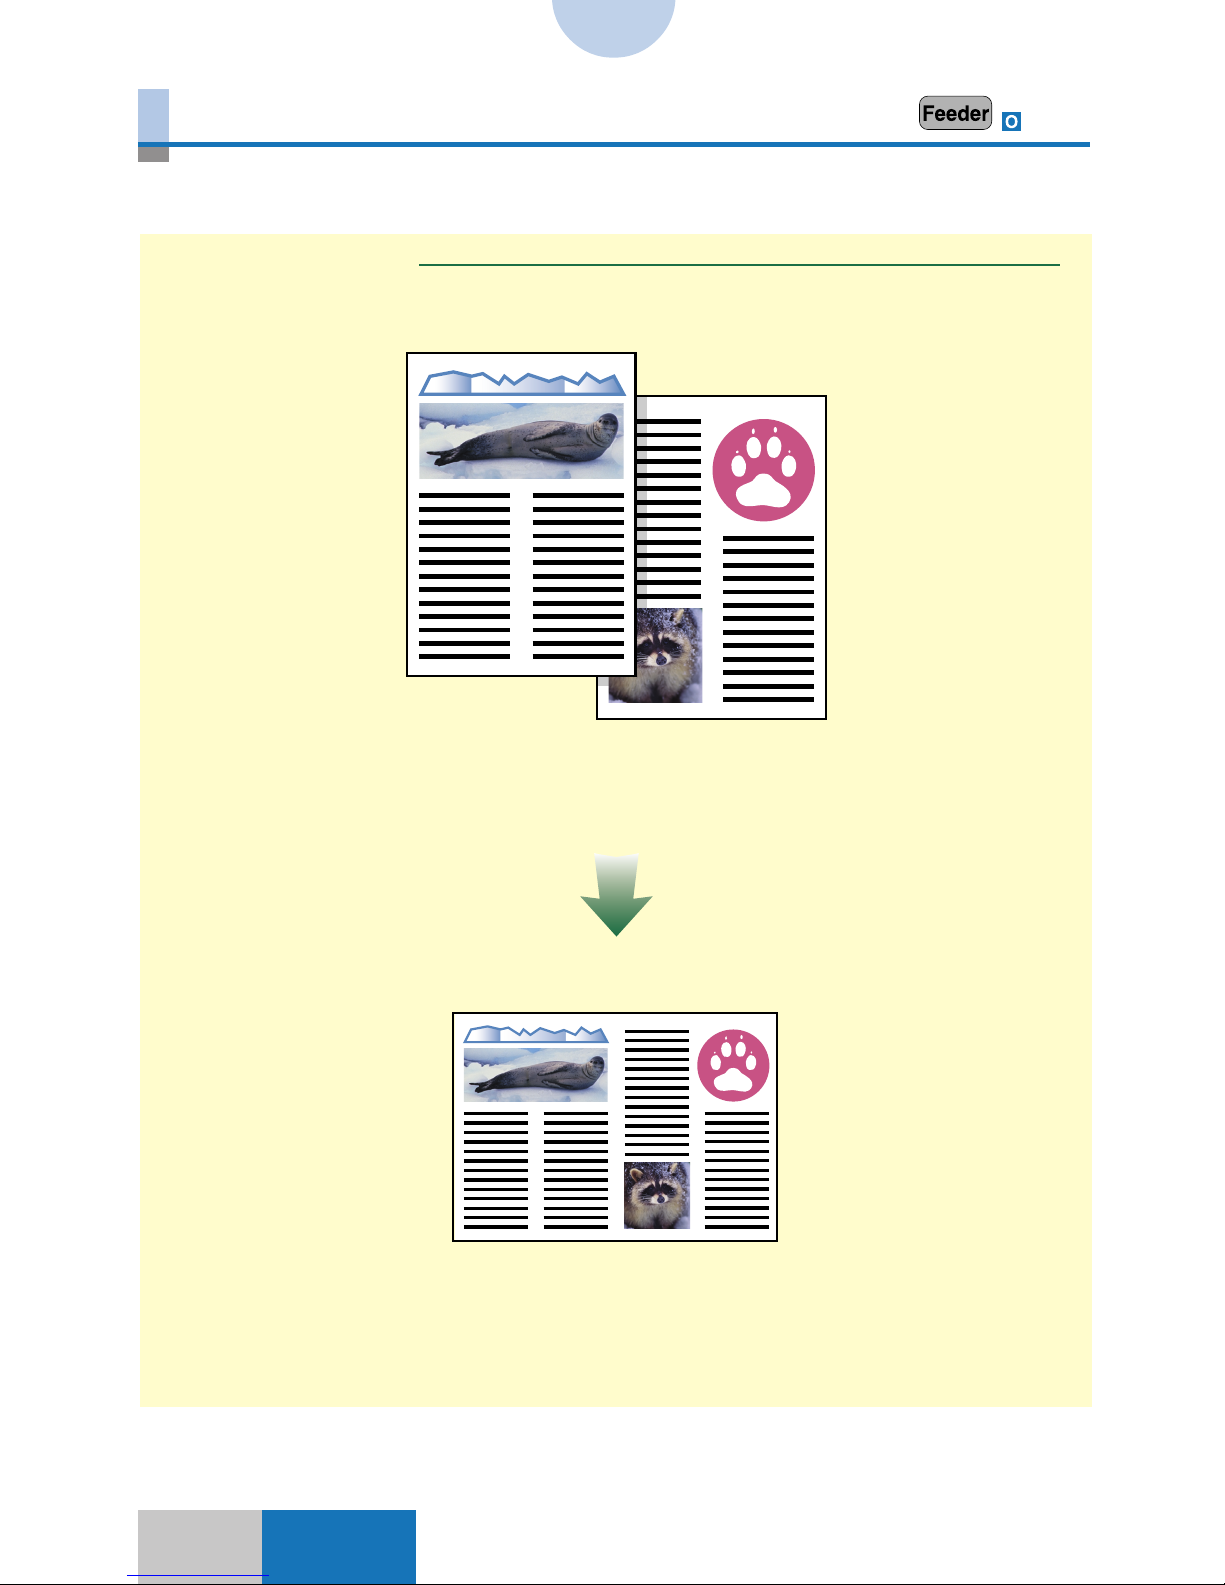
91-9
1
Visual Index
Indexes
The facing pages (left and right pages) of a bound original such as a book are copied onto
two sheets of paper. It is possible to make copies onto both sides of one sheet.
Two-page Separation
Book → 2-sided
Two-page Separation 5-2
Page 19
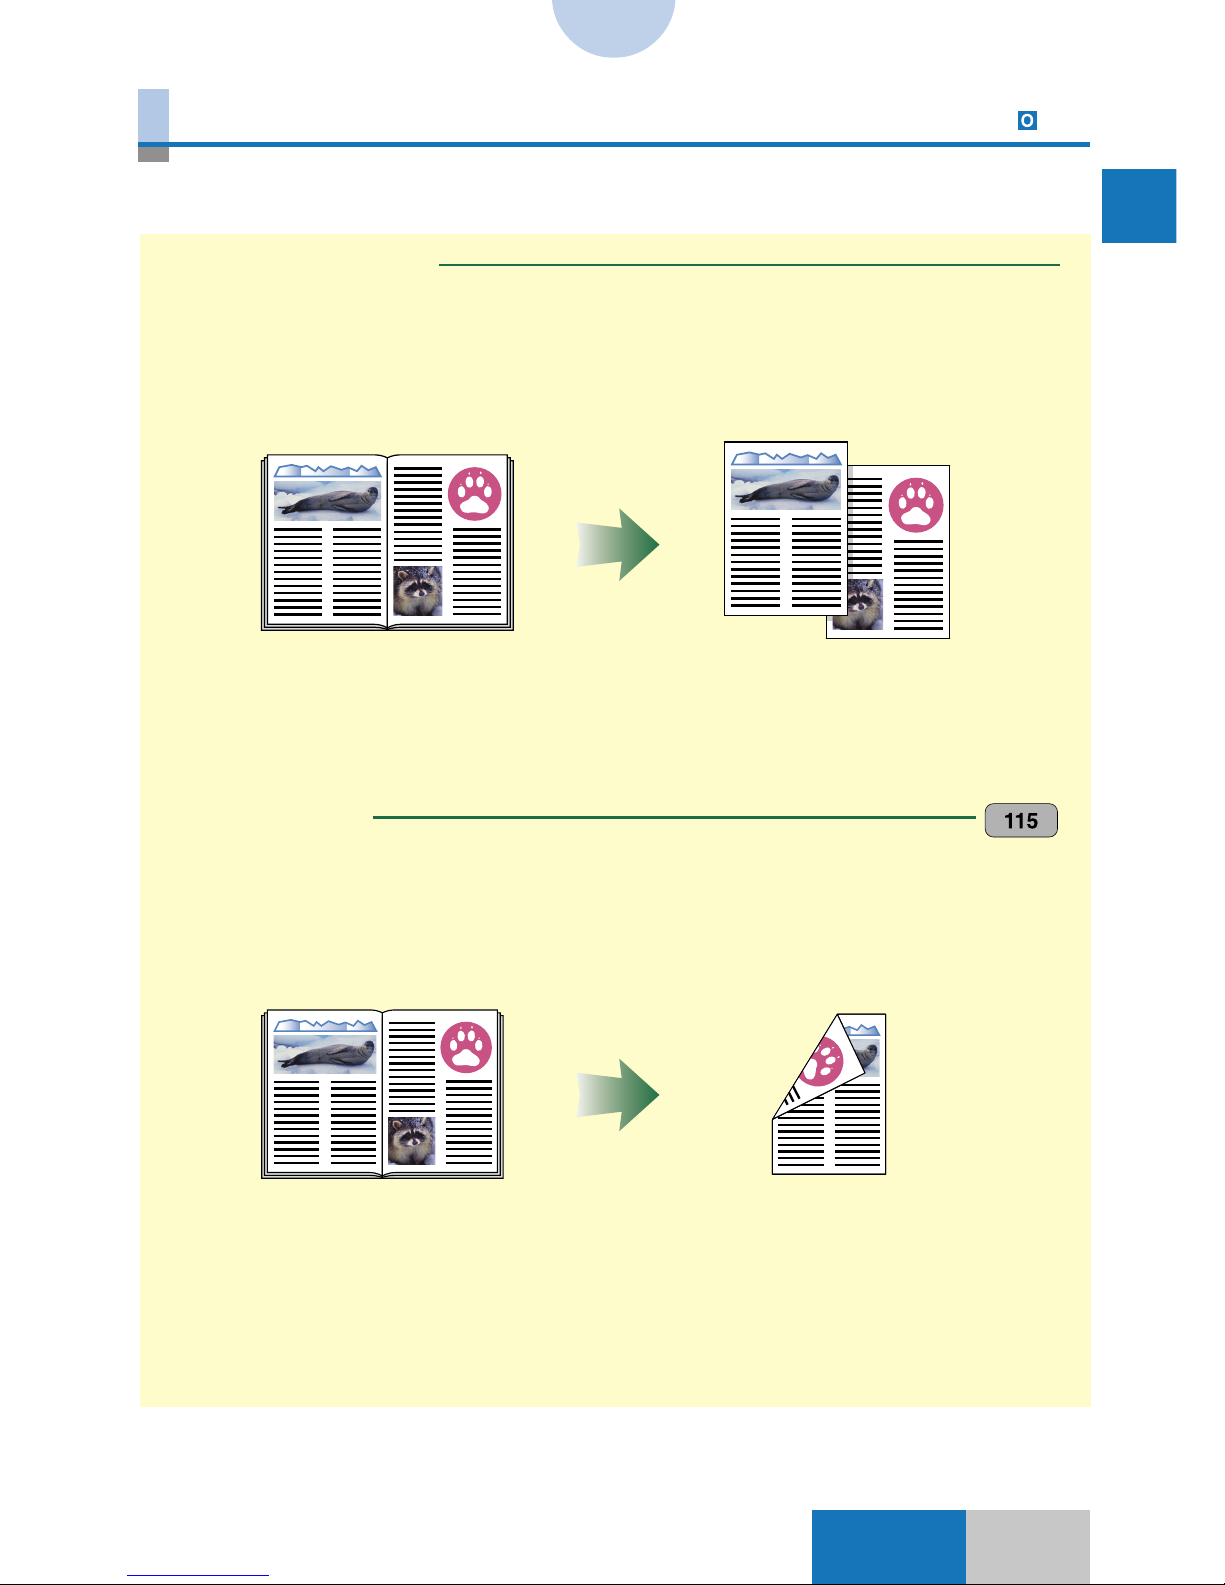
1-10
Indexes
Two originals are reduced and copied onto one sheet of paper. It is possible to make
reduced copies onto both sides of one sheet. This function requires the optional Feeder.
Image Combination
Original 1
Original 2
Image Combination 5-12
Page 20
111-11
1
Visual Index
Indexes
One Touch Color
One Touch Image Quality Adjustment 6-22
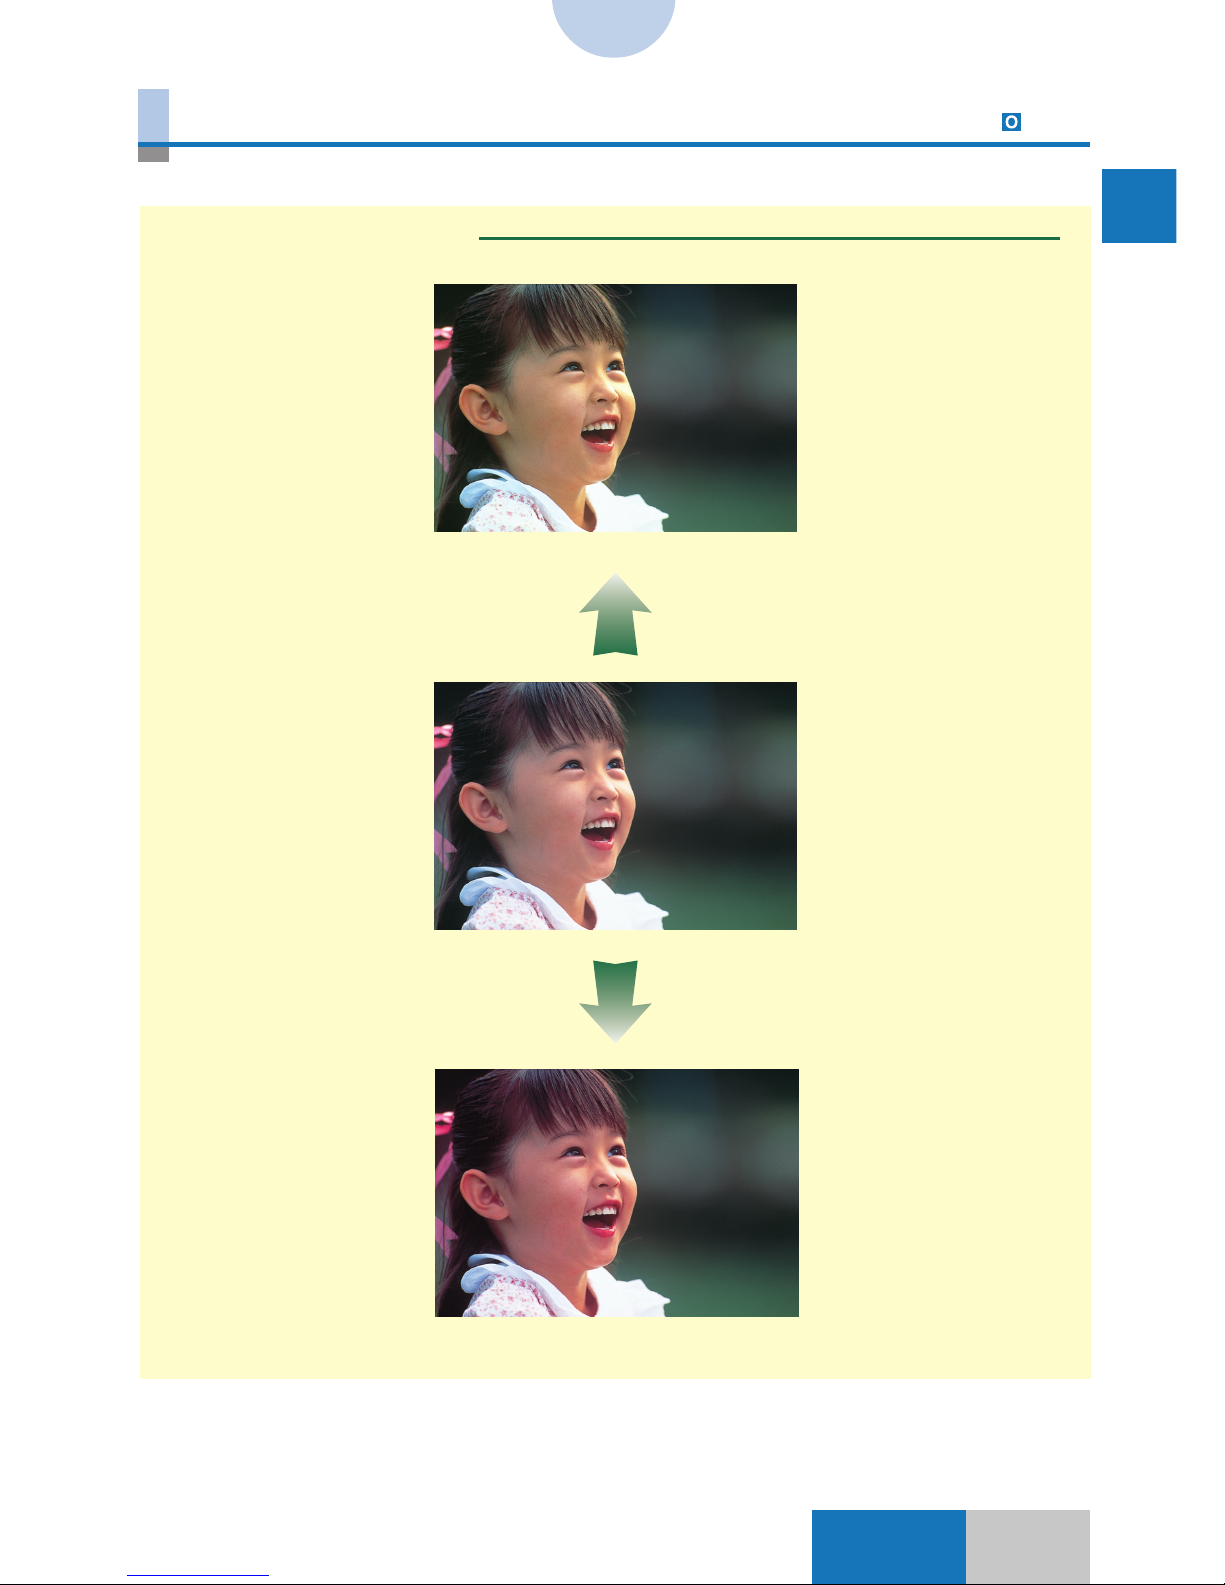
The image quality can be adjusted by a one-touch operation.
One Touch Image Quality Adjustment 1
Original
Tranquil Colors
Vivid Colors
Original
Darken Image
Lighten Image
Page 21
1-12
Indexes
One Touch Color
One Touch Image Quality Adjustment 6-22
The image quality can be adjusted by a one-touch operation.
One Touch Image Quality Adjustment 2
Original Highlight Reproduction
Original Old-fashioned Photo Image
Page 22

131-13
1
Visual Index
Indexes
One Touch Color
One Touch Color Intensity Adjustment 6-22
The color intensity can be adjusted by a one-touch operation.
One Touch Color Intensity Adjustment
Original
Decrease red Increase red
Decrease yellow Increase yellow
Decrease blue Increase blue
Page 23
1-14
Indexes
Image Quality Adjustment
Background Color Adjustment 6-27
Copies can be made by eliminating the color of the original paper or preventing the backside image from being copied.
Hide Background
Hide Backside Image
Original
Copy
Hide Backside Image
Normal copy
Original
Page 24

151-15
1
Visual Index
Indexes
Image Quality Adjustment
Color Range Adjustment 6-31
Colors with a high saturation that cannot be reproduced in the normal copy mode are
reproduced by automatically adjusting the color range in good balance.
Color Range Adjustment
Original
Without Color Range
Adjustment
With Color Range
Adjustment
Page 25
1-16
Indexes
Image Quality Adjustment
Black Adjustment 6-33
Differences in the black area of an original are reproduced by adjusting the gray scale.
Black Adjustment
Weaken Black
Original
Enhance Black
Page 26
171-17
1
Visual Index
Indexes
The reddish or yellowish hue of the person’s areas in an image is adjusted when copies are made.
Complexion Adjustment
Image Quality Adjustment
Complexion Adjustment 6-35
Increased yellow
Original
Increased red
Page 27
1-18
Indexes
Color Balance
Color Balance 6-2
Color tone balance is adjusted to reproduce colors faithful of an original.
Color Balance
Increased magenta Decreased magenta
Increased cyan Decreased cyan
Increased yellow
Decreased yellow
Increased black Decreased black
Original
Page 28

191-19
1
Visual Index
Indexes
Color Balance 6-4,6-6,6-10
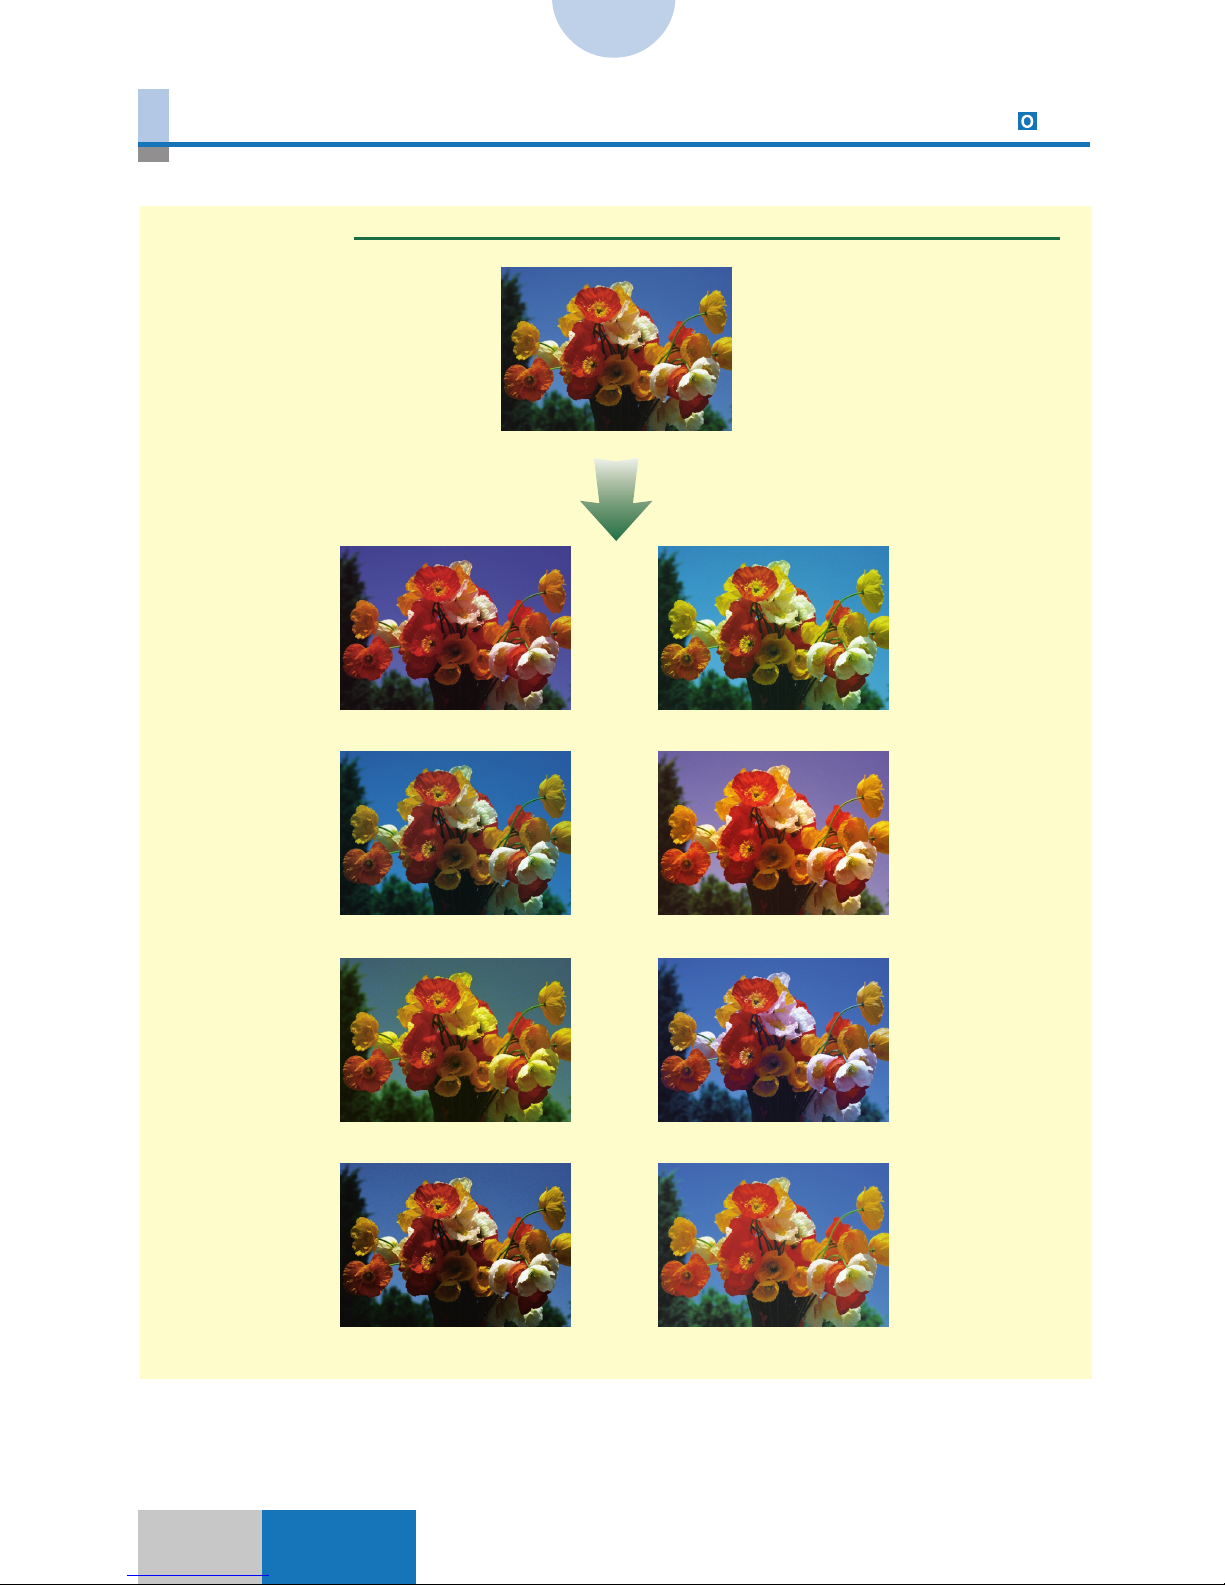
Saturation Adjustment/Hue Adjustment/Density Fine Adjustment
The saturation or hues are adjusted for all colors as a whole or for individual colors separately. It is possible to make fine adjustments of density for each color or each density
area.
Saturation Adjustment
Hue Adjustment
Density Fine Adjustment
Original
Original
Increased for all
colors
Decreased for all
colors
Original
YMC→ GRB YMC → GRB
Decreased magenta
in high density area
Increased cyan in
medium density area
Page 29
1-20
Indexes
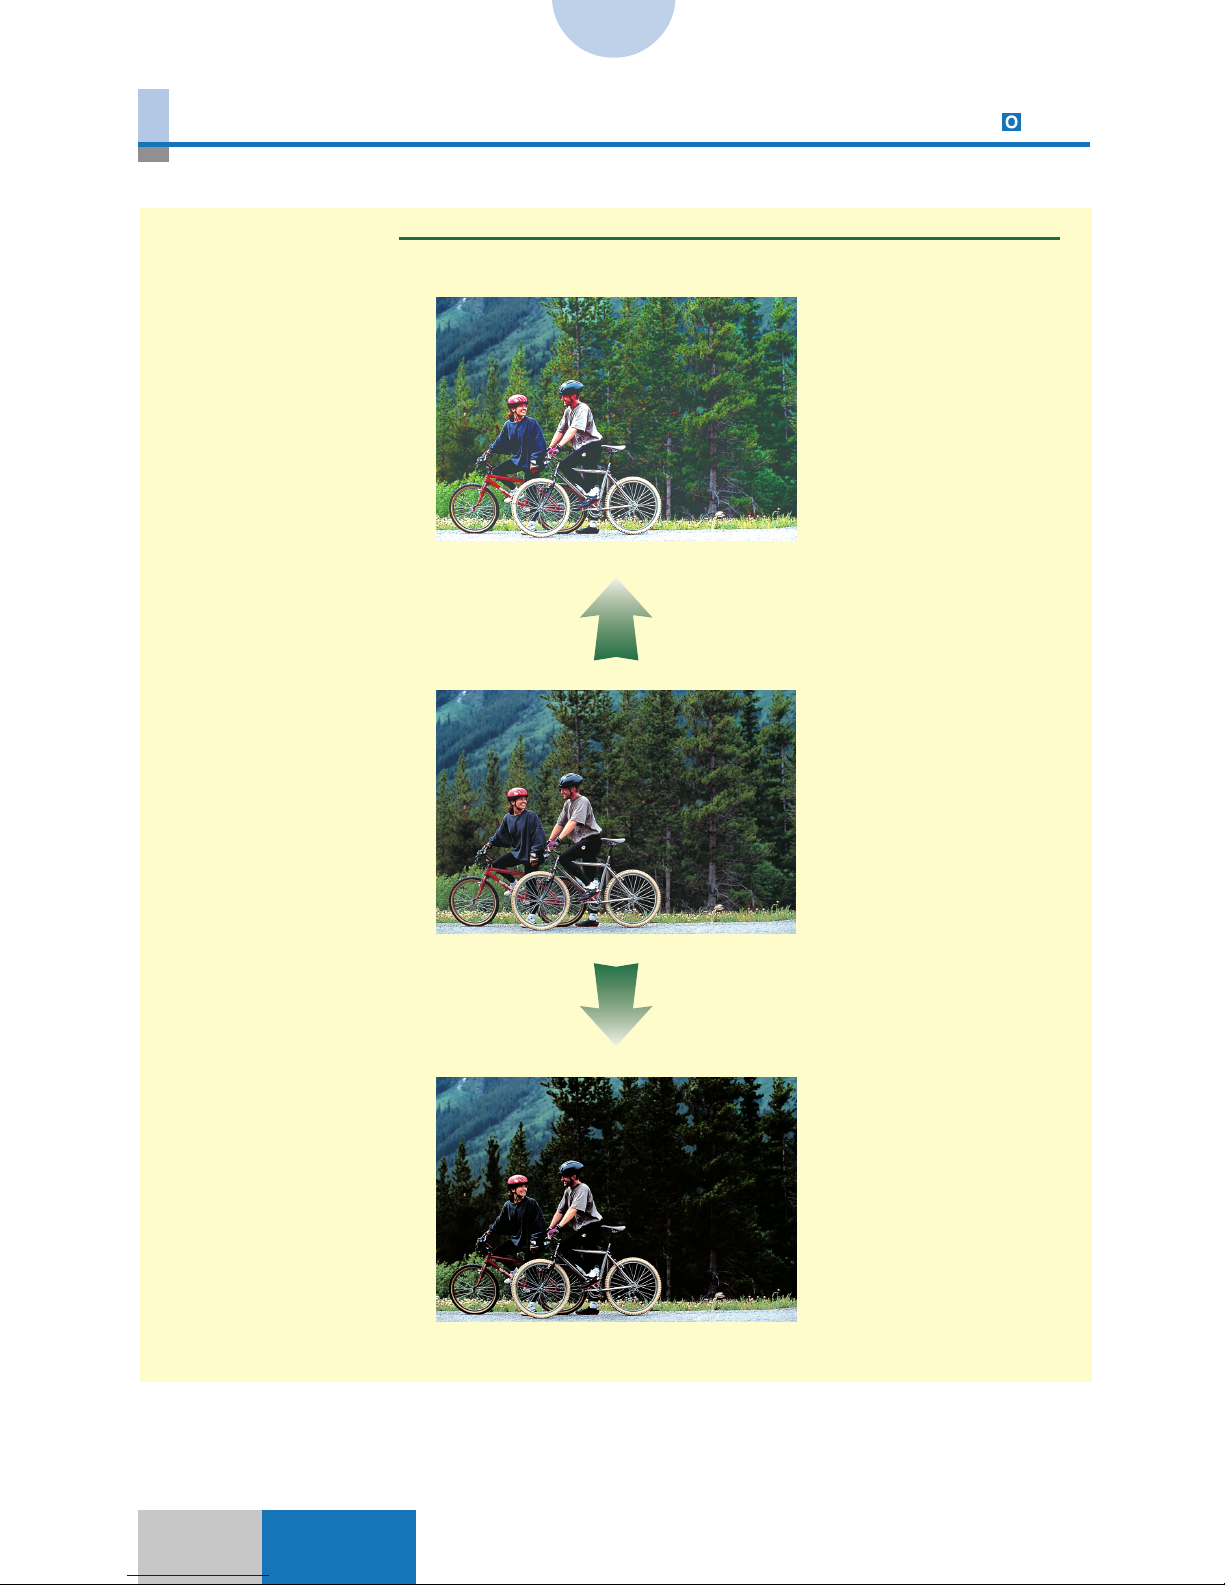
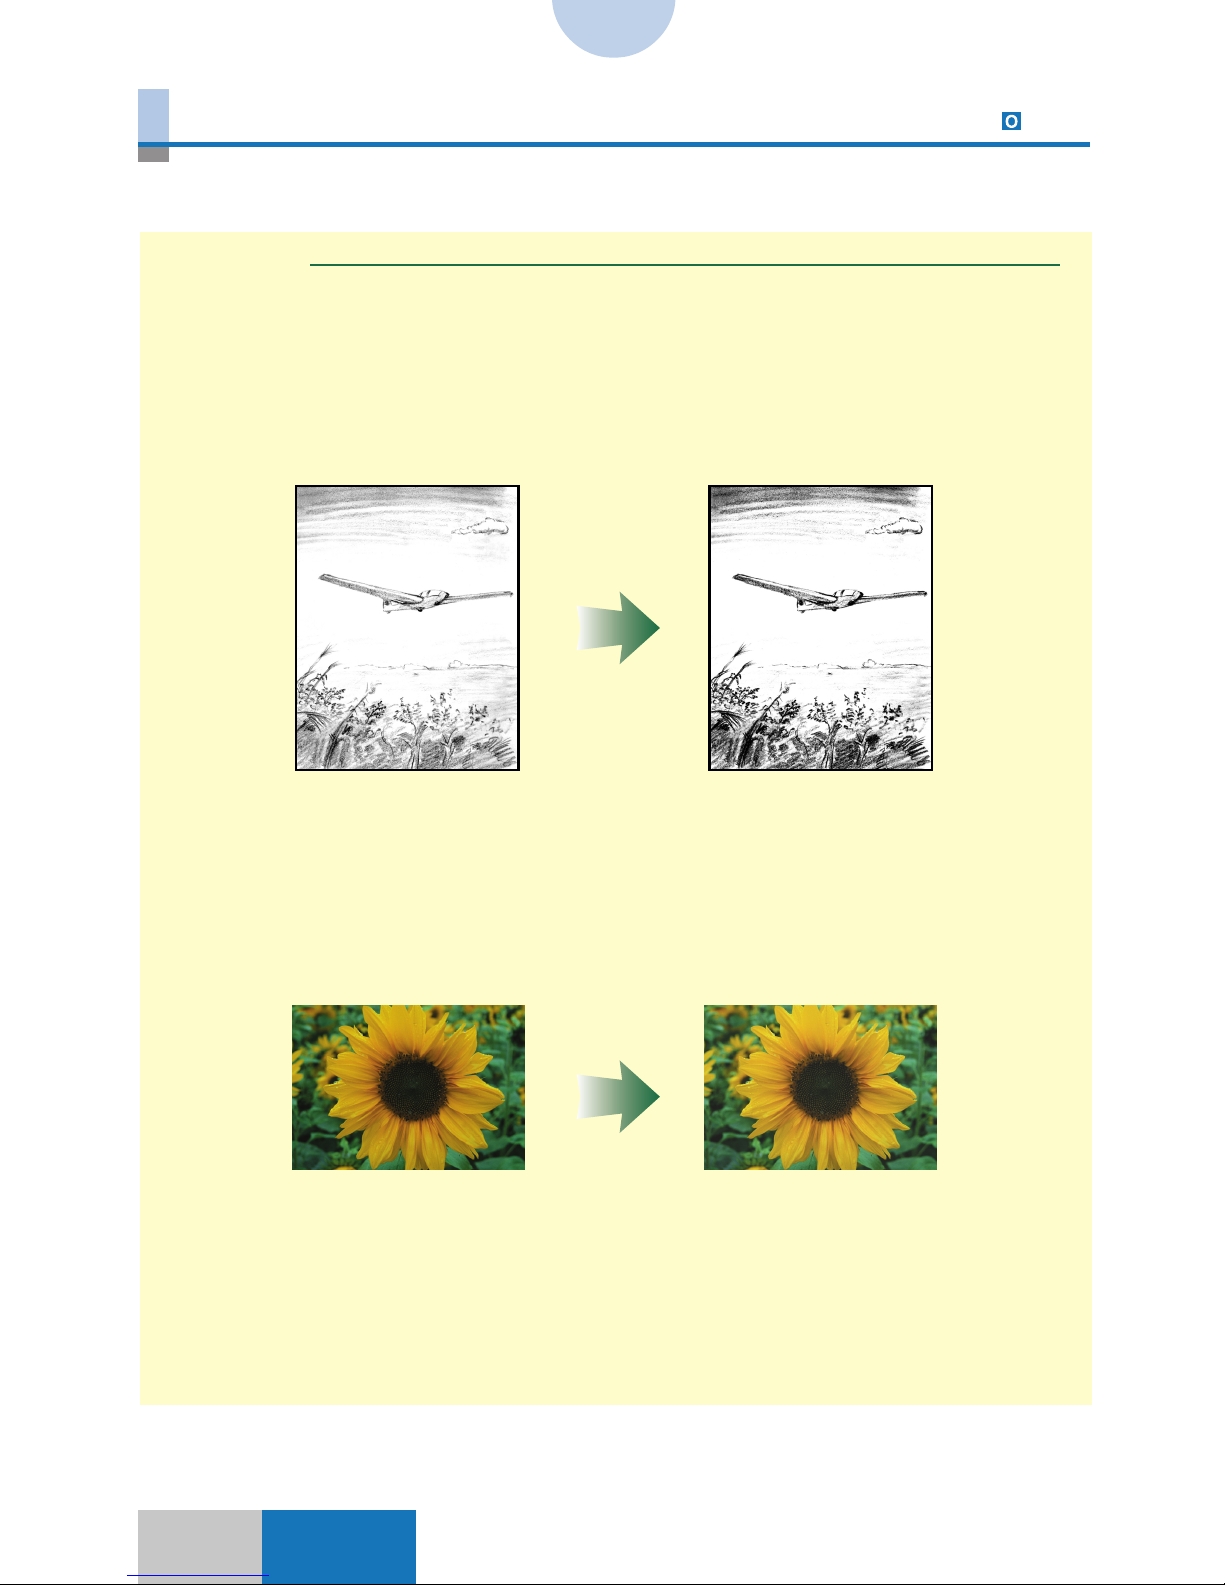
Sharpness 6-25
The clarity of the edges of a copy image is adjusted. This function is useful for making
copies from blueprints or originals written lightly with a pencil.
Sharpness
Original Increased Sharpness level
Decreased Sharpness levelOriginal
Page 30
211-21
1
Visual Index
Indexes
Color Creation
Single Color 7-21
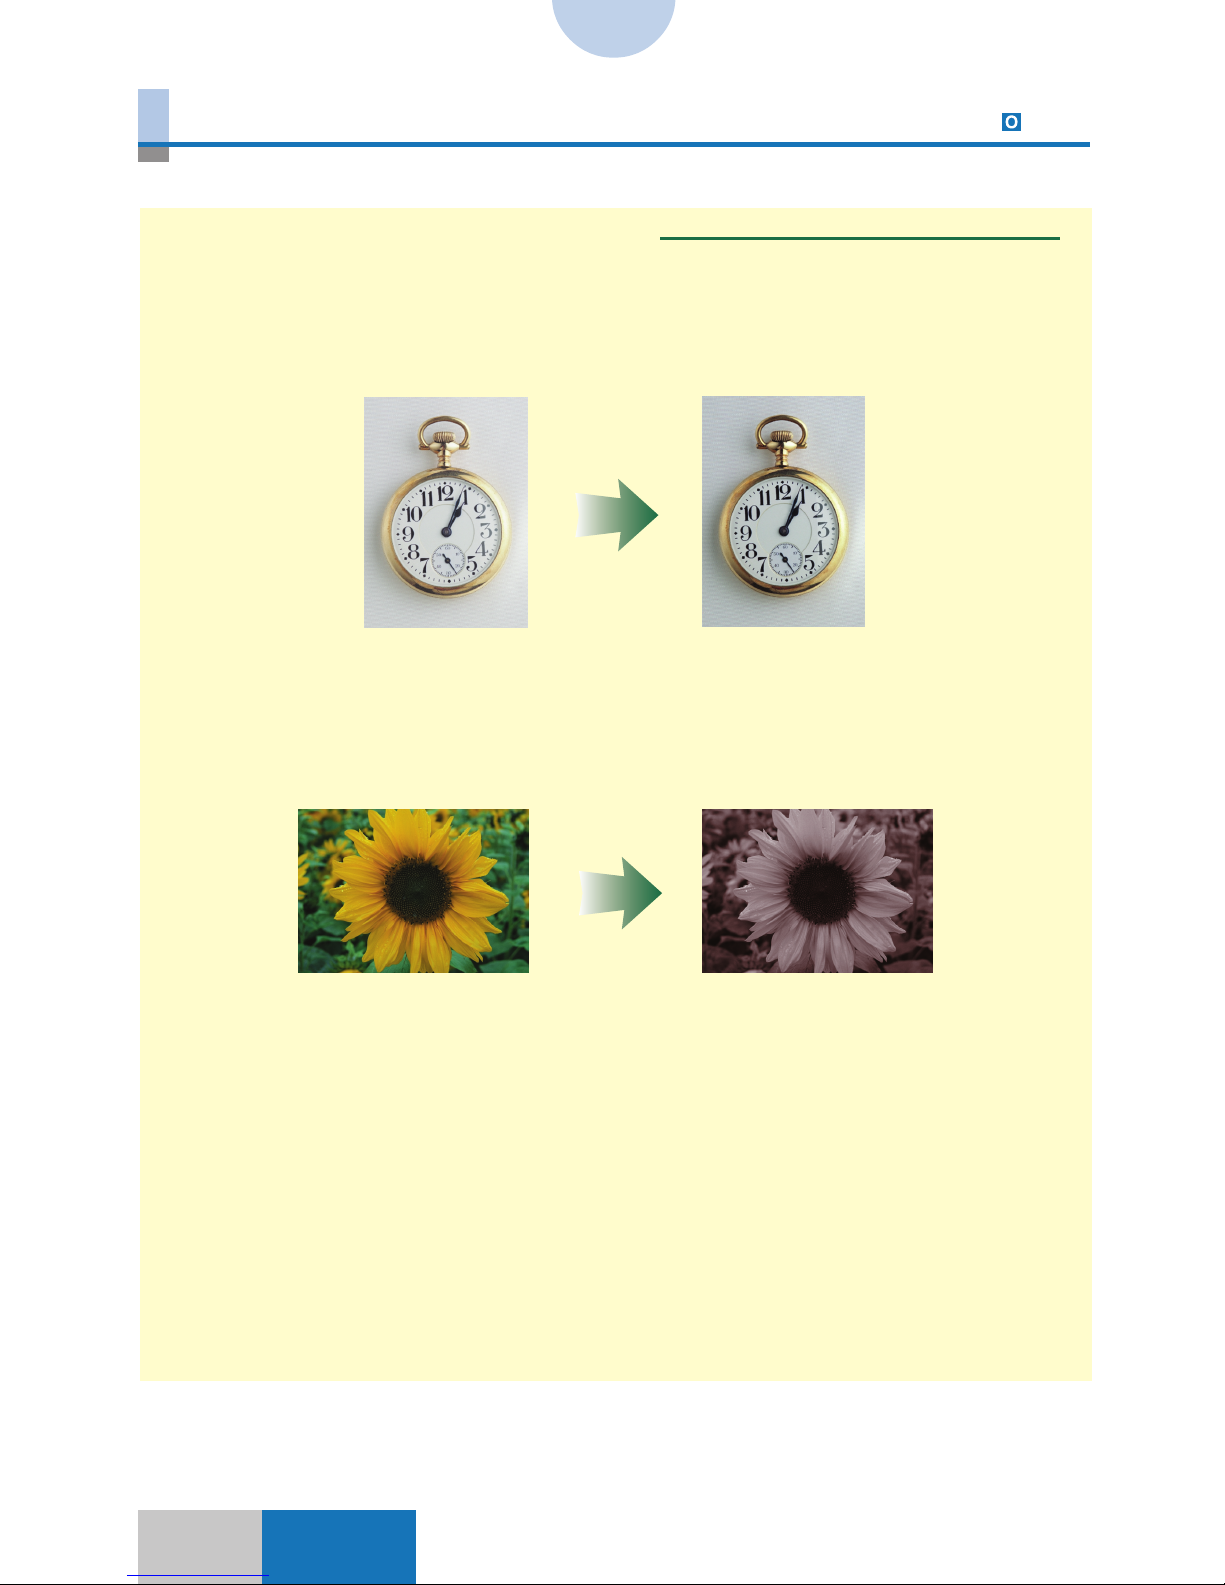
Originals are copied in one selected color.
Single Color
Original
Page 31

1-22
Indexes
Color Creation
Color Gradation 7-22
Copies are made by adding gradations of a specified color to the background or image in
an black-and-white original.
Color Gradation
Original
Image/Horizontal Image/Vertical Image/Vertical (Repeat)
Background/
Frame
Background/
Corner
Background/
Vertical (Repeat)
Background/
Square
Page 32

231-23
1
Visual Index
Indexes
Color Creation
Color Filter 7-29
Like a photograph taken with a camera equipped with a color filter, the color of the filter is
added to the entire image of an original and the other colors darken. For example, if
magenta is specified for Color Filter, the image becomes reddish as a whole and the image
portions of cyan and yellow darken.
Color Filter
Original
Magenta
Low
Medium
High
Yellow Cyan
Low
Medium
High
Low
Medium
High
Page 33

1-24
Indexes
Color Creation
Coloring 7-31
Copies are made by adding a selected color to a designated area in an original.
Coloring
Original Image Coloring
Background Coloring
(Designated Area)
Background Coloring
(Entire Enclosed)
Page 34

251-25
1
Visual Index
Indexes
Color Creation
Color Conversion 7-39
Copies are made by changing a specific color in a color original to other selected color.
Color Conversion
Original
Copy
Page 35

1-26
Indexes
Color Creation
Base Color 7-36
Copies are made by adding a selected color to the background of a black-and-white original. Unlike the Blue Background function, the image is not changed.
Base Color
Original
Copy
Page 36

271-27
1
Visual Index
Indexes
Color Creation
Blue Background 7-37
Copies are made by changing the color of the image in a black-and-white original to white
and adding a selected color to the background. Normally, blue background is added to the
background when copies are made onto transparencies, but a different color may be selected as the background color.
Blue Background
Original Copy/Blue
Copy/Red Copy/Gradation
Page 37

1-28
Indexes
Image Creation
Nega/Posi 8-2
Copies are made by reversing the hues and gradations in an original. The Nega/Posi
function creates the same relationship as that between a photographic print and a negative
film.
Nega/Posi
Original
Copy
Page 38

291-29
1
Visual Index
Indexes
Image Creation
Image Repeat 8-3
Copies are made by repeating the image from a single original on a single copy sheet.
Image Repeat
Original
Copy
Page 39

1-30
Indexes
Image Creation
Mirror Image 8-8
Copies are made with the image upside down. It is possible to make copies of both the
original image and the upside down or downside up onto one sheet of copy paper.
Mirror Symmetry
Top Symmetry
Bottom Symmetry
Original Copy
Original Copy
Original Copy
Page 40

311-31
1
Visual Index
Indexes
Image Creation
Slanted Image 8-10
Copies are made by transforming the image into a parallelogram shape.
Slanted Image
Original Copy
Original Copy
Slanted by -30 deg.
Slanted by +30 deg.
Page 41

1-32
Indexes
Image Creation
Text Editing 8-12
Copies are made by editing the image. The editing includes adding color to the image,
copying contours only, adding shadows, and copying shadows only.
Text Editing
Original
Color For Text Image & Shadow
(flat shadow)
Shadow Only
(flat shadow)
Contour Shadow Only
(3D shadow)
Image & Shadow
(3D shadow)
(Actual original placement)
Page 42

331-33
1
Visual Index
Indexes
Image Creation
Texture 8-21
A texture or pattern such as cloth or wood is scanned and inserted onto the entire image.
Texture
OriginalTexture to be
scanned
Copy
Page 43

1-34
Indexes
Image Creation
Special Effects 8-24
Copies are made by reducing the number of gradations (Reduced Gradation) or reversing
colors in the middle of gradations (Solarization).
Special Effects
Reduced Gradation
Original
Solarization
Page 44

351-35
1
Visual Index
Indexes
Composition
Image Composition 11-2
A color image is inserted onto a black-and-white original.
Image Composition
Page 45

1-36
Indexes
Composition
Character Composition 11-8
Copies are made by inserting a black-and-white text onto a color original. The mode of
inserting the text can be selected from Superimpose, Window, Multiple Editing, and Shift
Text.
Superimpose
Window
Multiple Editing
Shift Text
Page 46

371-37
1
Visual Index
Indexes
Composition
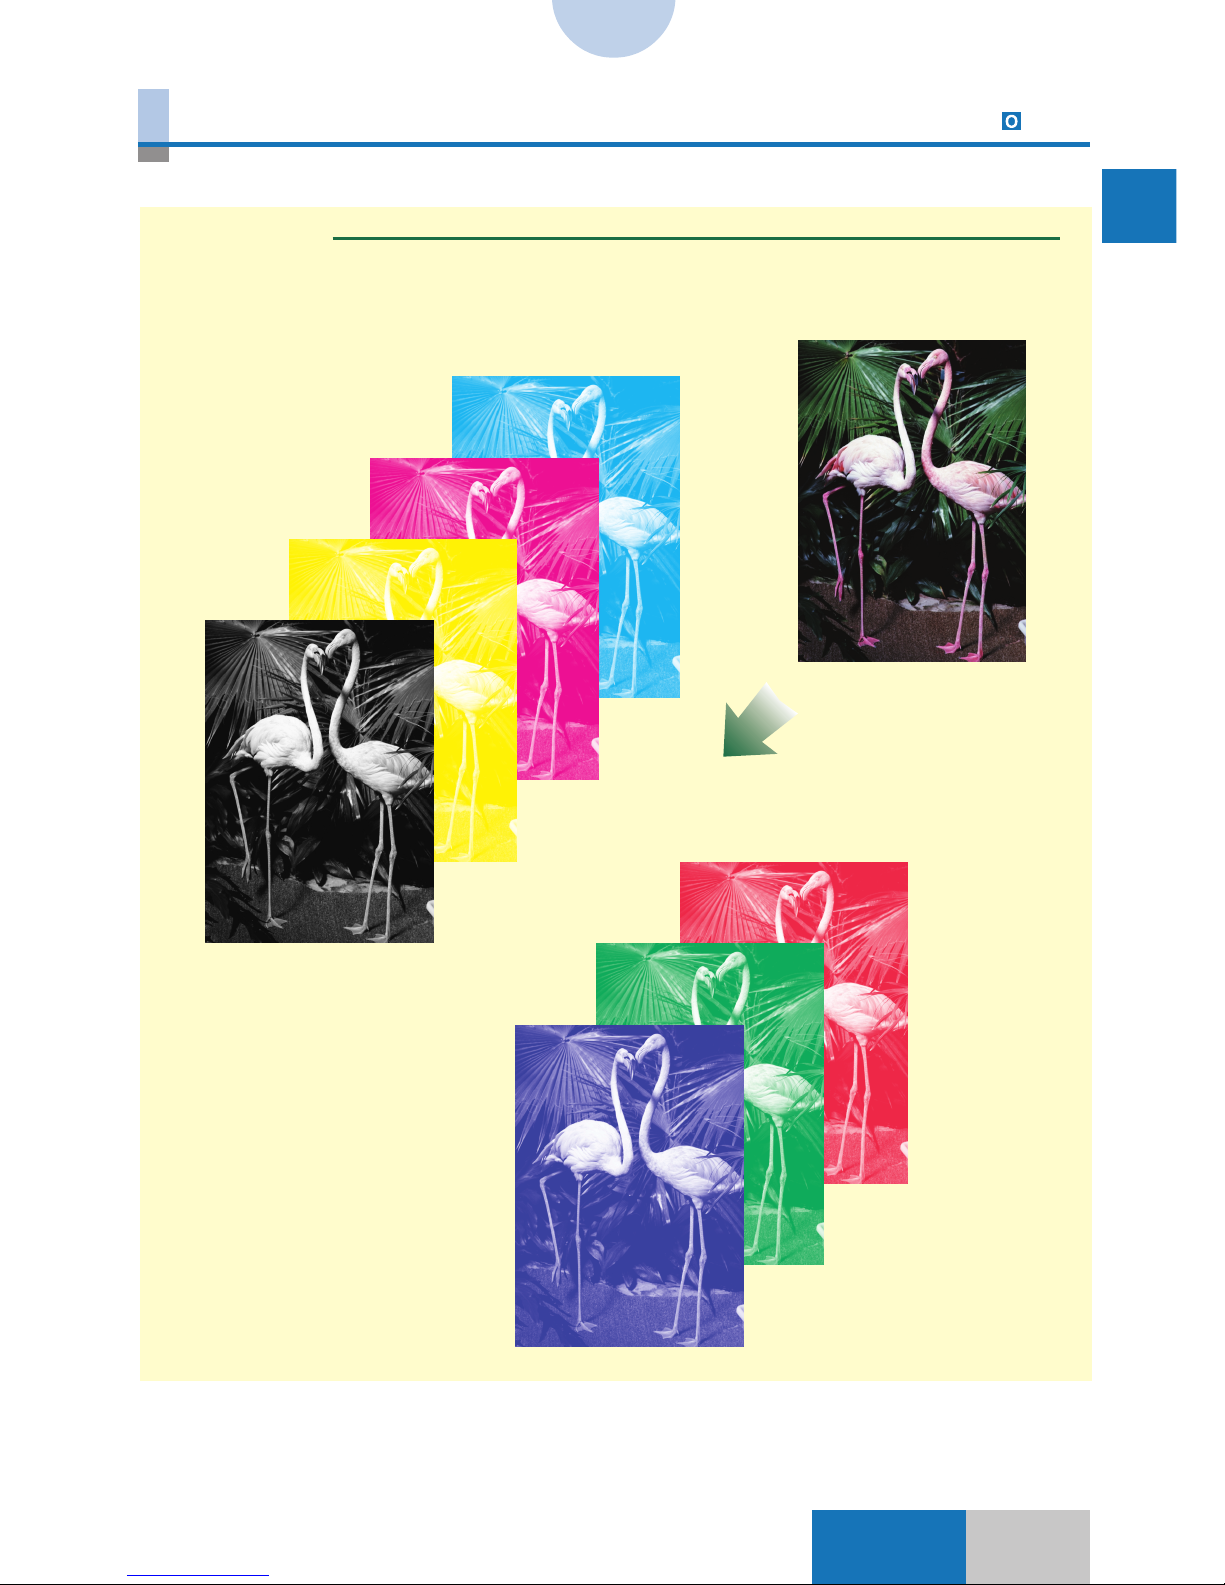
Offset Plate Original 11-33
Copies are made in black monochrome each for yellow, magenta, cyan, and black
separately from a color original.
Offset Plate Original
Original
Cyan separation
Magenta separation
Yellow separation
Black separation
Page 47

1-38
Indexes
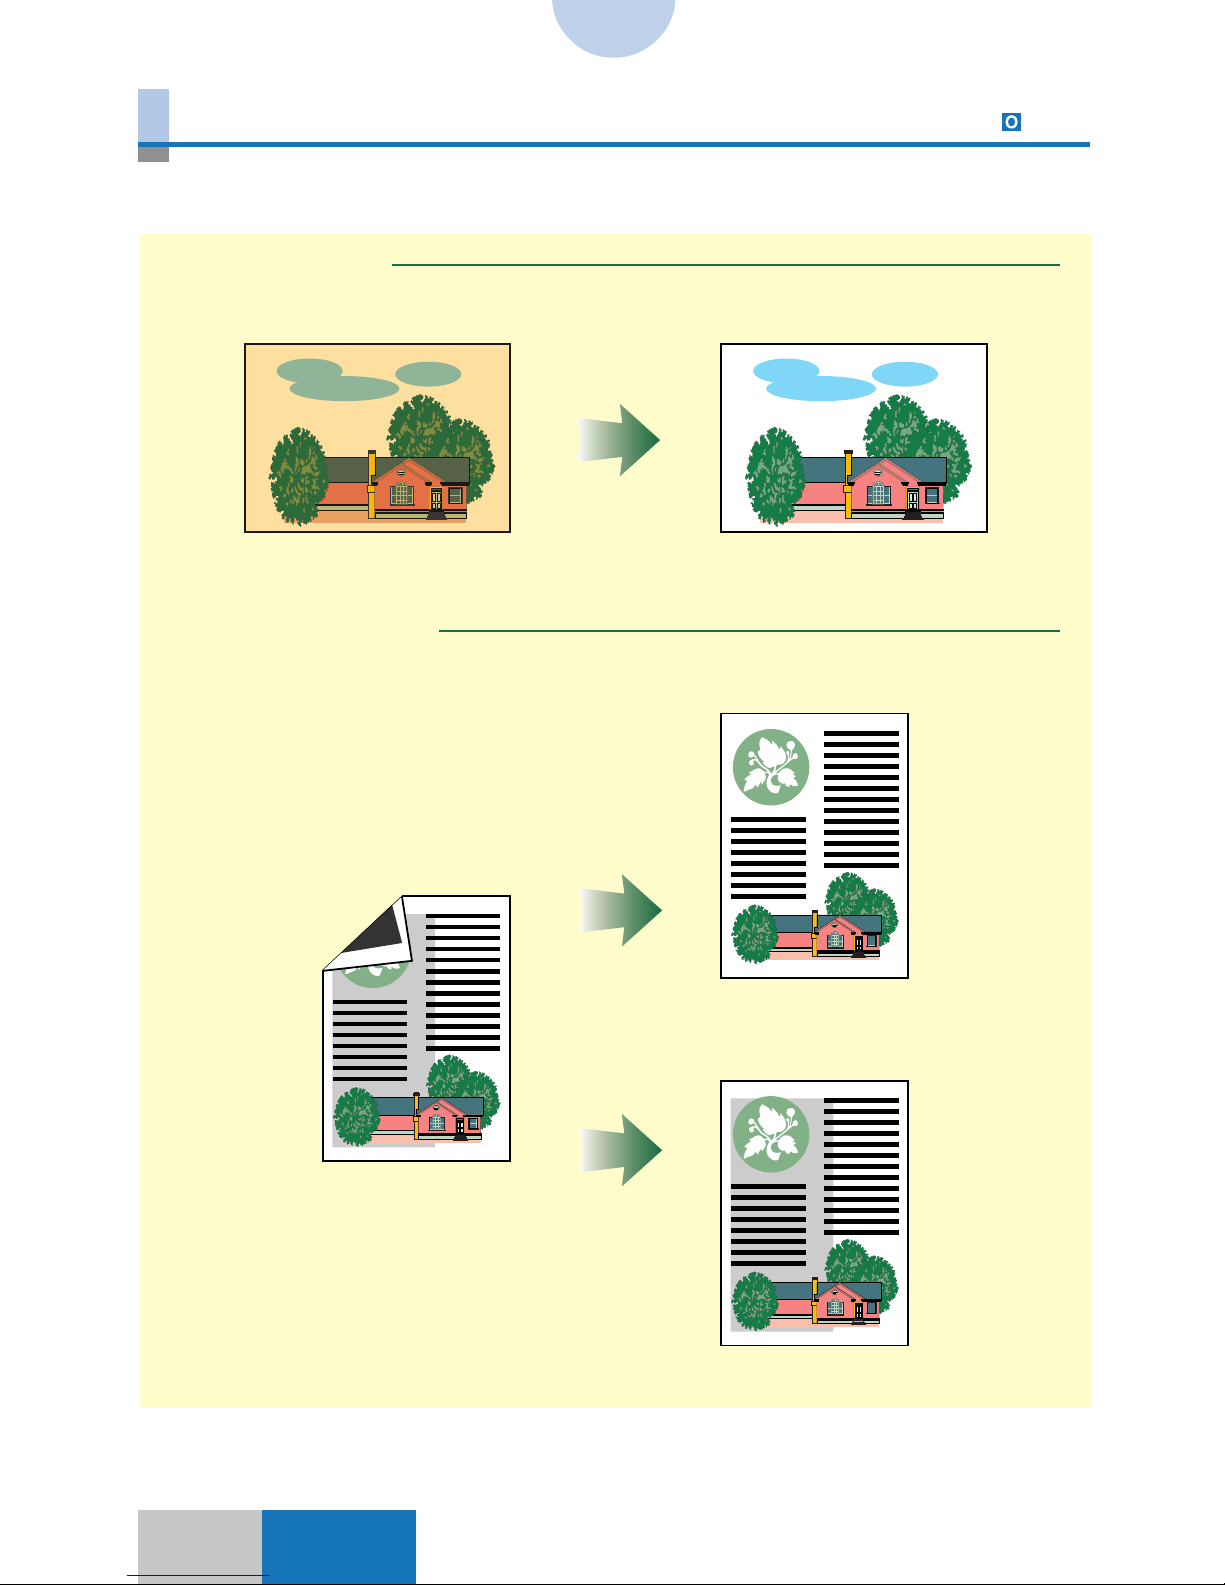
Framing/Blanking 10-2
Only the area inside or outside a designated area is copied.
Framing
Blanking
Original Copy
Original Copy
Page 48

391-39
1
Visual Index
Indexes
Transparency Interleaving 5-19
Copy sheets are interleaved between transparencies when copies are made onto transparencies. It is possible to copy the same image as that on the transparencies onto the
interleaf sheets.
Transparency Interleaving
Plain paper
Transparency
Original
Plain paper
Transparency
With no image copied on the interleaf sheet
With the image copied on the interleaf sheet
Page 49

1-40
Indexes
Marker Editing 9-22
Copies are made by adding a selected color to an area designated with a marker pen.
Marker Editing
Marker pen
One-point Designation
Entire Enclosed
(Base Color)
Designated Area
(Base Color)
Encircled Designation
Entire Enclosed
(Base Color)
Enclosed Area
(Base Color)
Page 50

CHAPTER 2
Index by Purpose
This chapter shows the quick index to the operation of finding the page using “what you
want to do” as a key.
2
Page 51

2-2
Indexes
Activating/deactivating Auto Sort ................................................................... 13-15
Activating/deactivating Auto Start when an original is placed in the single sheet document
feeder of the Feeder ..................................................................................................
13-33
Activating/deactivating automatic switching to a drawer with the same size paper loaded as
the currently selected paper when the drawer runs out of paper .................................
13-17
Activating/deactivating Confirmation Window Auto Display.........................................
13-13
(Press once.)
Additional Functions
(Press three
times.)
Additional Functions
Additional Functions
(Press once.)
Additional Functions
A
(Press once.)
Page 52

32-3
2
Index by Purpose
Indexes
Activating/deactivating sound when a key is touched
➝ Activating/deactivating error alert sound or operation sound (p. 2-3)
Activating/deactivating the Inch Entry mode ..................................................................
13-11
Adding a color to the image (Color For Text) .............................................
8-12, 1-32
Adding a pattern (Texture) ...........................................................................
8-21, 1-33
Activating/deactivating error alert sound or operation sound ...................................... 13-19
(Press once.)
Additional Functions
Additional Functions
Selecting a color (p. 2-52)
A
Page 53

2-4
Indexes
Adding a solid color to the background .............................................................. 7-36, 1-26
Adding color to an area (Coloring) ......................................................
7-31, 1-24
Selecting a color (p. 2-52)
➝ Selecting a color (p. 2-52)
A
Page 54

52-5
2
Index by Purpose
Indexes
Adding covers (Front & Back Covers) ...................................................................... 5-15
Adding covers (Front Covers) ...................................................................................
5-15
Adding gradations to the image or background .................................................
7-22, 1-22
(Front cover paper selection)
(Main text copy paper selection)
(To the next page)
Specifying the gradation pitch (p. 2-60)
Adjusting the gradation smoothness (p. 2-8)
Adding the frame with gradations (p. 2-6)
Frame
Repeat
Gradation
Adjust.
(Front cover paper selection)
(Main text copy paper selection)
To the next page
A
Page 55

2-6
Indexes
Adding shadows to the image (Shadow) .................................................... 8-17, 1-32
Adding the frame with gradations ......................................................................................
7-25
Shadow Color
Shadow Length
Selecting a color (p. 2-52)
➝ Adding gradations to the image or background (p. 2-5)
(From the previous page)
Frame
A
Selecting a
color
(p. 2-52)
Page 56

72-7
2
Index by Purpose
Indexes
Adjusting an area .................................................................................................. 9-6
Adjusting the black area...................................................................................................... 6-33
Adjusting the color balance ....................................................................................
6-2, 1-18
(After area designation)
➝ Designating an area (p. 2-16)
A
Adjust Area
Page 57

2-8
Indexes
Adjusting the color range (Color Range Adjustment) ........................................ 6-31, 1-15
Adjusting the gradation smoothness.................................................................................
7-28
➝ Adding gradations to the image or background (p. 2-5)
➝ Making copies by changing a black-and-white original image to white
and adding a color to the background (Blue Background) (p. 2-31)
Gradation
Adjust
A
Page 58

92-9
2
Index by Purpose
Indexes
Adjusting the hue of a complexion (Complexion Adjustment) .......................... 6-35, 1-17
Adjusting the hues
➝ Adjusting the hues by a one-touch operation (One Touch Color) (p. 2-10)
Adjusting the hues ...................................................................................................
6-6, 1-19
A
Page 59

2-10
Indexes
Adjusting the hues by a one-touch operation (One Touch Color) .................... 6-22, 1-13
Adjusting the image quality by a one-touch operation (One Touch Color) ......
6-22, 1-11
Adjusting the photo and text priority level ......................................................................
13-61
Additional Functions
A
Page 60

112-11
2
Index by Purpose
Indexes
Adjusting the vividness (Saturation Adjustment) ................................................. 6-4, 1-19
Applying the color filter effects ..........................................................................................
7-29
Automatically selecting copy paper according to the original size (Auto Paper Selection)
...............................................................................................................................................
2-24
Blanking
➝ Making copies of the area outside a designated area
(Blanking, Number Key Entry) (p. 2-42)
➝ Making copies of the area outside a designated area
(Blanking, Pen Entry) (p. 2-42)
Selecting a color (p. 2-52)
A-B
Page 61

2-12
Indexes
Calibrating the printer gradation ....................................................................
CS 110/115 NC
13-66
Changing a color (Color Conversion)
➝ Changing the color in an area (Color Conversion) (p. 2-12)
Changing the color in an area (Color Conversion) ............................
7-39, 1-25
Selecting a color
(p. 2-52)
Additional Functions
(Press once.)
C
Fine
Page 62

132-13
2
Index by Purpose
Indexes
Changing the color sheet ......................................................................................... 13-27
Changing the number of gradations for exposure adjustment .....................................
13-21
Changing the position of the image to a designated position (Number Key Entry)
.................................................................................................................................................
4-4
(Press twice.)
Additional Functions
(Press twice.)
Additional Functions
C
Page 63

2-14
Indexes
Changing the position of the image to a designated position (Pen Entry)
........................................................................................................................................
4-6
Changing the position of the image to the center by a one-touch operation
...............................................................................................................................................
2-17
Center Shift
Designate the reference point (one point)
for the area to be moved.
Designate the reference point (one point) for the destination area.
C
Page 64

152-15
2
Index by Purpose
Indexes
Changing the position of the image to the top, bottom, right, left, corner, or center
.....................................................................................................................................
4-3, 1-5
Cleaning the Feeder ..................................................................................................
13-62
Cleaning the Feeder when a copy has unnecessary black lines
➝ Cleaning the Feeder (p. 2-15)
Cleaning the wire ............................................................................................................... 13-64
Cleaning the wire when a copy is dirty
➝ Cleaning the wire (p. 2-15)
Designating a free area
➝ Designating an area (p. 2-16)
(Press once.)
Additional Functions
(Press once.)
Additional Functions
C-D
Page 65

2-16
Indexes
Designating a polygonal area
➝ Designating an area (p. 2-16)
Designating a rectangular area
➝ Designating an area (p. 2-16)
Designating a rectangular area with rounded corners
➝ Designating an area (p. 2-16)
Designating an area .............................................................................................. 9-2
(Designate necessary points.)
D
Page 66

172-17
2
Index by Purpose
Indexes
Designating an area of the image and moving it to another area ............................ 4-9
Designating an elliptical area
➝ Designating an area (p. 2-16)
Designating an oval area
➝ Designating an area (p. 2-16)
Designate an area (two points) to be moved.
Designate an area (two points) to move.
D
Page 67

2-18
Indexes
Dividing one original into sections and making an enlarged copy onto a number of sheets
(Multi-page Enlargement at the specified copy ratio)...........................................
3-11, 1-4
Dividing one original into sections and making an enlarged copy onto a number of sheets
(Multi-page Enlargement with the specified page count).....................................
3-14, 1-4
D
Page 68

192-19
2
Index by Purpose
Indexes
Duplicating a color sheet ......................................................................................... 13-31
(Press twice.)
Additional Functions
D
Page 69

2-20
Indexes
Editing a black-and-white text original for each area and inserting the edited areas into a
color image (Multiple Editing) ............................................................
11-25, 1-36
(For Superimpose, designate the area
for Multiple Editing.)
Selecting a color (p. 2-52)
E
Page 70
212-21
2
Index by Purpose
Indexes
Enhancing the edges ............................................................................................. 6-25, 1-20
Enhancing/weakening one primary color
➝ Adjusting the hues by a one-touch operation (One Touch Color) (p. 2-10)
Erasing shadows of an original (Book Frame Erase) ............................................
5-9, 1-8
E
Page 71

2-22
Indexes
Erasing shadows of an original (Original Frame Erase) ........................................ 5-7, 1-7
Erasing shadows of an original (Sheet Frame Erase) ............................................
5-4, 1-7
Faithfully reproducing highlights
➝ Adjusting the image quality by a one-touch operation (One Touch Color) (p. 2-10)
E-F
Page 72

232-23
2
Index by Purpose
Indexes
Finely adjusting the color density ........................................................................ 6-10, 1-19
Finely adjusting the zoom copy ratio ...............................................................................
13-54
Framing
➝ Making copies of the area inside a designated area (Framing, Number Key Entry)
(p. 2-41)
➝ Making copies of the area inside a designated area (Framing, Pen Entry) (p. 2-41)
Increasing the density in a light tone portion (Highlight Reproduction)
➝ Adjusting the image quality by a one-touch operation (One Touch Color) (p. 2-10)
Additional Functions
F-I
Page 73

2-24
Indexes
(Press three
times.)
Additional Functions
Initializing the standard copy settings ............................................................................. 13-35
I
Page 74

252-25
Index by Purpose
2
Indexes
Inserting a black-and-white text original into a color image
(Character Composition) ......................................................................
11-8, 1-36
Designate the Window
area (two points).
To the next page
(Designate an area only for Window.)
Selecting a color (p. 2-52)
I
Page 75

2-26
Indexes
From the previous page
I
Page 76

272-27
Index by Purpose
2
Indexes
Inserting a color original into a black-and-white text original
................................................................................................................
11-2, 1-35
➝ Adjusting an area (p. 2-7)
Designate the area to be extracted.
Designate the insert
destination area.
I
Page 77

2-28
Indexes
Inserting text from a black-and-white text original into a designated
area on a color image (Character Composition Shift) .....................
11-19, 1-36
I
Designate the Window area (two points).
(For Superimpose, designate an area to be moved.)
To the next page
Selecting a color (p. 2-52)
Designate a shift destination area (two points).
Page 78

292-29
Index by Purpose
2
Indexes
Interleaving a copy sheet between transparencies
(Transparency Interleaving) ................................................................................................
5-19
From the previous page
I
Page 79

2-30
Indexes
Making a pair of symmetric images from one image (Mirror Image) .................. 8-8, 1-30
Making color copies in a single color ................................................................................
7-21
Making colors closer to the offset SWOP Emulations .................................
CS 110/115 NC
13-68
Selecting a color (p. 2-52)
(Press once.)
Additional Functions
M
Page 80

312-31
Index by Purpose
2
Indexes
Making copies by changing a black-and-white original image to white and adding a color to
the background (Blue Background) .....................................................................
7-37, 1-27
Making copies by changing the vertical and horizontal ratio (XY Zoom) .............
3-7, 1-3
Making copies by erasing shadows at the center and around the image
➝ Erasing shadows of an original (Book Frame Erase) (p. 2-21)
Gradation
Adjust.
Selecting a color (p. 2-52)
Adjusting the gradation smoothness (p. 2-8)
Specifying the gradation pitch (p. 2-60)
Repeat
(When gradation pattern is selected)
M
Page 81

2-32
Indexes
Making copies by manually feeding copy sheets ............................................................. 2-27
Place a sheet in the stack bypass.
M
Page 82

332-33
Index by Purpose
2
Indexes
Making copies from 35 mm negative film ................................................................. 4-66
To the next page
M
Page 83

2-34
Indexes
(From the previous page)
M
Color Tone
Adjustment
Page 84

352-35
Index by Purpose
2
Indexes
Making copies from 35 mm positive film .................................................................. 4-71
To the next page
M
Page 85

2-36
Indexes
(From the previous page)
M
Color Tone
Adjustment
Page 86

372-37
Index by Purpose
2
Indexes
Making copies from a transparency .......................................................................... 4-75
M
(After the shading is complete)
Page 87

2-38
Indexes
Making copies from large-size negative film ............................................................ 4-78
(After the shading is complete)
M
Page 88

392-39
Index by Purpose
2
Indexes
Making copies from large-size positive film ............................................................. 4-82
(After the shading is complete)
M
Page 89

2-40
Indexes
Making copies in a tranquil color
➝ Adjusting the image quality by a one-touch operation (One Touch Color) (p. 2-10)
Making copies in black only................................................................................................
2-11
Making copies of a photograph
➝ Selecting an original type (Original Type) (p. 2-55)
Making copies of a print containing a photograph
➝ Selecting an original type (Original Type) (p. 2-55)
Making copies of an original consisting of small characters and graphics
➝ Selecting an original type (Original Type) (p. 2-55)
Making copies of contours of the image (Contour) ...................................
8-14, 1-32
Selecting a color
(p. 2-52)
Contour Type Contour Color
Black
M
Page 90

412-41
Index by Purpose
2
Indexes
Making copies of the area inside a designated area
(Framing, Number Key Entry) .............................................................................................
10-2
Making copies of the area inside a designated area
(Framing, Pen Entry) ...................................................................................................
10-4
(Designate necessary points.)
(Designate necessary points.)
M
Page 91

2-42
Indexes
Making copies of the area outside a designated area
(Blanking, Number Key Entry) ............................................................................................
10-2
Making copies of the area outside a designated area
(Blanking, Pen Entry) ..................................................................................................
10-4
(Designate necessary points.)
(Designate necessary points.)
M
Page 92

432-43
Index by Purpose
2
Indexes
Making copies of the image repeatedly onto one sheet....................................... 8-3, 1-29
Making copies of two originals onto one sheet (Image Combination)
.........................................................................................................................
5-12, 1-10
Making copies onto transparencies ...................................................................................
2-36
M
Page 93

2-44
Indexes
Making copies which look like old-fashioned photographs
➝ Adjusting the image quality by a one-touch operation (One Touch Color) (p. 2-10)
Making copies with a margin (Margin) ...................................................................
4-13, 1-6
Making copies with heavier tones
➝ Adjusting the image quality by a one-touch operation (One Touch Color) (p. 2-10)
Making copies with lighter tones
➝ Adjusting the image quality by a one-touch operation (One Touch Color) (p. 2-10)
Making copies with no surrounding edges missing (Entire Image)................................
2-23
Making copies with the white text and color background from
a black-and-white original
➝ Making copies by changing a black-and-white original image to white and adding a color
to the background (Blue Background) (p. 2-31)
Making copies with vivid colors
➝ Adjusting the image quality by a one-touch operation (One Touch Color) (p. 2-10)
M
Page 94

452-45
Index by Purpose
2
Indexes
Making copies without the background color (Hide Background) .................... 6-27, 1-14
Making enlarged/reduced copies onto standard size paper ............................................
2-19
Making one-sided copies from a two-sided original onto two sheets ...................
3-23
M
Page 95

2-46
Indexes
Making one-sided copies of facing (right and left) pages onto two sheet
(Two-page Separation) ...........................................................................................................
5-2
Making two-sided copies by manually feeding copy sheets ...........................................
2-34
Making two-sided copies from a one-sided original (Two-sided Mode)
......................................................................................................................................
3-21
Making two-sided copies from a two-sided original ........................................
3-24
To make a copy
of the first side
To make a copy
of the second side
M
Place a sheet in the stack bypass.
Page 96

472-47
Index by Purpose
2
Indexes
Making two-sided copies of facing (right and left) pages
(Book ➝ 2-sided) .........................................................................................................
3-26
Manually selecting the copy paper size .............................................................................
2-26
Preventing a backside image from being copied on the front side
(Hide Backside Image) ...........................................................................................
6-29, 1-14
M-P
Page 97

2-48
Indexes
Printing a color sheet ....................................................................................... 13-28
Printing a test chart for Automatic Gradation Adjustment ............................................
13-58
(Press twice.)
Additional Functions
Additional Functions
Scanning
Scanning
P
Page 98

492-49
Index by Purpose
2
Indexes
Recalibrating the copy exposure...................................................................................... 13-56
Recalling the registered copy settings from mode memory............................................
12-7
Reducing the number of gradations (Reduced Gradation) ....................... 8-24, 1-34
Registering a drawer with thin paper loaded ..................................................................
13-25
Additional Functions
(Press the
mode memory
button with the
copy settings
registered.)
(Press twice.)
Additional Functions
R
Page 99

2-50
Indexes
Registering a drawer with transparencies loaded .......................................................... 13-23
Registering a color sheet .........................................................................................
13-29
(Press twice.)
Additional Functions
(Press twice.)
Additional Functions
Duplicating a color sheet (p. 2-19)
Selecting
a Color
(p. 2-52).
R
Page 100

512-51
Index by Purpose
2
Indexes
Registering the copy settings in mode memory ............................................................... 12-2
Registering the standard copy settings...........................................................................
13-35
(Press three
times.)
Additional Functions
R
 Loading...