

Page 1
Océ
cm3522/
cm2522
Print Operations
User’s Guide
Printing for
Professionals
Page 2

Introduction
Thank you for purchasing this machine.
The Océ cm3522/cm2522 is equipped with an integration printer controller that allows you to print directly
from Windows-compatible computers or Macintosh computers.
This User’s Guide describes the printing functions of the printer controller, operating instructions, and
precautions for proper operation. In order to allow functionality of this product fully and to use it effectively,
please read this User’s Guide as necessary.
In order to operate the product safely and properly, be sure to read the accompanying User’s Guide
[Copy/Print/Fax/Scan/Box Operations].
For descriptions on trademarks and copyrights, refer to [Trademarks/Copyrights].
Illustrations shown in the User’s Guide may differ from actual machine.
Océ cm3522/cm2522 x-1
Page 3

Table of contents
Introduction
Table of contents....................................................................................................................................................x-2
About this manual...................................................................................................................................................x-9
Contents ..................................................................................................................................................x-9
Product notation ......................................................................................................................................x-9
Explanation of manual conventions .......................................................................................................x-10
User’s Guides........................................................................................................................................................x-11
Printed manual .......................................................................................................................................x-11
User’s Guide CD manuals .....................................................................................................................x-11
1 Overview of printer functions
1.1 Printer controller................................................................................................................................... 1-2
1.1.1 Role of the printer controller.....................................................................................................................1-2
1.1.2 Printing flow..............................................................................................................................................1-3
1.1.3 Control panel ............................................................................................................................................1-4
1.2 Operating environment ........................................................................................................................ 1-5
1.2.1 Compatible computers and operating systems .......................................................................................1-5
Windows ...................................................................................................................................................1-5
Macintosh .................................................................................................................................................1-5
1.2.2 Compatible interfaces...............................................................................................................................1-6
Ethernet interface .....................................................................................................................................1-6
USB interface............................................................................................................................................1-6
Connection diagram .................................................................................................................................1-6
1.3 Setting up the system........................................................................................................................... 1-7
1.3.1 Network connection .................................................................................................................................1-7
1.3.2 Local connection ......................................................................................................................................1-7
1.4 Contents of CD-ROM ........................................................................................................................... 1-9
2 Precautions for installation
2.1 Introduction........................................................................................................................................... 2-2
2.2 Printer drivers applicable to operating systems................................................................................ 2-3
2.3 Connection methods selectable in each operating system ............................................................. 2-4
2.3.1 Windows 2000/XP/Server 2003................................................................................................................2-4
2.3.2 Windows Vista ..........................................................................................................................................2-5
2.3.3 Windows NT 4.0 .......................................................................................................................................2-6
2.3.4 Mac OS 10.2, 10.3, or 10.4.......................................................................................................................2-6
2.3.5 NetWare....................................................................................................................................................2-6
3 Easy installation using the installer (Windows)
3.1 Installer .................................................................................................................................................. 3-2
3.1.1 Installer operating environment ................................................................................................................3-2
3.2 Easy installation using the installer .................................................................................................... 3-3
3.2.1 Settings of this machine ...........................................................................................................................3-3
3.2.2 Installation of the printer driver.................................................................................................................3-3
4 Manual installation using the Add Printer wizard
4.1 Windows XP/Server 2003..................................................................................................................... 4-2
4.1.1 Network connection (LPR/Port9100)........................................................................................................4-2
TCP/IP setting for this machine................................................................................................................4-2
RAW port number setting for this machine ..............................................................................................4-2
LPD setting for this machine ....................................................................................................................4-2
Océ cm3522/cm2522 x-2
Page 4

Printer driver installation using the Add Printer Wizard ............................................................................4-2
4.1.2 Network connection (SMB).......................................................................................................................4-5
TCP/IP setting for this machine................................................................................................................4-5
SMB setting for this machine ...................................................................................................................4-5
Printer driver installation by specifying printers using the Add Printer Wizard.........................................4-6
4.1.3 Network connection (IPP or IPPS)............................................................................................................4-8
4.1.4 Local connection ......................................................................................................................................4-9
4.2 Windows Vista..................................................................................................................................... 4-11
4.2.1 Network connection (LPR, Port9100, or SMB) .......................................................................................4-11
4.2.2 Network connection (IPP or IPPS)..........................................................................................................4-15
4.2.3 Network connection (Web Service print)................................................................................................4-17
4.2.4 Local connection ....................................................................................................................................4-20
4.3 Windows 2000 ..................................................................................................................................... 4-21
4.3.1 Network connection (LPR/Port9100)......................................................................................................4-21
4.3.2 Network connection (SMB).....................................................................................................................4-23
4.3.3 Network connection (IPP or IPPS)..........................................................................................................4-24
4.3.4 Local connection ....................................................................................................................................4-26
4.4 Windows NT 4.0 .................................................................................................................................. 4-27
4.4.1 Network connection (LPR)......................................................................................................................4-27
Specifying the TCP/IP setting for this machine........................................................................................4-8
Specifying the IPP settings for this machine ............................................................................................4-8
Printer driver installation using the Add Printer wizard.............................................................................4-8
Specifying the TCP/IP setting for this machine......................................................................................4-11
RAW port number setting for this machine ............................................................................................4-11
LPD setting for this machine ..................................................................................................................4-11
SMB setting for this machine .................................................................................................................4-11
Printer driver installation by searching printers using the Add Printer Wizard .......................................4-11
Printer driver installation by creating a port using the Add Printer Wizard.............................................4-13
Specifying the TCP/IP setting for this machine......................................................................................4-15
Specifying the IPP settings for this machine ..........................................................................................4-16
Printer driver installation using the Add Printer wizard...........................................................................4-16
TCP/IP setting for this machine..............................................................................................................4-17
Web Service settings for this machine ...................................................................................................4-17
Printer installation from the Network window.........................................................................................4-17
Printer driver installation by specifying the IP address using the Add Printer Wizard ...........................4-18
TCP/IP setting for this machine..............................................................................................................4-21
RAW port number setting for this machine ............................................................................................4-21
LPD setting for this machine ..................................................................................................................4-21
Printer driver installation using the Add Printer Wizard ..........................................................................4-21
TCP/IP setting for this machine..............................................................................................................4-23
SMB setting for this machine .................................................................................................................4-23
Printer driver installation using the Add Printer Wizard ..........................................................................4-23
Specifying the TCP/IP setting for this machine......................................................................................4-24
Specifying the IPP settings for this machine ..........................................................................................4-25
Printer driver installation using the Add Printer wizard...........................................................................4-25
TCP/IP setting for this machine..............................................................................................................4-27
LPD setting for this machine ..................................................................................................................4-27
Printer driver installation using the Add Printer Wizard ..........................................................................4-27
5 Installation on Macintosh computers
5.1 Mac OS X 10.2, 10.3, or 10.4 ................................................................................................................ 5-2
5.1.1 Installing the printer driver ........................................................................................................................5-2
5.1.2 Selecting and connecting the printer (OS 10.4)........................................................................................5-3
Specifying the Bonjour settings................................................................................................................5-3
Specifying the AppleTalk settings ............................................................................................................5-4
Specifying the LPR settings .....................................................................................................................5-5
Specifying the IPP settings.......................................................................................................................5-7
5.1.3 Selecting and connecting the printer (OS 10.2 and 10.3).........................................................................5-8
Specifying the Rendezvous settings ........................................................................................................5-8
Specifying the AppleTalk settings ............................................................................................................5-9
Océ cm3522/cm2522 x-3
Page 5

Specifying the LPR settings ...................................................................................................................5-10
Specifying the IPP settings.....................................................................................................................5-11
5.2 Mac OS 9.2 .......................................................................................................................................... 5-13
5.2.1 Installing the printer driver ......................................................................................................................5-13
5.2.2 Selecting and connecting the printer......................................................................................................5-13
Specifying the AppleTalk settings ..........................................................................................................5-13
Specifying the LPR settings ...................................................................................................................5-14
6 Installation to use NetWare
6.1 NetWare................................................................................................................................................. 6-2
6.1.1 Network Settings ......................................................................................................................................6-2
6.1.2 Windows Client Setting ............................................................................................................................6-2
7 Uninstalling the printer driver
7.1 Windows ................................................................................................................................................ 7-2
7.1.1 Uninstallation by an uninstallation program .............................................................................................7-2
7.1.2 Uninstallation by an installer.....................................................................................................................7-2
7.1.3 Manual uninstallation................................................................................................................................7-3
7.2 Macintosh.............................................................................................................................................. 7-4
7.2.1 For Macintosh OS X .................................................................................................................................7-4
7.2.2 For Macintosh OS 9.2...............................................................................................................................7-4
8 Print functions of the PCL/PS drivers for Windows
8.1 Printing operations ............................................................................................................................... 8-2
8.2 Initializing the printer driver................................................................................................................. 8-3
8.2.1 How to display the Properties screen ......................................................................................................8-3
8.2.2 Configure tab............................................................................................................................................8-3
8.2.3 Settings tab ..............................................................................................................................................8-4
8.2.4 Registration of the default settings...........................................................................................................8-5
8.3 Common settings ................................................................................................................................. 8-6
8.4 Parameter details ................................................................................................................................. 8-7
8.4.1 Basic tab...................................................................................................................................................8-7
8.4.2 Layout tab.................................................................................................................................................8-9
8.4.3 Finish tab ................................................................................................................................................8-10
8.4.4 Cover Mode tab......................................................................................................................................8-11
8.4.5 Stamp/Composition tab .........................................................................................................................8-12
Editing watermark...................................................................................................................................8-14
Eding copy protect .................................................................................................................................8-15
Editing date/time and page number.......................................................................................................8-16
8.4.6 Quality tab ..............................................................................................................................................8-17
8.4.7 Other tab.................................................................................................................................................8-18
9 Print function of Mac OS X
9.1 Printing operations ............................................................................................................................... 9-2
9.2 Initializing the printer driver................................................................................................................. 9-3
9.2.1 Options .....................................................................................................................................................9-3
9.2.2 Registration of the default settings...........................................................................................................9-4
9.3 Common settings ................................................................................................................................. 9-5
9.4 How to add a custom size ................................................................................................................... 9-6
9.5 Parameter details ................................................................................................................................. 9-7
9.5.1 Page Attributes.........................................................................................................................................9-7
9.5.2 Copies & Pages ........................................................................................................................................9-8
9.5.3 Output Method .........................................................................................................................................9-8
Checking the Output Method setting details............................................................................................9-9
Océ cm3522/cm2522 x-4
Page 6

9.5.4 Layout/Finish ..........................................................................................................................................9-11
9.5.5 Paper Tray/Output Tray..........................................................................................................................9-13
9.5.6 Cover Mode/Transparency Interleave ....................................................................................................9-14
9.5.7 Per Page Setting.....................................................................................................................................9-15
9.5.8 Stamp/Composition................................................................................................................................9-16
Eding copy protect .................................................................................................................................9-17
Editing date/time ....................................................................................................................................9-18
Editing page number ..............................................................................................................................9-19
Editing header/footer..............................................................................................................................9-19
9.5.9 Quality.....................................................................................................................................................9-20
10 Print function of Mac OS 9.2
10.1 Printing operations ............................................................................................................................. 10-2
10.2 Initializing the printer driver............................................................................................................... 10-3
10.2.1 Options ...................................................................................................................................................10-3
10.2.2 Registration of the default settings.........................................................................................................10-4
10.3 Parameter details ............................................................................................................................... 10-5
10.3.1 Page Attributes .......................................................................................................................................10-5
10.3.2 Setting Custom Page Size......................................................................................................................10-5
10.3.3 General ...................................................................................................................................................10-6
10.3.4 Layout (Pages per sheet)........................................................................................................................10-6
10.3.5 Printer specific options (Finishing Options 1 to 5) ..................................................................................10-7
11 Function detail description
11.1 Proof print............................................................................................................................................ 11-2
11.1.1 Setting up the printer driver....................................................................................................................11-2
11.1.2 Recalling a job from the control panel....................................................................................................11-3
11.2 Secure print......................................................................................................................................... 11-5
11.2.1 Setting up the printer driver....................................................................................................................11-5
11.2.2 Recalling a job from the control panel....................................................................................................11-8
11.3 Save in User Box............................................................................................................................... 11-13
11.3.1 Setting up the printer driver..................................................................................................................11-13
11.3.2 Recalling a job from the control panel..................................................................................................11-15
11.4 Printing on a machine with the user authentication set up.......................................................... 11-18
11.4.1 Setting up the printer driver..................................................................................................................11-18
11.5 Printing with the machine enabling the Account Track function................................................. 11-21
11.5.1 Setting up the printer driver..................................................................................................................11-21
11.6 Touch and Print................................................................................................................................. 11-24
11.7 Specifying a user-defined encryption passphrase........................................................................ 11-25
11.7.1 Settings of this machine .......................................................................................................................11-25
11.7.2 Setting up the printer driver..................................................................................................................11-27
For Windows...........................................................................................................................................11-2
For Macintosh OS X ...............................................................................................................................11-3
For Windows...........................................................................................................................................11-5
For Macintosh OS X ...............................................................................................................................11-7
When "Confidential Document Access Method" is set to "Mode 1" .....................................................11-8
When "Confidential Document Access Method" is set to "Mode 2" ...................................................11-10
For Windows.........................................................................................................................................11-13
For Macintosh OS X .............................................................................................................................11-14
For Windows.........................................................................................................................................11-18
For Macintosh OS X .............................................................................................................................11-20
For Windows.........................................................................................................................................11-21
For Macintosh OS X .............................................................................................................................11-23
For Windows.........................................................................................................................................11-27
For Macintosh OS X .............................................................................................................................11-28
Océ cm3522/cm2522 x-5
Page 7

11.8 ICC profile settings........................................................................................................................... 11-29
11.8.1 Setting up the printer driver..................................................................................................................11-29
For Windows.........................................................................................................................................11-29
For Macintosh OS X .............................................................................................................................11-30
11.9 Registering ICC profiles in the printer driver................................................................................. 11-31
11.9.1 Setting up the printer driver..................................................................................................................11-31
11.10 Banner paper printing function ....................................................................................................... 11-35
11.10.1 Copy paper ...........................................................................................................................................11-35
11.10.2 Printer drivers and supported operating systems ................................................................................11-35
11.10.3 Setting up the printer driver..................................................................................................................11-35
11.10.4 Printing..................................................................................................................................................11-36
For Windows.........................................................................................................................................11-31
For Macintosh OS X .............................................................................................................................11-33
Applicable paper...................................................................................................................................11-35
12 Settings on the control panel
12.1 Basic operations for user settings.................................................................................................... 12-2
12.1.1 Displaying the User Settings screen.......................................................................................................12-2
12.2 User settings ....................................................................................................................................... 12-4
12.2.1 PDL setting .............................................................................................................................................12-4
12.2.2 Number of Copies ..................................................................................................................................12-5
12.2.3 Original Direction ....................................................................................................................................12-6
12.2.4 Spool Print Jobs in HDD before RIP.......................................................................................................12-7
12.2.5 A4/A3←→LTR/LGR Auto Switch............................................................................................................12-8
12.2.6 Banner Sheet Setting..............................................................................................................................12-9
12.2.7 Binding Direction Adjustment...............................................................................................................12-10
12.2.8 Line Width Adjustment .........................................................................................................................12-11
12.2.9 Paper Tray ............................................................................................................................................12-12
12.2.10 Paper Size.............................................................................................................................................12-13
12.2.11 2-Sided Print.........................................................................................................................................12-14
12.2.12 Binding Position....................................................................................................................................12-15
12.2.13 Staples..................................................................................................................................................12-16
12.2.14 Punch....................................................................................................................................................12-17
12.2.15 Banner Paper Tray................................................................................................................................12-18
12.2.16 Font Settings ........................................................................................................................................12-19
12.2.17 Symbol Set ...........................................................................................................................................12-20
12.2.18 Font Size...............................................................................................................................................12-21
12.2.19 Line/Page..............................................................................................................................................12-22
12.2.20 CR/LF Mapping ....................................................................................................................................12-23
12.2.21 Print PS Errors ......................................................................................................................................12-24
12.2.22 ICC Profile Settings ..............................................................................................................................12-25
12.2.23 Verify XPS Digital Signature..................................................................................................................12-26
12.2.24 Print Reports.........................................................................................................................................12-27
12.3 Basic operations for Administrator Settings.................................................................................. 12-29
12.3.1 Displaying the Administrator Settings screen.......................................................................................12-29
12.4 Administrator Settings ..................................................................................................................... 12-31
12.4.1 Print/Fax Output Settings .....................................................................................................................12-31
12.4.2 Output Tray Settings.............................................................................................................................12-32
12.4.3 Delete Secure Print Documents ...........................................................................................................12-32
12.4.4 Auto Delete Secure Document .............................................................................................................12-33
12.4.5 Print without Authentication .................................................................................................................12-34
12.4.6 I/F Timeout............................................................................................................................................12-35
12.4.7 Print XPS Errors....................................................................................................................................12-36
12.4.8 Print Data Capture................................................................................................................................12-36
12.4.9 Driver Password Encryption Setting.....................................................................................................12-37
Océ cm3522/cm2522 x-6
Page 8

13 Web Connection
13.1 Using Web Connection....................................................................................................................... 13-2
13.1.1 Operating environment ...........................................................................................................................13-2
13.1.2 Accessing Web Connection ...................................................................................................................13-2
13.1.3 Web browser cache................................................................................................................................13-3
With Internet Explorer.............................................................................................................................13-3
With Netscape Navigator........................................................................................................................13-3
With Mozilla Firefox ................................................................................................................................13-3
13.1.4 Structure of pages ..................................................................................................................................13-4
13.2 Logging on and logging off................................................................................................................ 13-6
13.2.1 Login and logout operations...................................................................................................................13-6
13.2.2 Logout.....................................................................................................................................................13-8
13.2.3 Login.......................................................................................................................................................13-8
13.3 Overview of User mode.................................................................................................................... 13-12
13.3.1 Information............................................................................................................................................13-12
13.3.2 Job........................................................................................................................................................13-13
13.3.3 Box .......................................................................................................................................................13-13
13.3.4 Direct Print............................................................................................................................................13-14
13.3.5 Store Address.......................................................................................................................................13-15
13.4 Overview of Administrator mode .................................................................................................... 13-16
13.4.1 Maintenance .........................................................................................................................................13-16
13.4.2 Security.................................................................................................................................................13-17
13.4.3 Box .......................................................................................................................................................13-18
13.4.4 Print Setting ..........................................................................................................................................13-19
13.4.5 Store Address.......................................................................................................................................13-20
13.4.6 Network ................................................................................................................................................13-21
When user authentication and account track settings are not specified ...............................................13-6
When user authentication and account track settings are specified .....................................................13-7
Options that can be selected when logged on to Web Connection.......................................................13-8
Logging on as a public user ...................................................................................................................13-9
Logging on as a registered user .............................................................................................................13-9
Logging on to Administrator mode.......................................................................................................13-10
Logging on as a user box administrator...............................................................................................13-11
14 Troubleshooting
14.1 Cannot print ........................................................................................................................................ 14-2
14.2 Unable to specify desired settings or unable to print as specified ............................................... 14-4
14.2.1 Printer driver settings have no effect......................................................................................................14-4
14.2.2 Other.......................................................................................................................................................14-5
14.2.3 Error message ........................................................................................................................................14-5
15 Appendix
15.1 Product specifications ....................................................................................................................... 15-2
15.2 Configuration page............................................................................................................................. 15-4
15.3 Font list ................................................................................................................................................ 15-5
15.3.1 PCL Font List ..........................................................................................................................................15-5
15.3.2 PS Font List ............................................................................................................................................15-6
15.3.3 Demo page .............................................................................................................................................15-7
15.4 PPD driver (for Linux and applications)............................................................................................ 15-8
15.4.1 PPD driver types.....................................................................................................................................15-8
15.4.2 About the PPD driver for Linux...............................................................................................................15-8
15.4.3 About the PPD driver for applications ....................................................................................................15-9
15.5 Glossary............................................................................................................................................. 15-10
Océ cm3522/cm2522 x-7
Page 9

16 Index
16.1 Index .................................................................................................................................................... 16-2
Océ cm3522/cm2522 x-8
Page 10

About this manual
This manual is the User’s Guide describing printing features that can be implemented with the printer
controller. For copy, scan, box, and fax functions, refer to the respective User’s Guides.
This manual is intended for persons with basic knowledge of computers and this machine. For details on the
Windows or Macintosh operating systems, or software applications, refer to the corresponding manuals.
Contents
This manual consists of the following chapters:
Chapter 1 Overview of printer functions
Chapter 2 Precautions for installation
Chapter 3 Easy installation using the installer (Windows)
Chapter 4 Manual installation using the Add Printer wizard
Chapter 5 Installation on Macintosh computers
Chapter 6 Installation to use NetWare
Chapter 7 Uninstalling the printer driver
Chapter 8 Print functions of the PCL/PS drivers for Windows
Chapter 9 Print function of Mac OS X
Chapter 10 Print function of Mac OS 9.2
Chapter 11 Function detail description
Chapter 12 Settings on the control panel
Chapter 13 Web Connection
Chapter 14 Troubleshooting
Chapter 15 Appendix
Chapter 16 Index
Product notation
Product name Notation
Océ cm3522/cm2522, printer main body, and this machine Machine or printer
Built-in network controller Network controller
Printing system incorporating a printer controller and this machine Printing system
Microsoft Windows Windows
Océ cm3522/cm2522 x-9
Page 11
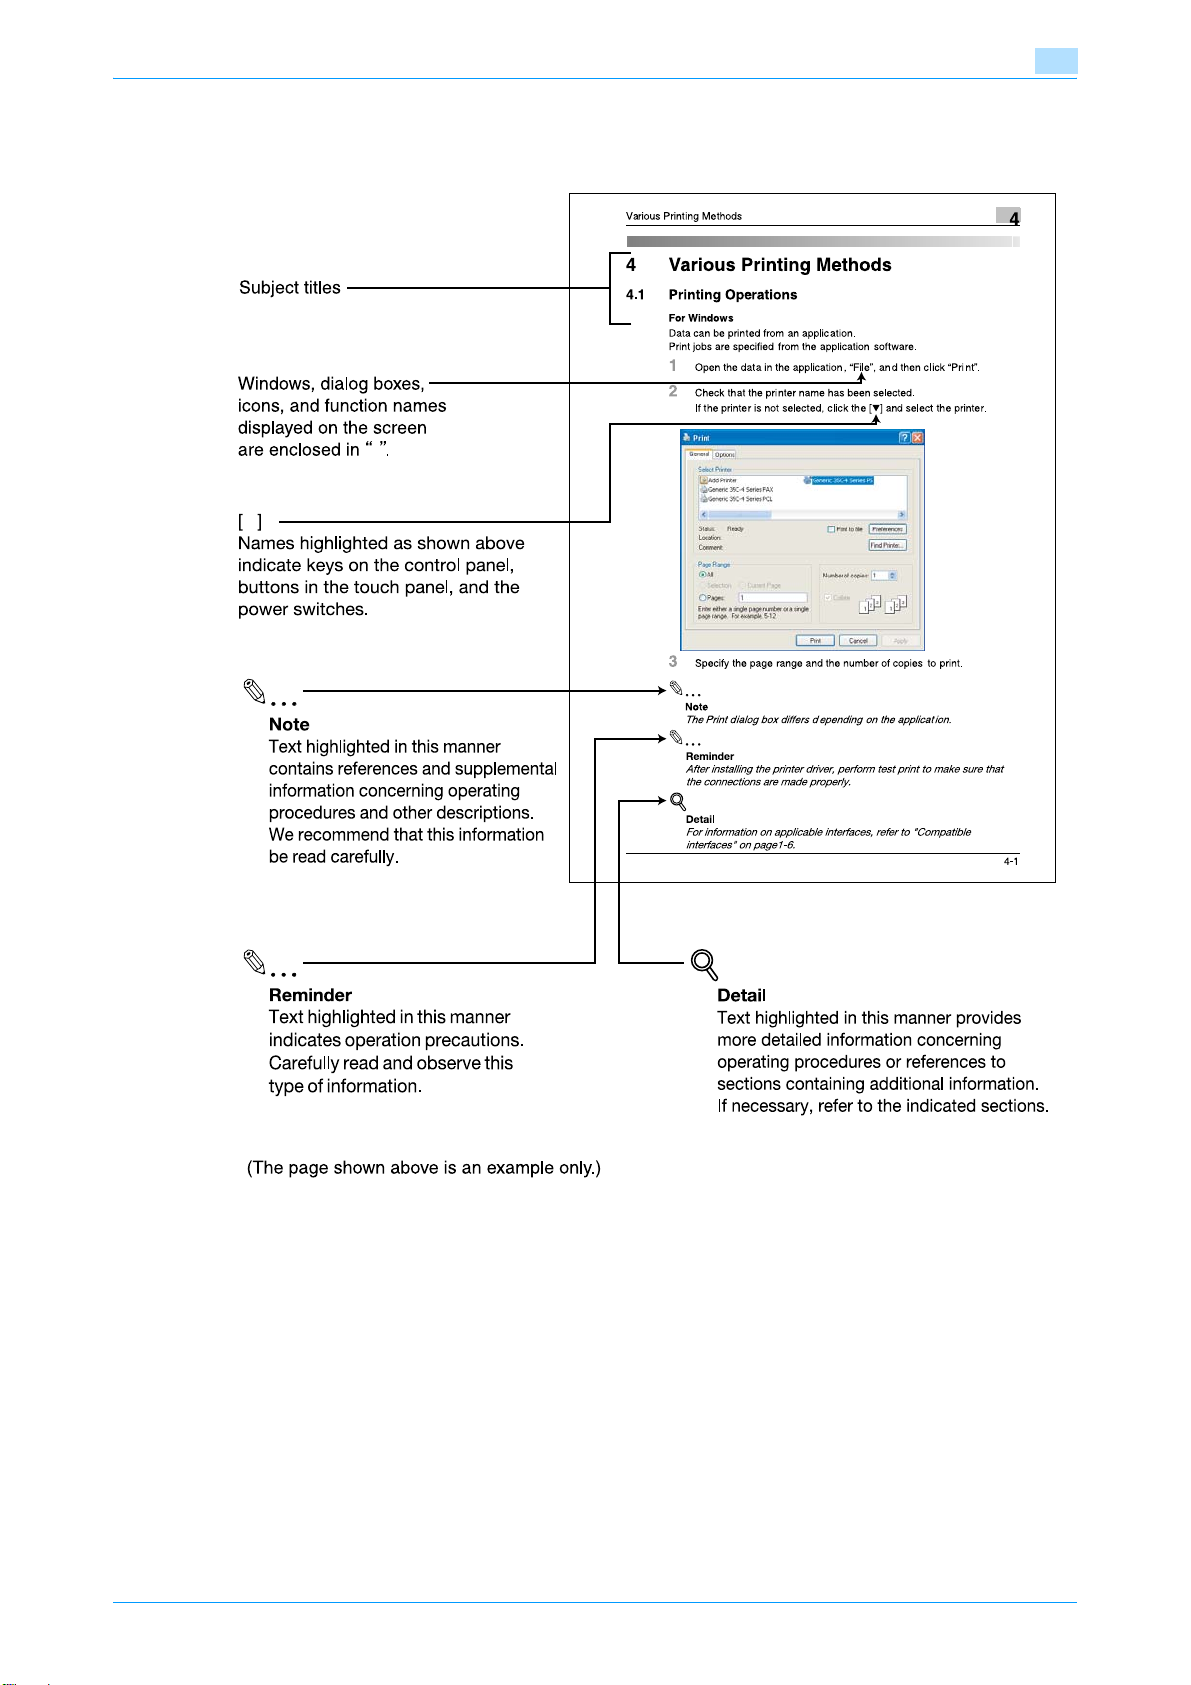
Explanation of manual conventions
Océ cm3522/cm2522 x-10
Page 12

User’s Guides
This machine is provided with printed manuals and PDF manuals on the User’s Guide CD.
Printed manual
Quick Guide [Copy/Print/Fax/Scan/Box Operations]
This manual contains operating procedures and descriptions of the most frequently used functions, allowing
the machine to immediately be used.
In addition, this manual contains notes and precautions that should be followed for safe use of the machine.
Be sure to read this manual before using the machine.
User’s Guide CD manuals
User’s Guide [Copy Operations]
This manual contains descriptions of the Copy mode operations and machine maintenance.
Refer to this manual for details on the paper and originals, copy procedures using convenient Application
functions, replacing consumables, and troubleshooting operations such as clearing paper misfeeds.
User’s Guide [Enlarge Display Operations]
This manual contains details on operating procedures in Enlarge Display mode.
Refer to this manual for details on using copy, scanner, G3 fax, and network fax operations in Enlarge Display
mode.
User’s Guide [Print Operations]
This manual contains details of the printing functions that can be specified with the standard built-in printer
controller.
Refer to this manual for operating procedures on using the printing functions.
User’s Guide [Box Operations]
This manual contains operating procedures for using the user boxes on the hard disk.
Refer to this manual for details on saving data in user boxes, retrieving data from user boxes and transferring
data.
User’s Guide [Network Scan/Fax/Network Fax Operations]
This manual contains details on the network scan, G3 fax, and network fax operations.
Refer to this manual for details on using network scan function by E-Mail or FTP, G3 fax, Internet fax and IP
address fax operations.
In order to use the fax functions, the optional fax kit must be purchased separately.
User’s Guide [Fax Driver Operations]
This manual contains details of the fax driver functions that can be used to send a fax directly from a
computer.
Refer to this manual for operating procedures on using the PC-FAX functions.
In order to use the fax functions, the optional fax kit must be purchased separately.
User’s Guide [Network Administrator] (this manual)
This manual contains descriptions on setting methods for each function utilizing network connection, mainly
using the Web Connection.
Refer to this manual for details on using network functions.
Trademarks/Copyrights
This manual contains descriptions on trademarks and copyrights.
Be sure to read this manual before using the machine
Océ cm3522/cm2522 x-11
Page 13

Océ cm3522/cm2522 x-12
Page 14

1
Overview of printer functions
Page 15
Overview of printer functions
1 Overview of printer functions
1.1 Printer controller
The printer controller is a device for performing printing functions and network printing functions with this
machine.
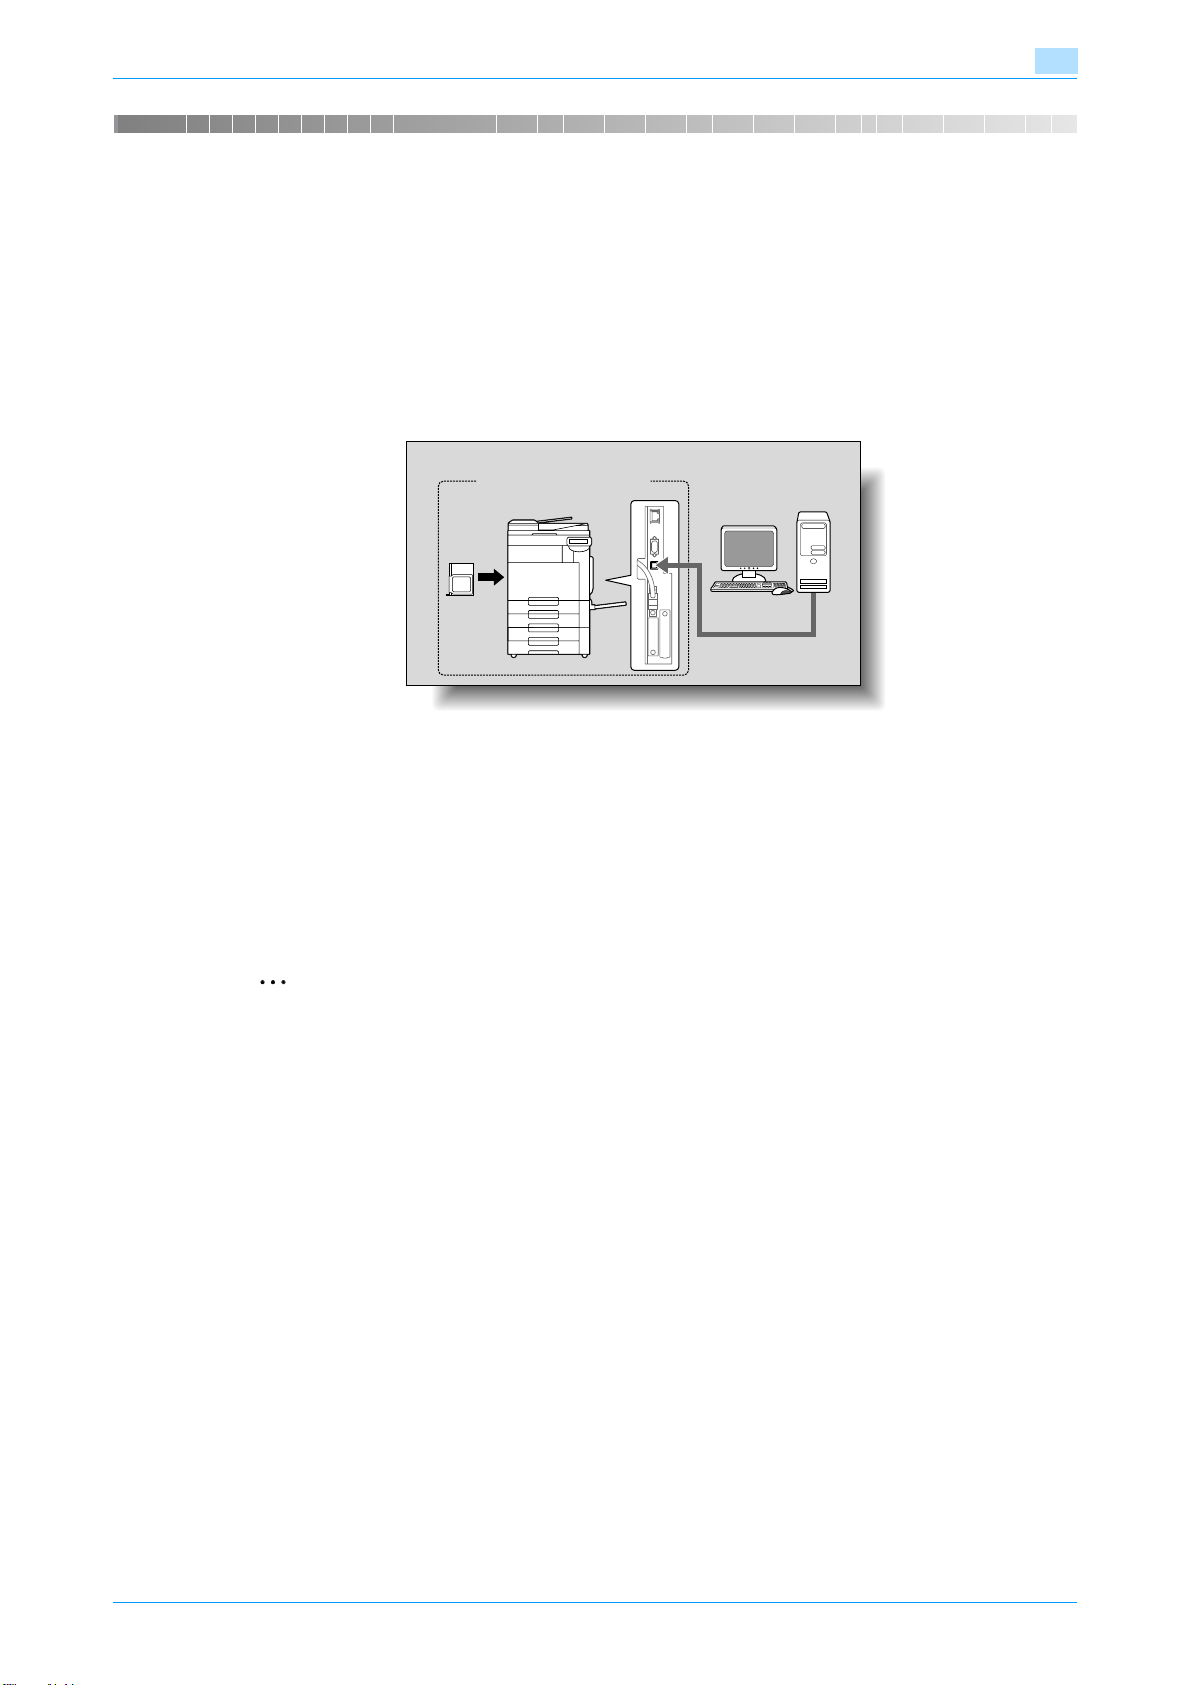
1.1.1 Role of the printer controller
With the built-in printer controller, this machine works as a printing system, allowing printing from
applications on the computer connected to the printing system. When using this machine as a network
printer, you can print from applications on the computer.
1
Printing system
Machine
Printer
controller
The printer controller provides the following functions:
- Printing data being sent from a printer driver on a computer
- Support of network protocols including TCP/IP (IPv4/IPv6), IPX/SPX, and AppleTalk
- Direct printing over a network using SMB (Windows), LPR, and IPP printing
- Access to settings for this machine and the printer controller from a client computer over the network
(using a Web browser)
- Control of the number of pages printed (the User Authentication and Account Track functions)
- Fax operations using a computer (PC-fax transmission)
Computer
2
Note
In order to use the fax functions, the optional fax kit is required.
!
Detail
For details on the PC-fax transmission, refer to the User’s Guide [Fax Driver Operations].
Océ cm3522/cm2522 1-2
Page 16
Overview of printer functions
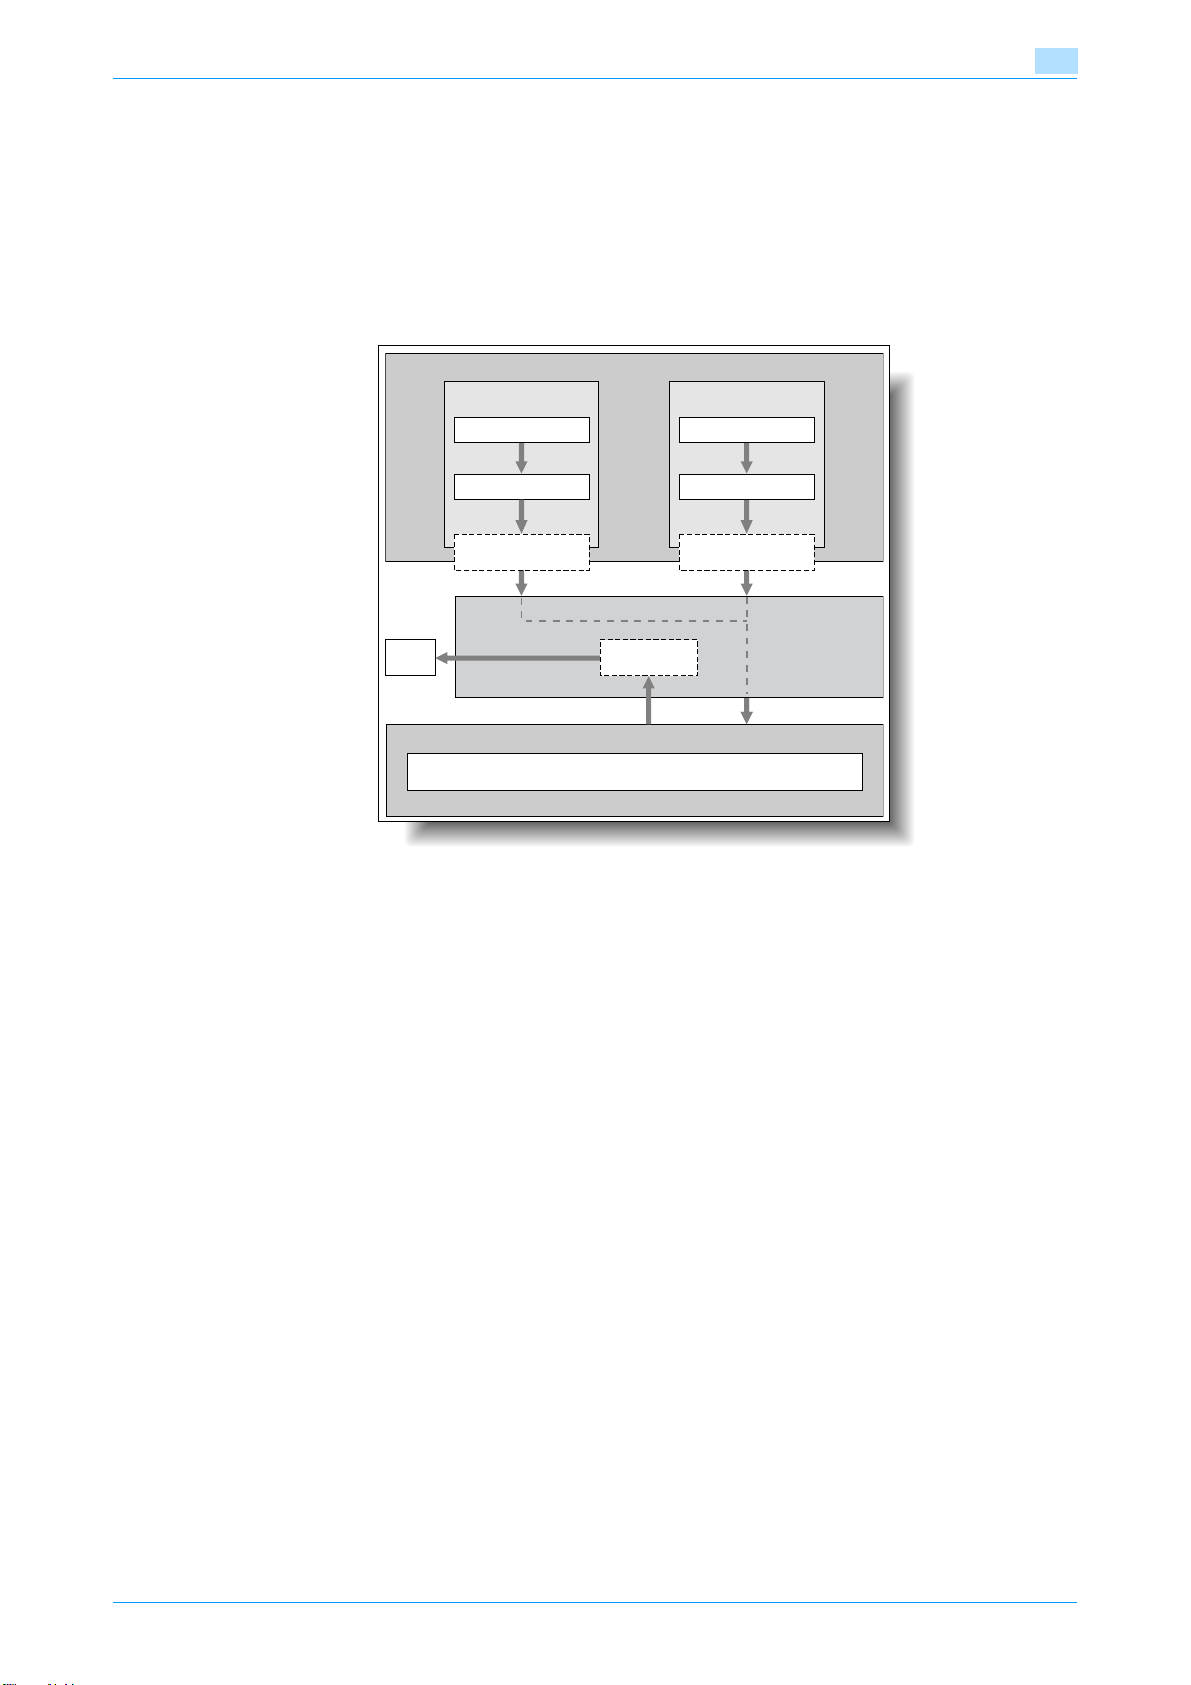
1.1.2 Printing flow
The following outlines the flow of operations for using this printing system as a printer.
The printer driver receives print commands from applications.
Data is transmitted to this machine over a USB interface when this machine is used via a USB connection,
or over an Ethernet interface (TCP/IP, IPX/SPX, or AppleTalk) when this machine is used via an Ethernet
connection. The data is then delivered from this machine to the printer controller, which performs image
rasterization (development of output characters and images to bitmap data). Finally, this data is printed from
this machine.
Used with a USB
connection
Application
Computer
Used with a network
connection
Application
1
Printer driver
USB
Machine
Print
Printer controller
PS/PCL processing (rasterizing)
Printer driver
Ethernet (TCP/IP, IPX/SPX,
or AppleTalk)
Original documents can be scanned in the copy function or network scan function while this machine is
operating as a printer. To use the copy functions, press the [Copy] key on the control panel.
When a print job is received during copying, the data is stored in the memory of this machine. When the
copying is completed, the print job is automatically printed.
Océ cm3522/cm2522 1-3
Page 17
Overview of printer functions
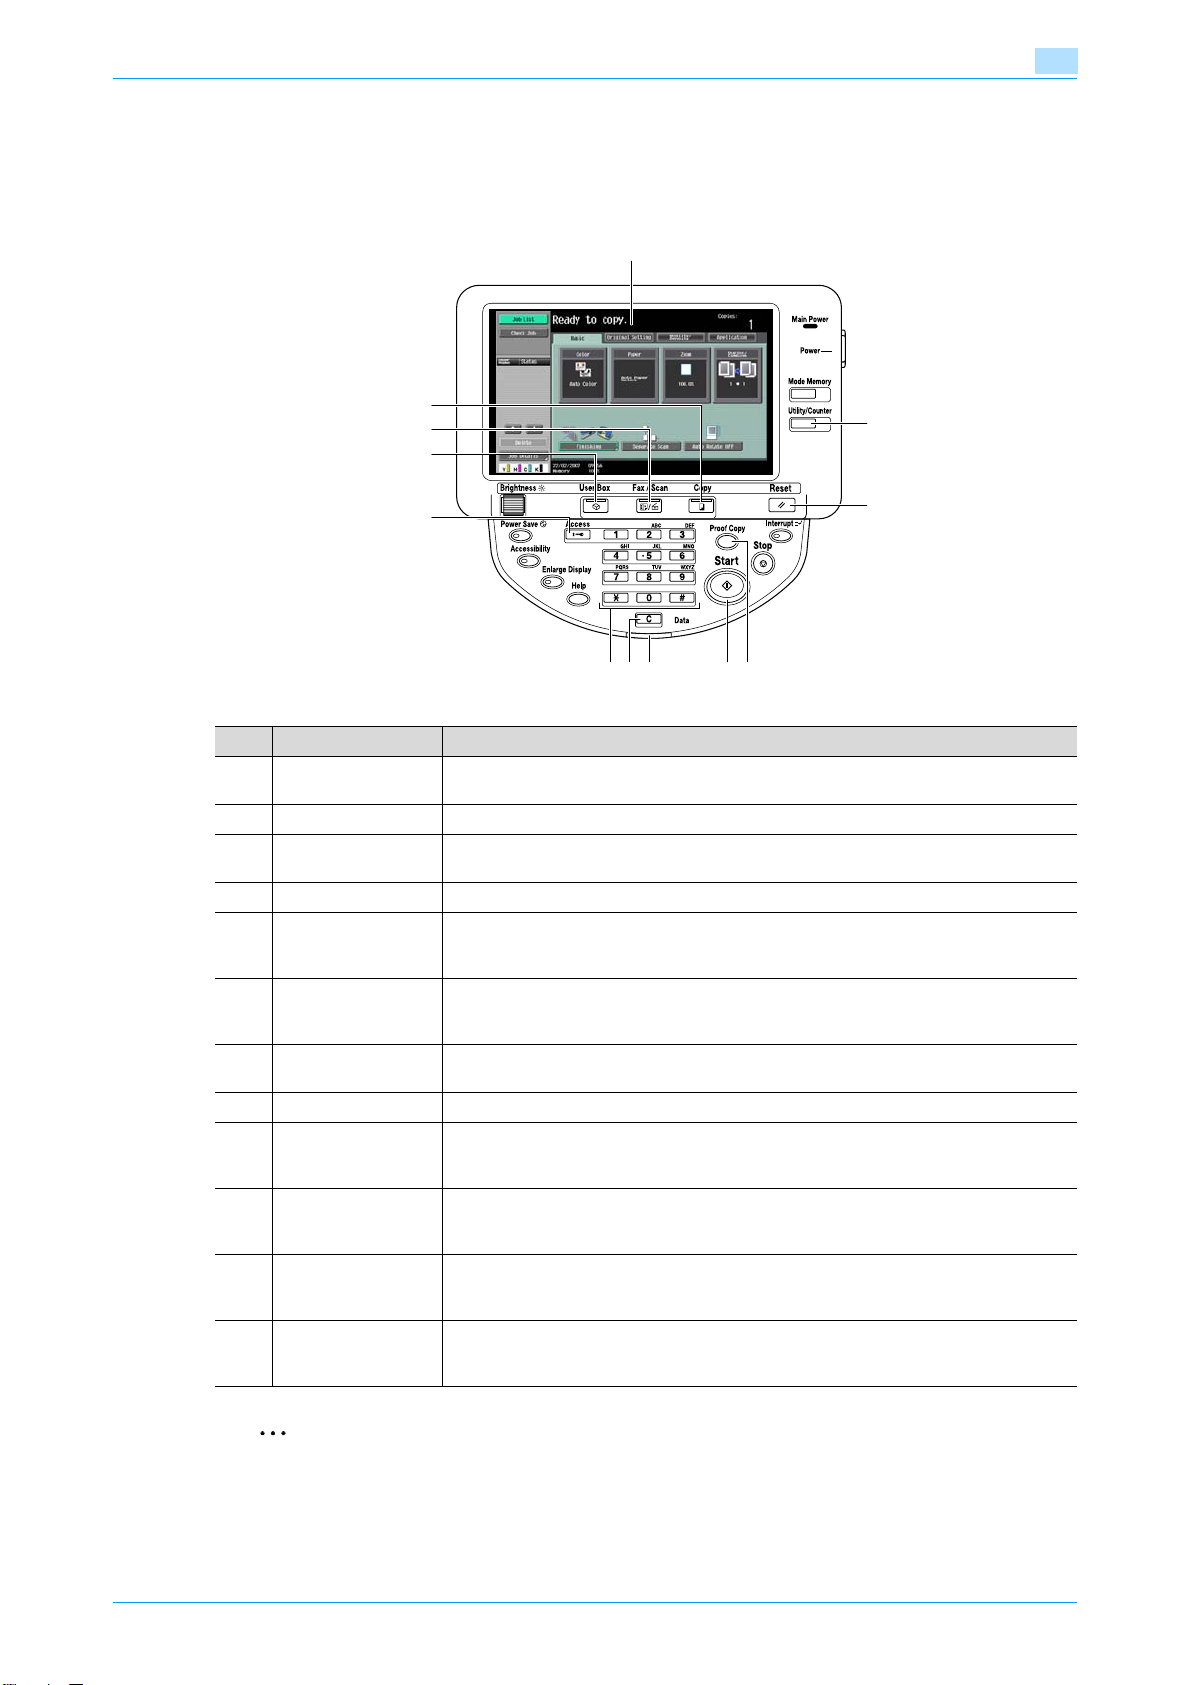
1.1.3 Control panel
The printer driver settings are mainly specified on the computer, however, the font list can be printed and the
printer controller settings and default print settings can be specified using the control panel of this machine.
The following describes major keys used for the printer function.
1
1
12
11
10
9
8
74
6 5
No. Name Description
1 Touch panel Displays various screens and messages.
2 [Utility/Counter] key Press to display the Utility screen and the Meter Count screen.
3 [Reset] key Press to reset all settings (except programmed settings) entered in the control panel
4 [Proof Copy] key Press to perform proof printing when a proof print job is stored.
5 [Start] key Press to start the operation of the selected function. When this machine is ready to
6 Data indicator Flashes in blue while a print job or fax is being received.
7 [C] (clear) key Press to erase a value entered using the keypad or characters entered the keyboard
8 Keypad Use to enter numerals such as the administrator password or other settings.
9 [Access] key In order to use this machine when user authentication or account track settings have
10 [User Box] key Press to enter User Box mode. While the machine is in User Box mode, the indicator
11 [Fax/Scan] key Press to enter Fax/Scan mode. While the machine is in Fax/Scan mode, the indicator
12 [Copy] key Press to enter Copy mode. (As a default, the machine is in Copy mode.) While the ma-
Specify various settings by directly touching the touch panel.
or touch panel.
start the operation, the indicator on the [Start] key lights up in blue. If the indicator on
the [Start] key lights up in orange, the operation cannot be started.
Lights up in blue when a print job or fax is queued to be printed or while it is being printed.
on the screen.
been applied, enter the user name and password (for user authentication) or the account name and password (for account track), and then press this key.
on the [User Box] key lights up in green. For details, refer to the User’s Guide [Box Operations].
on the [Fax/Scan] key lights up in green. For details, refer to the User’s Guide [Network
Scan/Fax/Network Fax Operations].
chine is in Copy mode, the indicator on the [Copy] key lights up in green. For details,
refer to the User’s Guide [Copy Operations].
2
3
2
Note
For details on proof printing, refer to "Proof print" on page 11-2.
You can use this machine as a printer in any of User Box, Fax/Scan, and Copy modes.
Change the default print settings in the Utility mode.
Océ cm3522/cm2522 1-4
Page 18

Overview of printer functions
1.2 Operating environment
The following descriptions the system requirements for using this printing system and the interfaces used for
connection.
1.2.1 Compatible computers and operating systems
Check that the computer being connected meets the following conditions.
Windows
Item Operating environment
Operating System Windows NT Workstation /Server Version4.0 (Service Pack 6 or later), Windows 2000 Profes-
Processor According to the environment recommended for the operating system
Memory Capacity recommended for the operating system
Drive CD-ROM
Web Browser (when
using Web Connection)
sional /Server (Service Pack 3 or later), Windows XP Home Edition/Windows XP Professional,
Windows XP Professional x64 Edition, Windows Vista Home Basic/Home Premium/Ultimate/Business/Enterprise, Windows Vista Home Basic/Home Premium/Ultimate/Business/Enterprise x64 Edition, Windows Server 2003 Standard Edition, or Windows Server 2003
x64 Edition
With sufficient memory resources in the operating system and application being used
Microsoft Internet Explorer Ver. 6 or later (JavaScript and Cookies enabled)
Netscape Navigator Ver. 7.02 or later (JavaScript and Cookies enabled)
Mozilla Firefox Ver. 1.0 or later (JavaScript and Cookies enabled)
®
Adobe
Flash® (plug-in ver. 7.0 or later required if Flash is selected as the display format)
1
Macintosh
Item Operating environment
Operating System Mac OS 9.2, Mac OS X 10.2.8, Mac OS X 10.3, or Mac OS X 10.4
Processor PowerPC, Intel Processor
Memory Capacity recommended for the operating system
Drive CD-ROM
Web Browser (when
using Web Connection)
(Intel Processor is Mac OS X 10.4 only)
Netscape Navigator Ver. 7.02 or later (JavaScript and Cookies enabled)
Mozilla Firefox Ver. 1.0 or later (JavaScript and Cookies enabled)
®
Adobe
Flash® (plug-in ver. 7.0 or later required if Flash is selected as the display format)
Océ cm3522/cm2522 1-5
Page 19
Overview of printer functions
1.2.2 Compatible interfaces
The following interfaces can be used to connect this printing system to a computer.
Ethernet interface
Select to use this printing system via a network connection.
Supports 10Base-T, 100Base-TX, and 1000Base-T standards. In addition, the Ethernet interface supports
the TCP/IP (LDP/LPR, IPP, SMB), Web Service, IPX/SPX (NetWare), and AppleTalk (EtherTalk) protocols.
USB interface
Select to use this printing system via a USB connection.
The USB interface can be connected to a computer running Windows. A USB cable is required for
connection. Use a type A (4 pin, male) or type B (4 pin, male) USB cable. A USB cable measuring three meters
or less is recommended.
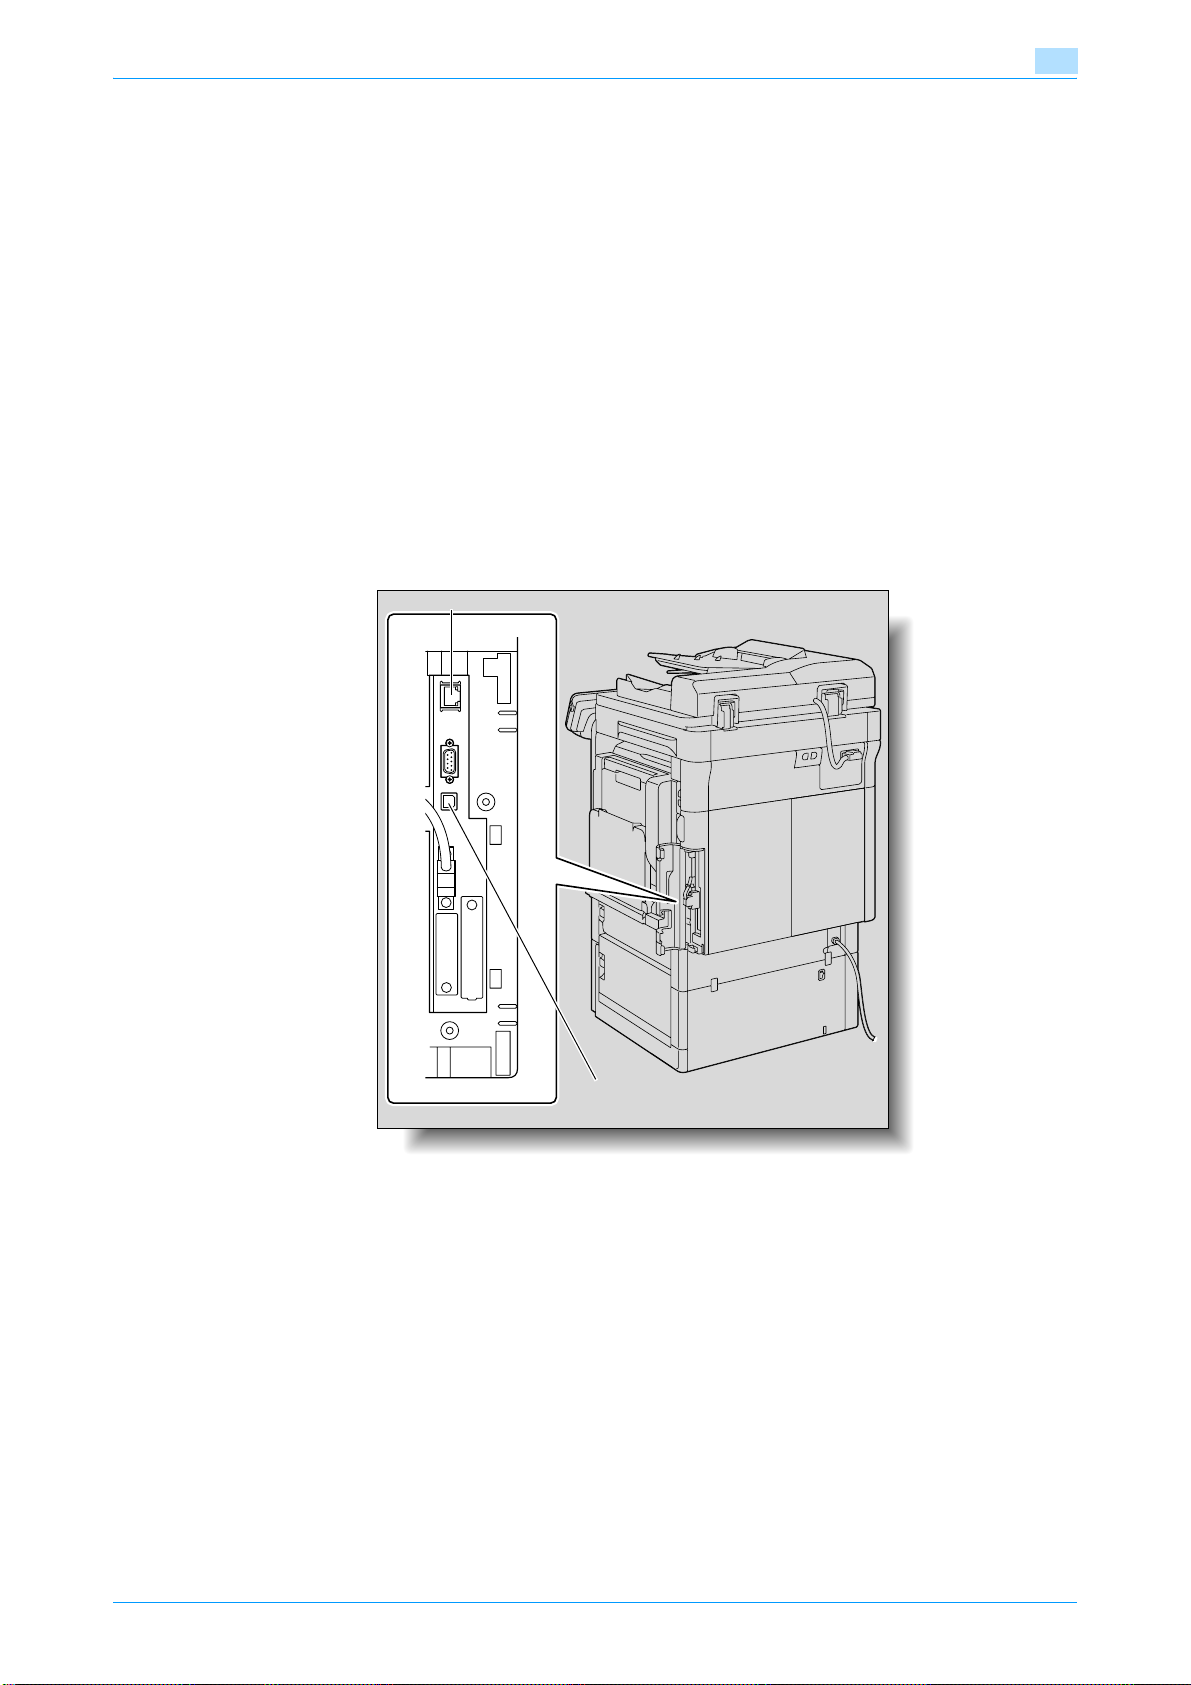
Connection diagram
The printer cables are connected to each port on this machine.
Machine (rear view)
Ethernet port (1000Base-T/100Base-TX/10Base-T)
1
USB port
Océ cm3522/cm2522 1-6
Page 20

Overview of printer functions
1.3 Setting up the system
In order to use this printing system, it must first be set up.
The setup procedure refers to a series of steps for connecting this machine to a computer and installing the
printer driver on the computer.
The setup procedure consists of the following steps.
1.3.1 Network connection
1 Connect this machine to a computer.
2 Make sure the computer is connected to the network.
3 Specify the IP address of the machine to connect it to the network.
4 Depending on the connection method and protocol, change the network settings of this machine.
– LPR: Enable LPD print in the LPD Setting screen.
– Port9100: Enable the RAW port number (9100 at default), in the TCP/IP Setting screen.
– SMB: Specify "Print Setting" in the SMB Setting screen.
– IPP/IPPS: Enable IPP print in the IPP Setting screen. For IPPS print, install the certificate in advance.
– Web Service: Enable the print function in "Web Service Settings".
– Bonjour: Enable Bonjour in the Bonjour Setting screen.
– AppleTalk: Enable AppleTalk in the AppleTalk Setting screen.
1
5 Install the printer driver.
– Specify the network port of the printer driver according to the connection method and protocol.
6 Install the screen fonts.
– The CD-ROM contains the Latin TrueType fonts as screen fonts. The ScreenFont or Screen Fonts
folder in the CD-ROM contains the screen fonts.
– Install the screen fonts after adding the operating system standard fonts. For details, refer to Help
of the operating system.
– Macintosh fonts are compressed. Decompress them before installing.
1.3.2 Local connection
1 Connect this machine to a computer.
2 Install the printer driver.
3 Install the screen fonts.
– The CD-ROM contains the Latin TrueType fonts as screen fonts. The ScreenFont or Screen Fonts
folder in the CD-ROM contains the screen fonts.
– Install the screen fonts after adding the operating system standard fonts. For details, refer to Help
of the operating system.
2
Reminder
After installing the printer driver, perform test print to make sure that the connections are made
properly.
!
Detail
For details on applicable interfaces, refer to "Compatible interfaces" on page 1-6.
For details on network settings, refer to the User’s Guide [Network Administrator].
The procedure for installing the printer driver differs depending on the connection method, operating
system of the computer, and printer driver. For details, refer to "Precautions for installation" on
page 2-2.
Océ cm3522/cm2522 1-7
Page 21

Overview of printer functions
2
Note
To update an existing printer driver, delete the existing printer driver first. For details, refer to
"Uninstalling the printer driver" on page 7-2.
If necessary, specify the interface timeout settings in the Utility mode on the control panel. For details,
refer to "I/F Timeout" on page 12-35.
1
Océ cm3522/cm2522 1-8
Page 22

Overview of printer functions
1.4 Contents of CD-ROM
The following CDs are available for printer controllers.
- 35C-4 series CD (printer driver)
- Application CD (Utilities)
- User’s Guide CD
Each CD contains printer drivers (for Windows and Macintosh), utilities, document data such as User’s Guide
manuals and release notes, and screen fonts.
2
Note
In User’s Guide, locations of folders or files may not contain the root directory.
Be sure to use files contained in the EN (English) folder.
1
Océ cm3522/cm2522 1-9
Page 23

Overview of printer functions
1
Océ cm3522/cm2522 1-10
Page 24

2
Precautions for installation
Page 25

Precautions for installation
2 Precautions for installation
2.1 Introduction
Keep in mind the following information before install the printer driver.
The procedure for installing the printer driver differs depending on how this machine is connected to the
computer, what operating system is installed on the computer, and what printer driver is to be installed.
To determine the printer driver to be installed and connection method, check the operating system on the
computer and connection environment.
Select the installation method according to the printer driver and connection method.
2
Océ cm3522/cm2522 2-2
Page 26

Precautions for installation
2.2 Printer drivers applicable to operating systems
In order to use this printing system, the printer driver must be installed.
The following lists the printer drivers included on the CD and the supported computer operating systems.
Select the required printer driver.
2
Printer driver Page description
PCL Driver (PCL
driver)
PostScript Driver
(PS driver)
PostScript PPD
driver (PS-PPD)
Fax driver Windows NT Workstation /Server Version4.0 (Service Pack 6 or later)
language
PCL6 Windows NT Workstation /Server Version4.0 (Service Pack 6 or later)
PostScript3 Emulation
Supported operating systems
Windows 2000 Professional /Server (Service Pack 3 or later)
Windows XP Home Edition/Windows XP Professional, Windows XP Professional x64 Edition
Windows Vista Home Basic/Home Premium/Ultimate/Business/Enterprise, Windows Vista Home Basic/Home Premium/Ultimate/Business/Enterprise x64 Edition
Windows Server 2003 Standard Edition, Windows Server 2003 x64 Edition
Mac OS 9.2 or later
Mac OS X 10.2.8, Mac OS X 10.3, or Mac OS X 10.4
Windows 2000 Professional /Server (Service Pack 3 or later)
Windows XP Home Edition/Windows XP Professional, Windows XP Professional x64 Edition
Windows Vista Home Basic/Home Premium/Ultimate/Business/Enterprise, Windows Vista Home Basic/Home Premium/Ultimate/Business/Enterprise x64 Edition
Windows Server 2003 Standard Edition, Windows Server 2003 x64 Edition
2
Note
Select the page description language according to the application used for printing.
For details on fax drivers, refer to the User’s Guide [Fax Driver Operations].
Océ cm3522/cm2522 2-3
Page 27

Precautions for installation
2.3 Connection methods selectable in each operating system
The connection method for this machine differs depending on the operating system of the computer. The
printer driver installation method also differs depending on the connection method.
This machine can be connected via a network or a USB interface. In network connection, the printer driver
installation method differs depending on the protocol to be used.
Network connection (Ethernet):
This machine is connected as a network printer.
This printing system supports 10Base-T, 100Base-TX, and 1000Base-T standards. In addition, the Ethernet
interface supports the TCP/IP (LDP/LPR, IPP, SMB), IPX/SPX (NetWare), and AppleTalk (EtherTalk)
protocols.
The applicable protocols differ depending on the operating system of the computer.
USB interface:
This machine is connected as a local printer. The USB interface can be connected to a computer Windowscompatible computer.
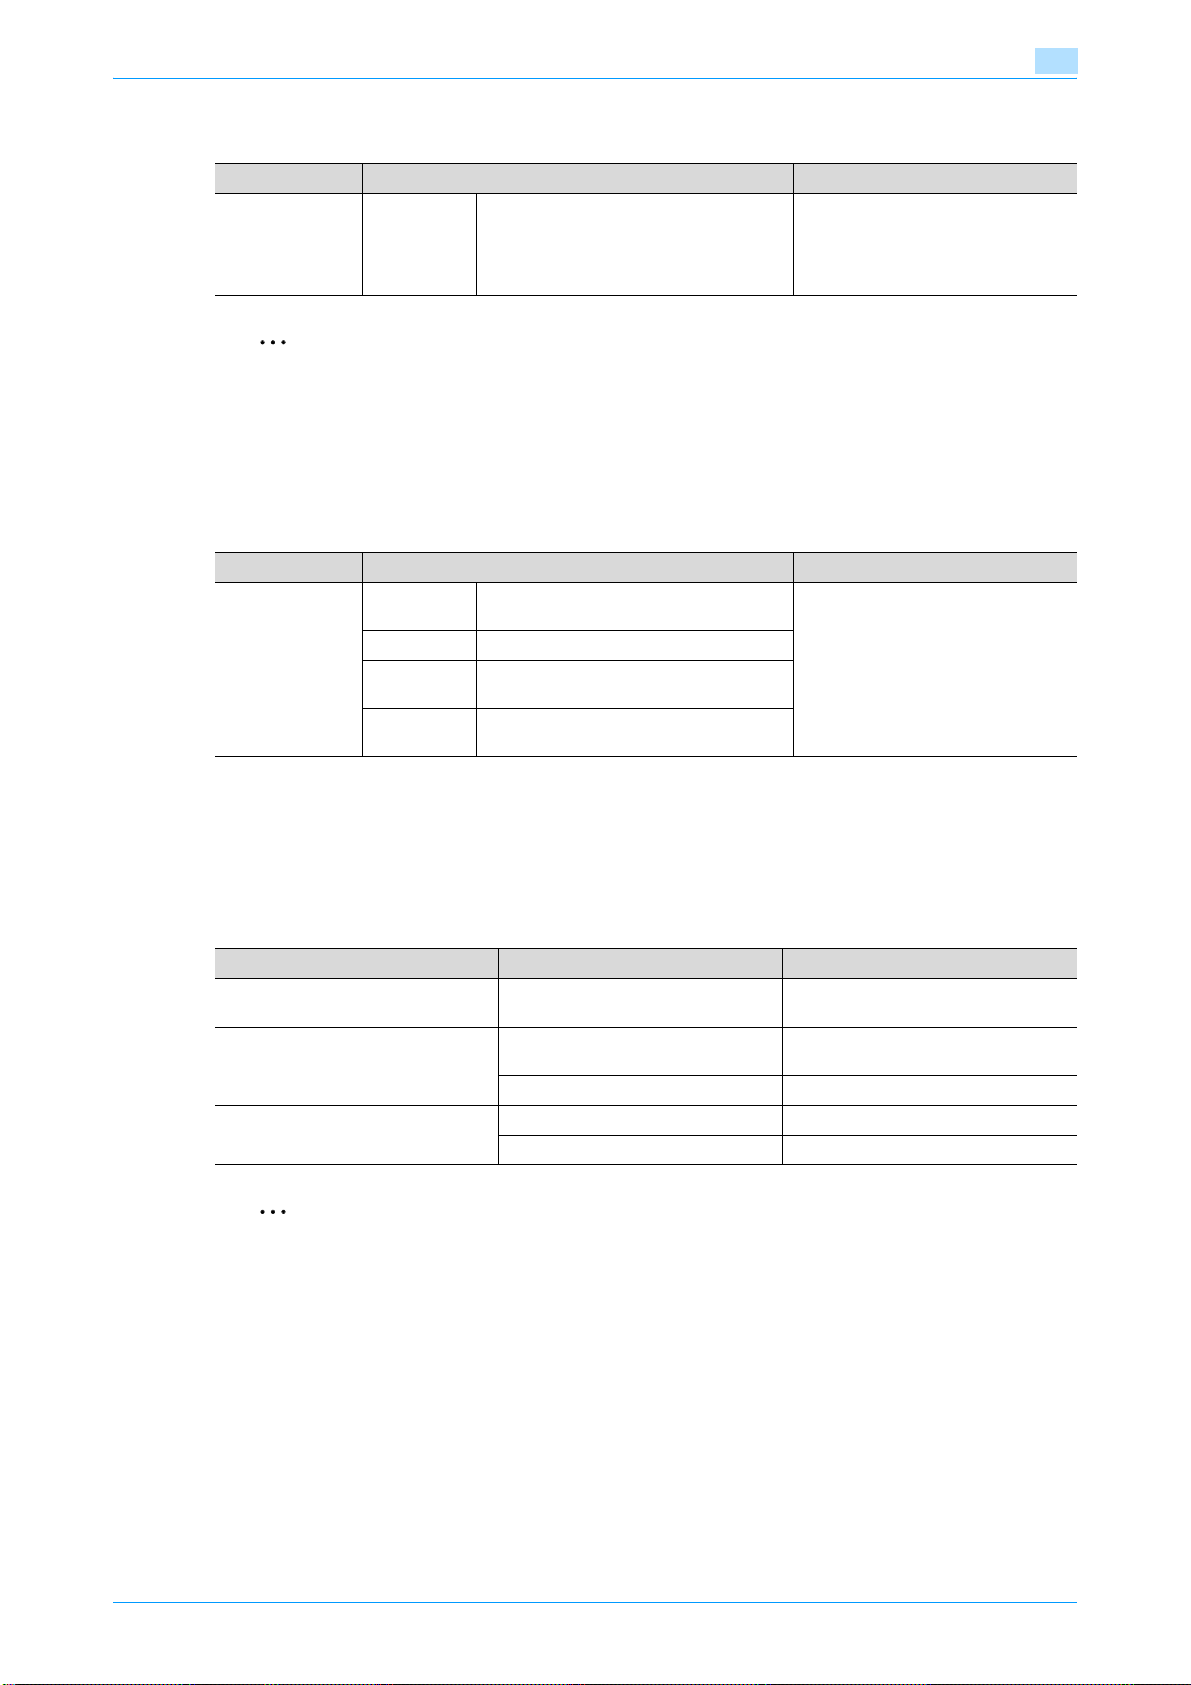
2.3.1 Windows 2000/XP/Server 2003
Setup method Connection method Refer to
Connection
method that can
be set up with an
installer
Connection
method that can
be set up with
the Add Printer
wizard
Connection
method that can
be set up with
plug-and-play
Port9100 A network connection using the
PORT9100 print service. It uses a TCP/IP
protocol and the RAW printing port.
IPP/IPPS A network connection using the IPP (In-
ternet Printing Protocol) print service.
Printing via the Internet is possible with
the HTTP (HyperText Transfer Protocol)
of the TCP/IP protocol. IPPS is an IPP for
SSL encrypted communication.
USB A connection using a USB port.
LPR A network connection using the LPR
(Line Printer Remote) print service. It
uses a TCP/IP protocol and the LPR
printing port.
Port9100 A network connection using the
PORT9100 print service. It uses a TCP/IP
protocol and the RAW printing port.
SMB A network connection using SMB (Server
Message Block) for sharing files or printers in Windows. It supports the TCP/IP
protocol.
IPP/IPPS A network connection using the IPP (In-
ternet Printing Protocol) print service.
Printing via the Internet is possible with
the HTTP (HyperText Transfer Protocol)
of the TCP/IP protocol. IPPS is an IPP for
SSL encrypted communication.
USB A connection using a USB port.
USB A connection using a USB port. For Windows XP/Server 2003: "Lo-
"Easy installation using the installer (Windows)" on page 3-2
* Select the connection method in
the course of installation. Select
"Normal Printing" for Port 9100 or
USB connection, "Internet Printing"
for IPP connection, or "Secure Printing" for IPPS connection.
"Manual installation using the Add
Printer wizard" on page 4-2
cal connection" on page 4-9
For Windows 2000: "Local connec-
tion" on page 4-24
2
2
Note
Before using this machine in a network environment, the network settings must be specified for this
machine. For details, refer to the User’s Guide [Network Administrator].
To install the printer driver under Windows 2000, XP, or Server 2003, log on using a user name that is
authorized by the administrator.
This manual describes the setup method of USB connection only using the Plug and Play.
Océ cm3522/cm2522 2-4
Page 28

Precautions for installation
2.3.2 Windows Vista
Setup method Connection method Refer to
Connection
method that can
be set up with an
installer
Connection
method that can
be set up with
the Add Printer
Wizard
Connection
method that can
be set up with
plug-and-play
Port9100 A network connection using the
IPP A network connection using the IPP (In-
USB A connection using a USB port.
LPR A network connection using the LPR
Port9100 A network connection using the
SMB A network connection using SMB (Server
IPP/IPPS A network connection using the IPP (In-
Web Service print
USB A connection using a USB port.
USB A connection using a USB port. For Windows Vista: "Local connec-
PORT9100 print service. It uses a TCP/IP
protocol and the RAW printing port.
ternet Printing Protocol) print service.
Printing via the Internet is possible with
the HTTP (HyperText Transfer Protocol)
of the TCP/IP protocol.
(Line Printer Remote) print service. It
uses a TCP/IP protocol and the LPR
printing port.
PORT9100 print service. It uses a TCP/IP
protocol and the RAW printing port.
Message Block) for sharing files or printers in Windows. It supports the TCP/IP
protocol.
ternet Printing Protocol) print service.
Printing via the Internet is possible with
the HTTP (HyperText Transfer Protocol)
of the TCP/IP protocol. IPPS is an IPP for
SSL encrypted communication.
A connection supports Web Service
Function (Web Service on Devices) of
Windows Vista, detects the printer on the
network automatically and connects.
"Easy installation using the installer (Windows)" on page 3-2
* Select the connection method in
the course of installation. Select
"Normal Printing" for Port 9100 or
USB connection, or "Internet Printing" for IPP connection.
"Manual installation using the Add
Printer wizard" on page 4-2
tion" on page 4-19
2
2
Note
Before using this machine in a network environment, the network settings must be specified for this
machine. For details, refer to the User’s Guide [Network Administrator].
To install the printer driver under Windows Vista, log on as the Administrator.
Either of the installer or Add Printer Wizard can be used to install the PCL driver and PS driver.
When using Windows Vista, the IPPS connection can not be setup using the installer. For using IPPS
connection, setup the connection using the Add Printer Wizard. For details, refer to "Network
connection (IPP or IPPS)" on page 4-14.
Océ cm3522/cm2522 2-5
Page 29
Precautions for installation
2.3.3 Windows NT 4.0
Setup method Connection method Refer to
Connection
method that can
be set up with
the Add Printer
wizard
LPR A network connection using the LPR print
2
Note
Before using this machine in a network environment, the network settings must be specified for this
machine. For details, refer to the User’s Guide [Network Administrator].
To install the printer driver under Windows NT 4.0, log on using a user name that is authorized by the
administrator.
2.3.4 Mac OS 10.2, 10.3, or 10.4
Setup method Connection method Refer to
Connection
method that can
be set up with an
installer
Bonjour A network connection using Bonjour and
AppleTalk A network connection using AppleTalk.
LPR A network connection using the LPR print
IPP A network connection using the IPP print
service.
Rendezvous.
service.
service.
2
"Manual installation using the Add
Printer wizard" on page 4-2
"Installation on Macintosh computers" on page 5-2
* Specify the connection method
when selecting the printer.
!
Detail
Before using this machine in a network environment, the network settings must be specified for this
machine. For details, refer to the User’s Guide [Network Administrator].
2.3.5 NetWare
NetWare version Protocol used Connection method
NetWare 4.x IPX Bindery Pserver
NetWare 5.x IPX NDS Pserver
NetWare 6.x IPX NDS Pserver
2
Note
For details on the NetWare functions, refer to the NetWare operation manual of the NetWare.
Before using this machine in a NetWare environment, the network settings must be specified for this
machine. For details, refer to the User’s Guide [Network Administrator].
Nprinter/Rprinter
Nprinter/Rprinter
TCP/IP NDPS
TCP/IP NDPS
Océ cm3522/cm2522 2-6
Page 30

3
Easy installation using the
installer (Windows)
Page 31

Easy installation using the installer (Windows)
3 Easy installation using the installer (Windows)
3.1 Installer
This installer automatically detects whether this machine is connected via USB or on the same TCP/IP
network as the computer, then installs the required printer driver. You can also manually specify the
connection destination during installation.
2
Reminder
When installing the driver on NT 4.0/2000/XP/Vista/Server 2003, administrator permissions are
required.
When this machine is connected via USB, if a wizard for adding new hardware starts up, click the
[Cancel] button.
3.1.1 Installer operating environment
Item Operating environment
Operating system Windows NT Workstation /Server Version4.0 (Service Pack 6 or later)*
Windows 2000 Professional /Server (Service Pack 3 or later)
Windows XP Home Edition/Windows XP Professional, Windows XP Professional x64 Edition
Windows Vista Home Basic/Home Premium/Ultimate/Business/Enterprise, Windows Vista
Home Basic/Home Premium/Ultimate/Business/Enterprise x64 Edition
Windows Server 2003 Standard Edition, Windows Server 2003 x64 Edition
Processor According to the environment recommended for the operating system
Memory Capacity recommended for the operating system
With sufficient memory resources in the operating system and application being used
* With Windows NT 4.0, in order to install this machine connected directly to a network using the TCP/IP protocol,
Microsoft TCP/IP Print Services must first be installed on the computer.
3
Océ cm3522/cm2522 3-2
Page 32

Easy installation using the installer (Windows)
3.2 Easy installation using the installer
3.2.1 Settings of this machine
Specify the IP address of this machine.
2
Note
To allow this machine to be automatically detected when connected to a network, be sure to set the IP
address for this machine before starting installation. For details, refer to the User’s Guide [Network
Administrator].
Depending on the connection method and protocol, change the network settings of this machine.
- Port9100: Enable the RAW port number (9100 at default), in the TCP/IP screen.
- IPP/IPPS: Enable IPP print in the IPP Setting screen.
2
Note
For details on the TCP/IP settings and IPP settings of this machine, refer to the User’s Guide [Network
Administrator].
To use IPPS printing, the certificate must be registered to this machine. For details, refer to the User’s
Guide [Network Administrator].
3
3.2.2 Installation of the printer driver
!
Detail
If the User Account Control window appears when installing on Windows Vista, click the [Allow] button
or the [Continue] button.
1 Insert the printer driver CD-ROM into the CD-ROM drive of the computer.
– Check that the installer starts up, and then continue with step 2.
– If the installer does not start up, open the printer driver folder on the CD-ROM, double-click
"Setup.exe", and then continue with step 3.
2 Click the "Printer Install" button.
The installer of the printer driver starts.
3 If you agree with all terms and conditions of the license agreement, click the [AGREE] button.
– If not, the software cannot be installed.
– You can change the display language of the installer using the box in the lower-left corner.
– You can change the display language of the installation license agreement in the lower-right corner.
Océ cm3522/cm2522 3-3
Page 33

Easy installation using the installer (Windows)
4 If the setup selection window appears, select "Install printers/MFPs", and then click the [Next] button.
The connected printers and MFP are detected.
– If the printer is not detected, turn off this machine, then on again.
– When turning off the power, then on again, wait at least 10 seconds before turning it on again.
Otherwise, this machine may not function properly.
5 Select this machine, and then click the [Next] button.
– If the connection of this machine cannot be recognized, this machine is not listed. If this is the case,
select "Specify the Printer/MFP Except for the Above. (IP Address, Host Name...)", and then specify
this machine manually.
– In addition to "Normal Printing" (Port 9100 and USB), "Internet Printing" (IPP) and "Secure Printing"
(IPPS) can be selected as the printing method. Secure Printing (IPPS) can be used when SSL is
enabled from Web Connection and IPP is enabled.
– When using Windows Vista, the IPPS connection can not be setup using the installer. For using IPPS
connection, setup the connection using the Add Printer Wizard. For details, refer to "Network
connection (IPP or IPPS)" on page 4-14.
3
6 Check the installation settings.
– To change the settings, click the [Installation Settings] button, and then continue with step 7.
– If not changing the settings, continue with step 8.
Océ cm3522/cm2522 3-4
Page 34

Easy installation using the installer (Windows)
7 Select the components to be installed, and then click the [OK] button.
– For details on fax drivers, refer to the User’s Guide [Fax Driver Operations].
8 In the Confirm Installation Settings dialog box, click the [Install] button.
– If the Windows Logo Testing or Digital Signature dialog box appears, click the [Continue] or [Yes]
button.
9 In the Finish Installing Drivers dialog box, click the [Finish] button.
This completes the fax driver installation.
3
In the Finish Installing Drivers dialog box, installation items can be confirmed and settings can be changed.
[Review]: Confirm the installation settings.
[Rename Printer]: Change the printer name.
[Share Setting]: Specify shared settings of the printer.
[Property]: Specify the property settings of the printer. For details, refer to "Initializing the printer driver" on
page 8-3.
[Print Setting]: Specify the functions of the printer driver. For details, refer to "Parameter details" on
page 8-7.
[Print Test page]: Perform test print.
Océ cm3522/cm2522 3-5
Page 35

Easy installation using the installer (Windows)
3
Océ cm3522/cm2522 3-6
Page 36

4
Manual installation using the
Add Printer wizard
Page 37

Manual installation using the Add Printer wizard
4 Manual installation using the Add Printer wizard
4.1 Windows XP/Server 2003
4.1.1 Network connection (LPR/Port9100)
When using the LPR/Port9100 printing, specify the port during the printer driver installation process.
TCP/IP setting for this machine
Specify the IP address on TCP/IP Setting of this machine.
!
Detail
For details on specifying the IP address of this machine, refer to the User’s Guide [Network
Administrator].
RAW port number setting for this machine
To use Port9100 printing, enable the RAW port number (9100 at default), in the TCP/IP Setting screen of this
machine.
4
!
Detail
For details on specifying the RAW port number of this machine, refer to the User’s Guide [Network
Administrator].
LPD setting for this machine
To use LPR printing, enable LPD print on "LPD Setting" of this machine.
!
Detail
For details on the LPD settings of this machine, refer to the User’s Guide [Network Administrator].
Printer driver installation using the Add Printer Wizard
2
Reminder
When installing on Windows XP or Server 2003, administrator permissions are required.
1 Insert the printer driver CD-ROM into the CD-ROM drive of the computer.
2 Click the [Start] button, and then click "Printers and Faxes".
– If "Printers and Faxes" does not appear in the Start menu, open Control Panel from the Start menu,
select "Printers and Other Hardware", and then click "Printers and Faxes".
3 For Windows XP, click "Add a printer" on the "Printer Tasks" menu.
For Windows Server 2003, double-click the "Add Printer" icon.
The Add Printer Wizard starts.
Océ cm3522/cm2522 4-2
Page 38

Manual installation using the Add Printer wizard
4 Click the [Next] button.
5 Select "Local printer attached to this computer", and then click the [Next] button.
– Clear the "Automatically detect and install my Plug and Play printer" check box.
The Select a Printer Port dialog box appears.
4
6 Click "Create a new port", and select "Standard TCP/IP Port" for "Type of port:".
7 Click the [Next] button.
The Add Standard TCP/IP Printer Port Wizard starts.
8 Click the [Next] button.
9 In the "Printer Name or IP address" box, enter the IP address for this machine, and then click the [Next]
button.
– If the Additional Port Information Required dialog box appears, go to step 10.
Océ cm3522/cm2522 4-3
Page 39

Manual installation using the Add Printer wizard
– If the Finish dialog box appears, go to step 13.
10 Select "Custom", and then click the [Settings] button.
11 Change the settings according to the port, and then click the [OK] button.
– For an LPR connection, select "LPR", and then enter "Print" in the "Queue name" box.
– For a Port9100 connection, select "RAW", and then enter the RAW port number (9100 at default) in
the "Port Number" box.
– The information entered here is case-sensitive.
4
12 Click the [Next] button.
13 Click the [Finish] button.
The Add Printer Wizard appears.
14 Click the [Have Disk] button.
15 Click the [Browse] button.
16 Specify the desired folder on the CD-ROM that contains the printer driver, and then click the [Open]
button.
– Select the specified folder according to the printer driver to be used, the operating system, and the
language.
Printer drivers that can be selected:
Windows XP/Server 2003: PCL driver, PS driver, fax driver
17 Click the [OK] button.
The "Printers" list appears.
Océ cm3522/cm2522 4-4
Page 40

Manual installation using the Add Printer wizard
18 Click the [Next] button.
19 Follow the on-screen instructions.
– If the Windows Logo Testing or Digital Signature dialog box appears, click the [Continue] or [Yes]
button.
– When using a network connection, perform a test print after the network settings have been
specified.
4
20 Click the [Finish] button.
21 When installation is complete, make sure that the icon of the installed printer appears in the Printers
and Faxes window.
22 Remove the CD-ROM from the CD-ROM drive.
This completes the printer driver installation.
4.1.2 Network connection (SMB)
When using the SMB printing, specify the port by specifying the printer during the printer driver installation
process. Printers can be specified either by searching printers on the network, or by entering the printer
name.
TCP/IP setting for this machine
Specify the IP address in the TCP/IP Setting screen of this machine.
!
Detail
For details on specifying the IP address of this machine, refer to the User’s Guide [Network
Administrator].
2
Note
To use SMB printing in the IPv6 environment, the Direct Hosting setting must be enabled. For details,
refer to the User’s Guide [Network Administrator].
SMB setting for this machine
In "Print Setting" in the SMB Setting screen of this machine, specify the NetBIOS name, print service name,
and workgroup.
!
Detail
For details on the SMB settings of this machine, refer to the User’s Guide [Network Administrator].
Océ cm3522/cm2522 4-5
Page 41

Manual installation using the Add Printer wizard
Printer driver installation by specifying printers using the Add Printer Wizard
2
Reminder
When installing on Windows XP or Server 2003, administrator permissions are required.
1 Insert the printer driver CD-ROM into the CD-ROM drive of the computer.
2 Click the [Start] button, and then click "Printers and Faxes".
– If "Printers and Faxes" does not appear in the Start menu, open Control Panel from the Start menu,
select "Printers and Other Hardware", and then click "Printers and Faxes".
3 For Windows XP, click "Add a printer" on the "Printer Tasks" menu.
For Windows Server 2003, double-click the "Add Printer" icon.
4
The Add Printer Wizard starts.
4 Click the [Next] button.
5 Select "Local printer attached to this computer", and then click the [Next] button.
– Clear the "Automatically detect and install my Plug and Play printer" check box.
The Select a Printer Port dialog box appears.
Océ cm3522/cm2522 4-6
Page 42

Manual installation using the Add Printer wizard
6 Click "Create a new port", and select "Local Port" for "Type of port:"
7 In the "Enter a port name" box, enter "\\NetBIOS name\print service name".
– Enter the same NetBIOS name and print service name those appear in "Print Setting" in the SMB
Setting screen of this machine.
4
8 Click the [OK] button.
The Add Printer Wizard appears.
9 Click the [Have Disk] button.
10 Click the [Browse] button.
11 Specify the desired folder on the CD-ROM that contains the printer driver, and then click the [Open]
button.
– Select the specified folder according to the printer driver to be used, the operating system, and the
language.
Printer drivers that can be selected:
Windows XP/Server 2003: PCL driver, PS driver, fax driver
12 Click the [OK] button.
The "Printers" list appears.
13 Click the [Next] button.
14 Follow the on-screen instructions.
Océ cm3522/cm2522 4-7
Page 43

Manual installation using the Add Printer wizard
– If the Windows Logo Testing or Digital Signature dialog box appears, click the [Continue] or [Yes]
button.
– When using a network connection, perform a test print after the network settings have been
specified.
15 Click the [Finish] button.
16 When installation is complete, make sure that the icon of the installed printer appears in the Printers
and Faxes window.
17 Remove the CD-ROM from the CD-ROM drive.
This completes the printer driver installation.
4.1.3 Network connection (IPP or IPPS)
For IPP printing, specify the port during the printer driver installation process.
Specifying the TCP/IP setting for this machine
Specify the IP address of this machine.
!
Detail
For details on specifying the IP address of this machine, refer to the User’s Guide [Network
Administrator].
4
Specifying the IPP settings for this machine
Enable IPP printing in "IPP Setting" of this machine.
!
Detail
For details on the IPP settings of this machine, refer to the User’s Guide [Network Administrator].
To use IPPS printing, the certificate must be registered to this machine. For details, refer to the User’s
Guide [Network Administrator].
Printer driver installation using the Add Printer wizard
2
Reminder
When installing on Windows XP or Server 2003, administrator permissions are required.
1 Insert the printer driver CD-ROM into the CD-ROM drive of the computer.
2 Click the [Start] button, and then click "Printers and Faxes".
– If "Printers and Faxes" does not appear in the "Start" menu, open the Control Panel from the "Start"
menu, select "Printers and Other Hardware", and then click "Printers and Faxes".
3 For Windows XP, click "Add a printer" on the "Printer Tasks" menu. For Windows Server 2003, double-
click the "Add Printer" icon.
"Add Printer wizard" starts.
4 Click the [Next] button.
5 In the Local or Network Printer dialog box, select "Network printer", and then click the [Next] button.
6 In the Specify a Printer dialog box, select "Connect to a printer on the Internet or on a home or office
network".
7 In the "URL" field, enter the URL for this machine in the following format, and then click the [Next]
button.
– http:// (IP_address_of_machine) /ipp Example: If the IP address of this machine is 192.168.1.20,
enter http://192.168.1.20/ipp.
Océ cm3522/cm2522 4-8
Page 44

Manual installation using the Add Printer wizard
– When setting this machine for IPPS printing, enter "https:// (IP_address_of_machine) /ipp".
8 When the confirmation dialog box appears, click the [OK] button.
9 Click the [Have Disk] button.
10 Click the [Browse] button.
11 Specify the desired folder on the CD-ROM that contains the printer driver, and then click the [Open]
button.
– Select the specified folder according to the printer driver to be used, the operating system, and the
language. Printer drivers that can be selected: Windows XP/Server 2003: PCL driver, PS driver
12 Click the [OK] button.
The "Printer" list appears.
13 Click the [Next] button.
14 Follow the on-screen instructions.
– If the Windows Logo Testing or Digital Signature dialog box appears, click the [Continue] or [Yes]
button.
15 Click the [Finish] button.
4
16 When the installation is completed, make sure that the icon of the installed printer appears in the
Printers and Faxes window.
17 Remove the CD-ROM from the CD-ROM drive.
This completes the printer driver installation.
Once the settings for the printer have been specified, you can use the printer in the same way as a default
local printer.
4.1.4 Local connection
When this machine is connected via a USB port, the printer driver can be installed with plug-and-play.
2
Note
When a USB connection is used, the printer driver is installed easily with the Plug and Play feature.
However, it can also be installed using the Add Printer Wizard. When using the Add Printer Wizard,
select the USB port to be connected in the Select a Printer Port dialog box.
1 Connect this machine to a computer using a USB cable, and then start up the computer.
– Do not disconnect or connect the cable while the computer is starting up.
2 Insert the printer driver CD-ROM into the CD-ROM drive of the computer.
3 Turn on the main power of this machine.
The Found New Hardware Wizard dialog box appears.
– If the Found New Hardware Wizard does not start up, turn off this machine, then on again.
– When turning off the power, then on again, wait at least 10 seconds before turning it on again.
Otherwise, this machine may not function properly.
4 Select "Install from a list or specific location (Advanced)", and then click the [Next] button.
– If the Windows connect to Windows Update dialog box appears, select "NO".
5 From "Search for the best driver in these locations," select "Include this location in the search", and
then click the [Browse] button.
6 Specify the desired folder on the CD-ROM that contains the printer driver, and then click the [Open]
button.
Océ cm3522/cm2522 4-9
Page 45

Manual installation using the Add Printer wizard
– Select the specified folder according to the printer driver to be used, the operating system, and the
language. Windows XP/Server 2003: PCL driver, PS driver, fax driver
7 Click the [Next] button, and then follow the on-screen instructions.
– If the Windows Logo Testing or Digital Signature dialog box appears, click the [Continue] or [Yes]
button.
8 Click the [Finish] button.
9 When the installation is completed, make sure that the icon of the installed printer appears in the
Printers and Faxes window.
10 Remove the CD-ROM from the CD-ROM drive.
This completes the printer driver installation.
4
Océ cm3522/cm2522 4-10
Page 46

Manual installation using the Add Printer wizard
4.2 Windows Vista
4.2.1 Network connection (LPR, Port9100, or SMB)
In Windows Vista, the printer driver can be installed either by searching printers on the network, or by creating
a new printer port.
Specifying the TCP/IP setting for this machine
Specify the IP address of this machine.
!
Detail
For details on specifying the IP address of this machine, refer to the User’s Guide [Network
Administrator].
2
Note
To use SMB printing in the IPv6 environment, the Direct Hosting setting must be enabled. For details,
refer to the User’s Guide [Network Administrator].
RAW port number setting for this machine
To use Port9100 printing, enable the RAW port number (9100 at default), in the TCP/IP Setting screen of this
machine.
4
!
Detail
For details on specifying the RAW port number of this machine, refer to the User’s Guide [Network
Administrator].
LPD setting for this machine
To use LPR printing, enable LPD print in the LPD Setting screen of this machine.
!
Detail
For details on the LPD settings of this machine, refer to the User’s Guide [Network Administrator].
SMB setting for this machine
In "Print Setting" in the SMB Setting screen of this machine, specify the NetBIOS name, print service name,
and workgroup.
!
Detail
For details on the SMB settings of this machine, refer to the User’s Guide [Network Administrator].
Printer driver installation by searching printers using the Add Printer Wizard
2
Note
When installing on Windows Vista, administrator permissions are required.
Printers will be found during installation. Connect this machine to the network, and then turn on the
power.
1 Insert the printer driver CD-ROM into the CD-ROM drive of the computer.
2 Click the [Start] button, and then click "Control Panel".
3 From "Hardware and Sound", click "Printer".
– If Control Panel is displayed with Classic View, double-click "Printers".
The Printers window appears.
Océ cm3522/cm2522 4-11
Page 47

Manual installation using the Add Printer wizard
4 Click "Add a printer" from the toolbar.
The Add Printer window appears.
5 Click "Add a network, wireless or Bluetooth printer".
4
– If the printer is not detected, turn off this machine, then on again.
– When turning off the power, then on again, wait at least 10 seconds before turning it on again.
Otherwise, this machine may not function properly.
The connected printers are detected.
6 Select this machine from the list, and then click the [Next] button.
– When using the LPR/Port9100 protocol, select the printer having its IP address.
– When using an SMB connection, select the printer having its "\\NetBIOS name\print service name".
– It may take some time to finish searching the entire list of printers.
Océ cm3522/cm2522 4-12
Page 48

Manual installation using the Add Printer wizard
7 Click the [Have Disk] button.
8 Click the [Browse] button.
9 Specify the desired folder on the CD-ROM that contains the printer driver, and then click the [Open]
button.
– Select the specified folder according to the printer driver to be used, the operating system, and the
language. Printer drivers that can be selected: Windows Vista: PCL driver, PS driver, fax driver
10 Click the [OK] button.
The "Printer" list appears.
11 Click the [Next] button.
4
12 Follow the on-screen instructions.
– If the "User Account Control" window appears, click the [Continue] button.
– If the Verify the publisher dialog box of Windows Security appears, click "Install this driver software
anyway".
13 Click the [Finish] button.
14 When the installation is completed, make sure that the icon of the installed printer appears in the
Printers window.
15 Remove the CD-ROM from the CD-ROM drive.
This completes the printer driver installation.
Printer driver installation by creating a port using the Add Printer Wizard
2
Reminder
When installing on Windows Vista, administrator permissions are required.
Printers will be found during installation. Connect this machine to the network, and then turn on the
power.
1 Insert the printer driver CD-ROM into the CD-ROM drive of the computer.
2 Click the [Start] button, and then click "Control Panel".
3 From "Hardware and Sound", click "Printer".
– If Control Panel is displayed with Classic View, double-click "Printers".
The Printers window appears.
Océ cm3522/cm2522 4-13
Page 49

Manual installation using the Add Printer wizard
4 Click "Add a printer" from the toolbar.
The Add Printer window appears.
5 Click "Add a local printer".
4
The Select a Printer Port dialog box appears.
6 Click "Create a new port", and select the port type.
– When using an LPR/Port9100 connection, select "Standard TCP/IP Port".
– When using an SMB connection, select "Local Port".
7 Click the [Next] button.
8 Specify the IP address and port.
– When using an LPR/Port9100 connection, select "TCP/IP Device", and then enter the IP address.
– When using an SMB connection, enter "\\NetBIOS name\print service name" in the "Enter a port
name" box.
– When both LPR and Port9100 are enabled for this machine, the printer driver and the machine is
connected with LPR.
– Enter the same NetBIOS name and print service name those appear in "Print Setting" in the SMB
Setting screen of this machine.
9 Click the [Next] button.
– If the Additional Port Information Required dialog box appears, go to step 10.
– If the Install the printer driver dialog box appears, go to step 13.
10 Select "Custom", and then click the [Settings] button.
11 Change the settings according to the port, and then click the [OK] button.
– For an LPR connection, select "LPR", and then enter "Print" in the "Queue name" box.
– For a Port9100 connection, select "RAW", and then enter the RAW port number (9100 at default) in
the "Port Number" box.
– The information entered here is case-sensitive.
Océ cm3522/cm2522 4-14
Page 50

Manual installation using the Add Printer wizard
12 Click the [Next] button.
The Install the printer driver dialog box appears.
13 Click the [Have Disk] button.
14 Click the [Browse] button.
15 Specify the desired folder on the CD-ROM that contains the printer driver, and then click the [Open]
button.
– Select the specified folder according to the printer driver to be used, the operating system, and the
language.
Printer drivers that can be selected:
Windows Vista: PCL driver, PS driver, fax driver
16 Click the [OK] button.
The "Printers" list appears.
17 Click the [Next] button.
4
18 Follow the on-screen instructions.
– If the User Account Control window appears, click the [Continue] button.
– If the Verify the publisher dialog box of Windows Security appears, click "Install this driver software
anyway".
19 Click the [Finish] button.
20 After installation is completed, make sure that the icon of the installed printer appears in the Printers
window.
21 Remove the CD-ROM from the CD-ROM drive.
This completes the printer driver installation.
4.2.2 Network connection (IPP or IPPS)
For IPP printing, specify the network setting before installing the printer driver.
Specifying the TCP/IP setting for this machine
Specify the IP address of this machine.
!
Detail
For details on specifying the IP address of this machine, refer to the User’s Guide [Network
Administrator].
Océ cm3522/cm2522 4-15
Page 51

Manual installation using the Add Printer wizard
Specifying the IPP settings for this machine
Enable IPP printing in "IPP Setting" of this machine.
!
Detail
For details on the IPP settings of this machine, refer to the User’s Guide [Network Administrator].
To use IPPS printing, the certificate must be registered to this machine. For details, refer to the User’s
Guide [Network Administrator].
Printer driver installation using the Add Printer wizard
2
Reminder
When installing on Windows Vista, administrator permissions are required.
1 Insert the printer driver CD-ROM into the CD-ROM drive of the computer.
2 Click the [Start] button, and then click "Control Panel".
– If Control Panel is displayed with Classic View, double-click "Printers".
3 From "Hardware and Sound", click "Printer".
The Printers window appears.
4
4 Click "Add a printer" from the toolbar.
The Add Printer window appears.
5 Click "Add a network, wireless or Bluetooth printer".
The connected printers are found.
6 In the window showing the search results, click "The printer that I want isn’t Listed".
7 In the "Select a shared printer by name" box, enter the URL for this machine in the following format,
and then click the [Next] button.
– http:// (IP_address_of_machine) /ipp Example: If the IP address of this machine is 192.168.1.20,
enter http://192.168.1.20/ipp.
– When specifying to use IPPS printing, enter "https:// < host name>.<domain name>/ipp".
For <host name>.<domain name>, specify the host name and the domain name registered for the
DNS server used.
– When the certificate of this machine is not published by certificate authority, register the certificate
of this machine to Windows Vista as a certificate of "Trusted Root Certification Authorities" for
"Computer account" in advance.
– When registering a certificate to this machine, confirm that <host name>.<domain name> is
displayed as the common name of the certificate.
8 Click the [Have Disk] button.
9 Click the [Browse] button.
10 Specify the desired folder on the CD-ROM that contains the printer driver, and then click the [Open]
button.
– Select the specified folder according to the printer driver to be used, the operating system, and the
language. Printer drivers that can be selected: Windows Vista: PCL driver, PS driver, fax driver
11 Click the [OK] button.
The "Printer" list appears.
12 Click the [Next] button.
Océ cm3522/cm2522 4-16
Page 52

Manual installation using the Add Printer wizard
13 Follow the on-screen instructions.
– If the "User Account Control" window appears, click the [Continue] button.
– If the Verify the publisher dialog box of Windows Security appears, click "Install this driver software
anyway".
14 Click the [Finish] button.
15 When the installation is completed, make sure that the icon of the installed printer appears in the
Printers window.
16 Remove the CD-ROM from the CD-ROM drive.
This completes the printer driver installation.
Once the settings for the printer have been specified, you can use the printer in the same way as a default
local printer.
4.2.3 Network connection (Web Service print)
In Windows Vista, Web Service print-supporting printers on the network can be located and installed.
2
Note
When the different kind of printer driver install after installing the printer driver, delete the installed
printer driver in advance.
4
For details, refer to "Manual uninstallation" on page 7-3.
TCP/IP setting for this machine
Specify the IP address in the TCP/IP Setting screen of this machine.
!
Detail
For details on specifying the IP address of this machine, refer to the User’s Guide [Network
Administrator].
Web Service settings for this machine
To use the Web Service print, enable the print function in the Web Service Settings screen of this machine.
!
Detail
For details on the Web Service settings of this machine, refer to the User’s Guide [Network
Administrator].
Printer installation from the Network window
2
Reminder
When installing on Windows Vista, administrator permissions are required.
1 Turn on the power of the machine while it is connected to the network.
– To allow printers to be detected during installation, the machine must be connected to the network.
2 To use the Web Service print, check that "Network discovery" is enabled in "Network and Sharing
Center" on the computer.
3 Insert the printer driver CD-ROM into the CD-ROM drive of the computer.
4 Click the [Start] button, and then click "Network".
The Network window appears, showing the computers and devices on the network.
Océ cm3522/cm2522 4-17
Page 53

Manual installation using the Add Printer wizard
5 Select the device name of this machine, and then click "Install" from the toolbar.
The selected Web Service print-supporting printer is found, and then the Found New Hardware Wizard
dialog box appears.
– If the User Account Control window appears, click the [Continue] button.
6 Follow the on-screen instructions.
– The steps performed in the New Hardware Wizard dialog box are the same as those described in
"Printer driver installation by specifying the IP address using the Add Printer Wizard". For details,
refer to Steps 11 through 20 of "Printer driver installation by specifying the IP address using the
Add Printer Wizard" on page 4-17.
– If the User Account Control window appears, click the [Continue] button.
– If the Verify the publisher dialog box of Windows Security appears, click "Install this driver software
anyway".
Printer driver installation by specifying the IP address using the Add Printer Wizard
2
Reminder
When installing on Windows Vista, administrator permissions are required.
Printers will be found during installation. Connect this machine to the network, and then turn on the
power.
4
1 Turn on the power of the machine while it is connected to the network.
– To allow printers to be detected during installation, the machine must be connected to the network.
2 To use the Web Service print, check that "Network discovery" is enabled in "Network and Sharing
Center" on the computer.
3 Insert the printer driver CD-ROM into the CD-ROM drive of the computer.
4 Click the [Start] button, and then click "Control Panel".
5 From "Hardware and Sound", click "Printer".
The Printers window appears.
– If Control Panel is displayed with Classic View, double-click "Printers".
6 Click "Add a printer" from the toolbar.
The Add Printer window appears.
Océ cm3522/cm2522 4-18
Page 54

Manual installation using the Add Printer wizard
7 Click "Add a local printer".
The Select a Printer Port dialog box appears.
8 Click "Create a new port", and select the port type.
– Select "Standard TCP/IP Port".
4
9 Click the [Next] button.
10 Select "Web Services Device" and enter the IP address.
The Web Service print-supporting printer corresponding to the entered IP address is found, and then
the Found New Hardware Wizard dialog box appears.
11 Click "Locate and install driver software (recommended)".
12 If a screen to confirm whether or not to search online, click "Do not search online".
13 Click "Browse my computer for driver software (advanced)".
14 Click the [Browse] button.
15 Specify the desired folder on the CD-ROM that contains the printer driver, and then click the [Open]
button.
– Select the specified folder according to the printer driver to be used, the operating system, and the
language.
Océ cm3522/cm2522 4-19
Page 55

Manual installation using the Add Printer wizard
Printer drivers that can be selected:
Windows Vista: PCL driver, PS driver, fax driver
16 Click the [Next] button.
17 Follow the on-screen instructions.
– If the User Account Control window appears, click the [Continue] button.
– If the Verify the publisher dialog box of Windows Security appears, click "Install this driver software
anyway".
18 Click the [Close] button.
19 After installation is completed, make sure that the icon of the installed printer appears in the Printers
window.
20 Remove the CD-ROM from the CD-ROM drive.
This completes the printer driver installation.
4.2.4 Local connection
When this machine is connected via a USB port, the printer driver can be installed with plug-and-play.
2
4
Note
When a USB connection is used, the printer driver is installed easily with the Plug and Play feature.
However, it can be installed using the Add Printer Wizard. When using the Add Printer Wizard, select
the USB port to be connected in the Select a Printer Port dialog box.
1 Connect this machine to a computer using a USB cable, and then start up the computer.
– Do not disconnect or connect the cable while the computer is starting up.
2 Turn on the main power of this machine.
The Found New Hardware Wizard dialog box appears.
– If the Found New Hardware Wizard dialog box does not appear, turn off this machine, then on again.
– When turning off the power, then on again, wait at least 10 seconds before turning it on again.
Otherwise, this machine may not function properly.
3 Click "Locate and install the driver software (recommended)".
– If the disk is not available, click "I don’t have the disk. Show me other options". In the next window,
select "Browse my computer for driver software (advanced)", and then specify the desired printer
driver folder.
The dialog box prompting you to insert the disk appears.
4 Insert the printer driver CD-ROM into the CD-ROM drive of the computer.
The information on the disk is retrieved. A list of software supporting this machine appears.
5 Specify the name of the desired printer driver, and then click the [Next] button.
– Printer drivers that can be selected: PCL driver, PS driver, fax driver
6 Follow the on-screen instructions.
– If the "User Account Control" window appears, click the [Continue] button.
– If the dialog box of Windows Security appears, click "Install this driver software anyway".
7 When the installation is completed, click the [Close] button.
8 When the installation is completed, make sure that the icon of the installed printer appears in the
Printers window.
9 Remove the CD-ROM from the CD-ROM drive.
This completes the printer driver installation.
Océ cm3522/cm2522 4-20
Page 56

Manual installation using the Add Printer wizard
4.3 Windows 2000
4.3.1 Network connection (LPR/Port9100)
When using the LPR/Port9100 printing, specify the port during the printer driver installation process.
TCP/IP setting for this machine
Specify the IP address in the TCP/IP Setting screen of this machine.
!
Detail
For details on specifying the IP address of this machine, refer to the User’s Guide [Network
Administrator].
RAW port number setting for this machine
To use Port9100 printing, enable the RAW port number (9100 at default), in the TCP/IP Setting screen of this
machine.
!
Detail
For details on specifying the RAW port number of this machine, refer to the User’s Guide [Network
Administrator].
4
LPD setting for this machine
To use LPR printing, enable LPD print in the LPD Setting screen of this machine.
!
Detail
For details on the LPD settings of this machine, refer to the User’s Guide [Network Administrator].
Printer driver installation using the Add Printer Wizard
2
Reminder
When installing on Windows 2000, administrator permissions are required.
1 Insert the printer driver CD-ROM into the CD-ROM drive of the computer.
2 Click the [Start] button, point to "Settings", and then click "Printers".
3 Double-click "Add Printer".
The Add Printer Wizard starts.
4 Follow the on-screen instructions.
5 In the dialog box for specifying the connection method, select "Local printer", and then click the [Next]
button.
Océ cm3522/cm2522 4-21
Page 57

Manual installation using the Add Printer wizard
– Clear the "Automatically detect and install my Plug and Play printer" check box.
The Select a Printer Port dialog box appears.
6 Click "Create a new port", and select "Standard TCP/IP Port" for "Type of port:".
7 Click the [Next] button.
The Add Standard TCP/IP Printer Port Wizard starts.
4
8 Click the [Next] button.
9 In the "Printer Name or IP address" box, enter the IP address for this machine, and then click the [Next]
button.
– If the Additional Port Information Required dialog box appears, go to step 10.
– If the Finish dialog box appears, go to step 13.
10 Select "Custom", and then click the [Settings] button.
11 Change the settings according to the port, and then click the [OK] button.
– For an LPR connection, select "LPR", and then enter "Print" in the "Queue name" box.
– For a Port9100 connection, select "RAW", and then enter the RAW port number (9100 at default) in
the "Port Number" box.
– The information entered here is case-sensitive.
12 Click the [Next] button.
13 Click the [Finish] button.
The Add Printer Wizard appears.
14 Click the [Have Disk] button.
15 Click the [Browse] button.
16 Specify the desired folder on the CD-ROM that contains the printer driver, and then click the [Open]
button.
– Select the specified folder according to the printer driver to be used, the operating system, and the
language.
Printer drivers that can be selected:
Windows 2000: PCL driver, PS driver, fax driver
17 Click the [OK] button.
The "Printers" list appears.
Océ cm3522/cm2522 4-22
Page 58

Manual installation using the Add Printer wizard
18 Click the [Next] button.
19 Follow the on-screen instructions.
– When the Digital Signature dialog box appears, click the [Yes] button.
20 Click the [Finish] button.
4
21 After installation is completed, make sure that the icon of the installed printer appears in the Printers
window.
22 Remove the CD-ROM from the CD-ROM drive.
This completes the printer driver installation.
4.3.2 Network connection (SMB)
When using the SMB printing, specify the port by specifying the printer during the printer driver installation
process.
TCP/IP setting for this machine
Specify the IP address in the TCP/IP Setting screen of this machine.
!
Detail
For details on specifying the IP address of this machine, refer to the User’s Guide [Network
Administrator].
SMB setting for this machine
In "Print Setting" in the SMB Setting screen of this machine, specify the NetBIOS name, print service name,
and workgroup.
!
Detail
For details on the SMB settings of this machine, refer to the User’s Guide [Network Administrator].
Printer driver installation using the Add Printer Wizard
2
Reminder
When installing on Windows 2000, administrator permissions are required.
1 Insert the printer driver CD-ROM into the CD-ROM drive of the computer.
2 Click the [Start] button, point to "Settings", and then click "Printers".
Océ cm3522/cm2522 4-23
Page 59

Manual installation using the Add Printer wizard
3 Double-click "Add Printer".
The Add Printer Wizard starts.
4 Follow the on-screen instructions.
5 In the dialog box for specifying the connection method, select "Local printer", and then click the [Next]
button.
– Clear the "Automatically detect and install my Plug and Play printer" check box.
The Select a Printer Port dialog box appears.
6 Click "Create a new port", and select "Local Port" for "Type of port:"
7 Click the [Next] button.
8 In the "Port Name" box, enter "\\NetBIOS name\print service name".
– Enter the same NetBIOS name and print service name those appear in "Print Setting" in the SMB
Setting screen of this machine.
9 Click the [OK] button.
The Add Printer Wizard appears.
10 Click the [Have Disk] button.
4
11 Click the [Browse] button.
12 Specify the desired folder on the CD-ROM that contains the printer driver, and then click the [Open]
button.
– Select the specified folder according to the printer driver to be used, the operating system, and the
language.
Printer drivers that can be selected:
Windows 2000: PCL driver, PS driver, fax driver
13 Click the [OK] button.
The "Printers" list appears.
14 Click the [Next] button.
15 Follow the on-screen instructions.
– When the Digital Signature dialog box appears, click the [Yes] button.
16 Click the [Finish] button.
17 After installation is completed, make sure that the icon of the installed printer appears in the Printers
window.
18 Remove the CD-ROM from the CD-ROM drive.
This completes the printer driver installation.
4.3.3 Network connection (IPP or IPPS)
For IPP printing, specify the network setting before installing the printer driver.
Specifying the TCP/IP setting for this machine
Specify the IP address of this machine.
!
Detail
For details on specifying the IP address of this machine, refer to the User’s Guide [Network
Administrator].
Océ cm3522/cm2522 4-24
Page 60

Manual installation using the Add Printer wizard
Specifying the IPP settings for this machine
Enable IPP printing in "IPP Setting" of this machine.
!
Detail
For details on the IPP settings of this machine, refer to the User’s Guide [Network Administrator].
To use IPPS printing, the certificate must be registered to this machine. For details, refer to the User’s
Guide [Network Administrator].
Printer driver installation using the Add Printer wizard
2
Reminder
When installing on Windows 2000, administrator permissions are required.
1 Insert the printer driver CD-ROM into the CD-ROM drive of the computer.
2 Click the [Start] button, and then click "Setup" - "Printer".
3 Double-click "Add Printer".
"Add Printer wizard" starts.
4
4 Click the [Next] button.
5 In the Local or Network Printer dialog box, select "Network printer", and then click the [Next] button.
6 In the Locate Your Printer dialog box, select "Connect to a printer on the Internet or on your intranet".
7 In the "URL" field, enter the URL for this machine in the following format, and then click the [Next]
button.
– http:// (IP_address_of_machine)/ipp Example: If the IP address of this machine is 192.168.1.20,
enter http://192.168.1.20/ipp.
– When setting this machine for IPPS printing, enter "https:// (IP_address_of_machine) /ipp".
8 When the confirmation dialog box appears, click the [OK] button.
9 Click the [Have Disk] button.
10 Click the [Browse] button.
11 Specify the desired folder on the CD-ROM that contains the printer driver, and then click the [Open]
button.
– Select the specified folder according to the printer driver to be used, the operating system, and the
language. Printer drivers that can be selected: Windows 2000: PCL driver, PS driver
12 Click the [OK] button.
The "Printer" list appears.
13 Click the [OK] button.
14 Follow the on-screen instructions.
– When the "Digital Signature" dialog box appears, click the [Yes] button.
15 Click the [Finish] button.
16 When the installation is completed, make sure that the icon of the installed printer appears in the
Printers and Faxes window.
17 Remove the CD-ROM from the CD-ROM drive.
This completes the printer driver installation.
Océ cm3522/cm2522 4-25
Page 61

Manual installation using the Add Printer wizard
Once the settings for the printer have been specified, you can use the printer in the same way as a default
local printer.
4.3.4 Local connection
When this machine is connected via a USB port, the printer driver can be installed with plug-and-play.
2
Note
When a USB connection is used, the printer driver is installed easily with the Plug and Play feature.
However, it can also be installed using the Add Printer Wizard. When using the Add Printer Wizard,
select the USB port to be connected in the Select a Printer Port dialog box.
1 Connect this machine to a computer using a USB cable, and then start up the computer.
– Do not disconnect or connect the cable while the computer is starting up.
2 Insert the printer driver CD-ROM into the CD-ROM drive of the computer.
3 Turn on the main power of this machine.
The Found New Hardware Wizard dialog box appears.
– If the Found New Hardware Wizard does not start up, turn off this machine, then on again.
– When turning off the power, then on again, wait at least 10 seconds before turning it on again.
Otherwise, this machine may not function properly.
4
4 Select "Search for a suitable driver for my device (recommended)", and then click the [Next] button.
5 Select "Specify location", and then click the [Next] button.
6 Specify the desired folder on the CD-ROM that contains the printer driver, and then click the [Open]
button.
– Select the specified folder according to the printer driver to be used, the operating system, and the
language. Windows 2000: PCL driver, PS driver, fax driver
7 Click the [OK] button, and then follow the on-screen instructions.
– When the "Digital Signature" dialog box appears, click the [Yes] button.
8 Click the [Finish] button.
9 When the installation is completed, make sure that the icon of the installed printer appears in the
Printers and Faxes window.
10 Remove the CD-ROM from the CD-ROM drive.
This completes the printer driver installation.
Océ cm3522/cm2522 4-26
Page 62

Manual installation using the Add Printer wizard
4.4 Windows NT 4.0
4.4.1 Network connection (LPR)
When using the LPR printing, specify the port during the printer driver installation process.
TCP/IP setting for this machine
Specify the IP address in the TCP/IP Setting screen of this machine.
!
Detail
For details on specifying the IP address of this machine, refer to the User’s Guide [Network
Administrator].
LPD setting for this machine
To use LPR printing, enable LPD print in the LPD Setting screen of this machine.
!
Detail
For details on the LPD settings of this machine, refer to the User’s Guide [Network Administrator].
Printer driver installation using the Add Printer Wizard
4
2
Reminder
When installing on Windows NT 4.0, administrator permissions are required.
To use the LPR port in Windows NT 4.0, Microsoft TCP/IP Print Services must be installed on the
computer.
1 Insert the printer driver CD-ROM into the CD-ROM drive of the computer.
2 Click the [Start] button, point to "Settings", and then click "Printers".
3 Double-click "Add Printer".
The Add Printer Wizard starts.
4 Follow the on-screen instructions.
5 In the dialog box for specifying the connection method, select "This computer", and then click the
[Next] button.
6 Click the [Next] button.
A screen for specifying ports appears.
7 Click the [Add Port] button.
8 In the "Available Printer Ports" list, select "LPR Port", and then click the [New Port] button.
9 Enter the IP address of this machine in the "Address" box and "Print" in the "Queue Name" box, and
then click the [OK] button.
– The information entered here is case-sensitive.
10 Select the created port, and then click the [Next] button.
11 Click the [Have Disk] button.
12 Click the [Browse] button.
13 Specify the desired folder on the CD-ROM that contains the printer driver, and then click the [Open]
button.
Océ cm3522/cm2522 4-27
Page 63

Manual installation using the Add Printer wizard
– Select the specified folder according to the printer driver to be used, the operating system, and the
language.
Printer drivers that can be selected:
Windows NT 4.0: PCL driver, fax driver
14 Click the [OK] button.
The "Printers" list appears.
15 Click the [Next] button.
16 Follow the on-screen instructions.
17 Click the [Finish] button.
18 After installation is completed, make sure that the icon of the installed printer appears in the Printers
window.
19 Remove the CD-ROM from the CD-ROM drive.
This completes the printer driver installation.
4
Océ cm3522/cm2522 4-28
Page 64

5
Installation on Macintosh
computers
Page 65

Installation on Macintosh computers
5 Installation on Macintosh computers
5.1 Mac OS X 10.2, 10.3, or 10.4
5.1.1 Installing the printer driver
1 Start up the Macintosh computer.
2 Insert the printer driver CD-ROM into the CD-ROM drive of the computer.
– Exit all running applications, if any.
3 Open the folder on the CD-ROM that contains the desired printer driver.
– Select the specified folder according to the printer driver to be used, the operating system, and the
language.
4 Copy the driver file for the Mac OS version on the desktop.
– OS X 10.2: GENERIC_35C-4 _102.pkg
– OS X 10.3: GENERIC_35C-4 _103.pkg
– OS X 10.4: GENERIC_35C-4 _103.pkg
5
5 Double-click the file copied on the desktop.
– As prompted, enter the administrator name and password.
– For the administrator name and password, contact your network administrator.
– To quit the installation, click the [Cancel] button.
6 Click the [Continue] button and follow the on-screen instructions until the Easy Install dialog box
appears.
7 In the Easy Install dialog box, click the [Install] button.
– When the printer driver is installed for the second and subsequent times, the [Install] button may
appear as the [Upgrade] button.
The printer driver is installed to the Macintosh computer. When the installation is completed, a message
appears.
8 Click the [Close] button.
This completes the printer driver installation.
Next, select a printer.
Océ cm3522/cm2522 5-2
Page 66

Installation on Macintosh computers
5.1.2 Selecting and connecting the printer (OS 10.4)
In OS 10.4, this machine can be connected with Bonjour, AppleTalk, LPR (LPD), or IPP.
After specifying the network setting for this machine, selecting this machine as the printer in Printer Setup
Utility or Print Center enables printing.
Specifying the Bonjour settings
Specifying the Bonjour settings for this machine
Enable Bonjour in "Bonjour Setting", and then enter the Bonjour name.
!
Detail
For details on the Bonjour settings of this machine, refer to the User’s Guide [Network Administrator].
Adding a printer
1 Select "HDD" - "Applications" - "Utility" where the driver was installed, and then double-click "Printer
Setup Utility" or "Print Center" to open it.
2 When the Add Printer dialog box appears, click the [Add] button. When the printer list appears, click
the [Add] button.
– If available printers have already been set up, the Add Printer dialog box does not appear.
– If the printer is not detected, turn off this machine, then on again.
– When turning off the power, then on again, wait at least 10 seconds before turning it on again.
Otherwise, this machine may not function properly.
The connected printers are detected.
5
3 From the "Printer Name" list, select the desired model name and connection (Bonjour).
4 Select "GENERIC" in "Print Using", select the desired model from the list of models, and then click the
[Add] button.
If the selected printer is registered in the printer list, the setting procedure is completed.
Océ cm3522/cm2522 5-3
Page 67

Installation on Macintosh computers
2
Note
If the Installable Options window appears, proceed to change the option settings as necessary. For
details, refer to "Initializing the printer driver" on page 9-3.
Specifying the AppleTalk settings
Specifying the AppleTalk settings for this machine
Enable AppleTalk in "AppleTalk Setting", and then enter the printer name.
!
Detail
For details on the AppleTalk settings of this machine, refer to the User’s Guide [Network Administrator].
Specifying the AppleTalk settings for the computer
Specify the AppleTalk settings for the Macintosh computer connected to this machine.
1 On the "Apple" menu, select "System Preferences".
2 Click the "Network" icon.
3 From "Show", select "Built-in Ethernet".
5
4 Click the AppleTalk tab, and then select the "Make AppleTalk Active" check box.
5 Click the close button at the upper left corner of the dialog box.
– When the "Apply configuration changes?" message appears, click the [Apply] button.
Adding a printer
1 Select "HDD" - "Applications" - "Utility" where the driver was installed, and then double-click "Printer
Setup Utility" or "Print Center" to open it.
2 When the Add Printer dialog box appears, click the [Add] button. When the printer list appears, click
the [Add] button.
– If available printers have already been set up, the Add Printer dialog box does not appear.
– If the printer is not detected, turn off this machine, then on again.
– When turning off the power, then on again, wait at least 10 seconds before turning it on again.
Otherwise, this machine may not function properly.
The connected printers are detected.
3 From the "Printer Name" list, select the desired model name and connection (AppleTalk).
Océ cm3522/cm2522 5-4
Page 68

Installation on Macintosh computers
4 Select "GENERIC" in "Print Using", select the desired model from the list of models, and then click the
[Add] button.
5
If the selected printer is registered in the printer list, the setting procedure is completed.
2
Note
If the Installable Options window appears, proceed to change the option settings as necessary. For
details, refer to "Initializing the printer driver" on page 9-3.
Specifying the LPR settings
Specifying the TCP/IP setting for this machine
Specify the IP address of this machine.
!
Detail
For details on specifying the IP address of this machine, refer to the User’s Guide [Network
Administrator].
LPD setting for this machine
To use LPR printing, enable LPD print in the LPD Setting screen of this machine.
!
Detail
For details on the LPD settings of this machine, refer to the User’s Guide [Network Administrator].
Specifying the TCP/IP setting for the computer
Specify the TCP/IP setting for the Macintosh computer connected to this machine.
1 On the "Apple" menu, select "System Preferences".
2 Click the "Network" icon.
3 From "Show", select "Built-in Ethernet".
Océ cm3522/cm2522 5-5
Page 69

Installation on Macintosh computers
4 Click the TCP/IP tab.
5 Select "Configure" items according to the settings for the network to which the Macintosh computer is
connected, and then specify the IP address and subnet mask.
6 Click the close button at the upper left corner of the dialog box.
– When the "Apply configuration changes?" message appears, click the [Apply] button.
Adding a printer
1 Select "HDD" - "Applications" - "Utility" where the driver was installed, and then double-click "Printer
Setup Utility" or "Print Center" to open it.
2 When the Add Printer dialog box appears, click the [Add] button. When the printer list appears, click
the [Add] button.
– If available printers have already been set up, the Add Printer dialog box does not appear.
The "Printer Browser" appears.
3 Click the [IP Printer] button.
4 From "Protocol", select "LPD".
5 In "Address", enter the IP address of this machine.
5
6 Select "GENERIC" in "Print Using", select the desired model from the list of models, and then click the
[Add] button.
If the selected printer is registered in the printer list, the setting procedure is completed.
2
Note
If the Installable Options window appears, proceed to change the option settings as necessary. For
details, refer to "Initializing the printer driver" on page 9-3.
Océ cm3522/cm2522 5-6
Page 70

Installation on Macintosh computers
Specifying the IPP settings
Specifying the TCP/IP setting for this machine
Specify the IP address of this machine.
!
Detail
For details on specifying the IP address of this machine, refer to the User’s Guide [Network
Administrator].
IPP setting for this machine
Enable IPP print in the IPP Setting screen of this machine.
!
Detail
For details on the IPP settings of this machine, refer to the User’s Guide [Network Administrator].
Specifying the TCP/IP setting for the computer
Specify the TCP/IP setting for the Macintosh computer connected to this machine.
1 On the "Apple" menu, select "System Preferences".
2 Click the "Network" icon.
5
3 From "Show", select "Built-in Ethernet".
4 Click the TCP/IP tab.
5 Select "Configure" items according to the settings for the network to which the Macintosh computer is
connected, and then specify the IP address and subnet mask.
6 Click the close button at the upper left corner of the dialog box.
– When the "Apply configuration changes?" message appears, click the [Apply] button.
Adding a printer
1 Select "HDD" - "Applications" - "Utility" where the driver was installed, and then double-click "Printer
Setup Utility" or "Print Center" to open it.
2 When the Add Printer dialog box appears, click the [Add] button. When the printer list appears, click
the [Add] button.
– If available printers have already been set up, the Add Printer dialog box does not appear.
The "Printer Browser" appears.
3 Click the [IP Printer] button.
4 From "Protocol", select "IPP".
5 In "Address", enter the IP address of this machine. In "Queue", enter "ipp".
Océ cm3522/cm2522 5-7
Page 71

Installation on Macintosh computers
6 Select "GENERIC" in "Print Using", select the desired model from the list of models, and then click the
[Add] button.
5
If the selected printer is registered in the printer list, the setting procedure is completed.
2
Note
If the Installable Options window appears, proceed to change the option settings as necessary. For
details, refer to "Initializing the printer driver" on page 9-3.
5.1.3 Selecting and connecting the printer (OS 10.2 and 10.3)
In OS 10.2/10.3, this machine can be connected with Rendezvous, AppleTalk, LPR (LPD), or IPP.
After specifying the network setting for this machine, selecting this machine as the printer in Printer Setup
Utility or Print Center enables printing.
Specifying the Rendezvous settings
Specifying the Bonjour settings for this machine
Enable Bonjour in "Bonjour Setting", and then enter the Bonjour name.
!
Detail
For details on the Bonjour settings of this machine, refer to the User’s Guide [Network Administrator].
Adding a printer
1 Select "HDD" - "Applications" - "Utility" where the driver was installed, and then double-click "Printer
Setup Utility" or "Print Center" to open it.
2 When the Add Printer dialog box appears, click the [Add] button. When the printer list appears, click
the [Add] button.
– If available printers have already been set up, the Add Printer dialog box does not appear.
3 Select "Rendezvous" for the connection method.
– If the printer is not detected, turn off this machine, then on again.
Océ cm3522/cm2522 5-8
Page 72

Installation on Macintosh computers
– When turning off the power, then on again, wait at least 10 seconds before turning it on again.
Otherwise, this machine may not function properly.
The connected printers are detected.
4 From the "Name" list, select the desired model name.
5 Select "GENERIC" in "Printer Model", select the desired model from the list of model names, and then
click the [Add] button.
5
If the selected printer is registered in the printer list, the setting procedure is completed.
Specifying the AppleTalk settings
Specifying the AppleTalk settings for this machine
Enable AppleTalk in "AppleTalk Setting", and then enter the printer name.
!
Detail
For details on the AppleTalk settings of this machine, refer to the User’s Guide [Network Administrator].
Specifying the AppleTalk settings for the computer
Specify the AppleTalk settings for the Macintosh computer connected to this machine.
1 On the "Apple" menu, select "System Preferences".
2 Click the "Network" icon.
3 From "Show", select "Built-in Ethernet".
4 Click the AppleTalk tab, and then select the "Make AppleTalk Active" check box.
5 Click the close button at the top left of the dialog box.
– When the "Apply configuration changes?" message appears, click the [Apply] button.
Adding a printer
1 Select "HDD" - "Applications" - "Utility" where the driver was installed, and then double-click "Printer
Setup Utility" or "Print Center" to open it.
2 When the Add Printer dialog box appears, click the [Add] button. When the printer list appears, click
the [Add] button.
– If available printers have already been set up, the Add Printer dialog box does not appear.
3 Select "AppleTalk" for the connection method, and then select the zone to which this machine is
connected.
Océ cm3522/cm2522 5-9
Page 73

Installation on Macintosh computers
– If the printer is not detected, turn off this machine, then on again.
– When turning off the power, then on again, wait at least 10 seconds before turning it on again.
Otherwise, this machine may not function properly.
The connected printers are detected.
4 From the "Name" list, select the desired model name.
5 Select "GENERIC" in "Printer Model", select the desired model from the list of model names, and then
click the [Add] button.
5
If the selected printer is registered in the printer list, the setting procedure is completed.
Specifying the LPR settings
Specifying the TCP/IP setting for this machine
Specify the IP address of this machine.
!
Detail
For details on specifying the IP address of this machine, refer to the User’s Guide [Network
Administrator].
LPD setting for this machine
To use LPR printing, enable LPD print in the LPD Setting screen of this machine.
!
Detail
For details on the LPD settings of this machine, refer to the User’s Guide [Network Administrator].
Specifying the TCP/IP setting for the computer
Specify the TCP/IP setting for the Macintosh computer connected to this machine.
1 On the "Apple" menu, select "System Preferences".
2 Click the "Network" icon.
3 From "Show", select "Built-in Ethernet".
4 Click the TCP/IP tab.
5 Select "Configure" items according to the settings for the network to which the Macintosh computer is
connected, and then specify the IP address and subnet mask.
6 Click the close button at the upper left corner of the dialog box.
– When the "Apply configuration changes?" message appears, click the [Apply] button.
Océ cm3522/cm2522 5-10
Page 74

Installation on Macintosh computers
Adding a printer
1 Select "HDD" - "Applications" - "Utility" where the driver was installed, and then double-click "Printer
Setup Utility" or "Print Center" to open it.
2 When the Add Printer dialog box appears, click the [Add] button. When the printer list appears, click
the [Add] button.
– If available printers have already been set up, the Add Printer dialog box does not appear.
3 Select "IP Printing" for the connection method.
4 For OS 10.3, from "Printer Type", select "LPD/LPR".
5 In "Printer Address", enter the IP address of this machine.
6 Select "GENERIC" in "Printer Model", select the desired model from the list of model names, and then
click the [Add] button.
5
If the selected printer is registered in the printer list, the setting procedure is completed.
Specifying the IPP settings
Specifying the TCP/IP setting for this machine
Specify the IP address of this machine.
!
Detail
For details on specifying the IP address of this machine, refer to the User’s Guide [Network
Administrator].
IPP setting for this machine
Enable IPP print in the IPP Setting screen of this machine.
!
Detail
For details on the IPP settings of this machine, refer to the User’s Guide [Network Administrator].
Specifying the TCP/IP setting for the computer
Specify the TCP/IP setting for the Macintosh computer connected to this machine.
1 On the "Apple" menu, select "System Preferences".
2 Click the "Network" icon.
3 From "Show", select "Built-in Ethernet".
Océ cm3522/cm2522 5-11
Page 75

Installation on Macintosh computers
4 Click the TCP/IP tab.
5 Select "Configure" items according to the settings for the network to which the Macintosh computer is
connected, and then specify the IP address and subnet mask.
6 Click the close button at the upper left corner of the dialog box.
– When the "Apply configuration changes?" message appears, click the [Apply] button.
Adding a printer
1 Select "HDD" - "Applications" - "Utility" where the driver was installed, and then double-click "Printer
Setup Utility" or "Print Center" to open it.
2 When the Add Printer dialog box appears, click the [Add] button. When the printer list appears, click
the [Add] button.
– If available printers have already been set up, the Add Printer dialog box does not appear.
3 Select "IP Printing" for the connection method.
4 For OS 10.3, from "Printer Type", select "IPP".
5 In "Printer Address", enter the IP address of this machine.
–Leave "Queue Name" blank.
5
6 Select "GENERIC" in "Printer Model", select the desired model from the list of model names, and then
click the [Add] button.
If the selected printer is registered in the printer list, the setting procedure is completed.
Océ cm3522/cm2522 5-12
Page 76

Installation on Macintosh computers
5.2 Mac OS 9.2
5.2.1 Installing the printer driver
After connected to a computer, this machine can be used as a printer by selecting a PostScript printer and
by specifying the printer description (PPD) file.
First, copy the printer description (PPD) file to the Macintosh computer.
1 Insert the printer driver CD-ROM into the CD-ROM drive of the computer.
2 Open the folder on the CD-ROM that contains the desired printer driver.
– Select the specified folder according to the printer driver to be used, the operating system, and the
language.
3 Select PPD file GENERIC35C-4UVxxx.ppd, and then copy it into the Printer Descriptions folder in
"System Folder" - "Extensions" of "Hard Disk".
This completes the printer driver installation.
5.2.2 Selecting and connecting the printer
In OS 9, this machine can be connected with AppleTalk or LPR (LPD).
Specify the network settings for this machine, and then select the printer.
5
Specifying the AppleTalk settings
Specifying the AppleTalk settings for this machine
Enable AppleTalk in "AppleTalk Setting", and then enter the printer name.
!
Detail
For details on the AppleTalk settings of this machine, refer to the User’s Guide [Network Administrator].
Specifying the AppleTalk settings for the computer
Specify the AppleTalk settings for the Macintosh computer connected to this machine.
1 On the "Apple" menu, select "Control Panel" - "AppleTalk".
2 From the "Connect via" drop-down list, select "Ethernet".
3 Click the close button at the upper left corner of the dialog box.
– When the "Save changes to the current configuration?" message appears, click the [Save] button.
Selecting a printer
1 On the "Apple" menu, select "Chooser".
2 Make sure that "AppleTalk" is set to "Active", and then click the "LaserWriter" icon.
3 From the "Select a PostScript Printer" list, click the desired model name, and then click the [Create]
button.
A window for selecting a PostScript printer description (PPD) file appears.
4 Select the applicable PPD file, and then click the [Select] or [Open] button.
Océ cm3522/cm2522 5-13
Page 77

Installation on Macintosh computers
– If a different PPD file has already been selected, click the [Setup] button in step 3, and then click the
[Select PPD] button from the window that is already displayed.
A window for specifying options appears.
5 Select options installed on this machine on the "Options Installed 1" and "Options Installed 2" windows.
5
6 Click the [OK] button.
The "selector" window appears again.
7 Close the "selector" window.
Specifying the LPR settings
Specifying the TCP/IP setting for this machine
Specify the IP address of this machine.
!
Detail
For details on specifying the IP address of this machine, refer to the User’s Guide [Network
Administrator].
LPD setting for this machine
To use LPR printing, enable LPD print in the LPD Setting screen of this machine.
!
Detail
For details on the LPD settings of this machine, refer to the User’s Guide [Network Administrator].
Specifying the TCP/IP setting for the computer
Specify the TCP/IP setting for the Macintosh computer connected to this machine.
1 On the "Apple" menu, select "Control Panel" - "TCP/IP".
2 From the "Connect via" drop-down list, select "Ethernet".
3 Select "Configure" items according to the settings for the network to which the Macintosh computer is
connected, and then specify the IP address and subnet mask.
Océ cm3522/cm2522 5-14
Page 78

Installation on Macintosh computers
4 Click the close button at the upper left corner of the dialog box.
– When the "Save changes to the current configuration?" message appears, click the [Save] button.
Adding a printer
1 Select "HDD" - "Applications" - "Utility", and then double-click "Desktop Printer Utility" to open it.
The New Desktop Printer window appears.
2 From "Printer", select "LaserWriter".
3 From "Create Desktop", select "Printer (LPR)".
5
The Untitled window appears.
4 Click the [Change] button for "PostScript™ Printer Description (PPD) File".
A window for selecting a PostScript printer description (PPD) file appears.
5 Select the applicable PPD file, and then click the [Select] button.
The Untitled window appears again.
6 Click the [Change] button for "LPR Printer Selection".
A window for entering the IP address appears.
7 In "Printer Address", enter the IP address of this machine, and then click the [OK] button.
The Untitled window appears again.
8 Click the [Create] button.
A window for saving the setting appears.
9 Enter a desktop printer name, and then click the [Save] button.
An icon for the LPR printer is created on the desktop.
Océ cm3522/cm2522 5-15
Page 79

Installation on Macintosh computers
5
Océ cm3522/cm2522 5-16
Page 80

6
Installation to use NetWare
Page 81

Installation to use NetWare
6 Installation to use NetWare
6.1 NetWare
6.1.1 Network Settings
Use "NetWare Settings" of this machine to make "IPX Settings" and "NetWare Print Settings".
!
Detail
For details on the NetWare settings of this machine, refer to the User’s Guide [Network Administrator].
6.1.2 Windows Client Setting
Install the printer driver using the Add Printer Wizard for an Window client who uses a printer.
2
Reminder
When installing on NT4.0/2000/XP/Vista/Server 2003, administrator permissions are required.
1 Insert the printer driver CD-ROM into the CD-ROM drive of the computer.
6
2 Open the Printers window or Printers and Faxes window.
3 Perform "Add a printer" or "Add Printer".
Add Printer Wizard starts.
4 In the port settings, browse the network, and specify the name of the created queue (or NDPS printer
name).
5 From the printer model list, specify the desired folder on the CD-ROM that contains the printer driver.
– Select the specified folder according to the printer driver to be used, the operating system, and the
language. Printer drivers that can be selected: Windows 2000/XP/Vista/Server 2003: PCL driver, PS
driver Windows NT4.0: PCL driver
6 Follow the on-screen instructions to complete the installation.
Océ cm3522/cm2522 6-2
Page 82

7
Uninstalling the printer driver
Page 83

Uninstalling the printer driver
7 Uninstalling the printer driver
7.1 Windows
If it becomes necessary to delete the printer driver, for example, when you want to reinstall the printer driver,
delete the driver according to the following procedure.
7.1.1 Uninstallation by an uninstallation program
If the printer driver was installed with an installer, the delete function of the printer driver is included.
1 Click the [Start] button, and then select "All Programs" (or "Programs"), select "Generic", select
"Generic 35C-4 Series", and then click "Uninstall Printer Driver".
2 Select the components to be deleted, and then click the [Uninstall] button.
– Follow the on-screen instructions.
7
3 If the restart screen appears, click the [OK] button to restart the computer.
7.1.2 Uninstallation by an installer
If the printer driver was installed with an installer, it can be deleted by the installer.
1 Insert the printer driver CD-ROM into the CD-ROM drive of the computer.
– Check that the installer starts up, and then continue with step 2.
– If the installer does not start up, open the printer driver folder on the CD-ROM, and then double-
click "Setup.exe" to continue with step 3.
2 Click "Printer Install".
The installer of the printer driver starts.
3 Click the [Agree] button on the installation license agreement screen.
4 In the setup selection dialog box, select "Uninstall Printer Driver", and then click the [Next] button.
5 Select the components to be deleted, and then click the [Delete] button.
– Follow the on-screen instructions.
6 If the restart screen appears, click the [OK] button to restart the computer.
Océ cm3522/cm2522 7-2
Page 84

Uninstalling the printer driver
7.1.3 Manual uninstallation
If the printer driver was installed without using an installer, manually delete the printer driver.
1 Open the Printers window or Printers and Faxes window.
2 Select the icon of the printer to be deleted.
3 Press the [Delete] key on the computer keyboard to delete the printer driver.
4 Follow the on-screen instructions.
When the driver has been deleted, the icon disappears from the Printers window or the Printers and
Faxes window.
For Windows NT 4.0, this completes the driver uninstallation.
For Windows 2000/XP/Vista/Sever 2003, delete the printer driver in "Server Properties".
5 Open "Server Properties".
– For Windows 2000/XP/Server 2003, click the "File" menu, and then click "Server Properties".
– For Windows Vista, right-click space in the Printers window and click "Run as administrator", then
click "Server Properties".
– If the User Account Control window appears, click the [Continue] button.
6 Click the Driver tab.
7
7 Select the printer driver to be deleted from the "Installed printer drivers" list, and then click the [Remove]
button.
– For Windows 2000/XP/Server 2003, continue with step 9.
– For Windows Vista, continue with step 8.
8 Select "Remove driver and driver package" on the deletion confirmation screen and then click the [OK]
button.
9 Click the [Yes] button on the deletion confirmation screen.
– For Windows Vista, when the deletion confirmation screen is additionally displayed, click the
[Delete] button.
10 Close the opened screen and restart the computer.
– Be sure to restart the computer.
This completes the printer driver uninstallation.
2
Note
Even if the printer driver is deleted using the preceding method, the model information file will remain
in the computer for Windows 2000/XP/Server 2003. Therefore, when reinstalling the same version of
the printer driver, the driver may not be able to be overwritten. In this case, delete the following files.
"C: \WINDOWS\system32\spool\drivers\w32x86"
When you check folders and find a folder of the applicable model, delete it. However, if multiple drivers
are installed including the driver, PostScript driver and fax driver, the model information of all drivers is
deleted. If other drivers are remaining, do not delete it.
"C: "Delete "oem*.inf" and "oem*.PNF" in "\WINDOWS\inf" folder (the asterisk "*" in the file name
indicates a number, and the number varies according to the environment of the computer).
Before deleting the files, open the INF file, check that the model name is described in the last several
lines, and then check that the file of the corresponding model is available. The PNF file is the same
number as the INF file.
In Windows Vista, when you have deleted a file using "Remove driver and driver package", this
operation is not required.
Océ cm3522/cm2522 7-3
Page 85

Uninstalling the printer driver
7.2 Macintosh
If it becomes necessary to delete the printer driver, for example, when you want to reinstall the printer driver,
delete the driver according to the following procedure.
7.2.1 For Macintosh OS X
1 Open the [Printer Setup Utility] (or [Print Center]) located in "Applications" - "Utilities" of "Hard Disk".
2 Select the printer name to be deleted, and then click the [Delete] button.
The selected printer is deleted.
3 Close the printer list.
4 Drag the following file, which is located in "Library" - "Printers" - "PPDs" - "Contents" - "Resources" -
"en.lproj" of "Hard Disk", to the "Trash" icon.
– "GENERIC 35C-4.gz"
– "GENERIC 25C-4.gz"
5 Delete the unnecessary files from "Library" - "Printers".
– Drag the "35C-4" folder, which is located in "Library" - "Printers" - "GENERIC", to the "Trash" icon.
– For Mac OS 10.2, drag all the "GENERIC 35C-4" folders, which are located in "Library" - "Printers"
- "PPDPlugins", to the "Trash" icon.
7
6 Restart the computer.
This completes the printer driver uninstallation.
7.2.2 For Macintosh OS 9.2
1 Drag the printer icon on the desktop to the "Trash" icon.
2 Drag PPD file "GENERIC35C-4UVxxx.ppd", which is located in "System Folder" - "Extensions" -
"Printer Descriptions" of "Hard Disk", to the "Trash" icon.
The related printer driver files are deleted.
3 Restart the computer.
This completes the printer driver uninstallation.
Océ cm3522/cm2522 7-4
Page 86

8
Print functions of the PCL/PS
drivers for Windows
Page 87

Print functions of the PCL/PS drivers for Windows
8 Print functions of the PCL/PS drivers for Windows
8.1 Printing operations
Print jobs are specified from the application software.
1 Open the data in the application, click the [File] button, and then click "Print" from the menu.
– If the menu is not available, click the [Print] button.
2 Check that the printer name has been selected in "Printer Name" or "Select Printer".
– If the printer is not selected, click to select the printer.
8
– The Print dialog box differs depending on the application.
3 Specify the print range and the number of copies to be printed.
4 Click the [Properties] or the [Preferences] button to change the printer driver settings as necessary.
– By clicking the [Properties] button or the [Preferences] button in the Print dialog box, you can specify
the settings of each model in the printer driver dialog box that appears. For details, refer to
"Parameter details" on page 8-7.
– If the changed settings are not saved in the Print dialog box, the original settings are restored when
the application is quit.
5 Click the [Print] button.
The data indicator of this machine flashes.
Océ cm3522/cm2522 8-2
Page 88

Print functions of the PCL/PS drivers for Windows
8.2 Initializing the printer driver
When you have installed the printer driver, you need to change the initialization condition such as options,
user authentication and account track functions and enable functions of the machine from the printer driver.
2
Reminder
If the model name, installed options, the User Authentication and Account Track functions are not
specified on the Configure tab, the option functions cannot be used from the printer driver. When
installing options, be sure to make the proper settings.
8.2.1 How to display the Properties screen
1 Open the Printers window or Printers and Faxes window.
– For Windows 2000/NT 4.0, click the [Start] button, click "Settings", and then click "Printers".
– For Windows XP/Server 2003, click the [Start] button, and then click "Printers and Faxes".
– For Windows XP/Server 2003, if "Printers and Faxes" does not appear in the [Start] menu, open the
"Control Panel" from the [Start] menu, select "Printers and Other Hardware", and then click "Printers
and Faxes".
– For Windows Vista, click the [Start] button to open the "Control Panel", select "Hardware and
Sound", and then click "Printers".
– In Windows Vista, if Control Panel is displayed with Classic View, double-click "Printers".
8
2 Right-click the icon of the installed printer, and then click "Properties".
8.2.2 Configure tab
The functions of this machine can be used from the printer driver if the model name used, installed options,
the User Authentication and Account Track functions are specified.
2
Reminder
Be sure to select a model and options from the "Device Option".
Match the "Encrypt. Passphrase" to that specified by "Driver Password Encryption Setting" of this
machine.
Océ cm3522/cm2522 8-3
Page 89

Print functions of the PCL/PS drivers for Windows
Item Description
Device Option Specifies the model name of this machine, options that are installed on this machine and
Paper Tray Information Indicates the paper type specified for each tray.
Acquire Device Information
Acquire Settings Specifies the conditions of the connection destination to execute Acquire Device Informa-
Encrypt. Passphrase Enter the encryption passphrase when it is defined by the user through communication
Software Tool Starts up software tools such as Web Connection.
the status of the User Authentication and Account Track functions. Specify the status of
each item from the "Setting" dropdown list.
Click the [Paper Tray Settings] button to specify the settings for each paper tray.
Communicates with this machine to read the status of the installed options.
tion.
with this machine.
2
Note
The [Acquire Device Information] function cannot be used unless you are connected and able to
communicate with this machine.
!
Detail
For the procedure for specifying "Encrypt. Passphrase" to be defined by the user, refer to "Specifying
a user-defined encryption passphrase" on page 11-25.
8
8.2.3 Settings tab
The default settings for displaying the confirmation messages or the dialog box for entering the authentication
settings can be changed.
Item Description
EMF Spool Select this check box when meta file (EMF) spool is required for use in its own system en-
Display Constraint Message
Océ cm3522/cm2522 8-4
vironment.
Displays a message when functions that cannot be specified at the same time were enabled from the printer driver.
Page 90

Print functions of the PCL/PS drivers for Windows
Item Description
Display paper set in Print
Server Properties
Verify Authentication
settings before printing
Popup Authentication
Dialog when printing
Save Custom Size Saves the custom paper sizes.
Uses the paper that was added in [Server Properties] of the printer folder.
Verifies the authentication settings for this machine before printing and displays a message if the settings are not compatible.
Displays the User Authentication/Account Track dialog box when a print job is specified
to enter a user name or a department name.
2
Note
"EMF Spool" and "Save Custom Size" are functions only for the PCL driver.
8.2.4 Registration of the default settings
The settings specified for the functions of this machine when printing can only be applied while using the
application. When the application is quit, the settings return to their default settings.
When registering the settings, change the printer driver basic settings (default settings).
1 Open the Printers window or Printers and Faxes window.
– For Windows 2000/NT 4.0, click the [Start] button, click "Settings", and then click "Printers".
– For Windows XP/Server 2003, click the [Start] button, and then click "Printers and Faxes".
– For Windows XP/Server 2003, if "Printers and Faxes" does not appear in the [Start] menu, open the
"Control Panel" from the [Start] menu, select "Printers and Other Hardware", and then click "Printers
and Faxes".
– For Windows Vista, click the [Start] button to open the "Control Panel", select "Hardware and
Sound", and then click "Printers".
– In Windows Vista, if Control Panel is displayed with Classic View, double-click "Printers".
8
2 Right-click the icon of the installed printer, and then click "Printing Preferences".
– For Windows NT 4.0, right-click the icon of the installed printer, and then click "Document Defaults".
The Printer Driver Preference dialog box appears.
3 Change the settings of the function, and then click the [OK] button to exit from the function.
The changed settings are applicable when the printer is used by all of the application software.
!
Detail
For the function and settings of the printer driver, refer to "Parameter details" on page 8-7.
The printer driver has the function to save the setting as "Favorite Setting". For details, refer to
"Common settings" on page 8-6.
Océ cm3522/cm2522 8-5
Page 91

Print functions of the PCL/PS drivers for Windows
8.3 Common settings
The following describes the common settings and buttons that are displayed on all tabs.
8
Item Description
OK Click this button to close the dialog box and apply any settings that have been changed.
Cancel Click this button to cancel any settings that have been changed and close the dialog box.
Help Click this button to display the help for each item on the currently displayed dialog box.
Add (Favorite Setting) Click this button to save the current settings and to view them at a later time.
Edit (Favorite Setting) Click this button to change the saved settings.
Default Click this button to return the default setting.
View When the "Paper View" button is selected, a preview of the page layout as specified in the
Printer Information Starts up the Web Connection to confirm the printer information. This is available when
current settings is displayed and a preview image of the print job can be checked.
When the "Printer View" button is selected, a printer figure is displayed showing any options, such as the paper tray, that are installed on this machine.
Paper Printer
communication with this machine is enabled.
Océ cm3522/cm2522 8-6
Page 92

Print functions of the PCL/PS drivers for Windows
8.4 Parameter details
The print setting screen is the screen to set printer driver functions.
Click the [Properties] or [Preferences] button on the Print dialog box, or right-click the printer icon of the
"Printers" window or the "Printers and Faxes" window, and then specify "Print Setting" ("Document Defaults"
for Windows NT 4.0) to open it.
8.4.1 Basic tab
8
Function name Option Description
Original Orientation Portrait, Landscape Specifies the orientation of the original.
Original Size Paper size registered as the stand-
ard paper size and non-standard
paper size.
Custom Size Register the size.
Paper Size Paper size registered as the stand-
ard paper size and non-standard
paper size available on this machine.
Custom Size Custom sizes can be registered.
Zoom 25 to 400% Specifies the enlargement and reduction ratio.
Paper Tray Auto, Tray1-4, LCT, Bypass Tray Selects the paper tray to be used.
Paper Type Paper type available on this ma-
chine.
Specifies the size of the original document.
Specifies the output paper size. The original is automatically enlarged or reduced to the size specified
here when it differs from the "Original Size" setting
and "Zoom" is set to "Auto".
The selectable items differ depending on the options
that are installed.
Selects the paper type for printing.
Can be changed only when the paper tray is set to
"Auto". When the paper tray is not set to "Auto", the
paper type registered by "Paper Settings for Each
Tray" is effective.
Océ cm3522/cm2522 8-7
Page 93

Print functions of the PCL/PS drivers for Windows
Function name Option Description
Output Method Print Prints immediately.
Secure Print Saves the document to be printed in "Secure Print
Save in User Box Saves the document to be printed in the user box on
Save in User Box/Print Saves the document in a box and prints at the same
Proof Print After one copy of the document has been printed, this
[User Settings] — Specifies the ID and password, or the file name and
[Authentication/Account Track]
Copies 1 to 999 Specify the number of copies to be printed.
Collate ON/OFF Specifies whether to print multiple copies by collating
Offset ON/OFF When printing multiple copies, shifts the output posi-
[Paper Settings for
Each Tray]
— Specifies the user name and password when perform-
Paper Type Setting Selects the paper tray to be specified.
Paper Type Selects the type of paper to be loaded onto the paper
8
Us er Bo x" of th is machine. When printing, entering the
ID and password is required in the control panel of this
machine. Select this option when printing highly confidential documents.
this machine.
time.
machine stops printing temporarily. Select this option
to avoid misprinting a large volume of print jobs.
box number when performing "Secure Print" or "Save
in User Box".
ing user authentication, and the department name and
password when performing account track on this machine.
them.
tion of each set.
The selectable items differ depending on the installed
options.
tray.
2
Note
The paper size "12 × 18" is equivalent to 304.8 × 457.2 mm which is slightly larger than A3.
To print on paper sizes other than the standard sizes, be sure to set the custom paper sizes first. You
can register a non-standard size by selecting "Custom Size" from the paper size option or original size
option.
When "W" is selected for each standard paper size, the data can be centered and printed.
For example, if you want to center and print 8-1/2 × 11 size data on 11 × 17 size paper, specify "8 1/2
× 11W" as the paper size and "Bypass Tray" as the paper tray with the printer driver. To print, set 11 ×
17 size paper on the specified tray ("Bypass Tray"), select [Basic screen (Paper)] - [Change Tray
Settings] - [Wide Paper] on the operation panel, select "8 1/2 × 11W" from [Change Size] and enter 11
× 17 size.
Specify "Duplex Side 2" to print on the back side of a page.
!
Detail
For details on Output Method, refer to "Function detail description" on page 11-2.
Océ cm3522/cm2522 8-8
Page 94

Print functions of the PCL/PS drivers for Windows
8.4.2 Layout tab
8
Function name Option Description
Combination 2 in 1, 4 in 1, 6 in 1, 9 in 1, 16 in 1, 2
[Combination Details]
Rotate 180 ON/OFF Rotates 180° to print.
Skip Blank Pages ON/OFF Does not print blank pages in the data.
Chapters ON/OFF Specifies the page to be printed on the front side.
Page Number — Specifies the page to be printed on the front side
Print Type 1-Sided, 2-Sided, Booklet Specifies duplex printing and booklet printing.
Binding Position Auto, Left Bind, Right Bind, Top
Page Margin ON/OFF Specifies the binding margin. Click the [Binding Mar-
[Binding Margin
Settings]
Image Shift ON/OFF Prints by shifting the entire print image. Click the [Im-
× 2, 3 × 3, 4 × 4
Combination Selects the combination conditions.
Layout Order Specifies the layout order. The layout order can be
Border Specifies the presence and type of border lines. The
Overlap width line Specifies the presence of a poster mode overlap. You
Bind
Shift Mode Selects how to process the image to prepare the bind-
Front Side/Back Side Specifies the binding margin values. For 2-sided print-
Units Selects the measurement unit that specifies the size.
Prints multiple pages on one page, or prints one sheet
of an original document divided on multiple pages.
[Combination Details] allows you to specify the page
order and the presence of the border frame.
specified when N in 1 is specified in "Combination".
layout order can be specified when N in 1 is specified
in "Combination".
can specify it when N × N is specified in "Combination".
You can specify it when the print type is "2-Sided" or
"Booklet".
when "Chapters" is ON.
Specifies the binding position.
gin Settings] button to specify the margin values.
ing margin.
ing, clearing the "Same Value for Front and Back
Sides" check box allows you to set different values
between the front and back sides.
age Shift Settings] button to specify the image shift
values.
Océ cm3522/cm2522 8-9
Page 95

Print functions of the PCL/PS drivers for Windows
Function name Option Description
[Image Shift Settings]
Units Selects the measurement unit that specifies the size.
Front Side/Back Side Specifies the shift direction and values. For 2-sided
2
Note
"Combination" provides options "2 × 2, 3 × 3, 4 × 4" to print a sheet of document into multiple sheets
of paper. The function is only for the PCL driver.
The "Skip Blank Pages" function is only for the PCL driver.
The positions of binding margins vary according to the "Binding Position" setting.
8.4.3 Finish tab
8
printing, clearing the "Same Value for Front and Back
Sides" check box allows you to set different values
between the front and back sides.
Function name Option Description
Staple ON/OFF Specifies stapling.
Center Staple and
Fold
Punch ON/OFF Specifies hole punching.
Fold ON/OFF Specifies folding.
Center Erase ON/OFF When Center Staple and Fold is specified, select this
Output Tray Default, Tray1-3, Bin 5-6 Specifies the tray where to output the printed pages.
Paper Arrangement Prioritize Arranging Papers, Priori-
ON/OFF Specifies to saddle stitch a printed document.
tize Productivity
From the drop-down list, specify the number of staples and the stapling position.
From the drop-down list, specify the number of
punches and the position.
option not to print on the center fold line.
The selectable items differ depending on the options
that are installed.
Specifies the method for adjusting the binding position for 2-sided print. The biding position is adjusted
after receiving all data for finishing priority. The data is
received and printed for productivity priority.
Océ cm3522/cm2522 8-10
Page 96

Print functions of the PCL/PS drivers for Windows
2
Note
"Staple" and "Center Staple and Fold" functions are available only if the optional finisher is installed.
The "Punch" function is available only when the punch kit is installed on the optional finisher.
The "fold" function is available only when optional finisher 9356 and saddle kit are installed.
The "Center Erase" function is available only when optional finisher 9355 is installed and the "Center
Staple and Fold" function is specified.
8.4.4 Cover Mode tab
8
Function name Option Description
Front Cover ON/OFF, Blank/Print Attaches a front cover page.
Front Cover Tray Tray1-4, LCT, Bypass Tray Selects the paper tray for the cover.
Back Cover ON/OFF, Blank/Print Attaches a back cover page.
Back Cover Tray Tray1-4, LCT, Bypass Tray Selects the paper tray for the back cover.
Per Page Setting ON/OFF Inserts paper between pages and switches the paper
You can specify it when "Auto" is not selected for the
paper tray.
The selectable items differ depending on the options
that are installed.
You can specify it when "Auto" is not selected for the
paper tray.
The selectable items differ depending on the options
that are installed.
and tray for each page. [Edit List] allows you to create
a list by setting conditions by page.
Océ cm3522/cm2522 8-11
Page 97

Print functions of the PCL/PS drivers for Windows
Function name Option Description
[Edit List] List Name Selects the name of the list to be edited. The settings
[Edit List Name..] Renames a list.
[Up]/[Down] Moves the selected condition row up or down. Move
[Add] Adds a condition. Conditions are specified in
[Delete] Deletes the selected condition row.
Page Number Specifies the page numbers. To specify multiple pag-
Print Type Specifies the print type from the "Change Setting"
Paper Tray Specifies the paper tray used for printing from the
Staple Specifies the number of staples and the stapling posi-
Transparency Interleave
Interleave Tray Tray1-4, LCT Selects the paper tray for the transparency inter-
ON/OFF, Blank Outputs and inserts interleaves when printing over-
8
are listed.
the rows so that the page numbers are arranged in ascending order.
"Add/Delete".
es, separate each page number with a comma or
specify the range using a hyphen.
drop-down list.
"Change Setting" drop-down list.
tion from the "Change Setting" drop-down list.
head projector transparencies.
You can specify it when "Transparency" is selected for
the paper type.
leaves.
The selectable items differ depending on the options
that are installed.
8.4.5 Stamp/Composition tab
Function name Option Description
Watermark ON/OFF Prints a watermark (text stamp) on the page being
[Edit] — For details, refer to "Editing watermark" on
Create Overlay File ON/OFF Create overlay data by checking this to print the orig-
printed. [Edit] allows you to add, change and delete
Watermarks.
page 8-13.
inal.
Océ cm3522/cm2522 8-12
Page 98

Print functions of the PCL/PS drivers for Windows
Function name Option Description
Print in Overlay ON/OFF Prints an original document on top of an overlay data
[Edit] [Browse Files..] Loads an overlay file.
[Delete] Deletes the selected overlay.
Pages Specifies the pages to be printed.
Pattern Overwrite Specifies the sequence for printing the overlay on top
Copy Protect ON/OFF Prints a special pattern to prevent copying. [Edit] al-
[Edit] — For details, refer to "Eding copy protect" on
Date/Time ON/OFF You can print the date and time on a document. [Edit]
Page Number ON/OFF Prints the page number. [Edit] allows you to specify
[Edit] — For details, refer to "Editing date/time and page
Header/Footer Printer setting 1-20 Print the header and footer. Select header/footer infor-
[Edit] Distribution Control Number Prints the number of copies in the header and footer
[Edit] Specifies the distribution control number conditions.
Pages Specifies the pages to be printed.
Text Color Specifies the text color used for printing.
8
that was created separately. [Edit] allows you to
change the overlay printing method.
of the original document.
lows you to specify items, positions and the composition to be printed.
page 8-14.
allows you to specify items, pages and positions to be
printed.
items, pages and positions to be printed.
number" on page 8-15.
mation from the list of the printer setting. [Edit] allows
you to specify items and pages to be printed.
when printing multiple copies.
2
Note
For Windows Vista x64, "Watermark" cannot be selected with any of the following functions at the same
time.
[User Authentication]
[Account Track]
[Per Page Setting]
[Verify Authentication settings before printing]
[Popup Authentication Dialog when printing]
Océ cm3522/cm2522 8-13
Page 99

Print functions of the PCL/PS drivers for Windows
Editing watermark
8
Watermark Name: Enter the name of the watermark.
Watermark Text: Enter the text to be printed as the watermark.
[Add]: Click to create a new watermark.
[Delete]: Click to delete the selected watermark.
Position: Specifies the vertical and horizontal positions. The watermark position can also be specified by
using the horizontal and vertical sliders in the dialog box.
Angle: Specifies the watermark print angle.
Font Name: Specifies the font.
Size: Specifies the size.
Style: Specifies the font style.
Frame: Specifies the frame style.
Text Color: Specifies the watermark text color.
Transparent: Prints the watermark as a transparent image.
1st Page Only: Prints the watermark on the first page only.
Repeat: Prints the watermark repeatedly on a single page.
Sharing: Specifies whether to register the watermark as public or private.
Océ cm3522/cm2522 8-14
Page 100

Print functions of the PCL/PS drivers for Windows
Eding copy protect
8
Characters: Embeds the selected character string in a pattern. A preregistered character string (common
stamp) or a character string registered on this machine (registered stamp) can be specified.
Date/Time: Embeds the selected date and time in a pattern. By clicking the [Edit] button under "Format", you
can specify the display type or the time format.
Serial Number: Embeds the serial number of this machine in a pattern.
Distribution Control Number: Embeds the copy number in a pattern when printing multiple copies. By clicking
the [Edit] button under "Start Number", you can specify the start number or the display type.
Job Number: Embeds the print job number in a pattern for documents that are automatically paginated.
Text Size: Specifies the text size of a pattern.
Angle: Specifies the pattern angle.
Copy Protect: Embeds a hidden pattern that appears on copies.
Stamp Repeat: Prints a text pattern.
Océ cm3522/cm2522 8-15
 Loading...