

Page 1

Page 2

Introduction
Introduction
Thank you for choosing this machine.
This user’s guide contains details on the operation of the network connection
and scanner functions of this machine, precautions on its use, and basic
troubleshooting procedures. In order to ensure that this machine is used correctly and efficiently, carefully read this user’s guide before using the machine. After reading the manual, store it in the designated holder so that it
can easily be referred to when questions or problems arise during operation.
The illustrations used in this manual may appear slightly different from views
of the actual equipment.
Energy Star
As an ENERGY STAR® Partner, we have determined that this machine meets
the ENERGY STAR
What is an ENERGY STAR
An ENERGY STAR
ically switch to a “low-power mode” after a period of inactivity. An ENERGY
STAR
and helps protect the environment.
®
®
®
Guidelines for energy efficiency.
®
Product?
®
product has a special feature that allows it to automat-
product uses energy more efficiently, saves you money on utility bills
cm2520 x-1
Page 3

Trademarks and Registered Trademarks
Netscape Communications, the Netscape Communications logo, Netscape
Navigator, Netscape Communicator, and Netscape are trademarks of Netscape Communications Corporation.
This machine and Box Operator are based in part on the work of the Independent JPEG Group.
Compact-VJE
Copyright 1986-2003 VACS Corp.
RC4® is a registered trademark or trademark of RSA Security Inc. in the United States and/or other countries.
RSA® is a registered trademark or trademark of RSA Security Inc. RSA
BSAFE® is a registered trademark or trademark of RSA Security Inc. in the
United States and/or other countries.
License information
Introduction
This product includes RSA BSAFE Cryptographic software
from RSA Security Inc.
OpenSSL Statement
OpenSSL License
Copyright © 1998-2000 The OpenSSL Project. All rights reserved.
Redistribution and use in source and binary forms, with or without modification, are permitted provided that the following conditions are met:
1. Redistributions of source code must retain the above copyright notice,
this list of conditions and the following disclaimer.
2. Redistributions in binary form must reproduce the above copyright notice, this list of conditions and the following disclaimer in the documentation and/or other materials provided with the distribution.
3. All advertising materials mentioning features or use of this software must
display the following acknowledgment:
“This product includes software developed by the OpenSSL Project for
use in the OpenSSL Toolkit. (http://www.openssl.org/)”
4. The names “OpenSSL Toolkit” and “OpenSSL Project” must not be used
to endorse or promote products derived from this software without prior
written permission. For written permission, please contact opensslcore@openssl.org.
x-2 cm2520
Page 4

Introduction
5. Products derived from this software may not be called “OpenSSL” nor
6. Redistributions of any form whatsoever must retain the following ac-
THIS SOFTWARE IS PROVIDED BY THE OpenSSL PROJECT “AS IS” AND
ANY EXPRESSED OR IMPLIED WARRANTIES, INCLUDING, BUT NOT LIMITED TO, THE IMPLIED WARRANTIES OF MERCHANTABILITY AND FITNESS FOR A PARTICULAR PURPOSE ARE DISCLAIMED. IN NO EVENT
SHALL THE OpenSSL PROJECT OR ITS CONTRIBUTORS BE LIABLE FOR
ANY DIRECT, INDIRECT, INCIDENTAL, SPECIAL, EXEMPLARY, OR CONSEQENTIAL DAMAGES (INCLUDING, BUT NOT LIMITED TO, PROCUREMENT OF SUBSTITUTE GOODS OR SERVICES; LOSS OF USE, DATA, OR
PROFITS; OR BUSINESS INTERRUPTION) HOWEVER CAUSED AND ON
ANY THEORY OF LIABILITY, WHETHER IN CONTRACT, STRICT LIABILITY,
OR TORT (INCLUDING NEGLIGENCE OR OTHERWISE) ARISING IN ANY
WAY OUT OF THE USE OF THIS SOFTWARE, EVEN IF ADVISED OF THE
POSSIBILITY OF SUCH DAMAGE.
may “OpenSSL” appear in their names without prior written permission
of the OpenSSL Project.
knowledgment:
“This product includes software developed by the OpenSSL Project for
use in the OpenSSL Toolkit (http://www.openssl.org/)”
This product includes cryptographic software written by Eric Young
(eay@crypt-Soft.com). This product includes software written by Tim Hudson (tjh@cryptsoft.com).
Original SSLeay License
Copyright © 1995-1998 Eric Young (eay@cryptsoft.com) All rights reserved.
This package is an SSL implementation written by Eric Young (eay@cryptsoft.com).
The implementation was written so as to conform with Netscapes SSL.
This library is free for commercial and non-commercial use as long as the following conditions are aheared to. The following conditions apply to all code
found in this distribution, be it the RC4, RSA, Ihash, DES, etc., code; not just
the SSL code.
The SSL documentation included with this distribution is covered by the
same copyright terms except that the holder is Tim Hudson (tjh@cryptsoft.com).
Copyright remains Eric Young’s, and as such any Copyright notices in the
code are not to be removed. If this package is used in a product, Eric Young
should be given attribution as the author of the parts of the library used. This
can be in the form of a textual message at program startup or in documentation (online or textual) provided with the package.
Redistribution and use in source and binary forms, with or without modification, are permitted provided that the following conditions are met:
1. Redistributions of source code must retain the copyright notice, this list
of conditions and the following disclaimer.
cm2520 x-3
Page 5

Introduction
2. Redistributions in binary form must reproduce the above copyright notice, this list of conditions and the following disclaimer in the documentation and/or other materials provided with the distribution.
3. All advertising materials mentioning features or use of this software must
display the following acknowledgement:
“This product includes cryptographic software written by Eric Young
(eay@crypt-soft.com)”
The word ‘cryptographic’ can be left out if the rouines from the library being used are not cryptographic related.
4. If you include any Windows specific code (or a derivative thereof) from
the apps directory (application code) you must include an acknowledgement:
“This product includes software written by Tin Hudson (tjh@cryptsoft.com)”
THIS SOFTWARE IS PROVIDED BY ERIC YOUNG “AS IS” AND ANY EXPRESS OR IMPLIED WARRANTIES, INCLUDING, BUT NOT LIMITED TO,
THE IMPLIED WARRANTIES OF MERCHANTABILITY AND FITNESS FOR A
PARTICULAR PURPOSE ARE DISCLAIMED. IN NO EVENT SHALL THE AUTHOR OR CONTRIBUTORS BE LIABLE FOR ANY DIRECT, INDIRECT, INCIDENTAL, SPECIAL, EXEMPLARY, OR CONSEQUENTIAL DAMAGES
(INCLUDING, BUT NOT LIMITED TO, PROCUREMENT OF SUBSTITUTE
GOODS OR SERVICES; LOSS OF USE, DATA, OR PROFITS; OR BUSINESS
INTERRUPTION) HOWEVER CAUSED AND ON ANY THEORY OF LIABILITY, WHETHER IN CONTRACT, STRICT LIABILITY, OR TORT (INCLUDING
NEGLIGENCE OR OTHERWISE) ARISING IN ANY WAY OUT OF THE USE
OF THIS SOFTWARE, EVEN IF ADVISED OF THE POSSIBILITY OF SUCH
DAMAGE.
The licence and distribution terms for any publically available version or derivative of this code cannot be changed. i.e. this code cannot simply be copied and put under another distribution licence [including the GNU Public
Licence.]
All other product names mentioned are trademarks or registered trademarks
of their respective companies
x-4 cm2520
Page 6

Introduction
Contents
Introduction
Energy Star® ..................................................................................... x-1
What is an ENERGY STAR® Product? ...........................................x-1
Trademarks and Registered Trademarks ...................................... x-2
Contents ............................................................................................ x-5
About This Manual .......................................................................... x-14
Structure of the Manual ................................................................x-14
Notation .........................................................................................x-14
Screens, Windows and Dialog Boxes ...........................................x-14
Explanation of Manual Conventions ............................................. x-15
User’s Guides .................................................................................. x-16
User’s Guide [Copy Operations] ...................................................x-16
User’s Guide [Network Scanner Operations] <this manual> ........x-16
User’s Guide [Box Operations] .....................................................x-16
User’s Guide [Enlarge Display Operations] ...................................x-16
User’s Guide [cm3500210 Facsimile Operations] .........................x-16
User’s Guide [Network Facsimile Operations] ..............................x-16
User’s Guide [Print Operations] ....................................................x-17
Quick Guide [Print Operations] .....................................................x-17
1 Before Using the Scan Functions
1.1 Environment Required for Using the Scan Functions ................... 1-2
1.2 Available Scanning Functions ......................................................... 1-3
Sending the Scanned Data in an E-Mail Message ......................... 1-3
Sending the Scanned Data as Files (FTP) ...................................... 1-4
Sending the Scanned Data to a Computer on the Network
(SMB) ............................................................................................. 1-5
Saving the Scanned Data in Boxes ................................................ 1-6
Using the Machine as a Scanner ................................................... 1-7
1.3 Settings for Using Network/Scanning Functions .......................... 1-8
Specifying Network Settings .......................................................... 1-8
Registering Destinations and Specifying Their Settings ................ 1-8
Setting the From Address .............................................................. 1-9
Specifying the Scan Settings ......................................................... 1-9
Specifying Program Settings ....................................................... 1-10
Specifying Default Scan Settings ................................................. 1-10
1.4 Connecting to the Network ........................................................... 1-11
Network Connection .................................................................... 1-11
cm2520 x-5
Page 7

1.5 Flow Chart of Setup and Scanning Operations ............................1-12
2 Scanning Documents
2.1 Control Panel .....................................................................................2-2
2.2 Displaying the Scan Screen ..............................................................2-5
2.3 Sending Data in an E-Mail Message (Scan to E-Mail) ....................2-6
Scan to E-Mail ................................................................................2-6
Using Programs ..............................................................................2-6
Selecting Group Addresses ............................................................2-9
Selecting Destinations From the Address Book ...........................2-12
Searching the Destination .............................................................2-13
To search the destination .............................................................2-15
Entering the Addresses Directly ...................................................2-16
2.4 Sending Data to a Server (Scan to FTP) ........................................2-19
Scan to FTP ..................................................................................2-19
Using Programs ............................................................................2-19
Selecting Group Addresses ..........................................................2-21
Selecting Destinations From the Address Book ...........................2-24
Entering the Addresses Directly ...................................................2-27
Introduction
2.5 Sending Data to a PC on the Network (Scan to SMB) .................2-31
Scan to SMB .................................................................................2-31
SMB Transmission to Windows File Sharing (Mac OS X)/Samba
(Linux/Unix) ...................................................................................2-31
SMB Transmission to Windows 98 SE/Windows Me ...................2-31
Using Programs ............................................................................2-32
Selecting Group Addresses ..........................................................2-34
Selecting Destinations From the Address Book ...........................2-36
Entering the Addresses Directly ...................................................2-39
2.6 Specifying the Scan Settings ..........................................................2-42
Available Settings .........................................................................2-42
File Type ........................................................................................2-43
To specify the File Type settings ..................................................2-45
Resolution .....................................................................................2-47
Simplex/Duplex .............................................................................2-48
To specify the Simplex/Duplex setting .........................................2-48
Original Type .................................................................................2-49
To specify the Original Type setting .............................................2-49
Scan Size ......................................................................................2-51
To specify the Scan Size setting ...................................................2-51
Color .............................................................................................2-53
To specify the Color setting ..........................................................2-54
Background Removal ...................................................................2-55
Original Setting .............................................................................2-56
x-6 cm2520
Page 8

Introduction
2.7 Checking the Settings .................................................................... 2-67
2.8 Checking the Scanner Transmission Log .................................... 2-76
To specify the Original Settings ................................................... 2-56
Book Scanning (Application) ........................................................ 2-58
To use the “Book Scan” function ................................................. 2-59
Frame Erase (Application) ............................................................ 2-61
Annotation (Application) ............................................................... 2-63
Separate Scan .............................................................................. 2-64
File Name ..................................................................................... 2-65
To change the file name ............................................................... 2-65
Checking the Settings .................................................................. 2-67
To check a job .............................................................................. 2-67
Deleting Unneeded Destinations ................................................. 2-72
Specifying E-Mail Settings ........................................................... 2-74
To change the e-mail settings ...................................................... 2-75
Displaying the Current Jobs List .................................................. 2-76
Displaying the Job History List .................................................... 2-77
Displayed Information .................................................................. 2-78
3 Specifying Settings From the Control Panel
3.1 Settings on the Control Panel ......................................................... 3-2
Utility Types ................................................................................... 3-2
Other Related Settings ................................................................... 3-4
3.2 Displaying Setup Screens ................................................................ 3-5
To display the Scan screen ............................................................ 3-5
To display the User Setting screen ................................................ 3-7
To display the Administrator Setting screen .................................. 3-8
3.3 Registering Abbreviated Destinations .......................................... 3-10
E-Mail Destinations ...................................................................... 3-10
FTP Destinations .......................................................................... 3-12
SMB Destinations ........................................................................ 3-17
Box Destinations .......................................................................... 3-20
3.4 Registering Group Destinations .................................................... 3-22
To register a group destination .................................................... 3-22
3.5 Registering Program Destinations ................................................ 3-24
To register a program destination ................................................ 3-24
3.6 Specifying E-Mail Settings ............................................................. 3-27
Subject ......................................................................................... 3-27
Text .............................................................................................. 3-29
3.7 Setting the Main Scan Mode Screen ............................................ 3-31
Default Tab ................................................................................... 3-31
cm2520 x-7
Page 9

Introduction
Program Default ............................................................................3-32
Address Book Default Index .........................................................3-33
Address Type Symbol Display ......................................................3-34
3.8 Setting the Save Format of the Data to Be Scanned ...................3-35
JPEG Compression Level .............................................................3-35
To specify the compression level .................................................3-35
Black Compression Level .............................................................3-36
To specify the compression level .................................................3-36
TWAIN Lock Time .........................................................................3-37
3.9 One-Touch Registration List ..........................................................3-39
Address Book List .........................................................................3-39
Group List .....................................................................................3-40
Program List .................................................................................3-41
E-Mail Subject/Text List ................................................................3-42
3.10 Creating Annotation User Boxes ...................................................3-44
To create annotation user boxes ..................................................3-45
3.11 TCP/IP Settings ...............................................................................3-48
Before Specifying the Settings .....................................................3-48
Items To Be Specified ...................................................................3-49
To specify TCP/IP settings ...........................................................3-50
IP Filtering .....................................................................................3-53
RAW Port No. ................................................................................3-54
3.12 NetWare Settings .............................................................................3-55
NetWare Parameters .....................................................................3-55
To specify NetWare settings .........................................................3-56
Status ............................................................................................3-59
3.13 http Server Settings ........................................................................3-60
IPP and http Parameters ...............................................................3-60
To specify IPP and http settings ...................................................3-61
Support Operation ........................................................................3-63
Printer Information ........................................................................3-64
3.14 FTP Settings .....................................................................................3-67
FTP Parameters ............................................................................3-67
To specify FTP settings ................................................................3-68
3.15 SMB Settings ...................................................................................3-70
SMB Parameters ...........................................................................3-70
To specify SMB settings ...............................................................3-71
3.16 AppleTalk Settings ..........................................................................3-74
AppleTalk Parameters ...................................................................3-74
To specify AppleTalk settings .......................................................3-74
x-8 cm2520
Page 10

Introduction
3.17 Enabling LDAP Settings ................................................................. 3-76
3.18 Setting Up LDAP Settings .............................................................. 3-78
3.19 Search Default Setting ................................................................... 3-87
3.20 E-Mail TX (SMTP) Settings ............................................................. 3-88
3.21 E-Mail RX (POP) Settings ............................................................... 3-96
Enabling LDAP Parameters .......................................................... 3-76
To specify Enabling LDAP settings .............................................. 3-76
LDAP Server Registration Parameters ......................................... 3-78
To specify Setting Up LDAP settings ........................................... 3-81
Initial Setting for Search Details ................................................... 3-85
To specify the detect default server settings ............................... 3-87
E-Mail TX (SMTP) Parameters ...................................................... 3-88
To specify E-Mail TX (SMTP) settings .......................................... 3-89
SMTP Server Address .................................................................. 3-92
SMTP Detail ................................................................................. 3-93
SMTP Authentication ................................................................... 3-94
E-Mail RX (POP) Parameters ........................................................ 3-96
To specify E-Mail RX (POP) settings ............................................ 3-97
POP Server Address .................................................................... 3-99
3.22 Device Settings ............................................................................. 3-100
Device Parameters ..................................................................... 3-100
To specify device settings ......................................................... 3-100
3.23 Time Adjustment Settings ........................................................... 3-102
Time Adjustment Parameters ..................................................... 3-102
To specify time adjustment settings .......................................... 3-102
NTP Server Address ................................................................... 3-103
3.24 Status Notification Settings ......................................................... 3-105
Status Notification Parameters .................................................. 3-105
To specify status notification settings ....................................... 3-105
Notification Item Setting ............................................................ 3-106
3.25 Total Counter Report Setting ...................................................... 3-107
To specify the total counter report settings ............................... 3-107
Schedule Setting ........................................................................ 3-108
To specify the notification address settings .............................. 3-110
Notification Address Setting ...................................................... 3-110
3.26 PING Confirmation ........................................................................ 3-112
PING Confirmation Parameters ................................................. 3-112
To specify PING confirmation settings ...................................... 3-112
PING TX Address ....................................................................... 3-114
3.27 SLP Settings .................................................................................. 3-116
To specify SLP settings ............................................................. 3-116
cm2520 x-9
Page 11

Introduction
3.28 LPD Settings ..................................................................................3-117
To specify LPD settings ..............................................................3-117
3.29 Prefix/Suffix Settings ....................................................................3-118
Prefix/Suffix Parameters .............................................................3-118
To specify the prefix/suffix settings ............................................3-118
Prefix/Suffix Setting ....................................................................3-120
3.30 Job for the disable proof ..............................................................3-122
To specify the Job for the disable proof settings .......................3-122
3.31 SNMP Settings ...............................................................................3-124
SNMP Parameters ......................................................................3-124
To specify SNMP settings ..........................................................3-125
v1/v2c Setting .............................................................................3-126
v3 Setting ....................................................................................3-127
To specify the v3 settings ...........................................................3-128
3.32 Bonjour Setting ..............................................................................3-130
To specify the Bonjour settings ..................................................3-130
3.33 TCP Socket Setting .......................................................................3-132
To specify the TCP socket settings ............................................3-132
3.34 OpenAPI Settings ..........................................................................3-134
Access Setting ............................................................................3-134
Port No. .......................................................................................3-135
SSL .............................................................................................3-136
Authentication .............................................................................3-137
3.35 External Server Authentication ....................................................3-139
Using Active Directory ................................................................3-139
To specify the external server authentication settings ...............3-140
Using Novell NDS .......................................................................3-144
To specify the settings for using Novell NDS .............................3-144
Using NTLM v1/NTLM v2 ...........................................................3-146
To specify the settings for using NTLM v1/NTLM v2 .................3-146
4 Specifying Settings Using Web Connection
4.1 Items That Can Be Specified Using Web Connection ....................4-2
User Mode ......................................................................................4-2
Administrator Mode ........................................................................4-3
4.2 Using Web Connection .....................................................................4-5
Operating Environment ...................................................................4-5
Accessing Web Connection ............................................................4-5
Page Structure ................................................................................4-6
Web Browser Cache .......................................................................4-8
For Internet Explorer .......................................................................4-8
x-10 cm2520
Page 12

Introduction
4.3 Logging On and Logging Off ........................................................... 4-9
4.4 User Authentication (User Mode) .................................................. 4-16
4.5 Account Track (User Mode) ........................................................... 4-18
For Netscape Navigator ................................................................. 4-8
Logging Off .................................................................................... 4-9
To log off ........................................................................................ 4-9
Logging On to User Mode (Public User) ...................................... 4-10
Logging On to User Mode
(Registered User/Box Administrator) ........................................... 4-12
To log on as a registered user/Box Administrator ....................... 4-12
Logging On to Administrator Mode ............................................. 4-13
To log on to Administrator mode ................................................. 4-14
Changing the User Password ...................................................... 4-16
To change the user password ..................................................... 4-16
Checking the User Registration Information ................................ 4-17
To check the account track information ...................................... 4-18
4.6 Address Book .................................................................................. 4-19
Registering New Destinations ...................................................... 4-19
To register new destinations ........................................................ 4-22
Editing abbreviated destinations .................................................. 4-23
Deleting the Address Book .......................................................... 4-23
4.7 Group Destination ........................................................................... 4-24
To register group destinations ..................................................... 4-24
4.8 Program Registration ..................................................................... 4-26
To register new destinations ........................................................ 4-33
4.9 Temporary One-Touch Registration ............................................. 4-35
To register temporary destinations .............................................. 4-35
4.10 Subject Registration ....................................................................... 4-37
To register the subject ................................................................. 4-38
4.11 Text Registration ............................................................................ 4-39
To register text ............................................................................. 4-40
4.12 Administrator Mode ........................................................................ 4-41
Basic Operation ........................................................................... 4-41
4.13 Network TWAIN (Administrator Mode) ......................................... 4-42
Setting the Operation Lock Time for TWAIN ................................ 4-42
4.14 User Authentication (Administrator Mode) .................................. 4-43
User Registration ......................................................................... 4-43
To register a user ......................................................................... 4-44
Checking or Changing the Registered User Information ............. 4-46
To check or change the registered user information ................... 4-47
cm2520 x-11
Page 13

Introduction
To delete a registered user ...........................................................4-49
Default Function Permission .........................................................4-50
To specify the default function permission settings .....................4-50
4.15 Account Track Registration (Administrator Mode) ......................4-51
Account Track Registration ..........................................................4-51
To register an account ..................................................................4-52
Checking or Changing the Registered Account Information ........4-54
To check or change the registered account information ..............4-54
To delete registered accounts ......................................................4-56
4.16 Application Registration .................................................................4-57
Registering an Application ............................................................4-57
New Registration Items of an Application .....................................4-59
To register an application .............................................................4-61
Items that can Be Specified in Edit Application ............................4-64
To edit a registered application ....................................................4-69
To delete a registered application ................................................4-71
4.17 Prefix/Suffix ......................................................................................4-72
To register prefixes and suffixes ...................................................4-72
4.18 Import/Export ...................................................................................4-74
Importing .......................................................................................4-74
Exporting .......................................................................................4-74
4.19 Other .................................................................................................4-75
4.20 TCP/IP ...............................................................................................4-76
TCP/IP ...........................................................................................4-77
IP Address Filtering .......................................................................4-79
4.21 NetWare ............................................................................................4-80
NetWare Status .............................................................................4-81
4.22 IPP .....................................................................................................4-82
4.23 FTP ....................................................................................................4-84
FTP TX ..........................................................................................4-84
FTP Server ....................................................................................4-85
4.24 SNMP ................................................................................................4-86
4.25 SMB ..................................................................................................4-87
WINS Setting ................................................................................4-87
Client Setting ................................................................................4-88
Print Setting ..................................................................................4-89
4.26 AppleTalk .........................................................................................4-90
4.27 Bonjour Setting ................................................................................4-91
4.28 LDAP Setting ....................................................................................4-92
LDAP Setting ................................................................................4-92
x-12 cm2520
Page 14

Introduction
4.29 E-Mail Setting .................................................................................. 4-96
4.30 SSL/TLS ......................................................................................... 4-100
4.31 Authentication ............................................................................... 4-110
LDAP Server Registration ............................................................ 4-93
E-Mail RX (POP) ........................................................................... 4-96
E-Mail TX (SMTP) ......................................................................... 4-97
SSL/TLS Setting ......................................................................... 4-102
To create a certificate ................................................................ 4-103
SSL/TLS Setting — Install a Certificate ..................................... 4-105
Set an Encryption Strength ........................................................ 4-106
Remove a Certificate .................................................................. 4-107
Set Mode using SSL .................................................................. 4-108
Processing Mode ....................................................................... 4-109
To specify the mode using SSL ................................................. 4-109
User Authentication/Account Track ........................................... 4-110
To specify the user authentication and account track
settings ....................................................................................... 4-111
Auto Logout ............................................................................... 4-112
4.32 OpenAPI ......................................................................................... 4-113
4.33 TCP Socket Setting ...................................................................... 4-114
To specify the TCP socket settings ........................................... 4-115
5 Scan Function Troubleshooting
5.1 Error List ............................................................................................ 5-2
6 Appendix
6.1 Product Specifications ..................................................................... 6-2
Scanning Functions ....................................................................... 6-2
Network Function ........................................................................... 6-3
6.2 Entering text ...................................................................................... 6-5
To type text .................................................................................... 6-7
List of Available Characters ........................................................... 6-7
6.3 Glossary ............................................................................................. 6-8
6.4 Index ................................................................................................ 6-14
cm2520 x-13
Page 15

About This Manual
This User’s Guide covers the network and scanning functions.
This section introduces the structure of the manual and notations used for
product names, etc.
This manual is intended for users who understand the basic operations of
computers and the machine. For operating procedures of the Windows or
Macintosh operating system and application programs, refer to the respective manuals.
Structure of the Manual
This manual consists of the following chapters.
Chapter 1 Before Using the Scan Functions
Chapter 2 Scanning Documents
Chapter 3 Specifying Settings From the Control Panel
Introduction
Chapter 4 Specifying Settings Using Web Connection
Chapter 5 Scan Function Troubleshooting
Chapter 6 Appendix
Lists the product specifications and the characters that can be entered from
the control panel.
Notation
Product Name Notation in the Manual
Microsoft Windows 98 Windows 98
Microsoft Windows Me Windows Me
Microsoft Windows NT 4.0 Windows NT 4.0
Microsoft Windows 2000 Windows 2000
Microsoft Windows XP Windows XP
When the operating systems above are written
together
Windows 98/Me
Windows NT 4.0/2000/XP
Windows 98/Me/NT 4.0/2000/XP
Screens, Windows and Dialog Boxes
The touch panel screens and Web Connection windows and dialog boxes
that appear in this manual show a machine with optional ADF (automatic
document feeder) installed.
x-14 cm2520
Page 16
Introduction
Explanation of Manual Conventions
Note
Text highlighted in this manner
contains references and supplemental
information concerning operating
procedures and other descriptions.
We recommend that this information
be read carefully.
[]
Names highlighted as shown above
indicate keys on the control panel
and buttons in the touch panel.
Touch panel screens are shown to
check the actual display.
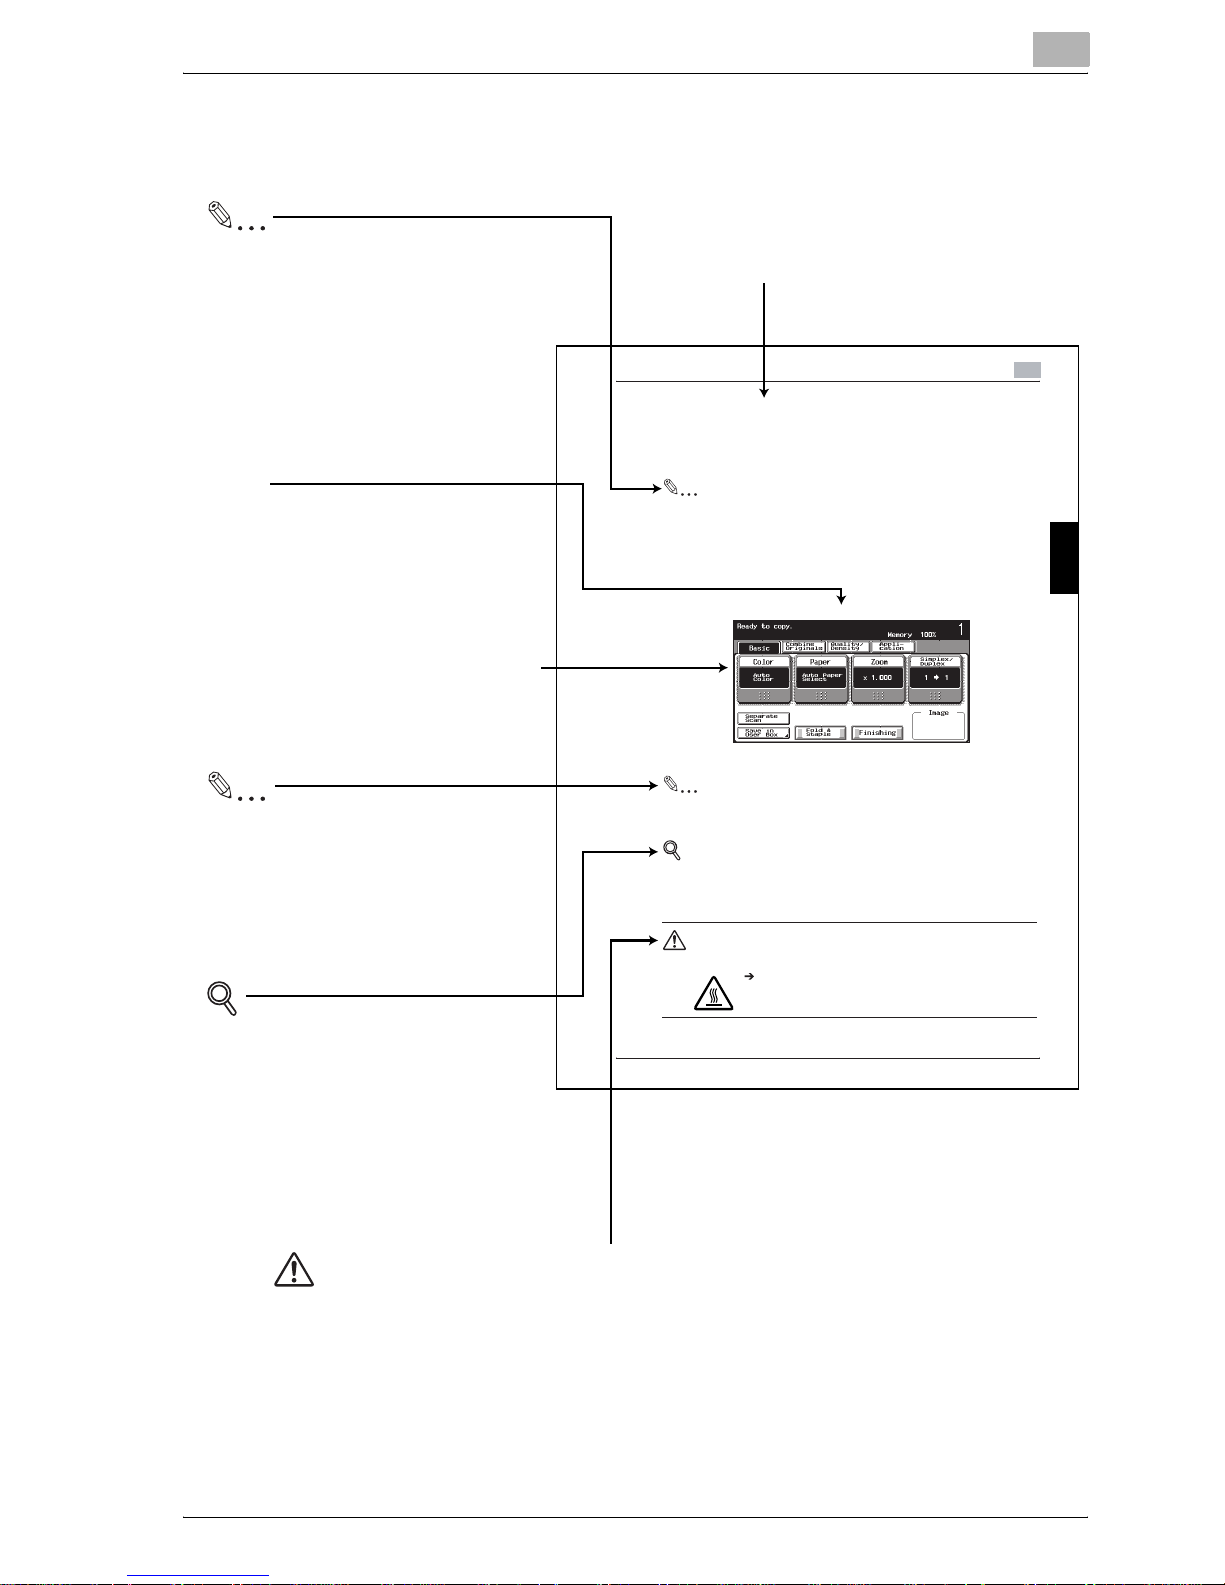
Reminder
Text highlighted in this manner
indicates operation precautions.
Carefully read and observe this
type of information.
Titles indicate the contents of the section.
Basic Copy Operations
3.6 Selecting a Paper Setting
The paper size can be selected automatically according to the document
size or it can be specified manually. Sp ecify the paper size according to the
corresponding procedure, depending on the desired copy settings.
Note
The default setting is Auto Paper Select.
Automatically Selecting the Paper Size (Au to Paper Select S etting)
The size of the loaded d ocument is detected, and copies are produced u sing
paper of the same size.
1
In the Basic screen, touch [Paper].
The Paper screen appears.
Reminder
Be careful that your fi ngers are not pinched when t he front door is closed.
Detail
For details on the positions of p aper misfeeds, refer to Paper Misfeed Indications on page 5-7.
CAUTION
Metallic parts on the inside of the upper cover are very hot.
Touching any part other than the paper may result in
burns.
3
Basic Copy Operations Chapter 3
Detail
Text highlighted in this manner
provides more detailed information
concerning operating procedures or
references to sections containing
additional information. If necessary,
refer to the indicated sections.
WARNING , CAUTION
Text highlighted in this manner indicates precautions to ensure safe use of this machine.
"Warning" indicates instructions that, when not observed, may result in fatal or critical injuries.
"Caution" indicates instructions that, when not observed, may result in serious injuries or
property damage.
(The page shown above is an example only.)
cm2520 x-15
3-31
Page 17

User’s Guides
The following User’s Guides have been prepared for this machine.
User’s Guide [Copy Operations]
This manual contains details on basic operations and the operating procedures for the various copy functions.
- Refer to this User’s Guide for details on operating procedures for copy
functions, including precautions on installation/use, turning the machine
on/off, loading paper, and troubleshooting operations such as clearing
paper misfeeds.
User’s Guide [Network Scanner Operations] <this manual>
This manual contains details on specifying network settings for standard
equipment and on operations for scanning functions.
- Refer to this User’s Guide for details on operating procedures for network
functions and for using Scan to E-Mail, Scan to FTP and Scan to SMB.
Introduction
User’s Guide [Box Operations]
This manual contains details on operating procedures for using the boxes.
- Refer to this User’s Guide for details on operating procedures for using
the boxes on the hard disk.
User’s Guide [Enlarge Display Operations]
This manual contains details on operating procedures for using copy, network scanner and fax functions in Enlarge Display mode.
- Refer to this User’s Guide for details on operating procedures in Enlarge
Display mode.
User’s Guide [cm3500210 Facsimile Operations]
This manual contains details on operating procedures for faxing.
- Refer to this User’s Guide for details on operating procedures for fax
functions when the fax kit is installed.
User’s Guide [Network Facsimile Operations]
This manual contains details on operating procedures for network faxing.
- Refer to this User’s Guide for details on operating procedures for using
the network fax functions (Internet faxing, SIP faxing and IP address faxing).
x-16 cm2520
Page 18

Introduction
User’s Guide [Print Operations]
This manual contains details on operating procedures using the standard
built-in printer controller.
- For details on the printing functions, refer to User’s Guide (PDF file) on
Quick Guide [Print Operations]
This manual contains details on operating procedures using the standard
built-in printer controller.
- Refer to this Quick Guide for basic operating procedures for the printing
User Software CD-ROM.
functions.
cm2520 x-17
Page 19

Introduction
x-18 cm2520
Page 20

1
Before Using the Scan
Functions
Before Using the Scan Functions Chapter 1
Page 21

1
Before Using the Scan Functions
1 Before Using the Scan Functions
1.1 Environment Required for Using the Scan Functions
The following conditions are required to use the network and scanning functions of this machine.
- The machine is connected to the network. (required)
The functions can be used over a TCP/IP network. For details on the connection, refer to “Connecting to the Network” on page 1-11. Also, network parameters such as the IP address of this machine must be
specified in order to use the machine on the network. For details, refer to
“Settings for Using Network/Scanning Functions” on page 1-8.
- The driver software is installed on the computer.
In order to use this machine as a scanner, the dedicated TWAIN must be
installed. For details, refer to the TWAIN driver manual that is on the User
Before Using the Scan Functions Chapter 1
Software CD-ROM.
1-2 cm2520
Page 22
Before Using the Scan Functions
1.2 Available Scanning Functions
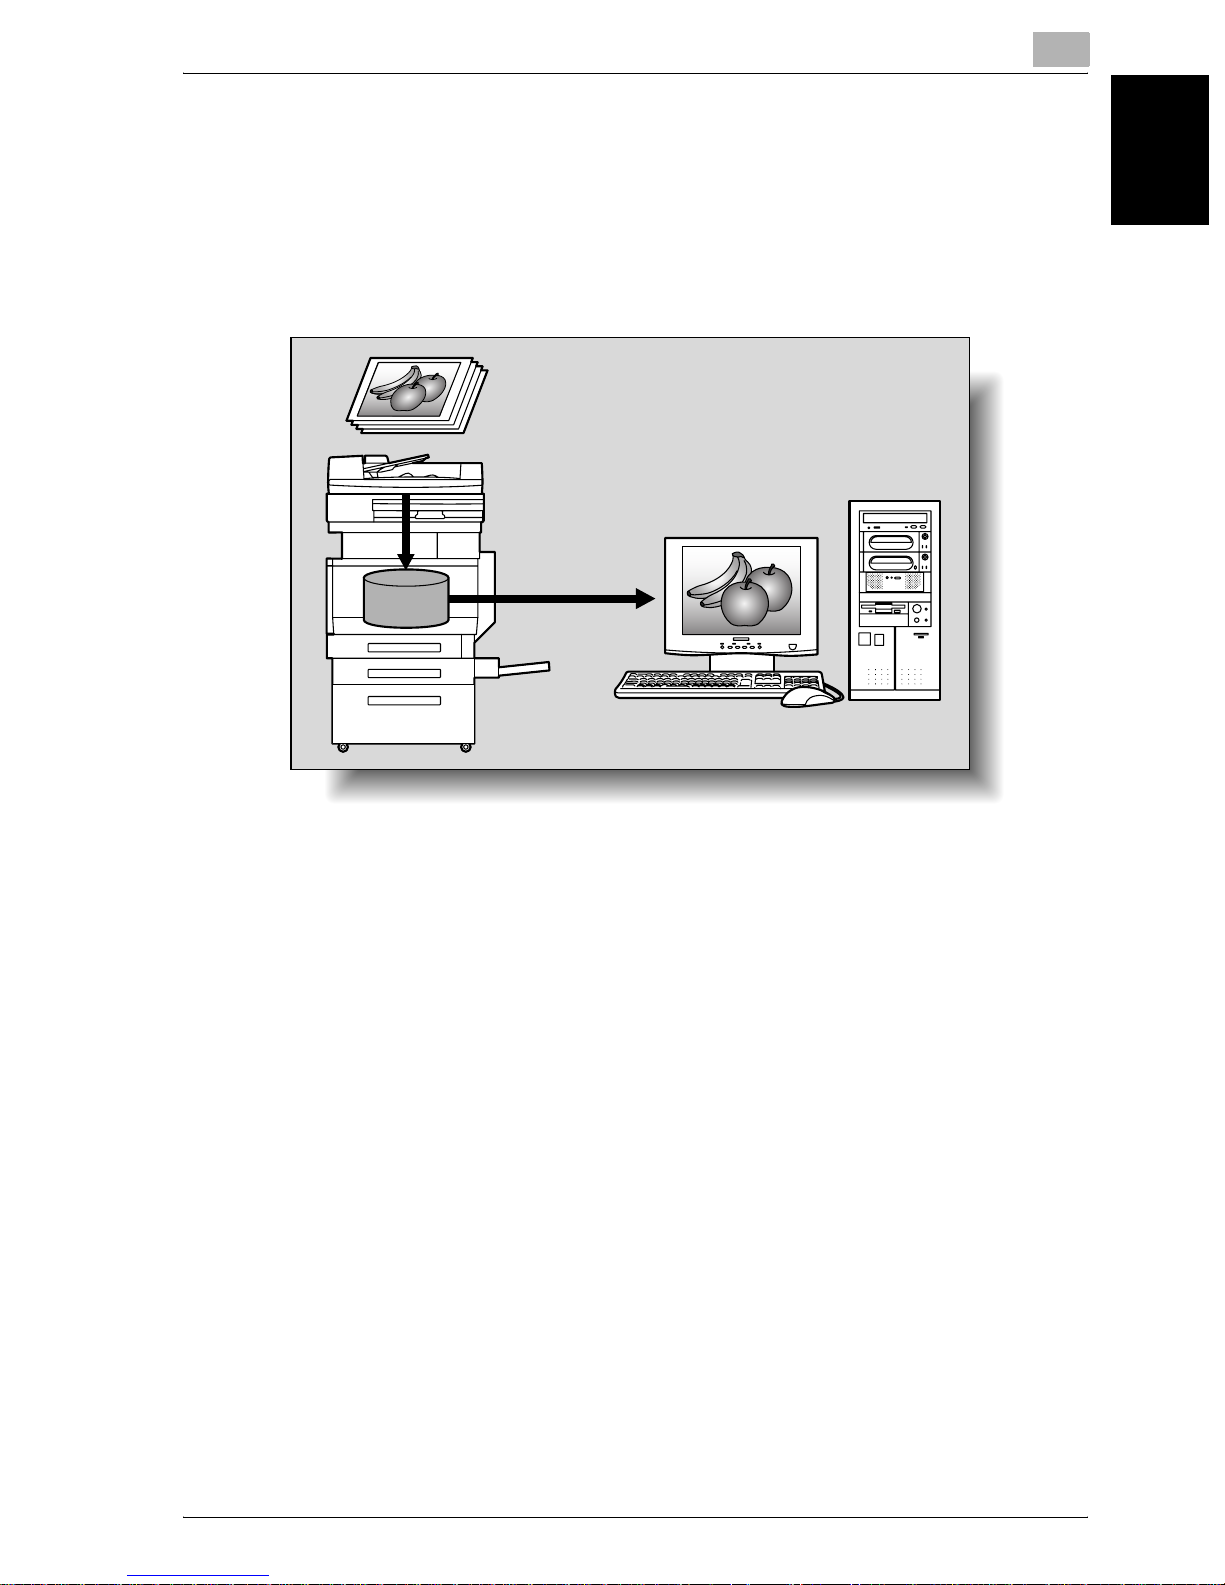
“Scanning” refers to the operation of reading the image of a document fed
through the ADF (optional) or placed on the original glass. The scanning
functions can be used to temporarily store the scanned data in the internal
memory of the machine and transmit the data in an e-mail message over the
network or upload the data to a file server.
In addition, the data can be stored on the internal hard disk of this machine.
This function can be used from the Box mode, which is described in the User’s Guide [Box Operations].
Furthermore, this machine can be used simply as a scanner.
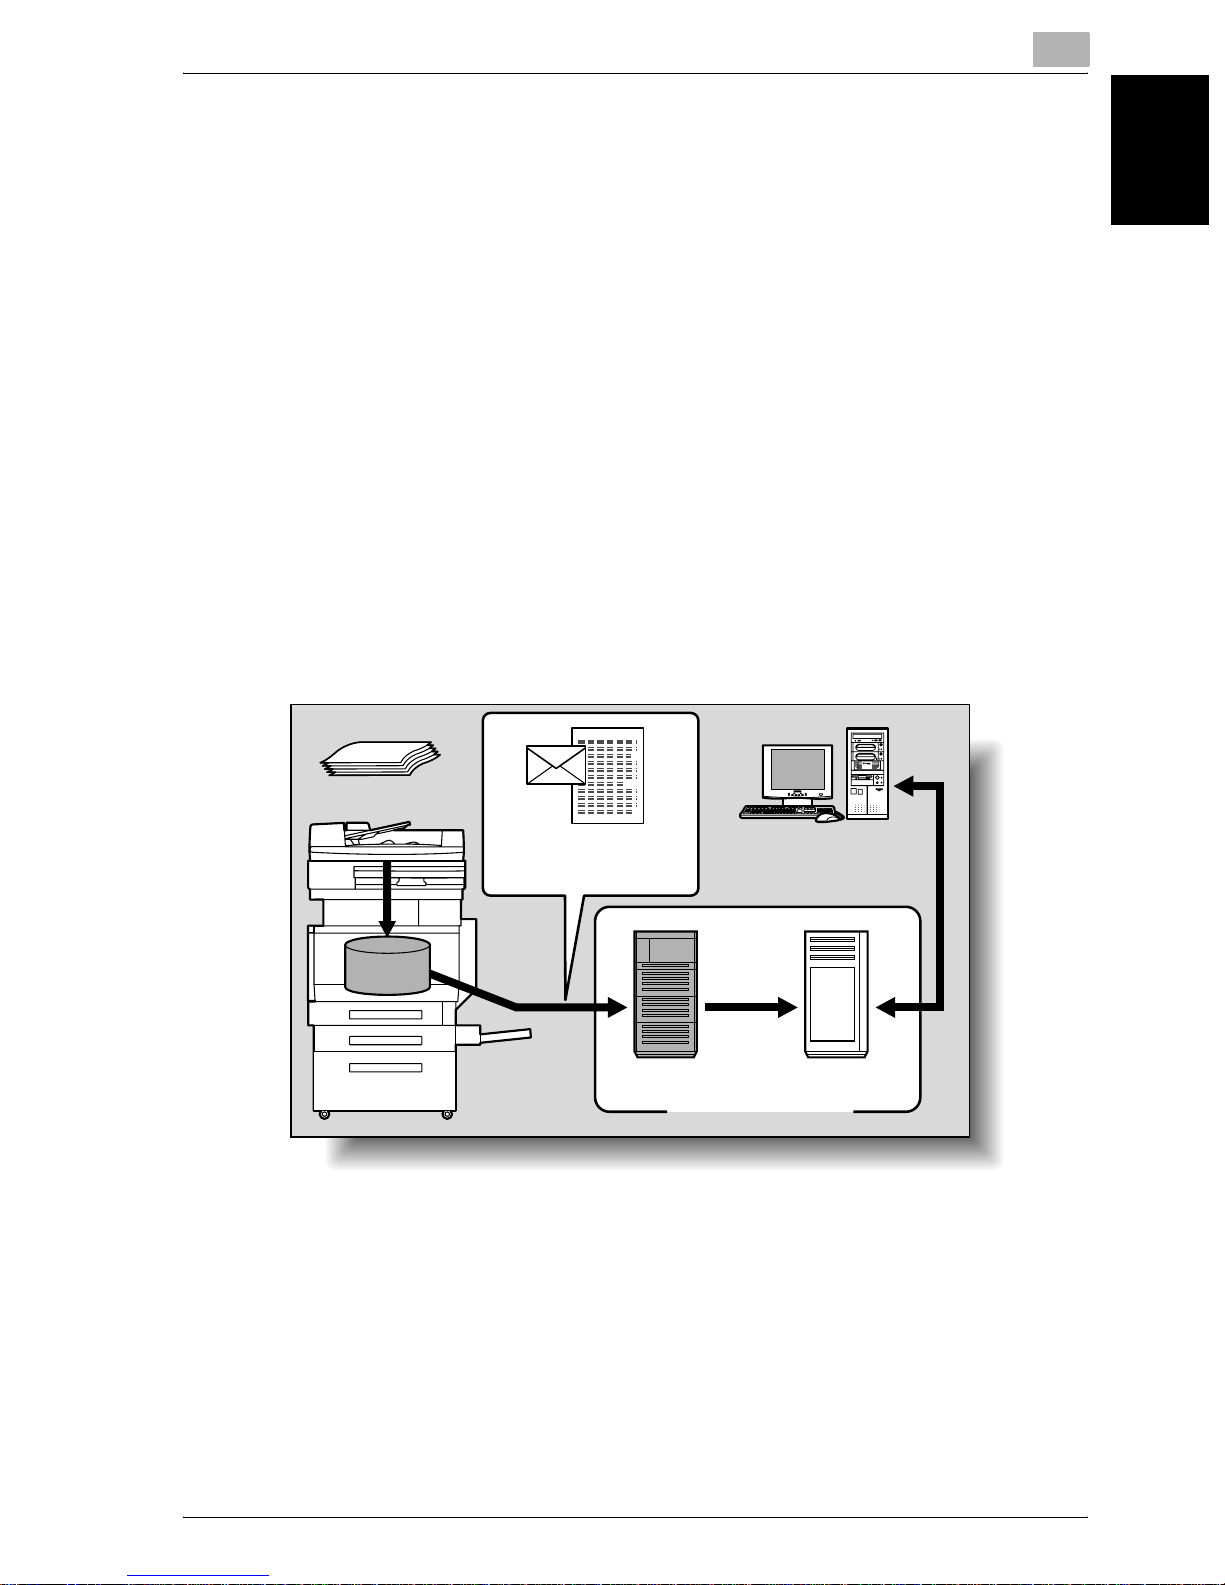
Sending the Scanned Data in an E-Mail Message
The scanned data can be sent to a specified e-mail address. The destination
is specified from the touch panel of this machine, and the scanned data is
sent as an e-mail attachment.
1
For details, refer to “Sending Data in an E-Mail Message (Scan to E-Mail)” on
page 2-6.
Original
Machine
E-mail and scan data
E-mail reception
Memory
SMTP server POP server
Internet
Before Using the Scan Functions Chapter 1
cm2520 1-3
Page 23
1
Before Using the Scan Functions
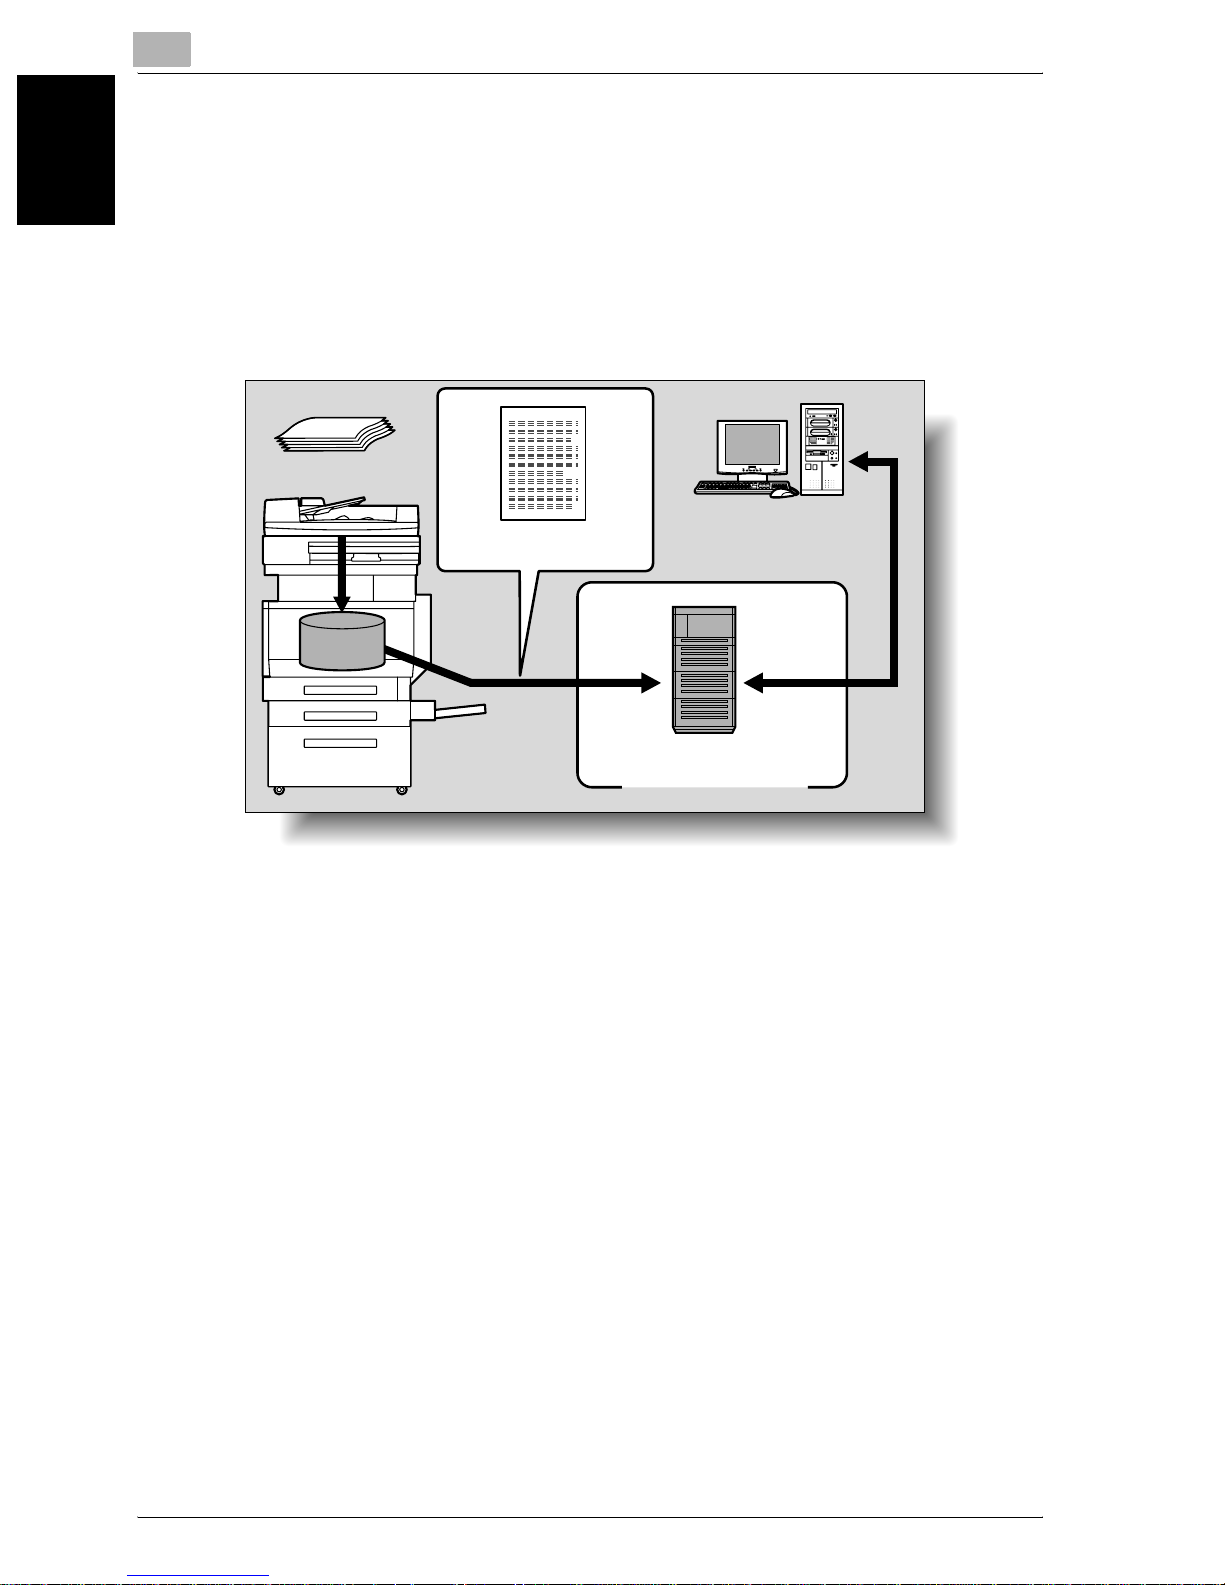
Sending the Scanned Data as Files (FTP)
The scanned data is uploaded to a specified FTP server. The FTP server address, login password, and other information are entered from the touch
panel of this machine.
The data files uploaded to the FTP server can be downloaded from a computer on the network.
For details, refer to “Sending Data to a Server (Scan to FTP)” on page 2-19.
Original
Machine
Scan data
Download
Before Using the Scan Functions Chapter 1
Memory
FTP server
Internet
1-4 cm2520
Page 24
Before Using the Scan Functions
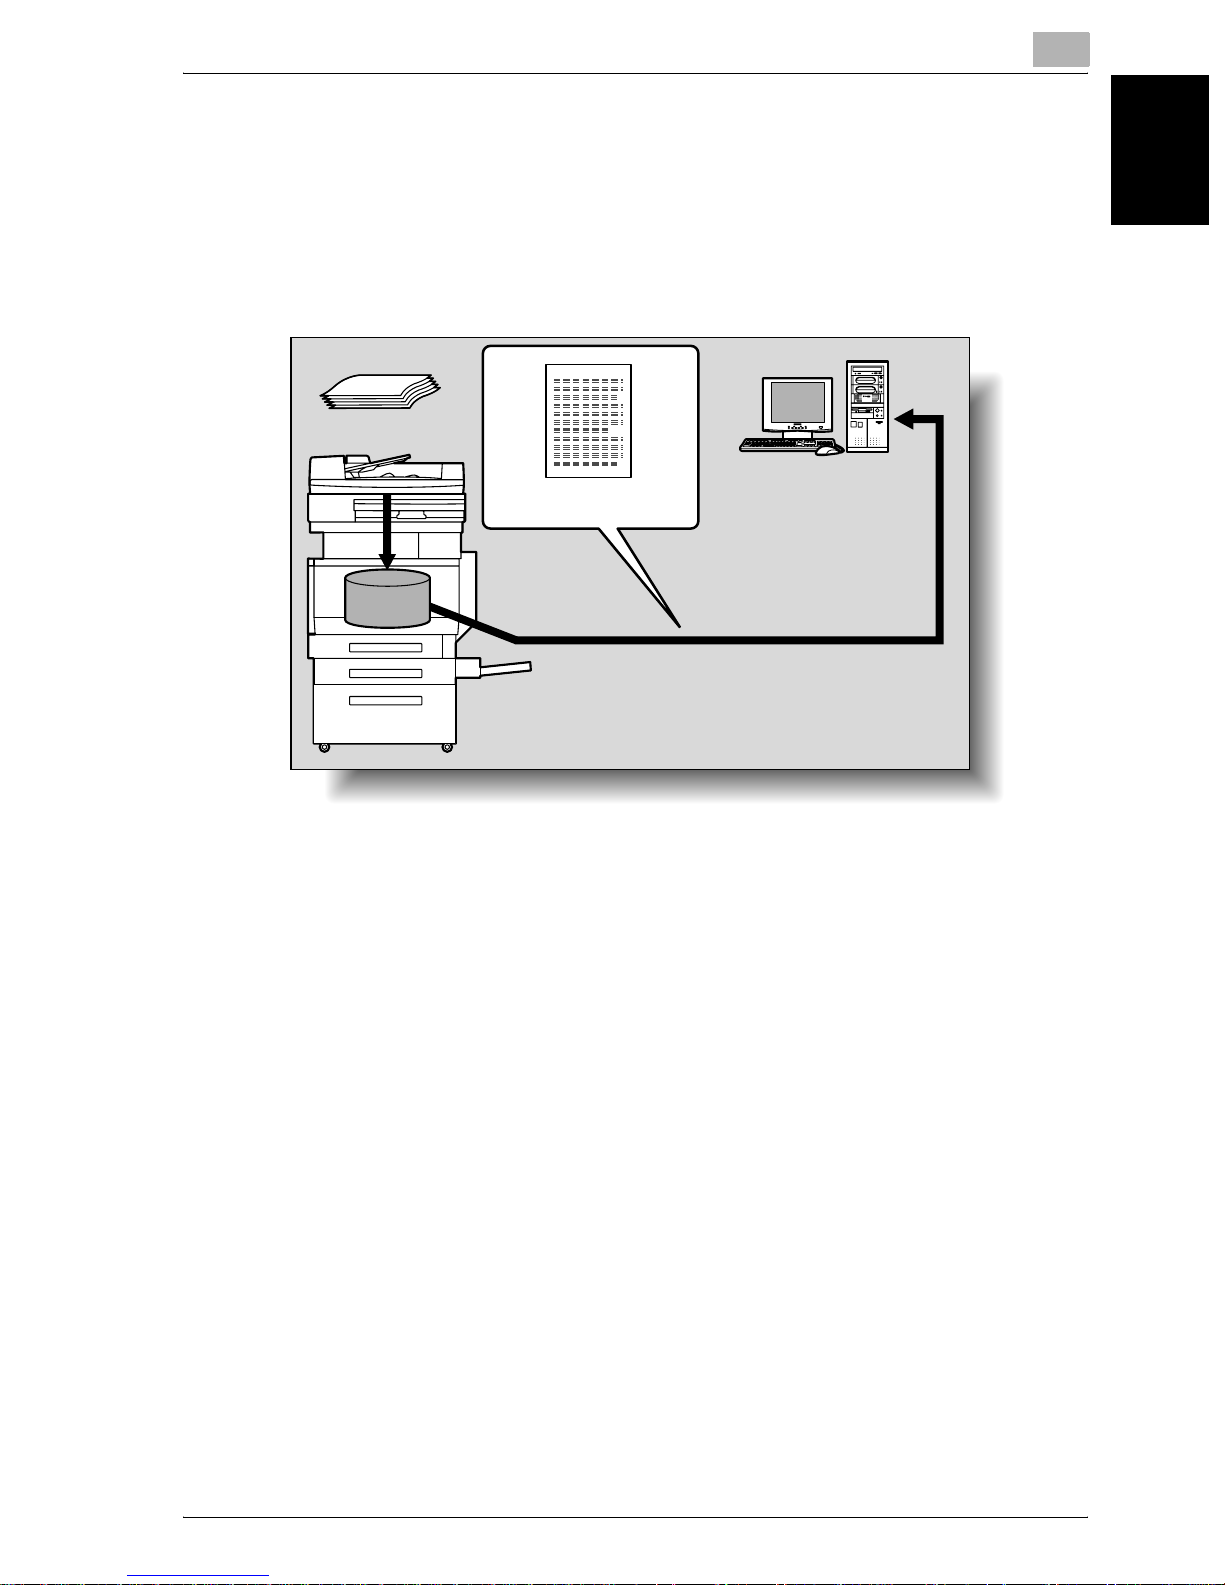
Sending the Scanned Data to a Computer on the Network (SMB)
The scanned data can be sent to a shared folder on a specified computer.
The name of the destination computer, login password, and other information are entered from the touch panel of this machine.
For details, refer to “Sending Data to a PC on the Network (Scan to SMB)”
on page 2-31.
Original
Machine
1
Scan data
Memory
Save to a shared folder
Before Using the Scan Functions Chapter 1
cm2520 1-5
Page 25

1
Before Using the Scan Functions
Saving the Scanned Data in Boxes
The scanned data can be saved in boxes created on the machine’s internal
hard disk. The data can be used in other applications. The file name can be
entered from the touch panel of the machine.
In addition, if the scanned data is saved in “Annotation User box”, you can
deliver it over the Internet by adding any domain name and the delivery date
and time.
For the procedure to save in an annotation user box, refer to “Annotation
(Application)” on page 2-63. For saving other data in a box or reusing the
data that has been saved, refer to User’s Guide “Box Operations”.
Machine
Before Using the Scan Functions Chapter 1
Hard disk
1-6 cm2520
Page 26
Before Using the Scan Functions
Using the Machine as a Scanner
This machine can be used as a scanner. The scanner can be controlled from
a computer connected to the network, and the scanned image can be loaded
into an application on the computer to be processed.
For details, refer to the TWAIN driver manual that is on the User Software CDROM.
Original
Machine
Memory
1
Before Using the Scan Functions Chapter 1
cm2520 1-7
Page 27

1
Before Using the Scan Functions
1.3 Settings for Using Network/Scanning Functions
It is recommended that the settings described below be specified before using the network/scanning functions. The network settings described in
“Specifying Network Settings” must be specified first. Set other items as
necessary.
!
Detail
For details on specifying network settings, refer to the chapters listed below.
“TCP/IP Settings” on page 3-48
“E-Mail TX (SMTP) Settings” on page 3-88
“4 Specifying Settings Using Web Connection”
Specifying Network Settings
An IP address must be assigned to the machine and settings such as the
Before Using the Scan Functions Chapter 1
SMTP server must be specified to use the machine on the network. Be sure
to set them.
There are two methods for specifying settings. One method is to specify the
settings from the touch panel of this machine. The other method is to use
Web Connection from a Web browser on a computer on the network.
Registering Destinations and Specifying Their Settings
The destinations (recipients) of scanned data must be registered.
The following registration methods are available.
- Register from the touch panel of the machine.
- Use Web Connection from a computer on the network.
The following types of destinations can be registered.
Type Description
Abbreviated Destination The destination can be selected with one button.
Group Multiple destinations can be registered in groups. E-mail, FTP,
SMB, and box destinations can be registered together in a single
group.
2
Note
The destination can also be entered before scanning. This is called “direct input”. For details, refer to “Entering the Addresses Directly” on
page 2-16.
1-8 cm2520
Page 28

Before Using the Scan Functions
!
Detail
For details on registering destinations and specifying settings, refer to the
sections listed below.
“Registering Abbreviated Destinations” on page 3-10
“Registering Group Destinations” on page 3-22
Setting the From Address
To perform Scan to E-Mail, the From address must be registered. The From
address is the address that indicates the sender when data is sent. Normally,
it is recommended that the e-mail address of administrator registration be
used.
If the e-mail address of administrator registration is not specified, the sender
e-mail address must be entered for each Scan to E-mail operation. Note that
Scan to E-Mail is not possible if the From address is not entered.
1
2
Note
When the user authentication setting is enabled, the e-mail address that
is specified for each user becomes the From address.
Specifying the Scan Settings
The following scan settings can be specifying when scanning a document.
These settings are specified from the touch panel of the machine.
Item Description
File Type Sets the file type to be saved.
Resolution Sets the scan resolution.
Simplex/Duplex Selects whether to scan one side of the document or both sides.
Original Type Sets the type of image to be scanned.
Scan Size Sets the size to be scanned.
Color Sets the color of the scanned document.
Before Using the Scan Functions Chapter 1
Background Removal Adjusts the density of the background (blank areas) of the document.
Original Setting Specifies the type and characteristics of the loaded document.
Application Provides functions for adjusting the print image, for example, for scan-
cm2520 1-9
ning books and for erasing the surrounding area.
Page 29

1
Before Using the Scan Functions
!
Detail
For details on the scan settings, refer to “Specifying the Scan Settings”
on page 2-42.
Specifying Program Settings
The destination and scan settings can be registered together as a single program. This is convenient for frequently scanning documents and sending
data under the same conditions.
These settings are specified from the touch panel of the machine.
!
Detail
For details, refer to “Registering Program Destinations” on page 3-24.
Before Using the Scan Functions Chapter 1
Specifying Default Scan Settings
The settings that are selected when [Scan] in the control panel is touched
can be specified.
!
Detail
For details, refer to “Setting the Save Format of the Data to Be Scanned”
on page 3-35.
1-10 cm2520
Page 30
Before Using the Scan Functions
1.4 Connecting to the Network
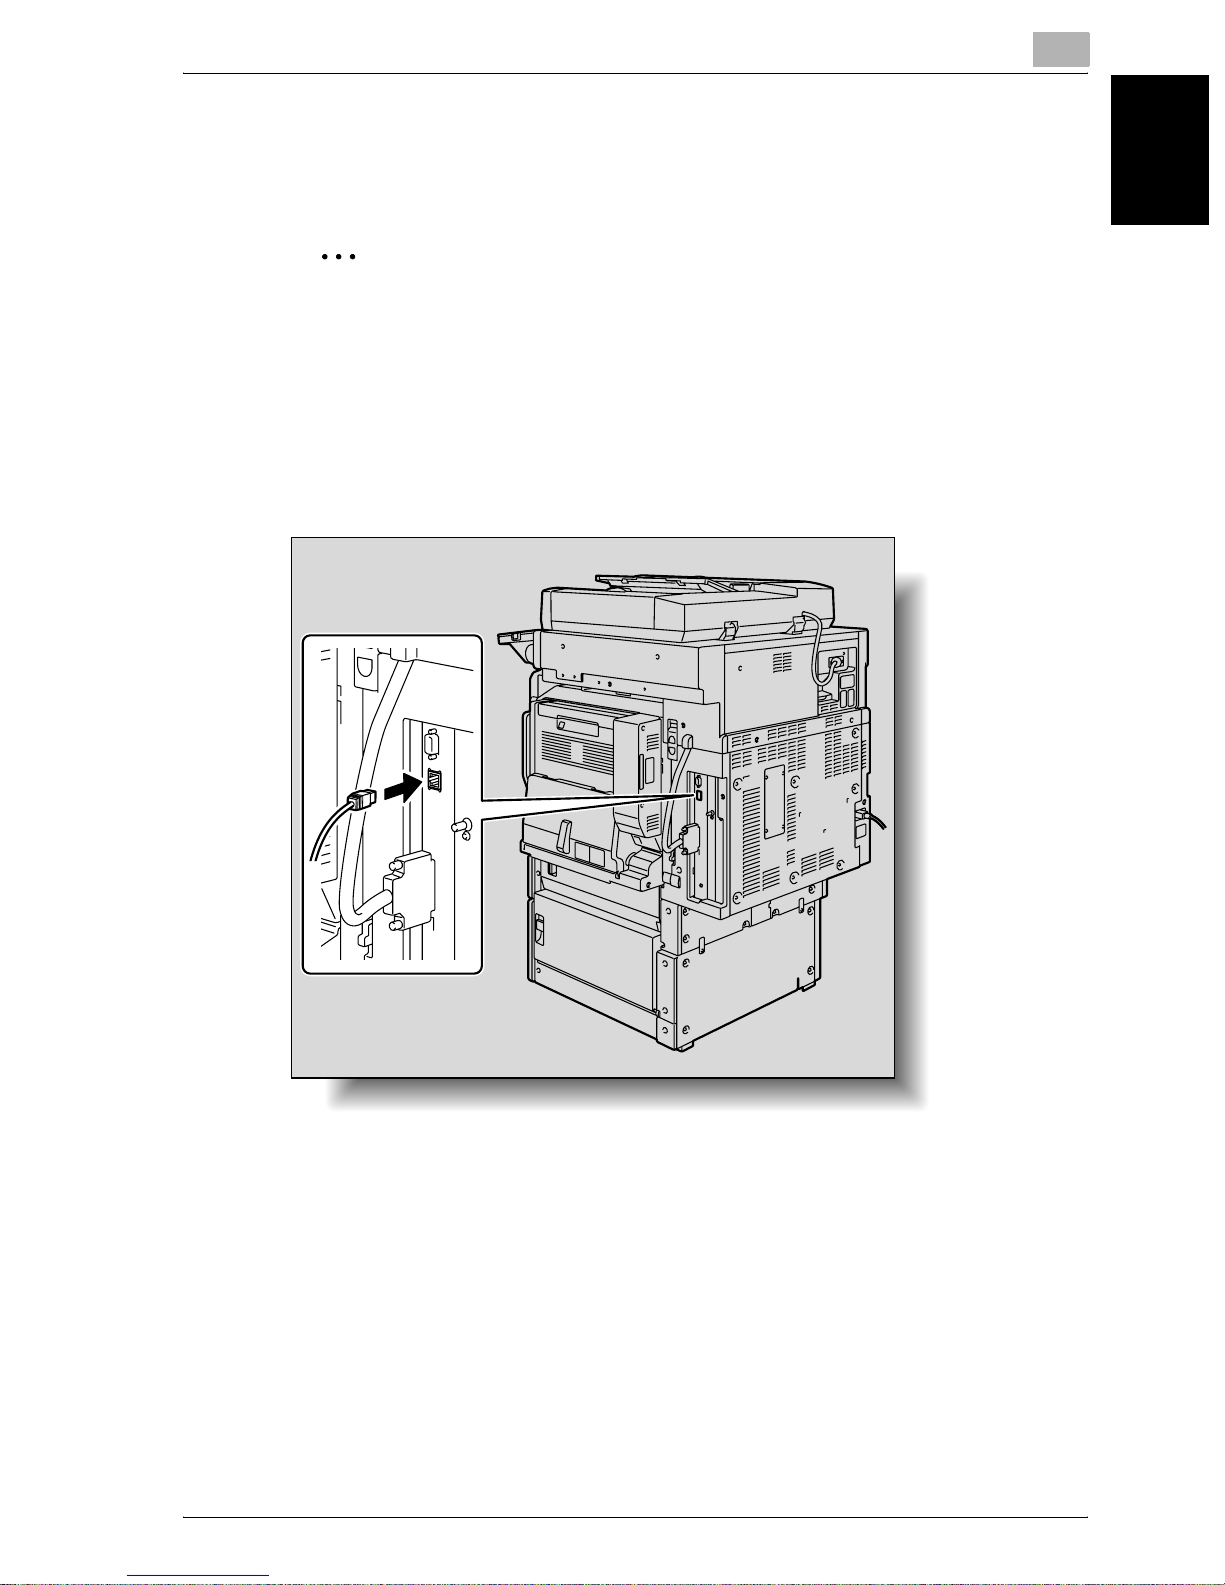
The machine can be connected to the network.
2
Reminder
The machine can be connected via a parallel or USB connection (optional). However, be sure to connect to the network to use the scanner function.
Network Connection
Connect a UTP cable (category 5 or later recommended) from the network to
the Ethernet connector on the machine.
1
Before Using the Scan Functions Chapter 1
cm2520 1-11
Page 31

1
Before Using the Scan Functions
1.5 Flow Chart of Setup and Scanning Operations
The sequence from the setup operations required to use the scanning functions to the scanning operation is shown below.
Specify scan settings in the screen that appears after pressing the [Utility/Counter] key,
then touching [User Setting].
* Specify basic settings such as the format in which scanned data is saved. (Refer to
“Setting the Main Scan Mode Screen” on page 3-31 and “Setting the Save Format of the
Data to Be Scanned” on page 3-35.)
Specify network settings in the screen that appears after pressing the [Utility/Counter]
key, then touching [Administrator Setting].
* Specify settings in order to use the machine on the network. (Refer to “TCP/IP Settings”
on page 3-48, “NetWare Settings” on page 3-55, “http Server Settings” on page 3-60,
“FTP Settings” on page 3-67, “SMB Settings” on page 3-70, “AppleTalk Settings” on
page 3-74, “Enabling LDAP Settings” on page 3-76, “Setting Up LDAP Settings” on
page 3-78, “Search Default Setting” on page 3-87, “E-Mail TX (SMTP) Settings” on
Before Using the Scan Functions Chapter 1
page 3-88, “E-Mail RX (POP) Settings” on page 3-96, “Device Settings” on page 3-100,
“Time Adjustment Settings” on page 3-102, “Status Notification Settings” on
page 3-105, “Total Counter Report Setting” on page 3-107, “PING Confirmation” on
page 3-112, “SLP Settings” on page 3-116, “LPD Settings” on page 3-117, “Prefix/Suffix
Settings” on page 3-118, “Job for the disable proof” on page 3-122, “SNMP Settings” on
page 3-124, “Bonjour Setting” on page 3-130, “TCP Socket Setting” on page 3-132,
“OpenAPI Settings” on page 3-134, and “External Server Authentication” on
page 3-139.)
Register destinations in the screen that appears after pressing the [Utility/Counter] key.
* Specify e-mail addresses for e-mail transmissions, register FTP servers, and
specify destination computers. (Refer to “Registering Abbreviated Destinations” on
page 3-10, “Registering Group Destinations” on page 3-22, “Registering Program Destinations” on page 3-24, and “Specifying E-Mail Settings” on page 3-27.)
Load the document.
Specify the destination.
Specify the scan settings (refer to page 2-42).
Press the [Start] key in the control panel.
1-12 cm2520
Page 32

Before Using the Scan Functions
The document is scanned, and the data is transmitted.
2
Note
Some settings that can be specified on the control panel can also be
specified from a computer over a network using Web Connection. For
details, refer to Chapter 4, “Specifying Settings Using Web Connection”.
1
Before Using the Scan Functions Chapter 1
cm2520 1-13
Page 33

1
Before Using the Scan Functions
Before Using the Scan Functions Chapter 1
1-14 cm2520
Page 34

2
Scanning Documents
Scanning Documents Chapter 2
Page 35

2
Power Save
Box
Access
ABC DEF
JKLGHI MNO
TUVPQRS WXYZ
Mode Memory
Mode Check
Utility/
Counter
Fax
Scan
Copy
Reset
Interrupt
Power
Stop
Proof Copy
Start
Data
Main Powerer
Help
Accessibility
Enlarge Display
Contrast
2 Scanning Documents
2.1 Control Panel
1234 5 6 7
Scanning Documents
8
Scanning Documents Chapter 2
24
23
22
No. Part Name Description
1 [Power Save] key Press to enter Power Save mode. While the
machine is in Power Save mode, the indicator on
the [Power Save] key lights up in green and the
touch panel goes off. To cancel Power Save mode,
press the [Power Save] key again.
2 Touch panel Displays various screens and messages.
Specify the various settings by directly touching the
panel.
3 [Access] key If user authentication or account track settings
have been applied, press this key after entering the
user name and password (for user authentication)
or the account name and password (for account
track) in order to use this machine.
This key is also used to log off.
Mode Chec
Main P
17192021
15141618
13
9
10
11
12
4 [Box] key Press to enter Box mode.
5 [Fax] key Press to enter Fax mode.
6 [Scan] key Press to enter Scan mode. While the machine is in
2-2 cm2520
While the machine is in Box mode, the indicator on
the [Box] key lights up in green. For details, refer to
the User’s Guide [Box Operations].
While the machine is in Fax mode, the indicator on
the [Fax] key lights up in green.
For details, refer to the User’s Guide [Facsimile
Operations].
Scan mode, the indicator on the [Scan] key lights
up in green.
Page 36

Scanning Documents
No. Part Name Description
7 [Copy] key Press to enter Copy mode. (As a default, the
8 [Reset] key Press to clear all settings (except programmed
9 [Interrupt] key Press to enter Interrupt mode. While the machine is
10 Auxiliary power button Press to turn on/off machine operations, for exam-
2
machine is in Copy mode.) While the machine is in
Copy mode, the indicator on the [Copy] key lights
up in green.
For details, refer to the User’s Guide [Copy Operations].
settings) entered in the control panel and touch
panel.
in Interrupt mode, the indicator on the [Interrupt]
key lights up in green and the message “Now in
Interrupt mode.” appears on the touch panel. To
cancel Interrupt mode, press the [Interrupt] key
again.
ple, for copying, printing or scanning. When turned
off, the machine enters a state where it conserves
energy.
11 [Stop] key Press the [Stop] key during scanning to stop the
scan operation.
12 [Start] key Press to start scanning. When this machine is ready
to begin scanning, the indicator on the [Start] key
lights up in green. If the indicator on the [Start] key
lights up in orange, scanning cannot begin.
Press to restart a stopped job.
13 Main Power indicator Lights up in green when the machine is turned on
with the auxiliary power button.
14 Data indicator Flashes in green while a print job is being received.
Lights up in green when data is being printed.
15 [Proof Copy] key Press to print a single proof copy to be checked
before printing a large number of copies.
16 Keypad Use to type in the number of copies to be
produced.
Use to type in the zoom ratio.
Use to type in the various settings.
17 [C] (clear) key Press to erase a value (such as the number of
copies, a zoom ratio, or a size) entered using the
keypad.
18 [Mode Check] key Press to display screens showing the specified
settings.
Scanning Documents Chapter 2
19 [Utility/Counter] key Press to display the Utility screen and Meter Count
20 [Mode Memory] key Press to register the desired copy settings as a pro-
21 Contrast dial Use to adjust the contrast of the touch panel.
22 [Enlarge Display] key Press to enter Enlarge Display mode.
23 [Accessibility] key Press to display the screen for specifying user
cm2520 2-3
screen.
gram or to recall a registered copy program.
accessibility functions.
Page 37

2
Scanning Documents
No. Part Name Description
24 [Help] key Press to display the Help Main Menu screen, where
descriptions of the various functions and details of
operations can be displayed.
7 CAUTION
To prevent damage to the touch panel, do not push down on the touch
panel with force.
% Also, do not push down on the touch panel using hard or sharp objects.
Scanning Documents Chapter 2
2-4 cm2520
Page 38

Scanning Documents
2.2 Displaying the Scan Screen
Display the Scan mode screen in order to perform scanning operations.
Turn the machine on. When the machine is ready to make copies, the Basic
screen appears.
Press the [Scan] key in the control panel to display the Scan mode screen.
The displayed functions and modes can be selected by gently touching the
buttons that are displayed in the screen.
2
2 4 5 6 7 8 10
93
1
No Name Description
1 Sub display area This area displays destinations, etc.
2 [Job List] button Displays jobs being performed and jobs being stored.
Various commands for checking and managing jobs are
available.
3 Date/Time display area Displays the current date/time.
4 Message display area Displays the machine status and details on operations
that must be performed.
11
Scanning Documents Chapter 2
5 [Program] button Displays destinations that are registered in programs.
6 [Group] button Displays destinations that are registered in groups.
7 [Address Book] button Used to Search for destinations that are registered in the
8 [Direct Input] button Used to type in the destination when performing Scan to
9 Available memory display Shows the amount of available memory that is used
10 Address number display
area
11 [Scan Settings] button Used to specify scan settings.
cm2520 2-5
address book.
E-mail, Scan to FTP, or Scan to SMB operations or to select the box where the job is to be stored.
This button does not appear if the [Manual Destination Input] on the Security Details screen (displayed by touching
[Security Setting] on the Administrator Setting screen) is
set to “Restrict”.
during the scanning operation.
Shows the number of specified addresses.
Page 39

2
Scan
Scanning Documents
2.3 Sending Data in an E-Mail Message (Scan to E-Mail)
Scan to E-Mail
The Scan to E-mail operation is used to send images scanned on this machine to an e-mail address as an attachment.
The methods described below are available for specifying the destination.
The methods can also be combined, for example, by selecting a group destination, then adding other destinations through direct input.
2
Note
For the procedure for sending e-mail, refer to “Sending the Scanned Data
in an E-Mail Message” on page 1-3.
Using Programs
Scanning Documents Chapter 2
“Program” refers to a set of destination addresses and scan settings that are
registered together. This feature is convenient for frequently scanning documents and sending data under the same conditions. The following procedure
describes how to send data by selecting a program that has been registered
in advance.
For details on registering programs, refer to “Registering Program Destinations” on page 3-24.
1 Press the [Scan] key on the control panel.
The Scan mode screen appears.
2-6 cm2520
Page 40

Scanning Documents
2 Touch [Program].
The selected destinations are listed under “Broadcast Destinations”.
Other destination addresses can be added using the address book or
through direct input.
Only the destinations that can be specified are displayed. For example,
fax destinations are not displayed.
2
3 Touch [Scan Settings] to check the specified scan settings. The spec-
ified settings can also be changed.
– For details on the scan settings, refer to “Specifying the Scan Set-
tings” on page 2-42.
4 After checking the settings, touch [OK].
Scanning Documents Chapter 2
cm2520 2-7
Page 41

2
Scanning Documents
5 Load the document into the ADF (optional) or position it on the original
glass of the machine.
6 Press the [Start] key on the control panel.
The document is scanned, and the data is sent.
2
Note
Do not turn off the machine until the scanned jobs disappear from the job
list.
Scanning Documents Chapter 2
2-8 cm2520
Page 42

Scanning Documents
Scan
Selecting Group Addresses
“Group” refers to multiple destinations that are registered collectively. The
following procedure describes how to send data by selecting a group that
has been registered in advance.
For details on registering groups, refer to “Registering Program Destinations” on page 3-24.
1 Press the [Scan] key on the control panel.
2
The Scan mode screen appears.
2 Touch [Group].
Touching the button for a group displays the list of members registered
in the group.
Scanning Documents Chapter 2
cm2520 2-9
Page 43

2
Scanning Documents
3 Select the desired destinations, and then touch [OK].
4 Touch [Scan Settings], and then specify the scan settings.
– For details on the scan settings, refer to “Specifying the Scan Set-
tings” on page 2-42.
Scanning Documents Chapter 2
5 After specifying the settings, touch [OK].
6 Load the document into the ADF (optional) or position it on the original
glass of the machine.
7 Press the [Start] key on the control panel.
The document is scanned, and the data is sent.
2-10 cm2520
Page 44

Scanning Documents
2
Note
Do not turn off the machine until the scanned jobs disappear from the job
list.
2
Scanning Documents Chapter 2
cm2520 2-11
Page 45

2
Scan
Scanning Documents
Selecting Destinations From the Address Book
“Address book” refers to the collection of destination addresses that were
registered in advance. The following procedure describes how to send data
by selecting destinations from the address book. Multiple addresses can be
specified simultaneously from the address book.
For details on registering addresses in the address book, refer to “Registering Abbreviated Destinations” on page 3-10.
1 Press the [Scan] key on the control panel.
Scanning Documents Chapter 2
The Scan mode screen appears.
2 Touch [Address Book].
The address book is displayed, and registered address names are displayed by touching the corresponding index button.
2-12 cm2520
Why is [LDAP Search] not displayed on the Address Book tab?
?
% If the [Manual Destination Input] on the Security Details screen (dis-
played by touching [Security Setting] on the Administrator Setting
screen) is set to [Restrict], [LDAP Search] does not appear on the
Address Book tab.
To perform LDAP searches, what settings are required?
?
Page 46

Scanning Documents
% Administrator settings such as the LDAP sever setting are required.
For details, refer to “Enabling LDAP Settings” on page 3-76.
3 Touch the button for a destination to select it.
The selected buttons are highlighted, and the selected destinations are
listed under “Broadcast Destinations”. Other destination addresses
can be added through direct input.
– If necessary, you can search for the destination. For details, refer to
“Searching the Destination” on page 2-13.
2
Searching the Destination
The following methods are available for searching the destination.
- Detail Search: Searches the address by entering a section of the name or
description of the address.
- LDAP search: Searches the address that meets the conditions from the
addresses registered on the LDAP server.
A “Basic Search” in which a keyword is entered and a “Advanced Search” in
which multiple conditions are used to narrow down the search are available.
Scanning Documents Chapter 2
cm2520 2-13
Page 47

2
Scanning Documents
!
Detail
To perform LDAP searches, the LDAP server settings that are specified
in Administrator Setting are required. For details, refer to “Enabling LDAP
Settings” on page 3-76.
Basic Search
Scanning Documents Chapter 2
Advanced Search
2-14 cm2520
Page 48

Scanning Documents
To search the destination
1 Touch [Scan Settings], and then specify the scan settings.
– For details on the scan settings, refer to “Specifying the Scan Set-
tings” on page 2-42.
2 After specifying the settings, touch [OK].
2
3 Load the document into the ADF (optional) or position it on the original
glass of the machine.
4 Press the [Start] key on the control panel.
The document is scanned, and the data is sent.
2
Note
Do not turn off the machine until the scanned jobs disappear from the job
list.
Scanning Documents Chapter 2
cm2520 2-15
Page 49

2
Scan
Scanning Documents
Entering the Addresses Directly
“Direct input” refers to the operation of directly entering the destination address from the machine’s control panel.
1 Press the [Scan] key on the control panel.
Scanning Documents Chapter 2
The Scan mode screen appears.
2 Touch [Direct Input], then [Scan to E-Mail].
A screen for entering the destination address appears.
Why is the Direct Input tab not displayed?
?
% If the [Manual Destination Input] on the Security Details screen (dis-
played by touching [Security Setting] on the Administrator Setting
screen) is set to [Restrict], the Direct Input tab does not appear.
2-16 cm2520
Page 50

Scanning Documents
3 Enter the destination address, and then touch [OK].
– To specify an additional address, touch [Next Dest.], and then
specify the address.
– Frequently entered user names and domain names can be regis-
tered to be recalled and used again. First, prefixes and suffixes
must be registered in Administrator mode.
The addresses that were entered are listed under “Broadcast Destinations”.
2
Scanning Documents Chapter 2
4 Touch [Scan Settings], and then specify the scan settings.
– For details on the scan settings, refer to “Specifying the Scan Set-
tings” on page 2-42.
cm2520 2-17
Page 51

2
Scanning Documents
5 After specifying the settings, touch [OK].
6 Load the document into the ADF (optional) or position it on the original
glass of the machine.
7 Press the [Start] key on the control panel.
The document is scanned, and the data is sent.
Scanning Documents Chapter 2
2
Note
Do not turn off the machine until the scanned jobs disappear from the job
list.
2-18 cm2520
Page 52

Scanning Documents
2.4 Sending Data to a Server (Scan to FTP)
Scan to FTP
The Scan to FTP operation can be used in a network environment with an
FTP server. The scanned data is sent to a specified folder in an FTP server
on the network.
This function is suitable for sending data of a large size such as high-resolution images.
The methods described below are available for specifying the destination.
The methods can also be combined, for example, by selecting a group destination, then adding other destinations through direct input.
Transmission may not be possible if the destination server has placed limitations on the document name. Because the document name becomes the file
name at the time of transmission, consult your network administrator when
specifying the document name.
2
2
Note
If a mail server is available on the network, the e-mail notification function
can be used to send an e-mail message containing notification of the
storage location of the scan data. For details on the e-mail notification
function, refer to “Specifying E-Mail Settings” on page 2-74.
2
Note
For the FTP transmission procedure, refer to “Sending the Scanned Data
as Files (FTP)” on page 1-4.
Using Programs
“Program” refers to a set of destination FTP servers and scan settings that
are registered together. The following procedure describes how to send data
by selecting a program that has been registered in advance.
If a proxy server is available on the network, FTP servers on the Internet can
be accessed via a proxy server.
Scanning Documents Chapter 2
For details on registering programs, refer to “Registering Program Destinations” on page 3-24.
cm2520 2-19
Page 53

2
Scan
Scanning Documents Chapter 2
Scanning Documents
1 Press the [Scan] key on the control panel.
The Scan mode screen appears.
2 Touch [Program].
The selected destinations are listed under “Broadcast Destinations”.
Other destination addresses can be added using the address book or
through direct input.
Only the destinations that can be specified are displayed. For example,
fax destinations are not displayed.
3 Touch [Scan Settings] to check the specified scan settings. The spec-
ified settings can also be changed.
2-20 cm2520
Page 54

Scanning Documents
– For details on the scan settings, refer to “Specifying the Scan Set-
tings” on page 2-42.
4 After specifying the settings, touch [OK].
5 Load the document into the ADF (optional) or position it on the original
glass of the machine.
2
6 Press the [Start] key on the control panel.
The document is scanned, and the data is sent.
2
Note
Do not turn off the machine until the scanned jobs disappear from the job
list.
Selecting Group Addresses
“Group” refers to multiple destinations that are registered collectively. The
following procedure describes how to send data by selecting a group that
has been registered in advance.
For details on registering groups, refer to “Registering Group Destinations”
on page 3-22.
Scanning Documents Chapter 2
cm2520 2-21
Page 55

2
Scan
Scanning Documents
1 Press the [Scan] key on the control panel.
The Scan mode screen appears.
Scanning Documents Chapter 2
2 Touch [Group].
Touching the button for a group displays the list of members registered
in the group. Other destination addresses can be added using the address book or through direct input.
3 Select the desired destination, and then touch [OK].
The selected destinations are listed under “Broadcast Destinations”.
2-22 cm2520
Page 56

Scanning Documents
4 Touch [Scan Settings], and then specify the scan settings.
– For details on the scan settings, refer to “Specifying the Scan Set-
tings” on page 2-42.
5 After specifying the settings, touch [OK].
2
6 Load the document into the ADF (optional) or position it on the original
glass of the machine.
7 Press the [Start] key on the control panel.
The document is scanned, and the data is sent.
2
Note
Do not turn off the machine until the scanned jobs disappear from the job
list.
Scanning Documents Chapter 2
cm2520 2-23
Page 57

2
Scan
Scanning Documents
Selecting Destinations From the Address Book
“Address book” refers to the collection of destination addresses that were
registered in advance. The following procedure describes how to send data
by selecting destinations from the address book. Multiple addresses can be
specified simultaneously from the address book.
For details on registering addresses in the address book, refer to “Registering Abbreviated Destinations” on page 3-10.
1 Press the [Scan] key on the control panel.
Scanning Documents Chapter 2
The Scan mode screen appears.
2-24 cm2520
Page 58

Scanning Documents
2 Touch [Address Book].
The address book is displayed, and registered address names are displayed by touching the corresponding index button.
How can the address book be searched for the desired address?
?
% Touch [Detail Search] to search for addresses. The address book
can be searched for names or addresses.
2
3 Touch the button for a destination to select it.
The buttons are highlighted, and the selected destinations are listed
under “Broadcast Destinations”. Other destinations can be added
through direct input.
Scanning Documents Chapter 2
cm2520 2-25
Page 59

2
Scanning Documents
4 Touch [Scan Settings], and then specify the scan settings.
– For details on the scan settings, refer to “Specifying the Scan Set-
tings” on page 2-42.
5 After specifying the settings, touch [OK].
Scanning Documents Chapter 2
6 Load the document into the ADF (optional) or position it on the original
glass of the machine.
7 Press the [Start] key on the control panel.
The document is scanned, and the data is sent.
2
Note
Do not turn off the machine until the scanned jobs disappear from the job
list.
2-26 cm2520
Page 60

Scanning Documents
Scan
Entering the Addresses Directly
“Direct input” refers to the operation of directly inputting the destination address from the machine’s control panel.
The following procedure describes how to directly specify an address.
1 Press the [Scan] key on the control panel.
2
The Scan mode screen appears.
2 Touch [Direct Input], then [Scan to FTP].
A screen for entering the destination host name, destination folder, and
other information appears.
Why is the Direct Input tab not displayed?
?
% If the [Manual Destination Input] on the Security Details screen (dis-
played by touching [Security Setting] on the Administrator Setting
screen) is set to [Restrict], the Direct Input tab does not appear.
Scanning Documents Chapter 2
cm2520 2-27
Page 61

2
Scanning Documents Chapter 2
Scanning Documents
3 Enter the host name, destination folder, user name, and password.
– Host Name: Use the keyboard that appears in the touch panel to
specify the destination host name or IP address, and then touch
[OK].
– Destination Folder: Use the keyboard that appears in the touch
panel to specify the path to the destination folder, and then touch
[OK].
– User Name: Use the keyboard that appears in the touch panel to
specify the login user name, and then touch [OK].
– Password: Use the keyboard that appears in the touch panel to
specify the password, and then touch [OK].
4 Touch [Detail Setting], and then specify detailed FTP settings.
– Port Number: Check the port number.
– PASV mode: Select whether the PASV (passive) mode is used.
Touch [Yes] or [No].
– Proxy: Select whether a proxy server is used. Touch [Yes] or [No].
5 Touch [OK].
2-28 cm2520
Page 62

Scanning Documents
6 Enter the destination Information, and then touch [OK].
– To specify an additional address, touch [Next Dest.], and then
specify the address.
The addresses that were entered are listed under “Broadcast Destinations”.
2
7 Touch [Scan Settings], and then specify the scan settings.
Scanning Documents Chapter 2
– For details on the scan settings, refer to “Specifying the Scan Set-
tings” on page 2-42.
cm2520 2-29
Page 63

2
Scanning Documents
8 After specifying the settings, touch [OK].
9 Load the document into the ADF (optional) or position it on the original
glass of the machine.
10 Press the [Start] key on the control panel.
The document is scanned, and the data is sent.
Scanning Documents Chapter 2
2
Note
Do not turn off the machine until the scanned jobs disappear from the job
list.
2-30 cm2520
Page 64

Scanning Documents
2.5 Sending Data to a PC on the Network (Scan to SMB)
Scan to SMB
The Scan to SMB operation can be used to directly send the scanned data
to a specific computer on the network.
To use the Scan to File (SMB) function, specify the Windows shared file setting on the computer that is to receive the data in advance.
2
Reminder
To send to a Windows shared folder, enter the host name and folder
name using capital letters when registering the destination.
2
Note
For the SMB transmission procedure, refer to “Sending the Scanned
Data to a Computer on the Network (SMB)” on page 1-5.
2
Scanning Documents Chapter 2
SMB Transmission to Windows File Sharing (Mac OS X)/Samba (Linux/
Unix)
When performing SMB transmission to Mac OS X, Linux, or Unix, the conditions described below must be meet for the network settings and user name.
Change the settings according to the transmission environment.
Settings on this machine
- From [Administrator Setting] — [Network Setting] — [SMB Setting], spec-
ify “v1” for the NTLM setting.
Settings on the server
- For the user name and shared folder names, enter 12 characters or less.
- When looking up a destination, the shared folder names are shown in al-
phanumeric characters only. Sub-folder names can be shown in characters other than alphanumeric characters.
- To lookup a destination, enter the user ID and password first.
2
Note
Samba is a program that provides services for SMB clients using Unix or
Linux. In Mac OS X, Samba is called “Windows File Sharing”.
SMB Transmission to Windows 98 SE/Windows Me
When SMB transmitting to Windows 98 SE/Windows Me, the network settings must meet the conditions described below.
cm2520 2-31
Page 65

2
Scan
Scanning Documents
Settings on this machine
- From [Administrator Setting] — [Network Setting] — [SMB Setting], specify “v1/v2” or “v1” for the NTLM setting.
Using Programs
“Program” refers to a set of destination computers and scan settings that are
registered together. The following procedure describes how to send data by
selecting a program that has been registered in advance.
For details on registering programs, refer to “Registering Program Destinations” on page 3-24.
1 Press the [Scan] key on the control panel.
Scanning Documents Chapter 2
The Scan mode screen appears.
2 Touch [Program].
The selected destinations are listed under “Broadcast Destinations”.
Other destination addresses can be added using the address book or
through direct input.
Only the destinations that can be specified are displayed. For example,
fax destinations are not displayed.
2-32 cm2520
Page 66

Scanning Documents
3 Touch [Scan Settings] to check the specified scan settings. The spec-
ified settings can also be changed.
– For details on the scan settings, refer to “Specifying the Scan Set-
tings” on page 2-42.
4 After checking the settings, touch [OK].
2
5 Load the document into the ADF (optional) or position it on the original
glass of the machine.
6 Press the [Start] key on the control panel.
The document is scanned, and the data is sent.
2
Note
Do not turn off the machine until the scanned jobs disappear from the job
list.
Scanning Documents Chapter 2
cm2520 2-33
Page 67

2
Scan
Scanning Documents
Selecting Group Addresses
“Group” refers to multiple destinations that are registered collectively. The
following procedure describes how to send data by selecting a group that
has been registered in advance.
For details on registering groups, refer to “Registering Group Destinations”
on page 3-22.
1 Press the [Scan] key on the control panel.
Scanning Documents Chapter 2
The Scan mode screen appears.
2 Touch [Group].
Touching the button for a group displays the list of members registered
in the group. Other destination addresses can be added using the address book or through direct input.
2-34 cm2520
Page 68

Scanning Documents
3 Select the desired destinations, and then touch [OK].
4 Touch [Scan Settings], and then specify the scan settings.
2
– For details on the scan settings, refer to “Specifying the Scan Set-
tings” on page 2-42.
5 After specifying the settings, touch [OK].
Scanning Documents Chapter 2
6 Load the document into the ADF (optional) or position it on the original
glass of the machine.
7 Press the [Start] key on the control panel.
The document is scanned, and the data is sent.
cm2520 2-35
Page 69

2
Scan
Scanning Documents
2
Note
Do not turn off the machine until the scanned jobs disappear from the job
list.
Selecting Destinations From the Address Book
“Address book” refers to the collection of destination addresses that were
registered in advance. The following procedure describes how to send data
by selecting destinations from the address book. Multiple addresses can be
specified simultaneously from the address book.
For details on registering addresses in the address book, refer to “Registering Abbreviated Destinations” on page 3-10.
1 Press the [Scan] key on the control panel.
Scanning Documents Chapter 2
The Scan mode screen appears.
2-36 cm2520
Page 70

Scanning Documents
2 Touch [Address Book].
The address book is displayed, and registered address names are displayed by touching the corresponding index button.
How can the address book be searched for the desired address?
?
% Touch [Detail Search] to search for addresses. The address book
can be searched for names or addresses.
2
3 Touch the button for a destination to select it.
The selected buttons are highlighted, and the selected destinations are
listed under “Broadcast Destinations”. Other destinations can be added through direct input.
Scanning Documents Chapter 2
cm2520 2-37
Page 71

2
Scanning Documents
4 Touch [Scan Settings], and then specify the scan settings.
– For details on the scan settings, refer to “Specifying the Scan Set-
tings” on page 2-42.
5 After specifying the settings, touch [OK].
Scanning Documents Chapter 2
6 Load the document into the ADF (optional) or position it on the original
glass of the machine.
7 Press the [Start] key on the control panel.
The document is scanned, and the data is sent.
2
Note
Do not turn off the machine until the scanned jobs disappear from the job
list.
2-38 cm2520
Page 72

Scanning Documents
Scan
Entering the Addresses Directly
“Direct input” refers to the operation of directly inputting the destination address from the machine’s control panel.
1 Press the [Scan] key on the control panel.
2
The Scan mode screen appears.
2 Touch [Direct Input], then [Scan to SMB].
A screen for entering the destination host name, destination folder, and
other information appears.
Why is the Direct Input tab not displayed?
?
% If the [Manual Destination Input] on the Security Details screen (dis-
played by touching [Security Setting] on the Administrator Setting
screen) is set to [Restrict], the Direct Input tab does not appear.
Scanning Documents Chapter 2
cm2520 2-39
Page 73

2
Scanning Documents Chapter 2
Scanning Documents
3 Enter the destination information.
– Host Name: Specify the destination host name (enter using capital
letters) or the IP address. Type in the destination name using the
keyboard, and then touch [OK].
– Destination Folder: Enter the path to the destination folder using
capital letters.
– User Name: Use the keyboard that appears in the touch panel to
specify the login user name, and then touch [OK].
– Password: Use the keyboard that appears in the touch panel to
specify the password, and then touch [OK].
– Reference: The folder structure of the connected computer can be
viewed. The destination folder can also be specified directly.
– To specify an additional address, touch [Next Dest.], and then
specify the address.
– To check the contents of the shared folders, touch [Reference].
4 Touch [OK].
The specified addresses are listed under “Broadcast Destinations”.
2-40 cm2520
Page 74

Scanning Documents
5 Touch [Scan Settings], and then specify the scan settings.
– For details on the scan settings, refer to “Specifying the Scan Set-
tings” on page 2-42.
6 After specifying the settings, touch [OK].
2
7 Load the document into the ADF (optional) or position it on the original
glass of the machine.
8 Press the [Start] key on the control panel.
The document is scanned, and the data is sent.
2
Note
Do not turn off the machine until the scanned jobs disappear from the job
list.
Scanning Documents Chapter 2
!
Detail
When a work group and computer that exceed the numbers described
below exist, browsing over the network (subnet) of this machine may not
be performed properly.
- Work group: 128
- Computer: 128
cm2520 2-41
Page 75

2
2.6 Specifying the Scan Settings
Available Settings
Detailed scan settings can be specified by touching [Scan Settings] in the
Scan mode screen.
The settings that can be specified are as follows:
Scanning Documents
Scanning Documents Chapter 2
Item Description Reference
File Type Selects the file type for saving the
scanned data.
Resolution Selects the scan resolution. “Resolution” on page 2-47
Simplex/Duplex Selects whether to scan one side of
the document or both sides.
Original Type Sets the image type of the scanned
document.
Scan Size Sets the paper size to be scanned. “Scan Size” on page 2-51
Color Sets whether to scan in color or
black and white.
Background
Removal
Original Setting Specifies the type of document that
Application Provides functions for adjusting the
Adjusts the density of the
background (blank areas) of the
document.
is loaded, for example, if it contains
mixed sizes or is a thick document.
print image, for example, for
scanning books and for erasing the
surrounding area.
“File Type” on page 2-43
“Simplex/Duplex” on page 2-48
“Original Type” on page 2-49
“Color” on page 2-53
“Background Removal” on
page 2-55
“Original Setting” on page 2-56
“Book Scanning (Application)” on
page 2-58
“Frame Erase (Application)” on
page 2-61
“Annotation (Application)” on
page 2-63
2-42 cm2520
Page 76

Scanning Documents
Item Description Reference
2
Separate Scan The scan operation can be divided
into several sessions when all pages
of a document cannot be loaded
into the ADF (optional) or when
placing the document on the original glass. In addition, the documents can be scanned separately
according to their type, such as
when single-sided documents are
mixed with double-sided documents.
File Name Changes the file name to be saved. “File Name” on page 2-65
“Separate Scan” on page 2-64
File Type
Select the file type for saving the scanned data. The following four file types
are available.
File type
Item Description
PDF Saves to the PDF format.
Compact PDF Saves to the compressed PDF format. Used for full-color scan data, etc.
Scanning Documents Chapter 2
TIFF Saves to the TIFF format.
JPEG Saves to the JPEG format.
If “PDF” or “Compact PDF” is selected as the file type, you can specify the
encryption level. The settings that can be specified are described below.
Item Description
Encryption Level Select the encryption level.
Password Enter the password that is required for opening data that is encrypted (up
to 32 alphanumeric characters). To confirm the password, enter the
password again.
Authority of the
Documents
Enter the password that is required for changing the authority of a document (up to 32 alphanumeric characters). To confirm the password, enter
the password again.
Some file types may not be available depending on the selected Color setting. The possible combinations of the File Type and Color settings are
shown below.
!
Detail
For details on the Color settings, refer to “Color” on page 2-53.
cm2520 2-43
Page 77

2
Scanning Documents
2
Note
“Compact PDF” in File Type, and “Text” or “Dot Matrix” in Original Type
cannot be specified at the same time.
Auto Full Color Gray Scale Black
PDF Yes Yes Yes Yes
Compact PDF No Yes No No
TIFF No No No Yes
JPEG Yes Yes Yes No
Also, grouping of the saved data can be specified.
Scan Setting
Scanning Documents Chapter 2
Item Description
Single Page A file is created for each page of the document.
Multi-Page The entire scanned document is saved to a single file. This setting is not
selectable when [File Type] is JPEG.
2-44 cm2520
Page 78

Scanning Documents
To specify the File Type settings
1 Touch [Scan Settings] in the Scan mode screen.
2 Touch [File Type].
3 Select the file type.
2
Scanning Documents Chapter 2
4 If [PDF] or [Compact PDF] is selected, touch [Encryption].
cm2520 2-45
Page 79

2
Scanning Documents
5 Specify the encryption settings.
6 Touch [OK].
7 Select the scan setting.
Scanning Documents Chapter 2
8 Touch [OK], and then touch [OK] in the next screen that appears.
2-46 cm2520
Page 80

Scanning Documents
Resolution
Set the scanning resolution to 200 dpi, 300 dpi, 400 dpi, or 600 dpi.
1 Touch [Scan Settings] in the Scan mode screen.
2 Touch [Resolution].
2
3 Select the resolution.
4 Touch [OK], and then touch [OK] in the next screen that appears.
Scanning Documents Chapter 2
cm2520 2-47
Page 81

2
Scanning Documents
Simplex/Duplex
Select whether to scan one side of the document or both sides.
Item Description
1-Sided Scans one side of the document.
2-Sided Scans both sides of the document.
Cover + 2-Sided Scans the first page of the document as the cover page only
on one side and scans the remaining pages on both sides.
To specify the Simplex/Duplex setting
1 Touch [Scan Settings] in the Scan mode screen.
2 Touch [Simplex/Duplex].
Scanning Documents Chapter 2
3 Select the scan type.
4 Touch [OK], and then touch [OK] in the next screen that appears.
2-48 cm2520
Page 82

Scanning Documents
Original Type
Select the type according to the document. The following six image types are
available.
Item Description
Text Select for a document consisting only of text.
Text/Photo Select for a document containing text and photo (half tone).
Photo Select for a document containing only photos (half tone).
Dot Matrix Select for a document with faint text.
Map Select for a document with a lot of light halftone colors such
Copied Paper Select for a copied or printed document with uniform density.
If “Text/Photo” or “Photo” is selected, the photo type can also be specified.
2
as a map.
Item Description
Photo Paper Specify this type for photos printed on photo paper.
Printed Photo Specify this type for photos printed in books and magazines.
2
Note
“Compact PDF” in File Type, and “Text” or “Dot Matrix” in Original Type
cannot be specified at the same time.
To specify the Original Type setting
1 Touch [Scan Settings] in the Scan mode screen.
2 Touch [Original Type].
Scanning Documents Chapter 2
cm2520 2-49
Page 83

2
Scanning Documents
3 Select the image type.
4 If “Text/Photo” or “Photo” is selected, select the photo type, and then
touch [OK].
Scanning Documents Chapter 2
5 Touch [OK], and then touch [OK] in the next screen that appears.
2-50 cm2520
Page 84

Scanning Documents
Scan Size
Set the paper size to be scanned.
The available scan sizes are as follows:
Item Description
Auto Detects the size of the first page of the loaded document.
Standard sizes Select a standard size and direction.
Custom Size Use to enter the dimensions of a custom size not available as
Photo Size Use to select the photo size.
To specify the Scan Size setting
1 Touch [Scan Settings] in the Scan mode screen.
2
a standard size.
The lengths in the X and Y directions can be set within the
ranges of 2 in. to 17 in. and 2 in. to 11-11/16 in., respectively.
2 Touch [Scan Size].
3 Select the size and direction.
Scanning Documents Chapter 2
cm2520 2-51
Page 85

2
Scanning Documents
– Select the size and direction of the paper to be scanned.
– Touch [Custom Size] to display a screen for specifying the size.
Use the keypad or touch [-] and [+] to specify the size. Touch [⇔]
to switch between the integer and the fraction. The integer can be
specified in increments of 1 inch, and the fraction can be specified
in increments of 1/16 in. Touch [OK].
Scanning Documents Chapter 2
– Touch [Photo Size] to display a screen for specifying the size. Se-
lect the size and direction of the photo to be Scanned, and then
touch [OK].
4 Touch [OK], and then touch [OK] in the next screen that appears.
2-52 cm2520
Page 86

Scanning Documents
Color
Set whether to scan in color or black and white. Select from the following four
types.
Item Description
Auto Automatically detects the color of the document and scans
Full Color Scans at full color.
Gray Scale Select this setting when the document is full of halftone colors
Black Select this setting when the white and black boundaries are
Some color settings may not be available depending on the selected File
Type setting. The possible combinations of the File Type and Color settings
are shown below.
2
accordingly.
such as in a black-and-white photo.
distinct such as in a line drawing.
!
Detail
For details on the File Type settings, refer to “File Type” on page 2-43.
Auto Full Color Gray
Scale
PDF Yes Yes Yes Yes
Compact PDF No Yes No No
TIFF No No No Yes
JPEG Yes Yes Yes No
Black
Scanning Documents Chapter 2
cm2520 2-53
Page 87

2
Scanning Documents Chapter 2
Scanning Documents
To specify the Color setting
1 Touch [Scan Settings] in the Scan mode screen.
2 Touch [Color].
3 Select the color type.
4 Touch [OK], and then touch [OK] in the next screen that appears.
2-54 cm2520
Page 88

Scanning Documents
Background Removal
Adjust the background density of the document during scanning. When
scanning a document on colored paper, the background may be dark in the
scan. In such cases, the background density can be adjusted.
1 Touch [Scan Settings] in the Scan mode screen.
2 Touch [Background Removal].
2
– Touch [Auto] to adjust the background density automatically.
– To select a specific density, touch [Lighter] or [Darker].
– Touch [Std.] to select the default setting.
3 Touch [OK], and then touch [OK] in the next screen that appears.
Scanning Documents Chapter 2
cm2520 2-55
Page 89

2
Scanning Documents
Original Setting
Specify the type of document that is loaded, for example, if it contains mixed
sizes or is a thick document.
2
Note
These functions can be combined.
Item Description
Mixed Original Select this setting when documents of different sizes are
loaded into the ADF (optional). The scan speed is decreased
since the size of each page is detected before it is scanned.
Thick Original Select this setting when Scanning a thick document.
Original Direction Specifies the orientation of the document. The data is
processed so that the top and bottom ends are correctly
positioned when the document is scanned.
Scanning Documents Chapter 2
Bind Specifies the binding position for punched holes and staples.
This function adjusts the binding position so that it is not reversed when a double-sided document is scanned.
Left: A document with a bind on the left side.
Top: A document with a bind on the top side.
Auto: If the length is 11-3/4 in. or less, the binding position is
along the long side of the paper. If the length is more than
11-3/4 in., the binding position is along the short side of the
paper.
To specify the Original Settings
1 Touch [Scan Settings] in the Scan mode screen.
2 Touch [Original Setting].
2-56 cm2520
Page 90

Scanning Documents
3 Specify the original settings.
– If “Original Direction” is selected, a screen for selecting the direc-
tion appears. Select the direction, and then touch [OK].
– To select the default settings, touch [Reset].
2
– If “Bind” is selected, a screen for selecting the document binding
position appears. Select the binding position, and then touch [OK].
Scanning Documents Chapter 2
4 Touch [OK], and then touch [OK] in the next screen that appears.
cm2520 2-57
Page 91

2
Scanning Documents
Book Scanning (Application)
Select this function when scanning page spreads. The four scanning methods listed below are available. In addition, frame erasing and center erasing
can be specified.
Item Description
Book Spread Scans a spread as one page.
Book Separation Scans a spread as separate left and right pages (2 pages).
Front Cover Scans the first page as a front cover.
Front and Back Cover Scans the first page as the front cover page, the second page
as the back cover page, and the remaining pages as the main
body of the document.
Specify the spread document size for the scan size.
Shadows that occur from scanning page spreads can be erased from the
scans.
Scanning Documents Chapter 2
Item Description
Erase Erases the perimeter of the document. The width to be erased
can also be specified separately for the top, left, right, and
bottom sides within the range of 1/16 in. to 2 in.
Center Erase Erases the shadow along the center binding. The width can be
set within the range of 1/16 in. to 1-3/16 in.
2
Note
If the width to be erased is specified using the Book Erase functions in
the Book Scanning screen, the same value is set for the “Erase” function
on the Application screen.
2-58 cm2520
Page 92

Scanning Documents
To use the “Book Scan” function
1 Touch [Scan Settings] in the Scan mode screen.
2 Touch [Application].
3 Touch [Book Scanning].
2
Scanning Documents Chapter 2
cm2520 2-59
Page 93

2
Scanning Documents
4 Specify the Book Scanning settings.
– If “Book Separation”, “Front Cover”, and “Front and Back Cover”
are selected, select the binding direction.
Scanning Documents Chapter 2
5 Touch [OK], and then touch [OK] in the next two screens that appear.
2-60 cm2520
Page 94

Scanning Documents
Frame Erase (Application)
Erases the perimeter of the document. The width to be erased can also be
specified separately for the top, left, right, and bottom sides within the range
of 1/16 in. to 2 in.
If the width to be erased is specified using the Book Erase functions in the
Book Scanning screen, the same value is set for the “Erase” function on the
Application screen.
1 Touch [Scan Settings] in the Scan mode screen.
2 Touch [Application].
2
3 Touch [Erase].
Scanning Documents Chapter 2
cm2520 2-61
Page 95

2
Scanning Documents Chapter 2
Scanning Documents
4 Specify the width to be erased.
– To erase all sides with the same width, touch [Frame] and enter the
value.
– To specify the width separately for the top, left, right, and bottom
sides, touch the corresponding button and enter the value. To
specify that no area is erased, touch [None].
– For North American users, touch [⇔] to switch between the integer
and the fraction.
5 Touch [OK], and then touch [OK] in the next two screens that appear.
2-62 cm2520
Page 96

Scanning Documents
Annotation (Application)
When saving a scanned document, add the preset domain name, sequence
number, date, and time, and then save the document in a box.
1 Touch [Scan Settings] in the Scan mode screen.
2 Touch [Application].
2
3 Touch [Annotation].
4 Select the saving destination for the annotation user box.
Scanning Documents Chapter 2
5 Touch [OK] three times.
cm2520 2-63
Page 97

2
Scanning Documents Chapter 2
Scanning Documents
2
Note
If selecting an annotation user box, the box that was selected in [Broadcast Destinations] is added.
!
Detail
Only the PDF file format can be saved.
When saving data in an annotation user box, e-mail transmission, FTP
transmission, and SMB transmission can be specified at the same time.
2
Note
For delivering the data that was saved in a filing number box over the Internet, refer to User’s Guide [Box Operations].
For creating a filing number box, refer to “Creating Annotation User Boxes” on page 3-44.
Separate Scan
The scan operation can be divided into several sessions according to the
type of document being scanned, for example, when all pages of a document cannot be loaded into the ADF (optional), when placing the document
on the original glass, or when single-sided documents are mixed with double-sided documents. Touch [Separate Scan] in the Scan Settings screen.
The function is enabled when its button appears selected.
2-64 cm2520
Page 98

Scanning Documents
File Name
You can change the file name to be saved.
!
Detail
If a file name is not specified when the data was scanned, it will automatically be specified by combining the mode and the date and time at the
time the file was saved. For specifying the file name, refer to “Specifying
E-Mail Settings” on page 2-74.
2
Note
To clear all of the file names that are displayed, press the [C] (clear) key.
Up to 30 characters can be entered.
2
To change the file name
1 In the Scan mode screen, touch [Scan Settings].
2 Touch [File Name].
3 Type in the new file name using the keyboard that appears.
Scanning Documents Chapter 2
cm2520 2-65
Page 99

2
Scanning Documents
4 Touch [OK], and then touch [OK] in the next screen that appears.
Scanning Documents Chapter 2
2-66 cm2520
Page 100

Scanning Documents
Mode Check
2.7 Checking the Settings
Checking the Settings
The selected setting can be checked in detail. The destination can be
changed on this screen.
The settings that can be viewed and changed are as follows:
Item Description
Type Displays the type of transmission.
Name Displays the registered destination name.
Dest. Displays the destination file path or the e-mail address.
Edit Touch to change the destination.
Set Dest. Specify the notification destination for the e-mail message
that is sent when the data is transmitted, etc.
Save in Add. Book Touch when the address is not registered in the address book
such as when the address is entered through direct input.
2
Scanning Documents Chapter 2
The notification destination cannot be specified when using Scan to E-mail.
2
Note
If Changing the “From” Address from [Administrator Setting] — [System
Setting] — [Restrict User Access] — [Restrict Access to job Setting] is
specified as restricted, direct input cannot be performed.
To check a job
1 Press the [Mode Check] key in the control panel while the Scan mode
screen is displayed.
The Mode Check screen appears.
cm2520 2-67
 Loading...