

Oce Arizona 400 GT, Arizona 440, Arizona 460, Arizona 480 GT, Arizona 480 XT User Manual

Océ User Manual
Océ Arizona 400 Series GT
Océ Arizona 440, 460, 480 GT/XT, Revision A

Copyright
© 2012, Océ
All rights reserved. No part of this work may be reproduced, copied, adapted, or transmitted
in any form or by any means without written permission from Océ.
Océ makes no representation or warranties with respect to the contents hereof and specifically disclaims any implied warranties of merchantability or fitness for any particular purpose.
Furthermore, Océ reserves the right to revise this publication and to make changes from
time to time in the content hereof without obligation to notify any person of such revision
or changes.
Edition: #3010114873

Contents
Contents
Chapter 1
Introduction.........................................................................................................7
Preface.........................................................................................................8
Product Compliance.................................................................................11
Chapter 2
Product Overview.............................................................................................15
Printer Specifications...............................................................................16
Chapter 3
Safety Information............................................................................................19
UV Ink and Flush.......................................................................................20
UV Curing System ...................................................................................21
Safety Interlock System...........................................................................23
Océ Arizona 400 Series GT Safety Labels..............................................24
Safety Awareness.....................................................................................28
Roll Media Safety Awareness.................................................................39
Chapter 4
How to Navigate the User Interface...............................................................41
Operator Interface Hardware...................................................................42
Printer Interface Software........................................................................45
Print Job Control Module........................................................................47
Periodic Maintenance..............................................................................57
Counters Module......................................................................................59
Settings Module.......................................................................................60
Tools and Utilities Module......................................................................65
Installation and Upgrade Module...........................................................70
Chapter 5
How to Operate Your Océ Arizona Printer.....................................................71
Training Requirements............................................................................72
How to Power the Printer On and Off.....................................................73
How to Install the ONYX Printer Driver..................................................78
How to Manage Print Jobs......................................................................81
Daily Start-up and Shut-down...........................................................81
How to Set Up a Print Job.................................................................82
How to Manage the Media Vacuum.......................................................85
The Table Vacuum System................................................................85
Using Vacuum Zones.........................................................................88
How to Manage Media.............................................................................93
3

Contents
How to Handle Media.........................................................................93
Chapter 6
How to Operate the Océ Arizona 400 Series XT............................................97
*Océ Arizona 400 Series XT Features.....................................................98
How to Use the Océ Arizona 400 Series XT Vacuum System............100
How to Print With Dual Origins.............................................................102
Chapter 7
How to Operate the Roll Media Option........................................................105
Roll Media Option Hardware.................................................................106
Roll Media Option Specifications..........................................................108
Foot Pedal Switch Functions.................................................................110
Roll Media Manager...............................................................................111
How to Load Media................................................................................113
How to Unload and Cut Media..............................................................123
How to Set Up a Roll Media Job in ProductionHouse........................125
How to Print on Roll Media ..................................................................127
How to Determine the Media Advance Correction Factor..................131
How to Use Media Edge Protectors......................................................133
Chapter 8
How to Use the Static Suppression Upgrade Kit........................................137
Reduce Static with a Static Suppression Kit .......................................138
Chapter 9
How to Work With White Ink and Varnish...................................................141
Operator Guidelines for White Ink and Varnish...................................142
White Ink Workflow Overview...............................................................144
Varnish Workflow Overview..................................................................147
How to Configure ONYX Software for White Ink and Varnish...........150
White Ink QuickStart..............................................................................152
Varnish QuickStart.................................................................................155
White Ink and Varnish Print Jobs..........................................................157
How to Select a Printer Flood Fill....................................................157
How to Create Spot Data with the Spot Layer Tool.......................160
How to Create White Spot Data in Photoshop...............................164
How to Create White Spot Data in Illustrator.................................169
How to Use Media Models....................................................................181
How to Create a Media for White Ink Print Jobs............................181
How to Create and Use Quick Sets.................................................195
Chapter 10
Ink System Management...............................................................................199
Arizona Printer Inks................................................................................200
How to Change Ink Bags........................................................................204
4

Contents
Chapter 11
Error Handling and Troubleshooting............................................................207
Troubleshooting Overview....................................................................208
How To Improve Quality When Banding Occurs.................................210
Chapter 12
Printer Maintenance.......................................................................................211
Maintenance Guidelines........................................................................212
Maintenance Procedures.......................................................................214
Clean Carriage Underside................................................................214
Printhead Maintenance....................................................................217
Swab Printheads...............................................................................227
How to Clean the UV Lamp Filter....................................................231
How to Remove Ink..........................................................................233
Empty the Ink Waste Tray................................................................235
Fill the Coolant Reservoir ................................................................237
Replace the Spit Catcher Foam Pad................................................240
Clean Gantry Rails............................................................................242
How to Change Ink Filters................................................................244
How to Change a UV Lamp Bulb.....................................................250
How to Maintain White Ink..............................................................257
Roll Media Option Maintenance...........................................................259
RMO Maintenance Guidelines.........................................................259
How to Clean the Rubber Capstan..................................................260
Appendix A
Application Information.................................................................................265
Application Resources on the Web Site...............................................266
5

Contents
6

Chapter 1 Introduction

Preface
Preface
Introduction
This manual provides the operator with information about the following Océ 400 Series
UV flatbed inkjet printers:
•
•
•
The operational features of these printer models are similar. The XT models have a larger
table than the GT models. The main functional differences between models are based
on the number of printheads and therefore the available channels for ink and varnish.
The table below provides an indication of the possible ink and varnish output that each
model is capable of supporting.
#
GT/XT
Océ Arizona® 440 GT/XT
Océ Arizona® 460 GT/XT
Océ Arizona® 480 GT/XT
CMYK4 channelOcé Arizona 440
GT/XT
GT/XT
This manual uses the terms Océ Arizona 400 Series GT or Océ Arizona 400 Series XT
to refer to these printers generally. The specific model printer name will depend on the
configuration selected. Also, the 4 channel printer can be upgraded to 6, and the 6
channel printer can be upgraded to 8 channels. This manual orients you to the many
features and procedures that allow you to print professional quality images on various
media with these printers.
Multi-Language Support
The printer's user interface software supports multiple languages. To select your preferred
language and other setup information, refer to the Settings Module in Chapter 4.
This manual is also available in other languages. Printers are shipped with a printed copy
of the US English version. You can download a PDF file of the manual in all of the languages that we support from the Customer Support web site: http://dgs.oce.com/
Supported languages:
•
English
•
Dutch
6 channelOcé Arizona 460
CMYKWW
CMYKWV
8 channelOcé Arizona 480
CCMMYKWW
CCMMYKWV
Chapter 1 - Introduction8

•
German
•
French
•
Spanish
•
Italian
•
Japanese
•
Chinese
Océ DGS on the Internet
For further information on documentation and support for your printer or for information
on other Océ Display Graphics Systems products, please visit our web site:
http://www.dgs.oce.com
To provide feedback and report errors in this document: DGSTechnical.Writer@oce.com
Safety Information
This manual has three sections that contain details on safety when handling ink and using
the printer. Also, where applicable, cautions and warnings are used throughout this
manual to draw your attention to safety precautions.
•
"Safety Guidelines for Ink Materials" offers advice in the proper handling of UV inks;
•
"Interlock Safety System" explains the safety features built in to the printer that prevent
and minimize access to Mechanical, Electrical, Thermal and UV hazards; and
•
"UV Curing System Safety" presents warning about the dangers of exposure to UV
light. Some of the material from that section are duplicated here.
Preface
Customer Service
If your printer malfunctions and you are unable to resolve the problem, field service
technicians can be dispatched to your site to conduct repairs. Service visits are paid for
by the customer, either under a maintenance agreement, by purchase order or prepayment.
Time and material rates are charged for any service not covered under a maintenance
agreement. Before calling to report a problem, gather as much information about the
problem as possible and have it ready to provide to your customer care center. The more
information you can provide initially, the more quickly the problem can be corrected.
Statement of Foreseen Use
The Océ Arizona flatbed inkjet printers are intended for use in a commercial printshop
environment. Factory-authorized training is made available for operators at the time of
installation. The printers use piezo printing technology and UV curable inks to produce
outdoor-durable output. They can print directly onto rigid and flexible media of up to
48 mm (1.89 inch) thickness. The printer holds the media stationary while the printhead
assembly moves across to create the print, eliminating image skew problems often associated with rigid stock feed systems. With the Roll Media Option installed the printers can
also print on various roll media. See your local representative or visit the Océ Media
Guide for more details on recommended media.
http://mediaguide.oce.com/
Chapter 1 - Introduction 9

Preface
Responsibilities of the Operator
The printer operator must be properly trained. Océ provides training for the operator in
the use of the printer hardware and software at the time of installation. It is the customer's
responsibility to ensure that only properly trained personnel operate the printer. Operators
must be fully versed in the operation of ONYX ProductionHouse® or PosterShop (318
GL only). For any operator unfamiliar with these applications, ONYX training is required.
Training courses are available; contact your local Océ representative.
The operator or other trained personnel are expected to handle all user maintenance as
detailed in the User Manual, and also replacement of consumable parts (except print
heads). If your site has a technician in charge of printer maintenance, that person is the
optimal candidate. While any trained operator may perform routine maintenance, the
best maintenance results from familiarity with the printer's internal operation and history.
The printer requires daily printhead maintenance to ensure the highest print quality and
longer life for the printheads. The printer design provides you easy access to perform this
simple task and it is essential that printhead maintenance is performed at least once a day,
and more frequently if needed. Periodic cleaning must be scheduled for some components
on a regular basis. A few minutes spent cleaning also helps to ensure optimal printer
function and the highest quality prints.
It is the responsibility of the operator to try to eliminate simple problems before calling
a service representative. But knowing when to call for service is also important. An untrained operator must not attempt to service the printer as this may cause further damage.
When you have determined that a service call is required, call as soon as possible. See the
Troubleshooting and Maintenance sections for more details.
Responsibilities of the Service Technician
Field service technicians must have Océ Display Graphics Systems service training. The
service technician is responsible for all repairs, upgrading and modification requested by
the customer or mandated by the Océ Display Graphics Systems Service and Support
Group. The service technician who installs the printer will also provide training for the
operator that covers all of the basic skills required to operate the printer. Service personnel
are furnished with proper tools for the installation and maintenance of the printer. In
addition to the tools and custom kits, each engineer will have basic tools for proper
maintenance and servicing.
Chapter 1 - Introduction10

Product Compliance
Introduction
This section provides the EMC FCC compliance information and points to the DGS
web site for access to the official documents for all agency compliance standards that the
Océ Arizona 400 Series GT and Océ Arizona 400 Series XT conform to. It also provides
printer manufacturing and contact information and a list of any toxic or hazardous material in the printer.
Electromagnetic Compliance (EMC)
FCC Statement for Class A Device:
This equipment generates, uses and radiates radio frequency energy and if not installed
and used as designed or intended, may cause interference to radio communications. This
equipment has been tested and found to comply with the limits for a Class A computing
device. This equipment has been designed to provide reasonable protection against such
interference when operated in residential and commercial environments. Operation of
this equipment in a residential area may cause interference, in which case the user, at his
own expense, is required to take whatever measures are required to correct the interference.
FCC Notice: This device complies with Part 15 of the FCC Rules.
Operation is subject to the following two conditions:
1) This device may not cause harmful interference, and
2) This device must accept any interference received, including interference that may
cause undesired operation.
Any change or modification not expressly approved by the manufacturer
could void the user's authority to operate the equipment.
Product Compliance
This device contains an intentional radiator (RFID)
Radio Certificate Number: IC:6497A-3010105668
FCC Identifier: U2P-3010105668
Product Safety
The CE Declaration of Conformity document is provided for your convenience.
Chapter 1 - Introduction 11
Product Compliance
[1] CE Declaration of Conformity
Manufacturer:
Océ Display Graphics Systems (ODGS)
13251 Delf Place - Building #406
Richmond, British Columbia
Canada V6V 2A2
Telephone +1 604)273-7730 - Fax +1 604 273-2775
E-mail: dgsinfo@oce.com
Chapter 1 - Introduction12

Product Compliance
Representative Marketing the Océ Arizona 400 Series GT in Europe:
Océ Technologies B.V.
St. Urbanusweg 43,
Venlo, The Netherlands, 5900 MA Venlo
Telephone: 31 77 359 2222
Fax: 31 77 354 4700
E-mail: info@oce.com
Toxic and Hazardous Substances or Elements in the Product
#
Part
Name
Lead
(pb)
Mercury
(Hg)
Cadmium (Cd)
Hexavalent
(CrVI)
Polybromiated
biphenyls
(PBB)
ing
Lamps
Monitor
Guage
Indicator
Polybrominated
dipenylether
(PBDE)
NoNoNoNoYesNoUV Cur-
NoNoNoNoYesN oVGA
NoNoNoNoNoYesVacuum
Encoder
Readheads
heads
Yes indicates that the substance is present in that printer component.
No indicates that the substance is NOT present in that printer component.
Chapter 1 - Introduction 13
NoNoNoNoNoYesLinear
NoNoNoNoNoYesPrint-

Product Compliance
Chapter 1 - Introduction14

Chapter 2 Product Overview
Printer Specifications
Printer Specifications
Introduction
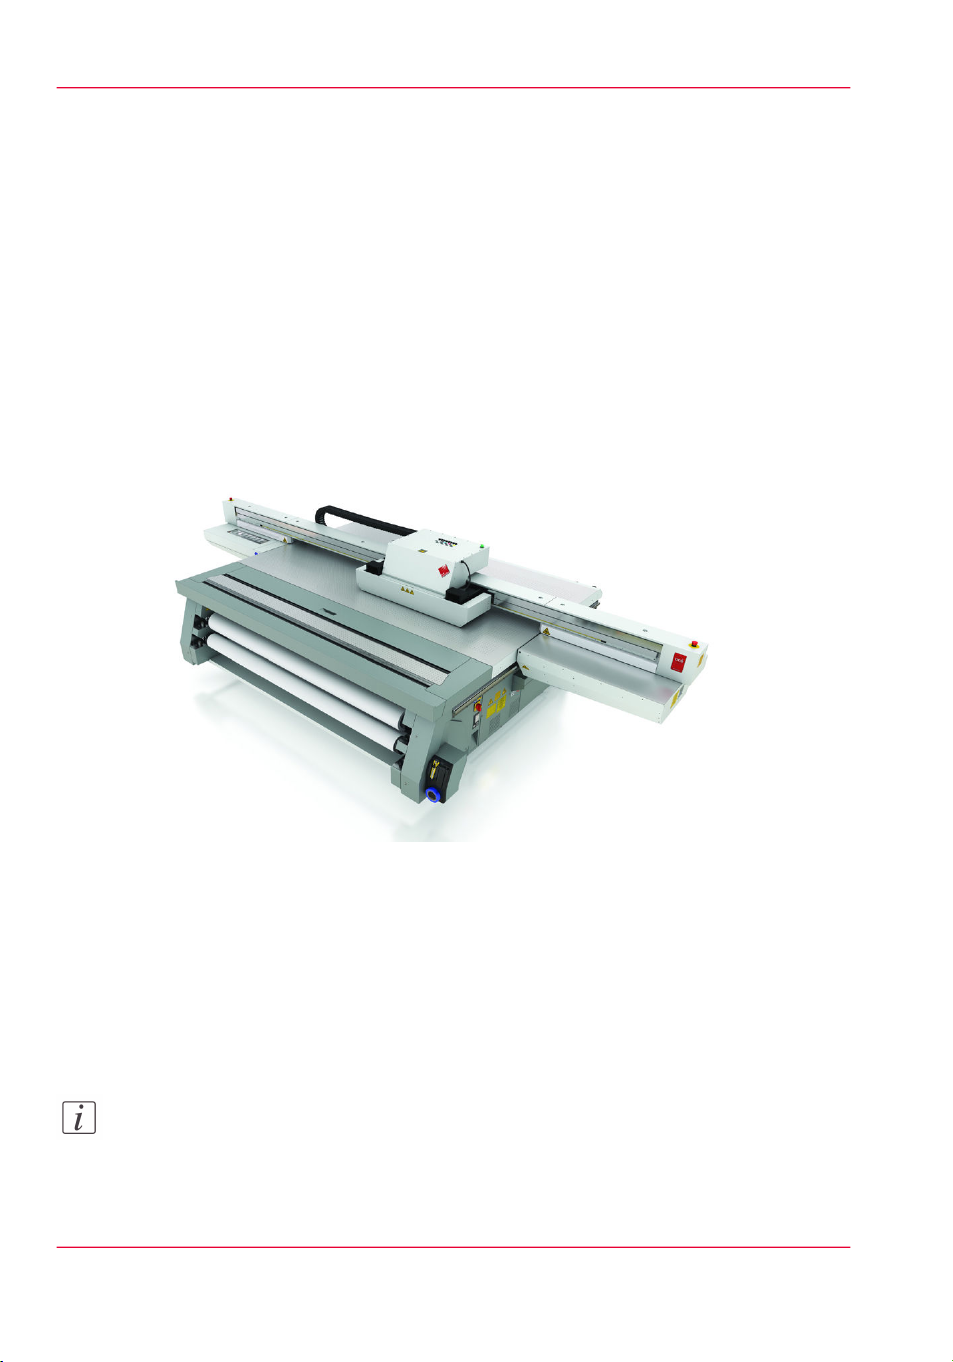
The Océ Arizona 400 Series GT and Océ Arizona 400 Series XT are flatbed inkjet
printers capable of producing large format images on various rigid and flexible media.
The printers consist of a flatbed vacuum table and moving gantry. Media is held flat and
stationary on the vacuum table during printing. The gantry contains a carriage that sweeps
across the table as the gantry moves in steps along the length of the table to print an image
on the media. A Roll Media Option is available to facilitate printing on roll media.
Illustration
[2] Arizona 400 Series GT Printer with RMO
Printer Specifications
The printer must be operated in accordance with the environmental conditions specified
in the Océ Arizona 400 Series Site Preparation Guide. Also note that there are many
safety requirements and precautions indicated in this document. Be sure to read all of
the safety sections before using your printer.
Note:
All specifications in this document are subject to change without notice. While due
caution has been exercised in the production of this document, possible errors and
omissions are unintentional.
Chapter 2 - Product Overview16
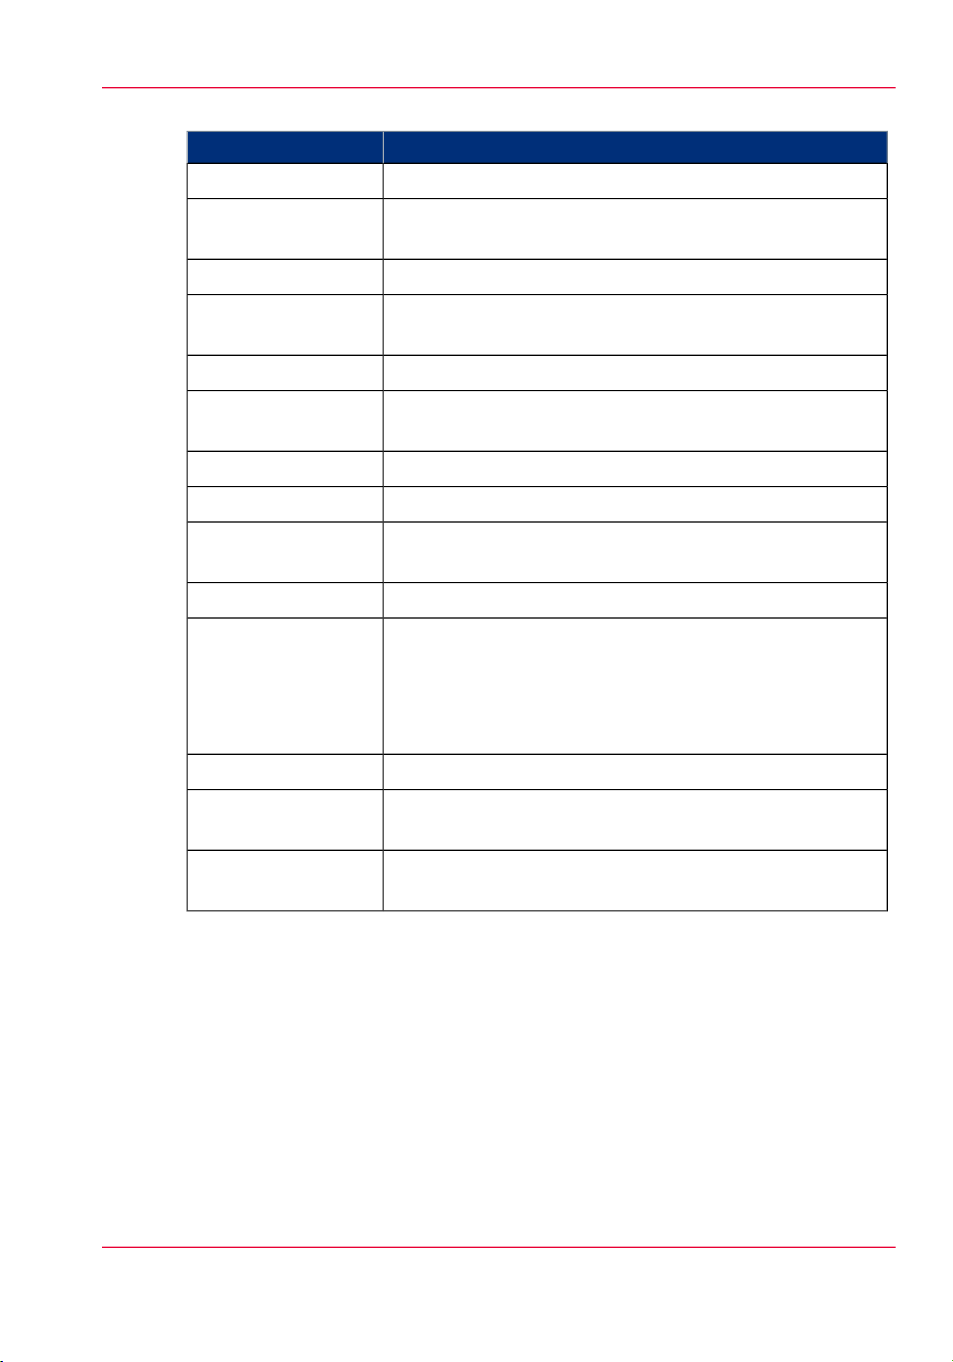
Specifications#
Printer Specifications
SpecificationFeature
Piezoelectric inkjet using Océ VariaDot™ technology:Printing Technology
UV Ink
Maximum Media Size
Maximum Print Size
User Interface
Power Requirements
Voltage:
(Rated Current: 16A)
Standard: CMYK
Optional: White, Light Cyan, and Light Magenta
OptionalVarnish
GT models: 2.5m (98.4") x 1.25m (49.2")
XT models: 2.5m (98.4") x 3.05m (120.1")
Maximum: 48mm (1.890")Media Thickness
GT models: 2.51m (98.8") x 1.26m (49.6")
XT models: 2.51m (98.8") x 3.06m (120.5")
Maximum: 34 kg/m² (7 lbs/ft²)Media Weight
Variable droplet sizes: 6, 12, 18, 24, or 30 picolitresNozzle Drop Volume:
LCD flat-panel monitor and mouse on a user-positioned
podium.
UV curing lamps with variable power settings.Curing System
208 through 240VAC ±10% 60Hz Single Phase
200 through 240VAC ±10% 50Hz Single Phase
Current: 2 AC lines -16A
Recommended Circuit Breaker:
North America 20A, European Union 16A.
10,000 BTU (2950 watts) under continuous operation.BTU Output
Hardware Interface
Image Processing
Software
USB, Ethernet TCP/IP, 100 base-T (or Gigabyte, if supported by the local network).
ONYX® ProductionHouse Océ Edition version X10.2 or
THRIVE.
Chapter 2 - Product Overview 17

Printer Specifications
Chapter 2 - Product Overview18

Chapter 3 Safety Information
UV Ink and Flush
UV Ink and Flush
Introduction
The safety concerns involved with the handling and use of the UV ink and Flush are detailed in the Material Safety Data Sheet (MSDS) documents. Review them before handling
any UV ink or flush.
Note:
The MSDS for all UV inks and Flush are available from the corporate Océ Global EMarketing (GEM) website. For the latest MSDS and PSDS, visit:
http://global.oce.com/support/
Caution:
UV inks can be harmful if not properly handled. Follow the MSDS guidelines carefully
in order to ensure maximum safety.
Personal Safety
The operator must wear nitrile gloves, a protective apron, and safety glasses with side
shields when handling inks. Read and practice safety guidelines as outlined in the MSDS
for each ink. Post these documents in the work area as required by prevailing law. MSDS
are provided with all inks and flush when you purchase them.
Print Height Warning
Avoid printing at a height greater than recommended as this causes excessive emmsisions
of UV light and ink mist. Always measure the thickness of the media in use and set the
carriage height correctly for that media.
Disposal of UV Ink
All waste containing uncured or partly cured UV ink is hazardous and must be disposed
of separately according to local regulations. Do not mix ink waste with non-hazardous
waste (household, office, etc.). Do not allow it to reach sewage systems or drinking water
supplies. Ink waste includes maintenance pads and cloths, gloves and any other material
containing uncured or partly cured UV ink.
Disposal must be made according to official local regulations.
Chapter 3 - Safety Information20
UV Curing System
Introduction
UV-curable ink need a high energy level of UV light to cure. The UV curing system is
made up of two mercury arc lamps attached to the carriage.
How to Handle UV Lamp: UV lamps operate at high temperatures. Never touch a lamp
in operation. Let the lamps cool for a minimum of five minutes before attempting any
maintenance. Use extreme care in handling the UV lamp bulbs. The UV bulbs contain
a small amount of metallic mercury which is toxic when ingested, handled, or breathed.
Therefore, if bulbs are broken, care should be taken to clean up the spill immediately,
and then disposed of according to local regulations concerning Mercury disposal.
Bare skin contact with the UV lamp bulbs must be avoided. When heated, compounds
from the skin can form permanent etching on the surface of the UV bulb. A contaminated
bulb may fail prematurely.
Ozone: As a UV lamp warms up, it briefly passes through a section of the light spectrum
which excites oxygen molecules enough to create ozone. Once a UV lamp has completely
warmed up, only very minute amounts of ozone are present.
UV Curing System
Note:
A high concentration of ozone can cause irritation, headaches or nausea. Provide adequate
ventilation as indicated in the Site Preparation Guide.
Caution:
Warning for Seated Individuals: UV emissions are highest at a height of 90 cm (35
inches) above the floor. This can be an issue for individuals seated near the printer.Remove
all chairs within 5 meters (16 feet) of the printer.
Attention:
The UV Lamps contain Mercury. Dispose according to local environmental regulations.
Personal Safety
UV Light Emissions can be harmful:
Protective measures are essential in the workplace. Use the UV safety glasses with side
shields supplied with the printer. Wear appropriate clothing that protects the skin from
UV light exposure. Keep a distance of at least 1 m (3 ft) from UV lamps while printing.
Chapter 3 - Safety Information 21

UV Curing System
Note:
Wear Industrial Protective Eyewear with lenses that block both UVA and UVB. Gloves
and long-sleeved work clothes are essential to reduce the skin's exposure to UV emissions.
Chapter 3 - Safety Information22

Safety Interlock System
Introduction
The printer has three Emergency-Stop buttons. The Maintenance Station drawer is part
of the safety interlock system. A beacon light indicates the status of the safety system and
the printer.
Components of the Interlock System
Emergency Stop Buttons:
These are located on the Operator Control Station, and on each end of the Gantry. Activating an Emergency-Stop button stops all printer motion and turns off the UV curing
system.
To re-activate the printer after you press an Emergency Stop button, turn the button
counter-clockwise. Upon release of the button, no motion can be initiated without acknowledgment of the Operator from the Control Station.
Maintenance Station Interlock Function:
The Maintenance Station is located under the carriage and provides access to perform
Printhead Maintenance and swab printheads. Carriage and Gantry motion motors are
disabled and UV lamps are turned off (if they were On), when the station drawer is open.
The Interlock system is automatically reset when the drawer is closed.
Safety Interlock System
Beacon Light Status
A green beacon light is mounted to the top surface of the printer carriage. The purpose
of this light is to indicate basic printer status to the operator.
Beacon off: indicates the printer can be approached without caution. The machine cannot
initiate movement since the interlock Safety System has disabled all motion and hazardous
hardware.
Beacon on: indicates the printer is powered up and ready to initiate motion. This tells
an operator to approach the machine with caution, because it can initiate motion at any
moment.
Chapter 3 - Safety Information 23

Océ Arizona 400 Series GT Safety Labels
Océ Arizona 400 Series GT Safety Labels
Introduction
The safety labels are placed at strategic locations on the printer to warn the operator of
possible dangers and hazards. It is important to be aware of the meaning of these labels
to ensure safe operation of the printer.
Caution:
Read and understand all of the safety label descriptions in the table below before operating
the printer.
Safety Labels
Safety Labels#
Warning: UV Light Hazard.
Avoid looking directly at UV lamps.
Located on carriage cover to remind the operator
that looking at the UV light source is dangerous.
Wear protective eye-wear with side shields, gloves
and long sleeves when using this printer.
Ultraviolet Light Radiation Hazards Emission: Effective UV-irradiance Emission Category according
to 7.1 of EN12198-1:2000 - - Special restrictions
and protective measures are essential when the machine is used in the workplace.
LabelDescription
Wear Safety Gloves
Located on the maintenance station as a reminder
to always wear gloves when handling ink.
Risk of Eye Injury. Wear Eye Protection - Located
on the maintenance station as a reminder that the
UV-curable ink is harmful to the eyes and skin. Always wear glasses and gloves when handling ink.
Chapter 3 - Safety Information24
Océ Arizona 400 Series GT Safety Labels
Machine lockout: a reminder to turn off and lock
out the AC power switch before servicing any electrical components.
Located on the mains power switch.
Warning: Electric Shock Hazard
Located on the door to the electronics enclosure,
the UV lamp power supply cover, the carriage cover,
and the vacuum pump enclosure. This area can only
be accessed by a trained service technician.
General Warning
Located on the AC enclosure cover. This area can
only be accessed by a trained service technician.
Pinch Point
A reminder that horizontal movement of the carriage
can create a pinch hazard as it moves along the
gantry.
Located on both ends and the rear of the carriage.
LabelDescription
Crush Hazard: Keep hands clear while operating.
A reminder that vertical movement of the carriage
can be a crush hazard if hands or objects are placed
in these locations. Located on the maintenance station and both ends of the gantry.
Thermal Hazard
Radiated heat from the UV lamps can cause burns.
Located on the carriage near the two UV lamps.
Caution: For Continued Protection Against Fire
And Electric Shock
Replace Only With Same Type and Ratings of Fuse
Caution: Disconnect Power Before Changing
Fuse.
Refer to the section "How to Power the Printer On
and Off"
[13] Disconnect Power
Chapter 3 - Safety Information 25
Océ Arizona 400 Series GT Safety Labels
Electrical Shock Hazard Equipment
Powered by two power cords.
Turn off power switch or remove both power cords
before servicing
Refer to the section "How to Power the Printer On
and Off"
Warning: High Leakage Current Earth Connection Essential Before Connecting Supply
Refer to the Arizona Printer Site Preparation Guide.
Danger: High Voltage
Warning that High Voltage is present behind
marked panel.
LabelDescription
[14] Electrical Shock Hazard
[15] High Leakage Current
[16] High Voltage
Warning: Isolate Power Before Servicing.
Refer to the section "How to Power the Printer On
and Off" and sub-section "How to Lock Out the
Power Switch".
Warning: Line Voltage Always Present
Warning that High Voltage is present behind
marked panel at all times, even when machine is
turned off
Warning: Moving Gantry
If the green beacon light on top of the carriage is
on, the gantry may start moving at any time.
[17] Isolate Power
[18] Line Voltage Present
[19] Moving Gantry
Chapter 3 - Safety Information26
Océ Arizona 400 Series GT Safety Labels
No Step
Do not step on the table strut. If pressure is put on
the table strut it can bend and thus affect the level
of the printer table and therefore print quality.
PE - K
GND Protective Earth Identification.
LabelDescription
[20] No Step on Strut
[21] PE-K
Chapter 3 - Safety Information 27
Safety Awareness
Safety Awareness
Introduction
This section contains two sets of principles that must be followed to assure maximum
safety when operating your Océ Arizona printer. The first set uses negative examples to
show you things to avoid in order to prevent injury to the operator. The second set of
principles illustrates some of the residual risks that are inherent in the operation of the
printer. These are situations or physical aspects of the printer that may present a potential
danger to the operator, but would compromise the capabilities of the printer if changed.
Therefore, they are pointed out as a precaution the operator must be aware of when using
the printer.
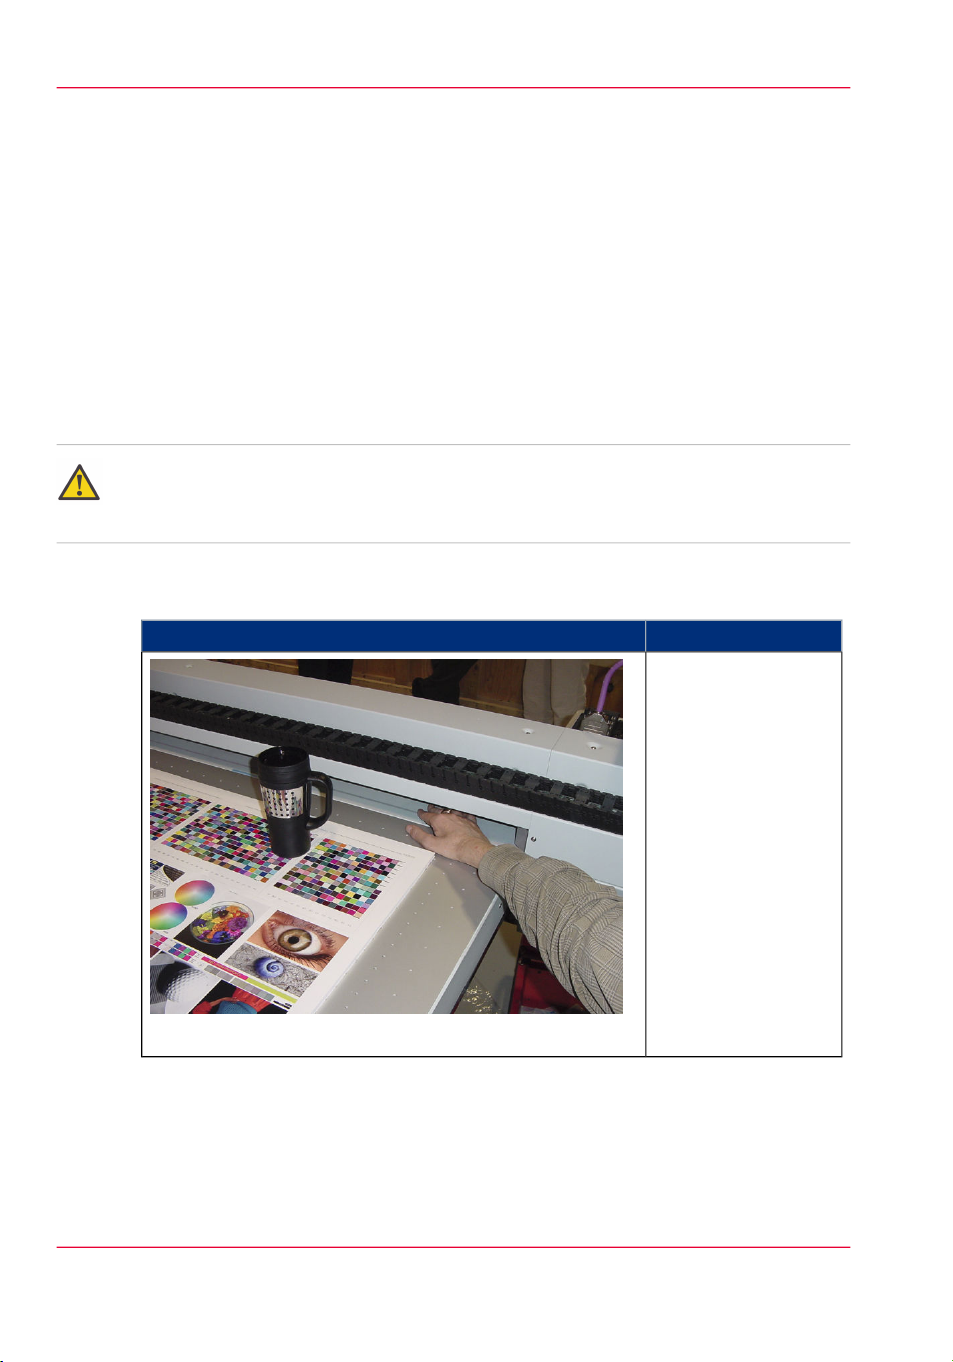
Attention:
The photos in the following table illustrate situations that must be avoided when operating
your printer.
Situations and Actions to Avoid
How NOT to use the printer#
Avoid these Situations For Your Personal Safety
Do not place your
hand in the carriage
pathway when printer
power is on. Do not
leave any objects on
the table printing surface, except for media
that you will print on.
Also make sure the
media is 48 mm (1.89
inches) or less in
thickness.
[22] Keep the table clear
Chapter 3 - Safety Information28
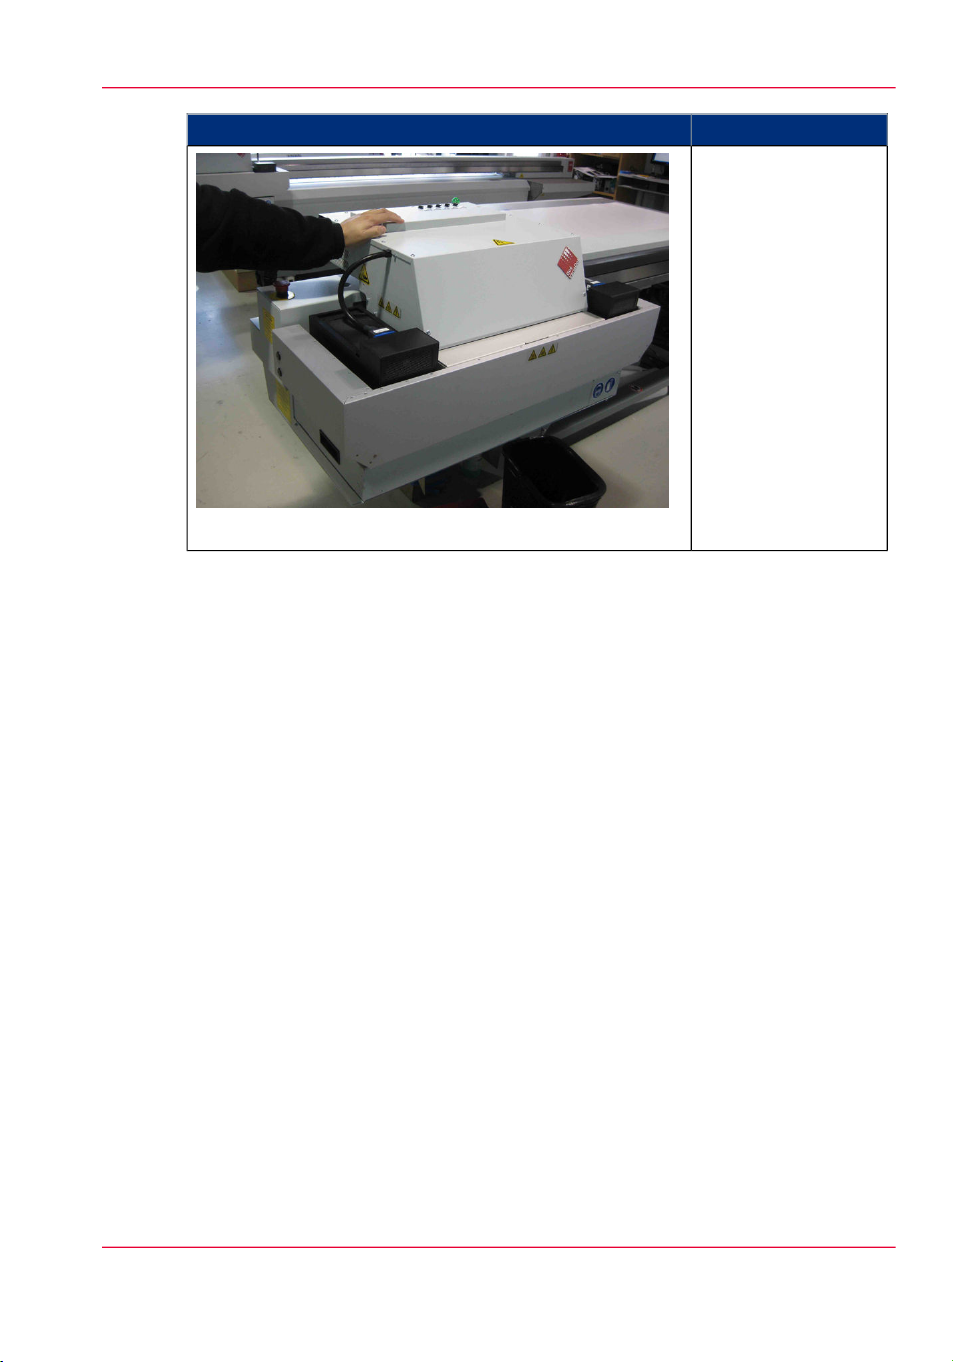
Avoid these Situations For Your Personal Safety
[23] Avoid Carriage Movement
Safety Awareness
Do not push or force
the carriage to move
manually if it is already in motion. If
you do move the carriage, a Motion Error
message will display
and you will have to
use the mouse to click
Reset on the user interface LCD display.
Chapter 3 - Safety Information 29
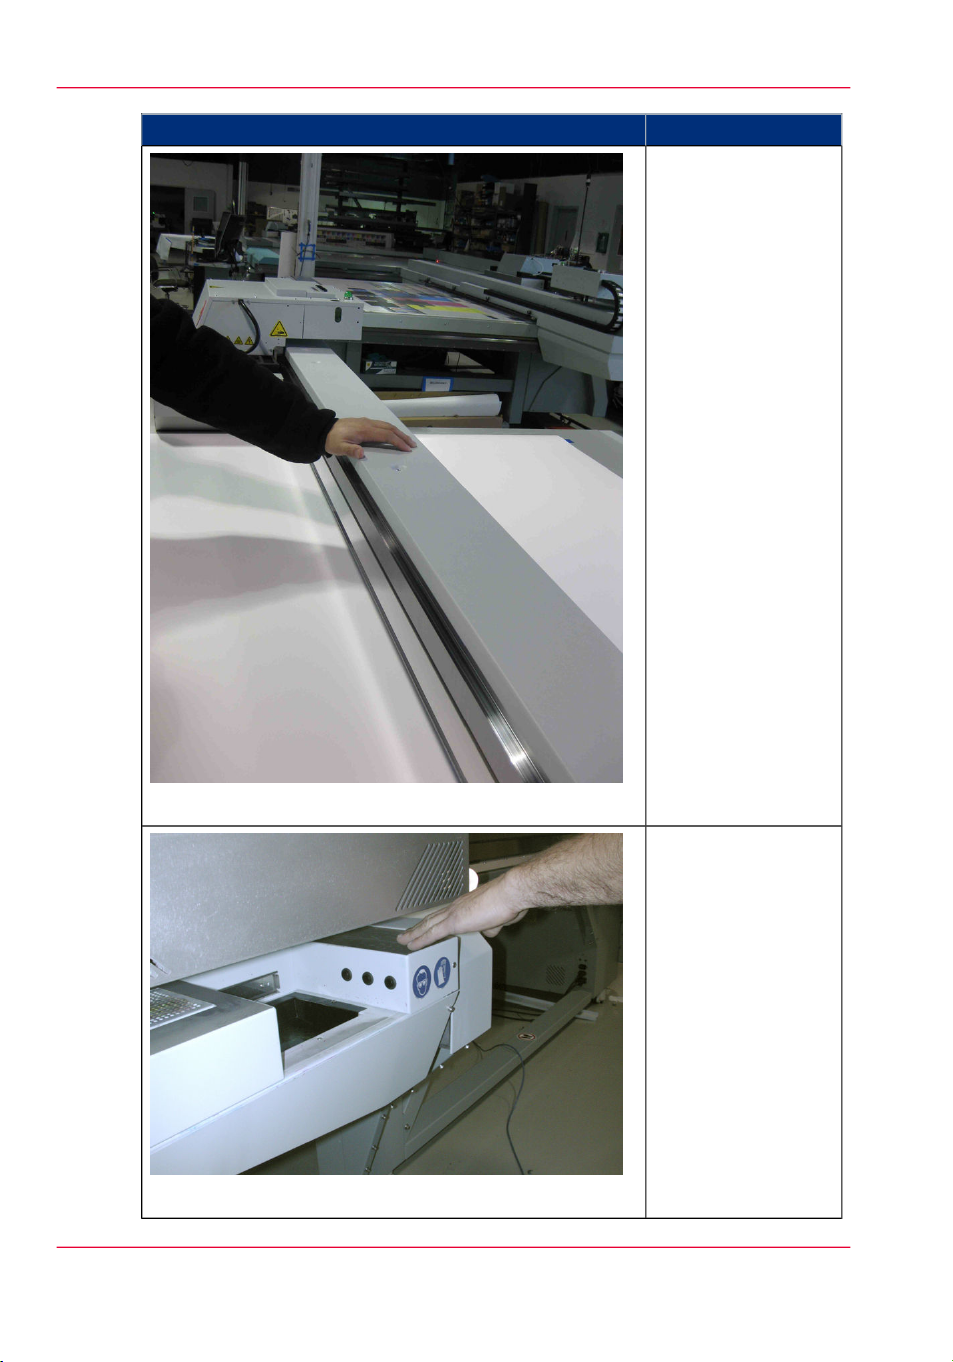
Safety Awareness
Avoid these Situations For Your Personal Safety
Do not push or force
the gantry to move
manually if it is already in motion. If
you do move the
gantry, a Motion Error message will display and you will have
to use the mouse to
click Reset on the user
interface LCD display.
[24] Do not push gantry
[25] Hot UV Lamps
Chapter 3 - Safety Information30
When the Maintenance Station is open
to perform printhead
maintenance, do not
touch the UV lamp
assembly as it can be
hot. Also be aware
that the carriage will
move up or down
when the Raise Carriage switch is pushed.
 Loading...