

Page 1
Océ 9700
Copier/Printer
User Manual
Page 2

Océ-Technologies B.V.
This manual contains a description of the Océ 9700 (controller release 1.2) and
the printing and copying that can be done with it. The introduction (chapter 1)
contains a general description of the working methods for using the system and
it is recom mended that you read at least th is chapter.
Overview of system parts on the covers
To assist you in finding parts of the system and the functions on the operating
panel quickly, an illustration of the Océ 9700 is presented on the inside front
cover and of the operating panel on the inside back cover, both of which can be
folded out.
Safety information
This man u al contains the followin g s af ety information:
■
Appendix B lists ‘Instructions for safe use’.
information befor e you star t to actually use the copier.
information such as safety data sheets can also be found in appen dix B.
■
Where applicable, cautions and warnings are used throughout this manual to
draw your attention to safet y pre c aut io ns to be taken.
You are advised to read this
Technical safety
Copyright
Océ-Technologies B.V. Venlo, The N etherlands © 1999
All rights reserved. No part of this work may be reproduced, copied, adapted,
or transmitted in any form or by any means without written permission from
Océ.
Océ-Technologies B.V. makes no representation or warran ti es wi th respect to
the contents hereof and specifically disclaims any implied warranties of
merchantabilit y or fitne ss for any part ic ul ar purpose.
Further, Océ-T echnologies B.V . reserves the right to revise this publication and
to make chan g es f r om time to time in th e content hereof without obli g ation to
notify any person of such revision or changes.
Code number 7114363
Edition 3.0
GB
Page 3

Contents
Chapter 1
Getting started
Switching on and off 10
How to do a simple copy job 12
Which Océ 9700 systems are available? 14
Océ 9700 Printer 14
Océ 9700 Copier/Printer 15
Océ 9700 optionals 16
Chapter 2
Using the Océ 9700
The operating panel (layout and use) 18
Buttons 18
Display and soft keys 19
The Océ 9700 w i t h a f ol d er (optional) 21
The Océ 9700 with a controller (plot option) 21
The Océ 9700 with Scan Station (optio nal) 2 2
Using the sect io n buttons 23
Stopping a copy or print job 29
Interrupting a copy or print job 30
Collecting your output 32
Copy Delivery Tray 32
Folder (optional) 33
High Capacity Stacker (optional) 34
Lower Output 35
Resetting t he count e r 36
Accounting 37
Contents 3
Page 4

Chapter 3
Chapter 4
Basic copy jobs
How to make a copy 42
Defining settings for the next original 44
Original delivery after scanning 45
Original Delivery Tray (optional) 46
Copying on cut sheet material 47
Stamp unit (optional) 49
Folded copies (optional) 51
High capaci ty output unit with punch unit (optio nal) 55
Reinf o rcement Unit (optiona l) 57
High Capacity Stacker (optional) 60
Lower Output 63
Special copy jobs
Copying with pre-programmed settings 66
Auto format selection 67
Copying non-standard size originals 68
Defining the original width 68
Defining t he copy size 69
Scanning originals with filing strip 71
Improving the image quality 75
Modifying the exposure 75
Editing 7 7
Auto shift 77
Making mirrored-image copies 78
Shifting the image 80
Erasing part of the image 81
Stretch 82
4 Océ 9700 Copier/Printer User Manual
Page 5

Chapter 5
Key operator
The Océ 9700 key operator 86
Entering the key operator mode 87
Defining clock settings 88
Setting the current time and date 88
Setting the reset time 89
Activating the time switch 90
De-activating the automatic feed 91
Defining the fixed zoom ratio 92
Image correction 93
Storing and era s ing settings in a prog ram 94
Editing the stamp 97
Defining the standard copy material type 98
Defining automatic roll change 99
Resetting the controller 100
Handling A4 formats 101
Chapter 6
Chapter 7
Print jobs
Introduction 104
Printing status information or test page 105
Resetting e rr or 107
System Administrator 108
Entering the system administrator mode 108
Defining connectivity settings 109
Defining default language settings 110
Resetting the configuration 116
Scan Station (optional)
Scan To File 118
Using Scan To File 118
Modifyin g the exposure 119
Using file size optimization 121
Scanning non-standard siz e originals 122
Using the zoo m settings 123
Scanning or iginals with fil in g s tr i p 124
Copying sets of originals, using Scan Station 127
Contents 5
Page 6

Chapter 8
Chapter 9
Maintenance
Introduction 130
Loading rolls of copy material 131
Emptying th e chip tray 134
Refilling toner 135
Cleaning the glass platen and the reference roller 137
Maintenance of the Reinforcement Unit 139
Inserting a new tape roll 139
Emptying th e w aste box 147
Cleaning the reinforcement knives 148
Problem solving
Introduction 152
Clearing original jams 153
Clearing paper jams 155
Clearing a paper jam in the manual feed 156
Clearing a paper ja m in the fu ser section 157
Clearing a paper jam in the roll feed section 160
Clearing a paper jam in the folder 163
Clearing a paper jam in the high capacity output unit (folder) 167
Clearing a paper jam in the High Capacity Stacker 171
Solving problems with the Reinforcement Unit 174
Clearing paper jams with the Reinforcement Unit 174
Clearing tape jams in the Reinforcement Unit 176
No reinfo rcement str ip s on the output w ith out an error message 178
Print controller errors 180
Other problems (call service) 180
Appendix A
Overview and tables
Product specifications 182
Originals that can be used 183
Copy material that can be used 184
Reinforcement strips 184
Overview of default settings on delivery 185
Controller default settings 186
Océ 9700 cont roller erro r c odes 190
6 Océ 9700 Copier/Printer User Manual
Page 7

Appendix B
Safety information
Instructions for safe use 194
Safety data sheets 196
Safety data sheet Océ 9700 High Capaci t y St acker 196
Safety data sheet Océ Copy/Original delivery tray 196
Safety data sheet Océ Reinforcement Unit 196
Safety data sheet Océ Clean er K 19 7
Safety data sheet Océ 9700 scanner 198
Safety data sheet Océ 9700 printer 199
Safety data sheet Océ 9700 printer and folder 200
Safety data sheet Océ 9700 printer, fol der and high capac i ty output unit 201
Safety data sheet Océ 9700 printer, folder, high capacity output unit and
puncher 202
Safety data sheet E1 toner 203
Safety data sheet OPC drum 205
Safety data sheet Océ Clean er A 20 7
Safety data sh eet O cé Fixing Unit Cleaning Oil 209
Appendix C
Miscellaneous
Notation conventions 212
Reader’s comment sheet 213
Addresses of local Océ organisations 215
Index 217
Contents 7
Page 8

8 Océ 9700 Copier/Printer User Manual
Page 9

Chapter 1
Getting started
Océ 9700 Copier/Printer
User Manual
This chapter provides the basic procedure to copy your
originals on the Océ 9700. It also explains in what
configurations the Océ 9700 is available.
9
Page 10
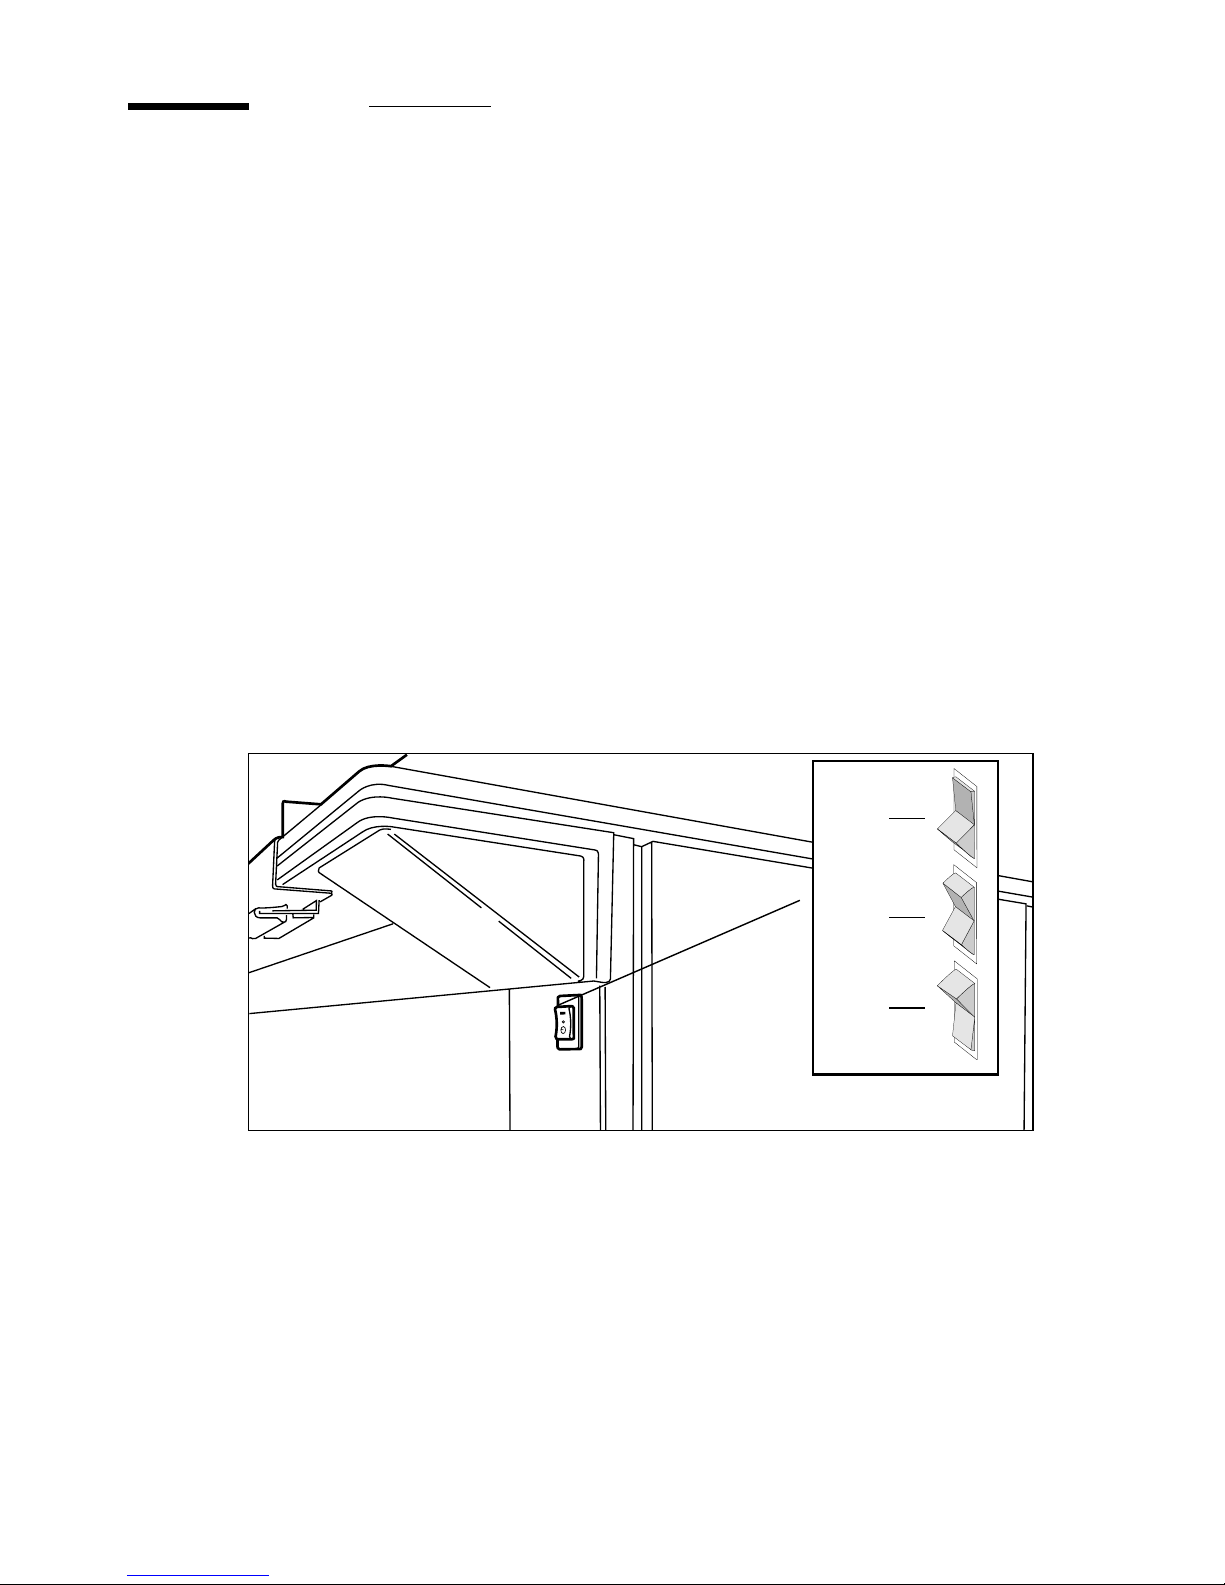
Switching on and off
The Océ 9700 can be switched on by hand, or switched on automatically by
the time switch. The setting of the time switch is set by the key operator. The
on/off timer switch is located on the scanner (see figure 1). Push this switch to
the ‘timer’ position if you want it to switch on and off automatically.
Your key operator can program the time switch to switch on the system each
day of a work week at a specified time. This can be quite handy because the
warm-up time of the system will be approximately 20 minutes. By activating
the timer you’ll find the system ready for use when you are.
The on/off timer switch has three settings:
on: the system is switched on.
■
off: the system is switched off.
■
timer: the system will be switched-on automatically at a time of your choice
■
and switched-off after a certain idle time.
▼▼▼▼
on
off
timer
[1] On/off switch with three positions
Switching on
Push the switch to ‘on’ position.
1
The system takes about 20 minutes to warm up. As soon as the system is
warmed up, the message ‘Ready to copy’ appears.
10 Océ 9700 Copier/Printer User Manual
Page 11

▼▼▼▼
Switching on the timer
Push the switch to ‘timer’ position.
1
▼▼▼▼
Switching off
Ensure that the engine is not running
1
Push the switch to the ‘off’ position.
2
Then push the switch to the ‘timer’ position if the machine has to be
3
automatically switched on by the timer.
For details refer to ‘Activating the time switch’ on page 90.
High Capacity Stacker (optional)
The on/off switch on the optional High
Capacity Stacker must always be left in the ‘on’ position. The High Capacity
Stacker is automatically switched on and off along with the system.
Getting started 11
Page 12

How to do a simple copy job
1. Place yo ur ori g i na l f ace - down, right aligned alon g th e o r ig i nal g ui d e.
The
original feed table of the scanner accepts originals up to 1050 mm wide.
2. Specify the number of copies using the numeric buttons.
3. Specify copy material on the operating panel.
Use the ‘Roll selection’ button
to select copy material and format. If you select ‘Automatic’ the Océ 9700 will
try to use a roll format that matches its size. After inserting the original, the roll
that is used is indicated by the ‘
4. Specify reduction/enlargement on the operating panel
’ sign.
❍
. You can use the
‘Zoom selection’ button to select a zoom factor. If you select ‘Automatic’, the
Océ 9700 will use a zoom factor that is needed to obtain a copy without loss of
information. After inserting the original, the zoom factor that is used is
indicated by the ‘
5. Specify ‘ Exposur e’ on the op erating p anel.
’ sign.
❍
This option can be used to obtain
a lighter or darker copy.
6. Specify ‘Folding’ on the operating panel.
If the optional folder is installed,
you can use the ‘Folding’ button to get a neatly folded copy. A black
background indicates that ‘Folding’ is active.
7. To start the copy job press the green start button .
Your original will be fed into the scanner. The printer starts.
8. Collect your output.
Your copy will be delivered on the selected output unit
of the print engine.
12 Océ 9700 Copier/Printer User Manual
Page 13
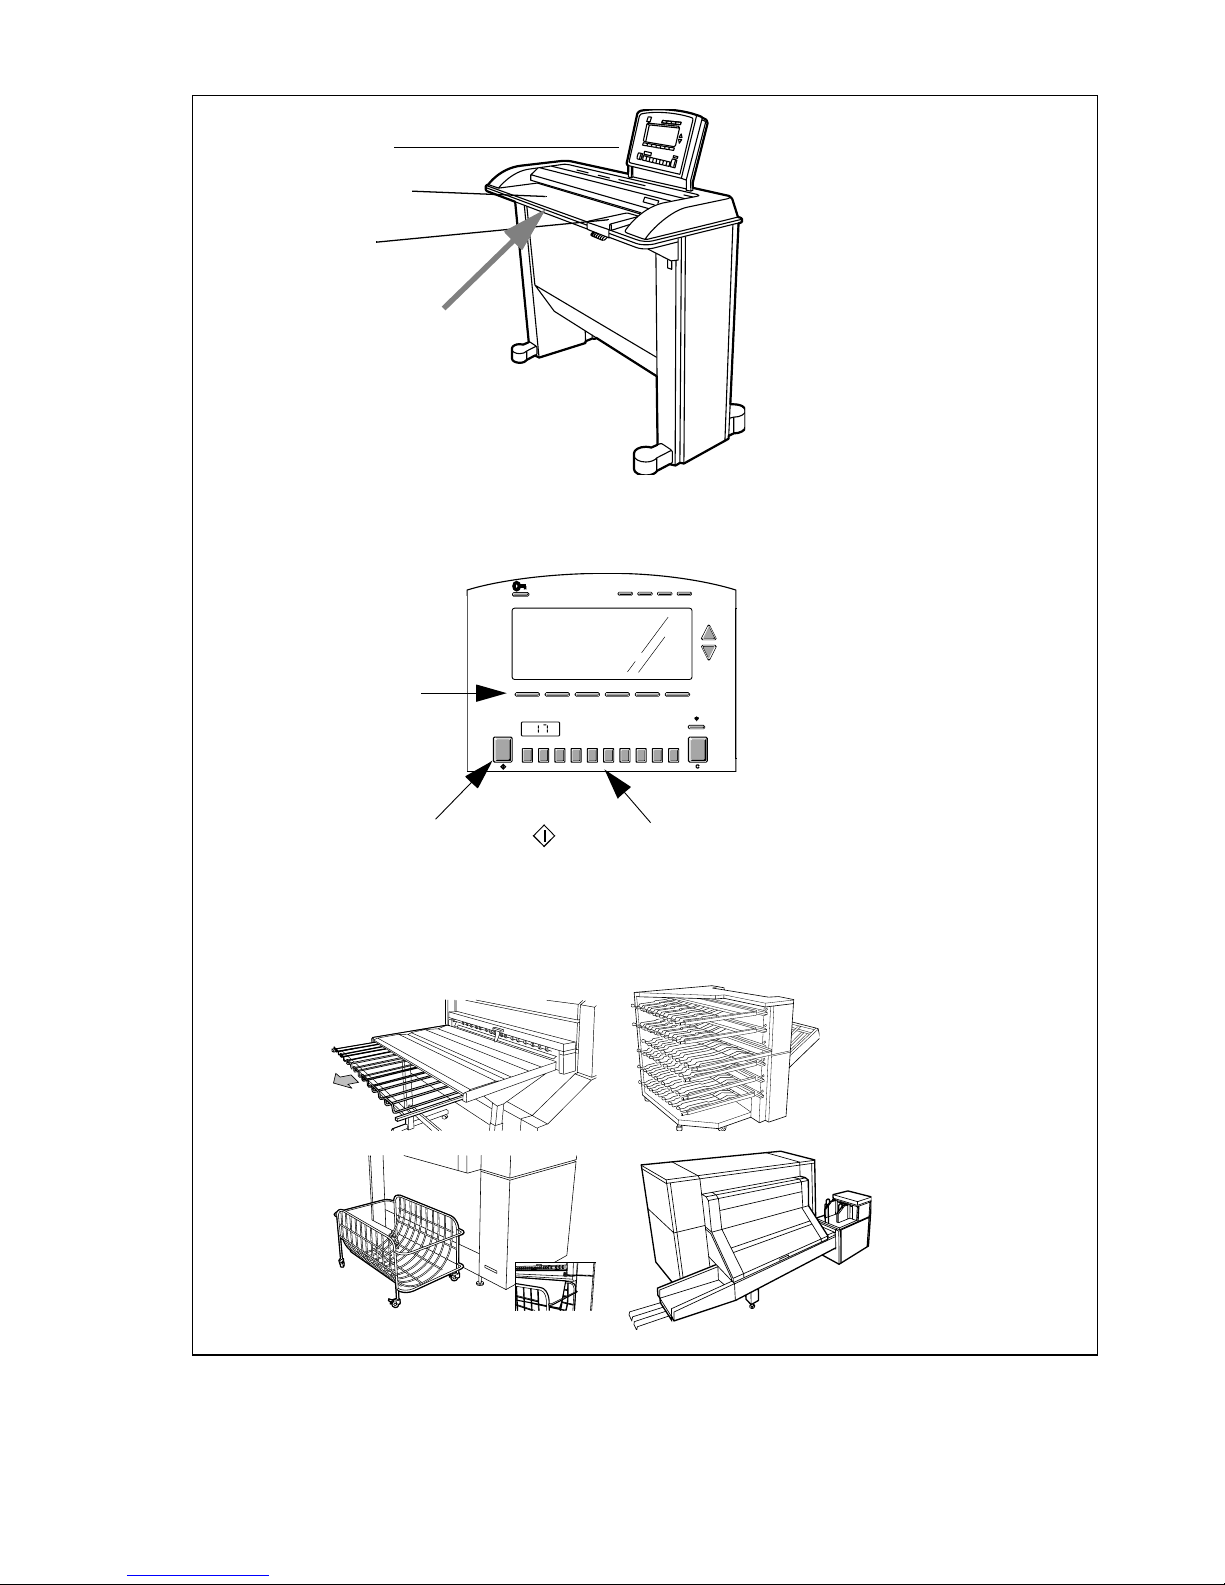
operating panel
original feed table
original guide
1.Place original face-down
stamp
3-6. Use soft keys to
select copy material,
zoom, exposure and
folding.
fold
set input
In the display:
feedback messages
min. 25% max. 400%
roll 1
lighter
6
4
2
0
2
4
6
darker
1234567 890
sheet feed
auto roll
paper
roll 2
paper
roll 3
paper
roll 4
paper
+ 1%
-
+
- 1%
100%
auto zoom
8. Collect your output
[2] How to do a simple copy job
2. Specify number of copies7. Press green Start
Getting started 13
Page 14
Which Océ 9700 systems are available?
The Océ 9700 is available in two versions:
Océ 9700 Printer
■
Océ 9700 Copier/Printer (this manual)
■
Océ 9700 Printer
The Océ 9700 Printer in basic configuration consists only of a print engine.
The operating panel is located on the printer.
[3] Océ 9700 Printer, described in another manual
To send your print jobs to the printer, you can use separate applications like
Océ Job Dire ctor , Océ Repro Station, or other dri vers, described in the separat e
user manuals.
The Océ 9700 Printer is described in the Océ 9700 Printer User Manual.
14 Océ 9700 Copier/Printer User Manual
Page 15
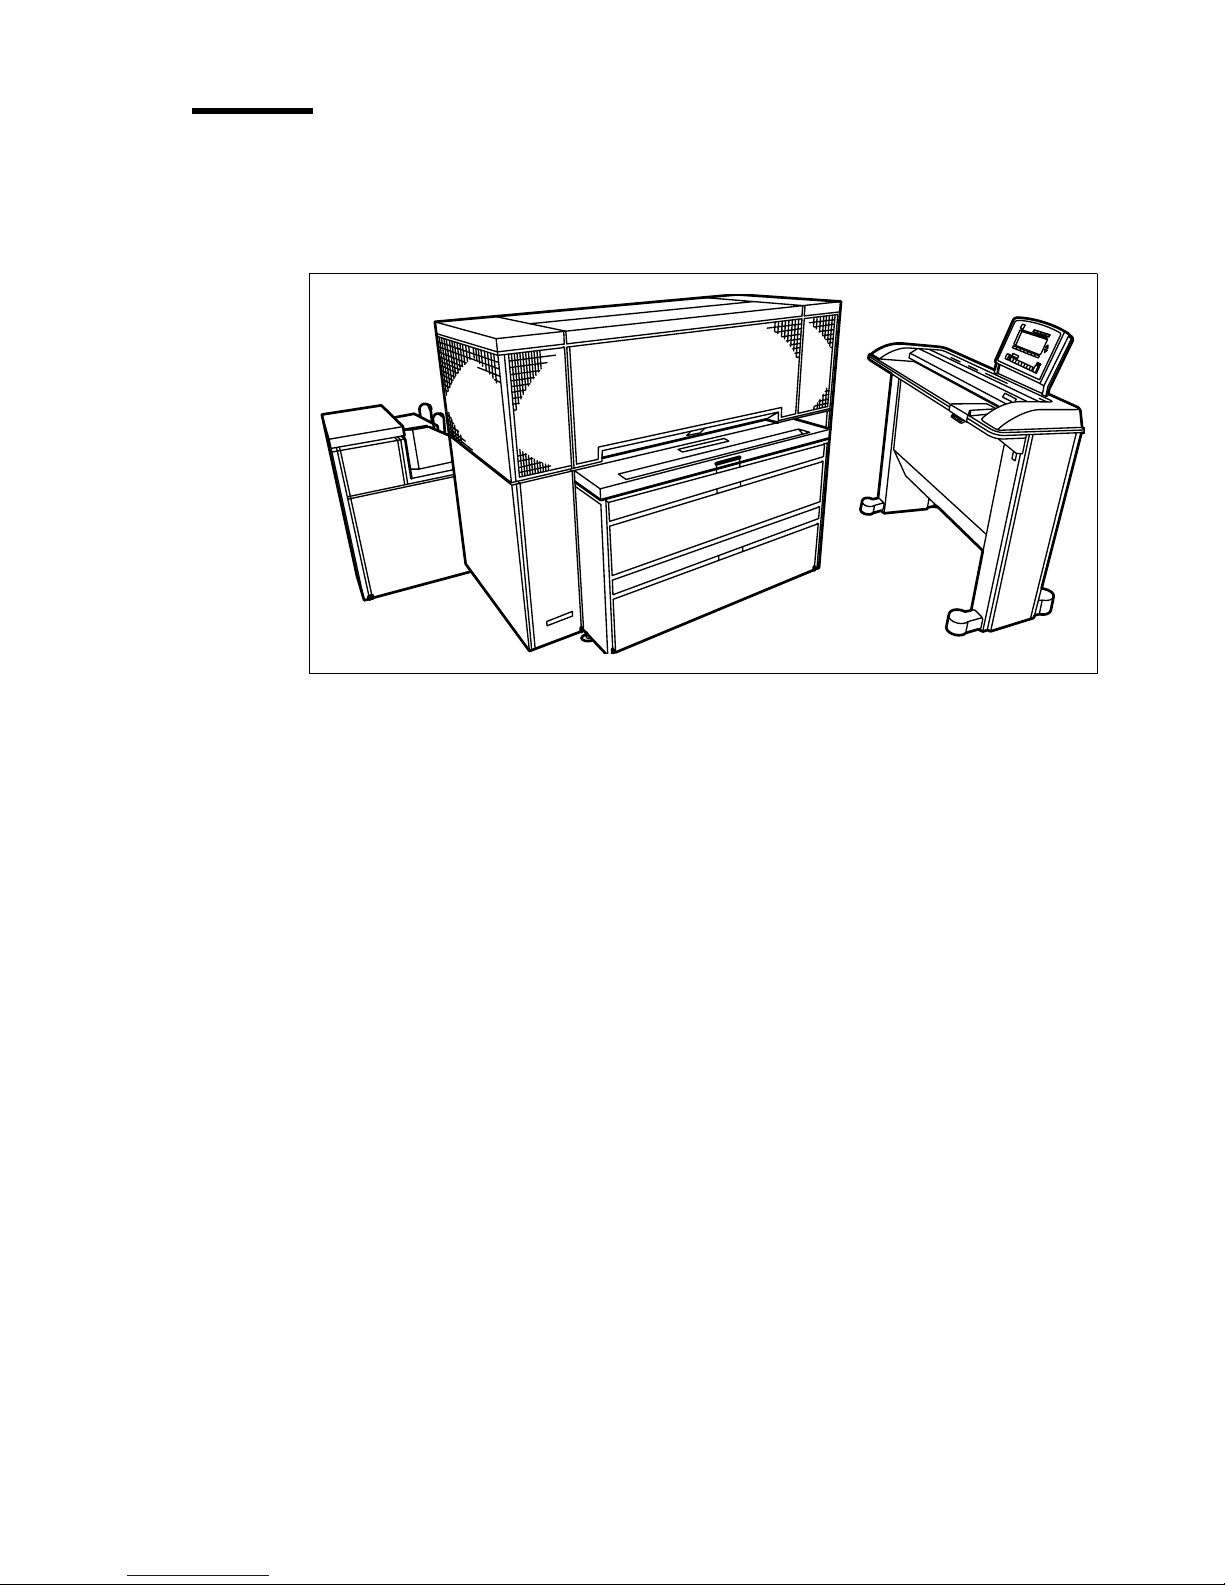
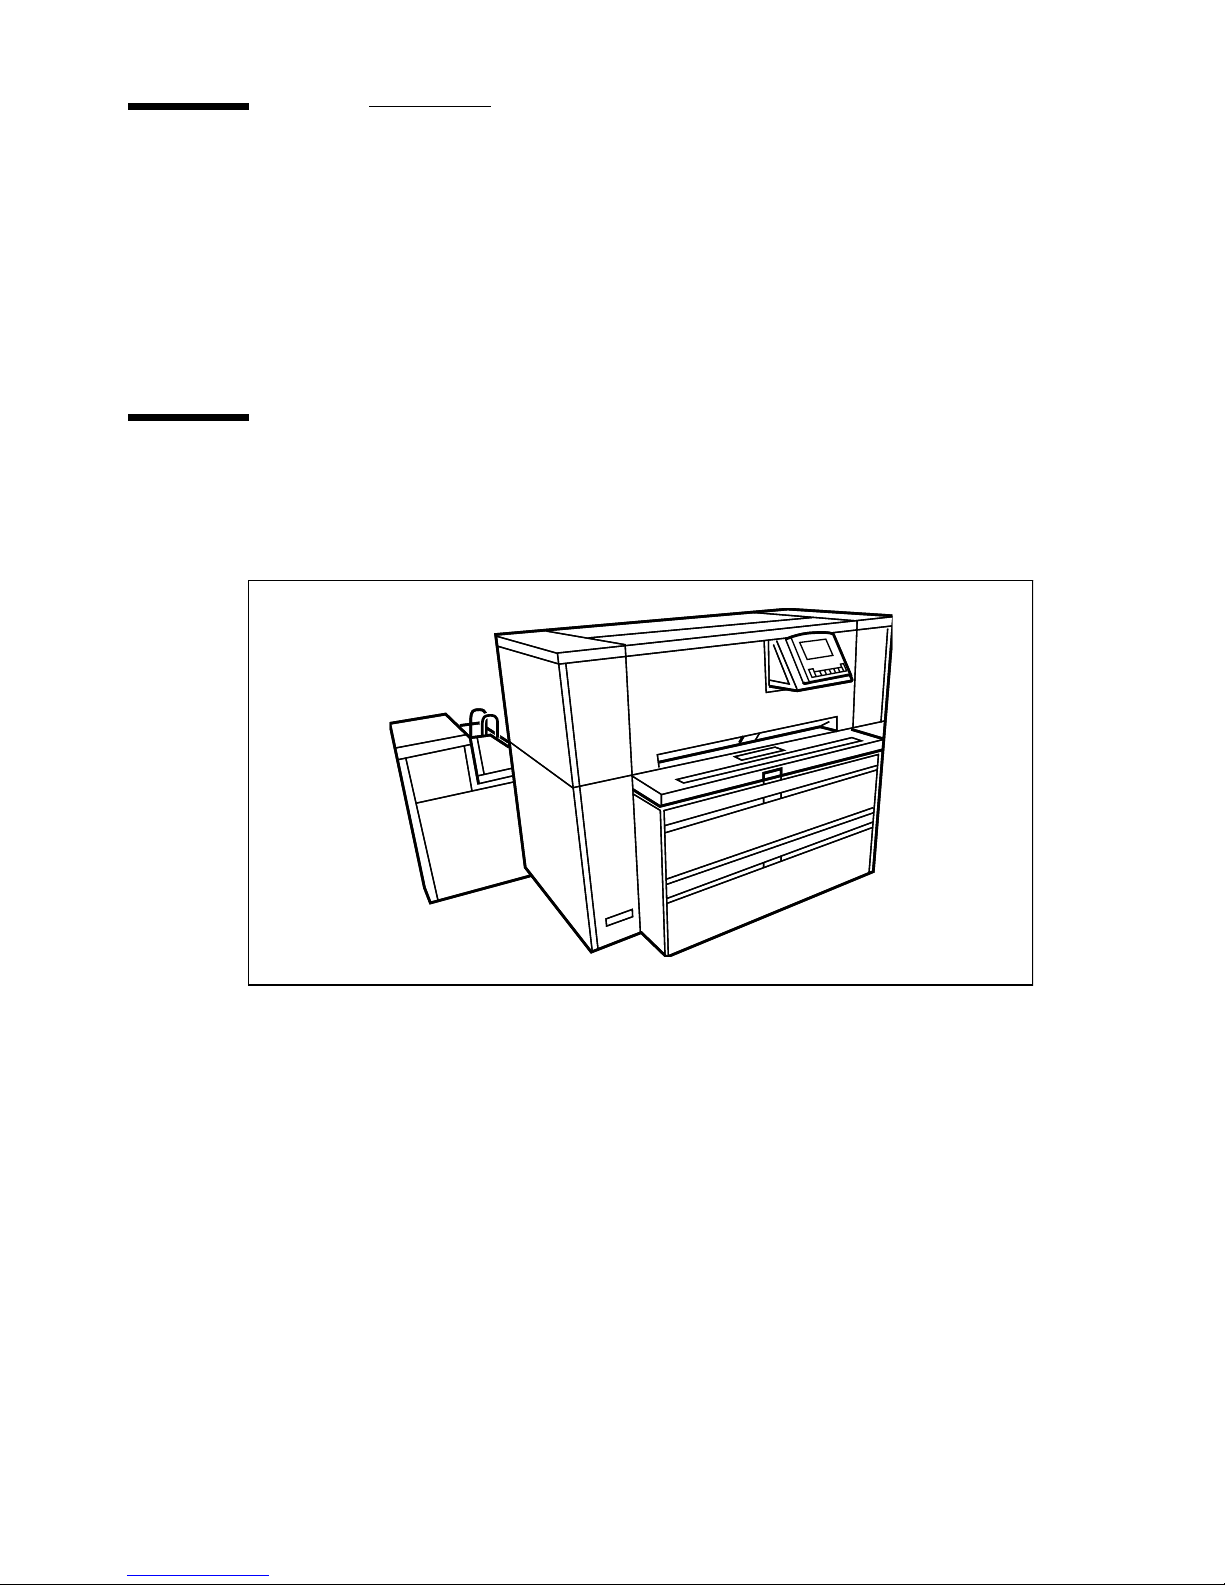
Océ 9700 Copier/Printer
The Océ 9700 Copier/Printer in basic configuration consists of a scanner and
a print engine. The operating panel is located on the scanner.
[4] Océ 9700 Copier/Printer, described in this manual
Use the scanner to feed your originals and to control the various functions of
the print engine.
If your print engine is equipped with a controller, you can connect it to your
computer system. To send your print jobs to the printer you can use Océ Job
Director, Océ Repro Station, or other drivers, described in the separate user
manuals.
This manual de scribes the Océ 9700 Copier/Printer.
Getting started 15
Page 16

Océ 9700 optionals
Third paper roll.
■
The Océ 9700 can be delivered with an extra drawer, containing an
additional paper roll.
High Capacity Stacker.
■
The 6 bin High Capacity Stacker can be installed as a replacement of the
copy delivery tra y.
Lower Output container
■
If no folder/punch unit is installed, this container can be used to deliver
(long) copies.
Folder
■
The folder can be delivered with optionals such as belt deli very units, a punch
unit, a first fold delivery and a reinforcement unit.
Original Delivery Tray (Océ 9700 Copier/Printer only)
■
This tray can be used to collect a set of originals at the rear of the scanner.
16 Océ 9700 Copier/Printer User Manual
Page 17

Océ 9700 Copier/Printer
User Manual
Chapter 2
Using the Océ 9700
This c hapter is a bout layo ut and use o f the oper ating pa nel.
You’ll learn how to us e the buttons a round the display to
define print settings for the original you are about to copy.
17
Page 18

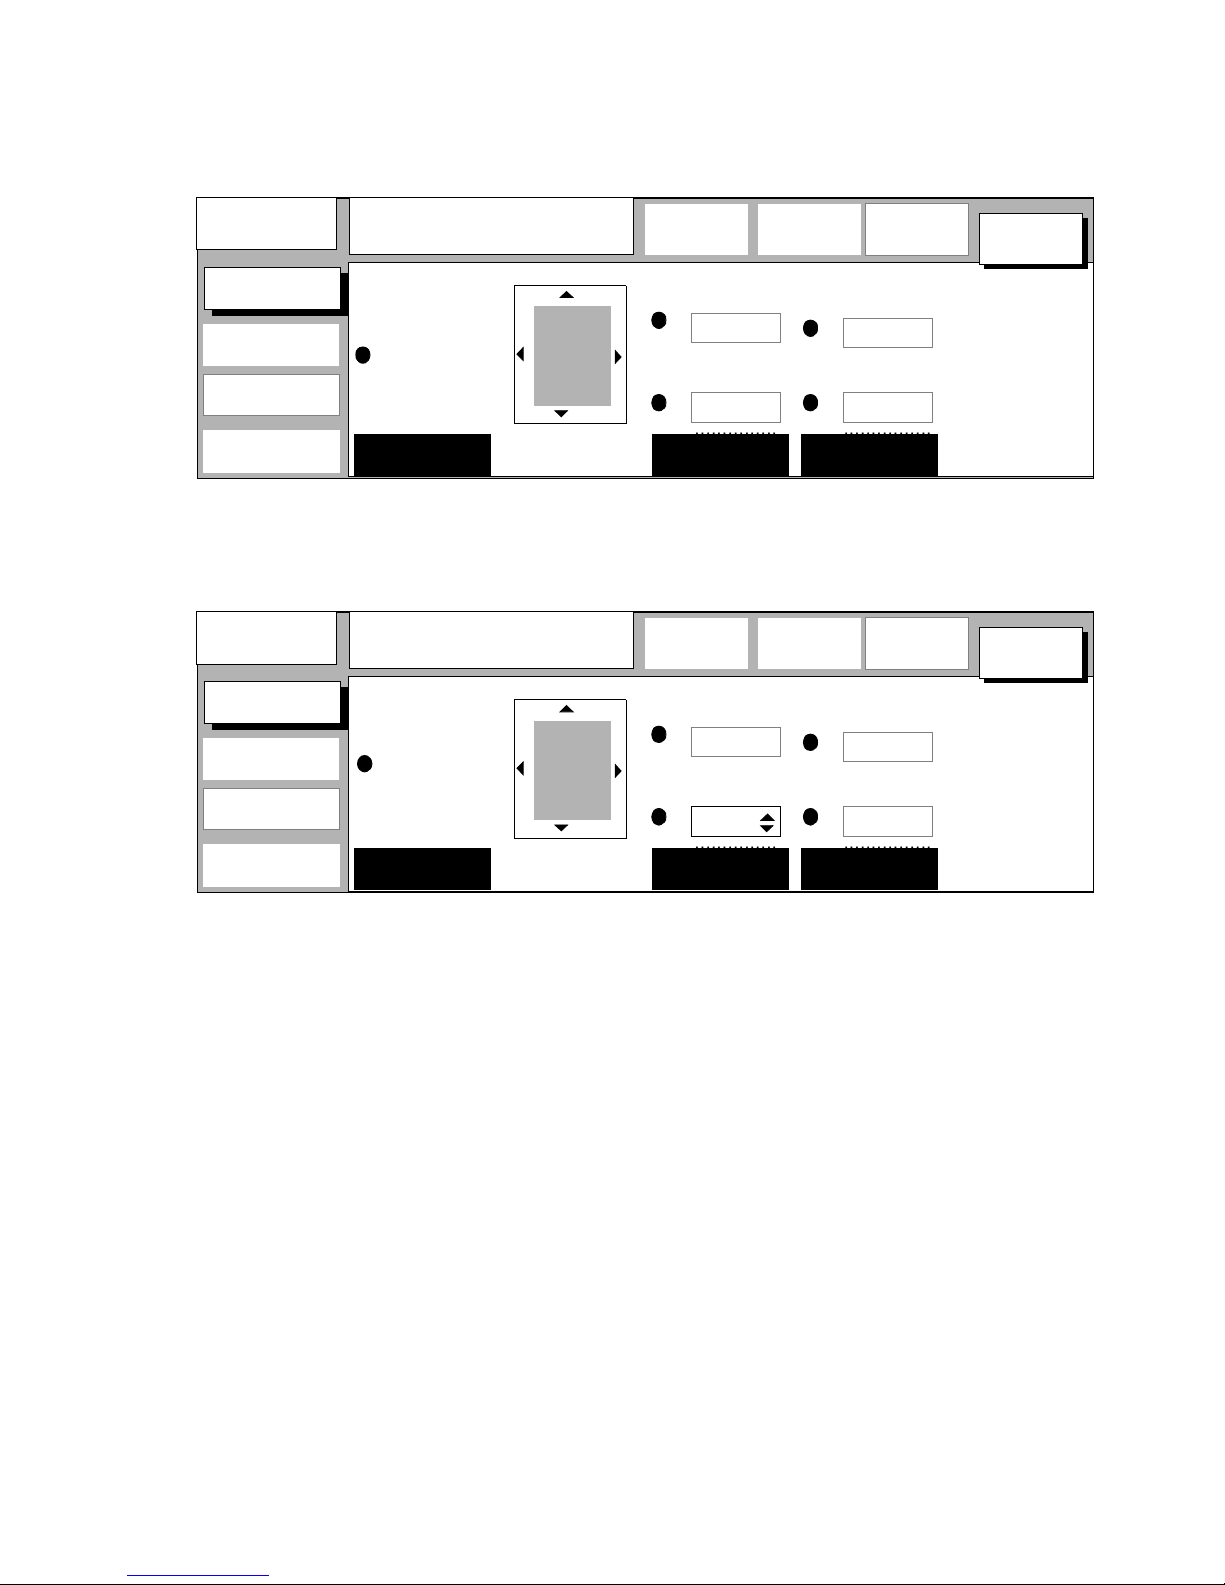
The operating panel (layout and use)
The operating panel is located over the original feed. The Océ 9700 scanner
operating panel is illustrated in this manual’s inside back cov er. As you can see
in this scheme, the panel consists of a display in the centre surrounded by its
soft keys. Below this you find the st art, numeri c , correction, and stop buttons.
This section consists of two parts. The first part explains for basic use the
names of th e fixed buttons and wher e to find them. The second part is about
special use, that is the use of the display. That is how to use the soft buttons
over and along the sides of the display to define your print settings.
Key operator
button
roll 1
sheet feed
stamp
fold
set input
Start button
lighter
6
4
2
0
2
4
6
darker
1234567 890
roll 2
roll 3
roll 4
Stop button
auto roll
Correction button
paper
paper
paper
paper
min. 25% max. 400%
-
+
100%
auto zoom
Buttons
Numeric buttons
[5] Operating panel
Start
The button marked with
is used to start the feeding of the original,
or to re-start the copy process.
Numeric buttons
The buttons with numbers on the lower part of the middle
operating panel are used to specify numbers. In many cases this will be the
number of copies or se ts up to a ma ximum of 999.
Correction button
The orange button marked with C, located at the bottom of
the operating panel. Press the correction button once: Resets the copy quantity
counter to ‘1’. Press the correction button twice: Resets all settings to their
default value.
18 Océ 9700 Copier/Printer User Manual
Page 19
Stop button
Pressing the small red button over the Correction butto n stops the
printing process. For more information, see ‘Stopping a copy or print job’ on
page 29 and ‘In terrupting a copy or print job’ on page 30.
Key operator button
As this functionality is restricted to a dedicated key operator, a PIN code is
required (see chapter 5, ‘Key operator’ on page 85).
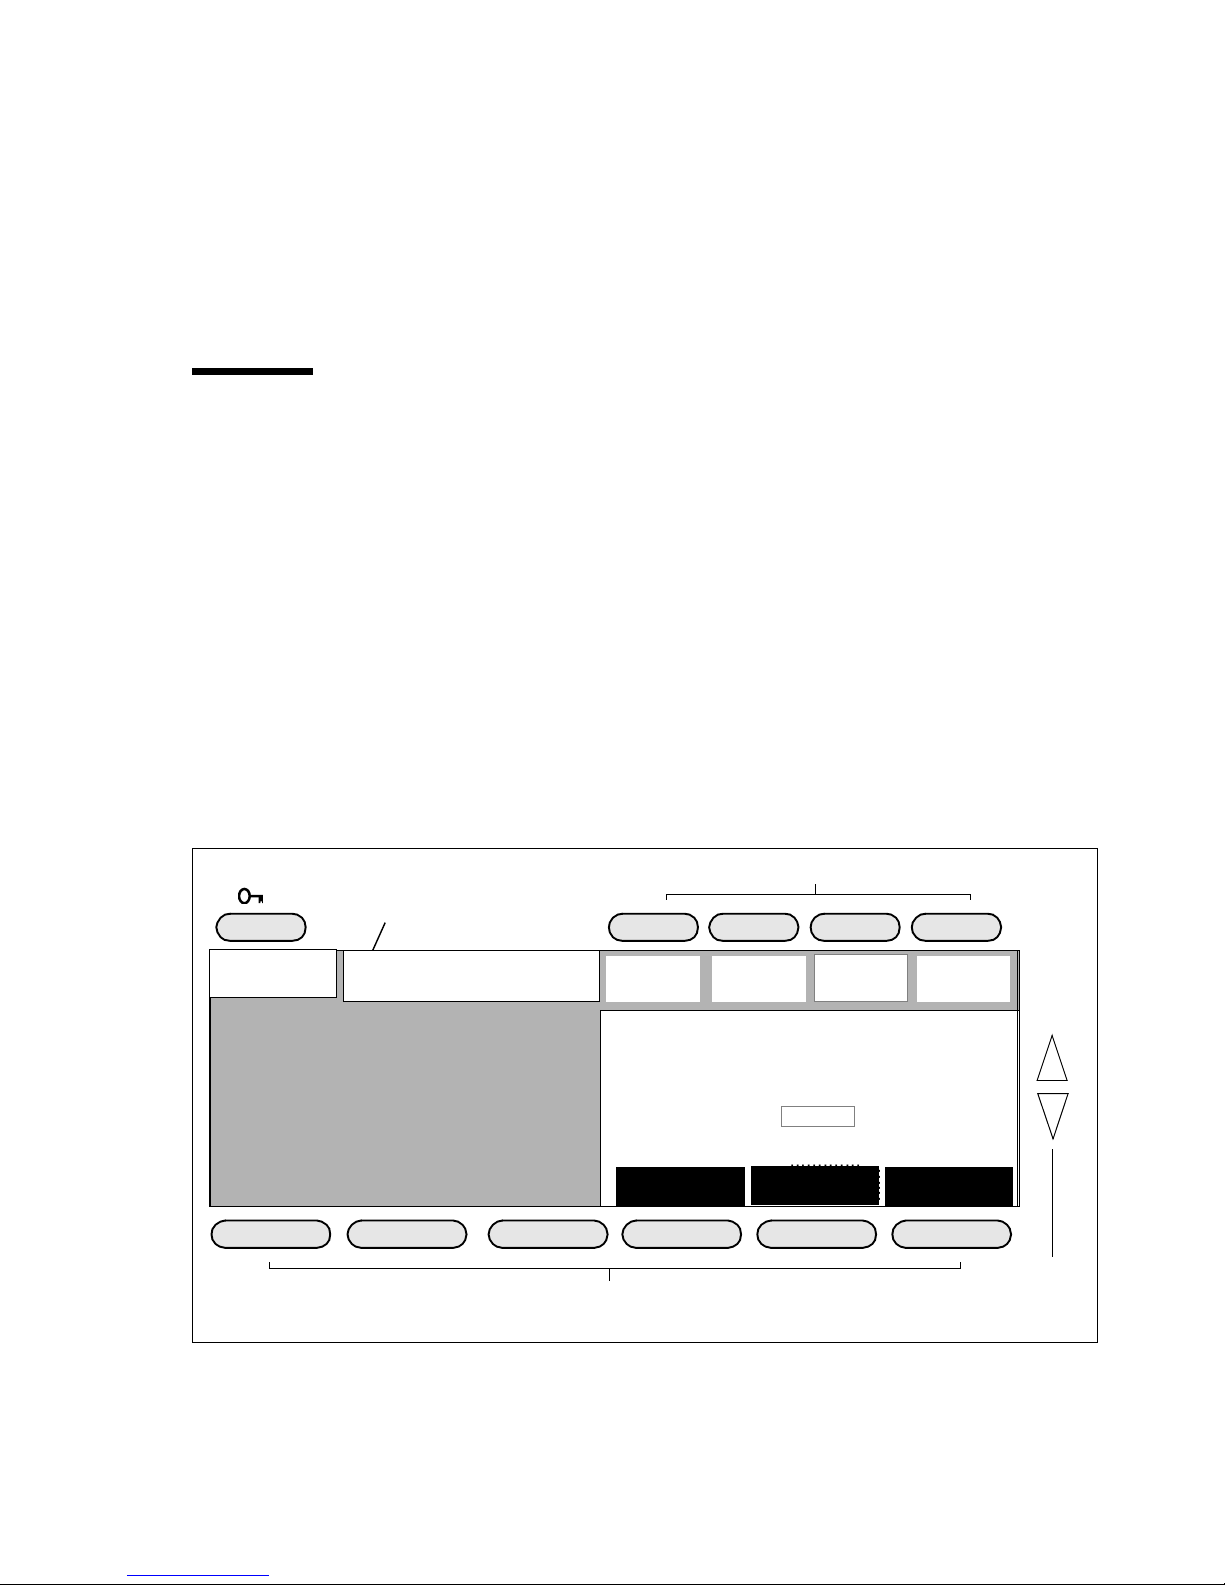
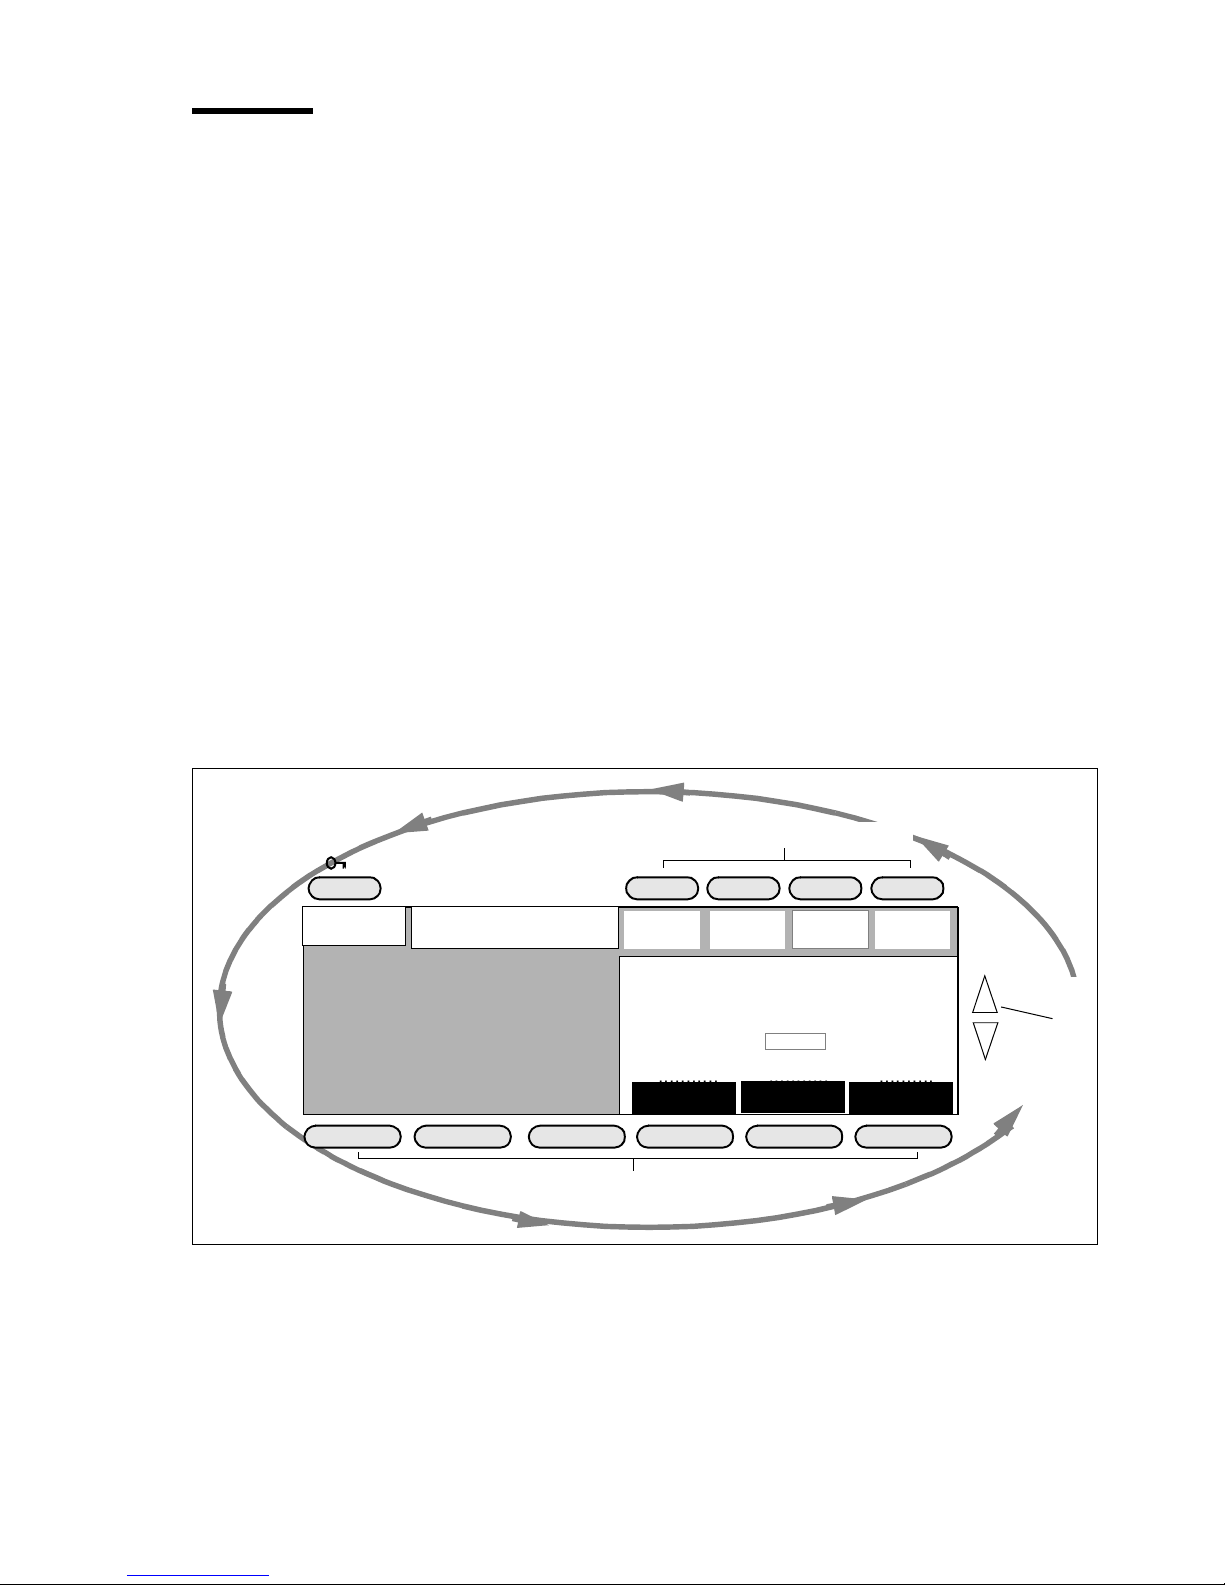
Display and soft keys
The display and its soft keys are used to make settings for copying and printing.
The display provides feedback about the system status. The main section and
the function buttons can be used to make setting s for a basic copy job. The
section buttons can be used to enter less commonly used settings.
The scanner display informs you about:
the number of copies you have selected and the number of copies still to be
■
made, the paper selection, exposure and zoom settings.
the actual system status, for example ‘Warming up’. In the event of an error
■
in printer or scanner, the exact error location (covers or panels) are
graphically shown on the scanner display, together with instructions on how
to solve the problem.
By pressing this button you can enter key operator mode.
KEY
Copies:
0
system status
Ready to copy
function buttons
[6] Section, function, and higher/lower buttons
................
Machine
A3 Paper
❍
A2 Paper
Automatic
●
..................................................................................
Roll
selection
.....................................
section buttons
................
Program
❍
Automatic
●
Zoom
selection
.....................................
...............
Finishing
100.0%
Lighter
.......
0
●
.......
Darker
Exposure
.....................................
................
Copy
higher/lower
buttons
Using the Océ 9700 19
Page 20

Roll selection
Use the ‘Roll selection’ button to select copy ma terial and
format. The display will show you what rolls are currently loaded. The selected
roll is indicated by the ‘
’sign.
●
If you select ‘Automatic’, the Océ 9700 will try to use a roll format that
matches the original size. After inserting the original, the roll that is used is
indicated by the ‘
’ sign.
❍
Note:
The
sign remains on its place until a new original is inserted. Then
‘
’
❍
it may move to indicate another roll, depending on the original format.
In ‘ Automatic’ mode, the Océ 9700 will start to look for a matching roll of the
‘Standard’ copy material. If such a roll is not found, it will try to find a
matching roll of anothe r type of material. The Key Operat or can define the
‘Standard’ copy material, as described in ‘Defining the standard copy material
type’ on page 98.
If ‘Automatic’ is selected for both ‘Roll selection’
and
‘Zoom selecti on’ , t he
size of the matching roll does not necessarily have to be the same as the size of
the original. For more information, see ‘Auto format selection’ on page 67.
Zoom selection
factor. If you select ‘Automatic’ with the ‘
You can use the ‘Zoom selection’ button to select a zoom
’ sign, the Océ 9700 will use a
●
zoom factor that is needed to obtain a copy without loss of information. This
will be done according to the selected paper roll. After inserting the original,
the zoom factor that is used is indicated by the ‘
’ sign.
❍
If you select the numeric zoom factor with the ‘
’ sign, yo u can d ef ine a zoom
●
factor yourself between 25% and 400%. After selecting the numeric zoom
factor, the ‘ ’ sign will appear at the right. Now you van define a new zoom
factor in two different ways:
By using the higher/lower b u ttons at th e right of the d isplay (see figure 6 on
■
page 19). If you press one of these buttons, the zoom factor will increase or
decrease with steps of 1%.
If you keep one of these buttons pressed, the zoom factor will scroll up or
down fast, with pauses when a fix ed zoom step is reached. The key operator
can specify these fixed zoom steps (see ‘Defining the fixed zoom ratio’ on
page 92).
By using the numeric buttons at the bottom of the operating panel. You can
■
specify the exact zoom factor with 0.1% increments.
For example, if you want to specify a zoom factor of 25.4%, you type 254. If
you want to specify a zoom factor of 254%, you type 2540.
20 Océ 9700 Copier/Printer User Manual
Page 21
Exposure
You can use the ‘Exposure’ button to obtain a lighter or darker copy .
After pressing the button, the ‘ ’ sign will appear . No w you can define a new
exposure factor by using the higher/lower buttons at the right of the display
(see figure 6 on page 19).
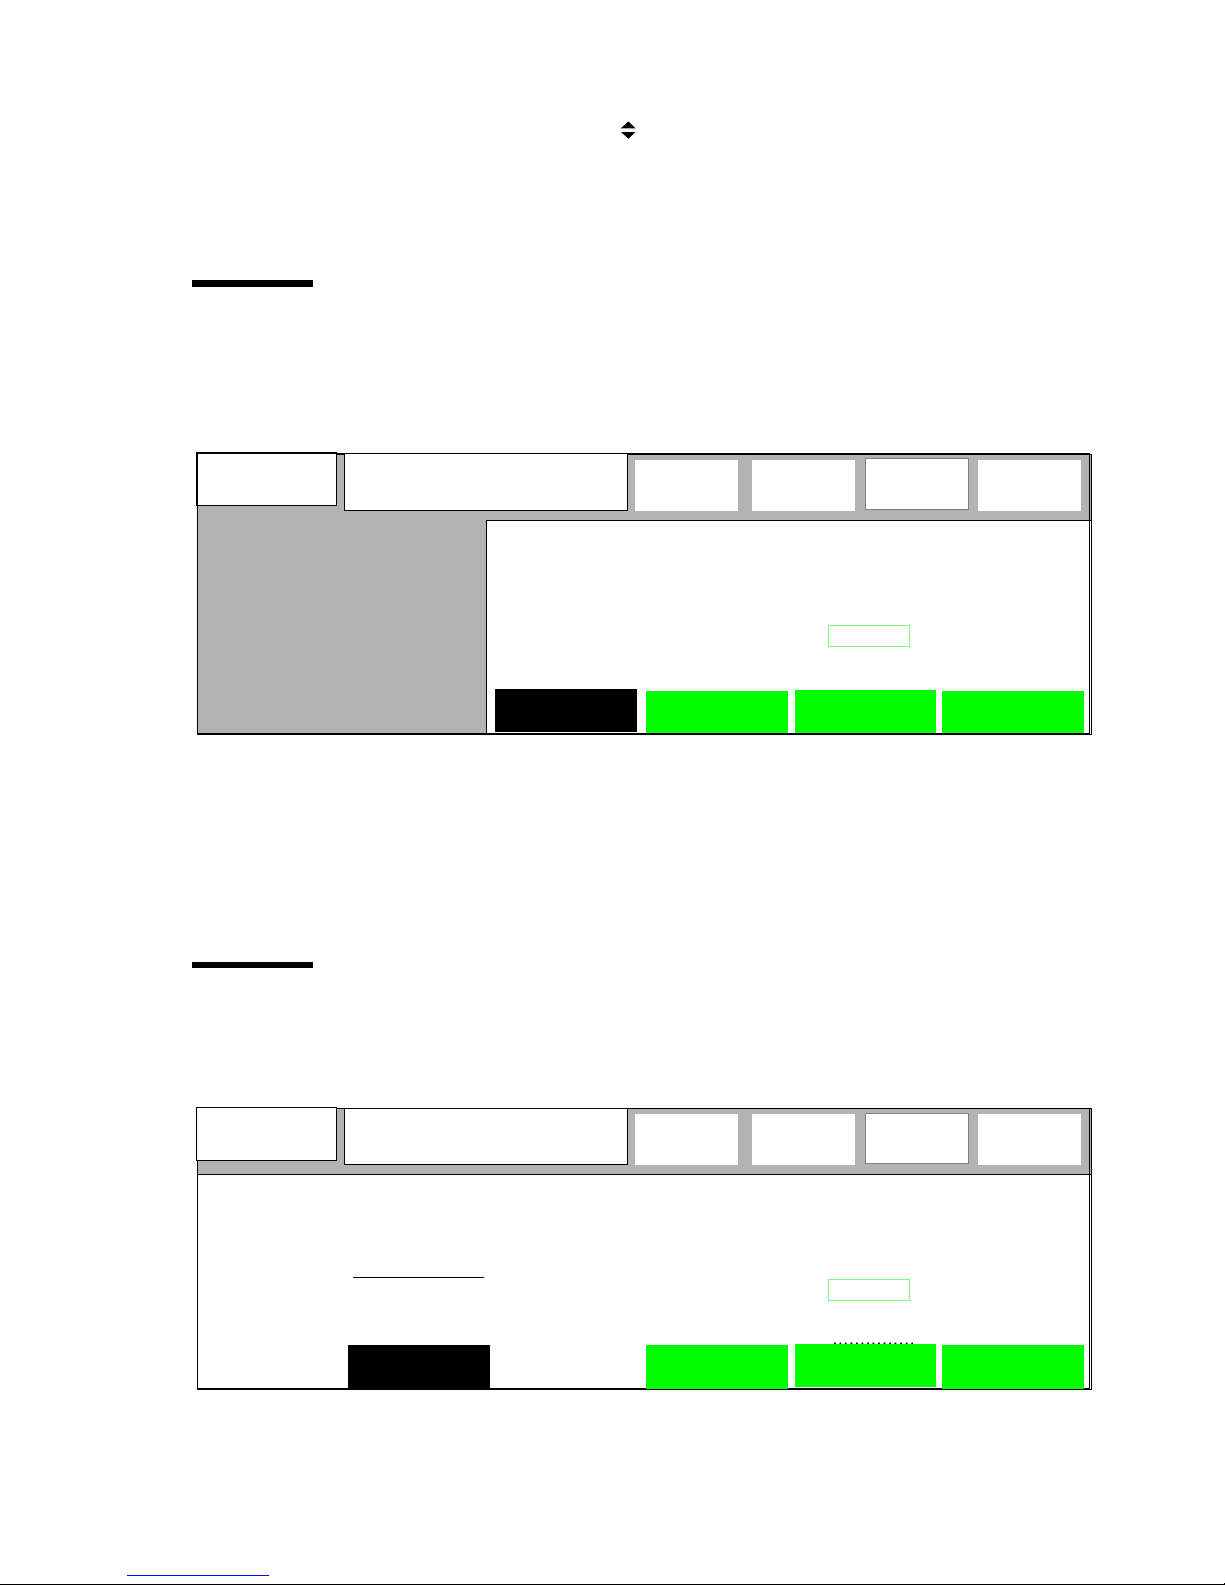
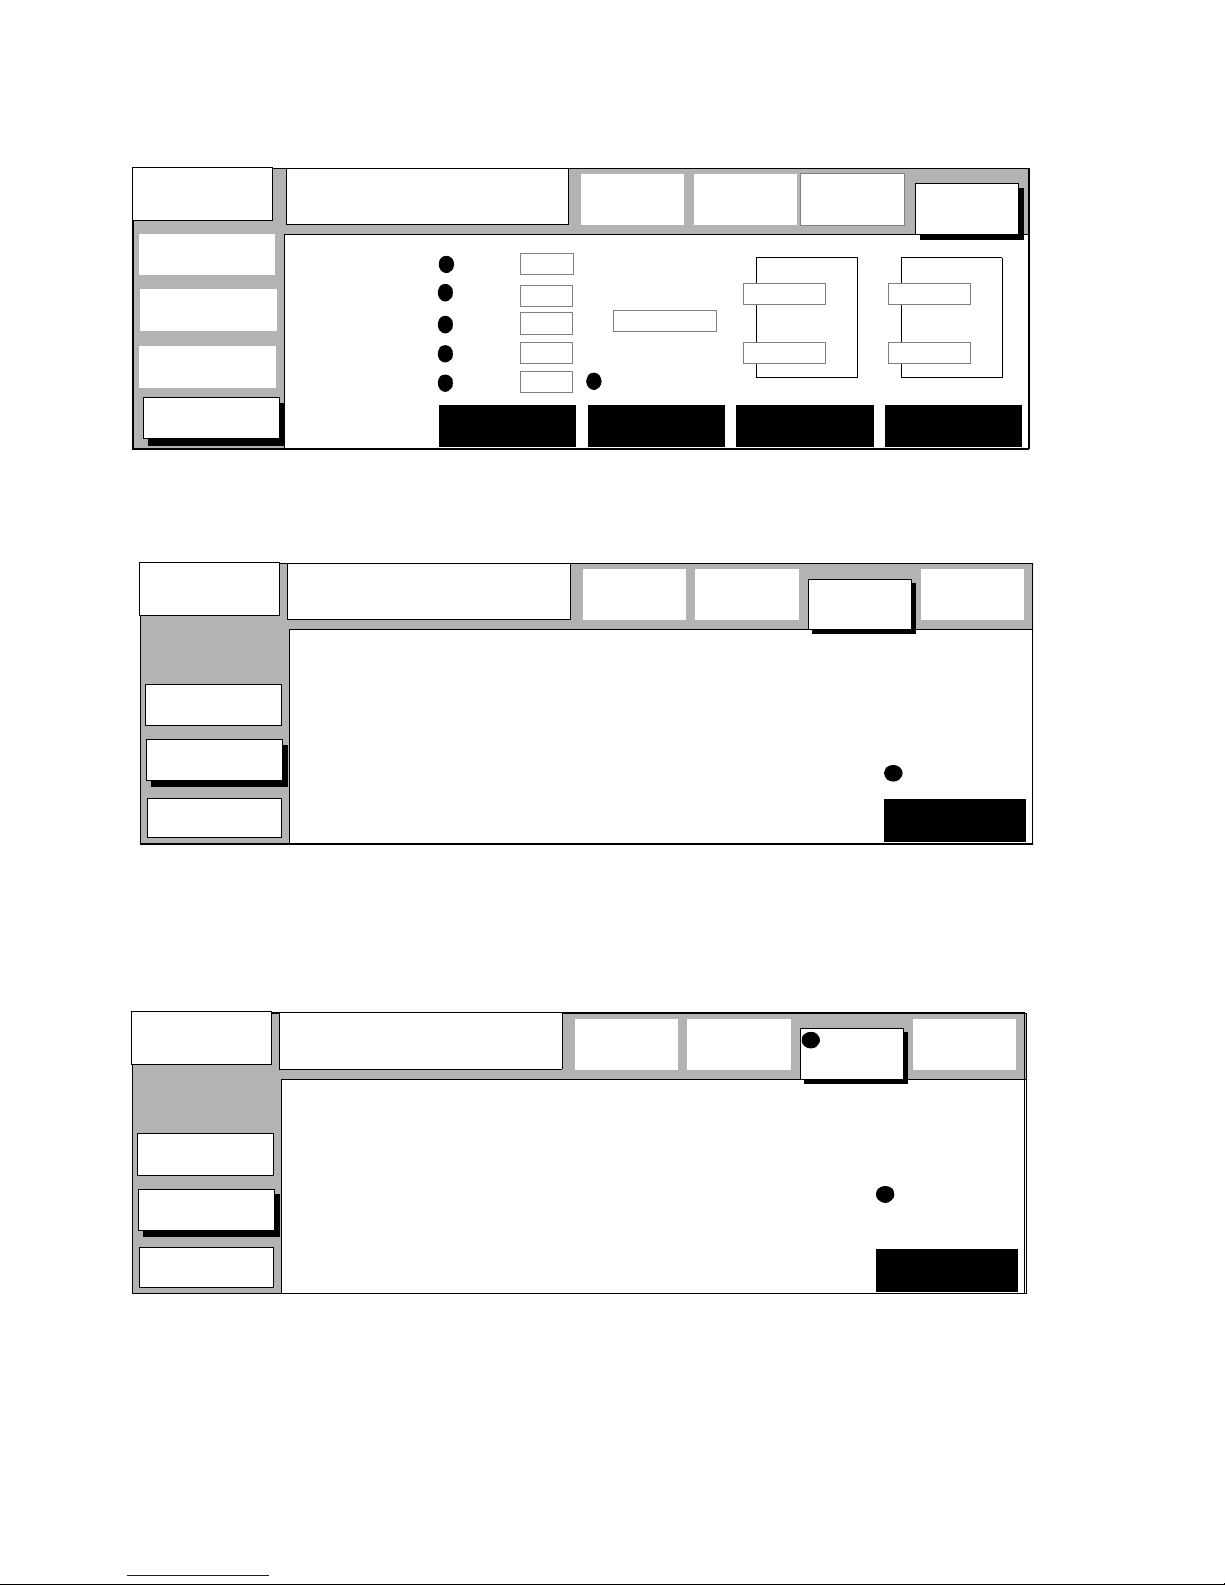
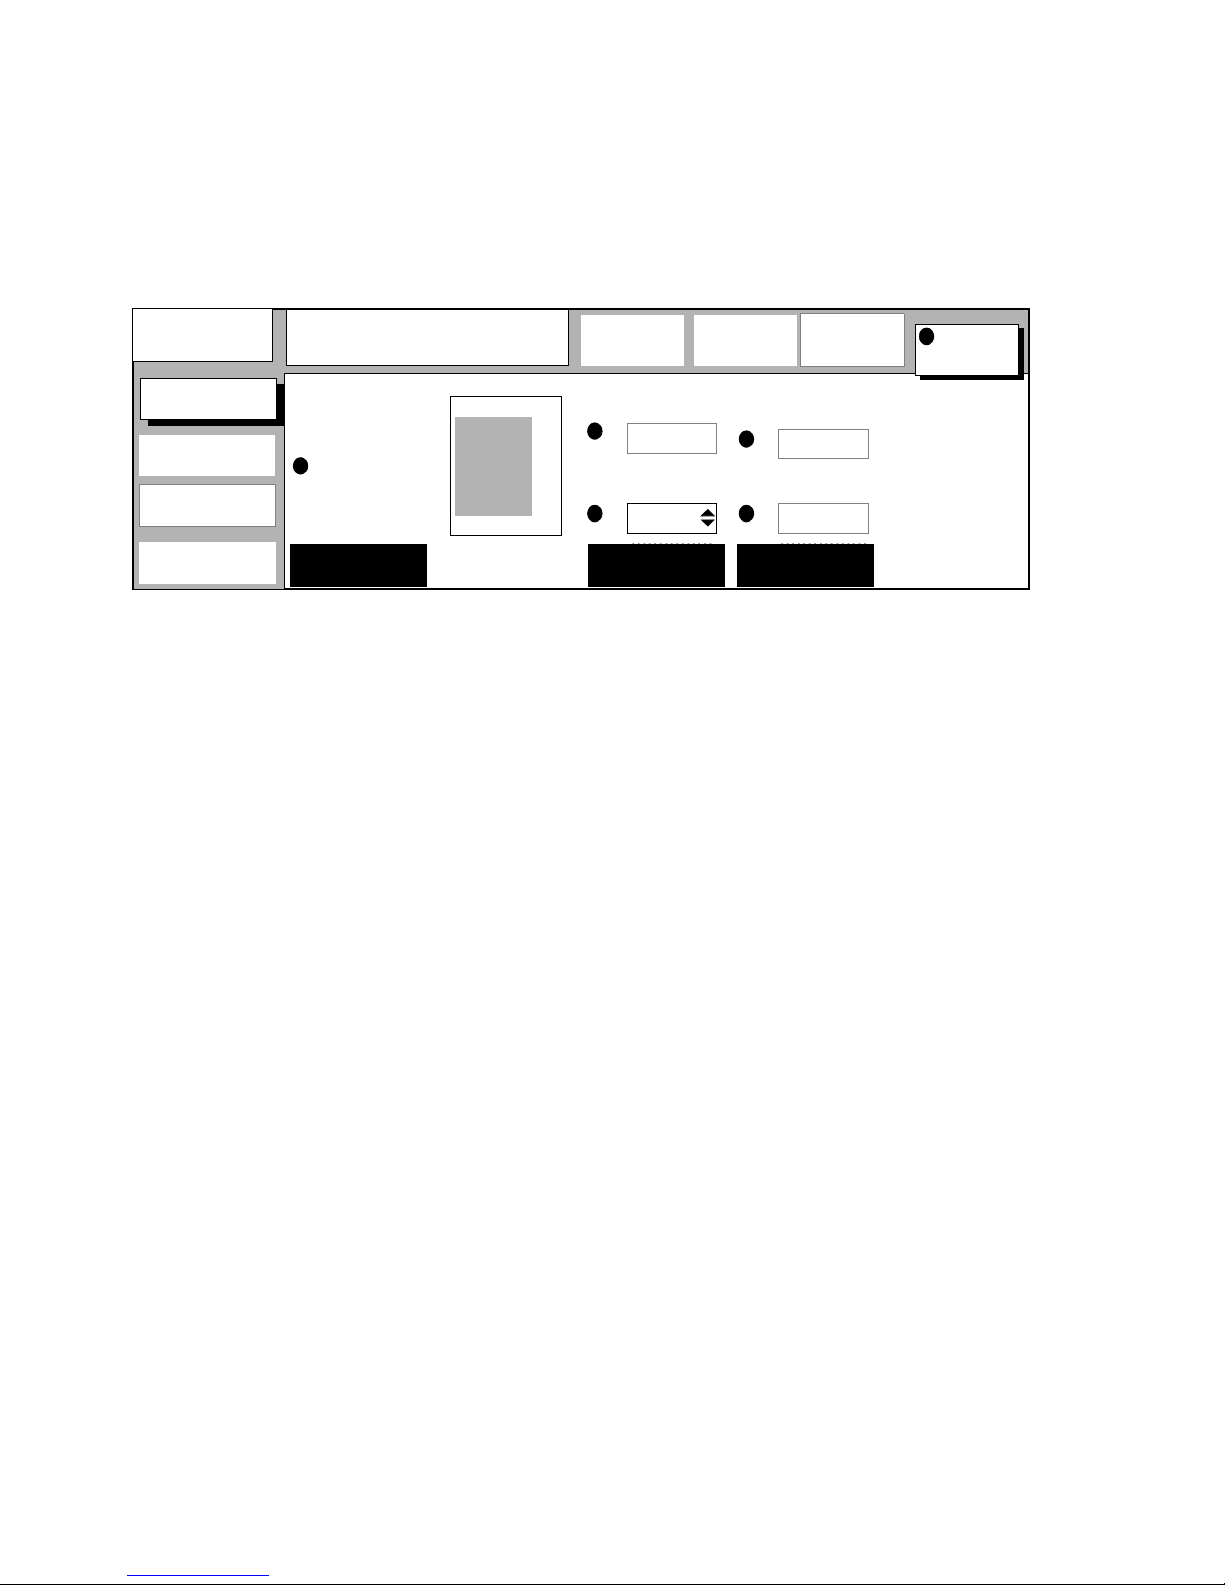
The Océ 9700 with a folder (optional)
If your configuration is equipped with a folder, the display will show the
‘Folding’ button as in illustration below.
Copies:
0
Ready to copy
................
Machine
❍
A3 Paper
❍
A2 Paper
Automatic
...........................................................................................................
Folding
Folding
length
.....................................
[7] The ‘Folding’ button is used to activate the optional folder.
●
Roll
selection
.....................................
................
Program
.....................................
By pressing the ‘Folding’ button you can activate the optional folder. If
‘Folding’ is selected (black background), all output will be folded. Additional
folding settings are described in ‘Folded copies (optional)’ on page 51.
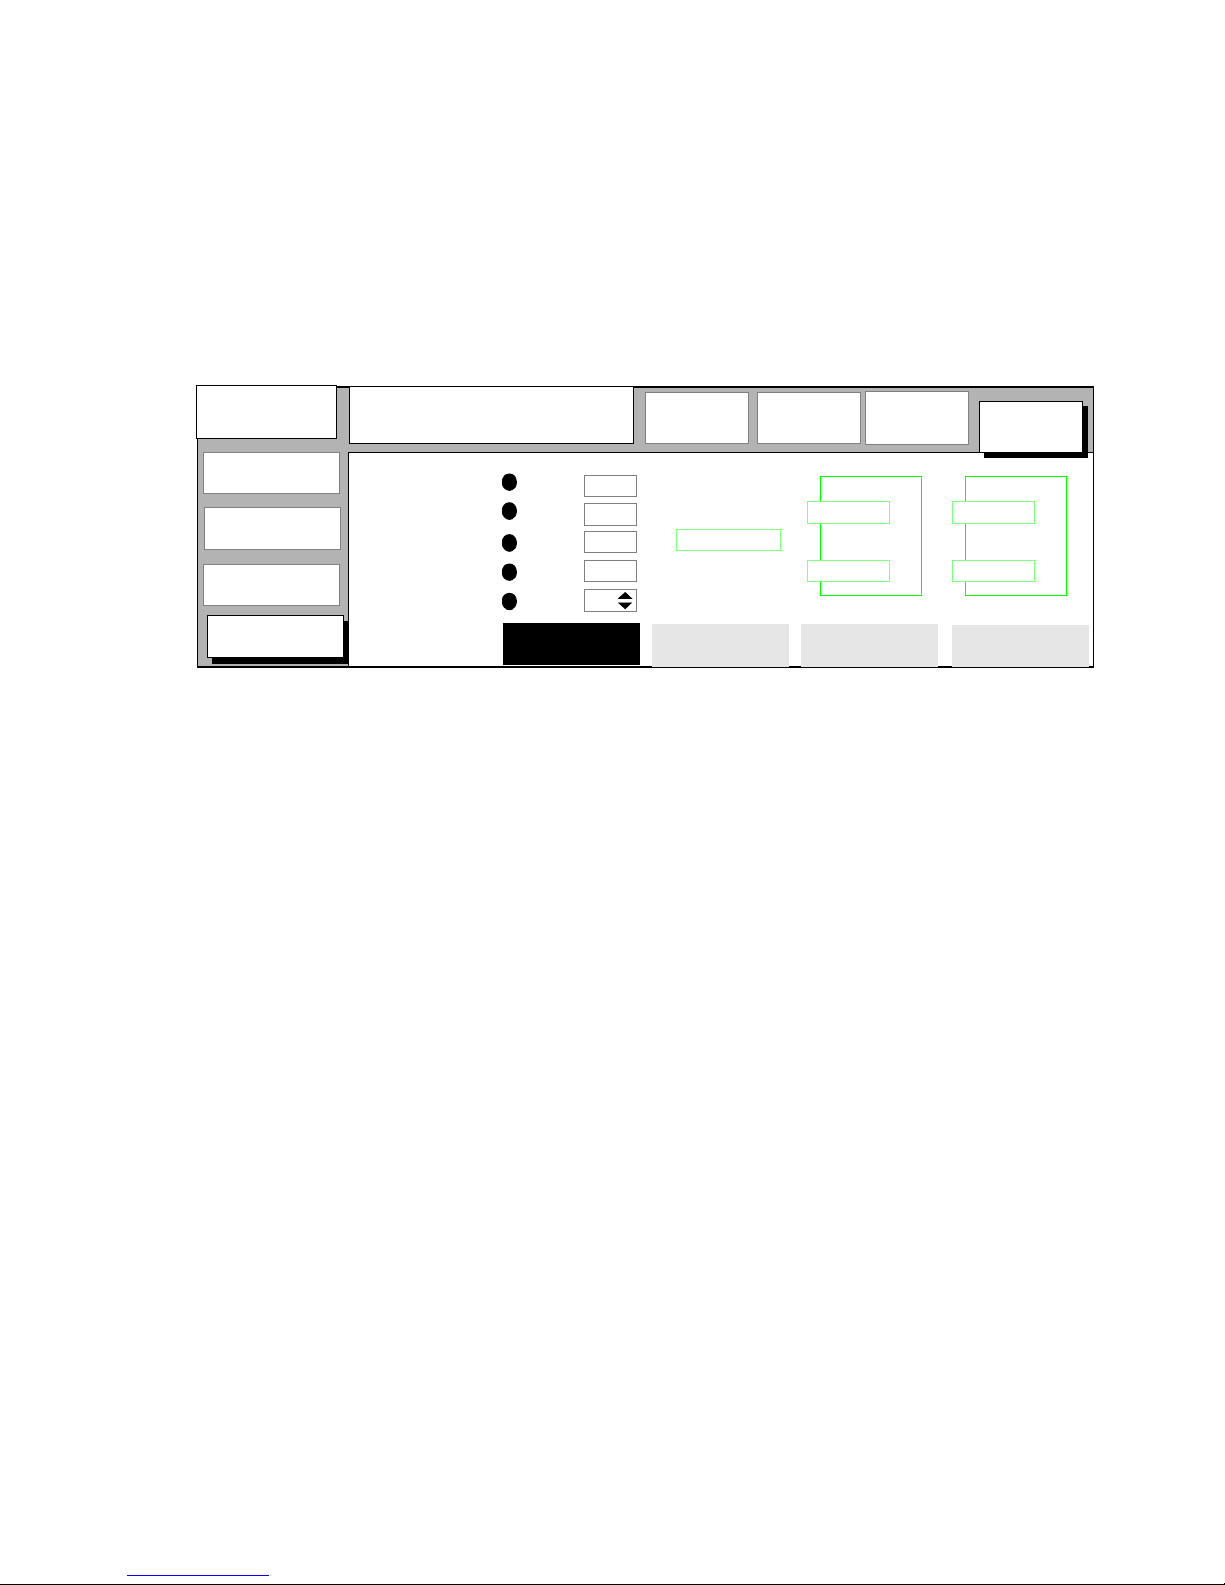
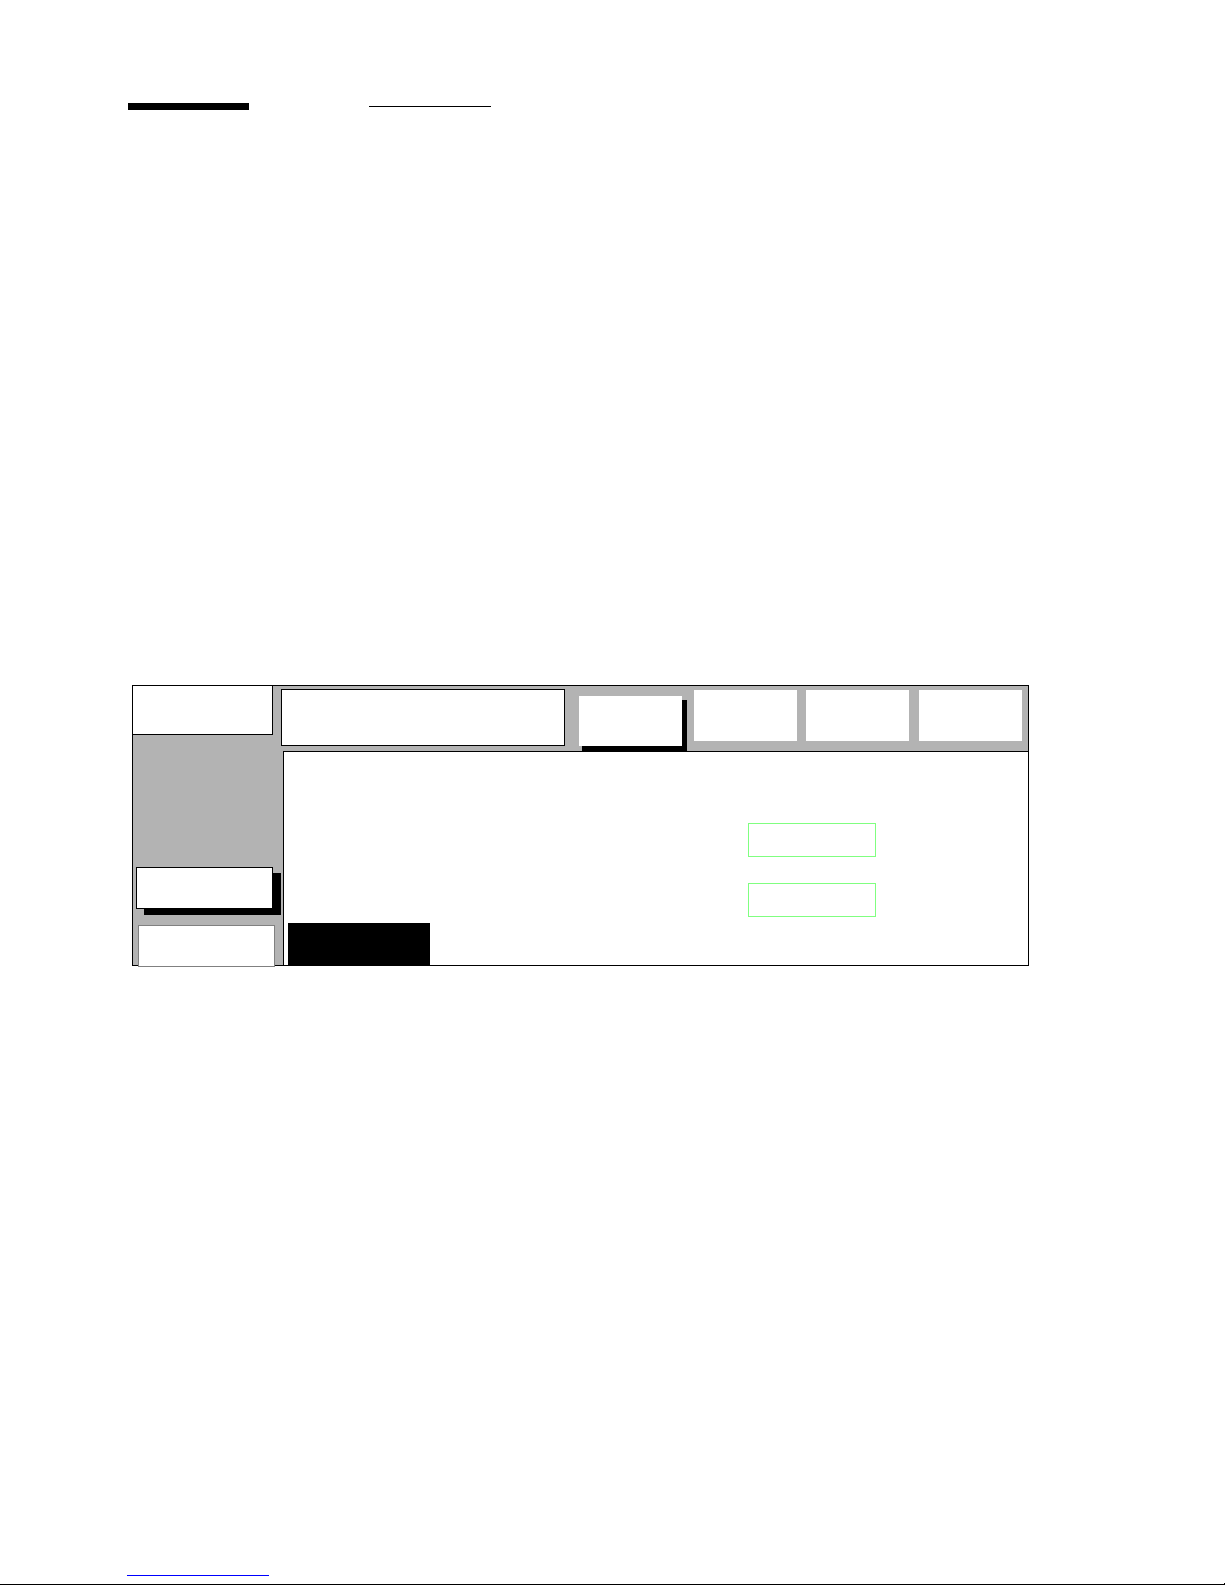
The Océ 9700 with a controller (plot option)
100.0%
❍
Automatic
●
Zoom
selection
...............
Finishing
●
.....................................
................
Copy
Lighter
.......
0
.......
Darker
Exposure
If your configuration is equipped with a controller, the scanner’s display will
show the print button as in illustration 8 below.
Copies:
0
Ready to copy
.........................
......................................................................................................................................
.....................................
[8] The Print button is used to enable or disable plotting on the Océ 9700 printer
Using the Océ 9700 21
Folding
.....................................
Folding
length
................
Machine
A3 Paper
❍
A2 Paper
Automatic
●
Roll
selection
.....................................
................
Program
❍
Automatic
●
Zoom
selection
.....................................
...............
Finishing
100.0%
0
●
ExposurePrint
.....................................
................
Copy
Lighter
.......
.......
Darker
Page 22
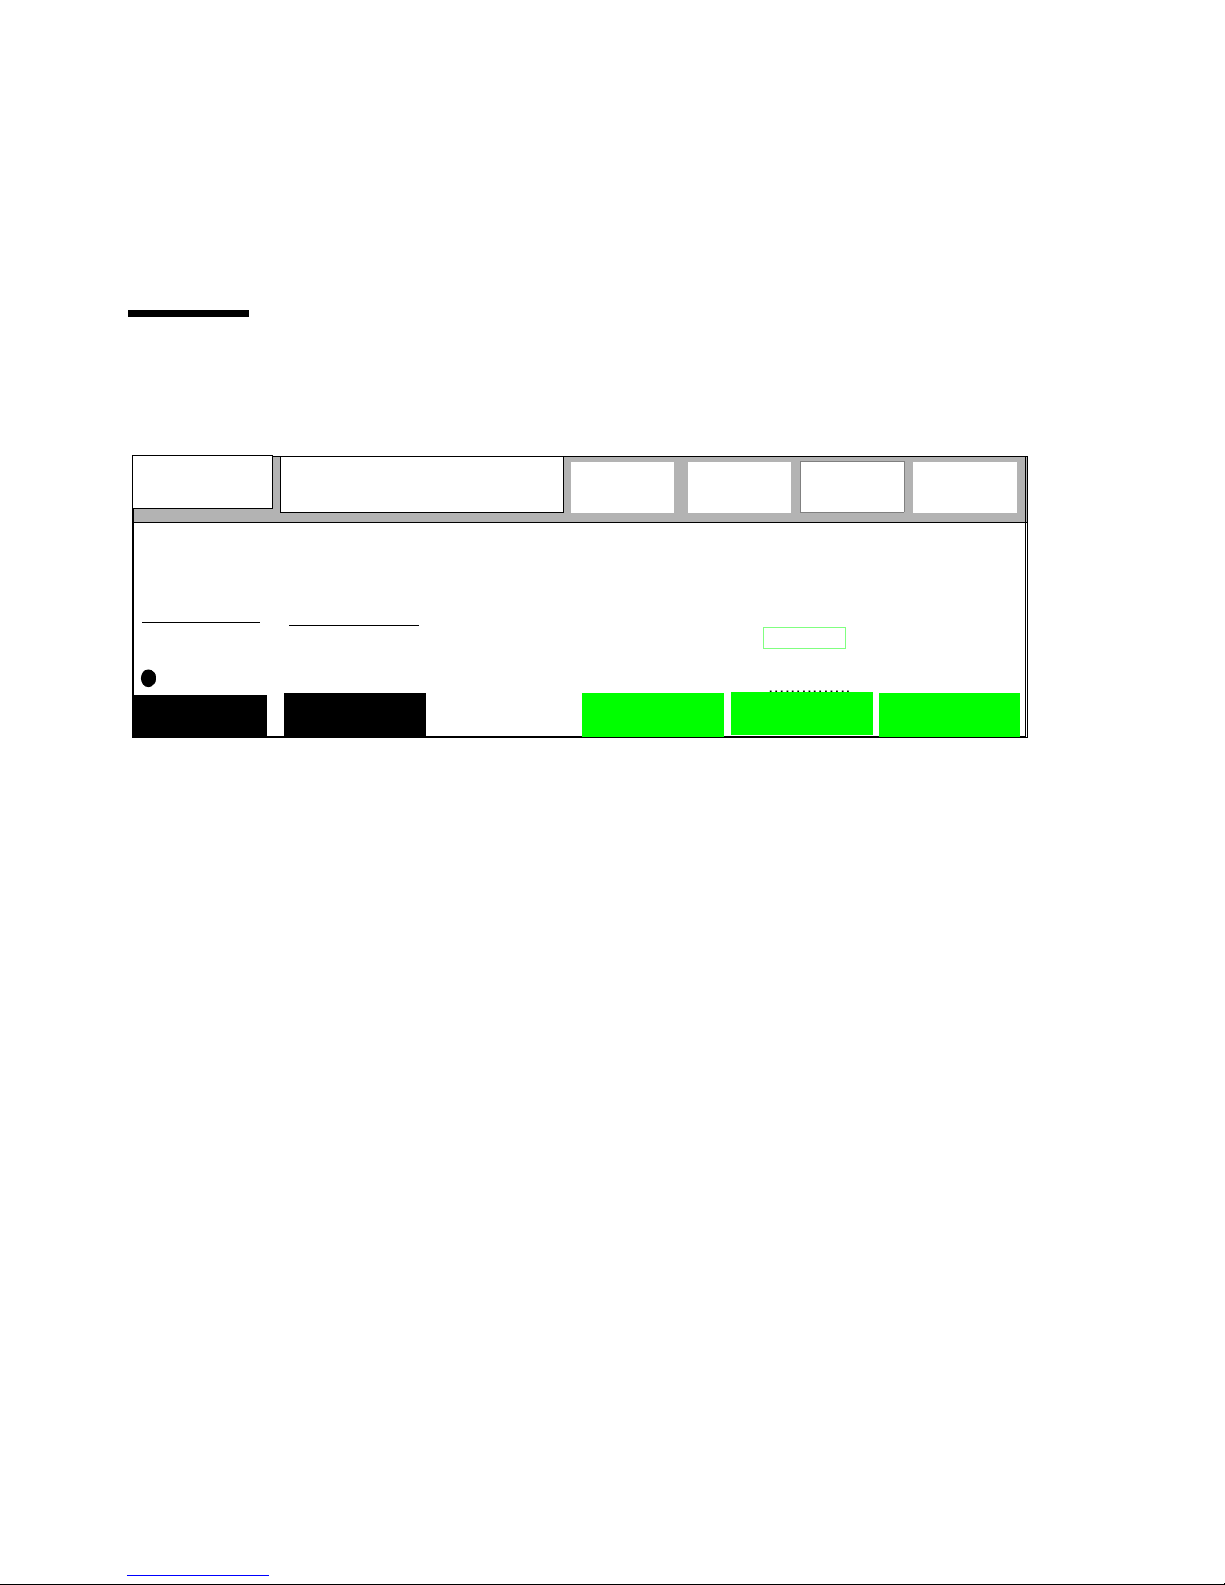
Note:
The ‘Folding’ button is only present if the optional folder is installed.
By pressing the Print button you can enable or disable plotting on the Océ 9700
printer . More information about printing can be found in chapter 6, ‘Print jobs’
on page 103 .
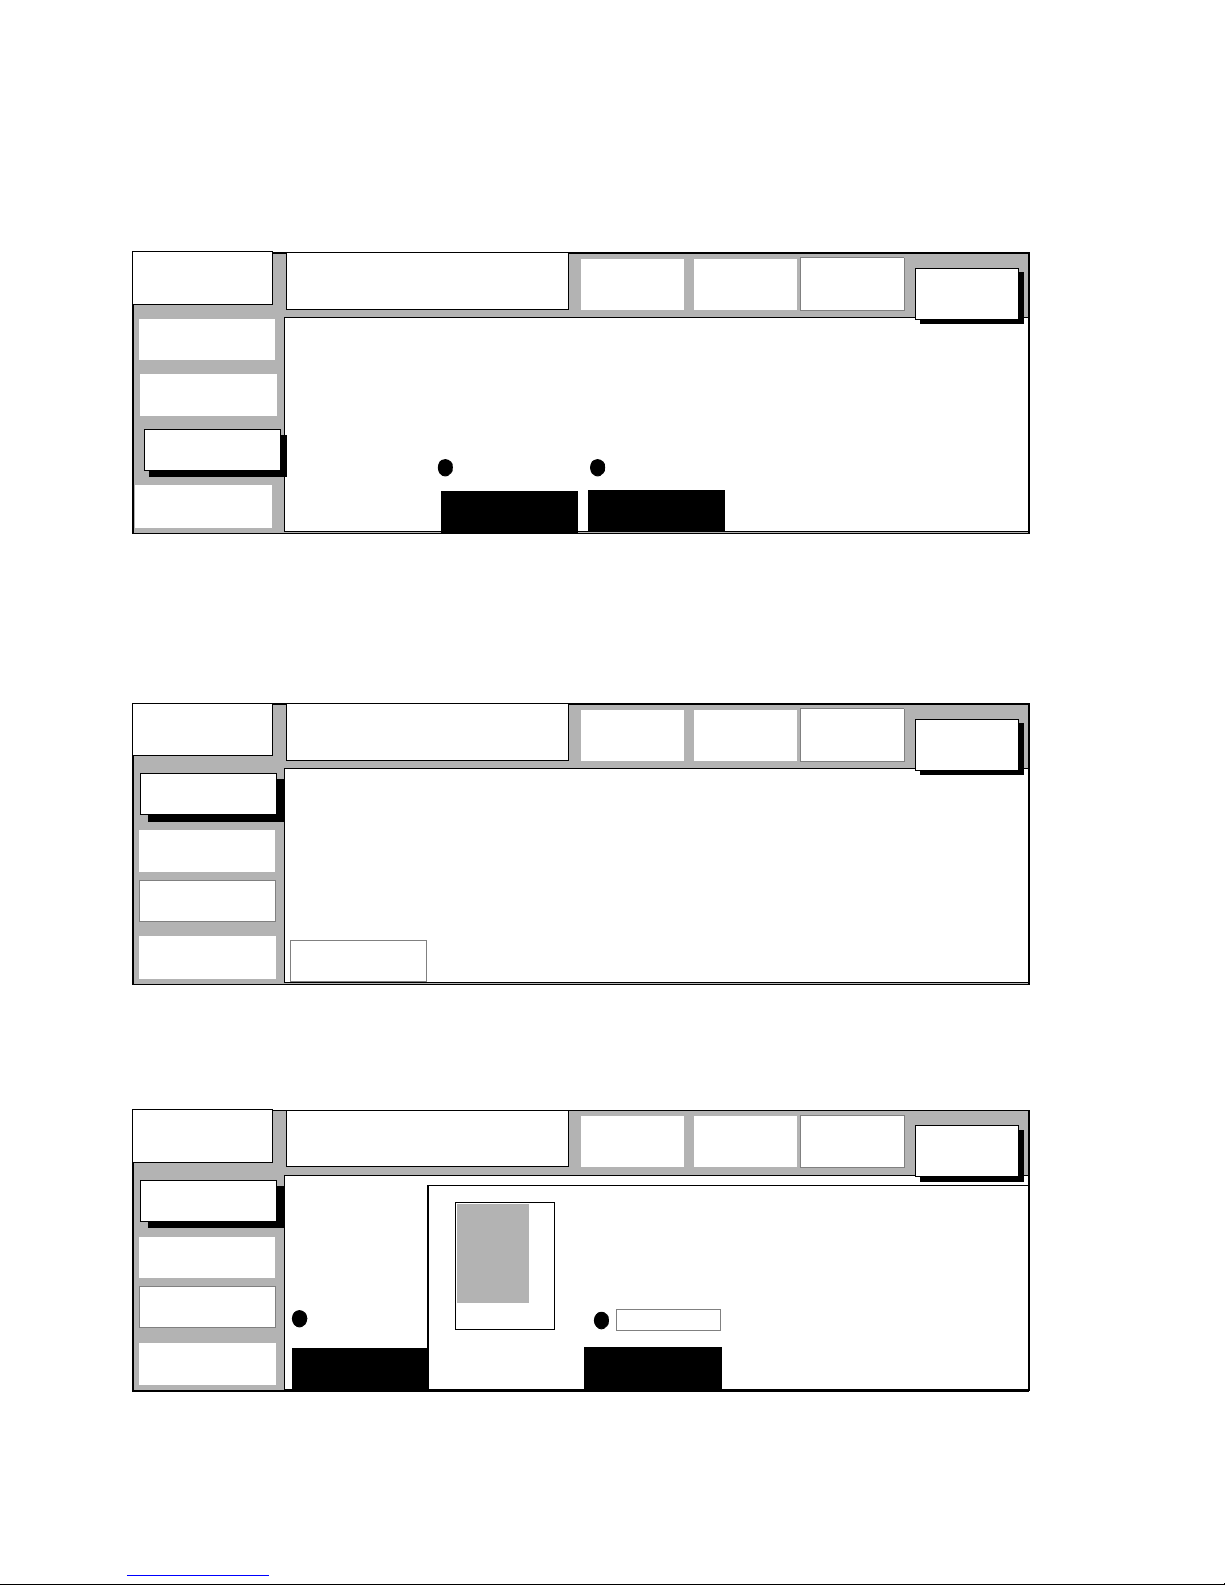
The Océ 9700 with Scan Station (optional)
If your configuration is equipped with the optional Océ Scan Station, the
scanner’s display will show the Scan button as in illustration 9 below.
Copies:
0
.....................
400 dpi
without copy
with copy
Scan
Ready to copy
.........................
......................................................................................................................................
.....................................
[9] Display if Océ Scan Station is installed
Note:
The ‘Folding’ button is only present if the optional folder is installed.
Folding
.....................................
Folding
length
................
Machine
A3 Paper
❍
A2 Paper
Automatic
●
Roll
selection
.....................................
................
Program
❍
●
.....................................
...............
Finishing
100.0%
Automatic
Zoom
selection
.......
0
●
.......
ExposurePrint
.....................................
................
Copy
Lighter
Darker
The Scan station offers ‘Scan T o File’ functionality: All scanned originals are
saved on the Scan Station.
More information about the Scan Station can be found in chapter 7, ‘Scan
Station (optional)’ on page 117, and in the ‘Scan Station User Manual’.
22 Océ 9700 Copier/Printer User Manual
Page 23
Using the section buttons
By means of the section buttons you can access the machine, program,
finishing and copy sections. In a section, you can use the function buttons to
select a specific function; the function name belonging to each button is shown
in the display.
As you can see in illustration 6 on page 19, the display is surrounded by
buttons. Their function depends on the state of the display.
The top four buttons (section buttons) prov ide access to the sections (main
menus). Each high level menu item contains several functions (‘cards’). The
function buttons allow you to select functions or sub functions in a card.
Finally you may use the higher/lower buttons, or numeric buttons to define
numeric settings.
When operating the buttons of the Océ 9700 display, keep this sequence in
mind: start with one of the section buttons and work counter clock-wise to the
function buttons. Finally, use the triangular higher/lower buttons to make a
selection.
section (top - men u) le vel
KEY
Copies:
0
[10] When using the Océ 9700 menu, work counter clockwise
Ready to cop y
function (bottom menu) level
............
Machine
❍
●
............... ... .... ... .... ... .... ... .... ... .... ... ....... .... ... .... ... .... ... .
Roll
selection
................ ... .... ... .... ... ....
A3 Paper
A2 Paper
Automatic
............
Program
❍
Automatic
●
Zoom
selection
................ ... .... ... .... ... ....
100.0%
.......... . .
Finishing
●
................ ... .... ... .... ... ....
............
Copy
Lighter
.......
0
.......
Darker
Exposure
function
value
level
Using the Océ 9700 23
Page 24
If you want access to a section, simply press its button. Pressing Copy for
example, displays:
Copies:
0
Image
Special
original
Copy
material
Copy
size
Copies:
0
Stamp
Fold
delivery
Fold
0 mm
0 mm
................
Finishing
.....................................
................
Copy
0 mm
0 mm
Add
strip
Ready to copy
................
Machine
A3
A4 >>
A3 >>
A3
A2
A2 >>
A1
A1 >>
A0
......................................................................................................................................
.....................................
[11] The Copy section
A0 >>
Auto format
selection
.....................................
Standard cut
Synchro cut
Copy
length
.....................................
210 mm
................
Program
Remove
strip
.....................................
If you press the Finishing button, this display will be shown:
Ready to cop y
................ ................
Machine Copy
.................. ... .... ... .... ... .... ... .... ... .... ... ....... .... ... .... ... .... ... .... ... .... ... .... ... .... ... ....... .... ... .. . .... .
Folding
................ ... .... ... .... ... ....
................ ... .... ... .... ... ....
length
................ ... .... ... .... ... ....
................
Program
................ ... .... ... .... ... ....
width
.......... .. .. ..
Finishing
................ ... .... ... .... ... ....
Belts
Belt 2
Belt 1
Stack
Copy
delivery
Copies:
0
Stamp
Fold
delivery
Fold
[12] The Finishing section (Fold delivery)
If you have selected settings in the Cop y or Finishing section, that are different
from the default settings, a bullet will appear in the according button:
Ready to copy
................ ................
Machine Copy
......................................................................................................................................
Folding
length
.....................................
[13] Indication of changed settings in Finishing menu
.....................................
.....................................
................
Program
.....................................
width
................
Finishing
.....................................
Belts
Belt 2
Belt 1
Stack
Copy
delivery
24 Océ 9700 Copier/Printer User Manual
Page 25
You can leave a section by:
pressing the same section button again. The start-up (blank) display as in
1
illustration 6 on page 19 will be shown,
pressing another section button. In this case the new section will be displayed
2
immediately.
Each section can be subdivided into se veral cards or sub menus. For instance,
the copy section contains these cards:
Copies
0
Image
Special
original
Copy
material
Copy
size
:
Ready to copy
......................................................................................................................................
.....................................
[14] The four cards in the Copy section
Auto format
selection
.....................................
A4 >>
A3 >>
A2 >>
A1 >>
A0 >>
A3
A3
A2
A1
A1
................
Machine
210 mm
Standard cut
Synchro cut
Copy
length
.....................................
................
Program
.....................................
You can leave a card by:
pressing the card selection button or (another) section button.
................
Finishing
0 mm
0 mm
Remove
strip
0 mm
Add
strip
.....................................
................
Copy
0 mm
Using the Océ 9700 25
Page 26
You can move between cards by:
pressing the card selection button. For instance if you press the card selection
button in the Copy size section as displayed above, you will enter the Copy
material card:
Copies:
0
Image
Special
original
Copy
material
Copy
size
Copies:
0
Image
Special
original
Copy
material
Copy
size
Ready to copy
Polyester
Transparent
Paper
................
Machine
Polyester
Transparent
Paper
................
Program
................
Finishing
................
Copy
......................................................................................................................................
Roll 1
.....................................
[15] The Copy material card selected
.....................................
.....................................
Roll 2
Roll 3
.....................................
Roll 4
.....................................
How to modify the settings in a card:
If you consider the image card in the copy section as an example,
Roll 2
Ready to copy
Stretch
Erase
Shift
Mirror
Autoshift
................
Machine
................
Program
......................................................................................................................................
Edit
type
.....................................
[16] Image card selected
.....................................
.....................................
.....................................
...............
Finishing
................
Copy
.....................................
If you press the Edit button, the function name is printed white-on black. This
indicates that the edit function has been activated. See the illustration below:
Copies:
0
Image
Special
original
Copy
material
Copy
size
[17] Edit function in image card activated
26 Océ 9700 Copier/Printer User Manual
Roll 2
Ready to copy
Stretch
Erase
Shift
Mirror
Autoshift
......................................................................................................................................
Edit
type
.....................................
..................................
................
Machine
Upper left
Shift
position
..................................
................
Program
..................................
...............
Finishing
................
Copy
..................................
Page 27
If you press the edit button twice, you’ll en ter the shift function as can be s een
in illustration 18.
Copies:
0
Image
Special
original
Copy
material
Copy
size
Copies:
0
Image
Special
original
Copy
material
Copy
size
Roll 2
Ready to copy
Stretch
Erase
Shift
Mirror
Autoshift
................
Machine
To right:
0 mm
To left
0 mm
................
Program
...............
Finishing
Down
0 mm
Up
0 mm
................
......................................................................................................................................
Edit Vertical
type
.....................................
[18] Se lecting another edit func tion
.....................................
Changing a numerical value
Horizontal
.....................................
.....................................
.....................................
If you press the ‘Horizontal’ function button the
display will change to:
Roll 2
Ready to copy
Stretch
Erase
Shift
Mirror
Autoshift
................
Machine
To right:
To left
................
Program
0 mm
0 mm
......................................................................................................................................
Edit Vertical
type
.....................................
[19] Selecting the ‘Horizontal; function in the Image card
.....................................
Horizontal
.....................................
.....................................
...............
Finishing
Down
0 mm
Up
0 mm
................
.....................................
Copy
Copy
Note the two triangles located to the right of the horizontal shift value in the
‘To left’ area. They inform you that the system is ready to accept numerical
data.
Using the Océ 9700 27
Page 28
You can modify a numeric value in two ways:
by using the higher/lower buttons, and
1
by using the numeric buttons.
2
Having changed the value, the display may look like this. Note the shaded
rectangle in the display which has been moved to the left:
Copies:
0
Image
Special
original
Copy
material
Copy
size
Roll 2
Ready to copy
Stretch
Erase
Shift
Mirror
Autoshift
................
Machine
To right:
0 mm
To left
10 mm
................
Program
...............
Finishing
Down
0 mm
Up
0 mm
................
Copy
......................................................................................................................................
Edit Vertical
type
.....................................
[20] The ‘Horizontal’ function in the Image card has been modified
.....................................
Horizontal
.....................................
.....................................
.....................................
The image of the next original you copy will be shifted 10 mm to the left on
the copy.
28 Océ 9700 Copier/Printer User Manual
Page 29

Stopping a copy or print job
Pressing the stop button interrupts the active print process. In case of a copy
job the original will be deposited in the original delivery tray.
▼▼▼▼
Stopping a job
Press the st op butt on. If yo u were pri nting a n umber of co pies, onl y the curre nt
1
copy of the original will be finished before the machine stops.
Note:
The machine can in general not stop immediately because the started
paper process has to be finished.
Using the Océ 9700 29
Page 30
Interrupting a copy or print job
You can interrupt a job that is currently being processed, to process an urgent
job in between. The settings of the current job will be saved, and you are
requested to wait. As soon as the m achine is ready , you can start the ur gent job .
When the urge nt job is finished, you can int r oduce anot her urgent job, o r you
can instruct the machine to continue with the job that was being processed at
the moment of interruption.
▼▼▼▼
Copies
0
General
Controller
.
Note:
Interrupting a job, automatically disables the processing of new print
jobs. If required, you must enable printing as described in the following
procedures.
Interrupting a copy or print job to start an urgent copy job
Open the ‘General’ card in the ‘Machine’ section.
1
Press the function button ‘Interrupt job’ (see figure 21 ).
2
Ready to cop y
Interrupt mode active
..................................................................................
..........................
Interrupt
Access to
job
Page
.....................................
[21] Interrupt a job
Sheet
feed
.....................................
................
Machine
Rewind
.....................................
................
Program
User ID:
Account ID:
............... .... ... .... ... .... ... .... ... .... ... ...
Accounting
.....................................
................
Finishing
0
00
Reset
counter
.....................................
................
Copy
Wait until the message ‘Interrupt mode active’ appears.
3
Start the urgent copy job
4
Wait until the urgent job has finished,
5
The display will show the message ‘Ready to copy’.
You can start another urgent job or,
6
Open the ‘General’ card in the ‘Machine’ section and press the function button
7
‘Interrupt job’ again, to continue with the job that was being processed at the
moment of interruption.
30 Océ 9700 Copier/Printer User Manual
Page 31

If required, return to the main menu, and enable printing by pressing the
8
function button ‘Print’ (see figure 22).
Copies:
0
▼▼▼▼
Ready to copy
.........................
......................................................................................................................................
.....................................
[22] Enable printing
Folding
.....................................
Folding
length
................
Machine
A3 Paper
❍
A2 Paper
Automatic
●
Roll
selection
.....................................
................
Program
❍
●
.....................................
...............
Finishing
100.0%
Automatic
Zoom
selection
0
●
ExposurePrint
.....................................
................
Copy
Lighter
.......
.......
Darker
Interrupting a copy or print job to start an urgent print job
Stop the print queue, using your printer driver, and wait until the controller is
1
idle.
Open the ‘General’ card in the ‘Machine’ section.
2
Press the function button ‘Interrupt job’ (see figure 21).
3
Wait until the message ‘Interrupt mode active’ appears.
4
Return to the main menu, and enable printing by pressing the function bu tton
5
‘Print’ (see figure 22).
Send the urgent print job, using your printer driver.
6
After the urg ent job has finished, you can:
7
Start another urgent job or,
Open the ‘General’ card in the ‘Machine’ section and press the function button
8
‘Interrupt job’ again, to continue with the job that was being processed at the
moment of interruption.
Using the Océ 9700 31
Page 32

Collecting your output
The Océ 9700 is av ailable in se veral conf igurations, each of which may ha ve a
special copy output delivery device. In this section you’ll see for the various
configurations where to find copy or print output.
Copy Delivery Tray
If you have the basic config ur ation, the co pies are delivered at the rear of the
printer onto the copy delivery tray . This tray can stack a number of copies from
various sizes to get a neat stack and the tray can be e xtended for longer copies.
The ‘Copy Delivery Tray’ can be combined with the ‘Lower Output’ or
‘Folder’, connected to the lower delivery ou tput.
[23] Basic configurat ion: unfolded copies are delivered onto the Copy Delivery Tray.
32 Océ 9700 Copier/Printer User Manual
Page 33

Folder (optional)
If the Océ 9700 is equipped with a folder, the folded copies are fed into the
standard delivery of the folder (see figure 24 on page 33).
The ‘Folder’ can be combined with the ‘Copy Delivery Tray’ or ‘High
Capacity Stacker’, connected to the upper delivery output. For more
information, see ‘Folded copies (optional)’ on page 51.
belt
First Fold
Delivery tray
[24] Folded copies will be delivered in the First Fold Delivery tray, the Standard Delivery tray, or
one of the belts of the optional high capacity output unit.
If the folder is equipped with the optional high capacity output unit
folder
Waste
box
Reinforcement
Unit
high capacity
output unit
Standard
delivery tray
the
folded copies can be delivered on one of the two belts. There is even the
possibility when one belt is full, to switch automatically to the other belt to
increase productivity.
Using the Océ 9700 33
Page 34

High Capacity Stacker (optional)
If the Océ 9700 is equipped with a High Capacity Stacker, copies can be
delivered at the rear of the printer onto one of the six stacker bins.
The ‘High Capacity Stacker’ can be combined with the ‘Lower Output’ or
‘Folder’, connected to the lower output.
[25] Emptying the High Capacity Stacker
2476
[26] Extending trays of the High Capacity Stacker
For more information, see ‘High Capacity Stacker (optional)’ on page 60.
34 Océ 9700 Copier/Printer User Manual
Page 35

Lower Output
If you have the basic configuration, the copies can be collected under the lower
delivery output, using an optional container for long copies.
The ‘Lower Output’ can be combined with the ‘Copy Delivery T ray’ or ‘High
Capacity Stacker’, connected to the upper delivery output.
[27] Long copies can be collected under the lower delivery output.
For more information, see ‘Lower Output’ on page 63.
Using the Océ 9700 35
Page 36

Resetting the counter
To record the daily production, the counter has to be reset.
▼▼▼▼
Copies:
0
General
.
Resetting the counter
Open the ‘General’ card in the ‘Machine’ section.
1
Press the function button ‘Reset counter’ (see figure 28).
2
.....................................
................
Copy
Reset
counter
Reset counter?
Print = reset counter
Clear C = cancel
................................................................................
Interrupt
job
.....................................
[28] Resetting the day counter
Press start to reset the counter. The value of the counter will change to ‘0’.
3
Sheet feed Rewind
Access to
.....................................
Special
................
Machine
.....................................
................
Program
User ID:
Account ID:
......................................................
Accounting
.....................................
................
Finishing
0
0
0
36 Océ 9700 Copier/Printer User Manual
Page 37

Accounting
You can keep track of your copy and print jobs by using the accounting
function. There are two ways of using accounting:
Via the optional ‘M achin e Monitor’ as described in a separate manual.
■
Via the RS232 output port as described in this section.
■
The RSR232 output port on the scanner’s operating panel sends accounting
data. T o use these data you need to connect a PC to the port and write your own
computer application that reads ASCII data. A line of ASCII text is sent to the
RS232 port (connected to the PC) after each job. The structure of the data is as
follows.
“AI=AccountIdUI=UserIdMI=MachineIdPT=PrintTypeST=SortType
TO=TotalOriginalsPP=PaperPrintsSP=tranSparentPrintsYP=polYest
erPrintsPC=PaperClicksSC=tranSparentClicksYC=polYesterClicksT
F=TotalFoldedTU=TotalpUnchedTS=TotalStampedTE=TotalEditedTG=T
otalenlarGedTC=TotalreduCedSR=ScanjobResolutionSF=ScanjobFile
formatSW=ScanjobWidthSH=ScanjobHeight;;;”
For example:
“AI=123456789UI=123456789MI=123456789PT=0ST=1
TO=123456789PP=123456789SP=123456789YP=123456789PC=123456789S
123456789C=123456789YC=123456789TF=123456789TU=123456789TS=12
3456789TE=123456789TG=123456789TC=123456789SR=0SF=0SW=297SH=0
;;;”
The table with accounting parameters applies:
Accounting parameter reference
Parameter Type Meaning
AccountId
MachineId
PrintType
SortType
TotalOriginal s
PaperPrints
<num> nine digit acco unt number
<num> nine digit machin e identification
<num> plot(0) or copy(1)
<num> always 0: sort by page
<num> number of printed originals
<num> number of pa per prints
Using the Océ 9700 37
Page 38

Accounting parameter reference
tranSparentPrints
polYesterPrin ts
PaperClicks
tranSparentClicks
polYesterClicks
TotalFolded
TotalpUnched
TotalStam ped
TotalEdited
TotalenlarGed
TotalreduCed
Scanjo bR e sol uti on
ScanjobFileformat
ScanjobWidth
ScanjobHeight
UserId
Note:
P ar amete rs that ar e not us ed by the Océ 9700 conf igur ation, ar e put to 0.
<num> number of transparent prints
<num> number of polyester prints
<num> paper media clicks used
<num> transparent media click s used
<num> polyester media clicks used
<num> number of folded prints
<num> number of punched prints
<num> number o f st amped prints
<num> number of edited (framed) prints
<num> number of enlarged prints
<num> number o f reduced prints
<num> 1=200 dpi, 2=300 dpi, 3=400 dpi
<num> 1=CALS, 2=TIFF
<num> fil e width in mm or 0.1”
<num> file height in mm or 0.1”
<num> Nine digits number to identfy us er
Use the communication parameters settings of your scanner’s RS232 port of
the table below:
Accounting communication RS232 parameters
baudrate
handshake
parity
databits
stopbits
[29] Accounting data communication parameters
Clicks can be registered in m, m
9600
off
none
8
1
2
, ft, or ft2. This depe nds on your particular
machine conf iguration. sp ecifie d by the Océ service engin eer . You must di vide
the number of clicks by 1000 to ge t the real num ber of m, m
2
, ft, or ft2.
For insta nce, th e P ape rCli cks of a parti cula r acco unt is 1730 ( PC= 1730) . This
2
is 1730 x 0.001 = 1.73 clic ks of pap e r medi a , for example 1.73 m
.
You can specify a numeric user and account identification for each job to be
logged. If no user ID or account ID have been specified, the default IDs 0 for
user ID and 0 for account ID will be sent to the output port.
38 Océ 9700 Copier/Printer User Manual
Page 39

▼▼▼▼
To switch on accounting
Open the ‘General’ card in the ‘Machine’ section.
1
Press the function button ‘ Accounting’
2
Copies:
0
General
Controller
.....................................
Reset
counter
................
Copy
Ready to copy
.......................................................................................................................................
Interrupt
Access to
job
.....................................
Page
[30] Switching on Accounting
Press the function button again to select the Account ID parameter.
3
Use the numeric buttons or the scroll buttons to define an Account ID.
4
Press the function button again to select the User ID parameter.
5
Use the numeric buttons or the scroll buttons to define a user ID.
6
Insert your original.
7
Sheet
Access to
feed
.....................................
Special
................
Machine
Rewind
.....................................
................
Program
User ID:
123456789
Account ID:
123456789
....................................................
.....................................
................
Finishing
Accounting
All jobs you copy from now on will be logged to the user ID and account Id
you just specified.
0
▼▼▼▼
Switching off accounting
Open the ‘General’ card in the ‘Machine’ section.
1
Press the function button ‘Accounting’ as many times as necessary to deselect
2
the function.
From now on, no data will be sent to the RS232 port of the scanner.
Using the Océ 9700 39
Page 40

40 Océ 9700 Copier/Printer User Manual
Page 41

Chapter 3
Basic copy jobs
Océ 9700 Copier/Printer
User Manual
This chapter describes how to make copies.
41
Page 42

How to make a copy
If you feed the original into the scanner and press the start button to make a
number of copies, the original will be pulled into the slot and then be deposited
at the front or the rear of the scanner. The engine will start printing and in the
display you will see:
Copies:
7
Automatic feed
[31] ‘Automatic feed’, you do not need to press start for the next original to be pulled into the
scanner
................
Machine
A3 Paper
❍
A2 Paper
Automatic
●
..................................................................................
Roll
selection
.....................................
................
Program
❍
●
.....................................
...............
Finishing
100.0%
Automatic
Zoom
selection
.......
0
●
.......
Exposure
.....................................
................
Copy
Lighter
Darker
The message ‘automatic feed’ means that the next original does not need to be
confirmed with the start button. The scanner pulls it in as soon as the printing
of the previous original has ended.
When printing, the system is processing the memory content. If the last copy
has been made, the memory will be cleared for the next original.
While printing copies of the previous original, you can make settings for the
next one.
42 Océ 9700 Copier/Printer User Manual
Page 43

If you leave the scanner unattended for a while after the last copy
(approximately 25 seconds), it will return to its default settings and display:
Copies:
0
Ready to copy
[32] ‘Ready to copy’, the machine is ready to accept a new original and the engine is not printing
................
Machine
A3 Paper
❍
A2 Paper
Automatic
●
..................................................................................
Roll
selection
.....................................
................
Program
❍
●
.....................................
...............
Finishing
100.0%
Automatic
Zoom
selection
.......
0
●
.......
Exposure
.....................................
................
Copy
Lighter
Darker
The ‘Ready to copy’ message invites you to define ne w settings and feed a new
original into the scanner . Note that the scanning of this ‘n ew’ original has to be
started by pressing the start button.
Note:
If you are copying thick originals or originals in a carrier sheet, it is
recommended to use the output at the rea r side of the scanner to ensure corr ect
delivery (s ee ‘Ori g i na l deli v er y aft e r sca nn i ng ’ on page 45).
▼▼▼▼
Making copies
Enter the number of copies using the numeric buttons.
1
Make other settings as required.
2
Insert the original face down and right aligned, along the original guide on the
3
scanner feed table (see figure 33).
Note:
When feeding the original , keep it in place u ntil it i s transporte d
(about 1 cm) by the machine.
[33] Inserting the original
Press the start button.
4
Basic copy jobs 43
Page 44

The copying process will start. If ‘Automatic feed’ is displayed in the system
status area, the next original will be fed automatically without pressing Start.
Defining settings for the next original
You can define the settings for each original you want to copy. When
‘automatic feed’ is enabled, you should bear in mind that the original is
automatically pulled into the scanner. If you want to be absolutely sure about
the settings that belong to an original, insert an original when the settings are
correct.
▼▼▼▼
Note:
To increase your versatility at the scanner input side, you can ask your
key opera tor to switch off Automatic Feed. When using the scanner in
‘non-auto matic-feed’ mode you mu st press the start button for each new
original to be scanned. This offers the possibility to c hange the settings for the
next original, even if you already put the original in place on the scanner feed
table.
Defining settings for the next copy job
Select all settings required for the next original.
1
Insert the next original.
2
If ‘Automatic feed’ is not active, press the start button.
If ‘Automatic feed’ is active, the original is fed automatically.
Note:
The Océ 9700 will w ait t o s can th e next original, until the last copy
of the prev ious origina l is printed.
44 Océ 9700 Copier/Printer User Manual
Page 45

Original deliver y after scanning
You can choose for delivery of the original at the front (rewind) or the rear side
of the scanner.
Attention:
Never
use the ‘Rewind’ function if the o ptional ‘Origina l
Delivery Tr ay’ is installed. The two mechanisms may try to pull the original
in two different directions.
Note:
If you are copying thick originals or originals in a carrier sheet, it is
recommended to use the output at the rea r side of the scanner to ensure corr ect
delivery .
Note:
If you are copying curled originals, it is recommended to use the o ut p ut
at the front side of the scanner to ensure correct delivery.
Selecting original delivery
Open the ‘General’ card in the ‘Machine’ section.
1
Press the function button ‘Rewind’ to make your selection:
2
‘Rewind’ is selected (black background): Originals are delivered at the front
■
side of the scanner. You have to collect each original by hand.
‘Rewind’ is not selected (white background): Originals are delivered at the
■
rear side of the scanner.
Copies
0
General
Controller
.....................................
Reset
counter
................
Copy
Sheet feed
..................................................................................
Interrupt
Interrupt
Access to
job
job
Page
.....................................
[34] Using the ‘Rewind’ function to select original delivery at the front or the rear
Basic copy jobs 45
Access to
Sheet feed
ial
.....................................
................
Machine
Rewind
.....................................
................
Program
User ID:
Account ID:
.....................................................
.....................................
................
Finishing
0
00
Accounting
Page 46

Original Delivery Tray (optional)
You can use the Original Deliv ery Tray to collect the o riginals at the rear of the
scanner. All originals will be collected on the Original Delivery Tray.
▼▼▼▼
Using the Original Delivery Tray
Make sure the ‘Rewind’ option is
1
not
selected (see ‘Selecting original delivery’
on page 45).
Originals will now be delivered at the rea r side of the scanner
Put the Original Delivery Tray in position (see figure 35).
2
[35] Original Delivery Tray in position, at the rear of the scanner.
Put the magnetic guide at the left side of the output (see figure 35).
3
If needed, the Original Delivery Tray can be extended as shown in figure 36.
4
[36] Extending the Original Delivery Tray
Ensure that the Original Delivery Tray is connected to the power supply.
5
46 Océ 9700 Copier/Printer User Manual
Page 47

Copying on cut sheet material
If you want to copy a job on a paper t ype and/or s ize that is not available on
one of the paper rolls, it can be convenient to manually feed sheets of paper
instead of changing one of the paper rolls. The sheet feed is a special slot just
above the paper roll drawers on the engine. You can insert pre-cut copy
material in this slot, one sheet at a time.
▼▼▼▼
Copies
0
General
Controller
Note:
Only use paper as specified in ‘Copy material that can be used’ on
page 184.
Copying on pre-cut sheets
Open the ‘General’ card in the ‘Machine’ section.
1
Press the ‘Sheet feed’ button. The display will look as follows:
2
.....................................
Reset
counter
................
Copy
Sheet feed
..................................................................................
Interrupt
Interrupt
Access to
job
job
Page
.....................................
Select any required other settings.
3
Enter the number of copies using the numeric buttons.
4
Feed the original.
5
Press the start button.
6
Take your sheet of copy material to the side of the printer engine that contains
7
Sheet feed
Access to
ial
.....................................
................
Machine
Rewind
.....................................
................
Program
User ID:
Account ID:
.....................................................
Accounting
.....................................
................
Finishing
0
00
the sheet feed.
Use both hands to align the copy material in accordance with the format
8
indication and the sticker on the manual feed table.
Move the paper forward in the nip of the roller . This must cause an ample paper
9
bulge over the full width of the page.
Basic copy jobs 47
Page 48

Hold the paper with both hands until the engine pulls in the first part of the
10
sheet.
The bulge will be reduced or it will disappear. A fe w seconds later the complete
sheet will be pulled in the printer.
[37] Manually feeding a sheet of paper
If the copy job requires more sheets, the display will ask you to feed the next
11
sheet.
Repeat steps 7 to 11 to complete the job.
12
Collect your output.
13
Note:
The image will be printed on the side of the sheet which is facing up.
48 Océ 9700 Copier/Printer User Manual
Page 49

Stamp unit (optional)
The optional stamp unit allows you to print a predefined text on all your copies.
The content of stamps can be created and modified by your key operator. This
may be useful if you want to have the date, time or other information printed
on your copies. You can enter a stamp per original. There are 50 programmable
stamps available.
This section describes how to select a stamp and ho w to modify its layout (i.e.
size, grayscale and position).
▼▼▼▼
Copies:
0
High cap.
stacker
Stamp
Fold
Delivery
Fold
Note:
The key opera tor ca n define the contents of a stamp (see ‘Editing the
stamp’ on page 97).
Copies with stamp
Open the ‘Stamp’ card in the ‘Finishing’ section.
1
Select ‘Select’ by pressing the function button ‘Stamp’ one or more times (see
2
figure 38).
Ready to copy
49
50
01/01/96
1
Layout
Select
......................................................................................................................................
Stamp
.....................................
[38] Selecting a stamp
..................................
01/01/96 12:00
2
3
Confidential
................ ................
Machine Copy
................
Program
.................
Finishing
Select one of the available stamps by using the higher/lower buttons.
3
Basic copy jobs 49
Page 50

If required, press the function button ‘Stamp’ again to adjust the layout: size,
4
greyscale and position (see figure 39).
Copies:
0
High cap.
stacker
Stamp
Fold
delivery
Fold
Ready to copy
Layout
Select
Small
Large
................ ................
Machine Copy
Black
Dark grey
Grey
Lig h t grey
Stamp
................
Program
Top
Middle
Bottom
................
Finishing
Standard
......................................................................................................................................
Stamp Font Position Legend
.....................................
[39] Card to adjust the stamp
Note:
Stamps are printed in the legend area. In this case, you must select
...................................
Greyscale
...................................
..................................
...................................
the legend function and set the folding metho d (Standard, Ericsson or
Afnor).
Make other settings as required.
5
Feed the original.
6
50 Océ 9700 Copier/Printer User Manual
Page 51

Folded copies (optional)
If a folder is installed, choose to have your copies folded. The copies are folded
according to the selected folding width and length in combination with a
folding method. The folding methods are Standard, Ericsson and Afnor with
or without a binding edge.
Scanned originals
When selecting ‘Portrait’ as folding method, all originals
should be fe d in portrai t orient ation. When choosing ‘Automatic’ you can fe ed
your original in portrait orientation as well as in landscape orientation.
Depending on the roll width, the machine measures the length of the original
to obtain a good fold package.
Digital originals
When selecting ‘Portrait’ as Folding method, all digital
originals should be in portrait orientation (see ‘Auto rotate’ on page 112).
When choosing ‘Automatic’, the machine determines the length of the digital
original to obtain a good fold package, depending on the roll width.
Polyester or transparent media cannot be folded. If you try to do so, a warning
appears in the display.
Long copies
Long copies can be folded up to 6 m long. However copies
between 2.5 m and 6 m long can only be processed by the first fold unit. The
Fist Fold Delivery will be selected automatically to collect the output.
You can also select a folding method and if requir ed a folding length, folding
width and bindin g edge (se e f igure ). When changi ng the fo lding len gth and /or
folding width, and the folder is equipped with a high capacity output unit
(belts) with punch unit, you must also change the folding length and/or folding
width in this unit (see ‘High capacity output unit with punch unit (optional)’
on page 55).
Basic copy jobs 51
Page 52

Folding settings
Output length Result
‘1+2 fold’ selected
‘first fold’ selected
[40] Folding settings
< 2.5 m 1+2 fold, delivered in folder
standard delivery tray or belts
2.5 m - 6 m first fold only, delivered in
First Fold Delivery
> 6 m Unfolded, de livered in upp er out-
put: copy delivery tray or High Capacity Stacker
< 2.5 m first fold only, delivered in
First Fold Delivery
2.5 m - 6 m first fold only, delivered in
First Fold Delivery
> 6 m Unfolded, de livered in upp er out-
put: copy delivery tray or High Capacity Stacker
First Fold
Delivery tray
[41] Delivery trays of the folder
Folder
Waste
box
Belt
Reinforcement
Unit
High capacity
output unit
Standard
delivery tray
52 Océ 9700 Copier/Printer User Manual
Page 53

Copies:
0
Ready to copy
................ ................
Machine Copy
................
Program
................
Finishing
Stamp
Fold
delivery
Fold
▼▼▼▼
Reinforcement
Folding
Folding
method
length
.....................................
Portrait
Standard
first fold
1 + 2 fold
......................................................................................................................................
Folding
method
.....................................
[42] Folding options
Folding
length
.....................................
310 mm
297 mm
Folding
width
.....................................
190 mm
210 mm
Punch
Binding
edge
.....................................
20 mm
Folding copies
Open the ‘Fold’ card in the ‘Finishing’ section.
1
Press the function button ‘Folding’ to select ‘1+2 fold’ or ‘first fold’ (see
2
figure 40 on page 52).
Press the function button ‘Folding method’, and use the higher/lower buttons
3
to select ‘Standard’, ‘Ericsson’ or ‘Afnor’ fo ld.
Press the function button ‘Folding method’ again, and use the higher/lower
4
buttons to select ‘Portrait’ or ‘Automatic’.
If required, press the function button ‘Folding length’ once or twice to choose
5
one of the specified lengths, or you can specify another length by using the
higher/lower buttons or the numeric buttons.
If required, press the function button ‘Folding width’ once or twice to choose
6
one of the specified widths, or you can specify another width by using the
higher/lower buttons or the numeric buttons.
If required, press the function button ‘Binding edge’.
7
Set the required binding edge using the higher/lower buttons or the numeric
buttons.
If the optional output unit with punch unit is installed, you can press the
function button ‘Binding edge’ again to select punching (see ‘High capacity
output unit with punch unit (optional)’ on page 55).
If the optional reinforcement unit is installed, you can press the function button
‘Binding edge’ again to select reinforcement (see ‘Reinforcement Unit
(optional)’ on page 57).
Make other settings as required.
8
Feed the original.
9
Basic copy jobs 53
Page 54

Feeding originals with legends to get folded copies
When folding according
to the fold method Standard or Ericsson, you have to tak e special consideration
of the place of the legend when feeding the original. If you feed with the
shortest side first (portrait), ensure that the legend is on the lower right hand
side. When feeding landscape, the place of the legend must be on the upper
right hand side. See illustration 43 on page 54 below.
Portrait feeding prints and folds faster than
landscape. Feed your originals face-down
and with th e legend in the appropriate
position, as illustrated below.
Océ
Legend drawing,
face down
Océ
The place of the legend is important when
folding. This picture shows how to feed
originals when folding Standard or
Ericsson.
[43] Feeding originals: portrait with the legend right below, landscape with the legend right above
Note:
The place of the legend area of the illustration above is not applicable
when folding Afnor-like.
When folding Afnor, the place of the legend depends on the size of your
original.
Original size
A0 portrait
A1 landscape
A2 portrait
A3 landscape
[44] Afnor folding, how to feed originals and where to place legend
If Afnor folding has been selected:
How to feed the original and where to place the legend:
Portrait and legend in upper right corner
Portrait and with legend in lower right corner (like DIN)
Landscap e and legend in lower right corner
Portrait and with legend in lower right corner. (like DIN)
54 Océ 9700 Copier/Printer User Manual
Page 55

High capacity output unit with punch unit (optional)
The optional high capacity output unit has one (standard) or two belts th at offer
a larger capacity and more flexibility. With this output unit you can have the
copies delivered on belt 1 or belt 2. For maximum capacity, the two belts can
be linked so that the system automatically switches to the empty belt when the
first one is full. The copies are delivered of fset stacked. You can adjust the side
guides of t he belts, dependin g on the wi dth of the f old pack age. The am ount of
copy output on the belts can be adjusted by the service technician.
An optional punch unit can be installed in the high capacity output unit to have
your copies perforated. Four-hole punching is standard. The service technician
can change the system to two-hole punching. Procedure ‘Folding copies’ on
page 53 describes how to activate the pu nch unit.
▼▼▼▼
Copies:
0
High cap.
stacker
Stamp
Fold
delivery
Fold
Note:
If you want to use a different folding length and folding width, you also
have to adapt the folding length and folding width in the punching unit (see
‘Adjustin g the punching unit’ on page 56).
Selecting settings for high capacity output unit
Open the ‘Fold delivery’ card in the ‘Finishing’ section.
1
To select the delivery of copies that are made from paper originals (using the
2
scanner), press the functio n button ‘Copy delivery’ until the required output
position is selected (see figure 45).
If the optional plot option is installed, you can make a separate selection for
3
copies that are sent to the printer by a computer system. To select the deliv ery
of these copies, press the function button ‘Print delivery’ until the required
output position is selected (see figure 45).
Ready to copy
......................................................................................................................................
.....................................
.....................................
Folding
length
.......... .. .. .. .......... .. .. ..
Machine Copy
.....................................
.......... .. .. ..
Program
Belts
Belt 2
Belt 1
Stack
Print
delivery
.....................................
width
........... .. .. .
Finishing
.....................................
Belts
Belt 2
Belt 1
Stack
Copy
delivery
[45] Copy delivery on the high capacity output unit
Make other settings as required.
4
Feed the original.
5
Basic copy jobs 55
Page 56

▼▼▼▼
Adjusting the side guides of the belts
Loosen the knurled nuts (see figure 46).
1
[46] Adjusting the side guides of the belts
Adjust the plate according the width of the fold package.
2
Tighten the knurled nuts.
3
▼▼▼▼
If you change the folding width and/or the folding length, you have to adjust
the punching unit.
Adjusting the punching unit
Open the front door of the high capacity output unit.
1
Turn the black knob to adjust the folding width (see figure 47). Refer to the
2
sticker inside the unit.
[47] Knob to adjust the folding width in the punch unit
56 Océ 9700 Copier/Printer User Manual
Page 57

Loosen the knurled screw and place the plate according to the folding length
3
(see figure 48).
[48] Knurled nut to adjust the folding length in the punch unit
Ti gh t en t he knur le d nu t .
4
Reinforcement Unit (optional)
If a Reinforcement Unit is installed, copies can be delivered with a
pre-punched, self-adhesive strip (see figure 49).
[49] Example a reinforcement strip
Protection
sheet
Basic copy jobs 57
Page 58

With this strip the copy can be stored in a binder, without the risk that the
punching holes tear out. You can unfo ld a folded map in a binder without
opening the binder mechanism (see figure 50).
[50] Example of a folded map with a reinforcement strip
▼▼▼▼
.
Copies:
0
Stamp
Fold
delivery
Fold
Note:
If the optional Reinforcement Unit is activated, all formats larger then
A4 are reinforced. The handling of A4 formats depends on a key operator
setting. For more details see ‘Handling A4 formats’ on page 101.
Selecting reinforcement
Open the ‘Fold’ card in the ‘Finishing’ section.
1
Press the function button ‘Binding edge’ until ‘Reinforce’ is selected (see
2
figure 51).
Ready to copy
Folding
method
.....................................
Portrait
Standard
Folding
length
first fold
1 + 2 fold
......................................................................................................................................
Folding
method
.....................................
................ ................
Machine Copy
310 mm
297 mm
Folding
length
.....................................
................
Program
190 mm
210 mm
Folding
width
.....................................
................
Finishing
.....................................
Reinforce
Punch
20 mm
Binding
edge
[51] Selecting Reinforcement
Make other settings as required.
3
Feed the original.
4
58 Océ 9700 Copier/Printer User Manual
Page 59

Note:
Reinforcing is only possible with the Standard folding method. When you
select reinforcing with another folder setting method the following message
will appear on the display: ‘Reinfor cing only possible with Standard folding
method’. As soon as you make another selection this message disappears.
Note:
When feeding reinforced originals into the scanner you have to fold
down the reinforcement strip so that it no longer sticks out of the page.
Note:
For more information about inserting a new tape roll and other
maintenance issues, see ‘Maintenance of the Reinforcement Unit’ on
page 139.
Note:
When reinforcing is disabled by some mechanical failure you can still
make copies or prints. When you select reinforcing the following message is
displayed: ‘Reinforcing not possible’. After a few seconds this message
disappears and reinforcing is deselected. For more information see ‘Solving
problems with the Re inforcement Unit’ on page 174.
Basic copy jobs 59
Page 60

High Capacity Stacker (optional )
If a High Capacity Stacker is installed, copies can be delivered at the rear of
the printer onto one of the six stacker bins. Each bin can stack up to 200
unfolded copies.
Long copies and polyester copies
Received copies longer than 1220 mm
(48”) are collected on the upper bin (bin 1). If the Océ 9700 is equipped with
a folder, polyester copies are also delivered on the High Capacity Stacker.
Otherwise, polyester copies are delivered via the Lower Output.
Note:
You must install the extra guide on bin 1 to ensure correct delivery of
long copies .
Note:
If the system is equipped with a folder, select bin 1 of the High Capacity
Stacker to deliver polyester copies, and guide the delivery by hand.
Note:
If ‘Lower output’ or ‘Folding’ is selected, copies are not deliver ed at the
High Capaci ty Stacker (see ‘Lower Output’ on page 63 and ‘Folded copies
(option al)’ on page 51).
[52] Emptying the High Capacity Stacker
The upper bin (bin 1) ca n not be moved. Bin 2 - 6 can be pulled out (opene d)
30 cm for easy emptying.
60 Océ 9700 Copier/Printer User Manual
Page 61

Indication ‘Bin in use’
If the indication light near a bin is continuously on, the
bin is in use for copy delivery. The bin should not be opened
Indication ‘Bin full’
per second), the bin is full. After emptying the bin
If the indication light near a bin is flashing slowly (once
completely
(and closing it),
the flashing will stop.
Indication ‘Close bin’
If the indication light is flashing fast (twice per second)
and the alarm is buzzing, the bin sh ould be closed immediately . If the bin is not
closed in time, the job will be interrupted. If the job is stopped, press the ‘Start’
button as indicated on the display, to resume the job.
The following stacker options can be selected:
Offset stack
Before the firs t copy of a new job is del ivered, the delivery bin
will shift to provide easy job separation (see figure 53).
Offset stack not selected
Offset stack selected
[53] Using ‘Offset stack’
Bin switching
Off (white background)
■
You can select one of the following options:
All copies are delivered onto the specified bin (see option ‘Bin number ’).
This process will continue until the specified bin is full (regardless if another
bin is empty). In that case printing is stopped.
Per Job
■
All copies within a job are delivered onto the specified bin (see option ‘Bin
number’). Copies of the following job will be deli vered onto the next bin (bin
6 will be followed by bin 1)
If a job does not fit onto one bin, the next bin will be selected
Note:
automatically to finish the job.
Continuous
■
All copies are delivered onto the specified bin (see option ‘Bin number ’).
If this bin is full, the next bin will be used (bin 6 will be followed by bin 1).
Bin number
You can specify which bin is to be used to deliver the first cop y of
a job. Following copies are delivered according to the specification of ‘Bin
switching’ as explained above. You can select one of the following options:
Basic copy jobs 61
Page 62

Automatic
■
If Bin switching is ‘off’ or ‘Continuous’, the printer will use the same bin to
deliver the first copy of a job. Only if Bin switching is ‘Continuous’ for the
current job but the previous job used another setting, the next bin will be
selected (bin 6 will be followed by bin 1).
If Bin switching is ‘Per job’ the printer will switch to the next bin to deliver
the first copy of a job (bin 6 will be followed by bin 1).
If Bin switching is activated (not ‘off’) and all bins are empty, bin 1 will be
selected t o deliver the first copy of a job.
Manual (num er ic )
■
You can specify the number of the bin that is to be used to deliver the first
copy of a job, using the higher/lower buttons or the numeric buttons.
If Bin switching is activated (not ‘of f’), this setting will only be used for one
job. After this job is finished, Bin number will be set to Automatic.
▼▼▼▼
Copies:
0
High cap.
stacker
Stamp
Fold
delivery
Fold
Note:
If the next bin is selected, and this bin is completely full, printing is
stopped (regardless the contents of other bins).
Note:
To prevent the printer from stopping, you can empty bins that are not in
use, without interrupting the print process.
Selecting settings for High Capacity Stacker
Open the ‘High cap. stacker’ card in the ‘Finishing’ section.
1
If required, press the ‘Offset stack’ button to select or deselect this option.
2
Select the required bin switching method, by pressing the button
3
‘Bin switching’ (see figure 54).
Ready to copy
.....................................
.....................................
Folding
length
.......... .. .. .. ............ .. ..
Machine Copy
Offset
stack
.....................................
.......... .. .. ..
Program
Continuous
Per Job
Bin
switching
.....................................
........... .. .. .
Finishing
..................................
Automatic
Bin
number
2
[54] Settings for High Capacity Stacker
Select the required bin number option, by pressing the button ‘Bin number’.
4
If you select manual (numeric), specify the bin number using the higher/lower
buttons or the numeric buttons (see figure 54).
62 Océ 9700 Copier/Printer User Manual
Page 63

Lower Outp ut
You can use the ‘Delivery’ menu to select which output is used to deliver
copies: the ‘Upper output’ or the ‘Lower output’.
▼▼▼▼
Note:
If a folding unit is installed, the lower output will be used for folded
copies. The ‘Delivery’ menu will not be present.
The following options can be selected in the ‘Delivery’ menu:
Upper out p ut
The copies are delivered to a copy delivery tray or the optional
High Capacity Stacker.
Lower outpu t
The copies are delivered through the lower output, using an
optional container.
Auto matic
Normally the upper output is used. Only if the copy is too long to
be collected on the copy delivery tray or High Capacity Stacker (longer than
1230 mm or 48.5”), the lower output is used.
Note:
If the Océ 9700 is equipped wth the optional High Capacity Stacker,
polyester copies are always delivered through the lower output.
Selecting settings for Lower Output
Open the ‘Delivery’ card in the ‘Finishing’ section.
1
Press the ‘Delivery’ button to select the required output (see figure 55).
2
Prints:
0
Delivery
High cap.
stacker
Stamp
Ready to print
Folding
length
.....................................
[55] Settings for Lower Output
Basic copy jobs 63
.....................................
................ ................
Machine Copy
.....................................
................
Program
.....................................
................
Finishing
Automatic
Lower output
Upper output
Delivery
.....................................
Page 64

64 Océ 9700 Copier/Printer User Manual
Page 65

Chapter 4
Special copy jobs
Océ 9700 Copier/Printer
User Manual
In this chapter special functions are described in more
detail.
65
Page 66

Copying with pre-programmed settings
The Océ 9700 is equipped with a memory function which can be used to
retrieve the settings of 5 different copying jobs. This is useful for jobs which
have to be done on a regular basis. Your key operator can store settings in 5
different programs. Note that each program represents all direct settings of the
operating panel. You only need to retrieve the program and press the start
button, thus saving valuable programming time.
▼▼▼▼
Copies:
0
Normal
Exposure
Synchr o cut
Zoom % (auto)
Roll: (auto)
Copies: 1
Default
settings
............... ... .... ... .... ... .... .
Note:
The default settings are used for copy and print jobs.
Retrieving a program
Press the section button ‘Program’.
1
Select ‘Load’ using the higher/lower buttons (see figure 56).
2
Ready to cop y
photo
stamp
fold
copy delivery belt
Zoom: % (auto)
Roll: (auto)
Copies: 10
1
............... ... .... ... .... ... .... .
[56] Retrieving a program
Press the function buttons 1 through 5 to load the required program (see
3
shift
standard cut
copy delivery:belt
Zoom: %(auto))
Roll: (auto)
Copies: 2
2
............... ... .... ... .... ... .... .
................
Machine
mirror
copydeliver:belt
Zoom: % (auto)
Roll:2
Copies: 3
31
............... ... .... ... .... ... .... .
3
................
................
Program
Program
Load
fold:
Zoom: % (auto)
Roll:2
Copies: 5
Margin
(mm)
............... ... .... ... .... ... .... .
................
Finishing
4
................
............... ... .... ... .... ... .... .
Copy
5
figure 56).
The operating panel will now show the settings for the selected copy job.
4
Feed the original.
5
Note:
Programs allow you to call-up predefined settings. You may change
individual settings with the ap propriate buttons. These modified settings
will only be use d for t he c opy j obs, and wi ll no t a ffect the program.
................................................................................................................................................................
66 Océ 9700 Copier/Printer User Manual
Page 67

Auto format selection
When ‘auto zoom’ and ‘auto roll’ are selected both, the system reacts conform
the auto format selection table. It is a list instructing the machine how to reduce
or enlarge input formats, avoiding loss of information.
Example: When an A0 original is fed, and ‘auto roll’ and ‘auto zoom’ are
selected, the system will automatically select an A1 roll and the appropriate
zoom factor (see figure 57 ).
Copies
0
Image
Special
original
Copy
material
Copy
size
▼▼▼▼
:
Ready to copy
......................................................................................................................................
.....................................
[57] Auto format selection table
A4 >>
A3 >>
A2 >>
A1 >>
A0 >>
Auto format
selection
.....................................
A3
A3
A2
A1
A1
................
Machine
210 mm
Standard cut
Synchro cut
Copy
Copy Remove
length
length
.....................................
................
Program
.....................................
................
Finishing
0 mm
0 mm
Remove
strip
.....................................
strip
Defining your ‘Auto format selection’ table
Open the ‘Copy size’ card in the ‘Copy’ section.
1
Press the function button ‘Auto format selection’ and select A0 original size
2
(see figure 57).
Adjust the copy size using the higher/lower buttons.
3
................
Copy
0 mm
0 mm
Add
strip
Special copy jobs 67
Page 68

Copying non-standard size originals
The scanner of the Océ 9700 system automatically detects the width of the
inserted original. For European sizes, for example, it detects whether the width
is A0, A1, A2, A3, A4, 500 mm, or 700 mm. The Océ 9700 system uses a
memory table that contains all standard width - standard length combinations
to predict the length of the original. The scanner also measures the real length
of each original while it is transferred through the scanner.
Note:
If you are copying thick originals or originals in a carrier sheet, it is
recommended to use the output at the rear side of the scanner to ensur e correct
delivery ( see ‘Original delivery af ter scannin g’ on page 45).
Defining the original width
To prevent information loss when copying a non-standard original, you can
select the ‘non-standard’ original width. The scanned width will then be larger
than the original width. It is also possible to define the scanned width and
length your s el f.
▼▼▼▼
Defining the original width
Open the ‘Special original’ card in the ‘Copy’ section.
1
Press ‘Original width’ to select the required setting:
2
Standard. This option must be used to copy a standard-size original.
■
Non-standard. This option can be used to copy a non-standard original. The
■
scanned width will be larger than the original width, to prevent information
loss.
68 Océ 9700 Copier/Printer User Manual
Page 69

Numeric. You can define the original width yourself, using the higher/lower
■
buttons or the numeric buttons.
Copies:
0
Image
Special
original
sheet
Copy
material
Copy
size
Ready to copy
Cut&paste
Blueprint
Dark
Photo
Normal
.....................................................................................................................................
Original
Original
type
type
type exposure
.....................................
[58] Selecting ‘Non-standard’ original size
Defining the copy size
The copy width depends on the selected roll, whereas the copy length depends
on the selected cut option.
▼▼▼▼
Copying non-standard size originals
Automatic
exposure
.....................................
................
Machine
Filesize
optimization
.....................................
................
Program
210 mm
Non-standard
Standard
Original
.....................................
width
...............
Finishing
.....................................
................
Copy
Copies:
0
Press the ‘Roll selection’ button in the main window to select ‘automatic’, or
1
to select the roll with the correct width (see figure 59 on page 69).
Ready to copy
................
Machine
.........................
A3 Paper
❍
A2 Paper
Automatic
......................................................................................................................................
Print
.....................................
[59] Selecting roll selection in the main window
Folding
.....................................
Folding
length
●
Roll
selection
.....................................
................
Program
❍
●
.....................................
...............
Finishing
100.0%
Automatic
Zoom
selection
0
●
ExposurePrint
.....................................
................
Copy
Lighter
.......
.......
Darker
Special copy jobs 69
Page 70

Open the ‘Copy size’ card i n the ‘Copy’ section.
2
Copies:
0
Image
Special
original
Copy
material
Copy
size
Ready to copy
A2
A4 >>
A3 >>
A2
A2
A2 >>
A2
A1 >>
A2
......................................................................................................................................
.....................................
[60] Copying with standard cut
Press the function button ‘Copy length’ to select the required cut option:
3
Standard cut, which cuts copies on a standard length.
■
Synchro cut, which cuts copies at the end of the image. The system cuts at
■
A0 >>
Auto format
selection
selection
.....................................
................
Machine
210 mm
Standard cut
Synchro cut
Copy
length
.....................................
................
Program
.....................................
................
Finishing
0 mm
0 mm
Remove
strip
0 mm
0 mm
Add
strip
.....................................
the measured length of the original.
Custom cut (numeric), which cuts copies on a specified length. You can
■
define the copy length yourself, using the higher/lower buttons or the
numeric buttons.
Make other settings as required.
4
Feed the original.
5
When
folding
copies of non-standard sized originals, refer to figure 40 on
page 52 for more information.
................
Copy
70 Océ 9700 Copier/Printer User Manual
Page 71

Scanning originals with filing strip
You can adjust the original guide of the scanner to remove a filing strip along
the left hand side (right hand side in the feed direction, face-down). This side
can be shortened up to 60 mm (see figure 61).
▼▼▼▼
Face up:
Left hand side
- 40 mm
[61] Example of adjusting the left hand side of an original
Scanning with removed filing strip along the left hand side (right hand side
in the feed direction, face-down)
Press the catch underneath the original guide, and move it to the right.
1
Face down:
right hand side
in feed direction
[62] Adjusting the original guide to add or remove a filing strip along the left hand side
Make all required settings.
2
Insert the original face down, right aligned along with the original guide on the
3
scanner feed table.
You can also remove the filing strip along the right hand side (left hand side in
the feed direction, face-down) by selecting a specific roll. If the paper width of
Special copy jobs 71
Page 72

the original is larger than the paper width of the selected roll, the remaining
paper part on the right hand side will not be scanned (see figure 63).
▼▼▼▼
Face up:
Right hand side
- 40 mm
[63] Example of removing the right hand side of an original
Scanning with removed filing strip along the right hand side (left hand side
in the feed direction, face-down)
Select one of the roll selection buttons on the operating panel.
1
Select the 100% button.
2
Make sure the ‘auto zoom’ and ‘auto roll’ buttons are not selected.
3
Make other settings as required.
4
Feed the original.
5
Face down:
left hand side in
feed direction
72 Océ 9700 Copier/Printer User Manual
Page 73

It is also possible to adjust the length of both the leading and trailing edge to
eliminate or add a filing st rip. It is also possible to adjust the length of both the
leading and trailing edge to eliminate or add a filing strip. Leading and trailing
edge can be extended up to 400 mm or shortened up to 100 millimetres (see
figure 64).
▼▼▼▼
Copies:
0
Image
Special
original
Copy
material
Copy
size
Leading edge:
- 40 mm
Trailing edge:
- 40 mm
[64] Example of adjusting the leading/trailing edge of an original
Leading edge:
+40 mm
Trailing edge:
+ 40 mm
Copying with removed filing strips along the leading and trailing edge
Open the ‘Copy size’ card in the ‘Copy’ section.
1
Press the func t ion button ‘Remove st rip’ (see figure 65).
2
40 mm
................
Finishing
.....................................
0 mm0 mm
Add
strip
Ready to copy
A2
A4 >>
A3 >>
A2
A2
A2 >>
A2
A1 >>
A2
......................................................................................................................................
.....................................
A0 >>
Auto format
selection
selection
.....................................
................
Machine
210 mm
Standard cut
Synchro cut
Copy
length
length
.....................................
................
Program
Remove
strip
.....................................
................
Copy
0 mm
[65] Removing strip
Adjust the values in millimetres for the trailing edge using the numeric or the
3
higher/lower buttons.
Press the function button ‘Remove strip’ again.
4
Adjust the values in millimetres for the leading edge using the numeric or the
5
higher/lower buttons.
Make other settings as required.
6
Feed the original.
7
Special copy jobs 73
Page 74

▼▼▼▼
Copying with added filing strips along the leading and trailing edge
Open the ‘Copy size’ card i n the ‘Copy’ section.
1
Press the function button ‘Add strip’ (see figure 66).
2
Copies:
0
Image
Special
original
Copy
material
Copy
size
Ready to copy
A4
A4 >>
A3 >>
A3
A2
A2 >>
A1
A1 >>
A0
......................................................................................................................................
.....................................
[66] Adding strip
Adjust the values in millimetres for the trailing edge using the numeric or the
3
A0 >>
Auto format
selection
selection
.....................................
................
Machine
Copy-
.
length
length
.....................................
210 mm
Standard cut
Synchro cut
................
Program
Remove
strip
.....................................
................
Finishing
0 mm
0 mm
Remove
strip
Add
strip
.....................................
................
Copy
0 mm
40 mm
higher/lower buttons.
Press the function button ‘Add strip’ again.
4
Adjust the values in millimetres for the leading edge using the numeric or the
5
higher/lower buttons.
Make other settings as required.
6
Feed the original.
7
74 Océ 9700 Copier/Printer User Manual
Page 75

Improving the image quality
You can improve the image quality by modifying the exposure, or making use
of special functions. You will learn how to switch on and off automatic
exposure, or how to use the lighter and darker buttons to achiev e the best copy
quality. For your convenience, the Océ 9700 has five standard exposure types
at your disposal.
Modifying the exposure
The automatic exposure control will provide a good quality copy from a large
variety of originals. The automatic expos ure setting, which is switched on (by
default), ensures the production of background-free copies of most line
drawings (see figure 67).
Copies:
0
Image
Special
original
Copy
material
Copy
size
▼▼▼▼
sheet
Ready to copy
Cut&paste
Blueprint
Dark
Photo
Normal
......................................................................................................................................
Original
type
type
.....................................
[67] Automatic exposure setting
Setting the automatic exposure
Open the ‘Special original’ card in the ‘Copy’ section.
1
Automatic
exposure
.....................................
................
Machine
Filesize
optimization
.....................................
................
Program
.....................................
...............
Finishing
210 mm
Non-standard
Standard
Original
width
................
Copy
.....................................
If the function ‘Automatic exposure’ is shown as in figure 67 above, then the
automatic exposure has been activated already.
If ‘Automatic exposure’ is deactivated press the function button ‘Automatic
2
exposure’.
When copying extremely light or dark originals , or originals with unequal
background density such as paste ups, the result may not meet your
requirements (e.g. too much background). In such cases you can manually
adjust the exposure.
Special copy jobs 75
Page 76

▼▼▼▼
Manually adjusting the exposure setting
Press the ‘lighter or darker’ button on the scanner operating panel to set the
1
exposure as desired.
Make other settings as required.
2
Feed the original.
3
The Océ 9700 allows you to adjust the exposure according to the type of image
on the original. There are four original types av ailable. Select a suitable mode
according to the original (see figure 68).
Copies:
0
Image
Special
original
Copy
material
Copy
size
▼▼▼▼
sheet
Ready to copy
Cut&paste
Blueprint
Dark
Photo
Normal
......................................................................................................................................
Original
type
type exposure
.....................................
[68] Selecting the original type
Automatic
exposure
.....................................
................
Machine
Filesize
optimization
.....................................
................
Program
.....................................
...............
Finishing
210 mm
Non-standard
Standard
Original
width
................
Copy
.....................................
Adjusting the exposure according the type of image
Open the “Special original’ card in the ‘Copy’ section. As default ‘Normal’
1
and ‘Automatic exposure’ are active. When the original contains characters
and line works this is the most suitable setting.
Press the function button ‘Original type’ to select ‘Photo’ when the original
■
consists of a combination of characters, line art and picture images.
If you select ‘Photo’, the ‘Automatic exposure’ will default be
Note:
switched off automatically.
Press the function button ‘Original type’ to select ‘Dark’ when the original
■
has an extremely dark background (i.e. low contrast).
Press the function button ‘Original type’ to select ‘Blueprint’ when you want
■
to copy an original with an image in ‘negative’ (image in white on dark
background). The copy will be ‘positive’ (image in black on white
background).
Press the function button ‘Original type’ to select ‘Cut&paste’ when the
■
original contains paste ups (‘cut and paste’ with scissors and glue).
Make other settings as required.
2
Feed the original.
3
76 Océ 9700 Copier/Printer User Manual
Page 77

Editing
The Océ 9700 is equipped with a number of editing functions. These functions
can be set before scanning the original.
Note:
Note:
Auto shift
By selecting the auto shift function you can move your image to one side of the
page.
Auto shifting supports these shift options:
You can select only one edit function at a time.
The options ‘Stretch’ and ‘Erase’ can only be used for copy jobs.
Upper left Upper rig h t Centre Lower left Lower right
[69] Auto shift options with standard cut option active
Note:
You must switch on standard cut to get copies like the one in the example
of illustration 69 above . If sync hro cut has been switched on, the result will b e
as follows:
Upper left Upper right Centre Lower left Lower right
[70] Auto shift options with synchro cut option active
In ‘Shifting the image’ on page 80 you can read how to define the exact place
of your image on the page.
Special copy jobs 77
Page 78

▼▼▼▼
Selecting default settings for auto shifting
Open the ‘Image’ card in the ‘Copy’ section.
1
Press the function button ‘Edit’ until you have selected ‘Autoshift’ (see
2
figure 71).
Copies:
0
Image
Special
original
Copy
material
Copy
size
Roll 2
Ready to copy
Stretch
Erase
Shift
Mirror
Autoshift
......................................................................................................................................
Process
Edit
type
.....................................
[71] Auto shift
Press the ‘Shift position’ button.
3
Use the scroll buttons to select the Autoshift option of your choice.
4
Note:
If you select ‘Center’, make sure the original width is specified as
..................................
................
Machine FinishingProgram
Center
Shift position
..................................
................
..................................
................
..................................
follows (see ‘Defining the original width’ on page 68):
‘Standard’ if a standard sized original is used
■
The exact original width (numeric) if a non standard sized original is used.
■
Feed your original.
5
................
Copy
Making mirrored-image copies
Mirrored-image copies may be required, for example, when you want to make
additional changes on intermediates (see figure 72). By mirroring the image on
the transparent copy you are able to erase require d parts at the back and add
changes at the front side of the transparent, thus creating a new original.
[72] Example of a mirror-image copy
78 Océ 9700 Copier/Printer User Manual
Page 79

▼▼▼▼
Making a mirrored-image copy
Open the ‘Image’ card in the ‘Copy’ section.
1
Copies:
0
Image
Special
original
Copy
material
Copy
size
Roll 2
Ready to copy
Stretch
Erase
Shift
Mirror
Autoshift
......................................................................................................................................
Process
Edit
type
.....................................
[73] Mirror-image
Press the function button ‘Edit’ until you have selected ‘Mirror’ (see
2
..................................
................
Machine FinishingProgram
..................................
................
..................................
................
figure 73).
Make other settings as required and feed the original.
3
................
Copy
..................................
Special copy jobs 79
Page 80

Shifting the image
.
In some cases the margin may be too small to accommodate punch holes or
filing strips without loss of information. T o avo id this, you can shift the image
in horizontal and/or vertical direction (see figure 74).
▼▼▼▼
Copies:
0
Image
Special
original
Copy
material
Copy
size
[74] Example of shifting the image
Shifting the image
Open the ‘Image’ card in the ‘Copy’ section.
1
Roll 2
Ready to cop y
Stretch
Erase
Shift
Mirror
Autoshift
................. .... ... .... ... .... ... .... ... .... ... .... ....... ... .... ... .... ... .... ... .... ... .... ... .... ... .... ....... ... ... .... ... .
Edit Vertical
type
............... .... ... .... ... .... ... .
[75] Image shift
Press the function button ‘Edit’ to select ‘Shift’ (see figure 75).
2
Press the function button ‘Horizontal’.
3
Press the numeric or the higher/lower buttons until the required distance is set
4
............... .... ... .... ... .... .
................
Machine
To right:
To left
Horizontal
............... .... ... .... ... .... .
.......... .. .. ..
Program
0 mm
0 mm
............... .... ... .... ... .... .
................
Finishing
Down
0 mm
Up
0 mm
................
Copy
............... .... ... .... ... .... .
to shift the image to the left.
80 Océ 9700 Copier/Printer User Manual
Page 81

or,
Press the function button ‘Horizontal’ again.
5
Press the numeric or the higher/lower buttons until the required distance is set
6
to shift the image to the right.
Note:
When you shift the image horizontally you can only shift to the left or
to the right.
Press the function button ‘Vertical’.
7
Press the numeric or the higher/lower buttons until the required distance is set
8
to shift the image upwards.
or,
Press the function button ‘Vertical’ again.
9
Press the numeric or the higher/lower buttons until the required distance is set
10
to shift the image downwards.
Note:
Make other settings as required.
11
Feed the original.
12
Note:
When you shift the im age verticall y you can on ly sh ift up or dow n.
You can use one horizontal and vertical shift simultaneously.
Erasing part of the image
Suppose you want to copy just a part of an original. There are two ways to
accomplish this. The Océ 9700 allows you to select an area on the original. You
can then program the system to either delete all information inside (Blanking)
or outside the area (Framing) (see figure 76).
Original
Inside ar ea; the
selected area
has not been
copied
Outside area;
the selected
area has been
copied
[76] Erasing a part of an original
Special copy jobs 81
Page 82

▼▼▼▼
Erasing part of the image
Open the ‘Image’ card in the ‘Copy’ section.
1
Decide whether to delete inside or outside an area (see figure 77).
2
Press the function button ‘Edit’ until you have selected ‘Erase’.
3
Copies:
0
Image
Special
original
Copy
material
Copy
size
Roll 2
Ready to copy
Stretch
Erase
Shift
Mirror
Autoshift
......................................................................................................................................
Edit Ar ea Position Size
type
.....................................
[77] Er asing part of an original
Measure the width and height of the area and determine the position of the left
4
...................................
................
Machine
...................................
................
Program
Inside
...................................
................
Finishing
Left
0 mm
Top
100 mm
................
Copy
Width
0 mm
HeightOutside
0 mm
...................................
and the top of the area. That is, the distance from the left from the top of the
original.
Press the function button ‘Area’ to select ‘Inside’ or ‘Outside’.
5
Press the function button ‘Position’ to select the ‘T op’ and ‘Left’ position and
6
enter the required values using the numeric or the higher/lower buttons.
Press the function button ‘Size’ to select the ‘Height’ and ‘W idth’ and enter the
7
required values using the numeric or the higher/lower buttons.
Make other settings as required.
8
Feed the original.
9
Stretch
Use stretch to stretch the image in two directions independently. Values may
range between 25% and 400 %.
82 Océ 9700 Copier/Printer User Manual
Page 83

▼▼▼▼
Making copies with a stretched image
Open the ‘Image’ card in the ‘Copy’ section
1
Copies
0
Image
Special
original
Copy
material
Copy
size
:
[78] Stretched image
Press the function button ‘Edit’ until you have selected ‘Stretch’ (see
2
Roll 2
Ready to copy
Stretch
Erase
Shift
Mirror
Autoshift
......................................................................................................................................
Edit Hor izontal Vertical
.....................................
type
...................................
................
Machine
...................................
................
Program
105%
...................................
................
Finishing
110%
...................................
figure 78).
Press the function button ‘Horizontal’ and enter the required value using the
3
higher/lower or the numeric buttons.
Press the function button ‘Vertical’ and enter the requ ired value using the
4
higher/lower or the numeric buttons.
Make other settings as required
5
Feed the original.
6
Note:
Not all ratios are possible. The system will inform you when settings
are not correct.
................
Copy
Special copy jobs 83
Page 84

84 Océ 9700 Copier/Printer User Manual
Page 85

Chapter 5
Key operator
Océ 9700 Copier/Printer
User Manual
This chapter describes the tasks required of a key operator
and informs you how to access the key operator mode.
85
Page 86

The Océ 9700 key operator
This chapter is meant for key operators only and c ontains a ll details to
accommodate printer users and to keep the Oc é 9700 in excellent
condition.
The key operator is responsible for correct default settings of the system. These
include default settings, as such, and pre-programmed settings for recurring
copy jobs.
Also, the key operator must define all clock settings, such as time and date,
switch-off time, reset time and so on. Furthermore, the definition of default
zoom settings, and output delivery mode, form part of the key operator’s
responsibility.
This chapter will inform you how to access the key operator mode and how to
define key operator settings.
86 Océ 9700 Copier/Printer User Manual
Page 87

Entering the key operator mode
In order to perform special key operator functions, you must first access the
key operator mode.
As this functionality is restricted to a dedicated key operator, a PIN code is
required. The service engineer enters the key operator PIN code upon
installation.
▼▼▼▼
KEY
Copies:
0
Note:
When you are finished, make sure you quit the key operator mode to
prevent improper use of the Océ 9700.
Accessing the key operator mode
Press the ‘key’ button (see figur e 79).
1
You are requested to enter your PIN code.
Enter the key operator PIN code.
2
If correct, a key symbol is indicated in the scanner display.
Key operator access
Enter PIN code
CLEAR C = cancel
................
Machine
................ ................
Program Copy
................
Finishing
[79] Accessing the key operator mode
▼▼▼▼
Quitting the key operator mode
Press the ‘key’ button.
1
Key operator 87
Page 88

Defining clock settings
The Océ 9700 has an internal clock. This clock must be set accurately. The
clock can be used to switch Océ 9700 on or off automatically. The way in
which the current time and date is displayed can be adapted to local
conventions and must configured by the service engineer.
The reset time is the time the system will wait before it returns to the default
settings. This parameter can be modified.
The ‘Timers’ card in the ‘Machine’ section allows you to def ine the follo wing
time-related settings.
Setting the current time and date
To ensure correct functioning of the time switch you must set the current time
and date. The way in which the time and date are displayed can be adapted to
local conv entions.
▼▼▼▼
Copies:
0
Timers
Zoom
General
Controller
Selecting the required time and/or date
Access the key op erator mode.
1
Open the ‘Timers’ card in the ‘Machine’ section.
2
Press the function button ‘Time and Date’ (see figure 80).
3
Ready to cop y
On
.....
.....
08 00.
Off after
4 hrs.
......................................................................................................................................
On/Off-timer
.....................................
[80] Time and date notation
You can now adjust the day. Press the function button ‘Time and Date’ again
4
From:
Monday
Up to:
Friday
Work days
.....................................
................
Machine
2 min
Reset
time
.....................................
................
Program
Time and
.....................................
Date
................
Finishing
Time:
.....
12 00
Date:
.....
01 01 95
.....
.....
.......... ......
Copy
Automatic
feed
.....................................
to enter the month, press the function button ‘Time and Date’ again to enter the
year.
88 Océ 9700 Copier/Printer User Manual
Page 89

To select the current time:
Press the function button ‘Time and Date’.
5
You can now adjust the hours, press the function button ‘Time and Date’ again
6
to adjust the minutes.
When ready, quit the key opera tor mode.
7
Setting the reset time
If you leave the scanner unattended (no buttons pressed or originals fed) long
enough, the scanner settings will return to their default values. The reset time
is the time after which the system returns to the initial system state with
stand a rd values.
The reset time is 2 minutes by default, but can be changed to any time between
1 and 99 minutes, or you can de-activate the reset time.
▼▼▼▼
Copies:
0
Timers
Zoom
General
Controller
Setting the res et ti me
Access the key operator mode.
1
Open the ‘Timers’ card in the ‘Machine’ section.
2
Press the function button ‘Reset time’ (see figure 81).
3
Ready to copy
On
Off after
............................. ................................... ................................... ...................................
On/Off-timer Work days
.............................. .......
[81] Reset time
Use the numeric or higher/lower buttons to set the required reset time.
4
.....
08 00.
4 hrs.
.....
From:
Monday
Up to:
Friday
.............................. .......
................
Machine
2 min
Reset
time
.............................. .......
................
Program
Time and
.............................. .......
Date
................
Finishing
Time:
Date:
.....
.....
12 00.
.....
01 01. 95.
.....
.....
Automatic
feed
.....................................
Or,
Press the function button to deactivate the function thus forcing users to
5
manually reset the system.
When ready, quit the key opera tor mode.
6
................
Copy
Key operator 89
Page 90

Activating the time switch
The time switch function allows you to program the system to switch itself
automatically on at a specified time and off after a certain idle-time.
The advantages of this time switch are:
conv enience in having the system ready for use at the start of the working day
■
energy-saving when the system is not being used.
■
▼▼▼▼
Copies:
0
Timers
Zoom
General
Controller
Defining the switch on/off time and days
Access the key op erator mode.
1
Open the ‘Timers’ card in the ‘Machine’ section.
2
Press the function button ‘On/Off timer’ (see figure 82).
3
Ready to cop y
On
.....
.....
08 00.
Off after
4 hrs.
......................................................................................................................................
On/Off-timer Work days
.....................................
[82] On/Off timer
Enter the required switch-on time/switch-off delay (hours/minutes) using the
4
From:
Monday
Up to:
Friday
.....................................
................
Machine
2 min
Reset
time
.....................................
................
Program
Time and
.....................................
Date
................
Finishing
Time:
.....
12 00
Date:
.....
01 01 95
.....
.....
................
Copy
Automatic
feed
.....................................
‘higher/lower’ buttons.
Press the function button ‘Work days’.
5
Enter the required working days using the ‘higher/lower’ buttons.
6
When ready, q uit the key operator mode.
7
Note:
Make sur e that you push th e on/off switc h to ‘timer’ p osition if you want
the system to switch on automatically.
90 Océ 9700 Copier/Printer User Manual
Page 91

De-activating the automatic feed
By factory default ‘Automatic feed’ is active. This means that for the second
original in a set, you do not need to press the start button to start. If the original
has been placed along the original guide against the scanner feed opening, it
will be pulled into the machine as soon as possible.
As a consequence you do not have full control over the copier settings at the
moment the original is pulled in. You should define settings before the original
is inserted.
To achieve full control over the copy settings for each original can be obtained
by switching off ‘automatic feed’. In this mode the start button must be pressed
before each original is scanned.
▼▼▼▼
Copies:
0
Timers
Zoom
General
Controller
De-activatin g th e au tom atic fe ed
Open the ‘Timers’ card in the ‘Machine’ section.
1
Press the function button ‘Automatic feed (see figure 83)
2
Automatic feed is now de-activated.
Ready to copy
On
............................ ................................... ................................... ....................................
On/Off-timer
............................. ........
[83] De-activating ‘Automatic feed’
When ready, quit the key opera tor mode.
3
.....
08 00.
Off after
4 hrs.
.....
From:
Monday
Up to:
Friday
Work days
............................. ........
................
Machine
............................. ........
2 min
Reset
time
................
Program
Time and
............................. ........
Date
................
Finishing
Time:
Date:
.....
.....
12 00.
.....
01 01. 95.
.....
.....
................
Copy
Automatic
.....................................
feed
Key operator 91
Page 92

Defining the fi xed zoom ratio
8 fixe d zoom ste ps ha ve be en def ined i n the Océ 9700 as factory def ault s. You
can define your own fixed zoom settings between 25 and 400%.
▼▼▼▼
Copies:
0
Timers
Zoom
General
Controller
Defining th e zoo m step s
Open the ‘Zoom’ card in the ‘Machine’ section.
1
Press the function button ‘Zoom steps 1’ (see figure 84).
2
Ready to cop y
......................................................................................................................................
.....................................
[84] Zoom steps
Set the required value using the numeric or the higher/lower buttons.
3
Note:
The higher/lower buttons move up or dow n w ith s teps of 0.1% . You
.....................................
................
Machine
Vertical
1.000
Horizontal
1.000
Calibration
.....................................
................
Program
Zoom steps 1 Zoom steps 2
.....................................
................
Finishing
70.7%
50.0%
35.3%
25.0%
................
Copy
400.0%
282.8%
200.0%
141.0%
.....................................
can also use the numeric button, e.g. 353 will lead to a zoom factor of
35.3%.
If required press the function button again to set the other zoom steps.
4
Press the function button ‘Zoom steps 2’.
5
Set the required value using the numeric or the higher/lower buttons.
6
If required press the function button again to set the other zoom steps.
7
When ready, q uit the key operator mode.
8
92 Océ 9700 Copier/Printer User Manual
Page 93

Image correction
To correct possible image deviations in vertical and/or horizontal direction,
you can use ‘vertical’ and/or ‘horizontal’ correction of the calibration function.
The vertical and horizontal correction can be adjusted independently . The total
correction range in both directions is +/- 3% and is adjustable in 0.1% steps. In
practice this means that you can specify a calibration factor between 0.970 and
1.030.
▼▼▼▼
Copies:
0
Timers
Zoom
General
Controller
Note:
If you use the optional Scan Station (Scan To File), both factors must be
set to 1.000.
Calibrating the scanner
Open the ‘Zoom’ card in the “Machine’ section.
1
Press the function button ‘Calibration’ (see figure 85).
2
Ready to cop y
.............................. ................................... ................................... ..................................
.............................. .......
[85] Calibration
Enter the required value for horizontal calibration using the numeric or the
3
.............................. .......
................
Machine
Vertical
0.970
Horizontal
1.030
Calibration
.............................. .......
................
Program
Zoom steps 1 Zoom steps 2
.............................. .......
................
Finishing
70.7%
50.0%
35.3%
25.0%
................
Copy
400.0%
282.8%
200.0%
141.0%
.....................................
higher/lower buttons.
Press the function button ‘Calibration’ again.
4
You can now enter the required v alue for vertical calibration using the numeric
5
or the higher/lower buttons.
When ready, quit the key opera tor mode.
6
Key operator 93
Page 94

Storing and erasing settings in a program
Settings for recurring jobs can be stored in a program. Besides the standard
default settings, up to five extra groups of settings can be stored under a
program button. This section explains how to store settings under a button,
what feedback is provided on the display, and how to erase programs.
Note:
The default settings are used for copy and print jobs.
When the Océ 9700 is installed, the ‘default settings’ program contains the
factory default settings. Refer to Appendix A for a complete overview.
Not all factory default settings are visible in the ‘Default settings’ area. The
area can contain up to 8 values. The most important settings are:
the number of copies
■
the selected roll number and whether auto-roll has been pressed. This will be
■
indicated as: (auto)
the zoom factor
■
copy delivery
■
print delivery (if applicable)
■
Other settings that can be displayed in the remaining 2 or 3 lines are:
synchro cut/standard cut
■
fold (always visible if switched on)
■
edit: mirror, shift, erase, stretch
■
stamp (always visible if switched on)
■
add strip/remove strip
■
exposure
■
original type: normal, photo, dark, blueprint (visible if switched on)
■
bin number of High Capacity Stacker (optional)
■
▼▼▼▼
Changing the Océ 9700 default settings
Make the settings.
1
Press the section button ‘Program’.
2
Select ‘Store’ using the higher/lower buttons.
3
Press the function button ‘Default settings’. The system will ask you to
4
confirm.
The new defaults are now stored in memory. Note that not all active settings
can be displayed. The m a ximum numbe r to be displayed is eight.
When ready, q uit the key operator mode.
5
94 Océ 9700 Copier/Printer User Manual
Page 95

You have the possibility to re-store the factory default settings in your ‘default
settings’ program by erasing the default settings program.
▼▼▼▼
Returning to the factory default settings
Press the section button ‘Program’.
1
Select ‘Erase’ using the higher/lower buttons.
2
Press the function button ‘Default settings’.
3
You will be asked to confirm the erase procedure.
Quit the key operator mode.
4
▼▼▼▼
Copies:
0
Normal
Exposure
Synchro cut
Zoom % (auto)
Roll: (auto)
Copies: 1
............................................................................................................................................................
Default
settings
.....................................
Storing settings under a program button
Make the settings you want to program.
1
Press the section button ‘Program’.
2
Select ‘Store’ using the higher/lower buttons (see figure 86).
3
Ready to copy
copydelivery:belt
1
Zoom: % (auto)
Roll: (auto)
Copies: 3
1
.....................................
2
.....................................
................
Machine
.....................................
3
................
................
Program
Program
Store
Margin
(mm)
.....................................
4
................
Finishing
.....................................
................
Copy
5
[86] Storing a copy job
Select the appropriate button to store the copy job into memory. The copy job
4
is now stored in memory.
Note:
You will be asked to confirm the store procedure when the program
already contains data.
When ready, quit the key opera tor mode.
5
Key operator 95
Page 96

▼▼▼▼
Erasing settings under a program button
Press the section button ‘Program’.
1
Select ‘Erase’ (see figure 87).
2
Copies:
Ready to copy
0
Normal
Exposure
Synchro cut
Zoom % (auto)
Roll: (auto)
Copies: 1
............................................................................................................................................................
Default
settings
.....................................
3
copydelivery:belt1
Zoom: % (auto)
Roll: (auto)
Copies: 3
.....................................
[87] Erasing a copy job
1
2
.....................................
Select the appropriate button to erase or overwrite the copy job.
Note:
You will be asked to confirm the erase/overwrite procedure when the
................
Machine
.....................................
3
................
................
Program
Program
Erase
.....................................
Margin
4
(mm)
................
Finishing
................
Copy
.....................................
5
program already contains data.
When ready, q uit the key operator mode.
4
96 Océ 9700 Copier/Printer User Manual
Page 97

Editing the stamp
Stamps are pre-defined strin gs of t ext. This information m a y be a ny sequence
of characters. Also date and time are at your disposal. If you select the symbol
then the current date will be printed. The symbol will be used to
print the time. If you want to use a space, select the space located to the right
of the Z character.
▼▼▼▼
Copies:
0
High cap.
stacker
Stamp
Fold
delivery
Fold
Note:
If you have selected date and/or time the actual date and/or time will be
printed o n y our output .
By selecting a stamp, users can print this information on the copy. The key
operator , is allo wed to def ine up to 50 stamps . The procedure bel ow sho ws how
to do so.
Editing the stamp
Open the ‘Stamp’ card in the ‘Finishing’ section.
1
Ready to cop y
1
Edit
Layout
Select
................. .... ... .... ... .... ... .... ... .... ... .... ....... ... .... ... .... ... .... ... ... .... ... .... ... .... ... ....... .... ... ... . ... ..
Stamp
............... .... ... ... .... ... .... .
Write
................ ... .... ... .... ... ..
................ ................
Machine Copy
Erase
charactercharacter
........
.......... .. . .. .
Program
........
................
Finishing
........
[88] Stamp card
Press the function button ‘Stamp’ to select ‘Select’ and then the higher/lower
2
buttons to select the stamp you want to change.
Press the function button ‘Stamp’ again to select ‘Edit’ (see figure 88) .
3
With the function button to the right or to the left you can move the
4
cursor to select a character.
Press the function button ‘Write character’ to include the selected character in
5
your stamp.
If you want to delete the last entered character in the stamp, then press the
6
function button ‘Erase character’.
Edit the stamp as required.
7
When ready, quit the key opera tor mode.
8
Key operator 97
Page 98

Defining the standard copy material type
By defining the standard copy material you instruct the Océ 9700 to select a
roll with this copy material when it has to choose between two rolls with the
same width, but different materials.
▼▼▼▼
Copies:
0
Image
Special
original
Copy
material
Copy
size
Note:
The machine cannot detect the media type. This should be specified as
described in ‘Defining the type of material’ on page 134.
Defining the preferred standard type of copy material
Open the ‘C opy material’ ca rd in the ‘Copy’ sec tion.
1
Press the function button ‘Standard’ to set the standard copy material type (see
2
figure 89).
Ready to copy
Polyester
Transparent
Paper
......................................................................................................................................
Standard
.....................................
[89] Default copy material
Polyester
Transparent
Paper
Roll 1
.....................................
................
Machine
Polyester
Transparent
Paper
Roll 2
.....................................
................
Program
.....................................
...............
Finishing
................
Copy
.....................................
When ready, q uit the key operator mode.
3
98 Océ 9700 Copier/Printer User Manual
Page 99

Defining automatic roll change
By switching ‘ Automatic roll change’ on, the printer will switch to another roll
of the same format and copy material when the roll becomes empty durin g
printing. Switching off ‘Automatic roll change’ causes the machine to stop
printing when the selected roll is empty and asks you to load a new roll.
▼▼▼▼
Copies:
0
Image
Special
original
Copy
material
Copy
size
Note:
The machi ne cannot detect the load ed copy material type . This should be
specified when loading a roll of copy material, as described in ‘Defining the
type of mate rial’ on page 134.
Switching ‘Automatic roll change’ on/off
Open the ‘Copy size’ card in the ‘Copy’ section.
1
Press the function button ‘Automatic roll change’ to switch on or off (see
2
figure 90).
Ready to copy
A2
A4 >>
A3 >>
A2
A2
A2 >>
A2
A1 >>
A2
......................................................................................................................................
Automatic
roll change
.....................................
[90] Switching ‘Automatic roll change’ on/off
A0 >>
Auto format
selection
selection
.....................................
................
Machine
210 mm
Standard cut
Synchro cut
Copy
length
.....................................
................
Program
.....................................
................
Finishing
0 mm
0 mm
Remove
strip
.....................................
0 mm
Add
strip
................
Copy
0 mm
When ready, quit the key opera tor mode.
3
Key operator 99
Page 100

Resetting the controller
If a controller error can not be solved by resetting an error message, you can
reset the entire controller without switching off the printer.
▼▼▼▼
Copies:
0
General
Controller
Resetting the printer controller
Stop the print application at the host system.
1
Open the ‘Controller’ card in the ‘Machine’ section (see figure 91).
2
Reset
Reset
error
...............
Language
Ready to copy
......................................................................................................................................
Test
print
.....................................
[91] Resetting an error, example screen
Press the ‘Reset controller’ button.
3
Print
Folding
length
settings
.....................................
................
Machine
Reset
config.
.....................................
................
Program
.....................................
The entire controller will be reset.
When ready quit the key operator mode.
4
Start up the print application at the host system.
5
................
Connect
Reset
controller
.....................................
100 Océ 9700 Copier/PrinterUser Manual
 Loading...