

Oce 9400-I, 9400-II User Manual
Océ 9400-I
User Manual

Océ-Technologies B.V.
This manual contains a description of the Océ 9400-II system and a detailed
explanation of the plot functions. The introduction (chapter 1), gives a general
description of the working methods employed in using the copier and we
recommend that you read at least this chapter.
Overview of copier parts on the covers
To assist you in quickly identifying the various parts of the copier/printer and
the functions on the operating panel, there is an illustration of the Océ 9400-II
on the inside front cover and an illustration of the operating panel on the inside
back cover, both of which can be folded out.
Safety information
This manual contains the following safety information:
Appendix B lists ‘Instructions for safe use’.
■
information before you start to actually use the copier.
information such as safety data sheets can also be found in appendix B.
Where applicable, cautions and warnings are used throughout this manual to
■
draw your attention to the safety precautions which you should follow.
We advise you to read this
Technical safety
Trademarks
PostScript is a trademark of Adobe Systems Inc.
HP-GL, HP-GL/2, HP-RTL are trademarks of Hewlett Packard Company.
Microsoft, MS, and MS-DOS are registered trademarks of Microsoft
Corporation.
MS-Windows is a trademark of Microsoft Corporation.
CalComp is a trademark of California Computer Products Inc.
TIFF is a trademark of Aldus Corporation.
CALS is a military standard.
Copyrigh
Océ-Technologies B.V. Venlo, The Netherlands © 2000
All rights reserved. No part of this work may be reproduced, copied, adapted,
or transmitted in any form or by any means without written permission from
Océ.
Océ-Technologies B.V. makes no representation or warranties with respect to
the contents hereof and specifically disclaims any implied warranties of
merchantability or fitness for any particular purpose.
Further, Océ-Technologies B.V. reserves the right to revise this publication and
to make changes from time to time in the content hereof without obligation to
notify any person of such revision or changes.
Code number 7137099
Edition 2.0
US

Table of Contents
Chapter 1
Getting started
The Océ 9400-II printe r10
The printer operating panel
Buttons 12
Display 12
The Océ 9400-II copi er14
Image logic 1 4
Optiona l14
The scanner operating p anel15
Stand-by mode16
Buttons and funct ions16
Turning the copier on a nd off18
Switching the printer on/ off20
Chapter 2
Installing the printer
Connect the printer to your host environment
Centronic s23
SCSI- 225
Ethernet 27
Ethernet cabli ng27
Supported printing protoco ls29
Preferred printing soluti on29
Printing via L PD31
Printing via F TP32
Printing via S MB34
Setting up SMB on Windows 95/98 and NT
Troubleshootin g35
Set up the memory configuration 36
Input buffe r36
Bitmap buffe r37
Table of Contents 3

Chapter 3
Chapter 4
(Re)load media and toner
Inserting a new print material roll 40
Automatic roll switch ing40
Reloading rol ls41
Cutting the paper to get a straight leading edge
Printing using the manual f eed48
Programming media setti ngs49
Refilling to ner52
Copy jobs
Introductio n56
Making copi es57
Starting the copy proces s57
Activating/de-activating the rewind fun ction58
Changing setti ngs60
Number of copies 6 0
Copying using roll 1 or ro ll 260
Copying using manual fee d61
Reduction/enlargeme nt62
Copying using synchro or standard cut62
Adjusting the leading/trailing ed g e64
Modifying the exposure 67
Inverted copies/Blueprints67
Poster mode
Chapter 5
Print jobs
Printing file s70
Océ applicati on71
Océ drivers 71
Cut metho d72
Plot Center 72
Leading/trailing edge 73
Demo plot 74
Cancel plo t74
4 Océ 9400-II User Manual

Chapter 6
Chapter 7
Use of the Scan-to-File option
Introduct ion76
Related documentation 77
Customizing the printer
Defining pen setti ngs80
Defining language se ttings82
Automatic language sensi ng82
Data format recogniti on83
Manual data format selection 84
HP-GL 85
HP-GL print origin 85
HP-GL page advance
Merge mod e86
HP-GL/2 87
HP-GL/2 print origin 87
HP-GL/2 page advance 87
HP-GL/2 pen priorit y88
Designjet compatibili ty89
Merge mod e89
HP-RTL
CalComp 91
CalComp print origin 91
Checksum parameter 91
CalComp pen priorit y92
Merge mod e92
End of Message parame ter93
Synchronization code parame ter94
Double synchronization code paramet er94
CalComp step size 95
Raster format s96
CALS 96
NIRS
TIFF 96
C4 (EDMICS) 96
PostScript level 297
PostScript data format selectio n97
PostScript page layout
Default PostScript page size 98
Table of Contents 5

Chapter 8
Advanced printer menu functions
Introductio n100
Selecting the media save r101
Nestin g101
Autopositi on103
Media saver time-out 104
Flush media saver 104
Media saver plot size 105
Replot 106
Setting the number of copies 106
Quality set up107
Poster mode107
Renderin g107
Image typ e108
Transformatio n109
Print rotatio n109
Print scalin g109
Autoscalin g110
Password113
Dump configuratio n114
Service 1 15
Chapter 9
Troubleshooting
Troubleshooting the pri nter118
Printer warnings118
Operator-recoverable errors (printe r)119
Clearing paper jams 120
Machine-recoverable error s122
Troubleshooting the copier123
Scanner erro r123
Operator-recoverable scanner errors 124
Please wait 124
Printer erro r124
Clearing original ja m124
Cleaning the glass platen 125
6 Océ 9400-II User Manual

Appendix A
Appendix B
Overview and tables
Product specifications for the print er128
Product specifications for the scan ner129
Interface s130
Centronics protoco l130
SCSI-2 protoco l130
Ethernet protocol 130
Centronics port configurat ion131
SCSI-2 port configuratio n132
Ethernet port configura tion133
Originals that can be used 134
Copy material that can be use d135
Overview of standard zoom formats 137
Order of standard sizes for using standar d cut138
Controller firmware upgrade
Controller firmware upgr ade140
Troubleshootin g142
Appendix C
Appendix D
Safety information
Instructions for safe u se144
Safety data sheets 145
Safety data sheet Océ 9400-II for the prin ter146
Safety data sheet for the Océ 9400-II Printer and S c anner147
EPA Energy Star® 148
Miscellaneous
How to read this manua l152
User survey 153
Addresses of local Océ organization s155
Inde x157
Table of Contents 7

8 Océ 9400-II User Manual

Chapter 1
Getting started
Océ 9400-I
User Manual
This chapter contains a general description of the Océ
9400-II and instructions on how to install the printer and
prepare it for use. Also, it describes how to get the copier
ready for copying operations.
9

The Océ 9400-II printer
The Océ 9400-II is the successor of the Océ 9400. It has an improved, faster
controller and more memory.
The Océ 9400-II is a wide-format printing system. The machine is equipped
with an automatic 1- or 2-roll dispenser. The Océ 9400-II prints on paper,
transparencies, vellum, and polyester film. Its powerful digital technology
offers users optimal ease of use and the reliability that you have come to expect
of Océ.
The following are some of the features included in this machine:
■
automatic language sensing and remote control
■
centronics, Ethernet 10/100 Mb/s (TCP/IP), and SCSI interface (for the
Scan-to-File option only)
■
fast, high quality printing
■
autoscaling of vector data
■
media saver
Optional features:
■
automatic 2-roll unit
■
memory extension modules
■
compact output stacker
■
PostScript level 2
■
high-capacity delivery tray
■
Océ 9400 scanner
■
print server for Novell and Ethertalk
■
Repro Desk print management software
■
Scan-to-file software
■
Océ 940 off-line folder
Note:
The optional features can vary from one country to another.
10 Océ 9400-II User Manual
The printer operating panel
The operating panel located on the right-hand side of the printer console is easy
to use (see figu re1). The panel consists of buttons and a display.
READY
previous
next/select
C
program
[1] Printer operating panel
cancel/
continue
During normal operation, the printer can process print jobs and display the
current printer status (e.g. ‘READY’ or ‘RASTERIZING’).
The buttons on the operating panel allow you to enter the Program mode and
easily set up the printer according to your requirements.
Getting started 11

Buttons
‘Program’
To activate the program mode and to enter the top level menu. In
this mode, the user can use next/select’ the ‘previous’ and or buttons to
step through the menu.
Press Program’ again. If no action takes place for 1 minute in Program mode,
the machine will return to the status mode.
Note:
If you press the Program button while the printer is printing, the LED
above the program button flashes. As soon as the printing process is ready, you
will automatically enter the program mode. Keep in mind that the printer will
not print in Program mode.
‘Next/select’
To select an option or a setting in the menu. Or, if a submenu is
present, enter a lower-level menu.
‘Previous’
Pressing this button takes you one level higher in the menu
structure.
Browse buttons or
These two buttons are used to select another mode
at the same menu level, or to display the next or previous option from the
option list.
Display
‘Cancel/continue’
This button is used to cancel the present print job or to
continue after an operator-recoverable error.
The two-line LCD display provides status information on print jobs in normal
mode, and displays menu items in Program mode.
The following messages may appear during normal operation:
Status messages
indicates the actual status of the printer, e.g. ‘READY’,
‘PROCESSING’ etc.
Warning messages
the printer will continue to operate during a warning
message; however, it is likely that the print quality will not be optimal, e.g.
‘REFILL TONER’.
12 Océ 9400-II User Manual

Error messages
JAM’.
The printer stops and the user must take action, e.g. ‘PAPER
Action messages
An action message prompts the user to perform an action
before the print job resumes. e.g. ‘FEED SHEET’ in the case of manual feed.
Getting started 13

The Océ 9400-II copier
The Océ 9400-II is also a digital copier for large documents (such as
architectural orengineering drawings). The machine is easy to use and makes
copies on paper, transparencies, vellum and polyester film with the quality and
reliability that you have come to expect from Océ.
To use the Océ 9400-II as a copier, a wide-format scanner must be connected
to the printer. Please note that you can still send print jobs when the Océ
9400-II is used as a copier. The print jobs are processed after copying is
finished.
The machine detects whether a user wants to print a document or make a copy,
and automatically switches back to printing mode after 1 minute.
Image logic
Optional
The Océ 9400-II copier makes use of Océ image logic technology. This
technology ensures that the quality of every copy is automatically optimized.
Scan-to-file software (including Océ Scan Station and Océ View Station
Océ Batch Processor software.
14 Océ 9400-II User Manual

The scanner operating panel
The easy-to-use operating panel is located on the right-hand side of the scanne
(see figur e2).
+
4
2
0
-
2
trailingstandard
leading
lighter
darker
synchro
cut edge zoom
manual
roll 2
roll 1
please
wait
%
steps
auto
exposuredarkermedia
printer
error
start
[2] Scanner operating panel
Getting started 15
-
correction
stop/
+

Stand-by mode
The operating panel (see the illustration on inside back cover) on the Océ
9400-II is easy to use and has been specially designed to perform copy jobs.
After switching on the scanner, (see p age18), the machine is ready for
continuous operation. In this state, the operating panel is in stand-by mode,
which is a low-power mode. The operating panel is activated in the following
situations:
■
when you feed in an original
■
when you press a button on the operating panel
Note:
If you do not use the operating panel for more than 1 minute and no
original is fed in, the machine automatically returns to stand-by mode. The
Océ 9400-II, however, always remains ready for operation. However, if the
original remains in the scanner feed table, the operating panel returns to
stand-by mode after 2.5 minutes. The settings will remain unchanged.
Buttons and functions
Start button
pressed the start button, you cannot change the settings for copies that are
being processed, except by making use of the 'stop/correction' button.
-/+ button
The copy quantity can be changed at any time. It can be adjusted from 1 to 19
copies.
Stop/Correction button
during transport, or to correct the selected settings.
The copy process starts with the current settings. Once you have
Press these buttons to increase or decrease the number of copies.
This button has two functions: to stop the original
■
Before starting the copying process
If you press this button once
default value of '1' is displayed. All other settings remain unchanged.
If you press this button twice
reset to their default settings. The number of copies selected will revert to '1',
if it has not already done so. If required, you can select new settings.
16 Océ 9400-II User Manual
:
: The number of copies selected is erased and the
: All selected settings will also be erased and

■
During the copying process:
If you press this button while an original is being fed in, the process will stop
immediately. If you want to abort a multi-copy job after the scanning of the
original is finished, you must abort the copying process by pressing the
'cancel/continue' button on the printer. You must open the top cover of the
scanner to remove the original (‘Clearing original jam’ on pag e124).
Media button
This button allows you to choose the copy material input.
Possible input selections are Roll 1, Roll 2, or Manual feed.
Exposure scale
You modify the exposure level with the 'lighter' and 'darker'
buttons. The exposure level can be changed at any time.
Auto-exposure button
Automatic Background Compensation can be switched
on or off by using this button.
Cut button
This button toggles between synchro cut mode and standard cut
mode.
In synchro cut mode, the copy is cut to the length of the original.
In standard cut mode, the copy is cut to a standard length.
Edge button
This button toggles between the leading and trailing edge. This
allows you to add or remove a strip at the leading or trailing edge.
Zoom button
You can vary the zoom factor with the range of 25% to 400%. A
fixed increment or a percentage can be used.
Up/Down buttons
When using zoom-, edge-, or the standard-cut modes, you
can modify the values of these modes by pressing the up or down buttons.
Start indicator
This indicator, located above the start button, indicates that the
scanner is ready to perform a scan and turns off while the scanner is scanning
an original. This is also the only indicator that is turned on while the scanner
is in stand-by mode.
Please wait
This indicator flashes when the user has pressed the start button,
but the system is not ready to scan. This could be because the system is busy
with a multi-copy job, or because the system is processing a print job.
Printer error
This indicator activates if there is a printer error. Check the
operating panel of the printer for the error message.
Getting started 17
Turning the copier on and off
Switching on the copier involves:
■
turning on the scanner
■
turning on the printer (see page 20).
Once the system has been turned on, it is ready for operation. In this state, the
machine is in stand-by mode. There is no need to turn it off after each copy job.
You can leave the copier turned on for the rest of the day. The Océ 9400-II is
ready for operation at all times.
If the copier is idle for more than 1 minute, the operating panel automatically
returns to stand-by mode. The scanner's operating panel is activated in the
following situations:
■
you feed in an original
■
you press a button on the operating panel
▼▼▼▼ Turning on the scanne
1
Set the on/off switch, located at the back of the scanner, to position ‘1’ (see
figur e3). If the electrical supply is correctly connected, the green switch will
light up.
[3] Scanner on/off switch
Note:
The system is ready for use immediately. You can turn the scanner on and
off independent of the printer, and you do not need to follow any particular
order in doing so.
18 Océ 9400-II User Manual

▼▼▼▼ Turning off the scanne
1
Set the on/off switch, located at the back of the scanner, to position ‘0’ (see
figure 3 )
Getting started 19
Switching the printer on/of
Once the printer has been switched on, it is ready for operation.
▼▼▼▼ Turning the printer o
1
Set the on/off switch, located at the back of the printer to position ‘1’ (see
figur e4). If the electrical supply is correctly connected, the green switch will
light up.
[4] Printer on/off switch
Note:
When ‘Ready’ appears on the operating panel, the printer is ready for
use.
▼▼▼▼ Turning the printer off
2
Set the on/off switch, located at the back of the printer to position ‘0’ (see
figur e4).
Attention:
Switching off the printer during a print job may cause a loss o
information or a paper jam.
20 Océ 9400-II User Manual

Océ 9400-I
User Manual
Chapter 2
Installing the printer
This chapter describes how to connect your printer to your
host environment and how to configure the printer to meet
your specific needs.
21

Connect the printer to your host
environment
The Océ 9400-II supports several types of interfaces (Centronics, Ethernet 10
& 100 Mb/s, TCP/IP). Novell and Ethertalk are supported through the optional
print server.
To ensure proper operation, please follow the steps below when connecting
your host to the Océ 9400-II.
1
Make sure that both the host and the Océ 9400-II are turned OFF. See
‘Centronics’ on pa ge23 or ‘SCSI-2’ on pa ge25.
2
Connect the appropriate interface cable to your local host and the
corresponding interface connector to the Océ 9400-II (see ‘Centronics’ on
page 23 or ‘SCSI-2’ on pa ge25).
3
Turn on the Océ 9400-II (see ‘Centronics’ on pa ge23 or ‘Ethernet’ on
page 27).
4
Enter the Program mode to configure the connection parameters (see
‘Centronics’ on pa ge23, ‘Ethernet’ on page27 or ‘SCSI-2’ on page25).
5
Enter Program mode to configure the Océ 9400-II to meet your requirements
(see ‘Printing files’ on page70 o Customizing the printer’ on pa ge79).
6
Exit Program mode. If applicable, install and configure the appropriate host
software on your local host environment.
7
Turn the printer OFF and then ON again.
Note:
On again to activate your new parameters. Tip: configure all settings at the
same time, then turn the printer Off and On.
22 Océ 9400-II User Manual
When specifying connection settings, you must switch the printer Off and
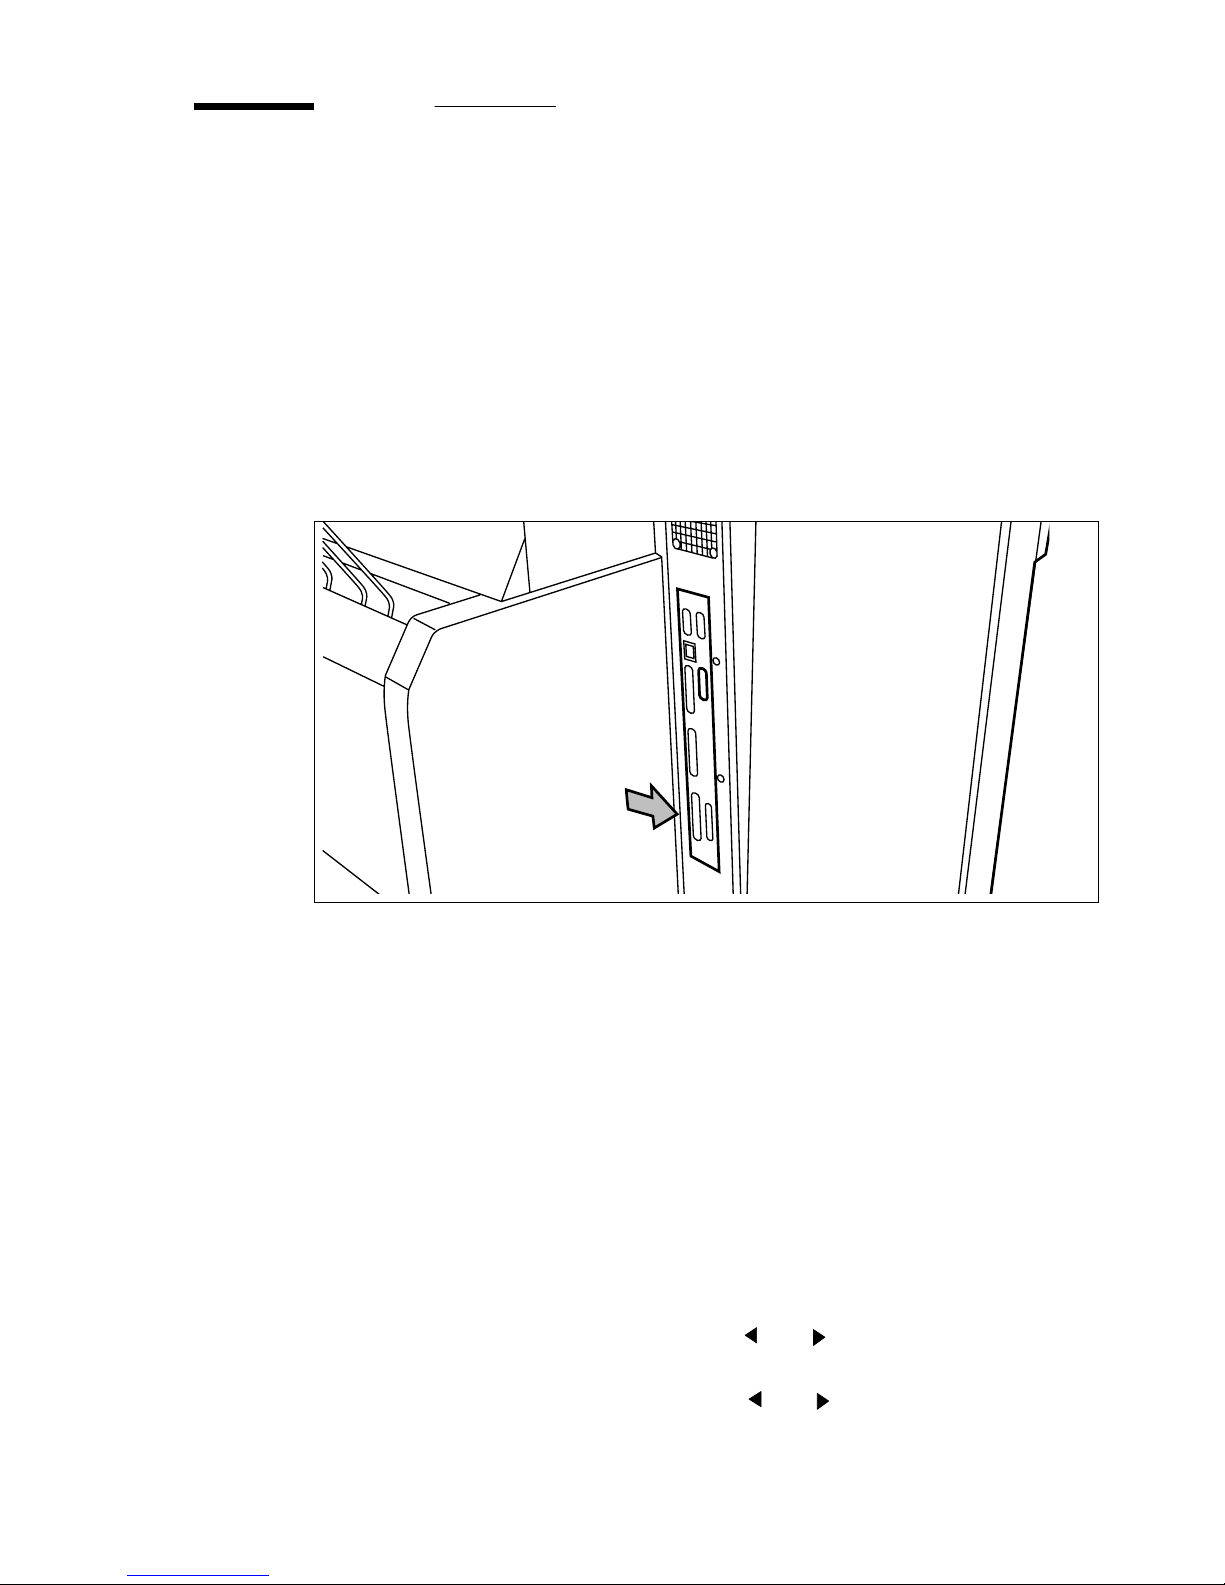
Centronics
Connection through the Centronics interface is straightforward and data
transfer is fast. You must set two parameters: the transmission type and the plot
time-out.
▼ Connecting Centronics
1
Turn off the printer and host.
2
Connect one end of the Centronics cable to the computer's Centronics parallel
port.
3
Connect the other end to the printer’s Centronics parallel port (see figure 5).
Centronics
[5] Centronics port
4
Turn the printer on.
▼ Defining transmission typ
You can choose to enable the IEEE P1284 ECP mode (enabled) or force the
use of the IEEE P1284 Compatible mode (disabled). The default is "disabled".
In certain host environments, the ECP mode does not work correctly and the
Océ 9400-II offers you the option to use the so-called compatible mode (ECP
mode disabled). Note that if your host allows this mode, ECP mode is faste
than compatible mode. The default is ECP disabled.
1
Press ‘Program’ to enter the main menu.
2
Select the ‘
3
Press ‘next/select’ to enter the ‘
4
Select the ‘C
CONNECTIONS
ONNECTIONS
’
’ menu using th e or button.
menu using th e or button.
CONFIGURATION
menu.
’
Installing the printer 23

5
Press ‘next/select’ to enter the ‘
6
Select the ‘
7
Press ‘next/select’ to enter the ‘
8
Select the ‘
9
Press ‘next/select’ to enter the ‘
10
Select the required setting usi ng the or button.
11
Press ‘next/select’ to confirm the selected type.
12
Press ‘Program’ to exit the main menu.
▼ Defining the end-of-plot time-ou
CENTRONICS
ECP
’ mode using the or button.
’ item using the or button.
CONNECTION
CENTRONICS
ECP
Normally, print files end with an instruction that tells the printer that the file is
finished.
However, some print data files do not have an end-of-print instruction. In this
case, the print will be considered ‘finished’ when the printer stops receiving
graphic commands over the Centronics interface.
The print time-out option sets the delay after which the print is considered
finished. You can choose between 15, 30, 180, or 500 seconds. The default is
180.
’ menu.
’ menu.
’ menu.
1
Press ‘Program’ to enter the main menu.
2
Select the ‘
3
Press ‘next/select’ to enter the ‘
4
Select the ‘
5
Press ‘next/select’ to enter the ‘
6
Select the ‘
7
Press ‘next/select’ to enter the ‘
8
Select the ‘
9
Press ‘next/select’ to enter the ‘
10
Select the required plot time-out usi ng the or button.
11
Press ‘next/select’ to confirm the selected plot time-out.
12
Press ‘Program’ to exit the main menu.
CONFIGURATION
CONNECTION
CENTRONICS
PLOT TIME OUT
’ item using the or button.
’ item using the or button.
’ item using t he or button.
CONFIGURATION
CONNECTION
CENTRONICS
’ menu.
’ menu.
’ item using t he or button.
PLOT TIME OUT
’ menu.
’ menu.
24 Océ 9400-II User Manual
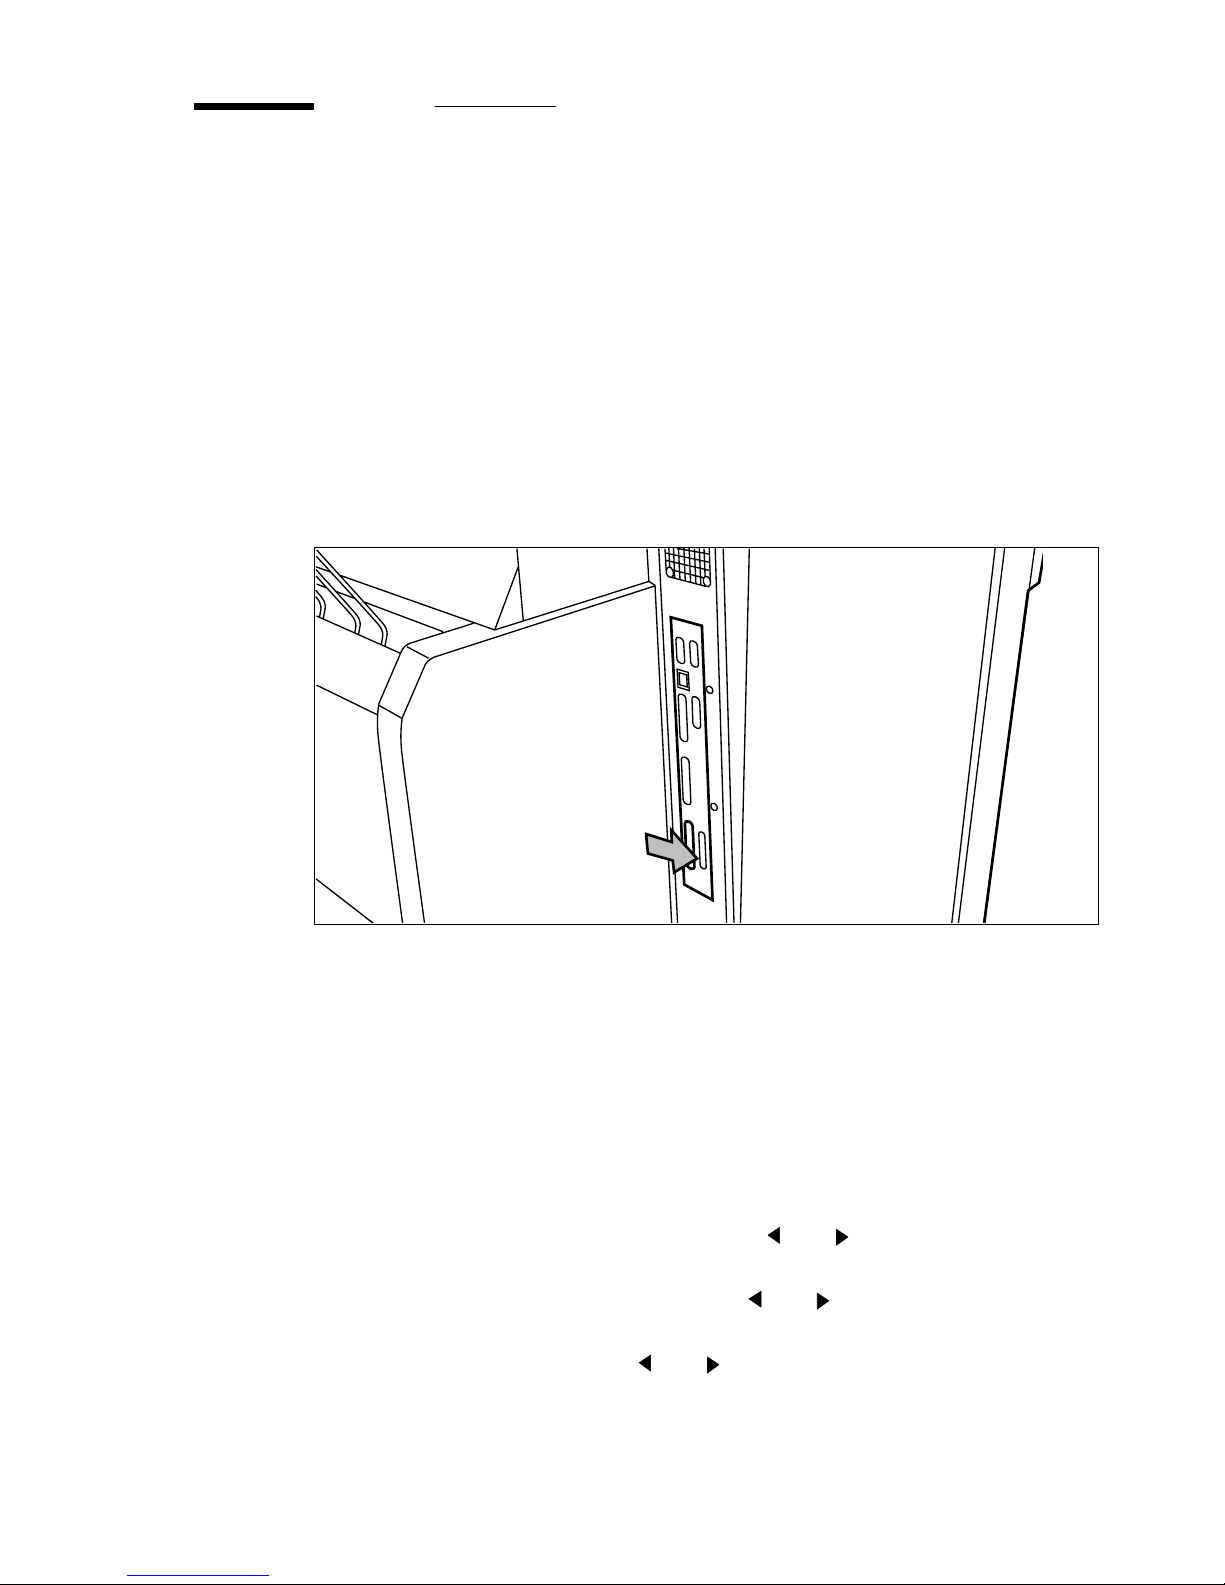
SCSI-2
If you are using the SCSI-2 port (for the scan-to-file option), you must
configure two parameters; the SCSI-2 ID and the terminator.
Note:
The SCSI-2 port is used only for the scan-to-file option, which allow you
to upload data from the controller to the connected PC.
▼ Connecting SCSI-2
1
Turn off the printer and the host.
2
Connect one end of the SCSI-2 cable to the computer’s SCSI-2 port.
3
Connect the other end to the printer’s SCSI-2 port (see fi gure6).
SCSI
[6] SCSI-2 port
4
Switch on the printer and the host.
▼ Defining the SCSI-2 I
You can select a number between 0 and 7. The default is 0. Check the
configuration of your computer to find an ID that is not being used by anothe
device on the SCSI-2-bus to which you want to connect the Océ 9400-II.
1
Press ‘Program’ to enter the main menu.
2
Select the ‘
3
Press ‘next/select’ to enter the ‘
4
Select the ‘C
5
Press ‘next/select’ to enter the ‘
6
Select the
7
Press ‘next/select’ to enter the SCSI-2 menu.
Installing the printer 25
CONFIGURATION
ONNECTIONS
SCSI-2
item using the or button.
menu using th e or button.
’
CONFIGURATION
menu.
’
’ menu using th e or button.
CONNECTION
’ menu.

8
Select the ‘ID’ item using the or button.
9
Press ‘next/select’ to enter the ‘ID’ menu.
10
Select the required ‘ID’ (a value from 0 to 7) using the or button.
11
Press ‘next/select’ to confirm the selected ‘ID’.
12
Press ‘Program’ to exit the main menu.
13
Switch the printer off and then on again to activate the configured settings.
▼ Defining the terminato
The termination should be set to ‘ON’ if the Océ 9400-II is the last device on
the SCSI-2 chain. It should be set to ‘OFF’ if it is placed between other devices.
1
Press ‘Program’ to enter the main menu.
2
Select the ‘C
3
Press ‘next/select’ to enter the ‘
4
Select the ‘C
5
Press ‘next/select’ to enter the ‘
6
Select the
7
Press ‘next/select’ to enter the SCSI-2 menu.
8
Select the ‘
9
Press ‘next/select’ to enter the ‘
10
Select ‘ON/
11
Press ‘next/select’ to confirm the required selection.
12
Press ‘Program’ to exit the main menu.
13
Turn the printer off and then on again to activate the configured settings.
ONFIGURATION
ONNECTIONS
SCSI-2
TERMINATION
OFF
item using t he or button.
’ using the o r button.
’ menu using th e or button.
CONFIGURATION
’ menu.
’ menu using th e or button.
CONNECTION
’ menu.
’ item using the or button.
TERMINATION
’ menu.
26 Océ 9400-II User Manual

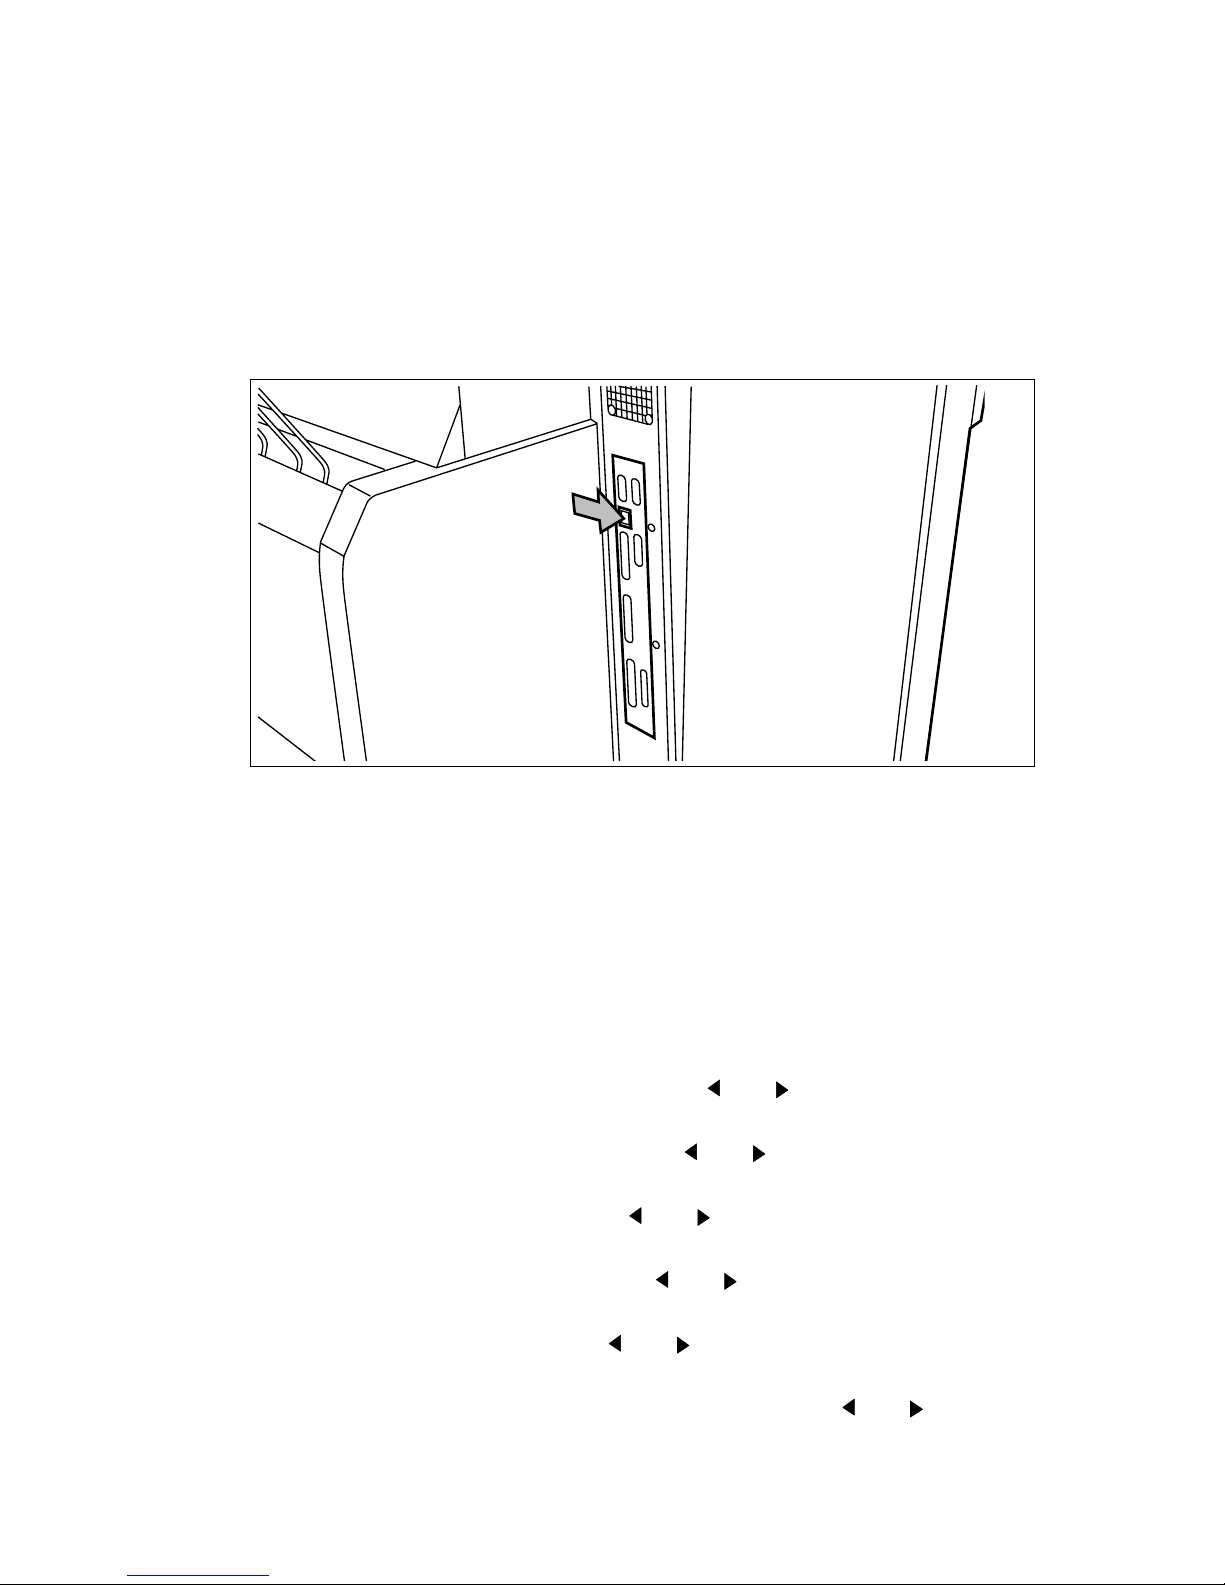
Ethernet
Your controller includes both an AUI transceiver connector (10 MB/s) and an
RJ45 connector (10 or 100Mb/s). Ethernet connections can therefore use Thin
or Thick Ethernet or UTP cabling.
Note:
performance.
AUI: 10Mbit only
RJ45 (UTP): 10 & 100 Mbit (automatic adjustment).
Do not use the AUI and RJ45 simultaneously.
We recommend using the RJ45 100 Mbit to achieve the highest possible
Ethernet cabling
An AUI (Attachment Unit Interface) connector is designed to connect a cable
from the network interface card in your controller to a transceiver mounted on
the backbone Ethernet cable. The backbone cable may be Thin or Thick
Ethernet cable.
AUI
[7] AUI port
Installing the printer 27
UTP (unshielded twisted pair) cable looks much like standard phone cable.
The cable should have RJ45 plugs.
If you are using the Ethernet port, you will need to configure a list o
parameters. All required parameters are described in the following procedures.
▼ Connecting Etherne
1
Connect one end of the Ethernet cable to the computer’s Ethernet port.
2
Connect the other end to the printer’s Ethernet port (see f igure8).
RJ45
[8] Ethernet port
▼ Setting up the TCP/IP protoco
You must configure the printer IP address, subnet mask and default gateway IP
address (consult your local network administrator). Each of these fou
addresses is composed of 4 numeric fields ranging from 0 to 255. For example:
194.2.66.146 or 255.255.255.0. The menu presents these fields in the
following order: field 0, field 1, field 2, field 3.
1
Press ‘Program’ to enter the main menu.
2
Select the ‘C
3
Press ‘next/select’ to enter the ‘
4
Select the ‘C
5
Press ‘next/select’ to enter the ‘
6
Select the ‘
7
Press ‘next/select’ to enter the ‘
8
Select the ‘IP
9
Press ‘next/select’ to enter the ‘IP
10
Select the ‘
11
Press ‘next/select’ to enter the ‘
12
Enter the ‘
ONFIGURATION
ONNECTIONS
ETHERNET
ADDRESS
FIELD
FIELD
’ item using the or button.
’ menu using th e or button.
0’ menu using th e or button.
0’ number of your ‘IP
’ menu using th e or button.
’ menu using th e or button.
CONFIGURATION
CONNECTION
ETHERNET
ADDRESS
FIELD
0’ menu.
ADDRESS
’ menu.
’ menu.
’ menu.
’ menu.
’ using the o r button.
28 Océ 9400-II User Manual

13
Press ‘next/select’ to confirm the required selection.
14
Press ‘previous’ to go up one level.
15
Repeat steps 10 to 14 for ‘
16
Press ‘previous’ to go up one level.
17
Select the ‘
18
Press ‘next/select’ to enter the ‘
19
Select the ‘
20
Press ‘next/select’ to enter the ‘
21
Press ‘next/select’ to confirm the required selection.
22
Enter the ‘
23
Press ‘previous’ to go up one level.
24
Repeat steps 19 to 23 for ‘
25
Press ‘previous’ to go up one level.
26
Select the ‘
27
Press ‘next/select’ to enter the ‘
28
Select the ‘
29
Press ‘next/select’ to confirm the required selection.
30
Press ‘next/select’ to enter the ‘
31
Enter the ‘
32
Press ‘previous’ to go up one level.
33
Repeat steps 28 to 32 for ‘
34
Press ‘Program’ to exit the main menu.
35
Turn the printer off/on to activate the configured Ethernet-ID.
SUBNET MASK
FIELD
0’ menu using the or button.
FIELD
0’ number of your ‘
DEF.GATEWAY
FIELD
0’ menu using the or button.
FIELD
0’ number of your ‘
FIELD
’ menu using the or button.
FIELD
’ menu using th e or button.
FIELD
FIELD
1,
SUBNET MASK
FIELD
SUBNET MASK
FIELD
1,
DEF.GATEWAY
FIELD
DEF.GATEWAY
FIELD
1,
FIELD
2,
0’ menu.
FIELD
2,
0’ menu.
FIELD
2,
3’.
’ menu.
’ using th e or button.
3’.
’ menu.
’ using the o r button.
3’.
Supported printing protocols
In addition to TCP\IP, the Océ 9400-II supports the following printing
protocols: LPD, FTP, SMB (also known as LAN Manager or Windows
networking). Simultaneous multiple protocols and users are supported.
Preferred printing solution
Windows network
■
Use Windows printing through SMB to print directly to the printer from your
workstation(s).
■
If you experience problems connecting to the printer through SMB, or if you
want to centralize printing on a server, you can install the printer on the
server (for example, using a local connection to an lpr port) and then share it
Installing the printer 29

to the rest of the network. You might want to do this if, for example, if you
printer is to be accessed by several important clients.
TCP/IP network.
■
TCP/IP is commonly used for the Unix, Win 95/98/NT and OS/2 operating
systems. For Win 95/98, LPD is not standard and must be supplied by third
parties. Contact your local service organization to determine the availability
of third party shareware or freeware. Use lpd or ftp (in that order of
preference).
30 Océ 9400-II User Manual
 Loading...