

Page 1

User's Guide
Network
Print
Controller
75
© 2001 by Océ USA, Inc. and Océ Printing Systems USA, Inc.
Page 2

Thank you for purchasing the Océ Network Print Controller 75.
This User’s Guide includes instructions for making prints, handling the machine correctly, and safety
precautions. Please read this manual before performing any printing operations or using the equipment
in any way.
In order to maintain satisfactory printing performance, please keep this User's Guide readily available for
reference.
© 2001 by Océ USA, Inc. and Océ Printing Systems USA, Inc.
ACKNOWLEDGEMENT:
Microsoft, MS and MS-DOS are registered trademarks of Microsoft Corporation in the United States.
IBM is a registered trademark of International Business Machines, Inc. in the United States.
Windows
TM
is a trademark of Microsoft Corporation.
HP and PCL are registered trademarks of Hewlett-Packard Company.
Agfa Microtype font is a registered trademark of Agfa Corporation.
PEERLESS is a registered trademark of PEERLESS SYSTEMS CORPORATION.
Adobe, Adobe Logo, Acrobat, Acrobat Logo, PostScript and PostScript Logo are registered trademarks or trademarks of Adobe Systems, Inc.
Other company names and product names used in this manual are the registered trademarks or
trademarks of their respective companies.
NOTICE:
Océ USA, Inc. and Océ Printing Systems USA, Inc. have made every effort to ensure that the
information in this manual is complete and accurate. However, constant efforts are also being made to
improve and update the product. Therefore, Océ USA, Inc. and Océ Printing Systems USA, Inc. shall
not be liable for errors in this manual or for any consequential damages resulting from the use of this
manual. The information contained herein is subject to change without notice.
FEDERAL OR STATE STATUTES MAY PROHIBIT THE COPYING OF CERTAIN DOCUMENTS OR
INFORMATION, RESULTING IN FINES OR IMPRISONMENT FOR VIOLATORS.
WEB SITE ADDRESS:
http://www. oceusa.com
CORRESPONDENCE:
Correspondence regarding this manual may be mailed to the address shown below.
Océ USA, Inc.
5450 N. Cumberland Avenue
Chicago, IL 60656
Océ Printing Systems USA, Inc.
5600 Broken Sound Blvd.
Boca Raton, FL 33487
Page 3

CONTENTS
CONTENTS
■ Introduction ....................................................................................................... v
● Package Contents..................................................................................................... vi
● System Requirements............................................................................................... vi
● About this Manual .................................................................................................... vii
● Conventions Used in this Manual ........................................................................... viii
Chapter 1 Overview ............................................................................... 1-1
■ Overview of the Print Controller ..................................................................... 1-2
● Print Controller and Main Body Printer .................................................................. 1-2
● Print Data Flow ...................................................................................................... 1-4
● Hardware Configuration ......................................................................................... 1-5
● Interface ................................................................................................................. 1-5
● Printer Driver .......................................................................................................... 1-6
● Page Description Language................................................................................... 1-6
● Memory .................................................................................................................. 1-7
Chapter 2 Printer Driver Setup ............................................................. 2-1
■ Installation of the Printer Driver ...................................................................... 2-2
● Before Installation .................................................................................................. 2-2
● Installing to Windows 95/98/Me ............................................................................. 2-3
● Installing to Windows NT4.0/2000 ......................................................................... 2-5
● Uninstalling the Printer Driver ................................................................................ 2-9
■ Test Page Print ............................................................................................. 2-10
Chapter 3 Printer Driver Functions ...................................................... 3-1
■ Printer Driver Functions ................................................................................. 3-2
● Compliant OS......................................................................................................... 3-2
● Properties............................................................................................................... 3-3
● Function List........................................................................................................... 3-7
● Description of Functions ...................................................................................... 3-13
ii Print Controller User’s Guide
Page 4

CONTENTS
Chapter 4 Control Panel Setup ............................................................. 4-1
■ Control Panel.................................................................................................. 4-2
● Names and Functions of the Control Panel ........................................................... 4-2
● LCD Touch Screen ................................................................................................. 4-4
● Basic Screen .......................................................................................................... 4-5
● Job Status Screen.................................................................................................. 4-6
● Printer Mode Basic Screen .................................................................................... 4-8
■ Configuration of Printer Setting Menu .......................................................... 4-10
■ Functions of the Printer Setting .................................................................... 4-11
● Test Print .............................................................................................................. 4-11
● Controller Set ....................................................................................................... 4-12
● Set Default ........................................................................................................... 4-14
● PCL Setup ............................................................................................................ 4-15
● Time Change........................................................................................................ 4-15
■ Print Job .......................................................................................................4-16
● Cancel .................................................................................................................. 4-16
● Check ................................................................................................................... 4-17
● Interrupt / Reserve ............................................................................................... 4-19
● Forced Output ...................................................................................................... 4-20
● Password Print (Confidential Output)................................................................... 4-21
● Job Combination .................................................................................................. 4-24
Chapter 5 Scanner Operation ............................................................... 5-1
■ Brief Description ............................................................................................. 5-2
■ To Install the Scanner Driver...........................................................................5-3
■ Scanning from the Copier ............................................................................... 5-4
● To Scan Documents in Real Mode ......................................................................... 5-4
● To Scan Documents in Store Mode ....................................................................... 5-6
● Scanner Setting Basic Screen ............................................................................... 5-7
● Functions ............................................................................................................. 5-10
■ Reading in Scanned Data on a computer.................................................... 5-13
● To Import Scanned Data ...................................................................................... 5-13
● Scanner Driver’s Main Screen ............................................................................. 5-15
● Variable Option .................................................................................................... 5-18
● To Delete Scanned Data ...................................................................................... 5-19
Print Controller User’s Guide iii
Page 5

CONTENTS
Chapter 6 Printer ECM .......................................................................... 6-1
■ Overview of the Printer ECM ..........................................................................6-2
● Setting of Printer ECM ........................................................................................... 6-2
● Printing with Printer ECM ....................................................................................... 6-2
● ECM Limit .............................................................................................................. 6-3
Appendix A Troubleshooting .............................................................Appendix A-1
Appendix B Product Specifications.................................................. Appendix B-1
Appendix C Font List..........................................................................Appendix C-1
INDEX............................................................................................................ Index-1
iv Print Controller User’s Guide
Page 6

■ Introduction
The Océ Network Print Controller 75 designed to be built-in type server of the Océ 3275
Copier-Printer and enables direct printing from Windows-compliant computers. It can also
enable use of the copier as a network printer when an optional Ethernet Card 75 network
interface card is added.
FCC Regulations
Warning:
This equipment has been tested and found to comply with limits for a Class B digital
device, pursuant to part 15 of FCC rules. These limits are designed to provide reasonable protection against harmful interference in a residential area.
This equipment generates, uses and can radiate radio frequency energy and, if not
installed and used in accordance with the instructions, may cause harmful interference
to radio communications. However, there is no guarantee that interference will not occur
in a particular installation. If this equipment does cause harmful interference to radio or
television reception, which can be determined by turning the equipment off and on, the
user is encouraged to try to correct the interference by one or more of the following
measures:
Introduction
• Reorient or relocate the receiving antenna.
• Increase the separation between the equipment and the receiver.
• Connect the equipment to an outlet on a circuit different from the circuit to which the
receiver is connected.
• Consult the dealer or an experienced radio/TV technician for help.
Canadian Department of Communications Regulations
Cet appareil numérique de la classe B est conforme à la norme NMB-003 du Canada.
This Class B digital apparatus complies with Canadian ICES-003.
Patent Notice
The product includes an implementation of LZW licensed under U.S.Patent 4,558,302.
Built-in Fonts
The print controller supports for PCL5e Language (HP PCL clone) and includes the 80
built-in Agfa Microtype fonts. For a complete list, see “Appendix C Font List”(Appendix
C-1).
This User’s Guide or any part there of shall not be used or copied without permission.
•
Océ assumes no liability for any influences caused by using the printing system and
•
this manual.
Information in this User’s Guide is subject to change without notice.
•
Océ Corporation shall have the copyright of this printer driver.
•
Print Controller User’s Guide v
Page 7

Introduction
● Package Contents
The following items are supplied with the Network Print Controller 75:
User Software CD
•
• Printer Driver
• Scanner Driver (compatible with TWAIN)
• Adobe Acrobat Reader
• User's Guide (this manual)
• Release Note (describes the latest information and limits of the system and
● System Requirements
Windows
The following are required to print from Windows-compliant computers to the printing
system:
the user software.)
Computers on which Windows 95/98/Me/NT4.0/2000 can run
•
CD-ROM drive (necessary to install the printer driver or the scanner driver)
•
Using Windows 95/98/Me
• Microsoft Windows 95/98/Me
• 32 MB RAM or more
Using Windows NT4.0/2000
• Microsoft Windows NT4.0/2000
• 32 MB RAM or more
Parallel Port
The following are required to print to the print controller by way of the parallel port:
Windows-compliant computers
•
IEEE 1284 parallel cable
•
One end of the cable is required to have a DB 25 pin male connector (connected to
the print controller).
vi Print Controller User’s Guide
Page 8

Introduction
● About this Manual
This manual is only for the Network Print Controller 75.
This manual describes how to operate the Network Print Controller 75 when the Océ 3275
Copier-Printer and Océ 750 is used as a printer by connecting it to computers or to a network.
The main body printer (copier) and the optional network interface card are
separately supplied with instruction manuals. Refer to these manuals as
needed.
For detailed operations of Windows 95/98/Me and Windows NT4.0/2000, refer
to the operating manuals for each operating system. For application operations,
refer to the operating manuals provided with each application.
This manual is composed of the following six chapters and Appendix:
Chapter 1: Overview
Chapter 1 describes the print controller hardware and the overview of its functions, and
briefly explains how to connect the parallel ports of computers to the print controller and
the main body printer (copier).
Chapter 2: Printer Driver Setup
Chapter 2 describes how to install the printer driver (user software included on the user
software CD) to Windows-compliant computers.
It enables printing from each application of Windows-compliant computers to the main
body printer by way of a parallel port/network.
Chapter 3: Printer Driver Functions
Chapter 3 describes various functions of the printer driver installed on Windows-compliant
computers.
Chapter 4: Control Panel Setup
Chapter 4 describes the layout of the control panel of the main body printer and
explains how to operate and set functions on the control panel.
Chapter 5: Scanner Operation
Chapter 5 describes the how to operate the scanner system; how to scan a graphic
at the Printer/Copier and transfer it to a Windows-compliant computer.
Chapter 6: Printer ECM
Chapter 6 describes how to set and use Printer ECM.
Appendix
• Appendix A describes troubleshooting tips for the print controller.
• Appendix B describes product specifications.
• Appendix C lists the built-in printer fonts included with the print controller.
Print Controller User’s Guide vii
Page 9

Introduction
● Conventions Used in this Manual
Notation of each product
•
The following abbreviations are used in this manual:
(1) Network Print Controller 75: print controller
(2) Océ 3275 or Océ 750
(3) Ethernet Card 75 Network Interface Card (option): network interface card
(4) A printing system that combines the above (1) and (2)
or (1), (2) and (3) products:
(5) Microsoft Windows 95: Windows 95
Microsoft Windows 98: Windows 98
Microsoft Windows Me: Windows Me
Microsoft Windows NT4.0: Windows NT4.0 or Windows NT
Microsoft Windows 2000: Windows 2000
Above OSs: Windows 95/98/Me
Notation of cautions in this manual are shown with the caution symbol.
•
Each mark used in this manual has the following meaning.
Copier-Printer
: main body printer or Copier
printing system
Windows NT4.0/2000
Windows NT/2000
Windows 95/98/Me/NT/2000
Precautions and limits at the time of operating hardware or software are written.
Hints, advice, confirming items, etc. at the time of operating hardware or software are written.
Notation of names shown on the screen are written within square brackets e.g., click
•
the [OK] button.
Notation of folders
•
Folders are referred to in upper-down-to-lower sequence.
For example:
Select the [Printer.inf] file in the “PCL\English\Win9X” folder of the User Software CD.
Notation of the reference in this manual is written within quotation marks
•
e.g., “Chapter 1 Overview.”
viii Print Controller User’s Guide
Page 10

Chapter 1 Overview
■ Overview of the Print Controller................ 1-2
● Print Controller and Main Body Printer .............1-2
● Print Data Flow.....................................................1-4
● Hardware Configuration ......................................1-5
● Interface ................................................................1-5
● Printer Driver ........................................................1-6
● Page Description Language ............................... 1-6
● Memory .................................................................1-7
Print Controller User’s Guide 1-1
Page 11

Chapter 1 Overview
■ Overview of the Print Controller
● Print Controller and Main Body Printer
The print controller is designed to be used as the built-in type server of the main body
printer/copier.
The print controller can be used to connect the main body printer to computers or to a
network on which the main body printer can function as a printer/network printer from applications on Windows 95/98/Me/NT/2000. The optional network interface card is required for
connecting to a network.
Printing System
Main Body Printer
Print Controller
For use as a networked printer
(NIC required)
For use as a local printer
When the command for printing is executed from an application on Windows 95/98/Me/NT/
2000, print data is sent to the print controller by way of a parallel Interface (IEEE 1284) or a
network.
The interpreter inside the print controller rasterizes the print data to image data (bitmap
extracting process), which is sent to the print engine in the main body printer via the VIC
(video interface card) installed in the main body printer to print.
The Serial bus (IEEE 1394) provides a high speed transmitting method for data, commands
and status transferring between the interpreter and the video interface card. The maximum
transferring rate is 200 Mbps.
The print engine in the main body printer receives image data through the PCI bus from the
video interface card.
Even while the main body printer is printing the previous print job data or receiving the print
data, the print controller can receive the next command for printing from an application.
The printing system can continuously print Letter/A4-size paper at the maximum print speed
of 75 ppm (400 dpi/600 dpi).
In addition, this system supports the duplex function and the finisher function which enables
the use of five paper trays, stapling, folding and stitching, punching.
1-2 Print Controller User’s Guide
Page 12

Chapter 1 Overview
Copy Mode, Printer Mode and Scanner Mode
The control panel of the main body printer can be used in any mode of the copy mode,
the printer mode or the scanner mode.
Even while the main body printer is printing or copying, the print controller can receive
the next job, and while the print controller is receiving a print job or a scan job, you can
use the copy mode.
Printer ECM
Printer ECM is a feature to manage the number of prints on the copier.
Setting the Printer ECM feature means that, provided you enter a password previously
established on the printer to request a print job, the copier counts up printouts based on
the ECM counter to know when a preset limit is hit, and also rejects a print request from
a client having no valid password.
E-RDH (Electronic Recirculating Document Handler)
The E-RDH system temporarily stores in memory the print data you select from available options. The main body printer E-RDH is used to print from the print controller.
The E-RDH memory is 64 MB (standard) and can be extended to 512 MB.
When using the E-RDH in the one-sided mode, printing will be performed simultaneously while the print controller rasterizes the pages in the print job and sends them to
the E-RDH memory. While pages are being printed from the E-RDH memory, the print
controller continues to rasterize the next print job in the sequence.
Print Controller User’s Guide 1-3
Page 13
Chapter 1 Overview
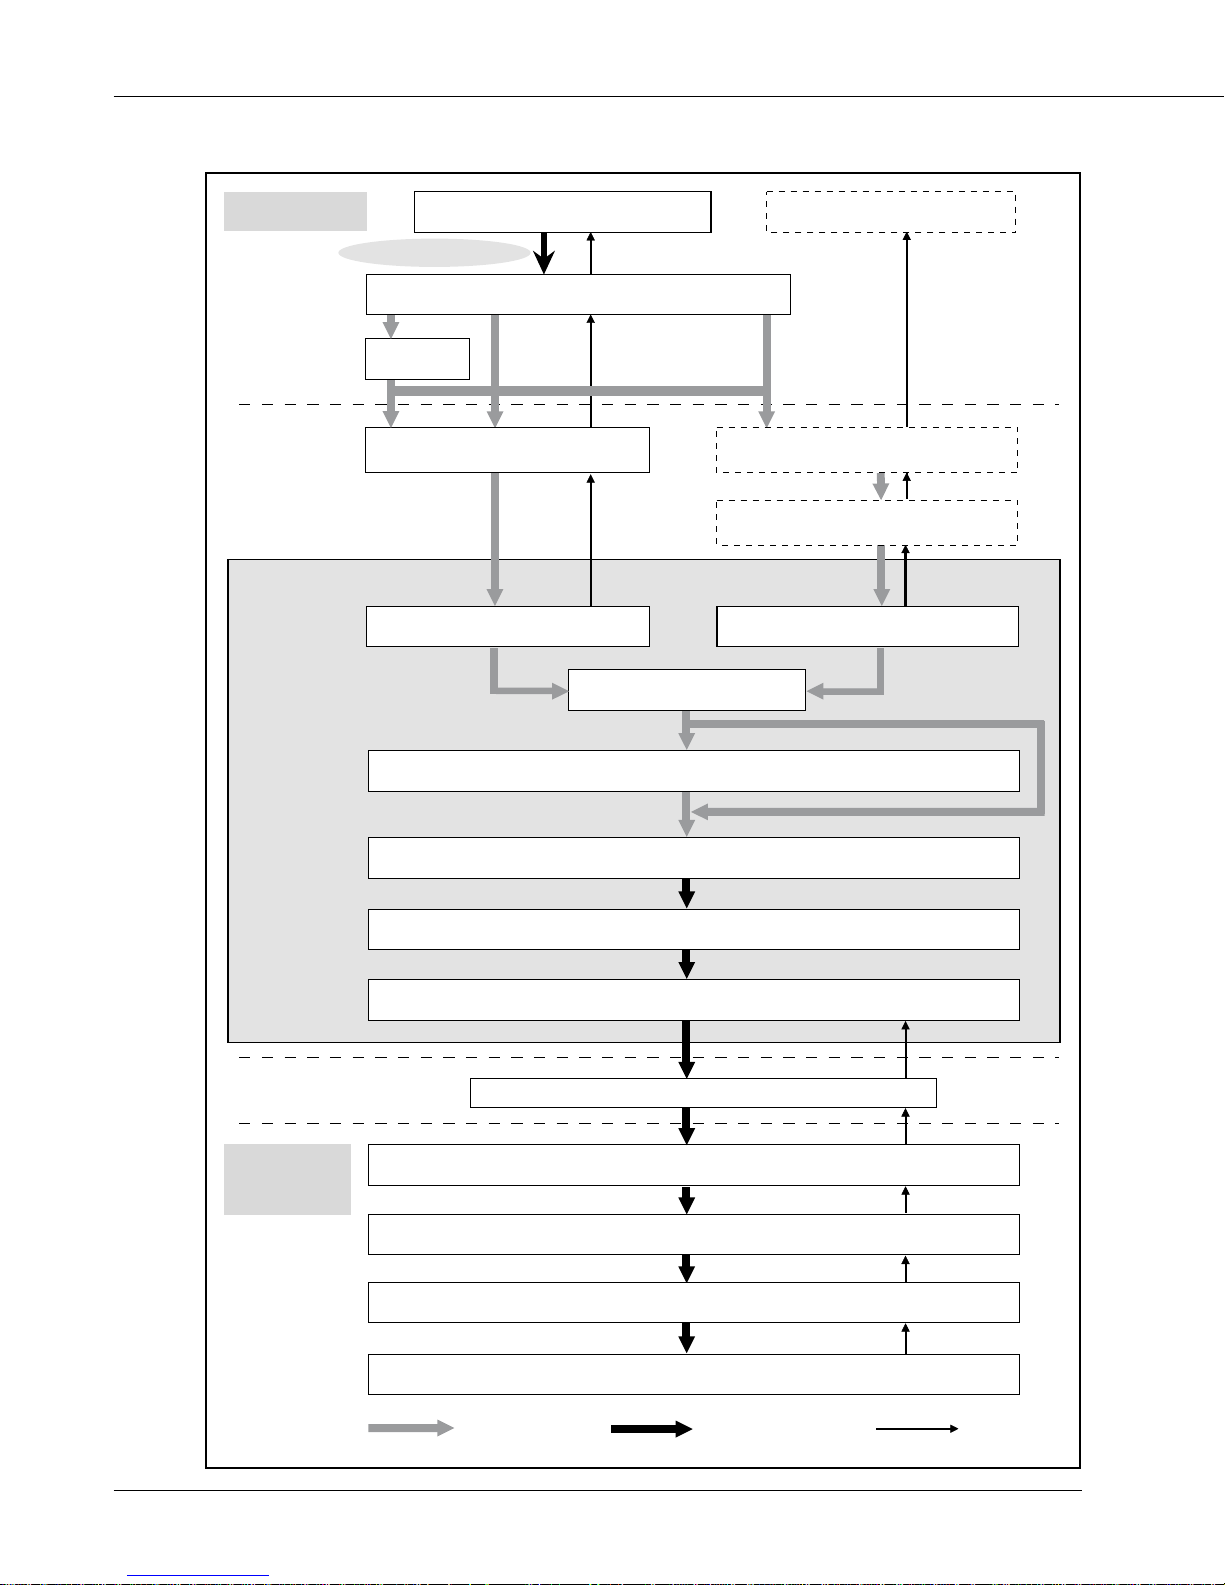
● Print Data Flow
Computer
Print Commands
Spooler
Interface
Print Controller
Application
Printer Driver
Parallel I/F
( IEEE 1284 )
Parallel I/F
Browser HTML
Ethernet Network I/F
( TCP/IP, IPX/SPX, AppleTalk )
Nework Interface Card
( Option )
PCI bus
Input Buffer
Hard Disk
Interface
Main body
printer
PDL Processing ( Rasterization ) / Interpreter
Page memory
IEEE 1394 Communication Board
IEEE 1394
VIC ( Video Interface Card )
PCI bus
E-RDH memory
Print Engine ( Print )
PDL command
1-4 Print Controller User’s Guide
Rasterized image data
Printer status
Page 14

● Hardware Configuration
Basic Configuration
Configuration of the print controller is as follows:
●
Architecture: IBM Compatible PC System
●
Processor: Intel Celeron 800 MHz
●
Memory: 64 MB standard / 256 MB max. (option)
●
Hard Drive: IDE compatible 2.0 GB min.
●
Floppy Drive: 3.5" Floppy Disk 1.44 MB
● Interface
Parallel
Centronics (IEEE 1284)
Ethernet (option)
100BaseTX and 10BaseT
Chapter 1 Overview
The optional network interface card is used to connect to the Ethernet. This card is the
internal network interface card which supports multiple protocols on the Ethernet. This
card includes a CPU and flash memory with an upgradable program.
The network interface card supports the following network protocols.
●
IPX/SPX (NetWare, Peer to Peer)
●
TCP/IP (LPD/LPR, Peer to Peer)
●
AppleTalk (EtherTalk)
Refer to the corresponding operating manual for how to use the network interface card.
Do not use the parallel port with the Ethernet interface. Otherwise, a system
error may occur.
IEEE 1394
The maximum transferring rate is 200 Mbps.
Use the Océ engine interface only to connect the print controller and the main
body printer. Otherwise, a system error may occur.
Print Controller User’s Guide 1-5
Page 15

Chapter 1 Overview
● Printer Driver
The print controller works according to the condition of the printer driver.
The printer driver can be used on the following OS:
• Windows 95
• Windows 98
• Windows Me
• Windows NT4.0
• Windows 2000
Refer to “Chapter 2 Printer Driver Setup” (p. 2-1) for how to set up the printer.
Refer to “Chapter 3 Printer Driver Functions” (p. 3-1) for detailed functions of the printer
driver.
● Page Description Language
PDL (page description language) controls the transfer of information from the computer to
the print controller.
“PCL5e” comes as the PDL with the print controller.
1-6 Print Controller User’s Guide
Page 16

Chapter 1 Overview
● Memory
Most of the print controller memory is used for rasterizing images (bitmap extracting process), font cache, form overlay or other functions. Only a small part of it is used for system
operation.
The basic memory setting of the print controller is 64 MB. The memory of the print controller
can be expanded to 256 MB maximum.
The more memory in the print controller, the more pages that can be rasterized while waiting for the previous job to print. When Letter/A4 size paper is used, approximately 4,345 KB
memory is required to print 1 bit data in 600 dpi.
In addition, the E-RDH memory in the main body printer is used for the print process, which
can be expanded to 512 MB maximum.
For printouts using such features as multiple copies, booklet mode and wait mode, all data
about the entire set of pages rasterized by the print controller (one job) must be first stored
in the E-RDH memory.
Therefore, there are occasions when attempting to produce a very large number of pages
using those features does not lead to the correct printouts.
If this occurs, installing additional E-RDH memory in the main body printer (copier) is
recommended.
Memory Overflow
Depending on the functions selected in the printer driver, occasional memory overflow may
occur if the volume of the print job is large. In this case the print job is cancelled.
e.g., Booklet, Fold &Stitch, 2 in 1, etc.
In case of frequent memory overflow, extending the memory capacity of the main body
printer (copier) is recommended.
Upgrading Memory
To obtain optimum printer performance, memory expansion is recommended.
Contact the nearest Océ service representative for details.
Print Controller User’s Guide 1-7
Page 17

Chapter 2 Printer Driver Setup
■ Installation of the Printer Driver ................ 2-2
● Before Installation ............................................... 2-2
● Installing to Windows 95/98/Me ..........................2-3
● Installing to Windows NT4.0/2000 ......................2-5
● Uninstalling the Printer Driver ............................2-9
■ Test Page Print.......................................... 2-10
Print Controller User’s Guide 2-1
Page 18

Chapter 2 Printer Driver Setup
■ Installation of the Printer Driver
To use the printing system, it is necessary to connect it to computers by way of the parallel
interface or Ethernet interface and install the printer driver.
Printer driver is the program only for the print controller which expands the OS functions to
control the I/O of the printing system.
● Before Installation
Models and Environment of Computers
The printing system can be used with Windows-compliant computers.
The print controller includes the printer driver for Windows 95/98/Me/NT/2000.
The printer driver can be installed to computer models as long as Windows 95/98/Me/
NT/2000 has been installed on them to use the printing system.
Please keep the “User Software CD” on hand since it is required to install the printer
driver.
When the old version printer driver is installed, make sure to uninstall the
printer driver before installing the new printer driver.
Refer to “● Uninstalling the Printer Driver” (p.2-9) for how to uninstall the printer
driver.
When installing the printer driver, a screen may appear that asks the user to
select whether the printer driver file (file to be copied) or a new file that exists in
the computer is to be used. If this screen appears, select use of a new file that
already exists in the computer. If a new file is not used, the OS may not start
up properly the next time the OS is started up.
2-2 Print Controller User’s Guide
Page 19
Chapter 2 Printer Driver Setup
● Installing to Windows 95/98/Me
To install the printer driver to Windows 95/98/Me, perform the following steps.
Please keep the “User Software CD” on hand since it is required to install the printer driver.
1. Turn on the computer and start Windows.
Exit from all active Windows applications, if required.
2. Click the [Start] button of the task bar. Then, select [Settings] from the Start
menu to click [Printers] from the sub-menu.
The [Printers] window will open.
Opening from [My Computer]
To open the [Printers] window, double-click the [Printers] folder after doubleclicking the [My Computer] icon on the desktop.
3. Double-click the [Add Printer] icon of the [Printers] window.
The [Add Printer Wizard] will appear for setting the printer.
4. Click the [Next] button.
5. Select [Local] and click the [Next] button.
When the printing system is directly connected to a computer in which the printer driver will
be installed, select [Local].
The window to select the printer manufacturer and model will appear.
When selecting [Network]
When personal computers are connected to a network and you want to print via
the network, select [Network]. In this case, it is necessary to install the optional
network interface card in the printing system and to complete the network settings on the network interface card and on the personal computers. For details,
see your network administrator.
For a [Network Printer], type the network path or queue name and click the
[Next] button. If you don’t know its name, click the [Browse] button to view
available network printers.
Follow the procedure through step 6 to 15.
When the server stores the printer driver as available driver, go to step 13.
Print Controller User’s Guide 2-3
Page 20

Chapter 2 Printer Driver Setup
6. Click the [Have Disk] button.
The [Install From Disk] window will appear.
7. Click the [Browse] button.
The [Open] window will appear.
8. Set the “User Software CD” on the CD-ROM drive.
9. Select the [oemsetup.inf] file in the “Prn_Scan\Printer\Win9x_Me” folder of
the “User Software CD” and click the [OK] button.
The [Install From Disk] window will appear.
10. Click the [OK] button.
The next [Add Printer Wizard] window to select the printer manufacturer and model will
appear.
11. Be sure that in the list of [Printers], [Océ 3275/750 PCL] is highlighted, then
click the [Next] button.
The next [Add Printer Wizard] window to assign a port will appear.
12. Select the port to which the printing system is connected and click the [Next]
button.
Select LPT port when the printing system is used as a local printer.
The next [Add Printer Wizard] window to specify the printer name will appear.
13. Specify the printer name and click the [Next] button.
Default: [Océ 3275/750 PCL]
The next [Add Printer Wizard] window to perform the test page will appear.
14. Select whether you will perform the print test or not.
Select [Yes (recommended)] to perform the test page, or select [No] not to perform it.
15. Click the [Finish] button.
Necessary files will be copied from the “User Software CD” to complete the installation.
The printer driver of the printing system becomes available without restarting your
computer.
2-4 Print Controller User’s Guide
Page 21
Chapter 2 Printer Driver Setup
● Installing to Windows NT4.0/2000
The installation of the printer driver in Windows 2000 or Windows NT4.0 should be performed by a qualified system administrator or printer administrator.
The process of installing the printer driver necessitates the User Software CD. Get it ready
in advance.
About Printer Administration under Windows 2000 or Windows NT4.0
Since Windows 2000 and Windows NT4.0 are operating systems intended for network
operations, they offer more enhanced security options than in other Windows versions.
There are limitations to what you can operate or set up with their internal printers depending on the selected security level (access authorization).
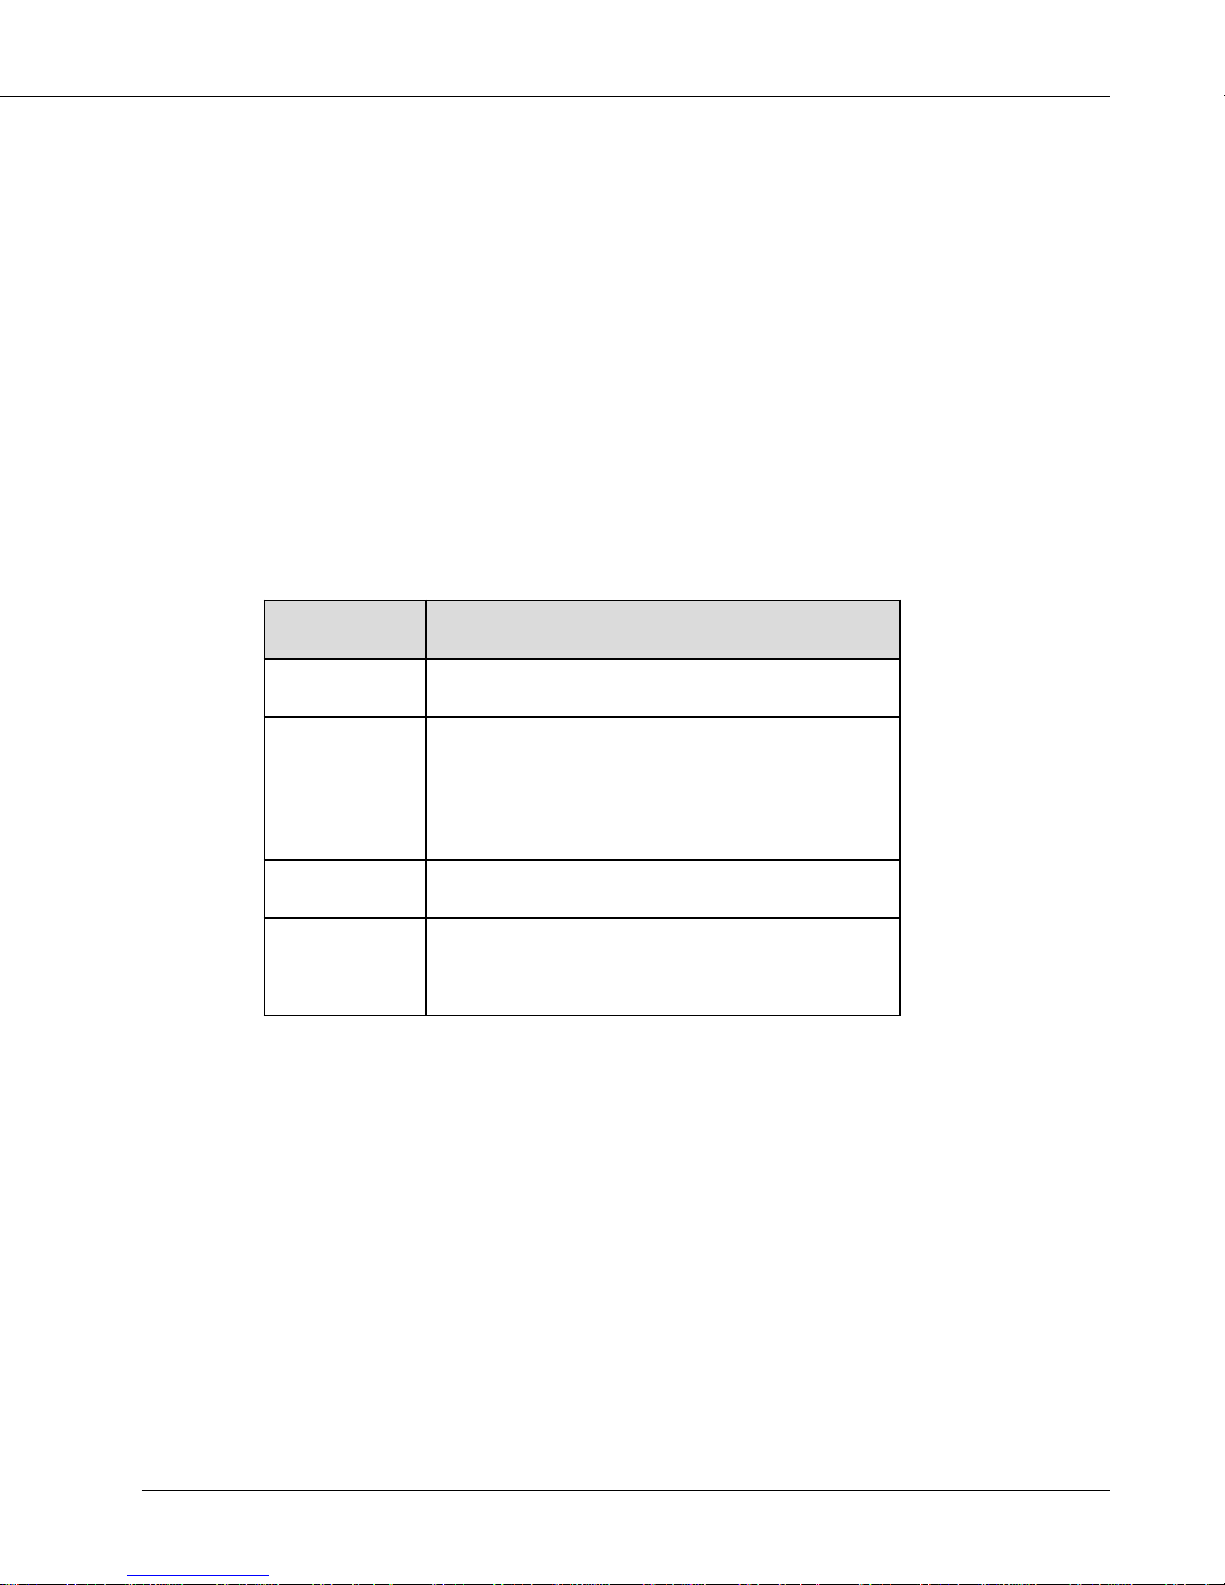
The table following figure shows the permission of the Windows NT compliant printers
and its operation range.
sthgiRsseccA egnaRnoitarepO
sthgiRoN
• gnitnirpotdetalersnoitarepO
gnitnirP
• scihpargotdetalersnoitarepO
• snoitcnufretnirP
tnemucoD
• sgnittestnemucodfolortnoC
tnemeganaM
• stnemucodfonoiteleddna,gnitnirper,tratser,esuaP
• "tnemeganaMtnemucoD"dna"gnitnirP"follA
• stnemucodllafonoiteleddnaretnirpehtfotratserdnaesuaP
lortnoClluF
• noitamrofniretnirpfosegnahcdnasgnitteS
• retnirpehtfonoiteleD
• sthgirsseccaretnirpfosegnahcdnasgnitteS
.dewollaerasretnirpfosnoitarepooN
fosnoitidnoctnirpgniwollofehtdnagnitnirptnemucodfonoitucexE
.tesebotdewollaeratnemucodhcae
).cte,yartrepapdnaezisrepapafonoitceles(
).cte,enotflahdnanoituloserfognissecorp(
)reipocehtotrailucepsnoitcnuffonoitceles(
After installing the printer driver, set up an appropriate access authorization for the
person assigned to operate the printer.
For guidance in setting up the printer access authorization, refer to “System Guide” for
Windows 2000 and Windows NT4.0.
Print Controller User’s Guide 2-5
Page 22
Chapter 2 Printer Driver Setup
Installation using [Add Printer]
1. Turn on the computer and start Windows.
Exit from all active Windows applications, if required.
2. Log on as an administrator (or a user entitled to install a printer).
3. Click the [Start] button of the task bar. Then, select [Settings] of the Start
menu and click [Printers] from the sub-menu.
The [Printers] window will open.
Opening from [My Computer]
To open the [Printers] window, double-click the [Printers] folder (or [Control
Panel] - [Printers]) after double-clicking the [My Computer] icon on the desktop.
4. Double-click the [Add Printer] icon of the [Printers] window.
The [Add Printer Wizard] will appear for adding the printer.
5. In case of Windows 2000, click the [Next] button.
In case of Windows NT4.0, follow steps 6.
6. Select [Local printer] (Windows 2000)/ [My Computer] (Windows NT4.0) and
click the [Next] button.
When the printing system is directly connected to a computer in which the printer driver will
be installed, select [Local printer] (Windows 2000)/ [My Computer] (Windows NT4.0).
Windows 2000
When using Windows 2000, the default setting of the [Automatically detect and
install my Plug and Play printer] is “on”. For manual installation, turn it “off” by
clicking.
Selecting [Network]
When personal computers or workstations are connected to the network and
you want to print via
and select [Network printer]
dows NT4.0)
.
the network, connect to the optional network interface card
(Windows 2000) / [
Network printer server
] (Win-
For a
[Network printer]
NT4.0), type the network path or queue name and click the [Next] button. If you
don’t know its name, click the [Browse] button to view available network printers
then follow steps 7 to 20.
2-6 Print Controller User’s Guide
(Windows 2000) / [
Network printer server
] (Windows
Page 23

Chapter 2 Printer Driver Setup
7. Select or create the Printer Port to install the printer controller and click the
[Next] button.
The next [Add Printer Wizard] window will appear.
8. Click the [Have Disk] button.
The [Install From Disk] window will appear.
9. Click the [Browse] button.
The [Open] window will appear.
10. Set the “User Software CD” on the CD-ROM drive.
11. Select the [oemsetup.inf] file in the “Prn_Scan\Printer\WinNT_2000” folder of
the “User Software CD” and click the [OK] button.
The [Install From Disk] window will appear.
12. Click the [OK] button.
The next [Add Printer Wizard] window to select the manufacturer and model of the printer
will appear.
In the list of [Printers], [Océ 3275/750 PCL] will be highlighted.
13. Click the [Next] button.
The next [Add Printer Wizard] window to specify the printer name will appear.
14. Specify the printer name and click the [Next] button.
Default: [Océ 3275/750 PCL]
The next [Add Printer Wizard] window to perform the test page will appear.
15. Select [Do not share this printer] (Windows 2000) / [Not shared] (Windows
N4.0) or [Share as] (Windows 2000) / [Shared] (Windows N4.0) by clicking.
In case of [Share as] (Windows 2000) / [Shared] (Windows N4.0), specify the
share name of the printer.
Default: [Océ 32757]
16. Click the [Next] button.
The next [Add Printer Wizard] window to perform the print test will appear.
17. Select whether you will perform the print test or not.
Select [Yes (recommended)] (Windows 2000) / [Yes] (Windows N4.0) to print the test page,
or select [No] to not print it.
18. Click the [Next] button.
The [Add Printer Wizard] completion window will appear.
19. Click the [Finish] button.
In case of Windows NT4.0, necessary files will be copied from the “User Software CD” to
complete the installation.
Print Controller User’s Guide 2-7
Page 24

Chapter 2 Printer Driver Setup
The printer driver of the printing system becomes available without restarting your computer.
In case of Windows 2000, [Digital Signature Not Found] window will appear then follow
steps 20.
20. In case of Windows 2000, click the [Yes] button.
Necessary files will be copied from the “User Software CD” to complete the installation. The
printer driver of the printing system becomes available without restarting your computer. If
you click the [No] button, the installation will not be done.
2-8 Print Controller User’s Guide
Page 25

Chapter 2 Printer Driver Setup
● Uninstalling the Printer Driver
To uninstall the printer driver, perform the following steps.
1. Turn on the computer and start Windows.
Exit from all active Windows applications, if required.
2. Click the [Start] button of the task bar. Then, select [Settings] of the Start
menu to click [Printers] from the sub-menu.
The [Printers] window will open.
Opening from [My Computer]
To open the [Printers] window, double-click the [Printers] folder (or [Control
Panel] - [Printers]) after double-clicking the [My Computer] icon on the desktop.
3. Click the printer icon of the [Printers] window and press [Delete] key.
The [Printers] dialog box will open.
4. Click the [Yes] button.
5. Restart the computer.
The printer driver will delete/uninstall.
If problems or incompatibilities are uncovered when updating the driver,
chances are the old version driver files are not yet all deleted. In this
case you need to delete them. For how to delete the old version driver
files, refer to the User's Manual for your Windows.
Print Controller User’s Guide 2-9
Page 26
Chapter 2 Printer Driver Setup
■ Test Page Print
You can check whether the printer driver functions properly by performing a test page after
the printer driver has been installed.
To print the test page, perform the following steps.
1. Click the [Start] button of the task bar. Then, select [Settings] from the Start
menu and click [Printers] in the sub menu.
The [Printers] window will open.
Opening from [My Computer]
To open the [Printers] window, double-click the [Printers] folder (or [Control
Panel] - [Printers]) after double-clicking the [My Computer] icon on the desktop.
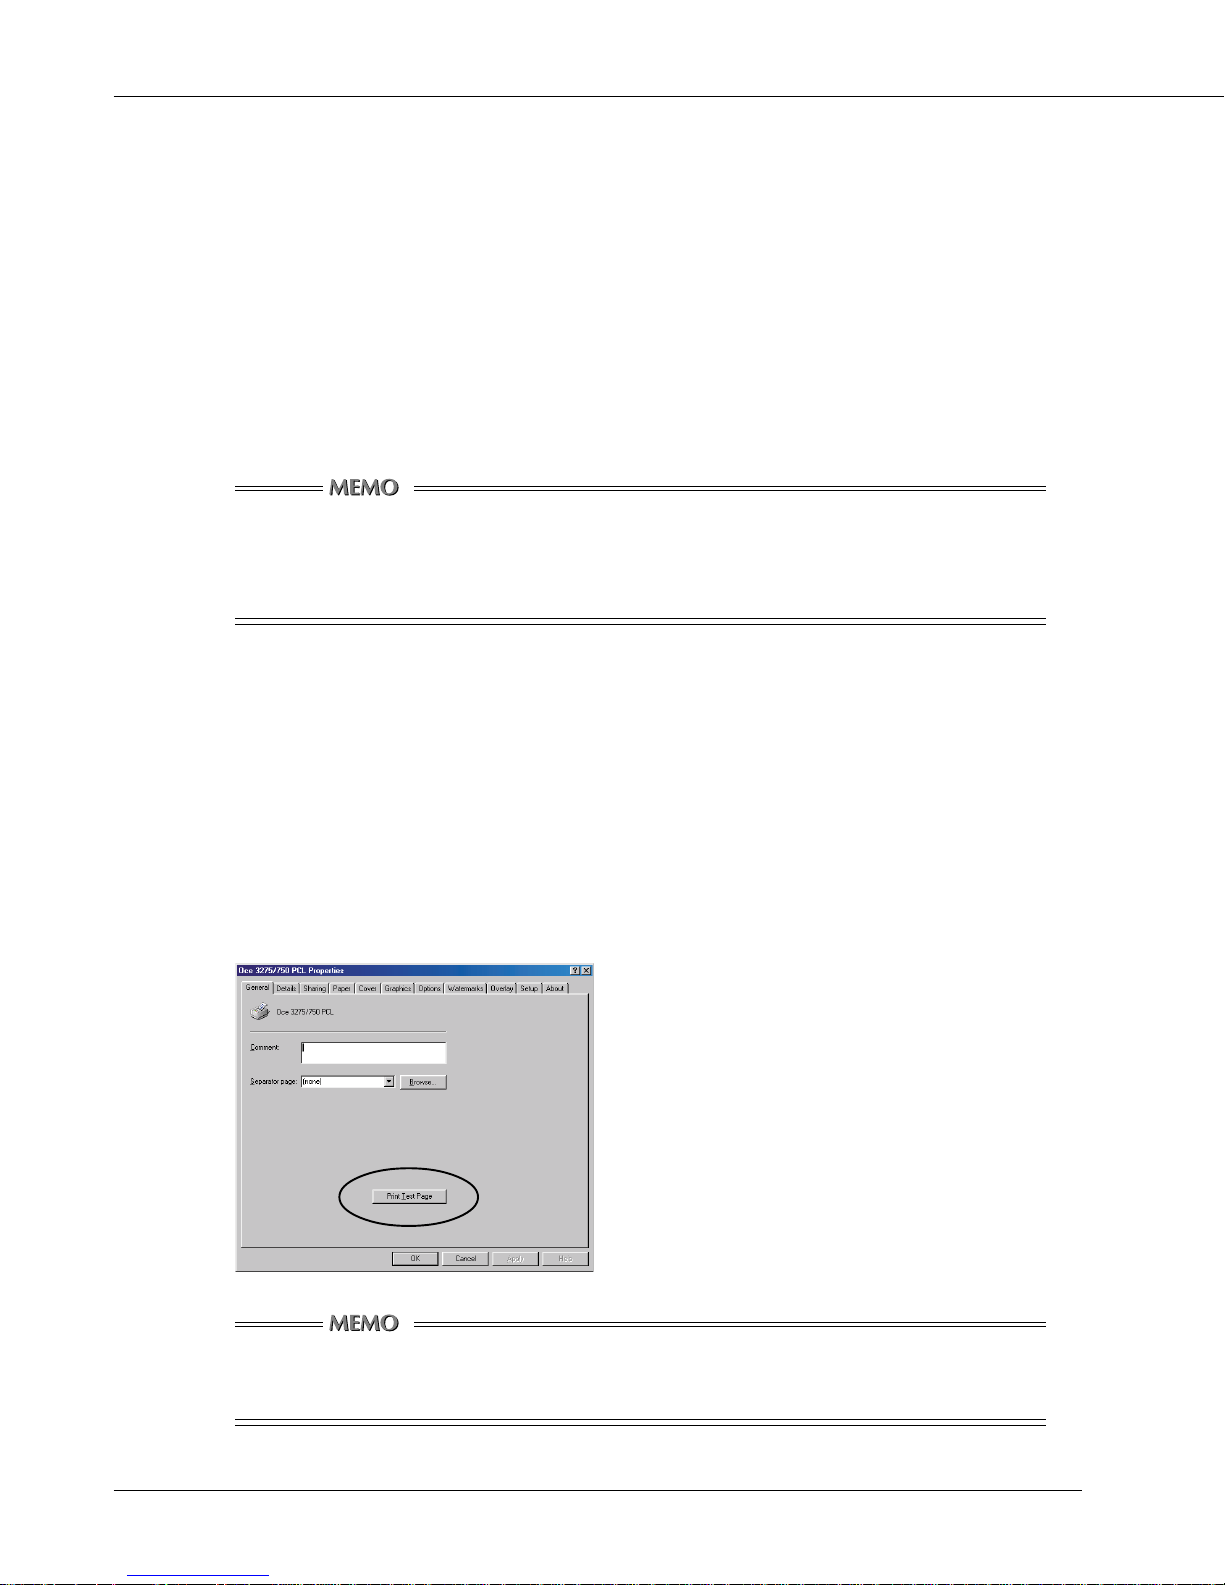
2. Right-click [Océ 3275/750 PCL] icon and click [Properties].
[Océ IP-601PCL Properties] will appear.
3. Select [General] of [Océ 3275/750 PCL Properties] and click the [Print Test
Page] button.
A test page print will start and a screen to confirm print end will appear.
4. Click the [Yes] button.
A test page print will end.
Windows 95/98/Me
In case of Windows NT/2000, the [General] tabs is displayed differently, but you
can find and click the same [Print Test Page] button.
2-10 Print Controller User’s Guide
Page 27

Chapter 3 Printer Driver Functions
■ Printer Driver Functions............................. 3-2
● Compliant OS .......................................................3-2
● Properties .............................................................3-3
● Function List ........................................................3-7
● Description of Functions .................................. 3-13
Print Controller User’s Guide 3-1
Page 28

Chapter 3 Printer Driver Functions
■ Printer Driver Functions
Printer driver is the program which is installed in Windows-compliant computers for using
and setting up the printing system. It expands the OS functions to control the I/O of the
printing system.
This chapter fully describes the various functions of the printer driver.
● Compliant OS
The printer driver can be used on the following OS:
• Windows 95
• Windows 98
• Windows Me
• Windows NT4.0
• Windows 2000
Refer to “Chapter 2 Printer Driver Setup” (p. 2-1) for installation of the Printer Driver.
3-2 Print Controller User’s Guide
Page 29

Chapter 3 Printer Driver Functions
● Properties
You have two ways of selecting or changing settings through the printer driver.
(1) The first way is by going through [Start] - [Settings] - [Printers] - [Océ 3275/750 PCL] -
[Properties].
Alternatively, you can select [Control Panel] - [Printers].
In case of Windows NT4.0, [Start] - [Settings] - [Printers] - [Océ 3275/750 PCL] - [Océ
3275/750 PCL Default] is also available excluding [Setup] and [Options].
In case of Windows 2000, [Start] - [Settings] - [Printers] - [Océ 3275/750 PCL] - [Océ
3275/750 PCL Printing Preferences] is also available excluding [Setup] and [Options].
(2) The second way is to use applications to make settings each time you need to
produce printouts.
In advance, check to make sure of [Printer Name] by selecting [File] - [Print] - [Print
Dialog] on the application in use.
Settings made in the first way are effective when getting printouts, whatever the application.
Settings made in the second way are effective only when the corresponding application
is running. When launching the application next time, settings made by going though [Start]
- [Settings] - [Printers] are applied.
Some of the interfaces to tabs and others are displayed differently by OSs.
Also, among the tabs there are some that are not shown depending on settings.
Incidentally, “Océ 3275/750 PCL” is the default printer name.
A different name may occasionally be given to the printer icon depending on the system
configurations or settings.
Refer to “Chapter 4 Control Panel Setup” (p. 4-1) for how to perform printer settings from the
control panel of the main body printer.
Print Controller User’s Guide 3-3
Page 30

Chapter 3 Printer Driver Functions
Windows 95/98/Me
1. Click [Start]-[Settings]-[Printers], right-click the [Océ 3275/750 PCL] icon, and
then click [Properties].
The following tabs will appear:
[General], [Details], [Sharing], [Paper], [Cover], [Graphics], [Options], [Watermarks], [Over-
lay], [Setup] and [About].
[OK]
When the [OK] button is clicked, all tab settings are saved with the close of the properties screen.
[Cancel]
When the [Cancel] button is clicked, all tab settings are canceled with the close of the
properties screen.
[Apply]
When the [Apply] button is clicked, the present tab settings are saved. This button is used when
settings continue to be performed by using other tabs, and the present tab settings are registered
before using other tabs.
[Help]
When the [Help] button is clicked, Help information will appear. As well, when you click
[Help] button, which appears when right-clicking a desired item, pop-up help for the item
appears.
3-4 Print Controller User’s Guide
Page 31

Chapter 3 Printer Driver Functions
Windows NT4.0/2000
1. Click [Start]-[Settings]-[Printers], right-click the [Océ 3275/750 PCL] icon, and
then click [Properties].
The following tabs will appear, then settings of the printer ports and options should be
made:
[General], [Ports], [Scheduling], [Sharing], [Security], [Paper], [Cover], [Graphics], [Options],
[Setup] and [About].
2. Click [Start]-[Settings]-[Printers], right-click the [Océ 3275/750 PCL] icon, and
then click [Document Defaults] or [Printing Preferences].
The following tabs will appear:
[Paper], [Graphics], [Options], and [About].
[OK]
When the [OK] button is clicked, all tab settings are saved and the properties screen is
closed.
[Cancel]
When the [Cancel] button is clicked, all tab settings are canceled and the properties
screen is closed.
[Apply]
When the [Apply] button is clicked, the present tab settings are saved. This button is
used when settings continue to be performed by using other tabs, and the present tab
settings are registered before using other tabs.
[Help]
When the [Help] button is clicked, Help information will appear. As well, when you click
[Help] button, which appears when right-clicking a desired item, pop-up help for the item
appears.
Print Controller User’s Guide 3-5
Page 32

Chapter 3 Printer Driver Functions
Setting details of each tab
[General] tab
Enables printing a test page.
[Details] tab
Performs settings related to ports, drivers, time-out and spooling.
[Sharing] tab
Performs share settings of a printer.
[Paper] tab
Performs settings related to Copies, Collate, Orientation, Paper size, Paper Source,
Duplex, Output Tray, Media Type, Password Print and Features to use the main body
printer functions.
[Cover] tab
Performs settings related to front/back cover, intersheet and PI cover sheet.
[Graphics] tab
Performs settings related to Halftones, Brightness, Contrast and Negative.
[Options] tab
Performs settings related to Layout and TrueType options.
[Watermarks] tab
Performs settings related to definitions of Watermark.
[Overlay] tab
Performs settings related to Symbol, Shade, Size, and Position of Form Overlay.
[Setup] tab
Performs settings related to optional accessories and installed memory.
[About] tab
Shows some system information and the printer driver version.
3-6 Print Controller User’s Guide
Page 33

Chapter 3 Printer Driver Functions
● Function List
The following list summarizes functions (Setting Items) which can be set by using the printer
driver of the printing system.
Some of the interfaces to tabs and others are displayed differently by OSs.
Also, among the tabs there are some that are not shown depending on settings.
Refer to “● Description of Functions” (p. 3-13) for details of each function (Setting Items).
In addition, refer to “Chapter 4 Control Panel Setup” (p. 4-1) for how to perform printer
settings from the LCD touch screen.
noitacifissalCsmetIgnitteS eulaVteSnoitpircseD
batrepaP
seipoC
etalloC
noitatneirO
ezisrepaP
9999ot1
nO
ffO
tiartroP
epacsdnaL
"5.8x"5.5
"11x"5.8
"41x"5.8
"71x"11
W"5.8x"5.5
W"11x"5.8
W"71x"11
/89/59
eM
yficepsotdesusinoitcnufsihT
ebotseipocforebmuneht
.detnirp
yficepsotdesusinoitcnufsihT
.segapelpitlumtuptuootwoh
yficepsotdesusinoitcnufsihT
.noitatneiro
mm024x792-3A
mm792x012-4A
mm012x841-5A
mm841x501-6A
mm453x052-4B
mm752x281-5B
mm281x821-6B
sehcni31x0.8-4F
mm093x762-K8
mm762x591-K61
mm024x792-W3A
mm792x012-W4A
mm012x841-W5A
mm453x052-W4B
mm752x281-W5B
nognidnepedreffid
tesnacuoysezisrepapehT
gnitarepoehtotrefeR.syart
dnayrtnuocehtnisnoitacificeps
.sliatedrofreipocehtfolaunam
o o
o o
o o
o o
/0.4TN
0002
epyTaideM
ecruoSrepaP
repapnialP
repapnihT
repapkcihT
teehsbaT
lanigirOdn2
]ycnerapsnarT[PHO
]knalB[evaelretnI-PHO
]tnirP[evaelretnI-PHO
epytdenifedresU
tceleSotuA
yartssapyB
1yarT
2yarT
3yarT
4yarT
.yartssapyBehtmorf
.yartrepapeht
yficepsotdesusinoitcnufsihT
detnirpebotepytrepapeht
yficepsotdesusinoitcnufsihT
o o
o o
Print Controller User’s Guide 3-7
Page 34

Chapter 3 Printer Driver Functions
noitacifissalCsmetIgnitteS eulaVteSnoitpircseD
batrepaP
)serutaeF(
batscihparG
xelpuD
yarTtuptuO
tnirPdrowssaP
sgnitteS -
stluafeDerotseR -
tesffO
elpatS
noitanibmoC
hcnuP
hctitS&dloF
edoMtiaW
tfihSegamI
gninotflaH
ssenthgirB 001ot001-
tsartnoC 001ot001-
evitageN
stluafeDerotseR -
enoN
egdegnolnopilF
tluafeD
yarTbuS
yarTniaM
nO
ffO
ffO
nO
enoN
tfeLelgniS
poTelbuoD
tfeLelbuoD
enoN
telkooB
1-ni-2
taepeR1-ni-2
ffO
tfeL
poT
enoN
ylnOdloF
mirT&dloF
hctitS&dloF
dloF-Z
)41x5.8(dloF-Z
enoN
tiaW
foorPhtiwtiaW
ffO
nO
syarGdenrettaP
syarGdesuffiD
nO
ffO
/89/59
eM
ehttesotdesusinoitcnufsihT
egdetrohsnopilF
.yarttuptuoeht
s.)tuptuo
.edomtesffo
.tuoyalegap
mirT&hctitS,dloF
)K8,71x11,4B,3A(
etihWdnakcalBdiloS
.srepap
.boj
.gnitnirpxelpuDfoedom
yficepsotdesusinoitcnufsihT
ehttesotdesusinoitcnufsihT
laitnedifnoc(tnirpdrowssap
nepootnottubsihtsserP
nruterotdesusinoitcnufsihT
.sgnittestluafedotsgnitteseht
yficepsotdesusinoitcnufsihT
tcelesotdesusinoitcnufsihT
.noitisopelpatseht
egnarraotdesusinoitcnufsihT
tcelesotdesusinoitcnufsihT
.noitisophcnupeht
egnarraotdesusinoitcnufsihT
detnirprofdohtemgnihsinifeht
mrifnocotdesusinoitcnufsihT
tuotnirpafoorpotrognittes
tnirperitneehtgnitratserofeb
aetaercotdesusinoitcnufsihT
.srepapnonigramgnidnibwen
tcelesotdesusinoitcnufsihT
egamiehtfodohtemeht
.senotflahrofgnissecorp
.senotflahnotnemtsujda
.senotflahnotnemtsujda
tnirpotdesusinoitcnufsihT
.enotesreverhtiwegami
nruterotdesusinoitcnufsihT
.sgnittestluafedotsgnitteseht
.golaid]sgnitteStnirPdrowssaP[
.drowssapdnaDIresuruoyretnE
naekamotdesusinoitcnufsihT
naekamotdesusinoitcnufsihT
o o
o o
o o
o o
o o
o o
o o
o o
o o
o o
o o
o o
o o
o o
o o
o o
o o
/0.4TN
0002
3-8 Print Controller User’s Guide
Page 35

Chapter 3 Printer Driver Functions
noitacifissalCsmetIgnitteS eulaVteSnoitpircseD
batsnoitpO
sgnitteS
-tuoyaL
retpahC
noituloseR
teehsrepsegaP
gnilacS-tuoyaL 004ot01
snoitpoepyTeurT
segaP-retpahC -
5723evirDdraH
egarotSegamI
5723evirDdraH
-egarotSegamI
61/9/6/4/2/1
004x004
006x006
stnoftfoseniltuO
stnoftfospamtiB
sretsaR
ffO
nO
ffO
nO
erotS
tnirPdnaerotS
-
/89/59
eM
tnirpotdesusinoitcnufsihT
afoegapenonahterom
foteehsenonotnemucod
.repap
yficepsotdesusinoitcnufsihT
noitcuderrotnemegralneeht
.egatnecrepniegamifoetar
yficepsotdesusinoitcnufsihT
.noitulosergnitnirpeht
yficepsotdesusinoitcnufsihT
.stnofepyTeurTtuptuootwoh
yficepsotdesusinoitcnufsihT
.deretpahcebotegapeht
egarotsotdesusinoitcnufsihT
.egamieht
boJ[nepootnottubsihtsserP
]sgnitteStnirPnoitanibmoC
dnaDIbojruoyretnE.golaid
.drowssap
.retpahcotdesusinoitcnufsihT
o
o
o o
o o
o o
o o
o o
o o
/0.4TN
0002
stluafeDerotseR -
skramretaW
bat
txeT-kramretaW
egaP-kramretaW
-kramretaW
mottoB/poT
tnuoC-kramretaW -
-kramretaW
noitarapeS
enoN
LAITNEDIFNOC
YPOC
TFARD
YPOCELIF
LANIF
FOORP
TERCESPOT
egaptsriftubllA
segapllA
ylnoegaptsriF
kramretawoN
poT
mottoB
-
.kramretaweht
.detnirpsikramretaw
elpitlumtraparafwoh
nruterotdesusinoitcnufsihT
.sgnittestluafedotsgnitteseht
yficepsotdesusinoitcnufsihT
yficepsotdesusinoitcnufsihT
detcelesahcihwnoegapeht
yficepsotdesusinoitcnufsihT
niskramretawtnirpotrehtehw
.dnuorgkcabrodnuorgerofeht
yficepsotdesusinoitcnufsihT
ehtfoseipocynamwoh
.egaphcaenokramretaw
yficepsotdesusinoitcnufsihT
o o
o
o
o
o
o
.egapehtnoskramretaw
Print Controller User’s Guide 3-9
Page 36

Chapter 3 Printer Driver Functions
noitacifissalCsmetIgnitteS eulaVteSnoitpircseD
skramretaW
bat
emaN-tnoF
roloC-tnoF
ssenkraD-tnoF 001ot0
dloB-tnoF
cilatI-tnoF
eziS-tnoF 003ot1
noitisoP
elgnA-noitisoP 063ot0
tnemtsujdA
tuoyalwohS
egapelgniswohS
weN -
lairA
kcalBlairA
weNreiruoC
lobmyS
amohaT
namoRweNsemiT
.cte.,sgnidgniW
kcalB
yerGkraD
yerGthgiL
etihW
ffO
nO
ffO
nO
yllacitamotuA
denifedresU
)001ot0:X(
)001ot0:Y(
evoM
etatoR
-
.kramretaw
.kramretaw
.txet
.txet
.txet
.kramretaw
.kramretaw
detcelesehtfotnofeht
)deyalpsidsiCP
yficepsotdesusinoitcnufsihT
ehtnidellatsnistnofehtfotsilA(
yficepsotdesusinoitcnufsihT
detcelesehtforoloceht
lortnocotdesusinoitcnufsihT
kramretawehtfo"ytisned"eht
ylppaotdesusinoitcnufsihT
kramretawehtotgnittamrofdlob
ylppaotdesusinoitcnufsihT
kramretawehtotgnittamrofcilati
yficepsotdesusinoitcnufsihT
detcelesehtfoezistnofeht
yficepsotdesusinoitcnufsihT
detcelesehtfonoitisopeht
yficepsotdesusinoitcnufsihT
foelgna"nael"ehtlortnoceht
.kramretawdetceleseht
yficepsotdesusinoitcnufsihT
.tnemtsujdafoepyteht
weiverpotdesusinoitcnufsihT
ehthtiwtuoyalnisgnittesruoy
.sgnitteskramretawtnerruc
etaercotdesusinoitcnufsihT
.kramretawmotsuceht
/89/59
eM
o
o
o
o
o
o
o
o
o
o
o
/0.4TN
0002
eteleD -
stluafeDerotseR -
batyalrevO
-lobmyS
eliF
-lobmyS
egaP
3-10 Print Controller User’s Guide
eteledotdesusinoitcnufsihT
.kramretawdetceleseht
nruterotdesusinoitcnufsihT
.sgnittestluafedotsgnitteseht
)tluafed(enoN
.repapnodetnirp
egaptsriftubllA
segapllA
ylnoegaptsriF
yalrevooN
swodniWtfosorciM(elifPMB
mrofyalrevonasa)dradnats
yficepsotdesusinoitcnufsihT
detcelesahcihwnoegapeht
.detnirpsimrofyalrevo
o
o
ayficepsotdesusinoitcnufsihT
o
o
Page 37

Chapter 3 Printer Driver Functions
noitacifissalCsmetIgnitteS eulaVteSnoitpircseD
batyalrevO
-lobmyS
pamtiBtceleS
-edahS
roloC
-edahS
ssenkraD
eziS
noitisoP
tuoyalwohS
stluafeDerotseR -
-
kcalB
001ot0
yllacitamotuA
denifedresU
)001ot01(
yllacitamotuA
denifedresU
)001ot0:X(
)001ot0:Y(
-
egapelgniswohS
/89/59
eM
retsigerotdesusinoitcnufsihT
.yalrevorofegamipamtiB
yficepsotdesusinoitcnufsihT
ylnO.egamipamtibarofroloc
.elbatcelessikcalB
yficepsotdesusinoitcnufsihT
rofegamipamtibafossenkraD
.yalrevo
yficepsotdesusinoitcnufsihT
.egatnecrepniegami
yficepsotdesusinoitcnufsihT
.egamiyalrevofonoitisopeht
weiverpotdesusinoitcnufsihT
ehthtiwtuoyalnisgnittesruoy
.sgnittesyalrevotnerruc
nruterotdesusinoitcnufsihT
.sgnittestluafedotsgnitteseht
o
o
o
yalrevofoetarnoitacifingameht
o
o
o
o
/0.4TN
0002
batputeS
snoitpoelbaliavA
snoitpodellatsnI -
ddA -
evomeR -
yromemdellatsnI
57rehsiniF
57redloF-rehsiniF
5723evirDdraH
57yticapaCegraL
A57yticapaCegraL
57retresnItsoP
57tinUhcnuP
57tinUremmirT
.snoitpo
.snoitpodellatsni
.snoitpodellatsnifo
BM46
BM69
BM821
BM061
BM291
BM422
BM652
.yromemdellatsnieht
yficepsotdesusinoitcnufsihT
nodellatsniecivedlanoitpoeht
.)reipoc(retnirpydobniameht
dedda/detcelesehtyalpsiD
elbaliavafotsilehtmorfsnoitpo
fotsilehtotsnoitpoehtddA
yficepsotdesusinoitcnufsihT
tsilehtmorfsnoitpoehtevomeR
o o
o o
o o
o o
o o
Print Controller User’s Guide 3-11
Page 38

Chapter 3 Printer Driver Functions
noitacifissalCsmetIgnitteS eulaVteSnoitpircseD
batrevoC
revoCtnorF
yarT-revoCtnorF
revoCkcaB
yarT-revoCkcaB
noitresnIteehS
noitresnIteehS-
segaP
ffO
nO
knalB
detnirP
yartssapyB
1yarT
2yarT
3yarT
4yarT
ffO
nO
knalB
detnirP
yartssapyB
1yarT
2yarT
3yarT
4yarT
ffO
nO
knalB
detnirP
-
/89/59
eM
tnorfnehwdesusinoitcnufsihT
kcabnehwdesusinoitcnufsihT
o o
o o
o o
o o
o o
o o
.desuerasrevoc
atcelesotdesusinoitcnufsihT
tnorfrofdesuecruosrepap
.srevoc
.desuerasrevoc
atcelesotdesusinoitcnufsihT
kcabrofdesuecruosrepap
.srevoc
nehwdesusinoitcnufsihT
.desuerasteehsretni
yficepsotdesusinoitcnufsihT
.detresniebotegapeht
/0.4TN
0002
yartssapyB
yarT
sgnitteS
battuobA
-
-noitresnIteehS
-noitresnIteehS
decnavdA
-noitresnIteehS
teehSrevoCIP
stluafeDerotseR -
1yarT
2yarT
3yarT
4yarT
ffO
nO
-
enoN
nO
tnorF
kcaB
kcaBdnatnorF
-
.steehsretni
.revird
rofdesuecruosrepap
.sgnittesdecavda
.yarthcaerep,detresni
.desuerasteehsrevoc
atcelesotdesusinoitcnufsihT
o o
mrofrepotdesusinoitcnufsihT
]sgnitteSdecnavdAnoitresnI
ebotegapehtyficepS.golaid
IPnehwdesusinoitcnufsihT
nruterotdesusinoitcnufsihT
.sgnittestluafedotsgnitteseht
wohsotdesusinoitcnufsihT
teehS[nepootnottubsihtsserP
retnirpehtfonoitamrofninoisrev
o o
o o
o o
o o
o o
3-12 Print Controller User’s Guide
Page 39

Chapter 3 Printer Driver Functions
● Description of Functions
Functions (setting items) that can be set with the Printer Driver are summarized in the tab
order.
Refer to “● Properties” (p.3-3) for how to indicate each tab in the properties.
Some of the interfaces to tabs and others are displayed differently by OSs.
Also, among the tabs there are some that are not shown depending on settings.
Refer to “Chapter 4 Control Panel Setup” (p. 4-1) for how to perform printer settings from the
control panel of the main body printer.
Print Controller User’s Guide 3-13
Page 40

Chapter 3 Printer Driver Functions
[Paper] Tab
Copies
This function is used to specify the number of copies to be printed.
Click the [▲] or [▼] button or directly enter the number of copies from the keyboard
(1-9999).
Default is 1.
Collate
This function is used to specify how to output multiple pages.
When [Collate] is checked (on, Default), after one copy of all pages has been printed,
the second copy, the third copy, ..... are printed.
When [Collate] is not checked (off), the required pieces of the first page are printed.
Then, the required pieces of the second page, the third page, ..... are printed.
It is recommended that you select [Collate] on the [Paper] tab rather than select it for
each application.
collate on collate off
2
1
2
1
1
2
2
1
3-14 Print Controller User’s Guide
Page 41

Chapter 3 Printer Driver Functions
Orientation
This function is used to specify orientation.
Select either [Portrait] or [Landscape].
Default is Portrait.
Paper Size
You can select a paper size from the list shown by clicking the [▼] button.
Default is [8.5” x 11”].
detcelesebotezisrepaP
"5.8x"5.5
"11x"5.8
"41x"5.8
"71x"11
mm024x792-3A
mm792x012-4A
mm012x841-5A
mm841x501-6A
mm453x052-4B
mm752x281-5B
mm281x821-6B
sehcni31x0.8-4F
mm093x762-K8
mm762x591-K61
W"5.8x"5.5
W"11x"5.8
W"71x"11
mm024x792-W3A
mm792x012-W4A
mm012x841-W5A
mm453x052-W4B
• The paper sizes selected automatically according to the job settings:
5.5 x 8.5R / 8.5 x 11R / A4R / A5R / A6R / B5R / B6R / F4R /
5.5 x 8.5WR / 8.5 x 11WR / A4WR / A5WR / B5WR
mm752x281-W5B
Print Controller User’s Guide 3-15
Page 42

Chapter 3 Printer Driver Functions
Media Type
Select the paper type from the list shown by clicking the [▼] button.
Default is [Plain paper].
The settings you can select are as follows:
[Plain paper], [Thin paper], [Thick paper], [Tab sheet], [2nd Original], [OHP (Transparency)],
[OHP-Interleave (Blank)], [OHP-Interleave (Print)] or [User defined type].
The settings except [OHP-Interleave (Blank)] and [OHP-Interleave (Print)] are used for the
paper type set on [Bypass tray].
When [2nd Original] or [OHP (Transparency)] is selected, use [Bypass tray] in [Paper Source].
Paper Source
Select the paper source from the list shown by clicking the [▼] button.
The settings you can select are as follows:
[Auto Select], [Bypass tray], [Tray1], [Tray2], [Tray3], or [Tray4]. Default is [Auto Select].
When [Auto Select] is selected, a paper tray with paper which a user specified from an
application by using [Properties] of the printing system is automatically selected.
[Tray4] can not be selected when [Large Capacity Input 75 (75A)] (8.5 x 11) or [Large
Capacity Input 75 (75A)] (11 x 17) is not available.
When [OHP-Interleave(Blank)] or [OHP-Interleave (Print)] is selected, specify the paper tray
in which the interleaf sheet is loaded from Tray 1, 2, 3, or 4.
Available paper size in each paper tray is shown in the following table:
xelpuD/ecruoSrepaP ezisrepapelbaliavA
/"41x"5.8/"5.8x"5.5/"11x"5.8
/5B/4B/5A/4A/3A/"71x"11
/W"5.8x"5.5/W"11x"5.8
W5B/W4B/W5A/W4A/W3A
/"41x"5.8/"5.8x"5.5/"11x"5.8
/5B/4B/5A/4A/3A/"71x"11
/W"5.8x"5.5/W"11x"5.8
W5B/W4B/W5A/W4A/W3A
/"41x"5.8/"5.8x"5.5/"11x"5.8
/5B/4B/5A/4A/3A/"71x"11
/W"5.8x"5.5/W"11x"5.8
W5B/W4B/W5A/W4A/W3A
/"71x"11/"41x"5.8/"11x"5.8
W4A/W"71x"11/W"11x"5.8
/"41x"5.8/"5.8x"5.5/"11x"5.8
/4B/6A/5A/4A/3A/"71x"11
W5B/W4B/W5A/W4A/W3A
/"41x"5.8/"5.8x"5.5/"11x"5.8
/5B/4B/5A/4A/3A/"71x"11
/W"5.8x"5.5/W"11x"5.8
W5B/W4B/W5A/W4A/W3A
(Large Capacity Input 75)
(Large Capacity Input 75A)
1yarT
2yarT
3yarT
4yarT/4F/5B/4A/"11x"5.8
4yarT
yartssapyB
xelpuD
/K8/K61/4F/6B
/W"71x"11
/K8/K61/4F/6B
/W"71x"11
/K8/K61/4F/6B
/W"71x"11
W5B/W4A/W"11x"5.8
/4F/4B/4A/3A
/W"11x"5.8
/W"71x"11
/K8/K61/4F
/W"71x"11
/K8/K61/4F/6B/5B
3-16 Print Controller User’s Guide
Page 43

Chapter 3 Printer Driver Functions
Duplex
Select the Duplex setting from the list shown by clicking the [▼] button.
The settings you can select are as follows:
[None], [Flip on long edge] or [Flip on short edge]
Default is [None].
Flip on long edge
Prints paper so that heads of both sides become upward.
Flip on short edge
Prints paper so that the head of the front becomes the foot of the back.
Output Tray
[Default], [Sub Tray] or [Main Tray] can be selected from the list shown by clicking the [▼] button.
If you select [Default], the main body printer will use [Main Tray] automatically.
[Sub Tray] can not be selected in the following cases:
• When Finisher is not available
• When [On] is selected in [Features] - [Offset]
• When settings other than [None] are selected in [Features] - [Fold & Stitch]
• When settings other than [None] are selected in [Features] - [Staple]
• When settings other than [None] are selected in [Features] - [Punch]
• When [PI Tray] is selected in [Front Cover Tray]
• When [PI Tray] is selected in [Back Cover Tray]
Print Controller User’s Guide 3-17
Page 44

Chapter 3 Printer Driver Functions
Password Print
When [Password Print] is checked, you can use password print (confidential output)
function to print the confidential documentation.
In this method, both settings on computer and the operation from the LCD touch panel
are used. Default is [Off].
Refer to “Chapter 4 Control Panel Setup ■ Print Job ● Password Print (Confidential
Output)” (p. 4-21) for password print procedure.
Settings
Open the [Password Print Settings] dialog for password setting.
Enter your user ID in the [UserID] text box. You can select any 8-digit number for the
User ID.
Enter your password in the [Password] text box. You can select any 8-digit number or
character for the Password. You can also select the following marks:
[ (space) ], [ . ], [ - ], [ _ ]
When the Password is entered, the password of [Job Combination Print Settings] dialog
for Password Print is replaced with the password of [Password Print Settings] dialog.
You must enter the same password (8 digits or less) in the User ID text box that
you set up on the copier for Printer ECM.
If you do not enter the correct password or if you leave the User ID text box
blank, the print job is not performed and is registered as Unsuccessful jobs.
When in doubt about the password for Printer ECM, ask your system
administrator.
Features
Features use the special functions of the main body printer, with which you can set up
the various printing and finishing method.
When you select a function you would like to use from the upper list, an actual setting of
the function you selected will be shown on the lower box.
You can select the other setting of the function you selected from the list shown by
clicking the [▼] button of the lower box.
Features you can select are as follows:
3-18 Print Controller User’s Guide
Page 45

Chapter 3 Printer Driver Functions
Offset
Staple
Combination
Punch
Fold & Stitch
Off / On
None / Single Left / Double Top / Double Left
None / Booklet / 2-in-1 / 2-in-1 Repeat
Off / Left / Top
None / Fold Only / Fold & Trim / Fold & Stitch / Fold, Stitch &
Tr i m
Wait Mode
Image Shift
None / Wait / Wait with Proof
Off / On
Features - Offset
[On] offsets each copied set upon exit.
In case of printing page1, 2 and 3:
page 1 page 2 page 3
3 sets
Offset OFF
(Collate ON only)
3 sets
2 sets
1 set
Offset ON
(Collate ON)
2 sets
1 set
Offset ON
(Collate OFF)
[Offset] can not be performed in the following cases:
• When Finisher is not available
• When [A6] or [B6] is selected in [Paper size]
• When settings other than [None] are selected in [Features] - [Fold & Stitch]
• When [Sub Tray] is selected in [Output Tray]
3 sets
2 sets
1 set
Print Controller User’s Guide 3-19
Page 46

Chapter 3 Printer Driver Functions
Features - Staple
[Single-Left], [Double Top] or [Double Left] makes each stapled set of copies and output
to the tray of the finisher.
Stapling is performed as shown for the following orientations:
Single Left (Portrait) Single Left (Landscape)
Double Top (Portrait) Double Top (Landscape)
Double Left (Portrait) Double Left (Landscape)
[Staple] can not be performed in the following cases:
• When Finisher is not available
• When [A6] or [B6] is selected in [Paper size]
• When [OHP (Transparency)], [OHP-Interleave (Blank)], [OHP-Interleave (Print)] is
selected in [Media Type]
• When [Collate] is not selected in [Copies]
• When [Booklet] is selected in [Features] - [Combination]
• When settings other than [None] are selected in [Features] - [Fold & Stitch]
• When [Sub Tray] is selected in [Output Tray]
• The following combination is selected
e.g., A3-size paper (portrait) and [Double Left]
3-20 Print Controller User’s Guide
Page 47

Chapter 3 Printer Driver Functions
1 212
e.g., 2 pages of A4-size paper
Prints 2 pages onto a A3-size paper
2-in-1
1 112
e.g., 2 pages of A4-size paper
Prints a page twice onto a A3-size paper
22
2-in-1
Repeat
Features - Combination
The settings you can select are as follows:
[None], [Booklet], [2-in-1] or [2-in-1 Repeat]
Default is [None].
[Booklet] prints paper so that booklets are made when it is folded into two.
7
8
1 2 7 8
A4/B5/A5 A3/B4/A4 A3/B4/A4
1
2
5
6
3
4
[2-in-1] setting is available which prints out two page data on one sheet of paper. Two
page data is printed out on a sheet of paper twice as large as the selected size of
paper.
[Combination] can not be selected in the following cases:
• When [Collate] is not selected in [Copies]
• When [8.5” x 14”], [11” x 17”], [A3], [A6], [B4], [B6], [F4], [8K],[K16], [11” x 17” W],
[A3W], or [B4W] is selected in [Paper size]
• When [OHP-Interleave (Blank)] or [OHP-Interleave (Print)] is selected in [Media Type]
• When settings other than [None] are selected in [Duplex]
[Booklet] can not be performed in the following cases:
• When settings other than [None] are selected in [Features] - [Staple]
• When [Back Cover] and/or [Sheet Insertion] are/is selected in [Cover] tab
• When [OHP (Transparency)], [OHP-Interleave (Blank)], [OHP-Interleave (Print)] or
[Tab sheet] is selected in [Media Type]
• When [On] is selected in [Features]-[Offset]
[2-in-1] or [2-in-1 Repeat] can not be performed in the following cases:
• When [Back Cover], [Front Cover] and/or [Sheet Insertion] are/is selected in [Cover] tab
Print Controller User’s Guide 3-21
Page 48

Chapter 3 Printer Driver Functions
Features - Punch
[Left], [Top] makes each punched set of copies and outputs to the tray of the finisher.
Punching is performed as shown for the following orientations:
Left (Portrait) Left (Landscape)
Top (Portrait) Top (Landscape)
[Punch] can not be performed in the following cases:
• When Finisher is not available
• When [5.5” x 8.5”], [8.5” x 14”], [A5], [A6], [F4], or wide paper is selected in [Paper
size]
• When [OHP (Transparency)], [OHP-Interleave (Blank)], [OHP-Interleave (Print)], [Tab
sheet] is selected in [Media Type]
• When [Collate] is not selected in [Copies]
• When any of [Fold], [Stitch] or [Trim] is set in [Features]-[Fold&Stitch]
• When [Sub Tray] is selected in [Output Tray]
• The following combination is selected
e.g., [Staple - Top] and [Left]
Refer to the diagram on the next page for the paper size, punching and
punching & stapling combination.
3-22 Print Controller User’s Guide
Page 49

Chapter 3 Printer Driver Functions
noitanibmocgnilpats&gnihcnup/gnihcnuprofezisrepapelbaliavA
seloh2 seloh3 seloh4
ezisrepaptuptuo
gnihcnup
&gnihcnup
gnilpats
gnihcnup
"5.8x"5.5 O OXXXX
&gnihcnup
gnilpats
gnihcnup
&gnihcnup
gnilpats
"11x"5.8
"41x"5.8
"71x"11
3A
4A
O O O O OX
O OXXXX
O O O O OX
O O O O O O
O O O O O O
5A XXXXXX
6A XXXXXX
4B
5B
O O OXOX
O O OXOX
6B XXXXXX
)"31x"0.8(4F
K8
K61
O OXXXX
O O OXOX
O O OXOX
repapediw/etinifedni XXXXXX
Print Controller User’s Guide 3-23
Page 50

Chapter 3 Printer Driver Functions
Features - Fold & Stitch
You can make the following finish settings:
[Fold Only] makes each folded set of copies and outputs to the tray of the finisher.
[Fold & Trim] makes each folded set of copies and cuts off the excess part resulted from
folding to keep the paper size and outputs to the tray of the finisher.
[Fold & Stitch] makes each folded and stitched set of copies and outputs to the tray of
the finisher.
[Fold, Stitch & Trim] makes each folded and stitched set of copies and cuts off the
excess part resulted from folding to keep the paper size and outputs to the tray of the
finisher.
Fold & Stitch Fold Only Fold, Stitch & Trim Fold & Trim
Cutting off the excess part
[Fold & Stitch] can not be performed in the following cases:
• When [Finisher-Folder] is not available
• When [Collate] is not selected in [Copies]
• When [5.5” x 8.5”], [A5], [A6], [B5], [B6], [F4], [16K], [5.5” x 8.5” W], [A5W] or [B5W] is
selected in [Paper size]
• When [OHP (Transparency)], [OHP-Interleave (Blank)], [OHP-Interleave (Print)] is
selected in [Media Type]
• When [On] is selected in [Features]-[Offset]
• When [On] is selected in [Features]-[Staple]
• When [On] is selected in [Features]-[Punch]
[Fole & Trim] or [Fold, Stitch & Trim] can not be performed in the following cases:
• When [Trimmer Unit 75] is not available
3-24 Print Controller User’s Guide
Page 51

Chapter 3 Printer Driver Functions
Features - Wait Mode
[Wait] enables checking of the current job settings on the LCD touch screen of the main
body printer
[Proof] enables checking of the current job settings on the LCD touch screen of the
main body printer and to see how the printed job will look before printing out multiple
sets.
Refer to “Chapter 4 Control Panel Setup ■ Print Job ● Check” (p. 4-16).
Features - Image Shift
[On] creates a new binding margin on print papers.
You can set the value of new binding margin via the LCD touch screen of the main body
printer.
Restore Defaults
By clicking the [Restore Defaults] button, the [Paper] tab settings return to defaults.
Print Controller User’s Guide 3-25
Page 52

Chapter 3 Printer Driver Functions
[Cover] Tab
Front Cover
You can select this setting when using for the front covers a different paper from that of
the body of the booklet (colored one, for example). [Front Cover] inserts a sheet to the
top of each set of copies as a Front cover.
When [Front Cover] is checked, you can select [Printed] or [Blank].
• When [Blank] is selected, nothing is printed on the front cover.
• When [Printed] is selected, the first page data is printed on the front cover.
None Printed Blank
[Front Cover] can not be performed in the following cases:
• When [Collate] is not selected in [Copies]
• When [2-in-1] or [2-in-1 Repeat] is selected in [Features] - [Combination]
• When [OHP (Transparency)], [OHP-Interleave (Blank)], [OHP-Interleave (Print)] is
selected in [Media Type]
Front Cover - Tray
Specify the paper tray for the front cover.
The settings you can select are as follows:
[Bypass tray], [Tray 1], [Tray 2], [Tray 3], or [Tray 4]
When [Front Cover] is not selected, [Tray] can not be performed.
3-26 Print Controller User’s Guide
Page 53

Chapter 3 Printer Driver Functions
Back Cover
You can select this setting when using for the back covers a different paper from that of
the body of the booklet (colored one, for example). [Back Cover] inserts a sheet to the
top of each set of copies as a Back cover.
When [Back Cover] is checked, you can select [Printed] or [Blank].
[None], [Printed] or [Blank]
Default is [None].
• When [Blank] is selected, nothing is printed on the back cover.
• When [Printed] is selected, the last page data is printed on the back cover.
None Printed Blank
[Back Cover] can not be performed in the following cases:
• When [Collate] is not selected in [Copies]
• When [Booklet], [2-in-1] or [2-in-1 Repeat] is selected in [Features] - [Combination]
• When [OHP (Transparency)], [OHP-Interleave (Blank)], [OHP-Interleave (Print)] is
selected in [Media Type]
Back Cover - Tray
Specify the paper tray for the back cover.
The settings you can select are as follows:
[Bypass tray], [Tray 1], [Tray 2], [Tray 3], or [Tray 4]
When [Back Cover] is not selected, [Tray] can not be performed.
Sheet Insertion
[Sheet Insertion] inserts a sheet to the specified page as the inter-sheet.
When [Sheet Insertion] is checked, you can select [Printed] or [Blank].
• When [Blank] is selected, nothing is printed on the inter-sheet.
• When [Printed] is selected, the specified page data is printed on the inter-sheet.
Print Controller User’s Guide 3-27
Page 54

Chapter 3 Printer Driver Functions
[Sheet Insertion] can not be performed in the following cases:
• When [Collate] is not selected in [Copies]
• When [2-in-1] or [2-in-1 Repeat] is selected in [Features] - [Combination]
• When [Booklet] is selected in [Features] - [Combination]
• When [OHP (Transparency)], [OHP-Interleave (Blank)], [OHP-Interleave (Print)] is
selected in [Media Type]
Sheet Insertion - Pages
When [Sheet Insertion] is checked, you can enter the number of page in the [Pages]
box.
When [Sheet Insertion] is not selected, [Pages] can not be performed.
[Sheet Insertion] inserts a inter-sheet at the specifyed page.
You can specify the numbers using comma “,” as follows:
e.g. insert at page 3: 3
insert at pages 3, 5, and 12: 3, 5, 12
The maximum number of total pages you can specify to insert is 28.
You can not specify the duplicate numbers in the [Pages] box.
Sheet Insertion - Tray
Specify the paper tray for the inter-sheet.
The settings you can select are as follows:
[Bypass tray], [Tray 1], [Tray 2], [Tray 3], or [Tray 4]
When [Sheet Insertion] is not selected, [Tray] can not be performed.
Sheet Insertion - Advanced
Check the [Advanced] to use the different tray for each the inter-sheet.
When [Advanced] is selected, [Settings] can be performed.
Sheet Insertion - Settings
Open the [Sheet Insertion Advanced Settings] dialog for advanced setting.
Enter the number of pages per tray.
When [Advanced] is not selected, [Settings] can not be performed.
3-28 Print Controller User’s Guide
Page 55

Chapter 3 Printer Driver Functions
PI Cover Sheet
[PI Cover Sheet] inserts a sheet from PI tray as a Front cover and/or a Back cover.
The settings you can select are as follows:
[Front], [Back], or [Front and Back]
[PI Cover Sheet] can not be performed in the following cases:
• When [Finisher-Folder 75] is not available
• When [Post Inserter 75] is not available
Restore Defaults
By clicking the [Restore Defaults] button, the [Cover] tab settings return to defaults.
Print Controller User’s Guide 3-29
Page 56

Chapter 3 Printer Driver Functions
[Graphics] Tab
Halftoning
You can select [Patterned Grays], [Solid Black and White] or [Diffused Grays] by clicking the radio button.
[Patterned Grays] prints image by an ordered dither algorithm.
[Solid Black and White] prints without dithering and gray tone.
[Diffused Grays] prints image with error diffusion.
According to your selection, a sample image will be displayed.
Brightness
Using the Brightness slider or entering the value from -100 to 100 into the text box
beside the slider, you can brighten or darken the graphic.
If the graphic appears too bright, slide the brightness slider to the left.
If the graphic appears too dark, slide the brightness slider to the right.
Contrast
Using the Contrast slider or entering the value from -100 to 100 into the text box beside
the slider, you can increase or decrease the range of contrast within the graphic.
To increase the range of luminance, slide the brightness slider to the left.
To decrease the range of luminance, slide the brightness slider to the right.
Negative
[Negative] prints image with reverse tone.
Restore Defaults
By clicking the [Restore Defaults] button, the [Graphics] tab settings return to defaults.
3-30 Print Controller User’s Guide
Page 57

[Options] Tab
Layout
Pages per sheet
You can select the number of document pages to be printed on one piece of paper.
Select [1], [2], [4], [6], [9] or [16] from the list shown by clicking the [▼] button.
Chapter 3 Printer Driver Functions
Default for [Pages per sheet] is [1].
[1] [2] [4] [6]
[9] [16]
At the Pages per sheet print time, an automatic reduction is activated so
that all information is printed within the printable area on the page.
Print Controller User’s Guide 3-31
Page 58

Chapter 3 Printer Driver Functions
Scaling
Select the enlargement or reduction rate of image in 1% by entering the value from 10
to 100 into the text box.
Default is [100]%.
Resolution
Select [400 x 400] or [600 x 600] by clicking the radio button.
[400 x 400] prints documents with 400 dot per inch (dpi).
[600 x 600] prints documents with 600 dot per inch (dpi).
TrueType options
Select [Outline soft fonts], [Bitmap soft fonts] or [Rasters] by clicking the radio button.
[Outline soft fonts] prints documents using a TrueType font which downloaded from your
computer using Outline data format.
[Bitmap soft fonts] prints documents using a TrueType font which downloaded from your
computer using bitmap data format.
[Rasters] is selected, all text and font data is converted in the computer into Raster
graphics and downloaded to the printer.
Chapter
When [Chapter] is checked, you can chapter by the specified page in the [Pages] box.
The specified page in the [Pages] box means the first page of a chapter.
On [Duplex] printing, [Chapter] prints the specified page to the front of paper, if the page
has an even number which would be printed to the back of paper on duplex printing. (In
case of that an even number is specified, [Chapter] inserts a blank page before the
specified page.)
[Chapter] is on;
[Duplex] - [Flip on short edge] [Duplex] - [Flip on long edge]
end of a chapter
an inserted
blank page
3-32 Print Controller User’s Guide
1’st page of a chapter
Page 59

Chapter 3 Printer Driver Functions
[Chapter] is off;
[Duplex] - [Flip on short edge] [Duplex] - [Flip on long edge]
end of a chapter
1’st page of a chapter
The maximum number of total pages you can specify to chapter is 30.
You can specify the numbers using comma “,”.
The same number can not be specified.
You can specify 1 to 999 as follows;
e.g. chapter at page 4: 4
chapter at pages 4, 6, and 12: 4, 6, 12
[Chapter] can not be performed in the following cases:
• When [Collate] is not selected in [Copies]
• When [OHP (Transparency)], [OHP-Interleave (Blank)], [OHP-Interleave (Print)] is
selected in [Media Type]
• When [On] is not selected in [Duplex]
• When settings other than [1] are selected in [Layout] - [Pages per sheet]
• When settings other than [None] are selected in [Features]-[Combination]
Print Controller User’s Guide 3-33
Page 60

Chapter 3 Printer Driver Functions
Image Storage
When [Image Storage] is checked, you can select [Store] or [Store and Print] to store
the printing image.
If [Hard Drive 3275] is not available, [Image Storage] cannot be performed.
[Store] saves the printing image to the Hard Disk of the printer.
[Store and Prints] prints the printing image and saves it to the Hard Disk of the printer.
Refer to “Chapter 4 ■ Print Job ● Job Combination ” (p. 4-24) for printing of stored
images.
Settings
Open the [Job Combination Print Settings] dialog for password setting.
The [Job Combination Print Settings] dialog also appears on checking [Image Storage]
unless password setting yet.
Enter your job ID in the [JobID] text box. You can select any 8-digit number or character
(upper/lower case) for the Job ID.
Enter your password in the [Password] text box. You can select any 8-digit number or
character (upper case only) for the Password. You can also select the following marks:
[ (space) ], [ . ], [ - ], [ _ ]
When the Password is entered, the password of [Password Print Settings] dialog for
Password Print is replaced with the password of [Job Combination Print Settings]
dialog.
3-34 Print Controller User’s Guide
Page 61

Chapter 3 Printer Driver Functions
Job Combination
You can combine and print the data held in the print controller’s hard disk as a result of
the [Image Storage] settings on the printer driver and/or using the Copier in store mode
under the following conditions;
reipoC retnirP eton
detcelestonsi]BOJ-P[-
si]noitresnIrevoC/teehS[
detceleston
detcelestonsi]retpahC[detcelestonsi]retpahC[-
tonsi]noitanibmoC[
detceles
detcelestonsi]taepeR[detcelestonsi]taepeR[-
detcelestonsi]telkooB[detcelestonsi]telkooB[-
tonsi]evaelretnI-PHO[
detceles
tonsi]tresnIegamI[
detceles
tonsi]lanigirOdexiM[
detceles
srepap
-
detcelestonsi]egaPlauD[-
tuptuofoezisemaseht
detceles
detceles
detceles
srepap
srepap
tonsi]noitresnIteehS[
tonsi]noitanibmoC[
tonsi]evaelretnI-PHO[
-
-
-
lanigirofoezisemaseht
-
tuptuofoezisemaseht
-
retnirpno
retnirpnodemrofrep
ebtonnac]egaPlauD[
retnirpnodemrofrep
demrofrepebtonnac]BOJ-P[
ebtonnac]tresnIegamI[
noituloseremasehtnoituloseremaseht-
edomcihpargemasehtedomcihpargemaseht
-yartelgniS-
]lamroN[;reipoC
]tib1[;retnirP
Refer to “Chapter 4 ■ Print Job ● Job Combination ” (p. 4-24) for printing of stored
images.
Restore Defaults
By clicking the [Restore Defaults] button, the [Options] tab settings return to defaults.
Print Controller User’s Guide 3-35
Page 62

Chapter 3 Printer Driver Functions
[Watermarks] Tab
Watermark
Text
Select the text to be printed as a watermark from the list shown by clicking the [▼]
button.
You can select a watermark from [CONFIDENTIAL], [COPY], [DRAFT], [FILE COPY],
[FINAL], [PROOF] and [TOP SECRET].
Default watermarks that are set up during driver installation can be modified and
customized. If you want to create new text, click the [New] button. To view the list of
available default watermarks and others you’ve created, click the [▼] button.
Page
Select the pages on which to print watermarks.
Select [All but first page], [All pages], [First page only] or [No watermark] from the list
shown by clicking the [▼] button.
Top / Bottom
[Top] prints watermarks over the text or other material on the page.
[Bottom] prints watermarks under the text or other material on the page.
Count
Define how many copies of the watermark you would like printed on each page.
Click the [▲] or [▼] button or directly enter the page number from the keyboard.
Default for the number of copies is 1.
Separation
Define how far apart you want multiple watermarks to be on the page. If you have set
the count to one, this will be unavailable.
3-36 Print Controller User’s Guide
Page 63

Chapter 3 Printer Driver Functions
Font
Name
You can select only one font per watermark from the list shown by clicking the [▼]
button.
When you change the font, the preview window will refresh itself by showing the effect
of the new font on the existing text sample displayed there.
The default font name is [Arial].
Color
Select the color of watermarks.
Select [Black], [Dark Gray], [Light Gray], or [White] from the color palette shown, by
clicking the [▼] button.
Darkness
You can control the “density” of the watermark text with this slider. If you slide this to
the right, the “density” of the watermark text will be more dense. If you slide this to the
left, it will be less dense.
Bold & Italic
When [Bold] is selected, bold formatting will be applied to your selected watermark
text.
When [Italic] is selected, italic formatting will be applied to your selected watermark
text.
When both of these are selected, bold and italic formatting will be applied.
Size
Select a point size for the font to be used in your watermark by clicking the [▲] or [▼]
button or by directly entering the size from the keyboard.
Position
Control the position of the watermark on the page manually or leave it at the automatic setting and let the driver position it for you.
If you select [User defined], the controls below this option will be available and you
can define X axis position (left and right) and Y axis position (up and down) of the
watermark on the page by clicking the [▲] or [▼] button or by directly entering the
values from the keyboard (0-100).
The value of [X] or [Y] represents the placement of origin (beginning) of the watermark in a percentage of the total page width. In case of [X], a value of 20% means the
watermark begins 20% of the way across the page from left to right. In case of [Y], a
value of 20% means the watermark begins 20% of the way down the page from top to
bottom.
Print Controller User’s Guide 3-37
Page 64

Chapter 3 Printer Driver Functions
Angle
Control the “lean” angle of the watermark by sliding this control back and forth or by
typing a number in the text value box from 0 degrees to 360 degrees (a full circle all
the way around).
Adjustment
Select [Move] or [Rotate] by clicking the radio button.
When [Move] is selected, you can move the watermark as you position it manually by
clicking on the page sample and “dragging” the mark around.
When [Rotate] is selected, you can rotate the watermark as you position it manually by
clicking on the page sample and “dragging” the mark around.
Show layout / Show single page
When [Show layout] button is clicked, you can preview how your [pages per sheet]
options selected in the [Options] tab will look with the current watermark settings. The
[Show layout] button will change to the [Show single page] button by clicking it.
When the [Show single page] button is clicked, you can preview how the single page will
look with the current watermark settings. The [Show single page] button will change to
the [Show layout] button by clicking it.
New
When the [New] button is clicked, [Custom watermark n] appears in the [Text] box.
Create the new watermark text, to replace the current text by typing the new text and
pressing the [Enter] key. When the [Enter] key is pressed, the [Text Change & Image
Request] screen will appear. Click the [Yes] button, [No] button, or [Cancel] button.
When you click the [Yes] button, your newly created watermark text will appear in the
available-for-use list when you click the [▼] button beside the [Text] box.
Delete
Click this to delete the current watermark.
You cannot undo this action, so be sure the currently-displayed watermark is
the one you wish to delete.
Restore Defaults
When the [Restore Defaults] button is clicked, the [Watermark - Restore Defaults Request] screen will appear.
• Clicking the [Yes] button resets all the settings to their factory defaults except [Custom
watermark] you have created by pressing the [New] button.
• Clicking the [No] button resets the setting to factory default.
3-38 Print Controller User’s Guide
Page 65

[Overlay] Tab
Symbol
File
You can select a bitmap file to use from the list shown by clicking the [▼] button. The
bitmap files selected before will appear in the list in order of using (the top of the list is
a most recently used file). If you’ve not selected any file, this will say [None].
Chapter 3 Printer Driver Functions
Select a file from this list or click the [Select bitmap] button to navigate through your
system’s hard disk to locate a bitmap file to use.
Page
You can choose a page on which to place the overlay design.
Select [All but first page], [All pages], [First page only] or [No overlay] from the list
shown by clicking the [▼] button.
Select bitmap
When you click the [Select bitmap] button, the [Open overlay file] dialog box will
appear. Select a suitable bitmap file for the overlay from your system’s directories and
click the [OK] button to load the bitmap file.
Shade
Color
This function is used only for black and white (monochrome) bitmaps.
Darkness
You can define with the slider or numerical entry box how “dark” or “solid” your overlay
will be. A setting of 100% is a completely solid overlay, a setting of 50% provides
equal overlay to background coverage, and lesser settings make the overlay more
transparent.
Print Controller User’s Guide 3-39
Page 66

Chapter 3 Printer Driver Functions
Size
When [Automatically] is selected, a symbol you selected will be resized to 30% of the
page size.
When [User defined] is selected, you can set the overlay size on the page.
Position
You can control the position of the overlay on the page manually or leave it at the automatic setting and let the driver position it for you.
If you select [User defined], you can define the X axis position (left and right) and Y axis
position (up and down) of the overlay on the page by clicking the [▲] or [▼] button or by
directly entering the values from the keyboard (0-100).
Show layout / Show single page
When the [Show layout] button is clicked, you can preview how your [pages per sheet]
options selected in [Options] tab will look with the current overlay settings. The [Show
layout] button will change to the [Show single page] button by clicking it.
When the [Show single page] button is clicked, you can preview how the single page will
look with the current overlay settings. The [Show single page] button will be change to
the [Show layout] button by clicking it.
Restore Defaults
By clicking [Restore Defaults] button, settings of the [Overlay] tab return to defaults.
3-40 Print Controller User’s Guide
Page 67

[Setup] Tab
Available options
This list shows available printer options. If you purchase this optional accessory you can
make the printer driver “aware” of it by selecting it from this list and clicking the [Add]
button. The selected option’s label will move into the list of [Installed options].
Chapter 3 Printer Driver Functions
Installed options
This list displays the selected options from the list of [Available options].
Add
When you click the [Add] button after selecting an option from the list of [Available options]
(such as Finisher, Hard Disk, Large Capacity Tray, Trimmer Unit, Punch Unit etc.), the
driver software will make the option available from that point on.
Remove
Clicking the [Remove] button after selecting an option from the list of [Installed options]
will remove the option from the list of [Installed options]. The option will move to the list
of available options, ready to install later.
Installed memory
You can select the amount of memory you have installed in your printer from the list
shown by clicking the [▼] button.
Your printer supports expansion up to 512 megabytes of RAM using standard DIMM
modules. It comes with 64 megabytes pre-installed on the print controller, which should
be sufficient for general office use.
Print Controller User’s Guide 3-41
Page 68

Chapter 3 Printer Driver Functions
[About] Tab
The [About] tab shows some system information and the printer driver version.
3-42 Print Controller User’s Guide
Page 69

Chapter 4 Control Panel Setup
■ Control Panel .............................................. 4-2
● Names and Functions of the Control Panel ......... 4-2
● LCD Touch Screen ...............................................4-4
● Basic Screen ........................................................4-5
● Job Status Screen ............................................... 4-6
● Printer Mode Basic Screen .................................4-8
■ Configuration of Printer Setting Menu.... 4-10
■ Functions of the Printer Setting .............. 4-11
● Test Print ............................................................4-11
● Controller Set .....................................................4-12
● Set Default ..........................................................4-14
● PCL Setup...........................................................4-15
● Time Change ......................................................4-15
■ Print Job .................................................... 4-16
● Cancel .................................................................4-16
● Check ..................................................................4-17
● Interrupt / Reserve .............................................4-19
● Forced Output ....................................................4-20
● Password Print (Confidential Output)..............4-21
● Job Combination ............................................... 4-24
Print Controller User’s Guide 4-1
Page 70

Chapter 4 Control Panel Setup
■ Control Panel
You can set up the printing system from the control panel of the main body printer (copier).
This chapter describes the basic operation of the control panel and the setup menu and
functions of the printing system setup.
Refer to the operating manual of the copier for other functions and screens of the control
panel.
● Names and Functions of the Control Panel
The control panel has the following names and functions.
1
14
2
COPY
SCANNER / SERVER
CHECK
JOB MEMORY
AUTO RESET
13
PRINTER
HELP
3
COUNTER
12
11 10
4
CLEAR QTY.
5
INTERRUPT
PROOF COPY
START
9
STOP
6
7
TIMER
POWER SAVER
ON / OFF
8
1 LCD TOUCH SCREEN
Displays printing system status; various setting menus and setup items; help information; interactive screens; and touch keys for selecting all functions.
2 CHECK
Displays a screen showing all settings that are selected for the current job when setting
up the Wait Mode on the printer driver screen.
3 MODE
Switches the machine operation mode to copy, printer, and scanner/server in turn.
4 KEYPAD
Enters numeric values.
5 INTERRUPT
Stops printing in progress to allow copying from the platen glass.
4-2 Print Controller User’s Guide
Page 71

Chapter 4 Control Panel Setup
6STOP
Stops the copying sequence, scanning or printing; deletes the stored memory.
7 TIMER
Lights when the timer function is set.
8 POWER SAVER ON/OFF
Activates power-saving mode for times when the copier is inactive, or activates timer
interrupt mode when weekly timer function is active.
9START
Activates scanning or copying.
Restarts the printing after Wait Mode - Wait or Proof.
10 [C] (CLEAR QTY.)
Allows resetting of print quantity.
11 [P] (COUNTER)
Displays the Counter Screen or accesses programming modes for setting special functions.
12 HELP
Displays a screen with help for the currently selected function.
13 AUTO RESET
Restores copier to automatic mode settings or to key operator settings.
14 JOB MEMORY
Displays screens for selecting job store/job recall functions.
Print Controller User’s Guide 4-3
Page 72

Chapter 4 Control Panel Setup
● LCD Touch Screen
The touch screen is an LCD (liquid crystal display) that displays interactive screens with
touch sensitive keys for making copy/print job selections. Selections are highlighted at the
touch.
The screens also work with the conventional control panel keys.
The touch screen of the control panel is covered with glass. Do not drop heavy
items on the glass, or put excess weight or pressure on it; otherwise the glass
may break or become scratched.
After the power switch is turned on, the Océ name displays for approximately 10 seconds,
until initial machine settings are established. Then, the 7 levels of Warm-Up Screen displays
for approximately 6 minutes, until the fixing temperature is reached.
When the [Basic Screen] (copy mode basic screen) is displayed, the touch screen becomes
interactive. The interactive condition enables you to communicate directly with the printing
system/copier system/scanner system simply by touching keys displayed on the screen; or
by pressing conventional keys, as required.
[Basic Screen] (copy mode basic screen)
When you touch the [STATUS] key on the Basic Screen, the Job Status Screen will be
displayed.
[Job Status Screen]
These screens automatically display information regarding copying/printing status, print job
status and settings.
4-4 Print Controller User’s Guide
Page 73

Chapter 4 Control Panel Setup
● Basic Screen
The [Basic Screen] displays the status and the condition of each mode and the settings.
[Notice icon] means the following under print mode:
IDLE
The printing system is ready to receive the print data from your computer.
PRINT
The print controller is currently printing.
The print data rasterized in the print controller is now being transferred to the E-RDH
memory in the main body printer.
ERROR
The print controller generated an error message.
WAIT
The main body printer is in warm-up mode.
INITIALIZING
The print controller is in initialization process.
Print Controller User’s Guide 4-5
Page 74

Chapter 4 Control Panel Setup
● Job Status Screen
When you touch the [STATUS] key on the Basic Screen, the [Job Status Screen] will be
displayed and you can confirm the status of a print job.
Contents of the Job Status Screen are as follows:
NO.
Displays the No. (1-99) for each job (print/copy/scan) assigned to the machine.
MODE
Displays the current operation mode of the printing system:
COPIER
PRINTER
SCANNER
STATUS
Displays the current status of the machine for each job:
[Indication] [Meaning]
READY Ready to use in each mode
ERROR Error in each mode
PRINTING Output in each mode
RESERVE Ready to reserve
NO PAPER No paper in paper tray in copy/print mode
STOP Stop in each mode
JAM Jam in each mode
INTERRUPT Interrupting the previous job
4-6 Print Controller User’s Guide
Page 75

Chapter 4 Control Panel Setup
TOTAL PAGE(s)
Displays the number of print originals for each job. (0 - 9999)
PAGE(s) TO GO
Displays the remaining print count of the job.
0 to 9999 (The number exceeding 9999 will be displayed as 9999≠.)
MINUTE(s) TO GO
Displays the time (in minutes) required for completing the job.
1 to 999
Exceeding 999 minutes: 999↑
Shorter than 1 minute: <1
Other
The following message will be displayed on the bar when the reserved job does not
exist.
RESERVED JOB DOES NOT EXIST
Print Controller User’s Guide 4-7
Page 76

Chapter 4 Control Panel Setup
● Printer Mode Basic Screen
When the printing system starts properly, the Printer Mode Basic Screen (main menu
screen) is displayed on the LCD by pressing the [MODE] button.
When the [MODE] button is pressed again, the LCD is changed to the Copy Mode Basic
Screen, and the normal copy settings becomes available.
The following settings can be selected from the Printer Mode Basic Screen.
[Test Print Menu]
Display the Test Print Setup Screen. You can print the test print by selecting the item.
[Controller Set]
Display the Controller Set Screen. You can perform various settings related to the Print
Controller.
[Set Default]
Display the Set Default Screen. You can return various settings to the factory default by
selecting the item.
[PCL Setup]
Display the PCL Setup Screen. You can perform various settings related to PCL.
[Password Print]
Display the Password Print Screen. The password print job to be set up from the printer
driver is printed after entering the password from the LCD touch screen.
[Controller Time]
Display the Time Change Screen. You can change the Printer’s current time setting.
See “■ Configuration of Printer Setting Menu”
ting”
(p. 4-11)
For details on the password print, refer to “■ Print Job ● Password Print (Confidential
Output)” (p. 4-21).
4-8 Print Controller User’s Guide
on printer setting.
(p. 4-10)
or “■ Functions of the Printer Set-
Page 77

Chapter 4 Control Panel Setup
Procedures of the Printer Setting
You can select or change settings from the LCD by touching a key on the LCD touch screen.
Item Selection and Appearance of Selected Items
Various settings are performed by touching a icon of the item you would like to select on
the LCD. Currently selected items are displayed with reverse color.
As a result of selecting [PCL Demo Page] of [Test Print Menu]
As a result of selecting [Config. Data] of [Test Print Menu]
How to set the Banner Page On
1. Press the [MODE] key to show the [Printer Mode Basic Screen].
The [Copy Mode Basic Screen] is switched to the [Printer Mode Basic Screen].
2. Touch the [Controller Set] key.
The [Printer Mode Basic Screen] is switched to the [Controller Set Screen].
3. Touch the [Banner Page] key.
4. Touch the [OK] key.
The setting screen of the selected item is displayed.
5. Touch the [ON] icon.
6. Touch the [OK] icon.
[Controller Set] - [Banner Page] - [ON] is configured.
Key Operation
[ ] [ ] Touch the [ ] / [ ]key to display the main menu item.
[▲] [▼] Touch the [▲] / [▼] key to display the sub menu item or setting item.
[Cancel]
Touch the [
Cancel
] key to cancel the current setting and to return to the upper menu screen.
Print Controller User’s Guide 4-9
Page 78

Chapter 4 Control Panel Setup
■ Configuration of Printer Setting Menu
Test Print Menu
Controller Set
Banner Page
Banner Page Tray
Spool
Job Time Out
Copier Time Out
ScanDataAutoDel.
Set Default
Default Paper
Off
Bypass Tray
Off
120
180
A4
B5
8.5 x 14R
PCL Font List
Tray 3
Tray 4
240
300
PCL Demo Page
Config. Data
On
default
Auto Tray
default
Tray 1
Tray 2
On
default
5
203060
10
default
15
15 30 60 90
default
Del After 24H
default
A3R
B4R
11 x 17R
8.5 x 11
default
Off
Resolution
Print Quality
Duplex
Orientation
PCL Setup
Courier Style
CR/LF Mapping
Input Tray
Password Print
Controller Time
400 x 400 dpi 600 x 600 dpi
default
default
1 bit
Long Edge Short Edge
Off
default
Por trait
default
Dark Light
CR/LF
Auto Tray
default
Tray 1
Tray 2
Landscape
default
CR
default
Tray 3
Tray 4
Bypass Tray
4-10 Print Controller User’s Guide
Page 79

■ Functions of the Printer Setting
● Test Print Menu
Select [Test Print Menu] from the Printer Mode Basic Screen to display the Test Print Setup
Screen.
Setting items are as follows:
[PCL Demo Page]
Select [PCL Demo Page] to print the PCL Demo Page immediately.
[PCL Font List]
Select [PCL Font List] to print the PCL Font List immediately.
[Config. Data]
Select [Config. Data] to print the System Configuration data immediately.
Items of the Config. Data are as follows:
Chapter 4 Control Panel Setup
• Version information
• Current Settings (Resolution / Copy mode timeout / Default Paper size / Language)
• Installed Paper (Bypass Tray / Tray1 / Tray2 / Tray3 / Tray4 / )
• Device Status (Total RAM installed / Hard disk free space)
• Miscellaneous (PCL pages printed)
Print Controller User’s Guide 4-11
Page 80

Chapter 4 Control Panel Setup
● Controller Set
To enable the settings, it is necessary to turn OFF/ON the main body printer.
Select [Controller Set] on the Printer Mode Basic Screen to display the Controller Set
Screen.
Setting items are as follows:
[Banner Page]
Select [Banner Page] to set the Banner Page.
Setting items are as follows:
• On : prints the Banner Page prior to the set of print job
• Off : (Default)
[Banner Page Tray]
Select [Banner Page Tray] to set the tray for Banner Page.
Setting items are as follows:
Auto Tray / Tray1 / Tray2 / Tray3 / Tray4 / Bypass Tray
[Spool]
Select [Spool] to set the Spool condition.
Setting items are as follows:
• On : spool waiting print job queue within HDD
• Off : interpreter within the print controller processes the print job without spooling
(Default)
[Job Time Out]
Select [Job Time Out] to set the Job Timeout value. When it reaches the job time out
value without receiving any print job data or without any communication between the
printing system and your computer, the printing system deems it to be the end of the
print job.
Setting values are as follows:
• 5 / 10 / 15 / 20 / 30 (Default) / 60 / 120 / 180 / 240 / 300 (unit: seconds)
4-12 Print Controller User’s Guide
Page 81

Chapter 4 Control Panel Setup
[Copier Time Out]
Select [Copier Time Out] to set the Copier Timeout value. When it reaches the Copier
Timeout value after operations for copy on the control panel of the main body printer,
the print controller can receive the print job data.
Setting values are as follows:
• 15 / 30 (Default) / 60 / 90 (unit: seconds)
[Scan Data AutoDel.]
Select [Scan Data AutoDel.] to set the Scan Data AutoDel. condition.
Setting values are as follows:
• Del After 24H: The scan data held in the print controller’s hard is automatically
deleted after 24 hours (Default)
• Off: The scan data held in the print controller’s hard is not deleted automatically
Print Controller User’s Guide 4-13
Page 82

Chapter 4 Control Panel Setup
● Set Default
It is not necessary to turn OFF/ON the main body printer.
Select [Set Default] on the Printer Mode Basic Screen to display the Set Default Screen.
Setting items are as follows:
[Default Paper]
Select [Default Paper] to set the default paper size.
Setting items are as follows:
A3R / A4 / B4R / B5 / 11 x 17R / 8.5 x 14R / 8.5 x 11 (Default)
[Resolution]
Select [Resolution] to set the default Resolution.
Setting items are as follows:
• 400 x 400 dpi : set the Resolution to 400 dpi (Default)
• 600 x 600 dpi : set the Resolution to 600 dpi
[Print Quality]
Select [Print Quality] to set the default Print Quality. Only [1 bit] is available.
[Duplex]
Select [Duplex] to set the default Duplex.
Setting Items are as follows:
• Off : set the Duplex off (Default)
• Long Edge : set the Long Edge Duplex
• Short Edge : set the Short Edge Duplex
[Orientation]
Select [Orientation] to set the default Orientation.
Setting items are as follows:
• Portrait : set the Orientation to Portrait (Default)
• Landscape : set the Orientation to Landscape
4-14 Print Controller User’s Guide
Page 83

Chapter 4 Control Panel Setup
● PCL Setup
It is not necessary to turn OFF/ON the main body printer.
Select [PCL Setup] from the Printer Mode Basic Screen to display the PCL Setup Screen.
Setting items are as follows:
[Courier Style]
Select [Courier Style] to set the Courier Style.
Setting items are as follows:
• Dark : use old version Courier Style
• Light : use new version Courier Style (Default)
[CR/LF Mapping]
Select [CR/LF Mapping] to set the CR/LF Mapping.
Setting items are as follows:
• CR/LF : replace line ending LF code to CR/LF
• CR : does not convert line ending code (Default)
[Input Tray]
Select [Input Tray] to set the Input Tray.
Setting items are as follows:
• Auto Tray (Default)
• Tray 1
• Tray 2
• Tray 3
• Tray 4
• Bypass Tray
● Controller Time
Select [Controller Time] from the Printer Mode Basic Screen to display the Time Change
Screen. You can change the Printer’s current time setting.
Print Controller User’s Guide 4-15
Page 84

Chapter 4 Control Panel Setup
■ Print Job
● Cancel
You can stop the job reserved or the job in progress. If the job is still on your computer, first,
delete the job from your computer and press the [STOP / CLEAR] key on the control panel.
You can not stop the remaining job completely by only pressing the [STOP / CLEAR] key.
The [STOP / CLEAR] key can clear the memory of the print controller and E-RDH in the
main body printer but can not clear the remaining job on your computer.
How to cancel the job
1. While a job is currently printing, touch the [Stop] key to cancel the job.
The confirmation screen will appear.
2. Touch the [EXIT] to confirm the cancelation.
Touch the [CONTINUE] to continue printing without canceling the job.
NON COMPLETE JOB LIST
You may want to view a list of the print jobs that remain not output because of cancellation or deletion from the queue.
To do this, touch [NON COMPLETE JOB LIST] in the Job Status Screen.
The list is displayed with job names, user names, file names, status, etc.
4-16 Print Controller User’s Guide
Page 85

Chapter 4 Control Panel Setup
● Check
You can check the current job settings and see how the printed job will look using the Wait
Mode on the printer driver screen to print out only one set of the print job for checking
before printing out multiple sets.
How to check the job - Wait Mode - Proof:
This method prints one set of the print job for checking after checking the settings on
the control panel.
On your computer:
1. Right click the printer icon and then click the properties to display the printer
properties dialog.
2. Select [Wait Mode] from the upper list of [Features] in [Paper] tab of the printer
properties window and select [Proof] from the list by clicking the [▼] button of
the lower box of the [Features].
3. Start to print.
On the control panel:
4. The [Printer Check Mode Screen] will appear on the LCD touch screen and no
printing is performed.
[HDD STORE] appears only when the optional HDD is installed in the main body printer.
5. Confirm the current settings.
6. Change setting values of [Print Quantity], [Duplex Mode] or [Image Shift], if
necessary.
• How to change [Print Quantity]
Enter the value from the keypad on the control panel when the [Printer Check Mode
Screen] appears.
• How to change [Duplex Mode]
To show the [Basic Screen], touch the [Duplex Mode]. Set the [Duplex Mode] on the [Basic
Screen]. To return to the [Printer Check Mode Screen], press the [CHECK] button on the
control panel.
Print Controller User’s Guide 4-17
Page 86

Chapter 4 Control Panel Setup
• How to change [Image Shift]
Available only when [On] is selected in [Image Shift] of printer driver.
To show the [Image Shift Screen], touch the [Image Shift]. Set the [Image Shift] on the
[Image Shift Screen]. To return to the [Printer Check Mode Screen], touch [EXIT] on the
[Image Shift Screen].
7. Touch the [PROOF PRINT] to print one copied set for proofreading.
8. Touch the [Exit] to return to the print mode basic screen.
9. Press [START] to resume the rest of the print job.
When you change the settings, press [STOP] to cancel the print job, and change the
settings on the printer properties on your computer.
How to check the job - Wait Mode - Wait:
This method is used only for confirming the settings on the control panel without
printing.
On your computer:
1. Right click the printer icon and then click the properties to display the printer
properties dialog.
2. Select [Wait Mode] from the upper list of [Features] in [Paper] tab of the printer
properties window and select [Wait] from the list by clicking the [▼] button of the
lower box of the [Features].
3. Start to print.
On the control panel:
4. The settings are displayed on the LCD.
The [Printer Check Mode Screen] will appear on the LCD touch screen and no printing is
performed.
5. Confirm the current settings.
Change setting values of [Print Quantity], [Duplex Mode] or [Image Shift], if
necessary.
(Refer to the above mentioned procedure : How to check the job - Wait Mode -
Proof, 6.)
6. Press [START] button to resume the rest of the print job.
When you change the settings, press [STOP] to cancel the print job, and change the
settings on the printer properties on your computer.
4-18 Print Controller User’s Guide
Page 87

Chapter 4 Control Panel Setup
● Interrupt / Reserve
The Interrupt mode can be used to interrupt the current printing operation to perform a
copying job. The Interrupt mode can be selected when the engine is receiving print data or
when printing is already in progress.
Under some conditions of printing or Finisher settings, the Interrupt mode cannot be used.
How to interrupt
1. Press the [INTERRUPT] key when the print job is in progress.
2. Place new original(s) on the platen glass or in the document feeder.
3. Press [START] key to start Interrupt Copying .
4. After copying is completed, press the [INTERRUPT] key again to enable the
engine to resume the Interrupted print job.
If the [INTERRUPT] key is pressed while receiving the job data, Interrupt mode
will become available after the receiving is complete.
If the [INTERRUPT] key is pressed while printing is in progress, Interrupt mode
will become available after the current set of print job is completed.
Even without pressing the [INTERRUPT] key again, interrupted print job will
resume automatically on the following conditions:
• AUTORESET is being activated and when it reaches the set value
• When Interrupt release timer which works 1 min after INTERRUPT job is
complete works.
This timer works when AUTORESET is not activated
How to use Reserve function
1. Touch the [FREE] folder to set the conditions for a copying job.
2. This copying job will be performed after the print job in progress is completed.
Print Controller User’s Guide 4-19
Page 88

Chapter 4 Control Panel Setup
● Forced Output
When the tray runs out of preset size papers, or when the tray does not contain papers
whose size meets the demand from the printer driver, the printing system displays a message prompting the user to load additional papers.
The process by which the user selects, when the prompt appears, a different size of papers
on the operation panel and lets the print work continue on these papers, is referred to as
“Forced Output.”
Forced Output Procedure
1. Make sure that the LCD touch screen shows a massage prompting the user to
load additional papers of proper size.
2. Touch and select the desired size displayed in the paper sizes area.
3. Press the [START] button.
4. The printout is made on the selected size of papers.
When you choose not to use Forced Output, delete the print job, and change the setting
concerned on the application, or set the requested size of papers in the tray.
4-20 Print Controller User’s Guide
Page 89

Chapter 4 Control Panel Setup
● Password Print (Confidential Output)
A Confidential Output feature enables you to password protect specific print jobs. The printing process starts only when you enter a password on the control panel of the main body
printer; a password you can set up when transferring a print job from your computer.
Thanks to this feature you can manage confidential documents without worrying about
someone else having access to them.
Password Print (Confidential Output) Procedures
● On your computer:
1. Get the Printer Properties dialog displayed.
2. Put a check in [Password Print] on the [Paper] tab of the Printer Properties dialog.
[Password Print Settings] dialog appears.
When you have already set up the password on the [Password Print Settings] dialog, go to
step 6.
3. Enter your user ID in the [UserID] text box.
You can select any eight-digit number for user ID.
Providing the Printer ECM feature has been set on the copier, [User ID] set up
in the [Settings] dialog is recognized for a password for Printer ECM.
Provided a Printer ECM feature has been set on the copier, you can enter the
same number in the [User ID] text box as that representing your password for
Printer ECM.
For Printer ECM, refer to “ Chapter 6 Printer ECM ”.
4. Enter your password in the [Password] text box.
You can select any eight-digit number or character for Password.
5. Click the [OK] button.
If you click the [Cancel] button, [Password Print] check box will be [OFF] and password print
(confidential output) will not be performed.
6. Set up the other functions if necessary, then start to print.
Print Controller User’s Guide 4-21
Page 90

Chapter 4 Control Panel Setup
● On the control panel:
7. Press the [MODE] button to display the print mode basic screen and display
[Password Print] touch key.
8. Touch the [Password].
[User ID] key, [Password] key and numeric key etc. are displayed.
9. Enter your user ID using the numeric keys, and touch the [OK] key.
The ID is displayed with the [Password] key highlighted.
10. Enter your password using the numeric, uppercase or lowercase keys, and touch
the [OK] key.
If no uppercase letters are displayed, you can touch the [Uppercase] key to get them
displayed.
If no lowercase letters are displayed, you can touch the [Lowercase] key to get them displayed.
If no numbers are displayed, you can touch the [Number] key to get them displayed.
When you touch the [OK] key, a list of the corresponding print jobs is displayed.
The list will be blank if there are no corresponding print jobs.
If this is the case, touch the [Cancel] key to terminate the Confidential Output feature.
11. Select the print job you need, and touch the [Print] key.
The print process starts.
You can specify multiple print jobs for them to be printed out at one time.
4-22 Print Controller User’s Guide
Page 91

Chapter 4 Control Panel Setup
Deleting Password Print Jobs
You can delete print jobs once set for Password Print (Confidential Output).
To do this, in the window appearing in step 11 under the heading of “Password Print
(Confidential Output) Procedures”, select the print job you want to delete, and touch the
[Delete] key.
When the [Delete After 24H] is selected in the [Set Default] - [Scan Data
AutoDel.], the data held in the print controller’s hard disk as a result of the
password printing process is automatically deleted in 24 hours.
Print Controller User’s Guide 4-23
Page 92

Chapter 4 Control Panel Setup
● Job Combination
You can combine and print the data held in the print controller’s hard disk as a result of the
[Hard Drive 3275] settings on the printer driver and/or using the Copier in store mode.
Job Combination Procedures
● On your computer:
1. Get the Printer Properties dialog displayed.
2. Put a check in [Hard Drive 3275] on the [Options] tab of the Printer Properties
dialog.
3. Click the [Settings] button.
[Job Combination Print Settings] dialog appears.
When you have already set up the job ID and the password on the [Job Combination Print
Settings] dialog, go to step 7.
4. Enter your user ID in the [UserID] text box.
You can select any eight-digit number for user ID.
If the Printer ECM has been set up this User ID is identified as a password for
the Printer ECM.
The Printer ECM is described in "Chapter 6 Printer ECM".
5. Enter your job ID in the [JobID] text box.
You can select any eight-digit number for job ID.
6. Enter your password in the [Password] text box.
You can select any eight-digit number or character for Password.
7. Click the [OK] button.
8. Set up the other functions if necessary, then start to print.
● On the control panel:
Refer to the manual of the Copier for how to perform the job combination settings from the
control panel of the Copier.
4-24 Print Controller User’s Guide
Page 93

Chapter 5 Scanner Operation
■ Brief Description ......................................... 5-2
■ To Install the Scanner Driver ...................... 5-3
■ Scanning from the Copier .......................... 5-4
● To Scan Documents in Real Mode .....................5-4
● To Scan Documents in Store Mode....................5-6
● Scanner Setting Basic Screen ........................... 5-7
● Functions ...........................................................5-10
■
Reading in Scanned Data on a Computer
● To Import Scanned Data....................................5-13
.. 5-13
● Scanner Driver’s Main Screen ..........................5-15
● Variable Option ..................................................5-18
● To Delete Scanned Data ....................................5-19
Print Controller User’s Guide 5-1
Page 94

Chapter 5 Scanner Operation
■ Brief Description
This chapter describes how to operate the scanner system: installing the scanner driver,
scanning from the main body printer (copier) and reading in scanned data on a computer.
Original document images scanned into the E-RDH memory from the copier’s RADF or
platen glass are stored on the print controller’s hard disk as a TIFF file.
During scanning preparation, you can set such things as IMAGE ENHANCE, SCAN MODE,
SCAN DENSITY, LENS MODE, SCAN SIZE, QUALITY, SPECIAL ORIGINAL, etc.
To scan documents, you must first specify a 4-digit box number on the control panel. This
box number is handled like a folder on the controller’s hard disk.
The saved file can be read into TWAIN-capable Windows applications through the network
for editing/storage. This process also requires a box number.
Data scanned into the controller’s hard disk can be cleared from computers on the network.
Import
TWAIN-capable Application
Network Scanner Driver
Ethernet
TCP/IP (FTP)
Original
Scanning
E-RDH
Print Controller
Main Body Printer/Copier
When the [Delete After 24H] is selected in the [Set Default] - [Scan Data
AutoDel.], the data held in the print controller’s hard disk as a result of the
scanning process is automatically deleted in 24 hours. When the remaining
space on the hard disk diminishes below 20 MB the scanned data is
automatically deleted.
5-2 Print Controller User’s Guide
Page 95

■ To install the Scanner Driver
To use the printing system as a scanner, a scanner driver (Océ Scanner Driver) must be
installed in a computer in which a TWAIN scanner driver-equipped application has been
previously installed.
Compliant OS
The scanner driver can be used on the following OS:
• Windows 95/98/Me
• Windows NT 4.0
• Windows 2000
For the printing system to be used as a scanner, you need the network interface card. The parallel port on the print controller is not available for scanning
work.
It is necessary that the PC and the network interface card should be assigned
appropriate IP addresses, and that the TCP/IP network should be enabled.
Chapter 5 Scanner Operation
For the TCP/IP settings of the network interface card, see the separate User’s
Guide for the network interface card.
To install the scanner driver (Océ Scanner Driver)
To install the scanner driver, perform the following procedure.
1. Turn on the computer and start Windows.
Exit from all active Windows applications, if required.
2. Set the “User Software CD” on the CD-ROM drive.
3. Double-click the [My Computer] icon on the desk top to open the [My Computer]
window, and then double-click the icon corresponding to the connected CD (i.e.
User Software CD).
4. Double-click [Setup.exe] in the [Scanner] folder.
5. Follow the instructions given in the installation wizard screen.
Print Controller User’s Guide 5-3
Page 96

Chapter 5 Scanner Operation
■ Scanning from the Copier
Document images scanned by the copier can be stored on the print controller’s hard disk as
a TIFF file. To do this, you have to specify a 4-digit box number.
In addition, there are two ways that you can scan the original using the copier. In either way,
you can specify IMAGE ENHANCE, SCAN MODE, SCAN DENSITY, LENS MODE, SCAN
SIZE, QUALITY, SPECIAL ORIGINAL and others before getting the original read in.
● To Scan Documents in Real Mode
The scanned data is sent to the print controller every time one sheet is scanned in this
mode.
1. Set the original document to be scanned (that is, to be read) on the RADF or
platen glass of the copier.
2. Press the [MODE] button on the operation panel to display the SCANNER/
SERVER basic screen.
3. Press the [SCANNER] key in the SCANNER/SERVER basic screen.
A BOX-No. Input window appears.
5-4 Print Controller User’s Guide
Page 97

Chapter 5 Scanner Operation
4. Enter a 4-digit box number, and press the [OK] key. The display is switched to a
scanner setting basic screen.
Be sure to jot down this number. You need it when reading scanned data from the computer.
When using the printing system as a scanner, we recommend assigning a box
number (1-9998) to each user and informing them of their numbers via e-mail
beforehand.
The box number assists in protecting the individual user’s data.
5. Perform the scanner settings, as required.
6. Press the [START] button and the original is scanned depending on the current
settings.
The image direction you will have on reading application depends on the original document
direction.
Print Controller User’s Guide 5-5
Page 98

Chapter 5 Scanner Operation
● To Scan Documents in Store Mode
The scanned data is sent to the print controller after canceling store mode.
You can use the Store Mode to sent the scanned data of multiple originals at once.
1. Complete steps 1 through 5 under the heading “To Scan Documents in Real
Mode”.
2. Press the [STORE] key in the scanning setting basic screen.
3. Press the [START] button so the original document you’ve set on the platen
glass or RADF is scanned depending on the current scanning settings.
At this point of the process, no data is sent to the print controller.
4. Press the [STORE] key, and press the [START] button to send the scanned data
to the print controller.
5-6 Print Controller User’s Guide
Page 99

● Scanner Setting Basic Screen
Basic Features
[BOX No.]
Press this key to change / enter a box number.
When this key is pressed, the BOX No. Input window appears.
Chapter 5 Scanner Operation
[IMAGE ENHANCE]
Use to select an image quality.
The default is the same as that in the copy mode (AUTO mode). For the default setting
of the copy mode (Key Operation mode), refer to the copier manual.
[AUTO]:
Distinguish between text and photo automatically and select the appropriate image
quality.
[INCREASE CONTRAST]:
Darken lightly printed images ( e.g., pencil) without changing background exposure.
[PHOTO]:
Reproduce a halftone photo image.
[TEXT]:
In this mode, text is improved in comparison to using the AUTO mode.
[SCAN MODE]
Use this features to determine the mode from Duplex or Simplex in which the original
document is read.
When [DUPLEX] is selected, the message appears for mounting of the RADF.
Print Controller User’s Guide 5-7
Page 100

Chapter 5 Scanner Operation
[SCAN DENSITY]
Press this key to select a read density. The default is the same as that in the copy
mode.
When the original document is being read, you can change the density, but you cannot
select [AUTO] in the process.
[LENS MODE]
Press this key to change the magnification ratio at which the original document is read.
You can select [ZOOM], [RE] or [1:1]. [RE] is the same as the default in the copy mode.
[ZOOM] range in each resolution are as follows:
200 dpi: 0.66 - 4.00
300 dpi: 0.44 - 4.00
400 dpi: 0.33 - 4.00
600 dpi: 0.33 - 2.00
[SCAN SIZE]
Press this key to select the scanning paper size.
Available only when using the Platen mode. You can select [AUTO] or [SIZE SETTING].
[AUTO]: Same as the default in the copy mode
[SIZE SETTING]: Allows you to select a scanning frame size.
Example: When an 5.5”x8.5” original is loaded and you select 8.5”x11”,
then the scanning takes on the 8.5”x11” frame.
Options: 5.5”x8.5”, 5.5”x8.5”R, 8.5”x11”, 8.5”x11”R, 8.5”x14”, 11”x17”,
A3, A4R, A4, A5R, A5, A6R, B4, B5R, B5, B6R, F4, Full AREA
Default is [AUTO].
5-8 Print Controller User’s Guide
 Loading...