

Page 1
Océ 7055/7056
n
User Manual
Page 2

Océ-Technologies B.V.
This manual contains a description regarding the Océ 70 55/7056 system and a
detailed explanation about the plot functions. The introduction (chapter 1)
contains a general description of the working methods for using the copier and
it is recommended that you read at least this chapter.
Overview of copier parts on the covers
To assist you in finding parts of the copier/printer and the functions on the
operating panel quickly, an illustration of the Océ 7055/7056 is presented on
the inside front cover and of the op erating panel on the inside back co ver, both
of which can be folded out.
Safety information
This manual contains the following safety information:
■
Appendix B lists ‘Instructions for safe use’.
information before you start to actually use the copier.
information such as safety data sheets can also be found in appendix B.
■
Where applicable, cautions and warnings are used throughout this manual to
draw your attention to safety precautions to be taken.For more information
on the notation conventions used in this manual, refer to Appendix C.
You are advised to read this
Technical safety
Copyright
Océ-Technologies B.V. Venlo, The Netherlands © 1998
All rights reserved. No part of this work may be reproduced, copied, adapted,
or transmitted in any form or by any means without written permission from
Océ.
Océ-Technologies B.V. makes no representation or warranties with respect to
the contents hereof and specifically disclaims any implied warranties of
merchantability or fitness for any particular purpose.
Further, Océ-Technologies B.V . reserves the right to re vise this publication and
to make changes from time to time in the content hereof without obligation to
notify any person of such revision or changes.
Code number 7114124
Edition 2.0
GB
Page 3

Contents
Chapter 1
Introduction
The Océ 7055/7056 6
The operating panel 7
Stand-by mode 7
Buttons and functions 7
Display 8
Switching on/off 9
Chapter 2
Copy jobs
Introduction 12
Making copies 13
Special settings 19
Exposure setting 19
Trailing edge and leading edge 20
Making a test strip 22
Chapter 3
Chapter 4
Materials
Inserting a new copy material roll 24
Programming roll specifications 31
Adding toner 32
Cleaning the transparent platen 35
Solving problems
Introduction 38
Operator recoverable errors 39
Machine errors 40
Clearing original jams 41
Clearing paper jams 42
Contents 3
Page 4

Appendix A
Appendix B
Overview and Tables
Standard settings 46
Standard operating mode 47
Product specifications 48
Roomtemperature (T) and Relative Humidity (RH) 48
Originals that can be used 49
Copy material that can be used 50
Safety information
Instructions for safe use 54
Mains core colours 56
Safety data sheets 57
Safety data sheets Océ 7055/7056. 58
Safety data sheet Océ OPC Drum 59
Safety data sheet Océ B1 Toner 61
Safety data sheet Océ Cleaner A 63
Safety data sheet Océ Developer 65
EPA ENERGY STAR® 67
Appendix C
Miscellaneous
Notation conventions 70
Reader’s comment sheet 71
Addresses of local Océ organisations 73
Index 75
4 Océ 7055/7056 User Manual
Page 5

Chapter 1
Introduction
Océ 7055/7056
User Manual
This chapter contains a general description of the Océ
7055/7056 and how to get the copier ready to copy.
5
Page 6

The Océ 7055/7056
The Océ 7055/7056 is a copier for large documents (e.g. architectural or
engineering drawings). The machine is ea sy to use and mak es copies on pa per ,
transparent, vellum or polyester film with the quality and reliability that one
might expect from Océ. The Océ 7055 /7056 has, beside s a copy fee d table for
manual copy material input, an automatic copy material input mechanism. The
Océ 7055 has only one copy material roll for auto matic input whereas the Océ
7056 has two rolls.
6 Océ 7055/7056 User Manual
Page 7

The operating panel
Stand-by mode
The operating panel (see the illustration on inside back cover) on the Océ
7055/7056 is easy to use and specially designed to carry out copy jobs. After
switching on, (see page 9), the machine is always ready for operation: the
display shows blinking LEDs. In this state, the operating panel is in stand-by
mode. The operating panel activates in the following situations:
you feed an original
■
you feed a copy material
■
a button on the operating panel is pressed
■
a roll unit is opened.
■
Note:
If you do not work with the operating panel for more than 2 minutes, it
retur ns automatically to stand-by mode . The Océ 7055/7056, howe ver, remains
always for operation.
Buttons and functions
Start button
Stop button
without finishing the current job . The original and the copy material rem ain in
the copier.
Exposure level
buttons. The exposure level can be changed at all times.
Copy material input button
material. Possible input selections are manual feed, roll 1 or roll 2.
The copy process starts with the current settings.
The stop button stops the current copy process immediately
You modify the exposure level with the ‘lighter’ and ‘darker’
With this b utton you choose the input of the copy
Copy material selection button
button to select the copy material. Your selection, paper or film, influences the
fusing temperature. All materials, except for film, should be copied in the
‘paper’ setting. You also use this button to program the copy material on a roll.
Introduction 7
If you have selecte d manual feed, you use this
Page 8

Copy quantity selection button
number of copies. The copy quantity can be changed at all times.
the
Press these buttons to increase or decrease
Display
Correction button
Resets the copy quantity counter to ‘1’.
By pressing the
correction button twice, all settings will reset to the standard settings (see
‘Standard settings’ on page 46).
Trailing edge
With this button you add or remove a filing strip at the trailing
edge varying between +40 to -100 mm in steps of 5 mm.
Leading edge
W ith this b utton, you add or remove a filing strip at the lea ding
edge varying between +100 to -100 mm in steps of 5 mm.
Operating mode button
This button toggles between synchro cut mode and
standard mode. In synchro cut mode, the copy is cut at the length of the
original. In standard mode, the copy is cut at a standard length.
Depending on the mode you are working in, you have to interpret the figures
shown on the display in a different way:
In stand-by mode, the display shows blinking LEDs.
■
In manual feed mode, the display shows the length of the original in mm.
■
When you select roll 1 (or roll 2 for the Océ 7056) in automatic feed mode,
■
the display shows the width of the roll. The width of the roll and the kind of
■
material should be configured when a new roll is inserted.
■
When a r oll unit is opened, the display flashes. In this mode you can pr o gram
the width of the roll and the kind of copy material of the roll.
■
In standar d op erating mode, the display shows the s tanda rd length that you
select with the selections buttons. The pair of symbols on the display
and next the operating mode indicator are lighted.
■
In synchro-cut mode, you can see the values of the trailing and leading
edges.
The pair of symbols on the display and next to the e dge
adjustments indicators identify which values are displayed.
8 Océ 7055/7056 User Manual
Page 9

Switching on/of f
After switching on the machine is ready for operation. The display shows
blinking LEDs. In this state, the operating panel is in stand-by mode . After you
have switched on the mach ine, there is no need to switch it of f after each copy
job. You can leave the machine switched on for the rest of the day since it uses
less than 15 W in this mode. At all times, the Océ 7055/7056 is ready for
operation. If the machine has been inactive for more than 2 minutes, the
operating panel returns automatically to the stand-by mode. The operating
panel activates in the following situations:
you feed an original
■
you feed a copy material
■
a button on the operating panel is pressed
■
a roll unit is opened.
■
▼▼▼▼
Switching on
Set the on/off switch at the rear of the machine, to position ‘1’ (see figure 1).
1
If the mains is connected correctly, the green switch will light up.
[1] On/off switch
Note:
▼▼▼▼
Switching off
1
Introduction 9
The machine is immediately ready for use.
Set the on/off switch at the rear of the machine, to position ‘0’ (see figure 1).
Page 10

10 Océ 7055/7056 User Manual
Page 11

Chapter 2
Copy jobs
Océ 7055/7056
User Manual
Making copies and special settings
11
Page 12

Introduction
With the Océ 7055/7056, you can make copies on paper, transparent, vellum
or polyester film.
You can select between manual feed and automatic feed by pressing the copy
material input button. When automatic feed is selected, the copy material is
taken from the selected roll. The copy material is then cut. The length of the
copy depends on the operating mode you have selected. The operating mode
can be either synchro cut or standard.
With the copy material selection button you can select the copy material.
Pressing the button toggles between film and paper. You only have to use this
button if you hav e selected manual feed. When using au tomatic feed, the copy
material should be configured as a new roll is inserted.
Note:
on page 50). A void storing paper in r ooms where temper ature and humidity ar e
high (see ‘Roomtemperature (T) and Relative Humidity (RH)’ on page 48).
Also, avoid dust and direct sunlight. Wrap unused paper in plastic to prevent
it absorbing moisture.
Only use paper as is specif ied in ‘(see ‘Copy material that ca n be used’
12 Océ 7055/7056 User Manual
Page 13
Making copies
stop+-start
correction
C
paperpath
add toner
When you use the manual feed option, you can al wa ys feed the original or the
copy material. The copying process only starts after pressing the ‘start’ button.
Before pressing the ‘start’ button, you can control and change the settings.
When you use the automatic feed option, yo u can always feed the original. The
copying process only starts after pressing the ‘start’ button. Before pres sing the
‘start’ button, you can control and change the settings.
▼▼▼▼
Note:
After 2 minutes of idleness, the operator panel returns to the re ady mode.
When you wait more than 2 minutes between two operations, you have to
restart the procedure.
Making copies using the automatic feed option
Press the copy material input button until the LED that corresponds with the
1
roll of your choice lights up. The display shows the width of the selected roll.
Note:
The copy material should be conf igur ed as a new roll is inserted. Hence ,
as you select a roll, the copy material selection is automatically updated.
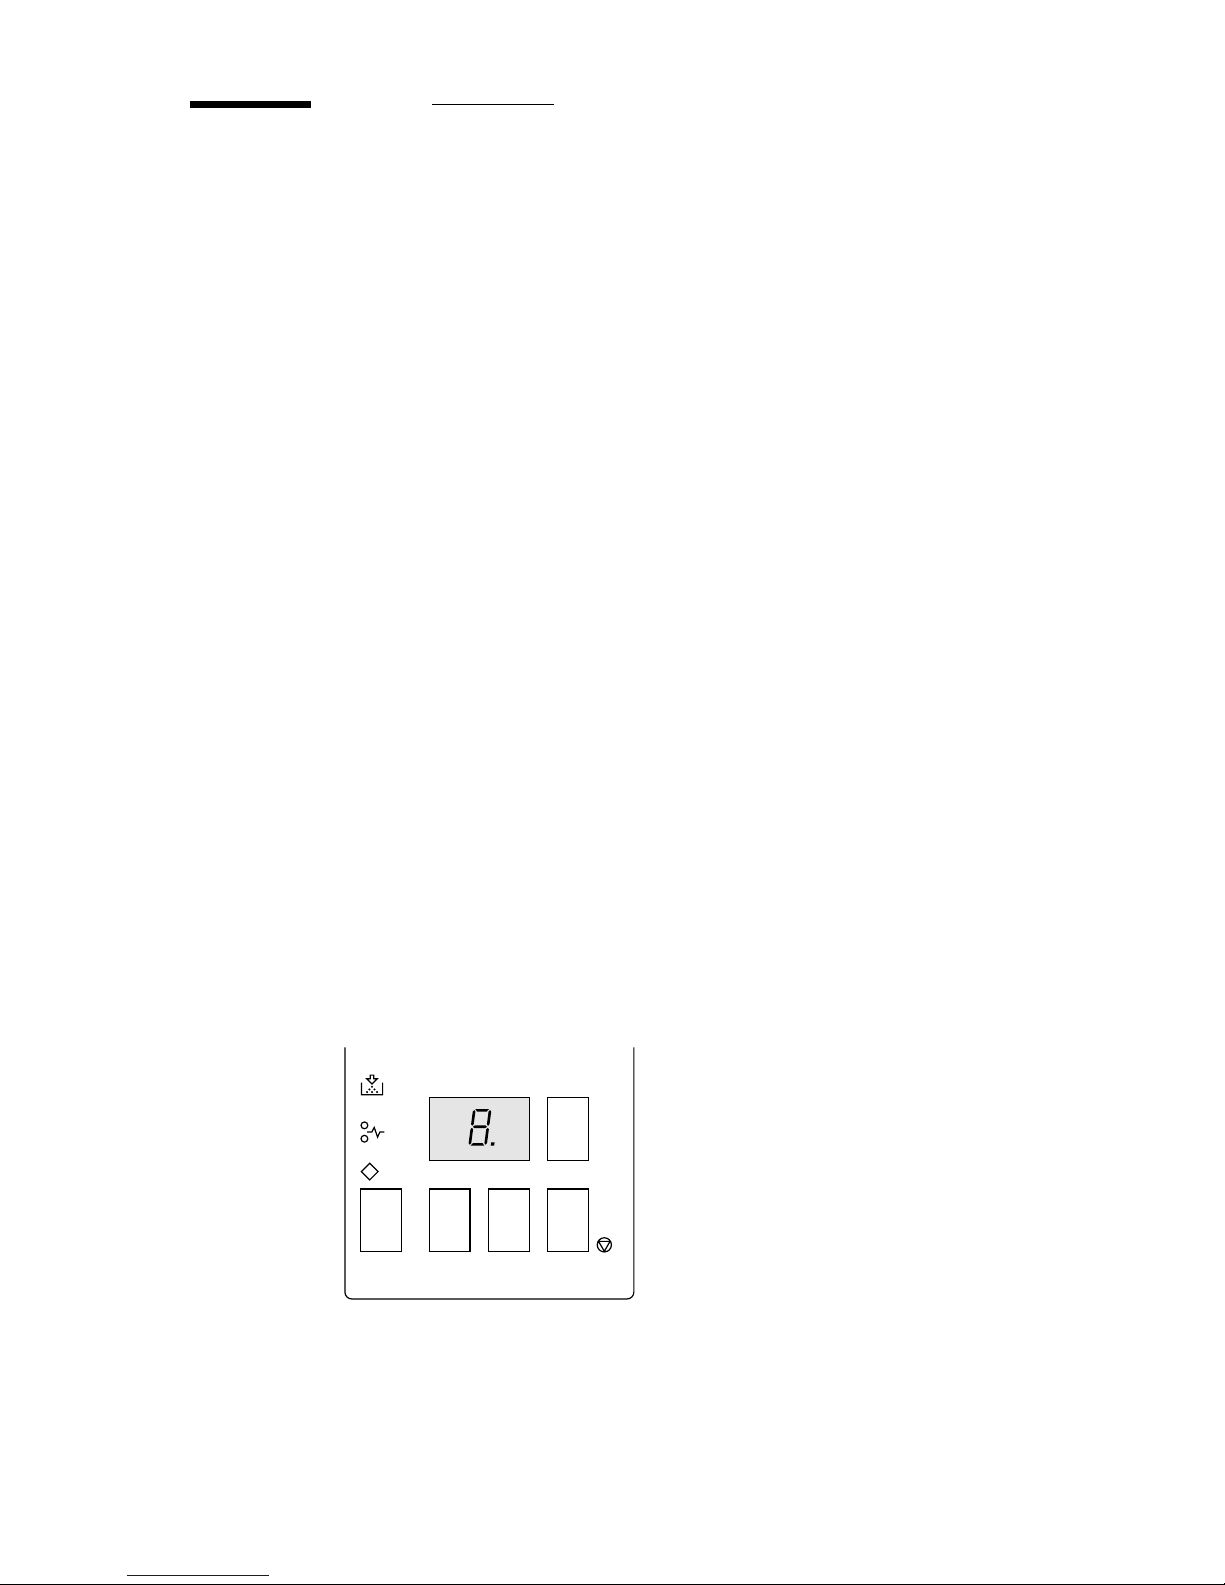
Select the desired number of copies by pressing the ‘+’ or ‘-’ button on the
2
operating panel see figure 2.
Note:
Changing the copy quantity can be done at all times. When you make a
mistake you simply press the correction button to correct the copy quantity.
[2] Setting more than one copy using the ‘+’ or ‘-’ button
Copy jobs 13
Page 14
Press the operating mode button to toggle between synchro cut mode and
3
standard mode. Synchro cut mode is selected by default.
In synchro cut mode, the copy is cut at the length of the original.
■
In standard mode, the copy is cut at a stan dard length. You select the standard
■
length with the selection buttons. For an overview of the possible standard
lengths, refer .
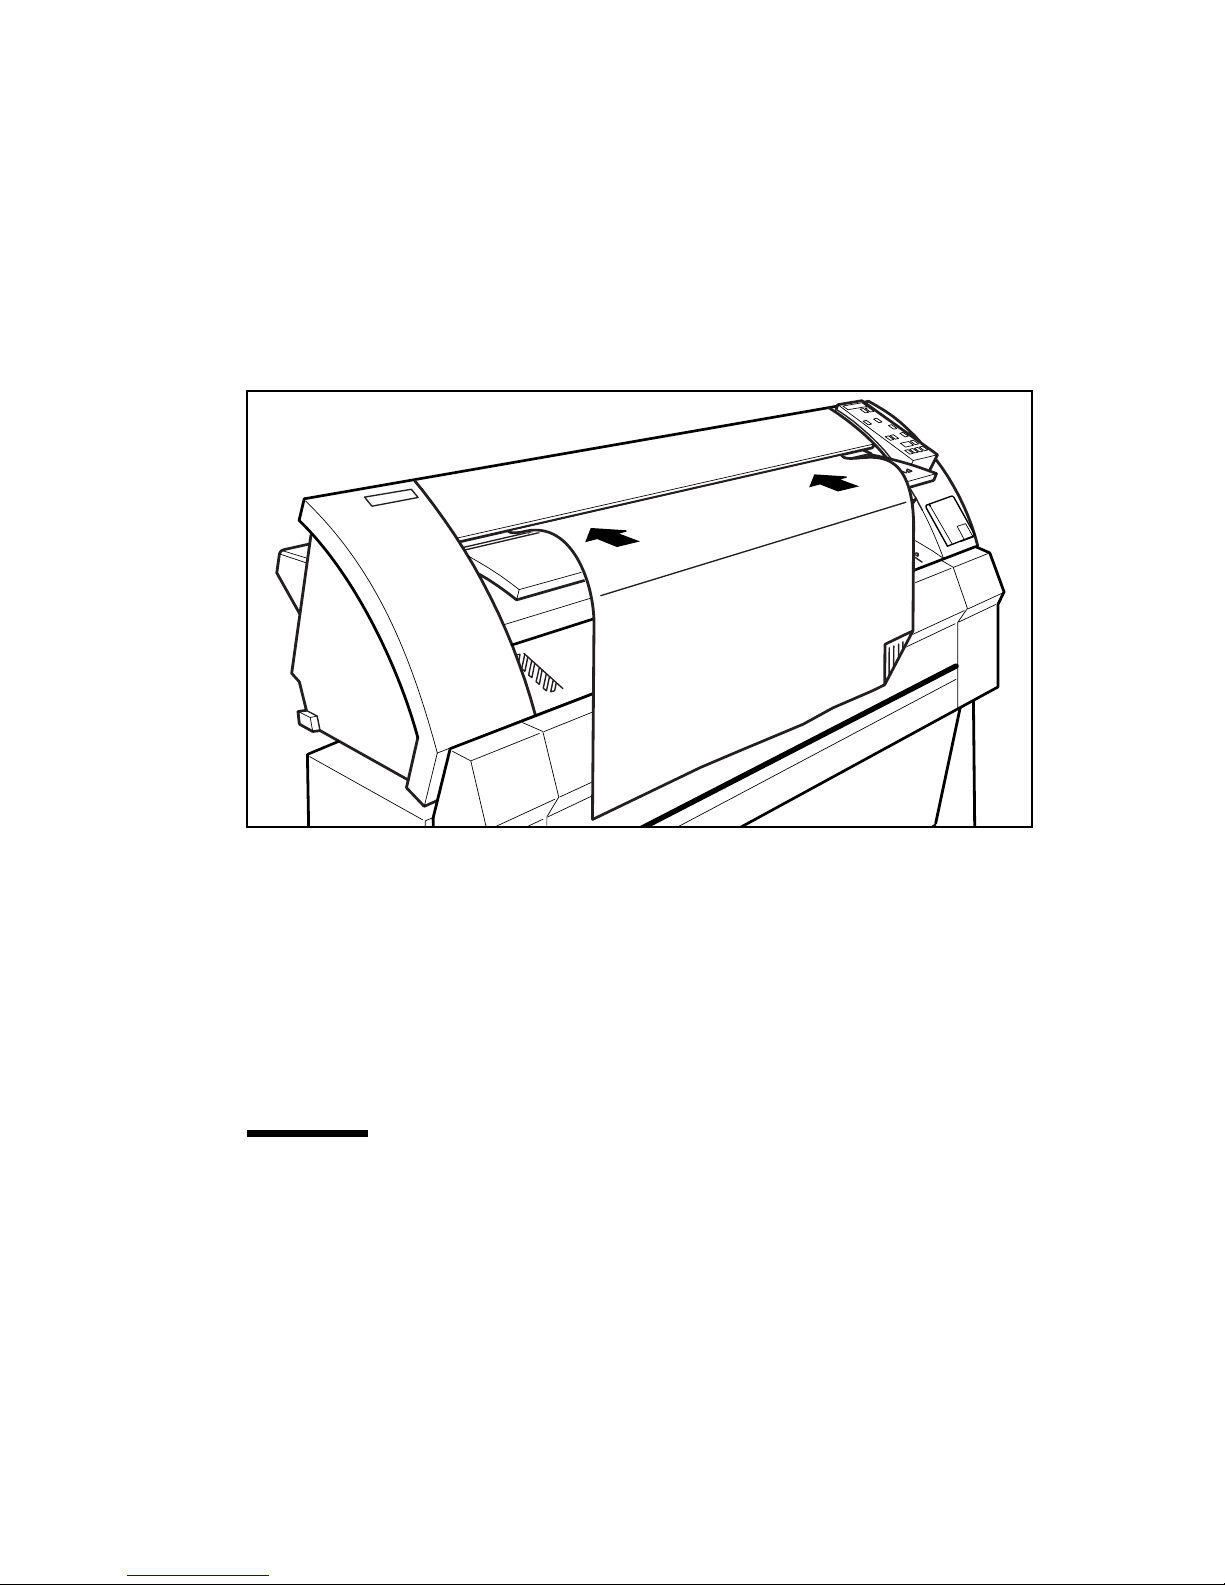
Feed the original centrally and face down into the original feed table in
4
accordance with the guidelines see figure 3.
[3] Feeding an original
Note:
The original is aligned in the nip of the rollers. By inserting the material
with an amount of slack, the leading edg e is aligned in the nip. A delay between
insertion of the material and the start of the transport ensures proper
alignment.
The original is transported to the rear of the machine.
Attention:
Strongly curled originals have to be fed in carefully. In certain
circumstances the copier can pull the original in.
Note:
Minimum length that the machine can cut is 420 mm.
14 Océ 7055/7056 User Manual
Page 15

Press the start button.
5
The copies are made and cut at the appropriate length.
After the job is completed the copy counter is set to 0. If you want to make
more copies of the same original, you don’t have to feed the original again as
long as you haven’ t pulled it from the original feed table. Control the settings
and press the ‘start’ button again: the original is transported back into the rear
of the machine to prepare for a next batch of copies, and the counter
isincreased to 1. By pulling out the original the counter will be set to 1.
▼▼▼▼
Making copies using the manual feed option
Press the copy material input button until the manual feed LED lights up or
1
insert a sheet of copy material in the manual copy material feed table.
Press the copy material selection button to toggle between paper (paper,
2
vellum,...) or film.
Attention:
Select the appropriate copy material to avoid flawed copies. All
materials (except for film) should be copied with the copy material
selection set to ‘paper’. Only select the setting ‘film’ if you mak e copies on
polyester film 3.
Select the desired number of copies by pressing the ‘+’ or ‘-’ button on the
3
operating panel (see figure 4 on page 16).
Copy jobs 15
Page 16
Note:
Changing the copy quantity can be done at all times. When you make a
mistake you simply press the correction button to correct the copy quantity.
2477
[4] Setting more than one copy using the ‘+’ or ‘-’ button
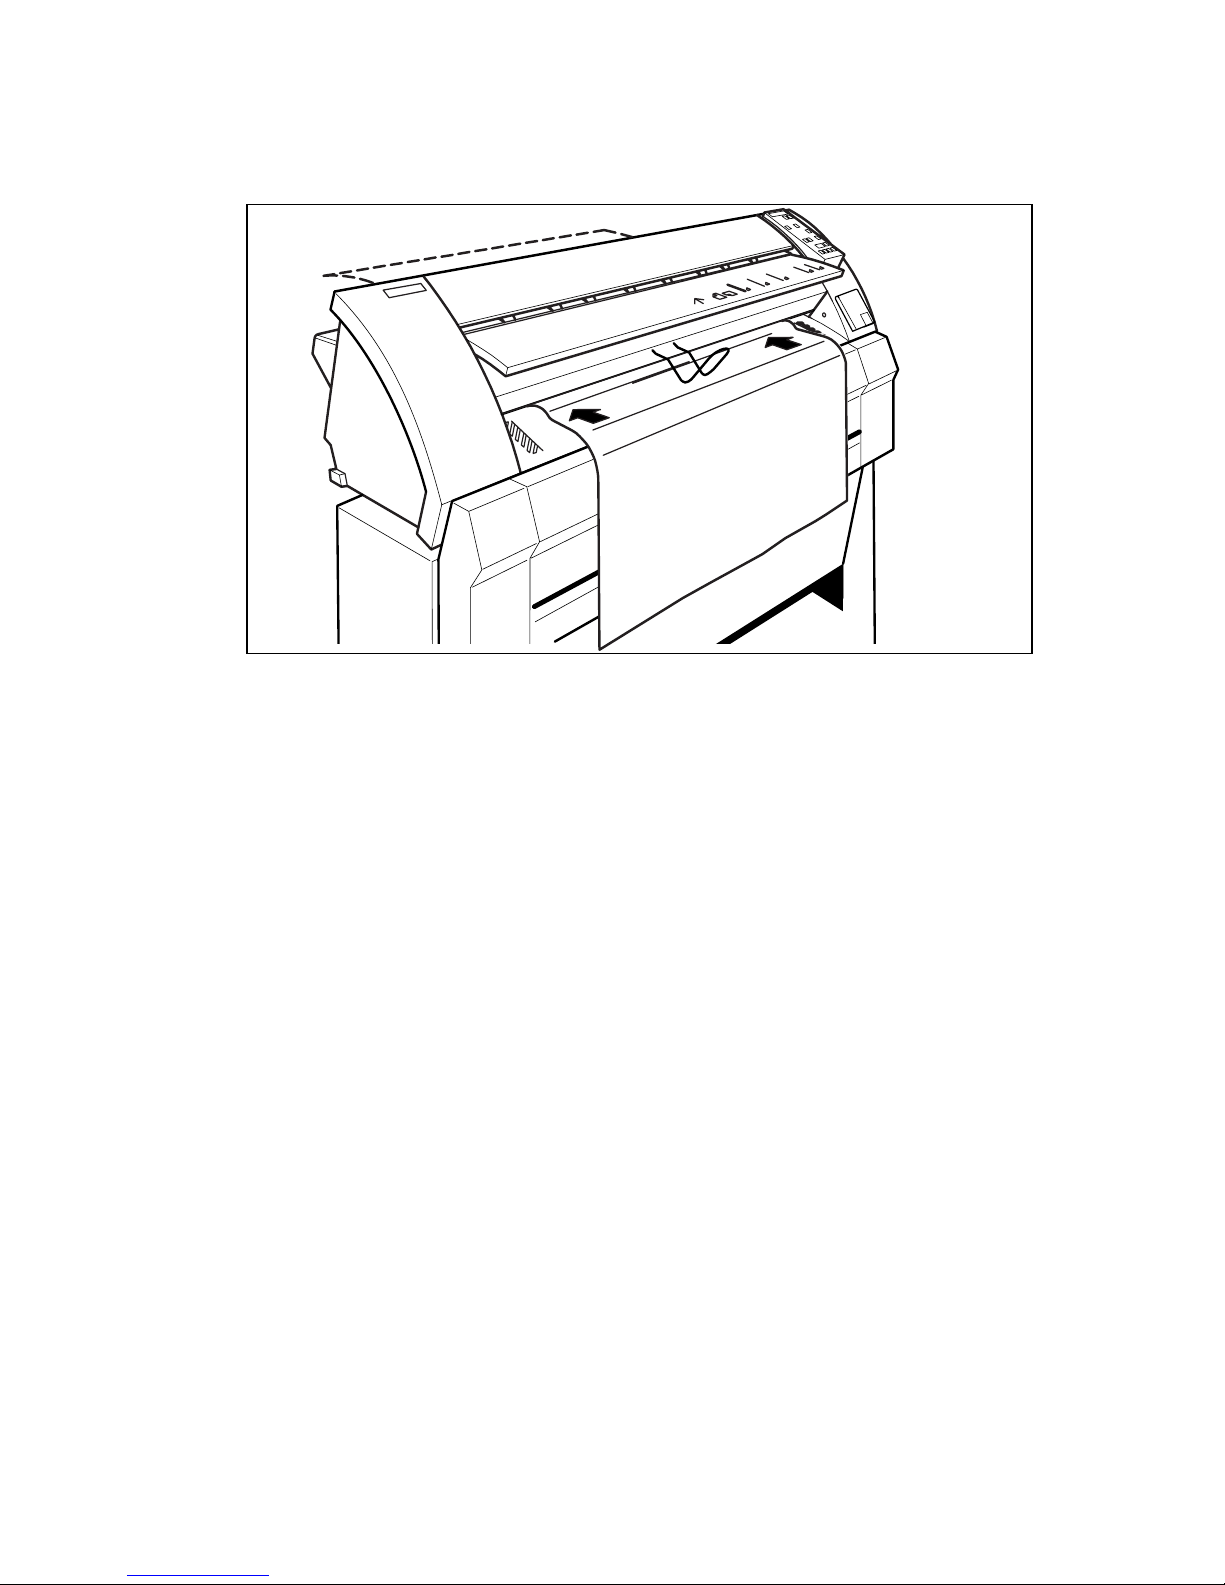
Feed the original centrally and face down into the original feed table in
4
accordance with the guidelines (see figure 5 on page 17).
Note:
The original is aligned in the nip of the rollers. By inserting the material
with an amount of slack, the leading edg e is aligned in the nip. A delay between
insertion of the material and the start of the transport ensures proper
alignment.
The original is transported to the rear of the machine and the display shows
the length of the original.
16 Océ 7055/7056 User Manual
Page 17
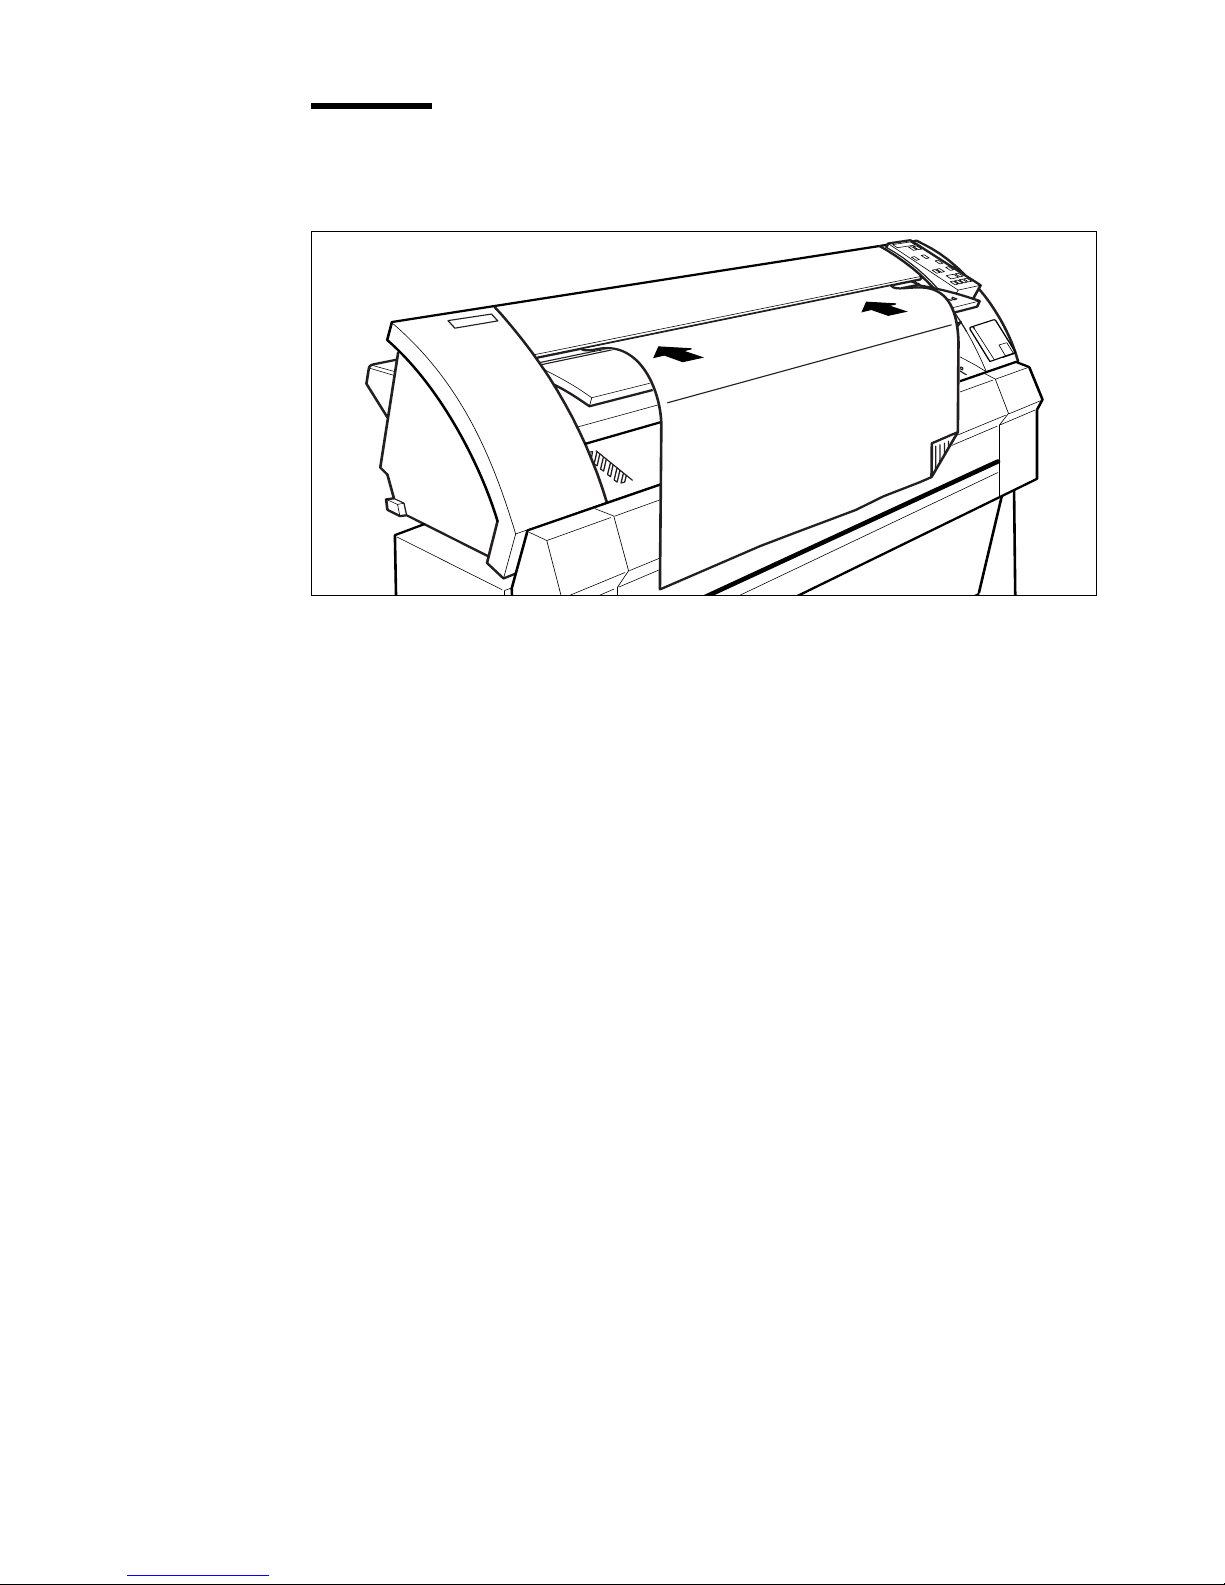
Attention:
Strongly curled originals have to be fed in carefully. In certain
circumstances the copier can pull the original in.
[5] Feeding an original
Note:
Feed a sheet of copy material, in line with the original, into the copy feed table
5
Minimum length of the copy material is 420 mm.
in accordance with the guidelines (see figure 6 on page 18) .
Note:
The copy material is aligned in the nip of the rollers. By inserting the
material with an amount of slac k, the leading edge is a ligned in the nip. A delay
between insertion of the material and the start of the transport ensures pr oper
alignment.
Copy jobs 17
Page 18
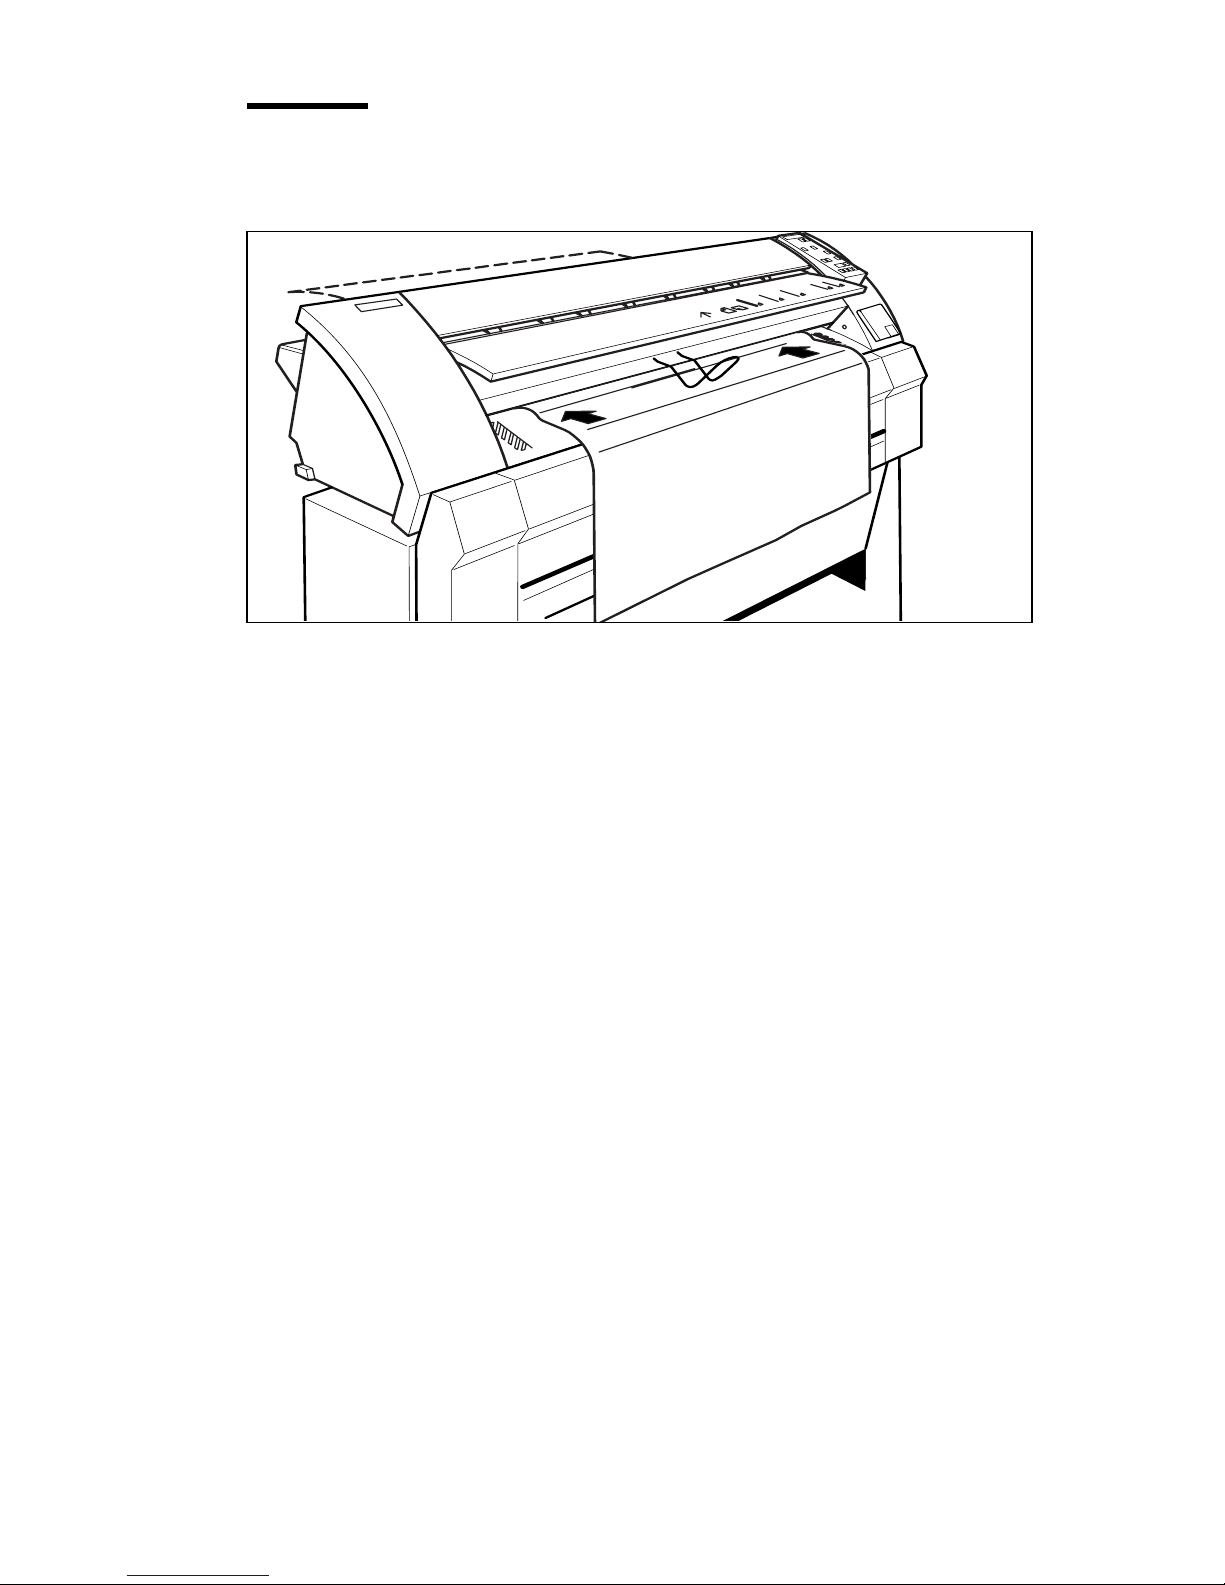
Attention:
If sheets of copy material are curled, feed them with th e curl
facing down.
2477
[6] Feeding the copy materialmakemore copies of
Press the start button.
6
The copy will now be made and the copy quantity counter decreases by one.
After the job is completed the copy counter is set to 0. If you want to make
more copies of the same original, you don’t have to feed the original again as
long as you haven’t pulled it from the original feed table. Control the settings
and press the ‘start’ button again: the original is transported back into the rear
of the machine to prepare for a next batch of copies, and the counter is
increased to 1. By pulling out the original the counter will be set to 1.
18 Océ 7055/7056 User Manual
Page 19
Special settings
lighter
darker
roll 1 paper
manual feed
4
2
0
2
4
roll 2 film
Exposure setting
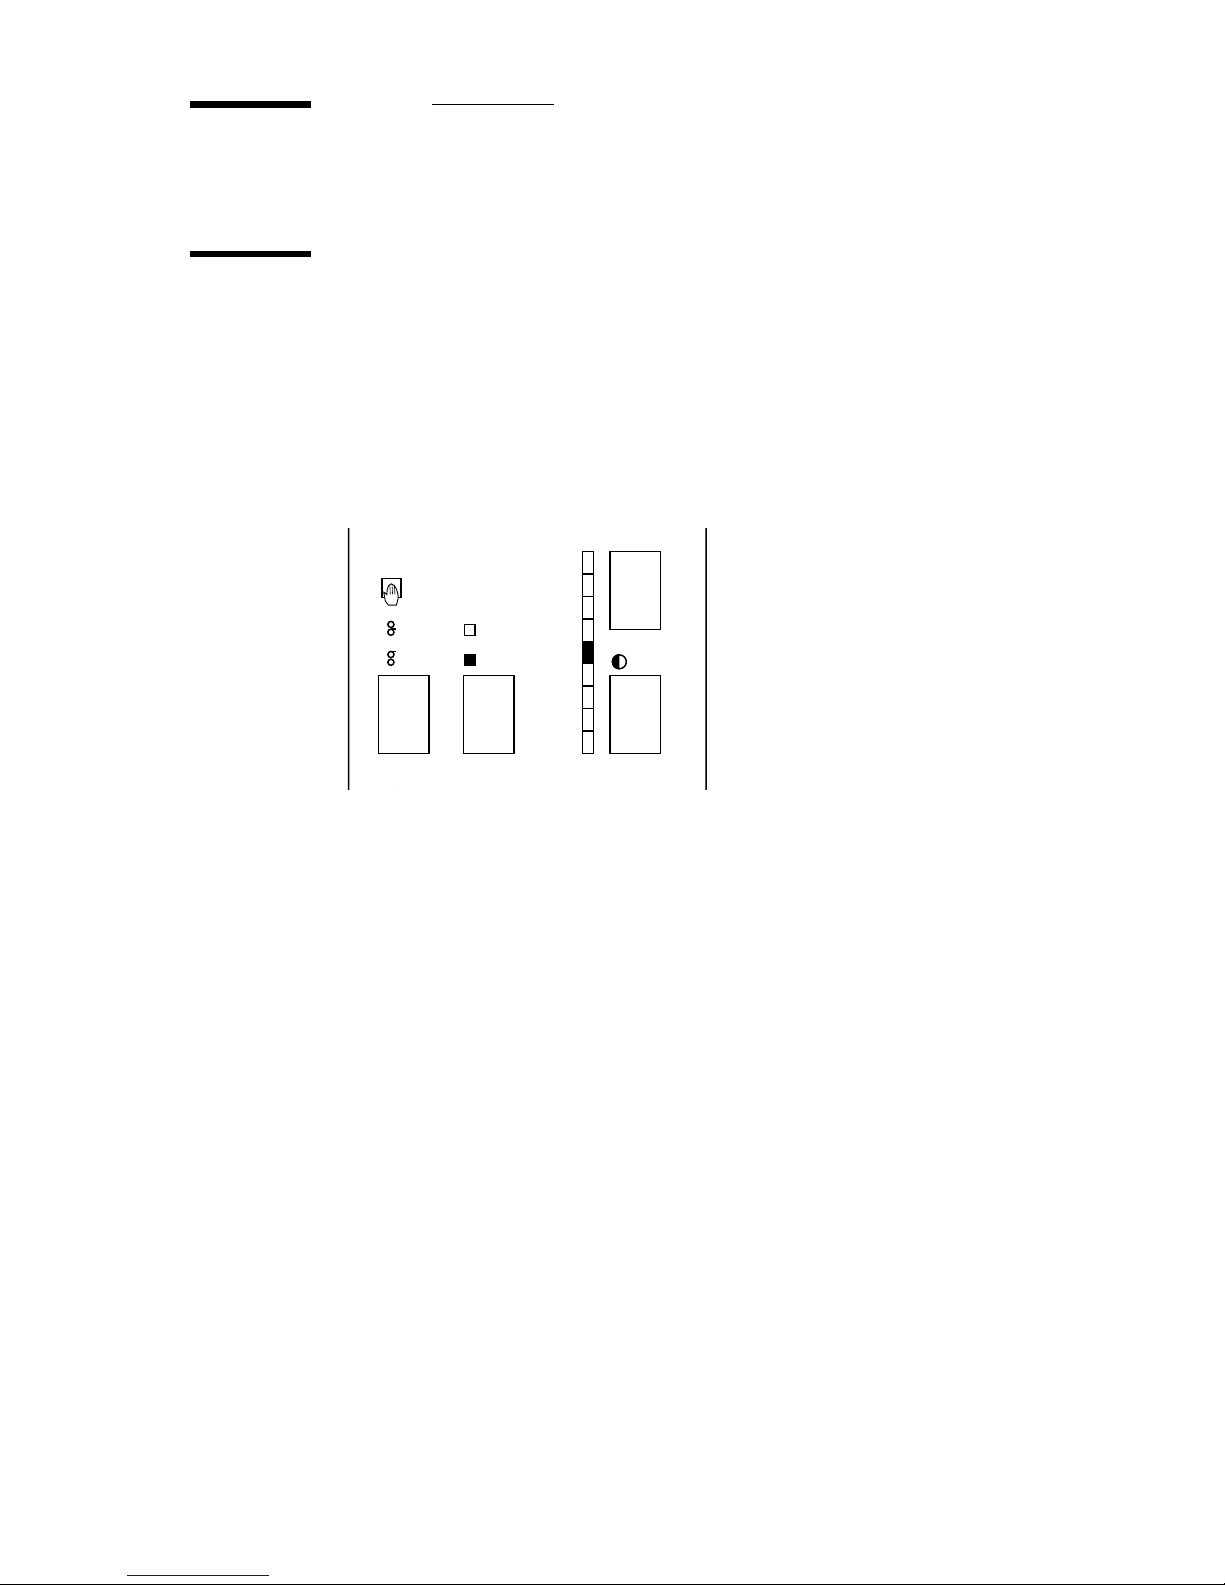
When copying extremely light or dark originals, or originals with unequal
background density, the result may not meet your requirements (e .g. too much
background). In such cases you can adjust the exposure level. In the default
setting the exposure level indicator is in the neutral position see figure 7.
▼▼▼▼
[7] Exposure setting
Exposure setting
If the copy is too dark, you can modify the exposure level using the ‘lighter’
1
button.
If the copy is too light, you can modify the exposure level using the ‘darker’
2
button.
Copy jobs 19
Page 20
Trailing edge and leading edge
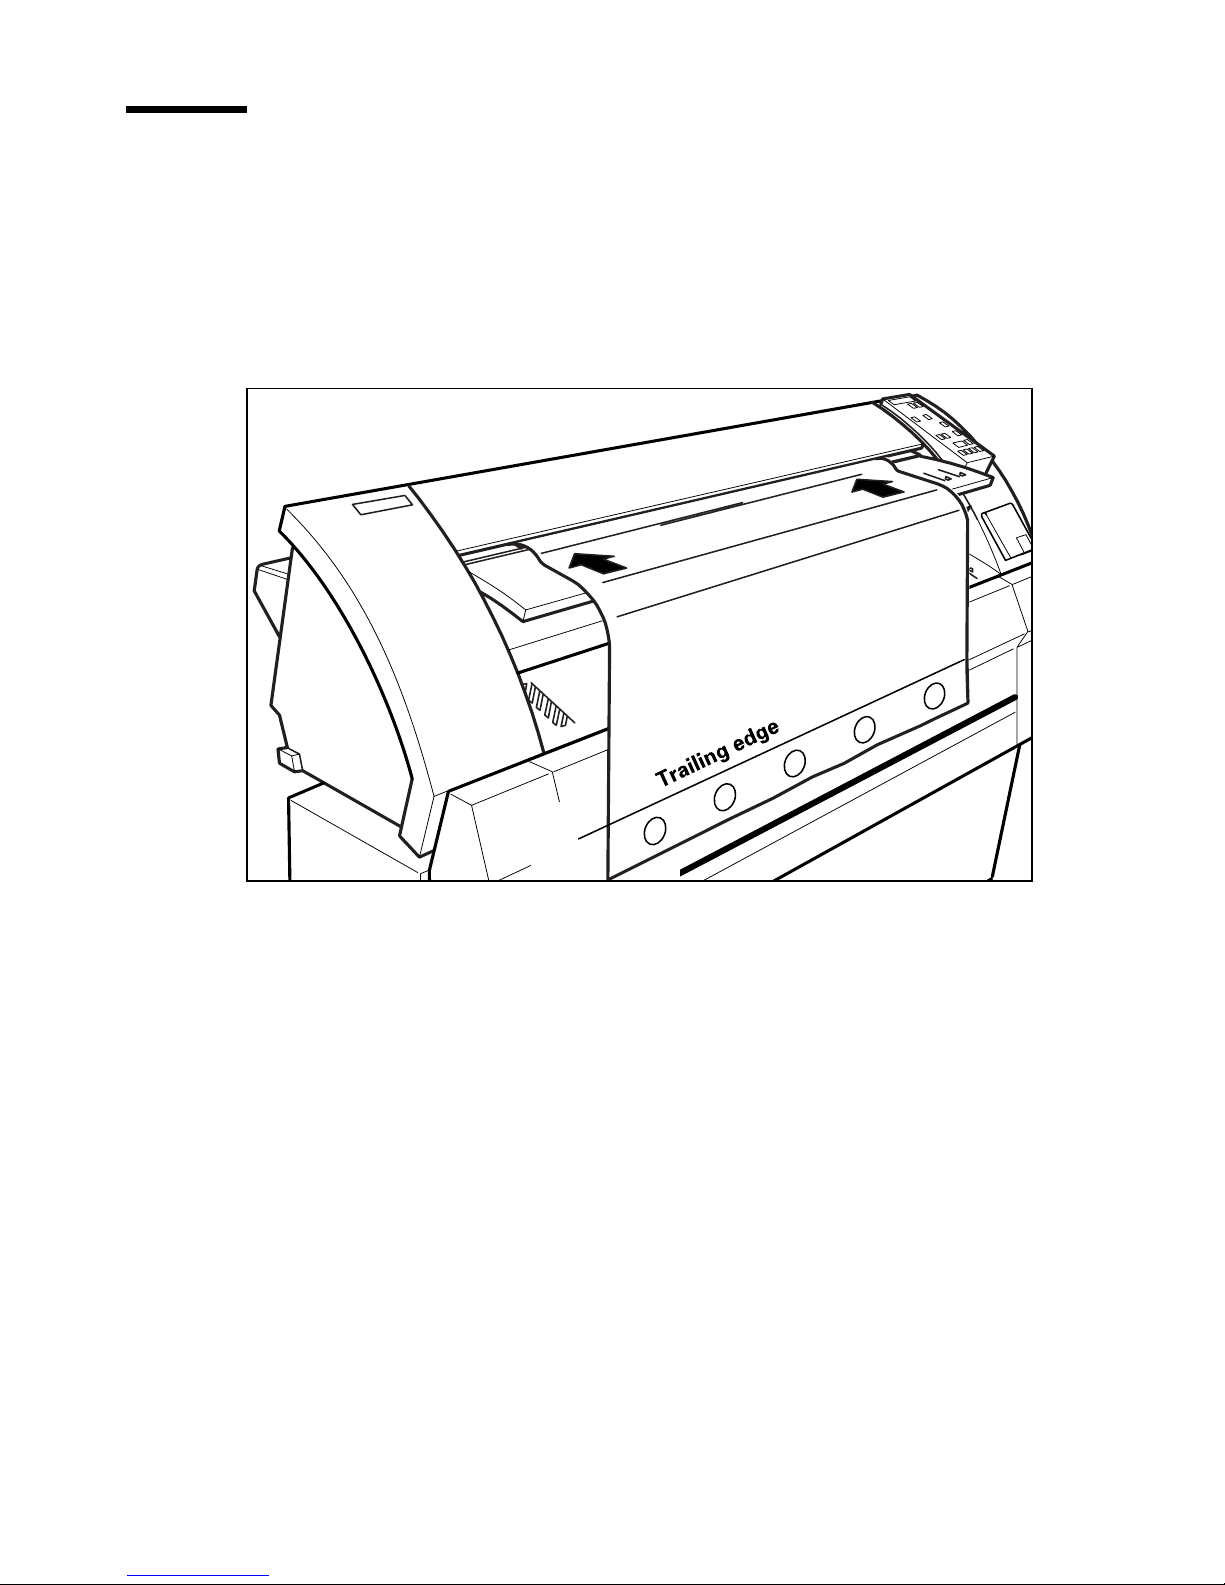
Assume that you are working in automatic feed mode and your original has a
filing strip. If you don’ t want the f iling strip to sho w on the cop y, it is possible
to create an edge. Make sure that the filing strip is at the trailing edge of the
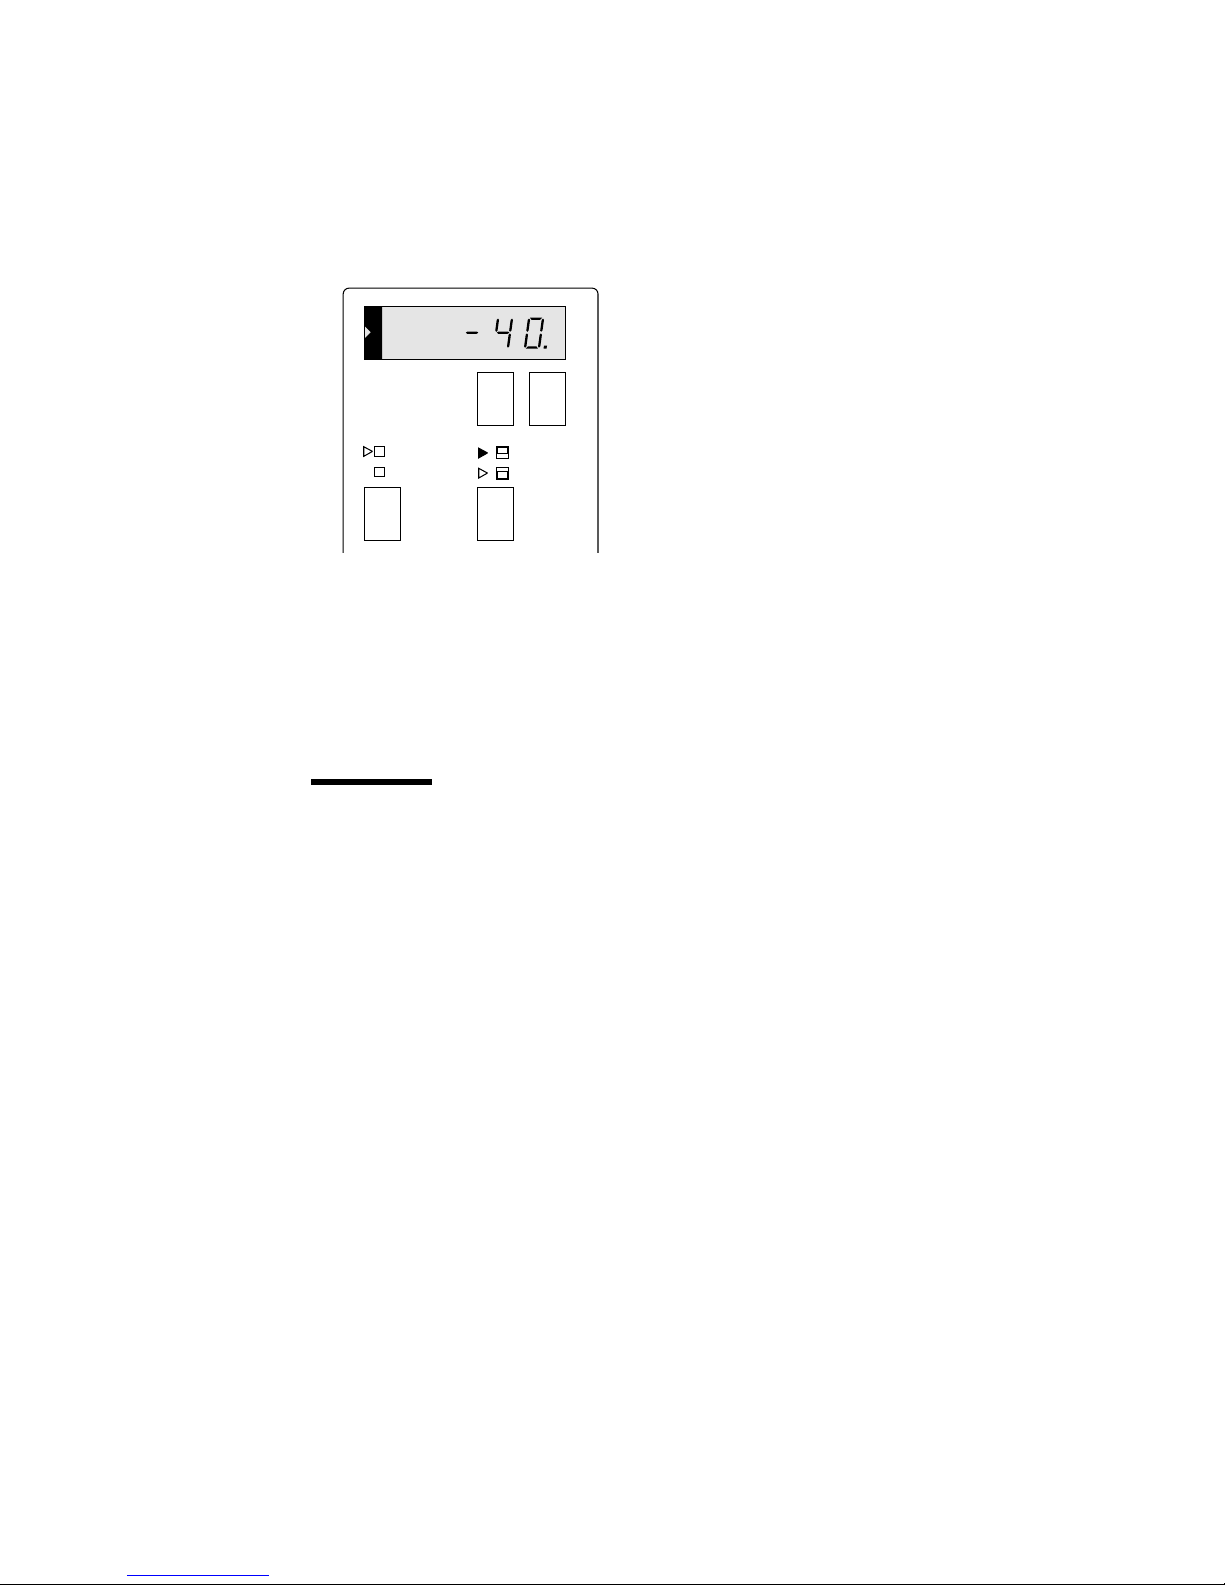
original see figure 8 . The adjustment steps are indicated on the operating panel,
expressed in millimetres. The opposite of a trailing edge is called leading edge.
- 40
[8] Example of adjusting the trailing edge
20 Océ 7055/7056 User Manual
Page 21
▼▼▼▼
+-
synchro cut
standard
trailing
edge
leading
edge
Adjusting the edge
Press the edge selection button to toggle between leading edge and trailing
1
edge (see figure 9 for an example).
The length display shows the length of the currently selected edge.
[9] Trailing edge buttons
Press the edge adjustment buttons to change the siz e of the e dge . Pre ss ing the
2
‘-’ button decreases the size of the edge. Pressing the ‘+’ button increases the
edge.
Attention:
Be aware that decreasing the edges too muc h may r esult in a loss
of information.
Copy jobs 21
Page 22
Making a test strip
In some cases you want to ch eck the e xposure setting s and the quality without
wasting a complete copy. If this is the case, you can make a test strip. A small
part of the original is copied on a strip. This test strip is cut the minimum length
of 420 mm.
▼▼▼▼
Making a test strip
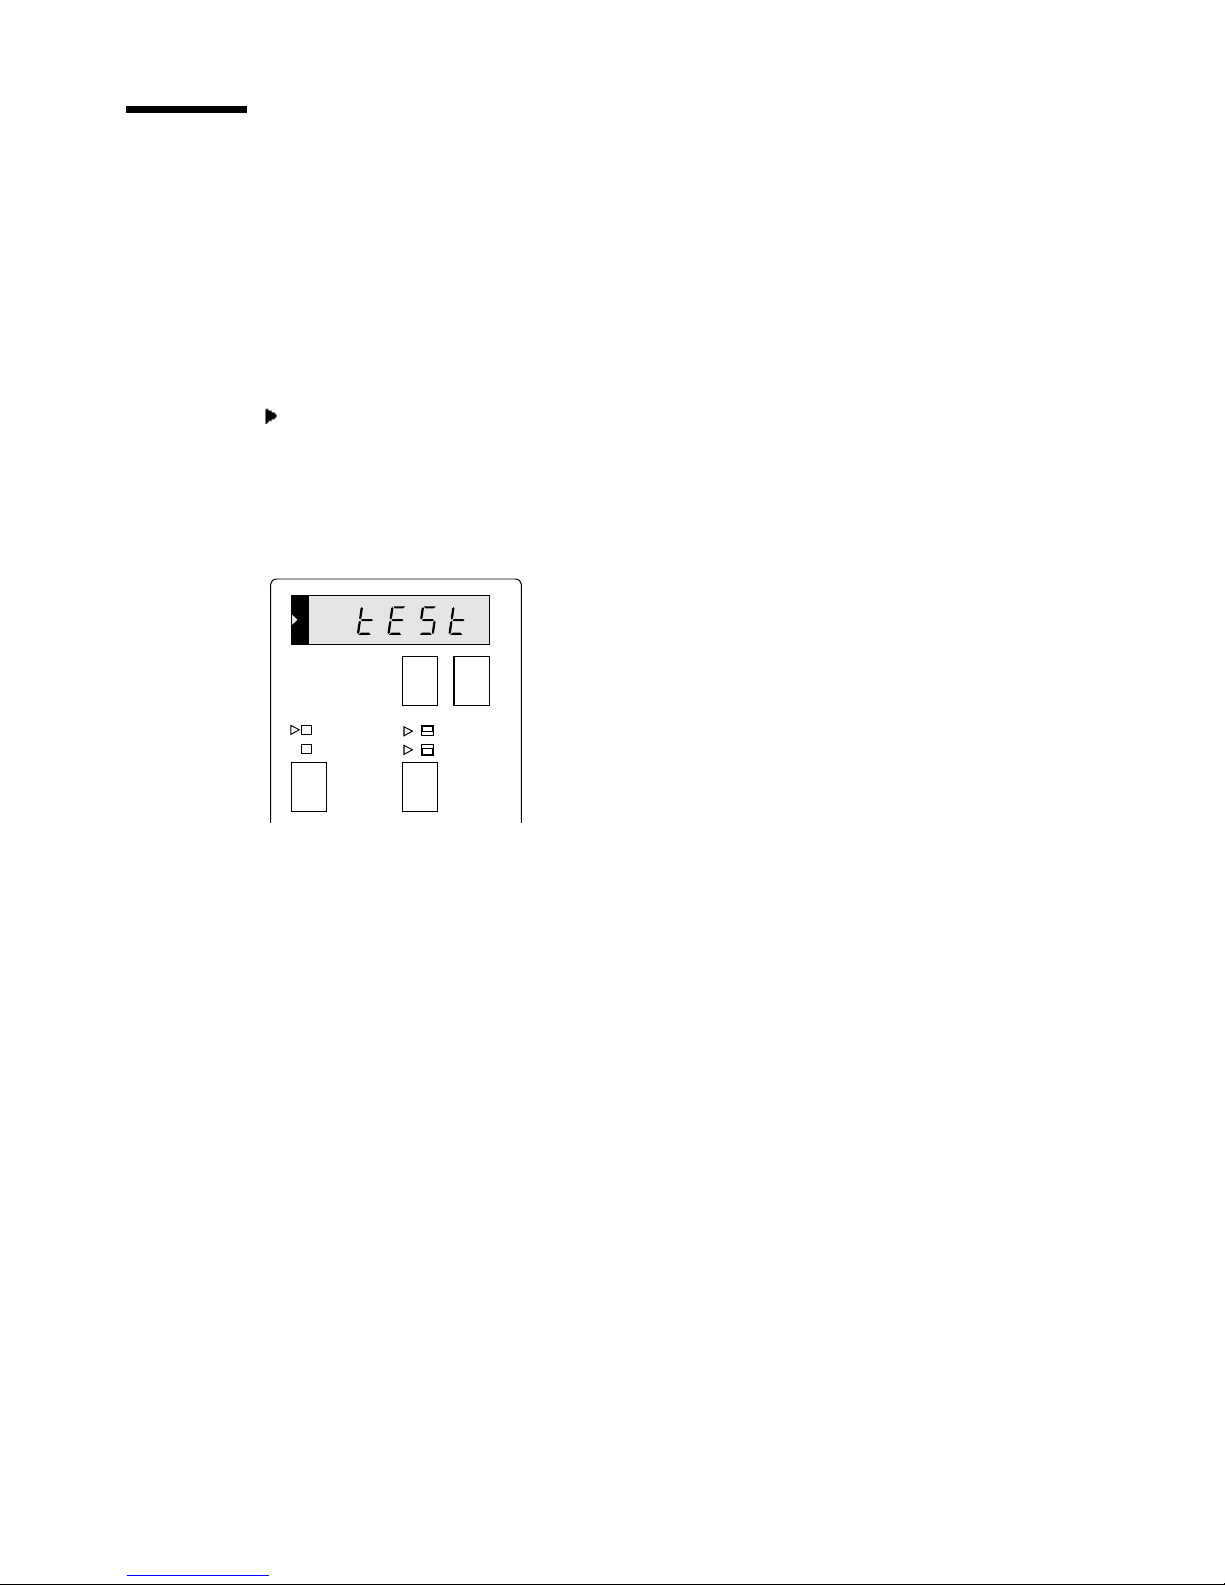
Press the operating mode button and select the standard operating mode. The
1
symbols in the display and next to th e standa rd operating mode indicator
light up.
Press the selection buttons until the display shows ‘tESt’.
2
+-
standard
synchro cut
[10] Trailing edge buttons
trailing
edge
leading
edge
Press the start button.
3
The test strip is copied and cut.
22 Océ 7055/7056 User Manual
Page 23

Chapter 3
Materials
Océ 7055/7056
User Manual
This chapter describes how to insert a new copy material
roll, how to add toner and how to clean the transparent
platen.
23
Page 24
Inserting a new copy material roll
If the paper path indicator flashes and the display shows error message E5, then
you have to insert a new copy material roll.
▼▼▼▼
Inserting a new material roll in the drawer sec tion (roll 1)
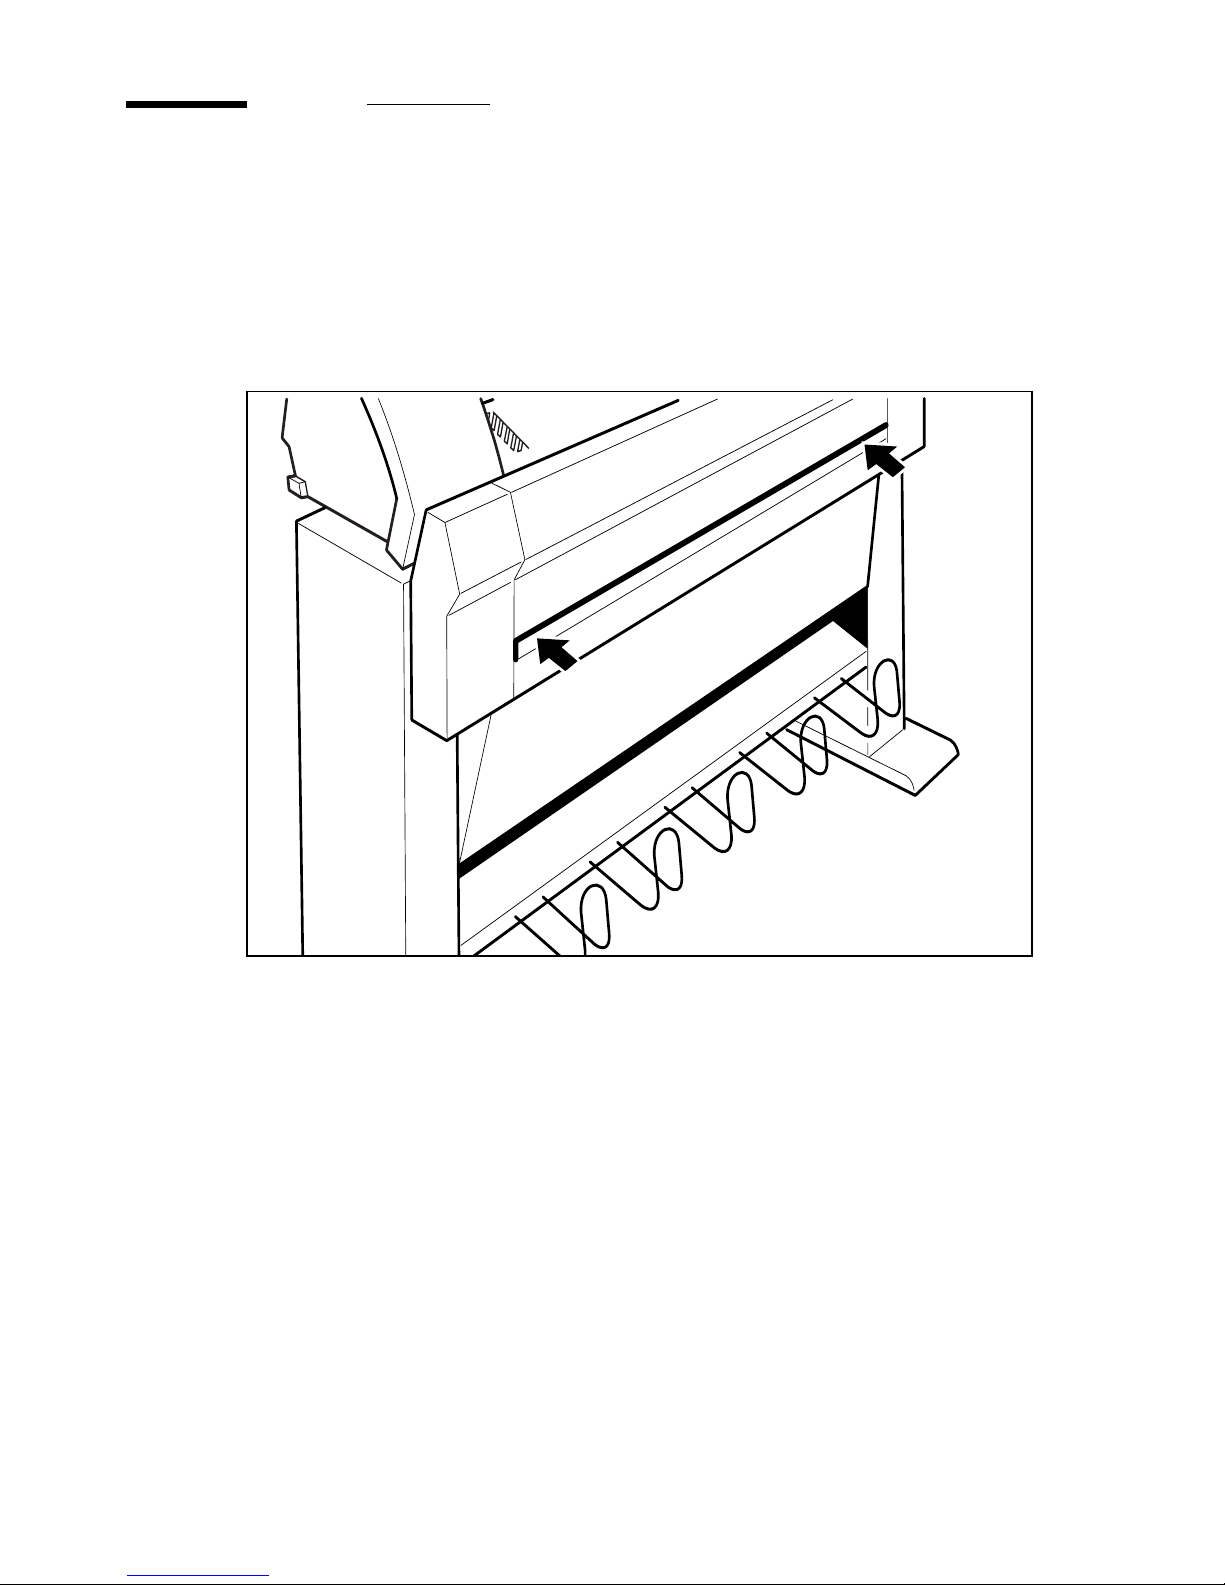
Pull the drawer section open by using the two catches. (see figure 11)
1
2488
[11] Opening the drawer section
24 Océ 7055/7056 User Manual
Page 25
2488
2486
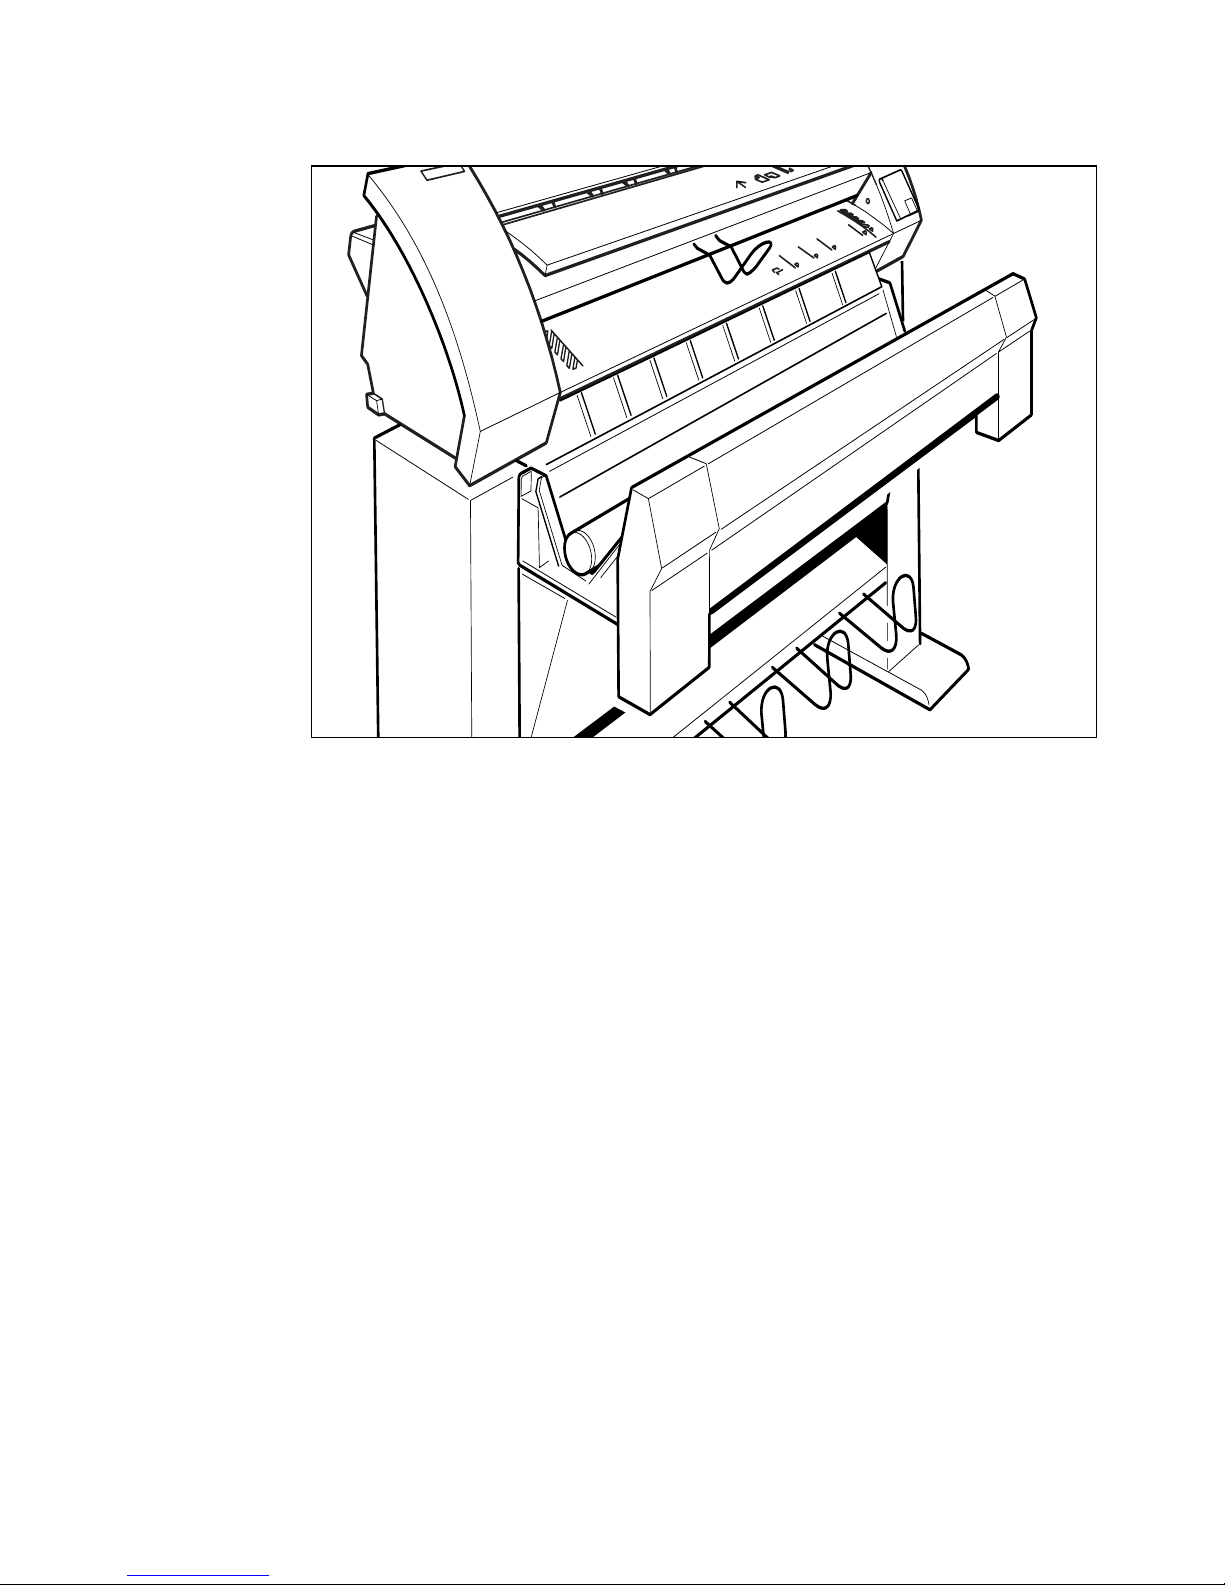
Remove the roll holder from the drawer. (see figure 12)
2
[12] Removing the roll holder from the drawer section
Remove the cardboard core from the roll holder.
3
Place the new roll of copy material on a table.
4
Materials 25
Page 26
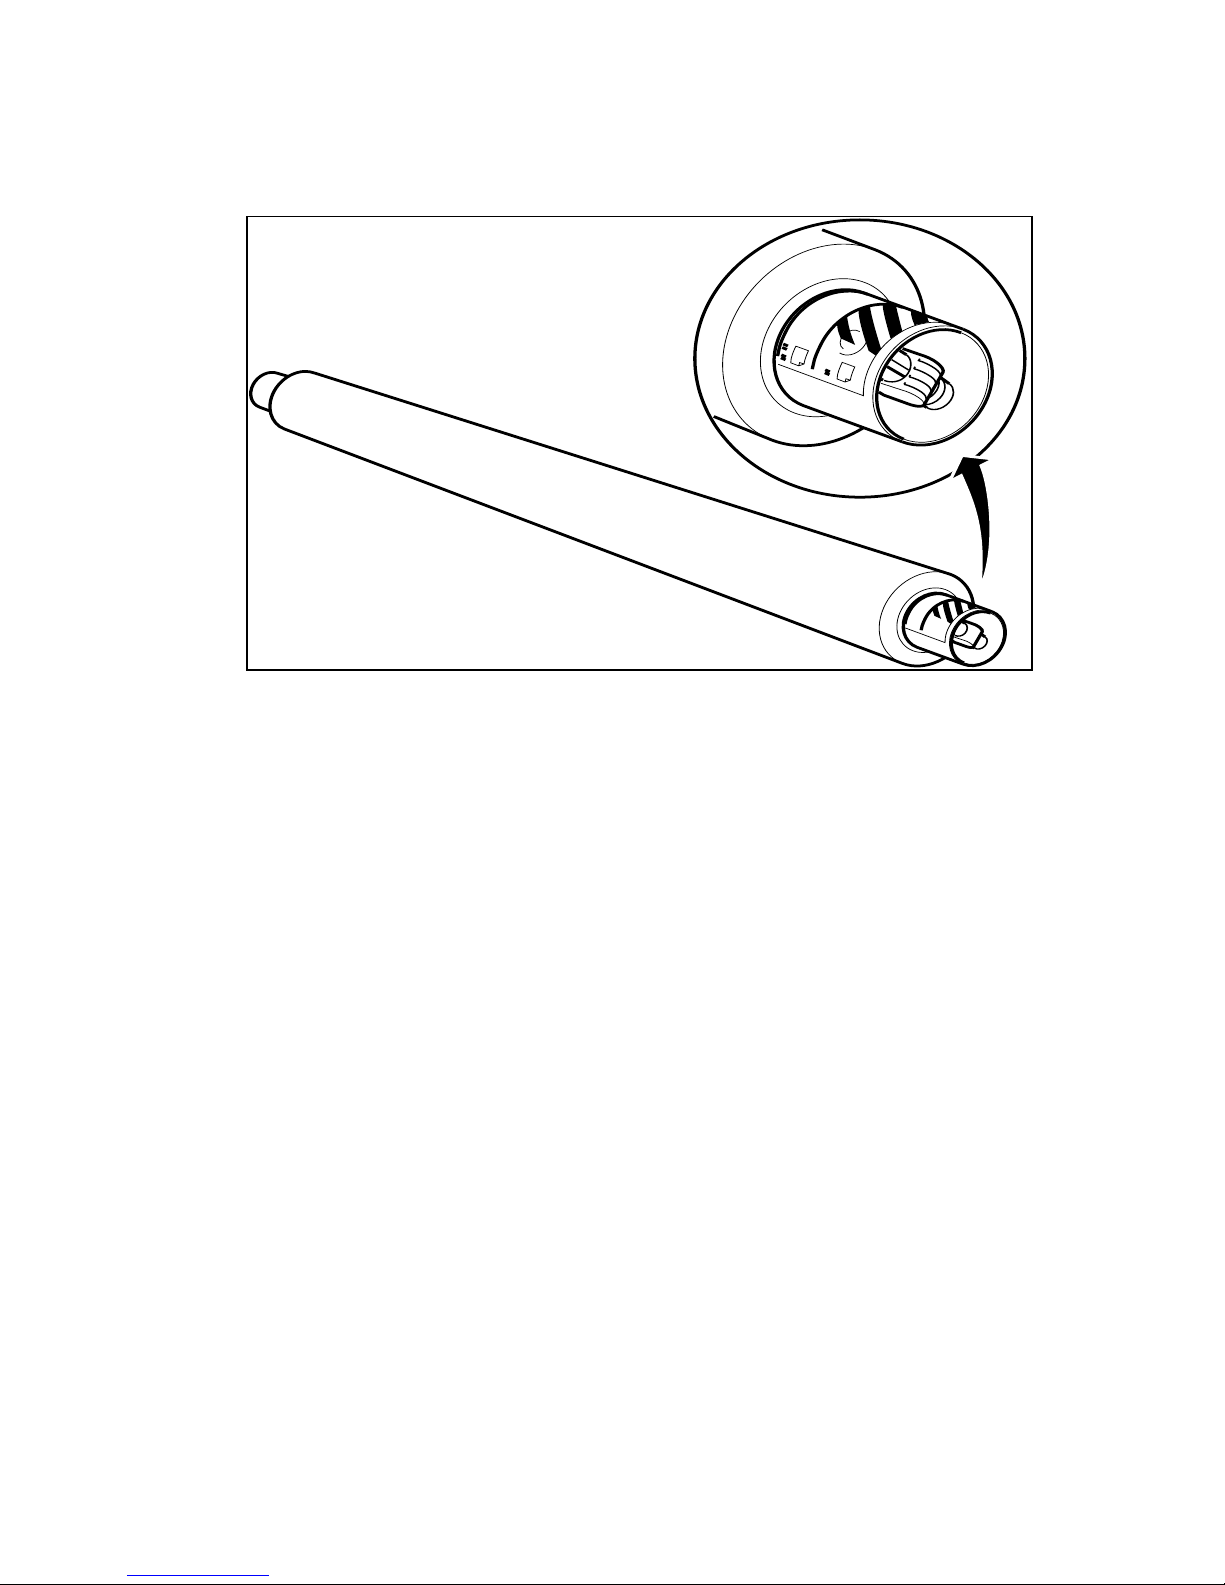
Slide the roll holder in the new roll of copy material while pressing the knob.
5
(see figure 13)
2485
[13] Pressing the knob
Align the copy material roll with the appropriate lines on the roll holder while
6
pressing the knob .
26 Océ 7055/7056 User Manual
Page 27
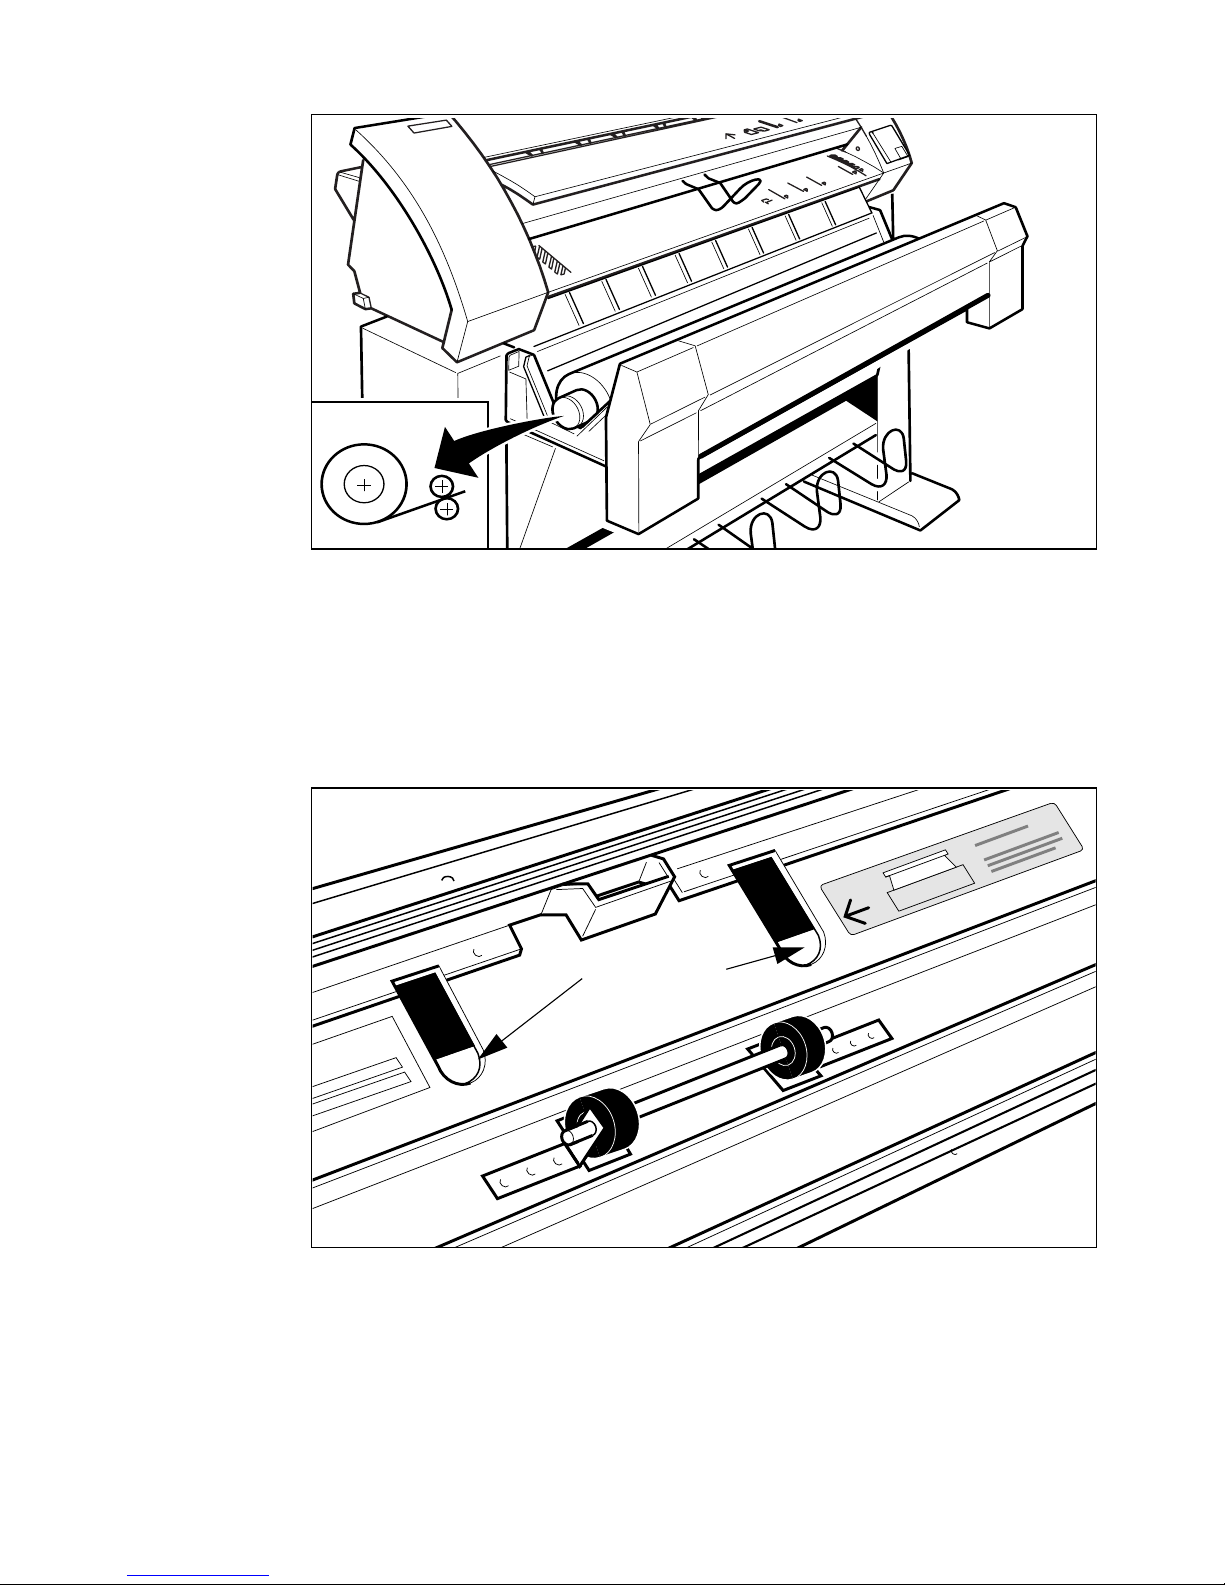
Reposition the roll holder with the copy material in the drawer. (see figure 14)
2490
copy material
7
[14] Repositioning the roll
Feed the copy material as is sh o wn in 15 on page 27. Use your th umbs to feed
8
the copy material with the rollers. The arrow on the sticker indicates how far
you have to feed the copy material.
.
[15] Feeding copy material
If you have inserted a roll with an another copy material or with different
9
width, you have to program this (see ‘Programming roll specifications’ on
page 31).
Materials 27
Page 28
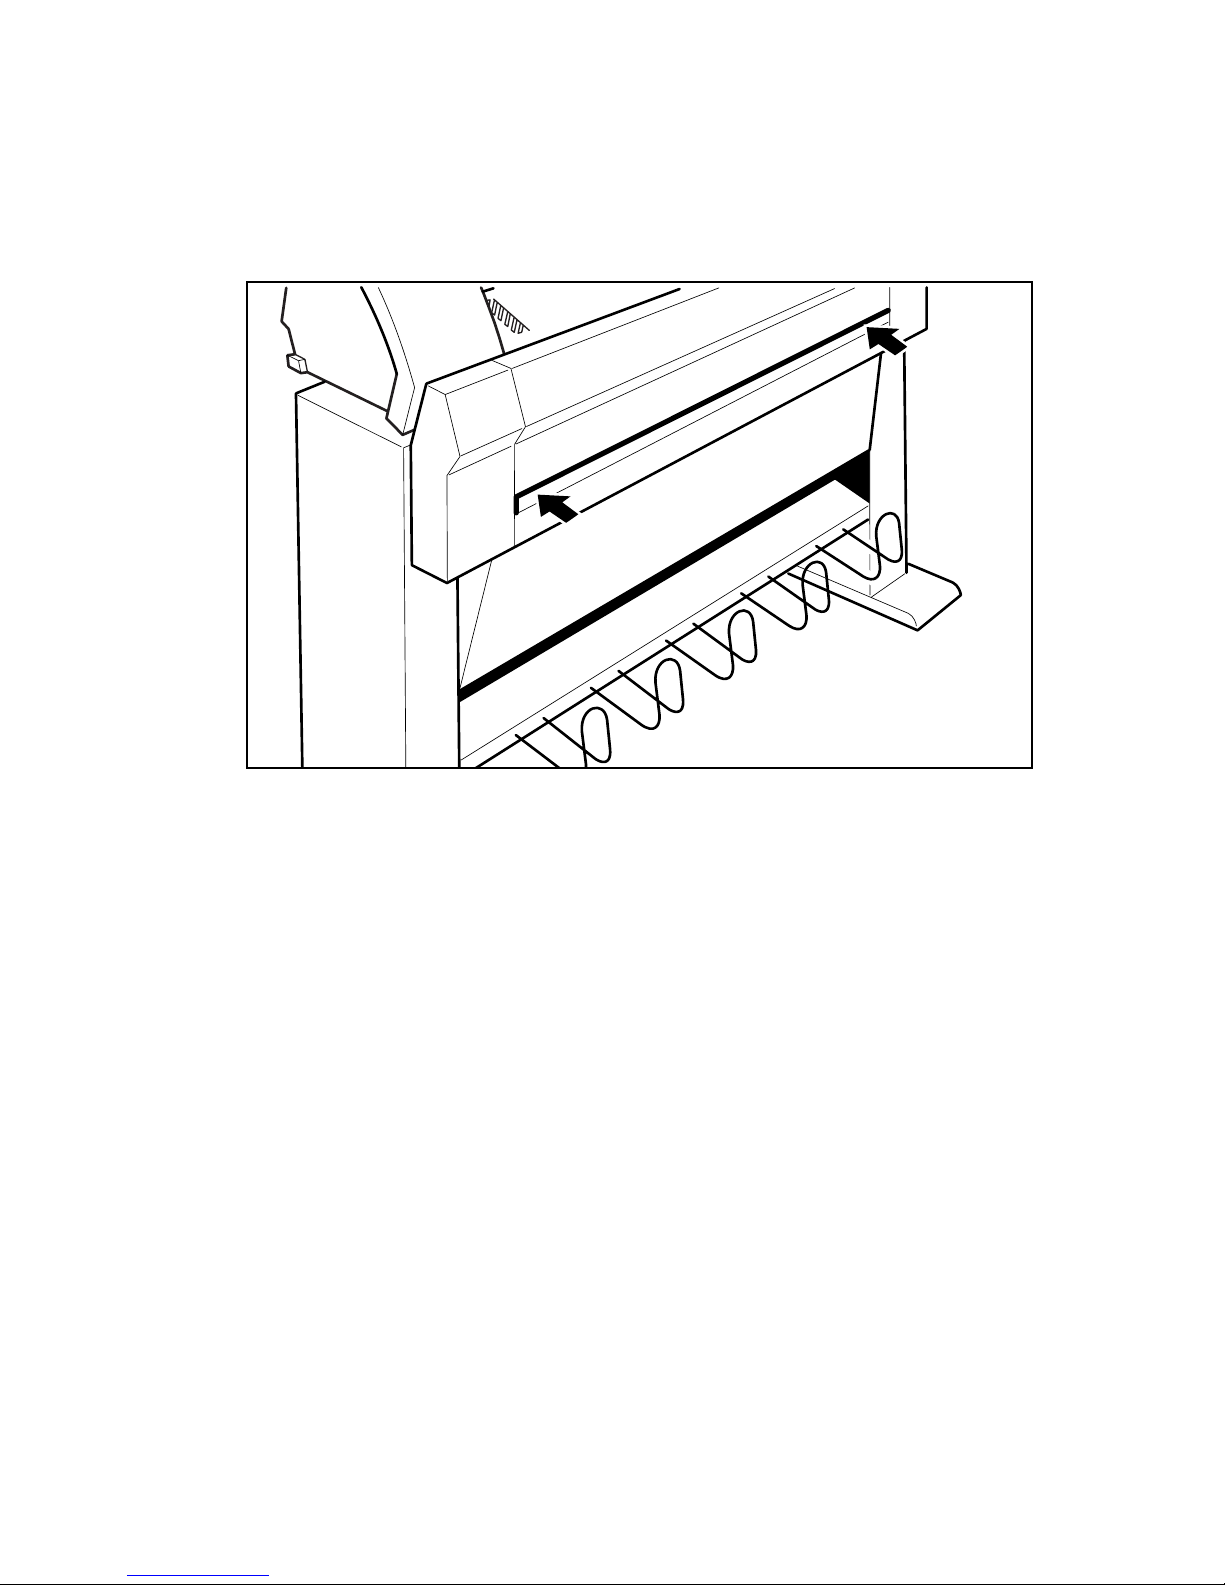
Close the drawer.
10
▼▼▼▼
Inserting a new material roll in the flap section (roll 2)
Note:
Pull the flap section open by using the two catches. (see figure 16)
1
This section is only intended for the Océ 7056.
2488
[16] Opening the flap section
28 Océ 7055/7056 User Manual
Page 29
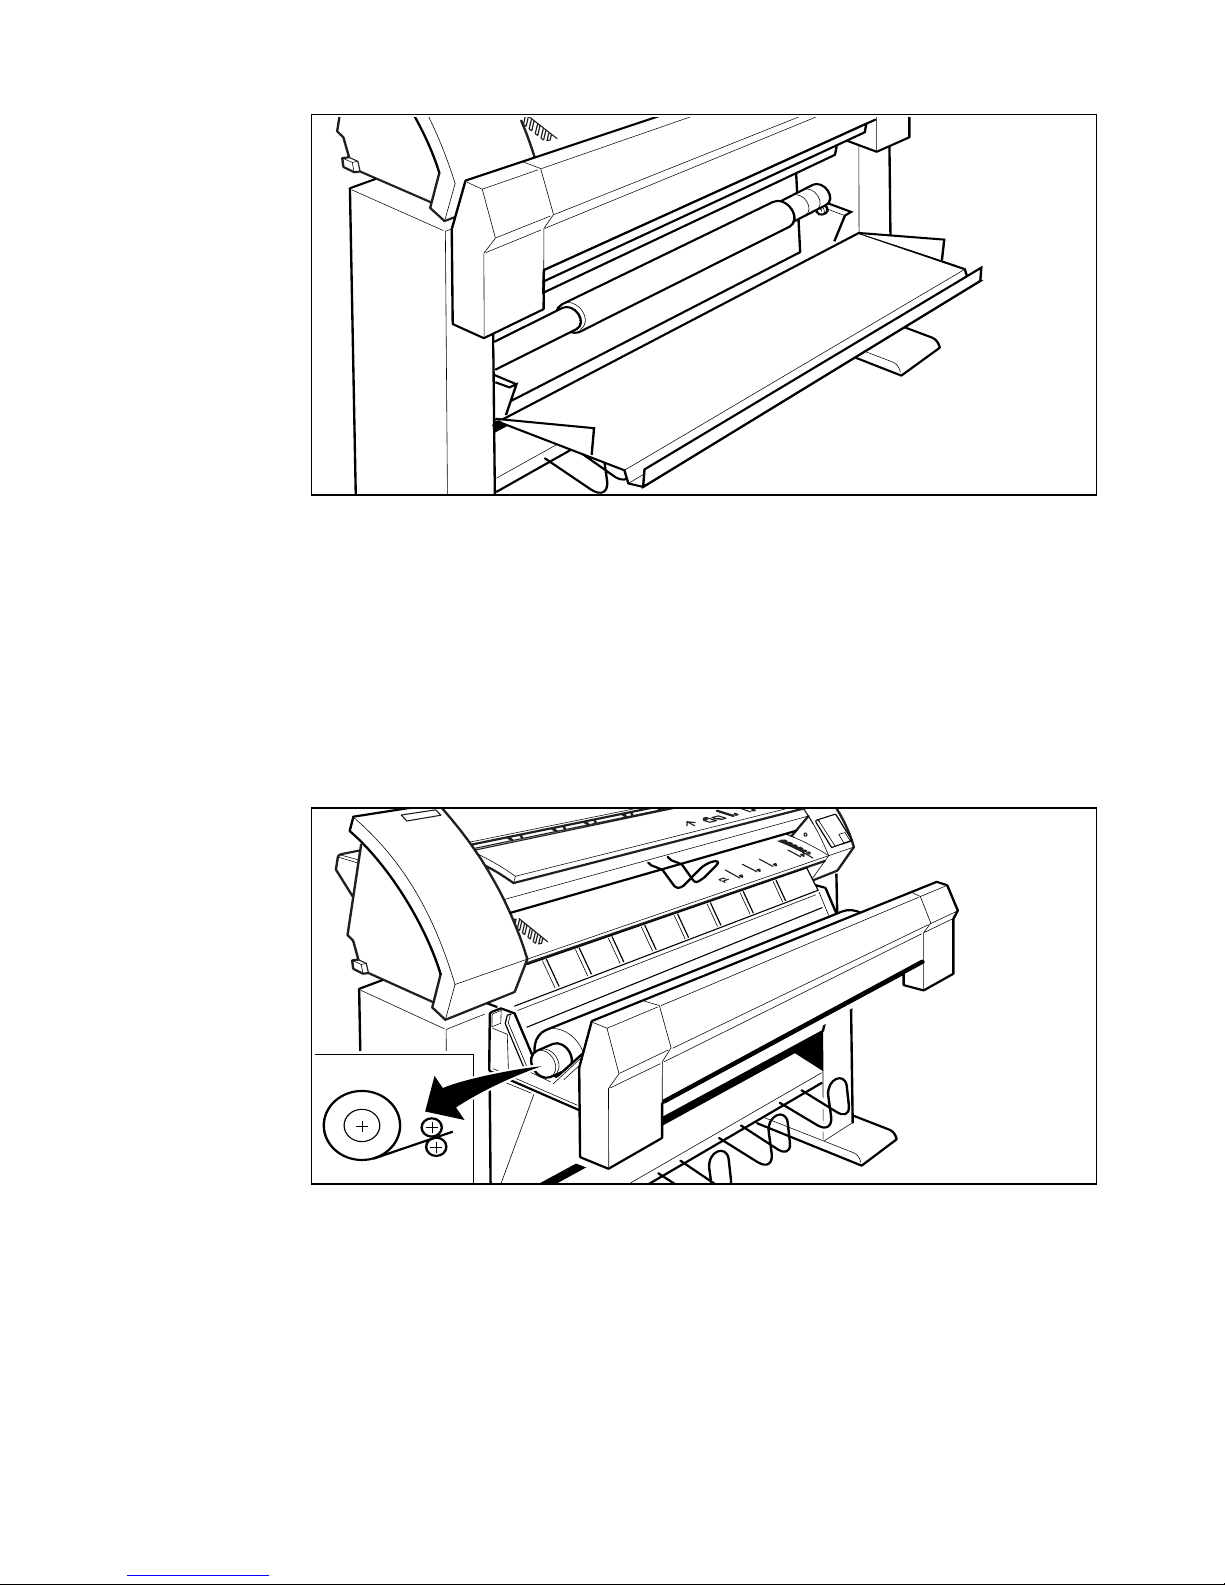
Remove the roll holder. (see figure 17)
2487
2490
2
[17] Removing the tube from the flap section
Remove the cardboard core from the roll holder.
3
Place a new roll of copy material on a table.
4
2488
Slide the roll holder in the roll of copy material while pressing the knob. (see
5
figure 13 on page 26)
[18] Pressing the knob
Align the copy material roll with the appropriate lines on the roll holder.
6
Materials 29
Page 30
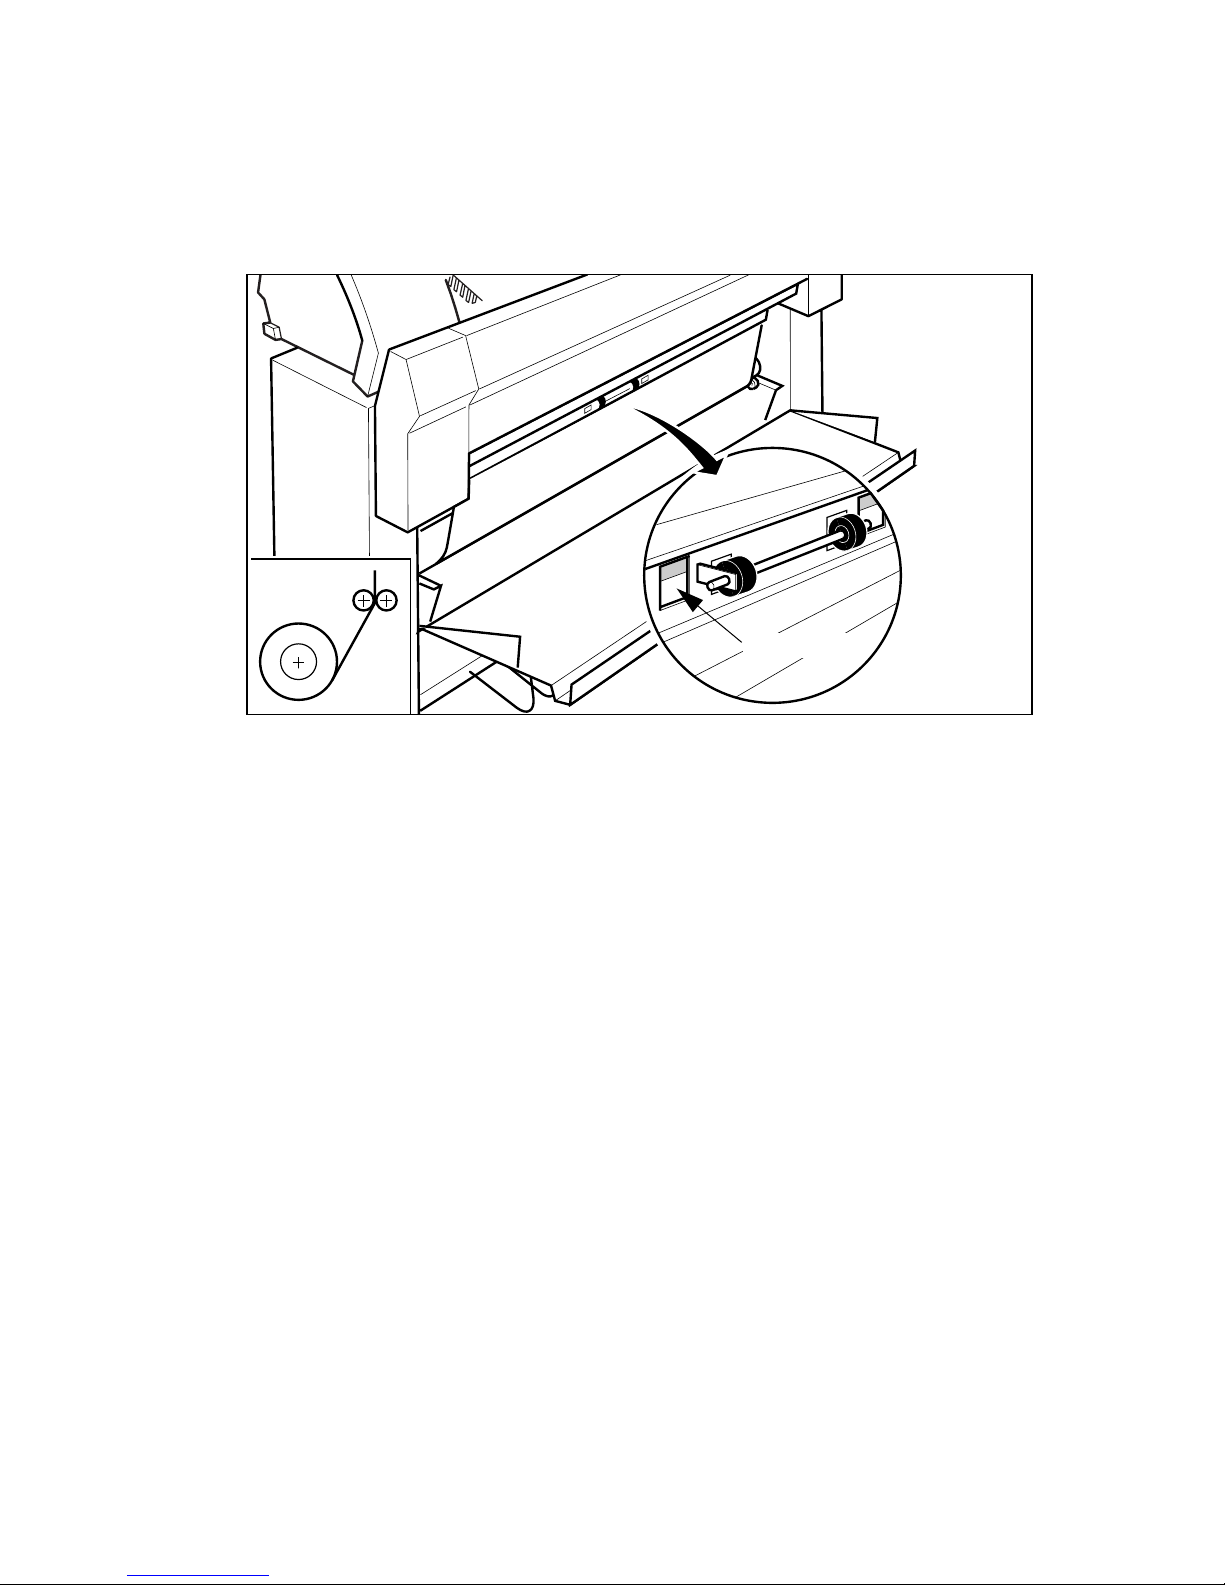
Reposition the roll holder with the copy material roll in the drawer and feed the
7
copy material (see figure 14 on page 27). Use your thumbs to feed the copy
material with the rollers. The arrow on the sticker indicates how far you have
to feed the copy material.
copy material
2485
2489
[19] Repositioning the roll
If you have inserted a roll with an another copy material or with a different
8
width, you have to program this(see ‘Programming roll specifications’ on
page 31).
9
Close the flap.
30 Océ 7055/7056 User Manual
Page 31

Programming roll specifications
If you have inserted a new roll with another copy material or with a different
width, you have to program the Océ 7055/7056. Programming the roll
specifications implies that you instruct the machine of the specifications of the
copy material on the rolls. These specifications are the following:
paper or film
■
width of the copy material.
■
▼▼▼▼
Programming roll specifications
Open the roll unit.
1
The display flashes indicating that you are now in programming mode.
If necessary, insert a new copy material roll. (see ‘Inserting a new copy
2
material roll’ on page 24)
Press the copy material input button to toggle between roll 1 or roll 2. Select
3
the roll that you want to program the specifications for.
Press the copy material selection button to toggle between paper (paper,
4
vellum,...) or film.
Attention:
Select the appropriate copy material to avoid flawed copies. All
materials (except for film) should be copied with the copy material
selection set to ‘paper’. Only select the setting ‘film’ if you mak e copies on
polyester film
Close the roll unit.
5
The specifications of the roll are now programmed.
Materials 31
Page 32
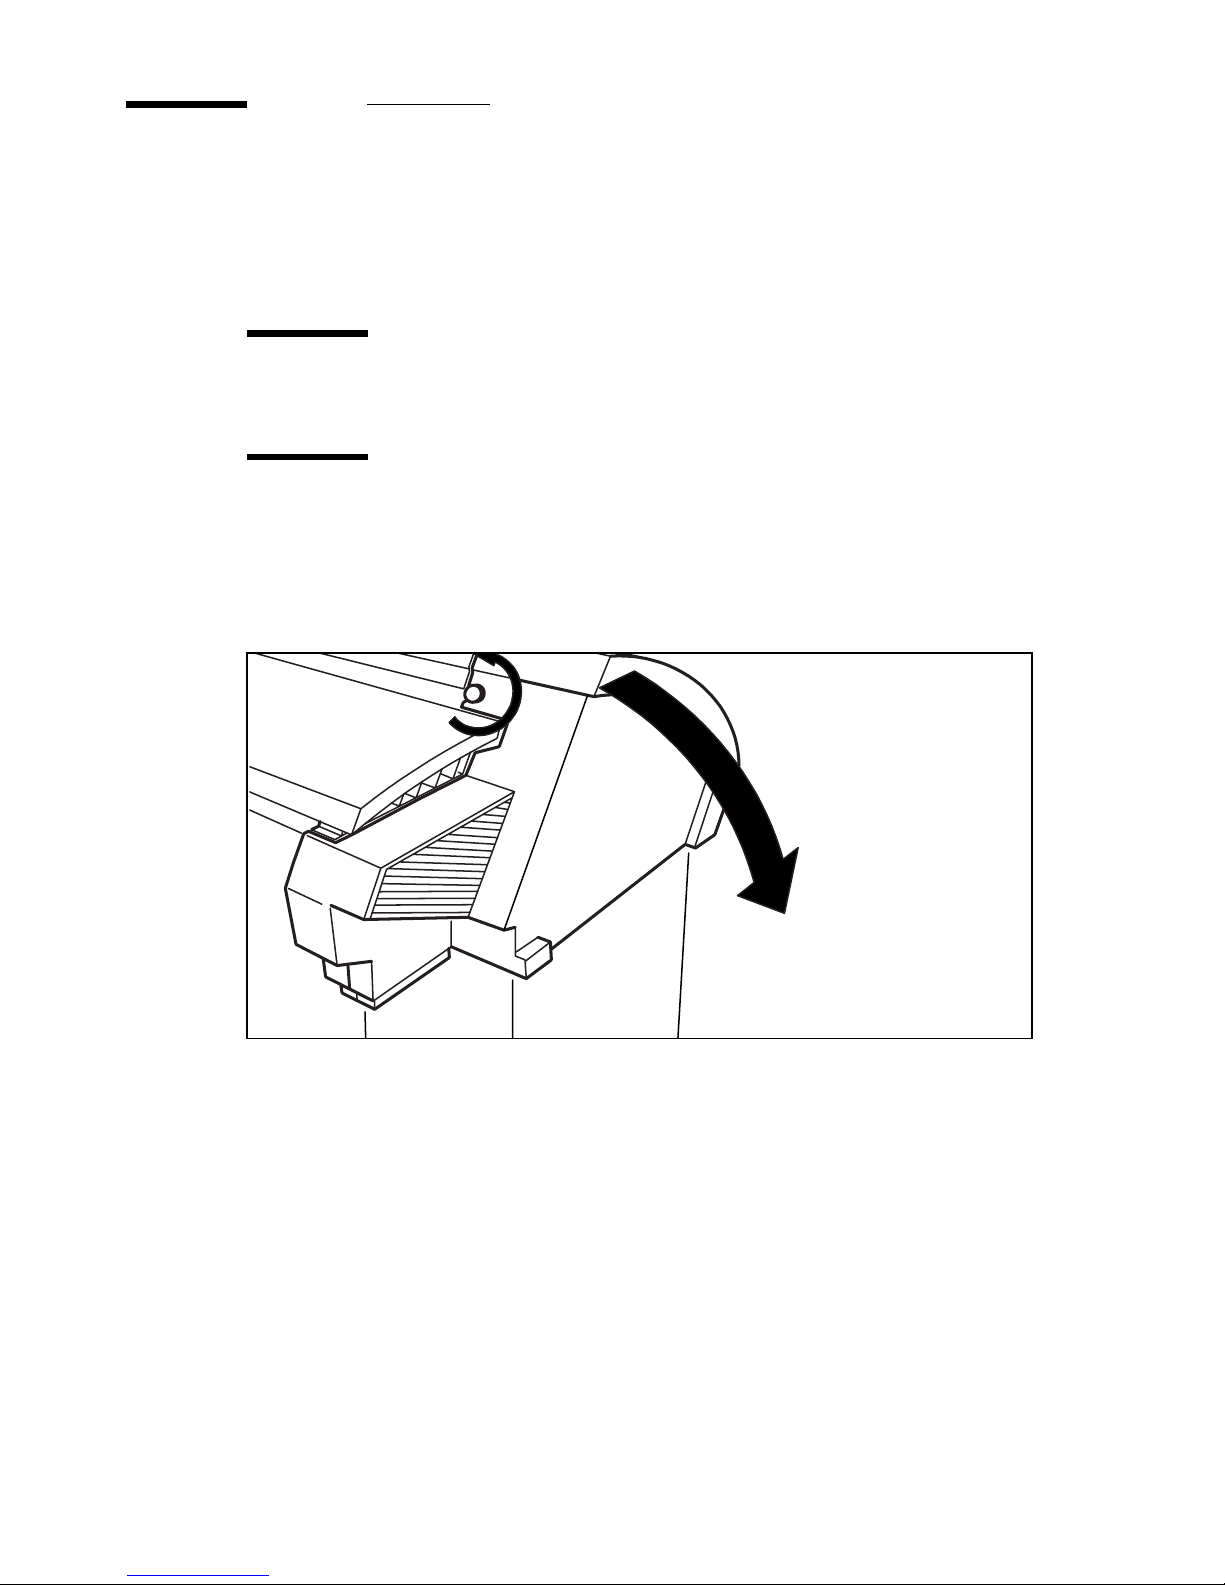
Adding toner
If the toner level is lo w , the ‘add toner’ indicator starts flashing. You can finish
your job. Then add toner.
▼▼▼▼
Attention:
Adding toner
Attention:
Switch off the copier.
1
Unscrew the knurled nu t at the left hand side of the machine and open the cov er
2
If you ignore this symbol, copy quality will diminish.
Only use B1 toner.
(see figure 20).
[20] Unscrewing knurled nut and opening the cover
Shake the toner bottle thoroughly and open the bottle.
3
32 Océ 7055/7056 User Manual
Page 33
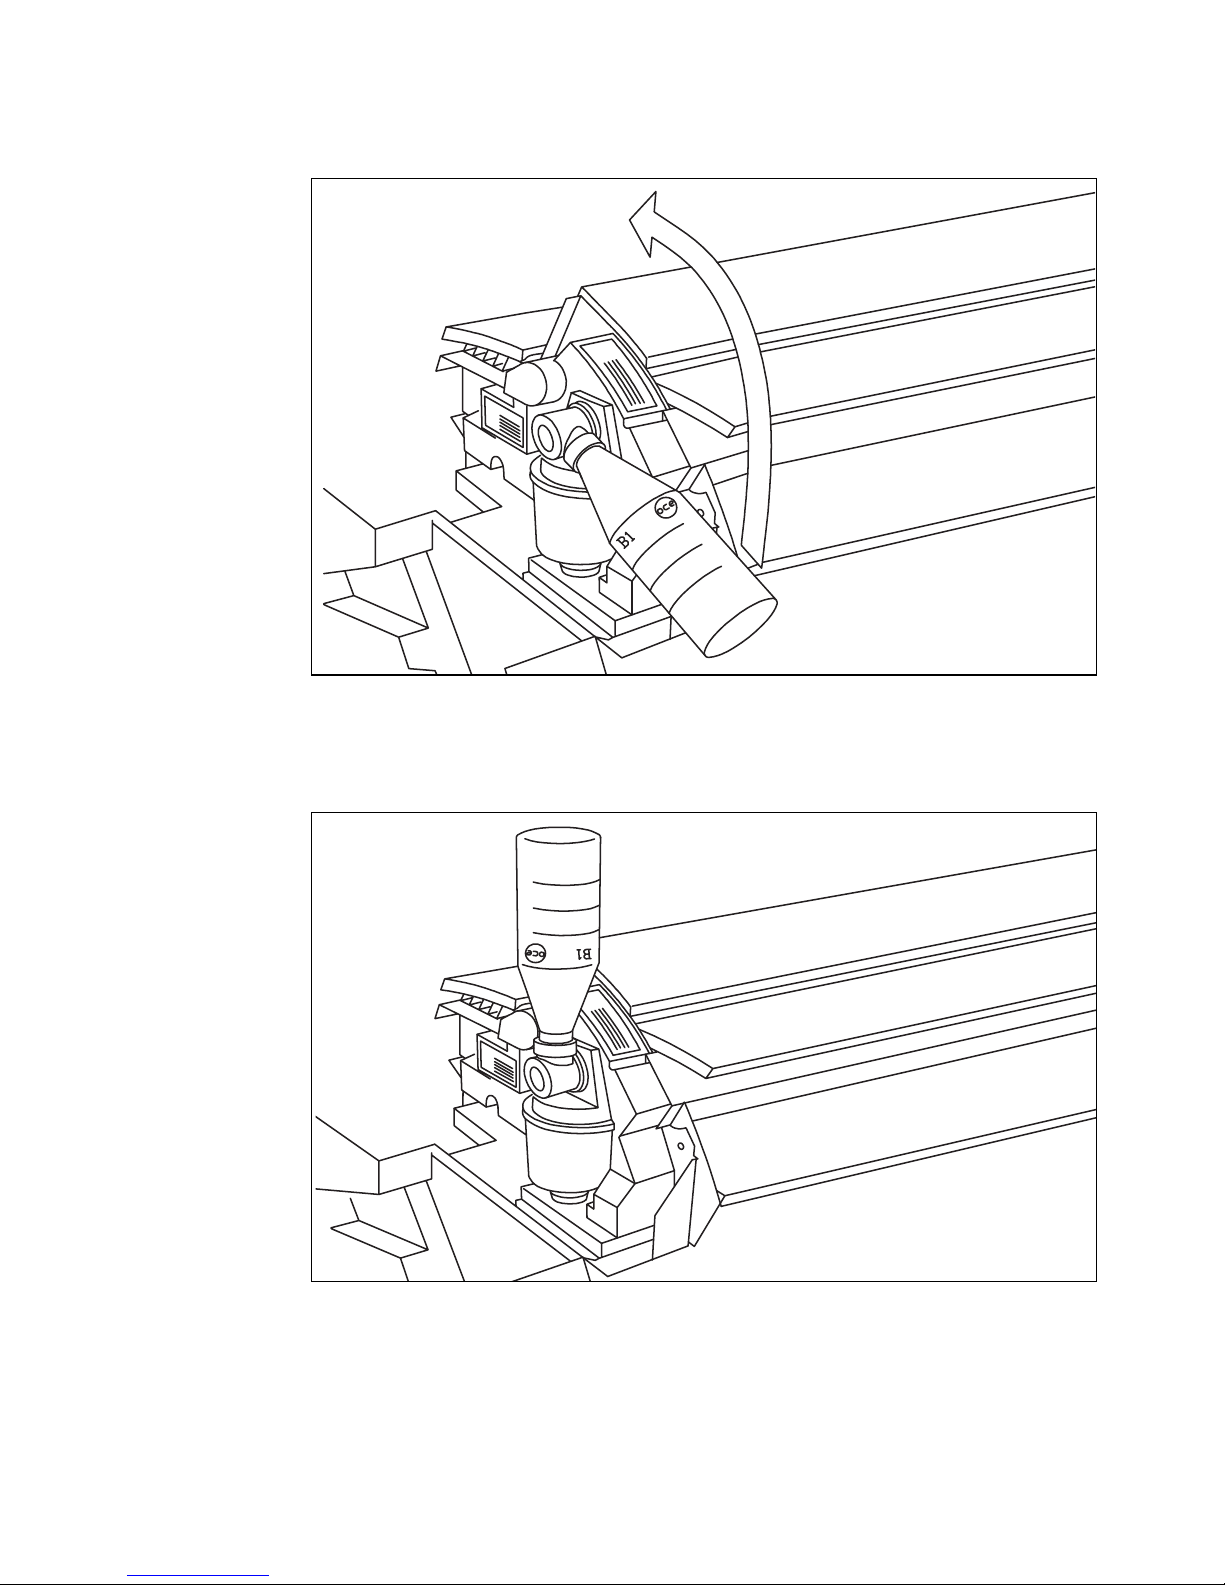
Screw in the bottle clockwise in a slanted position (see figure 21).
4
[21] Screwing in the bottle
Move the toner bottle to a vertical position ( see figure 21 and 22 ).
5
[22] Adding toner
When the toner bottle is empty return the bottle to the original position.
6
Unscrew the toner bottle anti clockwise.
7
Materials 33
Page 34
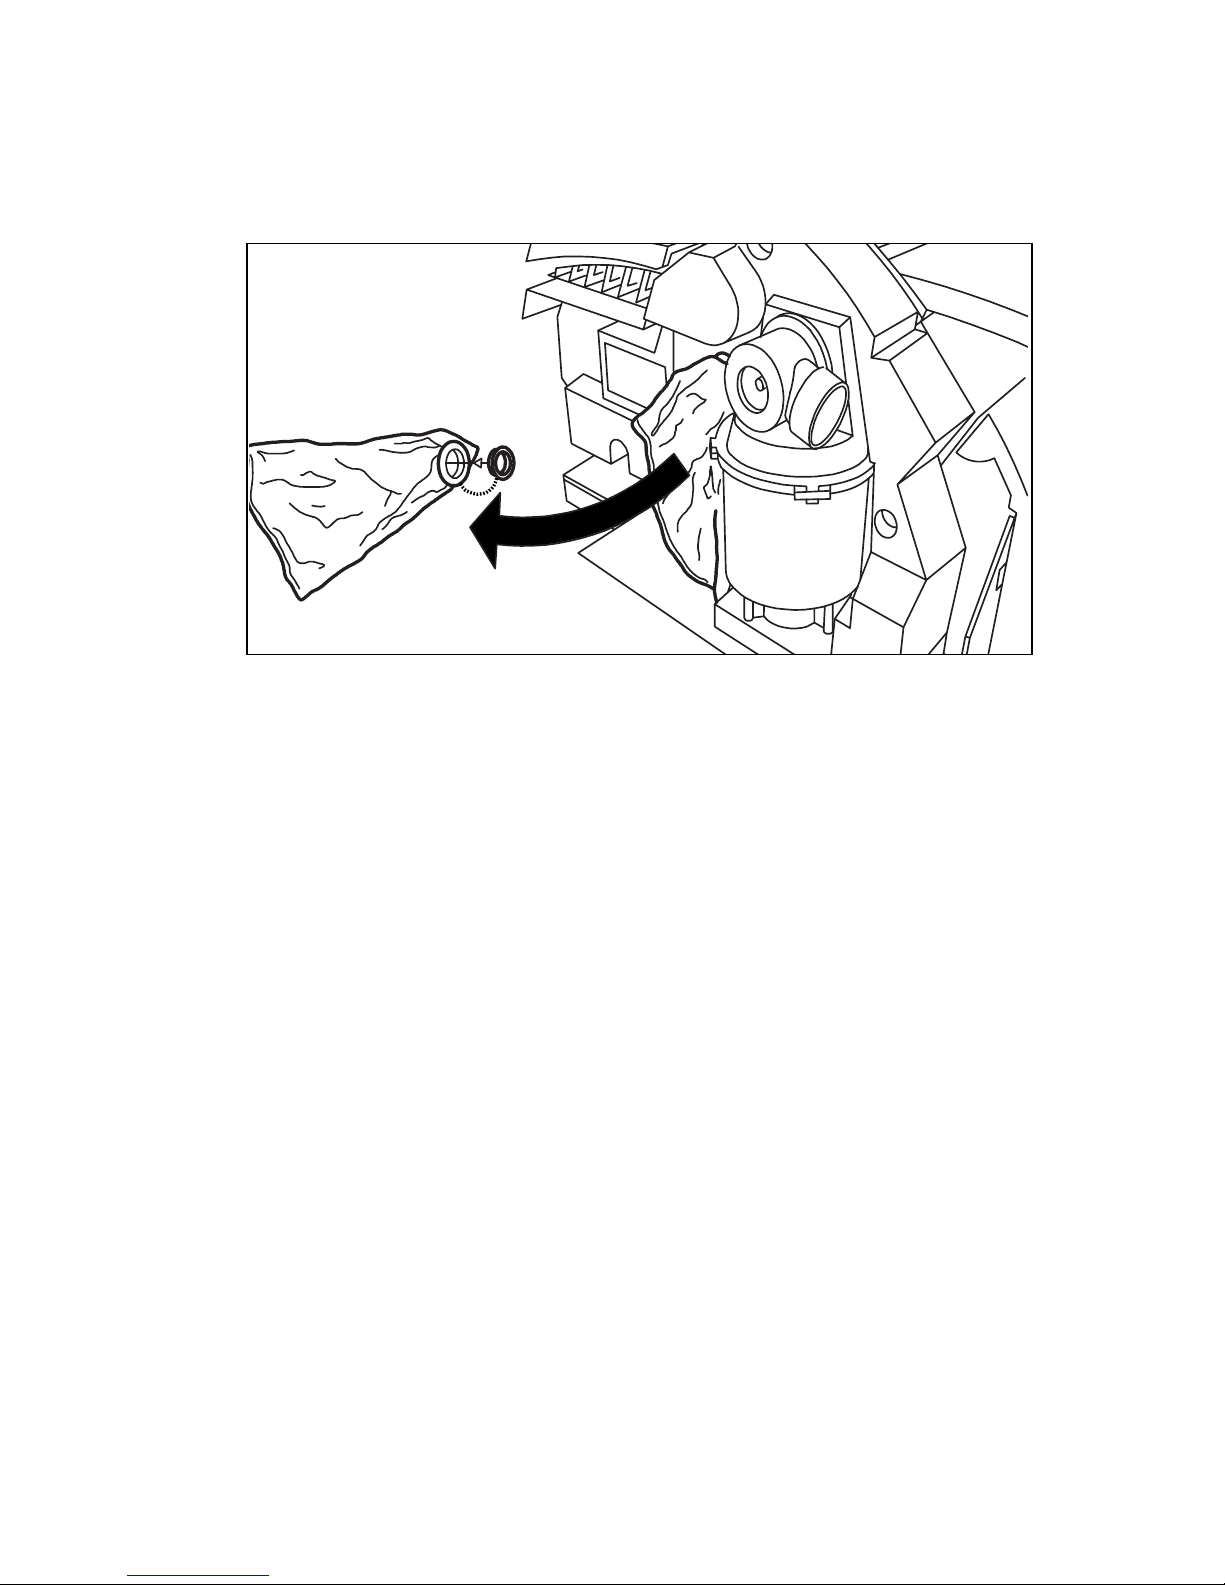
▼▼▼▼
Replacing the waste toner bag
Pull the waste toner bag from the holder and p lace the cap pro vided on the bag
8
(see figure 23).
[23] Replacing the waste toner bag
Slide a new waste toner bag over the holder.
9
Close the cover and tighten the knurled nut.
10
Switch on the copier.
11
34 Océ 7055/7056 User Manual
Page 35
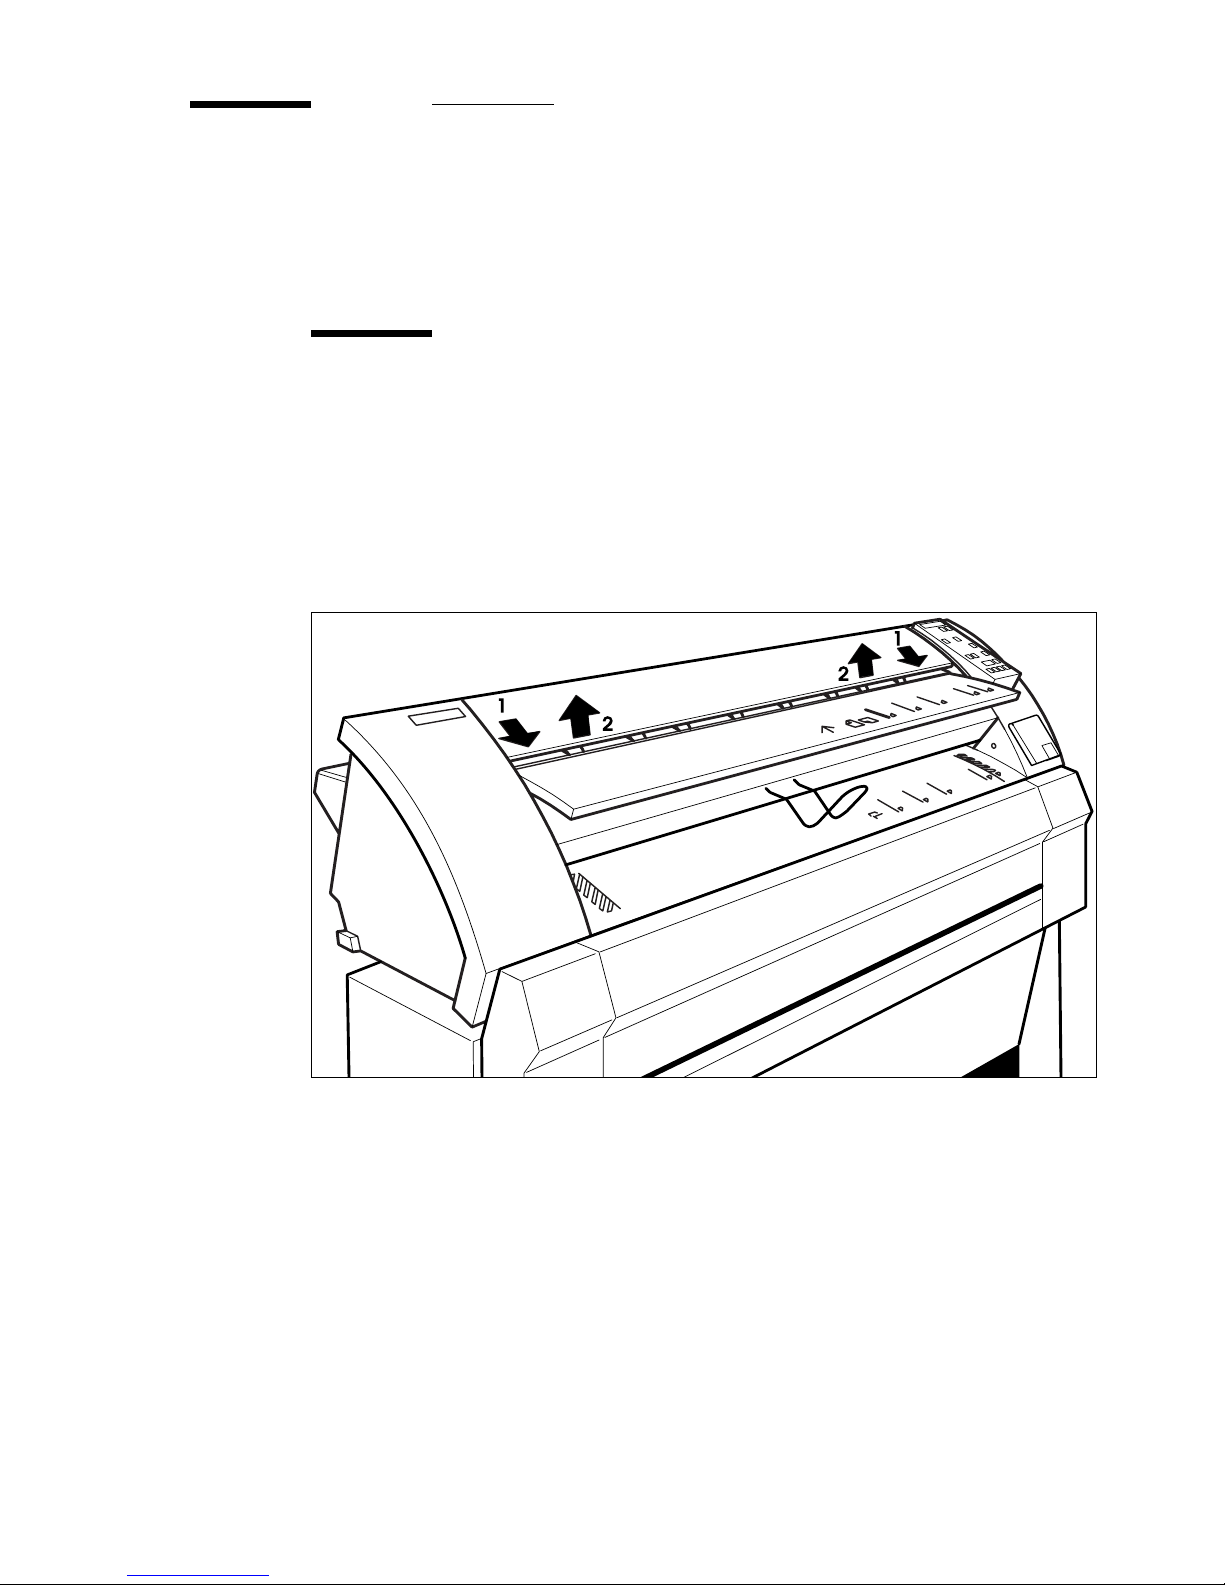
Cleaning the transparent platen
2469
If the transparent platen is dirty or static it should be cleaned to ensure top
quality copies. At the same time you can clean the white pressure platen
▼▼▼▼
Attention:
To achieve the best results , we r ecommend the use of Océ cleaner
‘A’. (Codenr. 1068117; Cleaner kit).
Cleaning the transparent platen and the pr essure platen
Switch off the copier.
1
Open the top cover by pulling it towards you and raising the cover (see
2
figure 24).
[24] Opening the top cover
Materials 35
Page 36
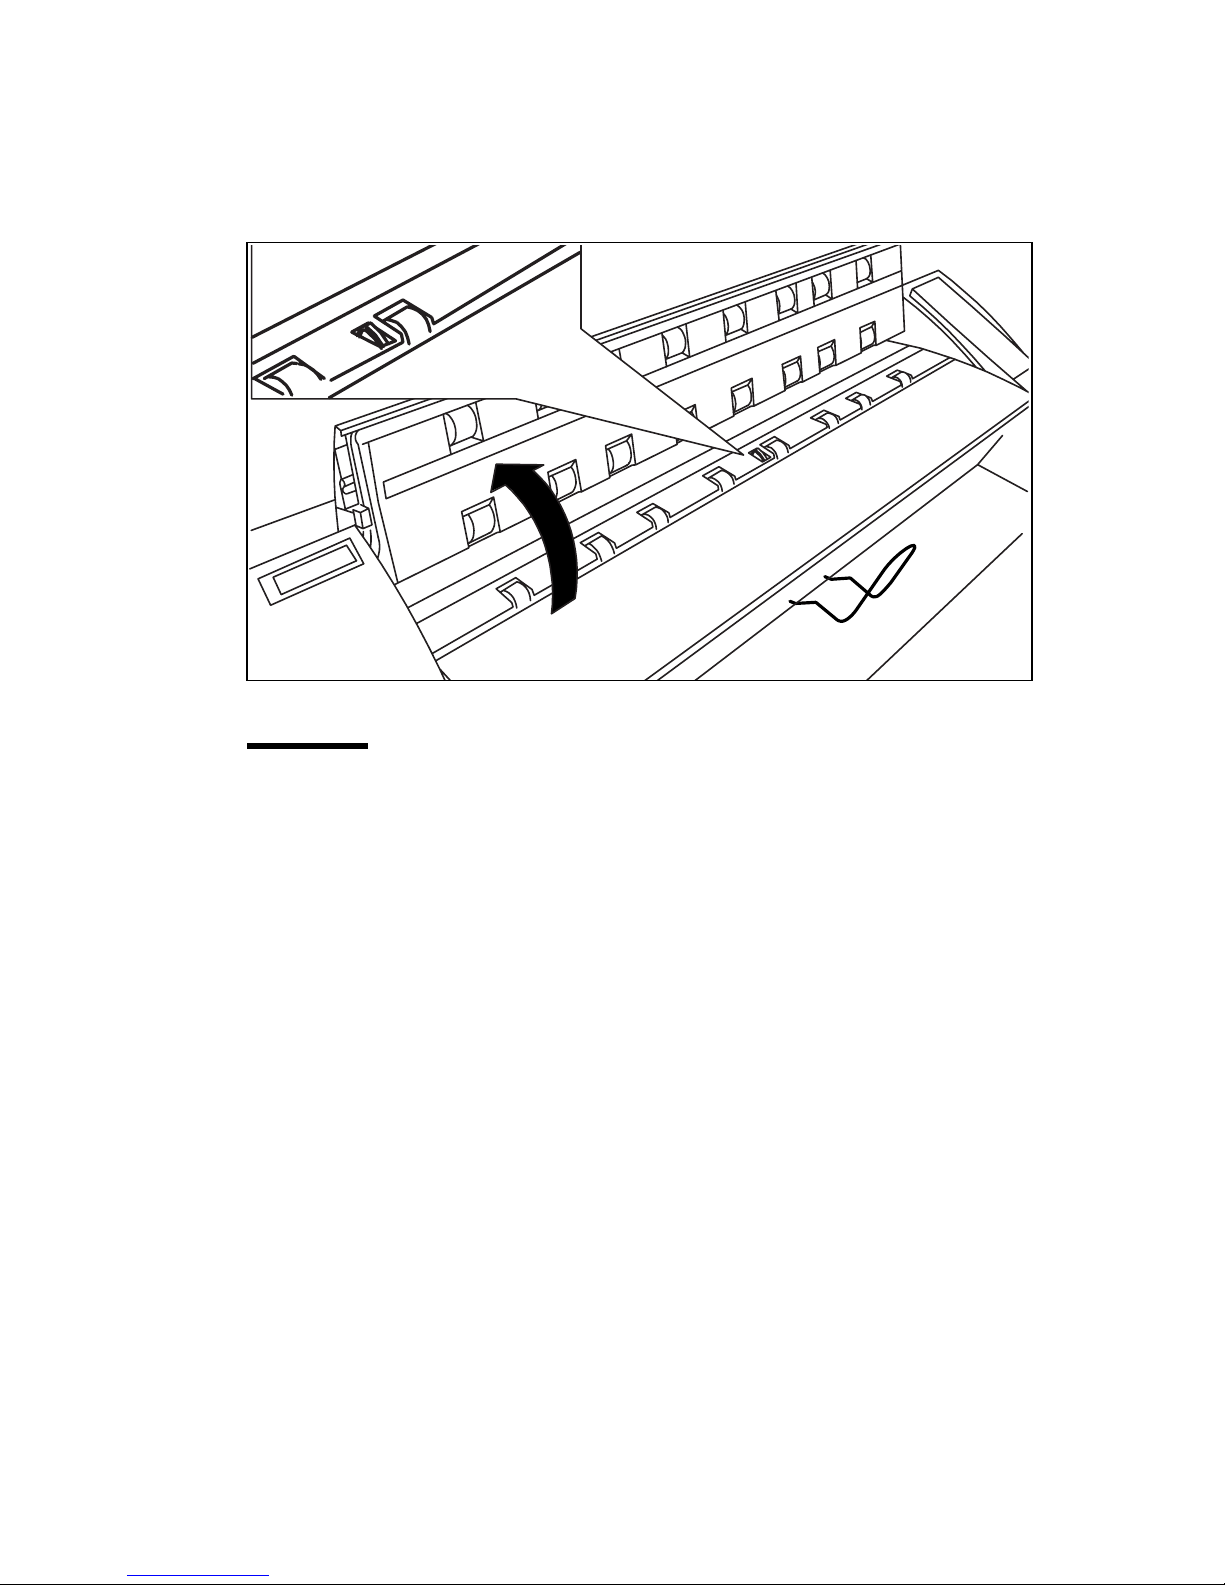
Clean the transparent platen and the white pressure platen with a soft cloth
3
moistened with a small quantity “Cleaner A”.
For safety information see the safety data sheet in Appendix B.
[25] Cleaning the transparent platen and the white pressure platen
Attention:
Make sure not to damage the actuator 25 on page 36, located in
the middle of the transparent platen.
Close the top cover and push it back until you hear a click.
4
5
Switch on the copier.
9
36 Océ 7055/7056 User Manual
Page 37

Océ 7055/7056
User Manual
Chapter 4
Solving problems
This chapter contains information on how to proceed
incase a problem arises.
37
Page 38

Introduction
This chapter documents problems that may occur with the Océ 7055/7056 and
how to solve them.
When an error occurs, the operating panel informs you about the nature of the
problem.
if the paper path indicator flashes, a paper jam has occurred (see ‘Clearing
■
original jams’ on page 41)and (see ‘Clearing paper jams’ on page 42).
if the display shows an error code, i.e. between E0 and E5, an operator
■
recoverable error has occurred. (see ‘Operator recoverable errors’ on
page 39)
if the display shows a flashing 4-digit error code, a machine error has
■
occurred (see ‘Switch on the copier.’ on page 44).
38 Océ 7055/7056 User Manual
Page 39

Operator recoverable errors
When the copier detects an error , the copier stop s immediately . The pap er path
indicator will lit and the length display shows an error code. The following
explains the general procedure in case of an operator recoverable error
▼▼▼▼
General procedure for operator r ecoverable e rrors
Remove the original.
1
Open the manual copy material feed table.
2
Remove the copy material.
3
Check the paper path.
4
Close the manual copy material feed table.
5
The following table gives an overview of possible causes and specific actions.
Error messages
Message Possible causes Specific actions
E0
E1 Paper feed table is open. Close paper feed table.
E2 Copy material is too short Contact the key operator.
E3
E4
■
Copy material is removed dur-
ing
the copy process.
■
Stop button has been pressed
during a copy process.
■
Original feed problem.
■
Initialisation error
■
Paper feed timing error
■
Knife cut timing error.
Automatic copy material drawer
or flap opened during operation
Contact the key operator.
1
Cut the paper manually with
a cutter.
2
Contact the key operator
1
Close the drawer
2
Contact the service operator
E5
Solving problems 39
Out of paper
1
Insert a new paper roll.
2
check the paper path
Page 40

Machine errors
▼▼▼▼
Solving a machine error
Switch off the copier and check the complete paper path (see page 41 and
1
page 42).
Then switch it on again.
2
If no error number is shown on the length display, you can continue copying.
If the machine error maintains, then call the key operator.
40 Océ 7055/7056 User Manual
Page 41
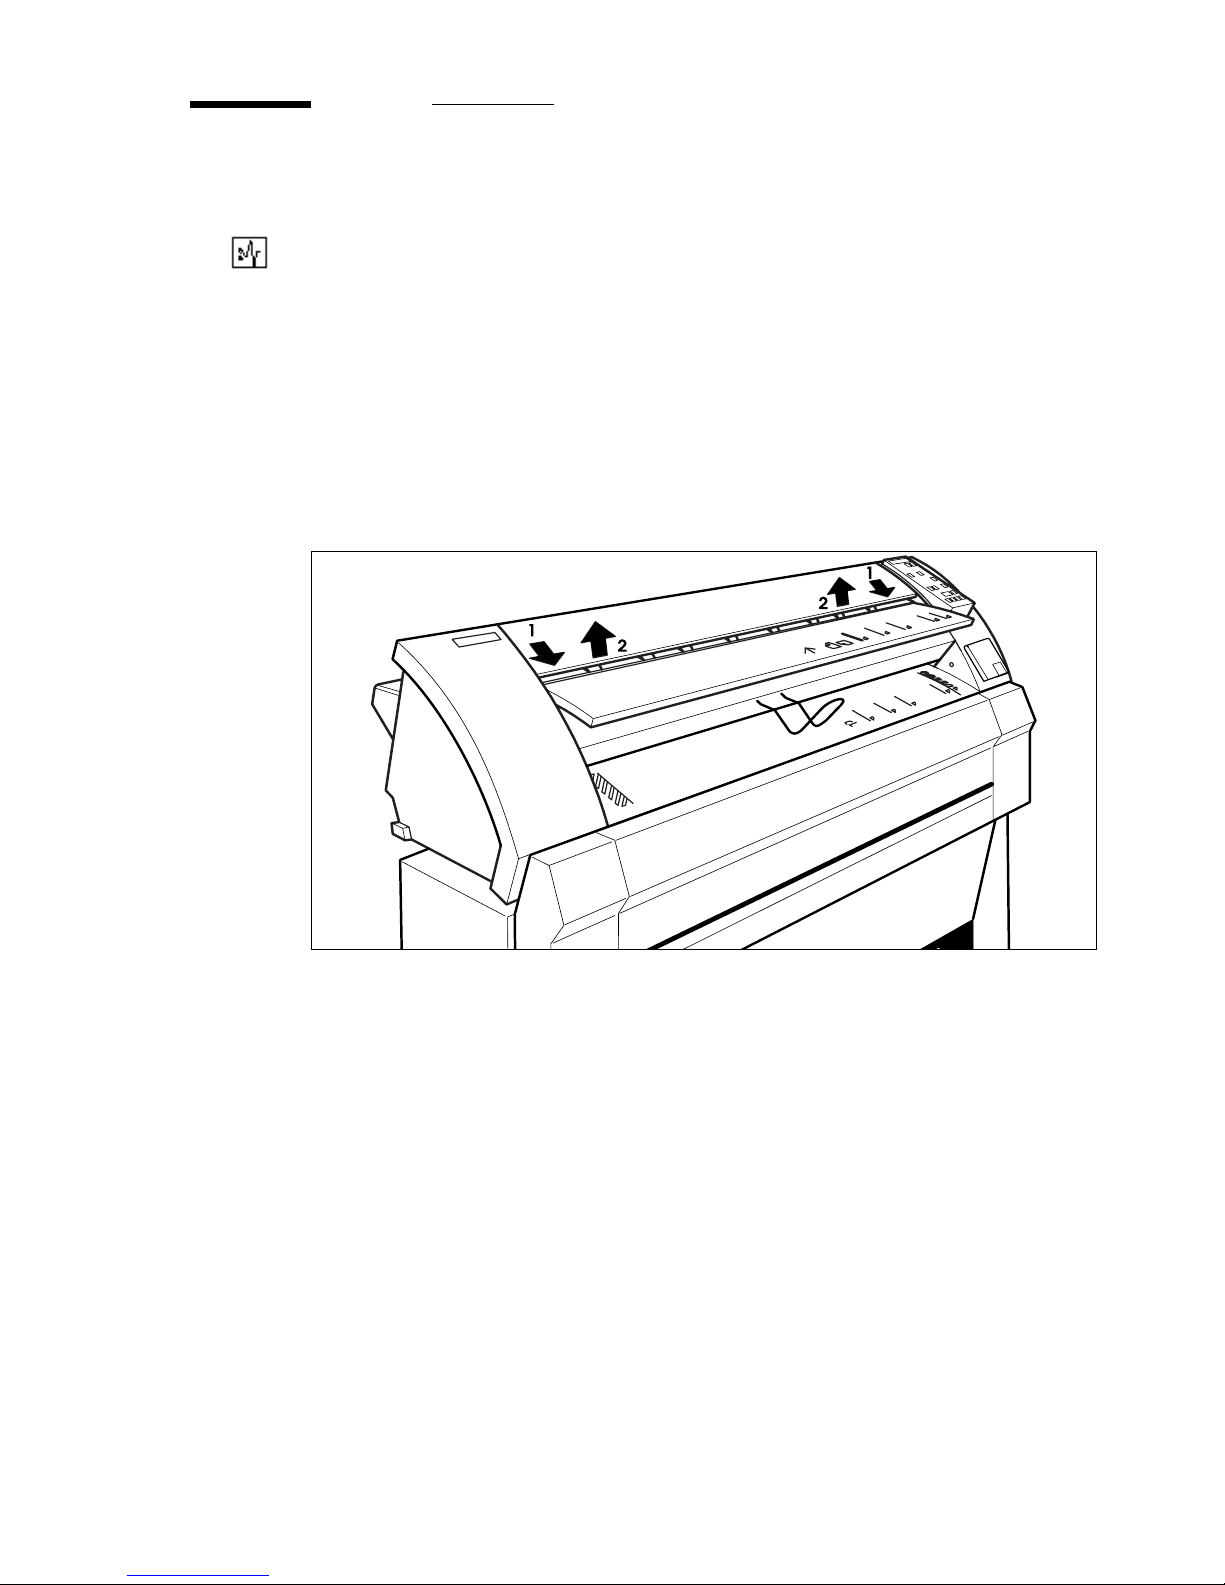
Clearing original jams
2469
When during copying an original jam occurs, the paper path indicator will start
flashing and the display shows the error message E0.
▼▼▼▼
Clearing an original jam
Switch off the copier.
1
First try to remove the jammed original by pulling it gently towards you with
2
both hands.
In case of a very fragile original:
Open the top cover by pulling it towards you and raising the cover (see
3
figure 26).
[26] Opening the top cover
Remove the original.
4
Close the top cover and push it back until you hear a click.
5
If there is copy material in the co pier, clear copy path (see ‘Clearing paper
6
jams’ on page 42).
Switch on the copier.
7
Solving problems 41
Page 42
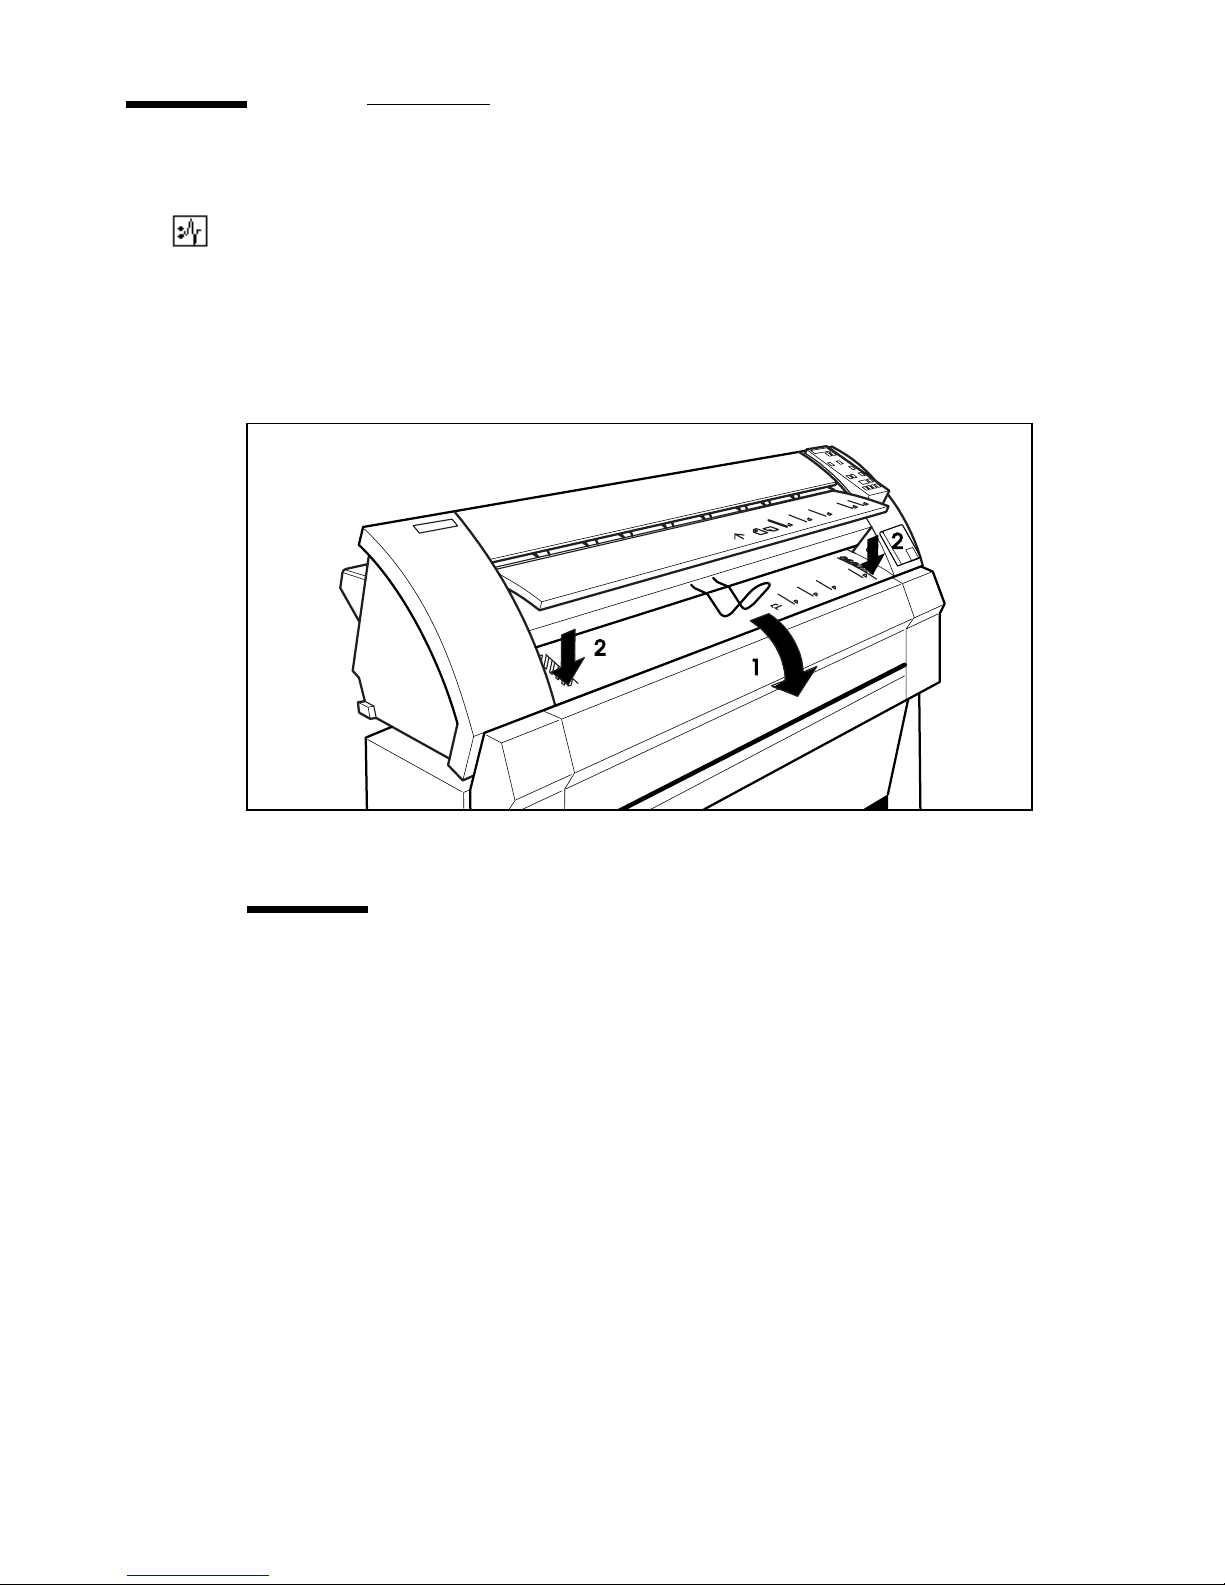
Clearing paper jams
When paper feeds incorrectly, the paper path indicator will flash.
▼▼▼▼
Clearing a paper jam in the copy material feed section
Switch off the copier.
1
Lower the copy feed table, using the two catches on the front underneath the
2
copy feed table (see figure 27).
[27] Lowering the copy feed table
Remove the jammed copy material.
3
Attention:
Pull the sheet of paper backwards carefully, the sheet might be
unfused on some parts.
Note:
Close the copy feed table.
4
Switch on the copier.
5
Check thoroughly that no scraps of material are left behind.
42 Océ 7055/7056 User Manual
Page 43
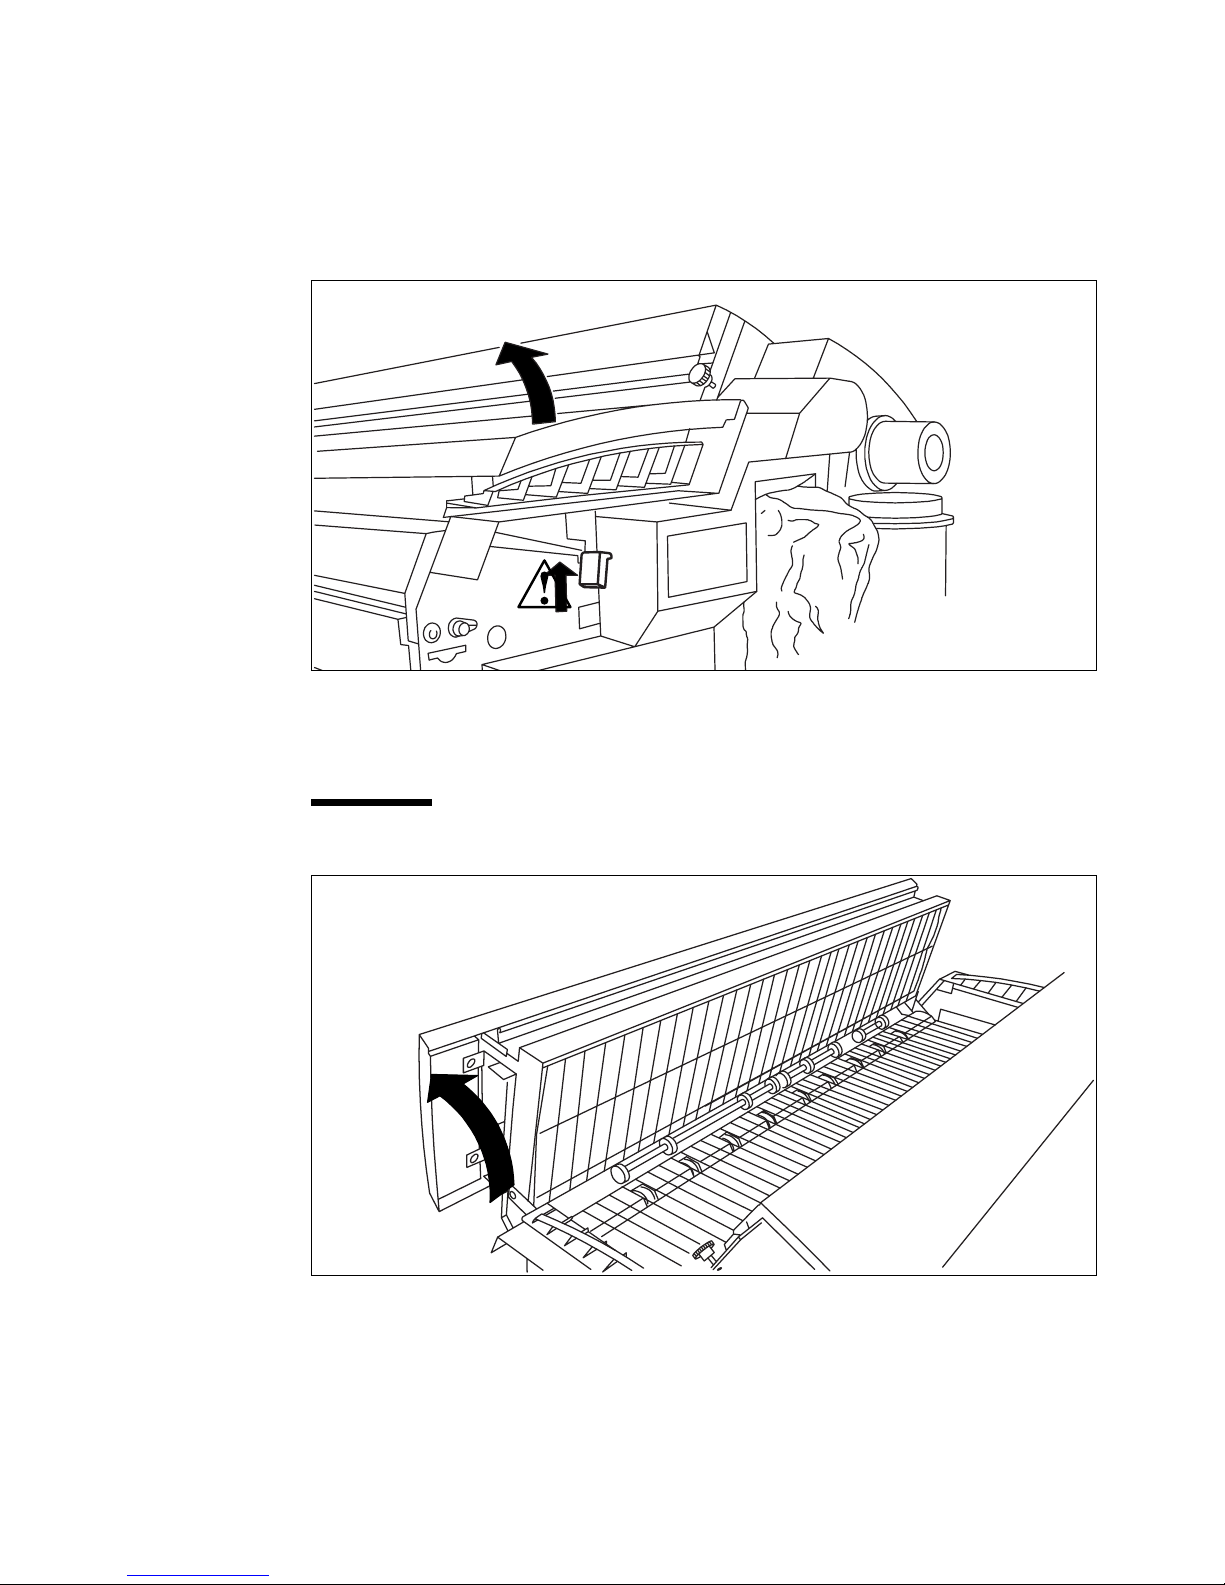
If the paper jam can not be cleared by opening the copy feed table than open
the fusing section by:
Switch off the copier.
1
Unscrew the knurled nut a t the left hand side of the machine and open the co ver
2
(see figure 28).
[28] Opening the left cover at the rear of the machine
Lift the green handle and open the fuser unit ( see fig ure 28 and 29 on page 43
3
).
Caution:
If the copier has been used recently, the fuser may still be hot.
2475
[29] Opening the fuser unit
Solving problems 43
Page 44

Remove the jammed copy material.
4
Attention:
Note:
Lift the green handle and close the fuser unit.
5
Close the left cover and screw the knurled nut.
6
Switch on the copier.
7
Be careful! The toner is not fused.
Check thoroughly that no scraps of material are left behind.
44 Océ 7055/7056 User Manual
Page 45

Océ 7055/7056
User Manual
Appendix A
Overview and Tables
45
Page 46

Standard settings
On delivery the Océ 7055/7056 is configured with a number of standard
settings.
Standard settings
Océ 7055/7056
Exposure level 0
Copy material paper
Trailing edge 0 mm
Leading edge 0 mm
Copy quantity 1
Copy material roll 1
Operating mode synchro cut
46 Océ 7055/7056 User Manual
Page 47

Standard operating mode
When standard operating mode selected, the copy is cut at a pre-set standard
length. Nine different settings are available by selecting standard operating
mode and pressing the selection buttons. The following settings are possible:
1189 mm
■
841 mm
■
594 mm
■
420 mm
■
1230 mm
■
880 mm
■
450 mm
■
420 mm
■
tESt
■
Overview and Tables 47
Page 48
Product specifications
For more information about product spec ifications refer to the Océ 7055/70 56
safety data sheet in Appendix B.
Product specifications
Process Dry indirect electrostatic
Exposure Slit exposure with one fluorescent lamp and SLA
Developing system Binary toner system
Fixing system Instant heating system
Warm-up time none
Scale 1:1(+/- 0.5%)
Image width Max. 914 mm (36”)
Copying speed 3m/min
Machine size 1352 x 1240 x 900 (wxdxh in mm)
Machine weight Océ 7055: 152 kg (copy material excluded)
Océ 7056: 162 kg (copy material excluded)
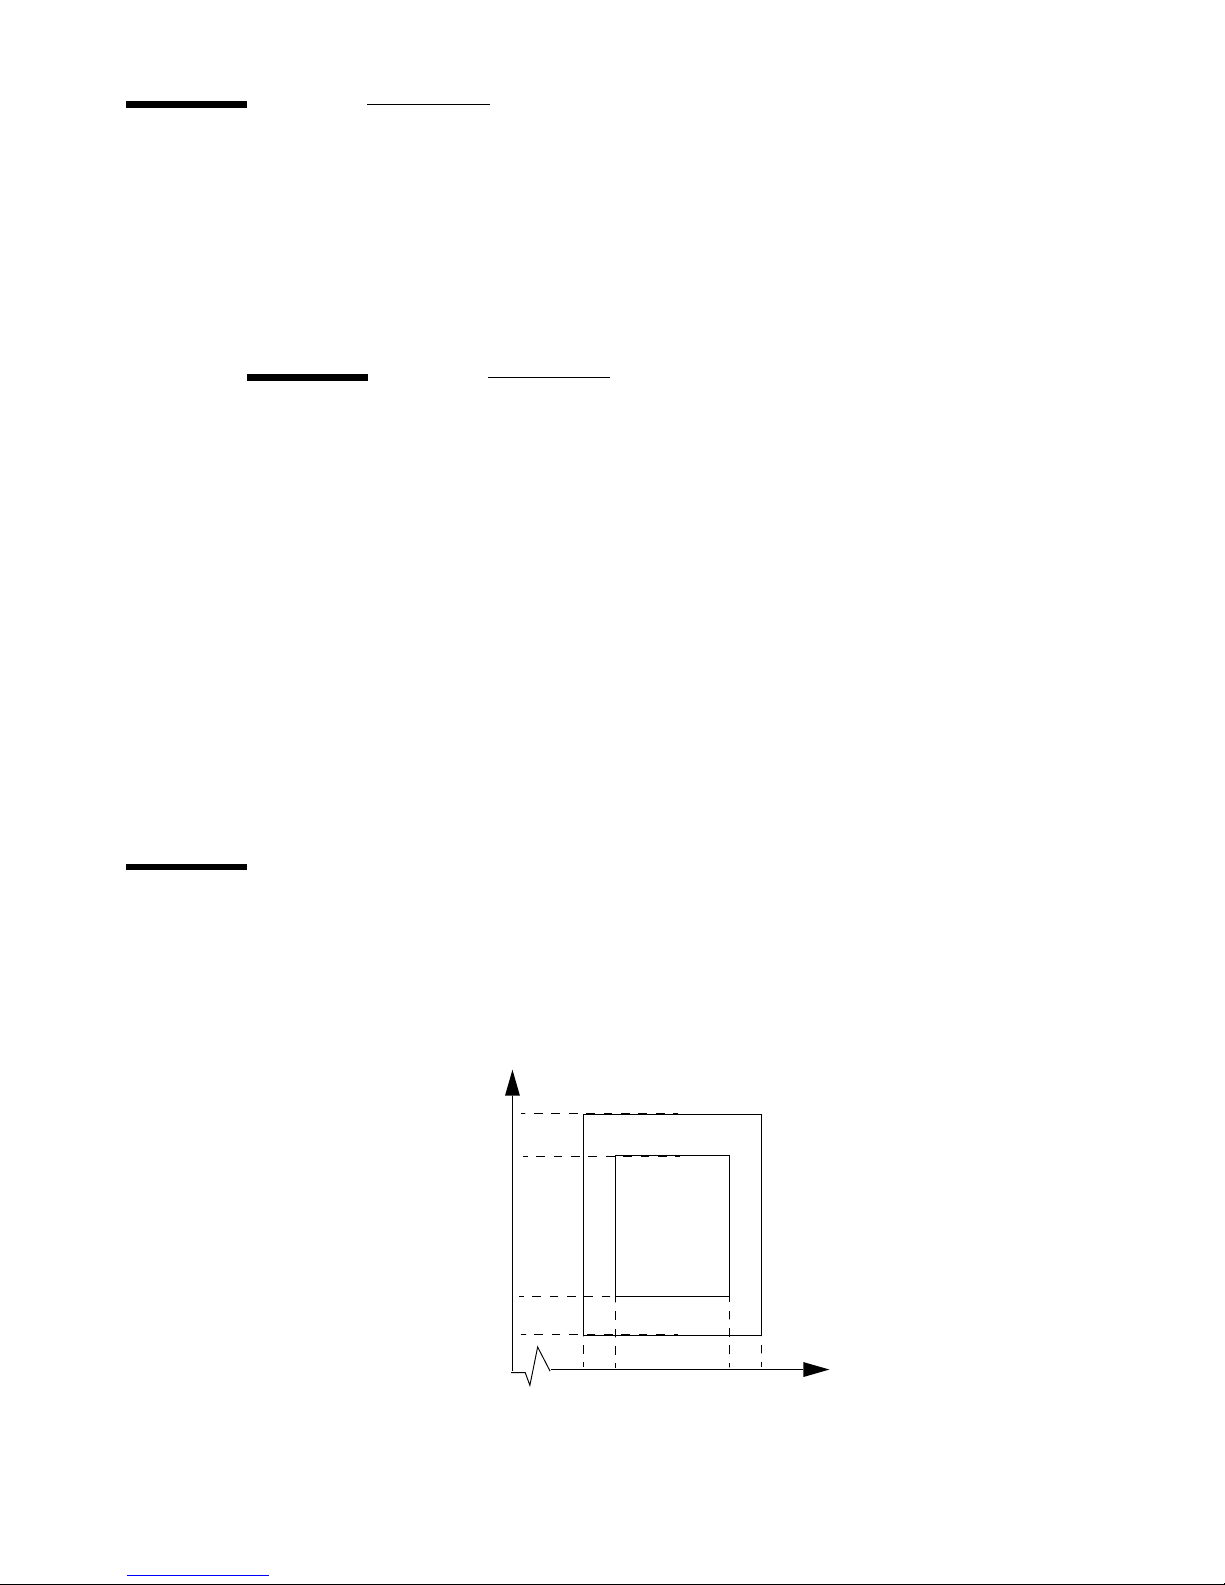
Roomtemperature (T) and Relative Humidity (RH)
A: Machine specifications are applicable for the following conditions.
B: Copy quality not guaranteed, no permanent machine damage.
RV %
80
60
30
20
17 20 27 30 T ˚C
B
A
48 Océ 7055/7056 User Manual
Page 49

Originals that can be used
Overview of originals
Originals Minimum Maximum recommended
Width 210 mm (8.5”) 1000 mm (40”)
Length 279 mm (10”) 3000 mm (10”) ( max. 30 m)
Length in re-
tention
Thickness 0.05 mm 1.5 mm
Weight 60 g/m
Mechanical conditions originals
Curls
> Ø 75mm without help of operator
< Ø 75 mm with help of operator
< Ø 50 mm in carrier sheet
Paste ups
Paste ups should be pasted 100% at all edges or in carrier sheet
Filing strips
May be present at all edges of the original.
Maximum size of hole: Ø 36 mm
Borders
Punching holes, reinforcement borders and damages may require operator
interventions or use of carrier sheets
Folds
Wrinkles and folds may be visible on the copy
1200 mm (48”)
2
120 g/m2 (max. 210 g/m2)
Overview and Tables 49
Page 50

Copy material that can be used
Océ copy machines and materials are matched for optimal quality and
performance. It is therefore recomm ended to use only a pprov ed Océ materials
in the Océ 7055/7056.
A full list of Océ materials suited for use in the Océ 7055/7056, including plain
paper, transparent paper, coloured papers and various polyester films is
available from your Océ representative. The maximum length of the copy
2
material is 175 m when you use 75 g/m
2
110 g/m
. The diameter of the roll holder equals 3 inch.
Overview of copy material
Copy material Recommended
Plain paper 75 g/m
Transparent paper 110 g/m
2
2
Vellum 20 lbs
Polyester film 3.5 mil
ECO papers 75 g/m
2
Minimum Maximum
Width 297 mm 914 mm
Length 420 mm any manegeable length
copy material and 150 m in case of
Attention:
Paper- and transparentmaterial is sensitive to high humidity. To
ensure optimal copy quality it is advised to keep the copy materials in the
packaging specially overnight.
Caution:
Materials which ar e metalbased or conductive are not designed to
use in this machine and may result in injury to the operator.
Attention:
If sheets of copy material are curled, feed them in with the curl
facing down, otherwise you will damage the drum.
50 Océ 7055/7056 User Manual
Page 51

Compatibility review media
Materials Weight Judgement Remark
Opaque pa-
75 g/m
2
good
per
Opaque pa-
110 g/m
2
acceptable Guaranteed upto 50% RH
per
ECO papers 75 g/m
2
good/acceptable
Transparent
paper
80/85 g/m
90/95 g/m
110/115 g/m
2
2
acceptable
acceptable
2
good
Polyester film 3.5 mil good
Clear polyes-
4 mil acceptable
ter film
Contrast film 3.5 mil good
Vellum 20 lbs go od
Vellum 16 lbs acceptable
Contrast pa-
135 g/m
2
acceptable Guaranteed upto 50% RH
per
Fluor paper 90 g/m
Pastel paper 80 g/m
2
2
acceptable
acceptable
Good: means fully recommended
Acceptable: me ans acceptable for limited performance
Not suitable: means not suitable at all
Overview and Tables 51
Page 52

52 Océ 7055/7056 User Manual
Page 53

Appendix B
Safety information
Océ 7055/7056
User Manual
53
Page 54

Instructions for safe use
Océ designed products have been tested in accordance with the strictest
international safety standards. T o help assure safe working with these products
it is important that you observe the following safety rules:
Maintenance
Do not remove any screws from fixed panels.
■
Do not carry out maintenance activities except for the parts and maintenance
■
materials mentioned in this manual.
Do not place any liquids on the machine.
■
Use maintenance materials o r other materials for the ir original purpose only.
■
Keep maintenance materials away from children.
Do not mix cleaning fluids or other substances.
■
To av oid the risk o f introducing hazards , all modif ications to Océ equipment
■
are strictly reserved to properly qualified and trained service technicians.
Connection
If for some reason you ha ve to mo v e the machine y ourself, please mak e sure
■
that the mains powe r point has the right fuse capacity . See the Océ 7055/7056
safety data sheet in this appendix for information about maximum current.
Do not bridge any mechanical or electrical circuit breakers.
■
Do not use an extension lead to connect the machine.
■
This equipment has not been de signed for connection to an IT power syst em.
■
(An IT power system is a voltage network in which the neutral wire is not
connected to earth).
For equipment connected via a wall socket: locate the machine close to a wall
■
socket that is easily accessible.
For equipment connected via a fixed connection to the electricity grid: the
■
disconnect device in the fixed connection should be easily accessible.
54 Océ 7055/7056 User Manual
Page 55

Surroundings
Do not block the ventilation openings of the machine.
■
Ensure that the machine is placed on a level, horizontal surface of sufficient
■
strength. See the Océ 7055/7056 safety data sheet in this appendix for
information about the weight of the equipment.
Ensure there is sufficient space around the machine. This facilitates
■
reloading materials as well as maintenance.
Do not place the machine in rooms which are subject to excessive vibration.
■
Do not place the machine in rooms which are too small and insufficiently
■
ventilated. See the Océ 7055/7056 safety data sheet in this appendix for
information about space and ventilation requirements.
General
Always use materials recommended by Océ and developed for this Océ
■
machine. Materials not approved by Océ may result in faults in your
machine.
Do not use the machine when it is emitting unusual soun ds. Remove the plug
■
from the power socket or switch off the fixed connection to the electricity
grid and contact Customer Service.
Safety information 55
Page 56

Mains core colours
As the colours of the cores in the mains lead of this equipment may not
correspond with the coloured markings iden tifying the termin als in your plug,
proceed as follows:
The core which is coloured green and yellow must be connected to the
■
terminal in the plug which is marked with the letter E or by the earth symbol,
coloured green and yellow.
The core which is coloured blue must be connected to the terminal which is
■
marked with the letter N or coloured black.
The core which is coloured brown must be connected to the terminal which
■
is marked with the letter L or coloured red.
56 Océ 7055/7056 User Manual
Page 57

Safety data sheets
The disclaimer below is valid for all safety data sheets in this manual.
For questions about Océ products regarding health, safety and environment,
please contact your Océ organisation; you can find the address in the last
appendix of this manual.
Disclaimer
best of our knowledge as a compact guide to safe handling of this produ ct. We
reserve the right to revise safety data sheets as new information becomes
available. It is the user’s responsibility to determine the suitability of this
information for the adoption of safety p recaution s as may be neces sary and to
contact the company to make sure that the sheet is the latest one issued. If and
in so far as limitation of liability is permitted under the applicable laws, we do
not accept liability for any inaccuracy that may occur in this information.
The safety data sheets in this manual have been compiled to the
Safety information 57
Page 58
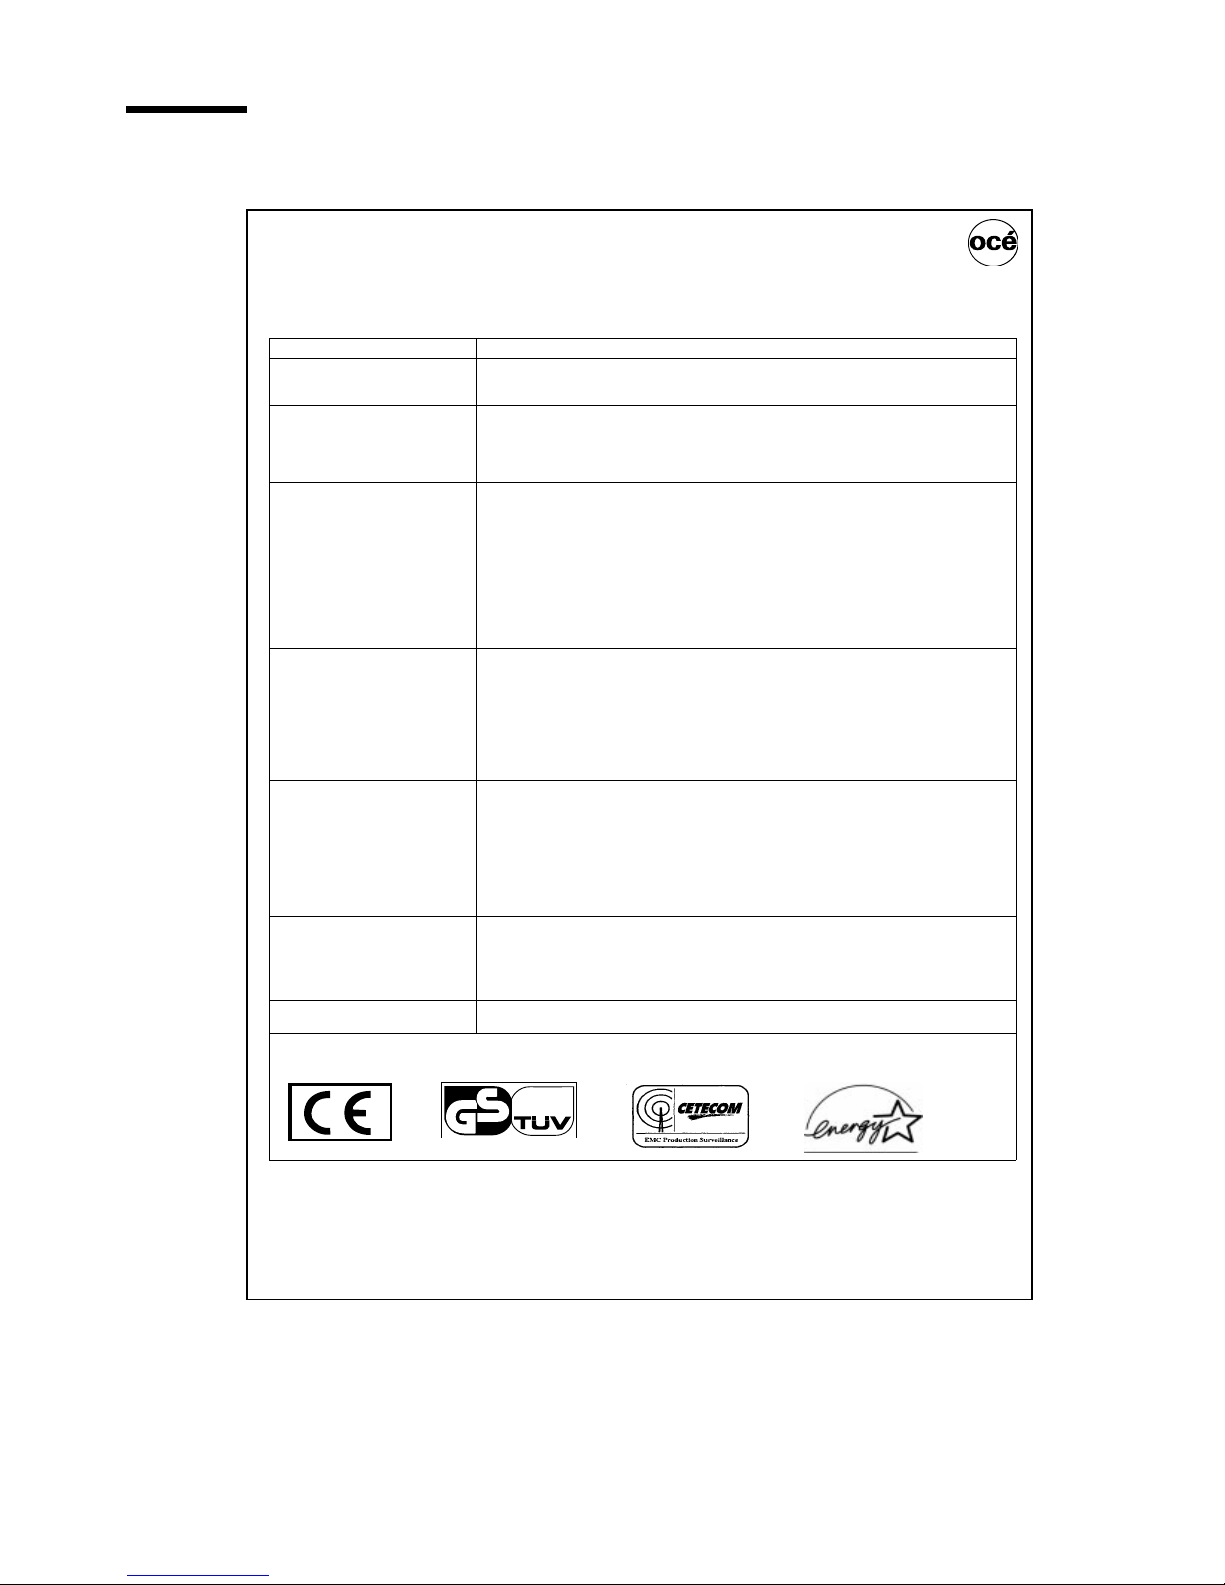
Safety data sheets Océ 7055/7056.
PRODUCT SAFETY DATA SHEET
Océ-(UK), Ltd
United Kingdom
Model Océ 7055/7056
Description
Max. process speed
Dimensions Width
Weight
Voltage
Frequency
Current - rated
Current - max
Power consumption
Power consumption, stand by
EPA Energy Star®
* Power consumption, auto off
Mains connection
Safety class
Protection class
Sound pressure level
(at operator position)
Sound power level
Radio interference
Radiation
Heat emission
Ozone emission
Room volume
Room ventilation
Use simulation at random
operation
Consumables
Additional safety information
CE-Compliance Approved according to Approved according to EPA Copier Compliance
Depth
Height
Electrostatic large format copier, instant copying, desk-top or console model, plain paper,
organic photoconductive drum, powder toner.
3 m/min
7055 7056
1352 mm 1352 mm
918 mm 918 mm
1251 mm 1251 mm
152 kg 162 kg
230 V
50 Hz
7,5 A
10 A
1500 W at continuous operation
14 W
14 W; Default time 2 minutes
Cable with plug
I (IEC 536) Protective earth connection
IP 20 (IEC 529)
Stand by In operation
0 dB(A) main body 58 dB(A)
0 dB(A) main body 65 dB(A)
Complies with Directive 89/336/EEC
Below the Threshold Limit Values for UV, Visible and IR radiation (TLV list of ACGIH)
Stand by 14 W, 1500 W at continuous operation
0,04 mg/min at continuous operation
Recommendation: min. 25 m
Recommendation: min. 12,5 m
With a room volume and ventilation as recommended and a daily volume of 100 m (much
more than average) the use simulation at random operation gives the following ozone concentrations:
- Time weighted average 0,002 mg/m
- Peak 0,008 mg/m
Threshold Limit Value/Occupational Exposure Limit
(Time Weighted Average) for ozone 0,2 mg/m
Odour Perception Limit for ozone 0,04 mg/m
Océ OPC Drum (Océ Safety Data Sheet E-192)
Océ B1 Toner (Océ Safety Data Sheet E-180)
Océ D1 Developer (Océ Safety Data Sheet E-181)
Océ Copying Materials.
This apparatus is suitable for processing recycling paper which complies with the
requirements of ENV 12281.
The ozone filter does not have to be replaced to keep the ozone concentration in the
workplace below 0,04 mg/m
Low Voltage Directive EMC Directive
73/23/EEC 89/336/EEC
impulse ∆ L
Number
Date
= 3 dB(A)
i
3
3
/h (natural ventilation)
3
3
3
3
3
(i.e. the life of the filter equals that of the apparatus).
E-664-c-UK
November 1997
(0,001 ppm)
(0,004 ppm)
(0,1 ppm)
(0,02 ppm)
Copyright © 1995 Océ-Technologies B.V., Venlo, NL
The content of this safety data sheet is subject to the disclaimer on page 57 of
this manual.
58 Océ 7055/7056 User Manual
Page 59

Safety data sheet Océ OPC Drum
MATERIAL SAFETY DATA SHEET
Number E-192-b-UK
(93/112/EEC and ISO 11014-1) Date July 1997
Page 1 of 2
Océ OPC Drum Part No. 2912571
1. Product and company identification
Product name Océ OPC Drum Part No. 2912571 (for Océ 7050 family)
Packing Cardboard box
C
Océ
2. Composition / information on ingredients
3. Hazards identification
To our knowledge this product presents no health hazard in normal use.
4. First aid measures
Eyes contact Not Applicable(=N.A.)
Skin contact N.A.
Inhalation N.A.
Ingestion N.A.
For any medical advice take along this material safety data sheet.
5. Fire fighting measures
Flash point (oC) N.A. (=Not Applicable)
Explosion limits (dust explosion) LEL N.A. UEL N.A
Ignition temperature (
o
C) N.A.
Extinguishing media Dry chemical, carbon dioxide, water spray (fog), foam
Special fire fighting precautions N.A.
Hazardous products of decomposition N.A.
6. Accidental release measures
N.A.
7. Handling and storage
No special technical measures for storage.
8. Exposure controls / personal protection
No special technical measures. No personal protective equipment needed.
No special work hygiene practices needed.
Ingredients CAS No. Classification Weight %
Aluminium 7429-90-5 >99
Resins < 1
Pigments < 1
ompany
Address Langston Road, Loughton, Essex IG10 3SL
Telephone 0181-508 5544 (contact product safety coordinator)
Telefax 0181-508 6689
(UK) Ltd.
continued on the next page
Safety information 59
Page 60
MATERIAL SAFETY DATA SHEET Number E-192-b-UK
(93/112/EEC and ISO 11014-1) Date July 1997
Page 2 of 2
Océ OPC Drum Part No. 2912571
9. Physical and chemical properties
Appearance and odour brown odourless drum
Boiling point (
Vapour density (air = 1) N.A. Melting point (
Solubility in water Insoluble Evaporation rate (butyl acetate =1) N.A.
Vapour pressure N.A. % Volatile 0
Other characteristics N.A. pH (solution) N.A.
10. Stability and reactivity
Thermal decomposition None at intended use
Hazardous decomposition products None at intended use
Hazardous reaction None at intended use
11. Toxicological information
Inhalation N.A.
Skin No adverse health effects are expected. (Based on toxicological literature on the ingredients of this product)
Eyes N.A.
Ingestion N.A.
Mutagenicity No mutagenicity detected in Ames test. None of the ingredients is listed as mutagenic or carcinogenic.
12. Ecological information
This product is not biodegradable.
The ingredients are not classified as ecologically hazardous. No adverse environmental effects are expected.
13. Disposal considerations
The drum will be returned to Océ for re-use.
14. Transport information
This product is not classified as a dangerous substance according to the international transport regulations.
15. Regulatory information
This product is an article and contains no dangerous substances. Therefore, indications of special risks or safety advice on the packing are
not prescribed for this product.
16. Other information
Use: photoconductor for copiers.
Revision of E-192-a-UK dated December 1994.
Modification:none
o
C) N.A Density (g/cm3) 2,7
o
C) N.A.
.
Copyright © 1994 Océ-Technologies B.V. Venlo, NL
The content of this safety data sheet is subject to the disclaimer on page 57 of
this manual.
60 Océ 7055/7056 User Manual
Page 61
Safety data sheet Océ B1 Toner
MATERIAL SAFETY DATA SHEET Number E-180-b-UK
(93/112/EEC and ISO 11014-1) Date July 1997
Page 1 of 2
Océ B1 Toner
1. Product and company identification
Product name Océ B1 Toner
Packing Polyethylene bottle, contents 0,4 kg/0.89 lb
C
Océ (UK)
2. Composition / information on ingredients
3. Hazards identification
In a toner dust cloud the formation of an explosive dust-air mixture is possible.
Toner dust may cause discomfort for the eyes and respiratory tract, in the same manner as inert nuisance dust.
To our knowledge, with due observance of the recommended exposure limit and of normal hygiene this product presents no health hazard
in normal use.
4. First aid measures
Eyes contact Rinse with plenty of water.
Skin contact Wash with cold water and soap.
Inhalation Clean nose, mouth, throat. Cough up. Fresh air.
Ingestion Rinse mouth with water. If large quantity swallowed seek medical advice.
For any medical advice take along this material safety data sheet.
5. Fire fighting measures
Flash point (oC) N.A. (=Not Applicable)
Explosion limits (dust explosion) LEL approx.
60 g/m
3
. UEL U (= unknown)
Ignition temperature (
o
C) Approx. 500
Extinguishing media Dry chemical, carbon dioxide, water spray (fog), foam
Special fire fighting precautions N.A.
Hazardous products of decomposition N.A.
6. Accidental release measures
Spills can be cleaned with a vacuum cleaner or a damp rag. Do not use warm water, because this makes the powder soft and sticky.
7. Handling and storage
Keep bottle tightly closed to prevent dust formation. Handle carefully. Avoid breathing dust.
No special technical measures for storage.
8. Exposure controls / personal protection
No special technical measures. No personal protective equipment needed.
Industrial hygiene: after skin contact wash with cold water and soap.
Threshold Limit Value for nuisance dust: 10 mg/m
3
.
Threshold Limit Value for carbon black: 3,5 mg/m
3
.
Ingredients CAS No. Classification Weight %
Polyester resin 170831-75-1 50-100
Phenoxy resin PMN P-95-461 25-50
Carbon black 1333-86-4 5-10
Dye 1-5
Pigments < 1
ompany
Address Langston Road, Loughton, Essex IG10 3SL
Telephone 0181-508 5544 (contact product safety coordinator)
Telefax 0181-508 6689
Ltd.
continued on the next page
Safety information 61
Page 62
MATERIAL SAFETY DATA SHEET Number E-180-b-UK
(93/112/EEC and ISO 11014-1) Date July 1997
Page 2 of 2
Océ B1 Toner
9. Physical and chemical properties
Appearance and odour Black powder, faint odour.
Boiling point (
Vapour density (air = 1) N.A. Softening point (
Solubility in water Insoluble Evaporation rate (butyl acetate = 1) N.A.
Vapour pressure N.A. % Volatile 0
Other characteristics N.A. pH (solution) N.A.
10. Stability and reactivity
Thermal decomposition Above approx. 450oC
Hazardous decomposition products None at intended use
Hazardous reaction None at intended use
11. Toxicological information
Inhalation * At high concentration in air the powder may cause discomfort of upper respiratory system.
Skin * No adverse health effects are expected.
Eyes * Dust may cause discomfort in the same manner as nuisance dust.
Ingestion * Considered relatively harmless.
Mutagenicity No mutagenicity detected in Ames test.
12. Ecological information
This product is not biodegradable.
The ingredients are not classified as ecologically hazardous. No adverse environmental effects are expected.
13. Disposal considerations
Pack waste dustproof to prevent dusting. With due observance of local laws and regulations, dispose of by burial in a sanitary landfill or
incineration. Do not throw in open fire, in order to prevent the risk of a dust explosion.
14. Transport information
This product is not classified as a dangerous substance according to the international transport regulations.
15. Regulatory information
This product is not classified as a dangerous preparation according to the European Directives 67/548/EEC and 88/379/EEC for the
classification, packaging and labelling of dangerous substances and preparations.
Therefore, indications of special risks or safety advice on the packing are not prescribed for this product.
16. Other information
Use: ink powder for copiers.
Room ventilation: see operator manual or safety data sheet for the copier.
Revision of E-180-a-UK dated November 1994.
Modifications: Statement of mutagenicity, softening point and information on ingredients changed.
o
C) N.A Bulk density (kg/m3) Approx. 1250
* These statements are based on toxicological literature on the ingredients of this product and test results of similar
products.
o
C) Approx. 50
Copyright © 1994 Océ-Technologies B.V. Venlo, NL
The content of this safety data sheet is subject to the disclaimer on page 57 of
this manual.
62 Océ 7055/7056 User Manual
Page 63

Safety data sheet Océ Cleaner A
Number: E-104-a-NL
Language: English
Safety Data Sheet
Commercial product name
Packing
Use
Océ Cleaner A, Part No. 1068104
Polyethylene bottle, contents 100 ml
Antistatic cleaning and maintenance ?uid for
glass surfaces
1.1 Chemical characterization
1.2 Form:
liquid
Preparation:
Water (CAS No. 7732-18-550)
Petroleum distillate (free of aromatic
hydrocarbons (CAS No. 8002-05-09)
Silicone oil (CAS No. 67762-92-9)
Emulsi?er
1.3 Colour:
white
50 - 100 %
10 - 25 %
1 - 5 %
< 1 %
Odour: faint
2 Physical and safety data
2.1 Change in physical state
Boiling point approx
. 100 °C
2.2 Density (water=1)
approx. 1
g/cm
3
2.3 Vapour pressure (20 C)
approx. 23
mbar *
2.4 Viscosity ( C)
U (=unknown)
mPas
2.5 Solubility in water
miscible
g/l
in g/l
2.6 pH (in g/l H
2
O) (20°C)
6 to 7
2.7 Flash point >
100
°C
2.8 Ignition temperature
U
°C *
2.9 Explosion limits lower:
U
upper:
U
2.10 Thermal decomposition
No decomposition at normal use
2.11 Hazardous decomposition products
Carbon monoxide in case of incomplete combustion
2.12 Hazardous reaction
None
2.13 Further information
3 Transport IMDG-code:
N.A.
UN-No.:
N.A.
ICAO/IATA-DGR:
N.A.
RID/ADR:
N.A.
ADNR:
N.A.
Other information:
Not classi?ed as a dangerous substance
4 Regulations
OSHA Permissible Exposure Limit for petroleum distillate (CAS No. 8002-05-09):2000 mg/m3(500 ppm.)
This product is not classi?ed as a dangerous preparation according to the European Directives 67/548/EEC and
88/379/EEC/ for the classi?cation, packaging and labelling of dangerous substances and preparations. Therefore,
indications of special risks or safety advice on the packing are not prescribed for this product.
continued on the next page
Safety information 63
Page 64

Safety Data Sheet
Number: E-104-a-NL
Language: English
Commercial product name
Océ Cleaner A, Part No. 1068104
5 Protective measures, storage and handling
5.1 Technical protective measures
No
5.2 Personal protective equipment
Respiratory protection:
Hand protection:
5.3 Industrial hygiene
Avoid frequent or prolonged skin contact
5.4 Protection against ?re and explosion
No special measures
5.5 Disposal
Do not empty into drains. Dispose of in accordance with local laws and regulations.
No
None needed at normal use
Eye protection:
Other:
6 Measures in case of accidents and ?re
6.1 After spillage/leakage/gas leakage
Remove spills with water
6.2 Extinguishing media
6.3 First aid
Inhalation :
Skin :
Eyes :
Ingestion :
6.4 Further information
For any medical advice take along this safety data sheet.
Water, Dry Powder, Carbon dioxide
Suitable:
Not to be used:
Fresh air
Wash with water
Rinse with plenty of water for 5 minutes
Do not induce vomiting, seek medical advice
No
No
Copyright @ 1991 Océ-Nederland B.V., Venlo, NL
The content of this safety data sheet is subject to the disclaimer on page 57 of
this manual.
64 Océ 7055/7056 User Manual
Page 65
Safety data sheet Océ Developer
MATERIAL SAFETY DATA SHEET Number E-181-b-UK
(93/112/EEC and ISO 11014-1) Date July 1997
Page 1 of 2
Océ D1 Developer
1. Product and company identification
Product name Océ D1 Developer
Packing Polyethylene bottle, contents 1,65 kg/3.63 lb
C
Océ (UK)
2. Composition / information on ingredients
3. Hazards identification
In a developer dust cloud the formation of an explosive dust-air mixture is possible.
Developer dust may cause discomfort for the eyes and respiratory tract, in the same manner as inert nuisance dust.
To our knowledge, with due observance of the recommended exposure limit and of normal hygiene this product presents no health hazard
in normal use.
4. First aid measures
Eyes contact Rinse with plenty of water.
Skin contact Wash with cold water and soap.
Inhalation Clean nose, mouth, throat. Cough up. Fresh air.
Ingestion Rinse mouth with water. If large quantity swallowed seek medical advice.
For any medical advice take along this material safety data sheet.
5. Fire fighting measures
Flash point (oC) N.A. (=Not Applicable)
Explosion limits (dust explosion) LEL U (= unknownUEL U)
Ignition temperature (
o
C) Approx. 500
Extinguishing media Dry chemical, carbon dioxide, water spray (fog), foam
Special fire fighting precautions N.A.
Hazardous products of decomposition N.A.
6. Accidental release measures
Spills can be cleaned with a vacuum cleaner or a damp rag. Do not use warm water, because this makes the powder soft and sticky.
7. Handling and storage
Keep bottle tightly closed to prevent dust formation. Handle carefully. Avoid breathing dust.
No special technical measures for storage.
8. Exposure controls / personal protection
No special technical measures. No personal protective equipment needed.
Industrial hygiene: after skin contact wash with cold water and soap.
Threshold Limit Value for nuisance dust: 10 mg/m
3
.
Threshold Limit Value for carbon black: 3,5 mg/m
3
.
Ingredients CAS No. Classification Weight %
Iron oxide 1317-61-9 50-100
Polyester resin 170831-75-1 1-5
Phenoxy resin PMN P-95-461 1-5
Carbon black 1333-86-4 < 1
Dye < 1
Pigments < 1
ompany
Address Langston Road, Loughton, Essex IG10 3SL
Telephone 0181-508 5544 (contact product safety coordinator)
Telefax 0181-508 6689
Ltd.
continued on the next page
Safety information 65
Page 66
MATERIAL SAFETY DATA SHEET Number E-181-b-UK
(93/112/EEC and ISO 11014-1) Date July 1997
Page 2 of 2
Océ D1 Developer
9. Physical and chemical properties
Appearance and odour Black powder, faint odour.
Boiling point (
Vapour density (air = 1) N.A. Softening point (
Solubility in water Insoluble Evaporation rate (butyl acetate = 1) N.A.
Vapour pressure N.A. % Volatile 0
Other characteristics N.A. pH (solution) N.A.
10. Stability and reactivity
Thermal decomposition Above approx. 450oC
Hazardous decomposition products None at intended use
Hazardous reaction None at intended use
11. Toxicological information
Inhalation * At high concentration in air the powder may cause discomfort of upper respiratory system.
Skin * No adverse health effectsare expected.
Eyes * Dust may cause discomfort in the same manner as nuisance dust.
Ingestion * Considered relatively harmless.
Mutagenicity No mutagenicity detected in Ames- test of similar products.
12. Ecological information
This product is not biodegradable.
The ingredients are not classified as ecologically hazardous. No adverse environmental effects are expected.
13. Disposal considerations
Pack waste dustproof to prevent dusting. With due observance of local laws and regulations, dispose of by burial in a sanitary landfill or
incineration. Do not throw in open fire, in order to prevent the risk of a dust explosion.
14. Transport information
This product is not classified as a dangerous substance according to the international transport regulations.
15. Regulatory information
This product is not classified as a dangerous preparation according to the European Directives 67/548/EEC and 88/379/EEC for the
classification, packaging and labelling of dangerous substances and preparations.
Therefore, indications of special risks or safety advice on the packing are not prescribed for this product.
16. Other information
Use: ink powder for copiers.
Room ventilation: see operator manual or safety data sheet for the copier.
Revision of E-181-a-UK dated December 1994.
Modifications: Statement of mutagenicity, softening point and information on ingredients changed.
o
C) N.A Bulk density (kg/m3) Approx. 2500
* These statements are based on toxicological literature on the ingredients of this product and test results of similar
products.
o
C) Approx. 50
Copyright © 1994 Océ-Technologies B.V. Venlo, NL
The content of this safety data sheet is subject to the disclaimer on page 57 of
this manual.
66 Océ 7055/7056 User Manual
Page 67

EPA ENERGY STAR
Océ-Technologies B.V. has joined the ENERGY STAR ®Program of the
United States Environmental Protection Agency (EPA). The purpose of the
®
ENERGY ST AR
energy-efficient equipment, thereby potentially reducing combustion-related
pollution.
Using the energy management features outlined below prevents unnecessary
power consumption, which helps to prevent air pollution from electricity
generating plants and saves money on your utility bills.
Program is to promote the manufacturing and marketing of
®
As an ENERGY STAR
Océ 7055 and 7056 large format copier models meet the ENERGY ST AR®
the
guidelines for energy efficiency.
The EPA ENERGY STAR
following features:
auto-off mode
environmental benef its. The copiers are shipped with the auto-off mode default
time set at 2 minutes, which means that the device switches itself of f 2 minutes
after the last copy is made. The auto-off mode default time is a fix ed value and
cannot be adjusted. The auto-off mode recovery time is less than 1 second ,
after which copying can be resumed (“instant copying”).
recycled paper
These copiers are designed to use recycled paper. Product literature on
recommended types of recycled copier paper can b e o btained from your local
Océ company or Océ Headquarters (Océ-Technologies B.V.) in Venlo, the
Netherlands.
The use of the auto-off feature offers economic and
The use of recycled paper also benefits the environment.
®
Partner, Océ-Technologies B.V. has determined that
®
criteria for these large format copiers involve the
ENERGY STAR
Safety information 67
®
is a U.S. registered mark.
Page 68

68 Océ 7055/7056 User Manual
Page 69

Appendix C
Miscellaneous
Océ 7055/7056
User Manual
69
Page 70

Notation conventions
There are a number of notation conventions used in this manual. This
consistent style enables yo u to quickly bec ome conversant with the u se of this
manual and consequently the Océ 7055/7056.
Description
Each section or subsection contains a description of the feature or
operation identified in the title. It might also include possible applications, as
well as any guidelines that you should bear in mind.
Procedures
A description is followed by a procedure. A procedure always
begins with a phrase which briefly describes the procedure, followed by a
series of numbered steps that take you, step by step, through all phases of
performing the operation.
Figures and tables
Figures and tables are titled and numbered sequentially
throughout this manual. Figures include pictures of product components,
screendumps, examples, and diagrams of concepts discussed in the
description.
Attention getters
There are several types of information to which we draw
your attention. This information is classified as follows:
Note:
In a ‘Note’, information is given about matters whic h ensure the proper
functioning of the machine or application, but useful advice concerning its
operation may also be given.
Attention:
The information that follows ‘Attention’ is given to prevent
something (your copy or original, the copier or printer, data files etc.)
being damaged.
Caution:
The information that follows ‘Caution’ is given to prevent you
suffering personal injury.
70 Océ 7055/7056 User Manual
Page 71

Reader’s comment sheet
Have you found this manual to be accurate?
Yes
❏
No
❏
Could you operate the product after reading this manual?
Yes
❏
No
❏
Does this manual provide enough background information?
Yes
❏
No
❏
Is the format of this manual convenient in size, readability and arrangement
(page layout, chapter order, etc.)?
Yes
❏
No
❏
Could you find the information you were looking for?
Always
❏
Most of the times
❏
Sometimes
❏
Not at all
❏
What did you use to find the required information?
Table of contents
❏
Index
❏
Are you satisfied with this manual?
Yes
❏
No
❏
Thank you for evaluating this manual.
If you have other comments or concerns, please explain or suggest
improvements overleaf or on a separate shee t.
Miscellaneous 71
7114124
Page 72

Comments:
--------------------------------------------------------------------------------------------
--------------------------------------------------------------------------------------------
--------------------------------------------------------------------------------------------
--------------------------------------------------------------------------------------------
--------------------------------------------------------------------------------------------
--------------------------------------------------------------------------------------------
Date:
This reader’s comment sheet is completed by:
(If you prefer to remain unknown, please do fill in your occupation)
:
Name
Occupation:
Company:
Phone:
Address:
City:
Country:
Please return this sheet to:
Océ-Technologies B.V.
For the attention of ITC User Documentation.
P.O. Box 101,
5900 MA Venlo
The Netherlands
72 Océ 7055/7056 User Manual
Page 73

Addresses of local Océ organisations
Océ-Australia Ltd.
P.O.Box 363
Ferntree Gully MDC VIC 3165
Australia
Océ-Österreich GmbH
Postfach 95
1233 Vienna
Austria
Océ-Belgium N.V./S.A.
Avenue J.Bordetlaan 32
1140 Brussels
Belgium
Océ-Brasil Comércio e Industria Ltda.
Caixa Postal 3187
01060-970 Sao Paulo, SP
Brazil
Océ-Danmark A.S.
Korn marksvej 6
DK 2605
Denmark
Océ-France S.A.
32, Avenue du Pavé Neuf,
93161 Noisy-le-grand, Cedex
France
Océ-Deutschland GmbH
Postfach 101454
4330 Mülheim an der Ruhr (13)
Deutschland
Océ (Hong Kong China) Ltd.
12/F 1202 The Lee Gardens
33 Hysan Avenue, Causeway Bay
Hong Kong
Brøndby
Océ-Canada Inc.
525, Logan Avenue,
Toronto, Ontario M4K 3B3
Canada
Océ Office Equipment (Beijing) Co Ltd.
Xu Mu Cheng
Chaoyang District
Beijing 100028
China
Océ-Česká republika s.r.o.
Hanusova 18
14021 Praha 4
Pankrác,
Czech Republic
Océ-Hungária Kft.
P.O.B. 237
1241 Budapest
Hungary
Océ-Italia S.p.A.
Strada Padana Superiore 2/B
20063 Cernusco sul Naviglio (MI)
Italia
Océ Systems (Malaysia Sdn. Bhd.)
#3.01, Level 3, Wisma Academy
Lot 4A, Jalan 19/1
46300 Petalig Jaya
Malaysia
Miscellaneous 73
Page 74

Océ-Nederland B.V.
P.O.Box 800
5201 AV ‘s-Hertogenbosch
The Netherlands
Océ (Taiwan) Ltd.
No. 99-24 Nan Kang Road Sec.2
Taipeh, Taiwan
Taiwan, RO
Océ Norge A/S
Postboks 53, Grefsen
0409 Oslo 4
Norway
Océ-Poland Ltd.
ul. Lopuszànska 53
02-0232 Warszawa
Poland
Océ-Lima Mayer S.A.
Av. José Gomes Ferreira, 11
Ed. Atlas II Miraflores
1495 Algés
Portugal
Océ (Far East) Pte. Ltd./
Océ (Singapore) Pte. Ltd.,
#03-00 Wisma Gulab
190 MacPherson Road
Singapore 348548
Océ (Thailand) Ltd.
16th Floor, B.B. Building
54 Asoke Road, Sukhumvit 21
Bangkok 10110
Thailand
Océ-U.K.Ltd.
Langston Road
Loughton, Essex IG10 3SL
United Kingdom
Océ-USA Inc.
5450 North Cumberland Av.
Chicago, Ill. 60656
U.S.A.
Océ España SA
Business Park MAS BLAU
C/Osona 2, 2-3a Planta
08820 El Prat del Llobregat (Barcelona)
Spain
Océ-Svenska AB
P.O.box 1231
S-164 28 Kista
Sweden
Océ-Schweiz AG
Sägereistrasse 29
CH8152 Glattbrugg
Switzerland
74 Océ 7055/7056 User Manual
Page 75

Index
A
add toner’ indicator 32
adding toner 32
C
cleaner a 36
cleaning the transparent platen 35
copy feed table 42
copy material 7
copy material input button 7
copy material selection button 7
copy quantity 8
correction button 8
correction button 16
pressure platen 35
programming roll specifications 31
S
safety data sheets 57
safety information 53
standard mode 8
start button 7
stop button 7
switching on/off 9
synchro cut mode 8
T
toner 32
top cover 41
trailing edge 8, 20
transparent platen 35
E
exposure level 7
exposure setting 19
F
fuser 43
O
on/off switch 9
operating mode 8
operating panel 7
original feed 14, 16
W
waste toner bag 34
P
paper path indicator 38, 41, 42
Index 75
 Loading...