

Page 1
Océ 3122
Addendum Copy
Addendum Océ 3122
Page 2

Océ 3122 Copy
Copying Manual
This document provides information which is new or has changed compared
with the Océ 3121 manual.
Common remarks
■
The Fax Monitor key is always displayed in the Basic Features screen for
copying.
■
When using the Stack Bypass, press the [Paper Select] key and then the
[Stack Bypass] key.
■
The Film Projector is not available with the Océ 3122.
Page 3-27, Notice and 3-29, step 3:
To cancel [Number of Output PG S] and
change to [Copy Ratio(s)], cancel the Multi-page Enlarge mode using the
Reset key and then change the specification.
Page 3-35, Memo:
If the ADF or RDF is used and there are an odd number of
originals, the back of the last page is left blank. (The machine’s counter does
not count the blank page as a copy).
Page 3-37, step 4 and page 4-11, step 3:
If you place your original on the
platen glass the following messages appear on the touch p a nel display:
“Copying the 2nd side...”
Place the 2nd original and press the Start key again.
“Copying the 1st side...”
Page 3-45, Memo in step 2:
■
You can staple copies manually after they have been sorted, by using the
Manual Staple Mode.
■
If you are going to perform manual stapli ng for sorted copies of originals
placed on the platen glass, before copying turn Face Down Output “Off” and
then start copying from the last page.
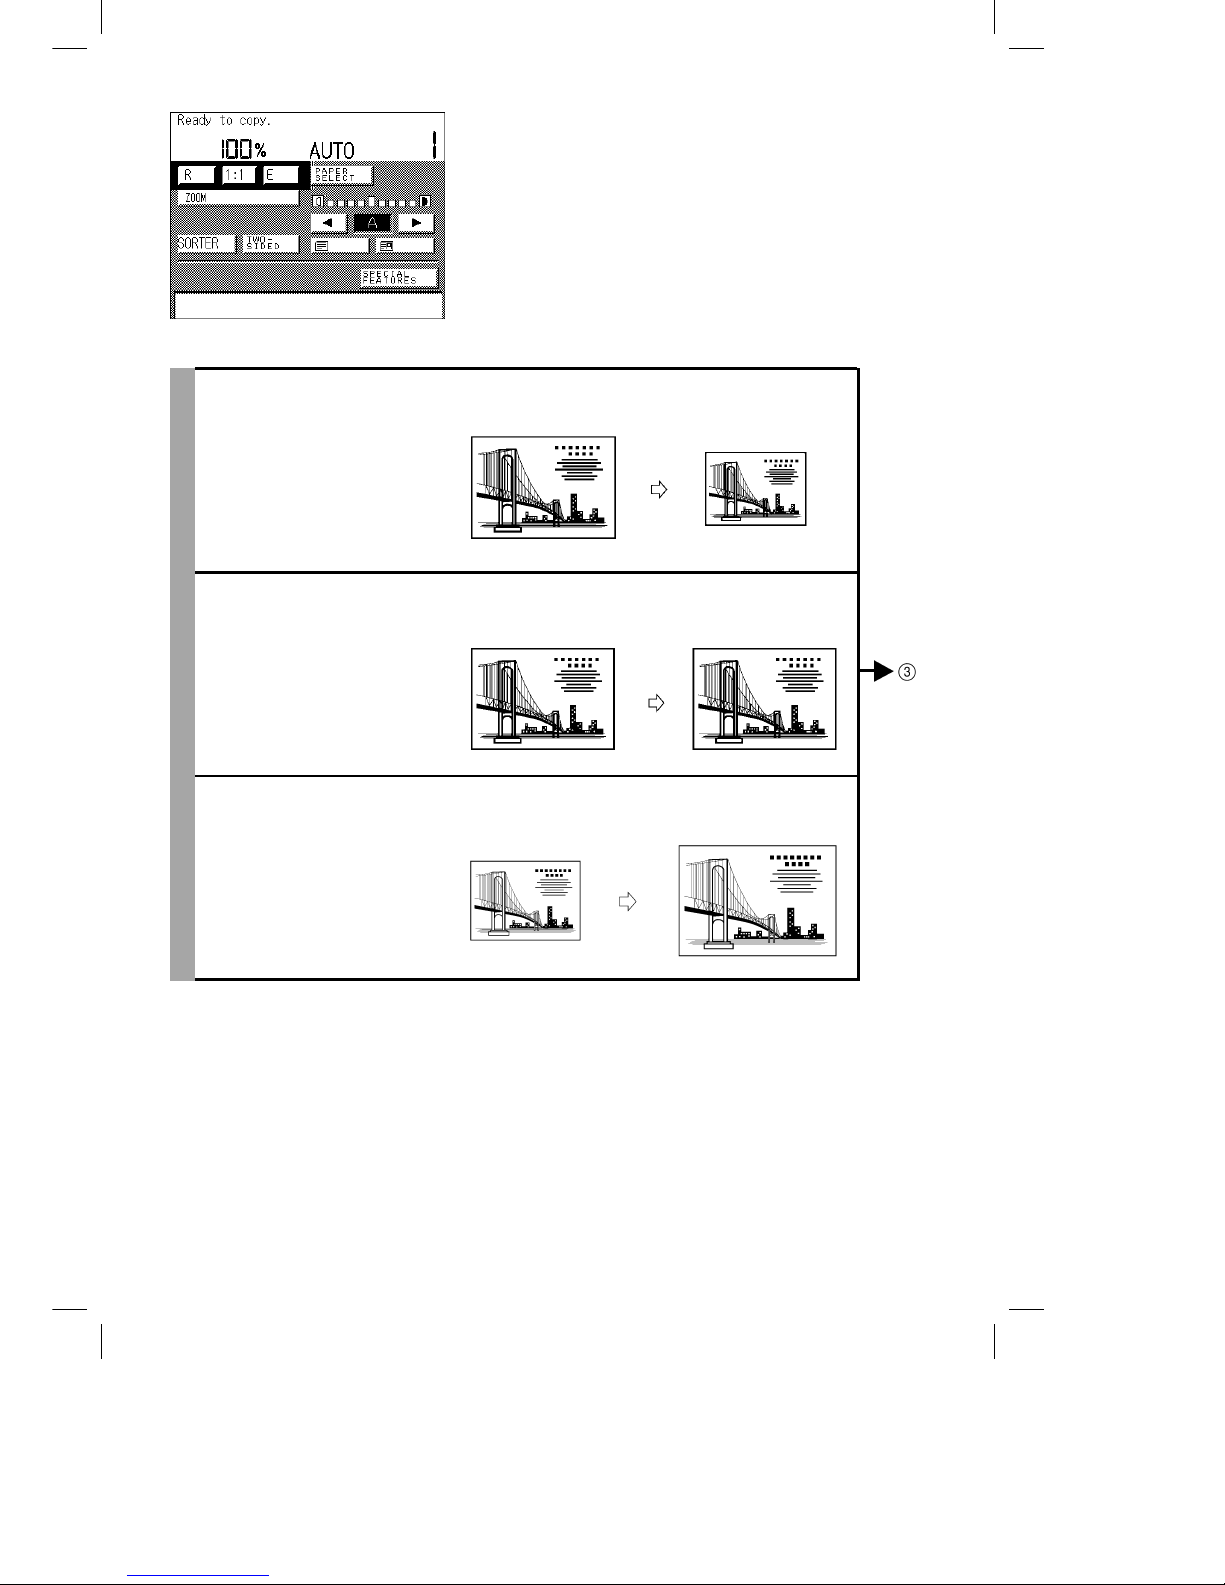
Page 4-19, Memo in step 3:
The image will shift in the exact opposite
direction of the selected arrow.
Page 4-36, step 3:
■
When the RDF is attached: Select either [2 on 1], [4 on 1] or [2 on
1/Two-sided], then press the [Ok] key.
Page 3

Addendum Océ 3122
Notice: Only [2 on 1] can be selected when the originals are placed
horizontally.
■
When RDF is not attached: Press the [Ok] key.
Page 4

Océ 3122 Copy
Page 5
Océ 3121 – Copying Manual – English
1
PREFACE
Thank you for purchasing the Océ 3121 Series. This manual describes the Océ 3121 Series, their
functions, and their method of use. It also describes the various precautions to be observed in order to
ensure safe operation. Please read this manual thoroughly before operating the Océ 3121 Series in order
to familiarise yourself with its capabilities, and to make the most of its many functions. After reading this
manual, store it in a safe place for future reference.
CAUTION:
In this manual, CAUTION MESSAGES with this symbol indicate that neglecting the suggested
procedure or practice could result in personal injury.
NOTICE:
Considerable effort has been made to ensure that this manual is free of inaccuracies and omissions.
However, as we are constantly improving our products, some of the data contained herein may not
exactly reflect the current model of the particular product with which this manual has been included. If
you have a need for an exact specification, please contact Océ 3121 for the current specification.
This apparatus complies with the requirements of Directive 76/889/EEC, 87/308/EEC and European Standard EN 55014.
Cet appareil est conforme aux Directives 76/889/CEE et 87/308/CEE, ainsi qu’à la Norme Européenne EN 55014.
Dieses Gerät entspricht den Vorschriften der EG-Richtlinie 76/889/EWG, 87/308/EWG und der Europäischen Norm
EN 55014.
Dette apparat overholder bestemmelserne i EF-direktiverne 76/889/EEC, 87/308/EEC og Europæisk Standard EN 55014.
Denna apparat motsvarar kraven i EG-direktiv 76/889/EG och 87/308/EG samt Europeisk Standard EN 55014.
Tämä laite noudattaa EY-direktiivejä 76/889/EEC, 87/308/EEC sekä Euroopan Standardia EN 55014.
Dette apparat etterkommer kravene i EF direktiv 76/889/EEC, 87/308/EEC og europeisk standard EN 55014.
Deze apparatuur voldoet aan de gestelde richtlijnen 76/889/EEC, 87/308/EEC en aan de europese norm EN 55014.
Questo apparecchio è conforme alle direttive CEE/76/889, CEE/87/308 e alla normativa Europea EN 55014.
Este aparato cumple los requisitos de las directivas 76/889/CEE, 87/308/CEE y la Norma Europea EN 55014. Se han
incorporado filtros de línea para la eliminación de interferencias, según las especificaciones requeridas.
Este aparelho está de acordo com os requisitos da Directiva 76/889/EEC, 87/308/EEC e Standard Europeu EN 550 14.
Η συσκευη´ αυτη´ συµφωνει´ µε τις απαιτη´ σεις των οδηγιω´ ν 76/889/EEC, 87/308/EEC και τα Ευρωπαικα´ Standard
EN 55014.
Aparat ustreza zahtevam navodil 76/889/EGS, 87/308/EGS in evropskemu standardu EN 550 14.
A berendezés megfelel a 76/889/EEC, a 87/308/EEC és az EN 55014 szabványok elo˝ írásainak.
Niniejsze urza˛dzenie spelnia wymagania zalecen´ 76/889/EEC, 87/308/EEC i normy europejskiej EN 55014.
Zarˇízení vyhovuje pozˇadavku˚m prˇedpisu˚ 76/889/EEC, 87/308/EEC a evropské normeˇ EN 55014.
Seade vastab EÜ normidele 76/889 EEC, 87/308 EEC ja Euroopa Standardile EN 55014.
Iekârta atbilst Eiropas Savienìbas direktìvu 76/889/EEC, 87/308/EEC un Eiropas standarta EN 55014 prasìbâm.
Sˇis aparatas atitinka direktyvu˛ 76/889/EEC ir 87/308/EEC reikalavimus ir Europos standartus EN 55014.
Ètot apparat sootvetstvuet trebovaniqm direktiv 76/889/EEC, 87/308/EEC i Evropejskogo standarta
EN 55014.
Copier I.8
Page 6

Océ 3122
Addendum Copy
Addendum Océ 3122
Page 7

Copying Manual
This document provides information which is new or has changed compared
with the Océ 3121 manual.
Common remarks
■
The Fax Monitor key is always displayed in the Basic Features screen for
copying.
■
When using the Stack Bypass, press the [Paper Select] key and then the
[Stack Bypass] key.
■
The Film Projector is not available with the Océ 3122.
Page 3-27, Notice and 3-29, step 3:
To cancel [Numb er of Output PGS] and
change to [Copy Ratio(s)], cancel the Multi-page Enlarge mode using the
Reset key and then change the specification.
Page 3-35, Memo:
If the ADF or RDF is used and there are an odd number of
originals, the back of the last page is left blank. (The machine’s counter does
not count the blank page as a copy).
Page 3-37, step 4 and page 4-11, step 3:
If you place your original on the
platen glass the foll owi ng message s a ppear on t he touch pan el display:
“Copying the 2nd side . ..”
Place the 2nd original and press the Start key again.
“Copying the 1st side...”
Page 3-45, Memo in step 2:
■
You can staple copies manually after they have been sorted, by using the
Manual Staple Mode.
■
If you are going to perform manual stapling fo r sorted copi e s of originals
placed on the platen glass, before copying turn Face Down Output “Off” and
then start copying from the last page.
Page 4-19, Memo in step 3:
direction of the selected arrow.
Page 4-36, step 3:
■
When the RDF is attached: Select either [2 on 1], [4 on 1] or [2 on
1/Two-sided], then press the [Ok] key.
Océ 3122 Copy
The image will shift in the exact opposite
Page 8

Notice: Only [2 on 1] can be selected when the originals are placed
horizontally.
■
When RDF is not attached: Press the [Ok] key.
Addendum Océ 3122
Page 9

Océ 3122 Copy
Page 10
Océ 3121 – Copying Manual – English
2
Manuals Provided with the Océ 3121 Series
We have prepared the following manuals so that you can make full use of the Océ 3121 Series
functions. The Copying Manual and Reference Manual (English versions) are packed together with all
of the main units in this product series. When other functions such as FAX functions are provided as
part of the standard specification, the function related manual (English versions) for the respective
function also is packed together with the main units. When FAX functions or printer functions are added
on later, the required function related manual is also packed together with the following boards
(optional). We recommend using these function related manuals in combination with the Reference
Manual.
Operator’s Manual
Main Unit
and Options
Reference
Manual
Copying Manual Facsimile
Manual
PostScript/PCL
Operator’s
Manual
PCL
Operator’s
Manual
Océ 3121 Yes Yes
Option
G3 FAX
Board-C1
Yes
Multi-PDL Printer
Board-B1
Yes
Printer
Board-P3
Yes
Page 11

Océ 3121 – Copying Manual – English
3
Differences between Copying Manual and
Reference Manual
The Océ 3121 Series can be expanded to support non-copy functions such as, FAX and printer
functions. Accordingly, you are provided with a Reference Manual, Copying Manual, and a Facsimile
Manual.
Reference Manual: Describes operations common to all machines such as how to turn the
power ON, how to inspect and maintain machines, and how to handle
and set common functions.
Function related manual: Describes how to handle each of the functions such as copy and FAX
functions.
Descriptions of copy functions are distributed between the Reference Manual and Copying Manual as
follows. We recommend that you use these manuals according to your particular needs. At the back of
this Copying Manual, you will also find indexes that list the combined functions of the Reference
Manual and Copying Manual.
Reference Manual
Cautions for ensuring safe use of the machine ................................................................... (Chapter 1)
Names, functions and specifications of parts of copier and options....................................(Chapter 1)
How to turn the power ON and OFF .................................................................................... (Chapter 2)
Clearing paper jams..............................................................................................................(Chapter 5)
Loading paper (paper drawer, stack bypass) and adding toner ..........................................(Chapter 5)
Cleaning parts when copies appear dirty .............................................................................(Chapter 5)
How to set common specifications to each of the following functions.................................(Chapter 3)
· Settings on the display when power is turned ON
· Settings on display set by Initial Function
· Setting Automatic Exposure Adjustment
· Setting the Audible Tones (Entry tone, Error tone, Job completed tone)
· Setting whether or not each drawer is subject to Auto Drawer Switching function
· Setting paper size and icon for special cassettes
· Setting envelope cassettes
· Setting display of the Paper Selection display for the stack bypass
· Setting TRAY functions
· Setting the printing order in copy, FAX and printer operations
· Setting the system setting password
· Setting Dept. ID management
· Returning the Custom Common Settings to their defaults
· Setting the Auto Clear Time and Auto Sleep Time
Copying Manual
Parts and their functions when using the copy functions of the machine ........................... (Chapter 1)
How to place originals .......................................................................................................... (Chapter 2)
How to use the guide function ..............................................................................................(Chapter 2)
How to make copies in the Basic Features and Special Features modes .................(Chapters 3 to 6)
How to make copies using options.......................................................................................(Chapter 7)
How to set Custom Copy Settings to each of the following functions ................................. (Chapter 8)
· Setting Automatic Sort ON/OFF
· Setting Reversal and Output of Copied Sheets ON/OFF
· Setting Display of Projector Key ON/OFF
· Setting Photo Mode ON/OFF
· Setting Standard Keys
· Restoring Settings to Initial Settings
· Changing the Current Standard Settings
Page 12

Océ 3121 – Copying Manual – English
4
Contents
■ Preface........................................................................................................................ 1
Manuals Provided with the Océ 3121 Series .....................................................................2
Differences between Copying Manual and Reference Manual ..........................................3
Contents ..............................................................................................................................4
How This Manual is Organised ...........................................................................................8
Illustrated Function Summary .............................................................................................9
How to Use This Manual ..................................................................................................26
Chapter 1 Before You Start Using Copy Functions
■ Parts and Their Functions.................................................................................... 1-2
· Control Panel......................................................................................................... 1-2
· Touch Panel Display ............................................................................................. 1-3
· Basic Features Screen ..................................................................................... 1-3
· Special Features Screen .................................................................................. 1-4
· Additional Function Screen .............................................................................. 1-6
■ Keying Operations ................................................................................................. 1-7
· Using the Control Panel to Perform Settings........................................................ 1-7
· Using the Touch Panel Display to Perform Settings .......................................... 1-11
Chapter 2 Basic Copying
■ Flow of Copy Operations ...................................................................................... 2-2
· Auto Drawer Switching .......................................................................................... 2-5
· Auto Clear Function .............................................................................................. 2-5
· Sleep Function ...................................................................................................... 2-5
· Auto Sleep Function .............................................................................................. 2-6
· Paper Supply Indicator .......................................................................................... 2-6
· Guide Function...................................................................................................... 2-7
■ Inserting the Control Card .................................................................................... 2-8
· Operations before Using Copy Functions ............................................................. 2-8
· Operations after Using Copy Functions ................................................................ 2-9
■ Entering the Dept. ID and Password................................................................. 2-10
· Operations after Turning Power ON ................................................................... 2-10
· Operations after Using Copy Functions .............................................................. 2-11
■ Placing Originals.................................................................................................. 2-12
· Orientation of Originals ....................................................................................... 2-12
· Placing an Original on the Platen Glass ............................................................. 2-13
· Placing Originals in the ADF ............................................................................... 2-14
· How Originals Feed Through the ADF .......................................................... 2-15
· Placing Originals in the RDF............................................................................... 2-16
· How Originals Feed Through the RDF
(when making copies of one side of the original).......................................... 2-18
· How Originals Feed Through the RDF
(when making copies of two sides of the original)........................................ 2-19
■ Entering the Copy Quantity (making a specific number of copies)............... 2-20
· Entering the Copy Quantity ................................................................................. 2-20
· Changing the Copy Quantity ............................................................................... 2-21
■ Interrupting the Current Copy Job to Make Priority Copies
(Interrupt Mode).................................................................................................... 2-22
Page 13

Océ 3121 – Copying Manual – English
5
Chapter 3 Making Copies Using the Basic Features
■ Selecting the Copy Paper Size (PAPER SELECT).............................................. 3-2
· Auto Paper Selection ............................................................................................ 3-2
· Manual Paper Selection........................................................................................ 3-4
· Using the Stack Bypass........................................................................................ 3-5
■ Adjusting Exposure and Image Quality............................................................... 3-8
· Adjusting Exposure (LIGHT, DARK)..................................................................... 3-8
· Selecting Image Quality (TEXT, TEXT/PHOTO, PHOTO) ................................... 3-9
· Automatic Adjustment of Exposure and Image Quality (A)................................ 3-11
■ Enlarging/Reducing Originals from One Standard Paper Size to Another
(R, 1:1, E).............................................................................................................. 3-12
■ Reducing/Enlarging Originals to the Desired Size (ZOOM MODE)................ 3-14
· Reducing Originals at a Desired Copy Ratio (ZOOM) ....................................... 3-14
· Automatically Setting the Copy Ratio Based on the Original and Copy
Paper Sizes (AUTO ZOOM)................................................................................ 3-16
· Slightly Reducing Images to Prevent the Original Periphery from Being Cut
(ENTIRE IMAGE)................................................................................................. 3-19
· Calculating the Copy Ratio Based on the Original and Copy Paper Sizes
(ZOOM PROGRAM) ............................................................................................ 3-20
· Enlarging/Reducing Originals at Copy Ratios Set Independently for X and Y
Axes (XY ZOOM)................................................................................................. 3-23
· Manually Specifying the Copy Ratio.............................................................. 3-24
· Automatically Specifying the Copy Ratio....................................................... 3-25
· Reducing/Enlarging Originals to Copy Paper Sizes Larger than A3
(MULTI-PG ENLARGE) ....................................................................................... 3-27
· Copy Ratio Specification and Required Paper Sizes and Quantities ........... 3-28
· Specifying the Copy Ratio by % (COPY RATIO (S)) .................................... 3-29
· Specifying the Copy Ratio by Number of Output Pages
(NUMBER OF OUTPUT PGS)...................................................................... 3-31
■ Copying Two-sided Originals, Copying onto Both Sides of Copy Paper
(TWO-SIDED) ........................................................................................................ 3-34
· Making Two-sided Copies from One-sided Originals (1 ➝ 2-SIDED)................ 3-35
· Making Two-sided Copies from Two-sided Originals (2 ➝ 2-SIDED)................ 3-38
· Making One-sided Copies from Two-sided Originals (2 ➝ 1-SIDED)................ 3-40
· Making Two-sided Copies from Facing Pages in a Book in One Step
(BOOK ➝ 2-SIDED) ............................................................................................ 3-42
■ Sorting Copies (SORTER)................................................................................... 3-44
Chapter 4 Special Features
■ Special Feature Modes.......................................................................................... 4-2
■ Calling up the Special Features Screen.............................................................. 4-3
■ Making Copies of Facing Pages in a Book onto Two Separate Copy
Sheets in One Step (TWO-PAGE SEPARATION) ................................................ 4-4
■ Making Copies with Sheets of Paper Interleaved between Transparencies
(TRANSP. INTERLVING)........................................................................................ 4-6
■ Superimposing Two Original Images onto a Single Copy Sheet
(OVERLAY).............................................................................................................. 4-9
· Superimposing Two Originals (SHEET OVERLAY) ........................................... 4-10
· Superimposing Facing Pages in a Book (BOOK OVERLAY) ............................ 4-12
■ Feeding Different-size Originals Together in the Feeder
(DIF. SIZE ORIGINAL) .......................................................................................... 4-14
Page 14

Océ 3121 – Copying Manual – English
6
■ Scanning Thin Sheet Originals (THIN SHEET ORIGINAL)............................... 4-16
■ Making Copies with Original Images Shifted (SHIFT)...................................... 4-18
· Making Copies with Original Images Shifted to the Center or Corner............... 4-18
· Making Copies with Original Images Shifted Using the Number Keys .............. 4-19
■ Making Copies with Margins (MARGIN)............................................................ 4-22
· Making Copies with Margins on Left or Right ..................................................... 4-22
· Making Copies with Margins on Top or Bottom ................................................. 4-24
■ Erasing Shadows from Copies (FRAME ERASE)............................................. 4-26
· Erasing Shadows Around the Original Image on Copies
(ORIGINAL FRAME ERASE).............................................................................. 4-27
· Erasing Shadows from the Edge of Copies (SHEET FRAME ERASE)............. 4-29
· Erasing Shadows from the Center Line or Edge of Copies
(BOOK FRAME ERASE) .................................................................................... 4-30
· Erasing Binding Holes on Copies (BINDING ERASE) ...................................... 4-31
■ Reducing Two or Four Originals to Fit on a Single Copy Sheet
(IMAGE COMB.)................................................................................................. 4-33
■ Dividing an Original into Equal Sections and Copying Each Section on
a Separate Copy Sheet (IMAGE SEPARATION)................................................ 4-38
Chapter 5 Making Copies Using Image Processing Features
■ Image Processing Modes...................................................................................... 5-2
■ Image Processing Designated Areas (AREA DESIG.)....................................... 5-3
· Designating Areas................................................................................................. 5-4
· Clearing Designated Areas (CLEAR AREA)......................................................... 5-6
■ Making Copies Using Image Processing Features (IMAGE CREATION)......... 5-8
· Inverting Original Images (NEGA/POSI) ............................................................... 5-8
· Making Copies with Original Images Repeated in the Vertical Direction
(IMAGE REPEAT) ................................................................................................. 5-9
· Making Copies with Original Images Flipped around the Horizontal Axis
(MIRROR IMAGE)............................................................................................... 5-12
· Making Copies with Original Images Slanted (SLANTED IMAGE).................... 5-15
■ Making Sharp Contrast Copies (SHARPNESS)................................................ 5-17
Chapter 6 Recalling and Storing Modes (Two Special Features)
■ Modes in which Copy Jobs can be Called up .................................................... 6-2
■ Storing Often Used Copy Settings in Memory (MODE MEMORY) ................... 6-3
· Storing Copy Settings for a Copy Job .................................................................. 6-3
· Storing a Memory Key Name................................................................................ 6-6
· Erasing a Copy Job............................................................................................... 6-8
· Recalling a Copy Job.......................................................................................... 6-10
■ Recalling the Previous Copy Job (RECALL).................................................... 6-11
Page 15

Océ 3121 – Copying Manual – English
7
Chapter 7 Making Copies Using the Optional Film Projector
■ Names of Parts on Film Projector........................................................................ 7-2
■ How to Setup and Disconnect the Film Projector.............................................. 7-3
· How to Set up the Film Projector.......................................................................... 7-3
· How to Disconnect the Film Projector .................................................................. 7-4
■ Making Copies from Photographic Film (PROJECTOR).................................... 7-6
· Making Copies from 35 mm Negative Film .......................................................... 7-7
· Making Copies from 35 mm Positive Film.......................................................... 7-13
· Making Copies from 4 x 5 Negative Film ........................................................... 7-18
· Making Copies from 4 x 5 Positive Film............................................................. 7-23
· Cautions when Using the Film Projector ............................................................ 7-28
· Main Specifications ............................................................................................. 7-28
Chapter 8 Custom Settings
■ What are “Additional Functions”? ....................................................................... 8-2
· Calling up the Custom Copy Settings Screen ...................................................... 8-2
· Custom Copy Settings .......................................................................................... 8-4
■ Setting Automatic Sort ON/OFF (AUTO SORT).................................................. 8-5
■ Setting Reversal and Output of Copied Sheets ON/OFF
(FACE DOWN OUTPUT)......................................................................................... 8-6
■ Setting Display of Projector Key ON/OFF (PROJECTOR) ................................. 8-7
■ Setting Photo Mode ON/OFF (PHOTO MODE) .................................................... 8-8
■ Setting Standard Keys (STANDARD KEY1/KEY2 SETTING) ........................... 8-10
■ Restoring Settings to Initial Settings (INITIALISE CUSTOM SETTINGS)....... 8-11
■ Changing the Current Standard Settings (STANDARD SETTINGS)............... 8-12
· Storing the Standard Settings............................................................................. 8-13
· Initialising the Standard Settings......................................................................... 8-14
Chapter 9 Troubleshooting
■ Self-diagnostic (Error) Displays ........................................................................... 9-2
■ Service Call Message............................................................................................ 9-4
Chapter 10 Appendix
■ Main Specifications.............................................................................................. 10-2
■ Index...................................................................................................................... 10-4
Page 16

Océ 3121 – Copying Manual – English
8
How This Manual is Organised
Chapter 1 Before You Start Using Copy Functions
This chapter describes items you should understand and be familiar
with before using the machine, such as names and functions of parts
on the control panel, how to use the touch panel display, and
meanings of items that appear in the touch panel display.
Chapter 2 Basic Copying
This chapter describes the steps necessary to perform basic copying
with the Océ 3121 Series, including simple ways of making copies,
entering the copy quantity, how to use the Interrupt mode, and how to
place originals.
Chapter 3 Basic Features
This chapter describes the modes that can be selected from the Basic
Features screen in the touch panel display.
Chapter 4 Special Features
This chapter describes the modes that can be selected from the
Special Features screen in the touch panel display.
Chapter 5 Making Copies Using Image Processing
Features
This chapter describes image processing (Area Designation,
Sharpness, Image Creation) that can be set in the Special Features
screen.
Chapter 6 Recalling and Storing Modes
(Two Special Features)
This chapter describes the ”Mode Memory” and ”Recall” features that
can be selected in the Special Features screen.
Chapter 7 Making Copies Using the Film Projector
This chapter describes the ”Projector” mode that can be selected from
the Special Features screen. Attaching the optional film projector on
the machine allows you to make copies from photographic film.
Chapter 8 Custom Settings
This chapter describes how you can change or adjust the initial
settings (defaults) for the various functions described in this chapter to
meet your specific copying needs.
Chapter 9 Troubleshooting
This chapter describes the procedures to be followed when a selfdiagnostic message or service call message appears in the touch
panel display.
Chapter 10 Appendix
This chapter describes machine specifications and gives an index of
this manual.
Parts and Their Functions
Keying Operations
Flow of Copy Operations
Inserting the Control Card
Entering the Dept. ID and Password
Placing Originals
Entering the Copy Quantity (making a specific number of copies)
Interrupting the Current Copy Job to Make Priority Copies (Interrupt
Mode)
Selecting the Copy Paper Size (PAPER SELECT)
Adjusting Exposure and Image Quality
Enlarging/Reducing Originals from One Standard Paper Size to Another
(R, 1:1, E)
Reducing/Enlarging Originals to the Desired Size (ZOOM MODE)
Copying Two-sided Originals, Copying onto Both Sides of Copy Paper
(TWO-SIDED)
Sorting Copies (SORTER)
Special Feature Modes
Calling up the Special Features Screen
Making Copies of Facing Pages in a Book onto Two Separate Copy
Sheets in One Step (TWO-PAGE SEPARATION)
Making Copies with Sheets of Paper Interleaved between
Transparencies (TRANSP. INTERLVING)
Superimposing Two Original Images onto a Single Copy Sheet
(OVERLAY)
Feeding Different-size Originals Together in the Feeder (DIF. SIZE
ORIGINAL)
Scanning Thin Sheet Originals (THIN SHEET ORIGINALS)
Making Copies with Original Images Shifted (SHIFT)
Making Copies with Margins (MARGIN)
Erasing Shadows from Copies (FRAME ERASE)
Reducing Two or Four Originals to Fit on a Single Copy Sheet (IMAGE
COMB.)
Dividing an Original Into Equal Sections and Copying Each Section on a
Separate Copy Sheet (IMAGE SEPARATION)
Image Processing Modes
Image Processing Designated Areas (AREA DESIG.)
Making Copies Using Image Processing Features (IMAGE CREATION)
Making Sharp Contrast Copies (SHARPNESS)
Modes in which Copy Jobs can be Called up
Storing Often Used Copy Settings in Memory (MODE MEMORY)
Recalling the Previous Copy Job (RECALL)
Names of Parts on Film Projector
How to Setup and Disconnect the Film Projector
Making Copies from Photographic Film (PROJECTOR)
Cautions when Using the Optional Film Projector
Main Specifications
What are ”Additional Functions”?
Setting Automatic Sort ON/OFF (AUTO SORT)
Setting Reversal and Output Copies Sheets ON/OFF (FACE DOWN
OUTPUT)
Setting Display of Projector Key ON/OFF (PROJECTOR)
Setting Photo Mode ON/OFF (PHOTO MODE)
Setting Standard Keys (STANDARD KEY1/KEY2 SETTING)
Restoring Settings to Initial Settings (INITIALISE CUSTOM SETTINGS)
Changing the Current Standard Settings (STANDARD SETTINGS)
Self-diagnostic (Error) Displays
Service Call Message
Main Specifications
Index
Page 17

Océ 3121 – Copying Manual – English
9
Illustrated Function Summary
[PAPER SELECT]
(See p. 3-2.)
The machine automatically
selects the right paper size
based on the size of the original
and the selected copy ratio.
A5 original Copy to A4
Example:
If you want to make
an A5 copy of an
A4 original,
designate the size
manually.
[ ] (LIGHT)
[
] (DARK)
(See p. 3-8.)
Adjusts the copy exposure to
match the contrast of the
original.
Original Light Dark
[ ] (TEXT)
[
] (TEXT/PHOTO)
[
] (PHOTO)
(See p. 3-9.)
Adjusts the image quality to
match the type of original.
Text Text/Photo Photo
[A] (AUTO)
(See p. 3-11.)
The machine automatically
adjusts the image quality to the
most appropriate level.
Specifications are also set so
that the exposure and image
quality are automatically
adjusted.
Original Copy
1
2
3
4
5
6
7
8
9
10
Page 18
Océ 3121 – Copying Manual – English
10
[R]
(See p. 3-12.)
Makes reduced size copies of
standard-size originals onto
standard-size paper.
A4R original A5R copy
[1:1]
(See p. 3-12.)
Makes copies the same size as
the original.
A4R original A4R copy
[E]
(See p. 3-12.)
Makes enlarged size copies of
standard-size originals onto
standard-size paper.
A5R original A4R copy
Page 19
Océ 3121 – Copying Manual – English
11
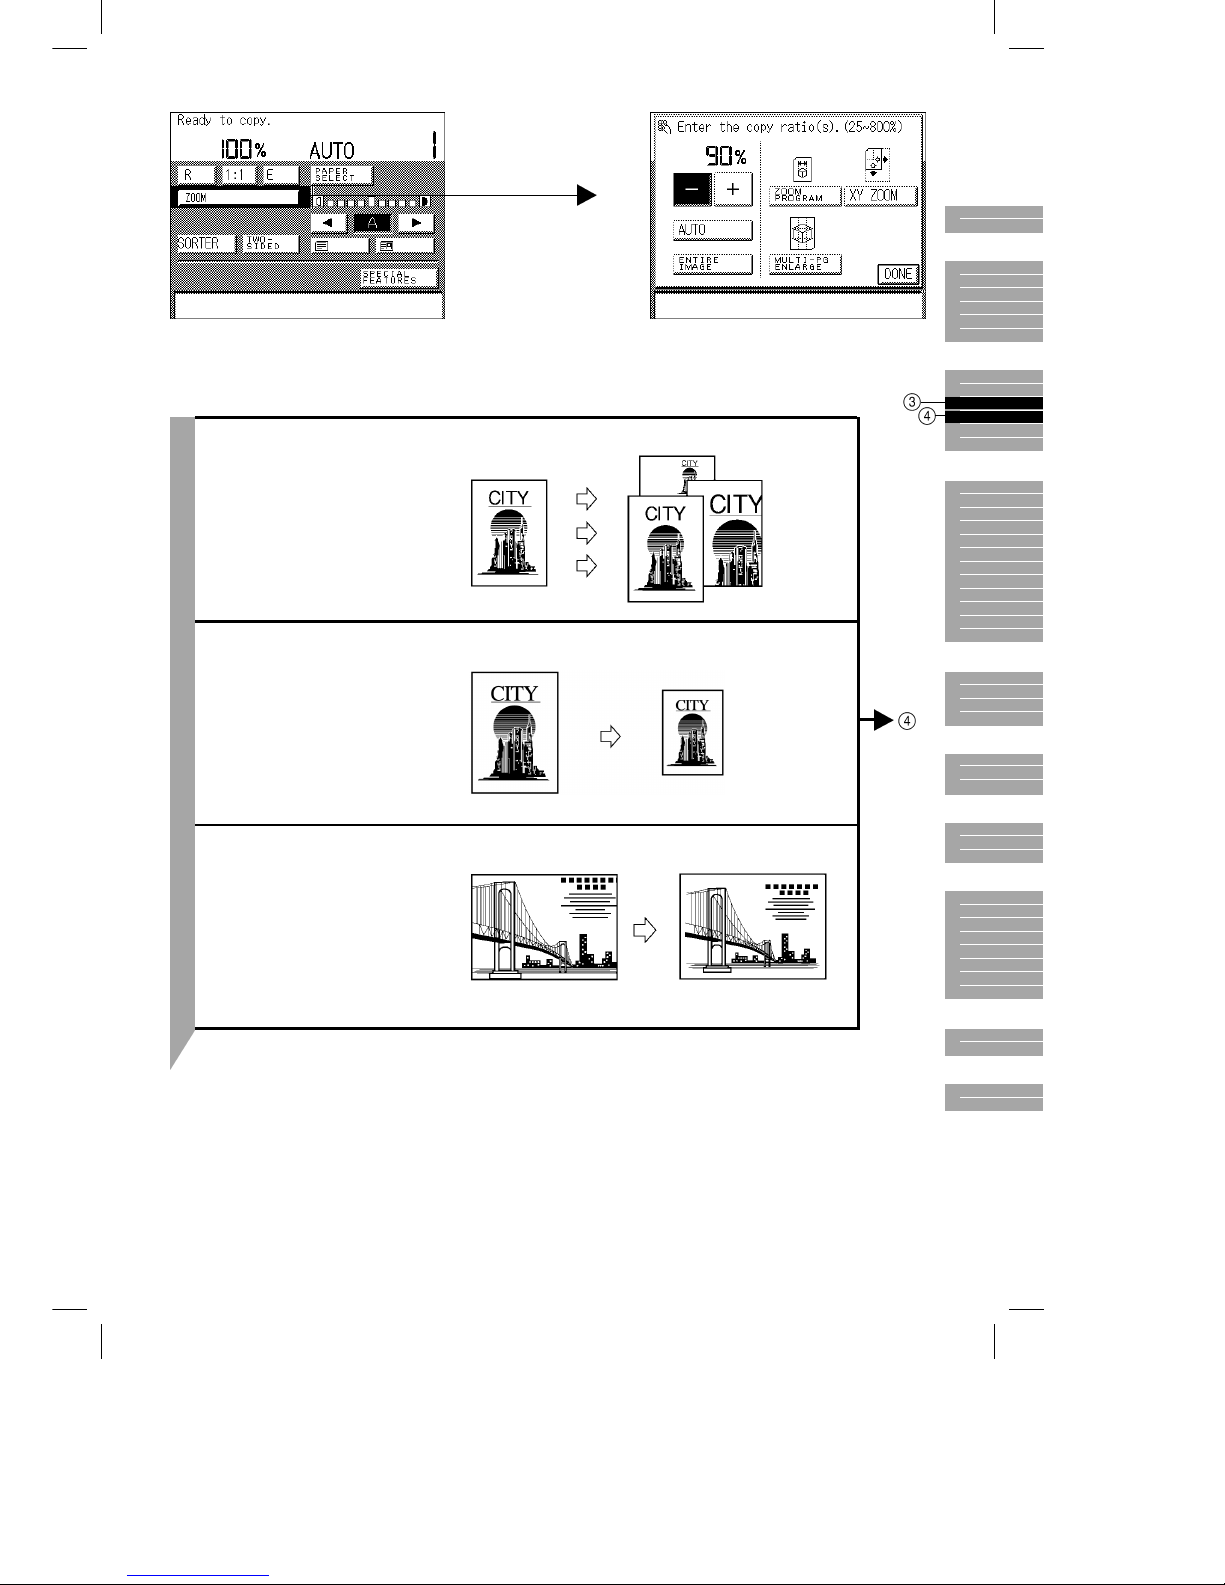
[ZOOM]
[–] (ZOOM)
[+]
(See p. 3-14.)
Makes reduced or enlarged
copies at any copy ratio in 1%
increments.
Original Copy
[AUTO]
(See p. 3-16.)
The machine automatically
selects the appropriate copy
ratio based on the size of the
original and the selected copy
paper.
Enlargement Reduction
[ENTIRE IMAGE]
(See p. 3-19.)
When copying an original where
the image fills the page, parts of
the image may be cut off on
copies. Using the Entire Image
mode, the image is slightly
reduced before copying so that
the entire original image is
reproduced on the copy.
Original Copy
1
2
3
4
5
6
7
8
9
10
Page 20
Océ 3121 – Copying Manual – English
12
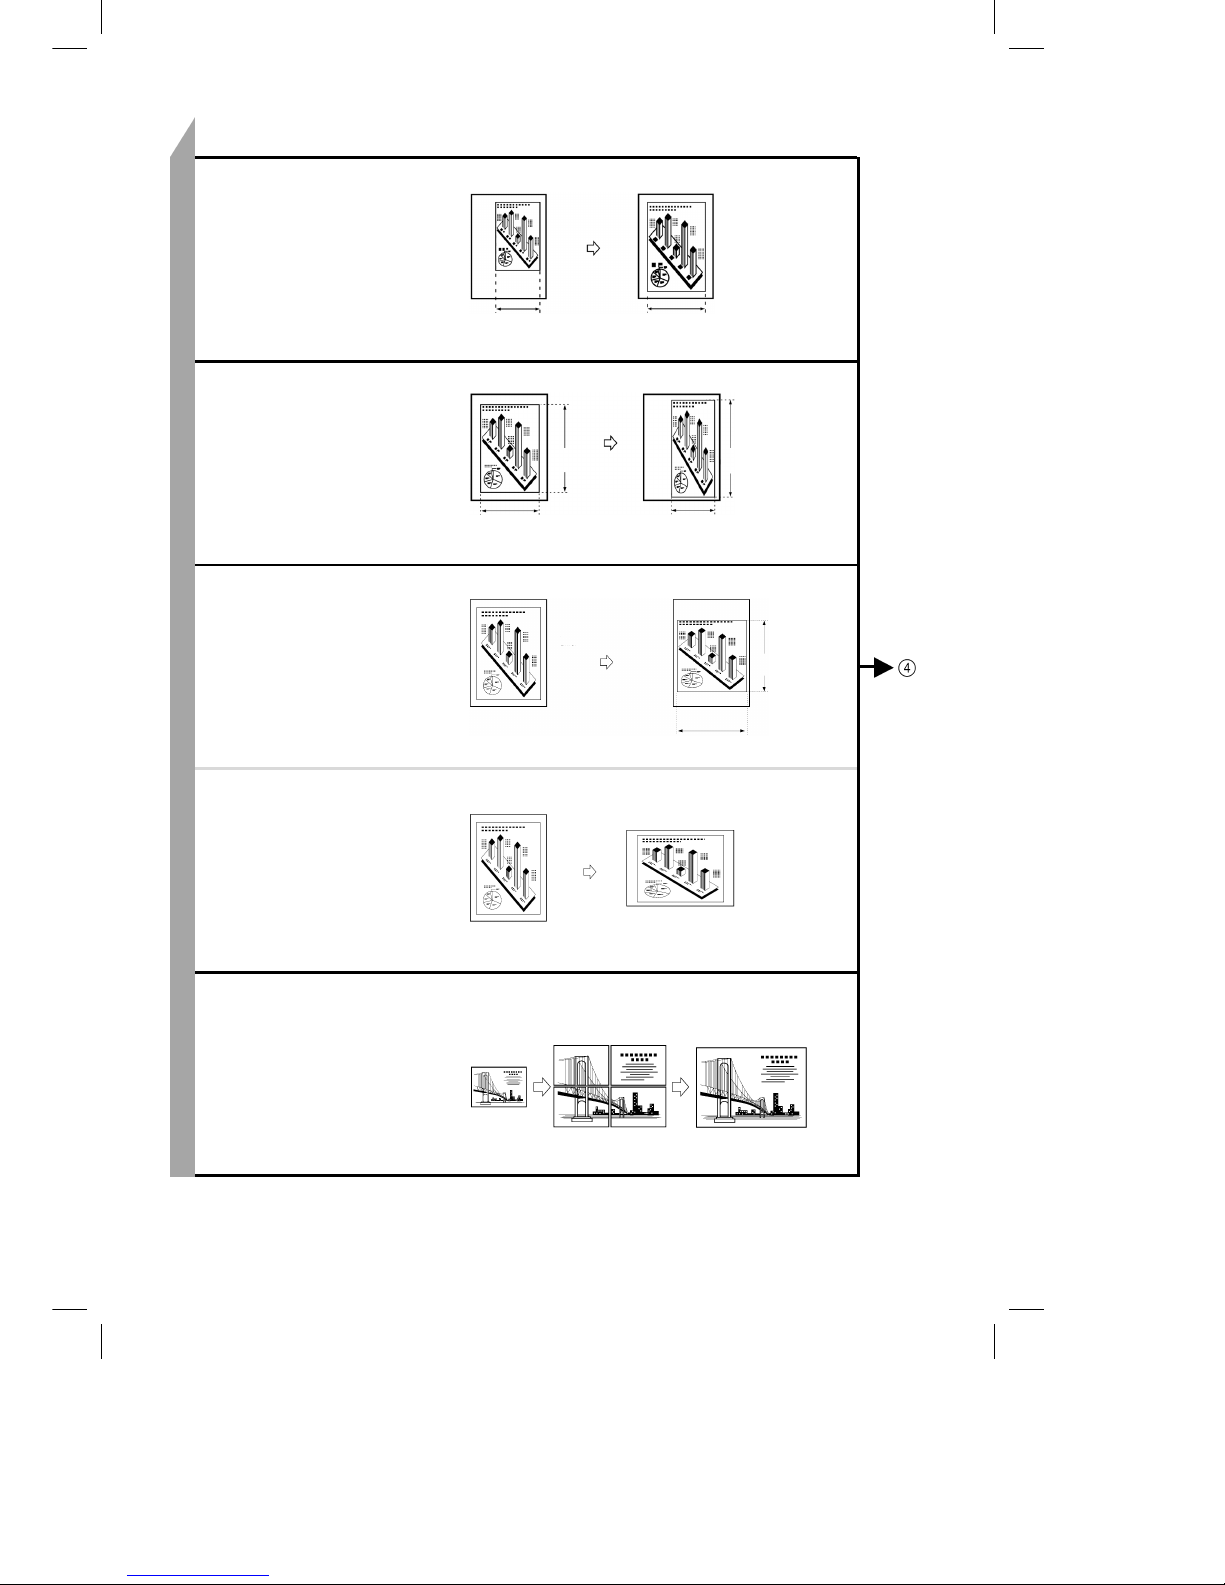
[ZOOM PROGRAM]
(See p. 3-20.)
You can designate the original
size (size of original image or
original) and copy size (size of
copied image or paper) in mm
when making copies.
[XY ZOOM]
(See p. 3-23.)
You can designate different copy
ratios (%) for each of the X and
Y directions when making
copies.
[MULTI-PG ENLARGE]
(See p. 3-27.)
The machine automatically
calculates how many sheets the
original is to be copied on based
on the enlarged copy size. If you
cut and paste the output sheets
together, you can make copies
larger than A3 in size.
Original Copy
X=100 mm X=150 mm
ZOOM
(X and Y axes are reproduced at the same size)
Original Copy
X=100 mm X=80 mm
ZOOM
(X and Y axes are reproduced at different sizes)
Y=120 mm Y=140 mm
Original Copy
X=120%
XY ZOOM
(X and Y axes are
reproduced at
manually set sizes)
Y=80%
Original Copy
A4 A4R
XY ZOOM
(X and Y axes are reproduced at manually set sizes)
A4R
drawer
selected.
Original Copy Copies cut and
pasted together.
Page 21
Océ 3121 – Copying Manual – English
13
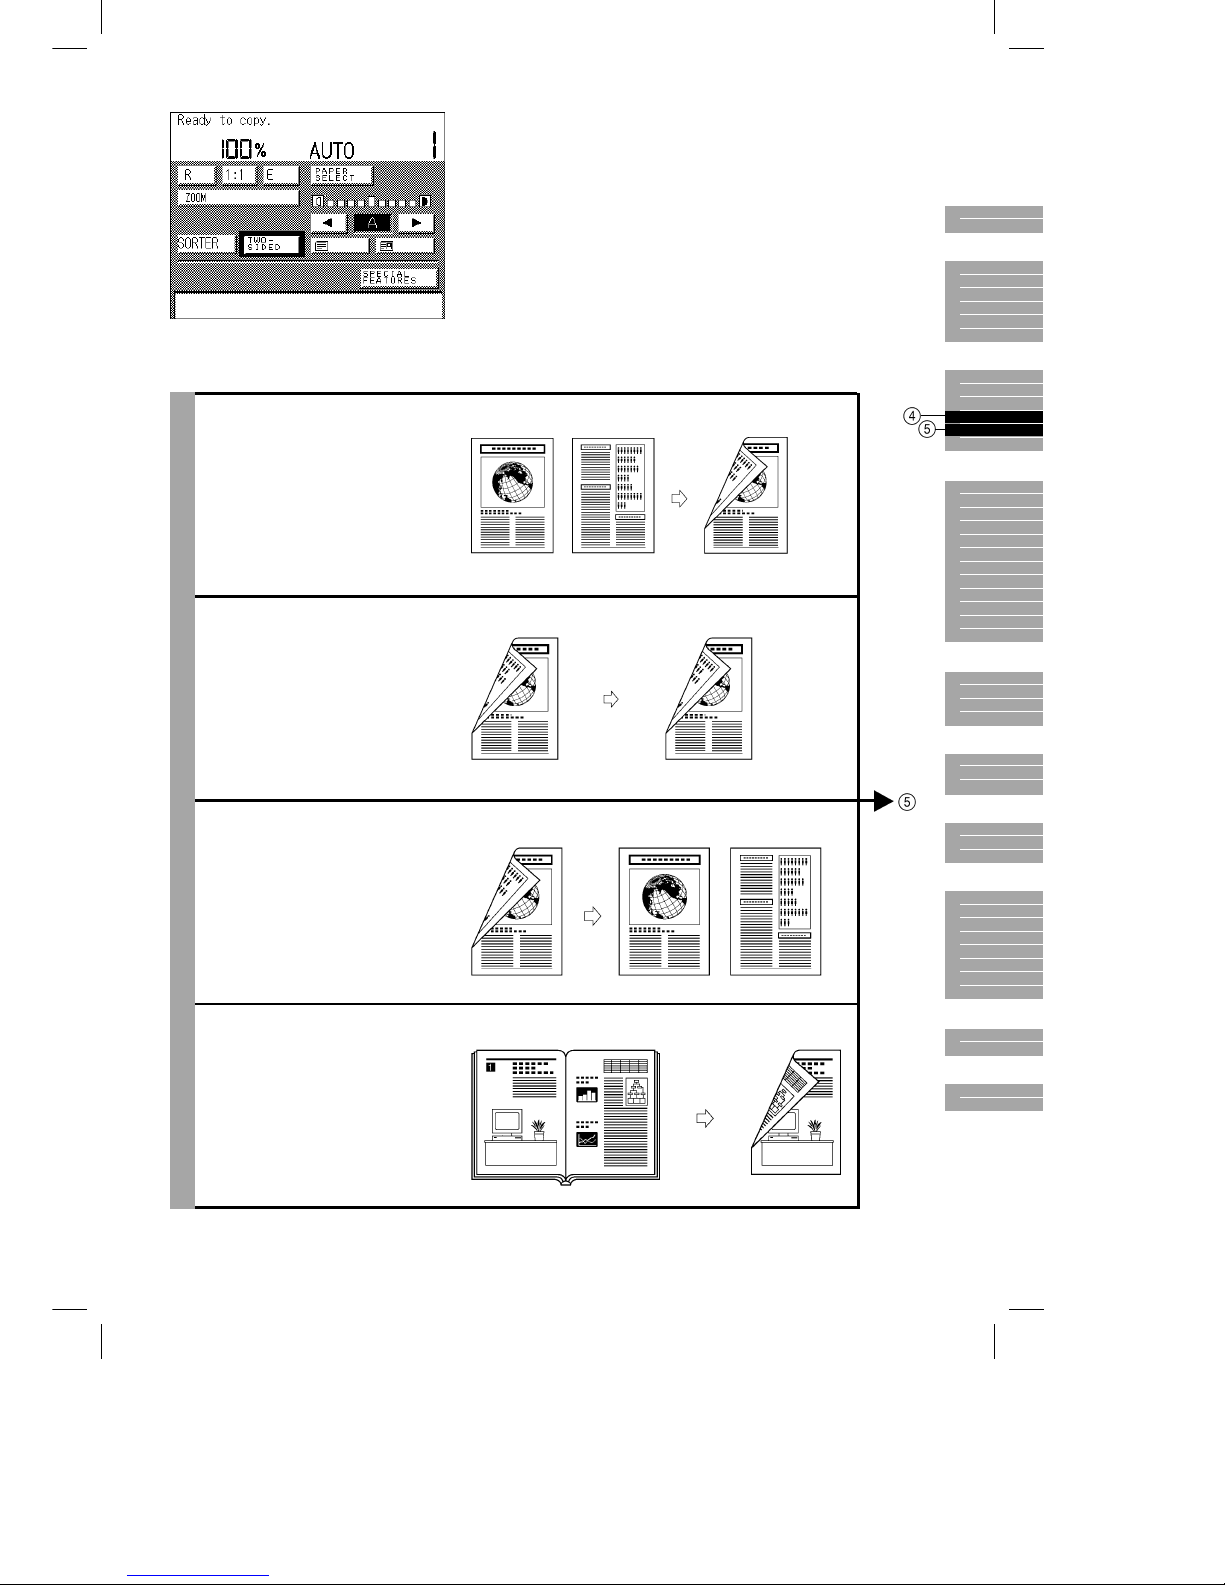
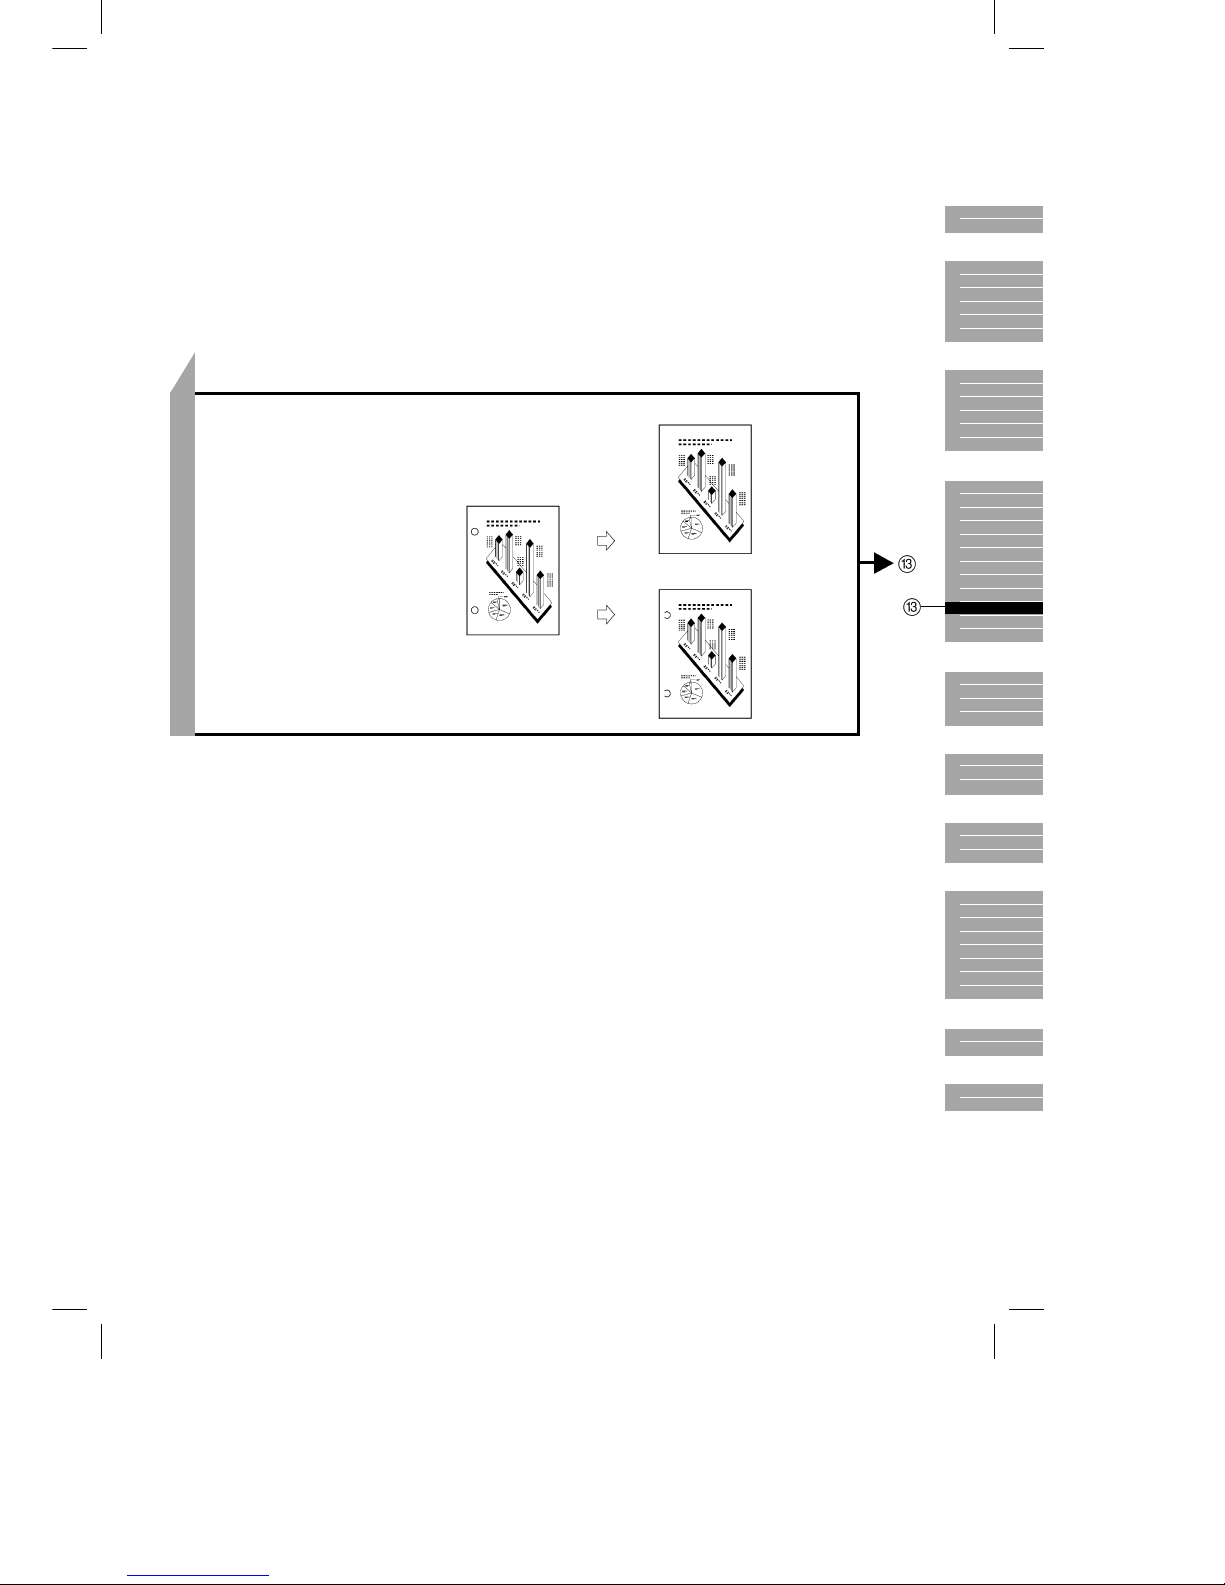
[TWO-SIDED]
[1 ➝ 2 SIDED]
(See p. 3-35.)
Makes two-sided copies from
one-sided originals.
[2 ➝ 2 SIDED]
(See p. 3-38.)
Makes two-sided copies from
two-sided originals.
[2 ➝ 1 SIDED]
(See p. 3-40.)
Makes one-sided copies from
two-sided originals.
[BOOK ➝ 2-SIDED]
(See p. 3-42.)
Makes two-sided copies from
facing pages in a book.
One-sided originals Two-sided copy
Two-sided original Two-sided copy
Two-sided original One-sided copy
Facing page original Two-sided copy
1
2
3
4
5
6
7
8
9
10
Page 22
Océ 3121 – Copying Manual – English
14
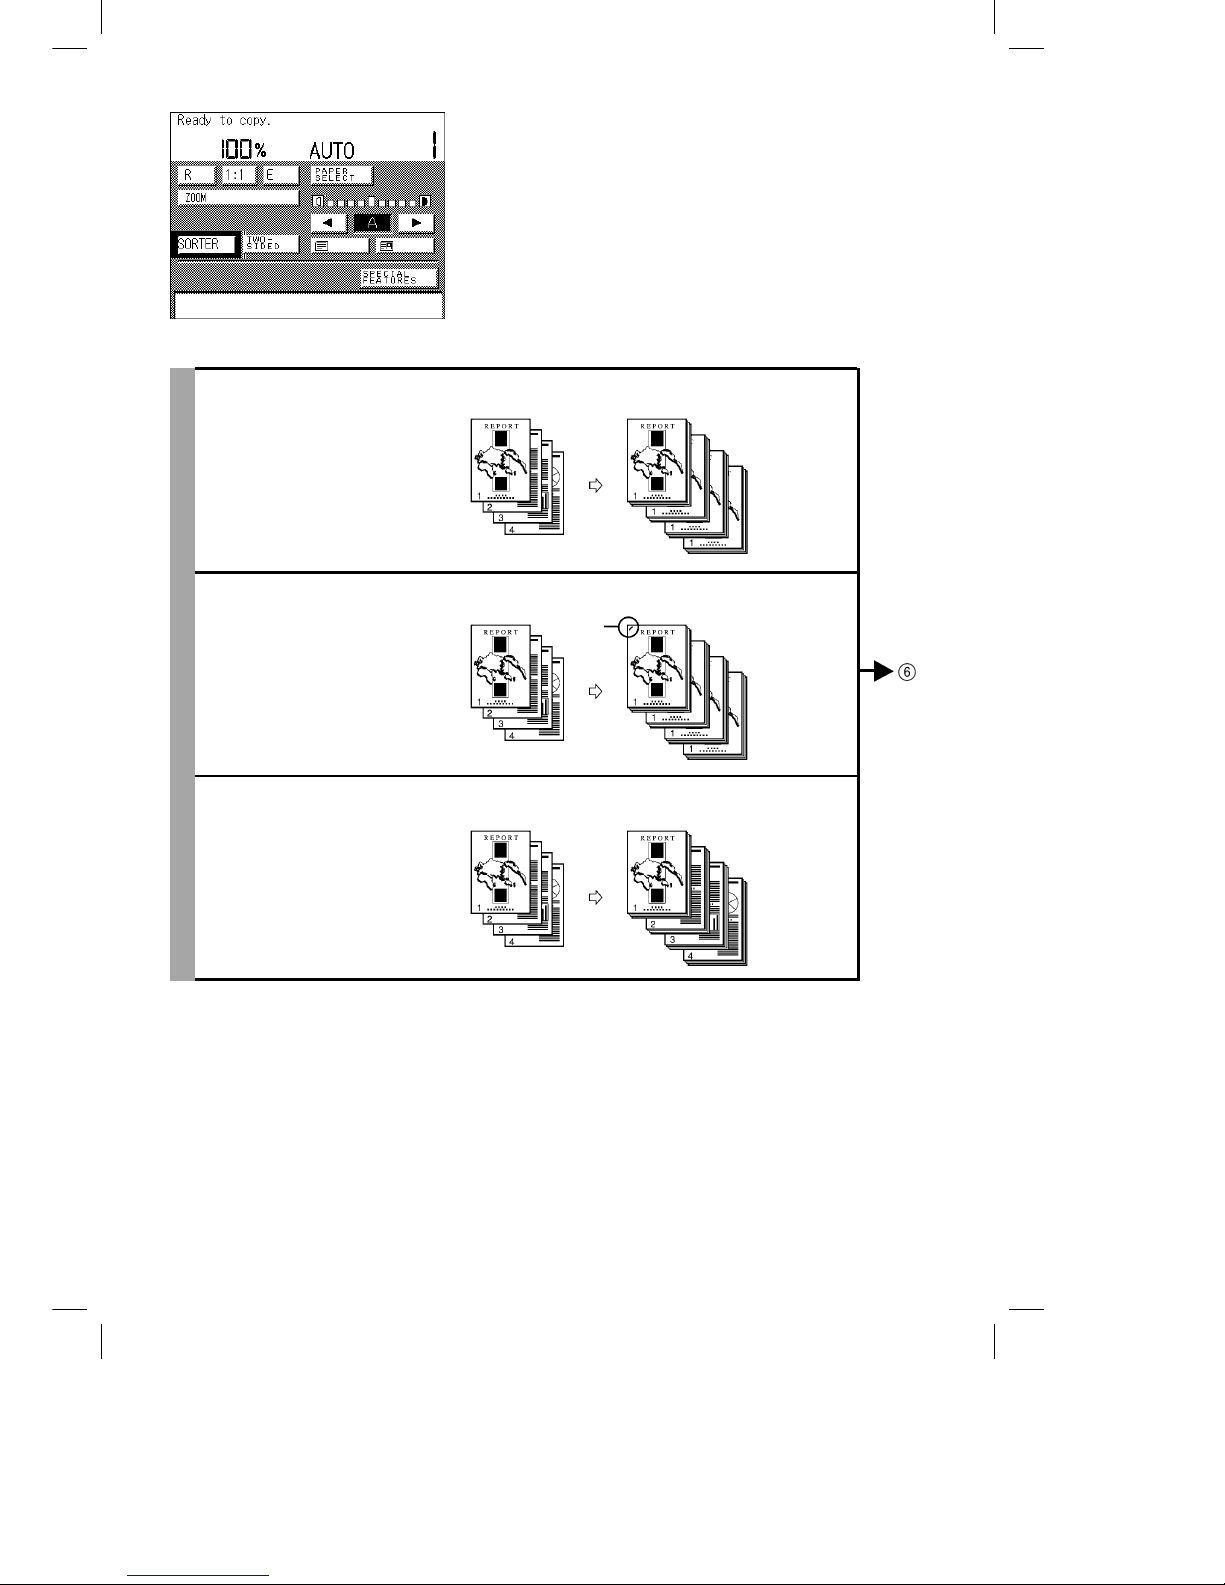
[SORTER]
[SORT]
(See p. 3-44.)
Sorts copies into sets arranged
in page order, and outputs them
onto the bins.
Originals Sorted copies
[STAPLE-SORT]
(See p. 3-44.)
Sorts copies into sets arranged
in page order, outputs them into
the bins and automatically
staples them.
Originals Sorted and stapled
copies
[GROUP]
(See p. 3-44.)
Groups all copies of the same
original page together, and
outputs them into the bins.
Originals Grouped copies
Stapled
area
Page 23
Océ 3121 – Copying Manual – English
15
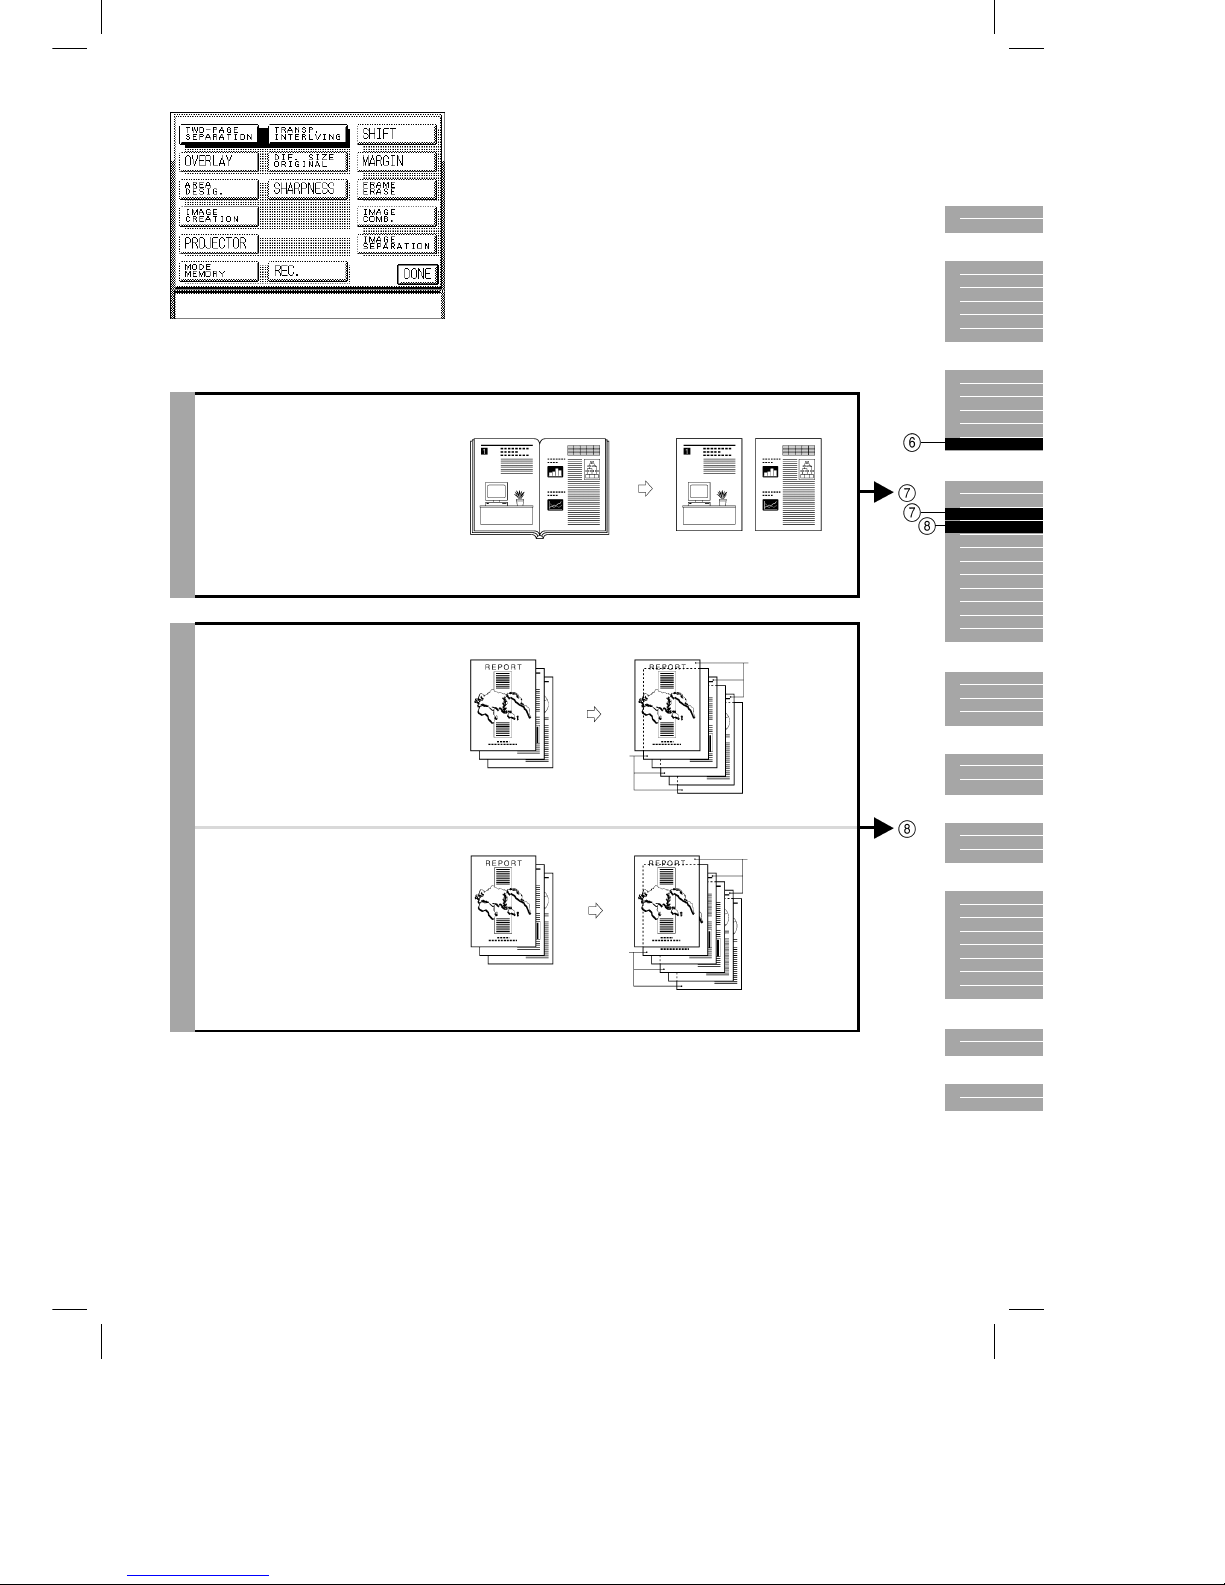
[TWO-PAGE
SEPARATION]
(See p. 4-4.)
Copies facing pages in a bound
original onto two copy sheets in
one step.
[TRANSP. INTERLVING]
(See p. 4-6.)
When copying onto
transparencies, you can
programme the machine to
automatically insert a copy sheet
(interleaf sheet) between each
transparency.
When not copying onto interleaf sheets:
When copying onto interleaf sheets:
You can make
copies of the same
original image on
both the
transparencies and
interleaf sheets.
Original Copy
Original Copies
Original Copies
Transparencies
Transparencies
Interleaf
sheets
Interleaf
sheets
1
2
3
4
5
6
7
8
9
10
Page 24
Océ 3121 – Copying Manual – English
16
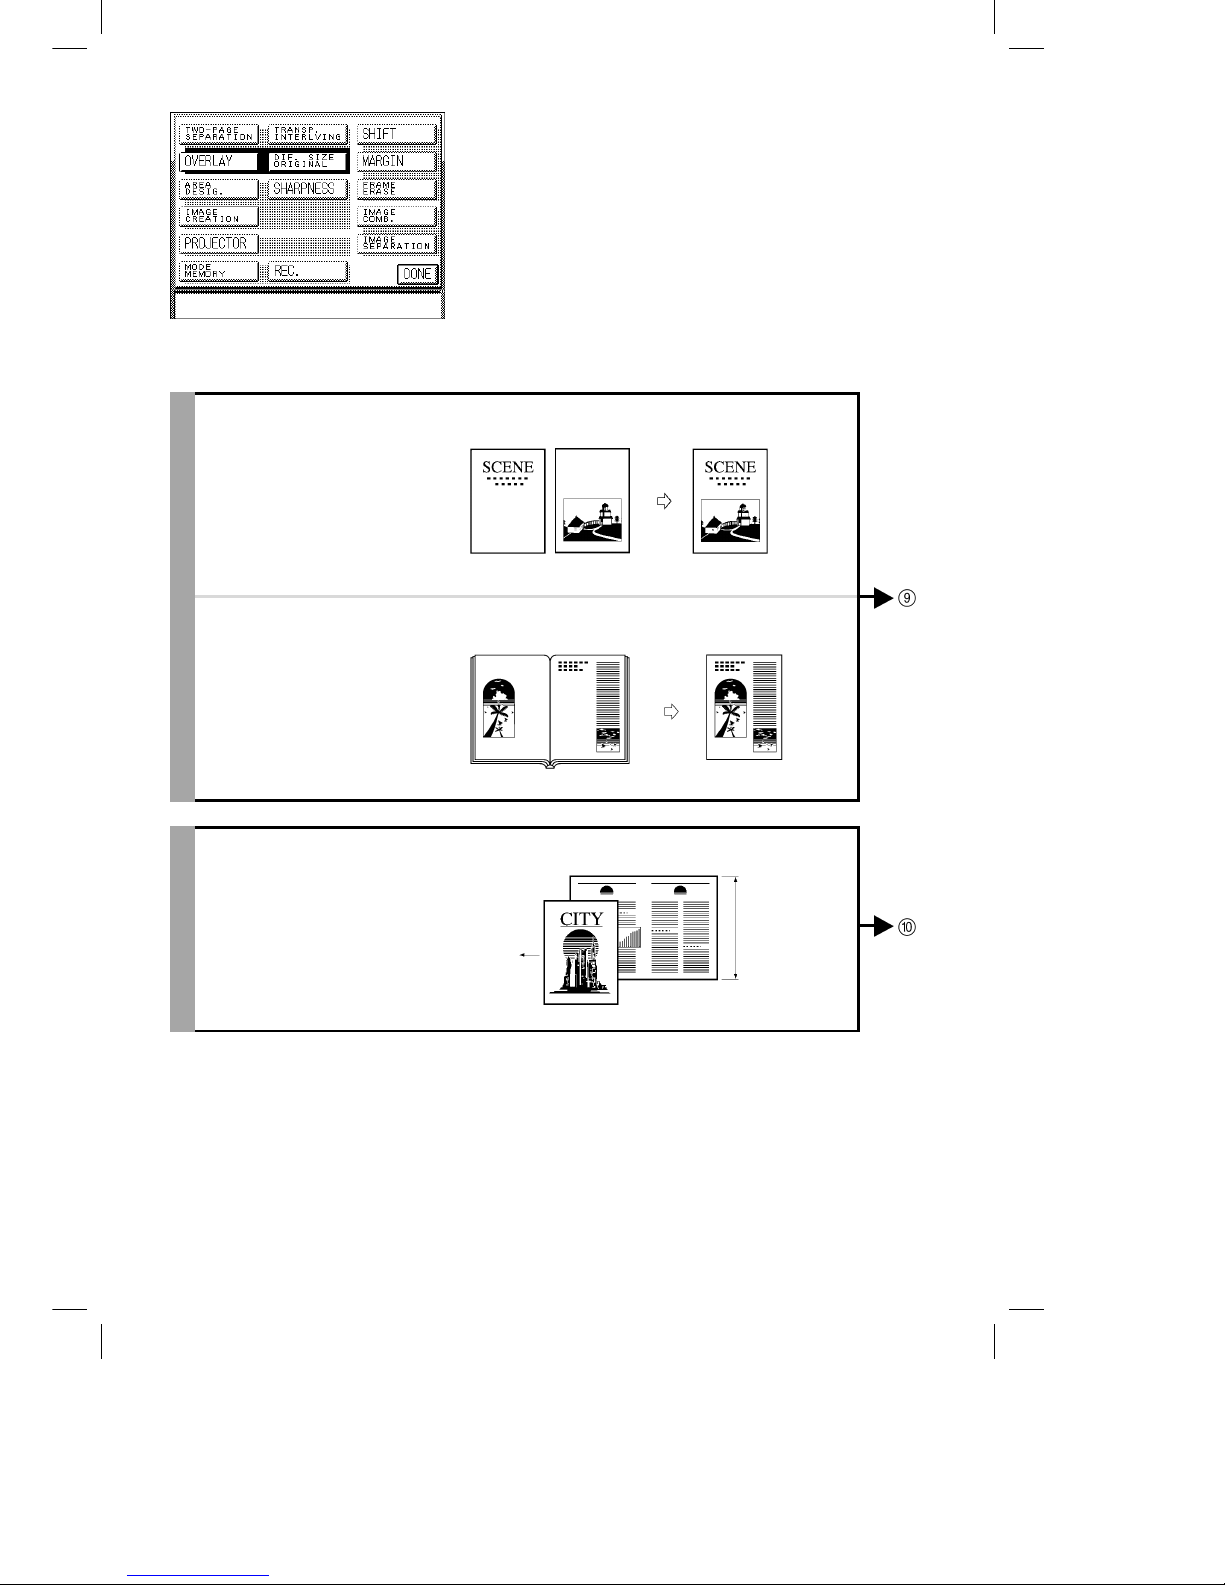
[OVERLAY]
[SHEET OVERLAY]
(See p. 4-10.)
Superimposes two original
images onto a single copy sheet.
[BOOK OVERLAY]
(See p. 4-12.)
Superimposes images from
facing pages in a bound original
onto a single copy sheet.
[DIF. SIZE ORIGINAL]
(See p. 4-14.)
You can feed different-size
originals (e.g. A4 and A3, A5
and A4R) together in one group
in the RDF, provided that the
leading edge of each page is the
same length.
Original feeding
directing
Original Copy
Original Copy
A4 original
A3 original
Leading edge
length
Page 25
Océ 3121 – Copying Manual – English
17
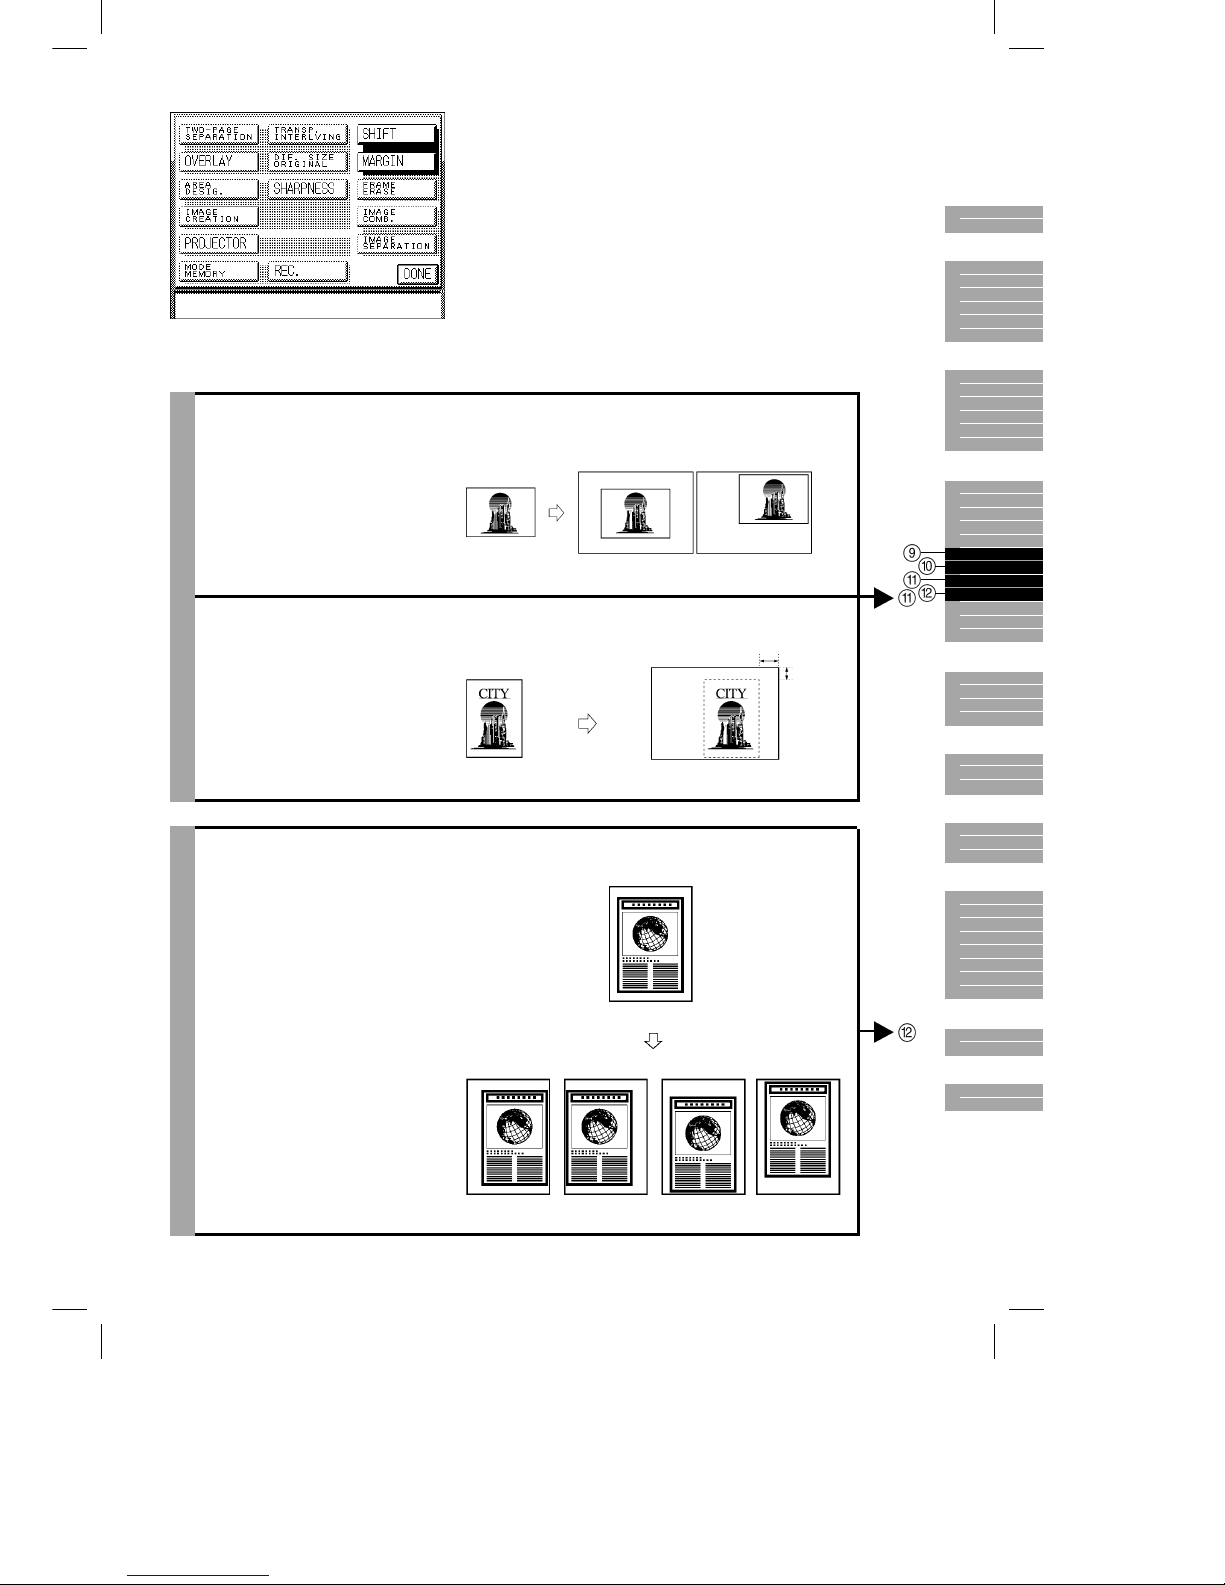
[SHIFT]
[CENTRE SHIFT]
[CORNER SHIFT]
(See p. 4-18.)
Makes copies with the entire
image shifted diagonally to the
top left, top right, bottom right,
bottom left or center.
[NO. KEY ENTRY]
(See p. 4-19.)
Makes copies with the entire
original shifted to a position
designated by the Number keys.
[MARGIN]
(See p. 4-22.)
Makes copies with the entire
original image shifted slightly to
the left, right, top or bottom to
create a margin on copy sheets.
Original
A5R
Center-shifted
copy
A3
Corner-shifted
copy
A3
Original Copy
Move to
designated
area
120 mm
80 mm
Original
Left margin Right margin Top margin Bottom
margin
1
2
3
4
5
6
7
8
9
10
Page 26
Océ 3121 – Copying Manual – English
18
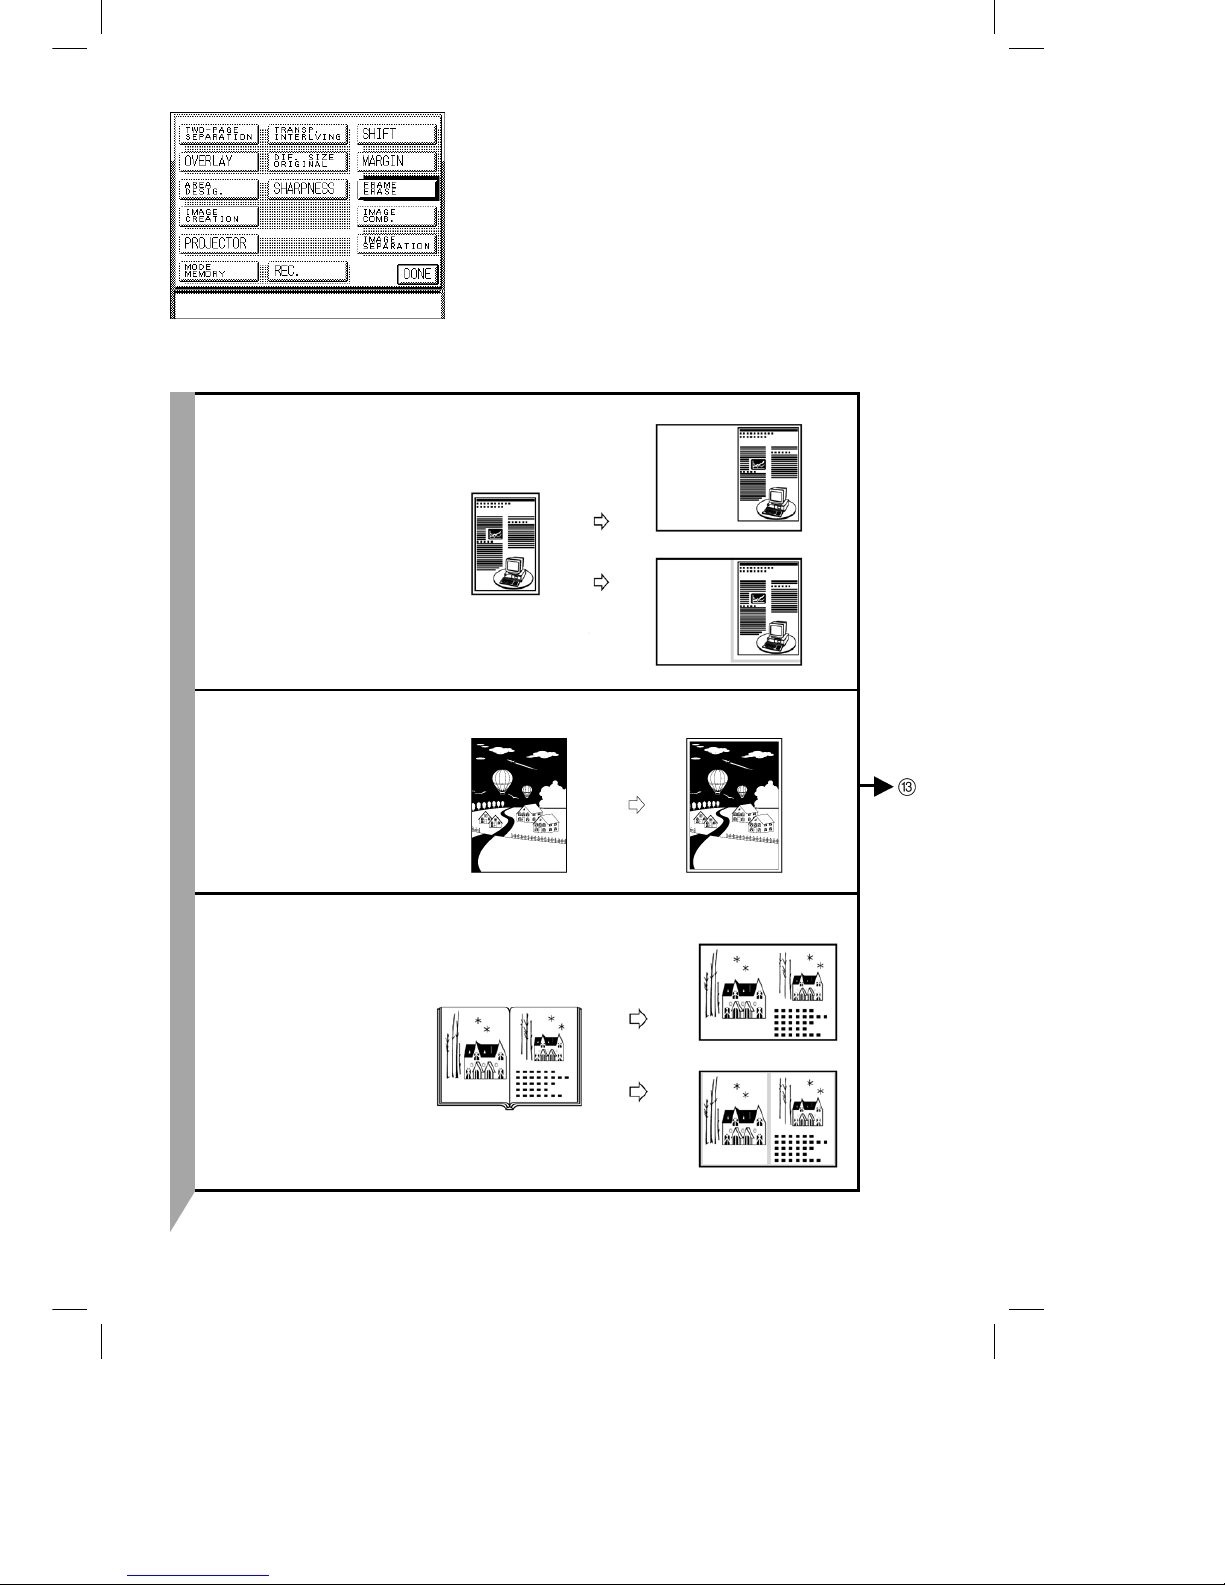
[FRAME ERASE]
[ORIGINAL FRAME
ERASE]
(See p. 4-27.)
Eliminates the dark border area
and lines that appear around the
original image when the original
is smaller than the selected
paper size.
[SHEET FRAME ERASE]
(See p. 4-29.)
Makes clean copies of originals
with ragged edges by eliminating
the dark border around the edge
of copy sheets.
[BOOK FRAME ERASE]
(See p. 4-30.)
Eliminates the dark border and
center line which appear when
copying facing pages in a book
onto a single sheet.
A4 original
Copy A3
Copy A3
With frame
erase
Without
frame erase
Original Copy
Original
Copy
Copy
With frame
erase
Without
frame erase
Page 27
Océ 3121 – Copying Manual – English
19
[BINDING ERASE]
(See p. 4-31.)
When copying an original with
binding holes, this mode erases
the shadows of the holes so that
they are not reproduced on copy
sheets.
Original
Copy
Copy
With binding
erase
Without
binding erase
1
2
3
4
5
6
7
8
9
10
Page 28
Océ 3121 – Copying Manual – English
20
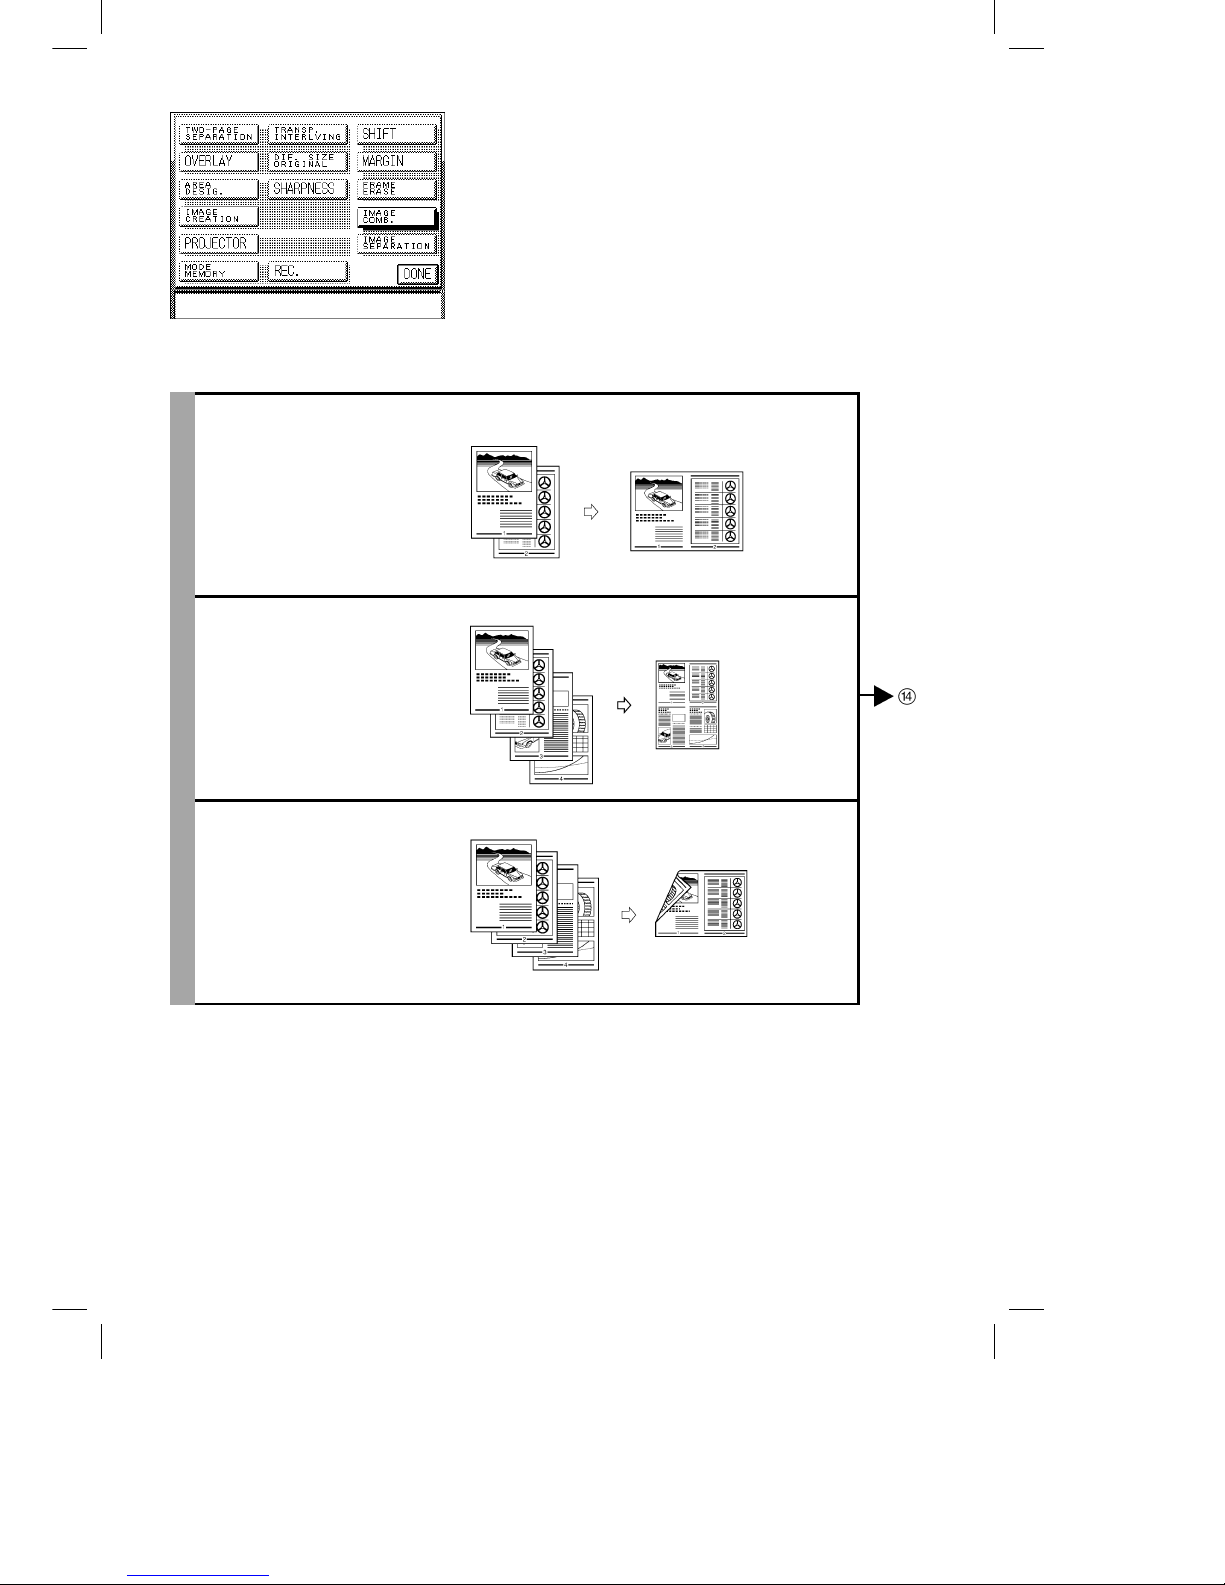
[IMAGE COMB.]
[2 ON 1]
(See p. 4-33.)
Makes copies of two originals
reduced onto a single sheet.
[4 ON 1]
(See p. 4-34.)
Makes copies of four originals
reduced onto a single sheet.
[2 ON 1/TWO-SIDED]
(See p. 4-34.)
Makes copies of four originals
reduced onto two sides of a
single sheet.
Original Copy
Original Copy
Original Copy
Page 29

Océ 3121 – Copying Manual – English
21
[IMAGE SEPARATION]
[1 TO 2]
(See p. 4-38.)
Makes copies of an original
divided into equal sections and
enlarged onto two copy sheets.
[1 TO 4]
(See p. 4-38.)
Makes copies of an original
divided into equal sections and
enlarged onto four copy sheets.
[1 TO 2/2 ➝ 1 SIDED]
(See p. 4-39.)
Makes copies of a two-sided
original divided into equal
sections on both sides and
enlarged onto four copy sheets.
[1 TO 4/2 ➝ 1 SIDED]
(See p. 4-39.)
Makes copies of a two-sided
original divided into equal
sections on both sides and
enlarged onto eight copy sheets.
Original Copy
Original Copy
Original Copy
Original Copy
1
2
3
4
5
6
7
8
9
10
Page 30
Océ 3121 – Copying Manual – English
22
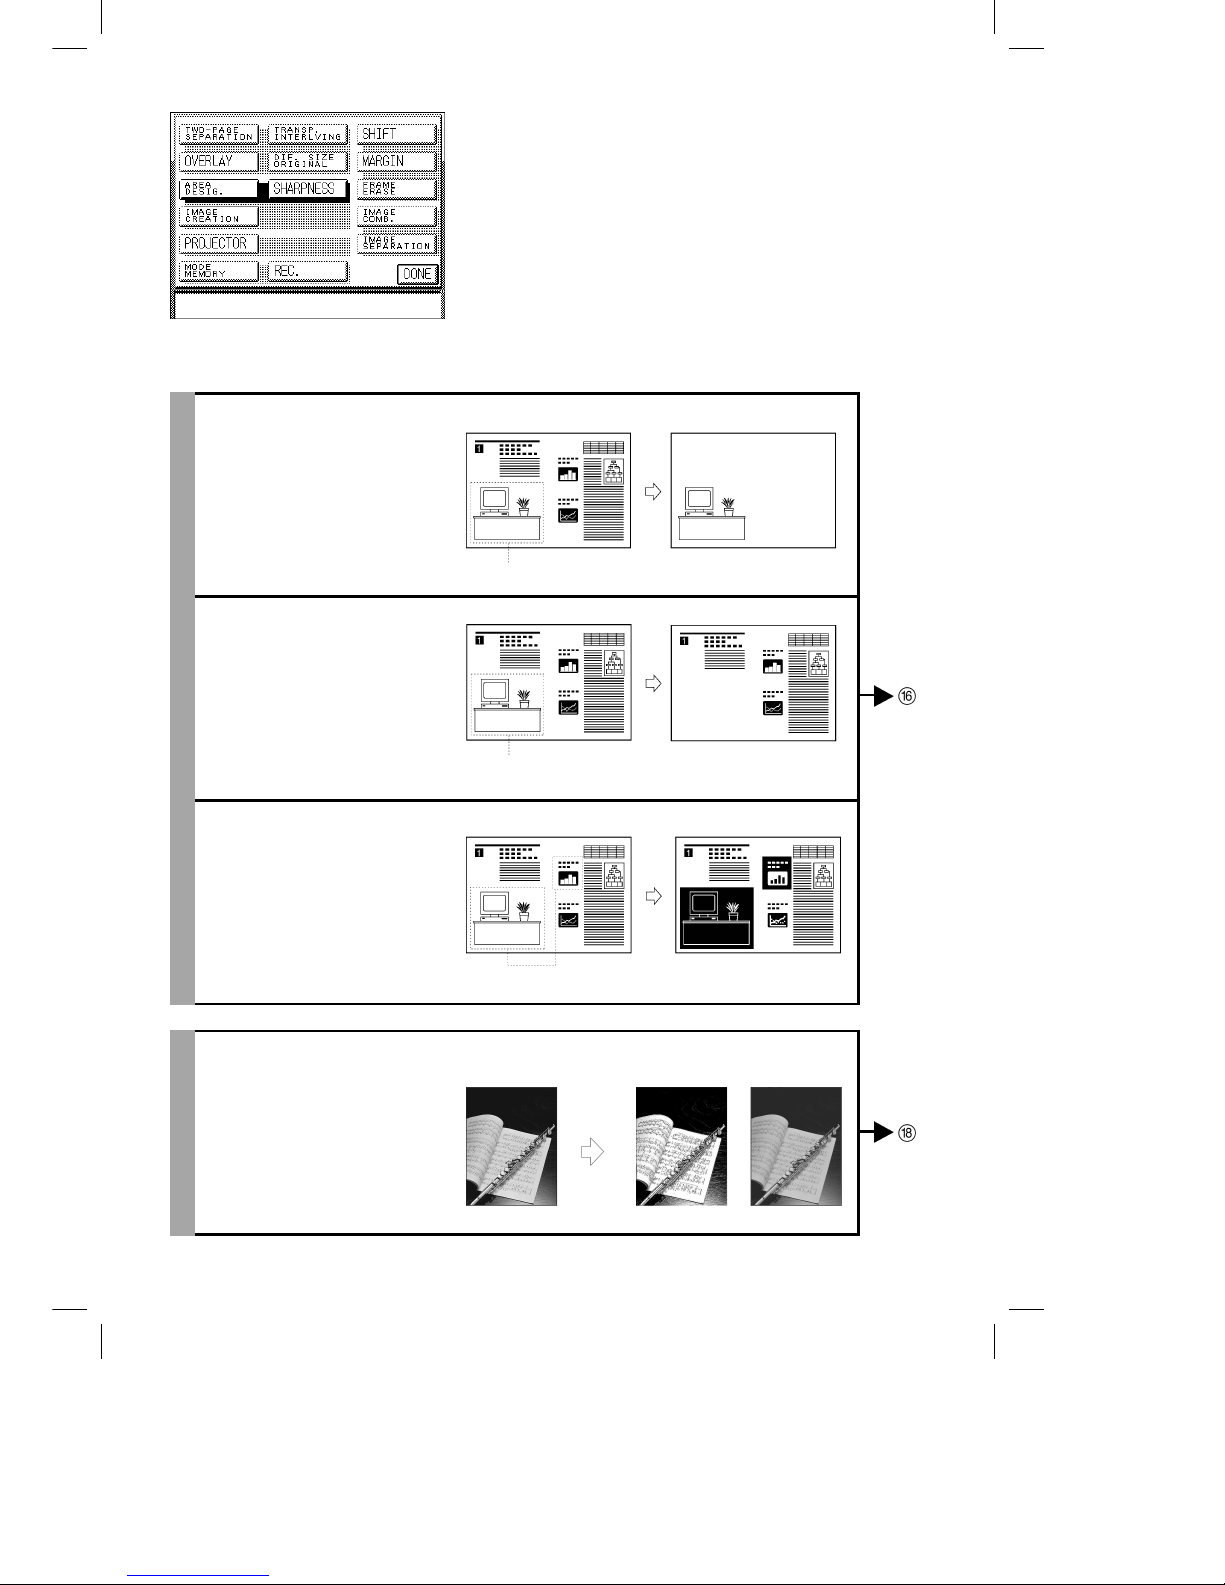
[AREA DESIG.]
[FRAMING]
(See p. 5-3.)
Makes copies of only the inside
of a designated area on the
original.
[BLANKING]
(See p. 5-3.)
Makes copies of only the outside
of a designated area on the
original.
[NEGA/POSI]
(See p. 5-3.)
Makes copies of a designated
area on the original with the
original image inverted.
[SHARPNESS]
(See p. 5-17.)
Makes copies of original images
with the contrast reproduced
more sharply.
Original Copy
Designated area
Original Copy
Designated area
Original Copy
Designated areas
Original Copy
Low set Low not set
Page 31

Océ 3121 – Copying Manual – English
23
[IMAGE CREATION]
[NEGA/POSI]
(See p. 5-8.)
Makes copies with the original
image inverted.
[IMAGE REPEAT]
(See p. 5-9.)
You can also make copies of
designated areas in the original
repeated in the vertical direction.
Automatic setting:
The original image is copied so
that the maximum possible
number of copies fit in the
selected size of copy paper.
Manual setting:
The original image is copied for
the specified numbers of times.
Example
When ”three times” is specified.
Original Copy
Original Copy
Entire
original
Designated
area only
Original Copy
Entrire
original
Designated
area only
Images are
copied
clipped.
1
2
3
4
5
6
7
8
9
10
Page 32

Océ 3121 – Copying Manual – English
24
[MIRROR IMAGE]
(See p. 5-12.)
Makes copies of the original
image flipped around the
horizontal axis. You can also
make mirror image copies of
designated areas.
[SLANTED IMAGE]
(See p. 5-15.)
Makes copies of the original
slanted at a designated angle.
Copy (A4)
Original
(A5R)
Flipped around
horizontal axis
Top
symmetry
Bottom
symmetry
Copy (A4)
Original
(A4)
Flipped around
horizontal axis
Top
symmetry
Bottom
symmetry
Designated area
Original Copy
Page 33

Océ 3121 – Copying Manual – English
25
M1 – M5
1 BEFORE
2 BEFORE
3 BEFORE
[MODE MEMORY]
(See p. 6-3.)
Enables you to store the copy
settings (e.g. copy quantity, copy
exposure, and copy ratio) for
often run copy jobs in memory
for later use. This function
eliminates the need to
programme copy settings each
time you run a routine copy job.
[REC.]
(See p. 6-11.)
Recalls (up to three before)
previously set copy jobs and
makes copies using the settings
of that copy job.
[PROJECTOR]
(See chapter 7.)
Makes copies from 35 mm
negative/positive or 4 x 5
negative/positive film using the
optional Film Projector.
Recall stored copy settings from memory.
Recall stored copy settings from memory.
Original Copy
1
2
3
4
5
6
7
8
9
10
Page 34

Océ 3121 – Copying Manual – English
26
How to Use This Manual
The descriptions in this manual are presented using the following general format.
4-4
Making Copies of Facing Pages in a Book onto
Two Separate Copy Sheets in One Step
(TWO-PAGE SEPARATION)
NOTICE
● This feature can be used with the following combinations of model and options.
Original Placement Where to place the original
Series Name Platen glass ADF RDF
GP215 series Yes No Yes
This feature enables you to copy facing pages in a book or magazine on separate sheets of copy
paper in one step.
NOTICE
● Combined use of the Two-sided, Transparency Interleaving, Overlay, Image Combination and Image Separation
modes cannot be set.
Place your original on the platen glass.
■ For instructions on how to place an original on
the platen glass, see p. 2-13.
■ For instructions on how to place originals in
the RDF, see p. 2-16.
NOTICE
● If you want to make copies in page order begin copying from the
last pages and work your way forward.
● Place the original face down so that the top of it is against the
top edge of the platen glass.
Original Copy
4-5
1
Press the [TWO-PAGE SEPARATION] key.
CAUTION
● Indicates a caution concerning operations that may lead to injury
to persons or damage to property if not performed correctly. In
order to use the machine safely, always pay attention to these
cautions.
2
Press the [DONE] key.
The display returns to the Basic Features screen.
Proceed to make copies in the usual way.
(See chapter 2, ”Basic Copying”.)
MEMO
● To cancel the settings, press the [SPECIAL FEATURES], [TWO-PAGE SEPARATION], and [C] keys in that
order.
● You can also cancel the mode by pressing the
key. (The machine returns to the Standard mode.)
1
2
3
4
5
6
7
8
9
10
Describes options and models on which the described
function can be used and set.
Title (function name)
Description of modes and operations
Illustrations
Illustrations help you identify
keys and parts of the copier.
Reference
Page and chapter numbers containing
related items are provided.
Notes
Notes and restrictions
regarding the use of a
function are provided.
Operational Instructions
Numbered steps describe how to set
and operate various functions.
Supplementary
Instructions
Supplementary instructions
and reference pages are
provided.
Symbols Used in This Manual
WARNING Indicates a warning concerning operations that may lead to death or injury to persons if not
performed correctly. In order to use the machine safely, always pay attention to these warnings.
CAUTION Indicates a caution concerning operations that may lead to injury to persons or damage to property if
not performed correctly. In order to use the machine safely, always pay attention to these cautions.
☞ REQUEST Indicates important items or prohibited actions that should always be followed when operating the
machine. These should always be read to avoid damage to the machine or injury to persons.
● NOTICE Indicates operational warnings. Be certain to read these items so that you operate the machine
correctly.
● MEMO Indicates notes for operation or additional explanations. Reading these is recommended.
The following symbols, key names and unit names are used in this manual.
Key on control panel .............................
key ADF-F1 (Automatic Document Feeder) ................ADF
Key on touch panel display................... [OK] RADF-G1 (Recirculating Document Feeder) ........ RDF
Platen Cover Type C ............................................Platen cover
● When options or accessory boards are mounted on the machine, this manual refers to the machine including
these options or boards simply as the ”Océ 3121 Series”.
● Screen shots of the touch panel display used in this manual are those taken when Multi-output Tray B2, Océ
3121 Cassette Feeding Unit-L1, RADF-G1 and G3 Fax Board-C1 are attached to the Océ 3121. Note that
functions that cannot be used depending on the model or options and accessories are not displayed in the
touch panel display.
Original Placement Where to place the original
Series Name Platen glass ADF RDF
Océ 3121 Yes No Yes
Page 35

Océ 3121 – Copying Manual – English
Chapter 1 Before You Start Using Copy Functions
■ Parts and Their Functions................................................................................................................................................... 2
■ Keying Operations............................................................................................................................................................... 7
This chapter describes items you should understand and be familiar with
before using the copy functions, such as names and functions of parts on the
control panel, how to use the touch panel display, and meanings of items that
appear in the touch panel display.
Page 36

Océ 3121 – Copying Manual – English
1-2
Parts and Their Functions
This section describes the names and functions of parts on the control panel used for making copies.
Control Panel
OPTIONS key
Press to use expanded functions other than copy or
FAX.
FAX key
Press to use the FAX functions of the Océ 3121
Series. The FAX Basic Features Screen appears in
the touch panel display.
COPY key
Press to use copy functions of the Océ
3121 Series. The Copy Basic Features
screen appears in the touch panel display.
(See “Flow of Copy Operations,” on p. 2-2.)
Power Indicator
Lights when the main
power is turned ON.
Touch panel display
(See “Parts and Their Functions,” on p.1-3.)
Reset key
Press to return the copy settings to the
Standard settings. (See “Keying Operations,”
on p. 1-9.)
Guide key
Press to display explanations of modes or
functions in the touch panel display. (See
“Flow of Copy Operations,” on p. 2-7.)
Additional function key
Press to set Custom Copy Settings.
Interrupt key
Press to interrupt a contiuous copying job when you need to
make priority copies. (See “Interrupting the Current Copy Job
to Make Priority Copies,” on p. 2-22.)
Number keys
Press to enter numeric values such as copy
quantity or the ID number.
(See “Keying Operations,” on p. 1-7.)
START key
Press to start copying.
STOP key
Press to stop the copy job
before copying is completed.
Control panel power switch
Press to turn the control panel
ON or OFF. When set to OFF,
the machine is in the Sleep
mode. (See “Sleep Function,”
on p. 2-5.)
Clear key
Press to return the copy quantity to one,
or to clear an incorrect value entered
when setting a mode.
Page 37

Océ 3121 – Copying Manual – English
1-3
Touch Panel Display
Basic Features Screen
[PAPER SELECT]
Press to select the paper size (Auto Paper
Selection, drawer or stack bypass).
(See ”PAPER SELECT,” on p. 3-2.)
[R]/[1:1]/[E]
Press to reduce or enlarge using a preset copy
ratio, or return the copy ratio to direct copying
(100%). (See ”R, 1:1, E,” on p. 3-12.)
[ZOOM]
Press to set or cancel the
Zoom, Auto Zoom, Zoom
Programme, XY Zoom or
Multi-Page Enlarge modes.
(See ”ZOOM,” on p. 3-14.)
[SORTER]
Press to select or cancel Sort,
Staple Sort or Group modes.
(See ”SORTER,” on p. 3-44.)
[Two-Sided]
Press to select or cancel the Two-sided mode.
(See ”TWO-SIDED,“ on p. 3-34.)
Job/
Communications
Status Display
Displays the current
status of the copy job
or other functions.
[TEXT]
Press to copy originals containing text and photos, or
printed photographs.
(See ”TEXT, TEXT/PHOTO, PHOTO,” on p. 3-9).
[TEXT/PHOTO]
Press to copy originals containing both text and photos, or
photographs printed on photographic printing paper.
(See ”TEXT, TEXT/PHOTO, PHOTO,” on p. 3-9.)
[SPECIAL FEATURES]
Press to select the Special
Features mode.
(See ”Special Features Screen,”
on pp. 1-4 through 1-5.)
[FAX MONITOR]
Press to check the status of
FAX communications. This
is displayed only when FAX
functions are supported.
[ID]
Press to escape the ID
mode. (See ”Flow of
Copy Operations,”
on p. 2-2.)
[LIGHT]/[A]/[DARK]
Press LIGHT or DARK to manually control
the copy exposure. Press [A] key to select
or cancel Auto Exposure Control.
(See ”LIGHT/DARK,” on p. 3-8.)
(See ”A,” on p. 3-11.)
1
2
3
4
5
6
7
8
9
10
Page 38

Océ 3121 – Copying Manual – English
1-4
Special Features Screen
When you press the [SPECIAL FEATURES] key in the Copy Basic Features screen, the Special
Features screen appears in the touch panel display. The Special Features screen displays special
feature modes. If you select a Special Feature mode, a more detailed screen for the selected mode
appears in the touch panel display. To close the Special Features screen and return to the Basic
Features screen, press the [DONE] key.
■ When the RDF is attached (1/2)
[DIF. SIZE ORIGINAL]
Press to set or cancel the Different Size Original mode. This mode enables you to feed
different-size originals together in one group in the RDF providing that the leading
edge of each page is the same length.
(See ”DIF. SIZE ORIGINAL,” on p. 4-14.)
[TRANSP. INTERLVING]
Press to select or cancel the Transparency
Interleaving mode. This mode enables you to insert a
copy sheet between transparencies. You can also
make copies of the same original image on both the
transparencies and interleaf sheets.
(See ”TRANSP. INTERLVING,” on p. 4-6.)
[TWO-PAGE SEPARATION]
Press to select or cancel the Two-page
Separation mode. This mode enables you to
copy bound originals such as books in one
step.
(See ”TWO-PAGE SEPARATION,” on p. 4-4.)
[OVERLAY]
Press to select or cancel the Sheet
Overlay or Book Overlay modes.
This mode enables you to
superimpose two original images
onto a single copy sheet.
(See ”OVERLAY,” on p. 4-9.)
[AREA DESIG.]
Press to select or cancel the Area
Designation mode. This mode enables
you to image-process designated
areas. (See ”AREA DESIG.,” on
p. 5-3.)
[IMAGE CREATION]
Press to select or cancel the Image Creation
mode. (See ”IMAGE CREATION,” on p. 5-8.)
[SHARPNESS]
Press to select or cancel the Sharpness mode. This
mode enables you to make copies of original images
with the contrast reproduced more sharply.
(See ”SHARPNESS,” on p. 5-17.)
Page 39

Océ 3121 – Copying Manual – English
1-5
■ When the RDF is attached (2/2)
[PROJECTOR]
Press to make copies from
photographic film.
(See ”PROJECTOR,” on p. 7-6.)
[SHIFT]
Press to select or cancel the Shift mode. This mode
enables you to shift the position of the original image
on the copy sheet. Two modes are available: shifting
the original image to a fixed position or shifting the
original mode to a position designated using the
Number keys.
(See ”SHIFT,” on p. 4-16.)
[MARGIN]
Press to select or cancel the Margin
mode. This mode enables you to
create margins along the sides of
originals.
(See ”MARGIN,” on p. 4-22.)
[FRAME ERASE]
Press to select or cancel the Frame
Erase mode. This mode enables
you to eliminate dark border areas
and lines that appear around
original images, or shadows from
punched holes.
(See ”FRAME ERASE,” on p. 4-24.)
[IMAGE COMB.]
Press to select or cancel the Image
Combination mode. This mode
enables you to automatically reduce
two or four originals to fit on a
single copy sheet.
(See ”IMAGE COMB.,” on p. 4-31.)
[IMAGE SEPARATION]
Press to select or cancel the Image
Separation mode. This mode enables you
to divide an original into equal sections and
copy each section on one or two sides of a
copy sheet of a specified size.
(See ”IMAGE SEPARATION,” on p. 4-36.)
[MODE MEMORY]
Press to store or recall copy jobs.
This mode enables you to store up to
five often used copy jobs in mode
memory.
(See ”MODE MEMORY,” on p. 6-3.)
[REC.]
Press to recall the previously set copy job.
(See ”RECALL,” on p. 6-11.)
1
2
3
4
5
6
7
8
9
10
Page 40

Océ 3121 – Copying Manual – English
1-6
■ When the ADF is attached
When the ADF is attached to your machine, the [DIF. SIZE ORIGINAL] key changes to [THIN
SHEET ORIGINALS]. For details on other modes, see the description for when the RDF is
attached.
Additional Function Screen
When you press the key, the Additional Function screen appears in the touch panel display.
With Additional functions, you can set the specifications common to all copy functions.
By pressing the [CUSTOM COPY SETTINGS] key, you can change the initial settings (defaults) of copy functions. For
example, you can set the Auto Sort to ON or OFF, or set the Photo mode to ON or OFF.
MEMO
● For details on how to set custom settings, see the following manuals:
Copying Manual : Chapter 8, Custom Copy Settings
Facsimile Manual
: Chapter 9, Storing and Setting Custom FAX Settings
Reference Manual
: Chapter 3, Custom Common Settings, Timer Settings and Adjustment/Cleaning
[THIN SHEET ORIGINALS]
Press to make copies of thin or faint
originals such as invoices.
(See ”Thin Sheet Originals,” on p. 4-16.)
(See chapter
8, ”Custom
Settings“.)
Page 41

Océ 3121 – Copying Manual – English
1-7
Keying Operations
Keying operations on the control panel involve operating keys on the control panel and keys in the
touch panel display.
Using the Control Panel to Perform Settings
This section describes how to use the keys on the control panel when setting copy jobs.
● Number keys
Use these keys to enter numeric values such as
copy quantity.
Example: Entering the department ID.
Control panel GUIDE key COPY key RESET key CLEAR key
Touch panel
display
ADDITIONAL
FUNCTION key Number keys
1
2
3
4
5
6
7
8
9
10
Page 42

Océ 3121 – Copying Manual – English
1-8
● CLEAR key
Press this key to clear numbers or numerals that you
have entered.
Page 43

Océ 3121 – Copying Manual – English
1-9
● RESET key
Press this key to cancel Copy mode settings.
When you press this key, all currently set copy jobs (or
copy jobs in the process of being set) are cancelled,
and the machine returns to the Standard mode. The
display returns to the Basic Features screen.
MEMO
● Standard mode settings are as follows:
Copy ratio : 1:1 (100%)
Paper size : Auto Paper Selection
Exposure control : A (Auto Exposure Control)
Copy quantity : 1
● COPY key
Press this key to use the copy functions of this
machine.
When a copy function is being used, the COPY key is
lit (green).
1
2
3
4
5
6
7
8
9
10
Page 44

Océ 3121 – Copying Manual – English
1-10
● ADDITIONAL FUNCTION key
Press this key to display the Additional Function
screen, or to return to the Copy Functions screen from
the Additional Function screen.
(See chapter 8, ”Custom Settings”.)
Page 45

Océ 3121 – Copying Manual – English
1-11
Using the Touch Panel Display to Perform Settings
This section describes the keys and icons that appear in the touch panel display.
[OK]
Press to set an item and proceed
to the next operation screen.
[C]
Press to cancel a set item and return
to the previous operation screen.
[▲] [▼]
Press to scroll up or down, lists
displayed on the screen.
Indicates that you can
select the currently
displayed item in the touch
panel display directly with
the tip of your finger.
Indicates that the
number keys can be
used.
[DONE]
Press to return to the
previous display.
1
2
3
4
5
6
7
8
9
10
Page 46

Océ 3121 – Copying Manual – English
1-12
Mode keys: Press to select a mode from the Basic
Features screen or Special Features screen.
Once selected, the mode key is highlighted to
indicate that the mode has been initiated.
When modes cannot be used depending on
the machine status or settings, they are
displayed lightly dimmed.
Example 1:
Modes which cannot be combined with
already set modes are displayed lightly
dimmed.
When the Two-page Separation mode is set,
[TRANSP. INTERLVING], [OVERLAY],
[IMAGE COMB.] and [IMAGE SEPARATION]
are displayed lightly dimmed.
Example 2:
Also, modes that do not require setting
according to the supported options or
machine model are not displayed.
When the sorter or RDF are not attached,
[SORTER] is not displayed.
Page 47

Océ 3121 – Copying Manual – English
Chapter 2 Basic Copying
■ Flow of Copy Operations.................................................................................................................................................... 2
■ Inserting the Control Card................................................................................................................................................... 8
■ Entering the Dept. ID and Password ................................................................................................................................ 10
■ Placing Originals............................................................................................................................................................... 12
■ Entering the Copy Quantity (making a specific number of copies).................................................................................. 20
■ Interrupting the Current Copy Job to Make Priority Copies (Interrupt Mode) .................................................................. 22
This chapter describes the steps necessary to perform basic copying with the
Océ 3121 Series, including simple ways of making copies, entering the copy
quantity, how to use the Interrupt mode, and how to place originals.
Page 48

Océ 3121 – Copying Manual – English
2-2
Flow of Copy Operations
This section describes the flow of basic copy operations. It is useful for finding out how to use a basic
feature, how to find where an operation-related item is described in this manual, and learning about the
overall features of this machine.
MEMO
● For details on the following items, see the
Reference Manual:
· Turning the power ON/OFF (See p. 2-2.)
· Loading paper and adding toner (See p. 5-2.)
· How to clear paper jams (See chapters 4 and 6.)
· How to clean the machine when copies are dirty (See p. 5-16.)
1
Press the key.
2
Insert a control card.
(For details, see ”Inserting the Control Card,” on
p. 2-8.)
MEMO
● This step is not required if the optional Control Card V is not
attached.
3
Enter the Dept. ID and the password, and press the
[OK] key.
(See ”Entering the Dept. ID and password,” on
p. 2-10.)
MEMO
● This operation is not required if you have not set Department ID
Management.
Page 49

Océ 3121 – Copying Manual – English
2-3
4
Place your originals. (See ”Placing Originals,” on p. 2-12.)
MEMO
● When making copies using the optional Film Projector, insert film into the Film Projector.
5
Enter the copy quantity. (See ”Entering the Copy
Quantity,” on p. 2-20.)
MEMO
● Only one copy can be made when using the ADF.
6
Set the copy mode in the Basic Features screen.
(See chapter 3, ”Making Copies Using the Basic
Features”.)
MEMO
● In the Basic Features screen, you can select the copy paper
size, set exposure and image quality, and select the desired
sorting function.
7
Set the copy mode in the Special Features screen.
(See chapters 4 through 7.)
8
Press the key.
NOTICE
● You cannot change copy mode settings such as the copy
quantity, copy paper size and copy ratio during copying.
1
2
3
4
5
6
7
8
9
10
Page 50

Océ 3121 – Copying Manual – English
2-4
■ Stopping before copying is completed
· To stop the machine before copying is
completed, press the
key.
MEMO
● After you have pressed the
key, several copies may be
output from the machine.
■ To interrupt a continuous copying job
· To interrupt a continuous copying job when you
need to make priority copies, press the
key.
(See ”Interrupting Copying,” on p. 2-22.)
9
When all copies have been made, press the key
at the top right of the touch panel display.
MEMO
● This step is not required if you have not set Department ID
Management.
10
Remove the control card.
MEMO
● This step is not required if the optional Control Card V is not
attached.
Page 51

Océ 3121 – Copying Manual – English
2-5
Auto Drawer Switching
If a paper drawer runs out of paper during copying, the machine automatically locates another paper
supply drawer loaded with the same paper size and begins feeding copy paper from that paper drawer.
MEMO
● You can set whether or not a drawer is subject to Auto Drawer Switching for copy, FAX, or printer functions. (See
”Drawer Eligibility for APS/ADS,” on p. 3-11 in the
Reference Manual
.)
Auto Clear Function
If the machine is not in operation for a period of about two minutes, it automatically returns to the
Standard setting.
MEMO
● You can set the Auto Clear Time from 1 to 9 minutes, in one-minute increments. You can also cancel the Auto
Clear function. (See ”Auto Clear Time,” on p. 3-33 in the
Reference Manual
.)
Sleep Function
If you press the control panel power switch to OFF, the
display in the touch panel display disappears, and the
machine enters the Sleep mode.
Setting the machine to the Sleep mode allows you to save
power. To resume FAX operations, press the control panel
power switch again. The copy Basic Features screen
appears in the touch panel display.
MEMO
● You can set your machine so that the FAX Basic Features screen
is displayed when the power is turned ON. (See ”Initial Function,”
on p. 3-6 in the Reference Manual.)
● This machine can receive telephone calls or documents sent by
FAX, and print out received documents even in the Sleep mode.
We recommend using the Sleep mode to receive fax documents
while you are out of the office.
● Turn the main power switch OFF when not using your machine for
a prolonged period of time, for example at night, when your
machine supports only copy functions, or when only printer
functions are supported in addition to copy functions.
1
2
3
4
5
6
7
8
9
10
Page 52

Océ 3121 – Copying Manual – English
2-6
Auto Sleep Function
If the machine is not operated for a period of about five minutes after copying has finished or after a
keying operation, the control panel power switch automatically moves to the OFF position, and the
machine enters the Sleep mode.
To turn the power back ON, press the power switch to the ON position.
MEMO
● You can set the auto sleep time from 1 minute to 8 hours. (See ”Auto Sleep Time,” on p. 3-32 in the
Reference
Manual
.)
Paper Supply Indicator
If the machine runs out of paper during paper selection (PAPER SELECT) operations or continuous
copying, the amount of copy paper remaining in the paper drawer is displayed. There are four different
indicators as shown below.
Indicator Paper Amount
Drawer is anywhere from 40% to 100% full
Drawer is anywhere from 10% to 40% full
Drawer is 10% full
Empty
Paper Selection Menu No Paper Left Display
Paper Supply
Indicator
Page 53

Océ 3121 – Copying Manual – English
2-7
Guide Function
This machine supports two guide functions: Usage Guide
and Information Guide.
■ Usage Guide
If you press the key while setting a function, an
explanation for that copy mode appears in the touch
panel display. Use this guide function if you do not
understand how to use the copy mode you are setting.
(In this example, the Transparency Interleaving mode has
been selected.)
If you press the
key, while setting [TRANS.
INTERLVING], the touch panel display changes to the
Usage Guide screen as shown on the right. To return to
the display for [TRANS. INTERLVING], press the [DONE]
key.
■ Information Guide
This machine supports many functions.
To find the right function for your particular copy needs,
or to find a simple description of a function, press the
key while the Basic Features screen (See ”Basic
Features Screen,” on p. 1-3.) or Special Features screen
(See ”Special Features Screen,” on p. 1-4.) is displayed.
The touch panel display changes to the Information
Guide screen.
(In this example, copies are being made from photo
originals.)
Press the [VARIOUS TYPES OF ORIGINALS] key.
You can display simple explanations of the Text/Photo or
Book Frame Erase modes using the [▼] or [▲] keys.
To return the display to the Types of Originals screen,
press the [DONE] key.
Usage Guide screen
Information Guide screen
1
2
3
4
5
6
7
8
9
10
Page 54

Océ 3121 – Copying Manual – English
2-8
Inserting the Control Card
When the optional Control Card V is attached to the machine, you must insert the control card before
starting to make copies.
NOTICE
● When the display in step 3 below does not appear in the touch panel display even if the control card is inserted,
check the following:
· Make sure that the control card is inserted in the correct direction.
· Make sure that the control card is inserted as far as it can go.
· Make sure that an unusable control card is not inserted.
MEMO
● For details on how to handle the control card, see the
Control Card Instruction Manual
.
Operations before Using Copy Functions
1
Press the key. The screen on the right appears.
MEMO
● For details on operations to carry out until turning the power ON,
see ”Turning the Power ON/OFF,” on p. 2-2 in the
Reference
Manual
.
2
Insert the control card into the card slot making sure
it is facing the correct direction.
Page 55

Océ 3121 – Copying Manual – English
2-9
3
The Basic Features screen appears in the touch
panel display.
Operations after Using Copy Functions
1
After making copies, remove the control card.
The touch panel display returns to the screen for
inserting the control card.
NOTICE
● After removing the control card, copies cannot be made unless
you insert it back into the card slot.
1
2
3
4
5
6
7
8
9
10
Page 56

Océ 3121 – Copying Manual – English
2-10
Entering the Dept. ID and Password
When Department ID Management has been set (See p. 3-19 in the
Reference Manual
.), you must
enter the Dept. ID and password before starting to make copies.
MEMO
● If you press the
key when you are not using the control card, the message “Insert a control card.” appears in
the touch panel display. Insert the control card into the card slot. (For details, see ”Inserting the Control Card,” on
p. 2-8.)
Operations after Turning Power ON
1
Press the key. The screen on the right appears.
MEMO
● For details on operations to carry out until turning the power ON,
see ”Turning the Power ON/OFF,” on p. 2-2 in the
Reference
Manual
.
2
Press the [DEPT. ID] key, and enter the department
ID.
MEMO
● Enter the four-digit department ID with the Number keys.
● If you make a mistake when entering values, press the
key,
and enter the values again.
3
Press the [PASSWORD] key, and enter the
password with the Number keys.
MEMO
● Enter the four-digit password with the number keys.
● If you make a mistake when entering the password, press the
key, and enter the password again.
● If a password has not been set, proceed to step 4.
Page 57

Océ 3121 – Copying Manual – English
2-11
4
Press the [OK] key.
The Basic Features screen appears in the touch
panel display.
If the department ID and/or ID number that you
entered are wrong, the message ”Wrong ID or ID
number” appears. Repeat the procedure from step 2.
Operations after Using Copy Functions
1
After making copies, press the key on the top
right of the touch panel display.
The screen for entering the department ID and
password appears. To make copies again, enter the
department ID and password again.
NOTICE
● If you do not press the
key, after finishing your copy job, any
additional copies will be totaled under the same department ID
which you previously entered.
MEMO
● After making copies, the screen for entering the password
automatically appears after the set time has elapsed if you forget
to press the
key. (See ”Auto Clear Function,” on p. 2-5.)
1
2
3
4
5
6
7
8
9
10
Page 58

Océ 3121 – Copying Manual – English
2-12
Placing Originals
There are three ways to place originals for copying. The method that you select will depend on the size
and type of the original that you are using, and the copy settings that you have programmed.
■ Platen glass
Use when copying books, originals on heavy paper, lightweight paper, and transparencies.
■ ADF (Automatic Document Feeder)
Place a stack of originals in the ADF, and they are automatically fed to the platen glass for copying.
NOTICE
● Only one copy can be made when using the ADF.
■ RDF (Recirculating Document Feeder)
Place a stack of originals in the RDF, and they are automatically fed to the platen glass for copying.
Two-sided copies can also be automatically made from two-sided originals.
Orientation of Originals
You can place originals vertically or horizontally. Always align the top edge of your original with the
back edge of the platen.
NOTICE
● If the original is not placed correctly, copies may not be made correctly depending on the copy mode.
MEMO
● A4/A5-size originals can be placed vertically or horizontally. However, the copy speed for vertically placed
originals is somewhat faster than that for horizontally placed originals. (Horizontally placed A4/A5-size originals
are referred to as “A4R/A5R.”)
● A3-size originals must be placed horizontally.
[Platen glass]
[RDF]
Vertical placement Horizontal placement
Vertical placement Horizontal placement
Page 59

Océ 3121 – Copying Manual – English
2-13
[ADF]
Vertical placement Horizontal placement
Placing an Original on the Platen Glass
You should use the platen glass when copying books, originals on heavy paper, and transparencies,
etc.
1
Lift up the platen cover (or ADF or RDF).
2
Place your original.
The surface that you want to copy must be placed
face down. Align the corner of the original with the
mark at the top left corner of the platen glass.
MEMO
● Place books and other bound originals on the platen glass in the
same way.
● When enlarging A4/A5-size originals to A3-size paper, place the
original horizontally on the platen glass and align it with the A4R
or A5R marks.
1
2
3
4
5
6
7
8
9
10
Page 60

Océ 3121 – Copying Manual – English
2-14
3
Gently lower the platen cover (or ADF or RDF).
NOTICE
● When placing originals on the platen glass, the size of the
original is detected after the platen cover (or ADF or RDF) has
been lowered. Be sure to lower the platen cover/ADF/RDF
before copying.
☞ REQUEST
● Do not press down hard on the platen cover (or ADF or RDF)
when using the platen glass to copy thick books. This may
damage the platen glass.
Placing Originals in the ADF
Place a stack of originals in the ADF, and they are automatically fed to the platen glass for copying.
You can place the following originals in the original supply tray:
· Weight: 35 g/m
2
to 105 g/m2(The Thin Sheet Original mode must be set for originals
such as invoices that are over 35 g/m
2
but less than 50 g/m2.)
· Size: A5, A4, A3
· Tray capacity: A3-size: 15 (80 g/m
2
),
A5/A4-size: 30 (80 g/m
2
)
☞ REQUEST
● Do not place objects in the document tray. Doing so might damage originals that are output to the document tray.
NOTICE
● Only one copy can be made when using the ADF.
● Do not place the following types of originals in the ADF:
· Originals with tears or large binding holes
· Severely curled originals or originals with sharp folds
· Clipped or stapled originals
· Carbon-backed paper or other originals which might not feed smoothly
· Transparencies and other highly transparent originals
● Do not bring paper or your hands within 5 cm of the paper sensors on the ADF during copying. Doing so may
result in erroneous copying.
MEMO
● Names and functions of ADF parts (See p. 6-8 in the
Reference Manual
.)
1
Adjust the slide guides to fit the size of the originals.
Slide guides
Page 61

Océ 3121 – Copying Manual – English
2-15
2
Neatly stack your originals face up in the original
supply tray.
The capacity of the original supply tray is as follows:
· A3-size originals : 15
· A4, A5-size originals : 30
NOTICE
● After copying begins, do not add or remove originals.
● Place the next set of originals after the last original is output to
the Document Tray.
MEMO
● When enlarging A4-size originals to A3-size paper, place your
originals horizontally. (A5 cannot be placed horizontally)
● Once copies are made from originals, originals are output in the
same order and facing the same direction that they were placed
on the Original Supply Tray.
How Originals Feed Through the ADF
Neatly stack your originals face up in the original supply tray.
Scanning is carried out from the lowermost original.
The light source is fixed. (flow scanning function*)
* The ”flow scanning function” refers to scanning originals by
moving the originals fed by the ADF over a fixed scanner.
Once copied, originals are output to the document tray.
☞ REQUEST
● Do not place objects in the document tray. Doing so might damage
originals that are output to the document tray.
Originals
Scanning unit
1
2
3
4
5
6
7
8
9
10
Page 62

Océ 3121 – Copying Manual – English
2-16
Placing Originals in the RDF
Place a stack of originals in the RDF, and they are automatically fed to the platen glass for copying.
Two-sided copies can also be automatically made from two-sided originals.
You can place the following originals in the original supply tray:
· Weight: 50 to 105 g/m
2
· Size: A5, A4, A3
· Tray capacity: A3-size: 25 (80 g/m
2
),
A4, A5-size: 50 (80 g/m
2
)
NOTICE
● Do not place the following types of originals in the RDF:
· Originals with tears or large binding holes
· Severely curled originals or originals with sharp folds
· Clipped or stapled originals
· Carbon-backed paper or other originals which might not feed smoothly
· Transparencies and other highly transparent originals
● Check the condition of originals which have been fed through the RDF many times. Originals which have been fed
through the RDF many times can become folded or wrinkled and might not feed smoothly.
1
Adjust the slide guides to fit the size of the originals.
Slide guides
Page 63

Océ 3121 – Copying Manual – English
2-17
2
Neatly stack your originals face up in the original
supply tray.
The capacity of the original supply tray is as follows:
· A3-size originals : 25
· A4, A5-size originals : 50
NOTICE
● After copying begins, do not add or remove originals.
MEMO
● When enlarging A4-size originals to A3-size paper, place your
originals horizontally.
● Before placing the following types of originals in the RDF, flip
open the auxiliary tray:
· A4/A4R-size originals (horizontal placement)
· A5-size originals (vertical placement)
· Different-size originals
(See ”Feeding Different-size Originals Together in the Feeder,”
on p. 4-14.)
● You can place different-size originals together in one group in
the RDF provided that the leading edge of each page is the
same length and the originals are the same thickness. (See
”Feeding Different-size Originals Together in the Feeder,” on
p. 4-14.)
● Once copies are made from originals, originals are output in the
same order and facing the same direction that they were placed
on the Original Supply Tray.
1
2
3
4
5
6
7
8
9
10
Page 64

Océ 3121 – Copying Manual – English
2-18
How Originals Feed Through the RDF
(when making copies of one side of the original)
Neatly stack your originals face up in the original tray.
Originals are fed from the lowermost original to the platen
glass.
When the original is placed on the platen glass, the original is
scanned by the light source in the moving scanning unit.
The next original (2) is fed to the platen glass.
The first scanned original (3) is returned to the original supply
tray.
All originals that were placed in the RDF are output to the
original supply tray.
Originals
Scanning unit
Page 65

Océ 3121 – Copying Manual – English
2-19
How Originals Feed Through the RDF
(when making copies of two sides of the original)
Neatly stack your originals face up in the original supply tray.
Originals are fed from the lowermost original to the platen
glass.
First, the original is reversed, and then fed to the platen glass.
When the original is placed on the platen glass, the original is
scanned by the light source in the moving scanning unit.
Next, the original is reversed, and the front of the original is fed
to the platen glass, and is scanned.
The first scanned original (5, 6) is returned to the original
supply tray.
Originals
Scanning unit
1
2
3
4
5
6
7
8
9
10
Page 66

Océ 3121 – Copying Manual – English
2-20
Entering the Copy Quantity
(making a specific number of copies)
This section describes how to enter and change the copy quantity.
MEMO
● Up to 100 copies can be set. The maximum number of copies can also be changed. (For details, contact your
service representative.)
Entering the Copy Quantity
1
Press the Number ( to ) keys to enter the
desired copy quantity (1 to 100).
NOTICE
● Only one copy can be made when using the ADF.
● After copying begins, you cannot change the copy quantity.
MEMO
● The maximum copy quantity varies according to the copy job
settings.
● The copy quantity appears in the right side of the touch panel
display.
Copy Quantity
Page 67

Océ 3121 – Copying Manual – English
2-21
Changing the Copy Quantity
1
Press the key to clear the entered number.
Then press the Number (
to ) keys to enter the
copy quantity again.
NOTICE
● Only one copy can be made when using the ADF.
● After copying begins, you cannot change the copy quantity.
MEMO
● The copy quantity appears in the right side of the touch panel
display.
Copy Quantity
1
2
3
4
5
6
7
8
9
10
Page 68

Océ 3121 – Copying Manual – English
2-22
Interrupting the Current Copy Job to Make
Priority Copies
(Interrupt Mode)
The Interrupt mode enables you to stop the current copy job long enough to make other priority copies.
This mode comes in useful when making a rush copy during a continuous copy job.
MEMO
● When using the Interrupt mode, place your originals on the platen glass. Originals cannot be scanned from the
ADF/RDF.
● There are five modes or settings which can be set in the Interrupt mode:
· Adjusting Exposure Setting and Image Quality (See p. 3-8.)
· Enlarging/Reducing Originals from Standard Paper Sizes to Another (See p. 3-12.)
· Reducing/Enlarging Originals to the Desired Size (See p. 3-14.)
· Selecting the Copy Paper Size (See p. 3-2.)
· Entering the Copy Quantity (See p. 2-20.)
● Auto Clear is not carried out while the Interrupt mode is set.
● Up to 100 copies can be made in the Interrupt mode.
1
Press the key.
When you press the
key, it begins flashing.
After the current copy job has stopped, the touch
panel display changes as shown on the right, and
the
key stops flashing and stays lit.
MEMO
● If a department ID was being used to run the current copy job,
the screen for entering the department ID and password
appears. (See ”Entering the dept. ID and password,” on p. 2-10.)
When managing copying using the control card, the control card
must be inserted before using the Interrupt mode. (See ”Inserting
the Control Card,” on p. 2-8.)
2
Lift up the platen cover/ADF/RDF.
NOTICE
● If the interrupted copy job was being run using the platen glass, temporarily remove the original from the platen
glass.
● If the interrupted copy job was being run using the ADF/RDF, slowly lift the ADF/RDF so that none of the
originals fall out of the original supply tray.
Page 69

Océ 3121 – Copying Manual – English
2-23
3
Place the original on the platen glass.
(See ”Placing Originals,” on p. 2-12.)
4
Gently lower the platen cover (or ADF or RDF).
Then, programme the necessary copy settings.
MEMO
● You can enter up to 100 copies.
● Press the
key and copy mode will return to the Standard
mode.
5
Press the key.
During copying, the message to the right appears in
the touch panel display.
MEMO
● If your machine is equipped with the Multi-output Tray-B2, copies
are output to the top bin.
● If you want to make copies of another original, replace the
current original with the new one. Programme the new copy
settings. Then, press the
key.
1
2
3
4
5
6
7
8
9
10
Page 70

Océ 3121 – Copying Manual – English
2-24
6
When you finish copying, the touch panel display
changes as shown on the right.
To continue making copies in the Interrupt mode,
press the [YES] key. To end making copies in the
Interrupt mode, press the [NO] key.
When you press the [NO] key, the Interrupt mode is
cancelled.
■ You can also cancel the Interrupt mode by
pressing the
key.
NOTICE
● When you have finished making copies in the Interrupt mode, be
sure to cancel the Interrupt mode.
● Printing by the FAX or printer is not possible while the machine
is in the Interrupt mode.
● Copies cannot be made in the regular mode unless the Interrupt
mode is cancelled.
● The Interrupt mode will not be cancelled even by pressing the
key.
7
Lift the platen cover (or ADF or RDF), and remove
the original from the platen glass.
8
Lift the platen cover (or ADF or RDF).
If the interrupted copy job was being run using the
platen glass, place the original (that you removed in
step 2) back on the platen glass.
If the interrupted copy job was being run using the
RDF, rearrange your originals in page order with the
first page on top. Then place your originals in the
original supply tray again.
If the interrupted copy job was being run using the
ADF, rearrange your originals in page order with the
first page at the bottom. Then place your originals in
the document tray.
Page 71

Océ 3121 – Copying Manual – English
2-25
9
Press the key.
The machine resumes the interrupted copy job.
1
2
3
4
5
6
7
8
9
10
Page 72

Page 73

Océ 3121 – Copying Manual – English
Chapter 3 Making Copies Using the Basic Features
■ Selecting the Copy Paper Size (PAPER SELECT)............................................................................................................ 2
■ Adjusting Exposure and Image Quality............................................................................................................................... 8
■ Enlarging/Reducing Originals from One Standard Paper Size to Another (R, 1:1, E)..................................................... 12
■ Reducing/Enlarging Originals Originals to the Desired Size (ZOOM MODE).................................................................. 14
■ Copying Two-sided Originals, Copying onto Both Sides of Copy Paper (TWO-SIDED)................................................. 34
■ Sorting Copies (SORTER) ................................................................................................................................................ 44
This chapter describes the modes that can be selected from the Basic
Features screen in the touch panel display.
PAPER SELECT
A
R 1:1 E
ZOOM
TWO-SIDED
SORTER
Page 74

Océ 3121 – Copying Manual – English
3-2
Selecting the Copy Paper Size
(PAPER SELECT)
The following three ways of selecting the copy paper size are available.
■ Auto Paper Selection (See p. 3-2.)
The machine automatically selects the appropriate paper size based on the size of the original and
the selected copy ratio.
■ Manual Paper Selection (See p. 3-4.)
You can freely select the paper size using the [PAPER SELECT] key.
■ Using the Stack Bypass (See p. 3-5.)
You can place the appropriate paper size in the stack bypass, and select the paper size from the
paper selection screen displayed in the touch panel display.
NOTICE
● You cannot use Auto Paper Selection when copying the following types of originals. Copy these by Manual Paper
Selection.
· Non-standard size originals
· Highly transparent originals such as transparencies
· Originals with an extremely dark background
· Originals smaller than A5 in size
● Auto Paper Selection cannot be set together with the Zoom, XY Zoom, Auto Zoom, Image Combination, Image
Separation and Image Repeat (when set to AUTO) modes.
MEMO
● The initial setting in the Standard mode is Auto Paper Selection.
● To make copies on transparencies or special (thick) copy stock, use the stack bypass.
● You can set Auto Paper Selection to specific paper drawers. (See ”Drawer Eligibility for APS/ADS,” on p. 3-11 in
the
Reference Manual
.)
Auto Paper Selection
If a paper size is displayed in the center of the touch panel display, press the [PAPER SELECT] key to
select the [AUTO] key.
Place your originals.
■ For instructions on how to place an original on the platen glass, see p. 2-13.
■ For instructions on how to place originals in the ADF, see p. 2-14.
■ For instructions on how to place originals in the RDF, see p. 2-16.
Page 75

Océ 3121 – Copying Manual – English
3-3
1
Press the [PAPER SELECT] key.
MEMO
● Auto Paper Selection is the Standard mode setting.
2
Select the [AUTO] key.
The screen on the right appears.
Proceed to make copies in the usual way.
(See chapter 2, ”Basic Copying”.)
MEMO
● When using Auto Paper Selection, the selected paper size is indicated as follows:
· If you place your original on the platen glass, the paper size appears in the touch panel display after the
platen cover is lowered.
· If you place your originals in the ADF, the paper size appears in the touch panel display after you place the
original in the Original Supply Tray.
· If you place your originals in the RDF, the paper size appears in the touch panel display after you press the
key.
● You can also cancel the mode by pressing the
key. (The machine returns to the Standard mode.)
1
2
3
4
5
6
7
8
9
10
Page 76

Océ 3121 – Copying Manual – English
3-4
Manual Paper Selection
Place your originals.
■ For instructions on how to place an original on the platen glass, see p. 2-13.
■ For instructions on how to place originals in the ADF, see p. 2-14.
■ For instructions on how to place originals in the RDF, see p. 2-16.
1
Press the [PAPER SELECT] key.
2
Select the paper size.
MEMO
● The paper sizes are displayed in the order in which they are
loaded in the paper drawers.
● The paper sizes shown in the display will vary depending on
which paper sizes are loaded in the paper drawers.
The selected paper size is displayed.
Proceed to make copies in the usual way.
(See chapter 2, ”Basic Copying”.)
MEMO
● You can also cancel the mode by pressing the
key. (The machine returns to the Standard mode.)
Page 77

Océ 3121 – Copying Manual – English
3-5
Using the Stack Bypass
To make copies on transparencies or special (thick) copy stock, use the stack bypass. Copies will be
made not on paper fed from the paper drawers but on paper in the stack bypass automatically fed into
the machine.
If you select the Stack Bypass mode with Auto Paper Selection, you can make copies from the stack
bypass. The following three types of paper can be copied using the stack bypass.
■ Standard Size
You can select standard inch system copy paper, or A or B series copy paper.
■ Free Size
You can place standard-size or non-standard size copy paper.
■ Envelope
You can place envelopes (COM10, Monarch, DL, ISO-B5, ISO-C5 and YOUKEI 4).
MEMO
● When copying the following originals, you cannot use Auto Paper Selection:
· Highly transparent originals such as transparencies
· Originals with an extremely dark background
Use Manual Paper Selection with these types of paper.
● When the Transparency Interleaving mode is already set, you cannot make copies using the stack bypass by Free
Size. When the Transparency Interleaving mode is selected when making copies by Free Size, enter the copy size
during copying.
● Two-sided and Overlay modes cannot be set for envelopes.
NOTICE
● Free Size and Envelope cannot be discharged and sorted to Multi-output Tray-C1 and -B2.
● Note the following points when using the stack bypass.
· Copy quantity: 1 to about 50 sheets (stack about 5 mm high)
· Paper size: A3 size to postcard (horizontaly placed)
· Paper weight: 64 g/m
2
to 128 g/m
2
· Curl down copy paper before use.
· There are some types of copy stock which may meet the above specifications but cannot be fed in the stack
bypass.
MEMO
● When [STACK BYPASS SIZE ENTRY] in the Custom Copy Settings is set to [ON] (See p. 3-15 in the
Reference
Manual
.) and the stack bypass in [DRAWER ELIBILITY FOR APS / ADS] is set to [OFF] (See p. 3-11 in the
Reference Manual
.), the Size Entry selection screen appears when you place copy paper in the stack bypass.
● Once you have set a copy paper size, that setting is held in memory until you next place copy paper in the stack
bypass.
Place your originals.
■ For instructions on how to place an original on the platen glass, see p. 2-13.
■ For instructions on how to place originals in the ADF, see p. 2-14.
■ For instructions on how to place originals in the RDF, see p. 2-16.
1
2
3
4
5
6
7
8
9
10
Page 78

Océ 3121 – Copying Manual – English
3-6
1
Programme the copy settings.
2
Open the stack bypass.
3
Adjust the slide guides to fit the size of the copy
paper.
When feeding large copy paper, pull out the auxiliary
tray.
Page 79
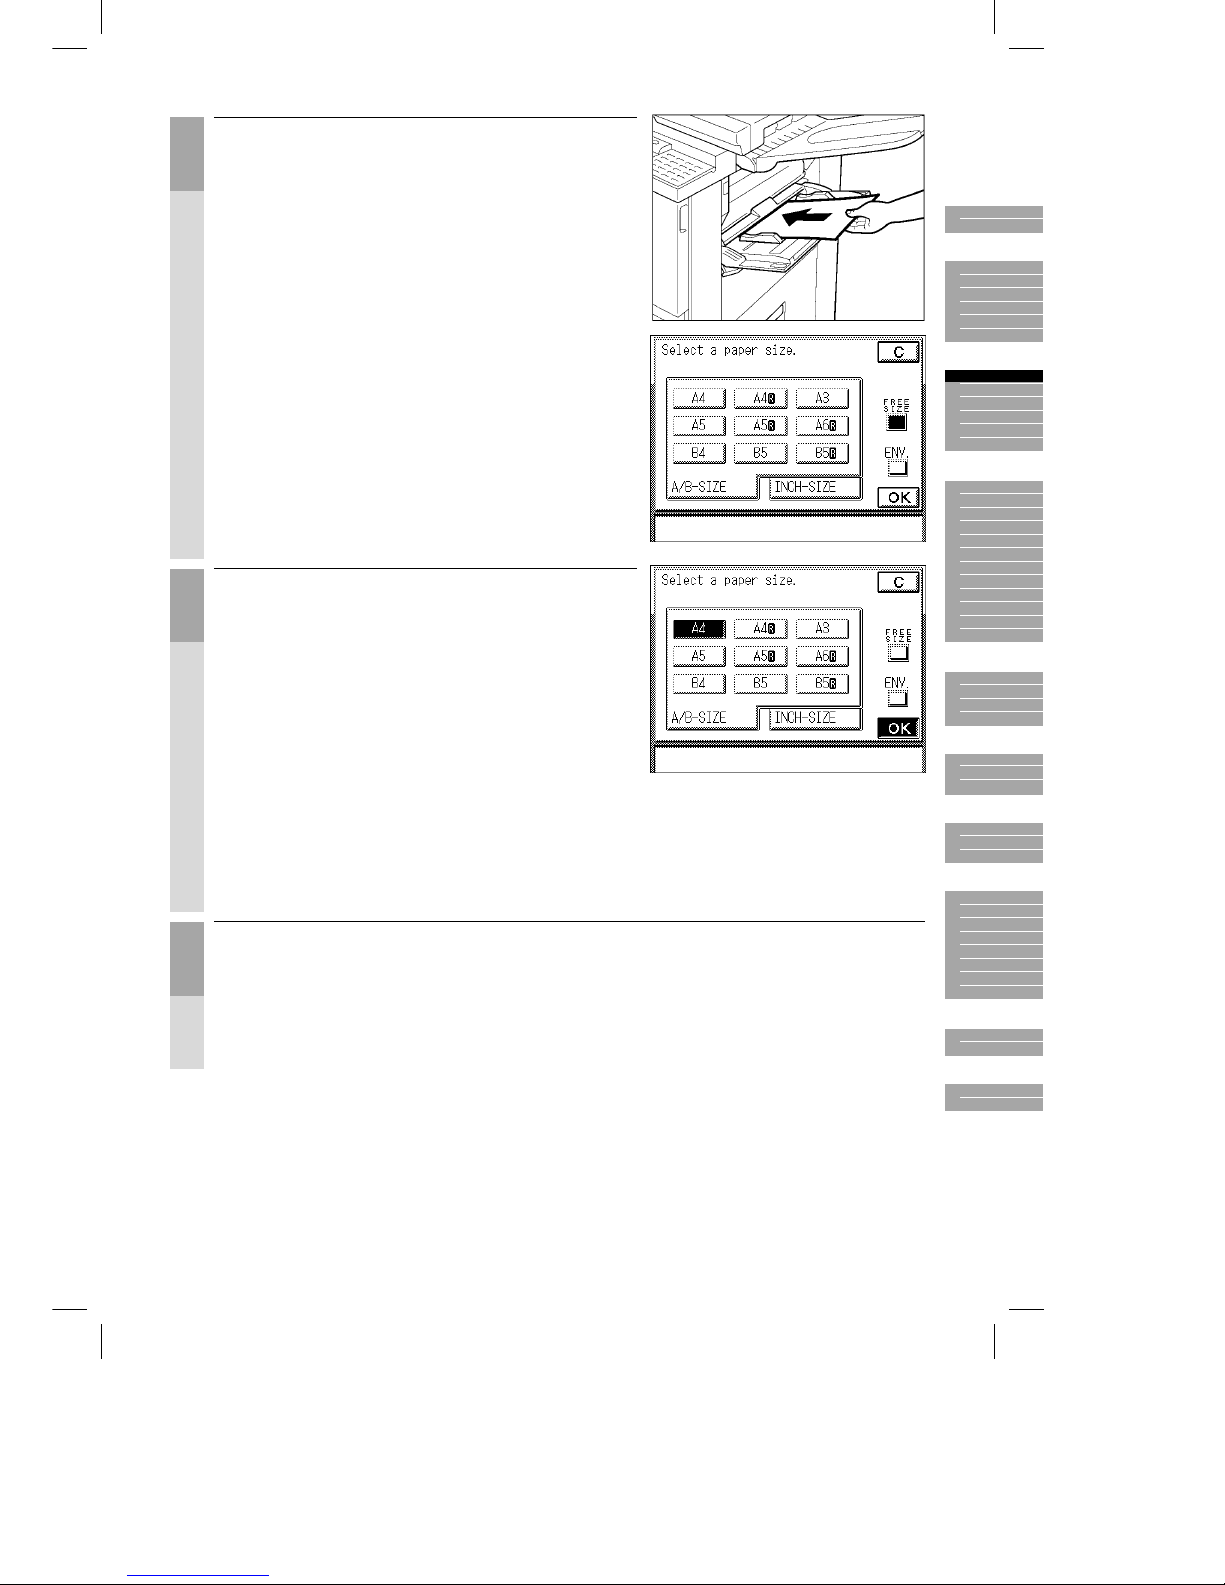
Océ 3121 – Copying Manual – English
3-7
4
Place the copy paper in the stack bypass.
Align the required number of sheets of copy paper
with the slide guides. The surface that you want to
copy on must be placed face up. Insert the copy
paper into the machine until it stops.
The Stack Bypass Size Entry screen is displayed.
MEMO
● When [STACK BYPASS SIZE ENTRY] in the custom settings is
set to [ON] (See p. 3-15 in the
Reference Manual
.), the screen
on the right appears. Initial setting is [OFF].
5
Select the copy size, then press the [OK] key.
Select one of the [A/B SIZE], [INCH-SIZE], [FREE
SIZE] or [ENV.] (COM10, Monarch, DL, ISO-B5,
ISO-C5, YOUKEI 4) keys.
NOTICE
● When placing envelopes on the stack bypass, be sure to press
the [ENV.] key and specify which standard of envelope is placed.
Incorrectly specifying the envelope standard may cause a paper
jam.
MEMO
● If one of the Two-sided, Overlay, or Image Combination modes
has been set, select the size of the copy papers placed in the
stack bypass from among the copy sizes displayed in the touch
panel display.
Proceed to make copies in the usual way.
(See chapter 2, ”Basic Copying”.)
1
2
3
4
5
6
7
8
9
10
Page 80

Océ 3121 – Copying Manual – English
3-8
Adjusting Exposure and Image Quality
The following three methods are available for adjusting the copy exposure.
■ Manual Exposure Control (See p. 3-8.)
You can manually adjust the copy exposure to the desired level using the Exposure ( [ ] or [ ] )
keys.
■ Setting Text/Photo Exposure (See p. 3-9.)
You can select the appropriate image quality for the type of original (text or photo).
■ A (Automatic Exposure Control) (See p. 3-11.)
The machine automatically adjusts the copy exposure to the most appropriate level for the original.
Adjusting Exposure (LIGHT, DARK)
Manually adjust the copy exposure to the most appropriate level for the original.
Place your originals.
■ For instructions on how to place an original on the platen glass, see p. 2-13.
■ For instructions on how to place originals in the ADF, see p. 2-14.
■ For instructions on how to place originals in the RDF, see p. 2-16.
1
Press the [ ] or [ ] keys to adjust the copy
exposure.
MEMO
● Move the indicator above the [
] [A] [ ] keys to the left to make
the exposure lighter or to the right to make the exposure darker.
● If you press the [
] or [ ] keys while Automatic Exposure
Control is in active (i.e. the [A] key is highlighted), the [A] key
returns to normal and Manual Exposure Control become active.
Proceed to make copies in the usual way.
(See chapter 2, ”Basic Copying”.)
MEMO
● You can also cancel the mode by pressing the
key. (The machine returns to the Standard mode.)
Page 81

Océ 3121 – Copying Manual – English
3-9
Selecting Image Quality (TEXT, TEXT/PHOTO, PHOTO)
You can adjust image quality to the appropriate level best suited to the quality of text or photo originals.
The following three modes are available for adjusting image quality.
■ TEXT
This mode is best suited for making copies from text originals (600 dpi). Good-looking copies can be
made from even blueprints or faint pencil-drawn originals.
■ TEXT/PHOTO
This mode is best suited for making copies from originals containing both text or photos, or photo
originals containing halftones (i.e. printed photos).
■ PHOTO
This mode is best suited for making copies from photos printed on photographic paper. (200 dpi)
NOTICE
● If you make copies of an original containing half-tones such as a printed photograph using the Photo mode, moiré
may occur. If this happens, you can soften this moiré effect by using the Sharpness mode. (See ”Making Sharp
Contrast Copies,” on p. 5-17.)
● Combinations of these three modes cannot be set. If you select one of these modes, the previously set mode is
cancelled.
MEMO
● When the Photo mode in the Custom Copy Settings is set to [ON], [PHOTO] is displayed. (See ”Photo Mode,” on
p. 8-8.)
● When you have selected the Text, Text/Photo or Photo mode, the copy exposure can be adjusted only by Manual
Exposure Control. Automatic Exposure Control [A] cannot be selected.
● If the original is a transparency, select the Text, Text/Photo or Photo mode to adjust the image quality to the most
appropriate level.
Text Text/Photo Photo
1
2
3
4
5
6
7
8
9
10
Page 82

Océ 3121 – Copying Manual – English
3-10
Place your originals.
■ For instructions on how to place an original on the platen glass, see p. 2-13.
■ For instructions on how to place originals in the ADF, see p. 2-14.
■ For instructions on how to place originals in the RDF, see p. 2-16.
1
Select the [ ] (TEXT), [ ] (TEXT/PHOTO) or
[
] (PHOTO) key, then press [ ] or [ ] to adjust
the copy exposure.
MEMO
● Move the indicator above the [
] [A] [ ] keys to the left to make
the exposure lighter or to the right to make the exposure darker.
● If you press the [
] or [ ] keys while Automatic Exposure
Control is in effect (i.e. the [A] key is highlighted), the [A] key
returns to normal and Manual Exposure Control become active.
3
Proceed to make copies in the usual way.
(See chapter 2, ”Basic Copying”.)
MEMO
● You can also cancel the mode by pressing the
key. (The machine returns to the Standard mode.)
Page 83

Océ 3121 – Copying Manual – English
3-11
Automatic Adjustment of Exposure and Image Quality (A)
Place your originals.
■ For instructions on how to place an original on the platen glass, see p. 2-13.
■ For instructions on how to place originals in the ADF, see p. 2-14.
■ For instructions on how to place originals in the RDF, see p. 2-16.
1
Press the [A] key.
The copy exposure is automatically adjusted to the
appropriate level best suited to the quality of the
original.
MEMO
● To return the machine to the Manual Exposure Adjustment
mode, press the [A] key again. The machine also returns to the
Manual Exposure Control mode after you have adjusted the copy
exposure by the [
] or [ ] keys.
● If the original is a transparency, you may not be able to use
Automatic Exposure Control. If so, adjust the copy exposure
using Manual Exposure Control.
Proceed to make copies in the usual way.
(See chapter 2, ”Basic Copying”.)
MEMO
● Automatic Copy Exposure is carried out in one of two ways. For details on how to set this (See “Setting
Automatic Exposure Adjustment,” on p. 3-9 in the
Reference Manual
.)
· [SPEED PRIORITY] (default)
The copy exposure is automatically adjusted. By this exposure method, copies are made with background
density skipped.
· [IMAGE PRIORITY]
The copy exposure and image quality are automatically adjusted. Before the original is scanned, the original
is ”pre-scanned” by the machine to judge the copy exposure. So, this method takes longer than the Speed
Priority mode.
● You can also cancel the mode by pressing the
key. (The machine returns to the Standard mode.)
NOTICE
● When making copies using the ADF with the Automatic Exposure Adjustment mode set to ”Image Priority,” prescanning is not possible. So, set the Automatic Exposure Adjustment mode to ”Speed Priority.”
1
2
3
4
5
6
7
8
9
10
Page 84

Océ 3121 – Copying Manual – English
3-12
Enlarging/Reducing Originals from One Standard
Paper Size to Another
(R, 1:1, E)
You can make copies at the same size as the original, and make enlarged or reduced copies from
standard-size originals on standard-size copy paper.
■ 1:1 (Direct)
This mode enables you to make copies the same size as the original.
■ R (Reduce)
This mode enables you to make reduced size copies from standard-size originals to standard-size
copy paper. This machine is provided with the following preset reduction copy ratios.
A3 ➝ A4 ➝ A5 (70%)
A3 ➝ A5 (50%)
25% MIN.
■ E (Enlarge)
This mode enables you to make enlarged size copies from standard-size originals to standard-size
copy paper. This machine is provided with the following preset enlargement copy ratios.
A5 ➝ A4 ➝ A3 (141%)
A5 ➝ A3 (200%)
400%
800% MAX.
NOTICE
● Place your originals horizontally in the following cases:
· When enlarging A4-size originals to A3-size
· When enlarging A5-size originals to A3-size
● When reducing A3-size originals to A4-size, select the A4R paper
drawer loaded with A4-size copy paper.
● Copies cannot be made at the [25% MIN], [400%] or [800% MAX]
copy ratios when using the ADF. Make copies at these copy
ratios with the original placed on the platen glass.
Page 85

Océ 3121 – Copying Manual – English
3-13
Place your originals.
■ For instructions on how to place an original on the platen glass, see p. 2-13.
■ For instructions on how to place originals in the ADF, see p. 2-14.
■ For instructions on how to place originals in the RDF, see p. 2-16.
1
Press the [E] or [R] key to display the preset copy
ratios in the touch panel display.
■ To make larger size copies on a standard
paper size, press the [E] key.
■ To make smaller size copies on a standard
paper size, press the [R] key.
MEMO
● When making copies the same size as the original (100%), see
”Flow of Copy Operations,” on p. 2-2.
2
Select a preset copy ratio.
The display returns to the Basic Features screen,
and the selected copy ratio is displayed.
NOTICE
● Copies cannot be made at the [25% MIN], [400%] or [800%
MAX] copy ratios when using the ADF. Make copies at these
copy ratios with the original placed on the platen glass.
Proceed to make copies in the usual way.
(See chapter 2, ”Basic Copying”.)
MEMO
You can also cancel the mode by pressing the
key. (The machine returns to the Standard mode.)
1
2
3
4
5
6
7
8
9
10
Page 86

Océ 3121 – Copying Manual – English
3-14
Reducing/Enlarging Originals to the Desired Size
(ZOOM MODE)
You can make copies reduced or enlarged to the desired copy ratio. The following six zoom modes are
available.
■ ZOOM (See p. 3-14.)
You can enlarge or reduce images by a copy ratio of your choice, selectable in 1% increments.
■ AUTO ZOOM (See p. 3-16.)
You can automatically copy from a standard-size original to a different standard-size copy at the
same XY ratio.
■ ENTIRE IMAGE (See p. 3-19.)
This mode slightly reduces the entire image.
This mode prevents images that fill the entire page from being cut off at the edges if it fills the entire
page.
■ ZOOM PROGRAM (See p. 3-20.)
You can make copies with a copy ratio, by specifying the copy size and original size.
Two Zoom Programme modes are available: [ZOOM] for specifying copying at the same XY copy
ratio, and [XY ZOOM] for specifying copying at a different XY copy ratio.
■ XY ZOOM (See p. 3-23.)
This mode makes enlarged or reduced copies at a different XY copy ratio.
Two XY Zoom modes are available: automatic for automatically specifying the copy ratio, and
manual for manually specifying the copy ratio.
■ MULTI-PG ENLARGE (See p. 3-27.)
This mode automatically calculates how many sheets the original is to be copied on based on the
enlarged copy size. If you paste together the copy sheets output in the Multi-PG Enlarge mode, you
can enlarge originals to copy paper sizes larger than A3.
Reducing Originals at a Desired Copy Ratio (ZOOM)
You can reduce or enlarge images by any copy ratio, selectable in 1% increments. The copy ratios are
as follows:
■ When placing originals in the RDF or on the platen glass: 25 to 800%
■ When placing originals in the ADF: 50 to 200%
NOTICE
● When the selected copy ratio is outside of the 50 to 200% range, copies cannot be made from originals placed on
the ADF.
Place your originals.
■ For instructions on how to place an original on the platen glass, see p. 2-13.
■ For instructions on how to place originals in the ADF, see p. 2-14.
■ For instructions on how to place originals in the RDF, see p. 2-16.
Original Copy
Page 87

Océ 3121 – Copying Manual – English
3-15
1
Press the [ZOOM] key.
2
Enter the copy ratio.
You can enter the copy ratio with the [–] [+] keys or
the Number keys in 1% increments.
■ To increase the copy ratio, press the [+] key.
■ To decrease the copy ratio, press the [–] key.
■ To enter the copy ratio directly, press the
Number (
to ) keys.
MEMO
● If you enter the copy ratio with the Number keys, you can
directly change (increase/decrease) the entered values with the
[–] [+] keys in the touch panel display.
● If you make a mistake when entering values, press the
key,
and enter the correct value.
● If you enter a value outside the setting range, a message
prompting you to enter the appropriate value will appear on
screen.
● If you have placed originals in the ADF, you can make copies at
a copy ratio within the range 50 to 200%.
3
Press the [DONE] key.
The display returns to the Basic Features screen,
and the selected copy ratio is displayed.
1
2
3
4
5
6
7
8
9
10
Page 88

Océ 3121 – Copying Manual – English
3-16
Proceed to make copies in the usual way.
(See chapter 2, ”Basic Copying”.)
NOTICE
● When the selected copy ratio is outside of the 50 to 200% range, copies cannot be made from originals placed
on the ADF.
MEMO
● If you press the [1:1] key, the setting is cancelled, and the copy ratio returns to direct copying (100%).
● You can also cancel the mode by pressing the
key. (The machine returns to the Standard mode.)
Automatically Setting the Copy Ratio Based on the Original and Copy
Paper Sizes
(AUTO ZOOM)
In this mode, the machine automatically selects the appropriate copy ratio based on the size of the
originals and the selected copy paper. The copy ratios are as follows:
■ When placing originals in the RDF or on the platen glass: 25 to 800%
■ When placing originals in the ADF: 50 to 200%
NOTICE
● You cannot use the Auto Zoom mode with Auto Paper Selection.
● You cannot copy highly transparent originals, such as transparencies, in the Auto Zoom mode. Use the Reduction,
Enlargement or Zoom modes.
● To use the Auto Zoom mode, your originals must conform to a standard paper size.
● When the copy ratio is outside the 50 to 200% range in the Auto Zoom mode, copies cannot be made from
originals placed on the ADF.
MEMO
● If an error occurs between the Auto Zoom copy ratio and the actual copy size, you can adjust this with the Zoom
Fine Adjustment function. (See “Zoom Fine Adjustment,” on p. 3-38 in the
Reference Manual
.)
● The copy paper placed in the stack bypass normally is not processed in the Auto Zoom mode. To process this
paper in the Auto Zoom mode, you must first specify the size of the copy paper to be placed in the stack bypass.
(See “Selecting the Copy Paper Size,” on p. 3-2.)
● The paper sizes that can be used with Auto Zoom are as follows:
For an original placed on the platen glass : A3, A4, A4R, A5
For originals placed in the ADF : A3, A4, A4R, A5, A5R
For originals placed in the RDF : A3, A4, A4R, A5
Place your originals.
■ For instructions on how to place an original on the platen glass, see p. 2-13.
■ For instructions on how to place originals in the ADF, see p. 2-14.
■ For instructions on how to place originals in the RDF, see p. 2-16.
Original Copy
Page 89

Océ 3121 – Copying Manual – English
3-17
1
Press the [PAPER SELECT] key.
2
Select the copy paper size.
NOTICE
● Select a copy paper size other than [AUTO].
3
Press the [ZOOM] key.
1
2
3
4
5
6
7
8
9
10
Page 90

Océ 3121 – Copying Manual – English
3-18
4
Select the [AUTO] key, then Press the [DONE] key.
The display returns to the Basic Features screen.
■ If you placed your original on the platen glass:
When you have lowered the platen cover (or ADF or
RDF), the selected copy ratio appears in the touch
panel display.
■ If you placed your original in the ADF:
After you have placed the originals, the selected copy
ratio appears in the touch panel display.
■ If you placed your original in the RDF:
After you press the key to begin copying, the
selected copy ratio appears in the touch panel display.
MEMO
● The copy ratio is set within the range of 25 to 800%.
Proceed to make copies in the usual way.
(See chapter 2, ”Basic Copying”.)
NOTICE
● When the copy ratio is outside the 50 to 200% range in the Auto Zoom mode, copies cannot be made from
originals placed on the ADF.
MEMO
● If you press the [1:1] key, the setting is cancelled, and the copy ratio returns to direct copying (100%).
● You can also cancel the mode by pressing the
key. (The machine returns to the Standard mode.)
Page 91

Océ 3121 – Copying Manual – English
3-19
Slightly Reducing Images to Prevent the Original Periphery from Being
Cut
(ENTIRE IMAGE)
When copying an original onto the same size of paper at a 100% copy ratio, the periphery of the
original may be cut slightly on the copy.
However, if you set the Entire Image mode, the copied image is automatically reduced slightly based
on the copy paper size and copy image size. As a result, the entire original image is reproduced on the
copy without its periphery being cut off.
Place your originals.
■ For instructions on how to place an original on the platen glass, see p. 2-13.
■ For instructions on how to place originals in the ADF, see p. 2-14.
■ For instructions on how to place originals in the RDF, see p. 2-16.
1
Press the [ZOOM] key.
2
Select the [ENTIRE IMAGE] key, then press the
[DONE] key.
Proceed to make copies in the usual way.
(See chapter 2, ”Basic Copying”.)
MEMO
● To cancel the settings, press the [ZOOM] and [ENTIRE IMAGE]
in that order.
● You can also cancel the mode by pressing the
key. (The
machine returns to the Standard mode.)
1
2
3
4
5
6
7
8
9
10
Page 92

Océ 3121 – Copying Manual – English
3-20
Calculating the Copy Ratio Based on the Original and Copy Paper
Sizes
(ZOOM PROGRAM)
If you enter measurements for the original and desired copy images (or sheets), the machine will
automatically calculate and set the appropriate copy ratio. The following two Zoom Programme modes
are available.
■ Making copies with the same XY copy ratio (ZOOM)
Designate the same copy ratio for the vertical and horizontal directions.
■ Making copies with a different XY copy ratio (XY ZOOM)
Designate a different copy ratio for the vertical and horizontal directions.
MEMO
● Sizes designated in millimeters are converted to the copy ratio (%) as follows:
copy ratio (%) = copy size (mm)/original size (mm) x 100
Numbers past the decimal point are discarded.
● If the calculated copy ratio is smaller than 25%, it is set to 25%. If it is larger than 800%, it is set to 800%.
NOTICE
● When the calculated copy ratio is outside the 50 to 200% range, copies cannot be made from originals placed on
the ADF.
Original Copy
X=100 mm Copy paper size
Original Copy
X=100 mm X=80 mm
Original size
Y=140 mm
Page 93

Océ 3121 – Copying Manual – English
3-21
Place your originals.
■ For instructions on how to place an original on the platen glass, see p. 2-13.
■ For instructions on how to place originals in the ADF, see p. 2-14.
■ For instructions on how to place originals in the RDF, see p. 2-16.
1
Press the [ZOOM] key.
2
Select the [ZOOM PROGRAM] key.
3
Select the [ZOOM] or [XY ZOOM] key.
Select the [ORIGINAL SIZE] key, then enter the
original size (mm) with the Number keys.
Select the [COPY SIZE] key, then enter the copy
size (mm) with the Number keys.
MEMO
● If you make a mistake when entering values, press the
key,
and enter the values again.
1
2
3
4
5
6
7
8
9
10
Page 94

Océ 3121 – Copying Manual – English
3-22
4
Press the [OK] key.
The display returns to the Basic Features screen,
and the selected copy ratio is displayed.
Proceed to make copies in the usual way.
(See chapter 2, ”Basic Copying”.)
NOTICE
● When the calculated copy ratio is outside the 50 to 200% range, copies cannot be made from originals placed
on the ADF.
MEMO
● If you press the [1:1] key, the setting is cancelled, and the copy ratio returns to direct copying (100%).
● To cancel the settings, press the [ZOOM], [ZOOM PROGRAM] and [C] keys in that order.
● You can also cancel the mode by pressing the
key. (The machine returns to the Standard mode.)
Page 95

Océ 3121 – Copying Manual – English
3-23
Enlarging/Reducing Originals at Copy Ratios Set Independently for X
and Y Axes
(XY ZOOM)
If you set the XY Zoom mode, you can make enlarged or reduced copies at a different XY copy ratio.
The following two XY Zoom modes are available.
■ Manually Specifying the Copy Ratio (XY ZOOM) (See p. 3-24.)
Manually specify the XY copy ratio in 1% increments.
■ Automatically Specifying the Copy Ratio (AUTO XY ZOOM) (See p. 3-25.)
The XY copy ratio is automatically set to suit the size of the selected copy paper.
NOTICE
● You cannot use the Auto XY Zoom mode with Auto Paper Selection.
● If you set the Auto XY Zoom mode, select the copy paper size by Manual Paper Selection. If you do not select the
copy paper size, the copy ratio is automatically set to the size of the copy paper set in the topmost paper drawer
during copying.
● You cannot copy highly transparent originals, such as transparencies, in the Auto XY Zoom mode. Use the
Reduction, Enlargement or Zoom modes.
● When the copy ratio is outside the 50 to 200% range in the Auto XY Zoom mode, copies cannot be made from
originals placed on the ADF.
MEMO
● When the copy ratio is smaller than 25% in the Auto XY Zoom mode, it is set to 25%. If it is larger than 800%, it is
set to 800%.
● If an error occurs between the Auto XY Zoom copy ratio and the actual copy size, you can adjust this with the
Zoom Fine Adjustment function. (See ”Zoom Fine Adjustment,” on p. 3-38 in the
Reference Manual
.)
Original Copy
Enlarging and reducing at
different XY copy ratios
X=120%
Y=80%
Original Copy
A4
A4R
A4R selected
1
2
3
4
5
6
7
8
9
10
Page 96

Océ 3121 – Copying Manual – English
3-24
Manually Specifying the Copy Ratio
Place your originals.
■ For instructions on how to place an original on the platen glass, see p. 2-13.
■ For instructions on how to place originals in the ADF, see p. 2-14.
■ For instructions on how to place originals in the RDF, see p. 2-16.
1
Press the [ZOOM] key.
2
Select the [XY ZOOM] key.
3
Enter the XY copy ratio.
Press the [X] and [Y] keys, and enter the values for
X and Y.
You can enter the XY copy ratio in the range of 25 to
800% with the [–] [+] keys or the Number keys in 1%
increments.
· To increase the copy ratio, press the [+] key.
· To decrease the copy ratio, press the [-] key.
· To enter the copy ratio directly, press the Number
(
to ) keys.
MEMO
● If you enter the copy ratio with the Number keys, you can
directly change (increase/decrease) the entered values with the
[–] [+] keys on the touch panel display.
The display returns to the Basic Features screen,
and the selected copy ratio is displayed.
Page 97

Océ 3121 – Copying Manual – English
3-25
Proceed to make copies in the usual way.
(See chapter 2, ”Basic Copying”.)
NOTICE
● When the set copy ratio is outside the 50 to 200% range, copies cannot be made from originals placed on the
ADF.
MEMO
● If you press the [1:1] key, the setting is cancelled, and the copy ratio returns to direct copying (100%).
● To cancel the settings, press the [ZOOM], [XY ZOOM], and [C] keys in that order.
● You can also cancel the mode by pressing the
key. (The machine returns to the Standard mode.)
Automatically Specifying the Copy Ratio
Place your originals.
■ For instructions on how to place an original on the platen glass, see p. 2-13.
■ For instructions on how to place originals in the ADF, see p. 2-14.
■ For instructions on how to place originals in the RDF, see p. 2-16.
1
Press the [PAPER SELECT] key.
2
Select the copy paper size.
NOTICE
● Select a copy size other than the [AUTO] key. When the [AUTO]
key is selected, the paper loaded in the upper drawer is
selected.
3
Press the [ZOOM] key.
1
2
3
4
5
6
7
8
9
10
Page 98

Océ 3121 – Copying Manual – English
3-26
4
Select the [XY ZOOM] key.
5
Select the [AUTO XY ZOOM] key, then press the
[OK] key.
The display returns to the Basic Features screen.
Proceed to make copies in the usual way.
(See chapter 2, ”Basic Copying”.)
NOTICE
● When the copy ratio is outside the 50 to 200% range in the Auto Zoom mode, copies cannot be made from
originals placed on the ADF.
MEMO
● If you press the [1:1] key, the setting is cancelled, and the copy ratio returns to direct copying (100%).
● To cancel the settings, press the [ZOOM], [XY ZOOM], and [C] keys in that order.
● You can also cancel the mode by pressing the
key. (The machine returns to the Standard mode.)
Page 99

Océ 3121 – Copying Manual – English
3-27
Reducing/Enlarging Originals to Copy Paper Sizes Larger than A3
(MULTI-PG ENLARGE)
NOTICE
● This feature can be used with the following combinations of model and options.
Original Placement Where to place the original
Series Name Platen glass ADF RDF
Océ 3121 Yes No Yes
If you set the Multi-Page Enlarge mode, you can enlarge and copy originals onto sheets larger than A3
in size.
The machine automatically calculates how many sheets the original is to be copied on based on the
enlarged copy size. If you paste together the copy sheets output in this mode, you can make copies
larger than A3.
■ Specifying the Copy Ratio by % (COPY RATIO(S)) (See p. 3-29.)
Specify the copy ratio up to 800%. The copy paper size is automatically set.
■ Specifying the Copy Ratio by Number of Output Pages (NUMBER OF OUTPUT
PGS) (See p. 3-31.)
Specify the copy paper size and number of output pages. The copy ratio is automatically set.
NOTICE
● Copies output in the Multi-page Enlarge mode are output so that adjacent images are overlapping. When cutting
and pasting these copies together, overlap and paste duplicated image areas.
● Only the following standard-size originals can be copied in the Multi-page Enlarge mode: A3, A4, A4R, A5, A5R
● Only one copy can be made in the Multi-page Enlarge mode.
Original
Copies Copies cut and pasted
together
1
2
3
4
5
6
7
8
9
10
Page 100

Océ 3121 – Copying Manual – English
3-28
Copy Ratio Specification and Required Paper Sizes and Quantities
When making an enlarged copy with a specified copy ratio, the size of the copy paper and the number
of sheets required for the resulting copy depend on the copy ratio that was specified. The following
table shows typical copy ratios and the size and number of sheets of copy paper required. Use this
table as a guide when determining the desired copy ratio.
■ When the original and output copy sheets are horizontal
Output Size/
Orientation
Original Size/
Orientation
A3/Horizontal A4/Horizontal
Number of Copy Sheets at
Suitable Copy Paper Size
A0 x 2 / Horizontal 400% – A3 5 × 5 = 25 sheets
A0 / Horizontal 282% 400% A3 3 × 3 = 9 sheets
A1 / Horizontal 200% 282% A3 3 × 3 = 9 sheets
A2 / Horizontal 141% 200% A3 2 × 2 = 4 sheets
■ When the original and output copy sheets are vertical
Output Size/
Orientation
Original Size/
Orientation
A4/Vertical
Number of Copy Sheets at
Suitable Copy Paper Size
A0 / Vertical 400% A3 3 × 5 = 15 sheets
A1 / Vertical 282% A3 2 × 3 = 6 sheets
A2 / Vertical 200% A3 2 × 2 = 4 sheets
NOTICE
● The values shown in the above table are only meant as a guide. The actual values may be slightly different.
● The resulting size after the printed copies have been cut and pasted together will be slightly smaller than the size
indicated in the above table.
● For originals as large as A3-size, the copy ratio can be set freely from 25% to 800%.
MEMO
● Horizontal placement and vertical placement are shown below.
Horizontal
placement
Vertical
placement
Far side
Near side
(closer to
the control
panel)
 Loading...