

Page 1

Océ VarioPrint®
2090
User manual
Page 2

Océ-Technologies B.V.
Océ and Océ VarioPrint are registered trademarks of
Océ-Technologies B.V.
Adobe, Acrobat and PostScript 3 are registered trademarks of
Adobe Systems Inc.
Linux is a registered trademark of Linus Torvalds
Mac is a registered trademark of Apple Computer, Inc.
Microsoft, Microsoft NT and Windows are registered trademarks
of Microsoft Corporation.
OpenVMS is a registered trademark of Hewlett-Packard
Company.
OS/2 is a registered trademark of IBM Corp.
UNIX is a registered trademark of X/Open Group Limited.
Copyright
© 2004, Océ-Technologies B.V. Venlo, The Netherlands
All rights reserved. No part of this work may be reproduced, copied, adapted,
or transmitted in any form or by any means without written permission from
Océ.
Océ-Technologies B.V. makes no representation or warranties with respect to
the contents hereof and specifically disclaims any implied warranties of
merchantability or fitness for any particular purpose.
Further, Océ-Technologies B.V. reserves the right to revise this publication and
to make changes from time to time in the content hereof without obligation to
notify any person of such revision or changes.
Code number 1060012903
Edition 2004-02
GB
Page 3

Notes for the reader
Introduction
This manual helps you to use the Océ VarioPrint 2090 . The manual contains
a description of the Océ VarioPrint 2090 and guidelines to use and operate the
Océ VarioPrint 2090 . There are also tips to increase your knowledge of the
Océ VarioPrint 2090 and to help you manage the workflow even better.
Definition
Attention Getters
Parts of this manual require your special attention. These parts provide
important, additional information or are about the prevention of damage to
your properties.
Note, Attention and Caution
The words Note, Attention and Caution indicate these important parts.
■ The word Note comes before additional information about the correct
operation of the Océ VarioPrint 2090 or before a hint.
■ A part marked with Attention contains information to prevent damage to
items, for example the Océ VarioPrint 2090 or a file.
■ A part marked with Caution contains information to prevent personal
injury.
Safety information
The safety information for this product is included in a separate manual with
the title Safety manual. This manual is part of the documentation set that you
received with your product.
3
Page 4

4 Océ VarioPrint 2090 User manual
Page 5
Contents
Notes for the reader 3
Chapter 1
Introduction
About the users of the Océ VarioPrint 2090 10
Available documentation 11
The concepts and philosophy 13
Chapter 2
Get to know the Océ VarioPrint 2090
The configuration 20
The power modes 26
The on-line help on the operator panel 29
The 'System information' section 32
Chapter 3
Turn on and off the system
Turn on the system 36
Shut down the system 38
Restart the system 39
Chapter 4
Chapter 5
The accounting function
About the accounting function 42
Enter and cancel an 'Account ID' 45
Download the accounting log files 47
Make a copy or print with the copy card 49
The job queue
About the job queue 52
Give priority to jobs 55
Contents 5
Page 6

Chapter 6
The print function
General information 58
About the printer driver 58
About the page programmer 60
About automatic printing 63
Print to the Océ VarioPrint 2090 65
Create a print job 65
Create a secured print job 67
Print a secured print job 68
Create a print job with an Account ID 69
Print a print job with an Account ID 71
My Paper in a print job 72
Covers in a print job 74
Special paper in a print job 76
Use the mailbox 78
About the mailbox 78
Print a job from the mailbox 81
Edit a mailbox job 83
Stop printing 87
Remove jobs from the mailbox 89
Océ Intra Logic 90
About Océ Intra Logic 90
Océ Intra Logic functions 93
Chapter 7
The copy function
Basic copies 98
Make a copy 98
Types of copy job settings 100
Correct the settings for a copy job 107
Copy special originals and originals of a non-standard size 108
Stapled copies 110
Extended copies 113
Combine subsets into one document 113
Concatenation and chapterization 115
Delete subsets 118
Create a booklet 120
Stop the scanning of a copy job 121
6 Océ VarioPrint 2090 User manual
Page 7
Chapter 8
The scan function
Configure the scan-to-file function 124
Introduction to the scan-to-file function 124
The configuration of the scan-to-file function 127
Configure the scan server 128
Configure the scan job export function 131
Check the export status of a scan job 133
About the scan profiles file 135
Use the scan-to-file function 136
Types of scan job settings 136
Scan special originals and originals of a non-standard size 142
Combine subsets into one file 144
Stop the scanning of a scan job 146
Error messages and possible solutions 148
Chapter 9
Chapter 10
Appendix A
Appendix B
Add the supplies
Load the paper trays 150
Add the toner 153
Add the staples 156
Error handling
Handle contradictions 162
Handle errors 165
About the paper jams 167
About the staple jams 169
Overview and tables 171
Product specifications 172
Originals that can be used 173
Materials that can be used 174
Miscellaneous 177
Reader's comment sheet 178
Addresses of local Océ organisations 180
Contents 7
Page 8

8 Océ VarioPrint 2090 User manual
Page 9

Chapter 1 Introduction
Océ VarioPrint 2090
User manual
9
Page 10

About the users of the Océ VarioPrint 2090
Introduction
Information for operators, key operators, system administrators
For the purpose of this User manual, the following target groups are defined.
■ Operators (including general users)
■ Key operators
■ System administrators.
The target group for the information or task in a section is indicated at the top
of that section.
Tasks of the types of users
[1] Tasks of the users
Types of users Examples of tasks
Operators
Key operators
System
administrators
■ Create print jobs, copy jobs and scan jobs
■ Process print jobs, copy jobs and scan jobs
■ Handle errors on the Océ VarioPrint 2090
■ Manage the key operator settings in the Océ Settings
Editor
■ Configure the Océ VarioPrint 2090 in the network
■ Manage the system administrator settings in the Océ
Settings Editor
[1] Tasks of the users
10 Océ VarioPrint 2090 User manual
Page 11
Available documentation
The documentation set of the Océ VarioPrint 2090
Information for operators, key operators, system administrators
Océ delivers the Océ VarioPrint® 2090 with a documentation set.
The documentation set for the Océ VarioPrint 2090 contains the following
items.
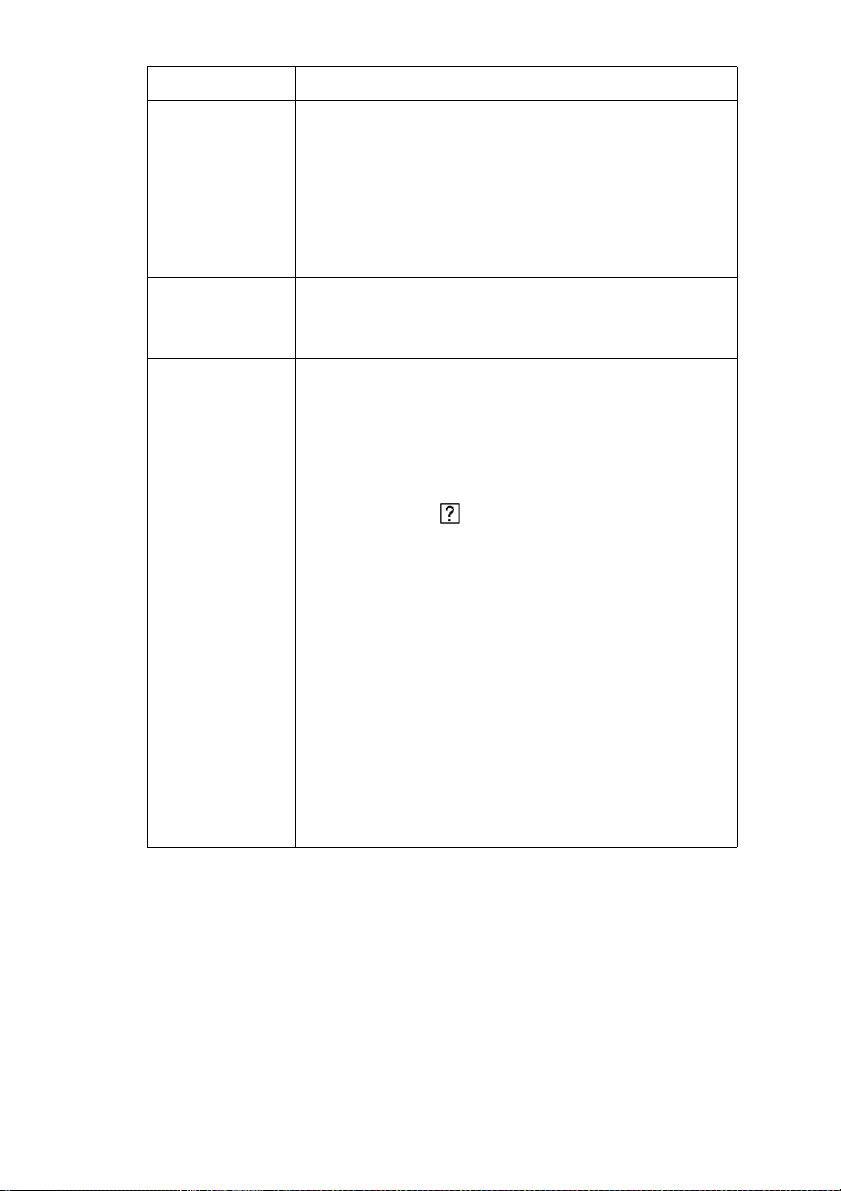
[2] The documentation set
Item Description
User manual The User manual describes the workflow of print
jobs, copy jobs and scan jobs.
■ Print from the mailbox
■ Print directly to the Océ VarioPrint 2090
■ Make simple and advanced copies
■ Convert analogue documents into digital documents
(scan to file)
■ Add the supplies
■ Solve possible errors
The manual also contains general information about
the system.
■ Configuration, workflow and structure of the Océ
VarioPrint 2090
■ Turn on, turn off and restart the system
■ Product specifications, originals and copy materials
to use
Safety manual The multilingual Safety manual gives information
about safety issues.
■ Instructions for safe use
■ Safety data sheets
■ EPA Energy Star®
Introduction 11
Page 12
Item Description
Quick Reference
Card
The Quick Reference Card contains basic instructions
for new users who are not experienced with the Océ
VarioPrint 2090 . The card contains information about
the following tasks.
■ Print from the mailbox
■ Make a copy
■ Scan an original to a file
CD-ROM The CD-ROM contains a digital copy of the User
manual, the Safety manual and the Quick Reference
Card.
On-line help The Océ VarioPrint 2090 contains the following
types of on-line help.
■ An on-line help on the operator panel.
The on-line help on the operator panel gives
experienced users more information about advanced
functions of the Océ VarioPrint 2090 .
The Help key on the operator panel gives access
to this on-line help.
■ An on-line help in the Océ Settings Editor application
on the Océ Smart Imager.
The User manual sometimes refers to settings in the
Océ Settings Editor.
The Océ Settings Editor allows key operators and
system administrators to change the default system
settings.
Key operators and system administrators can refer to
the on-line help in the Océ Settings Editor for more
information about the settings.
■ An on-line help in the printer driver (PCL and
PostScript®) of the Océ VarioPrint 2090 .
[2] The documentation set
12 Océ VarioPrint 2090 User manual
Page 13

The concepts and philosophy
Definition
Information for operators, key operators, system administrators
The Océ VarioPrint 2090 is a high-volume black and white system. The
system is based on the successful Océ 31x5. The system has improvements in
productivity, in paper input, document finishing and document output.
The printer supports, by default, PCL5e. Adobe® PostScript® (optional) is
also supported.
Introduction
In this section you find an explanation and description of the main concepts,
and the philosophy behind the concepts that are applied in the Océ VarioPrint
2090 .
Automatic print jobs and interactive print jobs
The Océ VarioPrint 2090 allows you to send your print jobs directly to the job
queue. The jobs in the job queue are printed without operator intervention.
This type of printing is called automatic printing.
You can also send your print jobs to the mailbox. You must first select a job in
the mailbox to print the job. You can also edit the settings of the jobs in the
mailbox. This type of printing is called interactive printing.
You can indicate the destination in the printer driver.
The key operator can define various print settings in the Océ Settings Editor.
For example the following.
■ Define the default destination of the print jobs (the mailbox or the job
queue).
■ Remove automatic or interactive print jobs from the job queue.
Introduction 13
Page 14

The mailbox
The mailbox is what makes the Océ VarioPrint 2090 everybody's personal
printer. The mailbox is a user-specific storage area for print jobs. You (each
user) can print these mailbox print jobs from any networked location at any
time.
Cost reduction
The philosophy of the mailbox brings a number of benefits for the user. For
example, all jobs are grouped by user. This means that you do not need any
banner pages when you print a job on the system. The mailbox also reduces the
paper mess near the system, because you print on demand.
Flexibility
The mailbox offers you flexibility. You can change the settings locally on the
operator panel before you print your job. You can also indicate in your printer
driver that you want to print a secured print job on the system (PIN code
needed to start the job).
Efficiency
The mailbox offers you efficiency. You can send your print job at any time, and
print later. Send a job once and print many. You can make proof prints, which
enable you to check the print before you print many. The system allows you to
give priority to mailbox jobs.
The user manual gives you detailed information about the workflow of a job to
the mailbox (see ‘Print a job from the mailbox’ on page 81).
Next job
Whether it is an analogue or digital job, the comprehensive job queue system
(called the Factory) increases the daily production on the system. The job
queue enables you to prepare jobs in advance. The jobs are created and sent to
the job queue while other jobs are prepared to be printed.
Next job preparation is independent from print production. Scanning, printing
and processing is done at the same time, which keeps the system active and
enables the processing of a wide variety of jobs.
14 Océ VarioPrint 2090 User manual
Page 15

Set Logic (set-build)
Océ Set Logic enables you to handle hardcopy originals on the Océ VarioPrint
2090 in an effective way. Océ Set Logic allows you to define subsets within
the document (page programming).
The Océ VarioPrint 2090 allows you to combine different originals or subsets
into one analogue or digital document, for example a report or book.
■ Different original size.
■ 1-sided and 2-sided originals.
■ Different paper types.
You can change 1-sided originals into 2-sided documents. If the originals result
in an odd number of pages, the Océ VarioPrint 2090 detects this. An odd
number of pages can result in an empty page between the subsets.
■ Concatenation
You decide to print the next subset on this empty page (do not keep the
empty page).
■ Chapterization
You decide to keep the empty page and start the next subset on a new sheet
(a new chapter starts on a new sheet).
Océ Image Logic
The system detects and adjusts photos and fine lines on the original with the
unique Océ Image Logic technology. The Océ VarioPrint 2090 processes even
complex originals with only one push of a button into prints of excellent
quality.
Introduction 15
Page 16

The paper trays
For the Océ VarioPrint 2090 a complete new paper unit is introduced. The
following table shows the changes and advantages of this new concept.
Feature Description
Refill during run No loss of productivity when you reload the paper trays.
Paper tray
linking
Print long runs without reload of the paper trays (you can
link trays that contain the same paper type).
Front loading The paper trays are easy to access at the front of the
system (less floor space required).
Uniform paper
input
All the trays have the same orientation of the paper.
This system simplifies the task of loading the paper
trays. You also avoid misprints because the paper is
always loaded the same way.
■ Face down
■ Header up
Flexible paper
trays
All the trays can contain the same variety of media
types.
■ 90 degrees rotation allows you to feed the paper in
both short edge feed (SEF) as well as long edge feed
(LEF), the information on the prints and copies can
always be read.
■ Air separation in the trays makes the paper trays
suitable for special paper.
The finisher
The finisher has two general output destinations. There are 4 output trays and
there is 1 upper output tray.
■ Jobs that only use long edge feed (LEF) paper (A4 or Letter Std) go into the
output trays.
■ Other jobs and jobs that need multiple sheet sizes go into the upper output
tray.
Offset stacking
If the sets in a job have more than one page, the sets are offset stacked. For
stapled sets, offset stacking increases the capacity and stacking quality of the
output sets.
16 Océ VarioPrint 2090 User manual
Page 17

Behaviour of the output trays
The key operator can define the deposit behaviour of the output trays in the Océ
Settings Editor.
■ Deliver the output from top to bottom.
The print jobs are delivered to the output trays in a top to bottom manner.
The print jobs are first sent to the highest ouput tray. When the first output
tray is full, the print jobs are sent to the next tray below. This behaviour
continues untill all the print jobs are delivered.
This option can be preferred in a central environment. The capacity of the
output trays is used in an optimal way. The system remains productive as
long as possible without the intervention of an operator.
■ Deliver the output bottom up.
The Océ VarioPrint 2090 sends the print jobs to the first output tray located
above the bulk tray. If this output tray is full, the Océ VarioPrint 2090 sends
the print jobs in a bottom up manner to the next output tray located above
the tray that is full. This behaviour continues until the highest output tray is
also full. When the three highest trays are full, the print jobs are sent to the
lowest tray, which is the bulk tray.
This option can be preferred in a decentral environment. The output is
delivered in a more logical order. The documents are sorted in the order in
which they were produced. The documents are put face down into the
output trays. The user can find the documents quicker and easier.
Introduction 17
Page 18

18 Océ VarioPrint 2090 User manual
Page 19

Océ VarioPrint 2090
User manual
Chapter 2 Get to know the Océ VarioPrint 2090
19
Page 20

The configuration
Introduction
Information for operators, key operators, system administrators
The Océ VarioPrint 2090 allows you to copy and print your jobs. You can add
the optional scan-to-file function.
When your system only supports the copy and print function, the basic view of
the operator panel displays the templates 'Copy' and 'Print from mailbox...'.
When the optional scan-to-file function is installed, the basic view of the
operator panel displays the templates 'Scan', 'Copy' and 'Print'.
The templates 'Print from mailbox...' and 'Print' give access to the mailbox of
the Océ VarioPrint 2090 .
The Océ VarioPrint 2090 has the following functional units.
■ The printer
■ The scanner
■ The operator panel
■ The controller.
20 Océ VarioPrint 2090 User manual
Page 21

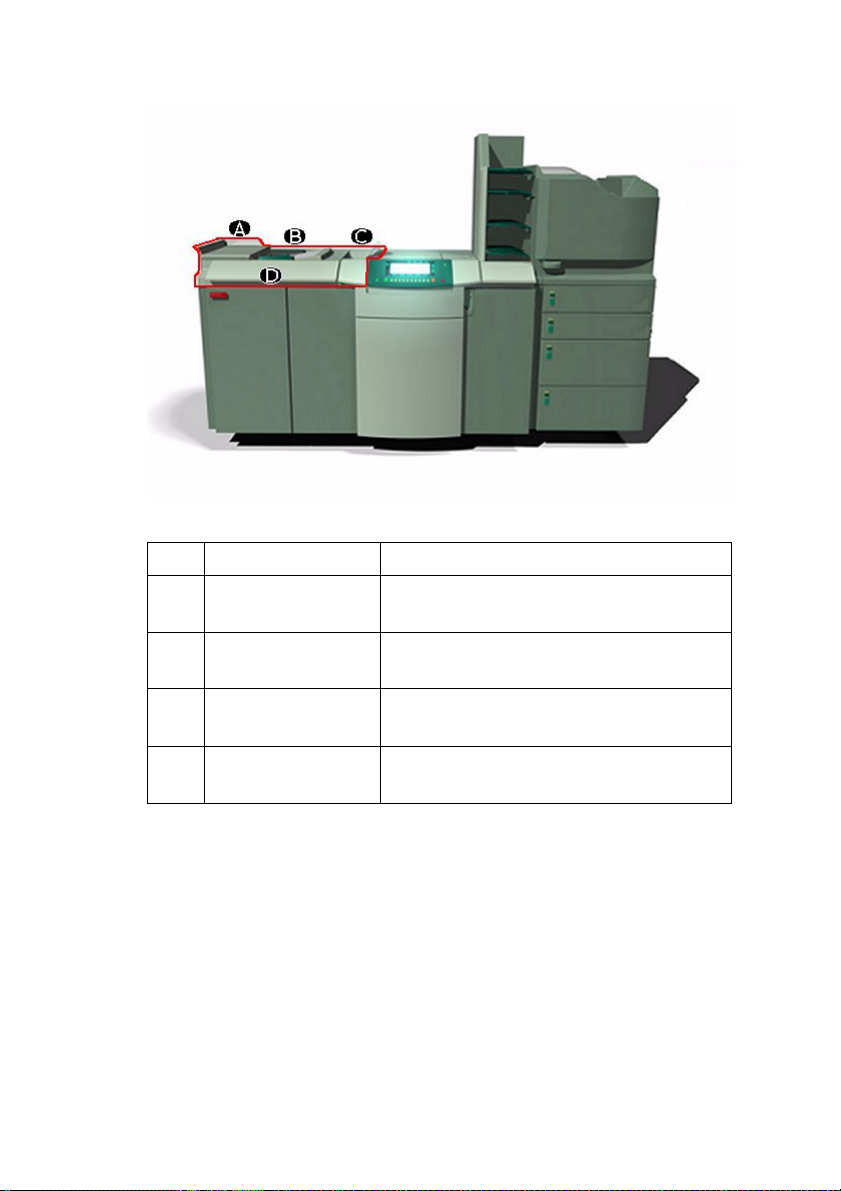
The printer
[1] The printer
[1] The printer
Part Description Function (for example)
A Left front door Access to the toner unit
B Top left cover of the
printer. The top right cover
Access to the paper path to solve paper
jams
of the printer is situated
under the output trays
C Output trays Receive the printed documents
D Upper output tray Receive the error prints, the clean job
sheets and other formats than A4 or
Letter
E Finisher front door Access to the staplers and the finisher
areas labelled D and E
F Paper trays Contain the paper. Open the paper trays
to add the paper
G Front doors Access to the areas inside the system
labelled A, B and C. Open the front
doors to handle errors
Get to know the Océ VarioPrint 2090 21
Page 22
The scanner
[2] The scanner
[2] The scanner
Part Description Function (for example)
A Top left cover of the
scanner
B Aut omatic documen t
Access to the original section. Here you can
handle original errors
Feed the originals
feeder
C Original receiving
Hold the scanned originals
tray
D Cover handle Access to the glass plate. Open the scanner
cover to copy or scan from the glass plate
22 Océ VarioPrint 2090 User manual
Page 23

The operator panel
[3] The operator panel
[3] The operator panel
Part Description Function (for example)
A Set-build key Define subsets within the document (page
B Start key Send a print job or copy job to the job queue.
C Job queue manager
D Function keys Scroll through the sections to make original
E Help key Access the on-line help function
key
programming).
Join different originals, subsets, into one
digital document, for example a report or
book that contains some of the following
items.
■ Different original sizes
■ 1-sided and 2-sided originals
■ Different paper types (for example colour
or special front)
Start a scan job
Open and close the job queue manager.
You can use the job queue manager to view,
delete or give priority to the waiting print
jobs
and print settings
Get to know the Océ VarioPrint 2090 23
Page 24
Part Description Function (for example)
F System information
key
Open the 'System monitor' and the 'System
manager' (during normal operation the
'System monitor' is not on the screen).
The LED next to the key indicates that the
'System information' is active. To close the
'System information' view, either press
again or press 'Close' (the rightmost key at
the top of the screen).
The 'System monitor' includes the
following items.
■ Message area for text messages
■ Paper level icons for each tray of the four
paper trays
■ Paper type information for each tray of
the four paper trays:
- Size
- Special type (cover and special)
■ Warnings for a low level of the supplies:
- Toner
- Staples in stapler 1
- Staples in stapler 2
- Staples in the off-line stapler.
The 'System manager' displays the
following functions.
■ Lock and unlock the paper trays
■ Shut down the system
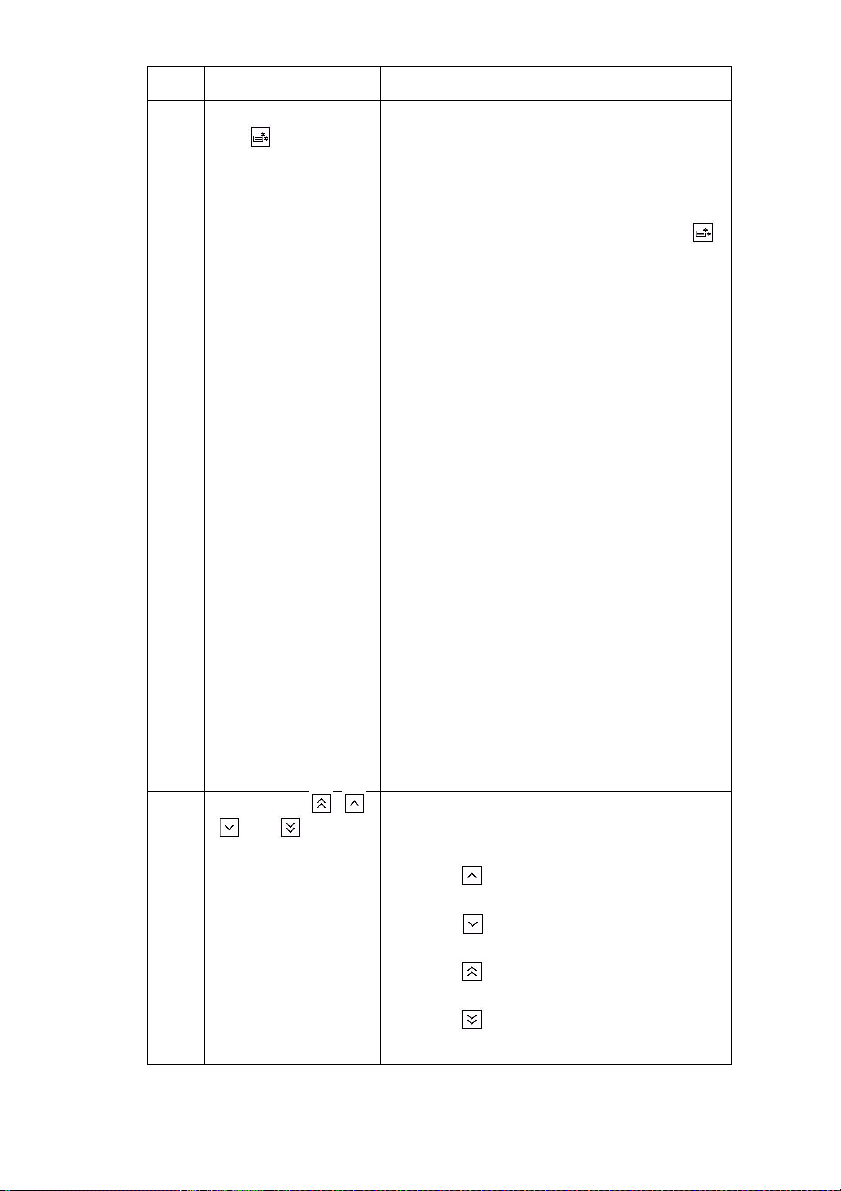
G Arrow keys , ,
and
24 Océ VarioPrint 2090 User manual
Note: When the low toner level indicator is
on, the 'Toner refill' key is active.
Use these keys to navigate through the
mailbox and on-line help, or to change
values in the job editor.
■ Press to increase the value in
minimum step sizes
■ Press to decrease the value in
minimum step sizes
■ Press to increase the value in
predefined steps
■ Press to decrease the value in
predefined steps
Page 25
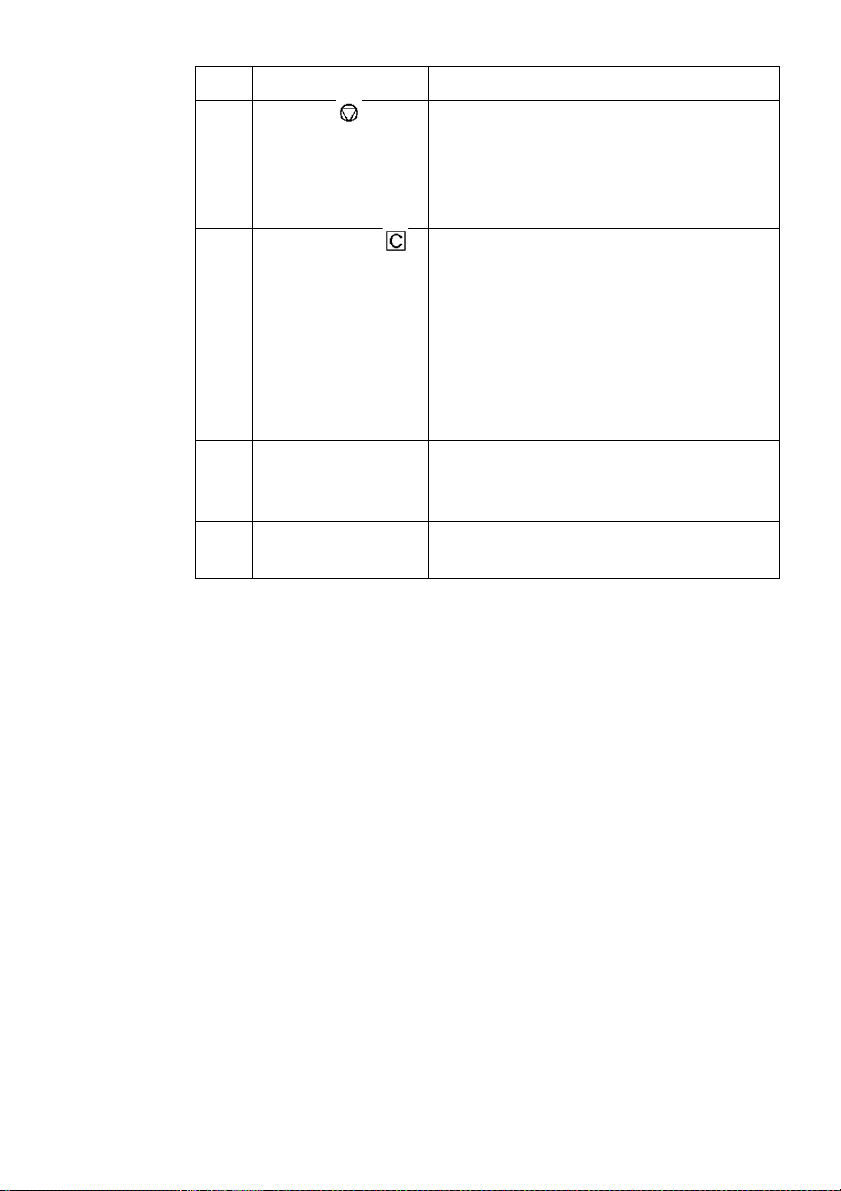
Part Description Function (for example)
H Stop key Stop the current print job.
■ Press one time to stop the job after a
complete set
■ Press two times to stop the job as soon as
possible, within a set
I Correction key Make corrections when you edit a job.
■ Press one time to set the number of prints
to 1
■ Press two times to reset all the job
settings to the default values
■ Press three times to cancel the job or the
last subset
Stop a scan process
J Numeric keys Enter the number of copies and prints
Enter PIN codes
Navigate through the on-line help
K Function keys Define original and print settings
React to the messages on the operator panel
Get to know the Océ VarioPrint 2090 25
Page 26

The power modes
Introduction
Information for operators, key operators, system administrators
The main power modes of the Océ VarioPrint 2090 are the following.
■ Off
■ Low power mode
■ Sleep mode.
The low power mode and the sleep mode are the energy save modes of the Océ
VarioPrint 2090 .
Note: The key operator can change the settings in the Océ Settings Editor. The
on-line help in the Océ Settings Editor contains more information about how
to change the settings.
OFF
The Océ VarioPrint 2090 is completely turned off.
You can not reach the system through the network.
You must press the power switch to turn on the system (see ‘Turn on the
system’ on page 36).
26 Océ VarioPrint 2090 User manual
Page 27

Low power mode
When the printer is in low power mode, the power consumption is decreased
to a lower level.
The operator panel on the printer displays a screen saver with the text 'Energy
save mode'.
You can not disable the low power mode.
The system goes in the low power mode in the following situation.
[3] System goes into the low power mod e
1 The Océ VarioPrint 2090 was not used for a defined time
[3] System goes into the low power mode
The system returns from the low power mode in the following situations.
[4] System returns from the low power mode
1 You press a key on the operator panel
2 You send a print job.
When
Note: This time is defined in the Océ Settings Editor. The key
operator can set a time between 1 and 240 minutes in steps of 1
minute. The factory default is 15 minutes.
When
Sometimes the system remains in the low power mode when you
send a print job. This event can occur when the print job is forced
to the mailbox.
[4] System returns from the low power mode
Note: The system needs 30 seconds to warm up.
Get to know the Océ VarioPrint 2090 27
Page 28
Sleep mode
When the system is in sleep mode, the power consumption is decreased to a
very low level.
The operator panel on the printer is off. The On/Off button on the printer
is amber.
The system goes in the sleep mode in the following situations.
[5] System goes into the sleep mod e
When
1 The Océ VarioPrint 2090 is not used for a defined time
Note: This time is defined in the Océ Settings Editor. The key
operator can set a time between 1 and 240 minutes in steps of 1
minute. The factory default is 90 minutes.
2 You press the On/Off button on the printer
[5] System goes into the sleep mode
The system returns from the sleep mode in the following situations.
[6] System returns from the sleep mode
When
1 You press the On/Off button on the printer
2 An automatic print job (AP) arrives in the job queue.
Sometimes the system remains in the sleep mode when you send
an automatic print job. This event occurs in the following
situations.
■ A PIN code protects the sleep mode
■ The automatic print job is forced to the mailbox (defined in the
Océ Settings Editor)
3 You send a print job (only when the setting 'Automatic wake-up' in
the Océ Settings Editor is enabled)
[6] System returns from the sleep mode
Note: The system needs a couple of minutes to warm up.
28 Océ VarioPrint 2090 User manual
Page 29
The on-line help on the operator panel
Introduction
Information for operators
The operator panel has an on-line help. The on-line help contains information
that helps you to improve the productivity of your system. The on-line help
describes the more advanced functions of your system.
About the on-line help
You must press the Help key on the operator panel to access the on-line
help. When the on-line help is open, the green LED at the right-hand side of
the help key is on.
The on-line help uses the whole screen of the operator panel. The other settings
are hidden.
The on-line help is always available, even when an error occurs.
When the on-line help is open, no error messages or other messages are
displayed. You must close the on-line help to read the messages.
Get to know the Océ VarioPrint 2090 29
Page 30
The sections in the on-line help
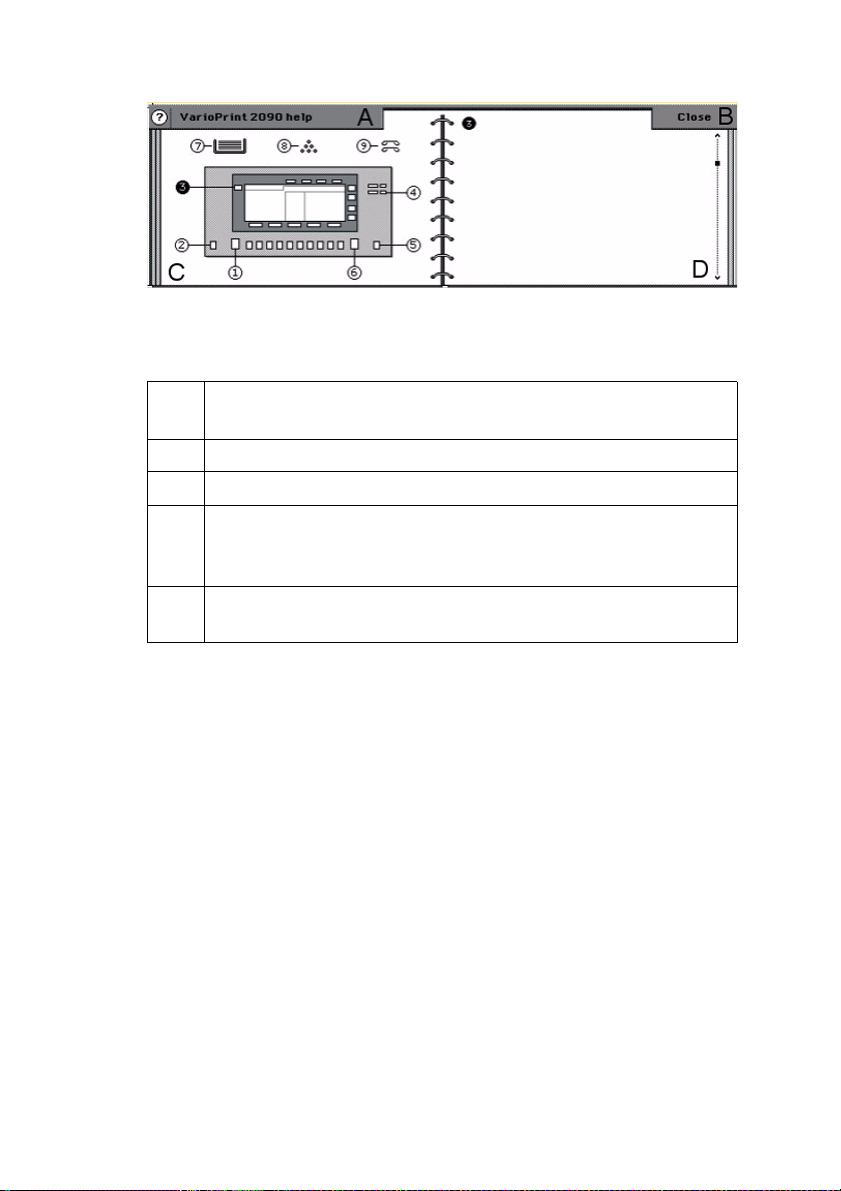
[4] The on-line help
[4] The on-line help
The following table describes the sections in the on-line help.
[7] The sections in t he on-line help
SectionDescription
A Shows the title of your current on-line help topic.
B Press the function key 'Close' to quit the on-line help.
C The left-hand pane displays a numbered overview of the operator
panel. Above the operator panel, the screen displays the icons for
paper, toner and staples.
D The right-hand pane contains the information. The bookmark
indicator displays the current position within the topic.
[7] The sections in the on-line help
30 Océ VarioPrint 2090 User manual
Page 31

Navigate in the on-line help
[8] Navigate in the on-line help
Key Function
Help key Access and quit the on-line help.
Numeric keys The numbers in the left-hand pane of the on-line help
Arrow key
Arrow key Scroll 1 line up.
Arrow key Scroll 1 line down.
Arrow key Scroll to the beginning of the next section.
Function key
'Close'
Note: You can also press the function key 'Close' to quit
the on-line help.
match the numeric keys on the operator panel. Press the
matching key on the operator panel to get more
information about the supplies or the functions of the
keys.
Note: Press the numeric key 0 to return to the start
section.
■ Scroll up to the beginning of the section.
■ Scroll to the beginning of the previous section when
you are at the beginning of the current section.
Quit the on-line help. This key is available in all the
topics.
Note: You can also press the Help key to quit the
on-line help.
[8] Navigate in the on-line help
Get to know the Océ VarioPrint 2090 31
Page 32

The 'System information' section
Introduction
Information for operators
You can use the System information key to access the 'System information'
section. The 'System information' section contains two sections. The left-hand
pane displays the 'System manager'. The right-hand pane displays the 'System
monitor'.
The following tables give an overview of the items in the 'System information'
section.
[9] The items of the 'S ystem manager' sect ion
Section Function
'System' section
'Toner refill'
section
[9] The items of the 'System manager' section
[10] The items of the 'System monitor'
Section Function
The warning
section
The paper
section
■ Shut down the system
■ Lock and unlock the paper trays
Confirm the refill of the toner
The warning section is the left-hand part of the 'System
monitor'. This part contains information about the level
of the staplers and the toner level
The paper section is the right-hand part of the 'System
monitor'. This part contains information about the paper
types in the paper trays and the levels of the paper in the
trays
[10] The items of the 'System monitor'
32 Océ VarioPrint 2090 User manual
Page 33

The icons in the warning section
[11] The icons in the war ning section
Icon Description
The stapler contains sufficient staples. The number indicates
which stapler is OK
The stapler is empty. The number indicates which stapler is
empty
The toner level is OK
The toner reservoir is empty
[11] The icons in the warning section
The icons in the paper section
[12] The icons in the pa per section
Icon Description
or The horizontal lines are an indication of the level of the
media in the paper trays. Each horizontal line indicates
approximately 100 sheets (80 g/m
or The paper tray is empty
or The plate inside the paper tray moves up or down.
For example before or after you load the paper
or The paper tray contains more paper than the maximum
allowed amount of paper.
Remove the excess sheets
or The paper tray contains a paper size or paper orientation that
the printer can not process. The paper is not supported
or The icons indicate the feed direction of the paper (short-edge
feed or long-edge feed)
The paper tray contains covers
The paper tray contains 'My Paper'
The paper tray contains special paper
The paper trays are locked
The paper trays are unlocked
2
, 20 lb bond)
[12] The icons in the paper section
Get to know the Océ VarioPrint 2090 33
Page 34

34 Océ VarioPrint 2090 User manual
Page 35

Océ VarioPrint 2090
User manual
Chapter 3 Turn on and off the system
35
Page 36

Turn on the system
Introduction
Task for operators
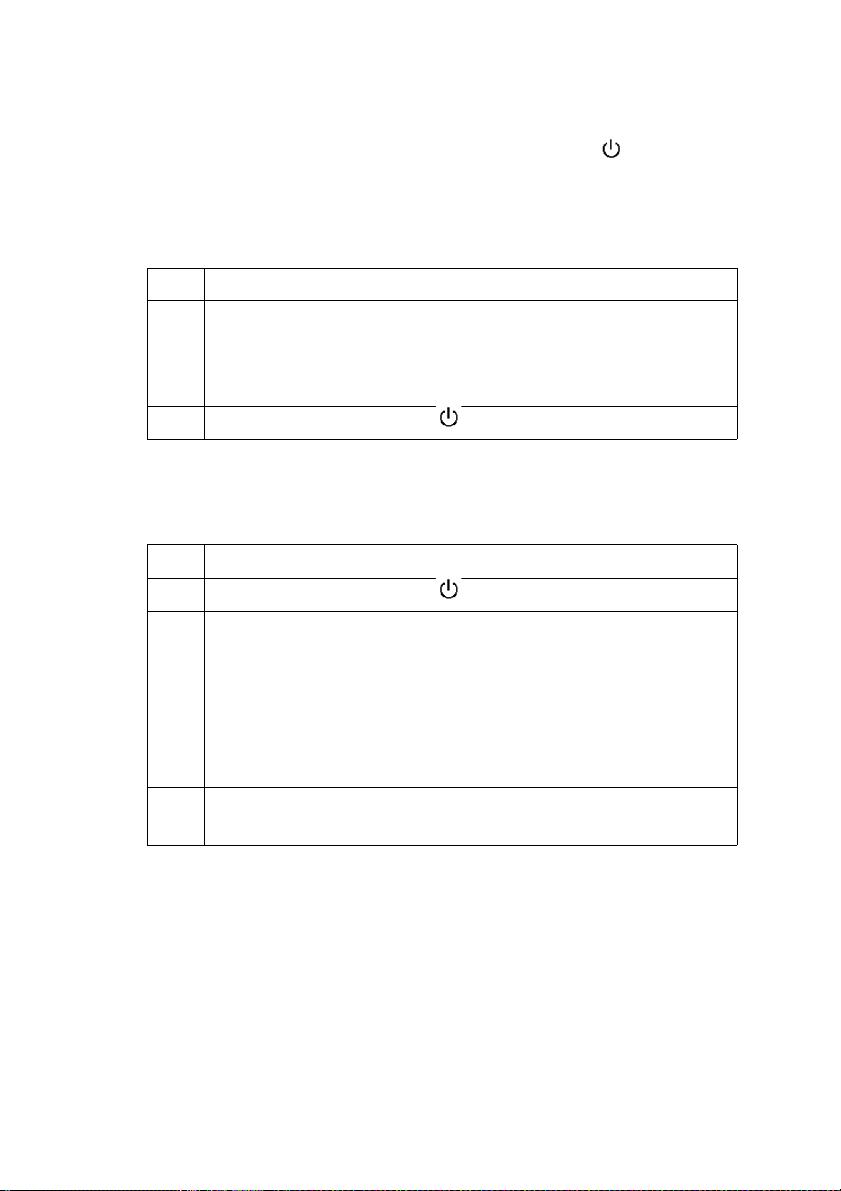
The system has the following switches and buttons (see the illustration for the
correct location).
■ Power switch
You can find the power switch at the left-hand side of the printer. The power
switch cuts and connects the power to the complete system.
■ On/Off button with amber and green LED .
The On/Off button allows you to toggle the status of the system between the
stand-by mode and the sleep mode. This action is only possible if the power
switch is in '1' position and the startup phase was done. After the startup
phase, the operator panel displays 'Copy' and 'Print from mailbox...' or
'Scan', 'Copy' and 'Print'. What the operator panel displays, depends on the
configuration of your system.
[5] Turn on the system
[5] Turn on the system
In the table below you find the state indicators of the LED in the On/Off button
and the state indicators of the LEDs at the right-hand side of the operator panel.
Note: When the system is in the sleep mode, you must wake up the system to
process the jobs (see ‘The power modes’ on page 26).
36 Océ VarioPrint 2090 User manual
Page 37

[13] System state indic ators
Power state On/Off button LEDs at the
Off Off Off
Controller initializing Amber blinking Green (in turns)
■ Sleep mode
■ Safety sleep mode
■ Fatal error
■ Permanent error
■ Low power mode
■ System initializing
■ System warming up
■ Stand-by mode
■ Process an automatic or
interactive print job
■ Operator recoverable error
■ Run-time contradiction
Machine recoverable error Amber Off
[13] System state indicators
How to turn on the Océ VarioPrint 2090
1
Press the power switch .
The system starts up. The following occurs.
■ The LEDs on the operator panel blink.
■ The screen of the operator panel is off / black.
■ The amber LED in the On/Off button blinks.
2 Wait until the system asks you to press the On/Off button .
3 Press the On/Off button .
The LED in the On/Off button changes from amber to green.
right-hand side of the
operator panel
Amber Off
Green Off
Turn on and off the system 37
Page 38

Shut down the system
Introduction
Task for operators
Follow the shut-down procedure that is described in this part before you use
the power switch on the Océ VarioPrint 2090 . This procedure makes the
system shut down in a controlled way.
Note: To save energy, you can also put the Océ VarioPrint 2090 into sleep
mode (see ‘Sleep mode’ on page 28).
How to shut down the Océ VarioPrint 2090
Press the System information key on the operator panel to open the 'System
1
manager'.
2 Press the key for 'System' to select 'Shut down'.
The operator panel displays the message 'Are you sure you want to shut
down?'.
3 Press the key for 'Yes'.
The printer starts to shut down.
The LED at the right-hand side of the operator panel changes from green to
red.
Wait for the message 'When the light next to the System information key on the
operator panel is off, you can turn off the system. Press Close to continue.'.
4 Press the key for 'Close' to continue the shut-down procedure. The following
occurs.
■ The LED in the On/Off button changes from green to amber.
■ The screen of the operator panel goes off.
■ The LED next to the System information key goes off.
5 Press the power switch .
38 Océ VarioPrint 2090 User manual
Page 39

Restart the system
Introduction
Task fo r key operators, system administrators
When you change settings in the Océ Settings Editor, the software may ask you
to restart the system. A restart activates the new, changed settings.
If you restart the system, the following occurs.
■ The Océ Settings Editor changes become active
■ The jobs in the mailbox are saved
■ The job number of new copy jobs and scan jobs is set to 1.
You must restart the system in the Océ Settings Editor. Follow the procedure
below to restart the system.
Illustration
[6] Restart the Océ Smart Imager
[6] Restart the Océ Smart Imager
Turn on and off the system 39
Page 40

How to restart the system
1
Start the Océ Settings Editor in your web browser.
2 Click 'Service'.
3 Click 'Control'.
4 Click 'Restart'.
The screen displays 'Restart the Océ Smart Imager'.
5 Click 'OK'.
The system restarts.
The screen of the operator panel displays the message 'When the light next to
the System information key on the operator panel is off, you can turn off the
system. Press Close to continue.'.
Note: The system waits until all active jobs are finished.
6 Press the key for 'Close' on the operator panel.
The printer goes into the sleep mode.
7 Press the On/Off button on the printer to wake up the system.
The LED in the On/Off button changes from amber to green.
40 Océ VarioPrint 2090 User manual
Page 41

Océ VarioPrint 2090
User manual
Chapter 4 The accounting function
41
Page 42

About the accounting function
Introduction
Information for operators, system administrators
The Océ VarioPrint 2090 has an accounting function that is available on the
operator panel.
The system administrator must enable the accounting function in the Océ
Settings Editor.
Note: The system administrator can refer to the on-line help of the Océ
Settings Editor for more information about how to enable the accounting
function.
The principles of accounting
Accounting is the allocation of costs for all types of jobs to an account. An
account can for example represent a customer, a user, a department or a project.
You can use the accounting function to charge the costs for the jobs.
An 'Account ID' identifies an account. You must enter the 'Account ID' on the
operator panel before you start a job. Then a log file is created on the Océ
Smart Imager.
The Océ Settings Editor software on the controller contains an accounting
section for the system administrator. The system administrator can retrieve the
log file from the controller and export the file to an application, for example
Microsoft® Excel.
42 Océ VarioPrint 2090 User manual
Page 43

The use of the accounting function
Reprographic departments often process the jobs for a particular customer in
succession. The consecutive processing of these jobs is called a session.
Sessions are the basis of accounting.
When you start your first job of the day, you must first enter the 'Account ID'
for your first customer. Then you can start to process the jobs. The 'Account
ID' remains valid until you enter a new 'Account ID', or the time-out of the
operator panel has expired, or you press the Correction key .
You can enter an 'Account ID' in your printer driver and send the job to the
mailbox. Make sure that you cancel the current 'Account ID' of the session
before you print that job from the mailbox. Otherwise, the current 'Account ID'
of the session overrules the 'Account ID' that you indicated in the printer driver.
Note: Automatic print jobs that do not have a valid 'Account ID' are
automatically sent to the mailbox. You must enter a valid 'Account ID' to print
the job.
The accounting log file
When you use accounting, an accounting log file is created on the Océ Smart
Imager. The .acl file is the current accounting file that the system uses to store
the accounting information. This file remains active for 24 hours. The file is
converted at 0:00 hours to a .csv file and added to the list of links. The
controller can store a maximum of 99 log files. The oldest file is removed when
the limit is reached.
The log file records the information in a comma separated file (.csv file). For
example the following information is recorded.
- Account ID
- Job name and job type (copy job, scan job, interactive print job, automatic
print job)
- Time and date
- Paper sizes
- 1-sided or 2-sided jobs
The system creates .csv files. The system administrator can define the field
separator (comma or semicolon) in the Océ Settings Editor.
The .csv file format is based on a text file format that consists of a sequence of
lines of text. A line of text is an ordered sequence of characters. The last
characters indicate the end of line.
Note: Cancelled jobs are also logged.
The accounting function 43
Page 44

The tasks of the system administrator for the accounting function
The system administrator can define a number of accounting settings in the
Océ Settings Editor. The following table displays the main settings in relation
to accounting.
[14] System administrator tasks for ac counting
Person responsible Tasks
System administrator
■ Enable the 'Account ID' setting.
■ Enable the account ID check.
When an account ID file is uploaded to the Océ
Smart Imager and the account ID check is
enabled, the system checks the validity of the
account IDs that are entered on the operator
panel.
■ Upload the account ID file to the Océ Smart
Imager.
■ Download the account ID file from the Océ
Smart Imager to make changes in the file.
■ Download the account log files.
[14] System administrator tasks for accounting
44 Océ VarioPrint 2090 User manual
Page 45

Enter and cancel an 'Account ID'
Introduction
Task fo r operators
You can enter the 'Account ID' with the function key on top of the operator
panel before you start to process your job. When you press a key first, a forced
dialogue appears that asks you to enter the 'Account ID'.
Note: When the setting 'Identification' in the 'Account settings' section in the
Océ Settings Editor is enabled, the system checks the validity of the ID.
How to enter an 'Account ID' with the function key
Press the function key 'Enter Account ID'.
1
2 Enter the 'Account ID' for the job (1 - 10 digits).
The accounting function 45
Page 46

3 Press the key for 'Confirm'.
You can start to process your jobs.
How to enter an 'Account ID' after a forced dialogue
[15] Enter an 'Account ID' after a forced dialogue
When Then
■ You select the 'Copy' template
■ You press the 'Edit...' key in the
mailbox
■ You press the Start key in the
mailbox
before you enter an 'Account ID'
[15] Enter an 'Account ID' after a forced dialogue
How to cancel an 'Account ID'
[16] Cancel an 'Account ID '
OptionThe current 'Account ID' is cancelled when
A dialogue box appears.
Enter the 'Account ID' (1 - 10 digits).
Press the key for 'Confirm'.
The system continues to process the
job.
1 You use the function key 'Account ID' to enter a new 'Account ID'.
2 You press the Correction key on the operator panel when the
system is not scanning originals.
3 A time-out of the operator panel has occurred when no key was
pressed for a certain period.
Note: The key operator can define the time-out in the Océ Settings
Editor.
[16] Cancel an 'Account ID'
46 Océ VarioPrint 2090 User manual
Page 47

Download the accounting log files
Introduction
Task fo r system administrators
The accounting log file on the Océ Smart Imager contains the relevant job
information. You can access the accounting log file through the Océ Settings
Editor. You can download the file to a location of your choice. You can use for
example Microsoft® Excel to open the file.
Illustration
[7] Download the accounti ng log files
[7] Download the accounting log files
The accounting function 47
Page 48

How to download the accounting log files
1
Select 'Settings' in the title bar of the Océ Settings Editor.
2 Click 'Accounting'.
3 Click 'Log files'.
4 Click one of the links in the right-hand pane.
The file opens.
Note: The .acl file is the current accounting log file that the system uses to store
the accounting information. The file remains active for 24 hours The file is
converted at 0.00 hours to a .csv file. The .csv file is added to the list of links.
The controller can store a maximum of 99 log files. The oldest file is removed
when the limit is reached.
48 Océ VarioPrint 2090 User manual
Page 49

Make a copy or print with the copy card
Introduction
Task fo r operators
You can use the Océ VarioPrint 2090 in combination with a separate copy
count device. The key operator must enable the copy count device in the Océ
Settings Editor.
You can use the copy count device as a prepaid credit system or a post-paid
debit system. The prepaid system requires copy cards with credit units. The
post-paid system uses an account number.
Prepaid system
The prepaid system uses a copy card that contains credit units. When you make
a print, this print is subtracted from the credit value on your card. When the
card runs out of credit units during a print job or copy job, the system stops
printing and displays a message. You must add credit units or insert a new
card.
Post-paid system
The post-paid system uses an account number that you must enter at the start
of a job.
How to make a copy with the copy card
1
Insert the copy card into the copy count device.
2 Select a job from the mailbox. You can also create a copy job with the Start key
.
3 Press the Start key . The job is sent to the job queue.
Note: If you run out of credit units during a job, the system stops the job and
asks you to refill the credits on your card or insert a new card.
The accounting function 49
Page 50

50 Océ VarioPrint 2090 User manual
Page 51

Chapter 5 The job queue
Océ VarioPrint 2090
User manual
51
Page 52

About the job queue
Introduction
Information for operators
The job queue is a summary of the job queue manager. If the job queue
manager contains one job or more, the job queue is visible on the left-hand side
of the operator panel. The job queue and the job queue manager allow you to
manage the print jobs and the copy jobs. The Océ VarioPrint 2090 handles
multiple tasks which makes the machine a highly productive system. As soon
as you start a print job or a copy job with the Start key on the operator
panel, the jobs are sent to the job queue. The job queue allows you to check the
status of your jobs.
If you want to access the full information of the job queue, you must open the
job queue manager view with the job queue manager key on the left-hand
side of the operator panel.
52 Océ VarioPrint 2090 User manual
Page 53

Job queue view
[8] Job queue view
[8] Job queue view
The job queue view gives summarized job information and allows you to check
the following information about the jobs.
[17] Job queue information
Information displayed
in the job queue
Status icon The icon indicates whether the job is printing or
Number of originals The number of sheets of the original document is
Progress indication The progress of the pages that are printed is
Estimated duration The estimated duration of the jobs is indicated in
Collapsed jobs The bottom line indicates if there are more jobs,
Description
scanning.
The icon can also indicate that there is a problem,
for example the stapler runs empty (for example
runtime contradiction, start contradiction).
indicated.
counted. The total number of pages is displayed.
minutes. The time is cumulative. For example,
00:03 indicates that the job will be printed in about
3 minutes from now.
that are not displayed. These jobs are collapsed.
You can access these jobs with the arrow keys at
the right-hand side of the operator panel. If you
scroll down, the collapsed jobs will be displayed
and the jobs at the top of the view are collapsed.
[17] Job queue information
The job queue 53
Page 54

Job queue manager view
[9] Job queue manag er view
[9] Job queue manager view
The job queue manager view gives more detailed job information than the job
queue view. The table below describes the information that is visible in the job
queue manager.
[18] Job queue mana ger information
Information in
the job queue
manager
Paper trays The four columns represent the paper trays. A bullet in
Staple This column indicates that the job has 0, 1 or 2 staples
Messages Displays a warning if there is runtime contradiction or a
Description
the column indicates that the job uses this paper tray
start contradiction
[18] Job queue manager information
The job queue manager also allows you to manage the jobs in the job queue
manager. The table below describes the functions in the job queue manager.
[19] Job queue mana ger functions
Function Description
'Delete' This function allows you to delete jobs from the job queue.
Note: You can not use this function to delete a job that is
currently being printed
'Move to top' The function allows you to give priority to a job (see ‘Give
priority to jobs’ on page 55). The selected job is printed
when the current print job is ready
'Interrupt' +
'Move to top'
The function allows you to give priority to a job (see ‘Give
priority to jobs’ on page 55). The selected job is printed
when a set of the current print job is ready
[19] Job queue manager functions
54 Océ VarioPrint 2090 User manual
Page 55

Give priority to jobs
Introduction
Task fo r operators
The job queue contains jobs that wait to be printed. The job on top of the job
queue is the current job that is printed.
You can interrupt the current job to give priority to an urgent job. Depending
on the urgency of the job, you can select 'Move to top' or 'Interrupt'. You can
move more than 1 job. You must move the jobs one job at a time.
Use 'Interrupt' + 'Move to top' for jobs with the highest priority.
Note: A flag indicates an urgent job.
[20] Job priority
When you select Then
'Move to top' The current print job is finished first. Then the urgent job
'Interrupt' +
'Move to top'
[20] Job priority
is printed.
The current print job stops after the set that is currently
printed. Then the urgent job is printed.
When the urgent job is ready, the interrupted print job is
resumed.
Before you begin
Make sure that the urgent copy job or print job is sent to the job queue.
You can use the Next job function (see ‘Next job’ on page 14) to prepare your
urgent job while the printer proceeds with the current print job.
The job queue 55
Page 56

Illustration
[10] Give priority to jobs
[10] Give priority to jobs
How to use the 'Move to top' function
1
Press the Job queue manager key .
2 Use the arrow keys to select the urgent job.
3 Press the key for 'Move to top'.
Result
■ The urgent job moves to the place below the current print job.
■ The urgent job is printed after the current print job.
How to use the 'Interrupt' function
Press the Job queue manager key .
1
2 Press the key for 'Interrupt' .
3 Use the arrow keys to select the urgent job.
4 Press the key for 'Move to top'.
Result
■ The urgent job moves to the place below the current print job.
■ The current print job stops after the set that is currently printed.
■ The urgent job moves to the top. The interrupted job moves to the place
below the urgent job.
■ The urgent job is printed.
■ After the urgent job is printed, the interrupted job is resumed.
56 Océ VarioPrint 2090 User manual
Page 57

Chapter 6 The print function
Océ VarioPrint 2090
User manual
57
Page 58

General information
About the printer driver
Introduction
Information for operators
You need a printer driver to print jobs from the network to the Océ VarioPrint
2090 . The printer driver allows you to define the print job settings on your PC.
Note: The User manual only contains a short description of the printer drivers.
Please refer to the on-line help of the printer driver for detailed information
about the settings in the printer driver.
Functions of the Océ VarioPrint 2090 printer driver
If you want to print a document to the Océ VarioPrint 2090 , you must first
access the print window of the application. When you click 'Properties', the
print window of the Océ VarioPrint 2090 appears.
Océ provides a Universal Printer Driver for the Microsoft® Windows®
operating system to make printing on the Océ VarioPrint 2090 easier. The
driver is specially designed to use the characteristics of the Océ VarioPrint
2090 in an optimal way. You can use the driver to define a large number of
settings for layout, paper, finishing and image.
Océ provides 2 versions of the printer driver.
One version creates HP® PCL5e files.
The other version creates Adobe® PostScript® 3 files.
Both drivers are based on Microsoft driver core technology to guarantee an
optimal integration with the PC's operating system. The drivers run only on
Windows 2000, Windows XP and Windows 2003.
Océ also provides a printer driver for the Apple® Macintosh® MacOS X
operating system. This driver allows you to do page progamming and to use
the Océ VarioPrint 2090 mailbox, including secured print jobs. This driver
runs on MacOS 10.2 and higher.
58 Océ VarioPrint 2090 User manual
Page 59

For all other environments (Windows 95/98/ME, Windows NT4, older MacOS
versions, Linux®), Océ provides a printer driver on the basis of the Océ
VarioPrint 2090 PPD (PostScript Printer Description). This PPD add the Océ
VarioPrint 2090 characteristics to a general Adobe PostScript 3 printer driver,
which translates the print jobs into PostScript files.
Settings in the Océ VarioPrint 2090 printer drivers
The following table gives an overview of the possible settings in the printer
drivers.
[21] Settings in the pri nter driver
Section Settings
Layout
■ Print 1-sided or 2-sided
■ Define the orientation (portrait or landscape)
■ Define the binding edge
■ Define the number of images per sheet (1-up, 2-up,
4-up, 6-up, 9-up, 16-up)
■ Create a booklet
Paper
■ Define the paper size
■ Define the media type
■ Use covers
■ Access the page programmer (not available in the
PCL5e printer driver)
Finishing
Image
■ Define the number of staples
■ Define the page order
■ Define the sorting method
■ Define the scale (not available in the PCL5e printer
driver)
■ Define the halftone value
■ Define a watermark
■ Define a mirrored print (not available in the PCL5e
printer driver)
■ Define the colour conversion (not available in the
PCL5e printer driver)
[21] Settings in the printer driver
The print function 59
Page 60

About the page programmer
Introduction
Information for operators
The page programmer is available in the Océ VarioPrint 2090 PostScript
printer driver. This function enables you to describe the paper type for separate
pages within one print job. You can define per page range whether the paper
type is 'Special 1', 'Special 2', 'Special 3', 'Normal' or 'My Paper'.
[11] Page programmer
[11] Page programmer
60 Océ VarioPrint 2090 User manual
Page 61

Note: When you click 'OK', the system automatically stores the changed
settings in a profile. Then you can use these page program settings for other
jobs.
Note: You can program a maximum of 100 subsets. If you define more than 100
subsets, the boxes for the page range are disabled. You can not add subsets.
The table below describes the options you can use in the page programmer.
Topic Description
Page range In the Page range selection box in the upper part of the
window you enter the start page and the end page of a
subset that is processed with the same method (1-9999).
Note: The Page range must be positive (end page greater
than or equal to the start page).
'Media type' In the media box you can select one of the preferred
media types.
■ 'Normal' paper: This category refers to standard
paper.
■ 'Special' paper: This category includes pre-printed
paper, punched paper and other materials. You can
use up to 3 different types of special paper ('Special 1',
'Special 2', 'Special 3'.)
■ 'My Paper': This category refers to paper that the user
needs to put into the paper tray when the user starts a
print job with 'My Paper' on the Océ VarioPrint 2090 .
You can use the 'Define paper' button to change the
names of the possible media types in the 'Media type'
box. You can use all 5 possible media types in one job.
The print function 61
Page 62

Topic Description
Toolbar After you select the media type, you can define the
process method for a page range. Click on the icons in
the toolbar to select the required process.
■ ' 1-sided'. The image is printed on the front side of a
sheet.
■ '2-sided'. The images are printed on the front side and
back side of a sheet.
■ Force to front. The start page of a page range is
printed on the front side of a sheet. The next pages of
the page range will be printed 2-sided.
■ Force to back. The start page of a page range is
printed on the back side of a sheet. The front side of
this sheet will be the last page of the previous page
range.
■ Sheet before. Insert a blank sheet in front of the
selected page or page range.
■ Sheet after. Insert a blank sheet behind the selected
page or page range.
■ Delete sheet. Delete the blank insert sheet that you
can put in front or behind the selected page (range).
■ +1. Add one page to the selected page range. The
consecutive page ranges all move one page up.
■ -1. Remove one page from the selected page range.
The consecutive page ranges all move one page down.
■ Undo last action. You undo the last action. After this
undo, the Undo last action button is disabled.
Note: To undo all actions in the page programmer, click
the 'Cancel' button.
Page list (main
window)
The page list shows the page program. The main window
displays the main page program. A number indicates a
printed page. A "." indicates an empty page.
In the column next to the programmed pages the selected
media type is displayed. You can change the preferred
media types. Click the paper type you want to change
and select another paper type in the 'Media type' box.
Note: You can not program covers in the page programmer. You can define the
use of covers in the 'Paper' settings on the 'Job' tab.
62 Océ VarioPrint 2090 User manual
Page 63

About automatic printing
Introduction
Information for operators
The Océ VarioPrint 2090 allows you to print your jobs in two ways, the
interactive way and the automatic way (see ‘Create a print job’ on page 65).
You must put a check mark in the box 'To mailbox' in your printer driver to
make your job an interactive print job. Your job then goes into the mailbox. In
order to print your job, you must start the job at the operator panel.
The automatic print jobs are also created in the printer driver. To create an
automatic print job, you must leave the box 'To mailbox' empty. Your
automatic print job then goes into the job queue.
Note: In the Océ Settings Editor, the key operator can define that all new jobs
are sent 'To mailbox', not to the job queue. When the setting 'To mailbox' is
enabled, automatic print jobs become interactive print jobs. You must start all
print jobs from the mailbox (see ‘Print a job from the mailbox’ on page 81).
The printing of automatic print jobs starts in the following situation.
■ All the interactive jobs are finished.
■ The time out of the operator panel has expired.
■ At least 1 automatic print job is present.
When all conditions in the bulleted list above are met, the display shows the
following message 'Automatic printing will start in ... seconds'.
After the time displayed in the message expires, the printing of your automatic
print job starts. When there are more automatic print jobs, all the jobs are
printed automatically, one job after the other job. The display does not
announce all automatic print jobs separately. Only the first automatic print job
is announced.
Stop automatic print jobs
When you do not put a check mark in the box 'To mailbox' in your printer
driver, you create an automatic print job. Your job goes straight into the job
queue.
The print function 63
Page 64

When an automatic print job is printed, the operator panel displays the
following screen.
[12] Automatic printing
[12] Automatic printing
You can always interrupt an automatic print job to start an urgent copy job or
print job. In order to stop an automatic print job, press 'Close' or any other key.
The automatic print job then moves into the mailbox. When all conditions
described in the bulleted list of the introduction are met again, the
announcement of your automatic print job appears again. The automatic print
job continues after the time displayed in the message expires.
64 Océ VarioPrint 2090 User manual
Page 65

Print to the Océ VarioPrint 2090
Create a print job
Introduction
Information for operators
If you want to print a document from your desktop application, you can define
the print settings before you send the job to the Océ VarioPrint 2090 . The
settings that you define are set in the printer driver dialogue box.
Note: The printer driver allows you to define up to 5 different types of paper
for a print job.
How to start a print job
1
Select the print option in your application.
The print window of your application appears.
2 Select the page range if necessary.
3 Select the number of prints.
4 Select the name of the printer, for example Océ VarioPrint 2090 .
5 Select 'Properties' to access the settings in the printer driver.
How to define the print settings in the Windows printer driver
1
Select the template that matches the settings you want to use.
2 Click 'OK'.
The window of the printer driver closes.
3 Click 'OK' in the application window.
The document is sent to the Océ VarioPrint 2090 .
Note: When a correct template is not available, you can also define the settings
in the 'Properties' section. The new template is saved for future use. Click the
'Settings' bar or a short-cut link in the 'Preview' window to access the print
settings.
The print function 65
Page 66

Result
Note: You can also activate the 'Show settings before printing' dialogue in the
'Printing Preferences'. When the option is enabled, the printer driver pops up
automatically after you press the 'OK' button in the print window of your
application. You do not need the 'Properties' section to select the correct
template or to define the settings.
The print job arrives in your personal mailbox on the Océ VarioPrint 2090 or
is printed automatically. This depends on your settings. When the print job
arrives in the mailbox, you can access the print job on the operator panel to
check the settings you defined in the printer driver or start the print job (see
‘Print a job from the mailbox’ on page 81).
66 Océ VarioPrint 2090 User manual
Page 67

Create a secured print job
Introduction
Task fo r operators
The Océ VarioPrint 2090 allows you to protect sensitive information in a print
job. If you want to print a job that contains sensitive information you can set a
protective PIN code. This PIN code is set in the printer driver. The PIN code
has a length of 1-5 digits. After you send the print job to the Océ VarioPrint
2090 , you can not change the PIN code of the print job. The secured print job
goes to the mailbox on the Océ VarioPrint 2090 . Enter the correct PIN code to
print this job.
How to create a secured print job
Select the print option in your application.
1
The print window of your application appears.
2 Select the Océ VarioPrint 2090 printer.
3 Select 'Properties' to access the settings of the printer driver.
The 'Job' tab is opened automatically.
4 Select a template or define the settings.
5 Click the 'Security' check box.
A check mark indicates a secured print job.
A pop-up window appears.
6 Enter a PIN code that contains 1-5 digits.
Note: You can not change the PIN code after you send the print job to the
printer.
7 Click 'OK' after you have defined all the settings.
The printer driver window closes.
8 Click 'OK' to close the print window of the application.
The print job is sent to the mailbox on the Océ VarioPrint 2090 (see ‘Print a
secured print job’ on page 68).
The print function 67
Page 68

Print a secured print job
Introduction
Task for operators
The Océ VarioPrint 2090 allows you to protect sensitive information in a print
job. If you want to print a job that contains sensitive information, you can set
a protective PIN code (see ‘Create a secured print job’ on page 67). This PIN
code is set in the printer driver or in Océ Intra Logic. The PIN code has a length
of 1-5 digits. After you send the print job to the Océ VarioPrint 2090 , you can
not change the PIN code of the print job. The secured print job goes to the
mailbox. You can open the job editor to modify the job settings. You do not
need to enter the PIN code to change the job settings. When you press the Start
key , a message appears. Enter the PIN code to continue.
Note: You do not need a PIN code to remove a secured print job from the
mailbox (see ‘Remove jobs from the mailbox’ on page 89).
How to print a secured print job
1
Press the key for 'Print' or 'Print from mailbox...'(see ‘Print a job from the
mailbox’ on page 81).
2 Select your job.
3 Press the Start key .
A dialogue box appears that asks you to enter the PIN code.
4 Use the numeric keys to enter the PIN code (enter 1-5 digits).
Note: You can not set or change a PIN code of a print job on the operator panel
of the Océ VarioPrint 2090 .
Result
The following situations can occur after you enter the PIN code.
■ Correct PIN code
The dialogue box disappears and the print job is sent to the job queue.
■ Wrong PIN code
The print job is not started and the dialogue box remains open.
Note: If you edit a secured print job and then enter the wrong PIN code, the job
is not started. The dialogue box that asks you to enter the PIN code remains
open. The display does not return to the mailbox view. Press the key for
'Cancel' to return to the mailbox view.
68 Océ VarioPrint 2090 User manual
Page 69

Create a print job with an Account ID
Introduction
Task fo r operators
The Océ VarioPrint 2090 allows you to charge the costs for print jobs and copy
jobs to the users or customers (see ‘About the accounting function’ on
page 42). The Océ VarioPrint 2090 allows you to define an 'Account ID' in the
printer driver.
Note: You can only enter an 'Account ID' when the accounting function is
enabled in the printer driver.
How to enable the Account ID in the printer driver
In your Windows® operating system, click 'Start'.
1
2 Click 'Settings'.
3 Click 'Printers'.
4 Right-click the Océ VarioPrint 2090 printer.
5 Click 'Properties'.
6 Select the Océ VarioPrint 2090 tab.
7 Check the 'Enable accounting' box.
8 Click 'Apply'.
9 Click 'OK'.
The print function 69
Page 70

How to create a print job with an Account ID
1
Select the print option in your application.
The print window of your application appears.
2 Select the Océ VarioPrint 2090 printer.
3 Select 'Properties' to access the settings of the printer driver.
The 'Job' tab opens automatically.
4 Select a template or define the settings.
5 Select 'Settings'.
6 Select 'Account'.
7 Enter the values for 'Account ID', 'Cost centre' and 'Custom'.
8 Click 'OK' after you have defined all the settings.
The printer driver window closes.
9 Click 'OK' to close the print window of the application.
The print job is sent to the mailbox (see ‘Print a print job with an Account ID’
on page 71).
Note: When the accounting function is enabled, you must enter an 'Account
ID' before you print your job. If you do not enter an 'Account ID', you cannot
print your job. If you print from your desktop application without an 'Account
ID', the driver will automatically ask you for an 'Account ID'. If you print
through the printer icon in your desktop application, you must enable 'Show
settings before printing' to make the driver ask you for an 'Account ID'.
70 Océ VarioPrint 2090 User manual
Page 71

Print a print job with an Account ID
Introduction
Task fo r operators
The Océ VarioPrint 2090 allows you to charge the costs for print jobs and copy
jobs to the users or customers. The Océ VarioPrint 2090 allows you to define
an 'Account ID' in the printer driver (see ‘Create a print job with an Account
ID’ on page 69).
Note: Make sure that you cancel the 'Account ID' of the current session before
you print the job (see ‘Enter and cancel an 'Account ID'’ on page 45). The
session ID always cancels the 'Account ID' that you define in the printer driver
(see ‘About the accounting function’ on page 42)
How to print a job with an Account ID
1
Press the key for 'Print' or 'Print from mailbox...'(see ‘Print a job from the
mailbox’ on page 81).
2 Select your job.
3 Press the Start key .
The job is printed.
The print function 71
Page 72

My Paper in a print job
Introduction
Task for operators
The Océ VarioPrint 2090 allows you to use your personal paper for print jobs.
This function is called 'My Paper'.
The operator panel displays the following icon for a 'My Paper' job: .
'My Paper' refers to paper that is not available as the standard paper in the paper
trays. To use this personal paper type, you must load the paper tray when the
Océ VarioPrint 2090 starts the print job with 'My Paper'. When you define a
print job in for example the printer driver or in Océ Intra Logic, you can
indicate to print the job on 'Normal' paper, 'Special 1', 'Special 2', 'Special 3',
or on 'My Paper'.
How to create a print job with 'My Paper'
1
Select the print option in your application.
The print window of your application appears.
2 Select the Océ VarioPrint 2090 printer.
3 Select 'Properties' to access the settings of the printer driver.
The 'Job' tab is opened automatically.
4 Select a template or define the settings.
5 Select 'Settings'.
6 Select 'Paper'.
Note: You can also click the short-cut link 'Media type' in the 'Preview' section.
7 Select 'My Paper' in the 'Media type' box.
8 Click 'OK' to confirm your settings.
9 Click 'OK' to send the job to the Océ VarioPrint 2090 .
72 Océ VarioPrint 2090 User manual
Page 73

How to print a job on 'My Paper'
1
Load the paper in one of the trays (see ‘Load the paper trays’ on page 150).
2 Use the arrow keys to select your user name.
3 Press the function key 'Print from mailbox...'.
4 Select the print job and check the settings if necessary.
5 Use the numeric keys to define the number of prints.
6 Press the Start key .
7 A message appears 'Job needs My Paper. Please indicate the tray'.
[13] Indicate the tray
[13] Indicate the tray
8 Indicate the correct paper tray on the operator panel.
9 Press the function key 'OK' to continue.
The job starts to print.
After the job is ready, the operator panel displays a message that asks you to
remove the remaining 'My Paper' from the paper tray.
The print function 73
Page 74

Covers in a print job
Introduction
Task for operators
The Océ VarioPrint 2090 allows you to use covers at the front side or back side
of your document. When you define a print job in for example the printer
driver or in Océ Intra Logic, you can indicate the use of covers.
To use covers, you can do one of the following.
■ Indicate that a paper tray contains covers.
■ Load the covers in a paper tray that the Océ VarioPrint 2090 indicates when
the print job with the covers starts to print.
You can also define the use of covers on the operator panel.
Note: The key operator can define a default paper tray for covers in the Océ
Settings Editor.
How to create a print job with covers
Select the print option in your application.
1
The print window of your application appears.
2 Select the Océ VarioPrint 2090 printer.
3 Select 'Properties' to access the settings in the printer driver.
The 'Job' tab is opened automatically.
4 Select a template or define the settings.
5 Select 'Settings'.
6 Select 'Paper'.
7 Check the check box for 'Front', 'Back', or both in the 'Covers' section.
8 Click 'OK' to confirm your settings.
9 Click 'OK' to send the job to the mailbox.
74 Océ VarioPrint 2090 User manual
Page 75

How to define covers on the operator panel
1
Use the arrow keys to select your user name.
2 Press the function key 'Print from mailbox...'.
3 Select the print job.
4 Press the function key 'Edit...'.
5 Press the function key 'Paper'.
6 Press the function key 'Covers' to define the required covers.
[14] Define the use of covers
[14] Define the use of covers
How to print a job with covers
1
Load the covers in tray 1, 2 or 4 (see ‘Load the paper trays’ on page 150).
2 Use the arrow keys to select your user name.
3 Press the function key 'Print from mailbox...'.
4 Select the print job and check the settings if necessary.
5 Use the numeric keys to define the number of prints.
6 Press the Start key .
A message appears 'Job needs covers. Please indicate the tray'.
[15] Indicate the 'Covers' tray
[15] Indicate the 'Covers' tray
7 Indicate the correct paper tray on the operator panel.
8 Press the function key 'OK' to continue.
The job starts to print.
Note: When the paper trays contain the required paper, the Océ VarioPrint
2090 can also print the jobs on covers automatically. When the paper trays do
not contain the required paper, the job is always printed from the mailbox.
The print function 75
Page 76

Special paper in a print job
Introduction
Task for operators
Special paper can be any kind of paper that you choose to use in a print job.
You can create a print job with special paper on your PC. You must indicate on
the 'Job' tab of the printer driver that you want to use special paper.
You can use up to 3 different types of special paper ('Special 1', 'Special 2' or
'Special 3'.)
Note: The key operator can define default paper trays for the special paper in
the Océ Settings Editor.
How to create a job with special paper
1
Select the print option in your application.
The print window of your application appears.
2 Select the Océ VarioPrint 2090 printer.
3 Select 'Properties' to access the settings of the printer driver.
The 'Job' tab is opened automatically.
4 Select a template or define the settings.
5 Select 'Settings'.
6 Select 'Paper'.
Note: You can also click the short-cut link 'Media type' in the 'Preview' section.
7 Select 'Special 1', 'Special 2' or 'Special 3' in the 'Media type' box.
8 Click 'OK' after you finished.
The printer driver window closes.
9 Click 'OK' to send the job to the Océ VarioPrint 2090 .
Note: You can use the page programmer to define more than one type of
'Special' paper in one print job (see ‘About the page programmer’ on page 60).
Note: You can rename the 'Special 1', 'Special 2' and 'Special 3' paper names
according to your requirements. This makes the use of special paper easier.
76 Océ VarioPrint 2090 User manual
Page 77

How to print a job on special paper
1
Load the paper in tray 1, 2 or 4 (see ‘Load the paper trays’ on page 150).
2 Use the arrow keys to select your user name.
3 Press the function key 'Print from mailbox...'.
4 Select the print job and check the settings if necessary.
5 Use the numeric keys to define the number of prints.
6 Press the Start key .
7 A message appears 'Job needs Special. Please indicate the tray'.
[16] Indicate the 'Special' tray
[16] Indicate the 'Special' tray
Note: If 1 of the paper trays is already configured for 'Special', the message box
will not appear. The print job starts and takes paper from the paper tray that
is configured for 'Special' by the key operator.
8 Indicate the correct paper tray on the operator panel.
9 Press the function key 'OK' to continue.
Note: When the paper trays contain the required paper, the Océ VarioPrint
2090 can also print the jobs on special paper automatically. When the paper
trays do not contain the required paper, the job is always printed from the
mailbox.
The print function 77
Page 78

Use the mailbox
About the mailbox
Introduction
Information for operators
A mailbox is a digital storage area (not intended for archiving purposes) for
print jobs from the network. This digital storage area is on the hard disk of the
Océ Smart Imager.
When you print a document from your desktop, there are 2 options.
1 The print job is sent to the mailbox of the Océ VarioPrint 2090 (interactive
printing).
2 The print job is sent to the job queue of the Océ VarioPrint 2090 (automatic
printing).
If the job is sent to the mailbox, you can access the job on the operator panel
of the Océ VarioPrint 2090 . You have a personal user area in the mailbox
where you can find your print jobs.
In the Océ VarioPrint 2090 Windows and Mac printer drivers you can change
the name of your personal mailbox.
The mailbox allows you to do the following.
■ Edit the job settings for multiple print jobs.
■ Start to print one or more jobs.
■ Delete one or more jobs.
When you start a job from the mailbox, you send a copy of the mailbox job to
the job queue. The original job remains in the mailbox. You can reuse the
mailbox job as many times as required. Each time you start a job from the
mailbox, you create a copy of the print job that is sent to the job queue.
To remove a job from the mailbox, you must delete the job.
If you delete the mailbox job, the jobs that are started to the job queue are not
automatically deleted as well. You must delete these jobs separately.
Note: The key operator can clear the mailboxes periodically. The key operator
can define the storage time of jobs in the mailbox in the Océ Settings Editor.
78 Océ VarioPrint 2090 User manual
Page 79

Job order in the mailbox
When you open your mailbox on the operator panel, you see all your jobs. All
new (or not printed) jobs that you sent from your desktop are highlighted. (The
user that last sent a print job to the Océ VarioPrint 2090 is highlighted in the
user list on the operator panel.) You can scroll through the list of jobs with the
4 arrow keys ( , , and ) on the right-hand side of the display.
If you send a job to the job queue, the job gets a check mark . This check mark
indicates that the job is 'Done' (printed before).
Mailbox information
The mailbox header contains the following information.
[22] Information in the header of the mailb ox
Nr. Header information
1 The user name.
2 The total number of jobs in the mailbox.
3 The number of jobs that you select.
[22] Information in the header of the mailbox
The mailbox of the Océ VarioPrint 2090 displays the following job
information.
[23] Presentation of t he jobs in the mailbox
Nr. Job information
1 A check mark to indicate that the job is sent to the job queue.
2 The file name of the job.
3 The date and time the job arrived in the mailbox.
[23] Presentation of the jobs in the mailbox
[17] Example of a per sonal mailbox
[17] Example of a personal mailbox
The print function 79
Page 80

Graphical information
The left-hand side of the job editor displays graphic information about the job
settings for mailbox jobs, copy jobs and scan jobs. The information is
described in the table below. (Please note that some information is fixed for
mailbox jobs and variable for the other jobs.)
[24] Graphical informati on
Nr. Graphical information
1 Title of the mailbox job (or copy job)
2 Staple indication, 0, 1 or 2 staples
3 1-sided or 2-sided
4 Document orientation
5 Document type
6 Document size (variable for copy jobs only)
7 Margin shift
8 Number of prints
[24] Graphical information
[18] Graphical feedbac k in the job editor
[18] Graphical feedback in the job editor
80 Océ VarioPrint 2090 User manual
Page 81

Print a job from the mailbox
Introduction
Task fo r operators
If you send a print job from your desktop to the Océ VarioPrint 2090 , the job
goes to the job queue or to the mailbox. A job that goes to the job queue is
called an automatic print job (AP). A job that goes to the mailbox on the Océ
VarioPrint 2090 is called an interactive print job (IP).
Before you begin
■ Create a print job on your desktop (see ‘Create a print job’ on page 65).
■ Select the job settings in the printer driver.
■ Send the print job through the network to the mailbox on the Océ VarioPrint
2090 .
How to print a job from the mailbox
1
Use the arrow keys at the right-hand side of the operator panel to select your
user name from the list.
[19] Select your user name
[19] Select your user name
2 Press the function key 'Print' or 'Print from mailbox...'.
3 Use the arrow keys at the right-hand side of the operator panel display to select
a job from the list.
Note: You can press the function keys 'Select all' or 'Select new' to make a
selection.
4 Press the Start key .
The print function 81
Page 82

Result
A copy of the mailbox job is sent to the job queue of the Océ VarioPrint 2090
. The mailbox job gets a check mark . This check mark indicates that the job
has been sent to the job queue. The job remains in the mailbox and you can use
the job again until you delete the job.
82 Océ VarioPrint 2090 User manual
Page 83

Edit a mailbox job
Introduction
Task fo r operators
When you start a job from the mailbox, a copy of this mailbox job is sent to the
job queue. You can change the settings of that job in the job editor before you
send the job to the job queue. Your changes are not applied to the original job
that you sent to the mailbox. The changes you make in the job editor are
applied to the job that is sent to the job queue.
Options
You access the job settings through the 'Edit...' function. The job settings are
accessible in the following 4 sections.
■ 'Basic'
■ 'Paper'
■ 'Layout'
■ 'Extra'
Use the numeric keys to define the number of prints. The number of prints is
displayed at the left-hand side of the screen.
Note: If you select more than one job in the mailbox and you edit a setting, that
setting is changed in all the selected jobs.
When to do
If you want to check or change the job settings of a print job or define the
number of prints before you start a print job, you can access the job settings in
the mailbox.
After you have checked and changed the settings in the 4 sections, you can
press the Start key to send the modified job to the job queue.
The print function 83
Page 84

Illustration
[20] Edit a mailbox job
[20] Edit a mailbox job
How to edit a mailbox job
1
Open the mailbox to access your print job (see ‘Print a job from the mailbox’
on page 81).
2 Press the function key 'Edit...'.
The job editor opens with the settings of the initial mailbox job.
3 If necessary, follow the procedures described below.
These procedures help you to change the values of the print job settings.
Change the settings in the 'Basic' section
1
Press the function key 'Basic' (only necessary if the section is not displayed
after you pressed the function key 'Edit...').
[21] The 'Basic' sectio n
[21] The 'Basic' section
2 Press the function key 'Print'.
You can define that the print is '1-sided' or '2-sided'.
3 Press the function key 'Staple'.
You can set the number of staples. Select 'No staple', '1 staple' or '2 staples'
for the print job.
Note: The 'Print job identification' section displays the file name and the user
name. You can not change this information for a print job.
84 Océ VarioPrint 2090 User manual
Page 85

Change the settings in the 'Paper' section
1
Press the function key 'Paper'.
[22] The 'Paper' section
[22] The 'Paper' section
2 Press the function key 'Paper' to select the paper tray for the print job.
3 Press the function key 'Covers' to define the use of covers.
Change the settings in the 'Layout' section
1
Press the function key 'Layout'.
[23] The 'Layout' sectio n
[23] The 'Layout' section
2 Press the function key 'Print document type'.
You can set the binding edge of the print. This setting defines if the document
flips over the long edge or the short edge of a sheet. This setting also allows
you to select the orientation of the print. You can select landscape or portrait.
You can only set 1 staple for documents that flip over the short edge of a sheet.
Note: The 'Original document type' section displays an indication of how the
information is oriented on the original, in landscape or portrait direction. You
can not change this information for a print job.
The print function 85
Page 86

Change the settings in the 'Extra' section
1
Press the function key 'Extra'.
[24] The 'Extra' section
[24] The 'Extra' section
2 Press the function key 'Margin shift'.
You can indicate the distance between the information on the sheet and the
binding edge. When you increase the margin shift, the information on the sheet
is shifted away from the binding edge of the print.
3 Press the function key 'Sort'.
When you select 'By page', the output is sorted in the order 111, 222, 333.
When you select 'By set', the output is sorted in the order 123, 123, 123.
Note: The setting 'Sort' is only visible when the key operator enables the
'Display expert settings' in the Océ Settings Editor.
86 Océ VarioPrint 2090 User manual
Page 87

Stop printing
Introduction
Task fo r operators
Press the Stop key one time if you want to stop a print job at the end of a
set. Press the Stop key two times to stop within a set (end of page).
After you press the Stop key, the printing stops and a dialogue is displayed.
Then you can cancel or resume the job.
You can use the Stop key for example if you made a mistake in the job
definition.
Illustration
[25] Stop printing
[25] Stop printing
Stop key behaviour
[25] Stop key behaviour
If you want to stop a job at the Then press the Stop key ...
End of a set One time
End of a page Two times
[25] Stop key behaviour
The print function 87
Page 88

Result
After the printer stops printing, the following dialogue with two options
appears.
[26] Stop key dialogue
'Cancel this job?' Result
'Yes' The job is cancelled. If the job is stored in the mailbox,
you can print the job again. If you stopped printing at
the end of a page, you must remove the partial set from
the output trays. The Océ VarioPrint 2090 prints the
next job in the job queue.
'No' The Océ VarioPrint 2090 continues to print the job.
[26] Stop key dialogue
88 Océ VarioPrint 2090 User manual
Page 89

Remove jobs from the mailbox
Introduction
Task fo r operators
The jobs in the mailbox are not automatically deleted after they are sent to the
queue. If a mailbox job is not needed anymore, you must manually remove the
job. The key operator can also use the Océ Settings Editor to remove the jobs.
Illustration
[26] Delete a job from the mailbo x
[26] Delete a job from the mailbox
How to remove jobs from the mailbox
1
Open the mailbox to access your print jobs (see ‘Print a job from the mailbox’
on page 81).
2 Use the arrow keys to scroll through the print jobs in the mailbox.
Note: If you want to select more than 1 job, you can use the function keys
'Select all' and 'Select new'.
3 Press the function key 'Delete'. The selected jobs are removed from the
mailbox.
Note: If you want to delete a job from the job queue, you must open the job
queue manager and manually delete the job from the job queue with the
function key 'Delete'. This action is only possible for jobs in the job queue that
were not started yet. If the job in the job queue is currently printed, you must
first use the Stop key . Please note that if you delete a job from the mailbox,
this action does not affect the jobs in the job queue.
The print function 89
Page 90

Océ Intra Logic
About Océ Intra Logic
Definition
Information for operators
Document and device control @ your desktop
Maximise the efficiency, optimise the device usage and simplify management
and support.
Print and copy from and to every networked machine. Océ Intra Logic®
provides convenient desktop access to these functions.
Illustration
[27] Océ Intra Logic
[27] Océ Intra Logic
90 Océ VarioPrint 2090 User manual
Page 91

The concepts of Océ Intra Logic
Makes multi-functional devices work
Do you need many different office devices to handle document tasks and do
you find that different interfaces and stand-alone functions increase
complexity and cause time-consuming manual handling?
Océ Intra Logic makes devices work in a single, easy-to-use environment.
With simple desktop access from any location.
Gets digital and analogue documents under control
Océ Intra Logic makes it easy for you to access all the document functions you
need. That means efficient reproduction, handling and distribution of digital
documents. But also - with convenient scan to email and other scan to office
applications - the ability to do all the same tasks with hard-copy documents.
Supports effective information sharing
When business processes depend on fast information availability, get
documents to those who need them is more important than ever. Thanks to the
open interface to different tasks like fax, archive and other office applications.
All these tasks are accessible from the users' desktops.
Get maximum productivity from all office devices.
With Océ Intra Logic you can make the most efficient, productive use of
printers and copiers. Address all SNMP/MIB compatible printing systems
through a web based browser interface. You can use the right resources for
every job, wherever the jobs are located.
The print function 91
Page 92

Illustration
[28] Océ Intra Logic s creen
[28] Océ Intra Logic screen
Simplify management and support tasks
Support document-related network devices like printers, desktop scanners.
Ensure maximum availability which can be a time-consuming task for IT and
help desk staff. Océ Intra Logic makes it easy to work with remote device
access. Specialists can check configuration and status details, and even read the
total counters and alerts (for example runtime contradictions), all without
leaving their desks.
Part of Océ's integrated document management solutions
Océ Intra Logic is part of Océ's wide range of solutions, focused on
maximising the availability of documents and information. Comprising
hardware, software and supporting services, the Océ range offers users highly
flexible and modular solutions to their document needs.
92 Océ VarioPrint 2090 User manual
Page 93

Océ Intra Logic functions
Introduction
Information for operators
Océ Intra Logic® is an easy-to-use intranet application that is used to make
more efficient use of the printer. This application allows you to do the
following.
■ Know which paper is loaded.
■ See whether the machine is available or not available.
■ Gather jobs, the whole day and print all the jobs in one session.
■ Get information about problems (for example that the machine is out of
paper).
■ Program difficult jobs.
Only relevant information is offered to the user, for example the user is
informed when there is a paper jam or paper empty situation for a job.
The print function 93
Page 94

Next to the items listed above, you can use Océ Intra Logic to change job
settings for jobs on the Océ VarioPrint 2090 . In the figure below you see an
example of job settings in Océ Intra Logic.
[29] Océ Intra Logic j ob settings
[29] Océ Intra Logic job settings
94 Océ VarioPrint 2090 User manual
Page 95

Job settings overview
The following table gives an overview of the job settings you can change in
Océ Intra Logic. In the table you see a Yes when a setting is applicable. You
see a No when the setting does not influence the Océ VarioPrint 2090 .
[27] Océ Intra Logic job settings
Setting label Change in mailbox via Océ Intra Logic
General
Number of copies Yes
AP/IP No
Security Code No
Basic
Original sides No
Print sides Yes
Staple Yes
Zoom No
Paper
Paper size No (read-only)
Paper tray No
Paper type Yes
Cover Yes
Orientation
(jobs from glass plate only)
Document type No
Image type
(analogue originals only)
Lay out print
Lay out Booklet No (read-only)
Document type Yes
Margin shift front No
Margin shift back No
No
No
[27] Océ Intra Logic job settings
The print function 95
Page 96

96 Océ VarioPrint 2090 User manual
Page 97

Chapter 7 The copy function
Océ VarioPrint 2090
User manual
97
Page 98

Basic copies
Make a copy
Introduction
Task for operators
The Océ VarioPrint 2090 is a network printer and copier. The print jobs are
digital originals that you send from the desktop to the mailbox. The copy jobs
are analogue originals that you scan and print on the Océ VarioPrint 2090 .
The workflow to make a copy is presented in the table below.
Actions Description
1 Put originals in the automatic document feeder or on the glass
2 Access the 'Copy' function to create a copy job
3 Describe the original and print settings
4 Set the number of copies
5 Start the copy job with the Start key
plate
If you press the Start key and you have not selected the 'Copy' function on
the operator panel, a message appears on the display. The message indicates
that you must first select the function 'Copy' on the operator panel to start a
copy job.
After the originals are scanned, you can use the 'Copy' template for a new job.
The system remembers the settings of the previous job.
98 Océ VarioPrint 2090 User manual
Page 99

Before you begin
When you start a copy job.
■ Remove all staples from your originals with the staple remover.
■ Remove the paper clips.
■ Make sure that the originals in the automatic document feeder have the
same size.
■ Make sure that the originals are not curled.
Illustration
[30] Use the 'Copy' template
[30] Use the 'Copy' template
How to make a copy
1
Put the originals face down and in readable form into the automatic document
feeder or on the glass plate.
2 Adjust the original guides.
3 Press the function key 'Copy'.
4 Define the settings in the sections 'Basic', 'Paper', 'Layout' and 'Extra'.
5 Enter the number of copies with the numeric keys.
6 Press the Start key .
The copy function 99
Page 100

Types of copy job settings
Introduction
Information for operators
When you create a copy job, you define the job settings in the job editor on the
operator panel. The job settings allow you to describe the originals and the
copies.
There are 4 sections available to define the job settings. Press the function keys
on the operator panel to access the following sections.
■ 'Basic'
■ 'Paper'
■ 'Layout'
■ 'Extra'.
Graphical information
The left-hand side of the job editor displays graphic information about the
copy job settings for copy jobs (and mailbox jobs). The information is
described in the table below. (Please note that some information is fixed for
mailbox jobs and variable for copy jobs.)
[31] Graphical feedbac k
[31] Graphical feedback
[28] Graphical informati on
Number Graphical information
1 Title and number of the copy job (or mailbox job)
2 Staple indication: 0, 1 or 2 staples
3 1-sided or 2-sided
4 Document orientation
5 Document type
100 Océ VarioPrint 2090 User manual
 Loading...