

Observint Technologies BLK-CPT235VH, BLK-CPT237VH, BLK-CZT242VH, BLK-CZT243VH, BLK-CPT235VH2 User Manual
High Performance IR
Indoor/Outdoor Color CCTV
Bullet Camera User Manual
Products: BLK-CPT235VH, BLK-CPT237VH, BLK-CZT242VH,
BLK-CZT243VH
Please read this manual before using your camera, and always follow the instructions for
safety and proper use. Save this manual for future reference.
BLK-BulletCameras_CM
3/18/11
ii
www.digiop.com
WARNING
!
Changes or modications not expressly approved by the manufacturer could void the
user’s authority to operate the equipment.
CAUTION
To prevent electric shock and risk of re hazards:
Do NOT use other than the specied power source.
REGULATORY NOTICE
This device complies with Part 15 of the FCC Rules. Operation is subject to the following two conditions:
(1) This device may not cause harmful interference, and
(2) This device must accept any interference received, including interference that may cause undesired operation.
This equipment has been tested and found to comply with the limits for a Class A digital device, pursuant to Part
15 of the FCC Rules. These limits are designed to provide reasonable protection against harmful interference in a
residential installation.
This equipment generates, uses, and can radiate radio frequency energy and, if not installed and use in
accordance with the instructions, may cause harmful interference to radio communications.
Operation of this equipment in a residential area is likely to cause interference, in which case the user will be
required to correct the interference at his own expense.
LEGAL NOTICE
DIGIOP products are designed to meet safety and performance standards with the use of specic DIGIOP
authorized accessories. DIGIOP disclaims liability associated with the use of non-DIGIOP authorized accessories.
The recording, transmission, or broadcast of any person’s voice without their consent or a court order is strictly
prohibited by law.
DIGIOP makes no representations concerning the legality of certain product applications such as the making,
transmission, or recording of video and/or audio signals of others without their knowledge and/or consent. We
encourage you to check and comply with all applicable local, state, and federal laws and regulations before
engaging in any form of surveillance or any transmission of radio frequencies.
Other trademarks and trade names may be used in this document to refer to either the entities claiming the marks
and names or their products. DIGIOP, Inc. disclaims any proprietary interest in trademarks and trade names other
than its own.
No part of this document may be reproduced or distributed in any form or by any means without the express written
permission of DIGIOP, Inc.
© 2011 by DIGIOP, Inc. All Rights Reserved.
3850 Priority Way South Drive, Suite 200, Indianapolis, IN 46240
Sales/Support: 1.877.972.2522

iiiHigh Performance IR CCTV Bullet Camera User Manual
Table of Contents
Precautions . . . . . . . . . . . . . . . . . . . . . . . . . . . . . . . . . . . . . . . . . . . . . . . . . . . . . . . . . . . . . . . . . . . . . . . . . . . . . iv
SECTION 1 Introduction . . . . . . . . . . . . . . . . . . . . . . . . . . . . . . . . . . . . . . . . . . . . . . . . . . . . . . . . . . . . . . . . . . . . . . . 1
1.1 Features . . . . . . . . . . . . . . . . . . . . . . . . . . . . . . . . . . . . . . . . . . . . . . . . . . . . . . . . . . . . . . . . . . . . . . . . . . . .1
SECTION 2 Installation . . . . . . . . . . . . . . . . . . . . . . . . . . . . . . . . . . . . . . . . . . . . . . . . . . . . . . . . . . . . . . . . . . . . . . . . 4
2.1 General Guidelines . . . . . . . . . . . . . . . . . . . . . . . . . . . . . . . . . . . . . . . . . . . . . . . . . . . . . . . . . . . . . . . . . . .4
2.2 Mounting the camera. . . . . . . . . . . . . . . . . . . . . . . . . . . . . . . . . . . . . . . . . . . . . . . . . . . . . . . . . . . . . . . . .4
2.3 Camera adjustments . . . . . . . . . . . . . . . . . . . . . . . . . . . . . . . . . . . . . . . . . . . . . . . . . . . . . . . . . . . . . . . . .5
SECTION 3 Software Setup . . . . . . . . . . . . . . . . . . . . . . . . . . . . . . . . . . . . . . . . . . . . . . . . . . . . . . . . . . . . . . . . . . . . . 7
3.1 LENS . . . . . . . . . . . . . . . . . . . . . . . . . . . . . . . . . . . . . . . . . . . . . . . . . . . . . . . . . . . . . . . . . . . . . . . . . . . . . . .7
3.2 EXPOSURE . . . . . . . . . . . . . . . . . . . . . . . . . . . . . . . . . . . . . . . . . . . . . . . . . . . . . . . . . . . . . . . . . . . . . . . . . .8
3.3 WHITE BAL . . . . . . . . . . . . . . . . . . . . . . . . . . . . . . . . . . . . . . . . . . . . . . . . . . . . . . . . . . . . . . . . . . . . . . . . .12
3.4 DAY/NIGHT . . . . . . . . . . . . . . . . . . . . . . . . . . . . . . . . . . . . . . . . . . . . . . . . . . . . . . . . . . . . . . . . . . . . . . . . .13
3.5 3DNR. . . . . . . . . . . . . . . . . . . . . . . . . . . . . . . . . . . . . . . . . . . . . . . . . . . . . . . . . . . . . . . . . . . . . . . . . . . . . .16
3.6 SPECIAL . . . . . . . . . . . . . . . . . . . . . . . . . . . . . . . . . . . . . . . . . . . . . . . . . . . . . . . . . . . . . . . . . . . . . . . . . . .16
3.7 Adjust . . . . . . . . . . . . . . . . . . . . . . . . . . . . . . . . . . . . . . . . . . . . . . . . . . . . . . . . . . . . . . . . . . . . . . . . . . . . .21
3.8 RESET . . . . . . . . . . . . . . . . . . . . . . . . . . . . . . . . . . . . . . . . . . . . . . . . . . . . . . . . . . . . . . . . . . . . . . . . . . . . .22
3.9 EXIT . . . . . . . . . . . . . . . . . . . . . . . . . . . . . . . . . . . . . . . . . . . . . . . . . . . . . . . . . . . . . . . . . . . . . . . . . . . . . . .22
SECTION 4 Cleaning . . . . . . . . . . . . . . . . . . . . . . . . . . . . . . . . . . . . . . . . . . . . . . . . . . . . . . . . . . . . . . . . . . . . . . . . . . 24
SECTION 5 Specications . . . . . . . . . . . . . . . . . . . . . . . . . . . . . . . . . . . . . . . . . . . . . . . . . . . . . . . . . . . . . . . . . . . . . 25
APPENDIX A Troubleshooting . . . . . . . . . . . . . . . . . . . . . . . . . . . . . . . . . . . . . . . . . . . . . . . . . . . . . . . . . . . . . . . . . . . 27
APPENDIX B Camera Dimensions . . . . . . . . . . . . . . . . . . . . . . . . . . . . . . . . . . . . . . . . . . . . . . . . . . . . . . . . . . . . . . . . 28
BLK-CPT235VH
. . . . . . . . . . . . . . . . . . . . . . . . . . . . . . . . . . . . . . . . . . . . . . . . . . . . . . . . . . . . . . . . . . . . . . . . . .28
BLK-CPT237VH and BLK-CZT242VH
. . . . . . . . . . . . . . . . . . . . . . . . . . . . . . . . . . . . . . . . . . . . . . . . . . . . . . . . .29
BLK-CZT243VH
. . . . . . . . . . . . . . . . . . . . . . . . . . . . . . . . . . . . . . . . . . . . . . . . . . . . . . . . . . . . . . . . . . . . . . . . . .30

iv
www.digiop.com
Precautions
• This camera should be installed by qualied personnel only.
• There are no user serviceable parts inside.
• Do not disassemble this camera other than to make initial adjustments.
• Use a UL approved regulated 24 volt AC or 12 volt DC power supply.
• Use appropriate low voltage power cable to prevent re or electrical shock.
• Please insure that your installation area can support the weight of the camera.
Handle this camera carefully
• Do not use a strong or abrasive detergent when cleaning the camera.
• Do not install near cooling or heating devices.
• Do not install the camera in extreme temperature conditions. Use the camera in environments where temperature
is within 14°F to 122°F. Use adequate ventilation if a camera is installed where high temperatures may occur.
• Do not install or use the camera in an environment where the humidity is high. Very high humidity levels can
reduce image quality.
• Do not install the camera under unstable lighting conditions. Severe lighting change or icker can cause the camera
to work improperly.
• Do not touch the front lens of the camera. Be careful not to leave ngerprints on the lens cover.
• Do not drop the camera or subject it to physical shocks.
• Do not expose the camera to rain or spill liquids on it. If it gets wet, wipe dry immediately. Liquids can contain
minerals that corrode the electronic components.
• Do not expose the camera to radioactivity. If exposed to radioactivity the CCD will fail.
• Do not disassemble the camera. There are no user-serviceable parts inside it.
• Do not drop the camera or subject them to physical shocks. It can cause malfunctions to occur.
• Never point the camera at a strong light, or exposing it to a spotlight or an object reecting the strong light.
Smear or blooming may occur, and it can damage the CCD.
• Before applying power to the camera, check the power source to ensure that it is within specications.
1High Performance IR CCTV Bullet Camera User Manual
SECTION 1: INTRODUCTION
SECTION 1
Introduction
DIGIOP Black high performance indoor/outdoor IR CCTV bullet cameras feature a very high resolution Sony® CCD sensor providing
600 TVL, with True day/night capability, dual voltage range (24 VAC, 12 VDC), and on-screen display (OSD) for control and setup.
1.1 Features
• High resolution: color - 600 TV Lines / B/W - 650 TV Lines
• Next generation 3D DNR with 3D Filter
• Maximum sens-up (×258), 0 Lux of minimum illumination
• OSD control functions
• DC auto-iris varifocal lens, ×32 digital zoom
• Customizable backlight compensation (BLC) and motion detection (MD) areas
• Privacy masking for up to 8 areas
• Super DNR (digital noise reduction) feature for improved imaging and ecient video storage
• Negative image function
• Digital Wide Dynamic Range function (D-WDR)
• Dual power (AC 24V / DC 12V) option
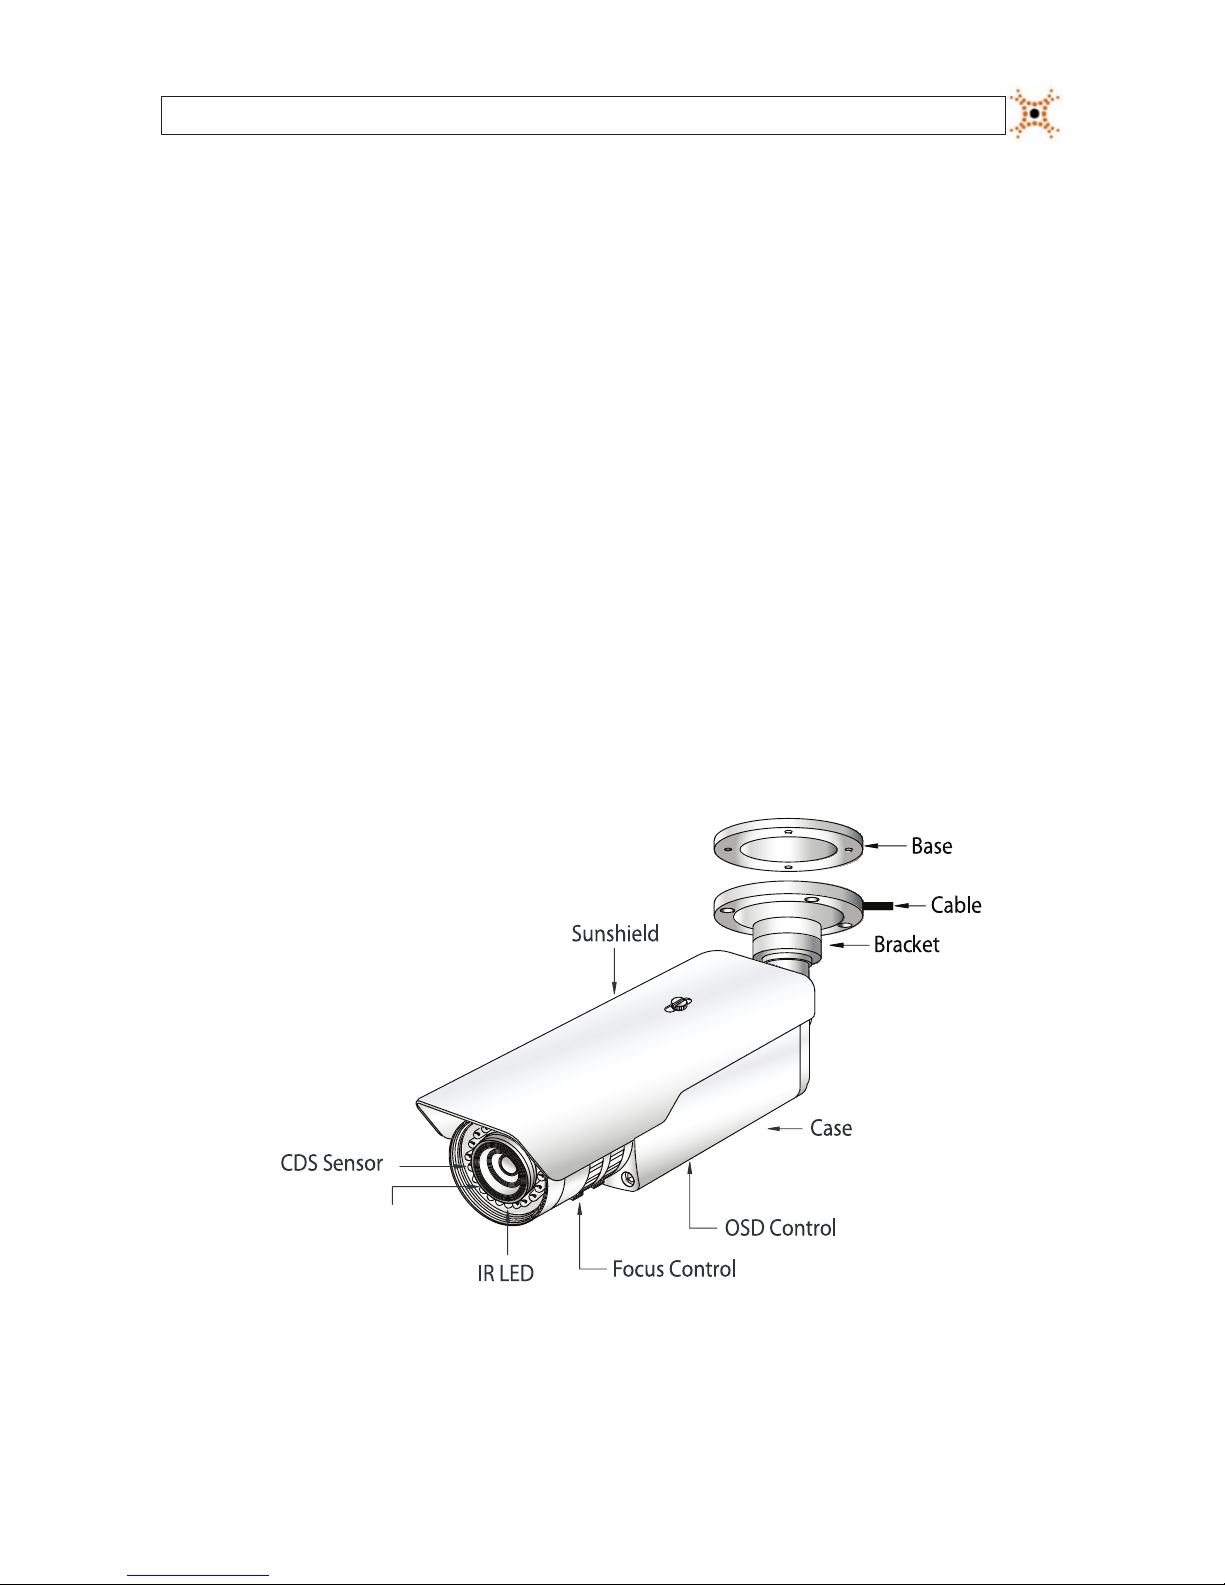
DC Auto Iris Varifocal Lens
(2.8mm-12mm)
BLK-CPT235VH Camera
2
www.digiop.com
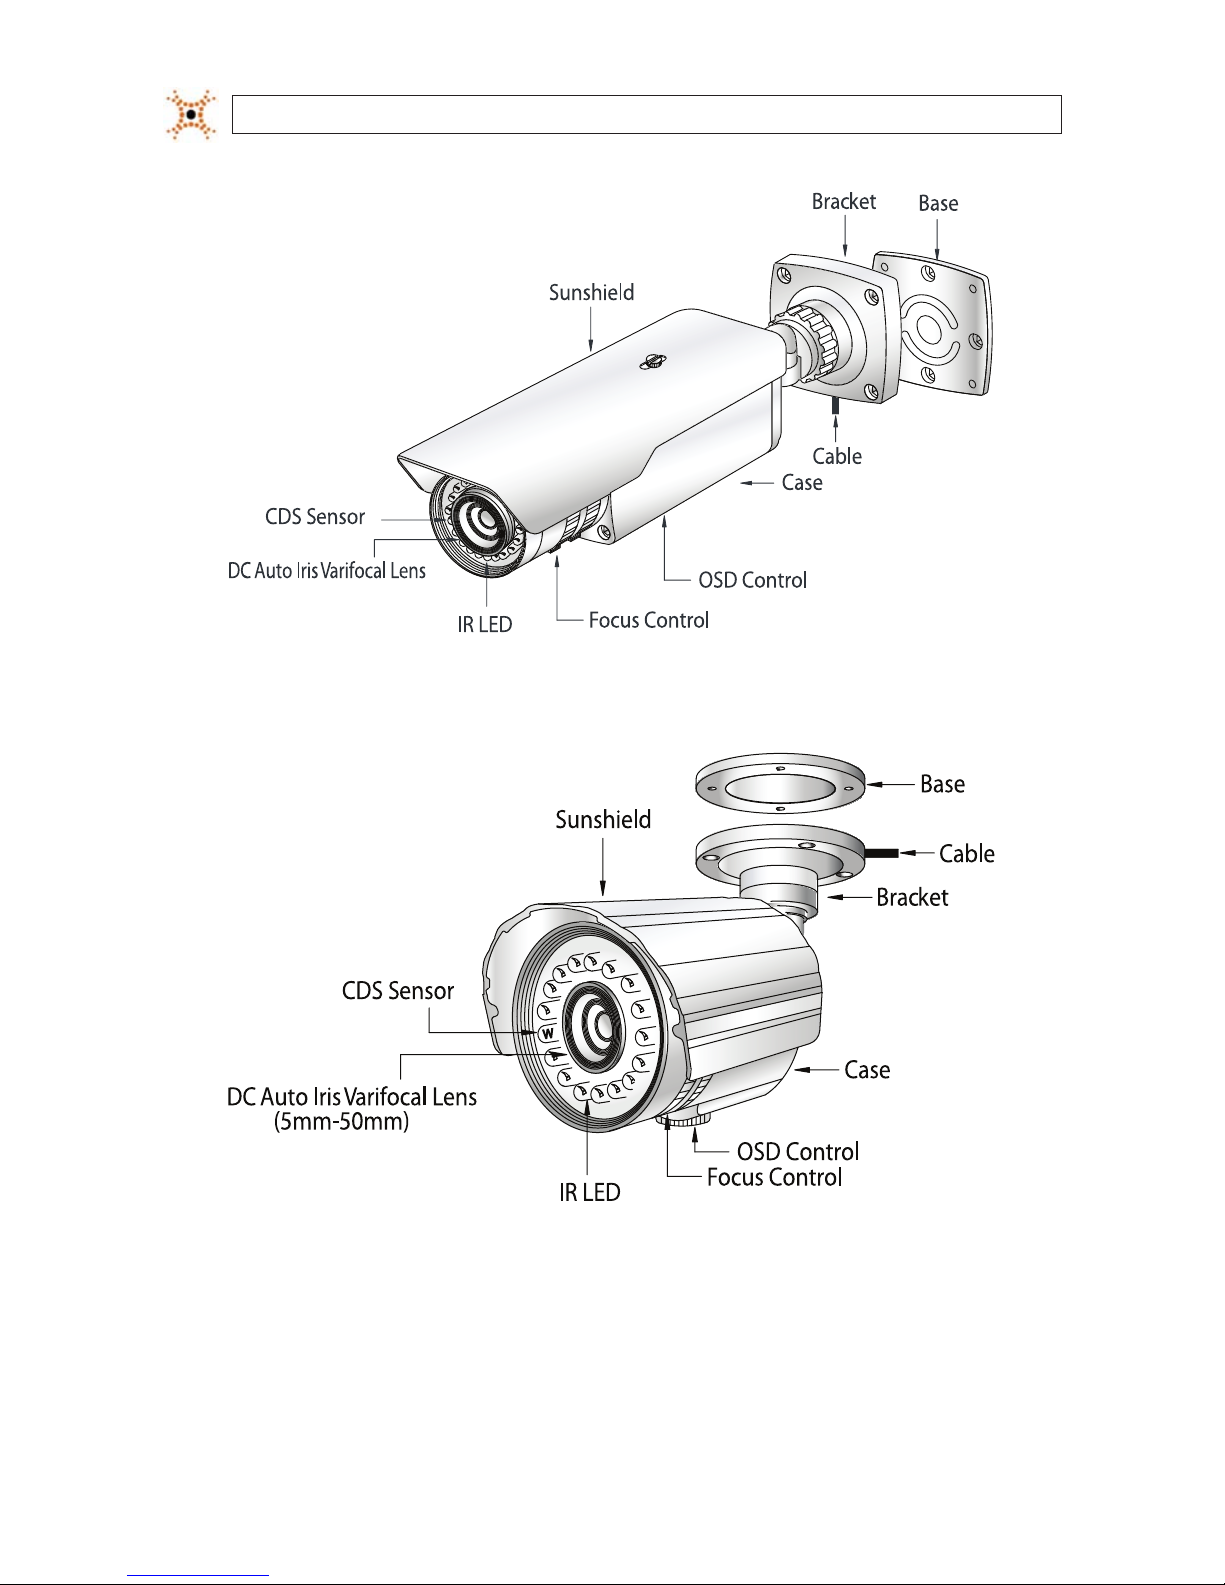
BLK-CPT237VH, CZT242VH Cameras
BLK-CZT243VH Camera
SECTION 1: INTRODUCTION

3High Performance IR CCTV Bullet Camera User Manual
SECTION 1: INTRODUCTION
1.1.1 What’s in the box
Your camera includes the following:
• Four (4) coarse-threaded screws to secure the base plate to the mounting surface
• Four (4) machined screws to secure the camera bracket to the base plate
• Hex wrench for adjusting the camera bracket
• Camera video test port to BNC adapter
• Power source adapter cable
• This manual
1.1.2 Tools you need
To install the camera, you will need:
• 12 VDC or 24 VAC power source
• Tools for mounting the camera
• Video and power extension cables, if needed
• Hand-held CCTV video setup monitor (optional)
4
www.digiop.com
SECTION 2: INSTALLATION
SECTION 2
Installation
2.1 General Guidelines
• Camera Lens: Handle the camera carefully to prevent scratching or soiling the lens. If the lens or IR array shield becomes
soiled, clean it only with approved products. See the Cleaning section later in this manual.
• Monitor impedance: Set the monitor impedance switch to 75Ω.
• Power supply: To avoid re or shock hazard, use only a UL listed power supply.
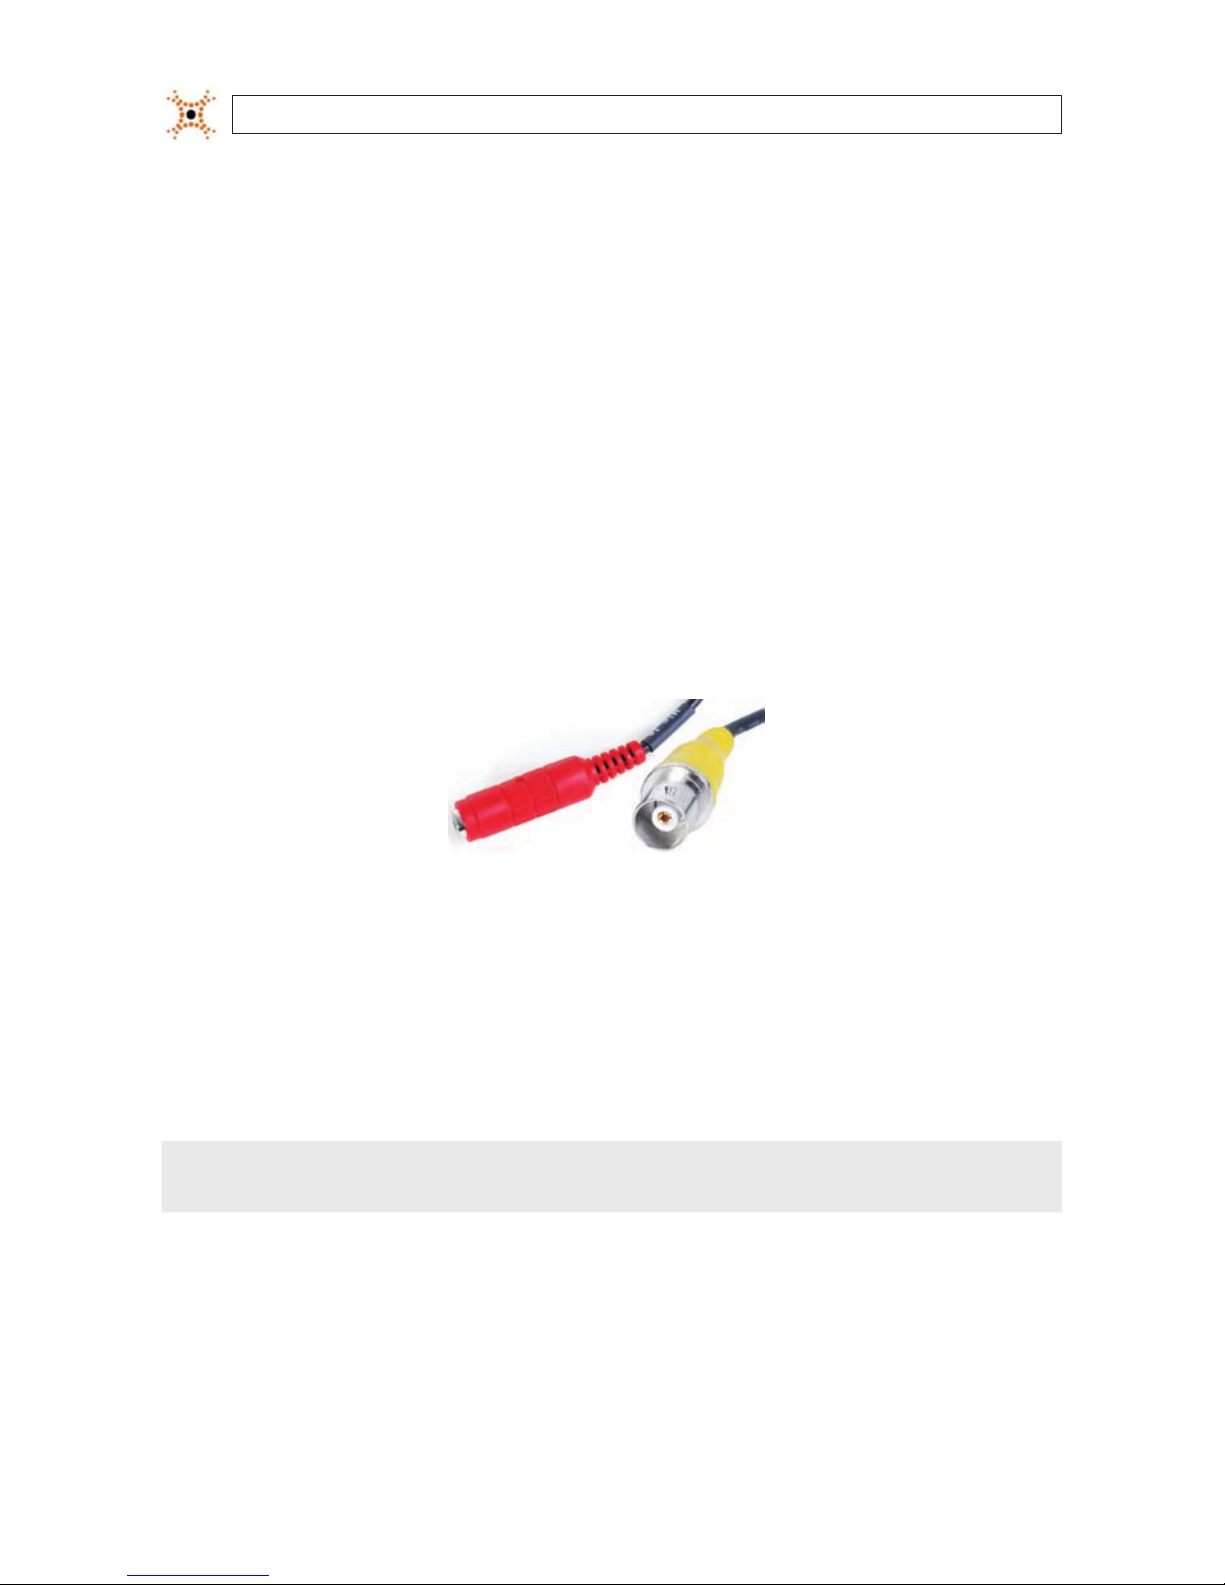
• Camera drop cable: The camera drop cable includes two connectors:
— Power connector (red sleeve) – Use AC24V power source (AC24V 1A adapter) or DC 12V power source (DC12V
1A adapter). To attach the power connector to an AC24V power source, use a connector adapter.
— Video coax connector (BNC, yellow sleeve) – for transmission of the video signal across coax (75Ω) cable.
Power Connector
Video BNC
Connector
2.2 Mounting the camera
The camera can be mounted on any surface with sucient strength to support it. The video/power drop cable from the camera can
be routed either through the cable hole in the center of the base plate, or through a cable guide in the mounting bracket.
1. Using the camera base plate as a guide, mark the location of the screws that anchor the base plate to the mounting surface. If
you are routing the drop cable through the mounting plate, also mark the position of the hole for the drop cable.
NOTE
Position the base plate so that the cable guide in the mounting bracket is pointing away from any source of water,
dust, and other contaminates.
2. Drill holes for the screws that anchor the base plate to the mounting surface. Four (4) course-threaded screws are provided.
However, depending on the surface materials, more appropriate fasteners may be required.
3. Drill a 3/4” hole form the drop cable, if necessary.
4. Anchor the base plate to the mounting surface using the screws provided, or screws better suited for the surface structure.
5High Performance IR CCTV Bullet Camera User Manual
SECTION 2: INSTALLATION
5. Route the drop cable through the hole through the base plate, or through the cable guide in the mounting bracket, then
attach the camera to the base plate using the four (4) machine screws provided.
6. Connect the camera drop cable to video and power cables as required.
NOTE
Drop cable connectors are not waterproof.
2.3 Camera adjustments
In this procedure, set the camera to point at your surveillance target. Rotate the far - near and tele - wide rings to frame the video
image.
8. Apply power to the camera.
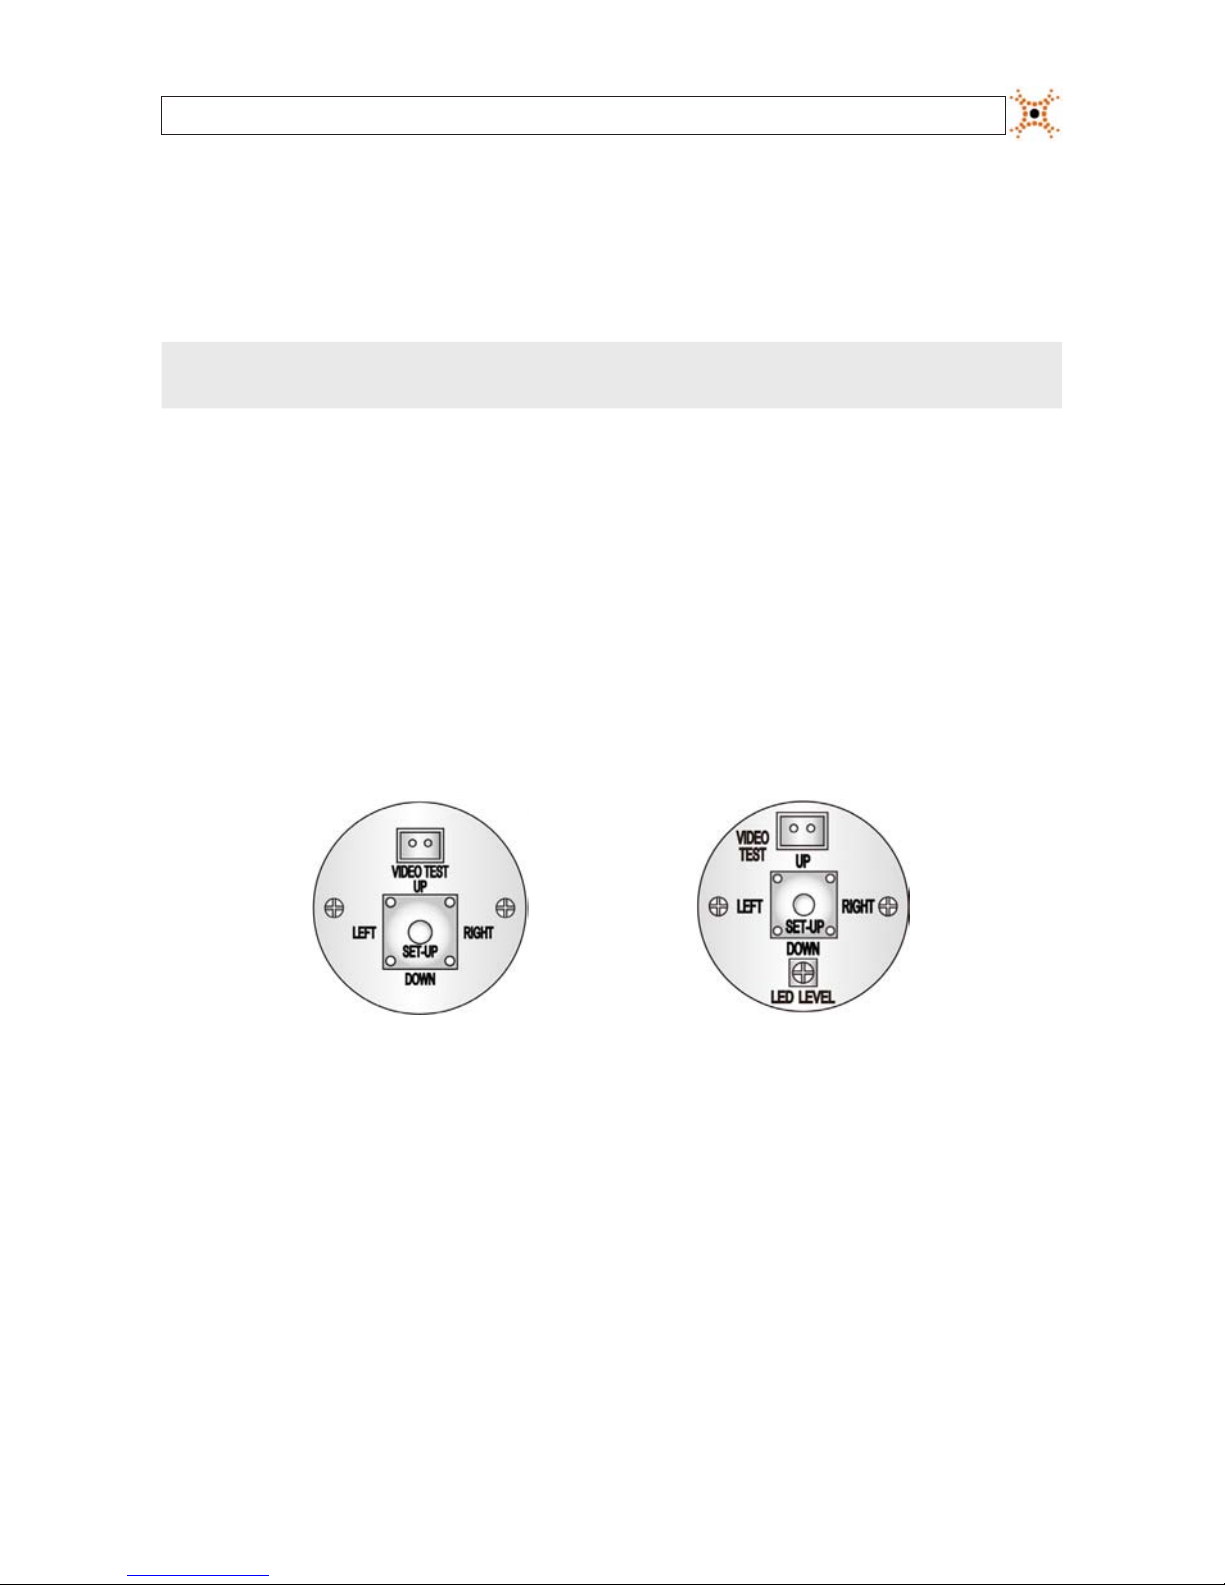
9. If using a hand-held CCTV video setup monitor with your camera:
a. Remove the cover to the OSD control panel by unscrewing it counter clockwise.
BLK-CPT235VH OSD Control Panel BLK-CPT237VH, BLK-CZT242VH,
BLK-CZT243VH OSD Control Panel
b. Connect the BNC adapter cable to the VIDEO TEST port on the OSD control panel.
c. Connect a CCTV setup monitor to the BNC adapter cable.
10. If using a CCTV video system monitor to setup your camera, connect the video output of the camera to your CCTV monitor.
11. Verify that video from the camera can be seen on the monitor.
12. While observing video from the camera, loosen the bracket adjustment ring and the hex screws.
6
www.digiop.com
SECTION 2: INSTALLATION
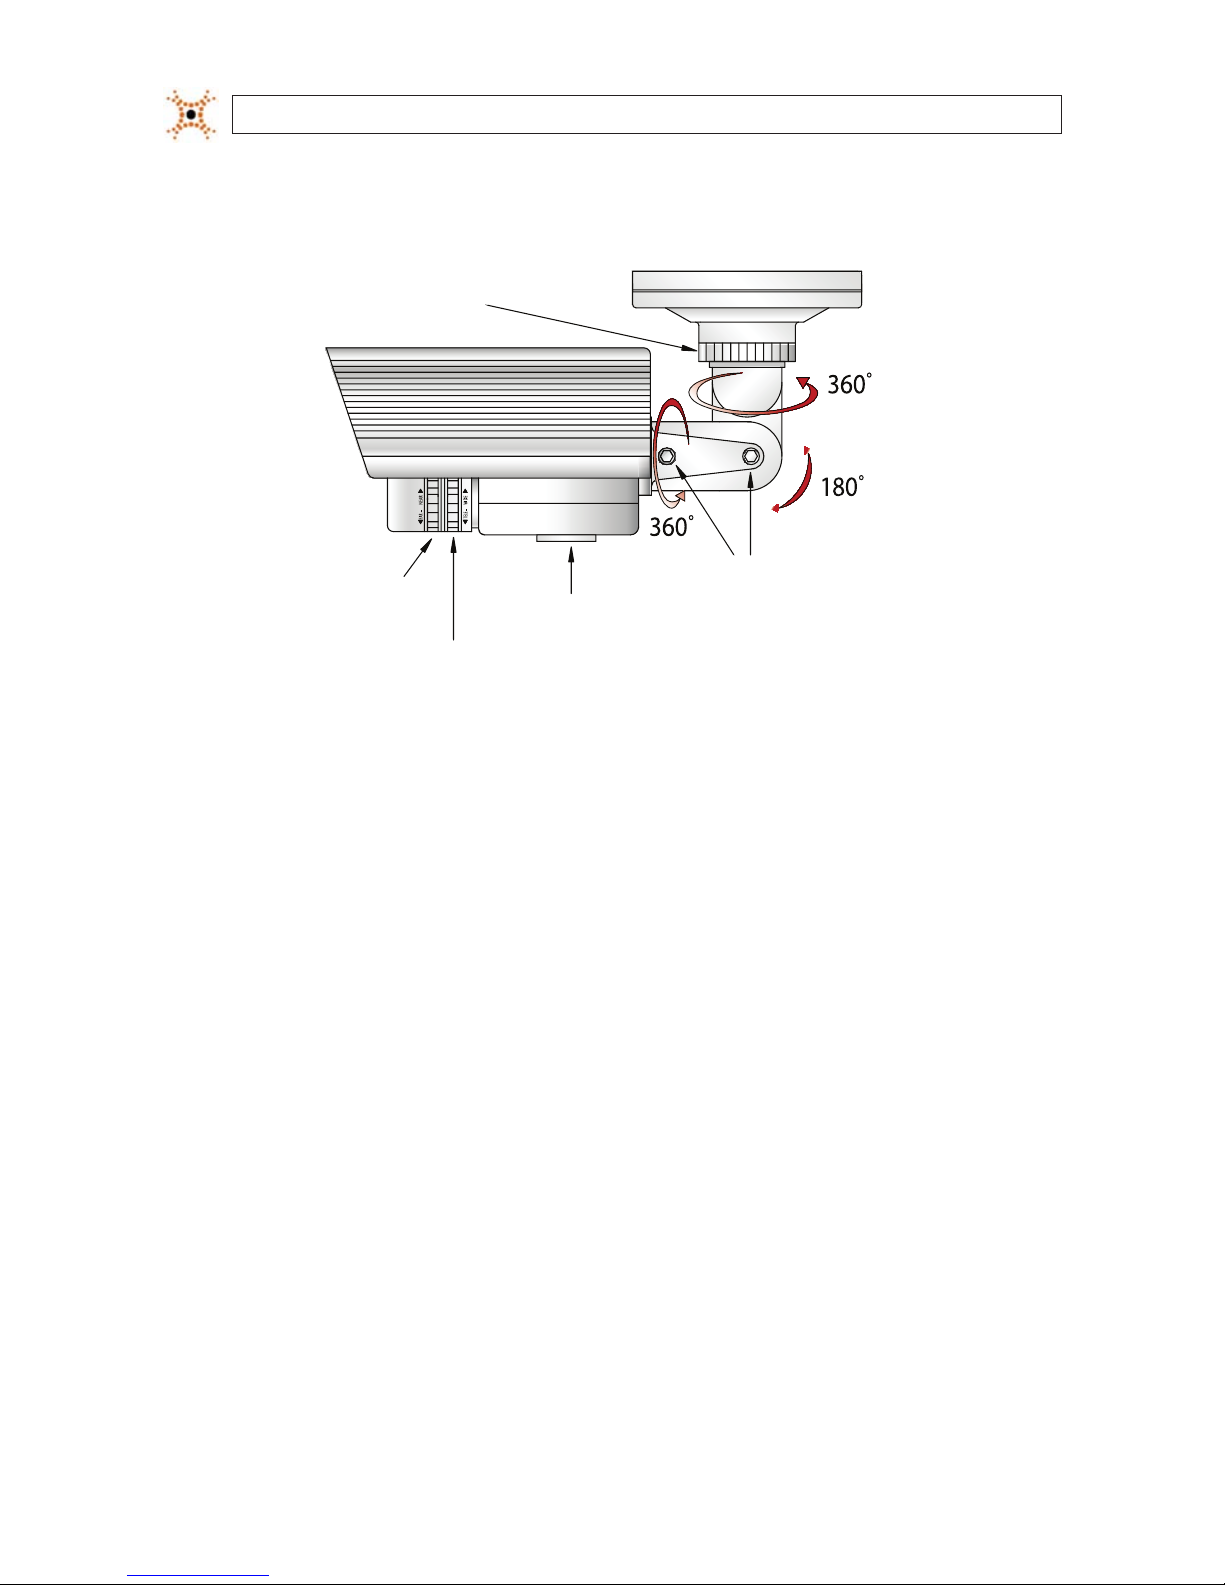
13. Point the camera at your surveillance target, then tighten the bracket ring and hex screws to lock the bracket in place.
Bracket Adjustment
Ring
Far - Near
Adjustment
Bracket Adjustment
Hex Screws
Tele - Wide
Adjustment
OSD Control
14. Rotate the Far - Near adjustment ring and the Tele - Wide adjustment ring to improve the image of the your
surveillance target.
15. Congure your camera using the software menus in the OSD. See Software Setup in the following section of this
manual.
2.3.1 LED LEVEL adjustment
The LED LEVEL for these cameras is preset at the factory. However, an adjustment screw is provided on the OSD panel of the BLKCPT237VH, BLK-CZT242VH and BLK-CZT243VH cameras for installations where the image brightness in dark conditions is still not
satisfactory after performing a Software Setup of the camera. The LED LEVEL for the BLK-CPT235VH camera is not adjustable.
To adjust the LED LEVEL (BLK-CPT237VH, BLK-CZT242VH and BLK-CZT243VH cameras only):
1. Operate the camera in a dark environment.
2. Unscrew the OSD panel access cover.
3. While observing the video image from the camera, use a screwdriver to turn the LED LEVEL screw to counter-clockwise to
brighten the image, and/or clockwise to darken the image until the image brightness is acceptable.
4. Reinstall the OSD panel access cover.
7High Performance IR CCTV Bullet Camera User Manual
SECTION 3: SOFTWARE SETUP
SECTION 3
Software Setup
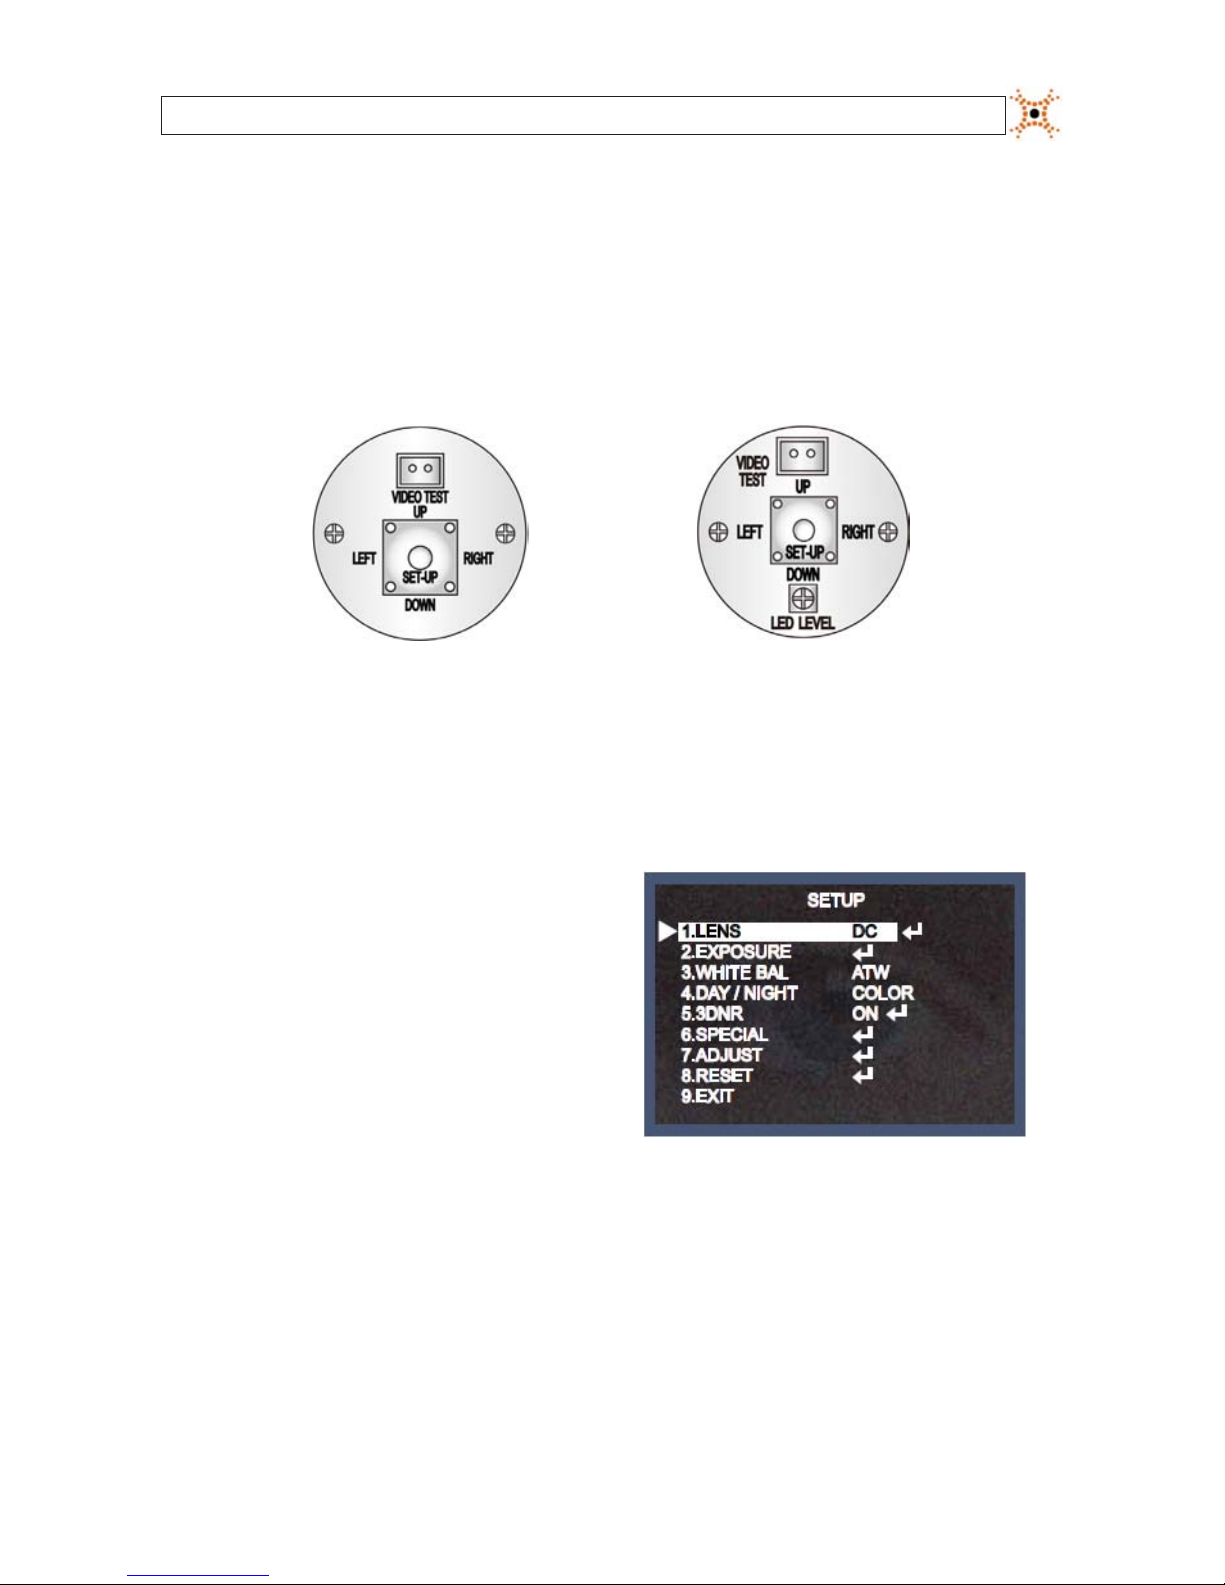
The OSD SETUP menu can be viewed from the camera video output or through the VIDEO TEST port under the OSD Control cover.
Conguration settings are made using the OSD control panel, located on the underside of the camera. Unscrew the cover to access
the controls. Depending on the model of your camera, the OSD control panel may appear as one of the following:
BLK-CPT235VH OSD Control Panel BLK-CPT237VH, BLK-CZT242VH,
BLK-CZT243VH OSD Control Panel
Use the SETUP joy stick on the OSD control panel to navigate through the menu system. Press the joy stick in (toward the camera) to
enter the SETUP menu or select an entry, rock the stick up or down to highlight an item in the list, and left or right display the option
you want to select.
The SETUP menu consists of a list of sub-menus or displays the
option selected for a camera function. When sub-menus are
available, the
symbol is shown.
3.1 LENS
To enter the LENS submenu, highlight LENS, then press the joy stick in. Image brightness can be adjusted in the LENS sub-menu.

8
www.digiop.com
SECTION 3: SOFTWARE SETUP
With the cursor pointing at the BRIGHTNESS option, rock the joystick left and right to change the setting.
To return to the SETUP menu, rock the joystick down to select RETURN, then press it in.
3.2 EXPOSURE
To enter the EXPOSURE submenu, highlight EXPOSURE, then press the joy stick in. The EXPOSURE sub-menu will open.
SHUTTER: This function is used to select automatic (AUTO) or manual shutter speed control. An FLK option is also provided to
reduce ickering caused by the frequency of electric lighting. If the FLK option is selected, the SENS-UP option is not available.
AGC (AUTO GAIN CONTROL): Higher gain increases brightness but also increases any noise.
OFF: Deactivates the AGC function
LOW: Sets automatic gain control to LOW.
MIDDLE: Sets automatic gain control to MIDDLE.
HIGH: Sets automatic gain control to HIGH
SENS - UP: At night and/or in dark conditions, the Sens-Up mode can be selected to desired value from x2 ~ x258.

9High Performance IR CCTV Bullet Camera User Manual
SECTION 3: SOFTWARE SETUP
NOTE
When SENS-UP is activated, the increased magnication can induce noise and pixelation.
RETURN: Select RET to save changes and return to the EXPOSURE menu, or END to close the SETUP menu.
BLC: Backlight control. This feature enables the camera to compensate for strong back light conditions.
OFF: The BLC function is disabled.
BLC: The BLC function is enabled. Use the sub-menu to setup options. When selected, an area of the image where BLC is
applied can be dened.
GAIN: Select LOW, MIDDLE, or HIGH. The current selection is applied to the image.
AREA: Select AREA to enter a graphical sub-menu for dening the position and size of the part of the image where
BLC is applied.

10
www.digiop.com
SECTION 3: SOFTWARE SETUP
— After selecting the AREA graphical submenu, a POSITION screen opens. Rock the joystick up, down, left and/or
right to position the upper-left corner of the BLC area, then push the joystick in to conrm your selection and
enter the SIZE graphical submenu.
— In the SIZE graphical submenu, rock the joystick up or down to raise or lower the bottom edge of the AREA.
Rock the joystick left and/or right to contract or expand the AREA horizontally.
— Press the joystick in twice to return to the BLC menu.
DEFAULT: Select DEFAULT to revert to the default AREA position and size.
RETURN: Select RET to return to the main menu, or END to close the SETUP menu.
HSBLC: The HSBLC function is enabled. This feature is especially eective for reading car license plates at the night.
HSBLC OFF HSBLC ON
Use the sub-menu to setup options. When selected, an area of the image where HSBLC is applied can be dened.

11High Performance IR CCTV Bullet Camera User Manual
SECTION 3: SOFTWARE SETUP
LEVEL: With the cursor pointing at LEVEL, rock the joystick right or left to increase or decrease the decrease the
HSBLC level.
AREA: Select AREA to enter a graphical sub-menu for dening the position and size of the part of the image where
BLC is applied. (See the SIZE and POSITION pictures above.)
— After selecting the AREA graphical submenu, a POSITION screen opens. Rock the joystick up, down, left and/or
right to position the upper-left corner of the HSBLC area, then push the joystick in to conrm your selection and
enter the SIZE graphical submenu.
— In the SIZE graphical submenu, rock the joystick up or down to raise or lower the bottom edge of the AREA.
Rock the joystick left and/or right to contract or expand the AREA horizontally.
— Press the joystick in twice to return to the HSBLC menu.
DEFAULT: Select DEFAULT to revert to the default AREA position and size.
RETURN: Select RET to return to the EXPOSURE menu, or END to close the SETUP menu.
D-WDR: The D-WDR feature employs intelligent light level control to compensate for strong backlight conditions.
DWDR OFF DWDR ON
Use the sub-menu to setup options.

12
www.digiop.com
SECTION 3: SOFTWARE SETUP
OFF: The D-WDR function is disabled.
INDOOR: The D-WDR is preset with default LOW-LEVEL and HIGH-LEVEL settings for normal indoor lighting condition.
These settings can be adjusted in the INDOOR sub-menu.
RETURN: Select RET to return to the EXPOSURE menu, or END to close the SETUP menu.
OUTDOOR: The D-WDR is preset with default LOW-LEVEL and HIGH-LEVEL settings for normal outdoor lighting
condition. These settings can be adjusted in the OUTDOOR sub-menu.
RETURN: Select RETURN to return to the EXPOSURE menu.
RETURN: In the EXPOSURE menu, select RET to return to the SETUP menu, or END to close the SETUP menu.
3.3 WHITE BAL
The WHITE BAL (white balance) function is used to control the on-screen colors.
ATW (Auto Tracking White Balance): Normal setting for a color temperature range from 1,800˚K to 10,500˚K (ex: a uorescent
lamp or outdoors).

13High Performance IR CCTV Bullet Camera User Manual
SECTION 3: SOFTWARE SETUP
AWB: The White Balance is automatically adjusted in a specic environment.
AWC g SET: With this setting, focus the camera on white paper, then press the joystick in to set the white balance to ambient
lighting conditions. If the environment and/or light source changes, the white balance should be re-adjusted.
MANUAL: This option is used to make ne adjustments to the white balance setting. To use this option:
— Set the white balance using ATW or AWC.
— Select MANUAL.
Rock the joystick right and/or left to Increase or decrease the value of BLUE (B-gain) or RED (R-gain) while monitoring
the color of the image.
RETURN: Select RET to return to the SETUP menu, or END to close the SETUP menu.
3.4 DAY/NIGHT
The DAY/NIGHT feature is used to congure the camera to provide images in color, black and white, or either depending on lighting
conditions.

14
www.digiop.com
SECTION 3: SOFTWARE SETUP
EXT: This EXT is selected, the DAY/NIGHT feature is not used.
B/W: The picture is displayed in black and white. When B/W is used, WHITE BAL is disabled. Selecting this option opens the B/W
sub-menu.
BURST: Burst ON sends a color signal to the monitor in B/W mode. This signal does degrade the clarity of the image from
the camera.
IR SMART: This option controls the IR LED output level to compensate for object distance. IR SMART is applied to objects
in a specied area of the image.
IR SMART OFF IR SMART ON
Selecting IR SMART ON opens the IR SMART sub-menu where you can set the IR gain and position and size of the target area.

15High Performance IR CCTV Bullet Camera User Manual
SECTION 3: SOFTWARE SETUP
GAIN: With the cursor pointing to GAIN, rock the joystick right or left to increase or decrease the IR level.
AREA: Select AREA to enter a graphical sub-menu for dening the position and size of the part of the image where
IR SMART is applied.
— In the POSITION window, rock the joystick up, down, left and/or right to position the upper-left corner of the IR
SMART area, then push the joystick in to conrm your selection and enter the SIZE graphical submenu.
— In the SIZE graphical submenu, rock the joystick up or down to raise or lower the bottom edge of the AREA.
Rock the joystick left and/or right to contract or expand the AREA horizontally.
— Press the joystick in twice to return to the IR SMART menu.
RETURN: Select RET to return to the B/W menu, or END to close the SETUP menu.
COLOR: The picture is displayed in color.
AUTO: In this mode, the camera automatically switches to COLOR in normal condition and to B/W mode when ambient
illumination is low. Selecting this option opens the AUTO sub-menu.
DELAY: This option species the switching time from color to B/W and B/W to color.
D g N (AGC): This option sets the AGC brightness when switching from day to night. The recommended setting is 170.

16
www.digiop.com
SECTION 3: SOFTWARE SETUP
N g D (AGC): This option sets the AGC brightness when switching from night to day. The recommended setting is 70.
RETURN: Select RET to return to the SETUP menu, or END to close the SETUP menu.
3.5 3DNR
The 3DNR feature is used to reduce the level of background noise in a low luminance environment.
OFF: Deactivates 3DNR noise reduction.
ON: Activates the noise reduction feature. Selecting this option opens the 3DNR sub-menu where the level of noise reduction can
be adjusted.
LEVEL: With the cursor pointed at the LEVEL, rock the joystick left or right to decrease or increase the level of noise
reduction.
RETURN: Select RET to return to the SETUP menu, or END to close the SETUP menu.
3.6 SPECIAL
Selecting SPECIAL opens a feature list of special camera functions.

17High Performance IR CCTV Bullet Camera User Manual
SECTION 3: SOFTWARE SETUP
CAM TITLE: This feature will display a user dened camera name on the image.
OFF: When OFF is selected, the camera title is not displayed.
ON: Selecting ON opens the CAMERA TITLE display where the title can be specied.
On the camera title screen:
— To enter a character in the title at the cursor position, rock the joystick up, down, left and right to highlight a character
(0 - 9, A - Z, u - .), then press the joystick in to select it and move to the next character position.
— To move to a character position in the title, highlight f or g (to move left or right), then press the joystick in.
— To clear all entries in the title, highlight CLR then press the joystick in.
— To position the title on the image, highlight POS, press the joystick in, rock the joystick up, down, left or right to move
the title to the position you prefer, then press the joystick in to select it.
— To return to the SPECIAL sub-menu, highlight END, then press the joystick in.
D-EFFECT: Allows you to apply a digital eect to the image, such as freezing the image, mirroring it, etc.
FREEZE: When switched ON, this option locks the current image on the screen.
MIRROR: When switched on, this option causes the image to be reversed horizontally.

18
www.digiop.com
SECTION 3: SOFTWARE SETUP
MIRROR OFF MIRROR ON
D-ZOOM: D-ZOOM allows you to zoom in on a portion of the image by rst setting the digital zoom in factor, and then
using the PAN and TILT controls to move to the area of the image you want to see.
To use the D-ZOOM feature:
— Move the cursor to point at D-ZOOM, then rock the joystick right to set the D-ZOOM to a number greater than 1.
— Similarly, adjust the PAN and TILT options to move to the portion of the image you want to zoom in on.
— RETURN: Select RETURN to return to the D-EFFECT menu.
NEG. IMAGE: Set this option to ON to show a color-reversed or black and white-reversed image.(available on some
models).
RETURN: On the D-EFFECT menu, select RET to return to the SPECIAL menu, or END to close the SETUP menu.
MOTION: The MOTION feature allows you to quickly identify areas of the image where motion is detected. Set MOTION to ON to
open the MOTION sub-menu.

19High Performance IR CCTV Bullet Camera User Manual
SECTION 3: SOFTWARE SETUP
AREA SELECT: You can congure up to four motion detect areas on the image. Each motion detect areas can be
individually positioned and sized:
— Move the cursor to AREA SELECT, then rock the joystick right or left to select AREA1, AREA2, AREA3, or AREA4.
— Move the cursor to AREA DISPLAY, then rock the joystick right or left to select ON to congure that area, or OFF to
disable that area, then push the joystick in to conrm your selection. If ON is selected, the POSITION display will open:
— In the POSITION display, rock the joystick left, right, up and/or down to move the block (detection area) to the
region of the display you want to monitor, then press the joystick in to select that position.
— In the SIZE display, rock the joystick right or left to expand or contract the area horizontally. Rock the joystick
down or up to expand or contract the area vertically. Press the joystick in twice to return to the MOTION
submenu.
— Move the cursor to SENSITIVITY, then rock the joystick left or right to adjust the motion detection sensitivity for
objects in you want the camera to detect in that area.
Repeat this procedure to congure or disable the other motion detection zones.
MOTION VIEW: This feature is used to highlight objects found moving in motion detection areas.
— OFF. When set to OFF and motion is detected in any motion detection area, the message “MOTION” appears on
the camera image.
— ON: When motion is detected, objects moving in the motion detection areas are highlighted, and the message
“MOTION” appears on the camera image.
RETURN: On the D-EFFECT menu, select RET to return to the SPECIAL menu, or END to close the SETUP menu.
PRIVACY: The PRIVACY feature allows you to block areas of the image from being displayed. Set PRIVACY to ON to open the
PRIVACY sub-menu.

20
www.digiop.com
SECTION 3: SOFTWARE SETUP
AREA SELECT: Eight (8) rectangular privacy areas can be setup on the image. These 8 areas can be positioned
anywhere on image, are color coded, and can be individually enabled or disabled. To setup a privacy area:
— Set the cursor on AREA SELECT, then rock the joystick right or left to select any area,
AREA1 .. AREA8.
— Set the cursor on AREA DISPLAY and rock the cursor to ON to use the area, or OFF to disable it. If set to ON, press the
joystick in to position and re-size the privacy area:
— In the POSITION display, rock the joystick up, down, left or right to move the rectangle to the area you want to
block, then press the joystick in to select it.
— In the SIZE display, rock the joystick up or down to shorten or lengthen the height of the rectangle, or left or
right to widen or shorten the width of the rectangle. Press the joystick in twice to return to the privacy display.
— If using the area, move the cursor to COLOR, and rock the joystick left or right to select one of 16 colors for the
rectangle.
— Repeat this procedure for each of the 8 areas.
RETURN: After all 8 areas are congured, select RET to return to the SPECIAL menu, or END to close the SETUP menu.
DEFECT: This feature is used to eliminate up to 128 white spots (defects) in the image. Selecting DEFECT opens the DEFECT
sub-menu.

21High Performance IR CCTV Bullet Camera User Manual
SECTION 3: SOFTWARE SETUP
SENSE-UP: Use this option to set the sensitivity for nding defects. Setting this level to x64 or x32 produces the best
results.
DIFF: Use this option to set the defect size from 1 to 6.
START: Selecting START initiates defect repair processing. Follow the instructions on the image to complete the operation.
RETURN: Select RET to return to the SPECIAL menu, or END to close the SETUP menu.
3.7 Adjust
Use the adjust feature for perfecting the image from your camera.
SHARPNESS: With the cursor pointing at SHARPNESS, rock the joystick right or left as necessary to produce the clearest image
from your camera.
MONITOR: The monitor feature enables you to setup your camera to produce the best image for the monitor you use. Rock
the joystick left or right to select either LCD, CRT or USER. In the monitor type sub-menu, adjust the settings for each parameter to
produce the preferred image.

22
www.digiop.com
SECTION 3: SOFTWARE SETUP
RETURN: Rock the joystick to select RET, to return to the SETUP menu, or END, to close the menu system.
RETURN: In the ADJUST menu, select RET to return to the SETUP menu, or END to close the SETUP menu.
3.8 RESET
Use RESET to revert the camera conguration settings to the factory default values.
FACTORY: Select FACTORY to reset the camera conguration.
RETURN: Rock the joystick to select RET, to return to the SETUP menu, or END, to close the menu system.
3.9 EXIT
Select EXIT to close the SETUP menu.

23High Performance IR CCTV Bullet Camera User Manual
SECTION 3: SOFTWARE SETUP

24
www.digiop.com
SECTION 4: CLEANING
SECTION 4
Cleaning
Clean the camera dome with an approved glass cleaning solution and a lint free cloth.
• Dust can be removed from the unit by wiping it with a soft damp cloth. To remove stains, gently rub the surface with a soft
cloth moistened with a mild detergent solution, then rinse and dry it with a soft cloth.
• Remove all foreign particles, such as plastic or rubber materials, attached to the camera housing. These may cause damage to
the surface over time.
CAUTION
Do not use benzene, thinner or other chemical products on the camera assembly; these may dissolve the paint and
promote damage of the surfaces. Before using any chemical product, read the accompanying instructions carefully.

25High Performance IR CCTV Bullet Camera User Manual
SECTION 5: SPECIFICATIONS
SECTION 5
Specications
Table 1. Component Specications
Compo nent BLK-CPT235VH
BLK-CPT237VH/
BLK-CZ T242VH
BLK-CZ T243VH
Sensor 1/3” SONY Super HAD CCD
Total Pixels 811(H) * 508(V)
Eec tive Pixels 768(H) * 494(V)
Scanning System 2:1 interlace
Synchro nization Internal
OSD Available
Backlight OFF / HSBLC / BLC selectable
Resolution 600 T V Lines (Color), 650TV Lines (B/W)
S/N (Y signal) 52dB (AGC O, weight on)
Min. Illumination 0 Lux (IR LED ON)
White Balance
ATW / AWB / Manual / AWC g SET
Elec tronic Shut ter Speed AUTO (1/50 sec, 1/60 se c ~ 1/120,000 sec)
Sense -Up O / Auto (selectable limit *2 ~ *258x)
Gain Cont rol High, Mid dle, Low, O selec table
3 DNR O/On (1~50 level adjustable)
D-WDR Indoor / Outdoor / O
Motion Detecti on On / O (4 zone s, alarm outpu t)
Privacy On / O (8 zones)
Mirror O / On
Freeze On / O
Sharpn ess 0~31’(level adjust able)
D&N Selection Color /BW/ Auto
Digital Zoom On (*32) / O
Blemish Compensation 256 point (even 128 point, odd 128 point)
Power Dual voltage: AC 24V or DC 12V
Power Consumption CDS ON: 350 mA max CDS ON: 850 mA max CDS ON: 1,300 mA max
Lens
DC Auto Ir is Varifocal Lens (2.8mm12mm)
DC Auto Ir is Varifocal Lens (2.8mm12mm / 6mm-50 mm)
DC Auto Ir is Varifocal Lens (5mm50mm)

26
www.digiop.com
SECTION 5: SPECIFICATIONS
Compo nent BLK-CPT235VH
BLK-CPT237VH/
BLK-CZ T242VH
BLK-CZ T243VH
Operating Temperature/
Humidity
-4˚F ~ 140 ˚F (-20˚C ~ +60˚C). RH 95% Max.
Storage Temperature/Humidity -4˚F ~ 140 ˚F (-20˚C ~ +60˚C). RH 95% Max.
Dimension 2.68” ( W) * 3.82” (H) * 9.45” (D) 3.46” (W) * 4. 53” (H) * 9.65” (D) 3.54” (W ) * 5.28” (H) * 11.42” (D)
Weight 1.76 lbs 3.53 lbs 4.85 lbs

27High Performance IR CCTV Bullet Camera User Manual
APPENDIX A: TROUBLESHOOTING
APPENDIX A
Troubleshooting
Problem Possible Cause
Nothin g appears on the s creen - Check the power connection.
- Check the video signal cable connection to the monitor.
The video image is dim or not clear. - If the camera lens is dir ty, clean it with a soft, clean cloth.
- Adjust t he monitor cont rols, if neces sary.
- If the camera is facing a very str ong light, change the camera p osition..
- Adjust t he lens focus.
The screen is dark. - Adjust t he contrast control of the monitor.
- If you have an intermediate device, set the impedance (75Ω /Hi-Z) properly, and chec k the cable connections.
The camera is not work ing properly and the
surf ace of the camer a is hot.
- Verif y that the camer a is correct ly connecte d to an appropriate regulated p ower source.
The MOTION DETECTION func tion is not work ing - Is “MOTION DETECTI ON” mode turned on?
- Check the setting of the MD AREA.
The imag e on the monitor ickers - Make sure t hat the camera isn’t facing dir ect sunlight o r uorescent light. If necessary,change the camera
posit ion.
Colors are not quite right. - Check the set tings in the WHITE BAL menu.
The SENS -UP does not work. - Verif y that the AGC set ting in the EX POSURE menu isn’t s et to OFF.
- Check the SHUTTER setting in the EXPOSURE menu.

28
www.digiop.com
APPENDIX B: CAMERA DIMENSIONS
APPENDIX B
Camera Dimensions
BLK-CPT235VH
360°
180°
360°
9.45”
3.82”
2.68”

29High Performance IR CCTV Bullet Camera User Manual
APPENDIX B: CAMERA DIMENSIONS
BLK-CPT237VH and BLK-CZT242VH
360°
180°
360°
3.46”
4.53”
9.65”

30
www.digiop.com
APPENDIX B: CAMERA DIMENSIONS
BLK-CZT243VH
360°
180°
360°
11.42”
7.40”
2.68”
6.30”
3.94”
5.28”
3.82”
3.46”
 Loading...