

Observint Technologies BLK-CDS205NS Quick Installation Manual

1 BLK-CDS205NS_CQ
11/20/12
3. If the lens assembl y has an auto-iris feature, plug the lens c able to the lens connector on the bac k
of the camera.
Installing the came ra
1.
Install the came ra mounting bracket using the inst ructions provided wit h the bracket.
2. Attach the cam era to the mounting bracket.
3. Route a video/power ex tension cable betwe en the camera and a video monitor and po wer
source.
4.
Apply power to the cam era. NOTE: When connecting 12 Vdc power, observe the p olarity marked
on the power input conn ector.
5. While observ ing video from the camera on t he monitor, aim the camera at your surveillance
target.
6. Adjust the lens fo cus and zoom if controls are provided. If y ou installed a xed lens to the camera,
you can adjust the f ocus by:
a. Loosing th e set screw on the side of the camera (se e photo above).
b. Slowly rotate the mountin g ring until the best focus is a chieved.
c. T ighten the set screw.
OSD Camera Me nu
The OSD (On Screen Display) came ra menu appears over the video image f rom the camera. It is
controlled by the joy stick on the back panel of the cam era.
UP
LEFT
DOWN
Press in to
“Enter”
RIGHT
In general, the joys tick can rock up or down to move the curs or between parameter s in the OSD menu
list, or lef t or right to change the selecte d parameter value. Press the joys tick in (toward the camera) to
open a submenu or st art an operation.
To use the OSD conguration menu s, connect a video monitor to the c amera, then press the joystic k
in (“Enter”). The CAME RA MENU will open. The OSD CAMER A MENU provides links to submenus.
Submenu links are indic ated by the 8 icon at the end of the line. Selec ting the 8 icon parameter on
submenus and press ing the joystick in (“Enter”) re turns to the previous menu.
OSD Menus
• LENS: Select Manual, Vide o or DC (default).
• EXPOSURE
— Shutter : You can set the shut ter to auto or manual
mode: Options are: Au to, 1/60, FLK, 1/250, 1/500,
1/1000, 1/2000, 1/4000, 1/5000, 1/10,000 and
1/100,000
— Brightne ss: You can adjust brig htness level 0
(dark) to 255 (bright)
— AGC: You can select auto gain le vel. O / Low /
Middle/High
— DWDR: The DWDR feature empl oys intelligent light
level control to compen sate for strong backlight
conditions. DWDR : OFF / ON
• White Balanc e: You can choose f rom one of the
following mode s. ATW1 / ATW2 / AWC SET / MANUAL
(INDOOR / OUTDO OR / MANUAL)
— ATW1: Automatically adjusts colo r for the available
lighting temperatu re range: 2500 °K to 9500 K.
— ATW2: Automatically adjus ts color for the available
lighting temperatu re range: 2300 K to 10000 K.
BLK-CDS205NS 600 TVL DWDR
CS Mount Camera
Quick Installation Guide
This document guid es you through the basic steps to ins tall your BLK-CDS205NS camera. The camera
is designed fo r CS type lenses, and C-type lenses wit h an adapter. The lens is not includ ed The camera
features:
• Ultra-comp act box size with CS mounting
• 1/3” Sony® SuperHAD II CCD
• Resolution > 6 00 TVL
• Sensitivit y 0.1 lux (F1.2, 50 IRE, 30 fps)
• Adaptive 2D digital nois e reduction
• Programmable OSD
BLK-CDS205NS camera with lens (lens not included)
Precaut ions
• Please read this manual car efully before installing the c amera.
• Precision compo nents are contained in this camera. Avoid s trong shocks or vibratio ns during
installation and mainte nance. Do not connect the power until you have co mpleted the installation.
• Obey all local ele ctrical wiring regulatio ns when using this unit.
• Do not use abrasive o r corrosive materials for cleaning. Use only a s oft cloth for cleaning.
• To prevent damage to the lens and sens or, do not point the camer a directly into the sun or toward
a strong light sou rce.
• Operate the cam era only within the recommended temp erature and humidity ranges.
• Ensure that the power s upply meets the current re quirements of the camera and that the su pply
voltage is inside th e tolerances of the camera.
• Ensure that the moun ting hardware is adequate to suppor t the weight of camera and lens.
• Do not dismantle or ser vice the camera. Refer it to quali ed service personnel f or repair.
Connec tions
All connectio ns to the camera are make at the back panel.
y
Video out conn ector (75Ω BNC): Connect
to a monitor, DVR, etc.
IRIS: Lens connector f or auto-Iris lens.
Joystick : Used for conguring OSD menus
Power input: 12 Vdc or 24 Vac.
y LED power indic ator: Illuminated when
power is applied.
Attachi ng the lens
1.
Remove the protec tive cap covering the camera image se nsor.
2. Attach the lens a ssembly to the camera by screwing it c lockwise onto the camera mo unting ring
until it is fully seate d.
Camera Bo dy
Mounting Ring
Lens
Set Screw
Connecto r for CS bracket (top and bot tom)
2 © 2012 Observint Technolo gies, Inc. All rights re served.
WHITE BALANCE (continued)
— AWC SET: It is a xed white balance mode that may be au tomatically readjusted only by
pressing SET Bu tton in
— OUTDOOR: Se t color temperature for Outdoor light (54 00 K)
— INDOOR: Set colo r temperature for Indoor light (3200 K)
— MANUAL: Color can be cor rected when the user increas es or decreases red gain or blue gain.
— RED GAIN: Adjust red gain valu e 0 ~ 255
— BLUE GAIN: Adjust blue gain value 0 ~ 2 55
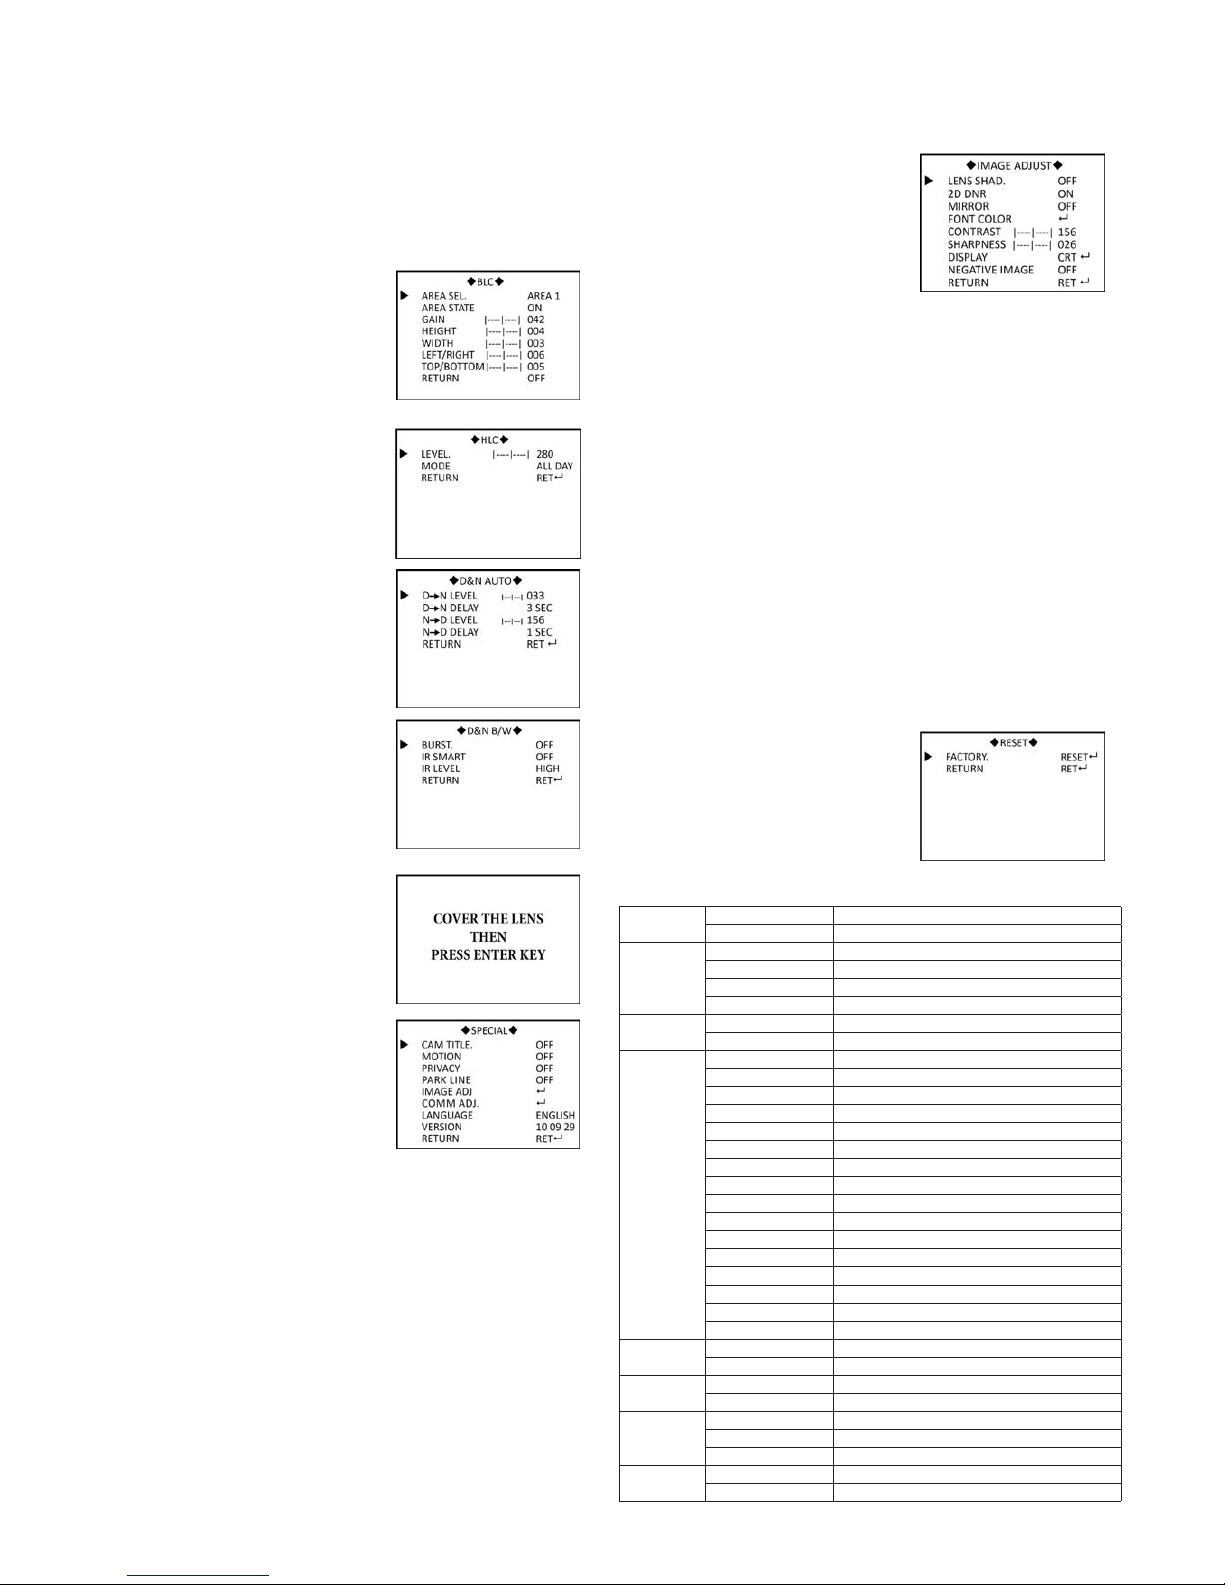
• BACKLIGHT: Select OFF, BLC, HLC.
BLC mode:
— AREA SEL: Selec t AREA1, AREA2
— AREA STATE: Select OFF / ON
— GAIN: Select 0 ~ 2 55 steps
— HEIGHT: Select 0 ~ 15 steps
— WIDTH: Select 0 ~ 15 steps
— LEFT/RIGHT: Select 0 ~ 15 steps
— TOP/BOTTOM: Select 0 ~ 15 step s
HLC: High Light Compens ation.
— Level: 0-255 steps.
— Mode: All Day, Night Only
• Day& Night Level: Selec t AUTO / COLOR / B/W /
D&N AUTO mode:
— D -> N LEVEL: 0 ~ 255 steps
— D -> N DELAY: 1 ~ 30 SEC
— N -> D LEVEL: 0 ~ 255 steps
— N -> D DELAY: 1 ~ 30 SEC
Color: D&N color m ode only
D&N B/W mode:
— BURST: OFF / ON
— IR SMART: OFF / ON. This option cont rols the
IR LED output leve l to compensate for object
distance. The IR smar t options is used for objec ts
in an area of the image
— IR LEVEL: HIGH / LOW
• DPC (Dead Pixel Compens ation): When used, th e
camera will remove def ective pixels from an image.
• SPECIAL
— CAM TITLE: Sele ct camera title menu (text e dit).
— MOTION: Selec t camera title menu (text edit)
» AREA SEL: Selec t AREA1, AREA2, AREA3,
AREA4
» AREA STATE: Select OFF / ON
» HEIGHT: Select 0 ~ 15 steps
» WIDTH: Select 0 ~ 15 steps
» LEFT/RIGHT: Select 0 ~ 15 steps
» TOP/BOTTOM: Select 0 ~ 15 step s
» DEGREE: Selec t 0 ~ 255 steps
» VIEW: OFF / ON
— PRIVACY: You can cover an area of the screen.
» AREA SEL: Selec t AREA1, AREA2, AREA3, ARE A4
» HEIGHT: Select 0 ~ 255 steps
» WIDTH: Select 0 ~ 2 55 steps
» LEFT/RIGHT: Select 0 ~ 255 steps
» TOP/BOTTOM: Select 0 ~ 2 55 steps
» COLOR: Selec t 0 ~ 15 steps
— PARKLINE: You can insert a line on the s creen.
» LT: You can adjust the top lef t area on screen. (0 ~ 195 steps)
» LB: You can adjust the botto m left area on screen. (0 ~ 194 steps)
» RT: You can adjust the top right area on scre en. (0 ~ 194 steps)
» RB: You can adjust the botto m right area on screen. (0 ~ 194 steps)
» F: You can adjust the front area o n screen. (0 ~ 68 steps)
» N: You can adjust the near area on scr een. (0 ~ 68 steps)
» T: You can adjust t he parking line thickness. (0 ~ 15 steps)
— IMAGE ADJUST: You can adjust camera image.
» 2DNR: (on-screen Digi tal Noise Reduction)
(OFF/ON)
» MIRROR: (reverse cam era image horizontally)
(OFF/ON)
» FONT COLOR:
FONT: 16 colors (O ~ 15 steps)
ID & TITLE: O ~ 15 steps
» CONTRAST: You can adjust contras t on screen. (0 ~ 255 steps)
» SHARPNESS: You can adjust camera ima ge for clarity. (0 ~ 31 steps)
» DISPLAY: You can adjust camera outp ut for the display type. (CRT / LCD / USER)
CRT (cathode ray tube).
PED LEVEL: 0 ~ 63 steps
COLOR GAIN: 0 ~ 255 steps
LCD (liquid crys tal display)
GAMMA: 0.05 ~ 1.00 steps
PED LEVEL: 0 ~ 63 steps
COLOR GAIN: 0 ~ 255 steps
USER
GAMMA: 0.05 ~ 1.00 steps
PED LEVEL: 0 ~ 63 steps
COLOR GAIN: 0 ~ 255 steps
» NEG.IMAGE: You can invert a colo r image, or a black and white image. (OFF/ON)
— LANGUAGE: Selec t language. (ENGLISH / CHINESE)
— VERSION: Factor y version number.
• RESET: Set the camera opt ions to the factory def ault
setting s.
Specic ations
CCD Sensor 1/3” Sony Super H AD II CCD
Eect ive Pixels 768 x 494
Perfo rmance Resolu tion > 620 TVL
Sensit ivity 0.1 lux (Colo r), 50 IRE
S/N Ratio 52 dB
Day / Night Soft ware Control led
Lens Type DC / manual
Mount CS (C with a daptor)
Functi ons OSD English / Chi nese
Shutte r 1/60~1/120,000
Flicker less
On / O
Wide Ex tended Ran ge O / Low / Medium / High
AGC Adjust able
Elect ronic shut ter
O/On 1/200,0 00 second ma ximum
Sync Int ernal
Camera I D Number
O / On 1 .. 255
Camera N ame O / On, 8 alphanu meric charac ters
White Ba lance ATW / push / manua l
2D Adapti ve DNR O / Low / Midd le / High
Gamma 0.45 / 0.7 / 1.0
Chroma G ain Adjusta ble
Motion D etection
4 areas, O / O n, Position and Se nsitivit y adjustable
Privac y masking 4 areas, O / O n, Color and Positi on adjustabl e
Image fu nctions Sharpne ss, Mirror
Input / ou tput Video O utput CV BS 1.0 Vp-p, 75 Ω
Progra mming Inter face Joyst ick
Power Power Supp ly
12 Vdc -10 % to +15 %, 24 Vac ± 20 %
Power Cons umption 2.1 W maximum
Physic al Dimens ions (l x w x h) 2.87” x 1.57” x 1.5 7” (73 mm x 40 mm x 40 mm)
Weight 7.76 oz (220 g)
Mounti ng 2 x ¼” BSW
Enviro nmental
Operat ing Temp 14 °F ~ 122 °F (-10 °C ~ 50 °C)
Operat ing Humidi ty < 90 % non-cond ensing
 Loading...