

Page 1
Content is subject to change without notice.
User can download latest Manual Book on www.remo-ai.com
OBSBOT Tail
User Manual
Page 2
Reading Guide
Note
Important consideration
Recommendation
REMO TECH provides a series of tutorial videos and the following
documentation for our Tail users: Inventory,User Manual,Getting Started.
We recommend that users watch instructional videos and read Getting
Started first to understand the usage process. Please download User
Manual from our official website: www. remo-ai.com.
Tutorial Video
User could access and watch tutorial videos through the following links
to use the product correctly and safely.http://www.remo-ai.com/...
Obsbot Studio App
User needs to download and install Obsbot Studio App to operate
OBSBOT Tail.iOS users can download and install "Obsbot Studio" from
App Store.Android users can download and install “Obsbot Studio”from
Google Playstore.
Obsbot Studio App - Compatibility: iOS 9.0 or later /
Obsbot Studio
Android 6.0 or later.
01
Page 3

Contents
Reading Guide
1. OBSBOT Tail
Overview
2. Smart Battery
3. Gimbal & Camera
Note
Recommendation
Tutorial Video
Obsbot Studio App
1.1 About Tail
1.2 Parts Info
2.1 Battery Overview
2.2 Battery Specification
2.3 Charging Instructions
2.4 Battery Indicator
2.5 Check Battery
2.6 Battery Safety Instructions
3.1 About Gimbal & Camera
3.2 Camera Indicators
3.3 Buzzer
01
01
01
01
04
04
05
05
06
06
07
07
08
08
09
5. Use Tail
6. Firmware upgrade
7. Appendix
5.1 Turn on/off Tail
5.2 Connect App
5.3 Power Gesture
5.4 Target Selection
5.5 Shooting Mode
5.6 Launchpad
5.7 Manual Control
5.8 Post-editing
6.1 Firmware Upgrade Overview
6.2 Using Obsbot Studio App to Upgrade
6.3 Using SD Card to Upgrade
7.1 Maintenance and Care
7.2 Application Scope Instruction
7.3 Specification
7.4 Common Problems and Solutions
7.5 Disclaimer and Warning
7.6 Three Guarantees
12
12
13
13
13
15
17
17
17
17
18
18
18
19
21
22
22
4. Obsbot Studio App
02 03
4.1 About
4.2 Installation
4.3 App Homepage
4.4 App & Camera
10
10
10
11
Page 4
1. OBSBOT Tail Overview
05
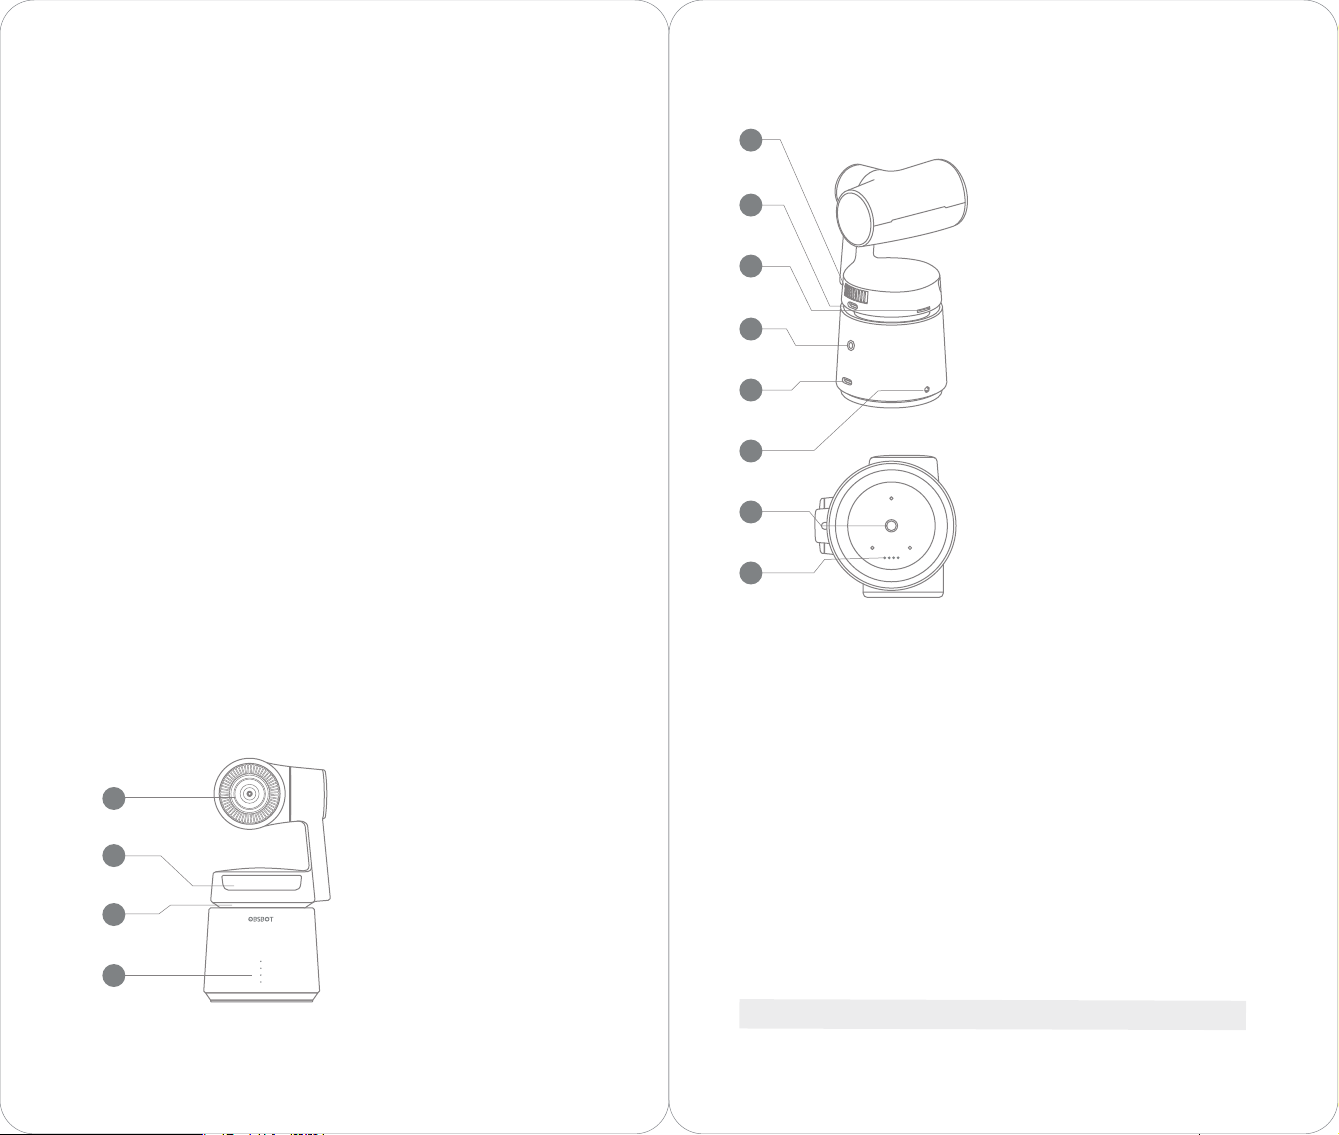
Cooling Outlet
1.1 About Tail
Tail is the first in class artificial intelligence camera developed and designed by REMO
TECH. Combining artificial intelligence, motion control and professional imaging
technologies, Tail can independently take videos and photos, bringing powerful
functions and new experience to filmmakers.
Tail is equipped with an AI core processor with powerful computing performance. By
combining numerous AI algorithms, Tail adapts to various complex environments
and completes a series of professional video and photography operations, such as
intelligent tracking, single-target/multi-target intelligent composition, automatic
zoom, intelligent lens motion, and intelligent photo capture. Tail is equipped with a
high-precision three-axis gimbal, which can shoot lockfree 360 degree horizontally.
Tail is equipped with a professional wide-angle zoom lens system, which is composed
of 10 ultra-clear optical lenses, supporting 3.5x optical zoom and 10x hybrid zoom,
which can steadily shoot 4K 60FPS UHD videos and 12 megapixel photos. Video
supports 16:9 and 9:16, photos support 16:9, 4:3, 1:1 ratio of horizontal and vertical
shooting modes, and can achieve creative time-lapse photography , slow motion and
other video creative shooting functions.
Through built-in Wi-Fi connection with Obsbot Studio App, users can view real-time
high-definition videos on their mobile devices. You can use the App to control the
shooting as you like, and use the gestures to unlock more creative shooting methods
easily. The professional post editing function of the App can make your work
distinctive with only a few simple steps. At the same time, Tail also provides an
Eco-system of accessories to meet the needs of different users in different scenes.
1.2 Parts Info
06
07
08
09
10
11
12
2. Smart Battery
Type-C Data Port
Micro SD Slot
Power/Status Button
Type-C Charging Port
Microphone Jack
UNC 1/4-20
Electrical Contact Interface
01
Lens
2.1 Battery Overview
Camera Indicator
Cooling Intake
Battery Indicator
The smart battery independently developed by REMO TECH powers the Tail, with
multiple protection and accurate intelligent power calculation functions. The battery
capacity is 1,850 mAh and the battery operating time is up to 120.
2.2 Battery Specification
Model
OBS-LI-TWS-0001
02
03
04
04 05
Page 5
Type
Capacity
Energy
Voltage
Charging Temperature
Operating Temperature
LiPo
1850 mAh
20.54 Wh
11.1 V
0°- 40°
0°-40°
2.3 Charging Instructions
Use the Type-C Charging cable to connect the camera
to an adapter or power bank, and ensure a good
connection. Refer to the Battery Indicator section for
more information about charging statuses.
The camera will be fully charged after about 90
minutes (when using the included adapter) and the
indicator will turn steady blue.
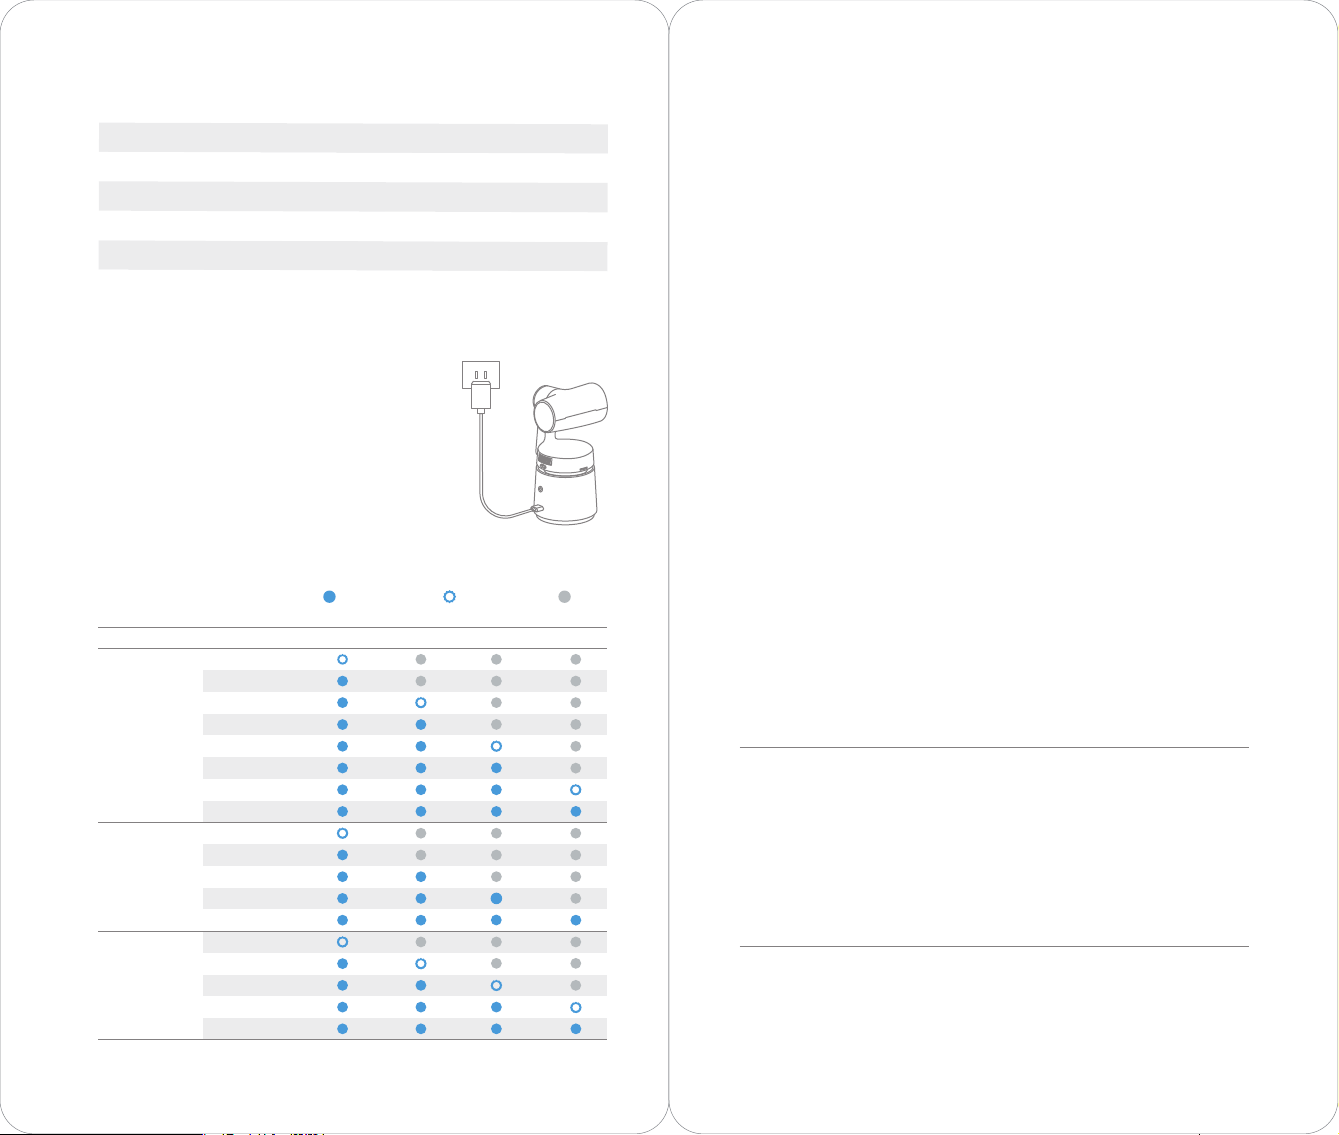
2.4 Battery Indicator
CapacityType
0% — 10%
11% — 25%
Battery
Detection
Upon
Pressing
the Power
Button
Discharging
Charging
26% — 30%
31% — 45%
46% — 60%
61% — 75%
76% — 95%
96% — 100%
0% — 10%
11% — 25%
26% — 45%
46% — 75%
76% — 100%
0% — 25%
26% — 45%
46% — 75%
76% — 95%
96% — 100%
Flashing blue Steady blue OFF
LED 1 LED 2
LED 3
LED 4
2.5 Check Battery
Before starting, press the power button to judge the current battery power status
through the battery indicator light;
After connecting the App, you can check the percentage of remaining power through
the App interface.
2.6 Battery Safety Instructions
Charge over-current protection:
When the gap in charge and discharge current is too large, the battery automatically
cuts off the input or output;
Discharge under voltage protection:
Excessive discharge can seriously damage the battery, when the battery voltage is too
low, the battery will cut off the output;
Overvoltage protection:
Overcharging can seriously damage the battery, when the battery charging voltage is
too high, the battery will stop charging;
Short circuit protection function:
In the case of short circuit detected by the battery, the battery will cut off the output
for safety;
Temperature protection function:
The smart battery will stop charging when it exceeds the charging temperature
range; Ideal charging environment temperature is 0℃ to 40℃; When the discharge
temperature is too high, the battery will cut off the output for safety of device;
Power calculation function:
The percentage of power can be seen through the battery indicator or Obsbot Studio
App.
1. In order to protect the smart battery and prevent over discharge, the battery
remains in a low-power state before leaving the factory. While using Tail for the first
time, the Type C cable must be used for charging to activate the device.
2. If no QC quick charger is used to charge Tail, after Tail is turned off, it must wait for
the Tail to be turned on normally before it is ready to be used.
3. The charger below 5V/2A cannot charge the equipment and may cause irreversible
damage to the battery of the equipment.
4. Please read carefully and strictly follow the requirements in the user manual of
OBSBOT Tail before using it.
06 07
Page 6
3. Gimbal & Camera
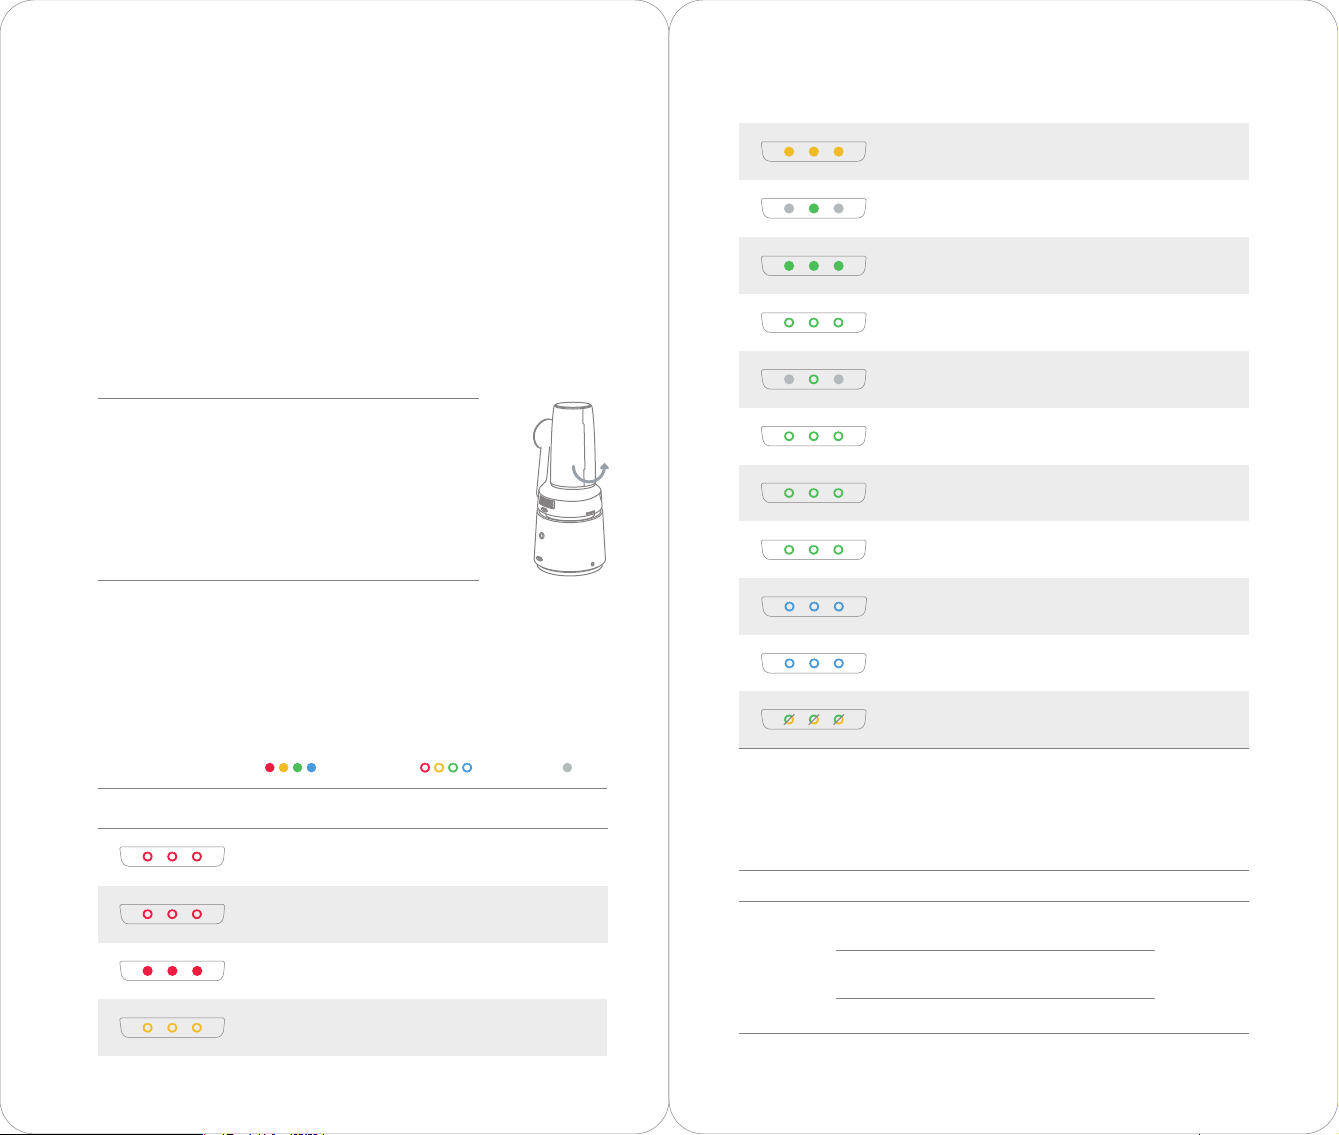
All 3 bars on steady yellow indicates a notification, such
as lens still locked indicates target loss and the camera
is in setting status.
3.1 About Gimbal & Camera
OBSBOT Tail adopts a 3-axis gimbal with precise control technology on
high-efficiency brushless motor and advanced algorithm to remove the jitter in
movements. The lens protection is enhanced under the independent lens locking
structure. The lens is locked when it is vertically down (as shown below). It can be
unlocked by gently rotating towards the indicators.Regulations when trying to move
the lens: (1). Please don’t unlock it reversely. (2). Please don’t shake the camera when
the lens is unlocked. (3). When carrying the camera, please make sure that the lens is
locked, and the product should be better packed inside the standard leather box for
transporting.
1. The lens can be unlocked before or after the start-up. It is
suggested that the lens should be unlocked before the start-up.
2. If the lens is locked when the camera is turned on, buzzer
from the camera will send out a "beep-beep-beep-beep......"
sound, the indicators will slowly blink giving red light.
Meanwhile, modules except the lens will still work normally.
3. If the lens is unlocked after booting, it needs to be rotated
slightly by hand. Lens will be working when the camera passes
the internal checking.
3.2 Camera Indicators
The camera indicator has five statuses: Red indicates warning, yellow or green
indicates setting with flashing for a long time , yellow or green flashing slowly
indicates shooting , blue indicates device system initialization or performing gestures
successfully, and alternating green and yellow indicates calibration or upgrade.
Flashing blue
Steady blue
OFF
The middle bar on steady green indicates target loss
and there is no target.
Steady green middle bar indicates there is no target and
camera is in standby status or upgrade was succesful.
All 3 bars continuously flashing red every 2 seconds
indicates there is a target and the camera is in normal
shooting status.
The middle bar continuously flashing green every 2
seconds indicates there is no target and the camera is in
normal shooting status.
All 3 bars flashing green once indicates the camera is in
shooting or recording video status.
All 3 bars flashing green 3 times every 400ms indicates
shooting under Burst mode.
All 3 bars continuously flashing green every 1 second
indicates count down has started.
Blue flashes of 1, 2, and then 3 bars back to back
indicates device system initialization.
Blue flashes of 1, 2, and then 3 bars and then 1 blue flash
of all 3 bars indicates successfully performed gesture.
Continuous flashes of alternating green and yellow on
all 3 bars indicates an upgrade or calibration is in
progress.
Camera Indicator
Status
08 09
Description
All three bars continuously flashing red for eight
seconds, indicates that the device temperature is too
high, then the device will directly shut down.
All 3 bars continuously flashing red every 2 seconds
indicates a warning, such as TF card exception or lens
still locked.
3 bars on steady red indicates device fault, such as
upgrade failed or gimbal fault.
All 3 bars continuously flashing yellow every 2 seconds
indicates shooting but target loss.
3.3 Buzzer
Category
Error prompt
Directive content
equipment error
SD card error
Upgrade error
Explain
Out-of-line or error occurred
in pan/battery/AI/lens, etc.
SD Card Not Inserted/Stored
Full/SD Card Abnormal
Pitch Ununlocked
Tweet mode
D·DD·····
Page 7

Warning hints
Lens not unlocked
Low electricity is
running out
Switchgear
Video start and stop
Pitch Ununlocked
Low power (< 10%)
Turn on or off
Video start or stop
D·D·D···
D·D
3. App Settings: Personal account log-on, personal information input and modification,
master list and basic parameters setting, factory setting restore and feedback, etc.
4. Remote Shutdown: Connect to the device, click the icon in the main page, click the
shutdown key after the animation is finished, and select "Shut down" to shut down
remotely.
Notification
prompt
Photograph
gesture
Delay 3s /1 0s
Photographs (all modes are
triggered manually once)
Successful gesture recognition
Delay 3s / 10s to start shooting
D
D···
1
3 3
2 4
连接设备 进入相机
1
4. Obsbot Studio App
4.4 App & Camera
4.1 About
The Obsbot Studio App works with OBSBOT Tail to achieve a real time HD preview,
settings of camera and gimbal, AI shooting, Smart capture etc. on mobile devices.
4.2 Installation
iOS users can download the “Obsbot Studio App” from
App Store.
Android users can download the ”Obsbot Studio App”
from Google Playstore or www.remo-ai.com .
iOS / Android
Download Obsbot studio App
4.3 App Homepage
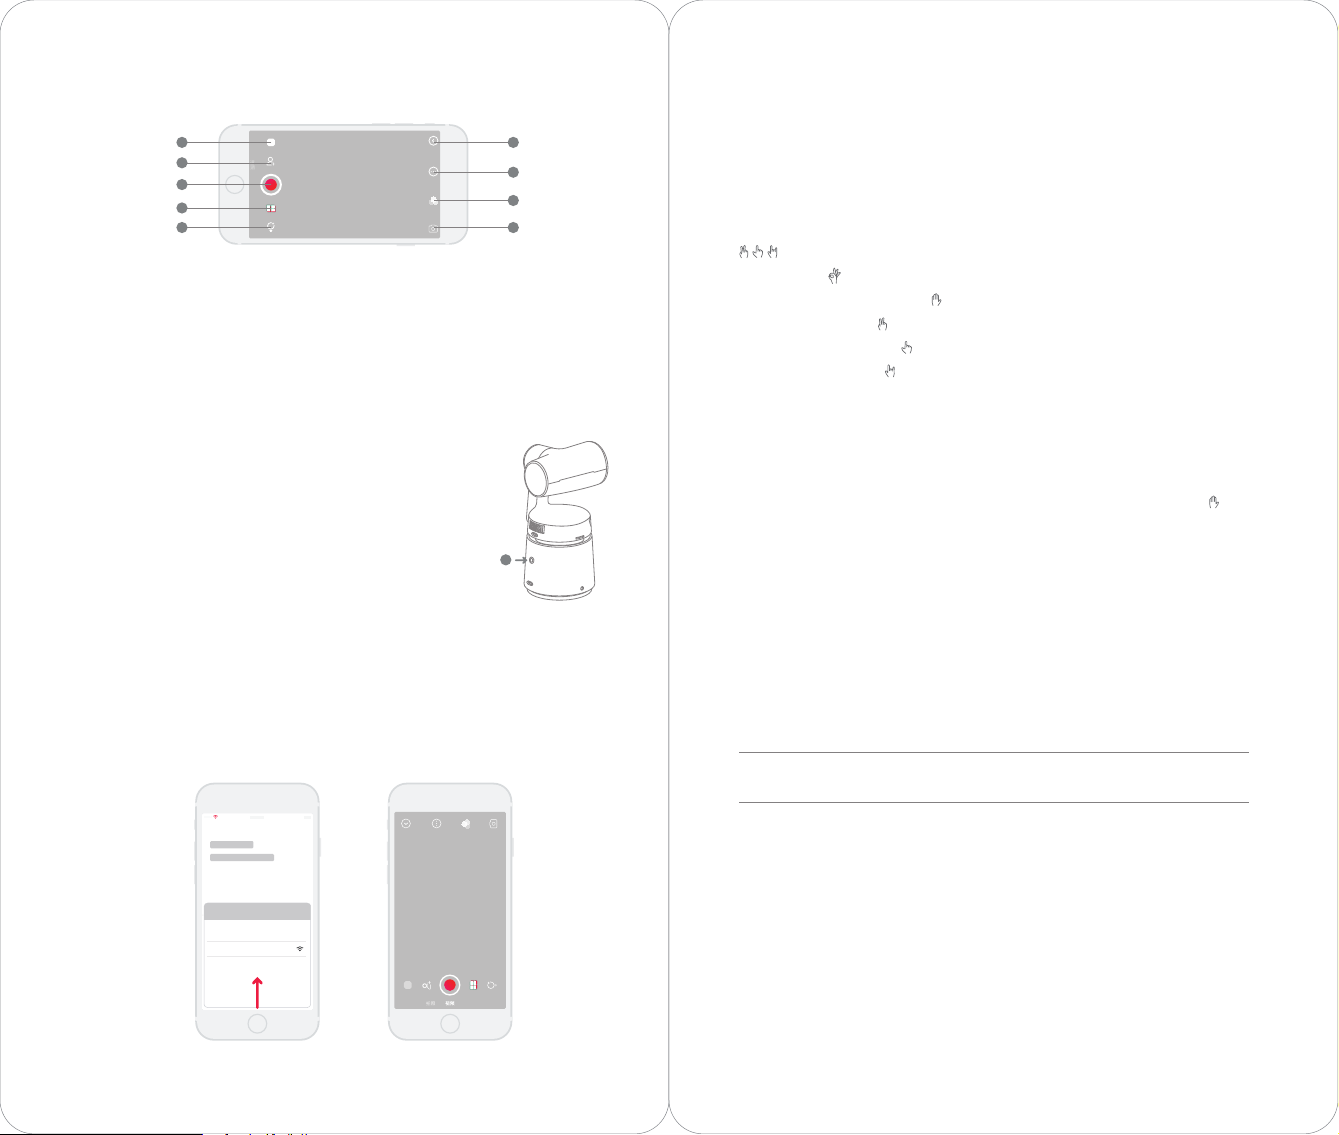
1. Connection / Disconnection: Connect the Tail using WiFi, enter the main interface
after WiFi is successfully connected. Disconnect the device by clicking the button
after exiting the real-time preview interface.
2. App Album: By entering into the App Album, user can download photos / videos to
mobile phone. In addition, post-editing media can be shared by one-tap operation.
10 11
1. Camera album: In the camera album, you can download the original film, video and
picture playback.
2. Shooting mode: Choose shooting mode by sliding or clicking: photo shooting,
video recording;
Photo shooting: Supports single, multiple, continuous photo shooting; supports
intelligent shooting, portrait and landscape mode;
Video: Supports Normal video, slow motion, intelligent shooting mode.
3. Target selection: Single person or multiple people can be selected as the shooting
target; the "auto" mode regards the closest person as the target; in the "multi-person"
mode, target tracking starts when the people are in the frame; a long-time touch on
the icon makes the mode switch to “Pet-tracking”, a mode targeting cats and dogs;
4. Shutter/shoot button: Tap to take photo or start the video recording. Click again to
stop the video recording;
5. LaunchPad: Triggers a variety of special and interesting special effects by
convenient and fast one-key operation; variety of complex special effects combined
through gestures, making the shooting more creative;
6. Intelligent Settings: Intelligent capture, intelligent zoom, tracking speed, cloud
platform and other settings;
7. Advanced settings: Set camera parameters such as recording slow motion video,
white balance, exposure mode, sharpness, anti-flicker, AE Lock, grid, etc.
8. Filters: Switch a variety of filters to facilitate later film formation;
9. More: Set shooting angle, picture proportion (only for taking photos), beauty, delay,
mirror, more settings and other functions;
10. Return: Return to Obsbot Studio App home page.
Page 8
拍照
1 10
3
4
5
6
5. Use Tail
5.3 Power Gesture
OBSBOT Tail has first of its kind implementation of power gesture in AI video
视频
9
8
7
shooting, empowering users to access a series of functions such as start recording,
tracking, zoom and creative camera movements with natural simple gestures. Go to
settings tab to enable or disable the gestures function.
OBSBOT Tail can recognize gestures made near your face around 2 seconds and then
camera indicator light will turn blue, indicates successfully performed gesture.
Gestures for user-defined functions
— Start/Stop:
— Select Target/Cancel Target:
— Lens Lock (default):
— Zoom Control (default):
— Crazy Time (default):
5.1 Turn on/off Tail
First, slightly rotate the lens to unlock it; press and hold the
power button for 2 seconds to turn it on or off.
2
5.2 Connect App
1. Turn on and wait for Tail to self-test; the status light will be green after the self-test is
completed.
2. Turn on Wi-Fi for mobile device, run Obsbot Studio App, select the device
Obsbot-XXX network, and enter the default password "12345678" to connect.
3. After the mobile device is successfully connected, return to the main interface, as
shown below.
5.4 Target Selection
OBSBOT Tail offer two ways to lock target:
Power gesture: After tail is activated, you can quickly select/cancel a subject by
gesture.
Tap Lock: In “Obsbot Studio”App interface,double-click the shooting target to enter
the locked tracking state, and double-clicking again will cancel the selected state.
Double-click to select another target and switch to shoot the selected target.
Quick: Click the “Quick” button, the camera will automatically lock the last one person
to shoot the target and exit the selection state.
Multiple: Click the “Multiple” button to enter the multi-person shooting state and exit
the selection state.
Other: Click the “Select” button to enter the selection state; if you do not need the above
two buttons, you can long press “Select” button and move it to find shooting target, and
then click to select the target. You can select 1 person as the shooting target. After
selecting the target, click the “Select” button to complete the selection status.
After choosing the target, OBSBOT Tail will start to track and follow the target.
5.5 Shooting Mode
OBSBOT Tail provides a variety of shooting modes:photo mode, video mode, slow
连接设备
选取设备
OBSBOT_Tail_001
12 13
motion and so on. The mode can be selected by simply clicking the corresponding
button on the App.
Video Mode: The default interface when entering into the app is video shooting
mode.
Launch Pad: Simply click the launch pad and use the features.
More: Choose landscape/portrait mode, beauty,filter, mirror mode and other settings.
Smart Shoot Setting: In the shooting interface, click the button and explore the smart
shooting setting menu.
Page 9
a. Smart Capture: Turn on or turn off the smart capture. When turned on, AI
algorithms can automatically capture the highlights according to the trigger
conditions during shooting. The default trigger condition is: expression capture and
action capture.
b. Tracking Speed: There are different speed for users to choose according to different
scenario like lazy, slow, normal, fast and crazy.
a. Gimbal Reset: Simply click the gimbal reset and the gimbal will go back to the
default position.
b. Pan axis lock: Choose whether to follow the target in horizontal direction by turning
on or turning off the yaw axis lock
c. Tilt axis lock: Choose whether to follow the target in vertical direction by turning on
or turning off the pitch axis lock.
d. Gimbal Rage: There are 4 range to choose from which is 72°,144°,216° and 288°. If
there is no chosen range, the default gimbal range is unrestricted 360° .
e. Composition line: The target’s shooting position can be set when shooting one
target. By dragging the target in the nine patch grid, the target’s position can also be
adjusted.
Advance Setting
a. Slow motion video: The default setting is closed. Start to record slow motion video
by turning the button on. The default setting for slow motion video here is 1080p at
120fps.
b. White balance: Different balance mode can be chosen like auto, cloudy,
fluorescent,sunny,filament lamp.
c. Exposure mode: P,S, and M numbers can be changed to set different ISO, Shutter
and EV according to users’ needs.
d. Smart exposure: Automatically adjust the exposure effect according to the
shooting target and shooting environment.
e. Sharpness: Different sharpness mode like weak, soft, normal, clear and sharp can be
chosen according to users’ need.
f. Anti-Flicker: Users can choose to turn on/off the fuction, and choose 50HZ/60HZ
according to their own needs.
g. Auxiliary Setting: AE lock and network can be chosen here.
Photo Mode
Photo Setting: In photo shooting interface, start taking photo and choose between
single picture, multiple pictures and continuous pictures..
More: Choose landscape/landscape mode, frame ,beauty, delay and other setting.
Advance setting: Set white exposure, exposure mode, sharpness, and auxiliary setting
(same as video mode)
5.6 LaunchPad
The LaunchPad, which integrates artificial intelligence and traditional
cinematography, creates a stable, fluid, and easy-to-use shooting concept. With
ingenious visual sense and just a few clicks, user can record video with a variety of
special and interesting effects, convenient and fast.
LaunchPad can only be used in humans tracking mode and cannot be used in pet
tracking mode. It consists of two parts: “Touch and Go” Pad and “Picture Controller”
Pad. There are 24 sub-functions in total.
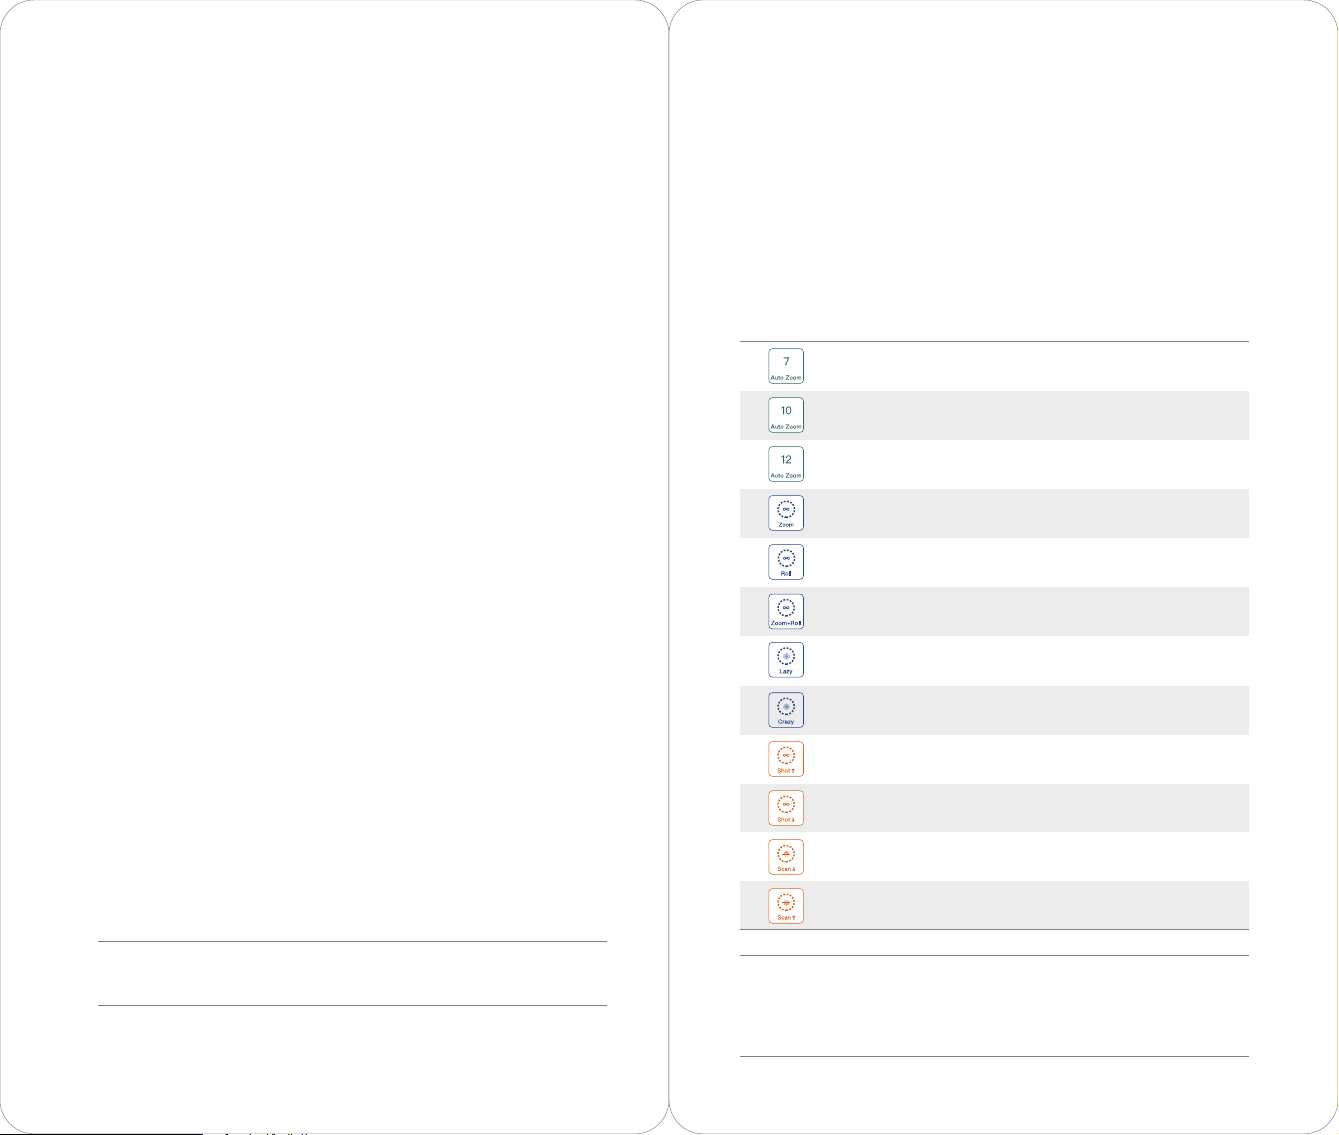
“Touch and Go” Pad 12 sub-functions:
7 Auto Zoom: Always keeps the target's 70% body in the frame
when target is locked within the zoom range. If no target, the
function is invalid.
10 Auto Zoom: Always keeps the target's whole body in the frame
when target is locked within the zoom range. If no target, the
function is invalid.
12 Auto Zoom: Always keeps the target's whole body and frame
with 10/12 proportion, when target is locked within the zoom range.
Zoom: Lens keeps zooming in and out.
Roll: Lens keeps rolling clockwise and anticlockwise with reference
to the settled parameters.
Zoom+Roll: Zooming and rolling at the same time, with reference
to the settled parameters.
Lazy Mode: Adjust to the Lazy tracking speed mode.
Crazy Mode: Adjust to the Crazy tracking speed mode.
Upper Body: Zoom to focus and shoot upper body when the target
is locked. If no target, the function is invalid.
Lower Body: Zoom to focus and shoot lower body when the target
is locked. If no target, the function is invalid.
Scan Upward: Focus on lower body first and shoot upwards, when
the target is locked. If no target, the function is invalid.
Scan Downward: Focus on upper body first and shoot downwards,
when the target is locked. If no target, the function is invalid.
Crazy Mode suits for target that moves fast like tracking pet, target with
skateboarding, or riding bicycle.
14 15
Note: All of the above functions have four states: Preparation, Execution, Ending and
Closing. These 7 functions of “Zoom”, “Roll”, “Zoom+Roll”, “Upper Body”, “Lower Body”,
“Scan Upward”, “Scan Downward” will be under preparation state when the previous
functions are not completely close.
Page 10
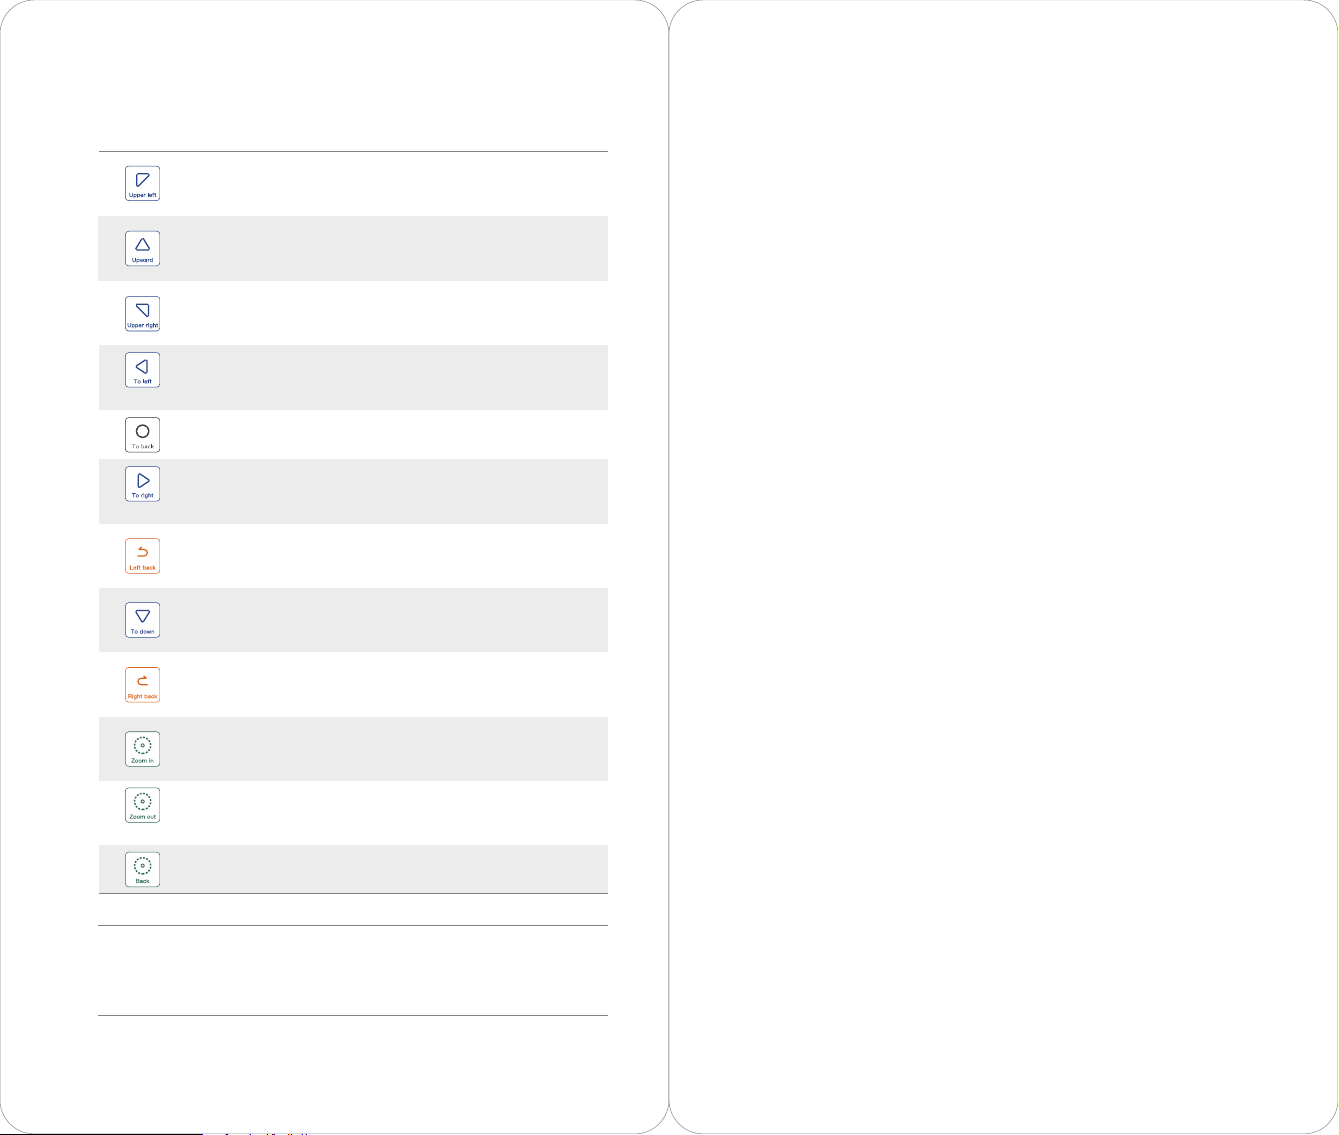
“Picture Controller” Pad 12 sub-functions:
Upper Left: According to setting, Pan and Tilt axis gimbals move upper
left at a constant speed. When the Tilt axis gimbal reaches the limit or
you click the option again, the movement will stop automatically.
Upward: According to setting, Tilt axis gimbal moves upward at a
constant speed. When the Tilt axis gimbal reaches the limit or you
click the option again, the movement will stop automatically.
Upper Right: According to setting, Pan and Tilt axis gimbals move upper
right at a constant speed. When the Tilt axis gimbal reaches the limit or
you click the option again, the movement will stop automatically.
To Left: According to setting, Pan axis gimbal moves left at a constant
speed. Click the option again and the movement will stop
automatically.
To Back: Pan, Tilt and Roll axis gimbals back to the initial place.
To Right: According to setting, Pan axis gimbal moves right at a
constant speed. Click the option again and the movement will stop
automatically.
Left Back: According to setting, lens roll anticlockwise quickly, when
the Roll axis gimbal reaches the limit or you click the option again, the
movement will stop automatically.
To Down: According to setting, Tilt axis gimbal moves upward at a
constant speed. When the Tilt axis gimbal reaches the limit or you
click the option again, the movement will stop automatically.
Right Back: According to setting, lens roll clockwise quickly, when
the Roll axis gimbal reaches the limit or you click the option again,
the movement will stop automatically.
Zoom in: According to setting, zoom in happens at a constant speed,
when the lens reaches the limit or you click the option again, the
movement will stop automatically.
Zoom out: According to setting, zoom out happens at a constant
speed, when the lens reaches the limit or you click the option again,
the movement will stop automatically.
Back: Back to initial focus status.
5.7 Manual Control
— Click the zoom icon, curved slider the dial for zoom operation.
— Press the screen until the red circle appears, then move the red circle to change
the position of lens.
— Double click a person to select shooting target and double click again to cancel
selection.
— Click to operate AFS focus.
5.8 Post-editing
Video editing
— Video cropping
— To add video clips
— To add transitions
6. Firmware upgrade
6.1 Firmware Upgrade Overview
1. During the upgrade, yellow light and green light will be cross flashing continuously
and slowly.
2. When the light turns green, it means that the upgrade is completed.
3. If you fail to upgrade, the light turns red and the camera will make a beep sound
(no matter if the old version can still be used or not).
4. If you fail to upgrade and the old firmware version can be used, restart the camera,
the indicator light and the hint tone will turn into normal.
5. When the upgrade completes, the App will show the upgrade result.
6. If you restart the camera and connect the App again, the App would not show the
upgrade result.
6.2 Using Obsbot Studio App to Upgrade
1. Need to enable gimbals after using 1-9 options.
2. Need to enable AF after using 10-12 options.
3. Gimble Lock: AI tracking function is off.
16 17
Connect Tail and Obsbot Studio App, if the App shows new firmware upgrade, please
click to upgrade. According to the App, you can connect your mobile devices with
Internet to download upgrade package. We recommend using Wi-Fi network to
download. When you complete downloading the upgrade package, please reconnect
Tail to upgrade. During the upgrade, device would restart. After completing upgrade,
it will show the upgrade result.
Page 11

Please make sure that Micro SD card is inserted during upgrade. Micro SD card
should have more than 1GB of usable capacity and the device battery needs to be
more than 50%.
6.3 Using SD Card to Upgrade
Please download latest upgrade package on Obsbot’s official website and make sure
SD card has more than 1GB of usable capacity. Unzip the upgrade package and copy
the .bin file to the SD card root directory. Insert the SD card into Tail. Once Tail reads
the SD card, .bin file would restart and upgrade. After completing upgrade, you can
check the upgrade result through the txt file in SD card root directory.
Possibilities of unavailable hand gesture control
1. The target is too far away from Tail when showing the hand gesture, it’s hard for Tail
to identify hand gestures.
2. If the target people do not show hand gestures next to head, it’s hard for Tail to
identify hand gestures.
3. If the target people do not show hand gestures towards Tail, it’s hard for Tail to
identify hand gestures.
4. In the super dim light, it’s hard for Tail to identify hand gestures.
5. If the target is wearing the mask when showing hand gestures, it’s hard for Tail to
identify hand gestures.
6. When the targets are very close to other people, Tail may identify the targets
wrongly so that Tail may initiate the functions to another people rather than the
target people.
7. If the target people show the hand gesture in front of the face and cover the face,
the Power Gesture function can not be initiated.
7. Appendix
7.1 Maintenance and Care
Please lock the lens of OBSBOT Tail when you transport or carry it to protect lens well.
Please avoid sand, dust and water to avoid physical or internal damage.. Please use
dry and soft wipes to clean the Tail. Do not use any cleaning liquid chemical on Tail.
7.2 Application Scope Instruction
Possibilities of unavailable tracking
1. In super dim light, Tail may lose the target to track.
2. When the target is very far away from Tail and the target is very similar to the
crowding environment, it could be hard for Tail to recognize the targets so the
tracking might be unavailable.
3. If the targets have been covered and don’t come back in frame for too long time,
Tail may not be able to track.
4. If the targets are twins, Tail may be confused to track.
5. In Pet Mode, Tail may not be tracking when the pet is jumping suddenly to the total
different direction.
6. When the targets uses mask to cover face, it’s possible for Tail to lose the target.
7. When the targets are too close to Tail and move very fast, Tail may not be able to
track.
8. When other undesired people are very close to Tail and pass in front of the targets,
it’s possible for Tail to lose the target to track.
9. It’s possible for Tail to lose the target when the targets are in too complicated
environments for example walking in the crowd.
18 19
7.3 Specification
General
Size
Weight (Battery included)
Power Consumption 10W
Gimbal
Angular Vibration Range ±0.05°
Assembling method Non detachable
Controllable Range Pan: 360° Unlcok Tilt: -55°to+42°; Roll: -45°to+135°
Designed Range Pan: 360° Unlcok Tilt: -90° to +90°; Roll: -135° to +135°
Max Controllable Speed 180°/s
Camera
Camera model
Sensor 1/2.3'' CMOS SENSOR;Effective pixels:12,400,000
Lens
ISO Range Video: 100-6400;Photo: 100-6400
Electronic Shutter Speed 1/8000-1/30(Support long exposure soon)
Max Image Size 4000x3000
Still Photography Modes
Operating Mode:167.2*86.7*85.5mm
Shutdown: 185.7*86.7*85.5mm
610g
F126S
3.5x Optical Zoom,10x Hybrid Zoom,Equivalent Focal
Length: 21-74mm,Focal Length: 3.85-13.4mm,
F2.4 (wide angle) - F5.0 (long focus)
FOV 92°(wide angle) -32° (long focus)
Single Shot / Burst: 3,5,7
Continuous shooting / Smart Capture
Page 12

Video Resolution
Slow Motion
Video Recording Mode Normal video, Slow motion
Max storage bit rate
Supported File Formats FAT32
Photo Formats JPEG,DNG(RAW)
Video Formats MP4
Supported SD Cards
Operating Temperature 0°-40°
Audio Input AAC,48kHz
Wi-Fi
Operating frequency 2.4G / 5.8GHZ
Signal transmission
range
Transmission power
Battery
Battery Mode OBS-LI-TWS-0001
Battery Type LiPo
Battery Capacity 1850mAh
Battery Energy 20.54Wh
Battery Voltage 11.1V
Environment
Temperature
for Charging
4K:60/50/48/30/25/24 fps
2.7K:60/50/48/30/25/24fps
1080p:60/50/48/30/25/24 fps
1080p:240/120fps
720p:240/120fps
80Mbps
Above and included Micro SD cards, Class 10/ Achieve
UHS-1 ,Max support 256GB(only fat32)
SanDisk Extreme PRO 128/64GB UHS-3 microSDXC
SanDisk Extreme PRO 32GB UHS-3 microSDHC
SanDisk Extreme 128/64GB UHS-3 microSDXC
SanDisk Extreme 32GB UHS-3 microSDHC
SanDisk Ultra 128/64GB UHS-1 microSDXC
SanDisk Ultra 32/16GB UHS-1 microSDHC
Samsung EVO Plus 128/64GB UHS-3 microSDXC
Samsung EVO Plus 32GB UHS-1 microSDHC
Samsung PRO Plus 128/64GB UHS-3 microSDXC
Samsung EVO 128/64GB UHS-3 microSDXC
Samsung EVO 32GB UHS-1 microSDHC
And other mainstream Micro SD cards with minimum
write speed 15MB/s
2.4G:80m
5.8G:140m
2.4G:14dBm
5.8G:13dBm
0°-40°
Environment
Temperature for Using
Battery Life 120Min
Charger
Charger Model A138A
Input 100-240V;50/60Hz
Output 12V/1.5A 9V/2A 5V/3A
Supported Live streaming platforms
China
Other Countries Youtube / Twitch / Liveme;
0°-40°
斗鱼、 战旗、龙珠、映客、淘宝 、抖音、虎牙、哔哩哔哩、企鹅体育
7.4 Common Problems and Solutions
1. Unable to connect with OBSBOT Tail?
— Check your mobile device to see if Wi-Fi has been turned on.
— If the Wi-Fi name of OBSBOT Tail is not showing up in the Wi-Fi list of the mobile
device, please check whether the mobile device can connect Wi-Fi with two
frequencies of 2.4Ghz and 5.8Ghz (only for mobile phones that support manual Wi-Fi
band setting). If so, please change the Settings and try to reconnect the OBSBOT Tail.
If the Wi-Fi name does not appear, please restart the OBSBOT Tail.
— If still unable to connect, please restore factory setting in the App.
— If it doesn’t work with these methods. Please contact customer service through
[email protected]
2. Can I still shoot video after turning application off and disconnecting the device
from Tail?
— Yes, OBSBOT Tail will keep shooting after turning off the application. You can use
hand gestures to control the Tail.
3. What should I do after upgrade failed?
— Download the firmware package and try to upgrade again.
20 21
Page 13

7.5 Disclaimer and Warning
Before starting to film, please give full respect to other people’s privacy. Especially
for:
— Licensing
— Privacy
— Legality of when, where and under what circumstances to use OBSBOT Tail.
Users should pay close attention to the change of law application. REMO TECH CO.,
LTD. is not liable for any violation of local laws. User is responsible for themselves if
they breach any of above rules.
Any use of this product for any violation of laws and regulations, or use beyond the
laws and regulations or misconduct is prohibited. The use of this product to violate
other’s personal property/privacy is unacceptable.
7.6 Three Guarantees
Warranty regulations
The after-sales service of the OBSBOT Tail is strictly based on the Law of the People's
Republic of China on Consumer Rights and Interests and the Product Quality Law of
the People's Republic of China. The content is as follows:
Within 7 days from the date of delivery, you can request the service of return or
replace goods after it’s tested and performance failure is confirmed by REMO TECH
CO., LTD. after-sales service center.
Within 15 days from the date of delivery, you can request the service of free repair or
replace goods after it’s tested and performance failure is confirmed by REMO TECH
CO., LTD. after-sales service center.
Within 12 months from the date of delivery, you can request the free repair of goods
after it’s tested and performance failure is confirmed by REMO TECH CO., LTD.
after-sales service center.
Beyond warranty regulations
Under the following circumstances (but not limited to the following) is not covered
by the "Three Guarantees" service:
Unauthorized repair, misuse, impact, carelessness, abuse, liquid damage, accident,
modification, incorrect use of unofficial adaptor, or tear up/alter the anti counterfeiting labels.
Beyond “Three Guarantees” validity period.
Inevitable damage caused by fire, flood, thunder and other force majeure.
22
 Loading...