

Oblica Focus, SLIMFOCUS Series Manual

SLIMFOCUS:
MODEL SPECIFICATIONS
1. TECHNICAL DATA 2
2. PRE-INSTALLATION 3
3. INSTALLATION 5
4. OPERATION 13
5. TESTING 14
Keep for future use

PAGE 2
OBLICA | SLIMFOCUS INSTALLATION AND USER MANUAL
1. TECHNICAL DATA
DETERMINED UNDER TEST CONDITIONS:
Nominal thermal output 9kW
Efficiency (Australian Test) 60%
Emissions (Australian Test) 1.4 g/Kg
575245
655
2070
324
WEIGHT AND DIMENSIONS:
Dimensions Firebox O 324mm
Firebox weight 180kg
Flue kit Standard 6”/8”/10”
/

PAGE 3
OBLICA | SLIMFOCUS INSTALLATION AND USER MANUAL
2. PRE-INSTALLATION
Congratulations on your purchase of the SlimFocus. This appliance should be installed and checked by a qualified
professional. Ensure you have read the operation guidelines thoroughly prior to first use. For any questions or concerns
please contact Oblica on 03 9416 0400.
The installation process is outlined below:
– Determine position of firebox and flue carefully observing the clearances described within this section
– Install the external flue
– Install the internal flue and engage the firebox
– Ensure the floor has adequate protection
CAUTION:
Using components or parts other than those provided by the manufacturer or modifying the specification of components
may result in inferior or unsafe operation. If such action is necessary, consult the manufacturer in the first instance.
WARNING:
• The appliance and flue-system must be installed in accordance with AS/NZS 2918 and the
relevant building code or codes.
• Any modification of the appliance that has not been approved in writing by the testing authority
will be in breach of the approval granted for compliance with AS/NZS 4013.
• Once the flue has been installed and approved by a professional installer, the flue must not be
modified in any way.
PAGE 4
OBLICA | SLIMFOCUS INSTALLATION AND USER MANUAL
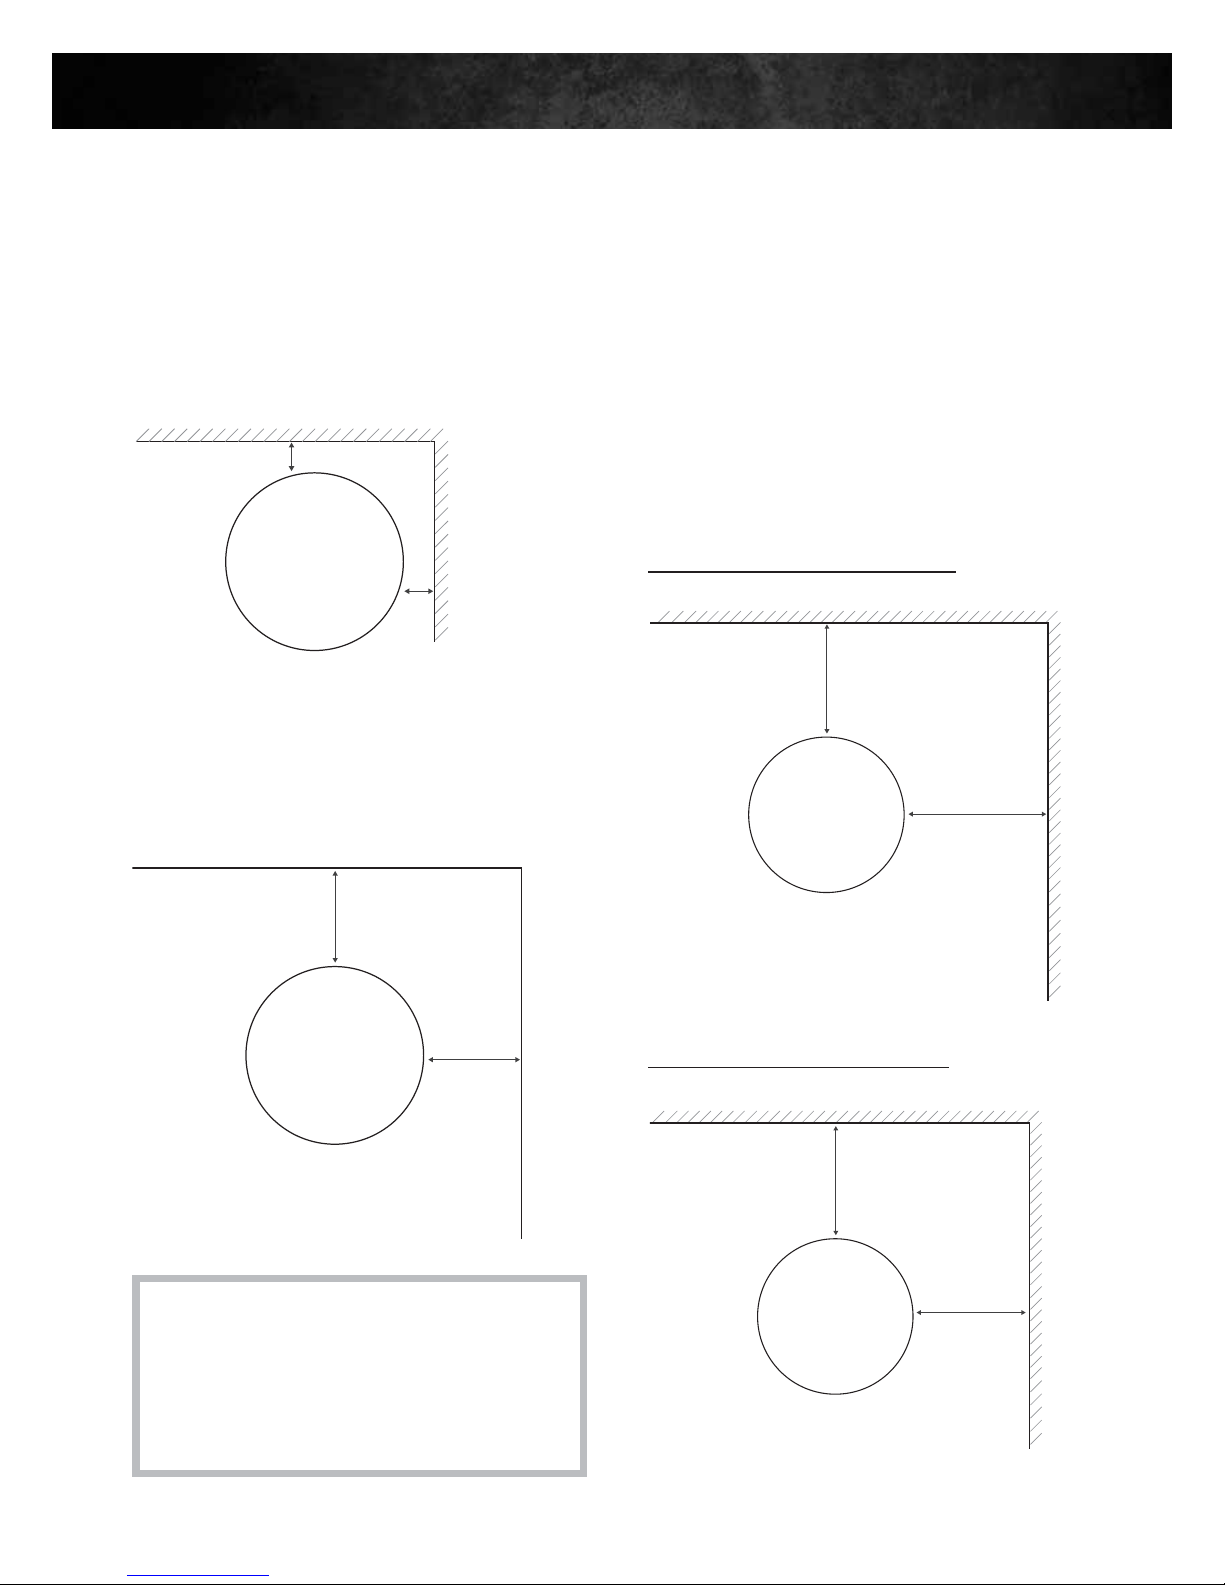
MINIMUM CLEARANCE – INTERNAL
2.1 Clearance from non-combustible surfaces
(eg masonry)
100mm minimum clearance is required from fully
non-combustible surfaces.
100
100
Non Combustible
Non Combustible
2.2 Clearance from glass
300mm minimum clearance is required from normal
non-combustible glass.
2.3 Clearance from combustible surfaces
(eg timber joist & concrete)
Clearances may be reduced with the application of
heat shielding to walls in accordance to the
Australian Building Code.
For information on heat shielding please contact our
office on 03 9416 0400 or email info@oblica.com.au.
IMPORTANT:
Frames must also be considered. Timber window
frames must be treated as combustible surfaces
(see 2.3). Aluminium frames can be treated as
non-combustible surfaces (see 2.2).
2. PRE-INSTALLATION (CONTINUED)
Glass (frameless or aluminium frame)
Glass (frameless or aluminium frame)
300mm
300mm
475mm
Combustible
Combustible
550mm
Combustible
Combustible
475mm
475mm
Configuration 1 – Parallel installation
Configuration 2 – Corner installation

PAGE 5
OBLICA | SLIMFOCUS INSTALLATION AND USER MANUAL
3. INSTALLATION
SUSPENSION BRACKET
CEILING FLANGE
CROSS BAR SET IN-BETWEEN RAFTERS
RUBBER FLASHING
TRIPLE SKIN FLUE
150 X 200 X 250
(6’ x 8’ x 10’)
CHINAMAN HAT
(Anti-Down-Draft device)
Insulative pad
(Plaster Ceiling Minimum Gap)
150
250
12
25
3.1 Installing the suspension bracket
• The bracket must be structurally secured within the roof as shown in the diagram below.
• The largest cylinder must project down from the ceiling by at least 150mm to connect with lower section.
• You must leave a 25mm clearance gap between the bracket and the ceiling. This gap will be covered by
the ceiling Flange.
• 12mm ventilation gap between the plasterboard and the ceiling flange.
• 25mm minimum clearance from the triple skin flue to any combustible material within the roof space.
TYPICAL FLAT ROOF INSTALLATION
 Loading...