

Obihai OBi1062, OBi1032, OBi1022 Administration Manual

Obihai Technology, Inc.
OBi1000 Series IP Phone Administration Guide
Models:
OBi1062
OBi1032
OBi1022
April 2015
Copyright, Obihai Technology, Inc. 2015. All Rights Reserved.
Copyright material. Do not make copies. Do not distribute.
All contents subject to change without notification.

A
UDIENCE
..........................................................................................................................................................................10
W
HERE TO GO FOR HELP
N
OTATIONAL CONVENTIONS
Boolean Values....................................................................................................................................................................................................... 11
...................................................................................................................................................... 10
.................................................................................................................................................. 11
INTRODUCTION........................................................................................................................................... 12
OBI IP P
HONE HARDWARE
Accessories Available Separately from Obihai........................................................................................................................................................ 16
Other Accessories................................................................................................................................................................................................... 16
C
ONNECTING THE OBI IP PHONE
Connecting the Phone to the Network................................................................................................................................................................... 16
Connecting to the LAN Over Wired Ethernet ......................................................................................................................................................... 16
Connecting to the WLAN Over WiFi ....................................................................................................................................................................... 16
O
VERVIEW OF PHONE FEATURES
Administrative Features ......................................................................................................................................................................................... 17
Voice Features........................................................................................................................................................................................................ 17
Call Features........................................................................................................................................................................................................... 17
Soft Switch Support................................................................................................................................................................................................ 17
Integrated GUI Applications ................................................................................................................................................................................... 17
C
OMPLEMENTARY OBIHAI PRODUCTS AND SERVICES
.................................................................................................................................................... 12
............................................................................................................................................ 16
............................................................................................................................................ 16
..................................................................................................................18
CONFIGURATION AND MANAGEMENT INTERFACES................................................................................... 19
D
EVICE LOCAL CONFIGURATION
To access the OBi IP Phone Device Management Web Page:................................................................................................................................. 19
Web Page Conventions and Icons & Buttons: ........................................................................................................................................................ 20
Local Configuration Web Page Layout.................................................................................................................................................................... 21
R
EMOTE PROVISIONING
About ZT (Zero Touch): Device Customization at Obihai’s Factory......................................................................................................................... 24
OBITALK P
T
ELEPHONE
P
HONE
ORTALS
..............................................................................................................................................................25
User Portal ............................................................................................................................................................................................................. 25
ITSP Portal.............................................................................................................................................................................................................. 25
-IVR-B
ASED LOCAL CONFIGURATION
Main Menu............................................................................................................................................................................................................. 26
Additional Options (Menu 0).................................................................................................................................................................................. 27
System Level Options ........................................................................................................................................................................................ 27
Network Related Configuration Options ........................................................................................................................................................... 27
SP1 Configuration Options ................................................................................................................................................................................ 28
SP2 Configuration Options ................................................................................................................................................................................ 30
OBiTALK Configuration Options......................................................................................................................................................................... 31
Auto Attendant Configuration Options ............................................................................................................................................................. 32
Customized AA Prompt Recording Options....................................................................................................................................................... 32
GUI........................................................................................................................................................................ 33
Settings................................................................................................................................................................................................................... 33
Preferences ............................................................................................................................................................................................................ 36
Admin Password..................................................................................................................................................................................................... 36
.............................................................................................................................................. 19
........................................................................................................................................................ 23
.......................................................................................................................25
NETWORKING FEATURES ............................................................................................................................ 37
E
THERNET PORTS
WAN I
NTERFACE
.................................................................................................................................................................37
.................................................................................................................................................................37
Copyright 2010-2015 Obihai Technology, Inc.
2

VLAN....................................................................................................................................................................................................................... 37
LLDP ....................................................................................................................................................................................................................... 37
IP Address Assignment........................................................................................................................................................................................... 37
DNS Servers............................................................................................................................................................................................................ 37
WIFI I
NTERFACE
IP Address Assignment........................................................................................................................................................................................... 38
DNS Servers............................................................................................................................................................................................................ 38
DHCP O
DNS L
OOKUP
Lookup Order ......................................................................................................................................................................................................... 38
Locally Configured DNS Lookup Table.................................................................................................................................................................... 38
NTP S
ERVERS AND LOCAL TIME
..................................................................................................................................................................38
PTIONS
..................................................................................................................................................................38
.....................................................................................................................................................................38
.............................................................................................................................................. 39
FEATURE KEYS............................................................................................................................................. 40
L
INE KEYS AND VIRTUAL LINE KEYS
P
ROGRAMMABLE KEYS
S
IDE CAR KEYS
F
EATURE KEY CONFIGURATION PARAMETERS
H
IGHLIGHTS OF FEATURE KEY FUNCTIONS
Call Keys ................................................................................................................................................................................................................. 46
Line Monitor Keys .................................................................................................................................................................................................. 47
Speed Dial Keys ...................................................................................................................................................................................................... 47
BLF Keys ................................................................................................................................................................................................................. 47
Presence Monitor................................................................................................................................................................................................... 47
Group Page Keys .................................................................................................................................................................................................... 47
......................................................................................................................................................... 45
....................................................................................................................................................................45
.......................................................................................................................................... 45
............................................................................................................................46
................................................................................................................................. 46
VOICE SERVICES .......................................................................................................................................... 48
ITSP P
ROFILES
....................................................................................................................................................................48
O
VERVIEW OF COMMON TRUNK CONFIGURATION
Service Enable ........................................................................................................................................................................................................ 48
Service Account Credentials................................................................................................................................................................................... 49
Servers ................................................................................................................................................................................................................... 49
Trunk Capacity........................................................................................................................................................................................................ 49
Basic Incoming Call Handling.................................................................................................................................................................................. 49
Basic Outgoing Call Handling.................................................................................................................................................................................. 50
S
PECIFICATION OF TARGET PHONE NUMBERS
.....................................................................................................................48
............................................................................................................................50
SIP/SP SERVICE............................................................................................................................................ 51
SIP Registration ...................................................................................................................................................................................................... 51
Third Party Registration..................................................................................................................................................................................... 52
Registration Period............................................................................................................................................................................................ 52
REGISTER Final Non-2xx Response Handling ..................................................................................................................................................... 53
SIP Outbound Proxy Server .................................................................................................................................................................................... 53
DNS Lookup of SIP Servers ..................................................................................................................................................................................... 54
NAT Traversal Considerations ................................................................................................................................................................................ 54
Keep Alive Messages ......................................................................................................................................................................................... 55
SIP Proxy Server Redundancy and Dual REGISTRATION ......................................................................................................................................... 55
SIP Privacy .............................................................................................................................................................................................................. 56
STUN and ICE.......................................................................................................................................................................................................... 57
Copyright 2010-2015 Obihai Technology, Inc.
3

ITSP Driven Distinctive Ringing............................................................................................................................................................................... 58
RTP Statistics – the X-RTP-Stat Header................................................................................................................................................................... 58
RTCP ....................................................................................................................................................................................................................... 58
Media Loopback Service......................................................................................................................................................................................... 58
A SIP/SP Configuration Example............................................................................................................................................................................. 59
GOOGLE VOICE™ SERVICE ........................................................................................................................... 60
OBITALK SERVICE ........................................................................................................................................ 61
OBIBLUETOOTH SERVICE............................................................................................................................. 62
CALL FEATURES ........................................................................................................................................... 63
P
HONE LEVEL AND LINE LEVEL FEATURE
C
ALL STATES
C
ORE CALL FEATURES
Line Capacity .......................................................................................................................................................................................................... 64
Complex Operations Between Multiple, Diverse Voice Services............................................................................................................................ 64
Making Outgoing Calls............................................................................................................................................................................................ 64
Handling Incoming Calls ......................................................................................................................................................................................... 67
Ending Calls ............................................................................................................................................................................................................ 67
Holding Calls........................................................................................................................................................................................................... 67
Resuming Calls ....................................................................................................................................................................................................... 67
“Foregrounding” a Call........................................................................................................................................................................................... 67
Call Waiting ............................................................................................................................................................................................................ 68
Call Transfer ........................................................................................................................................................................................................... 68
Conference Calls..................................................................................................................................................................................................... 69
E
XPANDED CALL FEATURES
Auto Answer and Intercom .................................................................................................................................................................................... 71
Push To Talk ........................................................................................................................................................................................................... 71
Speed Dial Feature Key........................................................................................................................................................................................... 72
Block Caller ID* ...................................................................................................................................................................................................... 72
Block Anonymous Call ............................................................................................................................................................................................ 73
Calling Line ID Display............................................................................................................................................................................................. 73
Call Forwarding ...................................................................................................................................................................................................... 73
.......................................................................................................................................................................63
........................................................................................................................................................... 64
Digit Map........................................................................................................................................................................................................... 64
Audio Path and On/Off-Hook States.................................................................................................................................................................. 64
Off-Hook Dialing................................................................................................................................................................................................ 65
On-Hook Dialing ................................................................................................................................................................................................ 65
Outbound Call Routes ....................................................................................................................................................................................... 65
Primary Line ...................................................................................................................................................................................................... 65
Explicitly Selecting a Line to make call............................................................................................................................................................... 66
Dialing “Speed Dials 99” Numbers..................................................................................................................................................................... 66
Dialing Star Codes.............................................................................................................................................................................................. 66
Called Party Caller ID Display............................................................................................................................................................................. 66
Inbound Call Routes .......................................................................................................................................................................................... 67
Rejecting Incoming Calls.................................................................................................................................................................................... 67
Caller ID Display................................................................................................................................................................................................. 67
Transfer Signaling.............................................................................................................................................................................................. 69
Limitations of Transfer by Internal Bridging ...................................................................................................................................................... 69
Local Mixing/Bridging........................................................................................................................................................................................ 70
External Conference Bridge............................................................................................................................................................................... 70
.................................................................................................................................................... 71
................................................................................................................................... 63
Copyright 2010-2015 Obihai Technology, Inc.
4

Call Forward Numbers....................................................................................................................................................................................... 73
Call Forward ALL................................................................................................................................................................................................ 74
Call Forward on Busy......................................................................................................................................................................................... 74
Call forward on No Answer:............................................................................................................................................................................... 74
Call Forward Signaling ....................................................................................................................................................................................... 75
Limitations of Call Froward by Internal Bridging................................................................................................................................................ 75
Do Not Disturb ....................................................................................................................................................................................................... 75
Do Not Ring ............................................................................................................................................................................................................ 75
Message Waiting Indication – Visual and Tone Based............................................................................................................................................ 75
Multicast Page Groups ........................................................................................................................................................................................... 76
Music On Hold (MOH) ............................................................................................................................................................................................ 77
P
REMIUM CALL FEATURES
Busy Lamp Field (BLF)............................................................................................................................................................................................. 77
Single Versus Multiple BLF Event Notification................................................................................................................................................... 78
BLF with Call Park Status ................................................................................................................................................................................... 78
What Happens When BLF Key is Pressed........................................................................................................................................................... 78
BLF Operation: Speed Dial................................................................................................................................................................................. 79
BLF Operation: Directed Call Pickup.................................................................................................................................................................. 79
BLF Operation: Barge In..................................................................................................................................................................................... 79
BLF Operation: Call Pickup................................................................................................................................................................................. 79
BLF Operation: Resume..................................................................................................................................................................................... 79
BLF Configuration .............................................................................................................................................................................................. 79
Floating BLF Key Assignment............................................................................................................................................................................. 80
SIP for BLF.......................................................................................................................................................................................................... 81
Call Park and Call Pickup......................................................................................................................................................................................... 82
Call Park Methods ............................................................................................................................................................................................. 82
Call Park Monitor and Call Pickup Methods ...................................................................................................................................................... 83
Shared Line and Shared Call Appearances (SCA).................................................................................................................................................... 84
Line Seize........................................................................................................................................................................................................... 85
What Happens When a Call Appearance Key is Pressed.................................................................................................................................... 86
Buddy List............................................................................................................................................................................................................... 86
Expanded Buddy List and Groups...................................................................................................................................................................... 88
Buddy List Management.................................................................................................................................................................................... 88
Presence Monitor.............................................................................................................................................................................................. 89
Call Recording Controls .......................................................................................................................................................................................... 89
Hold and Talk Event Package.................................................................................................................................................................................. 89
Advice of Charges (AOC)......................................................................................................................................................................................... 89
BroadSoft Call Center Features .............................................................................................................................................................................. 89
Disposition Code................................................................................................................................................................................................ 90
Customer Originated Call Trace......................................................................................................................................................................... 90
Escalation .......................................................................................................................................................................................................... 90
Call Center Information..................................................................................................................................................................................... 90
BroadSoft Guest Login/Logout (Hoteling) .............................................................................................................................................................. 90
Emergency Calls ..................................................................................................................................................................................................... 91
Call Diversion History ............................................................................................................................................................................................. 91
B
ROADSOFT
Call Forward All ...................................................................................................................................................................................................... 92
Call Forward Busy................................................................................................................................................................................................... 92
Call Forward No Answer......................................................................................................................................................................................... 93
Do Not Disturb ....................................................................................................................................................................................................... 93
AS-F
..................................................................................................................................................... 77
EATURE-EVENT FEATURES
............................................................................................................................. 92
Copyright 2010-2015 Obihai Technology, Inc.
5

ACD Agent State..................................................................................................................................................................................................... 93
Security Classification............................................................................................................................................................................................. 94
Executive Call Filter ................................................................................................................................................................................................ 94
Executive Assistant................................................................................................................................................................................................. 94
Call Recording Settings........................................................................................................................................................................................... 94
B
ROADSOFT
Network Directories ............................................................................................................................................................................................... 95
Network Call Logs................................................................................................................................................................................................... 95
BroadWorks Anywhere .......................................................................................................................................................................................... 96
Remote Office ........................................................................................................................................................................................................ 96
Simultaneous Ring.................................................................................................................................................................................................. 96
Call Forward Always ............................................................................................................................................................................................... 96
Call Forward Busy................................................................................................................................................................................................... 97
Call Forward No Answer......................................................................................................................................................................................... 97
Anonymous Call...................................................................................................................................................................................................... 97
Do Not Disturb ....................................................................................................................................................................................................... 97
XSI F
EATURES
.................................................................................................................................................... 94
PHONE GUI CUSTOMIZATION ..................................................................................................................... 99
M
AIN MENU
L
INE KEY TABS
C
ONTROLLING MULTIPLE CALLS PER CALL KEY
Calls App Behavior.................................................................................................................................................................................................. 99
S
OFT KEY SET CUSTOMIZATION
Soft Key Set Parameter Syntax............................................................................................................................................................................. 100
Assignable Soft Keys............................................................................................................................................................................................. 101
Soft Key Set Parameters:...................................................................................................................................................................................... 103
L
INE KEY WINDOW CUSTOMIZATION
LED P
LED Settings Parameters ...................................................................................................................................................................................... 106
Call State .............................................................................................................................................................................................................. 106
SCA State.............................................................................................................................................................................................................. 106
BLF State............................................................................................................................................................................................................... 107
Service State......................................................................................................................................................................................................... 107
ACD Agent State................................................................................................................................................................................................... 107
Presence State...................................................................................................................................................................................................... 107
Feature Key State ................................................................................................................................................................................................. 108
VMWI Lamp.......................................................................................................................................................................................................... 109
GUI M
Preferences Menu................................................................................................................................................................................................ 110
Settings Menu ...................................................................................................................................................................................................... 110
Product Information Menu .................................................................................................................................................................................. 110
Preferences Menu Item IDs.................................................................................................................................................................................. 110
Settings Menu Item IDs........................................................................................................................................................................................ 111
Product Info Menu Item IDs................................................................................................................................................................................. 111
P
HONE CUSTOMIZATION DATA
Startup Splash Screen........................................................................................................................................................................................... 112
Background Pictures............................................................................................................................................................................................. 112
Text Fonts Customization..................................................................................................................................................................................... 113
......................................................................................................................................................................99
.....................................................................................................................................................................99
........................................................................................................................... 99
............................................................................................................................................ 100
Soft Key Specification...................................................................................................................................................................................... 100
..................................................................................................................................... 104
ATTERN CUSTOMIZATION
ENU CUSTOMIZATION
............................................................................................................................................ 106
............................................................................................................................................... 110
............................................................................................................................................. 112
Copyright 2010-2015 Obihai Technology, Inc.
6

Language Customization with Dictionary Files..................................................................................................................................................... 115
Phone Book Pictures ............................................................................................................................................................................................ 123
Ring Tones............................................................................................................................................................................................................ 123
Phone Customization Data Package..................................................................................................................................................................... 123
Uploading Customization Data Package to the Phone ......................................................................................................................................... 123
I
NTERNAL DATA STORAGE PATHS FOR USER PREFERENCES SETTINGS
........................................................................................... 124
OBIPHONE XML APPLICATIONS................................................................................................................. 127
A
CTION
URLS – P
Action URL Feature Key........................................................................................................................................................................................ 127
Action URL Soft Key.............................................................................................................................................................................................. 127
SIP N
OTIFY – PUSH MODEL
XML A
PP DEVELOPMENT
ULL MODEL
.............................................................................................................................................. 127
................................................................................................................................................. 127
.................................................................................................................................................... 128
AUTO ATTENDANT.................................................................................................................................... 129
AA C
ALLBACK SERVICE
U
SER RECORDED PROMPTS
C
USTOMIZING AA PROMPT LISTS
........................................................................................................................................................ 129
.................................................................................................................................................. 130
.......................................................................................................................................... 130
VOICE GATEWAYS AND TRUNK GROUPS................................................................................................... 132
V
OICE GATEWAY
T
RUNK GROUPS
...............................................................................................................................................................132
.................................................................................................................................................................132
LDAP ......................................................................................................................................................... 133
LDAP S
ERVICE SETUP
Client Authentication ........................................................................................................................................................................................... 134
LDAP D
IRECTORY SEARCH APPLICATION
Search Fields ........................................................................................................................................................................................................ 135
......................................................................................................................................................... 133
................................................................................................................................ 134
IP PHONE SETTINGS .................................................................................................................................. 137
P
HONE SETTINGS
DigitMap and OutboundCallRoute ....................................................................................................................................................................... 137
Primary Line ......................................................................................................................................................................................................... 137
Network Directory................................................................................................................................................................................................ 138
Buddy List............................................................................................................................................................................................................. 138
User Preferences Settings .................................................................................................................................................................................... 138
Page Groups 1 and 2 ............................................................................................................................................................................................ 138
L
INE KEYS
P
ROGRAMMABLE KEYS
S
IDE CAR 1 AND SIDE CAR
...............................................................................................................................................................137
......................................................................................................................................................................... 138
....................................................................................................................................................... 138
2 ................................................................................................................................................ 138
AUDIO CODEC PROFILES............................................................................................................................ 140
TONE PATTERNS........................................................................................................................................ 141
T
ONE PROFILE FEATURES OF THE OBI DEVICE
T
ONE EXAMPLES
:............................................................................................................................................................... 142
.......................................................................................................................... 141
RINGTONES AND RING PATTERNS............................................................................................................. 145
STAR CODE PROFILES ................................................................................................................................ 147
Copyright 2010-2015 Obihai Technology, Inc.
7

S
TAR CODE SCRIPT VARIABLES
S
TAR CODE SCRIPT ACTIONS
S
TAR CODE SCRIPT FORMAT
S
TAR CODE SCRIPT EXAMPLES
Default Star Codes................................................................................................................................................................................................ 149
(VAR).................................................................................................................................... 147
(ACT).......................................................................................................................................148
................................................................................................................................................ 148
.............................................................................................................................................. 149
USER SETTINGS ......................................................................................................................................... 151
S
PEED DIAL NUMBERS
U
SING SPEED DIAL NUMBER AS AD HOC GATEWAY
........................................................................................................................................................ 151
..................................................................................................................151
CALL ROUTING .......................................................................................................................................... 152
T
RUNKS, ENDPOINTS, AND TERMINALS
S
UPPORTED 2-WAY CALL BRIDGES ON THE OBI
C
ALL ROUTING – THE OBI WAY
I
NBOUND CALL ROUTE CONFIGURATION
O
UTBOUND CALL ROUTE CONFIGURATION
.................................................................................................................................. 152
1000 ................................................................................................................ 152
........................................................................................................................................... 153
................................................................................................................................ 153
............................................................................................................................. 155
DIGIT MAP CONFIGURATION .................................................................................................................... 158
M
ATCHING AGAINST MULTIPLE RULES IN DIGIT MAP
Forcing Interdigit Timeout With The Hash/Pound (#) Key.................................................................................................................................... 165
I
NVOKE SECOND DIAL TONE IN DIGIT MAP
C
HANGE INTERDIGIT LONG TIMER DYNAMICALLY AFTER PARTIAL MATCH
U
SER DEFINED DIGIT MAPS
A U
SER DEFINED DIGIT MAP FOR IPV4 DIALING
................................................................................................................................................. 166
............................................................................................................................. 165
...............................................................................................................164
..................................................................................... 166
.....................................................................................................................166
ADMINISTRATIVE FEATURES..................................................................................................................... 167
N
ATIVE WEB SERVER
S
YSLOG
............................................................................................................................................................................ 167
F
ACTORY RESET
F
IRMWARE UPDATE
Automated Firmware Update .............................................................................................................................................................................. 167
C
ONFIGURATION BACKUP AND RESTORE
A
UTO PROVISIONING
OBiTALK Provisioning ........................................................................................................................................................................................... 167
ITSP Provisioning .................................................................................................................................................................................................. 167
C
USTOMIZATION DATA AUTO UPDATE
Customization Data Package................................................................................................................................................................................ 168
Auto Update Operation........................................................................................................................................................................................ 168
Auto Update Configuration Parameters............................................................................................................................................................... 168
.......................................................................................................................................................... 167
.................................................................................................................................................................167
........................................................................................................................................................... 167
................................................................................................................................ 167
.......................................................................................................................................................... 167
................................................................................................................................... 167
DEVICE WEB PAGE AND CONFIGURATION PARAMETER REFERENCE......................................................... 170
S
TATUS
............................................................................................................................................................................ 170
System Status....................................................................................................................................................................................................... 170
Reboot Reason Codes........................................................................................................................................................................................... 171
Call Status Web Page............................................................................................................................................................................................ 171
SP Services Statistics............................................................................................................................................................................................. 172
OBIWIFI C
ONFIGURATION WEB PAGE AND PARAMETER REFERENCE
........................................................................................... 173
Copyright 2010-2015 Obihai Technology, Inc.
8

WiFi Settings Web Page........................................................................................................................................................................................ 173
WiFi Scan Web Page............................................................................................................................................................................................. 173
S
YSTEM MANAGEMENT PARAMETERS
WAN Parameters.................................................................................................................................................................................................. 174
Auto Provisioning Parameters.............................................................................................................................................................................. 177
Zero-Touch, Massive Scale Remote Provisioning: ................................................................................................................................................ 180
Device Admin Parameters.................................................................................................................................................................................... 180
D
EVICE UPDATE WEB PAGE
Firmware Update ................................................................................................................................................................................................. 181
Possible Error Messages on Firmware Update Failure: ................................................................................................................................... 181
Backup (Customized) AA User Prompts................................................................................................................................................................ 181
Backup Configuration........................................................................................................................................................................................... 182
Restore Configuration .......................................................................................................................................................................................... 182
Reset Configuration (to Factory Default).............................................................................................................................................................. 182
S
ERVICE PROVIDER CONFIGURATION PARAMETERS
ITSP Profile X – General Web Page (X = A, B, C, D, E, F)........................................................................................................................................ 182
ITSP Profile X – SIP Web Page (X = A, B, C, D, E, F)................................................................................................................................................ 183
ITSP Profile X – RTP Web Page (X = A, B, C, D, E, F)............................................................................................................................................... 189
V
OICE SERVICES
SPn Service Web Page (n = 1, 2, 3, 4, 5, 6)............................................................................................................................................................ 189
OBiTALK Service Configuration............................................................................................................................................................................. 196
Auto Attendant Web Page ................................................................................................................................................................................... 199
Gateways and Trunk Groups Web Page ............................................................................................................................................................... 201
OBiBluetooth Web Page....................................................................................................................................................................................... 202
IP P
HONE SETTINGS
Phone Settings Web Page..................................................................................................................................................................................... 203
Line Keys .............................................................................................................................................................................................................. 207
Programmable Keys ............................................................................................................................................................................................. 207
Side Car m, m = 1, 2.............................................................................................................................................................................................. 207
LED Settings.......................................................................................................................................................................................................... 208
Soft Key Sets......................................................................................................................................................................................................... 210
C
ODEC PROFILES
Codec Profile X Web Page (X = A, B)..................................................................................................................................................................... 210
T
ONE PROFILES
Tone Profile X Web Page (X = A, B)....................................................................................................................................................................... 213
R
ING PROFILES
Ring Profile X Web Page (X = A, B)........................................................................................................................................................................ 215
S
TAR CODE PROFILES
Star Code Profile X Web Page (X = A, B) ............................................................................................................................................................... 216
U
SER SETTINGS
User Preferences Web Page................................................................................................................................................................................. 217
Speed Dials Web Page.......................................................................................................................................................................................... 220
User Defined Digit Maps Web Page ..................................................................................................................................................................... 220
.................................................................................................................................................................189
................................................................................................................................................................210
.................................................................................................................................................................213
..................................................................................................................................................................215
.................................................................................................................................................................217
................................................................................................................................................. 181
........................................................................................................................................................... 203
.......................................................................................................................................................... 216
.................................................................................................................................... 174
................................................................................................................... 182
Copyright 2010-2015 Obihai Technology, Inc.
9

Audience
Internet Telephony Service Providers (ITSPs), Managed Service VARS, IT Professionals, Technology Hobbyists.
Note for Australian readers: Throughout this document we refer to ITSPs – treat this term the same as you would for
VSP (Voice Service Provider).
Note to End Users
End users are highly encouraged to use the OBiTALK web portal to configure and manage their OBi devices.
Visit www.obitalk.com to create an OBiTALK account and within the portal click “Add Device” to add your OBi Phone to
the portal. You can change all the advanced settings within this guide via the portal by using “OBi Expert” mode. To
enter OBi Expert, click on your device and at the next page you’ll see a link to enter the expert configuration page.
Within this page you can then click another link to bring up the device’s complete set of configuration parameters.
You can enable 1-click expert access from the OBi Dashboard by enabling this option under your user settings within
the portal (This option is off by default).
Where to Go for Help
Obihai has a number of options available to customers who are seeking help regarding their Obihai products.
• Obihai Support Web Site: http://www.obihai.com/support.html
On this web site visitors will find links to the OBiTALK forum, Documents and Downloads, Tools Tips and Tricks as well as
an FAQ / Knowledge Base.
• Enter a Support Request at: http://www.obihai.com/supportTicketForm.php
• Go to the OBiTALK forum at: www.obitalk.com/forum
• E-mail the Obihai Support Team at: support@obihai.com
Copyright 2010-2015 Obihai Technology, Inc.
10

Notational Conventions
A device configuration parameter and it’s value is represented in the format:
Parameter Group Name::
Parameter Group Name::
ParameterName
ParameterName
= Parameter Value
= {replace-this-with-actual-value}
Parameter Group Name is the heading of the parameter group on the left side panel of the device configuration web
page (or OBi Expert) and may contain spaces. When a group heading has more than one level, each level is separated
with a – , such as:
Services Providers - ITSP Profile A – SIP::
ParameterName
is the name of the parameter as shown on the web page and MUST NOT CONTAIN ANY SPACES.
Parameter Value is the literal value to assign to the named parameter and may contain spaces. Group Name or its
top-level headings may be omitted when the context is clear. For example:
SP1 Service::
ITSP Profile A - SIP::
ProxyServerPort
AuthUserName
ProxyServer
= 5082
= 4082224312
= sip.myserviceprovider.com
[optional values]
Boolean Values
Parameters that take a Boolean (true or false) value can be identified on the phone native configuration web pages (or
OBi Expert) by a check box / tick box (instead of an input-box or drop-down list) next to the parameter name.
Throughout the document we may loosely refer to a Boolean value as enable/disable or yes/no, but the only valid
Boolean parameter values to use in a phone configuration file that is recognized by the phone is either true/false
or True/False (case-sensitive!). This is equivalent to checked/unchecked on the configuration web pages.
Copyright 2010-2015 Obihai Technology, Inc.
11

Introduction
The OBi1000 family of IP Phones, including the OBi1022, OBi1032 and OBi1062, support HD Voice with a full-duplex
speakerphone, have a high resolution color active-matrix TFT LCD display with a customizable user interface, as well as
a large number of fully programmable Feature Keys.
All OBi IP Phone models share the same functionalities:
• Support all standard SIP-based IP PABX and ITSPs/VSPs
• Suited for all service provider and enterprise deployment environments, regardless of size
• For do-it-yourself (DIY) or self-service installations, anyone regardless of whether they are a home user, small
business, or a corporate IT department can easily install, setup and manage the OBi IP Phone
• Integrate seamlessly with popular softswitch architectures such as BroadSoft, FreePBX, Asterisk, Elastix,
Metaswitch and FreeSwitch, to name a few
• Cloud management via OBiTALK.com with both a user portal as well as an ITSP partner portal with an optional
restful API
OBi IP Phone Hardware
This section summarizes the hardware characteristics of each OBi IP Phone. The following table provides a specification
summary for each model, while figures 1 through 4 show the front and back of each OBi IP Phone as well as the phone
with an attached OBi1000e Side Car.
OBi1062 OBi1032 OBi1022
LCD Display 480x272, 4.3" Color TFT 480x272, 4.3” Color TFT 320x160, 3.5” Color TFT
Ethernet Ports 2x GigE 2x Fast Ethernet 2x Fast Ethernet
PoE Yes Yes Yes
Line Keys/Virtual Line Keys 6/24 3/12 5/10
Programmable Keys 8 8 1
USB 2.0 Ports 2x USB 2.0 2x USB 2.0 1x USB 2.0
3.5mm Headset Jack Yes Yes Yes
RJ9 Headset Port Yes Yes No
Electronic Hook Switch (EHS)
Support
WiFi Yes (built-in) Yes (requires OBiWiFi USB
Bluetooth Yes (built-in) Yes (requires OBiBT USB
FXO Telco Line Service Yes (requires OBiLINE USB
HD Voice Yes Yes Yes
HD Full-Duplex Speakerphone Yes Yes Yes
Message Waiting Light Yes Yes Yes (via Programmable Key)
Sidecar* Support
*
Sidecars are available
separately from Obihai. Each
sidecar provides 16 additional
feature keys – Order Obihai
model OBi1000e
Yes (requires optional
OBiEHS)
Adapter)
Yes, 16 Keys per sidecar (up
to 2)
Yes (requires optional
OBiEHS Kit)
Adapter)
Adapter)
Yes (requires OBiLINE USB
Adapter)
Yes, 16 Keys per sidecar (up
to 2)
Yes (requires OBiWiFi USB
Adapter)
Yes (requires OBiBT USB
Adapter)
No
No
Copyright 2010-2015 Obihai Technology, Inc.
12
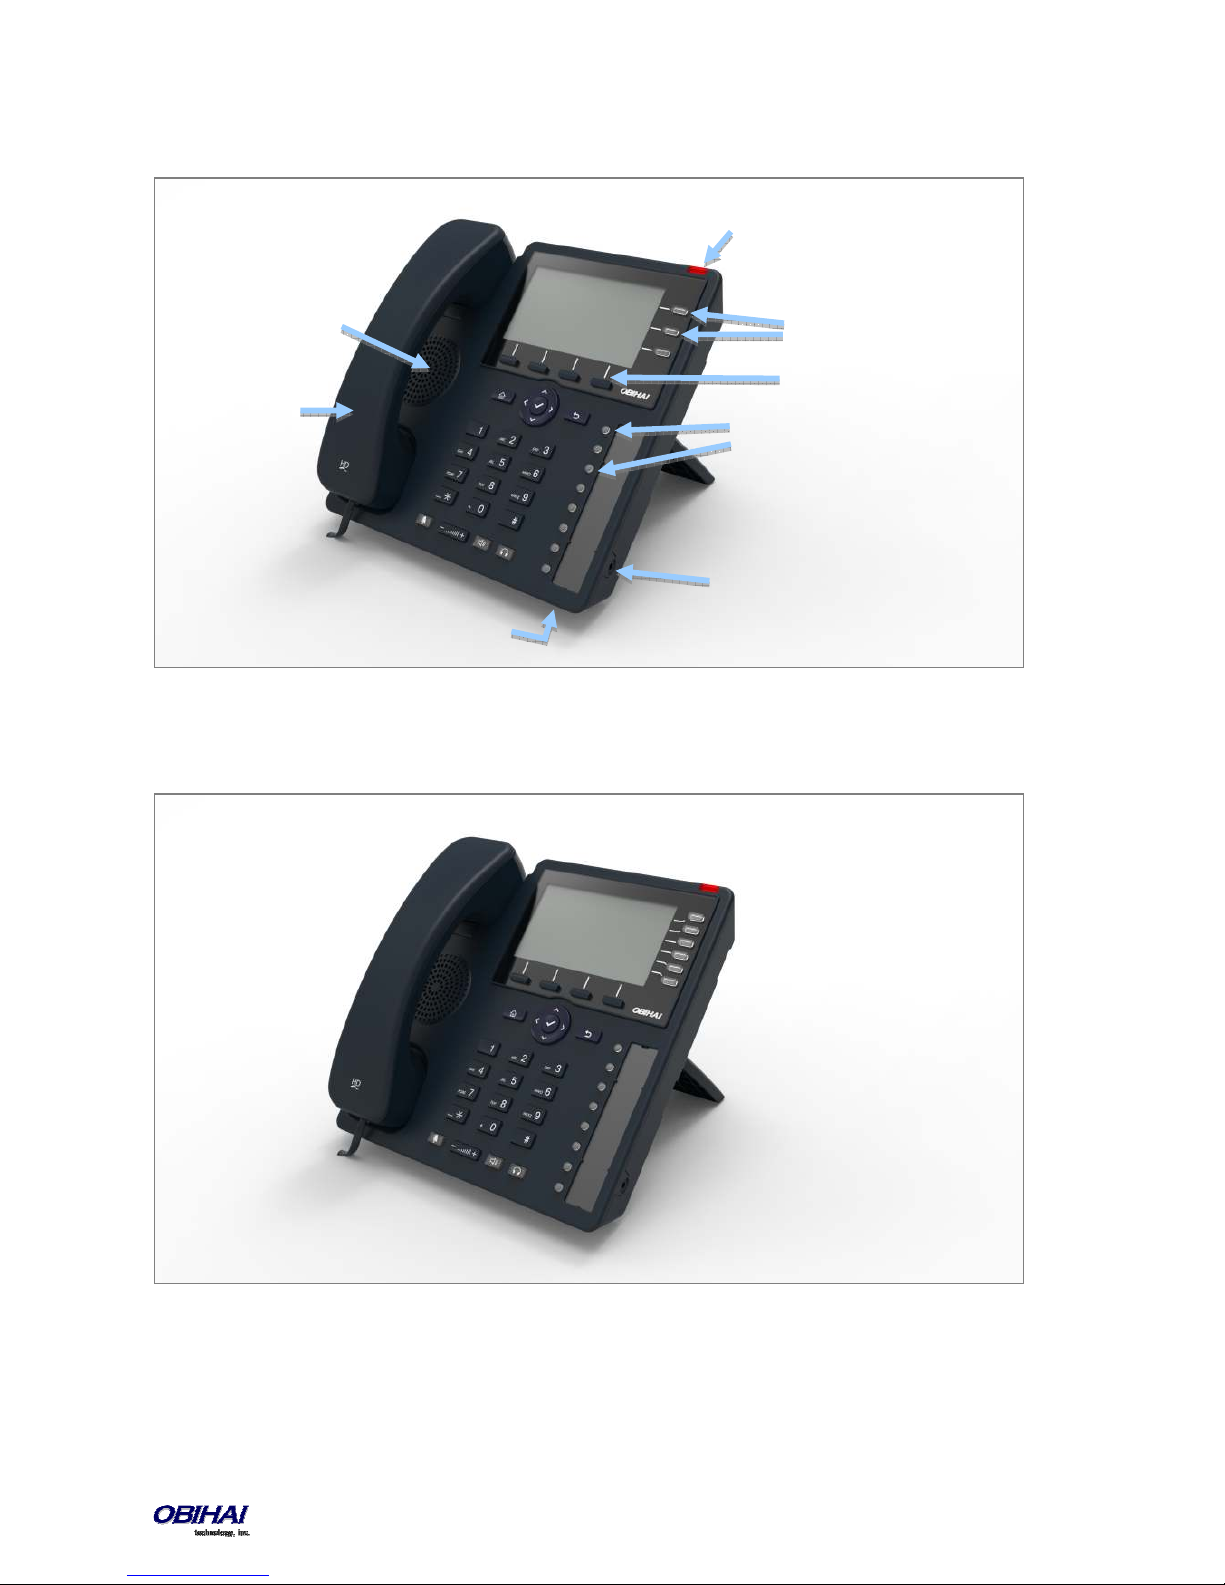
MWI Lamp
Speaker (HD)
Handset (HD)
Figure 1: Front of the OBi1032 IP Phone
Line Keys
(LK1– LK3 )
Soft Keys
(SK1–SK4)
Programmable Keys
(PK1–PK8)
Headset Jack
(3.5mm)
Microphone
Figure 2: Front of the OBi1062 IP Phone
Copyright 2010-2015 Obihai Technology, Inc.
13

(SK1–SK16)
Figure 3: Rear of the OBi1032 and OBi1062 IP Phones
Figure 4: OBi1062 with an attached OBi1000e Sidecar (Option Not Available on OBI1022)
Sidecar 1
Sidecar Keys
Copyright 2010-2015 Obihai Technology, Inc.
14

Line Keys
(LK1–LK5)
Programmable Key
(PK1: may be used
as Next Tab+MWI)
Headset Jack
(3.5mm)
Figure 5: Front of the OBi1022 IP Phone
USB Port
Wall Mounting
Points
Stand Mouting
Points
Power Socket
(12V DC )
Ethernet Switch Port
(Supports PoE)
Ethernet Passthrough
Port
Handset Port
Figure 6: Rear of the OBi1022 IP Phone
Copyright 2010-2015 Obihai Technology, Inc.
15

Accessories Available Separately from Obihai
The OBi IP Phone supports the following accessories:
• 12V DC Power Adapter: To power the OBi IP Phone where Power over Ethernet (PoE) is not available
• OBiWiFi USB Adapter: To connect the OBi IP Phone to a WiFi network
• OBiBT USB Adapter: To attach Bluetooth devices such as headsets and mobile phones
• OBi1000e Sidecar (Not available on OBi1022): To provide 16 additional feature keys. Up to two sidecars may
be daisy chained from the auxiliary (AUX) port on the rear of the OBi IP Phone.
• OBiLINE FXO Adapter (Not available on OBi1022): To connect to a Plain Old Telephone System (POTS), for
example, to connect the OBi to the PSTN via phone jack provided by your telephone company or to connect to
an analog PABX
Other Accessories
The OBi IP Phone also supports the follow storage devices for copying ring tones, background images and other media
to the device:
• USB Disk Drives
• USB Thumb Drives
Connecting the OBi IP Phone
The OBi can be powered in two ways:
• Using an Ethernet switch that supports Power over Ethernet (PoE): Connect the Ethernet Switch Port (marked
SW) on the rear of the OBi to a PoE Ethernet switch using Category-5 (or better) Ethernet cable
• Connecting an OBiPS 12V DC Power Adapter: Plug the 12v jack into the 12v socket on the back of the OBi IP
Phone, then connect AC (mains) adapter to the AC (mains) power socket.
Connecting the Phone to the Network
You must connect the phone to a wired LAN or WiFi network in order to obtain phone service. In most cases your
network will require an internet connection and your service provider will set out requirements for the required
capacity of your connection to support voice services. In some cases the OBi IP Phone may be deployed on a LAN or
WAN with no Internet access – for example in a corporate environment within a voice-only VLAN.
Connecting to the LAN Over Wired Ethernet
Connect a Category-5 (or better) Ethernet cable from an available switch port to the RJ45 Port labeled SW on the back
of the phone. Note that the SW port also supports PoE - if it is connected to a standard PoE switch port, it can draw
power from the switch without needing to connect to an OBiPS 12V DC power adapter (sold separately).
Connecting to the WLAN Over WiFi
The OBi IP Phone can also connect to a phone service over a WiFi network. The OBi1062 has built-in WiFi and the
OBi1022 and OBi1032 require the OBiWiFi USB Wireless dongle in order to connect to a wireless network. The phone
must join the wireless network by connecting to a WiFi Access Point (AP). The user may use the WiFi setup utility within
the Settings app to scan for APs that are nearby, identify the correct AP by its broadcast SSID (WiFi network name) and
connect to it. If security is enabled on the AP, an input prompt will pop up on the screen to let you enter the WiFi
access password. Upon entry of correct credentials and connection to WiFi the network, the screen will display an icon
on the status bar that indicates the access point is connected and also shows the signal strength. For further setup
information, read “WiFi Setup” in the “OBi Phone Apps” section of this document.
Overview of Phone Features
Copyright 2010-2015 Obihai Technology, Inc.
16

Administrative Features
• Web pages of phone status and configuration of all parameters
• Remote Provisioning
•
•
OBiTALK Provisioning
Automated Firmware Update
Voice Features
• Six (6) SIP or Google Voice (GV) Accounts
• Universal inter- and intra service two-way call bridging among the 6 SIP/GV services, the OBiTALK service, and
the OBiBluetooth service
• Universal intra- and inter-service call transfer and call forward by local call bridging
• Automatic Attendant with customizable audio prompts that may be recorded directly on the phone
• SIP Support for Voice Over IP
• OBiTALK Managed VoIP Network for OBi Endpoint Devices & Applications
• High Quality Voice Encoding Using G.711, G.726, G.729, G.722, iLBC, and OPUS Algorithms
• Recursive Digit Maps and Associated Call Routing (Outbound, Inbound)
Call Features
• Message Waiting Indication - Visual and Tone Based
• Four Way Conference Calling with Local Mixing
• Caller ID and Calling Line ID Presentation
• Call Waiting
• Call Forward - Unconditional
• Call Forward on Busy
• Call Forward on No Answer
• Call Transfer
• Call Park
• Anonymous Call
• Block Anonymous Call
• Do Not Disturb
• Call Return
• Repeat Dialing
• Multicast Paging Groups
• Music On Hold
Soft Switch Support
• BroadSoft
• FreePBX
• MetaSwitch
• FreeSwitch
Integrated GUI Applications
• Phone Book
• Call History
• 3rd Party XML Apps
Copyright 2010-2015 Obihai Technology, Inc.
17

Complementary Obihai Products and Services
OBi1000 IP Phones are complemented by other OBi Products & Services:
OBiTALK: A customer portal for device management allowing members to add people and associated OBi endpoints to
“circles of trust” such that additional functionality can be shared amongst authorized users.
OBiON for iPhone, iPad, iPod touch & Android Devices: An application for iPhone, iPad, iPod touch and Android
devices which makes possible placing and receiving calls to/from other OBi endpoints.
Copyright 2010-2015 Obihai Technology, Inc.
18

Configuration and Management Interfaces
There are several ways to configure and manage the OBi1000. Use the method (or combination of methods) that best
suit your deployment scenario.
Device Local Configuration
The OBi IP Phone has an integrated device management web server that can be accessed from any standard (desktop
or tablet) web browser. Although all popular browsers are tested for compatibility with the OBi device management
web server, there may be inconsistencies that arise from time to time. Please contact support@obihai.com if you have
any questions about the OBi device management web server and how it appears in your browser window.
To access the OBi IP Phone Device Management Web Page:
1. Connect the phone to the LAN
2. From the phone Main Menu, select Settings
3. Under Settings, the first item, Network, shows the IP address of the phone
4. Enter the phone IP Address as the URL of the web site you want to visit in your web browser
5. When prompted by the web browser, enter admin for user name and admin for password. Note that the
password is the standard factory default value. If the value has been changed, you must enter the correct
value instead.
When you access the OBi device management web page, you may be prompted to enter a user name and password.
There are two levels of access to the OBi web page – User Level and Admin Level. The default “user name / password”
for the User Level access is “user / user”. The default “user name / password” for the Admin Level access is “admin /
admin”. The Admin and/or User passwords may have been changed using the OBi device web page, provisioning by a
service provider or via the OBiTALK web portal (Admin only). Please be sure you have access to the correct Admin or
User password before you attempt to log on to the OBi Device Management Web Page.
The OBi device management web page is organized into sections to allow for a manageable and compartmentalized
approach to configuring the many hundreds of parameters available on the OBi device. Use the expandable /
collapsible menu tree on the left side of the page to easily navigate the various configuration parameter sections of the
OBi device.
IMPORTANT: Every configuration page must be submitted individually after changes made on the
page. Otherwise those changes will be discarded once you navigate to another page. Most
changes will require a reboot of the unit (by clicking the reboot button for instance) to take
effect. However, you may reboot the unit just once after you have made and submitted all the
necessary changes on all the pages.
Copyright 2010-2015 Obihai Technology, Inc.
19
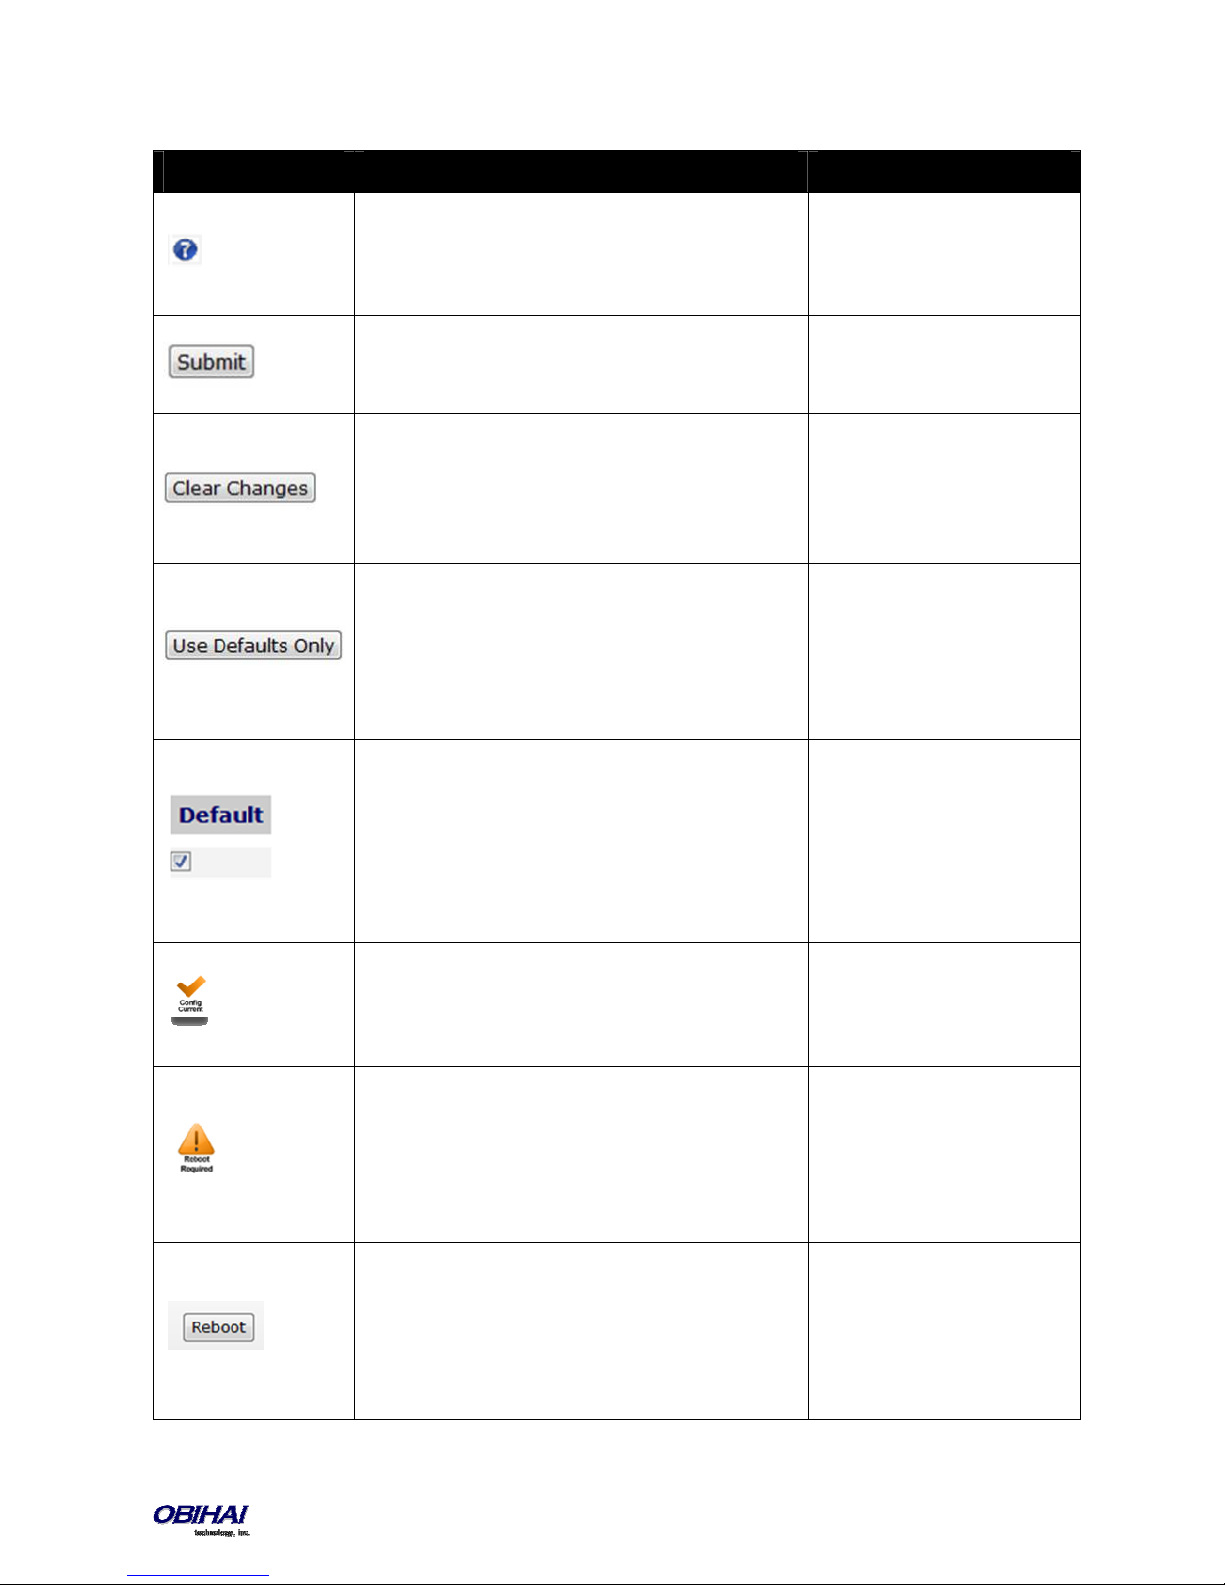
Web Page Conventions and Icons & Buttons:
Icon / Button Description Remark
This icon indicates that there is more information
available which might describe the workings, limits or
thresholds for the parameter to which it is adjacent. You
can mouse over this icon to reveal this information.
When a modification has been made to a parameter on
a page, the Submit button MUST be clicked before
proceeding to another page.
If you make changes to a parameter on a page and you
do not want to keep them for submission, click the
“Clear Changes” button to revert back to the parameter
setting present before the most recent change was
entered.
Click the “Use Defaults Only” button if you want to
revert all parameters on a given page to their Default
settings. If you want to revert just one or two
parameters on a page to default settings you should use
the Default check box found on the right side of the
parameter. See next Item.
When you wish to modify a parameter away from its
default setting, you should un-check the ‘Default’ box.
This will open the parameter field for access and
modification. If there is a non-default setting in a
parameter field and you want to revert that parameter
back to its default setting, check the “Default” box and
the default setting will appear.
You will be prompted to confirm
that you want all the parameters
on the page to revert back to
system default settings.
Default value of a parameter
may be changed with a firmware
upgrade. Leaving a parameter at
default setting allows the device
to use proper default value with
the firmware currently installed
in the device
This icon indicates that the configuration currently
programmed on the OBi device is “set” and “running”.
No reboot is necessary if you have submitted
configuration modifications.
After Submitting changes to a web page on the OBi, the
“Reboot Required” icon may appear. In order for the
modifications to run, you will need to reboot the OBi.
The “Reboot” button is used when the “Reboot
Required” icon appears indicating the OBi device
requires a reboot to invoke one or more parameter
modifications.
Copyright 2010-2015 Obihai Technology, Inc.
This icon does not indicate the
currently running configuration
is working properly.
You can continue to make
modifications to OBi parameters
– on separate pages if necessary
– before you reboot and ”set”
the modifications in the running
system.
When performing a System
Configuration Reset, the Reboot
button does not need to be
pressed. The OBi will reboot
automatically when the “Reset”
button is selected.
20
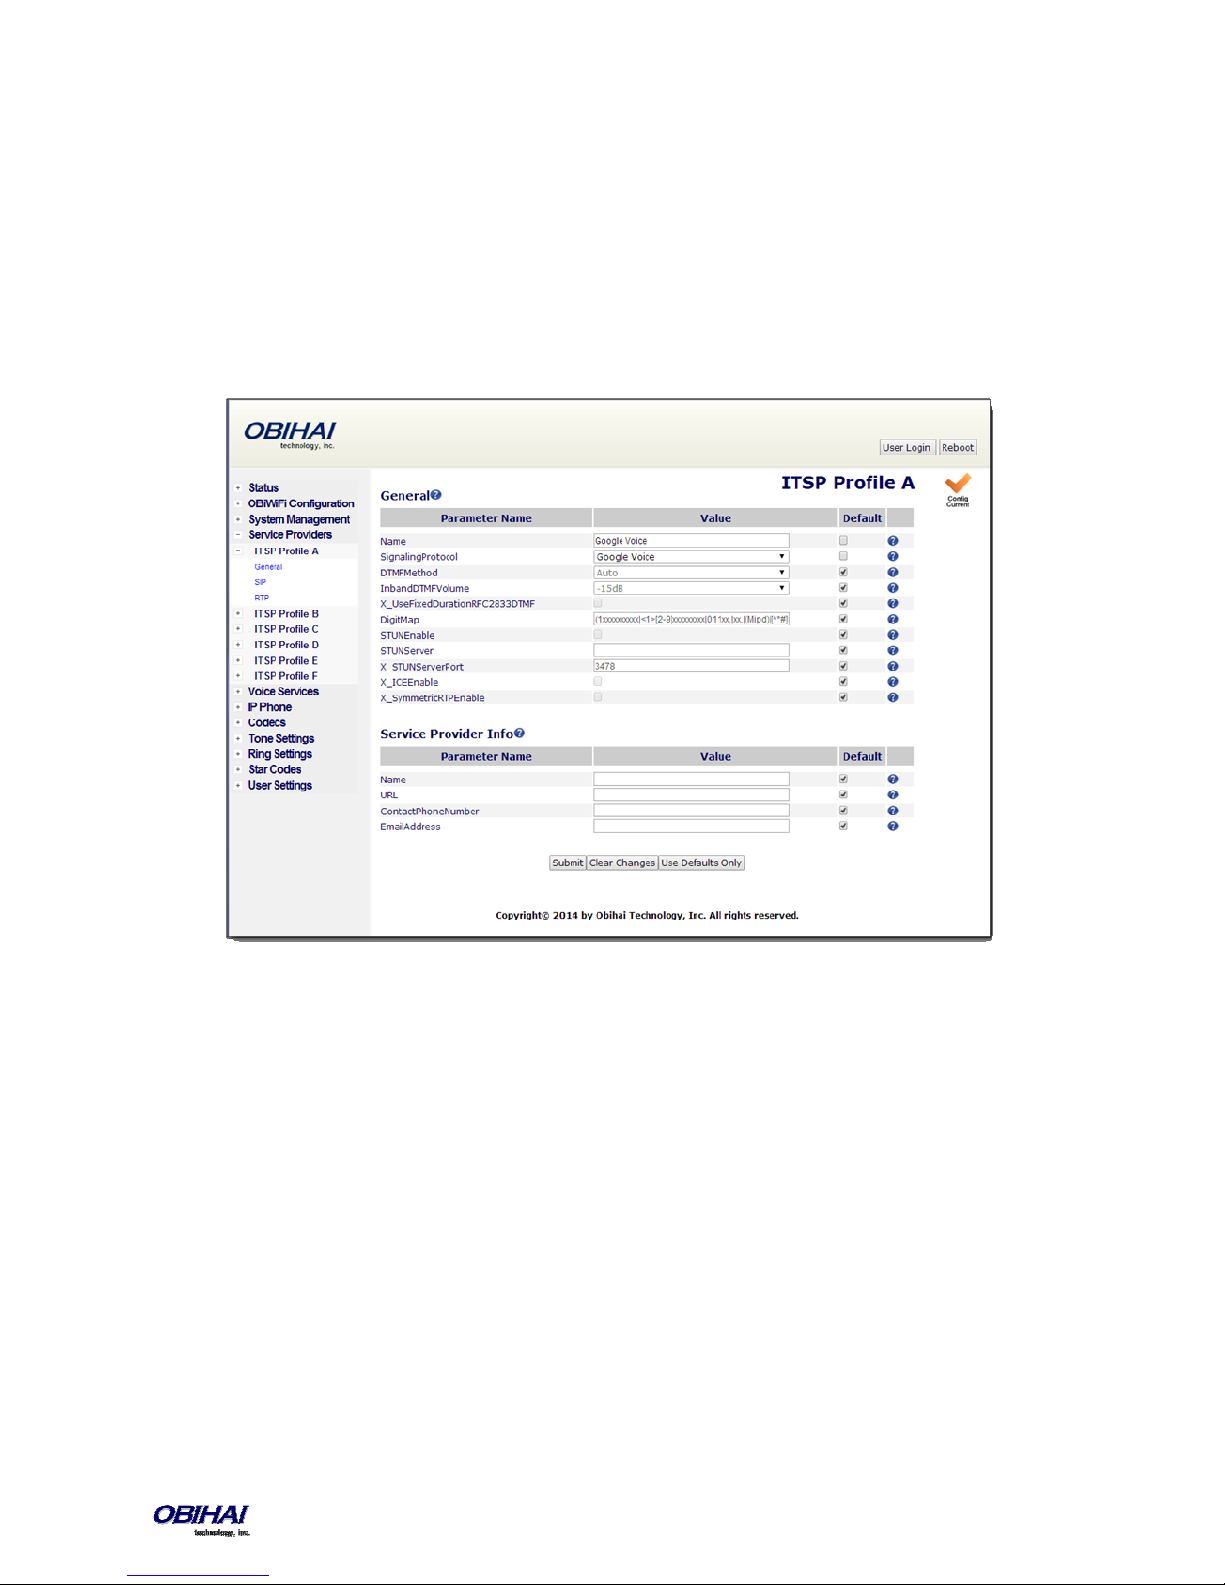
Local Configuration Web Page Layout
There are many configurable parameters available on the OBi1000. These parameters are organized into a number of
device configuration web pages. By browsing through the web pages you can discover all the parameters that can be
configured, then read or set their values. Each web page is divided into three frames: A top frame with the Obihai
banner (which can be customized by the administrator), a left frame that lists the links to the available pages, and a
main frame that shows the parameters of the currently selected page. An example of a device configuration web page
is shown below.
Below is the list of available device configuration web pages:
Status
• System Status
• Call Status
• SP Services Stats
OBiWiFi Configuration
• WiFi Settings
• WIFi Scan
System Management
• WAN Settings
• Auto Provisioning
• Device Admin
• Device Update
Copyright 2010-2015 Obihai Technology, Inc.
21

Service Providers
ITSP Profile A (repeated for ITSP Profile B, C, D, E, and F)
• General
• SIP
• RTP
Voice Services
• SP1 Service
• SP2 Service
• SP3 Service
• SP4 Service
• SP5 Service
• SP6 Service
• OBiTALK Service
• Auto Attendant
• Gateways and Trunk Groups
• OBiBluetooth
IP Phone
• Phone Settings
• Line Keys
• Programmable Keys
• Side Car 1
• Side Car 2
• Soft Keys
• LED Settings
• LDAP
• Feature Key Customization
Codec Profiles
• Codec Profile A
• Codec Profile B
Tone Settings
• Tone Profile A
• Tone Profile B
Ring Settings
• Ring Profile A
• Ring Profile B
Star Codes
• Star Code Profile A
• Star Code Profile B
User Settings
• User Preferences
• Speed Dials
• User Defined Digit Maps
Copyright 2010-2015 Obihai Technology, Inc.
22

Remote Provisioning
This is the process by which the OBi downloads a configuration file from a server, which may be located in the cloud or
in the same enterprise. The configuration file may contain all the necessary parameter values for the phone to function
normally, it may also tell the device to download an additional configuration file from a different URL, or to download a
different firmware to replace the current one, and so on. The configuration file format and parameter naming
conventions are proprietary to Obihai but are common across all Obihai products.
There are currently two configuration file formats supported: A full XML format with the XML tags in full text and a
short XML format with the XML tags substituted with a single letter abbreviation. The XML structure and parameter
naming convention closely follows TR-104. For a full description of the configuration file and parameter names, please
refer to the OBi Device Provisioning Guide.
Similar to the way parameters are grouped under different device configuration web pages, parameters are grouped
into a number of configuration objects for remote provisioning. In fact you will find a near one-to-one correspondence
between these objects and their location within the configuration web pages. To illustrate this, consider the web page
SP1 Service, the SIP Credentials section:
The corresponding configuration object in a phone configuration XML file is:
VoiceService.1.VoiceProfile.1.Line.1.SIP.
as shown below:
<Object>
<Name>VoiceService.1.VoiceProfile.1.Line.1.SIP.</Name>
<ParameterValueStruct>
<Name>AuthUserName</Name>
<Value>john.j.smith@gmail.com</Value>
</ParameterValueStruct>
<ParameterValueStruct>
<Name>AuthPassword</Name>
<Value>zYz123#$12</Value>
</ParameterValueStruct>
<ParameterValueStruct>
<Name>URI</Name>
<Value X_UseDefault="Yes"/>
</ParameterValueStruct>
<ParameterValueStruct>
<Name>X_MyExtension</Name>
<Value>16188</Value>
Copyright 2010-2015 Obihai Technology, Inc.
23

</ParameterValueStruct>
<ParameterValueStruct>
<Name>X_XsiUserName</Name>
<Value X_UseDefault="Yes"/>
</ParameterValueStruct>
<ParameterValueStruct>
<Name>X_XsiPassword</Name>
<Value X_UseDefault="Yes"/>
</ParameterValueStruct>
<ParameterValueStruct>
<Name>X_XmppDomain</Name>
<Value X_UseDefault="Yes"/>
</ParameterValueStruct>
<ParameterValueStruct>
<Name>X_XmppUserName</Name>
<Value X_UseDefault="Yes"/>
</ParameterValueStruct>
<ParameterValueStruct>
<Name>X_ContactUserID</Name>
<Value X_UseDefault="Yes"/>
</ParameterValueStruct>
<ParameterValueStruct>
<Name>X_EnforceRequestUserID</Name>
<Value X_UseDefault="Yes"/>
</ParameterValueStruct>
</Object>
Note that the dot (.) at the end of the object name is part of the name that must not be omitted in the XML file. You
must use the correct object name in order to create a valid configuration file for the phone. You can find the object
name corresponding to each configuration web page/section listed at the end of this document.
About ZT (Zero Touch): Device Customization at Obihai’s Factory
When products are shipped from the factory, they come with a set of default parameter values installed by Obihai for
all customers. A service is also available from Obihai such that products shipped to a particular customer can have a
small number of parameter values customized for that customer. For example, a very useful parameter to customize is
the ITSP Provisioning::
the first time a new phone is powered on and connected to the network, it can automatically contact the designated
URL to get the initial configuration file; hence the name “Zero-Touch”.
Note: ZT devices must contact OBiTALK.com one time to get the customized values before they can start normal
operation. Make sure the device can access the Internet before first use.
ConfigURL
parameter which tells the phone where to download a configuration file. With this,
Copyright 2010-2015 Obihai Technology, Inc.
24

OBiTALK Portals
OBiTALK.com is a device management portal website to serve Obihai customers. OBiTALK.com uses remote
provisioning to manage OBi devices; it stores, or dynamically generates on demand, a configuration file for each
managed device which periodically checks in with the OBiTALK server for configuration updates.
There are currently two levels of login at OBiTAK.com: User and ITSP.
User Portal
Users may add one or more OBi devices to their OBiTALK account to be managed. The portal has setup wizards that
help the user configure voice services on any of their devices. Users can also see the detailed status and current
parameter values of their devices and easily change settings on multiple devices from within the portal. The User Portal
has an upper limit of 20 devices per portal instance.
ITSP Portal
ITSPs can add devices to the OBiTALK portal and manage them in ways similar to regular users. ZT devices, on the other
hand, are added to the corresponding customer’s ITSP account automatically, as soon as the earmarked units are
manufactured at the factory. ZT device customers can monitor the status of their units on the portal and check if (and
when) new units have contacted the ZT server at OBiTALK.com and are successfully customized.
In addition, ITSPs can configure their devices on OBiTALK.com in batch mode by defining xml base profiles that may be
applied to many units. When a base profile is changed, all units using this base profile will be automatically updated
with any changes that have been made..
Telephone-IVR-Based Local Configuration
The OBi1000 has a built in IVR for checking and setting a small but essential subset of configuration parameters.
Configuration via the IVR is a legacy configuration method inherited from older OBi products that do not have a display
(such as the OBi202 and OBi508). It is included here nevertheless for additional convenience and also so that customers
who are already familiar with using the OBi IVR can perform basic configuration tasks without learning new specifics
about the phone first.
The IVR is, in essence, an instance of an automated attendant (AA). The OBi offers two instances of AA; referred to as
AA1 (or just AA where the suffix 1 is implied) and AA2. The IVR for configuration purposes is AA2, which we will just
refer to as the IVR to avoid confusion with AA1, which is the AA used to handle phone calls. AA is covered as the subject
of a later section.
To invoke the IVR, the user picks the phone, dials * * * and follows the announced instructions. In order for the * * *
number to work, make sure the digit map pattern *** is included in the Phone Settings::
the rule, {***:aa2} is included in the Phone Settings::
customized) default values of these parameters are, respectively:
([1-9]x?*(Mpli)|[1-9]S9|[1-9][0-9]S9|***|**0|**8(Mbt)|
**1(Msp1)|**2(Msp2)|**3(Msp3)|**4(Msp4)|**9(Mpp)|(Mpli))
and
{([1-9]x?*(Mpli)):pp},{**0:aa},{***:aa2},{(<**1:>(Msp1)):sp1},
{(<**2:>(Msp2)):sp2},{(<**3:>(Msp3)):sp3},{(<**4:>(Msp4)):sp4},
{(<**8:>(Mbt)):bt},{(<**9:>(Mpp)):pp},{(Mpli):pli}
OutboundCallRoute
DigitMap
parameter. The standard (non-
parameter, and
Copyright 2010-2015 Obihai Technology, Inc.
25

For the meaning of these values, please see the section Digit Maps and Call Routing. Some settings changes do require
a reboot of the phone to take effect. After such a change is entered and saved the phone will reboot automatically (or
when the user ends the current call).
Key Ahead: By pressing the appropriate button sequence on the telephone key pad, you can barge into the next menu
of the IVR or invoke a command without first waiting for the previous announcement to end.
Main Menu
The Main Menu after starting the IVR is a list of operations that can be selected by entering the corresponding 1-digit
option number, as listed below:
Selection Announcement What Can You Do?
1 Basic Network Status
Your IP address and DHCP status will
be read back to you.
2 Advanced Network Status
Your primary & back-up DNS server,
primary & back-up NTP server will be
read back to you.
3 DHCP Current Value
Your current value will be read back
to you and you will be given the
option to change the value
4 IP Address Current Value
Your current value will be read back
to you and you will be given the
option to change the value. If you
elect to enter a new value (static IP
address) DHCP will be disabled.
5 Password Current Value
Your current IVR password value will
be read back to you and you will be
given the option to change the value.
6 Please Wait (while OBi is checking for
software update)…
This is followed by either:
- Software Update Available. Press 1
to update software, OR
- Software Update Not Available
8 Restore Factory Default Press 1 to confirm device restore to
Press 0 to repeat the information.
Press 0 to repeat the information.
Press 1 to enter a new value.
Press 2 to set the default value.
Press 0 to repeat the information.
Press 1 to enter a new value.
Press 2 to set the default value.
Press 0 to repeat the information.
Press 1 to enter a new value.
Press 2 to set the default value.
Press 0 to repeat the information.
If an update is available, press 1 to
proceed with the update. The
software update process will start as
soon as you hang up the phone.
Warning: Once the software upgrade
process starts, the device’s power
LED will blink rapidly. Please make
sure the power and network cable
stay connected to the unit until the
process is complete.
factory default settings.
Press # to return to device
configuration menu.
Copyright 2010-2015 Obihai Technology, Inc.
26

Press # # to exit IVR.
9 Reboot OBi Device Press 1 to confirm device reboot.
Press # to return to device
configuration menu.
Press # # or hang up to exit IVR.
0 Additional Options
Enter option followed by the # key.
Access other configuration options of
the OBi device.
Additional Options (Menu 0)
There are many additional options beyond the top level options 1-9. Unlike the top level options, however, the list of
available additional options are not announced. The user must enter the corresponding option number followed by a #
key to select the particular option. The available additional options are listed in the tables below (grouped by function):
System Level Options
Selection
(Always Press “#” After Entering
Selection)
1 Firmware Version
2 IVR Password
3 Debug Level
4 Syslog Server IP Address
5 Syslog Server Port
Announcement What Can You Do?
The current value of the firmware version
will be read back.
The current value of the IVR password will
be read back.
The current value of the debug level will
be read back.
The current IP address of the syslog server
will be read back.
The current value of the syslog server port
will be read back.
Press 0 to repeat the information.
Press # to enter another configuration
selection.
Press 1 to enter a new value.
Press 2 to set the default value.
Press 0 to repeat the information.
Press # to enter another configuration
selection.
Press 1 to enter a new value.
Press 2 to set the default value.
Press 0 to repeat the information.
Press # to enter another configuration
selection.
Press 1 to enter a new value.
Press 2 to set the default value.
Press 0 to repeat the information.
Press # to enter another configuration
selection.
Press 1 to enter a new value.
Press 2 to set the default value of 514.
Press 0 to repeat the information.
Press # to enter another configuration
selection.
Network Related Configuration Options
Selection
(Always Press “#” After Entering
Announcement What Can You Do?
Copyright 2010-2015 Obihai Technology, Inc.
27

Selection)
20 DHCP Configuration
The current value of the DHCP
configuration will be read back.
21 IP Address
The current value of the IP address will be
read back.
22 Default Gateway
The current value of the default internet
gateway will be read back.
23 Subnet Mask
The current value of the subnet mask will
be read back.
24 DNS Server (Primary)
The current value of the primary DNS
server will be read back.
26 NTP Server (Primary)
The current value of the primary NTP
server will be read back.
Press 1 to enter a new value.
Press 2 to set the default value.
Press 0 to repeat the information.
Press # to enter another configuration
selection.
Press 1 to enter a new value.
Press 2 to set the default value.
Press 0 to repeat the information.
Press # to enter another configuration
selection.
Press 1 to enter a new value.
Press 2 to set the default value.
Press 0 to repeat the information.
Press # to enter another configuration
selection.
Press 1 to enter a new value.
Press 2 to set the default value.
Press 0 to repeat the information.
Press # to enter another configuration
selection.
Press 1 to enter a new value.
Press 2 to set the default value.
Press 0 to repeat the information.
Press # to enter another configuration
selection.
Press 1 to enter a new value.
Press 2 to set the default value.
Press 0 to repeat the information.
Press # to enter another configuration
selection.
SP1 Configuration Options
Selection
(Always Press “#” After Entering
Selection)
100 Enable Service Provider One (SP1)
101 Registration State of SP1
102 SP1 User ID
Announcement What Can You Do?
Press 1 to enter a new value.
The current value will be read back.
The current value will be read back.
The current value will be read back.
Copyright 2010-2015 Obihai Technology, Inc.
Press 2 to set the default value.
Press 0 to repeat the information.
Press # to enter another configuration
selection.
Press 0 to repeat the information.
Press # to enter another configuration
selection.
Press 1 to enter a new value.
Press 2 to set the default value.
28

Press 0 to repeat the information.
Press # to enter another configuration
selection.
167 SP1 Block Caller ID Enable Press 1 to enter a new value.
Press 2 to set the default value.
Press 0 to repeat the information.
Press # to enter another configuration
selection.
168 SP1 Block Anonymous Call Enable Press 1 to enter a new value.
Press 2 to set the default value.
Press 0 to repeat the information.
Press # to enter another configuration
selection.
172 SP1 Call Forward ALL – Enable / Disable Press 1 to enter a new value.
Press 2 to set the default value.
Press 0 to repeat the information.
Press # to enter another configuration
selection.
173 SP1 Call Forward ALL Number Press 1 to enter a new value.
Press 2 to set the default value.
Press 0 to repeat the information.
Press # to enter another configuration
selection.
174 SP1 Call Forward on Busy – Enable /
Disable
175 SP1 Call Forward on Busy Number Press 1 to enter a new value.
176 SP1 Call Forward on No Answer – Enable /
Disable
177 SP1 Call Forward on No Answer Number Press 1 to enter a new value.
Press 1 to enter a new value.
Press 2 to set the default value.
Press 0 to repeat the information.
Press # to enter another configuration
selection.
Press 2 to set the default value.
Press 0 to repeat the information.
Press # to enter another configuration
selection.
Press 1 to enter a new value.
Press 2 to set the default value.
Press 0 to repeat the information.
Press # to enter another configuration
selection.
Press 2 to set the default value.
Press 0 to repeat the information.
Press # to enter another configuration
selection.
Copyright 2010-2015 Obihai Technology, Inc.
29

SP2 Configuration Options
Selection
(Always Press “#” After Entering
Selection)
200 Enable Service Provider One (SP2)
201 Registration State of SP2
202 SP2 User ID
267 SP2 Block Caller ID Enable Press 1 to enter a new value.
268 SP2 Block Anonymous Call Enable Press 1 to enter a new value.
272 SP2 Call Forward ALL – Enable / Disable Press 1 to enter a new value.
273 SP2 Call Forward ALL Number Press 1 to enter a new value.
274 SP2 Call Forward on Busy – Enable /
275 SP2 Call Forward on Busy Number Press 1 to enter a new value.
Announcement What Can You Do?
Press 1 to enter a new value.
The current value will be read back.
The current value will be read back.
The current value will be read back.
Disable
Press 2 to set the default value.
Press 0 to repeat the information.
Press # to enter another configuration
selection.
Press 0 to repeat the information.
Press # to enter another configuration
selection.
Press 1 to enter a new value.
Press 2 to set the default value.
Press 0 to repeat the information.
Press # to enter another configuration
selection.
Press 2 to set the default value.
Press 0 to repeat the information.
Press # to enter another configuration
selection.
Press 2 to set the default value.
Press 0 to repeat the information.
Press # to enter another configuration
selection.
Press 2 to set the default value.
Press 0 to repeat the information.
Press # to enter another configuration
selection.
Press 2 to set the default value.
Press 0 to repeat the information.
Press # to enter another configuration
selection.
Press 1 to enter a new value.
Press 2 to set the default value.
Press 0 to repeat the information.
Press # to enter another configuration
selection.
Press 2 to set the default value.
Press 0 to repeat the information.
Copyright 2010-2015 Obihai Technology, Inc.
30
 Loading...