


User Manual
www.obiworldphone.com © 2015 Obi Worldphone. All rights reser ved.

2
The Obi SF1 Phone 3
Basic operations..........................................................................................4
Charge the battery .....................................................................................5
SIM and Micro SD cards .......................................................................... 5
Set up lock screen/security options ..................................................6
The Multi-touch Display Screen 7
The Home screen ........................................................................................7
Onscreen icons and indicators .............................................................8
Menu Launcher ..........................................................................................10
Context menus ........................................................................................... 12
Make and Receive Calls 13
Make a call ................................................................................................... 13
Answer a call............................................................................................... 13
Reject a call ................................................................................................. 14
End a call ...................................................................................................... 14
Adjust the volume on a call .................................................................. 14
Enable Airplane mode ........................................................................... 15
Send Messages 16
Create and send text messages ......................................................... 16
Create and send a multimedia message .........................................17
Other message options ......................................................................... 18
Get Connected 19
Connect to the Internet .........................................................................19
Connect to devices and PCs...............................................................20
Applications 22
Download applications ......................................................................... 22
Connect a Google Gmail account .................................................... 22
Use Multimedia 23
Camera ......................................................................................................... 23
FM radio ....................................................................................................... 25
Sound Recorder ....................................................................................... 25
Settings 26
Settings options ....................................................................................... 26
Managing notifications ...........................................................................27
Health and Safety Information 28
SAR (Specific Absorption Rate) information .............................. 28
Environmental compliances ................................................................28
Precautions ................................................................................................. 29
Taking care of your device ..................................................................30
Legal Notifications 32
Disclaimer ................................................................................................... 32
Trademarks ................................................................................................. 32
Limitation of damages .......................................................................... 32
Table of Contents

3
The Obi SF1 Phone
Front-facing
cameraFlash
Rear-facing camera
Headset
jack
Receiver
Multi-touch display
Volume up button
Flash
Volume down button
Power/Wake/Lock button
Speakers and microphone
Micro USB connector

4
Basic operations
Turn the phone on
Press and hold the Power/Wake/Lock button until the
phone vibrates.
Note: When you power on your Obi phone for the first time,
you’ll need to follow the on-screen prompts to set up your device.
You can set up your Obi Worldphone over your carrier’s cellular
network or over a Wi-Fi network.
Turn the phone o
Press and hold the Power/Wake/Lock button for a few seconds,
then touch Power O on the display screen.
To put the phone in Standby (Sleep) mode
Press and hold the Power/Wake/Lock button until the display
turns o. (This will prevent accidental touches of your multitouch display.)
To wake/unlock the phone from Standby (Sleep) mode
Press the Power/Wake/Lock button, then drag the Unlock icon
upwards on the screen to unlock the phone.
Other features of the Power/Wake/Lock button
With the power on, press and hold the Power/Wake/Lock button to:
• reboot the phone
• access airplane mode
• view your profile
• take a screenshot
To adjust the volume
Press the Volume up/down button.

5
Charge the battery
The battery in your Obi phone will need a full charge before you
can use the device. Plug in the device to charge the battery.
Note: The battery is not removable; attempting to remove it
may void your warranty.
SIM and Micro SD cards
A Micro SIM card or a Nano SIM card is required to use the cellular
network services.
Note: If your SIM card is already installed, you can skip this step.
SIM tray configurations
Your Obi phone has a hybrid SIM card tray that can fit either dual
SIM cards (Micro and Nano) or a Micro SIM and microSD card.
• Slot 1 in the SIM tray can be used with a Micro SIM card.
• Slot 2 can be used with a Nano SIM card.
• Slot 2 can be used with a microSD card instead of a Nano SIM
card. You can use the microSD card to store extra photos,
videos, and music.
Install SIM cards and microSD cards
How to insert a Micro SIM card or a Nano SIM card:
1. Use the eject tool provided in the packaging to remove the
SIM card tray from the phone (as shown in the illustration).
Push the eject tool all the way into the hole until the SIM tray
ejects, and then pull the tray out.
2. Put the SIM card into the slots with the gold contacts facing
down and the cut-o corner facing out (as illustrated above).
3. Insert the tray back into the phone.
MicroSD
NanoSIMNanoSIMMicroSIM
MicroSIMMicroSIM

6
Disable a SIM card
If you are only using one SIM card, you may want to disable
the other SIM card port.
• Go to: Settings > SIM cards > SIM 1/SIM 2.
Set up lock screen/security options
You can set your screen to unlock with a PIN number, password,
or an on-screen pattern. Or, if you choose not to have additional
unlock security, select “None.”
Note: If you set up security options, the steps to unlock your
phone will be dierent from those described above in “To wake/
unlock the phone from Standby (Sleep) mode.”
1. In the main menu, touch: Settings > Security > Screen Lock
2. Touch Set Up Screen Lock.
3. Choose the type of screen locking option desired.
Swipe one of thes e switches to turn
o the SIM port you wish to disa ble.

7
The Multi-touch Display Screen
Your Obi Worldphone features a multi-touch display which
provides a faster and more intuitive way to navigate through
lists and menus. The controls on the multi-touch display change
dynamically, depending on the task you are performing:
Selection: To select an icon on the screen, touch the icon with
your fingertip.
• Some features require you to touch and hold the icon to select.
• Some features require you to touch and swipe the icon to the
left or right.
Zoom in or out: To zoom in/out on a picture when viewed in
full screen, web page, or map:
• To zoom out: Place two fingers on the screen at once and
pinch them together.
• To zoom in: Place two fingers on the screen at once and
spread them apart.
The Home screen
The Home screen is your starting point to access all the features
on your phone.
• Customize the Home screen by adding applications, shortcuts,
widgets, or by changing the wallpaper.
Note: Apps and services that send or receive data over a
cellular network may incur additional fees. Contact your carrier
for information about your Obi service plan and fees.
Touch and hold an empty
spot to change wallpaper.
Swipe left or right to change
the desktop sc reen. You can
also add or de lete screen pan els.
Touch an icon to launch the
corresponding application.
Touch and hold to move or
remove an icon or a widget.

8
Onscreen icons and indicators
Icon: What it does:
Opens the Dialer
Opens Messaging
Opens Menu Launcher
Opens the Contacts list
Opens the Chrome™ browser
Opens the Gallery
Opens the context menu

9
Navigation icons
Icon: What it does:
Status bar icons
Icon: What it means:
Ringer is in silent mode
Missed call
Phone microphone is muted
Connected to a Wi-Fi network
An available Wi-Fi network
Alarm is on
Battery is charging
Battery is very low
New SMS or multimedia message
Downloading/Uploading data
Returns to the previous
screen you were working
in, even if it was in a
dierent application.
Returns to Home screen.
In idle screen, hold it to
access the Google search
application.
Displays recently
accessed apps.
No cellular network signal
Vibrate mode
Airplane mode
10
Menu Launcher
Menu Launcher gives you access to applications, widgets,
wallpapers and other customizations.
1. Touch the Menu Launcher at the bottom of the screen to
open the main menu and access all the applications installed
on your device.
2. Touch an application to open and launch it.
3. Swipe the Menu Launcher left or right to bring more icons
into view.
As soon as you install a new application, it will appear here.
Applications
1. Press to open the Home screen.
2. Touch the Menu Launcher to open the Main Menu.
3. To add an application shortcut to the desktop screen:
• Press and hold the shortcut until the screen flashes and the
Home screen appears.
• Drag the application to the desired location on the screen,
then release your finger.
Recently used applications
Press to view recently used applications.
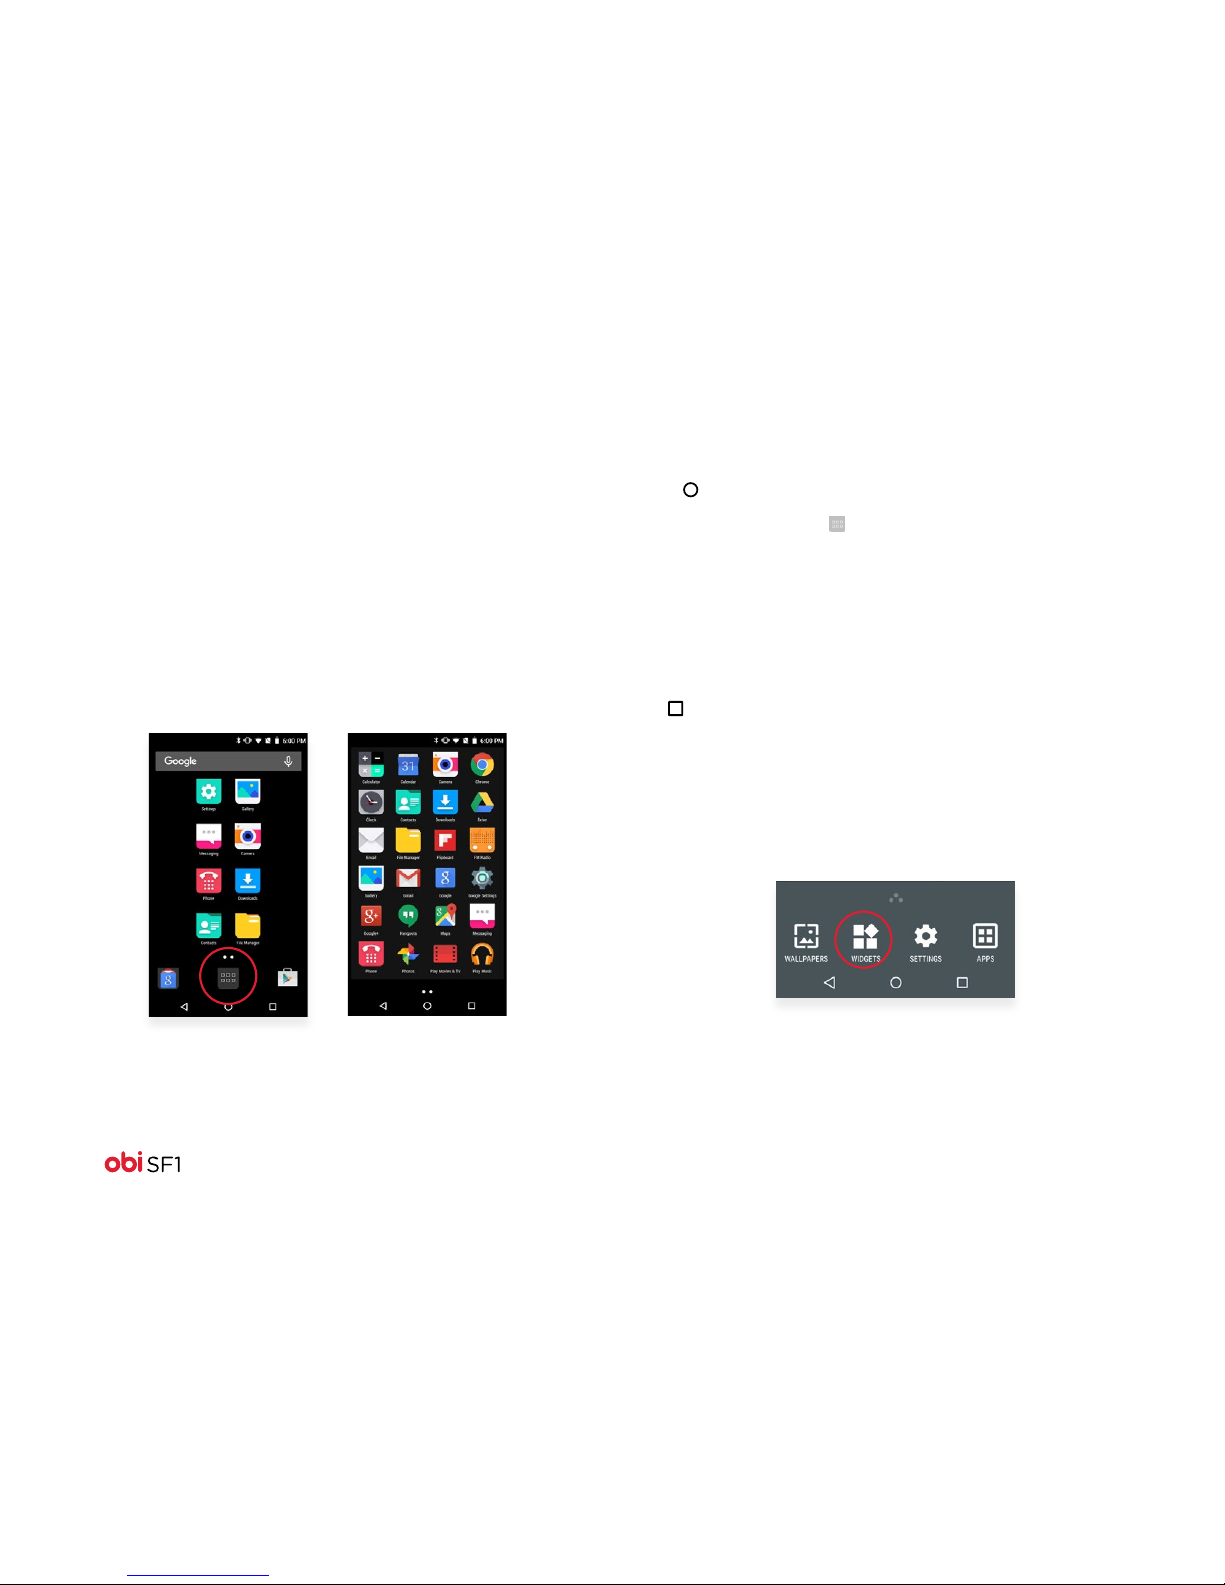
Widgets
1. From the Home screen, touch and hold an empty area
of the Home screen.
2. In the menu that displays on the bottom of the screen,
touch Widgets.
3. To add a widget shortcut to the desktop screen:
• Press and hold the widget until the screen flashes and the
Home screen appears.
• Drag the widget to the desired location on the screen, then
release your finger.
 Loading...