

Page 1
OB
M
x
User's
Guide
Oberhefm.
Page 2
OB-Mx
User's
Guide
Credits
►
Written
►
Layout & Design
►
ob-mx
a
division
^
OB-Mx
By
Warren
is a product
Designed
By
of
Gibson
By
Sirota
Denise
of
oberheim,
Don
Foret
Buchla
^
Warnings
There
are
servicable,
Do
Custom
Manufactured
thousands
so
not
kindly
take
the
designed
OBMx
by
For
more
information,
Oberheim
2230
Livigston
Oakland,
Phone
Fax
Technical
Mini-Moog
Electronic
of
parts
inside,
refrain
from
swimming
for
Oberheim
Oberheim,
is a registered
Technology
but
none
removing
the
or
play
it
in
by
Don
Oakland,
Street
CA
94606
Support
trademark of
Group,
are user
covers.
the
rain.
Buchla
California
Inc
contact
(5
10)
53
6-8600
(510)
(800)
/*\ 1 CAUTION
*f\
▼
AVIS:
RISQUE
261-1708
279-4346
RISK
OF
ELECTRIC
\
DO
NOT
DE
CHOC
ELECTRIQUE • NEPASOUVRIR
SHOCK
OPEN
Page 3
Table
of
Contents
i
Foreword
Section
Chapter
Chapter
1:
OB-Mx
Contents
By
Don
Buchia
Introduction
1
How
To
Use
This
Manual
2
Quick
2.1
2.2
2.3
Start
Basic
Setup
Analog
Basic
Synthesis
Basic
Analog
OB-Mx
Operations
Front
Panel
The
Back
Concepts
Synthesis
Analog
Operations
Exercise
Exercise
Exercise
Exercise
Panel
Main
Outputs
Individual
MIDI
Connections
User's
Synthesis
1:
Deconstructing
2:
Tweaking
3:
Saving
4:
Backing
Outputs/Insert
and
Up
an
Blind
Naming
and
Restoring
Points
Existing
Guide
Your
Work
Via
Sound
MIDI
v
/
3
3
5
5
7
8
8
10
12
12
13
14
15
15
15
Chapter
3
Explorations
3.1
3.2
Single
Using
Instrument
Exploration
Multiple
About
Exploration
Exploration
Save
the
Multiple
1:
Instruments
Multiple
2:
3:
Multis!
Instruments
Globals
The
Chorus
Instruments
Creating
Creating
Algorithm
a Layered
a
Balanced
and
MIDI
Program
Split
Performance
Change
Messages
77
17
17
18
18
19
22
22
23
Page 4
OB-Mx
User's
Guide
3.3
Modulation
&
The
Matrix
OB-Mx
Exploration
Exploration
Exploration
Exploration
The
Exploration:
Default
4:
5:
6:
7:
Matrix
Modulations
EG 4 and
Fixed-Pitch
Adding
Pulse
Pulsing
The
VCA
Sounds
Vibrato
Width
Modulation
Noise
and
Quartertone
23
24
25
Keyboards...26
27
28
29
29
Section
Chapter
Chapter
Chapter
2:
Reference
4
Voice
Allocation
4.1
Single
4.2
Multiple
5
Instruments
6
Control
Changing
Program
Voices
MIDI
Store
Compare
Parts
Matrix
Options
Instrument
Instrument
Module
Module
Values
Button
Prgrm
Prgrm
Button
Single
Multiple
Button
Button
Saving
Copying
Button
Parameters
Button
Parameters
Parameters
Parameter
Parameter
Instrument
Edited
Button
Button
Voice
Allocation
Voice
Allocation
in
the
Display
Descriptions,
Descriptions,
Mode
Instrument
Instruments
and
Swapping
Mode
Instruments
Algorithms
Algorithms
Single
Multiple
Instrument
Instrument
„
Mode
Mode
31
32
33
35
37
37
38
38
40
42
42
42
43
47
47
48
49
50
50
52
53
54
55
Chapter
7
Voltage
Selection
Parameter
Continuous
Controlled
Buttons
Toggles
Parameter
Modulation
Oscillators
Knobs
Section
Module
59
60
60
61
63
Page 5

Table
of
Contents
Chapter
Chapter
Chapter
Chapter
Chapter
8
9
10
11
12
MM & OB
Parameter
Continuous
Final
Disp
Envelope
Envelope
Parameter
Continuous
low
LFO
Parameter
Continuous
Voice
Part
Patch
Voltage
Controlled
Selection
Toggles
Parameter
Mix
Module
Selection
Continuous
Button
Generators
Selection
Toggles
Parameter
Frequency
Selection
Voice
Status
Usage
Selection
Selection
Oscillators
Buttons
Toggles
Parameter
Module
Indicators
Buttons
Buttons
Filters
Buttons
Parameter
Module
Knobs
Knobs
Module
Buttons
1-4
Knobs
Module
1
-3
Knobs
65
66
67
67
71
71
72
75
76
76
78
81
82
82
83
87
88
88
88
Chapter
Section
3:
Index
Instrument
MultiProgram
Voice
Matrix
MIDI
Front
Architecture
Implementation
Panel
13
Tuning
Module
Appendices
Definition
Record
Table
Instant
Record
Chart
Index
&
Charts
.
89
M
C-J
C-2
C-3
C-4
C-5
C-6
Page 6

iv
OB-Mx
User's
Guide
Page 7
Foreword
OB-Mx
Foreword
Remember
synthesizers?
abundance,
unabashedly
These
sounds,
just a fond
electronic
Problem
could
infinite
So
days
cryptic
memory,
instrument
back
never
possibilities,
we
had
this
technology
accessible
user
the
electronic.
our
musical
displays,
then
get
back
crazy
of
today,
interface?
User's
days
when
Knobs,
imagination
lives
and
and
the
seems
was
that
to
where
were
conspicuously
idea.
What
combined
Could
men
switches,
could
center
tedious
concept
to
while
around
instruction
of
have
died
you
you'd
been
if
we
took
them
with
be
interesting.
Guide
were
men
and
synthesizers
and
such
stuff
were
in
run
rampant,
four
button
actually
could
yesterday—synths,
short
playing
along
with
get into
on
the
sounds
controls
sounds
interfaces,
manuals.
a
Flash
pretty
memory.
of
the
up
the
were
Interaction
responsive
Gordon.
deep
with
70's,
wazoo,
space,
the
and
were
canned
is
you
their
an
Welcome
Thanks
Corless
Carlson.
Flint,
Jay
Cloidt,
Joel
The
in
high
basic
development
vital
to
the
OB
to
the
members
and
Lynx
Crowe,
Technical
Huck
Phomma,
Gerry
Davel,
support
Andrew
gear.
concepts,
link
between
support
Basserman,
of
Zeta,
Special
Keith
scene,
designer
Mx.
Schlesinger,
of
the
development
with
assistance
from
Keith
and
Pree
Boonkert.
Malcolm
Mike
G-WIZ
thanks
and
Labs
and
to
Tom
McMillen,
Warren
who
Sirota,
and
performer.
team -programming
from
Greg
Higgs
Edwards,
Sound
Doak,
Lee
and
Gibson
Oberheim,
masterfully
who
Mark
design
Roger
skillfully
Powell,
Ezra.
Guitars
who
Don
kept
pioneered
coordinated
Buchlo
Berkeley,
by
Andy
and
Chuck
Leas,
Mike
Lyon,
Kim
and
beta
testing
Richard
this
development
many
the
implemented
by
Bugg,
of
the
this
1994
Page 8
OB-Mx
User's
Guide
Section
1
Introduction
Oberheim
Page 9
Chapter 1 How
To
Use
This
Manual
1
CHAPTER
How
Welcome
like
possible,
as
possible.
■
Foreword,
■
Quick
concepts
■
Explorations,
to
■
Reference,
parameter
■
Appendices,
To
Start,
familiarize
to
to
make
this
end,
a
brief
where
and
operations
which
you
where
full
1
To
Use
This
Manual
the
world
learning
and
enable
we've
message
you'll
presents
with
you
of
technical
of
the
the
instrument
you
to
organized
from
the
setup
the
a
few
the
most
can
find
detailed
information,
Oberheim
discover
the
designer
instrument
carefully-chosen
useful
OB-Mx
as
your
manual
OB-Mx
information
are
included
synthesizer.
fun
and
easy
own
sounds
into several
and
learn
its
hands-on
features
on
any
at
the
We'd
for
you
as
as
quickly
sections:
basic
exercises
function
back
or
Key
Point:
■
The
Front
Panel
uniquely-convenient
the
OB-Mx
for
as
many
information
diagram
As
you
attention
learn
the
and
traverse
to
the
instrument.
Instant
design
parameters
about
turn
the
Quick
Key
Points
Index,
index
philosophy
and
how
any
to
the
page
Start
sections.
on
the
very
last
page
into
the
Reference
of
providing
functions
button
number
and
Explorations,
as
or
knob
printed
They
should
section
a
dedicated
possible.
works,
there
pay
make
of
this
manual,
made
If
you
just
special
it
possible
button
find
easier for
or
want
it
on
is
a
by
knob
the
you
to
Page 10
OB-Mx
User's
Guide
We
sections
investment
Explorations
them
recommend
in
quite
that
detail—we
of
time.
before
useful.
everyone
think
It's
not
you
go
you'll
necessary
explore
on
through
find
your
the
it
fun
that
you
own,
and
Quick
but
Start
well
worth
go
through
we
believe
and
Explorations
the
short
all
of
the
that
you'll
find
Page 11

Chapter
2
Quick
Start
3
2.1
►
Basic
Connections
CHAPTER
Quick
Setup
The
basic
connections
MIDI
In
and
Audio
Out
for
using
your
OB-Mx
or
headphones.
2
Start
are
quite
simple—power,
1.
Plug
the
female
male
end
into
the
2.
The
MIDI
In
port
the
synthesizer—as
create
to
controller,
the
OB-Mx.
3.
In
headphones
instrument's
a
cords.
outputs
Now
options—see
music
play
OB-Mx
guitar
MIDI
Out
order
to
listen
mixer,
amplifier,
If
you
you're
all
without
sounds
port
(with a 1/4"
front
are
wired
The
end
of
the
supplied
proper
is
controller
on
to
panel,
preamplifier
not
BackPanellater
electrical
not
absolutely
you'll
see
any
external
from
an
or
your
controller
the
OB-Mx,
stereo
or
connect
using
the
up
and
ready
power
outlet.
necessary
shortly,
other
OB-Mx
there
inputs
external
controller.
to
either
plug
phone
or
plug)
the
home
in
to
roll!
in
this
cord
into
in
order
are
self-running
at
all—but
MIDI
keyboard,
Use a MIDI
the
MIDI
In
in
a standard
into
the
Main
Outputs
stereo
system
stereo,
There
chapter
use
are
many
for
the
OB-Mx
to
get a sound
patches
most
people
drum
pad
cord
port
on
the
pair
of
Phones
using
either
more
jack
on
the
back
1/4"
one
of
other
information.
and
the
from
that
will
want
to
connect
back
of
the
stereo
on
the
panel
phone
the
connection
to
main
Page 12

OB-Mx
User's
Guide
►
Testing
The
Before
everything
Turn
1.
display
shortly.
2.
Turn
just
be
unauthorized
in
and
just
2.
playing"
is
sound.
Basic
you
start
is
working
on
the
power
should
the
Volume
above
blinking
the
that
under
Press
selected.
the
display,
under
button
display,
then
should
the
display
the
Trigger
instrument
Gradually
Troubleshooting
If
you
reach
your
amplifier
Phones
Please
this
through
audio
jack.
call
manual.
your
path
Setup
exploring
properly.
to
the
light
up
and
knob
all
press
the
number
pushing
good
get
you
until
button
that
turn
the
top
or
mixer,
If
you
Oberheim
If
you
can
speakers,
from
the
OB-Mx
the
instrument,
This
is
OB-Mx
the
for
the
will
the
volume
then
can't
Technical
then a setup
and
then
display
the
you!
some
way
down.
Single
of
an
Instrument.
and
the
Press
Instrument
the
number
and
release
continue
Volume
and
you
try
plugging a pair
hear
any
sound,
Support
hear
sound
output
to
it's a good
easy
to
do,
to
your
parameters,
In
the
button.
The
Instrument
the
Prgrm
display).
239
appears,
it—this
instrument
sounding
knob
until
still
don't
then
at
the
through
problem
your
the
speakers.
idea
as
follows:
audio
which
INSTRUMENTS
cursor
(If
youVe
parameters
button
Turn
the
with
until
another
you
can
hear
anything
of
headphones
something
number
headphones,
most
in
likely
Possible
to
make
sure
system.
The
we'll
talk
module
in
the
display
been
doing
won't
appear
under
the
Data
Adj
the
name
display
knob
Dance
is a "self-
Instrument
hear
some
through
into
the
is
wrong.
the
front
of
but
not
exists
in
the
causes
are:
that
about
will
some
■
The
■
The
down.
■
Another
■
The
■
The
■
The
isn't
If
you
Oberheim
or
your
4.
Now
that
you're
triggering.
Data
your
With
Adj
knob
MIDI
controller
sound.
OB-Mx
OB-Mx
main
mixer
mixer
check
dealer.
is
not
mixer
mixer
channel
mixer
or
amplifier
is
routed
selected
as
for
these
Technical
sure
the
the
cursor
on
click
if
plugged
channel
outputs
the
Support
audio
clockwise
it's
into
the
correct
either
is
muted
is
soloed,
are
is
not
to a preamplifier
sound
conditions
path
still
under
not
already
muting
turned
down.
powered
source.
and
none
at
the
number
is
working,
the
to
select
on
Instrument
and
mixer
channel.
or
has
the
Volume
the
OB-Mx
on.
or
home
of
in
the front of
it's
channel.
stereo
them
apply,
time
system
this
to
test
number,
Instrument
play a note.
1,
Pie & Oh.
You
turned
and
then
call
manual,
MIDI
turn
the
Turn
should
hear
on
a
Page 13
Troubleshooting
If
you
do
not
get
sound
following:
from
your
OB-Mx
Chapter 2 Quick
at
this
point,
check
Start
for
the
■ A bad
■
■
If
you
Oberheim
or
your
Congratulations!
you
can
start
MIDI
cable,
connection
The
Mx
is
Omni.
blinking
clockwise,
your
If
you're
route
Connect
switcher
check
dealer.
again.
controller
not
Press
controller
the
Technical
exploring
may
set
to
respond
the
Cursor > button
cursor
is
and
the
now.
using a MIDI
MIDI
streams
the
controller
for
now.
for
these
Support
Your
OB-Mx
the
or a cable
If
it
looks
be
under
Mode
conditions
instrument
not
connected
right,
try
substituting
transmitting
to.
the
will
switching
properly
and
at
the
setup
on a MIDI
The
solution
under
word
"Poly."
be
set
to
unit,
or
may
the
OB-Mx
and
none
number
is
now
and
is
the
Turn
Omni.
it
may
actually
of
them
in
up
and
having
properly.
another
channel
to
change
Data
Adj
the
Try
not
be
be
directly,
apply,
the
front
running
Check
cable.
that
the
knob
Data
Adj
playing a note
programmed
malfunctioning.
bypassing
then
of
this
correctly,
fun.
the
the
OB-
Mode
to
until
the
knob
on
to
the
contact
manual,
and
2.2
►
Basic
Analog
Synthesis
Analog
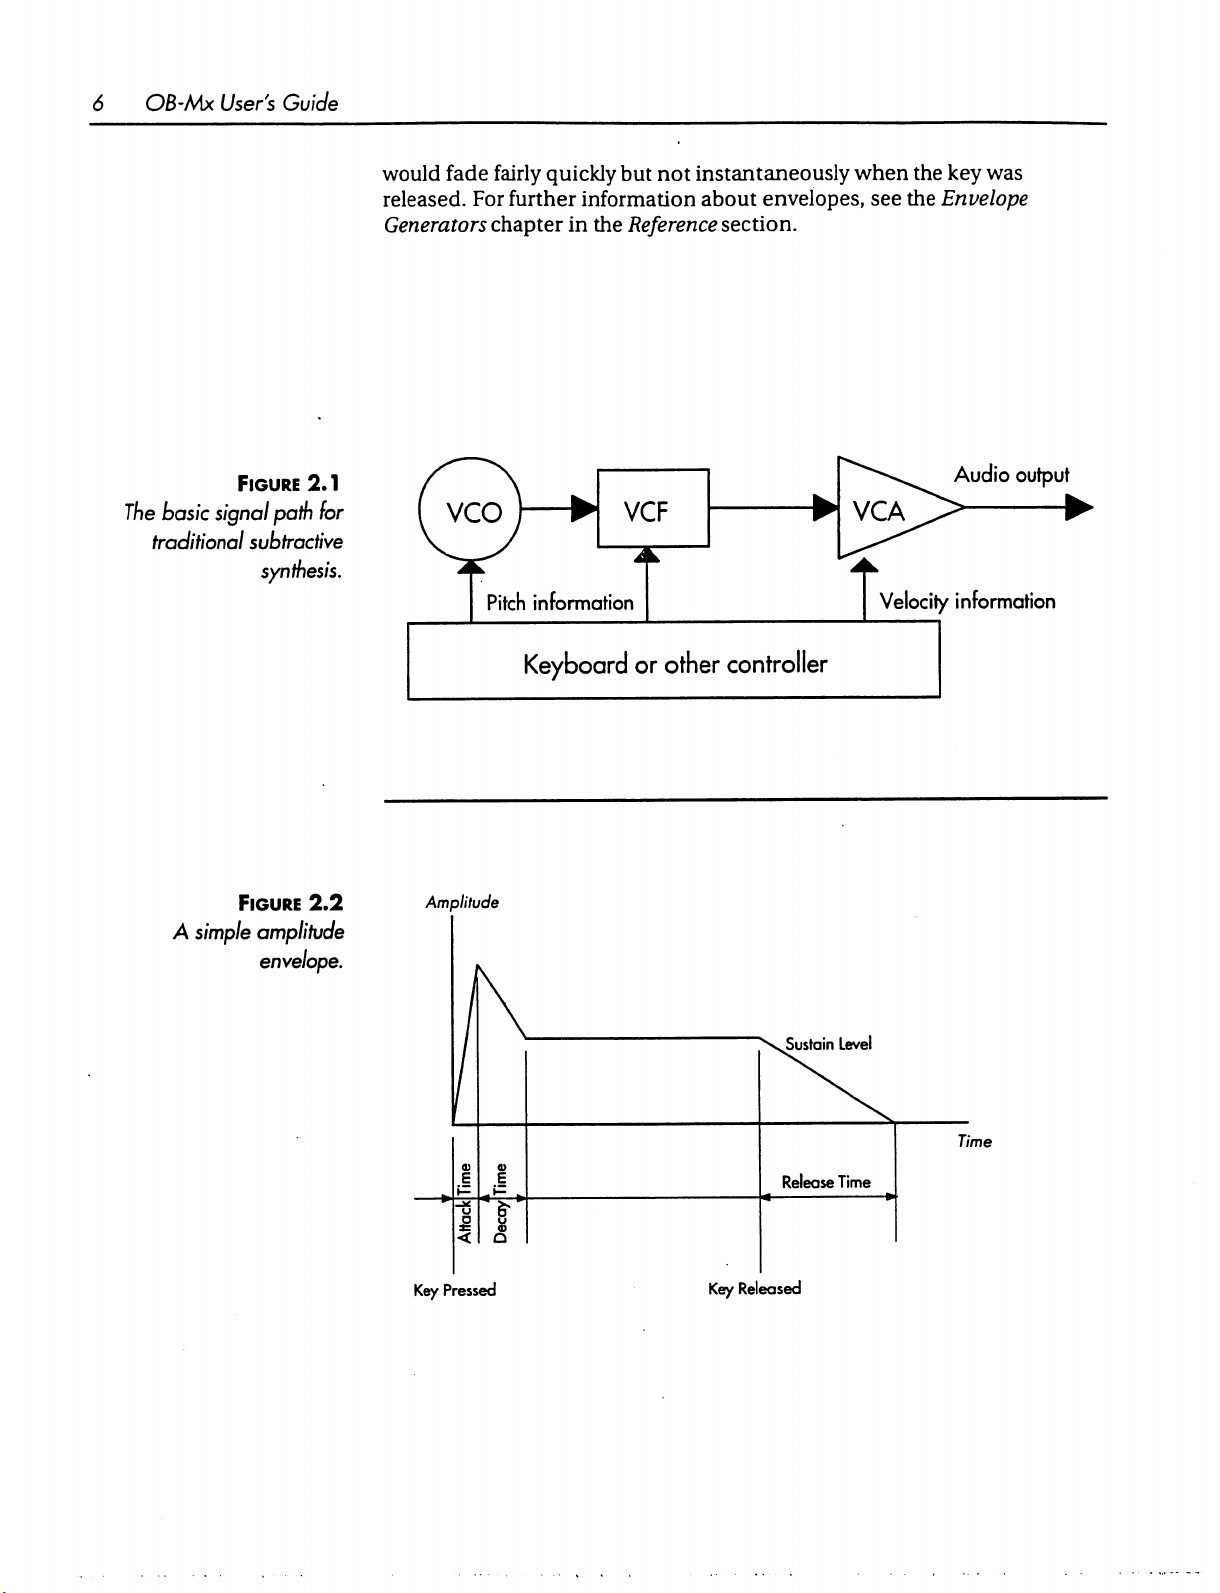
The
OB-Mx
Figure
controlled
unwanted
controlled
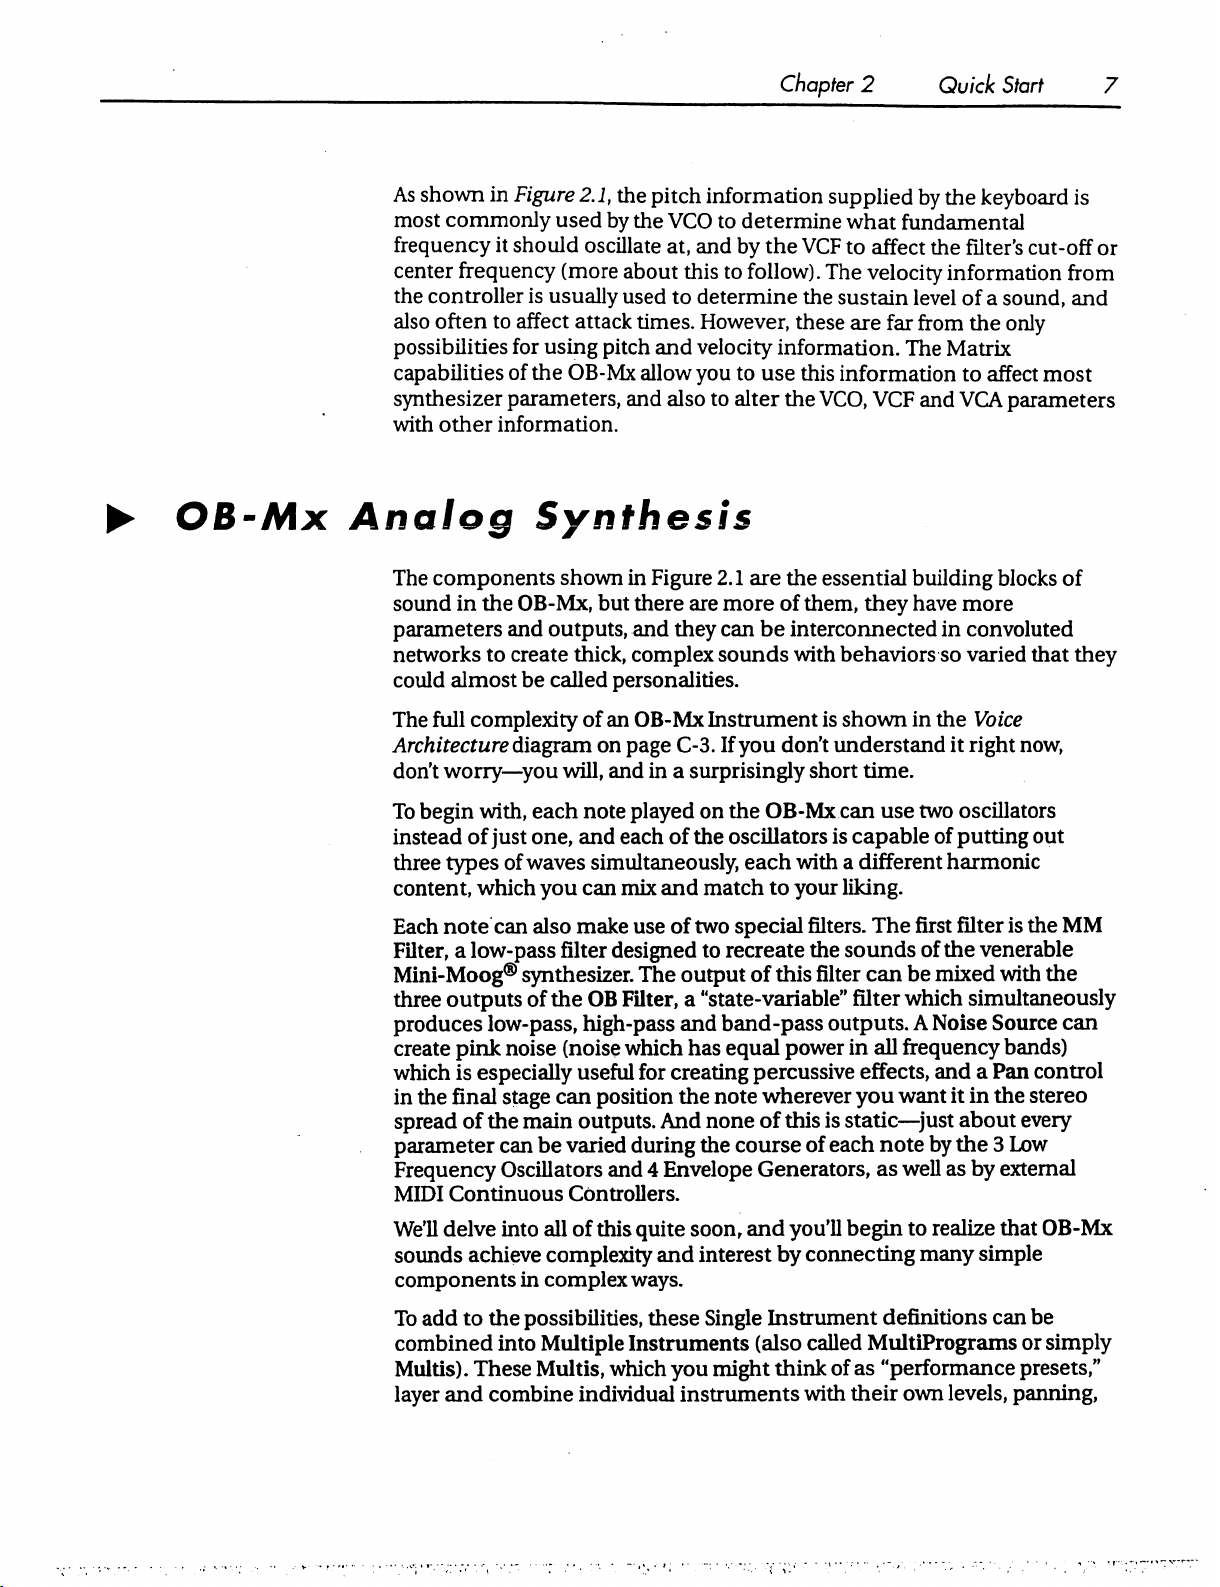
characteristic
release
For
instance,
decay
fairly
decay
Synthesis
is
2.1).
In
oscillator,
frequencies.
amplifier,
times,
quickly
long
release
to
speak
based
this
amplitude
plus a sustain
a
to a residual
on
the
classic
model, a sound
or
VCO)
is
put
The
filter's
which
changes
envelope,
level
drum-like
sound
level,
time. A pipe
of,
would
organ
sustain
Concepts
analog
source
through a filter
output
expressed
{see
would
and
as
subtractive
rich
in
overtones
is
then
put
levels
rapidly
in
terms
Figure
would
would
long
2.2).
typically
have a fast
then
gradually
have a fairly
as
the
key
to
synthesis
(VCF)
model
(a
voltage-
to
subtract
{see
through a voltage-
give
each
note
a
of
attack,
slow
was
held
decay
attack
fade-out
attack,
down,
and
and
then
with
no
and
a
then
Page 14
OB-Mx
User's
Guide
Figure
The
basic
signal
traditional
2.1
path
subfradive
synthesis.
would
released.
for
fade
fairly
For
further
Generators
chapter
Keyboard
quickly
but
not
instantaneously
information
in
the
Reference
or
about
other
when
the
key
envelopes,
section.
see
the
Envelope
Audio
Velocity
information
controller
was
output
Figure
A
simple
amplitude
envelope.
2.2
Amplitude
Key
Pressed
.Sustain
Release
Key
Released
Level
Time
Time
Page 15
As
shown
most
frequency
center
the
controller
also
possibilities
capabilities
synthesizer
with
in
Figure
commonly
it
frequency
often
to
other
used
should
(more
is
usually
affect
attack
for
using
of
the
OB-Mx
parameters,
information.
2.1,
the
by
oscillate
pitch
pitch
information
the
VCO
at,
and
about
used
this
to
determine
times.
and
However,
and
velocity
allow
you
also
to
Chapter
2
supplied
to
determine
by
the
to
follow).
information.
to
use
alter
the
what
VCF
to
The
velocity
the
sustain
these
are
this
information
VCO,
Quick
by
Start
the
keyboard
fundamental
affect
the
filter's
cut-off
information
level
of a sound,
far
from
the
only
The
Matrix
to
affect
VCF
and
VCA
parameters
7
is
or
from
and
most
►
OB-Mx
Analog
The
components
sound
parameters
networks
could
The
Architecturediagram
don't
To
instead
three
content,
Each
Filter,
Mini-Moog®
three
produces
create
which
in
spread
parameter
Frequency
MIDI
in
almost
full
complexity
worry—you
begin
of
types
note
a
low-pass
outputs
pink
is
the
final
of
Continuous
Synthesis
shown
the
OB-Mx,
and
outputs,
to
create
be
called
will,
with,
each
just
one,
of
waves
which
you
can
also
filter
synthesizer.
of
the
low-pass,
noise
(noise
especially
stage
can
the
main
can
be
varied
Oscillators
Controllers.
in
but
thick,
complex
personalities.
of
an
on
page
and
note
played
and
each
simultaneously,
can
mix
make
designed
OB
Filter,
high-pass
which
useful
position
outputs.
during
and 4 Envelope
Figure
there
and
OB-Mx
in a surprisingly
use
The
for
2.1
are
the
essential
are
more
of
them,
they
can
be
interconnected
sounds
Instrument
C-3.
If
on
the
of
the
oscillators
and
match
of
two
to
recreate
output
a
"state-variable"
and
band-pass
has
equal
creating
the
note
And
none
the
with
behaviors
is
shown
you
don't
understand
short
OB-Mx
each
to
special
of
this
can
is
capable
with a different
your
liking.
filters.
the
sounds
filter
filter
outputs.
power
in
percussive
wherever
of
this
course
you
is
static—just
of
each
Generators,
building
they have
in
the
time.
use
two
of
The
first
of
can
be
mixed
which
A
Noise
all
frequency
effects,
and a Pan
want
note by
as
well
blocks
more
in
convoluted
so
varied
Voice
it
right
oscillators
putting
harmonic
filter
the
venerable
with
simultaneously
Source
bands)
it
in
the
about
the 3 Low
as
by
external
of
that
they
now,
out
is
the
MM
the
can
control
stereo
every
We'll
delve
into
all
sounds
components
To
combined
Multis).
layer
achieve
add
to
the
into
These
and
combine
complexity
in
complex
possibilities,
Multiple
Multis,
of
this
quite
soon,
and
interest
ways.
these
Single
Instruments
which
you
might
individual
instruments
and
you'll
begin
by
connecting
Instrument
(also
called
think
with
definitions
MultiPrograms
of
as
"performance
their
to
realize
many
own
simple
can
levels,
that
OB-Mx
be
or
simply
presets,"
panning,
Page 16
8
OB-Mx
User's
Guide
2.3
►
Basic
Front
transposition
single
instruments
oscillators
Operations
Panel
The
panel
explore
around.
complete—that's
now, the
Operations
goal
of
of
the
and
We'll
aim
and
the
simultaneously,
with
up
to
this
section
OB-Mx
modify
do
is
works
Instruments, save
this
left
to
have
like.
A
single
24
waveforms
is
to
familiarize
so
that
you
in
an
ad-hoc,
for
the
Reference
fun
and
learn
MIDI
note
could,
creating
being
can
your
hands-on
the
a
super-thick
combined
you
with
confidently
changes
way,
section
later
basics.
for
at
the
way
push
and
with
in
this
example,
sound
once.
in
which
just
no
attempt
manual.
trigger
from
the
buttons,
generally
to
Right
4
8
front
poke
be
The
Front
The
logically
like
FILTERS,
The
operations
CONTROL
It's
Safe
Editing
copy
Whenever
existing
operation
location
you
compare
Panel
front
panel
consist
grouped
VOLTAGE
and
module
like
module
To
Experiment
is
completely
of
it
is
there's
data,
and
you
might
want
your
into
CONTROLLED
INSTRUMENTS.
directly
loaded
you
prefer.
under
storage
(see
safe
into a temporary
a
chance
are
asked
given
the
You
to
overwrite.
edited
sounds
of
an
LCD
display
modules.
and
Chapter
opportunity
even
The
modules
OSCILLATORS,
the
display
editing
on
the
of
losing
whether
get
And
to
the
controls
global
6).
OB-Mx.
memory
your
you
to
save
to
see
the
the
Compare
ones
and a lot
parameters,
When
edit
want
the
names
that
of
knobs
are
all
labeled,
VOLTAGE
many
you
area
changes
to
complete
Edit
button
have
CONTROLLED
system-level
and
pick
an
called
of
the
or
Buffer
the
Instruments
lets
been
saved
is
overwriting
and
switches,
with
names
called
Instrument,
Edit
or
to
you
the
Buffer.
cancel
any
the
storage
that
easily
into
memory.
a
Page 17
So
poke
around
to
avoid
saving
anything.
changing
in
this
chapter).
The
OB-Mx
locations
lower
128
can
freely
situation
anything
Save
changes
Instruments
comes
1-128
and
Instruments
overwrite
is
true
and
make a lot
you
(see
with
128
128
more
are
them
for
Multis.
Chapter 2 Quick
of
changes,
you
don't
really
do
want
Exercise
Single
duplicates
without
Instruments
in
permanent
fear
like,
to
keep
3:
Saving
of
the
of
losing
and
just
hit
the
Escape
and
you
won't
before
and
ROM
permanent
powering
Naming
in
user-programmable
locations
anything.
Your
set
in
The
Start
button
hurt
down
or
Work,
later
RAM
129-256.
ROM,
The
so
same
you
Using
The
If
you're
out
by
of
the
everything
The
first
panels,
parameters
leftmost
display.
Controlled
this
"the
other
The
button
parameters
There
■
Utility
started
■
Selection
■
Parameter
Buttons
used
learning
OB-Mx
else
thing
is
the
are
buttons
For
instance,
And
to
working
the
differences
and
the
confusing,
(okay,
to
concept
accessed
so
get
over,
of
in
most
pressing
Oscillators
VCO 2 button"
buttons
are 3 types
similarly),
itself
starts
is
displayed.
of
Buttons,
like
Buttons,
like
Toggles,
Display
with
other
synthesizers,
between
counter-intuitive
we're a little
if
you're
hidden,
directly
modules
the
module
in
the
future
brings
flashing,
Try
it.
buttons
the
Tune
the
VCO 2 button
which
turn
biased).
used
hierarchical
by
pressing
will
call a set
button
in
the
upper-left
for
the
parameters
to
let
you
to
be
VCO's
button
options
it
may
be
helpful
the
convenient,
to
working
menus.
a
front-panel
of
marked
"2"
part
convenience,
for
know
exactly
aware
you
you
on
or
of:
just
off
sensible
operations
with
other
On
the
OB-Mx,
button.
parameters
in
the
Voltage
of
the
panel
and
we'll
VCO 2 into
which
used
while
pressed
for
selected
to
start
operations
of
almost
synthesizer
most
The
into
the
(we'll
call
refer
to
the
display.
set
of
getting
objects
The
Utility
the
buttons
The
Selection
flash
include
Multiple
When
module
VCO 2 button,
module
Buttons
in
the
CONTROL
Buttons
when
pressed.
all
the
numbered
and
Disp.
you
press a Selection
apply
to
the
then
will
affect
just
perform
They
actions.
module.
are
the
buttons
are
located
buttons
Button,
object
every
you've
knob
VCO
2.
and
In
addition
that
on
the
and
the
it
makes
selected.
Parameter
to
change
left
in
buttons
every
For
instance,
Toggle
Tune,
the
each
labeled
knob
they
include
display
contents
module,
MM,
and
button
if
you
button
in
all
and
and
OB,
Single,
in
its
press
the
the
VCO
Page 18

10
OB-Mx
User's
Key
Guide
Point:
The
flashing
The
Parameter
reflect)
press
the
module
being
used.
patches
waveform
patches
the
exception
Selection
combination
One
other
Trigger
button
synthesizer
message
you're
right
next
buttons
Toggles
parameters
VCO 2 button,
is
likely
To
will
probably
output
will
probably
Buttons
button
button
has
the
from
is
sent
programming
to
the
that
to
light
shut
one
on,
of
the
are.
of
the
can
in
the
same
an
when
OB-Mx.
tell
you
what
is
are
the
third
can
be
either
one
or
more
up.
This
shows
off,
simply
get
thinner
click
an
get
thicker
LFO
Waveform
It's
perfectly
waveform
be
especially
ENVELOPE
effect
external
you
release
and
testing
when
unlit
when
outputs
GENERATORS
as
sending
controller.
the
sounds,
showing
type
on
of
which
press a lit
button
you
buttons)
permissible
active
useful
a
button.
in
the
display.
of
button,
or
off.
the
waveform
button.
you
do
to
light
do
are
as
you
middle C (MIDI
The
corresponding
especially
and
For
instance,
buttons
of
the
oscillator
The
this.
To
it
up.
this.
Parameter
not
mutually
to
have
at
once.
explore
module.
It's
very
convenient
if
your
they
affect
(and
when
you
in
the
VCO
outputs
sound
turn
The
all,
th
Pressing
note
of
most
another
sound
none
OB-Mx—the
Note
controller
of
Toggles
exclusive,
or
any
this
60)
to
the
Off
when
isn't
are
most
(with
as
Key
PointJ
Exercise
7;
Press
Deconstructing
In
and
with a sound
Instrument
this,
1 ♦ First,
Data
hear
2.
The
generating.
and
functions
the
Trigger
order
to
get
warmed
changing
things,
that's
239,
so
you
can
press
the
Single
Adj
knob
until
it
droning
first
thing
to
Press
the
triangle
off.
You'll
button
Dance
hear
at
any
time
An
Existing
up
and
used
lets
take
apart
already
familiar
2.
It's
easiest
the
effects
button,
then
Instrument
away.
Let's
try
and
do
is
to
try
and
the
VCO 1 button.
wave
button
are
immediately
to
hear
Sound
to
moving
an
existing
to
you
from
to
work
of
changes
the
Program
239
is
selected.
shut
it
up.
shut
off
any
You'll
both
hear
see
lit.
Press
less
sound,
the
current
around
sound.
the
with a self-playing
as
you
button
Press
waves
that
each
Instrument.
the
control
In
fact,
let's
Setup
section—
sound
make
them.
and
then turn
THgger.
that
the
Pulse
one
but
not
You
the
oscillators
Wave
to
turn
silence.
panel
start
like
the
should
are
button
these
Page 19
3.
Now
button.
buttons
4.
You
should
source
diagram
the
amount
A)
Press
"N:")
B)
Start
happens
is
understand.
current
corresponding
of
filter's
only
smooth
the
dial
let's
get
rid
of
the
next
Again,
is
typical
the
disadvantage
in
you'll
see
are
lit.
Press
each
still
hear
kind of a hissing
being
sent
through
on
page
C-3).
of
Noise
the
MM
is
set
turning
to
of
setting,
way
up
Noise
result
variation
the
full
that
button.
to
25.
the
Noise
the
Noise
the
way
Turning
rather
to
before
parameter
in a Noise
range
You
the
of
that
component
that
both
the
Triangle
one
to
silence
sound.
one
or
both
can't
shut
off
each
filter
accepts
Note
the
Noise
knob
slowly
parameter
all
the
the
knob
than
knob's
you
load
is
25,
parameter
any
parameter
you
might
of
any
in
front
panel
starts
setting
position.
the
Instrument
then
turning
of
have
knob:
Chapter 2 Quick
of
the
sound.
Wave
that
oscillator
That
of
the
filters
the
Noise
to
0.
level
in
to
the
right,
the
display.
knobs
changing
it
to
an
absolute
So,
if
the
the
about
40
from
it's
to
use
Press
and
Pulse
output.
suggests
(see
source,
Here's
the
work,
out
currently
the
how:
display
while
The
way
and
the
parameter
value
Noise
and
knob
knob
the
all
of
100.
following
Start
the
VCO
Wave
that
the
the
Signal
but you
(indicated
watching
this
knob
it's
important
is
value
of
the
way
This
allows
set
point,
technique
11
2
Noise
Flow
can
set
by
what
works
to
from
it's
turned
the
MM
up
will
but
3/4
has
to
Key
Point:
In
order
to
knob
all
the
desire.
C)
Since
the
right
D)
Press
there's
5)
You
will
still
in
the
Final
Since
we've
could
that
probably
synthesis
type
of
sound
Indeed,
show
pressing
you
resonance
sound.
extend
way
our
the
no
Mix
shut
UFO-like
have
for a while,
that
down
the
range
up
and
goal
is
to
shut
and
then
all
OB
button.
noise
leaking
hear
some
sound
module
off
the
sound
no
idea
of
then
without
both
any
the
OB
resonances
to 0 in
then
Note
all
oscillators
and
both
of a
knob
all
the
off
the
noise,
the
way
to
that
the
through
from
the
the
way
and
be?
If
you're
the
answer.
you
know
input
if
their
MM
buttons
levels
of
the
Filters
control
way
the
Noise
that
OB-Mx.
off
and
silenced
If
you've
that
to
down.
left.
Then
turn
the
This
level
filter
Turn
then
the
new
to
analog
been
analog
resonance
and
examining
are
set
fairly
will
eliminate
it's
maximum,
set
it
to
Noise
knob
should
in
up
eliminate
the
display
the
Master
to
boost
noise
the
source,
synthesis,
around
filters
is
set
high.
this
can
create
high
the
Turning
the
remaining
twist
the
the
value
you
all
the
way
to
the
hiss.
is
0,
so
Level
knob
sound.
what
then
you
type
of
a
ringing
enough.
display
will
the
Page 20
12
OB-Mx
User's
Guide
6)
Press
hear
second
7)
Leave
button
When
answer
the
Compare
the
original,
time
to
return
this
instrument
and
then
turning
prompted
"No"
by
pressing
button,
unedited
as
to
and
sound
control
without
whether
of
changing
the
Data
the
Escape
then
hit
the
return.
the
OB-Mx.
it
Adj
knob
or
not
you
button.
Trigger
Press
Compare
by
pressing
one
click
want
to
save
button
again.
and
Trigger
the
Instrument
in
either
your
direction.
changes,
You'll
a
Exercise
Key
2:
Point:
Tweaking
This
by
them
1.
Load
2.
Grab
notice
didn't
changes
regardless
a
Selection
affected
is a very
turning
into
Instrument
the
that
pressed a
lot
that
quick
knobs
the
display.
Noise
the
the
Noise
of
whether
you
can
Buttons
by
edits
Blind
exercise
without
239,
knob
and
amount
filter
button
parameter
just
that
(turning
to
actually
Dance
twist
of
noise
it
is
flashing
reach
right
are
lit
knobs
show
you
first
2.
Press
Trigger
it
all
the
in
the
to
select
for
the
filter
or
not.
out
but
not
flashing
and
pressing
how
parameters
pressing
way
sound
a
filter
and
a
Selection
to
turn
off,
then
changes,
to
affect.
whose
This
grab.
Selection
is
great
determine
buttons)
it
on.
all
the
even
The
for
which
in
can
be
changed
Button
way
though
Noise
Button
fast
their
to
bring
on.
You'll
you
knob
is
lit,
edits—there's
object
modules.
is
Exercise
3:
Saving
This
changes
to
to
The
memory
in
instruments,
Here's a quick
Instrument:
is
another
to
keep
in
the
be
sure
of
OB-Mx
locations.
ROM,
which
and
Single
comes
Naming
real
quickie.
Instruments,
course
not
of
experimenting.
overwriting
with
256
Instrument
cannot
and
run-through
be
can
be
overwritten..
overwritten
how
Your
Now
that
you
any
factory
Single
Work
you're
might
Where
patches?
Instrument
locations
The
without
to
save
your
getting
create
129-256
first
compunction.
changes
used
to
something
and
how
should
and
256
Multiple
are
factory
128
are
copies
to a Single
making
that
you
want
you
save
it,
Instrument
patches
of
stored
the
ROM
Page 21
1.
Load a Single
2.
Press
the
Store
asking
Escape
the
location
3.
Turn
the
4.
Press
5.
Press
started
the
Now
1.
Press
name.
where
or
any
Store
operation.
shown
the
Data
display.
Enter. A message
Program.
with,
newly-saved
let's
change
the
Cursor > button
Instrument.
button.
to
save
Selection
in
the
Adj
knob
Notice
not
the
instrument.
the
Grab a knob
The
display
the
modified
Button
Pressing
display.
until
will
that
one
that
name:
will
Enter
Don't
Instrument
appear
the
Instrument
you
to
move
Chapter 2 Quick
and
turn
it
to
will
prompt
Instrument.
leave
will
store
do
either
confirming
saved
to.
the
cursor
you
for a location
At
this
the
display
the
changes
of
these
128,
InitialConditions,
the
save.
that
is
loaded
Turn
the
underneath
Start
make
Data
some
point,
without
yet.
pressing
completing
to
the
Instrument
is
the
one
Adj
dial
the
Instrument
13
change.
number,
appears
to
in
you
call
up
Key
Point:
2.
Press
the
Enter
button.
3.
Turn
the
Data
Adj
knob
The
alphabet
letters,
counter-clockwise
easy
way
4.
Use
the
change
any
compunctions
5.
When
name
6.
Press
you're
changing
Store
is
stored
numbers
to
Cursor
this
and
special
twist
make a character
keys
to
particular
writing
done
changing
function.
and
then
Enter
to
change
in
the
the
order
symbols.
(towards
move
name
over
the
blank.
to
different
to
"Test"
it
later.
the
name,
to
save
first
letter
of:
SPACE,
Giving
"off"
or
press
the
new
capital
the
position,
characters.
"Garbage"
the
name.
of
the
name.
letters,
Data
Adj
knob a healthy
if
there
We
suggest
so
that
you
Escape
key
lower-case
were
one)
is
an
^^
that
you
won't
have
to
exit
the
Exercise
4:
Backing
If
you
have a MIDI
Exclusive
Up
dump
of
And
sequencer,
all
Restoring
you
can
or
part
of
the
data
Via
use
it
in
your
MIDI
to
record a MIDI
OB-Mx,
as
System
follows:
Page 22
14
OB-Mx
User's
Guide
1 • Make
2.
3.
4.
5.
6.
sure
to
the
sequencer's
Press
the
MIDI
you're
Turn
Set
has
like
record
Press
Save
in
Single
the
Data
your
sequencer
one,
is
Cakewalk,
the
the
Enter
the
data
Restoring
1.
Press
the
MIDI
2.
Make
sure
3.
Send
the
dump
messages
that a MIDI
button
or
Adj
set to
have an
data
into a track.
button
to a disk
the
data
cable
MIDI
In.
in
the
Multi
mode.
knob
until
ready
to
accept
System
independent
to
start
file.
in
your
button.
that
the
SysEx
parameter
from
your
sequencer
indicating
that
the
is
connected
CONTROL
the
Send
record.
Exclusive
module.
parameter
Make
sure
(Sys
System
the
dump.
OB-Mx
dump
is
is
turned
to
the
was
successful.
from
the
OB-Mx's
It
doesn't
reads
that
its
"record
Ex)
data.
Some
Exclusive
area,
easy:
On.
OB-Mx.
You'll
MIDI
Out
matter
"Dump
whether
All."
filter,"
if
sequencers,
while
others
see a series
of
port
it
►
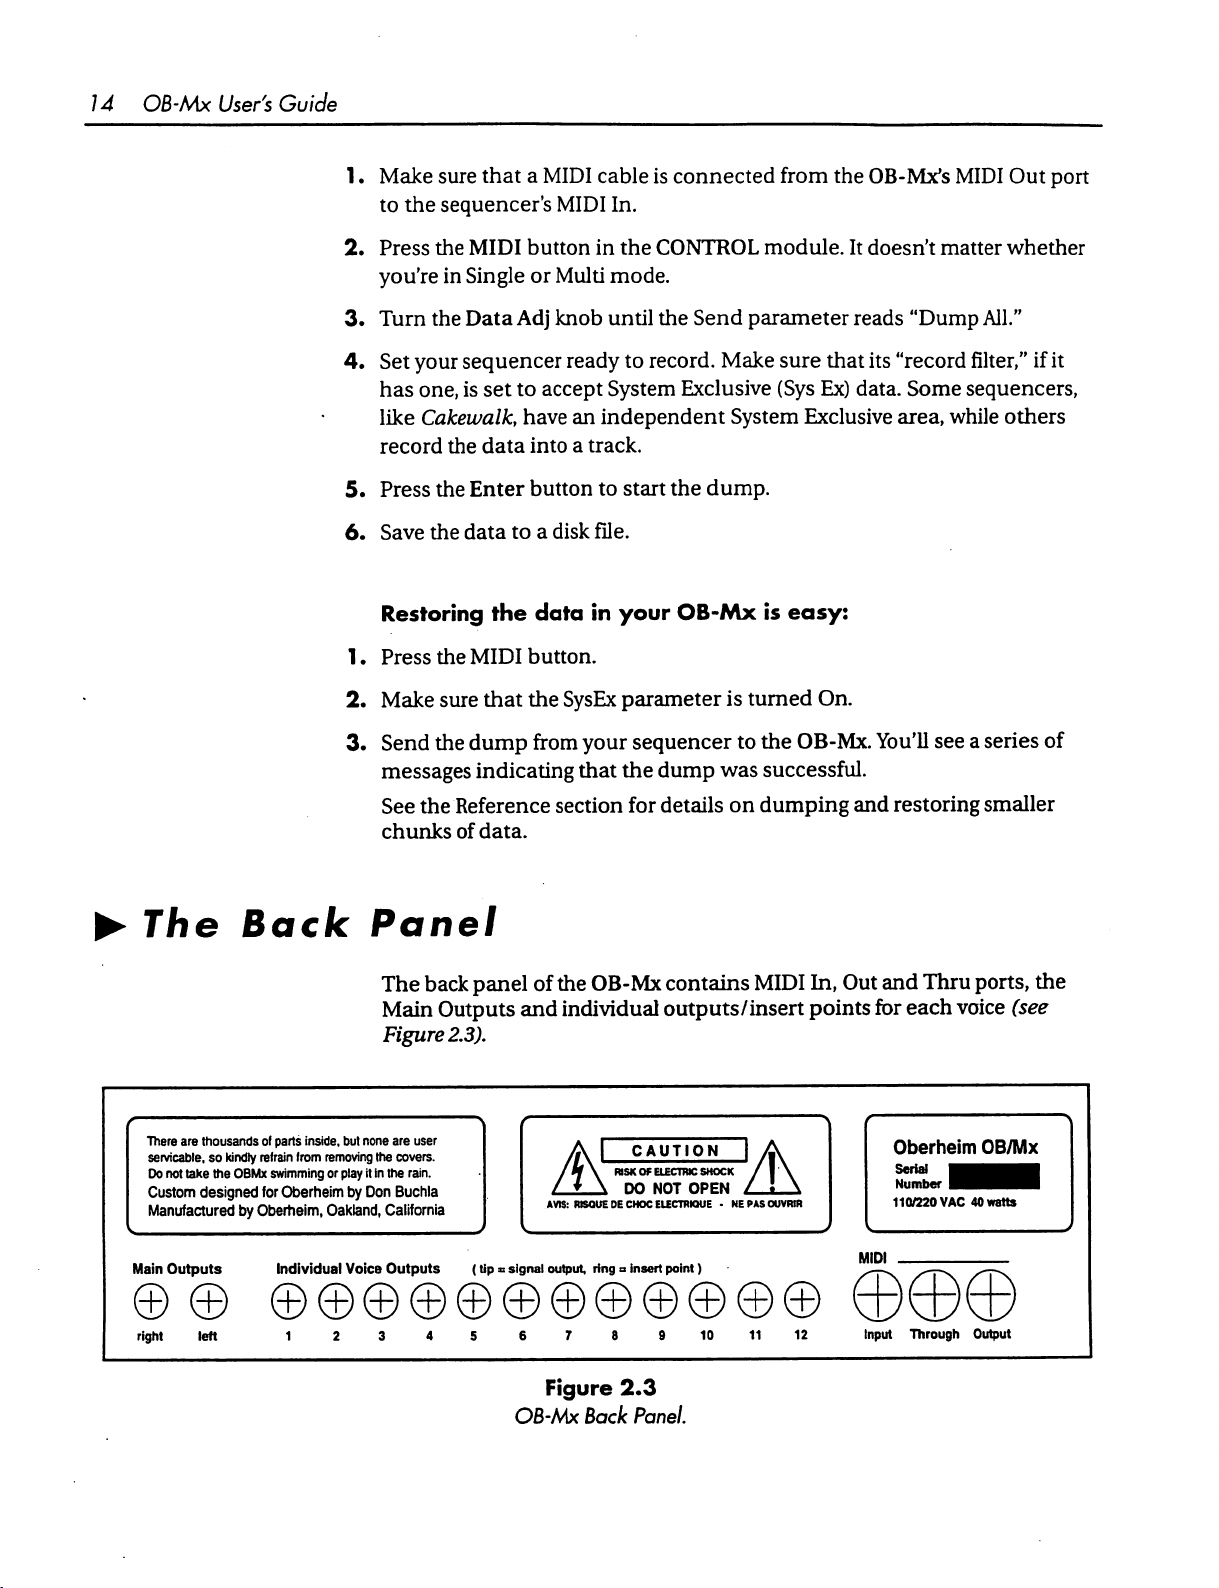
The
There
are
servicable,
Do
not
Custom
Manufactured
Main
Outputs
right
Back
thousands
of
so
kindly
take
left
refrain
the
OBMx
designed
swimming
for
by
Oberheim,
Panel
parts
inside,
but
from
Oberheim
Individual
none
removing
the
or
play
it
in
by
Don
Oakland,
Voice
See
the
Reference
chunks
The
Main
Figure
are
covers.
the
Buchla
California
Outputs
of
data.
back
panel
Outputs
2.3).
user
rain.
(Up * signal
section
of
the
and
individual
//\ 1 CAUTION
r4\
AVIS:
output,
for
OB-Mx
RISK
* \ DO
RISQUE
Of
DE
CHOC
ring ° insert
details
contains
outputs/insert
ELECTRIC
NOT
ELECTRIOUE -NE
point)
on
dumping
MIDI
SHOCK
OPEN
PAS
In,
points
OUVRIR
12
and
Out
and
for
MIDI
Input
restoring
Thru
each
Oberheim
Serial
Number
110/220
Through
smaller
ports,
voice
(see
OB/Mx
I
VAC
40
watts
Output
the
Figure
OB-Mx
Back
2.3
Panel.
Page 23
Chapter 2 Quick
Start
15
Main
Individual
Outputs
Connect
amplifier.
one
of
the
these
with
If
you
will
Main
Outputs
Outputs/Insert
Each
voice
has
its
ways:
■
Use
it
as
an
output
a
mixer
channel,
mixed
■
Use
connect
the
OB-Mx
■
Ignore
out
with
other
it
as
an
insert
it
to a signal
processor
{Ring)and
it
The
the
Main
own
(Tip),
voice's
Outputs.
1/4"
phone
not
be
and
cords
using
the
still
hear
to
OB-Mx
all
Points
output.
Plug
preamplifier
voices
point.
and
sent
You
can
use
in a 1
/4"
cord
or
amplifier.
and
will
not
Plug
in a TRS
processor.
the
to
the
output
The
voice's
processor's
Mixer
module's
will
be
mixed
your
mixer,
in
the voices
each
and
be
sent
cord
output
with
preamplifier
stereo,
in
one
bring
the
The
voice
out
the
(Tip/Ring/Sleeve)
VCA
output
will
Pan
processor.
the
you
may
use
of
the
following
voice's
output
Main
be
other
output
will
Outputs.
will
be
returned
voices
or
either
into
not
be
and
sent
to
to
the
and
sent
MIDI
Connections
There
receive
The
Mx
messages
devices.
are 3 MIDI
incoming
MIDI
Out
to a sequencer
that
ports
MIDI
port
is
used
or
computer.
come
in
on
messages
through
the
back
to
send
the
panel.
from a controller,
System
The
The
Exclusive
MIDI
Thru
MIDI
In
MIDI
port
port
for
In
port
computer
dumps
echoes
use
by
is
used
to
or
sequencer.
from
the
OB-
all
MIDI
other
MIDI
Page 24

16
OB-Mx
User's
Guide
Page 25
Chapter 3 Explorations
17
CHAPTER
Explorations
3.1
Single
In
to
order
this
section,
OB-Mx
examples.
be
independent
that
operations
The
appeals
we'll
different
to
you.
explore
and
of
each
the
concepts
sections
other,
Instrument
When
instrument
the
Instrument.
to
keys
to
you
press
appear
bottom
all
to
change
line
That's
Single
Instruments.
position
them.
Single
of
the
and
in
the
top
the
display
because
You
cursor
Program,
line
does
those
can
under
the
of
the
not
change
parameters
change
then,
and
most
so
you
common
with
in
this
can
short
and
hands-on
chapter
take
are
them
in
useful
meant
any
Globals
name
display.
and
You
from
are
them
by
then
turning
number
may
Instrument
global,
using
of
an
have
noticed
to
that
is
they
the
Cursor < and
the
Data
that
apply
Adj
knob
>
Exploration
I:
The
The
algorithm.
notes
simultaneously-held
general,
chapter
least
Chorus
Al
setting
This
and,
in
this
in
the
one
value
Algorithm
in
the
determines
particular,
is
pretty
Reference
that
Instrument
how
notes
technical
section
is
easy
display
how
voices
notes
are
exceed
to
the
and
you
for
more
understand—Chorus.
refers
to
the
voice
are
allocated
stolen
number
if
should
information.
to
incoming
the
number
of voices
refer
installed.
to
the
However,
allocation
MIDI
of
In
Voice
Allocation
there
is
at
Page 26
18
OB-Mx
User's
Guide
1.
Load a Single
not
play, a single
2.
Change
note
have
play a note.
prominence
Chorus
note,
3.
Notice
all
oscillators.
4.
If
uses.
For
parameters
Instrument
already
lines.
the
you
more
there.
button
the
Al
parameter
Notice
been
installed)
The
notes
of
the
voice
allocation
all
slightly
that.you
oscillators
wish,
information
detuned
can
It's a cold,
change
on
pages
that
Play
and
in
the
VOICE
to
that
now
in
the
VOICE
should
effect
varies
algorithm
from
only
play
to
sound,
cruel
the
Al
back
about
39-40.
you
like.
Set
the
listen
to
the
Instrument,
STATUS
"Chorus."
all
the
lights
STATUS
also
sound
from
plays
one
another.
single
lines,
so
it
shuts
world.
to
Rotate
Instrument
module
Play
(up
module
thicker
Instrument
every
not
off
the
for
Globals,
Al
parameter
and
notice
lights
some
more,
to
the
(the
to
oscillator
That's
chords.
previous
more
especially
number
go
on
perceived
Instrument).
at
what
adds
Every
note
conventional
see
the
list
to
Rotate
that
for
each
of
voices
each
time
once
the
new
and
steals
musical
of
global
if
it's
as
you
note.
single-
that
you
The
for
each
beef.
note
needs
its
3.2
►
Using
About
Multiple
Multiple
A
Multiple
a
Multi
convenience)
Instruments
keyboard
levels
and
determining
When
most-recently-selected
with
Each
may
information).
you
the
name
Multi
not
have
Instruments
Instrument
into a performance
splits
and
layers,
pans
with a single
which
press
can
channels
the
Multiple
of
the
Single
have
up
enough
Instruments
(also
called
a
MultiProgram
is a way
MultiProgram's
voices
of
grouping
preset.
for
calling
MIDI
will
button
Instrument
to 6 Parts,
installed
up
Program
respond
in
although
to
together
You
an
to
the
name
in
the
use
in
the
display,
a
number
can
use
it
for
entire
Change
INSTRUMENTS
there
ensemble
command
MIDI
inputs.
appear
MultiProgram's
all 6 (see
in
are
situations
Chapter 4 for
of
Single
setting
complete
or
module,
the
display,
Part
when
or
simply
up
with
for
simply
the
along
1.
you
more
Page 27

You
can
see
the
buttons
change
To
set
range
are
section.
in
the
in
the
see
exactly
to
respond
of 0 to
explained
Single
VOICE
display
what
only
127)
in
Instruments
STATUS
as
goes
to a specific
and
to
detail
in
assigned
module.
you
do
so.
into
each
Part,
keyboard
respond
the
on
Control
Chapter 3 Explorations
to
each
Part
by
pressing
You'll
one
Module
see
press
the
range
MIDI
(Zon—the
channel.
chapter
the
instrument
Parts
button.
default
All
the
in
the
Reference
names
Each
is
parameters
19
the
lit
part
is
the
full
Exploration
2:
Creating
Let's
Instrument
157,
Furthermore,
pretty
Phase
Soft
Figure 3.1
A
layered
split
A
Layered
set a somewhat
129,
Soft
Solo
on
let's
low—and
(see
Figure
Solo
mostly
Pie & oh,
arbitrary
Pie & Oh
the
upper
transpose
layer
the
3.1).
Also,
to
the
right.
up 1 octave
Split
task
for
on
the
lower
half.
the
left
entire
keyboard
let's
pan
Middle
C
Padding
Phase
ourselves:
half
half
up
with
the Pie & Oh
to
create a Multi
of
the
keyboard
an
octave—after
Instrument
mostly
Soft
to
Solo
that
plays
and
Instrument
all,
it
goes
182,
Padding
the
left
and
the
Here's
1.
Press
2*
We'll
button
Notice
exactly
how
it's
done:
the
Multiple
need 3 Parts
that
is
which
Parts
and
for
our
lit
in
the
Parts
you'll
1,2
and 3 active.
Program
layered
VOICE
need
buttons
split,
STATUS
to
activate
to
enter
Multi
one
for
each
module
represents
or
deactivate
mode.
Single
Instrument.
an
active
to
wind
up
with
Each
Part.
Page 28
20
OB-Mx
User's
Key
Guide
3.
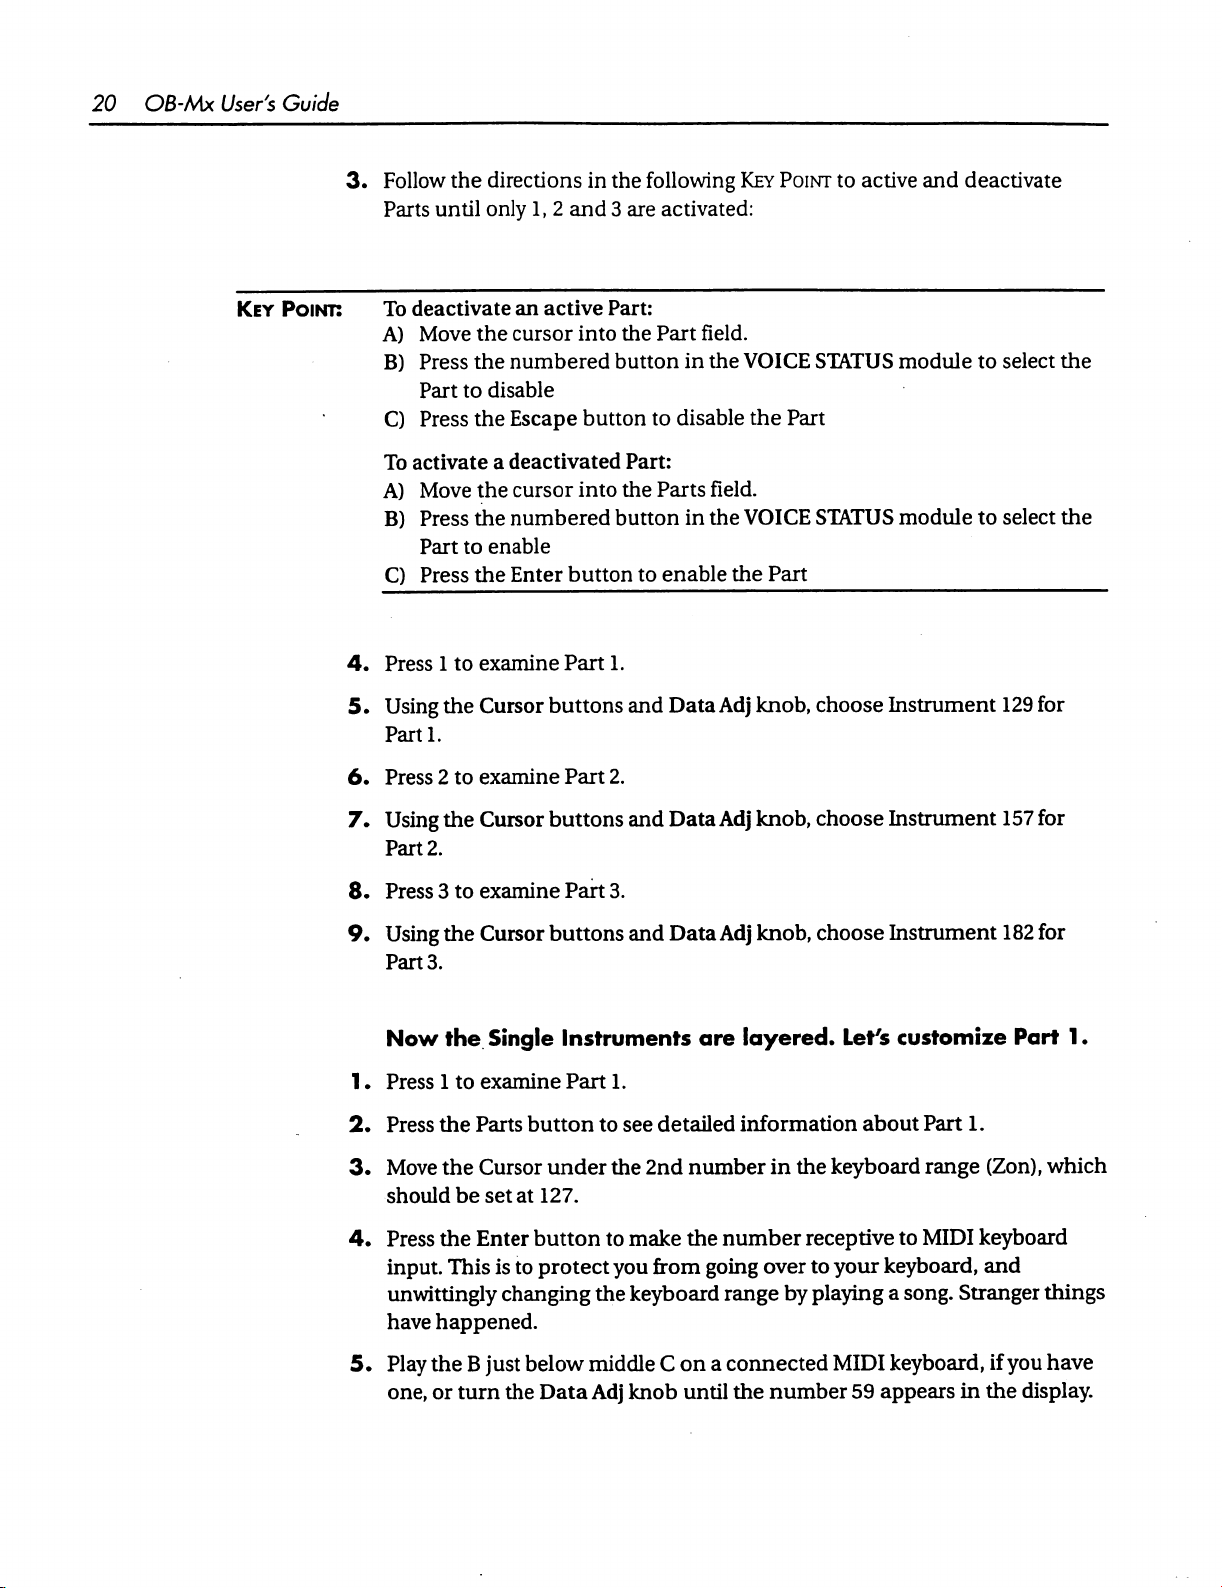
Follow
Point:
To
A)
A)
4.
the
directions
Parts
until
only
deactivate
Move
the
cursor
B)
Press
the
numbered
Part
to
disable
C)
Press
the
Escape
To
activate
Move
B)
Press
Part
C)
Press
Press 1 to
a
deactivated
the
cursor
the
numbered
to
enable
the
Enter
examine
in
the
1, 2 and 3 are
an
active
Part:
into
the
button
button
Part:
into
the
button
button
Part
to
1.
following
activated:
Part
to
disable
Parts
enable
Key
field.
in
the
VOICE
the
field.
in
the
VOICE
the
Point
Part
Part
to
active
STATUS
STATUS
module
module
and
deactivate
to
select
to
select
the
the
5.
Using
the
Cursor
Parti.
6.
Press 2 to
7.
Using
Part
8.
Press 3 to
9.
Using
Part
Now
1.
Press 1 to
2.
Press
3.
Move
should
4.
Press
input.
examine
the
Cursor
2.
examine
the
Cursor
3.
the
Single
examine
the
Parts
the
Cursor
be
set
the
Enter
This
is
unwittingly
have
happened.
buttons
Part
buttons
Part
buttons
and
2.
and
3.
and
Instruments
Part
1.
button
at
button
to
protect
changing
to
see
under
127.
the
to
you
the
make
keyboard
Data
Adj
knob,
Data
Adj
knob,
Data
Adj
knob,
are
layered.
detailed
2nd
from
information
number
the
number
going
over
range
choose
choose
choose
Instrument
Instrument
Instrument
Let's
customize
about
in
the
keyboard
receptive
to
your
by
playing
to
keyboard,
a
Part
1.
range
MIDI
(Zon),
keyboard
and
song.
Stranger
129
for
157
for
182
for
Part
1.
which
things
5*
Play
the B just
one,
or
turn
below
the
Data
middle C on a connected
Adj
knob
until
the
number
MIDI
59
appears
keyboard,
if
in
the
you
have
display.
Page 29
6.
Press
the
instrument
7.
Using
(Ch:)
8.
Set
9.
Check
for
10.
Change
the
to
1.
the
Pan
that
more
Xpose
Escape
Cursor
Attn
on
button
instead
buttons
to
-7,
which
is
0,
these
parameters.
to
+12
to
turn
your
keyboard
of a data
Al
(semitones)
entry
and
the
is
70%
over
is
Rotate
device.
Data
to
and
TT
to
transpose
Chapter 3 Explorations
back
into a performance
Adj
knob,
the
left.
is
10.
set
the
Check
the
this
Part
MIDI
Channel
Reference
up
an
section
octave.
21
Now
1.
Press
2*
Move
should
3*
Press
input.
4.
Play
Data
5.
Press
6.
Using
(Ch:)
7.
Set
8.
Check
work
Multi
the
be
the
middle C on a connected
Adj
the
the
to
the
Pan
that
Finally,
on
Part
part
number
Cursor
set
Enter
knob
Escape
Cursor
1.
Part
under
at
0.
button
until
button.
buttons
to
+7,
Attn
is
3:
2:
button 2 to
the
to
make
the
number
and
which
0,
Al
is
70%
is
Rotate,
1st
number
the
MIDI
60
the
Data
over
Xpose
examine
in
number
keyboard,
appears
Adj
to
the
is 0 and
Part
2.
the
keyboard
receptive
if
you
in
the
display.
knob,
set
right.
TT
range
to
MIDI
have
the
MIDI
is
10.
(Zon),
which
keyboard
one,
or
turn
Channel
the
1.
Press
2.
Using
(Ch:)
3.
Set
4.
Check
Now
you
Multi
part
number
the
Cursor
to
1.
the
Pan
that
Pan
you're
buttons
to +o,
which
is
0,
ready
expected?
button 3 to
and
is
the
Attn
is 0,
to
play.
examine
the
Data
Adj
center
Al
of
is
Rotate,
Does
the
Part
3.
knob,
set
the
MIDI
the
stereo
Xpose
MultiProgram
field.
is 0 and
TT
is
behave
Channel
10.
as
Page 30
22
OB-Mx
User's
Guide
Exploration
3:
1.
2.
3.
4.
Creating
Here's
good
experiment:
Examine
Press
parts.
Go
over
sends
some
Look
shouldn't
MIDI
This
Suppose
a
Multi
without
tool,
channel
balance
a
Balanced
where
balance
the
You'll
out
don't—then
at
Volume
behavior,
the
we
explore
among
the
Vol
part
number
notice
to
your
MIDI
the
volumes
they?
message.
while
we
could
to
our
taste?
changing
answer
1,
all 3 instruments
you'd
achieved.
the
parameter
buttons
that
they're
MIDI
controller
Volume
the
Vol
for
They're
all
perfectly
painstakingly
Could
the
balance?
would
be
Performance
the
ins
and
outs
of
creating
three
parts
in
our
Multi.
of
any
active
to
examine
all
the
and
messages—Continuous
value
in
the
all 3 Parts—they
on
the
same MIDI
logical,
balance
we
raise
If
the
"No."
At
would
That's
why
Part.
the
same.
change
display
raises
or
lower
MIDI
the
assume
we
the
Ve
all
channel,
an
the
different
the
Volume
first
sign
volume
put
in a Attn
will
and
maintaining
First,
let's
Notice
volumes
changed
the
value.
of
volume.
Controller
change.
interesting
volume
If
together.
receiving
Single
of
message
of a Volume
90,
wrecking
parameter.
a
try a little
the
other
two
the
controller
7;
some
do
and
And
why
the
same
question.
Instruments
the
whole
were
our
90
message
in
mix
only
in
whatever
Key
Point:
5.
Adjust
them.
6.
Turn
knob.
overall
Use
in a MultiProgram,
while
Save
The
It
would
locate a Multi
the
Attn
parameters
the
Volume
Notice
volumes.
the
Attn
retaining
knob
how
the
parameter
the
Mums!
be a good
that
in
all 3 Parts
on
your
controller,
balance
and
balance.
idea
you can
among
to
adjust
use
the
Vol
to
save
your
write
until
you
or
change
the
parts
is
the
balance
parameter
Multi
over,
and
among
to
definition
press
like
the
balance
it
with
the
Data
preserved
the
change
now.
Enter.
at
different
Single
the
Instruments
overall
Press
Store,
among
Adj
volume
Page 31

Chapter 3 Explorations
23
Multiple
Instruments
You
can
select
MIDI
Program
button
by
are
■
■
to
see
sending a Program
several
If a Part
Change
than
possibility
Base
MIDI
prevent
them
If
Program
Single
points
just a Single
Channel.
button
to
several
Instrument.
and
different
Change
this).
You
Change
to
be
within a Multi
on
the
Base
Instrument
of ambiguity,
Alternatively,
and
then
Program
change
Parts
Change
Changes
Single
within a Multi
on
MIDI
Multis
messages
can
change
aware
is
assigned
Channel
it's a good
setting
Instruments
that
channel
Program
numbered
on
the
on
the
of
with
will
change
you can
the
from
are
from 1 to
the
Base
Single
channel
regard
to
the
cause a new
within a Part.
idea
to
alter
MPC
parameter
affecting
within a Multi.
assigned
will
change
Change
128
remotely
Channel
Instrument
assigned
to
this
Base
avoid
this
Multis,
to
(press
assigned
to
that
process:
Channel,
Multi
assigning
behavior
while
the
same
all
Parts
then a Program
to
be
To
avoid
by
to
Off.
still
channel,
to
Messages
by
using
the
MIDI
to a Part
Part.
There
loaded
Parts
pressing
This
the
rather
any
to
the
the
will
allowing
then
a
same
3.3
Modulation
Modulation
parameters
output
feedback
target
modulation
■
The
every
note
what
would
other
this
parameter
■
Refer
and
controlling
modulates
during
means
of
an
oscillator,
of
another
loop).
The
or
destination,
source.
most
fundamental
note
that
modulates
allows
example,
back
Figure
you
result
in a sound
modulators
the
of a VCO
to
our
3.1.
the
the
the
Sustain
&
change.
component
component
and
Here
you
the
to
MIDI
discussion
An
output
output
The
In
the
filter,
or
(or
even
being
the
component
are a few
use
of
modulation
play.
In
most
pitch
of
the
play
most
forms
with
the
not
necessarily
note
number
is
the
target.
of
envelope
level
phase)
generator
level
of
parameter
during
Matrix
OB-Mx,
other
of
VCOs
same
the
the
it
means
Instrument
the
same
changed
doing
the
many
in
patches,
every
generating
of
music;
pitch,
related
VCA
each
to
is
the
classic
model
(source)
(target).
of
the
note.
affecting
component
component,
is
called
the
changing
uses
of
modulation:
synthesizers
keyboard
the
without
or
one
the
note
source,
and
of
is
responsible
The
VCA
constantly
In
the
OB-Mx,
the
with
creating
the
modulation
is
called
occurs
or
controller
sound.
it,
This
each
note
determined
that
you
played.
the
Pitch
analog
synthesis
for
envelope
(except
the
the
a
the
with
is
by
VCA
is
In
Page 32

24
OB-Mx
User's
Guide
incorporated
Envelope
sources
■
An
LFO
supplies
used
to
(at
various
naturally
sustains
■
Every
MIDI
You
can
frequency
simultaneously
character
■
The
time
very
gradual.
cycles
twisting
tell
exactly
variations
pulse
you'd
end
■
If
you're
output
digital
going
In
target
you
an
per
you
width
want
of
each
you
use
engaging
oscillators,
through
FM
terms,
is
just
exploration
into
Generator
that
you
map
is
often
used
a
voltage
modulate
points
occurs
a
use a MIDI
of
scale
the
that
glacial,
in
note.
Note
Continuous
of
the
OB
use
the
wah
of a
The
second.
Rate
the
Period
you
over
the
of
an
to
use a triangle-shaped
cycle.
the
output
in
of
each
oscillator
hundreds
the
called
hear
"the
its
profound
with
the
FINAL
4,
by
to
to
that
varies
oscillator
in
the
acoustic
that a single
footpedal,
filter
another
effect
source
slowest
If
you
knob
all
could
course
oscillator
of
FM
synthesis.
so
you
source
carrier."
MIX
module.
the
VCA
it
using
the
create
of
one
vibrato
periodically
pitches,
signal
Controller
path)
instruments
source
for
instance,
to
create a wah-wah
MIDI
by
modulating
can
vary
rate
on
an
press
the
the
way
this
LFO
easily
achieve
of a piece
or
the
resonance
oscillator
This
changes
can
or
continuously
take
thousands
oscillator
You
don't
timbral
this
technique
Its
output
Offset
footpedal
LFO 1 selection
counter-clockwise,
is
the
is
effects
knob
and
Matrix.
in
sustained
(usually).
filter
frequencies
to
simulate
when a wind
can
have
is a potential
to
modulate
effect;
or a slider
the
filter's
from
the
near-instantaneous
OB-Mx
100
by
LFO
called
shortly.
UFO
seconds.
subtle,
using
this
of a filter.
to
avoid a sudden
to
modulate
is
very
fast
word
"continuously"
of
complete
"the
actually
listen
on
the
is
controlled
by
any
additional
notes.
The
LFO
This
source
and
the
vibrato
or
string
multiple
modulation
the
you
to
resonance.
is
0.010
Hz,
button
the
While
that's
continuous
LFO
to
modulate
In
the
pitch
modulation;
(these
are
cycles
modulator"
to
the
carrier.
We'll
can
note
volumes
effect
player
targets.
source.
center
could
change
and
display
this
jump
the
to
or
1/100
then
will
not
timbral
case,
at
of
another,
the
analog,
literally),
each
second.
and
the
modulator;
be
doing
that
not
by
be
the
the
the
►
Ofi-Mx
Default
Modulations
A
number
which
tasks
with
configurable
another
of
default
are
active
in
every
that
musicians
our
philosophy
as
possible,
and
alternate
modulation
Single
encounter
of
creating
all
modulations
paths
Instrument.
when
setting
a
synthesizer
of
these
routings
put
have
been
These
up
that
can
in
their
set
up
in
the
ease
the
sounds.
is
be
place.
In
as
close
bypassed
OB-Mx
most
common
accordance
to
completely
in
oneway
or
Page 33

Table
Default
indicates
OB-Mx
The
Mod
how
or
modulations.
Amount
to
scale,
shut
off a given
modulation.
3.1
column
invert
Chapter 3 Explorations
25
The
the
few
Exploration
Key
4:
Point:
EG
Envelope
Envelope
always
dilute
1.
Load
play a note
default
table
of
4
Single
modulations
is
explained
the
key
ones
and
Generator
Generator
affects
its
its
effect.
Instrument
on
your
are
in
detail
with
hands-on
The
VCA
4
controls
4
is
hard-wired
target
It's
fully,
critical
128,
keyboard
shown
without
for
playing
InitialConditions.
to
in
Table
3.1.
in
the
Reference
explorations
the
VCA.
to
the
any
notes.
hear
the
section,
VCA;
modulation
Press
sound
Each
of
the
but
here.
it's
the
one
amount
the
Trigger
of
the
patch.
modulations
we'll
examine
source
that
parameter
button
in
a
to
or
Page 34

26
OB-Mx
User's
Guide
2.
Press
the
again
Change
Trigger
the
Envelope
value
shown
and
listen—the
the
Attack
button
Generator
in
the
display
initial
value
to
several
until
you
can
4
(vca)
button.
is
about
impact
hear
.3
of
the
seconds,
the
note
Turn
the
Attack
seconds.
note
and
fading
Press
the
is
softened
then
press
in.
button
Trigger
until
button
considerably.
and
hold
the
Notice
release
the
you
current
its
in
3.
With
Now
holding
parameter
not
Freerun
Note
Freerun
typically
4.
Turn
Now
that,
of
envelope
release
current
the
display—in
the
press
the
triggering
Off
Freerun
we're
with
the
Attack
the
Trigger
has
a
note,
level
to
level
Attack
the
Trigger
it
down.
is
set,
envelope,
comes
especially
generate
off,
ready
button
been
interrupted
the
envelope
the
Release
to
0,
using
this
case, a little
value
still
button
You'll
hear a note
the
entire
key
or
button
which
in,
without
handy
Note
Ons
and
reset
to
explore
value
set
to
several
doesn't
stage,
the
set
to
again,
envelope
proceeds
necessarily
for
use
only.
the
produce
before
generator
which
time
period
over
several
fade
is
held
immediately
with
attack
it
fades out
half a second.
seconds,
and
release
in
and
completes
down.
completing
percussion
to a short
velocity
seconds,
any
sound.
reached
proceeds
the
specified
press
it
immediately
then
regardless
This
to
controllers,
time.
a
quick
This
is
an
audible
directly
note
in
out.
is
in
the
the
from
gradually
the
Rels
the
Freerun
When
contrast
Release
Attack
the
of
whether
stage
or
which
press
because
level.
parameter
without
to
Decay.
sensitivity:
and
When
its
from
button.
Freerun
or
the
non-
when
a
5.
If
you
notes
but not
6.
Press
ENVELOPE
under them,
the
refers
velocity
7.
Play
Exploration
5:
Fixed-Pitch
Sometimes
most
a
percussive
have a velocity-sensitive
to
hear
the
dynamic
much,
the
way
clockwise,
to
your
difference
Alt
button.
GENERATORS
enclosed
This
in
until
the
difference
1
and
one
keyboard
in
with
again.
the display
velocity
Sounds
it's
important
commonly-used
sound
example
in
an
keyboard
range
of
the
Instrument.
between
switches
module
curly
the
softest
the
function
to
those
brackets.
Turn
shows a value
maximum
The
for a sound
entire
output
127.
dynamic
and
range
Quartertone
not
of
this
would
region
of
(most
are),
then
You
and
loudest
of
the
dials
indicated
the
level
should
to
track
be
the
keyboard.
by
knob
marked
of
25dB.
between a note
be
the
keyboard's
for a keyboard
play
soft
and
hard
should
the
greatly
hear
some,
sounds.
at
the
top
of the
names
This
printed
Velo
Sens
number
with
increased.
all
Keyboards
pitch.
The
split
to
play
This
frees
you
from
Page 35

Chapter
3
Explorations
27
having
this,
black
1.
Load
first
wave
2.
Play
Instrument
3.
Press
+1.00.
4.
Use
notice
you
The
5.
Turn
play
notes,
6.
Set
one
one-octave
between
to
and,
along
and
Single
pressing
button
your
keyboard
VCO
the
Track
that
press.
Track
the
knob
your
and
the
Trek
octave
adjacent
be
very
careful
the
white
keys.
Instrument
the
VCO 2 selection
so
that
follows
1.
Notice
knob
the
pitch
knob
can
all
the
keyboard—it's
vice-versa.
value
to
above
that.
change
keys
about
way,
how
256,
its
LED
or
other
the
notes
that
the
to
set
of
the
be
used
way
been
+0.50.
It
now
in
the
is
which
to
get
InitialConditions.
button
goes
off..
controller.
that
you
track
parameter
the
Trek
notes
you
for
some
counter-clockwise,
turned
Play a middle
takes
pitch
of
now a quartertone,
note
you
play.
at
some
of
the
Turn
and
then
Notice
play.
value
hear
other
CBrck
to
0.
Play
no
longer
neat
that
the
tricks,
until
upside
two
the
Instrument.
down!
C, a C
octaves
one
on
not a semitone.
We'll
learn
how
notes
in
between
off
VCO
2's
output
pressing
the
in
depends
the
lit
pitch
of
the
the
display),
controller
on
too:
the
value
is
-1.00.
High
keys
sound
octave
the
The
above
keyboard
pitch
difference
to
do
the
by
triangle
is
set
to
now.
You'll
which
key
Now
low
it
and a C
to
make
a
i
J
j
Exploration
6:
1.
2.
3.
4.
5.
6.
Adding
Load
For
sound.
Bring
Turn
Press
taste,
Experiment
try
5.0
Add
flautists
they
Vibrato
Single
simplicity's
the
THgger
about
add a vibrato
Instrument
sake,
VCO 1 into
Modulation/Pitch
turn
the
Hz.
1.5
perform;
the
and
knob
with
different
seconds
256,
turn
off
display.
listen
to
the
higher.
values
of
initial
their
notes
effect
to
InitialConditions.
VCO
2's
output.
LFO1
knob
sound.
are
support
If
for
the
delay.
This
often
stable
sustained
Press
THgger
until
the
value
the
effect
is
too
LFO 1 Rate.
is
analogous
for
notes.
For a flute-like
several
for
LFl>Pch
subtle
to
seconds
and
listen
for
the
way
before
to
the
is + .20.
your
sound,
many
Page 36

28
OB-Mx
User's
Guide
Exploration
Figure
A
Pulse
7:
3.2
Wave
Pulse
One
This
brief
The
instead
how
Width
of
the
wave
wave
consists
transitions,
pulse
wave
you
hear a continuous
many
up-and-down
Modulation
types
that
of
alternating
as
shown
looks
very
the
VCOs
can
high
in
Figure
"upl
choppy,
cycles
3.2.
time
1
cycle
but
tone.
The
complete
generate
and
low
you
don't
pitch
in a second.
is
outputs,
hear a chopped-up
of
the
called
a
Pulse
connected
tone
is
determined
Wave.
by
very
sound;
by
Key
Point: Pulse
1.
2.
3.
4. Turn
5*
The
amount
a
percentage
cycle
of
same
but
Width="Duty
The
frequency
timbre.
Load
Single
TurnoffVC02.
Select
VCO1.
output.
the P Width
Listen
While
range
of
The
only
of
time
of
the
the
pulse
wave.
the
timbre
determines
Instrument
Shut
off
Listen
to
holding
to
the
knob
the
sound
down
values.
thing
This
left
to
the
total
of
Cyclew=
sound.
of
the
pulse
wave
spends
time
for a complete
As
the
duty
cycle
the
note
changes.
"up"
time / period = "up"
the
pitch;
the
256,
InitialConditions.
the
triangle
until
the
Instrument
Trigger
simulates
do
is
to
wave
the
PW
parameter
again.
button,
what
Pulse
make
an
in
the
high
cycle,
changes,
pulse
output
twist
Width
LFO
do
the
width
and
in
the
the P Width
Modulation
that
position,
is
known
pitch
express
as
the
remains
as
duty
the
time * frequency.
determines
turn
on
display
knob
twisting
the
the
pulse
wave
is
in
the
60s.
through
is
all
about.
instead
of
us.
a
Page 37

6.
Set
7.
By
about
hold
8.
Experiment
of
The
Matrix
No,
time
modulation
connections
synthesizer
expressive,
the
PW
parameter
twisting
the
the
it's
continuum:
the P Width
the
3:00
position,
Trigger
oscillator.
not a weird
button
with
changing
sources
between
into
an
really
weird
back
to
0.
Env/LFO
set
and
the
cyberspace
it's
just a software
to
destinations.
simple
audio
computer.
or
both!
knob
the
LF2>Pw
listen
to
Rate
construct
components
Chapter 3 Explorations
(below
parameter
the
of
LFO 2 to
patch
It's
the
It's
the
the
pulse
to
sound.
see
how
or a tear
bay
can
in
you
can
nexus
where
transform
place
where
wave
button)
about
the
.70.
Press
it
affects
fabric
use
to
interacting
the
you
the
of
the
connect
OB-Mxfrom
can
get
to
and
sound
space-
really
29
a
Exploration
8:
1.
2.
3.
4.
5.
6.
7.
8.
Pulsing
Load
Press
display,
a
connection
along
program
Turning
sources.
default
Set
Set
change
Set
Press
with
Press
knob
Noise
Single
the
the
the
the
and
the
the
and
Instrument
Matrix
and
with a scaling
up
the
Select
purpose,
Multiplier
DESTINATION
as
Param
hold
basic
LFO 3 button
choosing
button.
the 1 button
between a modulation
to
12
Patches
Data
Adj
LFO
3.
so
we'll
to
you
change
to
Noise
the
Trigger
tone.
different
256,
InitialConditions.
The
parameters
in
the
VOICE
source
multiplier
knob
We
have
the
maximum
module
DESTINATION
In.
and
to
set
the
for
each
Single
takes
you
through
know
from
Table
complete
value,
to
MM
button.
experiment
You
waveforms.
for
Patch 1 will
STATUS
amount
freedom
VCE
module.
should
with
module
and a modulation
of
Instrument.
all
the
3.1
that
to
+1.00.
The
choices
hear a pulsing
the
effects
appear
will
modulation.
possible
this
is
play
with
in
of
in
the
flash.
A
Patch
is
destination,
You
can
modulation
not
used
for
any
it.
the
Param:
noise
turning
field
along
the
Rate
Page 38

30
OB-Mx
Users
Guide
Page 39

O
B -Mx
User's
Guide
Section
2
Reference
Oberheim
Page 40

Chapter 4 Voice
Allocation
31
CHAPTER
Voice
Your
least
sound.
The
Al
various
occur.
have
forearm
sequencer
situations).
OB-Mx
containing
make
one
voice,
(voice
interesting
Note
stealing
voices
for;
or
send a thick
(or,
synthesizer
2
up a note
but
you
allocation
ways,
for
example,
if
you
Allocation
has
between 2 and
VCOs, a noise
in a Single
may
algorithm)
and
happens
multi-part
have
just a few
source
Instrument.
decide
when
if
to
parameter
also
lets
you
you
play a keyboard
arrangement
voices
12
and
the
other
Each
stack
more
than
allows
you
control
try
to
installed,
how
play
more
with
to
the
4
voices,
note
you
in
each
components
played
one
for a thicker
to
stack
"note
stealing"
notes
your
entire
synthesizer
less
extreme
that
uses
at
sounds
than
you
from
in
is
to
a
You can
VOICE
(unless
module
watch
STATUS
you're
lit).
the
algorithms
module
in
Matrix
light
mode,
in
action
up
to
indicate
with
the
as
you
play;
each
voice
Matrix
button
the
buttons
as
it
is
in
the
CONTROL
in
the
played
Page 41

32
OB-Mx
User's
Guide
4.1
Single
Allocation
Instrument
Algorithms
In
Single
Rotate
Each
the
voices
sounding
Repeat
This
the
which
To
playing
A
chord
In
the
sustain,
the
number
to
be
Instrument
new
note
is
assigned
new
note
uses
the
are
available,
for
the
is
an
extremely
Repeat
understand
sustaining
algorithm,
won't
be
an
Instrument
played
Rotate
used
algorithm,
with
the
of
voices
for
the
longest
useful
stolen
the
reason
in
the
same
chord,
installed.
the
trill,
mode,
the
Al
parameter
to
the
next
voice
that's
been
new
note
steals
time.
algorithm
repetitions
by a new
for
with a 5
left
hand
a
2-note
long
especially
and
leaves
of
the
note
until
Repeat
release
Using
mode,
or 6 second
and
then
trill
played
time,
in
systems
Repeat,
the
sustained
Voice
can
take
the
free
voice.
released
a
voice
for a number
same
you've
released
would
however,
If
several
for
the
from
the
of
reasons.
note
will
use
run
out
think
of a keyboard
release
with
time
would
in
the
right
quickly
less
than
causes
chord
intact.
longest
note
of
(or
sustain
hand
steal
following
voices
the
voices.
try
voices
the
maximum
only
values:
are
free,
time.
If
no
that
has
been
When
same
it
during
using
voice,
player
yourself).
noticeably.
the
from
two
voices
Another
instrument.
modulators
time.
generally
However,
note
the
also
decay
reason
When
repeatedly.
Repeat
avoid
times
for
using
Therefore,
in different
playing
be
of
little
there
may
In
these
algorithm
the
unison
in
the
Rotate
Repeat
the
voices
notes
that
concern;
be
some
cases,
re-use
chords
mode.
mode
states
of the
is
likely
differ
in
fact,
situations
you'll
the
same
that
result
is
that
the
various
to
be
in
pitch,
they
where
get a more
voice
from
oscillators
slightly
these
add
life
you
for
the
repeating
OB-Mx
to
want
consistent
repeated
is
an
analog
and
analog
different
sonic
the
at
any
differences
overall
to
notes
sound.
play
the
sound
notes.
with
given
will
same
by
letting
You'll
long
Page 42

Combo
A
curious
is
assigned
the
notes
algorithm,
Experiment
#219)
combination
with
the
Rotate
algorithm
(releases
to
best
precede
while
overlapping
with a slowly
understand
of
the
above
Repeat
until
algorithm;
all
notes
closures)
notes
decaying
the
potential
Chapter 4 Voice
two
algorithms.
successive
are
released.
will
be
assigned
(legato)
sound
such
of
the
will
Combo
The
first
notes
are
A
succession
with
the
activate
as
Li'l
the
Bells
algorithm.
Allocation
note
assigned
of
single
Repeat
Rotate
(Instrument
33
sounded
with
mode.
Double,
Each
voices).
interesting
the
VCOs
waveform
value
different
Triple,
new
note
gets
This
creates
thickening
with
an
to
be
Random,
in
each
of
the
values,
which
Quad,
2,3,4
a
louder
effects
LFO
or
envelope.
voices
should
Unison
Each
new
note
gets
all
the
Chrs/3,
A
fast
the
voices,
from
voice-stacking
by a modulation
Chrs/4,
and
easy
respectively.
one
another
Chrs/6,
way
to
get
to
create a chorus
algorithms,
source.
All
Hex
or 6 voices,
sound
happen
then
each
and
will
thicken
voices
respectively
than a single
if
you
If,
for
instance,
Note
On
modulate
the
in
the
instrument.
Chorus
thicker
the
but
sounds.
voices
the
for
each
effect.
detuning
Each
(if
voice,
subtly
sound
This
modulate
you
will
trigger
the
oscillator
considerably.
new
note
are
is
similar
is
static
you
have
enough
but
the
the
set
the
LFO
a
new,
pitches
note
gets
3,4,
detuned
to
the
rather
than
most
pitch
of
1
different
to
6 or
all
of
slightly
previous
controlled
4.2
Multiple
Allocation
Instrument
In
the
Multi
mode,
pressing
allocated
voices
the
Voices
to
each
evenly
among
Voice
Algorithms
each
Part
has
its
own
voice
button,
Part.
Setting
the
Parts;
you
can
determine
the
Asgn
setting
allocation
which
parameter
it
to
User
to
will
algorithm.
voices
Auto
will
allow
you
By
will
be
allocate
to
the
customize
Page 43

34
OB-Mx
User's
Guide
the
chapter.
If
will
part,
several
The
the
VOICE
Single
Chrs/6,
voice
allocation.
you
have
one
produce
stealing
Al
parameter
CONTROL
Instrument
the
it
notes
in a Part
STATUS
Unison
For
further
voice
allocated
same
result—incoming
from a sounding
that
for a Multi
MODULE
module.
definitions
and
Most
and Chorus
information,
per
part,
note
the
algorithm
Part
is
found
the
number
of
the
listed
above,
are
absent,
see
the
all
the
voice
notes
will
take
if
necessary.
becomes
by
of
choices
and
but
there
It's
relevant.
pressing
the
Part
are
identical
supercede
is a new
CONTROL
allocation
the
when
the
you
wish
MODULE
algorithms
only
voice
there
are
Parts
button
to
edit in
to
those
in
the
them.
The
Hex,
in
choice:
the
in
the
Legato:
Note
currently-sounding
When
played
Each
On
comes
that
Note
that
note
triggers
in
before
On
is
still
held
all
the
the
prior
note
is
changed,
is
released,
down.
the
voices
assigned
note
has
but
the
pitch
will
to
the
Part.
ended,
envelope
the
pitch
is
change
to
that
not
When a new
of
the
retriggered.
of
the
last
key
Page 44

Chapter 5 Instruments
Module
35
CHAPTER
5
Instruments
Module
Single
INSTRUMENTS
Multiple
The
notes
(explained
Most
individual
and
with
When
are
prompted
you
description
buttons
mode.
the
currently-loaded
are
assigned
in
people
sounds,
layers
have
and
sequencers.
you
press
changed.
in
In
Single
to
the
CONTROL
will
use
and
for
addressing
one
first
to
You
of
the
Store
this
module
Instrument
different
Single
use
of
the
buttons
save
any
can
button
select
mode,
Instrument,
Parts
depending
MODULE
Instrument
Multis
save
for
multiple
in
Instruments—be
them
in
the
either
section
mode
creating
sounds
this
into
CONTROL
Single
all
incoming
while
in
Multi
upon
following
for
creating
performance
on
different
module
any
to
they
RAM
module
Instrument
notes
mode
various
this
and
change
Single
location.
for
or
Multi
are
played
incoming
parameters
one).
testing
presets,
MIDI
modes,
or
more
splits
channels
you
Multi—that
See
the
details.
on
Page 45

36
OB-Mx
User's
Guide
Page 46

Chapter 6 Control
Module
37
Chapter
Control
Prgrm
Parts
This
that
including
assignments
Voices
Matrix
module
are
not
storage,
in
Multis.
MIDI
Options
controls
directly
Store
most
related
global
6
Module
Data
Adj
Escape < Cursor > Enter
of
the
functions
to
sound
parameter
-
creation,
settings
Compare
in
the
and
OB-Mx
Part
Changing
in
the
Display
Values
As
you've
are
changed
underneath
that a parameter
cursor
(indicated
value.
no
doubt
by
the
under
by a flashing
already
first
using
parameter
in
the
it),
that
means
observed,
the
Cursor < and > buttons
and
display
Selection
is
that a parameter
many
then
turning
not
accessible
button)
parameter
is
the
the
values
to
Data
Adj
(i.e.,
you
knob
in
the
only
way
in
the
display
position
knob.
can't
active
to
the
cursor
If
you
find
position
module
change
that
the
Page 47

38
OB-Mx
User's
Guide
Program
►
Program
Single
Instrument
Button
This
button
display.
■
Loading
■
Changing
■
Changing
Parameter
Instrument:
Pan:+O
brings
Its
main
Instruments,
the
Instrument
functions
Instrument
the
Single
Instruments
Mode
127
Vol:127
<24Character
are:
either
names.
AhRotate
Name
and
some
key
Single
or
Multiple.
assigned
to
the
parameters
Parts
in a Multi.
into
Descriptions,
Instrument
Mode:Poly
Name>
TT:1
the
Instrument
A
number
you
save
answer
to
any
will
Instrument
The
long.
in
the
range
attempt
any
be
to
load a new
changes
"Yes"
user
discarded.
you've
by
pressing
location.
Name
name
of
the
currently
To
change
the
of 1 to
Single
made
Enter,
If
you
answer
loaded
name,
proceed
256
which
Instrument,
to
the
then
Single
loads a Single
current
you'll
"No"
as
follows:
Single
be
by
pressing
Instrument,
Instrument.
you'll
be
asked
Instrument.
able
to
save
your
Escape,
up
to
24
When
if
you
want
to
If
you
Instrument
then
changes
characters
Page 48

1.
Position
1.
Press
the
3.
Use
the
Data
4.
Use
the
Cursor < and > buttons
character.
5.
Repeat
6.
Press
7.
Store
The
all
Single
not
of
steps 3 and 4 until
the
the
next 5 parameters,
Single
Instrument
changed
these
settings,
the
cursor
Enter
Escape
Instrument
Instruments.
when
under
button.
Adj
knob
to
dial
button
use a Multi.
to
if
you
all
This
definition
you
load a new
the
the
exit
want
on
means
when
Chapter 6 Control
instrument
in a new
to
position
name
name
to
the^econd
you
Single
name.
character.
the
cursor
is
what
you
changing
preserve
that
they
use
mode.
your
line
of
are
the
Store
Instrument.
under a new
want
it
to
be.
changes.
the
display,
not
saved
along
button,
For
storable
Module
are
global
with
and
they
versions
39
for
the
are
Pan
Pans
the
Instrument
with
the
Pan
parameter
left)
to
+10
(full
right),
Vol
Responds
the
output
knob
overall
to
MIDI
of
the
in
the
upper-right
output
Instrument.
of
the
A[
The
global
on
the
Chrs/4,
Algorithms
voice
assignment
values
Rotate,
Hex,
Chrs/6,
for a complete
in
the
stereo
in
the
with 0 representing
Volume
(Continuous
corner
synthesizer.
Repeat,
Unison
main
outputs.
Instrument
definition.
the
Controller
This
control
of
the
algorithm
Combo,
or
Chorus.
is
OB
Mx,
for
Single
Double,
See
description.
This
control
Its
is
range
is
center.
7)
messages
independent
which
Instruments.
THple,
the
chapter
of
the
simply
attenuates
It
Chrs/3,
Quad,
on
Voice
additive
-10
(full
and
lowers
VOLUME
the
can
take
Allocation
Page 49

40
OB-Mx
User's
Guide
Mode
Omni
or
Poly.
MIDI
events
to
events
button.
TT
on
When a Single
coming
the
in
Base
Channel,
Instrument
on
any
is
in
channel.
which
In
Poly
you
can
Omni
mode,
mode,
set
by
it
will
respond
it
will
respond
pressing
the
MIDI
to
only
►
Determines
affect
VCOs
the
EditTune
Program
Multiple
Prarm
Parameter
Instrument
MultlProgram:
H
Part:
MultlProgram
A
number
load a new
made
the
Multiple.
first
and
any
changed
then
changes
discarded.
which
that
have
parameter
1
Inst:
in
the
range
Multi,
either
to
If
you
are
Single
to
the
you
presented
both
Tuning
Table
their
Track
of
the
Options
is
in
parameter
Descriptions,
Mode
127
<24
Character
58
<24
Character
of 1 to
you'll
Multi
answer
Instruments.
the
256
be
asked
or
to
any
"Yes"
with
Multi
and
which
if
you
Single
by
pressing
additional
If
you
to
effect.
The
Tuning
set
to
TT.
button
for
more
Program
Instrument
loads a Multi.
want
to
save
any
Instruments
Enter,
prompts,
answer
any
Single
then
one
"No"
by
Instruments
Table
will
only
See
the
description
details.
Name>
Name>
When
assigned
you
attempt
changes
the
by
pressing
you've
to
Parts
Multi
is
saved
one,
to
save
Escape,
will
be
of
to
in
<24
Character
The
name
the
name,
1.
Position
2.
Press
the
of
the
currently
proceed
the
cursor
Enter
button.
Program
as
follows:
under
Name>
loaded
the
Multi,
instrument
up
to
24
name.
characters
long.
To
change
Page 50

3.
Use
the
Data
4.
Use
the
Cursor < and > buttons
character
5.
Repeat
6.
Press
7.
Store
steps 3 and 4 until
the
Escape
the
Instrument
PART/Part
Use
this
for
deactivating
The
Part
number
and > buttons
button
in
the
Adj
knob
to
dial
the
button
changing
Parts.
can
and
VOICE
to
if
you
the
Part
be
1-6,
the
Data
STATUS
Chapter
in a new
to
position
name
exit
want
and
Adj
module.
is
name
to
preserve
that
is
displayed,
you
knob
6
character.
the
what
you
changing
your
change
or
it
by
simply
Control
cursor
want
it
mode.
changes.
and
for
either
pressing
Module
under a new
to
be.
activating
by
using
a
and
the
Cursor <
Part
Number
41
If a Part
the
of
If a Part
capitalized.
in
See
is
active,
Escape
an
active
is
deactivated,
the
Part
field
Explorations
the
word
button
Part.
Also,
will
Pressing
the
Enter
of a deactivated
2
and 3 for
Inst
The
Single
Instrument
other
number.
be
asked
<24
This
above.
leaving
the
exact
Instrument
is
the
one
modules.
If
if
Character
is
the
For
Multi
Bring a different
the
currently-loaded
you
want
to
Instrument
name
of
the
convenience,
mode.
steps.
Refer
"PART"
flash
when
Escape
the
word
button
is
the
will
"Part"
will
Part.
information
number
that
for
the
will
be
affected
instrument
Single
save
changes
Name>
Single
Instrument
it
can
be
edited
to
the
directions
displayed
cursor
deactivate
is
flash
Pressing
currently-displayed
Instrument
or
not.
in
all-capital
is
positioned
the
Part.
displayed
when
about
by
into
chosen
directly
for
with
only
the
cursor
Enter
will
activate
using
Parts.
any
parameter
the
Part
by
has
been
by
the
Inst
from
this
changing
Multi
letters.
in
is
Part.
changes
changing
Also,
the
Part
field
the
first
positioned
the
Part.
This
in
changed,
parameter
display
without
names
letter
the
this
you'll
for
Page 51

42
OB-Mx
User's
Guide
Voices
►
Single
Voices
Button
Instrument
This
button
mode.
significant
to
Parts.
Voice
Enable
An
asterisk
blank
space
installed
is
used
Most
of
the
time
function
Voice:
Status:
under a Voice
indicates
in
your
system
to
enable
you'll
is
in
and
probably
Multi
mode,
Mode
1
2
3
*
that
will
**********
*
number
it
is
off.
appear
disable
4 5
indicates
Only
voices in
leave
where
6
voice
in
the
top
all
the
it
is
also
7
8
that
the
numbers
row.
Single
Instrument
voices
on.
used
to
assign
9
1011
voice
is
turned
that
are
Its
more
voices
12
on,
a
actually
►
Multiple
Voices
Instrument
Multi
AsgmUser
This
screen
Each
Voice
Asgn
In
the
evenly
:127
is
where
in
the
Auto
assign
among
the
Mode
Voice:
Part:
you
top
mode,
active
1
2
112226655555
specify
line
is
assigned
the
available
parts
(the
3
how
many
to
ones
4
5
6
7
voices
the
Part
below
voices
are
that
are
automatically
lit
8
9
1011
are
assigned
it.
in
the
VOICE
12
to
each
Part.
distributed
STATUS
Page 52

Chapter
6
Control
Module
43
module)
parts.
Part
according
In
the
User
area
and
specify
Part
Shows
example
and
which
assign
Parts
module
Pressing
display
in
the
Part
display
5,
etc.
Parts
means
voices
won't
chapter
the
listed
Multi
mode.
that
to
sound
Voices
under
to
the
needs
assign
number
above,
are
Parts
until
for
mode,
your
own
assigned
Part 1 gets
numbered 1 to
the
voice
will
that
are
not
you
activate
more
detail).
button a second
Single
Instrument
of
the
Algorithms
you'll
be
able
voice
assignments
to
the
voice
the
first
2
6,
and
you
not
sound
currently
the
time
in
active.
Parts
while
mode
assigned
to
move
number
voices,
can
this
(see
in
above.
the
above
Part 2 gets
also
dial
Multi.
the
Note
The
voices
VOICE
Multi
mode
It
functions
to
the
various
cursor
into
the
it.
In
the
voices
in a blank,
that
for
STATUS
brings
3,
you
can
those
up
identically
4
the
MIDI
MIDI
Button
Sends
OB-Mx.
System
Send
:
Instr:
Control
Send
Sends a MIDI
sequencer
in
this
Single
Instruments,
Mx.
or
area;
Instrument
Exclusive
A:99
System
another
pressing
all
Tuning
dumps
137
BaseCh:1
B:10
Exclusive
OB
Mx.
it
will
start
or
Tuning
Tables,
and
determines
C:127
dump
The
Table,
all
of
Enter
the
dump.
a
block
global
global
MIDI
SysEx:O
D:100
all
or
selected
button
settings
flashes
You
can send a single
of 64
Multis
or
all
settings
for
the
MPC:On
DefltBnd:±12
parameters
when
or
32
the
data
to
a
the
cursor
Multi,
Single
in
the
OB-
is
Page 53

44
OB-Mx
User's
Guide
Later
the
effect
Multhnnn
A
sent,
Multi
Multis
on,
when a sequencer
synthesizer
(which
be
refers
on
pair
of
parameters,
and
in
RAM
sent
via
via
your
will
to
ability
the
second
(numbers
MIDI.
MIDI
sends
one
automatically
System
Copying
Exclusive
to
send a dump)
the
first
indicating
1-128)
to
load
reception
indicating
the
this
way.
RAM
locations
of
these
the
new
only,
is
set
to
On.
that
an
number
of
Note:
ROMMultis
will
dumps
data
individual
the
allow
back
if
the
SysEx
and
doesn't
Multi.
You
you
to
to
the
have
Multi
can
(129-256)cannot
send
OB-Mx,
parameter
any
will
be
send
any
these
Multi
Sends
1-64,
out a bank
Multi
of
64
Instnnnn
A
pair
of
parameters,
Instrument
Instrument.
this
way.
to
RAM
Ins
1-32,
Sends
will
be
sent,
You
can
Note:
ROM
locations
out a bank
will
Ins
33-64,
of
32
TuneT:nn
A
pair of
be
send
parameters,
sent,
and
the
second
any
Tuning
Table
65-128
Multis.
•
the
first
indicating
and
the
second
send
any
Single
Instruments
allow
Ins
Single
the
first
(129-256)cannot
you
to
65-96,
Instruments.
indicating
indicating
(numbers
1-19)
that
indicating
Instrument
send
these
Ins
that
the
number
this
an
individual
the
in
RAM
be
Intruments
Single
number
(numbers
sent
via
via
MIDI.
97-128
an
individual
of
the
way.
Tuning
Tuning
'
of
the
Single
1-128)
MIDI.
Copying
Table
Table.
You
can
will
AllTuneT
Sends
all
19
Tuning
Globals
Sends
■
the
following:
The
current
Tables.
mode,
whether
Single
or
Multiple
__
m
Page 54

■
The
Base
■
Whether
■
Whether
■
The
numbers
assigned
■
The
pitch
■
The
global
(Default
If
you're
would
mode,
■
■
■
in
be
if
they
The
number
The
Single
The
Single
Channel
SysEx
the
to
is
Multi
you
simply
reception
MPC
parameter
of
the
MIDI
modulation
bend
range
tuning,
440)
were
Instrument
Instrument
expressed
mode,
of
the
to
press
describe
the
currentiy-loaded
Chapter 6 Control
is
turned
Continuous
sources
following
the
Single
the
current
voice
MIDI
On
is
On
or
Off
MIDI
A,
as
the
frequency
parameters
button.
setup:
Single
assignment
mode,
whether
Module
or
Off
(see
page
46).
Controllers
MIDI
If
Instrument
algorithm
that
are
B,
MIDI C and
of
A,
expressed
describe
you're
Poly
what
in
Single
or
Omni
45
currently
MIDI
D.
in
Hz
the
setup
Instrument
■ The
Dump
Sends
Base
This
functions:
■
■
Single
Instrument
All
everything.
Channel
can
be
set
to
Multi
numbers
coming
On.
to,
Multiple
explanation.
The
means
Channel
single
once.
will
in
on
If
the
Base
only
the
Multi
Instruments
Base
Channel
that
any
will
be
MIDI
Volume
The
Controllers
also
be
routed
Tuning
any
MIDI
channel,
are
changed
the
Base
Channel,
Channel
will
MIDI
sent
is
be
affected
in
the
will
receive
Continuous
to
all
or
Mod
assigned
to
all
parts
Table
from 1 to
by
MIDI
providing
the
same
as a channel
by
the
Explorations
Global
Controller
Parts,
regardless
Wheel
message
to
MIDI
if
they
16.
It
Program
Change
the
MPC
Program
chapter
Continuous
coming
of
their
can
A,
MIDI
come
in
on
affects
that a Part
the
following
messages
parameter
Change.
is
is
assigned
See
Using
turned
for a detailed
Controllers.
in
channels.
affect
all
B,
MIDI C and
the
Base
This
on
the
Base
This
way,
sounds
at
MIDI
D
Channel.
a
SysEx
Turns
to
by
reception
Off
can
MIDI
dumps
of
MIDI
protect
the
RAM
embedded
System
Exclusive
in
the
instrument
in
sequences.
messages
from
Bear
on
or
accidental
in
mind,
though,
__
off.
Turning
overwriting
this
that
you
Page 55

46
OB-Mx
User's
Guide
can't
model
ignored.
MPC
overwrite
in
any
case;
the
data
SysEx
in
the
OB-Mx
dumps
with
from
other
data
from
any
other
instrument
models
synthesizer
will
be
Stands
Change
Off,
you
Instruments
Control
This
common
Controller
filter,
the
modulation
for
"Multiple
messages
MIDI
cannot
have
Parts
assigned
A:,
enables
you'd
modulation
you
ones
73,
set
Target.
Program
on
the
change
assigned
B:,
C:
to
use 4 MIDI
to
modulate
for
instance,
Control
Source,
DefaultBend
Determines
with a MIDI
octave).
values
Range
A
guitar
a
Bend
mode,
in
the
the
maximum
Pitch
Bend
When
other
set
controller
Range
default
Bend
the
than
on
your
of
±12
bend
(Bnd)
value
±0,
it's
MIDI
with a Bend
will
only
field.
Change."
Base
Channel
the
current
to
the
Base
to
them
with
and
D:
Continuous
parameters.
to
modulate
A: to
73
here,
and
set
the
number
message.
is
set to
±0,
normally
controller.
Range
give
you
affects
those
When
will
Multi.
Channel
MIDI
If
the
then,
MM
VCF,
of
semitones
It
can
have a value
no
bending
important
Of
course,
of
very
weird,
parts
this
is
On,
MIDI
load a new
This
and
messages.
Controllers
you
want
cut-off
in
the
parameter
will
that
you
±2
set
to
Multi.
parameter
want
to
change
other
to
use
frequency
Matrix,
use
Frequency
that a note
from
take
place.
this
value
don't
have
control
a
exaggerated
in
which
Def
has
Program
When
can
Continuous
Control
can
±0
to
match
to
synthesizer
bends.
been
this
be
useful
the
Single
than
the
of
the
MM
A
as
be
bent
±12
(one
When
using
the
be
normal.
In
Multi
entered
is
if
most
as
the
Bend
with
Page 56
Chapter
6
Control
Module
47
Store
►
Saving
Button
Saves
the
currently-loaded
Instrument
Edited
Whenever
made
button
want
to
straightforward.
complex
if
you
If
you've
while
load a new
to
another
Instruments
you
take
an
to a Single
after
save
because
take
made
in
Multi
or Multiple
you've
your
the
Multi,
made
changes.
In
Multiple
you
prompts
changes
mode,
and
Instrument
location
action
can
literally,
to a Multi
the
the
in
RAM
that
would
Instrument
any
edits,
you'll
When
choose
Escape
following
you're
mode,
the
to
save
you
won't
and/or
and
Store
message
to
any
RAM
location,
or
swap
any 2 RAM
cause
to
in
sequence
any
changes
be
lost,
or
be
prompted
Single
some
go
one
buttons
mode
can
changes
wrong.
or
more
will
will
be
displayed:
be a little
copy
any
Instruments.
that
you
if
you
press
the
as
to
whether
this
is
quite
more
but
not
others;
Single
Instruments
blink
when
trying
Ve
Store
you
still,
to
Save
Changes
Escape:NO
You're
Program
being
■
You
function.
example,
anything
■
If
you
Instruments.
■
If
you
Instrument
asked
refers
don't
have
If
you'll
new
answer
answer
whether
to
Multis
to
you
press
be
or
NO,
YES,
individually,
to
MultiProgram/lnstruments?
EntenYES
you
want
to
save
any
and
Instruments
take
either
choice—there's
any
Selection
returned
losing
you'll
you'll
to a different
any
data.
lose
the
be
given
beginning
refers
Button,
display
data
for
both
the
option
with
the
changes
to
Single
an
implied
like
Prgrm
Multiple
of
saving
following
at
all
here—
Instruments.
"Cancel"
or
MIDI,
without
loading
and
each
screen:
for
Single
changed
Page 57

48
OB-Mx
User's
Enter
Guide
At
will
memory
pressing
Instrument
Save
Modified
to
Multi:4
this
point,
be
flashing.
location
Escape
MultiProgram
(name
the
Store
button
Turning
to
will
options,
the
store
the
skip
storing
as
follows:
Number
of
MultiProgram)
will
be
lit
and
the
Data
Adj
knob
will
Multi.
Pressing
the
Multi
and
Enter
4
Escape
let
you
will
move
on
and
Enter
buttons
choose a different
store
the
to
the
Multi,
Single
and
►
As
press
without
You'll
If
MultiProgram
is
anything,
given
Mx
Copying
And
The
Single
unedited
screens.
Multis,
unsaved
to
pass
Save
you
that
Modified
to
lnst:12
before,
puts
you
Enter
to
saving.
be
prompted
Escape
if
you
you
the
chance.
you
Swapping
Store
button
and
Multis.
Instruments
If
you're
then
the
Instruments
save
them
through
Instrument
(name
can
use the
save
the
Instrument,
once
for
through
screen
really
would
back
as
those
all
of
with
wanted
have
Taking
at
is
If
in
screens
described
the
the
start
also
used
you
press
in
memory,
Multi
for
in
memory,
prompts
12
of
Instrument)
Data
Adj
knob
to
or
you
each
Single
the
saving
the
same
to
move
pressed
safest
of
the
options,
Multi
to a different
the
Escape
path
process.
change
can
Instrument
still
to
protect
the
press
Escape
that
you'll
be
loaded.
button
The
Multi
without
when
your
Instruments
to
access
the
mode,
above—repeatedly
you'll
Single
and
copy
and
swap
Store
button
you'll
Instruments.
then
take
pass
first
you'll
you
repeatedly
through
see
the
screens
If
you
first
be
given
pressing
to
the
swap
functions
the
have
and
(Parti)
target
Store
location
to
continue
has
been
changed.
returned
logic
changes,
when
copy
the
copy
to
behind
saving
you
were
the
for
you
and
swap
that
apply
any
edited,
opportunity
in
this
case
functions.
and
the
this
first
OB-
both
have
to
will
Page 58

Store
Copy
Multi:
to
Multi:
127
(24
126
(24
Chapter 6 Control
char
char
name
name
Module
of
program)
of
program)
49
Store
Store
Store
Swap
with
Copy
Swap
with
Multi:
Multi:
Inst:
to
Inst:
Inst:
Inst:
127
126
73
128
128
23
(24
(24
(24
(24
(24
char
(24
char
char
char
char
char
name
of
name
name
name
name
name
of
of
of
of
program)
of
program)
instrument)
instrument)
instrument)
instrument)
Compare
Button
These
Adj
the
and
Switches
in
displays
knob
to
change
operation,
exit
without
the
edit
or
the
current
buffer.
work
like
many
the
Instrument
press
any
Selection
storing
When
or
moving
Instruments
the
button
of
the
others
number
Button
anything.
between
is
the
lit,
you're
in
this
module—use
and
press
Enter
to
bring
up a different
stored
version
listening
to
the
Data
to
complete
display
and
the
one
the
stored
Page 59

50
OB-Mx
User's
Guide
Parts
Button
version,
Useful
program.
button
OB-Mx.
Only
go
numbered
otherwise
for
comparing
The
lit).
Press
active
into a Part.
in
buttons
you're
the
OB-Mx
Multi
You
controls
the
Compare
mode.
can
change
1-6
in
listening
effects
This
the
to
the
version
of
changes
are
inactive
button a second
is
used
to
which
VOICE
Part
STATUS
that
you've
youVe
in
edit
is
displayed
made
the
Compare
time
to
return
most
of
the
by
module.
changed.
with
the
original
mode
parameters
pressing
(Compare
control
of
that
the
the
►
Porte
PART:
Pan:+0
Parameters
Part
Use
this
deactivating
The
Part
and > buttons
button
in
6
Bnd:±0
Vol:127
for
changing
Parts.
number
the
can
and
the
VOICE
Zon:
AI:
the
Part
that
be
1-6,
and
Data
Adj
knob
STATUS
module.
0:127
Rotate
is
displayed,
you
change
or
Xpose:±0
AttmOdb
it
either
by
simply
and
for
activating
by
using
pressing
Ch:1
TT:1
and
the
Cursor
a
Part
Number
<
Page 60

Chapter
6
Control
Module
51
If a Part
the
active
If a Part
capitalized.
in
See
is
active,
Esc
button
Part.
is
deactivated,
the
Part
field
Explorations
the
word
will
flash
Pressing
Also,
Esc
the
Enter
of
an
2
and 3 for
Bnd
Determines
the
default
Zon
Sets
the
to.
It's
Instrument
to
the
values
the
amount
mode
range
useful
in
the
of
incoming
for
creating
to a particular
lowest
for
note
each
are
in
the
from 0 to
"PART"
when
the
will
deactivate
the
word
"Part"
button
active
Part.
information
of
bend
MIDI
menu.
MIDI
keyboard
set
of
notes.
range,
and
127.
is
displayed
cursor
the
is
will
flash
Pressing
for a
part.
note
numbers
splits
or
The
the
second
in all-capital
is
positioned
Part.
displayed
when
Esc
will
about
It
can
for
limiting
number
letters.
in
the
Part
with
only
the
the
cursor
deactivate
using
Parts.
be
set
that
the
in
to
the
highest.
to
"Def"
Part
the
range
the
first
is
the
will
The
Also,
field
of
an
first
letter
positioned
Part.
to
use
the
respond
of
an
field
refers
possible
There
particular
knob,
the
desired
just
Ins
are
two
ways
Zone.
as
with
the
cursor
play
until
to
the
boundary
the
right
you
press
The
other
field
note
one—the
Xpose
The
number
of
semitones
Ch
The
MIDI
channel
messages
channel.
Pan
The
being
Instrument
coming
Can
be 1 to
overall
panning
the
center.
to
determine
in
This
to
change
first
parameters
you
on
either the
for
the
on
16.
for
is
either
is
simply
want
to
your
MIDI
value
Escape
added
Part.
The
this
channel.
the
part,
added
the
final
to
the
lower
or
to
use
the
Cursor
in
this
display.
change,
will
to
incoming
Part
from
the
placement
press
controller
keep
changing
button
Several
Pan
or
exit
note
will
only
Parts
-10
(full
left)
parameter
in
upper
value
buttons
The
other
Enter
and
then
If
you
play
the
in
response
the
field
values.
respond
can
to
the
to
share
+10
(full
in
the
Part's
stereo
field.
for
a
and
Data
Adj
way
is
to
move
play
the
wrong
MIDI
the
note,
to
Note
same
___^^_
right),
with
Single
0
Page 61

52
OB-Mx
User's
Guide
The
change
messages
parameter
A[
See
Attn
Vol
overall
in
the
Voice
output
response
on
below.
volume
to
incoming
the
Part's
MIDI
Allocation
for
the
Part.
MIDI
channel.
chapter
at
the
The
range
Volume
Also
start
(Continuous
see
the
of
this
is 0 to
127,
and
will
Controller
description
section.
of
the
Attn
7)
Stands
create a
single
lower
set
for
Attenuation.
balance
MIDI
the
overall
by
the
Attn
among
channel.
volume
parameter.
TT
The
number
VCOs
parameters
in
of
the
the
Single
set
to
Controls
the
In
such a case,
of
active
tuning
Instrument
TT.
the
several
the
stacked
See
Exploration
table
assigned
relative
Parts
MIDI
volume
that
may
Volume
sounds
for
to
without
3
for
more
this
Part.
the
Part
of a Part.
be
set
messages
details.
This
which
It
is
to
respond
would
altering
will
the
only
have
their
used
to
on
a
raise
or
balance
effect
Track
Matrix
Button
This
allows
introduction
chapter.
Instruments,
Patches.
When
effect
course,
you
to
map
to
its
use,
Each
such
mapping
not
with
several
is
Matrix
additive,
exceed
within
its
range;
Patches
modulation
see
"Modulation
is
Parts.
Each
modulate
limits.
therefore,
sources
called
The
a
Single
destination
if
one
to
destinations.
&
The
Matrix"
Patch.
a
Patches
Instrument
single
destination
in the
are
can
parameter
controller
has
For
an
Explorations
stored
have
already
with
Single
up
to
12
parameter,
cannot,
pushed
their
of
a
Page 62

Chapter
6
Control
Module
53
►
parameter
maximum
will
have
Matrix
Patch
Destination
Parameters
Patch
The
Patch
to
the
edge
or
minimum),
no
effect.
:
12
Source:
Module:
number,
from 1 to
(say, a Mod
then
Wheel
any
ModWheel
OB
12.
has
pushed a filter
additional
modulation
Multiplier:
VCF
Param
frequency
in
that
to
direction
+1.00
:
Frequency
its
Source
The
modulation
■
NONE:
MIDI
■
Pressure:
■
Velocity:
■
Note
■
ModWheel:
by
■
PitchWhl:
Pitch
■
Breath:
■
Pedal:
■
Volume:
■
MIDI
modulation
button
■
MIDI
The
Modulation
The
#:
The
Mod
Wheels
Bend
MIDI
Expression
MIDI
A:
Any
B,
C,
source.
Patch
will
Sources
MIDI
Channel
velocity
pitch
of
MIDI
Continuous
on
keyboards
MIDI
Pitch
Wheels
MIDI
source
D:
on
Breath
pedal,
volume,
Continuous
in
Similar
It
can
take
the
following
be
inactive
Pressure,
of
each
each
MIDI
and
also
MIDI
Note
Note
have
known
On
Controller
Bend
messages,
keyboards
Controller,
Continuous
Continuous
Controller
the
display
to
MIDI
A.
usually
Continuous
Controller
Controller
brought
values:
no
effect.
as
Aftertouch
On
message
message
1,
usually
Controller
that
up
sent
sent
automatically
11
7
is
assigned
by
pressing
automatically
by
2
to
the
A
the
MIDI
Page 63

54
OB-Mx
User's
Guide
Internal
■
■
■
Modulation
LFO
1,2
or
3:
The
output
EnvGen
Random: A random
number
1,
2,3
or
4:
every
time a Note
Multiplier
Determines
the
destination.
modulation
its
maximum
modulator
increases,
Destination
This
can
VCF,
LFO,
different
the
amount
Takes
will
occur. A value
effect
on
will
have
its
the
value
of
Module
be
any
of
the
EG,
or
the
Mixer
choices
become
values
the
voltage-producing
Sources
of
LFO
1, 2 or
The
output
number
of
modulation
between
the
destination,
maximum
destination
to
receive
available
of
envelope
generator
In
message
effect
-1.00
of+1.00
means
while a value
inverse
parameter
modules.
modulation.
in
the
Param
3
generator
that
produces
is
received
that
and
that
effect
for
the
source
+1.00,
the
of
(i.e.,
as
decreases).
You
As
you
field.
1,
2,3
or
4
a
new
random
its
voice.
'
will
have
on
with 0 meaning
modulator
-LOO
means
the
source
can
select
change
no
will
have
that
the
a
VCO,
modules,
Param
Lets
Almost
Options
Button
Sets
you
choose
any
system-wide
Display:
EditTuneTable:
which
parameter
4
parameter
for
which
options.
Tune
A:
1
Demo:
to
there
440
modulate
is a knob
GlobalTranspose:
6
in
the
destination
may
be
modulated.
module.
+0
SystemSize:
12v
Page 64

The
settings
variables.
in
the
top
line,
as
well
Chapter
as
System
6
Size
Control
are
stored
Module
as
55
Global
;
►
Parameters
Display
Sets
the
easily
read
Tune
Moves
pitch
(in
tuning.
semitone.
Global
The
OB-Mx
other
processing.
viewing
the
Hz)
The
angle
from
your
pitch
of
all
of
the A below
Tune
is
variable
for
usual
VCOs
Transpose
adds
this
number
From
-60
the
display.
position.
in
the
middle
from
to
to
+60
Turn
synthesizer.
C. A value
415
to
all
incoming
semitones.
this
466
Hz,
so
that
the
display
The
number
of
440
represents
corresponding
MIDI
note
represents
values
is
standard
to ± 1
before
most
the
any
EditTuneTable
Press
Enter
when
that
simply
chosen
table
Instrument's
There
ROM
with each
most
edited
When
number
are
19
and
cannot
octave
of
the
by
users.
you
edit a Tuning
to
any
the
cursor
editing
for a Part
VCO's
Tuning
ROM
a
Tuning
or
for
must
have
Tables
be
altered.
divided
instruments.
Initially
pitch.
into
Tuning
Table,
is
in
this
Table
doesn't
the
current
their
in
the
OB-Mx.
Table
10
12
equal
Tables
Tables
you
can
field
to
edit
the
activate
Single
tracking
is
the
parts,
1-9
1-9
map
Instrument,
parameters
Tuning
familiar
are
are
Tables
and
is
stored
duplicates of
each
incoming
tuning
it—it
also
set
10-19
equal
temperament,
the
Tuning
in
RAM
tables.
must
and
to
and
tables
MIDI
Note
be
the
the
Single
"TT."
are
stored
Table
for
can
be
11-19.
key
in
Page 65

56
OB-Mx
User's
Guide
Tuning
MIDI
Tuning
Tells
you
1-19
here,
You
can
menu
displayed
new
table
changes.
changes,
Options
■
Unit:
■
Default:
■
Range: 1 to
MIDI
Table:
Key
#:
Table
which
only
and
Pressing
while
menu.
Key
table
but
tables
dial
returning)
table.
If
number,
pressing
Tuning
1
1
<24
64
Pitch:
you're
10-19
in a new
you've
you'll
Esc
Table
19
tuning
if
you
made
be
will
exit
Enter
number
Character
C4
editing.
can
only
haven't
any
asked
to
the
will
Cents
You
can
be
examined,
table
(without
made
whether
save
any
changes
Options
the
TT
Name>
Dev:
dial
changes
and
you
want
menu
changes
00
in
any
number
not
edited.
exiting
attempt
to
to
to
save
without
and
from
the
Options
the
currently-
to
dial
in
a
your
saving
also
any
exit
to
the
This
is
the
key
number
remainder
the
Part
parameters
number
that
would
by
the
Dev
field.
■
Unit:
■
Default:
■
Range: 0 to
of
the
display
or
the
Single
are
set
will
play a note with a pitch
be
produced
number
of
cents
MIDI
Key
1
127
whose
Instrument,
to
"TT"),
(lOOths of a semitone)
frequency
line.
When
and
then
an
by
the
note
is
this
tuning
only
incoming
equal
to
indicated
number
determined
table
if
the
VCO
MIDI
the
in
the
indicated
by
the
is
active
tracking
note
(both
with
this
equal-tempered
Pitch
field
offset
in
the
Cents
in
pitch
Page 66

Pitch
The
base
pitch
number.
tuned
■
■
■
Think
by
the
Unit:
Note
Default:
tempered
values
to
the
Range: 1 to
Tuning
that
left.
that
will
be
of
this
as a rough
Cents
Dev
parameter.
name
and
octave
Varies
from
ROM
Table
would
conventionally
127
10,
Chapter
produced
or
table
the
note
6
by
an
coarse
to
table.
name
be
called
Control
incoming
pitch,
which
In
the
standard,
and
octave
up
by
the
Module
MIDI
can
correspond
MIDI
57
note
be
fine-
equal-
to
the
Key
numbers
Cents
The
the
incoming
■
■
■
Dev
number
pitch
Unit:
Default:
tempered
Range: 0 to
of
indicated
note
Cents
Varies
Tuning
Demo
8
brief
demonstration
cursor
and
until
System
This
when
voice
Voice
additional
into
the
press
Enter
you
press
Size
is
the
number
you
install
cards
(two
Card
Isntructions
Voice
Demo
to
the
or
voices
Cards
cents
(1 / 100th
in
the
Pitch
number
+99
parameter
hear
Escape
of
voices
remove
indicated
from
ROM
Table
10,
pieces
may
it
play.
The
button.
in
the
voices.
per
card)
for
Use
and
for
more
information.
of a semitone)
field
when
by
the
table
to
table.
all
values
called
area,
Demo
system.
The
in
the
Installation"
are
up
use
the
will
It
value
system.
to
add
the
note
MIDI
Key
In
the
0.
and
listened
Data
Adj
continue
needs
to
should
be
Refer
to
that
to
or
subtract
is
triggered
field.
standard,
to.
knob
to
be
set
twice
the
came
equal-
Move
to
choose
cycle
through
manually
the
"OB-MxTwo
with
from
by
the
the
one,
number
any
of
Page 67

58
OB-Mx
User's
Guide
Page 68

Chapter
7
VCO
Module
59
CHAPTER
Voltage
Oscillators
Pitch
Fine
Sync
Controlled
Module
Track
A/
Port
7
P
Width
I
wave
simultaneously.
Source
triangle
->
VCO
VOLTAGE
wave,
CONTROLLED
a
sawtooth,
Env
1
LF01
OSCILLATORS
and
a
En2
LF2
pulse
Page 69

60
OB-Mx
User's
Guide
Selection
Parameter
Buttons
The
buttons
words,
result
of
module.
the
display.
Toggles
Sync
An
effect
(destination).
oscillator's
new
cycle
numbered 1 and 2 select
the
lit
selection
turning
If
that
a
the
button
uses
When
cycle
to
(see
Figure
button
knob
is
one
oscillator's
Sync
restart
7.1).
determines
or
pressing
also
flashing,
is
on
every
This
which
which
a
Parameter
its
parameters
(source)
in
the
time
results
output
destination
the
source
in a classic
VCO
is
being
edited—in
VCO
will
change
Toggle
oscillator's
button
are
currently
to
alter
the
oscillator,
timbral
it
output
effect.
other
as
a
in
the
visible
other
causes
the
starts
in
a
The
VCO1
to
cycle
in
cut
short
starts
FIGURE
effect
of
syncing
VCO
2.
The
VCO
1's
output
when
VCO
its
second
cycle.
A
has a new
fancy
fundamental
the
frequency
7.1
third
is
2
close
examination
cycle,
way
of
saying
pitch
destination's
(enharmonic
VCO
VCO
of
the
with a
period
that
of
the
output
1,
Sync
2,
Sync
Figure
the
destination,
that
overtones).
On
Off
will
reveal
equal
to
that
pitch of the
are
not
source
although
exact
of
multiples
that
the
destination
the
source
oscillator
there
oscillator.
determines
will
be
of
the
fundamental
oscillator
This
is
a
the
overtones
in
Page 70

Chapter
7
VCO
Module
61
Either
destinations,
This
waves
This
waves
This
are
their
process
information.
VCO
can
be
the
but
the
results
A/
Triangle
turns
are
rich
Sawtooth
turns
are
rich
fl_
Pulse
turns
exceptionally
tonal
called
Wave
the
triangle
in
all
harmonics.
Wave
the
sawtooth
in
even
Wave
the
pulse
wave
flexible
content
without
Pulse
Width
destination.
wave
harmonics
You
can
will
be
unpredictable.
output
wave
output
for
synthesis
affecting
Modulation.
of
the
output
of
the
and
tend
of the
oscillator
purposes,
their
See
even
make
oscillator
oscillator
to
sound
pitch.
This
Exploration
them
on
and
off.
on
and
"reedy."
on
and
off.
because
it's
is
done
7
for
both
Triangle
off.
Sawtooth
Pulse
waves
easy
to
change
through
more
a
Continuous
Parameter
Pitch
Determines
fundamental
high
or
low,
the
■
Unit:
Semitones
■
Default:
■
Range:
the
number
frequency
sounds
of
semitones
when
may
0
-64
to
+63
the
sound
pass
out of
Knobs
(half-steps)
is
triggered.
the
range
to
add
When
of
human
to
the
set
hearing.
extremely
Page 71

62
OB-Mx
User's
Guide
Fine
Adds
■
■
■ Range:
Track
or
subtracts
Units:
cents
Default:
fractions
(1/1
0
-97
to
+97
of a semitone
OOth
of a semitone)
cents
from
the
oscillator's
pitch.
Controls
keyboard's
oscillator
with
effect
the
When
active
Changes
be
the
note
usual—the
pitch
There
in
the
The
variable
in
Multi
■
■
■
the
degree
(i.e.,
the
will
track
12
semitones
on
the
pitch
Pitch
or
Fine
parameter
set to
TT,
each
tuning
read.
actual
62.
read
are
Reference
active
Units:
Default:
Range:
table.
to
the
VCO's
For
instance,
pitch
will
Non-zero
number
from
the
19
Tuning
section
Tuning
when
in
Single
mode.
Each
Ratio
of
+1.00
-1.00
to
which
incoming
the
per
octave.
generated,
incoming
The
Pitch
if
be
values
of
cents
tuning
Tables
Table
Part
keyboard
to
+1.00,
the
oscillator's
MIDI
note
keyboard
oscillator's
exactly,
When
which
is
changed
MIDI
pitch
parameter
Pitch
is
set
to
read
from
the
in
the
Fine
in
the
Fine
table.
in
the
OB-Mx.
relating
is
determined
Instrument
may
to
the
mode,
use a different
change
TT
to
fundamental
numbers).
yielding
set
to
0,
the
will
be
fixed
from
its
note
will
will
be
will
cause a different
+2
and a MIDI
tuning
parameter
table's
parameter
Editing
Options
by a Single
or
is
Tuning
oscillator
When
an
equal-tempered
note
number
at
middle C unless
default
be
read
will
button
value
used
as
from
note
value
be
interpreted
will
be
instructions
in
Instrument
set
in
the
Table.
pitch
change
pitch
follows
set
to
+1.00,
will
of
0.
an
index
the
table.
table
60
comes
corresponding
added
Chapter
to
can
the
the
scale
have
no
either
into
the
value
to
in,
then
to
as
the
be
found
6.
Global
Parts
display
(when
when
not
IT)
Port
Controls
successive
from
will
you'd
that
you
Portamento
Single
experience
the
portamento
notes
do
the
first
to
the
take
place
over
want
to
use
all
there
is
no
portamento
play a note.
is
essentially
Instrument
unforeseen
time.
not
change
second.
the
the
mode
If
the
time
period
time,
most
effect,
a
monophonic
with
the
behavior.
This
is
an
effect
instantly
value
and
discretely,
is
greater
indicated.
likely,
and
Rotate
When a new
so the
pitch
changes
effect.
algorithm
where
This
note
the
but
than
0,
is
not
default
If
you
value
occur
use
in
effect,
is
played,
pitches
the
an
portamento
between
rather
instantly
you're
glide
gliding
effect
a
effect
that
of 0
means
when
in
likely
voice
is
to
Page 72

Chapter 7 VCO
Module
63
allocated
the
portamento
each
it
won't
■
■
■
P
Width
This
Exploration
■
■
■
Modulation
for
it
and
new
pitch.
note.
make a difference
Units:
Default:
Range:
only
Units:
Default:
Range: 0 to
Whether
with
In a Multi,
seconds
0
(no
.001
has
an
7
in
Chapter 3 for a detailed
%
of
time
50
Section
the
pitch
glides
in
a Single
an
assignment
if
you
which
portamento
to
30
seconds
effect
if
the
pulse
wave
100
algorithm
just
assign
algorithm
effect)
pulse
wave
spends
from
the
previous
or
Multi
mode,
that
allocates
one
voice
to a Part
you
use
output
explanation
in
"Up"
is
position
pitch
in
you're
turned
in
that
of
best
all
the
with
Part.
on.
its
usage.
that
voice
to
off
using
voices
portamento,
See
to
fm/vco
The
frequency
output
to
■
■
■
of
FM.
The
Units:
Default:
Range: 0 to
Pitch/Env
Envelope
value
is
0,
envelope
■
Units:
■
Default:
■
Range:
of
the
the
other
ratio
between
%
of
total
0
100
7
1
is
automatically
the
envelope
can
change
Multiplier
0
-1.00
to
VCO
being
edited
VCO.
This
results
the
pitch
modulation
mapped
will
have
the
pitch
+1.00
in
of
the
amount
to
no
effect.
over a
range
can
be
changed
timbral
modulate
and
pitch
oscillator
If
the
multiplier
of
approximately
continuously
variations
pitch.
is
1,
4
by
the
unique
If
the
then
the
octaves.
Page 73

64
OB-Mx
User's
Guide
Pitch/LFO
LFO 1 is
0,
the
envelope
change
Make
this
Exploration
■
Units:
■
Default:
■
Range:
P
Width/Env
This
only
amount
The
center
will
take
amount
the
left
Envelope
one
or
the
Matrix
7
automatically
will
the
pitch
over a range
parameter
6.
Multiplier
0
-1.00
to
—
has
an
effect
by
which
(straight
place.
of
pulse
of
center
2.
other
to
achieve a second
either
Movjng
width
will
Clearly,
of
these
mapped
have
no
greater
+1.00
to
modulate
effect.
If
of
approximately
than 0 to
LFO
if
the
pulse
wave
envelope
up)
position
the
knob
modulation
increase
then,
you
sources
modulation.
2
means
to
the
amount
can
choose
but
oscillator
the
multiplier
4
introduce
output
or
LFO 2 will
that
the
right
due
to
not
is
no
pulse
of
center
LFO
2,
of
pulse
to
modulate
both,
unless
pitch.
If
is
1,
then
the
octaves.
a
vibrato
turned
modulate
and
width
effect.
on.
It
the
width
modulation
will
increase
moving
the
you
the
modulation
pulse
also
the
value
is
LFO
can
Also
see
controls
pulse
width
use
the
width.
the
knob
to
due
with
the
to
Pulse
Width
the
value
that
LFO
change
time
spent
50, a value
to
be
25
maximum
See
Exploration
■
Units:
■
Default:
■
Range:
Modulation
of
the
Pulse
2,
as
it
cycle
the
pulse
in
the
of
En2>Pw:0.50
when
envelope
level
of
Choice
0
En2>0.00
is
additive
Width
from
width
up
position).
parameter
its
minimum
from 0 to
If
means
2
is 0 and
100.
7
in
Chapter 3 for
of
Envelope
to
2
+1.00,
with
the
basic
is
50, a value
value
to
100
(where
the
value
that
envelope
75
when
more
or
LFO 2 and
LFO2>0.00
"pulse
of
the
(and
if)
details.
scaling
to
+1.00
pulse
width
of
LF2>Pw:1.00
its
maximum
width"
Pulse
2
will
Envelope
means
Width
cause
the
2
factor
parameter.
value,
If
means
will
the % of
parameter
pulse
reaches
is
width
the
Page 74

Chapter
8
VCF
Module
65
CHAPTER
Voltage
Filters
Controlled
(VCF)
Module
8
This
that
frequencies
they
cutoff
simultaneously
slope
The
MIX
module
Filter
Moog®
it
attenuates
leave
than
are
48
is
12
dB
balance
module.
controls
is a low-pass
synthesizer.
frequencies
one
octave
when
dB
quieter).
produces
per
octave.
among
the 4 different
above
they
the
behavior
filter
designed
It's
what's
by
24
the
cutoff
entered,
The
OB
Filter
low-pass,
of
to
called
dB
per
frequency
and
frequencies
is a "state-variable"
high-pass
filter
outputs
the
MM
and
OB
recreate the
a "4-pole
octave
and
is
sounds
filter,"
(in
other
words,
are
24
dB
two
octaves
band-pass
controlled
filters.
filter
The
MM
of
the
Mini-
which
means
quieter
outputs.
in
when
above
which
Its
the
FINAL
Page 75

66
OB-Mx
User's
Guide
MM
&
MM
OB
The
button
pressing
flashing,
The
The
Selection
MM
and
OB
determines
a
Parameter
its
parameters
MM
button
MM
1:100
Inputs
2:100
OB
button
buttons
calls
N
calls
select
which
VCF
Toggle
are
up
:100
up a similar
Buttons
which
will
button
currently
this
Frq
+63
VCF
change
in
the
visible
display:
Res
100
display:
is
being
edited.
as a result
module.
in
If
the
display.
The
of
turning
the
button
lit
Modulation
En1:+1.00
LF1:-1.00
selection
a
knob
or
is
also
OB
OB
Inputs
1:100
The
modulators
for
the
2:100
main
difference
for
the
OB
filter.
N:100
Frq
+63
between
MM
the
filter,
while
Res
100
displays
EG 2 and
Modulation
En2:+1.00
is
that
EG 1 and
LFO 2 are
LF2:-1.00
LFO 1 are
default
default
modulators
Page 76

Chapter 8 VCF
Module
67
Parameter
Kbrd
Track
~
2j3
Toggles
Kbrd
Determines
The
buttons
be
the
filter's
The
formula
filterChange=<pitch
where
filterChange
frequency.
pitch
of
scaling
Track
frequency
frequency
middle
factor
1/3
and
how
the
filter's
are
additive—when
of
the
MIDI
will
track
is:
ofMIDINoteln
is
the
number
It
adds
to
any
other
C=
523.25
=
1/3
or
2/3,
2/3
cutoff
the
of
Hz
depending
or
center
they're
Note
input
Hz
to
modulations
both
In
value.
pitch
proportionally.
-
pitch
be
added
on
which
frequency
lit,
When
of
middle
or
that
follows
the
filter's
only
subtracted
may
button
frequency
one
button
C>*<scalingfactor>
to
be
in
effect.
is
lit.
the
keyboard.
will
is
lit,
the
the
filter's
Continuous
VCO
The
■
■
*
Parameter
I
percentage
Unit:
Percentage
Default:
Range: 0 to
of
VCO
for
the
MM
100
l's
output
filter,
that
100;
for
Knobs
is
input
to
the
selected
the
OB
filter,
0
filter.
Page 77

68
OB-Mx
User's
Guide
The
VCO2
The
percentage
■
Unit:
Percentage
■
Default:
■
Range: 0 to
for
Noise
percentage
filter.
■
Unit:
Percentage
■
DefaultO
■
Range: 0 to
Freq
of
VCO
the
MM
100
of
the
100
2's
output
filter,
Noise
that
0;
for
Generator's
is
input
the
OB
output
to
the
selected
filter,
100
that
is
input
filter.
to
the
selected
Determines
set
extremely
hearing.
modulation,
■
Unit:
■
Default:
■
Range:
the
number
high
or
When
set
to
the
filter's
Semitones
+28.5
-15.5
to
Reson
Changes
centered
useful
parameter).
additional
■
■
■
the
filter's
at
the
"ringing"
Extremely
sound
Unit:
Percentage
Default:
Range: 0 to
resonance.
filter's
effects
source.
0
100
of
semitones
low,
the
sounds
0,
with
keyboard
frequency
+48.0
cutoff
(try
high
of
total
would
It
boosts
or
center
using
MIDI
values
boost
to
add
to
the
may
pass
out
tracking
be
the
frequency.
Velocity
cause
off
that
of
filter's
High
to
the
filter
filter
frequency.
of
the
range
of
and
no
other
VCF
middle
output
modulate
to
C.
in a narrow
values
produce
this
oscillate,
creating
When
human
range
an
Page 78

Env
1,
2
This
scales
filter)
applications,
■
Unit:
■
Default:
■
Range:
LFO
This
scales
OB
filter)
other
sustained
■
Unit:
■
Default:
■
Range:
the
amount
will
modulate
you
the
can
use
Multiplier
+0.00
-1.00
to+1.00
1,
2
the
amount
will
modulate
applications,
notes.
you
Multiplier
+0.00
-1.00
to
+1.00
Chapter
by
which
frequency
this
by
which
the
can
EG 1 (for
of
their
to
create
frequency
use
this
filter
LFO 1 (for
of
to
create
8
the
MM
respective
sweeps.
the
MM
their
respective
dynamic
VCFModule
filter)
filters.
filter)
timbral
or
EG 2 (for
Among
or
LFO 2 (for
filters.
the
other
Among
variations
69
OB
the
for
Page 79

70
OB-Mx
User's
Guide
Page 80

Chapter 9
Final
Mix
Module
71
CHAPTER
Final
Disp
FINAL
This
VCA, a function
MM
VCF
MIX
module
and
pans
the
also
responsible
particularly
Mix
OB
VCF_
Lopass
mixes
resultant signal
for
Bandpass
the
outputs
boosting
useful
9
Module
Pan
Hipass L R
of
the
VCFs
in
the
stereo
the
base
for
self-playing
to a mono
output
output
patches.
level
VCA
Offset
signal
field.
of
the
It's
Disp
Selection
Disp
H
Brings the
MM
100
Mixer
OB
LP:100
Button
parameters
BP:100
into
the
HP
:
display:
Pan
99
-8L<
I
VCA
>R
100
Page 81

72
OB-Mx
User's
Guide
►
Continuous
MM
The
signal.
■
■
■
OB
The
output
■
■
■
Parameter
VCF
percentage
Unit:
Percentage
Default:
Range: 0 to
VCF
Lopass
percentage
signal.
Unit:
Percentage
Default:
Range: 0 to
of
the
100
100
of
the
100
100
MM
filter's
OB
filter's
lowpass
Knobs
output
that
is
mixed
output
that
into
the
is
mixed
final
output
into
the
final
OB
VCF
Bandpass
The
percentage
final
output
■
Unit:
■
Default:
■
Range: 0 to
OB
VCF
The
percentage
output
■
Unit:
■
Default:
■
Range: 0 to
signal.
Percentage
0
Hipass
signal.
Percentage
0
of
the
100
of
the
100
OB
filter's
OB
filter's
bandpass
highpass
output
output
that
that
is
mixed
is
mixed
into
the
into
the
final
Page 82

Pan
L/R
Chapter
9
Final
Mix
Module
73
Positions
portions
■
■
■
VCA
This
self-playing
regardless of
traditionally-played
output
pressure
EG
4).
■
■
■
the
final
output
of
it
to
each
Unit:
-1
O=full
Default:
Range:-10
pan
0
to+10
Offset
boosts
Unit:
Default:
Range: 0 to
the
VCA
Instruments.
whether
and
lets
the
always
there,
Percentage
0
100
in
stereo
of
the
main
output
left,
0=center,
output.
the
notes, a Note
note
of
Its
most
In
this
case,
VCA
is
turned
In
out
(a
water
the
faucet
maximum
as
VCA
space
by
sending
jacks.
+1
O=full
pan
frequent
the
down
triggers
pipe
the
VCA
use
VCOs
to 0 or
EG
is a good
output
level
possibly
different
right
is
probably
oscillate
up
4,
which
analogy,
level
for
continually,
to
100.
For
turns
up
with
and
your
creating
the
VCA
the
water
hand
as
Page 83

74
OB-Mx
100%
Sustain
Level
User's
Output
Level
Guide
Figure
An
OB'Mx
Note
OK
10.1
envelope
Page 84

Chapter
10
Envelope
Generators
75
CHAPTER
1
0
Envelope
Generators
(EG)
Module
Attack
Attack
Delay
Alt
Decay
Decay
Delay
Freerun
Sustain
Sustain
Decay
Reset
Release
Velo
-i
Sens
j
Repeat
his
module
each
voice.
T
Envelope
volume).
in
Figure
refer
playing
4
Envelopes
Table
3.1
10.1
often
is,
on
shows
to
this
4
(vca)
ENVELOPE
controls
It
also
notes
by
page
from
default,
1
and 2 also
25.
an
OB-Mx
diagram
Special
Copy
GENERATORS
the 4 envelope
has a a
the
routed
envelope
in
this
convenient
front
to
have
panel.
control
default
with
section.
Trigger
Kbrd
Track
generators
Trigger
each
voice's
routings,
all
its
VCA
which
numeric
available
button
(and
are
parameters.
to
for
hence
indicated
its
We'll
Page 85

76
OB-Mx
User's
Guide
Envelope
Buttons
1..4
Selection
1-4
These
selection
knob
also
Atck
ADel
buttons
or
pressing
flashing,
select
button
.002s
.005s
determines
a
Parameter
its
parameters
Dcay
DDel
which
envelope
which
Toggle
are
.75s
.033s
generator
EG
will
button
currently
Sustain
SDcay
(EG)
change
in
the
visible
100
.75s
is
being
as a result
module.
in
the
edited.
of
If
the
display.
Rels
VSen
The
lit
turning
button
a
is
4.7s
9
db
Parameter
Toggles
Alt
This
alters
unlit,
the
button
is
Freerun
The
entire
This
is
often
occurs
the
progresses
Decay.
before
Attack
By
the
functions
dials
change
lit,
the
knobs
envelope
used
for
the
Sustain
and
Decay
to
the
Release
contrast,
of
the
change
is
performed
percussive
portions
if
Freerun
the
knobs
parameters
the
portion
complete
stage
is
in
the
printed
parameters
regardless
sounds.
of
immediately
off
When
the
envelope
normally
and
the
module.
of
after
Note
When
above
them.
printed
when
Freerun
below
the
has
been
and
the
the
completion
Off
occurs
the
Alt
button
When
the
them.
Note
Off
occurs.
is
on,
if
the
entered,
envelope
of the
before
Sustain
is
Alt
Note
Off
then
Page 86

has
been
stage
without
entered,
then
the
completing
Chapter
envelope
the
Attack
10
proceeds
and
Envelope
immediately
Decay.
Generators
to
the
Release
77
Reset
Each
new
note
value
0.
If
left
off,
current
level.
Repeat
Repeats
the
Sustain
stage.
Sustain
end
This
other
If
both
repeat
the
envelope
envelope
If
of
the
parameter
things.
forever.
completes
Decay
the
stage
the
run
Sustain
is
Decay
Repeat
Special
restarts
ignored
can
the
each
new
if a Note
its
the
level
Decay
and
stage
to
the
be
used
and
Freerun
envelope
note
entire
down
is
set
the
Release.
to
at
the
beginning
in a voice
Off
message
cycle.
to 0 and
to
None
envelope
create
lights
restarts
hasn't
This
then
while
proceeds
mandolin-like
are
lit
in
of
its
the
envelope
been
received
cycle
includes
waiting
Repeat
envelope
through
is
turned
immediately
tremolo
4,
_____^
cycle,
from
from
it's
by
the
letting
any
the
the
Release
on,
then
from
effects,
among
note
will
the
time
the
the
This
button
current
waves
100.
We
may
change
is
reserved
effect
is
to
with
minimum
advise
against
in
future
Copy
Allows
You
source
difference
you
to
copy
Copy
Escape:
can
Envelope:
NO
use
the
Cursor
and
destination
which
EG
for
use
by
possible
turn
all
the
envelope
attack,
storing
releases.
all
the
buttons
decay
Instruments
parameters
4
to
and
envelopes.
Selection
Button
future
generators
and
release
of
one
Envelope:
Enter:
Data
Adj
For
this
operation,
is
lit.
software
into
times
with
this
EG
to
another.
1?
YES
knob
to
simple
and a sustain
function
change
it
doesn't
upgrades.
active,
both
Its
rectangle
level
of
as
it
the
make
any
Page 87

78
OB-Mx
User's
Guide
Trigger
Pressing
(middle
Releasing
Kbrd
Shortens
times
instruments,
expansion
This
the
customize
Continuous
this
button
C)
and
the
Track
all
envelope
for
low
is
proportional
function
Matrix,
but
the
Parameter
is
equivalent
velocity
button
notes.
such
can
this
time
64
is
equivalent
times
This
simulates
as
pianos.
also
be
accomplished
button
scalings.
to
the
for
higher
The
to
the
is
more
to
sending
OB-Mx
to
sending
notes
the
properties
amount
incoming
convenient
a
MIDI
on
all
channels
the
corresponding
and
lengthens
of
of
time
compression
note's
distance
by
using a number
if
you
Knobs
Note
On
with
all
many
acoustic
from
of
don't
need
with
pitch
60
active
Parts.
Note
Offs.
envelope
or
middle
Patches
to
C.
in
Attack
Time
of
the
■
■
■
Delay
to
wait
envelope.
Unit:
Seconds
Default:
Range:
.001
Attack
The
time
it
takes
maximum
■
Unit:
■
Default:
■
Range:
value.
Seconds
.001
between
receiving
See
Figure
.001
to
30
from
the
See
Figure
.005
to
30
a
Note
On
10.1.
envelope
10.1.
to
go
and
initiating
from
its
starting
the
Attack
value
to
portion
its
Page 88

Chapter
10
Envelope
Generators
79
Decay
Time
See
■
■
■
Decay
The
end
proceed
this
stage.
■
■
■
Delay
to
wait
after
Figure
Unit:
Default:
Range:
time
of
time
Unit:
Default:
Range:
10.1.
Seconds
.001
.001
it
takes
the
Attack
all
the
(100-Sustain
Seconds
.20
.001
Sustain
the
end
of
to
30
from
the
envelope
stage
to 0 (See
way
to 0 unless the
Level
to
30
the
Attack
to
Figure
Sustain
%,
to
be
portion
go
10.1).
exact)
before
from
its
Since
level
is
will
actually
starting
maximum
the
Decay
0,
only a percentage
elapse
the
Decay.
value
at
the
stage
will
in
the
Decay
not
of
The
level
that
the
■
Unit:
Percentage
■
Default:
■
Range: 0 to
Sustain
The
slope
this
is
the
to 0 (see
number
can
be
used,
has
been
value
is
Release
■
Unit:
■
Default:
■
Range:
90
Decay
of
the
number
Figure
of
seconds
for
plucked
None,
stage
is
Seconds
11
.001
VCA
reaches
of
maximum
100
decay
10-1).
example,
then
initiated
once
of
seconds
If
the
Sustain
before
the
to
or
struck
the
to
30,
but
envelope
by a Note
None
the
simulate
at
the
end
level
Sustain
that
sound
before
remains
stage
it
would
level
is
dies
the
it
has
Off.
of
the
Decay
has
take
near
100,
out
even
gradual
been
at
the
stage.
been
the
VCA
think
as
you
decay
muted
Sustain
reached.
to
of a string
or
level
Literally,
decay
from
of
this
as
the
hold
the
note.
after
damped.
until
If
the
100
It
it
the
Release
Page 89

80
OB-Mx
User's
Guide
The
Off
return
time
The
new
that's
■
■
■
number
has
of
only
Instrument
sounding
Unit:
Default:
Range:
of
seconds
been
received.
to
0,
and
will
None
on
EG
ways
to
shut
in
with
Seconds
0.52
.001
to
place
that
it
takes
A
value
of
stay
at
the
sustain
4,
you'll
produce a note
the
note
off
of
the
one
another
30,
Note
None
the
envelope
None
means
level
will
be
that's
On.
to
return
that
the
envelope
forever.
that
to
turn
sustaining
If
you
will
sustain
off
the
OB-Mx,
or
to
use a Release
steal
to 0 after a Note
will
not
infinitely
the
long.
to
load
voice
a
Velo
Determines
particular,
dynamics
the
incoming
parameter
this
difference
and
■
■
■
Sens
the
envelope's
edit
this
respond
amount
by
notes
affects
parameter,
in
that
of a note
Unit:
Decibels
Default:
Range: 0 to
to
which
with
both
and
decibels
with
0
25
responsiveness
parameter
changes
the
velocities
the
the
Sustain
between
velocity
for
EG 4 to
in
playing
envelope's
Attack
levels
less
than
level,
level.
the
Attack
1.
to
changes
control
intensity.
are
the
which
In
precise
level
the
Specifically,
attenuated
maximum
is
100
terms,
of a note
in
MIDI
velocity.
way
that
note
this
(decreased)
of
127.
This
unless
attenuated
the
value
is
the
with
velocity
In
controls
by
with
127
Page 90

Chapter
11
Low
Frequency
Oscillators
87
CHAPTER
Low
Frequency
Oscillators
1
1
(LFO)
Module
Delay
2
Waveshape
Rate
A/
Offset
Sym
+1
S/H
Off
IU
Random
This
routings,
Unlike
continuously
module
available
modulation
which
the
envelope
and
controls
to
are
are
LOW
each
sources.
indicated
generators,
not
FREQUENCY
the 3 low
voice.
triggered
LFOs
LFOs 1 and 2 have
in
the
frequency
are
Table
LFOs
by
incoming
OSCILLATORS
oscillators
extremely
3.1
on
are
free-running;
MIDI
useful
default
page
modulation
25.
that
notes.
(LFOs)
is,
they
run
Page 91

82
OB-Mx
User's
Guide
LFO
Selection
1..3
Buttons
These
determines
a
parameters
buttons
Parameter
LFO
2
select
which
Toggle
are
currently
Delay
4.9s
1-3
which
LFO
button
LFO
is
being
edited.
will
change
in
visible
Rate/Period
5.0Hz
as a result
the
module.
in
the
display.
.200s
If
Ofst
100
The
of
turning
the
button
S&H
Off
lit
selection
a
knob
is
also
button
or
pressing
flashing,
WShape
Random
its
Parameter
Toggles
The
parameter
generates.
are
mutually
Sawtooth
The
LFO
gradually,
/\y
Triangle
The
LFO
gradually,
toggles
Since
exclusive—pressing
produces
then
abruptly
produces
then
gradually
in
this
each
LFO
can
a
sawtooth
dropping
a
triangle
dropping
module
only
wave,
wave,
determine
produce
one
shuts
starting
back
starting
back
which
a
single
the
others
from 0 and
to 0 and
to 0 and
starting
from 0 and
starting
waveshape
output,
off.
rising
over
rising
over
the
these
buttons
to
100
again.
to
100
again.
LFO
Page 92

Chapter
11
Low
Frequency
Oscillators
83
Reverse
The
reverse
descends
Random
Random
The
output
and
slope.
values
Continuous
Sawtooth
of
to
0,
of
The
providing
Parameter
the
first
and
then
the
LFO
Rate
knob
faster
waveform.
abruptly
is
constandy
controls
random
The
LFO
resets
changing,
the
change
output
to
100
average
starts
for
the
buth
with
rate
of
at
100,
start
of a new
random
change,
with
Knobs
gradually
cycle.
direction
higher
Figure
A
non-zero
LFO
Delay
fade-in
modulation
11.1
value
for
creates
for
the
effect
Delay
When
seconds
■
■
■
a
this
is
non-zero,
specified.
Unit:
Seconds
Default:
Range:
100%
.000
Output
Note
See
.000
to
Level
On
it
"fades
Figure
30
in"
the
11.1.
Delay
LFO
effect
Note
over
the
Off
number
of
Time
Page 93

84
OB-Mx
User's
Guide
Rate
The
or
causes
is
■
■
■
number
the
average
the
time
Unit:
Default:
Range:
of
times
rate
the
OB-Mx
it
takes
Hz
(cycles
5.0
.010
Hz = 0.200 s period
the
LFO
of
change
to
do a little
for
the
per
Hz
to
for
LFO
second)
30
Hz
goes
through a complete
the
Random
math
for
to
complete a cycle
(=
periods
waveform.
you
and
from
100
cycle
in
one
second,
Altering
display
to
the
(Period=l/Rate).
0.033
seconds)
the
Rate
Period,
which
Figure
The
effects
offsets
of
different
on
LFO
output.
11.2
Parameter
max.
value
Parameter
Parameter
Parameter
Value
Value
Value
Offset
=0
Offset
=50
Offset = 100
Page 94

Offset
A
fixed
amount
LFO
goes
0
to
its
maximum
LFO's
■
■
■
output
Unit:
Percentage
Default:
Range: 0 to
to
add
positive
and
value.
when
the
of
50
100
S/H
This
control,
discrete
becomes a square
common
where
S/H
that
an
would
you
when
number
usage
LFO
would
of
wave
for
is
used
create
discrete
get
with
it
is
steps.
this
to
Chapter
to
the
negative;
Offsets
maximum
total
not
When
(provided
parameter
modulate
individual
the
11
LFO's
output.
when
higher
value
available
turned
S/H
offset
Off,
set
to
the
would
a
VCO's
pitches
parameter
Low
Frequency
When
set
to
than
is
reached.See
quantizes
2,
the
LFO
waveshape
be
pitch.
set
the
Offset
50,
the
LFO
50
will
cause a "clipping"
the
LFO's
quantized
in
self-playing
In
this
rather
to
Off.
than
Oscillators
is
set
to
output
Figure
LFO
is
not
application,
the
ranges
11.2.
output
output
Instruments
into
Random).
sliding
85
0,
the
from
of the
a
A
using
pitches
S/H
is
named
and
hold.
sample
different.
between
time,
elapsed.
This
S/H
value
■
■
■
and
and
could
function
whenever
Unit:
Default:
Range:
after a traditional
OB-Mx
hold
A
traditional
samples.
put
out
Then
it
measures
be
called
is
quantization
the
Number
Off
32
to
analog
S/H
produces
circuits,
sample
What
it
that
one
quantization
LFO
output
of
equally-spaced
2,
Off
effects
but
the
and
does
is
value
until
the
LFO
in
the
crosses
synthesis
similar
way
that
it
hold
circuit
to
measure
the
time
output
in
voltage
values
again
the
time
domain,
a
quantization
to
output
technique
to
that
achieves
has
the
between
domain, whereas
them
just
LFO's
and
repeats
and
called
of the
traditional
is
quite
one
parameter, time
output
samples
at a given
has
the
process.
the
sends
out a new
threshold.
sample
OB-Mx
Page 95

86
OB-Mx
User's
Guide
Page 96

Chapter
12
Voice
Status
Module
87
1
VOICE
STATUS
CHAPTER
Voice
Status
Module
2
3
4
Multi
P8*
5
6
timber
—>
7
8
12
9
Matrix
patch
10
number
11
12
The
buttons
■
To
indicate
■
To
bring
■
To
bring
editing
in
this
module
voice usage
the
parameters
the
parameters
by
serve
incoming
for
different
for
different
multiple
MIDI
Parts
Matrix
purposes,
notes
into
the
Patches
as
display
into
for
the
follows:
editing
display
for
Page 97

88
OB-Mx
User's
Guide
Voice
Usage
Indicators
Whenever
pressed,
voices.
button(s)
been
shut
edited).
voice,
There
Single
actually
Release
light
though
MIDI
the
VOICE
That
is,
when a MIDI
for
the
lit
because
off
automatically
When a MIDI
the
light
goes
is
one
subtlety
Instrument
remain
stage
of
goes
out.
Additional
the
Voice
notes
come
into
STATUS
voice(s)
of
one
out.
to
has a long
in
use
Envelope
Status
buttons
Note
that
it
of
their
at
this
time.
Note
Off
be
aware
release
after
the
4
is
completed),
incoming
button
the
OB-Mx
show,
not
On
message
is
assigned
other
It
message
of
here:
time,
Note
notes
for
that
to
uses,
the
doesn't
comes
if a note
the
Off
message
and
may
voice
or
the
Trigger
surprisingly,
comes
light(s)
ones
for
affect
the
in
to
shut
is
played
voice
for
is
received
hence
steal a sounding
is
unlit.
button
the
status
in,
the
numbered
up
(if
the
buttons
unassigned
Part
or
Patch
off a sounding
in a Part
that
note
will
(until
after
the
Voice
note
is
of
the
had
voices
being
whose
the
Status
even
Part
Patch
Selection
Selection
Buttons
When
parameters
button
in
Multi
for
in
the
CONTROL
Pressing
into
any
of
the
display
mode,
that
the
if
pressing
Part
any
into
the
display
MODULE
of
the
is
lit.
buttons
if
either
Buttons
buttons
the
1-12
Matrix
button
will
bring
in
the
the
parameters
CONTROL
1-6
will
bring
the
Program
MODULE
the
or
for
that
Parts
Patch
is
lit.
Page 98

Index
1-3
MPC
Multiple
Multiplier
MultiProgram
MultiProgram
Multis
Multiple
►
N
Noise
Noise
Note
stealing
Note#
►
O
OB
filter
Omni
Options
Outputs
►
P
P
width
Pan
Param
Parameter
Part
Part
activation
Parts
button
Patch
Pedal
Pitch
Pitch
Bend
Pitch/Env
Pitch/LFO
Pitchwhl
Poly
Portamento
Instruments
Record
source
button
toggles
1
1
23,
45,
46
7,
18,40
54
7,
18,40
C-2
.7,18,40
35
68
7
31
53
7,65
40
54
15
63
7,
39,51,73
54
9
34,41,43,50
20
50
53
53
57,61
46
63
64
53
40
62
Pressure....
Prgrm
Program
Program
Pulse
Pulse
►
Q
Quad
Quartertone
Quick
►
f?
Random
Rate
Release
Repeat
Reset
Reson
Resonance
Reverse
Rotate
button
Change
name
wave
width
modulation
Start
sawtooth
►s
S/H
Saving
Sawtooth
Selection
Self-playing
Send
Setup 3
Signal
Single
Source
Special
Split
Store
Instruments
buttons
instruments
Flow
button
53
38
23
40
61
28
33
26
3
54
84
80
32,77
77
68
68
83
32
85
12
61,82
9
73
43
C-3
35
23,
53
77
19
47
Page 99

1-4
OB-Mx
User's
Guide
Subtractive
Sustain
Sustain
Swap
Sync
System
System
► r
Target
Track
Triangle
Triangle
Trigger
Triple
TT
Tune
Tune
VCOs
TuneT
Tuning
Tuning
Module
tables
synthesis
decay
Exclusive
size
wave
6
79
79
48
60
13,45
57
23
62
82
61
10,78
33
40,52,
40,55,
62
55
89
44
89
56
Velocity
Vibrato
Voice
Voice
Voice
Voices
Vol
Voltage
Voltage
Volume
►
X
Xpose
►z
Zon
sensitivity
Allocation
Status
usage
button
Controlled
Controlled
Filters
Oscillators
87,18,
Module
26
27
31
20,
31
88
42
39,52
65
5,
59
53
51
51
►
u
Unison
Utility
VCA
VCA
VCF
VCOl
VCO2
VCO
Velo
Velocity
buttons
offset
Sens
33,34
9
25
73
5
67
68
5
80
53
Page 100

Voltage
Low
Controlled
Frequency
1
Oscillators
Oscillators
Envelope
Attack
A
Generators
Decay
Delay D Delay S Decay
Sustain
Release
Vel
Sens
§
OBMx
Definition
Instrument
Record
12
in
I
§
8
 Loading...