

Page 1
MC 3000
Midi Master controller
MANUALE OPERATIVO
OPERATING MANUAL
I - GB Ver. AA4
Page 2

CAUTION
RISK OF ELECTRIC SHOCK
DO NOT OPEN
WARNING! TO REDUCE THE DANGER OF ELECTRIC SHOCK:
DO NOT REMOVE COVER (OR BACK)
DO NOT EXPOSE THIS APPLIANCE TO RAIN OR MOISTURE
NO USER SERVICEABLE PARTS INSIDE
REFER SERVICING TO QUALIFIED SERVICE PERSONNEL
This simbol is intended to
alert the user to the presence
of important operating and
maintenance (servicing)
instructions in the literature
accompanying the appliance.
This simbol is intended to alert
the user to the presence of
uninsulated “dangerous
voltage“ within the product’s
enclouser that may be of
sufficient magnitude to
constitute a risk of electronic
shock to persons.
“INSTRUCTIONS PERTAINING TO A RISK OF FIRE,
ELECTRIC SHOCK, OR INJURY TO PERSONS“
IMPORTANT SAFETY INSTRUCTIONS
“INSTRUCTIONS
PERTAINING TO A RISK OF FIRE,
ELECTRIC
SHOCK, OR INJURY TO PERSONS“
IMPORTANT
SAFETY INSTRUCTIONS
WARNING: When using electric products, basic precautions should always be fallowed,
including the following:
1) Read all instructions before using the product.
2) To reduce risk of injury, close supervision is necessary when product is used near
children.
3) Do not use this product near water – for example, near a batnub, washbowl, kitchen
sink, in a wet basement, or near a swimming pool, or the like.
4) This product, either alone or in combination with an amplifier and headphones or
speakers, may be capable of producing sound levels that could cause permanent
hearing loss. Do not operate for a long period of time in high volume level or at a level
that is unconfortable. If you experience any hearing loss or ringing in the ears, you
should consult an audiologist.
5) This products should be located away from heat sources such as radiators, heat
register, or other products that produce heat.
6) The power supply cord of the instrument should be unplugged from the outlet when left
unused for a long period of time.
7) Care should be taken so that objects do not fall and liquids are not spilled into the
enclosure of the instrument.
8) The products should be serviced by qualified personnel when:
a. The power supply cord or the plug has been demaged; or
b. Objects have fallen, or liquid has been spilled into the product; or
c. The products has been exposed to rain; or
d. The products does not appear to operate normally or exibist a marked
change in performance; or
e. The products has been dropped, or the enclosure demaged.
9) Do not attemp to service the product beyond that described in the user-maintenance
instructions. All other servicing should be referred to qualified personnel.
Page 3

MC 3000
Operating Manual
73
INDEX
1. General presentation
1.1 The Keyboard
1.2 The patch concept
1.3 Let's take a look at the instrument and discover some if its features
1.3.1. Wheels and sliders
1.3.2. The zone keys and the zone concept.
1.3.3. The display, the write key and the function keys
1.3.4. The dynamic encoder, the INC and DEC keys and the cursor keys
1.3.5. The Numeric pad and the mode keys
1.3.6. Using the mouse and its characteristics
1.3.7. The MC3000 MIDI ports and MIDI potential
1.3.8. The other items on the rear panel
2. Let's switch on the MC 3000
2.1. What the instrument does at switch-on
2.2. Setting the switch-on mode
2.3. Selecting the patch which will automatically appear at switch-on.
3. The PROGRAM operating mode
3.1. Introduction
3.2. TOP page
3.3. LIST
3.4. VIEW
3.5. INFO
3.5.1 Introduction
3.5.2 INFO 1
3.5.3 INFO 2
3.5.4 INFO 3
3.5.5 INFO 4
3.5.6 INFO 5
3.6. PRG (send program change) function
3.7. SOLO function
3.8. The WRITE procedure in the PROGRAM mode.
Page 4

MC 3000
Operating Manual
74
4. The EDIT operating mode
4.1. Introduction
4.2. Out channels (CFG)
4.3. Zone Definition (DEF)
4.4. Out Messages (MSG)
4.4.1. Introduction
4.4.2. Messages 1
4.4.3. Messages 2
4.5. Curves (CRV)
4.5.1. Introduction
4.5.2. Curves 1
4.5.3. Curves 2
4.6. Controllers (CTL)
4.6.1. Introduction
4.6.2. Sliders
4.6.3. Pedals
4.7. PATCH BAY
5 The CHAIN operating mode
5.1. Introduction
5.2. Play Chain
5.3. Edit Chain
6. The UTILITY operating mode.
6.1. Introduction
6.2. MIDI common
6.2.1. Introduction
6.2.2. Control Channel (CCH)
6.2.3. MIDI Filter (FLT)
6.2.4. MIDI Program map (MAP)
6.2.5. MIDI Bulk Dump (BLK)
6.3. MIDI monitor
6.4. System Controls
6.4.1. Introduction
6.4.2. Wheels SET-UP (WHL)
6.4.3. System Pedals (SPD)
6.4.4. Range (RNG)
Page 5

MC 3000
Operating Manual
75
6.5. Edit Tables
6.5.1. Introduction
6.5.2. Port Names Table.
6.5.3. Program change Tables.
6.5.4. Sys-ex Tables
6.6. Edit curves.
6.6.1. Introduction
6.6.2. Dynamic curves
6.6.3. Aftertouch Curves
6.7. Tools
6.7.1. Introduction
6.7.2. Mouse Set up
6.7.3. Battery Status.
6.7.4. Memory Status.
6.7.5. Power on procedures.
7 Additional Messages
7.1 Malfunction messages
7.2 Error messages
7.3 Status messages
8 Annex
8.1 Reset Procedures (Factory settings)
8.2 Panic Function
Page 6
MC 3000
Operating Manual
76
1 GENERAL PRESENTATION
1.1 THE KEYBOARD
The instrument is equipped with 88 weighted keys with after-touch sensitivity.
The keyboard's sensitivity to key velocity and after-touch varies depending on the
response curve set in the patch.
Up to 48 key velocity and after-touch response curves can be set with point to point
resolution by means of edit procedures we will be describing later.
1.2 THE PATCH CONCEPT
A patch can be defined as a program containing all the information which presets the
instrument to provide a given type of performance. For example, as well as the key
velocity response curves, a patch may contain the program changes assigned to the
various MIDI channels and lots of other parameters to be described in greater detail later.
The MC 3000 is able to store no less than 1024 patches. They can all be programmed
throughout by the user and recalled in real time, allowing the user to draw on a large
quantity of data without having to wait for them to be loaded from a sequencer or a
computer.
1.3 LET'S TAKE A LOOK AT THE INSTRUMENT and discover some if its features
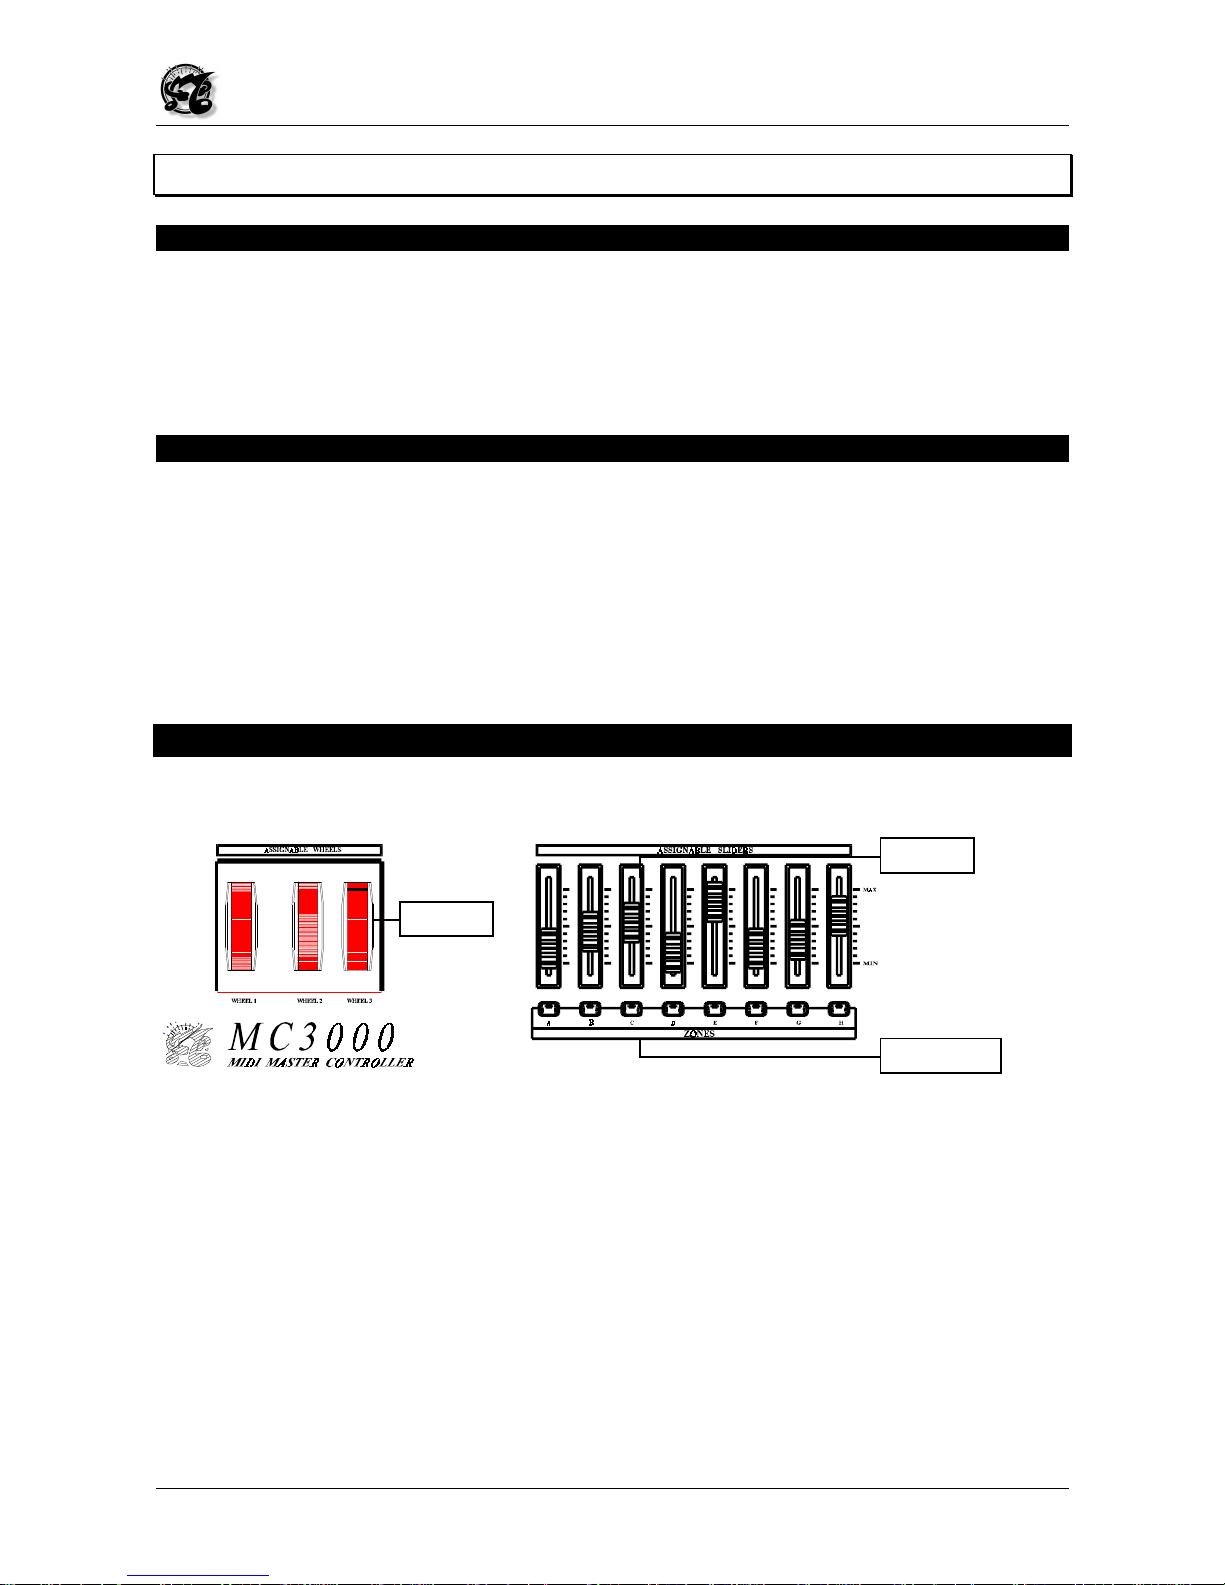
1.3.1 Wheels and sliders
If we look at the front panel, we will find that from left to right it contains 3 wheels and 8
sliders; any type of MIDI control of our choice can be assigned to each of these objects.
1.3.2 The zone keys and the zone concept.
In front of the sliders there are 8 zone keys. The zone is a specific region of the keyboard,
which can be set as we choose to include the entire range of 88 keys or just one key, in
which given parameters have been set. If a different program change assigned to a
specific MIDI channel, sent to one of the MIDI OUT ports available in the instrument,
corresponds to each zone, the zone is identified with a specific sound. In this case, if 8
zones are activated in our patch, we have 8 different sounds distributed within the range
of our keyboard. Therefore the zone is a real program assigned to a portion of the
keyboard or to the whole keyboard
3 Wheels
8 Sliders
8 Zone Keys
Page 7
MC 3000
Operating Manual
77
Each zone key has a LED indicating its activation status;
when it is off
, the zone is
not
active
, while
when it is
on the zone is
active
. When the LED
flashes
, the relative zone
is in
standby
condition, meaning that the zone is not yet active, but is ready to be
activated next time the key is pressed.
A standby status is useful if the parameters assigned to a given zone are to come into use
at a certain point in the player's performance, while the overall parameters of the patch
remain unchanged.
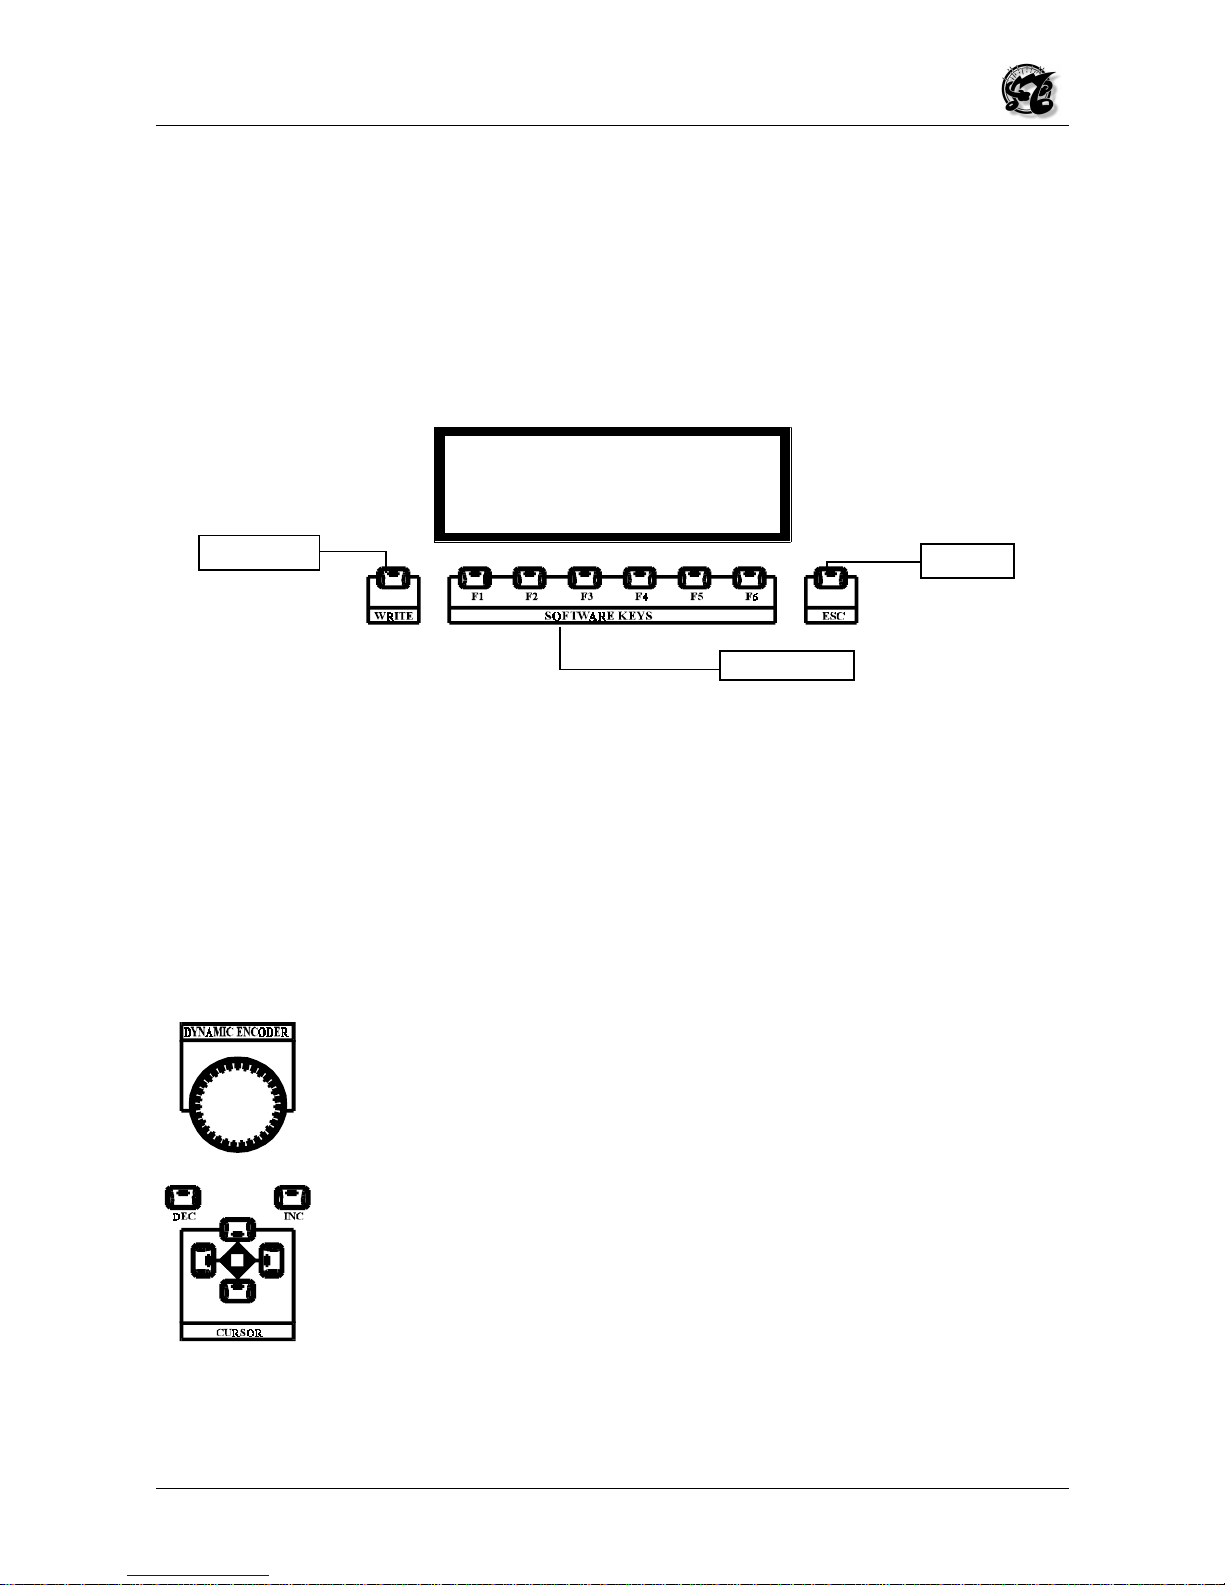
1.3.3 The display, the write key and the function keys
The centre of the front panel contains a high contrast graphic LCD of 240x60 pixels, with
neon back-lighting. Thanks to this large display and widespread use of the explanatory
graphics adopted by the instrument, programming of the MC3000 is simple and intuitive.
In front of the display there are 8 keys; the first is the write key (WRITE) , used to save the
settings which have been modified. This key is followed by 6 function keys (from F1 to F6)
used to select the function which appears on the display close to the key, and then the exit
key (ESC) pressed to return to the previous video page or the instrument's main menu
page.
1.3.4 The dynamic encoder, the INC and DEC keys and the cursor keys.
Further to the right on the front panel, we find a wheel called the
DYNAMIC ENCODER, used to vary parameters of any kind such as the
values of a specific control selected, or the number of the patch to be
selected, etc. The ENCODER can be turned in both directions to
change the selected value on a continuous scale, and can also be used
(in some enviroments) to move from one part of the display to another
to select different options or data.
Below this wheel there are 2 keys which provide the same function: the
left-hand key, marked
DEC
, decreases a value, while the right-hand
one, marked
INC
, increases a value. When the variation to be made is
of the order of magnitude of many values, it is more convenient to use
the encoder, which can provide very large variations in a short time. In
the opposite conditions, the INC and DEC keys should be used, since
they increase or decrease a value in steps of one unit.
In front of the INC and DEC keys are the cursor keys which allow the user to move around
the parameter setting fields in the display, in the direction in which the keys are located in
relation to a central square bounded by 4 arrows.
WRITE Key
ESC Key
6 function keys
Page 8
MC 3000
Operating Manual
78
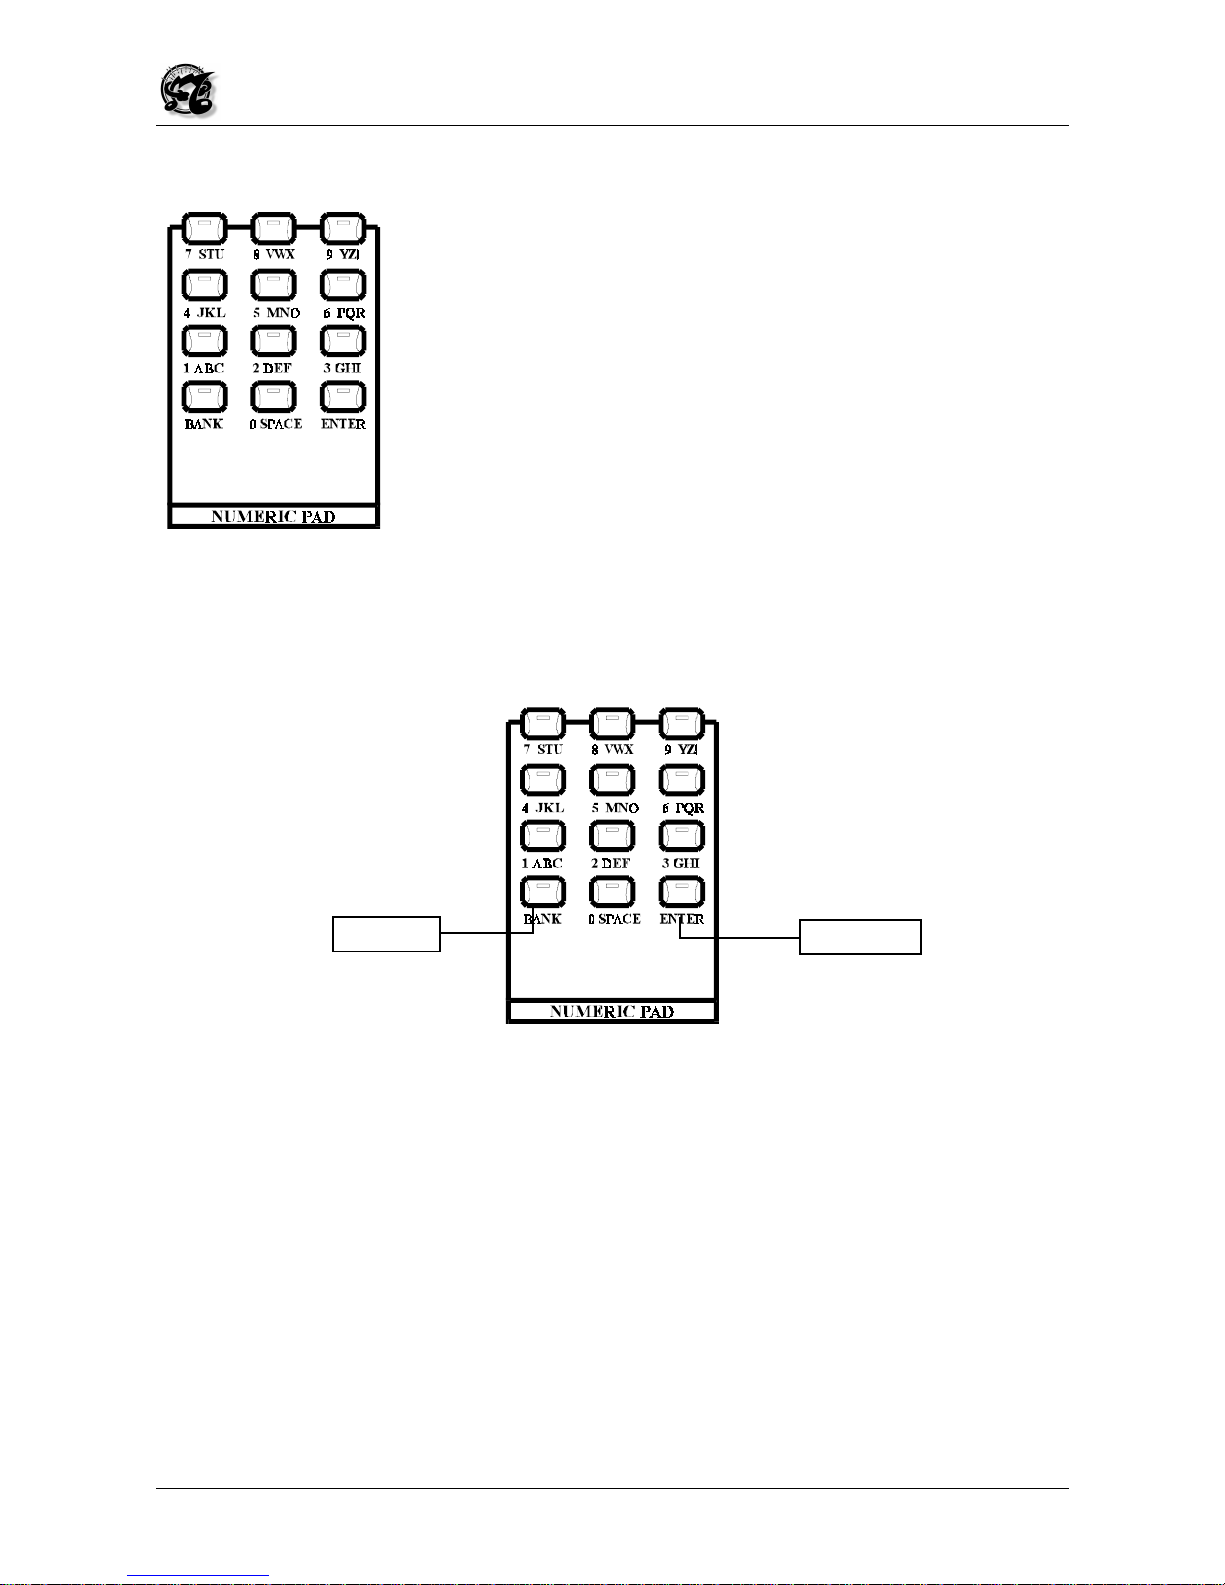
1.3.5 The Numeric pad and the mode keys.
Moving to the right, we now come to the
NUMERIC PAD
, a
combination of keys for selecting the patch number, also used to
set a parameter at a given value directly, without using the
encoder or the INC and DEC keys.
When the value set is too high, the instrument will automatically
set the maximum permitted value for the parameter.
For example, when selecting a program change, for which the
range is 0 to 127, if the user types the number 150 the machine
will automatically set 127. Similarly, when the number typed is too
low, the instrument will automatically set the minimum value
permitted for that parameter. The Numeric pad is a real
alphanumeric keyboard, and is thus also used for writing.
The Numeric pad contains the
BANK
key for selecting the bank in
which the patch to be recalled is located. This selection does not always start from bank
A, but starts from the bank current when the operation is carried out.
Finally we come to the
ENTER
key used to confirm the selection or confirm the name
typed; each patch typed in the Numeric pad, each value set in the Numeric pad must
always be confirmed with the ENTER key.
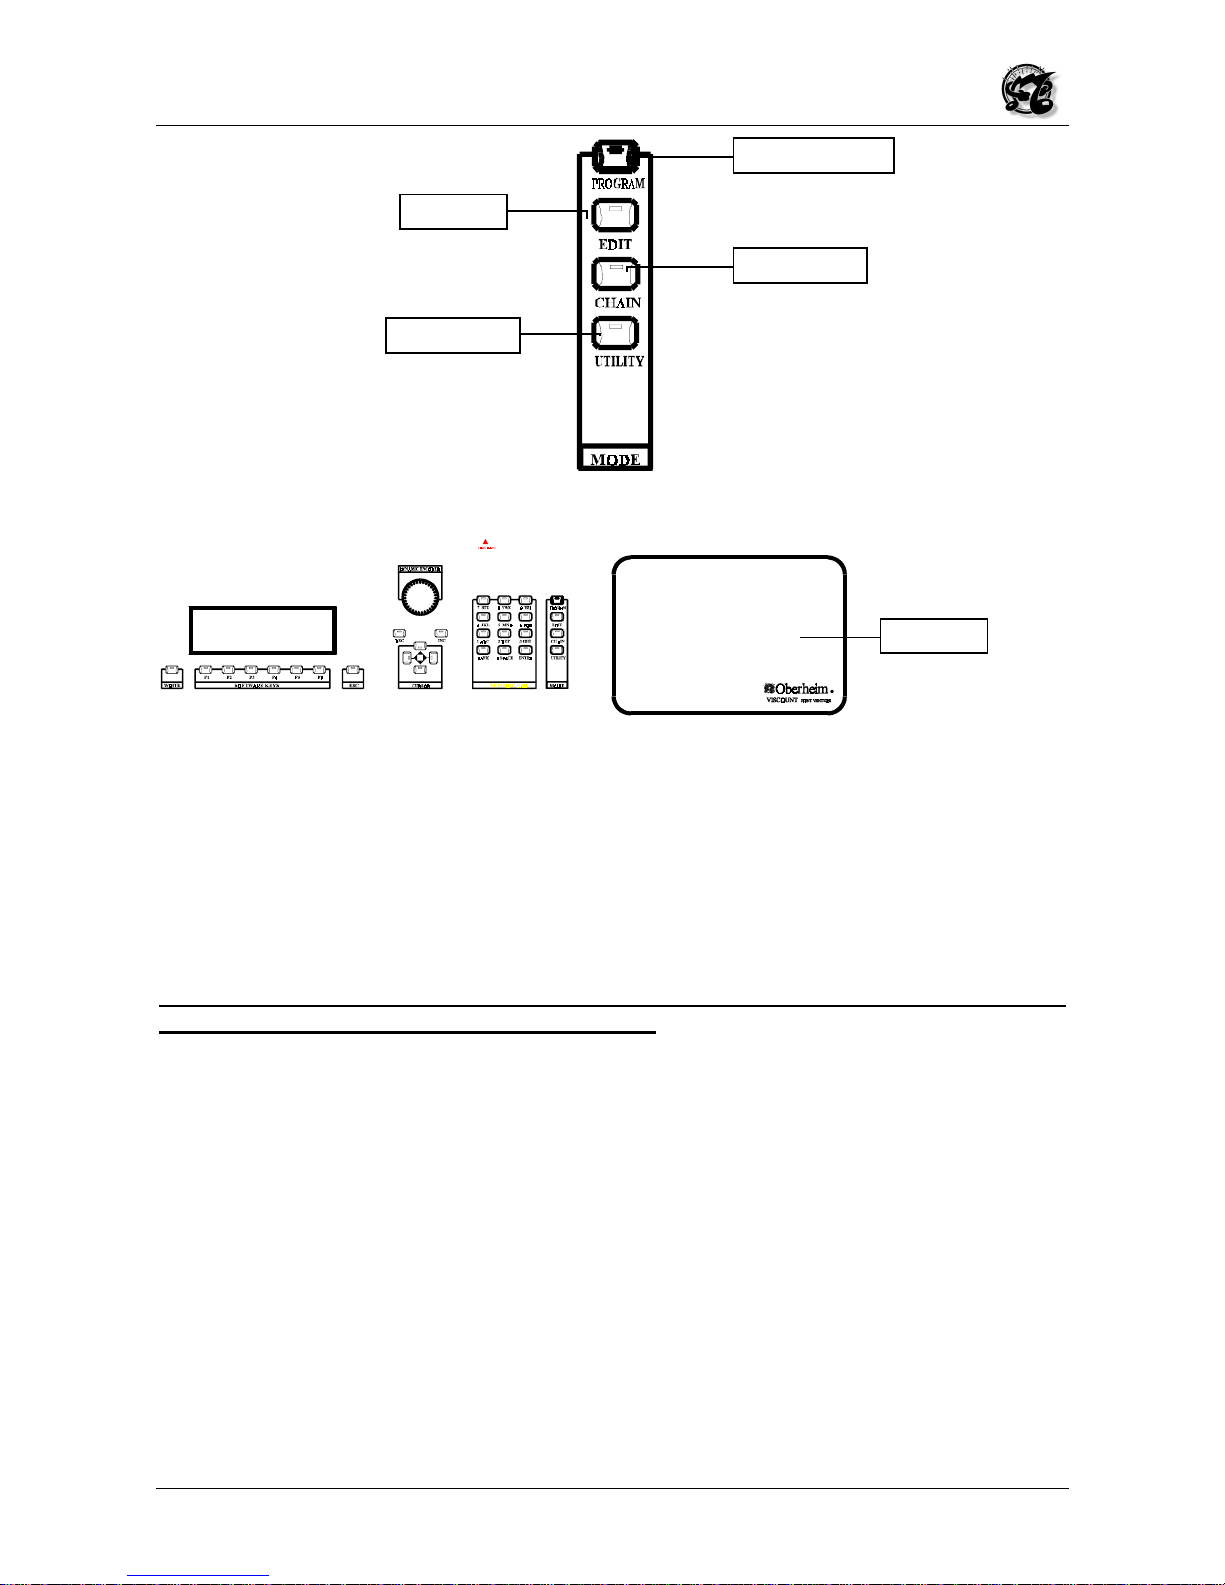
The last set of buttons on the right is the Mode set, consisting of 4 LED buttons allowing
the user to select one of the instrument's 4 operating modes, which are:
•
PROGRAM MODE
: Main operating mode; in this mode, the user can select the
programs (patches) and use all the instrument's real-time functions.
•
EDIT MODE
: Programming mode; this model allows the user to create and modify all
the parameters in a program (patch).
•
CHAIN MODE
: Concatenation; mode allowing the user to create and perform 128
different chains of several patches.
•
UTILITY
: This mode allows the user access to all the instrument's auxiliary functions
and the creation of user tables.
ENTER Key
BANK Key
Page 9
MC 3000
Operating Manual
79
.
1.3.6 Using the mouse and its characteristics
The mouse mat supplied with the instrument is housed inside the far right of the front
panel.
The MC-3000 requires a serial Mouse having the following characteristics:
• 9 pin RS-232 connector
•
3 buttons
• presence of
PC/MS
switch on the mouse. During use with the MC-3000, this switch
must be set on PC.
For correct operation of this peripheral, only MICE which comply perfectly with the
specifications given above may be connected.
As soon as the mouse is connected to the port provided in the rear panel, the mobile
pointer used to select the various fields or icons on the screen appears on the display.
When using the mouse, bear in mind that
the left-hand key selects, the central key
decreases
and
the right-hand one increases
.
In addition:
• Clicking the left-hand button on a function key icon enables the relative page.
• A double click of the left-hand button on the section in the top left-hand corner of the
display enables the ESC function (return to the main page of the section, aborting the
modifications made).
To increase the legibility of the display, the Mouse pointer disappears if it is unused for
about 6 seconds, and reappears next time the Mouse is moved.
Program Mode
Chain Mode
Edit Mode
Utility Mode
Mouse mat
Page 10
MC 3000
Operating Manual
80
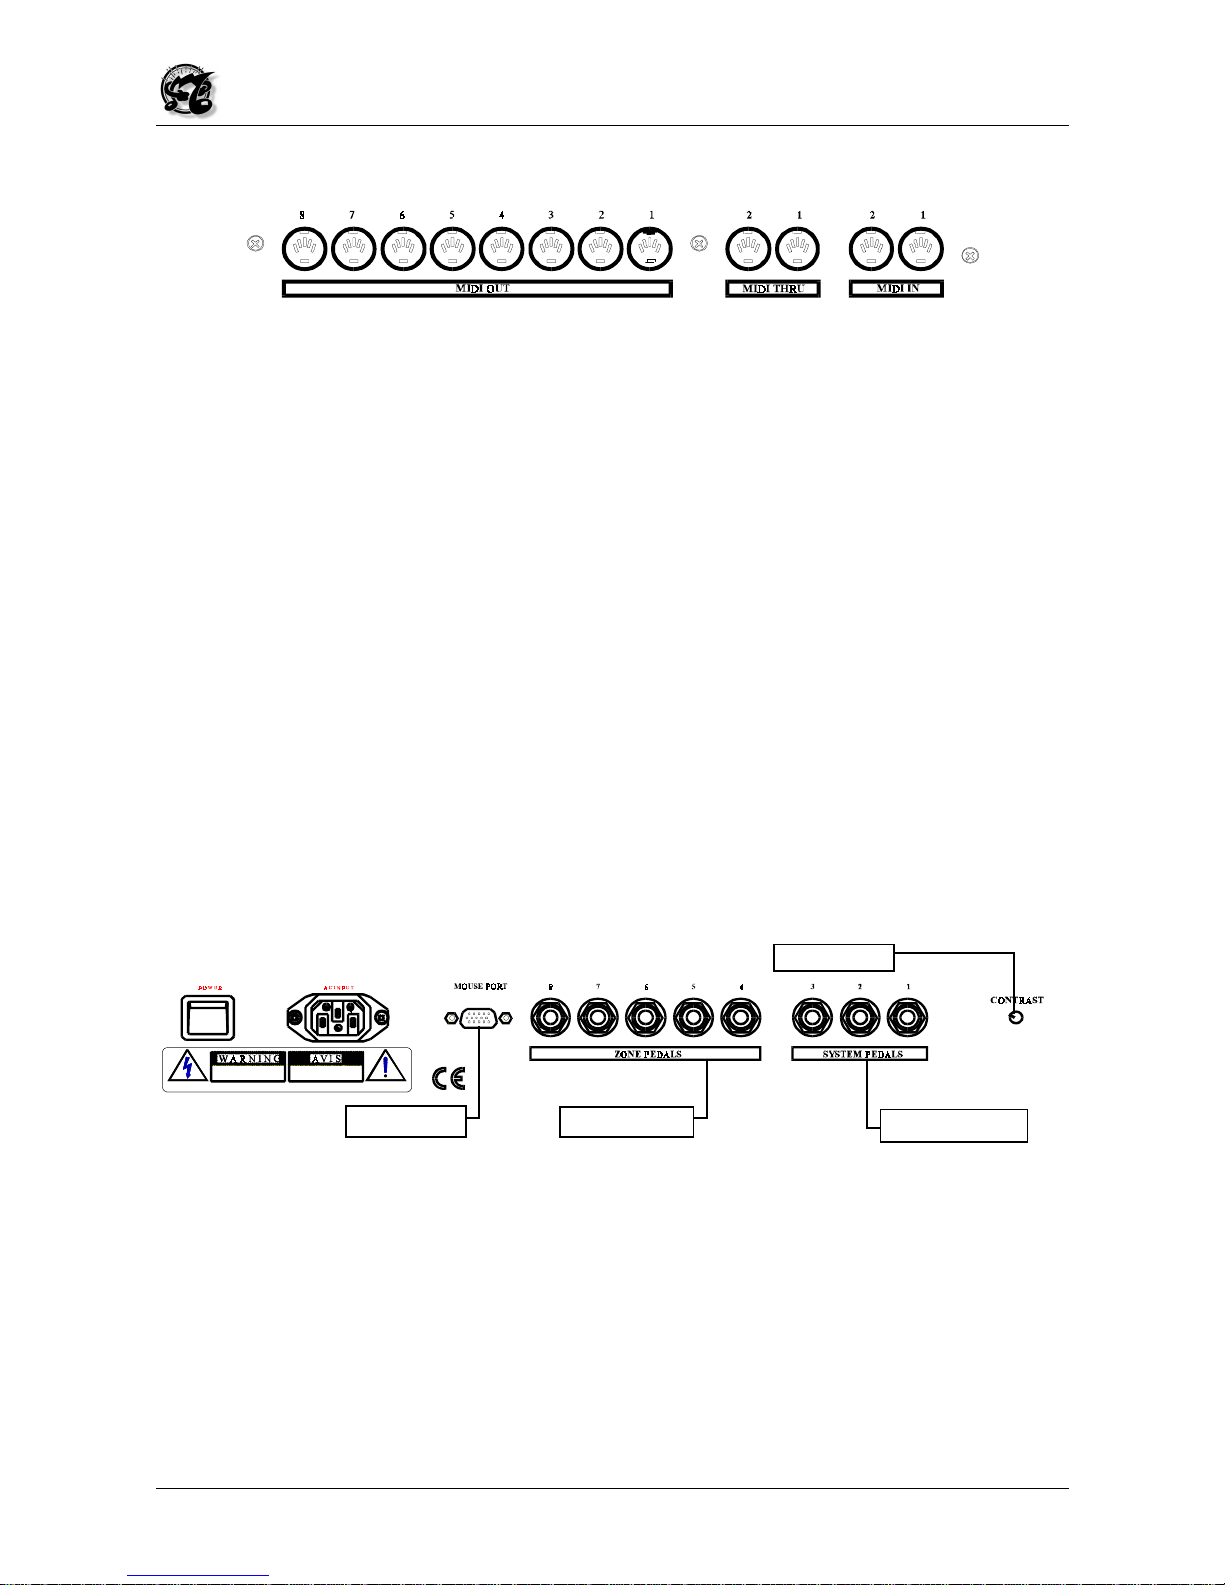
1.3.7 The MC3000 MIDI ports and MIDI potential.
Viewed frontally, the rear panel is structured as follows.
Moving from right to left, we find 2 MIDI In ports, 2 THRU ports and 8 OUT ports, all
consecutively numbered.
The presence of 8 separate MIDI outputs means that data can be transmitted on 128
independent MIDI channels, 16 for each port.
The MC3000 offers much more than a large number of outputs; the instrument is able to
act as a
MIDI patch-bay
, meaning that it is capable of providing a large number of INOUT setups which can be programmed for every single patch.
A powerful
MIDI MONITOR
in the display allows the user to monitor the entire flow of data,
in both DEC and HEX formats, on the various ports. The instrument offers the user 48
SYS-EX tables with auto-acquisition function; it will therefore be possible to acquire the
exclusive system codes from the instruments connected to the MC3000, save them inside
the tables and send them as assignment of the individual zone.
1.3.8 The other items on the rear panel
Moving towards the left, we find the trimmer for adjusting the display contrast and 8 inputs
for the pedals, the first 3 of which are defined as SYSTEM PEDALS, which act on the
entire patch zone simultaneously, and the others as ASSIGNABLE PEDALS, which act
only on the zones assigned to them.
Finally, we come to the RS2332 serial port for connection of the mouse, the on-off switch
and the network connection.
Mouse Port
5 Zone Pedals
3 System Pedals
LCD contrast
Page 11

MC 3000
Operating Manual
81
2. LET'S SWITCH ON THE MC 3000
2.1 WHAT THE INSTRUMENT DOES AT SWITCH-ON
What the MC 3000 does at switch-on depends on the settings the user has made. The
user can choose between two types of switch-on: NORMAL switch-on and FAST switchon. In NORMAL mode, as soon as we switch on the instrument the display shows a
message informing us about the status of the 3 lithium batteries inside the MC3000.
There may be 3 types of message: the batteries are charged,
they are almost flat (so the data stored inside the instrument should be saved),
the batteries are flat (all user data can be lost !)
Immediately afterwards, the display switches to the Program mode, showing the TOP
PAGE, or the main page of this operating environment, containing the name and number
of the patch selected
In the other mode, as soon as the instrument is switched on the patch is selected
immediately and the display does not show the name of the instrument or the message
indicating the status of the batteries, unless the batteries are flat, in which case the
Page 12

MC 3000
Operating Manual
82
message becomes especially urgent, because the user may have lost all the data the
instrument contained.
N.B.:
The estimated lifetime of the lithium batteries installed in the MC-3000 is about 4
years. However, specific conditions of use (such as high operating temperatures) may
significantly shorten the battery lifetime. Users are urged to save the memory by MIDI
Bulk Dump as soon as the instrument gives the battery low warning.
2.2. SETTING THE SWITCH-ON MODE.
• Press the UTILITY key on the right of the front panel (MODE section).
At this point the display will show the 6 sections of the UTILITY operating mode.
• Select the number 6 (TOOLS) in the bottom right-hand corner of your display using the
function key provided (or by turning the encoder until the word TOOLS on the display is
highlighted and confirming with ENTER). The display will show the following:
This is the first page of the TOOLS section, relating to the mouse parameters. The 4
pages of the section are shown in the bottom of your display, with the page currently
displayed with reverse illumination.
• Now press F4 (PWR icon) to select the fourth page, entitled POWER ON
PROCEDURES. The video page which appears is as follows:
POWER ON
PROCEDURES page
Page 13

MC 3000
Operating Manual
83
• Use the cursor keys to move to the line where the words POWER ON TYPE appear: at
this point the current function (NORMAL mode in the illustration) is selected, and the
word NORMAL will be highlighted.
• The INC and DEC keys or the encoder can now be used to vary the setting of the
switch-on mode from NORMAL to FAST and vice-versa.
• Press ESC to exit (Utility Menu page). All modifications will be saved automatically.
2.3 SELECTING THE PATCH which will automatically appear at switch-on.
You can choose the patch which will automatically appear when the instrument is switched
on. To do this, access the POWER ON PROCEDURES page (just described) in the
TOOLS section 6 of the UTILITY operating mode
• Now select the third line where the words PATCH POWER ON appear, using the cursor
keys to move around the display.
• Set the number of the patch you wish to appear automatically when the instrument is
switched on using the encoder or the alphanumeric keypad. The rectangle in the
bottom right-hand corner where the word LAST appears refers not to a page but to a
special function. When this function is selected using the corresponding function key
(F6), the last patch selected before switch-on will automatically appear.
• Press ESC to exit (Utility menu)
N.B.
Function Key F6 (LAST) works only when the field PATCH POWER ON is selected.
Switch-on
mode selection
function
Automatic switchon patch selection
function
Function Key
LAST
Page 14
MC 3000
Operating Manual
84
Available Functions
3. THE PROGRAM OPERATING MODE
3.1 INTRODUCTION
As already mentioned, this operating mode is automatically selected in switch-on. On
many other keyboards, its equivalent is known as the Play mode, meaning that the
keyboard is ready to be played. The keyboard also plays in the other modes, but the
program and chain modes are the typically "live" modes, because they allow the
immediate change of the patches prepared for the various musical and instrumental
contexts.
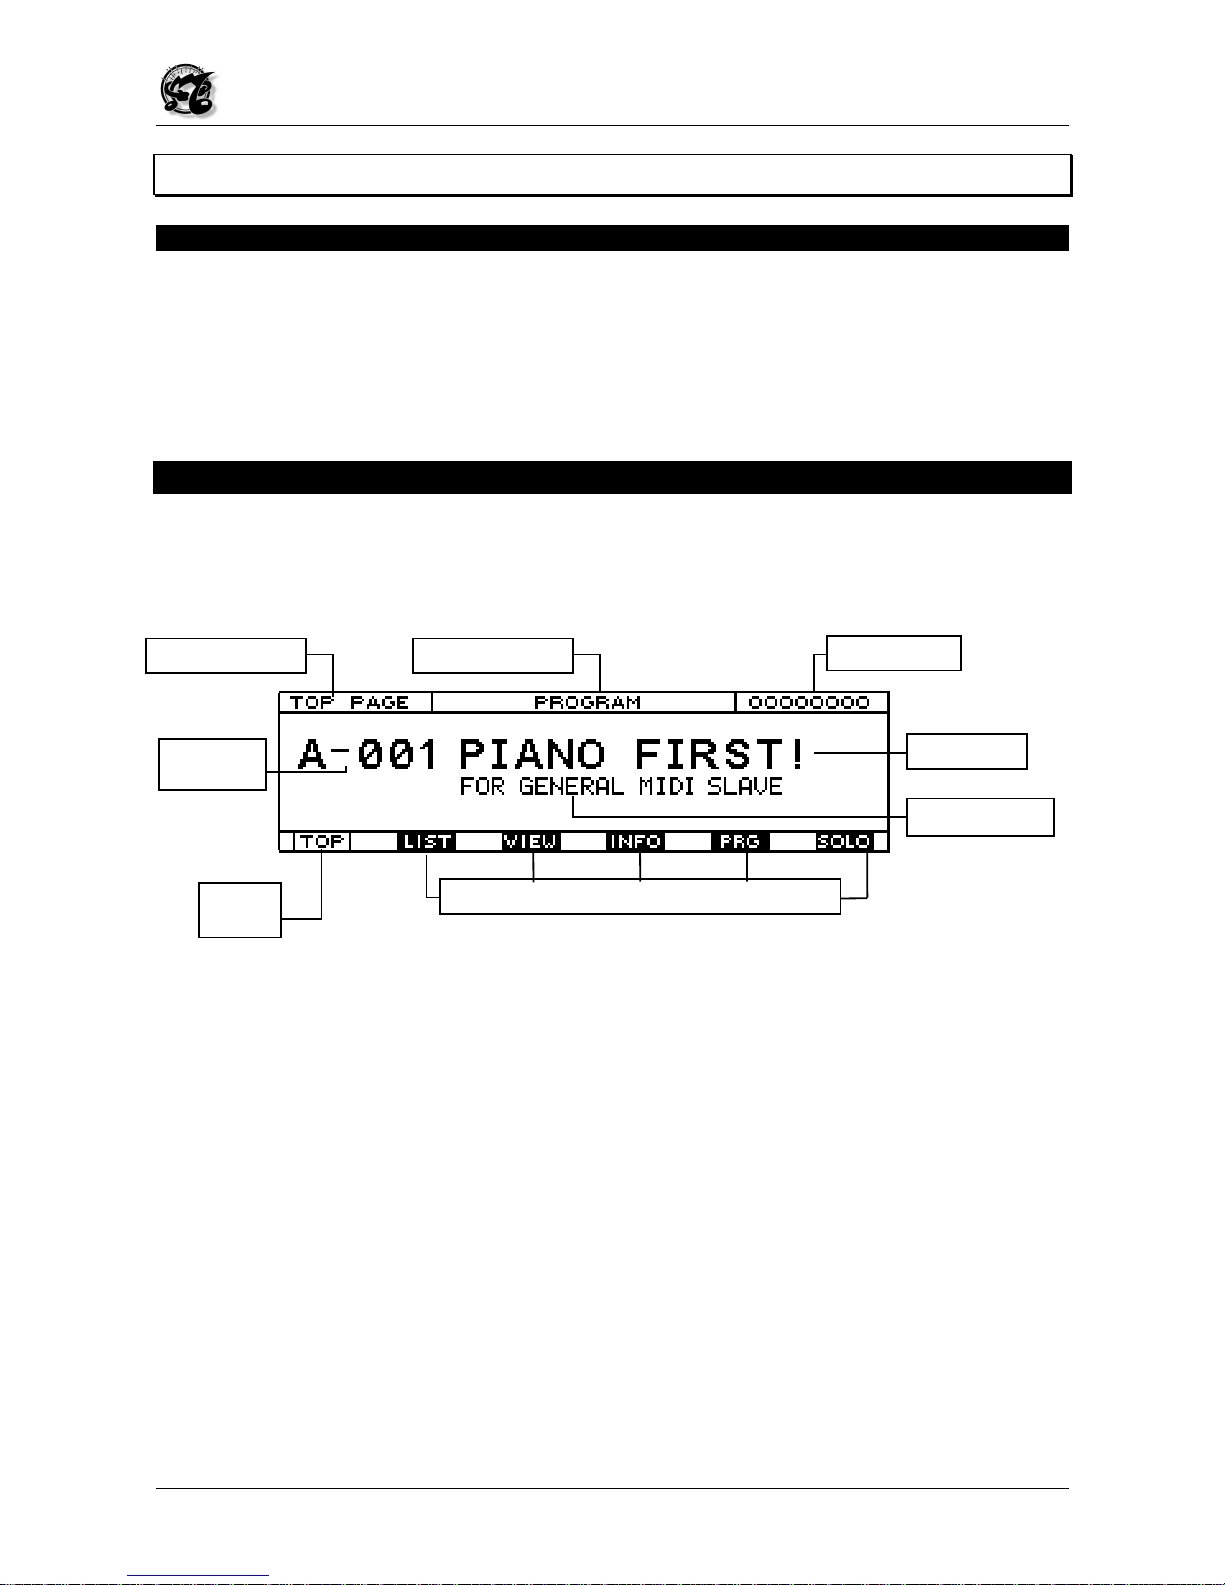
3.2 TOP PAGE
The first page which appears when the PLAY mode is accessed, and therefore also at
switch-on, is the TOP PAGE
.
This page contains all the information necessary during performance of a song. The
centre of the display shows the name of the bank and the number and name of the patch
being played, with a comments field of 24 letters.
In the top of the screen, we find the name of the page and the current operating mode,
while the box in the top right-hand corner indicates the activation status of the 8 zones in
that patch; the
solid circles
indicate the active zones which are
being played
, while the
empty ones
show the active zones
not being played
, and the zones
surrounded by
dotted lines
are in
standby mode
.
No icons
appear for the zones
not active
in that
patch; if only 4 zones are active in that patch, only 4 circles will appear, solid, empty or
with dotted lines depending on the conditions described above. At the bottom of the
screen there are rectangles indicating the pages of the Program mode. Here again, the
page selected, and thus the rectangle selected, is indicated by reverse lighting.
All the data input devices, such as the encoder, the INC and DEC keys and the numerical
keypad are enabled for patch selection; if the keypad is used a message on the display
will show the sequence of data entered with regard to the patch number and bank.
Remember that selections made from the numerical keypad must be confirmed by
pressing ENTER.
Current Page Operating Mode
Zone icons
Patch Name
Comment Field
Selected
Function
Bank and
Number
Page 15
MC 3000
Operating Manual
85
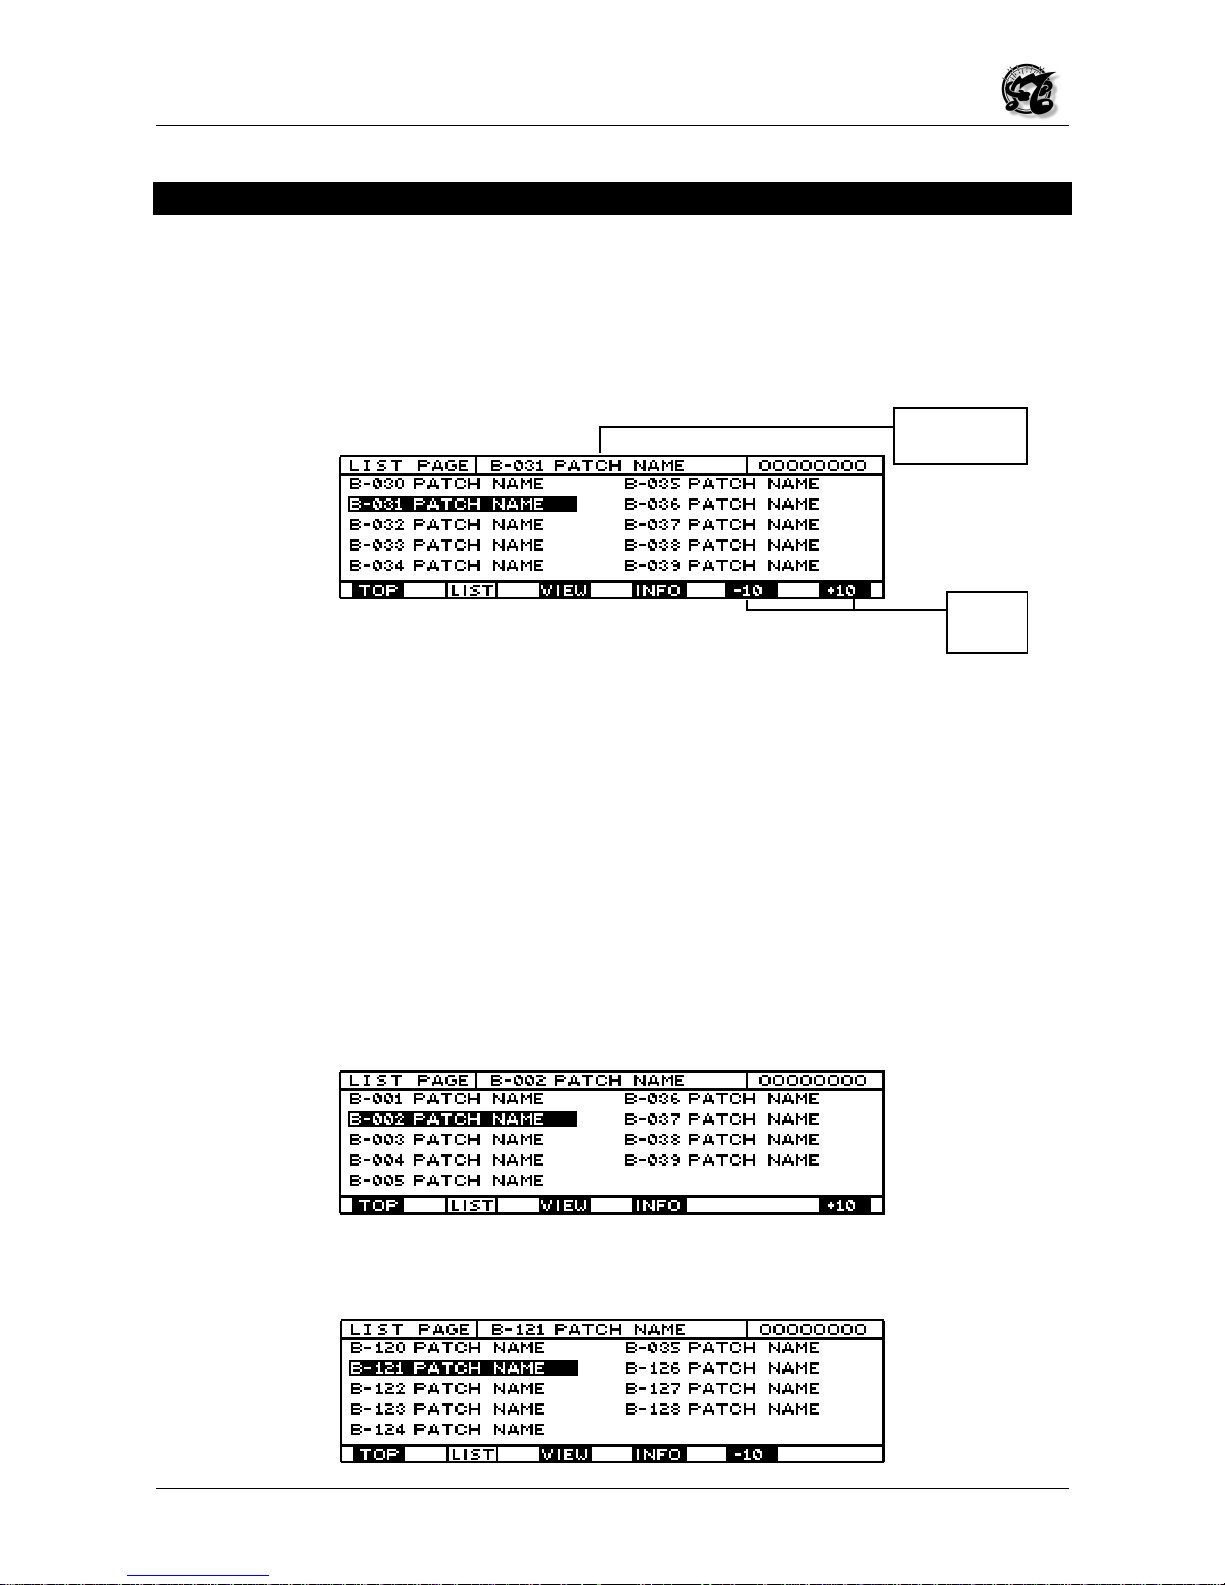
3.3 LIST
If LIST is selected using the corresponding function key
F2
from the TOP PAGE or from
any other successive page in the program mode, the second page of the program mode,
called the LIST PAGE, appears. The top of the page shows the name of the page, the
current operating mode and the number of the selected patch.
This page contains the list of the patches present in the current bank, displayed in groups
of 10 patches at a time (except for the last group, from 120 to 128). The group shown as
soon as this page is accessed is the one to which the current patch belongs. For
example, if we are in patch n. 02 of bank A when we access the LIST PAGE, this page will
show the group which goes from patch n. 00 to n. 09 of the respective bank A. At this
point, if we wish to display the groups which follow we simply press F6 located in line with
the rectangle marked
+10
, in the bottom right-hand corner of the display, and whenever
the key is pressed the groups belonging to gradually rising tens, 30-39, 40-49, 50-59, etc.,
will appear. Similarly, to display the previous groups press
F5
close to the rectangle
marked
-10
, and whenever the key is pressed the groups of lower tens, 90-99, 80-89, 7079, etc., will appear.
When the lowest group, 00-09, is displayed, only
+10
appears in the bottom right-hand
corner, meaning that only F6 is enabled, while F5 will be disabled because it is not
possible to select a group lower than the group displayed.
When the group displayed is the highest, the display will only show the rectangle marked 10, meaning that only function key F5 is enabled.
Current Patch
selected
Tens
selection
Page 16
MC 3000
Operating Manual
86
Once the group required is displayed, the chosen patch can be selected using the cursor
keys or the encoder, and as soon as the choice is confirmed with ENTER the instrument
switches to the desired patch, which will appear with its TOP PAGE
The usefulness of the LIST page lies in the rapid consultation it allows. For example, if we
do not remember the number to which we have associated the patch required, instead of
scrolling through them one by one in the TOP PAGE, the patches can be displayed in
groups of ten at a time. Note that the patch being played
remains active even during the
location process, until ENTER is pressed.
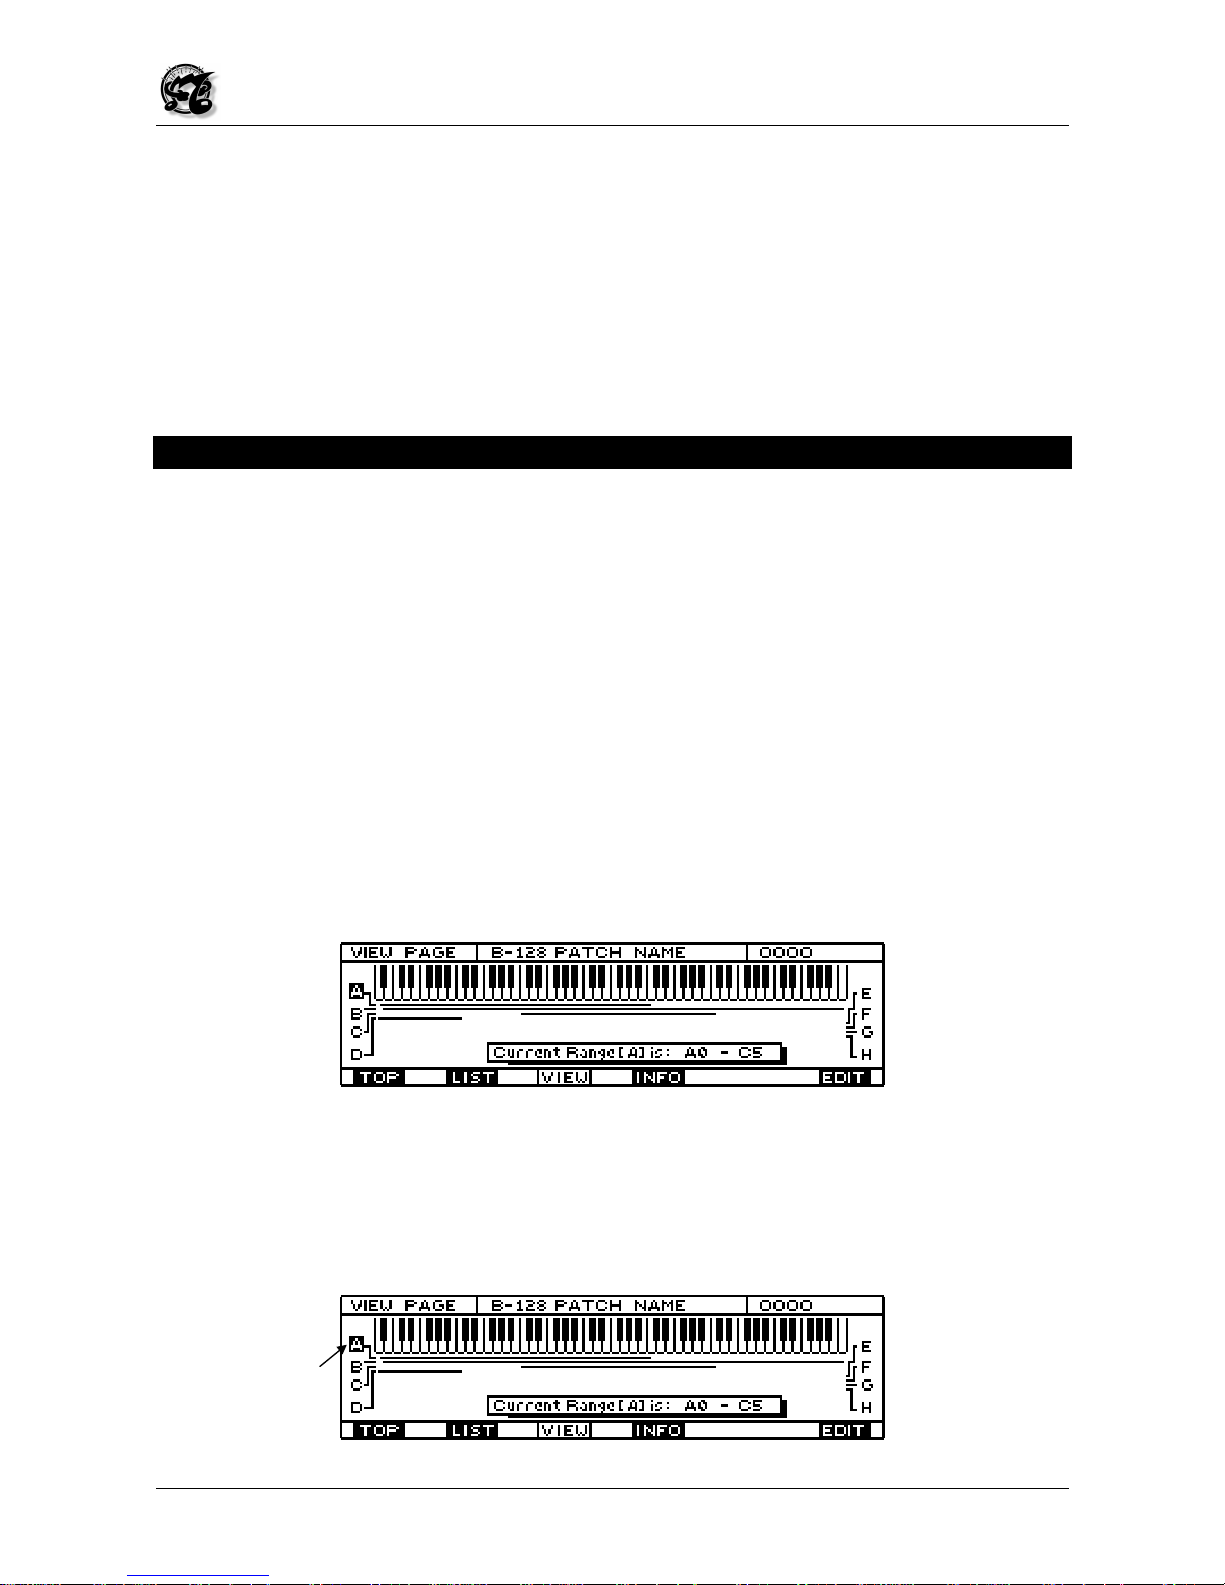
3.4 VIEW
F3, below the rectangle marked
VIEW
on the display, can be pressed from the previous
page or any other page in the program mode to select the VIEW PAGE. In this page, the
name of the page, the current operating mode and the number of the selected patch
appear in the top of the display.
This page shows the setup of the splits and layers relating to the current patch.
Each letter which appears on the right and left of the display under the image of the
keyboard represents a zone, and each of these is associated to a line which informs us of
the key range of that specific zone, or in other words the region of notes which the zone
covers. Any zone overlaps or layers are immediately visible in this window.
Let us suppose we have a patch with 4 zones active, each of which associated to a
different MIDI channel and Program Change, so basically we have 4 different instruments
available on the keyboard. When the VIEW PAGE is accessed, we can immediately see
where these instruments are positioned, and the placing of any layers. One possible
video page is shown below:
By scrolling over the letters representing the zones using the cursor keys or the encoder,
the user can display the key range of the selected zone in detail on the rectangle marked
"current range" in the centre of the lower part of the display.
Selection of zone A and detailed information about its key range.
Page 17
MC 3000
Operating Manual
87
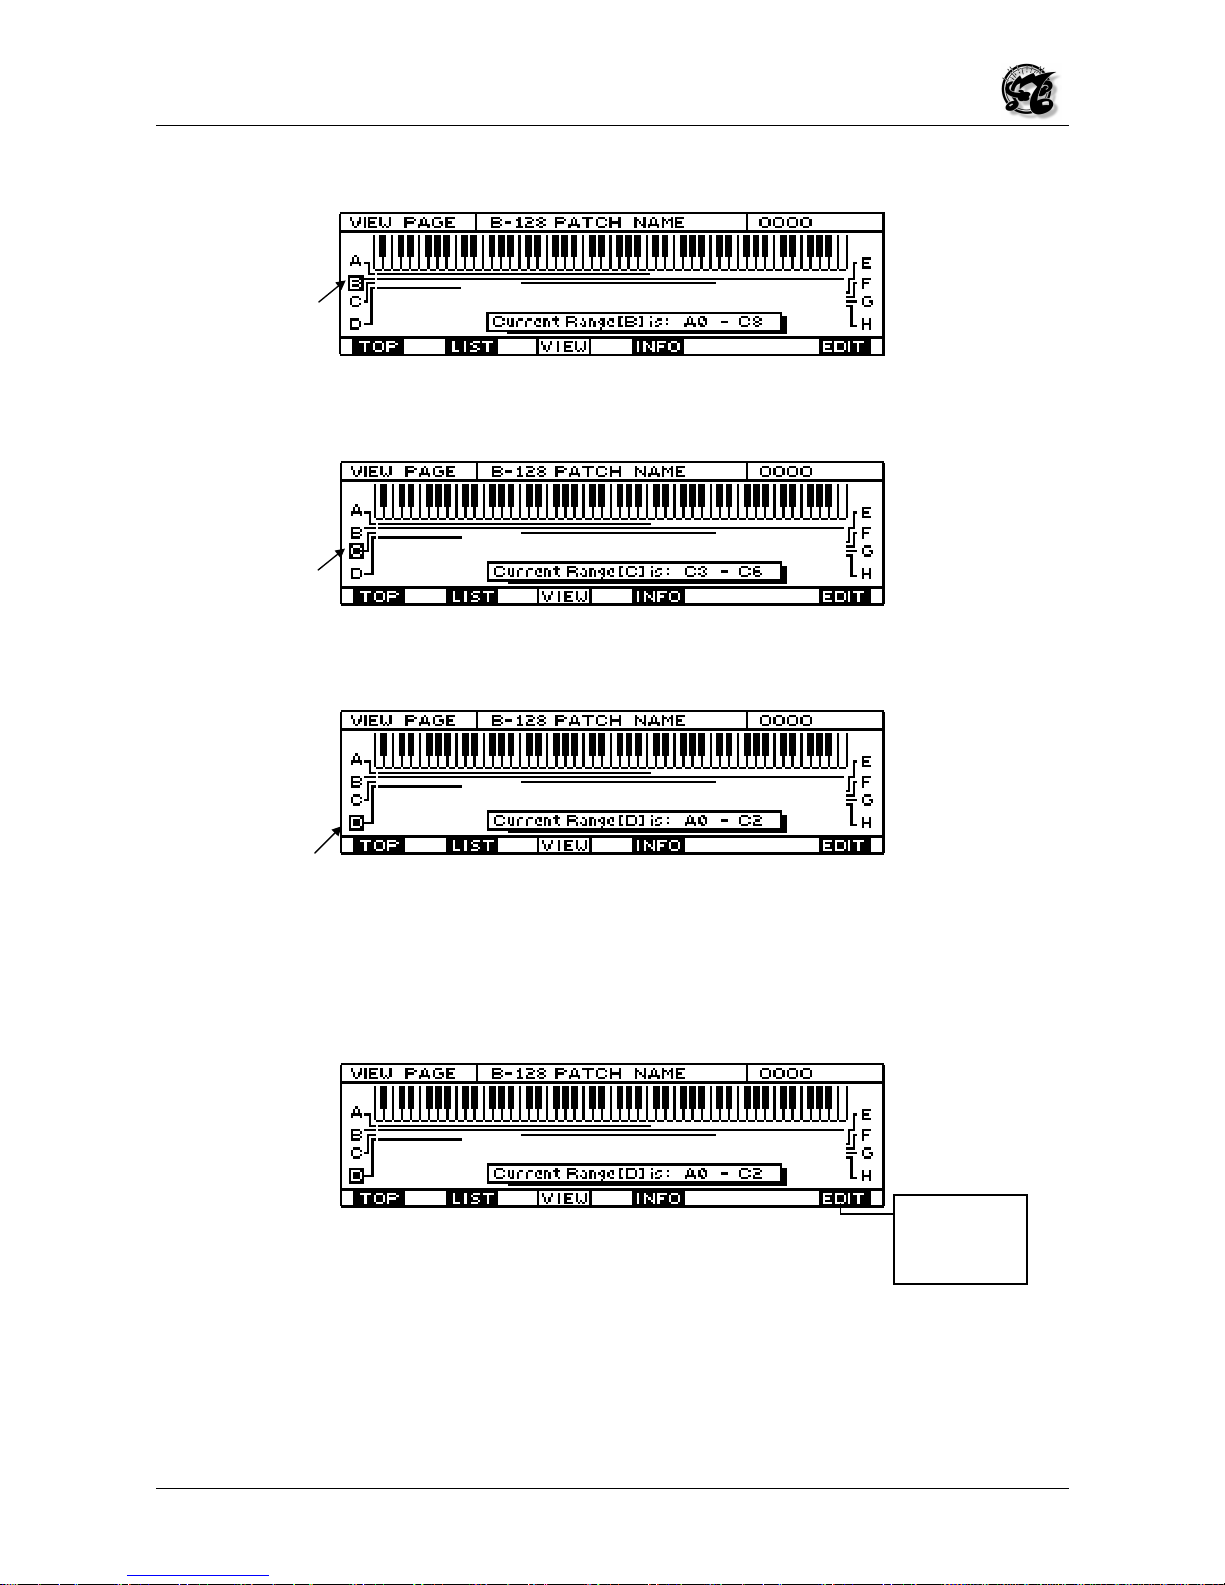
Selection of zone B and detailed information about its key range.
Selection of zone C and detailed information about its key range.
Selection of zone D and detailed information about its key range.
Press F1 or ESC to leave this function and go to the TOP PAGE.
The function key F6 switches directly to the EDIT environment of the ZONE DEFINITION
page, which allows the user to modify the key ranges
So if F6 is pressed the following page will appear :
Key for direct
access to the
EDIT mode
Page 18

MC 3000
Operating Manual
88
For the procedure for making the modifications in this page, refer to the EDIT section of
this manual, point 4.3
Press ESC twice to go back to the TOP PAGE
3.5 INFO
3.5.1 Introduction
F4, below the rectangle marked INFO, can be pressed on any program mode page to
select the last page of the mode, the INFO page. In actual fact this is a multiple page,
consisting of 5 subpages. Naturally, the first subpage which appears as soon as the INFO
page is selected is Info1. F5, under the word PAGE, can be pressed to scroll through the
successive subpages in increasing order up to 5, after which when F5 is pressed again
the system returns to INFO 1.
The name of the page (INFO) and the current mode appear at the top of all 5 subpages,
alongside the circles indicating the activation status of the current patch zones.
3.5.2 INFO 1
In this first subpage of the Info page, is reported a prospect where are shown the 8 zones
(colums from A to H) and, for each of them, is reported :
• The activation status (ON =Active, OFF = Not active, SB = Standby)
• The MIDI OUT port assigned to each zone
• The MIDI channel assigned to each zone
Zone status
Assigned Port
Assigned
Channel
PAGE (F5)
Zone columns
Page 19
MC 3000
Operating Manual
89
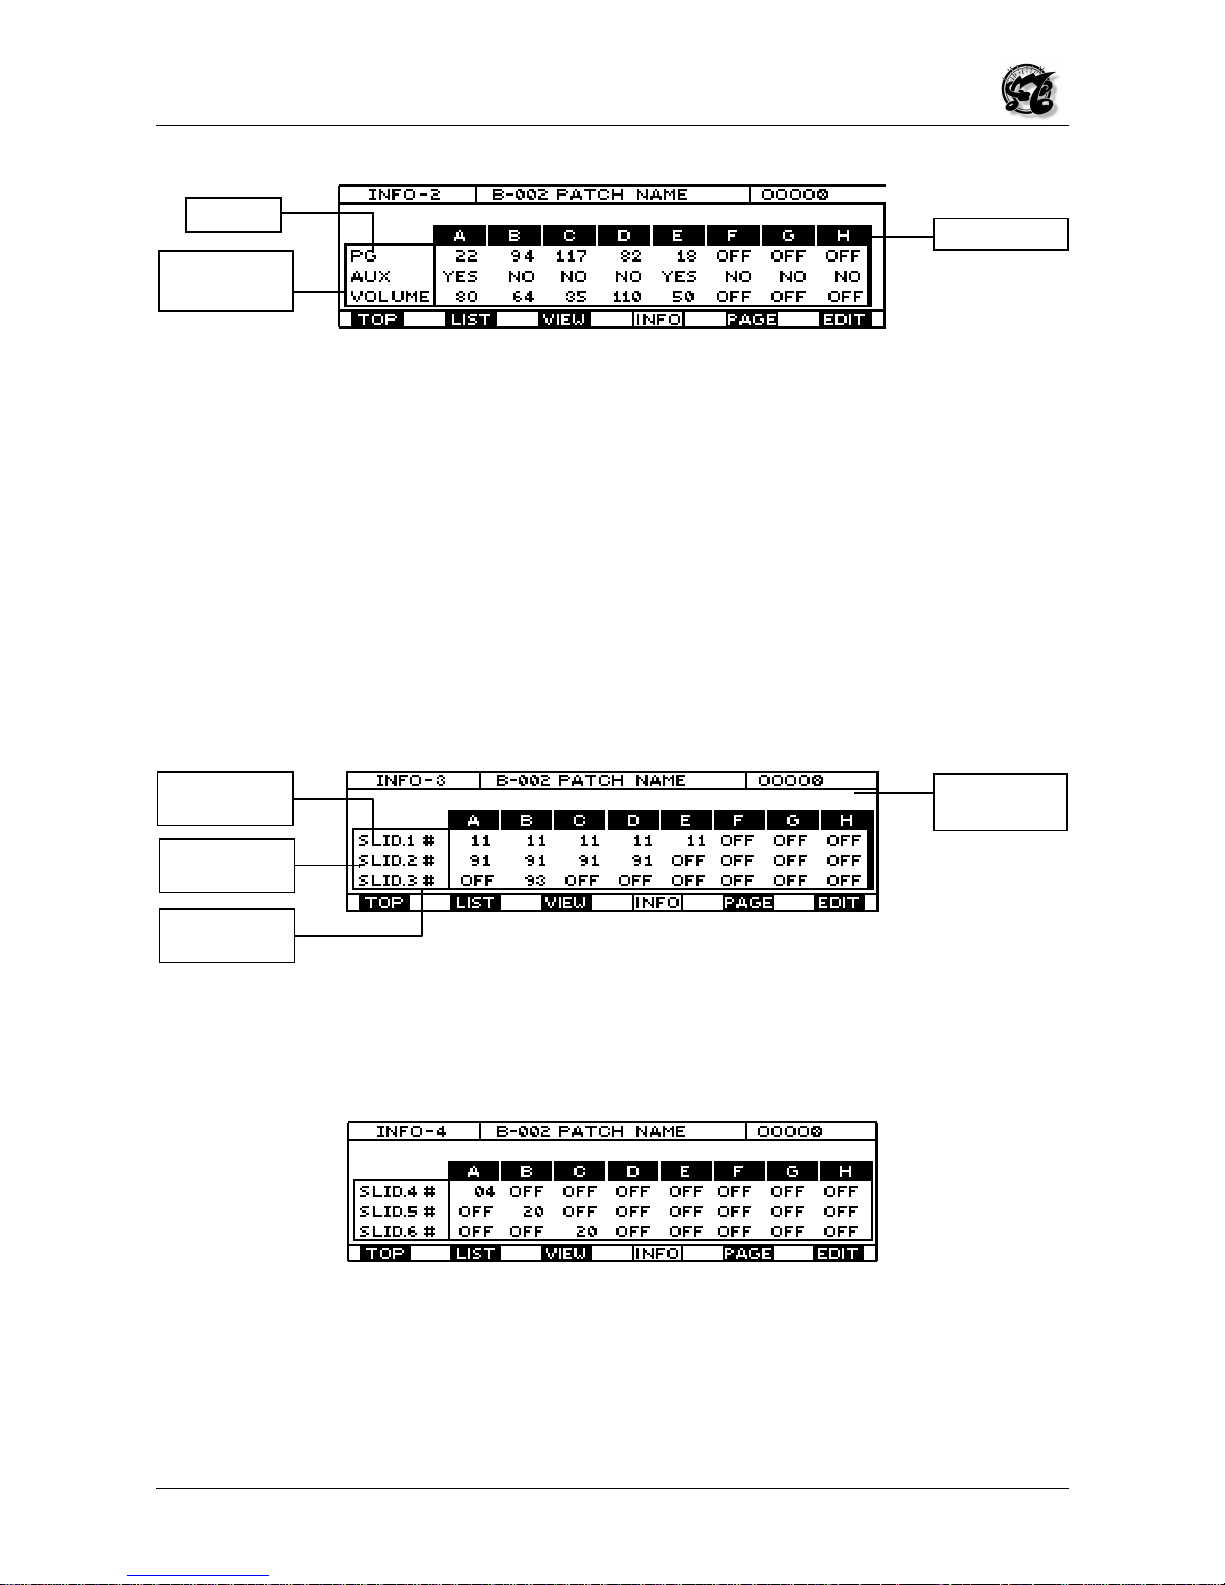
3.5.3 INFO 2
This subpage displays the program changes, whether or not auxiliary messages are
present and the base volumes for each zone. The base volume is the volume of each
zone when the patch is selected, which must be set and then saved with the edit
procedures. The volumes of the individual zones can be varied temporarily while playing
using the sliders, the volume pedal or any other controller, but are not saved, and are lost
whenever the user exits from the patch concerned and then re-selects it, or whenever the
MC 3000 is switched off. On the other hand, the volumes you assign to the zones in the
EDIT environment can be saved and recognized as base volumes, so whenever you
switch on the instrument and select that specific patch, the zones will retain the variations
in volume you have made.
Therefore, temporary variations in volume made in the program mode will never appear in
this subpage.
3.5.4 INFO 3
This subpage displays the type of control on which each of the first 3 sliders act for each
zone.
3.5.5. INFO 4.
This subpage displays the type of control on which sliders 4, 5 and 6 act for each zone.
Zone columns
Zone PG
Auxiliary
messages Y/N
Colonne delle
Zone
CC assigned to
slider 1
CC assigned to
slider 3
CC assigned to
slider 2
Page 20
MC 3000
Operating Manual
90
3.5.6. INFO 5.
This subpage displays the type of control on which sliders 7, 8 and 9 act for each zone.
In all the INFO subpages the user can press function key
F6
(next to the
EDIT
icon) to
move straight to the relative EDIT page corrisponding to the section present on the
display.
If ESC is pressed during display of the INFO video page, the MC 3000 returns to the TOP
PAGE; use the dedicated function keys to move directly to the Program Mode functions
analyzed previously.
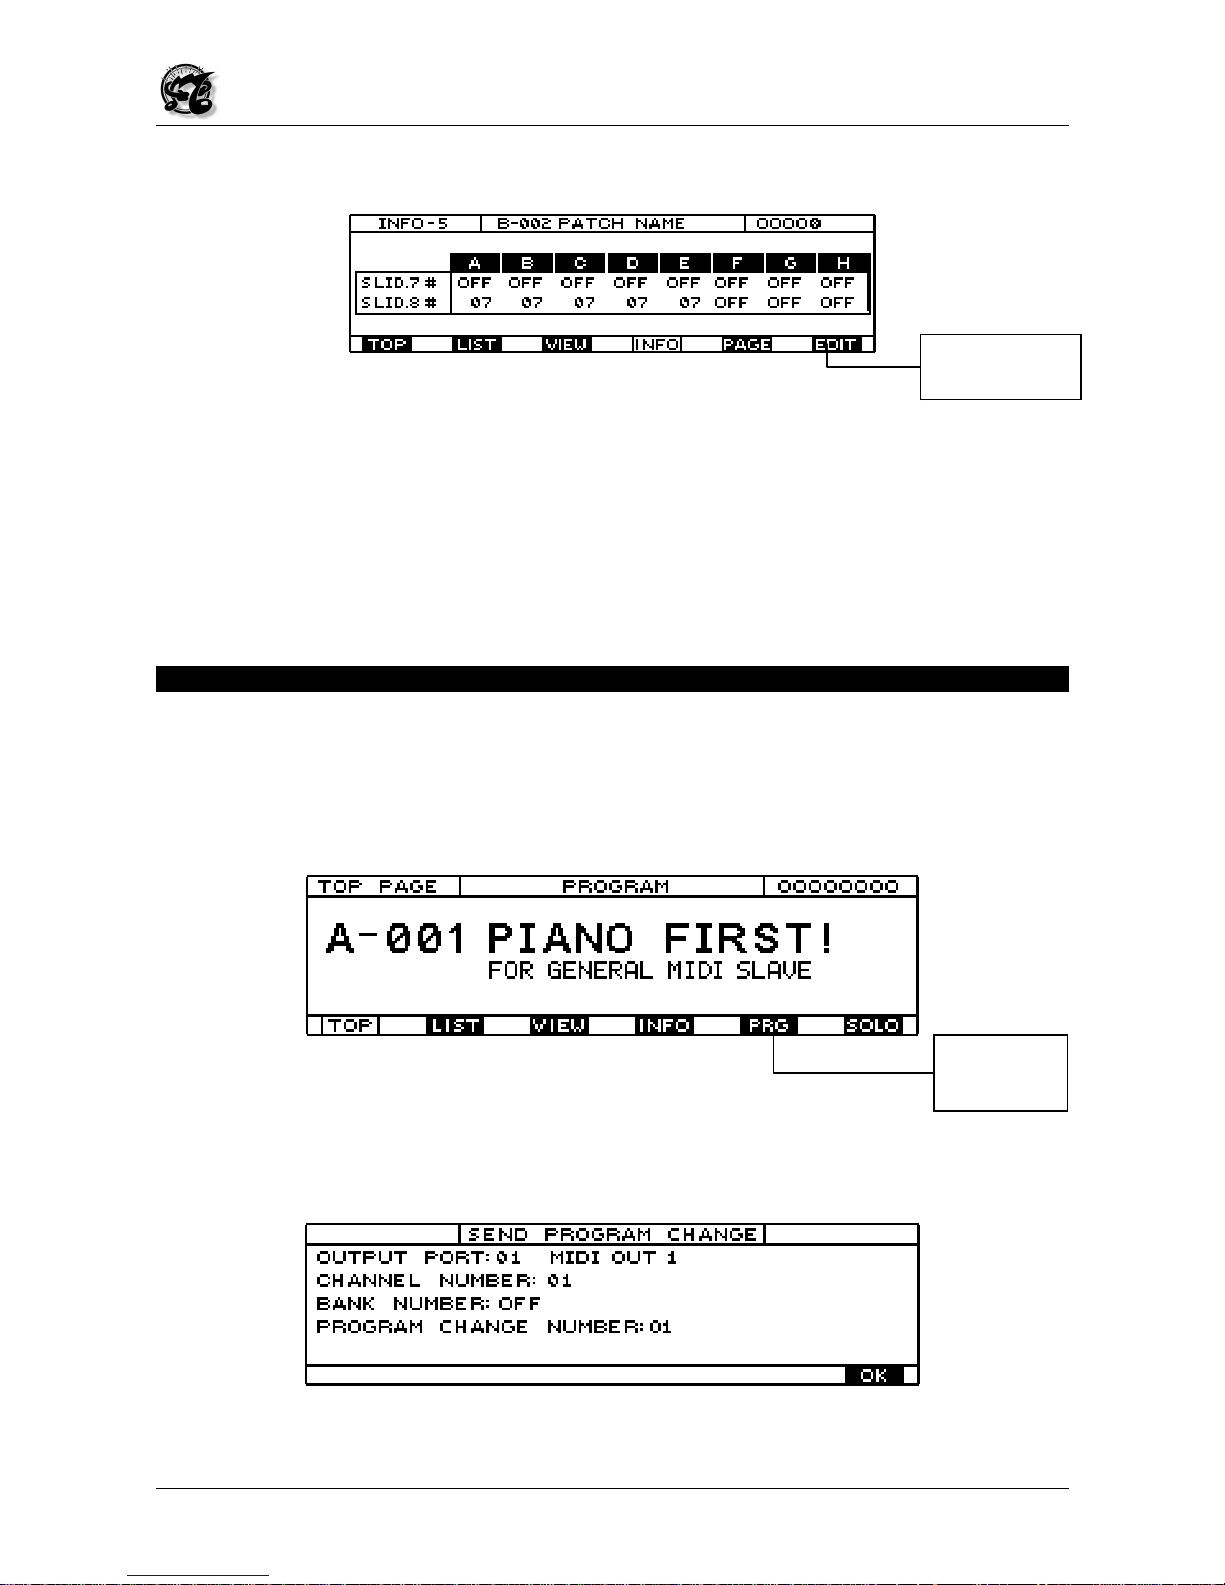
3.6 PRG (send program change) FUNCTION
The PRG (send Program Change) function which is the
exclusive property
of the TOP
PAGE allows the user to send a Program Change message which does not belong to the
patch programming data. This function is particularly useful, for example to recall a given
sound on a connected expander for testing purposes, without having to save it.
From the TOP PAGE, press key F5, corresponding to the PRG icon. The following video
page will appear:
The user is able to use the following fields:
Jump to related
EDIT procedures
Send program
change (PRG)
function
Page 21
MC 3000
Operating Manual
91
• OUTPUT PORT: Selects the MIDI OUT port on which the Program Change is to be
sent (from 01 to 08). The name attributed to selected port, which can be defined by the
user, also appears beside the number (see UTILITY - Tables section of this manual).
• CHANNEL NUMBER: Selects the MIDI channel on which the Program Change is to be
sent (from 01 to 16).
• BANK NUMBER: This field can be used to send a Bank Changee (Bank select LSB)
message together with the program change. Enter the appropriate value, bearing in
mind that if this field is OFF, the Bank Select message will NOT be sent.
• PROGRAM CHANGE: Number of the program change to be sent (0-127).
Use the CURSOR keys to select the field to be modified and enter the appropriate value
for it using the encoder, the INC and DEC keys or the numerical keypad.
Once the settings have been made, press ENTER to send the message without leaving
the current page, or F6 (OK icon) to send the message and return to the TOP PAGE.
Press ESC to leave the current page without sending a message.
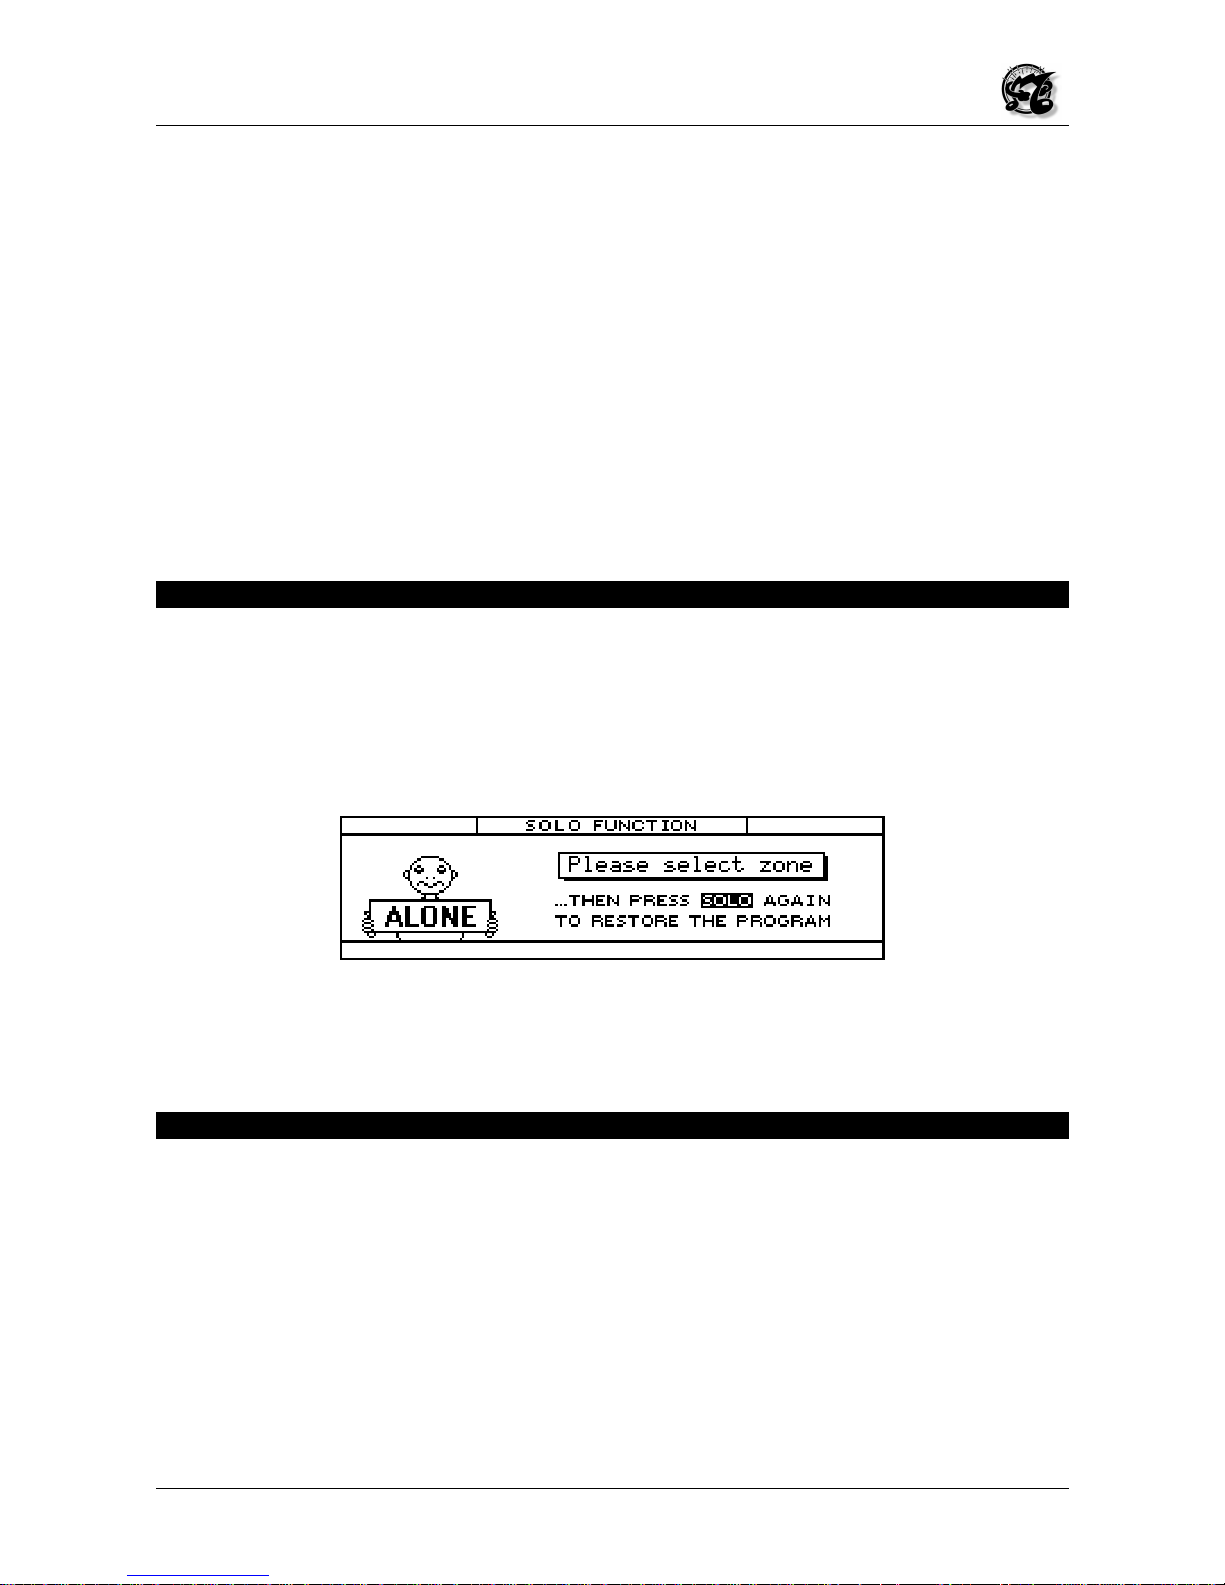
3.7 SOLO function
Another exclusive function of the TOP PAGE is the SOLO function, accessed by pressing
function key F6 (SOLO icon).
This function keeps only the zone selected by the user active, switching all the other
zones currently active to Stand-by status. When the function key is pressed, the following
video page appears on the display:
All the LEDs relating to the active zones will start to flash awaiting the selection. Press the
key for the zone to be left active and the MC-3000 will return to the Top Page, switching all
the other zones to Stand-by mode; when function key F6 (SOLO) is pressed again, the
patch will be restored to the basic conditions.
3.8 THE WRITE PROCEDURE IN THE PROGRAM MODE.
This WRITE is used to save all the settings made by the user inside the patch. Since
these settings are made in the EDIT environment, the WRITE key is of fundamental
importance in the EDIT mode but might seem useless in the PROGRAM mode. In fact,
the WRITE key is also useful in the PROGRAM mode because it activates a special video
page from which the location of the selected patch can be changed, and it can be
assigned a name and a specific comment.
The comment field is only enabled in the WRITE video page of the PROGRAM and EDIT
modes, since in the other modes the saving procedure does not refer to the patch, but to
other parameters or entities such as the key velocity curves, tables, chains, etc., which do
not have a comment field.
Page 22

MC 3000
Operating Manual
92
When the WRITE key on the front panel of the instrument is pressed, the display will show
the following video page:
• The CURRENT LOCATION field indicates the current Memory location (bank and
number) and the name of the patch it contains.
• The DESTINATION field, which can be modified by the user, indicates the memory
location (bank, number and name of the patch contained there) on which the current
patch will be memorized. Use the data input devices (encoder, numerical keypad,
INC/DEC keys) to select the desired location.
Press the WRITE key again to confirm the operation or ESC to abort it.
The function keys F5 (TEXT icon) and F6 (NAME) icon allow the user to modify the
comments field and the patch name respectively. When one of the two choices is made,
the display will switch to the respective video pages, structured as shown below:
A dash blinking under the first character of the name indicates that this character is
selected and can be modified using the data input devices (including the number keypad).
The cursor keys can be used to locate on other characters and modify them with the same
procedure, thus making up the new patch name. The function keys enable the following
functions:
• F1 (
INS
) selects the
INSERT
writing mode (the blinking cursor doubles in thickness),
where each character selected using the number pad is inserted, moving all the other
characters forward one place. When this mode is not selected, the characters entered
overwrite the existing ones.
• F2 (
BKS
) provides the
BACKSPACE
function, used to delete the character before the
one selected.
• F3 (
DEL
) enables the
DELETE
function which deletes the selected character.
• F4 (
SPC
) inserts a
SPACE
carachter
Modifies the
patch name
Modifies the
patch comment
field
Page 23
MC 3000
Operating Manual
93
• F5 (
CAPS
) enables/disables the
CAPITAL
LOCK condition (shown in the top right-hand
corner of the display). With this function enabled, the letters selected using the numeric
pad will be capitals; in OFF they will be lower case letters.
F6 (
DONE
) terminates the patch renaming operations, returning the instrument to the
previous video page, where the user can decide whether to save all the modifications by
pressing WRITE or abort them by pressing ESC.
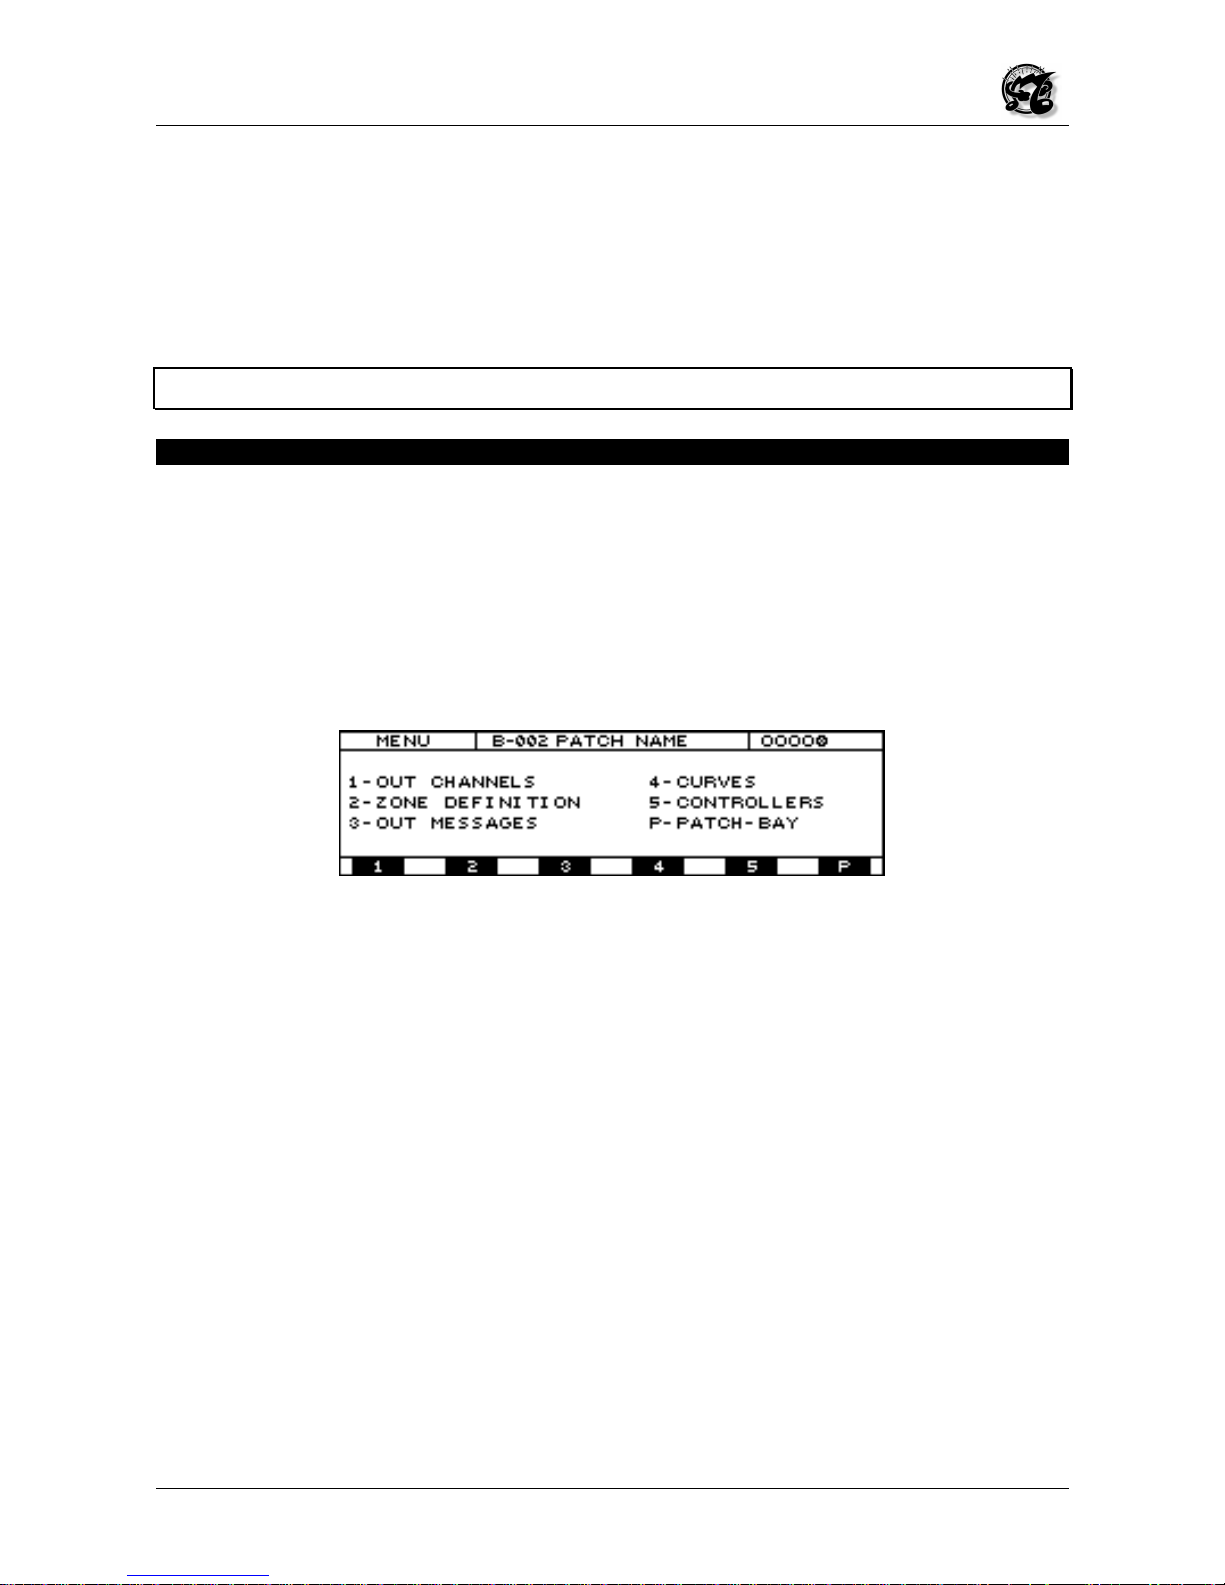
4. THE EDIT OPERATING MODE
4.1 INTRODUCTION.
This is the operating mode which allows the user to set all the parameters of the patch
selected and to create all the personalized patches needed. To make these settings, the
user first selects a patch from PROGRAM mode and then accesses the EDIT environment
by pressing the relative key on the right of the instrument front panel. As soon as this key
is pressed, the display shows the menu video page indicating the 6 sections of the EDIT
mode, each of which can be accessed using the relative function keys or by moving onto
the section to be selected with the encoder or the cursor keys and confirming using
ENTER.
Each section may consist of one or two pages. To facilitate the edit procedures, the MC
3000 allows the user to move around the 5 seconds without leaving the current page and
accessing the menu. To allow this, all the video pages contain rectangular icons which
give access to the video pages of the other sections by means of the corresponding
function keys, except for the patch bay section which is treated separately:
• OUT CHANNELS: This section allows the user to define the activation status, MIDI
channels and output ports of each of the 8 zones in the patch
• ZONE DEFINITIONS: Define the Key-range, transposition and mode of the zone
• OUT MESSAGES: Here the user can assign all control messages to zones like
Program Change, Bank Select, Volume, Panpot, Reverb, Chorus, including System
exclusive and auxiliary messages
• CURVES: This section allows the user to assign the Dynamic and Aftertouch curve to
each zone.
• CONTROLLERS: Definition of the Sliders and Pedals assigned to each zone
• PATCH BAY: Configuration of the MIDI PATCH BAY. For each patch it is possible to
create situations of MIDI OUTs union and situations containning the redirection of one
ore more MIDI INs on one or more MIDI OUTs
Page 24

MC 3000
Operating Manual
94
4.2. OUT CHANNELS (CFG)
This section, also known as the setup section, allows the user to define the activation
status, MIDI channel and OUTPUT PORT of each zone
The name CONFIGURE, representing the second section name, the name of the current
patch and the lights indicating the activation status of its zones all appear at the top of the
display. Immediately below is a field where the user can select the individual zone of the
patch to be set up. To do this, the user uses the cursor keys to locate on the ZONE= field
and then selects the zone desired using the INC and DEC keys or the encoder.
The activation status of the selected zone appears in the central window of the display
and can be modified using the encoder or INC and DEC once the user has located on the
STATUS option using the cursor keys. The same window also shows the MIDI port
assigned to the same zone (PORT field), which can be modified by using the cursor keys
to locate next to PORT and turning the encoder or pressing INC and DEC using the
procedure already described above. The name assigned to the MIDI port to be selected
in the TABLE section of the UTILITY operating mode also appears alongside PORT.
The last field in the central window (TX CHANNEL) specifies the MIDI channel on which
the selected zone transmits its messages. This may be modified using the same
procedure: the user locates the cursors in the TX CHANNEL field and modifies the MIDI
channel using the INC and DEC keys or by turning the encoder.
The bottom of the display contains the usual icon rectangles indicating the various
sections, with the one indicating the current section illuminated in reverse. Pressing the
function keys relating to these rectangles gives access to the corresponding sections.
When programming is complete, to save these modifications press WRITE and follow the
procedure described at point 3.8.
4.3. ZONE DEFINITION (DEF)
The ZONE DEFINITION section can be accessed from any section video page or any
EDIT mode page by pressing F2, next to the DEF icon. This section can also be
accessed from the EDIT MENU video page by using the cursor keys or encoder to select
option 2 on the display and then confirming with ENTER.
Here the user can define the range of the zone, meaning its extension over the keyboard,
creating zone layers and splits. He can also establish the zone transposition for a
maximum range of 2 octaves above or 2 octaves below the current range, and establish
whether the selected zone will transmit note messages in polyphonic or mono mode, and
whether or not the portamento messages generated by the master are to be transmitted.
Zone selection
Zone status
TX Channel
MIDI OUT Port
Page 25

MC 3000
Operating Manual
95
After using the cursor keys to locate in the ZONE field, the user can use the encoder or
INC and DEC to select the zone to be edited.
With the cursor in the
LO-KEY
or
HI-KEY
fields, the encoder or INC and DEC can be
used to select the lowest and highest notes of the zone respectively, thus setting its range.
In the display, the continuous line immediately below the image of the keyboard shows the
range of the selected zone, and will alter in response to the modifications made in these
two fields.
Similarly, with the cursor in the
TRANSPOSER
field the user can set the degree of
transposition of the zone using the encoder or INC and DEC.
With the cursor in the MODE field, the user can set MONOphonic or POLYphonic mode
for transmission of the note messages.
In the PORTAMENTO field, the user can select ON or OFF status using the encoder or
INC and DEC, to set whether the current zone is to transmit the portamento.
Important note:
The MONO mode message is a strictly MIDI datum and thus a
transmission parameter, so the keyboard is always polyphonic. However, for mono
transmission the receiver unit must be capable of receiving in this mode, as otherwise the
desired effect is not created.
When programming is complete, to save these modifications press WRITE and follow the
procedure described at point 3.8.
4.4 OUT MESSAGES (MSG)
4.4.1 Introduction
The OUT MESSAGES section can be accessed from the previous section video page or
any EDIT mode section by pressing F3, next to the DEF icon. This section can also be
accessed from the EDIT MENU video page by using the cursor keys or encoder to select
option 3 on the display and then confirming with ENTER. Here the user can assign all
control messages except notes to zones. All these messages, including any exclusive
code messages assigned to the zone, are inserted when the patch is selected. In this
section, the user can define the auxiliary zones, which are the zones destined to control
devices which do not need note messages, such as multieffects devices
4.4.2. MESSAGES 1
Zone selection
Back to the
Configuration
Page
Zone
PRG
Definition
Section
CC Section
Page 26

MC 3000
Operating Manual
96
The first page to appear when the section is selected is the MESSAGES 1 page. From left
to right, the top of the display shows the name of the page, the name of the current patch
and the lights which indicate the zones' activation status.
Immediately below is the zone selection field, where the cursor can be located using the
cursor keys to select the zone to be edited with the INC and DEC keys or the encoder.
Alongside the central window of the display there is a vertical icon marked PRG, indicating
that this window is dedicated to setting of the program, or in other words of the sound or
patch, of the expander assigned to that zone.
The first field, TABLE, selects one of the 64 tables (the contents of which can be set in the
UTILITY/TABLES section) where the names of the sounds contained in the connected
expander associated to the relative program change messages reside. The user can
locate in this field using the cursor keys and then select various lists of sounds relating to
different expanders, 16 of them already preset in the instrument memory (P1 - P16,) and
48 of them, (U17 - U64), programmable by the user. When this field is set in OFF status,
no table is associated to the current zone.
Alongside the TABLE field, the TABLE NAME field displays the name of the selected
table. This field is for display only, meaning that no modifications are possible since the
name has been assigned to the respective table when it was constructed.
Underneath the TABLE field is the PRG field, with the PRG NAME field beside it.
PRG stands for program change, and here the user can set the number of the program
change assigned to the selected zone, which will send it on the MIDI channel and port
specified in the CONFIGURE section.
If the PROGRAM field is set in
OFF
status, no program change will be sent to the zone
concerned.
The name of the sound corresponding to the program change number selected, in
accordance with the contents of the TABLE set, appears alongside this field as a message
for display only.
The BANK fields (MSB and LSB) define the value to be attributed to the BANK SELECT
messages. These messages can be used to change the bank of sounds selected on the
connected expander (refer to the service manual for information about the type and value
of the Bank select message recognized by your expander).
After locating on this field with the cursor keys, select the value to be attributed to the
BANK SELECT messages, BANK SELECT MSB (Control Change 0 value) and BANK
SELECT LSB (Control Change 32 value).
Important note
: in view of the characteristics of the Bank Select MSB and LSB
messages,
to ensure that the message concerned is recognized, it must be followed
by a Program Change message
. Bear in mind that while when the patch is recalled, the
MC-3000 performs this sequence automatically, during editing the Program Change must
be updated in manual mode immediately after one of the Bank select values has been
modified.
Although the OFF condition (message not transmitted) is available, it is important
always
to set the appropriate Bank Select value.
Page 27

MC 3000
Operating Manual
97
The last line of this video page (identified as CC) contains the main zone control
parameters, which will be sent when the patch is recalled. The parameters concerned
relate to the VOLUME level (corresponding to the value of Control Change 7), the
positioning within the stereo panorama PAN-POT (control change 10), and the level of the
Reverb effect (REV, control change 91) and the Chorus effect (CHO, control change 93).
All the parameters listed above offer the OFF status (message not sent) and a range of 0-
127.
The MORE icon (associated with key F6) in the function key section allows access to the
second EDIT page of the MESSAGES section.
4.4.3 MESSAGES 2.
This is the second page of the OUT MESSAGES section, which can only be accessed
from the previous page, by pressing function key F6. Note that in this page the icon
corresponding to F6 is marked BACK instead of MORE, indicating that the key should be
pressed to return to the previous page.
The word AUX in a vertical icon alongside the central window of the display indicates that
the window is dedicated to setting of the auxiliary messages. These messages do not
form part of the current zone but may be sent together with it in order to control devices
which do not need notes (multi-effects devices, mixers, etc.) without having to sacrifice a
split point. Each of the 8 auxiliary zones is simply a sort of program, which unlike the zone
to which it is associated, does not have any keyboard range assigned to it. For example,
if we wish the singer's reverb to be modified when a program change is sent to an
expander, an auxiliary zone controlling the singer's reverb can be associated to the zone
concerned.
In the AUX window are reported the following fields:
• PORT: MIDI OUT p ort selection for the auxiliary messages.
• PORT NAME: This field show the name of the MIDI OUT port selected (to modify this
name please see UTILITY / TABLES section).
• CHANNEL: Setting of the MIDI channel for the auxiliary messages.
• PG: Auxiliary program change number (sended out when patch is recalled)
• CC # and CC VALUE: Set up of a Control Change and its related value that will be
send out on the MIDI port and channel specified for this section
Access to the second
EDIT page of the
Zone
Auxiliary
messages
Sys Ex
Page 28

MC 3000
Operating Manual
98
Below the central window there is a window identified by the icon S, indicating that it is
dedicated to exclusive systems.
After locating in the SYS N field, the user can select the desired exclusive system table by
turning the encoder or pressing the INC and DEC keys.
The MC 3000 offers the user 16 preset tables in the instrument memory, P1-P16, and 48,
U17-U64, which can be programmed by the user himself in the UTILITY mode.
Each table contains exclusive system strings. When the patch is recalled, they are taken
from the table and sent to the connected expander before all the others.
CAUTION:
When the exclusive code selected has a
RESET
function, the unit connected
by MIDI takes a few milliseconds to reset the data; during this time, it is probable that the
other messages belonging to the zone will be ignored.
The SYS NAME field which appears alongside the SYS N field is for display only and will
contain the name corresponding to the Sys-ex table selected.
On completion of programming, to save these modifications press the WRITE key and
follow the procedure described in point 3.8.
4.5 CURVES (CRV)
4.5.1 Introduction
The user may press F4, below the CVR icon, from the previous page or any other page or
any section of the EDIT mode to access the CURVES section, where he is able to assign
the dynamic or aftertouch curve to each zone. These curves are chosen from the 16
preset in the instrument's ROM, or the 48 curves the user has set himself in the UTILITY /
EDIT CURVES section.
4.5.2 CURVES 1.
Here again, the top of the display shows the name of the current page, the name of the
current patch and the lights indicating the zone activation status.
After locating the zone field with the cursor keys, the user can select the zone where the
dynamic response curve will be set using the encoder or INC and DEC. After using the
cursor keys to move down to the CURVE N. field, the user can select the dynamic
response curve to be applied to the chosen zone.
Alongside this field is a window showing the appearance of the curve to be selected. This
window is for display only, and cannot be used to modify the curve. To modify the curve,
Zone
Dynamic curve
number
Name of the selected
D
y
namic curve
appearance
of the curve
Page 29

MC 3000
Operating Manual
99
the user must access the UTILITY mode in the DYNAMIC CURVES page of the EDIT
CURVES section and follow the instructions given in the part of this manual which
discusses that page. The name of the selected curve also appears, for display only.
The possibility of assigning different dynamic curves to several zones allows the user to
create dynamic layers and splits between different zones and MIDI channels. For
example, it is possible to create a patch with 2 overlapping zones where the first controls
the piano sound with a curve capable of reading all Key Velocity values, and the second
controls a brass sound but with a curve which only reads values above 70. This means
that as when the keyboard is played with a Key Velocity of less than 70, only the piano will
sound, but as soon as this value is exceeded, the brass sound will be overlapped with the
piano (dynamic Layer). If the dynamic curve of the piano were programmed to respond up
to a Key Velocity value of 70, above that value the piano would no longer sound and only
the brass would be heard (dynamic Split). This example can be extended to a larger
number of overlapping zones transmitting on different MIDI channels.
The bottom of the display contains the usual icon rectangles indicating the sections of the
EDIT mode, with the current section shown in reverse.
The last rectangle contains the word MORE. F6 can be pressed for access to the second
page of the section, dedicated to the Aftertouch curves which can be assigned to the
single zones.
4.5.3 CURVES 2.
This page, which as just stated can only be selected from the CURVES1 page by pressing
function key F6, contains a video page similar to the previous one, with the sole difference
that here the Aftertouch curve is displayed. These curves are chosen from the 16 preset in
the instrument's ROM, or the 48 curves the user has set himself in the UTILITY / EDIT
CURVES section.
Here again, the top of the display shows the name of the current page, the name of the
current patch and the lights indicating the zone activation status. Below this is the ZONE
field. After locating on this field with the cursor keys, the user can select the zone where
the dynamic response curve will be set using the encoder or INC and DEC.
After using the cursor keys to move down to the CURVE N. field, the user can turn the
encoder or use the INC and DEC keys to select the Aftertouch response curve to be
applied to the chosen zone. Alongside this field is a window showing the appearance of
the curve to be selected. This window is for display only, and cannot be used to modify
the curve. To modify the curve, the user must access the UTILITY mode in the
AFTERTOUCH CURVES page of the EDIT CURVES section and follow the instructions
given in the part of this manual which discusses that page.
The name of the selected curve also appears, for display only.
Page 30

MC 3000
Operating Manual
100
The last rectangle is marked MORE. The corresponding function key F6 can be pressed
to return to the previous page of the CURVES section. The possibility of assigning
different Aftertouch curves to several zones allows the user to create Aftertouch layers
and splits between different zones and MIDI channels. When programming is complete, to
save these modifications press WRITE and follow the procedure described at point 3.8.
4.6. CONTROLLERS (CTL).
4.6.1 Introduction
The user may press F5, close to which the CTL icon appears on all video pages, from any
EDIT page or section to access the CONTROLLERS section.
Here the user can define for
each
zone one or more controllers (slider and pedals) that
will move the value of a specific MIDI CONTROL CHANGE (CC).
4.6.2 SLIDERS
The first page of the CONTROLLERS section, which appears automatically when the
section is selected, is dedicated to the sliders, and is thus called SLIDERS.
Here again, the top of the display contains the name of the current page, the name of the
current patch and the lights indicating the activation status of its zones. The ZONE field
appears below this; after locating here with the cursor keys, the user can turn the encoder
or use the INC and DEC keys to select the zone where a specific type of control is to be
assigned.
The 8 sliders are shown in the centre of the display. Numerical values which identify the
type of control assigned to the slider corresponding, or OFF indicating that the slider in
question is not active in the current zone, appear below each slider in line with CC NR.
After locating on these values with the cursor keys, the user can select the type of control
to be assigned to the corresponding slider. The name of the control selected will appear
automatically in the top of the screen, beside CC NAME, as a display message only.
Zone
Zone
Aftertouch
curve number
CC assigned
to slider
Name of the selected
Aftertouch curve
Dafault
Value
Appearance
of the curve
Page 31

MC 3000
Operating Manual
101
The word
DEFAULT
appears below CC NR. In line with this
, the value of that slider for
the control assigned to it when the patch is recalled
(i.e. the default value) appears
below each slider. After locating on these values with the cursor keys, the user can turn
the encoder or use the INC and DEC keys to modify them.
Important note: when setting the default value of the volume, reverb and chorus, make
sure that this operation has not already been carried out in the MESSAGES 1 page; To
avoid the presence of contradictory data, it is advisable to set OFF status for all data
which could be set in other pages.
4.6.3 PEDALS
The PEDALS page can only be accessed from the SLIDERS page of the CONTROLLERS
section, by pressing the F6 function key.
MC 3000 is able to support on its inputs both switch (i.e. sustain) and expression pedals
(i.e. volume). Evidently a switch pedal will send only two MIDI messagges (0 when pedal
is released and 127 when pedal is pressed) while an expression pedal will be able to send
the entire data range (from 0 to 127)
Please note that the instrument supports the following types of pedals:
• Switch Pedals: Pedals with a NORMALLY CLOSED contact
• Expression Pedals: Pedals equipped with a stereo jack connector. The input
impedence must be included from 10 to 22 Kohm.
N.B
The use of unsuitable padals may causes damage to the machine's electronic
components.
Here again, the top of the display contains the name of the current page, the name of the
current patch and the lights indicating the activation status of its zones.
The ZONE field appears below this; after locating here with the cursor keys, the user can
turn the encoder or use the INC and DEC keys to select the zone where a specific type of
control is to be assigned.
The 8 pedals are shown in the centre of the display.
Numerical values which identify the type of control assigned to the pedal corresponding, or
OFF indicating that the pedal in question is not active in the current zone, appear below
each pedal in line with CC NR. After locating on these values with the cursor keys, the
user can turn the encoder or use the INC and DEC keys to select the type of control to be
assigned to the corresponding pedal. The name of the control selected will appear
automatically in the top of the screen, beside CC NAME, as a display message only.
The word DEFAULT appears below CC NR.
Zone
CC assigned
to pedals
Default
Value
Page 32

MC 3000
Operating Manual
102
NOTE:
the first 3 pedals are marked with the letter S since they
also
act as System
pedals; their characteristic is that they control all the zones simultaneously.
As the above indicates, these three pedals are able to control one or more zones of the
user's choice simultaneously with the system, thus allowing complete freedom when
selecting the configuration.
Refer to the UTILITY/SYSTEM CTRL section for the system pedal allocation procedure.
As for the sliders, in this section, when setting the default value for control changes 7
(volume), 10 (pan-pot), 91 (reverb) and 93 (chorus), make sure that this operation has not
already been carried out in the MESSAGES page.
To ensure that contradictory data are not present, the default condition should be set on
OFF for all data which might have been set in other sections of the edit mode.
Follow the instructions given in point 3.8 to save the settings made.
4.7. PATCH BAY.
This section can only be accessed from the EDIT mode menu page by pressing the
function key F6 or locating on the PATCH BAY option using the cursor keys (ENTER to
confirm).
This section is unusual in that the modifications set here, unlike those set in the other
sections, refer not to the single zone, but the whole patch in its entirety.
On completion of patch bay programming, to save the settings made the user must save
the patch itself by pressing WRITE and follow the procedure described in point 3.8. The
patch bay setting will thus be saved together with the patch in which it has been made.
(This means that since 1024 patches can be saved inside the instrument, up to 1024
different patch bay settings can also be saved).
There are three windows in the centre of the display. The one on the right contains 2
icons showing respectively, from left to right, the MIDI IN 1 port and the MIDI IN 2 port.
MIDI IN
Section
Logical lines
MIDI OUT
Section
Page 33

MC 3000
Operating Manual
103
The second window contains 8 columns representing 8 logical lines, and the third window
contains an icon representing one of the 8 MIDI outputs of the MC 3000.
The logical lines are variables included in a MIDI connection; in practice, instead of
connecting an input port directly to an output port,
each input port (MIDI IN
) can be
connected to a logical line which may be connected in turn to one or more MIDI outputs.
Thus once the connection between the In port and a logical line has been established, it
can be connected to one or more OUT outputs.
In practice, if several MIDI OUTs are connected to the same logical line, they will have the
same output data (COUPLING), while in the same way if two MIDI IN ports are connected
to the same logical line, they will be MERGED on the selected MIDI OUT port(s).
To make these connections, the user simply uses the cursor keys to locate on the arrow
above the icon of a MIDI IN port (when selected, the arrow becomes solid) and turns the
encoder or presses INC or DEC until the number of the logical line to be connected to the
port appears above the word PORT.
The user can now move on with the cursor keys to the second window, on the column or
logic line just connected to the input port, where the connections between this MIDI IN and
one or more OUT outputs can be made.
As soon as this second window is accessed, when the cursor is moved
horizontally
with
the cursor keys to select the various logic lines or columns, the number of the line being
selected will appear simultaneously against the word PORT in the top of the third window.
The cursor is moved
vertically
using the cursor keys to select the various MIDI outputs,
represented by the 8 vertical lines that make up each column. At the same time, the
name of the selected output will appear in the icon in the third window.
Once the user has located on the logic line and output required, the connection is created
by simply turning the encoder clockwise or pressing INC (to eliminate the connection, turn
the encoder anti-clockwise or press DEC). When the connection is made, a box will
appear against the logic line and the dash which represents the exit. When several boxes
appear in a column, several outputs are connected to the relative logic line.
F6 (
undo
) can be pressed to abort the last operation performed or modification made in
this page.
Selecting the
number of the
logical line for
UNDO function
Aborts last
modification
Page 34

MC 3000
Operating Manual
104
IMPORTANT
: The MC-3000 also uses the logical lines for transmission of the data of the
zones to the MIDI OUT ports, so if a MIDI OUT port is not connected to any logical line, it
will not be operational (port mute).
EXAMPLE:
For example, let us suppose we wish to merge the data received on the MIDI IN 1 and
MIDI IN 2 ports and send them simultaneously to the MIDI OUT ports 1, 7 and 8.
We use the cursor keys to locate on port IN 1 and use the encoder or INC and DEC to
establish the connection with a logic LINE 1.
After making the connection, we use the cursor keys to move to MIDI IN2, and connect it
to the same logical line.
Using the cursor key, select the first column of the central window showing the 8 MIDI
OUTs on logical line 1. Follow the procedures previously described to enable outputs 7
and 8 (the first output is already selected by default).
Note that:
• If the MIDI IN ports are not connected to any logical line, they are disconnected from
the patch-bays.
• The two MIDI IN ports can be connected on different logical lines.
• It is possible to combine one or more MIDI OUT ports on the same logical line without
any MIDI IN port connected to the line; this means that the data generated by the MC3000 will be offered on the various ports selected.
• This patch bay structure, with its grid of criss-cross connections, is extremely powerful
and enables you to create the widest possible range of configurations. When
programming, always remember the "capacity" of the MIDI protocol (31,250
bits/second).
Selecting the
logical line for
MIDI IN 2
Logical line 1
connected to the
OUT 1, OUT 7
and OUT 8
Page 35

MC 3000
Operating Manual
105
5. THE CHAIN OPERATING MODE
5.1 INTRODUCTION
The term Chain refers to a system which simplifies a sequence of patches; in other words,
a chain is simply a ladder which contains an order of succession for the MC3000 patches.
With this system, each of the MC-3000's 1024 patches can be different f rom the others in
all its parameters, and it is then up to the chain to recall the desired patches, which may
also be the same, from within its construction elements called STEPS.
5.2 PLAY CHAIN.
The first page of the CHAIN operating mode is the PLAY CHAIN page, which allows us to
select the number of the chain to be used, but does not allow us to modify or set the
chain, because all this is carried out in the next page, called EDIT CHAIN.
As soon as we access this page, we find the CHAIN N. field in the top right-hand of the
display selected automatically; here the encoder, the INC and DEC keys or the Numeric
pad followed by the ENTER key to confirm can be used to select the number of the chain
to be used. The number of the selected chain will appear alongside the number.
Under the chain number, the screen shows the STEP MODE, meaning the way in which
the system is moved on to the next step; this may be set by means of a pedal, a number
key, a key note key, etc. The central window contains the information about the current
step, while the patch assigned to that step appears beside the word PROGRAM. The
cursor keys are disabled since there are no other fields which can be selected. As its
associated icon indicates the first function key F1 gives access to the second page, the
EDIT CHAIN page. The other function keys are used to scroll through the steps in the
direction shown by the corresponding icon. F2 moves forward one step, F3 moves back
one step, while F4 and F5 take us to the first and last steps in the chain respectively. F6,
associated to the NEXT icon, is used to confirm the step selected using the function keys
or to move forward one step, with automatic confirmation of the selected step.
CAUTION: the step scroll functions (keys F2, F3, F4 and F5) are solely "pointing"
functions and do not cause loading of the patch associated to the step.
Once the desired step has been selected, press F6 or the device specified in the STEP
MODE to enable the patch selected for it.
When the chain is recalled, although it is displayed the first step is not yet operational;
press F6 (or one of the devices selected for step mode) to enable the corrisponding patch.
Chain Number
Chain Name
Step Mode
Page 36

MC 3000
Operating Manual
106
5.3 EDIT CHAIN.
F1 can be pressed from the PLAY CHAIN page to give access to the EDIT CHAIN page.
In this page, the icon corresponding to key F1 is marked PLAY, to indicate that when the
key is pressed again the system returns to the previous, PLAY CHAIN, page.
The display shows the number and name of the current chain, while the central window
contains the number of the step and the corresponding program or patch with the relative
number. The lower part of the display indicates the way in which the system moves
forward through the steps, while the bottom line contains the usual icon rectangles
corresponding to the function keys.
As well as the F1 key, used to return to the previous page, the display contains the
F3
key, associated to the
INS
icon, used to insert a step between two existing steps, and
F4
that can be pressed to obtain the reverse effect, i.e. to remove the current step. Note that
when a step is deleted, MC 3000 will apply the shifting function, moving all of the steps
onwards one place down.
The function keys F5 and F6 are used to move forward or back one step respectively.
Whenever you move one step forward or back, the central window will show you the
number and name of the patch associated to the step. You can select the patch you wish
to associate to that specific step using the encoder or the INC and DEC keys (or directly
using the Numeric pad confirming with ENTER), and confirm your choice using F6 .
In this page the cursor keys are enabled and allow you to move the selector around the
field under the central window, where you can set the forward movement mode. You can
use the encoder or INC and DEC to set OFF status to disactivate every advance mode, or
you can assign the step forward movement function to pedal 1, pedal 2, pedal 3, function
key F6, the ENTER key, the INC, key, the DEC key, a cursor key, a key of the Numeric
pad or a note of the keyboard (KEYB:NOTE), which will be selected automatically be
pressing the corresponding key. Once a method for moving through in the current chain
has been selected, it is maintained for all the steps in the chain.
When programming is complete, press WRITE and the following video page will appear:
Step
selection
Insert and
delete step
Page 37

MC 3000
Operating Manual
107
This video page informs you of the location to which the chain is currently assigned and
allows you to modify the number of the location for the chain you have just modified, using
the encoder or the INC and DEC keys, or using the number keys, in which case ENTER
must be used to confirm the figure typed.
The central panel on the display informs the user that to save the modification he must
press WRITE again, or he may press ESC to abort the procedure. If you wish to assign a
name to the chain or change the current name before saving the modification, press F5
below the Name icon. The following video page will appear
The name of the patch (or DEFAULT if the chain does not have a name) appears in the
centre of the display.
A dash which blinks under the first character in the name indicates that that character is
selected and may be modified using the encoder, the INC keys or the alphanumeric keys.
The cursor keys can be used to locate on other characters and modify them with the same
procedure, thus making up the new patch name.
All the function keys are enabled here.
• F1 selects the INSERT writing mode, where each character selected using the number
pad is inserted; if this mode is not selected, each character is selected is not entered
until the cursor keys are used to move on to the next space.
• F2 provides the Backspace function, used to delete the character before the one
selected.
• F3 deletes the selected character.
• F4 (SPC) insert a space character.
• If F5 (CAPS) is in ON status, the letters selected using the Numeric pad will be capitals;
in OFF they will be lower case letters.
F6
(DONE) can be pressed to return to the previous video page, where the user can
decide whether to save all the modifications (WRITE) or abort the entire operation (ESC).
Guided example of modification of a chain.
• When the Chain mode key on the right of the keyboard front panel is pressed, the
display will show the PLAY CHAIN video page, where the chain n. field is automatically
selected to allow the user to choose the chain to be selected.
• Select the chain to be modified by turning the encoder or pressing the INC and DEC
keys or by selecting the corresponding number using the Numeric pad and then
confirming with ENTER.
Page 38

MC 3000
Operating Manual
108
1. Press function key F1 (EDIT) to obtain the EDIT CHAIN page on the display; the
PROGRAM N.: field is automatically selected, indicating the patch which corresponds to
step 1 of the selected chain.
2. Modify the patch set in the PROGRAM N. field
3. Press function key F6 to actually assign the selected patch to the current step. At this
point, the step will automatically set on step n. 2.
4. Repeat the entire procedure for all the steps you wish, bearing in mind that you can
move the step selection using the function keys F5 and F6.
5. If you wish to make corrections to any step, position on the step (F5 and F6 keys) and
delete the current step (DEL) or insert a new one (INS).
6. W hen last step is reached, select the field STEP CHANGE (using the cursor keys) and
choose your preferred step change mode.
7. Press WRITE: the following video page will appear.
8. Press the F5 (NAME) function key and type the name of the chain using the
alphanumeric keypad, the INC and DEC keys, or by turning the encoder and moving
around with the cursor keys
9. Press function key F6 (DONE) and the previous video page will return to the display.
The MC 3000 places no less than
128 chains, each of which can contain up to 256
steps
, at the user's disposal.
Edit selected
chain
Page 39

MC 3000
Operating Manual
109
6. THE UTILITY OPERATING MODE
6.1 INTRODUCTION
The Utility operating mode allows access to all the MC-3000's global functions, such as:
• the reception MIDI (control channel, MIDI Filters, Bulk Dump)
• the MIDI Monitor
• The setting of the System Controllers, including the ranges of the sliders and the pedals
• the second relating to the creation of tables and curves
• The settings of the mouse and all the accessory functions.
In this operating mode, the WRITE key is only enabled in sections n. 4 (EDIT TABLES)
and n.5 (EDIT CURVES). In all the other sections, the settings made are saved
automatically.
The first video page which appears on the display as soon as this operating mode is
selected using the relative key in the group of MODE keys on the right of the front panel is
as shown below:
This video page shows all the sections of the UTILITY mode, each of which can be
accessed by selecting the corresponding option using the cursor keys or the encoder and
confirming ENTER, or by pressing the function key associated to each of them directly.
6.2 MIDI COMMON
6.2.1 Introduction
The MIDI COMMON option is selected from the UTILITY MASTER video page to access
the section which contains the overall MIDI reception functions plus the bulk dump
procedures; note that they are unaffected by the selected patch and any other process in
progress.
6.2.2 CONTROL CHANNEL (CCH)
The first page in this section, which appears automatically when the MIDI COMMON
option is selected, is dedicated to the choice of a reception channel the messages of
which will be interpreted by the MC-3000 (Control Channel).
Page 40

MC 3000
Operating Manual
110
The top of the display shows a reminder of the selected operating mode (and of the
section (CONTROL CHANNEL).
The central window contains the individual specific parameters, which refer to:
• 1. The number of the
input port
(PORT), which is recognized as specific port for the
control channel (IN1, IN2, IN1+2).
• 2. The number of the
MIDI channel
(CHANNEL), which is recognized as control
channel (1-16), provided it is received from the port specified previously.
• 3. T he DISPLAY MESSAGES function, which
displays the messages
transmitted by
other units to the master on its control channel. If this function is set as YES, whenever
our instrument receives messages from remote units on its overall channel through the
port specified in point 1, a window indicating the type of message received will appear
in the TOP PAGE video page.
To modify these parameters, the user must select the parameter to be changed using the
cursor keys and then modify its value using the data input devices (Encoder, INC/DEC
keys or number keypad).
N.B.
Since the MC-3000 does not have an internal sound generation system, the
messages it interprets are limited to Program Change, Bank select (patch selection), and
Exclusive bulk dump systems. If any control change other than Bank select is sent on the
MIDI control channel, it is interpreted as a system control and therefore redistributed on all
the zones active at that moment.
6.2.3 MIDI FILTER (FLT)
Function key 2 (icon FLT) can be pressed from the CONTROL CHANNEL page or from
any other page of the common sector for access to the MIDI FILTER page.
In this page the user can set which type of messages reaching the MIDI IN ports are to be
filtered.
Filtering a message means ensuring that it will be suppressed in the reception
phase
If we look at the window in the centre of the video page, we can note a table consisting of
two lines which specify the MIDI input port (IN 1 and IN 2) ad 4 columns corresponding to
the types of message filtered by the MC-3000. The cursor keys can be used to move
around inside the table, while the data entering devices allow the user to activate (ON
condition) or disactivate (OFF) the filter for the corresponding port and type of message.
Caution: When the filter is active (ON) the corresponding message will be
suppressed.
Page 41

MC 3000
Operating Manual
111
Bear in mind that the MIDI FILTER settings affect the data processed by the instrument
(control channel and IN/OUT redirection of the patch-bay)
while they have no effect on
the MIDI THRU ports.
6.2.4 MIDI PROGRAM MAP (MAP)
The MIDI PROGRAM MAP is accessed from the previous page or from any other page of
the COMMON section by pressing F3, in line with the icon rectangle marked MAP. As in
all the other pages, the top of the page displays the operating mode, the page and the
current section, while the bottom carries the icons associated to the various pages of the
section, with the icon of the current page highlighted by reverse lighting.
This page enables the user to create a personalized map where he can set the order of
the patches which can be recalled by a remote unit with consecutive program change
numbers. In other words, the user can make settings which mean that program change n.
1 does not necessarily correspond to patch n. 1 of selected bank, program change n. 2
does not correspond to patch n. 2, and so on. For example, the user may have program
change n.1 correspond to patch 13 of bank D and n. 2 correspond to patch 3 of bank H,
and so on. This function is useful when the remote unit is unable to send the bank
change message, and so using only program changes from 0 to 127, the user is forced to
use only the first 128 patches (0-127), of bank selected only.
Moving the cursor keys to the STATUS field in the top right-hand corner of the display, the
user can use the encoder or the INC and DEC keys to set the DISABLED status which
disables the personalized map of the program changes, or the MIDI PROGRAM MAP. In
this case, the program changes are received in the normal way and if the remote unit is
not capable of sending the bank change messages, the user will only be able to change
the patches of bank selected. If the user sets ENABLED in the STATUS field using the
INC and DEC keys or the encoder, the MIDI PROGRAM MAP will be enabled and each
program change number sent by the remote unit will correspond to a specific patch set
personally by the user and belonging to any bank he requires.
To set the map, use the cursor keys to move down into the central window of the display
and locate in the MIDI PROGRAM CHANGE. Then use the encoder or INC and DEC to
set the number of the program change sent by the remote unit by the MC 3000. After this,
use the cursor keys to move to the PROG. N. field in the left-hand corner of the central
window, and use the encoder or the numeric pad to set the patch which will appear when
the remote unit sends that specific program change. While this is done, the name of the
selected patch will also automatically appear in the right-hand side of the central window.
Repeat the entire procedure for all the associations you wish. All the modification will be
stored in memory automatically.
Page 42

MC 3000
Operating Manual
112
6.2.5 MIDI BULK DUMP (BLK)
The MIDI BULK DUMP page is accessed by pressing F4 next to the BLK icon, which
appears in all MIDI COMMON section pages.
This utility allows the user to send all or some of the data resident in the MC-3000 memory
to the MIDI OUT 1 port in the form of exclusive system codes (MIDI Sys. Ex.).
These data can be recorded in a computer or sequencer, thus allowing the user to create
himself one or more programming files and then reload them into the instrument when
necessary. All this enables both the creation of backup copies of data, and the formation
of real programming files containing patches, dynamic curves, tables, etc.
It can take a long time to dump all the data in the MC 3000 memory. For this reason, the
instrument allows the user to carry out partial dumps, in which just some of the data which
can be selected in this page are transmitted and then saved. As soon as this page is
accessed, the display automatically selects the group of data which appear in the
SECTION field, in the top right-hand corner of the display.
The section field can therefore be used to select the MC-3000 section to be transmitted in
the form of exclusive codes. The options available to the user are:
• ALL: The instrument's entire internal memory undergoes a Bulk Dump.
• PROGRAMS: Bulk Dump of the Programs
• CHAIN: Bulk Dump of the data relating to the Chains.
• PG TABLES: Bulk Dump of the data relating to the program change tables.
• SYS TABLES: Bulk Dump of the data relating to the exclusive systems.
• DYNAMIC CURVES: Bulk Dump of the data relating to the dynamic curves.
• AFTERTOUCH CURVES: Bulk Dump of the data relating to the Aftertouch curves.
The range of the memory locations relating to the chosen section can be selected in the
FROM and TO fields.
After making the appropriate selections, connect the MC-3000 MIDI OUT 1 connector to
the MIDI IN connector of the unit which is to receive the data and switch the latter to
record mode. Then press function key F6 (GO!) and the MC-3000 will start to send the
data; the message of the section undergoing the bulk dump will appear on the display.
Keep recording on the connected unit until the message "Bulk Dump completed" appears
on the display, at which point the procedure can be considered complete.
To reload the data, connect the MIDI OUT port of the device containing the bulk dump
data to the MC-3000 MIDI IN port selected as the control port (see UTILITY / CONTROL
CHANNEL section) and start playback. The display will show a message confirming the
operation in progress.
Page 43

MC 3000
Operating Manual
113
Special operating hints:
1. For optimum MIDI BULK DUMP results, set the metronome tempo of the sequencer or
computer clock at a value of about 100 BPM.
2. The user must absolutely never attempt to modify the contents of the exclusive code file
using file editors; even an apparently tiny variation of just one letter or number will mean
that the MC 3000 is unable to recognize the file, and all the data it contains will be
irreparably lost.
3. During reception of BULK DUMP data, the MC-3000 should be set on the TOP PAGE.
4. Remember that setting of an active file on the exclusive systems disables BULK DUMP
reception.
5. In case of a Bulk Dump containing a large number of MC-3000 data, suspend the
operation every 360 Kbytes of memory transmitted to allow the data to be saved. Press
F6 again to restart the interrupted procedure.
6.3 MIDI MONITOR
ESC can be pressed to exit from any page of the Common section and obtain the
UTILITY MASTER video page, which is the main page of the UTILITY mode, which also
appears when the mode is selected using the relative key on the far right of the panel.
From this video page, the second section of the mode can be accessed by locating on the
MIDI MONITOR field with the encoder or using the cursor keys and confirming with
ENTER.
This is the only page in the section and thus also the only one automatically displayed
when the section is selected. This video page shows all the MIDI data passing through
the instrument, on the inputs or outputs. Here again, the top of the display shows
information about the operating mode and the current section, which in this case is also
the name of the page, since the MIDI MONITOR section contains only one page. The top
right-hand corner shows the MIDI MONITOR port. To change it, press function key F5,
next to the PORT rectangle. At this point, the MC 3000 offers the user the opportunity to
monitor:
• IN 1 (data in input on MIDI IN 1 port only)
• IN 2 (data in input on MIDI IN 2 port only)
• ALL IN (all input data on both ports, MIDI IN 1 and MIDI IN 2)
• OUT1 (output data on MIDI OUT 1 port only)
• MIDI OUT2 (output data on MIDI OUT 2 port only)
• MIDI OUT3 (output data on MIDI OUT 3 port only)
• MIDI OUT4 (output data on MIDI OUT 4 port only)
• MIDI OUT5 (output data on MIDI OUT 5 port only)
• MIDI OUT6 (output data on MIDI OUT 6 port only)
• MIDI OUT7 (output data on MIDI OUT 7 port only)
• MIDI OUT8 (output data on MIDI OUT 8 port only)
• ALL OUT (all data leaving from all the 8 MIDI OUT ports of the MC 3000).
• OFF (MIDI MONITOR disactivated and so no MIDI messages displayed).
Page 44

MC 3000
Operating Manual
114
In a similar way to the choice of the port to be monitored, the MC 3000 also allows the
user to select the type of MIDI message to be monitored.
When function key F6 is pressed, word inside the relative icon rectangle changes:
• When it contains the word ALL, all the MIDI data are displayed in the MIDI MONITOR.
• At this point, if F6 is pressed the word NOTE appears in the rectangle, and the monitor
will only display the note messages.
• If F6 is pressed again, PG will appear in the rectangle and only program change
messages will appear in the monitor.
• If F6 is pressed again, CG will appear in the rectangle and only control change
messages will appear in the monitor.
• If F6 is pressed again, SYS will appear in the rectangle and only exclusive system
messages will appear in the monitor.
If F6 is pressed once more, the word ALL appears again in the rectangle, and so all the
MIDI data will be displayed in the MIDI MONITO R again.
In practice, the MC 3000 MIDI MONITOR has such flexibility in use that the user can
switch from total monitoring where all MIDI data of any kind entering and leaving all the
instrument's MIDI ports are displayed simultaneously, to extremely specific monitoring
where on a specific type of MIDI message passing through just one specific port of his
choice is displayed.
The MIDI MONITOR which appears in the centre of the display consists of 5 columns.
The events displayed scroll from the bottom to the top of the display, so new events are
added in the low part of the monitor while the older ones scroll upwards until they
disappear.
• The MIDI channel of the message monitored appears in the first column on the right.
• The type of event displayed is described in the second column.
• The data relating to the type of event are shown in the third and fourth columns. (In
case of note messages, the data relating to the note number and the key velocity are
shown in the third and fourth columns respectively; in case of a program change, only
the number appears in the third column; in case of a control change, the number and
the value appear in the third and fourth columns respectively; in case of an exclusive
code message, the video page changes and if the whole message will not fit onto one
line, an icon appears in the top right-hand corner of the display).
The last column on the right is kept for additional comments, which in case of note
messages consist of the name of the note monitored.
The first function key F1 next to the rectangle marked DEC allows the user to choose
between data display in decimal mode DEC or hexadecimal mode HEX. When F1 is
pressed, HEX appears in the rectangle and all messages except the comment messages
appear in hexadecimal mode; when F1 is pressed again, the word DEC appears in the
rectangle again and all the messages switch back to decimal mode.
Key F2, next to the icon rectangle marked HOLD is used to block display of the latest
events. Once this key has been pressed, the system provides a static view of the situation
at that moment, while none of the data which continue to pass through the MC 3000 are
shown.
2 rectangles appear beside the HOLD icon next to function keys F4 and F5, each marked
with a rectangle.
The arrow next to key F4 carries a rectangle pointing down, indicating that F54 can be
pressed to scroll downwards, displaying the more and more recent data one by one. The
Page 45

MC 3000
Operating Manual
115
arrow next to key F5 carries a rectangle pointing up, indicating that F54 can be pressed to
scroll upwards, displaying the more and more remote data one by one. When the first
event recorded by the MIDI MONITOR is reached, it is no longer possible to move back by
pressing F5, and if this key is pressed the word BOTTOM will appear in the top right-hand
corner of the display. The same thing occurs if the last event recorded is reached and the
user attempts to move forward by pressing F4.
Function key F3, next to the word ESC, can be pressed to exit from the MIDI MONITOR to
return to the UTILITY MASTER main video page.
6.4 SYSTEM CONTROLS
6.4.1 Introduction
The SYSTEM CONTROL is accessed from the UTILITY MASTER video page by pressing
function key F3 or locating on the SYSTEM CTRL field on the display using the cursor
keys or the encoder and confirming with ENTER. This section allows the user to set the
physical behaviour of the 3 wheels, the 8 pedals and the 8 sliders.
6.4.2 WHEELS SET-UP (WHL)
The first page which appears when the SYSTEM CONTROL section is selected is called
WHEELS SET-UP
The cursor keys can be used to locate on the three lines of the second column and select
a specific function assigned to the corresponding wheel. When the function is selected, it
is highlighted; at this point, it can be changed by turning the encoder or using the INC and
DEC keys, and the name in the third column will also change. Using this procedure, the
user can assign the value of any of the 128 controls made available by the MIDI protocol
to each wheel, or disactivate the wheel by setting it as OFF.
It is important to specify that the settings of the three wheels are of "system" type,
meaning that the settings made in this page are retained regardless of the patch selected.
ESC can be pressed in this page to return to the UTILITY MASTER video page.
6.4.3 SYSTEM PEDALS (SPD)
The SYSTEM PEDALS page is accessed by pressing function key F2 from the WHEELS
SET-UP page or any other page of the SYSTEM section.
Wheel 1
MIDI Message
assigned
Page 46

MC 3000
Operating Manual
116
Like the other pages, at the top it contains the operating mode, the name of the page and
the current section, while the bottom line carries the icon rectangles showing the pages of
the section (with that of the current page in reverse), while the central window has 2
columns.
The first column contains the 3 system pedals, and the second the functions assigned to
them. The cursor keys can be used to locate on the three lines of the second column and
select a specific function assigned to the corresponding pedal. When the function is
selected, it is highlighted; at this point, it can be changed by turning the encoder or using
the INC and DEC keys, and here again the function will automatically be assigned to the
pedal concerned. It is important to have system pedals, since some functions such as the
general volume control or the sustain are commonly used in all patches and so it would be
very tiresome to have to specify in every patch that that specific pedal controls the volume
and that specific pedal controls the sustain. If these functions are assigned to system
pedals, it is not necessary to specify their functions in every patch because these pedals
will always act as volume and sustain pedals, regardless of the patch selected. The MC
3000 offers the user 14 controls which can be assigned to each of the 3 system pedals, as
well as the OFF condition which disables the pedal. These 14 controls have been chosen
because they are generally used in a large number of patches. They are:
1. GENERAL SUSTAIN
2. GENERAL VOLUME
3. GENERAL EXPRESS
4. GENERAL PAN-POT
5. GENERAL REVERB
6. GENERAL CHORUS
7. GENERAL MODUL
8. SONG START-STOP
9. SONG PAUSE-CONT
10. PATCH UP
11. PATCH DOWN
12. CHAIN START-STOP
13. CHAIN STEP
14. PANIC
Each of the 3 system pedals can also behave as a non-system pedal (ASSIGNABLE
PEDAL) and thus act in the specific way assigned within each patch. For example, if
pedal 1 has been designated as system sustain pedal, so that it acts as a sustain pedal in
all patches, nothing prevents the user from setting it to act simultaneously as a modulation
pedal in patch B23, to meet special expression requirements of the song or the part of the
song performed with that patch. The programmer must use his common sense and not
combine two contradictory functions on the pedal.
To sum up, these 3 pedals may behave in 3 different ways:
1. they may act only as system pedals, meaning that their operation is independent of the
patch and is assigned in the SYSTEM CONTROL section, as in the case of the wheels.
2. they may act only as assignable pedals, meaning that the way they operate varies
within each patch and is set in their EDIT section.
3. they may act both as system pedals and as assignable pedals, acting on the 2 different
controls simultaneously provided they do not conflict with each other.
Press the ESC key from this video page to return to the UTILITY MASTER page.
Page 47

MC 3000
Operating Manual
117
6.4.4 RANGE (RNG)
The RANGE page can be access from the SYSTEM PEDALS page or any other page of
the current section (SYSTEM CONTROL) by pressing function key F3 next to the RNG
icon rectangle. It consists of two subpages, PEDALS RANGE and SLIDER RANGE.
The first subpage is dedicated to the 8 assignable pedals, the first 3 of which are also
system pedals, so that they may also be allocated system functions.
The bottom contains the icon rectangles indicating the pages in the section (the one of the
current page is in reverse) and the SLI rectangle icon representing the second subpage on
the right.
Nel riquadro centrale troviamo elencati gli 8 pedali con a fianco il range di escursione,
ossia l’ambito di valori in cui il pedale può variare il controllo ad esso assegnato.
Each range is defined by a minimum value on the left and a maximum value on the right.
If the user uses the cursor keys to locate on the value relating to the range of a pedal, it
will be highlighted and it can then be modified using the encoder, the INC and DEC keys
or the numeric pad. If the value represents the lower limit of the range, it will never be
possible to assign it a value higher than the upper limit. Similarly, if the value represents
the upper limit of the pedal's range, it will never be possible to assign it a value below the
minimum limit. If the two values are the same, the pedal will never be able to vary the
control assigned to it, whether pressed fully down or left fully up, and the value will always
remain the same.
A rectangle icon marked SLI in the bottom right-hand corner of the display indicates that
the slider range subpage can be accessed by pressing the corresponding function key F6.
This subpage and its functions are the same as the pedal page, except that here the 8
sliders appear instead of the 8 pedals.
The central window lists the 8 sliders; the screen shows the range of values in which the
slider may vary the control assigned to it by the patch.
Slider Range
Page 48

MC 3000
Operating Manual
118
Each range is defined by a minimum value on the left and a maximum value on the right.
If the user uses the cursor keys to locate on the value relating to the range of a slider, it
will be highlighted and it can then be modified using the encoder, the INC and DEC keys
and the numeric pad.
As for the PEDAL RANGE subpage, if the value represents the lower limit of the range, it
will never be possible to assign it a value higher than the upper limit. Similarly, if the value
represents the upper limit of the pedal's range, it will never be possible to assign it a value
below the minimum limit. If the two values are the same, the pedal will never be able to
vary the control assigned to it, whether pressed fully down or left fully up, and the value
will always remain the same.
The bottom right-hand corner of the display contains an icon rectangle marked PED which
indicates that the user can access the previous subpage, PEDAL RANGE, by pressing the
corresponding function key F6.
Press ESC to exit from the range page and return to the UTILITY MASTER page.
6.5 EDIT TABLES
6.5.1 Introduction
The EDIT TABLES section is accessed from the UTILITY MASTER video page by
pressing the F4 function keys or using the cursor keys or turning the encoder to locate on
option 4 in the display, marked EDIT TABLES, and confirming with ENTER.
In this section, the user can assign any names preferred to each of the 8 MIDI outputs and
to specific program changes, which can also be grouped together in a table to which the
name of the expander to which the program changes refer is associated.
This section can also be used to acquire, send and modify the exclusive codes.
6.5.2 PORT NAMES TABLE
This is the first page of the EDIT TABLES section and is thus also the page which is
accessed automatically when the section is selected. In this page, the user may display
the current names of the instrument's 8 MIDI outputs and use the edit function to assign
each of them the name of his choice. Once the desired name has been assigned to a
given MIDI OUT port, this name will always appear beside the number of the port on any
MC 3000 video page.
Pedal Range
Page 49

MC 3000
Operating Manual
119
The top of the display contains the operating mode, the page and the current section.
In the centre is a window listing the names of the MC 3000's 8 MIDI OUT PORTS.
The bottom of the screen carries the usual icon rectangles indicating the pages of the
EDIT TABLES section, with the icon of the current page (marked with the abbreviation
OUT, to indicate that the page refers to the OUT ports) illuminated in reverse.
The last icon represents not a page, but a function common to all the pages of the Tables
section. This is the EDIT function, associated to function key F6.
Once a given port has been selected using the encoder or function keys, its name can be
modified using the EDIT function; when the corresponding key F6 is pressed the display
switches to the PORT ASSIGN NAME video page, with the prompt PLEASE ENTER
PORT NAME in the centre.
The name of the port appears below this prompt with a flashing cursor dash on its first
character. This means that the first character of the port name is automatically selected
and ready for modification using the encoder or the alphanumeric keyboard, or using INC
and DEC. To select the other characters of the name, move onto them using the cursor
keys.
The bottom of the display contains icons associated to the function keys, which are:
1.
INS
, which stands for insert, meaning that the relative function key F1 can be pressed
to enter letters or numbers in line with the flashing cursor dash.
2.
BKS
, which stands for backspace, meaning that the relative function key F2 can be
pressed to remove one letter or number of the part preceding the flashing cursor dash.
3.
DEL
, which stands for delete, meaning that the relative function key F3 can be pressed
to remove a letter or number on the flashing cursor dash.
4.
SPC
, which stands for space, meaning that the relative function key F4 can be pressed
to insert an empty space on the flashing cursor dash.
5.
CAPS
, indicating that if the relative function key F5 is pressed, all the letters typed from
then on will be capitals until F5 is pressed again. (When this function is active, CAPS
ON will appear in the top right-hand corner, next to the name of the video page;
otherwise, CAPS OFF will appear).
The DONE icon, associated to key F6, confirms the modification made and returns you to
the previous, OUT, page, where the new name just assigned to the selected port appears
alongside it. To abort the procedure, press ESC and the OUT page will immediately
reappear with the original name against the selected port.
Edit name of the
selected MIDI
OUT port
Page 50

MC 3000
Operating Manual
120
6.5.3 PROGRAM CHANGE TABLES
The PROGRAM CHANGE TABLES page is accessed from the previous page but also
from any other page of the EDIT TABLES section byu pressing F2, corresponding to the
PRG icon.
Once again, the top of the display contains the name of the operating mode, the page and
the current section. In this page the user may select each of the 16 preset tables or set
and select up to 48 user tables. A table is a list of programs with the relative names, each
corresponding to a program change. The MC 3000 offers the user 16 preset tables,
containing the names of the program changes of the most widely used synthesizers
However, not all the expanders, synths or sound generators in general which may be
connected to an MC 3000 adopt these tables . As well as the 16 preset tables P1...P16,
there are 48 (U17...U64) user tables, programmed throughout by the user, available.
Therefore, users who have a sound module are able to build up a specific table for that
module.
The top field, TABLES N=P1 GENERAL MIDI represents the number and name of the
selected Table. The user can change the Table by turning the encoder or pressing the
INC and DEC keys, and the name of the corresponding table will appear beside the new
table number.
Below the TABLES N=P1 GENERAL MIDI field, the display also contains the PROGRAM
CHANGE N=0 field for display only and the PROGRAM CHANGE NAME = PIANO field;
respectively, these fields represent the number and name of the program change selected
in the GENERAL MIDI table.
Once the table required has been selected the user can see the name and then the
corresponding patch in the expander for each program change number. To do this, the
user locates on the PROGRAM CHANGE N= field using the cursor keys, and then uses
the INC and DEC keys or turns the encoder to select any program change number of his
choice.
In basso a destra del display oltre all’icona della funzione EDIT ,compare associata al
tasto di funzione F5 l’icona
LIST.
LIST Function
Page 51

MC 3000
Operating Manual
121
The bottom of the screen contains the usual icon rectangles indicating the pages of the
current section, with the icon of the current page in reverse. As well as the EDIT function
icon, the bottom right-hand corner contains the List icon, associated to function key F5.
This video page is similar to that of the LIST PAGE of the program operating mode. W ith
this subpage, the user can display all the names of the patches in a given table, and thus
all the names of the programs of a given expander, in groups of ten at a time.
The group shown as soon as this list is accessed is the one to which the program change
selected inside the chosen table belongs. If program n 02 of the table is selected when F5
is pressed, this subpage will show programs 00 to 09. If program change 23, the page will
display all the program change names between n. 20 and n. 29. At this point, to display
the groups which follow, the user simply presses F6, next to the rectangle marked +10 in
the bottom right-hand corner of the display; whenever the key is pressed the groups
belonging to gradually rising tens, 30-39, 40-49, 50-59, etc., will appear. Similarly, to
display the previous groups press F5 close to the rectangle marked -10, and whenever the
key is pressed the groups of lower tens, 90-99, 80-89, 70-79, etc., will appear.
The user presses ESC to exit from the List subpage and return to the PROGRAM
CHANGE TABLES page.
The EDIT icon represents the function which allows the user to create a personalized User
table
Let's now take a look at the operations required, step by step.
1. Use the cursor keys to locate on the TABLE N= field of the display and select a user
table using the encoder or the INC and DEC keys.
2. Use the cursor keys to locate on the PROGRAM CHANGE N= field and select program
change n. 0, using the encoder or the INC and DEC keys. (If the selected table is
empty, no name will appear below this field).
3. Press f unction key F6 next to the EDIT icon and the following video page will appear on
the display:
4. This video page, entitled PG NAME ASSIGN, is a subpage of the PROGRAM CHANGE
TABLES page. It is similar to the PORT NAME ASSIGN subpage of the PORT NAMES
TABLE, with the sole difference that here the user is prompted to assign a name to the
program change instead of to the MIDI OUT port. Using the same writing procedures as
EDIT PG Table
Function
Page 52

MC 3000
Operating Manual
122
described for the PORT NAME ASSIGN subpage, type the name of the program
change, moving around with the cursor keys and using the alphanumeric keyboard, the
function keys F1, F2, F3, F4 and F5 and the encoder.
5. Once the name has been typed, the user presses the function key F6 in line with the
DONE icon in the bottom right-hand corner of the display to confirm the name typed.
To abort the modification, press the ESC key; in both cases, the system returns to the
main menu page.
6. Use the cursor keys to locate on PROGRAM CHANGE N= and select the next program
changes using the encoder or the INC and dEC keys, repeating operations 5, 6 and 7
described above for each program change.
7. On completion, when all the program changes have been named, press WRITE and
the following video page will appear:
Here the display shows, as display only, the current location of the table which has
been modified, and allows the user to select its destination location.
8. Use the cursor keys to locate on DESTINATION and use the encoder or INC and DEC
keys to set the destination location.
9. To assign a name to the table, press F6 next to the Name icon in the bottom right-hand
corner of the display. The writing video page will return to the screen; it is similar to the
page which appeared in point 3 of this example, except that here the user is prompted
to type the name of the table instead of that of the individual program.
10. Use the writing procedure described in point 5 to type the name of the table and to
confirm the name typed, press the function key F6 next to the DONE icon in the bottom
right-hand corner of the display. To abort the modification, press ESC. In both cases,
the WRITE page described in point 8 will return to the screen.
Page 53

MC 3000
Operating Manual
123
6.5.4 SYS-EX TABLES
The SYS-EX TABLE page is accessed from the OUT page or the Program change tables
page by pressing the function key F3, corresponding to the SYS icon.
Here again, the top of the display contains the names of the operating mode, the current
page and the current section. The user can use the cursor keys to locate on the TABLE
N. field and then select 16 preset SYS-EX tables or 48 user SYS-EX tables which can be
set by the user, using the encoder or the INC and DEC keys
The SYS-EX tables contain the exclusive codes of various items of equipment which can
be connected to the MC 3000
After using the cursor keys to locate in the CHECK PORT= field, the user can use the
encoder or the INC and DEC keys to select the output port through which the exclusive
code messages can be sent by pressing ENTER
The contents of the exclusive code to be sent appear in the bottom of the central window
as display only. To modify them, the user must press the function key F6 (EDIT) and the
following video page will appear:
The centre of the display shows all the bytes of the exclusive code, which can be modified
by locating on each of them using the cursor keys and varying its value with the encoder
or the INC and DEC keys, or with the alphanumeric keyboard.
Bearing in mind that the first Byte (F0) can not be modified because it represents the
EXCLUSIVE START Byte, and the same applies to the last Byte (F7) which represents the
EXCLUSIVE END Byte.
The bottom of the screen contains the INS icon in line with the F1 function key, which
represents the insert function used to insert new bytes (only from numeric pad).
Page 54

MC 3000
Operating Manual
124
When this function is active, the message INS ON appears in the top right-hand corner of
the display. Like previous pages, this page offers the Backspace (BKS) function
associated to key F2 and the Delete (DEL) function associated to key F3.
This subpage also contains the CHK icon, next to function key F4, representing the
Check-Up function. This means that when F4 is pressed, the SYS-EX string just typed is
sent to the port specified in the previous subpage.
The LRN icon next to key F5 indicates the Learn function. In this function, the MC 3000
learns the exclusive code of a remote device connected to the MIDI IN 1 port
When F5 is pressed, the following message appears in the centre of the page:
The message which appears in the centre of the display informs us that when ENTER is
pressed, the MC 3000 presets to receive the exclusive message from the remote unit.
Once ENTER has been pressed, the message WAITING FOR DATA appears on the
display, indicating that the MC 3000 is waiting for the expander to send it the exclusive
code. When the transmission is complete, if there have been no problems the display will
show the message LEARNING COMPLETE! and all the bytes of the code just acquired
will also appear. Otherwise the message LEARNING ABORTED! will appear, and the old
code present in the memory will continue to be displayed
On each Sys-ex table MC 3000 stores up to 64 bytes.
Once the code has been acquired, to conserve it the user must first confirm it by pressing
the F6 (DONE) function key, and the main video page will return to the screen:
The user then presses WRITE to access the WRITE SYSEX TABLES subpage.
PLEASE SEND A SYSEX TO MIDI IN 1!
Press ENTER when ready.....
Check
Function
LEARN Function
Page 55

MC 3000
Operating Manual
125
As in the similar WRITE PROGRAM CHANGES page already examined, in this page the
user is prompted to assign a location to the SYS-EX table just acquired or constructed,
and to press WRITE again to save the exclusive code string or ESC to abort the saving
procedure. To give a name to this code, the user presses the function key F6 (NAME)
and the SYS-EX NAME ASSIGN subpage will appear:
Here the user assigns the name to the exclusive code using the procedure already
described for the similar TABLE NAME ASSIGN subpage.
Once the name has been typed, it is confirmed by pressing F6 (DONE).
At this point the WRITE SYS-EX subpage will return to the display, and the user can
decide whether to abort the procedure or save all the modifications by pressing ESC or
WRITE respectively.
6.6 EDIT CURVES
6.6.1 Introduction
The EDIT CURVES section is accessed from the UTILITY MASTER page by pressing
function key F5.
This section allows the user to create up to 48 user key velocity response curves, 48 user
aftertouch response curves.
6.6.2 DYNAMIC CURVES
This is the first video page, which appears automatically when the section is accessed.
The top of the display contains information about the operating mode, the page and the
current section. The bottom of the screen carries the usual icon rectangles indicating the
pages in the section; the first, marked DYN, is in reverse since it represents the current
Page 56

MC 3000
Operating Manual
126
page, while the AFT icon has normal lighting because it indicates the next page in the
section.
The last two icon rectangles on the right, marked
HMIR
and
VMIR
respectively, do not
refer to other pages in the section but to 2 specific functions common to both pages of the
section.
As soon as this page is accessed, the first curve available in the MC 3000 memory is
automatically selected. The curve to be modified can be selected by turning the encoder
or using the INC and DEC keys. The cursor keys can be used to locate on other fields, in
order to modify their values with the encoder or INC and DEC.
When this page is accessed, the MC 3000 disactivates the current patch because it might
not be suitable for the curve test; for example, there might be different sound splits which
respond differently to the velocity and might make the curve test uneven and unreliable.
Since the instrument disactivates the current patch, the page offers the user the option of
creating a provisional patch where only the output MIDI port and the MIDI transmission
channel are set. After using the cursor keys to locate in the OUT or CH fields, the user can
use the encoder or INC and DEC to select the MIDI port and the MIDI channel to be used
for transmission of the note message to perform the test curve, respectively. This test is
thus performed with the sound present in the remote unit connected to the specified port,
and receiving on the MIDI channel selected.
In the dynamic response curve the X axis (horizontal) represents the speed at which
the key is physically pressed and the vertical axis (y) represents the value of the
MIDI response emitted.
The MC-3000 allows the user to draw the curve by means of a series of segments having
length ranging from a maximum of 127 (the whole curve) to a minimum of 1 (construction
of the curve point by point).
The START and END fields are used to set the points on the horizontal axis where the
curve (or section of the same) to be drawn is to start and finish. The corresponding
values on the y axis (MIDI dynamics) are entered under the START and END fields, in the
fields marked VALUE. Obviously, a curve with point by point resolution can be created by
moving the Start field value by one unit at a time and setting the corresponding Y value.
In addition, the user is offered the M and Q fields.
Page 57

MC 3000
Operating Manual
127
The value of the M field indicates the angle coefficient to be attributed to the section of
curve set on the X axis (pressure on the key) by the START and END values, while the Q
field sets the shift of the same section of curve in relation to the x axis.
Example curve C1
Curve C1 after application of a positive value to parameter "q" : q = +
Page 58

MC 3000
Operating Manual
128
Direction of shift
Curve C1 after application of a negative value to parameter "q" :
q = -
Direction of shift
The HMIR (horizontal mirror) function is used to obtain a horizontal reflection of the curve,
in which the X values are reversed compared to the previous situation.
Original curve After HMIR function
The VMIR (vertical mirror) function is used to obtain a vertical reflection of the curve,
creating a new curve where the inversion occurs in relation to the vertical axis.
Page 59

MC 3000
Operating Manual
129
Once the curve is complete, the WRITE key is pressed to obtain the following video page:
The user selects the memory location which is to house the curve created and then
presses WRITE to confirm or ESC to abort the current operation. To give the destination
a new name, press the F6 function key and the display will show:
The current name with a flashing cursor dash under its first letter appears in the centre of
this screen. The flashing cursor dash indicates that the letter can be modified with the
encoder or the INC and DEC keys, using the number pad keys. After moving the flashing
cursor with the cursor keys, the user can modify all the letters and thus produce a new
name. Each number pad key is assigned a number which appears the first time the key is
pressed, followed by two or three letters which appear in order the next times the key is
pressed.
Original curve
After VMIR function
Page 60

MC 3000
Operating Manual
130
The display also contains icons associated to the function keys, which are:
1.
INS,
which stands for insert, meaning that the relative function key F1 can be pressed
to enter letters or numbers in line with the flashing cursor dash.
2.
BKS
, which stands for backspace, meaning that the relative function key F2 can be
pressed to remove one letter or number in the part preceding the flashing cursor dash.
3.
DEL,
which stands for delete, meaning that the relative function key F3 can be pressed
to remove a letter or number on the flashing cursor dash.
4.
SPC,
which stands for space, meaning that the relative function key F4 can be pressed
to insert an empty space on the flashing cursor dash.
5.
CAPS
, indicating that if the relative function key F5 is pressed, all the letters typed from
then on will be capitals until F5 is pressed again. (When this function is active, CAPS
ON will appear in the top right-hand corner, next to the name of the video page;
otherwise, CAPS OFF will appear).
The DONE icon, associated to key F6, returns to the WRITE Dynamic video page, where
the user can save everything by pressing the WRITE key or abort the modification by
pressing ESC.
6.6.3 AFTERTOUCH CURVES
The second page of the Curves section can only be accessed from the DYNAMIC
CURVES page, by pressing function key F2 in line with the icon rectangle marked AFT.
.
As soon as this page is accessed, the first curve available in the MC 3000 memory is
automatically selected. The curve to be modified can be selected by turning the encoder
or using the INC and DEC keys. The cursor keys can be used to locate on other fields, in
order to modify their values with the encoder or INC and DEC
Here again, as for the dynamic curve construction page, the provisional patch is very
simple and does not even have a program change number, so it can be programmed very
quickly. After using the cursor keys to locate in the OUT or CH fields, the user can use the
encoder or INC and DEC to select the MIDI port and the MIDI channel to be used for
transmission of the note message to perform the Aftertouch test curve, respectively.
Page 61

MC 3000
Operating Manual
131
N.B. For the aftertouch test, the dynamic response curve is set in the previous page
(edit dynamic curves).
The START and END fields can be used to set the points on the horizontal axis where the
curve to be drawn is to start and finish. The corresponding values on the vertical axis are
in the respective VALUE fields (below them).
The entire method for construction and/or modification of the curve is identical to that
described in point 6.6.2 for construction of the dynamic curves.
Naturally, the only difference is in the axes, which in this case represent
the physical
pressure applied to the key (x axis) and the respective MIDI Aftertouch value (y axis)
To modify the values between the START and END points, locate in the field M which
represents the angle coefficient and vary the value until you obtain the form of curve (if the
START and END points coincide with the beginning and end of the curve) or portion of the
curve required.
The value in the Q field can be increased to move the curve or portion of the same
upwards parallel to the x axis; if the value of this parameter is reduced, the curve will be
moved down.
Example curve C1
Curve C1 after application of a positive value to parameter "q" : q = +
Direction of shift
Page 62

MC 3000
Operating Manual
132
Curve C1 after application of a negative value to parameter "q" : q =
-
Direction of shift
The HMIR (horizontal mirror) function is used to obtain a horizontal reflection of the curve,
in which the X values are reversed compared to the previous situation.
Original curve After HMIR Function
The VMIR (vertical mirror) function is used to obtain a vertical reflection of the curve,
creating a new curve where the inversion occurs in relation to the vertical axis.
Original Curve
After VMIR function
Page 63

MC 3000
Operating Manual
133
Once the curve is complete, the WRITE key is pressed to obtain the following video page:
After selecting the memory location which is to house the curve just created, press WRITE
again to save it.
To modify the name of the curve, press function key F6 (NAME), which works exactly as
described for saving dynamic curves, in point 6.6.2 of this section.
N.B.
In order to keep MIDI communications streamlined, when a dynamic curve is created
parallel to the X axis (the same aftertouch value for any pressure applied to the key), the
MC-300 will send only one MIDI aftertouch value.
When creating this type of curve, users are advised always to place the point of origin of
the axes at 0 in order to guarantee emission of the dynamics and aftertouch messages.
Page 64

MC 3000
Operating Manual
134
6.7 TOOLS
6.7.1 Introduction
The TOOLS section can be accessed from the UTILITY MASTER video page by pressing
function key F6 or using the cursor keys or turning the encoder to locate on option n 6 on
the screen, where the word TOOLS appears, and confirming with ENTER.
6.7.2 MOUSE SET-UP
This is the first page, which appears automatically when the section is accessed
The top of the display contains information about the operating mode, the page and the
current section. The bottom carries the usual icon rectangles indicating the pages in the
section, where the mouse icon is highlighted in reverse because it indicates the current
page.
In this page the user can set the mouse sensitivity by using the cursor keys to locate in the
MOUSE SENSIBILITY field and varying the number associated to it with the encoder or
the INC and DEC keys.
Moving one step lower using the down arrow cursor hey, the user can use the INC and
DEC keys or the encoder to set the MOUSE AUTOREPEAT function ON or OFF (With the
MOUSE REPEAT function active, when the central or right-hand key on the mouse is kept
pressed, the selected parameter is varied continuously).
6.7.3 BATTERY STATUS
This page can be accessed from any page of the TOOLS section by pressing the F2
function key corresponding to the BAT icon. This is a display page only, and so it is not
possible to select any options within it.
The top of the display contains information about the operating mode, the page and the
current section.
The central window clearly shows the charge level of the two lithium batteries inside the
instrument.
When just one line appears for each of the two batteries, and thus the level is close to the
EMPTY condition, it is essential to dump the data and replace the batteries.
Battery N. 1
Battery N. 2
Page 65

MC 3000
Operating Manual
135
N.B.:
The estimated lifetime of the lithium batteries installed in the MC-3000 is about 4
years. However, specific conditions of use (such as high operating temperatures) may
significantly shorten the battery lifetime. Users are urged to save the memory by MIDI
Bulk Dump as soon as the instrument gives the battery low warning.
6.7.4 MEMORY STATUS
The MEMORY STATUS page can be accessed from the previous page or any page of the
TOOLS section by pressing the F3 function key corresponding to the MEM icon. This is
also a display page only, and so it is not possible to select any options within it.
The central window shows the amount of memory used, specifically for each group of
data. Note that the amount of memory is referred to each section and not to the entire
capacity of the instrument
A graphic symbol of a micro chip appears on the right of the central window.
6.7.5 POWER ON PROCEDURES.
The POWER ON PROCEDURES page can be accessed from the previous page or any
page of the TOOLS section by pressing the F3 function key corresponding to the PW R
icon.
The video page which appears is as shown below:
This page allows the user to modify the lighting of the video screen. To do this, the cursor
keys are used to locate in the
LCD MODE
field; at this point, the current function,
NORMAL in the case illustrated, is selected and the word NORMAL is highlighted;
NORMAL or REVERSE can be set by turning the encoder or using the INC and DEC keys
with no need to confirm with ENTER.
The switch-on mode can also be selected. To do this, use the cursor keys to locate on the
POWER ON TYPE line; at this point the current function (NORMAL in the example
illustrated) is selected and the word NORMAL is highlighted.
Now the INC and DEC keys or the encoder can be used to set the NORMAL or FAST
switch-on mode.
Page 66

MC 3000
Operating Manual
136
The user can also set the patch which will automatically be selecte d at switch-on. To do
this, use the cursor keys to select the third line, marked PATCH POWER ON, and set the
number of the patch you wish to appear automatically at switch-on using the encoder, the
INC and DEC keys or the alphanumeric keypad, in which case the operation must be
confirmed with ENTER.
The final rectangle in the bottom right-hand corner marked LAST represents not a page
but a special function. When this function is selected by pressing the corresponding
function key F6, at switch-on the instrument will automatically select the last patch
selected before switch-off.
N.B.
The function Key
LAST
works only if the “patch power on” field is selected.
Function Key
LAST
Page 67

MC 3000
Operating Manual
137
7
ADDITIONAL MESSAGES
7.1 MALFUNCTION MESSAGES
SYSTEM RESET !
The MC-3000 has detected a serious malfunction in its electronic components. Contact
an authorized Oberheim service centre as soon as possible.
UART (DA 0 A 6): CHIP FAILURE !
The control software has noted that a UART chip is not responding to the system. Since
the UART chips control the MC-3000 serial ports (such as the MIDI OUT ports and the
Mouse port), after this message is displayed some of them will not work. Contact an
authorized service centre for a solution to the problem.
KEYBOARD FAILED !
During the self-testing procedure (which takes place whenever the instrument is switched
on) the keyboard does not respond to the control messages. Contact an authorized
service centre for a solution to the problem.
7.2 ERROR MESSAGES
IN (1,2): MIDI STATUS ERROR
The error may appear in any operating mode (Program, Edit, Chain, Utility) and indicates
that illegal MIDI data are present at the MC-3000 input ports. Check the instrument from
which the data are originating and the connections made.
PATCH (NUMBER, BANK) ERROR
The memory location of the selecte d pa tch co nt ains ille gal d ata no t reco gnized b y the MC3000 software. If the error persists, carry out a factory setting (reset) of the memory
location concerned following the instructions in point 8.1 "Reset Procedure" (Factory
settings).
Page 68

MC 3000
Operating Manual
138
7.3 STATUS MESSAGES
ONE ZONE !
The SOLO function has been recalled in a patch containing only one active zone. In view
of its characteristics, the SOLO function can only be activated when at least two zones are
active.
SENDING PANIC MESSAGE
You have requested the Panic function (cursor keys and simultaneously): the
message persists on the display until the messages have been emitted.
PEDAL (da 1 a 8) JACK INSERTED !
The MC-3000 has noted the insertion of a jack in one of the pedal connectors. At switchon, the instrument will always display the relative message if one or more jacks are
connected.
PEDAL (da 1 a 8) JACK EJECTED !
The MC-3000 has noted ejection of the jack from the pedal connectors.
CTRL: (Control Change name)
A warning that a control change has been received on the MC-3000 control channel.
This control will be interpreted as a system control and re-dispatched to all the zones in
ON condition. The message is only displayed if the "Display Message" field in the "Midi
common/Control channel" section is set at YES.
CTRL: PROGRAM CHANGE
Informs the user of reception of a Program Change on the control channel, with
consequent change in the selected patch. The message is only displayed if the "Display
Message" field in the "Midi common/Control channel" section is set at YES.
SYS EX: (manufacturer's name)
Informs the user of reception of an exclusive system string on an MC-3000 MIDI IN port.
As well as the message "Sys ex", the instrument also displays the name of the
Page 69

MC 3000
Operating Manual
139
manufacturer of the transmitter device. The message is only displayed if the "Display
Message" field in the "Midi common/Control channel" section is set at YES.
CURVE AUTO-REPAIRED !
During editing of a dynamic (or aftertouch) curve, the control software has noted the
presence of illegal values inside the curve and has automatically corrected it.
(Section) BULK DUMP OUT!
During the BULK DUMP procedure these messages indicate the section being saved
(dispatch of the sys-ex strings relating to the MIDI OUT port).
DUMP OUT COMPLETED !
The Bulk Dump procedure has been terminated correctly.
DUMP OUT ABORTED !
The Bulk Dump procedure has been interrupted by the user and so the saving procedure
has not been completed.
BULK DUMP IN RECEIVED !
This message indicates that the MC-3000 is receiving the Bulk Dump data.
BULK DUMP IN ABORTED !
The Bulk Dump reception procedure has been interrupted by the user or a serious error
has occurred during reception of the data.
Caution
: after this message is displayed,
some of the instrument's memory locations might suffer problems. Repeat the operations,
remembering not to interrupt the bulk dump procedure once it has been started.
CHAIN EMPTY !
Page 70

MC 3000
Operating Manual
140
You have selected a Chain which does not contain steps (empty chain), so its execution
will not be possible.
FIRST CHAIN STEP !
This message appears during execution of Chains (Chain / Play chain modes) and
indicates that the first step of the selected chain has been reached.
LAST CHAIN STEP !
This message appears during execution of Chains (Chain / Play chain modes) and
indicates that the last step of the selected chain has been reached.
MONITOR BUFFER EMPTY !
In the MIDI MONITOR section the user has attempted to enable the HOLD function
(freezing of the contents of the display) without the presence of any data for monitoring, or
after the CLEAR key has been pressed: the operations must be repeated.
HOLD ON: NO CHANGE !
In the MINI MONITOR section the user has attempted to change display mode or
reference port with the HOLD function active: disable the function using the relative key
and repeat the operations.
IN (1 o 2): DEVICE DISCONNECTED !
The MC-3000 has detected that a device previously connected to the MIDI IN ports is no
longer sending Active sensing messages (device disconnected or switched off).
SW VERSION UPDATED !
This message indicates that an upgrade of the operating system has occurred. N.B.: This
message only appears when the instrument is switched on for the first time after the
update
Page 71

MC 3000
Operating Manual
141
8 ANNEX
8.1 RESET PROCEDURES (FACTORY SETTINGS)
The MC-3000 control software is extremely complex and its programming and optimization
have been very demanding tasks.
Every condition of use of the instrument has been analyzed, reproduced and verified, but
we are unable to rule out the possibility that particular situations may occur in which the
instrument is unable to operate correctly due to unpredictable external factors such as
magnetic fields or serious mains power disturbances.
For this reason, a number of special functions have been combined in a page which can
only be accessed using a special procedure, to be carried out when the instrument is
switched on.
To access the reset procedure, first switch the MC-3000 off and back on, keeping the
WRITE key pressed. The following video page will appear on the display:
As the presence of the SECTION field indicates, the MC-3000 allows the user to perform
a SELECTIVE RESET, meaning that the section and memory location to be initialized can
be decided.
The options available to the user in the section field are:
• ALL:
The whole of the instrument's internal memory undergoes a RESET (factory
setting).
• PROGRAMS: Program reset.
• CHAIN: Reset of the data relating to the chains
• PG TABLES: Reset of the data relating to the program change tables.
• SYS TABLES: Reset of the data relating to the exclusive system tables
• DYNAMIC CURVES: Reset of the data relating to the dynamic curves
• AFTERTOUCH CURVES: Reset of the data relating to the Af tertouch curves.
Caution:
when one or more sections undergo a RESET all the user data they contain
will be lost irremediably!
The range of the memory locations to be initialized within the chosen section can be
selected in the fields FROM and TO fields.
Once the desired settings have been made, press function key
F6 (RUN)
to start the
initialization procedure. When the procedure is complete the MC-3000 will repeat the
switch-on procedure.
Page 72

MC 3000
Operating Manual
142
Function key
F5 (SYS T)
can be pressed to enable reset for all the system variables, such
as the settings of the MIDI COMMON, reception Program change MAP, Power on
procedure, etc.
Press ESC to exit from the RESETTING PROCEDURES page without performing any
reset operations.
8.2 PANIC FUNCTION
The MC-3000 PANIC function causes the emission on all the MIDI OUT ports of a series
of messages which restore correct operation of the peripherals connected if specific "stall"
conditions occur in the MIDI communications (e.g.: notes which sound indefinitely,
permanent Pitch Bender Messages, etc.).
If this occurs, press the
CURSOR
and
CURSOR
keys simultaneously from the
TOP PAGE position in the PROGRAM mode.
The message "Sending PANIC message .." will appear on the display for a few m oments
and then the original conditions will be restored.
Remember that a switch type pedal can also be assigned to this specific function as
explained in point 6.4.3 (System Pedal) of this manual.
Page 73

MIDI IMPLEMENTATION CHART
Oberheim - Viscount MC-3000 Date: 15/07/1997
Midi Master Controller Version: AA4
FUNCTION ... TRANSMITTED RECOGNIZED REMARKS
BASIC DEFAULT
CHANNEL CHANGED
1 - 16
1 - 16
1 - 16
1 - 16
Tx up to 8 channels at the
same time
MODE Default
Messages
Altered
POLY / MONO
**********
X
NOTE
NUMBER True Voice
0-127
**********
X
X
*1
VELOCITY Note ON
Note OFF
O
X
X
X
*1
*1
AFTER Key’s
TOUCH Ch’s
X
O
X
X
*1
*1
PITCH BENDER
O X
*1
CONTROL All
CHANGE 0
32
O
O
O
X
O
O
*1
All CC are assignable to
sliders and / or pedals
PROGRAM
CHANGE True #
0-127
************
0-127
0-127
*1 , *2
SYSTEM EXCLUSIVE
O O
*1, *3
SYSTEM Song Pos
COMMON Song Sel
Tune
X
X
X
X
X
X
SYSTEM Clock
REAL TIME Commands
X
X
X
X
AUX Local On-Off
MESSAGES All note Off
Active Sense
Reset
X
O
O
O
X
O *1
X
X *1
NOTES: *1 Data incoming on Midi IN can be retrasmitted on one or more
midi out ports if Patch Bay function is activated
* 2 Eight memory banks selectable by means of Control Change
32 (Bank Select). Program Change mapping by means of table
*3 Bulk Dump, Sys Ex Tables with learn function.
Mode 1: Omni On, Poly Mode 2: Omni On, Mono O = YES
Mode 3: Omni Off, Poly Mode 4: Omni Off, Mono X = NO
Page 74

Page 75

CAUTION! This product contains a lithium battery. There is danger of explosion if battery is
incorretly replaced. Replace only with a Maxell CR2032.
Replace only with the correct polarity. Discard used battery according to manufacter’s
instruction’s.
ADVARSEL! Lithiumbatteri – Eksplosjonsfare. V ade utksifting benyttes kun batteri som anbefalt
av apparatfabrikanten. Brukt batteri returneres apparatleverandøren.
ADVARSEL! Lithiumbatteri - Eksplosjonsfare ved fejlagtig håndtering. Udskiftning må kun ske
med batteri av samme fabrikat og type. Levér det brugte batteri tilbage til leverandøren.
VAROITUS! Paristo voi räfähtää, jos se on virheellisesti asennettu. V aihda paristo ainoastaan
laitevalmistajan suosittelemaan tyyppin. Hävitä käytetty paristovalmistajan ohjeiden mukaisesti.
WARNING! Explosionsfar vid felaktigt batteribyte. Anväd samma batterityp eller en ekvivalent
typ som rekommendars av apparatillverkaren. Kassera använt batteri enlight fabrikantens
istructions.
The information contained in this manual is subject to change at any time without notification.
Some information contained in this manual may also be inaccurate due to undocumented
changes in the product or operating system since this version of the manual was completed.
The information contained in this version of the owner’s manual supercedes all previous version.
NOTE: This equipment has been tested and found to comply with the limits for a Class B
digital Device, persuant to Part 15 if the FCC Rules. These limits are designed to provide
reasonable protection against harmful interference in a residential installation. This equipment
generates, uses and can radiate radio frequency energy and, if not installed and used in
accordance with the instruction, may cause harmful interference to radio comunications.
However, there is no guarantee that the interference will not occur in a particular installation. If
this equipment does cause harmful interference to radio or television reception, which can be
determinated by turning the equipment off and on, the user is encuraged to try to correct the
interference by one or more of the following measures:
- Reorient or relocate the receiving antenna.
- Increase the separation between the equipment and receiver.
- Connect the equipment into an outlet on a circuit different from that to which the receiver
is connected.
- Consult the dealer or an experienced Radio/Tv technician for help.
The user is cautioned that any changes or modification not expressly approved by the party
responsable for compliance could void the user’s authority opearate the equipment.
Page 76

Sales Division: Via Belvedere Fogl i ense 8, I-47836 Mondaino (RN) Italy
tel.+39-0541-981700 - fax +39-0541-869605 -
e-mail: viscount @omniway.sm - Internet: www.viscount-organs.com - www.viscount. i t
Distribution for Italy: TITAN MUSIC S.A.
Strada Genghe di Atto, 80 - 47031 Acquavi va – Repubblica di San Marino
tel.0549-999164 - fax 0549-999490
e-mail: viscount @omniway.sm - Internet: www.viscount-organs.com - www.viscount. i t
 Loading...