

Page 1
·
cyclone
••••••••••••
Pei-i'/x
MIDI Perfonnance Effects
~g""'"
Oberheim..
~f§i,8
732 Kevin Court
~~
Oakland, CA
94621
Page 2

Conte/lis
(~haptc
..
1 'Velcolllc 1
Chapter
2
Quicl{-Start
3
2.1
Setup 3
2.2 Selecting
Programs
.4
2.3 Playing the Cyclone
.4
2.4
The Factory Prol!.r:lllls 5
Program
00
- Traditional Arpeggi.lIor 5
Program
01
-
OC\;Ive
Tlanspose Arpeggi:llion 5
Program 02 - Two-Nolcs·at-a-Time Arpeggiation 6
Program 03 -
Dunl
Arreggiation 6
Program 04 - Auto-lJoubled Arpeggiation 6
Program 05 - Manually-Doubled Arpeggiation 6
Program
06
- Inversion Transpose Arpeggi:ttion 6
Plogr:tm
07
- Chlomalic Recursion Arprgr.iation 6
Program
08
- Auto Record Arpeggiation 6
Program 09 - Plcssure
Mod
Arpeggiation · 7
Program 10 - Emcrsonic 7
Plogr:lIl1
II
- Random Notes 7
Progr:un12- One-track Sequence
RecorcVPlayhal'k
7
Program
13
- Recorded Rhythm
Arp~ggiation
8
Program
14
- Live Rhythm Playback 8
Program
15
- rylotechnics! 8
2.5 Global Perfonnance Effects 8
TenlJX)
Tap 8
Sustain 8
Tenlpo
~1odulation
8
Duration Modulation
9
Chapter
3
Unpacking
& )Jool{Up
Procedurc
11
3.1
Unpacking the Cydone
.1
1
3.2 Rear Panel Connections & Power-On
.1
1
3.2.1
~1IDI
11
3.2.2 Ped'lls
11
3.3 Powering
Up
12
3.3.1
Local Control
12
Resetting the Cyclone
13
Chapter
4
General
Overview
.15
4.1AnIntroductiontoArpcggialipll
.15
Cloning
16
Order
16
Auto·Transpose
16
4.2 What Makes the
Cyclone.>
I.>ifferent?.
.t7
The
real
clock gener:ltor 17
TIle
reallllelllory hllffrr 17
The reaIclone fu
net
ion
~
17
A couple
of
exalllples
18
Auto Transpose
18
Auto-Double
18
Clmpter
5
Genenll
OrganizatioIJ
21
5.1
rront
Panel 01 gani1.aliol1
21
PROGRAM
Par:llllcte.>rs
V!i. MASTER P;lIalllclcrs
21
PLAY
r.1ode
vs.
EDIT
Mode 21
PLAY
Mode
EDIT
Modc
5.2
'1\1COlOIY
22
Page 3

USER Prograrns
22
FACTOR Y Progranls 22
Chapter
6 PLAY Mode 25
6.1
Inlroduction 25
6.2 Selector Keys
.
..
- Select-"and "Enable" 25
6.3 PLAY Mode Functions
26
Clone
26
Cycle
26
Manual Control
26
Rec.ord/Hold
26
6.4 "Store" and "HoldtonlUle"
27
Store
27
Ilold to mute 27
CI13pter 7
EDI'r
l\1ode
;~
29
EDIT Options
"-
Select
-"
and "Enter" 29
7.1
Pages, Paranlcters & Functions 29
Single Pararneter Pages
~
29
~1ultiple
Parameter Pages
30
7.2 Display Conventions /
ShortcuL~
31
Values
31
Notes
31
Chapter
8
Sources
I
Uestinations
33
8.1
Sources 33
8.2
Destinations
33
8.3
Zone
Limits
34
Chapter
9
Cloning:
Rhythm,
Orders
& l\1ode 35
9.1
\Vhatsina clone 35
9.2
Rhytlll11
36
9.3 Mode 36
9.4 Order 37
9.5 Cloning
The General Case 37
Chapter
10
Tempo,
Timing
&
Cycling
39
10.1 Tempo 39
Tempo Tap 39
10.2
Tinling
.40
P.n - Pulse Note
40
d.U - Duration
40
L.i - Link
41
10.3 Cycling
41
E.b - End Beat
.41
S.Y - Sync-to-Trigger
42
r.S -
Mode
Resel.
42
LA
- Invert Alternate .42
Chapter
11
Record
I Hold 45
r.H - RecordlJlold
r..1ode
.45
A.C
- Auto-correct
Step
Size
.45
I) Record Ready
46
2)
Record
Start.
; .48
3) Record·in·Progress .48
4)
Record
Stop
50
Chapter
12
Control
Option
51
C.t
-
Manual
Control
52
. L.n and
B.n
-
Zone
Lirnits 52
Page 4

b.n - Base Nole
52
A.V
- Audible Conllol
53
P.r - Transposc p/
i'JI
ity
53
P.3 Local Pedal 3
53
P.4 Local Pedal 4
53
E.3 MIDI Pedal 3
53
E.4 MIDI Pedal 4
53
Chapter
13
Auto
Effects
55
13.1 Auto Xpose
55
A.\ - Auto-Transpose
t-1ode
55
S.Y
-Auto-Tnmspose
Sync 56
r.i
- Recursion Intervul 56
Il.t
- Number
of
Auto-Transpose Stages 56
E.t - Current Edit
Stage 56
i.n - Interval.
57
r.E - Repeats
57
13.2
AUIO-Double
57
n.d -
NUlllberofl)oubles
57
E.d -
CUlTent
Edit Douhle
57
Ln
- Douhle Interval
57
C.JI - Channcl
58
13.1 Auto·t-.1utate (t-.1odulalions)
58
n.L - Note Loudness/Velocity
58
t.A
- Tempo
t-.·1ndulation
A/llount 59
t.C - Tempo Modulation Controller Numher 59
d.A - Duralion Modulalion Amounl. 59
d.C - Duration
r-.1oclulalion
Controller 60
(~hapter
14
I)EVALS
61
redall:unction Listing 62
Para/neter Edit Exanlplc
63
rrogram Chain ()pcr:llioll
64
Chapter
15
I\tASTEn
Parmncters
& Functions 65
]
5.1
"t-tIDI " 65
b.C -
Basic Chanllel
65
E.C -
1\1101
E<:ho
66
C.L -
f\.11DI
Clock 67
E.l,
E.2, E.3 and
EA
--- MIDI Pedal Conuollers
67
15.3 "Dunlp/Load " 68
Chapter
16
Reference
Vata
69
16.1
Factory Default PlUgrallls & Master Parameters 69
]6.2 Global Parallleters 69
16.3
Editable P:lramelcrsinFactory Programs 70
16.4
F,.ont
Panel
1\1nel1l0nics
71
Chapter
17
"'a.'ranty
75
..
Page 5

Chapter 1
Welcome
Congratulations on your purchaseofthe Cyclone, the newestofOberheim's
MIDI
Performance instrument line, Perf/x, The Perf/x line was created with the intention
of
supplying the
modem
musician with time and labor-saving devices that simplify the
ever
increasing complexityoftoday's music systems, while also providing all-new performance
and programming controls that allow your creativity to Oourish in areas you might
never
even have thought about.
The Cyclone integrates the concepts
of
cuveggiation, sequencing, and MIDI rhythm
driving all
in
one package.Itcombines traditional arpeggiation and sequencing capabilities
with entirely
new
performance techniques, programmability, and synchronization.
One
innovation is the ability to provide
independence
of
rh~'thm
and
pitch,
andtoprovide
interactive controlofboth from the keyboard. Its 16 ROM and 16 (expandable to 83)
RAM
Programs allow you to pre-program pitch and rhythm events that will play simultaneously
or
independently, dual keyboard ranges, doublings, transpositions, tempi,
MIDI
assignments and many
other
parameters.
The
arpeggiation section is without precedent, allowing for not one, but
two
independent
keyboard
ranges as well as recorded information. There are eight transposition stages
per
Program, each stage having it's
own
numberofrepeals, inversions,orprogrmllmable
recursions. ]n addition to steady pulses you can program your aJveggiation rhythm.
Instead
of
single nole lines the arpeggios can
now
consistofchords as well.
The
possibilities for live performance arc endless as all parameters can be altered "on-the-Oy",
making the Cyclone the creative improvisor's
dream
come
true.
Add to these the ability to use your Cyclone as a master
I\HDI clock, fully capableoflive
"human feel" tempo changes using the
Tap
Tempo
pedal.
That'sjust
oneofthe 9
modes
your 8 independently programmable pedals
cu'e
capable of.
This manual provides both an introductory tutorial and a complete reference to the
information for
use
once
you are familiar with the overall operationofthe Cyclone.
We
hope that you enjoy this extraordinary instrument and recommend (as always) that you read
this manual in it's entirety.
Thank you for your investment in the State
of
the Art.Itjust
got
better.
Welcome
Page
1
Page 6
Chapter 2
Liftoff!
...
A
Quick-Start
Guide
to
the
Cye/one
This section explains how to getupand
running (without gelling into serious programming
or editing),bytaking advantageofthe
16
Factory Programs shipped with the Cyclone.
Each Factory Program behavesina different way, which provides the ability to try out
manyofthe
Performance Effects available with
the
C)'Cloncina short time.
2.1
SETUP
Before
JOlJ
turn
iJnyJhillC
011,
do
the
following -
Master Controller
Channel 1
MIDI
our
I
,
I
MIIJI
MIDI
MIDI MIDI
IN
OUT
IN
THRU
«~rc~©~8.l
Slave
Channel 1
CR.
..
Master Controller
Channel 1, Local
CII
OFF
MIDI MIDI
OUT
IN
,
MIIJI MIIJI
IN
CUT
C)f
C~
Q!il
t11
1)
Connect
the
MIDI Out from your Master controller to
the
MIDIInof
the
Cyclone. The Mastercontroller can be a MIDI keyboard, a MIDI guitar
controller, a sequencer, a computerwith sequencing software, a drum machine
or
any
other sourceofMIDI information.
2)
Connect MIDI Out from
the
C)'clonetoMIDIInof
the slave instrument you
want to control and set the slave's Basic Channelto1.
Ifyou want to use a synth
as
both
your master and slave, make sure MIDI Local ControlisOFF on the
synth. When you turn on the CJclone, it
will
automatically tell the slavetoenter
this mode.
If
you
have problems when
you
me arpeggiating
the
voicesinyour master controller
or when plilying the keyboardsofslave units, see the section on Locnl
Control
in
chapter
3.
Quick
Start
Page 3
Page 7
"
3)
If
you have oneormore "momentary" (spring-loaded ON/OFF) footswitches,
plug them into the Cyclone's rear panel Pedal jacks according to the desired
functions:
• Pedal 2 acts as a Program Chain advance, automatically selecting the next
Program.
• Pedal 3 turns starts and stops arpeggiation when in Play Mode.
• Pedal 4 provides a "Tempo Tap" ability.
• The Pedal 1jack
is
used as an audio out jack, providing a metronome click out
under certain conditions.
4) Turn on your Master controller and set its MIDI Dasic Channel to
1.
5) With the switch on the
€yc!one's
rear panclinits down (off) position, plug the
provided power pack into
an
AC outlet and connect it to
t1le
power jack on the
rear panel.
6)
Tum
the C)'c1oneonby flipping the switch to its up position.
• The section describing the factory presets assumes that a Hard Reset has been
performed, otherwise the
Cyclone
may not
perfonn
as described. A "Hard
Reset"
erases allofthe memory, including userprograms
and
Master settings
and initializes the C)'c!one to the condition in which it is shipped from the
factory.
To
perform a "Hard Reset" hold the switch on
t1le
front panelofthe
C)'c1one labelled "Enablc" while turning on power.
7) On the Slave(s), select sound patches with a short attack and a medium release,
such as an organ, piano,
or
plucked guitar.
2.2
SELECTING
PROGRAMS
• Press the "Mode" key so that the "Play" LED is flashing. This
LED
is now
flashing on quarter-notes at the current tempo.
• Use the "<" and ">" keys to select a program. Programs
00
through15are the
Factory Programs, while higher numbers are the User Programs. After selecting
the program, press "Enable" to activate the program.
• Pressing the "Enable" key while in PLAY Mode causes the display to
show"
••"
and effectively disables the
C)'clone. At this point, the unit simply passes
MIDI
data as MIDI Thru.
To
re-enable the Cyclone, simply press
"Enable"
again.
2.3
PLAYING THE CYCLONE
The
Cyclone
provides many different kindsofPerformance Effects, someofwhich
may be familiar and others will be new. Some effects are generally always available,
while most are dependent on which Program has been selected. There is always
one
and only one Program in effect.
If
at any time you want to mute all the sounding voices, just press and hold the far right
switch (labelled "hold to mute") and the
Cyclone
will automatically shut
off
every
Page 4
Cyclone Owner's Manual
Page 8
sounding voice
ill
the system. When the voices have been muted, press "Mode" to
return to "Play" mode.
2.4
THE
FACTORY
PROGRAMS
Program 00 -
In\uitional
6u'l..~ggiator
I)
Clnssic
Arpcggialion
This
isitbasic arpeggio, without any frills:
lkld
notes are played repetitively
in
an cighth-note pulse rhythm in up/down note order, one at a time. This
is
also a good stiu"ling place to demonstrate someofthe other featuresofthe
Cyclone.
• Play and hold (using the Sustain pedalifdesired) any numberofnotes.
•
Tap
Pedal 4inqUilrter-notes to set the Tempo.
•
To
change the oruerinwhich the held notes are played:
a)
Press the "Mode" switch to enter "Edit Mode"
b)
Press the "Clone" switch until the
LED
to the leftof"Order" is lit.
c) Use the
"<"
and
">"
keys to select other orders and press the "Enter"
switch.
d)
Press the "t\1odc" switch to return to "Play Mode".
2)
ChordIlIold
• Turn
off
the "Clone" functionbypressing the associated switch.
•
Press the "Record/llold" switch causing the associated LED to flash.
• Any notes you now play will be latched. fie wamed that although the
chord
is still held in the Cyclone's memory, with some patches the
sound may fade away.
•
Press the "Manual Control" switch, causing both its
LED
and the
"Record/IIold"
LEDtocome
on steady.
• Play notes in the lower octave
of
the keyboard. This will cause the
Cyclone
to gate and transpose the held chord accordingly.
3)
Arpeggiating,
Gating
and
Transposing
a Held
Chord
• From Chord Hold mode, press the "Clone" switch, causing both its
LED
to come on and the "Record/llold"
LED
to extinguish ("Manual
Control" will still
be
lit).
• Play notes
in
the lower octaveofthe keyboard, to simultaneously gate,
arpeggiate, and transpose the held chord.
• Also play notcs above the lowest
octllve to simultaneously mveggiate the
keyboard
and
the "Record Duffer" - the notes held in the
CJclone's
memory.
Program01- Octave Transpose Au'eggiation
Same
as Program 00, but with automatic transpositionhyoctaves ("untransposed/I
octave up/untransposedlJ octave down") at the end
of
each "scan"orpass through the
held notes.
Also, the orderofeach scan is the same as the order played. insteadofjust
strictly up and down.
..
Quick
Start
Page 5
Page 9
Program 02 -
TWQ-NQtes-at-a-Time
Arpe&l:iation
SameasPrQgram
00, but playing
tlVO
nQtes
at a time insteadofjust
Qne,
andinthe
Qrder
played.
Program 03 - Dual
AQ)eggiation
SameasProgram 00, but with
tWQ
keybQard
"Zones" active, providing two
il/dependel/t
arpeggiatiol/s at once. The
two
Zones split
the
keybQardatMiddle
C.
Also,
t11e
Qrderofthe
arpeggiatiQnist11e
Qrderinwhich the
nQtes
were played.
• Play
QneQrtWQ
notes below Middle C, and a related
chQrd
abQve
middle
C.
Note that
the
two arneggiatiQns can pulse "Qut-of-phase".
Program 04 - Auto-Doubled
ArpeggiatiQn
SameasProgram 01, but with cach held note automatically doubled atanoctave below
and a
fifth
above when
thc
Clone LEDislit.
Program
05
- ManuaJly-Doub1cd Arpeggiation
SameasProgram 01, except
the
functiQn
initiatedbythe "Manual Control" switch
allows real-time definition
of
doublestobe
used with
the
arpeggiation.
• Playa chord
at
the
high
cndQfthe
keyboard
and
play low CQnthe keyboard.
You will hear
the
chord arpeggiated. If
you
play
anot11er
note
in
t11e
bottom
octave,
YQU
will hear anothcr copyQfyour pattern playingatthe same time that
is
transpQsed from
the
Qriginal.
Program 06
-Inversion
Transpose Arpeggiatjon
SameasProgram 01, but
with
automatic transpositionbyinversions (like you would
invert a C chord:
CIEIG,E/G/C,G/C/E,etc.) at the beginning
of
each scanofthe held
notes. Three inversiQns occur at each octave, after playing once without inversion.
Program 07 - Chromatic Recursion
Arpeggiatjon
SameasPrQgram
01, but with chrQmatic (half-step)
transpQsitiQns
at the beginning
of
each scanofthe held notes. The original plus
tlu'ee
chrQmatic
transpositions are played
at each octave.
Program 08 - Auto Record
Arpcggiation
SameasProgram 01, except the Cyclune automatically replaces the previQus
contents
Qf
t11e
Record Duffer when new
nQtes
are played - and just playing back
when
no
keys are held.
• With
the
"ClQne"
LED lit,
playa
chQrd
and release
it.
The Cyclone will
continue to arpeggiate that chord.
Page 6
Cyclone Owner's Manual
Page 10
Program09- Pressure Mod
"rpcggiation
Same
as Program 00, but with tempo and duration controlled by keyboard pressure.
• Play and hold chords/notes, and while holding those notes, use keyboard
pressure to simultaneously control the tempo and duration
of
the resulting
notes.
Proglam
to -
Emersonic
SameasProgH\1lJ
02, but with an 8-stage automatic transposition through intervals
bascd on a
"V,
VII, IV, VII,
octave
V, I, IV, VII" progression.
• Use keyboard pressure to vary betwecn staccato and legato.
•
Works very well
withh
sampled piano.
Program I I -
Random
Notes
Same
as Program
00,
except that the order,
numberofheld-notes-at-a-time, and pulse
timingofthe arpeggiation are random.
Program
J2 - One-track Sequence Record/Playback
This program starts playing the contents
of
memory as soon as it is selected to
dcmonstrate lhal just
selecling the program is
a1litlakcs to start playing; you don't
need to manually tum cloning on.
t)
Recording up to 32 notes:
• Connect the Pedal
t
jack
to oneofthe audio inputs on
your
mixer for a
meU'onome click.
• Press the "Record/I lold" switch, causing its
LED
to flash at the current
tempo.
• Press the "Clone" switch, causing its
LED
to light.Ifhooked up, the
metronome should now be audible.
Use
Tempo
Tap
to adjust
tempo
as
desired.
•
The
Cyclone
will start recording
when
you start playing, automatically
placing the first note
on
the first beat, and quantizing note-ons to the
nearest 16th note.
• Press "Clone" to stop recording,
or
"Record/Hold" to
stop
and
automatically begin playback.
• By starting recording,
or
resuming Recording, the
C)'clone
erases
any
previous recording,soadditional takes can be started immediately.
2) Playing back a previously recorded sequence:
• With the
"Record/llold"
LED
turned off, press the "Clone" switch.
•
Use
the "Cyclc" switch to control
whcther
the
CJ'clone
loops the
recording
or
plays it only once.
• Duration Modulation has
no
effect.
•
To
hear the Factory
Demo
sequence. first select (User) Program16to
redefine the Record Buffer
(if
any prior Recording/Holding has been
happened since
lIard
Reset).
Quick
Start
Page 7
Page 11
Program]3- Rccordcd Rhythm Arpeggiation
Same as Program 00, except that this Program:
1) uses a previously recorded rhythm instead
of
a pulse
2) uses the recorded note-groupings to determine arpeggiated note-groupings
3) the order is as played.
• Use Program 12 to record a sequence with the desired rhythm pattern into the
Record Buffer. Then resclect Program
13
to use that rhythm pattern.
Program
]4
- Live Rhythm Playback
The inverse
of
Program 13, i.e. this program plays a previously recorded sequence
of
notes with a rhythm which is played Jive on the keyboard.
• Use Program
12
to record the desired patternofnotes and chords into the
Record Buffer.
• With the "Clone"
LED
lit, play notesinthe bollom octaveinthe desired rhythm
pattern, and the
CJclonc
will step thru the recorded notes and chords
accordingly.
Program
]5
- Pyrotechnics!
This program demonstrates what happens when you really start to use someofthe
Cyclone's more interesting features. This program is actually the same as program
03, with only three parameters changed.
• After selecting
this program, press and hold the "Record/hold" button, then
press the "Store" button. This erases the current recording and prepares for
recording.
• The tempo is automatically changed so it always takes the same amount
of
time
to get through the pattem,
no
matter how many notes you play.
• Play and release chords. Each time you
playa
new chord it replaces the
previous
one
in memory.
• When you get a pattcrn you like in memory, press the "Record/hold" button to
disable recording. Whatever is in memory will continue
to
play.
•
Now
play more chords.
The
keyboard is split at middle C, so you can get two
more independent patterns going over what is playing from
memory.
•
To
change the memory pattern, press "Rec/hold" to start recording, put in a
new
chord, then press "Rec/hold" again to play over the memory pattern.
2.5
GLOBAL PERFORMANCE EFFECTS
Tempo
Tap
When the "Clone"
LED
is lit, simply tap at least 3 quaJ1er·notes on Pedal 4 at the
desired tempo and the
CJclone
will follow along. .
Sustain
The
sustain pedal functionofthe Master controller "holds" any played keys until it is
released. .
Tempo
Modulation
Page 8
Cyclone
Owner's
Manual
Page 12
When the "Clone"
LED
is lit. the pitch bend lever on your controller controls
tJle
tempo. At center position, the tempo is normal. When you bend down,itslows
down.
Durntion I\lodulaCion
The mod wheel/leverofthe controller keyboard provides the ability to modify the
relative lengthoftime which noles sound, generally causing a more staccato feel with
increasing mod wheel position. This is also called "Gate Time" on other instruments.
These
factory presets are designec110 give you
justanavor
for what the C)'clone is
capable of. They also make good starting points for your own experiments, As you can
sec, this is a very nexible box: There are many features which are not even hinted at by
these examples.
We
encourage
)'CLlll
to read on and find out exactly why we say this is the
world's most powerful performance arpeggiator!
Quick
Start
Page 9
Page 13

Chapter 3
Unpacking
and
Hookup
Procedure
3.1
UNPACKING
THE
CYCLONE
The
CJdonc
i~
~hipped
from Oherheim boxed in protective
foam.
With it is this
Owner's Manual and a
power
pack.
( )nce you have unpacked the
CJdOIlC, place it on any solid
~urface
near
your
MIDI setup.
Bdore
JOU
tunt
fl1lylhim:
on,
refer to the following procedure for
connecting
the unit.
3.2
REAR
PANEL
CONNECTIONS
&
POWER-ON
3.2.II\IIDI
1) Connect the MIDI Out
fwm
your Master controller to the MIDIInof
the
Cyclone.
The
Master
controller can be a MIDI keyboard, a MIDI Controller
("mother") keyboard, any MIDI synthesizer or sampler that has a keyboard,
or
any other sourceofMIDI notes.
2)
Connect MIDI
Out
from the C)'clonc to MIDIInof
your
fir~t
Slave instrument.
The first Slave can be another MIDI keyboard, a keyboard synthesizer
or
sampler,
or
a
MIDI voice module (rack-mountortable-top)orthe
~]aster
controller keyboard itself.
If
a second Slave instrulllcntisavailable, conncct the MIDI Thruofthe first Slave to the
MIDI
Inofthe second.
3.2.2
Pedals
The
back panelofthe C)'clOIlC also includes four 1/4"
jacks
which accept any
"discrete" pedal (also known as
a "footswitch"). A discrete pedal is a momentary
(spring-loaded
ON/OFF) footswitch type.
Be
sure not to use a "continuous" (rocker
type) footpedal.
If
you plan to use any pedals with the C)'clone, simply
plug
them into
the desired inputs.
There are two kinds
of
discrete pedals available. The
C)'done
can use
either
kind by
automatically deciding which kind is in use
when
poweristurned on.
To
make
sure
that the kind
of
pedal is correctly determined, plug in the pedals before turning on
powcr
and
do
lIot
press
the
pedals
while
power
is
being
turned
011.
Unpacking
&
Hookup
Page
11
Page 14
3.3
POWERING UP
For starters ....
Tum
on your Master controller and set its MIDI Basic Channel.
Turn on the first Slave,
and set its Basic Channel. If you're using a second Slave, tum
it
on and set its Basic Channel as well.
Then
power
on the
CJclonc
....
Connect the provided Power Pack (Oberheim Part Number 400006 for 120V, 400007
for
220/240V) to the connector on the back
of
the C)'c1one and plug the pack into an
AC outlet.
Tum
the power on
~y
lifting the power switch on the left rear panel.
The
cUlTent
software revision number will be brieOy displayed, the the C)'CIone will
enter
Play Mode and willbein the same program as when it was turned off.
3.3.1 Local
Contrul
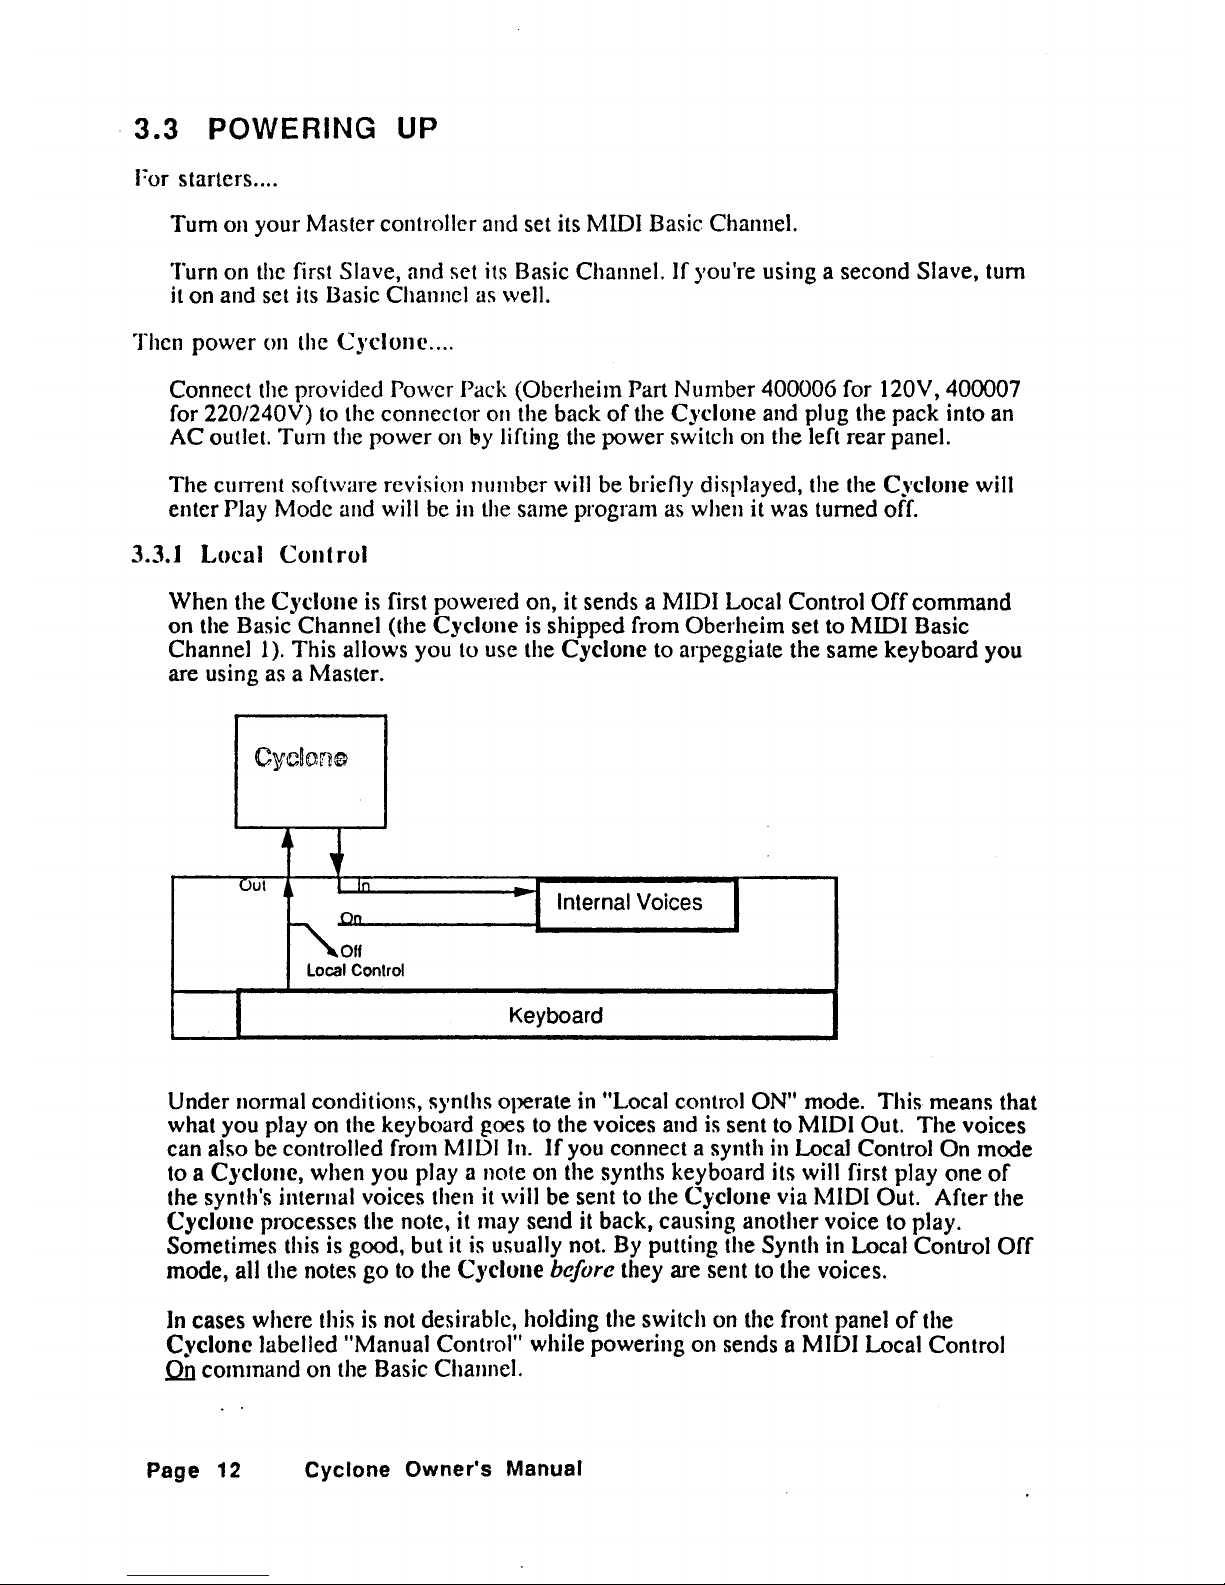
When the
Cycloneisfirst powered on, it sends a MIDI Local Control
Off
command
on
the Basic Channel (the C)'c1une is shipped from Oberheim set to MIDI Basic
Channell).
This allows you to use the Cyclone to arpeggiate the same keyboard you
are using as a Master.
Cwdon~
,
,
Oul
In
On
I Internal Voices
I
~·Olf
Local Control
Keyboard
Under normal conditions, synths operate in "Local control ON" mode. This means that
what you play on the keyboard
goes to the voices andissent to MIDI Out. The voices
can also be controlled from MIDI In.
If
you connect a synth in Local Control On mode
to a Cyclone, when you
playa
note on the synths keyboard its will first play
one
of
the synth's internal voices then
it
will be sent to the Cyclone via MIDI Out. After the
Cyclone
processes the note, it may senditback, causing another voice to play.
Sometimes this
is
good, but itisusually not. By putting the Synth in Local Control
Orf
mode, all the notesgoto the
Cyclone
before they are sent to the voices.
)n
cases where thisisnot desirable, holding the switch on the front panelofthe
Cyclone
labelled "Manual Control" while powering on sends a MIDI Local Control
On
command on the Basic Channel.
Page
12
Cyclone
Owner's
Manual
Page 15

Some synlhs, notably the DX-7,donot support the Local Control OFF function,
so
when those instruments are used as the master, it may be better not to try to arpeggiate
the built-in voices. You will pruhably want to use a separate master and slave since the
"doubling" problem described above only happens when the master and slave are the
same unit.
RescUing the
CJclolle
The
C)'c1one can be initialized to the condition it left the factory by performing the
"Hard Reset" function. This
is
accomplished by holding the Enter/Enable buttononthe
front panel while tuming on
IXW.'cr.
But be careful: the Hard Reset initializes the
C)'c1one to the default factory settings. This erases all programmed data and replaces
them with the Factory settings.
Unpacking
&
Hookup
Page 13
Page 16

Chapter 4
General
Overview
4.1
AN
INTRODUCTION
TO
ARPEGGIATION
Clock
Typical
Arpeggiator
Cion"
Transpose
Tpmpo
Order
CUIT
..
nt
(Which
-+
f-+
Time
Current.
nOles)
Sian?
Pulse ISlan
141
el
'2"~12OI2.t28
...
1
Timm9t
Duraloonl3131
313131313
...
I
Rpcord
Blffltt-r
T
T
IHIH
,ht':""d
Oul
The
Cyclone
is a high perfonnance, real-time, programmable, perfonnance-oriented
arpeggiator. That sounds neat, but what does it doexactly? The answer to that question
occupies the remainder
of
this manual. In other words, thereislot goingonin this box!
We will
try to make things easier
by
developing an understandingofwhat is going on by
starting all the way from scratch.
The meaning
of
"arpeggio"inits most basic senseis"The playingofthe tonesofa chord
in
rapid succession rather than simultaneously." Thisisexactly whatisperformed by a
typical electronic arpeggiator: You play the chord from your keyboard and the arpeggiator
will play the tones one after
the other as rapidly as you like and
will
continue to repeat the
tones as long as you hold the chord. There aren't usually too many things to control. The
main ones are:
•
TEMPO
- How fast the notes should be played
• ORDER
- When playing the notes, in which order should they be played? Typical
options include:
Stan
with the lowest pitch followedbyhigher and higher
pitches, start with the highest pitch and
go
down,orgo up then down. l\'Jany
nrpeggiators can also play the tones
in
the order that you played the keys in the
chord (or backward
or
forward then backward, etc.).
Unpacking
&
Hookup
Page
15
Page 17
• TRANSPOSE - Someofthe better arpeggiators will play the pattern, then transpose it
by an amount you specify, then play the pattern again and transpose it and
so
on.
• SOURCE - While much
of
the time you will hold notes to be arpeggiated on the
keyboard, sometimes you will want to play some pattern without actually holding
the keys. Some units will let you hold a set
of
notes to be arpeggiated in their
"memory". You then need to select the "source" for the arpeggiator:
Do
you want
to arpeggiate what you are playing from the keyboard
or
whatisbeing held in the
memory?
Cloning
Beyond that, not too much is standard. The picture above shows what this basic structure
looks like. There
is
a clock generator (a metronomeofsorts) which allows you to control
the rate at which the notes are played. This drives a function which we call
Clone
which
makes copies
of
the notes you play and alters them by parameters such as the mode, order,
and rhythm.
What
does the clone function do? Let's start out with what happens in a
simple arpeggiator. The figure above shows the two main parts
of
simple cloning:
Deciding when to play the next note, and deciding what pitch it should be.
The
clonc
function keeps trackofwhen the next note should play and for how long it
should play. For example
if
you wanled to have new notesbegenerated on quarter notes,
the
clone function would
be
waiting for the clock to reach the first beat, then the second
beat, then the third beat and so on, just like a sequencer would. When the clock reaches the
next "Start" time ,clone creates a "gate". That is, clone says
"We
should start playing a
note now and it should
last for an eighth note."
Ordcr
Note that the previous sentence did not say what pitch should be played, it only said that
something should be played and that it should last for a certain length
of
time.
The
order
function looks at the sources that are active (memory, the keyboard,orboth) and picks
which pilch to play for each gate. Which one
is
picked depends on whether you want play
back the notes from lowest to highest, highest to lowest, random,
or
whatever.
Auto-
Transpose
After the clone function generates new notes, they canbetransposed automatically by the
Auto- Transpose function. Remember, clone generates a patternofnotes based on what
you play and what is in memory. Auto-Transpose changes the pattern into a new key after
each time the pattern is played.
That
is
about all that most arpeggialors do. In the Cyclone there are a lotsofother things
going on as well. We'll get to most
of
those later in the manuaL There are a few other
relevant things that are important
in
understanding how the CyClone works.
Page
16
Cyclone
Owner's
Manual
Page 18

4.2
WHAT
MAKES
THE
CYCLONE
DIFFERENT?
Clock
Cyclone
Clone
Order
fT...-'..,~.
UDoo.-.~
1
TrlInspose
E.lernal
.1
2 4
I
1.1101
Inlernal
Tflmpo
~
AUlO
Trl"SOose
AIM.
O'd.r
S'.o.
,10 • t
•••
,
,"",
..
~
"'-
(How
(Which
NOles
Inltrval lel:;1f
I
--.
-+
Tima
Cu".nl
•
~
many
loele1
nOlesl
ReDealS',
12
,
I
51a,,7
ulO
Stile!
GallS
nOlesl
GallS~
Manual
Reco'de
T
-+
Timing Recorded Grouo.
run
Gales
Rocordod
live
Transpose
I
PilCh"
P,lches
Transposld
NOIII
~se
ISl""
141el'2116120124128
...
jt-PutStNo'.
Timing Durationl31313 1 31313 I 3
...
,.-Ou,.'",,,
Double
Double
,
2
3 4
5
E 7 "
1"~~rv~1
C ClC2FG2C
necord
Ilullo'
I
ItChannell'l'
II
I"
,121 1
Contto
LOl"'8
~"oOI'lmnm
,rl'"
ml"·
4
Manual
nAco,"ed
SIM
4
10'213 16
2'-,1Q~
I~
Doubles
Ga,os
Dura"on.
2 8 , 4 4 6
..
-
f-+
Transposocll
rI1r.h~~
Pilch
A C
o n
E
A
(1
..
,-
Doubleo
Ilole.
Oul
As the above picture indicates, there are quite a few things going on in the Cyclone which
go
beyond a typical arpeggiator. Don't worry - everything you, seeisdescribed
completely in later chapters. This
is
just a chance to see where we are going to end up.
If
you aren't comfortable with arpeggiators yet, or would just like to start playing with the
box,
you can skil) the restofthis
chapter,
and
go
ahead to
chapter
5. You may
also want to come back to this section after you have gone through a few
of
the parameters
to get a "big picture"
of
how it all fits together.
The
real clock
generator
Let's start at the left sideofthe picture. The first thing to seeisthat the clock generator has
a couple
of
new options. The internal clockisstill there and the
Tempo
control still
controls how fast it is going, but you can choose one
of
two other sources for the clock:
External clock like that generated by some drum machines, and MIDI clock for syncing the
Cyclone to sequencers.
The
real
memory
buffer
Next we move into the memory buffer. Above we said that the memory buffer memorizes
what keys are held so you can arpeggiate without actually holding the keys. \Vell. in the
Cyclone the memory buffer holds not only what notes you played, but it also the order in
which you played them, when you played them, how hard you played them and how long
you held them.
If
that sounds like what a sequencer does, you're right. And the Cyclone
candomany things that a sequencer can.
~ut
look at the memory buffer again. Although
there
is
I Start
Time
and duration togowith every note, the rhythms are handled
independantly from the pitches. This one simple fact makes the
C)'clone very different
from a sequencer.
The
real
clone function
The most obvious change isinthe clone function. Although basically the same things are
still happening here, there are a few extra things to see. And
of
course, thisiswhere things
start to gel complicated. First
is
that the current timeisstill updated by the clock, but now
there are two different rhythm sources. The Pulse Rhythm source provides nice evenly
Unpacking
&
Hookup
Page 17
Page 19

spaced gates with fixed durations, while the Rhythm partofthe Record Buffer uses the
rhythm you have recorded, including chords and rests. In either case,
clone
generates
gates based on these rhythms. These gates still don't have pitches, they
just
indicate that
something should happen and for how long. Another way to indicate when something
should be played and for how long is to use the keyboard. A range
of
notes can be set up
on the keyboard from which you can play the rhythm live.The
rhythm
function decides
which source to
use for these gates: The Pulse Rhythm source, the Record Buffer,orthe
Live Gates.
The next step
is
the mode. This basically decides how many notes should be played for
each gate coming from the
rh),thm
function. In a traditional arpeggiator,
mode
simply
says play one note for each gate coming from
rhythm.
That is what happens when you
are playing
in
traditional arpeggiator modeorin
sequencer mode. When you choose other
combinations
of
rhythm
and
l11o.de
settings,
mode
can either play more than one note
per incoming gate,
or
it can ignore someofthe incoming gatesiftoo many start at the same
time. We'll get into more detail about this later in the manual when
modeisdiscussed.
The last step
in
the clone function is to take the gates from
mode
and give them pitches.
This is what the
order
function does. The pitches can come from either what is currently
being held on the keyboard or from what
is
storedinmemory.
Order
simply picks the
next pitch to give to each gate.
A
couple
of
examples
To see how these functions relate to things we are familiar with consider these two
examples:
When
rh)'thm
is set to the Pulse Rhythm generator,
mode
is set to exactly
one
note
per gate and
order
is set to UP, the resultisa very basic arpeggio where the notes play
steadily, one at a time, starting with the lowest pitch and continuing up.
When
rhythmisset to Recorded Rhythm,
modeisset to one note for each gate (also
known as the "recorded" mode), and
order
is set to use the pitches from the memory
buffer in the order in which they were recorded, the result sounds like a sequencer.
When the clock comes to each recorded note's start time, a gate is generated. Since one
note
is
played for each gate, the corresponding pitch from the record bufferisplayed
for the duration
of
the gate. In short, for every note you recorded,
one
note comes
out
at the right time, with the same pitch and lasts for the same lengthoftime.
Auto
Transpose
The auto-transpose function now processes the notes coming from clone according to the
transpose list. The main difference from a typical arpeggiator here
is
that you can set how
many times the
C)'clone should playineach key. It will then play the pattern that number
of
timesinthe given key before going to the next transposition.Inaddition, there are two
new ways
of
doing auto-transpositions: Recursion and inversion. Recursion means that at
the end
of
a pattern the key is changed by an assigned numberofsemitones, the pattern is
played again, the key
is
changed by
tire
same numberofsem;tones , the pattern is played
yet again, and this keeps going for some·number
of
times
....
Inversions keep the pattern goingbyputting the lowest note on top (or vice versa) and
playing the pattern again.
Auto-Double
The last step before sending the noles out is to add extra copiesofeach note transposed
by
fixed amounts from the original. A common useofthisisto double each note in the
Page 18
Cyclone
Owner's
Manual
Page 20
(Irpeggio at
onc
octave below the original note. Since the C)'c1onc
can
supportupto
eight
simultaneous doubles, each note from the arpeggio could result in 8n
eight
note chord being
played.
We
hope that this has given you
some
insight into the overall layoutofthe
C)'clone.
We've
just
scratchcd the surface, but when you understand these last few pages it will
be
easier to grasp how all the parameters fit together and to see how to use them.
Unpacking &
Hookup
Page 19
Page 21
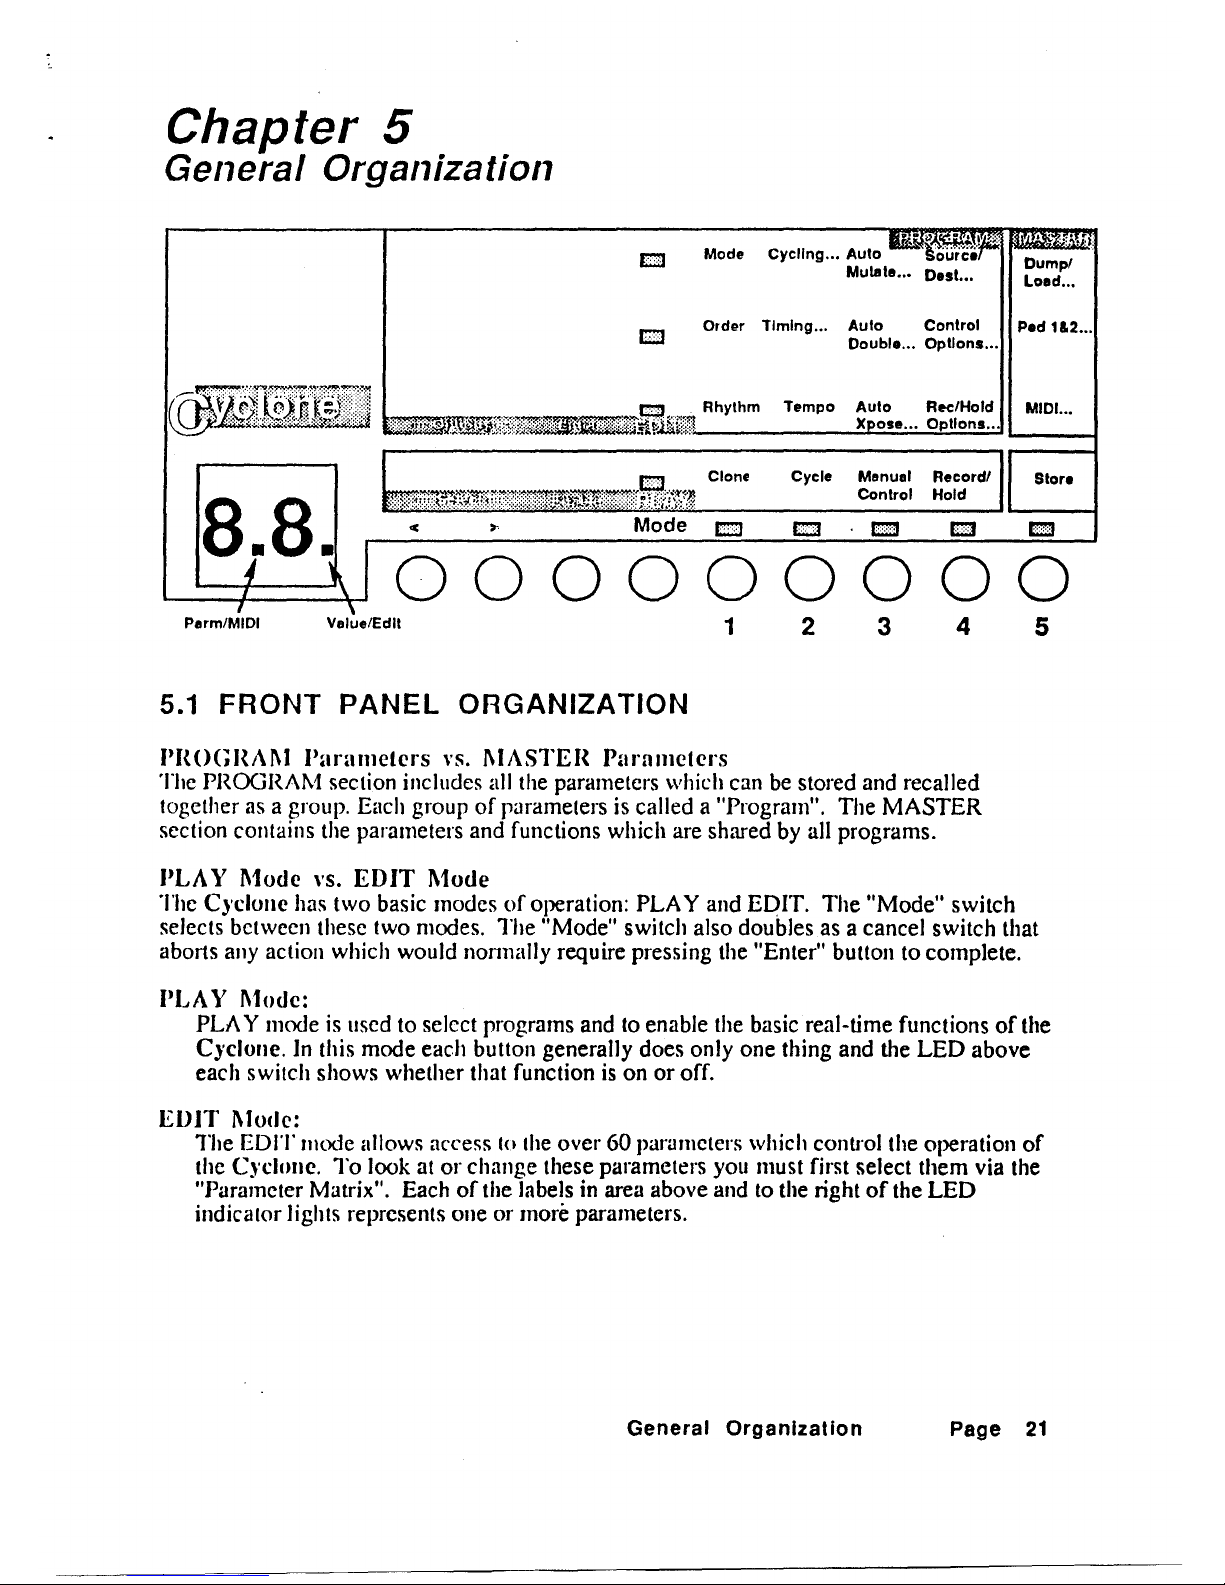
Chapter 5
General
Organization
Order Timing...
Auto
Control
P.d
1&2
••.
Doubl....
Options
...
5.1
FRONT
PANEL
ORGANIZATION
PHOGHAJ\J Pnrulllelers
\'S.
J\JASTEH Parfllllelers
The PROGRAM section includes all the parameters which can be stored and recalled
together
as a group. Each groupofparameters is called a "Program". The
MASTER
section contains the parameters and functions which are shared by all programs.
PLAY
Modc
\'S.
EDIT
Mode
The C)'c1onc has two basic modesofoperation: PLA Y and EDIT.
The
"Mode" switch
selects between these two modes. The "Mode" switch also doubles as a cancel switch that
aborts any action which would nonnally require pressing the "Enter" button to complete.
PLAY
Mode:
PLAY mode is used to select programs and to enable the basic real-time functionsofthe
Cyclonc. In this mode each button generally does only one thing and the
LED
above
each switch shows whether that function
isonor
off.
EDJT J\lode:
The
EDIT
mode allows access 10 the over60parameters which control the operation
of
the Cyclune.
To
look atorchange these parameters you must first select them via the
"Parameter Matrix". Each
of
the labels in area above and to the rightofthe
LED
indicator lights represents oneormore parameters.
General
Organization
Page
21
Page 22

5.2
MEMORY
:Curren't
Progri:un' , , ':
Us
16
. Master Buffer
Ed'
B
ff
p
COry
rOQrams
,
It
u
er
Factory Parms
-
-
- -
-
-
- - -
-
-
-
User Parms
-
-
- -
,
- - -
-
Factory Parms
.
...
- -
-
-
-
- -
~
-
- -
User Parms
,
-
,
- -
-
,
,
,
,
Re
~nrrl
~llffpr
~
Rhythm
,
- - - -
Factory Parms
,
~
- - -
Pitches
User Parms
,
,
,
......................................
)r
.....
Parms
-
roo-
- - -
Recording
-
Parms
-
-
-
-
Recording
Fa
t
00
01
15
17
31
Parms
~
-
--
Recording
The Cyclone leaves the factory with 32 Programs: 00 through 15 are Factory Programs,
while
16
through31are User Programs (an optional memory upgrade adds 68 more User
Programs for a total
of
100 Programs). The two types
of
Programs are described as
follows:
USER
Programs
User Programs are completely programmable and consistoftwo typesofdata:I)a set
of
Program Parameters that detennine
how
the music
wi1l
be played and 2) an actual
Recording
of
a musical sequencetobe played. When you select a user Program #, its
Program Parameters are loaded into the Edit Buffer
(a
sectionofmemory reserved for
Program functions) and its Recording
is
loaded into the Record Buffer (memory set
aside for Notes and Chords).
FACTORY
Programs
Page 22
Cyclone
Owner's
Manual
Page 23

Factory Programs, on the other hand, are comprisedofprimarily permanent
ROM
data
plus a limited subset
of
Program Parameters that are actually programmable by the user.
In
other words, there are several parameters in the Factory Programs that you can
change and Store
jf
you want. But for the most part, the Factory Programs' parameters
are pcnnanent. The following parameters an be changed in each Factory Program:
• Current state
of
all play mode flags: Clone On/Off, Cycle On/Off, Manual Cll.
On/Off, Record Ready/Pause/Off/Hold.
• Tempo
• Tempo Modulation Source
• Duration Modulation Source
• Destination
of
Record Duffer
• Destination
of
Keyboard Zones 1 and 2
• Chain Program Number
• Intclllal Pedal 3 and 4 Definitions
• Extcmal Pedal 3 and 4 Dcfinitions
The
Current
Program
The cun'cnt program includcs all the programmable data whichisactive at
anyone
time.
This includes allofthe PROGRAM parameters and a recording.
The
Master Buffer
hold the parameters that are shared
by
all user and factory programs, andisnot affected
by selecting
or
storing any program.
Whcn selecting
or
storing to a
factory
Program, only the Program Parameters are
affected; the Recording data from the most recent recording session
or
User Program
is
left intact in the Record Buffer. When a Hard Reset is perfonned, the
Cyclone
copies
. the
factory
Programs (with all factory defaults) to the User Program locations, along
with a
factory Default Recording.
General
Organization
Page
23
Page 24

Chapter 6
PLAY
Mode
6.1
INTRODUCTION
PLAY mode is indicated by a flashi ngorsteady Play LED, and is the normal modeofthe
C~'clonc.
This mode provides the ability to select, enable, and store Programs, as well as
activating
or
deactivating the highest-level Program Functions: Cloning, Cycling, Manual
Control, and Recording and Ilolding. In this mode, the left decimal point
of
the 2-digit
display
-labelled
"PannIMIDI" - is used to indicate receptionofMIDI note-on messages
on
the Basic Channelofthe C)'ch,me (and within an active keyboard Zone).
Whenever the
C)'c1one is Enabled, the functions which can be in effect are
detennined
by
the Program and Master Parameters.
The
Master Functions include the MIDI functions
(Echo, Clock, etc.) and the functions assigned to Pedals I and
2.
The
Program Functions
include the Zone processing (splits and re-channelization) and the functions assigned to
Pedals 3 and 4 (such as Sustain)
as well as those which can be executed in Play
Mode
by
the keys labeled "Clone" , "Cycle", "Manual Control", and "Record/Hold".
6.2
SELECTOR
KEYS:
"-
SELECT
-"
AND
"ENABLE"
While the C)'clone is in
PLA
Y mode, the 2-digil display reflects a Program number,
or
"-
_It
if
the currently selected Program is disabled. The display also contains two
decimal points that indicate a particular status while in
PLAY
mode:
• I
rthe right decimal point
is
off, the displayisreading a cUITently selected internal
Program.
.
•
If
the right decimal point is on steady, the display indicates a cun'ently selected
extcmal Program from a Data Card.
If the right decimal point is flashing, a new Program has been selected but not yet
activated.
The
previous Program # will still be active until "Enable" is pressed.
When "Enable" is pressed, the flashing decimal will
go
out, confirming the
selection, and the
new
Program will then be the active one.
Programs can be selected by either
or
two methods: press the
"-
Select
-"
"<
"and
">" arrow keys to cause the display to
show
the desired Program #, then press the
Enable switch to confirm the selection.
A
new
Program # cun be selected
over
MIDI via Program Change messages transmitted
from the Master controller. In this case, it
is not necessary to press "Enable" as the
selection
is
confinned automatically.
In
either
case, subsequent pressesofthe Enable switch
cause
the Cyclone to toggle
between the Enabled and Disabled Slates.
When
Disabled, the
C~'clone
is effectively
la.ken
outofthe MIDI chain and simply acts as a software "Thru"; when Enabled, the
Cyclone behaves according to the settings
of
the Program Function switches, the
Program Parameters,
and
the Master Parameters.
Play Mode
Page
25
Page 25

6.3
PLAY
MODE FUNCTIONS
Clone
The function enabled by the "Clone" switch provides mostofthe "active" note
generation output
of
the Cyclone.
The
function may be traditional arpeggiation,
sequencing,
or
any numberofhybrid modes, plus a few completely new types
of
interactive performance. The term "Cloning"isusedtogenerically refer to whichever
function
is
programmed, as allofthe available functions work on the concept
of
creating copies and variationsofuser-defined notes and patterns. There are three
"Sources"
of
these notes: the Record Buffer and two independent keyboard Zones
(Zone 1 and Zone 2). Each Source has a Destination which defines the output MIDI
channel for all notes Cloned from that Source.
CJcle,
The "Cycle" switch works in conjunction with "Clone" to enable a cyclic repetition
of
whatever Cloning functionisin effect. It will usually be on, except when itisdesired
to execute a "one-shot" (the patlcrn plays once and then stops) Clone,
or
to cause an
end to the Cloning process at the end
of
the next complete Cycle. As you experiment
with the Cyclone, you will notice that several layers
of
nested looping is possible,
depending on the Program. But in this case, "Cycle" as
itisreferred to hereisthe
outermost repetition.
I\lanual
Control
"Manual Control" activates a transpositionordoubling capability which can be
controJled from a "Control Zone" on the Master controller's keyboard. The Control
Zone's attributes and the particular Manual Control function
of
the
Cyclone
are
assigned
by
the Program parameters. This switch also works in conjunction with
"Record/Hold" to enable standard Chord Hold with manual transposition and doubling
of
the held notes, providing a second meansofactive note generation.
Hccord/lloid
The
"Record" function is the method by which notes and rhythms are input to the
Record Buffer by the user. The "Hold" function is a special type
of
recording which
provides the ability
to
treat the recorded notes as a Chord and simply "hold" it on
without actually keeping the
keys pressed. Again, the exact natureofthe Record/Hold
function
is
dependent upon the Program Parameters, and includes Step Entry,
Add/Replace, Loop-In-Record, etc.
If
both "Record/Hold" and "Store" are pressed,
the Record Buffer
is
erased. A detailed procedure for Recording is giveninChapter
11.
Page 26
Cyclone
Owner's
Manual
Page 26

6.4
"STORE"
AND
"HOLD
TO MUTE"
Store
The "Store" keyisused to write a Program into memory. Once you have set up a
Programtoperfonn the way
you
want, "Store" permits
you
to saveitinto oneof16
user memories numbered16through
31-
remember that 00 through 15 are factory
ROM memories.
Operation
1)
Press the "Store" keyinthe
Master column once, then release
it.
The
flashing LED above "Store" indicates that
you
are abouttowrite over one
of
your programs.
2) Use
the"
<It
and
">"
keystoselect
the
destination Program location. But
note that Factory Programs can onlybestoredtothe
same location or to a User
Program location. Also, if
anyofthe Factory Program "constants" have been
changed, then you can only store to one of the User Programs.
3)
Press the "Enable" key. The "Store" LED will tum off, indicating that the
data has been stored and
the
2-digit display
will
indicate the destinationasthe
new current Program.
Bold to
mute
A "holdtomute" functionisprovidedbyholding the right-most switch for one second,
andisavailableinboth Modes. The Mute function generates
128
Note Offs, Sustain
Off(controller # 64), andanAll
Notes Offmessage for each of the16MIDI channels.
Play
Mode
Page
27
Page 27

Chapter 7
EDIT Mode
In
the previous Chapter, we talked about the four playback functionsinPLAY Mode. As
you recall, PLAY Mode simply allows you
to
access previously stored Programs for
performance.
EDIT Mode provides access to the Program Parameters and
is
indicated whenever any
of
the "row" LEDs associated with the EDIT sectionofthe Parameter select matrix are lit. In
this Mode, the same keys used to access the Program parameters in PLAY Mode ("Clone",
"Cycle", "Manual Control" and
"~ecordJHold")
are used instead as row/column selectors
for the EDIT parameters.
Note that all
of
the PLAY and MASTER parameters are still active when in EDIT Mode,
allowing the user to audition the effects
of
the editsinreal-time.
EDIT Options:
"-
Select
-"
and
"Enter"
In EDIT Mode, the same three buttons used for
"-
Select
_It
and "Enable"inPLAY
are now used for
"-
Options
_It
and "Enter". Notice that the Cyclone's front panel
simply renames these keys in EDIT because
of
the way they are used in that Mode:
• The "Options" buttons select parameters within a Page,
or
the valuesofa
parameter.
• The "Enter" key
confinn~
any selection andisalso used to enter/exit the value
. listofany parameter.
7.1 PAGES, PARAMETERS & FUNCTIONS
Each row/column intersectionisreferred to as a "Page". The various Parameters and
Functions are organized into functional groups corresponding to these Pages. A Page
that has multiple ParameterslFunctions within
itis indicated by an ellipsis (...) after the
Page name.
Single
Parameter
Pages
Accessing a Page with a single Parameter (Rhythm, Order, Mode, Tempo, etc.)
results in a 2-character display
of
the current Valueofthe corresponding Parameter.
The other Values available for that Parameter can be viewed by using the Options
("<"
and
">
")
keys.
If
the Parameterisan "immediate" edit, no other action is required to change its
Value.
If
the Parameter is a "non-immediate" edit, the "Value/Edit"
dot
will flash,
indicating that the "Enter" key must be pressed
to
complete the selectionofthat Value.
Edit
Mode
Page
29
Page 28

For
example, to select the ORDER parameter:
• Press "Mode" to enter EDIT mode
• Press the "clone" button until the LED to the left
of
"Order" is lit.
• The display will now show the current value
of
the ORDER parameter.
•
To
change the ORDER, use the "<" and ">" keystochange the value.
• When the ORDER is changed, the right dot
in
the display will flash. Press
"Enter" to activate the new value. The dot will stop flashing.
Multiple
Parameter
Pages
Selecting a Page with multiple Parameters/Functions (examples: "Timing...",
"Cycling...", "Control Options...", etc.) results in a 2-character mnemonic display
which identifies the most recently-accessed Parameter
in
that Page. In addition, the
"ParmlMIDI" dot will light to indicate that
it
is
just the nameofthe Parameter, and not
its Value.
At this point, the
"<" and ">" arrow keys are used to select the desired
Parameter/Function within the Page, followed
by
a pressofthe "Enter" key to access
the Value mode as indicated
by
a display
ofa
number. You can then proceed with the
edit as with a single-Parameter Page. Exiting Value mode
is
accomplishedbyhitting
"Enter", any row/column selector,
or
Mode,ormay happen automatically in the case
of
a Function.
For Example, to change the DURATION
of
each noteto18
(slightly more than
100%) for a slight legato effect do the following:
• Press "Mode" to enter
EDIT
mode.
• Press the "Cycle" button until the LED
to
the leftof"Timing
..."is
lit.
• The display will now show the name
of
oneofthe parameters at that location:
Pn
(Pulse Note), dU (Duration),
or
Li
(Link). The left display dot is lit to
remind you that this is a parameter
name, not tile value
of
a parameter.
• Use the
"<"
and ">" buttons to select the DURATION (dU) parameter.
• Press the "Enter" button to see the current DURATION.
• Use the arrow buttons to set the duration to
18.Inthis case, the right display dot
does not flash - this change takes place immediately.
For
some parameters, like
the MIDI Basic Channel, the dot would flash and you would have to press
"Enter" here to activate the change and turn
off
the dot.
• Press "Enter" to return to showing
dU
(DURATION).
• You can now select some other parameter
in
"Timing
...
" like LINK using the
"<" and
">"
buttons,oryou can select some place else in the parameter matrix
by using the rightmost five buttons.
Toggling between PLAY and EDIT modes via the "Mode" switch always accesses the
most recent Page and Parameter/Function.
Page 30
Cyclone
Owner's
Manual
Page 29

7
.2
DISPLAY
CONVENTIONS I SHORTCUTS
Values
When values greater than 99 need to be displayedinthe Cyclone's two digit display,
letters are used in the first digit,
so
100 becomes "AD",
101
becomes"
AI" and 115
becomes "B5", etc.
Notes
Parameters which are represented as MIDI keyboard notes are displayed as a pitch
of
the scale (C, D, E, F, G, A, and B) in the left character, and the Octave number in the
right character (C3
= Middle C = MIDI Note # 60).
The
"c" below "CO" is displayed
as
C-,
and
the "c" below that is shown as
C=
(MIDI Note #0). Sharps are indicated
by
the Value/Edit dot.
An editing shortcut is available when working with Note # parameters. Pressing and
holding Enter, then pressing a key on the controller keyboard, allows immediate
definition
of
the desired Note #, eliminating a lotoftedious scrolling with the Option
keys.
Edit
Mode
Page
31
Page 30

Chapter 8
Sources/Destinations
8.1
SOURCES
First in the discussionofthe
PROGRAM
EDIT parameters is the assigningofthe unit's
Sources to some Destination. What we mean by this is the
Cyclone
- in the broadest
sense - takes a musical Source, processes it, and sends it to some Destination.
The original "Source"
of
musical data,ofcourse, is yourMaster controller.
The
Cyclone
can process MIDI information from the Master. These are called "Zones".
If
you want the C,Yclone to record anyofthe musical data from the Master controller for
playback at some later time, this data can be stored
in
the Record Buffer for that
Program.
Therefore,
Cyclone
can process up to
~
Sourcesofnote data simultaneously -
the contents
of
the Record Buffer, keyboard Zone1,and keyboard Zone 2. Each
Source may contain up to
32 notes.
8.2
DESTINATIONS
Each Source can be assigned to a Destination. In actual use, at least one Source
llll!.S1
be
assigned to a Destination in order for the Cyclone to do anything audible at all. Your
Slave instruments are considered the "Destinations"
of
the Cyclone's MIDI output.
The way that the unit identifies which Destination
it
is transniitting toisby MIDI
Channel Number.
The three possible Destinations are displayed
as
d.r
(the destinationofthe Record
Buffer),
d.l
(the destinationofKeyboard Zone 1) and d.2 (the destination
of
Keyboard Zone 2).
These parameters assign an output MIDI Channel to be used for all events originating in
that Source. Therefore,
if
d.r
is given a Value
of
"8", this means that the Record
Buffer will transmit on MIDI Channel
8.
The Slave instrument you intend to play with
the contents
of
the Record Buffer must be set to receive on MIDI Channel
8.
When
d.r,
d.l,
or
d.2 is displayed, pressing "Enter" permits you to select from
among the following options:
Display
Meaning
OF
bC
1·..16
Off
Basic Channel
Fixed Channel
Description
The Source is de-activated. No output results from
that Source.
The Source is active, and generates its output on the
Basic Channelofthe
Cyclone
as defined in the
MIDI Page, parameter
bC
(see chapter 15).
The Source is active and generates its output on the
indicated MIDI Channel.
SourcesIDestinations
Page 33
Page 31

8.3
ZONE LIMITS
Also included in this Page are the Zone Limit parameters for Zones 1 and2.The Zone
Limits simply specify the
Low
Note and High Note limits for each Zone
(L.I,
H.I,
L.2, H.2).Itis easiest to edit these parameters using the shortcut described in section
7.2 '.'Display Conventions/Shortcuts".
Note that within a Zone, the Hi note must be above the low note, and that Zones 1 and
2 are completely independent allowing them to be placed anywhere on the keyboard.
This allows both layering
of
your Slave instruments (when the Zones overlap) and
splits (when the Zones do
1lQ1
overlap, creating a lower keyboard playing one Slave and
an upper keyboard that plays another Slave).
Page 34
Cyclone Owner's Manual
Page 32

Chapter 9
Cloning: Rhythm, Order, Mode
9.1
WHATS
IN
A CLONE
After you have detennined what SourceorSources you will use, you are ready for the next
step: customizing the playback
of
the music. The performanceofany musical instrument
can be broken down into a number
of
activities and examined individually, if needed: what
notes are played, in what order they were played, how fast
or
slow they are played, the
rhythm
or
time signature and so forth.
The
power behind the Cyclone is the ability to take
previously recorded material stored in the Record Buffer,
or
notes/chords played in real
time ("live") from Zones 1 and 2, and arrange their playback characteristics
in
a
surprisingly wide variety
of
ways~
When "Clone"isselected on in PLAY Mode, the settings in the "Rhythm", "Order" and
"Mode" pages are what primarily determine the playback characteristics
of
the Sources'
notes/chords. In other words,
if
the Record Bufferisthe active Source, the data storedinit
will be played back according to how you have set the parameters in the "Rhythm",
"Order" and "Mode" pages (plus the "Tempo", "Timing..." and "Cycling..." pages. These
are next in line in your customizing
of
the Cyclone's playback and are discussed in the
next three sub-sections
of
this Chapter following this one.)
For
the purposesofthe Cyclone, a "Clone" is basically an exact copy,ora variation of,
an original Source list
of
pitches. This "listofpitches" is the contentsofthe Record Buffer,
or
the real-time input from keyboard Zones 1and2.But itisimportant to keep in mind that
in order to actually generate note
outputs from the C)'clone, the following criteria must be
met:
I)
At least one Source must be active. Thisisaccomplished by assigning the Source
to an output Destination (other than Off) in the SourcelDestination Page.
Likewise, there must be something on the receiving end which can make sound
if
it is to be heard.
2) The selected Source(s) must contain some notes to
be
Cloned.
For
the Record
Buffer, this means entering Record
or
Hold mode and playing some notes on the
keyboard, as described in "Record/Hold".
For
keyboard Zones 1 and 2, it simply
means holding down some notes as with a traditional arpeggiator, making sure to
observe the Zone
HiILo note Limits.
3) Rhythm triggers must be generated to signal the
C)'clone that it is time to play
some notes! Where this trigger comes from
is
definedbythe Rhythm parameter.
Cloning:
Rhythm,
Order,
Mode
Page 35
Page 33

9.2
RHYTHM
Unlike the pitch Sources, thereisonly one active Rhythm al anyone timeinthe Cyclone. but
there are three
to
choose from:
rC
PU
LS
LP
Recorded
Pulse
Live
The rhythm triggers are based on a previously input
(either
in
realorstep-time) patternofpolyphonic
timing data in the record buffer.
If
there is no data,
there will be no triggers! Up to 32 timing events can
be recorded per Program,
as
outlined in
"Record/Hold".
The rhythm triggers are based on an internally-
generated pulse clock, with the pulse note value,
duration, and other characteristics defined by
parameters in the Timing Page.
The rhythm triggers are input live from the keyboard,
using the Control Zone.
LS refers to Live Single Triggers, which means a
trigger
is
only generated on the firstofmultiple
simultaneously held notes played
in
the Control
Zone.
LP
refers to Live Poly Trigger, in which a trigger is
generated for every note played in the Control Zone,
with overlapping allowed.
Once a rhythm trigger has been generated, the remaining questions to be answered
before notes can be generated are
1)
how many? and 2) which ones?
The
Mode
parameter provides the answer
to
the first, while the Order parametertakes careofthe
second.
9.3
MODE
The Mode parameter specifies how many notes from the Source to play at a given
trigger, and allows several classes:
Display
Meaning
rC
As Recorded
Fl..·F8
Fixed
AL
P2..
·P8
Proportional
Description
The numberofSource notes played is based on the
recorded note groupings.
The number
of
Source notes played is fixed between
1 and 8 notes.
The number
of
Source notes to play at this trigger
is
proportional to the total numberofSource notes with
a divisor
of
1 through
8.
ALisdivisionby1.
Page 36
Cyclone
Owner's
Manual
Page 34

r2"'r8
Random
The
numberofSource notes is a random
number
between 1and the specified number.
9.4
ORDER
As previously indicated, the "Order" parameterdefines the criteria by which the
particular Source notes to generate are determined. The actual Values represent the
valid combinationsofthe ordercriteria (chronological, note#,orrandom), the initial
direction, and whether to alternate directions with each scan
of
the Source note list, as
described in the following table.
Chronologically - the
C)'clone
will process notes/chords in the exact order it
receives them from the Master.Itwill then transmit them as follows:
rF
Received Forward chronologically, forward only
rb
Received Backward chronologically, backward only
Fb
Forward-Backward chronologically, initially forward, alternating
bF
Backward-Forward chronologically, initially backward, alternating
By
Note # - the
C)'clone
will process notes/chords by Note Number.
The
chronological order it receives them from the Master is ignored.Itwill then transmit
them as follows:
UP
dn
Ud
dU
Up
Down
Up-Down
Down-Up
by note #, ascending only
by note # , descending only
by note #, initially ascending, alternating
by note #, initially descending, alternating
Random-
the
Cyclone
will process notes/chords randomly.
The
note
number
or
chronological order it receives them from the Master are ignored. It will then transmit
them as follows:
rn
Random
Random order, repeats
of
the same note allowed
9.5
CLONING: THE GENERAL CASE
With a little thought, it is possible to understand how these Cloning parameters, in
conjunction with the SourcelDestination parameters, can be defined to implement the
traditional performance techniques. Classical arpeggiation is really
just
the
combinationofa keyboard Zone, a Pulse Rhythm, Fixed I Mode, and
Up-Down
Order, while sequencing would result from activating the Record Buffer, using
Recorded Rhythm, As Recorded Mode, and Received Forward Order. However, all
combinationsofthese parameters are valid, leading to a large numberofcompletely
new performance techniques, which together are called "Cloning".
Cloning:
Rhythm, Order,
Mode
Page 37
Page 35

Chapter 10
Tempo, Timing and Cycling
10.1
TEMPO
The "Tempo" parameter controls the rateofthe Cloning output if being driven by the
CJclone's
internal hardware clock. Itisdisplayedasone-half the actual beats
per
minute due to the wide rangeofavailable tempos and the limitsofthe 2-digit display.
The Tempo range is displayed
in
"Beats Per Minute" from
10
bpm to 398 bpm (each
beat represents a quarter-note). This translates to a display range
of
5 bpm to 199 bpm
when cut
in
half. (Note that the display will revert to the "deciheximal" convention at
an actual Tempo
of
200 bpm).Ifeither External SyncorMIDI Sync has been selected
in the corresponding Master Parameters, the Tempo parameter display shows
f1EC"
as
a reminder, and editing
of
the Tempoisnot allowed.
When
in
Play Mode, the Play LED will flash at the actual Tempo as an indicator that
the Sync source is providing the appropriate timing reference. This applies to the
internal hardware clock as well.
Tempo
Tap
The C)'clone provides the ability to "tap" a Pedalinorder to defineoralter the
Tempo. The procedure for defining a Pedal
to
do thisisdescribed
in
the "Pedals"
section. (Note: the
Cyclone
ships from the factory with Pedal 4 already set for Tempo
Tap). This section describes how
to
actually use that Pedal for Tempo
Tap
in realtime. Assuming that such a Pedal has been assigned, all that is required is to
understand how the
C)'clone interprets the taps received from the
Tempo
Tap
Pedal.
Each tap is considered to represent a quarter note. The C.yclone uses an average
of
the
two intervals defined
by
the last three taps to calculate what the intended Tempo should
be. The full range
of
the Tempo parameterisavailable from the the
Tempo
Tap
Pedal,
so a little arithmetic shows that the slowest tap that can be interpreted
is
6 seconds.
Once beyond the 6-second limit, the
Tempo
Tap "times out" and resets, throwing out
the previous tap times and starts waiting to get three new beats to update the Tempo.
If
a tap is missed, itispossible to force an early reset by pressing and holding the Enter
button and then tapping once. This can be useful since 6 seconds
is
often a long time to
wait
in
a pieceofmusic.
As the resolution
of
the tapped Tempo is much more than can be displayed, the Tempo
is shown with the Value/Edit dot lit
if
the Tempo has been defined by tapping. The full
resolution is also stored and recalled with the Program.
Tempo,
Timing
and
Cycling
Page
39
Page 36

10.2
TIMING
...
The Timing page groups the parameters which define the characteristicsofthe Pulse
Clock used for Pulse Rhythm. These parameters have no effect in any other Rhythm!
P.n - Pulse Note
The Pulse Note
(p.n)
defines the time between Pulses. The numeric Values represent
the corresponding tempo-independent beat value
as
follows:
4 quarter-note
8
eighth-note
12
eighth-note triplet
16
16th-note
24
16th-note triplet
32
32nd-note
48
32nd-note triplet
96
64th-note triplet
tV
Tuplet mode
A Pulse Note Value
of
tV indicates Tuplet mode. In Tuplet mode, the time
between beats
is
calculated dynamically by dividing the lengthofthe Record
Buffer in beats by the number
of
notesinthe Source. The Record Buffer
length is available for editing in the ReclHold Options Page as the
End
Beat
(Eb)
parameter. Thus in Tuplet mode, the timeofeach iteration thru the
Source note list is a constant equal to the End Beat. Setting the
End
Beat to 1
allows division
of
the basic quarter-note according to how many notes are
held
on
the keyboard. Note also, each Source is actually able to Pulse at
different times, allowing poly-rhythms between the Sources.
d.V
-
Duration
The Duration (d.V) parameter defines what percentageofthe time each Pulse Note
stays gated, where 16 is 100%.
The
range is from 1 to31allowing approximately a
6%
to 194% variation.
The ability to provide a legato pulse, with Duration Values greater than 16, provides a
whole new feel even to classic arpeggiation, and works especially well with sampled
pianos.
On
the other hand, a durationofless than16creates a more mechanical,
staccato effect.
Page 40
Cyclone
Owner's Manual
Page 37

L.i -
Link
The Link (L.i ) parametercontrols whether the Sources share the same Pulse Clock
(when not in Tuplet mode).
Display
Meaning
OF
Off
{)Il
~1
Description
the Sources pulse independently.
the Sources are "linked" together, causing them to
pulse in phase.
The effect
of
this parameter is pot audible unless multiple Sources are active, and the
Sync-to-Trigger (SY) parameter (located in the Cycling Page)
is
not settoOff
(OF) or
Cycle (CY). Out-of-phase pulses are possible
if
LinkisOfr
and Sync-to- Trigger is set
to Clock
(CL)orOrder (Or).
10.3
CYCLING
...
The Cycling Page contains those parameters which govern the behaviorofthe Cyclone
in
relation to the various levelsofcyclic repetition which can occur during Cloning.
There are 5 nested layers
of
Cycling possible in the Cyclone as follows:
I)
The
innermost layerofCycling (and the shortest) is called the Scan, and is
comprised
of
the streamofnotes which results from one pass thru a list
of
Source notes in a single directioninthe selected Order.
2) The next layer
of
Cyclingiscalled the Basic Cycle, and is comprised
of
either one Scan (as in the caseof"Up" order)ortwo Scans (as in
"Up
and
Down" order).
4) The next layer
is
the Auto-Transpose Repeat.
3) The next layer is the Auto-Transpose Stage.
5) The outermost layer (and the longest)
is
simply called a Cycle.
In
Play
Mode, a single Cycle is generated by pressing Clone with Cycle off, while
infinite multiple Cycles are enabled
if
Cycleison.
The Auto-Transpose Repeat and Stage cycles are controlled
by
p,munetersinthe Auto-
Xpose Page, and covered in more detail
in
"Auto-Transpose".
E.b
-
End
Beat
The End Beat (E.b) parameter serves,two purposes.
In
Recorded Rhythm, it defines
the length
of
the recorded timing patterninquarter-note beats.
In
Tuplet modeofPulse
Rhythm (see "Timing,(Pulsing)"), the End Beat is used to define the length
of
time to
be sub-divided by the number
of
Source notes. The End Beat can always be changed
without losing any
of
the rhythm event data in the Record Buffer. The rangeofthe End
Beat is from 1 to
64
quarter-note beats.
Tempo,
Timing
and
Cycling
Page
41
Page 38

S.Y - Sync-to-
Trigger
The Sync-to-Trigger (SY) parameter allows
the
ability to synchronize various
functional behaviors
of
the
Cyclonetothe gatingofnotesonthe keyboard. (This
parameter has no effect
in
Live Trigger Rhythms). For
all
Values, the "Trigger" being
referred to
is
a transition from no notes being held/gatedtoany
notes being held/gated
within the Zone(s).
In
Pulse Rhythm,ifLink (Li)isOn, then this definition applies
to
both Zone 1and Zone 2 together; otherwise, each Zone can generate
its
own
independent Trigger. The processing which happens
when
this Triggerisreceived
is
determinedbythe ValueofSync-to-Triggerasfollows:
Display
Meaning
Description
OF
Off
No action results.
CL
Clock
In
Recorded Rhythm,
the
Cyclone re-starts the
timing pattern from the beginning, e.g. Beat
1.
In
Pulse Rhythm, the Cyclone advances
the
internal
Pulse Clock
to
coincide with the Trigger, so that a
Pulse occurs immediately, and notes are generated.
or
Order
In
additiontothe processing described above for
Clock,
all
Sources are forcedtobegin the next Scan.
CY
Cycle
All
Sources
are
forcedtorestart from the beginning
(including
all
Auto Transpose cycles).
r.S -
Mode
Reset
The Mode Reset (r.S) parameter determines what to do in
the
case where the number of
Source notes to play (as determined by the setting of the Mode parameter) is not zero when the
end of a Scan
is
reached.
Display
Meaning
On
On
OF
Off
Description
the internal counter which keeps track of the number
of
notes remainingtoplayissetto0, and the next
rhythm trigger
will
staJ1atthe beginningofthe
Source note list.
the
Cyclone will looptothe beginningofthe Source
note list (during the same rhythm trigger) and
continue
to
generate notes
until
the
number ofnotes
defined
by
the
Modeissatisfied.
i.A -
Invert
Alternate
The Invert Alternate (I.A) parameter changes the way alternating Orders are processed by the
Cyclone when Auto-Transposing.
Display
Meaning
Description
Page
42
Cyclone
Owner's
Manual
Page 39

OF
On
orr
On
At the endofa Scan, the direction is switched,
fonning the Basic Cycle on which the AutoTranspose Stages operate.
A single Scan
in
the initial direction
fOnTIS
the Basic
Cycle for each Repetition and each Stage; then the
Scan direction is inverted to form a new Basic Cycle
for the Repetitions, and the Stages are also processed
in the opposite direction.
Tempo,
Timing
and
Cycling
Page 43
Page 40

Chapter
11
Record / Hold
"Recording" is the processofgetting data into the memoryofthe C)'clone.
The
Cyclone
allows recordingofboth note and rhythm information, and when this information is
received by the
Cyclone,
it is
put
into the Record Buffer.
The rhythm data defines the timing pattern used whenever the "Recorded Rhythm"
parameter (displayed as
rC)isselected for Cloning. The note data is used whenever the
Record Buffer is activated according to the Destination parameter
(dr)inthe
SourcelDestination Page.
Record/I1old
Options
r.I1 -
Record/Hold
l\lode
The Record/Hold Mode (r.I1) parameter controls the add/replace logic during
Recording: .
Display
Meaning
rE
Replace
rG
Replace Gated
Ad
Add
Description
This Mode causes either the note dataorboth the
rhythm and note data
in
the Record Buffer to be
completely replaced
by
the new data received during
the Record-in-Progress state
of
the Recording
process.
If
Recording only notes, only notes are
replaced.
If
Recording rhythm data, then both
rhythm and note data are replaced. The old data is
not actually replaced until Recording starts.
If
Recording rhythm data, the End Beat will have a new
Value when Recording stops as well.
Playing legato,
or
holding any notes, causes the
entire phrase to be recorded just as in Replace Mode.
When the last note has been released, Recording
stops and the Cyclone
retU1l1S
automatically to
Record Ready, waiting to begin again at the next
note.
This Mode preserves the previous contents
of
the
Record Buffer when Recording, as well as the Value
of
the
End
Beat.Ifrecording rhythm events,
new
timing data is mergedinwith the old according to
note-on times.
If
recording rhythm data in real-time
and Cycle is on, then Loop-in-Record mode takes
effect, allowing multiple cycles
of
recording (see
"Record-in-Progress"). The Value
of
the
End
Beat is
preserved as well.
A.C
-
Auto-correct
Step
Size
Record I
Hold
Page 45
Page 41

The
Auto-correct Step Size (A.C) parameter serves two functions when Recording
rhythm events:
1)
In Recorded Rhythm, it defines the auto-correct resolution (also referred to
as quantization) to be applied to the note-on times when Recording.
2)
In
Live Trigger Rhythms, it defines the Step Sizeofthe current Recording
Step Time with each press
of
a key in the Control Zone. Like the Pulse Note
parameter, it is specified
as
a beat-value:
4
quarter-note
8 eighth-note
12
eighth-note triplet
16
16th-note
24
16th-note triplet
32
32nd-note
48
32nd-note triplet
OF
64th-note triplet
The
OF
Value indicates that no auto-colTection is taking place This means
that note-ons are being Recorded at the
fuJI
internal resolutionofthe C)'c1one
(24 pulses per quarter-note, same as MIDI Clock). When used as a Step Size,
it
indicates a 64th-note triplet as indicated (not a zero Step Size!).
NOTE:
Since auto-correction is a processofdetermining the closestoftwo pulses
to use for an event time, and since a 32nd-note and a 64th-note triplet consist
of
3
and 1 pulse each, and hence not divisible by
2,
it should be noted that auto-
correction by these values will result in "skewed" timings.
If
utmost accuracy is
important, these settings should be avoided by increasing the
Tempo
and using a
larger Step Size. This does not apply to its use
in
Step Recording.
As can be seen from the above, many different styles
of
Recording are available in the
Cyclone. Exactly which style is available
or
active depends primarily on the Valuesofthe
Rhythm and RecordlHold Program Parameters and the order
of
activating the various
Program Functions in Play Mode. The whole Recording process has four distinct stages
- Record Ready, Record Start, Record-in-Progress, and Record Stop - quite similar to a
tape recorder
or
sequencer. At each point in the process, several options may be present, as
described below.
1)
Record
Ready
Recording is enabled simply by pressing the Record/Hold switchinPlay Mode (with
Manual Control deactivated), thus entering the "Record Ready" state. In this state:
•
The
Record/Hold
LED
flashes at the current Tempo.
•
If
Cloning was enabled prior to entering Record Ready, then the output
continues normally.
It
may be stopped at any point by pressing "Clone".
Turning on Manual Control will abort the recording.
Page
46
Cyclone Owner's Manual
Page 42

•Ifnot already Cloning, then pressing the Clone switch enters the "Clone Pause"
mode, in which the Clone
LED
is on, but no actual output is generated,
awaiting the start
of
Record.Ifthe "Recorded Rhythm and Click"
(CL)
parameter has been programmed for Pedal 1 (see "Pedals 1 & 2"), a
metronomic click audio output will be available at the Pedal 1jack during Clone
Pause mode. Manual Control is automatically disabled
in
Clone Pause mode.
• "Cycle" may be turned on and
off
at will.
• Turning Manual Control on with Clone
off
will abort Recording andgodirectly
to the Chord Hold mode described
in
"Control Zone Parameters",
•
If
not CloningorpausedinRecorded Rhythm, pressing Record/Hold again will
also abort Recording.
~
• Pressing the "Store" switch erases
all
notesinthe Record Buffer, and all
rhythm events
if
in the
Cycloneisin
"Clone Pause" and Recorded Rhythm.
The Store LED will pulse once to indicate the erasure. This will also set the End
Beat to 1
if
in Tuplet Mode.
Record /
Hold
Page 47
Page 43

2) Record
Start
Initiating a Recording can be achievedbyanyoneofthree methods. Recording actually
starts under any
of
the following circumstances:
•
If
the
Cyclone
is in Record Ready, the first note is depressed on the keyboard
starts the Recording.
•
If
the
Cyclone
is in1)Record Ready, 2) Cloningorin
Clone Pause mode and
3)
in
Recorded Rhythm, pressing Record/Hold again starts the Recording.
This allows the first rhythm event to occur
il.fkr Beat
1.
•Ifthe
Cyclone
is not in Record Ready, butif1)
Zone
l's
actual Destination
channel is the same
asiliatofthe Record Buffer (and neither is Off) and 2)
notes are being held
in
Zone1,pressing RecordlHold starts the Recording.
This allows for a "quick start" mode.
In any case, the following actions occur immediately:
•
If
the Destinationofthe Record Buffer (dr)isOff, then itisautomatically
activated on the Basic Channel.
•
If
the RecordlHold Mode
(rH)
parameter is either Replace
(rE)
or Replace
Gated
(rG),
then the previous contentsofthe Record Duffer are erased, and the
End
Beat
(Eb)
is set to the maximum Valueof64.
• Zones 1 and 2 are deactivated for the duration
of
the Recording session.IfZone
1 is on the same Destination channel as the Record Buffer, any notes in Zone 1
are recorded. Any other notes held
in
the Zonesorcurrently being Cloned will
be muted.
•
If
previously in Clone Pause mode, then Cloning is actually activated.
If
previously actually Cloning, then it is stopped and re-started.
•
If
Cloning in Pulse Rhythm, Cyclingisautomatically enabled (if not already).
• The RecordIHold LED comes on steady to indicate transition to the Record-inProgress state.
• Manual Control
is
automatically disabled.
3)
Record-in-Progress
The behaviorofthe
Cyclone
during the Record-in-Progress state depends on a
combination
of
factors:
•
If
Cloning is not enabled, then "Holding" occurs. Holding is a special type
of
recordinginwhich only notes are recorded into the Record Buffer, and
in
which note-offs are not echoed over MIDI, causing the recorded notes to
sustain indefinitely. This is similar to the function
of
a normal HoldorSustain
pedal, except that the notes are committed to memory.
Page 48
Cyclone
Owner's
Manual
Page 44

•IfCloning is enabled, then the
Rhythm
determines the basic
behaviorofthe
Cyclone:
The
Cyclone generally behaves like a traditional
sequencer, passively recording the
new
note
and
rhythm data
and
echoing the notes in real-time.
The
Cyclone records the notes only (and retaining the
prvious
rhythm
information), without echoing the
performance itself, yet actively Cloning the
new
notes.
PULSE
RHYTHM
RECORDED
RHYTHM
LIVE
TRIGGER
~
RHYTHMS
The
Cyclone
records in "Step
Mode",
with the
"Step
Time"
advanced by pressing any key in the Control
Zone
and the "Step Size" equal to the Valueofthe
Auto-correct Step Size
(AC)
parameter.
The
new
note
and
rhythm
data is recorded and echoed.
•
Rhythm
events are recorded onlyifCloning
in the RecordedorLive
Trigger
Rhythms
while Recording. A rhythm
event
contains the note-on
and
note-off
times associated with a singe key press.
The
resolutionofthe timing data is the
sameasMIDI
timing clocks,24pulses-per-quarter-note.
The
note-on times
only
are quantized according to the Auto-correct
(AC)
setting when recorded;
the actual note-on time is not recorded. A Recording may be up to
64
beats
long
and
containupto 32 events. Any events past this
maximum
are
not
recorded.
• Note
data
is always recorded
except
when notes are played in an inaudible
Control
Zone
(see
chpter
12), in which
case
it is recorded as a
Restifnot
recording rhythm events
and
ignored otherwise. Note
data
includes both the
MIDI
note #
and
the note-on velocity. A
Rest
is a special
kindofnote
which
is
treated as a normal
Source
note in all respects,
except
that it is
muted
when
Cloned.
This
allows breakingupof
Rhythms
in predictable ways.
Upto32
notes can be recorded,
and
any notes
past
this
maximum
are neither recorded
nor
echoed.
•If1) recording
rhythm
events in real-time (e.g. Recorded
Rhythm);
2) the
Record/Hold
Mode
(rH)isAdd
(Ad);
and3)Cycle
is on, then a special
"Loop-in-Record"
mode
is active.
In this mode, the
Cyclone
stays in
Record
indefinitely, allowing
repeated
cyclic overdubs to previously recorded note and rhythm data
similartomost
drum
machines.
Notes
being held when the End Beat time
occurs
are muted
and
recorded with a
note-off
time equal to the End Beat.
RecordIHold
Page 49
Page 45

4) Record Stop
The endofthe Record-in-Progress state is causedbyanyofthe following events:
• Pressing any Front Panel switch.
• The use
of
any Pedal function other than Sustain, Sostenuto, Tempo Tap, Click
Out,
or
External Sync (see "Pedals 1 &2"and "Pedals 3 & 4").
• The End Beat
is
settothe lengthofthe recording when recording rhythm events
(and not in Loop-in-Record).
• Release
of
the last note on the keyboard wheninReplace Gated Record/Hold
Mode.
• Receipt
of
a MIDI Program Change on the Basic Channel (see Chapter15).
• Receiptofa MIDI Start or Stop Command,ifMIDI Clock is settoReceive (see
Chapter 15).
The action which is nonnally associated with the event causing Record to Stop also
occurs and has the same result as
if
the RecordlHold LED were off, except:
• The Record/Hold switch simply stops Recording. All other functions continue
in effect.
• The Manual Control switch causes a change
to
the Chord Hold modeifnot
Cloning.
• Release
of
the last note on the keyboardinReplace Gated Record/Hold Mode
causes the Cyclone to return to the Record Ready state, waiting for a new
keyboard note to re-start Recording.
• For all events,
if
recording rhythm eventsinReplaceorReplace Gated
RecordlHold Mode, then the End Beat
is
set equal to the closest whole beat to
the current Recording time.
Page 50
Cyclone Owner's Manual
Page 46

Chapter 12
Control Options...
In addition to the two keyboard Zones("1"
and "2"), the
Cyclone
provides another Zone,
called the Control Zone. This Zone
is
not a source Zone, although it exists on the Master
controller as a section
of
its keyboard. What the Control Zone does is provide a user-
definable section
of
the Master keyboard thatisusedtoperform a numberofcontrol
functions rather than musical data.
The "Control Options..." page comprises what we call the Control Zone which is used for
three independent functions:
• Input
of
Live Triggers and Step Advance for
LS
and
LP
Rhythms.
• Manual doubling and transposition while Cloning
or
Holding.
• Definition
of
Rests
These three functions can all be available simultaneously,
if
so programmed and enabled.
Input
of
Live Triggersisenabled automatically whenever Cloning in Live Single Trigger
or
Live Poly TriggerRhythms, and disabled at all other times. The Live Trigger note-on
velocity
is
used for all notes Cloned for that Live Trigger. Step Advance is automatically
enabled whenever Recording in Live Trigger Rhythms. Step Advances are never echoed,
regardless.
Manual doubling and transposition is enabled in PLAY Mode through the Manual Control
switch.
The
particular function is definedbythe Manual Control parameter parameter (see
below).
If
Cloning is enabled, then the transposition and doubling controls operate on the
Cloned note stream (at note-on time only).
If
Holding, then the Manual Control function
operates on the Record Buffer note list like a traditional Chord Hold, and the note-on
velocity
of
the Control notesisused for the transposed/doubled notes. (Note: Clone and
Hold may be activated either before or after Manual
Control-
it makes no difference).
Rests can be inserted into a Source note list instead
of
a note number by setting up an
inaudible Control Zone which overlaps the input keyboard Zone, and then playing
or
holding notes in the overlap region.
The available Control Zone functions, along with their corresponding display mnemonics,
are listed below:
C.
t Manual Control
L.n
Low Note
II.
n High Note
b .n Base Note
A . U Audible Control
P.
r Manual Transpose Priority
C .P Chain Program
P •3 Local Pedal 3
P.4
Local Pedal 4
E.3
MIDI Pedal 3
E . 4 MIDI Pedal 4
Control Options
...
Page
51
Page 47

C.t
-
Manual
Control
The
Manual Control
(C.t)
parameter determines whichoffour functions is enabled by
the Manual Control switch:
Display
tG
tC
dG
dC
Meaning
Transpose Gated
Transpose
Continuous
Double Gated
Double Continuous
Description
The
Holding or Cloning notes are transposed by the
interval definedbythe numberofsteps between the
transposing note within the Control Zone and the
Base Note (defined below).
If
more than one note
is
held in the Control Zone, the Transpose Priority
parameter is used to determine which note to use as
the transposing note.
If
no notes are held, there is
no
output at all from the CloninglHolding function thus
"gating" the playback.
Same as Transpose Gated, except that the
CloninglHolding function continues as
it
would
normally evenwhen notes in the Control Zone are
released.
The Holding
or
Cloning notes are doubled by each
note held in the Control Zone (up to 8), at intervals
defined by the number
of
steps between the doubling
note within the Control Zone and the Base Note, on
the same MIDI Channel as the Held/Cloning notes.
If
no notes are held, there is no output at all form the
Cloning/Holding function thus "gating" the
playback.
Same as Double Gated, except that the
CloninglHolding function continues as it would
normally even when notes in the Control Zone are
released. Legato playing
of
the control notes results
in an additional double for each such note, up to the
8-double limit, while staccato playing replaces any
previous doubles.
L.n
and
H.n
-
Zone
Limits
The
Control Zone can be placed anywhere on the keyboard, and may overlap with
Zones
1and 2. The
Lo
Note
(Ln)
and Hi Note
(lin)
parameters define the endpoints
of
the Control Zone, and are best defi!led using the Note# sh0l1cut edit described in
"Edit Mode". The
Lo
and Hi Notes cannot "cross". Notes playedinthe Control Zone
will cause the MIDI dot to flash in Play Mode.
b.n
-
Base
Note
The
Base Note (b.n) parameter allows a note to be defined (anywhere on the keyboard)
which is used for computing the transposition and doubling intervals for the Manual
Page 52
Cyclone
Owner's
Manual
Page 48

Control Function. That note will be considered to mean "no Transpose."
For
example,
when
CO
is used as the Base Note (as in the factory programs), usingFOfor a manual
transpose would result in a transposition
of
a fouth. It is best defined using the Note#
shortcut edit defined in "Edit Mode".
The
note does not have to be in the Control Zone.
A.U
-
Audible
Control
The Audible Control (A.U) parameter determines whether notes played within the
Control Zone are
hmdas well as providing control data from the Master to the
Cyclone.
OF
On
Off
On
A note played
in
the Control Zone will not be echoed
out
MIDI.Ifthe note is also in Zone 1or2, it is
treated as a Rest.
A note played
in
the Control Zone will be echoed out
on the Basic Channel
if1)not also in Zone 1or2,
and 2) MIDI Echo
is
On.Ifit is also in Zone 1or2,
then
1)
it is treatedasnormal input to that Zone; 2)
any Control function
in
effectisinvoked asifthere
were no overlap; and 3) no echo on the Basic
Channel
is
performed.
P.r
-
Transpose
Priority
The Transpose Priority
(P.r)
parameter provides the four standard keyboard priority
schemes for choosing between multiple notes in the Control Zone when manually
transposing. In the following table, the transpose interval
is
determined by:
Displa)'
Meaning
Description
LO Lowest Note
The
lowest note in the Control Zone.
Hi
Highest Note
The
highest note in the Control Zone.
OL OldestNote
The
oldest note being heldinthe Control Zone.
nE
Newest Note The latest note playedinthe Control Zone.
P.3
Local Pedal 3
P .4 Local Pedal 4
E.3
MIDI Pedal 3
E .4 MIDI Pedal 4
These parameters are used to set up pedals 3 and 4. For a complete description
of
pedal
setup and usage, see chapter 14.
Control
Options
... Page 53
Page 49

Chapter
13
Auto-Effects
13.1
AUTO XPOSE...
The Cyclone provides the abilitytoautomatically transpose notes during Cloning, in a
two-level cyclic repetition. The outermost transpose layer
is
refelTed to as a "Stage"
while the lower transpose layer is referred to simply as a "Repeat"
of
that Stage. There
are 8 Stages provided, with up to 128 Repeats per Stage. A Repeat normally consists
of
one Basic Cycle, as described in "Cycling".
Three independent
Auto-Transpose functions are available. At the Stage level, the
Cyclone allows specification
of
a fixed transpose interval which will beineffect for the
duration
of
that Stage.
Two
Auto-Transpose functions are available at the Repeat level. "Transpose by
Inversions" provides the ability to invert the notes within a Source note list
in
generally
the same sense as one inverts a standard triad. Inversion processing begins with the
original Source note list at the
fIrst Repeatofeach Stage, then at the beginningofeach
successive Repeat inverts the note list used by the prior Repeat. Inversions may
proceed either up
or
down, and do not alternate direction automatically. (A note added
to a Source after the beginning
of
the second Repeatofa Stageisinserted into the note
list according to its actual note value, not the value
it would have had
if
it had been
present at the
fIrst Repeatofa Stage and inverted along with the restofthe notes in the
Source).
"Transpose
by
Recursions", also at the Repeat level, provides the ability to add the
same constant interval to the Source notes at each Repeat. This allows such effects as
chromatic variations, circle
of
fIfths, diminished progressions, octaves, etc.
All transpose functions in the
Cyclone
are additive.
A.t
-
Auto-Transpose
Mode
The Auto-Transpose Mode (A.t) parameter conu'ols the enabling and styleofAutoTranspose.
Displa)'
Meaning
OF
Off
On
Normal
i U Inversions
Up
Descripti
on
Auto-Transposeisdefeated, and a Cycle simply
consists
of
a Basic Cycle. Noneofthe other Auto-
Transpose parameters have any effect if this
is
the
selected Mode.
Auto-Transpose
is
enabled, allowing the Stages to
progress as programmed.
Auto-Transpose is enabled, with each Repeat
inverting the note list used in the prior Repeat in the
Up direction.
Auto-Effects
Page
55
Page 50

id
Inversions Down Auto-Transposeisenabled, with each Repeat
inverting
the
note
list
usedinthe
prior Repeatinthe
Down direction.
S.Y -
Auto-Transpose
SJnc
The Auto-Transpose Sync (S.Y) parameter enables/disables a function which
coordinates progression thru the Auto-Transpose
RepealS
and
Stages
by
different
Sources.
If
multiple Sources
are
Cloning, the probable potential exists that due to
differences
in
Basic Cycles that a hannonic dissonance could resultasthose Sources
cycle
thru
the Repeats and Stages out-of phase
with
each other. This
mayor
may not
be
desired.
Display
Meaning
OF
Off
On
On
Description
Progress of the Sources
thru
the Auto-Transpose
Repeats and Stages
is
independent per Source. Each
Repeat contains exactly one Basic Cycle.
Progress
of
all Sources thru the Auto-Transpose
Repeats
and
Stagesislinkedtothat of
the
active
Source
with
the
highest priorityasdefinedbythe
following order: The Record Buffer,
then
keyboard
Zone
1,
keyboard Zone
2.
This Sourceiscalled the
"driving" Source,
anditproceeds thru its own Auto-
Transposition normally,
with
each Repeat containing
exactly one Basic Cycle. For the Synced Sources,
the Auto-Transpose Repeat
is
"de-coupled" from
the
Basic Cycle (which proceeds continuously for each
Source), and instead becomes "synced"
to
the
driving Source Repeats.
r.i -
Recursion
Interval
The Recursion Interval
(r.i)
parameter specifies
the
fixed transpose amounttobe
added
to
all
Source notesateach Repeatofa Stage( other
than
the first). The Recursion
Interval is specified relative
to
Middle C (displayedas"C3"), and maybedefined using
the note-number shortcut described
in
"Edit Mode". Recursions
are
enabled
by
selecting a Recursion Interval other
than
C3, and resultinupward Recursions for notes
greater than that and downward Recursions for notes less
than
that. For example
selecting C#3 will result
in
each successive Repeat being transposedupone additional
semi-tone.
n.t
-
Number
of
Auto-Transpose
Stages
This parameter (n.t) selects the number (upto8)ofAuto-Transpose Stages will
be
usedbythe current program.
E.t
-
Current
Edit
Stage
The Current Edit Stage (E.t) parameter selects which Stage
willbeedited
by
the
Interyal and Repeats parameters.Itmaybeany
Value
from1to
8.
Page 56
Cyclone
Owner's
Manual
Page 51

Ln -
Interval
The Interval (Ln) parameter defines the fixed transpose interval to use as the basic
transpose amount for the Stage selected by the Current Edit Stage (Et) parameter.
It
is
specified relative to Middle C (displayed as "C3"), and may be defined using the notenumber shortcut described in Section 7.2 on "Display Conventions/Shortcuts".
r.E
-
Repeats
The Repeats
(r.E)
parameter specifies how many Repeats to execute for the Stage
selected by the Current Edit Stage
(Et)
parameter. It may be any Value from 1 to
C8
(128).
13.2
AUTO-DOUBLE
The C)'clone has the ability to automatically generate additional notes at fixed intervals
(e.g. octaves) for each Source note while Cloning, i.e. Auto-Doubling. The Doubled
notes are
not counted when processing the Mode parameter, and are generated at the
same velocity as the Cloned Source note.
n.d
-
Number
of
Doubles
The NumberofDoubles (n.d) parameter specifies how manyofthe eight available
Doubles to generate, starting with the first
as
viewed/editedbythe Cun'ent Edit Double
(E.d) parameter.
It
may be any Value from 0 to 8, with 0 indicating that no Auto-
Doubles will be generated.
E.d
-
Current
Edit
Double
The Current Edit Double (E.d) parameter selects which Double will be edited by
the
Double Interval and Channel parameters. It may be any Value from 1 to 8.
i.n -
Double
Interval
The Double Interval (i.n) parameter defines the interval relative
to to
the Cloned Source
note
at
which to generate a Double note.Itis
specified relative to Middle C (displayed
as "C3" when "Enter" is pressed), and may be defined using the note-number shortcut
described in "Edit Mode".
Auto-Effects
Page 57
Page 52

C.II
-
Channel
The
Channel
(CH)
parameter
defines the MIDI Channel
on
which to transmit the
Double
note. Pressing "Enter" permits the selectionofthe following options:
Display
Meaning
1
···1
6 MIDI Channel
Sr
Source
Description
The
Double noteistransmitted on the indicated
Channel.
The
Double note is transmitted on the same Channel
as the
Cloned
Source note.
I
13.3
AUTO-MUTATE
(MODULATIONS)
The
C)'c1one has the unique capability to automatically "Mutate" (modulate) three
important attributes
of
a Clone (note-on Velocity,
Tempo,
and Pulse Duration) in
response to real-time input from the controller keyboard, without manually editing the
corresponding parameters.
n.L
-
Note
Loudness/Velocity
The
Note LoudnesslVelocity
(n.L)
parameter
provides both the manual editingofthe
note-on velocity,
and
the enablingofits Auto-Mutation. (The note-on velocity is often
used in the voicing instrument to control loudness.
Ever
try to get a "V" in a
7-segment
display?).
Display
Meaning
rC
As Received
Pr
Pressure
bn
Bender
t···C
7
Fixed
Description
The
note-on velocity transmitted for a
Cloned
note
will be the
same
as that originally received with the
Source
note.
For
notes in the
Record
Buffer,
the
recorded velocity will be used, while for notes
held
in Zones 1and 2, the velocity received at the time
of
the key-strike will be used.
The
note-on velocity transmitted for a
Cloned
note
will be equal to the valueofthe Pressure control
on
the master keyboard at the timeoftransmission.
The
velocity transmitted for a
Cloned
note will
be
equal to the valueofthe
Bender
controlonthe master
keyboard at the time
of
transmission.
The- velocity transmitted for a
Cloned
note will be the
indicated value. (Note that Values above 99 are
displayed in "deciheximal").
The
Cyclone
uses the nominal valueof64 for the release velocitiesofCloned
notes.
Page 58
Cyclone
Owner's
Manual
Page 53

LA
-
Tempo
Modulation
Amount
The
Tempo
Modulation Amount
(t.A)
parameter defines the intensity and sense
(direction)
of
the modulation to be applied to the Tempoinresponse to changes by the
Tempo
Mod Controller( described below).
The
rangeofValues is from 0 to 32. A
Value
of
16 is used to defeat
Tempo
Modulation. Amounts less than 16 transform
positive
Tempo
Mod Controller values (e.g. pitch bend up) into a slower
Tempo,
while
Amounts greater than 16 transform positive Tempo Mod Controller values into a faster
Tempo.
LC
-
Tempo
Modulation
Controller
Number
The
Tempo
Modulation Controller Number
(t.C)
parameter selects the MIDI Controller
which will be used as the
Tempo
Modulation Controller.
Displa)'
Meaning
Pr
Pressure
bn
Bender
0·..97
Controller
Description
Keyboard Channel Pressure will control
Tempo
Modulation.
The
Bender will control
Tempo
Modulation.
Negative Bender values reverse the sense
of
the
modulation.
The indicated general purpose MIDI Controller will
control
Tempo
Modulation.
d.A
-
Duration
Modulation
Amount
The
Duration Modulation Amount (d.A) parameter defines the intensity and sense
(direction)ofthe modulation to be applied to the Pulse Duration in response to changes
by the Duration
Mod
Controller.
The range
of
Values is from 0 to 32. A Valueof16 is used to defeat Duration
Modulation. Amounts less than 16 transform positive Duration
Mod
Controller values
into a shorter Pulse Duration, while Amounts greater than 16 transform positive
Duration Mod Controller values into a longer Pulse Duration. This parameter has an
effect only when Cloning in a Pulse Rhythm other than tuplet.
Auto-Effects
Page
59
Page 54

d.C
-
Duration
Modulation
Controller
The Duration Modulation Controller Number (d.C) parameter selects the MIDI
Controller which will be used as the Duration Modulation Controller.
Display
Meaning
Pr
Pressure
bn
Bender
0···97
Controller
Description
Keyboard Channel Pressure will control Duration
Modulation.
The Bender will control Duration Modulation.
Negative Bender values reverse the sense
of
the
modulation.
The indicated general purpose MIDI Controller will
control Duration Modulation.
Page 60
Cyclone
Owner's
Manual
Page 55

Chapter
PEDALS
14
Oneofthe most exciting perfonnance featuresofthe Cyclone is its programmable pedals.
In
all there are eight pedals, four local pedals and four externally controlled pedals via
MIDI. These eight pedals can be assigned to any parameter
or
switch on the Cyclone's
front panel.
Of
the eight, the four specified as internal and external pedals 3 and 4 are
programmable with each program, so their functions can be set
to
whateverisuseful for the
particular program. The other four, internal and external pedals I and 2 are set once for all
programs and are always active.
Note: All internal pedal jacks
ar~for
switch type pedals. Polarityofpedalisdetected at
power on. Make sure pedals are installed before poweris applied.
Because pedals 3
& 4 are programmable, they are accessed
in
the Program section under
the Page "Control Options
...
", while Pedals 1 & 2 are accessed through the "Pedals 1 &
2
...
" Page in the MASTER section. In addition, the assignmentofMIDI controllers to
External Pedals is done in the "MID!.
..
" Page.
In the "Control Options
...
" Page, the parameters are:
P.3
Programmable Local Pedal 3
P.4
Programmable Local Pedal 4
E .3 Programmable External Pedal 3
E.4
Programmable External Pedal 4
In
the "Pedals 1 & 2
...
" Page, the parameters are:
P.1 Programmable Local Pedal 1
P.2
Programmable Local Pedal 2
E .1 Programmable External Pedal 1
E.2
Programmable External Pedal 2
In the "MIDI
...
" Page, the parameters are:
C
.1 Controllernumber assigned to External Pedal
#1
(00-95)
C
.2
Controller number assigned to External Pedal #2 (00-95)
C
.3
Controller numberassigned to External Pedal#3(00-95)
C.4
Controller numberassigned to External Pedal #4 (00-95)
The functions that the pedals can perfonn include
• Editing any parameter
• Simulating any front panel switch
• Program chaining
• Sustain
I Sostenuto Pedal Functions
• Tempo Tap Input
• External Sync Input (Pedal 2 Only)
• Audio Click Output (Pedal 1 Jack Only)
Pedals
Page
61
Page 56

Pedal
Function
Listing
Display
IC
DC
DE
LE
liE
SS
DS
CII
SU
So
It
Name
Increment
Decrement
One-Shot Edit
Latched Edit
Hold Edit
Single Switch
Double Switch
Chains
Sustain
Sostenuto
Tempo Tap
Descri
plion
Usedtoincrement the valueofthe parameter
selected.
Used
to
decrement
the
valueofthe parameter
selected.
Depressing
the
pedal causes the selected parameter
to
changetoa new value. Releasing the pedal has no
effect.
Depressing the pedal causes the selected parameter to
change
to
a new value.Depressing
the
pedal again
causes the parameter
to
change backtoits original
value
Depressing the pedal causes the selected parameter to
change
to
a new value, while releasing the pedal
causes the parameter
to
change backtoits original
value
Used
to
simulate any button on the Cyclone's front
panel,asthough the buttonistapped when the pedal
is
pressed Nothing occurs when pedalisreleased.
Used
to
control any button on the Cyclone's front
panel. Similar
to
Single Switch except when a pedal
is
depressed simulationofthe button being pressed
occurs and when the pedal
is
released simulation
of
the button being released occurs.
Every SETUP #
in
the C)'Clone hasanalternate
SETUP
#.
We designed this feature to allow the
flexibility
of
being abletoswitch around to different
SETUP# instead
of
having to program all your
SETUP #
in
orderofwhich you want to use.
Holds the notes
in
a))
zonesbydefen'ing Note Offs
until the pedal
is
released.
Holds any notes
in
all
zones which are already gated
when the pedal
is
depressed. Notes played while the
pedalispressed are played normally. When the pedal
is
released, the held notes,are released.
Accepts taps
at
quarter notestoset the tempo. See
chapter
10
for more information.
Page
62
Cyclone Owner's Manual
Page 57

"
24
48
96
CL
24 ppq Ext. Sync
48 ppq Ext. Sync
96 ppq Ext. Sync
Click Out
(Pedal 2 Only) These functions allow the use
of
pedal 2 as a sync input for sychronizing to the high
resolution clocks
of
certain sequencers and drum
machines, The input must be a positive pulse greater
than 1 volt and longer than 100 uSee. This input is
not recommended for audio inputs.
(Pedal 1 Only) This function allows the pedal 1jack
to be used as an audio metronome output jack.
When recording a rhythm with record enabled and
clone enabled, a 3 volt pulse is produced for 1 mSec
on each quarter note.
Paramcter
Edit
Examplc
A simple exampleofhow to use oneofthese pedals might be to enable.auto-transposition
while pedal 3 is pressed. Since we are using pedal 3 this function will only be used for this
program.
• Press button 4 until you reach PEDALS.
P.I shows in display. P.I means
we
are working on Pedal 1 now. Use
the>
button to choose Pedal 3 displayed as
P.3.
• Press
ENTER
button.
For
this example use <or> to select
HE
in the display.
This means we are setting pedal 3 to
be
a "held edit" type pedal. This type
of
pedal function edits one parameter onlyaslong as the pedal is held down. When
the pedal is released, the parameter changes back to its original value.
• Press and hold pedal 3 down. Select the Auto-Transpose Enable in the usual
way: While still holding the pedal down, press button 3 to get to the "AutoXpose
...
" page. You will see that the display looks like things are happening
normally. Use the
<
or>
buttons to go to
A.I
and press "Enter".
Now
set the
value you would like to have when the pedal is held, in this case
011,
then release
the pedal. The pedal is now assigned to turn on the Auto-Transpose function.
Use the
<
or>
buttons to turn
off
Auto-Transpose so that when pedal 3 is not
held, Auto-Transpose will be disabled
..
• Press the pedal. You will notice that while the pedal is held, auto transposition is
enabled, turning
off
when the pedalisreleased.
Pedals
Page 63
Page 58

Program
Chain
Operation
• Select the first programinthe chain.
• Select parameter
CP
(Chain/Map Program)inthe "Control Options
...
" page and
set
it
to the next program number in the chain. Store the modified program.
• Select the next program
in
the chain, select the Chain/Map Program parameter, set
it to the program number which follows
it
in the chain. Store the modified
program.
• Repeat the previous operation for each step in the chain.
• Next, we need to assign one
of
the eight pedals to CHAIN MODE. Lets use
Pedal 2
(P.2).
• Press button 5 until
yOll
reach "MID!..." Use the <or> buttons until you reach
P.2.
• Press ENTER. Use the <
or>
buttons to select ell
in
the display.
• Press ENTER. Pedal
#2isnow assigned to CHAIN SELECT.
• Return to the first program
in
the chain. Pressing pedal 2 will step through the
chained programs.
Switch
Simulation
Operntion
• Press button 5 to getto"MID!..." Use the <
or>
buttons to select which pedal
you want to use.
• Press ENTER. Use the
<
or
> button to select either
SS
(Single Switch)
or
DS
(Double Switch).
• Depress and hold the pedal down. Now press and hold the button you want the
pedal to simulate.
• Release the pedal (display will show
SS
or
DS depending on which one you
selected). Release the button. Pedal
is
now assigned to the button.
Page 64
Cyclone
Owner's
Manual
Page 59

Chapter 15
MASTER Parameters & Functions
The Master Parameters define the detailed behavior to expect from the Master Functions.
The following sections are organized to present information according to the general layout
and functional breakdown
of
the Edit Mode Pages on the Front Panel, allowing quick
access to the function
of
interest.
15.1
"MIDI ..."
The MIDI parameters permit you to customize the Cyclone's MIDI functions for both
transmit and receive operations to best suit your MIDI requirements. When "MID!..."
is selected, pressing the <
and>
keys accesses the unit's seven MIDI parameters. In
this Page, you are able to set the
Cyclone's:
Parameter
Displayed
as
•..
Value
Range/Status
Basic Channel
b.C
1'''16, plus
OMNI
Mode
MIDI Echo
E.C
On or
orr
MIDI Clock
C.L
On or
Orf
I\'llDI Pedal 1
E.I
00..·97
MIDI Pedal 2
E.2
00·..97
MIDI Pedal 3
E.3
00..·97
MIDI Pedal 4
E.4
00"·97
As with
other
Cyclone
functions, when the desired parameter is selected, pressing
"Enter" gets you into the Value/Status mode. Then pressing the <or> keys lets you
select the desired numeric Value or Status. When the desired ValueorStatus is
displayed, pressing "Enter" again exits the mode and returns the display to the
parameter name.
b.C
-
Basic
Channcl
The
Basic Channel parameter selects the MIDI Channel on which the C)'c1onc:
• Receives MIDI Notes and Controllers, and Program Change messages.
• Transmits Cloned/Held notes when
the conesponding Source Destination is set to
the Basic Channel.
• Re-transmits notes received
in
ZonesI and 2 when not Cloning/Holding and the
corresponding Source Destination is set to the Basic Channel.
Master
Parameters
&
Functions
Page 65
Page 60

The
available values are MIDI Channels 1"'16, plus
OMNI
Mode
(displayed as
On)
which means that the
Cyclone
will receive on any Channel.
WheninOMNI
Mode, the
Cyclone
will transmitonChannel I for all situations described above.
This
is
important to remember because
if
the
Cyclone
has been set to transmit to a Destination
on the Basic Channel
or
any Channel higher than 1 (see Chapter5 "Source/Dest..."),
the
Cyclone
will switch automatically to transmit on Channel I when
OMNI
Mode
is
selected. This is an operational consideration designed to simplify the
Cyclone's
MIDI
section when
OMNI
Mode is selected. Be careful!
E.C - MIDI Echo
Since the
Cyclone,
like many other MIDI processors, does not have a MIDI Thru
port, there must be some means to pass MIDI data coming from your Master controller
to the Slaves when necessary.
MIDI "Echo" is the function that permits the MIDI
Out
jack
to act asifit were a Thru port when the
Cycloneistransmitting data from its
own
memory. This way, playing your Master in real time while the
Cyclone
is running will
be sent out the MIDI Out jack to yourSlaves all at the same time.
The Echo parameter, displayed as
E.C,
controls whether MIDI Channel data received
by the
Cyclone
is re-transmitted automatically out the
Cyclone's
MIDI Out port.
OF
Off
On
On
Channel Data received at the MIDI Input is not echoed to the
MIDI Output.
Channel Data received at the
~HDI
Inputisechoed if:
1) it is not on the Basic Channel,
or
2)itis
not a note message which falls within the Zone
Limits
of
Zone1orZone
2.
MIDI Echo
is
not
a time delay function.Itis
simply the abilityofthe unit to combine
incoming received MIDI data with internally generated data. Please also note that
MIDI
System data is always echoed, whether this function is turned onoroff. And like all
other
Cyclone
functions, the
Echo
function,orthe lack thereof, is defeated when the
Cyclone
is disabled (display shows "••").
Page 66
Cyclone
Owner's
Manual
Page 61

C.L
- MIDI
Clock
If
the
Cyclone
is being mastered by a SequencerorDrum Machine,itvery likely will
be receiving MIDI Timing Clock
as
wellasNotes and Controller information. In other
cases, the
Cyclone
may be transmitting MIDI Timing Clock to another device like a
MIDI Sequencer
or
Drum Macine. In many MIDI setups thisisvery useful, since the
Cyclone
generates its
own
Clock data (see Chapter10on "Tempo") in addition to
being able to respond to incoming MIDI Clock from another device.
The MIDI Clock parameter controls the response and transmission by the
C,yclone
of
MIDI Clock, Start Command, and Stop Command messages:
OF
Ofr
The
Cyclone
ignores MIDI
Clock,
Sta11,
and Stop
meS6ages altogether.
S n
Send
The
C)'c1one sources MIDI Clock, Start, and Stop
messages. MIDI Start and Stop commands are generated to
co-incide with the status
of
the Clone function, regardless
of
how it is activated/deactivated. MIDI Timing Clock data is
generated whenever internal
or
external Sync is happening
(see "Pedals 1
& 2 Functions").
rC
Receive The Cyclone uses MIDI Clock messages to establish the
Tempo
of
all Cloning functions except Live Trigger
rhythms. Start and Stop messages control the status
of
the
Clone function. Selecting External Sync
(24, 48, 96) for
Pedal 2 ovelTides this selection, and vice-versa. Deselecting this option will re-enable External Sync
if
it is
programmed; otherwise the Cyclone defaults back to Internal
Sync.
E.t,
E.2, E.3 and E.4 -
MIDI
Pedal
Controllers
.
As mentioned in Chapter 14, the C)'c1one permits you to use up to eight switch-type
pedals to control certain fucntions. As you program the various functions
of
the unit,
you will notice that the parameters for four
of
these Pedals are labelled "P"
("physical"), indicating that they are used for local control and are plugged into the
Cyclone's rear panel. The other four are labelled "E" ("external") for MIDI control
from the Master controller.
These are the four Extemal MIDI Pedal Controller Number parameters. They tell the
Cyclone
which MIDI Controller on the Master to use when the functions associated
with the External Pedals have been selected. For example,
if
you assign MIDI
Controller Number 64 to E.1, that means that every time
E.1
is used in a Program, it
will be activated by the Master's Sustain Pedal (MIDI Controller #64 is commonly used
for Sustain Pedal).
If
E.1isset to MIDI Controller #7. the Master's Volume Pedal is
used instead.
Operation
When
"E.l",
"E.2", "E.3"
or
"E.-I" is displayed, pressing the "Enter" key switches
the display to show that Pedal's current MIDI Controller value.
Master
Parameters &
Functions
Page
67
Page 62

Use the <
or
> keys to change the Value (immediate edit). Range is from
00
to 97.
MIDI Controller Values from
98 through 127 are not appropriate for this function and
are not available.
For additional information on setting up pedals and their uses, see chapter
14.
15.3
"DUMP/LOAD
..."
The
Cyclone
permits you to save its memory externally. This means that you are able
to
dump
the contentsofthe unit's 32 Programs to a computer equipped with a
MIDI
interface and
Oberheim
Cyclone
System Exclusive data,oranother C)'c1one.
The
MIDI implementation codes for the unit are printed in the backofthis manual.
You
are
also able to load Programs from an external source into the C)'clone . This
DUMPILOAD capability
provJdes a wayofbacking up your work in the likely event
that you create more than
32
Programsorin the unlikely eventofa malfunction.
Operation:
Press the
MASTER
button four times to enter DUMPILOAD mode.
Use the the
<
or
> buttons to select the desired memory sub-function.
Press ENTER.
The
display will switch to read
"Go"
with a flashing dot.
Press
ENTER
again to execute the sub-function. During the
time
it takes to complete
the routine, the display wiII continue to read
"Go"
but the flashing dot wiII disappear.
Note that some functions take less than one second. When the process is completed, the
display will revert back to the sub-function abbreviation.
Display
Translation
Description
SO
Send One The
Cyclone
will transmit the last selected SETUP to
the receiving device.
SG
Send Global
The Cyclone will transmit the data storedinMIDI and
MASTER to the receiving device.
SA
Send All The Cyclone will transmit all Programs. MIDI data and
MASTER data to the receiving device.
SE
Send Edit
The Cyclone will transmit any edits made to the last
selected SETUPtothe receiving device.
Note: The C)'c1one will receive any MIDI data sent to it regardlessofwhat operating
mode it is in.
Page
68
Cyclone
Owner's
Manual
Page 63

.,
Chapter 16
Reference Data
16.1
Factory Default
Programs
& l\faster
Parameters
Factory Programs (Rev 1.0)
fgm.
00
01
02
03
04
05
07
08
09
10
11
12
13
14
15
16.2
Global
Parameters
Basic Channel: 1
Echo:
On
#Description
Plain vanilla arpeggiation: Pulse Rhythm, Forward
Order, Fixed 1 Mode, Keyboard only, Duration
50%
Same
as 00 plus: Octave Auto-xpose ( 1upand 1
down), Duration 200%, As Received Order
"
""":
Fixed 2
Mode
( 2 notes at a
time), Cycle Reset
Off
.
"
"01":
Two
Zones active at once; split at
C3,
Same
as01plus:
Two
doubles, one down an Octave,
one up a fifth.
Same as
00
plus: Control Zone in loweroctave and a
halfprovides continuous manual transpose, relative
to C2.
"
"01":
Four
chromatic recursions
Same as
01
with Replace Gated
Same as
00
with Pressure modofduration and
velocity.
In the style
of
Emerson: Strange Xpose in Fixed 2
Same as
00with
random oreder and mode.
Plain vanilla sequence: Recorded Rhythm, Forward
Order, As Recorded Mode, Record Buffer only.
Sameas00
with recorded rhythm, order received
Sameas00
with live triggers, recorded pitches.
Dual Arpeggiation with tuplet timing and replace
gated record mode.
Pedal
1:
Click out
Pedal 2: Program Chain/Step .
Pedal 3: Clone Start/Stop
(in
Play Mode)
Pedal 4:
Tempo
Tap
Reference
Data
Page 69
Page 64

16.3 Editable
Parameters
in Factory
Programs
The following parameters in the Factory Programs may be edited. 'Vhen anyofthese
parameters are edited in a Factory Program, the user will only be able to store the
modified program back to the same program (thereby updating the factory program)
or
to oneofthe user programs.Ifany other parameters are modified in a factory program,
the user will be required to store the resulting program
in
oneofthe user program
locations.
• Current state
of
all play mode flags: Clone On/Off, Cycle On/Off, Manual Ctl.
On/Off, Record Ready/Pause/OfflHold.
• Tempo
• Tempo Modulation Source
• Duration Modulation Source
• Destination
of
Record Buffer
• Destination
of
Keyboard Zones 1 and 2
• Chain Program Number
• Internal Pedal 3 and 4 Definitions
• External Pedal 3 and 4 Definitions
Page 70
Cyclone
Owner's
Manual
Page 65

..
16.4
Front
Panel Mnemonics
Program
Edit
Block
Page
Parameter/Function
Value
Displav
Meaninl!
Disolav
Meaninl!
Rhythm
Rhythm -
rC
Recorded [Record Buffer]
Trigger Source
PU
Pulse (see "Timing" page]
LS
Live Single Trigger
LP
Live Poly Trig{!er
Qder
Order-
rF
Received Forward
• Which Notes
rb
Received Backward
Fb
Forward-then-Backward
bF
Backward-then-
Forn1ard
UP
l!l2; Increasing Note #
dn
~;
Decreasing Note #
Ud
l!l2-then-~
dU
~-then-l!l2
rn
Random
Mode
Mode-
rC
As
Recorded
(in
Rec Buffer]
#
of
Source Notes
FI..F8
Fixed
per
Trigger
AL
All (Chord/Cluster)
P2..P8
Proportional
r2..r8
Random
Tempo
Tempo+2
05
..
J9
10..398 Beats per Minute
EC
MIDI/External
SynC
Timing
...
Pn
Pulse Note 4 1I4th note
8
1I8th note
12
1I8th note triplet
16
1I16th note
24
11
16th note triplet
32
1I32nd note
48
1I32nd note triplet
96
J/64th note triplet
tU
Tuplet (proportional)
dU
Duration
01..32
16thsofPn
(16 = 100%)
Li
Link
of
Off
on
On
Cycling...
SY
Sync-to-Trigger
of
Off
CL
Clock
or
Order
CY
Cycle
rS
Mode Reset
of
Off
on
On
iA
Invert Alternate
of
Off
on
On
Reference
Data Page
71
Page 66

Auto-Xpose...
At
Auto-Transpose Mode
of
Off
on
On (Nonnal)
iU
Inversions
Up
id
Inversions Down
SY
Auto-Transpose Sync
of
Off
on
On
ri
Recursion Interval
C=..G8
Note # (C3'"no transpose)
Et
Current Edit Stage
01..08
Stage # for in and
rE
in
Transpose Interval
C=..G8
Note # (C3'"no transpose)
rE
Stage 'Repetitions
01..C8
#
of
Repeats
Auto-Double...
nd
NumberofDoubles
00..08
o
'"
No
Doubles
Ed
Current Edit Double
01..08
Double # for
in
and cn
in
Double Interval
C=..G8
Note # (C3'"same note)
CII
Double MIDI Channel
1..16
Fixed Channel
Sr
Same as Source Dest Chan
Auto-Mutate...
nL
Note Loudnessl
rC
As
Received!Recorded
Velocity
Pr
From Channel Pressure
bn
From Bender WheeVLever
01..C7
Fixed
tA
Tempo Mod Amount
00..32
Mod Amount (16'"no Mod)
tC
Tempo Mod Controller
Pr
Channel Pressure
bn
BenderWheeVLever
00..97
MIDI Controller #
dA
Duration Mod Amount
00..32
Mod Amount (16'"no Mod)
dC
Duration Mod Cntrlr
Pr
Channel Pressure
bn
Bender WheeVLever
00..97
MIDI Controller #
Rec/Hold
Options...
Eb
End Beat
01..64
Timing Pattern Size
[1I4th-notes 1
rll
Record/Hold Mode
rE
Replace
rG
Replace Gated
Ad
Ad:l
AC
Auto-correct/Step Size
4
1/4th note
8 1I8th note
12
1I8th note triplet
16
1I16th note
24
111
6th note triplet
32
1I32nd note
48
1I32nd note triplet
(IF
I/Mth
note triplet
Page 72
Cyclone
Owner's
Manual
Page 67

Control
Options...
Control Zone
Ct
Manual Control
tG
Transpose Gated
Function
tC
Transpose Continuous
dG
Double
Gated
de
Double Continuous
Ln
Control Zone
La Note C=
..
G8
Note
# [Clamped @ lin]
lin
Control ZoneHiNote
C=
..
G8
Note # [Clamped @ Ln]
bn
Base
Note
C=..G8
Note
# for zero tranpose
AU
Audible Control Zone
of
Off
.
on
On
Pr
Manual
Transpose
Lo
Lowest Control Note
Priority
Hi
Highest Control Note
oL
Oldest Control
Note
nE
Newest
Control Note
Pedal Functions
CP
ChainlMap Program 00
..
31
Program #toChain/Map
to
(99)
P3
Local
Pedal
3.
P4
Local
Pedal
4,
E3
External
Pedal
3.
E4
External
Pedal
CII
Chain Program
SS
Single Switch
dS
Double Switch
in
Increment
dE
Decrement
oE
One-shot Edit
LE
Latched
Edit
HE
Held
Edit
SU
Sustain
So
Sostenuto
tt
TemooTao
Source/Des!...
Destinations
dr
Record
Buffer.
dl
Keyboard Zone
1,
d2
Keyboard
Zone
2
of
Off/Source Disabled
bC
Basic
Channel
1..16
Fixed Channel
Keyboard Zone Limits
LI
Zone 1 La Note
C=
..
G8
Note # [Clamped @
Ill]
HI
Zone IHiNote
C=
..
G8
Note # [Clamped @
Ll]
L2
Zone 2 La Note C=..G8
Note # [Clamped @
112]
112
Zone 2HiNote
C=..G8
Note # rClamoed @
L21
Reference Data Page 73
Page 68

Master Edit Dlock
Page
Parameter/Function
Value
Displav
Meanin2
Display
Meaning
MID!...
bC
Basic
Channel
1..16
Channel #
on Omni On [Transmit
Chan
1]
EC
Echo
of
Off
on
On
CL
Clock
of
Off
Sn
Send
rC
Receive
El
Ext
Ped
1Controller,
E2
Ext
Ped
2 Controller,
E3
Ext
Ped
3 Controller,
E4
Ext
Ped
4 Controller 00
..
97
MIDI Controller #
Pedal 1 & 2...
PI
Local Pedal 1Function,
P2
Local Pedal 2 Function,
El
Ext Pedal 1 Function,
E2
Ext Pedal 2 Function
CH
Program Chain
SS
Single Switch
dS Double Switch
in
Increment
dE
Decrement
oE
One-Shot Edit
LE
Latched
Edit
liE
Held Edit
SU
Sustain
So
Sostenuto
tt
Tempo Tap
CL
Click Out
[PI
only]
24
24
ppq Ext Sync [P2 only]
48
48
ppq Ext Sync [P2 only]
96
96000
Ext Sync rp2
onlY]
Dump/Load
...
Send MIDI SysEx
So
Send Current Program,
SG
Send Globals (Master),
SA
Send
All,
SE
Send
EditlRec
Buffer
Go
Prompt [press "Enter"]
Er
Error
RAM Card
dC
Dump All,
LC
Load
All,
FC
Format Card
Go
Prompt [press "Enter"]
Er
Error
Page 74
Cyclone
Owner's
Manual
Page 69

Note.
Note'
Note'
Note'
oE
One-Shot Edit
LE
Latched Edit
HE
Held Edit
SU Sustain
So
Sostenuto
00
..
97 MIDI Cnttlr #
C=.,G8
C=..GI
C=..G8
C=..G8
on
On
rC
Receive
Off
Source/Pest...
Des/iIIa/jollS
dr
Record Buffer,
dl
Keyboard Zone
I,
d2
Keyboard Zone 2
of
Off/Source Disabled
bC
Basic Channel
1..16 Fixed Channel
Keyboard Zone Limits
L1 Zone I Lo Note
HI
Zone IHiNote
L2 Zone 2 Lo Note
H2 Zone 2HiNote
Master Edit Parameters
MWL....
bC
Basic Channel 1..16
Channel'
on
OmlJi
On [Transmit Chan I)
EC
Echo
of
CL
Oock
of
Off
Sn
Send
EI
Ext
Ped
I Controller,
E2 Ext Ped 2 Controller,
E3 Ext
Ped
3 Controller,
E4
Ext Ped 4 Controller
Pedal I ...
2..,
PI
Local Pedal I Function,
P2
Local Pedal 2 Function,
EI
Ext Pedal I Function,
E2 Ext
Pedal
2 Function
CH
Program Chain
SS
Single Switch
dS
Double Switch
In Increment
dE
Decrement
tt TempoTap
CL
Click Olll
[PI
only)
24 24 PM Ext Sync [P2 only)
48 48 PM Ext Sync [P2 only)
96 96
PM
Ext Sync [P2 only]
Dump/Load
..
Send
MID~
SysEz
So
Send lj)urent Program,
SG
Send Globals (Master),
SA Send Ali
SE
Send
Edi;'·~ec
Buffer
Go
Prompt [press "Ente''')
Er
Error
Perf/x
by
Oberheim
M.d.
In
!he
U.sA
Mod Arm
(16.
no Mod)
Chan Pressure
MIDI Cntrtr •
Timing
PaUern
Size
[114th-notes]
Replace
Add
C=;.G8
Note'
C=..GI
Note'
00..32 Mod Amount
(16.
no Mod)
Chan Pressure
00
..
32
01..64
Pr
00
..
97
IC Tempo Mod Cntrtr
Pr
bn
Bender Wheel/Lever
00..97
MIDI
Cntrtr'
dA Duration Mod Arm
Auto-Mutate...
nL
Note loudnesS/Velocity
rC
As
RecvdlRecorded
Pr
From ChanPressure
bn
From WheeVLever
01.•C7
Fixed
IA
Tempo Mod Amt
dC
Duration Mod Cntrtr
bn
Wheel/Lever
Ree/Hold Options
..
Eb
End Beat
rH
Record/Hold Mode
rE
rG
Replace Gated Ad
AC
Auto-correcVStep Size
4 1/4th note 16, 24, 32, 48 etc.
I 1/8th note
of
I/64th note triplet
12
118th
note
tri
plet
Control Options
Corllrol
?-oM
CI
Manual Control Function
IG Transpose Gated
Ie
Transpose Continuous
dC
Double Continuous
dG
Double Gated
LR
Control
Zone
Lo
Note
Hn Control ZoneHiNote
bn
Base Note
C=..GI
Note.
for zero tranpose
AU Audible Control Zone
of
orr
011
On
Pr
Manual Transpose Priority
Lo Lowest
oL
Oldest
HI Highest
nE
Newest
PediJI
FlI1ICtiollS
CP
ChainlMap Program
00
..
31
Program'
to
ChainlMap to
P3 Local Pedal 3,
P4
Local Pedal 4,
E3 External Pedal 3,
E4 External Pedal
CH,
LE, SS,
HE,
dS, SU, In, So,
dE,
tt,
oE
(see "Pedal
I&.
2")
cyclone
IU Inversions Up
Id Inversions
Down
of
orr
on On
C=••GI
Note.
01..01 Stage IIIn&.
rE
C=••GI
Note.
(0
no
transpoae)
OLCI
II
of
Repeals
on On
48 II32nd note triplet
96
1/64th
note triplet
IV
Tuplet
or
Order
CY
Cycle
011
On
00••08 0 • No Doubles
01••01 Double
'in
and
CH
C=..GI
Note'
(0
• same)
011
On
orr
Program Parameters
Rh!Ibm
Trigger Source
rC
Recorded [Record
ButTer)
PU
Pulse [see "TIming" page)
LS Live Single Trigger
LP
Live Poly Trigger
Qnl«.Whicll Notes
rF
Forward
UP
Up
rb
Backward
dn
Down
Fb
Forward/Backward Ud Up/Down
bF
BackwardlorwarddUDown/Up
rn Random
Msllk
, 0/Source Notes per Trigger
rC
As Recorded P2.•PI
Proportional
Fl..F8 Fixed
r2..rl
Random
AL
All
(Chord/Cluster)
ImIpg
Temp0+2:
OS..J9
10..398 Beats
per
Minllle
.
E.C
MIDIIExternal Sync
T1mIDII
...
Pn
Pulse Note
4
114th
note
I
118th
note
12,16,24,32
etc.
dU
Duration
01..32 l6ths
ofPn(16.
I
()()4l,)
LI
Link
of
CJcliDII
...
SY
Sync-to-Trigger
of
Off
CL
Oock
rS
Mode Reset
of
Off
IA Invert Alternate
of
Off
Auto-Xpgse...
AI Auto-Transpose
Mode
of
Off
on
On (Normal)
SY
Auto-Transpoae Sync
rI
Recursion Interval
EI
Current Edit Stage
In Transpose Interval
rE
Stage Repetitions
Auto-Double...
ndIIof
Doubles
Ed
Edit Double
In Double Interval
CH
Double MIDI Chan
1••16 Fixed Channel
Sr
Same as Source
Pest
Chan
••••••••••••
 Loading...