


OBDSTAR User Manual
http://www.uobdii.com/wholesale/obdstar-x300-dp-pad2-key-master-plus-full-configuration.html
Key Master DP Plus
Version: V1.0
Revised date: 2018/04/10
★Please read the manual carefully before operating your device.
I

OBDSTAR User Manual
http://www.uobdii.com/wholesale/obdstar-x300-dp-pad2-key-master-plus-full-configuration.html
Copyright Information
Copyright 2017 by OBDSTAR Technology Co.,Ltd. (called OBDSTAR for short) all rights
reserved.
No part of this publication may be reproduced, stored in a retrieval system, or
transmitted in any form or by any means, electronic, mechanical, photocopying,
recording or otherwise, without prior written permission of OBDSTAR. The
information contained herein is designed only for the use of the unit. OBDSTAR is
not responsible for any use of this information as applied to other use.
Neither OBDSTAR nor its affiliates shall be liable to the purchaser of this unit or third
parties for damages, losses, costs, or expenses, incurred by purchaser or third parties
as a result of : accident, misuse, or abuse of this unit or unauthorized modifications,
repairs, or alternations to this unit, failure to strictly comply with OBDSTAR operating
and maintenance instructions.
OBDSTAR shall not be liable for any damages or problems arising from the use of any
options or any consumable products other than those designated as original
OBDSTAR products or the products approved by OBDSTAR.
Trademark Information
OBDSTAR is a registered trademark of OBDSTAR Technology Co., Ltd. ( called
OBDSTAR for short) in China and other countries. In countries where any of the
OBDSTAR trademarks, service marks, domain names, logos and company names are
not registered, OBDSTAR claims other rights associated with unregistered
trademarks, service marks, domain names, logos, and company names. Other
products or company names referred to in this manual may be trademarks of their
respective owners. You may not use any trademark, service mark, domain
name, logo, or company name of OBDSTAR or any third party without permission
from the owner of the applicable trademark, service mark, domain name, logo, or
company name. You may contact OBDSTAR by visiting the website at
www.obdstar.com, or writing to OBDSTAR Technology Co., Ltd., West Block 4 floor.
NO. 8 building of Xinwu industrial area, Taoyuan Street, Nanshan District, Shenzhen,
Guangdong, China, to request written permission to use Materials.
II

OBDSTAR User Manual
http://www.uobdii.com/wholesale/obdstar-x300-dp-pad2-key-master-plus-full-configuration.html
Safety Precautions
Before using this device, please read the following safety information carefully.
1. Never collide, throw, or punch this device, and avoid falling, extruding and
blending it.
2. Do not use this device in exceptionally cold or hot, dusty, damp or dry
environments.
3. In places where this device is forbidden or using this device may cause
interference or generate a potential risk, please turn off it.
4. Do not use this device while driving.
5. Turn off this device before boarding any airplane.
6. Never place this device into apparatus with strong electromagnetic field.
7. Do not dismantle this device by yourself. If there is any inquiry, please contact the
dealer.
8. Keep this device far away from magnetic devices because its radiations may erase
the data stored on the devices.
9. Do not use this device in high temperature and other environment with
flammable gas, such as gas station.
10. Store this device out of the reach of children and do not allow children to use it
in unsupervised state.
11. Please use the included battery and charger. Otherwise, explosion may happen.
12. Adhere to laws and regulations, respect people’s privacy and legal rights, during
operating this device.
13. Follow the instructions strictly when using USB cable, otherwise, it will damage
your device and PC.
Precautions On Using This Device
● The ignition switch should be OFF while plugging or unplugging the diagnostic
connector.
● Do not disconnect the vehicle inner consumer when the ignition switch is on. High
voltage transients may encounter at the moment of disconnecting, which may
damage the sensors and the ECU.
● Keep the computer away from magnetic object.
● Do cut off the power supply of ECU system before welding on the vehicle.
● Pay more attention to the ECU and the sensors when the operation is next to
them.
● Ground yourself when you disassemble PROM, otherwise, ECU and sensors will be
damaged by static electricity.
● Do connect ECU harness connector firmly, otherwise, electronic elements, such as
IC inside ECU, will be damaged.
III

OBDSTAR User Manual
http://www.uobdii.com/wholesale/obdstar-x300-dp-pad2-key-master-plus-full-configuration.html
Content
1 INTRODUCTION ........................................................................................................... 1
1.1 PRODUCT PROFILE ............................................................................................ 1
1.2 FEATURES .......................................................................................................... 1
1.3 KNOWLEDGE OF THIS DEVICE ........................................................................... 2
1.3.1 The whole set .......................................................................................... 2
1.3.2 The tablet computer ............................................................................... 2
1.4 TECHNICAL PARAMETER ................................................................................... 3
1.5 ACCESSORY(Standard Configuration) .......................................................... 3
1.5.1 Main test cable ........................................................................................ 3
1.5.2 OBD Connector ....................................................................................... 4
1.5.3 Others ...................................................................................................... 4
2 PREPARATION .............................................................................................................. 5
2.1 CHARGE THIS DEVICE ........................................................................................ 5
2.2 USING BATTERY ................................................................................................. 5
2.3 POWER ON/POWER OFF THIS DEVICE .............................................................. 6
2.3.1 Power on ................................................................................................. 6
2.3.2 Power off ................................................................................................. 6
2.4 ABOUT DESKTOP ............................................................................................... 6
2.5 CUSTOMIZE YOUR DESKTOP ............................................................................. 6
2.5.1 Add items on the desktop ....................................................................... 6
2.5.2 Move items on the desktop .................................................................... 6
2.5.3 Delete items on the desktop ................................................................... 7
2.5.4 Change your wallpaper ........................................................................... 7
2.5.5 Create a folder on the desktop ............................................................... 7
2.6 ON USING TOUCH SCREEN ................................................................................ 7
2.7 AUTO-R0TATE THE SCREEN ............................................................................... 7
2.8 LOCK&UNLOCK .................................................................................................. 7
2.8.1 Lock the screen ....................................................................................... 7
2.8.2 Unlock the screen.................................................................................... 8
2.9 NOTIFACTION BAR ............................................................................................. 8
2.9.1 Turn on the notification panel ................................................................ 8
2.9.2 Turn off the notification panel ................................................................ 8
2.10 INPUT METHOD .............................................................................................. 8
2.11 HOW TO SET AS AIRPLANE MODE .................................................................. 8
3 HOW TO DIAGNOSE .................................................................................................... 9
3.1 CONNECT VCI CONNECTOR ............................................................................... 9
3.2 DIAGNOSIS FLOWCHAT ..................................................................................... 9
3.3 USER REGISTRATION & IAGNOSTIC SOFTWARE DOWNLOADING ..................... 9
3.3.1 User registration .................................................................................... 10
3.3.2 Download diagnosis software ............................................................... 11
3.3.3 Diagnostic software main interface introduction ................................. 12

OBDSTAR User Manual
http://www.uobdii.com/wholesale/obdstar-x300-dp-pad2-key-master-plus-full-configuration.html
3.4 START DIAGNOSING ........................................................................................ 13
3.4.1 Read vehicle information ...................................................................... 15
3.4.2 Read trouble code ................................................................................. 16
3.4.3 Clear trouble code ................................................................................. 16
3.4.4 Read data stream .................................................................................. 17
3.5 MAINTENANCE DATABASE .............................................................................. 18
3.6 VIDEO CENTER ................................................................................................. 18
3.7 ONE KEY UPGRADE.......................................................................................... 18
3.8 SYSTEM SETTINGS ........................................................................................... 19
3.8.1 VCI information ..................................................................................... 19
3.8.2 Language ............................................................................................... 19
3.8.3 Unit ........................................................................................................ 20
3.8.4 Data records .......................................................................................... 20
3.8.5 User information ................................................................................... 21
3.8.5.1 User login ................................................................................... 21
3.8.5.2 User registration ......................................................................... 21
3.8.5.3 Forget password ......................................................................... 22
3.8.5.4 Registration information ............................................................ 22
3.8.5.5 Info modification ........................................................................ 23
3.8.5.6 Modify password ........................................................................ 23
3.8.6 Self test .................................................................................................. 24
3.8.7 About ..................................................................................................... 24
3.9 REMOTE ASSISTANCE ...................................................................................... 25
3.10 REPORT CENTER ............................................................................................ 25
4 OTHERS ...................................................................................................................... 27
4.1 EMAIL .............................................................................................................. 27
4.1.1 Add an email account ........................................................................... 27
4.1.2 Delete an email account ....................................................................... 28
4.1.3 Send an email ........................................................................................ 28
4.1.4 View email ............................................................................................ 28
4.2 WLAN .............................................................................................................. 28
4.2.1 Set WI-FI on ........................................................................................... 28
4.2.2 Connect to WLAN .................................................................................. 28
4.3 BROWSER ........................................................................................................ 29
4.3.1 Open browser........................................................................................ 29
4.3.2 Browser webpage ................................................................................. 29
4.3.3 Zoom in/Zoom out a page ..................................................................... 29
4.3.4 Save favorite webpage to bookmark .................................................... 29
4.3.5 Open multiple pages ............................................................................. 30
4.3.6 Customize internet settings .................................................................. 30
4.4 CAMERA .......................................................................................................... 30
4.4.1 Open and close camera ......................................................................... 30
4.4.2 Take a photo .......................................................................................... 30
4.4.3 View a photo ......................................................................................... 30

OBDSTAR User Manual
http://www.uobdii.com/wholesale/obdstar-x300-dp-pad2-key-master-plus-full-configuration.html
4.4.4 Record a video ....................................................................................... 31
4.4.5 View a video .......................................................................................... 31
4.4.6 Customize camera settings ................................................................... 31
4.4.7 Customize video camera settings ......................................................... 32
4.5 GALLERY .......................................................................................................... 32
4.5.1 Open gallery .......................................................................................... 32
4.5.2 Browse images ...................................................................................... 32
4.6 MUSIC .............................................................................................................. 32
4.7 CALCULATOR ................................................................................................... 33
4.8 CALENDAR ....................................................................................................... 33
4.9 ALARMS ........................................................................................................... 33
4.9.1 Add an alarm ......................................................................................... 33
4.9.2 Delete an alarm ..................................................................................... 33
4.9.3 Customize your alarm ........................................................................... 33
4.9.4 Countdown set ...................................................................................... 34
4.9.5 Second clock setting .............................................................................. 34
4.10 ES FILE VIEWER .............................................................................................. 34
4.11 DISPLAY ......................................................................................................... 34
4.11.1 Brightness ............................................................................................ 34
4.11.2 Auto-rotate the screen ........................................................................ 34
4.12 SET SCREEN LOCK .......................................................................................... 35
4.13 APPLICATION ................................................................................................. 35
4.13.1 View installed applications ................................................................. 35
4.13.2 View the running applications ............................................................ 35
4.14 LANGUAGE&INPUT METHOD ....................................................................... 35
4.15 SET DATE&TIME............................................................................................. 36
4.16 RESTORE KEY MASTER TO FACTORY SETTINGS ............................................. 36
4.17 STORE ............................................................................................................ 36
4.18 APPS INSTALLATION/ UNINSTALLATION ........................................................ 36
ATTACHMENTS ............................................................................................................. 37

OBDSTAR User Manual
http://www.uobdii.com/wholesale/obdstar-x300-dp-pad2-key-master-plus-full-configuration.html
1 INTRODUCTION
1.1 PRODUCT PROFILE
This device is a new Android-based vehicle trouble diagnostic device developed for
internet applications. It inherits from OBDSTAR advanced diagnosing technology and
it is characterized by covering wide range of vehicles, featuring powerful function,
and providing precise result. Through vehicle diagnostic OBD connector and variant
mobile intelligent terminals, it achieves vehicle trouble diagnosis for full car model
and full system vehicle.
Meanwhile, taking advantage of mobile internet, this device integrates more
application and service, such as Maintenance Database, remote assistant, One Key
Upgrade etc.
1.2 FEATURES
1. Diagnostic function:
● Diagnose the electronic control system of prevailing vehicle models covering Asian,
European, American and Chinese. Diagnosis functions include: Read DTCS, Clear DTCS,
Read data stream, Special functions etc.
● Classify special function: ABS, EEPROM Adapter, Battery match, CVT learning, EPB,
Gear learning, Immobilizer, TPMS (low tire) reset, Cluster calibrate, ECU programming,
steering angle reset.
● Specially designed for Android platform with clear and user-friendly interface;
2. Maintenance database: equipped with powerful database.
3. Video center: large amount of videos help users to operate device easily.
4. One Key Upgrade: built-in WIFI mode can realize application downloading and
diagnostic function by one key upgrade.
5. System setting: set VCI formation, language, unit, data logging, user information
etc.
6. Remote assistance: achieve remote assistance by this function.
7. Report center: record maintenance data logging and create reports during
operation.
8. USB Inspection Camera (optional): Flexible and long pipe with HD camera, it can reach car
interior pipeline or narrow space to have an overall inspection.
1

OBDSTAR User Manual
http://www.uobdii.com/wholesale/obdstar-x300-dp-pad2-key-master-plus-full-configuration.html
1.3 KNOWLEDGE OF THIS DEVICE
1.3.1 The whole set
This device is composed of the tablet computer, main test cable and kinds of
connectors.
1.3.2 The tablet computer
Product Picture:
front view
reverse view
2
OBDSTAR User Manual
http://www.uobdii.com/wholesale/obdstar-x300-dp-pad2-key-master-plus-full-configuration.html
1.4 TECHNICAL PARAMETER
● Operation system: Android 5.1.1
● CPU: Exynos4418 Dual Core ARM Cortex A9 1.4GHz
● Battery: 3700mA, rechargeable polymer lithium battery
● Extension memory card: 32G Micro SD (TF) card supported
● Memory capacity:1GB
● Storage capacity: 32GB
● LCD: 8.0 inch
● LCD resolution: 1280*800
● Touch screen: Capacitive touch screen
● Camera: 5 mega rear view camera
● Wi-Fi: supported
● Working temperature: -10℃ ~ 55℃(14℉ ~ 131℉ )
● Storage temperature: -20℃ ~ 70℃(-4℉ ~ 158℉ )
● Weight: about 1.0 Kg
● Dimension: 254mm*174*mm*35mm
1.5 ACCESSORY(Standard Configuration)
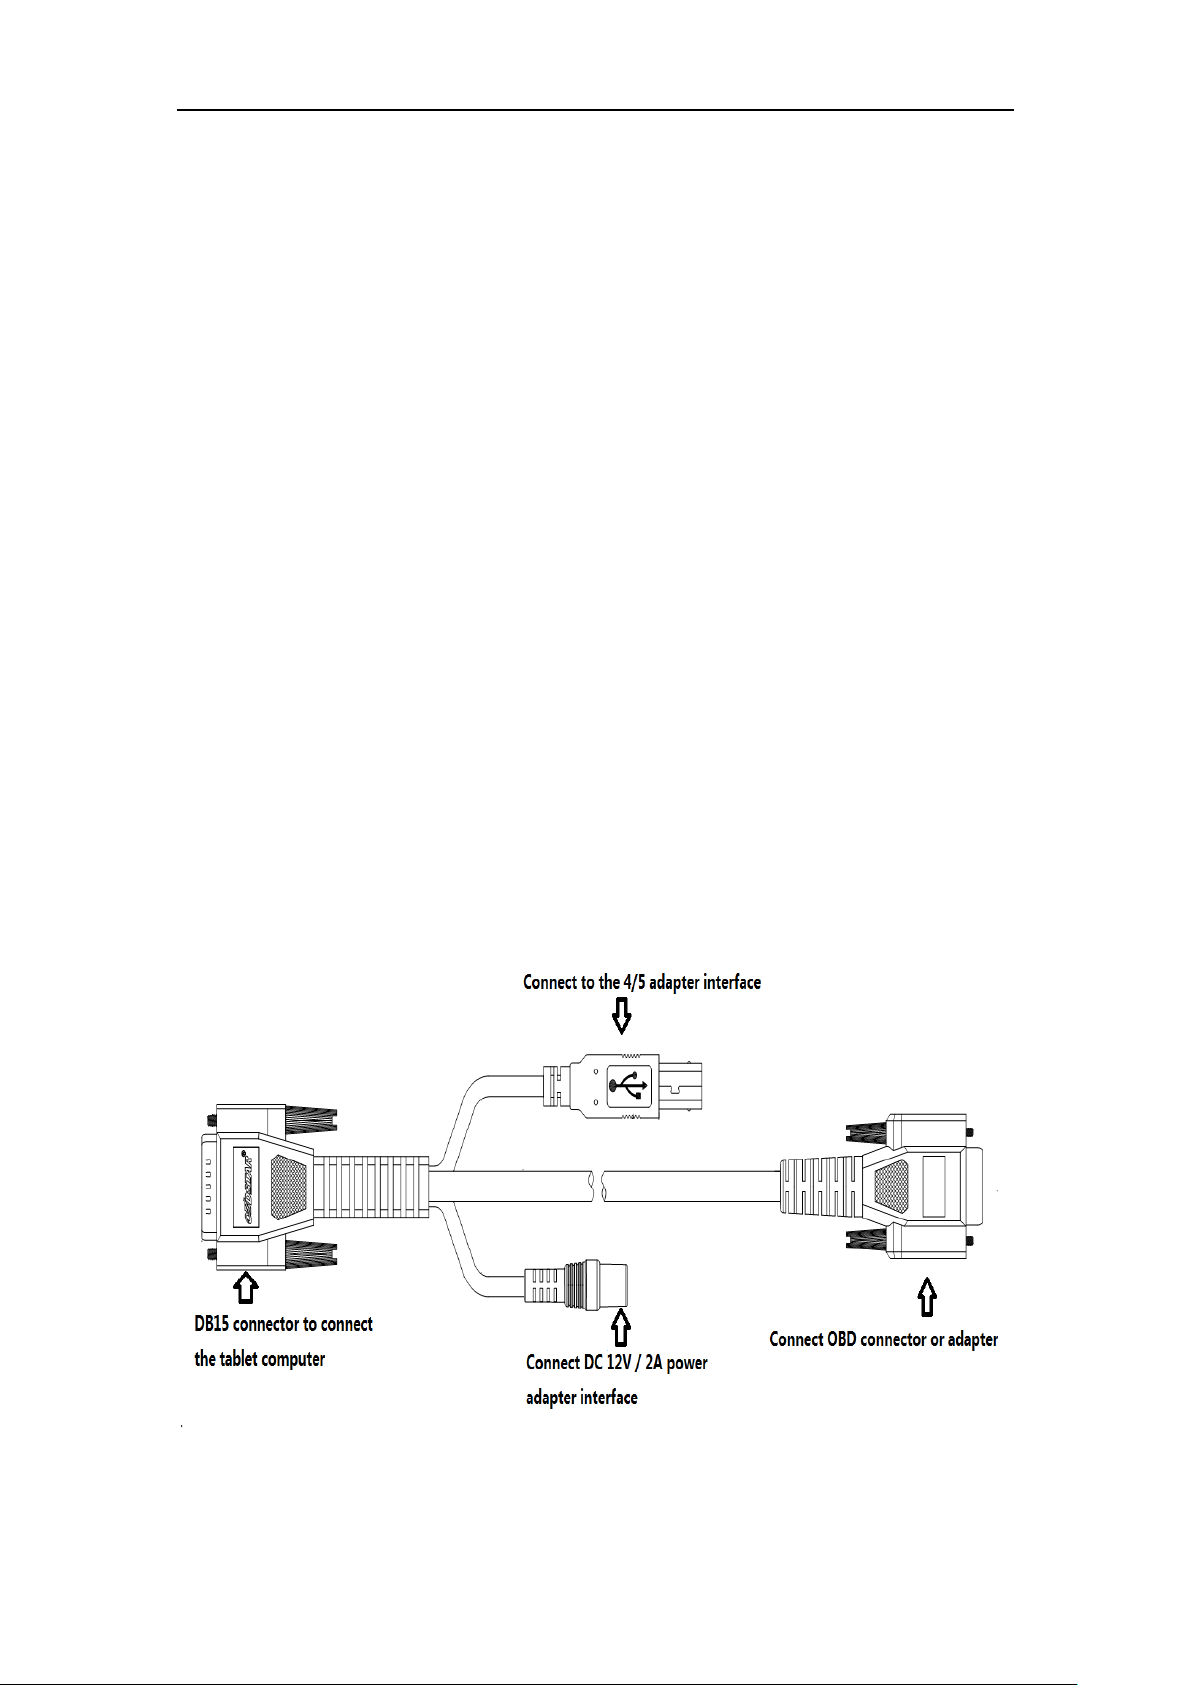
1.5.1 Main test cable
3
OBDSTAR User Manual
http://www.uobdii.com/wholesale/obdstar-x300-dp-pad2-key-master-plus-full-configuration.html
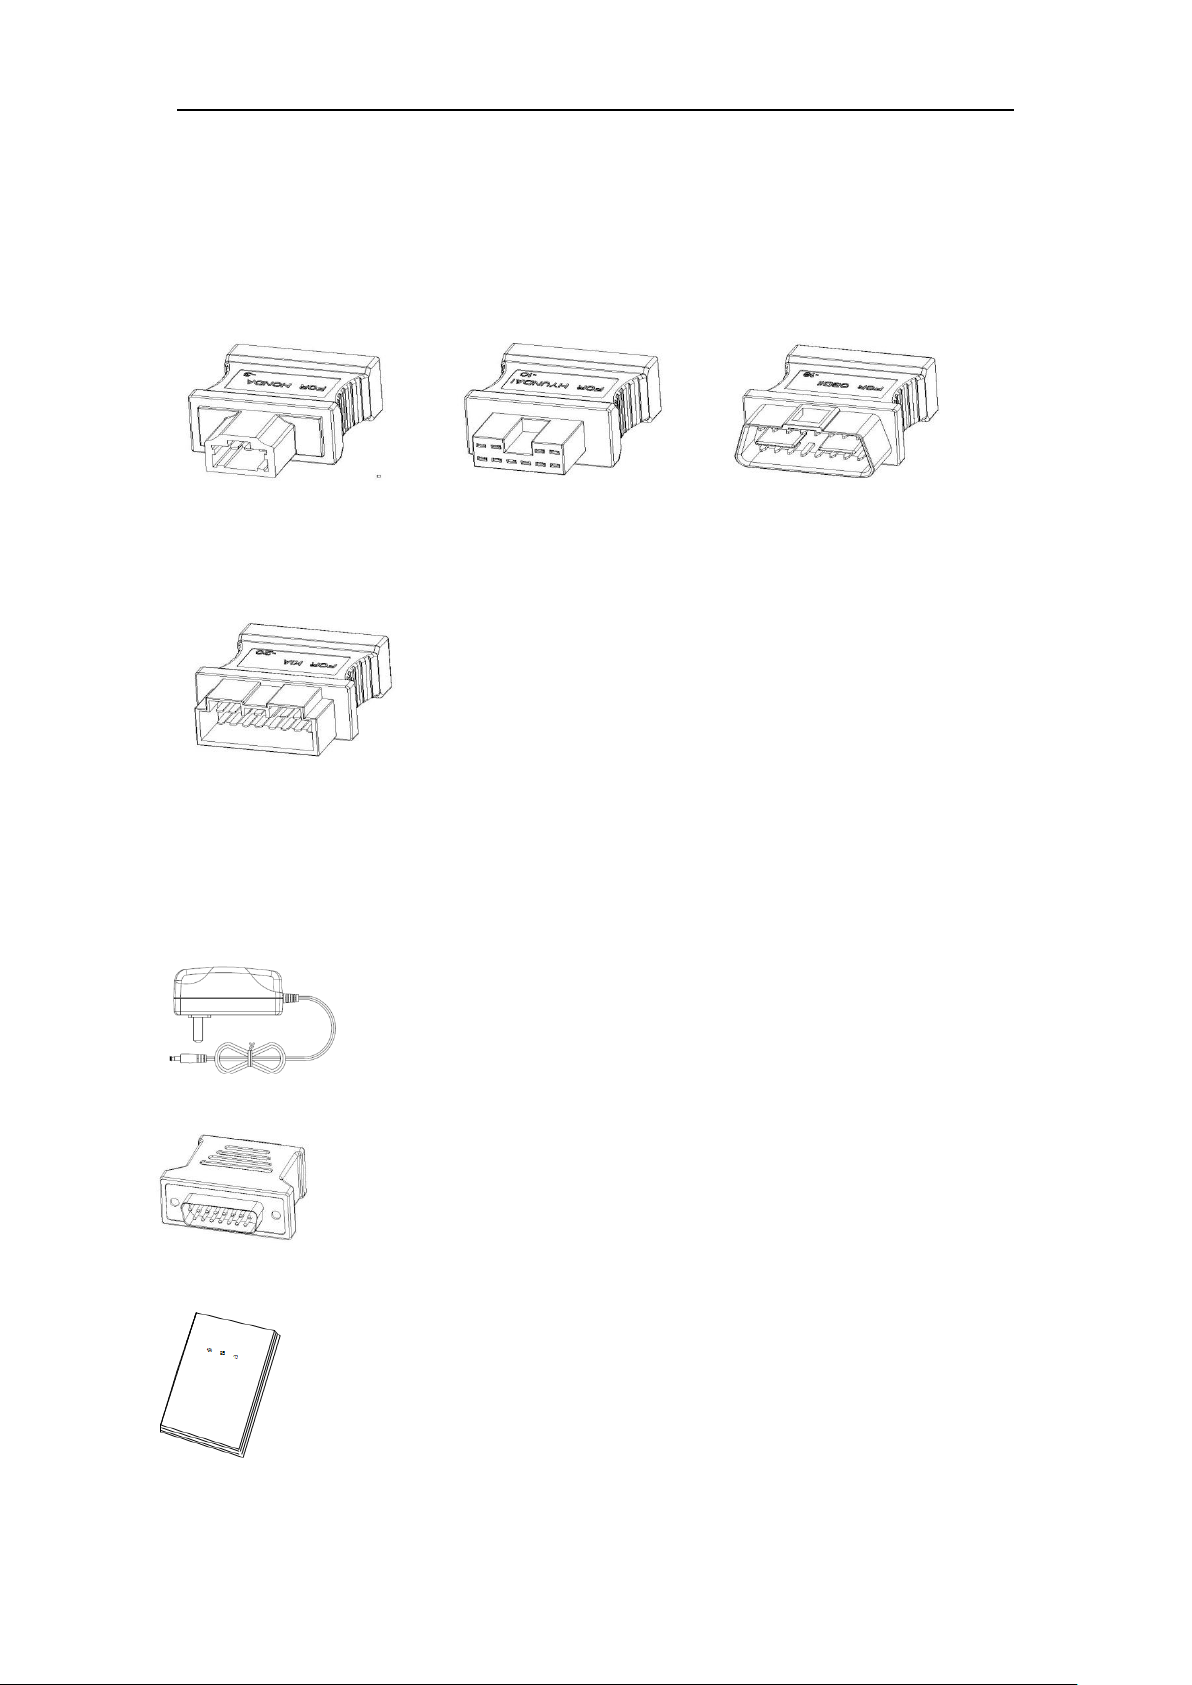
1.5.2 OBD Connector
OBD I connector to connect the diagnosis port of non OBD II vehicles.
To choose the connector according to the vehicle brand and models.
Common connectors are as below:
HONDA 3 HYUNDAI 10 OBD16
KIA20
1.5.3 Others
DC Power Adapter (Output DC 12V/2A)
To power up the tablet via connecting with outside power
Supply.
Adapter DB15-HDB15
Connect with EEPROM/PIC adapter via adapter.
User Manual
To learn more about the product and operation.
4

OBDSTAR User Manual
http://www.uobdii.com/wholesale/obdstar-x300-dp-pad2-key-master-plus-full-configuration.html
2 PREPARATION
2.1 CHARGE THIS DEVICE
1. Connect the included USB cable with charger.
2. Plug the charger into AC outlet.
3. When it connects to charger, battery logo indicates
, it indicates that the battery is in charging
4. When battery logo changes into
, it indicates that the battery is fully charged and then disconnect
charger from AC outlet.
5. Unplug USB cable on the charger from this device.
2.2 USING BATTERY
● If the battery keeps unused for a long time or battery is completely discharged, it is
normal if it cannot be turned on while being charged. Please charge it for a period
and then turn it on.
● Using data service will cause more power consumption and shorten the stand by
time.
● The charging time of battery varies with temperature condition and battery
consumption status.
● While this device has low battery, a beep will sound. If it is very low, this device will
be switched off automatically.
Note: Do one of the followings to save power:
1. When this device keeps unattended, press POWER key to turn off the LCD.
2. Shorten the standby time: Enter main menu, choose “Settings” > “DEVICE”>
“Display” > “Sleep” to select a shorter standby time.
3. Decrease the brightness of LCD display: Enter main menu, choose “Settings” >
“DEVICE” > “Display” > “Brightness”, and then drag the slider to adjust it.
4. Change “Live wallpaper” into “Gallery”.
5. Set Bluetooth off: Enter main menu, choose “Settings” > “Wireless &Network” >
“Bluetooth”, and then toggle the switch to OFF.
6. Set Wi-Fi off: Enter main menu, choose “Settings” > “Wireless &
Network” >“Wi-Fi”, and then toggle the switch to OFF.
7. Press VOLUME key to decrease the volume.
5

OBDSTAR User Manual
http://www.uobdii.com/wholesale/obdstar-x300-dp-pad2-key-master-plus-full-configuration.html
2.3 POWER ON/POWER OFF THIS DEVICE
2.3.1 Power on
Press and hold Power button for three seconds to turn on this device.
Note:set date, time and time zone.
2.3.2 Power off
1. Press and hold Power button for three seconds to turn off this device.
2.4 ABOUT DESKTOP
The screen is shown as blow:
A. Print screen : make a quick screenshot and save it to gallery
B. Back button : go back to previous interface or exit program.
C. Home button : return to the desktop
D. Touch screen menu button : select desired item
E. DP button : enter diagnose and program interface
F. VIC button : enter system settings
2.5 CUSTOMIZE YOUR DESKTOP
2.5.1 Add items on the desktop
On the main menu, hold and press the desired item, the system will automatically
enter the desktop and place the icon into the circle.
Hint: If many applications occupy the desktop, hold and press the desired one to
move it to other extension desktop.
2.5.2 Move items on the desktop
1. Hold and press the item to be moved.
2. After a movable circle appears on the screen, drag it to the target location.
6

OBDSTAR User Manual
http://www.uobdii.com/wholesale/obdstar-x300-dp-pad2-key-master-plus-full-configuration.html
2.5.3 Delete items on the desktop
1. Hold and press the desired item, “X Delete” appears in the upper middle of the
screen.
2. Dragon the item to “X Delete”.
3. When the item and icon turn red and then release it.
2.5.4 Change your wallpaper
1. Hold and press a blank area on the desktop, a pop-up wallpaper will be shown on
the screen.
2. Choose desired wallpaper.
3. Click upper left corner √ to set wallpaper.
2.5.5 Create a folder on the desktop
1. Drag one icon to another icon, the system will create a folder.
2. Input the folder name.
2.6 ON USING TOUCH SCREEN
● Tap: use your finger to tap desired items to confirm or open it.
● Long-press:press and hold the current interface, icon or input field to open the
available operation options.
● Slide: use your finger to slide the screen horizontally or vertically.
● Drag: hold and press the desired item, then drag it to any location.
2.7 AUTO-R0TATE THE SCREEN
To perform such operations as browsing webpage, viewing images etc., rotate this
device, the screen will automatically change the display direction. To disable this
function, click “Settings” and click “display ” to enter.
Unselect the option “Auto-rotate the screen”.
2.8 LOCK&UNLOCK
2.8.1 Lock the screen
● When Key Master is ON, press POWER key to lock the screen.
● The system will lock the screen automatically after this device remains idle for a
long time.
7

OBDSTAR User Manual
http://www.uobdii.com/wholesale/obdstar-x300-dp-pad2-key-master-plus-full-configuration.html
2.8.2 Unlock the screen
Press POWER key to activate the screen and then drag the lock to “Unlock position.”
2.9 NOTIFACTION BAR
The notice bar is used to display some activities, messages to remind and inform
users.
2.9.1 Turn on the notification panel
1. When a new notification icon appears on the status bar, slide the status bar
upwards to open it.
2. In the notification panel, click the desired notification item to open it.
2.9.2 Turn off the notification panel
Slide the panel upwards, and then specify the notifications as OFF to turn it off.
2.10 INPUT METHOD
Set input method:
Enter main menu, and then select “Settings”-> “Language and keyboard” to
Choose desired input method.
The default input method, Sogou input can support powerful word stock engine,
Intelligent Sogou input and multiple keyboard mode. Android keyboard and Google
input method and make input easier. To start text input mode, please click any text
input entry.
2.11 HOW TO SET AS AIRPLANE MODE
According to the regulations of some countries or areas, PC device must be turned
off before boarding on the airplane. The way to disable functions of this device is to
set it as airplane mode. In this mode, all wireless radio waves will be disabled,
including mobile network, Bluetooth and WLAN.
Do one of the followings to enable or disable airplane mode:
● Press POWER key and choose “Airplane mode” from the pop-up option menu.
● Access the main menu, and choose “Settings” > “WLAN” > “More…” >“Airplane
mode”.
8

OBDSTAR User Manual
http://www.uobdii.com/wholesale/obdstar-x300-dp-pad2-key-master-plus-full-configuration.html
3 HOW TO DIAGNOSE
3.1 CONNECT VCI CONNECTOR
Procedure to connect VCI connector:
1. Locate vehicle’s DLC socket. The DLC (Data Link Connector or Diagnostic Link
Connector) is the standardized 16-pin connector where diagnostic code readers
interface with the vehicle's on-board computer. The DLC is usually located 12 inches
from the center of the instrument panel (dash), under or around the driver’s side for
most vehicles. If Data Link Connector is not located under dashboard, a label should
be there telling location. For some Asian and European vehicles, the DLC is located
behind the ashtray and the ashtray must be removed to access the connector. If the
DLC cannot be found, refer to the vehicle’s service manual for the location.
2. Plug the diagnostic connector into the vehicle’s DLC socket (It is suggested to use
the OBD 2 extension cable to connect VCI connector and DLC socket.). For non-16PIN
DLC socket, please select the corresponding non-16 pin connector adapter, then plug
the non-16pin end of the adapter into the DLC socket, and then connect the standard
16pinend VCI connector.
3.2 DIAGNOSIS FLOWCHAT
For new users, please follow the 3.1 to get familiar with and start using this device.
connect the diagnostic connector –>user registration–>user login–>download or
upgrade software–>select function or vehicle type–>proceed diagnosis
3.3 USER REGISTRATION &DIAGNOSTIC SOFTWARE DOWNLOADING
9

OBDSTAR User Manual
http://www.uobdii.com/wholesale/obdstar-x300-dp-pad2-key-master-plus-full-configuration.html
3 .3.1 User registration
Click to enter diagnostic software, select “the user information” in “Settings”
menu, then enter user registration window. As shown in following photo:
Fill in the information in each field (Items with * must be filled). After inputting, tap
“OK” If you have registered to be a member, click “the user information” to enter
user login page, as following picture shown:
10

OBDSTAR User Manual
http://www.uobdii.com/wholesale/obdstar-x300-dp-pad2-key-master-plus-full-configuration.html
3.3.2 Download diagnosis software
Tap “One Key Upgrade” to enter one key upgrade page, as following picture shown:
Tap “One Key Upgrade” to start downloading, enter main interface after finishing
downloading. (Notes: Ensure internet connection is normal when updating. Besides,
because of many software, it may take several minutes, please wait patiently) If need
to cancel a software, just tap corresponding Check Box as following picture shown:
11

OBDSTAR User Manual
http://www.uobdii.com/wholesale/obdstar-x300-dp-pad2-key-master-plus-full-configuration.html
3.3.3 Diagnostic software main interface introduction
Function menu included as follows:
Diag Program: operate as a diagnostic tool.
Maintenance Database: Provides abundant automotive technology, handbook and
repair case for your reference.
Video Center: to guide users by video.
One Key Upgrade: To download diagnostic software or upgrade diagnostic software
to the latest version.
Settings: It includes VCI information, language, unit, data records, user information,
help, about.
Remote assistance: Realize remote hosting operation.
Report Center: Record maintenance data and diagnostic report.
Inspection Camera: To do a complete detection via flexible tube with HD camera into
the vehicles.
12

OBDSTAR User Manual
http://www.uobdii.com/wholesale/obdstar-x300-dp-pad2-key-master-plus-full-configuration.html
3.4 START DIAGNOSING
Tap on the main menu screen, and then choose “Diag Program” to enter the function
selection and vehicle selection page. As following photo shown:
Hereinafter, take OBDII for example, to introduce how to start diagnosing.
Tap “OBDII”, and tap “OBDII” icon. As following photo shown:
13

OBDSTAR User Manual
http://www.uobdii.com/wholesale/obdstar-x300-dp-pad2-key-master-plus-full-configuration.html
To select software version, as following photo shown:
To enter diagnostic function menu, as following photo shown:
14

OBDSTAR User Manual
http://www.uobdii.com/wholesale/obdstar-x300-dp-pad2-key-master-plus-full-configuration.html
To select AUTO SCAN, as following photo shown:
3.4.1 Read vehicle information
Tap “Read vehicle information”, as following photo shown:
15

OBDSTAR User Manual
http://www.uobdii.com/wholesale/obdstar-x300-dp-pad2-key-master-plus-full-configuration.html
3.4.2 Read trouble code
Tap “Read trouble code”, as following photo shown:
3.4.3 Clear trouble code
16

OBDSTAR User Manual
http://www.uobdii.com/wholesale/obdstar-x300-dp-pad2-key-master-plus-full-configuration.html
3.4.4 Read data stream
17

OBDSTAR User Manual
http://www.uobdii.com/wholesale/obdstar-x300-dp-pad2-key-master-plus-full-configuration.html
3.5 MAINTENANCE DATABASE
We have powerful maintenance database.
3.6 VIDEO CENTER
We have the details of the operation method of videos.
3.7 ONE KEY UPGRADE
Download and upgrade software by “One Key Upgrade”
Tap main screen “batch update”, start downloading and upgrading
18

OBDSTAR User Manual
http://www.uobdii.com/wholesale/obdstar-x300-dp-pad2-key-master-plus-full-configuration.html
3.8 SYSTEM SETTINGS
It includes VCI information, language, unit, data records, user information, self test,
about.
3.8.1 VCI information
3.8.2 Language
19

OBDSTAR User Manual
http://www.uobdii.com/wholesale/obdstar-x300-dp-pad2-key-master-plus-full-configuration.html
3.8.3 Unit
3.8.4 Data records
20

OBDSTAR User Manual
http://www.uobdii.com/wholesale/obdstar-x300-dp-pad2-key-master-plus-full-configuration.html
3.8.5 User information
It used to set and manage user’s information.
3.8.5.1 User login
3.8.5.2 User registration
21

OBDSTAR User Manual
http://www.uobdii.com/wholesale/obdstar-x300-dp-pad2-key-master-plus-full-configuration.html
3.8.5.3 Forget password
3.8.5.4 Registration information
22

OBDSTAR User Manual
http://www.uobdii.com/wholesale/obdstar-x300-dp-pad2-key-master-plus-full-configuration.html
3.8.5.5 Info modification
3.8.5.6 Modify password
23

OBDSTAR User Manual
http://www.uobdii.com/wholesale/obdstar-x300-dp-pad2-key-master-plus-full-configuration.html
3.8.6 Self test
3.8.7 About
Tap “check for updates” to check if any upgrade software version
24

OBDSTAR User Manual
http://www.uobdii.com/wholesale/obdstar-x300-dp-pad2-key-master-plus-full-configuration.html
3.9 REMOTE ASSISTANCE
This application can realize remote hosting operation via the Third Party’s software:
Quick Support.
3.10 REPORT CENTER
Diagnostic Report: Each diagnosis operation will create new diagnostic report. Those
reports will be grouped by Month.
25

OBDSTAR User Manual
http://www.uobdii.com/wholesale/obdstar-x300-dp-pad2-key-master-plus-full-configuration.html
Maintenance Station Information: Record related information of Maintenance
Station.
26

OBDSTAR User Manual
http://www.uobdii.com/wholesale/obdstar-x300-dp-pad2-key-master-plus-full-configuration.html
4 OTHERS
4.1 EMAIL
The function allows you to send and receive email. You can add common web email
service provider in this device. For example: Yahoo! ®, Sohu, 163 and external
device or IMAP email account of other manufacturers.
4.1.1 Add an email account
Note: Before sending or receiving email, you have to set up an email account. In
addition, this function requires a stable network connection.
1. On the desktop, tap to enter main menu screen, and then tap
2. Input email address, tap “next step” or “manual setup”
3. Tap the desired account type (here take this device as example) to enter the
incoming settings screen, tap “Next”.
4. Configure some sending settings, and tap “Next” to enter frequency settings.
5. After setting, tap “Next” and the system will prompt account setup has been
finished.
6. Tap “Next” to enter email main menu.
27

OBDSTAR User Manual
http://www.uobdii.com/wholesale/obdstar-x300-dp-pad2-key-master-plus-full-configuration.html
4.1.2 Delete an email account
1. Enter main menu screen, and tap to enter account screen.
2. Tap the desired account, and then tap to choose “Settings”.
3. Tap the account to be deleted to enter, and then scroll the screen until ”Remove
account” appears, tap it to delete.
4.1.3 Send an email
1. Enter main menu screen, and tap to enter account screen.
2. Tap the desired email account.
3. Tap to enter new mail writing interface.
4. Input the receiver address in to field.
5. Input a title in Subject column.
6. Enter the content in Compose email area.
7. After inputting, tap, you can perform any one of the followings: attach file, add
CC/BCC, save draft, discard and setting.
8. Tap to send email.
4.1.4 View email
1. Enter main menu screen, and tap to enter account screen.
2. Tap the desired email account.
3. Tap to refresh the inbox.
4. Tap the desired one to read.
4.2 WLAN
This function enables you to enjoy surfing on the internet and downloading data
from the internet via Wi-Fi.
4.2.1 Set WI-FI on
1. Enter main menu screen, choose “Settings” > WLAN
2. When the WLAN sign appears blue, it indicates Wi-Fi has been activated already.
Note: To prolong the battery life, please switch Wi-Fi off when it keeps
unattended.
4.2.2 Connect to WLAN
Start WLAN, if this device is within range of WLAN, it can automatically detect and
connect to current WLAN, select desired network and input password, then you can surf
the internet by WLAN.
28

OBDSTAR User Manual
http://www.uobdii.com/wholesale/obdstar-x300-dp-pad2-key-master-plus-full-configuration.html
4.3 Browser
You can use any APP based on browse website and network.
4.3.1 Open browser
Enter main menu screen, tap to OBDSTAR the browser. You can choose the desired
homepage or input the website address to browse.
1. Tap to input or edit the web
link
2. Web page display area
3. Tap to open bookmarks , view history and saved web pages.
4.3.2 Browser webpage
1. Open the browser.
2. Input the web address, and tap “Go” on the keyboard to visit the website.
Tips: Alternatively, you can also tap, and then choose “Bookmarks/History” from the
pull-down list to choose the web link you want to access.
3. After a webpage is open, slide the screen with the tip of your finger to view other
hidden content.
4.3.3 Zoom in/Zoom out a page
There are two ways to zoom in/ zoom out while browsing a webpage.
• To zoom in so that the text on a webpage appears in a column that fits your
device’s screen, double-tap with the tip of your finger.
• To zoom in manually, place two fingers on the screen and then spread them apart.
To zoom out, either double-tap again or place two fingers apart on the screen and
then pinch them together.
4.3.4 Save favorite webpage to bookmark
1. While browsing a webpage, tap and choose “Save to bookmarks”.
2. Edit a label for the bookmark.
3. Tap “OK” to confirm and save it.
29

OBDSTAR User Manual
http://www.uobdii.com/wholesale/obdstar-x300-dp-pad2-key-master-plus-full-configuration.html
4.3.5 Open multiple pages
The browser allows you to open multiple web pages and you can toggle between
these pages.
1. While browsing a webpage, tap and open new window.
2. Another web page will be displayed in the new window.
4.3.6 Customize internet settings
While browsing a webpage, choose “Settings”, you can view or
change browser settings, privacy & security setting and advanced setting etc.
4.4 CAMERA
4.4.1 Open and close camera
• Enter main menu screen, tap camera.
• In shoot mode, tap back button to exit the camera.
4.4.2 Take a photo
1. Open camera, select whether to remember the shoot spot of the photo? Tap the
next step.
2. In shoot mode, aim the camera lens at the object you want to photograph
and adjust it as desired.
3. Tap to take a photo.
4.4.3 View a photo
1. After a picture is taken, the picture will be stored automatically. Swipe the screen
leftwards to view the photo.
2. While browsing a picture, you can do any one of the followings:
• Tap to delete the picture.
• Share, tap to send this picture to your friend or upload it online.
• Edit, beatify the photo, and view the detailed information of the photo.
• Tap the back button on photo interface to return to the shoot mode.
3. Swipe the screen rightwards or leftwards to view the next/previous picture.
30

OBDSTAR User Manual
http://www.uobdii.com/wholesale/obdstar-x300-dp-pad2-key-master-plus-full-configuration.html
4.4.4 Record a video
1. Open the camera, and swipe the screen rightwards to display button , and
switch to video mode.
2. Aim the camera lens at the object you want to photograph and adjust it as desired.
3. Tap to start recording.
4. Tap to stop recording.
4.4.5 View a video
1. After a video is recorded, the video will be stored automatically. Swipe the screen
leftwards to view the video.
2. The following operations can be done:
• Delete, delete the video.
• Share, send this video file to your friend or upload it online.
• Tap to back button on the video interface to return to the view state.
3. When the video is playing, swipe the screen leftwards and rightwards to control
the speed of video playing, and tap to stop video playing, and tap to start
video playing.
4.4.6 Customize camera settings
In camera mode:
Tap to enter camera setting screen:
a. Tap to set camera sudoku mode;
b. Tap to turn on /off flash mode;
c. Tap to set timer of selfie, 3s or 10s
31

OBDSTAR User Manual
http://www.uobdii.com/wholesale/obdstar-x300-dp-pad2-key-master-plus-full-configuration.html
4.4.7 Customize video camera settings
In video mode:
Tap to enter video setting screen:
Tap to turn on/off flash light;
Tap to turn on/off sudoku mode
4.5 GALLERY
This option is used to manage pictures and video files.
4.5.1 Open gallery
Enter main menu screen, tap “Gallery” to access it. The system searches
images and videos in this device and SD card automatically, and categorizes it
into corresponding folders.
4.5.2 Browse images
1. Enter main menu screen, tap “Gallery”.
2. Tap the picture folder you want to view.
3. Tap the desired image to browse.
4. Swipe the screen rightwards or leftwards to view the next/previous picture.
4.6 MUSIC
Music files are stored into 4 categories: Artists, Albums, Songs and Playlist.
Tap the desired music to display music. Press the button on the right side to
increase or decrease the volume.
Tips: While playing, tap back button to switch to other applications and the player
will be running in background. Open the status bar and choose the audio file to
return to the player screen.
32

OBDSTAR User Manual
http://www.uobdii.com/wholesale/obdstar-x300-dp-pad2-key-master-plus-full-configuration.html
4.7 CALCULATOR
You can use calculator to operate algorithm of plus, subtract, multiply and divide, and
function operation of sin, cos, tan and log.
4.8 CALENDAR
This function lets you view calendar or create to-do events.
Enter main menu screen, tap “Calendar”. Swipe up and down to switch to month;
Tap someday, the followings can be done.
Tap to refresh, search, and hide control and setting.
4.9 ALARMS
4.9.1 Add an alarm
1. Enter main menu, and tap “Alarm”.
2. Tap to add alarms.
3. Set the detailed information of the alarm.
4. Tap to pack up the alarm to store the setting.
4.9.2 Delete an alarm
1. Enter main menu screen, tap “Alarms”.
2. Tap the desired alarm.
3. Tap to delete it.
Tips: After the alarm is deleted, you can choose to cancel delete alarm on the right
side from the option menu.
4.9.3 Customize your alarm
1. Enter main menu screen, tap “Alarms”.
2. Tap menu button, and then choose “Settings”.
3. Alarm volume: Set the volume of alarms.
4. Set the duration of alarm.
5. Set the duration the alarm snooze next time.
6. Volume buttons: set what these buttons function when pressed during an alarm.
7. Set default ringtone: choose the alarm ringtone.
33

OBDSTAR User Manual
http://www.uobdii.com/wholesale/obdstar-x300-dp-pad2-key-master-plus-full-configuration.html
4.9.4 Countdown set
1. Enter the main menu to tap to choose count down alarm:;
2. Set the time of countdown;
3. Tap to add count down alarm, and tap to delete alarm;
4. Tap to start count down, and tap to stop count down;
Notice: after the countdown ends, the device will ring alarm sound.
4.9.5 Second clock setting
1. Enter the main menu to tap to choose second clock;
2. Tap to start second and clock, and tap to stop second clock;
3. Tap to reset second time;
4. Tap on the right side to display the smaller unit counter of second clock;
4.10 ES FILE VIEWER
Open ES file viewer, and enter main menu.
You can manage SD card, browse by category and browse all music, picture, video,
document application, package, favorites, installation package, management
recommended through catalogue.
4.11 DISPLAY
4.11.1 Brightness
1. Enter main menu screen, tap “Settings” > “Display”.
2. Tap “Brightness” to enter.
3. Drag the slider leftward to lower the screen brightness. Drag the slider rightward
to increase the screen brightness.
4.11.2 Auto-rotate the screen
1. Enter main menu screen, tap “Settings” > “Display”.
2. When setting the rotation of device, remain the orientation of the rotated screen.
34

OBDSTAR User Manual
http://www.uobdii.com/wholesale/obdstar-x300-dp-pad2-key-master-plus-full-configuration.html
4.12 SET SCREEN LOCK
You can set the screen lock pattern, and when the screen is locked, it will
not be unlocked until you draw the right pattern.
1. Enter main menu screen, tap “Settings” > “Security” > “Screen lock”.
2. There are several options available for your selection. To define a pattern, follow
the on-screen prompts to plot your pattern.
3. After drawing, tap “Confirm” to save your setting.
4.13 APPLICATION
4.13.1 View installed applications
1. Enter main menu screen, tap “Settings” > “Apps” to open the downloaded
application list.
2. The following operations are available:
• Tap the desired one to view the application information.
• Tap and choose “Sort by size” from the pull-down menu, the applications will be
displayed in size order automatically.
• Tap and choose “Reset app preferences” from the pull-down menu, a confirmation
dialog box will appear on the screen, tap “Reset apps”
to proceed; tap “Cancel” to abort.
3. To uninstall an application, tap it to enter the application information screen.
4. Tap “Uninstall” and then follow the on-screen instructions to finish it.
4.13.2 View the running applications
1. Enter the main menu screen, tap “Settings” > “Apps”. Scroll the screen from right
to left to RUNNING tab to open the currently running application list.
2. The following operations can be done:
• View the currently running applications;
• Tap any one to stop it.
4.14 LANGUAGE&INPUT METHOD
1. Enter the main menu screen, tap “Settings” > “Language & input”>Tap language.
2. Tap “Language” and choose the desired language in this device.
The setting of input method
The device provides several kinds of input methods. Tap setting before the desired
input method.
35

OBDSTAR User Manual
http://www.uobdii.com/wholesale/obdstar-x300-dp-pad2-key-master-plus-full-configuration.html
4.15 SET DATE&TIME
This device is preset to use the network-provided date, time zone and time.
Note: If Automatic date & time is set as Use network-provided time, date, time
and time zone will not be defined.
1. Enter the main menu screen, and tap “Settings” > “Date & time”.
2. Tap “Set date”, and scroll the screen upwards and downwards until the desired
numbers appear on the highlight area.
3. Tap “Select time zone”, and choose the desired one from the time zone list. Scroll
the screen upwards and downwards to view more.
4. Tap “Set time” and scroll the screen upwards and downwards to adjust the hour
and minute. After setting, tap “Done” to confirm.
5. Select or deselect “Use 24-hour format” to switch between 12-hour format and
24-hour format.
6. Tap “Choose date format” to choose the desired date of this device format from
the list.
4.16 RESTORE KEY MASTER TO FACTORY SETTINGS
This option enables you to restore this device to the default factory settings.
Once it is reset, all data (including downloaded applications) will be deleted.
Note: Before resetting to factory data, please back up all important data saved in
Your device.
1. Enter the main menu screen, tap “Settings” > “Backup & reset” > “Factory data
reset”.
2. Follow the instructions on the screen to proceed.
4.17 STORE
Enter the main menu, and tap setting> store check the store situation of the device.
Store the download content in the default browser to the download content list.
4.18 APPS INSTALLATION/ UNINSTALLATION
1. Install: Put the application package under the root directory of SD card,
enter “File Manager” and then tap the desired package to start installing.
2. Uninstall: Tap “Settings” > “Apps”, and choose the desired one to uninstall.
36

OBDSTAR User Manual
http://www.uobdii.com/wholesale/obdstar-x300-dp-pad2-key-master-plus-full-configuration.html
ATTACHMENTS
Safety warnings and cautions
Before using and operating the device, please read and observe the following
precautions to avoid dangerous or illegal conditions and to ensure the best
performance of this device.
Medical equipment
▪ In the express provision for medical and health care facilities that prohibit the use
of wireless equipment, please comply with the provisions of the premises to shut
down this device.
▪ Radio waves generated by this device may affect the normal operation of
implantable medical devices or personal medical devices such as pacemakers,
implantation of cochlea, hearing aids, etc. If you are using these medical equipment,
consult your manufacturer for restrictions on the use of this device.
Flammable and explosive area
▪ Do not use this device at the gas station (repair station) or near flammable
materials or chemicals, and follow all graphic or text instructions. This device may
cause an explosion or fire in or around the fuel or chemical storage and transport
area or in an explosive area.
▪ Do not store or transport the equipment and its accessories in flame or flammable
liquids, gases or explosive materials in the same box.
Traffic safety
▪ Do not hold this device while driving, and comply with the regulations in your area
or country.
▪ Do not place this device above the car's airbag or in an area that can be touched by
the airbag after it is deployed. Otherwise when the airbag inflated, this device will be
subject to a strong external force to the car staff caused serious injury.
▪ The wireless device may interfere with the aircraft's flight system, please comply
with the relevant provisions of the airline, in the ban on the use of wireless
equipment, please turn off this device.
Operating environment
▪ Do not charge or use this device in a dusty, humid, dirty, or near magnetic field to
avoid malfunction of the internal circuit of the device.
▪ Do not use this device during lightning storms to avoid lightning or other damage.
▪ Turn off this device where it is expressly prohibited to use the wireless device.
▪ When this device is powered by the power adapter, the choice of the altitude of the
product is determined by the matching adapter. For the tropical environment
temperature condition, keep the ambient temperature from 0 ℃ to 40 ℃. When this
device is powered by the battery, keep the ambient temperature from -10℃ to 40 ℃.
Do not use the above temperature range, when the ambient temperature is too high
or too low, may cause a malfunction.
37

OBDSTAR User Manual
http://www.uobdii.com/wholesale/obdstar-x300-dp-pad2-key-master-plus-full-configuration.html
Child health
This device and its accessories may contain small parts, please place them in places
where children are not accessible.
Children may unintentionally damage this device and its accessories, or swallow
small parts to cause suffocation or other hazards.
Environmental protection
Please comply with local laws and regulations regarding device, batteries and their
accessories, and support recovery operations. Do not dispose of device, batteries and
their accessories as ordinary household waste.
Original accessories
Use only original accessories provided by the device manufacturer. If you use any
non-original accessories, are likely to affect the performance of this device, in
violation of the warranty terms of this device and the country on the communication
terminal products, the relevant provisions, and even lead to personal harm.
Use batteries and chargers
▪ When the charge is complete, disconnect the device from the power outlet device.
▪ Do not connect the metal conductor to the battery, or contact the end of the
battery to avoid short circuiting of the battery, as well as physical damage caused by
burnout due to overheating.
▪ Do not place the battery or device around the heating equipment, such as a
microwave oven, oven or radiator. Excessive battery may cause an explosion.
▪ Do not disassemble or modify the battery to prevent the battery from leaking,
overheating, igniting or bursting.
▪ If the battery leaks, do not expose the skin or eyes to the leaked liquid; if it gets on
the skin or eyes, rinse immediately with water and go to the hospital for medical
treatment.
▪ If the charger's cable is damaged, do not use it to avoid electric shock or fire.
▪ Do not throw the battery into the fire, otherwise it will cause the battery to fire and
burst.
Repair and maintenance
▪ Keep this device and its accessories dry. Do not use a microwave oven or other
external heating equipment to dry it.
▪ Do not subject this device and its accessories to strong shock or vibration to avoid
damage to the equipment and its accessories or to cause the battery to explode.
▪ Do not place the unit or its accessories in too high or low temperatures. Doing so
may cause device, batteries, and chargers to malfunction, fire, or explode. When the
temperature below 0 ℃, the battery performance will be limited.
▪ Do not use potent chemicals, cleaning agents or strong detergent cleaning device or
accessories. Before cleaning and maintenance, please shut down and disconnect the
charger.
▪ Do not disassemble device and accessories, otherwise the device and accessories
will not be covered by our warranty.
38

OBDSTAR User Manual
http://www.uobdii.com/wholesale/obdstar-x300-dp-pad2-key-master-plus-full-configuration.html
▪ If the device collides with a hard object or the device is strongly impacted by the
outside, the screen is broken, do not touch or attempt to remove the broken part,
stop using it immediately and contact the specified service point in time.
Warranty
The warranty is only applicable to users and distributors who purchase OBDSTAR
products through normal procedures.
Within one year from the date of delivery, OBDSTAR electronic products due to
material or process defects caused by warranty, due to abuse, unauthorized changes,
for non-product design purposes, not in accordance with the provisions of the
manual Operation, etc., resulting in damage to the device or components are not
covered by this warranty.
Waiver statement
The above warranty can be substituted for any other form of warranty.
Order notification
Replaceable parts and optional accessories can be ordered directly from the
OBDSTAR authorized supplier, please specify when ordering:
• Order quantity
• Serial number
• Part name
Customer service center
If you encounter any problems during the operation, please call the Service Hotline:
0086-755-86707161.
When the device needs repair, please send it to OBDSTAR Technology Co., Ltd.,
together with the purchase invoice and problem description. If the device is within
the scope of the warranty, OBDSTAR will provide free maintenance; if the device is
not in the warranty, OBDSTAR will charge maintenance and return freight.
OBDSTAR Technology Co., Ltd.
Address:
Floor 4, West Block, No.8 Building, Xinwu Industrial Zone, Taoyuan Street
Nanshan District, Shenzhen, 518000 China
Declaration
OBDSTAR reserves the right to change the product design and specifications without
notice. Physical appearance and color may be little different from the one shown in
the instruction, please take the device as the standard. We have made every effort to
make all the description of the book accurate, but still inevitably inappropriate, if in
doubt, please contact the dealer or OBDSTAR after-sales service center, the company
does not bear any consequences due to misunderstanding.
39
 Loading...