

MyGrid Switch — MG11AZ
User Guide
©2016 OATI, Inc. All Rights Reserved

2
TRADE SECRET
This document and attachments contain condential
and proprietary information of Open Access Technology
International, Inc. This information is not to be used,
disseminated, distributed, or otherwise transferred
without the expressed written permission of Open Access
Technology International, Inc.
PROPRIETARY NOTICE
OATI webSmartView™, OATI webSmartView Mobile™, OATI
GridPort™, OATI GridControl™, and OATI MyGrid Switch™ are
trademarks and service marks of OATI, Inc. OATI GridControl™
is U.S. Patent Pending. All rights reserved.
THIRD-PARTY TRADEMARKS
Wi-Fi® is a registered trademark of Wi-Fi Alliance®. ZigBee®
is a registered trademark of ZigBee Alliance®.
2

33
TABLE OF CONTENTS
Introduction ................................................ 4
Before You Begin ....................................... 5
Package Contents ...................................... 5
Helpful Terms ............................................. 5
Getting to Know Your
MyGrid Switch ............................................ 5
Getting Started ........................................... 6
Installing and Pairing
Your MyGrid Switch .......................................... 6
Features/Functions .................................... 8
Specications ............................................ 10
Safety Precautions ................................... 10
Federal Communications
Commission (FCC) .................................... 11
Industry Canada Notices ......................... 12

4
Introduction
The OATI MyGrid Switch is a powerful, simple and costeective, solution for you and your utility to monitor
and manage energy consumption. It pairs with the OATI
GridPort to form a wireless Home Area Network (HAN).
This connection combined with the associated web and
mobile applications provides you with a convenient means
to monitor and control your connected appliances. The
MyGrid Switch is designed for ease of installation, so you
can quickly install it yourself. Installation instructions are
included in this manual.

5
Before You Begin
Before installing a MyGrid Switch, install the GridPort
provided to you by your utility. Installation instructions are
included with your Gridport.
Package Contents
• MyGrid Switch
• User Guide
Helpful Terms
• Home Area Network (HAN) - Network of devices in your home
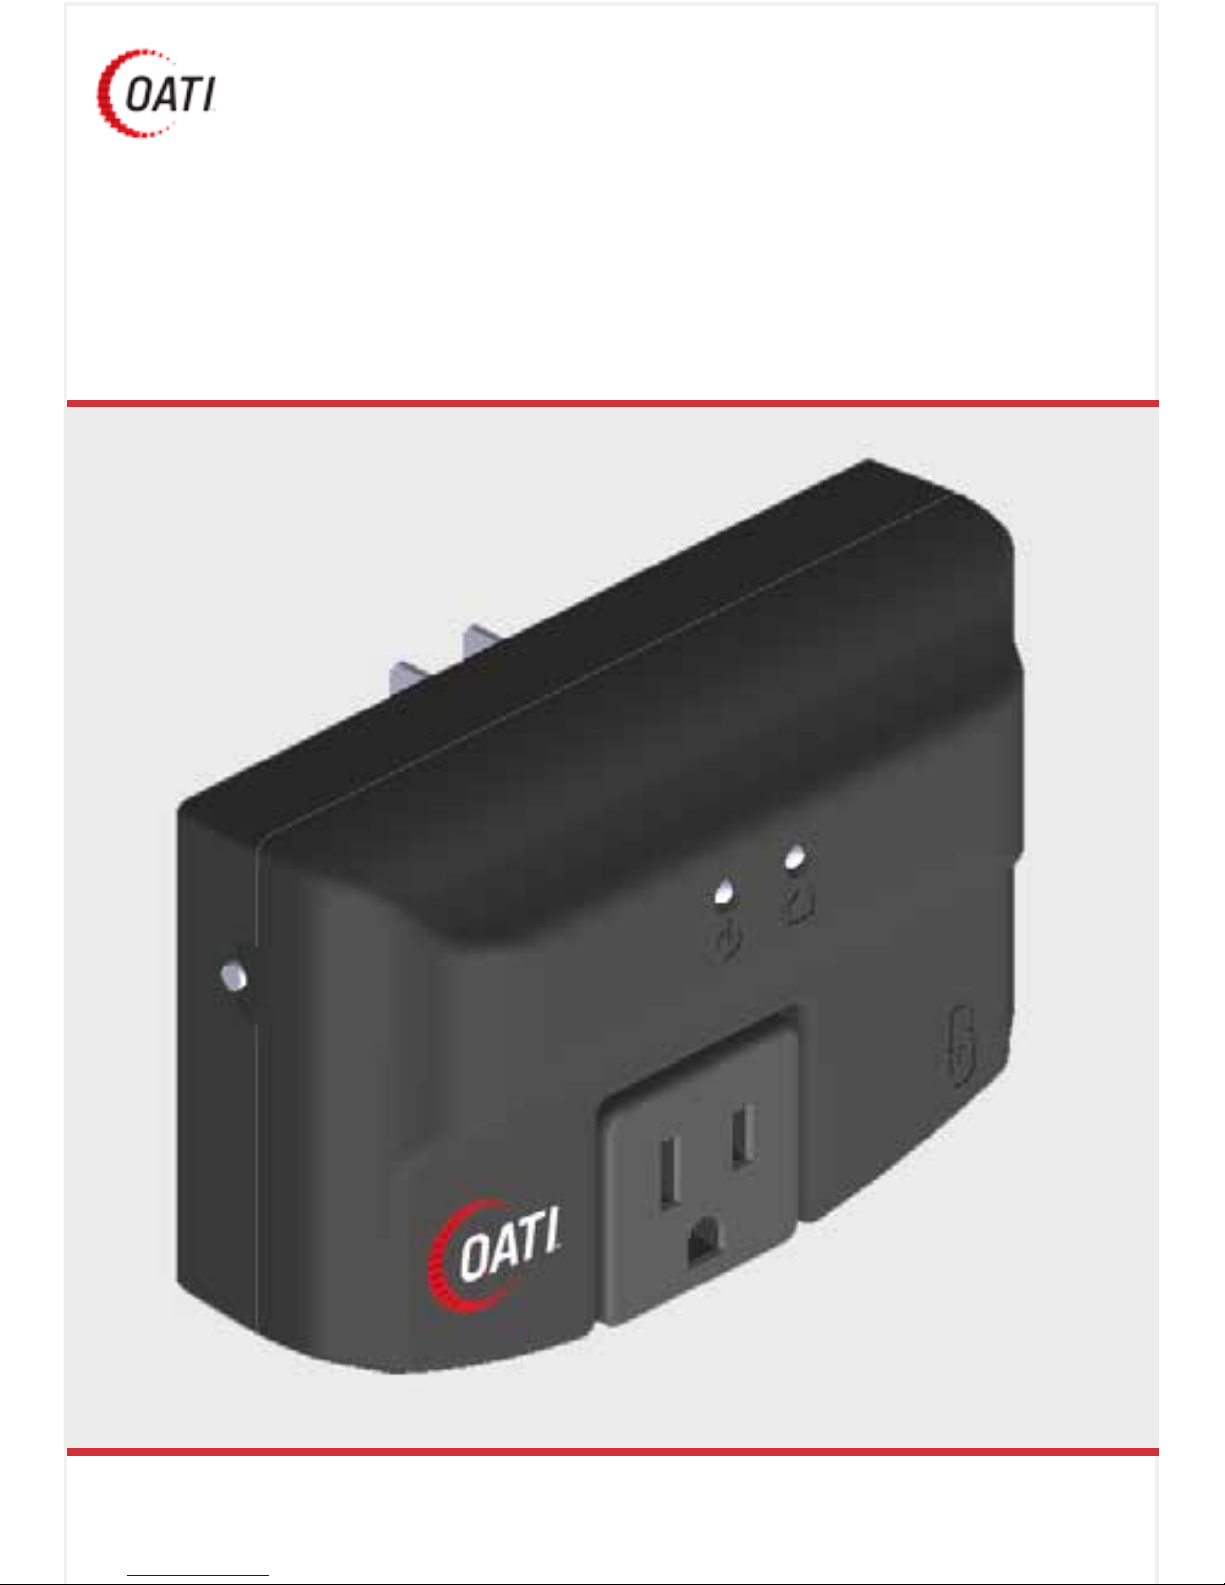
Getting to Know Your MyGrid Switch
1. Device Button – The
device has a single button
that allows for turning on and
o the MyGrid Switch outlet
and also resetting the device.
2. Power LED – Lights if there
is power at the front swivel
outlet.
3. HAN LED – Displays
connectivity status with the
MyGrid Switch.
4. Swivel Plug – Allows you
to install your MyGrid Switch
when using in tight spaces or
with odd sized plugs
1 2 3
4

6
Getting Started
1. Open the MyGrid mobile app that you downloaded when
you installed your GridPort.
2. From the device list, select the MyGrid Switch.
3. Follow the onscreen instructions to install the MyGrid
Switch and pair it with your GridPort (for reference, the
instructions are also presented below).
Installing and Pairing the MyGrid Switch
1. Plug the MyGrid Switch into the electrical wall outlet that
provides power to the appliance approved by your utility
(e.g., window air conditioner). Do not plug the appliance
into the MyGrid Switch yet.
2. Press the Device Button for 5 seconds to initiate pairing
mode
When the HAN LED blinks Blue, the device is ready to pair
with your GridPort. The MyGrid Switch remains in pairing
mode for 15-minutes. Perform the next steps within this
time.
HAN LED blinks Blue
Power LED turns Green

7
3. Return to the MyGrid mobile app, and click on the “Click
Here to Pair” button to pair the MyGrid Switch with your
GridPort.
4. Once the MyGrid Switch is successfully paired with your
GridPort, plug the power cord for the approved appliance
into the MyGrid Switch.

8
Other MyGrid Switch Features/Functions
On/O
Press and release the device button to turn the MyGrid
Switch on and o.
Factory Reset
Press and hold the device button for at least 10 seconds
to reset the MyGrid Switch. This will clear all data from the
device memory. Only reset if advised by utility/support.
The Power LED will ash green twice indicating that the
factory reset has begun.
When the HAN LED (blue) turns o, the factory reset is
complete. If it is already o at the beginning, then the reset
will be complete after the HAN LED ashes and then turns
o.
Pairing Mode:
To troubleshoot the device, Press and hold the device
button for 5 seconds to initiate a pairing mode. When the
Power LED ashes green once, the button can be released.
The MyGrid Switch must be in pairing mode for the GridPort
to discover and pair with the MyGrid Switch.

9
UL Listing Information

10
Specications
Size
• 3.25” H x 4.75” W x 1.5” D
Home Area Network
• ZigBee
Power Ratings
• 15A 120V
• Inrush Current: 80 Amps
Electrical Measurement Capabilities (Targeted)
• Volts, Amps, Watts = 0.5% accurate
• Hz = +/-0.02Hz accurate
Environmental Conditions
• Operating Temperature:
0°C to 60°C
• Storage Temperature:
-40°C to 85°C
• Relative Humidity:
20% to 90% non-condensing
Safety Precautions
1. Do not plug the MyGrid Switch into a power strip or
extension cord.
2. Do not use the MyGrid Switch in a damp location, such as
a wet basement or a bathroom.
3. Always unplug the appliance from the MyGrid Switch
before removing the MyGrid Switch from the power
outlet.
4. Do not pull on the cord of a connected appliance to
rotate the swivel plug on the MyGrid Switch. Hold the
plug portion of the appliance cord, then rotate.

11
Federal Communications Commission
(FCC)
Pursuant to Part 15 of the FCC Rules, this equipment
has been tested and complies with the limits for a Class
B digital device. These limits are designed to provide
reasonable protection, in a residential installation,
against harmful interference to radio communications.
This equipment generates, uses, and can radiate radio
frequency energy and may cause harmful interference
to radio communications if not installed and used in
accordance with the instructions. However, there is no
guarantee that interference will not occur in a particular
installation.
If this equipment causes interference to radio and
television reception, which can be determined by turning
the equipment o and on, the user may try to correct the
interference with one or more of the following measures:
• Reorient or relocate the receiving antenna.
• Increase the distance between the equipment and the
receiver.
• Connect the equipment to an outlet on a dierent circuit
than that to which the receiver is connected.
• Consult the radio/television dealer or an experienced
radio/television technician for help.
This device complies with Part 15 of the FCC Rules.
Operation of this device is subject to the following
two conditions: (1) This device may not cause harmful
interference; and (2) this device must accept any received
interference, including interference that may cause
undesired operation.

12
This device complies with FCC radiation exposure limits for
an uncontrolled environment. It should be installed and
operated with a minimum distance of 20cm between the
device and your body.
This device and its antenna(s) must not be co-located or
operated in conjunction with any other antenna or transmitter.
This device may contain an FCC-certied transmitter
module (CTM). The FCC ID for the module, if applicable, is
located on the back on the bottom of the device.
Changes or modications to the device not expressly
approved by SmartGuard L.L.C. could void the user’s
authority to operate the equipment.
Industry Canada Notices
This device complies with Industry Canada’s license-exempt
RSSs. Operation of this device is subject to the following
two conditions: (1) This device may not cause interference;
and (2) this device must accept any interference, including
interference that may cause undesired operation.
Le présent appareil est conforme aux CNR d’Industrie
Canada applicables aux appareils radio exempts de
licence. L’exploitation est autorisée aux deux conditions
suivantes: (1) l’appareil ne doit pas produire de brouillage;
(2) l’utilisateur de l’appareil doit acceptar tout brouillage
radioelectrique subi, meme si le brouillage est susceptible
d’en compromettre le fonctionnement.
OATI/SmartGuard Support:
763-201-2020
3660 Technology Drive NE, Minneapolis, MN 55418

13
 Loading...