

Oase Jumping Jet Rainbow Star Set, Jumping Jet Rainbow Star Add-On Set Operating Instructions Manual
Page 1
DE Gebrauchsanweisung
GB Operating instructions
FR Notice d'emploi
NL Gebruiksaanwijzing
ES Instrucciones de uso
PT Instruções de uso
IT Istruzioni per l'uso
DK Brugsanvisning
NO Bruksanvisning
SE Bruksanvisning
FI Käyttöohje
HU Használati utasítás
PL Instrukcja obsługi
CZ Návod k použití
SK Náv od na použitie
SL Navodilo za uporabo
HR Upute za upotrebu
RO Instrucţiuni de utilizare
BG Упътване за употреба
UA Посібник з експлуатації
RU Руководство по эксплуатации
CN
使用手册
Jumping Jet Rainbow Star Set,
Jumping Jet Rainbow Star Add-On Set
10467/04D
Pos: 1 /Alle Produkte/Dummy_module/===== Seitenwechse l ===== @ 0\mod_1125648978015_0.doc @ 1630
Page 2
3
Pos: 12 /Pumpen/Schlammsauger/Jumping Jet Rainbow Star/ Grafik Montage 1 @ 6\mod_1196342623223_0.doc @ 40584
Pos: 13 /Pumpen/Schlammsauger/Jumping Jet Rainbow Star/ Grafik Montage 2 @ 6\mod_1196344536694_0.doc @ 40610
Page 3
4
Pos: 14 /Pumpen/Schlammsauger/Jumping Jet Rainbow Star/ Grafik Montage 3 @ 6\mod_1196344912962_0.doc @ 40636
Page 4
5
Pos: 15 /Pumpen/Schlammsauger/Jumping Jet Rainbow Star/ Grafik Montage 4 @ 6\mod_1196346576066_0.doc @ 40662
Page 5
6
Pos: 16 /Alle Produkte/Länderkennzeichen/00===LEE R=== @ 0\mod_1126786111024_0.doc @ 5631
Pos: 17 /Alle Produkte/Dummy_module/===== Seitenwechse l ===== @ 0\mod_1125648978015_0.doc @ 1630
Page 6

17
- GB -
Pos: 84 /Alle Produkte/Länderkennzeichen/02===GB=== 1. Sprache @ 4\mod_1155109065198_0.doc @ 23181
Pos: 85 /Alle Produkte/Überschriften/H1_INH Vorwort @ 6\ m od_1 196355497538_121.doc @ 41063
Foreword
Pos: 86 /Pumpen/Schlammsauger/Jumping Jet Rainbow Star/Vor wort @ 6\mod_1196347929807_121.doc @ 40693
Welcome to OASE Living Water. Congratulations on the purchase of the Jumping Jet Rainbow Star set
or the Jumping Jet Rainbow Star Add-On set respectively.
Prior to commissioning the unit, please read the instructions of use carefully and fully familiarise yourself
with the unit. Ensure that all work with this unit is only carried out in accordance with these instructions.
Adhere to the safety information for the correct and safe use of the unit.
Keep these operating instructions in a safe place! Please also hand over the operating instructions when
passing the unit on to a new owner.
Pos: 87 /Alle Produkte/Dummy_module/Abstand 18 pt @ 6\mod_11963 55593257_0.doc @ 41089
Pos: 88 /Alle Produkte/Überschriften/H1_INH Inhalts verzeichnis @ 6\mod_1196352696480_121.doc @ 40825
Table of Contents
Pos: 89 /Alle Produkte/Verzeichnisse/INH Inhaltsver zeichnis @ 6\mod_1196426354681_121.doc @ 41249
1. Scope of delivery.............................................................................................................................. 18
2. Legal conditions ............................................................................................................................... 19
2.1 Intended use ............................................................................................................................ 19
2.2 Use other than that intended....................................................................................................19
3. CE Manufacturer's Declaration ........................................................................................................ 19
4. Safety information ............................................................................................................................ 19
4.1 Hazards encountered by the combination of water and electricity..........................................19
4.2 Correct electrical installation.................................................................................................... 19
4.3 Safe operation of the unit......................................................................................................... 20
5. Installation........................................................................................................................................ 21
6. Start-up............................................................................................................................................. 22
7. Operation.......................................................................................................................................... 24
8. Maintenance and cleaning............................................................................................................... 25
9. Storage/Over-wintering .................................................................................................................... 25
10. Remedy of faults .............................................................................................................................. 26
11. Disposal............................................................................................................................................ 26
c @ 42015
Technical data................................................................................................................................ 137
Pos: 91 /Alle Produkte/Verzeichnisse/INH Symbole auf de m Gerät @ 7\mod_1196634527018_121.doc @ 42068
Symbols on the unit........................................................................................................................ 139
Pos: 92 /Alle Produkte/Verzeichnisse/INH Ersatztei le @ 7\mod_1196634640409_121.doc @ 42094
Spare parts..................................................................................................................................... 140
Pos: 93 /Alle Produkte/Dummy_module/===== Seitenwechse l ===== @ 0\mod_1125648978015_0.doc @ 1631
-
GB -
Page 7

18
- GB -
Pos: 94 /Alle Produkte/Überschriften/H1 Lieferumfang @ 6\ mod_1196355702321_121.doc @ 41115
1. Scope of delivery
Pos: 95 /Pumpen/Schlammsauger/Jumping Jet Rainbow Star/Li eferumfang @ 6\mod_1196352344697_121.doc @ 40798
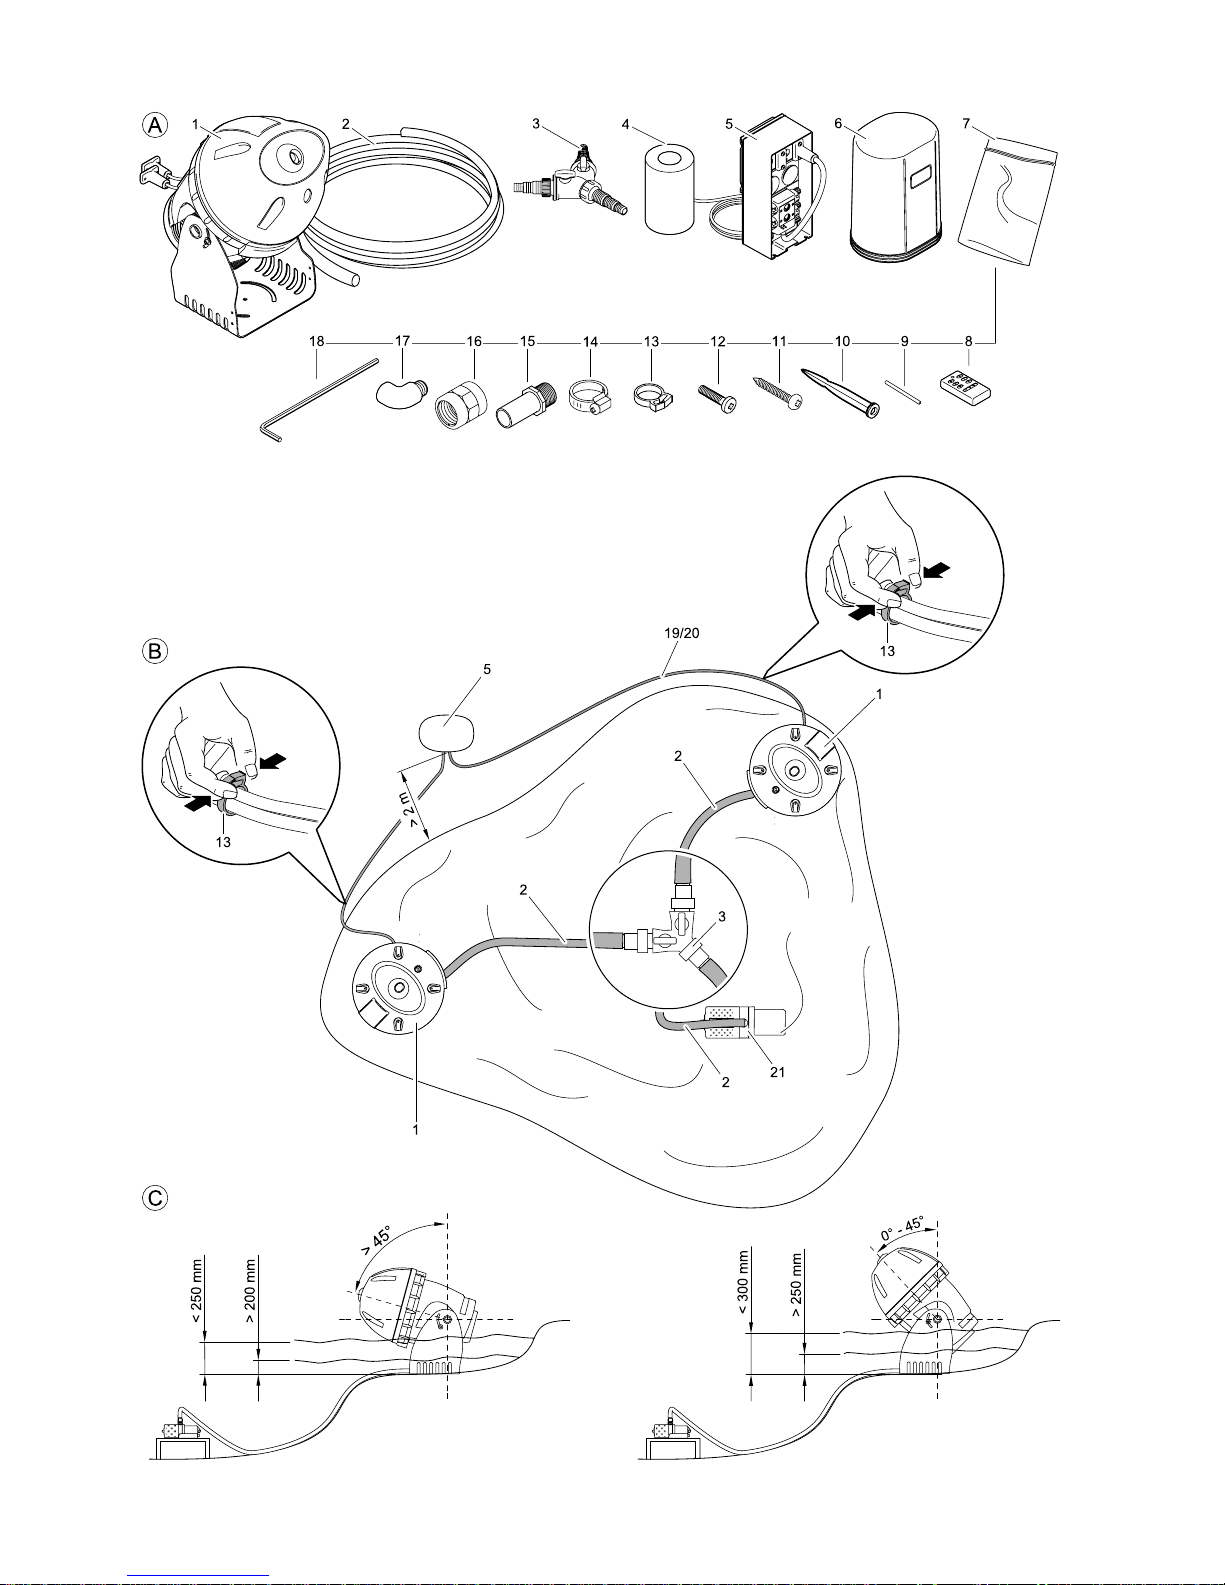
Jumping Jet Rainbow Star Set (Fig. A)
The Jumping Jet Rainbow Star set forms the basis for your water feature effects.
Fig. A Number Description
1 1 Jumping Jet Rainbow Star
2 1 4 m fabric hose (1 ")
4 1 Spare filter
5 1 12V Master control box
6 1 Protection hood
7 1 Set of accessories
8 1 Hand-held transmitter (including battery, type P 23GA)
9 1 Pin (to actuate the Teach-in key)
10 1 Ground stake
11 2 Self-tapping screw 4.8 x 25 mm
12 2 Threaded screw M5 x 22 mm
13 4 Cable clip
14 2 Hose clip
15 1 Hose nozzle
16 1 Double socket
17 2 Angle piece
18 1 Alley key, 5 mm
1 Instructions of use
Jumping Jet Rainbow Star Add-On set (Fig. A)
The Jumping Jet Rainbow Star Add-On set includes extension elements for the Jumping Jet Rainbow
Star set. Both sets include identical Jumping Jet Rainbow Stars which provide the same water feature
effects.
Fig. A Number Description
1 1 Jumping Jet Rainbow Star
2 1 5 m fabric hose (1 ")
3 1 Y distributor
4 1 Spare filter
7 1 Set of accessories
11 2 Self-tapping screw 4.8 x 25 mm
12 2 Threaded screw M5 x 22 mm
13 4 Cable clip
14 2 Hose clip
15 1 Hose nozzle
16 1 Double socket
17 2 Angle piece
18 1 Alley key, 5 mm
1 Instructions of use
► A pump (not included in our delivery) is required to operate the Jumping Jet Rainbow Star. We rec-
ommend the use of the powerful “Neptun 6000” pump from OASE. This pump is designed to operate
two Jumping Jet Rainbow Stars at the same time (synchronously).
► We also recommend the garden outlet “In Scenio FM Master 3” for easy control of the Neptun 6000.
With this outlet you can remote radio control the Neptun 6000 and regulate its flow rate to set the jet
range and jet height of the Jumping Jet Rainbow Star.
Pos: 96 /Alle Produkte/Dummy_module/===== Seitenwechse l ===== @ 0\mod_1125648978015_0.doc @ 1631
Page 8

19
- GB -
Pos: 97 /Alle Produkte/Überschriften/H1 Rechtliche Bes timmungen @ 6\mod_1196352859169_121.doc @ 40851
2. Legal conditions
Pos: 98 /Pumpen/Schlammsauger/Jumping Jet Rainbow Star/Bes timmungsgemäße Verwendung @ 6\mod_1196352950779_121.doc @ 40877
2.1 Intended use
The Jumping Jet Rainbow Star set and the Jumping Jet Rainbow Star Add-On set were designed for
use in clear or treated water. Both create light and water effects. The Jumping Jet Rainbow Star may
only be used in indoor or outdoor basins or ponds. The quality of the water jet could be impaired as the
fish population increases and the water quality diminishes. This can lead to an increase service in requirement for the unit. We recommend to place the Jumping Jet Rainbow Star at a wind protected place,
knowing that the water jet could be interrupted by wind. The Jumping Jet Rainbow Star requires frost
protection.
A maximum of two Jumping Jet Rainbow Stars may be connected to the 12V Master control box. The
hand-held transmitter allows the selection of five default programs at the 12V Master control box to synchronously access a maximum of two Jumping Jet Rainbow Stars.
Pos: 99 /Pumpen/Schlammsauger/Jumping Jet Rainbow Star/ Nicht bestimmungsgemäße Verwendung @ 6\mod_1196353110030_12 1.doc @ 40903
2.2 Use other than that intended
Danger to persons if the Jumping Jet Rainbow Star set and the Jumping Jet Rainbow Star Add-On set
are misused or not used as intended. If used for purposes other than that intended, our warranty and
operating permit will become null and void
Pos: 100 /Alle Produkte/Dummy_module/Abstand 18 pt @ 6\mod_1196 355593257_0.doc @ 41087
Pos: 101 /Alle Produkte/CE-Herstellererklärung Pump en @ 6\ mod_1194858915864_121.doc @ 40237
3. CE Manufacturer's Declaration
We declare conformity in the sense of the EC directive, EMC directive (2004/108/EC) as well as the low
voltage directive (2006/95/EC). The following harmonised standards apply:
Pos: 102 /Pumpen/Schlammsauger/Jumping Jet Rainbow Star / Angewandte Normen @ 6\mod_1196356021291_0.doc @ 41141
EN 60335-1, EN 61000-3-2, EN 61000-3-3, EN 61000-4-3, EN 61000-4-4, EN 61000-6-3, EN 61558-2-6
Pos: 103 /Alle Produkte/Unterschrift Hanke @ 0\mod_1126881 079296_121.doc @ 5743
Signature:
Pos: 104 /Alle Produkte/Dummy_module/Abstand 18 pt @ 6\mod_1196 355593257_0.doc @ 41089
Pos: 105 /Alle Produkte/Überschriften/H1 Sicherhei tshinweise @ 6\mod_1196353926316_121.doc @ 40981
4. Safety information
Pos: 106 /Pumpen/Schlammsauger/Jumping Jet Rainbow Star / SIC Intro @ 6\mod_1196356263418_121.doc @ 41167
OASE has built the Jumping Jet Rainbow Star Set and the Jumping Jet Rainbow Star Add-On set according to the state-of-the-art following the current safety regulations. Despite the above, hazards for
persons and assets can emanate from the Jumping Jet Rainbow Star if it is used in an improper manner
or not in accordance with its intended use, or if the safety instructions are ignored. Also note the safety
information given for the units you want to connect.
Pos: 107 /Alle Produkte/Sicherheit/SIC Kinder und Jugendli c he unter 16 Jahren @ 6\mod_1196356502951_121.doc @ 41194
For safety reasons, children and young persons under 16 years of age as w ell as persons who
cannot recognise possible danger or who are not familiar with these operating instructions, are
not permitted to use the unit.
Pos: 108 /Alle Produkte/Sicherheit/SIC Gefahr durch Kombina tion von Wasser und Elektrizität @ 7\mod_1196624299064_ 121.doc @ 41313
4.1 Hazards encountered by the combination of water and electricity
► The combination of water and electricity can lead to death or severe injury from electrocution, if the
unit is incorrectly connected or misused.
► Prior to reaching into the water, always disconnect the power supply to all units used in the water.
Pos: 109 /Pumpen/Schlammsauger/Jumping Jet Rainbow Star / SIC Vorschriftsmäßige elektrische Installation @ 7\mod _11 96624724895_121.doc @ 41339
4.2 Correct electrical installation
► For your own safety, consult a qualified electrician when you have questions or encounter problems.
► Electrical installations at garden ponds must meet the international and national regulations valid for
installers.
► For the installation of the 12V Master control box, keep a minimum distance of 2 m from the garden
pond or basin (Fig. B).
► Only connect the Jumping Jet Rainbow Star and the 12V Master control box when the electrical data
of the power supply coincide with the electrical data on the type plate.
► Only connect the supply cables of the Jumping Jet Rainbow Star to the 12V Master control box. No-
te the correct plug-socket assignment.
► Only connect the 12V Master control box power cable to a correctly installed wet room earthed con-
tact socket or to a “In Scenio FM Master 3” garden socket.
► Please note that the power supply must be fused via a fault current protection system with a maxi-
mum reference fault current of 30 mA.
► Only use cables that are uncoiled.
► Extension cables must be approved for outdoor use and meet DIN VDE 0620 standards.
Page 9

20
- GB -
► Route the connection cable so that damage is excluded.
► Keep all connection points dry. Risk of electrocution.
► Operation of the 12V Master control box is only allowed with the protection hood closed. In this
manner, connections and plugs are protected from rain and splash water (type of protection IP X4).
The 12V Master control box, the connections and plugs are not water-proof and must not be routed
or installed in water.
Pos: 110 /Pumpen/Schlammsauger/Jumping Jet Rainbow Star / SIC Sicherer Betrieb des Gerätes @ 7\mod_1196624794946_121.doc @ 41365
4.3 Safe operation of the unit
► Only operate the Jumping Jet Rainbow Star when no-one is in the water.
► Do not carry or pull the units by the power cable.
► Do not operate defective units. Never operate the unit if either the cable or the housing is defective!
Pull the power plug immediately. Repairs of connection cables may only be carried out by the manufacturer / supplier.
► Position the Jumping Jet Rainbow Star such that danger of injury to persons is excluded (e.g. cau-
ses by a water jet or light beam suddenly emerging).
► Never look directly into the water jet outlet opening or into the light source of the Jumping Jet Rain-
bow Star.
► Because of its weight, always have two persons carry the Jumping Jet Rainbow Star.
► Avoid vibrations and impacts in order not to damage the drive unit and the electronics in the Jum-
ping Jet Rainbow Star.
► Never open the housing or its attendant components, unless this is explicitly mentioned in these in-
structions of use.
► Always pull the power plugs of all units located in the water prior to starting work on the Jumping Jet
Rainbow Star.
► The Jumping Jet Rainbow Star is not suitable for dry installation. The water exits the container via a
lateral bypass when no water jet is produced. It must be guaranteed that the emerging water can return to the point from which it was taken.
► Where the water jet hits the water surface, the water depth must be at least 300 mm to avoid heavy
water splashes. During operation, the point where the jet hits the water surface could vary, depending on the degree of clogging of the filter and screen.
► This point should not be too close to the basin rim (> 1 m). Never guide the water jet beyond the ba-
sin rim, as in this case splash water cannot be avoided.
► Never connect the unit to the domestic water supply.
► Adhere to the maximum water level height specified in these instructions of use.
► The cleaning interval of filter and screen in the Jumping Jet Rainbow Star depends on the quality of
the water supplied.
► During the frost period, take the Jumping Rainbow Star out of operation and store it at a frost protec-
ted place.
► Clean the suction filter basket of the connected pump at regular intervals.
Pos: 111 /Alle Produkte/Dummy_module/===== Seitenwec hsel ===== @ 0\mod_1125648978015_0.doc @ 1631
Page 10

21
- GB -
Pos: 112 /Alle Produkte/Überschriften/H1 Installa ti on @ 7\mod_1196624877149_121.doc @ 41391
5. Installation
Pos: 113 /Pumpen/Schlammsauger/Jumping Jet Rainbow Star / INS Aufstellen @ 7\mod_1196626077860_121.doc @ 41573
Installation (Fig. B, C):
Carefully plan the installation of the Jumping Jet Rainbow Star. Careful planning and taking the environmental conditions into account will lead to optimum operating conditions for the Jumping Jet Rainbow
Star. The following points can help you with your planning.
► Position the Jumping Jet Rainbow Star (1) and the 12V Master control box (5) at a sufficient dis-
tance from each other.
► Keep a minimum distance to the water for the installation of the 12V Master control box (5). For the
prescribed distances, please refer to the regulations for installers of electrical installations in/at garden ponds valid in your country.
► When laying cables (19/20), please note the maximum cable lengths. Use the cable clips (13) to en-
sure proper routing of the two connection cables of the Jumping Jet Rainbow Star.
► Position the Jumping Jet Rainbow Star (1) in a wind protected place. Risk of the water jet being bro-
ken apart by wind.
► Where the water jet hits the water surface, the water depth must be at least 300 mm to avoid heavy
water splashes.
► This point should not be too close to the basin rim (> 1 m). Never guide the water jet beyond the ba-
sin rim, as in this case splash water cannot be avoided.
► Take the installation of another Jumping Jet Rainbow Star (1) (Jumping Jet Rainbow Star Add-On
set) into account that you might want to install in the future.
► Place the pump (21) at a higher level to prevent drawing in of dirt particles from the bottom of the
basin. This increases the cleaning interval for the Jumping Jet Rainbow Star (1).
► Note the required water depth for the Jumping Jet Rainbow Star (Fig. C).
Pos: 114 /Alle Produkte/Dummy_module/Abstand 6 pt @ 7\mod_11966 27997106_0.doc @ 41651
Pos: 115 /Pumpen/Schlammsauger/Jumping Jet Rainbow Star / INS Jumping Jet montieren @ 7\mod_1196626170939_121.doc @ 41599
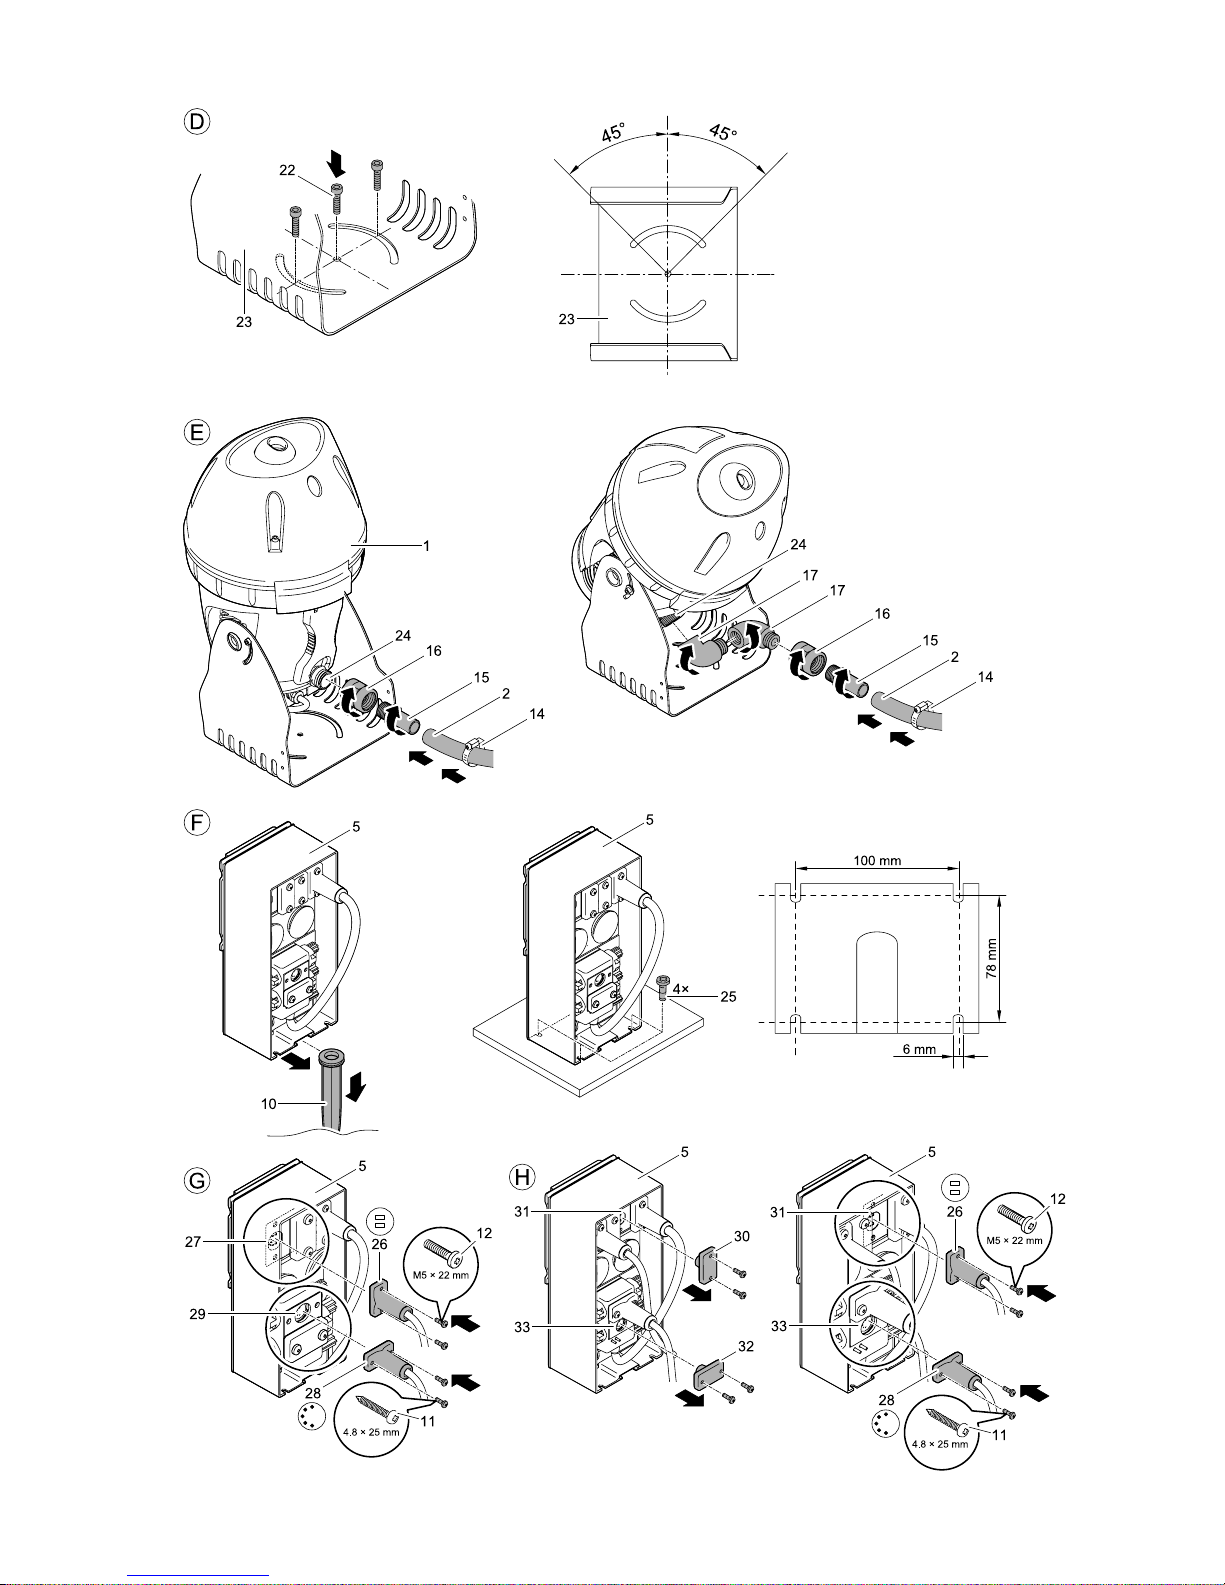
Installation of the Jumping Jet Rainbow Star (Fig. D, E)
Install the Jumping Jet Rainbow Star level and free from vibrations on a sturdy platform.
1. Fasten the unit foot (23) on the platform using 3 screws (22) (not included in our scope of delivery).
Turn the unit to the desired position and tighten the screws (22).
2. Connect the hose (2) (Fig. E)
In the case of steep inclination angles of the Jumping Jet Rainbow Star (1), the stepped hose
adapter (15) with socket (16) can be directly screwed onto the inlet (24).
In the case of flat inclination angles, screw the two angle pieces (17) on the inlet (24) to be able to fit
the stepped hose adapter (15) including the socket (16).
3. Slide the hose clip (14) over the hose (2), plug the hose (2) on the stepped hose adapter (15), and
secure by means of the hose clip (14).
4. Connect the other hose end to the pump. Adhere to the information given in the pump operating instructions.
5. Where two Jumping Jet Rainbow Stars (1) are used, connect each hose end to the Y distributor (Fig. B, 3) and use hose (2) to connect the Y distributor to the pump. The Y distributor is part of
the delivery of the Jumping Jet Rainbow Star Add-On set.
Pos: 116 /Alle Produkte/Dummy_module/===== Seitenwec hsel ===== @ 0\mod_1125648978015_0.doc @ 1631
Page 11

22
- GB -
Pos: 117 /Pumpen/Schlammsauger/Jumping Jet Rainbow Star / INS Steuerungsbox 12V-Master montieren @ 7\mod_11966263043 77_121.doc @ 41625
Installation of the 12V Master control box (Fig. F)
1. Push the ground stake (10) fully into the soil at the desired position, then slide the control box (5)
onto the ground stake (10).
2. As an alternative, the control box (5) can be screwed on using 4 screws (25) (not part of the scope of
delivery) inserted through the screw slots provided for this purpose in the housing of the control
box (5).
Pos: 118 /Alle Produkte/Dummy_module/Abstand 6 pt @ 7\mod_11966 27997106_0.doc @ 41651
Pos: 119 /Pumpen/Schlammsauger/Jumping Jet Rainbow Star / INS Jumping Jet an die Steuerungsbox 12V-Master anschließen @ 7\ mod _ 1196628098966_121.doc @ 41677
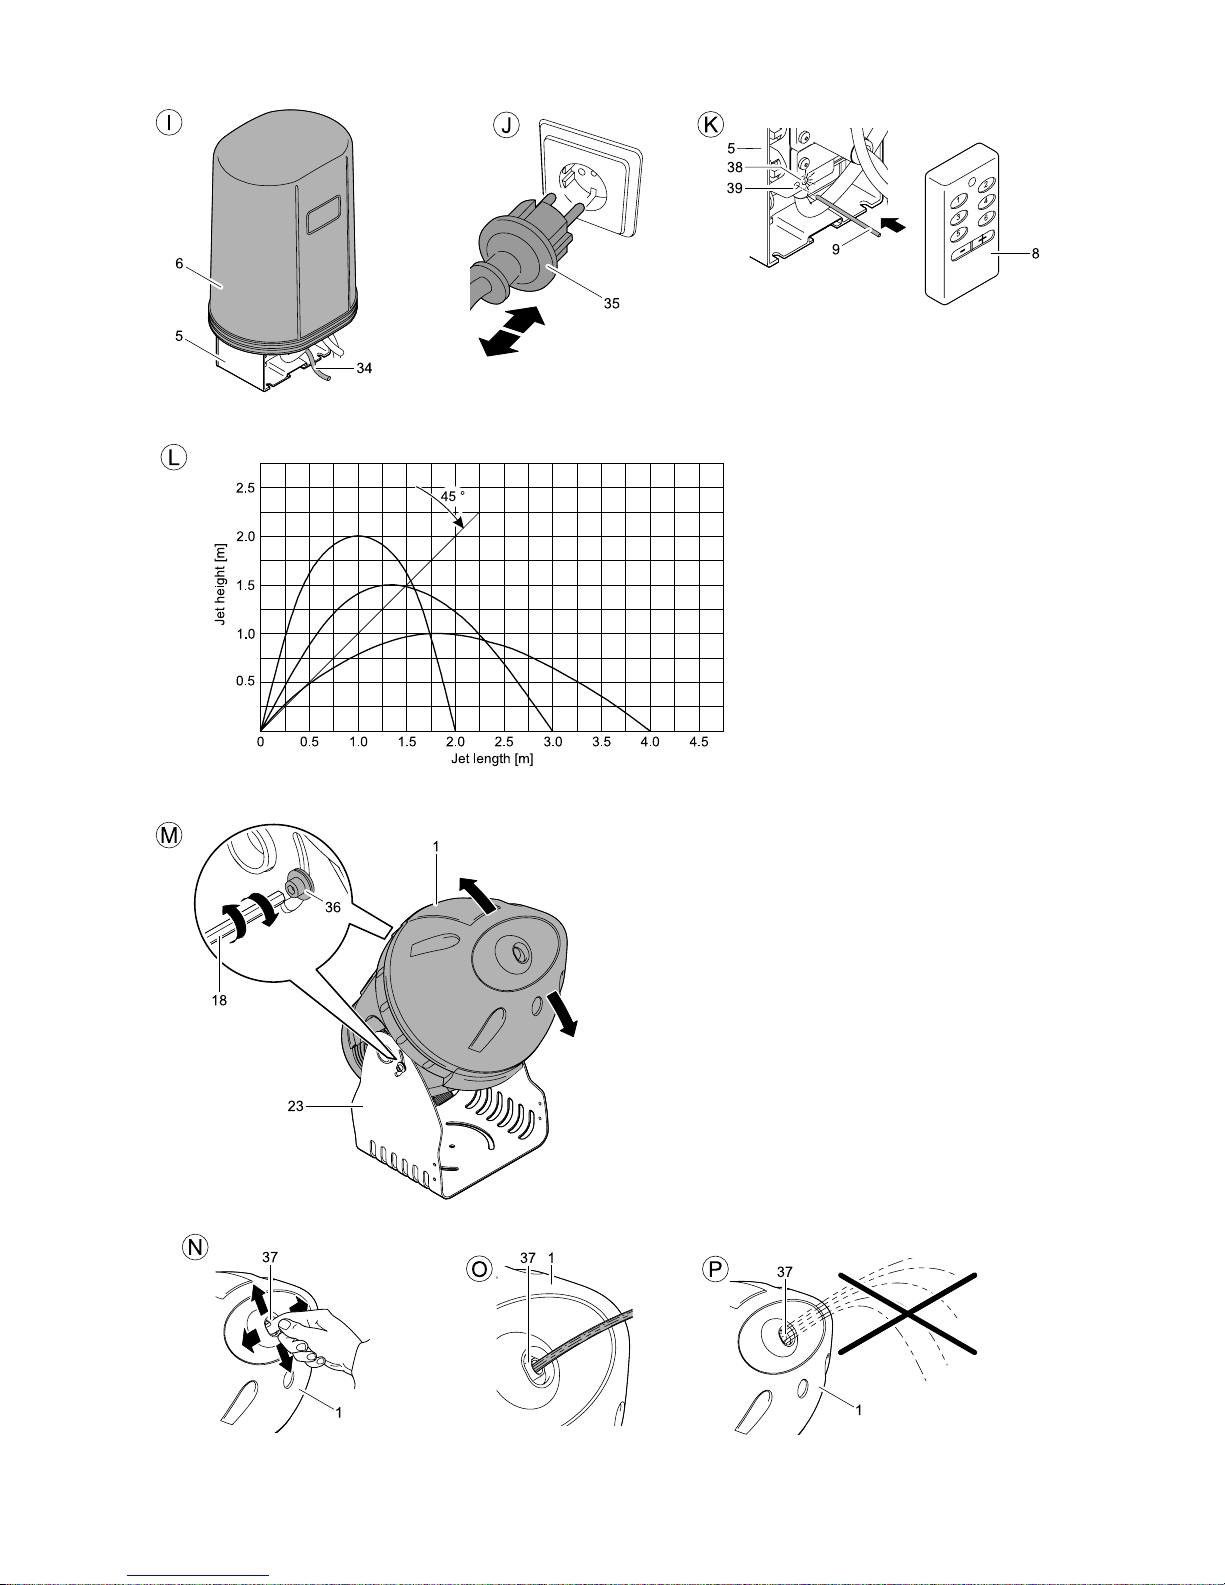
Connection of the Jumping Jet Rainbow Star to the 12V Master control box (Fig. G, I)
The receiver integrated in the 12V Master control box is factory-connected to the transformer by the 12V
plug.
1. Insert the 5-pole plug (28) of the Jumping Jet Rainbow Star in the top socket (29) of the receiver and
secure with the two 4.8 mm self-tapping screws (11) (part of our delivery).
2. Insert the 2pole plug (26) of the Jumping Jet Rainbow Star in the left socket (27) of the transformer
and secure with the two M5 screws (12) (part of our delivery).
3. Place the protection hood (6) over the 12V Master control box (5). Ensure that the receiving aerial
(34) is unobstructed.
The IP X4 protection is only guaranteed when the protection hood is in place!
Pos: 120 /Alle Produkte/Dummy_module/Abstand 6 pt @ 7\mod_11966 27997106_0.doc @ 41651
Pos: 121 /Pumpen/Schlammsauger/Jumping Jet Rainbow Star / INS Jumping Jet Add-On Set an die Steuerungsbox 12V-Master anschli eßen @ 7\mod_1196628631139_121.doc @ 41703
Connect the Jumping Jet Rainbow Star of the Add-On set to the 12V Master control box (Fig. H, I)
1. If necessary, remove the protection hood (6) from the 12V Master control box (5).
2. Remove the two screws from the cover (32) of the receiver, remove cover (32), insert the 5-pole
plug (28) of the Jumping Jet Rainbow Star in the socket (33) and secure with the two 4.8 mm self-
tapping screws (11).
3. Remove the two screws from the cover (30) of the transformer, remove cover (30), insert the 2-pole
plug (26) of the Jumping Jet Rainbow Star in the socket (31) of the transformer and secure with the
two M5 screws (12).
4. Place the protection hood (6) over the 12V Master control box (5). Ensure that the receiving aerial
(34) is unobstructed.
The IP X4 protection is only guaranteed when the protection hood is in place!
Pos: 122 /Alle Produkte/Dummy_module/Abstand 18 pt @ 6\mod_1196 355593257_0.doc @ 41089
Pos: 123 /Alle Produkte/Überschriften/H1 Inbetriebn ahme @ 7\mod_1196625111244_121.doc @ 41417
6. Start-up
Pos: 124 /Pumpen/Schlammsauger/Jumping Jet Rainbow Star / INB Einschalten/Ausschalten @ 7\mod_1196628865641_121. doc @ 41729
Attention! Dangerous electrical voltage.
Possible consequences: Death or severe injury.
Protective measures: Disconnect the power plug (Figure J, 35) prior to reaching into the water and
commencing work.
Follow the safety information!
Pump and 12V Master control box switch on automatically once the power connection is established.
Switching on (Fig. J): Plug the power plug (35) into the socket.
Switching off (Fig. J): Disconnect the power plug (35).
Pos: 125 /Alle Produkte/Dummy_module/===== Seitenwec hsel ===== @ 0\mod_1125648978015_0.doc @ 1631
Page 12

23
- GB -
Pos: 126 /Pumpen/Schlammsauger/Jumping Jet Rainbow Star / INB Handsender einlernen @ 7\mod_1196629141314_121.doc @ 41755
Manual transmitter teach-in (Fig. K)
To be able to commission the Jumping Jet Rainbow Star set, set the manual transmitter (8) to the receiver in the 12V Master control box (5) beforehand.
The receiver is equipped with a teach-in button (39) for the receiver to be set to the transmit signal of the
manual transmitter (8).
1. Insert the pin (9) into the opening for the teach-in button (39) until you feel a resistance.
2. Briefly actuate the teach-in button (39) using the pin (9). The green LED (38) lights up once.
3. Press any button of the manual transmitter (8) for at least 3 sec. The green LED (38) lights up once.
This completes the teaching in of the manual transmitter (8) to the receiver. Check the function of the
manual transmitter by actuating one of its buttons. The green LED (38) on the receiver must light up, the
‘water’ picture of the Jumping Jet Rainbow Star must change.
► A maximum of 10 manual transmitters can be set to the receiver.
► The manual transmitter has a maximum range of 80 m. Obstacles between transmitter and receiver,
a low battery in the manual transmitter, or electro-magnetic radiation of electrical equipment will impair the range.
Pos: 127 /Alle Produkte/Dummy_module/Abstand 6 pt @ 7\mod_11966 27997106_0.doc @ 41651
Pos: 128 /Pumpen/Schlammsauger/Jumping Jet Rainbow Star / INB Gespeicherte Handsender löschen @ 7\mod_1196629365300_1 21.doc @ 41781
Deleting stored manual transmitters (Fig. K)
► Actuate the teach-in button (39) using the pin (9) for at least 5 sec.
This deletes all manual transmitters stored in the receiver.
Pos: 129 /Alle Produkte/Dummy_module/Abstand 6 pt @ 7\mod_11966 27997106_0.doc @ 41651
Pos: 130 /Pumpen/Schlammsauger/Jumping Jet Rainbow Star / INB Wasserstrahl einstellen @ 7\mod_1196630056367_121. doc @ 41807
Setting the water jet (Fig. L - P)
The water jet of the Jumping Jet Rainbow Star has a parabolic shape. The jet height and range are determined by the pump rating (flow rate) and the inclination angle of the Jumping Jet Rainbow Star set.
Jet height, jet range and water quality notably influence the quality of the water jet and the light emittance.
1. Undo the Allen screws (36) on both sides of the unit foot (23) using the Allan key (18) and bring
the Jumping Jet Rainbow Star (1) to the desired inclination angle.
The diagram (Fig. L) shows water jet shapes of the Jumping Jet Rainbow Star resulting from
different inclination angles.
2. Retighten the Allan screws (36).
3. Set the pump flow rate.
The flow rate of electrically controlled pumps is set with the control unit (e.g. “In Scenio FM Master 3”), the flow rate of pumps without control feature is set manually by means of a slide in the
pump suction or pressure area.
4. Align the jet diaphragm (37) in the hood of the Jumping (1) Jet such that the water jet passes
the centre of the jet diaphragm (37) (Fig. O). Ensure that the water jet is not deflected by the
water jet diaphragm (37) (Fig. P).
5. Prior to reaching into the water, disconnect the power supply to all units used in the wa-
ter. Slide the jet diaphragm (37) to the optimum position (Fig. O). Switch the units on again and
check the position. It might be necessary to repeat the process.
Pos: 131 /Alle Produkte/Dummy_module/===== Seitenwec hsel ===== @ 0\mod_1125648978015_0.doc @ 1631
Page 13

24
- GB -
Pos: 132 /Alle Produkte/Überschriften/H1 Bedienung @ 7\ mo d_11 96625148604_121.doc @ 41443
7. Operation
Pos: 133 /Pumpen/Schlammsauger/Jumping Jet Rainbow Star / BED Beschreibung @ 7\mod_1196630317947_121.doc @ 41833
5 basic programs can be activated with the 12V Master control box, allowing you to run various animations on the Jumping Jet Rainbow Star. Each basic program can be activated at the manual transmitter
by a dedicated button.
► Basic programs 1 to 4
The main functions of these basic programs, such as, for instance, chaselight or pulsed jet are programmed as a default. The different colours (blue, turquoise, yellow, red, white, green) of the jet
lighting also change according to a defined cycle. In addition, you can set the jet lighting to a desired
colour or switch it off altogether.
► Basic program 5
This program is of a random play nature. All functions are automatically activated and alternate. You
cannot set one steady colour or deactivate the colour. However, you can accelerate or decelerate
the speeds of the program’s progress.
Note! The function will be activated as soon as the button concerned is released.
Selecting a basic program
− You start or change to the basic program concerned by briefly pressing one of the buttons 1 to 5. Any
additional functions set will be reset.
Activating additional functions for basic programs 1 to 4
− Setting the colour: Wait until the desired colour appears in the water jet, then press the [–] button.
− Allow the colours to run through one after the other: Press the [+] button.
− Switch off the light: Keep the [+] button pressed for 2 sec.
Activating additional functions for basic program 5
− Double the play speed: Press the [+] button.
− Halve the play speed: Press the [–] button.
Switching of the Jumping Jet Rainbow Star
− Switch off water jet and light: Press the [6] button.
Pos: 134 /Alle Produkte/Dummy_module/Abstand 6 pt @ 7\mod_11966 27997106_0.doc @ 41651
Pos: 135 /Pumpen/Schlammsauger/Jumping Jet Rainbow Star / BED Beispiel @ 7\mod_1196630403323_121.doc @ 41859
Example
You want to set the “red” colour for an uninterrupted jet with chaselight.
1. Press the [2] button.
The colours pass through in succession.
2. Wait until the “red” colour appears in the water jet.
3. Now set the colour by briefly pressing the [–] button.
Pos: 136 /Alle Produkte/Dummy_module/Abstand 6 pt @ 7\mod_11966 27997106_0.doc @ 41651
Pos: 137 /Pumpen/Schlammsauger/Jumping Jet Rainbow Star / BED Übersicht der Programmfunktionen @ 7\mod_1196630525401 _121.doc @ 41885
Review of the program functions
Button
[1] [2] [3] [4] [5] [6]
Uninter-
rupted jet
Jet section Uninterrupted
jet and
chaselight
Jet section and
chaselight
blue
turquoise
yellow
red
white
Basic program
Light colour
green
Light colour
changes at
4 sec inter-
vals
Light colour
changes at 4
sec intervals
Light colour
changes at 4
sec intervals
Light colour
changes at 4
sec intervals
Ramdom play, all
functions change
cyclically
[–] (1 × short) The light colour currently shown in the basic program can be set
by pressing the button
Halve the play
speed
[–] (1 × long) Switch off the light
[+] (1 × long)
Additional function
The light colour changes again at the 4 sec. interval Double the play
speed
Switch off
water jet and
light
Pos: 138 /Alle Produkte/Dummy_module/===== Seitenwec hsel ===== @ 0\mod_1125648978015_0.doc @ 1631
Page 14

25
- GB -
Pos: 139 /Alle Produkte/Überschriften/H1 Reinigung und W artung @ 7\mod_1196625212761_121.doc @ 41469
8. Maintenance and cleaning
Pos: 140 /Pumpen/Schlammsauger/Jumping Jet Rainbow Star / WAR Reinigung und Wartung @ 7\mod_1196631228875_121.doc @ 41911
Attention! Dangerous electrical voltage.
Possible consequences: Death or severe injury.
Protective measures: Disconnect the power plugs of all the units in the water prior to reaching into the
water and commencing work.
The cleaning intervals depend on the water quality. Clean filter and screen of the Jumping Jet Rainbow
Star as soon as the quality of the water jet diminishes.
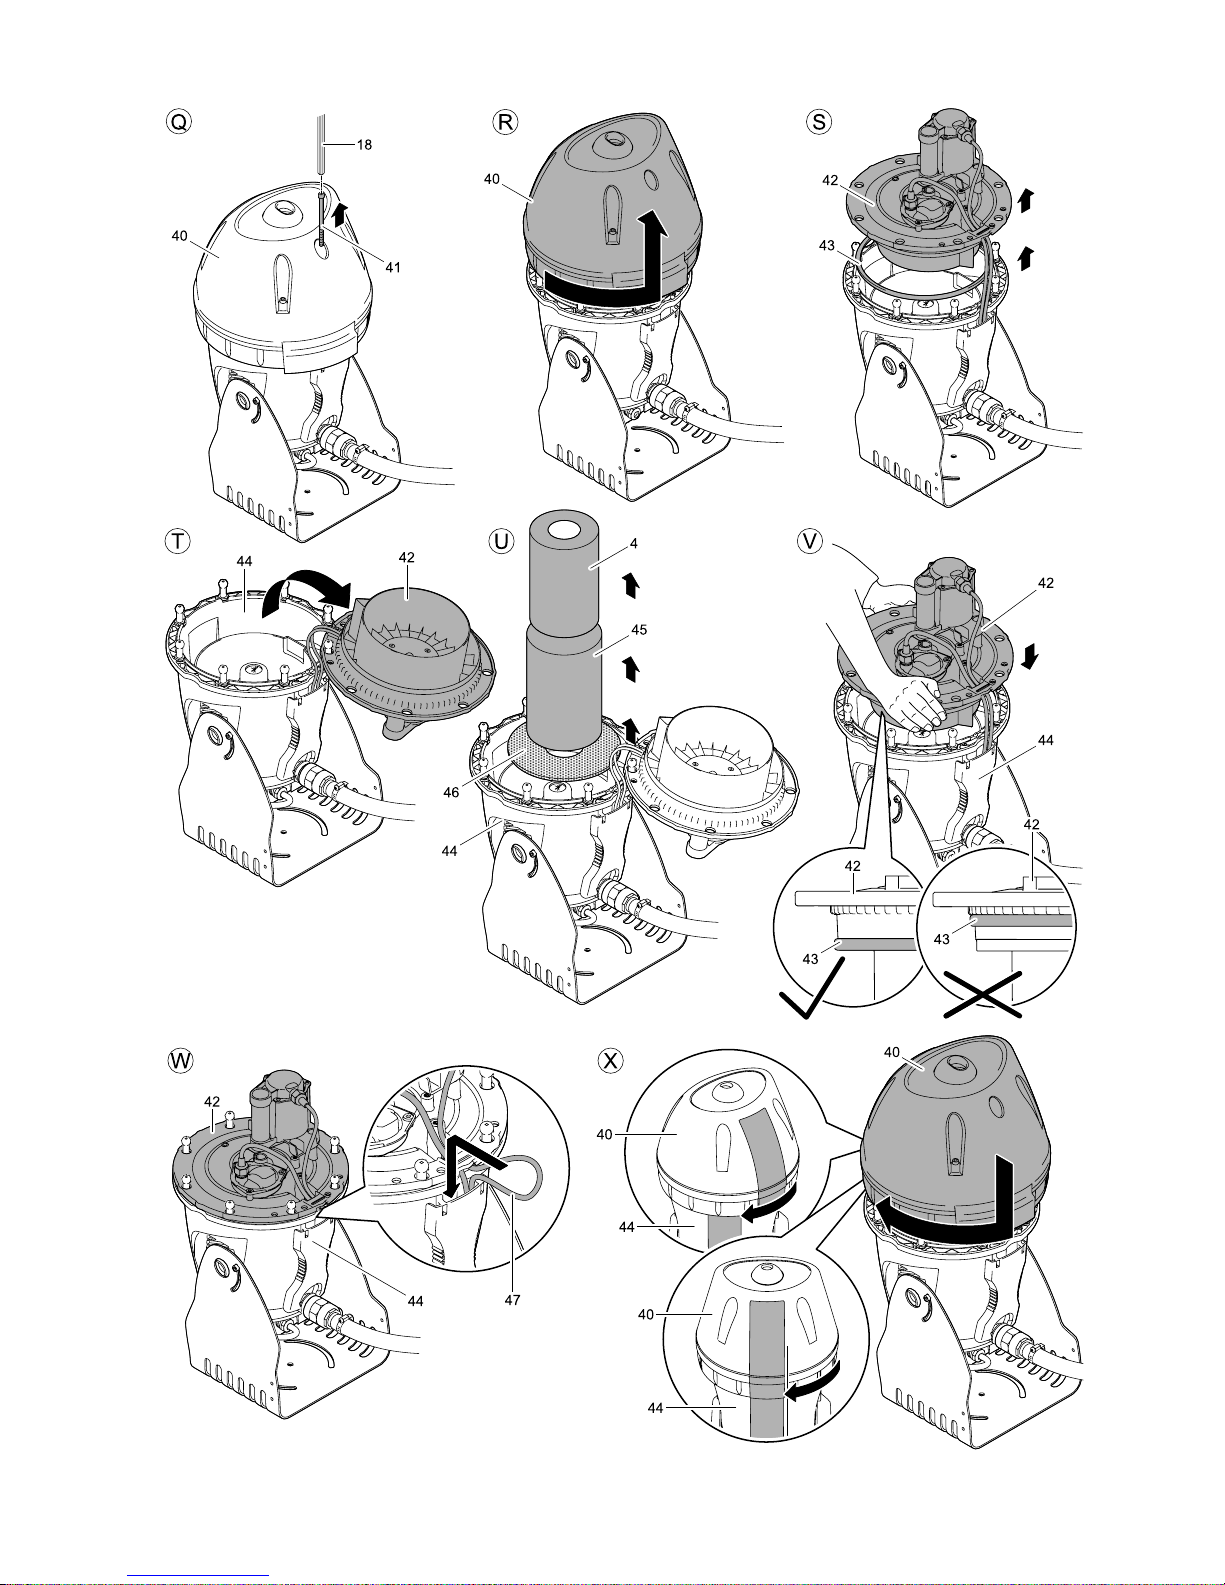
Cleaning filter and screen (Fig. Q – X)
1. Remove the locking screw (41) using an Allan key (18).
2. Turn the hood (40) counter-clockwise against the stop and lift off.
3. Lift the cover (42) and remove the O ring (43).
4. Turn the cover (42) upside down and suspend it on a pin at the container (44).
Important: Do not pull on the cables, otherwise they will be damaged.
5. Take the filter (4) including screen (45) out of the container.
6. Pull the filter (4) out of the screen (45) and carefully wash both.
7. If necessary, remove and clean the diffusor plate (46).
8. Reassemble filter (4) and screen (45) in the reverse order and reinsert into the container (44).
9. Place the O ring (43) on the rim of the cover (42) (Fig. V), then press the cover (42) uniformly onto
the container (44).
The O ring (43) is a roll ring that only adopts its final position when the cover (42) is put into place.
10. Remove the lugs of the two connection cables (47). To this effect, push the connection cables (47)
back into the cable duct at the container (44).
11. Place the hood (40) onto the container (44). Ensure that the contour of the cover (40) and that of the
container (44) are offset in relation to each other. Subsequently, turn the hood (40) clockwise up to
the stop.
Pos: 141 /Alle Produkte/Dummy_module/Abstand 18 pt @ 6\mod_1196 355593257_0.doc @ 41089
Pos: 142 /Alle Produkte/Überschriften/H1 Lagern / Überwin tern @ 7\mod_1196625251745_121.doc @ 41495
9. Storage/Over-wintering
Pos: 143 /Pumpen/Schlammsauger/Jumping Jet Rainbow Star / Lagern / Überwintern @ 7\mod_1196631916301_121.doc @ 41937
Put the Jumping Jet Rainbow Star out of operation at temperatures below zero. Thoroughly clean and
check the units for damage. Dry the Jumping Jet Rainbow Star and store it in a frost-free place.
Pos: 144 /Alle Produkte/Dummy_module/===== Seitenwec hsel ===== @ 0\mod_1125648978015_0.doc @ 1631
Page 15

26
- GB -
Pos: 145 /Alle Produkte/Überschriften/H1 Störungsb esei tigung @ 7\mod_1196625290699_121.doc @ 41521
10. Remedy of faults
Pos: 146 /Pumpen/Schlammsauger/Jumping Jet Rainbow Star / FEH Fehlertabelle @ 7\mod_1196632058018_121.doc @ 41963
Fault Cause Remedy
Manual transmitter not taught in Set manual transmitter to the receiver
The Jumping Jet Rainbow Star is too deep
in the water
Adapt unit to the water depth
Power plug of pump or 12V Master control
box not inserted
Connect unit to the power supply
The jet diaphragm not centred around the
water jet
Adjust the jet diaphragm such that the water
jet can pass unhindered
No water jet emerges
No basic program active Activate a basic program using the manual
transmitter
Water emerges from the nozzle
uncontrolled
The water does not pass the centre of the
jet diaphragm
Adjust the jet diaphragm such that the water
jet can pass unhindered
Filter and screen are clogged Clean filter and screen Jet length shortens
The Jumping Jet Rainbow Star is too deep
in the water
Adapt unit to the water depth
Water jet is torn apart by strong wind —
Filter and screen are clogged Clean filter and screen
The water jet contours seem diffused, jet loses its crystal clear
appearance
Pump takes in air Check the pump immersion depth
The minus button at the manual transmitter
was pressed by accident
Switch the light on again by pressing the
plus button
Lighting has failed
The LED of the spotlight is defective Contact the OASE service
Pos: 147 /Alle Produkte/Dummy_module/Abstand 18 pt @ 6\mod_1196 355593257_0.doc @ 41089
Pos: 148 /Alle Produkte/Entsorgung - gem. Bestimmungen @ 5\ mod_ 1168 335511647_121.doc @ 31883
11. Disposal
Dispose of the unit in accordance with the national legal regulations.
Pos: 149 /Alle Produkte/Dummy_module/===== Seitenwec hsel ===== @ 0\mod_1125648978015_0.doc @ 1630
Page 16

137
Pos: 877 /Pumpen/Schlammsauger/Jumping Jet Rainbow Star / TEC Technische Daten @ 7\mod_1196632504895_0.doc @ 41987
Jumping Jet Rainbow Star
DE Technische
Daten
Anschluss-
spannung
Max. Leistungs-
aufnahme
Wasser-
temperatur
Wasserdruck
am Eingang
Verunreinigung
des Wassers
pH-Wert
des Was-
sers
Chloridgehalt
des Wassers
Wasser-
härte
Durchmesser des
Wasserstrahls
Gewicht Länge An-
schluss-
leitungen
Abmessungen
GB Technical
data
Connection
voltage
Max. power
consumption
Water tem-
perature
Water pres-
sure at the
inlet
Soiled water Water pH
value
Water chlo-
ride content
Water
hardness
Diameter of the
water jet
Weight Length of the
connection
cables
Dimensions
FR Caractéris-
tiques
techniques
Tension Consommation
max.
Tempéra-
ture de l’eau
Pression de
l’eau à
l’entrée
Souillure de
l’eau
Valeur pH
de l’eau
Teneur en
chlorure de
l’eau
Dureté de
l’eau
Diamètre du jet
d’eau
Poids Longueur des
câbles de
raccordement
Dimensions
NL Technische
gegevens
Aansluitspa
nning
Max.
opgenomen
vermogen
Water-
temperatuur
Waterdruk
aan ingang
Water ve-
rontreiniging
pH-waarde
van het
water
Chloride-
gehalte van
water
Water-
hardheid
Diameter van
waterstraal
Gewicht Lengte aans-
luit-snoeren
Afmetingen
ES Datos
técnicos
Tensión de
conexión
Consumo de
potencia
máximo
Temperatur
a del agua
Presión de
agua en la
entrada
Suciedad en el
agua
Valor pH del
agua
Contenido de
cloruro en el
agua
Dureza del
agua
Diámetro del
choro de agua
Peso Longitud de
los cables de
conexión
Dimensiones
PT Dados
técnicos
Tensão
eléctrica
Consumo
máximo de
energia
Temperatur
a de água
Pressão de
água na
entrada
Impurezas da
água
Valor pH da
água
Teor em
clorito da
água
Dureza da
água
Diâmetro do jacto
de água
Peso Comprimento
cabos de
conexão
Dimensões
IT Caratteristi-
che tecni-
che
Tensione di
attacco
Potenza assor-
bita max.
Temperatu-
ra -
dell'acqua
Pressione
dell'acqua
sull'entrata
Inquinamento
dell'acqua
Valore pH
dell'acqua
Contenuto di
cloruro
dell'acqua
Durezza
dell'acqua
Diametro del getto
d'acqua
Peso Lunghezza
cavi di colle-
gamento
Dimensioni
DK Tekniske
specifika-
tioner
Tilslutnings-
spænding
Maks. effekt-
forbrug
Vand-
temperatur
Vandtryk ved
indgangen
Forurening af
vandet
Vandets
pH-værdi
Vandets klori-
dindhold
Vand-
hårdhed
Vandstrålens
diameter
Vægt Længde tils-
lutnings-
ledninger
Mål
NO Tekniske
data
Nettspennin
g
Maks.
strømforbruk
Vanntemper
atur
Vanntrykk ved
inngangen
Forurensning av
vannet
Vannets
pH-verdi
Vannets
kloridinnhold
Hardhetsg
rad
Tverrsnitt av
vannstrålen
Vekt Lengde
stikkledninger
Dimensjoner
SE Tekniska
data
Anslutnings-
spänning
Max. effekt-
förbrukning
Vatten-
temperatur
Vattentryck
vid ingång
Föroreningar i
vattnet
pH-värde i
vattnet
Kloridhalt i
vattnet
Vatten-
hårdhet
Vattenstrålens
diameter
Vikt Elkablarnas
längd
Mått
FI Tekniset
tiedot
Liitäntä-
jännite
Suurin syöttö-
teho
Veden
lämpötila
Veden tulo-
paine
Veden epä-
puhtaudet
Veden pH-
arvo
Veden kloridi-
pitoisuus
Veden
kovuus
Vesisuihkun läpi-
mitta
Paino Liitäntä-
johtojen
pituus
Mitat
RU Технически
е данные
Напряжени
е
питающей
сети
Макс.
потребление
мощности
Температу
ра воды
Давление
воды на
входе
Загрязнение
воды
pH-
показатель
воды
Содержание
хлоридов в
воде
Твёрдость
воды
Диаметр струи
воды
Вес Длина
соединитель
ных линий
Размеры
CN
技术参数 接入电压 最大消耗功率 水温 入口水压 水中杂质 水的pH值 水的氯含量 水的硬度 水柱的直径 重量 连接导线的长
度
尺寸
AC 12 V 32 W +4 - 35 °C < 0.5 bar < 50 g/m³ 7.2 – 7.6 < 120 mg/l < 15 °dH 12 mm 11 kg 10 m 478 × 305
× 355 mm
Page 17

138
Steuerungsbox 12V-Master
DE Technische Daten Nennspannung Ausgangs-
spannung
Ausgangsstrom Schutzart Umgebungs-
temperatur
Gewicht Länge Netzan-
schlussleitung
Abmessungen
GB Technical data Rated voltage Output voltage Output current Type of protection Ambient temperature Weight Length of power con-
nection cable
Dimensions
FR Caractéristiques
techniques
Tension nominale Tension de sortie Courant de sortie Type de protection Température ambian-
te
Poids Longueur de la ligne
de raccordement au
réseau
Dimensions
NL Technische
gegevens
Nominale spanning Uitgangsspan-
ning
Uitgangsstroom Beschermklasse Omgevings-
temperatuur
Gewicht Lengte netsnoer Afmetingen
ES Datos técnicos Tensión nominal Tensión de salida Corriente de salida Categoría de
protección
Temperatura del
entorno
Peso Longitud del cable de
conexión de red
Dimensiones
PT Dados técnicos Tensão nominal Tensão de saída Corrente de saída Classe de protecção Temperatura
ambiente
Peso Comprimento cabo
de alimentação
Dimensões
IT Caratteristiche tec-
niche
Tensione nominale Tensione di usci-
ta
Corrente di uscita Grado di protezione Temperatura ambien-
te
Peso Lunghezza cavo di
allacciamento alla
rete
Dimensioni
DK Tekniske specifika-
tioner
Mærkespænding Udgangs-
spænding
Udgangsstrøm Kapslingsklasse Omgivende tempera-
tur
Vægt Længde nettilslut-
ningsledning
Mål
NO Tekniske data Nettspenning Utgangsspenning Utgangsstrøm Beskyttelsestype Omgivelsestemperatu
r
Vekt Lengde
nettilkoblingsledning
Dimensjoner
SE Tekniska data Märkspänning Utgångsspänning Utgångsström Kapslingsklass Omgivnings-
temperatur
Vikt Elkabelns längd Mått
FI Tekniset tiedot Nimellisjännite Lähtöjännite Lähtövirta Kotelointitapa Ympäristön lämpötila Paino Verkkoliitäntäjohdon
pituus
Mitat
RU Технические
данные
Номинальное
напряжение
Напряжение на
выходе
Выходной ток Вид защиты Температура
окружающей среды
Вес Длина кабеля
сетевого питания
Размеры
CN
技术参数 额定电压 输出电压 输出电流 保护等级 环境温度 重量 电源导线长度 尺寸
AC 220-240 V /
50 Hz
AC 12 V max. 6.5 A IP X4 -20 - +45 °C 3.2 kg 10 m 215 × 155 × 295 mm
Pos: 878 /Alle Produkte/Dummy_module/===== Seitenwechsel ===== @ 0\mod_1125648978015_0.doc @ 1630
Page 18

139
Pos: 879 /Pumpen/Schlammsauger/Jumping Jet Rainbow Star / Symbole Typenschild @ 6\mod_1196412028704_0.doc @ 41221
DE Schutz gegen das Ein-
dringen von Spritzwasser.
Bei Frost, das Gerät
deinstallieren!
Schutzklasse II, Schutzisolierung,
die im Fehlerfall Spannung führen
kann
Sicherheitstrenn-
transformator
Vor direkter Sonnen-
einstrahlung schützen
Nicht mit normalem
Hausmüll entsorgen!
Achtung!
Lesen Sie die
Gebrauchsanweisung!
GB Protection against the
ingress of splash water.
Remove the unit at tem-
peratures below zero
(centigrade).
Protection class II, protection
insulation which could become
live in the event of a fault.
Safety isolating trans-
former
Protect from direct sun
radiation.
Do not dispose of together
with household waste!
Attention!
Read the operating
instructions!
FR Protection contre la péné-
tration de pro-jection
d’eau.
Retirer l’appareil en cas
de gel
Classe de protection II, double
isolation risquant de conduire une
tension électrique en cas de
défaut.
Transformateur de sépa-
ration de sécurité
Protéger contre les rayons
directs du soleil
Ne pas recycler dans les
ordures ménagères !
Attention !
Lire la notice d'emploi !
NL Beveiliging tegen het
binnendringen van
spatwater.
Bij vorst het apparaat
deïnstalleren!
Beschermingsklasse II,
randaarding, die bij defecten
spanning kan geleiden.
Veiligheidsscheidingstrans
formator
Beschermen tegen direct
zonlicht
Niet bij het normale
huisvuil doen!
Let op!
Lees de
gebruiksaanwijzing!
ES Protección contra la
entrada de agua
salpicante.
Desinstale el equipo en
caso de heladas.
Clase de protección II,
aislamiento de protección que en
caso de defecto pueden conducir
tensión.
Transformador de
separación de seguridad
Protéjase contra la
radiación directa del sol
¡No deseche el equipo en
la basura doméstica!
¡Atención!
Lea las instrucciones
de uso.
PT Protecção contra
respingos de água.
Em caso de geada,
desinstalar o aparelho!
Classe de isolamento II,
isolamento protector que em
caso de defeito pode ser
percorrido por tensão eléctrica
Transformador de
seccionamento de
segurança
Proteger contra radiação
solar directa
Não deitar ao lixo
doméstico!
Atenção!
Leia as instruções de
uso!
IT Protezione contro la pene-
trazione di spruzzi d'ac-
qua.
In caso di gelo disinstallla-
re l'apparecchio!
Classe di protezione II, isolamen-
to di protezione che in caso di
difetto può condurre tensione
Trasformatore di separa-
zione di sicurezza
Proteggere contro i raggi
solari diretti
Non smaltire con normali
rifiuti domestici!
Attenzione!
Leggete le istruzioni
d'uso!
DK Beskyttelse mod
indtrængning af vand-
sprøjt.
Afmonter apparatet ved
frostvejr!
Beskyttelses-klasse II,
beskyttelses-isolering, som i
tilfælde af fejl kan lede spænding.
Sikkerheds-transformator Beskyt mod direkte sollys Må ikke bortskaffes med
det almindelige
husholdnings-affald!
OBS!
Læs brugsanvis-
ningen!
NO Beskyttelse mot
inntrenging av vannsprut.
Ved frost, demonter
apparatet!
Beskyttelsesklasse II,
dobbeltisolering som kan bli
spenningsførende ved feil.
Sikkerhetsskille-
transformator
Beskytt mot direkte sollys. Ikke kast i alminnelig
husholdningsavfall!
NB!
Les bruksanvisningen!
SE Skydd mot inträngande
stänkvatten.
Demontera apparaten
innan första frosten!
Kapslingsklass II, skyddsisolering
som kan bli strömförande vid
störningar
Säkerhets-isoler-
transformator
Skydda mot direkt
solstrålning
Får inte kastas i
hushållssoporna!
Obs!
Läs igenom
bruksanvisningen!
FI Suoja roiskeveden
sisäänpääsemisen
estämiseksi.
Laite on purettava ennen
pakkasia.
Kotelointiluokka II,
häiriötapauksissa mahdollisesti
jännitteisten suojaeristys.
Suojamuuntaja Suojaa suoralta
auringonsäteilyltä.
Älä hävitä laitetta
tavallisen talousjätteen
kanssa!
Huomio!
Lue käyttöohje!
RU Защита от
проникновения водяных
брызг.
При наступлении
морозов прибор
демонтировать!
Класс защиты II, защитная
изоляция, которая при
неисправности может стать
токоведущей
Предохранитель-ный
разделительный
трансформатор
Защищать от прямого
воздействия солнечных
лучей
Не утилизировать
вместе с домашним
мусором!
Внимание!
Прочитайте
руководство по
эксплуатации!
CN
C防止溅水渗入。 霜冻时,拆卸设备 ! 第二保护级,绝缘保护层在故障时
会有电压
安全变压器 防止阳光直射 不要与普通的家庭垃圾一
起处理 !
注意 !
请您阅读使用说明书 !
Pos: 880 /Alle Produkte/Dummy_module/===Querformat -> Hochformat=== @ 0\mod_1127735629838_0.doc @ 6912
Page 19

140
Pos: 881 /Pumpen/Schlammsauger/Jumping Jet Rainbow Star / Grafik Ersatzteile @ 6\mod_1196345002900_0.doc @ 40770
===== Ende der Stückliste =====
 Loading...