

Page 1
FM-Master WLAN
FM-Master WLAN EGC
Page 2
- -
A
FMR0026
B
FMR0003
C
D
FMR0028
FMR0027
F
2
Page 3

E F
FMR0005
FMR0029
G
FMR0031
H
EGC0003
- -
3
Page 4

- -
I
FMR0008
J K
FMR0030
FMR0007
4
Page 5

- EN -
- EN -
Translation of the original Operating Instructions
Version of the instructions for use: 3.0
WARNING
• This unit can be used by children aged 8 and above and by per-
sons with reduced physical, sensory or mental capabilities or lack
of experience and knowledge if they are supervised or have been
instructed on how to use the unit in a safe way and they understand
the hazards involved.
• Do not allow children to play with the unit.
• Only allow children to carry out cleaning and user maintenance un-
der supervision.
• Ensure that the unit is fused for a rated fault current of max. 30 mA
by means of a fault current protection device.
• Only connect the unit if the electrical data of the unit and the power
supply correspond. The unit data is to be found on the unit type plate,
on the packaging or in this manual.
• Possible death or severe injury from electrocution! Before reaching
into the water, always disconnect all units in the water that have a
voltage of >12 V AC or >30 V DC from the power supply.
• Disconnect the power plug before carrying out any work on the unit.
• Never immerse the unit in water or other liquids.
• Do not use the unit if electrical cables or housings are damaged.
44
Page 6
Table of Contents
1 Information about these operating instructions ........................................................................................... 47
1.1 Symbols used in these instructions ................................................................................................. 47
1.1.1 Warnings ........................................................................................................................... 47
1.1.2 Additional information ....................................................................................................... 47
2 Safety information ....................................................................................................................................... 47
2.1 Correct electrical installation ........................................................................................................... 47
2.2 Safe operation ................................................................................................................................. 48
3 Scope of delivery ......................................................................................................................................... 48
4 Product Description ..................................................................................................................................... 48
4.1 Intended use .................................................................................................................................... 49
5 Installation and connection ......................................................................................................................... 49
5.1 Connecting the antenna .................................................................................................................. 49
5.2 Setting up the InScenio FM-Master WLAN ..................................................................................... 49
5.3 Connecting the power supply .......................................................................................................... 49
5.4 Connecting an EGC-compatible device .......................................................................................... 50
5.5 Connect the units to the power supply distributor ........................................................................... 50
6 Commissioning/start-up .............................................................................................................................. 51
6.1 Operating status display .................................................................................................................. 51
6.2 Installing the OASE "FM-Master" app ............................................................................................. 51
6.3 Establishing a connection to the WLAN router (router/cloud mode) .............................................. 52
6.3.1 Different methods of establishing the WLAN connection ................................................. 52
6.3.2 Establishing a connection to the WLAN router via WPS (router/cloud mode) ................. 52
6.4 Establishing a direct WLAN connection (access point mode) ........................................................ 53
7 Operation ..................................................................................................................................................... 54
7.1 "Home" screen ................................................................................................................................. 54
7.1.1 Adapting the symbol for the socket .................................................................................. 55
7.1.2 Operating a device with manual transmitter ..................................................................... 56
7.1.3 Operating the pump via EGC ........................................................................................... 57
7.1.4 Operating ProfiClear units via EGC ................................................................................. 59
7.1.5 Operating ProfiLux units via EGC .................................................................................... 62
7.2 "Timer" screen ................................................................................................................................. 64
7.2.1 Adding a timer................................................................................................................... 65
7.2.2 Changing/deleting a timer ................................................................................................ 65
7.3 "My devices" screen ........................................................................................................................ 66
7.3.1 Adding an EGC-compatible device .................................................................................. 67
7.3.2 Adding a device with a hand-held transmitter .................................................................. 68
7.3.3 ProfiClear Premium Filter – upgrade to EGC ................................................................... 69
7.3.4 Removing a device ........................................................................................................... 71
7.4 "Settings" screen ............................................................................................................................. 72
7.4.1 Establishing a connection to the WLAN router via WPS (router/cloud mode) ................. 74
7.4.2 Manually establishing a connection to the WLAN router (router/cloud mode) ................ 74
7.4.3 Changing the network name ............................................................................................ 75
7.4.4 Changing the WiFi passwort ............................................................................................ 75
7.4.5 Activating the cloud connection ........................................................................................ 76
7.4.6 Changing the device password ........................................................................................ 77
7.4.7 Updating the system time ................................................................................................. 77
7.4.8 Updating the firmware ...................................................................................................... 78
7.4.9 Displaying device information ........................................................................................... 78
7.4.10 Resetting the network settings ......................................................................................... 79
7.4.11 Restoring the factory default settings ............................................................................... 79
8 Remedy of faults ......................................................................................................................................... 80
8.1 Malfunction table ............................................................................................................................. 80
8.2 Manually starting the firmware update mode .................................................................................. 81
- EN -
45
Page 7
- EN -
9
Maintenance and cleaning .......................................................................................................................... 82
9.1 Cleaning the unit ............................................................................................................................. 82
9.2 Replacing the fuse ........................................................................................................................... 82
10 Wear parts ................................................................................................................................................... 82
11 Spare parts .................................................................................................................................................. 82
12 Disposal ....................................................................................................................................................... 82
Technical data .................................................................................................................................................... 863
Symbols on the unit ........................................................................................................................................... 865
46
Page 8
1 Information about these operating instructions
Welcome to OASE Living Water. You made a good choice with the purchase of this product GA InScenio FM
Master WLAN.
Prior to commissioning the unit, please read the instructions of use carefully and fully familiarise yourself with
the unit. Ensure that all work on and with this unit is only carried out in accordance with these instructions.
Adhere to the safety information for the correct and safe use of the unit.
Keep these instructions in a safe place! Please also hand over the instructions when passing the unit on to a
new owner.
• This operating manual only applies to InScenio FM-Master W LAN and InScenio FM-Master WLAN EGC.
– The name ʺFM Master WLANʺ is used for descriptions applying to both products.
1.1 Symbols used in these instructions
1.1.1 Warnings
– The name ʺFM Master WLAN EGCʺ is used for descriptions applying only to the EGC variant.
The warning information is categorised by signal words, which indicate the extent of the hazard.
WARNING
• Indicates a possibly hazardous situation.
• Non-observance may lead to death or serious injuries.
NOTE
Information for the purpose of clarification or for preventing possible damage to assets or to the en-
1.1.2 Additional information
vironment.
A Reference to a figure, e.g. Fig. A.
→ Reference to another section.
- EN -
2 Safety information
2.1 Correct electrical installation
• Electrical installations must meet the national regulations and may only be carried out by a qualified electrician.
• A person is regarded as a qualified electrician if, due to his/her vocational education, knowledge and experience, he or she is capable of and authorised to judge and carry out the work commissioned to him/her. This
also includes the recognition of possible hazards and the adherence to the pertinent regional and national
standards, rules and regulations.
• For your own safety, please consult a qualified electrician.
• Protect the plug connection from moisture.
47
Page 9

- EN -
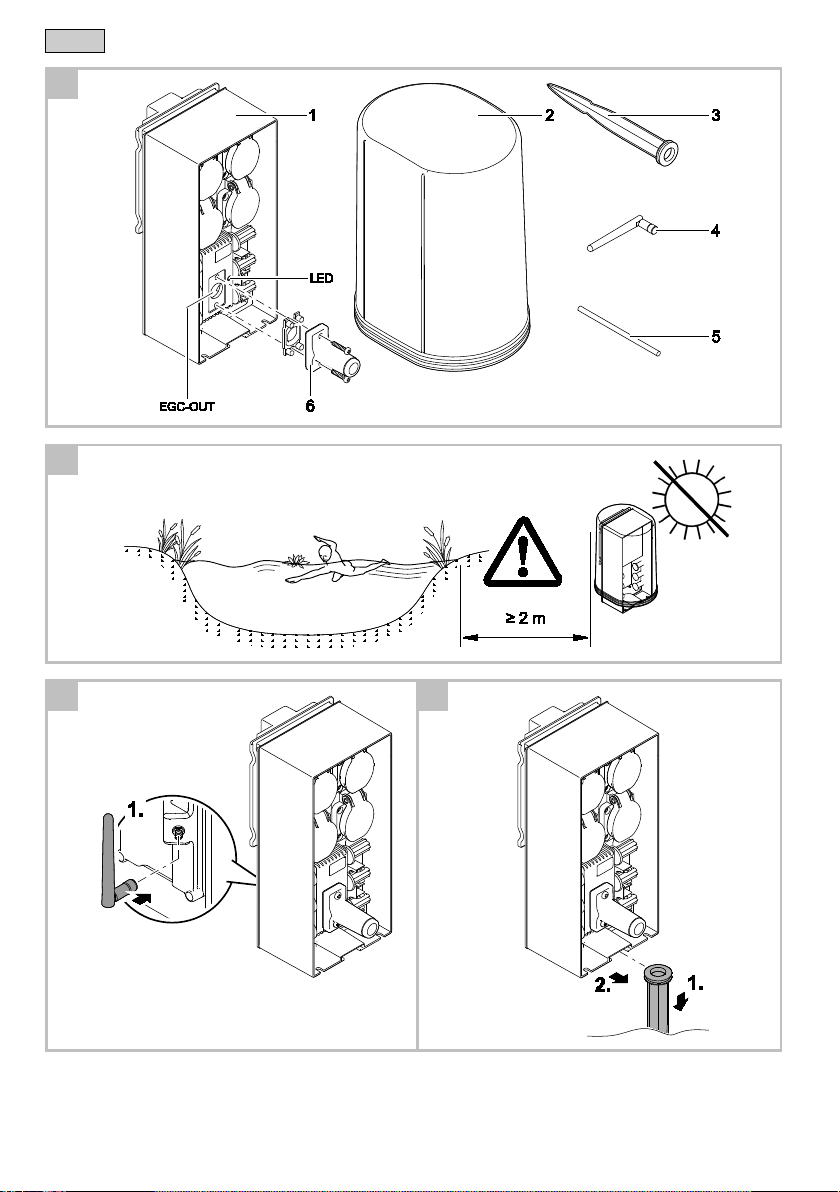
A
Quantity
Description
1 1 InScenio FM-Master WLAN EGC
2 1 Protection hood
3 1 Ground stake
4 1 WLAN antenna
5 1 Service pin for restoring the factory default settings
6 1 Terminal resistor for the EGC network
2.2 Safe operation
• We recommend operating the units with a protection hood installed. This also protects the unit from the effects
3 Scope of delivery
4 Product Description
of the weather.
• Connected units that could cause hazards must be disconnected from GA InScenio FM Master WLAN after
use to avoid them from being switched on accidentally. For example:
– Units that can heat up.
– Units with exposed moving parts that could cause injuries, such as electric knives or saws.
• Do not use GA InScenio FM Master WLAN in conjunction with medical devices.
• Never carry or pull the unit by the electrical cable.
• Route cables such that they are protected from damage and do not present a tripping hazard.
• Do not use multiple socket adapters.
• Only carry out work on the unit that is described in this manual. If problems cannot be overcome, please
contact an authorised customer service point or, if in doubt, the manufacturer.
• Never carry out technical changes to the unit.
• Only use original spare parts and accessories for the unit.
InScenio FM-Master W LAN is a device control system with a wireless local area network (WLAN). The connected devices can be controlled via a smartphone or tablet and the "OASE FM-Master" app.
Features:
• Four sockets that can be switched, one of which has a dimmer function.
• 24 hour control of each socket by means of an integrated timer.
• Up to 10 OASE units with hand-held transmitters can be additionally integrated and controlled via the app.
• Control possibilities for EGC-compatible end devices.
– The Easy Garden Control System (EGC) allows convenient control of units in the garden and pond, and
ensures maximum convenience and reliability.
– Information about EGC and the possibilities it offers can be found at www.oase-livingwater.com/egc-start.
• The InScenio FM-Master WLAN EGC allows EGC-compatible end devices to be controlled from anywhere
via the OASE web portal. The web portal can be accessed at https://egccloud.oase-livingwater.com.
• Cover to protect against splash water allows the unit to be used throughout the year.
48
Page 10

4.1 Intended use
Exclusively use the GA InScenio FM Master WLAN as follows:
• Operation only as a power supply distributor for suitable OASE products.
• Operation only at ambient temperatures of -20 °C … +45 °C.
• Operate in accordance with instructions.
The following restrictions apply to the GA InScenio FM Master WLAN:
• Do not connect any units that could pose danger to persons or assets and that have to be immediately swit-
5 Installation and connection
ched off in an emergency.
• Do not operate in or under water.
WARNING
Electrical current may cause death or severe injuries.
• Ensure that the unit is installed in a flood protected position at a distance of at least 2 m from the
water.
5.1 Connecting the antenna
5.2 Setting up the InScenio FM-Master WLAN
• Operate the unit with a protective hood fitted.
How to proceed:
C
1. Remove the blind plug and screw the antenna into place.
2. Align the antenna.
How to proceed:
B
• Install the unit at least 2 m from the edge of the pond.
• Do not expose the unit to direct sunlight.
D
1. Insert the ground stake by approx. ¾ of its length into the ground.
2. Slide the device onto the ground stake.
3. With the unit, push the ground stake fully into the ground.
4. Check its stability.
5.3 Connecting the power supply
How to proceed:
E
Unit version with power plug:
• Push the coupling of the power cable onto the unit plug.
F
Unit version with power cable:
• Connect the unit to the power supply.
– Work on the power supply may only be carried out by a qualified electrician.
– Adhere to the pin assignment specified on the power cable label.
– Only use wires with wire end ferrules for connection.
- EN -
49
Page 11

- EN -
1 Socket 1, switchable (max. 10 A / 2000 W)
2 Socket 2, switchable (max. 10 A / 2000 W)
3 Socket 3, switchable (max. 10 A / 2000 W)
4 Socket 4, switchable and dimmable (40 W … 320 W)
5.4 Connecting an EGC-compatible device
The correct fastening of the plug connector is important for a secure connection and an interference-free EGC
network.
An EGC connection cable is necessary for connection.
• The EGC connection cable is available as an accessory in the lengths 2.5 m (47038), 5 m (47039) and 10 m
5.5 Connect the units to the power supply distributor
(47040).
How to proceed:
G, H
1. Remove the terminal resistor from the unit.
2. Fit the plug connector and secure with the two screws (max. 2.0 Nm).
– Ensure that the rubber seal is clean and fits exactly.
– Replace the rubber seal if damaged.
3. Remove the protection cap from EGC-OUT of the last unit in the EGC network, fit the terminal resistor and
secure it with the two screws (max. 2.0 Nm).
– No EGC connection cable is connected to EGC-OUT on the last unit in the EGC network. The terminal
resistor has to be fitted to this EGC-OUT so that the EGC network is correctly terminated.
– The terminal resistor is included in the delivery scope of the InScenio FM-Master WLAN EGC.
• Only connect one unit per socket.
• Do not connect any InScenio controllers or portable multiple sockets to the unit.
Note: Ensure that the total output of 16 A / 3600 W is not exceeded!
How to proceed:
1. Choose a suitable socket (see fig. above) and insert the unit power plug into the socket.
– Ensure that it is permissible to connect the unit to this socket. For this purpose, consult the operating ma-
nual of the unit you wish to connect.
– Units powered via a transformer may not be connected to the socket with the dimmer function.
– Do not connect EGC-capable units to the socket with the dimmer function, otherwise they will be dama-
ged.
I
2. Fit the protection hood.
50
Page 12
LED colour
LED status
Description
–
Off
InScenio FM-Master WLAN is switched off.
Green
Lit
InScenio FM-Master WLAN is ready for operation and in access point mode.
Flashing fast
WPS is activated, InScenio FM-Master WLAN is waiting for the router access data.
Flashing slowly (2 seconds on,
1 second off)
InScenio FM-Master WLAN is ready for operation and connected to the router.
Yellow
Lit
InScenio FM-Master WLAN is starting up or is in update mode.
Flashing fast
Firmware update in progress
Flashing slowly (2 seconds on,
1 second off)
InScenio FM-Master WLAN is searching for a connection to the router.
Red
Flashing
Malfunction
• Carry out a Firmware_Update (→ Updating the firmware)
iOS
Android
How to proceed:
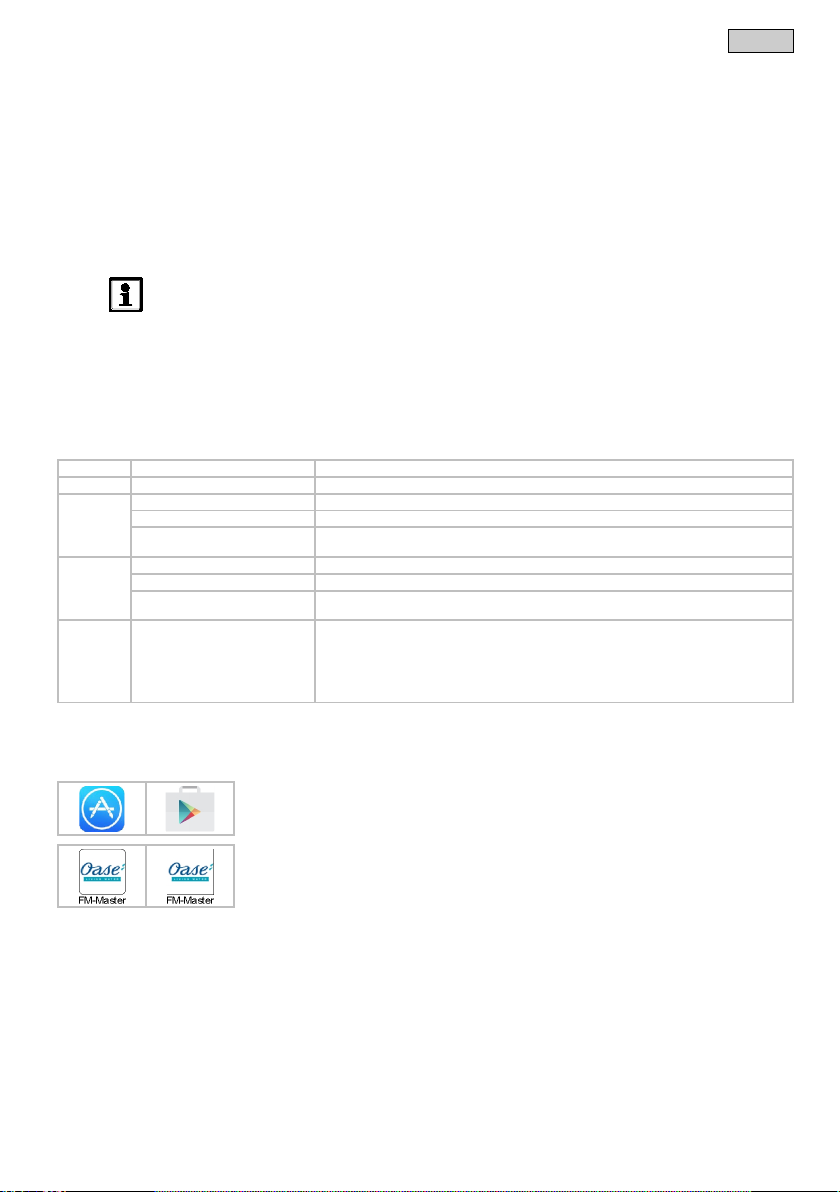
1. Open Google Play or App Store.
2. Search for the ʺOASE FM-Master WLANʺ app and install.
The app appears on the display after successful installation.
6 Commissioning/start-up
The units are operated via the "FM-Master" app on your smartphone/tablet. Proceed as follows for starting up:
1. Install the "FM-Masterʺ app. (→ Installing the OASE "FM-Master" app)
2. Connect the InScenio FM-Master WLAN to the power supply.
3. Establish the WLAN connection.
The smartphone/tablet can be connected to the InScenio FM-Master WLAN in two ways:
• Smartphone/tablet and InScenio FM-Master WLAN are connected via an available WLAN router.(→ Establishing a connection to the WLAN router (router/cloud mode))
• Smartphone/tablet and InScenio FM-Master WLAN are directly connected via WLAN.(→ Establishing a direct
WLAN connection (access point mode))
- EN -
6.1 Operating status display
6.2 Installing the OASE "FM-Master" app
NOTE
The LED on the InScenio FM-Master WLAN indicates the current operating status.
A
The LED indicates the operating status of the InScenio FM-Master WLAN.
• Help in the event of malfunctions or incorrect behaviour of the unit: (→ Malfunction table)
Remedy:
• Disconnect from the power supply. Wait for 10 seconds then reconnect.
• Reset the InScenio FM-Master WLAN to the factory default settings (→ Restoring the factory
default settings)
– Follow the instructions during installation.
3. Confirm the query "access to internal data of the unit".
– If access is permitted, individual product photos for identification of the sockets
can be created.
– The query appears during installation (Android) or when executing the app
((iOS).
51
Page 13

- EN -
6.3 Establishing a connection to the WLAN router (router/cloud mode)
Prerequisite:
• The range of the WLAN connection between the router and InScenio FM-Master WLAN can span a distance
6.3.1 Different methods of establishing the WLAN connection
6.3.2 Establishing a connection to the WLAN router via WPS (router/cloud mode)
of up to 80 m provided there is unobstructed signal transmission and no sources of interference.
• Compatibility with the following WLAN standards:
– InScenio FM-Master WLAN: 802.11b
– InScenio FM-Master WLAN EGC: 802.11n+g+b
The connection can be established in three different ways:
• Connection via WPS by pressing a button
• Connection using the Oase FM-Master app via WPS (→ Establishing a connection to the WLAN router via
WPS (router/cloud mode))
• Manual connection using the Oase FM-Master app (→ Manually establishing a connection to the W LAN router
(router/cloud mode))
How to proceed:
On the router:
1. Press the WPS button on the router to activate WPS.
– Follow the information given in the router operating instructions.
– WPS is only active for a limited time. Activate WPS on the InScenio FM-Master WLAN during this time.
J
On the InScenio FM-Master WLAN EGC:
2. Insert the service pin into the opening between the two top sockets until you feel a resistance. The pin is in
contact with the service button.
3. Press the service button briefly (max. 2 seconds) to activate the WPS.
– The LED is lit green and flashes fast.
– The WPS remains active for 2 minutes.
– The connection is established when the green LED flashes slowly (2 seconds on, 1 second off).
On the smartphone/tablet:
4. Establish a connection to the WLAN router.
5. Start the Oase "FM-Masterʺ app.
– When establishing the connection to the InScenio FM-Master WLAN for the first time, it is necessary to
define a device password to protect the InScenio FM-Master W LAN from unauthorised access.
– Remember the device password as it is also required for adding the InScenio FM-Master W LAN to the
OASE cloud. (→ Modification du mot de passe d’appareil)
52
Page 14
are
InScenio FM-Master W LAN by unauthorised persons.
iOS
Android
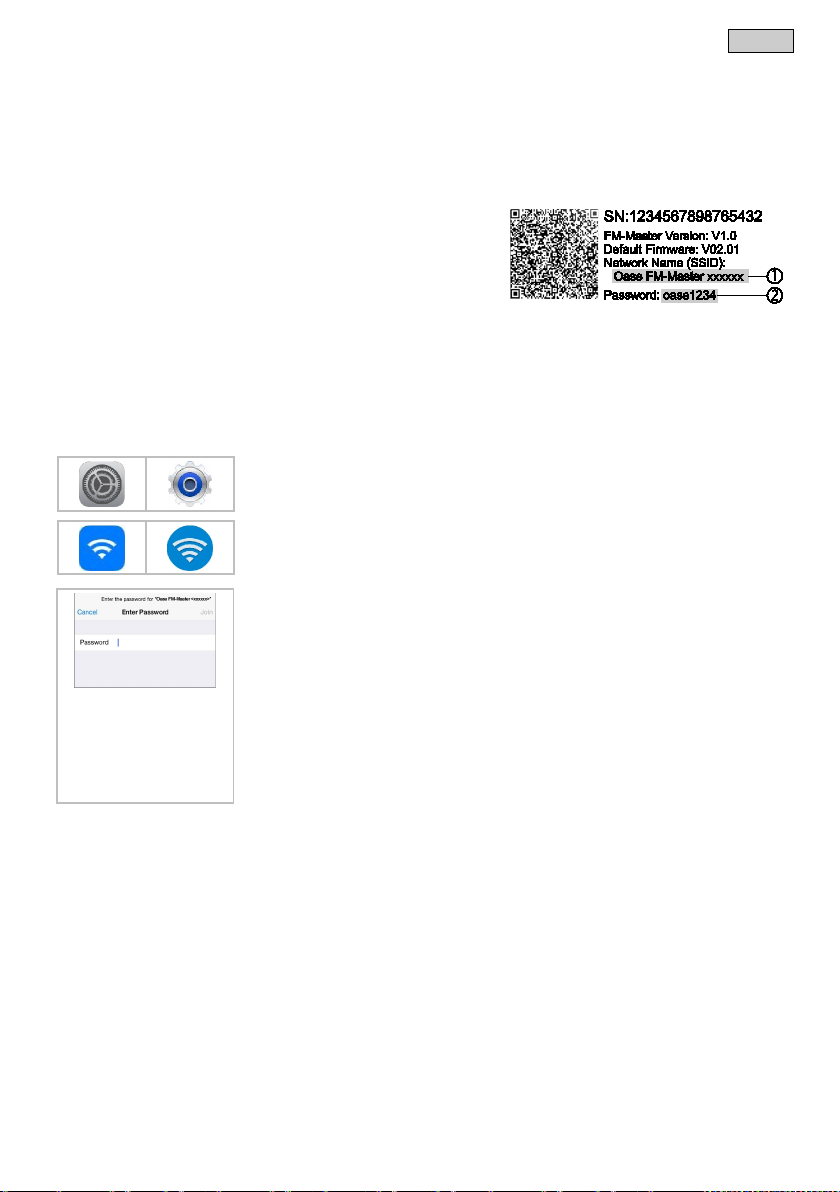
How to proceed:
1. Open "Settings".
2. Select and activate WLAN.
4. Enter the WiFi password and select "Connect".
-
Master WLAN to the OASE cloud. (→ Modification du mot de passe d’appareil)
6.4 Establishing a direct WLAN connection (access point mode)
Prerequisite:
• The range of the WLAN connection between the router and InScenio FM-Master WLAN can span a distance
of up to 80 m provided there is unobstructed signal transmission and no sources of interference.
• Compatibility with the following WLAN standards:
– InScenio FM-Master WLAN: 802.11b
– InScenio FM-Master WLAN EGC: 802.11n+g+b
• The network name (SSID) and WiFi password
specified on the adhesive label next to the unit type plate on
the InScenio FM-Master WLAN.
• The connection is encoded and protected by a password.
– Recommendation: Change the password when starting
the unit up for the first time to prevent access to the
• The last six characters of the network name (SSID) “Oase FM-Master <xxxxxx>“ are specific to the device
and are preset.
• The InScenio FM-Master WLAN has the password "oase1234" in its factory default setting.
The symbols used may differ slightly from the symbols on your smartphone/tablet.
3. Select ʺOase FM-Master <xxxxxx>ʺ from the network list.
– The connection to the InScenio FM-Master W LAN is established.
– If the connection is successful, "Connected" (Android) or a "" (iOS) will appear
under the network name.
– Other WLAN connections are deactivated.
5. Start the Oase "FM-Masterʺ app.
– The app automatically selects the language used by the operating system. If the
app does not support that language, it will use English.
– When establishing the connection to the InScenio FM-Master WLAN for the first
time, it is necessary to define a device password to protect the InScenio FMMaster WLAN from unauthorised access.
– Remember the device password as it is also required for adding the InScenio FM
- EN -
53
Page 15

- EN -
"Home" screen
FMR0035
1
• Switching the socket on/off
• Add the photo to the symbol (→ Adapting the symbol for the socket)
2 Activating/deactivating the timer
3 Number of devices added.
• Swipe right or left on the screen to select a device.
4
"Home" screen
• This screen is used for operating the connected devices.
"Timer" screen
• 24 hour control of the sockets by means of an integrated timer.
"My devices" screen
• For adding and configuring OASE devices permitting remote control.
"Settings" screen
• For updating the firmware.
5 Status of the WLAN connection
• ONLINE: Smartphone/tablet is connected to the InScenio FM-Master WLAN.
7 Operation
7.1 "Home" screen
The "home" screen is used for operating the connected devices. Swipe right or left on the screen to select a
connected device.
– Touch the symbol to switch the socket on or off.
• Touch the symbol to select the screen.
• Touch the symbol to select the screen.
• Touch the symbol to select the screen.
• Touch the symbol to select the screen.
• For displaying unit information.
• Establish a direct connection with the device (access point) or via a WLAN router.
• For changing the network name (SSID) and password.
• Touch the symbol to activate or deactivate the timers for the four sockets.
54
Page 16

• OFFLINE: Smartphone/tablet is not connected to the InScenio FM-Master WLAN.
6
15:51
System time of the InScenio FM-Master WLAN.
(→ Updating the system time)
7 Dimming the device connected to the bottom left-hand socket
• This function is available for OASE devices with dimmer function.
"Home" screen
FMR0036
1
Symbol for switching the socket
• The system time can be updated to the time shown on the operating device.
• Touch the button of the slider control and move it to dim the connected unit.
• Touch the point of the arrow to gradually dim the connected device.
7.1.1 Adapting the symbol for the socket
The symbols for switching the sockets can be individually designed using photos.
iOS
How to proceed:
1. Touch the symbol for 2 seconds.
– A dialogue field for selection will open.
2. Select a photo from the library, take a photo using the integrated camera or remove.
Android
How to proceed:
1. Touch the symbol for 2 seconds.
– A dialogue field for selection of the camera will open.
2. Take a photo of the desired object with the integrated camera.
– The photo is automatically inserted into the symbol.
- EN -
55
Page 17

- EN -
"Home" screen
FMR0020
1
Virtual manual transmitter
Teaching-in of the manual transmitter is described in the instructions for use of the added device.
7.1.2 Operating a device with manual transmitter
In the case of a device with manual transmitter, the manual transmitter is displayed on the screen. Functions
and ease of use are the same.
The OASE product name will be displayed at the top right of the screen. The added device can be labelled
with an individual name.
• The virtual manual transmitter is identical to the physical manual transmitter.
• Several virtual or physical manual transmitters can be assigned to an added device.
• Several of the same devices can be operated together using one virtual manual transmitter. For this,
the virtual manual transmitter has to be taught in for each device.
How to proceed:
1. Touch and hold down the button on the manual transmitter.
– A red LED signals that the function is being executed.
– The function of the buttons is described in the instructions for use of the added device.
56
Page 18

"Home" screen
FMR0037
1
Tiles for operation and display of current values.
2
Switching the device on or off.
• Tap the touch symbol "Off" to switch off the device.
3
Status display of the EGC connection
– No connection between EGC device and InScenio FM-Master WLAN.(→ Dépannage)
Dynamic Function Control (DFC)
5. To cancel the process, tap "Cancel".
7.1.3 Operating the pump via EGC
The OASE product name will be displayed at the top right of the screen. The added device can be labelled
with an individual name.
• Tap the touch symbol "On" to switch on the device.
• Status display lights up green:
– The connection between the EGC device and InScenio FM-Master WLAN is active.
• Status display lights up grey and the product image is greyed out:
- EN -
Only available for pumps supporting this function. The DFC function is described in the operating manual of the pump.
How to proceed:
1. Tap "On" or "Off" to switch the DFC function on or off.
– If the DFC function is on, the current Scene is displayed.
2. To change the Scene, touch the number of the Scene and hold it for 2 seconds.
– A dialogue field will open.
– Different Scene are available.
3. Select the desired Scene.
4. Tap ʺOKʺ to apply the setting.
– The Scene number is displayed in the tile.
57
Page 19

- EN -
Seasonal Flow Control (SFC)
enables the pump to adapt to
– Max: Summer mode, high flow rate.
Adjusting the pump capacity
Pump speed
Pump operating time
Pump power consumption
Only available for pumps supporting this function. The SFC function is described in the instructions for use of the pump.
• Tap "On" or "Off" to switch the SFC function on or off.
– If the SFC function is on, the current mode is displayed.
• The pump automatically switches between three modes. This
the ambient conditions of the pond.
– Min: Winter mode, low flow rate.
– Mid: Transition time, medium flow rate.
While the DFC or SFC function is on, no adjustments can be made. The tile is greyed out.
How to proceed:
• Touch the button of the slider control and move it to adjust the pump capacity.
– The set capacity is displayed in %.
0 %: Pump is idling.
100 %: Max. pump capacity.
• Display of the current speed in rpm.
• Display of the overall operating time in hours.
• Display of the current power consumption in watt.
58
Page 20

"Home" screen
FMR0039
1
Tiles for operation and display of current values.
• Swipe vertically across the tiles to display additional tiles.
2
Switching the device on or off.
• Tap the touch symbol "Off" to switch off the device.
3
Status display of the EGC connection
– No connection between EGC device and InScenio FM-Master WLAN.(→ Dépannage)
4
Display of system messages
ses and remedy.
7.1.4 Operating ProfiClear units via EGC
The OASE product name will be displayed at the top right of the screen. The added device can be labelled
with an individual name.
- EN -
• Tap the touch symbol "On" to switch on the device.
• Status display lights up green:
– The connection between the EGC device and InScenio FM-Master WLAN is active.
• Status display lights up grey and the product image is greyed out:
• Shows the last system message.
• Touch the system message and hold for 1 second to display all systems messages and reset.
– A dialogue window opens and lists all system messages that have occurred.
– When the cause has been remedied, the system messages are extinguished automatically or have
to be confirmed via the dialogue field.
– The operating instructions of the ProfiClear unit contains detailed descriptions about possible cau-
59
Page 21

- EN -
Current water temperature in °C
Number of cleaning cycles in the past 24 hours
is triggered at the
Total number of cleaning cycles
Manual cleaning
• Display only.
• The total of the automatic and time-dependent cleaning cycles is displayed.
• The value is saved in the filter control system.
NOTE:
The filter system self-diagnostics monitor automatic cleaning. The test is carried out continuously in a 2 × 24 hour cycle. The test is only active from a water temperature >12 °C.
Very different values may be indicated due to the test.
First 24 hour cycle
• If at least one automatic cleaning process is detected, the cycle is repeated after the
cleaning process has finished.
• If no automatic cleaning process is detected, the second 24 hour cycle starts once the
first has finished.
Second 24 hour cycle
The time-dependent cleaning cycle is deactivated. This reduces the number of cleaning
cycles.
• If at least one automatic cleaning process is detected, the first 24 hour cycle starts again
once the cycle has finished.
• If no automatic cleaning process is detected, the system message
Er22
end of the cycle. The time-dependent cleaning cycle starts again.
– If an automatic cleaning process is then detected, the first 24 hour cycle starts again.
The system message
Er22 is automatically reset.
• The total of the automatic, manual and time-dependent cleaning cycles is displayed.
• The value is saved in the filter control system.
Manually triggered cleaning cycle.
How to proceed:
1. Tap
– All active cleaning cycles (automatic, time-dependent or manual) are stopped.
2. To cancel the process, tap
60
to start the cycle.
again.
Page 22

- EN -
Cleaning time ʺCleaningʺ (CL)
Extended cleaning time "Extra Cleaning" (EC)
Time-dependent cleaning "Intervall" (ln)
– Basic setting: 20 minutes (the ideal setting for most applications).
Basic settings
This setting changes the duration of the cleaning cycle. If the water does not carry away all
dirt, a longer cleaning time is required. This may become necessary if, for instance, very
long drain pipes or drain pipes with many bends were installed or there is a particularly
large amount of sticky dirt (e.g. during spawning).
• A longer cleaning time increases the water consumption. The default setting of 10 s is
usually sufficient (corresponds to approx. a
How to proceed:
• Touch the button of the slider control and move it to adjust the time.
– Adjustable range: 10 – 30 s.
The extended cleaning time after every 20 cleaning cycles prevents larger deposits in the
dirt channel or the pipework. This ensures that the pipework is flushed out at regular intervals.
However, if dirt and residue build up due to unfavourable conditions, increase the cleaning
time to flush out the pipe with additional water.
How to proceed:
• Touch the button of the slider control and move it to adjust the time.
– Adjustable range: 10 – 60 s.
In addition to automatic cleaning, an option for time-dependent cleaning is available. This
is particularly useful for ponds containing fish. Even if there is only a small amount of dirt,
excrement is always removed from the water cycle before it leads to a build-up of nutrients.
The time-dependent cleaning cycle does not have any influence on the automatic cleaning
cycle that starts when the water level is too low. After each automatic cleaning cycle, the
time interval is reset and starts again from the beginning.
How to proceed:
• Touch the button of the slider control and move it to adjust the time.
– Adjustable range: 0; 3 – 60 min.
– 0 minutes: The function is deactivated.
7
/8 drum rotation).
The control system is reset to the basic settings.
• All individually set values are overwritten!
• The following values are set:
– Cleaning time
CL: 10 s
– Extended cleaning time
– Interval of the time-dependent cleaning
EC: 20 s
In: 20 min
61
Page 23

- EN -
"Home" screen
FMR0054
1
Tiles for operation and display of current values.
• Swipe vertically across the tiles to display additional tiles.
2
Switching the device on or off.
• Tap the touch symbol "Off" to switch off the device.
Adjusting the brightness
Show settings
5. To cancel the process, tap "Cancel".
7.1.5 Operating ProfiLux units via EGC
The OASE product name will be displayed at the top right of the screen. The added device can be labelled
with an individual name.
• Tap the touch symbol "On" to switch on the device.
The brightness is adjusted for all LED lamps. A separate adjustment is not possible.
How to proceed:
• Touch the button of the slider control and move it to adjust the brightness.
– The set brightness is displayed in %.
0 %: LED lamps off.
100 %: Max. brightness.
The show function contains several Scenen with different light choreographies. The show is
set for all LED lamps. A separate adjustment is not possible.
How to proceed:
1. Tap "On" or "Off" to switch the show function on or off.
– If the show function is on, the current Scene is displayed.
2. To change the Scene, touch the number of the Scene and hold it for 2 seconds.
– A dialogue field will open.
– Different Scene are available.
62
3. Select the desired Scene.
4. Tap ʺOKʺ to apply the setting.
– The Scene number is displayed in the tile.
Page 24

- EN -
Colour settings
Show speed adjustment
The colour is set for all LED lamps. A separate adjustment is not possible.
How to proceed:
1. Touch and hold the colour circle for 2 seconds.
– A dialogue field will open.
2. Tap the desired colour of a colour circle or swipe across the colour circles to select the colour.
– Tap the white inner circle to select "white" as a colour.
3. Tap ʺOKʺ to apply the setting.
4. To cancel the process, tap "Cancel".
Adjust the speed at which the selected show is processed. The show continues to repeat.
How to proceed:
• Touch the button of the slider control and move it to adjust the speed.
– Adjustable range: 1 – 100.
63
Page 25

- EN -
"Timer" screen
FMR0023
1
24 hour scale (0:00 … 24:00)
2
Time axis for display of the programmed timer.
Make a pinching movement with two fingers to compress the time axes.
3
Programmed timer
• For the socket with dimmer, the set percentage value of the dimmer is additionally displayed.
4
Aids for using small display:
Touch symbol
Touch symbol
stretch time axes.
5
Socket touch symbol
• Touch the touch symbol to program a new timer.
7.2 "Timer" screen
• A time axis is assigned to each socket.
• Programmed timers are represented as green bars on the time axis.
• The display is adjusted by touch gestures in the area of the time axes:
Swipe to the right or left to show different times.
Make a spreading movement with two fingers to stretch the time axes.
• The green bar shows the time period during which the socket is switched on.
• The switch-on time and switch-off time can be read off the 24 hour scale.
• compress time axes.
•
64
Page 26

"Timer" screen
FMR0024
"Timer" screen
FMR0025
7.2.1 Adding a timer
How to proceed:
1. Touch the touch symbol of the desired socket or touch an unassigned area on the time axis and hold.
– A new timer will be displayed.
2. Set the desired start time and end time by scrolling the respective time wheel.
3. For the socket with dimmer, additionally set a percentage value.
4. Touch to add the timer.
– The timer is indicated on the time axis.
7.2.2 Changing/deleting a timer
To abort the process, touch .
- EN -
Changing a timer
How to proceed:
1. Touch and hold the desired timer.
– The timer is displayed.
2. Set the desired start time and end time by scrolling the respective time wheel.
3. For the socket with dimmer, additionally set the desired percentage value.
4. To apply the settings:
5. Touch to apply the changes.
– The timer is indicated on the time axis.
To abort the process, touch .
65
Page 27

- EN -
"My devices" screen
FMR0016
1
Already added devices
2
Add new device
Adding a device name
Select the device and tap the touch symbol.
Removing a device
• Select the device and tap the touch symbol.
Deleting a timer
How to proceed:
1. Touch and hold the desired timer.
– The timer is displayed.
2. Touch to delete the programmed timer.
– A query is displayed asking whether only this timer or all programmed timers for the socket are to be de-
leted.
3. Touch the desired command.
7.3 "My devices" screen
– The timer or all timers will be deleted for the socket.
66
•
Page 28

"My devices" screen
7.3.1 Adding an EGC-compatible device
A maximum of 10 EGC-compatible devices or devices with hand-held transmitter can be added to the
InScenio FM-Master W LAN.
How to proceed:
1. Tap to open the list with available OASE devices.
– When the list is opened, the InScenio FM-Master W LAN automatically searches for connected EGC de-
vices. The EGC devices must be correctly connected to the EGC network and switched on so that the
InScenio FM-Master W LAN can find the EGC devices. Found devices are displayed in colour in the list
and the message "Device found" is shown underneath the product name.
– EGC-compatible devices are marked with the EGC logo (Easy Garden Control) in the product image.
– To search for connected EGC devices again, tap
.
2. Select the desired EGC-compatible device in the list.
– Only EGC devices found by the InScenio FM-Master W LAN in the EGC network can be added.
– For information on the device, tap
. If the following prompt is confirmed with "OK", the OASE homepage
with the relevant product information opens in your browser.
3. Tap
to add the device.
– The device has been added to the device list.
4. To give the added device a name, switch to the device overview.
5. Select the desired device in the device overview and tap
.
– A dialogue field will open.
6. Enter the device name and confirm with "OK".
– The device name has been assigned.
- EN -
NOTE
• If there are several devices of one type, repeat the process for each device.
67
Page 29

- EN -
"My devices" screen
7.3.2 Adding a device with a hand-held transmitter
A maximum of 10 EGC-compatible devices or devices with hand-held transmitter can be added to the
InScenio FM-Master W LAN.
iOS
How to proceed:
1. Touch to open the list with available OASE devices.
– When the list is opened, the InScenio FM-Master W LAN automatically searches for connected EGC de-
vices.
– Devices with hand-held transmitters are marked with an image of the hand-held transmitter in the product
image.
2. Select the desired device with a hand-held transmitter in the list.
– For information on the device, tap
with the relevant product information opens in your browser.
3. Tap
to add the device.
– A prompt for teaching in the hand-held transmitter is displayed.
4. Press the button for teach-in on the device and confirm the prompt with "OK".
– The teach-in button is described in the instructions for use of the device.
– Teach-in of the manual transmitter is complete.
– The device has been added to the device list.
5. To give the added device a name, switch to the device overview.
6. Select the desired device in the device overview and tap
– A dialogue field will open.
7. Enter the device name and confirm with "OK".
– The device name has been assigned.
Android
How to proceed:
1. Tap to open the list with available OASE devices.
– When the list is opened, the InScenio FM-Master W LAN automatically searches for connected EGC de-
vices.
– Devices with hand-held transmitters are marked with an image of the hand-held transmitter in the product
image.
2. Select the desired device with a hand-held transmitter in the list.
– For information on the device, tap
with the relevant product information opens in your browser.
3. Tap
to add the device.
4. Confirm the query.
5. Enter the device name and confirm with "OK".
– A prompt for teaching in the hand-held transmitter is displayed.
6. Press the button for teach-in on the device and confirm the prompt with "OK".
– Teach-in of the manual transmitter is complete.
– The device has been added to the device list.
– The device name has been assigned.
. If the following prompt is confirmed with "OK", the OASE homepage
.
. If the following prompt is confirmed with "OK", the OASE homepage
68
NOTE
When a virtual manual transmitter is used, the device name may also contain descriptions of the keys.
Example for a InScenio FM-Master 3:
• "Bio pond - 1:Light 2:Skimmer 3:Waterfall"
NOTE
The virtual manual transmitter on the "Home" screen can also be taught in after the device has been
added.
• To teach in, actuate the respective button on the virtual manual transmitter.
• Teaching-in of the manual transmitter is described in the instructions for use of the added device.
Page 30

"My devices" screen
FMR0053
1
ProfiClear Controller Upgrade
• First select and add the ProfiClear Controller.
2
ProfiClear Premium variants
tomatically calibrated for the control system.
7.3.3 ProfiClear Premium Filter – upgrade to EGC
To connect a ProfiClear Premium filter with the InScenio FM-Master WLAN, ensure that the control system is
EGC-compatible. For older ProfiClear Premium filters this compatibility can be established with a separately
available upgrade control system (article number 47723).
Prerequisite for a connection between ProfiClear Premium filter and InScenio FM-Master WLAN:
• The ProfiClear Premium is correctly connected to the control system with the EGC box.
• The ProfiClear control system is correctly connected to the InScenio FM-Master WLAN with the EGC con-
nection cable.
• The ProfiClear control system is switched on (connection with the mains is established).
- EN -
• Secondly, select the desired ProfiClear Premium variant and add it to the device list. The filter is au-
69
Page 31

- EN -
How to proceed:
1. Tap to open the list with available OASE devices.
– When the list is opened, the InScenio FM-Master WLAN automatically searches for connected EGC de-
vices. The EGC devices must be correctly connected to the EGC network and switched on so that the
InScenio FM-Master WLAN can find the EGC devices. Found devices are displayed in colour in the list
and the message "Device found" is shown underneath the product name.
– To search for connected EGC devices again, tap
– EGC-compatible devices are marked with the EGC logo (Easy Garden Control) in the product image.
2. Select the device ″ProfiClear Controller Upgrade″ in the list.
– The device can only be added if InScenio FM-Master WLAN has found the device in the EGC network.
– For information on the device, tap
. If the following prompt is confirmed with "OK", the OASE homepage
with the relevant product information opens in your browser.
3. Tap
to add the device.
– A message signals that the ProfiClear Controller must be assigned a ProfiClear Premium filter in the next
step.
4. In the list, select the ProfiClear Premium variant connected with the ProfiClear Controller.
– The ProfiClear Premium variants are marked in colour in the list.
– For information on the device, tap
. If the following prompt is confirmed with "OK", the OASE homepage
with the relevant product information opens in your browser.
5. Tap
to add the device.
– The teach-in of the ProfiClear Premium filter is complete and the filter is added to the device list.
6. To give the added device a name, switch to the device overview.
7. Select the desired device in the device overview and tap
– A dialogue field will open.
8. Enter the device name and confirm with "OK".
– The device name has been assigned.
.
.
70
Page 32

"My devices" screen
7.3.4 Removing a device
Variant 1
How to proceed:
1. Select the device to be deleted in the device list.
2. Tap .
3. Confirm the subsequent prompt with "OK".
– The device has been removed.
Variant 2
How to proceed:
1. Touch the line with the device you wish to delete, hold and pull to the left.
- EN -
2. Touch "Delete".
– The device has been removed.
71
Page 33

- EN -
"Settings" screen
FMR0021
1
on
nel.
7.4 "Settings" screen
72
Use the button to start the InScenio FM-Master WLAN in access point mode. In this
mode, the smartphone/tablet is directly connected to the InScenio FM-Master WLAN via the WLAN
"Oase FM-Master <xxxxxx>".(→ Establishing a direct WLAN connection (access point mode))
• Network name (SSID)
– The device makes a wireless network (WLAN) available under the specified network name with
which the smartphone/tablet is directly connected.
– The network name in the factory default settings is specified on the InScenio FM-Master WLAN
the adhesive label next to the type plate. (→ Establishing a direct WLAN connection (access point
mode))
– The network name is changed via the touch symbol . The last six characters "xxxxxx" are
specific to the device and are preset. (→ Changing the network name)
• WiFi password
– The password "oase1234" of the factory setting is specified on the InScenio FM-Master WLAN on
the adhesive label next to the type plate. (→ Commissioning/start-up)
– The WLAN password of the direct WLAN connection (Access Point) is changed using the touch
symbol .(→ Changing the WiFi passwort)
• WiFi channel
– If the set channel is fully utilised by other wireless devices, it is possible to use a different channel.
– It may be possible to remedy malfunctions of the WLAN connection by selecting a different chan-
Page 34

- EN -
2
InScenio FM-Master W LAN EGC is not connected to the OASE cloud.
3
Device password
password in order to change it. (→ Changing the device password)
4
System settings
• It is necessary to enter the current password in order to carry out an update.
5
Display of the device information. (→ Updating the firmware)
Use the button to start the InScenio FM-Master WLAN in router/cloud mode. In this mode,
the InScenio FM-Master WLAN is connected to the available WLAN of a router. The smartphone/tablet
has to be connected to the same WLAN.
(→ Establishing a connection to the WLAN router via WPS (router/cloud mode))
(→ Manually establishing a connection to the WLAN router (router/cloud mode))
• Network name (SSID)
– Indicates the WLAN to which the InScenio FM-Master WLAN is connected.
• Cloud connection (→ Activating the cloud connection)
– Use the touch symbol
to disconnect it.
• Connection status (→ Activating the cloud connection)
InScenio FM-Master W LAN EGC is connected to the OASE cloud.
• A new device password is entered using the touch symbol . It is necessary to enter the current
• Use the touch symbol to update the system time of the InScenio FM-Master WLAN to the time of
the operating device. (→ Updating the system time)
• The firmware is updated via the touch symbol . (→ Updating the firmware)
to connect the InScenio FM-Master WLAN EGC to the OASE cloud or
73
Page 35

- EN -
"Settings" screen
"Settings" screen
7.4.1 Establishing a connection to the WLAN router via WPS (router/cloud mode)
Prerequisite:
• The smartphone/tablet is directly connected (access point mode) to the InScenio FM-Master WLAN.
7.4.2 Manually establishing a connection to the WLAN router (router/cloud mode)
(→ Establishing a direct WLAN connection (access point mode))
• Compatibility with the following WLAN standards:
– InScenio FM-Master WLAN: 802.11b
– InScenio FM-Master WLAN EGC: 802.11n+g+b
How to proceed:
1. Tap .
2. Select "WPS" in the query.
– WPS is activated. Activate WPS on the WLAN router within 2 minutes. Read the router instructions if ne-
cessary.
– The connection is established when the LED on the InScenio FM-Master WLAN flashes green slowly
(2 seconds on, 1 second off).
3. Connect the smartphone/tablet to the WLAN of the router.
– The app can now connect to the InScenio FM-Master W LAN via the router.
Prerequisite:
• The smartphone/tablet is directly connected (access point mode) to the InScenio FM-Master WLAN.
(→ Establishing a direct WLAN connection (access point mode))
• Compatibility with the following WLAN standards:
– InScenio FM-Master WLAN: 802.11b
– InScenio FM-Master WLAN EGC: 802.11n+g+b
How to proceed:
1. Tap .
2. Select "Manual connection" in the query.
3. Enter the network name (SSID) of the router.
4. Enter the router password and confirm with "OK".
– While a connection is being established, a warning signal is given.
– The connection is established when the LED on the InScenio FM-Master WLAN flashes green slowly
(2 seconds on, 1 second off).
5. Connect the smartphone/tablet to the WLAN of the router.
– The app can now connect to the InScenio FM-Master W LAN via the router.
74
Page 36

"Settings" screen
"Settings" screen
7.4.3 Changing the network name
It can only be changed in access point mode. (→ Establishing a direct WLAN connection (access point mode))
How to proceed:
1. Touch next to the "Network name (SSID)".
– A prompt appears for the device password.
2. Enter a new network name and confirm with "change".
– The InScenio FM-Master WLAN gives an acoustic signal to indicate that the password has been suc-
cessfully changed.
– The WLAN connection to the InScenio FM-Master WLAN is disconnected and restarted.
3. Establish the WLAN connection using the new network name.
7.4.4 Changing the WiFi passwort
It can only be changed in access point mode. (→ Establishing a direct WLAN connection (access point mode))
How to proceed:
1. Touch next to the "WiFi password".
– A prompt appears for the device password.
2. Enter the new WiFi password, repeat the entry and confirm with "Change".
– The InScenio FM-Master WLAN gives an acoustic signal to indicate that the password has been suc-
cessfully changed.
– The WLAN connection to the InScenio FM-Master WLAN is disconnected and restarted.
3. Establish the WLAN connection using the new password.
- EN -
NOTE
When using an Android smartphone/tablet, the authentication may not function correctly after the WiFi
password is changed, as the new password is not automatically prompted. Remedy:
• Select the network name in the WLAN settings of your smartphone/tablet and enter the new WiFi
password.
• Delete WLAN on the smartphone/tablet, select WLAN again and connect.
75
Page 37

- EN -
"Settings" screen
7.4.5 Activating the cloud connection
EGC devices connected to the InScenio FM-Master WLAN EGC can be controlled from anywhere via the
OASE web portal. For this the InScenio FM-Master WLAN EGC has to be connected to the OASE cloud and
then added to the web portal. The device series number and device password are required for adding the
InScenio FM-Master WLAN EGC in the web portal.
Prerequisite:
Connection to the OASE cloud is only possible with the InScenio FM-Master WLAN EGC and in router/cloud
mode.
(→ Establishing a connection to the WLAN router via WPS (router/cloud mode))
(→ Manually establishing a connection to the WLAN router (router/cloud mode))
How to proceed:
1. Touch under Cloud to active the cloud connection.
– A dialogue field showing the device series number will open. Note down the device series number. You
need it for adding the InScenio FM-Master WLAN EGC in the web portal.
On your computer or smartphone/tablet
2. Enter the address https://egccloud.oase-livingwater.com in the web browser to call up the OASE web portal.
3. Log into the web portal.
– For the login it is necessary to register once beforehand.
4. Add the InScenio FM-Master WLAN EGC in the web portal.
– For this you require the device series number (displayed when the cloud connection is activated).
– The device password is required (defined during commissioning/start-up). The device password can be
changed. (→ Changing the device password)
In the "FM Master" app
5. Check the connection status in the menu "Settings" under "Cloud".
–
InScenio FM-Master W LAN EGC is connected to the OASE cloud.
–
InScenio FM-Master W LAN EGC is not connected to the OASE cloud.
– It may take several minutes to establish a connection, depending on the internet connection.
76
Page 38

"Settings" screen
"Settings" screen
7.4.6 Changing the device password
The device password protects the InScenio FM-Master WLAN from unauthorised access. It is defined during
commissioning/start-up but can be changed later.
If you forget the device password, you have to reset the network settings or restore the factory default settings.
When establishing the connection between InScenio FM-Master WLAN and the "FM Master" app, a new device password has to be defined.
• The device password is required in order to
– allow the InScenio FM-Master W LAN to be added in the web portal,
– change the SSID or WiFi password for the access point mode.
• The device password is automatically deleted when
– the firmware is updated
– the network settings are reset (→ Resetting the network settings),
– the factory default settings are restored (→ Restoring the factory default settings).
How to proceed:
1. Touch next to "Device password".
– A prompt appears for the old device password.
2. Enter the old device password and confirm with "OK".
3. Enter a new device password, repeat the entry and confirm with "OK".
- EN -
NOTE
When the device password is changed, the InScenio FM-Master W LAN EGC is automatically blocked
in the OASE web portal.
• The InScenio FM-Master WLAN EGC has to be deleted in the web portal and then added again.
7.4.7 Updating the system time
How to proceed:
The device series number and the new device password are required for this.
1. Touch next to "Update time".
– The touch symbol is active when the system time of the InScenio FM-Master WLAN differs from the time
on the operating device.
– The time is only updated when the touch symbol is active.
2. Confirm the query with "OK".
77
Page 39

- EN -
"Settings" screen
"Settings" screen
7.4.8 Updating the firmware
For a firmware update, the InScenio FM-Master WLAN changes to the firmware update mode and provides a
new network. Your smartphone/tablet has to be connected to this network for installing the update.
7.4.9 Displaying device information
Prerequisites for a malfunction-free firmware update:
• Other WLAN connections to the InScenio FM-Master WLAN are disconnected.
• The WLAN connection has a strong signal.
• The FM-Master app is not closed during the update.
• The power saving mode of the smartphone/tablet is deactivated.
• The smartphone/tablet battery is sufficiently charged. The update takes up to 2 minutes.
• The power supply of the InScenio FM-Master WLAN is not interrupted.
How to proceed:
1. Tap next to „FM-Master Firmware“.
– The touch symbol is only displayed when an update is available.
2. Confirm the notes for a malfunction-free firmware update.
– InScenio FM-Master WLAN switches to firmware update mode and confirms the switch with an acoustic
signal.
– InScenio FM-Master WLAN makes the network „OASE_UPDATE_xxxxxx“ or
„OASE_UPDATE_EGC_xxxxxx“ available.
– An instruction for changing the network is displayed.
3. Connect your smartphone/table with the network „OASE_UPDATE_xxxxxx“ or
„OASE_UPDATE_EGC_xxxxxx“.
– Use the standard password of the InScenio FM-Master WLAN for the prompt (see device type plate).
4. Switch to the "Settings" screen of the app and confirm the instruction.
– The update is started.
– The progress of the update is displayed.
5. After a successful update, re-connect the smartphone/tablet with the WLAN of the InScenio FM-Master
WLAN.
Displayed information:
• App version of the FM Master App
• Firmware version of the InScenio FM-Master WLAN
Touch "Further information" to display the following information:
• Serial number of the InScenio FM-Master WLAN
• Local IP address
• IP address of the InScenio FM-Master WLAN
• Touch Product information / FAQ to access the OASE website for further information about the product and
78
help with problems.
Page 40

7.4.10 Resetting the network settings
The network settings are reset to the delivery default settings. Saved entries from the device library and the
timer are retained.
How to proceed:
J
1. Remove the plug.
2. Insert the service pin into the opening between the two top sockets until you feel a resistance. That is the
reset button.
3. Keep the reset button pressed for approx. 5 seconds.
– An acoustic warning signal will sound at short intervals, signalling the deletion of the network settings.
– The network settings have been reset when the green LED on the InScenio FM-Master WLAN EGC is lit.
– Network name (SSID) and password of the WLAN router are deleted.
– The WiFi password of the InScenio FM-Master WLAN EGC is set to the factory default setting.
– The device password is deleted.
– The InScenio FM-Master WLAN EGC starts in access point mode and can now be directly connected to
7.4.11 Restoring the factory default settings
the smartphone/tablet.
4. Reinsert the plug.
The delivery default settings of the InScenio FM-Master W LAN are restored. All entered data will be lost.
How to proceed:
J
1. Remove the plug.
2. Insert the service pin into the opening between the two top sockets until you feel a resistance. That is the
reset button.
3. Hold down the service button for min. 15 seconds.
– After 5 seconds, an acoustic warning signal will sound at short intervals, signalling the deletion of the net-
work settings. After a further 10 seconds a continuous acoustic warning signal will sound. Then the LED
will flash and the factory default settings will start being restored.
– The factory default settings have been restored when the green LED is lit.
– The network name (SSID) and password of the WLAN router are deleted.
– The WiFi password of the InScenio FM-Master WLAN is set to the factory default setting.
– The device password is deleted.
– The device list is deleted.
– The InScenio FM-Master WLAN starts in access point mode and can now be directly connected to the
smartphone/tablet.
4. Reinsert the plug.
- EN -
79
Page 41

- EN -
Malfunction
Cause
Remedy
The WLAN connection is not established alt-
The smartphone/tablet cannot update the entered
iOS:
work again.
Android:
work again.
The WLAN standard set in the router is not compa-
The InScenio FM-Master WLAN only sup-
ting manual)
The InScenio FM-Master WLAN is not reacting
WLAN/WiFi on the smartphone/tablet is deacti-
Activate WLAN/WiFi on the smart-
the InScenio FM-Master WLAN.
Sources of interference between the smart-
• Reduce the distance between the smart-
Select a different location for operating by
screen).
Too large a distance between the smart-
• Reduce the distance, do not exceed the
the range.
The WLAN antenna of the InScenio FM-Master
Connect the WLAN antenna, tighten and
phone/tablet and router.
The WLAN antenna on the InScenio FM-Master
WLAN is not correctly aligned.
Align the WLAN antenna in the direction of
the smartphone/tablet and router.
The power supply of the InScenio FM-Master
Connect it to the power supply.
connection is established.
The receiver in the InScenio FM-Mast er WLAN is
defective.
Contact the OASE service.
The "FM-Master" app is outdated.
Install the latest version of the "FM-Master"
app on your smartphone/tablet.
The operating system of the smartphone/tablet is
outdated.
Update the operating system.
The dimmer is not functioning.
The fine-wire fuse has tripped.
• Replace the fuse with a new one
nected load.
The InScenio FM-Master WLAN switches at
The system time of the InScenio FM-Master WLAN
Update the system time to the time on the
time)
The added OASE device with wireless controls
There is too large a distance between the device
MHz wireless control.
Reduce the distance between the InScenio
not exceed the max. range of 80 m.
The added EGC device is not reacting to comThe data cable is interrupted.
Check the EGC connections.
The EGC device has no power supply
Connect it to the power supply.
No connection between EGC device and
The data cable is interrupted.
Check the EGC connections.
The EGC device has no power supply
Connect it to the power supply.
8 Remedy of faults
8.1 Malfunction table
hough the network name is displayed in the
WLAN settings.
to commands.
connection data for the network.
tible with the InScenio FM-Master WLAN.
vated.
phone/tablet and InScenio FM-Master WLAN
phone/tablet and the InScenio FM-Master WLAN
WLAN has become loose or is not connected.
WLAN is interrupted.
• Select the network and touch .
• Touch "Ignore this network" to remove
the network.
• Then establish a connection with the net-
• Select the network and touch "Remove"
to remove the network.
• Then establish a connection with the net-
ports the WLAN standard 802.11b.
The InScenio FM-Master WLAN EGC supports the WLAN standard 802.11n+g+b
• If necessary, select the correct WLAN
standard on the router (see router opera-
phone/tablet and establish a connection to
phone/tablet and the InScenio FM-Master
WLAN.
•
smartphone/tablet.
• Ensure that there are no obstructions between the InScenio FM-Master WLAN and
smartphone/tablet.
• For a direct WLAN connection (access
point) between the InScenio FM-Master
WLAN and smartphone/tablet, select a
different WLAN channel (→ "Settings"
max. range of 80 m.
• Use an off -the-shelf repeater to increase
align in the direction of the smart-
• The green LED is lit.
• The green LED flashes when the WLAN
the wrong time.
is not reacting to commands.
mands.
InScenio FM-Master WLAN EGC.
80
• A non-dimmable device has been connected to
the socket with dimmer function.
• The maximum permissible connected load has
been exceeded.
does not correspond to the actual time.
and the InScenio FM-Master WLAN for the 433.92-
(→ Technical data).
• Only connect suitable units to the socket
with dimmer function.
• Adhere to the maximum permissible con-
operating device. (→ Updating the system
FM-Master WLAN and the OASE device, do
Page 42

- EN -
Malfunction
Cause
Remedy
Several devices react to the command of the
Several devices have been taught into one chan-
Remove the device that is not required.
describe how to remove the device.
Yellow LED is lit
The InScenio FM-Master WLAN is in the firmware
Connect with the WLAN
the app to start the firmware update.
The yellow LED is flashing slowly (2 seconds
InScenio FM-Master WLAN is searching for a con-
• Reduce the distance, do not exceed the
may be weakening the WLAN signal (e.g.
mode))
Red LED is flashing.
Internal error
• Disconnect from the power supply, wait
the factory default settings.
The device does not start, red LED flashing.
No firmware found.
Manually start the firmware update mode
mode)
manual transmitter.
on, 1 second off).
nel of the InScenio FM-Master WLAN.
update mode.
nection to the router.
• The instructions for use of the device
„OASE_UPDATE_xxxxxx“ or
„OASE_UPDATE_EGC_xxxxxx“ and use
max. range of 80 m.
• Remove any sources of interference that
other wireless devices, differences in
height).
• Switch on the WLAN router.
• Activate the WLAN function on the router.
• If the router is no longer available or de-
fective, reset the network settings of the
InScenio FM-Master WLAN so that it can
be directly controlled in access point
mode (→ Resetting the network settings)
• Connect the InScenio FM-Master WLAN
to another router (→ Establishing a connection to the WLAN router (router/cloud
for 10 seconds and then reconnect.
• Reset the InScenio FM-Master WLAN to
(→ Manually starting the firmware update
8.2 Manually starting the firmware update mode
How to proceed:
J
1. Disconnect from the power supply.
2. Remove the plug.
3. Insert the service pin into the opening between the two top sockets until you feel a resistance. That is the
reset button.
4. Hold down the reset button.
5. Connect to the power supply again while pressing the reset button.
6. Release the reset button after approx. 2 seconds.
– The InScenio FM-Master WLAN is in firmware update mode when the yellow LED is flashing.
7. Use your smartphone/tablet to establish a WLAN connection with the WLAN OASE_UPDATE_XXXXXX or
OASE_UPDATE_EGC_XXXXXX.
8. Start the firmware update via the app. (→ Updating the firmware)
9. Reinsert the plug.
81
Page 43

- EN -
The use of original parts from OASE ensures continued
www.oase-livingwater.com/spareparts
9 Maintenance and cleaning
9.1 Cleaning the unit
9.2 Replacing the fuse
10 Wear parts
WARNING
Electrical current may cause death or severe injuries.
• Disconnect the power plug before carrying out any work on the unit.
Clean the unit with a soft, clean and dry cloth. Never use aggressive cleaning agents or chemical solutions.
These can attach the housing surface or impair the function.
The dimmer is protected by a fine-wire fuse.
Prerequisite:
• The power plugs of the connected devices are disconnected.
How to proceed:
K
1. Remove the plug.
2. Turn the fuse holder counter-clockwise by quarter of a turn (bayonet closure) using a screwdriver and
exerting light pressure.
3. Remove the fuse holder including the fine-wire fuse.
4. Replace the fine-wire fuse.
Type: → Technical data
5. Turn in the fuse holder again.
6. Reinsert the plug.
• Fine-wire fuse, dimmer
11 Spare parts
safe and reliable operation of the unit.
Please visit our website for spare parts drawings and
spare parts.
12 Disposal
NOTE
Do not dispose of this unit with domestic waste.
• Render the unit unusable beforehand by cutting the cables and dispose of the unit via the return
system provided for this purpose.
82
Page 44

DE
Anschlussspannung
Gesamtbelastung Leistung
Gesamtbelastung Strom
Belastung dimmbare Steckdose
Feinsicherung Dimmer
EN
Mains voltage
Total output, rating
Total output, current
Load, dimming socket
Fine-wire fuse, dimmer
FR
Tension de raccordement
Charge totale rendement
Charge totale courant
Densité de courant Prise avec variateur
Variateur à fusible pour courant
faible
NL
Aansluitspanning
Max. capaciteit
Totale belasting stroom
Belasting dimbaar stopcontact
Fijne zekering dimmer
ES
Tensión de conexión
Carga total potencia
Carga total corriente
Carga atenuable Tomacorriente
Fusible para baja intensidad re-
luz
PT
Tensão de conexão
Carga total potência
Carga total corrente
Carga, bucha de controlo por variação
Fusível fino - resistência variável
IT
Tensione di attacco
Carico totale potenza
Carico totale corrente
Carico presa regolabile
Fusibile a filo sottile dimmer
DA
Tilslutningsspænding
Samlet last, effekt
Samlet last, strøm
Belastning dimbar stikkontakt
Finsikring på dæmper
NO
Nettspenning
Total belastning effekt
Total belastning strøm
Belastning dimmbar stikkontakt
Finsikring dimmer
SV
Anslutningsspänning
Total belastning effekt
Total belastning ström
Belastning dimmeranslutning
Finsäkring för dimmer
FI
Verkkojännite
Kokonaiskuormitus, teho
Kokonaiskuormitus, virta
Kuormitus, himmennettävä Pistorasia
Tarkkuusvaroke valonsäädin
HU
Csatlakoztatási feszültség
Teljes terhelés teljesítmény
Teljes terhelés áram
A szabályozható dugaszoló aljzat terhelése
A dimmer kapcsoló fi-
nombiztosítéka
PL
Napięcie przyłączeniowe
Obciążenie całkowite - moc
Obciążenie całkowite - prąd
Obciążenie gniazdka o regulowanych parametrach
Bezpiecznik o wysokiej czułości
regulatora (ściemniacza)
CS
Připojovací napětí
Celkové zatížení - výkon
Celkové zatížení - el.proud
Zatížení stmívatelná zásuvka
Jemná pojistka stmívače
SK
Napájacie napätie
Celkové zaťaženie – výkon
Celkové zaťaženie – prúd
Zat’aženia stmievateľné zásuvka
Jemná poistka pre stmievač
SL
Priključna napetost
Skupna obremenitev moč
Skupna obremenitev tok
Obremenitev zniževalne vtičnice
Precizna varovalka za zatemnil-
nik
HR
Priključni napon
Ukupno opterećenje snagom
Ukupno strujno opterećenje
Opterećenje na prigušnoj utičnici
Fini osigurač prigušivača
RO
Tensiune de conexiune
Solicitare totală putere
Solicitare totală curent
Sarcină doza reglabilă
Siguranţă de precizie graduator
BG
Напрежение в точката на свързване
Пълно натоварване Мощност
Пълно натоварване Ток
Натоварване на регулирането Дюза на щекера
Слаботоков предпазител
Димер
UK
Напруга мережі живлення
Загальне навантаження
потужності
Загальне навантаження живлення
Навантаження, що затемнюється Розетка
Слабкострумовий запобіжник
димера
RU
Напряжение питающей сети
Полная нагрузка, мощность
Полная нагрузка, питание
Нагрузка розетки регулирования
Слаботочный предохранитель
диммера
CN
220 … 240 V AC, 50/60 Hz
max. 3600 W
max. 16 A
40 … 320 W
5 × 20 mm, T 1.6 H / 250 V
gulador de la intensidad de la
输入电压 总负荷功率 总负荷电流 负载可调插座 调光器熔断器
863
Page 45

DE
Frequenz WLAN / max. Reichweite
Frequenz Funksteuerung / max. Reichweite
Ausgänge
Abmessungen
Gewicht
EN
WLAN frequency / max. range
Wireless control frequency / max. range
Outlets
Dimensions
Weight
FR
Fréquence WLAN / portée max.
Fréquence radiocommande / portée max.
Sorties
Dimensions
Poids
NL
Frequentie WLAN / max. reikwijdte
Frequentie draadloze besturing / max. reikwijdte
Uitgangen
Afmetingen
Gewicht
ES
Frecuencia WLAN / alcance máximo
Frecuencia radiomando / alcance máximo
Salidas
Dimensiones
Peso
PT
Frequência WLAN / alcance máximo
Frequência telecomando / alcance máximo
Saídas
Dimensões
Peso
IT
Frequenza WLAN / distanza max.
Frequenza radiocomando / distanza max.
Uscite
Dimensioni
Peso
DA
Frekvens WLAN/maks. rækkevidde
Frekvens fjernbetjening/maks. rækkevidde
Udgange
Mål
Vægt
NO
Frekvens WLAN /maks. rekkevidde
Frekvens radiostyring / maks. rekkevidde
Utganger
Mål
Vekt
SV
Frekvens WLAN / max. räckvidd
Frekvens fjärrstyrning / max. räckvidd
Utgångar
Mått
Vikt
FI
WLAN-taajuus / suurin kantama
Radio-ohjauksen taajuus / suurin kantama
Lähdöt
Mitat
Paino
HU
WLAN frekvencia / max. hatótávolság
Rádiós vezérlés frekvencia / max. hatótávolság
Kimenetek
Méretek
Súly
PL
Częstotliwość WLAN / maks. zasięg
Częstotliwość zdalnego sterowania / maks. zasięg
Wyloty
Wymiary
Ciężar
CS
Frekvence WLAN / max. dosah
Frekvence radiového ovládání / max. dosah
Výstupy
Rozměry
Hmotnost
SK
Frekvencia WLAN / max. dosah
Frekvencia rádiového ovládania / max. dosah
Výstupy
Rozmery
Hmotnost’
SL
Frekvenca WLAN / maks. domet
Frekvenca radijskega krmiljenja / maks. domet
Izhodi
Dimenzije
Teža
HR
Frekvencija WLAN-a / maks. doseg
Frekvencija daljinskog upravljanja / maks. doseg
Izlazi
Dimenzije
Težina
RO
Frecvenţă WLAN / rază max. de acţiune
Frecvenţă sistem de comandă prin radio / rază max. de acţiune
Ieşiri
Dimensiuni
Greutate
BG
Честота WLAN / макс. обхват
Честота радиоуправление / макс. обхват
Изходи
Размери
Тегло
UK
Частота бездротової ЛОМ / макс. радіус дії
Частота радіокерування / макс. радіус дії
Виходи
Розміри
Вага
RU
Частота WLAN / макс. радиус действия
Частота радиоуправления / макс. радиус действия
Выходы
Размеры
Вес
CN
(WL AN) 频率 /
/
尺寸 重量
2,4 GHz / 80 m
433,92 MHz / 80 m
5
215 × 155 × 295 mm
2 kg
无线局域网
最大有效距离
864
无线电控制频率
最大有效距离
输出
Page 46

DE
Schutz gegen das Eindringen
von Spritzwasser.
Vor direkter Sonneneinstrahlung
schützen.
Nicht mit normalem Hausmüll
entsorgen!
Lesen Sie die Gebrauchsanlei-
tung
EN
Protection against the ingress of
splash water.
Protect from direct sun radia-
tion.
Do not dispose of together with
household waste!
Read the operating instructions
FR
Protection contre la pénétration
de pro-jection d’eau
Protéger contre les rayons di-
rects du soleil.
Ne pas recycler dans les or-
dures ménagères !
Lire la notice d'emploi
NL
Beveiliging tegen het binnen-
dringen van spatwater.
Beschermen tegen direct zon-
licht.
Niet met het normale huisvuil af-
voeren!
Lees de gebruiksaanwijzing
ES
Protección contra la entrada de
agua salpicante..
Protéjase contra la radiación di-
recta del sol.
¡No deseche el equipo en la ba-
sura doméstica!
Lea las instrucciones de uso
PT
Protecção contra respingos de
água.
Proteger contra radiação solar
directa.
Não deitar ao lixo doméstico!
Leia as instruções de utilização
IT
Protezione contro la penetra-
zione di spruzzi d'acqua..
Proteggere contro i raggi solari
diretti.
Non smaltire con normali rifiuti
domestici!
Leggete le istruzioni d'uso!
DA
Beskyttelse mod indtrængning
af vand-sprøjt.
Beskyt mod direkte sollys.
Må ikke bortskaffes med det al-
mindelige husholdningsaffald!
Læs brugsanvisningen
NO
Beskyttelse mot inntrenging av
vannsprut.
Beskytt mot direkte sollys.
Ikke kast i alminnelig hushold-
ningsavfall!
Les bruksanvisningen
SV
Skydd mot inträngande stänk-
vatten.
Skydda mot direkt solstrålning.
Får inte kastas i hushållsso-
porna!
Läs igenom bruksanvisningen
FI
Suoja roiskeveden si-
säänpääsemisen estämiseksi
Suojattava suoralta auringonva-
lolta.
Älä hävitä laitetta tavallisen koti-
talousjätteen mukana!
Lue käyttöohje
HU
Permetvíz behatolása elleni
Óvja közvetlen napsugárzástól.
A készüléket nem a normál ház-
megsemmisíteni!
Olvassa el a használati útmuta-
PL
Zabezpieczenie przed przenika-
niem rozpryskującej się wody.
Chronić przed bezpośrednim
nasłonecznieniem.
Nie wyrzucać wraz ze śmie-
ciami domowymi!
Przeczytać instrukcję użytkowa-
nia!
CS
Ochrana proti pronikání
odstřikující vody.
Chránit před přímým slunečním
zářením.
Nelikvidovat v normálním ko-
munálním odpadu!
Přečtěte Návod k použití!
SK
Ochrana proti prenikaniu odstre-
kujúcej vody
Chránit’ pred priamym slnečným
žiarením.
Nelikvidovať v normálnom
komunálnom odpade!
Prečítajte si Návod na použitie
SL
Zaščita pred vdiranjem pršeče
vode
Zaščitite pred neposrednimi
sončnimi žarki.
Ne zavrzite skupaj z gospodinj-
skimi odpadki!
Preberite navodila za uporabo!
HR
Zaštita od prodiranja prskajuće
vode
Zaštitite od izravnog sunčevog
zračenja.
Ne bacati u običan kućni otpad!
Pročitajte upute za upotrebu!
RO
Protecţie împotriva intrării apei
de stropire.
Protejaţi împotriva razelor di-
recte ale soarelui.
Nu aruncaţi în gunoiul menajer !
Citiţi instrucţiunile de utilizare !
BG
Защита от нахлуване на вода
Да се пази от слънчеви лъчи.
Не изхвърляйте заедно с
клук!
Прочетете упътването
UK
Захист від бризок води.
Пристрій повинен бути захи-
випромінювання.
Не викидайте з побутовим
Читайте інструкцію.
RU
Защита от проникновения во-
дяных брызг
Защищать от прямого воздей-
ствия солнечных лучей.
Не утилизировать вместе с
домашним мусором!
Прочитайте инструкцию по
использованию
CN
C
védelem.
от разпръсквана водна струя
щений від прямого сонячного
防止溅水渗入。
防止阳光直射。
tartási szeméttel együtt kell
обикновения домакински бо-
сміттям!
不要与普通的家庭
垃圾一起处理!
tót
请阅读使用说明书。
865
Page 47

40216/10
-17/V3.0
 Loading...