

Page 1
InScenio EGC Controller Home/Cloud
Downloaded from www.watergardeningdirect.com
Page 2
- -
2
A
EGC0004
B
EGC0005
C
EGC0006
F
Downloaded from www.watergardeningdirect.com
Page 3
- -
3
D
EGC0007
F
E
EGC0008
F
F
EGC0009
Downloaded from www.watergardeningdirect.com
Page 4

- EN -
34
- EN -
Translation of the original Operating Instructions
Version of the instructions for use: 1.0
WARNING
• This unit can be used by children aged 8 and above and by per-
sons with reduced physical, sensory or mental capabilities or lack
of experience and knowledge if they are supervised or have been
instructed on how to use the unit in a safe way and they understand
the hazards involved.
• Do not allow children to play with the unit.
• Only allow children to carry out cleaning and user maintenance un-
der supervision.
• Ensure that the unit is fused for a rated fault current of max. 30 mA
by means of a fault current protection device.
• Only connect the unit if the electrical data of the unit and the power
s
upply correspond. The unit data is to be found on the unit type plate,
on the packaging or in this manual.
• Possible death or severe injury from electrocution! Before reaching
i
nto the water, disconnect all electrical units in the water from the
mains.
• Disconnect the power plug before carrying out any work on the unit.
• Never immerse the unit in water or other liquids.
• Do not use the unit if electrical cables or housings are damaged.
Downloaded from www.watergardeningdirect.com
Page 5
- EN -
35
Table of Contents
1 Information about this operating manual .................................................................................................... 37
1.1 Warnings used in these instructions ............................................................................................... 37
1.1.1 Cross-references used in these instructions .................................................................... 37
2 Safety information ....................................................................................................................................... 37
2.1 Correct electrical installation ........................................................................................................... 37
2.2 Safe operation ................................................................................................................................. 38
3 Scope of delivery ......................................................................................................................................... 38
4 Product Description ..................................................................................................................................... 38
4.1 Function description ........................................................................................................................ 38
4.2 Intended use .................................................................................................................................... 38
5 Installation and connection ......................................................................................................................... 39
5.1 Installing the device with the ground stake ..................................................................................... 39
5.2 Fastening the device to the wall ...................................................................................................... 39
5.3 Connecting an EGC-compatible device .......................................................................................... 39
5.4 Connecting the power supply .......................................................................................................... 39
6 Commissioning/start-up .............................................................................................................................. 40
6.1 Installing the "OASE Easy Control" app .......................................................................................... 40
6.2 Establishing a WLAN connection .................................................................................................... 40
6.2.1 Establishing a connection to the WLAN router via WPS (router/cloud mode) ................. 40
6.2.2 Establishing a direct WLAN connection (access point mode) ......................................... 41
6.3 Operating status display .................................................................................................................. 42
7 Operation ..................................................................................................................................................... 43
7.1 "Home" screen ................................................................................................................................. 43
7.1.1 Operating the pump via EGC ........................................................................................... 44
7.1.2 Operating ProfiClear units via EGC ................................................................................. 46
7.1.3 Operating ProfiLux units via EGC .................................................................................... 49
7.2 "My devices" screen ........................................................................................................................ 51
7.2.1 Adding an EGC-compatible device .................................................................................. 51
7.2.2 ProfiClear Premium Filter – upgrade to EGC ................................................................... 52
7.2.3 Removing an EGC-compatible device ............................................................................. 53
7.3 "Settings" screen ............................................................................................................................. 54
7.3.1 Establishing a connection to the WLAN router via WPS (router/cloud mode) ................. 55
7.3.2 Manually establishing a connection to the WLAN router (router/cloud mode) ................ 56
7.3.3 Changing the network name ............................................................................................ 56
7.3.4 Changing the WiFi passwort ............................................................................................ 56
7.3.5 Activating the cloud connection ........................................................................................ 57
7.3.6 Changing the device password ........................................................................................ 58
7.3.7 Updating the system time ................................................................................................. 58
7.3.8 Updating the firmware ...................................................................................................... 59
7.3.9 Displaying device information ........................................................................................... 59
7.3.10 Resetting the network settings ......................................................................................... 60
7.3.11 Restoring the factory default settings ............................................................................... 60
8 Remedy of faults ......................................................................................................................................... 60
8.1 Malfunction table ............................................................................................................................. 60
8.2 Manually starting the firmware update mode .................................................................................. 62
9 Maintenance and cleaning .......................................................................................................................... 62
9.1 Cleaning the device ......................................................................................................................... 62
Downloaded from www.watergardeningdirect.com
Page 6
- EN -
36
10
Spare parts .................................................................................................................................................. 62
11 Disposal ....................................................................................................................................................... 62
Technical data .................................................................................................................................................... 643
Symbols on the unit ........................................................................................................................................... 644
Downloaded from www.watergardeningdirect.com
Page 7
- EN -
37
1 Information about this operating manual
Welcome to OASE Living Water. You made a good choice with the purchase of this product InScenio EGC
Controller.
Prior to commissioning the unit, please read the instructions of use carefully and fully familiarise yourself with
the unit. Ensure that all work on and with this unit is only carried out in accordance with these instructions.
Adhere to the safety information for the correct and safe use of the unit.
Keep these instructions in a safe place! Please also hand over the instructions when passing the unit on to a
new owner.
This operating manual appl
ies to InScenio EGC Controller Home and InScenio EGC Controller Cloud.
The name "InScenio EGC Controllerʺ is used for descriptions applying to both products.
The name "InScenio EGC Controller Cloudʺ is used for descriptions applying only to the cloud variant.
1.1 Warnings used in these instructions
The warning information is categorised by signal words, which indicate the extent of the hazard.
DANGER
I
ndicates an immediately dangerous situation, which will lead to death or severe injuries, if not
avoi
ded.
WARNING
I
ndicates a possibly dangerous situation, which could lead to death or severe injuries, if not avoided.
C
AUTION
I
ndicates a possibly dangerous situation, which could lead to medium or minor injuries, if not avoided.
N
OTE
I
ndicates a possibly dangerous situation, which could lead to damage to property or the environment,
if
not avoided.
1.1.1 Cross-r
eferences used in these instructions
A Reference to a figure, e.g. Fig. A.
→ Reference to another section.
2 Safety information
2.1 Correct electrical installation
Electrical installations must meet the national regulations and may only be carried out by a qualified electrician.
A person is regarded as a qualified electrician if, due to his/her vocational education, knowledge and experience,
he or she is capable of and authorised to judge and carry out the work commissioned to him/her. This also
includes the recognition of possible hazards and the adherence to the pertinent regional and national standards, rules and regulations.
For your own safety, please consult a qualified electrician.
Protect the plug connection from moisture.
Downloaded from www.watergardeningdirect.com
Page 8
- EN -
38
2.2 Safe operation
Never carry or pull the unit by the electrical cable.
Route cables such that they are protected from damage and do not present a tripping hazard.
Do not use multiple socket adapters.
Only carry out work on the unit that is described in this manual. If problems cannot be overcome, please contact
an
aut
horised customer service point or, if in doubt, the manufacturer.
Never carry out technical changes to the unit.
Only use original spare parts and accessories for the unit.
Data traffic with the O
ASE C
loud can lead to additional costs due to third-party online services.
3 Scope of delivery
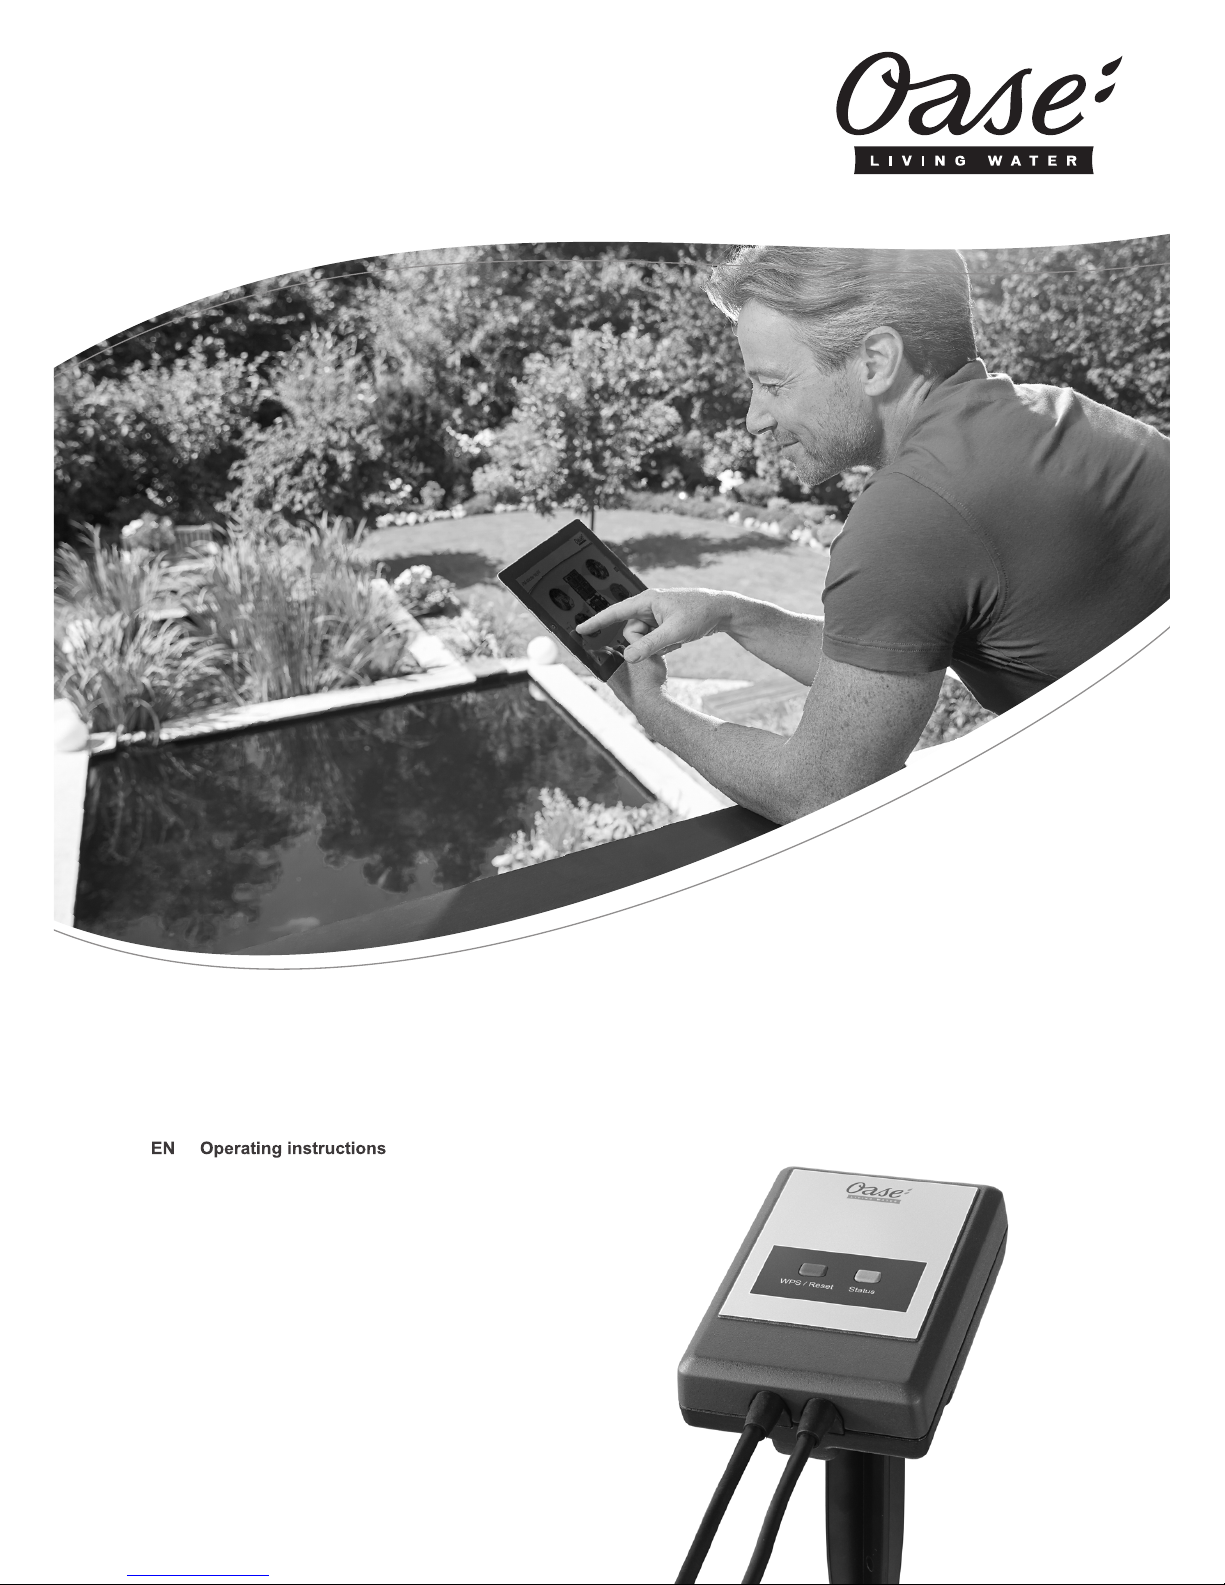
A
Quantity
Description
1 1 EGC Controller
2 1 Retaining frame for fastening to the wall or mounting the ground stake
3 1 Terminal resistor EGC
4 1 Cable connector EGC
5 4 Screws for fastening the plug-in connector
6 1 Ground stake for ground installation
7 1 Operating instructions
8 1 Transformer
4 Product Description
4.1 Function description
InScenio EGC Controller is a device control system with a wireless local area network (WLAN). The connected
units can be controlled via a smartphone or tablet with the OASE Easy Control app.
The controller is available in the versions Home and Cloud. EGC-compatible end devices can only be controlled via the OASE web portal using the InScenio EGC Controller Cloud. The web portal can be accessed at
https://oec.oase-livingwater.com .
Features:
Connection options for EGC-compatible end devices.
The Easy Garden Control System (EGC) allows convenient control of units in the garden and pond, and
ensures maximum convenience and reliability.
Information about EGC and the possibilities it offers can be found at www.oase-livingwater.com/egc-start.
4.2 Intended use
InScenio EGC Controller, referred to as "unit", may only be used as specified in the following:
Operation only as device control system with EGC-com
patible OASE end devices.
Operation only at ambient temperatures of -20 °C … +4
5 °C.
Operate in accordance with instructions.
Downloaded from www.watergardeningdirect.com
Page 9
- EN -
39
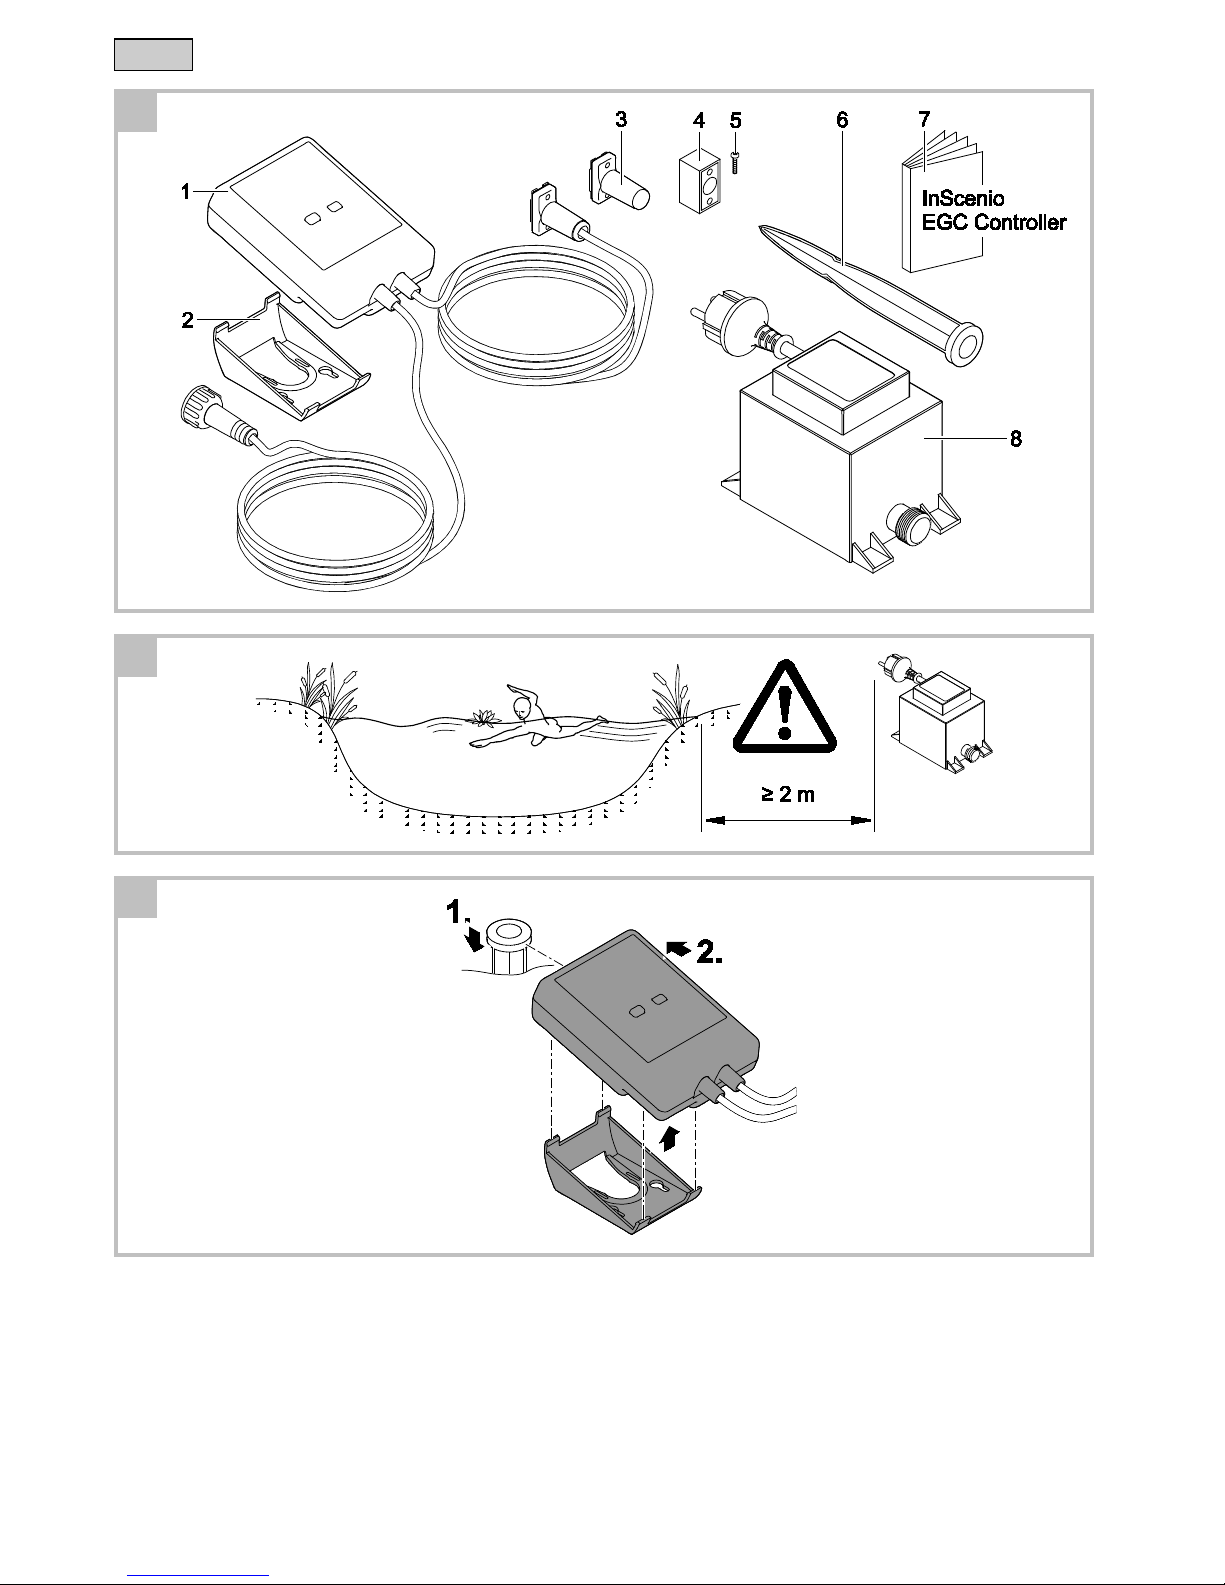
5 Installation and connection
WARNING
Electrical current may cause death or severe injuries.
Ensure that the unit is installed in a flood protected position at a distance of at least 2 m f
rom the wa-
ter.
5.1 Installing the device with the ground stake
How to proceed:
C
1. Fully insert the ground stake into the ground.
2. S
lide the device onto the ground stake.
3. Check its stability.
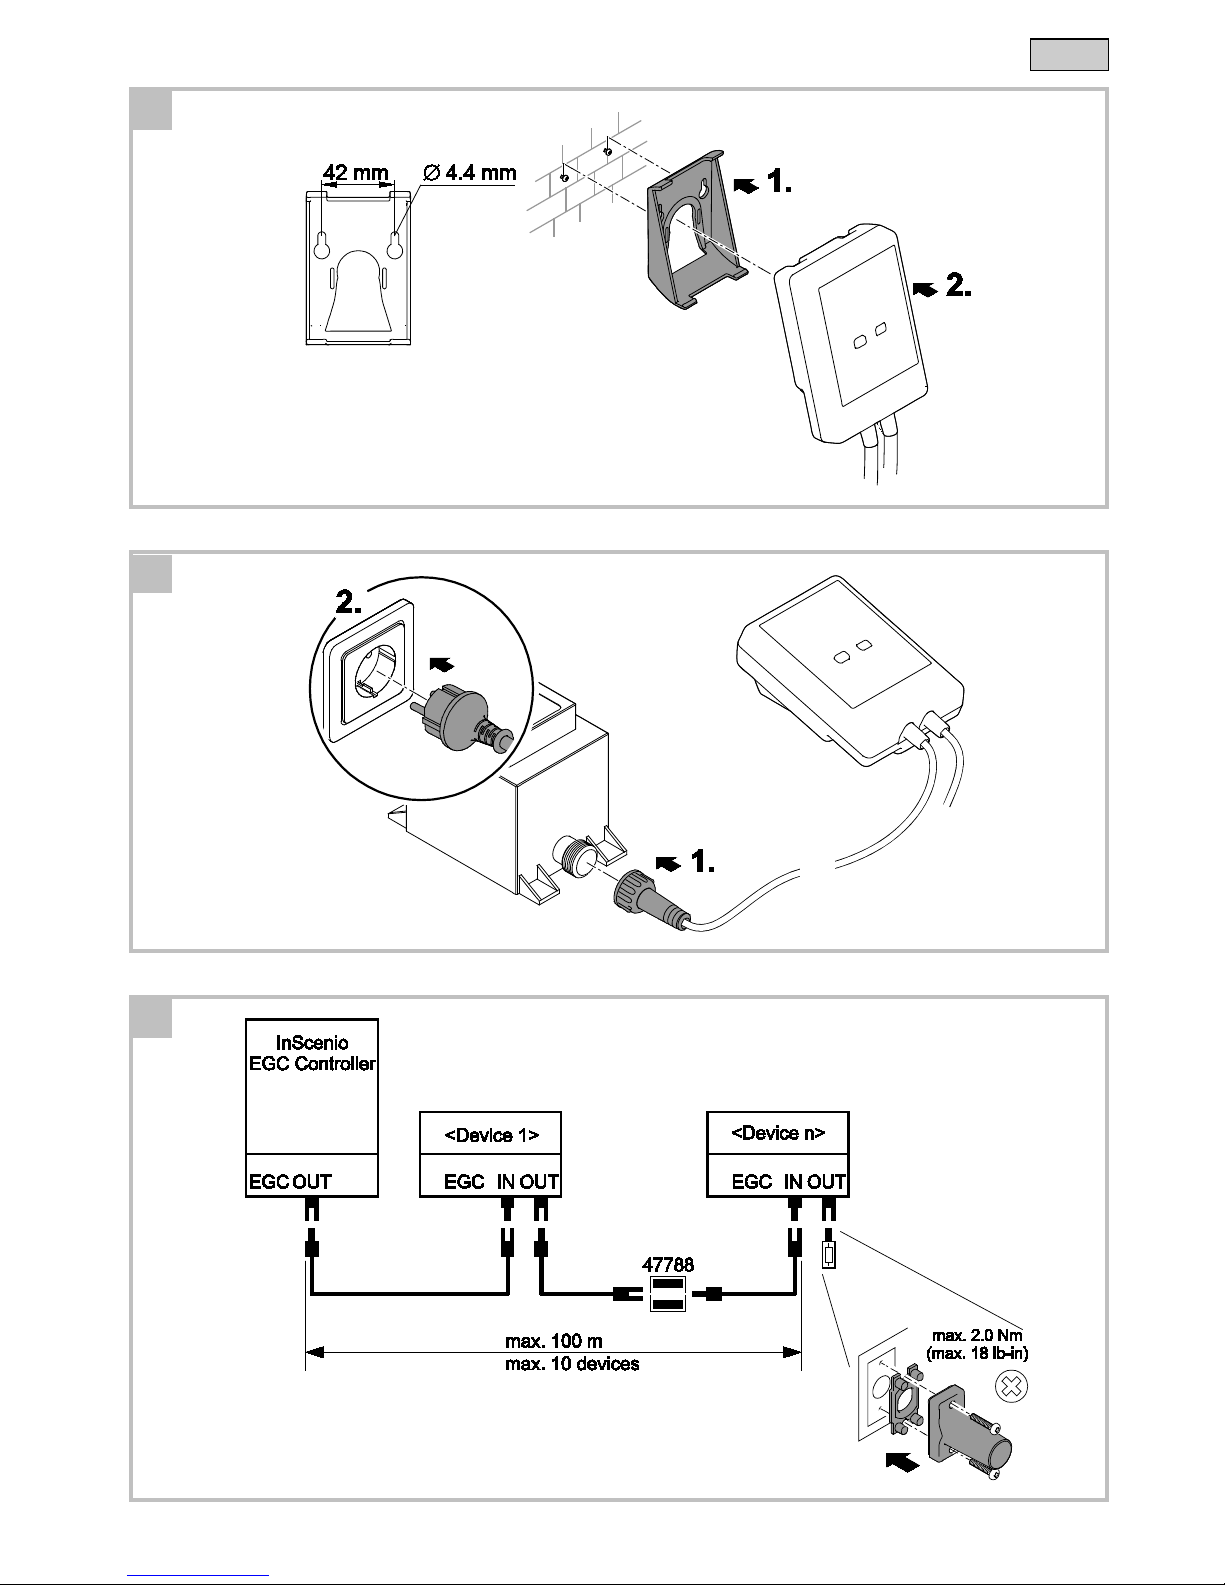
5.2 Fastening the device to the wall
How to proceed:
D
1. Remove the retaining frame and fasten it to the wall using suitable screws.
2. F
it the device into the retaining frame.
Ensure that the device is properly engaged in the retaining frame.
5.3 Connecting an EGC-compatible device
The correct fastening of the plug connector is important for a secure connection and an interference-free EGC
network.
The EGC connection cable is available as an accessory in the lengths 2.5 m (47
038), 5 m (47039) and 10 m
(47040).
The EGC connection cable and the connection cable of the InS
cenio EGC Controller are connected to the
EGC cable connector.
How to proceed:
F, G
1. Remove the EGC terminal resistor from the unit.
2. Fit the plug connector and secure with the two screws (max. 2.0 N
m).
Ensure that the rubber seal is clean and fits exactly.
Replace the rubber seal if damaged.
3. Remove the protection cap from EGC-OU
T of the last unit in the EGC network, fit the terminal resistor EGC
and secure it with the two screws (max. 2.0 Nm).
Ensure that on EGC-OUT of the last unit in the EGC network, the terminal resistor EGC is installed instead
of an EGC connection cable, to ensure that the EGC network is closed off properly.
The scope of delivery of InScenio FM-Master WLAN or InScenio EGC Controller each contains a terminal
resistor EGC.
NOTE
T
he device will be destroyed if water penetrates the sockets.
Close off sockets with plug connectors or protection caps and rubber seals.
For further information on the operation and integration into the EGC system, please refer to the operating manual of the InScenio EGC Controller under http://www.oase-livingwater.com/egc-start.
5.4 Connecting the power supply
How to proceed:
E
1. Screw the plug of the supply line onto the transformer.
2. E
stablish the power connection.
Downloaded from www.watergardeningdirect.com
Page 10
- EN -
40
6 Commissioning/start-up
Proceed as follows for starting up:
1. Install the app on your smartphone/tablet. (→ Installing the "OASE Easy Control" app )
2. Connect the InScenio EGC Controller to the power supply. (→ Connecting the power supply)
3. Establishing a WLAN connection and setting a device password (→ Establishing a WLAN connection)
6.1 Installing the "OASE Easy Control" app
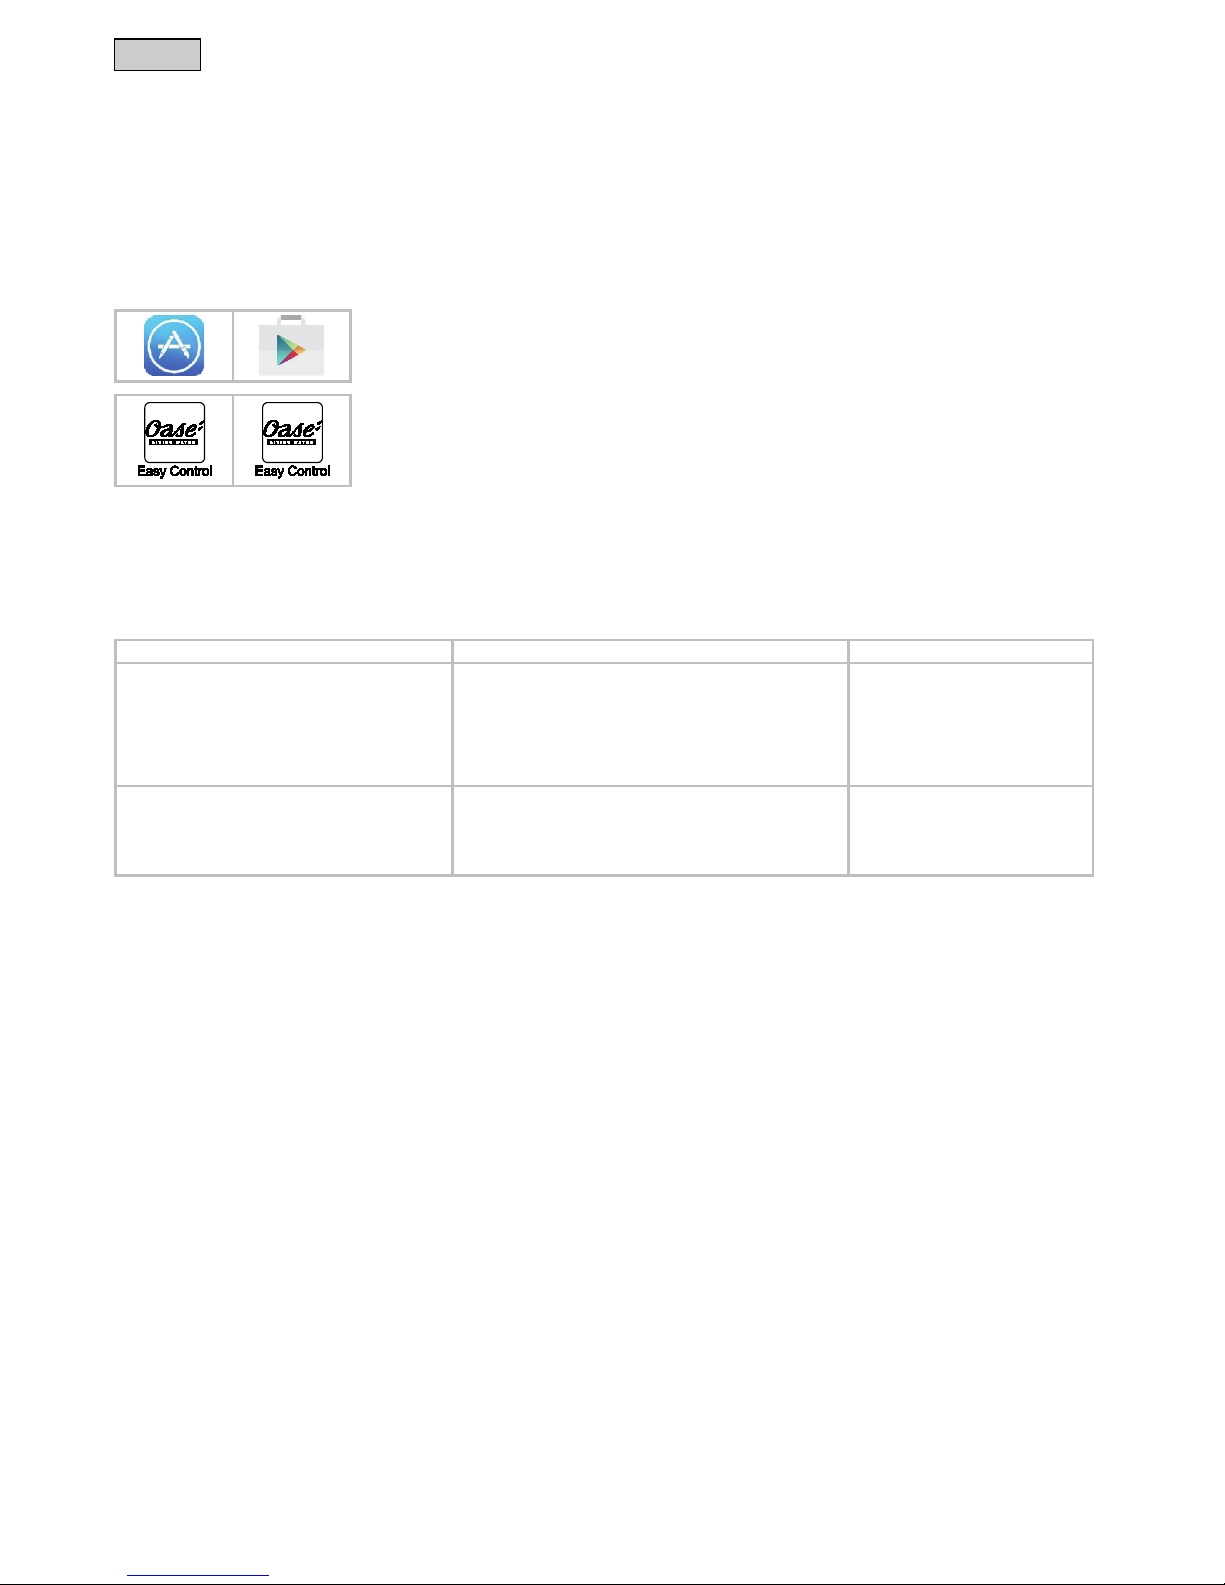
iOS
Android
How to proceed:
1. Open Google Play or App Store.
2. Search for the ʺOASE Easy Controlʺ app and install.
Follow the instructions during installation.
3. Confirm the query "access to internal data of the unit".
If access is permitted, individual product photos can be uploaded.
The query appears during installation (Android) or when executing the app ((iOS).
The app appears on the display after successful installation.
6.2 Establishing a WLAN connection
To establish a WLAN connection it is necessary to select one of the two connection types:
WLAN connection
Description
How to proceed
Connect the InScenio EGC Controller and
smartphone/tablet to the router of your home network.
The smartphone/tablet stays connected to the router.
EGC-compatible end devices can be controlled via the
OASE web portal (only InScenio EGC Controller Cloud)
The smartphone/tablet can access the internet.
(→ Establishing a connection to
the WLAN router via WPS
(router/cloud mode))
Alternatively:
(→ Manually establishing a connection to the WLAN router
(router/cloud mode))
Directly connecting the InScenio EGC Controller
and smartphone/tablet
EGC controller and smartphone/tablet are not connected
to the home network.
EGC-compatible end devices cannot be controlled via the
OASE web portal.
Smartphone/tablet cannot access the internet.
(→ Establishing a direct WLAN
connection (access point mode))
6.2.1 Establishing a connection to the WLAN router via WPS (router/cloud mode)
WPS (Wi-Fi Protected Setup) is a standard for establishing a secure WLAN connection at the touch of a button. This method is recommended in order to quickly and easily establish a WLAN connection between the
InScenio EGC Controller and the router.
In this case it is not necessary to enter the network name (SSID) and password.
The WLAN router must support WPS.
Prerequisite:
The range of the WLAN connection between the router and InScenio EGC Controller can span a distance of up
to 80 m provided there is unobstructed signal transmission and there are no sources of interference.
Compatibility with the following WLAN standards: 802.11n+g+b
Exclusively in the frequency range 2.4 GHz.
Downloaded from www.watergardeningdirect.com
Page 11
- EN -
41
How to proceed:
On the router:
Press the WPS button on the router to activate WPS.
Follow the information given in the router operating instructions.
WPS is only active for a limited time. Activate WPS on the InScenio EGC Controller during this time.
H
On the EGC Controller:
1. Press the button briefly (max. 2 seconds) to activate the WPS.
The LED is lit green and flashes rapidly.
The WPS remains active for 2 minutes.
The connection is established when the green LED flashes slowly (2 seconds on, 1 second off).
On the smartphone/tablet:
2. Establish a connection to the WLAN router.
3. Start the "OASE Easy Controlʺ app.
InScenio EGC Controller can now be controlled using the "OASE Easy Control" app.
6.2.2 Establishing a direct WLAN connection (access point mode)
If there is no router available or the existing router does not support WPS, it is necessary to establish a direct
connection between the InScenio EGC Controller and a smartphone/tablet. This is also recommended if the
distance from the router exceeds 80 m or the WLAN range for connection to the router is exceeded.
The range of the WLAN connection between the InScenio EGC Controller and your smartphone/tablet can span
a distance of up to 80 m provided there is unobstructed signal transmission and there is no source of interference.
Compatibility with the following WLAN standards: 802.11n+g+b
Exclusively in the frequency range 2.4 GHz.
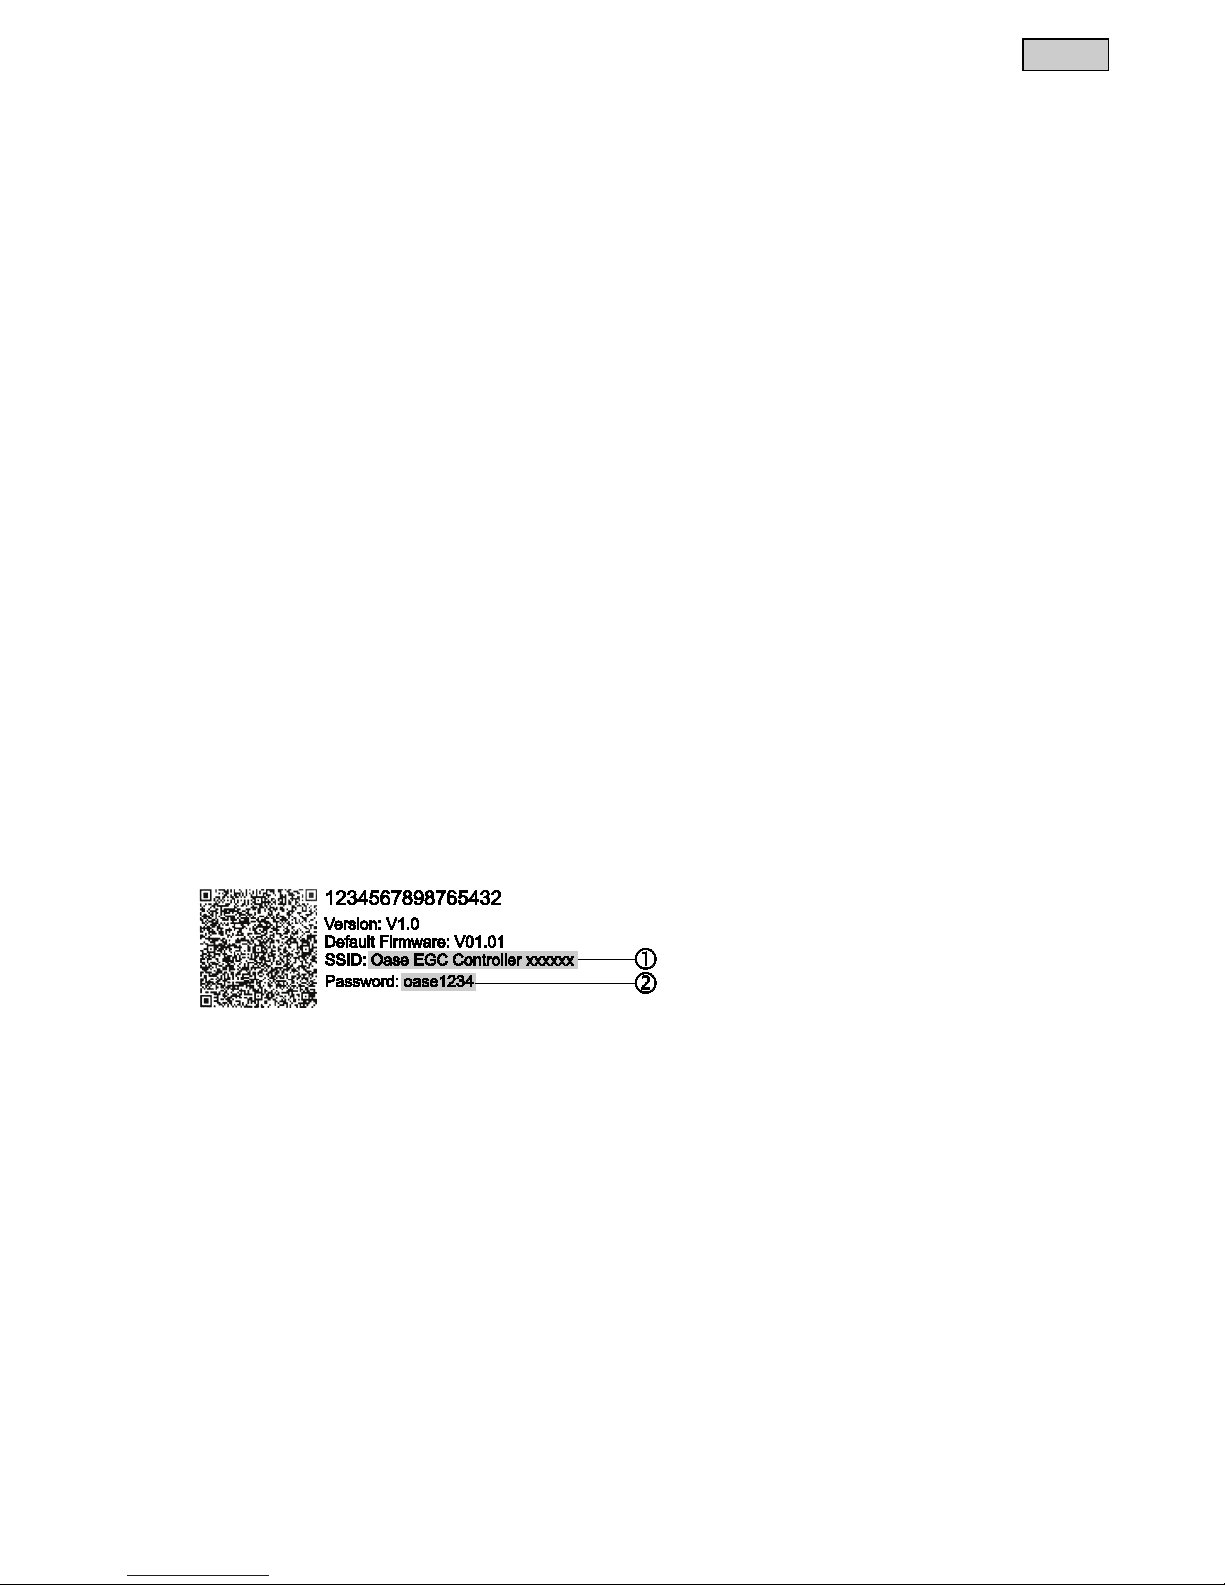
The network name (SSID) is indicated on the label on the InScenio EGC Controller.
The sequence of letters "xxxxxx" in the network name (SSID)
is device-specific and represents part of
the MAC address of the EGC controller.
The standard password
is also indicated on the label on the InScenio EGC Controller.
The InScenio EGC Controller is factory-set to the standard password
"oase1234".
The connection is encrypted and protected by a password.
Downloaded from www.watergardeningdirect.com
Page 12

- EN -
42
The symbols used may differ slightly from the symbols on your smartphone/tablet.
iOS
Android
How to proceed:
1. Open "Settings".
2. Select and activate WLAN.
3. Select ʺOase EGC Controller xxxxxxʺ from the network list.
4. Enter the WiFi password and select "Connect".
The connection to the InScenio EGC Controller is established.
If the connection is successful, "Connected" (Android) or a "" (iOS) will appear un-
der the network name.
Other WLAN connections are deactivated.
5. Start the "OASE Easy Control" app.
The app automatically selects the language used by the operating system. If the app
does not support that language, it will use English.
When establishing the connection to the InScenio EGC Controller
for the first time, it
is necessary to define a device password to protect the InScenio EGC Controller
from unauthorised access.
Remember the device password as it is also required for adding the InScenio EGC
Controller Cloud to the OASE cloud. (→ Activating the cloud connection)
6.3 Operating status display
H
The LED on the device indicates the operating status of the InS
cenio EGC Controller.
LED colour
LED status
Description
–
Off
InScenio EGC Controller is switched off.
Green
Lit
InScenio EGC Controller is ready for operation and in access point mode.
Flashing fast
WPS is activated, InScenio EGC Controller is waiting for the router access data.
Flashing slowly (2 seconds on,
1 second off)
InScenio EGC Controller is ready for operation and connected to the router.
Yellow
Lit
InScenio EGC Controller is starting up or is in update mode.
Flashing fast
Firmware update in progress
Flashing slowly (2 seconds on,
1 second off)
InScenio EGC Controller is searching for a connection to the router.
Red
Flashing
Malfunction
Remedy:
Disconnect from the power supply. Wait for 10 seconds then reconnect.
Reset the InScenio EGC Controller to the factory default settings (→ Restoring the fac-
tory default settings)
Carry out a firmware update (→ Updating the firmware)
Downloaded from www.watergardeningdirect.com
Page 13

- EN -
43
7 Operation
7.1 "Home" screen
"Home" screen
The "home" screen is used for operating the connected devices. Swipe right or left on the screen to select a
connected device.
EGC0015
1
Number of devices added.
Swipe right or left on the screen to select a device.
2
"Home" screen
Touch the symbol to select the screen.
This screen is used for operating the connected devices.
"My devices" screen
Touch the symbol to select the screen.
Add and configure OASE devices.
"Settings" screen
Touch the symbol to select the screen.
For displaying unit information.
Establish a direct connection with the device (access point) or via a WLAN router.
For changing the network name (SSID) and password.
For updating the firmware.
3
Status of the WLAN connection
ONLINE: Smartphone/tablet is connected to the InScenio EGC Controller.
OFFLINE: Smartphone/tablet is not connected to the InScenio EGC Controller.
4
15:51
System time of the InScenio EGC Controller.
The system time can be updated to the time shown on the operating device.
(→ Updating the system time)
Downloaded from www.watergardeningdirect.com
Page 14

- EN -
44
7.1.1 Operating the pump via EGC
"Home" screen
The OASE product name will be displayed at the top right of the screen. The added device can be labelled
with an individual name.
FMR0037
1
Tiles for operation and display of current values.
2
Switching the device on or off.
Tap the touch symbol "On" to switch on the device.
Tap the touch symbol "Off" to switch off the device.
3
Status display of the EGC connection
Status display lights up green:
The connection between the EGC device and InScenio EGC Controller is active.
Status display lights up grey and the product image is greyed out:
No connection between EGC device and InScenio EGC Controller.(→ Remedy of faults)
Dynamic Function Control (DFC)
Only available for pumps supporting this function. The DFC function is described in the operating manual of the pump.
How to proceed:
1. Tap "On" or "Off" to switch the DFC function on or off.
If the DFC function is on, the current Scene is displayed.
2. To change the Scene, touch the number of the Scene and hold it for 2 seconds.
A dialogue field will open.
Different Scene are available.
3. Select the desired Scene.
4. Tap ʺOKʺ to apply the setting.
The Scene number is displayed in the tile.
5. To cancel the process, tap "Cancel".
Downloaded from www.watergardeningdirect.com
Page 15

- EN -
45
Seasonal Flow Control (SFC)
Only available for pumps supporting this function. The SFC function is described in the instructions for use of the pump.
Tap "On" or "Off" to switch the SFC function on or off.
If the SFC function is on, the current mode is displayed.
The pump automatically switches between three modes. This enables the pump to adapt to
the ambient conditions of the pond.
Min: Winter mode, low flow rate.
Med: Transition time, medium flow rate.
Max: Summer mode, high flow rate.
Adjusting the pump capacity
While the DFC or SFC function is on, no adjustments can be made. The tile is greyed out.
How to proceed:
Touch the button of the slider control and move it to adjust the pump capacity.
The set capacity is displayed in %.
0 %: Pump is idling.
100 %: Max. pump capacity.
Pump speed
Display of the current speed in rpm.
Pump operating time
Display of the overall operating time in hours.
Pump power consumption
Display of the current power consumption in watt.
Downloaded from www.watergardeningdirect.com
Page 16

- EN -
46
7.1.2 Operating ProfiClear units via EGC
"Home" screen
The OASE product name will be displayed at the top right of the screen. The added device can be labelled
with an individual name.
FMR0039
1
Tiles for operation and display of current values.
Swipe vertically across the tiles to display additional tiles.
2
Switching the device on or off.
Tap the touch symbol "On" to switch on the device.
Tap the touch symbol "Off" to switch off the device.
3
Status display of the EGC connection
Status display lights up green:
The connection between the EGC device and InScenio EGC Controller is active.
Status display lights up grey and the product image is greyed out:
No connection between EGC device and InScenio EGC Controller.(→ Remedy of faults)
4
Display of system messages
Shows the last system message.
Touch the system message and hold for 1 second to display all systems messages and reset.
A dialogue window opens and lists all system messages that have occurred.
When the cause has been remedied, the system messages are extinguished
automatically or have to
be confirmed via the dialogue field.
The operating instructions of the ProfiClear unit contains detailed descriptions about possible causes
and remedy.
Downloaded from www.watergardeningdirect.com
Page 17

- EN -
47
Current water temperature in °C
Display only.
Number of cleaning cycles in the past 24 hours
The total of the automatic and time-dependent cleaning cycles is displayed.
The value is saved in the filter control system.
NOTE:
The filter system self-diagnostics monitor automatic cleaning. The test is carried out continuously in a 2 × 24 hour cycle. The test is only active from a water temperature >12 °C.
Very different values may be indicated due to the test.
First 24 hour cycle
If at least one automatic cleaning process is detected, the cycle is repeated after the clean-
ing process has finished.
If no automatic cleaning process is detected, the second 24 hour cycle starts once the first
has finished.
Second 24 hour cycle
The time-dependent cleaning cycle is deactivated. This reduces the number of cleaning cycles.
If at least one automatic cleaning process is detected, the first 24 hour cycle starts again
once the cycle has finished.
If no automatic cleaning process is detected, the system message
Er22 is triggered at the
end of the cycle. The time-dependent cleaning cycle starts again.
If an automatic cleaning process is then detected, the first 24 hour cycle starts again.
The
system message Er22 is automatically reset.
Total number of cleaning cycles
The total of the automatic, manual and time-dependent cleaning cycles is displayed.
The value is saved in the filter control system.
Manual cleaning
Manually triggered cleaning cycle.
How to proceed:
1. Tap
to start the cycle.
All active cleaning cycles (automatic, time-dependent or manual) are stopped.
2. To cancel the process, tap
again.
Downloaded from www.watergardeningdirect.com
Page 18

- EN -
48
Cleaning time ʺCleaningʺ (CL)
This setting changes the duration of the cleaning cycle. If the water does not carry away all
dirt, a longer cleaning time is required. This may become necessary if, for instance, very
long drain pipes or drain pipes with many bends were installed or there is a particularly
large amount of sticky dirt (e.g. during spawning).
A longer cleaning time increases the water consumption. The default setting of 10 s is usu-
ally sufficient (corresponds to approx. a
7
/8 drum rotation).
How to proceed:
Touc
h the button of the slider control and move it to adjust the time.
Adjustable range: 10 – 30 s.
Extended cleaning time "Extra Cleaning" (EC)
The extended cleaning time after every 20 cleaning cycles prevents larger deposits in the
dirt channel or the pipework. This ensures that the pipework is flushed out at regular intervals.
However, if dirt and residue build up due to unfavourable conditions, increase the cleaning
time to flush out the pipe with additional water.
How to proceed:
Touc
h the button of the slider control and move it to adjust the time.
Adjustable range: 10 – 60 s.
Time-dependent cleaning "Intervall" (ln )
In addition to automatic cleaning, an option for time-dependent cleaning is available. This
is particularly useful for ponds containing fish. Even if there is only a small amount of dirt,
excrement is always removed from the water cycle before it leads to a build-up of nutrients.
The time-dependent cleaning cycle does not have any influence on the automatic cleaning
cycle that starts when the water level is too low. After each automatic cleaning cycle, the
time interval is reset and starts again from the beginning.
How to proceed:
Touc
h the button of the slider control and move it to adjust the time.
Adjustable range: 0; 3 – 60 min.
0 minutes: The function is deactivated.
Basic setting: 20 minutes (the ideal setting for most applications).
Basic settings
The control system is reset to the basic settings.
All individually set values are overwritten!
The following values are set:
Cleaning time
CL: 10 s
Extended cleaning time
EC: 20 s
Interval of the time-dependent cleaning
In: 20 min
Downloaded from www.watergardeningdirect.com
Page 19

- EN -
49
7.1.3 Operating ProfiLux units via EGC
"Home" screen
The OASE product name will be displayed at the top right of the screen. The added device can be labelled
with an individual name.
EGC0020
1
Tiles for operation and display of current values.
Swipe vertically across the tiles to display additional tiles.
2
Switching the device on or off.
Tap the touch symbol "On" to switch on the device.
Tap the touch symbol "Off" to switch off the device.
3
Selecting the device for operation and display of current values or changing the lamp symbol.
Selecting the device for operation and display of current values
Tap the lamp symbol to select a device for the required operation and display of current values.
Tap the lamp symbol again to deselect the device.
Changing the lamp symbol
iOS:
Touch and hold down the lamp symbol for 2 seconds in order to select a photo from the library, to
take a photo using the integrated camera or to remove a photo.
Android:
Touch and hold down the lamp symbol for 2 seconds in order to take a photo using the integrated
camera or to remove a photo.
Adjusting the brightness
The brightness is adjusted for all selected LED lamps.
How to proceed:
Touc
h the button of the slider control and move it to adjust the brightness.
The set brightness is displayed in %.
0 %: LED lamps off.
100 %: Max. brightness.
Downloaded from www.watergardeningdirect.com
Page 20

- EN -
50
Colour settings
The colour is adjusted for all selected LED lamps.
How to proceed:
1. Tap
.
A dialogue field will open.
2. Tap the desired colour of a colour circle or swipe across the colour circle to select the colour.
Tap the white inner circle to select "white" as a colour.
3. Tap
to apply the setting.
4. To abort the process, touch
.
Show settings
The show function contains several Scenen with different light choreographies. The show is
adjusted for all selected LED lamps.
How to proceed:
1. Tap
to switch on the show function.
If the show function is on, the current Scene is displayed.
2. To change the Scene, touch the number of the Scene and hold it for 2 seconds.
A dialogue field will open.
Different Scene are available.
3. Select the desired Scene.
4. Tap
to apply the setting.
The Scene number is displayed in the tile.
5. To abort the process, touch .
Show speed adjustment
Adjust the speed at which the selected show is processed. The show continues to repeat.
How to proceed:
Touch the button of the slider control and move it to adjust the speed.
Adjustable range: 1 – 100.
Downloaded from www.watergardeningdirect.com
Page 21

- EN -
51
7.2 "My devices" screen
"My devices" screen
EGC0019
1
Already added devices
2
Add new device
Adding a device name
Select the device and tap the touch symbol.
Removing a device
Select the device and tap the touch symbol.
7.2.1 Adding an EGC-compatible device
"My devices" screen
A maximum of 10 EGC-compatible devices can be added to the InScenio EGC Controller .
How to proceed:
1. Tap to open the list with available OASE devices.
When the list is opened, the InScenio EGC Controller automatically searches for connected EGC devices.
The EGC devices must be correctly connected to the EGC network and switched on so that the InScenio
EGC Controller can find the EGC devices. Found devices are displayed in colour in the list and the message "Device found" is shown underneath the product name.
EGC-compatible devices are marked with the EGC logo (Easy Garden Control) in the product image.
To search for connected EGC devices again, tap
.
2. Select the desired EGC-compatible device in the list.
Only EGC devices found by the InScenio EGC Controller in the EGC network can be added.
For information on the device, tap
. If the following prompt is confirmed with "OK", the OASE homepage
with the relevant product information opens in your browser.
Downloaded from www.watergardeningdirect.com
Page 22

- EN -
52
3. Tap
to add the device.
The device has been added to the device list.
4. To give the added device a name, switch to the device overview.
5. Select the desired device in the device overview and tap
.
A dialogue field will open.
6. Enter the device name and confirm with "OK".
The device name has been assigned.
If there are several devices of one type, repeat the process for each device.
7.2.2 ProfiClear Premium Filter – upgrade to EGC
"My devices" screen
To connect a ProfiClear Premium filter with the InScenio EGC Controller, ensure that the control system is
EGC-compatible. For older ProfiClear Premium filters this compatibility can be established with a separately
available upgrade control system (article number 47723).
Prerequisite for a connection between ProfiClear Premium filter and InScenio EGC Controller:
The ProfiClear Premium is correctly connected to the control system with the EGC box.
The ProfiClear control system is correctly connected to the InScenio EGC Controller with the EGC connection
cable.
The ProfiClear control system is switched on (connection with the mains is established).
EGC0016
1
ProfiClear Controller Upgrade
First select and add the ProfiClear Controller.
2
ProfiClear Premium variants
Secondly, select the desired ProfiClear Premium variant and add it to the device list. The filter is auto-
matically calibrated for the control system.
Downloaded from www.watergardeningdirect.com
Page 23

- EN -
53
How to proceed:
1. Tap to open the list with available OASE devices.
When the list is opened, the InScenio EGC Controller automatically searches for connected EGC devices.
The EGC devices must be correctly connected to the EGC network and switched on so that the InScenio
EGC Controller can find the EGC devices. Found devices are displayed in colour in the list and the message "Device found" is shown underneath the product name.
To search for connected EGC devices again, tap
.
EGC-compatible devices are marked with the EGC logo (Easy Garden Control) in the product image.
2. Select the device ″ProfiClear Controller Upgrade″ in the list.
The device can only be added if InScenio EGC Controller has found the device in the EGC network.
For information on the device, tap
. If the following prompt is confirmed with "OK", the OASE homepage
with the relevant product information opens in your browser.
3. Tap
to add the device.
A message signals that the ProfiClear Controller must be assigned a ProfiClear Premium filter in the next
step.
4. In the list, select the ProfiClear Premium variant connected with the ProfiClear Controller.
The ProfiClear Premium variants are marked in colour in the list.
For information on the device, tap
. If the following prompt is confirmed with "OK", the OASE homepage
with the relevant product information opens in your browser.
5. Tap
to add the device.
The teach-in of the ProfiClear Premium filter is complete and the filter is added to the device list.
6. To give the added device a name, switch to the device overview.
7. Select the desired device in the device overview and tap
.
A dialogue field will open.
8. Enter the device name and confirm with "OK".
The device name has been assigned.
7.2.3 Removing an EGC-compatible device
"My devices" screen
Variant 1
How to proceed:
1. Select the device to be deleted in the device list.
2. Tap .
3. Confirm the subsequent prompt with "OK".
The device has been removed.
Variant 2
How to proceed:
1. Touch the line with the device you wish to delete, hold and pull to the left.
EGC0017
2. Touch "Delete".
The device has been removed.
Downloaded from www.watergardeningdirect.com
Page 24

- EN -
54
7.3 "Settings" screen
"Settings" screen
EGC0018
1
Use the button to start the InScenio EGC Controller in access point mode. In this
mode, the smartphone/tablet is directly connected to the InScenio EGC Controller via the WLAN "Oase
EGC Controller <xxxxxx>".
Network name (SSID)
The device makes a wireless network (WLAN) available under the specified network name with which
the smartphone/tablet is directly connected.
The network name in the factory default settings is specified on the InScenio EGC Controller on the
adhesive label.
The network name is changed via the touch symbol . The last six characters "xxxxxx" are specific
to the unit and are preset.
WiFi password
The password "oase1234" of the factory setting is specified on the InScenio EGC Controller on the
adhesive label.
The WLAN password of the direct WLAN connection (Access Point) is changed using the touch sym-
bol .
WiFi channel
If the set channel is fully utilised by other wireless devices, it is possible to use a different channel.
It may be possible to remedy malfunctions of the WLAN connection by selecting a different channel.
Downloaded from www.watergardeningdirect.com
Page 25

- EN -
55
2
Use the button to start the InScenio EGC Controller in router/cloud mode. In this mode, the
InScenio EGC Controller is connected to the available WLAN of a router. The smartphone/tablet has to
be connected to the same WLAN.
(→ Establishing a connection to the WLAN router via WPS (router/cloud mode))
(→ Manually establishing a connection to the WLAN router (router/cloud mode))
Network name (SSID)
Indicates the WLAN to which the InScenio EGC Controller is connected.
Cloud connection
Use the touch symbol
to connect the InScenio EGC Controller Cloud to the OASE cloud or to
disconnect it. (→ Activating the cloud connection)
Connection status
InScenio EGC Controller Cloud is connected to the OASE cloud.
InScenio EGC Controller Cloud is not connected to the OASE cloud.
3
Device password
A new device password is entered using the touch symbol . It is necessary to enter the current pass-
word in order to change it.
4
System settings
Use the touch symbol to update the system time of the InScenio EGC Controller to the time of the
operating device.
The firmware is updated via the touch symbol .
It is necessary to enter the current password in order to carry out an update.
5
Display of the device information
7.3.1 Establishing a connection to the WLAN router via WPS (router/cloud mode)
"Settings" screen
Prerequisite:
The smartphone/tablet is directly connected to the InS
cenio EGC Controller (access point mode).
(→ Establishing a direct WLAN connection (access point mode))
Compatibility with the following WLAN standards: 802.
11n+g+b
Exclusively in the frequency range 2.4 GHz.
How to proceed:
1. Tap
.
2. Select "WPS" in the query.
WPS is activated. Activate WPS on the WLAN router within 2 minutes. Read the router instructions if neces-
sary.
The connection is established when the LED on the InScenio EGC Controller flashes green slowly (2 sec-
onds on, 1 second off).
3. Connect the smartphone/tablet to the WLAN of the router.
The app "OASE Easy Control" can now connect to the InScenio EGC Controller via the router.
InScenio EGC Controller can now be controlled using the "OASE Easy Control" app.
Downloaded from www.watergardeningdirect.com
Page 26

- EN -
56
7.3.2 Manually establishing a connection to the WLAN router (router/cloud mode)
"Settings" screen
Prerequisite:
The smartphone/tablet is directly connected to the InScenio EGC Controller (access point mode).
(→ Establishing a direct WLAN connection (access point mode))
Compatibility with the following WLAN standards: 802.11n+g+b
Exclusively in the frequency range 2.4 GHz.
How to proceed:
1. Tap .
2. Select "Manual connection" in the query.
3. Enter the network name (SSID) of the router.
4. Enter the router password and confirm with "OK".
The InScenio EGC Controller indicates that it is establishing a connection by showing a yellow flashing
LED.
The connection is established when the LED on the InScenio EGC Controller flashes green slowly (2 sec-
onds on, 1 second off).
5. Connect the smartphone/tablet to the WLAN of the router.
The app "OASE Easy Control" can now connect to the InScenio EGC Controller via the router.
InScenio EGC Controller can now be controlled using the "OASE Easy Control" app.
7.3.3 Changing the network name
"Settings" screen
It can only be changed in access point mode. (→ Establishing a direct WLAN connection (access point mode))
How to proceed:
1. Touch next to the "Network name (SSID)".
A prompt appears for the device password.
2. Enter a new network name and confirm with "change".
The InScenio EGC Controller indicates with a yellow lit LED that the password has been successfully
changed.
The WLAN connection to the InScenio EGC Controller is disconnected and restarted.
3. Establish the WLAN connection using the new network name.
7.3.4 Changing the WiFi passwort
"Settings" screen
It can only be changed in access point mode. (→ Establishing a direct WLAN connection (access point mode))
How to proceed:
1. Touch next to the "WiFi password".
A prompt appears for the device password.
2. Enter the new WiFi password, repeat the entry and confirm with "Change".
The InScenio EGC Controller indicates with a yellow lit LED that the password has been successfully
changed.
The WLAN connection to the InScenio EGC Controller is disconnected and restarted.
3. Establish the WLAN connection using the new password.
Downloaded from www.watergardeningdirect.com
Page 27

- EN -
57
When using an Android smartphone/tablet, the authentication may not function correctly after the WiFi
password is changed, as the new password is not automatically prompted. Remedy:
Select the network name in the WLAN settings of your smartphone/tablet and enter the new WiFi
password.
Delete WLAN on the smartphone/tablet, select WLAN again and connect.
7.3.5 Activating the cloud connection
"Settings" screen
EGC devices connected to the InScenio FM-Master WLAN EGC can be controlled from anywhere via the
OASE web portal. For this the InScenio FM-Master WLAN EGC has to be connected to the OASE cloud and
then added to the web portal. The device series number and device password are required for adding the InScenio FM-Master WLAN EGC in the web portal.
Prerequisite:
Connection to the OASE cloud is only possible with the InS
cenio EGC Controller Cloud and in router/cloud
mode.
(→ Establishing a connection to the WLAN router via WPS (router/cloud mode))
(→ Manually establishing a connection to the WLAN router (router/cloud mode))
How to proceed:
1. T
ouch
under Cloud to active the cloud connection.
A dialogue field showing the device series number will open. Note down the device series number. You
need it for adding the InScenio EGC Controller Cloud in the web portal.
On your computer or smartphone/tablet
2. Enter the address https://egccloud.oase-livingwater.com in the web browser to call up the OASE web portal.
3. Log into the web portal.
For the login it is necessary to register once beforehand.
4. Add the InScenio EGC Controller Cloud in the web portal.
For this you require the device series number (displayed when the cloud connection is activated).
The device password is required (defined during commissioning/start-up). The device password can be
changed. (→ Changing the device password)
In the "OASE Easy Control" app
5. Check the connection status in the menu "Settings" under "Cloud".
InScenio EGC Controller Cloud is connected to the OASE cloud.
InScenio EGC Controller Cloud is not connected to the OASE cloud.
It may take several minutes to establish a connection, depending on the internet connection.
Downloaded from www.watergardeningdirect.com
Page 28

- EN -
58
7.3.6 Changing the device password
"Settings" screen
The device password protects the InScenio EGC Controller from unauthorised access. It is defined during
commissioning/start-up but can be changed later.
If you forget the device password, you have to reset the network settings or restore the factory default settings.
When establishing the connection between InScenio EGC Controller and the "OASE Easy Control" app, a new
device password has to be defined.
The device password is required in order to
allow the InScenio EGC Controller to be added in the web portal,
change the SSID or WiFi password for the access point mode.
The device password is automatically deleted when
the firmware is updated
the network settings are reset (→ Resetting the network settings),
the factory default settings are restored (→ Restoring the factory default settings).
How to proceed:
1. T
ouch ne
xt to "Device password".
A prompt appears for the old device password.
2. Enter the old device password and confirm with "OK".
3. Enter a new device password, repeat the entry and confirm with "OK".
When the device password is changed, the InScenio EGC Controller Cloud is automatically blocked in
the OASE web portal.
The InScenio FM-Ma
ster WLAN EGC has to be deleted in the web portal and then added again. The
device series number and the new device password are required for this.
7.3.7 Updating the system time
"Settings" screen
How to proceed:
1. Touch ne
xt to "Update time".
The touch symbol is active when the system time of the InScenio EGC Controller differs from the time on
the operating device,
The time is only updated when the touch symbol is active.
2. Confirm the query with "OK".
Downloaded from www.watergardeningdirect.com
Page 29

- EN -
59
7.3.8 Updating the firmware
"Settings" screen
For a firmware update, the InScenio EGC Controller changes to the firmware update mode and provides a new
network. Your smartphone/tablet has to be connected to this network for installing the update.
Prerequisites for a malfunction-free firmware update:
Other WLAN connections to the InScenio EGC Controller are disconnected.
The WLAN connection has a strong signal.
The OASE Easy Control app is not closed during the update.
The power saving mode of the smartphone/tablet is deactivated.
The smartphone/tablet battery is sufficiently charged. The update takes up to 2 minutes.
The power supply of the InScenio EGC Controller is not interrupted.
How to proceed:
1. Tap next to „InScenio EGC Controller Firmware“.
The touch symbol is only displayed when an update is available.
2. Confirm the notes for a malfunction-free firmware update.
The InScenio EGC Controller changes to the firmware update mode. The LED on the InScenio EGC Con-
troller is lit yellow
InScenio EGC Controller makes the network „OASE_EGC_UPDATE_xxxxxx“ available.
An instruction for changing the network is displayed.
3. Connect your smartphone/tablet to the network „OASE_EGC_UPDATE_xxxxxx“.
Use the standard password of the InScenio EGC Controller for the prompt (see device label).
4. Switch to the "Settings" screen of the app and confirm the instruction.
The update is started.
The progress of the update is displayed.
During the update, the LED InScenio EGC Controller is lit yellow and green.
5. After a successful update, re-connect the smartphone/tablet with the WLAN of the InScenio EGC Controller.
7.3.9 Displaying device information
"Settings" screen
Displayed information:
Version of the app "OASE Easy Control"
Firmware version of the InScenio EGC Controller
Touch "Further information" to display the following information:
Serial number of the InScenio EGC Controller
Local IP address
IP address of the InScenio EGC Controller
Touch Product information / FAQ to access the OASE website for further information about the product and help
with problems.
Downloaded from www.watergardeningdirect.com
Page 30

- EN -
60
7.3.10 Resetting the network settings
The network settings are reset to the delivery default settings. Saved entries from the device library and the
timer are retained.
How to proceed:
H
1. K
eep the reset button pressed for approx. 5 s
econds.
The LED on the InS
cenio EGC Controller first flashes green fast and is then lit yellow to acknowledge dele-
tion of the network settings.
The network settings have been reset when the green LED on the InScenio EGC Controller is lit.
Network name (SSID) and password of the WLAN router are deleted.
The WiFi password of the InScenio EGC Controller is set to the factory default setting.
The device password is deleted.
The InScenio EGC Controller starts in access point mode and can now be directly connected to the
smartphone/tablet.
7.3.11 Restoring the factory default settings
The delivery default settings of the InScenio EGC Controller are restored. All entered data will be lost.
How to proceed:
H
1. K
eep the reset button pressed for approx. 10 s
econds.
The LED on the InS
cenio EGC Controller first flashes green fast and then yellow fast to acknowledge dele-
tion of the network settings.
The factory default settings have been restored when the green LED is lit.
The network name (SSID) and password of the WLAN router are deleted.
The WiFi password of the InScenio EGC Controller is set to the factory default setting.
The device password is deleted.
The device list is deleted.
The InScenio EGC Controller starts in access point mode and can now be directly connected to the
smartphone/tablet.
8 Remedy of faults
8.1 Malfunction table
Malfunction
Cause
Remedy
The WLAN connection is not established alt-
hough the network name is displayed in the
WLAN settings.
The smartphone/tablet cannot update the entered
connection data for the network.
iOS:
Select the network and touch .
Touch "Ignore this network" to remove the
network.
Then establish a connection with the net-
work again.
Android:
Select the network and touch "Remove" to
remove the network.
Then establish a connection with the net-
work again.
The WLAN standard set in the router is not com-
patible with the InScenio EGC Controller.
InScenio EGC Controller supports the
WLAN standard 802.11n+g+b (only in the
frequency range 2.4 Ghz).
If necessary, select the correct WLAN
standard on the router (see router operat-
ing manual)
The InScenio EGC Controller is not reacting to
commands.
WLAN/WiFi on the smartphone/tablet is deac-
tivated.
Activate WLAN/WiFi on the
smartphone/tablet and establish a connec-
tion to the InScenio EGC Controller.
Downloaded from www.watergardeningdirect.com
Page 31

- EN -
61
Malfunction
Cause
Remedy
Sources of interference between the
smartphone/tablet and InScenio EGC Controller
Reduce the distance between the
smartphone/tablet and the InScenio EGC
Controller.
Select a different location for operating by
smartphone/tablet.
Ensure that there are no obstructions be-
tween the InScenio EGC Controller and
smartphone/tablet.
For a direct WLAN connection (access
point) between the InScenio EGC Controller and smartphone/tablet, select a different WLAN channel (→ "Settings"
screen).
Too large a distance between the smartphone/tab-
let and the InScenio EGC Controller
Reduce the distance, do not exceed the
max. range of 80 m.
Use an off-the-shelf repeater to increase
the range.
The power supply of the InScenio EGC Controller
is interrupted.
Establish power supply
The green LED is lit.
The green LED flashes when the WLAN
connection is established.
The receiver in the InScenio EGC Controller is defective.
Contact the OASE service.
The "OASE Easy Control" app is outdated.
Install the latest version of the "OASE Easy
Control" app on your smartphone/tablet.
The operating system of the smartphone/tablet is
outdated.
Update the operating system.
The InScenio EGC Controller switches at the
wrong time.
The system time of the InScenio EGC Controller
does not correspond to the actual time.
Update the system time to the time on the
operating device. (→ Updating the system
time)
The added EGC device is not reacting to com-
mands.
The data cable is interrupted.
Check the EGC connections.
The EGC device has no power supply
Establish power supply
No connection between EGC device and In-
Scenio EGC Controller.
The data cable is interrupted.
Check the EGC connections.
The EGC device has no power supply
Establish power supply
Yellow LED is lit
The InScenio EGC Controller is in the firmware up-
date mode.
Connect with the WLAN
„OASE_UPDATE_xxxxxx“ or
„OASE_UPDATE_EGC_xxxxxx“ and use
the app to start the firmware update.
The yellow LED is flashing slowly (2 seconds
on, 1 second off).
InScenio EGC Controller is searching for a con-
nection to the router.
Reduce the distance, do not exceed the
max. range of 80 m.
Remove any sources of interference that
may be weakening the WLAN signal (e.g.
other wireless devices, differences in
height).
Switch on the WLAN router.
Activate the WLAN function on the router.
If the router is no longer available or defec-
tive, reset the network settings of the In-
Scenio EGC Controller so that it can be
directly controlled in access point mode
(→ Resetting the network settings)
Connect the InScenio EGC Controller to an-
other router (→ Establishing a WLAN
connection)
Red LED is flashing.
Internal error
Disconnect from the power supply, wait for
10 seconds and then reconnect.
Reset the InScenio EGC Controller to the
factory default settings.
The device does not start, red LED flashing.
No firmware found.
Manually start the firmware update mode
(→ Manually starting the firmware update
mode)
Downloaded from www.watergardeningdirect.com
Page 32

- EN -
62
8.2 Manually starting the firmware update mode
How to proceed:
H
1. Disconnect from the power supply.
2. Hold down the reset button.
3. Connect to the power supply again while pressing the reset button.
4. R
elease the reset button after approx. 2 seconds.
The InScenio EGC Controller changes to the firmware update mode. The LED on the InScenio EGC Con-
troller is lit yellow
5. Establish a WLAN connection with WLAN OASE_EGC_UPDATE_XXXXXX with the smartphone/tablet.
6. Start the firmware update via the app. (→ Updating the firmware)
The update is started.
The progress of the update is displayed.
The LED on the InScenio EGC Controller flashes yellow and green.
9 Maintenance and cleaning
WARNING
Electrical current may cause death or severe injuries.
Disconnect the power plug before carrying out any work on the unit.
9.1 Cleaning the device
Clean the unit with a soft, clean and dry cloth. Never use aggressive cleaning agents or chemical solutions.
These can attach the housing surface or impair the function.
10 Spare parts
The use of original parts from OASE ensures continued
safe and reliable operation of the unit.
Please visit our website for spare parts drawings and
spare parts.
www.oase-livingwater.com/spareparts
11 Disposal
NOTE
Do not dispose of this unit with domestic waste.
Render the unit unusable beforehand by cutting the cables and dispose of the unit via the return sys-
tem provided for this purpose.
Downloaded from www.watergardeningdirect.com
Page 33

643
DE
Anschluss/Schnittstelle
Anschlussspannung
Länge Netzkabel
Länge 12-V-Kabel
Länge EGC-Kabel
Frequenz WLAN / max. Reichweite
Abmessungen
Gewicht
EN
Connection /interface
Mains voltage
Length of power cable
Length of 12-V-cable
Length of EGC cable
WLAN frequency / max. range
Dimensions
Weight
FR
Raccord/Interface
Tension de raccorde-
ment
Longueur du câble
secteur
Longueur de câble 12 V
Longeur de câble EGC
Fréquence WLAN / portée max.
Dimensions
Poids
NL
Aansluiting/interface
Aansluitspanning
Lengte netspan-
ningskabel
Lengte 12 V-kabel
Lengte EGC-kabel
Frequentie WLAN / max. reikwijdte
Afmetingen
Gewicht
ES
Conexión/ Interfaz
Tensión de conexión
Longitud cable de red
Longitud cable de 12 V
Longitud cable EGC
Frecuencia WLAN / alcance máximo
Dimensiones
Peso
PT
Conexão/Interface
Tensão de conexão
Comprimento cabo
eléctrico
Comprimento cabo 12
V
Comprimento cabo
eléctrico EGC
Frequência WLAN / alcance máximo
Dimensões
Peso
IT
Collegamento/Inter-
faccia
Tensione di attacco
Lunghezza cavo di
rete
Lunghezza cavi 12 V
Lunghezza cavo EGC
Frequenza WLAN / distanza max.
Dimensioni
Peso
DA
Tilslutning/grænseflade
Tilslutningsspænding
Længde på netkabel
Længde på 12-V-kabel
Længde på EGC-kabel
Frekvens WLAN/maks. rækkevidde
Mål
Vægt
NO
Tilkobling/grensesnitt
Nettspenning
Lengde nettkabel
Lengde 12-V - kabel
Lengde EGC - kabel
Frekvens WLAN /maks. rekkevidde
Mål
Vekt
SV
Anslutning/gränssnitt
Anslutningsspänning
Nätkabellängd
Längd 12-V-kabel
Längd EGC-kabel
Frekvens WLAN / max. räckvidd
Mått
Vikt
FI
Liitäntä
Verkkojännite
Verkkojohdon pituus
Pituus 12 V-kaapeli
EGC-kaapelin pituus
WLAN-taajuus / suurin kantama
Mitat
Paino
HU
Csatlakozó/interfész
Csatlakoztatási fes-
zültség
Hálózati kábel hossza
12 V-os kábel hossza
EGC kábel hossza
WLAN frekvencia / max. hatótávolság
Méretek
Súly
PL
Podłączenie / interfejs
Napięcie przyłączeniowe
Długość kabla siecio-
wego
Długość kabla 12 V
Długość kabla EGC
Częstotliwość WLAN / maks. zasięg
Wymiary
Ciężar
CS
Přípojka/rozhraní
Připojovací napětí
Délka síťového ka-
belu
Délka kabelu 12V
Délka kabelu EGC
Frekvence WLAN / max. dosah
Rozměry
Hmot-
nost
SK
Pripojenie/rozhranie
Napájacie napätie
Dĺžka sieťového kábla
Dĺžka kábla 12 V
Dĺžka kábla EGC
Frekvencia WLAN / max. dosah
Rozmery
Hmot-
nost’
SL
Priključek/vmesnik
Priključna napetost
Dolžina omrežnega
kabla
Dolžina kabla 12 V
Dolžina kabla EGC
Frekvenca WLAN / maks. domet
Dimenzije
Teža
HR
Priključak / spojno
mjesto
Priključni napon
Duljina električnog ka-
bela
Duljina 12 V kabela
Duljina EGC kabela
Frekvencija WLAN-a / maks. doseg
Dimenzije
Težina
RO
Racord/interfaţă
Tensiune de conexiune
Lungimea cablului de
reţea
Lungime cablu 12 V
Lungime cablu EGC
Frecvenţă WLAN / rază max. de acţiune
Dimensiuni
Greu-
tate
BG
Свързване/Интерфей
с
Напрежение в точката
на свързване
Дължина на
мрежовия кабел
Дължина на 12-V
кабел
Дължина на ECG
кабела
Честота WLAN / макс. обхват
Размери
Тегло
UK
З’єднання/роз’єм
Напруга мережі
живлення
Довжина
мережевого кабелю
Довжина кабелю 12 В
Довжина кабелю EGC
Частота бездротової ЛОМ / макс.
радіус дії
Розміри
Вага
RU
Подключение/интерф
ейс
Напряжение питающей
сети
Длина сетевого
кабеля
Длина кабеля на 12 В
Длина EGC-кабеля
Частота WLAN / макс. радиус дей-
ствия
Размеры
Вес
CN
连接/接口
输入电压
电缆长度
12 V 电缆长度
EGC 电缆长度
无线局域网 (WL AN) 频率 / 最大有效距
离
尺寸
重量
EGC
12 V AC — 2 m
2 m
2.4 GHz / 80 m
130 × 90 × 40 mm
0.9 kg — 230 V AC, 50 Hz
2 m — —
—
80 × 40 × 60 mm
0.45 kg
Downloaded from www.watergardeningdirect.com
Page 34

644
DE
Staubdicht. Wasserdicht bis 0.1 m Tiefe
Nicht mit normalem Hausmüll entsorgen!
Lesen Sie die Gebrauchsanleitung
EN
Dust tight. Submersible to 0.1 m depth.
Do not dispose of together with household
waste!
Read the operating instructions
FR
Imperméable aux poussières. Etanche à
l'eau jusqu'à une profondeur de 0.1 m
Ne pas recycler dans les ordures ména-
gères !
Lire la notice d'emploi
NL
Stofdicht. Waterdicht tot een diepte van
0.1 m
Niet met het normale huisvuil afvoeren!
Lees de gebruiksaanwijzing
ES
A prueba de polvo. Impermeable al agua
hasta 0.1 m de profundidad
¡No deseche el equipo en la basura do-
méstica!
Lea las instrucciones de uso
PT
À prova de pó. À prova de água até 0.1 m
de profundidade.
Não deitar ao lixo doméstico!
Leia as instruções de utilização
IT
A tenuta di polvere. Impermeabile all'ac-
qua fino a 0.1 m di profondità.
Non smaltire con normali rifiuti domestici!
Leggete le istruzioni d'uso!
DA
Støvtæt. Vandtæt ned til 0.1 m dybde
Må ikke bortskaffes med det almindelige
husholdningsaffald!
Læs brugsanvisningen
NO
Støvtett. Vanntett ned til 0.1 m dyp
Ikke kast i alminnelig husholdningsavfall!
Les bruksanvisningen
SV
Dammtät. Vattentät till 0.1 m djup
Får inte kastas i hushållssoporna!
Läs igenom bruksanvisningen
FI
Pölytiivis. Vesitiivis 0.1 m syvyyteen asti.
Älä hävitä laitetta tavallisen kotitalousjät-
teen mukana!
Lue käyttöohje
HU
Portömített. Vízálló 0.1 m-es mélységig
A készüléket nem a normál háztartási
szeméttel együtt kell megsemmisíteni!
Olvassa el a használati útmutatót
PL
Pyłoszczelny. Wodoszczelny do 0.1 m
głębokości.
Nie wyrzucać wraz ze śmieciami domo-
wymi!
Przeczytać instrukcję użytkowania!
CS
Prachotěsný. Vodotěsný do hloubky 0.1 m
Nelikvidovat v normálním komunálním
odpadu!
Přečtěte Návod k použití!
SK
Prachotesný. Vodotesný do hĺbky 0.1 m
Nelikvidovať v normálnom komunálnom
odpade!
Prečítajte si Návod na použitie
SL
Ne prepušča prahu. Vodotesno do globine
0.1 m.
Ne zavrzite skupaj z gospodinjskimi od-
padki!
Preberite navodila za uporabo!
HR
Ne propušta prašinu. Ne propušta vodu do
0.1 m dubine.
Ne bacati u običan kućni otpad!
Pročitajte upute za upotrebu!
RO
Etanş la praf. Etanş la apă până la o adân-
cime de 0.1 m.
Nu aruncaţi în gunoiul menajer !
Citiţi instrucţiunile de utilizare !
BG
Защитено от прах. Водоустойчив до
дълбочина 0.1 м
Не изхвърляйте заедно с обикновения
домакински боклук!
Прочетете упътването
UK
Пилонепроникний. Водонепроникний до
0.1 м
Не викидайте з побутовим сміттям!
Читайте інструкцію.
RU
Пыленепроницаемый, водонепроницае-
мый на глубине до 0.1 м
Не утилизировать вместе с домашним
мусором!
Прочитайте инструкцию по
использованию
CN
防尘。防水水深至
0.1 米
不要与普通的家庭
垃圾一起处理!
请阅读使用说明书。
Downloaded from www.watergardeningdirect.com
Page 35

645
EU-Konformitätserklärung
Declaration of EU-conformity
OASE GmbH
Tecklenburger Str. 161
48477 Hörstel
Tel. +49 54 54 / 80-0
Email: info@oase-livingwater.com
erklärt, dass das Produkt
declares that the product
Produkt / Product: Co
ntroller
Controller
Typ / Type:
InScenio EGC-Controller Home
InScenio EGC-Controller Cloud
den folgenden Richtlinien der Union entspricht:
complies to the following directives of the Union:
2014/53/EU, 2011/65/EU
Di
e vollständige EU-Konformitätserklärung ist unter der folgenden Internetadresse abrufbar:
The complete Declaration of EU-conformity is available at the following internet address:
www.oase-livingwater.com/ce
Downloaded from www.watergardeningdirect.com
Page 36

36425/06
-18
Downloaded from www.watergardeningdirect.com
 Loading...